Pima DPS/DPP Wireless PIR Standard/Pet Immune Motion Detector Guía de instalación
- Categoría
- Detectores de movimiento
- Tipo
- Guía de instalación

-1-
DPS/DPP
Standard/Pet Immune Wireless PIR Motion Detectors
Беспроводные ПИК датчики. Стандартный и не
реагирующий на животных
Detectores inalámbricos PIR de movimiento Estándar/
Inmune a mascotas /
English, Русский, Español, תירבע
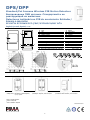
1
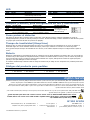
Lens
2
LED
3
Jumpers1
4
Tamper switch
5
Battery
6
Enrollment button
1
Линза
2
Светодиод
3
Перемычки2
4
Тампер
5
Батарея
6
Кнопка обучения
1
Lente
2
LED
3
Jumpers3
4
Interruptor contra sabotaje (Tamper)
5
Batería
6
Botón de registro/inscripción (enrolar)
1
2
4
3
4
5
6
Coverage pattern | Диаграмма направленности | Patrón de cobertura |
Surface mount | Монтаж на плоской
поверхности | Montaje en superficie plana |
Corner mount | Монтаж в углу
| Montaje en esquina |
Cover placing | Закрытие крышки
| Colocación de la cubierta |
1
Only in models 143/187
2
Только в 143/187
3
Solo en modelos 143/187
4
143
LOW
ON
LED
+
1
2
3
46
5

-2-
Installation Instructions
The DPS (Standard) and the DPP (Pet immune) are wireless PIR (Passive Infra-Red) motion detectors in FastLink technology, designed
for the FORCE Series and VISION intruder alarm systems. Using the DPS/DPP in FORCE requires the installation of a wireless receiver.
The two detectors are based on digital processing, and utilize an advanced movement detection algorithm. The DPS and the DPP can be
used in apartments, private houses and also in offices.
The DPP is immune to animals weighing up to 25 kilograms.
The DPS and the DPP have an elegant design. When detecting a movement the detectors transmit an alarm signal to the control panel.
The detectors have a tamper switch that alerts when their enclosure is opened or removed from the wall.
The DPS and the DPP transmit a supervision event when replacing the battery and also every 15 min. The two detectors alert on low
battery condition. For enrollment information, see the alarm system’s Installation guide.
Cautions: the DPS and the DPP are based on wireless (RF) transmissions. Any wireless
transmission can be subject to RF interference and, although unlikely, this interference may
cause the DPS and the DPP to not operate as intended. RF transmissions will be attenuated by
tinted glass, in wall isolation with metal foils, metal objects, etc.
Technical specifications
Frequency
(MHz)
Models
One-Way
Two-Way
433.92
DPS/DPP143
DPS/DPP243
868.95
DPS/DPP187
DPS/DPP287
Sizes: 11 X 5.5 X 5.5 cm
Weight: 110gr
CE Compliance
Temperature: -10 to +50 °C
Battery: 1X CR123A, 3VDC, Lithium
Battery Life: Up to Five Years (Typical Usage)
Humidity (Max.): up to 93% R.H.,
Non-condensing
Content of the product package
DPS/DPP detector
Screws, mounting tapes
This guide
Mounting considerations
Surface or corner mount the detectors at a height between 1.8m and 2.5m.
Allow the widest possible angle for the detector’s coverage pattern.
Mount the detector where an intruder will most likely cross through the coverage pattern; the DPS and DPS detection range is 10m
at 90 degrees.
Do not mount the detectors outdoors or where direct sunlight can reach it.
Do not mount the detectors where there are extreme levels of heat and light from heaters and air conditioners, hot and cold drafts,
lightning, and moving headlights.
Do not mount the DPP detector where pets can climb into the upper field of view.
How to install the DPS/DPP
1. Release the screw at the bottom of the detector and remove the cover.
2. Break the matching knock outs on the backplate for surface or corner mount; see the figures above.
3. Fix the backplate onto a flat surface.
4. Place the battery. Observe polarity!
5. Set the jumpers; see below.
6. Reassemble the detector: tilt it upwards, push it against the top part of the backplate first and then push the rest of it; see the
Cover placing
figure above.
7. Fasten the detector’s screw.
8. Enroll the detector (refer to the FORCE’s Installation guide).
9. Test the detector using the
Test and Diagnostics
menu.
The LED
All models
Two-way (“Walk test”)
Color and state
Description
Color and state
Reception (RSSI)
Green 1 blink
Battery OK, tamper closed.
Green 2 blinks
Good
Red 1 blink
Battery OK, tamper open.
Green 3 blinks
Excellent
Red 2 blinks
Low battery
Red 3 blinks
Poor

-3-
The jumpers
Label
Jumper closed (on)
Jumper open (off)
Models 243/287
LED
The LED illuminates
The LED stays off
Not in use (set by the
control panel)5
SENS
Low sensor sensitivity (8m)
High sensor sensitivity (10m)
PULSE
Alarm signal will only be transmitted,
if two pulses are detected.
Alarm signal will only be transmitted,
if three pulses are detected.
How to test the detector
To test the detector, tamper it by opening its cover. The detector transmits a tamper event and enters into test mode for five minutes.
During this time the LED will flash once on every detection (even if the LED jumper is in off position).
Sleep time
After transmitting a detection event, the detector will not transmit any detection event for that time (unless it is in Test mode).
In models 143/187 sleep time is three minutes; in models 243/287 sleep time is set by the control panel5.
Battery
The detector is powered by a 3V, CR123A Lithium battery. The battery’s life cycle is up to five years, with an average of 20 detections
per day. Before installing a new battery, press the enrollment button three times to discharge excess power. After replacing the battery
the detector warms up for one minute and goes into test mode for five more minutes.
Low battery condition is detected when the battery voltage drops below 2.6V. After that the battery can last for up to one month.
Ordering information
Model
One-way
Two-way
Model
One-way
Two-way
DPS
143: 8831010
187: 8831024
243: 8831210
287: 8831224
DPP
143: 8831012
187: 8831025
243: 8831212
287: 8831225
Инструкция по установке
DPS (обычный) и DPP (не реагирующий на животных) беспроводные ПИК датчики движения, работающие по технологии
FastLink, предназначены для работы с контрольными панелями серии FORCE и VISION. В приборах серии FORCE требуется наличие
беспроводного расширителя.
Датчики имеют современную цифровую обработку сигнала и используют передовой алгоритм обнаружения движения. Датчики
предназначены для установки в квартирах, домах, офисных помещениях и т.д.
Датчик DPP не реагирует на животных весом до 25 кг.
Датчики DPS и DPP имеют современный дизайн. При обнаружении движения датчики отправляют сигнал тревоги на
контрольную панель. Датчики имеют встроенный тампер, срабатывающий при попытке вскрытия корпуса или снятия со стены.
Датчики DPS и DPP передают собственный тест каждые 15 минут, а также извещают о разряде батареи. Информацию по
регистрации датчика в контрольной панели, читайте в Инструкции по установке к вашей охранной системе.
Внимание: работа датчика основана на технологии беспроводной связи. Любая
беспроводная связь подвержена внешним влияниям, которые могут ухудшить ее качество и
снизить дальность передачи сигнала. При установке датчика необходимо учитывать влияние
стен, перекрытий, тонированных стекол, металлических конструкций и т.д.
Технические характеристики
Частота
(МГц)
Модели
Односторонний
Двусторонний
433.92
DPS/DPP143
DPS/DPP243
868.95
DPS/DPP187
DPS/DPP287
Батарея: 1X CR123A, 3.0V, Литиевого типа
Размеры: 11 X 5.5 X 5.5см
Масса: 110г
Соответствует CE
Рабочая температура: -10°C
до +50°C
Срок службы батарей: до 5 лет (при
стандартном использовании)
Влажность (Макс.): 93% R.H., без
конденсации
Комплектация
Беспроводной ПИК датчик DPS/DPP 143/187
Шурупы, двухсторонняя наклейка
Данное руководство
5
System version 1.5 and higher

-4-
Рекомендации по монтажу
Высота установки датчика от 1.8м до 2.5м.
Покрытие датчика должно быть максимально возможным, согласно приведенной выше диаграмме.
Установите датчик так, чтобы зона наиболее вероятного проникновения нарушителя находилась в поле максимального
обзора; дальность обнаружения датчиков DPS и DPP 10м / 90 градусов.
Не монтируйте датчики вне помещений и под прямыми солнечными лучами.
Не монтируйте датчики в непосредственной близости к нагревателям, источникам света, кондиционерам, в местах с резким
изменением температуры и т.д.
Монтаж DPS/DPP
1. Раскрутите шуруп в нижней части корпуса датчика и, вставив плоскую отвертку в паз, подденьте и снимите крышку.
2. Удалите необходимые «нокауты» в задней крышке устройства в зависимости от типа установки - на поверхности или в углу
(см. рис. выше).
3. Прикрутите крышку к поверхности.
4. Вставьте батарею, соблюдая полярность.
5. Установите перемычки, согласно описанию ниже.
6. Соберите датчик. Для этого вставьте направляющие в верхней части корпуса, а затем прижмите его нижнюю часть до
щелчка (см. рис. выше).
7. Закрутите шуруп крышки датчика.
8. Пропишите датчик в контрольной панели.
9. Протестируйте модуль, используя меню Тесты и диагностика.
Светодиодная индикация
Все модификации
Двусторонний (“Проходной тест”)
Цвет и Состояние
Описание
Цвет и Состояние
Уровень приема (RSSI)
Зеленый мигает 1 раз
Батарея в порядке. Тампер закрыт.
Зеленый мигает 2 раза
Хорошо
Красный мигает 1 раз
Батарея в порядке. Тампер открыт.
Зеленый мигает 3 раза
Отлично
Красный мигает 2 раза
Разряд батареи
Красный мигает 3 раза
Слабо
Светодиодная индикация и перемычка чувствительности
Перемычка
ON
OFF
Модели
243/287
LED
Светодиодная индикация включена
Светодиодная индикация погашена
Не использ.
(задается с контр.
панели)6
SENS
Низкая чувствительность (8м)
Высокая чувствительность (10м)
PULSE
Сигнал тревоги будет отправлен
только при 2 пульсах
Сигнал тревоги будет отправлен
только при 3 пульсах
Тестирование датчика
Для включения режима тестирования, осуществите сработку тампера, вскрыв крышку датчика. При этом будет передано
событие о вскрытии тампера и датчик на 5 минут войдет в режим тестирования. В течение этого времени, каждая сработка
датчика будет подтверждаться светодиодной индикацией, даже если перемычка LED установлена в положение OFF.
Время «сна»
После каждого срабатывания датчик на 3 минуты переходит в режим «сна». В течение этого времени от него не будет
передаваться ни одного события сработки (данный режим не активен в режиме теста). В моделях 143/187 время «сна»
составляет три минуты; в моделях 243/287 время сна задается с контрольной панели6.
Батарея
Датчик питается от 3В литиевой батареи - CR123A. Срок службы данной батареи до 5 лет, при 20 срабатываниях в день (в
среднем). После установки батареи датчик «прогреется» в течение минуты, а потом на 5 минут зайдет в режим тестирования.
Обратите внимание, что перед установкой новой батареи в держатель необходимо нажать на кнопку обучения 3 раза для
разряда остаточной энергии конденсаторов.
Разряд батареи индицируется при падении ее напряжения до 2.6В. После появления первого извещения о разряде батареи,
срок ее службы ограничен до 1 месяца.
Информация для заказа
Модели
Односторонний
Двусторонний
DPS
143: 8831010
187: 8831024
243: 8831210
287: 8831224
DPP
143: 8831012
187: 8831025
243: 8831212
287: 8831225
6
Нач. с версии 1.5 контрольной панели

-5-
Instrucciones de Instalación
Los detectores DPS (Estándar) y DPP (Inmune a mascotas) son detectores inalámbricos PIR (infrarrojos pasivos) de movimiento con
tecnología FastLink, diseñados para los sistemas de alarma contra intrusión de las Series FORCE y VISION. Para usar estos detectores en
los sistemas FORCE se requiere la previa instalación de un receptor inalámbrico.
Los dos detectores trabajan basados en procesamiento digital y utilizan un algoritmo avanzado de detección de movimiento. El DPS y el
DPP se pueden usar en apartamentos, casas privadas y oficinas.
El DPP tiene inmunidad a mascotas y animales que pesen hasta 25 kilogramos.
El DPS y el DPP tienen un diseño elegante. Al detectar movimiento, los detectores transmiten una señal de alarma al panel de control.
Los detectores tienen un interruptor contra sabotaje (tamper) que alerta cuando su gabinete se abre o cuando el detector es removido
de la pared.
El DPS y el DPP transmiten un evento de supervisión cada 15 minutos y también al reemplazar la batería. Los dos detectores alertan
sobre la condición de batería baja. Para información sobre como registrar (enrolar) el dispositivo, consulte la guía de instalación del
sistema de alarma.
Precaución: los detectores DPS y DPP funcionan mediante transmisiones inalámbricas (RF).
Cualquier otra transmisión inalámbrica puede generar interferencias de RF y, aunque es poco
probable, estas interferencias pueden hacer que los detectores no funcionen según lo previsto.
Las transmisiones de RF se atenuarán en vidrios polarizados, en aislamiento de paredes con
láminas metálicas, objetos metálicos, etc.
Especificaciones técnicas
Frecuencia
(MHz)
Modelos
Una-Vía
Dos-Vías
433.92
DPS/DPP 143
DPS/DPP 243
868.95
DPS/DPP 187
DPS/DPP 287
Dimensiones: 11 X 5.5 X 5.5cm
Peso: 110gr
Batería: 1X CR123A, 3.0VDC, Litio
Duración estimada de la batería:
Hasta 5 años (en uso típico)
Cumple con la normativa CE
Temperaturas de operación: de -10 a +55 °C
Humedad (Máx.): 93% R.H., Sin
condensación
Contenido del paquete
Detector DPS/DPP
Tornillos y cintas de montaje
Esta guía
Consideraciones de montaje e instalación
Instale el detector en una superficie plana o en una esquina, a una altura de entre 1.8m y 2.5m.
Permita el ángulo más amplio posible de acuerdo al patrón de cobertura del detector.
Instale el detector en donde sea más probable que un intruso pudiera cruzar el patrón de cobertura; El rango de detección del DPS y
el DPP es de 10m a 90 grados.
No instale el detector al aire libre o en donde la luz solar directa pueda alcanzarlo.
No instale el detector en donde haya niveles extremos de calor y/o luz provenientes de calentadores y acondicionadores de aire,
corrientes de aire calientes o frías, rayos de luz y/o luces en movimiento.
No instale el detector DPP en donde las mascotas puedan alcanzar el campo de visión superior del detector.
Instalación de los detectores DPS/DPP
1. Suelte el tornillo en la parte inferior del detector y retire la cubierta.
2. Abra los orificios ciegos de la cubierta posterior correspondientes al montaje requerido (en superficie plana o esquina); observe la
imagen en la página inicial.
3. Fije la cubierta posterior sobre la superficie de montaje.
4. Coloque la batería (¡tenga en cuenta la polaridad!).
5. Configure los jumpers (puentes de conexión); vea la información más adelante.
6. Cierre el detector: inclínelo desde la parte superior y empújelo primero contra placa posterior, presione el resto del detector hacia
abajo como se muestra en la imagen de ‘Colocación de la cubierta’ al inicio de esta guía.
7. Asegure el tornillo del detector.
8. Registre el detector en el sistema de alarma (consulte la guía de instalación del sistema de alarma).
9. Pruebe el detector usando el menú ‘Pruebas y Diagnóstico’.

-6-
LED
Ambos modelos
Dos-vías (Prueba de caminado-“Walk test”)
Color
Estado
Descripción
Color
Estado
Nivel de recepción (RSSI)
Verde
Parpadea
La batería está bien, el interruptor
contra sabotaje está cerrado.
Verde
Parpadea 2 veces
Buena recepción
Rojo
Parpadea
La batería está bien, el interruptor
contra sabotaje está abierto.
Parpadea 3 veces
Excelente recepción
Parpadea dos veces
La batería está baja
Rojo
Parpadea 3 veces
Mala recepción
Jumpers (Puentes) para configuración de LED y sensibilidad
Jumper
Cerrado (ON)
Abierto (OFF)
Modelos 243/287
LED
El LED se enciende
El LED permanece apagado
Fuera de uso
(se configura desde el
panel de control)7
SENS
Baja sensibilidad (8m)
Alta sensibilidad (10m)
PULSE
La señal de alarma será enviada
solo si se detectan 2 pulsos
La señal de alarma será enviada
solo si se detectan 3 pulsos
Como probar el detector
Para probar el detector abra su cubierta y active el interruptor contra sabotaje (tamper). El detector transmitirá un evento de
sabotaje/manipulación y entrará en modo de prueba por 5 minutos. Durante este tiempo, el LED se iluminará en cada detección (incluso
si el jumper para control del LED está en la posición de apagado).
Tiempo de inactividad (Sleep time)
El detector tiene un tiempo de inactividad (tiempo de sueño) que se cuenta a partir de la transmisión de un evento, el detector no
transmitirá ningún otro evento detectado durante este tiempo, a menos que el detector se encuentre en el modo de prueba.
En los modelos 143/187 el tiempo de inactividad es de 3 minutos; en los modelos 243/287 el tiempo se configura desde el panel de
control7.
Batería
El detector es alimentado por una batería de litio de 3V, CR123A. El ciclo de vida de la batería es de hasta 5 años, con un promedio de
20 detecciones por día. Después de reemplazar la batería, el detector se inicializa durante un minuto y entra en el modo de prueba por
otros 5 minutos más. Tenga en cuenta que antes de quitar la batería de su soporte, debe presionar el botón de registro/inscripción
(enrolar) 3 veces para descargar el exceso de energía.
La condición de batería baja se detecta cuando el voltaje de la batería cae por debajo de 2.6V. Después de eso, la batería puede durar
hasta un mes.
Códigos del producto para pedidos
Modelo
Una-vía
Dos-vías
Modelo
Una-vía
Dos-vías
DPS
143: 8831010
187: 8831024
243: 8831210
287: 8831224
DPP
143: 8831012
187: 8831025
243: 8831212
287: 8831225
הנקתה תוארוה
DPSStandardDPPPet ImmunePIRFastLink
FORCEVISIONDPSDPPFORCE
DPSDPP
DPP
DPSDPP
DPSDPP
םיינכט םינותנ
433.92MHz
XCR123A3V
:XX
CE
-1055
7
En sistemas versiones 1.5 y superiores

-7-
רצומה תזירא תלוכת
DPS/DPP
יאלגה םוקימ תריחבם
DPSDPP
ה תא ןיקתהל ךיא-DPS/DPP
;
;
FORCE
( תירונהLED)
הירשגמ)םירפמ'ג( ם
LED
8
SENS
PULSE
יאלגה תקידב
LED
יא ןמז-יוליג
הללוס
3VCR123A
2.6V
תונמזהל עדימ
DPS
1438831010
8831210
DPP
1438831012
8831212
8

-8-
Limited Warranty
PIMA Electronic Systems Ltd. does not represent that its product may not be compromised and/or circumvented, or that the Product will prevent any
death, personal and/or bodily injury and/or damage to property resulting from burglary, robbery, fire or otherwise, or that the Product will in all cases
provide adequate warning or protection. The User understands that a properly installed and maintained equipment may only reduce the risk of events
such as burglary, robbery, and fire without warning, but it is not insurance or a guarantee that such will not occur or that there will be no death, personal
damage and/or damage to property as a result.
Read this guide in its entirety before attempting to program or operate your system. Should you misunderstand any part of this guide, please contact the
supplier or installer of this system.
Copyright 2020 PIMA Electronic Systems Ltd. All rights reserved. E&OE
Гарантийные Обязательства
Компания PIMA Electronic Systems Ltd, (далее "Производитель") гарантирует устойчивую работу своей продукции, при нормальной
эксплуaтации и обслуживании, в течение 36 (тридцать шесть) месяцев со дня производства.
Поскольку Производитель не устанавливает и не подключает приобретённое оборудование, и оно (оборудование) может использоваться
совместно с оборудованием других производителей, гарантия не распространяется на работу всей системы безопасности. Производитель не
несет ответственности за совместимость
своего Оборудования с любыми другими аппаратными или программными средствами, поставляемыми другими производителями.
ВНИМАНИЕ: Пользователь должен неукоснительно следовать инструкциям по установке и эксплуатации, проверять продукцию и всю
систему не реже одного раза в неделю.
По различным причинам, включающим, но не ограничивающихся, таким как:
изменения условий окружающей среды, электрических или электронных нарушений и вмешательстве в работу оборудования, возможно,
что оборудование не будет функционировать должным образом. Поэтому, потребителю рекомендуется принять все необходимые меры для
обеспечения своей безопасности и защиты собственности.
Ни при каких обстоятельствах Производитель не несет ответственности за какие-либо убытки, включая потерю данных, потерю прибыли и
другие случайные,
последовательные или косвенные убытки, возникшие вследствие некорректных действий по установке, сопровождению, эксплуатации либо
связанных с выходом из строя или временной неработоспособностью Оборудования
Copyright 2020 PIMA Electronic Systems Ltd. All rights reserved. E&OE
Garantía Limitada
PIMA Electronic Systems Ltd. no garantiza el que su Producto no haya sido o sea puesto en riesgo o que no sea evadido, saboteado o alterado de
alguna forma así como tampoco garantiza que el Producto vaya o pueda prevenir cualquier muerte y/o daños corporales y/o daños a la propiedad o
cualquier otra pérdida resultado directo o indirecto de vandalismo, robo, incendio, o cualquier otra causa y/o siniestro, o que el Producto en todos los
casos y/o en cada uno de ellos pueda o va a suministrar/proporcionar la advertencia o la protección adecuada. El Usuario comprende que un equipo
debidamente instalado y al que se le da un mantenimiento pertinente, puede únicamente reducir el riesgo contra eventos tales como vandalismo, robo,
e incendio sin previo aviso, pero que no existe la seguridad ni la garantía de que tales imprevistos vayan o no a ocurrir, ni de que a consecuencia de
alguno de estos sucesos no vaya o pueda ocurrir alguna muerte y/o daño personal y/o daño a la propiedad.
Lea esta guía en su totalidad antes de intentar programar u operar su sistema. Si no comprende alguna parte de esta guía, contacte al proveedor o
instalador de este sistema.
Derechos de reproducción © 2020, PIMA Electronic Systems Ltd. Todos los derechos están reservados. E & OE
תלבגומ תוירחא
אמיפ מ"עב תוינורטקלא תוכרעמ א ,רחא וא ,הפירש ,דוש ,הצירפמ האצותכ שוכרל והשלכ קזנ וא ,והשלכ ינפוג קזנ ,תוומ ענמיש וא ,הפיקעל ןתינ וניאכ הז רצומ תראתמ הניא ו
י הכלהכ קזחותמו ןקתוה רשא דויצ יכ ןיבמ שמתשמה .הנגה וא תקפסמ הערתה קפסי רצומהש הווהמ וניא ךא ,הארתה אלל הפירשו ,דוש ,הצירפ ןוגכ םיעוריאל םייוכיסה תא תיחפ
.האצותכ שוכרל קזנ וא ,ינפוג קזנ ,תוומ םרגי אל יכ וא ורקי אל ולאכ םיעוריא יכ החטבה וא חוטיב
אמיפל מ"עב תוינורטקלא תוכרעמ שוכרל והשלכ קזנ וא ,ינפוג קזנ ,תוומ הרקמ יפלכ תובח לכ היהת אל תרחא וא ,תינשמ האצותכ ,ןיפיקעב ,ןירשימב הרק םא ןיב רחא קזנ לכ וא
.לעפ אל רצומה יכ הנעטה לע ססבתהב
.אמיפמ הבותכ המכסה אלל הז ךמסמ רימהל ,םגרתל ,ץיפהל ,תונשל ,קיתעהל ,לפכשל ןיא
צעל תרמוש אמיפ .ינכדעו ןוכנ ונכות יכ חיטבהל ידכב םיצמאמה לכ ועקשוה הז ךמסמ תנכהב.תמדקומ העדוה אלל ,ןמזל ןמזמ ,ונממ םיקלח וא ולוכ ,הז ךמסמ תונשל תוכזה תא המ
.וז תכרעמ תנכתל וא/ו לעפתל ןויסינ לכ ינפל ותומלשב הז ךמסמ י/ארק אנא .וז תכרעמ לש ןיקתמה וא קפסל הנפ אנא ,רורב וניא הז ךמסמב םיוסמ קלחו הדימב
תורומש תויוכזה לכ© 0202 אמיפל א תוכרעממ"עב תוינורטקל ח.ל.ט
Manufactured by
PIMA Electronic Systems Ltd.
www.pima-alarms.com
5 Hatzoref Street, Holon 5885633, Israel
Tel: +972.3.6506414
Fax: +972.3.5500442
Email: [email protected]
P/N: 4410448
*4410448*
Revision: C1, XX multi, Dec 2020
-
 1
1
-
 2
2
-
 3
3
-
 4
4
-
 5
5
-
 6
6
-
 7
7
-
 8
8


Pima DPS/DPP Wireless PIR Standard/Pet Immune Motion Detector Guía de instalación
- Categoría
- Detectores de movimiento
- Tipo
- Guía de instalación