GE JKD3000DNBB El manual del propietario
- Categoría
- Enfriadores de bebidas
- Tipo
- El manual del propietario

Write the model and serial
numbers here:
Model # ____________________
Serial # ____________________
You can find them on a label on
the side trim or on the front of the
(lower) oven behind the oven door.
GE is a trademark of the General Electric Company. Manufactured under trademark license.
ESPAÑOL
Para consultar una version en
español de este manual de
instrucciones, visite nuestro sitio de
internet GEAppliances.com.
OWNER’S MANUAL
WALL OVEN
Built-In Electric
49-2000253 Rev. 0 03-19 GEA
JKS3000 - 27" Single Wall Oven
JTS3000 - 30" Single Wall Oven
JKD3000 - 27" Double Wall Oven
JTD3000 - 30" Double Wall Oven
SAFETY INFORMATION ..........3
USING THE OVEN
Single Wall Oven Controls ...............6
Double Wall Oven Controls ..............7
Special Features ........................8
Oven Racks ...........................10
Aluminum Foil and Oven Liners ..........10
Cookware .............................10
Cooking Modes ........................ 11
Cooking Guide ........................12
CARE AND CLEANING
Oven .................................13
Oven Light ............................14
Oven Door ............................15
TROUBLESHOOTING TIPS .......16
LIMITED WARRANTY ............18
ACCESSORIES ....................19
CONSUMER SUPPORT ...........20

2 49-2000253 Rev. 0
THANK YOU FOR MAKING GE APPLIANCES A PART OF YOUR HOME.
Whether you grew up with GE Appliances, or this is your first, we’re happy to have you in the family.
We take pride in the craftsmanship, innovation and design that goes into every GE Appliances
product, and we think you will too. Among other things, registration of your appliance ensures that we
can deliver important product information and warranty details when you need them.
Register your GE appliance now online. Helpful websites and phone numbers are available in the
Consumer Support section of this Owner’s Manual. You may also mail in the pre-printed registration
card included in the packing material.

49-2000253 Rev. 0 3
READ AND SAVE THESE INSTRUCTIONS
IMPORTANT SAFETY INFORMATION
READ ALL INSTRUCTIONS BEFORE USING THE APPLIANCE
SAFETY INFORMATION
WARNING
GENERAL SAFETY INSTRUCTIONS
Ŷ 8VHWKLVDSSOLDQFHRQO\IRULWVLQWHQGHGSXUSRVHDV
described in this Owner’s Manual.
Ŷ%HVXUH\RXUDSSOLDQFHLVSURSHUO\LQVWDOOHGDQG
grounded by a qualified installer in accordance with
the provided installation instructions.
Ŷ'RQRWDWWHPSWWRUHSDLURUUHSODFHDQ\SDUWRI\RXU
oven unless it is specifically recommended in this
manual. All other servicing should be performed by a
qualified technician.
Ŷ%HIRUHSHUIRUPLQJDQ\VHUYLFHGLVFRQQHFWWKH
power supply at the household distribution panel by
removing the fuse or switching off the circuit breaker.
Ŷ'RQRWOHDYHFKLOGUHQDORQH²FKLOGUHQVKRXOGQRW
be left alone or unattended in an area where an
appliance is in use. They should never be allowed to
climb, sit or stand on any part of the appliance.
Ŷ
CAUTION
'RQRWVWRUHLWHPVRILQWHUHVW
to children in cabinets above an oven - children
climbing on the oven to reach items could be
seriously injured.
Ŷ8VHRQO\GU\SRWKROGHUV²PRLVWRUGDPSSRWKROGHUV
RQKRWVXUIDFHVPD\UHVXOWLQEXUQVIURPVWHDP'R
QRWOHWSRWKROGHUVWRXFKKRWKHDWLQJHOHPHQWV'R
not use a towel or other bulky cloth in place of pot
holders.
Ŷ 1HYHUXVH\RXUDSSOLDQFHIRUZDUPLQJRUKHDWLQJ
the room.
Ŷ 'RQRWWRXFKWKHKHDWLQJHOHPHQWVRUWKHLQWHULRU
surface of the oven. These surfaces may be hot
enough to burn even though they are dark in color.
'XULQJDQGDIWHUXVHGRQRWWRXFKRUOHWFORWKLQJ
or other flammable materials contact any interior
area of the oven; allow sufficient time for cooling
first. Other surfaces of the appliance may become
hot enough to cause burns. Potentially hot surfaces
include the oven vent opening, surfaces near the
opening and crevices around the oven door.
Ŷ 'RQRWKHDWXQRSHQHGIRRGFRQWDLQHUV3UHVVXUH
could build up and the container could burst,
causing an injury.
Ŷ 'RQRWXVHDQ\W\SHRIIRLORUOLQHUWRFRYHUWKH
oven bottom or anywhere in the oven, except as
described in this manual. Oven liners can trap heat
or melt, resulting in damage to the product and risk
of shock, smoke or fire.
Ŷ $YRLGVFUDWFKLQJRULPSDFWLQJJODVVGRRUVRUFRQWURO
SDQHOV'RLQJVRPD\OHDGWRJODVVEUHDNDJH'R
not cook on a product with broken glass. Shock, fire
or cuts may occur.
Ŷ &RRNPHDWDQGSRXOWU\WKRURXJKO\²PHDWWRDWOHDVW
an internal temperature of 160°F and poultry to at
least an internal temperature of 180°F. Cooking
to these temperatures usually protects against
foodborne illness.
WARNING
Read all safety instructions before using the product. Failure to follow these instructions may result
in fire, electrical shock, serious injury or death.
WARNING
KEEP FLAMMABLE MATERIALS AWAY FROM THE OVEN
Failure to do so may result in fire or personal injury.
Ŷ 'RQRWVWRUHRUXVHIODPPDEOHPDWHULDOVLQRUQHDU
an oven, including paper, plastic, pot holders,
linens, wall coverings, curtains, drapes and gasoline
or other flammable vapors and liquids.
Ŷ 1HYHUZHDUORRVHILWWLQJRUKDQJLQJJDUPHQWVZKLOH
using the appliance. These garments may ignite if
they contact hot surfaces, causing severe burns.
Ŷ 'RQRWOHWFRRNLQJJUHDVHRURWKHUIODPPDEOH
materials accumulate in or near the oven. Grease in
the oven or near the oven may ignite.
Ŷ Remote Operation - This appliance is configurable
WRDOORZUHPRWHRSHUDWLRQDWDQ\WLPH'RQRWVWRUH
any flammable materials or temperature sensitive
items inside of the appliance.

4 49-2000253 Rev. 0
SAFETY INFORMATION
READ AND SAVE THESE INSTRUCTIONS
IMPORTANT SAFETY INFORMATION
READ ALL INSTRUCTIONS BEFORE USING THE APPLIANCE
WARNING
IN THE EVENT OF A FIRE, TAKE THE FOLLOWING
STEPS TO PREVENT INJURY AND FIRE SPREADING
Ŷ 'RQRWXVHZDWHURQJUHDVHILUHV1HYHUSLFNXSD
flaming pan.
Ŷ ,IWKHUHLVDILUHLQWKHRYHQGXULQJEDNLQJVPRWKHU
the fire by closing the oven door and turning the
oven off or by using a multi-purpose dry chemical or
foam-type fire extinguisher.
Ŷ ,IWKHUHLVDILUHLQWKHRYHQGXULQJVHOIFOHDQWXUQ
the oven off and wait for the fire to go out. 'RQRW
force the door open,QWURGXFWLRQRIIUHVKDLUDW
self-clean temperatures may lead to a burst of flame
from the oven. Failure to follow this instruction may
result in severe burns.
WARNING
OVEN SAFETY INSTRUCTIONS
Ŷ 6WDQGDZD\IURPWKHRYHQZKHQRSHQLQJWKHRYHQ
door. Hot air or steam which escapes can cause
burns to hands, face and/or eyes.
Ŷ .HHSWKHRYHQYHQWXQREVWUXFWHG
Ŷ .HHSWKHRYHQIUHHIURPJUHDVHEXLOGXS*UHDVHLQ
the oven may ignite.
Ŷ 3ODFHRYHQUDFNVLQGHVLUHGORFDWLRQZKLOHRYHQLV
FRRO,IUDFNPXVWEHPRYHGZKLOHRYHQLVKRWGRQRW
let pot holder contact hot heating element in oven.
Ŷ :KHQXVLQJFRRNLQJRUURDVWLQJEDJVLQWKHRYHQ
follow the manufacturer’s directions.
Ŷ 3XOOLQJRXWWKHVWDQGDUGUDFNVWRWKHLUVWRSORFNV
or the extension rack to its fully open position is
DFRQYHQLHQFHLQOLIWLQJKHDY\IRRGV,WLVDOVRD
precaution against burns from touching hot surfaces
of the door or oven walls.
Ŷ 'RQRWOHDYHLWHPVVXFKDVSDSHUFRRNLQJXWHQVLOV
RUIRRGLQWKHRYHQZKHQQRWLQXVH,WHPVVWRUHGLQ
an oven can ignite.
Ŷ 1HYHUSODFHFRRNLQJXWHQVLOVSL]]DRUEDNLQJVWRQHV
or any type of foil or liner on the oven floor. These
items can trap heat or melt, resulting in damage to
the product and risk of shock, smoke or fire.
WARNING
SELF-CLEANING OVEN SAFETY INSTRUCTIONS
The self-cleaning feature operates the oven at temperatures high enough to burn away food soils in the oven.
Follow these instructions for safe operation.
Ŷ 'RQRWWRXFKRYHQVXUIDFHVGXULQJVHOIFOHDQ
RSHUDWLRQ.HHSFKLOGUHQDZD\IURPWKHRYHQGXULQJ
self-cleaning. Failure to follow these instructions
may cause burns.
Ŷ %HIRUHVHOIFOHDQLQJWKHRYHQUHPRYHVKLQ\VLOYHU
colored oven racks (on some models), the probe,
any aluminum foil, and any broiler pan, grid, and
other cookware. Only porcelain coated oven racks
may be left in the oven.
Ŷ %HIRUHRSHUDWLQJWKHVHOIFOHDQF\FOHZLSHJUHDVH
and food soils from the oven. Excessive amount
of grease may ignite, leading to smoke damage to
your home.

49-2000253 Rev. 0 5
SAFETY INFORMATION
READ AND SAVE THESE INSTRUCTIONS
IMPORTANT SAFETY INFORMATION
READ ALL INSTRUCTIONS BEFORE USING THE APPLIANCE
WARNING
SELF-CLEANING OVEN SAFETY INSTRUCTIONS (Cont.)
Ŷ ,IWKHVHOIFOHDQLQJPRGHPDOIXQFWLRQVWXUQWKH
oven off and disconnect the power supply. Have it
serviced by a qualified technician.
Ŷ 'RQRWFOHDQWKHGRRUJDVNHW7KHGRRUJDVNHWLV
essential for a good seal. Care should be taken not
to rub, damage or move the gasket.
Ŷ 'RQRWXVHRYHQFOHDQHUV1RFRPPHUFLDORYHQ
cleaner or oven liner protective coating of any kind
should be used in or around any part of the oven.
How to Remove Protective Shipping Film and Packaging Tape
Carefully grasp a corner of the protective shipping film
with your fingers and slowly peel it from the appliance
VXUIDFH'RQRWXVHDQ\VKDUSLWHPVWRUHPRYHWKHILOP
Remove all of the film before using the appliance for the
first time.
To assure no damage is done to the finish of the
product, the safest way to remove the adhesive from
packaging tape on new appliances is an application of
a household liquid dishwashing detergent. Apply with a
soft cloth and allow to soak.
NOTE:7KHDGKHVLYHPXVWEHUHPRYHGIURPDOOSDUWV,W
cannot be removed if it is baked on.
The remote enable equipment installed on this oven
has been tested and found to comply with the limits for
D&ODVV%GLJLWDOGHYLFHSXUVXDQWWRSDUWRIWKH)&&
Rules. These limits are designed to:
(a) provide reasonable protection against harmful
interference in a residential installation. This equipment
generates, uses and can radiate radio frequency energy
and, if not installed and used in accordance with the
instructions, may cause harmful interference to radio
communications. However, there is no guarantee that
LQWHUIHUHQFHZLOOQRWRFFXULQDSDUWLFXODULQVWDOODWLRQ,I
this equipment does cause harmful interference to radio
or television reception, which can be determined by
turning the equipment off and on, the user is encouraged
to try to correct the interference by one or more of the
following measures:
Ŷ5HRULHQWRUUHORFDWHWKHUHFHLYLQJDQWHQQD
Ŷ,QFUHDVHWKHVHSDUDWLRQEHWZHHQWKHHTXLSPHQWDQG
receiver.
Ŷ&RQQHFWWKHHTXLSPHQWLQWRDQRXWOHWRQDFLUFXLW
different from that to which the receiver is connected.
Ŷ&RQVXOWWKHGHDOHURUDQH[SHULHQFHGUDGLR79
technician for help.
(b) accept any interference received, including
interference that may cause undesired operation of the
device.
Note that any changes or modifications to the wireless
communication device installed on this oven that are not
expressly approved by the manufacturer could void the
user's authority to operate the equipment.

6 49-2000253 Rev. 0
Single Wall Oven Controls
USING THE OVEN: Single Wall Oven Controls
1. Bake: Touch this pad to select the bake function. See
the Cooking Modes section for more information.
2. Broil: Touch this pad to select the broil function. See
the Cooking Modes section for more information.
3. Proof: Helps yeast bread rise. See the Cooking Modes
section for more information.
4. Warm:.HHSVKRWIRRGZDUP6HHWKH&RRNLQJ0RGHV
section for more information.
5. Clean: Your oven has two cleaning modes: Self Clean
and Steam Clean. See the Cleaning the Oven section for
important information about using these modes.
6. Start: Must be pressed to start any cooking, cleaning,
or timed function.
7. Cancel/Off: Cancels ALL oven operations except the
clock and timer.
8. Cook Time: Counts down cooking time and turns
RIIWKHRYHQZKHQWKHFRRNLQJWLPHLVFRPSOHWH,QLWLDWH
either a bake or warm mode, but don’t press Start. Press
the Cook Time pad, use the number pads to program a
cooking time in hours and minutes, then press Start.
9. Set Clock: Sets the oven clock time. Press the Set
Clock pad and the number pads to program the clock.
Press Set Clock to toggle between AM and PM. Press
Start to save the time.
10. Timer: Works as a countdown timer. Press the Timer
pad and the number pads to program the time in hours
and minutes. Press the Start pad. The control will
beep with 1 minute remaining and the display will show
seconds until the timer counts down to :00. The oven
will continue to operate when the timer countdown is
complete. To turn the timer off press the Timer pad.
11. Oven Light(s): 7XUQVWKHRYHQOLJKWVRQRURII1RWH
that opening a door only turns on the light in that oven.
12. Lock Controls: Locks out the control so that
pressing the pads does not activate the controls. Press
and hold the Lock Controls pad for three seconds to
lock or unlock the control. Locking the controls will cancel
active functions other than the timer.
13. Delay Time:'HOD\VZKHQWKHRYHQZLOOWXUQRQ8VH
this to set a time when you want the oven to start.
,QLWLDWH
either a bake or self clean mode, but don’t press Start.
Press the Delay Time pad and use the number pads to
program the time of day for the oven to turn on
, use Delay
Time to toggle between AM and PM,
then press Start.
With bake, a cook time may also be programmed if desired.
Follow the directions under Cook Time for setting this
IHDWXUH7KLVFDQRQO\EHXVHGZLWK%DNHDQG6HOI&OHDQ
NOTE: When using the delay time feature, foods that spoil
HDVLO\²VXFKDVPLONHJJVILVKVWXIILQJVSRXOWU\DQGSRUN²
should not be allowed to sit for more than 1 hour before or
after cooking. Room temperature promotes the growth of
KDUPIXOEDFWHULD%HVXUHWKDWWKHRYHQOLJKWLVRIIEHFDXVH
heat from the bulb will speed harmful bacteria growth.
14. Remote Enable:
CONNECTING YOUR OVEN
Off - Oven is not connected. Open the app then press
and hold Remote Enable pad for 5 seconds to begin the
connecting process.
Slow flash - Oven is in discovery mode and looking for a
network.
Rapid flash - An error occurred during the connecting
process.
Solid - Oven is connected to the network and can be
remotely controlled by a connected mobile device when in
operation, but it cannot be started remotely.
REMOTE STARTING YOUR OVEN
REMOTE
To be able to start the oven remotely, press the Remote
Enable pad and the REMOTE icon will turn on in the
display. The oven can now be remotely started with a
connected device. The REMOTE icon must be lit to start
the oven remotely. The REMOTE icon is not required to
change the oven settings or to turn the oven off. After
using the oven, remember to verify that the REMOTE icon
is lit if you wish to start the oven remotely in the future.
To disconnect your phone from Remote Enable, press the
Remote Enable pad and the Remote icon will turn off.
12543
1013 1112 14
9867
Control button shapes are representative; your oven may have alternate button shapes.

49-2000253 Rev. 0 7
Double Wall Oven Controls
USING THE OVEN:'RXEOH:DOO2YHQ&RQWUROV
1. Upper Oven and Lower Oven: 'HVLJQDWHV
which oven the controls will operate.
2. Bake: Touch this pad to select the bake function. See
the Cooking Modes section for more information.
3. Broil: Touch this pad to select the broil function. See
the Cooking Modes section for more information.
4. Proof: Helps yeast bread rise. See the Cooking Modes
VHFWLRQIRUPRUHLQIRUPDWLRQ1RWHWKDWSURRIFDQQRWEH
run when running a clean mode in the lower oven.
5. Warm:.HHSVKRWIRRGZDUP6HHWKH&RRNLQJ0RGHV
section for more information.
6. Clean: Your oven has two cleaning modes: Self Clean
and Steam Clean. See the Cleaning the Oven section for
LPSRUWDQWLQIRUPDWLRQDERXWXVLQJWKHVHPRGHV1RWHWKDW
proof cannot be run when running a clean mode in the
lower oven.
7. Start: Must be pressed to start any cooking, cleaning,
or timed function.
8. Cancel/Off: Cancels ALL oven operations except the
clock and timer.
9. Cook Time: Counts down cooking time and turns
RIIWKHRYHQZKHQWKHFRRNLQJWLPHLVFRPSOHWH,QLWLDWH
either a bake or warm mode, but don’t press Start. Press
the Cook Time pad, use the number pads to program a
cooking time in hours and minutes, then press Start.
10. Set Clock: Sets the oven clock time. Press the Set
Clock pad and the number pads to program the clock.
Press Set Clock to toggle between AM and PM. Press
Start to save the time.
11. Timer: Works as a countdown timer. Press the Timer
pad and the number pads to program the time in hours
and minutes. Press the Start pad. The control will
beep with 1 minute remaining and the display will show
seconds until the timer counts down to :00. The oven
will continue to operate when the timer countdown is
complete. To turn the timer off press the Timer pad.
12. Oven Light(s): Turns the oven light(s) on or off in both
RYHQV1RWHWKDWRSHQLQJDGRRURQO\WXUQVRQWKHOLJKWLQ
that oven.
13. Lock Controls: Locks out the control so that
pressing the pads does not activate the controls. Press
and hold the Lock Controls pad for three seconds to
lock or unlock the control. Locking the controls will cancel
active functions other than the timer.
14. Delay Time:'HOD\VZKHQWKHRYHQZLOOWXUQRQ8VH
this to set a time when you want the oven to start.
,QLWLDWH
either a bake or self clean mode, but don’t press Start.
Press the Delay Time pad and use the number pads to
program the time of day for the oven to turn on
, use Delay
Time to toggle between AM and PM,
then press Start.
With bake, a cook time may also be programmed if desired.
Follow the directions under Cook Time for setting this
IHDWXUH7KLVFDQRQO\EHXVHGZLWK%DNHDQG6HOI&OHDQ
NOTE: When using the delay time feature, foods that spoil
HDVLO\²VXFKDVPLONHJJVILVKVWXIILQJVSRXOWU\DQGSRUN²
should not be allowed to sit for more than 1 hour before or
after cooking. Room temperature promotes the growth of
KDUPIXOEDFWHULD%HVXUHWKDWWKHRYHQOLJKWLVRIIEHFDXVH
heat from the bulb will speed harmful bacteria growth.
15. Remote Enable:
CONNECTING YOUR OVEN
Off - Oven is not connected. Open the app then press
and hold Remote Enable pad for 5 seconds to begin the
connecting process.
Slow flash - Oven is in discovery mode and looking for a
network.
Rapid flash - An error occurred during the connecting
process.
Solid - Oven is connected to the network and can be
remotely controlled by a connected mobile device when in
operation, but it cannot be started remotely.
REMOTE STARTING YOUR OVEN
REMOTE
To be able to start the oven remotely, press the Remote
Enable pad and the REMOTE icon will turn on in the
display. The oven can now be remotely started with a
connected device. The REMOTE icon must be lit to start
the oven remotely. The REMOTE icon is not required
to change the oven settings or to turn the oven off. To
disconnect your phone from Remote Enable, press the
Remote Enable pad and the REMOTE icon will turn off.
After using the oven, remember to verify that the REMOTE
icon is lit if you wish to start the oven remotely in the future.
123645
10
11
14 1312 15
76789
1
8
Control button shapes are representative; your oven may have alternate button shapes.

8 49-2000253 Rev. 0
Special Features
USING THE OVEN: Special Features
There are several different special features on your wall oven. To change
the settings of these special features, press the Bake and Broil pads at the
same time and hold for three seconds. " " (“ ” on double ovens)
will appear in the display. For each of the features below, select and edit the
feature you want to change by using the 8 and 2 pads to scroll up and down,
the 6 pad to edit (or Save and exit), and the 4 pad to return to the prior menu
without saving.
Adjust the Oven Temperature ( )
This feature allows the oven baking temperature to be
DGMXVWHGXSWR)KRWWHURIGRZQWR)FRROHU8VH
this feature if you believe your oven temperature is too
hot or too cold and wish to change it. For double oven
models, the upper and lower ovens are adjusted
separately.'RQRWXVHWKHUPRPHWHUVVXFKDVWKRVH
found in grocery stores, to check the temperature setting
of your oven. These thermometers may vary 20–40
GHJUHHV1DYLJDWHWR³ ” for single ovens,
“ ” for the upper oven or “ ” for the lower
oven. Press 6 to edit the offset. “0” or a number between
+ and - 35 will be displayed. Press 2 to increase, 8 to
decrease. -35 to +35 is the available offset range. Press
6 to save and exit. Press 4 to exit without saving.
Sound Volume ( )
This feature allows the oven tone volume to be adjusted.
1DYLJDWHWR³ ” and press 6 to view or change the
current setting. Scrolling through allows you to hear each
volume level.
End of Timer Signals ( )
This is the tone that signals the end of a timer. The
tone can be continuous “ ” or one repeating
beep “ ”. A continuous setting will continue to
sound a tone until a button on the control is pressed.
1DYLJDWHWR³ ” and press 6 to view or change
the current setting.
Fahrenheit or Celsius Temperature
Display ( )
The oven control is set to use Fahrenheit temperatures
(F), but you can change it to use Celsius temperatures
&1DYLJDWHWR³ ” and press 6 to view or
change the current setting.
Clock Display ( )
This feature turns the clock on or off in the display.
1DYLJDWHWR³
” and press 6 to view or change
the current setting.
Clock Configuration ( )
This feature specifies how the time of day will be
displayed or if no time of day will be displayed. You can
select a standard 12-hour clock ( ) or 24-hour military
time display ( 1DYLJDWHWR³ ” and press 6 to
view or change the current setting.
12-Hour Shutoff ( )
When this feature is turned on, the oven will
automatically turn off after 12 continuous hours of use.
1DYLJDWHWR³ ” and press 6 to view or change the
current setting.
123
45
56
78
0
9
Cook
Time
Set
Clock
AM/PM
13
=
7
0
9
Cook
Time
Set
Clock
AM/PM
Cancel
Exit
Edit, Save
& Exit

49-2000253 Rev. 0 9
Special Features (Cont.)
USING THE OVEN: Special Features
Sabbath
Sabbath mode disables the oven lights (the oven light
will not turn on when the door is opened), all sounds
(the control will not beep when a button is pressed),
%URLO:DUP3URRI&RRN7LPH7LPHU&ORFNDQG
'HOD\7LPHIXQFWLRQV6DEEDWKPRGHFDQRQO\EHXVHG
ZLWK%DNH7KLVIHDWXUHFRQIRUPVWRWKH6WDU.-HZLVK
Sabbath requirements.
Press and hold the Bake and Broil pads for 3 seconds
to enter special features.
Press the 8 and 2 pads to scroll up and down until
“
´DSSHDUVLQWKHGLVSOD\8VHWKH6 pad to
view and edit the current setting, 2 and 8 to change
the setting, and 6 again to Save, 4 to exit the Special
Features and Start Sabbath mode. (Alternately, use the
4 pad to return to the prior menu from the Sabbath menu
without saving). A ] will appear in the display and the
clock will not display.
1RWHWKDWLI\RXKDYHDGRXEOHZDOORYHQZKHQ\RX
place the control into Sabbath mode, both ovens are
now in Sabbath mode and available for cooking.
Once in Sabbath mode, at any time you can press Bake,
use the number pads to enter a temperature between
170F and 550F, and press Start1RVRXQGZLOOEHJLYHQ
when the keys are pressed. At a random time between
30 seconds and 1 minute, ][, will appear in the display
indicating the oven is running.
1RWHWKDWERWKRYHQVRIDGRXEOHZDOORYHQFDQEH
used in Sabbath mode. Each oven can be programmed
to a different temperature and each oven must be
programmed separately by selecting the oven before
starting the bake mode.
,I\RXQHHGWRDGMXVWWKHWHPSHUDWXUHSUHVVBake, use
the number pads to enter a new temperature between
170F and 550F, and press Start.
To turn the oven off, press Cancel/Off at any time. The
oven will immediately turn off and ][ will change to ]
indicating that the oven has turned off.
1RWHWKDWHDFKRYHQRIDGRXEOHZDOORYHQPXVWEH
turned off separately.
To exit Sabbath mode, make sure that the oven is
turned off. Press and hold the Bake and Broil pads for
3 seconds to enter special features then press 2 or 8 to
scroll to “ ”, 6 to edit, 2 or 8 to change setting to
Off, 6 to save settings, 4 to exit from Special Features
menus. The clock will return to the display when Sabbath
mode is off.
NOTE:,ISRZHURXWDJHRFFXUVGXULQJ6DEEDWKPRGHWKH
unit will remain in Sabbath mode but off when power is
restored.
,I\RXZLVKWRXVHWKH&RRN7LPHIHDWXUHWREDNHLQWKH
oven and then have the oven automatically turn off, you
will need to press the Cook Time button, enter a cooking
time duration, and press Start. Then enter special
features to start Sabbath mode as detailed above.

10 49-2000253 Rev. 0
Your oven has six rack positions. Recommended rack
positions for various types of foods are provided in the
Cooking Guide. Adjusting rack position is one way to
impact cooking results. For example, if you would prefer
darker tops on cakes, muffins, or cookies, try moving
IRRGRQHUDFNSRVLWLRQKLJKHU,I\RXILQGIRRGVDUHWRR
brown on top try moving them down next time.
When baking with multiple pans and on multiple racks,
ensure there is at least 1½” between pans to allow
sufficient space for air to flow.
To avoid possible burns, place the racks in the desired
position before you turn the oven on.
Traditional Flat Racks
When placing and removing cookware, pull the rack out
to the bump (stop position) on the rack support.
To remove a rack, pull it toward you, tilt the front end up
and pull it out.
To replace, place the curved end of the rack (stop-locks)
onto the oven supports, tilt up the front of the rack and
push the rack in.
Racks may become difficult to slide, especially after a
self-clean. Put some vegetable oil on a soft cloth or paper
towel and rub onto the left and right edges of the racks.
CAUTION
Do not use any type of foil or oven liner to cover the oven bottom. These items can trap heat
or melt, resulting in damage to the product and risk of shock, smoke or fire. Damage from improper use of
these items is not covered by the product warranty.
)RLOPD\EHXVHGWRFDWFKVSLOOVE\SODFLQJDVKHHWRQDORZHUUDFNVHYHUDOLQFKHVEHORZWKHIRRG'RQRWXVHPRUH
IRLOWKDQQHFHVVDU\DQGQHYHUHQWLUHO\FRYHUDQRYHQUDFNZLWKDOXPLQXPIRLO.HHSIRLODWOHDVW´IURPRYHQZDOOV
to prevent poor heat circulation.
Cookware Guidelines
7KHPDWHULDOILQLVKDQGVL]HRIFRRNZDUHDIIHFWEDNLQJ
performance.
'DUNFRDWHGDQGGXOOSDQVDEVRUEKHDWPRUHUHDGLO\
than light, shiny pans. Pans that absorb heat more
readily can result in a browner, crisper, and thicker crust.
,IXVLQJGDUNDQGFRDWHGFRRNZDUHFKHFNIRRGHDUOLHU
WKDQPLQLPXPFRRNWLPH,IXQGHVLUDEOHUHVXOWVDUH
obtained with this type of cookware consider reducing
oven temperature by 25º F next time.
Shiny pans can produce more evenly cooked baked
goods such as cakes and cookies.
Glass and ceramic pans heat slowly but retain heat well.
These types of pans work well for dishes such as pies
and custards.
Air insulated pans heat slowly and can reduce bottom
browning.
.HHSFRRNZDUHFOHDQWRSURPRWHHYHQKHDWLQJ
Oven Racks
Aluminum Foil and Oven Liners
Cookware
USING THE OVEN: Oven Racks / Aluminum Foil and Oven Liners / Cookware

49-2000253 Rev. 0 11
Your new oven has a variety of cooking modes to help you get the best results. These modes are described below.
Refer to the Cooking Guide section for recommendations for specific foods. Remember, your new oven may perform
differently than the oven it is replacing.
Bake
The bake mode is for baking and roasting. This mode
uses heat primarily from the lower element but also from
the upper element to cook food. When preparing baked
goods such as cakes, cookies, and pastries always
preheat the oven first. Follow recipe recommendations
IRUIRRGSODFHPHQW,IQRJXLGHOLQHVDUHSURYLGHGFHQWHU
food in the oven. To use this mode press the Bake pad,
enter a temperature, and then press Start.
Proof
Proof mode is designed for rising (fermenting and
proofing) bread doughs. Press the Proof pad and then
press Start. Cover dough well to prevent drying out.
%UHDGZLOOULVHPRUHUDSLGO\WKDQDWURRPWHPSHUDWXUH
1RWHWKDWIRUGRXEOHZDOORYHQVSURRIFDQQRWEHUXQ
when running a clean mode in the other oven.
Warm
Warm mode is designed to keep hot foods hot for up to
3 hours. To use this mode, press the Warm pad then
press Start. Cover foods that need to remain moist and
do not cover foods that should be crisp. Preheating is
QRWUHTXLUHG'RQRWXVHZDUPWRKHDWFROGIRRGRWKHU
WKDQFULVSLQJFUDFNHUVFKLSVRUGU\FHUHDO,WLVDOVR
recommended that food not be kept warm for more
than 2 hours.
Broiling Modes
Always broil with the door closed. The broil element in
this oven is very powerful. Monitor food closely while
EURLOLQJ8VHFDXWLRQZKHQEURLOLQJRQXSSHUUDFN
positions as placing food closer to the broil element
increases smoking, spattering, and the possibility of fats
igniting. For best performance center food below the
broil heating element. Broiling on rack position 6 is
not recommended.
Try broiling foods that you would normally grill. Adjust
rack positions to adjust the intensity of the heat to the
food. Place foods closer to the broil element when a
seared surface and rare interior is desired. Thicker
foods and foods that need to be cooked through should
be broiled on a rack position farther from the broiler or
E\XVLQJ%URLO/R
Broil Hi
7KH%URLO+LPRGHXVHVLQWHQVHKHDWIURPWKHXSSHU
HOHPHQWWRVHDUIRRGV8VH%URLO+LIRUWKLQQHUFXWVRI
meat and/or foods you prefer less done on the interior.
To use this mode press the Broil pad once and then
press Start,WLVQRWQHFHVVDU\WRSUHKHDWZKHQXVLQJ
this mode.
Broil Lo
7KH%URLO/RPRGHXVHVOHVVLQWHQVHKHDWIURPWKHXSSHU
element to cook food thoroughly while also producing
VXUIDFHEURZQLQJ8VH%URLO/RIRUWKLFNHUFXWVRIPHDW
and/or foods that you would like cooked all the way
through. To use this mode press the Broil pad twice and
then press Start,WLVQRWQHFHVVDU\WRSUHKHDWZKHQ
using this mode.
Cooking Modes
USING THE OVEN: Cooking Modes

12 49-2000253 Rev. 0
FOOD TYPE
RECOMMENDED
MODE(S)
RECOMMENDED
RACK POSITION(S) ADDITIONAL SUGGESTIONS
Baked Goods
Layer cakes, sheet cakes,
bundt cakes, muffins, quick
breads on a Single Rack
%DNH 3 8VHVKLQ\FRRNZDUH
Layer cakes* on Multiple Racks %DNH 2 and 4 Ensure adequate airflow (see illustration below).
Chiffon cakes (angel food) %DNH 1 8VHVKLQ\FRRNZDUH
Cookies, biscuits, scones on a
Single Rack
%DNH 3 8VHVKLQ\FRRNZDUH
Cookies, biscuits, scones on
Multiple Racks
%DNH 2 and 4
For foods like sugar cookies, switch food location
partially through cooking for more even cooking
results between racks. Ensure adequate airflow.
Beef & Pork
Hamburgers %URLO+L 5
8VHDEURLOSDQPRYHIRRGGRZQIRUPRUH
doneness/less searing. Watch food closely when
broiling. For best performance center food below the
broil heating element.
Steaks & Chops %URLO+L 5
8VHDEURLOSDQPRYHIRRGGRZQIRUPRUH
doneness/less searing. Watch food closely when
broiling. For best performance center food below
the broil heating element.
Roasts %DNH 2
Leave uncovered, use a low sided pan such
as a broil pan. Preheating is not necessary.
Poultry
Whole chicken %DNH 2
8VHDORZVLGHGSDQVXFKDVDEURLOSDQ
Preheating is not necessary.
%RQHLQFKLFNHQEUHDVWVOHJV
thighs
%URLO/R
%DNH
3
%URLOVNLQVLGHGRZQILUVW:DWFKIRRGFORVHO\ZKHQ
broiling. For best performance when broiling, center
food below the broil heating element.
%RQHOHVVFKLFNHQEUHDVWV
%URLO/R
%DNH
3
Move food down for more doneness/less searing and
up for greater searing/browning when broiling. For
best performance when broiling, center food below
the broil heating element.
Whole turkey %DNH 1 or 2
8VHDORZVLGHGSDQVXFKDVDEURLOSDQ
Preheating is not necessary.
7XUNH\%UHDVW %DNH 2
8VHDORZVLGHGSDQVXFKDVDEURLOSDQ
Preheating is not necessary.
Fish %URLO/R
5 (1/2 thick or less)
4 (>1/2 inch)
Watch food closely when broiling. For best performance
center food below the broil heating element.
Casseroles %DNH 3
Frozen Convenience Foods
Potato products, chicken
QXJJHWVDSSHWL]HUVRQD
Single Rack
%DNH 3 8VHVKLQ\FRRNZDUH
Potato products, chicken
QXJJHWVDSSHWL]HUVRQ
Multiple Racks
%DNH 2 and 4
8VHVKLQ\FRRNZDUH
Switch food location partially through cooking for
more even cooking results.
*When baking four cake layers at a time, use racks
2 and 4. Place the pans as shown so that one pan is
not directly above another.
Cook food thoroughly to help protect against food
borne illness. Minimum safe food temperature
recommendations for food safety can be found at
IsItDoneYet.gov. Make sure to use a food thermometer
to take food temperatures.
USING THE OVEN: Cooking Guide
Cooking Guide

49-2000253 Rev. 0 13
%HVXUHHOHFWULFDOSRZHULVRIIDQGDOOVXUIDFHVDUHFRROEHIRUHFOHDQLQJDQ\SDUWRIWKHRYHQ
Control Panel
,W¶VDJRRGLGHDWRZLSHWKHFRQWUROSDQHODIWHUHDFKXVH
Clean with mild soap and water or vinegar and water,
rinse with clean water and polish dry with a soft cloth.
'RQRWXVHDEUDVLYHFOHDQVHUVVWURQJOLTXLGFOHDQVHUV
plastic scouring pads or oven cleaners on the control
SDQHO²WKH\ZLOOGDPDJHWKHILQLVK
Oven Exterior
'RQRWXVHRYHQFOHDQHUVDEUDVLYHFOHDQVHUVVWURQJ
liquid cleansers, steel wool, plastic scouring pads, or
cleaning powders on the interior or exterior of the oven.
Clean with a mild soap and water or vinegar and water
solution. Rinse with clean water and dry with a soft cloth.
When cleaning surfaces, make sure that they are at
room temperature and not in direct sunlight.
,IVWDLQRQWKHGRRUYHQWWULPLVSHUVLVWHQWXVHDPLOG
abrasive cleaner and a sponge-scrubber for best results.
Spillage of marinades, fruit juices, tomato sauces and
basting liquids containing acids may cause discoloration
and should be wiped up immediately. Let hot surfaces
cool, then clean and rinse.
Oven Interior
The interior of your new oven can be cleaned manually
or by using the Steam Clean or Self Clean modes.
Spillage of marinades, fruit juices, tomato sauces and
basting liquids containing acids may cause discoloration
and should be wiped up immediately. Let hot surfaces
cool, then clean and rinse.
Manual Cleaning
'RQRWXVHRYHQFOHDQHUVDEUDVLYHFOHDQHUVVWURQJ
liquid cleansers, steel wool, scouring pads, or cleaning
powders on the interior of the oven. Clean with a mild
soap and water or vinegar and water solution. Rinse with
clean water and dry with a soft cloth. When cleaning
surfaces, make sure that they are at room temperature.
Steam Clean Mode
Steam clean is intended to clean small spills using water
and a lower cleaning temperature than Self-Clean.
To use the Steam Clean feature, wipe grease and soils
from the oven. Pour one cup of water into the bottom of
the oven. Close the door. Press the Steam Clean pad
and then press Start. The oven door will lock. You can
not open the door during the 30 minute steam clean as
this will decrease the steam clean performance. At the
end of the steam clean cycle the door will unlock. Wipe
out any excess water and any remaining soil.
NOTE: Water in the bottom of the oven may be hot right
after finishing the cycle.
Self Clean Mode
5HDG6HOI&OHDQLQJ2YHQ6DIHW\,QVWUXFWLRQVDWWKH
beginning of this manual before using Self Clean Mode.
Self clean uses very high temperatures to clean the
oven interior. The oven door will lock when using this
IHDWXUH%HIRUHRSHUDWLQJWKHVHOIFOHDQF\FOHZLSHXS
grease and soils from the oven. Remove all items from
the oven other than enameled (dark color) racks. Shiny
or silver racks and any cookware or other items should
all be removed from the oven before initiating a self-clean
cycle. Close the door. Press the Self Clean pad and a
default self-clean time is displayed. The clean time can
be changed to any time between 3:00 and 5:00 hours
by using the number pads to enter a different time and
pressing Start. For heavily soiled ovens, the maximum
KRXUFOHDQWLPHLVUHFRPPHQGHG,I\RXZLVKWRXVH
the default time, press the Start pad immediately after
pressing the Self Clean pad. The oven will turn off
automatically when the self-clean cycle is complete. The
door will stay locked until the oven has cooled down. After
the oven has cooled down wipe any ash out of the oven.
IMPORTANT: The health of some birds is extremely
sensitive to the fumes given off during the self-cleaning cycle
of any range. Move birds to another well-ventilated room.
Stainless Steel Surfaces (on some models)
'RQRWXVHDVWHHOZRROSDGLWZLOOVFUDWFKWKHVXUIDFH
To clean the stainless steel surface, use warm sudsy
water or a stainless steel cleaner or polish. Always wipe
the surface in the direction of the grain. Follow the cleaner
instructions for cleaning the stainless steel surface.
&OHDQHUVZLWKR[DOLFDFLGVXFKDV%DU.HHSHUV)ULHQG6RIW
Cleanser™ will remove surface rust, tarnish and small
EOHPLVKHV8VHRQO\DOLTXLGFOHDQVHUIUHHRIJULWDQGUXELQ
the direction of the brush lines with a damp, soft sponge.
To inquire about purchasing cleaning products including
stainless steel appliance cleaner or polish read the
Accessories sections of this manual.
CARE AND CLEANING: Oven
Oven

14 49-2000253 Rev. 0
Flat Racks
Flat racks that are enameled, not shiny, can be left in the
cavity during self clean, or can be washed with warm,
soapy water.
Racks may be more difficult to slide, especially after a
self-clean. Put some vegetable oil on a soft cloth or paper
towel and rub onto the left and right edges.
CARE AND CLEANING: Oven / Oven Light
WARNING
SHOCK OR BURN HAZARD:%HIRUHUHSODFLQJRYHQOLJKWEXOEGLVFRQQHFWWKHHOHFWULFDOSRZHUWRWKH
oven at the main fuse or circuit breaker panel. Failure to do so may result in electric shock or burn.
CAUTION
BURN HAZARD: The glass cover and bulb should be removed when cool. Touching hot glass with
bare hands or a damp cloth can cause burns.
'LVFRQQHFWSRZHUDWWKHPDLQIXVHRUFLUFXLWEUHDNHU
panel.
2. Remove oven racks.
3. Slide a flat blade screwdriver or butter knife between
the metal housing and the glass light cover.
NOTE: on some models there is a metal clip visibly
holding the glass. The tool needs inserted between
the metal housing and the clip holding the glass.
4. Support the glass light cover with two fingers to prevent
the cover from falling to the bottom of the oven.
5. Gently twist the screwdriver blade or butter knife to
ORRVHQWKHJODVVOLJKWFRYHU%HFDUHIXOQRWWRFKLS
the oven coating.
6. Remove the glass light cover.
7. Remove the bulb by firmly grasping and sliding the
bulb straight out until the two prongs have cleared
the ceramic holder.
'RQRWWRXFKWKHJODVVRIWKHQHZUHSODFHPHQWEXOE
ZLWK\RXUILQJHUV,WZLOOFDXVHWKHEXOEWRIDLOZKHQLW
lights. Grasp the replacement bulb with a clean towel
or facial tissue with the prongs facing down. Align
the two prongs in the ceramic holder, pressing gently
until the bulb is securely in the ceramic socket.
9. Slide the protective lens into the holder and push
until the clips snap into the housing.
10. Reconnect power.
Oven (Cont.)
Oven Light

49-2000253 Rev. 0 15
CARE AND CLEANING:2YHQ'RRU
Oven Door
Oven Door Removal
NOTE:'RRUUHPRYDOLVQRWDUHTXLUHPHQWIRULQVWDOODWLRQ
of the product but is an added convenience.
To remove the door:
1. Open the oven door as far as it will go.
2. Remove hinge bracket (if present) from front frame
and set aside. The hinge bracket must be replaced
for proper door functionality when door is reinstalled.
3. Push both hinge locks down toward the door frame to
the unlocked position. This may require a flat-blade
screwdriver. DO NOT LIFT THE DOOR BY THE
HANDLE!
4. Place hands on both sides of the door and close the
oven door to the removal position (approximately
1”–2” [2.5 cm–5.1 cm] from the closed position).
5. Lift the door up and out until the hinge arms clear the
slots. NOTE:7KHRYHQGRRULVYHU\KHDY\%HVXUH
you have a firm grip before lifting the oven door off
WKHKLQJHV8VHFDXWLRQRQFHWKHGRRULVUHPRYHG
'RQRWOD\WKHGRRURQLWVKDQGOH7KLVFRXOGFDXVH
dents or scratches.
Replacing the Oven Door
NOTE: The oven door is heavy. You may need help
lifting the door high enough to slide it into the hinge slots.
'RQRWOLIWWKHGRRUE\WKHKDQGOH
1. Lift the oven door by grasping each side.
2. With the door at the same angle as the removal position
(approximately 1”–2” [2.5 cm–5.1 cm] from the closed
position), seat the notch of the hinge arm into the
bottom edge of the hinge slot. The notch of the hinge
arm must be fully seated into the bottom of the slot.
)XOO\RSHQWKHGRRU,IWKHGRRUZLOOQRWIXOO\RSHQWKH
indentation is not seated correctly in the bottom edge
of the slot.
4. Push the hinge locks up against the front frame of the
oven cavity, to the locked position.
5. Replace hinge bracket (if present). The hinge bracket
must be replaced for proper door functionality.
6. Close the oven door.
Hinge in
Locked
Position
1RWFKRI+LQJH
Securely Fitted
,QWR%RWWRPRI
Hinge Slot
%RWWRP
Edge of
Slot
Hinge
Arm
+LQJH1RWFK
+LQJH%UDFNHW
Hinge
Slot
Hinge
Arm
+LQJH8QORFNHG
Position
Hinge Clears Slot
+LQJH%UDFNHW

16 49-2000253 Rev. 0
Problem Possible Cause What To Do
My new oven doesn't
cook like my old one. Is
something wrong with the
temperature settings?
Your new oven has a different cooking
system from your old oven and therefore
may cook differently than your old oven.
For the first few uses, follow your recipe times
DQGWHPSHUDWXUHVFDUHIXOO\,I\RXVWLOOWKLQN\RXU
new oven is too hot or too cold, you can adjust the
temperature yourself to meet your specific cooking
preference.
Food does not bake
properly
Oven controls improperly set. See the Cooking Modes section.
Rack position is incorrect or rack is not
level.
See the Cooking Modes section and Cooking
Guide.
,QFRUUHFWFRRNZDUHRUFRRNZDUHRI
LPSURSHUVL]HEHLQJXVHG
See the Cookware section.
Oven temperature needs adjustment. See the Special Features section.
,QJUHGLHQWVXEVWLWXWLRQ Substituting ingredients can change the recipe
outcome.
Food does not broil
properly
Oven controls improperly set. Make sure you select the appropriate broil mode.
,PSURSHUUDFNSRVLWLRQEHLQJXVHG See Cooking Guide for rack location suggestions.
Food being cooked in a hot pan. Make sure cookware is cool.
Cookware not suited for broiling. 8VHDSDQVSHFLILFDOO\GHVLJQHGIRUEURLOLQJ
Aluminum foil used on the broiling pan and
grid has not been fitted properly and slit as
recommended.
,IXVLQJDOXPLQXPIRLOFRQIRUPWRSDQVOLWV
,QVRPHDUHDVWKHSRZHUYROWDJHPD\EH
low.
Preheat the broil element for 10 minutes.
Oven temperature too hot
or too cold
Oven temperature needs adjustment. See the Special Features section.
Oven does not work or
appears not to work
A fuse in your home may be blown or the
circuit breaker tripped.
Replace the fuse or reset the circuit breaker.
Oven controls improperly set. 6HHWKH8VLQJWKH2YHQVHFWLRQ
Oven is in Sabbath Mode. 9HULI\WKDWWKHRYHQLVQRWLQ6DEEDWK0RGH6HH
the Special Features section.
“Crackling” or “popping”
sound
This is the sound of the metal heating
and cooling during both the cooking and
cleaning functions.
This is normal.
Why is my range making
a "clicking" noise when
using my oven?
Your range has been designed to
maintain a tighter control over your oven's
temperature. You may hear your oven's
heating elements "click" on and off more
frequently than in older ovens to achieve
better results during baking, broiling, and
self-clean cycles.
This is normal.
Clock and timer do not
work
A fuse in your home may be blown or the
circuit breaker tripped.
Replace the fuse or reset the circuit breaker.
Sometimes the oven takes
longer to preheat to the
same temperature
Cookware or food in oven The cookware or food in the oven will cause the
oven to take longer to preheat. Remove items to
reduce preheat time.
1XPEHURIUDFNVLQRYHQ Adding more racks to the oven will cause the oven
to take longer to preheat. Remove some racks.
Troubleshooting tips ... %HIRUH\RXFDOOIRUVHUYLFH
Save time and money! Review the charts on the following pages or visit GEAppliances.com/ge/service-and-
support/cookingproducts.htm for helpful articles and support videos before you call for service.
TROUBLESHOOTING TIPS

49-2000253 Rev. 0 17
TROUBLESHOOTING TIPS
Problem Possible Cause What To Do
Oven light does not work Light bulb is loose or defective. Tighten or replace bulb.
Pad operating light is broken. Call for service.
Oven will not self-clean The temperature is too high to set a
self-clean operation.
Allow the oven to cool and reset the controls.
Oven controls improperly set. See the Cleaning the Oven section.
Excessive smoking
during clean cycle
Excessive soil or grease.. Press the Cancel/Off pad. Open the windows to rid
the room of smoke. Wait until the
goes off. Wipe
up the excess soil and reset the clean cycle.
Excessive smoking
during broiling
Food too close to burner element. Lower the rack position of the food.
Oven door will not open
after a clean cycle
Oven too hot. Allow the oven to cool below locking temperature.
Oven not clean after a
clean cycle
Oven controls improperly set. See the Cleaning the Oven section.
Oven was heavily soiled. Clean up heavy spillovers before starting the clean
cycle. Heavily soiled ovens may need to self-clean
again or for a longer period of time.
flashes in the display
The self-clean cycle has been selected but
the door is not closed.
Close the oven door.
is on when you want
to cook
The oven door is locked because the
temperature inside the oven has not
dropped below the locking temperature.
Press the Cancel/Off pad. Allow the oven to cool.
“F— and a number or
letter” flash in the display
You have a function error code. Press the Cancel/Off pad. Allow the oven to cool
for one hour. Put the oven back into operation.
,IWKHIXQFWLRQFRGHUHSHDWV 'LVFRQQHFWDOOSRZHUWRWKHRYHQIRUDWOHDVW
VHFRQGVDQGWKHQUHFRQQHFWSRZHU,IWKHIXQFWLRQ
error code repeats, call for service.
Display goes blank A fuse in your home may be blown or the
circuit breaker tripped.
Replace the fuse or reset the circuit breaker.
The clock is turned off. See the Special features section.
Oven is in Sabbath Mode. 9HULI\WKDWWKHRYHQLVQRWLQ6DEEDWK0RGH
See the Special Features section.
Power outage, clock
flashes
Power outage or surge 5HVHWWKHFORFN,IWKHRYHQZDVLQXVH\RXPXVW
reset it by pressing the Cancel/Off pad, setting the
clock and resetting any cooking function.
“Burning” or “oily” odor
emitting from the vent
This is normal in a new oven and will
disappear in time.
To speed the process, set a self-clean cycle for a
minimum of 3 hours. See the Cleaning the Oven
section. This is temporary.
Strong odor An odor from the insulation around the
inside of the oven is normal for the first few
times the oven is used.
This is temporary and will go away after several
uses or a self-clean cycle.
Fan noise A cooling fan may automatically turn on. This is normal. The cooling fan will turn on to cool
LQWHUQDOSDUWV,WPD\UXQIRUXSWRKRXUVDIWHU
the oven is turned off.
My oven door glass
appears to be "tinted" or
have a "rainbow" color. Is
this defective?
1R7KHLQQHURYHQJODVVLVFRDWHGZLWK
a heat barrier to reflect the heat back into
the oven to prevent heat loss and keep the
outer door cool while baking.
7KLVLVQRUPDO8QGHUFHUWDLQOLJKWRUDQJOHV\RX
may see this tint or rainbow color.
Oven will not work
remotely
Router issues, no wireless signal, etc. For assistance with oven wireless network
connectivity, please call 800.220.6899.
Oven is not connected.
Troubleshooting tips ... %HIRUH\RXFDOOIRUVHUYLFH

18 49-2000253 Rev. 0
Staple your receipt here. Proof of the original purchase
date is needed to obtain service under the warranty.
GEAppliances.com
$OOZDUUDQW\VHUYLFHLVSURYLGHGE\RXU)DFWRU\6HUYLFH&HQWHUVRUDQDXWKRUL]HG&XVWRPHU&DUH
®
technician. To
schedule service online, visit us at GEAppliances.com/service_and_support/, or call GE Appliances at 800.GE.CARES
(800.432.2737). Please have your serial number and your model number available when calling for service.
Servicing your appliance may require the use of the onboard data port for diagnostics. This gives a GE Appliances factory
service technician the ability to quickly diagnose any issues with your appliance and helps GE Appliances improve its
SURGXFWVE\SURYLGLQJ*($SSOLDQFHVZLWKLQIRUPDWLRQRQ\RXUDSSOLDQFH,I\RXGRQRWZDQW\RXUDSSOLDQFHGDWDWREH
sent to GE Appliances, please advise your technician not to submit the data to GE Appliances at the time of service.
What GE Appliances will not cover:
Ŷ Service trips to your home to teach you how to use
the product.
Ŷ ,PSURSHULQVWDOODWLRQGHOLYHU\RUPDLQWHQDQFH
Ŷ )DLOXUHRIWKHSURGXFWLILWLVDEXVHGPLVXVHG
modified or used for other than the intended purpose
or used commercially.
Ŷ 5HSODFHPHQWRIKRXVHIXVHVRUUHVHWWLQJRIFLUFXLW
breakers.
Ŷ 'DPDJHWRWKHSURGXFWFDXVHGE\DFFLGHQWILUH
floods or acts of God.
Ŷ 'DPDJHWRILQLVKVXFKDVVXUIDFHUXVWWDUQLVKRUVPDOO
blemishes not reported within 48 hours of delivery.
Ŷ ,QFLGHQWDORUFRQVHTXHQWLDOGDPDJHFDXVHGE\
possible defects with this appliance.
Ŷ 'DPDJHFDXVHGDIWHUGHOLYHU\
Ŷ 3URGXFWQRWDFFHVVLEOHWRSURYLGHUHTXLUHGVHUYLFH
Ŷ 6HUYLFHWRUHSDLURUUHSODFHOLJKWEXOEVH[FHSWIRU
/('ODPSV
LIMITED WARRANTY
GE Appliances Electric Oven Limited Warranty
EXCLUSION OF IMPLIED WARRANTIES
Your sole and exclusive remedy is product repair as provided in this Limited Warranty. Any implied warranties,
including the implied warranties of merchantability or fitness for a particular purpose, are limited to one year or
the shortest period allowed by law.
This limited warranty is extended to the original purchaser and any succeeding owner for products purchased for
KRPHXVHZLWKLQWKH86$,IWKHSURGXFWLVORFDWHGLQDQDUHDZKHUHVHUYLFHE\D*($SSOLDQFHV$XWKRUL]HG6HUYLFHU
LVQRWDYDLODEOH\RXPD\EHUHVSRQVLEOHIRUDWULSFKDUJHRU\RXPD\EHUHTXLUHGWREULQJWKHSURGXFWWRDQ$XWKRUL]HG
*($SSOLDQFHV6HUYLFHORFDWLRQIRUVHUYLFH,Q$ODVNDWKHOLPLWHGZDUUDQW\H[FOXGHVWKHFRVWRIVKLSSLQJRUVHUYLFH
calls to your home.
Some states do not allow the exclusion or limitation of incidental or consequential damages. This limited warranty
gives you specific legal rights, and you may also have other rights which vary from state to state. To know what your
legal rights are, consult your local or state consumer affairs office or your state’s Attorney General.
Warrantor: GE Appliances, a Haier company
/RXLVYLOOH.<
Extended Warranties: Purchase a GE Appliances extended warranty and learn about special discounts that are
available while your warranty is still in effect. You can purchase it online anytime at
GEAppliances.com/extended-warranty
or call 800.626.2224 during normal business hours. GE Appliances Service will still be there after your warranty expires.
For the period of GE Appliances will replace
One year
From the date
of the original
purchase
Any partRIWKHRYHQZKLFKIDLOVGXHWRDGHIHFWLQPDWHULDOVRUZRUNPDQVKLS'XULQJWKLV
limited one-year warranty, GE Appliances will provide, free of charge, all labor and in-home
service to replace the defective part.

49-2000253 Rev. 0 19
ACCESSORIES
Looking For Something More?
GE Appliances offers a variety of accessories to
improve your cooking and maintenance experiences!
Refer to the Consumer Support page for phone numbers
and website information.
The following products and more are available:
Accessories
Accessories
6PDOO%URLOHU3DQô´[ó´[ò³
/DUJH%URLOHU3DQô´[ó´[ò³
;/%URLOHU3DQ´[ó´[³
Parts
Oven racks
´1HYHU6FUXE*OLGH5DFN
´1HYHU6FUXE*OLGH5DFN
Oven elements
Light bulbs
Cleaning Supplies
CitruShine™ Stainless Steel Wipes
&HUDPD%U\WH6WDLQOHVV6WHHO$SSOLDQFH&OHDQHU
Graphite Lubricant***
*The large broiler pan does not fit in 20”/24” ranges.
** The XL broiler pan does not fit in 24” wall ovens, 27” drop ins
or 20”/24” ranges.
*** )RUXVHZLWK1HYHU6FUXEJOLGHUDFNV

20 49-2000253 Rev. 0
3ULQWHGLQWKH8QLWHG6WDWHV
Consumer Support
CONSUMER SUPPORT
GE Appliances Website
Have a question or need assistance with your appliance? Try the GE Appliances Website 24 hours a day, any day
of the year! You can also shop for more great GE Appliances products and take advantage of all our on-line support
VHUYLFHVGHVLJQHGIRU\RXUFRQYHQLHQFH,QWKH86GEAppliances.com
Register Your Appliance
Register your new appliance on-line at your convenience! Timely product registration will allow for enhanced
communication and prompt service under the terms of your warranty, should the need arise. You may also mail in
WKHSUHSULQWHGUHJLVWUDWLRQFDUGLQFOXGHGLQWKHSDFNLQJPDWHULDO,QWKH86GEAppliances.com/register
Schedule Service
Expert GE Appliances repair service is only one step away from your door. Get on-line and schedule your service at
\RXUFRQYHQLHQFHDQ\GD\RIWKH\HDU,QWKH86GEAppliances.com/service
or call 800.432.2737 during normal business hours.
Extended Warranties
Purchase a GE Appliances extended warranty and learn about special discounts that are available while your
warranty is still in effect. You can purchase it on-line anytime. GE Appliances Services will still be there after your
ZDUUDQW\H[SLUHV,QWKH86GEAppliances.com/extended-warranty
or call 800.626.2224 during normal business hours.
Remote Connectivity
For assistance with wireless network connectivity (for models with remote enable),
visit our website at GEAppliances.com/connect RUFDOOLQWKH86
Parts and Accessories
,QGLYLGXDOVTXDOLILHGWRVHUYLFHWKHLURZQDSSOLDQFHVFDQKDYHSDUWVRUDFFHVVRULHVVHQWGLUHFWO\WRWKHLUKRPHV
9,6$0DVWHU&DUGDQG'LVFRYHUFDUGVDUHDFFHSWHG2UGHURQOLQHWRGD\KRXUVHYHU\GD\
,QWKH86GEApplianceparts.com or by phone at 877.959.8688 during normal business hours.
Instructions contained in this manual cover procedures to be performed by any user. Other servicing
generally should be referred to qualified service personnel. Caution must be exercised, since improper
servicing may cause unsafe operation.
Contact Us
,I\RXDUHQRWVDWLVILHGZLWKWKHVHUYLFH\RXUHFHLYHIURP*($SSOLDQFHVFRQWDFWXVRQRXU:HEVLWHZLWKDOOWKH
details including your phone number, or write to:
,QWKH86*HQHUDO0DQDJHU&XVWRPHU5HODWLRQV_*($SSOLDQFHV$SSOLDQFH3DUN_/RXLVYLOOH.<
GEAppliances.com/contact

GE es una marca registrada de General Electric Company. Fabricado bajo licencia de marca.
MANUAL DEL
PROPIETARIO
Escriba los números de modelo y
serie aquí:
Nº de Modelo ________________
Nº de Serie __________________
Los podrá encontrar en una
etiqueta en el borde lateral o en el
frente del horno (inferior) detrás
de la puerta del horno.
HORNO DE PARED
Eléctrico Incorporado
49-2000253 Rev. 0 03-19 GEA
INFORMACIÓN DE SEGURIDAD ... 3
USO DEL HORNO
Controles del Horno de Pared Simple ........ 6
Controles del Horno de Pared Doble ......... 7
Funciones especiales ....................... 8
Estantes del Horno .........................10
Papel de Aluminio y Cobertores del Horno ....10
Utensilios .................................10
Modos de Cocción .........................11
Guía de Cocción ...........................12
CUIDADO Y LIMPIEZA
Horno ....................................13
Luz del Horno .............................14
Puerta del Horno ..........................15
CONSEJOS PARA LA
SOLUCIÓN DE PROBLEMAS .......16
GARANTÍA LIMITADA ...............18
ACCESORIOS .........................19
SOPORTE PARA
EL CONSUMIDOR ...................20
Horno de Pared Simple
JKS3000 de 27"
Horno de Pared Simple
JTS3000 de 30”
Horno de Pared Doble
JKD3000 de 27"
Horno de Pared Doble
JTD3000 de 30"

2 49-2000253 Rev. 0
GRACIAS POR HACER QUE GE APPLIANCES SEA PARTE DE SU HOGAR.
Ya sea que haya crecido usando GE Appliances, o que ésta es su primera vez, nos complace
tenerlo en la familia.
Sentimos orgullo por el nivel de arte, innovación y diseño de cada uno de los electrodomésticos de
GE Appliances, y creemos que usted también. Entre otras cosas, el registro de su electrodoméstico
asegura que podamos entregarle información importante del producto y detalles de la garantía
cuando los necesite.
Registre su electrodoméstico GE ahora a través de Internet. Sitios Web y números telefónicos útiles
están disponibles en la sección de Soporte para el Consumidor de este Manual del Propietario.
También puede enviar una carta en la tarjeta de inscripción preimpresa que se incluye con
el material embalado.

49-2000253 Rev. 0 3
LEA Y GUARDE ESTAS INSTRUCCIONES
INFORMACIÓN IMPORTANTE DE SEGURIDAD
LEA TODAS LAS INSTRUCCIONES ANTES DE USAR ESTE ELECTRODOMÉSTICO
INFORMACIÓN DE SEGURIDAD
ADVERTENCIA
INSTRUCCIONES GENERALES DE SEGURIDAD
Ŷ 8VHHVWHHOHFWURGRPpVWLFRVyORSDUDVXSURSyVLWRRULJLQDO
como se describe en el Manual del Propietario.
Ŷ6ROLFLWHTXHXQLQVWDODGRUFDOLILFDGRLQVWDOHVXHOHFWURGRPpVWLFR
y que esté adecuadamente conectado a tierra, de acuerdo con
las instrucciones de instalación provistas.
Ŷ1RLQWHQWHUHSDUDURUHHPSOD]DUQLQJXQDSDUWHGHOKRUQR
a menos que se recomiende específicamente en este
manual. Cualquier otra reparación deberá ser realizada
por un técnico calificado.
Ŷ$QWHVGHUHDOL]DUFXDOTXLHUVHUYLFLRWpFQLFRGHVFRQHFWHHO
suministro de corriente desde el panel de distribución del
hogar, retirando el fusible o desconectando el disyuntor.
Ŷ1RGHMHDORVQLxRVVRORV±QRVHGHEHUiGHMDUDORVQLxRV
solos o fuera de su radio de atención en el área donde
HOHOHFWURGRPpVWLFRVHHQFXHQWUHHQXVR1XQFDVHOHV
deberá permitir trepar, sentarse o pararse sobre ninguna
parte del electrodoméstico.
Ŷ
PRECAUCIÓN
1RFRORTXHDUWtFXORVGHLQWHUpV
para los niños sobre los gabinetes que están sobre un
KRUQR±VLORVQLxRVVHWUHSDQVREUHHOKRUQRSDUDOOHJDUD
estos artículos podrían sufrir lesiones graves.
Ŷ8VHVyORPDQJRVGHROODVVHFDV±ORVPDQJRVK~PHGRV
sobre superficies calientes pueden producir quemaduras
GHELGRDOYDSRU1RGHMHTXHORVPDQJRVGHODVROODVWRTXHQ
ORVHOHPHQWRVTXHHVWiQFDOLHQWHV1RXVHXQDWRDOODXRWUD
tela voluminosa para reemplazar el mango de las cacerolas.
Ŷ1XQFDXVHHOHOHFWURGRPpVWLFRSDUDFDOHQWDUR
calefaccionar la habitación.
Ŷ1RWRTXHHOHOHPHQWRFDOHQWDGRUQLODVXSHUILFLHLQWHULRUGHO
horno. Es posible que estas superficies estén demasiado
calientes como para quemar, aunque su color sea oscuro.
Durante y después del uso, no toque ni permita que telas u
otros materiales inflamables toquen cualquier área interior
del horno; espere a que haya pasado un tiempo suficiente
para que se enfríen. Otras superficies del electrodoméstico
se podrán calentar lo suficiente como para ocasionar
lesiones. Las superficies potencialmente calientes incluyen
la abertura de la ventilación del horno, superficies cercanas
a la abertura y grietas alrededor de la puerta del horno.
Ŷ1RFDOLHQWHHQYDVHVGHFRPLGDTXHQRKD\DQVLGR
abiertos. Se podría acumular presión y el envase podría
explotar, ocasionando una lesión.
Ŷ1RXVHQLQJ~QWLSRGHDOXPLQLRRFREHUWRUSDUDFXEULU
el fondo del horno o cualquier parte del horno, excepto
como se describe en este manual. Los cobertores de
horno pueden atrapar el calor o derretirse, ocasionando
daños sobre el producto y el riesgo de descargas, humo o
incendios.
Ŷ(YLWHODVUDOODGXUDVRLPSDFWRVVREUHODVSXHUWDVGHYLGULRR
los paneles de control. Hacer esto podrá producir la rotura
GHYLGULRV1RFRFLQHXQSURGXFWRFRQXQYLGULRURWR(V
posible que se produzcan descargas, incendios o cortes.
Ŷ&RFLQHFDUQHV\FDUQHVGHDYHHQIRUPDFRPSOHWD±OD
carne por lo menos a una temperatura interna de 160º F
y la carne de ave por lo menos a una temperatura interna
GH)1RUPDOPHQWHODFRFFLyQDHVWDVWHPSHUDWXUDV
es una protección contra las enfermedades transmitidas
por la comida.
ADVERTENCIA
/HDWRGDVODVLQVWUXFFLRQHVGHVHJXULGDGDQWHVGHXWLOL]DUHVWHSURGXFWR1RVHJXLUHVWDVLQVWUXFFLRQHV
puede generar un incendio, una descarga eléctrica, lesiones corporales o la muerte.
ADVERTENCIA
MANTENGA LOS MATERIALES INFLAMABLES ALEJADOS DE LA COCINA
Si esto no se cumple, se podrán sufrir lesiones personales graves o incendios.
Ŷ 1RJXDUGHQLXVHPDWHULDOHVLQIODPDEOHVHQRFHUFDGH
un horno, incluyendo papel, plástico, mangos de ollas,
trapos, cobertores de pared, cortinas, paños y gasolina u
otros vapores y líquidos inflamables.
Ŷ 1XQFDXVHSUHQGDVKROJDGDVRTXHFXHOJXHQPLHQWUDV
usa el electrodoméstico. Estas prendas se podrán
incendiar si entran en contacto con superficies calientes,
ocasionando quemaduras graves.
Ŷ 1RSHUPLWDTXHODJUDVDGHODFRFFLyQXRWURVPDWHULDOHV
inflamables se acumulen en o cerca del horno. La grasa
que está en o cerca del horno se podrá incendiar.
Ŷ Funcionamiento Remoto - Este electrodoméstico
permite su configuración para un funcionamiento remoto
HQFXDOTXLHUPRPHQWR1RJXDUGHPDWHULDOHVLQIODPDEOHV
ni ítems sensibles a la temperatura dentro de este
electrodoméstico.

4 49-2000253 Rev. 0
LEA Y GUARDE ESTAS INSTRUCCIONES
INFORMACIÓN DE SEGURIDAD
ADVERTENCIA
EN CASO DE INCENDIO, SIGA LOS SIGUIENTES PASOS PARA
EVITAR LESIONES O LA PROPAGACIÓN DEL FUEGO
Ŷ 1RXVHDJXDVREUHHOIXHJRGHODJUDVD1XQFDWRPHXQD
olla que se esté incendiando.
Ŷ 6LKD\XQLQFHQGLRHQHOKRUQRGXUDQWHHOKRUQHDGR
ahogue el fuego cerrando la puerta del horno y apagando
el mismo o usando un químico seco multipropósito o un
extintor de incendio con espuma.
Ŷ (QFDVRGHTXHKD\DIXHJRHQHOKRUQRGXUDQWHHOFLFOR
de limpieza automática, apague el horno y espere a que
el fuego se extinga. 1RIXHUFHODSXHUWDSDUDDEULUOD
La entrada de aire fresco sobre las temperaturas de la
limpieza automática podrá conducir a la producción de
llamas en el horno. Si no se siguen estas instrucciones,
se podrán producir quemaduras graves.
ADVERTENCIA
INSTRUCCIONES DE SEGURIDAD DEL HORNO
Ŷ 0DQWpQJDVHDOHMDGRGHOKRUQRDODEULUODSXHUWDGHO
mismo. El aire caliente o el vapor que sale puede causar
quemaduras en las manos, rostro y/u ojos.
Ŷ 0DQWHQJDGHVREVWUXLGDODYHQWLODFLyQGHOKRUQR
Ŷ 0DQWHQJDHOKRUQROLEUHGHDFXPXODFLyQGHJUDVD/D
grasa del horno se puede incendiar.
Ŷ &RORTXHORVHVWDQWHVGHOKRUQRHQODXELFDFLyQGHVHDGD
mientras éste se encuentra frío. Si es necesario mover
el estante mientras el horno está caliente, evite que
el mango de la olla tenga contacto con el elemento
calentador en el horno.
Ŷ $OXVDUODVEROVDVSDUDFRFLQDURGRUDUHQHOKRUQRVLJD
las instrucciones del fabricante.
Ŷ (VFRQYHQLHQWHHPSXMDUKDFLDDIXHUDORVHVWDQWHV
estándares hasta el tope o empujar el estante extensible
hasta la posición completamente abierta para levantar
comidas pesadas. Esto también es una precaución contra
quemaduras por tocar superficies calientes de la puerta o
las paredes del horno.
Ŷ 1RGHMHSURGXFWRVWDOHVFRPRSDSHOXWHQVLOLRVGHFRFLQDQL
comida en el horno cuando éste no se encuentre en uso.
Los artículos guardados en el horno se pueden incendiar.
Ŷ 1XQFDFRORTXHORVXWHQVLOLRVGHFRFLQDSLHGUDVSDUD
pizza u horneado o cualquier otro tipo de aluminio o
cobertor en la base del horno. Estos ítems pueden
atrapar el calor o derretirse, ocasionando daños sobre el
producto y el riesgo de descargas, humo o incendios.
ADVERTENCIA
INSTRUCCIONES DE SEGURIDAD DEL HORNO
CON LIMPIEZA AUTOMÁTICA
La función de limpieza automática usa el horno en temperaturas lo suficientemente altas como para consumir la suciedad de
comida que haya dentro del horno. Para un funcionamiento seguro, siga estas instrucciones.
Ŷ 1RWRTXHODVVXSHUILFLHVGHOKRUQRGXUDQWHHOFLFORGH
limpieza automática. Mantenga a los niños alejados del
horno durante la limpieza automática. Si no se siguen
estas instrucciones, se podrán producir quemaduras.
Ŷ $QWHVGHXVDUHOFLFORGHOLPSLH]DDXWRPiWLFDGHOKRUQR
retire los estantes de color gris brillante (en algunos
modelos), la sonda, cualquier papel de aluminio, y
cualquier bandeja para asar, rejilla, u otros utensilios.
Sólo se pueden dejar dentro del horno los estantes para
horno cubiertos de porcelana.
Ŷ $QWHVGHXWLOL]DUHOFLFORGHOLPSLH]DDXWRPiWLFDOLPSLH
ODJUDVD\UHVWRVGHFRPLGDTXHKD\DHQHOKRUQR8QD
cantidad excesiva de grasa se puede incendiar, lo cual
puede producir daños con humo en su hogar.
INFORMACIÓN IMPORTANTE DE SEGURIDAD
LEA TODAS LAS INSTRUCCIONES ANTES DE USAR ESTE ELECTRODOMÉSTICO

49-2000253 Rev. 0 5
LEA Y GUARDE ESTAS INSTRUCCIONES
INFORMACIÓN DE SEGURIDAD
ADVERTENCIA
INSTRUCCIONES DE SEGURIDAD DEL HORNO
CON LIMPIEZA AUTOMÁTICA (Cont.)
Ŷ 6LHOPRGRGHOLPSLH]DDXWRPiWLFDIXQFLRQDGHIRUPD
incorrecta, apague el horno y desconecte el suministro de
corriente. Solicite el servicio de un técnico calificado.
Ŷ 1ROLPSLHODMXQWDGHODSXHUWD/DMXQWDGHODSXHUWDHV
esencial para un buen sellado. Se debe tener cuidado de
no frotar, dañar ni mover la junta.
Ŷ 1RXVHOLPSLDGRUHVSDUDKRUQR1RVHGHEHUiXVDU
limpiadores comerciales para horno ni revestimientos de
protección para hornos de ningún tipo en o alrededor de
cualquier parte del horno.
Cómo Retirar la Película Protectora de Envío y la Cinta de Embalaje
Con cuidado tome un extremo de la película protectora
de envío con los dedos y lentamente retire la misma de la
VXSHUILFLHGHOHOHFWURGRPpVWLFR1RXWLOLFHQLQJ~QSURGXFWR
filoso para retirar la película. Retire toda la película antes de
usar el electrodoméstico por primera vez.
Para asegurar que no haya daños sobre el acabado del
producto, la forma más segura de retirar el adhesivo de la cinta
de embalaje en electrodomésticos nuevos es aplicando un
detergente líquido hogareño para lavar platos. Aplique con una
tela suave y deje que se seque.
NOTA: El adhesivo deberá ser eliminado de todas las partes.
1RVHSXHGHUHWLUDUVLVHKRUQHDFRQpVWHGHQWUR
INFORMACIÓN IMPORTANTE DE SEGURIDAD
LEA TODAS LAS INSTRUCCIONES ANTES DE USAR ESTE ELECTRODOMÉSTICO
El equipo de acceso remoto instalado en este horno fue
probado y cumple con los límites establecidos para un
GLVSRVLWLYRGLJLWDOGHFODVH%VHJ~QODSDUWHGHOD1RUPDWLYD
de la FCC. Estos límites fueron diseñados para:
(a) brindar una protección razonable contra interferencias
nocivas en una instalación residencial. Este equipo genera,
usa y puede emitir energía de radiofrecuencia y, si no se
instala y utiliza de acuerdo con las instrucciones, puede
ocasionar interferencias perjudiciales en las comunicaciones
de radio. Sin embargo, no se garantiza que no se presenten
interferencias en una instalación en particular. Si el equipo
provoca interferencias perjudiciales para la recepción de radio
o televisión, lo cual puede comprobar encendiendo y apagando
el equipo, se aconseja al usuario que intente corregir la
interferencia con una de las siguientes medidas:
Ŷ5HRULHQWHRUHXELTXHODDQWHQDUHFHSWRUD
Ŷ$XPHQWHODVHSDUDFLyQHQWUHHOHTXLSR\HOUHFHSWRU
Ŷ&RQHFWHHOHTXLSRDXQWRPDFRUULHQWHGHXQFLUFXLWRGLIHUHQWH
del tomacorriente al que se encuentra conectado el
receptor.
Ŷ3DUDVROLFLWDUD\XGDFRQVXOWHFRQHOSURYHHGRUPLQRULVWDRD
un técnico experimentado de radio/ TV.
(b) tolerar cualquier interferencia recibida, incluyendo las
interferencias que puedan provocar un funcionamiento no
deseado del dispositivo.
Observe que todos los cambios o modificaciones sobre el
dispositivo de comunicación inalámbrico instalado en este
horno que no estén expresamente aprobados por el fabricante
podrían anular la autoridad del usuario para operar el
equipamiento.

6 49-2000253 Rev. 0
Controles del Horno de Pared Simple
USO DEL HORNO: Controles del Horno de Pared Simple
1. Bake (Hornear): Presione esta tecla para seleccionar la
función para hornear. Para más información, consulte la sección de
Modos de Cocción.
2. Broil (Asar): Presione esta tecla para seleccionar la función
asar. Para más información, consulte la sección de Modos de
Cocción.
3. Proof (Leudar): Ayuda a elevar el pan con levadura. Para
más información, consulte la sección de Modos de Cocción.
4. Warm (Calentar): Mantiene la comida caliente. Para más
información, consulte la sección de Modos de Cocción.
5. Clean (Limpieza): El horno cuenta con dos modos de
limpieza: Self Clean (Limpieza Automática) y Steam Clean (Limpieza
con Vapor). Para acceder a información importante sobre el uso de
estos modos, consulte la sección de Limpieza del Horno.
6. Start (Iniciar): Se deberá presionar para comenzar cualquier
función de cocción, limpieza o por tiempo.
7. Cancel/Off (Cancelar/ Apagar): Cancelar TODAS
las operaciones del horno excepto el reloj y el temporizador.
8. Cook Time (Tiempo de Cocción): Cuenta el
tiempo de cocción y apaga el horno cuando el tiempo de cocción
está completo. Inicie el modo para hornear o calentar, pero no
presione Start (Iniciar). Presione la tecla Cook Time (Tiempo de
Cocción), use las teclas numéricas para programar un tiempo de
cocción en horas y minutos, y luego presione Start (Iniciar).
9. Set Clock (Configurar Reloj): Configure la hora
del reloj del horno: Presione la tecla Set Clock (Configurar Reloj)
y las teclas numéricas para programar el reloj. Presione Set Clock
(Configurar Reloj) para pasar de AM a PM. Presione Start (Iniciar)
para guardar la configuración de la hora.
10. Timer (Temporizador): Funciona como un temporizador
con cuenta regresiva: Presione la tecla Timer (Temporizador) y
las teclas numéricas para programar el tiempo en horas y minutos.
Presione la tecla Start (Iniciar). El control emitirá un pitido cuando
falte 1 minuto y la pantalla mostrará los segundos hasta que el
temporizador alcance :00 luego de la cuenta regresiva. El horno
continuará funcionando cuando la cuenta regresiva del temporizador
se haya completado. Para apagar el temporizador, presione la tecla
Timer (Temporizador).
11. Oven Light(s) (Luz(es) del Horno): Enciende
o apaga la luz(es) del horno. Observe que abrir una puerta sólo
enciende la luz de ese horno.
12. Lock Controls (Controles de Bloqueo):
Bloquean el control de modo que al presionar las teclas no se activen
los controles. Mantenga presionada la tecla Lock Controls (Controles
de Bloqueo) durante tres segundos para bloquear o desbloquear
el control. La función Cancel/Off (Cancelar/ Apagar) siempre
está activa, incluso cuando el control está bloqueado. Bloquear los
controles cancelará funciones activas pero no el temporizador.
13. Delay Time (Tiempo de Retraso): Genera un
UHWUDVRFXDQGRHOKRUQRHVHQFHQGLGR8VHHVWDWHFODSDUDFRQILJXUDU
el momento en que desea que el horno se inicie. Inicie el modo para
hornear o de limpieza automática, pero no presione Start (Iniciar).
Presione la tecla Delay Time (Tiempo de Retraso) y use las teclas
numéricas para programar la hora del día en que desea que el horno
se encienda; use Delay Time (Tiempo de Retraso) para pasar de
AM a PM, y luego presione Start (Iniciar). Si lo desea, con la función
para hornear también se podrá programar un tiempo de cocción. Siga
las instrucciones de Cook Time (Tiempo de Cocción) para configurar
esta función. Sólo se puede usar con los modos Bake (Hornear) y
Self-Clean (Auto Limpieza).
NOTA: Al usar la función de tiempo de retraso, las comidas que se
echan a perder rápidamente, tales como leche, huevos, pescado,
rellenos, ave y cerdo, no se deberán dejar reposar por más de 1 hora
antes y después de la cocción. La temperatura ambiente estimula el
desarrollo de bacterias nocivas. Asegúrese de que la luz del horno
esté apagada, ya que el calor de la lámpara acelerará el crecimiento
de bacterias nocivas.
14. Remote Enable (Acceso Remoto):
CÓMO CONECTAR EL HORNO
Off (Apagado) - El horno no está conectado. Abra la aplicación
y luego mantenga presionada la tecla Remote Enable (Acceso
Remoto) durante 5 segundos para iniciar el proceso de conexión.
Slow flash (parpadeo lento) - El horno está en modo de búsqueda
y está buscando una red.
Rapid flash (parpadeo rápido) - Se produjo un error durante el
proceso de conexión.
Solid (Sólido) - El horno está conectado a la red y puede ser
controlado en forma remota a través de un dispositivo móvil
conectado cuando está en funcionamiento, pero no puede ser
iniciado en forma remota.
INICIO DEL HORNO EN FORMA REMOTA REMOTE (Remoto)
Para poder iniciar el horno en forma remota, presione la tecla
Remote Enable (Acceso Remoto) y el ícono REMOTE (Remoto)
se encenderá en la pantalla. El horno puede ser iniciado ahora
en forma remota con un dispositivo conectado. El ícono REMOTE
(Remoto) debe estar iluminado para iniciar el horno de forma
UHPRWD1RVHUHTXLHUHHOtFRQRREMOTE (Remoto) para cambiar
las configuraciones del horno o para apagar el mismo. Luego de usar
el horno, recuerde verificar que el ícono REMOTE (Remoto) esté
iluminado, si desea iniciar el horno de forma remota en el futuro.
12543
1013 1112 14
9867
Las formas del botón de control son representativas; su horno puede contar con formas de botones alternativas.

49-2000253 Rev. 0 7
Controles del Horno de Pared Doble
USO DEL HORNO: Controles del Horno de Pared Doble
1. Upper Oven and Lower Oven (Horno
Superior y Horno Inferior):
Designa qué horno
operarán los controles.
2. Bake (Hornear): Presione esta tecla para seleccionar la
función para hornear. Para más información, consulte la sección de
Modos de Cocción.
3. Broil (Asar): Presione esta tecla para seleccionar la función
asar. Para más información, consulte la sección de Modos de Cocción.
4. Proof (Leudar): Ayuda a elevar el pan con levadura.
Para más información, consulte la sección de Modos de Cocción.
Se deberá observar que la función para leudar no se podrá activar
cuando se esté usando un modo de limpieza en el horno inferior.
5. Warm (Calentar): Mantiene la comida caliente. Para más
información, consulte la sección de Modos de Cocción.
6. Clean (Limpieza): El horno cuenta con dos modos de
limpieza: Self Clean (Limpieza Automática) y Steam Clean (Limpieza
con Vapor). Para acceder a información importante sobre el uso de
estos modos, consulte la sección de Limpieza del Horno.
7. Start (Iniciar): Se deberá presionar para comenzar cualquier
función de cocción, limpieza o por tiempo.
8. Cancel/Off (Cancelar/ Apagar): Cancelar TODAS
las operaciones del horno excepto el reloj y el temporizador.
9. Cook Time (Tiempo de Cocción): Cuenta el
tiempo de cocción y apaga el horno cuando el tiempo de cocción
está completo. Inicie el modo para hornear o calentar, pero no
presione Start (Iniciar). Presione la tecla Cook Time (Tiempo de
Cocción), use las teclas numéricas para programar un tiempo de
cocción en horas y minutos, y luego presione Start (Iniciar).
10. Set Clock (Configurar Reloj): Configure la hora
del reloj del horno: Presione la tecla Set Clock (Configurar Reloj)
y las teclas numéricas para programar el reloj. Presione Set Clock
(Configurar Reloj) para pasar de AM a PM. Presione Start (Iniciar)
para guardar la configuración de la hora.
11. Timer (Temporizador): Funciona como un temporizador
con cuenta regresiva: Presione la tecla Timer (Temporizador) y
las teclas numéricas para programar el tiempo en horas y minutos.
Presione la tecla Start (Iniciar). El control emitirá un pitido cuando
falte 1 minuto y la pantalla mostrará los segundos hasta que el
temporizador alcance :00 luego de la cuenta regresiva. El horno
continuará funcionando cuando la cuenta regresiva del temporizador
se haya completado. Para apagar el temporizador, presione la tecla
Timer (Temporizador).
12. Oven Light(s) (Luz(es) del Horno): Enciende o
apaga la luz(es) en ambos hornos. Observe que abrir una puerta sólo
enciende la luz de ese horno.
13. Lock Controls (Controles de Bloqueo):
Bloquean el control de modo que al presionar las teclas no se activen
los controles. Mantenga presionada la tecla Lock Controls (Controles
de Bloqueo) durante tres segundos para bloquear o desbloquear
el control. La función Cancel/Off (Cancelar/ Apagar) siempre
está activa, incluso cuando el control está bloqueado. Bloquear los
controles cancelará funciones activas pero no el temporizador.
14. Delay Time (Tiempo de Retraso): Genera un retraso
FXDQGRHOKRUQRHVHQFHQGLGR8VHHVWDWHFODSDUDFRQILJXUDUHOPRPHQWR
en que desea que el horno se inicie. Inicie el modo para hornear o de
limpieza automática, pero no presione Start (Iniciar). Presione la tecla
Delay Time (Tiempo de Retraso) y use las teclas numéricas para
programar la hora del día en que desea que el horno se encienda; use
Delay Time (Tiempo de Retraso) para pasar de AM a PM, y luego
presione Start (Iniciar). Si lo desea, con la función para hornear también
se podrá programar un tiempo de cocción. Siga las instrucciones de Cook
Time (Tiempo de Cocción) para configurar esta función. Sólo se puede
usar con los modos Bake (Hornear) y Self-Clean (Auto Limpieza).
NOTA: Al usar la función de tiempo de retraso, las comidas que se
echan a perder rápidamente, tales como leche, huevos, pescado,
rellenos, ave y cerdo, no se deberán dejar reposar por más de 1 hora
antes y después de la cocción. La temperatura ambiente estimula el
desarrollo de bacterias nocivas. Asegúrese de que la luz del horno
esté apagada, ya que el calor de la lámpara acelerará el crecimiento
de bacterias nocivas.
15. Remote Enable (Acceso Remoto):
CÓMO CONECTAR EL HORNO
Off (Apagado) - El horno no está conectado. Abra la aplicación
y luego mantenga presionada la tecla Remote Enable (Acceso
Remoto) durante 5 segundos para iniciar el proceso de conexión.
Slow flash (parpadeo lento) - El horno está en modo de búsqueda
y está buscando una red.
Rapid flash (parpadeo rápido) - Se produjo un error durante el
proceso de conexión.
Solid (Sólido) - El horno está conectado a la red y puede ser
controlado en forma remota a través de un dispositivo móvil
conectado cuando está en funcionamiento, pero no puede ser
iniciado en forma remota.
INICIO DEL HORNO EN FORMA REMOTA REMOTE (Remoto)
Para poder iniciar el horno en forma remota, presione la tecla
Remote Enable (Acceso Remoto) y el ícono REMOTE (Remoto) se
encenderá en la pantalla. El horno puede ser iniciado ahora en forma
remota con un dispositivo conectado. El ícono REMOTE (Remoto)
debe estar iluminado para iniciar el horno de forma remota.
1RVHUHTXLHUHHOtFRQRREMOTE (Remoto) para cambiar las
configuraciones del horno o para apagar el mismo. Para desconectar
su teléfono de la función Remote Enable (Acceso Remoto Activado),
presione la tecla Remote Enable (Acceso Remoto Activado) y
el ícono REMOTE (Remoto) se apagará. Luego de usar el horno,
recuerde verificar que el ícono REMOTE (Remoto) esté iluminado, si
desea iniciar el horno de forma remota en el futuro.
123645
10
11
14 1312 15
76789
1
8
Las formas del botón de control son representativas; su horno puede contar con formas de botones alternativas.

8 49-2000253 Rev. 0
Funciones especiales
USO DEL HORNO: Funciones especiales
Existen varias funciones especiales en su horno de pared. Para modificar las
configuraciones de estas funciones especiales, mantenga presionadas las teclas
Bake (Hornear) y Broil (Asar) al mismo tiempo durante tres segundos. “
” (“ ” en hornos dobles) se visualizará en la pantalla. Para cada una de las
siguientes funciones, seleccione y edite la función que desee cambiar usando las
teclas 8 y 2 para girar hacia arriba o abajo, la tecla 6 para editar (o Save (Guardar)
y Salir), y la tecla 4 para regresar al menú anterior sin guardar cambios.
Ajuste de la Temperatura del Horno
(
)
Esta función permite que la temperatura de horneado del
horno sea ajustada hasta 35ºF más caliente o 35ºF más fría.
8VHHVWDIXQFLyQVLSLHQVDTXHODWHPSHUDWXUDGHVXKRUQR
es demasiado caliente o demasiado fría y desea modificarla.
Para los modelos con horno doble, los hornos superior e
inferior se ajustan de forma separada1RXVHWHUPyPHWURV
tales como los que se encuentran en tiendas, para controlar
la configuración de temperatura del horno. Estos termómetros
SXHGHQYDULDUHQWUH\JUDGRV1DYHJXHKDVWD³ ”
para hornos simples, “ ” para el horno superior u
“ ” para el horno inferior. Presione 6 para editar el
GHVSOD]DPLHQWR6HYLVXDOL]DUi³´RXQQ~PHURHQWUH\±
Presione 2 para incrementar, y 8 para reducir. -35 a +35 es el
rango de desplazamiento disponible. Presione 6 para guardar
y salir. Presione 4 para salir sin guardar cambios.
Volumen del Sonido ( )
Esta función permite que el volumen del tono sea ajustado.
1DYHJXHKDVWD³ ” (Sonido) y presione 6 para visualizar
o cambiar la configuración actual. Realizar el desplazamiento
le permitirá escuchar cada nivel de volumen.
Sonido de Finalización del Temporizador
( )
Se trata de un tono que indica la finalización de un
temporizador. El tono puede ser continuo
“ ”
o un
pitido repetido
“ ”
8QDFRQILJXUDFLyQFRQWLQXDVHJXLUi
haciendo que un tono suene hasta que un botón del control
sea presionado.
1DYHJXHKDVWD³ ” y presione 6 para
visualizar o cambiar la configuración actual.
Selección de Temperatura Fahrenheit o
Celsius (
)
El control del horno está configurado para su uso con
temperaturas Fahrenheit (F), pero lo puede modificar a
WHPSHUDWXUDV&HOVLXV&1DYHJXHKDVWD “
” y
presione 6 para visualizar o cambiar la configuración actual.
Pantalla del Reloj ( )
(VWDIXQFLyQHQFLHQGHRDSDJDHOUHORMHQODSDQWDOOD1DYHJXH
hasta “ ” y presione 6 para visualizar o cambiar la
configuración actual.
Configuración del Reloj ( )
Esta función especifica cómo la hora del día será exhibida o
si la misma no se exhibirá. Puede seleccionar la pantalla del
reloj estándar de 12 horas ( ) o de tipo militar de 24 horas
( 1DYHJXHKDVWD³ ” y presione 6 para visualizar
o cambiar la configuración actual.
Apagado en 12 Horas ( )
Cuando esta función sea activada, el horno se apagará
de forma automática luego de 12 horas de uso continuo.
1DYHJXHKDVWD³ ” y presione 6 para visualizar o cambiar la
configuración actual.
123
45
56
78
0
9
Cook
Time
Set
Clock
AM/PM
13
=
7
0
9
Cook
Time
Set
Clock
AM/PM
Cancel
Exit
Edit, Save
& Exit

49-2000253 Rev. 0 9
Funciones especiales (Cont.)
USO DEL HORNO: Funciones especiales
Modo Sabático
El modo sabático desactiva las luces del horno (la luz del
horno no se encenderá cuando la puerta sea abierta), todos
los sonidos (el control no emitirá un pitido cuando se presione
un botón), los modos de Asado, Calentar, Leudar, Tiempo
de Cocción, Temporizador, Reloj, y las funciones de Tiempo
Retrasado. El modo sabático sólo puede ser usado con la
función Bake (Hornear). Esta función se activa conforme con
los requisitos Sabáticos Judíos de la Estrella K.
Mantenga presionadas las teclas Bake (Hornear) y Broil
(Asar) durante 3 segundos para ingresar al modo de funciones
especiales.
Presione las teclas 0 y 2 para desplazarse hacia arriba o abajo
hasta que se visualice “
´HQODSDQWDOOD8VHODWHFOD
6 para visualizar y editar la configuración actual, 2 y 8 para
cambiar la configuración, y 6 nuevamente para acceder a Save
(Guardar), 4 para salir del modo Special Features (Funciones
Especiales) y Start Sabbath (Iniciar Modo Sabático). (De forma
alternativa, use la tecla 4 para regresar al menú anterior desde
el menú Sabbath (Sabático) sin guardar los cambios). Aparecerá
una ] en la pantalla y el reloj no será exhibido.
Observe que si cuenta con un horno de pared doble, al colocar
el control en el modo Sabático, ambos hornos están ahora en
el modo sabático y están disponibles para la cocción.
8QDYH]HQHOPRGR6DEEDWK6DEiWLFRHQFXDOTXLHU
momento puede presionar Bake (Hornear); use las teclas
numéricas para ingresar una temperatura entre 170ºF y 550ºF,
y presione Start (Iniciar)1RVHHPLWLUiQLQJ~QVRQLGRFXDQGR
las teclas sean presionadas. En un momento al azar entre los
30 segundos y 1 minuto, ][, aparecerá en la pantalla indicando
que el horno está en funcionamiento.
Observe que ambos hornos de un horno de pared doble
pueden ser usados en el modo sabático. Cada horno podrá ser
programado en una temperatura diferente y cada uno deberá
ser programado de forma individual, seleccionando el horno
antes de iniciar el modo para hornear.
Si necesita ajustar la temperatura, presione Bake (Hornear),
use las teclas numéricas para ingresar una nueva temperatura
entre 170º F y 550º F, y presione Start (Iniciar).
Para apagar el horno, presione Cancel/Off (Cancelar/
Apagar) en cualquier momento. El horno se apagará
inmediatamente y el ícono, ][ cambiará a ], indicando que el
horno fue apagado.
Observe que cada horno de un horno de pared doble se
deberá apagar por separado.
Para salir del modo sabático, asegúrese de que el horno esté
apagado. Mantenga presionadas las teclas Bake (Hornear) y
Broil (Asar) durante 3 segundos para ingresar a las funciones
especiales, y luego presione 2 u 8 para desplazarse hasta
“ ”, 6 para editar, 2 u 8 para cambiar la configuración a
Off (Apagar), 6 para guardar las configuraciones, y 4 para salir
de los menús Special Features (Funciones Especiales). El reloj
regresará a la pantalla cuando el modo Sabbath (Sabático) se
encuentre apagado.
NOTA: Si se produce un corte de corriente durante el modo
Sabático, la unidad permanecerá en el modo Sabático pero
apagada cuando vuelva la corriente.
Si desea usar la función Cook Time (Tiempo de Cocción)
(si está disponible) para hornear en el horno y luego hacer
que éste se apague de forma automática, deberá presionar
el botón Cook Time (Tiempo de Cocción), ingresar una
duración del tiempo de cocción, y presionar Start (Iniciar).
Luego ingrese a las funciones especiales para iniciar el modo
Sabbath (Sabático), como se detalla más arriba.

10 49-2000253 Rev. 0
USO DEL HORNO:(VWDQWHVGHO+RUQR3DSHOGH$OXPLQLR\&REHUWRUHVGHO+RUQR8WHQVLOLRV
El horno cuenta con seis posiciones de estantes. En la Guía
de Cocción, se brindan recomendaciones de posiciones de
los estantes para diferentes tipos de comidas. Se ajusta
un estante en una dirección para afectar los resultados de
cocción. Por ejemplo, si se prefieren partes superiores más
oscuras en tartas, panecillos o galletas, pruebe moviendo
la comida a un estante que se encuentre una posición más
arriba. Si encuentra que las comidas están demasiado doradas
en la parte superior, pruebe moviendo las mismas más abajo
la próxima vez.
Al hornear con múltiples ollas y en múltiples estantes,
asegúrese de que haya por lo menos 1 ½” entre las ollas, a fin
de dejar suficiente espacio para que fluya el aire.
Para evitar posibles quemaduras, coloque los estantes en la
posición deseada antes de encender el horno.
Estantes Planos Tradicionales
Al colocar y retirar utensilios de cocina, empuje el estante
hacia afuera del tope (posición de detención) sobre el soporte
del estante.
Para retirar el estante, empuje el mismo hacia usted, incline el
extremo frontal hacia arriba y empuje hacia afuera.
Para hacer un reemplazo, coloque el extremo curvo del
estante (bloqueadores) en los soportes del horno, incline hacia
arriba el frente y empuje el estante hacia adentro.
Es posible que resulte difícil deslizar los estantes, especialmente
luego de la limpieza automática. Coloque un poco de aceite
vegetal en una tela suave o papel y frote el mismo sobre los
extremos izquierdos y derechos de los estantes.
Estantes del Horno
PRECAUCIÓN
No use ningún tipo de aluminio o cobertor de horno para cubrir el fondo del horno. Estos ítems
pueden atrapar el calor o derretirse, ocasionando daños sobre el producto y el riesgo de descargas, humo o incendios.
Los daños por uso inadecuado de estos ítems no están cubiertos por la garantía del producto.
Se podrá usar aluminio para evitar derrames, colocando una hoja sobre un estante inferior varias pulgadas debajo de la comida.
1RXVHPiVDOXPLQLRTXHHOQHFHVDULR\QXQFDFXEUDWRWDOPHQWHHOHVWDQWHGHXQKRUQRFRQSDSHOGHDOXPLQLR0DQWHQJDHO
aluminio a por lo menos 1 1/2” de las paredes del horno, para evitar una circulación deficiente del calor.
Papel de Aluminio y Cobertores del Horno
Utensilios
Pautas de Uso de Utensilios
El material, el acabado y el tamaño de los utensilios afectan el
horneado.
Las ollas oscuras, revestidas y opacas absorben el calor más
rápidamente que las ollas claras y brillantes. Al usar ollas
que absorben el calor más rápidamente, las comidas podrán
resultar más doradas, crocantes y con una capa más gruesa.
Si utiliza utensilios oscuros y revestidos, controle la comida
antes del tiempo mínimo de cocción. Si se obtienen resultados
no deseados con este tipo de utensilios, considere la posibilidad
de reducir la temperatura del horno en 25º F la próxima vez.
Las ollas brillantes pueden producir resultados de horneado
más parejos en tortas y galletas.
Las ollas de vidrio y cerámica calientan con lentitud, pero
retienen bien el calor.
Estos tipos de ollas funcionan bien con platos tales como
tartas y postres con natilla.
Las ollas con aislante de aire calientan lentamente y pueden
producir fondos dorados.
Mantenga los utensilios limpios para una cocción más pareja.

49-2000253 Rev. 0 11
Su nuevo horno posee una variedad de modos de cocción para que pu eda obtener los mejores resultados. Estos modos
se describen a continuación. Para acceder a recomendaciones para comidas específicas, consulte la sección de la Guía de
Cocción. Recuerde que es posible que su nuevo horno funcione de manera diferente que aquel que está reemplazando.
Hornear
El modo de horneado es utilizado para hornear y dorar. Este
modo usa el calor principalmente desde el elemento inferior,
pero también desde el elemento superior para cocinar la
comida. Al preparar comidas horneadas tales como tartas,
galletas y masas, siempre precaliente el horno primero. Siga
las recomendaciones de la receta sobre la colocación de
la comida. Si no se brindan pautas, centre la comida en el
horno. Para usar este modo, presione la tecla Bake (Hornear),
ingrese una temperatura, y luego presione Start (Iniciar).
Leudar
El modo Proof (Leudar) está diseñado para elevar (fermentar y
leudar) masas de pan. Presione la tecla Proof (Leudar) y luego
presione Start (Iniciar). Cubra bien la masa para evitar que se
seque. El pan se elevará más rápidamente que a temperatura
ambiente. Se deberá observar que con los hornos de pared
doble, la función para leudar no se podrá activar cuando se
esté usando un modo de limpieza en el otro horno.
Calentar
El modo Warm (Calentar) está diseñado para mantener
comidas calientes hasta durante 3 horas. Para usar este
modo, presione la tecla Warm (Caliente) y luego presione
Start (Iniciar). Cubra las comidas que necesitan mantener la
humedad y no cubra aquellas comidas que deberían quedar
FURFDQWHV1RVHUHTXLHUHSUHFDOHQWDUODVPLVPDV1RXVHOD
función Warm (Calentar) para calentar comida fría, excepto
galletas crujientes, papas fritas o cereales secos. También se
recomienda que la comida no se mantenga caliente por más
de dos horas.
Modo para Asar
Siempre ase con la puerta cerrada. El elemento para asar en
el horno es muy potente. Monitoree la comida de cerca al asar.
Tenga cuidado al asar en posiciones de estantes superiores,
ya que colocar la comida más cerca del elemento para asar
incrementa el humo, salpicaduras y la posibilidad de que se
incendien las grasas. No se recomienda asar en el estante
de la posición 6.
Intente asar las comidas que normalmente haría a la parrilla.
Ajuste las posiciones de los estantes para ajustar la intensidad
del calor a la comida. Coloque las comidas más cerca del
elemento para asar, cuando se desee una superficie más
cocinada y un interior poco cocido. Las comidas más gruesas
y las comidas cuyo interior debe ser cocinado deberían ser
asadas en un estante en una posición alejada del usado para
asar, o usando las funciones Broil Lo (Asar Bajo).
Asar Alto
El modo Broil Hi (Asar Alto) usa calor intenso del elemento
VXSHULRUSDUDVRDVDUODVFRPLGDV8VHODIXQFLyQ%URLO+L
(Asado Alto) para cortes más delgados de carne y/o comidas
que prefiera que quedan menos cocinadas en su interior. Para
usar este modo, presione la tecla Broil (Asar) una vez en
Traditional (Tradicional) y luego presione Start (Iniciar)1R
es necesario realizar el precalentamiento al usar este modo.
Asar Bajo
El modo Broil Lo (Asar Bajo) usa menos calor intenso del
elemento superior para cocinar la comida completamente
PLHQWUDVWDPELpQVHUHDOL]DHOGRUDGRVXSHUILFLDO8VHOD
función Broil Lo (Asado Bajo) para cortes de carne más
gruesos y/o comidas que desee que queden completamente
cocinadas. Para usar este modo, presione la tecla Broil (Asar)
dos veces y luego presione Start (Iniciar)1RHVQHFHVDULR
realizar el precalentamiento al usar este modo.
Modos de Cocción
USO DEL HORNO: Modos de Cocción

12 49-2000253 Rev. 0
USO DEL HORNO: Guía de Cocción
Guía de Cocción
TIPO DE COMIDA
MODO(S)
RECOMENDADO(S)
POSICIÓN(ES)
DE ESTANTES
RECOMENDADA SUGERENCIAS ADICIONALES
Productos Horneados
Tortas con capas, tortas
rectangulares, roscas, panecillos,
pan rápido en un Solo Estante
Hornear 3 8VHXWHQVLOLRVEULOODQWHV
Tortas con capas* en Múltiples
Estantes
Hornear 2 y 4
Asegúrese de que haya un flujo de aire adecuado
(Vea la ilustración).
Tortas de grasa (pastel de ángel) Hornear 1 8VHXWHQVLOLRVEULOODQWHV
Galletas, galletitas, bizcochitos en
un Solo Estante
Hornear 3 8VHXWHQVLOLRVEULOODQWHV
Galletas, galletitas, bizcochitos en
Múltiples Estantes
Hornear
2 y 4
1, 3 y 5
Con comidas tales como galletas con azúcar, cambie la ubicación
de la comida parcialmente durante la cocción, a fin de lograr
resultados de cocción más parejos entre los estantes.
Bife y Cerdo
Hamburguesas Asar Alto 5
8VHXQDROODSDUDDVDSUHFDOLHQWHPLQXWRVVLXVDUiHO0RGR
para Asar por Convección. Mueva la comida hacia abajo para
que quede más preparada y menos soasada. Preste atención a
la comida al asarla.
Para un mejor rendimiento, centre la comida
debajo del elemento que emite calor para asar.
Bifes y Chuletas Asar Alto 5
8VHXQDROODSDUDDVDU0XHYDODFRPLGDKDFLDDEDMRSDUDTXH
quede más preparada y menos soasada. Preste atención a la
comida al asarla.
Para un mejor rendimiento, centre la comida
debajo del elemento que emite calor para asar.
Dorados Hornear 2
Deje sin cubrir, use una olla chata tal como una olla para asar.
1RVHUHTXLHUHSUHFDOHQWDUOD
Ave
Pollo entero Hornear 2
8VHXQDROODFKDWDWDOFRPRXQDROODSDUDDVDU
1RVHUHTXLHUHSUHFDOHQWDUOD
Pechugas, patas, muslos con
huesos
Asado Bajo
Hornear
3
Ase del lado de la piel hacia abajo primero. Preste atención a la
comida al asarla. Para un mejor rendimiento, centre la comida
debajo del elemento que emite calor para asar.
Pechugas de pollo deshuesadas
Asado Bajo
Hornear
3
Mueva la comida más abajo para que quede más preparada y
menos soasada y más arriba para soasar/ dorar al asar. Para un
mejor rendimiento, centre la comida debajo del elemento que emite
calor para asar.
Pavo entero Hornear 1 o 2
8VDXQDROODFKDWDWDOFRPRXQDROODSDUDDVDU
1RVHUHTXLHUHSUHFDOHQWDUOD
Pechuga de Pavo Hornear 2
8VHXQDROODFKDWDWDOFRPRXQDROODSDUDDVDU
1RVHUHTXLHUHSUHFDOHQWDUOD
Pescado Asado Bajo
5 (mitad del grosor o
menos)
4 (>1/2 pulgada)
Precaliente 5 minutos al Asar por Convección. Preste atención a
la comida al asarla. Para un mejor rendimiento, centre la comida
debajo del elemento que emite calor para asar.
Cazuelas Hornear 3
Comidas Congeladas a Conveniencia
Productos con papa, patitas de
pollo fritas, aperitivos en un Solo
Estante
Hornear 3 8VHXWHQVLOLRVEULOODQWHV
Productos con papa, patitas de
pollo fritas, aperitivos en Múltiples
Estantes
Hornear 2 y 4
8VHXWHQVLOLRVEULOODQWHV
Cambie la ubicación de la comida parcialmente durante la cocción,
a fin de obtener resultados de cocción más parejos.
*Al hornear cuatro tortas con capas a la vez, use los estantes
2 y 4. Coloque las ollas como se muestra, de modo que no
quede una olla encima de la otra.
Cocine la comida completamente para evitar que se
produzcan enfermedades a partir de la comida. Puede
encontrar recomendaciones sobre temperatura mínima para
cocinar de forma segura en IsItDoneYet.gov. Asegúrese de
usar un termómetro de comidas para medir la temperatura de
las mismas.

49-2000253 Rev. 0 13
Asegúrese de que la corriente eléctrica esté apagada y que todas las superficies estén frías antes de limpiar cualquier parte del horno.
Panel de Control
8QDEXHQDLGHDHVOLPSLDUHOSDQHOGHFRQWUROOXHJRGHFDGD
uso. Limpie con un jabón suave y agua o vinagre y agua,
enjuague con agua limpia y pula en seco con una tela suave.
1RXVHOLPSLDGRUHVDEUDVLYRVOLPSLDGRUHVOtTXLGRVIXHUWHV
almohadillas para fregar de plástico ni limpiadores de horno en
el panel de control; dañarán el acabado.
Exterior del Horno
1RXVHOLPSLDGRUHVGHKRUQROLPSLDGRUHVDEUDVLYRV
limpiadores líquidos fuertes, estropajos de acero, almohadillas
para fregar de plástico, ni polvos limpiadores en el interior
o el exterior del horno. Limpie el mismo con agua y jabón o
una solución de vinagre y agua. Enjuague con agua limpia y
seque con una tela seca. Al limpiar supeficies, asegúrese de
que estén a temperatura ambiente y fuera del contacto con
la luz solar. Si las manchas en el borde de la ventana de la
puerta son persistentes, use un limpiador abrasivo suave o
una esponja con estropajo para obtener un mejor resultado. El
derrame de adobo, jugos de fruta, salsas de tomate y líquidos
para humedecer que contengan ácidos pueden ocasionar
descoloración y se deberán limpiar de inmediato. Deje que las
superficies calientes se enfríen, y luego limpie y enjuague.
Superficies de Acero Inoxidable (en algunos modelos)
1RXVHYLUXWDVGHDFHURpVWDVGDxDUiQODVXSHUILFLH
Para limpiar la superficie de acero inoxidable, use agua tibia
con jabón o un limpiador o pulidor para acero inoxidable.
Siempre limpie la superficie en la dirección del veteado. Siga
las instrucciones del limpiador para limpiar la superficie de
acero inoxidable.
Los limpiadores con ácido oxálico tales como Bar Keepers
Friend Soft Cleanser™ eliminarán el óxido, deslustres y
SHTXHxDVPDQFKDVVREUHODVXSHUILFLH8VHVyORXQOLPSLDGRU
líquido libre de material abrasivo y frote en la dirección de las
líneas del cepillo con una esponja suave y húmeda.
Para realizar consultas sobre la adquisición de productos,
incluyendo limpiadores o pulidores para electrodomésticos de
acero inoxidable, lea las secciones de Asistencia y Accesorios,
en el comienzo de este manual.
Interior del Horno
El interior de su nuevo horno puede ser limpiado de forma
manual o utilizando los modos Steam Clean (Limpieza con
Vapor) o Self Clean (Limpieza Automática).
El derrame de adobo, jugos de fruta, salsas de tomate y
líquidos para humedecer que contengan ácidos pueden
ocasionar descoloración y se deberán limpiar de inmediato.
Espere a que las superficies calientes se enfríen, y luego
limpie y enjuague.
Limpieza Manual
1RXVHOLPSLDGRUHVGHKRUQROLPSLDGRUHVDEUDVLYRV
limpiadores líquidos fuertes, estropajos de acero, almohadillas
para fregar, ni polvos limpiadores en el interior del horno.
Limpie el mismo con agua y jabón o una solución de vinagre
y agua. Enjuague con agua limpia y seque con una tela seca.
Al limpiar supeficies, asegúrese de que estén a temperatura
ambiente y fuera del contacto con la luz solar.
Modo de Limpieza con Vapor
La limpieza con vapor está pensada para limpiar pequeños
derrames usando agua y a una temperatura de limpieza más
baja que la función Self-Clean (Limpieza Automática).
Para usar la función Steam Clean (Limpieza con Vapor), limpie
las grasas y suciedades del horno. Vierta una taza de agua en
la parte inferior del horno. Cierre la puerta. Presione la tecla
Steam Clean (Limpieza con Vapor) y luego presione Start
(Iniciar)/DSXHUWDGHOKRUQRVHWUDEDUi1RSRGUiDEULUOD
puerta durante los 30 minutos de la limpieza con vapor, ya que
esto reducirá su rendimiento. Al finalizar el ciclo de limpieza
al vapor, la puerta se destrabará. Limpie cualquier exceso de
agua y cualquier suciedad que haya quedado.
NOTA: El agua
en la parte inferior del horno podrá estar caliente justo después
de finalizado el ciclo.
Modo de Limpieza Automática
Lea las Instrucciones de Seguridad del Horno con Limpieza
Automática, en el comienzo de este manual antes de usar
el modo Self Clean (Limpieza Automática). Este modo usa
temperaturas muy altas para limpiar el interior del horno.
Cuando use esta función, la puerta del horno se trabará. Antes
de utilizar el ciclo de limpieza automática, limpie la grasa
y restos de comida que haya en el horno. Retire todos los
artículos del horno, excepto los estantes esmaltados (color
oscuro). Los estantes brillantes o de plata y cualquier utensilio u
otros artículos deberían ser retirados del horno antes de iniciar
un ciclo de limpieza automática. Cierre la puerta. Presione
la tecla Steam Clean (Limpieza con Vapor) y se exhibirá
un tiempo de limpieza automática por omisión. El tiempo de
limpieza puede ser modificado en cualquier momento entre
las 3:00 y las 5:00 horas, usando las teclas numéricas para
ingresar un tiempo diferente y presionando Start (Iniciar).
Si desea usar el tiempo por omisión, presione la tecla Start
(Iniciar) inmediatamente luego de presionar la tecla Steam
Clean (Limpieza con Vapor). El horno se apagará de forma
automática cuando el ciclo de limpieza automática sea
completado. La puerta permanecerá bloqueada hasta que el
KRUQRVHKD\DHQIULDGR8QDYH]TXHHOKRUQRVHKD\DHQIULDGR
limpie cualquier ceniza que haya quedado en el horno.
IMPORTANTE: Las emanaciones producidas por el ciclo de
autolimpieza de cualquier horno afectan la salud de algunas
aves de manera notoria. Procure llevar sus aves a otra
habitación bien ventilada.
Horno
CUIDADO Y LIMPIEZA: Horno

14 49-2000253 Rev. 0
Estantes Planos
Los estantes planos que estén esmaltados, y no sean brillosos,
se podrán dejar en la cavidad durante la limpieza automática o
se podrán lavar con agua caliente y jabón.
Es posible que resulte más difícil deslizar los estantes,
especialmente luego de la limpieza automática. Coloque aceite
vegetal en una tela húmeda o toalla de papel y frote sobre los
extremos izquierdo y derecho.
CUIDADO Y LIMPIEZA: Horno / Luz del Horno
ADVERTENCIA
PELIGRO DE DESCARGA O QUEMADURAS: Antes de reemplazar la lámpara de luz del horno,
desconecte la conexión eléctrica del horno del fusible principal o del panel del disyuntor. Si esto no se
cumple, se podrá producir una descarga eléctrica o un incendio.
PRECAUCIÓN
RIESGO DE INCENDIO: La tapa de vidrio y la lámpara de luz se deberán retirar cuando estén frías. Tocar
el vidrio caliente sin protección en las manos o con un trapo húmedo puede ocasionar quemaduras.
1. Desconecte la corriente desde el fusible principal o el
panel del disyuntor.
2. Retire los estantes del horno.
3. Deslice un destornillador de punta plana o un cuchillo
para untar manteca entre la carcasa metálica y la tapa
de luz de vidrio. NOTA: algunos modelos cuentan con un
sujetador metálico que visiblemente sostiene el vidrio. Es
necesario insertar la herramienta entre la carcasa metálica
y el sujetador que sostiene el vidrio.
4. Apoye la tapa de luz de vidrio con dos dedos para evitar
que se caiga al fondo del horno. Tenga cuidado de no
astillar la cubierta del horno.
5. De forma suave, gire la punta del destornillador o del
cuchillo para untar manteca, a fin de aflojar la tapa de luz
de vidrio. Tenga cuidado de no astillar la cubierta del horno.
6. Retire la tapa de luz de vidrio.
7. Retire la lámpara sosteniendo firmemente y deslizando
la misma hacia afuera, hasta que las dos clavijas hayan
dejado el soporte de cerámica.
1RWRTXHHOYLGULRGHODQXHYDOiPSDUDFRQORVGHGRV
Esto hará que la lámpara falle al dar luz. Tome la lámpara
de reemplzado con una toalla limpia o un pañuelo de
papel con las clavijas hacia abajo. Aliñe las dos clavijas
en el soporte de cerámica, presionando suavemente hasta
que la lámpara quede asegurada en la ficha de cerámica.
9. Deslice las lentes protectoras del soporte y presione hasta
que las pinzas queden enganchadas en la caja.
10. Vuelva a conectar la corriente.
Horno (Cont.)
Luz del Horno

49-2000253 Rev. 0 15
CUIDADO Y LIMPIEZA: Puerta del Horno
Puerta del Horno
Retiro de la Puerta del Horno
NOTA: La remoción de la puerta no es un requerimiento de la
instalación del producto, pero es una comodidad adicional.
Para quitar la puerta:
1. Abra la puerta del horno en su totalidad.
2. Retire el soporte de la bisagra (de estar presente) de la
estructura frontal y déjelo a un lado. El soporte de la bisagra
debe ser colocado nuevamente para un funcionamiento
apropiado de la puerta cuando está última sea reinstalada.
3. Presione ambas trabas de la bisagra hacia abajo en
dirección del marco de la puerta hasta destrabarlas. Para
esto puede hacer falta un destornillador de lados planos.
¡NO LEVANTE LA PUERTA DE LA MANIJA!
4. Coloque las manos sobre ambos lados y cierre la puerta
del horno hasta la posición de remoción (aproximadamente
´±´>FP±FP@GHODSRVLFLyQGHFLHUUH
5. Levante la puerta hasta que los brazos de la bisagra hayan
salido de las ranuras. NOTA: La puerta del horno es muy
pesada. Asegúrese de tener un agarre firme antes de
levantar la puerta del horno de sus bisagras. Tenga cuidado
XQDYH]TXHKD\DTXLWDGRODSXHUWD1RGHSRVLWHODSXHUWD
sobre la manija. Esto puede provocar abolladuras o rayones.
Reemplazo de la Puerta del Horno
NOTA: La puerta del horno es pesada. Puede necesitar ayuda
para levantar la puerta lo suficiente como para deslizarla dentro
GHODVUDQXUDVGHODELVDJUD1ROHYDQWHODSXHUWDGHODPDQLMD
1. Levante la puerta del horno tomándola de ambos lados.
2. Con la puerta en el mismo ángulo de la posición de
UHPRFLyQDSUR[LPDGDPHQWH´±´>FP±FP@GHVGH
la posición de cerrado), introduzca la muesca del brazo
de la bisagra dentro del extremo inferior de la ranura de la
bisagra. La ranura del brazo de la bisagra debe estar bien
colocada en la parte inferior de la ranura.
3. Abra la puerta por completo. Si la puerta no se abre por
completo, la muesca no está bien colocada en el extremo
inferior de la ranura.
4. Presione las trabas de la bisagra hacia arriba contra el
armazón frontal de la cavidad del horno, hasta alcanzar la
posición de trabado.
5. Reemplace el soporte de la bisagra (de estar presente). El
soporte de la bisagra debe ser colocado nuevamente para
un funcionamiento apropiado de la puerta.
6. Cierre la puerta del horno.
Bisagra en
la posición
de trabado
Ranura de la
bisagra bien
colocada en la
parte inferior de
la ranura de la
bisagra
Lado
inferior de
la ranura
Brazo
de la bisagra
Ranura de la bisagra
Soporte de la Bisagra
Ranura
de la
bisagra
Brazo
de la
bisagra
Posición destrabada
de la bisagra
La bisagra sale de la ranura
Soporte de la Bisagra

16 49-2000253 Rev. 0
Consejos para la Solución de Problemas... Antes de solicitar el servicio técnico
Problema Causa Posible Qué Hacer
Mi horno nuevo no cocina
como el anterior. ¿Hay
algún problema con
las configuraciones de
temperatura?
Su horno nuevo cuenta con un sistema de cocción
diferente con relación al anterior y, por lo tanto, es
posible que cocine de forma diferente.
En los primeros usos, use los tiempos y temperaturas
de su receta con cuidado. Si aún piensa que su horno
nuevo cocina con demasiado calor o demasiado frío,
podrá ajustar el termostato usted mismo para aplicar
su preferencia de cocción específica. NOTA: Este
ajuste afecta las temperaturas de Bake (Hornear),
Convection Bake 1 Rack (Hornear por Convección
en 1 Estante) y Convection Bake Multi (Hornear
por Convección Múltiple); no afectará las funciones
Convection Roast (Dorar por Convección), Broil
(Asar), o Clean (Limpiar).
La comida no se hornea
de forma apropiada
Controles del horno configurados de forma incorrecta. Consulte la sección Modos de Cocción.
La posición del estante es incorrecta o el estante no
está nivelado.
Consulte la sección Modos de Cocción y la Guía de
Cocción.
8VRGHXQDFDFHURODLQFRUUHFWDRGHXQDFDFHURODGH
tamaño incorrecto.
&RQVXOWHODVHFFLyQ8WHQVLOLRV
La temperatura del horno debe ser ajustada. Consulte la sección Funciones Especiales.
Sustitución de ingredientes Sustituir ingredientes puede modificar el resultado de
la receta.
La comida no asa de
forma apropiada
Controles del horno configurados de forma incorrecta. Asegúrese de seleccionar el modo correcto para asar.
Se usó una posición incorrecta del estante. Para acceder a sugerencias de ubicación de
estantes, consulte la Guía de Cocción.
Se cocinó comida en una olla caliente. Asegúrese de que el utensilio esté frío
8WHQVLOLRGHFRFLQDLQDGHFXDGRSDUDDVDU 8VHXQDROODHVSHFtILFDPHQWHGLVHxDGDSDUDDVDU
El papel de aluminio usado para la olla y la rejilla para
asar no se ajustó ni cortó de forma apropiada, según lo
recomendado.
Si usará papel de aluminio, deberá usarse conforme
con las aberturas de la olla.
En algunas áreas, es posible que el nivel de corriente
(voltaje) sea bajo.
Precaliente el elemento para asar durante 10 minutos.
La temperatura del horno
es demasiado caliente o
demasiado fría
La temperatura del horno debe ser ajustada. Consulte la sección Funciones Especiales.
El horno no funciona o
parece no funcionar
Es posible que un fusible de su hogar se haya quemado
o que el disyuntor se haya desconectado.
Reemplace el fusible o reinicie el disyuntor.
Controles del horno configurados de forma incorrecta. &RQVXOWHODVHFFLyQ8VRGHO+RUQR
El horno se encuentra en Sabbath Mode (Modo
Sabático)
Verifique que el horno no esté en Sabbath Mode
(Modo Sabático). Consulte la sección Funciones
Especiales.
Sonido de “chisporroteo”
o “traqueo”
Éste es el sonido de metal calentándose o enfriándose
durante las funciones de cocción y limpieza..
Esto es normal.
¿Por qué la estufa hace
un sonido de “clic”
cuando uso el horno?
Su estufa fue diseñada para mantener un control más
ajustado sobre la temperatura del horno. Es posible que
escuche que los elementos de calentamiento del horno
hagan sonidos de “clic” con mayor frecuencia que con
hornos más antiguos para lograr mejores resultados
durante los ciclos de horneado, asado, convección y
limpieza automática.
Esto es normal.
El reloj y el temporizador
no funcionan
Es posible que un fusible de su hogar se haya quemado
o que el disyuntor se haya desconectado.
Reemplace el fusible o reinicie el disyuntor.
A veces el horno tarda
más en precalentarse a la
misma temperatura
8WHQVLOLRRFRPLGDHQHOKRUQR El utensilio o la comida en el horno hará que éste
tarde más en precalentarse. Retire estos artículos
para reducir el tiempo de precalentamiento.
Cantidad de estantes en el horno Agregar más estantes al horno hará que éste tarde
más en precalentarse. Retire algunos estantes.
¡Ahorre tiempo y dinero! Revise los cuadros de las siguientes páginas o visite GEAppliances.com/ge/service-and-support/
cookingproducts.htm para acceder a artículos y videos de apoyo útiles antes de llamar al servicio técnico.
CONSEJOS PARA LA SOLUCIÓN DE PROBLEMAS

49-2000253 Rev. 0 17
CONSEJOS PARA LA SOLUCIÓN DE PROBLEMAS
Problema Causa Posible Qué Hacer
La luz del horno no
funciona
La lámpara está floja o presenta defectos. Ajuste o reemplace la lámpara.
La luz de funcionamiento del interruptor está rota. Llame al servicio técnico.
El modo de limpieza
automática del horno no
funciona
La temperatura del horno es demasiado caliente como
para configurar la limpieza automática.
Espere a que el horno se enfríe y reinicie los
controles.
Los controles del horno están configurados de forma
incorrecta.
Consulte la sección de Limpieza del Horno.
Exceso de humo durante
un ciclo de limpieza
Suciedad o grasa excesiva. Presione la tecla Cancel/Off (Cancelar/ Apagar)
Abra las ventanas para liberar el humo en la
habitación. Espere hasta que
se apague. Limpie el
exceso de suciedad y reinicie el ciclo de limpieza.
Humo excesivo al asar La comida está demasiado cerca del quemador. Baje la posición del estante con comida.
La puerta del horno no se
abrirá luego de un ciclo
de limpieza
El horno está demasiado caliente. Espere a que el horno se enfríe por debajo de la
temperatura de bloqueo.
El horno no limpia luego
de un ciclo de limpieza
Los controles del horno están configurados de forma
incorrecta.
Consulte la sección de Limpieza del Horno.
El horno estaba demasiado sucio. Limpie derrames excesivos antes de iniciar el ciclo
de limpieza. Es posible que, en hornos con mucha
suciedad, sea necesario usar la limpieza automática
nuevamente o usarla durante un período de tiempo
más prolongado.
parpadea en la pantalla
El ciclo de limpieza automática fue seleccionado pero la
puerta no está cerrada.
Cierre la puerta del horno.
está encendido cuando
desea cocinar
La puerta del horno está bloqueada debido a que la
temperatura interior del horno no descendió por debajo
de la temperatura de bloqueo.
Presione la tecla Cancel/Off (Cancelar/ Apagar)
Deje que el horno se enfríe.
“F – y un número o letra”
titila en la pantalla
Tiene un código de error de función. Presione la tecla Cancel/Off (Cancelar/ Apagar)
Permita que el horno se enfríe durante una hora.
Vuelva a poner el horno en funcionamiento.
Si el código de función se repite. Desconecte totalmente la corriente de la cocina
durante por lo menos 30 minutos y vuelva a conectar
la misma. Si el código de error de función se repite,
llame al servicio técnico.
La pantalla queda en
blanco
Es posible que un fusible de su hogar se haya quemado
o que el disyuntor se haya desconectado.
Reemplace el fusible o reinicie el disyuntor.
El reloj está apagado. Consulte la sección Funciones Especiales.
El horno se encuentra en Sabbath Mode (Modo Sabático).
Verifique que el horno no esté en Sabbath Mode (Modo
Sabático). Consulte la sección Funciones Especiales.
Corte de corriente, el reloj
titila
Corte o exceso de corriente Reinicie el reloj. Si el horno estuvo en uso, deberá
reiniciar el mismo presionando la tecla Cancel/
Off (Cancelar/ Apagar) configurando el reloj y
reiniciando cualquier función de cocción.
Olor a “quemado”
o “aceite” desde la
ventilación
Esto es normal en un horno nuevo y desaparecerá con
el tiempo.
Para acelerar el proceso, configure un ciclo de
limpieza automática por un mínimo de 3 horas.
Consulte la sección de Limpieza del Horno.
Olor fuerte
8QRORUHQODDLVODFLyQDOUHGHGRUGHOLQWHULRUGHOKRUQRHV
normal desde las primeras veces en que el horno es usado.
Esto es temporario y desaparecerá luego de varios
usos o de un ciclo de limpieza automática.
Ruido del ventilador Es posible que un ventilador de enfriamiento se active
automáticamente.
Esto es normal. El ventilador de enfriamiento se
encenderá para enfriar las partes internas. Es posible
que funcione hasta durante una hora y media, una
vez que el horno se haya apagado.
La puerta de vidrio del
horno parece estar “teñida”
o tener un color “arcoíris”.
¿Es esto un defecto?
1R(OYLGULRGHOKRUQRLQWHUQRHVWiFXELHUWRFRQXQD
barrera de calor que refleja este último nuevamente
hacia el horno, a fin de evitar la pérdida de calor y de
mantener fría la puerta externa mientras se hornea.
Esto es normal. Bajo ciertas luces y ángulos, es
posible que visualice esta tinta o arcoíris.
El horno no funciona en
forma remota
Problemas en el enrutador, no hay señal inalámbrica, etc.
Para solicitar asistencia con la conectividad de red
inalámbrica, comuníquese al 800.220.6899.
El horno no está conectado.
Consejos para la Solución de Problemas... Antes de solicitar el servicio técnico

18 49-2000253 Rev. 0
Garantía Limitada del Horno Eléctrico de GE Appliances
GARANTÍA LIMITADA
Abroche su recibo aquí. Para acceder al servicio técnico de acuerdo con
la garantía deberá contar con la prueba de la fecha original de compra.
GEAppliances.com
Todo el servicio de garantía es provisto por nuestros Centros de Servicio de Fabricación, o un técnico autorizado de Customer Care®.
Para programar una visita del servicio técnico a través de Internet, visítenos en GEAppliances.com/service_and_support/, o llame
al 800.GE.CARES (800.432.2737). Cuando llame para solicitar el servicio, tenga los números de serie y modelo disponibles.
Para realizar el servicio técnico de su electrodoméstico, se podrá requerir el uso de datos del puerto de abordaje para su diagnóstico.
Esto da al técnico del servicio de fábrica de GE Appliances la habilidad de diagnosticar de forma rápida cualquier problema con
su electrodoméstico, y de ayudar a GE Appliances a mejorar sus productos al brindarle a GE Appliances la información sobre su
electrodoméstico. Si no desea que los datos de su electrodoméstico sean enviados a GE Appliances, solicitamos que le indique a su
técnico no entregar los datos a GE Appliances en el momento del servicio.
Qué no cubrirá GE Appliances:
Ŷ Viajes del técnico del servicio a su hogar para enseñarle
sobre cómo usar el producto.
Ŷ ,QVWDODFLyQHQWUHJDRPDQWHQLPLHQWRLQDGHFXDGRV
Ŷ )DOODVGHOSURGXFWRHQFDVRGHDEXVRPDOXVRPRGLILFDFLyQ
o uso para propósitos diferentes al original o uso comercial.
Ŷ 5HHPSOD]RGHIXVLEOHVGHODFDVDRUHLQLFLRGHGLV\XQWRUHV
Ŷ 'DxRVRFDVLRQDGRVVREUHHOSURGXFWRSRUDFFLGHQWH
incendio, inundaciones o catástrofes naturales.
Ŷ 'DxRVVREUHHODFDEDGRWDOHVFRPRy[LGRVREUHOD
superficie, deslustres o manchas pequeñas no informadas
dentro de las 48 horas luego de la entrega.
Ŷ 'DxRVLQFLGHQWDOHVRFRQVHFXHQWHVFDXVDGRVSRUSRVLEOHV
defectos sobre este producto.
Ŷ 'DxRFDXVDGRGHVSXpVGHODHQWUHJD
Ŷ 3URGXFWRQRDFFHVLEOHSDUDEULQGDUHOVHUYLFLRUHTXHULGR
Ŷ 6ROLFLWHHOVHUYLFLRWpFQLFRSDUDUHSDUDURUHHPSOD]DUODV
lámparas, excepto las lámparas LED.
EXCLUSIÓN DE GARANTÍAS IMPLÍCITAS
Su única y exclusiva alternativa es la reparación del producto, como se indica en la Garantía Limitada. Las
garantías implícitas, incluyendo garantías implícitas de comerciabilidad o conveniencia sobre un propósito
particular, se limitan a un año o al período más corto permitido por la ley.
Esta garantía limitada se extiende al comprador original y a cualquier propietario posterior de los productos
FRPSUDGRVSDUDXVRGRPpVWLFRGHQWURGH((88 Si el producto está en un área donde no se encuentra disponible
un Proveedor Autorizado del Servicio Técnico de GE Appliances, usted será responsable por el costo de un viaje o se
podrá requerir que traiga el producto a una ubicación del Servicio Técnico de GE Appliances autorizado para recibir el
servicio. En Alaska, la garantía limitada excluye el costo de envío o visitas de servicio a su domicilio. Algunos estados
no permiten la exclusión o limitación de daños fortuitos o consecuentes. Esta garantía limitada le otorga derechos
legales específicos, y usted también podría tener otros derechos que varían de estado a estado. Para conocer cuáles
son sus derechos legales, consulte a la oficina de asuntos del consumidor local o estatal o al Fiscal de su estado.
Garante: GE Appliances, a Haier company
Louisville, KY 40225
Garantías Extendidas: Adquiera una garantía extendida de GE Appliances y conozca los descuentos especiales que
están disponibles mientras su garantía aún está vigente. Puede acceder a la misma a través de Internet en cualquier
momento en
GEAppliances.com/extended-warranty
o llamando al 800.626.2224 durante el horario comercial. Los Servicios para los GE Appliances aún estarán
disponibles cuando su garantía caduque.
Por el Período de GE Appliances reemplazará
Un Año
Desde la fecha de la
compra original
Cualquier parte del horno que falle debido a un defecto en los materiales o la fabricación. Durante esta
garantía limitada de un año, GE Appliances también proveerá, sin costo, todo el trabajo y el servicio
en el hogar para reemplazar la parte que presente defectos.

49-2000253 Rev. 0 19
ACCESORIOS
¿Busca Algo Más?
¡GE Appliances ofrece una variedad de accesorios para
mejorar sus experiencias de cocción y mantenimiento!
Para acceder a números telefónicos e información de sitios
Web, consulte la página de Soporte para el Consumidor.
Estos y otros productos están disponibles:
Accesorios
Accesorios
Olla para Asar Pequeña (8 ¾ ” x 1 ¼” x 13 ½ “)
Olla para Asar Grande* (12 ¾ ” x 1 ¼” x 16 ½ “)
Olla para Asar Extra Grande** (17 ¾ ” x 1 ¼” x 19 ½ “)
Piezas
Estantes del horno
(VWDQWH'HVOL]DEOH1HYHU6FUXEGH´
(VWDQWH'HVOL]DEOH1HYHU6FUXEGH´
Elementos del horno
Lámparas de luz
Suministros de Limpieza
Limpiadores de Acero Inoxidable CitriShine™
Limpiador de Electrodomésticos de Acero Inoxidable
CeramaBryte
Lubricante de Grafito***
*La olla para asar grande no entra en cocinas de 20”/24”.
** La olla XL no entra en hornos de pared de 24”, empotrables de 27”
o cocinas de 20”/24”.
*** 3DUDXVRFRQHVWDQWHVGHVOL]DEOHV1HYHU6FUXE

20 49-2000253 Rev. 0
,PSUHVRHQ(VWDGRV8QLGRV
Soporte para el Consumidor
SOPORTE PARA EL CONSUMIDOR
Sitio Web de GE Appliances
¿Desea realizar una consulta o necesita ayuda con su electrodoméstico? ¡Intente a través del Sitio Web de GE Appliances las
KRUDVGHOGtDFXDOTXLHUGtDGHODxR8VWHGWDPELpQSXHGHFRPSUDUPiVHOHFWURGRPpVWLFRVPDUDYLOORVRVGH*($SSOLDQFHV\
aprovechar todos nuestros servicios de soporte a través de Internet, diseñados para su conveniencia.
(Q((88GEAppliances.com
Registre su Electrodoméstico
£5HJLVWUHVXHOHFWURGRPpVWLFRQXHYRDWUDYpVGH,QWHUQHWVHJ~QVXFRQYHQLHQFLD8QUHJLVWURSXQWXDOGHVXSURGXFWRSHUPLWLUi
una mejor comunicación y un servicio más puntual de acuerdo con los términos de su garantía, en caso de surgir la necesidad.
También puede enviar una carta en la tarjeta de inscripción preimpresa que se incluye con el material embalado.
(Q((88GEAppliances.com/register
Servicio Programado
El servicio de reparación de expertos de GE Appliances está a sólo un paso de su puerta. Conéctese a través de Internet y programe
VXVHUYLFLRDVXFRQYHQLHQFLDFXDOTXLHUGtDGHODxR(Q((88GEAppliances.com/service
o comuníquese al 800.432.2737 durante el horario de atención comercial.
Garantías Extendidas
Adquiera una garantía extendida de GE Appliances y conozca los descuentos especiales que están disponibles mientras su
garantía aún está vigente. La puede adquirir en cualquier momento a través de Internet. Los servicios de GE Appliances aún
estarán allí cuando su garantía caduque.
(Q((88GEAppliances.com/extended-warranty
o comuníquese al 800.626.2224 durante el horario de atención comercial.
Conectividad Remota
Para solicitar asistencia para la conectividad de red inalámbrica (para modelos con acceso remoto),
visite nuestro sitio web en GEAppliances.com/connect RFRPXQtTXHVHDOHQ((88
Piezas y Accesorios
Aquellos individuos calificados para realizar el servicio técnico de sus propios electrodomésticos podrán solicitar el envío de
piezas o accesorios directamente a sus hogares (se aceptan las tarjetas VISA, MasterCard y Discover). Ordene hoy a través de
,QWHUQHWGXUDQWHODVKRUDVWRGRVORVGtDV(Q((88GEApplianceparts.com o de forma telefónica al 877.959.8688 durante
el horario de atención comercial.
Las instrucciones que figuran en este manual cubren los procedimientos que serán realizados por cualquier usuario.
Otros servicios técnicos generalmente deben ser derivados a personal calificado del servicio. Se deberá tener cuidado,
ya que una reparación indebida podrá hacer que el funcionamiento no sea seguro.
Contáctenos
Si no se encuentra satisfecho con el servicio que recibió de GE Appliances, comuníquese con nosotros a través de nuestro sitio
Web con todos los detalles, incluyendo su número telefónico, o escriba a:
(Q((88*HQHUDO0DQDJHU&XVWRPHU5HODWLRQV_*($SSOLDQFHV$SSOLDQFH3DUN_/RXLVYLOOH.<
GEAppliances.com/contact
-
 1
1
-
 2
2
-
 3
3
-
 4
4
-
 5
5
-
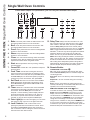 6
6
-
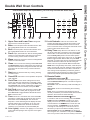 7
7
-
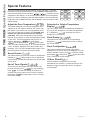 8
8
-
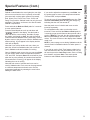 9
9
-
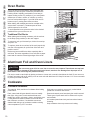 10
10
-
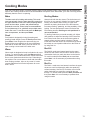 11
11
-
 12
12
-
 13
13
-
 14
14
-
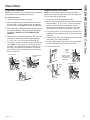 15
15
-
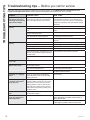 16
16
-
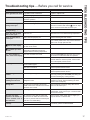 17
17
-
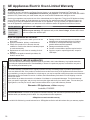 18
18
-
 19
19
-
 20
20
-
 21
21
-
 22
22
-
 23
23
-
 24
24
-
 25
25
-
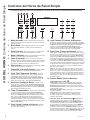 26
26
-
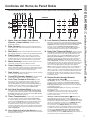 27
27
-
 28
28
-
 29
29
-
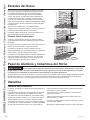 30
30
-
 31
31
-
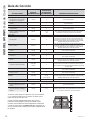 32
32
-
 33
33
-
 34
34
-
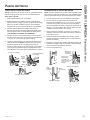 35
35
-
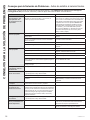 36
36
-
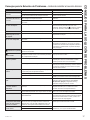 37
37
-
 38
38
-
 39
39
-
 40
40


GE JKD3000DNBB El manual del propietario
- Categoría
- Enfriadores de bebidas
- Tipo
- El manual del propietario
en otros idiomas
- English: GE JKD3000DNBB Owner's manual
Artículos relacionados
-
GE JTS3000ENES El manual del propietario
-
-
GE Appliances JKD5000SNSS El manual del propietario
-
Yes JKD5000SNSS El manual del propietario
-
GE Cafe Series PT7050SF5SS El manual del propietario
-
GE JK3500DFCC El manual del propietario
-
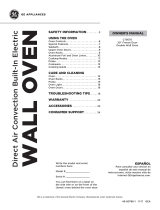 Cafe CT9570SLSS El manual del propietario
-
GE CTD90DP4MW2 El manual del propietario
-
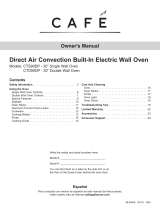 Cafe CTS90DP3MD1 El manual del propietario

