
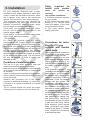
ANAFE/ENCIMERA A GAS
GAS COOKTOP
ESP
EN
2
16
GC58V, GC70V, GC75P,
GT60X, GT75X
MANUAL DE INSTRUCCIONES
INSTRUCTION MANUAL
LA INSTALACIÓN DEL PRODUCTO DEBERÁ SER REALIZADA SOLAMENTE POR INSTALADORES
AUTORIZADOS POR LA SUPERINTENDENCIA DE ELECTRICIDAD Y COMBUSTIBLES. (SEC)
THE PRODUCT INSTALLATION MUST BE MADE ONLY BY INSTALLERS AUTORIZED BU THE
SUPERINTENDENCE OF ELECTRICITY AND FUELS. (SEC)
LEA ATENTAMENTE ESTE MANUAL ANTES DE PONER EN FUNCIONAMIENTO
ESTE ARTEFACTO.
READ THIS MANUAL CAREFULLY BEFORE ATTEMPTING TO OPERATE THE APPLIANCE.
Prelimin
18-Jul-2

2
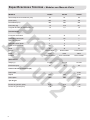
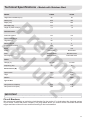
MODELO GC58V GC70V GC75P
Altura después de la instalación (mm) 55 55 62
Ancho (mm) 580 730 750
Profundidad (mm) 460 460 520
Peso neto (kg) 7,9 10,0 12,1
Longitud del cable de alimentación (m) 1,0 1,0 1,0
Características
Encendido Automático Sí Sí Sí
Quemador Llama tripla No No 1
Quemador Rápido 1 2 1
Quemador Semi rápido 3 3 3
Panel de control frontal No Sí Sí
Bivolt Sí Sí Sí
Perillas Desmontable Desmontable Desmontable
Mesa Vidrio Vidrio Vidrio
Parrillas Acero esmaltado Acero esmaltado Hierro fundido
Alimentación
Voltaje (V) 127-220 127-220 127-220
Frecuencia (Hz) 60 60 60
Potencia de los Quemadores (W)
Llama tripla - - 3700
Rápido 3000 3000 2700
Semi rápido 1800 1800 2000
Tipo de gas
Presión de gas GLP (kPa) 2,75 2,75 2,75
Presión de gas GN (kPa) 1,96 1,96 1,96
Especicaciones Técnicas - Modelos con Mesa de Vidrio
Prelimin
18-Jul-2

3
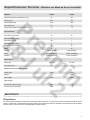
MODELO GT60X GT75X
Altura después de la instalación (mm) 55 62
Ancho (mm) 600 750
Profundidad (mm) 520 520
Peso neto (kg) 8,0 9,7
Longitud del cable de alimentación (m) 1,0 1,0
Características
Encendido Automático Sí Sí
Quemador Llama tripla 1 1
Quemador Rápido No 1
Quemador Semi rápido 3 3
Panel de control frontal Sí Sí
Bivolt Sí Sí
Perillas Desmontable Desmontable
Mesa Acero Inoxidable Acero Inoxidable
Parrillas Acero esmaltado Acero esmaltado
Alimentación
Voltaje (V) 127-220 127-220
Frecuencia (Hz) 60 60
Potencia de los Quemadores (W)
Llama tripla 3700 3700
Rápido - 2700
Semi rápido 2000 2000
Tipo de gas
Presión de gas GLP (kPa) 2,75 2,75
Presión de gas GN (kPa) 1,96 1,96
Especicaciones Técnicas - Modelos con Mesa de Acero Inoxidable
Disyuntores
Se recomienda instalar un disyuntor exclusivo para la cocina. Si tiene duda sobre el sistema eléctrico de su
hogar, consulte la compañía de energía eléctrica los cables del enchufe donde se conectará su cocina deben
ser de cobre y tener sección mínima según la norma local.
IMPORTANTE
Este producto fue elaborado y debe ser utilizado solamente para uso doméstico.
Prelimin
18-Jul-2

4
IMPORTANTE
CUIDADOS CON LAS PARTES ELÉCTRICAS:
Desenchufe la cocina siempre que se haga
limpieza o servicio de mantenimiento para
evitar choques eléctricos.
Nunca desenchufe la cocina al tirar por el
cable eléctrico. Desenchufe por el tapón.
No cambie el tapón de la cocina. No
cuelgue, fuerza o ate el cable eléctrico y no
intente arreglarlo, si ocurren daños, llame
al Servicio Tecnico para evitar riesgos.
Cuidado para que la cocina no se apoye
sobre el cable eléctrico.
Utilice un enchufe exclusivo para la cocina,
no utilice extensiones o conectores.
Antes de instalar o
sustituir la lámpara, los
quemadores de la cocina
deben estar apagados y
el cable eléctrico debe
estar desconectado. De
este modo, se evitarán
accidentes. Cambie o
instale la lámpara por
otra lámpara de la cocina y veri que la
tensión eléctrica de la red local. Consulte
la potencia correcta de la lámpara para su
modelo en “Especi caciones Técnicas”.
Es peligroso cambiar las especi caciones
o características de la cocina.
Para cambiar el gas llame al Servicio
Tecnico más próximo para su conversión.
La conversión solo será posible si el gas
natural esté disponible.
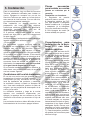
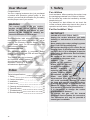
Manual del Usuario
¡FELICITACIONES! Usted es un cliente especial
que acaba de adquirir un producto con calidad
mundial Electrolux.
En este manual, va a encontrar todas las
informaciones para su seguridad y el uso
adecuado de su cocina.
Lea todas las instrucciones antes de utilizar el
producto y guarde este Manual para futuras
referencias.
Índice
Para los niños
Evite accidentes. Después de desenvolver la
cocina, mantenga el material del empaque lejos
de los niños.
No permita que los niños manejen la cocina,
aunque apagado.
Ponga atención para que los niños no toquen la
superficie de la cocina, tampoco se queden cerca
de ella, cuando en funcionamiento y todavía
caliente, aunque apagado.
Para el Usuario / Instalador
1. Seguridad
Especificaciones técnicas 2
1. Seguridad 4
2. Descripción del fogón 6
3. Instalación 7
4. Cómo Usar 11
5. Limpieza y mantenimiento 12
6. Sugerencias y consejos 12
7. Soluciones de problemas 13
8. Esquema Eléctrico 14
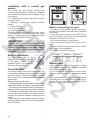
ATENCIÓN
Este manual atiende a las cocinas a gas
modelos GC58V, GC70V, GC75P, GT60X,
GT75X. Luego, observe el modelo de su
producto en la factura de compra para
identi car las informaciones correctas en
ese manual.
La etiqueta de identificación donde están las
informaciones de código, modelo, fabricante y
otras, será utilizada por el Servicio Tecnico, si
su cocina necesite reparo. No lo saque del local
donde está pegado.
Sugerencias ambientales
El material del empaque es
reciclable. Trate de seleccionar
plásticos, papel y cartón y enviar
a las empresas de reciclaje.
Este producto no puede ser
tratado como basura del hogar.
Al contrario, debe ser entregue al centro de
separación en la fuente para reciclaje de equipos
electro electrónicos.
Prelimin
18-Jul-2

5
CUIDADOS CON ALIMENTOS Y APARATOS
Para manejar o retirar
los alimentos del horno,
póngase guantes térmicos
de protección.
No utilice cacerolas con
fondo redondeado, para
evitar accidentes.
Nunca deje el mango afuera
de la cocina.
Al utilizar aceite o grasa en
las frituras, hay que tener
más cuidado, pues son
in amables.
No almacene aparatos en
la cocina, principalmente
los que presenten residuos
o gran cantidad de aceite o
grasa.
CUIDADOS CON LA LIMPIEZA:
Por cuestiones de higiene y seguridad, se
debe mantener la cocina siempre limpio.
La acumulación de grasa u otros alimentos
pueden llevar al mal funcionamiento y
riesgos de accidentes (consulte limpieza y
mantenimiento).
Después de limpiar el panel de control,
certifíquese que los botones están en la
posición “apagado”, principalmente el botón
del horno, que gira libremente para los dos
sentidos.
CUIDADOS GENERALES
Nunca deje paños o materiales in amables
sobre la tapa de cristal durante el uso de
la cocina. Mantenga a los niños y a los
animales lejos de la cocina, principalmente
cuando está en uso. Las partes próximas a
los quemadores, las partes externas, los
tiradores y la puerta calientan y pueden
causar quemaduras.
La instalación de la cocina debe seguir las
instrucciones descritas en este manual.
Antes de encender el horno, abra totalmente
su puerta para evitar acumulación de gas
en el interior. Certifíquese que el horno
encendió antes de cerrar la puerta.
Al ausentarse por un período largo, cierre
el registro de entrada de gas.
Evite la instalación de la cocina cerca de
materiales in amables: cortinas, paños de
cocina, etc.
Los agujeros en la parte inferior de la cocina
no deben ser obstruidos. Las paredes del
horno no deben ser revestidas con hojas
de papel aluminio, principalmente la base.
Veri que siempre si los botones están
en la posición “
” (apagado) cuando la
cocina no está en uso.
Si hay piezas dañadas, vaya al Servicio
Tecnico y adquiera solo piezas y
accesorios originales para sustitución.
Nunca use llamas o
chispas para localizar
vaciado de gas, pues
pueden causar explosión.
Utilice una esponja
con espuma de jabón o
detergente líquido.
En caso de falta de energía eléctrica,
certifíquese que ningún botón de control
de la cocina está abierto antes de usar un
fósforo para encender la llama.
Perdida de gas
Al sentir el olor de gas dentro de casa, tome las
siguientes providencias:
1. Apague toda y cualquier llama.
2. No encienda ningún tipo de llama.
3. No toque en disyuntores eléctricos.
4. No utilice teléfonos y móviles cerca del local.
Salga del ambiente y haga la llamada desde un
local abierto y ventilado.
5. Cierre el registro de entrada de gas.
6. Abra las ventanas y las puertas para permitir
mayor ventilación del ambiente.
7. Aleje las personas del local.
8. Si el vaciado sea en la bombona, sáquela y
llévela para un local abierto y bien ventilado; llame
al distribuidor de gas
9. Si la cocina tiene gas butano o central (edificios),
cierre inmediatamente los registros de suministro;
llame a la compañía de gas responsable.
10. Llame al soporte tecnico para verificar el
problema
Vaciado de gas con fuego
1. Si posible, cierre el registro de gas.
2. Aleje las personas del local.
3. Salga del local
4. Llame a los Bomberos
Incorrecto
Incorrecto
Correcto
Prelimin
18-Jul-2

6
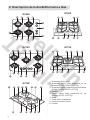
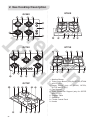
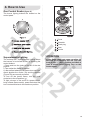
1. Quemador Semi rápido
2. Quemador Llama Tripla (solamente en los
modelos GC75P, GT60X y GT75X)
3. Quemador Rápido (solamente en los modelos
GC58V, GC70V, GC75P y GT75X)
4. Parrillas
5. Parrilla Llama Tripla (solamente en los
modelos GC75P y GT75X)
6. Mesa
7. Copa de los quemadores
8. Panel de Control Frontal
9. Perillas
2. Descripción de la Anafe/Encimera a Gas
4
4
4 4
4
4
4
1 1
1
1
3
3 3
7
8
9
6
4 41 1
7 89 6
4
1
1 1
3 4
44
2 5
1
1 4 3
19 8
8
6
6
1 44 2
9 8 61 1
4
9
52
GC58V
GT60X
GC70V
GT75X
GC75P
7
7
7
Prelimin
18-Jul-2

7
Para su tranquilidad, hay una Red de Servicios
Tecnicos altamente calificada para instalar su
cocina. Póngase en contacto con uno de los
Servicios Tecnicos que están en la lista junto a
este manual de instrucciones. Por ese servicio,
se cobrará una tasa de instalación.
Esta instalación no abarca servicios de
preparación del local (ej.: red eléctrica,
conexiones eléctricas e hidráulica, albañilería,
alcantarilla, enchufes, etc.) que son de
responsabilidad del consumidor.
Si lo prefiere, usted puede instalar su cocina,
puesto que siga paso a paso las instrucciones
de este manual.
Verifique antes en la etiqueta de identificación en
la parte inferior de la anafe/ecimera:
- El tipo de gas;
Por seguridade, nuestros produtos salen de
la fábrica con configuración GLP. Póngase en
contacto com uno de los Servicios Técnicos
Autorizados Electrolux más cercano, si desea
utilizar su anafe/encimera com GN (gas natural).
Si lo produto no ha sido utilizado, la conversión
será grátis, durante el período de cobertura de la
garantía (excepto los custos de desplazamiento
del Servicio Autorizado cuando el producto se
encuentra fuera del asiento de condado de la
Autorizada). La conversión sólo será posible
si ha gas natural disponible en el lugar.
Si se necesita cambiar la instalación eléctrica, lo
debe hacer una persona calificada, de acuerdo
con las normas vigentes.
Condiciones del local de instalación
El uso de una cocina con gas produce calor y
humedad en el local en que está instalado.
Certifíquese que hay circulación de aire en el
local de instalación del producto y mantenga
la ventilación natural o instale un extractor de
aire. Una mala ventilación produce la falta de
oxigeno, que es perjudicial al desempeño de la
cocina y a la salud.
La utilización intensiva y larga de la cocina
requiere una ventilación suplementar, por
ejemplo, la apertura de una ventana o de una
ventilación más eficaz que aumente el flujo de
aire.
Las corrientes de aire no deben dificultar el buen
funcionamiento de la cocina o apagar la llama.
Procedimientos para
instalación de la bom-
bona P13 con tubo
fl exible metálico
Utilice una llave de boca de 22
mm para la fijación de un extre-
mo del tubo flexible metálico em
la entrada de gas de produto.
Una el otro extremo del tubo em
el registro regulador de presión
(figura 3) usando una llave de
boca de 26 mm (1 pulg.), sin
olvidar de usar el anillo de se-
llado que acompaña el tubo.
Si el regulador de presión no
tiene conexión compatible con
el tubo (figura 4), el registro re-
gulador debe ser reemplazado
(figura 5).No recomendamos el
uso de conexiones. Verifique la
distancia entre la bombona y la
anafe/encimera. Si el tubo de
metal de 125 cm de longitude
no es suficiente, la instalación
debe ser hecho con tubos de
acero o de cobre.Conectar el
regulador de gas a la bombona,
pressionando sólo com las ma-
nos (figura 6). Se desarrolló este
sistema para sellado sólo com
el fuerza manuale, no requiere
herramientas.Encienda el gas y
comprobar si hay fugas usando
detergente líquiso viscoso, que
garantiza um mejor rendimento
y la eficácia de la prueba (figura
7). Caso burbujas se producen,
se aprietan las conexiones para
eliminar la fuga.
3. Instalación
Piezas necesarias
para instalar su cocina
(piezas no cubiertas por la
garantía)
Instalación con bombona:
1. Regulador de presión
exclusivo para su cocina.
2. Manguera plástica de PVC
con faja amarilla o manguera
flexible metálica de ½ pulgada
y adaptador (si la manguera
cruce por detrás de la cocina).
3. Dos bisagras de metal (de
buena calidad) con pernos.
Regulador
Manguera
Bisagra
Prelimin
18-Jul-2

8
Instalación utilizando la central de gas
La central de gas y el área del edificio delimitada
que contiene los recipientes transportables
o estacionarios y los accesorios dirigidos al
almacenaje de gas para consumo.
En una instalación con central de gas hay
algunos puntos importantes como:
1- Cilindro estacionario o batería de cilindros
transportables;
2- Regulador de 1er nivel;
3- Regulador de 2do nivel;
4- Medidor de consumo.
Para instalar su cocina em la central de gas,
verifique si su hogar tiene un registro de pared
exclusivo para la cocina y en buenas condiciones
de uso y siga según el ítem anterior.
Instalación eléctrica
Para su seguridad, solicite al
electricista de su confianza para
que verifique las condiciones de la
red eléctrica del local de instalación
de la cocina o póngase en contacto
con Servicio Tecnico.
Disyuntor
Para su seguridad, solicite al electricista de su
confianza para que verifique las condiciones de la
red eléctrica del local de instalación de la cocina o
póngase en contacto con Servicio Tecnico.
Se recomenda utilizar un disyuntor 2A. El lugar
de instalación del disyuntor debe estar cerca del
aparato (alrededor de 5 metros). Si la distancia
es superior a 5 metros, pida a un electricista de
confianza para hacer lo adecuado.
Antes de conectar, certifíquese:
- El gas reductor y la instalación doméstica puedan
soportar la carga unitária, de acuerdo con sus
características.
- La toma o el disyuntor utilizado para la conexión es
facilmente accesible.
- El cable de alimentación se coloca de modo que
no toque las partes caliente de lo producto, ya que
se puede ocurrir el derretimiento del aislamiento
eléctrico, resultando em cortocircuito.
- Cuando hay un horno instalado debajo de la anafe/
encimera, el cable de alimentación de los productos
no pueden estar em contacto com la parte posterior
del horno.
Antes de conectar, certifíquese:
- el enchufe o disyuntor utilizados para conexión
son de fácil acceso, aun después de tener
instalada la cocina;
- el cable de alimentación deberá estar de modo
que nunca toque las paredes calientes de la
cocina, pues pueden derretir el aislamiento
eléctrico y causar el cortocircuito;
- no utilice extensiones o conectores;
- nunca conecte el cable tierra en los tubos de
gas o de PVC;
- Instale adecuadamente el cable tierra de su
cocina de acuerdo con las normas locales;
- En caso de duda, consulte un electricista.
Cable de conexión a tierra
Si su cocina tiene un cable tierra (verde o verde/
amarillo) próximo al cable de suministro, este
cable tierra debe conectarse a un punto de ater-
ramiento adecuado.
No conecte el cable tierra a grifos, tubería de agua,
tubería eléctrica o de gas o al cable neutral de la red.
Si su producto tiene un tampón de 3 pinos, utilice
el enchufe adecuado con aterramiento. No se pu-
ede cortar el pino de conexión a tierra del enchufe.
Para su seguridad, solicite a un electricista que in-
stale en su hogar el cable tierra.
IMPORTANTE
Utilice siempre un regulador de presión
para cualquier tipo de bombona. Su ausen-
cia puede causar exceso de presión y vaci-
ado de gas. Veri que el plazo de caducidad
del regulador de presión y de la manguera.
Tensión Mínima Máxima
Prelimin
18-Jul-2

9
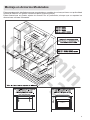
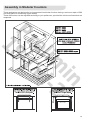
Estes aparatos están diseñados para ser empotrados en muebles de cocina que tienen una profundidad
mínima de 580 mm con granito o mármol superior (figura siguiente)
Estas dimensiones se pueden ajustar de acuerdo con su preferencia, siempre que se respeten las
dimensiones mínimas informadas.
Montaje en Armarios Modulados
Prelimin
18-Jul-2

10
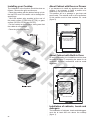
Instalación de su Anafe/Encimera
La instalación en el móvil debe realizarse de la
siguiente manera:
- Retirar las parrillas y quemadores.
- Coloque la anafe/encimera con la parte inferior
hacia arriba em la tapa superior de EPS. Tenga
cuidade de no danar las bujías de encendido.
- Pegar la tira del sellador que se suministra en
el extremo de la superficie metálica (GT60X y
GT75X) o de la superficie de vidrio (GC58V,
GC70V y GC75P).
- Poner la anafe/encimera en el móvil, teniendo
cuidade de que la goma no está expuesta.
- Colocar las parrillas y quemadores.
Sobre Armario con Puertas o Cajón
Si decide no instalar ningún aparato debajo de
la anafe/encimera, es necesario instalar uma
partición a uma distancia de 150 mm de la mesa.
Esta partición será un pasaje a manguera de gas y
el cable de alimentación. El material utilizado en la
fabricación de esta partición debe ser resistente al
calor. Ex: madera (figura 4).
Sobre Armario com Horno de
Empotrar
Para evitar el sobrecalentamiento, la instalación
deve hacerse de acuerdo con la figura 5, respetando
el espacio para la circulación de aire. Los enlaces
eléctricos deben hacerse por separado.
Instalación de armarios, campanas
y depuradores
La instalación de armarios, campanas y
depuradores debe ser de al menos 800 mm por
encima de la anafe/encimera (figura 1).
PARTICIÓN CON ABERTURAS
PARA PASAR LA MANGUERA
Y EL CABLE DE ALIMENTACIÓN
HORNO DE EMPOTRAR
CIRCULACIÓN DE AIRE
Prelimin
18-Jul-2

11
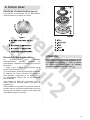
Perilla de Control de Gas (gura 6)
Las perillas de encendido de los quemadores
están situados en el panel de control.
Encendido Superautomático
La anafe/encimera con encendido
superautomático permite encender los
quemadores solamente acionando los botones
de control.
1. Pulse y gire el botón a la izquierda de la
posición de la estrela.
2. A continuación, ajustar la llama según se desee.
Si después de varios intentos, la llamada no
está activado, comprobar si las tapas (7a) y
los separadores (Figura 7B) se han montado
correctamente.
Para apagar la llama del quemador, girar el
mando hacia la derecha hasta la posición de
apagado (
•
).
Para encender un quemador en caso de cortes de
energía, trae un (cerilla encendida) llama, pulse el
botón y gire en sentido contrario a las agujas del
reloj hasta la posición máxima.
4. Cómo Usar
ATENCIÓN
Si la llama no se enciende después de 15
segundos o apagan accidentalmente Girar
el mando a la posición “•” (OFF) y espere
al menos un minuto antes de intentar
encender el quemador de nuevo.
Prelimin
18-Jul-2

12
Limpieza General
Antes de realizar cualquier
limpieza o mantenimiento,
desenchufe la cocina y cierre
el gas. Se debe limpiar con la
cocina fría.
Nunca utilice agentes de limpieza en base de
cloro (hipoclorito de sodio, agua sanitaria,
etc.), queroseno, gasolina, solventes,
removedores, ácidos, vinagre, jugo de limón,
productos químicos o abrasivos, pues pueden
causar manchas y accidentes.
Para limpiar la mesa, saque las rejas, los
quemadores y los botones. Lave la mesa y las
piezas. Individualmente con la parte más suave
de la esponja, detergente neutro y agua. No
utilice en la mesa la parte verde y abrasiva
de las esponjas, post abrasivos y sustancias
corrosivas que puedan rascar la pieza. Para
quitar la suciedad más resistente en las rejas y
tapas de los quemadores, utilice una esponja
de lana de acero seca en las piezas secas, con
movimientos circulares.
Antes de ponerlos otra vez en su lugar, séquelos
bien y verifique si todos están limpios y secos.
Verifique si están bien encajados. Encienda
los quemadores y déjelos encendidos por
aproximadamente 1 minuto para garantizar el
sacado completo.
Pueden ocurrir puntos de oxidación en la parte
inferior de la tapa del quemador, en la región sin
esmalte. Sin embargo, esos puntos de oxidación
no interfieren en el funcionamiento de la cocina.
No utilice papel aluminio para cubrir la mesa
de la cocina, pues puede manchar la mesa y
perjudicar el funcionamiento de las velas. No deje
que sustancias acidas o alcalinas, como: Vinagre,
café, leche, agua salada, salsa de tomate, etc.,
permanezcan mucho tiempo en contacto con las
superficies de la mesa, quemadores o superficies
esmaltadas (tapas de los quemadores, rejas,
parte superior e inferior del horno). En el caso de
derrames, limpie inmediatamente. En las rejas
de la mesa (trempes), es normal ocurrir marcas
blancas o plateadas que parecen rascados. Esas
marcas ocurren debido al residuo del metal en
el fondo de las cacerolas que se acumula en las
rajas y se remueven fácilmente con esponja de
acero seca.
La limpieza de los quemadores, de las tapas
y de los distribuidores debe ser realizada
periódicamente con agua tibia y jabón neutral o
detergente tipo para lavavajillas neutral. No deje
caer líquidos o sólidos dentro del quemador para
que no desregle la llama o atasque el quemador.
Si eso ocurre, apague el quemador, espere enfriar
y limpie con un paño húmedo.
5. Limpieza y Mantenimiento
Cuidado principalmente cuando la mesa esté
sin los quemadores. No deje caer detritos en el
sistema de gas, pues puede desreglar la llama o
atascar en el pequeño agujero de salida de gas.
Si eso ocurre, utilice una aguja para limpieza
especí ca de fogones.
Conserve las velas de encendimiento electrónico
de los quemadores limpios y sin suciedad.
Limpieza de los quemadores
Evite que se derrame alimentos sobre los
quemadores durante el cocimiento. Si eso ocurre,
límpielos inmediatamente después de usar el
largo uso de los quemadores con residuos de
alimentos va a hacer la limpieza muy difícil. No
deje las piezas de los quemadores inmersas en
agua con detergente por más de 10 minutos. No
ponga los quemadores aún calientes en el agua
fría, pues pueden causar alitas por el choque
térmico.
Recomendaciones Importantes
Para menor consume de gas
y mejor aprovechamiento, se
aconseja utilizar cacerolas
con diámetro adaptado al
tamaño de los quemadores
(figs. 1 y 2), lo que evita que
la llama queme en el vacío
(fig. 3).
Se recomienda que tan pronto
el líquido empiece a hervir,
la llama se reduzca hasta
lo mínimo posible, lo que
mantiene el hervor. Asegúrese
que haya circulación de aire
en el entorno donde se instale
la cocina.
Para facilitar la ignición,
encienda el quemador antes
de poner la cacerola sobre la
reja. Baje o apague la llama
antes de sacar la cacerola.
Durante el cocimiento, cuando se utiliza aceites
y otras grasas, hay que estar atento, pues al
trasbordar, pueden ponerse fuego.
Utilice solo cacerolas con fondo llano y que
garanticen una buena estabilidad sobre las rejas.
6. Sugerencias y consejos
CUADRO DE DIÁMETROS MÍNIMOS Y
MÁXIMOS DE CACEROLA
Quemador
Diámetro
mínimo
Diámetro
máximo
Llama triple 24cm 26cm
Rápido 18cm 26cm
Semi rápido 12cm 22cm
Prelimin
18-Jul-2

13
Servicio de Atención al Consumidor.
Si su cocina presente algún problema de funcionamiento, antes de llamar al Servicio Tecnico, verifique
si la causa no es de fácil resolución o si no es falla en el uso, lo que puede ser corregido de modo fácil
y rápido, sin tener que esperar al tecnico.
7. Solución de Problemas
Problemas Probables Causas Correcciones
Quemador de la
mesa no enciende.
Distribuidor mal ubicado. Verifique si el distribuidor está correctamente
montado.
El quemador no per-
manece encendido.
El sistema de bloqueo de gas
no fue desactivado correcta-
mente.
Después de encender el quemador, siga presio-
nando el botón de control por 10 segundos, hasta
que el sistema de bloqueo de gas se desactive.
Olor a gas en el
ambiente.
Cerrar la vávula de gas. Comprobar se la válvula está mal conectada o si
es necesario reemplazarlo.
Si las correcciones sugeridas no sean sucientes, llame al Servicio Tecnico, que está a su disposición.
Prelimin
18-Jul-2

14
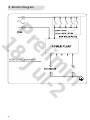
8. Esquema Eléctrico
GC58V / GT60X
GC70V / GC75P/ GT75X
GC58V/GT60X - 4 eletrodos
GC70V/GC75P/GT75X - 5 eletrodos
Prelimin
18-Jul-2

15
IMPORTANTE:
a) Mantener los alrededores del aparato libres de
materiales combustibles, gasolina y otros vapores o
líquidos amables;
b) No obstruir la salida de los gases de combustión del
horno o asador;
c) No debe utilizarse como calefactor de ambiente;
d) Si huele a gas: Abra las ventanas, no accione
interruptores elétricos, apague todas las amas
cerrando la válvula general de paso y llame
inmediatamente al Servicio de Supresión de Fugas o a
su proveedor de gas.
e) Este aparato no se destina para utilizarse por
personas (incluyendo niños) cuyas capacidades
físicas, sensoriales o mentales sean diferentes o estén
reducidas, o carezcan de experiencia o conocimiento,
a menos que dichas personas reciban una supervisión
o capacitación para el funcionamiento del aparato por
una persona responsable de su seguridad.
f) Los niños deben supervisarse para asegurar que
ellos no empleen los aparatos como juguete.
Prelimin
18-Jul-2

16
MODEL GC58V GC70V GC75P
Height after instalation(mm) 55 55 62
Width (mm) 580 730 750
Depth (mm) 460 460 520
Net weight (kg) 7,9 10,0 12,1
Length of power cord (m) 1,0 1,0 1,0
Characteristics
Automatic Ignition Yes Yes Yes
Triple Crown Burner No No 1
Large Burner 1 2 1
Medium Burner 3 3 3
Frontal Control Panel No Yes Yes
Bivolt Yes Yes Yes
Knobs Removable Removable Removable
Table Glass Glass Glass
Pan Support Enameled Steel Enameled Steel Cast Iron
Power
Voltage (V) 127-220 127-220 127-220
Frequency (Hz) 60 60 60
Burner Power (W)
Triple Crown - - 3700
Large 3000 3000 2700
Medium 1800 1800 2000
Type of Gas
Gas pressure LPG(kPa) 2,75 2,75 2,75
Gas pressure NG (kPa) 1,96 1,96 1,96
Technical Specications - Models with Glass Table
Prelimin
18-Jul-2

17
MODEL GT60X GT75X
Height after instalation(mm) 55 62
Width (mm) 600 750
Depth (mm) 520 520
Net weight (kg) 8,0 9,7
Length of power cord (m) 1,0 1,0
Characteristics
Automatic Ignition Yes Yes
Triple Crown Burner 1 1
Large Burner No 1
Medium Burner 3 3
Frontal Control Panel Yes Yes
Bivolt Yes Yes
Knobs Removable Removable
Table Stainless Steel Stainless Steel
Pan Support Stainless Steel Enameled Steel
Power
Voltage (V) 127-220 127-220
Frequency (Hz) 60 60
Burner Power (W)
Triple Crown 3700 3700
Large - 2700
Medium 2000 2000
Type of Gas
Gas pressure LPG(kPa) 2,75 2,75
Gas pressure NG (kPa) 1,96 1,96
Technical Specications - Models with Stainless Steel
Circuit Breakers
We recommend installing an exclusive circuit breaker for the cooker. If in doubt about the electrical system
in your home, consult the power company. The plug cables where you cooker will be connected should be
copper and have minimum cross section according to the local standard.
IMPORTANT
This cooker was developed and must be used for domestic purposes only.
Prelimin
18-Jul-2

18
The identification label where the code, model,
manufacturer and others information are, will be
used by the Electrolux Service Station, if your
cooker needs repair. Do not remove it from the
place where it is attached.
Environmental tips
The packaging material is recyclable. Select
plastics, paper, cardboard, EPS and send them to
companies of recycling.
This product may not be treated
as household waste. Instead, it
shoud be deliver to central source
separation recycling of electrical
and electronic appliances.
IMPORTANT
CARING WITH ELECTRICAL PARTS
Unplug the cooker whenever you make
cleaning or maintenance to avoid electric
shocks.
Never unplug the cooker pulling by power
cord. Turn it off by pulling plug.
Do not alter the plug of your cooker. Do not
hang up, force or tie the power cord and do
not try to x it. If it is damaged, it must be
replaced by the Electrolux Service Station
to avoid risks.
Be careful to the cooker does not stay
supported on the power cord.
Connect on your
cooker to an exclusive
socket and do not use
extensions or adapters.
Before installing or
replacing the lamp, the
cookers burners should
be switched off and the
power cord must be
disconnected from the socket. So you
will avoid accidents. Replace or install
the lamp with another lamp for cookers,
checking the voltage of local electric net.
Check the correct lamp potency lamp to
your model in “Technical Speci cations”.
It is dangerous to change the cooker
speci cations or features.
To change the gas call the nearest
Electrolux Service Station for conversion.
The conversion will only be possible if
natural gas is available.
User Manual
Congratulations!
You are a special customer who just purchased
a product with Electrolux global quality. In this
manual, you can find all information for your safety
and the proper use of your cooker.
Index
For children
Avoid accidents. After unpacking the cooker, keep
the packaging materials out of reach of children.
Do not allow the cooker be handled by children,
despite being off.
Pay attention so that children do not touch the
cooker surfaces neither stay close to him, when in
operation and still warm, though turned off.
For the Installer / User
1. Safety
WARNING
This manual serves to the gas cookers
models GC58V, GC70V, GC75P, GT60X,
GT75X. So, look at the model of your
product in the invoice to identify the
correct information in the manual.
Technical specifications 16
1. Safety 18
2. Cooker description 20
3. Installation 21
4. How to use 25
5. Cleaning and maintenance 26
6. Tips and advice 26
7. Troubleshooting 27
8. Electrical diagram 28
Prelimin
18-Jul-2

19
Always make sure the knobs are in “●“
position (OFF) when the cooker is not being
used.
If any part is damaged, please contact
the Electrolux Service Station and get
only original parts
and accessories for
replacement.
Never use ames or sparks
to nd gas leaks as they
may cause explosion. Use
a sponge with soapsuds or
liquid detergent.
In the absence of
electricity, be sure that no cooker control
knob is open before using a match to light
the ame.
CARE WITH FOOD ANS UTENSILS
To handle or remove food from oven, use
thermal gloves.
Do not use pans with rounded bottom to
avoid accidents.
Never leave the pans cables outside the
cooker.
When using oil or fat in
fried foods, you must be
more careful, because
they are ammable.
Do not store utensils on
the cooker, mainly those
showing residues or large
amount of oil or fat.
CARE CLEANING
For hygiene and safety
reasons, your cooker
should always be kept
clean. The accumulation
of fat or other food may
cause malfunction and
risk of accidents. See the
chapter “Cleaning and Maintenance”.
After cleaning the control panel make sure
that the knobs are all in “OFF” position”,
especially the oven knob, which turns
freely in both directions.
GENERAL CARE
Never leave cloths or ammable materials
on the glass lid when using the cooker. Keep
children and pets away from the cooker
especially if it is working. The parts near the
burners, external parts, handles and door
get heat and can cause burns.
The cooker installation must follow the
instructions in this manual.
Before tuern the coker on, fully open its door
to avoid the accumulation of gas inside it.
Make sure that the oven is ON before closing
the door.
If you stay away from home for an extended
period, close the gas valve.
Avoid installing the cooker near ammable
materials, as curtains, dishcloths, etc.
The holes in the oven oor must not be
obstructed. The oven walls must not be
lined with aluminum foil, particularly the
oven oor.
Gas leak
If you smell gas inside the house, take the
following orders:
1. Turn any flame off.
2. Do not light any flame.
3. Do not touch electrical switches.
4. Do not use neither the telephone nor cell near
the place. Leave the room and call from an
open and ventilated place.
5. Close the gas supply valve;
6. Open the windows and doors, allowing better
ventilation of the room;
7. Take people away from the room;
8. If the leak is in the gas cylinder, remove it and
take it to an open and well-ventilated place,
then call the gas dealer;
9. If the cooker is fueled with butane gas or by
a gas central (buildings), close immediately
the supply valves and call the gas company
responsible for it;
10. Call Electrolux Service Station to check the
problem.
Gas leak with re
1. If possible, close the gas valve;
2. Take people away from the room;
3. Leave the room;
4. Call fire department.
Incorrect
Incorrect
Correct
Prelimin
18-Jul-2

20
1. Medium Burner
2. Triple Crown Burner ( only for GC75P, GT60X
and GT75X)
3. Larger Burner (only for GC58V, GC70V,
GC75P and GT75X)
4. Pan Support
5. Triple Crown Pan Support (only for GC75P
and GT75X)
6. Superior Table
7. Spill Bowl
8. Frontal Control Panel
9. Knobs
2. Gas Cooktop Description
4
4
4 4
4
4
4
1 1
1
1
3
3 3
7
8
9
6
4 41 1
7 89 6
4
1
1 1
3 4
44
2 5
1
1 4 3
19 8
8
6
6
1 44 2
9 8 61 1
4
9
52
GC58V
GT60X
GC70V
GT75X
GC75P
7
7
7
Prelimin
18-Jul-2

21
For your tranquility, Electrolux has a highly
qualified Service Station Network to install your
cooker. Contact Service Station Electrolux, which
are in relation found next to this instructions
manual. For this service, a fee will be charged.
This installation does not cover services like
place preparation (eg. power grid, electrical and
hydraulic connections, masonry, sewer, plugs,
etc.) as they are customer responsibility.
If you prefer, you can even install your cooker,
but you need to follow the instructions in this
manual step by step.
Check before, on the identification label located
in the inferior part of the cooktop:
- The gas type;
For safety, our products leave the factory
configurate to LGP. Contact one of the nearest
Electrolux Authorized Technical Services if you
wish to use your cooktop with NG (natural gas).
If the product has not been used, the conversion
will be free of charge during the warranty
coverage period ( expect the costs of travel of the
Authorized Service when the product is outside
of the Authorized county seat). The conversion
will only be possible if there is natural gas
available on site.
Conditions of installation place
The use of a gas coker produces heat and
moisture at the place where it is installed.
Make sure there is air circulation in the installation
room, keeping natural ventilation or installing an
air extractor.
A poor ventilation produces a lack of oxygenation,
which is harmful to the performance of the cooker
and to the health.
Intensive and prolonged use of the cooker
requires an additional ventilation, eg. opening of
a window or an effective ventilation to increase
the air flow.
The air currents should not hinder the proper
functioning of the cooker or tuern the flame out.
3. Installation
Procedures for insta-
lling the P13 gas
cylinder with fl exible
metal hose
Use a 22 mm wrench to attach on
of the ends of the flexible metal
hose to the cooktop gas inlet.
Attach the other end of the hose
to the pressure regulator register
(figure 3) using a 26 mm (1 in.)
wrench, without forgetting to use
the sealing ring attached to the
tube.
If the pressure regulator is not
compatible with the flexible metal
hose (figure 4), you must replace
the regulator valve (figure 5).The
usage of connections is not re-
commeded. Check the distance
between the gas cylinder and
the cooktop. If the metal hose of
125 cm of length is not enough,
the instalation should be done
with steel or cooper hoses.Attach
the pressure regulator to the gas
cylinder, apriete tighten it only with
the hands (figure 6). This system
was developed for sealing only
with “manual force”, requiring no
tools.Release the gas and check
if there are leaks using viscous
liquid detergent, which ensures
better performance and effecti-
veness in test (figure 7). If blisters
occur, retighten the connections
to eliminate the leaks.
Parts required to
install your cooker
(parts not covered by
warranty)
Gas cylinder installation:
1. Exclusive pressure regulator
for your cooker.
2. PVC plastic hose with yellow
stripes or 1/2” flexible metal
hose and adaptor (if the hose
cross behind the cooker).
3. Two metal clamps (good
quality) with bolts.
Regulador
Hose
Clamp
Prelimin
18-Jul-2

22
Installation with a central gas
system
The central gas and defined building area
containing transportable or stationary containers
and accessories intended for the storage of gas
consumption.
In a installation with central gas there are some
important points:
1- Stationary cylinder or cylinders portable
battery;
2- 1
st
level regulator;
3- 2
nd
level regulator;
4- Consumption meter.
To install your cooker to the central gas, check
if your home has a unique wall gas valve for the
kitchen, in a good working condictions and follow
according to the previous item.
Before connecting, be sure:
- The plug or circuit breaker used for connection
are easily accessible, even after having installed
the cooker;
- The power cord must be so never touch the hot
walls of the cooker, as they can melt the electrical
insulation and cause short circuit;
- Do not use extensions or connectors;
- Never connect the ground wire to gas or PVC
pipes;
- Properly install the ground wire of your cooker
according to local regulations;
- If in doubt, consult an electrician.
Ground wire
If your cooker has a ground wire (green or green/
yellow) near the power cable, it must be connected
to a suitable grounding point.
Do not connect the ground wire to taps, water,
electric or gas pipelines or to the network neutral
cable.
If your product has a 3 pin plug, use the appropriate
grounding plug. You must not cut grounding pin of
the plug. For your safety, ask an electrician to install
the ground wire in your residence.
IMPORTANT
Always use a pressure regulator to any
type of gas cylinder. Its absence can cause
excess of gas pressure and leaks. Check
the expiry date of the pressure regulator
and hose.
Voltage Minimum Maximum
Electric installation
For your safety ask to an
electrician to check the condition
of the electric network of the
installation place or o contact the
Electrolux Service Station.
Circuit Breaker
It is recommended to use a 2A circuit breaker. The
circuit breaker installation location should be close to
the device (about 5 meters). If the distance is more
than 5 meters, ask a trusted electrician to make the
adjustments.
Before connecting, make sure:
- That the gas redactor and domestic installation can
support the unit load, according to its characteristics.
- The socket or circuit breaker used for connection is
easily accessible, even after the product installation.
- The power cord is placed so that it does not touch
the hot parts of the product, as it may occur the
melting of the electrical insulation, resulting in short
circuit.
- When there is an oven installed under the cooktop,
the product power cord can not be in contact with the
back of the oven.
Prelimin
18-Jul-2

23
These appliances are designed to be incorporated into kitchen furniture having a minimum depth of 580
mm with granite or marble top (figure below)
These dimensions can be adjusted according to your preference, provided the minimum dimensions are
respected.
Assembly in Modular Counters
Prelimin
18-Jul-2

24
Installing your Cooktop
The installation in the furniture should be done as
follows:- Remove the grills and burners.
- Place the cooktop with the bottom facing up into
the top EPS cover. Be careful not to damage the
spark plugs.
- Glue the sealant strip supplied at the end of
the metal surface (GT60X and GT75X) or glass
surface (GC58V, GC70V and GC75P).
- Put the cooktop on the furniture, taking care that
the rubber is not exposed.
- Place the grills and burners.
About Cabinet with Doors or Drawer
If you decide not to install any appliance under the
cooktop, it is necessary to install a partition at a
distance of 150 mm from the table.
This partition will be a passage to gas hose and
power cable. The material used in the manufacture
of this partition must be heat resistant. Ex: wood
(figure 4).
About Cabinet with Built-In Oven
To avoid overheating, the installation must be done
according to figure 5, respecting the space for air
circulation. Electrical connections must be made
separately.
Installation of cabinets, hoods and
debugers
The installation of cabinets, hoods and debuggers
must be at least 800 mm above the cooktop
(figure 1).
PARTITION WITH OPENINGS
TO PASS THE HOSE AND
THE POWER CABLE
BUILT-IN OVEN
AIR CIRCULATION
Prelimin
18-Jul-2

25
Gas Control Knobs (gure 6)
The burner lighting buttons are located on the
control panel.
Superatomatic lighting
The cooktop with superautomatic lighting allows
the burners to be turned on only by pressing the
control buttons.
1 Press and turn the knob to the left of the star
position.
2 Then adjust the flame as desired.
If, after several attempts, the flame does not light,
check whether the covers (7a) and the spacers
(Figure 7B) are correctly mounted.
To turn off the burner flame, turn the knob
clockwise to the off position (
•
).
To light a burner in the event of a power failure,
bring a flame (flame match), press the button and
turn counterclockwise to the maximum position.
4. How to Use
Cover
Spreader
Spark plug
Base
Nozzle
ATTENTION
If the ame does not come on after 15
Seconds or accidentally turn off Turn the
knob to the “•” (OFF) position and Wait at
least a minute before trying Turn on the
burner again.
Prelimin
18-Jul-2

26
General cleaning
Before performing any
cleaning or maintenance,
unplug the cooker and close
the gas taps. The cleaning
should be done with the
cooker cold.
Do not use, under any circumstances, cleaning
agents such as chlorine, bleach, kerosene,
gasoline, solvents, removers, acids, vinegar,
juice lemon, chemicals or abrasives because
they can cause stains and accidents.
To clean the cooktop, remove the grids, burners
and knobs. Wash the cooktop and the other parts
individually, using a soft sponge, neutral detergent
and water. Do not use in the cooktop the green
part sponges, abrasive powders and corrosive
substances that may scratch the part. To
remove the toughest dirt from grids and burner
caps, use a dry steel wool sponge in the dry parts,
making circular movements.
Before putting them in their places, dry them well
and make sure they were all clean and dry. Make
sure they are properly seated. Turn the burners
on and leave it lighted for about 1 minute to
ensure a complete drying.
There may be rust points on the bottom of the
burner cap, on the unpolished area. However,
oxidation of these points does not interfere with
the operation of the cooker.Do not use aluminum
foil to line the cooktop of the cooker because it
can cause stains on the cooktop and prejudice the
functioning of the spark plugs. Do not let acid or
alkaline substances, such as vinegar, coffee, milk,
salt water, juice tomato etc., remain for a long time
in contact with surfaces of the cooktop, burners
or enameled surfaces (burner caps, trivets, top
and bottom parts of the oven). In case of spills,
do cleaning immediately. In the cooktop grods is
normal to appear white or silver marks that seem
risks. These marks occur due to the metal residue
in pans bottom that is accumulated in the grids,
but they are easily removed using a steel dry
sponge.
The cleaning the burners, caps and spreaders
must be made periodically with warm water and
mild soap or neutral detergent for dishwasher.
Do not spill liquid or solid inside the burner to not
deragulate the flame or cause clogging. If this
happens, turn the burner off and wipe with a damp
cloth.
Be careful especially when the cooktop is with no
burners. Do not drop residues in the gas system,
as it can deregulate the flame or clog in the small
5. Cleaning and Maintenance
hole of the gas outlet. If that happens, use a
speci c needle for cleaning cookers. Keep the
spark plugs clean and free of dirt burners crusts.
Burners cleaning
Avoid that food be spilled on the burners during
the cooking. If this occurs, clean them immediately
after use. Prolonged use of burners containing
food residues become cleaning very difficult.
Do not leave parts of the burner immersed in
detergent with water for more than 10 minutes.
Do not place the hot burners in cold water because
it can cause warping by thermal shock.
Important recommendations
For a lower consumption
of gas and better use, we
recommend using poans with
a diameter adapted to the
size of the burners (figs. 1
and 2), preventing the flame
burns in the vacuum (fig. 3).
It is recommended that
when the liquid starts to
boil, the flame is reduced
to a minimum possible,
maintaining the boil. Ensure
that there are air circulation
in the room where cooker is
installed. To facilitate ignition,
light the burner before placing
pan on the grid. Lower or turn
the flame off before removing
the pan.
During cooking, when using oils and other fats,
you must be aware because if they are spilled,
they can catch fire.
Only use pans with flat bottom that guarantee a
good stability on the grids.
6. Tips and Advices
TABLE OF MINIMUM AND MAXIMUM
DIAMETER OF PANS
Burner
Minimum
diameter
Maximum
diameter
Triple crown 24 cm 26 cm
Large 18 cm 26 cm
Medium 12 cm 22 cm
Prelimin
18-Jul-2

27
Customer support
If your cooker has operation problems, before calling the Service Station, check below if the cause of the
failure is not simple to be resolved or if it is not a use failure, which can be easily and quickly corrected,
without wait for a technician.
7. Troubleshooting
Problems Possible causes Solutions
Cooktop burner
does not light
The spreader is misplaced. Place the burners properly.
Burner does not
stay lighted
Blockage gas system was no
properly deactivated.
After lighting the burner, keep control knob
pressed during 10 seconds to disable the
blockage gas system.
When the suggested solutions are not sufcient, call an Electrolux Service Station.
Prelimin
18-Jul-2

28
8. Electric Diagram
GC58V/GT60X - 4 electrodes
GC70V/GC75P/GT75X - 5 electrodes
Prelimin
18-Jul-2

29
IMPORTANT:
a) Keep around the appliance free of combustible
materials, gasoline and other ammable vapors or
liquids;
b) Do not obstruct the ow of combustion gases from
the oven or grill;
c) Ii must not be used as a space heater;
d) If you smell gas: open the windows, do not operate
electric switches, extinguish all ames closing the
general valve and immediately call the Leak Service
Suppression or the gas supplier.
e) This device is not intended for use by persons
(including children) whose physical, sensory or mental
abilities are different or reduced, or lack of experience
or knowledge unless such persons are monitoring or
training to operate the system by a person responsible
for their safety.
f) Children should be supervised to ensure they do not
use the devices as a toy.
Prelimin
18-Jul-2

30
Anotaciones / Notes
Prelimin
18-Jul-2

31
Anotaciones / Notes
Prelimin
18-Jul-2

www.electrolux.com
A05981102/A
G0015193/002
Jul/17
Prelimin
18-Jul-2
-
 1
1
-
 2
2
-
 3
3
-
 4
4
-
 5
5
-
 6
6
-
 7
7
-
 8
8
-
 9
9
-
 10
10
-
 11
11
-
 12
12
-
 13
13
-
 14
14
-
 15
15
-
 16
16
-
 17
17
-
 18
18
-
 19
19
-
 20
20
-
 21
21
-
 22
22
-
 23
23
-
 24
24
-
 25
25
-
 26
26
-
 27
27
-
 28
28
-
 29
29
-
 30
30
-
 31
31
-
 32
32


en otros idiomas
- English: Electrolux GT60X
Artículos relacionados
-
Electrolux ETIR12G7ERB Manual de usuario
-
-
-
-
-
-
-
-
-
