
PRODUCT
HOPPER BENCH – FLOOR FASTENING – STABILIZING SUPPORT –
MAINTENANCE
HOPPER BENCH
© design by dirk wynants
READ INSIDE
ASSEMBLY INSTRUCTIONS,
HOW TO USE, USEFUL TIPS
FOR KEEPING YOUR TOOL FOR
TOGETHERNESS IN SHAPE
LANGUAGES
FR – IT – ES
MORE
WWW.EXTREMIS.BE

LANGUAGES
ENGLISH P. 3
contents p. 3
assembly hopper bench p. 4
oor fastening p. 7
stabilizing support p. 7
maintenance p. 8
NEDERLANDS P. 11
inhoud p. 11
montage hopper bench p. 12
grondverankering p. 15
grondplaat p. 15
onderhoud p. 16
DEUTSCH P. 19
inhalt p. 19
montage hopper bench p. 20
bodenverankerung p. 23
bodenplatte p. 23
pege p. 24
FRANÇAIS P. 27
contenu p. 27
montage hopper bench p. 28
xation dans le sol p. 31
plaque de stabilisation p. 31
entretien p. 32
ITALIANO P. 35
contenuto p. 35
montaggio hopper bench p. 36
ancoraggio a terra p. 39
supporto di stabilizzazione p. 39
manutenzione p. 40
ESPAÑOL P. 43
contenido p. 43
montaje hopper bench p. 44
anclaje al suelo p. 47
soporte estabilizador p. 47
mantenimiento p. 48
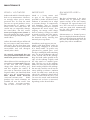
2 content

extremis
extremis
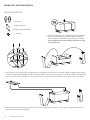
2 x felt 2 x oor plate
PROTECTION FELT STABILIZING SUPPORT
OPTIONAL
12 x lock washer
(hot galvanised)
2 x steel table leg 12 x carriage bolt M10 x 30
(hot galvanised)
12 x nut M10
(hot galvanised)
1 x tabletop 1 x bench
CONTENTS
english 3

+/- 20 min.
3. Put the lid back on the box and put the 2 boards mentioned in step 2 on top of the lid. e box is now located
centrally with respect to the four table legs.
2. Remove the four screws from the two boards that prevent the table legs from moving during transport. Fold down
the cardboard aps to have better access to the table legs. Take them out of the box and position them as shown in
the drawing. Depending on the size of the table put them 2,6 m (bench for 3 people) or 3,2 m (bench for 4 people)
apart.
1. Remove the lid of the box containing the table legs.
is is the box on the wooden pallet. To this end, just
cut the pallet straps. e packaging material must
stay intact for the rest of the assembly!
WHAT YOU NEED
spanner no. 17
2 people
screwdriver
ASSEMBLING HOPPER BENCH
4 assembly hopper bench

A
B
6. Before assembling the benches, remove the packaging material from under the frame!
5. Put 3 carriage bolts through the square holes of eacht table leg. Move the table legs towards the table frame until
the 3 threaded rods t into the 3 holes in the coupling piece. Screw the supplied nuts and lock washers onto the
threaded rods, but do not tighten them yet.
4. Put the tabletop with its frame facing downwards on top of the two boards. e top of the table legs is now at the
same height as the tabletop.
english 5

7. Fasten the bench frame to the table
legs in the way described above.
en tighten all the nuts.
8. Put the optional felt mats under
the table legs.
ASSEMBLING HOPPER BENCH
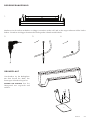
6 assembly hopper bench - floor fastening - stabilizing support

1.
2. 3. 4.
Attach the oor plates to the legs by
means of the bolts we have included.
NOTE that in this case the bench
should be standing on a at and rm
surface.
STABILIZING SUPPORT
Mark the spots on the ground where you want to anchor the table and drill holes at the indicated spots. Use the xing
media most suited to the type of ground on which you intend to install the Hopper Bench.
FLOOR FASTENING
english 7

MAINTENANCE
8 maintenance
IROKO / H.O.T.WOOD
Iroko wood and H.O.T.wood requires
little or no maintenance. However,
we strongly advise you to remove
persistent dirt. To clean the wood
you can use special products (www.
rmc-extremis.be) or simply a sti
bristle brush and some water. Be
careful not to irreparably damage
the wood bres. For this reason,
never use a high pressure cleaner as
this will roughen the wood’s smooth
surface and irreparably damage the
wood’s bres.
At rst, the wood will give o this red
dye every time it comes into contact
with water. e dye that drips onto
the frame and the surface will remain
water-soluble and will dissapear
entirely aer a while.
We strongly recommend that you
treat your wood for indoor use with
wood oil to protect it from stains.
When delivered, the wooden parts of
our products are untreated. Exposure
to sun and rain will gradually
change their colour to silvery grey,
and also roughen the surface. If
you want to somewhat retain their
original colour, you should oil them
once a year. We recommend using
RMC Hybrid Wood Protector
(www.rmc-extremis.com). RMC
products for wood treatment are
available all over the world. Visit
the website www.rmc-extremis.
com to nd a reseller near you.
IMPORTANT!
Wood is a living matter and,
in spite of the superior quality
provided by Iroko and H.O.T.wood,
outdoors it constantly has to adapt
to extreme changes in temperature
and humidity. Due to internal
stress resulting from these constant
adaptations the wood “warps”. is
warping can among other things
lead to cracking. Changes in colour
or wood structure may also appear.
ese characteristics are typical of
the material and by choosing this
material you accept them.
Should any cracks appear, you can
simply sand them down either by
hand using sandpaper or by means
of a hand sander. To protect any
galvanised or painted parts, cover
the edges with highly robust masking
tape. Use 80-grit sandpaper and start
at the vertical side of the tabletop.
Keep the hand sander parallel to the
edge of the tabletop. Lightly sand
the edge until it is smooth again.
Now sand the rest of the tabletop.
Make sure that you always hold the
hand sander parallel to the tabletop.
Do not only sand the crack, but the
entire tabletop to obtain a uniform
result. To avoid burrs, sand the top
edge of the tabletop by hand. When
you have removed all the burrs, you
can treat the wood with hardwood
furniture oil or leave it untreated,
depending on the desired eect.
GALVANISED LEGS +
FRAME
Hot dip galvanisation is the most
durable way of protecting metal
against rusting. If the zinc coating
is damaged, the exposed metal can
rust. is can easily be touched up
with zinc paint that automatically
has the same colour and is readily
available in shops.
Galvanisation is a thermal process
that can slightly deform the material.
Other metal protection methods do
not have this disadvantage, but the
quality they oer is insucient.

english 9

10 inhoud
LANGUAGES
ENGLISH P. 3
contents p. 3
assembly hopper bench p. 4
oor fastening p. 7
stabilizing support p. 7
maintenance p. 8
NEDERLANDS P. 11
inhoud p. 11
montage hopper bench p. 12
grondverankering p. 15
grondplaat p. 15
onderhoud p. 16
DEUTSCH P. 19
inhalt p. 19
montage hopper bench p. 20
bodenverankerung p. 23
bodenplatte p. 23
pege p. 24
FRANÇAIS P. 27
contenu p. 27
montage hopper bench p. 28
xation dans le sol p. 31
plaque de stabilisation p. 31
entretien p. 32
ITALIANO P. 35
contenuto p. 35
montaggio hopper bench p. 36
ancoraggio a terra p. 39
supporto di stabilizzazione p. 39
manutenzione p. 40
ESPAÑOL P. 43
contenido p. 43
montaje hopper bench p. 44
anclaje al suelo p. 47
soporte estabilizador p. 47
mantenimiento p. 48

nederlands 11
INHOUD
1 x tafelblad 1 x bank
2 x stalen tafelpoot 12 x slotbout M10 x 30
(warm verzinkt)
12 x moer M10
(warm verzinkt)
12 x veering
(warm verzinkt)
2 x viltpad 2 x grondplaten
VILT BESCHERMVEL GRONDPLAAT
OPTIONEEL
extremis
extremis

MONTAGE HOPPER BENCH
BENODIGDHEDEN
steeksleutel nr. 17
2 personen
philips schroevendraaier
1. Schuif het deksel van de verpakking met de tafelpoten.
Dit is de verpakking op de houten pallet. Hiervoor
dienen enkel de spanbanden doorgeknipt te worden.
De verpakking moet intact blijven voor het vervolg
van de montage!
+/- 20 min.
2. Verwijder de vier vijzen uit de twee plankjes die de tafelpoten xeren voor transport. Plooi de appen naar buiten
zodat de tafelpoten makkelijk bereikbaar worden. Haal ze nu uit de doos en plaats ze zoals op tekening. Aankelijk
van de grootte van de tafel plaats je ze 2,6m (bank voor 3 personen) of 3,2m (bank voor 4 personen) van elkaar.
3. Plaats nu het deksel opnieuw op de doos en leg de xeerplankjes van stap 2 er bovenop. De verpakking staat nu
centraal tussen de vier tafelpoten.
12 montage hopper bench

nederlands 13
4. Leg het tafelblad met het dragende frame op de twee plankjes. De bovenzijde van de tafelpoten komt nu op gelijke
hoogte met het tafelblad.
5. Per tafelpoot steek je 3 slotbouten door de vierkante gaten. Schuif vervolgens de tafelpoten tot tegen het tafelframe,
en zorg hierbij dat de 3 draadeinden telkens in de 3 openingen van de koppelplaat passen. Draai vervolgens de
bijgeleverde moeren met veerring op het draadeinde, maar span nog niet aan.
6. Vooraleer de bank te monteren moet de verpakking van onder het frame gehaald worden!
A
B

14 montage hopper bench - grondverankering - grondplaat
MONTAGE HOPPER BENCH
7. Monteer nu op dezelfde manier het
bankframe aan de tafelpoten. Pas
hierna kunnen alle moeren
aangespannen worden.
8. Leg de optionele viltpads onder
elke tafelpoot.

nederlands 15
GRONDVERANKERING
GRONDPLAAT
Markeer de plaatsen op de vloer waar de verankeringen moeten komen en boor op de aangeduide punten. Gebruik
hiervoor de bevestigingsmiddelen die meest geschikt zijn voor de ondergrond waarop de Hopper moet staan.
Maak de grondplaten vast aan de
poten met de bijgeleverde bouten.
LET OP: in dit geval moet de bank
zeker op een vlakke en harde
ondergrond staan.
1.
2. 3. 4.

ONDERHOUD
16 onderhoud
IROKO / H.O.T.WOOD
Iroko en H.O.T. wood vragen weinig
tot geen onderhoud. Wij raden u
echter wel aan om hardnekkige
vuilresten te verwijderen. Om het
hout te reinigen, kunt u speciale
producten (www.rmc-extremis.
be) gebruiken of gewoon een
harde borstel en wat water. Zorg er
echter voor dat u de houtvezels niet
beschadigt. Gebruik daarom nooit
een hogedrukreiniger. Hierdoor
wordt het gladde oppervlak van
het hout immers ruwer en raken
de houtvezels onherstelbaar
beschadigd.
Zoals vele andere houtsoorten bevat
Iroko een wateroplosbare gomstof.
In het begin zal het hout deze fel
rode kleurstof afscheiden telkens
het met water in contact komt. De
op het onderstel en de ondergrond
afgedropen kleurstof blij
wateroplosbaar en zal na zekere tijd
volledig verdwijnen.
We raden ten sterkste aan het hout
voor binnen gebruik in te oliën
tegen vlekken.
Bij levering zijn de houten
onderdelen van onze producten
onbehandeld. Door blootstelling
aan zonlicht en regen zullen ze
geleidelijk een grijs patina krijgen
en zal hun oppervlak ook ruwer
worden. Als u de oorspronkelijke
kleur min of meer wilt behouden,
moet u ze jaarlijks oliën.
Hiervoor raden wij RMC
Hybrid Wood Protector (www.
rmc-extremis.com) aan. De
houtbeschermingsproducten
van RMC zijn overal ter wereld
verkrijgbaar. Kijk op www.rmc-
extremis.com voor een verkooppunt
in uw buurt.
BELANGRIJK!
Hout is een levende materie, en
ondanks de superieure kwaliteiten
van Iroko en H.O.T.wood, moet
het zich buiten steeds aanpassen
aan extreme schommelingen
van temperatuur en vochtigheid.
Hierdoor opgebouwde interne
spanningen doet het materiaal
“werken” of vervormen en kan
er mogelijk o.a. scheurvorming
veroorzaken. Ook kunnen er kleur-
en structuurverschillen voorkomen.
Deze kenmerken zijn typisch voor
het materiaal, die u door uw keuze
hiervoor accepteert.
U kan mogelijke scheuren
eenvoudig glad schuren met de
hand en een vel schuurpapier of
met een handschuurmachine.
Om de gegalvaniseerde of gelakte
onderdelen te beschermen, moet
u hun randen vooraf afplakken
met stevige afplakband. Gebruik
schuurpapier met korrel 80 en
begin bij de vertikale zijde van
het tafelblad. Houd de machine
evenwijdig aan de tafelrand. Schuur
lichtjes tot de rand weer egaal glad
is. Schuur nu het bovenblad. Let
er op dat u de machine evenwijdig
aan het tafelblad houdt. Behandel
niet enkel de gescheurde plaats,
maar gans uw blad om een egaal
resultaat te bekomen. Om bramen
te vermijden schuurt u de bovenste
rand van het tafelblad glad. Doe dit
deel met de hand. Als alle bramen
verwijderd zijn kan u, aankelijk
van het gewenste eect, de tafel
inoliën met hardhout olie.
GEGALVANISEERDE
POTEN + FRAME
Galvanisatie, of thermische
verzinking, is de meest duurzame
manier om metaal te beschermen
tegen roestvorming. Als de
zinklaag wordt beschadigd, kan het
blootgekomen metaal toch roesten.
Dit is eenvoudig bij te werken
met zinkverf, die automatisch
dezelfde kleur hee en in de handel
verkrijgbaar is.
Galvanisatie is een thermisch
proces en kan het materiaal
licht vervormen. Andere
metaalbeschermingsmethodes
hebben dit nadeel niet, maar leveren
onvoldoende kwaliteit.

nederlands 17

LANGUAGES
ENGLISH P. 3
contents p. 3
assembly hopper bench p. 4
oor fastening p. 7
stabilizing support p. 7
maintenance p. 8
NEDERLANDS P. 11
inhoud p. 11
montage hopper bench p. 12
grondverankering p. 15
grondplaat p. 15
onderhoud p. 16
DEUTSCH P. 19
inhalt p. 19
montage hopper bench p. 20
bodenverankerung p. 23
bodenplatte p. 23
pege p. 24
FRANÇAIS P. 27
contenu p. 27
montage hopper bench p. 28
xation dans le sol p. 31
plaque de stabilisation p. 31
entretien p. 32
ITALIANO P. 35
contenuto p. 35
montaggio hopper bench p. 36
ancoraggio a terra p. 39
supporto di stabilizzazione p. 39
manutenzione p. 40
ESPAÑOL P. 43
contenido p. 43
montaje hopper bench p. 44
anclaje al suelo p. 47
soporte estabilizador p. 47
mantenimiento p. 48
18 inhalt

extremis
extremis
2 x Filzschutz 2 x Bodenplatte
FILZSCHUTZ BODENPLATTE
OPTION
12 x Sprengring
(feuerverzinkt)
2 x Tischbein aus Stahl 12 x Muttern M10 x 30
(feuerverzinkt)
12 x Muttern M10
(feuerverzinkt)
1 x Tischplatte 1 x Bank
INHALT
deutsch 19

MONTAGE HOPPER BENCH
+/- 20 min.
20 montage hopper bench
3. Setzen Sie jetzt den Deckel wieder auf den Karton und legen Sie die Fixierungsbrettchen von Schritt 2 darauf. Die
Verpackung steht jetzt mittig zwischen den vier Tischbeinen.
2. Entfernen Sie die vier Schrauben aus den zwei Brettchen, die die Tischbeine beim Transport xieren. Biegen Sie
die Klappen nach außen, sodass die Tischbeine leicht erreichbar werden. Nehmen Sie sie jetzt aus dem Karton und
stellen Sie sie auf, wie auf der Zeichnung angegeben. Je nach Größe des Tisches stellen Sie sie im Abstand von
2,6 m (Bank für 3 Personen) oder 3,2 m (Bank für 4 Personen) voneinander auf.
1. Nehmen Sie den Deckel von der Verpackung mit den
Tischbeinen. Das ist die Verpackung auf der
Holzpalette. Dafür müssen nur die Spannbänder
durchschnitten werden. Für die nächsten
Montageschritte muss die Verpackung intakt
bleiben!
WAS SIE BRAUCHEN
Maulschlüssel Nr. 17
2 Personen
schraubenzieher

A
B
6. Vor dem Montieren der Bänke muss die Verpackung unter dem Rahmen herausgezogen werden!
5. Stecken Sie je Tischbein 3 Schlossschrauben durch die viereckigen Löcher. Schieben Sie darauin die Tischbeine
bis an den Tischrahmen und sorgen Sie hierbei dafür, dass die 3 Gewindeenden jeweils in die 3 Önungen der
Verbindungsplatte passen. Drehen Sie dann die mitgelieferten Muttern mit Sprengring auf das Gewindeende, aber
ziehen Sie sie noch nicht an.
4. Legen Sie die Tischplatte mit dem tragenden Rahmen auf die zwei Brettchen. Die Oberkante der Tischbeine
bendet sich jetzt auf gleicher Höhe wie die Tischplatte.
deutsch 21

MONTAGE HOPPER BENCH
7. Montieren Sie jetzt das Bankgestell
auf dieselbe Weise auf die
Tischbeine. Erst danach können
alle Muttern angezogen werden.
8. Legen Sie gegebenenfalls die
Filzunterleger (Option) unter
jedes Tischbein.
22 montage hopper bench - bodenverankerung - bodenplatte

1.
2. 3. 4.
Verschrauben Sie die Bodenplatte
mit dem Gestell der Bank. Die
benoetigten Schrauben liegen bei.
ACHTEN SIE DARAUF, dass der
Untergrund stets wagerecht und
stabil ist.
GRONDPLAAT
Markieren Sie die Stellen am Boden, wo Hopper verankert werden soll, und an den angezeichneten Stellen Löcher
bohren. Verankern Sie Hopper dann mit den beiliegenden Schrauben und Dübeln.
BODENVERANKERUNG
deutsch 23

PFLEGE
IROKO / H.O.T.WOOD
Iroko und ermoholz benötigen
wenig oder gar keine Pege. Wir
empfehlen Ihnen jedoch
nachdrücklich, anhaenden
Schmutz zu entfernen. Zur
Reinigung des Holzes können
Sie Spezialprodukte (www.rmc-
extemis.be) oder einfach nur eine
harte Bürste und etwas Wasser
verwenden.
Achten Sie darauf, die Holzfasern
nicht irreparabel zu beschädigen.
Aus diesem Grund sollten Sie
niemals einen Hochdruckreiniger
verwenden, da dadurch die glatte
Oberäche des Holzes aufgeraut
wird und die Holzfasern irreparabel
beschädigt werden.
Am Anfang kann das Holz,
wenn es mit Wasser in Kontakt
kommt, diesen hellroten Farbsto
ausscheiden. Der auf das Gestell und
die Unteräche getrope Farbsto
ist nach wie vor wasserlöslich
und ist nach einiger Zeit völlig
verschwunden.
Wir raten unbedingt dazu, das
Holz
für die Verwendung in
Innenräumen zum Schutz vor
Flecken einzuölen.
Bei der Lieferung sind die Holzteile
unserer Produkte unbehandelt.
Wenn sie Sonne und Regen
ausgesetzt sind, werden sie mit
der Zeit eine silbergraue Farbe
annehmen und ihre Oberäche wird
rauer. Wenn Sie ihre ursprüngliche
Farbe zu einem gewissen Grad
bewahren wollen, sollten Sie sie
einmal jährlich ölen. Wir empfehlen
die Verwendung von RMC Hybrid
Wood Protector (www.rmc-
extremis.be). RMC-Produkte zur
Holzbehandlung sind weltweit
erhältlich. Auf der Webseite
www.rmc-extremis.com nden Sie
einen Händler in Ihrer Nähe.
WICHTIG!
Irokoholz und H.O.T.wood ist ein
lebendes Material, das sich trotz
seiner vorzüglichen Eigenschaen
ständig an extreme Temperatur-
und htigkeitsschwankungen
anzupassen hat, was für Spannungen
im Holz sorgt. Aufgrund dieser
Spannungen fängt das Holz zu
„arbeiten“ an, was zu Rissen sowie
Farb- und Strukturunterschieden
führt. Diese Eigenschaen sind
charakteristisch für das Material.
Wenn Sie sich für diese Holzart
entscheiden, müssen Sie diese
Eigenschaen einfach in Kauf
nehmen.
Eventuelle Risse können Sie
einfach mit der Hand und einem
Blatt Schleifpapier oder mit einer
Handschleifmaschine abschleifen.
Um verzinkte und gestrichende
Teile zu schützen, decken Sie
die Kanten mit sehr robustem
Abdeckband. Verwenden Sie
Schleifpapier mit 80er Körnung und
beginnen Sie an der senkrechten
Seite der Tischplatte. Halten Sie die
Maschine plan an den Tischrand.
Leicht anschleifen, bis der Rand
wieder gleichmäßig glatt ist. Danach
die Oberseite der Tischplatte
schleifen. Achten Sie darauf, dass
Sie die Maschine plan auf die
Tischplatte aufsetzen. Schleifen
Sie nicht nur die gerissene Stelle,
sondern die gesamte Platte, um ein
gleichmäßiges Ergebnis zu erzielen.
Um Grate zu vermeiden, schleifen
Sie den oberen Rand der Tischplatte
glatt. Schleifen Sie diesen Teil mit
der Hand. Wenn alle Grate entfernt
sind, können Sie den Tisch je nach
gewünschtem Eekt mit Hartholzöl
einölen.
VERZINKTE BEINE UND
RAHMEN
Feuerverzinkung ist die
dauerhaeste Art und Weise, um
Metall vor Rost zu schützen. Wenn
die Zinkschicht aber beschädigt ist,
kann das freigelegte Metall dennoch
anrosten. Mit Zinkfarbe lässt sich
diese Beschädigung leicht beheben.
Der Unterschied ist nicht merkbar,
da die Zinkfarbe und das verzinkte
Bein dieselbe Farbe haben. Zudem
ist diese Farbe im Handel frei
erhältlich.
Galvanisation ist ein thermischer
Prozess, der das Material leicht
verformen kann. Andere
Metallschutzmethoden weisen
diesen Nachteil nicht auf, sie sind
aber von geringerer Qualität.
24 pflege

deutsch 25

LANGUAGES
ENGLISH P. 3
contents p. 3
assembly hopper bench p. 4
oor fastening p. 7
stabilizing support p. 7
maintenance p. 8
NEDERLANDS P. 11
inhoud p. 11
montage hopper bench p. 12
grondverankering p. 15
grondplaat p. 15
onderhoud p. 16
DEUTSCH P. 19
inhalt p. 19
montage hopper bench p. 20
bodenverankerung p. 23
bodenplatte p. 23
pege p. 24
FRANÇAIS P. 27
contenu p. 27
montage hopper bench p. 28
xation dans le sol p. 31
plaque de stabilisation p. 31
entretien p. 32
ITALIANO P. 35
contenuto p. 35
montaggio hopper bench p. 36
ancoraggio a terra p. 39
supporto di stabilizzazione p. 39
manutenzione p. 40
ESPAÑOL P. 43
contenido p. 43
montaje hopper bench p. 44
anclaje al suelo p. 47
soporte estabilizador p. 47
mantenimiento p. 48
26 contenu

extremis
extremis
2 x feutre de protection 2 x plaque de stabilisation
FEUTRE DE PROTECTION PLAQUE DE STABILISATION
OPTION
12 x rondelle élastique
(galvanisé chaud)
2 x pied de table en acier 12 x boulon M10 x 30
(galvanisé chaud)
12 x écrou M10
(galvanisé chaud)
1 x plateau de table 1 x banc
CONTENU
français 27

MONTAGE HOPPER BENCH
+/- 20 min.
28 montage hopper bench
3. Replacez le couvercle sur la boîte et déposez par-dessus les planchettes de xation mentionnées à l’étape 2.
L’emballage se trouve à présent au centre, entre les quatre pieds de table.
2. Ôtez les quatre vis des deux planchettes qui xent les pieds de la table pour le transport. Pliez les rabats de la boîte
vers l’extérieur de manière à avoir facilement accès aux pieds. Sortez-les à présent de la boîte et placez-les comme
indiqué sur le dessin. Selon la taille de la table, vous les poserez 2,6 m (banc pour 3 personnes) ou 3,2 m (banc pour
4 personnes) de distance.
1. Soulevez le couvercle de l’emballage contenant les
pieds de table, c’est-à-dire le colis posé sur une palette
en bois. Il sut pour cela de couper les sangles qui
l’entourent. L’emballage doit rester intact pour la
suite du montage!
OUTILS
clé palte nr. 17
2 personnes
tournevis

A
B
4. Déposez le plateau de table avec le cadre portant sur les deux planchettes. Le haut des pieds de la table est à présent
à la même hauteur que le plateau de la table.
5. Insérez par pied de table 3 boulons à tête bombée dans les orices carrés. Faties ensuite glisser les pieds de la table
jusque contre le cadre de la table, en veillant à ce que les 3 tiges letées entrent dans les 3 orices dans la plaque de
raccord. Posez ensuite les écrous fournis avec rondelles en plastique sur les tiges letées, mais ne les serrez pas
encore.
6. Avant de monter les bancs, il faut retirer l’emballage de sous le cadre!
français 29

MONTAGE HOPPER BENCH
7. Montez à présent de la même
manière le cadre du banc sur les
pieds de la table. C’est seulement
après cette opération que vous
pourrez serrer tous les écrous.
8. Fixez une pièce en feutre (option)
sous chaque pied de table.
30 montage hopper bench - fixation dans le sol - plaque de stabilisation

1.
2. 3. 4.
Attachez les plaques de sol aux
pattes à l’aide des boulons qui sont
inclus.
ATTENTION : dans ce cas, le banc
doit bien se trouver sur une surface
plane et stable.
PLAQUE DE STABILISATION
Marquez sur le sol les endroits où doivent venir les xations et forez les trous aux endroits indiqués. Fixez-la au sol à
l’aide des moyens de xation les plus appropriés au type de sol où vous entendez monter la table Hopper.
FIXATION DANS LE SOL
français 31

ENTRETIEN
IROKO / H.O.T.WOOD
Les bois Iroko et H.O.T. ne
demandent que peu ou pas
d’entretien, mais nous
recommandons néanmoins
fortement d’enlever la saleté
persistante. Pour nettoyer le bois,
vous pouvez utiliser des produits
spéciaux (www.rmc-extremis.be) ou
tout simplement une brosse à poils
durs et un peu d’eau. Soyez attentif
à ne pas endommager les bres du
bois. N’utilisez dès lors jamais
de nettoyeur à haute pression car
cela rendrait la surface lisse du
bois rugueuse et endommagerait
irrémédiablement les bres du bois.
Comme beaucoup d’autres essences,
le Iroko contient une gomme soluble
à l’eau. Au début, le bois sécrétera ce
colorant rouge chaque fois qu’il entre
en contact avec l’eau. Le colorant
ainsi tombé sur le piètement et sur le
sol reste soluble à l’eau et disparaîtra
complètement après quelque temps.
Il est fortement recommandé de
huiler le bois à usage intérieur
pour le protéger contre les taches.
À la livraison, les parties en bois
de nos produits sont non traitées.
L’exposition au soleil et à la pluie
modiera progressivement leur
aspect et les rendra grisâtres.
Leur surface deviendra aussi plus
rugueuse. Si vous souhaitez leur
conserver leur couleur d’origine,
il faut les huiler une fois par an.
Nous recommandons l’utilisation
de RMC
Hybrid Wood Protector (www.
rmc-
extremis.com). Les produits
d’entretien du bois RMC sont
disponibles dans le monde entier.
Rendez-vous sur le site Web www.
rmc-extremis.com pour trouver un
revendeur dans vos environs
IMPORTANT !
Le bois est un matériau vivant; bien
que l’Iroko et H.O.T.wood soit un
bois de qualité supérieure, il doit
s’adapter à des variations extrêmes
de températures et à l’humidité.
Cela crée des tensions internes
qui font “travailler” le matériau
et peuvent causer entre autres des
ssures. Des diérences de couleur
et de structure peuvent aussi
apparaître. Ces caractéristiques sont
typiques du
matériau, et vous les acceptez par
votre choix.
Vous pouvez poncer d’éventuelles
gries simplement à la main avec
une
feuille de papier émeri ou avec une
ponceuse manuelle. Protégez les
parties galvanisées ou peintes avec
du ruban de masquage. Utilisez
du papier émeri de grain 80, et
commencez sur la face verticale du
plateau de table. Tenez la machine
parallèlement au bord de la table.
Poncez légèrement jusqu’à ce que
le bord soit à nouveau parfaitement
lisse. Poncez à présent le dessus du
plateau. Veillez à tenir la machine
bien parallèle au plateau de table. Ne
vous limitez pas à la partie griée
mais poncez l’ensemble du plateau
an d’obtenir un résultat égal.
Pour éviter les arbes, lissez l’arête
supérieure du plateau. Eectuez
cette
partie-là à la main. Une fois que
toutes les barbes ont été enlevées,
vous pouvez, en fonction de l’eet
souhaité, huiler la table avec de
l’huile pour bois dur.
PIEDS GALVANISES
La galvanisation, ou zingage
thermique, est la manière la plus
durable de protéger le métal contre
la formation de rouille. Si la couche
de zinc est endommagée, le métal
risque de rouiller. C’est facile
à traiter; il sut de passer une
peinture au zinc de la même couleur,
disponible dans le commerce.
La galvanisation est un procédé
thermique qui peut légèrement
déformer le matériau. Les autres
techniques de protection du métal
n’ont pas cet inconvénient, mais leur
qualité est insusante.
32 entretien

français 33

LANGUAGES
ENGLISH P. 3
contents p. 3
assembly hopper bench p. 4
oor fastening p. 7
stabilizing support p. 7
maintenance p. 8
NEDERLANDS P. 11
inhoud p. 11
montage hopper bench p. 12
grondverankering p. 15
grondplaat p. 15
onderhoud p. 16
DEUTSCH P. 19
inhalt p. 19
montage hopper bench p. 20
bodenverankerung p. 23
bodenplatte p. 23
pege p. 24
FRANÇAIS P. 27
contenu p. 27
montage hopper bench p. 28
xation dans le sol p. 31
plaque de stabilisation p. 31
entretien p. 32
ITALIANO P. 35
contenuto p. 35
montaggio hopper bench p. 36
ancoraggio a terra p. 39
supporto di stabilizzazione p. 39
manutenzione p. 40
ESPAÑOL P. 43
contenido p. 43
montaje hopper bench p. 44
anclaje al suelo p. 47
soporte estabilizador p. 47
mantenimiento p. 48
34 contenuto

extremis
extremis
2 x feltro protettivo 2 x supporto di stabilizzazione
FELTRO PROTETTIVO
OPZIONALE
12 x rondella elastica
(zincato a caldo)
2 x gamba del tavolo in acciaio 12 x bulloni M10 x 30
(zincato a caldo)
12 x dado M10
(zincato a caldo)
1 x piano del tavolo 1 x panchina
CONTENUTO
italiano 35
SUPPORTO DI STABILIZZAZIONE

+/- 20 min.
36 montaggio hopper bench
3. Rimettere il coperchio sulla cassa e posizionarvi sopra le assicelle di ssaggio di cui al punto 2. La cassa si trova
ora in posizione centrale rispetto alle quattro gambe.
2. Svitare le quattro viti dalle due assicelle che bloccano le gambe del tavolo durante il trasporto. Piegare le alette
dell’imballaggio verso l’esterno così che le gambe del tavolo diventino più accessibili. Estrarle dalla cassa e
posizionarle come nel disegno. A seconda della grandezza del tavolo le gambe vanno posizionate a una distanza di
2,6 m (panchina per 3 persone) o 3,2 m (panchina per 4 persone).
1. Sollevare il coperchio della cassa contenente le gambe
del tavolo. Si tratta del cartone sul pallet di legno. Per
farlo bisogna soltanto tagliare le cinghie di ssaggio.
Per il montaggio l’imballaggio deve rimanere
intatto!
MONTAGGIO HOPPER BENCH
NECESSARIO PER IL MONTAGGIO
chiave inglese nr. 17
2 persone
cacciavite

A
B
6. Prima di montare le panche, la cassa deve essere tolta da sotto la struttura!
5. Per ogni gamba inserire 3 bulloni attraverso i buchi quadrati. Spingere quindi le gambe del tavolo contro la
struttura dello stesso, facendo in modo che le 3 estremità lettate si inseriscano nei 3 fori della placca di giunzione.
A questo punto avvitare i dadi forniti con relativa rondella sull’estremità lettata, ma non ancora completamente.
4. Appoggiare il piano del tavolo con la struttura portante sulle due assicelle. L’estremità superiore delle gambe è ora
alla stessa altezza del ripiano.
italiano 37

7. Seguendo la stessa procedura,
montare ora la struttura delle
pancha alle gambe del tavolo. Solo
dopo averlo fatto, tutti i dadi
potranno essere ssati.
8. Posizionare i feltrini opzionali
sotto ciascuna gamba.
MONTAGGIO HOPPER BENCH
38 montaggio hopper bench - ancoraggio a terra - supporto di stabilizzazione

1.
2. 3. 4.
Fissare le basi alle gambe con i
bulloni in dotazione.
ATTENZIONE: in tal caso, la panca
deve poggiare sicuramente su una
base rigida e piana.
SUPPORTO DI STABILZZAZIONE
Segnare sul terreno i punti in cui andrà ssato Hopper e forare con un trapano i punti individuati. Fissarla al suolo
con i dispositivi di ssaggio più appropriati al tipo di terreno sul quale si intende posizionare il tavolo Hopper.
ANCORAGGIO A TERRA
italiano 39

MANUTENZIONE
IROKO / H.O.T.WOOD
Il legno di Iroko e il legno H.O.T.
non
richiedono particolare
manutenzione. Tuttavia,
consigliamo vivamente di rimuovere
lo sporco persistente. Per pulire il
legno è possibile utilizzare prodotti
specici (www.rmc-extremis.be)
o semplicemente una spazzola a
setole dure con un po’ d’acqua.
Fare attenzione a non danneggiare
irreparabilmente le bre del legno.
Per evitarlo, non utilizzare mai un
idropulitrice ad alta pressione, che
graerebbe la supercie liscia
del legno danneggiandone
irrimediabilmente le bre.
Come molte altre essenze, la Iroko
contiene una gomma idrosolubile.
Nel primo tempo dopo líacquisto
questo colorante rosso si liberer ogni
volta che la Jatoba entra a contatto
con líacqua. Il colorante sulle
gambe e sul suolo resta idrosolubile
e sparir‡ dunque completamente
dopo qualche tempo.
Consigliamo vivamente di oliare il
legno da utilizzare all’interno per
evitare le macchie.
Al momento della consegna, le parti
in legno dei nostri prodotti sono non
trattate. L’esposizione al sole e alla
pioggia ne modicherà
gradualmente
il colore a un grigio argentato,
rendendone inoltre ruvida la
supercie. Per preservarne il più
possibile il colore originale, le
parti andrebbero trattate con olio
una volta all’anno. Consigliamo di
utilizzare il prodotto RMC Hybrid
Wood Protector (www.rmc-
extremis.com). I prodotti RMC per
la cura del legno sono disponibili
in tutto il mondo. Per trovare il
rivenditore più vicino,
visitare il sito web www.rmc-
extremis.com
IMPORTANTE!
Il legno è un materiale vivo e,
nonostante sia un legno di qualità
superiore, all’aperto Iroko e
H.O.T.wood deve costantemente
adattarsi alle oscillazioni estreme di
temperatura e umidità. A causa delle
tensioni interne derivanti da questi
adattamenti il legno “si deforma” ed
è anche possibile che si creino delle
crepe. Possono anche determinarsi
variazioni nel colore e nella
struttura.
Queste caratteristiche sono tipiche
del materiale: scegliendolo, accettate
anche queste possibili variazioni.
Eventuali gra possono essere
eliminati semplicemente a mano
utilizzando della carta vetrata
oppure servendosi di una levigatrice
manuale. Per proteggere le parti
galvanizzate o verniciate, coprirne
i bordi con scotch di carta molto
resistente. Utilizzare carta vetrata a
grana 80 iniziando dal lato verticale
del piano del tavolo. Tenere la
levigatrice in posizione parallela
rispetto al bordo del tavolo. Levigare
leggermente nché il bordo è di
nuovo liscio e omogeneo. Levigare
quindi il ripiano. Fare attenzione a
mantenere la levigatrice in posizione
parallela rispetto alla supercie del
tavolo. Per ottenere un risultato
uniforme, non trattare soltanto
le parti danneggiate, ma l’intera
supercie. Per evitare imperfezioni,
levigare il bordo superiore del piano
del tavolo a mano. Quando tutte le
imperfezioni saranno state rimosse,
sarà possibile, a seconda dell’eetto
desiderato, trattare il tavolo con olio
per legno duro.
GAMBE GALVANIZZATE
La galvanizzazione, o zincatura
a caldo, è il modo più duraturo
per proteggere il metallo dalla
ruggine. Se lo strato di zinco viene
danneggiato, il metallo esposto può
arrugginire. È possibile ovviare
al problema con una vernice allo
zinco, che automaticamente assume
lo stesso colore ed è facilmente
reperibile in commercio.
La galvanizzazione è un processo
termico che può leggermente
deformare il materiale. Altri metodi
di protezione del metallo non
presentano questo svantaggio, ma
non orono la stessa qualità.
40 manutenzione

italiano 41

LANGUAGES
ENGLISH P. 3
contents p. 3
assembly hopper bench p. 4
oor fastening p. 7
stabilizing support p. 7
maintenance p. 8
NEDERLANDS P. 11
inhoud p. 11
montage hopper bench p. 12
grondverankering p. 15
grondplaat p. 15
onderhoud p. 16
DEUTSCH P. 19
inhalt p. 19
montage hopper bench p. 20
bodenverankerung p. 23
bodenplatte p. 23
pege p. 24
FRANÇAIS P. 27
contenu p. 27
montage hopper bench p. 28
xation dans le sol p. 31
plaque de stabilisation p. 31
entretien p. 32
ITALIANO P. 35
contenuto p. 35
montaggio hopper bench p. 36
ancoraggio a terra p. 39
supporto di stabilizzazione p. 39
manutenzione p. 40
ESPAÑOL P. 43
contenido p. 43
montaje hopper bench p. 44
anclaje al suelo p. 47
soporte estabilizador p. 47
mantenimiento p. 48
42 contenido

extremis
extremis
2 x viltpad 2 x soporte estabilizador
PROTECTORA DE FIELTRO SOPORTE ESTABILIZADOR
OPCIONAL
12 x arandela de resorte
(galvanisado en caliente)
2 x pata de mesa de acero 12 x tornillo de cerraje M10 x 30
(galvanisado en caliente)
12 x tuerca M10
(galvanisado en caliente)
1 x tablero 1 x banco
CONTENIDO
español 43

+/- 20 min.
3. Ahora vuelva a poner la tapa en la caja y ponga las dos tablitas del paso 2 sobre la tapa. El embalaje está en el centro
de las cuatro patas.
2. Quite los cuatro tornillos de las dos tablitas que jaron las patas durante el transporte. Doble las solapas hacia
afuera, para facilitar el acceso a las patas. Ahora saque las patas de la caja y colóquelas como se ve en el dibujo.
Según el tamaño de la mesa separadas por 2,6 m (banco para 3 personas) o 3,2 m (banco para 4 personas).
1. Quite la tapa del embalaje que contiene las patas, es
decir el embalaje sobre el pallet de madera. Sólo hace
falta cortar las correas. ¡El embalaje debe quedar
intacto para la continuación del montaje!
MONTAJE HOPPER BENCH
UTENSILOS
llave ja no. 17
2 personas
destornillador
44 montaje hopper bench

A
B
6. Antés de montar los bancos, ¡hace falta quitar el embalaje debajo del armazón!
5. Insiera 3 tornillos de cerraje por los agujeros cuadrados, por pata. Ponga las patas contra el armazón de la mesa,
asegurando que los 3 extremos roscados caben en los 3 agujeros de la placa de unión. Ahora ponga los tornillos y
arandelas de resorte suministrados en el extremo roscado, pero no apriételos.
4. Ponga el tablero con el armazón portante sobre las dos tablitas. El lado superior de las patas está al mismo nivel
que el tablero.
español 45

7. Ahora proceda de la misma
manera, para unir los armazones
del banco con las patas. Después,
apriete todas las tuercas.
8. Ponga las zapatillas de eltro
opcionales bajo cada pata.
MONTAJE HOPPER BENCH
46 montaje hopper bench - anclaje al suelo - soporte estabilizador

1.
2. 3. 4.
SOPORTE ESTABILIZADOR
Fije las bases en los pies, empleando
los pernos suministrados.
CUIDADO: en este caso, hay que
poner el banco en una supercie
llana y dura.
Marque los lugares en el suelo donde se deben instalar los anclajes y taladre en los lugares marcados. Fijela al suelo con
los medios de jación más adecuados para el tipo de suelo en el que se encuentre la mesa Hopper.
ANCLAJE AL SUELO
español 47

MANTENIMIENTO
IROKO / H.O.T.WOOD
La madera de Iroko y H.O.T. wood
necesitan poco o ningún
mantenimiento. Sin embargo,
está fuertemente recomendado
eliminar la suciedad persistente.
Para limpiar la madera, puede
emplear productos especiales (www.
rmc-extremis.be) o simplemente
un cepillo de cerdas duras y agua.
Evite dañar irreparablemente las
bras de la madera. Por eso, nunca
emplee una manguera a presión;
la supercie lisa de la madera se
puede volver áspera y puede dañar
irreparablemente las bras de la
madera.
Al principio, la madera liberará un
tinte rojo cada vez que entre en
contacto con agua. El tinte que
se pueda ltrar a la estructura o
la supercie inferior sigue siendo
soluble, por lo que desaparecerá por
completo al cabo de cierto tiempo.
Es fuertemente recomendado
aceitar la madera para uso interior;
así se evitan manchas.
Las partes de madera de nuestros
productos se suministran sin
tratamiento. Expuestas al sol y a la
lluvia, adquirirán una pátina gris
plateada. Si quiere mantener más o
menos el color original, trátelas con
aceite una vez al año. Recomendamos
emplear RMC Hybrid Wood
Protector (www.rmc-extremis.
com). Los productos para el
tratamiento de madera RMC se
venden en el mundo entero. Visite
el sitio web www.rmc-extremis.be
para buscar un revendedor cerca de
usted.
¡IMPORTANTE!
La madera es un material vivo, por
lo
que, a pesar de la calidad superior
de la Iroko y H.O.T.wood, se ve
afectada por los cambios bruscos
de temperatura y por la humedad.
Como consecuencia de las tensiones
internas provocadas por estas
constantes adaptaciones, la madera
se alabea. Entre otras cosas, este
alabeo puede provocar la aparición
de grietas. Asimismo, puede
producirse cambios en el color y
en la estructura. Dado que estas
características son
inherentes al material, quien lo elige
debe aceptarlas.
Es posible lijar grietas a mano y con
papel de lija, o con una lijadora. Para
proteger las partes galvanizadas o
pintadas, cubra los bordes con cinta
de enmascarar muy robusta. Emplee
papel de lija de grano 80 y empiece
por el lado vertical del tablero.
Mantenga la lijadora paralela al
borde de la mesa. Lije ligeramente
hasta que el borde sea plano.
Ahora lije la parte superior. Cuide
de mantener la lijadora paralela
al tablero. No sólo trate la parte
agrietada, pero todo el tablero. Esto
asegura que el resultado es llano.
Para evitar barbas, lije a mano el
borde superior del tablero. Una vez
eliminadas las barbas, puede
tratar la mesa con aceite para madera
dura, en función del efecto deseado.
PATAS GALVANIZADAS
La galvanización o el zincado en
caliente es la manera más ecaz
de evitar la formación de óxido en
el metal. Sin embargo, cuando la
capa de zinc está dañada, el metal
expuesto se oxidará. Este daño es
fácilmente remediable mediante la
pintura de zinc, de color idéntico y
de venta en tiendas.
Es muy excepcional la formación de
óxido, pero necesita una reparación
a tiempo. La galvanización es un
proceso en caliente y puede
deformar
ligeramente el material. Otros
métodos de protección anticorrosiva
no presentan esta desventaja,
pero proporcionan una calidad
insuciente.
48 mantenimiento

español 49


www.extremis.com
Our headquarters:
Couthoflaan 20b
B-8972, Poperinge
info@extremis.com
+ 32 57 346020
Connect with us:
All rights reserved. Unless otherwise specified, all designs and photographs contained in this publication are copyright protected
and are the property of Extremis. No part of this publication may be copied or distributed without Extremis’ prior written consent.
The names of the authors of photographs to which we do not hold rights are mentioned here. We have done our utmost to provide a
comprehensive list of names. In the event of an alleged breach, please contact the editorial sta. © Extremis
20200120
-
 1
1
-
 2
2
-
 3
3
-
 4
4
-
 5
5
-
 6
6
-
 7
7
-
 8
8
-
 9
9
-
 10
10
-
 11
11
-
 12
12
-
 13
13
-
 14
14
-
 15
15
-
 16
16
-
 17
17
-
 18
18
-
 19
19
-
 20
20
-
 21
21
-
 22
22
-
 23
23
-
 24
24
-
 25
25
-
 26
26
-
 27
27
-
 28
28
-
 29
29
-
 30
30
-
 31
31
-
 32
32
-
 33
33
-
 34
34
-
 35
35
-
 36
36
-
 37
37
-
 38
38
-
 39
39
-
 40
40
-
 41
41
-
 42
42
-
 43
43
-
 44
44
-
 45
45
-
 46
46
-
 47
47
-
 48
48
-
 49
49
-
 50
50
-
 51
51
-
 52
52


en otros idiomas
- français: Extremis Hopper bench Manuel utilisateur
- italiano: Extremis Hopper bench Manuale utente
- English: Extremis Hopper bench User manual
- Deutsch: Extremis Hopper bench Benutzerhandbuch
- Nederlands: Extremis Hopper bench Handleiding