
Instructions for Bath Drain Assembly
Lift & Turn Polypro Tubing w/ Chrome Finish
9D 51933
©2021 Manufactured for
Danco, Inc., Irving, TX 75062
51933i
M
L
Instructions
Tools Needed: Strainer Wrench or Pliers (not included), Plumber’s Putty (not included), and Phillips screwdriver (not included)
Note: This product is compatible with standard tub depths of up to 15”.
Extensions (not included) may be necessary for deeper tubs.
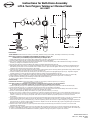
1. Install rubber gasket (A) onto the overflow (B) by folding the 3 small flaps of the gasket onto the overflow tube (B).
2. Insert the rubber gasket (A) with overflow (B) through the overflow hole of the bathtub.
3. Roll a piece of plumber’s putty that is about the same thickness of a pencil. Wrap this putty on the underside of the flange of tub shoe
strainer (C), making sure it reaches all the way around.
4. Align the show elbow (D) under the bathtub with gasket (E) between the bathtub and elbow (D).
5. Hand tighten the tub shoe strainer (C) through the bathtub into shoe elbow (D) by turning it clockwise to catch the first few threads of the
drain elbow (D). Be careful not to cross thread. Use a strainer wrench or pliers to further tighten. Remove any excess putty that may be
squeezed out around the edge of the flange of the strainer.
6. Insert slip nut (F) onto elbow (D) with the nut facing outward. Insert washer (G) onto elbow (D) with larger diameter facing outward. Repeat
with overflow (B) tube and second slip nut (F) and second washer (G).
7. Insert shoe elbow (D) with washer (G) and slip nut (F) into waste tee (H) and secure by tightening the slip nut (F). Adjust the length as
needed. Repeat on overflow (B) tube and adjust the length as needed. Only hand-tighten the slip nuts.
8. Using tapping screws (L), attach retainer plate (M) to the overflow (B) by threading the screws into the smaller holes of overflow (B).
9. Using screws (K), attach face plate (J) onto the overflow (B) by threading the screws into the larger holes of overflow (B).
10. Install Lift & Turn assembly (I) by threading it clockwise into tub shoe strainer (C).
11. Check for leaks. Tighten connections if necessary.
11" - 15"
Adjustable
8.5"
4"
2"
2-45/64"
1.5"
6.5" - 8"
Adjustable
Instrucciones
Herramientas necesarias: Llave para coladero o alicates (no se incluyen), masilla de plomero (no se incluye)
y destornillador Phillips (no se incluye)
Nota: Este producto es compatible con las bañeras estándar de hasta 15 plg (38.1 cm) de profundidad.
Es posible que se necesiten extensiones (no incluidas) para las bañeras más profundas.
1. Instala la junta de goma (A) en el rebosadero (B) plegando las 3 pequeñas solapas de la junta sobre el tubo de rebosadero (B).
2. Inserta la junta de goma (A) con el rebosadero (B) a través del orificio de rebosadero de la bañera.
3. Enrolla un poco de masilla de plomería que sea del mismo grosor que un lápiz. Envuelve esta masilla debajo de la brida del coladero
inferior de la bañera (C), asegurándote de que cubra todo alrededor de la misma.
4. Alinea el codo de zapata (D) debajo de la bañera con la junta (E) entre la bañera y el codo (D).
5. Aprieta con la mano el coladero inferior de la bañera (C) a través de la bañera para insertarlo en el codo de zapata (D) girándolo hacia la
derecha de modo que encastre con las primeras roscas del codo para desagüe (D). Ten cuidado de no roscar torcido. Usa una llave para
coladero o alicates (no se incluyen) para apretar más. Retira el exceso de masilla que pueda expulsarse en el borde de la brida
del coladero.
6. Inserta la tuerca de ajuste (F) en el codo (D) con la tuerca mirando hacia afuera. Inserta la arandela (G) en el codo (D) con el diámetro más
grande mirando hacia afuera. Repite con el tubo de rebosadero y la segunda tuerca de ajuste (F) y la segunda arandela (G).
7. Inserta el codo inferior (D) con la arandela (G) y la tuerca de ajuste (F) dentro del conector en T para desagüe (H) y asegura apretando la
tuerca de ajuste (F). Ajusta la longitud según sea necesario. Repite en el tubo de rebosadero (B) y ajusta la longitud según sea necesario.
Ajusta solo con la mano las tuercas de ajuste.
8. Usando tornillos autorroscantes (L), sujeta la placa de retención (M) al rebosadero (B) enroscando los tornillos en los orificios más
pequeños del rebosadero (B).
9. Usando tornillos (K), sujeta la placa frontal (J) al rebosadero (B) enroscando los tornillos en los orificios más grandes del rebosadero (B).
10. Instala el ensamblaje de Levantar y girar (I) enroscándolo en el sentido de las manecillas del reloj en el coladero inferior de la bañera (C).
11. Verifica el funcionamiento del desatascador levantando y bajando el mango de la palanca. Ajusta si es necesario.
-
 1
1

en otros idiomas
- English: DANCO 51933 Installation guide
Artículos relacionados
Otros documentos
-
Everbilt WO-5-PB-TL Guía de instalación
-
-
-
-
-
-