Korona 46221 Barbecue Grill Manual de usuario
- Categoría
- Barbacoas
- Tipo
- Manual de usuario

KORONA electric GmbH, Sundern/Germany
www.korona-electric.de
Deutsch
Bedienungsanleitung
Barbecue Standgrill
English
Instruction Manual
Barbecue grill with stand
Nederlands
Gebruiksaanwijzing
Barbecue/grill met standaard
Français
Manuel d‘instructions
Barbecue Grill sur pieds
Italiano
Manuale delle Istruzioni
Barbecue con Supporto
Español
Manual de instrucciones
Barbacoa con Soporte
Türkçe
Kullanma Kılavuzu
Ayaklı Barbekü Izgarası
Polski
Instrukcja obsługi
Grill ze Stojakiem
Český
Návod k použití
Barbecue Gril se Stojanem
46221

2
Bestimmungsgemäßer Gebrauch
Lesen Sie vor Inbetriebnahme des Gerätes die folgenden
Sicherheitshinweise sowie die Bedienungsanleitung
sorgfältig durch und bewahren Sie diese Unterlagen auf. Bei
Weitergabe des Gerätes an einen Dritten geben Sie auch
diese Anleitung weiter.
Dieses Gerät ist nur zum Grillen von Lebensmitteln geeignet.
Jede andere Verwendung gilt als nicht bestimmungsgemäß
und birgt erhebliche Unfallgefahren für den Benutzer. Das
Gerät ist nicht für den gewerblichen Gebrauch bestimmt!
Sicherheit:
Dieses Symbol warnt vor allgemeinen
Verletzungsgefahren /Beschädigungen am Gerät!
Dieses Symbol warnt vor heißen Oberflächen,
Verbrennungsgefahr!
Dieses Symbol warnt vor Gefahren durch Stromschlag!
Allgemeine Sicherheitshinweise
• Bei nicht bestimmungsgemäßem Gebrauch oder falscher
Handhabung kann keine Haftung für evtl. auftretende
Schäden übernommen werden.
•Falsche Bedienung und unsachgemäße Behandlung
können zu Störungen am Gerät und zu Verletzungen des
Benutzers führen.
•Prüfen Sie vor Inbetriebnahme, ob die Spannung Ihres
Haushaltsstroms der Spannungsangabe auf dem Gerät
entspricht, damit das Gerät bei Gebrauch nicht überhitzt
und beschädigt wird.

DEUTSCH
Bedienungsanleitung
3
Vorsicht! Lebensgefahr durch Stromschlag!
•Gerät, Netzkabel und Netzstecker nicht in Wasser oder
andere Flüssigkeiten tauchen.
•Gerät nicht in der Nähe eines Wasch- oder Spülbeckens
benutzen.
•Gerät nicht mit feuchten Händen benutzen.
•Gerät nicht im Freien benutzen.
Elektrische Geräte sind kein Spielzeug!
•Das Gerät während des Gebrauchs nie unbeaufsichtigt
lassen.
•Erlauben Sie Kindern ab 8 Jahren und älter sowie
Personen mit eingeschränkten physischen, sensorischen
oder geistigen Fähigkeiten oder mangelnder Erfahrung
und Kenntnis nur dann eine unbeaufsichtigte
Benutzung des Gerätes, wenn diese eine umfangreiche
Unterweisung erhalten haben, die Ihnen eine gefahrlose
Benutzung des Gerätes erlaubt und diese die Gefahren
bei unsachgemäßer Benutzung verstehen.Kinder sollten
beaufsichtigt werden, um sicherzustellen, dass diese nicht
mit dem Gerät spielen. Reinigung und Pflege des Gerätes
darf nicht von Kindern unter 8 Jahren vorgenommen
werden, es sei denn, diese sind älter als 8 Jahre und
werden beaufsichtigt.
•GerätundNetzkabel vor Kindern unter 8 Jahren
unzugänglich aufbewahren.
•Ziehen Sie immer den Netzstecker, wenn das Gerät
nicht in Betrieb ist und vor dem Reinigen.
•Netzkabel nur am Stecker aus der Steckdose ziehen.
•Gerät und Netzkabel dürfen nicht mit heißen Oberächen
in Berührung kommen, damit es nicht zu Beschädigungen
am Gerät kommt.

4
•Das Netzkabel sollte nicht über die Tischkante/
Arbeitsfläche herunterhängen, um ein Herunterreißen
des Gerätes zu verhindern. Es darf nicht an scharfen
Gegenständen scheuern.
• Das Netzkabel nicht knicken oder um das Gerät wickeln.
Das Gerät nicht verwenden,
• wenn das Netzkabel beschädigt ist.
• bei Funktionsstörungen.
• wenn das Gerät durch einen Sturz oder eine andere
Ursache möglicherweise Schaden genommen hat.
Schäden an der Netzanschlussleitung müssen durch
eine autorisierte Fachwerkstatt überprüft bzw. repariert
werden. Nehmen Sie selbst niemals Veränderungen oder
Reparaturen an dem Gerät vor.
• Verwenden Sie nur Original-Zubehörteile.
• Keinerlei Gegenstände in das Innere des Gehäuses
einführen!
• Niemals selbst versuchen, das Gehäuse zu öffnen!
• Verwenden Sie dieses Gerät nicht zusammen mit
einer externenZeitschaltuhr oder einem separaten
Fernwirksystem.
Gerätebezogene Sicherheitshinweise
Warnung! Zur Vermeidung von Verletzungen/
Beschädigungen des Gerätes, elektrischem Schock,
eines Brandes, und Verbrennungen!
• Das Gerät darf nur für den vorgesehenen Zweck genutzt
werden, d.h. zum Zubereiten von Lebensmitteln.

DEUTSCH
Bedienungsanleitung
5
• Stellen Sie das Gerät auf einen Tisch oder eine andere
ebene, rutschfeste und hitzebeständige Arbeitsfläche.
Stellen Sie es auf keine Metalloberfläche.
• Lassen Sie das Gerät vor dem Reinigen oder Auswechseln
von Zubehörteilen stets abkühlen.
• Das Gerät niemals betreiben, ohne zuvor Wasser in die
Schale des Grillgehäuses, auf keinen Fall in die ALU-
Reflektorschale, einzufüllen.
• Achten Sie beim Einfüllen von Wasser darauf, die
Markierung MAX (0,9L) im Innern des Grillgehäuses nicht
zu überschreiten.
• Während des Grillens reduziert sich die Wassermenge.
Gegebenenfalls nachfüllen. Achten Sie beim Nachfüllen
darauf, dass die vorgegebene Menge von 0,9 Liter
nicht überschritten wird, und kein Wasser auf das
Heizelement gelangt.
• Das Gerät während des Betriebes nicht verschieben.
Verbrennungsgefahr durch heißes Wasser!
• Das Gerät wird während des Betriebes heiß. Berühren Sie
es deshalb lediglich im wärmeisolierten Thermostatbereich
zum Einstellen der Grilltemperatur. Zum Auegen
und Entnehmen von Grillgut verwenden Sie stets
entsprechende Hilfsmittel, d.h. geeignetes Grillbesteck.
Berühren Sie damit jedoch niemals das Heizelement!
Verbrennungsgefahr!
• Betreiben Sie das Gerät unter keinen Umständen in der
Nähe von brennbaren Flüssigkeiten oder Gasquellen.
• Das Gerät keinesfalls mit Holzkohle oder ähnlichen
Brennstoff betreiben.
• Das Gerät darf nicht unter oder in der Nähe von brennbaren
Materialien, wie Hängeschränken, Fenstervorhängen oder
Tischdecken, etc. genutzt werden.
• Vorsicht: Besonders öl- bzw. fetthaltige Speisen können
sich bei hoher Hitze leicht entzünden.

6
• Sorgen Sie dafür, dass der Grillort immer gut belüftet ist,
da unter Umständen Rauch entsteht.
• Schalten Sie das Gerät NUR ein, wenn alle Teile komplett
montiert sind! Aus dem Grill entnommenes Heizelement
niemals an das Stromnetz anschließen und einschalten.
Verbrennungsgefahr!
• Achtung! Im Bedienteil des Heizelementes befindet sich
ein Sicherheitsschalter (siehe unstensthende Abb.)
• Der Schalter wird durch Aufstecken des Heizelements auf
das Grillgehäuse aktiviert. Sollte das Grillgehäuse an dieser
Stelle verbogen sein, funktioniert der Sicherheitsschalter
möglicherweise nicht, d. h. das Gerät heizt nicht.
• Benutzen Sie keine Mehrfachsteckdosen. Der Netzstecker
des Geräts muß im Notfall leicht erreichbar sein.

DEUTSCH
Bedienungsanleitung
7
Produktbeschreibung
7
4
9
11
1
2
3
10
5
8
6
1. Windschutz, abnehmbar
2. Grillgehäuse
3. ALU-Reektorschale, herausnehmbar
4. Heizelement
5. Bedienelement mit Temperaturregler / Thermostat
6. Kontrollleuchte
7. Grillrost
8. 4 Gummifüße (Unterteil)
9. Netzkabel und –stecker
10. Sicherheitsschalter
11. Schraube & Mutter

8
Temperaturregler / Thermostat
-MIN
-MAX
MAX
MIN
Das Gerät ist mit einem Thermostat ausgestattet. Während des Betriebes schaltet sich das Gerät an und
aus, um eine konstante Gartemperatur zu gewährleisten.
Windschutz
Bei der Benutzung des Grills im geschützten Außenbereich kann der Windschutz Wärmeverlust durch
Windeinwirkung und damit verbundene längere Garzeiten vermeiden.
Sicherheitsschalter
Hinweis: Der Sicherheitsschalter stellt sicher, dass das Gerät nur dann eingeschaltet werden kann, wenn
das Heizelement korrekt auf das Grillgehäuse aufgesteckt wurde.

DEUTSCH
Bedienungsanleitung
9
Gestell
1. Standbeine ( Metallrohr lang (4x) , kurz (4x) )
2. Abdeckkappen (8x)
3. Metallplatten (lang (2x), kurz (2x) )
4. Schrauben und Muttern (4x)
5. Ablagerost
1
4
3
2
5
Vor Erstgebrauch
• Entfernen Sie alle Verpackungsmaterialien und überprüfen Sie das Gerät auf Vollständigkeit und
Unversehrtheit.
• Reinigen Sie Sie das Gerät gemäß Reinigung und Pflege.
• Gerät wie unter Montage des Grills beschrieben montieren.
• Stellen Sie das Gerät auf einen Tisch oder eine andere ebene, stabile, rutschfeste und hitzebeständige
Arbeitsfläche.
• Wickeln Sie das Netzkabel vollständig ab und schließen Sie das Gerät an eine ordnungsgemäß installierte
und frei zugängliche Steckdose an.
• Falls das Gerät Schäden aufweist, unter keinen Umständen benutzen.
Warnung: Plastiktüten können eine Gefahr darstellen, daher außerhalb der Reichweite von
Kleinkindern und Babies aufbewahren.
Schutzschicht
Die Heizwindungen des Heizelements verfügen über eine Schutzschicht.
Betreiben Sie das Gerät, ohne Lebensmittel, für ca. 10 Minuten auf höchster Stufe, damit die aufgetragene
Schutzschicht einbrennen kann.
Nach diesem Aufheizprozess, das Gerät vollständig auskühlen lassen.

10
Hinweis: Während dieses Vorganges kann für kurze Zeit, bedingt durch eventuelle
Beschichtungsrückstände auf den Heizwindungen eine ungewohnte Geruchsbildung entstehen. Dies ist
vollkommen normal und nicht schädlich. Sorgen Sie dabei für eine ausreichende Belüftung.
Montage des Gestells
Das Gestell muss vor Gebrauch montiert werden. Nehmen Sie die Teile aus ihrer Verpackung und montieren
Sie das Gestell wie nachfolgend beschrieben:
1. Nehmen sie die Metallrohre(lang / kurz) (1) und schieben diese ineinander. Achten Sie darauf, dass die
Bohrlöcher übereinander liegen. Das kürzere Standbein (Metallrohr) (1) sollte immer nach oben zeigen,
in Richtung Grill.
2. Befestigen Sie die Standbeine (Metallrohre) (1) des Gestells an den Metallplatten (3).
- Legen Sie die Bohröffnungen der kurzen sowie der langen Metallplatten (3) über die Bohröffnungen der
Metallrohre (1) und führen die Schraube (4) durch die Bohrungen an Metallplatten (3) und Metallrohre
(1). Setzen Sie die Flügelmutter (4) auf das Gewinde der Schraube (4) und drehen Sie die Mutter (4)
zunächst nur leicht fest. Die lange Metallplatte (3) muss an der Vorderseite und die kurze (3) an der Seite
angebracht werden.
- Verfahren Sie entsprechend mit den anderen 3 Beinen des Gestells.
Kurzes Metallrohr
Langes Metallrohr
Langes Metallplatte
Kurze Metallplatte

DEUTSCH
Bedienungsanleitung
11
3. Drehen Sie nun die Flügelmuttern (4) fest.
Hinweis: Das montierte Gestell ist trapezartig und zeigt mit der Schmalseite nach oben.
4. Setzen Sie die Abdeckkappen (2) in die untere und obere Öffnung der Standbeine (1) ein.
5. Setzen Sie den Ablagerost (5) in das fertig montierte Untergestell ein.
6. Das Untergestell ist nun fertig montiert.

12
Montage des Tischgrills
1. Befestigen Sie die Gummifüße (8) an den dafür vorgesehenen Öffnungen des Grillgehäuses (2).
2. Befestigen Sie den Windschutz (1), indem Sie die Nasen unten am Windschutz (1) in die vorgesehenen
Öffnungen am Grillgehäuse (2) fest einstecken. Achten Sie darauf, dass die Unterkante des Windschutzes
(1) mit dem Grillgehäuse (2) bündig ist.
3. Setzen Sie die herausnehmbare ALU-Reektorschale (3) in das Grillgehäuse (2) ein.
4. Fixieren Sie die Alu-Reektorschale (3) mit der, im Lieferumfang enthaltenen Schraube und Mutter (11)
Die vorgefertigten Löcher befinden sich frontseitig, links neben der Bedieneinheit.
5. Führen Sie die beiden Vorsprünge des Bedienelements (5) in die Bohrungen des Grillgehäuses (2) ein.
Achten Sie beim Einlegen des Thermostats (5) in die sich auf beiden Seiten befindlichen Führungen
darauf, dass es einrastet.

DEUTSCH
Bedienungsanleitung
13
6. Setzen Sie den Grillrost (7) in das Grillgehäuse (2) ein. Stellen Sie sicher, dass es korrekt eingesetzt ist.
Der Grillrost ist höhenverstellbar (abhängig davon, welche Einstecköffnung gewählt wird): Hoch oder
Niedrig.
Hoch Niedrig
7. Setzen Sie den fertig montierten Grill auf das Gestell. Dabei müssen die 4 Standfüße des Tischgrills in
die entsprechenden Aussparungen der Halterung eingreifen.
Sie können den Grill auch nur als Tischgrill (ohne Untergestell benutzen).
Bedienung
Achten Sie darauf, dass die Auffangschale des Grillgehäuses (2) während der Benutzung immer
mit Wasser gefüllt ist. Die herausnehmbare Alu-Reflektorschale (3) wird erst nachdem Einfüllen des
Wassers in die Auffangschale des Grillgehäuses (2) eingesetzt. Gerät nie ohne Wasser betreiben!
Das Gerät sollte nur in gut belüfteten Räumen oder im geschützten Aussenbereich betrieben
werden.
1. Nach der Montage des Gerätes entfernen Sie den Grillrost (7), das Heizelement (4), und die
herausnehmbare Alu Reflektorschale (3).
2. Füllen Sie zwischen 0,4 L bis 0,9 L Wasser in die Auffangschale des Grillgehäuses (2) ein. ACHTEN SIE
DARAUF die MAX Markierung nicht zu überschreiten.
Achtung! Dabei muss das Gerät ausgeschaltet und der Netzstecker gezogen sein.
3. Befolgen Sie die Schritte 3. – 6. wie unter Montage des Tischgrills beschrieben.
4. Schließen Sie das Gerät an eine ordnungsgemä
ß
installierte und frei zugängliche Steckdose an.
5. Schalten Sie das Gerät ein, indem Sie den Temperaturregler (5) auf die maximale Heizstufe (MAX.)
stellen. Lassen Sie das Gerät ca. 10 Minuten aufheizen. Die Kontrollleuchte (6) leuchtet auf. Nach
dieser Aufheizphase stellen sie Ihre Wunschtemperatur mit dem Temperaturregler (5) ein. Die von Ihnen
vorgewählte Temperatur wird dann, durch die Thermostatsteuerung, auf einem Level gehalten.
6. Sobald die gewählte Temperatur erreicht ist, erlischt die Kontrollleuchte (6).
Achtung: Der Temperaturregler (5) ist stufenlos regelbar.
7. Das Gerät ist nun betriebsbereit. - Grillgut immer mittig auf den Grillrost (7) auegen -

14
Das Gerät ist mit einem Thermostat ausgestattet. Während des Betriebes schaltet sich das Gerät
an und aus, um eine konstante Gartemperatur zu gewährleisten.
8. Nach der Benutzung den Temperaturregler auf MIN drehen und den Netzstecker ziehen.
Achten Sie unbedingt darauf, dass Sie während und kurz nach der Benutzung des Gerätes,
nicht mit den aufgeheizten Teilen in Berührung kommen. Es besteht Verbrennungsgefahr! Fassen Sie
das Gerät nur an den dafür vorgesehenen Griffen an.
Achtung: Das Gerät sollte nur an eine ordnungsgemäß installierte und frei zugängliche Steckdose
angeschlossen sein und nicht zusammen mit einer externen Zeitschaltuhr oder einem separaten
Fernwirksystem verwendet werden.
Reinigung und Pflege
Aus hygienischen Gründen, das Gerät nach jeder Benutzung reinigen. Lebensmittelreste und starke
Fettrückstände können überhitzen und zu Rauch- bzw. Brandentwicklung führen.
Vor der Reinigung immer den Netzstecker des Gerätes ziehen und komplett abkühlen lassen.
Gerät und Netzkabel niemals in Wasser oder andere Flüssigkeiten eintauchen. Elektrischer Schock!
Das Heizelement mit dem Bedienteil vom Gehäuse abheben und mit einem trockenen Tuch / Schwamm
reinigen. Stellen Sie sicher, dass es komplett abgekühlt ist.
Reinigen Sie das Gehäuse mit einem leicht feuchten Tuch. Zum Reinigen des Gerätes und der Zubehörteile
keine aggressiven Reinigungsmittel oder Scheuermittel verwenden.
Grillrost und ALU-Reektorschale in warmem Spülwasser reinigen. Vorher abkühlen lassen. Alle Teile
gründlich nachtrocknen.
Speiserückstände können Sie mit einem feuchten Tuch oder Küchenpapier entfernen.
Die Zubehörteile des Gerätes sind nicht spülmaschinengeeignet.
Kinder sollten dieses Gerät nicht ohne Aufsicht oder Anweisung durch eine verantwortliche Person
benutzen resp. reinigen.

DEUTSCH
Bedienungsanleitung
15
Aufbewahrung
Nach Gebrauch Netzstecker des Gerätes ziehen und komplett abkühlen lassen.
Bewahren Sie das Gerät, außer Reichweite von Kindern, an einem trockenen und sauberen Ort auf.
Entsorgungshinweis
Altgeräte, die mit dem abgebildeten Symbol gekennzeichnet sind, dürfen nicht mit dem Hausmüll
entsorgt werden, sondern müssen fachgerecht entsorgt werden. Bitte geben Sie dieses Gerät am
Ende seiner Verwendung zur Entsorgung an den dafür vorgesehenen öffentlichen Sammelstellen ab.
Ihr Barbecue Standgrill 46221 befindet sich in einer Verpackung. Verpackungen sind Wertstoffe
und somit wiederverwendungsfähig oder können in den Rohstoffkreislauf zurückgeführt werden.

16
Technische Daten:
Netzspannung: 220 - 240 V ~ 50 / 60 Hz
Nennleistung: 2200 W
Schutzklasse: I
Technische Änderungen vorbehalten!

DEUTSCH
Bedienungsanleitung
17
Garantie und Service:
Sie erhalten 2 Jahre Garantie ab Kaufdatum auf Material-
und Fabrikationsfehler der Produkte.
Die Garantie gilt nicht:
• im Falle von Schäden, die auf unsachgemäßer Bedienung
beruhen
• für Verschleißteile (z.B. Batterien)
• für Mängel, die dem Kunden bereits beim Kauf bekannt
waren
• bei Eigenverschulden des Kunden
Die gesetzlichen Gewährleistungen des Kunden bleiben
durch die Garantie unberührt. Für Geltendmachung eines
Garantiefalles innerhalb der Garantiezeit ist durch den
Kunden der Nachweis des Kaufes zu führen.
Die Garantie ist innerhalb eines Zeitraumes von 2 Jahren ab
Kaufdatum gegenüber der
KORONA electric GmbH, Sundern.
Telefon Hotline: +49 2933 90284-80
Mail: [email protected]
web: www.korona-electric.de
geltend zu machen. Der Kunde hat im Garantiefall das Recht
zur Reparatur der Ware bei unseren eigenen oder bei von uns
autorisierten Werkstätten. Weitergehende Rechte werden
dem Kunden (aufgrund der Garantie) nicht eingeräumt.

18
Intended Use
Before use, please read these instructions carefully and keep
them in a safe place for future reference. When passing on
the appliance to a third party, make sure to include these
instructions for use.
This appliance is only intended and suitable for broiling foods.
All other use or modification of the appliance is not intended
by the manufacturer and might entail a risk of damage or
injury. This appliance is not intended for commercial use!
Safety:
This symbol identifies hazards which may cause
injuries!
This symbol warns of hot surfaces. Risk of burns!
This symbol identifies electric shock hazards!
General Safety Instructions
• Manufacturer takes no responsibility for any damage
caused by incorrect use.
• Incorrect or improper use can damage the appliance and
cause injuries to the user.
• Before connecting this appliance to the mains, make
sure your local voltage matches the technical data of the
appliance. Otherwise the appliance may overheat and get
damaged.

Instruction Manual
ENGLISH
19
Caution! Danger of electric shock!
• Never put the appliance, cord or plug into water or any
other liquid.
• Do not use the appliance near a sink or wash basin.
• Do not use the appliance with wet hands.
• Do not use the appliance outdoors.
An electric appliance is not a toy!
• Never leave the appliance unattended during use.
• This appliance can be used by children aged from 8 years
and above and persons with reduced physical, sensory or
mental capabilities or lack of experience and knowledge
if they have been given supervision or instruction
concerning the use of the appliance in a safe way and
understand the hazards involved. Children shall not play
with the appliance. Cleaning and user maintenance shall
not be made by children unless they are older than 8 and
supervised.
• Keep the appliance and its cord out of reach of children
less than 8 years.
• Always unplug your appliance when it is not in use, and
before cleaning.
• Always pull the plug – not the cord.
• Keep the appliance and the cord well away from any hot
surfaces to avoid any damage to the appliance.
• Make sure the cord may not inadvertently be pulled or
cause anyone to trip when in use. Do not allow the cord
to hang over sharp edges.
• Do not bend the cord or wind it round the appliance.

20
Do not use the appliance,
• if the cord is damaged.
• in case of malfunction.
• if the appliance was dropped or is damaged otherwise.
Have it checked and, if necessary, repaired by a qualified
person/Customer Service. Never attempt to make any
modifications to or repair the appliance yourself.
• Only use accessories evaluated for use with this appliance.
• Never attempt to drive any objects into the appliance.
• Never attempt to open the housing yourself!
• The appliance is not intended to be operated by means of
an external timer or separate remote-control system.
Special Safety Instructions
Warning! To avoid the possibility of injury/damage to the
appliance, electric shock, risk of fire and burns!
• Only use the appliance for its intended purpose and as
described in this manual.
• Place the appliance on a even and heat-resistant surface.
Do not place it on top of a metal surface.
• Always let the appliance cool down before attempting to
exchange accessories or clean it.
• Never use the appliance without having filled water into
the drip pan of the housing enclosure but NEVER fill water
into the aluminium reflector tray of the appliance
• When filling in water, make sure not to exceed the MAX
(0.9L) filling mark inside the housing enclosure
• Water level decreases during use. Fill up water, if necessary.
When filling up, make sure not to exceed the MAX amount
of 0.9 L and not to splash water onto the heating element.

Instruction Manual
ENGLISH
21
• Do not move the appliance during use. Danger of serious
burns from hot water!
• The appliance heats up during use. Therefore, only touch
the protected control panel area to set the cooking
temperature. When handling food on the grill always use
tongs, spatulas or forks. Never touch the heating element
with these utensils! Danger of serious burns!
• Never operate the appliance near inflammable liquids or
gas sources.
• Never use charcoal or similar combustible fuels with this
appliance.
• Do not use the appliance close to or under inflammable
objects, e.g. table cloth, curtains, wall cabinets.
• Attention: Foods with a high oil and fat content might
easily ignite and catch fire.
• Ensure proper room ventilation, when using the barbecue
indoors, as smoke may develop.
• ONLY switch on the appliance when all parts have been
assembled! When the heating element is detached from
the barbecue, never connect it to the mains. Danger of
serious burns!
• Attention! The control panel of the heating element has
an integrated safety switch (see photo underneath). Fixing
the heating element to the barbecue enclosure’s sheet
metal activates this switch. Should the enclosure be bent,
the safety switch might not be able to operate, i.e. the
appliance would not heat. If necessary, adjust sheet metal
manually.
• Do not connect any other household appliances to the
same receptacle /multiple receptacle, as in an emergency
the plug must be quickly accessible.
• CAUTION: In order to avoid a hazard due to inadvertent
resetting of the thermal cut out, this appliance must not
be supplied through an external switching device, such as
an external timer, or connected to a circuit that is regularly
switched on and off by the utility.

22
Product Description
7
4
9
11
1
2
3
10
5
8
6
1. Detachable windshield
2. Barbecue enclosure (housing)
3. Removable aluminium reflector tray
4. Heating element
5. Operating control with temperature control knob / Thermostat
6. Indicator light
7. Grill rack
8. 4 rubber feet (rear side)
9. Power cord and plug
10. Safety switch
11. Screw & Nut (drip tray)

Instruction Manual
ENGLISH
23
Temperature control knob/Thermostat:
-MIN
-MAX
MAX
MIN
During operation, an integrated thermostat switches the appliance on and off to ensure a constant
temperature. This is indicated by the indicator light cycling on and off.
Windshield
When using the barbecue outside, the windshield can help to avoid heat loss owing to strong wind and thus
prolonged cooking times.
Safety Switch
Note: The Safety switch ensures that the heating element will only start the heating process, once it is
properly sitting on the barbecue enclosure!

24
Stand
1. Legs (long metal poles (4x) / short metal poles (4x) )
2. Rubber caps (8x)
3. Metal plates (long (2x), short(2x) )
4. Screw and nuts (4x)
5. Storage rack
1
4
3
2
5
Before First Use
• Remove all packaging material and check whether the appliance is complete.
• Clean the parts as described under Cleaning and Care.
• Assemble the appliance as described under Assembly.
• Place the appliance on an even, non-slippery and heat resistant surface.
• Fully unwind the power cord and connect the appliance to a properly installed wall socket.
• Do not use the appliance if it shows any sign of damage.
Warning: Plastic bags are a danger to toddlers and babies, therefore keep them away to avoid
suffocation.
Protective coating
The heating element of the appliance has a protective coating.To remove the protective layers on the heating
element, heat up the appliance for about 10 minutes on the highest setting.
Afterwards, let the appliance and accessories completely cool down and clean them according to “Cleaning
and Care”.
Note: During this process, the appliance may briefly produce some smoke or smell which is due to
residues on the heating elements left over from the manufacturing process. This is normal and not harmful.
Make sure that the room is well ventilated.

Instruction Manual
ENGLISH
25
Assembly of the Stand
The stand must be assembled before using the barbecue grill.
Remove all parts from its packing and start assembling the stand.
Short metal pole
Long metal pole
1. Take the metal poles (1) and insert the long pole (1) into the short pole (1). Make sure that the holes of
both poles (1) are aligned. The shorter metal pole (1) should be facing upwards towards the grill unit.
Long metal pole
Short metal pole
2. Attach the legs (metal poles) (1) of the stand to the metal plates (3).
- Place the holes of the short as well as the long metal plates (3) over the holes of the metal poles (1) and
insert the screw (4).
- Attach the nut (4) onto the screw (4) and slightly fasten it. The long metal plates (3) should be attached
to the front and the short metal plates (3) should be attached to the sides of the stand.
- Attach the remaining 3 legs (1) to the stand accordingly.
3. Now, fasten the nut (4).

26
Note: The mounted stand has a trapezoidal shape. The narrow side is facing upward.
4. Insert the rubber caps (2) into each opening of the assembled leg (1).
5. Insert the storage rack.
6. The stand is now fully assembled.

Instruction Manual
ENGLISH
27
Assembly of the Grill
1. Attach the 4 rubber feet (8) to appliance (rear side).
2. Attach the windshield (1) by inserting the prongs into the respective openings of the housing (2). Make
sure to properly secure it.
3. Place the removable aluminium reflector tray (3) into the barbeque enclosure (housing) (2).
4. Fasten the aluminium reflector tray (3) with the screw and nut (11). The drilling holes are at the front, on
the left of the operating control.
5. Insert the two prongs of the operating control (5) into the drilling holes of the appliance housing (2). Make
sure when inserting the thermostat (5) that it is properly positioned into the guides on both sides and
press it down firmly until it clicks into place.

28
6. Attach the grill rack (7) to the appliance housing (2) and make sure that it is properly secured. The height
of the grill rack is adjustable: High or Low.
Higher Level Lower level
Operation
Always make sure to fill water into the drip pan of the barbecue enclosure (2) before operating the
appliance.
The removable drip tray (3) will be placed on top, after the drip pan of the barbecue enclosure (2)
has been filled with water.
Never operate the appliance without water in the barbecue enclosure drip pan (2)!
The appliance should only by used in a well ventilated room or a wind protected outer area!
1. After assembling the appliance, remove the grill rack (7), heating element (4) and removable aluminium
reflector tray (3).
2. Fill between 0.4L to 0.9L of water into the drip pan of the barbecue enclosure (housing) (2). Make sure
not to exceed the MAX (0.9L) level.
Caution! Make sure the appliance is shut off and unplugged! Danger of electric shock.
3. Follow steps 3. – 6. under Assembly.
4. Connect the appliance plug to a properly installed and easy accessible wall socket.
5. Switch the appliance on by turning the temperature control knob (5) to the highest level (MAX). Heat the
appliance up for approx. 10 Minutes. The indicator light (6) lights up. After this heating up process, adjust
the temperature by turning the temperature control knob (5) to your desired
level. The integrated thermostat will keep the pre set temperature at a constant level.
6. As soon as the respective temperature is reached the indicator light (6) goes out.
Attention: The temperature control (5) is continuously variable.
7. The appliance l is now ready for use. -Always place the food to be grilled into the middle of the grill rack
(7) –
During use the indicator light will will cycle on and off while the thermostat keeps the heating
element at the right temperature.
8. After use, always turn the temperature control knob (5) to MIN. and unplug the appliance.
The temperature of accessible surfaces may be high during operation. Therefore, do not
touch the appliance during and/or immediately after operation. Use pot handlers when handling the
food.

Instruction Manual
ENGLISH
29
Warning: This appliance should only be connected to a properly installed wall socket and should
not be operated by any means of an external timer or separate remote-control system.
Cleaning and Care
Due to hygienic reasons clean your appliance on a regular basis, best after each use, and remove
any food residues. Not doing so could possibly result in a hazardous situation.
Before cleaning, always switch off the appliance and disconnect it from the mains. Let it completely cool
down.
Never immerse the appliance in water. Danger! Electric Shock!
Remove the heating element with the operating control before cleaning and wipe it off with a dry cloth. Make
sure that it has completely cooled down.
Clean the housing of the appliance with a moistened soft cloth. Do not use any aggressive cleaning agents
and/or other hard objects to clean the appliance.
Once the aluminium reflector tray and grill rack have cooled down, clean them in warm water using some
dishwashing detergent, rinse and dry them thoroughly.
Remove splatter/food residues with a damp soft cloth. If necessary, use a mild washing up liquid.
The parts of the appliance are not dishwasher safe.
Cleaning and user maintenance shall not be made by children without supervision.
Storage
Disconnect the appliance from the mains and let it completely cool down.
Keep the appliance away from children and store it in a clean and dry place.

30
Disposal Instructions
Waste electrical devices marked with this sign must not be disposed of with your household waste,
but are to be collected separately. Therefore, please return this device at the end of its life cycle to special
collection points for disposal or your local dealer.
Your Barbecue Grill with Stand 46221 is packed in a retail box. Such boxes are recyclable
waste, i.e. they are reusable or recyclable.
Technical Data:
Voltage: 220 - 240 V ~ 50 / 60 Hz
Rated Power: 2200 W
Protection Class: I
Technical data subject to change!

Instruction Manual
ENGLISH
31
Guarantee:
This product is guaranteed against defects in materials and
workmanship for a period of 2 years.
This guarantee is not valid:
• if the appliance has not been used in accordance to the
instructions
• for damages due to wear and tear (batteries, etc.)
• for damages known by customer at time of purchase
• for damages caused by owner
This guarantee does not affect your statutory right, nor any
legal right you may have as a custumer under applicable
national legislation governing the purchase of goods.
In order to assert his/her right in a guarantee case during the
guaranteed period, the customer must provide evidence of
the date of purchase (receipt).
The guarantee is to be asserted against
KORONA electric GmbH, Sundern/Germany.
Telephone Hotline: +49 2933 90284-80
Mail: [email protected]
web: www.korona-electric.de
within 2 years after the date of purchase. In case of guarantee
the customer is given the right to get the appliance repaired
at our own or at an authorized shop. Further rights (due to
guarantee case) are not given to the customer.

32
Beoogd gebruik
Lees deze handleiding aandachtig door vóór gebruik en
bewaar de handleiding op een veilige plek, zodat u deze in
de toekomst nog eens kunt doornemen. Als u het apparaat
in de toekomst doorgeeft aan een derde partij, zorg er dan
voor dat u deze handleiding bijvoegt.
Dit apparaat is alleen bedoeld en geschikt voor het braden
van voedsel. Wijziging van het apparaat of gebruik voor
doeleinden anders dan bedoeld door de fabrikant kan leiden
tot gevaar, schade en letsel. Dit apparaat is niet bedoeld
voor commercieel gebruik!
Veiligheid:
Dit symbool wijst op gevaren die tot letsel kunnen
leiden!
Dit symbool waarschuwt voor hete oppervlakken.
Gevaar voor brandwonden!
Dit symbool wijst op elektrische schokgevaren!
Algemene veiligheidsinstructies
• De fabrikant aanvaardt geen enkele verantwoordelijkheid
voor schade als gevolg van onjuist gebruik.
•Onjuist gebruik kan schade aan het apparaat veroorzaken
en kan leiden tot letsel bij de gebruiker.
• Zorg er, voordat u het apparaat aansluit op het
stopcontact, voor dat uw lokale spanning overeenkomt
met de technische gegevens van het apparaat. Als dit niet
het geval is, kan het apparaat oververhit en beschadigd
raken.

NEDERLANDS
Gebruiksaanwijzing
33
Let op! Gevaar voor elektrische schokken!
• Plaats het apparaat, het netsnoer of de stekker nooit in
water of andere vloeistoffen.
• Gebruik het apparaat niet in de buurt van een gootsteen
of wastafel.
• Gebruik het apparaat niet met natte handen.
• Gebruik het apparaat niet buitenshuis.
Een elektrische apparaat is geen speelgoed!
• Laat het apparaat nooit onbeheerd achter tijdens gebruik.
• Dit apparaat mag worden gebruikt door kinderen van 8
jaar en ouder en personen met verminderde lichamelijke,
zintuiglijke of verstandelijke vermogens of gebrek aan
ervaring en kennis indien ze onder toezicht staan of zijn
geïnstrueerd over het gebruik van het apparaat op een
veilige manier en de gevaren die samengaan met het
gebruik begrijpen. Kinderen mogen niet met het apparaat
spelen. Reiniging en onderhoud mag niet worden
uitgevoerd door kinderen, tenzij zij ouder zijn dan 8 en
worden begeleid.
• Houd het apparaat en het netsnoer buiten bereik van
kinderen jonger dan 8 jaar.
•Haal de stekker van het apparaat altijd uit het
stopcontact wanneer het apparaat niet wordt gebruikt
en vóór het reinigen.
• Trek altijd aan de stekker– niet het snoer.
• Houd het apparaat en netsnoer uit de buurt van hete
oppervlakken om schade aan het apparaat te voorkomen.
• Zorg ervoor dat er tijdens gebruik niet per ongeluk aan
het netsnoer kan worden getrokken en dat er niemand
over het netsnoer kan struikelen. Laat het snoer niet over
scherpe randen hangen.
• Buig het netsnoer niet en wikkel het niet rond het apparaat.

34
Gebruik het apparaat niet,
• als het netsnoer is beschadigd.
• in geval van storing.
• als het apparaat is gevallen of anderszins beschadigd.
Laat het nakijken en, indien nodig, repareren door een
gekwaliceerd persoon/de klantenservice. Probeer nooit
zelf wijzigingen te maken of het apparaat te repareren.
• Gebruik alleen accessoires die zijn geëvalueerd voor
gebruik met dit apparaat.
• Probeer nooit om voorwerpen in het apparaat te steken.
• Probeer nooit zelf de behuizing te openen!
• Dit apparaat is niet bedoeld om gebruikt te worden met
een externe timer of apart afstandsbedieningssysteem.
SPECIALE VEILIGHEIDSINSTRUCTIES
Waarschuwing! Om de kans op verwondingen/schade
aan het apparaat, elektrische schokken, brand en
brandwonden te voorkomen.
• Gebruik het apparaat alleen voor het beoogde doel en
zoals beschreven in deze handleiding.
• Plaats het apparaat op een vlakke en hittebestendige
ondergrond. Plaats het niet op een metalen ondergrond.
• Laat het apparaat altijd afkoelen voordat u probeert om
accessoires te wisselen of het apparaat te reinigen.
• Gebruik het apparaat nooit zonder de lekbak van de
behuizing te hebben gevuld, maar vul de aluminium
reflectorbak van het apparaat NOOIT met water.
• Zorg er tijdens het vullen met water voor dat u de MAX
(0,9L) vulmarkering in de behuizing niet overschrijdt.
• Het waterniveau neemt af tijdens gebruik. Bijvullen met
water indien nodig. Zorg er tijdens het vullen voor dat de

NEDERLANDS
Gebruiksaanwijzing
35
MAX-hoeveelheid van 0,9 L niet wordt overschreden en
dat er geen water op het verwarmingselement spat.
• Verplaats het apparaat niet tijdens gebruik. Gevaar voor
ernstige brandwonden door heet water!
• Het apparaat wordt warm tijdens gebruik. Raak daarom
alleen het beschermde gebied bij het bedieningspaneel
aan om de bereidingstemperatuur in te stellen. Gebruik bij
het omgaan met voedsel altijd tangen, spatels of vorken.
Raak het verwarmingselement nooit aan met deze
hulpmiddelen! Gevaar voor ernstige brandwonden!
• Gebruik het apparaat nooit in de buurt van ontvlambare
vloeistoffen of gasbronnen.
• Gebruik nooit houtskool of soortgelijke brandbare
brandstoffen met dit apparaat.
• Gebruik het apparaat niet in de buurt van of onder
ontvlambare voorwerpen, bijv. tafelkleden, gordijnen,
wandkasten.
• Let op: Voedsel met een hoog olie- en vetgehalte kan
eenvoudig ontbranden en vlam vatten.
• Zorg voor een goede ventilatie van de ruimte wanneer
u de barbecue binnenshuis gebruikt, omdat er rook kan
ontstaan.
• Schakel het apparaat ALLEEN in als alle onderdelen zijn
gemonteerd! Sluit de barbecue nooit aan op het lichtnet
als het verwarmingselement is losgekoppeld van de
barbecue. Gevaar voor ernstige brandwonden!
• Let op! Het bedieningspaneel van het
verwarmingselement heeft een geïntegreerde
veiligheidsschakelaar (zie onderstaande foto). Deze
schakelaar wordt geactiveerd door het
verwarmingselement te bevestigen aan het plaatstaal van
de behuizing van de barbecue. Als de behuizing wordt
verbogen, dan werkt de veiligheidsschakelaar mogelijk
niet meer naar behoren, d.w.z. het apparaat verwarmt niet
meer. Pas het plaatstaal indien nodig handmatig aan.

36
• Sluit geen andere huishoudelijke apparaten op hetzelfde
stopcontact / dezelfde stekkerdoos aan, omdat de stekker
in geval van nood eenvoudig bereikbaar moet zijn.
• LET OP: Om gevaar als gevolg van het onbedoeld
resetten van de thermische beveiliging te voorkomen,
mag het apparaat niet worden gevoed met behulp van
een extern schakelapparaat, zoals een externe timer, of
worden aangesloten op een groep die regelmatig in en uit
wordt geschakeld door het elektriciteitsbedrijf.

NEDERLANDS
Gebruiksaanwijzing
37
Productbeschrijving
7
4
9
11
1
2
3
10
5
8
6
1. Afneembaar windscherm
2. Barbecue (behuizing)
3. Uitneembare aluminium reflectorbak
4. Verwarmingselement
5. Bediening met temperatuurknop / thermostaat
6. Indicatielampje
7. Grillrooster
8. 4 rubberen voetjes (achterkant)
9. Netsnoer en stekker
10. Veiligheidsschakelaar
11. Schroef & moer (lekbak)

38
Temperatuurknop/thermostaat:
-MIN
-MAX
MAX
MIN
Een geïntegreerde thermostaat schakelt het apparaat tijdens het gebruik in en uit om te zorgen voor een
constante temperatuur. Dit wordt aangegeven door het in- en uitschakelen van het indicatielampje.
Windscherm
Als u de barbecue buitenshuis gebruikt, kan het windscherm helpen om warmteverlies door sterke wind en
langere bereidingstijden als gevolg daarvan te voorkomen.
Veiligheidsschakelaar
Opmerking: De veiligheidsschakelaar zorgt ervoor dat het verwarmingselement alleen start met het
verwarmingsproces wanneer de schakelaar juist op de behuizing van de barbecue is geplaatst!

NEDERLANDS
Gebruiksaanwijzing
39
Standaard
1. Poten (lange metalen palen (4x) / korte metalen palen (4x) )
2. Rubberen doppen (8x)
3. Metalen platen (lang (2x), kort (2x))
4. Schroef en moeren (4x)
5. Opbergrek
1
4
3
2
5
Vóór het eerste gebruik
• Verwijder alle verpakkingsmaterialen en controleer of het apparaat compleet is.
• Reinig de onderdelen zoals beschreven onder Reiniging en onderhoud.
• Monteer het apparaat zoals beschreven onder Montage.
• Plaats het apparaat op een vlakke, niet-gladde en hittebestendige ondergrond.
• Rol het netsnoer volledig uit en sluit het apparaat aan op een correct geïnstalleerde wandcontactdoos.
• Gebruik het apparaat niet indien het tekenen van schade vertoont.
Waarschuwing: Plastic zakken vormen een verstikkingsgevaar voor peuters en baby’s en moeten
daarom uit de buurt worden gehouden.
Beschermende coating
Het verwarmingselement van het apparaat is voorzien van een beschermende coating. U kunt de
beschermende lagen op het verwarmingselement verwijderen door het apparaat ongeveer 10 minuten te
verwarmen op de hoogste instelling.
Laat het apparaat en de accessoires daarna volledig afkoelen en reinig ze volgens de instructies onder
“Reiniging en onderhoud”.
Opmerking: Het apparaat kan tijdens dit proces kort wat rook en geur produceren als gevolg van
resten van het fabricageproces op het verwarmingselement. Dit is normaal en is niet schadelijk. Zorg ervoor
dat de ruimte goed is geventileerd.

40
Montage van de standaard
De standaard moet voordat u de barbecue gebruikt worden gemonteerd.
Haal alle onderdelen uit de verpakking en begin met de montage van de standaard.
1. Pak de metalen palen (1) en steek de lange paal (1) in de kortere paal (1). Zorg ervoor dat de gaten
op beide palen (1) zijn uitgelijnd. De kortere metalen paal (1) moet naar boven gericht zijn richting het
grillapparaat.
2. Bevestig de poten (metalen palen) (1) van de standaard aan de metalen platen (3).
- Plaats de gaten van zowel de korte als de lange metalen platen (3) boven de gaten van de metalen palen
(1) en steek de schroef (4) erin.
- Lijn de moer (4) uit met de schroef (4) en draai licht vast. De lange metalen platen (3) moeten aan de
voorkant worden bevestigd en de korte metalen platen (3) moeten aan de zijkanten van de standaard
worden bevestigd.
- Bevestig de resterende 3 poten (1) dienovereenkomstig aan de standaard.
3. Draai de moer nu vast (4).
Korte metalen paal
Lange metalen paal
Lange metalen paal
Korte metalen paal

NEDERLANDS
Gebruiksaanwijzing
41
Opmerking: De gemonteerde standaard heeft een trapeziumvorm. De smalle zijde is naar boven gericht.
4. Plaats de rubberen doppen (2) in de openingen van de gemonteerde poten (1).
5. Plaats het opbergrek.
6. De standaard is nu volledig gemonteerd.

42
Montage van de grill
1. Bevestig de 4 rubberen voetjes (8) aan het apparaat (achterkant).
2. Bevestig het windscherm (1) door de pinnen in de bijbehorende openingen in de behuizing (2) te steken.
Zorg ervoor dat het goed wordt vastgezet.
3. Plaats de uitneembare aluminium reflectorbak (3) in de barbecuebehuizing (2).
4. Bevestig de aluminium reflectorbak (3) met de schroef en moer (11). De boorgaten bevinden zich aan de
voorzijde, links van de bediening.
5. Steek de twee pinnen van de bediening (5) in de boorgaten van de apparaatbehuizing (2). Zorg er bij het
plaatsen van de thermostaat (5) voor dat deze aan beide kanten goed in de geleiders is geplaatst en druk
de thermostaat vervolgens stevig omlaag totdat deze op de daarvoor bestemde plaats vastklikt.

NEDERLANDS
Gebruiksaanwijzing
43
6. Bevestig het grillrooster (7) aan de behuizing van het apparaat (2) en zorg ervoor dat deze goed is
vastgezet.
De hoogte van het grillrooster is instelbaar: hoog of laag.
Hoge stand Lage stand
Gebruik
Zorg er altijd voor dat de lekbak van de barbecuebehuizing (2) is gevuld met water voordat u het
apparaat gebruikt.
De verwijderbare lekbak (3) wordt hier bovenop geplaatst, nadat de lekbak van de barbecuebehuizing
(2) is gevuld met water.
Gebruik het apparaat nooit als de lekbak (2) van de barbecuebehuizing niet is gevuld met water!
Het apparaat mag alleen worden gebruikt in een goed geventileerde ruimte of een
buitenomgeving die is beschermd tegen wind!
1. Verwijder het grillrooster (7), het verwarmingselement (4) en de uitneembare aluminium reflectorbak (3)
nadat u het apparaat hebt gemonteerd.
2. Vul de lekbak van de barbecuebehuizing (2) met 0,4L tot 0,9L water. Zorg ervoor dat u het MAX (0,9L)
niveau niet overschrijdt.
Let op! Zorg ervoor dat het apparaat is uitgeschakeld en de stekker uit het stopcontact is
getrokken! Gevaar voor elektrische schokken.
3. Volg de stappen 3. – 6. onder Montage.
4. Steek de stekker van het apparaat in een correct geïnstalleerde en eenvoudig bereikbare
wandcontactdoos,
5. Schakel het apparaat in door de temperatuurknop (5) naar het hoogste niveau (MAX) te draaien.
Verwarm het apparaat voor ca. 10 minuten. Het indicatielampje (6) licht op. Stel de temperatuur na dit
opwarmproces In door de temperatuurknop (5) naar het gewenste niveau te draaien. De geïntegreerde
thermostaat houdt de vooraf ingestelde temperatuur op een constant niveau.
6. Zodra de overeenkomstige temperatuur is bereikt, schakelt het indicatielampje (6) uit.

44
Let op: De temperatuurknop (5) is traploos instelbaar.
7. Het apparaat is nu klaar voor gebruik. - Plaats het te grillen voedsel altijd in het midden van het grillrooster
(7) –
Tijdens gebruik zal het indicatielampje in en uit schakelen terwijl de thermostaat het
verwarmingselement op de juiste temperatuur houdt.
8. Draai de temperatuurknop (5) na gebruik altijd naar MIN en trek de stekker van het apparaat uit het
stopcontact.
De temperatuur van de bereikbare oppervlak kan tijdens gebruik hoog zijn. Raak het
apparaat daarom tijdens en/of net na gebruik niet aan. Gebruik pannenlappen bij het omgaan met
voedsel.
Waarschuwing: Dit apparaat mag alleen worden aangesloten op een juist geïnstalleerde
wandcontactdoos en mag niet worden gebruikt in combinatie met een externe timer of apart
afstandsbedieningssysteem.
Reiniging en onderhoud
Om hygiënische redenen, maak uw apparaat regelmatig, bij voorkeur na elk gebruik, schoon en
verwijder alle voedselresten. Als u dit niet doet, kan dit mogelijk leiden tot een gevaarlijke situatie.
Schakel het apparaat altijd uit en trek de stekker uit het stopcontact alvorens reinigingshandelingen uit te
voeren. Laat het apparaat volledig afkoelen.
Dompel het apparaat nooit onder in water. Gevaar! Elektrische schokken!
Verwijder het verwarmingselement met de bediening vóór het reinigen en veeg deze af met een droge doek.
Zorg ervoor dat het apparaat volledig is afgekoeld.
Reinig de behuizing van het apparaat met een vochtige, zachte doek. Gebruik geen agressieve
reinigingsmiddelen en/of harde voorwerpen om het apparaat te reinigen.
Zodra de aluminium reectorbak en het grillrooster zijn afgekoeld, maakt u ze schoon in warm water met wat
afwasmiddel, spoelt u ze en droogt u ze grondig af.
Verwijder voedselspatten en -resten met een vochtige, zachte doek. Gebruik indien nodig een mild
afwasmiddel.
De onderdelen van het apparaat zijn niet vaatwasmachinebestendig.
Reinigings- en onderhoudswerkzaamheden mogen zonder toezicht niet worden uitgevoerd door
kinderen.

NEDERLANDS
Gebruiksaanwijzing
45
Opslag
Trek de stekker van het apparaat uit het stopcontact en laat het apparaat volledig afkoelen.
Houd het apparaat uit de buurt van kinderen en bewaar het op een schone en droge plaats.
Verwijderingsinstructies
Afgedankte elektrische apparaten die zijn gemarkeerd met dit symbool mogen niet met het
huishoudelijk afval worden weggegooid, maar moeten apart worden ingezameld. Breng dit apparaat daarom
aan het einde van zijn levensduur terug naar een speciaal inzamelpunt voor verwijdering of naar uw dealer.
Uw Barbecue/grill met standaard 46221 is verpakt in een doos. Dergelijke dozen zijn
recycleerbaar afval, d.w.z. ze zijn herbruikbaar of recycleerbaar.

46
Technische gegevens:
Spanning: 220 - 240 V ~ 50 / 60 Hz
Nominaal vermogen: 2200 W
Beschermingsklasse: I
Technische gegevens onderhevig aan verandering!

NEDERLANDS
Gebruiksaanwijzing
47
Garantie:
Er zit op dit product 2 jaar garantie tegen defecten in
materialen en fabricagefouten.
Deze garantie is niet geldig:
• als het apparaat niet is gebruikt in overeenstemming met
de instructies
• voor schade als gevolg van slijtage (batterijen, etc.)
• voor schade die bij de klant bekend was op het moment
van aankoop
• voor schade veroorzaakt door de eigenaar
Deze garantie heeft geen invloed op de wettelijke rechten die
u als klant kunt hebben onder de van kracht zijnde nationale
wetgeving inzake de aankoop van goederen.
De klant moet, om zich tijdens de garantieperiode op zijn/
haar garantierecht te beroepen, bewijs geven van de
aankoopdatum (aankoopbon).
De garantie kan worden ingesteld tegen
KORONA electric GmbH, Sundern/Duitsland.
Telefoon: +49 2933 90284-80
Mail: [email protected]
web: www.korona-electric.de
binnen 2 jaar vanaf de aankoopdatum. De klant heeft in geval
van garantie het recht om het apparaat te laten repareren in
onze winkel of bij een andere erkende winkel. Er worden (op
grond van de garantie) geen verdere rechten aan de klant
gegeven.

48
Utilisation prévue
Avant utilisation, veuillez lire attentivement ces instructions et
les conserver dans un endroit sûr pour référence ultérieure.
Si vous avez l’intention de prêter, de donner ou de revendre
cet appareil à un tiers, veillez à y inclure ces instructions
d’utilisation.
Cet appareil est uniquement destiné et adapté pour griller
des aliments. Toute autre utilisation ou modification de
l’appareil qui n’est pas prévue par le fabricant peut entraîner
un risque de dommages ou de blessures. Cet appareil n’est
pas destiné à un usage commercial !
Sécurité :
Ce symbole identifie les dangers qui peuvent causer
des blessures !
Ce symbole met en garde contre les surfaces chaudes.
Risque de brûlures !
Ce symbole identifie les risques de choc électrique !
Consignes générales de sécurité
• Le fabricant ne sera pas tenu responsable pour les
dommages causés par une utilisation incorrecte du
produit.
•Une utilisation incorrecte ou impropre peut endommager
l‘appareil et causer des blessures à l‘utilisateur.
• Avant de brancher cet appareil sur le secteur, assurez-
vous que la tension locale corresponde aux données
techniques de l‘appareil. Sinon, l‘appareil risquera de
surchauffer et d‘être endommagé.

FRANÇAIS
Manuel d‘instructions
49
Attention ! Danger risque de choc électrique !
• Ne mettez jamais l’appareil, le cordon ou la prise dans
l’eau ou tout autre liquide.
• N’utilisez pas l’appareil près d’un évier ou d’un lavabo.
• N’utilisez pas l’appareil avec des mains mouillées.
• N’utilisez pas l’appareil à l’extérieur
Un appareil électrique n’est pas un jouet !
• Ne laissez jamais l’appareil sans surveillance pendant
l’utilisation.
• Cet appareil peut être utilisé par des enfants âgés de 8 ans
et plus et des personnes ayant des capacités physiques,
sensorielles ou mentales réduites voire même un manque
d’expérience et de connaissances uniquement s’ils ont reçu
une supervision ou une instruction concernant l’utilisation
de l’appareil d’une manière sûre et comprennent les
dangers qui y sont associés. Les enfants ne doivent pas
jouer avec l’appareil. Le nettoyage et l’entretien effectués
par des utilisateurs ne doivent pas être effectués par des
enfants à moins qu’ils ne soient âgés de plus de 8 ans et
sous la surveillance d’un adulte.
• Gardez l’appareil et son cordon hors de portée des enfants
de moins de 8 ans.
•Débranchez toujours l’appareil lorsqu’il n’est pas utilisé
et avant de le nettoyer.
• Tirez toujours la che pour débrancher –et non pas le
cordon.
• Gardez l’appareil et le cordon loin de toute surface chaude
pour éviter tout dommage à l’appareil.
• Assurez-vous que le cordon ne peut pas être tiré par
inadvertance ou faire trébucher quelqu’un lorsqu’il est
utilisé. Ne laissez pas le cordon s’accrocher sur bords
tranchants.

50
• Ne pliez pas le cordon ni ne l’enroulez autour de l’appareil.
N’utilisez pas l’appareil,
• si le cordon est endommagé.
• en cas de dysfonctionnement.
• si l’appareil est tombé ou s’il est endommagé.
Faites vérifier et, si nécessaire, réparé par une personne
qualiée/service à la clientèle. N’essayez jamais de
modier ou de réparer vous-même l’appareil.
• N’utilisez que des accessoires testés pour l’utilisation
avec cet appareil.
• N’essayez jamais d’enfoncer des objets dans l’appareil.
• N’essayez jamais d’ouvrir le boîtier vous-même !
• L’appareil n’est pas conçu pour fonctionner au moyen
d’uneminuterieexterneoud’unsystèmedetélécommande
séparé.
Consignes spéciales de sécurité
AVERTISSEMENT ! Pour éviter les risques de blessures/
dommages de l‘appareil, de choc électrique et de
brûlures.
• Utilisez l’appareil uniquement selon l’usage prévu et tel
que décrit dans ce manuel.
• Placez l’appareil sur une surface uniforme et résistante à
la chaleur. Ne le placez pas sur une surface métallique.
• Laissez toujours l’appareil refroidir avant de changer
d’accessoire ou de le nettoyer.
• N’utilisez jamais l’appareil sans avoir rempli d’eau le bac
récupérateur de graisse situé dans le boîtier, mais NE
JAMAIS verser d’eau dans le bac réflecteur en aluminium
de l’appareil.

FRANÇAIS
Manuel d‘instructions
51
• Lors du remplissage en eau, veillez à ne pas dépasser le
niveau indiqué par le marquage MAX (0,9 L) à l’intérieur
du boîtier.
• Le niveau d’eau diminue pendant l’utilisation. Rajoutez de
l’eau si nécessaire. Lors du remplissage, assurez-vous de
ne pas dépasser la quantité MAX de 0,9 L et de ne pas
projeter d’eau sur l’élément chauffant.
• Ne déplacez pas l’appareil lors de son utilisation. Danger
risque de brûlures graves provenant de l’eau chaude
du bac !
• L’appareil chauffe pendant l’utilisation. Par conséquent,
touchez uniquement la zone protégée du panneau
de commande pour régler la température de cuisson.
Lorsque vous manipulez des aliments sur la grille, utilisez
toujours des pinces, des spatules ou des fourchettes. Ne
touchez jamais l’élément chauffant avec ces ustensiles !
Danger risque de brûlures graves !
• N’utilisez jamais l’appareil à proximité de liquides
inflammables ou de sources de gaz.
• N’utilisez jamais de charbon de bois ou de combustibles
similaires avec cet appareil.
• N’utilisez pas l’appareil près ou sous des objets
inflammables, par ex. des nappes, des rideaux, des
armoires murales.
• Attention : les aliments riches en huile et en graisse
peuvent facilement s’enflammer et prendre feu.
• Veillez à bien aérer la pièce lorsque vous utilisez le barbecue
à l’intérieur, car la cuisson avec cet appareil peut produire
de la fumée.
• Allumez l’appareil UNIQUEMENT lorsque toutes les
pièces ont été assemblées ! Lorsque l’élément chauffant
est détaché du barbecue, ne le connectez jamais à une
prise secteur. Danger risque de brûlures graves !

52
• Attention ! Le panneau de commande de l’élément
chauffant est doté d’un interrupteur de sécurité intégré
(voir photo ci-dessous). La xation de l’élément chauffant
sur la tôle du boitier du barbecue active cet interrupteur.
Si le boitier du barbecue est tordu, l’interrupteur de
sécurité pourrait ne pas fonctionner, c’est-à-dire que
l’appareil ne chaufferait pas. Si nécessaire, ajustez la tôle
manuellement.
• Ne branchez aucun autre appareil électroménager sur la
même prise/sur plusieurs prises car en cas d’urgence, la
prise doit être rapidement accessible.
• ATTENTION : Afin d’éviter tout danger dû au réarmement
intempestif du coupe-circuit thermique, l’appareil ne doit
pas être alimenté par l’intermédiaire d’un interrupteur
externe, comme une minuterie, ou être connecté à un
circuit qui est régulièrement mis sous tension et hors
tension par le fournisseur d’électricité.

FRANÇAIS
Manuel d‘instructions
53
Description du produit
7
4
9
11
1
2
3
10
5
8
6
1. Pare-vent amovible
2. Corps du barbecue (boitier)
3. Bac réflecteur amovible en aluminium
4. Élément chauffant/résistance
5. Dispositif de contrôle du fonctionnement avec bouton decontrôle de la température / thermostat
6. Voyant lumineux
7. Grille
8. 4 pieds en caoutchouc (côté arrière)
9. Cordon d‘alimentation et fiche
10. Interrupteur de sécurité
11. Vis et écrou (bac récupérateur)

54
Molette de contrôle de la température/thermostat :
-MIN
-MAX
MAX
MIN
Pendant le fonctionnement, un thermostat intégré allume et éteint l‘appareil pour assurer une température
constante. Ceci est indiqué par le voyant qui s‘allume et s‘éteint par cycle.
Pare-vent
Lorsque vous utilisez le barbecue à l‘extérieur, le pare-vent peut aider à éviter les pertes de chaleur dues au
vent fort et donc des temps de cuisson plus long.
Interrupteur de sécurité
Remarque : L’interrupteur de sécurité garantit que l’élément chauffant ne démarrera uniquement le
processus de chauffage lorsque que l’élément chauffant est correctement installé sur le barbecue !

FRANÇAIS
Manuel d‘instructions
55
Pieds de support
1. Pieds (tubes en métal longs (4x) / tubes en métal courts (4x))
2. Bouchons en caoutchouc (8x)
3. Plaques en métal (longues (2x), courtes (2x))
4. Vis et écrous (4x)
5. Grille de rangement
1
4
3
2
5
Avant la première utilisation
• Enlevez tout le matériel de l’emballage et vériez que l’appareil est complet.
• Nettoyez les pièces comme indiqué dans la section «Nettoyage et entretien».
• Assemblez l’appareil comme décrit dans la section «Assemblage».
• Placez l’appareil sur une surface uniforme, non glissante et résistante à la chaleur.
• Déroulez complètement le cordon d’alimentation et branchez l’appareil à une prise murale correctement
installée.
•N’utilisez pas l’appareil s’il présente des signes de dommages.
AVERTISSEMENT : Les sacs en plastique constituent un danger pour les enfants en bas âge et
les bébés. Par conséquent, éloignez-les pour éviter tout risque de suffocation.
Revêtement protecteur
L’élément chauffant de l’appareil est doté d’un revêtement protecteur. Pour enlever les couches protectrices
de l’élément chauffant, chauffez l’appareil pendant environ 10 minutes au réglage le plus élevé.
Ensuite, laissez l’appareil et ses accessoires refroidir complètement et nettoyez-les conformément à la
section « Nettoyage et entretien ».
Remarque : au cours de ce processus, l’appareil peut produire brièvement de la fumée ou une
odeur due aux résidus sur les éléments chauffants laissés par le processus de fabrication. Ceci est normal
et sans danger. Assurez-vous alors que la pièce soit bien ventilée.

56
Assemblage des pieds
Les pieds de support doivent être assemblé avant d’utiliser le barbecue.
Retirez toutes les pièces de son emballage et commencez à assembler les pieds de support.
1. Prenez les tubes en métal (1) et insérez le tube long (1) dans le tube court (1). Assurez-vous que les
trous des deux tubes (1) soient alignés. Le tube en métal plus court (1) doit être orienté vers le haut, en
direction du gril.
2. Fixez les pieds (tubes en métal) (1) aux plaques de métal (3).
-Placez les trous de la petite plaque en métal et de la grande plaque (3) sur les trous des tubes en métal
(1) et insérez la vis (4).
-Fixez l’écrou (4) sur la vis (4) et serrez-le légèrement. La grande plaque de métal (3) doit être xées à
l’avant et les petites plaques de métal (3) doivent être fixées sur les côtés du support.
-Fixez les 3 pieds restants (1) au support en conséquence.
3. Maintenant, serrez l’écrou (4).
Tube en métal court
Tube en métal long
Longue plaque
de métal
Petite plaque en métal

FRANÇAIS
Manuel d‘instructions
57
Remarque : Le cadre support des pieds monté a une forme trapézoïdale. Le côté étroit est tourné vers le
haut.
4. Insérez les capuchons en caoutchouc (2) dans chaque ouverture du pied assemblé (1).
5. Insérez la grille de rangement pour former une tablette de rangement.
6. Le cadre de support des pieds est maintenant complètement assemblé.

58
Assemblage du gril
1. Fixez les 4 pieds en caoutchouc (8) à l’appareil (côté arrière).
2. Fixez le pare-vent (1) en insérant les broches dans les ouvertures respectives du boîtier (2). Assurez-vous
de bien le sécuriser.
3. Placez le bac récupérateur de graisse amovible (3) dans le corps du barbecue (boîtier) (2).
4. Fixez le bac réflecteur en aluminium (3) avec la vis et l’écrou (11). Les trous de perçage sont à l’avant, à
gauche du dispositif de contrôle du fonctionnement.
5. Insérez les deux broches du dispositif de contrôle du fonctionnement (5) dans les trous de perçage
du boîtier de l’appareil (2). Assurez-vous lors de l’insertion du thermostat (5) qu’il est correctement
positionné dans les guides des deux côtés et appuyez fermement dessus jusqu’à ce qu’il se fixe en
place.

FRANÇAIS
Manuel d‘instructions
59
6. Fixez la grille (7) au boîtier de l’appareil (2) et assurez-vous qu’elle soit correctement xée. La hauteur de
la grille est réglable : position haute ou position basse.
Position haute Position basse
Fonctionnement
Assurez-vous toujours de remplir en eau le bac récupérateur du barbecue (2) avant de faire
fonctionner l’appareil.
Le bac récupérateur amovible (3) doit être placé dans le boitier du barbecue (2) une fois qu’il aura été
rempli d’eau. Ne faites jamais fonctionner l’appareil sans eau dans le bac récupérateur de graisse
du barbecue (2) !
L’appareil ne doit être utilisé que dans une pièce bien ventilée ou dans une zone extérieure
protégée du vent !
1. Après avoir assemblé l’appareil, retirez la grille du gril (7), l’élément chauffant (4) et le bac réecteur
amovible en aluminium (3).
2. Remplissez entre 0,4 L et 0,9 L d’eau dans le bac récupérateur du boitier du barbecue (2). Assurez-vous
de ne pas dépasser le niveau MAX (0,9 L).
Mise en garde ! Assurez-vous que l’appareil soit éteint et débranché ! Danger risque
d’électrocution.
3. Suivez les étapes 3. - 6. dans la section «Assemblage».
4. Branchez la fiche de l’appareil dans une prise murale correctement installée et facilement accessible.
5. Allumez l’appareil en tournant la molette de contrôle de la température (5) au niveau le plus élevé
(MAX). Chauffez l’appareil pendant environ 10 minutes. Le voyant (6) s’allumera. Après ce processus de
chauffage, réglez la température en tournant la molette de contrôle de la température (5) sur la position
désirée. Le thermostat intégré maintiendra la température préréglée à un niveau constant.
6. Dès que la température correspondante est atteinte, le voyant (6) s’éteindra.

60
Attention : Le contrôle de la température (5) est continuellement variable.
7. L’appareil est maintenant prêt à être utilisé. - Placez toujours les aliments à griller au centre de la grille
(7). –
Pendant l’utilisation, le voyant s’allumera et s’éteindra par cycle tandis que le thermostat
maintiendra l’élément chauffant à la bonne température
8. Après chaque utilisation, tournez toujours la molette de contrôle de la température (5) sur MIN. et
débranchez l’appareil.
La température des surfaces accessibles peut être élevée pendant le fonctionnement. Par
conséquent, ne touchez pas l’appareil pendant et/ou immédiatement après son utilisation. Utiliser
des ustensiles appropriés comme des pinces pour manipuler les aliments.
Avertissement : Cet appareil ne doit être branché que sur une prise murale correctement
installée et ne doit pas être utilisé avec un dispositif de minuterie externe ni avec un système de commande
à distance séparé.
Nettoyage et entretien
Pour des raisons d’hygiène, nettoyez votre appareil régulièrement, de manière optimale après chaque
utilisation, et éliminez les résidus d’aliments. Un nettoyage non régulier pourrait éventuellement
entraîner une situation dangereuse.
Avant de nettoyer, éteignez toujours l’appareil et débranchez-le du secteur. Laissez-le refroidir complètement.
N’immergez jamais l’appareil dans l’eau. Danger ! Risque de choc électrique !
Retirez l’élément chauffant avec le dispositif de contrôle du fonctionnement avant le nettoyage et essuyez-le
avec un chiffon sec. Assurez-vous qu’il a complètement refroidi.
Nettoyez le boîtier de l’appareil avec un chiffon doux et humide. N’utilisez pas de produits de nettoyage
agressifs et/ou d’autres objets durs pour nettoyer l’appareil.
Une fois que le bac réecteur en aluminium et la grille du gril ont refroidi, nettoyez-les à l’eau tiède avec
un peu de détergent à vaisselle, rincez-les et séchez-les soigneusement. Éliminez les éclaboussures et les
résidus d’aliments avec un chiffon doux et humide. Si nécessaire, utilisez un liquide à vaisselle doux.
Les pièces de l’appareil ne sont pas lavables au lave-vaisselle.
Le nettoyage et la maintenance par l’utilisateur ne doivent pas être effectués par des enfants sans
la surveillance par un adulte.

FRANÇAIS
Manuel d‘instructions
61
Stockage
Débranchez l’appareil de la prise secteur et laissez-le refroidir complètement.
Gardez l’appareil loin des enfants et rangez-le dans un endroit propre et sec.
Instructions relatives à l’élimination
Les déchets d’appareils électriques marqués de ce signe ne doivent pas être éliminés avec vos
déchets ménagers, mais sont à collecter séparément. Par conséquent, veuillez retourner cet appareil à la fin
de son cycle de vie à des points de collecte spéciaux pour l’élimination ou à votre revendeur local.
Votre Barbecue Grill sur pieds 46221 est emballée dans une boîte destinée à la vente au détail.
De telles boîtes sont des déchets recyclables, c’est-à-dire qu’elles sont réutilisables ou recyclables.

62
Données techniques :
Tension: 220 - 240 V ~ 50 / 60 Hz
Puissance nominale: 2200 W
Classe de protection: I
Données techniques sujettes à changement!

FRANÇAIS
Manuel d‘instructions
63
Garantie :
Ce produit est garanti contre les défauts de matériaux et de
fabrication pour une période de 2 ans.
Cette garantie n’est pas valide :
• si l’appareil n’a pas été utilisé conformément aux
instructions
• pour les dommages causés par l’usure (piles, etc.)
• pour les dommages connus du client au moment de
l’achat
• pour les dommages causés par le propriétaire
Cette garantie n’affecte pas votre droit légal, ni aucun droit
légal que vous pourriez avoir en tant que client en vertu de
la législation nationale applicable régissant l’achat de biens.
Pour faire valoir son droit de garantie pendant la période de
garantie, le client doit fournir la preuve de la date d’achat
(reçu).
La garantie doit être demandé à
Ligne téléphonique : +49 2933 90284-80
E-mail : [email protected]
web : www.korona-electric.de
Dans les 2 ans suivant la date d’achat. En cas de garantie,
le client a le droit de réparer l’appareil avec nous ou dans un
magasin autorisé. Les droits supplémentaires (en raison du
droit de garantie) ne sont pas donnés au client.

64
Destinazione d’Uso
Prima dell’uso, leggi attentamente queste istruzioni e
conservale in un luogo sicuro per riferimento futuro. Quando
si cede l’apparecchio a terzi, assicurati di includere queste
istruzioni.
Questo apparecchio è destinato e adatto esclusivamente
alla cottura alla griglia. Qualsiasi altro uso o modifica
dell’apparecchio non è previsto dal produttore e potrebbe
comportare il rischio di danni o lesioni. Questo apparecchio
non è destinato ad un uso commerciale!
Sicurezza:
Questo simbolo avverte l’utente del rischio di infortuni!
Questo simbolo segnala la presenza di parti roventi.
Rischio di ustioni!
Questo simbolo avverte l’utente del rischio di
folgorazioni!
Avvertenze Generali
• Il produttore non si assume alcuna responsabilità per
eventuali danni causati da un uso errato.
• L‘uso errato o improprio può danneggiare l’apparecchio e
causare lesioni all’utente.
• Prima di collegare questo apparecchio alla rete elettrica,
accertati che la tensione disponibile corrisponda ai dati
tecnici dell’apparecchio. In caso contrario, l’apparecchio
potrebbe surriscaldarsi e danneggiarsi.

ITALIANO
Manuale delle Istruzioni
65
Attenzione! Rischio di scossa elettrica!
• Non immergere mai l’apparecchio, il cavo o la spina in
acqua o altri liquidi.
• Non usare l’apparecchio nei pressi di vasche e lavandini.
• Non usare l’apparecchio con le mani bagnate.
• Non usare l’apparecchio in ambienti esterni.
Gli elettrodomestici non sono giocattoli!
• Non lasciare mai l’apparecchio incustodito durante l’uso.
• Questo apparecchio non è adatto ad essere usato da
bambini di età inferiore agli 8 anni o da persone con
ridotte capacità fisiche, sensoriali o mentali, o prive
della necessaria esperienza e perizia, a meno che non
supervisionate e istruite sull’uso sicuro dell’apparecchio
e sui rischi ad esso connessi. I bambini non devono
giocare con l’apparecchio. La pulizia e la manutenzione
dell’utente non devono essere eseguite da bambini a
meno che non maggiori di 8 anni e supervisionati.
• Tieni l’apparecchio e il suo cavo fuori dalla portata dei
bambini di età inferiore a 8 anni.
• Stacca sempre la spina dell’apparecchio quando non
lo usi e prima di pulirlo.
• Tira sempre afferrando la spina e mai il cavo.
• Tieni l’apparecchio ed il cavo lontano da superfici calde, in
modo che non si danneggi.
• Accertati che il cavo non sia causa d’inciampo e che non
possa essere accidentalmente strattonato durante l’uso.
Non far pendere il cavo da bordi spigolosi.
• Non piegare il cavo e non avvolgerlo attorno all’apparecchio.

66
Non usare l’apparecchio se…:
• il cavo è danneggiato.
• presenta guasti.
• è caduto o ha subito danni di alcun tipo.
Se necessario, consegna l’apparecchio a un riparatore
professionista o al servizio clienti. Non tentare mai di
apportare modifiche o riparare l’apparecchio da solo.
• Utilizza solo accessori approvati per l’uso con questo
apparecchio.
• Non tentare mai di inserire oggetti all’interno
dell’apparecchio.
• Non tentare mai di aprire l’apparecchio da solo!
• L’apparecchio non è progettato per essere utilizzato con
un timer esterno od un telecomando separato.
Avvertenze Speciali
Avvertenza! Per evitare la possibilità di lesioni personali,
danni all’apparecchio, scosse elettriche, incendi e
rischio di ustioni!
• Usa l’apparecchio esclusivamente per gli scopi previsti e
come descritto nel presente manuale.
• Posiziona l’apparecchio su una superficie piana e
resistente al calore. Non posizionarlo sopra una superficie
metallica.
• Lascia sempre raffreddare l’apparecchio prima di
procedere alla pulizia o alla sostituzione degli accessori.
• Non utilizzare mai l’apparecchio senza aver prima riempito
d’acqua la leccarda della base, ma non riempire MAI
d’acqua la vaschetta in alluminio riflettente dell’apparecchio
• Quando riempi d’acqua, accertati di non superare il segno
di riempimento massimo (MAX) (0,9l) posto sulla base.

ITALIANO
Manuale delle Istruzioni
67
• Il livello dell’acqua diminuisce durante l’uso. Rabbocca
se necessario. Durante il riempimento, accertati di non
superare la quantità massima (MAX) di 0,9l e di non
spruzzare acqua sull’elemento riscaldante.
• Non spostare l’apparecchio durante l’uso. Pericolo di
gravi ustioni a causa dell’acqua calda!
• L’apparecchio si riscalda durante l’uso, e non va toccato
eccetto che sull’area protetta del pannello di controllo per
impostare la temperatura di cottura. Quando maneggi
gli alimenti sulla griglia utilizza sempre pinze, spatole o
forchette. Non toccare mai l’elemento riscaldante con
questi utensili! Pericolo di gravi ustioni!
• Non azionare mai la griglia nei pressi di liquidi infiammabili
o fonti di gas.
• Non usare mai questo apparecchio con carbonella o simili
combustibili.
• Non utilizzare l’apparecchio vicino o sotto oggetti
infiammabili, come tovaglie, tende, pensili e simili.
• Attenzione: gli alimenti con un alto contenuto di olio e
grasso possono facilmente incendiarsi e bruciare.
• Quando usi la griglia in ambienti chiusi, garantisci
un’adeguata ventilazione dei locali poiché potrebbe
svilupparsi del fumo.
• Accendi l’apparecchio SOLO quando tutte le parti sono
state montate! Non collegare ma la griglia alla rete se
l’elemento riscaldante è staccato. Pericolo di gravi ustioni!
• Attenzione! Il pannello di controllo dell’elemento
riscaldante ha un interruttore di sicurezza integrato (vedi
foto sotto), che si attiva fissando l’elemento riscaldante
alla base. Se l’involucro si dovesse piegare, l’interruttore
di sicurezza potrebbe non funzionare, e di conseguenza
l’apparecchio non si riscalderebbe. Se necessario,
sistema manualmente la base.

68
• Non collegare altri elettrodomestici alla stessa presa
elettrica o prolunga, poiché in caso di emergenza la spina
deve essere rapidamente accessibile.
• ATTENZIONE: Al fine di evitare i rischi dovuti al ripristino
accidentale dell’interruttore termico, questo apparecchio
non deve essere alimentato tramite un dispositivo di
commutazione esterno, come un timer, o collegato a
un circuito che viene regolarmente attivato e disattivato
acceso e spento dall’utenza.

ITALIANO
Manuale delle Istruzioni
69
Descrizione del Prodotto
7
4
9
11
1
2
3
10
5
8
6
1. Parabrezza staccabile
2. Base per barbecue (alloggiamento)
3. Vassoio rimovibile in alluminio riflettente
4. Elemento riscaldante
5. Pannello di controllo con manopola di regolazione della temperatura (termostato)
6. Indicatore luminoso
7. Griglia di cottura
8. Quattro piedini in gomma (lato posteriore)
9. Cavo e spina di alimentazione
10. Interruttore di sicurezza
11. Vite e dado (vassoio di raccolta)

70
Manopola di controllo della temperatura / termostato:
-MIN
-MAX
MAX
MIN
Durante l’uso, il termostato integrato accende e spegne l’apparecchio per garantire una temperatura
costante. Ciò è indicato dall’accensione e spegnimento della spia.
Parabrezza
Quando usi la griglia all’esterno, il parabrezza può aiutare ad evitare dispersioni di calore e conseguenti
tempi di cottura prolungati dovuti al forte vento.
Interruttore di Sicurezza
Nota: l’interruttore di sicurezza garantisce che l’elemento riscaldante si attivi solo una volta che sia stato
posizionato correttamente sulla base!

ITALIANO
Manuale delle Istruzioni
71
Supporto
1. Gambe (tubi in metallo lunghi (4x) / tubi in metallo corti (4x))
2. Cappucci in gomma (8x)
3. Piastre in metallo (lunghe (2x), corte (2x))
4. Viti e bulloni (4x)
5. Griglia
1
4
3
2
5
Prima dell’Uso Iniziale
• Rimuovi tutto il materiale di imballaggio e verica che l’apparecchio sia completo.
• Pulisci le parti come descritto in Pulizia e Cura.
• Assemblare l’apparecchio come descritto in Montaggio.
• Posiziona l’apparecchio su una superficie piana, non scivolosa e resistente al calore.
• Srotola completamente il cavo di alimentazione e collegare l’apparecchio ad una presa elettrica
correttamente installata.
• Non utilizzare l’apparecchio se mostra danni visibili.
Avvertenza: Le buste di plastica sono pericolose per i bambini, e vanno perciò tenute al di fuori
della loro portata, per evitare il rischio di soffocamento.
Rivestimento protettivo
L’elemento riscaldante dell’apparecchio ha un rivestimento protettivo. Per rimuovere tale strato protettivo,
riscalda l’apparecchio a massima potenza per circa 10 minuti.
Successivamente, lascia raffreddare completamente l’apparecchio e gli accessori, e puliscili come descritto
nella sezione “Pulizia e manutenzione”.
Nota: Durante questa procedura, l’apparecchio può emettere brevemente fumo o odori causati
dai residui di fabbricazione deposti sugli elementi riscaldanti. Si tratta di un evento normale e non dannoso.
Accertati che il locale sia ben ventilato.

72
Montaggio del Supporto
l supporto va assemblato prima di usare la griglia.
Rimuovi tutte le parti dall’imballaggio ed inizia ad assemblare il supporto.
Palo metallico carto
Palo metallico lungo
1. Prendi i tubi metallici (1) e inserisci i tubi lunghi (1) nei tubi corti (1). Accertati che i fori di entrambi i tubi
siano allineati. Il tubo metallico più corto (1) deve essere rivolto in l’alto verso la griglia.
Palo metallico lungo
Palo metallico corto
2. Fissa le gambe (pali metallici) (1) del supporto alle piastre metalliche (3).
- Allinea i fori delle piastre metalliche corte e lunghe (3) ai fori dei tubi metallici (1) e inserisci le viti (4).
- Fissa debolmente i dadi (4) alle viti (4). Le piastre metalliche lunghe (3) vanno ssate alla parte anteriore
e le piastre metalliche corte (3) vanno fissate ai lati del supporto.
- Fissa correttamente le altre tre gambe (1) al supporto.
3. A questo punto, serra bene i bulloni (4).

ITALIANO
Manuale delle Istruzioni
73
Nota: Una volta assemblato, il supporto avrà una forma trapezoidale, con il lato corto rivolto verso l’alto.
4. Inserire i cappucci in gomma (2) in ogni apertura delle gambe dopo averle assemblate (1).
5. Installa la rastrelliera.
6. Il supporto sarà ora completamente assemblato.

74
Assemblaggio della Griglia
1. Fissa i quattro piedini in gomma (8) all’apparecchio (sul retro).
2. Fissa il parabrezza (1) inserendo i rebbi nelle rispettive aperture della base (2). Accertati che sia fissato
adeguatamente.
3. Colloca il vassoio rimovibile in alluminio riflettente (3) sulla base della griglia (2).
4. Fissa il vassoio in alluminio riflettente (3) con viti e dadi (11). I fori sono nella parte anteriore, a sinistra del
panello di controllo.
5. Inserisci i due rebbi del pannello di controllo (5) nei fori del corpo dell’apparecchio (2). Quando inserisci
il termostato (5), accertati che sia posizionato correttamente nelle guide su entrambi i lati e premilo con
decisione fino allo scatto.

ITALIANO
Manuale delle Istruzioni
75
6. Fissa la griglia (7) alla base dell’apparecchio (2) e accertati che sia ben ssata. L’altezza della griglia è
regolabile: Alta o Bassa.
Posizione Alta Posizione Bassa
Funzionamento
Accertati sempre di riempire d’acqua la leccarda della base (2) prima di attivare l’apparecchio. La
vaschetta raccogli-gocce estraibile (3) andrà posizionata sopra, dopo aver riempito d’acqua la
leccarda della base (2).
Non mettere mai in funzione l’apparecchio senza acqua nella leccarda della base (2)!
L’apparecchio deve essere utilizzato solo in locali ben ventilati o in aree esterna protette
dal vento!
1. Dopo aver assemblato l’apparecchio, rimuovi la griglia (7), l’elemento riscaldante (4) e il vassoio rimovibile
in alluminio riflettente (3).
2. Versa 0,4~0,9 litri d’acqua nella leccarda della base (2). Accertati di non superare il livello MAX (0,9L).
Attenzione! Accertati che l’apparecchio sia spento e con la spina staccata! Pericolo di
scossa elettrica.
3. Segui i passaggi 3~6 sotto Assemblaggio.
4. Collega la spina dell’apparecchio ad una presa a muro correttamente installata e facilmente accessibile.
5. Attiva l’apparecchio ruotando la manopola di regolazione della temperatura (5) al livello più alto (MAX).
Riscalda l’apparecchio per ca. 10 minuti. La spia (6) si accenderà. Al termine di questo processo
di riscaldamento, regola la temperatura ruotando la manopola (5) al livello desiderato. Il termostato
integrato manterrà costante la temperatura selezionata.
6. La spia (6) si spegnerà non appena raggiunta la temperatura selezionata.
Attenzione: Il controllo della temperatura (5) è regolabile continuamente.
7. L’apparecchio è così pronto all’uso. – Posiziona sempre il cibo da grigliare al centro della griglia (7) –
Durante l’uso la spia si accenderà e spegnerà ciclicamente mentre il termostato mantiene
l’elemento riscaldante alla giusta temperatura.
8. Dopo l’uso, sposta sempre la manopola di controllo (5) su MIN. e stacca la spina dell’apparecchio.
La temperatura delle superfici accessibili può essere elevata durante il funzionamento.
Pertanto, non toccare l’apparecchio durante e/o subito dopo l’uso. Utilizza le presine per maneggiare
il cibo.

76
Avvertenza: Questo apparecchio deve essere collegato solo a presa elettriche correttamente
installate e non deve essere azionato tramite un timer esterno o un sistema di controllo remoto separato.
Pulizia e Manutenzione
Per motivi igienici, pulisci regolarmente l’apparecchio, meglio se dopo ogni uso, rimuovendo
eventuali residui di cibo. KA mancata pulizia potrebbe creare il rischio di situazioni pericolose.
Prima di procedere alla pulizia, spegni sempre l’apparecchio e staccane la spina. Lascia raffreddare
completamente.
Non immergere mai l’apparecchio nell’acqua. Pericolo! Scossa Elettrica!
Rimuovere l’elemento riscaldante con il pannello di controllo prima di pulirlo con un panno asciutto. Accertati
che si sia completamente raffreddato.
Pulisci la base dell’apparecchio con un panno morbido inumidito. Non utilizzare detergenti aggressivi e/o
altri oggetti duri per pulire l’apparecchio.
Una volta che il vassoio in alluminio e la griglia si siano raffreddati, puliscili con acqua tiepida ed un po’ di
detersivo per piatti, sciacquali e asciugali accuratamente.
Rimuovi schizzi e residui di cibo con un panno morbido umido. Se necessario, usa del detersivo per piatti
delicato.
Le parti dell’apparecchio non sono lavabili in lavastoviglie.
La pulizia e la manutenzione eseguibili dall’utente non vanno affidate a bambini senza supervisione.
STOCCAGGIO
Lascia raffreddare completamente l’apparecchio dopo averne staccato la spina.
Tieni l’apparecchio fuori dalla portata dei bambini e conservalo in un luogo pulito e asciutto.
Istruzioni per lo smaltimento
I dispositivi elettrici di scarto contrassegnati da questo simbolo non vanno smaltiti insieme ai rifiuti
domestici, ma raccolti separatamente. Pertanto, alla fine del suo ciclo di servizio, questo dispositivo va
consegnato ad un punto di raccolta differenziata o al tuo rivenditore locale.
Il Barbecue con Supporto 46221 è confezionato in una scatola per la vendita al dettaglio.
Queste scatole sono riciclabili, ovvero possono essere riusate.
DATI TECNICI :
Voltaggio: 220 - 240 V ~ 50 / 60 Hz
Alimentazione: 2200 W
Classe di protezione: I
Dati tecnici soggetti a modifiche!

ITALIANO
Manuale delle Istruzioni
77
Garanzia:
Questo prodotto è garantito per un periodo di 2 anni contro
difetti nei materiali e nella lavorazione.
Questa garanzia non è valida:
• se l’apparecchio non è stato utilizzato secondo le istruzioni;
• per danni causati da usura (batterie, ecc.);
• per danni noti al cliente al momento dell’acquisto;
• per danni causati dal proprietario.
Questa garanzia non pregiudica i diritti legali dell’utente,
né alcun diritto legale garantito all’utente dalla vigente
legislazione nazionale sull’acquisto di beni.
Al fine di inviare una richiesta di garanzia durante il periodo
valido, il cliente dovrà produrre la prova della data di acquisto
(ricevuta o fattura).
La richiesta di garanzia deve essere fatta valere inviandola a
KORONA electric GmbH, Sundern / Germania.
Hotline telefonica: +49 2933 90284-80
Mail: [email protected]
web: www.korona-electric.de
entro 2 anni dalla data di acquisto. In caso di garanzia, il
cliente ha il diritto di far riparare l’apparecchio presso la
nostra azienda o presso un rivenditore autorizzato. Il cliente
non detiene altri diritti relativi alla garanzia.

78
Uso previsto
Antes de su uso, lea cuidadosamente estas instrucciones
y guárdelas en un lugar seguro para futuras consultas. Al
darle el dispositivo a un tercero, asegúrese de incluir estas
instrucciones de uso.
Este aparato está diseñado y es adecuado únicamente para
asar alimentos. Cualquier otro uso o modificación del aparato
no está previsto por el fabricante y podría implicar un riesgo
de daños o lesiones. Este aparato no está destinado para
un uso comercial.
Seguridad:
Este símbolo identifica peligros que pueden causar
lesiones.
Este símbolo advierte sobre superficies calientes.
Peligro de quemaduras.
Este símbolo identifica peligros de descarga eléctrica.
Instrucciones generales de seguridad
• El fabricante no se hace responsable de los daños
causados por un uso incorrecto.
• Un uso incorrecto o inadecuado puede dañar el dispositivo
y causar lesiones al usuario.
• Antes de conectar el dispositivo a la red eléctrica,
asegúrese de que el voltaje local coincida con los datos
técnicos del dispositivo. De lo contrario, el dispositivo
podría sobrecalentarse y dañarse.

ESPAÑOL
Manual de instrucciones
79
Precaución. Peligro de descarga eléctrica.
• Nunca coloque el aparato, el cable o el enchufe en agua
o en cualquier otro líquido.
• No use el aparato cerca de un fregadero o lavamanos.
• No use el aparato con las manos mojadas.
• No use el aparato en exteriores.
Un aparato eléctrico no es un juguete.
• Nunca deje el aparato desatendido durante su uso.
• Este aparato puede ser usado por niños de 8 años en
adelante, y por personas con las capacidades físicas,
sensoriales o mentales disminuidas, o por personas
que carezcan de experiencia y conocimiento, si son
supervisadas o han sido instruidas sobre el uso seguro
del dispositivo y entienden los peligros involucrados.
Los niños no deben jugar con el aparato. Las tareas
de limpieza y mantenimiento no deben ser realizadas
por niños a menos que sean mayores de 8 años y estén
supervisados.
• Mantenga el aparato y su cable fuera del alcance de niños
menores de 8 años.
• Cuando no esté en uso y antes de limpiarlo, desenchufe
el aparato siempre.
• Tire siempre del enchufe no del cable.
• Mantenga el aparato y el cable alejados de cualquier
superficie caliente para evitar daños al aparato.
• Asegúrese de no se pueda tirar del cable o tropezarse
involuntariamente con él mientras esté en uso. No permita
que el cable cuelgue sobre bordes afilados.
• No doble ni enrolle el cable alrededor del aparato.

80
No use el aparato
• si el cable está dañado.
• en caso de mal funcionamiento.
• si el aparato se ha caído o está dañado de alguna manera.
Haga que lo revise y, si fuera necesario, lo repare una
persona o servicio de atención al cliente cualificado.
Nunca intente realizar modificaciones o reparar el aparato
usted mismo.
• Use solo los accesorios evaluados para su uso con este
aparato.
• Nunca trate de introducir objetos en el aparato.
• Nunca trate de abrir la carcasa usted mismo.
• Este aparato no está diseñado para ser usado mediante
un temporizador externo o un sistema de control remoto
independiente.
Instrucciones especiales de seguridad
Advertencia! Para evitar la posibilidad de lesiones o
daños en el aparato, descargas eléctricas, incendio y
quemaduras.
• Use el dispositivo solo para su uso previsto y tal y como
se describe en este manual.
• Coloque el aparato en una superficie uniforme y resistente
al calor.
• No lo coloque sobre una superficie metálica.
• Deje que el aparato se enfríe antes de tratar de cambiar
los accesorios o limpiarlo.
• Nunca use el aparato sin haber llenado con agua la
bandeja de goteo de la carcasa, pero NUNCA llene con
agua la bandeja reflectora de aluminio del aparato.

ESPAÑOL
Manual de instrucciones
81
• Al llenar con agua, asegúrese de no exceder la marca de
llenado máximo (0,9 l) dentro de la carcasa.
• El nivel de agua disminuye durante el uso. Si fuera
necesario, rellene con agua. Al llenarlo, asegúrese de no
exceder la cantidad máxima de 0,9 l y de no salpicar con
agua el elemento calefactor.
• No mueva el aparato durante su funcionamiento. Peligro
de quemaduras graves por agua caliente.
• El aparato se calienta durante el uso. Por lo tanto, toque
solo el área protegida del panel de control para establecer
la temperatura de cocción. Al manipular los alimentos en
la parrilla, use siempre pinzas, espátulas o tenedores.
Nunca toque el elemento calefactor con estos utensilios.
Peligro de quemaduras graves.
• Nunca use el aparato cerca de líquidos inflamables o
fuentes de gas.
• Nunca use carbón vegetal o combustibles similares con
este aparato.
• No use el aparato cerca o bajo objetos inflamables como
manteles, cortinas, armarios de pared.
• Atención: los alimentos con un alto contenido de aceite y
grasa pueden prenderse e incendiarse fácilmente.
• Asegúrese de que la habitación tenga una ventilación
adecuada cuando use la barbacoa en interiores, ya que
puede producirse humo.
• SOLO encienda el aparato cuando todas las piezas se
hayan montado. Cuando el elemento calefactor esté
desconectado de la barbacoa, nunca la conecte a la red
eléctrica. Peligro de quemaduras graves.
• Atención: el panel de control del elemento calefactor
tiene un interruptor de seguridad integrado (vea la foto
a continuación). Fijar el elemento calefactor a la chapa
metálica de la carcasa de la barbacoa activa este
interruptor. En caso de que la carcasa se doblase, el

82
interruptor de seguridad podría no funcionar, es decir,
que el aparato no se caliente. Si fuera necesario, ajuste la
chapa metálica manualmente.
• No conecte ningún otro electrodoméstico en el mismo
enchufe o ladrón, ya que en caso de emergencia el
enchufe debe ser de rápido acceso.
• PRECAUCIÓN: para evitar el peligro debido a un
restablecimiento inadvertido del protector térmico, no
debe alimentar el aparato a través de un dispositivo de
conmutación externo como un temporizador externo
o conectarlo a un circuito que se encienda o apague
regularmente.

ESPAÑOL
Manual de instrucciones
83
Descripción del producto
7
4
9
11
1
2
3
10
5
8
6
1. Parabrisas desmontable
2. Carcasa de la barbacoa
3. Bandeja reflectora de aluminio extraíble
4. Elemento calefactor
5. Control de funcionamiento con control de temperatura/termostato
6. Luz indicadora
7. Parrilla
8. 4 patas de goma (parte trasera)
9. Cable de alimentación y enchufe
10. Interruptor de seguridad
11. Tornillo y tuerca (bandeja de goteo)

84
Control de temperatura/termostato:
-Mínimo
-Máximo
MAX
MIN
Durante el funcionamiento, un termostato integrado encenderá y apagará el aparato para garantizar una
temperatura constante. Esto se indica mediante el encendido y apagado de la luz indicadora.
Parabrisas
Al usar la barbacoa al aire libre, el parabrisas puede ayudar a evitar la pérdida de calor debido a fuertes
vientos y, por lo tanto, los tiempos prolongados de cocción.
Interruptor de seguridad
Nota: el interruptor de seguridad asegura que el elemento calefactor solo comenzará el proceso de
calentamiento una vez que esté colocado correctamente en la carcasa de la barbacoa.

ESPAÑOL
Manual de instrucciones
85
Soporte
1. Patas (4 barras metálicas largas, 4 barras metálicas cortas)
2. Topes de goma (8)
3. Placas metálicas (2 largas, 2 cortas)
4. Tornillos y tuercas (4)
5. Estante de almacenamiento
1
4
3
2
5
Antes del primer uso
• Retire todo el material de embalaje y compruebe si el aparato está completo.
• Limpie las piezas tal y como se describe en la sección de Limpieza y cuidado.
• Monte el aparato tal y como se describe en la sección de Montaje.
• Coloque el aparato en una superficie uniforme, no resbaladiza y resistente al calor.
• Desenrolle completamente el cable de alimentación y conecte el aparato a una toma de corriente
correctamente instalada.
• No use el aparato si muestra algún signo de daños.
Advertencia: Las bolsas de plástico son un peligro para niños pequeños y bebés, por lo tanto,
manténgalas alejadas de ellos para evitar riesgos de asfixia.
Capa protectora
El elemento calefactor del aparato tiene una capa protectora. Para retirar las capas protectoras del elemento
calefactor, caliente el aparato durante unos 10 minutos en el ajuste más alto.
A continuación, deje que el aparato y los accesorios se enfríen completamente y límpielos según la sección
de “Limpieza y cuidado”.
Nota: durante este proceso, el aparato podría producir brevemente algo de humo u olor, debido
a residuos que pudieron quedar en los elementos calefactores durante el proceso de fabricación. Esto es
normal y no dañino. Asegúrese de que la habitación está bien ventilada.

86
Montaje del soporte
Antes de usar la parrilla de la barbacoa, el soporte debe estar montado.
Retire el embalaje de todas las piezas y comience a montar el soporte.
Barra metálica corta
Barra metálica larga
1. Coja las barras metálicas (1) e inserte la barra larga (1) en la corta (1). Asegúrese de que los orificios
de ambas barras (1) estén alineados. La barra metálica más corta (1) debe mirar hacia arriba, hacia la
parrilla.
Barra metálica larga
Barra metálica corta
2. Fije las patas (barras metálicas) (1) del soporte a las placas metálicas (3).
- Coloque los oricios de las placas metálicas cortas y largas (3) sobre los oricios de las barras metálicas
(1) e inserte el tornillo (4).
- Coloque la tuerca (4) en el tornillo (4) y apriételo ligeramente. Las placas metálicas largas (3) deberían
fijarse a la parte delantera del soporte y las cortas (3) a los laterales.
- Fije las 3 patas restantes (1) al soporte según corresponda.
3. Ahora, apriete la tuerca (4).

ESPAÑOL
Manual de instrucciones
87
Nota: el soporte montado tiene forma trapezoidal. La parte estrecha mira hacia arriba.
4. Inserte los topes de goma (2) en cada abertura de la pata montada (1).
5. Inserte el estante de almacenamiento.
6. El soporte estará ahora completamente montado.

88
Montaje de la parrilla
1. Coloque las 4 patas de goma (8) en el aparato (parte trasera).
2. Coloque el parabrisas (1) insertando las puntas en las respectivas aberturas de la carcasa (2). Asegúrese
de que esté correctamente asegurado.
3. Coloque la bandeja reflectora de aluminio extraíble (3) en la carcasa de la barbacoa (2).
4. Fije la bandeja reflectora de aluminio (3) con el tornillo y la tuerca (11). Los orificios de perforación están
en la parte delantera, a la izquierda del control de funcionamiento.
5. Inserte las dos puntas del control de funcionamiento (5) en los orificios de perforación de la carcasa del
aparato (2). Al insertar el termostato (5) asegúrese de que esté correctamente posicionado en las guías
en ambos lados y presiónelo firmemente hacia abajo hasta que encaje en su lugar.

ESPAÑOL
Manual de instrucciones
89
6. Coloque la parrilla (7) en la carcasa del aparato (2) y asegúrese de que esté correctamente asegurada.
La altura de la parrilla es ajustable: alta o baja.
Nivel más alto Nivel más bajo
Uso
Asegúrese siempre de llenar con agua la bandeja de goteo de la carcasa de la barbacoa (2) antes de
usar el aparato. La bandeja de goteo extraíble (3) se colocará en la parte superior, después de que
se haya llenado con agua la bandeja de goteo de la carcasa de la barbacoa (2).
Nunca use el aparato sin agua en la bandea de goteo de la carcasa de la barbacoa (2)!
El aparato debe usarse solamente en una habitación bien ventilada o en un área exterior
protegida del viento.
1. Tras montar el aparato, retire la parrilla (7), el elemento calefactor (4) y la bandeja reflectora de aluminio
extraíble (3).
2. Llene la bandeja de goteo de la carcasa de la barbacoa con entre 0,4 y 0,9 litros de agua. Asegúrese de
no exceder el nivel máximo (0,9 l).
Precaución – Asegúrese de que el aparato esté apagado y desenchufado. Riesgo de
descarga eléctrica.
3. Siga los pasos del 3 al 6 de la sección de Montaje.
4. Conecte el enchufe del aparato a una toma de corriente correctamente instalada y de fácil acceso.
5. Encienda el aparato girando el control de temperatura (5) al nivel más alto (MAX). Caliente el aparato
durante aproximadamente 10 minutos. La luz indicadora (6) se encenderá. Tras este proceso de
calentamiento, ajuste la temperatura girando el control de temperatura (5) al nivel deseado. El termostato
integrado mantendrá la temperatura preestablecida a un nivel constante.
6. Tan pronto como se alcance la temperatura respectiva, la luz indicadora (6) se apagará.
Atención: el control de temperatura (5) es continuamente variable.
7. El aparato l estará ahora listo para su uso. Coloque siempre los alimentos a asar en el centro de la parrilla
(7).
Durante el uso, la luz indicadora se encenderá y apagará mientras el termostato mantiene el
elemento calefactor a la temperatura correcta.
8. Tras su uso, gire el control de temperatura (5) a MIN y desenchufe el aparato.
La temperatura de las superficies accesibles puede ser alta durante el funcionamiento. Por
lo tanto, no toque el aparato durante o inmediatamente después de su uso. Use manoplas cuando
manipule los alimentos.

90
Advertencia: este aparato debe conectarse únicamente a una toma de pared correctamente
instalada y no debe ser usado mediante ningún tipo temporizador externo o un sistema de control remoto
independiente.
Limpieza y cuidado
Por motivos de higiene, limpie el aparato de forma regular, mejor tras cada uso y elimine los restos
de comida. No hacerlo podría resultar en una situación peligrosa.
Antes de limpiarlo, apague siempre el aparato y desconéctelo de la red eléctrica. Deje que se enfríe
completamente.
Nunca sumerja el aparato en agua. Peligro. Descarga eléctrica.
Retire el elemento calefactor con el control de funcionamiento antes de limpiarlo, y límpielo con un paño
seco. Asegúrese de que se haya enfriado completamente.
Limpie la carcasa del aparato con un paño suave humedecido. No use productos de limpieza agresivos u
objetos duros para limpiar el aparato.
Una vez que la bandeja reflectora de aluminio y la parrilla se hayan enfriado, límpielas en agua tibia con un
poco de detergente de lavavajillas, enjuáguelas y séquelas bien.
Elimine las salpicaduras y restos de comida con un paño suave húmedo. Si fuera necesario, use un
lavavajillas suave.
Las piezas del aparato no son aptas para lavavajillas.
La limpieza y mantenimiento no debe realizarse por niños no supervisados.
ALMACENAMIENTO
Tras el uso, desconecte el aparato de la red eléctrica y déjelo enfriar completamente.
Mantenga el aparato fuera del alcance de los niños y guárdelo en un lugar limpio y seco.
Instrucciones de eliminación
Los dispositivos eléctricos marcados con esta imagen no deben desecharse junto con la basura
doméstica, sino que deben recogerse por separado. Por lo tanto, al final de su vida útil, lleve este dispositivo
a un punto de recogida especial o al distribuidor local.
Su Barbacoa con Soporte 46221 viene empaquetado en una caja de minorista. Dichas cajas
son basura reciclable, es decir, son reutilizables o reciclables.
DATOS TÉCNICOS:
Voltaje: 220 - 240 V ~ 50 / 60 Hz
Potencia: 2200 W
Clase de protección: I
Datos técnicos sujetos a cambios.

ESPAÑOL
Manual de instrucciones
91
Garantía:
Este producto está garantizado contra defectos en materiales
y de mano de obra por un periodo de 2 años.
Esta garantía no es válida:
• si el aparato no se ha usado según las instrucciones.
• por daños debidos al desgaste (baterías, etc.).
• por daños conocidos por el cliente en el momento de la
compra.
• por daños causados por el propietario.
Esta garantía no afecta su derecho estatutario, ni ningún
derecho legal que pueda tener como cliente bajo la legislación
nacional aplicable que rija la compra de bienes.
Para hacer valer su derecho de garantía durante el periodo
garantizado, el cliente debe proporcionar una evidencia de
la fecha de compra (recibo).
La garantía debe presentarse contra
KORONA electric GmbH, Sundern/Alemania.
Línea telefónica directa: +49 2933 90284-80
Correo electrónico: [email protected]
Página web: www.korona-electric.de
dentro de los 2 años posteriores a la fecha de compra. En
caso de hacer valer la garantía, el cliente tiene derecho a
tener su aparato reparado en nuestra tienda o en una tienda
autorizada. No se otorgan más derechos (por la garantía) al
consumidor.

92
Kullanım Amacı
Kullanmadan önce lütfen bu talimatları dikkatlice okuyun
ve güvenli bir yerde, ileride okumak üzere saklayın. Cihazı
üçüncü taraf kullanıcılara verirken bu kullanma kılavuzunun
da cihazla birlikte verildiğinden emin olun.
Bu alet sadece kızartma yapılacak yiyecekler için
tasarlanmıştır. Bu alet diğer kullanımlar için uygun değildir,
tersi durumda hasar ya da yaralanma riski doğabilir. Bu alet
ticarî kullanım için tasarlanmamıştır!
Güvenlik:
Bu sembol yaralanmalara neden olabilecek tehlikeleri
tanımlar!
Bu sembol sıcak yüzey tehlikesine karşı uyarır. Yanma
tehlikesi!
Bu sembol elektrik çarpması tehlikelerini belirtir!
Genel Güvenlik Yönergeleri
• Üretici yanlış kullanımından kaynaklanan herhangi bir zarar
için hiçbir sorumluluk kabul etmez.
• Hatalı ya da uygunsuz kullanım, cihazın zarar görmesine
ve kullanıcının yaralanmasına neden olabilir.
• Bu cihazı ana şebekeye bağlamadan önce yerel voltaj
değerlerinizin cihazın teknik verileriyle eşleştiğinden emin
olun. Aksi takdirde cihaz aşırı ısınır ve zarar görebilir.

TÜRKÇE
Kullanma Kılavuzu
93
Dikkat! Elektrik çarpması tehlikesi!
• Cihazı, kablosunu veya şini hiç bir zaman su veya başka
bir sıvı içerisine koymayın.
• Cihazı lavabo yakınında kullanmayın.
• Cihazı ıslak elle kullanmayın.
• Cihazı açık havada kullanmayın.
Elektrikli cihaz oyuncak değildir!
• Cihazı kullanım sırasında hiç bir zaman kendi başına
bırakmayın.
• Bu cihaz, kullanıma ilişkin olarak uygun bir biçimde gerekli
gözetim ve talimatlar verilmiş ve cihazın güvenli bir şekilde
kullanımıyla ilgili tüm tehlikeler anlaşılmış ise, 8 yaş ve üzeri
çocuklar ile ziksel, duyusal veya zihinsel kabiliyetleri sınırlı
veya deneyimsiz ve bilgisi olmayan kişiler tarafından da
kullanılabilir. Çocuklar cihazla oynamamalıdır. 8 yaşından
büyük ve gözetim altında olmadıkları sürece temizleme ve
kullanım bakımları çocuklar tarafından yapılmamalıdır.
• Cihazı ve kablosunu 8 yaşından küçük çocukların
ulaşamayacağı bir yerde tutun.
• Kullanılmadığında ve temizlemeden önce her zaman
cihazınızın fișini çekin.
• Her zaman şi çekin – kabloyu değil.
• Cihaza herhangi bir zarar gelmesini önlemek için cihazı ve
kablosunu sıcak yüzeylerden yeterince uzakta tutun.
• Kullanım sırasında kablonun yanlışlıkla çekilmediğinden
veya birisinin ayağına dolaşmadığından emin olun.
Kablonun keskin kenarlardan asılmasına izin vermeyin.
• Kabloyu bükmeyin veya cihazın etrafına sarmayın.

94
Cihazı șu durumlarda kullanmayın,
• kablosunun hasarlı olması durumunda.
• arızalı olması durumunda.
• cihazın düşürülmesi veya başka şekilde hasar görmesi
durumunda.
Cihazın kontrolünün ve gerektiğinde tamirinin nitelikli bir
kişi/Müşteri Hizmetleri tarafından yapılmasını sağlayın.
Cihazda kendi başınıza herhangi bir modikasyon veya
onarım yapmaya kalkmayın.
• Yalnızca bu cihazla kullanıma uygun aksesuarlar kullanın.
• Cihazın için herhangi bir cisim sokmaya çalışmayın.
• Cihaz muhafazasını kendi başınıza açmaya çalışmayın!
• Cihaz harici bir zamanlayıcı veya ayrı uzaktan kumanda
sistemi ile çalıştırılmak için TASARLANMAMIŞTIR.
Özel Güvenlik Talimatları
Uyarı! Yara lanmalar, cihazın hasar görmesi, elektrik
çarpması, yangın ve yanma riski olasılığını önlemek için!
• Cihazı yalnızca amacına uygun ve bu kılavuzda belirtildiği
şekilde kullanın, örn.
• Cihazı düz ve ısıya dayanıklı bir yüzeye yerleştirin.
• Metal bir yüzeyin üzerine koymayın.
• Aksesuarları değiştirmeden ya da temizlemeden önce
daima aleti soğumaya bırakın.
• Aleti koruyucu damlama tavasına su doldurmadan asla
kullanmayın. Aletin alüminyum reektör tepsisine ASLA su
doldurmayın.
• Su doldururken, koruyucu içindeki MAX. (0,9 lt.) dolum
işaretini aşmayın.
• Kullanım sırasında su seviyesi düşer. Gerekirse su ekleyin.
Doldururken, 0,9 lt.’’lik MAX. miktarı aşmadığınızdan ve
ısıtma parçasına su sıçratmadığınızdan emin olun.

TÜRKÇE
Kullanma Kılavuzu
95
• Kullanım sırasında aleti hareket ettirmeyin. Sıcak su ciddi
yanık tehlikesine neden olur!
• Alet kullanım sırasında ısınır. Bu nedenle, pişirme
sıcaklığını ayarlamak için sadece korumalı kontrol paneli
alanına dokunun. Yiyecekleri ızgarada tutarken daima
maşa, spatula ya da çatal kullanın. Bu aletlerle asla ısıtma
parçasına dokunmayın! Ciddi yanık tehlikesi vardır!
• Aleti asla yanıcı sıvıların ya da gaz kaynaklarının yakınında
çalıştırmayın.
• Bu alette asla kömür ya da benzeri yanıcı yakıtlar
kullanmayın.
• Aleti yanıcı nesnelerin yakınında ya da altında kullanmayın,
örn. masa örtüsü, perdeler, dolaplar.
• Dikkat: Yağ içeriği yüksek yiyecekler kolayca tutuşabilir ve
alev alabilir.
• Barbeküyü iç mekânlarda kullanırken duman çıkacaktır. O
nedenle havalandırma sağlayın.
• Tüm parçalar TAMAMEN monte edildikten sonra cihazı
çalıştırın! Isıtma parçası mangaldan ayrıldıktan sonra asla
elektrike bağlamayın. Ciddi yanık tehlikesi vardır!
• Dikkat! Isıtma parçasının kontrol panelinde entegre bir
güvenlik anahtarı bulunur (bkz. aşağıdaki resim). Isıtma
parçasının barbekü muhafazasının sacına sabitlenmesi
bu anahtarı etkinleştirir. Muhafaza bükülürse, güvenlik
anahtarı çalışmayabilir yani cihaz ısınmayabilir. Gerekirse
sac levhayı elinizle ayarlayın.
• Aynı prize/çoklu prize başka herhangi bir ev aleti
bağlamayın, çünkü acil bir durumda şin hızlı bir şekilde
erişilebilir olması gerekir.
• DİKKAT: Termal devre kesicinin yanlışlıkla sıfırlanmasından
kaynaklanan bir tehlikeyi önlemek için, bu alet harici
bir zamanlayıcı gibi harici bir anahtarlama cihazıyla
beslenmemeli ya da düzenli olarak açılıp kapatılan bir
devreye bağlanmamalıdır.

96
Ürün Açıklaması
7
4
9
11
1
2
3
10
5
8
6
1. Ayrılabilir ön cam
2. Barbekü koruyucusu
3. Çıkarılabilir alüminyum reektör tepsisi
4. Isıtma parçası
5. Sıcaklık kontrol düğmesiyle çalıştırma / Termostat
6. Gösterge ışığı
7. Izgara rafı
8. 4 lastik ayak (alt taraf)
9. Elektrik kablosu ve ş
10. Güvenlik anahtarı
11. Vida ve Somun (damlama tepsisi)

TÜRKÇE
Kullanma Kılavuzu
97
Sıcaklık kontrol düğmesi / Termostat:
-MIN
-MAX
MAX
MIN
Çalışma sırasında entegre bir termostat, sabit bir sıcaklık sağlamak için cihazı açar ve kapatır. Bu, gösterge
ışığının açılıp kapanmasıyla gösterilir.
Ön cam
Barbeküyü dışarıda kullanırken, ön cam kuvvetli rüzgâr ve dolayısıyla uzun pişirme süreleri nedeniyle ısı
kaybını önlemeye yardımcı olabilir.
Güvenlik anahtarı
Not: Güvenlik anahtarı, ısıtma elemanının ancak barbekü muhafazasına düzgün bir şekilde oturduktan sonra
ısıtma işlemini başlatmasını sağlar!

98
Ayaklık
1. Ayaklar (uzun metal direkler (4x) / kısa metal direkler (4x))
2. Lastik kapaklar (8x)
3. Metal plakalar (uzun (2x), kısa (2x))
4. Vida ve somunlar (4x)
5. Depolama rafı
1
4
3
2
5
İlk Kullanımdan Önce
• Ambalajı açıp tüm malzemeleri çıkarın.
• Parçaları, Temizlik ve Bakım bölümünde açıklandığı gibi temizleyin.
• Aletin montajını Montaj bölümünde açıklandığı gibi yapın.
• Cihazı düz, kaygan olmayan, sıcak ve dayanıklı bir yüzeye koyun.
• Elektrik kablosunu tamamen açın ve aleti uygun bir duvar prizine takın.
• Cihazda herhangi bir hasar varsa cihazı kullanmayın.
Uyarı: Plastik torbalar, küçük çocuklar ve bebekler için bir tehlike yaratabilir, bu nedenle boğulmayı
önlemek için onları uzak tutun.
Koruyucu kaplama
Cihazın ısıtma parçasında koruyucu bir kaplama vardır. Isıtma parçası üzerindeki koruyucu tabakaları
çıkarmak için cihazı en yüksek ayarda yaklaşık 10 dakika ısıtın.
Daha sonra cihazı ve aksesuarlarını tamamen soğumaya bırakın ve “Temizlik ve Bakım”daki açıklamaya göre
temizleyin.
Not: Alet bu işlem sırasında, üretim sürecinden kalan ısıtma parçalarındaki kalıntılardan dolayı kısa
süreliğine bir miktar duman ya da koku üretebilir. Bu normaldir ve zararlı değildir. Odanın iyi havalandırıldığından
emin olun.

TÜRKÇE
Kullanma Kılavuzu
99
Ayaklığın Montajı
Ayaklık, barbekü ızgarasını kullanmadan önce monte edilmelidir.
Tüm parçaları ambalajından çıkarın ve ayaklığı monte etmeye bașlayın.
Kısa metal çubuk
Uzun metal çubuk
1. Metal çubukları (1) alın ve uzun çubuğu (1) kısa çubuğa (1) yerleştirin. Her iki kutbun delikleri (1) hizalanır.
Daha kısa olan metal çubuk (1) ızgara ünitesine doğru yukarı bakmalıdır.
Uzun metal taraf
Kısa metal taraf
2. Standın ayaklarını (metal çubukları) (1) metal plakâlara (3) takın.
- Kısa ve uzun metal plakâların (3) deliklerini metal çubukların (1) deliklerinin üzerine yerleştirin ve vidayı (4)
takın.
- Somunu (4) vidaya (4) takın ve hafçe sıkın. Uzun metal plakâlar (3) ön tarafa, kısa metal plakâlar (3) ise
ayaklığın yan taraarına takılmalıdır.
- Kalan 3 ayağı (1) uygun şekilde sehpaya takın.
3. Şimdi somunu (4) sıkın.

100
Not: Monte edilen ayaklığın şekli yamuktur. Dar taraf yukarı bakar.
4. Lastik kapakları (2) monte edilmiş ayağın (1) her bir açıklığına sokun.
5. Depolama rafını yerleştirin.
6. Ayaklık artık tamamen monte edilmiştir.

TÜRKÇE
Kullanma Kılavuzu
101
Izgara Montajı
1. 4 lastik ayağı (8) alete (alt taraf) takın.
2. Uçları muhafazanın (2) ilgili açıklıklarına sokarak ön camı (1) takın. Doğru şekilde sabitlediğinizden emin
olun.
3. Çıkarılabilir alüminyum reektör tepsisini (3) barbekü muhafazasına (gövde) yerleştirin (2).
4. Alüminyum reektör tepsisini (3) vida ve somunla (11) sabitleyin. Delme delikleri, çalıştırma kontrolünün
solunda ön taraftadır.
5. Çalıştırma kontrolünün (5) iki ucunu aletin gövdesindeki (2) deliklere sokun. Termostatı (5) takarken, her
iki taraftaki kılavuzlara doğru şekilde yerleştirildiğinden emin olun ve yerine oturana kadar sıkıca bastırın.

102
6. Izgarayı (7) cihaz gövdesine (2) takın ve doğru şekilde sabitlendiğinden emin olun. Izgara rafının yüksekliği
ayarlanabilir: Yüksek veya Düşük.
Daha yüksek düzeyde Daha düşük düzeyde
Çalıștırma
Cihazı çalıștırmadan önce daima barbekü muhafazasının (2) damlama tavasına su doldurduğunuzdan
emin olun. Barbekü muhafazasının (2) damlama tavası suyla doldurulduktan sonra çıkarılabilir
damlama tepsisi (3) üste yerleștirilecektir.
Barbekü muhafazası damlama tavasında (2) su olmadan cihazı asla çalıștırmayın!
Cihaz yalnızca iyi havalandırılan bir odada ya da rüzgârdan korunan bir dıș alanda
kullanılmalıdır!
1. Cihazı monte ettikten sonra ızgarayı (7), ısıtma parçasını (4) ve çıkarılabilir alüminyum reektör tepsisini (3)
çıkarın.
2. Barbekü muhafazasının (gövde) (2) damlama kabına 0,4 lt. ila 0,9 lt. su doldurun. MAX (0.9 lt.) seviyesini
aşmadığınızdan emin olun.
Dikkat! Cihazın kapalı ve fișinin çekili olduğundan emin olun! Elektrik çarpma tehlikesi vardır.
3. Montajdaki 3. – 6. adımları izleyin.
4. Cihazın şini sağlam ve kolay erişilebilir bir duvar prizine takın.
5. Sıcaklık kontrol düğmesini (5) en yüksek seviyeye (MAX) çevirerek cihazı çalıştırın. Cihazı yaklaşık 10
dakika ısıtın. Gösterge ışığı (6) yanar. Bu ısıtma işleminden sonra sıcaklık kontrol düğmesini (5) istenilen
seviyeye çevirerek sıcaklığı ayarlayın. Entegre termostat, önceden ayarlanmış sıcaklığı sabit bir seviyede
tutacaktır.
6. İstenilen sıcaklığa ulaşılır ulaşılmaz gösterge ışığı (6) söner.
Dikkat: Sıcaklık kontrolü (5) sürekli değişkendir.
7. Cihaz artık kullanıma hazır. - Izgara yapılacak yiyecekleri her zaman ızgara rafının (7) ortasına yerleştirin.
Kullanım sırasında, termostat ısıtma parçasını doğru sıcaklıkta tutarken gösterge ışığı açılıp
kapanacaktır.
8. Kullanımdan sonra daima sıcaklık kontrol düğmesini (5) MIN konumuna getirin ve cihazın şini çekin.
Çalıșma sırasında erișilebilir yüzeylerin sıcaklığı yüksek olabilir. Bu nedenle, çalıștırma
sırasında ve/ya da hemen sonrasında cihaza dokunmayın. Yiyecekleri tutarken tencere tutacakları
kullanın.

TÜRKÇE
Kullanma Kılavuzu
103
Uyarı: Bu cihaz yalnızca doğru şekilde kurulmuş bir duvar prizine bağlanmalı ve herhangi bir harici
zamanlayıcı ya da ayrı bir uzaktan kumanda sistemi ile çalıştırılmamalıdır.
Temizlik ve Bakım
Hijyenik nedenlerden dolayı cihazınızı düzenli olarak, her kullanımdan sonra temizleyin ve yemek
artıklarını temizleyin. Bu yapılmadığında tehlikeli bir duruma neden olabilir.
Temizlemeden önce daima cihazı kapatın ve elektrik şebekesi bağlantısını kesin. Tamamen soğumaya bırakın.
Cihazı asla suya sokmayın. Tehlike! Elektrik Çarpması!
Temizlemeden önce ısıtma parçasını çalıştırma kontrolü ile çıkarın ve kuru bir bezle silin. Tamamen
soğuduğundan emin olun.
Cihazın gövdesini nemli yumuşak bir bezle temizleyin. Cihazı temizlemek için aşındırıcı temizlik maddeleri ve/
ya da başka sert nesneler kullanmayın.
Alüminyum reektör tepsisi ve ızgara rafı soğuduktan sonra, biraz bulaşık deterjanı kullanarak ılık suda
temizleyin, durulayın ve iyice kurulayın.
Sıçrayan/yemek artıklarını nemli yumuşak bir bezle temizleyin. Gerekirse, haf bir bulaşık deterjanı kullanın.
Cihazın parçaları bulaşık makinesinde yıkanabilir değildir.
Aletin temizlik ve bakımı çocuklar tarafından yapılmamalıdır.
MUHAFAZA
Kullandıktan sonra cihazı șebekeden ayırın ve tamamen soğumasını bekleyin.
Cihazı çocuklardan uzak tutun ve temiz ve kuru bir yerde saklayın.

104
Atma Talimatları
Bu işaretle işaretlenmiş elektrikli cihaz atıkları ev atıklarınızla birlikte atılmamalı, bunun yerine ayrı ayrı
toplanmalıdır. Bu nedenle, lütfen bu cihazı ömrünün sonunda özel toplama noktalarına veya yerel bayinize
iade edin.
Ayaklı Barbekü Izgarası 46221 cihazınız perakende kutuda paketlenmiştir. Bu kutular geri
dönüştürülebilir atıklardır, yani, tekrar kullanılabilir ya da geri dönüştürülebilir.
TEKNİK VERİLER:
Voltaj: 220 - 240 V ~ 50 / 60 Hz
Güç: 2200 W
Koruma sınıfı: I
Teknik veriler değișebilir!

TÜRKÇE
Kullanma Kılavuzu
105
Garanti:
Bu ürün 2 yıl süreyle malzeme ve işçilik hatalarına karşı
garantilidir.
Bu garanti şu durumlarda geçerli değildir:
• Cihazın talimatlara uygun olarak kullanılmadığı durumlarda
• aşınma ve yıpranma (piller, vb.) nedeniyle oluşacak hasarlar
için
• satın alma sırasında müşteri tarafından bilinen hasarlar için
• ürün sahibinin neden olduğu hasarlar için
Bu garanti, ulusal mevzuat uyarınca müşteri olarak sahip
olabileceğiniz herhangi bir yasal hakkı veya kanunlarla size
verilen müşteri haklarınızı etkilemez.
Garanti süresi boyunca, bir garanti durumunda hak iddia
edebilmek için müşterinin satın alma tarihini belgeleyen bir
kanıt (makbuz) sunmalıdır.
Garanti kapsamında hak iddiaları aşağıdaki şirkete
yöneltilecektir
KORONA electric GmbH, Sundern/Almanya.
Müşteri Hattı: +49 2933 90284-80
E-posta [email protected]
web: www.korona-electric.de
satın alma tarihinden itibaren 2 yıl içinde. Garanti durumunda
müşteriye cihazı masraar kendisinden olmak üzere veya
yetkili bir mağazada tamir ettirme hakkı verilir. Müşteriye
başka ekstra haklar (garanti durumu nedeniyle) verilmez.

106
Przeznaczenie
Przed użyciem należy uważnie przeczytać instrukcję i
przechowywać ją w bezpiecznym miejscu do wykorzystania
w przyszłości. W przypadku przekazywania urządzenia
osobom trzecim, należy koniecznie dołączyć do niego tę
instrukcję obsługi.
To urządzenie jest przeznaczone tylko do opiekania żywności.
Wszelkie inne zastosowania lub modyfikacje urządzenia
nie są zamierzone przez producenta i mogą wiązać się z
ryzykiem uszkodzenia lub zranienia. To urządzenie nie jest
przeznaczone do użytku komercyjnego!
Bezpieczeństwo:
Ten symbol wskazuje na zagrożenia, które mogą
powodować obrażenia!
Ten symbol ostrzega przed gorącymi powierzchniami.
Ryzyko poparzeń!
Ten symbol wskazuje na ryzyko porażenia prądem!
Ogólne instrukcje dotyczące bezpieczeństwa
• Producent nie ponosi odpowiedzialności za uszkodzenia
spowodowane nieprawidłowym użytkowaniem.
• Nieprawidłowe lub niewłaściwe użycie może spowodować
uszkodzenie urządzenia i obrażenia ciała użytkownika.
• Przed podłączeniem urządzenia do sieci elektrycznej
należy upewnić się, że lokalne napięcie jest zgodne z
danymi technicznymi urządzenia. W przeciwnym razie
urządzenie może się przegrzać i ulec uszkodzeniu.

POLSKI
Instrukcja obsługi
107
Uwaga! Niebezpieczeństwo porażenia
prądem elektrycznym!
• Nigdy nie należy wkładać urządzenia, przewodu lub
wtyczki do wody lub jakiegokolwiek innego płynu.
• Nie należy używać urządzenia w pobliżu zlewu lub
umywalki.
• Nie należy używać urządzenia mokrymi rękami.
• Nie należy używać urządzenia na wolnym powietrzu.
Urządzenie elektryczne nie jest zabawką!
• Nigdy nie należy pozostawiać urządzenia bez nadzoru
podczas użytkowania.
• Urządzenie może być używane przez dzieci w wieku
od 8 lat i starsze, a także osoby o ograniczonej
sprawności fizycznej, sensorycznej lub umysłowej lub o
niewystarczającym doświadczeniu i wiedzy, wyłącznie
jeśli są pod nadzorem lub otrzymały instrukcje dotyczące
użytkowania urządzenia w bezpieczny sposób i rozumieją
związane z tym zagrożenia. Dzieci nie powinny bawić
się urządzeniem. Dzieci nie powinny czyścić ani
konserwować urządzenia, chyba że mają więcej niż 8 lat
i są pod nadzorem.
• Przechowuj urządzenie i przewód w miejscu niedostępnym
dla dzieci w wieku poniżej 8 lat.
• Zawsze odłączaj urządzenie od zasilania, gdy nie jest
używane oraz przed przystąpieniem do czyszczenia.
• Zawsze ciągnij za wtyczkę - nie za przewód.
• Trzymaj urządzenie i przewód z dala od gorących
powierzchni, aby uniknąć uszkodzenia urządzenia.
• Upewnij się, że przewód nie może zostać przypadkowo
pociągnięty ani spowodować potknięcia się podczas
użytkowania. Nie pozwól, aby przewód zwisał nad ostrymi
krawędziami.

108
• Nie należy zginać przewodu, ani owijać go wokół
urządzenia.
Nie należy używać urządzenia,
• jeśli przewód jest uszkodzony.
• w przypadku awarii.
• jeśli zostało upuszczone lub uszkodzone w inny sposób.
Należy zlecić sprawdzenie i, w razie potrzeby, naprawę
wykwalikowanejosobie/obsłudzeklienta.Nigdyniepróbuj
samodzielnie modyfikować ani naprawiać urządzenia.
• Używaj tylko akcesoriów przeznaczonych do użytku z tym
urządzeniem.
• Nigdy nie próbuj wbijać żadnych przedmiotów w
urządzenie.
• Nigdy nie próbuj otwierać obudowy samodzielnie!
• Urządzenie nie jest przeznaczone do obsługi za pomocą
zewnętrznego wyłącznika czasowego lub oddzielnego
systemu zdalnego sterowania.
Specjalne instrukcje dotyczące bezpieczeństwa
Ostrzeżenie! Aby uniknąć możliwości zranienia/
uszkodzenia urządzenia, porażenia prądem, pożaru i
ryzyka poparzenia.
• Należy używać urządzenia tylko zgodnie z przeznaczeniem
i zgodnie z opisem zawartym w niniejszej instrukcji.
• Umieść urządzenie na równej i odpornej na ciepło
powierzchni.
• Nie umieszczaj go na metalowej powierzchni.
• Zawsze pozwól urządzeniu ostygnąć przed wymianą
akcesoriów lub czyszczeniem.

POLSKI
Instrukcja obsługi
109
• Nigdy nie używaj urządzenia bez napełnienia misy
ociekowej wodą, ale NIGDY nie napełniaj wodą
aluminiowej tacy urządzenia.
• Podczas napełniania wodą upewnij się, że nie został
przekroczony znak MAX (0,9l) poziomu napełniania
wewnątrz obudowy
• Poziom wody spada podczas użytkowania. W razie
potrzeby napełnij wodą. Podczas napełniania upewnij się,
aby nie przekroczyć poziomu MAX (0,9l) i nie rozpryskiwać
wody na element grzewczy.
• Nie przesuwaj urządzenia podczas pracy.
Niebezpieczeństwo poważnych oparzeń od gorącej
wody!
• Urządzenie nagrzewa się podczas użytkowania.
Dlatego dotykaj wyłącznie ochronnego obszaru panelu
sterowania, aby ustawić temperaturę gotowania.
Podczas obchodzenia się z żywnością na grillu zawsze
używaj szczypiec, szpatułek lub widelców. Nigdy
nie dotykaj elementu grzewczego tymi przyrządami!
Niebezpieczeństwo poważnych oparzeń!
• Nigdy nie obsługuj urządzenia w pobliżu łatwopalnych
cieczy lub źródła gazu.
• Nigdy nie używaj węgla drzewnego lub podobnych paliw
palnych przy użyciu tego urządzenia.
• Nie stosuj urządzenia w pobliżu lub pod łatwopalnymi
przedmiotami, np. obrusem, zasłonami, szafkami
ściennymi.
• Uwaga: Żywność o wysokiej zawartości oleju i tłuszczu
może łatwo się zapalić.
• Podczas korzystania z grilla w pomieszczeniach należy
zapewnić odpowiednią wentylację pomieszczenia,
ponieważ może rozwinąć się dym.
• Włącz urządzenie TYLKO po złożeniu wszystkich części!
Gdy element grzewczy jest odłączony od grilla, nigdy nie
podłączaj do zasilania. Niebezpieczeństwo poważnych
oparzeń!

110
• Uwaga! Panel sterowania elementu grzewczego posiada
zintegrowany wyłącznik bezpieczeństwa (patrz zdjęcie
poniżej). Mocowanie elementu grzewczego do blachy
obudowy grilla aktywuje ten przełącznik. W przypadku
wygięcia obudowy wyłącznik bezpieczeństwa może nie
działać, tzn. urządzenie nie nagrzeje się. W razie potrzeby
ręcznie wyreguluj blachę.
• Nie podłączaj żadnych innych urządzeń do tego samego
gniazda/wielu gniazd, ponieważ w nagłych przypadkach
wtyczka musi być szybko dostępna.
• UWAGA: Aby uniknąć zagrożenia spowodowanego
nieumyślnym zresetowaniem wyłącznika termicznego,
urządzenie to nie może być zasilane przez zewnętrzne
urządzenie przełączające, takie jak zewnętrzny timer, lub
podłączone do obwodu, który jest regularnie włączany i
wyłączany.

POLSKI
Instrukcja obsługi
111
Opis produktu
7
4
9
11
1
2
3
10
5
8
6
1. Zdejmowana osłona
2. Zabudowa grilla (obudowa)
3. Wyjmowana aluminiowa taca
4. Element grzewczy
5. Sterowanie z pokrętłem regulacji temperatury / Termostat
6. Lampka kontrolna
7. Ruszt do grillowania
8. 4 gumowe podnóżki (dolna część)
9. Przewód zasilający i wtyczka
10. Wyłącznik bezpieczeństwa
11. Śruba i nakrętka (taca ociekowa)

112
Pokrętło regulacji temperatury/Termostat:
-MIN
-MAX
MAX
MIN
Podczas pracy zintegrowany termostat włącza i wyłącza urządzenie, aby zapewnić stałą temperaturę.
Sygnalizuje to włączająca i wyłączająca się lampka kontrolna.
Osłona
Podczas korzystania z grilla na zewnątrz, przednia szyba może pomóc uniknąć utraty ciepła z powodu
silnego wiatru, a tym samym wydłużenia czasu gotowania.
Wyłącznik bezpieczeństwa
Uwaga: Wyłącznik bezpieczeństwa zapewnia, że element grzewczy rozpocznie proces ogrzewania dopiero
po prawidłowym ustawieniu na obudowie grilla!

POLSKI
Instrukcja obsługi
113
Stojak
1. Nogi (długie metalowe rurki (4x)/krótkie metalowe rurki (4x))
2. Gumowe nakładki (8x)
3. Metalowe płytki (długie (2x), krótkie (2x))
4. Śruby i nakrętki (4x)
5. Półka do przechowywania
1
4
3
2
5
Przed pierwszym użyciem
• Wyjmij wszystkie elementy z opakowania i sprawdź, czy urządzenie jest kompletne.
• Wyczyść części zgodnie z opisem w sekcji Czyszczenie i pielęgnacja.
• Zmontuj urządzenia zgodnie z opisem w sekcji Montaż.
• Umieść urządzenie na równej, antypoślizgowej i odpornej na ciepło powierzchni.
• W pełni rozwiń przewód zasilający i podłącz urządzenie do prawidłowo zainstalowanego gniazdka
ściennego.
• Nie używaj urządzenia, jeśli wykazuje jakiekolwiek oznaki uszkodzenia.
Ostrzeżenie: Plastikowe torby stanowią zagrożenie dla małych dzieci i niemowląt, dlatego trzymaj
je z daleka, aby uniknąć zadławienia.
Powłoka ochronna
Element grzewczy urządzenia ma powłokę ochronną. Aby usunąć warstwy ochronne na elemencie
grzewczym, podgrzej urządzenie przez około 10 minut na najwyższym ustawieniu.
Następnie pozwól urządzeniu i akcesoriom całkowicie ostygnąć i wyczyść je zgodnie z sekcją „Czyszczenie
i pielęgnacja”.
Uwaga: Podczas tego procesu urządzenie może na krótko wytworzyć dym lub zapach, który jest
spowodowany pozostałościami na elementach grzewczych po procesie produkcyjnym. Jest to normalne i
nieszkodliwe. Upewnij się, że pomieszczenie jest dobrze wentylowane.

114
Montaż stojaka
Stojak należy zmontowa przed użyciem grilla.
Wyjmij wszystkie części z opakowania i rozpocznij montaż stojaka.
Krótkametalowa rurka
Długa metalowa rurka
1. Weź metalowe rurki (1) i włóż długą rurkę (1) do krótkiej rurki (1). Upewnij się, że otwory obu rurek (1) są
wyrównane. Krótsza metalowa rurka (1) powinna być skierowana do góry w kierunku jednostki grilla.
Długa metalowa rurka
Krótka metalowa rurka
2. Przymocuj nogi (metalowe rurki) (1) stojaka do metalowych płytek (3).
- Umieść otwory krótkich i długich metalowych płytek (3) nad otworami metalowych rurek (1) i włóż śrubę
(4).
- Przyłóż nakrętkę (4) do śruby (4) i lekko ją dokręć. Długie metalowe płytki (3) powinny być przymocowane
do przodu, a krótkie metalowe płytki (3) powinny być przymocowane do boków stojaka.
- Przymocuj pozostałe 3 nogi (1) odpowiednio do stojaka.
3. Teraz przykręć nakrętkę (4).

POLSKI
Instrukcja obsługi
115
Uwaga: Zmontowany stojak ma kształt trapezu. Wąski bok skierowany jest ku górze.
4. Załóż gumowe nakładki (2) do każdego otworu zmontowanej nogi (1).
5. Załóż półkę do przechowywania.
6. Stojak jest już w pełni zmontowany.

116
Montaż grilla
1. Przymocuj 4 gumowe nóżki (8) do urządzenia (z tyłu).
2. Przymocuj osłonę (1), wkładając bolce do odpowiednich otworów obudowy (2). Upewnij się, aby
prawidłowo zabezpieczyć.
3. Umieść wyjmowaną aluminiową tacę (3) w zabudowie grilla (obudowa) (2).
4. Przymocuj aluminiową tacę (3) za pomocą śruby i nakrętki (11). Wywiercone otwory znajdują się z
przodu, po lewej stronie panelu sterowania.
5. Włożyć dwa bolce panelu sterowania (5) do wywierconych otworów obudowy urządzenia (2). Upewnij
się podczas wkładania termostatu (5), aby był prawidłowo umieszczony w prowadnicach po obu
stronach i mocno go przyciśnij, aż zatrzaśnie się na miejscu.

POLSKI
Instrukcja obsługi
117
6. Przymocuj ruszt do grillowania (7) do obudowy urządzenia (2) i upewnij się, że jest prawidłowo
zabezpieczony. Wysokość rusztu do grillowania jest regulowana: wysoka lub niska.
Wyższy poziom Niższy poziom
Działanie
Zawsze upewnij się, aby napełni wodą misę ociekową zabudowy grilla (2) przed uruchomieniem
urządzenia. Wyjmowana taca ociekowa (3) zostanie umieszczona na górze, po napełnieniu wodą
misy ociekowej zabudowy grilla (2).
Nigdy nie używaj urządzenia bez wody w misie ociekowej zabudowy grilla (2)!
Urządzenie powinno by używane tylko w dobrze wentylowanym pomieszczeniu lub w
strefie zewnętrznej chronionej przed wiatrem!
1. Po złożeniu urządzenia należy wyjąć ruszt (7), element grzewczy (4) i wyjmowaną aluminiową tacę (3).
2. Nalej od 0,4l do 0,9l wody do misy ociekowej zabudowy grilla (obudowy) (2). Upewnij się, aby nie
przekroczyć poziomu MAX (0,9l).
Uwaga! Upewnij się, że urządzenie jest wyłączone i odłączone od zasilania!
Niebezpieczeństwo porażenia prądem elektrycznym.
3. Wykonaj kroki 3. – 6. w sekcji Montaż.
4. Podłącz wtyczkę urządzenia do prawidłowo zainstalowanego i łatwo dostępnego gniazdka.
5. Włącz urządzenie, przekręcając pokrętło regulacji temperatury (5) na najwyższy poziom (MAX).
Podgrzewaj urządzenie przez ok. 10 minut. Zaświeci się lampka kontrolna (6). Po tym procesie
podgrzewania wyreguluj temperaturę, przekręcając pokrętło regulacji temperatury (5) do żądanego
poziomu. Zintegrowany termostat utrzyma żądaną temperaturę na stałym poziomie.
6. Po osiągnięciu odpowiedniej temperatury lampka kontrolna (6) gaśnie.
Uwaga: Regulacja temperatury (5) jest zmienna w sposób ciągły.
7. Urządzenie jest teraz gotowe do użycia. - Zawsze umieszczaj jedzenie do grillowania na środku rusztu
(7) –
Podczas użytkowania lampka kontrolna włącza się i wyłącza, podczas gdy termostat utrzymuje
element grzewczy w odpowiedniej temperaturze.
8. Po użyciu, zawsze przekręć pokrętło regulacji temperatury (5) na pozycję MIN i odłącz urządzenie od
zasilania.
Temperatura dostępnych powierzchni może by wysoka w czasie pracy. Dlatego nie należy
dotyka urządzenia podczas i/lub bezpośrednio po jego użyciu. Podczas przenoszenia żywności
używaj uchwytów do naczyń.

118
Ostrzeżenie: To urządzenie powinno być podłączone wyłącznie do prawidłowo zainstalowanego
gniazdka ściennego i nie powinno być obsługiwane za pomocą zewnętrznego wyłącznika czasowego lub
oddzielnego systemu zdalnego sterowania.
Czyszczenie i pielęgnacja
Ze względów higienicznych czyść urządzenie regularnie, najlepiej po każdym użyciu i usuń wszelkie
resztki żywności. Niezastosowanie się do tego mogłoby doprowadzi do niebezpiecznej sytuacji.
Przed przystąpieniem do czyszczenia należy zawsze wyłączyć urządzenie i odłączyć je od zasilania.
Pozostaw urządzenie do całkowitego wystygnięcia.
Nigdy nie zanurzaj urządzenia w wodzie. Niebezpieczeństwo! Porażenie prądem!
Przed czyszczeniem wyjmij element grzewczy z panelem sterowania i wytrzyj go suchą szmatką. Upewnij
się, że całkowicie ostygł.
Oczyść obudowę urządzenia zwilżoną miękką ściereczką. Nie używaj agresywnych środków czyszczących
i/lub innych twardych przedmiotów do czyszczenia urządzenia.
Gdy aluminiowa taca i ruszt do grillowania ostygną, wyczyść je w ciepłej wodzie za pomocą detergentu do
mycia naczyń, dokładnie spłucz i osusz.
Usuń rozpryski/pozostałości żywności wilgotną miękką ściereczką. W razie potrzeby użyj łagodnego płynu
do mycia naczyń.
Części urządzenia nie nadają się do mycia w zmywarce.
Dzieci nie mogą dokonywać czyszczenia i konserwacji bez nadzoru.
PRZECHOWYWANIE
Po użyciu odłącz urządzenie od sieci elektrycznej i pozostaw do całkowitego ostygnięcia.
Trzymaj urządzenie z dala od dzieci i przechowuj go w czystym i suchym miejscu.
Instrukcje dotyczące utylizacji
Zużytych urządzeń elektrycznych oznaczonych tym znakiem nie wolno wyrzucać wraz z odpadami
domowymi, lecz należy je utylizować osobno. Dlatego proszę zwrócić to urządzenie pod koniec cyklu życia
do specjalnych punktów zbiórki do utylizacji lub do lokalnego dystrybutora.
Grill ze stojakiem 46221 jest zapakowany w pudełko detaliczne. Takie pudełka nadają się do
ponownego użycia lub recyklingu.
DANE TECHNICZNE:
Napięcie: 220 - 240 V ~ 50 / 60 Hz
Moc: 2200 W
Klasa ochrony: I
Dane techniczne mogą ulec zmianie!

POLSKI
Instrukcja obsługi
119
Gwarancja:
Ten produkt jest objęty gwarancją na wady materiałowe i
produkcyjne przez okres 2 lat.
Niniejsza gwarancja nie jest ważna, jeśli:
• urządzenie nie był używany zgodnie z instrukcją
• uszkodzenia spowodowane są zużyciem (baterie, itp.)
• uszkodzenia znane były klientowi podczas zakupu
• szkody wyrządzone zostały przez właściciela
Niniejsza gwarancja nie ma wpływu na twoje ustawowe
prawo, ani żadne prawo, które Ci przysługuje jako klientowi
zgodnie z obowiązującym ustawodawstwem krajowym,
dotyczącym zakupu towarów.
Aby dochodzić swojego prawa do gwarancji w okresie
gwarancyjnym, klient musi przedstawić dowód daty zakupu
(paragon).
Gwarancji należy dochodzić w
KORONA electric GmbH, Sundern/Niemcy.
Infolinia: +49 2933 90284-80
e-mail: [email protected]
strona internetowa: www.korona-electric.de
w ciągu 2 lat od daty zakupu. W przypadku gwarancji
klientowi przysługuje prawo do naprawy urządzenia u
producenta lub w autoryzowanym sklepie. Dalsze prawa (w
związku z gwarancją) klientowi nie przysługują.

120
Zamýšlené použití
Před použitím si pozorně přečtěte tyto pokyny a uschovejte
je na bezpečném místě pro budoucí použití. Při předávání
zařízení třetí osobě nezapomeňte přiložit tento návod k
použití.
Tento spotřebič je určen a vhodný pouze pro grilování
potravin. Jakékoli jiné použití nebo úpravy spotřebiče nejsou
výrobcem zamýšleny a mohou znamenat riziko poškození,
nebo zranění. Tento spotřebič není určen pro komerční
použití!
Bezpečnost:
Tento symbol označuje nebezpečí, která mohou
způsobit zranění!
Tento symbol varuje před horkými povrchy. Nebezpečí
popálení!
Tento symbol označuje nebezpečí úrazu elektrickým
proudem!
Všeobecné bezpečnostní pokyny
• Výrobce neodpovídá za škody způsobené nesprávným
použitím.
• Nesprávné nebo nevhodné použití může poškodit
spotřebič a způsobit zranění uživatele.
• Před připojením tohoto spotřebiče k síti se ujistěte, že vaše
místní napětí odpovídá technickým údajům spotřebiče. V
opačném případě se může přístroj přehřát a poškodit.

ČESKÝ
Návod k použití
121
Upozornění! Nebezpečí úrazu elektrickým
proudem!
• Nikdy nedávejte spotřebič, kabel, nebo zástrčku do vody,
nebo jiné kapaliny.
• Nepoužívejte spotřebič v blízkosti dřezu, nebo umyvadla.
• Nepoužívejte spotřebič mokrýma rukama.
• Nepoužívejte spotřebič venku.
Elektrické zařízení není hračka!
• Během používání nikdy nenechávejte spotřebič bez
dozoru.
• Tento spotřebič mohou používat děti od 8 let a starší a
osoby se sníženými fyzickými, smyslovými nebo mentálními
schopnostmi, nebo nedostatkem zkušeností a znalostí,
pokud jim byl poskytnut dohled nebo poučení o používání
spotřebiče bezpečným způsobem a porozuměly jim
související rizika. Děti se se zařízením nesmí hrát. Čištění
a údržbu uživatelů nesmí provádět děti, pokud nejsou
starší než 8 let a nejsou pod dozorem.
• Udržujte spotřebič a jeho kabel mimo dosah dětí mladších
8 let.
• Vždy spotřebič odpojte, pokud se nepoužívá, a před
čištěním.
• Vždy vytáhněte zástrčku - ne kabel.
• Udržujte spotřebič a kabel v dostatečné vzdálenosti od
horkých povrchů, aby nedošlo k poškození spotřebiče.
• Dbejte na to, aby se kabel při používání nechtěně netáhl,
nebo aby o něj někdo nezakopl. Nenechávejte kabel viset
přes ostré hrany.
• Kabel neohýbejte, ani jej nenavíjejte kolem spotřebiče.

122
Nepoužívejte spotřebič,
• pokud je kabel poškozen.
• v případě poruchy.
• pokud přístroj spadl nebo je jinak poškozen.
Nechte jej zkontrolovat a v případě potřeby opravit
kvalikovanou osobou/zákaznickým servisem. Nikdy se
nepokoušejte sami provádět žádné úpravy nebo opravy
spotřebiče.
• Používejte pouze příslušenství určené k použití s tímto
zařízením.
• Nikdy se nepokoušejte vnést do zařízení žádné předměty.
• Nikdy se sami nepokoušejte otevřít kryt!
• Zařízení není určeno k provozu pomocí externího
časovače nebo samostatného systému dálkového
ovládání.
Zvláštní bezpečnostní pokyny
Výstraha! Snažte se předejít úrazu/poškození přístroje,
úrazu elektrickým proudem, požáru a riziku popálení!
• Spotřebič používejte pouze k zamýšlenému účelu a tak,
jak je popsáno v této příručce.
• Umístěte spotřebič na rovný a tepelně odolný povrch.
Nepokládejte jej na kovový povrch.
• Před výměnou příslušenství, nebo čištěním vždy nechte
spotřebič vychladnout.
• Nikdy nepoužívejte spotřebič bez naplněné vody do
odkapávací mísy krytu, ale NIKDY neplňte vodu do
hliníkové odrazné misky spotřebiče.
• Při plnění vodou dbejte na to, abyste nepřekročili značku
MAX (0,9 l) uvnitř pouzdra skříně

ČESKÝ
Návod k použití
123
• Hladina vody během používání klesá. V případě potřeby
doplňte vodu. Při plnění dávejte pozor, abyste nepřekročili
MAXIMÁLNÍ množství 0,9 l a nepostříkali topné těleso
vodou.
• Nepohybujte spotřebičem během používání. Nebezpečí
vážného popálení horkou vodou!
• Přístroj se během používání zahřívá. Proto se dotýkejte
pouze chráněné oblasti ovládacího panelu, abyste
nastavili teplotu vaření. Při manipulaci s jídlem na grilu
vždy používejte kleště, špachtle, nebo vidličky. Nikdy se
nedotýkejte topného tělesa tímto nádobím! Nebezpečí
vážného popálení!
• Nikdy nepoužívejte spotřebič v blízkosti hořlavých kapalin,
nebo zdrojů plynu.
• S tímto zařízením nikdy nepoužívejte dřevěné uhlí, nebo
podobná hořlavá paliva.
• Nepoužívejte spotřebič v blízkosti hořlavých předmětů,
nebo pod nimi, např. ubrusy, závěsy, nástěnné skříňky.
• Pozor: Potraviny s vysokým obsahem oleje a tuku se
mohou snadno vznítit a způsobit požár.
• Při používání grilu uvnitř místnosti zajistěte řádné větrání,
provoz zařízení může vytvářet kouř.
• Spotřebič zapínejte POUZE, když jsou sestaveny všechny
součásti!
• Kdyžje topnétěleso odpojeno odgrilu, nikdyjejnepřipojujte
k elektrické síti. Nebezpečí vážného popálení!
• Pozor! Ovládací panel topného tělesa má integrovaný
bezpečnostní spínač (viz foto níže). Upevněním topného
tělesa na plech grilovacího pláště se tento spínač aktivuje.
Pokud je plášť ohnutý, bezpečnostní spínač nemusí
správně fungovat, tj. Spotřebič by se nezahříval. V případě
potřeby upravte plech ručně.

124
• Nepřipojujte ke stejné zásuvce/více zásuvkám žádné jiné
domácí spotřebiče, protože v případě nouze musí být
zástrčka rychle přístupná.
• UPOZORNĚNÍ: Aby se předešlo nebezpečí v důsledku
neúmyslného resetování tepelné pojistky, nesmí být tento
spotřebič napájen externím spínacím zařízením, jako je
externí časovač, ani připojen k obvodu, který se pravidelně
zapíná a vypíná.

ČESKÝ
Návod k použití
125
Popis výrobku
7
4
9
11
1
2
3
10
5
8
6
1. Odnímatelné čelní panel
2. Ohrada pro grilování (pouzdro)
3. Vyjímatelná hliníková vanička
4. Topné těleso
5. Ovládací knoík pro ovládání teploty/termostatu
6. Kontrolka
7. Grilovací rošt
8. 4 gumové nožičky (zadní strana)
9. Napájecí kabel a zástrčka
10. Bezpečnostní spínač
11. Šroub a matice (odkapávací miska)

126
Ovladač teploty/termostat:
-MIN
-MAX
MAX
MIN
Integrovaný termostat během provozu spotřebič zapíná a vypíná, aby byla zajištěna konstantní teplota. To je
indikováno rozsvícením a zhasínáním kontrolky.
Čelní panel
Při používání grilu venku může čelní panel pomoci zabránit tepelným ztrátám v důsledku silného větru a s
tím spojené delší doby vaření.
Bezpečnostní spínač
Poznámka: Bezpečnostní spínač zajišťuje, že topné těleso spustí ohřívací proces pouze tehdy, když
správně sedí na krytu grilu!

ČESKÝ
Návod k použití
127
Stojka (stojící části)
1. Nohy (dlouhé kovové tyče (4x) / krátké kovové tyče (4x))
2. Gumové krytky (8x)
3. Kovové desky (dlouhé (2x), krátké (2x))
4. Šroub a matice (4x)
5. Úložný regál
1
4
3
2
5
Před prvním použitím
• Odstraňte veškerý obalový materiál a zkontrolujte, zda je spotřebič kompletní.
• Očistěte součásti podle popisu v části Čištění a péče.
• Sestavte spotřebič podle popisu v části Montáž.
• Umístěte spotřebič na rovný, neklouzavý a žáruvzdorný povrch.
• Zcela odviňte napájecí kabel a připojte spotřebič k řádně nainstalované zásuvce.
• Nepoužívejte spotřebič, pokud vykazuje známky poškození.
Varování: Plastové sáčky představují nebezpečí pro batolata a kojence, proto je udržujte mimo
dosah, aby nedošlo k udušení.
Ochranná vrstva
Topné těleso spotřebiče je opatřeno ochrannou vrstvou. Chcete-li odstranit ochranné vrstvy na topném
tělese, zahřejte spotřebič asi 10 minut na nejvyšší stupeň.
Poté nechejte spotřebič a příslušenství úplně vychladnout a vyčistěte je podle „Čištění a péče“.
Poznámka: Během tohoto procesu může zařízení krátce produkovat kouř nebo zápach, který je
způsoben zbytky na topných láncích, které zbyly z výrobního procesu. To je normální a není to škodlivé.
Ujistěte se, že je místnost dobře větraná.

128
Montáž stojanu
Před použitím grilu je nutné stojan sestavit.
Vyjměte všechny součásti z obalu a začněte sestavovat stojan.
Krátká kovová část
Dlouhá kovová tyč
1. Vezměte kovové tyče (1) a vložte dlouhou tyč (1) do krátké tyče (1). Ujistěte se, že otvory obou tyčí (1)
jsou zarovnány. Kratší kovová tyč (1) by měla směřovat nahoru ke grilovací jednotce.
Dlouhá kovová tyč
Krátká kovová tyč
2. Připevněte nohy (kovové tyče) (1) stojanu ke kovovým deskám (3).
- Umístěte otvory krátkých i dlouhých kovových desek (3) přes otvory kovových tyčí (1) a vložte šroub (4).
- Našroubujte matici (4) na šroub (4) a mírně ji utáhněte. Dlouhé kovové desky (3) by měly být připevněny
k přední části a krátké kovové desky (3) by měly být připevněny k bokům stojanu.
- Podle toho připevněte zbývající 3 nohy (1) ke stojanu.
3. Nyní utáhněte matici (4).

ČESKÝ
Návod k použití
129
Poznámka: Namontovaný stojan má lichoběžníkový tvar. Úzká strana směřuje nahoru.
4. Vložte gumové krytky (2) do každého otvoru sestavené nohy (1).
5. Vložte úložný stojan.
6. Stojan je nyní plně sestaven.

130
Montáž grilu
1. Připojte 4 gumové nožičky (8) k zařízení (zadní strana).
2. Připevněte čelní panel (1) zasunutím hrotů do příslušných otvorů pouzdra (2). Ujistěte se, že jste jej řádně
zajistili.
3. Umístěte odnímatelnou hliníkovou misku (3) do grilu (tělo zařízení) (2).
4. Upevněte hliníkovou misku (3) pomocí šroubu a matice (11). Vrtné otvory jsou vpředu vlevo od ovládacího
prvku.
5. Vložte dva hroty ovládacího prvku (5) do vyvrtaných otvorů ve skříni spotřebiče (2). Při vkládání termostatu
(5) se ujistěte, že je správně umístěn ve vodících drážkách na obou stranách, a pevně jej zatlačte, dokud
nezapadne na místo.

ČESKÝ
Návod k použití
131
6. Připevněte grilovací rošt (7) ke skříni spotřebiče (2) a ujistěte se, že je řádně zajištěn. Výška grilovacího
roštu je nastavitelná: Vysoká, nebo Nízká.
Vysoká úroveň Nízká úroveň
Provoz
Před spuštěním spotřebiče se vždy ujistěte, že jste do odkapávací misky grilu (2) napustili vodu.
Vyjímatelnou odkapávací misku (3) umístěte nahoru poté co bude odkapávací miska grilovacího
prostoru (2) naplněna vodou.
Nikdy nepoužívejte spotřebič bez vody v odkapávací misce grilu (2)!
Spotřebič používejte pouze v dobře větrané místnosti nebo ve větru chráněné vnější
prostoru!
1. Po sestavení spotřebiče sejměte grilovací rošt (7), topné těleso (4) a vyjímatelnou hliníkovou misku (3).
2. Do odkapávací misky grilu (2) nalijte 0,4 l až 0,9 l vody. Dbejte na to, abyste nepřekročili MAX (0,9 l).
Pozor! Ujistěte se, že je spotřebi vypnutý a odpojený ze zásuvky! Nebezpečí úrazu
elektrickým proudem.
3. Postupujte podle kroků 3. - 6. v části Montáže.
4. Zapojte zástrčku spotřebiče do řádně nainstalované a snadno přístupné zásuvky ve zdi.
5. Spotřebič zapněte otočením knoíku teploty (5) na nejvyšší úroveň (MAX). Zahřejte spotřebič na cca. 10
minut. Kontrolka (6) se rozsvítí. Po tomto procesu zahřívání upravte teplotu otáčením knoíku teploty (5)
na požadovanou úroveň. Integrovaný termostat udrží přednastavenou teplotu na konstantní úrovni.
6. Jakmile je dosaženo příslušné teploty, kontrolka (6) zhasne.
Pozor: Regulace teploty (5) je plynule regulovatelná.
7. Spotřebič je nyní připraven k použití. - Pokládejte grilované potraviny vždy doprostřed roštu (7).
Během používání se kontrolka bude opakovaně zapínat a vypínat, zatímco termostat udržuje
topné těleso na správné teplotě.
8. Po použití vždy otočte knoíkem regulace teploty (5) na MIN. a odpojte spotřebič.
Teplota přístupných povrchů může být během provozu vysoká. Nedotýkejte se proto
spotřebiče během a/nebo bezprostředně po provozu. Při manipulaci s jídlem používejte chňapky
(pro ochranu rukou).

132
Varování: Tento spotřebič by měl být zapojen pouze do řádně nainstalované zásuvky ve zdi a
neměl by být provozován jakýmkoli způsobem pomocí externího časovače, či jiného zařízení.
Čištění a péče
Z hygienických důvodů čistěte spotřebič pravidelně, nejlépe po každém použití, a odstraňte zbytky
jídla. Pokud tak neučiníte, může dojít k nebezpečné situaci.
Před čištěním, spotřebič vždy vypněte a odpojte od sítě. Nechte úplně vychladnout.
Nikdy neponořujte spotřebič do vody. Nebezpečí! Elektrický šok!
Před čištěním vytáhněte topné těleso pomocí ovládacího prvku a otřete jej suchým hadříkem. Ujistěte se,
že zcela vychladl.
Kryt spotřebiče čistěte navlhčeným měkkým hadříkem. K čištění spotřebiče nepoužívejte agresivní čisticí
prostředky a/nebo jiné tvrdé předměty.
Jakmile hliníkový rošt a grilovací rošt vychladnou, očistěte je v teplé vodě s trochou mycího prostředku na
nádobí, opláchněte a důkladně osušte.
Odstraňte zbytky jídla vlhkým měkkým hadříkem. V případě potřeby použijte jemný mycí prostředek.
Části spotřebiče nejsou vhodné do myčky.
Čištění a uživatelskou údržbu by neměly provádět děti bez dozoru.
SKLADOVÁNÍ
Po použití odpojte spotřebič od sítě a nechejte jej zcela vychladnout.
Udržujte spotřebič mimo dosah dětí a skladujte jej na čistém a suchém místě.
Pokyny k likvidaci
Odpadní elektrická zařízení označená tímto symbolem nesmí být likvidována s domovním odpadem,
ale musí být sbírána odděleně. Proto prosím na konci životnosti produktu, vraťte toto zařízení na speciální
sběrná místa k likvidaci nebo místnímu prodejci.
Váš Barbecue Gril se Stojanem 46221 je zabalen v maloobchodní krabici. Takové krabice jsou
recyklovatelné odpady, tj. jsou opakovaně použitelné nebo recyklovatelné.
TECHNICKÁ DATA:
Napětí: 220 - 240 V ~ 50 / 60 Hz
Výkon: 2200 W
Třída ochrany: I
Technické údaje se mohou změnit!

ČESKÝ
Návod k použití
133
Záruka:
Tento produkt je po dobu 2 let v záruce na vady materiálu a
zpracování.
Tato záruka nemůže být uplatněna:
• pokud nebyl spotřebič používán podle pokynů
• za škody způsobené opotřebením (baterie atd.)
• za škody známé zákazníkem v době nákupu
• za škody způsobené majitelem
Tato záruka nemá vliv na vaše zákonné parvo, ani na žádné
zákonné právo, které můžete mít jako zákazník podle
platných vnitrostátních právních předpisů upravujících nákup
zboží.
Aby mohl zákazník během záruční doby uplatnit své právo
v záručním případě, musí zákazník předložit doklad o datu
nákupu (fakturu/stvrzenku).
Záruka musí být uplatněna za
KORONA electric GmbH, Sundern / Německo.
Telefonní horká linka: +49 2933 90284-80
Mail: [email protected]
web: www.korona-electric.de
do 2 let od data nákupu. V případě záruky má zákazník právo
na opravu spotřebiče u nás nebo v autorizovaném obchodě.
Další práva (z důvodu záruky) nejsou zákazníkovi udělena.

Ref: 46221/2021.8
-
 1
1
-
 2
2
-
 3
3
-
 4
4
-
 5
5
-
 6
6
-
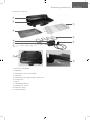 7
7
-
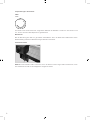 8
8
-
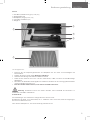 9
9
-
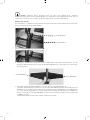 10
10
-
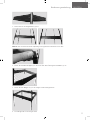 11
11
-
 12
12
-
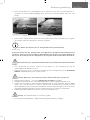 13
13
-
 14
14
-
 15
15
-
 16
16
-
 17
17
-
 18
18
-
 19
19
-
 20
20
-
 21
21
-
 22
22
-
 23
23
-
 24
24
-
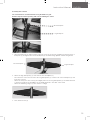 25
25
-
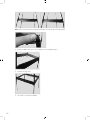 26
26
-
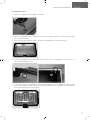 27
27
-
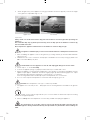 28
28
-
 29
29
-
 30
30
-
 31
31
-
 32
32
-
 33
33
-
 34
34
-
 35
35
-
 36
36
-
 37
37
-
 38
38
-
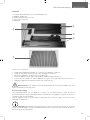 39
39
-
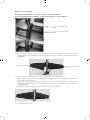 40
40
-
 41
41
-
 42
42
-
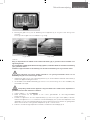 43
43
-
 44
44
-
 45
45
-
 46
46
-
 47
47
-
 48
48
-
 49
49
-
 50
50
-
 51
51
-
 52
52
-
 53
53
-
 54
54
-
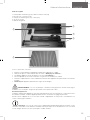 55
55
-
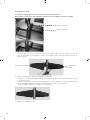 56
56
-
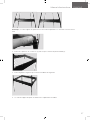 57
57
-
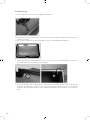 58
58
-
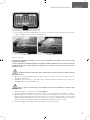 59
59
-
 60
60
-
 61
61
-
 62
62
-
 63
63
-
 64
64
-
 65
65
-
 66
66
-
 67
67
-
 68
68
-
 69
69
-
 70
70
-
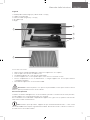 71
71
-
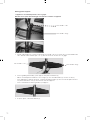 72
72
-
 73
73
-
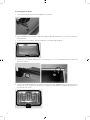 74
74
-
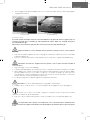 75
75
-
 76
76
-
 77
77
-
 78
78
-
 79
79
-
 80
80
-
 81
81
-
 82
82
-
 83
83
-
 84
84
-
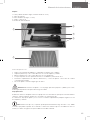 85
85
-
 86
86
-
 87
87
-
 88
88
-
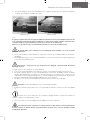 89
89
-
 90
90
-
 91
91
-
 92
92
-
 93
93
-
 94
94
-
 95
95
-
 96
96
-
 97
97
-
 98
98
-
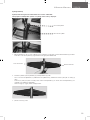 99
99
-
 100
100
-
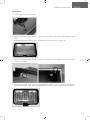 101
101
-
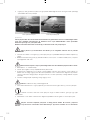 102
102
-
 103
103
-
 104
104
-
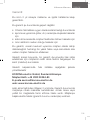 105
105
-
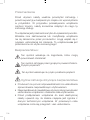 106
106
-
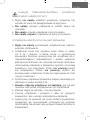 107
107
-
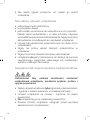 108
108
-
 109
109
-
 110
110
-
 111
111
-
 112
112
-
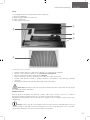 113
113
-
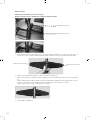 114
114
-
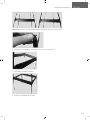 115
115
-
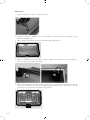 116
116
-
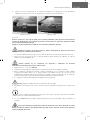 117
117
-
 118
118
-
 119
119
-
 120
120
-
 121
121
-
 122
122
-
 123
123
-
 124
124
-
 125
125
-
 126
126
-
 127
127
-
 128
128
-
 129
129
-
 130
130
-
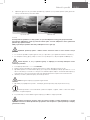 131
131
-
 132
132
-
 133
133
-
 134
134


Korona 46221 Barbecue Grill Manual de usuario
- Categoría
- Barbacoas
- Tipo
- Manual de usuario
En otros idiomas
- français: Korona 46221 Barbecue Grill Manuel utilisateur
- italiano: Korona 46221 Barbecue Grill Manuale utente
- English: Korona 46221 Barbecue Grill User manual
- Deutsch: Korona 46221 Barbecue Grill Benutzerhandbuch
- Nederlands: Korona 46221 Barbecue Grill Handleiding
- polski: Korona 46221 Barbecue Grill Instrukcja obsługi
- čeština: Korona 46221 Barbecue Grill Uživatelský manuál
- Türkçe: Korona 46221 Barbecue Grill Kullanım kılavuzu