Corsair K57 RGB Wireless Gaming Keyboard Slipstream Wireless Technology El manual del propietario
- Categoría
- Ratones
- Tipo
- El manual del propietario

corsair.com/downloads
Gaming Keyboard
with SLIPSTREAM WIRELESS Technology
WEB: corsair.com
PHONE: (888) 222-4346
SUPPORT: support.corsair.com
BLOG: corsair.com/blog
FORUM: forum.corsair.com
YOUTUBE: youtube.com/corsairhowto
© 2019 CORSAIR COMPONENTS, INC. All rights reserved. CORSAIR and the sails
logo are registered trademarks in the United States and/or other countries. All other
trademarks are the property of their respective owners. Product may vary slightly from
those pictured. 49-001846 AA
K57 RGB WIRELESS
K57 RGB WIRELESS

ENGLISH ..................................................................... 1
FRANÇAIS ................................................................... 5
ESPAÑOL .................................................................... 9
PORTUGUÊS ............................................................. 13

21
ENGLISH
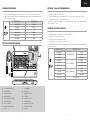
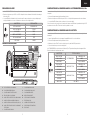
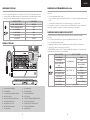
A
L
M N P
GE
D
H
B
F
C
OR
Q
I J K
A – SIX PROGRAMMABLE MACRO KEYS
B – MACRO RECORD KEY
C – BACKLIGHT BRIGHTNESS KEY
D – WINDOWS KEY DISABLE
E – BATTERY / WIRELESS STATUS INDICATOR
F – NUM LOCK LED INDICATOR
G – CAPS LOCK LED INDICATOR
H – WINLOCK / MACRO STATUS INDICATOR
I – MUTE KEY
J – VOLUME DOWN KEY
K – VOLUME UP KEY
L – DEDICATED MULTIMEDIA KEYS
M – POWER SWITCH
N – USB CHARGING / DATA PORT
O – USB WIRELESS RECEIVER
P – USB WIRELESS RECEIVER HOLDER
Q – USB CHARGING / DATA CABLE
R – PALM REST
The K57 RGB WIRELESS keyboard must be fully charged before its first use.
> Connect the keyboard to an available USB 2.0 or USB 3.0 port on your PC with the USB charging / data cable.
> The battery / wireless status LED indicator will begin pulsing green to denote battery charging and will turn solid
green when charging is complete.
CHARGING THE KEYBOARD
GETTING TO KNOW THE KEYBOARD
Hyper-fast sub-1ms wireless connection is designed for no-compromise gaming grade performance.
> Toggle power switch to turn on the keyboard.
> Connect the USB wireless receiver to an available USB 2.0 or 3.0 port located on the front panel of your PC.
> The status LED indicator will turn solid white when connected.
If reconnection is required, initiate USB wireless receiver pairing via the iCUE software settings menu and hold FN + F5
on the keyboard for 2 seconds.
SETTING UP 2.4GHz SLIPSTREAM WIRELESS
Bluetooth wireless is best for everyday computing tasks, productivity and office applications.
> Initiate Bluetooth pairing on your Bluetooth 4.0 or higher enabled device.
> Toggle power switch to turn on the keyboard.
> Hold FN + F6 until status LED indicator blinks blue.
> Follow the instructions to successfully connect your device.
The K57 RGB WIRELESS has two Bluetooth keys (F6 and F7) allowing you to remember and easily switch between
two Bluetooth host devices.
SETTING UP BLUETOOTH® WIRELESS
STATUS LED INDICATOR CONNECTIVITY STATUS
BLINKING WHITE
SLIPSTREAM WIRELESS
PAIRING
SOLID WHITE PAIRED
PULSING WHITE PAIRING FAILED
BLINKING BLUE
BLUETOOTH WIRELESS #1
PAIRING
SOLID BLUE PAIRED
PULSING BLUE PAIRING FAILED
BLINKING CYAN
BLUETOOTH WIRELESS #2
PAIRING
SOLID CYAN PAIRED
PULSING CYAN PAIRING FAILED
SOLID YELLOW USB CONNECTED
STATUS LED INDICATOR BATTERY STATUS
PULSING GREEN CHARGING
PULSING RED CRITICAL
SOLID RED LOW
BLINKING AMBER MEDIUM
BLINKING GREEN HIGH
SOLID GREEN CHARGED

43
ENGLISH
K57 RGB WIRELESS gaming keyboard has dedicated G1-G6 macro keys. Those keys can be assigned to perform
certain single or multi-key press actions for quick access during gaming or everyday computing.
MACRO FUNCTIONS
K57 RGB WIRELESS features dynamic per-key lighting, fully-programmable with iCUE software to enable virtually
unlimited lighting customization. It also comes with 11 built-in onboard lighting modes for instant illumination.
Those modes can be accessed by FN combo key.
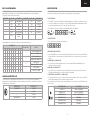
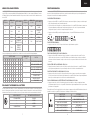
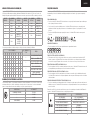
BUILT-IN LIGHTING MODES
LIGHTING MODE FN + KEY COMBO LIGHTING EFFECT LIGHTING MODE FN + KEY COMBO LIGHTING EFFECT
1 FN + 1 SPIRAL RAINBOW 7 FN + 7 COLOR SHIFT
2 FN + 2 RAIN 8 FN + 8 COLOR PULSE
3 FN + 3 RAINBOW WAVE 9 FN + 9 COLOR WAVE
4 FN + 4 VISOR 10 FN + 0 STATIC
5 FN + 5 TYPE LIGHTING (KEY) 11 FN + - NO LIGHTING
6 FN + 6 TYPE LIGHTING
(RIPPLE)
BRIGHTNESS LEVEL BATTERY LIFE, UP TO
0 (LIGHTING OFF) 175 HOURS
135 HOURS
220 HOURS
3 (MAX. BRIGHTNESS) 8 HOURS
On a full charge, the K57 RGB WIRELESS keyboard lasts for up to 170 hours of continuous use and may vary
depending on the usage, lighting brightness, wireless mode and other factors. Refer to the table below for estimated,
maximum battery life you may expect.
LIGHTING AND BATTERY LIFE
Dynamic lighting modes can be further customized for speed, duration and direction.
LIGHTING MODES FN + KEY COMBO FUNCTION
123456789
• • • • x x ••• iSPEED (FAST, MEDIUM, SLOW)
x x x x • • x x x DURATION (LONG, MEDIUM, SHORT)
• • • • x x • • • hSPEED (SLOW, MEDIUM, FAST)
x x x x • • xxx DURATION (SHORT, MEDIUM, LONG)
x x •xxxxx•fDIRECTION (LEFT)
•xxxxxxxx DIRECTION (COUNTER-CLOCKWISE)
x x •xxxxx•gDIRECTION (RIGHT)
•xxxxxxxx DIRECTION (CLOCKWISE)
SPECIAL MACRO KEY FUNCTIONS:
> Press and hold MR key for 2 seconds to enter Special Macro Key Functions mode. The macro status LED indicator
will turn solid yellow to confirm the new mode of operation. While in this mode, you have access to three macro key
functions.
TO ENABLE ANY G1-G6 MACRO KEY:
> Press any G1-G6 key again to enable the macro key. The macro status LED indicator will blink rapidly once to
confirm selected key is now enabled.
DISABLE ANY G1-G6 MACRO KEY:
> Press any G1-G6 key to disable the macro key without deleting action (if previously assigned). The macro status
LED indicator will blink rapidly twice to confirm selected key is now disabled.
TO DELETE MACRO ASSIGNED TO G1-G6 MACRO KEY:
> Press and hold any G1-G6 key for 3 seconds to delete macro previously assigned to the key. The macro status LED
indicator will blink rapidly three times to confirm macro has been deleted.
To exit Special Macro Key Functions mode, press and hold MR key for 2 seconds. The macro status LED indicator will
turn off to confirm.
STATUS LED INDICATOR MACRO STATUS
SOLID YELLOW MACRO CONFIGURE MODE
BLINKING YELLOW MACRO RECORDING READY
RAPID BLINKING YELLOW MACRO RECORDING IN PROGRESS
RAPID BLINK YELLOW x1 ENABLE MACRO
RAPID BLINK YELLOW x2 DISABLE MACRO
RAPID BLINK YELLOW x3 DELETE MACRO
TO RECORD MACRO:
> Press MR key. The macro status LED indicator will start blinking yellow to confirm macro recording mode is now on.
> Select G-key you want the macro assigned to. The macro status LED indicator will start blinking rapidly to indicate
macro recording is now in progress. Up to 50 key events can now be recorded.
> Press MR key to stop macro recording. The macro status LED indicator will stop blinking.
TO EXECUTE MACRO:
> Press any G1-G6 key to play previously recorded macro.

65
FRANÇAIS
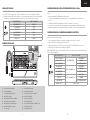
A
L
M N P
GE
D
H
B
F
C
OR
Q
I J K
A – SIX TOUCHES DE MACROS PROGRAMMABLES
B – TOUCHE D'ENREGISTREMENT DE MACRO
C – TOUCHE DE LUMINOSITÉ DU RÉTROÉCLAIRAGE
D – DÉSACTIVATION DE LA TOUCHE WINDOWS
E – VOYANT D'ÉTAT DE LA BATTERIEET DE LA CONNEXION SANS FIL
F – VOYANT DEL DE VERROUILLAGE NUMÉRIQUE (NUM LOCK)
G – VOYANT DEL DE VERROUILLAGE DES MAJUSCULES (CAPS LOCK)
H – VOYANT D'ÉTAT DE DÉSACTIVATION DE LA TOUCHE WINDOWS ET
D'ÉTAT DE MACRO
I – TOUCHE DE DÉSACTIVATION DU SON
J – TOUCHE DE DIMINUTION DU VOLUME
K – TOUCHE D'AUGMENTATION DU VOLUME
L – TOUCHES MULTIMÉDIAS DÉDIÉES
M – INTERRUPTEUR MARCHE/ARRÊT
N – PORT DE RECHARGE ET DE DONNÉES USB
O – RÉCEPTEUR SANS FIL USB
P – LOGEMENT DU RÉCEPTEUR SANS FIL USB
Q – CÂBLE DE RECHARGE ET DE DONNÉES USB
R – REPOSE-POIGNET
Le clavier K57 RGB WIRELESS doit être complètement chargé avant sa première utilisation.
> Branchez le clavier sur un port USB 2.0 ou USB 3.0 disponible de votre ordinateur à l'aide du câble de recharge et
de données USB.
> Le voyant DEL d'état de la batterie et de la connexion sans fil commencera à pulser en vert pour indiquer que la
recharge de la batterie est en cours et s'allumera en continu une fois la recharge terminée.
RECHARGE DU CLAVIER
PRÉSENTATION DU CLAVIER
La connexion sans fil ultrarapide à latence inférieure à 1ms est conçue pour les performances de compétition sans
compromis.
> Actionnez l'interrupteur marche/arrêt pour allumer le clavier.
> Branchez le récepteur sans fil USB sur un port USB 2.0 ou 3.0 disponible du panneau avant de votre ordinateur.
> Le voyant d'état DEL s'allume en blanc continu une fois la connexion établie.
Si une reconnexion est nécessaire, lancez le jumelage du récepteur sans fil USB dans les paramètres du logiciel iCUE
et maintenez les touches FN et F5 du clavier enfoncées pendant 2secondes.
CONFIGURATION DE LA CONNEXION SANS FIL SLIPSTREAM WIRELESS 2,4GHz
La technologie sans fil Bluetooth convient parfaitement aux tâches informatiques quotidiennes et aux applications de
bureautique.
> Lancez le jumelage Bluetooth sur votre appareil compatible Bluetooth 4.0 ou version ultérieure.
> Actionnez l'interrupteur marche/arrêt pour allumer le clavier.
> Maintenez les touches FN et F6 enfoncées jusqu'à ce que le voyant d'état DEL clignote en bleu.
> Suivez les instructions pour connecter votre appareil.
Le K57 RGB WIRELESS possède deux touches Bluetooth (F6 et F7) permettant d'enregistrer deux appareils hôtes
Bluetooth et de basculer facilement entre ceux-ci.
CONFIGURATION DE LA CONNEXION SANS FIL BLUETOOTH®
VOYANT D'ÉTAT DEL ÉTAT DE LA CONNEXION
BLANC CLIGNOTANT
SLIPSTREAM WIRELESS
JUMELAGE EN COURS
BLANC CONTINU JUMELÉ
BLANC PULSANT ÉCHEC DU JUMELAGE
BLEU CLIGNOTANT
SANS FIL BLUETOOTH #1
JUMELAGE EN COURS
BLEU CONTINU JUMELÉ
BLEU PULSANT ÉCHEC DU JUMELAGE
CYAN CLIGNOTANT
SANS FIL BLUETOOTH #2
JUMELAGE EN COURS
CYAN CONTINU JUMELÉ
CYAN PULSANT ÉCHEC DU JUMELAGE
JAUNE CONTINU USB CONNECTÉ
VOYANT D'ÉTAT DEL ÉTAT DE LA BATTERIE
VERT CLIGNOTANT LENT RECHARGE EN COURS
ROUGE CLIGNOTANT LENT CRITIQUE
ROUGE CONTINU FAIBLE
AMBRE CLIGNOTANT RAPIDE MOYEN
VERT CLIGNOTANT RAPIDE ÉLEVÉ
VERT CONTINU CHARGÉE

87
FRANÇAIS
Le clavier de jeu K57 RGB WIRELESS dispose des touches de macros dédiées G1 à G6. Ces touches peuvent être
affectées à l'exécution de différentes actions à une ou plusieurs touches afin de pouvoir y accéder rapidement lors
d'une partie ou lors de tâches informatiques quotidiennes.
FONCTIONS DE MACROS
Le K57 RGB WIRELESS offre un éclairage dynamique individuel à chaque touche entièrement programmable avec le
logiciel iCUE pour une personnalisation d'éclairage pratiquement illimitée. Le clavier comprend également 11 modes
d'éclairage intégrés pour une illumination instantanée. Vous pouvez accéder à ces modes via des combinaisons avec
la touche FN.
MODES D'ÉCLAIRAGE INTÉGRÉS
MODE
D’ÉCLAIRAGE
COMBINAISON FN
+ TOUCHE EFFETS LUMINEUX MODE
D’ÉCLAIRAGE
COMBINAISON FN
+ TOUCHE EFFETS LUMINEUX
1 FN + 1 ARC-EN-CIEL EN
SPIRALE 7 FN + 7 VARIATION DE
COULEUR
2 FN + 2 PLUIE 8 FN + 8 PULSATION DE
COULEUR
3 FN + 3 VAGUE ARC-EN-CIEL 9 FN + 9 VAGUE DE COULEUR
4 FN + 4 VISIÈRE 10 FN + 0 STATIQUE
5 FN + 5 ÉCLAIRAGE DE
FRAPPE (TOUCHE) 11 FN + - AUCUN ÉCLAIRAGE
6 FN + 6
ÉCLAIRAGE
DE FRAPPE
(ONDULATION)
Vous pouvez également personnaliser la vitesse, la durée et le sens des modes d'éclairage dynamiques.
MODE D’ÉCLAIRAGE COMBINAISON FN +
TOUCHE FONCTION
123456789
• • • • x x ••• iVITESSE (RAPIDE, MOYENNE, LENTE)
x x x x • • x x x DURÉE (LONGUE, MOYENNE, COURTE)
• • • • x x • • • hVITESSE (LENTE, MOYENNE, RAPIDE)
x x x x • • x x x DURÉE (COURTE, MOYENNE, LONGUE)
x x •xxxxx•fSENS (VERS LA GAUCHE)
•xxxxxxxx SENS (ANTIHORAIRE)
x x •xxxxx•gSENS (VERS LA DROITE)
•xxxxxxxx SENS (HORAIRE)
FONCTIONS SPÉCIALES DES TOUCHES DE MACROS:
> Appuyez sur la touche MR et maintenez-la enfoncée pendant 2 secondes pour basculer en mode Fonctions
spéciales des touches de macros. Le voyant DEL d'état de macro s'allumera en jaune continu pour confirmer le
nouveau mode de fonctionnement. Lorsque ce mode est activé, vous pouvez accéder à trois fonctions de touche
de macro.
POUR ACTIVER UNE TOUCHE DE MACRO DE G1 À G6:
> Appuyez à nouveau sur l'une des touches de G1 à G6 pour activer la touche de macro. Le voyant DEL d'état de
macro clignotera rapidement une fois pour confirmer que la touche sélectionnée est maintenant activée.
POUR DÉSACTIVER UNE TOUCHE DE MACRO DE G1 À G6:
> Appuyez sur l'une des touches de G1 à G6 pour désactiver la touche de macro en question sans en supprimer
l'action (si une telle action lui a été affectée précédemment). Le voyant DEL d'état de macro clignotera rapidement
deux fois pour confirmer que la touche sélectionnée est maintenant désactivée.
POUR SUPPRIMER LA MACRO AFFECTÉE À UNE TOUCHE DE MACRO DE G1 À G6:
> Appuyez sur une touche de G1 à G6 et maintenez-la enfoncée pendant 3 secondes pour supprimer la macro
précédemment affectée à la touche. Le voyant DEL d'état de macro clignotera rapidement trois fois pour confirmer
que la macro a été supprimée.
Pour quitter le mode Fonctions spéciales des touches de macros, appuyez sur la touche MR et maintenez-la enfoncée
pendant 2 secondes. Le voyant DEL d'état de macro s'éteindra pour confirmer l'action.
VOYANT D'ÉTAT DEL ÉTAT DE MACRO
JAUNE CONTINU MODE DE CONFIGURATION MACRO
JAUNE CLIGNOTANT ENREGISTREMENT DE MACRO PRÊT
JAUNE CLIGNOTANT RAPIDEMENT ENREGISTREMENT DE MACRO EN COURS
JAUNE CLIGNOTANT RAPIDEMENT x1 ACTIVER LA MACRO
JAUNE CLIGNOTANT RAPIDEMENT x2 DÉSACTIVER LA MACRO
JAUNE CLIGNOTANT RAPIDEMENT x3 SUPPRIMER LA MACRO
POUR ENREGISTRER UNE MACRO:
> Appuyez sur la touche MR. Le voyant DEL d'état de macro commencera à clignoter en jaune pour confirmer que le
mode d'enregistrement de macro est maintenant activé.
> Sélectionnez la touche G à laquelle vous souhaitez affecter la macro. Le voyant DEL d'état de macro commencera
à clignoter rapidement pour indiquer que l'enregistrement de la macro est en cours. Vous pouvez maintenant
enregistrer des séquences de touches comprenant jusqu'à 50 éléments.
> Appuyez sur la touche MR pour arrêter l'enregistrement macro. Le voyant DEL d'état de macro arrêtera de
clignoter.
POUR EXÉCUTER UNE MACRO:
> Appuyez sur une touche de G1 à G6 pour exécuter la macro précédemment enregistrée.
NIVEAU DE LUMINOSITÉ AUTONOMIE DE LA BATTERIE, JUSQU'À
0 (ÉCLAIRAGE ÉTEINT) 175 HEURES
135 HEURES
2 20 HEURES
3 (LUMINOSITÉ MAX.) 8 HEURES
Lorsqu'il est pleinement chargé, le clavier K57 RGB WIRELESS a une autonomie d'utilisation continue allant jusqu'à 170
heures. Cette autonomie peut varier en fonction de l'usage, de la luminosité, du mode de connexion sans fil, ainsi que
d'autres facteurs. Reportez-vous au tableau ci-dessous pour une estimation de l'autonomie maximale de la batterie.
ÉCLAIRAGE ET AUTONOMIE DE LA BATTERIE

109
ESPAÑOL
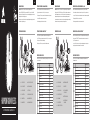
A
L
M N P
GE
D
H
B
F
C
OR
Q
I J K
A – SEIS TECLAS MACRO PROGRAMABLES
B – TECLA DE GRABADO MACRO
C – TECLA DE BRILLO DE RETROILUMINACIÓN
D – INHABILITAR TECLA WINLOCK
E – INDICADOR DE ESTADO A BATERÍA O INALÁMBRICO
F – INDICADOR LED DE BLOQEUO DE NÚMEROS
G – INDICADOR LED DE BLOQUEO DE MAYÚSCULAS
H – INDICADOR DE ESTADO MACRO O WINLOCK
I – TECLA DE SILENCIO
J – TECLA PARA BAJAR EL VOLUMEN
K – TECLA PARA SUBIR EL VOLUMEN
L – TECLAS PARA LA REPRODUCCIÓN MULTIMEDIA
M – INTERRUPTOR DE ENCENDIDO
N – PUERTO USB DE CARGA Y DATOS
O – RECEPTOR INALÁMBRICO USB
P – ESPACIO PARA GUARDAR EL RECEPTOR INALÁMBRICO USB
Q – CABLE USB DE CARGA Y DATOS
R – APOYO DE REPOSAMUñECAS
El teclado K57 RGB WIRELESS se debe cargar por completo antes del primer uso.
> Conecte el teclado a un puerto USB 2.0 o USB 3.0 disponible en su PC con el cable de datos y carga USB.
> El indicador de estado LED a batería o inalámbrico se encenderá de forma intermitente en color verde para señalar
que la batería se está cargando y se quedará encendido todo el tiempo cuando la carga esté completa.
CARGA DEL TECLADO
CONOZCA EL TECLADO
La conexión inalámbrica sub-1ms hiperrápida está diseñada para un rendimiento impecable mientras se está jugando
juegos.
> Mueva el interruptor de encendido para encender el teclado.
> Conecte el receptor inalámbrico USB a un puerto USB 2.0 o 3.0 disponible ubicado en el panel frontal
de su PC.
> El indicador de estado LED se iluminará de color blanco sólido cuando esté conectado.
Si es necesario volver a conectarse, inicie el emparejamiento del receptor inalámbrico USB mediante el menú de
configuración de software de iCUE y mantenga presionadas las teclas FN + F5 en el teclado durante 2 segundos.
CONFIGURACIÓN DE LA RED SLIPSTREAM WIRELESS DE 2.4 GHz
La conexión inalámbrica por Bluetooth es lo mejor para realizar tareas informáticas habituales, así como para las
aplicaciones de oficina y la productividad.
> Inicie el emparejamiento Bluetooth en su dispositivo compatible con Bluetooth 4.0 o posterior.
> Mueva el interruptor de encendido para encender el teclado.
> Mantenga presionadas las teclas FN + F6 hasta que el indicador de estado LED parpadee en color azul.
> Siga las instrucciones para conectar exitosamente su dispositivo.
El K57 RGB WIRELESS cuenta con dos teclas de Bluetooth (F6 y F7), lo que le permite recordar y cambiar fácilmente
entre dos dispositivos Bluetooth.
CONFIGURACIÓN DE LA CONEXIÓN INALÁMBRICA BLUETOOTH®
INDICADOR DE ESTADO LED ESTADO DE CONECTIVIDAD
BLANCO PARPADEANTE
SLIPSTREAM WIRELESS
EMPAREJAMIENTO
BLANCO SÓLIDO EMPAREJADO
BLANCO INTERMITENTE ERROR DE EMPAREJAMIENTO
AZUL PARPADEANTE
BLUETOOTH INALÁMBRICO #1
EMPAREJAMIENTO
AZUL SÓLIDO EMPAREJADO
AZUL INTERMITENTE ERROR DE EMPAREJAMIENTO
CIAN PARPADEANTE
BLUETOOTH INALÁMBRICO #2
EMPAREJAMIENTO
CIAN SÓLIDO EMPAREJADO
CIAN INTERMITENTE ERROR DE EMPAREJAMIENTO
AMARILLO SÓLIDO CONECTADO A USB
INDICADOR DE ESTADO LE ESTADO DE LA BATERÍA
VERDE INTERMITENTE CARGANDO
ROJO INTERMITENTE CRÍTICA
ROJO SÓLIDO BAJA
ÁMBAR PARPADEANTE MEDIA
VERDE PARPADEANTE ALTA
VERDE SÓLIDO CARGADA

1211
ESPAÑOL
El teclado para juegos K57 RGB WIRELESS tiene teclas macro especiales del G1 al G6. A estas teclas se les pueden
asignar funciones pulsando una o varias teclas para acceder rápidamente a ciertas acciones mientras se está jugando
o durante el uso habitual de la computadora.
FUNCIONES MACRO
El K57 RGB WIRELESS presenta la función completamente programable de iluminación por tecla dinámica con
software iCUE que permite personalizar la iluminación prácticamente sin límites. También viene con 11 modos de
iluminación integrados e incorporados que ofrecen iluminación instantánea. Estos modos se pueden acceder a través
de la tecla combinada FN.
MODOS DE ILUMINACIÓN INTEGRADOS
MODO DE
ILUMINACIÓN
FN + TECLA
COMBINADA EFECTO DE ILUMINACIÓN MODO DE
ILUMINACIÓN
FN + TECLA
COMBINADA EFECTO DE ILUMINACIÓN
1 FN + 1 ARCOIRIS EN ESPIRAL 7 FN + 7 CAMBIO DE COLOR
2 FN + 2 LLUVIA 8 FN + 8 INTERMITENCIA DE COLOR
3 FN + 3 OLA DE ARCOIRIS 9 FN + 9 OLA DE COLOR
4 FN + 4 VISOR 10 FN + 0 ESTÁTICO
5 FN + 5 TIPO DE ILUMINACIÓN
(TECLA) 11 FN + - SIN ILUMINACIÓN
6 FN + 6 TIPO DE ILUMINACIÓN
(ONDA)
Los modos de iluminación dinámicos también se pueden personalizar en función de la velocidad, la duración y la
dirección.
MODO DE ILUMINACIÓN FN + TECLA COMBINADA FUNCIÓN
123456789
• • • • x x ••• iVELOCIDAD (RÁPIDA, MEDIA, LENTA)
x x x x • • x x x DURACIÓN (LARGA, MEDIA, CORTA)
• • • • x x • • • hVELOCIDAD (LENTA, MEDIA, RÁPIDA)
x x x x • • x x x DURACIÓN (CORTA, MEDIA, LARGA)
x x •xxxxx•fDIRECCIÓN (IZQUIERDA)
•xxxxxxxx DIRECCIÓN (SENTIDO ANTIHORARIO)
x x •xxxxx•gDIRECCIÓN (DERECHA)
•xxxxxxxx DIRECCIÓN (SENTIDO HORARIO)
FUNCIONES ESPECIALES DE LAS TECLAS MACRO
> Pulse y mantenga pulsada la tecla MR durante dos segundos para entrar al modo de Funciones especiales
de las teclas macro. El indicador de estado LED de la macro se pondrá de color amarillo sólido para confirmar
el nuevo modo de funcionamiento. Mientras está en este modo, usted tiene acceso a tres funciones de las
teclas macro.
PARA HABILITAR CUALQUIER TECLA MACRO DEL G1 AL G6
> Pulse nuevamente cualquier tecla del G1 al G6 para habilitar la tecla macro. El indicador de estado LED de la
macro parpadeará rápidamente una vez para confirmar que la tecla seleccionada ahora está habilitada.
INHABILITAR CUALQUIER TECLA MACRO DEL G1 AL G6
> Pulse cualquier tecla del G1 al G6 para inhabilitar la tecla macro sin acción de borrado (si ya ha sido asignada
previamente). El indicador de estado LED de la macro parpadeará rápidamente dos veces para confirmar que la
tecla seleccionada ahora está inhabilitada.
PARA BORRAR UNA MACRO ASIGNADA A UNA TECLA DE G1 A G6
> Pulse y mantenga pulsado cualquier tecla de G1 a G6 para borrar la macro que se le ha asignado previamente a
esa tecla. El indicador de estado LED de la macro parpadeará rápidamente tres veces para confirmar que la tecla
seleccionada se ha borrado.
Para salir del modo de Funciones especiales de las teclas macro, pulse y mantenga pulsada la tecla MR durante dos
segundos. El indicador de estado LED de la macro se apagará para confirmar.
INDICADOR DE ESTADO LED ESTADO DE LA MACRO
AMARILLO SÓLIDO MODO DE CONFIGURACIÓN DE MACRO
AMARILLO GRABADO DE MACRO LISTO
AMARILLO PARPADEANTE RÁPIDO GRABADO DE MACRO EN CURSO
AMARILLO PARPADEANTE RÁPIDO x1 HABILITAR MACRO
AMARILLO PARPADEANTE RÁPIDO x2 INHABILITAR MACRO
AMARILLO PARPADEANTE RÁPIDO x3 ELIMINAR MACRO
PARA GUARDAR LA MACRO:
> Pulse la tecla MR. El indicador de estado LED de la macro comenzará a parpadear en amarillo para confirmar que
el modo de grabado de la macro está activo.
> Seleccione la tecla G a la que le desea asignar la macro. El indicador de estado LED de la macro comenzará a
parpadear rápidamente para indicar que el grabado de la macro está en curso. Se pueden grabar hasta 50 teclas.
> Pulse la tecla MR para detener el grabado de macros. El indicador de estado LED de la macro dejará
de parpadear.
PARA EJECUTAR LA MACRO:
> Pulse una tecla del G1 al G6 para reproducir la macro que ha guardado previamente.
NIVEL DE BRILLO VIDA ÚTIL DE LA BATERÍA, HASTA
0 (LUZ APAGADA) 175 HORAS
135 HORAS
220 HORAS
3 (BRILLO MÁX.) 8 HORAS
Con carga completa, el teclado K57RGB WIRELESS ofrece hasta 170horas de uso ininterrumpido, aunque la
duración puede variar según el uso, la intensidad del brillo, el modo inalámbrico y otros factores. Consulte la siguiente
tabla para conocer la vida útil máxima estimada de la batería.
ILUMINACIÓN Y VIDA ÚTIL DE LA BATERÍA

1413
PORTUGUÊS
A
L
M N P
GE
D
H
B
F
C
OR
Q
I J K
A – SEIS TECLAS DE MACRO PROGRAMÁVEIS
B – TECLA GRAVAR MACRO
C – TECLA PARA AJUSTAR A INTENSIDADE DA LUZ DE FUNDO
D – DESATIVAR TECLA WINLOCK
E – INDICADOR DE STATUS DA BATERIA/CONEXÃO SEM FIO
F – INDICADOR LED DA FUNÇÃO NUM LOCK
G – INDICADOR LED DA TECLA CAPS LOCK
H – INDICADOR DE STATUS WINLOCK/MACRO
I – TECLA PARA SILENCIAR
J – TECLA DIMINUIR VOLUME
K – TECLA AUMENTAR VOLUME
L – TECLAS DE MULTIMÍDIA DEDICADAS
M – BOTÃO LIGA/DESLIGA
N – PORTA USB DE CARREGAMENTO/TRANSFERÊNCIA DE DADOS
O – RECEPTOR DE CONEXÃO SEM FIO USB
P – SUPORTE DE RECEPTOR DE CONEXÃO SEM FIO USB
Q – CABO DE DADOS/CARREGAMENTO USB
R – DESCANSO PARA PULSO
O teclado sem fio K57 RGB WIRELESS precisa estar totalmente carregado antes do seu primeiro uso.
> Conecte o teclado a uma porta USB 2.0 ou 3.0 disponível do PC usando o cabo de carregamento/dados USB.
> O indicador LED DE status da bateria/conexão sem fio piscará lentamente em verde para sinalizar que a bateria
está sendo carregada, e permanecerá estável e aceso quando o carregamento estiver concluído.
CARREGANDO O TECLADO
CONHEÇA O TECLADO
A conexão Bluetooth sem fio é melhor para tarefas cotidianas de computação, produtividade e aplicativos
de escritório.
> Use o botão liga/desliga para ligar o teclado.
> Conecte o receptor de conexão sem fio USB a uma porta USB 2.0 ou 3.0 disponível localizada no painel frontal do
seu PC.
> O indicador LED de status ficará estável e aceso em branco depois que o receptor for inserido.
Se for necessário reconectar, inicie o receptor de conexão sem fio USB pareando-o pelo menu de configurações do
software iCUE e mantendo pressionadas as teclas FN e F5 simultaneamente por dois segundos.
CONFIGURAR SLIPSTREAM WIRELESS DE 2,4 GHz
A conexão Bluetooth sem fio é melhor para tarefas cotidianas de computação, produtividade e aplicativos
de escritório.
> Inicie o modo de pareamento Bluetooth no seu dispositivo habilitado para Bluetooth 4.0 ou superior.
> Use o botão liga/desliga para ligar o teclado.
> Mantenha pressionadas as teclas FN e F6 simultaneamente até o indicador LED de status piscar em azul.
> Siga as instruções para conectar seu dispositivo com sucesso.
O K57 RGB WIRELESS tem duas teclas (F6 e F7) para conexão Bluetooth, permitindo que você se lembre e alterne
com facilidade entre dois dispositivos com conexão Bluetooth.
CONFIGURAR CONEXÃO SEM FIO POR BLUETOOTH®
INDICADOR LED DE STATUS STATUS DE CONECTIVIDADE
PISCANDO EM BRANCO
SLIPSTREAM WIRELESS
PAREANDO
ACESO EM BRANCO PAREADO
PISCANDO LENTAMENTE EM
BRANCO FALHA NO PAREAMENTO
PISCANDO EM AZUL
BLUETOOTH SEM FIO N.º 1
PAREANDO
ACESO EM AZUL PAREADO
PISCANDO LENTAMENTE EM AZUL FALHA NO PAREAMENTO
PISCANDO EM CIANO
BLUETOOTH SEM FIO N.º 2
PAREANDO
ACESO EM CIANO PAREADO
PISCANDO LENTAMENTE EM CIANO FALHA NO PAREAMENTO
ACESO EM AMARELO USB CONECTADO
INDICADOR LED DE STATUS STATUS DA BATERIA
PISCANDO LENTAMENTE EM VERDE CARREGANDO
PISCANDO LENTAMENTE EM VERMELHO CRÍTICA
ACESO EM VERMELHO BAIXA
PISCANDO EM AMARELO MÉDIA
PISCANDO EM VERDE ALTA
ACESO EM VERDE CARREGADA

1615
PORTUGUÊS
O teclado gamer K57 RGB WIRELESS tem teclas de macro dedicadas G1-G6. Podem ser atribuídas a essas teclas
determinadas ações de teclas individuais ou múltiplas para rápido acesso durante o jogo ou para a computação
cotidiana.
FUNÇÕES DE MACRO
O teclado K57 RGB WIRELESS tem iluminação dinâmica por tecla e pode ser totalmente programado com o software
iCUE para possibilitar uma personalização praticamente ilimitada de efeitos luminosos. Ele vem com 11 modos de
iluminação integrados para uso imediato. Para acessar esses modos, pressione a tecla FN e a combinação de teclas.
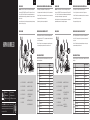
MODOS INTEGRADOS DE ILUMINAÇÃO
MODO DE
ILUMINAÇÃO
FN + COMBINAÇÃO
DE TECLAS
EFEITO DE
ILUMINAÇÃO
MODO DE
ILUMINAÇÃO
FN + COMBINAÇÃO
DE TECLAS
EFEITO DE
ILUMINAÇÃO
1 FN + 1 ARCO-ÍRIS ESPIRAL 7 FN + 7 MUDANÇA DE COR
2 FN + 2 CHUVA 8 FN + 8 PULSAÇÃO DE COR
3 FN + 3 ONDA DE ARCO-ÍRIS 9 FN + 9 ONDA DE CORES
4 FN + 4 VISOR 10 FN + 0 ESTÁTICO
5 FN + 5 ILUMINAÇÃO AO
DIGITAR (TECLA) 11 FN + - SEM ILUMINAÇÃO
6 FN + 6
ILUMINAÇÃO
AO DIGITAR
(ONDULAÇÃO)
Você pode personalizar a velocidade, a duração e a direção dos modos de iluminação dinâmica.
MODO DE ILUMINAÇÃO FN + COMBINAÇÃO DE
TECLAS FUNÇÃO
123456789
• • • • x x ••• iVELOCIDADE (RÁPIDA, MÉDIA, LENTA)
x x x x • • x x x DURAÇÃO (LONGA, MÉDIA, CURTA)
• • • • x x • • • hVELOCIDADE (LENTA, MÉDIA, RÁPIDA)
x x x x • • x x x DURAÇÃO (CURTA, MÉDIA, LONGA)
x x •xxxxx•fDIREÇÃO (PARA ESQUERDA)
•xxxxxxxx DIREÇÃO (SENTIDO ANTI-HORÁRIO)
x x •xxxxx•gDIREÇÃO (PARA DIREITA)
•xxxxxxxx DIREÇÃO (SENTIDO HORÁRIO)
FUNÇÕES DE TECLAS ESPECIAIS DE MACRO:
> Para entrar no modo Funções de teclas especiais de macro, pressione e mantenha pressionada a tecla MR
durante 2 segundos. O indicador LED de status de macros ficará estável e aceso em amarelo para confirmar o
novo modo de operação. Enquanto estiver nesse modo, você terá acesso a três funções de tecla de macro.
PARA ATIVAR QUALQUER TECLA DE MACRO G1-G6:
> Pressione qualquer tecla G1-G6 novamente para ativar a tecla de macro. O indicador LED de status de macros irá
piscar rapidamente para confirmar que as teclas selecionadas estão ativadas.
PARA DESATIVAR QUALQUER TECLA DE MACRO G1-G6:
> Pressione qualquer tecla G1-G6 para desativar a tecla de macro sem excluir a ação (se atribuída anteriormente).
O indicador LED de status de macro irá piscar rapidamente duas vezes para confirmar que as teclas selecionadas
estão desativadas.
PARA EXCLUIR MACRO ATRIBUÍDA À TECLA DE MACRO G1-G6:
> Pressione e mantenha pressionada qualquer tecla G1-G6 durante 3 segundos para excluir a macro anteriormente
atribuída a essa tecla. O indicador LED de status de macros irá piscar rapidamente três vezes para confirmar que a
macro foi excluída.
Para sair do modo Funções de teclas especiais de macro, pressione e mantenha pressionada a tecla MR durante 2
segundos. O indicador LED de status de macros se desligará para confirmar.
INDICADOR LED DE STATUS STATUS DE MACROS
ACESO EM AMARELO MODO CONFIGURAR MACRO
PISCANDO EM AMARELO GRAVAÇÃO DE MACROS PRONTA
PISCANDO RAPIDAMENTE EM AMARELO GRAVAÇÃO DE MACROS EM PROGRESSO
PISCANDO RAPIDAMENTE EM AMARELO x1 ATIVAR MACRO
PISCANDO RAPIDAMENTE EM AMARELO x2 DESATIVAR MACRO
PISCANDO RAPIDAMENTE EM AMARELO x3 EXCLUIR MACRO
PARA GRAVAR MACROS:
> Pressione a tecla MR. O indicador LED do status de macros começará piscando em amarelo para confirmar que o
modo de gravação de macros está ativo.
> Selecione a tecla G a que deseja atribuir a macro. O indicador LED do status de macros começará piscando
rapidamente, indicando que a gravação de macros está em andamento. Agora você pode gravar até 50 eventos
de teclas.
> Pressione a tecla MR para interromper a gravação de macros. O indicador LED de status de macros parará
de piscar..
PARA EXECUTAR MACROS:
> Pressione qualquer tecla G1-G6 para reproduzir uma macro gravada anteriormente.
NÍVEL DE BRILHO AUTONOMIA, ATÉ
0 (ILUMINAÇÃO DESLIGADA) 175 HORAS
135 HORAS
220 HORAS
3 (BRILHO MÁXIMO) 8 HORAS
Com uma carga completa, o teclado RGB K57 WIRELESS tem autonomia para até 170 horas de uso contínuo e pode
variar dependendo do uso, do brilho da iluminação, do modo sem fio e de outros fatores. Consulte a tabela abaixo
para ver o tempo máximo de autonomia estimado que você pode esperar do dispositivo.
ILUMINAÇÃO E AUTONOMIA DA BATERIA

corsair.com/downloads
SLIPSTREAM WIRELESS GAMING MOUSE
HARPOON RGB WIRELESS
A — LEFT CLICK BUTTON
B — RIGHT CLICK BUTTON
C — MIDDLE CLICK BUTTON
D — DPI CYCLE BUTTON
E — FORWARD BUTTON
F — BACKWARD BUTTON
G — MULTI-PURPOSE LED INDICATOR
H — OPTICAL GAMING SENSOR
I — PTFE GLIDE PADS
J — POWER / WIRELESS MODE SWITCH
K — USB WIRELESS RECEIVER
L — USB CHARGING / DATA CABLE
IMPORTANT: The HARPOON RGB WIRELESS mouse must be fully charged before its first use.
Connect the HARPOON RGB WIRELESS mouse to an available USB 2.0 or 3.0 port on your PC with the USB
charging / data cable. The multi-purpose LED indicator on the mouse will begin pulsing green to denote battery
charging and will turn solid when charging is complete.
The battery has no “memory effect” and should not be completely discharged before recharging to ensure it will
last for hundreds of charge / discharge cycles.
CHARGING THE MOUSE
GETTING TO KNOW YOUR MOUSE
2.4G
OFF
A B
C
DFE
K
G
J I
L
H
ENGLISH ENGLISH FRANÇAIS FRANÇAIS
> Turn on your Bluetooth 4.0 or higher enabled computer and initiate Bluetooth pairing mode on it.
> Hold DPI CYCLE button and toggle power / wireless mode switch to BT position to turn on your mouse.
The multi-purpose LED indicator will start blinking blue.
> The multi-purpose LED indicator on your mouse will turn solid blue when connected.
SETTING UP YOUR MOUSE USING BLUETOOTH®
Various aspects of mouse operation are communicated through the multi-purpose LED indicator located behind
on top cover of the mouse.
MULTI-PURPOSE LED INDICATOR
> Turn on your computer and connect the USB wireless receiver to an available USB port.
> Toggle power / wireless mode switch to “2.4GHz” position to turn on your mouse.
> The multi-purpose LED indicator on your mouse will turn solid white when automatically connected.
> Download the iCUE software from www.corsair.com/downloads.
> Run the installer program and follow instructions for installation.
SETTING UP YOUR MOUSE USING 2.4GHz WIRELESS
MULTI-PURPOSE LED
INDICATOR
BAT TERY
STATUS
BATTERY CHARGING PULSING GREEN
BATTERY CRITICAL, RECHARGE REQUIRED PULSING RED
BATTERY LOW, RECHARGE SOON BLINKING RED
BATTERY MEDIUM BLINKING AMBER
BATTERY HIGH BLINKING GREEN
BATTERY CHARGED GREEN
WIRELESS
STATUS
2.4GHz WIRELESS MODE – PAIRING BLINKING WHITE
2.4GHz WIRELESS MODE – PAIRED WHITE
2.4GHz WIRELESS MODE – PAIRING FAILED PULSING WHITE
BT WIRELESS MODE – PAIRING BLINKING BLUE
BT WIRELESS MODE – PAIRED BLUE
BT WIRELESS MODE – PAIRING FAILED PULSING BLUE
DPI S TAGE
STATUS
STAGE #1 – 500 DPI RED
STAGE #2 – 1000 DPI WHITE
STAGE #3 – 1500 DPI GREEN
STAGE #4 – 3000 DPI YELLOW
STAGE #5 – 5000 DPI CYAN
PRÉSENTATION DE LA SOURIS
A — BOUTON CLIC GAUCHE
B — BOUTON CLIC DROIT
C — BOUTON CLIC DU MILIEU
D — BOUTON DÉFILEMENT PPP
E — BOUTON SUIVANT
F — BOUTON PRÉCÉDENT
G — VOYANT À LED MULTIFONCTION
H — CAPTEUR GAMING OPTIQUE
I — PATINS EN PTFE
J — BOUTON D’ALIMENTATION /
DE MODE SANS FIL
K — RÉCEPTEUR SANS FIL USB
L — CÂBLE DE RECHARGE /
DONNÉES USB
2.4G
OFF
A B
C
DFE
K
G
J I
L
H
IMPORTANT: La souris SANS FIL HARPOON RGB doit être complètement chargée avant sa première utilisation
Branchez la souris SANS FIL HARPOON RGB sur un port USB 2.0 ou 3.0 disponible de votre ordinateur avec le
câble USB de chargement/données. Le voyant à DEL multifonction de la souris clignote lentement en vert pour
indiquer que la recharge de batterie est en cours et reste allumé en vert quand la recharge est terminée.
La batterie ne dispose d'aucun «effet mémoire» et ne doit pas être complètement déchargée avant la recharge
afin d'assurer son autonomie pour des centaines de cycles de recharge / utilisation.
RECHARGE DE LA SOURIS
> Allumez votre ordinateur muni de la fonction Bluetooth 4.0 ou supérieure et lancez le mode de jumelage Bluetooth.
> Cliquez sur le bouton DÉFILEMENT PPP et faites basculer le bouton d'alimentation / de mode sans fil sur la
position BT pour allumer votre souris.
> Le voyant à DEL multifonction commence alors à clignoter en bleu pour signaler que la souris est prête pour
le jumelage, puis reste allumé en bleu continu une fois la connexion établie.
CONFIGURATION DE LA SOURIS VIA LE BLUETOOTH®
Le voyant à DEL multifonction situé derrière la molette de défilement permet d'indiquer différents états de
fonctionnement de la souris.
VOYANT À LED MULTIFONCTION
> Allumez votre ordinateur et branchez le récepteur sans fil USB sur un port USB de votre ordinateur.
> Faites basculer le bouton d'alimentation / de mode sans fil sur la position «2,4GHz» pour allumer la souris.
> Le voyant à DEL multifonction de votre souris s'allume en blanc continu une fois la connexion automatique établie.
> Téléchargez le logiciel iCUE sur www.corsair.com/downloads.
> Exécutez le programme d'installation et suivez les instructions d'installation.
CONFIGURATION DE LA SOURIS EN MODE SANS FIL 2,4GHz
VOYANT À DEL MULTIFONCTION
ÉTAT DE LA
BAT TERIE
BATTERIE EN CHARGE VERT CLIGNOTANT LENT
BATTERIE CRITIQUE, RECHARGE NÉCESSAIRE ROUGE CLIGNOTANT LENT
BATTERIE FAIBLE, RECHARGER BIENTÔT ROUGE CLIGNOTANT RAPIDE
NIVEAU DE BATTERIE MOYEN ORANGE CLIGNOTANT RAPIDE
NIVEAU DE BATTERIE ÉLEVÉ VERT CLIGNOTANT RAPIDE
BATTERIE CHARGÉE VERT
STATUT
SANS FIL
MODE SANS FIL 2,4GHz – JUMELAGE EN COURS BLANC CLIGNOTANT RAPIDE
MODE SANS FIL 2,4GHz – JUMELÉ BLANC
MODE SANS FIL 2,4GHz – ÉCHEC DU JUMELAGE BLANC CLIGNOTANT LENT
MODE SANS FIL BT – JUMELAGE EN COURS BLEU CLIGNOTANT RAPIDE
MODE SANS FIL BT – JUMELÉ BLEU
MODE SANS FIL BT – ÉCHEC DU JUMELAGE BLEU CLIGNOTANT LENT
ÉTAT
NIVEAU PPI
NIVEAU #1 – 500 PPP ROUGE
NIVEAU #2 – 1000 PPP BLANC
NIVEAU #3 – 1500 PPP VERT
NIVEAU #4 – 3000 PPP JAUNE
NIVEAU #5 – 5000 PPP CYAN

ESPAÑOL ESPAÑOL PORTUGUÊS PORTUGUÊS
IMPORTANTE: El mouse HARPOON RGB INALÁMBRICO debe estar totalmente cargado antes del primer uso
Conecte el mouse HARPOON RGB INALÁMBRICO a un puerto USB 2.0 o 3.0 disponible en su PC con el cable
de datos y carga USB. El indicador LED multipropósito del mouse se encenderá de forma intermitente en color
verde para señalar que la batería se está cargando y se quedará encendido todo el tiempo en color verde cuando
la carga esté completa.
La batería no tiene "efecto de memoria" y no se debe descargar por completo antes de recargarla, para asegurar
que dure cientos de ciclos de carga y descarga.
CARGA DEL MOUSE
CONOZCA SU MOUSE
2.4G
OFF
A B
C
DFE
K
G
J I
L
H
A — BOTÓN DE CLIC IZQUIERDO
B — BOTÓN DE CLIC DERECHO
C — BOTÓN DE CLIC MEDIO
D — BOTÓN DE CICLO DE DPI
E — BOTÓN ADELANTE
F — BOTÓN ATRÁS
G — INDICADOR LED MULTIPROPÓSITO
H — SENSOR ÓPTICO DE JUEGOS
I — COJINES DE DESLIZAMIENTO PTFE
J — INTERRUPTOR DE ENCENDIDO /
MODO INALÁMBRICO
K — RECEPTOR INALÁMBRICO USB
L — CABLE USB DE CARGA Y DATOS
> Encienda su equipo habilitado con Bluetooth 4.0 o superior e inicie el modo de emparejamiento Bluetooth.
> Mantenga presionado el botón de CICLO DE DPI y coloque el interruptor de encendido/modo inalámbrico en la
posición de BT para encender el mouse.
> El indicador LED multipropósito del mouse comenzará a parpadear en color azul para indicar que el mouse
está listo para el emparejamiento y se quedará encendido en color azul cuando esté conectado.
CONFIGURACIÓN DEL MOUSE MEDIANTE BLUETOOTH®
Varios aspectos de la operación del mouse se comunican mediante el indicador LED multipropósito ubicado
detrás de la rueda de desplazamiento.
INDICADOR LED MULTIPROPÓSITO
> Encienda su equipo y conecte el receptor inalámbrico USB a un puerto USB disponible.
> Coloque el interruptor de encendido / modo inalámbrico en la posición de "2.4 GHz" para encender el mouse.
> El indicador LED multipropósito del mouse se encenderá en color blanco cuando se conecte automáticamente.
> Descargue el software de iCUE en www.corsair.com/downloads.
> Ejecute el instalador y siga las instrucciones para completar la instalación.
CONFIGURACIÓN DEL MOUSE MEDIANTE LA RED INALÁMBRICA DE 2.4 GHz
INDICADOR LED
MULTIPROPÓSITO
ESTADO DE LA
BAT ERÍ A
CARGANDO BATERÍA VERDE INTERMITENTE
BATERÍA EN ESTADO CRÍTICO, RECARGA REQUERIDA ROJO INTERMITENTE
BATERÍA BAJA, RECARGAR PRONTO ROJO PARPADEANTE
BATERÍA MEDIA ÁMBAR PARPADEANTE
BATERÍA ALTA VERDE PARPADEANTE
BATERÍA CARGADA VERDE
ESTADO
INALÁMBRICO
MODO DE RED INALÁMBRICA DE 2.4 GHz: EMPAREJANDO BLANCO PARPADEANTE
MODO DE RED INALÁMBRICA DE 2.4 GHz: EMPAREJADO BLANCO
MODO DE RED INALÁMBRICA DE 2.4 GHz: ERROR DE EMPAREJAMIENTO BLANCO INTERMITENTE
MODO DE RED INALÁMBRICA DE BT: EMPAREJANDO AZUL PARPADEANTE
MODO DE RED INALÁMBRICA DE BT: EMPAREJADO AZUL
MODO DE RED INALÁMBRICA DE BT: ERROR DE EMPAREJAMIENTO AZUL INTERMITENTE
ESTADO DE LA
ETAPA DPI
ETAPA #1: 500 DPI ROJO
ETAPA #2: 1000 DPI BLANCO
ETAPA #3: 1500 DPI VERDE
ETAPA #4: 3000 DPI AMARILLO
ETAPA #5: 5000 DPI CIAN
IMPORTANTE: O mouse HARPOON RGB WIRELESS deve estar totalmente carregado antes do primeiro uso
Conecte o mouse HARPOON RGB WIRELESS com um cabo de carregamento / dados USB a uma porta USB 2.0
ou 3.0 do PC. O indicador LED multifuncional do mouse piscará lentamente em verde, para sinalizar que a bateria
está sendo carregada, e acenderá em verde quando o carregamento estiver concluído.
A bateria não tem "efeito de memória" e não deve descarregar totalmente antes de um novo carregamento para
garantir sua durabilidade por centenas de ciclos de carregamento / descarregamento.
CARREGAR O MOUSE
CONHEÇA O MOUSE
2.4G
OFF
A B
C
DFE
K
G
J I
L
H
A — BOTÃO DE CLIQUE ESQUERDO
B — BOTÃO DE CLIQUE DIREITO
C — BOTÃO DE CLIQUE CENTRAL
D — BOTÃO DE CICLO DPI
E — BOTÃO PARA AVANÇAR
F — BOTÃO PARA VOLTAR
G — INDICADOR LED MULTIFUNCIONAL
H — SENSOR ÓPTICO PARA JOGOS
I — ALMOFADAS DESLIZANTES
DE PTFE
J — BOTÃO LIGAR / SELETOR DE MODO
DE CONEXÃO SEM FIO
K — RECEPTOR USB DE CONEXÃO
SEM FIO
L — CABO DE DADOS /
CARREGAMENTO USB
> Ligue o computador habilitado para Bluetooth 4.0 ou superior e inicie o modo de pareamento Bluetooth.
> Com o botão CICLO DPI pressionado, posicione o botão ligar / seletor de modo de conexão sem fio em BT
para ligar o mouse.
> O indicador LED multifuncional começará a piscar em azul para sinalizar que o mouse está pronto para o
pareamento e acenderá em azul quando estiver conectado.
CONFIGURAR O MOUSE USANDO UMA CONEXÃO BLUETOOTH®
Diversos aspectos da operação do mouse são informados pelo indicador LED multifuncional, localizado atrás da
roda de rolagem.
INDICADOR LED MULTIFUNCIONAL
> Ligue o computador e conecte o receptor de conexão sem fio USB a uma porta USB.
> Posicione o botão ligar / seletor de modo de conexão sem fio em “2,4 GHz” para ligar o mouse.
> O indicador LED multifuncional do mouse acenderá em branco quando ele for conectado automaticamente.
> Baixe o software iCUE em www.corsair.com/downloads.
> Execute o programa de instalação e siga as instruções.
CONFIGURAR O MOUSE USANDO UMA CONEXÃO SEM FIO DE 2,4GHz
INDICADOR LED MULTIFUNCIONAL
STATUS DA
BAT ERI A
BATERIA CARREGANDO PISCANDO LENTAMENTE EM VERDE
NÍVEL CRÍTICO DE BATERIA, RECARREGAMENTO NECESSÁRIO PISCANDO LENTAMENTE EM VERMELHO
NÍVEL BAIXO DE BATERIA, RECARREGAR EM BREVE PISCANDO EM VERMELHO
NÍVEL MÉDIO DE BATERIA PISCANDO EM ÂMBAR
NÍVEL ALTO DE BATERIA PISCANDO EM VERDE
BATERIA CARREGADA VERDE
STATUS DA
CONEXÃO
SEM FIO
MODO DE CONEXÃO SEM FIO DE 2,4 GHz – PAREANDO PISCANDO EM BRANCO
MODO DE CONEXÃO SEM FIO DE 2,4 GHz – PAREADO BRANCO
MODO DE CONEXÃO SEM FIO DE 2,4 GHz – FALHA NO PAREAMENTO PISCANDO LENTAMENTE EM BRANCO
MODO DE CONEXÃO SEM FIO BLUETOOTH – PAREANDO PISCANDO EM AZUL
MODO DE CONEXÃO SEM FIO BLUETOOTH – PAREADO AZUL
MODO DE CONEXÃO SEM FIO BLUETOOTH – FALHA NO PAREAMENTO PISCANDO LENTAMENTE EM AZUL
STATUS DO
ESTÁGIO
DE DPI
ESTÁGIO 1 – 500 DPI VERMELHO
ESTÁGIO 2 – 1000 DPI BRANCO
ESTÁGIO 3 – 1500 DPI VERDE
ESTÁGIO 4 – 3000 DPI AMARELO
ESTÁGIO 5 – 5000 DPI CIANO
WEB: corsair.com
PHONE: (888) 222-4346
SUPPORT: support.corsair.com
BLOG: corsair.com/blog
FORUM: forum.corsair.com
YOUTUBE: youtube.com/corsairhowto
© 2018 CORSAIR MEMORY Inc. All rights reserved. CORSAIR and the sails logo
are registered trademarks in the United States and/or other countries. All other
trademarks are the property of their respective owners. Product may vary slightly
from those pictured. 49-001708 AA
HARPOON RGB WIRELESS
-
 1
1
-
 2
2
-
 3
3
-
 4
4
-
 5
5
-
 6
6
-
 7
7
-
 8
8
-
 9
9
-
 10
10
-
 11
11
-
 12
12


Corsair K57 RGB Wireless Gaming Keyboard Slipstream Wireless Technology El manual del propietario
- Categoría
- Ratones
- Tipo
- El manual del propietario
en otros idiomas
- français: Corsair K57 RGB Wireless Gaming Keyboard Slipstream Wireless Technology Le manuel du propriétaire
- English: Corsair K57 RGB Wireless Gaming Keyboard Slipstream Wireless Technology Owner's manual
- Deutsch: Corsair K57 RGB Wireless Gaming Keyboard Slipstream Wireless Technology Bedienungsanleitung
- português: Corsair K57 RGB Wireless Gaming Keyboard Slipstream Wireless Technology Manual do proprietário