
2
4
7
6
9
17
12
18
8
10
13
X
X
3
5
19
20
16
1
11
14
15
ES
1. Indicadores exteriores de encendido y alarmas
2. Panel de control
3. Iluminación de LED principal
4. Ventilador
5. Iluminación en flujo múltiple*
6. Separador de niveles*
7. Área de aire frío de flujo múltiple*
8. Rejilla para botellas*
9. Cubierta del sensor
10. Cajón Cero grados*
11. Placa de características con el nombre comercial
12. Compartimento de refrigeración (recomendado para
la carne y el pescado)
13. Zona de repisas
14. Cajón para frutas y verduras
15. Separador del cajón para frutas y verduras*
16. Kit de reversibilidad de puertas
17. Bandeja para huevos*
18. Portabotellas*
19. Estantes de la puerta
20. Junta de la puerta
* Disponible en determinados modelos
PUESTA EN MARCHA DEL ELECTRODOMÉSTICO
El electrodoméstico se pone en marcha
automáticamente al enchufarlo. Después de poner en
marcha el electrodoméstico, espere al menos 4-6 horas
antes de colocar alimentos en su interior. Cuando el
electrodoméstico está conectado a la red eléctrica,
el visor se ilumina y se ven todos los iconos durante
aproximadamente 1 segundo. Se encienden los valores
por defecto (de fábrica) del compartimento congelador.
CÓMO MODIFICAR EL SENTIDO DE APERTURA DE
LA PUERTA
- consulte las Instrucciones de uso adjuntas (Version_2)
Es recomendable que la modificación del sentido de
apertura de la puerta la hagan dos personas.
No está prevista la reversibilidad de la puerta para:
- modelos con asa integrada
- modelos con panel de cristal en la puerta.
Las especificaciones, los datos técnicos y las
imágenes podrían variar según el modelo.
Antes de usar el electrodoméstico, lea
atentamente las instrucciones de uso.
5019 420 00042
GUÍA RÁPIDA
TABLA DE ALARMAS
TIPO DE ALARMA Indicación Causa Solución
Alarma de puerta abierta
La alarma acústica se activa y el indicador de alarma
parpadea.
La puerta ha estado abierta más de 2 minutos.
Cierre la puerta o pulse el botón de desactivación de alarma para detener la señal
acústica.
Avería La letra “F” parpadea en la pantalla (°C). Avería del producto. Póngase en contacto con el Servicio de Asistencia.
ES
Printed in Italy 01/14 - Bauknecht
®
Registered trademark/TM Trademark of Whirlpool group of companies - © Copyright Whirlpool Europe s.r.l. 2013. All rights reserved - http://www.bauknecht.eu
4
1. INSTALLING TWO APPLIANCES
During installing the freezer and the fridge
together ensure that the freezer is located on the left and
the fridge on the right (as shown on the drawing). Left side
of refrigerator is equipped with special device in order to
avoid condensation problems between appliances.
We recommended installing two appliances together
using the linking-kit (as shown on the drawing).
You can buy it in Service.
2. FUNCTIONS
2.1. SMART DISPLAY*
This function can be used to save energy.
Please follow the instructions contained in the Quick
Start Guide to activate/deactivate the function.
Two seconds after activation of the Smart Display, the
display goes off. To adjust the temperature or use other
functions, it is necessary to activate the display by
pressing any button. After about 15 seconds without
performing any action, the display goes off again.
When function is deactivated the normal display is
restored. The Smart Display is automatically disabled
after a power failure. Remember that this function does
not disconnect the appliance from the power supply,
but only reduce the energy consumed by external
display.
Note: The declared appliance energy consumption
refers to operation with the Smart Display function
activated.
This function is available only on the model with User
Interface on the door.
2.2. 6th SENSE /
GREEN INTELLIGENCE
The 6th Sense/ Green Intelligence function works to
maintain the right temperature in the following cases:
- Door opened for a while
The function activates when door opening causes the
internal temperature to increase to values that do not
ensure safe storage of food and remains active until
optimal storage conditions have been restored.
- Fresh food stored in the freezer
The function activates when fresh food is placed in the
freezer and remains active until optimal freezing
conditions are reached so as to ensure the best
freezing quality with the lowest power consumption.
Note: Besides the quantity of food loaded into the
freezer, ambient temperature and the quantity of food
already inside the freezer affect the duration of the 6th
Sense/ Green Intelligence function. Therefore
significant duration variations are quite normal.
*Available on selected models only. Please on the QUICK START GUIDE if this function is actually available on your model.
GREEN INTELLIGENCE
Esta función se activa automáticamente para
garantizar las condiciones óptimas de conservación
de los alimentos. Para desactivar la función
“
4
1. INSTALLING TWO APPLIANCES
During installing the freezer and the fridge
together ensure that the freezer is located on the left and
the fridge on the right (as shown on the drawing). Left side
of refrigerator is equipped with special device in order to
avoid condensation problems between appliances.
We recommended installing two appliances together
using the linking-kit (as shown on the drawing).
You can buy it in Service.
2. FUNCTIONS
2.1. SMART DISPLAY*
This function can be used to save energy.
Please follow the instructions contained in the Quick
Start Guide to activate/deactivate the function.
Two seconds after activation of the Smart Display, the
display goes off. To adjust the temperature or use other
functions, it is necessary to activate the display by
pressing any button. After about 15 seconds without
performing any action, the display goes off again.
When function is deactivated the normal display is
restored. The Smart Display is automatically disabled
after a power failure. Remember that this function does
not disconnect the appliance from the power supply,
but only reduce the energy consumed by external
display.
Note: The declared appliance energy consumption
refers to operation with the Smart Display function
activated.
This function is available only on the model with User
Interface on the door.
2.2. 6th SENSE /
GREEN INTELLIGENCE
The 6th Sense/ Green Intelligence function works to
maintain the right temperature in the following cases:
- Door opened for a while
The function activates when door opening causes the
internal temperature to increase to values that do not
ensure safe storage of food and remains active until
optimal storage conditions have been restored.
- Fresh food stored in the freezer
The function activates when fresh food is placed in the
freezer and remains active until optimal freezing
conditions are reached so as to ensure the best
freezing quality with the lowest power consumption.
Note: Besides the quantity of food loaded into the
freezer, ambient temperature and the quantity of food
already inside the freezer affect the duration of the 6th
Sense/ Green Intelligence function. Therefore
significant duration variations are quite normal.
*Available on selected models only. Please on the QUICK START GUIDE if this function is actually available on your model.
Green Intelligence”, pulse los botones
Vacaciones
y Desactivación de alarma al
mismo tiempo durante 3 segundos hasta que suene
una señal acústica y el icono del ventilador se
apague como confirmación de que se ha desactivado
la función. Para volver a activar esta función, repita el
mismo procedimiento.
Nota: La desactivación de la función desconecta el
VENTILADOR en el frigorífico.
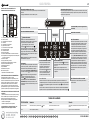
INDICADOR ENCENDIDO (LED exterior)
Un LED exterior se enciende en verde para indicar que el electrodoméstico está
activado.
Se apaga automáticamente cuando se abre la puerta.
INDICADOR ALARMA (LED exterior)
Este LED rojo parpadea para indicar que se ha producido una alarma o un fallo, incluso
si la puerta está cerrada. Abra la puerta y compruebe en el panel de control interior qué
alarma o fallo se ha producido.
INDICADOR DE
TEMPERATURA
BOTÓN
ENCENDIDO/EN ESPERA
Para que el producto pase al modo
de espera, pulse el botón durante
3 segundos. Todos los iconos se
apagarán excepto el indicador
Encendido/En espera . Para volver
a activar el electrodoméstico, pulse
una vez (brevemente) este botón.
(consulte las Instrucciones de uso).
BOTÓN
TEMPERATURA
Pulse el botón Temperatura
para cambiar la
temperatura: el valor cambia cíclicamente entre
8 °C y 2 °C.
Nota: Los puntos de ajuste mostrados se
corresponden con la temperatura media en todo
el frigorífico.
Botón FRÍO RÁPIDO
Utilizando la función de frío rápido es posible aumentar la capacidad de enfriamiento en el
compartimento frigorífico. Se recomienda usar esta función cuando se coloca una gran cantidad
de alimentos en el compartimento frigorífico. Pulse el botón Frío rápido
para activar la función
Frío rápido.
Cuando se activa, el indicador Frío rápido se enciende. La función se desactiva automáticamente
después de 6 horas o se puede desactivar manualmente volviendo a pulsar el botón Frío rápido
.
BOTÓN
DESACTIVACIÓN DE LA ALARMA
Debe pulsarse en caso de alarma para silenciar la
alarma acústica.
BOTÓN
VACACIONES
Esta función puede activarse para reducir el consumo
de energía del electrodoméstico durante un periodo
de tiempo prolongado. Antes de activar la función,
se deben retirar todos los alimentos perecederos
del compartimento de refrigeración y asegurarse de
que la puerta esté cerrada correctamente ya que
el frigorífico mantendrá una temperatura adecuada
para evitar la formación de olores desagradables
(+12 °C). Para activar/desactivar, pulse el botón de
modo Vacaciones durante 3 segundos. Si la función
está activada, el símbolo relacionado se encenderá
y la temperatura del compartimento frigorífico se
ajustará en un punto de ajuste más alto (el indicador
de temperatura mostrará el nuevo punto de ajuste de
temperatura de +12 °C). La función se desactivará
automáticamente al cambiar el punto de ajuste de
temperatura.
VENTILADOR
El ventilador distribuye la temperatura de manera más
uniforme en el producto y permite conservar mejor los
alimentos. De forma predeterminada, el ventilador
está encendido. Para apagar el VENTILADOR pulse
los botones Vacaciones
y Desactivación de alarma
al mismo tiempo durante 3 segundos hasta que
se escuche una señal acústica y el icono del
ventilador se apagará para confirmar que el
ventilador se ha desactivado. Para encender el
VENTILADOR repita el mismo procedimiento. Como
confirmación se escucha una señal acústica y el icono
se enciende.
INDICADOR
FRÍO RÁPIDO
Indicador ALARMA (consulte la siguiente Tabla
de alarmas)
INDICADOR
ENCENDIDO/EN ESPERA
INDICADOR
VACACIONES
UA
ROBG
RU
HUSKCZPLFIDKNOSEGRITPTNLFRDE
KZ
GB
-
 1
1

Bauknecht KR 19F4 A++ WS Program Chart
- Tipo
- Program Chart
- Este manual también es adecuado para
En otros idiomas
- English: Bauknecht KR 19F4 A++ WS
Documentos relacionados
Otros documentos
-
Whirlpool WME36652 W Program Chart
-
Whirlpool WMA36562 W Program Chart
-
Whirlpool SW8 AM2Y XR Program Chart
-
-
-
-
Whirlpool WME36582 W Program Chart
-
Whirlpool WME36962 X Program Chart
-
Whirlpool ACO 060.1 Program Chart
-
Whirlpool WME3611 W Guía del usuario