Caso VR 390 advanced Instrucciones de operación
- Categoría
- Selladores al vacío
- Tipo
- Instrucciones de operación

1
Original
Bedienungsanleitung
Vakuumiersystem
VR 390 advanced
Artikelnummer. 1522

2
Braukmann GmbH
Raiffeisenstraße 9
D-59757 Arnsberg
Service-Hotline International:
Tel.: +49 (0) 29 32 / 80 55 4 – 99
Fax: +49 (0) 29 32 / 80 55 4 – 77
eMail: [email protected]
Sie finden die aktuellste Version der Bedienungsanleitung auch auf
unserer Homepage:
www.caso-germany.de
Dokument-Nr.: 1522 04-12-2019
Druck- und Satzfehler vorbehalten. Bildabweichungen zur
Originalware sind technisch bedingt möglich.
© 2019 Braukmann GmbH

3
1 Bedienungsanleitung ................................................................................................ 10
2 Allgemeines ............................................................................................................... 10
2.1 Informationen zu dieser Anleitung ........................................................................ 10
2.2 Warnhinweise .......................................................................................................... 10
2.3 Haftungsbeschränkung .......................................................................................... 11
2.4 Urheberschutz ......................................................................................................... 11
3 Sicherheit ................................................................................................................... 11
3.1 Bestimmungsgemäße Verwendung ....................................................................... 11
3.2 Allgemeine Sicherheitshinweise ............................................................................ 12
3.3 Gefahrenquellen ...................................................................................................... 13
3.3.1 Verbrennungsgefahr .................................................................................................. 13
3.3.2 Brandgefahr ............................................................................................................... 13
3.3.3 Gefahr durch elektrischen Strom ............................................................................... 14
4 Sicherheitshinweise zur Aufbewahrung von Lebensmitteln ................................. 15
5 Inbetriebnahme .......................................................................................................... 15
5.1 Sicherheitshinweise ................................................................................................ 15
5.2 Lieferumfang und Transportinspektion ................................................................. 15
5.3 Einsatzbereich ......................................................................................................... 16
5.4 Auspacken ............................................................................................................... 16
5.5 Entsorgung der Verpackung .................................................................................. 16
5.6 Aufstellung ............................................................................................................... 16
5.6.1 Anforderungen an den Aufstellort .............................................................................. 16
5.7 Elektrischer Anschluss ........................................................................................... 17
6 Aufbau und Funktion ................................................................................................ 17
6.1 Gesamtübersicht ..................................................................................................... 18
6.2 Bedienelemente ....................................................................................................... 19
6.3 Typenschild ............................................................................................................. 19
7 Bedienung und Betrieb ............................................................................................. 19
7.1 Inbetriebnahme ........................................................................................................ 19
7.2 Beutel und Rollen .................................................................................................... 19
7.3 Vakuum-Verpacken in einem von der Rolle stammenden Beutel ....................... 20
7.4 Vakuum-Verpacken in einem Beutel ...................................................................... 20
7.5 Vakuum-Verpacken in einem Behälter .................................................................. 21
7.6 Aufbewahrung des Vakuumierers ......................................................................... 22
8 Reinigung und Pflege ................................................................................................ 22
8.1 Reinigung ................................................................................................................. 22
9 Störungsbehebung .................................................................................................... 23

4
9.1 Sicherheitshinweise ................................................................................................ 23
9.2 Störungsursachen und –behebung ....................................................................... 23
10 Entsorgung des Altgerätes ...................................................................................... 24
11 Garantie ...................................................................................................................... 25
12 Technische Daten ...................................................................................................... 25
13 Instruction Manual ..................................................................................................... 27
13.1 General ..................................................................................................................... 27
13.2 Information on this manual .................................................................................... 27
13.3 Warning notices ...................................................................................................... 27
13.4 Limitation of liability................................................................................................ 28
13.5 Copyright protection ............................................................................................... 28
14 Safety .......................................................................................................................... 29
14.1 Intended use ............................................................................................................ 29
14.2 General Safety information ..................................................................................... 29
14.3 Sources of danger ................................................................................................... 30
14.3.1 Danger of burns ................................................................................................... 30
14.3.2 Danger of fire ....................................................................................................... 31
14.3.3 Dangers due to electrical power .......................................................................... 31
14.4 Food storage safety information ............................................................................ 31
15 Getting Started........................................................................................................... 32
15.1 Packaging safety information ................................................................................ 32
15.2 Delivery scope and transport inspection .............................................................. 32
15.3 Functions ................................................................................................................. 32
15.4 Unpacking ................................................................................................................ 33
15.5 Disposal of the packaging ...................................................................................... 33
15.6 Setup ........................................................................................................................ 33
15.6.1 Setup location requirements: ............................................................................... 33
15.7 Electrical connection .............................................................................................. 33
16 Complete Overview ................................................................................................... 34
16.1 Appliance diagram .................................................................................................. 34
16.2 Control Panel ........................................................................................................... 35
16.3 Rating plate .............................................................................................................. 35
17 Operation ................................................................................................................... 35
17.1 Basics of sealing ..................................................................................................... 35
17.2 Bags and rolls .......................................................................................................... 36
17.3 Making a bag using the bag roll ............................................................................. 36
17.4 Vacuum packaging with a bag ............................................................................... 36

5
17.5 Vacuum package in a Canister ............................................................................... 37
17.6 Storage ..................................................................................................................... 37
18 Cleaning and Maintenance ....................................................................................... 38
18.1 Safety information ................................................................................................... 38
18.2 Cleaning ................................................................................................................... 38
19 Troubleshooting ........................................................................................................ 39
19.1 Safety notices .......................................................................................................... 39
19.2 Troubleshooting table ............................................................................................. 39
20 Disposal of the Old Device ....................................................................................... 40
21 Guarantee ................................................................................................................... 40
22 Technical Data ........................................................................................................... 41
23 Mode d´emploi ........................................................................................................... 43
23.1 Généralités ............................................................................................................... 43
23.2 Informations relatives à ce manuel ........................................................................ 43
23.3 Avertissements de danger ...................................................................................... 43
23.4 Limite de responsabilités ....................................................................................... 44
23.5 Protection intellectuelle .......................................................................................... 44
24 Sécurité ...................................................................................................................... 44
24.1 Utilisation conforme ................................................................................................ 45
24.2 Consignes de sécurités générales ........................................................................ 45
24.3 Sources de danger .................................................................................................. 46
24.3.1 Danger de brulures .............................................................................................. 46
24.3.2 Danger d'incendie ................................................................................................ 47
24.3.3 Dangers du courant électrique............................................................................. 47
24.4 Informations relatives à la sécurité de stockage des aliments ........................... 48
25 Mise en service .......................................................................................................... 48
25.1 Consignes de sécurité ............................................................................................ 48
25.2 Inventaire et contrôle de transport ........................................................................ 48
25.3 Fonctions ................................................................................................................. 49
25.4 Déballage ................................................................................................................. 49
25.5 Elimination des emballages ................................................................................... 49
25.6 Mise en place ........................................................................................................... 49
25.6.1 Exigences pour l'emplacement d'utilisation ......................................................... 49
25.7 Raccordement électrique ........................................................................................ 50
26 Structure et fonctionnement .................................................................................... 50
26.1 Vue d'ensemble ....................................................................................................... 51

6
26.2 Panneau de commande .......................................................................................... 52
26.3 Plaque signalétique ................................................................................................. 52
27 Commande et fonctionnement ................................................................................. 52
27.1 Sachets et rouleaux ................................................................................................ 52
27.2 Conservation dans des sachets du rouleau ......................................................... 53
27.3 Conservation dans un sachet ................................................................................ 53
27.4 Conservation dans un récipient à vide .................................................................. 54
27.5 Rangement de votre appareil d’emballage sous vide: ......................................... 55
28 Nettoyage et entretien ............................................................................................... 55
28.1 Consignes de sécurité ............................................................................................ 55
28.2 Nettoyage ................................................................................................................. 55
29 Réparation des pannes ............................................................................................. 56
29.1 Consignes de sécurité ............................................................................................ 56
29.2 Origine et remède des incidents ............................................................................ 56
30 Elimination des appareils usés ................................................................................ 57
31 Garantie ...................................................................................................................... 58
32 Caractéristiques techniques .................................................................................... 58
33 Istruzione d´uso ......................................................................................................... 60
33.1 In generale ............................................................................................................... 60
33.2 Informazioni su queste istruzioni d’uso ................................................................ 60
33.3 Indicazioni d’avvertenza ......................................................................................... 60
33.4 Limitazione della responsabilità ............................................................................ 61
33.5 Tutela dei diritti d’autore ......................................................................................... 61
34 Sicurezza .................................................................................................................... 62
34.1 Utilizzo conforme alle disposizioni ........................................................................ 62
34.2 Indicazioni generali di sicurezza ............................................................................ 62
34.3 Fonti di pericolo ...................................................................................................... 64
34.3.1 Pericolo di ustioni ................................................................................................ 64
34.3.2 Pericolo d’incendio .............................................................................................. 64
34.3.3 Pericolo dovuto a corrente elettrica ..................................................................... 64
34.3.4 Informazioni di sicurezza per la conservazione del cibo. ..................................... 65
35 Messa in funzione ...................................................................................................... 66
35.1 Indicazioni di sicurezza........................................................................................... 66
35.2 Insieme della fornitura ed ispezione trasporto ..................................................... 66
35.3 Funzioni .................................................................................................................... 66
35.4 Disimballaggio ......................................................................................................... 66

7
35.5 Smaltimento dell’involucro ..................................................................................... 66
35.6 Posizionamento ....................................................................................................... 67
35.6.1 Requisiti del luogo di posizionamento ................................................................. 67
35.7 Connessione elettrica ............................................................................................. 67
36 Costruzione e funzione ............................................................................................. 68
36.1 Panoramica complessiva........................................................................................ 68
36.2 Elementi di comando .............................................................................................. 69
36.3 Targhetta di omologazione ..................................................................................... 69
37 Utilizzo e funzionamento .......................................................................................... 69
37.1 Sacchetti in rotoli .................................................................................................... 70
37.2 Confezionamento sotto vuoto in un sacchetto derivante dal rotolo................... 70
37.3 Confezionamento sotto vuoto in un sacchetto ..................................................... 70
37.4 Confezionamento sotto vuoto in un contenitore del vuoto ................................. 71
37.5 Conservazione del sistema di sigillamento sottovuoto: ...................................... 72
38 Pulizia e cura ............................................................................................................. 72
38.1 Indicazioni di sicurezza........................................................................................... 72
38.2 La pulizia .................................................................................................................. 73
39 Eliminazione malfunzionamenti ............................................................................... 73
39.1 Indicazioni di sicurezza........................................................................................... 73
39.2 Cause malfunzionamenti e risoluzione ................................................................. 74
40 Smaltimento dell’apparecchio obsoleto .................................................................. 74
41 Garanzia ..................................................................................................................... 75
42 Dati tecnici ................................................................................................................. 75
43 Manual del usuario .................................................................................................... 77
43.1 Generalidades .......................................................................................................... 77
43.2 Información acerca de este manual ....................................................................... 77
43.3 Advertencias ............................................................................................................ 77
43.4 Limitación de responsabilidad ............................................................................... 78
43.5 Derechos de autor (copyright) ............................................................................... 78
44 Seguridad ................................................................................................................... 78
44.1 Uso previsto ............................................................................................................. 79
44.2 Instrucciones generales de seguridad .................................................................. 79
44.3 Fuentes de peligro .................................................................................................. 81
44.3.1 Peligro de quemaduras ....................................................................................... 81
44.3.2 Peligro de fuego .................................................................................................. 81
44.3.3 Peligro de electrocución ...................................................................................... 81

8
45 Indicaciones de seguridad para la conservación de alimentos ............................ 82
46 Puesta en marcha ...................................................................................................... 82
46.1 Instrucciones de seguridad .................................................................................... 83
46.2 Ámbito de suministro e inspección de transporte ............................................... 83
46.3 Funciones ................................................................................................................ 83
46.4 Desembalaje ............................................................................................................ 83
46.5 Eliminación del embalaje ........................................................................................ 83
46.6 Colocación ............................................................................................................... 84
46.6.1 Requisitos que debe reunir el lugar de montaje .................................................. 84
46.7 Conexión eléctrica .................................................................................................. 84
47 Estructura y funciones .............................................................................................. 85
47.1 Descripción general ................................................................................................ 85
47.2 Elementos de operación ......................................................................................... 86
47.3 Placa de especificaciones ...................................................................................... 86
48 Operación y funcionamiento .................................................................................... 87
48.1 Puesta en servicio ................................................................................................... 87
48.2 Bolsas y rollos ......................................................................................................... 87
48.3 Envasar al vacío en una de las bolsas del rollo ................................................... 87
48.4 Envasar al vacío en una bolsa ............................................................................... 88
48.5 Envasar al vacío en un recipiente de vacío ........................................................... 89
48.6 Almacenamiento de la envasadora ........................................................................ 89
49 Limpieza y conservación .......................................................................................... 89
49.1 Instrucciones de seguridad .................................................................................... 90
49.2 Limpieza ................................................................................................................... 90
50 Resolución de fallas .................................................................................................. 91
50.1 Instrucciones de seguridad .................................................................................... 91
50.2 Problemas, causas y remedios .............................................................................. 91
51 Eliminación del aparato usado ................................................................................. 92
52 Garantía ...................................................................................................................... 92
53 Datos técnicos ........................................................................................................... 93
54 Руководство по эксплуатации .............................................................................. 95
55 Общие сведения ...................................................................................................... 95
55.1 Информация о данной инструкции .................................................................... 95
55.2 Предупредительные указания ............................................................................ 95
55.3 Ограничение ответственности ............................................................................ 96
55.4 Защита авторского права ..................................................................................... 96

9
56 Безопасность ........................................................................................................... 96
56.1 Надлежащее использование ............................................................................... 96
56.2 Общие требования техники безопасности ........................................................ 97
56.3 Источники опасности ............................................................................................ 99
56.3.1 Опасность ожога ............................................................................................... 99
56.3.2 Опасность возгорания ....................................................................................... 99
56.3.3 Опасность, связанная с электрическим током! ............................................... 99
57 Правила безопасности при хранении продуктов питания ............................. 100
58 Ввод в эксплуатацию ............................................................................................ 101
58.1 Правила техники безопасности ........................................................................ 101
58.2 Комплектация и осмотр после транспортировки .......................................... 101
58.3 Область применения .......................................................................................... 101
58.4 Распаковка ............................................................................................................ 102
58.5 Утилизация упаковки .......................................................................................... 102
58.6 Установка .............................................................................................................. 102
58.6.1 Требования к месту установки ........................................................................ 102
58.7 Подключение к электросети .............................................................................. 103
59 Конструкция и назначение ................................................................................... 103
59.1 Общее описание .................................................................................................. 104
59.2 Элементы управления ........................................................................................ 105
59.3 Заводская табличка ............................................................................................ 105
60 Обслуживание и эксплуатация ........................................................................... 105
60.1 Ввод в эксплуатацию.......................................................................................... 105
60.2 Пакеты и рулоны ................................................................................................. 106
60.3 Вакуумная упаковка в пакете, сделанном из рулона .................................... 106
60.4 Вакуумная упаковка в пакете ............................................................................ 106
60.5 Вакуумная упаковка в вакуумную емкость..................................................... 107
60.6 Хранение вакуумного упаковщика ................................................................... 108
61 Очистка и уход ....................................................................................................... 108
61.1 Очистка .................................................................................................................. 109
62 Устранение неисправностей ................................................................................ 110
62.1 Правила техники безопасности ........................................................................ 110
62.2 Причины неисправностей и их устранение .................................................... 110
63 Утилизация отслужившего устройства.............................................................. 111
64 Гарантия .................................................................................................................. 111
65 Технические характеристики ............................................................................... 112

10
1 Bedienungsanleitung
2 Allgemeines
Lesen Sie die hier enthaltenen Informationen, damit Sie mit Ihrem Gerät schnell vertraut
werden und seine Funktionen in vollem Umfang nutzen können. Sachgerechte
Behandlung und Pflege wirken sich positv auf seine Lebensdauer aus.
Wir wünschen Ihnen viel Freude beim Gebrauch.
2.1 Informationen zu dieser Anleitung
Diese Bedienungsanleitung ist Bestandteil des Vakuumierers (nachfolgend als Gerät
bezeichnet) und gibt Ihnen wichtige Hinweise für die Inbetriebnahme, die Sicherheit, den
bestimmungsgemäßen Gebrauch und die Pflege des Gerätes. Die Bedienungsanleitung
muss ständig am Gerät verfügbar sein. Sie ist von jeder Person zu lesen und
anzuwenden, die mit der: Inbetriebnahme, Bedienung,
Störungsbehebung und/oder Reinigung des Gerätes beauftragt ist.
Bewahren Sie diese Bedienungsanleitung auf und geben Sie diese mit dem Gerät an
Nachbesitzer weiter.
2.2 Warnhinweise
In der vorliegenden Bedienungsanleitung werden folgende Warnhinweise verwendet:
Ein Warnhinweis dieser Gefahrenstufe kennzeichnet eine drohende gefährliche
Situation. Falls die gefährliche Situation nicht vermieden wird, führt dies zum Tod oder zu
schweren Verletzungen.
► Die Anweisungen in diesem Warnhinweis befolgen, um die Gefahr des Todes oder
schwerer Verletzungen von Personen zu vermeiden.
Ein Warnhinweis dieser Gefahrenstufe kennzeichnet eine mögliche gefährliche
Situation. Falls die gefährliche Situation nicht vermieden wird, kann dies zu schweren
Verletzungen führen.
► Die Anweisungen in diesem Warnhinweis befolgen, um Verletzungen von Personen zu
vermeiden.
Ein Warnhinweis dieser Gefahrenstufe kennzeichnet eine mögliche gefährliche
Situation. Falls die gefährliche Situation nicht vermieden wird, kann dies zu leichten oder
gemäßigten Verletzungen führen.
► Die Anweisungen in diesem Warnhinweis befolgen, um Verletzungen von Personen zu
vermeiden.
Ein Hinweis kennzeichnet zusätzliche Informationen, die den Umgang mit dem Gerät
erleichtern.

11
2.3 Haftungsbeschränkung
Alle in dieser Anleitung enthaltenen technischen Informationen, Daten und Hinweise für
die Installation, Betrieb und Pflege entsprechen dem letzten Stand bei Drucklegung und
erfolgen unter Berücksichtigung unserer bisherigen Erfahrungen und Erkenntnisse nach
bestem Wissen. Aus den Angaben, Abbildungen und Beschreibungen in dieser Anleitung
können keine Ansprüche hergeleitet werden. Der Hersteller übernimmt keine Haftung für
Schäden aufgrund: Nichtbeachtung der Anleitung
• Nicht bestimmungsgemäßer Verwendung Unsachgemäßer Reparaturen
• Technischer Veränderungen, Modifikationen des Gerätes
• Verwendung nicht zugelassener Ersatzteile
Modifikationen des Gerätes werden nicht empfohlen und sind nicht durch die Garantie
gedeckt. Übersetzungen werden nach bestem Wissen durchgeführt. Wir übernehmen
keine Haftung für Übersetzungsfehler, auch dann nicht, wenn die Übersetzung von uns
oder in unserem Auftrag erfolgte. Verbindlich bleibt allein der ursprüngliche deutsche Text.
2.4 Urheberschutz
Diese Dokumentation ist urheberrechtlich geschützt.
Alle Rechte, auch die der fotomechanischen Wiedergabe, der Vervielfältigung und der
Verbreitung mittels besonderer Verfahren (zum Beispiel Datenverarbeitung, Datenträger
und Datennetze), auch teilweise, behält sich die Braukmann GmbH vor, ebenso inhaltliche
und technische Änderungen.
3 Sicherheit
In diesem Kapitel erhalten Sie wichtige Sicherheitshinweise für den Umgang mit dem
Gerät.
Dieses Gerät entspricht den vorgeschriebenen Sicherheitsbestimmungen. Ein
unsachgemäßer Gebrauch kann jedoch zu Personen- und Sachschäden führen.
3.1 Bestimmungsgemäße Verwendung
Dieses Gerät ist nur für den Gebrauch im Haushalt in geschlossenen Räumen zum
Vakuumieren und Verschweißen von Beuteln und Vakuum-Behältern bestimmt.
Eine andere oder darüber hinaus gehende Benutzung gilt als nicht bestimmungsgemäß.
Gefahr durch nicht bestimmungsgemäße Verwendung!
Von dem Gerät können bei nicht bestimmungsgemäßer Verwendung und/oder
andersartiger Nutzung Gefahren ausgehen.
► Das Gerät ausschließlich bestimmungsgemäß verwenden.
► Die in dieser Bedienungsanleitung beschriebenen Vorgehensweisen einhalten.
Ansprüche jeglicher Art wegen Schäden aus nicht bestimmungsgemäßer Verwendung
sind ausgeschlossen.
Das Risiko trägt allein der Betreiber.

12
3.2 Allgemeine Sicherheitshinweise
Beachten Sie für einen sicheren Umgang mit dem Gerät die
folgenden allgemeinen Sicherheitshinweise:
► Kontrollieren Sie das Gerät vor der Verwendung auf äußere
sichtbare Schäden. Nehmen Sie ein beschädigtes Gerät
nicht in Betrieb.
► Bei Beschädigung der Anschlussleitung oder des Steckers,
müssen diese durch den Hersteller oder dessen
Servicebeauftragten ersetzt werden, um Gefahren
vorzubeugen.
► Dieses Gerät kann von Kindern ab 8 Jahren und darüber
benutzt werden, wenn sie beaufsichtigt werden oder
bezüglich des sicheren Gebrauchs des Gerätes unterwiesen
wurden und die daraus resultierenden Gefahren verstanden
haben.
► Reinigung und Wartung durch den Benutzer dürfen nicht
durch Kinder vorgenommen werden, es sei denn, sie sind 8
Jahre oder älter und werden beaufsichtigt.
► Kinder dürfen nicht mit dem Gerät spielen.
► Das Gerät und seine Anschlussleitung sind von Kindern
jünger als 8 Jahre fernzuhalten.
► Das Gerät kann von Personen mit reduzierten physischen,
sensorischen oder mentalen Fähigkeiten oder Mangel an
Erfahrung und/oder Wissen benutzt werden, wenn sie
beaufsichtigt oder bezüglich des sicheren Gebrauchs des
Gerätes unterwiesen wurden und die daraus resultierenden
Gefahren verstanden haben.
► Eine Reparatur des Gerätes darf nur von einem vom
Hersteller autorisierten Kundendienst vorgenommen werden,
sonst besteht bei nachfolgenden Schäden kein
Garantieanspruch mehr. Durch unsachgemäße Reparaturen
können erhebliche Gefahren für den Benutzer entstehen.

13
► Defekte Bauteile dürfen nur gegen Original-Ersatzteile
ausgetauscht werden. Nur bei diesen Teilen ist
gewährleistet, dass sie die Sicherheitsanforderungen erfüllen
werden.
► Das Gerät während des Betriebes nicht unbeaufsichtigt
lassen.
► Ziehen Sie nicht an der Anschlussleitung und tragen Sie das
Gerät nicht an der Anschlussleitung.
► Das Gerät nicht in Wasser oder andere Flüssigkeiten
tauchen und nicht in die Spülmaschine geben.
► Bitte zur Aufbewahrung den Deckel nur locker schließen,
nicht verriegeln, damit die Dichtungen sich nicht verformen
und die Funktion des Gerätes nicht beeinträchtigt wird.
3.3 Gefahrenquellen
3.3.1 Verbrennungsgefahr
Der Schweißbalken des Gerätes wird sehr heiß.
Beachten Sie bitte folgenden Sicherheitshinweis, um sich
und andere nicht zu verbrennen:
► Um eventuellen Verbrennungen vorzubeugen, berühren Sie
den Schweißbalken niemals unmittelbar nach dem
Schweißvorgang.
3.3.2 Brandgefahr
Bei nicht sachgemäßer Verwendung des Gerätes besteht
Brandgefahr.
Beachten Sie die folgenden Sicherheitshinweise um
Brandgefahr zu vermeiden:
► Stellen Sie das Gerät nicht in der Nähe von brennbarem
Material auf.

14
► Halten Sie das Gerät fern von jeglichen Wärmequellen (Gas,
Strom, Brenner, beheizter Ofen).
3.3.3 Gefahr durch elektrischen Strom
Lebensgefahr durch elektrischen Strom!
Beim Kontakt mit unter Spannung stehenden Leitungen
oder Bauteilen besteht Lebensgefahr!
Beachten Sie die folgenden Sicherheitshinweise um eine
Gefährdung durch elektrischen Strom zu vermeiden:
► Das Gerät darf nicht in Betrieb genommen werden, wenn die
Anschlussleitung oder der Stecker beschädigt sind, wenn es
nicht ordnungsgemäß funktioniert oder fallen gelassen oder
beschädigt worden ist. Bei Beschädigung der
Anschlussleitung oder des Steckers, müssen diese durch den
Hersteller oder dessen Servicebeauftragten ersetzt werden,
um Gefahren vorzubeugen.
► Öffnen Sie auf keinen Fall das Gehäuse des Gerätes.
Werden spannungsführende Anschlüsse berührt und der
elektrische und mechanische Aufbau verändert, besteht
Stromschlaggefahr. Darüber hinaus können
Funktionsstörungen am Gerät auftreten.
► Berühren Sie das Gerät sowie den Netzstecker nicht mit
nassen Händen.
► Keine Gegenstände in die Öffnungen des Gerätes einführen.
Bei Berührung Spannung führender Teile besteht
Stromschlaggefahr.

15
4 Sicherheitshinweise zur Aufbewahrung von Lebensmitteln
Befolgen Sie bitte bestimmte Vorgehensweisen beim Vakuum-verschweißen; so können
Sie die Qualität und die Sicherheit Ihrer vakuumierten / eingeschweißten Lebensmittel
garantieren.
Beachten Sie für einen sicheren Umgang mit dem Gerät die folgenden allgemeinen
Sicherheitshinweise:
► Wenn verderbliche Lebensmittel erhitzt oder aufgetaut wurden oder ungekühlt
aufbewahrt werden, müssen sie umgehend verzehrt werden.
► Bevor Sie Lebensmittel vakuum-verpacken ist es wichtig, dass Sie sich vorher Ihre
Hände waschen und sämtliche Utensilien und Oberflächen reinigen.
► Kühlen oder gefrieren Sie verderbliche Lebensmittel umgehend, nachdem Sie sie
vakuumverpackt haben. Bewahren Sie sie nicht bei Zimmertemperatur auf.
► Bewahren Sie fettreiche Lebensmittel möglichst kühl und dunkel auf, damit sie nicht
ranzig werden.
► Schälen Sie Früchte und Gemüse, wie z.B. Äpfel, Bananen, Kartoffeln und
Wurzelgemüse, nur so verlängert das Vakuumverpacken ihre Haltbarkeit.
► Um die Bildung von Gasen zu vermeiden, blanchieren Sie Gemüsearten wie Kohl und
Brokkoli, bevor Sie sie vakuumieren.
5 Inbetriebnahme
In diesem Kapitel erhalten Sie wichtige Hinweise zur Inbetriebnahme des Gerätes.
Beachten Sie die Hinweise, um Gefahren und Beschädigungen zu vermeiden.
5.1 Sicherheitshinweise
► Verpackungsmaterialien dürfen nicht zum Spielen verwendet werden. Es besteht
Erstickungsgefahr.
5.2 Lieferumfang und Transportinspektion
Das Gerät wird standardmäßig mit folgenden Komponenten geliefert:
• VR 390 advanced 10 Profi-Vakuumierbeutel (20 x 30 cm)
• Bedienungsanleitung Vakuumierschlauch
• Herausnehmbare Auffangschale für die Vakuumkammer
► Prüfen Sie die Lieferung auf Vollständigkeit und auf sichtbare Schäden.
► Melden Sie eine unvollständige Lieferung oder Schäden infolge mangelhafter
Verpackung oder durch Transport sofort dem Spediteur, der Versicherung und dem
Lieferanten.

16
5.3 Einsatzbereich
Die mit diesem Gerät vakuum-verpackten Lebensmittel bleiben bis zu achtmal länger
frisch: Besserer Geschmack – weniger Kosten durch verdorbene Lebensmittel.
• Verpacken Sie Lebensmittel, wie z.B. Fleisch, Fisch, Geflügel, Fisch und Meeresfrüchte
und Gemüse zum Einfrieren oder für die Aufbewahrung im Kühlschrank.
• Verpacken Sie trockene Lebensmittel, wie z.B. Bohnen, Nüsse, Müsli usw. um diese
Lebensmittel länger aufbewahren zu können.
• Setzen Sie Ihren Vakuumierer im Non-Food-Bereich ein: Eingeschweißter
Campingbedarf, wie z.B. Streichhölzer, Sanitätskästen und Kleidung bleiben sauber
und trocken, Silber und Sammlerstücke laufen nicht an.
5.4 Auspacken
Zum Auspacken des Gerätes entnehmen Sie das Gerät aus dem Karton und entfernen Sie
das Verpackungsmaterial.
5.5 Entsorgung der Verpackung
Die Verpackung schützt das Gerät vor Transportschäden. Die Verpackungsmaterialien
sind nach umweltverträglichen und entsorgungstechnischen Gesichtspunkten ausgewählt
und deshalb recycelbar. Die Rückführung der Verpackung in den Materialkreislauf spart
Rohstoffe und verringert das Abfallaufkommen. Entsorgen Sie nicht mehr benötigte
Verpackungsmaterialien an den Sammelstellen für das Verwertungssystem »Grüner
Punkt«.
► Heben Sie, wenn möglich, die Originalverpackung während der Garantiezeit des
Gerätes auf, um das Gerät im Garantiefall wieder ordnungsgemäß verpacken zu
können.
5.6 Aufstellung
5.6.1 Anforderungen an den Aufstellort
Für einen sicheren und fehlerfreien Betrieb des Gerätes muss der Aufstellort folgende
Voraussetzungen erfüllen:
• Das Gerät muss auf einer festen, ebenen, waagerechten und hitzebeständigen
Unterlage mit einer ausreichenden Tragkraft und Platz für das Gerät und das
erwartungsgemäß schwerste und größte zu vakuumierende Gut aufgestellt werden.
• Bewegen Sie den Vakuumierer nicht, während er in Betrieb ist.
• Wählen Sie den Aufstellort so, dass Kinder nicht an den heißen Schweißbalken des
Gerätes gelangen können.
• Stellen Sie das Gerät nicht in einer heißen, nassen oder sehr feuchten Umgebung oder
in der Nähe von brennbarem Material auf.
• Um für ausreichende Luftzirkulation zu sorgen, lassen Sie zu allen Seiten ca. 10 cm
Platz.

17
• Die Steckdose muss leicht zugänglich sein, so dass das Stromkabel notfalls leicht
abgezogen werden kann.
• Der Aufstellung des Gerätes an nichtstationären Aufstellungsorten (z. B. Schiffen) darf
nur von Fachbetrieben/Fachleuten durchgeführt werden, wenn sie die
Voraussetzungen für den sicherheitsgerechten Gebrauch dieses Gerätes sicherstellen.
5.7 Elektrischer Anschluss
Für einen sicheren und fehlerfreien Betrieb des Gerätes sind beim elektrischen Anschluss
folgende Hinweise zu beachten:
• Vergleichen Sie vor dem Anschließen des Gerätes die Anschlussdaten (Spannung und
Frequenz) auf dem Typenschild mit denen Ihres Elektronetzes. Diese Daten müssen
übereinstimmen, damit keine Schäden am Gerät auftreten.
Im Zweifelsfall fragen Sie Ihre Elektro-Fachkraft.
• Die Verwendung von Mehrfachsteckern oder Steckdosenleisten ist wegen der damit
verbundenen Brandgefahr verboten.
• Vergewissern Sie sich, dass das Stromkabel unbeschädigt ist und nicht über oder
unter dem Gerät oder über heiße und/oder scharfkantige Flächen verlegt wird.
• Die Steckdose muss über einen 16A-Sicherungsschutzschalter abgesichert sein.
• Die elektrische Sicherheit des Gerätes ist nur dann gewährleistet, wenn es an ein
vorschriftsmäßig installiertes Schutzleitersystem angeschlossen wird. Lassen Sie im
Zweifelsfall die Hausinstallation durch eine Elektro-Fachkraft überprüfen.
Der Hersteller haftet nicht für Schäden, die durch einen fehlenden oder unterbrochenen
Schutzleiter verursacht werden.
6 Aufbau und Funktion
In diesem Kapitel erhalten Sie wichtige Hinweise zu Aufbau und Funktion des Gerätes.

18
6.1 Gesamtübersicht
1 Sicherheitsschalter Wenn der Deckel geöffnet ist, dann arbeitet das Heizelement nicht
2 Verriegelungshaken
3 obere Dichtung + 9 untere Dichtung
4 Vakuumierschlauch zum Vakuumieren von Behältern
5 Schweißbalken & Teflonband: Enthält einen teflonbeschichteten Heizdraht; dieser
ermöglicht es, den Beutel zu versiegeln, ohne dass er festklebt.
6 Taste für Behälter
7 Entriegelungstaste
8 Gummidichtung (die den Beutel gegen den Schweißbalken drückt)
10 Vakuumkammer mit herausnehmbarer Auffangschale für Flüssigkeiten
11 Ansaugstutzen: Zum Anschluss eines Vakuumierschlauchs zum Vakuumieren von
Behältern.
Der Schweißbalken des Gerätes wird sehr heiß.
Beachten Sie bitte folgenden Sicherheitshinweis, um sich und andere nicht zu
verbrennen:
► Um eventuellen Verbrennungen vorzubeugen, berühren Sie den Schweißbalken
niemals unmittelbar nach dem Schweißvorgang.
► Entfernen Sie nicht das Teflonband (T)!

19
6.2 Bedienelemente
Tasten (die ausgewählte Funktion wird durch die jeweilige Kontrolleuchte angezeigt)
Taste Vakuum & Schweißen / Abbrechen
Zum automatischen Vakuumieren und Verschweißen eines Beutels oder eines Behälters.
Taste erneut drücken um den Vorgang abzubrechen.
Taste Lebensmittel (Trocken & Feucht)
Mit dieser Funktion können Sie die Versiegelungszeit an die Konsistenz Ihres
Vakuumiergutes anpassen. Wählen Sie bitte vor dem Vakuumiervogang „Trocken“ für
trockenes Vakuumiergut und „Feucht“ für feuchtes Vakuumiergut, bei dem etwas
Flüssigkeit entsteht.
Taste Vakuumstärke: (Normal & Schonend)
Zwei unterschiedliche Einstellungen zur Auswahl der Vakuumstärke
Normal – für normales Vakuumiergut
Schonend – für weiches und empfindliches Vakuumiergut. Wählen Sie Schonend aus,
wenn eine geringere Vakuumstärke erwünscht ist.
Taste Schweißen
Zum Verschweißen eines Beutels ohne zusätzlichen Vakuumiervorgang.
6.3 Typenschild
Das Typenschild mit den Anschluss- und Leistungsdaten befindet sich an der Unterseite
des Gerätes.
7 Bedienung und Betrieb
In diesem Kapitel erhalten Sie wichtige Hinweise zur Bedienung des Gerätes. Beachten
Sie die Hinweise, um Gefahren und Beschädigungen zu vermeiden.
7.1 Inbetriebnahme
Vor jedem Gebrauch und nach jedem Versiegeln müssen sowohl das Gerät als auch
sämtliche mit Lebensmitteln in Berührung kommende Zubehörteile sorgfältig gereinigt
werden; befolgen Sie dazu bitte die in dem Abschnitt „Reinigung und Pflege“ aufgeführten
Anweisungen.
7.2 Beutel und Rollen
Bitte verwenden Sie nur ausdrücklich für das Vakuumieren vorgesehene Beutel und
Rollen. Das Folienmaterial dieser speziellen Vakuumierfolien ist ein anderes als das von
gewöhnlichen Frischhaltefolien.

20
Alle von CASO gelieferten Folienrollen und –beutel sind für das Kochen-im-Beutel (Sous
Vide) geeignet. Bitte vergewissern Sie sich bei der Verwendung von Folien anderer
Hersteller, ob diese ebenfalls für die Mikrowelle und für das Kochen-im-Beutel (Sous Vide)
geeignet sind.
Bitte beachten Sie, dass Balkenvakuumierer wie dieses Gerät grundsätzlich nur mit
strukturierten Folienbeuteln betrieben werden können. Hierzu erhalten Sie von CASO ein
breites Angebot verschiedener Rollen und Beutel.
7.3 Vakuum-Verpacken in einem von der Rolle stammenden Beutel
Stellen Sie das Gerät an einem trockenen Platz auf.
1. Rollen Sie die Folie auf die gewünschte Länge aus und schneiden Sie einen Beutel
von der Rolle ab. Legen Sie ein Ende des Beutels über die Gummidichtung.
2. Schließen Sie den Deckel und stellen Sie die gewünschte Versiegelungszeit ein.
3. Drücken Sie die Taste Schweißen. Die entsprechende LED leuchtet auf und
erlischt, wenn der Vorgang abgeschlossen ist.
4. Entriegelungstasten drücken, dann den Deckel öffnen und den Beutel entnehmen.
Dieser kann nun zum Vakuumieren benutzt werden.
► Vergewissern Sie sich, dass die Länge des zu benutzenden Beutels mindestens 8cm
länger als das zu konservierende Lebensmittel ist und berücksichtigen Sie weitere
2cm, falls der Beutel nach dem Aufschneiden ein weiteres Mal versiegelt werden soll.
7.4 Vakuum-Verpacken in einem Beutel
Aufstellen wie unter 7.3 beschrieben.
1. Geben Sie die Lebensmittel in den
Beutel.
2. Platzieren Sie das offene Ende des
Beutels in der Vakuumkammer.
3. Schließen Sie den Deckel und
stellen Sie die gewünschte Versiegelungszeit
und die gewünschte Vakuumstärke ein.
4. Drücken Sie nun die Vakuum &
Schweißen / Abbrechen -Taste und der
Beutel wird automatisch vakuumiert und
versiegelt. Die entsprechende LED leuchtet auf und erlischt, wenn der Vorgang
abgeschlossen ist.
Wenn Sie den Vorgang abbrechen möchten, drücken Sie die Vakuum & Schweißen /
Abbrechen -Taste erneut und anschließend die beiden Entriegelungs-Tasten, um den
Deckel zu öffnen.
► Geben Sie nicht zu viele Lebensmittel in den Beutel, so dass die geöffnete Seite des
Beutels leicht im Vakuumierer platziert werden kann.

21
► Reinigen und glätten Sie das offene Ende des Beutels, bevor Sie ihn verschweißen.
Entfernen Sie Lebensmittelrückstände, Feuchtigkeit und Falten, um ein einwandfreies
Schweißergenis zu erreichen.
► Streichen Sie schon vor dem Vakuumieren die Luft aus dem Beutel, um den
Vakuumiervorgang zu optimieren.
► Sollten die Lebensmittel, scharfe Kanten, wie z.B. Knochen, haben, wickeln Sie sie in
Küchenpapier ein; so verhindern Sie, dass der Beutel beschädigt wird.
► Flüssige Lebensmittel frieren Sie erst in einem geeigneten Gefäß ein und füllen Sie
dann in einen Beutel, um sie zu vakuumieren.
► Da sich Lebensmittel beim Einfrieren etwas ausdehnen können, wählen Sie den
Beutel ca. 5 cm. größer.
► Legen Sie Fleisch oder Fisch auf Küchenpapier und vakuumieren Sie beides
zusammen. Das Küchenpapier hat den Vorteil, dass es Feuchtigkeit von den
Lebensmitteln aufnehmen kann.
► Weiche Lebensmittel, die leicht aneinanderhaften, trennen Sie mit Back- oder
Pergamentpapier, dann einvakuumieren. Dies ermöglicht eine leichtere Entnahme.
7.5 Vakuum-Verpacken in einem Behälter
Wischen Sie den Vakuum Behälter-
Deckel und den Behälter ab, um
sicher zu stellen, dass diese sauber
und trocken sind.
Füllen Sie das Vakuumiergut in den
Behälter. Achten Sie darauf nicht
zu viel Vakuumiergut einzufüllen.
Entnehmen Sie die Auffangschale
aus der Vakuumkammer.
Befestigen Sie ein Ende des Vakuumierschlauches am Ansaugstutzen am Gerät und ein
Ende am Anschluss des Behälterdeckels bzw. mit dem Adapter auf dem Behälterdeckel.
Die Taste für Behälter (6) drücken.
Um zu verhindern, dass Luft eindringt, empfehlen wir, zu Beginn des Vakuumvorgangs
den Deckel des Behälters anzudrücken. Der Vakuumiervorgang endet automatisch.
Entfernen Sie zuerst den Vakuumierschlauch vom Deckel des Behälters, erst dann vom
Ansaugstutzen am Gerät. Setzen Sie die Auffangschale wieder in die Vakuumkammer ein.
Sie können den Vorgang jederzeit abbrechen, in dem Sie erneut auf die Taste für
Behälter (6) drücken.

22
7.6 Aufbewahrung des Vakuumierers
Bewahren Sie Ihr Gerät an einem ebenen und sicheren Ort, außerhalb der Reichweite von
Kindern, auf.
► Wenn Sie das Gerät längere Zeit nicht nutzen, empfehlen wir, den Netzstecker aus
der Steckdose zu ziehen.
► Bitte zur Aufbewahrung den Deckel nur locker schließen, nicht verriegeln, damit die
Dichtungen sich nicht verformen.
8 Reinigung und Pflege
In diesem Kapitel erhalten Sie wichtige Hinweise zur Reinigung und Pflege des Gerätes.
Sicherheitshinweise
Beachten Sie die folgenden Sicherheitshinweise, bevor Sie mit der Reinigung des
Gerätes beginnen:
► Ziehen Sie vor dem Reinigen den Stecker aus der Steckdose.
► Das Gerät muss regelmäßig gereinigt und Rückstände entfernt werden, um seine
Funktionsfähigkeit und Sicherheit zu erhalten. Ziehen Sie vor dem Reinigen den
Stecker aus der Steckdose.
► Der Schweißbalken kann nach dem Vakuumieren heiß sein. Es besteht
Verbrennungsgefahr! Warten Sie, bis das Gerät abgekühlt ist.
► Reinigen Sie das Gerät möglichst nach jedem Gebrauch.
► Wenn Feuchtigkeit in das Gerät eindringt, können elektronische Bauteile beschädigt
werden. Achten Sie darauf, dass keine Flüssigkeit durch die Vakuumpumpe in das
Geräteinnere gelangt.
► Das Gerät nicht in Wasser oder andere Flüssigkeiten tauchen und nicht in die
Spülmaschine geben.
► Benutzen Sie keine aggressiven oder scheuernden Reinigungsmittel und keine
Lösungsmittel.
► Kratzen Sie hartnäckige Verschmutzungen nicht mit harten Gegenständen ab.
► Trocknen Sie das Gerät sorgfältig ab, bevor Sie es wieder benutzen.
8.1 Reinigung
◆ Außenseite des Gerätes
Die Außenseite des Gerätes mit einem feuchten Tuch oder unter Verwendung einer
milden, nicht scheuernden Seifenlösung abwischen.
◆ Innenseite des Gerätes
Reinigen Sie die Innenseite des Gerätes mit Küchenpapier, um Essensreste und
Flüssigkeiten zu entfernen.
Entnehmen Sie die Auffangschale aus der Vakuumkammer und spülen Sie sie in warmem
Wasser mit etwas Spülmittel, trocknen Sie sie sorgfältig ab und setzen sie wieder ein.

23
◆ Vakuumierbeutel
Sie können die Vakuumierbeutel mehrfach verwenden. Waschen Sie den Beutel in
warmem Spülwasser aus und lassen Sie ihn anschließend sorgfältig trocknen, bevor Sie
ihn wieder benutzen.
► Beutel, die zur Aufbewahrung von rohem Fleisch, Fisch oder fettigen Lebensmitteln
benutzt wurden, können nicht wieder verwendet werden.
◆ Gummidichtung (die den Beutel gegen den Schweißbalken drückt)
Nehmen Sie die Gummidichtung heraus und reinigen Sie diese in warmem Seifenwasser.
► Die Gummidichtung sollte sorgfältig getrocknet werden, bevor Sie sie wieder
einbauen.
► Achten Sie auf eine korrekte Platzierung der Dichtung, das Gerät ordnungsgemäß
funktionieren kann.
9 Störungsbehebung
In diesem Kapitel erhalten Sie wichtige Hinweise zur Störungslokalisierung und Störungs-
-behebung. Beachten Sie die Hinweise, um Gefahren und Beschädigungen zu vermeiden.
9.1 Sicherheitshinweise
► Reparaturen an Elektrogeräten dürfen nur von Fachleuten durchgeführt werden, die
vom Hersteller geschult sind.
► Durch unsachgemäße Reparaturen können erhebliche Gefahren für den Benutzer und
Schäden am Gerät entstehen.
9.2 Störungsursachen und –behebung
Die nachfolgende Tabelle hilft bei der Lokalisierung und Behebung kleinerer Störungen.
Fehler
Mögliche Ursache
Behebung
Der Vakuumierer
funktioniert nicht
Netzstecker nicht
eingesteckt
Netzstecker einstecken
Stromkabel oder
Stecker defekt
Kundendienst kontaktieren.
Steckdose defekt
Andere Steckdose wählen

24
Das abgeschnittene
Rollenstück wird nicht
korrekt verschweißt
Rollenstück nicht korrekt
positioniert
Befolgen Sie die Schritte im Kapitel
„Vakuum-Verpacken in einem von der
Rolle stammenden Beutel”
Es wird kein
vollständiges Vakuum
im Beutel erzeugt
Das offene Ende des
Beutels befindet sich
nicht vollständig in der
Vakuumkammer
Positionieren Sie den Beutel korrekt
Der Beutel ist defekt
Wählen sie einen anderen Beutel
Es befinden sich
Unreinheiten auf den
Schweiß- und/oder den
normalen Dichtungen
Säubern Sie die Dichtungen und
setzten Sie diese nach dem Trocknen
wieder korrekt ein.
Der Beutel wird nicht
korrekt verschweißt
Der Schweißbalken ist
überhitzt, so dass der
Beutel schmilzt
Öffnen Sie den Deckel des Gerätes
und lassen Sie es einige Minuten
abkühlen
Der Beutel hält das
Vakuum nicht, nachdem
er verschweißt wurde
Der Beutel ist defekt
Wählen sie einen anderen Beutel,
umwickeln Sie scharfe Kanten des
Inhalts eventuell mit Küchenpapier
Es befinden sich Lecke,
aufgrund von Falten,
Krümeln, Fett oder
Flüssigkeiten entlang
der Schweißnaht
Öffnen Sie den Beutel wieder,
reinigen Sie den oberen inneren Teil
des Beutels und entfernen Sie
eventuell vorhandene Fremdkörper
vom Schweißbalken, bevor Sie den
Beutel erneut zuschweißen.
► Wenn Sie mit den oben genannten Schritten das Problem nicht lösen können, wenden
Sie sich bitte an den Kundendienst.
10 Entsorgung des Altgerätes
Elektrische und elektronische Altgeräte enthalten vielfach noch wertvolle
Materialien. Sie enthalten aber auch schädliche Stoffe, die für ihre Funktion
und Sicherheit notwendig waren. Im Restmüll oder bei falscher Behandlung können diese
der menschlichen Gesundheit und der Umwelt schaden. Geben Sie Ihr Altgerät deshalb
auf keinen Fall in den Restmüll.
► Nutzen Sie die von Ihrem Wohnort eingerichtete Sammelstelle zur Rückgabe und
Verwertung elektrischer und elektronischer Altgeräte. Informieren Sie sich
gegebenenfalls bei Ihrem Rathaus, Ihrer Müllabfuhr oder bei Ihrem Händler.
► Sorgen Sie dafür, dass Ihr Altgerät bis zum Abtransport kindersicher aufbewahrt wird.

25
11 Garantie
Für dieses Produkt übernehmen wir beginnend vom Verkaufsdatum 24 Monate Garantie
für Mängel, die auf Fertigungs- oder Werkstofffehler zurückzuführen sind.
Ihre gesetzlichen Gewährleistungsansprüche nach §439 ff. BGB-E bleiben hiervon
unberührt.
In der Garantie nicht enthalten sind Schäden, die durch unsachgemäße Behandlung oder
Einsatz entstanden sind, sowie Mängel, welche die Funktion oder den Wert des Gerätes
nur geringfügig beeinflussen. Weitergehend sind Verschleißteile, Transportschäden,
soweit wir dies nicht zu verantworten haben, sowie Schäden, die durch nicht von uns
durchgeführte Reparaturen entstanden sind, vom Garantieanspruch ausgeschlossen.
Dieses Gerät ist für den Gebrauch im privaten Bereich (Haushaltseinsatz) konstruiert und
leistungsmäßig ausgelegt.
Eine etwaige Nutzung im gewerblichen Einsatz fällt nur soweit unter die Garantie, wie es
sich im Umfang mit der Beanspruchung einer privaten Nutzung vergleichen lässt. Es ist
nicht für den weitergehenden, gewerblichen Gebrauch bestimmt.
Bei berechtigten Reklamationen werden wir das mangelhafte Gerät nach unserer Wahl
reparieren oder gegen ein mängelfreies Gerät austauschen.
Offene Mängel sind innerhalb von 14 Tagen nach Lieferung anzuzeigen.
Weitere Ansprüche sind ausgeschlossen.
Zur Geltendmachung eines Garantieanspruches setzen Sie sich bitte vor einer
Rücksendung des Gerätes (immer mit Kaufbeleg!) mit uns in Verbindung.
12 Technische Daten
Gerät
Vakuumierer
Name
VR 390 advanced
Artikel-Nr.
1522
Anschlussdaten
220 V – 240 V; 50 Hz
Leistungsaufnahme
110 W
Außenabmessungen (B/H/T)
36,5 x 7 x 14 cm
Gewicht
1,47 kg

26
Instruction Manual
Vacuum Sealer System
VR 390 advanced
Item No. 1522

27
13 Instruction Manual
13.1 General
Please read the information contained herein so that you can become familiar with your
device quickly and take advantage of the full scope of its functions.
Your vacuum sealer system will serve you for many years if you handle it and care for it
properly.
We wish you a lot of pleasure in using it!
13.2 Information on this manual
These Operating Instructions are a component of the vacuum sealer system (referred to
hereafter as the Device) and provide you with important information for the initial
commissioning, safety, intended use and care of the device.
The Operating Instructions must be available at all times at the device. This Operating
Manual must be read and applied by every person who is instructed to work with the
device:
• Commissioning
• Operation
• Troubleshooting and/or
• Cleaning
Keep the Operating Manual in a safe place and pass it on to the subsequent owner along
with the device.
13.3 Warning notices
The following warning notices are used in the Operating Manual concerned here.
DANGER
A warning notice of this level of danger indicates a potentially dangerous situation.
If the dangerous situation is not avoided, this can lead to death or serious injuries.
► Observe the instructions in this warning notice in order to avoid the danger of death or
serious personal injuries.
WARNING
A warning notice of this level of danger indicates a possible dangerous situation.
If the dangerous situation is not avoided, this can lead to serious injuries.
► Observe the instructions in this warning notice in order to avoid the personal injuries.

28
ATTENTION
A warning notice of this level of danger indicates a possible dangerous situation.
If the dangerous situation is not avoided, this can lead to slight or moderate
injuries.
► Observe the instructions in this warning notice in order to avoid the personal injuries.
PLEASE NOTE
A notice of this kind indicates additional information, which will simplify the
handling of the machine.
13.4 Limitation of liability
All the technical information, data and notices with regard to the installation, operation and
care are completely up-to-date at the time of printing and are compiled to the best of our
knowledge and belief, taking our past experience and findings into consideration.
No claims can be derived from the information provided, the illustrations or descriptions in
this manual.
The manufacturer does not assume any liability for damages arising as a result of the
following:
• Non-observance of the manual
• Uses for non-intended purposes
• Improper repairs
• Technical alterations, modifications of the device
• Use of unauthorized spare parts
Modifications of the device are not recommended and are not covered by the guarantee.
All translations are carried out to the best of our knowledge. We do not assume any liability
for translation errors, not even if the translation was carried out by us or on our
instructions. The original German text remains solely binding.
13.5 Copyright protection
This document is copyright protected.
Braukmann GmbH reserves all the rights, including those for photomechanical
reproduction, duplication and distribution using special processes (e.g. data processing,
data carriers, data networks), even partially.
Subject to content and technical changes.

29
14 Safety
This chapter provides you with important safety notices when handling the device.
The device corresponds with the required safety regulations. Improper use can result in
personal or property damages.
14.1 Intended use
This device is only intended for use in households in enclosed spaces for vacuuming and
sealing of bags and vacuum canisters. Uses for a different purpose or for a purpose which
exceeds this description are considered incompatible with the intended or designated use.
Warning
Danger due to unintended use! Dangers can emanate from the device if it is used for an
unintended use and/or a different kind of use.
► Use the device exclusively for its intended use.
► Observe the procedural methods described in this Operating Manual.
Claims of all kinds due to damages resulting from unintended uses are excluded.
The User bears the sole risk.
14.2 General Safety information
Please note
Please observe the following general safety notices with
regard to the safe handling of the device.
► Examine the device for any visible external damages prior to
using it. Never put a damaged device into operation.
► If the power cable or plug are damaged, then they must be
replaced by the manufacturer or its service agent in order to
avoid a hazard.
► This device may be used by children aged 8 and above, if
they are supervised or have been instructed at to the safe
use of the device and have understood the resulting hazards.
► Cleaning and maintenance by the user must not be
performed by children unless they are at least 8 years old
and are supervised.
► Children are not allowed to play with the device.
► The device and its connecting cable must be kept away from
children who are less than 8 years old.

30
Please note
► The device may be used by individuals with reduced
physical, sensory or mental capabilities or a lack of
experience and / or knowledge of their use if they are
supervised or have been instructed at to the safe use of the
device and have understood the resulting hazards.
► Only customer service departments authorized by the
manufacturer may carry out repairs on the device, as
otherwise the guarantee entitlements will be null and void in
the event of any subsequent damages. Improperly performed
repairs can cause considerable dangers for the user.
► Defective components must always be replaced with original
replacement parts. Only such parts will guarantee that the
safety requirements are fulfilled.
► Do not leave the device unsupervised when it is in operation.
► When disconnect, please unplug by grasp the plug and not
the cord, to avoid any injury.
► Never immerse the device in water or other liquids and do
not place it in the dishwasher.
► For the correct storage, please slightly close the cover, do
not lock, it will deform the gaskets and affect the machine
function.
14.3 Sources of danger
14.3.1 Danger of burns
Warning
The sealing bar gets very hot. Please observe the following
safety notice in order not to burn yourself or others.
► To avoid getting burned, never touch the sealing bar directly
after sealing process.

31
14.3.2 Danger of fire
Warning
There is a danger of fire due to the event the device is not
used properly. Observe the following safety notices to
avoid dangers of fire:
► Do not set up the device near flammable material.
► Keep this appliance away from sources of heat (gas, electric,
burner, heated oven).
14.3.3 Dangers due to electrical power
Danger
Mortal danger due to electrical power!
Mortal danger exists when coming into contact with live
wires or subassemblies! Observe the following safety notices
to avoid dangers due to electrical power:
► Do not operate this device if it has a damaged cable or plug,
if it is not working properly or if it has been damaged or
dropped. If the power cable or plug are damaged, then they
must be replaced by the manufacturer or its service agent in
order to avoid a hazard.
► Do not open the housing on the device under any
circumstances. There is a danger of an electrical shock if live
connections are touched and the electrical or mechanical
structure is altered. In addition, functional faults on the device
can also occur.
► Before plugging the appliance in or when you operate it,
make sure your hands are dry.
► Do not insert objects into the openings of the device.
14.4 Food storage safety information
Please follow specific procedures for vacuum sealing; so you can guarantee the quality
and safety of your vacuumed / sealed food.
Please note
► If perishable foods have been heated, defrosted or un-refrigerated, consume them
immediately.

32
Please note
► Before vacuum sealing, it’s necessary to clean your hands, and all utensils and
surfaces to be used for cutting and vacuum sealing foods.
► Refrigerate or freeze the perishable foods immediately, if you have vacuum-sealed
them, and do not leave them sitting at room temperature.
► The shelf life of dry foods such as nuts, coconut or cereals will be extended in
vacuum-sealed package, while storing them in dark place. Oxygen and warm
temperature will cause high-fat content foods fat to rancidity.
► Before vacuum sealing some fruit and vegetables, such as apples, bananas, potatoes
and root vegetables, peel them, this will extend their shelf lives.
► When vacuum seal some vegetables such as broccoli, cauliflower and cabbage fresh
for refrigeration, they will emit gases, so it’s need to blanch and freeze these foods
before vacuum sealing.
15 Getting Started
This chapter will guide you through safely unpacking and setting up your new unit.
15.1 Packaging safety information
WARNING
► Do not allow children to play with packaging materials due to risk of suffocation.
15.2 Delivery scope and transport inspection
The vacuum sealer system VR 390 advanced includes the following components:
• VR 390 advanced 10 top-quality bags(20 x 30 cm) Instruction manual
• vacuum hose Removable drip tray for the vacuum chamber
PLEASE NOTE
► Examine the shipment to ensure the unit and manual are included and inspect the unit
for any visible damage.
► Immediately notify the carrier and/or the supplier about an incomplete shipment or any
damage as a result of inadequate packaging or mishandling.
15.3 Functions
Vacuum-packaged foods stay fresh for up to eight times longer: maintain taste and
freshness, and reduce costs with less spoiled food.
• Package foods, such as meat, fish, poultry, seafood and vegetables for refrigerated
storage.
• Maintain the freshness of dry foods, such as beans, nuts, and cereals.
• Besides storing food, there are many other uses for vacuum sealing: Protect moisture-
sensitive items such as camping supplies, matches, first aid kits, roadside flares and
clothing. Protect prized collectibles from dust and moisture.

33
15.4 Unpacking
Carefully remove the packaging material and unit from the carton.
15.5 Disposal of the packaging
Caso believes in the importance of recycling and has selected packaging materials that
not only protect your unit from damage during transit, but can be recycled to minimize any
ecological impact.
Recycling the packaging materials preserves raw materials and reduces waste. Take any
packaging materials that are no longer required to a recycling collection point for proper
disposal.
PLEASE NOTE
► If possible, keep the original packaging for the duration of the guarantee period in the
event a return is necessary.
15.6 Setup
15.6.1 Setup location requirements:
In order to ensure the safe and trouble-free operation of the device, the setup location
must fulfill the following prerequisites:
• The device must be set up on a solid, even, horizontal surface capable of supporting
the vacuum sealer and any items to be vacuum-sealed.
• Select a setup location where children cannot reach the hot sealing strip of the device.
• Do not set up the unit in a hot or damp environment or near flammable material.
• To operate correctly, the unit requires sufficient air flow. Leave at least 10 centimeters
(4 inches) of space on all sides when setting up the unit.
• Do not move the vacuum sealer when it is in operation.
• The electrical outlet must be easily accessible so that the plug can be quickly
disconnected in the case of an emergency.
• The setup of this unit in non-stationary locations (e.g., boats, airplanes, motor homes)
must be carried out by a qualified electrician, provided they guarantee the prerequisites
for the safe use of the unit.
15.7 Electrical connection
In order to ensure the safe and trouble-free operation of the device, the following
instructions must be observed for the electrical connection:
• Before plugging in the unit, compare the voltage and frequency data on the vacuum
sealer’s rating plate (found on the bottom of the unit) with that of your electrical
network. This data must be compatible. If in doubt consult a qualified electrician.
• The use of a multi-plug outlet adapter is not recommended due to fire danger.
• Inspect the power cord for damage and ensure it doesn’t run under the unit or over hot
or sharp surfaces.
• The electrical outlet must be protected by a 16A safety cut-out switch.

34
• The electrical safety of the unit is only guaranteed if it is connected to a properly
installed protective conductor system. If in doubt, consult a qualified electrician. The
manufacturer cannot be made responsible for damages due to a missing or damaged
protective conductor.
16 Complete Overview
This chapter provides you with an overview of your vacuum sealer and explains some of
its key features.
16.1 Appliance diagram
1 Safety switch: When the cover is open then the heating element will not work
2 Hook for latching of cover
3 upper gasket + 9 lower gasket
4 vacuum hose for vacuuming of canisters
5 Sealing bar: Contains a heating wire covered with teflon which allows the bag to
seal but not to stick to the wire. Place the bag over this sealing bar.
6 button for canisters
7 release button
8 sealing profile (presses the bag against the sealing bar)
10 vacuum chamber with removable drip tray for liquids
11 Air intake: Connector for vacuum hose for vacuuming of canisters
WARNING
The sealing bar gets very hot.
Please observe the following safety notice in order not to burn yourself or others.
► To avoid getting burned, never touch the sealing bar directly after sealing process.

35
Please note
► Do not remove the Teflon tape (T).
16.2 Control Panel
Buttons (indicator light shows selected function)
Button Vacuum & Seal / Cancel (Vakuum & Schweißen/Abbrechen)
For automatic vacuuming and sealing of bags or containers
Press the button again to cancel the operation.
Button Food dry & moist (Lebensmittel Trocken & Feucht)
With this function you could adjust the sealing time to the consistency of your vacuum
food. Choose "Trocken" for dry vacuum food and "Feucht" for moist vacuum food where
liquid is produced.
Vacuumstrength normal & gentle (Vakuumstärke Normal & Schonend):
Two buttons for choice of different vacuum pressure:
“normal” (normal) button: for regular items storage in normal vacuum pressure ;
“gentle” (schonend) button: for some soft & crushable items storage where less vacuum
pressure is desired.
Button Sealing function (Schweißen)
For sealing of a bag without additional vacuum operatioin.
16.3 Rating plate
The rating plate with the connection and performance data can be founded on the bottom
of the unit.
17 Operation
This chapter provides instructions on the proper operation of your vacuum sealer:
17.1 Basics of sealing
After each sealing session and before starting up, check to make sure the unit and all
accessories are clean and free of leftover food. Follow the cleaning instructions on in
Chapter Cleaning and Maintenance.

36
17.2 Bags and rolls
Please only use specified bags and rolls designed for vacuum sealing. Do not use other
materials such as plastic wrap. All vacuum rolls and bags delivered by CASO are
appropriate for cooking under vacuum (sous vide).
Please make sure when vacuum rolls and bags of other producers are used, whether they
are also microwaveable and suitable for cooking under vacuum. Please note that a bar
vacuumsealer as this device can only be used with structured bags. You can buy a wide
range of different bags and rolls from CASO.
17.3 Making a bag using the bag roll
Place the device on a dry place.
1. Unroll the bag to the desired length and cut the bag to the appropriate length with
precise and clear cut.
2. Put one end of the bag over the sealing profile.
3. Close the lid and choose desired sealing time.
4. Press seal button (Schweißen). The corresponding LED lights up and turns off when
the process is complete.
5. Press release buttons, than open the cover and take the bag out of the device. The bag
is ready for vacuum sealing.
PLEASE NOTE
► Make sure that the bag you want to use is at least 8cm/3.1in. longer than the food.
Add another 2 cm/0.8in. for each time the bag is re-used.
17.4 Vacuum packaging with a bag
Place the unit on a dry surface.
1. Place the food to be preserved inside the bag.
2. Place the open end of the bag into the vacuum chamber.
3. Close the lid and choose desired sealing time and
desired vacuumstrength.
4. Press Vacuum & Seal / Cancel (Vakuum &
Schweißen/Abbrechen) and the bag will be
vacuumed and sealed automatically. The
corresponding LED lights up and turns off when the
process is complete.
You can cancel the operation at any time by
pressing Vacuum & Seal / Cancel (Vakuum &
Schweißen/Abbrechen) again, then press cover
release buttons to open the cover.
PLEASE NOTE
► Do not overstuff the bag; leave enough empty length in the open end of the bag (at least
a few inches) so that the bag can be properly placed in the vacuum chamber.
► Do not wet the open end of the bag. Wet bags may not seal properly.
► Clean and straighten the open end of the bag before sealing. Foreign matter or creases
on the bag may result in a faulty seal.

37
PLEASE NOTE
► Press the bag to expel excess air before vacuuming it. Too much air inside the bag may
result in a poor vacuum.
► If the food you’re sealing has sharp edges (such as bones or shells) pack the edges
with kitchen paper to avoid tearing the bag
► When vacuum sealing liquid-based foods (such as soups or stew) freeze them first in a
baking pan or tempered dish before bagging and vacuum sealing them.
► Blanch vegetables by cooking them briefly in boiling water. Allow them to cool then
vacuum seal them in convenient portions.
► When vacuum sealing unfrozen food, allow at least two additional inches of bag length
for expansion while freezing. Place unfrozen meat or fish on a paper towel and vacuum
seal with the paper towel in the bag to absorb any extra moisture.
► Before storing foods such as tortillas, crepes or bread, use wax or parchment paper
between them to stack the pieces. This will make it easier to remove an individual piece,
reseal the rest and immediately replace them in the freezer.
17.5 Vacuum package in a Canister
Wipe canister cover and canister and ensure they are clean and dry.
Fill the vacuum goods into the
container. Be careful not to fill in
too much vacuum goods.
Remove the drip tray from the
vacuum chamber. Connect one end
of vacuum hose at the air intake at
device and other end at connector
at canister cover or with adapter at
the canister cover.
Press button for canisters (6).
To ensure there is no air leaking between the cover and the canister,
use your hand to push down the cover at the beginning of the vacuum
operation. The device will stop automatically when enough vacuum pressure is achieved.
Remove the vacuum hose from the cover of container first then from the air intake at
device. Replace drip tray into vacuum chamber.
You can cancel the operation at any time by pressing button for canisters (6) again.
17.6 Storage
Store the device in its upright position, out of the reach of children.
PLEASE NOTE
► Always unplug the appliance from its outlet immediately after using and before
cleaning.
► For the correct storage, please slightly close the cover, do not lock, it will deform the
gaskets and affect the machine function.

38
18 Cleaning and Maintenance
This chapter provides important information on properly cleaning and maintaining your
vacuum sealer.
18.1 Safety information
Attention
Please observe the following safety notices, before cleaning the unit to avoid
damage to the unit or personal injury:
► Unplug the device prior to cleaning it.
► To ensure optimum performance, the unit must be cleaned regularly. Failure to clean
the unit regularly can lead to potential malfunctions, as well as safety and health risks.
► The sealing bar remains hot after use. Wait a few minutes until the strip has cooled
before cleaning.
► Clean the unit after every use as soon as it has cooled. Leaving the unit uncleaned for
long periods can make it very difficult to remove leftover food and grime and may even
damage the unit.
► If moisture penetrates the unit’s housing, it can damage the electronic components.
Please ensure that no moisture enters the device.
► Do not use any harsh or abrasive cleaning agents.
► Do not attempt to scrape off stubborn grime with hard or abrasive tools.
► Dry all parts thoroughly before using after cleaning.
► Never immerse the device in water or other liquids and do not place in the dishwasher.
18.2 Cleaning
◆ Outside of the unit
Wipe with a damp cloth or sponge and mild dish soap.
◆ Inside of the unit
Wipe away any food or liquids with a paper towel.
Remove the drip tray and wash with warm water and a mild dishwashing soap. Dry it
carefully and replace it.
◆ Cleaning bags for reuse
Wash the bags in warm water with a mild dishwashing soap, then rinse them well and
allow them to dry completely before reusing.
Attention
► Bags used to store raw meats, fish or greasy foods should never be reused due to risk
of contamination.

39
◆ Sealing profile (which presses the bag against the sealing bar)
Remove the sealing profile and clean it in warm soapy water.
PLEASE NOTE
► The sealing profile should be cleaned thoroughly before installing it again.
► Be careful during re-installation, so that nothing will be damaged and sealing profile is
placed well so that the device can work properly.
19 Troubleshooting
The following table may help you narrow down and address minor malfunctions:
19.1 Safety notices
Attention
► Only qualified electricians, who have been trained by the manufacturer may carry out
any repairs on electrical equipment.
► Improperly performed repairs may result in personal injury or damage to the device.
19.2 Troubleshooting table
Error
Possible cause
Rectification
Vacuum unit is not
functioning
Power plug is not plugged in
Plug in mains plug!
Defective power cable or plug
Contact Customer Service
Defective electrical socket
Select another electrical socket
The first weld on the cut
off piece of the roll is
not being carried out.
Roll is not positioned correctly
Follow the steps in the chapter
“making a bag using the bag roll”
A complete vacuum is
not being created in the
bag.
The open end of the bag is not
completely inside the vacuum
chamber
Position the bag correctly
The bag is defective
Select another bag
There is dirt on the welding
and the normal seals
Clean the seals and retry correctly
once they are dry
The bag is not being
welded correctly
The welding bar is overheating
so that the bag melts
Open the cover on the unit and let
it cool down for a few minutes
The bag does not hold
the vacuum after it has
been welded shut
The bag is defective
Select another bag; wrap paper
serviettes around any sharp edges
on the content
There are leaks along the
welding seam as a result of
creases, crumbs, grease or
liquids.
Open the bag again and clean the
upper internal part of the bag and
remove any foreign matter that
might be on the welding bar before
you weld the bag shut again.

40
PLEASE NOTE
► If you are unable to solve the problem with the steps shown above, please contact
Customer Service.
20 Disposal of the Old Device
To protect the environment, it’s important to dispose of old electronic devices
properly. Do not place your old unit in the non-recyclable waste under any
circumstances.
PLEASE NOTE
► Please take your old unit to the nearest recycling center for safe disposal.
► Until it can be disposed of properly, store your old unit away from children.
21 Guarantee
We provide a 24 month guarantee for this product, commencing from the date of sale, for
faults which are attributable to production or material faults.
Your legal guarantee entitlements in accordance with § 439 ff. BGB-E remain unaffected
by this.
The guarantee does not include damages, which were incurred as a result of improper
handling or use, as well as malfunctions which only have a minor effect on the function or
the value of the device. Consumables, transit damages, inasmuch as we are not
responsible for these, as well as damages, which were incurred as a result of any repairs
that were not performed by us, are also excluded from the guarantee entitlements.
This device is designed for use in domestic situations and has the appropriate
performance levels.
Any use in commercial situations is only covered under the guarantee to the extent that it
would be comparable with the stresses of being used in a domestic situation. It is not
intended for any additional, commercial use.
In the event of justified complaints, we will repair the faulty device at our discretion or
replace it with a trouble-free device.
Any pending faults must be reported within 14 days of delivery.
All further claims are excluded.
To enforce a guarantee claim, please contact us prior to returning the device (always
provide us with proof of purchase).

41
22 Technical Data
Device
Vacuum sealer system
Name
VR 390 advanced
Item No.:
1522
Mains data
220 V – 240 V; 50 Hz
Power consumption
110 W
External measurements (W x H x D):
36,5 x 7 x 14 cm
Net weight
1,47 kg

42
Mode d'emploi original
Appareil d’emballage sous vide
VR 390 advanced
N°. d'art. 1522

43
23 Mode d´emploi
23.1 Généralités
Veuillez lire les indications de ce manuel afin de vous familiariser rapidement avec
l'appareil et afin de pouvoir utiliser l'ensemble de ses fonctions.
Votre l´apparail d´emballage sous vide vous sera fidèle de nombreuses années si vous
l'utilisez et l'entretenez conformément.Nous vous souhaitons beaucoup de plaisir lors de
son utilisation.
23.2 Informations relatives à ce manuel
Ce mode d'emploi appartient au l´appareil d´emballage sous vide (nommé par la suite
l'appareil) et vous donne des indications importantes pour la mise en service, la sécurité,
l'utilisation conforme et l'entretien de l'appareil.
Le mode d'emploi doit être en permanence disponible près de l'appareil. Il doit être lu et
mis en application par toute personne effectuant :
• sa mise en service, •son utilisation, •sa réparation • et/ou son entretien.
Veuillez conserver ce mode d'emploi, et le transmettre au propriétaire suivant de l'appareil.
23.3 Avertissements de danger
Dans le présent mode d'emploi vous pourrez trouver les avertissements suivants :
Danger
Un avertissement à ce niveau de danger signale un risque de situation dangereuse.
Si cette situation dangereuse n'est pas évitée, elle peut entraîner la mort ou des
blessures dangereuses.
► Il faut suivre les instructions données dans cet avertissement afin de prévenir tout
danger de mort ou de blessures graves pour les personnes.
Attention
Ce niveau de risque indique la présence possible d'une situation de danger.
Si cette situation dangereuse n'est pas évitée, elle peut entraîner des blessures
graves.
► Il faut suivre les instructions données dans cet avertissement afin de prévenir tout
danger de blessures graves.
Prudence
Ce niveau de risque indique la présence possible d'une situation de danger.
Si cette situation dangereuse n'est pas évitée, elle peut entraîner des blessures
légères ou superficielles.
► Il faut suivre les instructions données dans cet avertissement afin de prévenir les
blessures de personnes.

44
Remarque
Cette indication est accompagnée d'informations complémentaires pour faciliter
l'utilisation de l'appareil.
23.4 Limite de responsabilités
Tous les renseignements techniques, données et instructions d'installation, de
fonctionnement et d'entretien contenus dans ce manuel sont parfaitement actuels au
moment de la publication et tiennent compte de notre expérience réalisée jusqu'ici et de
nos connaissances actuelles en toute bonne foi.
Les indications, illustrations et descriptions contenues dans ce manuel ne peuvent donner
lieu à aucun recours.
Le constructeur décline toute responsabilité pour les dommages causés par :
• le non respect du mode d'emploi
• l'utilisation non conforme
• des réparations non professionnelles
• des modifications techniques, modifications de l’appareil
• l'utilisation de pièces non autorisées
Les modifications de l’appareil ne sont pas recommandées et ne sont pas couvertes par la
garantie.
Les traductions ont été réalisées avec la meilleure fidélité possible. Nous déclinons toute
responsabilité pour les erreurs de traduction, même si la traduction a été réalisée par nos
soins ou sur notre demande. Seul le texte original en allemand fait force de loi.
23.5 Protection intellectuelle
Cette documentation est protégée par la loi sur la propriété intellectuelle.
Tous droits de reproduction aussi photomécaniques, de multiplication et de diffusion du
texte, dans sa totalité ou en partie, au moyen de processus spéciaux (par exemple
informatique, sur support électronique ou en réseau), sont réservés à la Sté. Braukmann
GmbH.
Modifications techniques et de contenu réservées.
24 Sécurité
Ce chapitre vous indiquera des consignes de sécurité importantes pour l'utilisation de cet
appareil.
Cet appareil répond aux directives de sécurité prescrites. Une utilisation non conforme
peut toutefois entraîner des dommages sur les personnes et matériels.

45
24.1 Utilisation conforme
Cet appareil est conçu uniquement pour une utilisation ménagère à l'intérieur de locaux,
afin de scellager uniquement ou de vider des sacs et récipient à vide pour conserver
d´aliments sous vide. Toute autre utilisation est considérée comme non conforme.
Attention
Danger en cas d'utilisation non conforme !
En cas d'usage non conforme et/ou non approprié l'appareil peut devenir une
source de danger.
► Utiliser l'appareil uniquement de façon conforme.
► Respecter les procédures décrites dans ce mode d'emploi.
Tout recours en garantie est supprimé en cas de dommages causés par une utilisation
non conforme.
L'utilisateur est entièrement responsable des risques encourus.
24.2 Consignes de sécurités générales
Remarque
Pour une utilisation en toute sécurité de l'appareil veuillez
observer les consignes générales de sécurités suivantes :
► Avant son utilisation s'assurer qu'il ne comporte pas de
défauts visuels. Ne jamais mettre en marche un appareil
détérioré.
► Si le câble électrique ou la prise ont été endommagés, ceux-
ci doivent être changés par le fabricant ou son service après-
vente afin de prévenir tout danger.
► Cet appareil peut être utilisé par les enfants à partir de 8 ans
et plus s’ils sont surveillés ou s’ils ont été informés de la
manière d’utiliser l’appareil en sécurité et ont compris les
risques en résultant.
► Le nettoyage et l’entretien assuré par l’utilisateur ne doit pas
être effectué par des enfants à moins qu’ils ne soient âgés
de 8 ans ou plus et surveillés. Ne pas laisser les enfants
jouer avec l'appareil.
► L’appareil et son câble de branchement doivent être tenus à
l’écart des enfants de moins de 8 ans.

46
Remarque
► Les réparations doivent être effectuées uniquement par un
service après-vente agréé par le constructeur, sinon en cas
de dommages le recours en garantie est supprimé. Des
réparations incorrectes peuvent entraîner de graves dangers
pour l'utilisateur.
► Les pièces défectueuses doivent être remplacées
uniquement par des rechanges d'origine. Ces pièces sont
seules capables de répondre aux exigences de sécurité.
► Les pièces défectueuses doivent être remplacées
uniquement par des rechanges d'origine. Ces pièces sont
seules capables de répondre aux exigences de sécurité.
► Pendant son fonctionnement ne pas laisser l'appareil sans
surveillance.
► Pour débrancher l’appareil, assurez-vous de tirer sur la prise
et non sur le câble, afin d’éviter tout risque de blessure.
► Ne plongez pas l'appareil dans l'eau ou dans un autre liquide
et ne mettez pas au lave-vaisselle.
► Veuillez stocker avec le couvercle légèrement fermé, pas
vérrouiller, il se déforme les joints et affecter le
fonctionnement de la machine.
24.3 Sources de danger
24.3.1 Danger de brulures
Attention
La bande de scellage peuvent devenir très chauds.
Veuillez respecter la consigne de sécurité suivante pour
éviter de vous brûler et de brûler d’autres personnes:
► Pour éviter d’éventuelles brûlures, ne touchez jamais la
bande de scellage juste après le soudage .

47
24.3.2 Danger d'incendie
Attention
En cas d'utilisation non conforme de l'appareil cela peut
provoquer un incendie par inflammation du contenu.
Pour éviter tout risque d'incendie veuillez observer les
consignes de sécurité suivantes :
► Ne disposez pas l'appareil à proximité de matériaux
inflammables.
► N’approchez pas l’appareil de sources de chaleur (chauffage
à gaz ou électrique, brûleur, four chaud, etc.).
24.3.3 Dangers du courant électrique
Danger de mort par électrocution !
Danger de mort en cas de contact avec des câbles ou des
pièces sous tension ! Pour éviter les risques
d'électrocution veuillez observer les consignes de sécurité
suivantes :
► L'appareil ne doit pas être mis en marche si le câble
électrique ou la prise sont endommagés, s'il ne fonctionne
pas correctement ou est tombé ou a été endommagé. Si le
câble électrique ou la prise ont été endommagés, ceux-ci
doivent être changés par le fabricant ou son service après-
vente afin de prévenir tout danger.
► N'ouvrez en aucun cas le caisson de l'appareil. Il y a danger
d'électrocution si on touche des raccords conducteurs
électriques et si on modifie la structure électrique et
mécanique. Cela peut aussi provoquer des
dysfonctionnements de l'appareil.
► Avant de brancher l’appareil sur le secteur ou de le mettre
sous tension, assurez-vous que vos mains sont parfaitement
sèches.
► N'insérez pas d'objets dans les ouvertures de l'appareil.

48
24.4 Informations relatives à la sécurité de stockage des aliments
Veuillez suivre certaines procédures de mise sous vide pour garantir la qualité et la
sécurité de vos produits alimentaires scellés sous vide.
Remarque
Règles générales relatives à la sécurité alimentaire
► Consommez immédiatement tout aliment périssable réchauffé, décongelé ou sorti du
réfrigérateur.
► Avant de procéder à l’emballage sous vide, lavez-vous les mains et nettoyez tous les
ustensiles et éléments qui seront utilisés pour la découpe et l’emballage des aliments.
► Réfrigérez ou congelez les aliments périssables immédiatement après leur emballage
sous vide; ne les laissez pas à température ambiante.
► Pour prolonger la durée de conservation des aliments secs emballés sous vide, tels
que les fruits secs ou les céréales, stockez-les dans un endroit frais et sombre.
L’oxygène et des températures élevées entraîneront la rancidité des aliments riches
en lipides.
► Le fait de peler certains fruits et légumes, tels que les pommes, les bananes, les
pommes de terre et les légumes-racines, permet de prolonger leur durée de
conservation.
► Certains légumes frais emballés sous vide pour être réfrigérés émettront des gaz; ceci
est tout particulièrement le cas des brocolis, des choux-fleurs et des choux. Il est donc
nécessaire de blanchir et de congeler ces aliments avant de les emballer sous vide.
25 Mise en service
Ce chapitre est consacré à des indications importantes concernant la mise en service de
l'appareil. Observez les indications pour éviter les dangers et les détériorations.
25.1 Consignes de sécurité
Attention
► Ne pas utiliser les matériaux d'emballage pour jouer. Danger d'étouffement.
25.2 Inventaire et contrôle de transport
L´appareil d´emballage sous vide est livré de façon standard avec les composants
suivants : L´appareil d´emballage sous vide VR 390 advanced
• 10 sacs de haute valeur (20 x 30 cm) Tuyau Mode d'emploi
• Bac de récupération amovible pour la chambre à vide
Remarque
► Vérifier l'intégralité de la livraison et les éventuels défauts visuels.
► En cas de livraison incomplète ou de dégâts en raison d'un emballage insuffisant ou
du transport veuillez en avertir immédiatement l'expéditeur, l'assurance et le livreur.

49
25.3 Fonctions
La principale fonction de cet appareil est de prolonger le stockage d’une grande variété
d’aliments sans en altérer ni la fraîcheur ni le goût et de vous faire bénéficier d’une plus
grande commodité. En général, les emballages sous vide permettent de conserver la
fraîcheur des aliments huit fois plus longtemps que les méthodes de stockage
traditionnelles.
Conservez leur goût et leur fraîcheur et réduisez vos coûts en consommant moins
d'aliments gâtés.
• Emballez vos viandes, poissons, volailles, fruits de mer et légumes pour les congeler
ou les réfrigérer.
• Emballez vos aliments secs, tels que haricots, fruits secs ou céréales, pour pouvoir les
stocker plus longtemps.
• Cet appareil peut également être utilisé pour stocker et protéger d’autres articles, qu’il
s’agisse d’objets personnels, tels que des photos, des documents importants, des
collections de timbres, des bijoux, des cartes ou des bandes dessinées, d’éléments de
bricolage, tels que des vis, des clous ou des boulons, ou encore de médicaments ou
autres articles de premiers secours, etc.
25.4 Déballage
Pour déballer l'appareil procédez comme suit :
• Retirer l'appareil du carton et éliminez les matériaux d'emballage.
25.5 Elimination des emballages
L'emballage protège l'appareil contre les dégâts de transport. Les matériaux d'emballage
ont été choisis selon des critères environnementaux et de techniques d'élimination, c'est
pourquoi ils sont recyclables.
Le retour des emballages dans le circuit des matières épargne les matières premières et
restreint le volume des déchets. Eliminez les emballages inutiles dans les points
de collecte destinés au système de recyclage avec le logo «Point vert».
Remarque
► Veuillez si possible conserver l'emballage original pendant la durée de la garantie de
l'appareil afin de pouvoir emballer correctement l'appareil en cas de recours en
garantie.
25.6 Mise en place
25.6.1 Exigences pour l'emplacement d'utilisation
Pour un fonctionnement sûr et sans problème de l'appareil, son emplacement d'utilisation
doit être choisi selon les critères suivants :
• L'appareil doit être disposé sur un support solide, plat, à niveau et résistant à la chaleur
dont la capacité de charge est suffisante pour l´appareil et pour les choses les plus
lourdes devant être conserver d´aliments sous vide.
• Choisir un emplacement de sorte que les enfants ne puissent pas accéder aux bande
de scellage de l'appareil.

50
• Ne disposez pas l'appareil dans un environnement chaud, mouillé ou très humide ou à
proximité de matériaux inflammables.
• Ne déplacez pas l’appareil d’emballage sous vide en cours d’utilisation.
• Pour un fonctionnement correct l'appareil nécessite un flux d'air suffisant. Laissez un
espace de 10 cm au-dessus, de 10 cm à l'arrière et de 10 cm des deux côtés.
• La prise de courant doit être facilement accessible, de sorte à pouvoir débrancher
facilement le câble en cas d'urgence.
• L'installation et le montage de cet appareil sur des emplacements mobiles (par
exemple un bateau) doivent être exécutés uniquement par des entreprises / personnes
professionnels qui garantissent les exigences de sécurité d'utilisation de cet appareil.
25.7 Raccordement électrique
Pour une utilisation de l'appareil sûre et sans panne, il faut observer les indications
suivantes pour le raccordement électrique :
• Avant de brancher l'appareil il faut comparer les données de raccordement (tension et
fréquence) de la plaque signalétique avec celles de votre réseau. Ces données doivent
correspondre, afin de ne pas exposer l'appareil à des dégradations.
En cas de doute renseignez-vous auprès d'un électricien.
• Il est interdit d'utiliser des multiprises ou des barrettes de prises multiples en raison des
dangers potentiels.
• Assurez-vous que le câble électrique est en parfait état et qu'il n'est pas disposé sous
le four ou des surfaces chaudes ou des bords coupants.
• La prise de réseau doit être protégée par une protection de 16A.
• La sécurité électrique de l'appareil est garantie uniquement lorsqu'il est raccordé à un
circuit électrique avec un système de protection installé en toute conformité. En cas de
doute faites vérifier l'ensemble de l'installation électrique par un électricien.
Le constructeur ne peut pas être tenu responsable pour les dégâts causés par un
conducteur de masse absent ou interrompu.
26 Structure et fonctionnement
Ce chapitre est consacré à des indications importantes sur la structure et le
fonctionnement de l'appareil.

51
26.1 Vue d'ensemble
1 Interrupteur de sécurité Lorsque le couvercle est ouvert, l'élément chauffant ne
fonctionne pas.
2 Crochets de verrouillage pour le couvercle
3 Sceau supérieure + 9 Sceau inférieure
4 tuyau par exemple pour la mise sous vide de recipients
5 la Bande de scellage: Comporte un fil chauffant recouvert de Téflon, permettant le
scellage du sac sans qu’il colle à la bande.
6 Bouton Récipient vide
7 Bouton de déblocage
8 Joint en caoutchouc (comprimant le sachet contre la barre de scellage)
10 Chambre à vide avec bac de récupération amovible pour liquides
11 Aspiration de l'air :. Pour le raccordement d'un tuyau pour la mise sous vide de
récipients.
Attention
La bande de scellage peuvent devenir très chauds.
Veuillez respecter la consigne de sécurité suivante pour éviter de vous brûler et de
brûler d’autres personnes:
► Pour éviter d’éventuelles brûlures, ne touchez jamais la bande de scellage juste après
le soudage .
Remarque
► N'enlevez pas la bande en téflon (T).

52
26.2 Panneau de commande
Boutons (la fonction sélectionnée est indiquée par le témoin de contrôle correspondant)
Bouton Mettre sous vide & sceller / Arrêter (Vakuum & Schweißen/Abbrechen)
Pour la mise sous vide et le scellage automatiques d'un sachet ou d'un récipient.
Appuyer de nouveau sur la touche pour annuler l'opération.
Bouton Nourriture sèche et humide (Lebensmittel Trocken & Feucht)
Avec cette fonction, la longueur de soudure peut être adaptée à la consistance de votre
nourriture vide. Choisissez "Trocken" pour la nourriture vide sèche et "Feucht" pour la
nourriture vide humide.
Bouton Intensité de vide (Vakuumstärke Normal & Schonend):
Deux réglages différents pour choisir l'intensité de vide
Normal – pour des aliments normales
Schonend (protégant) – pour des aliments mous et sensibles. Choisir Schonend pour
une intensité de vide mineure.
Bouton Soudure (Schweißen)
Pour sceller un sachet sans mise sous vide supplémentaire
26.3 Plaque signalétique
La plaque signalétique indiquant les données de raccordement et de puissance se trouve
à l'arrière de l'appareil.
27 Commande et fonctionnement
Ce chapitre est consacré à des indications importantes sur la commande de l'appareil.
Pour éviter tout risque et dégradations veuillez observer les indications.
Avant d’utiliser l’appareil ou après chaque ensachage, vérifiez que l’appareil et tous les
accessoires étant entrés en contact avec des aliments sont parfaitement propres. Pour ce
faire, suivez les instructions de nettoyage.
27.1 Sachets et rouleaux
N’utilisez que des sachets et rouleaux prévus exclusivement pour la mise sous vide. La
matière de ces films spéciaux pour mise sous vide est différente de celle des films de
conservation. Tous les rouleaux de vide et les sachets livrés de CASO sont appropriés
pour la cuisson sous vide. Veuillez vous assurer que lorsque d’autres feuilles sont
utilisées, celles-ci sont également appropriées pour four à micro-ondes et pour cuire sous-
vide. Veuillez noter que des appareils de mise sous vide comme celui-ci ne peuvent être
utilisés par principe qu’avec des sacs en film plastique structuré. Vous recevrez donc en
plus de CASO une large offre de divers rouleaux et sacs.

53
27.2 Conservation dans des sachets du rouleau
Placez l'appareil sur une surfache sèche.
1. Enroulez le film jusqu'à la longueur souhaitée et détachez un sachet du rouleau.
2. Mettez une extrémité du sachet sur joint en caoutchouc.
3. Fermer le couvercle et régler le temps de scellage désiré.
4. Pressez le bouton Soudure (Schweißen). La LED correspondante s'allume et s'éteint
lorsque le processus est terminé.
5. Appuyez sur les boutons de déblocage du couvercle. Ouvrez le couvercle et retirez le
sachet pour commencer la mise sous vide.
Remarque
► Vérifiez que la longueur du sac que vous prévoyez d’utiliser dépasse les aliments d’au
moins 8 cm. Ajoutez 2 cm supplémentaires pour chaque réutilisation du sac.
27.3 Conservation dans un sachet
Placez l'appareil sur une surfache sèche.
1. Placez les aliments que vous souhaitez conserver à l'intérieur du sachet.
2. Placez l'ouverture du sachet dans la chambre à vide.
3. Fermez le couvercle et réglez le temps de scellage et le niveau de vide souhaités.
4. Appuyez maintenant sur la touche
Mettre sous vide & sceller / Arrêter et le
sachet sera automatiquement mis sous vide
et scellé. La LED correspondante s'allume
et s'éteint lorsque le processus est terminé.
5. Si vous voulez annuler le processus,
appuyez de nouveau sur la touche Mettre
sous vide & sceller / Arrêter puis sur les
deux boutons de déverrouillage pour ouvrir
le couvercle.
Remarque
► Ne remplissez pas trop les sacs; laissez suffisamment de place pour permettre de
mieux positionner l’extrémité ouverte du sac sur la plaque de mise sous vide.
► Ne mouillez pas l’ouverture du sac. Les sacs humides sont en effet plus difficiles à faire
fondre et à sceller parfaitement.
► Nettoyez et étirez l’ouverture du sac avant de le sceller. Vérifiez que l’ouverture du sac
ne présente ni pli, ni impureté. Les sacs présentant des plis ou des saletés peuvent en
effet s’avérer difficiles à sceller proprement.

54
Remarque
► Ne laissez pas trop d’air à l’intérieur du sac. Appuyez sur le sac afin d’en extraire le
maximum avant la mise sous vide. Un surplus d’air à l’intérieur du sac augmenterait la
charge de la pompe à vide et affecterait la puissance du moteur qui ne pourrait alors
expulser tout l’air du sac.
► Si les aliments que vous souhaitez emballer sont coupants ou pointus, par exemple des
os, des spaghettis ou des fruits de mer, rembourrez le sac avec de l’essuie-tout afin
d’éviter tout risque de déchirement.
► Pour emballer sous vide des aliments plus liquides, tels que des soupes, des ragoûts
ou des compotes, congelez-les d’abord dans un plat trempé ou allant au four, et
emballez-les ensuite sous vide, avant de les étiqueter et de les placer dans votre
congélateur sous forme solide.
► Blanchissez vos légumes en les plongeant quelques instants dans de l’eau bouillante
ou en les passant au four micro-ondes, laissez-les refroidir et emballez-les sous vide
pendant qu’ils sont encore croustillants, selon les portions désirées.
► Pour emballer sous vide des aliments non préalablement congelés, prévoyez environ
5 cm de longueur de sac supplémentaires pour laisser la place aux aliments de se
dilater durant la congélation. Placez tout morceau de viande ou de poisson sur une
serviette en papier et emballez le tout sous vide; ceci permettra d’absorber l’humidité
des aliments.
► Pour stocker des aliments tels que des tortillas, des crêpes ou des steak hachés, placez
des feuilles de papier sulfurisé ou paraffiné entre chaque portion ; ceci permettra de
séparer plus facilement les portions et d’ensuite pouvoir remballer le reste des aliments
avant de les replacer dans le congélateur.
27.4 Conservation dans un récipient à vide
Nettoyez le couvercle du récipient à vide et le récipient pour assurer qu'ils soient secs et
propres.
Remplissez les produits dans le
récipient. Veillez à ce que vous ne
remplissiez pas trop de produits.
Retirer le bac de récupération de la
chambre à vide.
Fixez une extrémité du tuyau à
aspiration de l'air à l'appareil et
l'autre extrémité à la connexion sur
le couvercle du récipient ou avec
l'adaptateur sur le couvercle du récipient.
Pressez bouton Récipient vide (6).
Pressez fermement au début le couvercle pour éviter que de l'air s'échappe. Le procédé
sous vide s'arrête automatiquement, si l'intensité suffisante sera atteinte. Retirez d'abord
le tuyau du couvercle du récipient, puis de la tubulure d'aspiration de l'appareil.
Replacez le bac de récupération dans la chambre à vide.
Vous pouvez annuler l'opération à tout moment en appuyant à nouveau sur le bouton
Récipient vide (6).

55
27.5 Rangement de votre appareil d’emballage sous vide:
Rangez l’appareil à plat dans un endroit sûr et hors de portée des enfants.
Remarque
► Débranchez toujours l’appareil du secteur immédiatement après son utilization.
► Veuillez stocker avec le couvercle légèrement fermé, pas vérrouiller, il se déforme les
joints et affecter le fonctionnement de la machine.
28 Nettoyage et entretien
Ce chapitre est consacré à des indications importantes sur le nettoyage et l'entretien de
l'appareil. Pour éviter la dégradation de l'appareil par un nettoyage incorrect et pour son
bon fonctionnement veuillez observer les conseils ci-dessous.
28.1 Consignes de sécurité
Prudence
Avant de commencer le nettoyage de l'appareil veuillez observer les consignes de
sécurité suivantes :
► Avant le nettoyage retirer le connecteur de la prise murale.
► L´appareil d´emballage sans vide doit être régulièrement nettoyé et il faut éliminer les
restes d'aliments cuits. Si l'appareil n'est pas maintenu dans un état permanent de
propreté, cela a des effets négatifs sur sa durée de vie et peut rendre l'appareil
dangereux et provoquer l'apparition de moisissures et d'attaques bactériennes.
► Après son utilisation la bande de scellage est chaude. Attention, risques de brulures !
Attendre que l'appareil soit froid.
► Nettoyer l´appareil après utilisation quand le four est refroidi. Ne pas attendre trop
longtemps car cela rend le nettoyage plus difficile, et éventuellement impossible. Un
encrassement trop important peut le cas échéant dégrader l'appareil.
► La pénétration d'humidité dans l'appareil peut détériorer les composants
électroniques. Faire attention qu'aucun liquide ne pénètre à l'intérieur de l'appareil par
les ouvertures de ventilation.
► Ne plongez pas l'appareil dans l'eau ou dans un autre liquide et ne mettez pas au
lave-vaisselle.
► Ne pas utiliser de produits nettoyants agressifs ou abrasifs et aucun solvant.
► Ne pas gratter les salissures résistantes avec des objets acérés.
► Séchez parfaitement l’appareil avant de le réutiliser.
28.2 Nettoyage
◆ L´exterieur de l´appareil
Nettoyez l’extérieur de l’appareil avec un chiffon ou une éponge humide et un liquide
vaisselle doux.

56
◆ L´interieur de l´appareil
Nettoyez l’intérieur de l’appareil en essuyant tout reste d’aliment ou de liquide avec une
serviette en papier.
Retirer le bac de récupération de la chambre à vide et rincer à l'eau tiède avec un peu de
détergent, sécher soigneusement et remplacer.
◆ Sacs de conservation :
Lavez les sacs à l’eau chaude avec un liquide vaisselle doux, puis rincez-les bien et
laissez-les totalement sécher avant de les réutiliser.
Prudence
► Les sacs ayant servi à conserver des viandes crues, du poisson ou des aliments gras
ne peuvent être réutilisés.
◆ Joint en caoutchouc (comprimant le sachet contre la bande de scellage)
Sortez le joint en caoutchouc et lavez-le à l’eau chaude savonneuse.
Remarque
► Le joint en caoutchouc doit être séché soigneusement avant de le remonter.
► Faites attention en le remontant de ne pas l’abîmer et insérez-le de manière à ce que
l’appareil puisse fonctionner correctement.
29 Réparation des pannes
Ce chapitre est consacré à des indications importantes sur la localisation des pannes et
leur réparation. Pour éviter les dangers et les dégradations il faut observer les indications.
29.1 Consignes de sécurité
Prudence
► Les réparations sur les appareils électriques doivent être effectuées uniquement par
des spécialistes agréés par le constructeur.
► Les réparations non professionnelles peuvent provoquer de graves dangers pour
l'utilisateur et des dégâts sur l'appareil.
29.2 Origine et remède des incidents
Le tableau suivant aide à la localisation et à la réparation des petits incidents.
Erreur
Cause possible
Réparation
L’emballeuse sous vide
ne fonctionne pas.
Fiche secteur non
encastrée
Enfoncer la fiche secteur
Câble d'électricité ou
prises de courant défectif.
Adressez-vous au service après
vente.
Prise défective.
Prendre une autre prise de courant.

57
Le premier soudage sur
la section de rouleau
découpée n'est pas mis
en œuvre.
Le rouleau n’est pas placé
correctement.
Suivez les étapes dans le chapitre
« Emballer sous vide dans un sac sur
rouleau ».
Aucun vide complet
dans le sac n'est
produit.
L’extrémité ouverte du sac
ne se trouve pas
complètement dans la
chambre à vide
Placez correctement le sac.
Le sac est défectif.
Prendre un autre sac.
Il y a des impuretés sur les
joints d’étanchéité et/ou les
autres joints.
Nettoyez les joints d’étanchéité et
replacez les correctement après
séchage.
Le sac n'est pas soudé
correctement.
La barre de soudage est
surchauffée de sorte que le
sac fond.
Ouvrez le couvercle de l'appareil et
laissez le refroidir quelques minutes.
Le sac ne tient pas le
vide après avoir été
soudé.
Le sac est défectif.
Prendre éventuellement un autre sac,
entourer éventuellement les pointes
du contenu avec des serviettes en
papier.
Il y a des fuites à cause de
miettes, graisse ou liquides
le long de la soudure
Ouvrez à nouveau le sac, nettoyez la
partie interne supérieure du sac et
éliminez les corps étrangers
éventuellement existants de la barre
de soudage avant de souder de
nouveau le sac.
Remarque
► Si vous ne pouvez pas résoudre le problème à l'aide du tableau ci-dessus, adressez-
vous au service après vente.
30 Elimination des appareils usés
Les appareils électriques et électroniques contiennent de nombreux matériaux
recyclables. Mais ils contiennent également des produits nocifs qui sont
indispensables au fonctionnement et à la sécurité.
Ces derniers peuvent être nocifs pour les personnes ou pour l'environnement en cas
d'élimination dans les ordures ménagères ou de traitement incorrect. Ne jamais jeter les
anciens appareils avec les ordures ménagères.
Remarque
► Portez les vieux appareils électriques et électroniques dans les points de collecte et de
recyclage près de chez vous. Le cas échéant informez-vous auprès de la mairie, des
services des ordures ou de votre concessionnaire.
► Assurez-vous que votre ancien appareil reste hors de portée des enfants jusqu'à son
transport définitif.

58
31 Garantie
Sur ce produit nous accordons une garantie de 24 mois à partir de la date d'achat pour les
manques et les défauts de fabrication ou de matériaux.
Vous conserver entièrement vos droits de garantie légale accordés par le §439 et suivants
BGB-E.
La garantie ne concerne pas les dégâts causés par une utilisation ou une manipulation
non conforme, ainsi que les défauts qui n'influencent que faiblement le fonctionnement ou
la valeur de l'appareil. D'autre part ne sont pas garantis également les pièces d'usure, les
dommages de transport dans la mesure où ils ne sont pas sous notre responsabilité, ainsi
que les dommages occasionnés par des réparations qui n'ont pas été effectuées par nos
soins.
La construction et la puissance de cet appareil sont conçues pour un usage ménager
privé.
Un éventuel usage commercial reste couvert par la garantie dans la mesure où cette
utilisation ne dépasse pas le cadre des contraintes d'un usage privé. L'appareil n'est pas
prévu pour un usage commercial plus intensif.
En cas de recours en garantie justifié nous déciderons de réparer l'appareil ou de le
remplacer par un appareil sans défaut.
Les manques doivent être signalés dans un délai de 14 jours après livraison.
Tout autre recours est sans objet.
Pour tout recours en garantie nous vous prions d'entrer en contact avec nos services
avant de nous retourner l'appareil (toujours avec le bon d'achat!).
32 Caractéristiques techniques
Appareil
Appareil d´emballage sans vide
Nom
VR 390 advanced
N°. d'article
1522
Données de raccordement
220 V – 240 V; 50 Hz
Puissance consommée
110 W
Dimensions externes (l/h/p)
36,5 x 7 x 14 cm
Poids net
1,47 kg

59
Istruzioni d’uso
originali
Sistema di sigillatura sottovuoto
VR 390 advanced
Articolo-N. 1522

60
33 Istruzione d´uso
33.1 In generale
Legga le informazioni qui contenute, affinché acquisti rapidamente familiarità con il suo
apparecchio e affinché possa utilizzare appieno le sue funzioni.
Il Suo VR 390 advanced le renderà un buon servizio per molti anni, se lo tratterà e lo
curerà in modo adeguato.
Ci auguriamo che il suo utilizzo Le procuri molta gioia.
33.2 Informazioni su queste istruzioni d’uso
Queste istruzioni d’uso sono una componente del VR 390 advanced (di seguito chiamato
l’apparecchio) e Le fornirà importanti indicazioni per la messa in funzione, la sicurezza, un
utilizzo conforme alle disposizioni e per la cura dell’apparecchio.
Le istruzioni d'uso devono trovarsi sempre nelle vicinanze dell’apparecchio. Dovranno
essere lette ed utilizzate da qualsiasi persona, incaricata con la:
• messa in funzione,
• l’utilizzo,
• l'eliminazione di malfunzionamenti e/o
• la pulizia
dell’apparecchio.
Conservi queste istruzioni d'uso e le passi insieme all’apparecchio al successivo
proprietario.
33.3 Indicazioni d’avvertenza
Nelle presenti istruzioni d’uso vengono utilizzate le seguenti indicazioni d’avvertenza:
Pericolo
Un’indicazione d'avvertimento di questo livello di pericolo contrassegna una
situazione di pericolo imminente.
Se tale situazione pericolosa non viene evitata, le conseguenze saranno la morte o
gravi lesioni.
► Osservare le indicazioni in queste avvertenze, per evitare il pericolo di morte o gravi
lesioni di persone.
Avviso
Un’indicazione d'avvertimento di questo livello di pericolo contrassegna una
situazione di pericolo potenziale.
Se tale situazione pericolosa non viene evitata, le conseguenze potranno essere la
morte o gravi lesioni.
► Osservare le indicazioni in queste avvertenze, per evitare il lesioni di persone.

61
Attenzione
Un’indicazione d'avvertimento di questo livello di pericolo contrassegna una
situazione di pericolo potenziale.
Se tale situazione pericolosa non viene evitata, le conseguenze potranno essere
lesioni leggere o di media entità.
► Osservare le indicazioni in queste avvertenze, per evitare il lesioni di persone.
Indicazione
Un indicazione contrassegna inoltre delle informazioni, che facilitano l’utilizzo della
macchina.
33.4 Limitazione della responsabilità
Tutte le informazioni tecniche, tutti i dati e le indicazioni per l’installazione, il
funzionamento e la cura, contenute in queste istruzioni d’uso, corrispondono all’ultimo
stato dell’arte al momento della messa in stampa e sono forniti in considerazione delle
nostre attuali esperienze e conoscenze, secondo scienza e coscienza.
Dalle indicazioni, le figure e le descrizioni in queste istruzioni d’uso non possono derivare
pretese di nessun tipo.
Il produttore non assume alcuna responsabilità per danni dovuti:
• Alla mancata osservanza delle istruzioni d’uso
• All’utilizzo non conforme alle disposizioni
• A riparazioni inadeguate
• A modifiche tecniche, modifiche dell'apparecchio
• All’utilizzo di pezzi di ricambio non autorizzati
Non è consigliabile apportare modifiche dell'apparecchio, le quali non sono coperte da
garanzia.
Le traduzioni avvengono secondo scienza e coscienza. Non assumiamo alcuna
responsabilità per errori nella traduzione, nemmeno in quei casi in cui la traduzione è stata
effettuata da noi o su nostro incarico. Soltanto il testo originale in tedesco sarà vincolante.
33.5 Tutela dei diritti d’autore
Questo documento è coperto dalla tutela per i diritti d’autore.
La Braukmann GmbH si riserva tutti i diritti, anche quelli della riproduzione fotomeccanica,
della riproduzione e diffusione mediante particolari procedure (per esempio mediante
l'elaborazione dati, supporto dati e reti di dati) anche parziale.
Ci si riserva il diritto di effettuare modifiche tecniche e nel contenuto.

62
34 Sicurezza
In questo capitolo riceverà importanti indicazioni sulla sicurezza nell’utilizzo
dell’apparecchio.
Questo apparecchio corrisponde alle disposizioni di sicurezza prescritte. Un utilizzo
inadeguato può però provocare danni a persone e cose.
34.1 Utilizzo conforme alle disposizioni
Questo apparecchio è previsto solo per l’utilizzo in un ambiente domestico, al aspira l’aria
dal sacchetto e sigilla il sacchetto e contenitore del vuoto. Un altro utilizzo o un utilizzo che
vada oltre a ciò è da considerarsi inadeguato.
Avviso
Pericolo per un utilizzo non conforme alle disposizioni!
Dall’apparecchio possono derivare pericoli, nel caso di un utilizzo non conforme
alle disposizioni e/o nel caso di un utilizzo differente.
► Utilizzare l’apparecchio esclusivamente in conformità alle disposizioni.
► Rispettare le procedure descritte in queste istruzioni d’uso.
Pretese di qualsiasi genere, per danni dovuti ad un utilizzo non conforme alle disposizioni,
sono escluse. L'utilizzo avviene a rischio esclusivo dell'operatore.
34.2 Indicazioni generali di sicurezza
Indicazione
Osservi le seguenti indicazioni di sicurezza per un utilizzo
sicuro dell'apparecchio:
► Controlli prima dell'utilizzo, che l’apparecchio non presenti
danni esterni. Non metta in funzione un apparecchio
danneggiato.
► Nel caso il cavo elettrico o la spina sono stati danneggiati,
questi vanno sostituiti solo dal fabbricante oppure dal suo
incaricato al Servizio, per evitare pericoli.
► Questo apparecchio può essere utilizzato da bambini di età
pari o superiore a 8 anni, se sono sorvegliati o istruiti sull'uso
sicuro dell’apparecchio e hanno compreso i rischi che ne
derivano. Non fare giocare i bambini con l'apparecchio.
► Tenere lontano dai bambini di età inferiore a 8 anni
l’apparecchio e il suo cavo di alimentazione.

63
Indicazione
► La pulizia e la manutenzione utente non devono essere
eseguite da bambini, eccetto questi hanno l'età di 8 anni o
maggiore e che vengano sorvegliati.
► L’apparecchio può essere utilizzato da persone con ridotte
capacità fisiche, sensoriali o mentali o mancanza di
esperienza e/o conoscenza se sono sorvegliate o istruite
sull'uso sicuro dell'apparecchiatura e hanno compreso i
rischi che ne derivano.
► Una riparazione dell’apparecchio dovrà essere effettuata
soltanto da un servizio Clienti autorizzato dal produttore,
altrimenti decade ogni diritto di garanzia per danni che ne
conseguono. Con riparazioni inadeguate possono verificarsi
pericoli per l’utilizzatore.
► Componenti difettosi dovranno essere sostituiti soltanto da
pezzi di ricambio originali. Solo con questi pezzi vi è la
garanzia, che i requisiti di sicurezza siano soddisfatti.
► Non lasciare l’apparecchio incustodito durante il suo
funzionamento.
► Per disinserire la presa, afferrare la presa stessa e non il
cavo elettrico per evitare incidenti.
► Non immergere l'apparecchio nell'acqua e in altri liquidi e
non metterli nella lavastoviglie.
► Per la conservazione chiudere il coperchio solo leggermente,
non bloccarlo con la chiave, si deformano le guarnizioni e
alterare il funzionamento della macchina.

64
34.3 Fonti di pericolo
34.3.1 Pericolo di ustioni
Avviso
La barra saldatura dell'apparecchio diventa molto caldo.
Osservare la seguente avvertenza di sicurezza, per non
scottarsi se stessi o altri:
► Per prevenire eventuali ustioni, mai toccare la barra di
saldatura direttamente dopo la saldatura.
34.3.2 Pericolo d’incendio
Avviso
In caso di utilizzo inadeguato dell’apparecchio, sussiste
pericolo d’incendio mediante l’incendiarsi del contenuto.
Di seguito osservi le indicazioni di sicurezza per evitare il
pericolo d'incendio:
► Non posizioni l’apparecchio in un ambiente caldo, bagnato o
molto umido o nelle vicinanze di materiale infiammabile.
► Tenere l’apparecchio di lontano da fonti di calore (gas,
elettricità, bruciatori, forni caldi).
34.3.3 Pericolo dovuto a corrente elettrica
Pericolo di vita dovuto a corrente elettrica!
In caso di contatto con cavi o componenti sotto tensione,
sussiste pericolo di vita. Di seguito osservi le indicazioni di
sicurezza per evitare il pericolo dovuto alla corrente
elettrica:
► Non mettere in funzione l'apparecchio quando il cavo
elettrico o la spina sono danneggiati, se non funziona
correttamente oppure è stato fatto cadere o è danneggiato.
Nel caso il cavo elettrico o la spina sono stati danneggiati,
questi vanno sostituiti solo dal fabbricante oppure dal suo
incaricato al Servizio, per evitare pericoli.

65
Pericolo
► Non aprire in nessun caso la scatola dell’apparecchio. Se si
toccano connessioni sotto tensione e se viene modificata la
struttura elettrica e meccanica, sussiste il pericolo di scossa
elettrica. Inoltre possono verificarsi malfunzionamenti
dell’apparecchio.
► Prima di connettere l’apparecchio o di utilizzarlo, assicurarsi
che le mani siano asciutte e in posizione sicura.
► Non inserire oggetti nelle aperture dell'apparecchio.
34.3.4 Informazioni di sicurezza per la conservazione del cibo.
Rispettare determinate procedure per la saldatura sottovuoto. In questo modo potete
garantire la qualità e la sicurezza dei vostri generi alimentari confezionati sotto vuoto /
saldati.
Indicazione
Osservi le seguenti indicazioni di sicurezza per un utilizzo sicuro dell'apparecchio:
► Se generi deperibili sono stati riscaldati, scongelati o non refrigerati, devono essere
consumati immediatamente.
► Prima di realizzare la confezione sottovuoto, è necessario pulirsi le mani e tutti gli
strumenti e le superfici usate durante l’operazione.
► Dopo averli messi sottovuoto, refrigerare o congelare immediatamente i generi
deperibili , e non lasciarli a temperatura ambiente.
► La durata di conservazione di alimenti secchi come noci, noci di cocco o cereali sarà
prolungata grazie al condizionamento sottovuoto e alla conservazione in un luogo
fresco e buio. L’ossigeno e la temperatura elevata faranno irrancidire i contenuti
grassi degli alimenti.
► Per aumentare la durata di conservazione di alcuni tipi di frutta e verdura, come
mele, banane patate e ortaggi con radici, e consigliabile sbucciarli prima di
confezionarli sottovuoto.
► Verdure come broccoli, cavolfiori e cavoli freschi emettono gas se conservati
sottovuoto; è dunque necessario sbollentarli e congelarli prima di sigillarli sottovuoto.

66
35 Messa in funzione
In questo capitolo riceverà indicazioni importanti sulla messa in funzione dell’apparecchio.
Osservi le indicazioni per evitare pericoli e danni.
35.1 Indicazioni di sicurezza
Avviso
► Materiali d’imballaggio non dovranno essere utilizzati come giocattoli. Sussiste il
pericolo di soffocamento.
35.2 Insieme della fornitura ed ispezione trasporto
Il VR 390 advanced viene fornito standard con le seguenti componenti:
• VR 390 advanced Istruzioni d’uso
• 10 buste professionali in dotazione (20 x 30 cm) Tubo flessibile per vuoto
• Vaschetta di raccolta estraibile per la camera del vuoto
Indicazione
► Controlli che la fornitura sia completa e non presenti danni visibili.
► Segnali immediatamente al spedizioniere, all’assicurazione e al fornitore una fornitura
incompleta o danni dovuti ad un imballaggio insufficiente o al trasporto.
35.3 Funzioni
La funzione principale di quest’apparecchio è di conservare una gran varietà di alimenti e
mantenere a lungo freschezza e sapore a vostro vantaggio. In generale, il
condizionamento sotto vuoto mantiene il cibo fresco per un periodo di tempo otto volte più
lungo rispetto ai metodi tradizionali di conservazione del cibo.
Mantengono il gusto e la freschezza e riducono i costi con alimenti meno viziati.
• Confezionare alimenti come carne, pesce, pollame, frutti di mare e verdure da
congelare o refrigerare.
• Confezionare alimenti secchi come fagioli, noci, o cereali per lunga conservazione.
• Questo sistema serve anche a conservare e proteggere altri oggetti preziosi come
fotografie, documenti importanti, collezioni di francobolli, libri da collezione, gioielli,
carte, fumetti. Può anche servire per proteggere articoli di ferramenta come viti, chiodi,
dadi o bulloni. Può infine conservare medicine, cerotti e altri articoli di pronto soccorso
ecc.
35.4 Disimballaggio
Per il disimballaggio dell’apparecchio, proceda come segue:
• Estragga l’apparecchio dal cartone e tolga il materiale d'imballaggio.
35.5 Smaltimento dell’involucro
L’involucro protegge l’apparecchio da danni dovuti al trasporto. I materiali per l'imballaggio
sono stati selezionati in considerazione dell'ambiente e della tecnica di smaltimento e
sono quindi riciclabili.

67
Ricondurre l’imballaggio nel circuito materiali permette di risparmiare sulle materie
prime e riduce la produzione di rifiuti. Smaltisca i materiali per l'imballaggio, che
non sono più necessari, nei punti di raccolta presso le “aree ecologiche” per il
sistema di riciclo.
Indicazione
► Conservi, se possibile, l'imballaggio originale durante il periodo di garanzia, per poter
reimballare adeguatamente l’apparecchio, in caso di necessità.
35.6 Posizionamento
35.6.1 Requisiti del luogo di posizionamento
Per un funzionamento sicuro privo di errori dell’apparecchio, il punto di posizionamento
dovrà soddisfare i seguenti presupposti:
• L’apparecchio deve essere posizionato su una superficie solida, piatta, orizzontale e
resistente al calore, con una portata sufficiente per il forno ed il preparato da cuocere
presumibilmente più pesante, che possa essere preparato.
• Scelga il luogo di posizionamento in modo tale, che i bambini non possano raggiungere
le superfici calde dell'apparecchio.
• Non posizioni l’apparecchio in un ambiente caldo, bagnato o molto umido o nelle
vicinanze di materiale infiammabile.
• Non spostare il sistema di sigillamento sottovuoto quando è in funzione.
• L’apparecchio necessita una sufficiente aerazione per un funzionamento corretto. Lasci
10 cm di spazio libero sopra, 10 cm dietro e 10 cm su entrambi i lati.
• La presa dovrà essere facilmente accessibile, in modo tale che il cavo elettrico possa
essere facilmente estratto, in casi d'emergenza.
• Il montaggio di questo apparecchio in luoghi di posizionamento non stazionari (per
esempio navi) dovrà essere effettuato esclusivamente da aziende/persone
specializzate, se i presupposti per un utilizzo conforme alla sicurezza dell'apparecchio
sono dati.
35.7 Connessione elettrica
Per un funzionamento sicuro e privo di errori dell’apparecchio, bisognerà considerare le
seguenti indicazioni durante la connessione elettrica.
• Prima di connettere l’apparecchio, confronti i dati di connessione (tensione e
frequenza) sulla targhetta di omologazione con quelli della rete elettrica. Questi dati
dovranno corrispondere, affinché non si verifichino danni sull’apparecchio.
In caso di dubbi, chieda il suo tecnico elettricista specializzato.
• La connessione dell’apparecchio alla rete elettrica dovrà avvenire al con una prolunga
lunga al massimo 3 metri, srotolata con una sezione di 1,5 mm2. L’utilizzo di prese
multiple o di ciabatte è vietato a causa del pericolo d’incendio collegato all’uso di
queste.
• Ci si assicuri che il cavo elettrico non sia danneggiato e che non venga posato sotto il
forno o sopra superfici calde o dai bordi taglienti.
• La spina dovrà essere assicurata mediante un interruttore di protezione 16°.

68
• La sicurezza elettrica dell’apparecchio viene garantita solo se ci si connette ad un
conduttore di terra installato in conformità alle disposizioni. In caso di dubbio, faccia
controllare l’installazione di casa mediante un tecnico elettricista specializzato.
Il produttore non può essere considerato responsabile per danni, provocati da una
conduttura di terra mancante o interrotta.
36 Costruzione e funzione
In questo capitolo riceverà indicazioni importanti sulla costruzione e sulla funzione
dell’apparecchio.
36.1 Panoramica complessiva
1 Interruttore di sicurezza Se il coperchio è aperto, l’elemento riscaldante non lavora
2 Gancio di bloccaggio
3 Guarnizione superior + 9 Guarnizione inferiore
4 Tubo di aspirazione ad esempio per la messa sotto vuoto di contenitori per vuoto
5 Barra di saldatura & nastro di teflon: Contiene un cavo riscaldato ricoperto da
Teflon che permette la sigillatura senza che il sacchetto aderisca alla barra.
6 Tasto di Contenitore del vuoto
7 Tasti sbloccare
8 Guarnizione di gomma (la quale preme il sacchetto contro la barra di saldatura)
10 Camera del vuoto con vaschetta di raccolta estraibile per liquidi
11 Bocchettone di aspirazione Per connettere tubo di aspirazione ad esempio per la
messa sotto vuoto di contenitori per vuoto

69
Avviso
La barra saldatura dell'apparecchio diventa molto caldo. Osservare la seguente
avvertenza di sicurezza, per non scottarsi se stessi o altri:
► Per prevenire eventuali ustioni, mai toccare la barra di saldatura direttamente dopo la
saldatura.
Indicazione
► Non rimuovere il nastro di teflon (T)!
36.2 Elementi di comando
Tasti (la funzione selezionata viene visualizzata dalla rispettiva spia di controllo)
Tasto Messa sotto vuoto e Sigillatura / Interrompe (Vakuum & Schweißen/
Abbrechen)
Per la messa sottovuoto e la saldatura di un sacchetto o di un contenitore
Premere di nuovo il tasto, per interrompere l’operazione.
Tasto Generi alimentari secco & umido (Lebensmittel Trocken & Feucht)
Con questa funzione è possibile adeguare il tempo di saldatura alla consistenza del
prodotto da mettere sotto vuoto. Selezionare „Trocken“ per prodotto secco e „Feucht“
per prodotto umido da mettere sotto vuoto, nel quale si crea un pò di liquido.
Tasto Potenza del vuoto normale & moderato (Vakuumstärke Normal & Schonend):
Sono disponibili due differenti impostazioni per la selezione della potenza del vuoto
„normale“ (Normal) – per prodotti normali da mettere sotto vuoto
„moderato“ (Schonend)– per prodotti morbidi e sensibili da mettere sotto vuoto.
Selezionare „moderato“, se si desidera una potenza ridotta del vuoto.
Tasto di sigillatura (Schweißen)
Per saldare un sacchetto senza operazione di messa sottovuoto aggiuntiva.
36.3 Targhetta di omologazione
La targhetta di omologazione con i dati di connessione e di potenza, si trova sul lato
posteriore dell'apparecchio.
37 Utilizzo e funzionamento
In questo capitolo riceverà indicazioni importanti sull’utilizzo dell’apparecchio. Osservi le
indicazioni per evitare pericoli e danni.
Prima di iniziare un’operazione di sigillatura, assicurarsi che l’unità e tutti i relativi accessori
che vengono a contatto con il cibo siano puliti. Seguire le istruzioni per la pulizia fornite.

70
37.1 Sacchetti in rotoli
Utilizzare solo ed esclusivamente i sacchetti in rotoli previsti per il confezionamento
sottovuoto. Il materiale di questi speciali sacchetti per il confezionamento sottovuoto è
diverso rispetto ai normali sacchetti utilizzati per mantenere la freschezza degli alimenti.
Tutti i rotoli e sacchetti forniti da CASO sono adatti per la cottura dentro il sacchetto (Sous
Vide). All’impiego di fogli di altri produttori, La preghiamo di verificare se questi possono
altresì essere utilizzati nel fornello a microonde e per la cottura nel sacchetto (Sous Vide).
Si prega di osservare che i sigillatori sotto vuoto a barra, come questo apparecchio,
principalmente possono essere fatti funzionare solo con sacchetti a foglia strutturata. A
riguardo, la CASO mette a disposizione una vasta gamma di diversi rotoli e sacchetti.
37.2 Confezionamento sotto vuoto in un sacchetto derivante dal rotolo
Collocare l’apparecchio in un luogo asciutto.
1. Srotolare il sacchetto alla lunghezza desiderata e tagliarlo alla dimensione necessaria
con un taglio netto.
2. Mettere un'estremità del sacchetto sopra guarnizione di gomma.
3. Chiudere il coperchio e impostare il tempo di sigillatura desiderato.
4. Premere il Tasto di sigillatura (Schweißen)
5. Il corrispondente LED si accende e si spegne una volta terminata l’operazione.
6. Premere sui tasti sbloccare e aprire il coperchio e rimuovere il sacchetto. Questo può
ora essere utilizzato per la messa sotto vuoto.
Indicazione
► Assicurarsi che il sacchetto che si desidera utilizzare sia più lungo del cibo di almeno
8cm. Aggiungere 2 cm. supplementari ogni volta che il sacchetto viene riutilizzato.
37.3 Confezionamento sotto vuoto
in un sacchetto
Collocare l’apparecchio in un luogo asciutto.
1. Mettere il cibo da conservare all’interno del
sacchetto.
2. Assicurarsi che l'estremità aperta del
sacchetto si trovi dentro la camera del vuoto.
3. Chiudere il coperchio e impostare il tempo
di sigillatura e la potenza del vuoto
desiderato.
4. Premere quindi il Tasto Messa sotto vuoto
e Sigillatura / Interrompe (Vakuum &
Schweißen/ Abbrechen) e il sacchetto viene automaticamente messo sotto vuoto e
sigillato. Il corrispondente LED si accende e si spegne una volta terminata l’operazione.
5. Se desiderate interrompere l’operazione, premere il Tasto Messa sotto vuoto e
Sigillatura / Interrompe (Vakuum & Schweißen/ Abbrechen) di nuovo e poi i due
tasti di sblocco per aprire il coperchio.
Indicazione
► Non mettere una quantità di cibo eccessiva nel sacchetto; lasciare una lunghezza
sufficiente all’estremità aperta del sacchetto in modo che possa essere ben
posizionato sull’area di sigillatura.

71
Indicazione
► Non inumidire l’estremità aperta. Questo può rendere più difficile la chiusura ermetica
del sacchetto.
► Esistono diversi usi non alimentari per sacchetti sotto vuoto. Tenere gli articoli per il
campeggio come fiammiferi, cassette di pronto soccorso e indumenti, puliti ed asciutti.
Proteggere razzi di segnalazione di pericolo stradale. Mantenere l’argenteria lucida e
inossidata.
► Pulire e appianare il lato aperto prima di sigillarlo. Assicurarsi che niente rimanga nella
parte aperta del sacchetto, che non ci siano grinze o pieghe sulle estremità del lato
aperto. Corpi estranei o grinze e pieghe possono compromettere il sigillo.
► Non lasciare troppa aria nel sacchetto. Premere sul sacchetto per fare uscire l’aria
eccedente prima di creare il vuoto. Troppa aria nel sacchetto sovraccarica la pompa e
può causare un calo di potenza del motore che non riesce ad eliminare tutta l’aria .
► Se gli alimenti da sigillare hanno dei bordi taglienti, come ossa, spaghetti o molluschi, è
necessario coprire le punte con carta assorbente per evitare perforazioni o tagli del
sacchetto.
► Per cibi liquidi come minestre, pasticci o stufati, conviene prima congelarli in una
padella o un recipiente resistente, poi sigillarli sotto vuoto, etichettarli e riporli nel
congelatore appena solidificati.
► Sbollentare le verdure in acqua bollente o forno a microonde per un corto periodo, farle
raffreddare ancora croccanti e condizionarle sotto vuoto in porzioni convenienti.
► Per sigillare sotto vuoto alimenti non congelati, sono necessari due pollici (5 cm) di
lunghezza supplementare del sacchetto per compensare la dilatazione del
congelamento. Mettere la carne o il pesce su una carta assorbente e sigillare sotto vuoto
con la carta nel sacchetto. Questo accorgimento permette di assorbire meglio l’umidità
del cibo.
► Per cibi come tortillas, frittelle, crêpe o polpette per hamburger, è utile separarli con uno
strato di paraffina o di carta oleata prima di sovrapporli. Questo permette di rimuoverne
una parte, risigillare il resto e rimetterlo immediatamente nel congelatore.
37.4 Confezionamento sotto vuoto in un contenitore del vuoto
Pulire il coperchio e il contenitore per vuoto con un panno per assicurare che siano puliti e
asciutti. Riempire il prodotto da
mettere sotto vuoto nel contenitore.
Fare attenzione di non riempire troppo
prodotto da mettere sotto vuoto.
Togliere la vaschetta di raccolta dalla
camera del vuoto.
Fissare un'estremità del tubo flessibile
al bocchettone di aspirazione
dell’apparecchio sull'apparecchio e
un'estremità all'attacco sul coperchio
del contenitore ovvero con l’adattatore sul coperchio del contenitore.
Premere il pulsante „Contenitore per vuoto (6)”

72
All'inizio della procedura di messa sotto vuoto premere il coperchio saldamente, per
evitare che possa fuoriuscire dell'aria. La procedura di messa sotto vuoto termina
automaticamente, non appena è stata raggiunta una potenza sufficiente del vuoto.
Rimuovere dapprima il tubo flessibile per sottovuoto dal coperchio del contenitore, solo
dopo dal bocchettone di aspirazione dell’apparecchio.
Reinserire la vaschetta di raccolta nella camera del vuoto.
Potete interrompere l’operazione in qualsiasi momento, premendo di nuovo il Tasto
„Contenitore per vuoto (6)”.
37.5 Conservazione del sistema di sigillamento sottovuoto:
Tenere l’apparecchio in un posto piano e sicuro, fuori dalla portata dei bambini.
Indicazione
► Per la conservazione chiudere il coperchio solo leggermente, non bloccarlo con la
chiave, si deformano le guarnizioni e alterare il funzionamento della macchina.
► Sempre staccare la presa elettrica immediatamente dopo l’uso.
38 Pulizia e cura
In questo capitolo riceverà indicazioni importanti sulla pulizia e la cura dell’apparecchio.
Osservi le indicazioni per evitare danni dovuti ad una erronea pulizia dell’apparecchio e
per assicurare un funzionamento senza inconvenienti.
38.1 Indicazioni di sicurezza
Attenzione
Osservi le seguenti indicazioni di sicurezza, prima di procedere con la pulizia
dell’apparecchio:
► Estragga la spina dalla presa a muro prima della pulizia.
► L’apparecchio dovrà essere pulito regolarmente e residui del composto da cuocere
dovranno essere rimossi. Se il sistema di sigillatura sottovuoto non viene mantenuto
pulito, ci saranno effetti negativi per la durata dell'apparecchio. Le condizioni
dell’apparecchio potranno risultare pericolose e comportare un’infestazione di funghi e
di batteri.
► Il barra saldatura scotta dopo l’utilizzo. Sussiste il pericolo di ustioni! Attenda che
l'apparecchio si sia raffreddato.
► Pulisca l’apparecchio dopo l'utilizzo, non appena si è raffreddato. Attendere troppo,
rende inutilmente difficile la pulizia e la rende impossibile in casi estremi. Un eccesso
di sporcizia può, in alcune situazioni, danneggiare l'apparecchio.
► Non immergere l'apparecchio nell'acqua e in altri liquidi e non metterli nella
lavastoviglie.
► Se penetra dell'umidità nell'apparecchio, possono danneggiarsi componenti elettriche.
Osservi che non penetrino liquidi nell’interno dell’apparecchio, attraverso le fessure
d’aerazione.

73
Attenzione
► Non utilizzi detersivi aggressivi o abrasivi e non utilizzi solventi.
► Non utilizzi oggetti duri per grattare via i residui incrostati.
► Lasciare asciugare completamente prima di utilizzare di nuovo.
38.2 La pulizia
◆ l´esterno
Strofinare l’esterno con un panno umido o una spugna e un detergente da cucina neutro.
◆ L´interno
Pulire l’interno togliendo ogni residuo alimentare o liquido con una carta assorbente.
Togliere la vaschetta di raccolta dalla camera del vuoto e sciacquarla in acqua calda con
un poco di detergente, asciugarla accuratamente e reinserirla.
◆ Conservazione dei sacchetti
Lavare i sacchetti con acqua calda e con un detergente neutro per stoviglie, risciacquarli
bene e lasciarli asciugare completamente prima di utilizzarli nuovamente .
Attenzione
► Sacchetti usati per carne cruda, pesce o cibi grassi non possono essere riutilizzati.
◆ Guarnizione di gomma (la quale preme il sacchetto contro la barra di saldatura)
Estrarre la guarnizione di gomma e pulirla in acqua saponata calda.
Indicazione
► Prima di rimontare la guarnizione di gomma, asciugarla accuratamente.
► Durante l'assemblaggio fare attenzione di non danneggiare niente e di collocare la
guarnizione di gomma in modo che l'apparecchio possa regolarmente funzionare.
39 Eliminazione malfunzionamenti
In questo capitolo riceverà indicazioni importanti sulla localizzazione di malfunzionamenti e
sulla loro eliminazione. Osservi le indicazioni per evitare pericoli e danni.
39.1 Indicazioni di sicurezza
Attenzione
► Riparazioni su apparecchi elettrici dovranno essere eseguiti soltanto da personale
specializzato, addestrato dal produttore.
► Con riparazioni inadeguate possono verificarsi gravi pericoli per l’utilizzatore e danni
sull’apparecchio.

74
39.2 Cause malfunzionamenti e risoluzione
La seguente tabella aiuta a localizzare e a risolvere malfunzionamenti più lievi.
Malfunzionamento
Possibile causa
Risoluzione
La macchina sottovuoto
non funziona
Non è stata inserita la spina
Inserire la spina
Il cavo elettrico o la spina
sono difettosi
Contatta il servizio clienti.
La presa è difettosa
Scegliere un’altra presa
Non viene eseguita la
prima saldatura sulla
parte di rullo tagliata
Il rullo non è stato posizionato
in modo corretto
Segua i passi nel capitolo
"Imballare sottovuoto in un
sacchetto che proviene dal rullo"
Nel sacchetto non viene
generato un vuoto
assoluto
La parte aperta del sacchetto
non si trova completamente
nella camera sottovuoto
Posizioni il sacchetto
correttamente
Il sacchetto è difettoso
Scelga un altro sacchetto
Sulle guarnizioni di saldatura
e su quelle normali sono
presenti delle impurità
Pulisca le guarnizioni e le posizioni
di nuovo correttamente dopo
l'asciugatura.
Il sacchetto non viene
saldato nel modo corretto
La barra di saldatura è troppo
calda, quindi il sacchetto si
scioglie
Apra il coperchio dell’apparecchio
e lo faccia raffreddare per alcuni
minuti
Il sacchetto non resta
sottovuoto, dopo essere
stato saldato
Il sacchetto è difettoso
Selezioni un altro sacchetto,
avvolga eventualmente i bordi
taglienti del contenuto con dei
tovaglioli di carta
A causa di pieghe, briciole,
del grasso o di liquidi lungo la
saldatura, sono presenti delle
perdite
Apra nuovamente il sacchetto e
pulisca la parte superiore del
sacchetto all’interno e rimuova
eventualmente corpi estranei
presenti sulla barra di saldatura,
prima di saldare nuovamente il
sacchetto.
Indicazione
► Se non riesce a risolvere il problema con i passi sopra descritti, la preghiamo di
rivolgersi al servizio Clienti.
40 Smaltimento dell’apparecchio obsoleto
Apparecchi elettrici ed elettronici obsoleti contengono spesso ancora materiali preziosi.
Essi contengono però anche sostanze nocive, che erano necessarie per il loro
funzionamento e la loro sicurezza. Questi possono nuocere alla salute umana o
all’ambiente se vengono gettati tra i rifiuti non riciclabili o in caso di un
trattamento errato. Per questo eviti assolutamente di gettare il suo apparecchio
obsoleto nella spazzatura non riciclabile.

75
Indicazione
► Si serva dell'area ecologica realizzata nel suo comune di residenza, per la consegna
ed il riciclo di apparecchi elettrici o elettronici obsoleti. Si informi eventualmente presso
il Suo comune, il Suo servizio di nettezza urbana o presso il suo rivenditore.
► Si assicuri, che il suo apparecchio obsoleto venga stoccato a prova di bambini, fino al
momento della sua rimozione.
41 Garanzia
A partire dalla data di vendita assumiamo per questo prodotto una garanzia di 24 mesi per
difetti, riconducibili ad errori di fabbricazione o nelle materie prime.
Ciò non ha alcuna influenza sulle sue pretese di garanzia di legge in conformità al §439 e
seguenti del BGB-E.
Non contenute nella garanzia sono i danni, che si sono verificati a causa di un trattamento
o un impiego inadeguato, così come i danni, che compromettono solo lievemente il
funzionamento o il valore dell’apparecchio.
Inoltre si escludono dalle pretese di garanzia pezzi d'usura, danni dovuti al trasporto, fin
tanto questi non siano imputabili alla nostra responsabilità, così come danni, che sono
riconducibili a riparazioni non eseguiti da noi.
Questo apparecchio è stato realizzato per un utilizzo in ambito privato (impiego domestico)
ed è stato realizzato con una potenza adeguata.
Un eventuale utilizzo di tipo commerciale è assoggettabile alla garanzia, solo fintanto il
suo utilizzo possa essere confrontato con quello in ambito privato. Non è previsto per un
uso che vada oltre questo tipo di utilizzo commerciale.
In caso di reclami giustificati, saremo liberi di scegliere se riparare l’apparecchio o se è il
caso di sostituirlo con uno privo di malfunzionamenti.
Malfunzionamenti aperti dovranno essere comunicati entro 14 giorni dalla fornitura.
Altre pretese sono escluse.
Per far valere una pretesa di garanzia, La preghiamo di mettersi in contatto con noi, prima
di reinviarci l’apparecchio (sempre con scontrino d’acquisto!).
42 Dati tecnici
Apparecchio
Sistema di sigillatura sottovuoto
Nome
VR 390 advanced
N. articolo
1522
Dati connessione
220 V – 240 V; 50 Hz
Potenza assorbita
110 W
Misure esterne (L/H/P)
36,5 x 7 x 14 cm
Peso netto
1,47 kg

76
Manual del usuario
Envasadora al vacío
VR 390 advanced
Ref. 1522

77
43 Manual del usuario
43.1 Generalidades
Lea atentamente la información contenida en este manual para familiarizarse
rápidamente con el aparato y poder utilizar sus funciones en toda su capacidad.
Su VR 390 advanced le servirá durante muchos años si lo trata y conserva
adecuadamente.
Le deseamos una gran satisfacción durante el uso.
43.2 Información acerca de este manual
El manual de instrucciones forma parte integrante del VR 390 advanced (en lo
sucesivo denominado aparato) y le proporciona instrucciones importantes para la
puesta en marcha, la seguridad, el uso previsto y la conservación del aparato.
El manual del usuario debe guardarse siempre a mano, cerca del aparato. Debe ser
leído y utilizado por la persona encargada de:
• la puesta en marcha, •operación, •resolución de fallas y/o • limpieza
del aparato. Guarde este manual de instrucciones en un lugar seguro y facilítelo a
las terceras personas que vayan a utilizarlo en el futuro.
43.3 Advertencias
En el presente manual se utilizan las siguientes advertencias:
Peligro
Una advertencia de este nivel de peligro indica una situación peligrosa.
Si la situación peligrosa no se evita, puede causar la muerte o lesiones graves.
► Siga las instrucciones que indica esta advertencia para evitar el peligro de
muerte o de lesiones graves a personas.
Advertencia
Una advertencia de este nivel de peligro indica una posible situación peligrosa.
Si la situación de peligro no se evita, puede conducir a lesiones graves.
► Siga las instrucciones que indica esta advertencia para evitar lesiones a
personas.
Precaución
Una advertencia de este nivel de peligro indica una posible situación peligrosa.
Si la situación de peligro no se evita, puede conducir a lesiones de gravedad
moderada a leve.
► Siga las instrucciones que indica esta advertencia para evitar lesiones a
personas.

78
Nota
Esta indicación proporciona información adicional que facilitará el manejo de
la máquina.
43.4 Limitación de responsabilidad
La información técnica contenida, datos e indicaciones contenidos en el presente
manual para la instalación, operación y conservación se corresponden con los
últimos avances técnicos en el momento de la impresión y se publican teniendo en
cuenta nuestra experiencia y conocimientos hasta ese momento.
Por este motivo no nos hacemos responsables de las indicaciones, ilustraciones o
descripciones contenidas en el presente manual del usuario.
El fabricante no se hace responsable de los daños causados por:
• desobedecimiento de las instrucciones
• uso indebido
• reparaciones indebidas
• modificaciones técnicas, modificaciones del aparato
• uso de piezas de repuesto no autorizadas
No se recomienda realizar modificaciones en el aparato y no están cubiertas por la
garantía.
Las traducciones se realizan a nuestro buen saber y entender. No nos hacemos
responsables de ningún error de traducción, incluso si la traducción hubiera sido
realizada por nosotros o por orden nuestra. Por tanto, sólo el texto original en
alemán tendrá carácter vinculante.
43.5 Derechos de autor (copyright)
Esta documentación está protegida por los derechos de autor.
Braukmann GmbH se reserva todos los derechos, incluida la reproducción
fotomecánica, la publicación y distribución mediante procedimientos especiales (p.ej.
procesamiento de datos, soporte de datos y redes de datos), ya sea en su totalidad
o en parte.
Válido salvo errores de contenido y modificaciones técnicas
44 Seguridad
En este capítulo obtendrá importantes instrucciones de seguridad sobre la
manipulación del aparato.
Este aparato cumple la normativa de seguridad vigente. No obstante, el uso indebido
puede causar lesiones a personas y daños materiales.

79
44.1 Uso previsto
Este aparato se ha concebido para hacer vacío en bolsas y recipientes así como el
sellado de láminas de manera doméstica en salas cerradas.
Cualquier otro uso distinto al aquí previsto se considera un uso indebido del aparato.
Advertencia
Peligro ante el uso no conforme a lo previsto.
El uso indebido del aparato o cualquier uso distinto al uso previsto puede
entrañar peligro.
► Utilice el aparato exclusivamente para su uso previsto
► Los procedimientos descritos en el manual de instrucciones deben obedecerse.
Queda excluida cualquier reclamación de garantía debido a daños derivados del uso
no conforme a lo previsto. La responsabilidad recae exclusivamente en el usuario.
44.2 Instrucciones generales de seguridad
Nota
Para una manipulación segura del aparato, observe las
siguientes instrucciones generales de seguridad:
► Antes de utilizar el aparato debe revisarlo para detectar
posibles daños. Si el aparato presenta daños, no lo
ponga en marcha.
► Si el cable de alimentación o el enchufe resultan
dañados, éstos deben ser sustituidos por el fabricante o
su distribuidor, con el fin de evitar daños.
► Este aparato puede ser utilizado por niños de a partir de
8 años si estos reciben la supervisión correspondiente o
reciben instrucciones sobre el uso seguro del aparato y
los peligros resultantes de ello.
► La limpieza y mantenimiento del usuario no deben ser
realizados por niños, a menos que estos tengan 8 o más
años de edad y lleven a cabo dicho uso bajo supervisión
de un adulto. Los niños no deben jugar con el aparato.
► El aparato y su cable de alimentación deben mantenerse
fuera del alcance de los niños menores de 8 años.
► La instalación sólo debe ser realizada por personal
técnico autorizado.

80
Nota
► El aparato puede utilizarse poe personas con merma en
sus capacidades físicas, sensoriales o mentales o falta
de experiencia o conocimientos si lo hacen bajo
supervisión o se les instruye previamente del uso seguro
del aparato y comprenden los peligros resultantes.
► La reparación del aparato sólo debe ser realizada por el
servicio técnico autorizado por el fabricante. De lo
contrario, la garantía quedará anulada en caso de sufrir
daños. Las reparaciones incorrectas pueden causar
riesgos significativos para el usuario.
► Los componentes defectuosos solo deben ser sustituidos
por piezas de repuesto originales. Sólo en este tipo de
componentes se asegura el cumplimiento de los
requisitos de seguridad.
► No deben dejarse niños sin supervisión junto a la cocina.
No deje jugar a los niños con el aparato.
► No deje el aparato sin vigilancia durante el
funcionamiento.
► Para desconectar el aparato, no tire del cable de
alimentación ni transporte el aparato arrastrando el
cable.
► No sumerja el aparato en agua ni otros líquidos ni lo
coloque en el lavavajillas.
► No deje el aparato sin vigilancia durante el
funcionamiento para poder reaccionar rápidamente ante
los peligros.
► Para almacenar el producto, coloque la tapa sin
bloquearla, que las juntas se deformen y no perjudicar el
funcionamiento del aparato.

81
44.3 Fuentes de peligro
44.3.1 Peligro de quemaduras
Advertencia
La barra selladora puede estar muy caliente.
Tenga presente la siguiente indicación de seguridad
para no quemarse a sí mismo ni quemar a otras
personas:
► Para evitar posibles quemaduras, nunca toque la barra
selladora justo después de sellar.
44.3.2 Peligro de fuego
Advertencia
El uso no adecuado del aparato puede provocar fuego.
Tenga en cuenta las siguientes indicaciones de
seguridad para evitar el peligro de fuego:
► No coloque el aparato cerca de materiales combustibles.
► Aleje el aparato de fuentes de calor (gas, electricidad,
quemador, horno caliente).
► No coloque potas vacías sobre los fogones.
44.3.3 Peligro de electrocución
Peligro
Peligro de muerte por electrocución
El contacto con cables o componentes energizados implica
peligro de muerte. Tener en cuenta las precauciones
indicadas, a fin de evitar peligro de electrocución:
► El aparato no puede utilizarse si el cable de alimentación
o el enchufe presentan daños, si no funciona
correctamente o se ha caído y sufrido daños. Si el cable
de alimentación o el enchufe resultan dañados, éstos
deben ser sustituidos por el fabricante o su distribuidor,
con el fin de evitar daños.

82
Peligro
► Nunca abra la carcasa del aparato. Si toca cualquier
conexión energizada y cambia la disposición del
cableado eléctrico o el diseño mecánico existe peligro de
electrocución. Además, pueden producirse fallos de
funcionamiento en el aparato.
► No toque el aparato ni el enchufe de alimentación con
las manos mojadas.
► No introduzca objetos en las aberturas de la carcasa.
45 Indicaciones de seguridad para la conservación de
alimentos
Siga procedimientos específicos al sellar al vacío para garantizar la calidad y la
seguridad del envasado al vacío/sellado de alimentos.
Nota
Tenga en cuenta las siguientes indicaciones de seguridad para un uso
adecuado del aparato:
► Consuma inmediatamente los alimentos perecederos que hayan sido
calentados, descongelados o almacenados sin refrigeración.
► Es importante que se lave las manos y límpie los utensilios y superficies que
vaya a utilizar antes de empaquetar alimentos al vacío.
► Enfríe o congele los alimentos perecederos inmediatamente después de
haberlos sellado al vacío. No los deje a temperatura ambiente.
► El tiempo de conservación de alimentos secos sellados al vacío, como por
ejemplo nueces, coco o cereales, se alarga al almacenarlos en la oscuridad. El
oxígeno y el calor rancian los alimentos, especialmente los ricos en grasas.
► Pele fruta y verdura, por ejemplo manzanas, plátanos, patatas y verduras de
raíces antes de envasarlas al vacío. Esto alarga el tiempo de conservación.
► Algunos tipos de verduras, como brécol, coliflor y col, emiten gases. Estos se
deben escaldar primero y dejar enfriar después antes de ser envasados para
conseguir buen vacío.
46 Puesta en marcha
Este capítulo incluye algunos consejos importantes acerca de la puesta en marcha
del aparato. Observe dichos consejos para evitar peligros y daños.

83
46.1 Instrucciones de seguridad
Advertencia
► Los materiales de embalaje no deben utilizarse como juguetes. Peligro de
asfixia.
46.2 Ámbito de suministro e inspección de transporte
El aparato se entrega con los siguientes componentes:
• VR 390 advanced 10 bolsas profesionales en vacío (20 x 30 cm)
• Manual del usuario Tubo flexible de vacío
• Bandeja de recogida extraíble para la cámara de vacío
Nota
► Verifique la integridad del suministro y revíselo para detectar daños visibles.
► Si detectara cualquier falta o daños en el suministro debidos a un embalaje
defectuoso o al transporte debe informar de inmediato al transportista, a la
aseguradora y al proveedor.
46.3 Funciones
Este aparato permite el almacenamiento de una gran variedad de alimentos
manteniendo su frescura y sabor. En general, el tiempo de almacenamiento de un
alimento envasado al vacío se ocho veces con respecto a los métodos
convencionales. Esta envasadora al vacío se convertirá en una parte indispensable
de su vida y le ahorrará dinero al malgastar menos alimentos.
• Empaquete alimentos como carnes, pescados, aves, mariscos y verduras para
congelar o para almacenar en el frigorífico.
• Empaquete alimentos secos como alubias, nueces, muesli, etcétera, para alargar
la conservación.
• La envasadora se puede utilizar también para otros usos con productos no
alimenticios: mantenga utensilios de cámping secos y limpios, como cerillas,
botiquín o ropa; mantenga objetos de plata o de coleccionismo.
46.4 Desembalaje
Para desembalar el aparato, sáquelo de la caja y retire el material de embalaje.
46.5 Eliminación del embalaje
El embalaje protege al aparato frente a daños ocasionados por el transporte. Los
materiales de embalaje han sido seleccionados con una filosofía respetuosa con el
medio ambiente e idónea a efectos de una correcta eliminación y, por tanto, son
reciclables.
La devolución del embalaje al ciclo de material ahorra materia prima y reduce la
generación de residuos. Por tanto, deposite los materiales de embalaje que no
necesite en los puntos de recogida "punto verde”.

84
Nota
► Si fuera posible, conserve el embalaje original durante el período de garantía
para poder embalar el aparato adecuadamente en caso de que requiera hacer
uso de la garantía.
46.6 Colocación
46.6.1 Requisitos que debe reunir el lugar de montaje
Para garantizar el funcionamiento seguro y correcto del aparato, el lugar de
colocación debe cumplir los siguientes requisitos:
• El aparato debe colocarse sobre una superficie sólida, plana, horizontal y
resistente al calor, con suficiente capacidad portante para el aparato y los
alimentos más pesados que podrían ser preparados en el horn la manera en que
compra alimentos y los conserva
• El lugar de colocación debe quedar fuera del alcance de los niños, para que no
puedan tocar el barra selladora del horno.
• El aparato no es apto para su encastre en una pared o en un armario empotrado.
• No coloque el aparato en un lugar demasiado cálido, húmedo o con presencia de
agua ni cerca de materiales inflamables.
• Para su correcto funcionamiento, el aparato requiere suficiente ventilación. Deje
10 cm de espacio libre sobre el horno, 10 cm por detrás y 10 cm a ambos lados.
• No tape las aberturas del aparato ni las obstruya.
• No retire las patas de regulación del aparato.
• La toma de alimentación debe estar fácilmente accesible para poder desconectar
el cable de alimentación rápidamente, si fuera preciso.
• La colocación y montaje del presente aparato en lugares no estacionarios (p.ej.
barcos) debe ser realizado por personal técnico autorizado, con el fin de asegurar
el cumplimiento de los requisitos para el uso seguro de este aparato.
• La cocina de inducción no debe ponerse en funcionamiento sobre una superficie
que contenga acero, ya que éste puede calentarse mucho.
• El aire frío es aspirado por la parte inferior del aparato. No tape las aberturas del
aparato ni las obstruya.
46.7 Conexión eléctrica
Para que el aparato funcione con seguridad y correctamente debe observar las
siguientes indicaciones al establecer la conexión eléctrica:
• Antes de conectar el aparato, compare los datos de conexión (tensión y
frecuencia) de la placa de especificaciones con las de la red eléctrica doméstica.
Estos datos deben coincidir para evitar daños en el aparato.
• En caso de duda, consulte a su servicio técnico eléctrico.
• Asegúrese de que el cable de alimentación no resulte dañado y que no se tienda
bajo el horno ni sobre superficies calientes o de bordes afilados.

85
• La conexión del aparato a la red eléctrica debe realizarse mediante un cable
alargador arrollado, de 3 metros de longitud como máximo y una sección recta de
1,5 mm². El uso de regletas de conexiones o ladrones con varias tomas está
prohibido, por el peligro de incendio.
• La toma de alimentación debe estar provista de un fusible protector de 16A.
• La seguridad eléctrica del aparato sólo se asegurará si se conecta un sistema de
protección frente a sobrecargas. En caso de duda, avise al electricista autorizado
para que revise la instalación doméstica. El fabricante no se hace responsable de
los daños ocasionados por falta de protección o protección interrumpida.
47 Estructura y funciones
Este capítulo incluye algunos consejos importantes acerca de la estructura y el
funcionamiento del aparato.
47.1 Descripción general
1 tecla de seguridad mientras la tapa está abierta, la resistencia no funciona.
2 gancho de bloqueo para la tapa
3 junta superior + 9 junta inferior
4 tubo flexible de vacío per vuoto per la messa sotto vuoto di contenitori
5 barras selladoras / cinta de teflón, con los filamentos calentadores recubiertos
de teflón. esto permite sellar las bolsas sin que se peguen a las barras.
6 bóton “recipiente de vacío ”.
7 tecla de desbloqueo
8 junta de goma (que presiona la bolsa contra la barra selladora)
10 cámara de vacío con bandeja de recogida extraíble para líquidos

86
11 aspirazione aria: attacco del tubo flessibile per vuoto: per il collegamento di
un tubo flessibile per vuoto per la messa sotto vuoto di contenitori.
Advertencia
La barra selladora puede estar muy caliente.
Tenga presente la siguiente indicación de seguridad para no quemarse a sí
mismo ni quemar a otras personas:
► Para evitar posibles quemaduras, nunca toque la barra selladora justo después
de sellar.
Nota
► ¡No retire la cinta de teflón (T)!
47.2 Elementos de operación
.
Teclas La luz indicativa (chivato) muestra la función seleccionada.
Botón vacío y sellado / cancelar (Vakuum & Schweißen/Abbrechen)
Para envasar al vacío y sellar una bolsa o un recipiente
Pulsar de nuevo la tecla para interrumpir el proceso.
Botón Alimentos secos y húmedos (Lebensmittel Trocken & Feucht)
Con esta función puede ajustar la duración de sellado a la consistencia del material
que desea envasar al vacío. Seleccione "Trocken" para material seco y "Feucht"
para material húmedo que genere algo de líquido.
Botón Intensidad de vacío normal & suave (Vakuumstärke Normal & Schonend)
Dos ajustes distintos para seleccionar la intensidad de vacío
"normal" (Normal), para un producto normal envasado al vacío
"suave" (Schonend), para un producto delicado blando y sensible. Seleccione el
modo "suave" si desea una baja intensidad de vacío.
Botón de sellado (Schweißen)
Para sellar una bolsa sin proceso de vacío adicional.
47.3 Placa de especificaciones
La placa de especificaciones con los datos de conexión y de potencia se encuentra
en la parte trasera del aparato.

87
48 Operación y funcionamiento
Este capítulo incluye algunos consejos importantes acerca de la operación y el
funcionamiento del aparato. Observe dichos consejos para evitar peligros y daños.
48.1 Puesta en servicio
Limpie cuidadosamente el aparato y los accesorios que hayan estado en contacto
con alimentos después de cada uso y de cada sellado. Por favor, siga las
indicaciones expuestas en la sección “Limpieza y conservación”.
48.2 Bolsas y rollos
Por favor, utilice solamente las bolsas y rollo necesarios previstos. El material de
estas láminas especiales para vacío es distinto que el de los rollos comunes de
plástico de cocina. Todos los rollos y bolsas de film suministrados por CASO son
aptos para cocinar en bolsa (al vacío).
Asegúrese de que si se utilizan films de otros fabricantes, éstos sean aptos para
microondas y para el cocinado en bolsa (al vacío). Tenga presente que los
envasadores al vacío, como este aparato, sólo pueden utilizarse con bolsas
laminadas estructuradas. Para ello puede usted contar con una amplia gama de
rollos y bolsas CASO.
48.3 Envasar al vacío en una de las bolsas del rollo
Coloque el aparato en un lugar seco.
1. Desenrolle el largo deseado y córtelo con un corte preciso y limpio mediante las
cuchillas.
2. Coloque un extremo de la bolsa sobre junta de goma.
3. Cierre la tapa y ajuste el tiempo de sellado deseado.
4. Pulse el Botón de sellado (Schweißen).
5. El piloto LED correspondiente se iluminará y apagará una vez finalizado el
proceso.
6. Presione las teclas de desbloqueo y luego abra la tapa y retire la bolsa.
7. Ésta puede utilizarse ya para envasar al vacío.
Nota
► Asegúrese de que la longitud de la bolsa es 8 cm mayor que la del alimento a
conservar y prevea 2 cm adicionales por si tuviera que volver a sellarla.

88
48.4 Envasar al vacío en una bolsa
Coloque el aparato en un lugar seco.
1. Introduzca en la bolsa los alimentos
que quiera almacenar.
2. Asegúrese de que el extremo abierto
de la bolsa se encuentra dentro de la
cámara de vacío.
3. Cierre la tapa y ajuste el tiempo de
sellado y la intensidad de vacío
deseados.
4. A continuación, pulse el botón vacío
y sellado / cancelar (Vakuum &
Schweißen/Abbrechen) y la bolsa
quedará firmemente sellada
automáticamente y envasada al vacío.
5. El piloto LED correspondiente se iluminará y apagará una vez finalizado el
proceso.
Si desea interrumpir el proceso, pulse el botón vacío y sellado/cancelar (Vakuum
& Schweißen/Abbrechen) de nuevo y luego las dos teclas de desbloqueo para abrir
la tapa.
Nota
► No llene la bolsa demasiado. Deje suficiente espacio para que pueda meterse la
boca de la bolsa fácilmente en la envasadora.
► No moje la boca de la bolsa. Las bolsas mojadas son difíciles de sellar.
► Limpie y alise la boca de la bolsa antes de ser sellada. Asegúrese de que no hay
restos de comida ni arrugas en la boca de la bolsa. Estos pueden dificultar el
sellado.
► No deje demasiado aire en la bolsa. Antes de cerrarla herméticamente saque el
aire que contiene. Si hubiera demasiado aire, la bomba de vacío podría
sobrecargarse y el motor podría no tener potencia suficiente para sacar todo el
aire.
► Si los alimentos a envasar al vacío tuvieran cantos afilados, por ejemplo huesos,
espaguetis o cangrejos, envuélvalos en papel de cocina para evitar que la bolsa
se dañe.
► Para almacenar alimentos con alto contenido de agua, por ejemplo sopas,
gratinados o guisos, congélelos en un cuenco u otro recipiente antes de ser
envasados. A continuación enváselos al vacío y devuélvalos al congelador
inmediatamente.
► Escalde las verduras durante un periodo corto de tiempo en agua hirviendo o en
el microondas. Enfríelas y enváselas al vacío en prácticas raciones.
► Para envasar al vacío alimentos no congelados se necesitan bolsas unos 5 cm
más largas para que los alimentos se puedan expandir al congelarse. Ponga
carne y pescado en papel de cocina y enváselos al vacío juntos. Usar papel de
cocina tiene la ventaja de absorver la humedad de los alimentos.

89
Nota
► Para envasar alimentos como tortillas, crepes, hamburguesas o empanadillas,
sepárelos con papel encerado o de pergamino, así se pueden apilar mejor.
Después podrá coger una parte de los alimentos fácilmente y volver a envasar y
congelar el resto.
48.5 Envasar al vacío en un recipiente de vacío
1. Limpie la tapa del recipiente de vacío y el propio recipiente para asegurarse de
que está limpio y seco. Llene el alimento que desea envasar en el recipiente.
Procure no llenar demasiada cantidad de alimento.
2. Retire la bandeja de
recogida de la cámara de
vacío.
3. Fije un extremo del tubo
flexible de vacío en la boca
de aspiración del aparato y
otro extremo a la conexión
de la tapa del recipiente o
mediante el adaptador de la
tapa del recipiente.
4. Pulse bóton “recipiente de vacío (6)”. Presione firmemente
la tapa del recipiente al principio del proceso de vacío para evitar
que salga aire.
5. El proceso de vacío finaliza automáticamente cuando se alcanza una intensidad
de vacío suficiente. Retire primero tubo flexible de vacío de la tapa del recipiente y
luego de la boca de aspiración del aparato.
Puede interrumpir el proceso en cualquier momento pulsando de nuevo la tecla
“recipiente (6)”.
48.6 Almacenamiento de la envasadora
Guarde el aparato en un sitio plano, seguro y fuera del alcance de los niños.
Nota
► Si no va a utilizar el aparato durante un periodo largo de tiempo le aconsejamos
que desconecte el enchufe de la toma de red eléctrica.
► Para almacenar el producto, coloque la tapa sin bloquearla, que las juntas se
deformen y no perjudicar el funcionamiento del aparato.
49 Limpieza y conservación
Este capítulo incluye algunos consejos importantes acerca de la limpieza y la
conservación del aparato. Tenga presentes las instrucciones y daños por limpieza
incorrecta del aparato y asegúrese de que el aparato funciona sin errores.

90
49.1 Instrucciones de seguridad
Precaución
Tenga presentes las siguientes instrucciones de seguridad antes de comenzar a
limpiar el aparato:
► Antes de limpiar desconectarlo de la toma de alimentación eléctrica.
► El aparato debe limpiarse periódicamente para eliminar los restos de alimentos
cocinados. Un aparato que no se mantenga limpio perjudicará la conservación
del aparato y puede hacer peligrar el aparato, además de causar una
acumulación de hongos y bacterias.
► Las barras selladoras pueden estar calientes después del proceso de vacío.
¡Existe peligro de fuego! Espere a que el aparato se enfríe.
► Después del uso debe limpiar el espacio de cocción en cuanto enfríe. Si espera
demasiado, será más difícil llevar a cabo la limpieza e incluso, la hará imposible.
Si se acumula demasiada suciedad el aparato podría sufrir daños.
► Si la humedad penetra en el aparato, sus componentes electrónicos pueden
resultar dañados. Evite que caiga líquido en el interior del aparato, a través de
las ranuras de ventilación.
► No utilice limpiadores agresivos ni disolventes.
► No elimine la suciedad incrustada mediante la fuerza, utilizando objetos duros.
► No sumerja el aparato en agua ni otros líquidos ni los meta en el lavavajillas.
49.2 Limpieza
◆ Superficie externa del aparato
Limpie la superficie externa del aparato con un trapo húmedo o utilice jabón suave
no abrasivo.
◆ Superficie interior del aparato
Limpie la superficie interior del aparato con papel de cocina para eliminar restos de
comida y líquidos.
Retire la bandeja de recogida de la cámara de vacío y lávela con un poco de jabón
lavavajillas, séquela completamente y vuelva a colocarla.
◆ Bolsas
Limpie las bolsas con agua caliente y jabón para lavar platos, déjelas secar
completamente antes del siguiente uso.
Precaución
► No reutilice bolsas que hayan contenido carne cruda, pescado o alimentos
grasos.
◆ Junta de goma (que presiona la bolsa contra la barra selladora)
Extraiga la junta de goma y lávela utilizando agua jabonosa caliente.
Nota
► La junta de goma debería secarse completamente antes de volver a colocarse.

91
Nota
► Al volver a colocarla, evite dañarla y asegúrese de colocar la junta de goma de
forma que el aparato pueda funcionar correctamente.
50 Resolución de fallas
Este capítulo incluye algunos consejos importantes acerca de la localización y
resolución de fallas del aparato. Observe dichos consejos para evitar peligros y
daños.
50.1 Instrucciones de seguridad
Precaución
► Las reparaciones de aparatos eléctricos y electrónicos sólo deben realizarse por
personal técnico autorizado e instruido por el fabricante.
► Una reparación indebida podría poner en grave peligro al usuario y causar daños
en el aparato.
50.2 Problemas, causas y remedios
La siguiente tabla le ayudará a localizar y remediar pequeños problemas.
Problema
Posible causa
Remedio
La envasadora no
funciona
Enchufe no conectado
Conectar el enchufe
Cable o enchufe defectuoso.
Contacte al Servicio al Cliente.
Toma de red defectuosa
Escoger otra toma de red
El primer sellado de la
bolsa hecha de rollo no
se efectúa
Rollo en posición incorrecta
Siga los pasos del capítulo
“Envasado al vacío en bolsas
hechas con el rollo”
No se hace vacío en la
bolsa
La boca de la bolsa no está
colocada correctamente en la
cámara de vacío
Coloque correctamente la bolsa
La bolsa está defectuosa
Coja otra bolsa
Hay suciedad en las barras
selladoras y en las juntas.
Limpie las juntas y colóquelas
correctamente cuando estén
secas.
La bolsa no ha sido
sellada correctametne
La barra selladora se ha
sobrecalentado y la bolsa se
ha fundido
Abra la tapa del aparato y déjelo
enfriar unos minutos
La bolsa no mantiene
el vacío después de
haber sido sellada
La bolsa está defectuosa
Coja otra bolsa. Cubra los cantos
afilados del contenido con
servilletas de papel

92
Hay fugas debido a arrugas,
migas, grasa o líquidos en la
costura de sellado.
Vuelva a abrir la bolsa; limpie la
parte interior de la boca de la
bolsa; limpie la posible suciedad
de la barra selladora. Vuelva a
sellar la bolsa.
Nota
► Si con los pasos que se indica más arriba no consigue solucionar el problema,
diríjase al servicio de atención al cliente.
51 Eliminación del aparato usado
Los productos eléctricos y electrónicos usados contienen materiales
reutilizables. No obstante, también contienen materiales nocivos, necesarios
para su funcionamiento y seguridad. En la basura doméstica, o ante la
manipulación indebida, puede ponerse en peligro la salud humana y el medio
ambiente. Por tanto, no debe depositar su aparato usado en ningún caso junto con la
basura doméstica.
Nota
► Utilice el puesto de recogida más cercano para devolver y reciclar los aparatos
electrónicos usados. Infórmese, si fuera preciso, en su ayuntamiento, en el
servicio de recogida de basura o en su distribuidor.
► Guarde su aparato usado, protegido frente al acceso de los niños, para su
eliminación
52 Garantía
Otorgamos para este producto, 24 meses de garantía a contar desde la fecha de
venta por defectos de fabricación o de material.
Su derecho legal de reclamación de garantía, de conformidad con el §439 ss. de la
ley BGB-E alemana permanecen invariables.
En la garantía no se incluyen daños resultantes de la manipulación o el uso
indebidos, ni aquellos daños que impidan el correcto funcionamiento o disminuyan el
valor del aparato en lo más mínimo. Además, no nos hacemos responsables en
cuanto a la garantía en relación a los componentes desgastados, daños de
transporte, siempre que no seamos responsables, así como daños no atribuibles a
las reparaciones realizadas por nosotros.
Este aparato es apto para el uso doméstico y sus características de diseño y
potencia así lo confirman.
Cualquier uso industrial o comercial restringe el derecho a garantía en la medida en
que el aparato haya sido sometido a esfuerzo equivalente al uso doméstico. El
aparato no está previsto para el uso industrial.

93
En caso de reclamaciones legítimas, enviaremos el aparato defectuoso, a nuestra
discreción, a reparar o a sustituir por un aparato sin defecto.
Los defectos detectados deben notificarse en un plazo de 14 días a partir de la fecha
de suministro.
Queda excluida cualquier otra reclamación de garantía.
Para hacer valer una declaración de garantía, antes de devolver el aparato (siempre
con presentación del recibo de compra), póngase en contacto con nosotros.
53 Datos técnicos
Aparato
Envasadora al vacío
Denominación
VR 390 advanced
Nº de art
1522
Conexión
220 V – 240 V; 50 Hz
Consumo de potencia
110 W
Dimensiones exteriores (An/H/P)
36,5 x 7 x 14 cm
Peso neto
1,47 kg

94
Руководство по эксплуатации
Вакуумный упаковщик
VR 390 advanced
Артикул 1522

95
54 Руководство по эксплуатации
55 Общие сведения
Прочтите содержащуюся здесь информацию, чтобы быстро ознакомиться со
своим прибором и в полной мере использовать все его функции. Надлежащее
обращение и уход положительно влияют на срок службы устройства.
Желаем приятного пользования.
55.1 Информация о данной инструкции
Это руководство по использованию является составной частью вакуумного
упаковщика (называемого далее "прибор") и дает важные указания по первому
использованию, безопасности, надлежащему применению прибора и уходу за
ним. Руководство по использованию должно всегда находиться вблизи
прибора. Его необходимо прочесть всем лицам, осуществляющим: ввод
в эксплуатацию,
• эксплуатацию, устранение неисправностей и/или очистку
прибора. Сохраните данное Руководство по эксплуатации, при передаче
устройства другому лицу передайте вместе с ним Руководство по эксплуатации.
55.2 Предупредительные указания
В данной инструкции по эксплуатации используются следующие
предупредительные указания:
Опасность
Предупредительное указание этой степени опасности обозначает опасную
ситуацию, сопряженную с сильной угрозой. Если опасная ситуация не будет
предотвращена, это может привести к смерти или тяжелым травмам.
► Во избежание опасности смерти или тяжелых травм людей необходимо
следовать инструкциям в данном предупредительном указании.
Предостережение
Предупредительное указание этой степени опасности обозначает
возможность опасной ситуации. Если опасная ситуация не будет
предотвращена, это может привести к тяжелым травмам.
► Во избежание опасности травмирования людей необходимо следовать
инструкциям в данном предупредительном указании.
Внимание
Предупредительное указание этой степени опасности обозначает
возможность опасной ситуации. Если не предотвратить опасную ситуацию,
это может привести к травмам легкой или средней степени тяжести.
► Во избежание опасности травмирования людей необходимо следовать
инструкциям в данном предупредительном указании.

96
Примечание
Примечание обозначает дополнительную информацию, облегчающую
обращение с прибором.
55.3 Ограничение ответственности
Все содержащиеся в данном Руководстве по использованию технические
сведения, данные и указания по установке, использованию и уходу за прибором
актуальны на момент печати и учитывают весь наш опыт и знания. Сведения,
рисунки и описания, содержащиеся в данном Руководстве по использованию,
не могут являться основанием для каких-либо претензий. Производитель не
несет ответственности за ущерб, возникший вследствие:
Несоблюдения инструкции
• Использования прибора не по назначению неправильного
ремонта,
• технических изменений, модификаций прибора
• использования неразрешенных запчастей
Модификации прибора не рекомендуются и не покрываются гарантией.
Перевод осуществляется самым добросовестным образом. Однако мы не
несем ответственности за ошибки в переводе, даже если перевод был
выполнен нами или по нашему заказу. Наши обязательства ограничиваются
только исходным немецким текстом.
55.4 Защита авторского права
Данная документация защищена авторским правом.
Braukmann GmbH сохраняет за собой все права, в том числе право на
фотомеханическое воспроизведение, копирование и распространение
посредством особых способов (например, обработка данных, носители данных,
сети передачи данных), в том числе частичное.
56 Безопасность
В этой главе Вы получите важные указания по безопасности при обращении с
прибором.
Этот прибор соответствует установленным нормам безопасности. Однако
ненадлежащая эксплуатация прибора может привести к травмированию людей
и причинению материального ущерба.
56.1 Надлежащее использование
Данный прибор предназначен только для бытового использования внутри
помещения для вакуумной упаковки и запаивания пакетов и контейнеров для
вакуумного упаковывания.
Любое иное использование или использование за рамками указанного
считается ненадлежащим.

97
Предостережение
Опасность из-за ненадлежащего использования!
При использовании не по назначению и/или использовании, отличном от
указанного в Руководстве по использованию, прибор может являться
источником опасностей.
► Используйте прибор только по назначению.
► Соблюдайте порядок действий, описанный в данном Руководстве по
использованию.
Исключаются претензии всякого рода, связанные с ущербом вследствие
использования не по назначению.
Все риски несет исключительно пользователь.
56.2 Общие требования техники безопасности
Примечание
В целях обеспечения безопасного обращения с
прибором следуйте нижеприведенным общим
требованиям техники безопасности:
► Перед использованием проверяйте прибор на
предмет видимых внешних повреждений. Не
используйте поврежденное устройство.
► Во избежание опасности в случае повреждения
соединительного провода или штекера прибора его
замена должна осуществляться производителем или
его уполномоченным представителем по
техническому обслуживанию.
► Прибор может использоваться детьми 8 лет и старше
при условии, что они находятся под присмотром или
проинструктированы о безопасном использовании
прибора и понимают связанные с этим опасности.
► Чистка и обслуживание могут осуществляться
детьми, только если они старше 8 лет и находятся
под наблюдением.
► Детям запрещается играть с устройством.
► Храните устройство и электрошнур в недоступном
для детей младше 8 лет месте.

98
Примечание
► Устройство может использоваться людьми с
ограниченными физическими, сенсорными или
умственными способностями, или с недостаточным
опытом или знаниями, при условии, что они
находятся под наблюдением или
проинструктированы о безопасном использовании
устройства и понимают связанные с этим опасности.
► Ремонт прибора может выполняться только
сервисной службой, авторизованной
производителем, в противном случае претензии по
гарантии в отношении последующих повреждений не
принимаются. Ремонт, выполненный
неквалифицированными лицами, может привести к
серьезным опасностям для пользователя.
► Неисправные детали можно заменять только
оригинальными запчастями. Выполнение требований
техники безопасности гарантировано только при
использовании оригинальных запчастей.
► Во время работы не оставляйте прибор без
присмотра.
► Не тяните за электрический провод и не носите
прибор за провод.
► Прибор нельзя погружать в воду и другие жидкости, а
также помещать в посудомоечную машину.
► При хранении не закрывайте крышку плотно, не
блокируйте ее, чтобы уплотняющие прокладки не
деформировались и не влияли негативно на качество
работы прибора.

99
56.3 Источники опасности
56.3.1 Опасность ожога
Предостережение
Сварная планка прибора очень сильно нагревается.
Соблюдайте следующие правила безопасности,
чтобы не обжечь себя и других:
► В целях предотвращения возможных ожогов ни в
коем случае не прикасайтесь к сваривающей планке
непосредственно после операции запаивания.
56.3.2 Опасность возгорания
Предостережение
При ненадлежащем применении прибора
существует опасность возгорания.
Соблюдайте следующие указания по технике
безопасности, чтобы избежать опасности возгорания:
► Не ставьте прибор поблизости от горючих
материалов.
► Держите прибор вдали от возможных источников
тепла (газ, ток, горелка, отапливаемая печь).
56.3.3 Опасность, связанная с электрическим
током!
Опасность
Опасность для жизни из-за поражения
электрическим током!
Контакт с проводами или деталями прибора,
находящимися под напряжением, опасен для жизни!
Чтобы избежать угроз, связанных с электрическим
током, соблюдайте следующие правила безопасности:

100
Опасность
► Прибор нельзя использовать, если его
соединительный провод или штекер повреждены,
если прибор работает со сбоями, упал или получил
повреждения. Во избежание опасности в случае
повреждения соединительного провода или штекера
прибора его замена должна осуществляться
производителем или его уполномоченным
представителем по техническому обслуживанию.
► Ни в коем случае не вскрывайте корпус прибора. При
контакте с соединительными элементами,
находящимися под напряжением, а также при
изменении электрической и механической конструкции
существует опасность удара током. Кроме того, это
может привести к сбоям в работе прибора.
► Никогда не трогайте прибор и штепсельную вилку
мокрыми руками.
► Не помещайте никакие предметы в отверстия
прибора. При касании находящихся под напряжением
соединений существует опасность удара
электрическим током.
57 Правила безопасности при хранении продуктов
питания
При упаковывании в вакуумную упаковку и запаивании следуйте, пожалуйста,
определенным процедурам; это позволит Вам гарантировать качество и
безопасность Ваших продуктов.
Примечание
В целях обеспечения безопасного обращения с прибором следуйте
нижеприведенным общим требованиям техники безопасности:
► Если скоропортящиеся продукты были разогреты или разморожены или
хранились в неохлажденном виде, их следует немедленно использовать.
► Перед вакуумной упаковкой продуктов питания важно вымыть руки и
вымыть все инструменты и поверхности.

101
Примечание
► Охлаждайте или замораживайте скоропортящиеся продукты сразу после их
вакуумной упаковки. Не храните их при комнатной температуре.
► Храните продукты с высоким содержанием жира по возможности в
прохладном и темном месте, чтобы не допустить появления неприятного
запаха и горького вкуса.
► Очищайте от кожуры такие фрукты и овощи как, например, яблоки, бананы,
картофель и корнеплоды; только таким образом возможно продлить срок
действия вакуумной упаковки.
► Чтобы избежать образования газов, перед вакуумизацией бланшируйте
такие виды овощей, как капуста и брокколи.
58 Ввод в эксплуатацию
В этой главе содержатся важные указания по вводу прибора в эксплуатацию.
Следуйте этим указаниям, чтобы избежать опасностей и повреждений.
58.1 Правила техники безопасности
Предостережение
► Упаковочные материалы не предназначены для игры. Существует
опасность удушья.
58.2 Комплектация и осмотр после транспортировки
В стандартный объем поставки устройства входят следующие компоненты:
• VR 390 advanced 10 пакетов для профессиональной вакуумной
упаковки (20 x 30 см)
• Руководство по эксплуатации Вакуумируюший шланг
• Съемный поддон для вакуумной камеры
Примечание
► Проверьте поставку на комплектность и на видимые повреждения.
► Сразу сообщите экспедитору, страховой компании и поставщику о неполной
поставке или повреждениях вследствие неудовлетворительной упаковки
или транспортировки.
58.3 Область применения
Упакованные с помощью данного прибора в вакуумную упаковку продукты
остаются свежими в восемь раз дольше: сохраните вкус и свежесть продуктов и
снизьте свои затраты благодаря меньшему количеству испорченных продуктов.
• Упаковывайте такие продукты, как, например, мясо, рыба, птица,
морепродукты и овощи для заморозки или для хранения в холодильнике.
• Упаковывайте такие сухие продукты питания, как, например, бобы, орехи,
мюсли и т.д., чтобы их срок хранения стал намного дольше.

102
• Используйте свой вакууматор для непищевых целей: инвентарь для
кемпинга, такой как, например, спички, аптечка и одежда, остается чистым и
сухим, серебро и антиквариат не покрываются налетом.
58.4 Распаковка
Для распаковки прибора выньте его из коробки и удалите упаковочный
материал.
58.5 Утилизация упаковки
Упаковка защищает прибор от повреждений при транспортировке. Упаковочные
материалы выбираются с учетом экологичности и техники устранения, и
поэтому пригодны для утилизации. Возврат упаковки в оборот материалов
экономит сырье и сокращает отходы. Сдавайте ненужные упаковочные
материалы в приемные пункты системы утилизации "Зеленая точка".
Примечание
► Если возможно, сохраняйте оригинальную упаковку в течение гарантийного
периода прибора, чтобы в гарантийном случае снова можно было упаковать
прибор надлежащим образом.
58.6 Установка
58.6.1 Требования к месту установки
Для надежной и безупречной работы прибора место установки должно
выполнять следующие условия:
• Устанавливайте прибор на прочное, ровное, горизонтальное и жаропрочное
основание с достаточной несущей способностью и поверхностью для
прибора и для самого тяжелого и большого предполагаемого продукта для
вакуумной упаковки.
• Не перемещайте вакуумный упаковщик во время его работы.
• Выбирайте место установки таким образом, чтобы дети не могли достать до
горячих спаивающих пластин прибора.
• Не устанавливайте прибор в горячей, мокрой или очень влажной среде или
поблизости от горючего материала.
• Чтобы обеспечить достаточную циркуляцию воздуха, убедитесь, что с
каждой стороны сохраняется расстояние примерно в 10 см.
• Розетка должна быть легкодоступна, чтобы при необходимости кабель
электропитания можно было легко вытащить из розетки.
• Установка прибора в нестационарных местах установки (например, на
кораблях) может проводиться только специализированными
предприятиями/специалистами, если эти места удовлетворяют условиям
безопасного использования этого прибора.

103
58.7 Подключение к электросети
Для обеспечения безопасной и бесперебойной работы прибора при
подключении к сети необходимо соблюдать нижеперечисленные указания:
• Перед подключением прибора к сети сравните технические параметры
подключения (напряжение и частоту) на заводской табличке прибора с
техническими параметрами Вашей сети. Во избежание повреждения
прибора эти параметры должны совпадать.
В случае наличия сомнений проконсультируйтесь с электриком.
• Запрещается использовать многоконтактные штекеры или сетевые
разветвители из-за связанной с ними опасностью возгорания.
• Убедитесь, что электрический кабель не поврежден и не проложен над или
под прибором или над горячими поверхностями и/или поверхностями с
острыми кромками.
• Розетка должна быть защищена защитным автоматом 16А.
• Электрическая безопасность прибора гарантирована лишь в том случае,
если он подключен к системе защитного заземления, установленной по всем
правилам. В случае сомнений поручите электрику проверить внутреннюю
электропроводку.
Производитель не несет ответственности за ущерб, нанесенный вследствие
отсутствия или прерывания провода заземления.
59 Конструкция и назначение
В этой главе содержатся важные указания по устройству и работе прибора.

104
59.1 Общее описание
1 Аварийный выключатель Когда крышка открыта, нагревательный элемент
не работает
2 Крючок для фиксации
3 Верхний уплотнитель + 9 нижний уплотнитель
4 шланг для вакуумирования емкостей
5 Сваривающая пластина и тефлоновая лента: включает в себя
нагревательный провод с тефлоновым покрытием; он позволяет запечатывать
пакет без прилипания.
6 Кнопка для емкости
7 кнопка разблокировки
8 Резиновая прокладка (прижимает пакет к сварочной планке)
10 Вакуумная камера с отсоединяемым поддоном для жидкости
11 Всасывающий штуцер: для подсоединения вакуумирующего шланга для
вакуумирования емкостей.
Предостережение
Сварная планка прибора очень сильно нагревается.
Соблюдайте следующие правила безопасности, чтобы не обжечь себя и
других:
► В целях предотвращения возможных ожогов ни в коем случае не
прикасайтесь к сваривающей планке непосредственно после операции
запаивания.

105
Примечание
► Не снимайте тефлоновую ленту (Т)!
59.2 Элементы управления
Кнопки (выбранная функция отображается соотвутствующим световым
индикатором)
Кнопка Вакуум и запаивание/ Отмена
Для автоматического вакуумирования и запаивания пакета или емкости.
Нажмите на кнопку еще раз для отмены действия.
Кнопка "Продукты (сухие и влажные)"
С помощью этой функции можно установить длительность запаивания в
зависимости от консистенции вакуумируемого продукта. Выберите „сухой“ для
сухого вакуумируемого продукта и „влажный“ для влажного вакуумируемого
продукта, из которого выделяется немного жидкости.
Кнопка регулировки силы вакуумирования: (нормальная и умеренная)
Две разных настройки для выбора интенсивности вакуумирования.
"нормальный" - для нормального вакуумируемого продукта
"умеренный" - для мягких и чувствительных вакуумируемых продуктов. Если
нужна низкая интенсивность вакуумирования, выберите "умеренный".
Кнопка "Запаивание"
Для запаивания пакета без вакуумирования.
59.3 Заводская табличка
Заводская табличка с информацией о подключении и техническими
характеристиками находится на нижней стороне устройства.
60 Обслуживание и эксплуатация
В этой главе содержатся важные указания по обслуживанию прибора. Следуйте
этим указаниям, чтобы избежать опасностей и повреждений.
60.1 Ввод в эксплуатацию
Перед каждым использованием и после каждого процесса запечатывания
следует тщательно очистить как сам прибор, так и все принадлежности,
контактирующие с продуктами питания, следуйте, пожалуйста, указаниям в главе
"Очистка и техническое обслуживание".

106
60.2 Пакеты и рулоны
Используйте только пакеты и рулоны, которые однозначно предназначены для
вакуумирования. Материал этой специальной предназначенной для
вакуумирования пленки отличается от обычной пленки для сохранения
свежести продуктов.
Все поставляемые CASO пленочные рулоны и пакеты подходят для готовки в
пакете (Sous Vide). При применении пленки других производителей убедитесь,
действительно ли она подходит также для использования в микроволновой
печи и для готовки в пакете (Sous Vide). Пожалуйста, учтите, что такие
пластинные вакуумные упаковщики как этот в принципе могут использоваться
только со структурированными пленочными пакетами. В этих целях CASO
предлагает Вам широкий выбор различных рулонов и пакетов.
60.3 Вакуумная упаковка в пакете, сделанном из рулона
Установите прибор в сухом месте.
1. Размотайте пленку на необходимую длину и обрежьте пакет перед
рулоном. Разместите один конец пакета над резиновым уплотнителем.
2. Закройте крышку и установите необходимое время запаивания.
3. Нажмите на кнопку "Запаивание". Загорится соответствующий
светодиод, а затем погаснет по окончанию процесса.
4. Нажмите на кнопки разблокировки, затем откройте крышку и достаньте
пакет. Теперь его можно использовать для вакуумирования.
Примечание
► Убедитесь, что длина используемого пакета не менее чем на 8 см больше
длины консервируемого продукта и учтите еще 2 см, если пакет после
вскрытия еще раз будет запечатываться.
60.4 Вакуумная упаковка в пакете
Установка в соответствии с пунктом
60.3.
1. Положите продукты в пакет.
2. Разместите открытый конец пакета
в камере для вакуумирования.
3. Закройте крышку и установите
необходимое время запаивания и
силу вакуумирования.
4. Нажмите кнопку "Вакуумирование
и запаивание / Отмена", пакет будет
автоматически вакуумирован и
запаян. Загорится соответствующий светодиод, а затем погаснет по
окончанию процесса.

107
Если Вы хотите прервать процесс, нажмите на кнопку "Вакуумирование и
запаивание / Отмена" еще раз, а затем на обе кнопки разблокировки, чтобы
открыть крышку.
Примечание
► Не кладите в пакет слишком много продуктов; оставляйте достаточно
места, чтобы открытая сторона пакета легко размещалась в вакуумном
упаковщике.
► Очистите и разгладьте открытый конец пакета, прежде чем его сваривать.
Удалите остатки продуктов, влагу и складки для достижения оптимальных
результатов запаивания.
► Перед процессом вакуумирования удалите воздух из пакета для
оптимизации процесса вакуумирования.
► Если продукты имеют острые концы, такие как, например, кости, обмотайте
их в бумажное полотенце; таким образом вы предотвратите повреждение
пакета.
► Чтобы вакуумировать жидкие продукты, замораживайте их сначала в
подходящем сосуде, а затем помещайте в пакет.
► Так как при заморозке продукты могут немного расшириться, выбирайте
пакет размером примерно на 5 см больше.
► Положите мясо или рыбу на бумажное полотенце и вакуумируйте все
вместе. Преимуществом кухонного полотенца является его способность
впитывать влагу с продуктов питания.
► Мягкие продукты, легко прилипающие друг к другу, разделяйте бумагой для
запекания или пергаментной бумагой, а затем вакуумируйте. Это поможет
впоследствии их легко достать.
60.5 Вакуумная упаковка в вакуумную емкость
Протрите крышку вакуумной
емкости и саму емкость,
чтобы они были сухими и
чистыми.
Заложите вакуумируемый
продукт в емкость. Не
закладывайте слишком
большое количество
продукта.
Достаньте поддон из камеры вакуумирования. Закрепите один конец шланга
для вакуумирования на разъеме на приборе, а второй конец на разъеме
крышки емкости или с адаптером на крышке емкости.

108
Нажмите кнопку для емкости (6).
Для предотвращения попадания воздуха мы рекомендуем в начале процесса
вакуумирования надавить на крышку емкости. Процесс вакуумирования
заканчивается автоматически.
Сначала снимите шланг для вакуумирования с крышки емкости, а только затем
из всасывающего штуцера на приборе. Вставьте поддон обратно в камеру
вакуумирования.
Вы можете отменить процесс в любой момент, снова нажав на кнопку для
емкости (6).
60.6 Хранение вакуумного упаковщика
Храните прибор на ровном и устойчивом месте, в месте, недоступном для
детей.
Примечание
► Если в течение продолжительного времени вы не будете пользоваться
прибором, мы рекомендуем вынимать вилку из розетки.
► При хранении рекомендуется закрывать крышку не до конца, т.е. не
запирать ее, чтобы уплотнения не деформировались.
61 Очистка и уход
В данной главе приведены важные указания по чистке устройства и уходу за
ним. Правила техники безопасности
Внимание
Прежде чем приступить к очистке прибора, примите к сведению
нижеприведенные указания по безопасности:
► Перед очисткой вытащите вилку из розетки.
► Прибор необходимо регулярно очищать и удалять из него остатки
материалов, чтобы сохранить его функциональность и безопасность
использования. Перед очисткой вытащите вилку из розетки.
► Сваривающая пластина после процесса вакуумирования может быть
горячей. Существует опасность ожога! Подождите, пока прибор остынет.
► По возможности очищайте прибор после каждого использования.
► Если в прибор попадет влага, электронные элементы могут быть
повреждены. Следите за тем, чтобы жидкость не попадала внутрь прибора
через вакуумный насос.

109
Внимание
► Прибор нельзя погружать в воду и другие жидкости, а также помещать в
посудомоечную машину.
► Не используйте агрессивные или абразивные чистящие средства и
растворители.
► Не пытайтесь удалить стойкие загрязнения с помощью жестких предметов.
► Тщательно высушите прибор, прежде чем его снова использовать.
61.1 Очистка
◆ Наружная сторона прибора
Снаружи протрите прибор влажной тряпкой или с использованием мягкого, не
абразивного мыльного раствора.
◆ Внутренняя сторона прибора
Внутреннюю сторону прибора очистите кухонным полотенцем для удаления
остатков пищи и жидкостей.
Снимите поддон из камеры вакуумирования и ополосните его в теплой воде с
небольшим количеством чистящего средства, тщательно протрите его и
вставьте на место.
◆ Пакеты для вакуумирования
Пакеты для вакуумирования можно использовать повторно. Вымойте пакет в
теплой мыльной воде и потом тщательно его высушите, прежде чем снова
использовать.
Внимание
► Пакеты, которые использовались для хранения сырого мяса, рыбы или
жирных продуктов питания, повторно использовать нельзя.
◆ Резиновый уплотнитель (прижимающий пакет к сваривающей пластине)
Выньте резиновый уплотнитель и промойте его в теплом мыльном растворе.
Примечание
► Прежде чем снова вставить резиновый уплотнитель, нужно его тщательно
высушить.
► Следите за правильной установкой уплотнителя, чтобы обеспечить
правильную работу прибора.

110
62 Устранение неисправностей
В этой главе содержатся важные указания по поиску и
устранению неисправностей. Следуйте этим указаниям, чтобы избежать
опасностей и повреждений.
62.1 Правила техники безопасности
Внимание
► Ремонт электроприборов разрешено осуществлять только
квалифицированным специалистам, прошедшим обучение у производителя.
► Из-за ненадлежащего ремонта могут возникать значительные риски для
пользователя и повреждения прибора.
62.2 Причины неисправностей и их устранение
Следующая таблица помогает при локализации и устранении мелких
неисправностей.
Ошибка
Возможная причина
Устранение
Вакуумный упаковщик
не работает
Вилка не вставлена в
розетку
Вставить вилку в розетку
Неисправность
питающего кабеля или
вилки
Обратитесь в сервисную службу.
Розетка неисправна
Выбрать другую розетку
Отрезанный кусок
рулона неправильно
запаивается
Кусок рулона
расположен
неправильно
Следуйте пошаговым указаниям в
главе "Вакуумная упаковка в пакет
из рулона"
В пакете не создается
полный вакуум
Открытый конец
пакета не полностью
находится в вакуумной
камере
Разместите пакет правильно
Пакет поврежден
Выберите другой пакет
На сварочных и
обычных уплотнителях
имеются загрязнения
Очистите уплотнители и после
просушивания правильно вставьте
их на место.
Пакет спаивается
неправильно
Сварочная пластина
перегрелась и пакет
плавится
Откройте крышку прибора и дайте
ему остыть в течение нескольких
минут

111
После запечатывания
пакет не держит
вакуум
Пакет поврежден
Выберите другой пакет, при
необходимости обмотайте острые
края содержимого бумажными
салфетками
Имеются утечки из-за
наличия складок,
крошек, жира и
жидкостей на
поверхности вдоль
шва спайки.
Снова откройте пакет, очистите
верхнюю внутреннюю часть пакета
и удалите со сваривающей
пластины возможно имеющиеся
там инородные тела, прежде чем
снова сваривать пакет.
Примечание
► Если Вы с помощью описанных выше шагов не можете решить проблему,
обратитесь, пожалуйста, в сервисную службу.
63 Утилизация отслужившего устройства
Отслужившие электрические и электронные приборы содержат еще много
ценных материалов. Но они содержат также и вредные вещества,
которые были необходимы для их работы и безопасности. В бытовых
отходах или при неправильном обращении они могут быть опасны
для здоровья людей и окружающей среды. Поэтому ни в коем случае
не выбрасывайте отслуживший прибор в бытовые отходы.
Примечание
► Для утилизации отслуживших электрических и электронных приборов
воспользуйтесь сборными пунктами, организованными в месте Вашего
проживания. При необходимости соответствующую информацию можно
получить в городской администрации, службе вывоза мусора или у
продавца.
► Позаботьтесь о безопасном хранении Вашего отслужившего прибора в
недоступном для детей месте до его вывоза.
64 Гарантия
Мы предоставляем на данный продукт гарантию в течение 24 месяцев с даты
продажи. Гарантия распространяется на недостатки, вызванные
производственными дефектами и дефектами материала.
Гарантия не покрывает повреждения, вызванные ненадлежащим обращением
или использованием, а также дефекты, которые незначительно влияют на
работоспособность или стоимость прибора.

112
Кроме того, гарантийные требования не распространяются на
быстроизнашивающиеся детали, повреждения при транспортировке, если мы
не несем за них ответственность, а также повреждения, которые появились
вследствие ремонтных работ, выполненных не нами.
Прибор предназначен для частного использования (для использования в
домашних условиях) и имеет соответствующую конструкцию и мощностные
характеристики.
Любое возможное его использование в коммерческих целях покрывается
гарантией только в той мере, в какой его загруженность можно сравнить с
загруженностью при использовании в частном порядке. Он не предназначен
для иного коммерческого использования.
65 Технические характеристики
Прибор
Вакуумный упаковщик
Наименование
VR 390 advanced
№ артикула
1522
Параметры подключения
220 В - 240 В; 50 Гц
Мощность
110 Вт
Габаритные размеры
(Ш/В/Г)
36,5 x 7 x 14 см
Вес
1,47 кг
-
 1
1
-
 2
2
-
 3
3
-
 4
4
-
 5
5
-
 6
6
-
 7
7
-
 8
8
-
 9
9
-
 10
10
-
 11
11
-
 12
12
-
 13
13
-
 14
14
-
 15
15
-
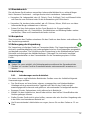 16
16
-
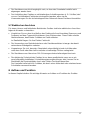 17
17
-
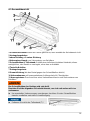 18
18
-
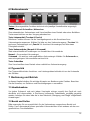 19
19
-
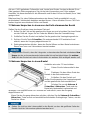 20
20
-
 21
21
-
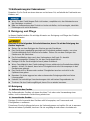 22
22
-
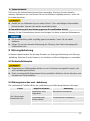 23
23
-
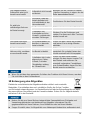 24
24
-
 25
25
-
 26
26
-
 27
27
-
 28
28
-
 29
29
-
 30
30
-
 31
31
-
 32
32
-
 33
33
-
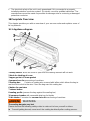 34
34
-
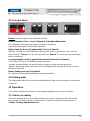 35
35
-
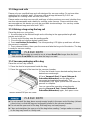 36
36
-
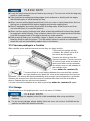 37
37
-
 38
38
-
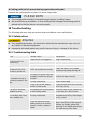 39
39
-
 40
40
-
 41
41
-
 42
42
-
 43
43
-
 44
44
-
 45
45
-
 46
46
-
 47
47
-
 48
48
-
 49
49
-
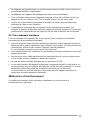 50
50
-
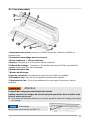 51
51
-
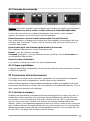 52
52
-
 53
53
-
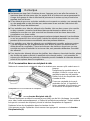 54
54
-
 55
55
-
 56
56
-
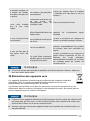 57
57
-
 58
58
-
 59
59
-
 60
60
-
 61
61
-
 62
62
-
 63
63
-
 64
64
-
 65
65
-
 66
66
-
 67
67
-
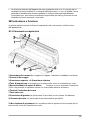 68
68
-
 69
69
-
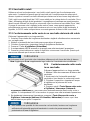 70
70
-
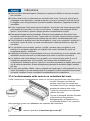 71
71
-
 72
72
-
 73
73
-
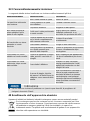 74
74
-
 75
75
-
 76
76
-
 77
77
-
 78
78
-
 79
79
-
 80
80
-
 81
81
-
 82
82
-
 83
83
-
 84
84
-
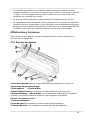 85
85
-
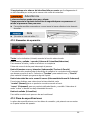 86
86
-
 87
87
-
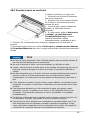 88
88
-
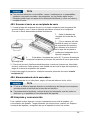 89
89
-
 90
90
-
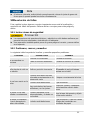 91
91
-
 92
92
-
 93
93
-
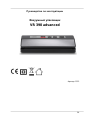 94
94
-
 95
95
-
 96
96
-
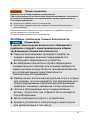 97
97
-
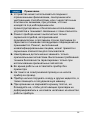 98
98
-
 99
99
-
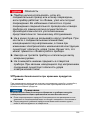 100
100
-
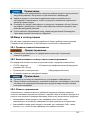 101
101
-
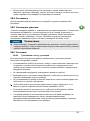 102
102
-
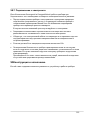 103
103
-
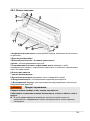 104
104
-
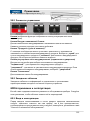 105
105
-
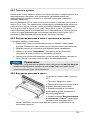 106
106
-
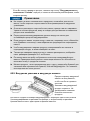 107
107
-
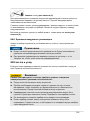 108
108
-
 109
109
-
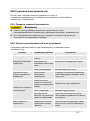 110
110
-
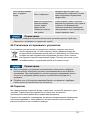 111
111
-
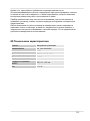 112
112


Caso VR 390 advanced Instrucciones de operación
- Categoría
- Selladores al vacío
- Tipo
- Instrucciones de operación
en otros idiomas
- français: Caso VR 390 advanced Mode d'emploi
- italiano: Caso VR 390 advanced Istruzioni per l'uso
- Deutsch: Caso VR 390 advanced Bedienungsanleitung
Artículos relacionados
-
Caso VR 390 advanced Instrucciones de operación
-
Caso Design FastVAC 500 Instrucciones de operación
-
Caso VRH 490 advanced Instrucciones de operación
-
-
Caso GourmetVAC 480 Instrucciones de operación
-
Caso Design VRH 690 advanced Manual de usuario
-
-
Caso FastVac 390 Instrucciones de operación
-
-
Caso Vakuumierer FastVac 4000 + GRATIS Beutel, Folienrolle und Vakuumschlauch Instrucciones de operación
