
Dell™ PowerEdge™ SC 1430 Systems
Information Update
Installing a Fourth Hard Drive
A fourth hard drive requires an optional hard-drive carrier with a cooling fan. Installation steps are
described in "Installing an Optional Fourth Hard Drive" in your Hardware Owner’s Manual. When
performing this procedure, note the following additional information:
NOTE: If a second processor is installed in your system, do not route the fan cable through the narrow space
between the air baffle and the processor heat sink. Open the processor access door on the air baffle and push
the fan cable underneath the heat sink fins to prevent damage to the cable.
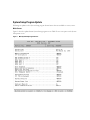
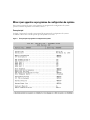
System Messages
Table 1 provides an additional system message that your system may display on the screen.
See "System Messages" in your Hardware Owner’s Manual for information about
other system messages.
Table 1. System Messages
Message Causes Corrective Actions
The FBD link to the
following DIMM failed
to train: DIMM x
Faulty or improperly installed
memory module.
Ensure that only Dell-qualified memory
is used. Dell recommends purchasing
memory upgrade kits directly from
www.dell.com or your Dell sales agent
to ensure compatibility.
Reseat memory modules. See "Memory"
in your Hardware Owner’s Manual.
If the problem persists, see
"Troubleshooting System Memory"
in your Hardware Owner’s Manual.
October 2006

System Setup Program Update
Following are updates to the System Setup program about features that are available on some systems.
Main Screen
Figure 1 shows the updated main System Setup program screen. Table 2 lists a new option on the System
Setup main screen.
Figure 1. Main System Setup Program Screen

Integrated Devices Screen
Table 3 lists a new Integrated Devices screen option.
Diagnostic Indicator Lights
During system startup, at the completion of POST, all four lights are immediately turned off. The lights
cannot be seen to illuminate as described in Table 1-5, "Diagnostic Indicator Codes During POST,"
in your Hardware Owner’s Manual. For further information about codes that may be displayed before
and during POST, see "Diagnostic Indicator Codes" in your Hardware Owner’s Manual.
NOTE: Once the system completes POST, all diagnostic lights will be OFF.
____________________
Information in this document is subject to change without notice.
© 2006 Dell Inc. All rights reserved. Printed in Malaysia.
Reproduction in any manner whatsoever without the written permission of Dell Inc. is strictly forbidden.
Trademarks used in this text: Dell and the DELL logo are trademarks of Dell Inc.
Other trademarks and trade names may be used in this document to refer to either the entities claiming the marks
and names or their products. Dell Inc. disclaims any proprietary interest in trademarks and trade names other than its own.
Table 2. System Setup Program Options
Option Description
Boot Sequence Retry
(Disabled default)
Enables or disables the Boot Sequence Retry feature. When set to Enabled, the
system reattempts the boot sequence after a 30-second timeout if the previous
boot attempt failed.
Table 3. Integrated Devices Screen Options
Option Description
I/OAT DMA Engine
(Disabled default)
Enables or disables the I/O Acceleration Technology (I/OAT) option. When set
to Enabled, I/OAT reduces system CPU usage for applications that use TCP by
offloading part of the TCP receive operation to the DMA engine.

Dell™ PowerEdge™ SC 1430
系统
信息更新
安装第四个硬盘驱动器
第四个硬盘驱动器需要一个可选的硬盘驱动器托盘以及一个冷却风扇。《硬件用户手册》中的
“安装可选的第四个硬盘驱动器”部分介绍了安装步骤。执行这一过程时,请注意以下附加信息:
注:如果在系统中安装了第二个处理器,请勿将风扇电缆穿过空气挡板与处理器散热器之间的狭窄空间。
打开空气挡板上的处理器拆装盖,将风扇电缆推入散热器片下方,以防止损坏电缆。
系统信息
表
1
提供了系统可能在屏幕上显示的一条附加系统信息。有关其它系统信息的详情,请参阅
《硬件用户手册》中的“系统信息”。
表
1.
系统信息
信息 原因 纠正措施
The FBD link to the
following DIMM failed
to train:DIMM x
(指向以下
DIMM 的 FBD
链路无法正常使用:DIMM x)
内存模块出现故障
或安装不正确。
确保只使用经
Dell
认可的内存。
Dell
建
议直接从
www.dell.com
或您的
Dell
销售
代理商处购买内存升级套件,以确保兼
容性。
重置内存模块。请参阅《硬件用户手册》
中的“内存”。
如果问题仍然存在,请参阅《硬件用户
手册》中的“排除系统内存故障”。
2006 年 10 月


集成设备屏幕
表
3
列出了新的
Integrated Devices
(集成设备)屏幕选项。
诊断指示灯
在系统启动期间,当完成
POST
后,所有四个指示灯都立即熄灭。这些指示灯不能按照《硬件用户手
册》中的表
1-5
(“开机自测
(POST)
期间的诊断指示灯代码”)所述亮起。有关在
POST
之前或
POST
期间可能显示的代码的详情,请参阅《硬件用户手册》中的“诊断指示灯代码”。
注:一旦系统完成了 POST,所有诊断指示灯都将熄灭。
____________________
本说明文件中的信息如有更改,恕不另行通知。
©2006DellInc.
版权所有,翻印必究。
马来西亚印制
。
未经
Dell Inc.
书面许可,严禁以任何形式进行复制。
本文中使用的商标:
Dell
和
DELL
徽标是
Dell Inc.
的商标。
本文件中述及的其它商标和产品名称是指拥有相应商标和名称的公司或其制造的产品。
Dell Inc.
对本公司的商标和产品名称之外的其它商标和产品名称不拥有任何专有权。
表
2.
系统设置程序选项
选项 说明
Boot Sequence Retry
(引导顺序重试)
(默认设置为
Disabled [
禁用
]
)
启用或禁用引导顺序重试功能。当设置为
Enabled
(启用)
时,如果上一次试
图引导时失败,系统将在
30
秒超时后重试引导顺序。
表
3.
集成设备屏幕选项
选项 说明
I/OAT DMA Engine
(
I/OAT DMA
引擎)
(默认设置为
Disabled [
禁用
]
)
启用或禁用
I/O Acceleration Technology
(
I/O
加速技术,
I/OAT
)选项。
当设置为
Enabled
(启用)时,对于使用
TCP
的应用程序,
I/OAT
将通
过由
DMA
引擎分担部分接收操作来降低对系统
CPU
的占用。

Systèmes Dell™ PowerEdge™ SC 1430
Mise à jour des informations
Installation d'un quatrième disque dur
Pour installer un quatrième disque dur, vous devez utiliser un support en option équipé d'un ventilateur.
Les instructions correspondantes se trouvent dans le document Hardware Owner's Manual (Manuel du
propriétaire), à la section “Installing an Optional Fourth Hard Drive” (Installation d'un quatrième disque
dur en option). Lorsque vous effectuez cette procédure, tenez compte de la remarque suivante :
REMARQUE : si un deuxième processeur est installé, ne faites pas passer le câble du ventilateur dans l'espace
séparant la chicane d'air et le dissipateur de chaleur du processeur. Pour éviter d'endommager ce câble, ouvrez la
porte d'accès au processeur qui se trouve sur la chicane et faites passer le câble sous les ailettes du dissipateur.
Messages système
Le tableau 1 contient un message supplémentaire qui peut s'afficher sur l'écran du système. Pour plus
d'informations sur les autres messages système, voir “System Messages” (Messages système) dans le
document Hardware Owner's Manual (Manuel du propriétaire).
Tableau 1. Messages système
Message Causes Actions correctrices
The FBD link to the
following DIMM failed
to train: DIMM x
Barrette de mémoire
défectueuse ou
mal installée.
Vérifiez que vous utilisez uniquement des barrettes de
mémoire certifiées par Dell. Nous vous recommandons
d'acheter les kits d'extension de mémoire directement
sur le site www.dell.com ou de contacter votre
représentant commercial Dell à cet effet.
Remboîtez les barrettes de mémoire dans leur
logement. Voir la section “Memory” (Mémoire),
dans le document Hardware Owner's Manual
(Manuel du propriétaire).
Si l'incident persiste, voir la section “Troubleshooting
System Memory” (Dépannage de la mémoire système),
dans le document Hardware Owner's Manual
(Manuel du propriétaire).
Octobre 2006

Mise à jour apportée au programme de configuration du système
Cette section présente les mises à jour apportées au programme de configuration du système
pour des fonctions disponibles sur certains systèmes.
Écran principal
La figure 1 représente le nouvel écran principal du programme de configuration du système.
Le tableau 2 décrit une nouvelle option qui a été ajoutée à cet écran.
Figure 1. Écran principal du programme de configuration du système

Écran Integrated Devices (Périphériques intégrés)
Le tableau 3 présente une nouvelle option ajoutée à l'écran Integrated Devices (Périphériques intégrés).
Voyants de diagnostic
Au démarrage du système, les quatre voyants s'éteignent dès que l'auto-test de démarrage est terminé.
Ils n'affichent donc plus les codes décrits dans le document Hardware Owner's Manual (Manuel du
propriétaire), dans le tableau 1-5 intitulé “Diagnostic Indicator Codes During POST” (Codes des
voyants de diagnostic pendant l'auto-test de démarrage). Pour plus d'informations sur les codes pouvant
être affichés avant et pendant l'auto-test de démarrage, voir “Diagnostic Indicator Codes” (Codes des
voyants de diagnostic) dans le document Hardware Owner's Manual (Manuel du propriétaire).
REMARQUE : tous les voyants de diagnostic s'éteignent dès que l'auto-test de démarrage est terminé.
____________________
Les informations contenues dans ce document peuvent être modifiées sans préavis.
© 2006 Dell Inc. Tous droits réservés. Imprimé en Malaisie.
La reproduction de ce document de quelque manière que ce soit sans l'autorisation écrite de Dell Inc. est strictement interdite.
Marques utilisées dans ce document : Dell et le logo DELL sont des marques de Dell Inc.
Tous les autres noms de marques et marques commerciales utilisés dans ce document se rapportent aux sociétés propriétaires des
marques et des noms de ces produits. Dell Inc. décline tout intérêt dans l'utilisation des marques déposées et des noms de marques
ne lui appartenant pas.
Tableau 2. Options du programme de configuration du système
Option Description
Boot Sequence Retry
(Ré-exécution de la
séquence d'amorçage)
Disabled (Désactivé,
option par défaut)
Active ou désactive la fonction de ré-exécution de la séquence d'amorçage. Si vous
sélectionnez Enabled (Activé), le système ré-exécute la séquence d'amorçage après
un délai de 30 secondes si la tentative d'amorçage précédente a échoué.
Tableau 3. Options de l'écran Integrated Devices (Périphériques intégrés)
Option Description
I/OAT DMA Engine
(Moteur DMA I/OAT)
Disabled (Désactivé,
option par défaut)
Active ou désactive la technologie d'accélération des E/S (I/OAT). Si vous
sélectionnez Enabled (Activé), la technologie I/OAT libère partiellement le
processeur du travail de réception effectué pour le compte des applications
utilisant TCP. Pour ce faire, elle décharge une partie de ce travail sur le moteur
DMA.

Dell™ PowerEdge™ SC 1430-Systeme
Aktuelle Informationen
Installation eines vierten Festplattenlaufwerks
Für ein viertes Festplattenlaufwerk ist ein optionaler Festplattenträger mit Lüfter erforderlich. Die
Installationsschritte sind im Abschnitt „Installation eines optionalen vierten Festplattenlaufwerks“
im Hardware Owner’s Manual (Hardware-Benutzerhandbuch) beschrieben. Wenn Sie diesen Vorgang
durchführen, beachten Sie die folgenden zusätzlichen Informationen:
ANMERKUNG: Wenn ein zweiter Prozessor im System installiert ist, führen Sie das Lüfterkabel nicht durch den
engen Spalt zwischen dem Luftleitblech und dem Prozessorkühlkörper. Öffnen Sie die Prozessorzugangsklappe
am Luftleitblech, und drücken Sie das Lüfterkabel unter die Kühlkörperrippen, um eine Beschädigung des Kabels
zu vermeiden.
Systemmeldungen
Tabelle 1 enthält eine weitere Systemmeldung, die eventuell auf dem Bildschirm angezeigt wird.
Informationen über andere Systemmeldungen finden Sie im Abschnitt „Systemmeldungen“
des Hardware Owner’s Manual (Hardware-Benutzerhandbuchs).
Tabelle 1. Systemmeldungen
Meldung Ursachen Maßnahmen
The FBD link to the
following DIMM failed
to train: DIMM x
Fehlerhaftes oder nicht
ordnungsgemäß installiertes
Speichermodul.
Stellen Sie sicher, dass nur von Dell
zugelassener Speicher verwendet wird.
Es wird empfohlen, Speicher-Upgrade-Kits
direkt auf www.dell.com oder beim
Vertriebsbeauftragten von Dell zu bestellen,
um die Kompatibilität zu gewährleisten.
Setzen Sie die Speichermodule neu ein.
Siehe den Abschnitt „Speicher“ im
Hardware Owner’s Manual (Hardware-
Benutzerhandbuch).
Wenn das Problem weiterhin besteht, lesen
Sie den Abschnitt „Fehlerbehebung beim
Systemspeicher“ im Hardware Owner’s
Manual (Hardware-Benutzerhandbuch).
Oktober 2006

Aktualisierung des System-Setup-Programms
Dieser Abschnitt enthält Aktualisierungen des System-Setup-Programms zu Funktionen,
die bei bestimmten Systemen verfügbar sind.
Hauptbildschirm
Abbildung 1 zeigt den aktualisierten Hauptbildschirm des System-Setup-Programms. In Tabelle 2
ist eine neue Option im System-Setup-Hauptbildschirm beschrieben.
Abbildung 1. System-Setup-Hauptbildschirm

Bildschirm „Integrated Devices“ (Integrierte Geräte)
Tabelle 3 enthält eine neue Option im Bildschirm Integrated Devices (Integrierte Geräte).
Diagnoseanzeigen
Beim Systemstart erlöschen nach dem Durchlaufen des POST sofort alle vier Anzeigen. Die Anzeigen
leuchten nicht, entgegen der Beschreibung von Tabelle 1-5 („Diagnoseanzeigecodes während des
POST“) im Hardware Owner’s Manual (Hardware-Benutzerhandbuch). Weitere Informationen über
Codes, die möglicherweise vor und während des POST angezeigt werden, finden Sie im Abschnitt
„Diagnoseanzeigecodes“ im Hardware Owner’s Manual (Hardware-Benutzerhandbuch).
ANMERKUNG: Nach Abschluss des Einschaltselbsttests (POST) sind alle Diagnoseanzeigen AUS.
____________________
Irrtümer und technische Änderungen vorbehalten.
© 2006 Dell Inc. Alle Rechte vorbehalten. Gedruckt in Malaysia.
Die Vervielfältigung oder Wiedergabe in jeglicher Weise ohne die vorherige schriftliche Genehmigung von Dell Inc. sind strengstens
untersagt.
In diesem Text verwendete Marken: Dell und das DELL Logo sind Marken von Dell Inc.
Alle anderen in dieser Dokumentation genannten Marken und Handelsbezeichnungen sind Eigentum der entsprechenden Hersteller
und Firmen. Dell Inc. erhebt keinen Anspruch auf Marken und Handelsbezeichnungen mit Ausnahme der eigenen.
Tabelle 2. Optionen des System-Setup-Programms
Option Beschreibung
Boot Sequence Retry
(Standardeinstellung
Disabled)
Aktiviert oder deaktiviert die Funktion zum erneuten Durchlaufen der Start-
reihenfolge. Wenn diese Option auf Enabled (Aktiviert) gesetzt ist, versucht
das System die Startreihenfolge nach einer 30-sekündigen Pause erneut zu durch-
laufen, falls ein vorheriger Startversuch fehlgeschlagen ist.
Tabelle 3. Optionen des Bildschirms „Integrated Devices“ (Integrierte Geräte)
Option Beschreibung
I/OAT DMA Engine
(Standardeinstellung
Disabled)
Aktiviert oder deaktiviert die Option für I/O Acceleration Technology (I/OAT).
Wenn auf Enabled (Aktiviert) gesetzt, wird mit I/OAT die Nutzung des System-
prozessors für Anwendungen reduziert, die TCP verwenden, indem ein Teil der
TCP-Empfangsbetriebs auf die DMA-Engine übergeht.

Dell™ PowerEdge™ SC 1430 システム
アップデート情報
4 台目のハードドライブの取り付け
4
台目のハードドライブを取り付けるには、オプションのハードドライブキャリアと冷却ファンが
必要です。取り付けの手順は、『ハードウェアオーナーズマニュアル』の「オプションの
4
台目の
ハードドライブの取り付け」で説明しています。この手順を行う際には、次の追加情報に留意して
ください。
メモ: システムにセカンドプロセッサを取り付けた場合は、ファンケーブルをエアーバッフルとプロ
セッサヒートシンクの間の狭いスペースに配線しないでください。ケーブルの損傷を防ぐために、
エアーバッフル上のプロセッサアクセスドアを開き、ファンケーブルをヒートシンクフィンの下に押
し込みます。
システムメッセージ
表
1
に、画面に表示される可能性のあるシステムメッセージの追加分を示します。他のシステム
メッセージについては、『ハードウェアオーナーズマニュアル』の「システムメッセージ」を参照し
てください。
表 1 システムメッセージ
メッセージ 原因 対応処置
The FBD link to the
following DIMM failed
to train: DIMM x
メモリモジュールに障害がある
か、または正しく取り付けられ
ていません。
デル認定のメモリのみが使用されて
いることを確認します。互換性を保
つには、メモリアップグレードキッ
トを www.dell.com から直接、ま
たはデルの販売代理店から購入され
ることをお勧めします。
メモリモジュールを取り付けなおし
ます。『ハードウェアオーナーズマ
ニュアル』の「メモリ」を参照して
ください。
問題が解決しない場合は、『ハード
ウェアオーナーズマニュアル』の
「システムメモリのトラブルシュー
ティング」を参照してください。
2006 年 10 月
PD836ap2.fm Page 9 Monday, October 30, 2006 11:36 AM

セットアップユーティリティのアップデート情報
以下は、一部のシステムで利用できる機能に関するセットアップユーティリティのアップデート情
報です。
メイン画面
新しくなったセットアップユーティリティのメイン画面を
図
1
に示します。表
2
には、
セットアップユーティリティのメイン画面の新しいオプションを示します。
図 1 セットアップユーティリティのメイン画面
表 2 セットアップユーティリティのオプション
オプション 説明
Boot Sequence Retry
(起動順序再試行)
(デフォルトは
Disabled(無効))
Boot Sequence Retry(起動順序再試行)機能の有効 / 無効を切り替えます。
Enabled(有効)に設定しておくと、前回の起動が失敗した場合、
30 秒のタイムアウト後に、システムは起動順序を再試行します。
PD836ap2.fm Page 10 Monday, October 30, 2006 11:36 AM

Integrated Devices(内蔵デバイス)画面
新しくなった
Integrated Devices
(内蔵デバイス)画面のオプションを
表
3
に示します。
診断インジケータ LED
システム起動時に
POST
が終了すると、
4
つのライトすべてがただちに消灯します。ライトは
『ハードウェアオーナーズマニュアル』の表
1-5
「
POST
中の診断インジケータコード」の説明どおり
に点灯しているように見えません。
POST
前と
POST
中に表示される可能性のあるコードの詳細につ
いては、『ハードウェアオーナーズマニュアル』の「診断インジケータコード」を参照してください。
メモ: POST が完了すると、すべての診断ライトが消灯します。
____________________
本書の内容は予告なく変更されることがあります。
© 2006 すべての著作権は Dell Inc. にあります。 Printed in Malaysia.
Dell Inc. の書面による許可のない複製は、いかなる形態においても厳重に禁じられています。
本書に使用されている商標:Dell および DELL ロゴは Dell Inc. の商標です。
本書では、必要に応じて上記以外の商標や会社名が使用されている場合がありますが、
それらの商標や会社名は、一切 Dell Inc. に帰属するものではありません。
表 3 Integrated Devices (内蔵デバイス)画面のオプション
オプション 説明
I/OAT DMA Engine
(I/OAT DMA エンジン)
(デフォルトは
Disabled(無効))
I/O アクセラレーションテクノロジ(I/OAT)オプションの有効 / 無効を切り
替えます。Enabled(有効)に設定すると、I/OAT は、TCP 受信処理の一部
を DMA エンジンにオフロードすることによって、TCP を使用するアプリ
ケーションに対するシステム CPU の使用を抑えます。
PD836ap2.fm Page 11 Monday, October 30, 2006 11:36 AM

Dell™ PowerEdge™ SC 1430 시스템
설명서 갱신본
네 번째 하드 드라이브 설치
네
번째
하드
드라이브에는
냉각
팬이
장착된
하드
드라이브
캐리어
옵션이
필요합니다
.
설치
단계는
하드웨어
사용
설명서의
"
네
번째
하드
드라이브
옵션
설치
"
에
설명되어
있습니다
.
이
절차를
수행할
때
다음
추가
정보를
참고하십시오
.
참고 : 시스템에 두 번째 프로세서가 설치되면 공기 조절 장치와 프로세서 방열판 사이의 좁은 공간을 통
해 팬 케이블을 두지 마십시오. 공기 조절 장치의 프로세서 접근 도어를 열고 케이블이 손상되지 않도록 팬
케이블을 방열판 아래로 밀어 넣으십시오 .
시스템 메시지
표
1
은
시스템에서
화면에
표시할
수
있는
추가
시스템
메시지입니다
.
기타
시스템
메시지에
대한
내용
은
하드웨어
사용
설명서의
"
시스템
메시지
"
를
참조하십시오
.
표 1. 시스템 메시지
메시지 원인 조치
The FBD link to the
following DIMM failed
to train: DIMM x
결함이
있거나
잘못
설치되었습
니다메모리
모듈
Dell
에서
보증하는
메모리를
사용하고
있는지
확인하십시오
.
호환성을
보장하
려면
www.dell.com
또는
Dell
판매
대리
점에서
메모리
업그레이드
키트를
직접
구입하는
것이
좋습니다
.
메모리
모듈을
다시
장착하십시오
.
하드
웨어
사용
설명서의
"
메모리
"
를
참조하
십시오
.
문제가
계속되면
하드웨어
사용
설명서
의
"
시스템
메모리
문제
해결
"
을참조
하십시오
.
2006 년 10 월


내장형 장치 화면
표
3
에는
새
Integrated Devices
화면
옵션이
나열됩니다
.
진단 표시등
시스템
시작
도중
POST
가
완료될
때
4
개의
표시등이
모두
즉시
꺼집니다
.
표시등은
하드웨어
사용
설명
서의
"POST
도중
진단
표시등
코드
"
에
있는
표
1-5
에
설명된
대로 밝게
표시될
수
없습니다
. POST
이전
및
도중에
표시될
수
있는
코드에 대한
자세한
내용은
하드웨어
사용
설명서의
"
진단
표시등
코드
"
를
참
조하십시오
.
참고 : 시스템에서 POST 가 완료되면 진단 표시등이 모두 꺼집니다 .
____________________
본 설명서에 수록된 정보는 사전 통보 없이 변경될 수 있습니다.
© 2006 Dell Inc. All rights reserved. 말레이시아에서 인쇄됨 .
어떠한 경우에도 Dell Inc.의 사전 승인 없이 무단 복제하는 행위는 엄격하게 금지되어 있습니다.
본 설명서에 사용된 상표인 Dell 및 DELL 로고는 Dell Inc.의 상표입니다.
본 설명서에서 특정 회사의 표시나 제품 이름을 지칭하기 위해 기타 상표나 상호를 사용할 수도있습니다.
Dell Inc.는 자사가
소유하고 있는 것 이외에 기타 모든 등록 상표 및 상표 이름에 대한 어떠한 소유권
도 보유하지 않습니다.
표 2. System Setup 프로그램 옵션
옵션 설명
부팅
순서
재시도
(
기본값
:
Disabled
)
부팅
순서
재시도
기능을
활성화
또는
비활성화합니다
.
Enabled
로
설정되어
있
으면
이전
부팅
시도가
실패한
경우
30
초의
타임아웃
후
부팅
순서를
다시
시도합
니다
.
표 3. Integrated Devices 화면 옵션
옵션 설명
I/OAT DMA
엔진
(
기본값
:
Disabled
)
I/OAT(I/O Acceleration Technology )
옵션을
사용
또는
사용하지
않도록
설정합니
다
.
Enabled
로
설정되어
있으면
I/OAT
가
DMA
엔진으로
TCP
수신
동작의
일부
를
오프로드하여
TCP
를
사용하는
응용프로그램용
시스템
CPU
용도를
줄입니다
.

Sistemas Dell™ PowerEdge™ SC 1430
Actualización de información
Instalación de una cuarta unidad de disco duro
Una cuarta unidad de disco duro requiere un portaunidades de disco duro opcional con un ventilador
de refrigeración. Los pasos de instalación se describen en “Instalación de una cuarta unidad de disco
duro opcional” en el Manual del propietario del hardware. Al realizar este procedimiento, tenga en cuenta
la siguiente información adicional:
NOTA: si va a instalar otro procesador en el sistema, no pase el cable del ventilador por el espacio estrecho que
separa el deflector de aire y el disipador de calor del procesador. Abra la puerta de acceso al procesador situada
en el deflector de aire y pase el cable del ventilador por debajo de las aletas del disipador de calor para evitar
daños en el cable.
Mensajes del sistema
En la tabla 1 se muestra otro mensaje del sistema que puede aparecer en la pantalla del sistema.
Consulte “Mensajes del sistema” en el Manual del propietario del hardware para obtener más información
sobre otros mensajes del sistema.
Tabla 1. Mensajes del sistema
Mensaje Causas Acciones correctivas
The FBD link to the
following DIMM failed
to train: DIMM x
El módulo de memoria
es defectuoso o
se ha instalado incorrectamente.
Asegúrese de que sólo se utiliza memoria
aprobada por Dell. Dell recomienda
adquirir los kits de ampliación de
memoria directamente de www.dell.com
o de su representante de ventas de Dell
para asegurar la compatibilidad.
Vuelva a colocar los módulos de
memoria. Consulte “Memoria” en el
Manual del propietario del hardware.
Si el problema persiste, consulte
“Solución de problemas de la memoria
del sistema” en el Manual del propietario
del hardware.
Octubre de 2006

Actualización del programa de configuración del sistema
A continuación se presentan actualizaciones del programa de configuración del sistema que incluyen
funciones disponibles en algunos sistemas.
Pantalla principal
En la figura 1 se muestra la pantalla principal actualizada del programa de configuración del sistema,
y en la tabla 2 se describe una nueva opción de la pantalla principal del programa de configuración
del sistema.
Figura 1. Pantalla principal del programa de configuración del sistema

Pantalla de dispositivos integrados
En la tabla 3 se muestra una nueva opción de la pantalla Integrated Devices (Dispositivos integrados).
Indicadores luminosos de diagnóstico
Al iniciar el sistema, una vez finalizada la POST, los cuatro indicadores luminosos se apagan
inmediatamente. Dichos indicadores no se encienden tal como se describe en la tabla 1-5, “Códigos de
los indicadores de diagnóstico durante la POST” del Manual del propietario del hardware. Para obtener
más información acerca de los códigos que pueden aparecer antes y durante la POST, consulte “Códigos
de los indicadores de diagnóstico” en el Manual del propietario del hardware.
NOTA: cuando el sistema concluya la POST, se apagarán todos los indicadores luminosos de diagnóstico.
____________________
La información contenida en este documento puede modificarse sin previo aviso.
© 2006 Dell Inc. Reservados todos los derechos. Impreso en Malasia.
Queda estrictamente prohibida la reproducción de este documento en cualquier forma sin la autorización por escrito de Dell Inc.
Marcas comerciales utilizadas en este texto: Dell y el logotipo de DELL son marcas comerciales de Dell Inc.
Otras marcas y otros nombres comerciales pueden utilizarse en este documento para hacer referencia a las entidades que los poseen
o a sus productos. Dell Inc. renuncia a cualquier interés sobre la propiedad de marcas y nombres comerciales que no sean los suyos.
Tabla 2. Opciones del programa de configuración del sistema
Opción Descripción
Boot Sequence Retry
(valor predeterminado:
Disabled)
Activa o desactiva la función Boot Sequence Retry (Reintento de la secuencia
de inicio). Cuando esta opción está activada (Enabled), el sistema reintenta la
secuencia de inicio tras un tiempo de espera de 30 segundos si el intento de inicio
anterior ha fallado.
Tabla 3. Opciones de la pantalla de dispositivos integrados
Opción Descripción
I/OAT DMA Engine
(valor predeterminado:
Disabled)
Activa o desactiva la opción I/OAT (Tecnología de aceleración de E/S). Cuando
está activada (Enabled), I/OAT reduce la utilización de la CPU del sistema para
aplicaciones que utilizan TCP mediante la descarga de parte de la operación de
recepción de TCP en el motor DMA.
-
 1
1
-
 2
2
-
 3
3
-
 4
4
-
 5
5
-
 6
6
-
 7
7
-
 8
8
-
 9
9
-
 10
10
-
 11
11
-
 12
12
-
 13
13
-
 14
14
-
 15
15
-
 16
16
-
 17
17
-
 18
18
-
 19
19
-
 20
20
-
 21
21


en otros idiomas
- français: Dell POWEREDGE SC1430 spécification
- Deutsch: Dell POWEREDGE SC1430 Spezifikation
- 日本語: Dell POWEREDGE SC1430 仕様