
804754
8 87480 04754 7
1005 975 898
BRAND:
DESC. :
PACKAGE TYPE:
PART
UPC #:
SKU #:
DATE ROUND
DESIGNER:
PRINTED COLORS
Card
5.7874” w x 8.6614”h
12.02.19 3
Dieline
CMYK
PMS 541
PMS CG11
xxxxx
xxxxx
xxxxx
xxxxx
MP
Lamp Accessories
Commercial Electric
1005 975 898
FIXTURE
1005 975 898
DISTRIBUTED BY:
DISTRIBUIDO POR:
HOME DEPOT
2455 PACES FERRY RD.
ATLANTA, GA 30339
FOR ASSISTANCE, CALL:
SI NECESITA AYUDA, LLAME AL:
1-877-527-0313
HOMEDEPOT.COM
Recycle
Recicla
WHITE
BLANCO
WHITE
5
in
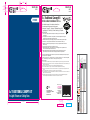
TRADITIONAL CANOPY KIT
For Light Fixtures or Ceiling Fans
5in Traditional Canopy Kit
Kit de cubierta tradicional 12.7cm
MODEL/MODELO 804754
Use traditional canopy kits to update or enhance décor.
Can also be used to replace worn or broken parts.
Kit Includes: 1 Canopy (E), 1 Crossbar (F), 4 Mounting Screws (C & D) ,
1 Lock Washer (B), 1 Lock Nut (B), 1 Screw Collar Loop (A), 2 Cap Nuts
INSTRUCTIONS:
1. Turn off power supply. Install and use this product according to your local electrical codes
and regulations.
2. If the lighting fixture is mounted to a ceiling outlet box, the box must be supported directly by the
building structure and be capable of supporting up to 50 lbs.
3. Attach the threaded loop (A) to the canopy (E) using the nut and lock washer (B) provided. Tighten.
4. Thread both 1 in screws (C) into the threaded holes from the offset side of the crossbar (F).
5. Mount the crossbar to the ceiling box using both 1/2 in screws (D). Tighten until the bracket is flush
with the ceiling.
6. Pass fixture wires through hold in loop to the back of canopy.
7. While supporting the fixture, connect fixture wires to current supply wires in ceiling outlet box. Use
wire connectors following manufacturer’s directions.
8. While supporting the fixture at the canopy, attach the canopy to the ceiling box using the cap nuts .
Tighten securely. Be sure the fixture wires are carefully placed inside the ceiling outlet box.
Usar kits de cubierta tradicional para modernizar o mejorar la decoración. También pueden usarse para reponer
partes o piezas rotas o desgastadas.
El kit incluye: 1 cubierta (E), 1 barra transversal (F), 4 tornillos de montaje (C y D), 1 arandela de seguridad
(B), 1 contratuerca (B), 1 bucle de collarín con tornillo (A), 2 tuercas para tapa
INSTRUCCIONES:
1. Cortar el suministro de electricidad. Instalar y usar este producto cumpliendo con las regulaciones y códigos eléctricos de tu localidad.
2. Si la lámpara se monta a una caja eléctrica en el cielo raso, esta tiene que quedar fijada directamente a la estructura de la edificación y ser
capaz de soportar hasta 22.3 kg.
3. Fijar el lazo con rosca (A) a la cubierta (E) con la tuerca y arandela de seguridad (B) incluidas. Apretar.
4. Enroscar ambos tornillos de 2.54 cm (C) en los orificios con rosca del lado desplazado de la barra transversal (F).
5. Montar la barra transversal en la caja del cielo raso con ambos tornillos de 1.27 cm (D). Apretar hasta que el soporte quede al ras con el
cielo raso.
6. Pasar los cables de la lámpara, a través del soporte en el bucle, a la parte posterior de la cubierta.
7. Al sostener la lámpara, conectarla a los cables de suministro de corriente en la caja eléctrica del cielo raso. Usar los conectores de cable
siguiendo las instrucciones del fabricante.
8. Sosteniendo la lámpara en la cubierta, fijarla a la caja del cielo raso usando las tuercas de la tapa . Apretar firmemente. Asegurar que
los cables de la lámpara están cuidadosamente colocados dentro de la caja eléctrica en el cielo raso.
E
E
A
B
DC
F
Vendor ID: XXXXXX
Helvetica Condensed
5pt
Vendor is responsible for
updating the vendor id#
Vendor is responsible for
updating the Country of Origin
Country of Origin: XXXXXX
Helvetica Condensed
7pt
MADE IN VIETNAM
HECHO EN VIETNAM
-
 1
1

Commercial Electric 804754 Guía de instalación
- Tipo
- Guía de instalación
- Este manual también es adecuado para
En otros idiomas
Documentos relacionados

Otros documentos
-
Progress Lighting P250085 AirPro 52-Inch Ceiling Fan Guía de instalación
-
-
-
-
-
-
-
 Hampton Bay 43242 Guía de instalación
-
Westinghouse 7800000 Manual de usuario
-
Home Decorators Collection 51544 Guía de instalación
