
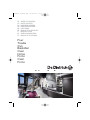
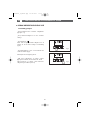
FR GUIDE D'UTILISATION
CS NÁVOD K POUŽITÍ
DA BRUGERVEJLEDNING
DE BETRIEBSANLEITUNG
EN USER GUIDE
ES MANUAL DE UTILIZACIÓN
IT MANUALE D'USO
NL GEBRUIKSAANWIJZING
PT MANUAL DE UTILIZAÇÃO
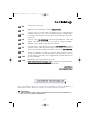
Four
Trouba
Ovn
Backofen
Oven
Horno
Forno
Oven
Forno
99641611_A_MULTI.qxp 20/03/2007 17:34 Page 1
La página se está cargando...
La página se está cargando...
La página se está cargando...

5
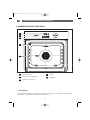
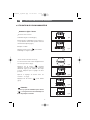
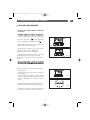
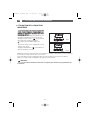
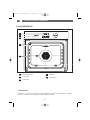
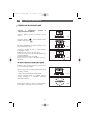
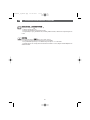
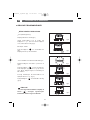
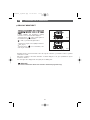
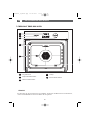
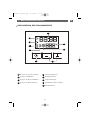
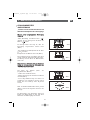
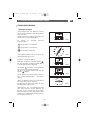
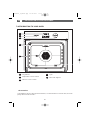
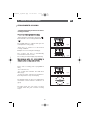
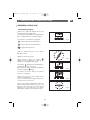
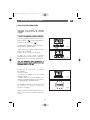
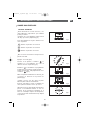
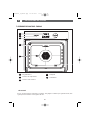
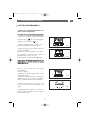
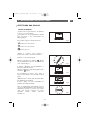
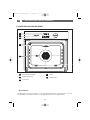
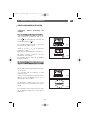
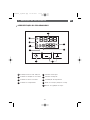
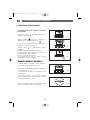
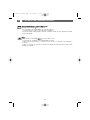
1 / DESCRIPTION DE VOTRE APPAREIL
FR
PRESENTATION DU PROGRAMMATEUR
••
A
D
A
B
Affichage de l’heure et des durées
Indicateur de durée de cuisson
Indicateur de fin de cuisson
Indicateur du minuterie
C
D
E
Indicateur de verrouillage
Indicateur de nettoyage
Affichage de la température
Touche de sélection (durées et heures)
Touches de réglage du temps
F
G
G
H
H
C
B
F
I
E
I
99641611_A_MULTI.qxp 20/03/2007 17:34 Page 5

6
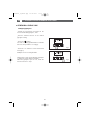
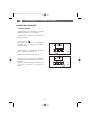
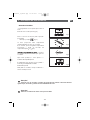
2 / UTILISATION DE VOTRE APPAREIL
FR
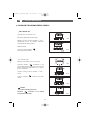
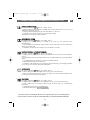
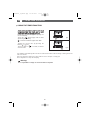
UTILISATION DU PROGRAMMATEUR
•
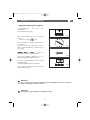
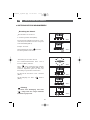
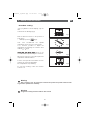
Comment régler l’heure
--
A la mise sous tension
L’afficheur clignote à 12:00 (fig.1).
Réglez l’heure en appuyant sur les touches +
et - (le maintien de la touche permet d’obtenir
un défilement rapide) (fig.2).
Exemple : 12H30
Appuyez sur la touche “ ” pour valider.
L’affichage ne clignote plus.
- Pour remettre à l’heure l’horloge
Le sélecteur de fonction doit obligatoirement
être sur la position 0 (fig.1).
Appuyez sur la touche “ ” pendant
quelques secondes jusqu’à faire clignoter
l’afficheur (fig.2), puis relâchez. Des bips
sonores indiquent que le réglage est alors
possible.
Ajustez le réglage de l’heure avec les
touches + et - (fig.3).
Appuyez sur la touche “ ” pour valider
(fig.4).
fig.1
fig.2
fig.2
fig.3
fig.4
fig.1
Attention
S’il n’y a pas de validation par la touche
“ ”, l’enregistrement est automatique au
bout de quelques secondes.
••
99641611_A_MULTI.qxp 20/03/2007 17:34 Page 6

7
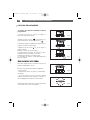
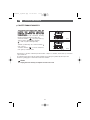
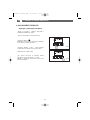
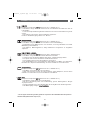
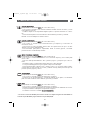
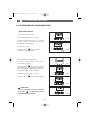
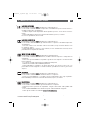
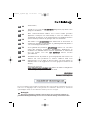
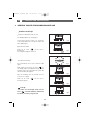
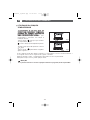
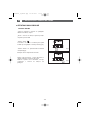
2 / UTILISATION DE VOTRE APPAREIL
FR
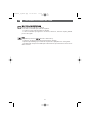
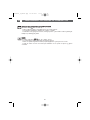
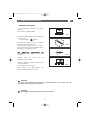
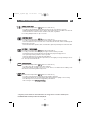
•Cuisson immédiate
— Le programmateur ne doit afficher que
l’heure.
Celle-ci ne doit pas clignoter (fig.1).
Tournez le sélecteur de fonctions sur la posi-
tion de votre choix.
Exemple : position (fig.2).
Votre four vous propose la température opti-
male pour ce type de cuisson.
Il vous est cependant possible d’ajuster la
température en actionnant la manette de sé-
lection de température vers
++
ou
--
(fig.3).
PPllaacceezz vvoottrree ppllaatt ddaannss llee ffoouurr
selon les re-
commandations fournies par le guide de cuis-
son.
Après ces actions, le four chauffe, et l’indica-
teur de température clignote.
Une série de bips sonores retentit lorsque le
four atteint la température choisie.
Celle-ci cesse de clignoter.
Pour arrêter la cuisson, ramenez le sélecteur
de fonctions sur 0.
fig.2
fig.4
Attention
Toutes les cuissons se font porte fermée.
Attention
Après un cycle de cuisson, la turbine de refroidissement continue de fonctionner
pendant un certain temps, afin de garantir une bonne fiabilité du four.
fig.1
fig.3
99641611_A_MULTI.qxp 20/03/2007 17:34 Page 7
La página se está cargando...
La página se está cargando...
La página se está cargando...
La página se está cargando...
La página se está cargando...
La página se está cargando...
La página se está cargando...
La página se está cargando...
La página se está cargando...
La página se está cargando...

18
1 / POPIS VAŠEHO SPOTŘEBIČE
CS
POPIS PŘÍSTROJE
••
A
B
Programový panel
Volič funkcí
Volič funkcí
C
D
E
Žárovka
Stupeň lišty
E
D
B
A
C
•Příslušenství
Váš přístroj je vybaven dvěmi bezpečnostními mřížkami s úchytkou, jedním grilem s úchytkou
pro plech o 45mm, formou na pečení Lissium a plechem 45mm.
99641611_A_MULTI.qxp 20/03/2007 17:34 Page 18

19
1 / POPIS VAŠEHO SPOTŘEBIČE
CS
POPIS PROGRAMAČNÍHO PANELU
••
A
D
A
B
Zobrazení času a doby pečení
Ukazatel doby pečení
Ukazatel konce pečení
Ukazatel minutky
C
D
E
Ukazatel uzamčení
Ukazatel čištění
Zobrazení teploty
Tlačítko výběru (dob a hodin)
Tlačítka pro nastavení času
F
G
G
H
H
C
B
F
I
E
I
99641611_A_MULTI.qxp 20/03/2007 17:34 Page 19

20
2 / POUŽITÍ PŘÍSTROJE
CS
OVLÁDÁNÍ PROGRAMAČNÍHO PANELU
•
Jak nastavit čas
--
Při zapojení do elektrické sítě
Na displeji bliká údaj 12:00h (obr.1).
Nastavte hodinu stiskem tlačítka + nebo -
(přidržením prstu na tlačítku umožníte
rychlejší změnu hodin) (obr.2)
Příklad: 12H30
Potvrďte stiskem tlačítka “ ”.
Hodiny přestanou blikat.
- Pro seřízení hodin
Musí být volič funkcí v poloze 0 (obr.1).
Stiskněte tlačítko “ ” a přidržte jej, až
začne blikat symbol doby pečení (obr.2), pak
pusťte. Zvukové signály značí, že je možno
provést nastavení.
Seřiďte hodiny pomocí tlačítka + nebo -
(obr.3).
Stiskem tlačítka nastavení potvrdíte
(obr.4).
obr.1
obr.2
obr.2
obr.3
obr.4
obr.1
Pozor
Pokud nedošlo k potvrzení
tlačítkem “ ”, nastavení se za několik
vteřin uloží automaticky.
••
99641611_A_MULTI.qxp 20/03/2007 17:35 Page 20

21
2 / POUŽITÍ PŘÍSTROJE
CS
•Okamžitý start
— Programátor má zobrazovat pouze hodiny.
Ty nesmějí blikat (obr.1).
Otočte volič funkcí do zvolené polohy.
Příklad: pozice (obr.2).
Trouba Vám navrhne optimální teplotu pro
zvolený způsob pečení :
Nyní můžete nastavit teplotu otočením
výběrového knoflíku směrem k
++
nebo
--
(obr.3).
ZZaassuuňňttee ppookkrrmm ddoo ttrroouubbyy
podle doporučení,
uvedených v návodu k pečení.
Po provedení těchto úkonů se trouba začne
vyhřívat a kontrolka termostatu se rozsvítí.
Jakmile trouba dosáhne nastavené teploty,
ozve se série zvukových signálů.
Kontrolka přestane blikat.
Pro ukončení pečení vraťte volič funkcí do
polohy 0.
obr.2
obr.4
Pozor
Dbejte na to, aby byla dvířka při pečení zavřená.
Pozor
Po dokončení cyklu pečení je chladicí turbína ještě po nějakou dobu v provozu, aby
byla zachována dobrá spolehlivost trouby.
obr.1
obr.3
99641611_A_MULTI.qxp 20/03/2007 17:35 Page 21
La página se está cargando...

23
CS
2 / POUŽITÍ PŘÍSTROJE
--
Pečení s posunutým začátkem a
zvolená hodina konce pečení
PPoossttuuppuujjttee jjaakkoo uu nnaapprrooggrraammoovvaannééhhoo ppeeččeenníí..
- Po nastavení délky pečení, stiskněte tlačítko
“ ”, až začne blikat symbol konce pečení
“ ” symbol bliká, čímž oznamuje, že je
možno provést nastavení (obr.
1).
Stiskněte tlačítko
++
nebo
--
, čímž nastavíte
požadovanou hodinu konce pečení.
Příklad: Konec pečení ve 13h (obr.
2).
Uložení konce pečení se provede automaticky
po několika vteřinách.
Zobrazení konce pečení již nebliká.
PPoo ttěěcchhttoo 33 úúkkoonneecchh jjee zzaaččáátteekk vvyyhhřříívváánníí
ooddlloožžeenn ttaakk,, aabbyy ppeeččeenníí sskkoonnččiilloo vvee 1133hh..
Na konci pečení (konec naprogramovaného
času)
- trouba se zastaví,
- ukazatel doby pečení a 0:00 blikají (obr.
3),
- během několika minut se vydávají zvukové
signály. Definitivne je zastavíte stlačením
jakéhokoliv tlačítka.
Zobrazení se vrátí na hodiny, když vrátíme
volič funkcí na 0 (obr.
4).
Vnitřek trouby je osvětlen od začátku pečení a
zhasne na konci pečení.
obr.1
obr.2
obr.3
obr.4
PEČENÍ NAPROGRAMOVANÉ
••
99641611_A_MULTI.qxp 20/03/2007 17:35 Page 23
La página se está cargando...
La página se está cargando...
La página se está cargando...
La página se está cargando...
La página se está cargando...

29
5 / POPRODEJNÍ SERVIS
CS
Případné opravy na Vašem přístroji musí
provádět kvalifikovaný personál spolupracující
s výrobcem. Při objednávání opravy uveďte
kompletní referenci Vašeho přístroje (typ,
druh, sériové číslo). Tyto informace jsou
uvedeny na výrobním štítku
(obr.1).
PŮVODNÍ SOUČÁSTKY
Při zákroku údržby, požadujte
používání
výlučně originálních certifikovaných
náhradních dílů.
•OPRAVY
**
Služba poskytovaná společností Brandt Customer Services, akciovou společností se jměním 2.5000.000
euro, 5/7 avenue des Béthunes, 95310 Saint Ouen l’Aumône - RCS Pontoise 440 303 303
BBrraannddtt AApppplliiaanncceess
- akciová společnost se jměním 10.000.000 euro RCS Nanterre 440 302 347.
BRANDT APPLIANCES SAS
7 rue Henri Becquerel
92500 RUEIL MALMAISON
230V ~ 50 Hz
MADE IN FRANCE
obr.1
99641611_A_MULTI.qxp 20/03/2007 17:35 Page 29
La página se está cargando...
La página se está cargando...

32
1 / BESKRIVELSE AF APPARATET
DA
OVERSIGT OVER OVNEN
••
A
B
Programvælger
Temperaturvælger
Funktionsvælger
C
D
E
Lampe
Indsats til rist
E
D
B
A
C
•Tilbehør
Apparatet er udstyret med to riste, som er forsynet med sikkerhedsgreb, en rist med greb til
plade på 45 mm, en Lissium bageplade og en plade på 45 mm.
99641611_A_MULTI.qxp 20/03/2007 17:35 Page 32

33
1 / BESKRIVELSE AF APPARATET
DA
OVERSIGT OVER PROGRAMVÆLGER
••
A
D
A
B
Klokkeslætsdisplay og varigheder
Indikator for varighed af bagning eller stegning
Indikator for afsluttet bagning eller stegning
Indikator til minutur
C
D
E
Indikator til fastlåsning
Indikator for rengøring
Temperaturdisplay
Vælgerknap (varighed og tider)
Knapper til tidsregulering
F
G
G
H
H
C
B
F
I
E
I
99641611_A_MULTI.qxp 20/03/2007 17:35 Page 33

34
2 / ANVENDELSE AF APPARATET
DA
BRUG AF PROGRAMVÆLGER
•
Sådan indstilles klokkeslættet
--
Ved spændingsføring
Displayet blinker kl. 12:00 (fig.1)
Indstil klokkeslættet ved at trykke på
knapperne + og - (hvis du holder knappen
nede, ruller tallene forbi) (fig.2).
Eksempel: 12H30
Tryk på knappen “ ” for at bekræfte dit
valg.
Displayet holder op med at blinke.
- For at indsætte det aktuelle klokkeslæt igen
Funktionsvælgeren skal være i positionen 0
(fig.1).
Tryk på knappen “ ” i nogle få sekunder,
indtil displayet (fig.2) blinker, og slip tasten
igen. Nogle biplyde angiver, at indstilling nu
kan udføres.
Foretag indstillingen af klokkeslættet ved
hjælp af tasterne + og - (fig.3).
Tryk på knappen “ ” for at bekræfte dit valg
(fig.4).
fig.1
fig.2
fig.2
fig.3
fig.4
fig.1
Advarsel!
Hvis valget ikke bekræftes ved hjælp af
tasten “ ”, foretages registreringen
automatisk i løbet af nogle få sekunder.
••
99641611_A_MULTI.qxp 20/03/2007 17:35 Page 34

35
2 / ANVENDELSE AF APPARATET
DA
•Omgående kogning eller stegning
— Programvælgeren skal kun vise
klokkeslættet.
Den skal ikke blinke (fig.1).
Drej funktionsvælgeren til den ønskede
position.
Eksempel: Stilling (fig.2).
Ovnen foreslår den optimale temperatur til
den valgte ret.
Du kan dog justere temperaturen ved at
sætte temperaturvælgeren manuelt mod
++
eller
--
(fig.3).
AAnnbbrriinngg rreetttteenn ii oovvnneenn
i henhold til
anvisningerne i bage- og stegeguiden.
Efter denne handling opvarmes ovnen, og
temperaturindikatoren begynder at blinke.
Der lyder en række biplyde, når den valgte
temperatur er nået.
Temperaturdisplayer ophører med at blinke.
For at stoppe tilberedningen skal du sætte
funktionsvælgeren på 0.
fig.2
fig.4
Advarsel!
Al bagning og stegning udføres med lukket ovnlåge.
Advarsel!
Efter en bage- eller stegecyklus fortsætter ovnens ventilator med at køre i en periode
for at sikre en nedkøling af ovnens elementer.
fig.1
fig.3
99641611_A_MULTI.qxp 20/03/2007 17:35 Page 35
La página se está cargando...
La página se está cargando...
La página se está cargando...

39
3 / FREMGANGSMÅDE FOR BAGNING OG STEGNING I OVN
DA
*
Anvendt(e) sekvens(er) til skriftlig meddelelse om energimærkning til el-ovne til husholdningsbrug i
overensstemmelse med den europæiske standard EN 50304 og i henhold til EF-direktiv 2002/40/EF.
CCIIRRKKUULLEERREENNDDEE VVAARRMMEE
(foreslået temperatur
118800°°CC
min. 35°C maks. 235°C)
•
Bagning eller stegning udføres ved hjælp af det nedre varmeelement i ovnen og ved
hjælp af den luftdrevne propel.
•
Hurtig temperaturstigning: Nogle retter kan sættes i en kold ovn.
•
Anbefales til at holde hvidt kød, fisk og grøntsager saftigt.
Til bagning eller stegning i indtil 3 niveauer.
KKOOMMBBIINNEERREETT VVAARRMMEE
(foreslået temperatur
220055°°CC
min. 35°C maks. 275°C)
•
Bagning og stegning udføres ved hjælp af de nedre og øvre elementer uden
luftopvarmning.
•
Tre kombinerede varmekilder: Meget varme nederst, lidt varme fra den cirkulerende
varme og en smule grill.
•
Anbefales til mad- eller desserttærter, som er anbragt i et lerfad.
VVAARRMMLLUUFFTTSSGGRRIILLLL ++ SSTTEEGGEESSPPIIDDVVEENNDDEERR
(foreslået temperatur
220000°°CC
min. 180°C maks. 230°C)
•
Bagning eller stegning udføres skiftevis ved hjælp af det øvre element og den luftdrevne
propel.
•
Forvarmning er ikke nødvendig. Fjerkræ, stege og flæskesvær steges og brunes på alle
flader.
•
Stegespidvenderen fortsætter med at køre, indtil lågen åbnes.
•
Sæt bradepanden på det nederste trin.
•
Anbefales til alt fjerkræ eller stege på spyd samt til brasning og rosastegning af køller
og oksestege. For at bevare saften fra fiskestykker.
TTRRAADDIITTIIOONNEELL
(foreslået temperatur
224400°°CC
min. 35°C maks. 275°C)
•
Tilberedningen udføres ved hjælp af det nedre og øvre varmeelement.
•
Efter foropvarmning tilberedes de fleste af retterne her. Denne stilling anbefales til at
holde hvidt kød, fisk og grøntsager saftigt.
EECCOO ((ØØKKOO))
(foreslået temperatur
220000°°CC
min. 35°C maks. 275°C)
•
Bagning eller stegning udføres ved hjælp af de nedre og øvre varmeelementer.
•
Denne stilling gør det muligt at spare energi, alt imens bage- og stegekvaliteten
bibeholdes.
•
Stilligen ECO anvendes til energimærkning.
•
Alle tilberedninger sker
uuddeenn ffoorrooppvvaarrmmnniinngg..
*
*
99641611_A_MULTI.qxp 20/03/2007 17:35 Page 39
La página se está cargando...
La página se está cargando...
La página se está cargando...

43
5 / KUNDESERVICE
DA
Eventuelle reparationer skal udføres af en
professionel kvalificeret tekniker. Når du
ringer, skal du referere til apparatets model,
type og serienr. Disse oplysninger finder du på
skiltet
(fig.1).
ORIGINALDELE:
I forbindelse med reparationer skal du anmode
om, at der kun anvendes
originaldele.
• REPARATION
**
Service leveret af Brandt Customer Services, forenklet aktieselskab med en kapital på 2.500.000 euro,
5/7 avenue des Béthunes, 95310 Saint Ouen l’Aumône - RCS Pontoise 440 303 303
BBrraannddtt AApppplliiaanncceess
- forenkelt aktieselskab med en kapital på 10.000.000 euro - RCS Nanterre 440 302 347.
BRANDT APPLIANCES SAS
7 rue Henri Becquerel
92500 RUEIL MALMAISON
230V ~ 50 Hz
MADE IN FRANCE
fig.1
99641611_A_MULTI.qxp 20/03/2007 17:35 Page 43
La página se está cargando...
La página se está cargando...

46
1 / BESCHREIBUNG DES GERÄTS
DE
ÜBERSICHT ÜBER DEN OFEN
••
A
B
Programmierer
Temperaturwahlschalter
Funktionswahlschalter
C
D
E
Lampe
Einschubleistenhalter
E
D
B
A
C
•Zubehör
Ihr Ofen wird mit zwei Sicherheitsrosten mit Griff, einem Rost mit Griffen für ein 45 mm Blech,
einem Lissium-Backblech und einem Blech 45 mm geliefert.
99641611_A_MULTI.qxp 20/03/2007 17:35 Page 46

47
1 / BESCHREIBUNG DES GERÄTS
DE
BESCHREIBUNG DES PROGRAMMIERERS
••
A
D
A
B
Anzeige von Uhrzeit und Dauer
Anzeiger der Gardauer
Anzeige des Endes der Garzeit
Anzeige des Kurzzeitweckers
C
D
E
Verriegelungsanzeige
Reinigungsanzeige
Temperaturanzeige
Auswahltaste (Dauer und Zeit)
Zeiteinstelltasten
F
G
G
H
H
C
B
F
I
E
I
99641611_A_MULTI.qxp 20/03/2007 17:35 Page 47

48
2 / BENUTZUNG DES GERÄTS
DE
NUTZUNG DES PROGRAMMIERERS
•
Einstellung der Uhrzeit
--
Bei Anschluss an den Strom
In der Anzeige blinkt 12:00 (Abb.1).
Die Uhrzeit durch Drücken der Tasten + und -
einstellen (bei Festhalten der Taste erfolgt ein
Schnelldurchlauf) (Abb.2).
Beispiel: 12.30 Uhr
Zur Bestätigung die Taste “ ” drücken.
Die Anzeige blinkt nicht mehr.
- Einstellung der korrekten Uhrzeit
Der Funktionswahlschalter muss sich in
Position 0 (Abb.1) befinden.
Taste “ ” einige Sekunden lang gedrückt
halten, bis die Anzeige blinkt (Abb.2), dann
loslassen. Signaltöne geben an, dass eine
Einstellung vorgenommen werden kann.
Die Uhrzeit mit den Tasten + und - einstellen
(Abb.3).
Zur Bestätigung die Taste “ ” drücken
(Abb.4).
Abb.1
Abb.2
Abb.2
Abb.3
Abb.4
Abb.1
Achtung
Wenn keine Bestätigung über Taste
“ ” erfolgt, wird nach einigen Sekunden
automatisch gespeichert.
••
99641611_A_MULTI.qxp 20/03/2007 17:35 Page 48

49
2 / BENUTZUNG DES GERÄTS
DE
•Sofortiger Garvorgang
— Der Programmierer darf nur die Uhrzeit
anzeigen;
Diese darf nicht blinken (Abb.1).
Den Funktionswahlschalter auf die gewünschte
Position drehen.
Beispiel: Position (Abb.2).
Der Backofen schlägt die für die gewählte
Garart optimale Temperatur vor.
Die Temperatur kann jedoch noch reguliert
werden. Dazu den Temperaturwahlschalter in
Richtung
++
oder
--
(Abb.3) drehen.
DDiiee ZZuubbeerreeiittuunngg eennttsspprreecchheenndd ddeenn
Empfehlungen der Gartabelle in den Ofen
schieben.
Danach heizt der Ofen und die
Temperaturanzeige blinkt.
Wenn die gewählte Temperatur erreicht wird,
ertönen Signaltöne.
Die Anzeige hört auf zu blinken.
Zum Stoppen des Garvorgangs den
Funktionswahlschalter auf 0 stellen.
Abb.2
Abb.4
Achtung
Garvorgänge erfolgen immer bei geschlossener Ofentür.
Achtung
Nach einem Garzyklus funktioniert die Gebläseturbine noch einige Zeit, um
zuverlässigen Ofenbetrieb sicher zu stellen.
Abb.1
Abb.3
99641611_A_MULTI.qxp 20/03/2007 17:36 Page 49
La página se está cargando...
La página se está cargando...
La página se está cargando...
La página se está cargando...
La página se está cargando...

55
4 / PFLEGE UND REINIGUNG DES OFENS
DE
Abb.1
•Sofortige Pyrolyse
--
Alles Zubehör aus dem Backofen nehmen
und eventuell vorhandene stark übergelaufene
Reste entfernen.
--
Prüfen, dass der Programmierer die Tageszeit
anzeigt und diese nicht blinkt (Abb.1).
Es besteht die Auswahl zwischen
3 Pyrolysezyklen:
Pyrolysedauer 1 1/2 Stunden.
Pyrolysedauer 1 3/4 Stunden.
Pyrolysedauer 2 Stunden.
--
Den Funktionswähler auf die Position der
gewünschten Pyrolyse stellen.
Beispiel: 1 3/4 Stunden (Abb.2).
Zu Beginn der Pyrolyse wird das Symbol ,
wie auch die Dauer des Pyrolysezyklus (Abb.3)
in der Programmierleiste angezeigt.
Das Symbol erscheint in der Programmier-
leiste und zeigt die Türverriegelung an.
Am Ende der Pyrolyse blinken 0:00 und das
Symbol (Abb.4).
Um zur Anzeige der Uhrzeit zurück zu kehren,
den Funktionswahlschalter ausschalten
(Abb.5).
--
Wenn der Backofen kalt ist, die weiße Asche
mit einem feuchten Tuch entfernen.
Der Backofen ist sauber und wieder für einen
beliebigen Garvorgang bereit.
Anmerkungen: Die Reinigungstemperatur
kann nicht verändert werden. Während der
Pyrolyse ist die Beleuchtung abgeschaltet.
Wenn der Backofen nach einer Pyrolyse nicht
sauber ist, ist zu lange damit gewartet worden.
Den Vorgang wiederholen.
PYROLYSEVORGANG
••
Abb.2
Abb.3
Abb.4
Abb.5
99641611_A_MULTI.qxp 20/03/2007 17:36 Page 55
La página se está cargando...

57
5 / KUNDENDIENST
DE
Eventuelle Reparaturarbeiten an dem Gerät
müssen von qualifiziertem Fachpersonal des
Händlers vorgenommen werden. Bei
Benachrichtigung des Kundendienstes die
vollständigen Geräteangaben (Modell, Typ
und Seriennummer) mitteilen. Diese Angaben
sind dem Typenschild
(Abb.1)
zu entnehmen.
ORIGINAL ERSATZTEILE
Bei Reparaturarbeiten darum bitten, dass
ausschließlich
zertifizierte Original Ersatzteile
verwendet werden.
•REPARATURARBEITEN
**
Dienstleistung des Brandt Customer Service, einfache Aktiengesellschaft mit einem Kapital von 2.5000.000 Euro,
5/7 avenue des Béthunes, 95310 Saint Ouen l’Aumône - RCS Pontoise 440 303 303
BBrraannddtt AApppplliiaanncceess
- vereinfachte Aktiengesellschaft mit einem Kapital von 10.000.000 Euro RCS Nanterre 440 302 347.
BRANDT APPLIANCES SAS
7 rue Henri Becquerel
92500 RUEIL MALMAISON
230V ~ 50 Hz
MADE IN FRANCE
Abb.1
99641611_A_MULTI.qxp 20/03/2007 17:36 Page 57

58
FR
02
DE
44
EN
58
ES
72
IT
86
NL
100
PT
114
DA
30
CS
16
Dear Customer,
You have just acquired a
DDEE DDIIEETTRRIICCHH
oven and we would like to
thank you.
Our research teams have created this new generation of appliances
for you. Their quality, appearance, functions and technological
advances make them exceptional products, showcases of our unique
know-how.
Your new
DDEE DDIIEETTRRIICCHH
oven will blend harmoniously into your
kitchen and perfectly combine cooking performance and ease of use.
We wanted to offer you a product of excellence.
In the line of
DDEE DDIIEETTRRIICCHH
products, you will also find a wide range of
cookers, hobs, ventilation hoods, dishwashers, and refrigerators, all of
which can be built in and coordinated with your new
DDEE DDIIEETTRRIICCHH
oven.
Of course, in an ongoing effort to better satisfy your demands with
regard to our products, our after-sales service department is at your
disposal and ready to listen in order to respond to all of your questions
and suggestions (contact information at the end of this booklet).
You can also log onto our site:
wwwwww..ddeeddiieettrriicchh--eelleeccttrroommeennaaggeerr..ccoomm
where you will find our latest
new ideas and useful additional information.
DDEE DDIIEETTRRIICCHH
SSeettttiinngg NNeeww VVaalluueess
As part of our commitment to constantly improving our products, we reserve the right to make
changes to them based on advances to their technical, functional and/or aesthetic properties.
Important:
Before installing and using your appliance, please read this Installation and Usage
Guide carefully, as it will allow you to quickly familiarise yourself with its operation.
99641611_A_MULTI.qxp 20/03/2007 17:36 Page 58
La página se está cargando...
La página se está cargando...

61
1 / DESCRIPTION OF YOUR APPLIANCE
EN
INTRODUCTION TO THE PROGRAMMER
••
A
D
A
B
Time and cooking time display
Cooking time indicator
Cooking end time indicator
Timer display
C
D
E
Lock indicator
Cleaning indicator
Temperature display
Selection button (cooking time and time)
Time setting buttons
F
G
G
H
H
C
B
F
I
E
I
99641611_A_MULTI.qxp 20/03/2007 17:36 Page 61

62
2 / USING YOUR APPLIANCE
EN
USING THE PROGRAMMER
•
How to set the time
--
When plugged in
The display flashes 12:00 (fig.1).
Set the time by pressing the + or - buttons
(holding your finger on the button allows you
to scroll through the numbers rapidly) (fig.2).
Example: 12:30
Press the “ ” button to confirm.
The display stops flashing.
- To set the time on the clock
The function selector switch must be in the 0
position (fig.1).
Press and hold the “ ” button for a few
seconds until the display starts flashing (fig.2),
then release. Audible beeps indicate that it is
now possible to set the time.
Adjust the clock setting with the + and -
buttons (fig.3).
Press the “ ” button to confirm (fig.4).
fig.1
fig.2
fig.2
fig.3
fig.4
fig.1
Warning
If there is no confirmation from the
“ ” button, the time is recorded
automatically after a few seconds.
••
99641611_A_MULTI.qxp 20/03/2007 17:36 Page 62

63
2 / USING YOUR APPLIANCE
EN
•Immediate cooking
— The programmer should display only the
time.
It should not be flashing (fig.1).
Turn the function selector to the position of
your choice.
Example: position (fig.2).
Your oven recommends the optimal
temperature for the chosen cooking mode.
It is, however, possible to adjust the
temperature by pushing the selection lever
towards
++
or
--
(fig.3).
PPllaaccee yyoouurr ddiisshh iinn tthhee oovveenn
based on the
recommendations provided by the cook book.
After these steps, the oven heats up and the
temperature indicator flashes.
A series of beeps will sound when the oven
reaches the selected temperature.
The temperature stops flashing.
To stop this heating, return the function
selector to 0.
fig.2
fig.4
Warning
All types of cooking are done with the door closed.
Warning
After a cooking cycle, the cooling fan continues to operate for a period of time in order
to guarantee optimal oven reliability.
fig.1
fig.3
99641611_A_MULTI.qxp 20/03/2007 17:36 Page 63
La página se está cargando...
La página se está cargando...
La página se está cargando...
La página se está cargando...
La página se está cargando...
La página se está cargando...
La página se está cargando...

71
5 / AFTER-SALES SERVICE
EN
Any repairs that are made to your appliance
must be handled by a qualified professional
authorised to work on the brand. When you
call, mention your appliance’s complete
reference (model, type, serial number). This
information appears on the manufacturer’s
nameplate
(fig.1).
GENUINE REPLACEMENT PARTS
During maintenance work, request that only
certified genuine replacement parts are
used.
•SERVICE CALLS
**
Service provided by Brandt Customer Services, simplified shareholder company with capital of 25,000,000 Euros,
5/7 avenue des Béthunes, 95310 Saint Ouen l’Aumône - RCS Pontoise 440 303 303
BBrraannddtt AApppplliiaanncceess
- simplified shareholder company with capital of 10,000,000 Euros RCS Nanterre 440,302,347.
BRANDT APPLIANCES SAS
7 rue Henri Becquerel
92500 RUEIL MALMAISON
230V ~ 50 Hz
MADE IN FRANCE
fig.1
99641611_A_MULTI.qxp 20/03/2007 17:36 Page 71
La página se está cargando...

73
ÍNDICE
ES
1 / DESCRIPCIÓN DEL APARATO
••
Presentación del horno
_____________________________________
74
••
Accesorios
________________________________________________
74
••
Presentación del programador
_______________________________
75
2 / UTILIZACIÓN DEL APARATO
••
Utilización del programador
º
Cómo ajustar la hora
___________________________________
76
º
Cocción inmediata
_____________________________________
77
••
Cocción programada
º
Puesta en marcha inmediata
_____________________________
78
º
Puesta en marcha retardada
_____________________________
79
••
Utilización de la función minutería
_____________________________
80
3 / MODOS DE COCCIÓN DEL HORNO
_____________________________
81
4 / MANTENIMIENTO Y LIMPIEZA DEL HORNO
______________________
83
5 / SERVICIO TÉCNICO
••
Intervenciones
_____________________________________________
85
99641611_A_MULTI.qxp 20/03/2007 17:36 Page 73

74
1 / DESCRIPCIÓN DEL APARATO
ES
PRESENTACIÓN DEL HORNO
••
A
B
Programador
Selector de temperatura
Selector de funciones
C
D
E
Lámpara
Niveles de altura cable
E
D
B
A
C
•Accesorios
Su aparato está equipado con dos rejillas de seguridad con empuñadura, una rejilla con
empuñaduras para bandeja de 45 mm, una bandeja de repostería Lissium y una bandeja de
45 mm.
99641611_A_MULTI.qxp 20/03/2007 17:36 Page 74

75
1 / DESCRIPCIÓN DEL APARATO
ES
PRESENTACIÓN DEL PROGRAMADOR
••
A
D
A
B
Visualización de hora y duración
Indicador de duración de cocción
Indicador de final de cocción
Indicador de minutería
C
D
E
Indicador de bloqueo
Indicador de limpieza
Visualización de la temperatura
Mando de selección (duración y hora)
Mandos de regulación del tiempo
F
G
G
H
H
C
B
F
I
E
I
99641611_A_MULTI.qxp 20/03/2007 17:36 Page 75

76
2 / UTILIZACIÓN DEL APARATO
ES
UTILIZACIÓN DEL PROGRAMADOR
•
Cómo ajustar la hora
--
Al conectar el horno
El visor parpadea a las 12:00 (fig.1).
Regule la hora pulsando los mandos + y -
(manteniendo pulsado el mando, los números
pasan rápidamente) (fig.2).
Ejemplo: 12H30
Pulse el mando “ ” para validar.
La visualización deja de parpadear.
- Para volver a poner el reloj en hora
El selector de función debe estar
obligatoriamente en la posición 0 (fig.1).
Pulse el mando “ ” durante unos segundos
hasta que parpadee el visor (fig.2) y luego
suéltelo. Unos pitidos indican que se puede
comenzar la regulación.
Regule la hora con los mandos + y - (fig.3).
Pulse el mando “ ” para validar (fig.4).
fig.1
fig.2
fig.2
fig.3
fig.4
fig.1
Atención
Si no se efectúa la validación mediante
el mando “ ”, el registro es automático al
cabo de unos segundos.
••
99641611_A_MULTI.qxp 20/03/2007 17:36 Page 76

77
2 / UTILIZACIÓN DEL APARATO
ES
•Cocción inmediata
— El programador sólo debe indicar la hora.
Ésta no debe parpadear (fig.1).
Gire el selector de funciones a la posición
seleccionada.
Ejemplo: posición (fig.2).
El horno le propone la temperatura óptima
para este tipo de cocción.
Sin embargo, es posible ajustar la
temperatura accionando la manecilla de
selección de temperatura a
++
o
--
(fig.3).
CCoollooqquuee llaa bbaannddeejjaa eenn eell hhoorrnnoo
según las
recomendaciones indicadas en la guía de
cocción.
Después de estas acciones, el horno calienta
y el indicador de la temperatura parpadea.
Se emite una serie de pitidos cuando el horno
alcanza la temperatura seleccionada.
Esta deja de parpadear.
Para parar la cocción, ponga el selector de
funciones en 0.
fig.2
fig.4
Atención
Todas las cocciones se realizan con la puerta cerrada.
Atención
Después de un ciclo de cocción, la turbina de enfriamiento sigue funcionando durante
cierto tiempo, para garantizar una buena fiabilidad del horno.
fig.1
fig.3
99641611_A_MULTI.qxp 20/03/2007 17:36 Page 77

78
ES
2 / UTILIZACIÓN DEL APARATO
--
Cocción con puesta en marcha inmediata
y duración programada
- Elija el modo de cocción deseado y ajuste la
temperatura (fig.1).
- Pulse el mando “ ” hasta que el indicador de
duración de la cocción parpadee “ ”.
La visualización parpadea a 0,00 h para indicar
que es posible realizar el ajuste (fig.
2).
- Pulse el mando
++
o
--
para ajustar el tiempo
deseado.
Ejemplo: 30 min de cocción (fig.
3).
El registro del tiempo de cocción es automático
al cabo de unos segundos.
El visor del tiempo deja de parpadear.
La cuenta atrás del tiempo se efectúa
inmediatamente después del ajuste.
DDeessppuuééss ddee eessttaass 33 aacccciioonneess,, eell hhoorrnnoo ccaalliieennttaa::
Se emite una serie de pitidos cuando el horno
alcanza la temperatura seleccionada.
Al final de la cocción (fin del tiempo programado),
- el horno se para,
- el indicador de duración de cocción y 0:00
parpadean (fig.
4),
- se emite una serie de pitidos durante unos
minutos. La parada definitiva de estos pitidos se
realiza pulsando cualquier mando.
La visualización pasa de nuevo a la hora del día
volviendo a colocar el selector de funciones en 0
(fig.5
).
fig.2
fig.3
COCCIÓN PROGRAMADA
••
fig.1
fig.4
fig.5
99641611_A_MULTI.qxp 20/03/2007 17:37 Page 78

79
ES
2 / UTILIZACIÓN DEL APARATO
--
Cocción con puesta en marcha
retardada y hora de fin de cocción
elegida
PPrroocceeddaa ccoommoo ppaarraa uunnaa ccoocccciióónn pprrooggrraammaaddaa..
- Una vez regulada la duración de la cocción,
pulse el mando “ ” hasta que parpadee el
indicador de fin de cocción “ ”.
La visualización parpadea para indicar que es
posible realizar el ajuste (fig.
1).
- Pulse el mando
++
o
--
para regular la hora de
fin de cocción deseada.
Ejemplo: fin de cocción a las 13h (fig.
2).
El final de cocción queda registrado
automáticamente al cabo de unos segundos.
El visor del fin de cocción deja de parpadear.
UUnnaa vveezz eeffeeccttuuaaddaass eessttaass ooppeerraacciioonneess,, llaa
ppuueessttaa eenn mmaarrcchhaa qquueeddaa rreettaarrddaaddaa ppaarraa qquuee
llaa ccoocccciióónn tteer
rmmiinnee aa llaass 1133hh..
Al final de la cocción (fin del tiempo
programado),
- el horno se para,
- el indicador de duración de cocción y 0:00
parpadean (fig.
3),
- se emite una serie de pitidos durante unos
minutos. La parada definitiva de estos pitidos
se realiza pulsando cualquier mando.
La visualización pasa de nuevo a la hora del
día volviendo a colocar el selector de
funciones en 0 (fig.4).
El interior del horno queda iluminado desde el
inicio de la cocción y se apaga al final de la
cocción.
fig.1
fig.2
fig.3
fig.4
COCCIÓN PROGRAMADA
••
99641611_A_MULTI.qxp 20/03/2007 17:37 Page 79

80
2 / UTILIZACIÓN DEL APARATO
ES
-- EEll pprrooggrraammaaddoorr ddeell hhoorrnnoo ppuueeddee uuttiilliizzaarrssee
ccoommoo mmiinnuutteerrííaa iinnddeeppeennddiieennttee qquuee ppeerrmmiittee llaa
ccuueennttaa aattrrááss
ddee cciieerrttoo ttiieemmppoo ssiinn
ffuunncciioonnaammiieennttoo ddeell hhoorrnnoo..
En ese caso, la visualización de la minutería
predomina sobre la visualización de la hora.
- Pulse el mando “ ” (fig.1) hasta que
parpadee el símbolo correspondiente a la
minutería.
-> 0.00 y un pequeño reloj de arena parpadean.
- Ajuste el tiempo elegido pulsando los mandos
++
o
--
(fig.2).
- Pulse el mando “ ” para validar o esperar
unos segundos.
Atención
Se puede modificar o anular en cualquier momento la programación del minutero.
fig.1
fig.2
UTILIZACIÓN DE LA FUNCIÓN
MINUTERÍA
••
El visualizador deja de parpadear al cabo de unos segundos y el minutero se pone en marcha
y descuenta el tiempo de segundo en segundo.
Una vez transcurrido el tiempo, el minutero emite una serie de pitidos para advertirle.
La parada de estos pitidos se realiza pulsando cualquier mando.
99641611_A_MULTI.qxp 20/03/2007 17:37 Page 80

81
3 / MODOS DE COCCIÓN DEL HORNO
ES
*
Secuencia o secuencias utilizadas para el anuncio escrito en la etiqueta energética de conformidad con
la norma europea EN 50304 y según la directiva europea 2002/40/CE.
CCAALLOORR GGIIRRAATTOORRIIOO
(temperatura recomendada
118800°°CC
mín. 35°C máx. 235°C)
•
La cocción se efectúa con el elemento calefactor situado al fondo del horno y con la
hélice para mover el aire.
•
Aumento rápido de la temperatura. Algunos platos se pueden introducir en el horno
frío.
•
Recomendado para conservar tiernas las carnes blancas, pescados y verduras.
Para las cocciones múltiples de hasta 3 niveles.
CCAALLOORR CCOOMMBBIINNAADDOO
(temperatura recomendada
220055°°CC
mín. 35°C máx. 275°C)
•
La cocción se efectúa con la resistencia inferior y la superior y con la hélice de
movimiento de aire.
•
Tres fuentes de calor asociadas: mucho calor en la parte inferior, un poco de calor
giratorio y un toque de grill para dorar.
•
Recomendado para quiches, empanadas, tartas de frutas jugosas, colocadas
preferentemente en una bandeja de barro.
GGRRIILLLL PPUULLSSAADDOO ++ AASSAADDOORR
(temperatura recomendada
220000°°CC
mín. 180°C máx. 230°C)
•
La cocción se realiza alternativamente con el elemento superior y con la hélice para
mover el aire.
•
No hace falta precalentamiento. Aves y asados jugosos y crujientes por todos los
lados.
•
El asador rotativo continua funcionando hasta que se abre la puerta.
•
Coloque la bandeja para recoger la grasa en la posición más baja.
•
Recomendado para todas las aves o asados hechos con el asador, para soasar y
cocinar hasta el centro piernas de cordero y chuletas de buey. Para que los bloques de
pescado queden jugosos y tiernos.
TTRRAADDIICCIIOONNAALL
(temperatura recomendada
224400°°CC
mín. 35°C máx. 275°C)
•
La cocción se efectúa con la resistencia inferior y superior.
•
Después de un precalentamiento, cocinará la mayoría de sus platos, recomendado
para conservar tiernas las carnes blancas, pescados y verduras.
EECCOO
(temperatura recomendada
220000°°CC
mín. 35°C máx. 275°C)
•
La cocción se efectúa con la resistencia inferior y superior.
•
Esta posición permite una ganancia de energía conservando las cualidades de cocción.
•
La posición ECO se utiliza para el etiquetado energético.
•
Todas las cocciones se realizan
ssiinn pprreeccaalleennttaammiieennttoo..
*
*
99641611_A_MULTI.qxp 20/03/2007 17:37 Page 81

82
3 / MODOS DE COCCIÓN DEL HORNO
ES
GGRRIILLLL FFUUEERRTTEE ++ AASSAADDOORR
(posición recomendada
44
- mín. 1 - máx. 4)
•
La cocción se efectúa con la resistencia superior.
•
El grill fuerte cubre toda la superficie de la rejilla.
•
Recomendado para asar chuletillas, salchichas, rebanadas de pan, langostinos a la
parrilla.
PPAANN
(temperatura recomendada
220055°°CC
mín. 35°C máx. 275°C)
•
Secuencia de cocción recomendada para la cocción del pan.
•
Tras un precalentamiento, coloque la bola de pan en la bandeja de repostería - 2º nivel.
•
No olvide colocar un molde de agua en la solera para obtener una corteza crujiente y
dorada.
99641611_A_MULTI.qxp 20/03/2007 17:37 Page 82

83
4 / MANTENIMIENTO Y LIMPIEZA DEL HORNO
ES
fig.1
•Pirólisis inmediata
--
Retire la batería de cocina del horno y los
desbordamientos importantes que hubieran
podido producirse.
--
Verifique que el programador indica la hora
del día y que ésta no parpadea (fig.1).
Tiene la posibilidad de elegir 3 duraciones de
ciclo de pirólisis:
duración de pirólisis de 1 hora 30.
duración de pirólisis de 1 hora 45.
duración de pirólisis de 2 horas.
--
Gire el selector de funciones a la posición de
pirólisis deseada.
Ejemplo: 1 hora 45 (fig.2).
Al inicio de la pirólisis, el símbolo se
visualiza en el programador así como la
duración del ciclo de pirólisis (fig.3).
El símbolo se visualiza en el programador
indicándole que la puerta está bloqueada.
Al final de la pirólisis, 0:00 parpadea así como
el símbolo (fig.4).
Para recuperar la visualización de la hora, gire
el selector de funciones a la posición de
parada (fig.5).
--
Cuando el horno esté frío, utilice un paño
húmedo para retirar la ceniza blanca.
El horno está limpio y puede ser utilizado de
nuevo para efectuar la cocción que desee.
Observaciones: La temperatura de limpieza no
puede ser modificada. Durante el ciclo de
pirólisis, la luz permanece apagada. Si el
horno no está limpio después de una pirólisis,
es que ha esperado demasiado tiempo. Repita
la operación.
HACER UNA PIRÓLISIS
••
fig.2
fig.3
fig.4
fig.5
99641611_A_MULTI.qxp 20/03/2007 17:37 Page 83

84
4 / MANTENIMIENTO Y LIMPIEZA DEL HORNO
ES
fig.1
•Pirólisis diferida
--
Siga las instrucciones descritas en el párrafo
“Pirólisis inmediata” y, a continuación:
--
Gire el selector de funciones a la posición de
pirólisis deseada.
- Pulse el mando .
El símbolo de fin de cocción parpadea
indicando que se puede comenzar la
regulación (fig.1).
- Pulse el mando + o - para regular la hora de
fin de cocción que desea (fig.2).
Ejemplo: fin de limpieza a las 18 horas.
--
Una vez hecho esto, la puesta en marcha de
la pirólisis queda retardada para que finalice a
las 18:00.
Una vez terminada la pirólisis, vuelva a poner
el selector de funciones en posición de
parada.
HACER UNA PIRÓLISIS
••
fig.2
99641611_A_MULTI.qxp 20/03/2007 17:37 Page 84

85
5 / SERVICIO TÉCNICO
ES
Las posibles intervenciones en su aparato
deberán ser realizadas por un profesional
cualificado depositario de la marca. Cuando
realice su llamada, mencione la referencia
completa del aparato (modelo, tipo, número
de serie). Esta información figura en la placa
de características
(fig.1).
PIEZAS ORIGINALES
Al realizar una intervención de mantenimiento,
solicite el uso exclusivo de
piezas de recambio
certificadas originales.
•INTERVENCIONES
**
Servicio proporcionado por Brandt Customer Services, sociedad por acciones simplificada con un capital
de 2.5000.000 euros, 5/7 avenue des Béthunes, 95310 Saint Ouen l’Aumône - RCS Pontoise 440 303 303
BBrraannddtt AApppplliiaanncceess
- sociedad por acciones simplificada con un capital de 10.000.000 euros RCS Nanterre 440 302 347.
BRANDT APPLIANCES SAS
7 rue Henri Becquerel
92500 RUEIL MALMAISON
230V ~ 50 Hz
MADE IN FRANCE
fig.1
99641611_A_MULTI.qxp 20/03/2007 17:37 Page 85

86
FR
02
DE
44
EN
58
ES
72
IT
86
NL
100
PT
114
DA
30
CS
16
Cara Cliente, Caro Cliente,
Grazie per avere acquistato un forno
DDEE DDIIEETTRRIICCHH
.
I nostri team di ricerca hanno progettato per Lei questa nuova
generazione di forni che, per la loro qualità, il design, le funzionalità e
le evoluzioni tecnologiche, sono prodotti eccezionali, frutto del nostro
know-how.
Il nuovo forno
DDEE DDIIEETTRRIICCHH
s'integrerà perfettamente nella Sua
cucina associando performance di cottura e facilità di utilizzo.
Abbiamo voluto offrirLe un prodotto d'eccellenza.
Troverà, inoltre, nella gamma dei prodotti
DDEE DDIIEETTRRIICCHH
, un'ampia
scelta di cucine, piani di cottura, cappe, lavastoviglie e frigoriferi a
incasso, che potrà coordinare con questo nuovo forno
DDEE DDIIEETTRRIICCHH
.
Al fine di soddisfare al meglio le esigenze della clientela, il nostro
servizio consumatori è a Sua disposizione per rispondere a tutte le
Sue domande o ascoltare i Suoi suggerimenti (estremi alla fine del
presente manuale).
E' possibile inoltre collegarsi al nostro sito:
wwwwww..ddeeddiieettrriicchh--eelleeccttrroommeennaaggeerr.
.ccoomm
nel quale troverà le nostre ultime
novità e tante informazioni utili e complementari.
DDEE DDIIEETTRRIICCHH
II nnuuoovvii ooggggeettttii ddii vvaalloorree
Al fine di migliorare sempre i nostri prodotti, ci riserviamo il diritto di modificarne le
caratteristiche tecniche, funzionali o estetiche, conformemente alla loro evoluzione.
Importante:
Prima di utilizzare il forno, leggere attentamente il presente manuale d'installazione e
d'uso per conoscerne meglio il funzionamento.
99641611_A_MULTI.qxp 20/03/2007 17:37 Page 86
La página se está cargando...

88
1 / DESCRIZIONE DEL FORNO
IT
PRESENTAZIONE DEL FORNO
••
A
B
Programmatore
Selettore di temperatura
Selettore delle funzioni
C
D
E
Lampada
Scanalature
E
D
B
A
C
•Accessori
Il forno ha due griglie di sicurezza con manico, una griglia con manici per teglia di 45 mm, una
teglia per dolci Lissium e una teglia di 45 mm.
99641611_A_MULTI.qxp 20/03/2007 17:37 Page 88

89
1 / DESCRIZIONE DEL FORNO
IT
PRESENTAZIONE DEL PROGRAMMATORE
••
A
D
A
B
Visualizzazione dell'ora e della durata
Indicatore durata di cottura
Indicatore di fine cottura
Indicatore del timer
C
D
E
Indicatore di bloccaggio
Indicatore di pulizia
Visualizzazione della temperatura
Tasto di selezione (durata e ora)
Tasti di regolazione del tempo
F
G
G
H
H
C
B
F
I
E
I
99641611_A_MULTI.qxp 20/03/2007 17:37 Page 89

90
2 / UTILIZZAZIONE DEL FORNO
IT
UTILIZZAZIONE DEL PROGRAMMATORE
•
Regolazione dell’ora
--
Al momento dell'accensione
Il display lampeggia alle ore 12 (fig.1).
Regolare l'ora premendo i tasti + e - (tenendo
il tasto premuto è possible far scorrere
rapidamente i numeri) (fig.2).
Esempio: Ore 12,30
Premere il tasto “ ” per confermare.
Il display non lampeggia più.
- Per ripristinare l'ora dell'orologio
Il selettore delle funzioni deve essere
posizionato su 0 (fig.1).
Premere il tasto “ ” per pochi secondi fino
a far lampeggiare il display (fig.2); lasciare il
tasto. Una serie di segnali acustici indica che
la regolazione può essere effettuata.
Regolare l'ora con i tasti + e - (fig 3).
Premere il tasto “ ” per confermare (fig.4).
fig.1
fig.2
fig.2
fig.3
fig.4
fig.1
Attenzione
Se la regolazione non viene confermata
con il tasto “ ”, la registrazione diventa
automatica dopo pochi secondi.
••
99641611_A_MULTI.qxp 20/03/2007 17:37 Page 90

91
2 / UTILIZZAZIONE DEL FORNO
IT
•Cottura immediata
— Sul programmatore deve apparire soltanto
l'ora e quest'ultima non deve lampeggiare
(fig.1).
Girare il selettore delle funzioni e posizionarlo
sul valore desiderato.
Esempio: posizione (fig.2).
Il forno propone la temperatura ottimale per
questo tipo di cottura.
E' possibile tuttavia regolare la temperatura
girando la manopola di selezione della
temperatura verso
++
o
--
(fig.3).
MMeetttteerree iill ppiiaattttoo nneell ffoorrnnoo
seguendo i consigli
della guida di cottura.
Dopo queste operazioni, il forno comincia a
riscaldare e l'indicatore di temperatura
lampeggia.
Una serie di segnali acustici indica che il
forno ha raggiunto la temperatura scelta.
Quest'ultima smette di lampeggiare.
Per interrompere la cottura, riposizionare il
selettore delle funzioni su 0.
fig.2
fig.4
Attenzione
Tutti i tipi di cottura devono essere effettuati con la porta del forno chiusa.
Attenzione
Dopo un ciclo di cottura, la turbina di raffreddamento continua a funzionare per un
certo lasso di tempo, al fine di garantire il corretto funzionamento del forno.
fig.1
fig.3
99641611_A_MULTI.qxp 20/03/2007 17:37 Page 91
La página se está cargando...
La página se está cargando...
La página se está cargando...
La página se está cargando...
La página se está cargando...

97
4 / MANUTENZIONE E PULIZIA DEL FORNO
IT
fig.1
•Pirolisi immediata
--
Togliere tutte le teglie dal forno ed eliminare
lo sporco e le incrostazioni.
--
Controllare che sul programmatore appaia
l'ora del giorno e che quest'ultima non
lampeggi (fig.1).
E' possibile scegliere 3 durate di pirolisi:
pirolisi di 1 ora e 30 min.
pirolisi di 1 ora e 45 min.
pirolisi di 2 ore.
--
Girare il selettore delle funzioni e
posizionarlo sul tipo di pirolisi desiderato.
Esempio: 1 ora e 45 min (fig.2).
All'inizio della pirolisi, il simbolo appare
sul programmatore insieme alla durata del
ciclo di pirolisi (fig.3).
Il simbolo appare sul programmatore e
indica che la porta è chiusa.
Alla fine della pirolisi, 0:00 lampeggia insieme
al simbolo (fig.4).
Per visualizzare di nuovo l'ora, girare il
selettore delle funzioni e posizionarlo su Stop
(fig.5).
- Quando il forno è freddo, usare un panno umido
per eliminare la cenere bianca.
Il forno è pulito e di nuovo utilizzabile per
realizzare la cottura desiderata.
N.B.: La temperatura della pulizia non può
essere modificata. Durante il ciclo di pirolisi, la
lampadina è spenta. Se il forno non è pulito
dopo una pirolisi, significa che avete
aspettato troppo tempo. Ripetere
l'operazione.
EFFETTUARE UNA PIROLISI
••
fig.2
fig.3
fig.4
fig.5
99641611_A_MULTI.qxp 20/03/2007 17:37 Page 97
La página se está cargando...

99
5 / SERVIZIO POST VENDITA
IT
Gli eventuali interventi sull'apparecchio
devono essere effettuati da un professionista
qualificato, depositario del marchio. Al
momento della richiesta, comunicare tutte le
referenze del forno (modello, tipo, numero di
serie). Queste informazioni si trovano sulla
targhetta delle caratteristiche
(fig.1).
PEZZI D'ORIGINE
In occasione di un intervento di manutenzione,
chiedere che vengano usati esclusivamente
ppeezzzzii cceerrttiiffiiccaattii dd''oorriiggiinnee..
•INTERVENTI
**
Servizio fornito da Brandt Customer Services, società per azioni semplificata con capitale di 2.500.000 euro
5/7, avenue des Béthunes, 95310 Saint Ouen l'Aumône - RCS Pontoise 440 303 303
BBrraannddtt AApppplliiaanncceess
- società per azioni semplificata con capitale di 10.000.000 di euro RCS Nanterre 440 302 347.
BRANDT APPLIANCES SAS
7 rue Henri Becquerel
92500 RUEIL MALMAISON
230V ~ 50 Hz
MADE IN FRANCE
fig.1
99641611_A_MULTI.qxp 20/03/2007 17:37 Page 99
La página se está cargando...
La página se está cargando...

102
1 / BESCHRIJVING VAN HET APPARAAT
NL
VOORSTELLING VAN DE OVEN
••
A
B
Programmaschakelaar
Temperatuurknop
Keuzeknop
C
D
E
Lamp
Draadrichels
E
D
B
A
C
• Accessoires
Uw apparaat is uitgerust met twee roosters met kantelbeveiligngen en handgreep, een rooster
met handgrepen voor platen 45 mm, een gebakplaat Lissium en een plaat 45 mm.
99641611_A_MULTI.qxp 20/03/2007 17:37 Page 102

103
1 / BESCHRIJVING VAN HET APPARAAT
NL
VOORSTELLING VAN DE PROGRAMMASCHAKELAAR
••
A
D
A
B
Weergave van de tijd en de baktijden
Indicator van de bakduur
Weergave einde bakduur
Indicator schakelklok
C
D
E
Indicator vergrendeling
Indicator reiniging
Weergave van de temperatuur
Selectietoets (duren en tijden)
Toetsen voor tijdinstellingen
F
G
G
H
H
C
B
F
I
E
I
99641611_A_MULTI.qxp 20/03/2007 17:37 Page 103

104
2 / GEBRUIK VAN HET APPARAAT
NL
GEBRUIK VAN DE PROGRAMMASCHAKELAAR
••
•
Instellen van de tijd
--
Tijdens het aansluiten van de oven
De display knippert op 12:00 (fig.1).
Stel de tijd in met de toetsen + of - (houd de
toetsen ingedrukt als u de cijfers sneller wilt
laten gaan) (fig.2).
Bijvoorbeeld: 12U30
Druk op de toets “ ” om de tijd te
bevestigen.
De weergave knippert niet meer.
- De tijd weer instellen
De selectieknop moet op de stand 0 staan
(fig.1).
Druk enkele seconden op de toets “ ” tot
de display begint te knipperen (fig.2), daarna
loslaten. Een reeks van pieptonen geeft aan
dat de instelling mogelijk is.
Pas de instelling van de tijd aan met de
toetsen + en 1 (fig.3).
Druk op de toets “ ” om de tijd te
bevestigen (fig.4).
fig.1
fig.2
fig.2
fig.3
fig.4
fig.1
Let op
Indien niet bevestigd wordt met de
toets “ ”, wordt de bakduur automatisch
na enkele seconden geregistreerd.
99641611_A_MULTI.qxp 20/03/2007 17:37 Page 104
La página se está cargando...
La página se está cargando...

107
NL
2 / GEBRUIK VAN HET APPARAAT
--
Uitgesteld bakken (instelling van
eindtijd)
VVoollgg ddee aaaannwwiijjzziinnggeenn bbiijj bbaakkccyycclluuss iinnsstteelllleenn..
- Na instelling van de bakduur, druk op de
toets “ ” tot de indicator van het einde van
de bakduur knippert “ ”.
De weergave knippert om aan te geven dat
instellen dan mogelijk is (fig.
1
).
- Druk op de toets
++
of
--
om de gewenste
eindtijd in te stellen.
Bijvoorbeeld: einde bakduur om 13u (fig.
2).
Na enkele seconden registreert de oven
automatisch de instelling.
De weergave van het einde van de bakduur
knippert niet meer.
NNaa ddeezzee iinnsstteelllliinnggeenn iiss hheett ssttaarrtteenn vvaann ddee oovveenn
uuiittggeesstteelldd zzooddaatt hheett bbaakkkkeenn kkllaaaarr iiss oomm 1133uu0000..
Na het bakken (einde geprogrammeerde tijd),
- stopt de oven,
- de indicator van de bakduur en 0:00
knipperen (fig.
3).
- u hoort een reeks piepjes gedurende enkele
minuten. U stopt de pieptonen door op een
willekeurige toets te drukken.
De weergave schakelt terug over op de
huidige tijd door de keuzeknop op 0 te zetten
(fig.
4).
De ovenruimte wordt verlicht van bij de start
van de baktijd en gaat op het einde van het
bakken uit.
fig.1
fig.2
fig.3
fig.4
GEPROGRAMMEERD BAKKEN
••
99641611_A_MULTI.qxp 20/03/2007 17:37 Page 107

108
2 / GEBRUIK VAN HET APPARAAT
NL
-- DDee pprrooggrraammmmaasscchhaakkeellaaaarr vvaann uuww oovveenn kkaann
aallss oonnaaffhhaannkkeelliijjkkee sscchhaakkeellkkllookk wwoorrddeenn
ggeebbrruuiikktt zzooddaatt uu eeeenn t
tiijjdd kkuunntt aafftteelllleenn zzoonnddeerr
ddee oovveenn ttee llaatteenn wweerrkkeenn..
Bij het gebruik van de schakelklok wordt op de
display de tijdweergave vervangen door
weergave van de schakelklok.
- Druk op de toets “ ” (fig.1) tot het symbool
van de schakelklok knippert.
-> 0:00 en een kleine zandloper knipperen.
- Stel de gewenste tijd in door op de toetsen
++
of
--
te drukken (fig.2).
- Druk op de toets “ ” om te bevestigen of
enkele seconden wachten.
Let op
U kunt op elk moment de programmering van de schakelklok annuleren of wijzigen.
fig.1
fig.2
GEBRUIK VAN DE FUNCTIE
SCHAKELKLOK
••
De display stopt met knipperen na een paar seconden en de schakelklok begint te lopen en telt
de tijd in seconden af.
Als deze duur is afgelopen hoort u een reeks piepjes van de schakelklok om u te waarschuwen
U stopt de pieptonen door op een willekeurige toets te drukken.
99641611_A_MULTI.qxp 20/03/2007 17:38 Page 108
La página se está cargando...
La página se está cargando...
La página se está cargando...
La página se está cargando...

113
5 / SERVICEDIENST
NL
Eventuele ingrepen op het apparaat dienen
door een gekwalificeerde alleenvertegen-
woordiger van het merk te worden uitgevoerd.
Vermeld de “Service” referentie van het
apparaat (model, type, serienummer). Deze
inlichtingen staan op het identificatieplaatje
(fig.1).
OORSPRONKELIJKE ONDERDELEN
Bij een onderhoudsingreep, dient u uitsluitend
om oorspronkelijke onderdelen te vragen.
•INGREPEN
**
Service geleverd door Brandt Customer Services, vennootschap op aandelen met kapitaal van 2.5000.000 euro,
5/7 avenue des Béthunes, 95310 Saint Ouen l’Aumône - RCS Pontoise 440 303 303
BBrraannddtt AApppplliiaanncceess
- vennootschap op aandelen met kapitaal van 10.000.000 euro RCS Nanterre 440.302.347.
BRANDT APPLIANCES SAS
7 rue Henri Becquerel
92500 RUEIL MALMAISON
230V ~ 50 Hz
MADE IN FRANCE
fig.1
99641611_A_MULTI.qxp 20/03/2007 17:38 Page 113

114
FR
02
DE
44
EN
58
ES
72
IT
86
NL
100
PT
114
DA
30
CS
16
Estimado(a) Cliente,
Acabou de adquirir um forno
DDEE DDIIEETTRRIICCHH
e estamos-lhe gratos por
isso.
As nossas equipas de investigação conceberam esta nova geração de
aparelhos a pensar em si, que pela sua qualidade, estética, funções e
evoluções tecnológicas se tornam produtos excepcionais, reveladores
do nosso saber-fazer.
O seu novo forno
DDEE DDIIEETTRRIICCHH
integra-se harmoniosamente na sua
cozinha e alia perfeitamente os mais altos desempenhos de cozedura
com a facilidade de utilização. Foi nosso desejo oferecer-lhe um
produto de excelência.
Na gama de produtos
DDEE DDIIEETTRRIICCHH
, encontrará igualmente uma vasta
gama de fogões, placa de cozinha, exaustores, máquinas de lavar louça
e frigoríficos integráveis que poderá coordenar com o seu novo forno
DDEE DDIIEETTRRIICCHH
.
No intuito permanente de satisfazer o melhor possível as suas
exigências em relação aos nossos produtos, o nosso serviço de Apoio
ao Consumidor encontra-se, naturalmente, à sua disposição e à sua
escuta para responder a todas as suas perguntas ou sugestões
(morada e n.º de telefone no fim deste guia).
Também pode contactar-nos através do nosso sítio:
wwwwww..ddeeddiieettrriicchh--eelleeccttrroommeennaaggeerr..ccoomm
onde poderá tomar conhecimento
das nossas mais recentes inovações e obter informações de carácter útil
e complementar.
A Marca
DDEE DDIIEETTRRIICCHH
NNoovvooss oobbjjeeccttooss ddee vvaalloorr
Num esforço de melhoria constante dos nossos produtos, reservamos o direito de fazer
alterações técnicas, funcionais ou estéticas para melhorar o produto.
Importante:
Antes de ligar o seu aparelho, leia com atenção este manual de instalação e de
utilização, de modo a familiarizar-se mais rapidamente com o seu funcionamento.
99641611_A_MULTI.qxp 20/03/2007 17:38 Page 114
La página se está cargando...

116
1 / DESCRIÇÃO DO SEU APARELHO
PT
APRESENTAÇÃO DO SEU FORNO
••
A
B
Programador
Selector da temperatura
Selector de funções
C
D
E
Lâmpada
Encaixes fio
E
D
B
A
C
•Acessórios
O aparelho está equipado com duas grelhas de segurança com pega, uma grelha com pegas
para prato de 45 mm, um tabuleiro para pastelaria Lissium e um tabuleiro de 45 mm.
99641611_A_MULTI.qxp 20/03/2007 17:38 Page 116

117
1 / DESCRIÇÃO DO SEU APARELHO
PT
APRESENTAÇÃO DO PROGRAMADOR
••
A
D
A
B
Indicação da hora e das durações
Indicador de duração de cozedura
Indicador de fim de cozedura
Indicador do temporizador
C
D
E
Indicador de bloqueio
Indicador de limpeza
Visualização da temperatura
Botão de selecção (durações e horas)
Botões de regulação do tempo
F
G
G
H
H
C
B
F
I
E
I
99641611_A_MULTI.qxp 20/03/2007 17:38 Page 117

118
2 / UTILIZAÇÃO DO SEU APARELHO
PT
UTILIZAÇÃO DO PROGRAMADOR
•
Como acertar a hora
--
Aquando da ligação eléctrica
O visor pisca nas 12:00 (fig.1).
Acerte a hora, premindo os botões + e - (para
obter um desfile rápido, premir continuamente
o botão) (fig.2).
Exemplo: 12H30
Prima o botão “ ” para validar.
O visor fica fixo.
- Para acertar o relógio
O selector de função deve estar
obrigatoriamente na posição 0 (fig.1).
Prima o botão “ ” durante alguns
segundos até que o visor esteja a piscar
(fig.2), depois solte. Os bips sonoros indicam
que a regulação é possível.
Acerte a hora com os botões + e - (fig.3).
Prima o botão “ ” para validar (fig.4).
fig.1
fig.2
fig.2
fig.3
fig.4
fig.1
Atenção!
Se não houver uma validação através
do botão “ ”, a memorização é
automática após alguns de segundos.
••
99641611_A_MULTI.qxp 20/03/2007 17:38 Page 118

119
2 / UTILIZAÇÃO DO SEU APARELHO
PT
•Cozedura imediata
— O programador deve apenas apresentar a
hora.
Esta não deve estar a piscar (fig.1).
Rode o selector de funções para a posição
pretendida.
Exemplo: posição (fig.2).
O forno propõe-lhe uma temperatura
optimizada para este tipo de cozedura.
É, no entanto, possível regular a temperatura
accionando o botão de selecção da
temperatura para
++
ou
--
(fig.3).
CCoollooqquuee oo sseeuu ttaabbuulleeiirroo nnoo ffoorrnnoo
consoante
as recomendações fornecidas pelo guia de
cozedura.
Após estas operações, o forno aquece e o
indicador da temperatura pisca.
É emitida uma série de bips sonoros quando o
forno atinge a temperatura escolhida.
Esta deixa de piscar.
Para parar a cozedura, coloque novamente o
selector de funções em 0.
fig.2
fig.4
Atenção!
Todas as cozeduras são feitas com a porta fechada.
Atenção!
Após um ciclo de cozedura, a turbina de arrefecimento continua a funcionar durante
algum tempo, de modo a garantir uma boa fiabilidade do forno.
fig.1
fig.3
99641611_A_MULTI.qxp 20/03/2007 17:38 Page 119
La página se está cargando...
La página se está cargando...
La página se está cargando...
La página se está cargando...
La página se está cargando...
La página se está cargando...
La página se está cargando...

127
5 / SERVIÇO PÓS-VENDA
PT
As eventuais intervenções no seu aparelho
devem ser efectuadas por um profissional
qualificado representante da marca. Durante o
seu telefonema, indique a referência completa
do seu aparelho (modelo, tipo, número de
série). Estas informações figuram na placa
informativa
(fig.1).
PEÇAS DE ORIGEM
Durante uma intervenção de manutenção,
peça para utilizar exclusivamente
peças de
substituição certificadas de
origem.
•INTERVENÇÕES
**
Serviço fornecido por Brandt Customer Services, sociedade por acções simplificada com um capital social
de 2.5000.000 euros, 5/7 avenue des Béthunes, 95310 Saint Ouen l’Aumône - RCS Pontoise 440 303 303
BBrraannddtt AApppplliiaanncceess
- sociedade por acções simplificada com um capital de 10.000.000 euros RCS Nanterre 440 302 347.
BRANDT APPLIANCES SAS
7 rue Henri Becquerel
92500 RUEIL MALMAISON
230V ~ 50 Hz
MADE IN FRANCE
fig.1
99641611_A_MULTI.qxp 20/03/2007 17:38 Page 127

Translation / DTP by Technicis SAS – Boulogne-Billancourt - France
9999664411661111
03/07
DDOOPP770055**
99641611_A_MULTI.qxp 20/03/2007 17:38 Page 128
-
 1
1
-
 2
2
-
 3
3
-
 4
4
-
 5
5
-
 6
6
-
 7
7
-
 8
8
-
 9
9
-
 10
10
-
 11
11
-
 12
12
-
 13
13
-
 14
14
-
 15
15
-
 16
16
-
 17
17
-
 18
18
-
 19
19
-
 20
20
-
 21
21
-
 22
22
-
 23
23
-
 24
24
-
 25
25
-
 26
26
-
 27
27
-
 28
28
-
 29
29
-
 30
30
-
 31
31
-
 32
32
-
 33
33
-
 34
34
-
 35
35
-
 36
36
-
 37
37
-
 38
38
-
 39
39
-
 40
40
-
 41
41
-
 42
42
-
 43
43
-
 44
44
-
 45
45
-
 46
46
-
 47
47
-
 48
48
-
 49
49
-
 50
50
-
 51
51
-
 52
52
-
 53
53
-
 54
54
-
 55
55
-
 56
56
-
 57
57
-
 58
58
-
 59
59
-
 60
60
-
 61
61
-
 62
62
-
 63
63
-
 64
64
-
 65
65
-
 66
66
-
 67
67
-
 68
68
-
 69
69
-
 70
70
-
 71
71
-
 72
72
-
 73
73
-
 74
74
-
 75
75
-
 76
76
-
 77
77
-
 78
78
-
 79
79
-
 80
80
-
 81
81
-
 82
82
-
 83
83
-
 84
84
-
 85
85
-
 86
86
-
 87
87
-
 88
88
-
 89
89
-
 90
90
-
 91
91
-
 92
92
-
 93
93
-
 94
94
-
 95
95
-
 96
96
-
 97
97
-
 98
98
-
 99
99
-
 100
100
-
 101
101
-
 102
102
-
 103
103
-
 104
104
-
 105
105
-
 106
106
-
 107
107
-
 108
108
-
 109
109
-
 110
110
-
 111
111
-
 112
112
-
 113
113
-
 114
114
-
 115
115
-
 116
116
-
 117
117
-
 118
118
-
 119
119
-
 120
120
-
 121
121
-
 122
122
-
 123
123
-
 124
124
-
 125
125
-
 126
126
-
 127
127
-
 128
128


De Dietrich DOP805W El manual del propietario
- Categoría
- Microondas
- Tipo
- El manual del propietario
en otros idiomas
- français: De Dietrich DOP805W Le manuel du propriétaire
- italiano: De Dietrich DOP805W Manuale del proprietario
- English: De Dietrich DOP805W Owner's manual
- Deutsch: De Dietrich DOP805W Bedienungsanleitung
- Nederlands: De Dietrich DOP805W de handleiding
- português: De Dietrich DOP805W Manual do proprietário
- dansk: De Dietrich DOP805W Brugervejledning
- čeština: De Dietrich DOP805W Návod k obsluze