
Write the model and serial
numbers here:
Model # _________________
Serial # _________________
You can find them on a label on
the back of the dehumidifier.
GE is a trademark of the General Electric Company. Manufactured under trademark license.
OWNER’S MANUAL
DEHUMIDIFIER
49-5000427 Rev. 1 01-20 GEA
APEL50
APEW50
APER50
ENGLISH/ESPAÑOL
SAFETY INFORMATION .........3
OPERATING INSTRUCTIONS
Controls ..............................4
How the Dehumidifier Operates .........5
Automatic Defrost .....................5
Choosing a Location ...................5
Removing Collected Water .............6
Water Level ...........................7
Bucket Operation ......................7
CARE AND CLEANING
Grille and Case ........................8
Water Bucket .........................8
Air Filter ..............................8
Bucket Filter ..........................9
Storage. . . . . . . . . . . . . . . . . . . . . . . . . . . . . . .9
TROUBLESHOOTING TIPS ......10
LIMITED WARRANTY ........... 11
CONSUMER SUPPORT ..........12

2 49-5000427 Rev. 1
THANK YOU FOR MAKING GE APPLIANCES A PART OF YOUR HOME.
Whether you grew up with GE Appliances, or this is your first, we’re happy to have you in the family.
We take pride in the craftsmanship, innovation and design that goes into every GE Appliances
product, and we think you will too. Among other things, registration of your appliance ensures that we
can deliver important product information and warranty details when you need them.
Register your GE appliance now online. Helpful websites and phone numbers are available in the
Consumer Support section of this Owner’s Manual. You may also mail in the pre-printed registration
card included in the packing material.

49-5000427 Rev. 1 3READ AND SAVE THESE INSTRUCTIONS
IMPORTANT SAFETY INFORMATION
READ ALL INSTRUCTIONS BEFORE USING THE APPLIANCE
SAFETY INFORMATION
WARNING
For your safety, the information in this manual must be followed to minimize the risk of
fire, electric shock or personal injury.
Ŷ8VHWKLVDSSOLDQFHRQO\IRULWVLQWHQGHGSXUSRVHDV
described in this Owner’s Manual.
Ŷ7KLVGHKXPLGLILHUPXVWEHSURSHUO\LQVWDOOHGDQG
grounded as described in this manual before it is
used.
Ŷ1HYHURSHUDWHWKLVGHKXPLGLILHULQDQDUHDWKDWLV
likely to accumulate standing water. If this condition
develops, for your safety disconnect the power supply
before stepping into the water.
Ŷ1HYHUXQSOXJ\RXUGHKXPLGLILHUE\SXOOLQJRQWKH
power cord. Always grip plug firmly and pull straight
out from the receptacle.
Ŷ5HSODFHLPPHGLDWHO\DOOHOHFWULFVHUYLFHFRUGV
that have become frayed or otherwise damaged.
A damaged power supply cord must be replaced
with a new power supply cord obtained from the
manufacturer and not repaired. Do not use a cord that
shows cracks or abrasion damage along its length or
at either the plug or connector end.
Ŷ,IWKHUHFHSWDFOHGRHVQRWPDWFKWKHSOXJWKH
receptacle must be changed out by a qualified
electrician
Ŷ,IWKH6833/<&25'LVGDPDJHGLWPXVWEHUHSODFHG
by the manufacturer, its service agent or similary
qualified person in order to avoid a hazard.
Ŷ7KHDSSOLDQFHVKDOOEHLQVWDOOHGLQDFFRUGDQFHZLWK
national wiring regulations.
Ŷ7XUQWKHGHKXPLGLILHU2))DQGXQSOXJLWEHIRUH
cleaning.
Ŷ*($SSOLDQFHVGRHVQRWVXSSRUWDQ\VHUYLFLQJRIWKH
dehumidifier. We strongly recommend that you do not
attempt to service the dehumidifier yourself.
Ŷ)RU\RXUVDIHW\GRQRWVWRUHRUXVHFRPEXVWLEOH
materials, gasoline or other flammable vapors or
liquids in the vicinity of this or any other appliance.
Ŷ$OOGHKXPLGLILHUVFRQWDLQUHIULJHUDQWVZKLFKXQGHU
federal law must be removed prior to product
disposal. If you are getting rid of an old product
with refrigerants, check with the company handling
disposal about what to do.
Ŷ'RQRWXVHRXWGRRUV
Ŷ7KLVGHKXPLGLILHULVLQWHQGHGIRULQGRRUUHVLGHQWLDO
DSSOLFDWLRQVRQO\7KLVGHKXPLGLILHUVKRXOGQRWEH
used for commercial or industrial applications.
Ŷ7KHVH5$'HKXPLGLILHU6\VWHPVUHTXLUH
contractors and technicians to use tools, equipment
and safety standards approved for use with this
UHIULJHUDQW'2127XVHHTXLSPHQWFHUWLILHGIRU5
refrigerant only.
Ŷ
7KLVDSSOLDQFHFDQEHXVHGE\SHUVRQVZLWKUHGXFHG
physical, sensory or mental capabilities or lack of
experience and knowledge if they have been given
supervision or instruction concerning use of the appliance
in a safe way and understand the hazards involved.
WARNING
USE OF EXTENSION CORDS
RISK OF FIRE. Could cause serious injury or death.
Ŷ'2127XVHDQH[WHQVLRQFRUGZLWKWKLV'HKXPLGLILHU
Ŷ'2127XVHVXUJHSURWHFWRUVRUPXOWLRXWOHWDGDSWRUV
with this Dehumidifier.
HOW TO CONNECT ELECTRICITY
Do not, under any circumstances, cut or remove the third
JURXQGSURQJIURPWKHSRZHUFRUG)RUSHUVRQDOVDIHW\
this appliance must be properly grounded.
'2127XVHDQDGDSWHUSOXJZLWKWKLVDSSOLDQFH
7KHSRZHUFRUGRIWKLVDSSOLDQFHLVHTXLSSHGZLWKD
3-prong (grounding) plug which mates with a standard
3-prong (grounding) wall outlet to minimize the possibility
of electric shock hazard from this appliance.
Have the wall outlet and circuit checked by a qualified
electrician to make sure the outlet is properly grounded.
Where a 2-prong wall outlet is encountered, it is your
personal responsibility and obligation to have it replaced
with a properly grounded 3-prong wall outlet.
7KHGHKXPLGLILHUVKRXOGDOZD\VEHSOXJJHGLQWRLWVRZQ
individual electrical outlet, which has a voltage rating
matching the rating plate.
7KLVSURYLGHVWKHEHVWSHUIRUPDQFHDQGDOVRSUHYHQWV
overloading house wiring circuits, which could cause a
fire hazard from overheated wires.
RECYCLING INFORMATION
For appliance recycling information please visit www.geappliances.com/recycling.

49-5000427 Rev. 1
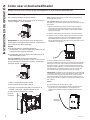
OPERATING INSTRUCTIONS
Controls
Controls
NOTE: When the bucket is full or removed, the controls
cannot be set.
1. Power Pad
3UHVVWRWXUQWKHGHKXPLGLILHURQDQGRII
2. Filter Timer
$IWHUKRXUVRIRSHUDWLRQWKH&OHDQWKH)LOWHU
indicator light will glow to remind you to clean the filter.
Remove the filter and clean it.
3UHVVWRWXUQRIIWKH&OHDQWKH)LOWHUOLJKW6HHWKH&DUH
and Cleaning section.
3. Humidity Set Control Pads
7KHKXPLGLW\OHYHOFDQEHVHWZLWKLQDUDQJHRI
5+5HODWLYH+XPLGLW\WR5+5HODWLYH+XPLGLW\
LQLQFUHPHQWVRUDW16IRUFRQWLQXRXVRSHUDWLRQ7R
set the unit for continuous operation, press the – pad
XQWLOWKHVFUHHQUHDGV16
NOTE: ,I161RQVWRSLVVHOHFWHGWKHGHKXPLGLILHUZLOO
operate continuously at its maximum dehumidification
settings if attached to a hose to drain or until the bucket
is full.
)RUGULHUDLUSUHVVWKH±SDGDQGVHWWRDORZHU
SHUFHQWYDOXH
)RUGDPSHUDLUSUHVVWKH+ pad and set to a higher
SHUFHQWYDOXH
When you first use the dehumidifier, set the humidity
FRQWUROWRRU$OORZDWOHDVWKRXUVIRUWKH
dehumidifier to achieve the humidity level. If you still
have damper air than desired, set the humidity level
WRDORZHUVHWWLQJRUVHOHFW1RQVWRSIRUPD[LPXP
dehumidification.
4. Display
6KRZVWKHVHWKXPLGLW\OHYHOZKLOHVHWWLQJWKHQVKRZV
WKHDFWXDO±DFFXUDF\URRPKXPLGLW\OHYHO
5. Fan Speed Pad
Controls the fan speed.
3UHVVWRVHOHFWHLWKHU+LJK0HGLXPRU/RZIDQ
speed.
Set the fan control to High for maximum moisture
removal. When the humidity has been reduced and
quiet operation is preferred, set the fan control to
0HGLXPRU/RZ
6. Delay Off
While the dehumidifier is in operation, press this pad to
VHWLWWRDXWRPDWLFDOO\WXUQRIILQKRXUVRUKRXUV
7. Pump
$FWLYDWHVWKHLQWHUQDOSXPSIXQFWLRQ3UHVVIRUVHFRQGV
to activate the internal pump for automatic removal of
FRQGHQVDWH7KHLQWHUQDOSXPSLQGLFDWRUOLJKWZLOOUHPDLQ
LOOXPLQDWHGDIWHUVHFRQGV3UHVVWRGHDFWLYDWHWKH
pump.
Other Features
Empty Light
Glows when the bucket is ready to be emptied, or when the
bucket is removed or not replaced in the proper position.
Alarm
If the bucket is full or missing for more than 3 minutes, an
DODUPZLOOVRXQGIRUDERXWVHFRQGVWRUHPLQG\RXWR
empty and replace the bucket.
Auto Shut Off
7KH:DWHU/HYHO&RQWURO6ZLWFKVKXWVRIIWKHGHKXPLGLILHU
when the bucket is full, or when the bucket is removed
or not replaced in the proper position. NOTE: )DQZLOO
continue to run approximately 3 minutes after bucket is
removed.
Auto Defrost
When frost builds up on the evaporator coils, the
compressor will cycle off and the fan will continue to run
until the frost disappears.
Power Outage
In the case of a power outage or interruption, the unit will
automatically restart, in the settings last used, after the
power is restored.
Nonstop
Humidity %
On
Filter
Power
Fan Pump
Hold 3 Sec To Rest Hold 3 Sec
Requires Hose
Filter
Timer
Delay
Off
Empty
Pump
4 hour
2 hour
Medium
Low
High
%XFNHW)XOOOLJKWLQGLFDWHV
bucket needs to be
emptied or is not in place
in the unit
3XPSOLJKW
indicates
the pump is
activated
KRXURUKRXU
delay off
indicator lights
Continuous
Operation on
indicator light
3RZHU2Q
indicator light
&OHDQWKH)LOWHU
indicator light
High, Medium
DQG/RZIDQ
indicator light

49-5000427 Rev. 1 5
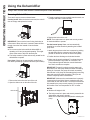
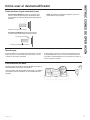
Using the Dehumidifier
Choosing a Location
How the Dehumidifier Operates
Moist, humid air is drawn over a cold refrigerated
dehumidifying coil. Moisture in the air condenses on this coil
and drains into a bucket (or through a hose and drain).
Dry, clean air is drawn through the condenser where it is
heated and discharged out the top grille into the room.
It is normal for the surrounding air to become slightly
warmer as the dehumidifier operates.
Automatic Defrost
When frost builds up on the evaporator coils, the
compressor will cycle off and the fan will continue to run
until the frost disappears.
When the coil is defrosted, the compressor or fan will
automatically restart and dehumidifying will resume.
OPERATING INSTRUCTIONS
When first using the dehumidifier, operate the unit continuously for 24 hours.
A dehumidifier operating in a basement will have little or no
effect in drying an adjacent enclosed storage area, such as
a closet, unless there is adequate circulation of air in and
out of the area.
Ŷ'RQRWXVHRXWGRRUV
Ŷ7KLVGHKXPLGLILHULVLQWHQGHGIRULQGRRUUHVLGHQWLDO
DSSOLFDWLRQVRQO\7KLVGHKXPLGLILHUVKRXOGQRWEHXVHG
for commercial or industrial applications.
Ŷ3ODFHWKHGHKXPLGLILHURQDVPRRWKOHYHOIORRUVWURQJ
enough to support the unit with a full bucket of water.
Ŷ$OORZDWOHDVWLQFKHVRIDLUVSDFHRQDOOVLGHVRIWKH
unit for good air circulation.
Ŷ3ODFHWKHGHKXPLGLILHULQDQDUHDZKHUHWKHWHPSHUDWXUH
ZLOOQRWIDOOEHORZ)&RUDERYH)&7KH
coils can become covered with frost at temperatures
EHORZ)ZKLFKPD\UHGXFHSHUIRUPDQFH
Ŷ7KHVXJJHVWHGUDQJHRIUHODWLYHKXPLGLW\LVEHWZHHQ
DQG
Ŷ8VHWKHGHKXPLGLILHULQFRRNLQJODXQGU\EDWKLQJDQG
dishwashing areas that have excessive moisture.
NOTE: 3ODFHWKHGHKXPLGLILHUDZD\IURPWKHFORWKHV
dryer.
Ŷ8VHWKHGHKXPLGLILHUWRSUHYHQWPRLVWXUHGDPDJH
anywhere books or valuables are stored.
Ŷ8VHWKHGHKXPLGLILHULQDEDVHPHQWWRKHOSSUHYHQW
moisture damage.
Ŷ7KHGHKXPLGLILHUPXVWEHRSHUDWHGLQDQHQFORVHGDUHD
to be most effective.
Ŷ&ORVHDOOGRRUVZLQGRZVDQGRWKHURXWVLGHRSHQLQJVWR
the room.
NOTE: 7KHGHKXPLGLILHUKDVUROOHUVWRDLGSODFHPHQW
but it should only be rolled on smooth, flat surfaces.
Do not attempt to roll the dehumidifier on carpet or
over objects.
41 °F
(5 °C)
41 °F
(5 °C)
Above
Below
Correct Wrong
at least 18 inches
at least 18 inches

6 49-5000427 Rev. 1
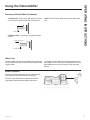
Using the Dehumidifier
Removing Collected Water
7KHUHDUHZD\VWRUHPRYHFROOHFWHGZDWHU
Use the bucket. When the bucket is removed, the unit will
shut off. Empty and replace the bucket.
IMPORTANT: Do not use the hose if using the bucket to
collect water. When the hose is connected, water will flow
through it onto the floor instead of into the bucket.
NOTES:
Ŷ'RQRWUHPRYHWKHEXFNHWZKLOHWKHGHKXPLGLILHULV
RSHUDWLQJRULILWKDVMXVWVWRSSHGRSHUDWLQJ7KLVPLJKW
cause some water to drip from the drain pan.
Ŷ7KHEXFNHWPXVWEHLQSODFHDQGVHFXUHO\VHDWHGIRUWKH
dehumidifier to operate.
Use a hose. Water can be automatically emptied into a
floor drain by attaching a garden water hose (not included).
5HPRYHWKHEXFNHWIURPWKHIURQWRIWKHXQLW
2. Open the drain cover on the side of the unit.
7KUHDGDJDUGHQKRVHQRWVXSSOLHGRQWRWKHQR]]OHFXW
to length, and lead it to the floor drain.
5HSODFHWKHEXFNHWLQWKHXQLW
NOTE: 7KHEXFNHWPXVWEHLQSODFHDQGVHFXUHO\VHDWHG
for the dehumidifier to operate.
Use the internal pump. Water can be automatically
emptied into a remote location by attaching the included
pump hose.
$WWDFKWKHSXPSKRVHWRWKHKRVHFRQQHFWRUE\SXVKLQJ
the tube fitting into the connector until it fits into place
(should not be able to remove the hose when pulled).
3RVLWLRQWKHKRVHGLVFKDUJHWRWKHGHVLUHGORFDWLRQ
0DNHVXUHWKHSXPSLVDFWLYDWHG7RDFWLYDWHWKHSXPS
SUHVVDQGKROGWKH3XPSEXWWRQIRUVHFRQGV7KH
3XPSLQGLFDWRUOLJKWZLOOIODVKWKHQUHPDLQLOOXPLQDWHG
once the 3 seconds are complete.
IMPORTANT:3XPSZLOOQRWEHJLQUHPRYLQJZDWHUXQWLO
the bucket is full. After pump button has been activated by
holding for 3 seconds, the pump will remain on stand-by.
When bucket is full, pump will automatically begin removing
ZDWHUDQGVWRSZKHQEXFNHWLVHPSWLHG7KLVF\FOHZLOO
continue until pump button is deactivated.
IMPORTANT: Make sure the condensate hose is properly
connected and is not kinked, bent or cracked as this may
FDXVHZDWHUWRIORZRQWRWKHIORRU7KHEXFNHWPXVWDOVREH
fully seated for the pump to work properly. Do not operate
WKHPDFKLQHLIWKHURRPWHPSHUDWXUHLV)RUEHORZ
NOTES:
Ŷ0D[LPXPOLIWKHLJKWLVIW
Ŷ7KHEXFNHWPXVWEHLQSODFHDQGVHFXUHO\VHDWHGIRUWKH
dehumidifier and pump to operate.
Make sure to install hose (included) before activating the
pump.
OPERATING INSTRUCTIONS
Always make sure the water bucket is locked into place on the dehumidifier.
drain hose
nozzle

49-5000427 Rev. 1 7
Using the Dehumidifier
Removing Collected Water (Continued)
Water Level
7KHGHKXPLGLILHUZLOOWXUQRIIDXWRPDWLFDOO\ZKHQWKHEXFNHW
is full, or when the bucket is removed or not replaced in the
proper position.
7KHEXFNHWPXVWEHUHSODFHGLQWKHSURSHUSRVLWLRQIRUWKH
GHKXPLGLILHUWRZRUN7KHEXFNHWIXOOOLJKWZLOOEHRQDQGWKH
dehumidifier will not run if the bucket is not in the proper
position.
Bucket Operation
'2127UHPRYHWKHIRDPSLHFHLQWKHEXFNHWDVVHPEO\
If removed the Dehumidifier will not work properly.
When the coil is defrosted, the compressor or fan will
automatically restart and dehumidifying will resume.
OPERATING INSTRUCTIONS
To Install Hose: 3XVKLQKRVHDQGJHQWO\SXOOWRPDNH
sure it is secure. Should not be able to be removed.
To Release Hose: Hold the grey ring while pulling to
remove.
NOTE: '2127NLQNRUFULPSKRVHDVLWFDQEORFNZDWHU
flow.
3XVKKRVHLQ
+ROGJUH\ULQJLQ
3XOOKRVHRXW

8 49-5000427 Rev. 1
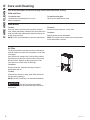
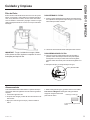
Care and Cleaning
CARE AND CLEANING
Air Filter
7KHDLUILOWHUEHKLQGWKHIURQWJULOOHVKRXOGEHFKHFNHGDQG
FOHDQHGDWOHDVWHYHU\KRXUVRIRSHUDWLRQRUPRUHRIWHQ
if necessary.
$IWHUKRXUVRIRSHUDWLRQWKH&OHDQWKH)LOWHULQGLFDWRU
light will glow to remind you to clean the filter. Remove the
ILOWHUDQGFOHDQLW5HSODFHWKHILOWHUDQGSUHVVWKH)LOWHU
7LPHUSDGWRWXUQRIIWKH&OHDQWKH)LOWHUOLJKW
To remove:
Remove the bucket. Grasp the filter edge, and pull it
straight down and out.
To clean:
Clean the filter with warm, soapy water. Rinse and let the
filter dry before replacing it.
NOTE: '2127SXWWKHILOWHULQDQDXWRPDWLFGLVKZDVKHU
CAUTION
'2127RSHUDWHWKHGHKXPLGLILHU
without a filter because dirt and lint will clog it and reduce
performance.
Grille and Case
To clean the case:
8VHZDWHUDQGDPLOGGHWHUJHQW'RQRWXVH
bleach or abrasives.
To clean the front grille:
8VHDYDFXXPDWWDFKPHQWRUEUXVK
Water Bucket
To clean:
Every few weeks, clean the bucket to prevent growth of
PROGPLOGHZDQGEDFWHULD3DUWLDOO\ILOOWKHEXFNHWZLWKFOHDQ
water and add a little mild detergent. Swish it around in the
bucket, empty and rinse.
NOTE: Do not use a dishwasher to clean the water bucket.
To remove:
Remove the bucket and pour out any water.
To replace:
Slide the bucket into the dehumidifier.
NOTE: 7KHEXFNHWPXVWEHLQSODFHDQGVHFXUHO\VHDWHG
for the dehumidifier to operate.
Turn off the dehumidifier and remove the plug from the wall outlet before cleaning.
Air Filter

49-5000427 Rev. 1
Care and Cleaning
Storage
If the unit is to be stored for an extended period of time,
take the following actions before putting away the machine.
(PSW\WKHEXFNHWRIDOOZDWHU
2. Clean the water bucket and bucket filter per instructions.
3. Allow water bucket to dry and reinstall.
5HPRYHSXPSKRVHDQGVWRUHZLWKXQLW
To Release Hose: Hold the grey ring while pulling the
hose to remove.
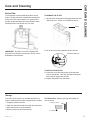
Bucket Filter
7KHEXFNHWILOWHULVORFDWHGLQVLGHWKHEXFNHWQHDUWKH
ERWWRP7KHILOWHUVKRXOGEHFKHFNHGZKHQFOHDQLQJWKH
bucket. If the filter has any debris on it, gently remove
the filter as described below and rinse with warm water.
Replace the filter in the bucket once it is clean.
IMPORTANT: Be careful not to tear or damage filter
during removal, cleaning or replacement. Do not use the
dishwasher to clean the filter.
TO REMOVE THE FILTER:
1. Squeeze both clasp inward to disengage clasp clips from
ZDWHUWDQNFRYHU/LIWWKHFRYHUXSZDUGVWRUHPRYH
2. /LIWWKHHQGRIWKHILOWHUXSZDUGVWRUHPRYHWKHILOWHU
Rotate and lift filter up
TO REPLACE THE FILTER:
3. 3ODFHODUJHHQGRIILOWHUDERYHWDEVSUHVVILOWHUGRZQ
firmly to spread tabs. Once filter is between tabs press
filter inward to engage tabs into filter.
4. Replace water tank cover and handle.
Cover
CARE AND CLEANING
+ROGJUH\ULQJLQ
3XOOKRVHRXW

49-5000427 Rev. 1
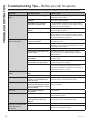
Troubleshooting Tips... Before you call for service
TROUBLESHOOTING TIPS
Save time and money! Review the charts on the following pages first and you may not need to call for service.
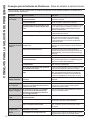
Problem Possible Cause What To Do
Dehumidifier does not
start
The dehumidifier is unplugged. Makes sure the dehumidifier’s plug is pushed
completely into the outlet.
The fuse is blown/circuit breaker
is tripped.
Check the house fuse/circuit breaker box and replace
the fuse or reset the breaker.
Dehumidifier has reached its
preset level or bucket is full.
7KHGHKXPLGLILHUDXWRPDWLFDOO\WXUQVRIIZKHQHLWKHU
condition occurs. Change to a lower setting or empty
the bucket and replace properly.
Bucket is not in the proper
position.
7KHEXFNHWPXVWEHLQSODFHDQGVHFXUHO\VHDWHGIRU
the dehumidifier to operate.
Power Failure. 7KHUHLVDSURWHFWLYHWLPHGHOD\XSWRPLQXWHVWR
SUHYHQWWULSSLQJRIWKHFRPSUHVVRURYHUORDG)RUWKLV
reason, the unit may not start normal dehumidification
for 3 minutes after turning back on.
Dehumidifier does not dry
the air as it should
Did not allow enough time to
remove the moisture.
:KHQILUVWLQVWDOOHGDOORZDWOHDVWKRXUVWRPDLQWDLQ
the desired dryness.
Airflow is restricted.
Make sure there are no curtains, blinds or furniture
blocking the front of back of the dehumidifier. See the
&KRRVLQJD/RFDWLRQVHFWLRQ
Dirty Filter See the Care and Cleaning section.
The Humidity Control may not be
set low enough.
)RUGULHUDLUSUHVVWKH±SDGDQGVHWWRDORZHU
SHUFHQWYDOXHRUDW161RQVWRSIRUPD[LPXP
dehumidification.
Doors and windows may not be
closed tightly.
Check that all doors, windows and other openings are
securely closed.
Clothes dryer may be blowing
moisure-laden air into the room.
,QVWDOOWKHGHKXPLGLILHUDZD\IURPWKHG\HU7KHGU\HU
should be vented to the outside.
Room temperature is too low. Moisture removal is best at higher room temperatures.
/RZHUURRPWHPSHUDWXUHVZLOOUHGXFHWKHPRLVWXUH
removal rate. Models are designed to be operated at
WHPSHUDWXUHVDERYH)&
Dehumidifier runs too
much
Area to be dehumidified is too
large.
7KHFDSDFLW\RI\RXUGHKXPLGLILHUPD\QRWEHDGHTXDWH
Doors and windows are open. Close all doors and windows to the outside.
Frost appears on the coils Dehumidifier has been turned on
recently, or room temperature is
below 41F (5C)
7KLVLVQRUPDO)URVWZLOOXVXDOO\GLVDSSHDUZLWKLQ
minutes. See the Automatic Defrost section
Control cannot be set The compressor will turn off and
the fan will automatically continue
to run for approximately 3 minutes
at a fixed setting.
7KLVLVQRUPDO:DLWDSSUR[LPDWHO\PLQXWHVDQGVHW
the fan as desired.
Fan noise Air is moving through the
dehumidifier.
7KLVLVQRUPDO
Water on floor Hose connection may be loose. Check the hose connection. See the Removing
Collected Water section.
Intended to use the bucket to
collect water, but a hose was
attached.
Disconnect the hose if using a bucket to collect water.
See the Removing Collected Water section.
Bucket Full LED light
flashing and alarm sounds
while drain hose is
connected.
Drain hose not tight on fitting. Check drain hose connection.
Drain hose is kinked. Ensure the drain hose is pointed straight down to the
floor and is not kinked in anyway.

49-5000427 Rev. 1
LIMITED WARRANTY
GE Appliances Dehumidifier Limited Warranty
Ŷ&XVWRPHULQVWUXFWLRQ7KLVRZQHU¶VPDQXDOSURYLGHV
information regarding operating instructions and
user controls.
Ŷ,PSURSHULQVWDOODWLRQ,I\RXKDYHDQLQVWDOODWLRQ
problem, or if the product is of improper capacity,
contact your dealer or installer. You are responsible
for providing adequate electrical connecting facilities.
Ŷ)DLOXUHRIWKHSURGXFWUHVXOWLQJIURPPRGLILFDWLRQV
to the product or due to unreasonable use including
failure to provide reasonable and necessary
maintenance.
Ŷ5HSODFHPHQWRIKRXVHIXVHVRUUHVHWWLQJRIFLUFXLW
breakers.
Ŷ)DLOXUHGXHWRFRUURVLRQ
Ŷ'DPDJHWRWKHSURGXFWFDXVHGE\LPSURSHUSRZHU
supply voltage, accident, fire, floods or acts of God.
Ŷ,QFLGHQWDORUFRQVHTXHQWLDOGDPDJHFDXVHGE\
possible defects with this product.
Ŷ'DPDJHFDXVHGDIWHUGHOLYHU\
What GE Appliances Will Not Cover:
7KLVOLPLWHGZDUUDQW\LVH[WHQGHGWRWKHRULJLQDOSXUFKDVHUDQGDQ\VXFFHHGLQJRZQHUIRUSURGXFWVSXUFKDVHGIRU
KRPHXVHZLWKLQWKH86$
6RPHVWDWHVGRQRWDOORZWKHH[FOXVLRQRUOLPLWDWLRQRILQFLGHQWDORUFRQVHTXHQWLDOGDPDJHV7KLVOLPLWHGZDUUDQW\
JLYHV\RXVSHFLILFOHJDOULJKWVDQG\RXPD\DOVRKDYHRWKHUULJKWVZKLFKYDU\IURPVWDWHWRVWDWH7RNQRZZKDW\RXU
legal rights are, consult your local or state consumer affairs office or your state’s Attorney General.
([FOXVLRQRILPSOLHGZDUUDQWLHV([FHSWZKHUHSURKLELWHGRUUHVWULFWHGE\ODZWKHUHDUHQRZDUUDQWLHVZKHWKHU
express, oral or statutory which extend beyond the description on the face hereof, including specifically the implied
warranties of merchantability or fitness for a particular purpose.
Warrantor: GE Appliances, a Haier company
Louisville, KY 40225
EXCLUSION OF IMPLIED WARRANTIES—Your sole and exclusive remedy is product repair as provided in this
Limited Warranty. Any implied warranties, including the implied warranties of merchantability or fitness for a
particular purpose, are limited to one year or the shortest period allowed by law.
For The Period Of: GE Appliances Will Replace:
One Year
)URPWKHGDWHRIWKHRULJLQDO
purchase
Replacement unit for any product which fails due to a defect in materials or
ZRUNPDQVKLS7KHUHSODFHPHQWXQLWLVZDUUDQWHGIRUWKHUHPDLQGHURI\RXUSURGXFW¶V
original one-year warranty period. The replacement unit may either be a new unit
or a refurbished unit.
Ŷ
Properly pack your unit. We recommend using
the original carton and packing materials.
Ŷ5HWXUQWKHSURGXFWWRWKHUHWDLOORFDWLRQZKHUH
it was purchased.
Ŷ Include in the package a copy of the sales receipt
or other evidence of date of original purchase. Also
print your name and address and a description of the
defect.
In Order to Make a Warranty Claim During the First 90 Days from the Date of Original Purchase:
Ŷ/RFDWH\RXURULJLQDOVDOHVUHFHLSWDQGPDNHDQRWH
of your model and serial number.
Ŷ&DOO*($SSOLDQFHVDWWRLQLWLDWHWKH
product replacement process.
Ŷ<RXZLOOEHDVNHGWRSURYLGH\RXUQDPHDGGUHVV
date of purchase, model and serial number.
Ŷ*($SSOLDQFHVZLOODUUDQJHIRUDFDUWRQWREHVHQWWR
your home to recover the product.
Ŷ<RXPXVWUHWXUQWKHSURGXFWSRVWDJHSUHSDLGE\*(
$SSOLDQFHVWR*($SSODLQFH¶VUHFRYHU\FHQWHUEHIRUH
a replacement unit will be provided. Please include a
description of the defect.
Ŷ<RXVKRXOGUHFHLYH\RXUUHSODFHPHQWSURGXFWZLWKLQ
7 to 10 business days after your unit is received.
In Order to Make a Warranty Claim During the Remainder of the One-Year Warranty:
6WDSOH\RXUUHFHLSWKHUH3URRIRIWKHRULJLQDOSXUFKDVH
date is needed to obtain service under the warranty.

49-5000427 Rev. 1
3ULQWHGLQWKH8QLWHG6WDWHV
Consumer Support
CONSUMER SUPPORT
GE Appliances Website
+DYHDTXHVWLRQRUQHHGDVVLVWDQFHZLWK\RXUDSSOLDQFH"7U\WKH*($SSOLDQFHV:HEVLWHKRXUVDGD\DQ\GD\
of the year! You can also shop for more great GE Appliances products and take advantage of all our on-line support
VHUYLFHVGHVLJQHGIRU\RXUFRQYHQLHQFH,QWKH86GEAppliances.com
Register Your Appliance
5HJLVWHU\RXUQHZDSSOLDQFHRQOLQHDW\RXUFRQYHQLHQFH7LPHO\SURGXFWUHJLVWUDWLRQZLOODOORZIRUHQKDQFHG
communication and prompt service under the terms of your warranty, should the need arise. You may also mail in
WKHSUHSULQWHGUHJLVWUDWLRQFDUGLQFOXGHGLQWKHSDFNLQJPDWHULDO,QWKH86GEAppliances.com/register
Schedule Service
Expert GE Appliances repair service is only one step away from your door. Get on-line and schedule your service at
\RXUFRQYHQLHQFHDQ\GD\RIWKH\HDU,QWKH86GEAppliances.com/serviceRUFDOOGXULQJQRUPDO
business hours.
Extended Warranties
3XUFKDVHD*($SSOLDQFHVH[WHQGHGZDUUDQW\DQGOHDUQDERXWVSHFLDOGLVFRXQWVWKDWDUHDYDLODEOHZKLOH\RXU
warranty is still in effect. You can purchase it on-line anytime. GE Appliances Services will still be there after your
ZDUUDQW\H[SLUHV,QWKH86GEAppliances.com/extended-warrantyRUFDOOGXULQJQRUPDO
business hours.
Remote Connectivity
)RUDVVLVWDQFHZLWKZLUHOHVVQHWZRUNFRQQHFWLYLW\IRUPRGHOVZLWKUHPRWHHQDEOHYLVLWRXUZHEVLWHDW
GEAppliances.com/connectRUFDOOLQWKH86
Parts and Accessories
Individuals qualified to service their own appliances can have parts or accessories sent directly to their homes
9,6$0DVWHU&DUGDQG'LVFRYHUFDUGVDUHDFFHSWHG2UGHURQOLQHWRGD\KRXUVHYHU\GD\
,QWKH86GEApplianceparts.comRUE\SKRQHDWGXULQJQRUPDOEXVLQHVVKRXUV
Instructions contained in this manual cover procedures to be performed by any user. Other servicing
generally should be referred to qualified service personnel. Caution must be exercised, since improper
servicing may cause unsafe operation.
Contact Us
If you are not satisfied with the service you receive from GE Appliances, contact us on our Website with all the
GHWDLOVLQFOXGLQJ\RXUSKRQHQXPEHURUZULWHWR
,QWKH86*HQHUDO0DQDJHU&XVWRPHU5HODWLRQV_*($SSOLDQFHV$SSOLDQFH3DUN_/RXLVYLOOH.<
GEAppliances.com/contact

Escriba los números de modelo
y serie aquí:
# de Modelo _____________
# de Serie _______________
Puede encontrar estos números en
una etiqueta en la parte atrás del
deshumedificador.
GE es una marca registrada de General Electric Company. Fabricado bajo licencia de marca.
MANUAL DEL
PROPIETARIO
DESHUMEDIFICADOR
49-5000427 Rev. 1 01-20 GEA
APEL50
APEW50
APER50
INFORMACIÓN
DE SEGURIDAD ...................3
INSTRUCCIONES DE OPERACIÓN
Controles .............................4
Cómo funciona el deshumedificador .....5
Descongelado automático ..............5
Selección del lugar adecuad ............5
Cómo desechar el agua acumulada ......6
Nivel de agua .........................7
Funcionamiento del Balde ..............7
CUIDADO Y LIMPIEZA
Rejilla y gabinete ......................8
Tanque de agua .......................8
Filtre de aire ..........................8
Filtro del Cubo ........................9
Almacenamiento .......................9
CONSEJOS PARA LA SOLUCIÓN
DE PROBLEMAS .................10
CONSEJOS PARA LA SOLUCIÓN
DE PROBLEMAS .................10
GARANTÍA LIMITADA .......... 11
AYUDA AL CLIENTE ............12

2 49-5000427 Rev. 1
GRACIAS POR HACER QUE GE APPLIANCES SEA PARTE DE SU HOGAR.
Ya sea que haya crecido usando GE Appliances, o que ésta es su primera vez, nos complace
tenerlo en la familia.
Sentimos orgullo por el nivel de arte, innovación y diseño de cada uno de los electrodomésticos de
GE Appliances, y creemos que usted también. Entre otras cosas, el registro de su electrodoméstico
asegura que podamos entregarle información importante del producto y detalles de la garantía
cuando los necesite.
Registre su electrodoméstico GE ahora a través de Internet. Sitios Web y números telefónicos útiles
están disponibles en la sección de Soporte para el Consumidor de este Manual del Propietario.
También puede enviar una carta en la tarjeta de inscripción preimpresa que se incluye con
el material embalado.

49-5000427 Rev. 1 3
INFORMACIÓN IMPORTANTE DE SEGURIDAD
LEA TODAS LAS INSTRUCCIONES ANTES DE USAR ESTE ELECTRODOMÉSTICO
INFORMACIÓN DE SEGURIDAD
LEA Y GUARDE ESTAS INSTRUCCIONES
ADVERTENCIA
Por su seguridad, se debe seguir la información en este manual para minimizar el riesgo de
incendios, descargas eléctricas o lesiones personales.
Ŷ8VHHVWHHOHFWURGRPpVWLFRVRODPHQWHSDUDHOSURSyVLWR
determinado según se describe en este Manual del
propietario.
Ŷ(VWHGHVKXPHGLILFDGRUGHEHLQVWDODUVHFRUUHFWDPHQWH\
conectado a tierra de acuerdo con las instrucciones de este
manual antes de su uso.
Ŷ1XQFDRSHUHHVWHGHVKXPHGLILFDGRUHQXQiUHDHQODTXH
es posible que se acumule agua. De encontrarse en estas
condiciones, por su seguridad, desconecte el suministro de
corriente eléctrica antes de pisar sobre
el agua.
Ŷ1XQFDGHVHQFKXIHVXGHVKXPHGLILFDGRUWLUDQGRGHOFDEOH
eléctrico. Siempre agarre firmemente el enchufe y tire de él
directamente hacia afuera.
Ŷ5HHPSODFHLQPHGLDWDPHQWHWRGRVORVFDEOHVHOpFWULFRV
que se hayan pelado o que se hayan dañado de alguna
RWUDPDQHUD8QFDEOHGHFRUULHQWHGDxDGRQRGHEH
repararse, sino que debe ser sustituido por uno nuevo que
VHDGTXLHUDGHOIDEULFDQWH1RXVHXQFDEOHHOpFWULFRTXH
muestre evidencias de deterioro, o daños de abrasión en
su superficie en alguno de sus extremos.
Ŷ6LHOUHFHSWiFXORQRFRLQFLGHFRQHOHQFKXIHXQHOHFWULFLVWD
calificado debe reemplazar el receptáculo.
Ŷ6LHO&$%/('($/,0(17$&,21HVWiGDxDGRGHEHUiVHU
reemplazado por el fabricante, su agente de servicios o
una persona con calificación similar a fin de evitar riesgos.
Ŷ(OHOHFWURGRPpVWLFRGHEHUiVHULQVWDODGRGHDFXHUGRFRQ
las regulaciones de cableado nacionales.
Ŷ$SDJXHHOFRQWURO\GHVHQFKXIHVXGHVKXPHGLILFDGRUDQWHV
de hacer cualquier reparación o limpiar.
Ŷ*($SSOLDQFHVQRHVWiQRDSR\DTXHVHOHSURSRUFLRQH
ningún servicio al deshumedificador. Vehementemente
recomendamos que usted no intente proporcionar servicio
al deshumedificador usted mismo.
Ŷ3RUVXVHJXULGDGQRDOPDFHQHQLXVHPDWHULDOHV
combustibles, gasolina u otros vapores o líquidos
inflamables en la proximidad de éste o algún otro
electrodoméstico.
Ŷ1RXVHHOGHVKXPHGLILFDGRUHQH[WHULRUHV
Ŷ(VWHGHVKXPHGLILFDGRUHVWiGLVHxDGRH[FOXVLYDPHQWHSDUD
DSOLFDFLRQHVUHVLGHQFLDOHVGHLQWHULRU1RGHEHXVDUVHSDUD
aplicaciones comerciales ni industriales.
Ŷ(VWRV6LVWHPDV'HVKXPHGLILFDGRUHV5$UHTXLHUHQ
que los contratistas y técnicos utilicen herramientas,
equipamiento y normas de seguridad aprobadas para
VXXVRFRQHVWHUHIULJHUDQWH12XWLOLFHHTXLSDPLHQWR
certificado sólo para refrigerante R22.
Ŷ(VWHHOHFWURGRPpVWLFRSXHGHVHUXVDGRSRUSHUVRQDVFRQ
capacidades físicas, sensoriales o mentales reducidas o
con falta de experiencia y conocimiento, si les fue dada
supervisión o instrucción relacionada con el uso de este
electrodoméstico de una forma segura y entienden los
riesgos involucrados.
ADVERTENCIA
USO DE PROLONGADORES
RIESGO DE INCENDIO. Podría ocasionar lesiones graves o la muerte.
Ŷ12XVHSURORQJDGRUHVFRQHVWH'HVKXPLGLILFDGRU
Ŷ12XVHSURWHFWRUHVFRQWUDSLFRVGHFRUULHQWHQL
adaptadores para múltiples tomacorrientes con este
Deshumidificador.
COMO CONECTAR LA ELECTRICIDAD
%DMRQLQJXQDFLUFXQVWDQFLDFRUWHRUHPXHYDODWHUFHUDS~D
(tierra) del cable eléctrico. En pos de la seguridad personal,
este electrodoméstico debe siempre conectarse a tierra.
1286(XQHQFKXIHDGDSWDGRUFRQHVWHDSDUDWR
El cable eléctrico de este electrodoméstico está equipado
con un enchufe de tres púas (tierra) que combina con
un tomacorriente estándar de tres tomas de pared para
minimizar la posibilidad de una descarga eléctrica.
Pida a un técnico que inspeccione el tomacorriente y el
circuito para cerciorarse de que el tomacorriente está
conectado a tierra de la manera apropiada.
Donde exista un tomacorriente de dos tomas, es su
responsabilidad y obligación personal hacer que dicho
tomacorriente sea reemplazado por uno de tres tomas con
conexión a tierra.
El deshumedificador debería siempre estar conectado
a un tomacorriente individual con su circuito de voltaje
correspondiente.
Esto proporciona el mayor rendimiento y además evita
que los circuitos del resto de la casa se sobrecarguen, lo
cual podría causar incendios por el sobrecalentamiento del
cableado.
INFORMACIÓN SOBRE CÓMO RECICLAR
Para acceder a información sobre como reciclar sus electrodomésticos, ingrese a www.geappliances.com/recycling.

49-5000427 Rev. 1
INSTRUCCIONES DE OPERACIÓN
Controles
Controls
NOTA: Cuando el recipiente está lleno o es retirado, los controles
no pueden ser ajustados.
1. Power Pad
Presione para encender o apagar el deshumedificador.
2. Temporizador del filtro (Filter Timer)
'HVSXpVGHKRUDVGHRSHUDFLyQVHHQFHQGHUiODOX]
LQGLFDGRUDGH&OHDQWKH)LOWHU/LPSLH]DGHILOWURSDUDUHFRUGDUOH
que debe limpiar el filtro. Quite el filtro y límpielo.
3UHVLRQHSDUDDSDJDUODOX]GH&OHDQWKH)LOWHU/LPSLH]DGH
filtro) light. Ver la sección Cuidado y limpieza.
3. Botones para el Control de humedad
(Humidity Set Control)
/DKXPHGDGVHSXHGHFRQWURODUDQLYHOHVGHHQWUH
+5KXPHGDGUHODWLYD±+5KXPHGDGUHODWLYDHQ
LQFUHPHQWRVGHORFRQ16SDUDXQIXQFLRQDPLHQWRFRQWLQXR
Para configurar la unidad en operación continua, presione la
IOHFKDKDFLDDEDMRKDVWDTXHVHREVHUYH16HQODSDQWDOOD
NOTA: 6LVHVHOHFFLRQD161RQVWRSHOGHVKXPHGLILFDGRU
funcionará en forma continua en la configuración máxima de
deshumedificación hasta que se llene el tanque.
Si desea aire más seco, presione el botón – y seleccione un
YDORUSRUFHQWXDOPiVEDMR
Si desea aire más húmedo, presione el botón + y seleccione
XQYDORUSRUFHQWXDOPiVDOWR
Cuando use por primera vez el deshumedificador, coloque
HOFRQWUROGHOGHVKXPHGLILFDGRUDy3HUPLWD
TXHWUDQVFXUUDQSRUORPHQRVKRUDVSDUDTXHHO
deshumedificador alcance el nivel de humedad. Si el
aire aún está más húmedo de lo deseado, ajuste el nivel
de humedad a un nivel menor o seleccione el botón de
IXQFLRQDPLHQWRFRQWLQXR1RQVWRSSDUDREWHQHUXQDPi[LPD
deshumidificación.
4. Pantalla
0XHVWUDHOGHOQLYHOGHKXPHGDGSURJUDPDGRGXUDQWHOD
FRQILJXUDFLyQOXHJRPXHVWUDHOGHOQLYHOGHKXPHGDGUHDOGH
ODKDELWDFLyQFRQXQDSUHFLVLyQGH±
5. Boton de velocidad del ventilador (Fan Speed)
Controla la velocidad de circulación del aire.
Presione para seleccionar la velocidad del ventilador en alta
+LJKPHGLR0HGLXPREDMR/RZ
Coloque el control del ventilador a alta (High) velocidad para
lograr remover la mayor cantidad
de humedad. Cuando la humedad haya sido reducida y usted
prefiera una operación más tranquila, coloque el control del
YHQWLODGRUDPHGLR0HGLXPREDMR/RZYHORFLGDG
6. Retardo en apagado (Delay Off)
Mientras el deshumedificador se encuentra en funcionamiento,
presione este botón para que se apague automáticamente a las
KRUDVRDODVKRUDV
7. Bomba
Activa la función de la bomba interna. Presione durante 3
segundos para activar la bomba interna para el retiro automático
GHOFRQGHQVDGR/DOX]LQGLFDGRUD3XPS2Q%RPED
Encendida) titilará y luego permanecerá´iluminada una vez
completados los 3 segundos.
Presione para desactivar la bomba.
Otras funciones
Luz de Recipiente Vacío
Este indicador se ilumina cuando el tanque esté lleno y
debera vaciarse, o cuando el recipiente se remueva o no esté
colocado en la posición correcta.
Alarma (Alarm)
Si el tanque se encuentra lleno o no está en su lugar por más
GHWUHVPLQXWRVVRQDUiXQDDODUPDGXUDQWHVHJXQGRVSDUD
recordarle de vaciar y volver a colocar el tanque.
Apagado automático (AUTO SHUT OFF)
El Interruptor de control de nivel de agua apaga el
deshumedificador cuando el tanque esté lleno, o cuando el
tanque no esté presente o no esté colocado en una posición
apropiada. NOTA: El ventilador seguirá funcionando durante
aproximadamente 3 minutos después de quitar el tanque
Descongelado automático (AUTO DEFROST)
Cuando se acumule escarcha en los serpentines
evaporadores, el compresor se apagará, y el ventilador
continuará funcionando hasta que la escarcha desaparezca.
Pérdida de energía (POWER OUTAGE)
En caso de la pérdida de la energía o interrupción, la unidad
reiniciará automáticamente, en las configuraciones usadas por
última vez, una vez la energía sea restablecida.
Nonstop
Humidity %
On
Filter
Power
Fan Pump
Hold 3 Sec To Rest Hold 3 Sec
Requires Hose
Filter
Timer
Delay
Off
Empty
Pump
4 hour
2 hour
Medium
Low
High
/DOX]GH%XFNHW)XOO
5HFLSLHQWH/OHQRLQGLFD
que éste deberá ser
vaciado o que no está en el
lugar correcto de la unidad
/XFHVLQGLFDGRUDV
de retardo en
DSDJDGRGH
horas o 2 horas
/X]LQGLFDGRUDGH
funcionamiento de
operación continua
Encendido Activado
luz indicadora de
encendido
/X]LQGLFDGRUDGH
limpieza de filtro
/XFHVLQGLFDGRUDVGH
velocidad de ventilador
alta, media y baja
/DOX]LQGLFDGRUD
3XPS%RPED
indica que la bomba
está funcionando

49-5000427 Rev. 1 5
Cómo usar el deshumedificador
Selección del lugar adecuado
Cómo funciona el deshumedificador
/DKXPHGDGHQHODLUHSDVDSRUXQVHUSHQWLQ
GHVKXPHGLILFDGRU/DKXPHGDGHQHODLUHVHFRQGHQVDHQ
este serpentin y se drena hacia el tanque (o a través de la
manguera y luego través del drenaje).
El aire limpio y seco pasa luego por el condensador donde
es calentado y desechado de regreso al medio ambiente a
través de la parrilla.
Es normal que el aire en los alrededores se caliente un
poco conforme el deshumedificador funciona.
Descongelado automático
Cuando se acumule escarcha en los serpentines
evaporadores, el compresor se apagará, y el ventilador
continuará funcionando hasta que la escarcha
desaparezca.
Cuando el evaporador se descongele, el compresor o el
ventilador se encenderá automáticamente y el proceso de
deshumedificación continuará.
INSTRUCCIONES DE OPERACIÓN
Cuando se disponga a usar el deshumedificador por primera vez, permita que la unidad opere de manera
continua por 24 horas.
El deshumedificador ubicado en un sótano tendrá poco o
ningún efecto en secar el aire dentro areas adjacentes de
almacenamiento, como un armario, por ejemplo, al menos que
exista una circulación adecuada de aire hacia en interior y
hacia el exterior de dicha área.
Ŷ1RXVHHOGHVKXPHGLILFDGRUHQH[WHULRUHV
Ŷ
Este deshumedificador está diseñado exclusivamente para
aplicaciones residenciales
GHLQWHULRU1RGHEHXVDUVHSDUDDSOLFDFLRQHVFRPHUFLDOHV
ni industriales.
Ŷ
Coloque el deshumedificador en un piso firme y nivelado
que sea lo suficientemente fuerte para soportar la unidad
cuando la cubeta esté llena de agua.
Ŷ
'HMHSRUORPHQRVSXOJDGDVGHHVSDFLROLEUHDOUHGHGRU
de la unidad para que exista una buena circulación de aire.
Ŷ
Coloque el deshumedificador en un área en la que la
WHPSHUDWXUDQRVHDLQIHULRUD)&QLVXSHULRUD)
&/RVVHUSHQWLQHVSXHGHQHVFDUFKDUVHHQDPELHQWHV
FRQWHPSHUDWXUDVLQIHULRUHVD)&ORFXDOSXHGH
reducir su rendimiento.
Ŷ
(OUDQJRVXJHULGRRODKXPHGDGUHODWLYDHVWiHQWUH\
Ŷ
8VHHOGHVKXPHGLILFDGRUHQiUHDVFRPRODFRFLQDFXDUWRV
de lavado, baños, y en áreas donde exista humedad
excesiva. NOTA: Coloque el deshumedificador lejos la
secadora de ropa.
Ŷ
8VHHOGHVKXPHGLILFDGRUSDUDHYLWDUGDxRVFDXVDGRVSRU
la humedad en lugares donde guarde libros o artículos de
valor.
Ŷ
8VHHOGHVKXPHGLILFDGRUHQHOVyWDQRSDUDD\XGDUD
prevenir los daños causados por la humedad.
Ŷ
El deshumedificador debe usarse en áreas cerradas para
mayor efectividad.
Ŷ
Cierre todas las puertas, ventanas y otras aberturas
hacia el exterior de la habitación en donde esté el
deshumedificador.
NOTA: El deshumedificador tiene ruedas para ayudarle
a colocarlo en distintos lugares, pero debe rodarse en
VXSHUILFLHVILUPHV\SODQWDV1RLQWHQWHURGDUORVREUHREMHWRVR
sobre una alfombra.
Above
Below
Correct Wrong
at least 18 inches
at least 18 inches
SI
NO
Por
debajo
GH)
&
Por
encima
GH)
&
SXOJDGDVPtQ
SXOJDGDVPtQ

6 49-5000427 Rev. 1
Cómo usar el deshumedificador
Cómo desechar el agua acumulada
Hay 2 formas de desechar el agua acumulada
Use el tanque. Cuando usted saque el tanque de su lugar, la
unidad se apagará. Vacíe y reinstalelo.
IMPORTANTE:1RXVHHOPDQJXHUDVLXVDHOWDQTXHSDUD
recoger agua. Si el manguera está conectada, el agua caerá al
piso en lugar de caer dentro del tanque.
NOTAS:
Ŷ1RUHWLUHHOEDOGHFRQHOGHVKXPHGLILFDGRUHQ
funcionamiento o si recién se apagó. Esto puede hacer que
el agua gotee del recipiente de drenaje.
Ŷ(OWDQTXHGHEHHVWDUHQVXOXJDU\ELHQVXMHWRSDUDTXHHO
deshumedificador funcione.
Use una manguera. El agua puede desecharse
automáticamente hacia un drenaje en el piso si usted conecta
el tubo de drenaje con boquilla de la unidad a una manguera
para agua de jardín (no incluida).
6DTXHHOWDQTXHGHOIUHQWHGHODXQLGDG
2. Abra la tapa de drenaje sobre el lado de
3. Enrosque una manguera para jardín (no provista) en la
boquilla, cut to length, y diríjala al drenaje de piso.
9XHOYDDFRORFDUHOWDQTXHHQODXQLGDG
NOTA: El tanque debe estar en su lugar y bien sujeto para que el
deshumedificador funcione.
Use la bomba interna. El agua puede ser vaciada de forma
automática en una ubicación remota, adhiriendo la manguera incluida
de la bomba.
$GKLHUDODPDQJXHUDGHODERPEDDOFRQHFWRUGHODPDQJXHUD
presionando el accesorio de la tubería en el conector hasta que
quede colocada correctamente (usted no debería poder retirar la
manguera al empujar).
2. Posicione la descarga de la manguera en la ubicación deseada.
3. Asegúrese de que la bomba esté activada. Para activar la bomba,
PDQWHQJDSUHVLRQDGRHOERWyQ3XPS2Q2II%RPED$FWLYDGD
'HVDFWLYDGDGXUDQWHVHJXQGRV/DOX]LQGLFDGRUD3XPS2Q
%RPED(QFHQGLGDWLWLODUi\OXHJRSHUPDQHFHUiLOXPLQDGDXQDYH]
completados los 3 segundos.
9XHOYDDFRORFDUHOFXFKDUyQHQODXQLGDG
/DERPEDQRFRPHQ]DUiDHOLPLQDUDJXDKDVWDTXHHOEDOGHHVWpOOHQR
Después de que el botón de la bomba se haya activado al mantener
presionado durante 3 segundos, la bomba permanecerá en espera.
Cuando el cucharón está lleno, la bomba comenzará a eliminar agua
automáticamente y se detendrá cuando se vacíe el cucharón. Este
ciclo continuará hasta que se desactive el botón de la bomba.
IMPORTANTE: Asegúrese de que la manguera para condensado esté
correctamente conectada y que no esté retorcida, inclinada ni fisurada,
ya que esto puede hacer que caiga agua al piso. El cubo también
debe estar completamente apoyado para que la bomba funcione de
IRUPDFRUUHFWD1RXWLOLFHODPiTXLQDVLODWHPSHUDWXUDDPELHQWHHVGH
32ºF o inferior.
NOTAS:
Ŷ/DDOWXUDPi[LPDGHHOHYDFLyQHVGHSLHV
Ŷ(OFXERGHEHHVWDUFRUUHFWDPHQWHFRORFDGR\DSR\DGRGHIRUPD
segura para que el deshumidificador y la bomba funcionen.
Asegúrese de instalar la manguera (incluida) antes de activar la
bomba.
INSTRUCCIONES DE OPERACIÓN
Siempre cerciórese de que la tanque de agua esté asegurada en su lugar dentro del deshumedificador.
drain hose
nozzle
Manguera
de Desagüe
Manguera
de Desagüe

49-5000427 Rev. 1 7
Cómo usar el deshumedificador
Nivel de agua
El deshumedificador se apagará automáticamente cuando el
tanque se llene, o cuando el tanque sea removido o no sea
colocado en la posición apropiada.
El tanque debe colocarse en la posición apropiada para que
HOGHVKXPHGLILFDGRUIXQFLRQH/DOX]GHFXEHWDOOHQDHVWDUi
encendida y el deshumidificador no funcionará si la cubeta no
está en la posición correcta.
Funcionamiento del Balde
12UHWLUHODSLH]DGHHVSXPDHQODMXQWDGHOEDOGH6LVHUHWLUDHO
Deshumidificador no funcionará correctamente.
Cuando la bobina esté descongelada, el compresor o el ventilador
se reiniciarán de forma automática y la des humidificación será
reiniciada.
Para Instalar la Manguera: Empuje la manguera hacia
adentro y de forma suave empuje la misma hacia usted
SDUDFRQWURODUTXHHVWpELHQDVHJXUDGD1RGHEHSRGHUVHU
eliminado.
Para Liberar la Manguera: Sostenga el anillo gris
mientras empuja hacia usted para retirar la misma.
NOTE: 12UHWXHU]DQLSHOOL]TXHODPDQJXHUD\DTXHHVWR
puede bloquear el flujo de agua
Cómo desechar el agua acumulada (cont.)
Empuje la manguera hacia adentro
6RVWHQJDHODQLOORJULV
2. Empuje la manguera hacia afuera
INSTRUCCIONES DE OPERACIÓN

8 49-5000427 Rev. 1
Cuidado y limpieza
CUIDADO Y LIMPIEZA
Filtro de aire
El filtro de aire detrás de la rejilla frontal debe inspeccionarse y
limpiarse por lo menos cada
KRUDVRPiVDPHQXGRVLIXHVHQHFHVDULR
'HVSXpVGHKRUDVGHRSHUDFLyQVHHQFHQGHUiOD
luz indicadora de Clean the Filter (limpieza de filtro) para
recordarle que debe limpiar el filtro. Quite el filtro y límpielo.
Vuelva a colocar el filtro y presione el botón Filter Timer
(temporizador del filtro) para apagar la luz Clean the Filter
(limpieza del filtro).
Para retirarlo:
Quite el tanque, tome el extremo del filtro y jale hacia abajo y
afuera.
Para limpiar:
/LPSLHHOILOWURFRQDJXDWLELD\MDEyQ(QMXiJXHOR\SHUPLWD
que se seque antes de colocarlo otra vez en su lugar.
NOTA:12ODYHHOILOWURXVDQGRXQDPiTXLQDODYDYDMLOODV
automática
PRECAUCIÓN
1223(5(HOGHVKXPHGLILFDGRUVLQ
el filtro debido a que la suciedad y las pelusas lo obstruirán y
reducirán su rendimiento.
Rejilla y gabinete
Para limpiar el gabinete:
8VHDJXD\XQGHWHUJHQWHGHEDMDFRQFHQWUDFLyQ1RXVH
blanqueador ni limpiadores abrasivos.
Para limpiar la rejilla:
8VHXQDDVSLUDGRUDFRQDFFHVRULRGHFHSLOORVXDYH
o un cepillo de mano.
Tanque de agua
Para limpiar:
Después de algunas semanas, limpie el tanque para evitar la
IRUPDFLyQGHPRKRPLOGL~\EDFWHULDV/OHQHSDUFLDOPHQWHHO
tanque con agua limpia y agregue un poco de detergente suave.
Agite el contenido dentro del tanque, luego vacíelo y enjuáguelo.
NOTA: 1RXVHXQDPiTXLQDODYDYDMLOODVSDUDOLPSLDUHOWDQTXHGH
agua.
Para retirar:
Retire el tanque y deseche todo resto de agua.
Para volver a colocar:
Coloque el tanque en el deshumedificador deslizándolo.
NOTA: El tanque debe estar en su lugar y bien sujeto para que el
deshumedificador funcione.
Apague el deshumedificador y desconecte el enchufe del tomacorriente en la pared antes de limpiarlo.
Air Filter
Filtro de aire

49-5000427 Rev. 1
Cuidado y limpieza
CUIDADO Y LIMPIEZA
Almacenamiento
Si la unidad estará almacenada durante un período de tiempo
prolongado, realice las siguientes acciones antes de guardar la
máquina.
9DFtHWRGDHODJXDGHOFXER
/LPSLHHOFXERGHDJXD\HOILOWURGHOFXERGHDFXHUGRFRQODV
instrucciones.
3. Deje que el cubo de agua se seque y vuelva a instalar el
mismo.
5HWLUHODPDQJXHUDGHDJXD\JXDUGHODPLVPDFRQODXQLGDG
Para Liberar la Manguera: Sostenga el anillo gris mientras
empuja la manguera hacia usted
para retirar la misma.
Filtro del Cubo
El filtro del cubo está ubicado dentro del cubo cerca de la parte
LQIHULRU9HUOD)LJXUD(OILOWURGHEHVHUFRQWURODGRDOOLPSLDUHO
cubo. Si hay desechos en el filtro, de forma suave retire el filtro
como se describe a continuación y enjuague el mismo con agua
caliente. Reemplace el filtro en el cubo una vez que este último
esté limpio.
IMPORTANT: Tenga el cuidado de no rasgar ni dañar
HOILOWURGXUDQWHVXUHWLUROLPSLH]DRUHHPSOD]R1RXVHHO
lavavajillas para limpiar el filtro.
PARA RETIRAR EL FILTRO:
1. Presione ambas abrazaderas hacia adentro para desconectar
VXVVXMHWDGRUHVGHODWDSDGHOWDQTXHGHDJXD/HYDQWHODWDSD
hacia arriba para retirar la misma.
2. /HYDQWHHOH[WUHPRGHOILOWURKDFLDDUULEDSDUDUHWLUDUHOPLVPR
PARA REEMPLAZAR EL FILTRO:
3. Coloque el extreme grande del filtro sobre las lengüetas, y
presione el filtro hacia abajo de manera firme para esparcir
ODVOHQJHWDV8QDYH]TXHHOILOWURHVWpHQWUHODVOHQJHWDV
presione el filtro hacia dentro para conectar las lengüetas en el
filtro..
4. Reemplace la tapa y la manija del tanque de agua.
Gire y levante el filtro
6RVWHQJDHODQLOORJULV
2. Empuje la manguera hacia
afuera

49-5000427 Rev. 1
Consejos para la Solución de Problemas... Antes de solicitar el servicio técnico
CONSEJOS PARA LA SOLUCIÓN DE PROBLEMAS
¡Ahorre tiempo y dinero! Primero revise los cuadros que aparecen en las siguientes páginas y es posible que no
necesite solicitar reparaciones.
Problema Causas posibles Qué hacer
El deshumedificador
no enciende
El cable eléctrico del deshumedificador
está desenchufado.
Cerciórese de que la clavija del deshumedificador esté
conectada en la pared.
El fusible está quemado o el disyuntor del
circuito está abierto.
Revise la caja del disyuntor del circuito ó el fusible;
cambie el fusible o vuelva activar el disyuntor.
El deshumedificador ha alcanzado su nivel
preseleccionado o el tanque de agua está
lleno.
El deshumedificador se apaga automáticamente cuando
ocurre alguna de las dos condiciones. Cambie a una
configuración más baja o vacíe el tanque de agua y
reinstale apropiadamente.
El tanque no está en su lugar. El tanque debe estar en su lugar y bien sujeto para que
el deshumedificador funcione.
Corte de energía. Hay una demora protectora (de hasta 3 minutos)
para prevenir la interrupción de la sobrecarga del
compresor. Por esa razón, la unidad no reiniciará
la deshumedificación a los 3 minutos de haber sido
encendida de nuevo.
Deshumedificador
no seca el aire como
debiera
No ha pasado suficiente tiempo para que
seque el aire.
Cuando se instala por primera vez, deje que pasen
KRUDVSDUDTXHVHPDQWHQJDHOQLYHOGHKXPHGDG
deseada.
Hay escasa circulación de aire. Cerciórese de que no haya cortinas, persianas o
muebles que bloqueen la parte posterior ó al frente del
deshumedificador. Vea la sección Seleccione del lugar
adecuado.
Filtro sucio Vea la sección de Cuidado y limpieza.
El Control de humedad no está ajustado lo
suficientemente bajo.
Para aire más seco, presione el botón y seleccione un
YDORUSRUFHQWXDOPiVEDMRRHQNS1RQVWRSSDUD
obtener una máxima deshumidificación.
Las puertas y ventanas no están cerradas
completamente.
Revise que todas las puertas, ventanas y otras aberturas
están cerradas completamente.
El secador de ropa podría estar generando
aire húmedo en el recinto.
Instale el deshumedificador lejos de la secadora de ropa.
El secador debe desechar el aire hacia el exterior.
La temperatura del recinto está demasiado
baja.
/DGHVKXPHGLILFDFLyQHVPHMRUDWHPSHUDWXUDVDPELHQWH
altas. Temperaturas bajas causan bajo rendimiento
de deshumedificación. Modelos están diseñada para
IXQFLRQDUDWHPSHUDWXUDVSRUHQFLPDGH)&
El deshumedificador
trabaja demasiado
El volumen de aire a deshumedificar es
excesivo.
/DFDSDFLGDGGHVXGHVKXPHGLILFDGRUQRHVWiQ
adecuada.
Las puertas y ventanas están abiertas. Cierre todas las puertas y ventanas que den al exterior.
Se forma escarcha
en el serpentín
El deshumedificador ha sido encendido
hace poco o la temperatura del recinto es
inferior a 41 °F (5 °C).
(VWRHVQRUPDO/DHVFDUFKDQRUPDOPHQWHGHVDSDUHFHUi
HQPLQXWRV9HDODVHFFLyQGH'HVFRQJHODGR
automático (Automatic defrost).
Los controles no se
pueden configurar
El compresor se apaga, y el ventilador
sigue funcionando automáticamente
durante aproximadamente 3 minutos a
una configuración fija.
Esto es normal. Espere aproximadamente 3 minutos y
coloque el ventilador lo desee.
El ventilador hace
ruido
El aire se mueve a través del
deshumedificador.
Esto es normal.
Hay agua en el piso La conexione a la manguera está floja. Inspeccione la conexione a la manguera. Consulte la
sección Cómo desechar el agua acumulada.
Intenta usar el tanque para recoger agua,
pero el manguera está colocada.
Desconecte el manguera si usa el tanque para recoger
agua. Consulte la sección Cómo desechar el agua
acumulada.
La luz LED de
Tanque Lleno
destella y suena la
alarma
La manguera de drenaje no está bien
ajustada en el accesorio
Verifique la conexión de la manguera de drenaje
La manguera de drenaje está torcida Verifique que la manguera de drenaje apunte en forma
recta hacia el piso y que no se encuentre torcida.

49-5000427 Rev. 1
GARANTÍA LIMITADA
GE Appliances Garantía Limitada de su Deshumedificador
Ŷ,QVWUXFFLRQHVDOFOLHQWH(O0DQXDOGHOSURSLHWDULR
proporciona información acerca de las instrucciones de
operación y de los controles del usuario.
Ŷ,QVWDODFLyQRHQWUHJDLQDSURSLDGDRPDQWHQLPLHQWR
impropio. Si usted tiene un problema durante la instalación,
o si su producto no tiene la capacidad que usted necesita,
póngase en contacto con nuestro distribuidor. Usted es
responsable de proporcionar las instalaciones eléctricas y
de plomerianecesarias.
Ŷ)DOORGHOSURGXFWRUHVXOWDQWHGHPRGLILFDFLRQHVDOSURGXFWR
o debido a uso irrazonable incluyendo no proporcionar
mantenimiento razonable y necesario.
Ŷ5HHPSOD]RGHIXVLEOHVGHODFDVDRUHDMXVWHGHOVLVWHPDGH
circuitos.
Ŷ)DOORGHELGRDODFRUURVLyQ
Ŷ'DxRDOSURGXFWRFDXVDGRSRUYROWDMHLQDSURSLDGRKDFLDHO
equipo, accidentes, incendios, inundaciones o actos
de la naturaleza de fuerza mayor.
Ŷ'DxRVLQFLGHQWDOHVRFRQVHFXHQFLDOHVFDXVDGRVSRU
defectos posibles con este producto.
Ŷ&DXVDUGDxRVGHVSXpVGHODHQWUHJD
Lo quxe no está cubierto:
Esta garantía limitada se extiende al comprador original y cualquier comprador posterior de productos comprados para uso
UHVLGHQFLDOGHQWURGH(VWDGRV8QLGRV
Algunos estados no permiten la exclusión o las limitaciones de daños incidentales o consecuenciales. Esta garantía limitada
da derechos legales específicos, y usted podría tener otros derechos que variarán de estado a estado. Para saber cuáles son
sus derechos legales, consulte a la oficina de asuntos del consumidor local o la oficina del Attorney General en su localidad.
Exclusión de garantías implicadas: Excepto donde está prohibido o restringido por la ley, no hay garantías, expresas, orales
o estatutarias que extiendan más allá de la descripción específica, incluyendo específicamente las garantías implicadas de
mercantibilidad o propiedad para un propósito particular.
Garante: GE Appliances, a Haier company
Louisville, KY 40225
EXCLUSIÓN DE GARANTÍAS IMPLÍCITAS—Su único y exclusivo derecho es el reemplazo del producto, tal y
como se indica en esta Garantía limitada. Cualquier garantía implícita, incluyendo las garantías implícitas de
FRPHUFLDELOLGDGRDGHFXDFLyQSDUDXQILQGHWHUPLQDGRHVWiQOLPLWDGDVDXQDxRRHOSHUtRGRGHWLHPSRPiV
breve permitido por la ley.
Por el período de: Nosotros reemplazaremos:
8QDxR
A partir de la fecha de la
compra original
Unidad de reemplazo para cualquier producto que falle debido a defectos en los materiales o
HQHOSURFHVRGHIDEULFDFLyQ/DXQLGDGGHUHHPSOD]RHVWiJDUDQWL]DGDSDUDHOUHVWRGHOSHUtRGR
de un año de garantía original del producto. La unidad de reemplazo puede ser una nueva o
una reparada.
Ŷ Empaque su unidad apropiadamente. Recomendamos usar
el cartón original y los materiales de empaquetado.
Ŷ
Regrese el producto al local de ventas donde usted
lo compró.
Ŷ
Incluya en el paquete una copia del recibo de venta
u otra evidencia de la fecha original de la compra.
Además imprima su nombre y dirección y una descripción
del defecto.
Si desea realizar una queja durante los primeros 90 días de la garantía desde la fecha original de compra:
Ŷ8ELTXHDVXUHFHSWRURULJLQDOGHYHQWDV\KDJDXQDQRWD
indicando su modelo y número de serie.
Ŷ/ODPHD*($SSOLDQFHVDODILQGHLQLFLDUHO
proceso de reemplazo del producto.
Ŷ6HOHSHGLUiTXHGpVXQRPEUHGRPLFLOLRIHFKDGH
adquisición, modelo y número de serie.
Ŷ
GE hará arreglos para que se envíe una caja a su hogar
a fin de que pueda recuperar el producto.
Ŷ
Deberá entregar el producto (con los gastos de correo
previamente cubiertos por GE) al centro de recuperación de
GE para que se pueda entregar una unidad de reemplazo.
Incluya una descripción del defecto.
Ŷ
Deberá recibir el producto de reemplazo entre los 7 y 10
días hábiles luego de que hayamos recibido su unidad.
6LGHVHDKDFHUXQDTXHMDGXUDQWHHODxRGHJDUDQWtDUHVWDQWH
Abroche su recibo aquí. Para acceder al servicio técnico de acuerdo con
la garantía deberá contar con la prueba de la fecha original de compra.

49-5000427 Rev. 1
,PSUHVRHQ(VWDGRV8QLGRV
Soporte al Cliente
SOPORTE AL CLIENTE
GE Appliances Sitio Web
¿Desea realizar una consulta o necesita ayuda con su electrodoméstico? ¡Intente a través del Sitio Web de Electrodomésticos
GH*($SSOLDQFHVODVKRUDVGHOGtDFXDOTXLHUGtDGHODxR8VWHGWDPELpQSXHGHFRPSUDUPiVJUDQGLRVRVSURGXFWRVGH*(
Appliances y sacar ventaja de todos nuestros servicios a través de Internet diseñados para su conveniencia.
(Q((88GEAppliances.com
Registre su Electrodoméstico
£5HJLVWUHVXHOHFWURGRPpVWLFRQXHYRDWUDYpVGH,QWHUQHWVHJ~QVXFRQYHQLHQFLD8QUHJLVWURSXQWXDOGHVXSURGXFWRSHUPLWLUi
una mejor comunicación y un servicio más puntual de acuerdo con los términos de su garantía, en caso de surgir la necesidad.
También puede enviar una carta en la tarjeta de inscripción pre-impresa que se incluye con el material embalado.
(Q((88GEAppliances.com/register
Servicio Programado
El servicio de reparación de expertos de GE Appliances está a sólo un paso de su puerta. ¡Conéctese a través de Internet y
SURJUDPHVXVHUYLFLRDVXFRQYHQLHQFLDFXDOTXLHUGtDGHODxR(Q((88GEAppliances.com/serviceROODPHDO
durante el horario comercial habitual.
Garantías Extendidas
Adquiera una garantía extendida de GE Appliances y aprenda sobre descuentos especiales que están disponibles mientras su
JDUDQWtDD~QHVWiYLJHQWH/DSXHGHDGTXLULUHQFXDOTXLHUPRPHQWRDWUDYpVGH,QWHUQHW/RV6HUYLFLRVGH*($SSOLDQFHVD~Q
HVWDUiQDOOtFXDQGRVXJDUDQWtDFDGXTXH(Q((88GEAppliances.com/extended-warrantyROODPHDOGXUDQWH
el horario comercial habitual.
Conectividad Remota
Para solicitar asistencia con la conectividad de red inalámbrica (para modelos con activación remota), visite nuestro sitio Web en
GEAppliances.com/connectROODPHDOHQ((88
Piezas y Accesorios
Individuos calificados para realizar el servicio técnico de sus propios electrodomésticos podrán solicitar el envío de piezas o
DFFHVRULRVGLUHFWDPHQWHDVXVKRJDUHVVHDFHSWDQODVWDUMHWDV9,6$0DVWHU&DUG\'LVFRYHU2UGHQHDWUDYpVGH,QWHUQHWKR\
GXUDQWHODVKRUDVGHOGtD(Q((88GEApplianceparts.comRSRUWHOpIRQRDOGXUDQWHHOKRUDULRFRPHUFLDO
habitual.
Las instrucciones que figuran en este manual cubren los procedimientos que serán realizados por cualquier usuario.
Otros servicios técnicos generalmente deberían ser derivados a personal calificado del servicio. Se deberá tener
cuidado, ya que una reparación indebida podrá ocasionar que el funcionamiento no sea seguro.
Contáctenos
Si no se encuentra satisfecho con el servicio que recibió de GE Appliances, comuníquese con nosotros a través de nuestro sitio
Web con todos los detalles, incluyendo su número telefónico, o escriba a:
(Q((88*HQHUDO0DQDJHU&XVWRPHU5HODWLRQV_*($SSOLDQFHV$SSOLDQFH3DUN_/RXLVYLOOH.<5
GEAppliances.com/contact
-
 1
1
-
 2
2
-
 3
3
-
 4
4
-
 5
5
-
 6
6
-
 7
7
-
 8
8
-
 9
9
-
 10
10
-
 11
11
-
 12
12
-
 13
13
-
 14
14
-
 15
15
-
 16
16
-
 17
17
-
 18
18
-
 19
19
-
 20
20
-
 21
21
-
 22
22
-
 23
23
-
 24
24


GE APEL50LZ El manual del propietario
- Categoría
- Deshumidificadores
- Tipo
- El manual del propietario
En otros idiomas
- English: GE APEL50LZ Owner's manual
Documentos relacionados
-
GE APEL45LY El manual del propietario
-
-
GE ADEW45LY El manual del propietario
-
-
-
GE ADHB50LZ Guía del usuario
-
-
GE ADEL70LW El manual del propietario
-
-
