Truper DES-330 El manual del propietario
- Categoría
- Podadoras de césped
- Tipo
- El manual del propietario

Manual
DES-330
ModelCode
DES-330
Applies for:
11029
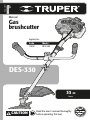
Motor
33 cc
ENGLISH
ESPAÑOL
CAUTION Read the user’s manual thoroughly
before operating this tool.
Gas
brushcutter

Use and care recomendations
1 liter
of Gasoline
1 L
Mix
50:1
4 oil
capfuls
Use gasoline mixed with 2-STROKE motor OIL.
A wrong mix may cause the brushcutter to throw
a rod, causing expensive repairs!
ALWAYS USE the GUARD. USE THREAD with diameter from 3/32” to 9/64”
Do not use a fuel MIX that has been stored longer than 15 days.
Perform periodic MAINTENANCE to your machine (page 11).
ALWAYS operate your brushcutter at MAXIMUM POWER
with the trigger FULLY tightened
2
3
3
4
5
6
7
9
9
10
11
12
13
15
16
WARNING
ENGLISH
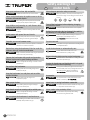
Contents
To gain the best performance of
the tool, prolong the duty life,
make the Warranty valid if
necessary, and to avoid hazards
of fatal injuries please read and
understand this Manual before
using the tool.
Keep this manual for future references.
The illustrations in this manual are for reference
only. They might be different from the real tool.
Technical Data
Fuel Specifications
Safety warnings for motor tools
Safety warnings for brushcutters
Parts
Assembly
Fuel supply
Tuning on
Operation
Maintenance
Troubleshooting
Notes
Authorized service centers
Warranty policy

Code
Description
Net weight
Motor
Motor rated power
Fuel tank
Speed
Cutting capacity
Axis length
DES-330
11029
19.8 lb
Gas brushcutter
0.23 gal
1.4 Hp
9000 RPM
18”
5.2 ft
Cutting systems
Blade diameter
Nylon line diameter
Nylon line spool and blade
Outer: 10” Inner: 1”
From 0.09” to 0.14” (recommended)
Type of handle
Work cycle
“Bicycle” type
20 minutes rest per each tank consumed.
Maximum 6 hours daily.
33 cc
3
ENGLISH
• The brushcutter has an air-cooled 2-cycle motor using a mix of unleaded gasoline and high quality self-propulsion
oil for air-cooled two-cycle motors.
• The motor is certified to run with unleaded gasoline for vehicles with 87 or more ([R+M]) octane level.
• Do not use any type of gasoline premixed with oil bought in service stations such as gasoline for motorcycles.
• Do not use automotive oil or oil for 2-cycle outboard motors oil.
• The mix ratio should be 50 parts gasoline per 1 part oil (50:1 ratio). Prepare the mix in a gasoline-approved
container. Always mix thoroughly before pouring in the motor tank.
Do not use fuel mix stored longer than 15 days. Make small amounts of mix.
Never smoke near fuel, the gasoline filling up area or where the oil mix is being prepared or when
operating the tool.
Any attempt to start the brushcutter with no oil added to the fuel mix will damage to the
brushcutter.
WARNING
CAUTION
WARNING
Mix
1 liter
1L+ = 50:1
ratio
4 capfuls oil
Gasoline
A wrong mix may cause the motor to throw a rod causing
expensive repairs!
To prolong the useful life of the motor use two-cycle synthetic motor oil.
* 1 gallon = 3.78 liter ** Not included
Technical data
Fuel specifications
Use ACES-2, ACES-5 or ACES-20 oil caps** to measure the mix.
Mix 4 capfuls oil per each gasoline liter.

4ENGLISH
Keep your work area clean, tidy and well lit.
Cluttered and dark areas may cause accidents.
Never use the brushcutter in explosive areas or in the
presence of flammable liquids.
Before starting the motor keep the brushcutter at least
9 meters (30 feet) away from the fill up area.
Keep children and passersby at a safe distance while
operating the brushcutter.
Distractions could cause loosing control and cause
accidents.
Avoid contact with power lines and circuits.
Find and avoid power lines and circuits, especially
hidden wiring as well as any grounded object.
Stay alert, use care and common sense.
Familiarity with the brushcutter operation could lead to
distractions. It could cause accidents.
Refrain from using the brushcutter if tired or under the
influence of drugs, alcohol or medication.
Being momentarily distracted while using the brushcutter
could cause severe personal injury.
Operate the brushcutter with guards and protection
devices in place and in good working condition.
Failure to comply with this warning is a hazard of severe
personal injury.
Do not force the brushcutter.
Working within the tool’s working design assures
a better and safer job.
Keep the brushcutter in a safe place and out of the
reach of children.
Motor powered tools are dangerous to
inexperienced people.
Wear proper clothes.
Loose clothes, jewelry or long hair could get
caught in the mobile parts.
Keep hands away from rotating and/or mobile parts.
Failure to comply with this warning is a hazard
of severe personal injury.
Do not operate the brushcutter in enclosed areas.
Avoid breathing accumulated carbon monoxide, a
potentially deadly odorless toxic gas.
Wear adequate protective safety accessories.
Wear eye protection, dust mask, non-skid safety shoes,
helmet and ear plugs. These safety gears reduce the risk
of injury.
Turn off the brushcutter before adjusting, changing
accessories or storin.
Double check the brushcutter switch is in the off position.
Refrain from operating the brushcutter if the switch is
not working or is not properly assembled.
Failure to complain with this warning is a hazard of
personal injury. Immediately send it to a
Authorized Service Center.
Do not overreach.
Good balance and support lead to better controlling the tool
in unexpected situations.
Avoid the brushcutter to unintentionally start.
Double-check the brushcutter motor is off
before maintenance or putting it away.
Remove brackets before turning on the brushcutter.
Additional tools or vices installed in a rotating part could
cause severe personal injury.
Service the brushcutter and double-check it is in good
working conditions before operating.
Carefully check mobile parts, alignment and assembly.
Do it periodically. Look for any damaged element or part
not working properly. Repair immediately in a
Authorized Service Center.
Accessories.
Use only accessories or spare parts indicated in this
Manual or certified by .
Never leave a running brushcutter unattended.
Turn off and disconnect the brushcutter after using. Set it
in a safe position to avoid severe injury.
Never smoke in the proximity of fuel.
Do not smoke in the proximity of the fuelling
area or when using the brushcutter.
CAUTION CAUTION
CAUTION
CAUTION
CAUTION
CAUTION
CAUTION
DANGER
DANGER
DANGER
DANGER
DANGER
DANGER
DANGER
WARNING
WARNING
WARNING
WARNING
WARNING
WARNING
WARNING
WARNING
Safety warnings for
motor tools

5
formations or condensation in the brushcutter.
• Verify visibility and light condition are adequate to see
clearly. Otherwise do not use the brushcutter.
• Do not use the brushcutter with any guards in place. Or
if the guards show any type of damage or they have
missing parts.
• Wear the right clothes to operate the brushcutter. Tight
fitting clothes, strong pants, anti-skid safety boots,
heavy-duty protecting gloves and safety glasses with side
protection complying with ANSI Z87.1. Standard.
• Remove any accessory or loose
clothes that could get caught by the moving cutter head.
Fasten your long hair above your shoulders.
• Verify the brushcutter is in perfect working conditions. Do
not turn on is not properly adjusted or fully assembled to
work in a safe manner, or if the fuel tank shows leakage or
loose screws.
• Verify the cutter head stops moving when the throttle
trigger is released. If it does not stop shut off the
brushcutter. Go to a Authorized
Service Center to solve the problem.
• Verify the brushcutter is clean, dry and free of oil or fuel.
• Double-check the work area is in an open area and is
well ventilated.
• Check the work area. Remove stones, pieces of broken
glass, nails, wire or rope. They could be soot out or be
tangled in the brushcutter.
• In extreme temperatures verify there are no ice
• Keep passersby, children and animals
away no less than 50 feet away.
• Verify the cutter head is not making contact with any
object before starting the motor.
• Keep both feet firmly set on the
ground and both hands holding the brushcutter by the
handles. Never operate the brushcutter single-handed.
Otherwise the operator and any other person present
may be injured.
• Keep all your body away from the cutter head when the
motor is running.
• Always keep the cutting head pointed downwards,
below your waist level. Never raise it above 2.4 feet from
the ground.
• Keep all your body parts away from the muffler.
Otherwise severe burns can occur.
• Keep the brushcutter away from flammable materials.
• The blades are designed to cut grass and vines no
thicker than 0.5” in diameter.
• Do not use the brushcutter to cut woody shrubs.
• Be alert to surrounding risks. The brushcutter noise
could prevent you from noticing them.
• If making jobs near traffic roads, stop
cutting until there are no vehicles in sight. The brushcutter
could shoot particles towards the moving vehicles and
produce a severe accident.
• Do not try to stop the cutter head
rotating movement in any other way than releasing the
switch. Wait for the cutter head stop after shutting off the
brushcutter. It will take a couple of seconds.
• Always carry the brushcutter with the
motor off and the muffler away from your body. Before
putting the brushcutter in a vehicle, drain the fuel tank.
• Turn off the motor before idling the
brushcutter. DO NOT leave the motor running
unattended. Wait for the brushcutter to cool off before
storing.
• Highly trained personnel of a
Authorized Service Center should
only carry out service and repairs.
Before operating the brushcutter
Fuel handling
When operating the brushcutter
After operating the brushcutter
DANGER
CAUTION
CAUTION
WARNING
WARNING
CAUTION
CAUTION
CAUTION
WARNING
WARNING
WARNING
• Never smoke near fuel or where gasoline is supplied.
Or where the oil mix is prepared or while operating the
brushcutter.
• Handle fuel with care to reduce risk of fire or burns.
Fuel is very flammable.
• Do not allow gasoline or oil getting contact with your
skin.
• Protect your eyes. Avoid spilling oil or gasoline. In the
event of accidental contact, wash eyes immediately with
clean water. If irritation persists, see a doctor.
• Mix and store fuel in a labeled container.
• Mix fuel outdoors away from flames
or sparks.
• Before refueling the brushcutter turn off the motor. Set
the brushcutter in the ground in a clear surface. Wait for
the motor to cool down.
• Clean all the fuel that might have been
spilled before operating the brushcutter.
• Verify there are no leaks. If so, correct
them before using the brushcutter to prevent fire or
burns.
• Move the brushcutter at least 30 feet away from the fuel
filling up site before starting the motor.
• Under no circumstance burn spilled fuel.
• Under no circumstance, use any other type of fuel
different from the specified in this Manual.
ENGLISH
Safety warnings
for brushcutters

Padded
Support
Lumbar
Belt
Guard
Harness
Ring
Fast Release
System
Straight Axis
Cutter
Head
Blade
6
Parts
Double Harness
• Do not try to modify the brushcutter
or manufacture not recommended accessories.
Otherwise, the user may suffer severe injuries and will
make the warranty void.
• When assembling parts, always
disconnect the motor spark plug cable to prevent an
accidental start up causing severe personal injuries.
WARNING
WARNING
Control
Handle
Throttle
Trigger
Switch
Trigger
Release
Starter
Handle
Spark Plug Cover
Easy Adjusting
Knob
Starter
Handle
Exhaust
Fuel
Tank
Cap
Fuel Tank
Choke
Lever
Harness
Ring
Primer
Bulb
Auxiliary
Handle
Air Filter
Cover Knob
Cutting
Line Spool
ENGLISH

Straight Axis
a
Handle
7
Assembly
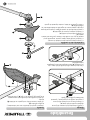
• Separate the hinge bracket from the straight axis frame
loosening the easy adjusting knob (a).
• Set the handle in the straight axis frame.
• Secure the handle in place and tighten the easy
adjusting knob firmly.
Handle
• Fasten the guard into the cutting head using the bracket
and the bolts included (A).
• If using the line spool, use the guard with the protection (B)
included.
• When using the blade, remove the screw in the rear of
the guard (C). Press both clips (D) and remove the
protection.
Guard
• Press the turn table onto the cutter head (1).
• Set the blade onto the pressed turn table making sure the turning
direction is the same as the sense labeled on the guard (2).
• Set the flange onto the blade (3).
• Set the cover and the lock nut (4).
• Insert the Allen key in the pressed turn table to block the axis (5)
and tighten the lock nut counterclockwise using the included
wrench (6).
• Use the guard with the protection removed. See the guard section.
Blade installation
D
A
B
C
b
• To rotate the handle, loosen the easy adjusting knob and
turn the handle (b) 90°. This is useful to store and
transport the brushcutter.
3
6
1
5
2
4
ENGLISH

8
Assembly
8
9
7
5
A B
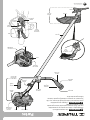
• Set the pressure turn table onto the cutter head (7).
• Set the flange onto the turn table (8).
• Insert the Allen key into the turn table side to block the
axis (5).
• Place the threaded spool in the axis
and tighten counterclockwise using
your hand (9).
• Use the guard with the protection.
See the guard section.
Line spool installation
• Wear the harness and adjust to set it firmly and
comfortably.
• Join the harness into the harness ring of the straight axis
of the brushcutter.
• Travel the ring upwards and downwards until the
brushcutter is balanced and the cutter head points down,
below the user’s waist and no more than 30” away from
the ground.
• When using the line spool, the cutter head shall touch
the ground slightly (A).
• When using the blade, the cutter head shall be
approximately 8” away from the ground (B).
Balancing the brushcutter
8”
ENGLISH

G
Dx10
x4
I
x6
C
H
E
F
9
A
B
K
ENGLISH
• Follow the safety standards for handling fuel (page 5).
• Wait until the motor has cooled down completely
before supplying fuel.
• Set the brushcutter onto a flat surface.
• Wipe clean around the fuel tank cap to prevent
contamination.
• Slowly loosen the fuel tank cap.
• Use care to prevent spills. Pour the fuel mix into the
tank. Follow the fuel specifications (page
3).
• Before capping the fuel tank check and clean the joints.
• Set immediately the fuel tank cap and tighten with your
hand.
• Clean all fuel spilled.
In a new motor smoke emissions are
normal during and after using for the first time.
• Set the brushcutter on level ground where the blade or
spool will not make contact with any obstacle.
• Set the switch into the ON position (A).
• Press and release the primer bulb 10 times (B).
• Move the choke lever upwards (C).
• Press simultaneously the trigger release (D) and the
throttle trigger (E). Keep the trigger depressed.
• Pull the starter handle (G) to start the motor. Do NOT
pull more than 4 times to avoid flooding the motor.
• If the motor is not starting, move the choke lever
downwards (H). Pull again the starter handle (I) until the
motor starts. DO NOT pull more than 6 times (although
in cold climate you may need to pull the starter handle
more times).
• If the motor is not starting still, repeat steps from (B)
and on.
• Once the motor starts, leave it running a few seconds in
that position.
• Press and release the throttle trigger to set the motor
idle (K).
• The brushcutter is now ready to operate. Hold both
handles using both hands and lift it to start the job.
Start up with a cold motor
CAUTION
CAUTION
Fuel supply
Turning on

G
Dx10
10
Operation
• Set the brushcutter on level ground where the blade or
spool will not make contact with any obstacle.
• Set the switch into the ON position (A).
• Press simultaneously the trigger release (D) and the
throttle trigger (E).Keep the trigger depressed.
• Pull the starter handle (G) to start the motor.
• Press and release the throttle trigger to set the motor
idle (K).
Start up with a hot motor
• Press and hold the switch into the OFF position (E) until
the motor stops.
Turning off
• Remember, you as the brushcutter
operator is responsible of your own safety as well as
people close to the work area. Follow all safety warnings
(pages 4 and 5) before operating the brushcutter.
• Keep a balanced stance with both feet firmly set onto the
ground.
• Hold the brushcutter firmly in front of you; one hand
holds the handle and the other holds the auxiliary handle
so that the brushcutter is aligned to your body and
pointing the cutter head 30° downwards, away from your
feet.
• Do not start the brushcutter in a
different position.
• Turn ON the brushcutter and cut from left to right
rotating your waist and keeping the brushcutter position.
• As the cut is performed, the cutting line wears out and
will be detached. To release more line from the spool,
press the brushcutter slightly downwards. The ground will
depress the retention cap against the spool and will release
more line. The guard blade will cut the remaining line.
Then, stop pushing the brushcutter against the ground to
save line lengths.
• To cut brush or grass, cut gradually. Do not try to cut in
one movement from the base because the residues may
clog the cutting head or can go out of control from the
operator.
30°
Cutting
movement
Waist
Rotation
CAUTION
DANGER
E
F
A
B
K
ENGLISH
Turning on
E

R: 2 mm -
3 mm
R: 4 mm -
5 mm
11
A
11
ENGLISH
• The motor runs with a NGK BPMR7A spark plug with 0.025”
electrode gap. Replace the spark plug once a year with and
identical spark plug.
• With the motor totally cold, loosen the worn spark plug
towards the left using a spark plug wrench and remove it.
•Insert the new spark plug and using your hand tighten
towards the right.
• Use care not to damage the spark plug
thread. Otherwise it can damage the motor.
• Give the spark plug half-a turn more using the spark plug
wrench included.
• Before inspecting, cleaning or servicing the tool turn the motor off, wait for all the mobile parts to stop, disconnect the spark
plug cable and set it away from the spark plug. Otherwise, the operator may suffer severe burns and / or damage the tool.
Maintenance
Air filter cleansing
• Remove the air filter cover loosening the cap knob.
• Remove the air filter.
• Depending on how long the machine is used, you may
clean the filter by superficially tapping it lightly against a
flat surface to displace most of the particles.
• You may also use compressed air on both sides of the
filter to blow away dirt.
• For a more thorough cleansing clean the air filter in
soapy water. Rinse and let it dry completely before
installing it back into the brushcutter.
• Set back the filter. Verify it is flush in place.
• Clean the air filter as frequently as necessary to keep it
always clean. Otherwise the motor efficiency may lessen.
General cleansing
• Using a brush or compressed air, clean and clear the
ventilation slots from the starter unit when necessary.
• Likewise, clean periodically the motor cylinder and fan
blades to remove debris. Otherwise the motor may get
damaged do to overheating.
Muffler and exhaust cleansing
• The muffler and exhaust can get clogged with carbon
deposits dependent of type of fuel, amount of oil used
and / or conditions of the use of the brushcutter. If there
is power loss, deposits shall need to be removed to
improve performance. Go to a Au-
thorized Service Center to carry out the service.
• The muffler is built with a spark-arrest screen inside the
muffler. After long periods of use the screen gets dirty
and the muffler needs replacement. Go to a
Authorized Service Center to carry
out the replacement.
• Check often that the muffler has the
fasteners perfectly secured and that there is no damage or
corrosion. In the event of leaks stop the brushcutter and
take it immediately to a Authorized
Service Center to repair.
Lubrication
• The inside of the cutting head gearbox is lubricated with
lithium-based multiple use grease. Add grease every 25
hours use.
• To add grease set the grease device into the nipple (A)
and pump twice.
Carburetor adjustment
• It is recommended to carry out the carburetor adjustment
in a Authorized Service Center.
• A faulty adjustment can damage the motor and makes
warranty void.
Fuel filter
• Check the gasoline filter frequently.
• If the filter is dirty, replace it.
• If the gasoline tank is dirty inside, rinse with gasoline.
Blade
• Check and maintain the blade always in the best
condition.
• Sharpen if necessary with a flat file. Use care not to
change the blade profile and the sharpness to assure the
best performance of the brushcutter.
Spark plug replacement
DANGER
DANGER

Troubleshooting
12 ENGLISH
Maintenance
The motor does not
start.
The motor starts but
will not accelerate.
The motor starts but
runs only in high
speed with half a
choke.
The motor is not
reaching full speed
and starts having
smoke emissions.
The motor starts, runs,
accelerates but there is
no idle speed.
• There is no spark.
• There is no fuel.
• The motor is flooded.
• The starter jack-line is
harder to pull than
when it was new.
• The motor needs a
couple of minutes to be
hot.
• The carburetor has to
be adjusted.
• Check the oil / fuel
mix.
• The air filter is dirty.
• The spark arrest
screen is dirty.
• The idle screw in the
carburetor need to be
adjusted.
• Check the spark. Remove the motor cover. Remove the spark plug from
the cylinder. Connect the spark plug cable and set it onto the motor
cylinder, with the metal part touching the cylinder. Pull the jack-line and
observe the spark in the spark plug electrode. If there is no spark, repeat
the test using a new spark plug.
• Press the starter choke until fuel is visible in the bulb. If fuel is not visible,
it means the primary system in the fuel supply is blocked. Contac a
. Authorized Service Center. If the starter choke is
filled with fuel, the motor is flooded.
• With the switch off, remove the spark plug. Move the choke lever
downwards and pull the jack-line 15 to 20 times to eliminate excessive
fuel from the motor. Clean the spark plug and set it back in place. Follow
the normal starting procedure (see page 9). If the motor is not starting,
repeat the procedure using a new spark plug.
• Take the Gas Brushcutter to a Authorized Service
Center.
• Allow the motor to be completely hot. If the motor will not accelerate
after three minutes, contact your Authorized Service
Center.
• Take the Gas Brushcutter to a Authorized Service
Center.
• Use new fuel and the right oil mix for a 2-stroke motor.
• Clean the air filter. See page 11.
• Take the Gas Brushcutter to a Authorized Service
Center.
• Turn the idle screw clockwise to increase speed.
Problem Cause Solution
Gas Brushcutter Storage
In the event of storing the Gas Brushcutter for one month or longer, bear in mind the following considerations:
• Drain all the fuel tank contents into an approved gasoline container. All the remaining fuel can be re-used in another tool that uses
2-stroke motor with a 50:1 ratio.
• Start the motor until the rest of fuel is consumed and the motor shuts down. This will eliminate the fuel residues and will prevent gum
formations that damage the fuel system.
• Clean the Gas Brushcutter thoroughly.
• Store the unit in a well-ventilated space, away from corrosive agents such as garden chemical products or de-icing salts. And away from
children’s reach.
• Observe all the government rulings concerning safety in management and storing fuel.
General cleaning
Air filter cleaning
Carburetor cleaning *
Spark plug inspection and adjustment *
Fuel tank cleaning **
Fuel filter change **
Fuel chamber replacement **
Combustion chamber cleaning **
Regular maintenance Every use Every 25 h
of use
Every 50 h
of use
Every 150 h
of use
Every 250 h
of use
* Trained user or Authorized Service Center** Authorized Service Center
Cutterhead Gearbox Lubrication

13
Notes
ENGLISH

14
Notes
ENGLISH

15
Authorized Service Centers
ENGLISH
In the event of any problem contacting a Truper Authorized Service Center, please see our webpage www.truper.com
to get an updated list, or call our toll-free numbers 800 690-6990 or 800-018-7873 to get information about the
nearest Service Center.
AGUASCALIENTES
BAJA
CALIFORNIA
BAJA
CALIFORNIA SUR
CAMPECHE
CHIAPAS
CHIHUAHUA
CIUDAD DE
MÉXICO
COAHUILA
COLIMA
DURANGO
ESTADO DE
MÉXICO
GUANAJUATO
GUERRERO
HIDALGO
JALISCO
MICHOACÁN
MORELOS
NAYARIT
NUEVO LEÓN
OAXACA
PUEBLA
QUERÉTARO
QUINTANA ROO
SAN LUIS
POTOSÍ
SINALOA
SONORA
TABASCO
TAMAULIPAS
TLAXCALA
VERACRUZ
YUCATÁN
DE TODO PARA LA CONSTRUCCIÓN
GRAL. BARRAGÁN #1201, COL. GREMIAL, C.P. 20030,
AGUASCALIENTES, AGS. TEL.: 449 994 0537
SUCURSAL TIJUANA
AV. LA ENCANTADA, LOTE #5, PARQUE INDUSTRIAL EL
FLORIDO II, C.P 22244, TIJUANA, B.C.
TEL.: 664 969 5100
FIX FERRETERÍAS
FELIPE ÁNGELES ESQ. RUIZ CORTÍNEZ S/N, COL. PUEBLO
NUEVO, C.P. 23670, CD. CONSTITUCIÓN, B.C.S.
TEL.: 613 132 1115
TORNILLERÍA Y FERRETERÍA AAA
AV. ÁLVARO OBREGÓN #324, COL. ESPERANZA
C.P. 24080 CAMPECHE, CAMP. TEL.: 981 815 2808
FIX FERRETERÍAS
AV. CENTRAL SUR #27, COL. CENTRO, C.P. 30700,
TAPACHULA, CHIS. TEL.: 962 118 4083
SUCURSAL CHIHUAHUA
AV. SILVESTRE TERRAZAS #128-11, PARQUE INDUSTRIAL
BAFAR, CARRETERA MÉXICO CUAUHTÉMOC, C.P. 31415,
CHIHUAHUA, CHIH. TEL. 614 434 0052
FIX FERRETERÍAS
EL MONSTRUO DE CORREGIDORA, CORREGIDORA # 22,
COL. CENTRO, C.P. 06060, CUAUHTÉMOC, CDMX.
TEL: 55 5522 5031 / 5522 4861
SUCURSAL TORREÓN
CALLE METAL MECÁNICA #280, PARQUE INDUSTRIAL
ORIENTE, C.P. 27278, TORREÓN, COAH.
TEL.: 871 209 68 23
BOMBAS Y MOTORES BYMTESA DE MANZANILLO
BLVD. MIGUEL DE LA MADRID #190, COL. 16 DE
SEPTIEMBRE, C.P. 28239, MANZANILLO, COL.
TEL.: 314 332 1986 / 332 8013
TORNILLOS ÁGUILA, S.A. DE C.V.
MAZURIO #200, COL. LUIS ECHEVERRÍA, DURANGO,
DGO.TEL.: 618 817 1946 / 618 818 2844
SUCURSAL CENTRO JILOTEPEC
PARQUE INDUSTRIAL # 1, COL. PARQUE INDUSTRIAL
JILOTEPEC, JILOTEPEC, EDO. DE MÉX. C.P. 54257
TEL: 761 782 9101 EXT. 5728 Y 5102
CÍA. FERRETERA NUEVO MUNDO S.A. DE C.V.
AV. MÉXICO - JAPÓN #225, CD. INDUSTRIAL, C.P. 38010,
CELAYA, GTO. TEL.: 461 617 7578 / 79 / 80 / 88
CENTRO DE SERVICIO ECLIPSE
CALLE PRINCIPAL MZ.1 LT. 1, COL. SANTA FE, C.P. 39010,
CHILPANCINGO, GRO. TEL.: 747 478 5793
FERREPRECIOS S.A. DE C.V.
LIBERTAD ORIENTE #304 LOCAL 30, INTERIOR DE PASAJE
ROBLEDO, COL. CENTRO, C.P. 43600, TULANCINGO,
HGO. TEL.: 775 753 6615 / 775 753 6616
SUCURSAL GUADALAJARA
AV. ADOLFO B. HORN # 6800, COL: SANTA CRUZ DEL
VALLE, C.P.: 45655, TLAJOMULCO DE ZUÑIGA, JAL.
TEL.: 33 3606 5285 AL 90
FIX FERRETERÍAS
AV. PASEO DE LA REPÚBLICA #3140-A, COL.
EX-HACIENDA DE LA HUERTA, C.P. 58050, MORELIA,
MICH. TEL.: 443 334 6858
FIX FERRETERÍAS
CAPITÁN ANZURES #95, ESQ. JOSÉ PERDIZ, COL.
CENTRO, C.P. 62740, CUAUTLA, MOR.
TEL.: 735 352 8931
HERRAMIENTAS DE TEPIC
MAZATLAN #117, COL. CENTRO, C.P. 63000, TEPIC, NAY.
TEL.: 311 258 0540
SUCURSAL MONTERREY
CARRETERA LAREDO #300, 1B MONTERREY PARKS,
COLONIA PUERTA DE ANÁHUAC, C.P. 66052, ESCOBEDO,
NUEVO LEÓN, TEL.: 81 8352 8791 / 81 8352 8790
FIX FERRETERÍAS
AV. 20 DE NOVIEMBRE #910, COL. CENTRO, C.P. 68300,
TUXTEPEC, OAX. TEL.: 287 106 3092
SUCURSAL PUEBLA
AV PERIFÉRICO #2-A, SAN LORENZO ALMECATLA,
C.P. 72710, CUAUTLACINGO, PUE.
TEL.: 222 282 8282 / 84 / 85 / 86
ARU HERRAMIENTAS S.A DE C.V.
AV. PUERTO DE VERACRUZ #110, COL. RANCHO DE
ENMEDIO, C.P. 76842, SAN JUAN DEL RÍO, QRO.
TEL.: 427 268 4544
FIX FERRETERÍAS
CARRETERA FEDERAL MZ. 46 LT. 3 LOCAL 2, COL EJIDAL,
C.P. 77710 PLAYA DEL CARMEN, Q.R.
TEL.: 984 267 3140
FIX FERRETERÍAS
AV. UNIVERSIDAD #1850, COL. EL PASEO, C.P. 78320,
SAN LUIS POTOSÍ, S.L.P. TEL.: 444 822 4341
SUCURSAL CULIACÁN
AV. JESÚS KUMATE SUR #4301, COL. HACIENDA DE LA
MORA, C.P. 80143, CULIACÁN, SIN.
TEL.: 667 173 9139 / 173 8400
FIX FERRETERÍAS
CALLE 5 DE FEBRERO #517, SUR LT. 25 MZ. 10, COL.
CENTRO, C.P. 85000, CD. OBREGÓN, SON.
TEL.: 644 413 2392
SUCURSAL VILLAHERMOSA
CALLE HELIO LOTES 1, 2 Y 3 MZ. #1, COL. INDUSTRIAL,
2A ETAPA, C.P. 86010, VILLAHERMOSA, TAB.
TEL.: 993 353 7244
VM ORINGS Y REFACCIONES
CALLE ROSITA #527 ENTRE 20 DE NOVIEMBRE Y GRAL.
RODRÍGUEZ, FRACC. REYNOSA, C.P. 88780, REYNOSA,
TAMS. TEL.: 899 926 7552
SERVICIOS Y HERRAMIENTAS INDUSTRIALES
PABLO SIDAR #132, COL . BARRIO DE SAN BARTOLOMÉ,
C.P. 90970, SAN PABLO DEL MONTE, TLAX.
TEL.: 222 271 7502
LA CASA DISTRIBUIDORA TRUPER
BLVD. PRIMAVERA. ESQ. HORTENSIA S/N, COL.
PRIMAVERA C.P. 93308, POZA RICA, VER.
TEL.: 782 823 8100 / 826 8484
SUCURSAL MÉRIDA
CALLE 33 #600 Y 602, LOCALIDAD ITZINCAB Y MULSAY,
MPIO. UMÁN, C.P. 97390, MÉRIDA, YUC.
TEL.: 999 912 2451

1
YEAR
16 www.truper.com
01-2023
11029
Warranty
policy
Code
DES-330
Model Brand
ENGLISH
Stamp of the business. Delivery date:
Warranty. Duration: 1 year. Coverage: parts, components and workmanship against manufacturing or operating
defects, except if used under conditions other than normal; when it was not operated in accordance with the
instructive; was altered or repaired by personnel not authorized by Truper®. To make the warranty valid, present
the product, stamped policy or invoice or receipt or voucher, in the establishment where you bought it or in
Corregidora 35, Centro, Cuauhtémoc, CDMX, 06060, where you can also purchase parts, components,
consumables and accessories. It includes the costs of transportation of the product that derive from its fulfillment
of its service network. . Phone number 800-018-7873. Made in China. Imported by Truper, S.A. de C.V. Parque
Industrial 1, Parque Industrial Jilotepec, Jilotepec, Edo. de Méx. C.P. 54257, Phone number 761 782 9100.

16
1
AÑO
ESPAÑOL www.truper.com
01-2023
11029
Póliza de
Garantía
Sello del establecimiento comercial. Fecha de entrega:
Código
DES-330
Modelo Marca
Garantía. Duración: 1 año. Cobertura: piezas, componentes y mano de obra contra defectos de fabricación o
funcionamiento, excepto si se usó en condiciones distintas a las normales; cuando no fue operado conforme
instructivo; fue alterado o reparado por personal no autorizado por Truper®. Para hacer efectiva la garantía
presente el producto, póliza sellada o factura o recibo o comprobante, en el establecimiento donde lo compró
o en Corregidora 35, Centro, Cuauhtémoc, CDMX, 06060, donde también podrá adquirir partes, componentes,
consumibles y accesorios. Incluye los gastos de transportación del producto que deriven de su cumplimiento de
su red de servicio. Tel. 800-018-7873. Made in/Hecho en China. Importador Truper, S.A. de C.V. Parque
Industrial 1, Parque Industrial Jilotepec, Jilotepec, Edo. de Méx. C.P. 54257, Tel. 761 782 9100.

15
ESPAÑOL
Centros de Servicio Autorizados
En caso de tener algún problema para contactar un Centro de Servicio Autorizado Truper
®
consulte nuestra página
www.truper.com donde obtendrá un listado actualizado, o llame al: 800 690 6990 u 800-018-7873 donde le
informarán cuál es el Centro de Servicio más cercano.
AGUASCALIENTES
BAJA
CALIFORNIA
BAJA
CALIFORNIA SUR
CAMPECHE
CHIAPAS
CHIHUAHUA
CIUDAD DE
MÉXICO
COAHUILA
COLIMA
DURANGO
ESTADO DE
MÉXICO
GUANAJUATO
GUERRERO
HIDALGO
JALISCO
MICHOACÁN
MORELOS
NAYARIT
NUEVO LEÓN
OAXACA
PUEBLA
QUERÉTARO
QUINTANA ROO
SAN LUIS
POTOSÍ
SINALOA
SONORA
TABASCO
TAMAULIPAS
TLAXCALA
VERACRUZ
YUCATÁN
DE TODO PARA LA CONSTRUCCIÓN
GRAL. BARRAGÁN #1201, COL. GREMIAL, C.P. 20030,
AGUASCALIENTES, AGS. TEL.: 449 994 0537
SUCURSAL TIJUANA
AV. LA ENCANTADA, LOTE #5, PARQUE INDUSTRIAL EL
FLORIDO II, C.P 22244, TIJUANA, B.C.
TEL.: 664 969 5100
FIX FERRETERÍAS
FELIPE ÁNGELES ESQ. RUIZ CORTÍNEZ S/N, COL. PUEBLO
NUEVO, C.P. 23670, CD. CONSTITUCIÓN, B.C.S.
TEL.: 613 132 1115
TORNILLERÍA Y FERRETERÍA AAA
AV. ÁLVARO OBREGÓN #324, COL. ESPERANZA
C.P. 24080 CAMPECHE, CAMP. TEL.: 981 815 2808
FIX FERRETERÍAS
AV. CENTRAL SUR #27, COL. CENTRO, C.P. 30700,
TAPACHULA, CHIS. TEL.: 962 118 4083
SUCURSAL CHIHUAHUA
AV. SILVESTRE TERRAZAS #128-11, PARQUE INDUSTRIAL
BAFAR, CARRETERA MÉXICO CUAUHTÉMOC, C.P. 31415,
CHIHUAHUA, CHIH. TEL. 614 434 0052
FIX FERRETERÍAS
EL MONSTRUO DE CORREGIDORA, CORREGIDORA # 22,
COL. CENTRO, C.P. 06060, CUAUHTÉMOC, CDMX.
TEL: 55 5522 5031 / 5522 4861
SUCURSAL TORREÓN
CALLE METAL MECÁNICA #280, PARQUE INDUSTRIAL
ORIENTE, C.P. 27278, TORREÓN, COAH.
TEL.: 871 209 68 23
BOMBAS Y MOTORES BYMTESA DE MANZANILLO
BLVD. MIGUEL DE LA MADRID #190, COL. 16 DE
SEPTIEMBRE, C.P. 28239, MANZANILLO, COL.
TEL.: 314 332 1986 / 332 8013
TORNILLOS ÁGUILA, S.A. DE C.V.
MAZURIO #200, COL. LUIS ECHEVERRÍA, DURANGO,
DGO.TEL.: 618 817 1946 / 618 818 2844
SUCURSAL CENTRO JILOTEPEC
PARQUE INDUSTRIAL # 1, COL. PARQUE INDUSTRIAL
JILOTEPEC, JILOTEPEC, EDO. DE MÉX. C.P. 54257
TEL: 761 782 9101 EXT. 5728 Y 5102
CÍA. FERRETERA NUEVO MUNDO S.A. DE C.V.
AV. MÉXICO - JAPÓN #225, CD. INDUSTRIAL, C.P. 38010,
CELAYA, GTO. TEL.: 461 617 7578 / 79 / 80 / 88
CENTRO DE SERVICIO ECLIPSE
CALLE PRINCIPAL MZ.1 LT. 1, COL. SANTA FE, C.P. 39010,
CHILPANCINGO, GRO. TEL.: 747 478 5793
FERREPRECIOS S.A. DE C.V.
LIBERTAD ORIENTE #304 LOCAL 30, INTERIOR DE PASAJE
ROBLEDO, COL. CENTRO, C.P. 43600, TULANCINGO,
HGO. TEL.: 775 753 6615 / 775 753 6616
SUCURSAL GUADALAJARA
AV. ADOLFO B. HORN # 6800, COL: SANTA CRUZ DEL
VALLE, C.P.: 45655, TLAJOMULCO DE ZUÑIGA, JAL.
TEL.: 33 3606 5285 AL 90
FIX FERRETERÍAS
AV. PASEO DE LA REPÚBLICA #3140-A, COL.
EX-HACIENDA DE LA HUERTA, C.P. 58050, MORELIA,
MICH. TEL.: 443 334 6858
FIX FERRETERÍAS
CAPITÁN ANZURES #95, ESQ. JOSÉ PERDIZ, COL.
CENTRO, C.P. 62740, CUAUTLA, MOR.
TEL.: 735 352 8931
HERRAMIENTAS DE TEPIC
MAZATLAN #117, COL. CENTRO, C.P. 63000, TEPIC, NAY.
TEL.: 311 258 0540
SUCURSAL MONTERREY
CARRETERA LAREDO #300, 1B MONTERREY PARKS,
COLONIA PUERTA DE ANÁHUAC, C.P. 66052, ESCOBEDO,
NUEVO LEÓN, TEL.: 81 8352 8791 / 81 8352 8790
FIX FERRETERÍAS
AV. 20 DE NOVIEMBRE #910, COL. CENTRO, C.P. 68300,
TUXTEPEC, OAX. TEL.: 287 106 3092
SUCURSAL PUEBLA
AV PERIFÉRICO #2-A, SAN LORENZO ALMECATLA,
C.P. 72710, CUAUTLACINGO, PUE.
TEL.: 222 282 8282 / 84 / 85 / 86
ARU HERRAMIENTAS S.A DE C.V.
AV. PUERTO DE VERACRUZ #110, COL. RANCHO DE
ENMEDIO, C.P. 76842, SAN JUAN DEL RÍO, QRO.
TEL.: 427 268 4544
FIX FERRETERÍAS
CARRETERA FEDERAL MZ. 46 LT. 3 LOCAL 2, COL EJIDAL,
C.P. 77710 PLAYA DEL CARMEN, Q.R.
TEL.: 984 267 3140
FIX FERRETERÍAS
AV. UNIVERSIDAD #1850, COL. EL PASEO, C.P. 78320,
SAN LUIS POTOSÍ, S.L.P. TEL.: 444 822 4341
SUCURSAL CULIACÁN
AV. JESÚS KUMATE SUR #4301, COL. HACIENDA DE LA
MORA, C.P. 80143, CULIACÁN, SIN.
TEL.: 667 173 9139 / 173 8400
FIX FERRETERÍAS
CALLE 5 DE FEBRERO #517, SUR LT. 25 MZ. 10, COL.
CENTRO, C.P. 85000, CD. OBREGÓN, SON.
TEL.: 644 413 2392
SUCURSAL VILLAHERMOSA
CALLE HELIO LOTES 1, 2 Y 3 MZ. #1, COL. INDUSTRIAL,
2A ETAPA, C.P. 86010, VILLAHERMOSA, TAB.
TEL.: 993 353 7244
VM ORINGS Y REFACCIONES
CALLE ROSITA #527 ENTRE 20 DE NOVIEMBRE Y GRAL.
RODRÍGUEZ, FRACC. REYNOSA, C.P. 88780, REYNOSA,
TAMS. TEL.: 899 926 7552
SERVICIOS Y HERRAMIENTAS INDUSTRIALES
PABLO SIDAR #132, COL . BARRIO DE SAN BARTOLOMÉ,
C.P. 90970, SAN PABLO DEL MONTE, TLAX.
TEL.: 222 271 7502
LA CASA DISTRIBUIDORA TRUPER
BLVD. PRIMAVERA. ESQ. HORTENSIA S/N, COL.
PRIMAVERA C.P. 93308, POZA RICA, VER.
TEL.: 782 823 8100 / 826 8484
SUCURSAL MÉRIDA
CALLE 33 #600 Y 602, LOCALIDAD ITZINCAB Y MULSAY,
MPIO. UMÁN, C.P. 97390, MÉRIDA, YUC.
TEL.: 999 912 2451

Notas
14 ESPAÑOL

13
ESPAÑOL
Notas

Solución de problemas
12 ESPAÑOL
Mantenimiento
El motor no arranca.
El motor arranca pero
no acelera.
El motor arranca pero
solo va a velocidad
alta con la mitad del
ahogador.
El motor no alcanza la
velocidad completa y
emite demasiado
humo.
El motor arranca,
funciona y acelera
pero no tiene ralentí.
• No hay chispa.
• No tiene combustible.
• El motor está
ahogado.
• La piola del arrancador
jala con más dificultad
que cuando nueva.
• El motor requiere de
unos minutos para
calentarse.
• El carburador requiere
de ajuste.
• Revise la mezcla de
aceite / combustible.
• El filtro de aire está
sucio.
• La pantalla de la
guarda anti chispas
está sucia.
• El tornillo de ralentí
en el carburador
necesita ajuste.
• Revise la chispa. Retire la cubierta del motor. Retire la bujía del cilindro.
Conecte el cable de la bujía y colóquela sobre el cilindro del motor con su
parte metálica tocando el cilindro. Tire de la piola y observe la chispa en el
electrodo de la bujía. Si no la hay, repita la prueba con una bujía nueva.
• Presione el bulbo cebador hasta que el combustible sea visible en el
bulbo. Si no se ve el combustible, significa que el sistema primario de
suministro de combustible está bloqueado. Contacte un Centro de Servicio
Autorizado . En caso que el bulbo cebador se llene de
combustible, es señal que el motor está ahogado.
• Teniendo apagado el interruptor de encendido, retire la bujía. Mueva la
palanca del ahogador hacia abajo y tire de la piola de 15 a 20 veces para
eliminar el exceso de combustible del motor. Limpie la bujía y vuelva a
instalarla. Siga el procedimiento de arranque normal (consulte la página
9). Si no arranca el motor, mueva la palanca del ahogador hacia abajo y
repita el procedimiento de arranque. Si el motor aún no arranca, repita el
procedimiento con una bujía nueva.
• Lleve la desmalezadora a un Centro de Servicio Autorizado
.
• Permita que el motor se caliente por completo. Si el motor no acelera
después de tres minutos, contacte a su Centro de Servicio Autorizado
.
• Lleve la desmalezadora a un Centro de Servicio Autorizado
.
• Use combustible nuevo y la mezcla correcta de aceite para 2 tiempos.
• Limpie el filtro de aire. Consulte la página 11.
• Lleve la desmalezadora a un Centro de Servicio Autorizado
.
• Gire el tornillo de ralentí en sentido de las agujas del reloj para aumentar
la velocidad.
Problema Causa Solución
Almacenamiento de la desmalezadora
En caso de que almacene la desmalezadora durante un mes o más, tome en cuenta las siguientes consideraciones:
• Drene todo el contenido del tanque de combustible en un recipiente de uso aprobado para gasolina. Todo el sobrante debe reutilizarse en otro
equipo con motor de dos tiempos con proporción de 50:1.
• Ponga a funcionar el motor hasta que consuma el resto del combustible y se apague por si mismo. Así eliminará el combustible residual y
evitará que se forme goma que podría dañar el sistema de combustible.
• Limpie la desmalezadora por completo.
• Almacene la unidad en un espacio ventilado, apartado de agentes corrosivos como productos químicos para jardín o sales para derretir hielo y lejos
del alcance de los niños.
• Cumpla con todos los reglamentos gubernamentales relacionados con la seguridad en el manejo y almacenamiento de combustibles.
Limpieza general
Limieza filtro de aire
Limpieza carburador *
Inspección y ajuste de bujía *
Limpieza de tanque de combustible **
Cambio de filtro de combustible **
Reemplazo de manguera de combustible **
Limpieza de cámara de combustión **
Mantenimiento periódico Cada uso Cada 25 h
de uso
Cada 50 h
de uso
Cada 150 h
de uso
Cada 250 h
de uso
* Usuario capacitado o Centro de Servicio Autorizado ** Centro de Servicio Autorizado
Lubricación de la caja de engranes de cabezal de corte

R: 2 mm -
3 mm
R: 4 mm -
5 mm
11
Mantenimiento
ESPAÑOL
A
• El motor utiliza una bujía NGK BPMR7A con una
separación de electrodos de 0.63 mm (0.025”). Reemplace la
bujía por otra igual una vez al año.
• Con el motor totalmente frío, afloje la bujía gastada hacia la
izquierda con una llave y retírela.
• Inserte la bujía nueva y apriétela con la mano hacia la
derecha.
• Tenga cuidado de no estropear la rosca de
la bujía, de lo contrario resultaría seriamente dañado el motor.
• Apriétela media vuelta mas con la llave para bujía incluida.
• Antes de inspeccionar, limpiar o dar servicio a la desmalezadora, apague el motor, espere a que todas las partes móviles se
hayan detenido; desconecte el cable de la bujía y sepárelo de la bujía. De lo contrario puede sufrir lesiones de gravedades y/o
daños al equipo.
11
Limpieza del filtro del aire
• Retire la tapa del filtro de aire aflojando la perilla de la tapa.
• Retire el filtro del aire.
• Dependiendo del tiempo de uso puede limpiar
superficialmente el filtro golpeándolo ligeramente contra
una superficie plana para desalojar la mayoría de las
partículas.
• También puede sopletear el filtro con aire comprimido,
hágalo por ambos lados.
• O para una limpieza más completa limpie el filtro del
aire en agua jabonosa tibia, enjuáguelo y déjelo secar
por completo antes de instalarlo de nuevo en
la desmalezadora.
• Instale de nuevo el filtro del aire, verificando que
empate en su lugar.
• Realice la limpieza del filtro de aire tan frecuentemente
como sea necesario para mantenerlo siempre limpio, de
lo contrario la eficiencia del motor puede disminuir.
Limpieza general
• Con un cepillo o aire comprimido limpie y despeje las
ranuras de ventilación de la unidad del arrancador cada
vez que sea necesario.
• De la misma forma limpie periódicamente las aletas del
cilindro del motor y las aletas del ventilador para retirar
cualquier impureza. De no hacerlo el motor puede
dañarse debido a un recalentamiento.
Limpieza del escape y del silenciador
• El escape y el silenciador se pueden tapar con depósitos
de carbón, dependiendo del tipo de combustible, la
cantidad de aceite utilizada y/o las condiciones es las que
se utiliza la desmalezadora. Si nota pérdida de potencia
se deberán retirar esos depósitos para restaurar el
desempeño. Acuda a un Centro de Servicio Autorizado
para realizar este servicio.
• El silenciador está equipado con una pantalla anti
chispas dentro del silenciador. Después de usarse por
largos periodos de tiempo la pantalla se ensucia y se
debe reemplazar el silenciador. Acuda a un Centro de
Servicio Autorizado para realizar el
reemplazo.
• Revise constantemente que el
silenciador tenga debidamente asegurados los
sujetadores y que no existan daños o corrosión. En caso
de encontrar una fuga detenga la desmalezadora y llévela
de inmediato a un Centro de Servicio Autorizado
para su reparación.
Lubricación
• El interior de la caja de engranes del cabezal de corte
esta lubricado con grasa para usos múltiples con base de
litio, añadir grasa cada 25 horas de uso.
• Para agregar la grasa coloque la grasera en el nipple (A)
y aplique 2 bombeadas.
Ajuste del carburador
• Se recomienda hacer los ajustes del carburador en un
Centro de Servicio Autorizado .
• Un ajuste incorrecto puede dañar el motor e invalidar la
garantía.
Filtro de combustible
• Revise el filtro de gasolina con frecuencia.
• Si el filtro está sucio debe ser reemplazado.
• Si el interior del tanque de gasolina está sucio, enjuáguelo
con gasolina.
Cuchilla
• Revise y mantenga la cuchilla siempre en óptimas
condiciones.
• Afile de ser necesario con una lima plana. Tenga cuidado
de no alterar el perfil de la cuchilla y el filo para asegurar el
buen desempeño de la desmalezadora.
Cambio de la bujía
PELIGRO
PELIGRO
ESPAÑOL

Dx10
E
F
A
B
E
G
10
Encendido
Operación
• Coloque la desmalezadora en suelo nivelado en donde
la cuchilla o carrete no haga contacto con ningún
obstáculo.
• Coloque el interruptor en la posición de encendido (A).
• Presione al mismo tiempo el liberador del gatillo (D) y
el gatillo acelerador (E), mantenga el gatillo presionado.
• Tire de la piola (G) para que el motor arranque.
• Oprima y suelte el gatillo acelerador para que el motor
funcione en ralentí (K).
Arranque del motor en caliente
• Presione y sostenga el interruptor en la posición de
apagado (E), hasta que se detenga el motor.
Apagado
• Recuerde que usted como operador
de la desmalezadora es responsable de su seguridad, así
como de quienes se encuentren cerca del área de trabajo.
Siga todas las advertencias de seguridad (páginas 4 y 5)
antes de operar la desmalezadora.
• Mantenga una postura equilibrada con ambos pies
apoyados firmemente en el piso.
• Sostenga la desmalezadora con firmeza frente a usted
con una mano en el mango y la otra en el mango auxiliar
de manera que la desmalezadora quede alineada a su
cuerpo y apuntando el cabezal de corte 30° hacia abajo,
lejos de sus pies.
• No encienda ni opere la desmalezado-
ra en cualquier otra posición.
• Encienda la desmalezadora y realice los cortes de
izquierda a derecha rotando su cintura manteniendo la
posición de la desmalezadora.
• Conforme se realice el corte el hilo de corte se desgastará
y terminará por desprenderse, para liberar más hilo del
carrete presione un poco la desmalezadora hacia abajo
para que el suelo presione la tapa de retención contra el
carrete y libere más hilo. El sobrante será cortado por la
cuchilla de la guarda, en ese instante deje de empujar la
desmalezadora contra el piso para no gastar hilo.
• Para cortar maleza o cesped hágalo gradualmente, no
intente cortarlo de una sola vez desde la base, pues los
residuos pueden atascar el cabezal de corte o hacerle
perder el control de la desmalezadora.
30°
Movimiento
de corte
Rotación de
la cintura
ATENCIÓN
PELIGRO
ESPAÑOL
K

Dx10
E
F
A
B
G
x4
I
x6
C
H
Abastecimiento de combustible
Encendido
9
• Siga las normas de seguridad para el manejo de
combustible (página 5).
• Espere a que el motor se enfríe por completo antes de
abastecer el combustible.
• Coloque la desmalezadora sobre una superficie plana.
• Limpie alrededor de la tapa del tanque de combustible
para evitar su contaminación.
• Afloje lentamente la tapa del tanque de combustible.
• Teniendo cuidado de evitar derrames vierta la mezcla de
combustible en el tanque. Siga las
especificaciones del combustible (página 3).
• Antes de tapar el tanque de combustible revise y limpie
las juntas.
• Coloque de inmediato la tapa del tanque de
combustible y apriételo con la mano.
• Limpie todo derrame de combustible.
En un motor nuevo, es normal que
haya emisiones de humo durante y después de usarse
por primera vez.
• Coloque la desmalezadora en suelo nivelado en donde
la cuchilla o carrete no haga contacto con ningún
obstáculo.
• Coloque el interruptor en la posición de encendido (A).
• Oprima y suelte el bulbo cebador 10 veces (B).
• Mueva la palanca del ahogador hacia arriba (C).
• Presione al mismo tiempo el liberador del gatillo (D) y
el gatillo acelerador (E), mantenga el gatillo presionado.
• Tire de la piola (G) para que el motor arranque,
NO tire más de 4 veces para evitar ahogar el motor.
• En caso de que el motor no haya arrancado mueva la
palanca del ahogador hacia abajo (H). Tire de nuevo de
la piola (I) hasta que el motor arranque, NO tire más de 6
veces (aunque en climas fríos podría necesitar tirar más
veces de la piola).
• En caso que el motor todavía no arranque, repita los
pasos a partir del (B).
• Una vez que el motor arranque permita que funcione
en esa posición durante unos segundos.
• Oprima y suelte el gatillo acelerador para que el motor
funcione en ralentí (K).
• La desmalezadora ya está lista para operar. Sujétela por
ambos mangos con las dos manos y levántela para iniciar
el trabajo.
Arranque del motor en frío
ATENCIÓN
ATENCIÓN
ESPAÑOL
K

8
Ensamblado
ESPAÑOL
• Coloque el plato a presión sobre el cabezal de corte (7).
• Coloque la brida sobre el plato a presión (8).
• Inserte la llave allen en el costado del plato a presión
para bloquear el eje (5).
• Coloque el carrete roscado en el eje y
apriete con la mano en sentido
antihorario (9).
• Utilice la guarda con el faldón,
consulte el apartado de guarda.
Instalación del carrete de hilo
8
9
7
5
A B
• Póngase el arnés y ajústelo para que quede firme y
cómodo.
• Una el arnés a la argolla para arnés del eje recto de la
desmalezadora.
• Recorra la argolla hacia arriba y hacia abajo hasta que la
desmalezadora quede equilibrada de tal forma que el
cabezal de corte quede apuntando hacia abajo, por
debajo del nivel de su cintura y a no más de 75 cm del
suelo.
• Cuando se usa con carrete, el cabezal de corte debe
tocar ligeramente el suelo (A).
• Cuando se usa con cuchilla, el cabezal de corte debe
quedar aproximadamente 20 cm sobre el suelo (B).
Balance de la desmalezadora
20 cm

Eje recto
a
Mango
7
Ensamblado
• Separe la abrazadera de la montura del eje recto
aflojando la perilla de fácil ajuste (a).
• Coloque el mango en la montura del eje recto.
• Asegure el mango en su lugar fijando y apretando
firmemente la perilla de fácil ajuste.
Mango
• Asegure la guarda al cabezal de corte con la abrazadera y
los pernos incluidos (A).
• Si utiliza el carrete de hilo, use la guarda con el faldón (B)
incluido.
• Si utiliza la cuchilla retire el tornillo en la parte posterior
de la guarda (C), presione los 2 clips (D) y retire el faldón.
Guarda
• Coloque el plato a presión sobre el cabezal de corte (1).
• Coloque la cuchilla sobre el plato a presión, asegurando que el
sentido de giro, de la cuchilla sea el mismo que el marcado sobre la
guarda (2).
• Coloque la brida sobre la cuchilla (3).
• Coloque la cubierta y la tuerca de seguridad (4).
• Inserte la llave allen en el costado del plato a presión para bloquear
el eje (5) y apriete la tuerca de seguridad en sentido antihorario con
la llave incluida (6).
• Utilice la guarda sin el faldón, consulte el apartado de guarda.
Instalación de la cuchilla
D
A
B
C
ESPAÑOL
b
• Para girar el mango, afloje la perilla de fácil ajuste y gire
90° el mango (b). Esto es útil para almacenar y transportar
la desmalezadora.
3
6
1
5
2
4

Guarda
Eje recto
Cabezal
de corte
Cuchilla
6
Partes
• No intente modificar la
desmalezadora o fabricar accesorios no recomendados
para ella. De lo contrario puede sufrir lesiones personales
serias e invalida la garantía.
• Siempre que ensamble las
piezas desconecte el cable de la bujía del motor, con el fin
de prevenir un arranque accidental que pueda ocasionar
lesiones personales serias.
ADVERTENCIA
ADVERTENCIA
ESPAÑOL
Mango
de control
Gatillo
acelerador
Interruptor
Liberador
del gatillo
Piola
Tapa de bujía
Perilla de
fácil ajuste
Piola
Escape
Tapa del
tanque de
combustible
Tanque de
combustible
Palanca del
ahogador
Argolla
para arnés
Bulbo
cebador
Mango
auxiliar
Perilla de la
cubierta del
filtro de aire
Carrete de
hilo de
corte
Soporte
acolchado
Soporte
lúmbar
Argolla
para arnés
Sistema de
liberación
rápido
Arnés doble

• Revise el área de trabajo y retire cualquier piedra, vidrios
rotos, clavos, alambre o cuerda. Pues podrían ser
lanzados o enredarse en la desmalezadora.
• En temperaturas extremas revise que no hayan
formaciones de hielo o condensación en la desmalezadora.
• Asegúrese de que la visibilidad y las condiciones de luz
sean adecuadas para ver claramente, de lo contrario no
utilice la desmalezadora.
• No use la desmalezadora sin las guardas, o si éstas
presentan algún daño o no cuentan con todas sus partes.
• Equípese con ropa adecuada para operar la desmaleza-
dora: ropa ajustada, pantalones gruesos, botas de
seguridad antideslizantes, guantes protectores para
trabajo pesado, y anteojos de seguridad con protección
lateral bajo la norma ANSI Z87.1.
• Retírese cualquier accesorio o
ropa holgada que pueda ser atrapado por los dientes de
la cuchilla en movimiento. Recójase el cabello para que
quede por arriba del nivel de los hombros.
• Asegúrese de que la desmalezadora se encuentre en
perfectas condiciones. No la encienda si se encuentra mal
ajustada o no está armada completamente de manera que
funcione de forma segura o el tanque de combustible
presenta alguna fuga o tiene algún tornillo flojo.
• Asegúrese de que la cuchilla deje de moverse cuando
se suelte el gatillo del acelerador. En caso de que no se
detenga apague la desmalezadora y acuda a un Centro de
Servicio Autorizado para solucionar
el problema.
• Asegúrese de que la desmalezadora se encuentre limpia,
seca y libre de aceite o combustible.
• Asegúrese de que el área de trabajo se encuentra en
una área abierta y bien ventilada.
• Mantenga a los transeúntes, niños y
animales alejados, a no menos de 15 m de distancia.
• Asegúrese de que la cuchilla no esté en contacto con
algún objeto antes de arrancar el motor.
• Mantenga ambos pies apoyados
firmemente en el piso y ambas manos sujetando la
desmalezadora por los mangos, jamás la opere con una
sola mano, de lo contrario pueden resultar lesionados el
operador, y demás personas presentes.
• Mantenga todas las partes del cuerpo alejadas del
cabezal de corte cuando esté funcionando el motor.
• Siempre mantenga el cabezal de corte apuntando hacia
abajo, por debajo del nivel de su cintura y jamás lo
levante más de 75 cm del suelo.
• Mantenga todas las partes del cuerpo alejadas del
silenciador. De lo contrario puede producirle una
quemadura seria.
• Aleje la desmalezadora de materiales inflamables.
• Las cuchillas están diseñadas para cortar hierbas y
enredaderas carnosas de no más de 13 mm de diámetro.
• Esté atento a riesgos en su entorno, el ruido de la
desmalezadora podría evitar que los note.
• En caso de realizar trabajos cerca de
vías de tránsito suspenda el corte hasta que no haya
vehículos a la vista. La desmalezadora podría lanzar
partículas hacia los vehículos en movimiento y pueden
desencadenar un accidente grave.
• Nunca fume cerca del combustible, ni de la zona en
donde se abastezca de la gasolina, ni donde prepare la
mezcla con el aceite, ni al operar la desmalezadora.
• Para reducir el riesgo de incendio o quemaduras
maneje el combustible con cuidado, es muy inflamable.
• No deje que gasolina o aceite toquen la piel.
• Protéjase los ojos para evitar salpicaduras de gasolina y
aceite. En caso de contacto accidental lávelos inmediata-
mente con agua limpia. Si persiste la irritación acuda a un
médico.
• Mezcle y almacene el combustible en un recipiente
diseñado para tal fin.
• Mezcle el combustible al aire
libre lejos de cualquier chispa o llama.
• Antes de reabastecer la desmalezadora de combustible
apague el motor, colóquela en suelo despejado y espere
a que el motor se enfríe.
• Limpie todo el combustible que
pueda haber caído en la desmalezadora antes de operarla.
• Revise si hay fugas de combustible,
de ser así corríjalas antes de usar la desmalezadora, para
evitar incendios o lesiones por quemadura.
• Aleje la desmalezadora por lo menos 9 metros (30 pies)
del lugar de carga de combustible antes de arrancar el
motor.
• Bajo ninguna circunstancia queme el combustible
derramado para eliminarlo.
• Por ningún motivo utilice cualquier otro tipo de
combustible que el especificado para la desmalezadora
en este instructivo.
• No intente detener el giro del
cabezal de corte de ninguna otra forma que soltando el
interruptor. Espere a que se detenga por sí mismo
después de apagar la desmalezadora, esto demorará
unos cuantos segundos.
• Siempre traslade la desmalezadora con
el motor apagado, y con el silenciador alejado del cuerpo.
Vacíe el tanque de combustible para subirla a un vehículo.
• Apague el motor antes de poner
en reposo la desmalezadora. NO deje el motor
funcionando sin prestarle atención. Deje que se enfríe
antes de almacenar la desmalezadora.
• El servicio y reparación de la
desmalezadora debe de ser realizado en un Centro de
Servicio Autorizado
5
Advertencias de Seguridad
para desmalezadoras
Antes de operar la desmalezadora
Manejo de combustible
Al operar la desmalezadora
Después de operar la desmalezadora
ADVERTENCIA
ADVERTENCIA
ADVERTENCIA
ADVERTENCIA
ADVERTENCIA
ATENCIÓN
ATENCIÓN
ATENCIÓN
ATENCIÓN
ATENCIÓN
PELIGRO
ESPAÑOL

4
Advertencias de Seguridad
para herramientas motorizadas
Mantenga su área de trabajo limpia, ordenada y bien
iluminada.
Áreas desordenadas y obscuras pueden provocar
accidentes.
Nunca utilice el equipo en ambientes explosivos, o en
presencia de líquidos inflamables.
Aleje el equipo al menos 9 metros (30 pies) del lugar
de recarga de combustible antes de arrancar el motor.
Mantenga a los niños y a otras personas a una distancia
segura mientras utiliza el equipo.
Las distracciones pueden hacerle perder el
control y provocar accidentes.
Evite hacer contacto con líneas y circuitos eléctricos.
Ubique y evite todas las líneas y circuitos
eléctricos, especialmente el cableado oculto.
Así como cualquier objeto conectado a tierra.
Esté siempre alerta, sea prudente y utilice el sentido común.
No deje que la familiaridad con el uso del
equipo lo distraiga mientras lo utiliza.
Esto puede provocar accidentes.
No utilice el equipo si está cansado, o bajo la influencia
de drogas, alcohol o medicamentos.
Un momento de distracción mientras utiliza el equipo
puede provocar lesiones personales graves.
Utilice el equipo con sus guardas y protectores en su
lugar y en buen estado.
De no hacerlo se expone a lesiones personales graves.
Nunca fuerce el equipo.
Trabajar dentro del rango para el que fue diseñado
asegura un mejor trabajo y es más seguro.
Guarde el equipo en un lugar seguro fuera del alcance
de los niños.
Los equipos motorizados son peligrosos en
manos inexpertas.
Utilice la indumentaria adecuada.
La ropa suelta, joyas o cabello largo pueden
ser atrapados por las piezas móviles.
Mantenga las manos alejadas de las partes giratorias
y/o móviles.
De no hacerlo se expone a lesiones personales graves.
No utilice el equipo en espacios encerrados.
Para evitar respirar la acumulación de monóxido
de carbono, gas inodoro tóxico y potencialmente
mortal.
Utilice equipo adecuado de protección personal.
Usar protección para los ojos, mascarillas antipolvo,
zapatos de seguridad antideslizantes, casco, protección
para los oídos y guantes de seguridad, reduce
considerablemente el riesgo de lesiones.
Apague el equipo antes de hacer ajustes, cambiar sus
accesorios o guardarlo.
Asegúrese de que el interruptor del equipo esté en posición
de apagado.
Nunca utilice el equipo si el interruptor no funciona o
no está debidamente ensamblado.
De hacerlo se expone a lesiones personales
graves, repárelo inmediatamente en un
Centro de Servicio Autorizado .
No sobre extienda su campo de acción.
Un buen apoyo y equilibrio permiten un mejor control
del equipo en situaciones inesperadas.
Evite encendidos accidentales.
Asegúrese de que el motor del equipo esté
apagado antes de dejarlo o darle mantenimiento.
Retire cualquier llave de ajuste antes de encender el
equipo.
Herramientas adicionales o llaves colocadas en piezas
giratorias del equipo puede provocar lesiones personales
graves.
Déle mantenimiento al equipo y cerciórese que se
encuentra en condiciones óptimas antes de utilizarlo.
Revise cuidadosamente sus partes móviles, su
alineación y montaje. Hágalo periódicamente.
Busque cualquier elemento dañado o pieza que no
funcione adecuadamente para su inmediata reparación
en un Centro de Servicio Autorizado .
Accesorios.
Utilice sólo los accesorios o refacciones indicados en este
instructivo o certificados por
Nunca deje el equipo en marcha sin supervisión.
Apáguelo después de operarlo y antes de colocarlo en
un lugar seguro para evitar accidentes graves.
Nunca fume cerca del combustible.
No fume cerca de la zona en donde se abastezca de
combustible, ni al operar el equipo.
No toque las partes con altas temperaturas.
La superficie del motor y del escape alcanzan altas temperaturas durante la
operación del equipo.
Servicio y reparación
Acuda siempre a un Centro de Servicio Autorizado para utilizar
piezas de respuesto idénticas y así mantener la seguridad de la desmalezadora.
ATENCIÓN
ATENCIÓN
PELIGRO
ADVERTENCIA
PELIGRO
ATENCIÓN
PELIGRO
PELIGRO
ADVERTENCIA
ADVERTENCIA
ADVERTENCIA
ADVERTENCIA
ATENCIÓN
ATENCIÓN
ATENCIÓN
ATENCIÓN
ADVERTENCIA
ADVERTENCIA
ADVERTENCIA
PELIGRO
PELIGRO
PELIGRO
ESPAÑOL

1 litro
1L+ = 50:1
proporción
Mezcla
4 tapas de aceite
Gasolina
• La desmalezadora tiene un motor de 2 tiempos enfriado por aire que utiliza una mezcla de gasolina sin plomo y aceite
automezclante de alta calidad para motor de dos tiempos enfriado por aire.
• El motor está certificado para funcionar con gasolina sin plomo para vehículos con un octanaje de 87 ([R+M]/2) o más.
• No use ningún tipo de gasolina premezclada con aceite adquirida en gasolineras, como la destinada a motocicletas.
• No use aceite de uso automotor ni aceite para motores fuera de borda de 2 tiempos.
• La relación de la mezcla debe de ser de 50 tantos de gasolina por 1 de aceite (proporción 50:1). Prepare la mezcla en un
recipiente aprobado para gasolina. Siempre mezcle bien antes de verterlo en el tanque del motor.
No utilice mezcla de combustible almacenada durante mas de 15 días. Haga la mezcla en pequeñas
cantidades.
Nunca fume cerca del combustible, ni de la zona en donde se abastezca de la gasolina, ni donde
prepare la mezcla con el aceite, ni al operar la desmalezadora.
Cualquier intento de arrancar la desmalezadora sin añadirle aceite a la mezcla de combustible
provocará fallas en el motor.
Código
Descripción
Peso neto
Motor
Potencia nominal del motor
Tanque de combustible
Velocidad
Capacidad de corte
Longitud del eje
DES-330
11029
9 kg
Desmalezadora a gasolina
900 ml
1044 W
9000 r/min
18” (45 cm)
160 cm
Sistemas de corte
Diámetro de cuchilla
Diámetro de hilo de nailon
Carrete de hilo de nailon y cuchilla
Exterior: 25.4 cm Interior: 2.5 cm
De 2.4 mm a 3.7 mm (recomendado)
Tipo de mango
Ciclo de trabajo
Tipo “Bici”
20 minutos de descanso por cada tanque consumido.
Máximo diario 6 horas.
33 cm3 (cc)
Especificaciones técnicas
Especificaciones de combustible
Para alargar la vida útil del motor use aceite sintético para motores de dos tiempos.
* 1 galón = 3.78 litros ** No incluidos
¡Una mezcla incorrecta puede provocar que la desmalezadora
se desbiele, ocasionando costosas reparaciones!
ADVERTENCIA
ADVERTENCIA
ATENCIÓN
3
ESPAÑOL
Utilice la tapa de los aceites** ACES-2, ACES-5 o ACES-20 como medida
para preparar la mezcla. Mezcle 4 tapas de aceite con cada litro de gasolina

Recomendaciones de uso y cuidados
1 litro
de Gasolina Mezcla
4 tapas
de aceite
1 L
50:1
Utilice gasolina mezclada con ACEITE para motor
de 2 TIEMPOS. ¡Una mezcla incorrecta
puede provocar que la desmalezadora se desbiele,
ocasionando costosas reparaciones!
UTILICE siempre con la GUARDA. UTILICE HILO con diámetro de 2.4 mm a 3.7 mm
No usar MEZCLA de combustible de más de 15 días.
Realice MANTENIMIENTO periódico a su máquina (página 11).
SIEMPRE opere su desbrozadora a MÁXIMA POTENCIA con el gatillo TOTALMENTE
apretado.
Í
ndice
2
Especificaciones técnicas
Especificaciones de combustible
Advertencias de Seguridad
para herramientas motorizadas
Advertencias de Seguridad
para desmalezadoras
Partes
Ensamblado
Abastecimiento de combustible
Encendido
Operación
Mantenimiento
Solución de problemas
Notas
Centros de Servicio Autorizados
Póliza de Garantía
Guarde este instructivo para futuras referencias.
Los gráficos de este instructivo son para
referencia, pueden variar del aspecto real de la
desmalezadora.
3
3
4
5
6
7
9
9
10
11
12
13
15
16
ATENCIÓN
Para poder sacar el máximo
provecho de la desmalezadora,
alargar su vida útil, hacer válida
la garantía en caso de ser
necesario y evitar riesgos o
lesiones fatales, es fundamental
leer y comprender este
instructivo por completo antes
de usar la desmalezadora.
ESPAÑOL

Instructivo de
Desmalezadora
a gasolina
DES-330
ModeloCódigo
DES-330
Este instructivo es para:
11029
Motor
33 cm3 (cc)
ESPAÑOL
ENGLISH
ATENCIÓN Lea este Instructivo por completo
antes de usar la herramienta.
-
 1
1
-
 2
2
-
 3
3
-
 4
4
-
 5
5
-
 6
6
-
 7
7
-
 8
8
-
 9
9
-
 10
10
-
 11
11
-
 12
12
-
 13
13
-
 14
14
-
 15
15
-
 16
16
-
 17
17
-
 18
18
-
 19
19
-
 20
20
-
 21
21
-
 22
22
-
 23
23
-
 24
24
-
 25
25
-
 26
26
-
 27
27
-
 28
28
-
 29
29
-
 30
30
-
 31
31
-
 32
32


Truper DES-330 El manual del propietario
- Categoría
- Podadoras de césped
- Tipo
- El manual del propietario
En otros idiomas
- English: Truper DES-330 Owner's manual