La página se está cargando ...

58
RQT5968
Table of contents
Inserting the batteries. . . . . . . . . 160
Hold function. . . . . . . . . . . . . . . . . 164
The operation tone . . . . . . . . . . . . 164
Setting the time. . . . . . . . . . . . . . 166
Changing modes. . . . . . . . . . . . . . 168
Recording . . . . . . . . . . . . . . . . . . 170
Playback. . . . . . . . . . . . . . . . . . . . 184
Dividing files . . . . . . . . . . . . . . . . . 190
Moving files. . . . . . . . . . . . . . . . . . 192
Erasing files. . . . . . . . . . . . . . . . . . 194
Erasure prevention . . . . . . . . . . . . 196
Timer recording and
playback . . . . . . . . . . . . . . . . . . 196
Care and Use . . . . . . . . . . . . . . . . 104
Maintenance . . . . . . . . . . . . . . . . . 104
Specifications . . . . . . . . . . . . . . . . 104
Troubleshooting guide. . . . . . . . 105
ENGLISH ESPAÑOL
Índice
Colocación de las pilas . . . . . . . 160
Función de retención. . . . . . . . . . . 164
El tono operativo. . . . . . . . . . . . . . 164
Fijación de la hora. . . . . . . . . . . . 166
Cambio de modos. . . . . . . . . . . . . 168
Grabación . . . . . . . . . . . . . . . . . . 170
Reproducción . . . . . . . . . . . . . . . 184
Dividiendo archivos. . . . . . . . . . . . 190
Moviendo archivos . . . . . . . . . . . . 192
Borrando archivos. . . . . . . . . . . . . 194
Prevención de borrado . . . . . . . . . 196
Grabación y reproducción con
temporizador . . . . . . . . . . . . . . . 196
Cuidados y uso . . . . . . . . . . . . . . . 106
Mantenimiento. . . . . . . . . . . . . . . . 106
Especificaciones . . . . . . . . . . . . . . 106
Guía para la localización
de las fallas . . . . . . . . . . . . . . . 107

60
RQT5968
B
2
1
+
+
-
-
a
3
A
b
Inserting the batteries
Long life alkaline batteries are recom-
mended.
If rechargeable batteries are to be
used, rechargeable batteries manufac-
tured by Panasonic are recommended.
Follow steps 1–3.
a AAA SIZE (R03/LR03, UM-4)
(not included)
b Ribbons
Note
≥Lay the ribbons under the batteries to
make removal easier.
≥Be sure the ribbons do not stick out
when the lid is closed.
If the battery cover comes loose: A
Push the cover’s levers into the cutouts
in the compartment as shown in the
illustration.
After the batteries are inserted:
If the year starts flashing on the display
(see B), set the time so the unit can
keep track of the time and date of
recordings. For details see “Setting the
time” (page 66).
Note
Do not press the buttons while insert-
ing the batteries. This may cause mal-
function of the unit or its display.
ENGLISH ESPAÑOL
Colocación de las pilas
Se recomienda el uso de pilas alcalinas para
alto consumo.
Si van a utilizarse baterías recargables, se re-
comiendan las fabricadas por Panasonic.
Siga los pasos 1–3.
a AAA SIZE (R03/LR03, UM-4)
(no incluidas)
b Cintas
Nota
≥Coloque las cintas debajo de las pilas para
facilitar su extracción.
≥Asegúrese de que las cintas no quedan
fuera del compartimiento cuando coloque la
tapa de éste.
Si la tapa del compartimiento de pilas
se afloja:
A
Coloque las palancas de la tapa en las mues-
cas que se encuentran en el compartimiento,
tal como se ilustra en la figura.
Luego de colocar las pilas:
Si el año comienza a destellar en el visor (ver
B), fijar la hora, de forma tal que la unidad
pueda mantener la hora y fecha de las graba-
ciones. Para obtener detalles más precisos,
consulte lo indicado en el título “Fijación de la
hora” (página 66).
Nota
No pulse los botones mientras coloca las
pilas, ya que puede causar un mal funciona-
miento de la unidad o del visor.

62
RQT5968
a
Inserting the batteries
∫ The battery indicator
a Replace the batteries when the
indicator flashes.
The flash memory preserves files and
file information even if you remove the
batteries or they go flat. Other memory
items, however, revert to the factory
settings if you take more than
30 seconds to replace the batteries or
leave flat batteries in the unit for an
extended period.
Note
≥The battery indicator is not shown
while the recorder is stopped.
≥The unit does not work correctly if
the battery cover is not closed com-
pletely.
ENGLISH ESPAÑOL
Colocación de las pilas
∫ El indicador de estado de las
pilas
a Reemplace las pilas cuando el
indicador destelle.
La memoria fugaz conserva los
archivos y la información de archivos
aun si Ud. retira las pilas o si éstas se
agotan.
Sin embargo, otros ítems de la memo-
ria regresan a los ajustes de fábrica si
le toma a Ud. más de 30 segundos
reemplazar las pilas o deja pilas agota-
das en el aparato por un periodo largo.
Nota
≥El indicador de pilas no funciona
mientras el grabador no funcione.
≥La unidad no funciona correctamente
si la tapa del compartimiento de pilas
no está del todo cerrada.

64
RQT5968
HOLDHOLD
HOLDHOLD
B
A
C
b
a
Hold function
This function prevents accidental oper-
ation.
a HOLD mode
b Release
“hold” appears when a button is
pressed but there is no other response
while this function is on. A
Release HOLD before attempting
any operation.
The operation tone
The operation tone can be turned on
and off.The tone is originally set to
“On”.
1 Press [MODE] several times
until “bEEP” is displayed. B
2 Turn [PLAY/STOP, SEL] to
select “On”or “OFF”. C
3 Within 10 seconds, press [PLAY/
STOP, SEL].
A tone sounds each time an opera-
tion is performed if you select “On”.
ENGLISH ESPAÑOL
Función de retención
Esta función evita una operación acci-
dental.
a Modo HOLD
b Liberación
La palabra “hold” aparece cuando se
pulsa una tecla, pero no existe res-
puesta alguna mientras la función está
activada. A
Libere HOLD antes de intentar
cualquier operación.
El tono operativo
El tono operativo puede activarse
(“On”) o desactivarse (“OFF”). Original-
mente está fijado en “On”.
1 Pulse [MODE] varias veces
hasta que se exhiba “bEEP”. B
2(“On”) active o (“OFF”) des-
active [PLAY/STOP, SEL]. C
3 Dentro de los 10 segundos,
pulse [PLAY/STOP, SEL].
Un tono se escucha cada vez que
se lleva a cabo una operación si
selecciona “On”.

66
RQT5968
1
2
MD
MD
H
AM
M
A
HM
HQ
AM
1
2
3
4
65
Setting the time
Set the time after inserting the batteries
so the times for the recordings are
saved.
Reset the clock regularly to maintain
accuracy. (Monthly accuracy i/j
60 seconds.)
1
Within 10 seconds, turn
[PLAY/STOP, SEL] to select the
item.
2
Within 10 seconds, press
[PLAY/STOP, SEL] to set the
item.
Repeat 1 and 2 to complete the
settings.
1 the year>
2 the month>
3 the day>
4 12 or 24 hour time display
>
5 the time>
6 Normal display
Correcting the time settings
Press [MODE] to display the setting
you want to correct, then
and to change it.
SET
SELECT
SET
SELECT
SET
SET
SELECT
SET
SELECT
SET
ENGLISH
SELECT
SET
SELECT
SELECT
Fijación de la hora
Fije la hora luego de haber colocado
las pilas, de forma tal que se registren
las horas de la grabación.
Reajuste el reloj con regularidad para
mantener la exactitud. (Exactitud men-
sual i/j 60 segundos.)
1
Dentro de los 10 segundos
siguientes, haga girar [PLAY/
STOP, SEL] para seleccionar el
ítem.
2
Dentro de los 10 segundos
siguientes, oprima [PLAY/STOP,
SEL] para ajustar el ítem.
Repita 1 y 2 para completar la fijación.
1 el año>
2 el mes>
3 el día>
4 indicación de tiempo
12 o 24 horas>
5 la hora>
6 Representación visual normal
Corrección de la fijación de la hora
Pulse [MODE] para exhibir la fijación
que desea corregir, luego
y para cambiarla.
FIJAR
FIJAR
SELECCIONAR
FIJAR
FIJAR
FIJAR
FIJAR
FIJAR
SELECCIONAR
SELECCIONAR
SELECCIONAR
SELECCIONAR
SELECCIONAR
ESPAÑOL
SELECCIONAR

68
RQT5968
MODE
ENGLISH
Changing modes
Each time [MODE] is pressed, the
modes change in the following order.
Locking files (see page 96)§(------------]
;|
Recording mode (see page 78) |
;|
Microphone sensitivity (see page 82) |
;|
Voice activated system (see page 80)|
;|
Playback speed (see page 88) |
;|
Operation tone (see page 64) |
;|
Timer recording (see page 96) |
;|
Timer playback (see page 100)§ |
;|
Time setting—year>month>day>|
time display>time—(see page 66) }
§Not displayed if there are no
recordings.
Note
≥The original display is restored if an
operation isn’t performed within
10 seconds.
≥Settings can be canceled by pressing
[STOP].
ESPAÑOL
Cambio de modos
Cada vez que pulse [MODE], los modos cam-
bian en el siguiente orden.
Bloqueando archivos (ver página 96)§(------]
;|
Modo grabación (ver página 78) |
;|
Sensibilidad del micrófono (ver página 82) |
;|
Sistema activado por voz (ver página 80) |
;|
Velocidad de reproducción (ver página 88) |
;|
Tono de operación (ver página 64) |
;|
Grabación con temporizador |
(ver página 96) |
;|
Reproducción con temporizador |
(ver página 100)§ |
;|
Ajuste de tiempo—año>mes>día>|
indicación de tiempo>hora— |
(ver página 66) -----------------------------------------------}
§No se exhibe de no haber grabaciones.
Nota
≥La representación visual original se res-
tablece si no se lleva a cabo una operación
dentro de los 10 segundos.
≥Las fijaciones pueden cancelarse pulsando
[STOP].

70
RQT5968
Recording
Files can be stored in separate “folders”. Each folder can
hold up to 99 files. Total recording time depends on the
model and recording mode (see page 78, “Changing
recording mode”).
Available
recording
time
(approx.)
Folders
Recording
mode
LP (Long
play)
SP
(Standard
play)
HQ (High
quality)
Model
Note
≥Total recording time is the combined time of all the
folders.
≥The recording mode is originally set to “HQ”.
≥The recording being made can be lost if the unit receives
a shock (e.g. it is dropped), or if the batteries and cover
come loose.
≥Leave VAS (page 80) off when recording important files.
ENGLISH
RR-QR400
420 min.
131 min.
65 min.
RR-QR200
200 min.
65 min.
32 min.
RR-QR100
100 min.
31 min.
15 min.
4 (A, B, C, D)
ESPAÑOL
Grabación
Los archivos pueden almacenarse en “carpetas” sepa-
radas. Cada carpeta puede contener hasta 99 archivos.
El tiempo total de grabación depende del modelo y de la
calidad de grabación (ver página 78-“Cambio del modo de
grabación”).
Nota
≥El tiempo total de grabación es el tiempo combinado de
todas las carpetas.
≥El modo de grabación está fijado originalmente en “HQ”.
≥La grabación que se está realizando puede perderse si la
unidad recibe un golpe (por ejemplo, si se cae) o si las
pilas y la tapa se aflojan.
≥Mantenga VAS (página 80) desactivada (off) cuando
grabe archivos importantes.
Tiempo
disponible
de
grabación
(Aprox.)
Carpetas
Modo de
grabación
LP (repro-
ducción
prolongada)
SP (repro-
ducción
estándar)
HQ (Alta
calidad)
Modèle
RR-QR400
420 min.
131 min.
65 min.
RR-QR200
200 min.
65 min.
32 min.
RR-QR100
100 min.
31 min.
15 min.
4 (A, B, C, D)

74
RQT5968
HQ
B
a
1
MIC
b
2
B
MS
HQ
d
e
3
B
B
REC
DATE
MD
B
REC
DATE
H
PM
M
B
MS
HQ
HQ
HQ
HQ
1
3
2
4
c
Recording
1 Press [FOLDER] to select the
folder to record into.
a Folder
2 Press [$REC, %PAUSE].
Recording begins and the record-
ing indicator lights.
b Recording indicator
c Built-in microphone
d File number
e Recording time
3 Press [STOP].
Recording stops.
The display changes in the follow-
ing order:
1 Date of recording
2 Time of recording
3 Length of recording
4 Total number of files
To pause recording:
Press and hold [$REC, %PAUSE].
The recording indicator flashes.
Press again to resume recording.
To record through the external mi-
crophone:
Plug the external microphone (not
included) into the [MIC] jack.
Then follow the steps 1–3 above.
You can use a condenser microphone
with or without built-in power supply.
Plug type: 3.5 mm monaural
ENGLISH ESPAÑOL
Grabación
1 Pulse [FOLDER] para seleccio-
nar la carpeta en la cual se debe
grabar.
a Carpeta
2 Pulse [$REC, %PAUSE].
Comienza a grabar y se ilumina la
lámpara de grabación.
b Indicador de grabación
c Micrófono incorporado
d Número de archivo
e Tiempo de grabación
3 Pulse [STOP].
Detención de la grabación.
La representación visual del visor cam-
bia en el siguiente orden:
1 Fecha de la grabación
2 Hora de la grabación
3 Longitud de la grabación
4 Número total de archivos
Para hacer una pausa en la
grabación:
Pulse y mantenga pulsado [$REC,
%PAUSE].
La luz de grabación destella.
Púlsela nuevamente para retomar la grabación.
Para grabar a través de un micró-
fono externo:
Conecte el micrófono externo (no
incluido) en el conector [MIC].
Luego, siga los pasos 1–3 mencio-
nados anteriormente.
Puede usar un micrófono con condensador,
con o sin fuente de alimentación incorporada.
Tipo de conector macho: 3,5 mm monaural

76
RQT5968
A
B
HQ
MS
a
b
c
Recording
To check available recording time:
Press [MODE] while recording.
A
a e.g. Display for RR-QR400
b Available recording time
c Time indicator
Press again to restore the display.
This display also appears when
there is about 10 % of the total
recording time left. Press [MODE]
to show the normal recording dis-
play for about 3 seconds.
ENGLISH
Recording time displays
The display shows minutes and
seconds.
: The display shows hours
and minutes when the
length of recording and re-
maining recording time are
300 minutes or longer.
The time indicator is a rough guide to
the remaining recording time. The sec-
tions disappear as available time re-
duces and the last section flashes
when there is about 10 percent left.
“FULL” is displayed when there is no
time or file numbers left. Erase unnec-
essary files to continue recording.
RR-QR400
ESPAÑOL
Grabación
Para verificar el tiempo disponible
de grabación:
Pulse [MODE] mientras graba. A
a por ejemplo: Visor para RR-QR400
b Tiempo disponible de grabación
c Indicador de tiempo
Pulse nuevamente para restablecer la repre-
sentación visual.
Esta representación visual asimismo
aparece cuando queda aproximada-
mente el 10 % del tiempo total de
grabación. Pulse [MODE] para mostrar
la representación visual normal de
grabación durante aproximadamente
3 segundos.
Visualizaciones de tiempo de
grabación
La visualización muestra los minutos y los
segundos.
: La visualización muestra las
horas y los minutos cuando la
duración de la grabación y el
tiempo remanente de graba-
ción son 300 minutos o más.
El indicador de tiempo es una guía aproxi-
mada del tiempo remanente de grabación.
Las secciones desaparecen a medida que el
tiempo disponible se reduce y la última
sección destella cuando queda aproximada-
mente un 10 por ciento.
“FULL” es visualizado cuando no quedan
tiempo o números de archivos. Borre los
archivos innecesarios para continuar la
grabación.
RR-QR400

78
RQT5968
A
a
B
b
c
d
Recording
∫ Changing recording mode
Three modes can be selected. The
mode is originally set to HQ (“HI”).
1 Press [MODE] several times
until the recording mode display
is displayed. A
a Recording mode display
2 Within 10 seconds, turn [PLAY/
STOP, SEL] to select the re-
quired mode. B
Recording mode changes the total
recording time.
b High quality mode
c Standard play mode
d Long play mode
3 Within 10 seconds, press [PLAY/
STOP, SEL].
The mode is selected.
Note
“HQ” lights in other displays to indicate
you have selected high quality mode.
ENGLISH ESPAÑOL
Grabación
∫ Cambio del modo de grabación
Pueden seleccionarse tres modos. El
modo original está fijado en HQ (“HI”).
1 Pulse [MODE] varias veces has-
ta que se exhiba la representa-
ción visual del modo de graba-
ción. A
a Representación visual del
modo de grabación
2 Dentro de los 10 segundos, gire
[PLAY/STOP, SEL] para selec-
cionar el modo requerido. B
El modo de grabación cambia el
tiempo total de grabación.
b Modo High quality
c Modo Standard play
d Modo Long play
3 Dentro de los 10 segundos,
pulse [PLAY/STOP, SEL].
Se selecciona el modo.
Nota
“HQ” se ilumina en otras representa-
ciones visuales para indicar que ha
seleccionado el modo High Quality.

80
RQT5968
A
a
Recording
∫ Preventing unnecessary recor-
ding (Voice activated system:
VAS)
VAS detects silence and pauses recor-
ding automatically.
The voice mark flashes while VAS is
waiting for a sound to record.
1 Press [MODE] several times
until the voice mark is displayed.
A
a Voice mark
2 Within 10 seconds, turn [PLAY/
STOP, SEL] to select “On”.
3 Within 10 seconds, press [PLAY/
STOP, SEL].
VAS is now on.
To turn the function off:
Select “OFF” in step 2 and press
[PLAY/STOP, SEL].
ENGLISH ESPAÑOL
Grabación
∫ Evitar la grabación innecesaria
(Sistema de voz activada: VAS)
VAS detecta el silencio y automática-
mente hace una pausa en la gra-
bación.
La marca de voz destella mientras
VAS espera grabar un sonido.
1 Pulse [MODE] varias veces has-
ta que se exhiba la marca de voz.
A
a Marca de voz
2 Dentro de los 10 segundos, gire
[PLAY/STOP, SEL] para selec-
cionar “On”.
3 Dentro de los 10 segundos,
pulse [PLAY/STOP, SEL].
VAS ahora se encuentra activada.
Para desactivar (off) la función:
Seleccione “OFF” en el paso 2 y pulse
[PLAY/STOP, SEL].

82
RQT5968
A
a
B
b
c
L
M
I
C
S
E
N
S
H
L
M
I
C
S
E
N
S
H
L
M
I
C
S
E
N
S
H
Recording
∫ Changing microphone sensitivity
Two levels of microphone sensitivity
can be selected. The level is originally
set to “H”.
1 Press [MODE] several times
until the microphone sensitivity
display is displayed. A
a Microphone sensitivity display
2 Within 10 seconds, turn [PLAY/
STOP, SEL] to select the re-
quired level of sensitivity. B
b High: Relatively soft sounds
are recorded.
c Low: Only relatively louder
sounds are recorded.
Use when recording
close to the mouth.
3 Within 10 seconds, press [PLAY/
STOP, SEL].
The level is selected.
Note
Microphone sensitivity is shown only
when sensitivity level is being
changed. It is not shown constantly.
ENGLISH ESPAÑOL
Grabación
∫ Cambio de la sensibilidad del
micrófono
Pueden seleccionarse dos niveles de
sensibilidad de micrófono.
El nivel se encuentra originalmente
fijado en “H”.
1 Pulse [MODE] varias veces has-
ta que se exhiba la representa-
ción visual de sensibilidad del
micrófono. A
a Representación visual de la
sensibilidad del micrófono
2 Dentro de los 10 segundos, gire
[PLAY/STOP, SEL] para selec-
cionar el nivel requerido de sen-
sibilidad. B
b Alto: Se graban los sonidos
relativamente suaves.
c Bajo: Se graban sólo los soni-
dos relativamente altos.
Utilice este nivel cuando
se grabe cerca de la
boca.
3 Dentro de los 10 segundos,
pulse [PLAY/STOP, SEL].
Se selecciona el nivel.
Nota
La sensibilidad del micrófono se indica
solamente cuando cambia el nivel de
sensibilidad. No se indica en forma
constante.

84
RQT5968
1
2
3
4
A
B
B
HQ
MS
a
Playback
1 Press [FOLDER] to select the
folder containing the file you
want to play.
2 Turn [PLAY/STOP, SEL] to
select the file you want to play.
Information about the selected file
appears in the following order:
1 Date of recording
2 Time of recording
3 Length of recording
4 Number of files
5 Normal display
3 Press [PLAY/STOP, SEL].
Playback starts.
a Play time
4 Adjust the volume.
To stop play
Press [STOP]. Press [PLAY/STOP,
SEL] to resume play from you stopped.
∫ Other methods of play
Use [PLAY/STOP, SEL].
To stop playback: A
Press during play.
Press again to resume playback.
To move to other files during play:
B
Turn slowly. Return to the beginning of
the file by turning backward. Turn
again within 3 seconds to move to the
previous file.
ENGLISH ESPAÑOL
Reproducción
1 Pulse [FOLDER] para selec-
cionar la carpeta que contiene el
archivo que desea reproducir.
2 Gire [PLAY/STOP, SEL] para
seleccionar el archivo que desea
reproducir.
La información sobre el elemento selec-
cionado aparece en el siguiente orden:
1 Fecha de la grabación
2 Hora de la grabación
3 Longitud de la grabación
4 Número de archivos
5 Representación visual normal
3 Pulse [PLAY/STOP, SEL].
Se inicia la reproducción.
a Tiempo de reproducción
4 Regule el volumen.
Para detener la reproducción
Oprima [STOP]. Oprima [PLAY/STOP, SEL]
para reanudar la reproducción que Ud.
detuvo.
∫ Otros métodos de reproducción
Use [PLAY/STOP, SEL].
Para detener la reproducción: A
Pulse durante la reproducción.
Pulse nuevamente para retomar la repro-
ducción.
Para pasar a otros archivos durante
la reproducción: B
Hágalo girar lentamente.
Retorne al comienzo del archivo girando
hacia atrás. Hágalo girar nuevamente dentro
de los 3 segundos para pasar al archivo
previo.

86
RQT5968
A
B
B
HQ
MS
a
b
MODE
C
B
HQ
MS
Playback
Cue and review: A
Turn quickly during play.
You can cue and review not only within
a file, but the previous and the follow-
ing files as well.
Note
Volume may be changed after cueing,
reviewing, stopping and dividing files.
∫ To check the remaining playback
time: B
Press [MODE] during play.
Press again to restore the display.
a Remaining playback time
b Time indicator
Time indicator:
The sections disappear clockwise to in-
dicate remaining playback time.
∫ To listen to the first few seconds
of each file (Intro-scan) C
Press and hold [PLAY/STOP, SEL]
while stopped for a moment.
The first 5 seconds of each file are
played in order, beginning with the first
file.
If you want to listen to a file in full, press
[PLAY/STOP, SEL] while it is playing.
ENGLISH ESPAÑOL
Reproducción
Avance rápido y rebobinado: A
Gire rápidamente durante la reproducción.
Se puede insertar indicadores y revisar no
sólo dentro de un archivo, sino también el
archivo previo y los siguientes.
Nota
El volumen puede cambiarse luego de la
operación de avance rápido, rebobinado, la
detención y la división de archivos.
∫ Para verificar el tiempo restante
de reproducción: B
Puse [MODE] durante la repro-
ducción.
Pulse nuevamente para restablecer la repre-
sentación visual.
a Tiempo restante de reproducción
b Indicador de tiempo
Indicador de tiempo:
Las secciones desaparecen en sentido hora-
rio para indicar el tiempo restante de repro-
ducción.
∫ Para escuchar los primeros se-
gundos de cada archivo
∫ (intro-scan) C
Pulse y mantenga pulsado [PLAY/
STOP, SEL] mientras que está de-
tenido un momento.
Se reproducen los primeros 5 segundos de
cada archivo, en orden, comenzando por el
primer archivo. Si desea escuchar un archivo
en forma completa, pulse [PLAY/STOP, SEL]
mientras se está reproduciendo.

88
RQT5968
A
B
b
S
L
O
W
F
A
S
T
a
S
L
O
W
F
A
S
T
S
L
O
W
F
A
S
T
S
L
O
W
F
A
S
T
C
%
c
d
Playback
∫ To change playback speed
Three playback speeds can be
selected. The speed is originally set to
normal.
1 Press [MODE] several times
until the playback speed display
is displayed. A
a Playback speed display
2 Within 10 seconds, turn [PLAY/
STOP, SEL] to select the speed.
B
b Slow
c Normal
d Fast
3 Within 10 seconds, press [PLAY/
STOP, SEL].
The speed is selected.
For your reference
Press and hold [STOP] to restore
normal playback speed.
∫ Using earphone (not included) C
Use a monaural type if you want to
listen with an earphone.
Insert the earphone plug into the
earphone jack [#]. (Plug in firmly.)
Sound will not be heard from the
speaker.
Plug type: 3.5 mm monaural
ENGLISH ESPAÑOL
Reproducción
∫ Para cambiar la velocidad de
reproducción
Pueden seleccionarse tres veloci-
dades de reproducción. La velocidad
fijada originalmente es normal.
1 Pulse [MODE] varias veces
hasta que se exhiba la repre-
sentación visual de velocidad de
reproducción. A
a Visual de velocidad de repro-
ducción
2 Dentro de los 10 segundos, gire
[PLAY/STOP, SEL] para selec-
cionar la velocidad. B
b Lenta c Normal d Rápida
3 Dentro de los 10 segundos,
pulse [PLAY/STOP, SEL].
Se selecciona la velocidad.
Para su referencia
Pulse y mantenga el botón [STOP]
para restaurar la velocidad de repro-
ducción normal.
∫ Uso de audífono (no incluidos) C
Utilice un tipo monoaural si desea
escuchar con un audífono.
Coloque el conector macho del auri-
cular en el conector hembra de audí-
fono [#]. (Conéctelo firmemente.)
El altavoz no emitirá ningún sonido.
Tipo de conector macho:
3,5 mm monoaural

90
RQT5968
B
1
2
3
b
a
B
HQ
c
Dividing files
You can divide a file into two at a point you
choose. This allows you to extract the impor-
tant parts of a recording to save.
Preparation:
Select the folder and the file you want to di-
vide. (page 84, step1–2)
1 Press [PLAY/STOP, SEL] to start
playback of the file.
2 Press [DIVIDE] at the point you
want to divide the file.
The number of the file flashes.
a File number
b Total number of files
3 Within 10 seconds, press and
hold [DIVIDE].
The file is divided.
c File number after division
The file numbers after the divided file
increase by one.
Play is ready to start from the beginning of the
latter of the two files created by this operation.
Note
≥You cannot divide a file if a folder already
has 99 items.
≥You may not be able to divide recordings
less than one second.
≥There may be a slight different between the
recording start time display for the files after
division and the actual recording start time.
The recording start time is intended to serve
as a general guide only.
≥The total time may not agree with the origi-
nal recording time if a file is divided into
many different files.
ENGLISH ESPAÑOL
Dividiendo archivos
Puede dividir un archivo en dos, en un punto
que usted seleccione. Esto le permite extraer
las partes importantes de una grabación para
guardarlas.
Preparación:
Seleccione la carpeta y el archivo que desea
dividir. (página 84, paso 1–2)
1 Pulse [PLAY/STOP, SEL] para comen-
zar la reproducción del archivo.
2 Pulse [DIVIDE] en el punto en el que
desea dividir el archivo.
El número del archivo destella
a Número de archivo
b Número total de archivos
3 Dentro de los 10 segundos, pulse y
mantenga pulsada [DIVIDE].
Se divide el elemento.
c Número del archivo después de la
división
Los números de archivo después del archivo
dividido se incrementan de a uno.
La reproducción está lista para comenzar
desde el comienzo del último de los archivos
creados por esta operación.
Nota
≥No puede dividir un archivo si una carpeta
ya posee 99 archivos.
≥No puede dividir grabaciones de menos de
un segundo.
≥Puede que haya una pequeña diferencia
entre la representación de la hora de inicio
de los archivos después de la división y la
hora real de inicio de grabación real. La
hora inicial de grabación tiene el propósito
de servir sólo como una guía general.
≥El tiempo total puede no coincidir con el
tiempo de grabación original si un archivo
es dividido en muchos archivos distintos.

92
RQT5968
A
C
2
1
a
b
3
Moving files
You can move a file to a different fold-
er. This allows you to categorize files
and save them together.
Preparation:
Select the folder and the file you want
to move. (page 84, step1–2)
1 Press [PLAY/STOP, SEL] to start
playback of the file.
2 Press [FOLDER] to select the
folder you want to move the file
to.
a Present folder
b New folder
3 Within 10 seconds, press [PLAY/
STOP, SEL].
The file moves to the end of the se-
lected folder.
ENGLISH ESPAÑOL
Moviendo archivos
Se puede mover un archivo a una
carpeta diferente. Esto le permite cate-
gorizar archivos y guardarlos juntos.
Preparación:
Seleccione la carpeta y el archivo que
desea desplazar.
(página 84, paso 1–2)
1 Pulse [PLAY/STOP, SEL] para
iniciar la reproducción del ele-
mento.
2 Pulse [FOLDER] para selec-
cionar la carpeta a la que desea
desplazar el archivo.
a Carpeta actual
b Carpeta nueva
3 Dentro de los 10 segundos,
pulse [PLAY/STOP, SEL].
El archivo se mueve al final de la
carpeta seleccionada.

94
RQT5968
1
3
2
b
a
c
B B
ERASE ERASE
A B
C D
ERASE
B
ERASE
d
ERASE
B
Erasing files
Files can either be erased one by one
or all at once. ERASE mode cannot be
selected while an empty folder is
selected. Erased files cannot be
recalled.
Preparation:
Select the folder first to erase individual
files or folders. (page 84, step1)
1 Press and hold [ERASE] while
stopped or during play.
2 Within 10 seconds, turn [PLAY/
STOP, SEL] to select the file you
want to erase.
The display changes in the follow-
ing order:
a The first file in the folder
b The last file in the folder
c All files in the folder
d All folders
3 Within 10 seconds, press
[ERASE].
The selected file is erased.
Note
≥Locked files will not be erased.
≥(see page 96)
≥Total recording time can be reduced
after erasing a number of files.
Remedy this by erasing all the folders
occasionally.
≥You cannot erase files being played
slow or fast.
ENGLISH ESPAÑOL
Borrando archivos
Los archivos pueden ser borrandos ya sea uno
por uno o todos de una sola vez. El modo
ERASE no puede seleccionarse mientras selec-
ciona una carpeta vacía esté seleccionada. Los
archivos borrados no pueden ser recuperarse.
Preparación:
Seleccione la carpeta para borrar archivos
individuales o carpetas. (página 84, paso 1)
1 Pulse y mantenga pulsada
[ERASE] mientras que se en-
cuentra detenido o durante la re-
producción.
2 Dentro de los 10 segundos, haga
girar [PLAY/STOP, SEL] para
seleccionar el archivo que desea
borrar.
La representación visual cambia en el
siguiente orden:
a El primer archivo en la carpeta
b El último archivo en la carpeta
c Todos los archivos en la carpeta
d Todas las carpetas
3 Dentro de los 10 segundos,
pulse [ERASE].
Se borra el archivo seleccionado.
Nota
≥Los archivos bloqueados no se borrarán.
(ver página 96)
≥El tiempo de grabación total. Puede ser
reducido luego de borrar un número de
archivos. Solucione esta circunstancia bor-
rando todas las carpetas periódicamente.
≥No se puede borrar archivos que están
siendo reproducidos lenta o rápidamente.

96
RQT5968
1
3
2
LOCK
B
Erasure prevention
Lock individual recordings to avoid
accidentally erasing them.
Preparation:
Select the folder containing the file you
want to lock. (page 84, step 1)
1 Press [MODE] until “LOCK”
flashes.
2 Within 10 seconds, turn [PLAY/
STOP, SEL] to select the file.
3 Within 10 seconds, press [PLAY/
STOP, SEL].
The file is locked and “LOCK” is
displayed until canceled.
To unlock:
1 Select the locked file.
2 Repeat steps 1 and 3 for each file.
Timer recording and
playback
∫ Timer recording
Recording can be set to start and finish
at set times. You must set the current
time (see page 66).
Preparation:
Select the folder to record into.
(page 74, step1)
(Continued on page 98.)
ENGLISH ESPAÑOL
Prevención de borrado
Bloquee las grabaciones individuales para
evitar que se borren accidentalmente.
Preparación:
Seleccione la carpeta que contiene el archivo
que desea bloquear. (página 84, paso 1)
1 Pulse [MODE] hasta que
“LOCK” destelle.
2 Dentro de los 10 segundos, haga
girar [PLAY/STOP, SEL] para
seleccionar el archivo.
3 Dentro de los 10 segundos,
pulse [PLAY/STOP, SEL].
El archivo es bloqueado y “LOCK” es
exhibido hasta que se cancele.
Para desbloquear:
1 Seleccione el archivo bloqueado.
2 Repita los pasos 1 y 3 para cada archivo.
Grabación y reproducción
con temporizador
∫ Grabación por temporizador
La grabación puede fijarse para que comien-
ce y finalice en horas prefijadas. Debe fijar la
fecha actual (ver página 66).
Preparación:
Seleccione la carpeta en la cual va a grabar.
(página 74, paso 1)
(Continúa en la página 98.)

98
RQT5968
1
2
REC
F
REC
F
a
3
PM
REC
F
B
PM
REC
F
B
2
4
b
c
Timer recording and playback
1 Press [MODE] several times
until the timer recording display
is displayed.
a Timer recording display
2 Within 10 seconds, turn [PLAY/
STOP, SEL] to select “On”.
3 Set the times.
1 Within 10 seconds, press [PLAY/
STOP, SEL].
The start time flashes.
2 Within 10 seconds, turn
[PLAY/STOP, SEL] to change the
start time.
b Start time
3 Within 10 seconds, press [PLAY/
STOP, SEL].
The start time is set and the finish time
flashes.
4 Within 10 seconds, turn
[PLAY/STOP, SEL] to change the
finish time.
c Finish time
5 Within 10 seconds, press [PLAY/
STOP, SEL].
The display changes in the following
order indicating completion of the
settings.
Recording start time
Recording finish time
Current number of files
Normal display
ENGLISH ESPAÑOL
Grabación y reproducción con
temporizador
1 Pulse [MODE] varias veces hasta que
se exhiba la representación visual de
grabación por temporizador.
a Representación visual de grabación
por temporizador
2 Dentro de los 10 segundos, gire
[PLAY/STOP, SEL] para seleccionar
“On”.
3 Fije las horas.
1 Dentro de los 10 segundos, pulse
[PLAY/STOP, SEL].
La hora de inicio comienza a destellar.
2 Dentro de los 10 segundos, gire
[PLAY/STOP, SEL] para cambiar la
hora de inicio.
b Hora de inicio
3 Dentro de los 10 segundos, pulse
[PLAY/STOP, SEL].
Se fija la hora de inicio y destella la hora
de terminación.
4 Dentro de los 10 segundos, gire
[PLAY/STOP, SEL] para cambiar la
hora de terminación.
c Hora de terminación
5 Dentro de los 10 segundos, pulse
[PLAY/STOP, SEL].
La representación visual cambia en el
siguiente orden, indicando la terminación
de la fijación de los valores.
Hora de inicio de grabación
Hora de terminación de grabación
Cantidad actual de archivos
Indicación normal

100
RQT5968
1
2
3
b
PLAY
F
a
PLAY
F
PLAY
PM
F
B
2
Timer recording and playback
∫ Timer playback
Playback can be set to start at set time. You
must set the current time (see page 66).Timer
playback cannot be selected while an empty
folder is selected.
Preparation:
Select the folder and the file you want to play.
(page 84, step1–2)
1 Press [MODE] several times until the
timer play display is displayed.
a Timer play display
2 Within 10 seconds, turn [PLAY/
STOP, SEL] to select “On”.
3 Set the times.
1 Within 10 seconds, press [PLAY/
STOP, SEL].
The start time flashes.
2 Within 10 seconds, turn [PLAY/
STOP, SEL] to change the start time.
b Start time
3 Within 10 seconds, press [PLAY/
STOP, SEL].
The start time is set.
The display changes in the following
order indicating completion of the
settings.
Playback start time
Selected file number
Normal display
The timer playback stops automatically.
ENGLISH ESPAÑOL
Grabación y reproducción con
temporizador
∫ Reproducción por temporizador
La reproducción puede fijarse para que
comience a una hora prefijada. Debe fijar la
hora actual (ver página 66). La reproducción
por temporizador no puede seleccionarse
mientras se seleccione una carpeta vacía.
Preparación:
Seleccione la carpeta y el archivo que desea
reproducir. (página 84, paso 1–2)
1 Pulse [MODE] varias veces hasta que
se exhiba la representación visual de
reproducción por temporizador.
a Visor de reproducción con tempori-
zador
2 Dentro de los 10 segundos, gire
[PLAY/STOP, SEL] para seleccionar
“On”.
3 Fije las horas.
1 Dentro de los 10 segundos, pulse
[PLAY/STOP, SEL].
Destella la hora de inicio.
2 Dentro de los 10 segundos, gire
[PLAY/STOP, SEL] para cambiar la
hora de inicio.
b Destella la hora
3 Dentro de los 10 segundos, pulse
[PLAY/STOP, SEL].
Se fija la hora de inicio.
La representación visual cambia en el
siguiente orden, indicando la terminación
de la fijación de valores.
Hora de inicio de reproducción
Número de archivo seleccionado
Indicación normal
La reproducción por temporizador se detiene
automáticamente.

102
RQT5968
Timer recording and playback
The timer indicators (REC F and
PLAY F) light to show which timer is
set and flash when the timer is oper-
ating.
To cancel the timer:
Select “OFF” in step 2 and press
[PLAY/STOP, SEL].
To check the timer settings:
Press [MODE] several times until the
timer display is displayed. The display
will then change to show the following
automatically.
Timer recording: Start time, finish
time, folder the file will enter.
Timer playback: Start time, folder and
file to be played.
Note
≥The two timers cannot be used together.
The timer set last is activated.
≥The timers can only be set within a single
twenty-four hour period. The recording timer
can only be set if there is one minute or
more of available recording time.
≥If you make recordings before timer record-
ing begins, be aware that the time available
is reduced. The timer recording can only
continue as long as the available time
allows.
≥If VAS is left on during timer recording, the
recording may be shorter than the set time.
≥The timer settings are canceled if the clock
is cleared (i.e. the batteries are removed
from the battery compartment).
ENGLISH ESPAÑOL
Grabación y reproducción con
temporizador
Los indicadores del temporizador (REC F y
PLAY F) se iluminan para mostrar cuál tem-
porizador está ajustado y destellan cuando el
temporizador está funcionando.
Para cancelar el temporizador:
Seleccione “OFF” en el paso 2 y pulse
[PLAY/STOP, SEL].
Para verificar los valores del tempori-
zador:
Pulse [MODE] varias veces hasta que se ex-
hiba la representación visual del tempori-
zador. En forma automática, la representa-
ción visual exhibirá el cambio para indicar lo
siguiente.
Grabación por temporizador: Hora de inicio,
hora de terminación, carpeta en la que el
archivo entrará.
Reproducción por temporizador: Hora de
inicio, carpeta y elemento a reproducirse.
Nota
≥Los dos temporizadores no pueden utili-
zarse en forma conjunta. Se activa la última
fijación del temporizador.
≥Los temporizadores pueden fijarse sola-
mente dentro de un período único de veinti-
cuatro horas. El temporizador de grabación
puede fijarse solamente si existe un minuto
o más de tiempo disponible de grabación.
≥Si realiza grabaciones antes de que comi-
ence la grabación por temporizador, tenga
presente que el tiempo disponible se redu-
ce. La grabación por temporizador puede
continuar solamente en la medida que lo
permita el tiempo disponible.
≥Si VAS queda activado durante la grabación
por temporizador, la grabación puede ser
más corta que el tiempo programado.
≥Se cancelan los valores de referencia del
temporizador si se borra el reloj (es decir, se
extraen las pilas del compartimento).
La página se está cargando ...
La página se está cargando ...
La página se está cargando ...
Transcripción de documentos
ENGLISH Table of contents RQT5968 Inserting the batteries. . . . . . . . . 160 Hold function . . . . . . . . . . . . . . . . . 164 The operation tone . . . . . . . . . . . . 164 Setting the time . . . . . . . . . . . . . . 166 Changing modes . . . . . . . . . . . . . . 168 Recording . . . . . . . . . . . . . . . . . . 170 Playback. . . . . . . . . . . . . . . . . . . . 184 Dividing files . . . . . . . . . . . . . . . . . 190 Moving files . . . . . . . . . . . . . . . . . . 192 Erasing files. . . . . . . . . . . . . . . . . . 194 Erasure prevention . . . . . . . . . . . . 196 Timer recording and playback . . . . . . . . . . . . . . . . . . 196 Care and Use . . . . . . . . . . . . . . . . 104 Maintenance . . . . . . . . . . . . . . . . . 104 Specifications . . . . . . . . . . . . . . . . 104 Troubleshooting guide . . . . . . . . 105 58 ESPAÑOL Índice Colocación de las pilas . . . . . . . 160 Función de retención. . . . . . . . . . . 164 El tono operativo . . . . . . . . . . . . . . 164 Fijación de la hora. . . . . . . . . . . . 166 Cambio de modos . . . . . . . . . . . . . 168 Grabación . . . . . . . . . . . . . . . . . . 170 Reproducción . . . . . . . . . . . . . . . 184 Dividiendo archivos . . . . . . . . . . . . 190 Moviendo archivos . . . . . . . . . . . . 192 Borrando archivos . . . . . . . . . . . . . 194 Prevención de borrado . . . . . . . . . 196 Grabación y reproducción con temporizador . . . . . . . . . . . . . . . 196 Cuidados y uso . . . . . . . . . . . . . . . 106 Mantenimiento. . . . . . . . . . . . . . . . 106 Especificaciones . . . . . . . . . . . . . . 106 Guía para la localización de las fallas . . . . . . . . . . . . . . . 107 ENGLISH Inserting the batteries 1 + - - 2+ a 3 Long life alkaline batteries are recommended. If rechargeable batteries are to be used, rechargeable batteries manufactured by Panasonic are recommended. Follow steps 1–3. a AAA SIZE (R03/LR03, UM-4) (not included) b Ribbons Note ≥Lay the ribbons under the batteries to make removal easier. ≥Be sure the ribbons do not stick out when the lid is closed. b A RQT5968 B 60 If the battery cover comes loose: A Push the cover’s levers into the cutouts in the compartment as shown in the illustration. After the batteries are inserted: If the year starts flashing on the display (see B), set the time so the unit can keep track of the time and date of recordings. For details see “Setting the time” (page 66). Note Do not press the buttons while inserting the batteries. This may cause malfunction of the unit or its display. ESPAÑOL Colocación de las pilas Se recomienda el uso de pilas alcalinas para alto consumo. Si van a utilizarse baterías recargables, se recomiendan las fabricadas por Panasonic. Siga los pasos 1–3. a AAA SIZE (R03/LR03, UM-4) (no incluidas) b Cintas Nota ≥Coloque las cintas debajo de las pilas para facilitar su extracción. ≥Asegúrese de que las cintas no quedan fuera del compartimiento cuando coloque la tapa de éste. Si la tapa del compartimiento de pilas se afloja: A Coloque las palancas de la tapa en las muescas que se encuentran en el compartimiento, tal como se ilustra en la figura. Luego de colocar las pilas: Si el año comienza a destellar en el visor (ver B), fijar la hora, de forma tal que la unidad pueda mantener la hora y fecha de las grabaciones. Para obtener detalles más precisos, consulte lo indicado en el título “Fijación de la hora” (página 66). Nota No pulse los botones mientras coloca las pilas, ya que puede causar un mal funcionamiento de la unidad o del visor. ENGLISH Inserting the batteries ∫ The battery indicator a Replace the batteries when the indicator flashes. The flash memory preserves files and file information even if you remove the batteries or they go flat. Other memory items, however, revert to the factory settings if you take more than 30 seconds to replace the batteries or leave flat batteries in the unit for an extended period. a Note RQT5968 ≥The battery indicator is not shown while the recorder is stopped. ≥The unit does not work correctly if the battery cover is not closed completely. 62 ESPAÑOL Colocación de las pilas ∫ El indicador de estado de las pilas a Reemplace las pilas cuando el indicador destelle. La memoria fugaz conserva los archivos y la información de archivos aun si Ud. retira las pilas o si éstas se agotan. Sin embargo, otros ítems de la memoria regresan a los ajustes de fábrica si le toma a Ud. más de 30 segundos reemplazar las pilas o deja pilas agotadas en el aparato por un periodo largo. Nota ≥El indicador de pilas no funciona mientras el grabador no funcione. ≥La unidad no funciona correctamente si la tapa del compartimiento de pilas no está del todo cerrada. ENGLISH b a HOLD HOLD A ESPAÑOL Hold function Función de retención This function prevents accidental operation. a HOLD mode b Release Esta función evita una operación accidental. a Modo HOLD b Liberación “hold” appears when a button is pressed but there is no other response while this function is on. A La palabra “hold” aparece cuando se pulsa una tecla, pero no existe respuesta alguna mientras la función está activada. A Release HOLD before attempting any operation. Libere HOLD antes de intentar cualquier operación. The operation tone B RQT5968 C 64 The operation tone can be turned on and off.The tone is originally set to “On”. 1 Press [MODE] several times until “bEEP” is displayed. B 2 Turn [PLAY/STOP, SEL] select “On”or “OFF”. C 3 Within 10 seconds, press [PLAY/ STOP, SEL]. A tone sounds each time an operation is performed if you select “On”. El tono operativo El tono operativo puede activarse (“On”) o desactivarse (“OFF”). Originalmente está fijado en “On”. 1 Pulse [MODE] varias veces hasta que se exhiba “bEEP”. B 2 (“On”) active o (“OFF”) desactive [PLAY/STOP, SEL]. C 3 Dentro de los 10 segundos, pulse [PLAY/STOP, SEL]. Un tono se escucha cada vez que se lleva a cabo una operación si selecciona “On”. to ENGLISH ESPAÑOL Setting the time 1 2 1 Set the time after inserting the batteries so the times for the recordings are saved. Reset the clock regularly to maintain accuracy. (Monthly accuracy i/j 60 seconds.) Fije la hora luego de haber colocado las pilas, de forma tal que se registren las horas de la grabación. Reajuste el reloj con regularidad para mantener la exactitud. (Exactitud mensual i/j 60 segundos.) 1 1 2 M D 4 M D 5 6 A RQT5968 66 HQ AM AM H M SELECT H M SELECCIONAR Dentro de los 10 segundos siguientes, haga girar [PLAY/ STOP, SEL] para seleccionar el ítem. Within 10 seconds, turn [PLAY/STOP, SEL] to select the item. 2 3 Fijación de la hora SET 2 Within 10 seconds, press [PLAY/STOP, SEL] to set the item. Repeat 1 and 2 to complete the settings. 1 SELECT the year> SET 2 SELECT the month> SET 3 SELECT the day> SET 4 SELECT 12 or 24 hour time display > SET 5 SELECT the time> SET 6 Normal display Dentro de los 10 segundos siguientes, oprima [PLAY/STOP, SEL] para ajustar el ítem. Repita 1 y 2 para completar la fijación. 1 SELECCIONAR el año> FIJAR 2 SELECCIONAR el mes> FIJAR 3 SELECCIONAR el día> FIJAR 4 SELECCIONAR indicación de tiempo 12 o 24 horas> FIJAR 5 SELECCIONAR la hora> FIJAR 6 Representación visual normal Correcting the time settings Press [MODE] to display the setting you want to correct, then SELECT and SET to change it. Corrección de la fijación de la hora Pulse [MODE] para exhibir la fijación que desea corregir, luego SELECCIONAR y FIJAR para cambiarla. FIJAR ENGLISH ESPAÑOL Changing modes MODE Cambio de modos Each time [MODE] is pressed, the modes change in the following order. Cada vez que pulse [MODE], los modos cambian en el siguiente orden. Locking files (see page 96)§(------------] ; | Recording mode (see page 78) | ; | Microphone sensitivity (see page 82) | ; | Voice activated system (see page 80) | ; | Playback speed (see page 88) | ; | Operation tone (see page 64) | ; | Timer recording (see page 96) | ; | Timer playback (see page 100)§ | ; | Time setting—year>month>day> | time display>time—(see page 66) } Bloqueando archivos (ver página 96)§(------] ; | Modo grabación (ver página 78) | ; | Sensibilidad del micrófono (ver página 82) | ; | Sistema activado por voz (ver página 80) | ; | Velocidad de reproducción (ver página 88) | ; | Tono de operación (ver página 64) | ; | Grabación con temporizador | (ver página 96) | ; | Reproducción con temporizador | (ver página 100)§ | ; | Ajuste de tiempo—año>mes>día> | indicación de tiempo>hora— | (ver página 66) -----------------------------------------------} §Not displayed recordings. §No se exhibe de no haber grabaciones. if there are no RQT5968 Note 68 ≥The original display is restored if an operation isn’t performed within 10 seconds. ≥Settings can be canceled by pressing [STOP]. Nota ≥La representación visual original se restablece si no se lleva a cabo una operación dentro de los 10 segundos. ≥Las fijaciones pueden cancelarse pulsando [STOP]. ENGLISH Recording Files can be stored in separate “folders”. Each folder can hold up to 99 files. Total recording time depends on the model and recording mode (see page 78, “Changing recording mode”). Model Recording mode RR-QR400 RR-QR200 RR-QR100 LP (Long 420 min. 200 min. 100 min. play) Available SP recording 131 min. 65 min. 31 min. (Standard time play) (approx.) HQ (High 65 min. 32 min. 15 min. quality) Folders 4 (A, B, C, D) Note RQT5968 ≥Total recording time is the combined time of all the folders. ≥The recording mode is originally set to “HQ”. ≥The recording being made can be lost if the unit receives a shock (e.g. it is dropped), or if the batteries and cover come loose. ≥Leave VAS (page 80) off when recording important files. 70 ESPAÑOL Grabación Los archivos pueden almacenarse en “carpetas” separadas. Cada carpeta puede contener hasta 99 archivos. El tiempo total de grabación depende del modelo y de la calidad de grabación (ver página 78-“Cambio del modo de grabación”). Modèle Modo de grabación RR-QR400 RR-QR200 RR-QR100 LP (repro420 min. 200 min. 100 min. ducción Tiempo prolongada) disponible SP (reprode 131 min. 65 min. 31 min. ducción grabación estándar) (Aprox.) HQ (Alta 65 min. 32 min. 15 min. calidad) Carpetas 4 (A, B, C, D) Nota ≥El tiempo total de grabación es el tiempo combinado de todas las carpetas. ≥El modo de grabación está fijado originalmente en “HQ”. ≥La grabación que se está realizando puede perderse si la unidad recibe un golpe (por ejemplo, si se cae) o si las pilas y la tapa se aflojan. ≥Mantenga VAS (página 80) desactivada (off) cuando grabe archivos importantes. ENGLISH b c MIC a 1 1 B HQ 2 d e B HQ M 3 1 3 B B REC DATE HQ M M B B REC DATE HQ PM H RQT5968 S 4 2 74 HQ D M ESPAÑOL Recording HQ S Press [FOLDER] to select the folder to record into. a Folder 2 Press [$REC, %PAUSE]. Recording begins and the recording indicator lights. b Recording indicator c Built-in microphone d File number e Recording time 3 Press [STOP]. Recording stops. The display changes in the following order: 1 Date of recording 2 Time of recording 3 Length of recording 4 Total number of files To pause recording: Press and hold [$REC, %PAUSE]. The recording indicator flashes. Press again to resume recording. To record through the external microphone: Plug the external microphone (not included) into the [MIC] jack. Then follow the steps 1–3 above. You can use a condenser microphone with or without built-in power supply. Plug type: 3.5 mm monaural Grabación 1 Pulse [FOLDER] para seleccionar la carpeta en la cual se debe grabar. a 2 Carpeta Pulse [$REC, %PAUSE]. Comienza a grabar y se ilumina la lámpara de grabación. b Indicador de grabación c Micrófono incorporado d Número de archivo e Tiempo de grabación 3 Pulse [STOP]. Detención de la grabación. La representación visual del visor cambia en el siguiente orden: 1 Fecha de la grabación 2 Hora de la grabación 3 Longitud de la grabación 4 Número total de archivos Para hacer una pausa en la grabación: Pulse y mantenga pulsado [$REC, %PAUSE]. La luz de grabación destella. Púlsela nuevamente para retomar la grabación. Para grabar a través de un micrófono externo: Conecte el micrófono externo (no incluido) en el conector [MIC]. Luego, siga los pasos 1–3 mencionados anteriormente. Puede usar un micrófono con condensador, con o sin fuente de alimentación incorporada. Tipo de conector macho: 3,5 mm monaural ENGLISH Recording A a B b c HQ M S To check available recording time: Press [MODE] while recording. A a e.g. Display for RR-QR400 b Available recording time c Time indicator Press again to restore the display. RQT5968 This display also appears when there is about 10 % of the total recording time left. Press [MODE] to show the normal recording display for about 3 seconds. 76 Recording time displays The display shows minutes and seconds. RR-QR400 : The display shows hours and minutes when the length of recording and remaining recording time are 300 minutes or longer. The time indicator is a rough guide to the remaining recording time. The sections disappear as available time reduces and the last section flashes when there is about 10 percent left. “FULL” is displayed when there is no time or file numbers left. Erase unnecessary files to continue recording. ESPAÑOL Grabación Para verificar el tiempo disponible de grabación: Pulse [MODE] mientras graba. A a por ejemplo: Visor para RR-QR400 b Tiempo disponible de grabación c Indicador de tiempo Pulse nuevamente para restablecer la representación visual. Esta representación visual asimismo aparece cuando queda aproximadamente el 10 % del tiempo total de grabación. Pulse [MODE] para mostrar la representación visual normal de grabación durante aproximadamente 3 segundos. Visualizaciones grabación de tiempo de La visualización muestra los minutos y los segundos. RR-QR400 : La visualización muestra las horas y los minutos cuando la duración de la grabación y el tiempo remanente de grabación son 300 minutos o más. El indicador de tiempo es una guía aproximada del tiempo remanente de grabación. Las secciones desaparecen a medida que el tiempo disponible se reduce y la última sección destella cuando queda aproximadamente un 10 por ciento. “FULL” es visualizado cuando no quedan tiempo o números de archivos. Borre los archivos innecesarios para continuar la grabación. ENGLISH A a B ∫ Cambio del modo de grabación Pueden seleccionarse tres modos. El modo original está fijado en HQ (“HI”). 1 Press [MODE] several times until the recording mode display is displayed. A a Recording mode display 1 2 Within 10 seconds, turn [PLAY/ STOP, SEL] to select the required mode. B Recording mode changes the total recording time. b High quality mode c Standard play mode d Long play mode Pulse [MODE] varias veces hasta que se exhiba la representación visual del modo de grabación. A a Representación visual del modo de grabación 2 Dentro de los 10 segundos, gire [PLAY/STOP, SEL] para seleccionar el modo requerido. B El modo de grabación cambia el tiempo total de grabación. b Modo High quality c Modo Standard play d Modo Long play 3 Dentro de los 10 segundos, pulse [PLAY/STOP, SEL]. Se selecciona el modo. 3 c Within 10 seconds, press [PLAY/ STOP, SEL]. The mode is selected. Note RQT5968 “HQ” lights in other displays to indicate you have selected high quality mode. d Grabación ∫ Changing recording mode Three modes can be selected. The mode is originally set to HQ (“HI”). b 78 ESPAÑOL Recording Nota “HQ” se ilumina en otras representaciones visuales para indicar que ha seleccionado el modo High Quality. ENGLISH A a RQT5968 Grabación ∫ Preventing unnecessary recording (Voice activated system: VAS) VAS detects silence and pauses recording automatically. The voice mark flashes while VAS is waiting for a sound to record. ∫ Evitar la grabación innecesaria (Sistema de voz activada: VAS) VAS detecta el silencio y automáticamente hace una pausa en la grabación. La marca de voz destella mientras VAS espera grabar un sonido. 1 Press [MODE] several times until the voice mark is displayed. A a Voice mark 1 Pulse [MODE] varias veces hasta que se exhiba la marca de voz. A a Marca de voz 2 Within 10 seconds, turn [PLAY/ STOP, SEL] to select “On”. 2 3 Within 10 seconds, press [PLAY/ STOP, SEL]. VAS is now on. Dentro de los 10 segundos, gire [PLAY/STOP, SEL] para seleccionar “On”. 3 Dentro de los 10 segundos, pulse [PLAY/STOP, SEL]. VAS ahora se encuentra activada. To turn the function off: Select “OFF” in step 2 and press [PLAY/STOP, SEL]. 80 ESPAÑOL Recording Para desactivar (off) la función: Seleccione “OFF” en el paso 2 y pulse [PLAY/STOP, SEL]. ENGLISH A Recording a ∫ Changing microphone sensitivity Two levels of microphone sensitivity can be selected. The level is originally set to “H”. L MIC SENS H B 1 Press [MODE] several times until the microphone sensitivity display is displayed. A a Microphone sensitivity display 2 Within 10 seconds, turn [PLAY/ STOP, SEL] to select the required level of sensitivity. B b High: Relatively soft sounds are recorded. c Low: Only relatively louder sounds are recorded. Use when recording close to the mouth. 3 Within 10 seconds, press [PLAY/ STOP, SEL]. The level is selected. b L MIC SENS H c Note RQT5968 L 82 MIC SENS H Microphone sensitivity is shown only when sensitivity level is being changed. It is not shown constantly. ESPAÑOL Grabación ∫ Cambio de la sensibilidad del micrófono Pueden seleccionarse dos niveles de sensibilidad de micrófono. El nivel se encuentra originalmente fijado en “H”. 1 Pulse [MODE] varias veces hasta que se exhiba la representación visual de sensibilidad del micrófono. A a Representación visual de la sensibilidad del micrófono 2 Dentro de los 10 segundos, gire [PLAY/STOP, SEL] para seleccionar el nivel requerido de sensibilidad. B b Alto: Se graban los sonidos relativamente suaves. c Bajo: Se graban sólo los sonidos relativamente altos. Utilice este nivel cuando se grabe cerca de la boca. 3 Dentro de los 10 segundos, pulse [PLAY/STOP, SEL]. Se selecciona el nivel. Nota La sensibilidad del micrófono se indica solamente cuando cambia el nivel de sensibilidad. No se indica en forma constante. ENGLISH 1 4 1 2 3 B HQ M a RQT5968 A 84 ESPAÑOL Playback B S Press [FOLDER] to select the folder containing the file you want to play. 2 Turn [PLAY/STOP, SEL] to select the file you want to play. Information about the selected file appears in the following order: 1 Date of recording 2 Time of recording 3 Length of recording 4 Number of files 5 Normal display 3 Press [PLAY/STOP, SEL]. Playback starts. a Play time 4 Adjust the volume. To stop play Press [STOP]. Press [PLAY/STOP, SEL] to resume play from you stopped. ∫ Other methods of play Use [PLAY/STOP, SEL]. To stop playback: A Press during play. Press again to resume playback. To move to other files during play: B Turn slowly. Return to the beginning of the file by turning backward. Turn again within 3 seconds to move to the previous file. Reproducción 1 2 Pulse [FOLDER] para seleccionar la carpeta que contiene el archivo que desea reproducir. Gire [PLAY/STOP, SEL] para seleccionar el archivo que desea reproducir. La información sobre el elemento seleccionado aparece en el siguiente orden: 1 Fecha de la grabación 2 Hora de la grabación 3 Longitud de la grabación 4 Número de archivos 5 Representación visual normal 3 Pulse [PLAY/STOP, SEL]. Se inicia la reproducción. a Tiempo de reproducción 4 Regule el volumen. Para detener la reproducción Oprima [STOP]. Oprima [PLAY/STOP, SEL] para reanudar la reproducción que Ud. detuvo. ∫ Otros métodos de reproducción Use [PLAY/STOP, SEL]. Para detener la reproducción: A Pulse durante la reproducción. Pulse nuevamente para retomar la reproducción. Para pasar a otros archivos durante la reproducción: B Hágalo girar lentamente. Retorne al comienzo del archivo girando hacia atrás. Hágalo girar nuevamente dentro de los 3 segundos para pasar al archivo previo. ENGLISH Playback Cue and review: A Turn quickly during play. You can cue and review not only within a file, but the previous and the following files as well. MODE Note A Volume may be changed after cueing, reviewing, stopping and dividing files. B ∫ To check the remaining playback time: B Press [MODE] during play. Press again to restore the display. a Remaining playback time b Time indicator B HQ a M S b C B HQ RQT5968 M 86 S ESPAÑOL Reproducción Avance rápido y rebobinado: A Gire rápidamente durante la reproducción. Se puede insertar indicadores y revisar no sólo dentro de un archivo, sino también el archivo previo y los siguientes. Nota El volumen puede cambiarse luego de la operación de avance rápido, rebobinado, la detención y la división de archivos. ∫ Para verificar el tiempo restante de reproducción: B Puse [MODE] durante la reproducción. Pulse nuevamente para restablecer la representación visual. a Tiempo restante de reproducción b Indicador de tiempo Time indicator: The sections disappear clockwise to indicate remaining playback time. Indicador de tiempo: ∫ To listen to the first few seconds of each file (Intro-scan) C Press and hold [PLAY/STOP, SEL] while stopped for a moment. The first 5 seconds of each file are played in order, beginning with the first file. If you want to listen to a file in full, press [PLAY/STOP, SEL] while it is playing. ∫ Para escuchar los primeros segundos de cada archivo ∫ (intro-scan) C Pulse y mantenga pulsado [PLAY/ STOP, SEL] mientras que está detenido un momento. Las secciones desaparecen en sentido horario para indicar el tiempo restante de reproducción. Se reproducen los primeros 5 segundos de cada archivo, en orden, comenzando por el primer archivo. Si desea escuchar un archivo en forma completa, pulse [PLAY/STOP, SEL] mientras se está reproduciendo. ENGLISH A a Playback FAST SLOW ∫ To change playback speed Three playback speeds can be selected. The speed is originally set to normal. 1 Press [MODE] several times until the playback speed display is displayed. A a Playback speed display 2 Within 10 seconds, turn [PLAY/ STOP, SEL] to select the speed. B b Slow c Normal d Fast 3 Within 10 seconds, press [PLAY/ STOP, SEL]. The speed is selected. B b SLOW FAST SLOW FAST c For your reference Press and hold [STOP] to restore normal playback speed. d SLOW RQT5968 C 88 FAST % ∫ Using earphone (not included) C Use a monaural type if you want to listen with an earphone. Insert the earphone plug into the earphone jack [#]. (Plug in firmly.) Sound will not be heard from the speaker. Plug type: 3.5 mm monaural ESPAÑOL Reproducción ∫ Para cambiar la velocidad de reproducción Pueden seleccionarse tres velocidades de reproducción. La velocidad fijada originalmente es normal. 1 Pulse [MODE] varias veces hasta que se exhiba la representación visual de velocidad de reproducción. A a Visual de velocidad de reproducción 2 Dentro de los 10 segundos, gire [PLAY/STOP, SEL] para seleccionar la velocidad. B b Lenta c Normal d Rápida 3 Dentro de los 10 segundos, pulse [PLAY/STOP, SEL]. Se selecciona la velocidad. Para su referencia Pulse y mantenga el botón [STOP] para restaurar la velocidad de reproducción normal. ∫ Uso de audífono (no incluidos) C Utilice un tipo monoaural si desea escuchar con un audífono. Coloque el conector macho del auricular en el conector hembra de audífono [#]. (Conéctelo firmemente.) El altavoz no emitirá ningún sonido. Tipo de conector macho: 3,5 mm monoaural ENGLISH Dividing files You can divide a file into two at a point you choose. This allows you to extract the important parts of a recording to save. Preparation: 1 Select the folder and the file you want to divide. (page 84, step1–2) 1 2 a b 2 B The number of the file flashes. a File number b Total number of files 3 3 RQT5968 c 90 Press [PLAY/STOP, SEL] to start playback of the file. Press [DIVIDE] at the point you want to divide the file. B HQ Within 10 seconds, press and hold [DIVIDE]. The file is divided. c File number after division The file numbers after the divided file increase by one. Play is ready to start from the beginning of the latter of the two files created by this operation. Note ≥You cannot divide a file if a folder already has 99 items. ≥You may not be able to divide recordings less than one second. ≥There may be a slight different between the recording start time display for the files after division and the actual recording start time. The recording start time is intended to serve as a general guide only. ≥The total time may not agree with the original recording time if a file is divided into many different files. ESPAÑOL Dividiendo archivos Puede dividir un archivo en dos, en un punto que usted seleccione. Esto le permite extraer las partes importantes de una grabación para guardarlas. Preparación: Seleccione la carpeta y el archivo que desea dividir. (página 84, paso 1–2) 1 Pulse [PLAY/STOP, SEL] para comenzar la reproducción del archivo. 2 Pulse [DIVIDE] en el punto en el que desea dividir el archivo. El número del archivo destella a Número de archivo b Número total de archivos 3 Dentro de los 10 segundos, pulse y mantenga pulsada [DIVIDE]. Se divide el elemento. c Número del archivo después de la división Los números de archivo después del archivo dividido se incrementan de a uno. La reproducción está lista para comenzar desde el comienzo del último de los archivos creados por esta operación. Nota ≥No puede dividir un archivo si una carpeta ya posee 99 archivos. ≥No puede dividir grabaciones de menos de un segundo. ≥Puede que haya una pequeña diferencia entre la representación de la hora de inicio de los archivos después de la división y la hora real de inicio de grabación real. La hora inicial de grabación tiene el propósito de servir sólo como una guía general. ≥El tiempo total puede no coincidir con el tiempo de grabación original si un archivo es dividido en muchos archivos distintos. ENGLISH ESPAÑOL Moving files 1 You can move a file to a different folder. This allows you to categorize files and save them together. Preparation: Select the folder and the file you want to move. (page 84, step1–2) 2 a b RQT5968 3 92 A C 1 Press [PLAY/STOP, SEL] to start playback of the file. 2 Press [FOLDER] to select the folder you want to move the file to. a Present folder b New folder 3 Within 10 seconds, press [PLAY/ STOP, SEL]. The file moves to the end of the selected folder. Moviendo archivos Se puede mover un archivo a una carpeta diferente. Esto le permite categorizar archivos y guardarlos juntos. Preparación: Seleccione la carpeta y el archivo que desea desplazar. (página 84, paso 1–2) 1 Pulse [PLAY/STOP, SEL] para iniciar la reproducción del elemento. 2 Pulse [FOLDER] para seleccionar la carpeta a la que desea desplazar el archivo. a Carpeta actual b Carpeta nueva 3 Dentro de los 10 segundos, pulse [PLAY/STOP, SEL]. El archivo se mueve al final de la carpeta seleccionada. ENGLISH 1 ERASE B 3 2 b a ERASE ERASE B c d ERASE RQT5968 A B CD 94 B Files can either be erased one by one or all at once. ERASE mode cannot be selected while an empty folder is selected. Erased files cannot be recalled. Preparation: Select the folder first to erase individual files or folders. (page 84, step1) 1 Press and hold [ERASE] while stopped or during play. 2 Within 10 seconds, turn [PLAY/ STOP, SEL] to select the file you want to erase. The display changes in the following order: a The first file in the folder b The last file in the folder c All files in the folder d All folders 3 Within 10 seconds, press [ERASE]. The selected file is erased. Note ERASE B ESPAÑOL Erasing files ≥Locked files will not be erased. ≥(see page 96) ≥Total recording time can be reduced after erasing a number of files. Remedy this by erasing all the folders occasionally. ≥You cannot erase files being played slow or fast. Borrando archivos Los archivos pueden ser borrandos ya sea uno por uno o todos de una sola vez. El modo ERASE no puede seleccionarse mientras selecciona una carpeta vacía esté seleccionada. Los archivos borrados no pueden ser recuperarse. Preparación: Seleccione la carpeta para borrar archivos individuales o carpetas. (página 84, paso 1) 1 2 Pulse y mantenga pulsada [ERASE] mientras que se encuentra detenido o durante la reproducción. Dentro de los 10 segundos, haga girar [PLAY/STOP, SEL] para seleccionar el archivo que desea borrar. La representación visual cambia en el siguiente orden: a El primer archivo en la carpeta b El último archivo en la carpeta c Todos los archivos en la carpeta d Todas las carpetas 3 Dentro de los 10 segundos, pulse [ERASE]. Se borra el archivo seleccionado. Nota ≥Los archivos bloqueados no se borrarán. (ver página 96) ≥El tiempo de grabación total. Puede ser reducido luego de borrar un número de archivos. Solucione esta circunstancia borrando todas las carpetas periódicamente. ≥No se puede borrar archivos que están siendo reproducidos lenta o rápidamente. ENGLISH ESPAÑOL Erasure prevention 1 LOCK B 2 Prevención de borrado Lock individual recordings to avoid accidentally erasing them. Preparation: Select the folder containing the file you want to lock. (page 84, step 1) RQT5968 Seleccione la carpeta que contiene el archivo que desea bloquear. (página 84, paso 1) Press [MODE] flashes. “LOCK” 1 Pulse [MODE] “LOCK” destelle. 2 Within 10 seconds, turn [PLAY/ STOP, SEL] to select the file. 2 Dentro de los 10 segundos, haga girar [PLAY/STOP, SEL] para seleccionar el archivo. 3 Dentro de los 10 segundos, pulse [PLAY/STOP, SEL]. until Within 10 seconds, press [PLAY/ STOP, SEL]. The file is locked and “LOCK” is displayed until canceled. To unlock: 1 Select the locked file. 2 Repeat steps 1 and 3 for each file. Timer recording and playback ∫ Timer recording Recording can be set to start and finish at set times. You must set the current time (see page 66). Preparation: Select the folder to record into. (page 74, step1) (Continued on page 98.) 96 Preparación: 1 3 3 Bloquee las grabaciones individuales para evitar que se borren accidentalmente. hasta que El archivo es bloqueado y “LOCK” es exhibido hasta que se cancele. Para desbloquear: 1 2 Seleccione el archivo bloqueado. Repita los pasos 1 y 3 para cada archivo. Grabación y reproducción con temporizador ∫ Grabación por temporizador La grabación puede fijarse para que comience y finalice en horas prefijadas. Debe fijar la fecha actual (ver página 66). Preparación: Seleccione la carpeta en la cual va a grabar. (página 74, paso 1) (Continúa en la página 98.) ENGLISH 1 1 2 a REC F ESPAÑOL Timer recording and playback REC F Press [MODE] several times until the timer recording display is displayed. a Timer recording display 2 Within 10 seconds, turn [PLAY/ STOP, SEL] to select “On”. 3 Set the times. 1 Within 10 seconds, press [PLAY/ STOP, SEL]. The start time flashes. 2 Within 10 seconds, turn [PLAY/STOP, SEL] to change the start time. b Start time 3 Within 10 seconds, press [PLAY/ STOP, SEL]. The start time is set and the finish time flashes. 3 2 4 B RQT5968 c B REC F PM 98 4 Within 10 seconds, turn [PLAY/STOP, SEL] to change the finish time. REC F PM b c Finish time 5 Within 10 seconds, press [PLAY/ STOP, SEL]. The display changes in the following order indicating completion of the settings. Recording start time Recording finish time Current number of files Normal display Grabación y reproducción con temporizador 1 Pulse [MODE] varias veces hasta que se exhiba la representación visual de grabación por temporizador. a Representación visual de grabación por temporizador 2 Dentro de los 10 segundos, gire [PLAY/STOP, SEL] para seleccionar “On”. 3 Fije las horas. 1 Dentro de los 10 segundos, pulse [PLAY/STOP, SEL]. La hora de inicio comienza a destellar. 2 Dentro de los 10 segundos, gire [PLAY/STOP, SEL] para cambiar la hora de inicio. b Hora de inicio 3 Dentro de los 10 segundos, pulse [PLAY/STOP, SEL]. Se fija la hora de inicio y destella la hora de terminación. 4 Dentro de los 10 segundos, gire [PLAY/STOP, SEL] para cambiar la hora de terminación. c Hora de terminación 5 Dentro de los 10 segundos, pulse [PLAY/STOP, SEL]. La representación visual cambia en el siguiente orden, indicando la terminación de la fijación de los valores. Hora de inicio de grabación Hora de terminación de grabación Cantidad actual de archivos Indicación normal ENGLISH 1 PLAY F 2 a PLAY F ∫ Timer playback Playback can be set to start at set time. You must set the current time (see page 66).Timer playback cannot be selected while an empty folder is selected. Preparation: Select the folder and the file you want to play. (page 84, step1–2) 1 Press [MODE] several times until the timer play display is displayed. a Timer play display 2 Within 10 seconds, turn STOP, SEL] to select “On”. 3 1 3 2 B PLAY F RQT5968 PM 100 b ESPAÑOL Timer recording and playback [PLAY/ Set the times. Within 10 seconds, press [PLAY/ STOP, SEL]. The start time flashes. 2 Within 10 seconds, turn [PLAY/ STOP, SEL] to change the start time. b Start time 3 Within 10 seconds, press [PLAY/ STOP, SEL]. The start time is set. The display changes in the following order indicating completion of the settings. Playback start time Selected file number Normal display The timer playback stops automatically. Grabación y reproducción con temporizador ∫ Reproducción por temporizador La reproducción puede fijarse para que comience a una hora prefijada. Debe fijar la hora actual (ver página 66). La reproducción por temporizador no puede seleccionarse mientras se seleccione una carpeta vacía. Preparación: Seleccione la carpeta y el archivo que desea reproducir. (página 84, paso 1–2) 1 Pulse [MODE] varias veces hasta que se exhiba la representación visual de reproducción por temporizador. a Visor de reproducción con temporizador 2 Dentro de los 10 segundos, gire [PLAY/STOP, SEL] para seleccionar “On”. 3 Fije las horas. 1 Dentro de los 10 segundos, pulse [PLAY/STOP, SEL]. Destella la hora de inicio. 2 Dentro de los 10 segundos, gire [PLAY/STOP, SEL] para cambiar la hora de inicio. b Destella la hora 3 Dentro de los 10 segundos, pulse [PLAY/STOP, SEL]. Se fija la hora de inicio. La representación visual cambia en el siguiente orden, indicando la terminación de la fijación de valores. Hora de inicio de reproducción Número de archivo seleccionado Indicación normal La reproducción por temporizador se detiene automáticamente. ENGLISH Timer recording and playback RQT5968 The timer indicators (REC F and PLAY F) light to show which timer is set and flash when the timer is operating. To cancel the timer: Select “OFF” in step 2 and press [PLAY/STOP, SEL]. To check the timer settings: Press [MODE] several times until the timer display is displayed. The display will then change to show the following automatically. Timer recording: Start time, finish time, folder the file will enter. Timer playback: Start time, folder and file to be played. 102 Note ≥The two timers cannot be used together. The timer set last is activated. ≥The timers can only be set within a single twenty-four hour period. The recording timer can only be set if there is one minute or more of available recording time. ≥If you make recordings before timer recording begins, be aware that the time available is reduced. The timer recording can only continue as long as the available time allows. ≥If VAS is left on during timer recording, the recording may be shorter than the set time. ≥The timer settings are canceled if the clock is cleared (i.e. the batteries are removed from the battery compartment). ESPAÑOL Grabación y reproducción con temporizador Los indicadores del temporizador (REC F y PLAY F) se iluminan para mostrar cuál temporizador está ajustado y destellan cuando el temporizador está funcionando. Para cancelar el temporizador: Seleccione “OFF” en el paso 2 y pulse [PLAY/STOP, SEL]. Para verificar los valores del temporizador: Pulse [MODE] varias veces hasta que se exhiba la representación visual del temporizador. En forma automática, la representación visual exhibirá el cambio para indicar lo siguiente. Grabación por temporizador: Hora de inicio, hora de terminación, carpeta en la que el archivo entrará. Reproducción por temporizador: Hora de inicio, carpeta y elemento a reproducirse. Nota ≥Los dos temporizadores no pueden utilizarse en forma conjunta. Se activa la última fijación del temporizador. ≥Los temporizadores pueden fijarse solamente dentro de un período único de veinticuatro horas. El temporizador de grabación puede fijarse solamente si existe un minuto o más de tiempo disponible de grabación. ≥Si realiza grabaciones antes de que comience la grabación por temporizador, tenga presente que el tiempo disponible se reduce. La grabación por temporizador puede continuar solamente en la medida que lo permita el tiempo disponible. ≥Si VAS queda activado durante la grabación por temporizador, la grabación puede ser más corta que el tiempo programado. ≥Se cancelan los valores de referencia del temporizador si se borra el reloj (es decir, se extraen las pilas del compartimento).-
 1
1
-
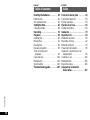 2
2
-
 3
3
-
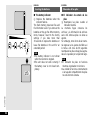 4
4
-
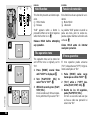 5
5
-
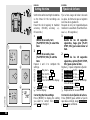 6
6
-
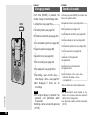 7
7
-
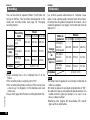 8
8
-
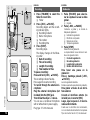 9
9
-
 10
10
-
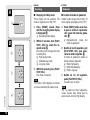 11
11
-
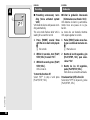 12
12
-
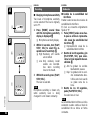 13
13
-
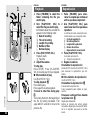 14
14
-
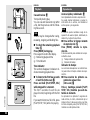 15
15
-
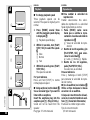 16
16
-
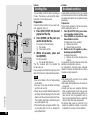 17
17
-
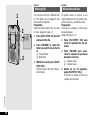 18
18
-
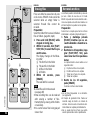 19
19
-
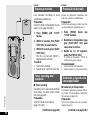 20
20
-
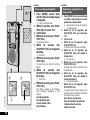 21
21
-
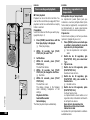 22
22
-
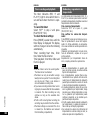 23
23
-
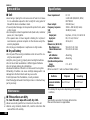 24
24
-
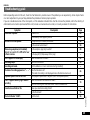 25
25
-
 26
26


Panasonic RRQR100 Instrucciones de operación
- Categoría
- Dictáfonos
- Tipo
- Instrucciones de operación