
SKYSCRAPER
HEAT
Kerakmik-Heizlüfter
Ceramic Column Heater
Radiateur colonne céramique
Calefactor cerámico vertical
Termoventilatore in Ceramica Colonna
www.klarstein.com
10029344
Hinweis: Dieses Produkt ist nur für gut isolierte Räume
oder für den gelegentlichen Gebrauch geeignet.
Note: This product is only suitable for well insulated
spaces or occasional use.
Nota: Este producto está indicado únicamente en
lugares abrigados o para una utilización punctual.
Remarque : Ce produit ne peut être utilisé que dans
des locaux bien isolés ou de manière occasionnelle.
Advertencia: Questo prodotto è adatto solo per spazi
ben isolati o uso occasionale.


3
DE
Sehr geehrter Kunde,
wir gratulieren Ihnen zum Erwerb Ihres Gerätes. Lesen Sie
die folgenden Hinweise sorgfältig durch und befolgen Sie
diese, um möglichen Schäden vorzubeugen. Für Schäden,
die durch Missachtung der Hinweise und unsachgemäßen
Gebrauch entstehen, übernehmen wir keine Haftung.
Scannen Sie den folgenden QR-Code, um Zugriff auf die
aktuellste Bedienungsanleitung und weitere Informationen
rund um das Produkt zu erhalten.
INHALTSVERZEICHNIS
Produktdatenblatt4
Sicherheitshinweise 5
Geräteübersicht 7
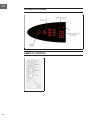
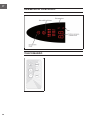
Bedienfeld 8
Fernbedienung 8
Montage 9
Inbetriebnahme 10
Wartung 12
Spezielle Entsorgungshinweise für Verbraucher in Deutschland 13
Hinweise zur Entsorgung 15
Hersteller & Importeur (UK) 15
TECHNISCHE DATEN
Artikelnummer 10029344
Größe 32 x 113 cm
Stromversorgung 220-240 V ~ 50 Hz
Leistungsaufnahme 1600 - 2500 W
Windgeschwindigkeit 1,6 m/s
English 17
Español 29
Français 41
Italiano 53

4
DE
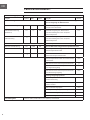
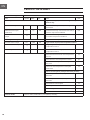
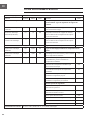
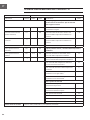
PRODUKTDATENBLATT
Modellkennung(en) 10029344
Angabe Symbol Wert Einheit Angabe Einheit
Wärmeleistung Nur bei elektrischen Speicher-Einzelraumheizgeräten:
Art der Regelung der Wärmezufuhr
Nennwärmeleistung Pnom 2,5 kW Manuelle Regelung der Wärmezufuhr mit
integriertem Thermostat
k.A.
Mindestwärmeleistung
(Richtwert)
Pmin 1,5 kW Manuelle Regelung der Wärmezufuhr
mit Rückmeldung der Raum- und/oder
Außentemperatur
k.A.
Maximale kontinuierliche
Wärmeleistung
Pmax,c 2,5 kW Elektronische Regelung der Wärmezufuhr
mit Rückmeldung der Raum- und/oder
Außentemperatur
k.A.
Hilfsstromverbrauch Wärmeabgabe mit Gebläseunterstützung k.A.
Bei Nennwärmeleistung elmax 2,444 kW Art der Wärmeleistung/Raumtemperaturkontrolle
Bei Mindestwärmeleistung elmin 1,583 kW Einstuge Wärmeleistung, keine
Raumtemperaturkontrolle
nein
Im Bereitschaftszustand elSB 0,5 W Zwei oder mehr manuell einstellbare Stufen,
keine Raumtemperaturkontrolle
nein
Raumtemperaturkontrolle mit mechanischem
Thermostat
nein
Mit elektronischer Raumtemperaturkontrolle ja
Mit elektronischer Raumtemperaturkontrolle
und Tageszeitregelung
nein
Mit elektronischer Raumtemperaturkontrolle
und Wochentagsregelung
nein
Sonstige Regelungsoptionen
Raumtemperaturkontrolle mit
Präsenzerkennung
nein
Raumtemperaturkontrolle mit Erkennung
offener Fenster
nein
Mit Fernbedienungsoption nein
Mit adaptiver Regelung des Heizbeginns nein
Mit Betriebszeitbegrenzung nein
Mit Schwarzkugelsensor nein
Kontaktangaben Chal-Tec GmbH, Wallstraße 16, 10179, Berlin, Deutschland

5
DE
SICHERHEITSHINWEISE
• Kinder ab 8 Jahren, psychisch, sensorisch und körperlich eingeschränkte
Menschen dürfen das Gerät nur benutzen, wenn sie vorher von einer für
sie verantwortlichen Aufsichtsperson ausführlich mit den Funktionen und
den Sicherheitsvorkehrungen vertraut gemacht wurden und die damit
verbundenen Risiken verstehen.
• Achten Sie darauf, dass Kinder nicht mit dem Gerät spielen.
• Kinder dürfen das Gerät nur unter Aufsicht reinigen.
• Halten Sie Kinder unter 3 Jahren vom Gerät fern und benutzen Sie das Gerät in
Anwesenheit von Kindern nur unter Aufsicht.
Hinweise zum Standort und zur Bedienung
• Das Gerät kann während dem Betrieb sehr heiß werden. Stellen Sie es daher
in ausreichen- der Entfernung zu leicht entzündlichen Gegenständen, wie
Vorhängen oder Möbeln auf.
• Decken Sie das Gerät nicht ab.
• Stellen Sie das Gerät nicht direkt unter eine Steckdose.
• Schließen Sie das Gerät nicht an eine externe Zeitschaltuhr oder eine
ferngesteuerte Steckdose an, damit es sich nicht automatisch einschaltet.
• Stellen Sie das Gerät nicht in Räume, in denen leichtentzündliche oder
explosive Flüssigkeiten gelagert werden.
• Falls Sie das Gerät zusammen mit einem Verlängerungskabel nutzen, achten
Sie darauf, dass das Kabel voll abgerollt ist.
• Schließen Sie das Gerät nicht an Steckdosen, an bereits andere Gerät
angeschlossen sind.
• Stellen Sie das Gerät nicht in die Nähe einer Badewanne, einer Dusche oder
eines Schwimmbeckens.
• Falls das Netzkabel oder der Stecker beschädigt sind, müssen sie vom
Hersteller, einem autorisierten Fachbetrieb oder einer ähnlich qualizierten
Person ersetzt werden.
• Lassen Sie das Gerät während des Betriebs nicht aus den Augen und halten
Sie Kinder und Haustiere vom Gerät fern.
• Stellen Sie das Gerät nicht auf Rollwägen oder auf Flächen, von denen es leicht
herunterfallen kann.
• Wenn Sie das Gerät länger nicht benutzen, ziehen Sie den Stecker aus der
Steckdose. Lassen Sie das Gerät während des Betriebs nicht über längere Zeit
unbeaufsichtigt. Ziehen sie den Stecker nicht am Kabel aus der Steckdose,
sondern halten Sie ihn beim Abziehen mit der Hand fest.
• Stellen Sie das Gerät so auf, dass der Luftstrom nicht von anderen
Gegenständen blockiert wird.
• Der Netzstecker ist wasserdicht, wenn er nicht in Gebrauch ist. Um einen
elektrischen Schlag oder Leckstrom zu vermeiden, benutzen Sie das Gerät
niemals mit nassen Händen oder betreiben Sie das Gerät nicht, wenn sich
Wasser auf dem Netzkabel bendet.

6
DE
Spezielle Sicherheitsvorkehrungen
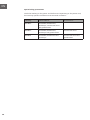
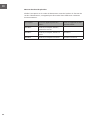
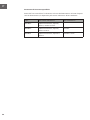
Überprüfen Sie vor der Verwendung die Markierung am Netzkabel. Abhängig
vom Netzkabel kann dieses Gerät unter verschiedenen Umgebungsbedingungen
betrieben werden:
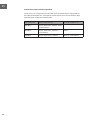
Beschriftung Kann verwendet werden in: Nicht verwenden in:
H07RN-F Haushalt, Lagerhäusern,
Werkstätten, Baustellen und
Gewächshäusern.
H05RN-F Haushalt, Lagerhäusern,
Werkstätten und
Gewächshäusern.
Baustellen
H05RR-F Haushalt, Lagerhäusern und
Werkstätten
Baustellen und
Gewächshäusern

7
DE
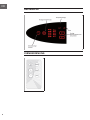
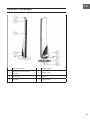
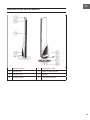
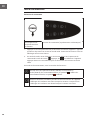
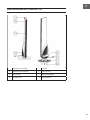
GERÄTEÜBERSICHT
1 Bedienfeld 5 Ein/Aus-Schalter
2 IR-Empfänger 6 Netzkabel
3 Luftauslass 7 Ständer
4 Lufteinlass 8 Flügelschraube

8
DE
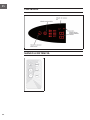
BEDIENFELD
FERNBEDIENUNG

9
DE
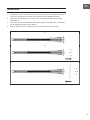
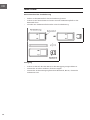
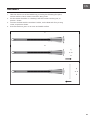
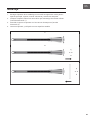
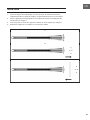
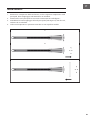
MONTAGE
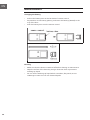
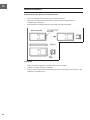
1. Entnehmen Sie die Gegenstände aus der Verpackung, einschließlich folgender
vier Teile: Grundgerät, Standfuß, Fernbedienung und Flügelschrauben.
2. Legen Sie das Hauptgerät auf einen Tisch, so dass die Enden hervorragen
(siehe Bild 1).
3. Verbinden Sie den Standfuß mit der Halterung des Grundgerätes. Verwenden
Sie die Flügelschrauben (siehe Bild 2).
4. Richten Sie das Gerät auf. Stellen Sie es auf einen festen Untergrund.
1
2
3

10
DE
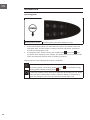
INBETRIEBNAHME
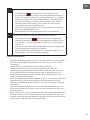
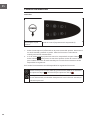
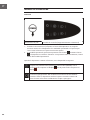
Bedienelemente
Unterer Ein/Aus-
Schalter
Bedienfeld (schematische Darstellung)
1. Drücken Sie den Ein/Aus-Schalter auf der Rückseite des Gerätes. Das Gerät
tritt mit einem Piepton in den Bereitsschaftsmodus. Alle Funktionen und
Anzeigen sind noch aus.
2. Im Bereitschaftmodus werden keine Eingaben über das Bedienfeld
angenommen außer der Taste . Drücken Sie und das Gerät geht in den
Betrieb über. Drücken Sie die Taste erneut, und das Gerät geht wieder in den
Bereitschaftsmodus.
Im Betriebsmodus sind es folgende Funktionen verfügbar:
Wechseln zwischen niedriger Leistung (1600 W) und hoher Leistung
(2500 W). Bei niedriger Leistung erscheint in der Anzeige . Bei hoher
Leistung erscheint in der Anzeige .
Ein- und Ausschalten der Oszillation während des Betriebes. Im
ausgeschalteten Zustand ist die Oszillations-Anzeige aus. Im
eingeschalteten Zustand ist die Oszillations-Anzeige an.

11
DE
Einstellen des Timers während des Betriebes (1x drücken)
• Die Zeitanzeige schaltet sich ein. Die Anzeige blinkt im
0,5-Sekunden-Rhythmus. Drücken Sie in dem Moment die Tasten (+)
und (-), um die Zeit in Stufen von 1 Stunde einzustellen (1-12 Stunden).
• Drücken Sie erneut SET, um die eingestellte Zeit zu bestätigen und
die Timer-Einstellung zu verlassen. Wenn Sie keine Taste drücken
oder eine andere Taste außer (+) und (-) wird der Timer mit der
eingestellten Zeit nach 5 Sekunden aktiv.
• Wenn der Timer auf 0 gesetzt wurde, schaltet das Gerät sich ab und
geht in den Standby-Modus über.
• Zum Verlassen des Timer-Modus drücken Sie noch einmal SET.
Einstellen der Temperatur (während des Betriebes 2x drücken)
• Die Temperaturanzeige schaltet sich ein. Die Anzeige blinkt
zweimal die Sekunde. Drücken Sie in dem Moment die Tasten „UP (+)“
und „DOWN (-)“, um die Temperatur in Stufen von 1 °C einzustellen
(15-28 °C).
• Drücken Sie erneut SET, um die eingestellte Temperatur zu bestätigen
und die Temperatur-Einstellung zu verlassen.
• Wenn Sie keine Taste drücken oder eine andere Taste außer „UP (+)“
und „DOWN (-)“ wird die Temperatur angezeigt.
Temperaturfunktionen
• Wenn die Umgebungstemperatur unter -10 °C fällt, erscheint auf der Anzeige
[LO]. Wenn die Umgebeungstemperatur über 40 °C liegt, erscheint auf der
Anzeige [HI].
• Das Gerät hat erst 10 Sekunden nach dem Einschalten eine
Temperaturmessung. Danach geht die Heizfunktion aus. Wenn die
Umgebungstemperatur über der eingestellten Temperatur liegt oder gleich
ist. Die Anzeige geht aus und der Ventilator läuft 10 Sekunden nach. Der
Schwenkbetrieb wird dann auch eingestellt, falls er eingeschaltet war. Die
anderen Anzeigen bleiben gleich.
• Wenn die Umgebungstemperatur gefallen ist, und 2 °C unter der eingestellten
Temperatur liegt, geht das Gerät wieder in den Heizmodus und ein evtl.
gewählter Schwenkbetrieb geht wieder an. Die anderen Anzeigen erscheinen
auch wieder.
• Wenn die Umgebungstemperatur die voreingestellte Temperatur von 25 °C
erreicht, läuft das Gerät nur weiter, wenn Sie eine Temperatur von über 25 °C
eingestellt haben.
• Wenn Sie den Timer- und die Temperaturmodus gleichzeitig eingestellt haben,
erscheint ein Kreis in der Anzeige. Die Anzeige der Temperatur und der Zeit
wechseln sich im 30-Sekunden-Rhythmus ab. Wenn der Timer nicht eingestellt
ist oder auf „0“ steht, wird die Zeit nicht angezeigt.

12
DE
WARTUNG
Batteriewechsel der Fernbedienung
• Ziehen Sie das Batteriefach der Fernbedienung heraus
• Achten Sie auf die Polarität und setzen Sie eine CR2032-Knopfzelle in das
Batteriefach ein.
• Schieben Sie das Batteriefach wieder in die Fernbedienung.
Reinigung
• Achten Sie darauf, dass das Gerät vor der Reingigung ausgeschaltet ist.
• Verwenden Sie einen sauberen, feuchten Lappen.
• Verwenden Sie keine Reingungsmittel wie Beizmittel, Benzin, chemische
Substanzen usw.

13
DE
SPEZIELLE ENTSORGUNGSHINWEISE FÜR
VERBRAUCHER IN DEUTSCHLAND
Entsorgen Sie Ihre Altgeräte fachgerecht. Dadurch wird gewährleistet, dass die
Altgeräte umweltgerecht verwertet und negative Auswirkungen auf die Umwelt
und menschliche Gesundheit vermieden werden. Bei der Entsorgung sind
folgende Regeln zu beachten:
• Jeder Verbraucher ist gesetzlich verpichtet, Elektro- und Elek-
tronikaltgeräte (Altgeräte) sowie Batterien und Akkus getrennt
vom Hausmüll zu entsorgen. Sie erkennen die entsprechenden
Altgeräte durch folgendes Symbol der durchgestrichene Müll-
tonne (WEEE Symbol).
• Sie haben Altbatterien und Altakkumulatoren, die nicht vom Altgerät
umschlossen sind, sowie Lampen, die zerstörungsfrei aus dem Altgerät
entnommen werden können, vor der Abgabe an einer Entsorgungsstelle vom
Altgerät zerstörungsfrei zu trennen.
• Bestimmte Lampen und Leuchtmittel fallen ebenso unter das Elektro- und
Elektronikgesetz und sind dementsprechend wie Altgeräte zu behandeln.
Ausgenommen sind Glühbirnen und Halogenlampen. Entsorgen Sie
Glühbirnen und Halogenlampen bitte über den Hausmüll, sofern Sie nicht das
WEEE Symbol tragen.
• Jeder Verbraucher ist für das Löschen von personenbezogenen Daten auf dem
Elektro- bzw. Elektronikgerät selbst verantwortlich.
Rücknahmepicht der Vertreiber
Vertreiber mit einer Verkaufsäche für Elektro- und Elektronikgeräte von
mindestens 400 Quadratmetern sowie Vertreiber von Lebensmitteln mit einer
Gesamtverkauäche von mindestens 800 Quadratmetern, die mehrmals im
Kalenderjahr oder dauerhaft Elektro- und Elektronikgeräte anbieten und auf dem
Markt bereitstellen, sind verpichtet,
1 bei der Abgabe eines neuen Elektro- oder Elektronikgerätes an einen Endnutzer
ein Altgerät des Endnutzers der gleichen Geräteart, das im Wesentlichen die
gleichen Funktionen wie das neue Gerät erfüllt, am Ort der Abgabe oder in
unmittelbarer Nähe hierzu unentgeltlich zurückzunehmen und
2 auf Verlangen des Endnutzers Altgeräte, die in keiner äußeren Abmessung
größer als 25 Zentimeter sind, im Einzelhandelsgeschäft oder in unmittelbarer
Nähe hierzu unentgeltlich zurückzunehmen; die Rücknahme darf nicht an den
Kauf eines Elektro- oder Elektronikgerätes geknüpft werden und ist auf drei
Altgeräte pro Geräteart beschränkt.

14
DE
• Bei einem Vertrieb unter Verwendung von Fernkommunikationsmitteln
ist die unentgeltliche Abholung am Ort der Abgabe auf Elektro- und
Elektronikgeräte der Kategorien 1, 2 und 4 gemäß § 2 Abs. 1 ElektroG, nämlich
„Wärmeüberträger“, „Bildschirmgeräte“ (Oberäche von mehr als 100 cm²)
oder „Großgeräte“ (letztere mit mindestens einer äußeren Abmessung
über 50 Zentimeter) beschränkt. Für andere Elektro- und Elektronikgeräte
(Kategorien 3, 5, 6) ist eine Rückgabemöglichkeit in zumutbarer Entfernung
zum jeweiligen Endnutzer zu gewährleisten.
• Altgeräte dürfen kostenlos auf dem lokalen Wertstoffhof oder in folgenden
Sammelstellen in Ihrer Nähe abgegeben werden: www.take-e-back.de
• Für Elektro- und Elektronikgeräte der Kategorien 1, 2 und 4 an bieten wir auch
die Möglichkeit einer unentgeltlichen Abholung am Ort der Abgabe. Beim
Kauf eines Neugeräts haben sie die Möglichkeit eine Altgerätabholung über
die Webseite auszuwählen.
• Batterien können überall dort kostenfrei zurückgegeben werden, wo sie
verkauft werden (z. B. Super-, Bau-, Drogeriemarkt). Auch Wertstoff- und
Recyclinghöfe nehmen Batterien zurück. Sie können Batterien auch per Post
an uns zurücksenden. Altbatterien in haushaltsüblichen Mengen können Sie
direkt bei uns von Montag bis Freitag zwischen 07:30 und 15:30 Uhr unter der
folgenden Adresse unentgeltlich zurückgeben:
Chal-Tec GmbH
Member of Berlin Brands Group
Handwerkerstr. 11
15366 Dahlwitz-Hoppegarten
Deutschland
• Wichtig zu beachten ist, dass Lithiumbatterien aus Sicherheitsgründen vor der
Rückgabe gegen Kurzschluss gesichert werden müssen (z. B. durch Abkleben
der Pole).
• Finden sich unter der durchgestrichenen Mülltonne auf der Batterie zusätzlich
die Zeichen Cd, Hg oder Pb ist das ein Hinweis darauf, dass die Batterie
gefährliche Schadstoffe enthält. (»Cd« steht für Cadmium, »Pb« für Blei und
»Hg« für Quecksilber).
Hinweis zur Abfallvermeidung
Indem Sie die Lebensdauer Ihrer Altgeräte verlängern, tragen Sie dazu bei,
Ressourcen ezient zu nutzen und zusätzlichen Müll zu vermeiden. Die
Lebensdauer Ihrer Altgeräte können Sie verlängern indem Sie defekte Altgeräte
reparieren lassen. Wenn sich Ihr Altgerät in gutem Zustand bendet, könnten Sie
es spenden, verschenken oder verkaufen.

15
DE
HINWEISE ZUR ENTSORGUNG
Wenn es in Ihrem Land eine gesetzliche Regelung
zur Entsorgung von elektrischen und elektronischen
Geräten gibt, weist dieses Symbol auf dem Produkt oder
auf der Verpackung darauf hin, dass dieses Produkt
nicht im Hausmüll entsorgt werden darf. Stattdessen
muss es zu einer Sammelstelle für das Recycling von
elektrischen und elektronischen Geräten gebracht
werden. Durch regelkonforme Entsorgung schützen
Sie die Umwelt und die Gesundheit Ihrer Mitmenschen
vor negativen Konsequenzen. Informationen zum
Recycling und zur Entsorgung dieses Produkts,
erhalten Sie von Ihrer örtlichen Verwaltung oder Ihrem
Hausmüllentsorgungsdienst.
Dieses Produkt enthält Batterien. Wenn es in Ihrem
Land eine gesetzliche Regelung zur Entsorgung von
Batterien gibt, dürfen die Batterien nicht im Hausmüll
entsorgt werden. Informieren Sie sich über die örtlichen
Bestimmungen zur Entsorgung von Batterien. Durch
regelkonforme Entsorgung schützen Sie die Umwelt
und die Gesundheit Ihrer Mitmenschen vor negativen
Konsequenzen.
HERSTELLER & IMPORTEUR (UK)
Hersteller:
Chal-Tec GmbH, Wallstraße 16, 10179 Berlin, Deutschland.
Importeur für Großbritannien:
Berlin Brands Group UK Ltd
PO Box 1145
Oxford, OX1 9UW
United Kingdom


17
EN
Dear Customer,
Congratulations on purchasing this device. Please read the
following instructions carefully and follow them to prevent
possible damages. We assume no liability for damage
caused by disregard of the instructions and improper use.
Scan the QR code to get access to the latest user manual
and more product information.
CONTENT
Product Data Sheet18
Safety Instructions 19
Product Overview 21
Operation Panel 22
Remote Control 22
ASSEMBLY 23
Operation 24
Maintenance 26
Disposal Considerations27
Manufacturer & Importer (UK) 27
TECHNICAL DATA
Item number 10029344
Size 32 x 113 cm
Power supply 220-240 V ~ 50 Hz
Power consumption 1600 - 2500 W
Wind speed 1,6 m/s

18
EN
PRODUCT DATA SHEET
Model identier(s):
Item Symbol Value Unit Item Unit
Heat output Type of heat input, for electric storage local space
heaters only
Nominal heat output Pnom 2,5 kW manual heat charge control, with integrated
thermostat
N/A
Minimum heat output
(indicative)
Pmin 1,5 kW manual heat charge control with room and/or
outdoor temperature feedback
N/A
Maximum continuous heat
output
Pmax,c 2,5 kW electronic heat charge control with room and/
or outdoor temperature feedback
N/A
Auxiliary electricity consumption fan assisted heat output N/A
At nominal heat output elmax 2,444 kW Type of heat output/room temperature control
At minimum heat output elmin 1,583 kW single stage heat output and no room
temperature control
no
In standby mode elSB 0,5 W Two or more manual stages, no room
temperature control
no
with mechanic thermostat room temperature
control
no
with electronic room temperature control yes
electronic room temperature control plus
day timer
no
electronic room temperature control plus
week timer
no
Other control options (multiple selections possible)
room temperature control, with presence
detection
no
room temperature control, with open window
detection
no
with distance control option no
with adaptive start control no
with working time limitation no
with black bulb sensor no
Contact details Chal-Tec GmbH, Wallstraße 16, 10179, Berlin, Germany

19
EN
SAFETY INSTRUCTIONS
• Children over the age of 8 and persons with reduced physical, sensory or
mental capabilities or those with a lack of experience and knowledge may only
use the device if they are instructed on how to do so by a person responsible
for their safety, or if they are supervised and understand the hazards
associated with the use of the device.
• Make sure that children do not play with the device.
• Children may only clean the device under supervision.
• Keep children under 3 years of age away from the appliance and use the
appliance in the presence of children only under supervision.
Notes on location and operation
• The device can become very hot during operation. Therefore, place it at a
sucient distance from easily ammable objects such as curtains or furniture.
• Do not cover the unit.
• Do not place the unit directly under a power outlet.
• Do not connect the unit to an external timer or remote controlled power outlet
to prevent the unit from turning on automatically.
• Do not place the device in rooms where highly ammable or explosive liquids
are stored.
• If you use the device together with an extension cable, make sure that the
cable is fully unrolled.
• Do not connect the device to sockets where other devices are already
connected.
• Do not place the unit near a bathtub, shower or swimming pool.
• If the power cord or plug is damaged, it must be replaced by the
manufacturer, an authorised service centre or a similarly qualied person.
• Do not leave the appliance out of sight during operation and keep children
and pets away from the appliance.
• Do not place the appliance on trolleys or on surfaces from which it can easily
fall.
• If you do not use the appliance for a long period of time, unplug the appliance
from the power outlet. Do not leave the appliance unattended for long periods
during operation. Do not pull the plug out of the outlet by the cord, but hold it
with your hand when unplugging it.
• Position the appliance so that the airow is not blocked by other objects.
• The power plug is waterproof when not in use. To avoid electric shock or
leakage current, never use the appliance with wet hands or operate the
appliance if there is water on the power cord.

20
EN
Special safety precautions
Check the marking on the power cord before use. Depending on the power cord,
this unit may operate in different environmental conditions:
Labeling Can be used in: Do not use in:
H07RN-F Household, warehouses,
workshops, construction sites
and greenhouses.
H05RN-F Household, warehouses,
workshops and greenhouses.
Construction sites
H05RR-F Household, warehouses and
workshops
Construction sites and
greenhouses

21
EN
PRODUCT OVERVIEW
1 Operation panel 5 Power switch
2Remote control receiver
window 6 Power cord
3 Air outlet 7 Base
4 Air inlet 8 Wing screw

22
EN
OPERATION PANEL
REMOTE CONTROL

23
EN
ASSEMBLY
1. Take the devices out of the bubble bag, including the following four parts,
master machine, base, remote controller, Wing screw
2. Put the master machine on a desktop, with the bottom reaching out, as
picture 1 shows.
3. Connect the base with the machine’s holder, tie the base with four pc wing
screw, as picture 2 shows.
4. Erect the machine, put it on an even and stable surface.
1
2
3

24
EN
OPERATION
Operating panel
Bottom power switch Operating panel schematic diagram on top
1. Press Power switch which is in the back of the device, the device enters into
energized state, and the heater is ready to use with a Bi sound, now all the
functions and displays are off.
2. In energized state, all the pressing are invalid except key. Press key,
the device starts working. Press it again, the device enters into standby mode.
There are following situation when in working condition.
During operation the following functions are available:
Shift between low power (1600 W) and high power (2500 W). Operated at
low heating power: low heating power indicator on. Operated at high
heating power: Middle heating power on.
In working condition, press this key to make the device swing or not. Press
Swing: the device will oscillate, and the indicator will be on. Press Swing
again: the swing function turns off, and the indicator will be off.

25
EN
Setting the time (press this key once in working condition)
• The time indicator will be on. The light will icker twice per
second. At this time press the „UP (+)“ and the „DOWN (-)“ key to set
the timer (within a range of 1-12 hours), the timer will add or subtract
1 h with every press.
• Enter into the timer setting mode, the timer that has been set before
can not be changed. You can reset the time, only when pressing „UP
(+)“ and „DOWN (-)“ key.
• If the timer turns to value 0, then the device will turn off at once, and
enter into stand- by mode.
• Press SET key, the timer setting is nished, and enter into
temperature setting.
Setting the temperature (press this key twice in working conditition)
• The light indicator will be on. The LED will icker twice a second.
You can change the temperature by pressing the „UP (+)“ and „DOWN
(-)“ key. The range of tempera- ture is from 15 to 28 °C.
• Press SET key to quit temperature setting, and the temperature that
you have set will be effect at once.
• If no operation to the keys after 5 seconds or press other keys except
„UP (+)“ and „DOWN (-)“ then the LED indicator will show room
temperature.
Functioning of temperature and timer function
• If the temperature is -10 °C, then it will show “LO”. If the temperature is over
40 °C, then it will show “HI“.
• The device will not judge the temperature within 10s when power on the
device. After the device work for 10s, if the ambient temperature reaches or
over the temperature that has been set, the heating function will turn off, the
low/high heating power light will be off, and the fan will be off in 10 seconds.
If you have pressed Swing, it will turn off as well. For the other indicators will
not change.
• If the ambient temperature decreased, and 2 °C lower than the temperature
that has been set, the heat- ing function will be on again, as well as the fan
& the swing function (if you have pressed Swing before). Also the other
indicators will be on.
• If the ambient temperature reaches or over the automatically setting
temperature 25 °C, then the device will work when you set the temperature
over 25 °C.
• When setting the time & temperature at the same time, it will show in a circle,
time show 30 seconds, and not show temperature. Then the temperature is
shown for 30 seconds instead of the time. If you do not set the timer or set the
timer to 0, then time will not show.

26
EN
MAINTENANCE
Changing the battery
• Pull out the battery door at the back side of remote control.
• Pay attention to the battery polarity, and insert the battery (CR2032) to the
tray of the door .
• Push the battery door into the remote control.
Cleaning
• Make sure that the device is switched off before cleaning or maintenance.
• Wipe the surface of the device by using a clean wet cloth or punctuate
washing-up liquid.
• Do not use the washing-up liquid which is mordant, like petrol, Do not
submerge in water. Do not use chemical liquids.

27
EN
DISPOSAL CONSIDERATIONS
If there is a legal regulation for the disposal of electrical
and electronic devices in your country, this symbol on the
product or on the packaging indicates that this product
must not be disposed of with household waste. Instead,
it must be taken to a collection point for the recycling
of electrical and electronic equipment. By disposing of
it in accordance with the rules, you are protecting the
environment and the health of your fellow human beings
from negative consequences. For information about the
recycling and disposal of this product, please contact your
local authority or your household waste disposal service.
This product contains batteries. If there is a legal
regulation for the disposal of batteries in your country,
the batteries must not be disposed of with household
waste. Find out about local regulations for disposing
of batteries. By disposing of them in accordance with
the rules, you are protecting the environment and the
health of your fellow human beings from negative
consequences.
MANUFACTURER & IMPORTER (UK)
Manufacturer:
Chal-Tec GmbH, Wallstrasse 16, 10179 Berlin, Germany.
Importer for Great Britain:
Berlin Brands Group UK Ltd
PO Box 1145
Oxford, OX1 9UW
United Kingdom


29
ES
Estimado cliente,
Le felicitamos por la adquisición de este producto. Lea
atentamente las siguientes instrucciones y sígalas para evitar
posibles daños. No asumimos ninguna responsabilidad
por los daños causados por el incumplimiento de las
instrucciones y el uso inadecuado. Escanee el siguiente
código QR para obtener acceso a la última guía del usuario
y más información sobre el producto.
ÍNDICE
Hoja de datos del producto30
Indicaciones de seguridad 31
Descripción del aparato 33
Controles 34
Mando a distancia 34
Montaje 35
Puesta en marcha 36
Mantenimiento 38
Indicaciones sobre la retirada del aparato 39
Fabricante e importador (Reino Unido) 39
DATOS TÉCNICOS
Numero articolo 10029344
Dimensioni 32 x 113 cm
Alimentazione 220-240 V ~ 50 Hz
Potenza 1600 - 2500 W
Velocità 1,6 m/s

30
ES
HOJA DE DATOS DEL PRODUCTO
Denominación del modelo 10029344
Dato Símbolo Valor Unidad Dato Unidad
Potencia térmica Solo con dispositivos de acumulación de calor
eléctricos para abastecimiento local: Tipo de
regulación del abastecimiento de calor
Potencia térmica nominal Pnom 2,5 kW Regulación manual del abastecimiento de
calor con termostato integrado:
n/a
Potencia térmica mínima
(valor orientativo)
Pmin 1,5 kW Regulación manual de abastecimiento de
calor con aviso de temperatura ambiente y/o
exterior
n/a
Potencia térmica continua
máxima
Pmax,c 2.5 kW Regulación electrónica de abastecimiento de
calor con aviso de temperatura ambiente y/o
exterior
n/a
Consumo de corriente auxiliar Disipación de calor con ventilación auxiliar n/a
Con potencia térmica
nominal
elmax 2,444 kW Tipo de potencia térmica/control de temperatura
ambiente
Con potencia térmica
mínima
elmin 1,583 kW Potencia térmica de un solo nivel, sin control
de temperatura ambiente
no
En modo de espera elSB 0,5 W Dos o más niveles regulables manualmente,
sin control de temperatura ambiente
no
Control de temperatura ambiente con
termostato mecánico
no
Con control electrónico de temperatura
ambiente
sí
Con control de temperatura ambiente y
regulación del momento del día
no
Con control de temperatura ambiente y
regulación del día de la semana
no
Otras opciones de regulación
Control de temperatura ambiente con
detección de presencia
no
Control de temperatura ambiente con
detección de ventanas abiertas
no
Con opción de control remoto no
Con regulación adaptable del comienzo de la
calefacción
no
Con limitación de tiempo de funcionamiento no
Con sensor de bulbo negro no
Información de contacto Chal-Tec GmbH, Wallstraße 16, 10179, Berlín (Alemania)

31
ES
INDICACIONES DE SEGURIDAD
• Los niños mayores de 8 años y las personas con discapacidades físicas o
psíquicas sola- mente podrán utilizar el aparato si han sido previamente
instruidas sobre su uso y conocen las indicaciones de seguridad.
• Asegúrese de que los niños no jueguen con el aparato.
• Los niños solamente podrán limpiar el aparato si se encuentran bajo
supervisión.
• Mantenga a los niños menores de 3 años alejados del aparato y utilice el
aparato sola- mente si estos están bajo supervisión.
Indicaciones para la ubicación y utilización
• El aparato puede alcanzar temperaturas muy elevadas durante su
funcionamiento. Por ello, deje suciente distancia entre el aparato y objetos
fácilmente inamables, como cortinas o muebles.
• No cubra el aparato.
• No coloque el aparato justo bajo una toma de corriente.
• No conecte el aparato a tomas de corriente manejadas por control remoto ni
con tempo- rizador para que no se encienda automáticamente.
• No coloque el aparato en estancias donde se almacenen líquidos explosivos o
combustibles.
• Si utiliza el aparato junto con un cable alargador, asegúrese de que este esté
completa- mente desenrollado.
• No conecte el aparato a tomas de corriente en la que ya se encuentren
conectados otros dispositivos.
• No coloque el aparato cerca de bañeras, duchas o piscinas.
• Si el cable de alimentación o el enchufe están dañados, deberán ser
sustituidos por el fabricante, un servicio técnico autorizado o una persona
igualmente cualicada.
• No deje el aparato sin supervisión durante su funcionamiento y mantenga a
los niños y mascotas alejados del mismo.
• No coloque el aparato sobre mesas con ruedas ni supercies desde donde sea
fácil que se caiga.
• Desconecte el enchufe de la toma de corriente cuando no utilice el aparato.
No deje el aparato sin supervisión durante su funcionamiento en periodos
prolongados de tiempo. Para desconectar el aparato no tire del cable, sino del
cuerpo del enchufe.
• Coloque el aparato de tal manera que la corriente de aire no se vea bloqueada
por otros objetos.
• El enchufe es impermeable si no está en uso. Para evitar una descarga
eléctrica o fuga de electricidad, nunca utilice el aparato con las manos
mojadas ni lo ponga en marcha cuando el cable de alimentación esté mojado.

32
ES
Indicaciones especiales de seguridad
Antes de su uso, compruebe la marca del cable de alimentación. Dependiendo
del cable de alimentación, este aparato puede ponerse en funcionamiento bajo
determinadas condiciones ambientales:
Denominación Puede emplearse en: No debe emplerse en:
H07RN-F Hogar, almacenes, talleres, obras
e invernaderos.
H05RN-F Hogar, almacenes, talleres e
invernaderos.
Obras
H05RR-F Hogar, almacenes y talleres Obras e invernaderos.

33
ES
DESCRIPCIÓN DEL APARATO
1 Panel de control 5 Interruptor on/off
2 Receptor IR 6 Cable de alimentación
3 Salida de aire 7 Soporte
4 Entrada de aire 8 Tuerca de mariposa

34
ES
CONTROLES
MANDO A DISTANCIA

35
ES
MONTAJE
1. Extraiga el aparato de su embalaje, encontrará las siguientes cuatro partes:
aparato principal, soporte, mando a distancia y tuercas de mariposa.
2. Coloque el aparato sobre una mesa de la que sobresalga el extremo inferior
(consulte ilustración 1).
3. Atornille el soporte al aparato con las tuercas de mariposa (consulte
ilustración 2).
4. Levante el aparato y colóquelo en una supercie estable.
1
2
3

36
ES
PUESTA EN MARCHA
Controles
Interruptor on/off
inferior
Panel de control (representación esquemática)
1. Pulse el interruptor on/off situado en la parte trasera del aparato. Este entrará
en modo standby y emitirá un pitido. Todas las funciones e indicadores
todavía permanecen desactivados.
2. 2. En el modo standby el panel de control no responderá excepto el botón .
Pulse el botón upara poner en marcha el aparato. Pulse de nuevo el botón
para cambiar de nuevo al modo standby. En el modo funcionamiento tendrá
disponibles las siguientes
En el modo funcionamiento tendrá disponibles las siguientes funciones:
Cambio entre potencia baja (1600 W) y potencia alta (2500 W). El indicador
para potencia baja es . El indicador para potencia alta es .
Activar y desactivar la oscilación durante el funcionamiento. Con la
función desactivada, el indicador desaparecerá. Con la función activada, el
indicador aparecerá.

37
ES
Conguración del temporizador durante el funcionamiento (pulsar 1 vez)
• El indicador de tiempo se enciende. Parpadeará cada medio
segundo. Pulse los botones UP (+) y DOWN (-) para aumentar o
reducir el tiempo en intervalos de una hora.
• Pulse de nuevo SET para conrmar el tiempo seleccionado y
abandonar la congu- ración. Si no pulsa ningún botón excepto UP y
DOWN, el temporizador se activará transcurridos 5 segundos.
• Si ajusta el temporizador con valor 0, el aparato entrará en modo
standby.
• Para abandonar el modo temporizador, pulse de nuevo SET.
Ajuste de temperatura (durante el funcionamiento, pulse 2 veces)
• El indicador de temperatura se encenderá y parpadeará
dos veces por segun- do. Pulse los botones UP (+) y DOWN (-) para
aumentar o reducir la temperatura en intervalos de 1 °C (15-35 °C.
• Pulse SET de nuevo para conrmar la temperatura selecciona y
abandonar los ajustes de temperatura.
• Si no pulsa ningún botón excepto UP y DOWN, la temperatura
aparecerá en el display
Funciones de la temperatura
• Si la temperatura ambiente es inferior a -10 °C, el indicador mostrará “LO”. Si
la temperatura ambiente sobrepasa los 40 °C, en el display aparecerá “HI”.
• El aparato mide la temperatura a los 10 segundos de encenderlo. A
continuación, la función de calefac- ción se apaga si la temperatura ambiente
es igual o superior a la seleccionada. El indicador se apaga y el ventilador
funciona durante 10 segundos. El modo oscilación se activará en caso de estar
conectado. Los otros indicadores permanecen intactos.
• Si la temperatura ambiente desciende y se encuentra por debajo de 2 °C
con respecto a la temperatura seleccionada, el aparato entrará de nuevo en
modo calefacción y si fuera el caso, el modo oscilación se activará. El resto de
indicadores permanecen intactos.
• Si la temperatura ambiente alcanza la temperatura predeterminada de
25 °C, el aparato solamente segui- rá funcionando si ha seleccionado una
temperatura superior a la indicada.
• Si ha congurado los modos temporizador y temperatura simultáneamente,
aparecerá un círculo en el indicador. El indicador de temperatura y de tiempo
alternarán cada 30 segundos en pantalla. Si el tem- porizador no está activado
o en valor “0”, no se mostrará el tiempo:.

38
ES
MANTENIMIENTO
Cambio de las pilas del mando a distancia
• Abra el compartimento para las pilas del mando a distancia.
• Tenga en cuenta la polaridad y coloque una pila de botón tipo CR2023.
• Vuelva a colocar el compartimento para la pila dentro del mando:
Limpieza
• Asegúrese de apagar el aparato antes de limpiarlo.
• Utilice un paño limpio y húmedo.
• No utilice productos de limpieza como abrasivos, gasolina o sustancias
químicas.

39
ES
INDICACIONES SOBRE LA RETIRADA DEL APARATO
Si en su país existe una disposición legal relativa a la
eliminación de aparatos eléctricos y electrónicos, este
símbolo estampado en el producto o en el embalaje
advierte que no debe eliminarse como residuo doméstico.
En lugar de ello, debe depositarse en un punto de
recogida de reciclaje de aparatos eléctricos y electrónicos.
Una gestión adecuada de estos residuos previene
consecuencias potencialmente negativas para el medio
ambiente y la salud de las personas. Puede consultar más
información sobre el reciclaje y la eliminación de este
producto contactando con su administración local o con
su servicio de recogida de residuos.
Este producto contiene baterías. Si en su país existe una
disposición legal relativa a la eliminación de baterías,
estas no deben eliminarse como residuo doméstico.
Infórmese sobre la normativa vigente relacionada con
la eliminación de baterías. Una gestión adecuada de
estos residuos previene consecuencias potencialmente
negativas para el medio ambiente y la salud de las
personas.
FABRICANTE E IMPORTADOR (REINO UNIDO)
Fabricante:
Chal-Tec GmbH, Wallstraße 16, 10179 Berlín, Alemania.
Importador para Gran Bretaña:
Berlin Brands Group UK Ltd
PO Box 1145
Oxford, OX1 9UW
United Kingdom


41
FR
Chère cliente, cher client,
Toutes nos félicitations pour l’acquisition de ce nouvel
appareil. Veuillez lire attentivement et respecter les
instructions de ce mode d’emploi an d’éviter d’éventuels
dommages. Nous ne saurions être tenus pour responsables
des dommages dus au non-respect des consignes et à
la mauvaise utilisation de l’appareil. Scannez le QR-Code
pour obtenir la dernière version du mode d‘emploi et des
informations supplémentaires concernant le produit.
SOMMAIRE
Fiche de données produit42
Consignes de sécurité 43
Aperçu de l’appareil 45
Panneau de commande 46
Télécommande 46
Montage 47
Mise en marche 48
Maintenance 50
Informations sur le recyclage 51
Fabricant et importateur (UK) 51
FICHE TECHNIQUE
Numéro d’article 10029344
Dimensions 32 x 113 cm
Alimentation électrique 220-240 V ~ 50 Hz
Puissance consommée 1600 - 2500 W
Vitesse du vent 1,6 m/s

42
FR
FICHE DE DONNÉES PRODUIT
Référence (s) du produit 10029344
Donnée Symbole Valeur Unité Donnée Unité
Puissance calorique Uniquement pour les radiateurs électriques à
accumulation : Type de régulation de l'apport de
chaleur
Puissance calorique
nominale
Pnom 2,5 kW Régulation manuelle de l'apport de chaleur
avec thermostat intégré
n.c.
Puissance calorique
minimale (indicative)
Pmin 1,5 kW Régulation manuelle de l'apport de chaleur
avec indication de la température de la pièce
et/ou de l'extérieur
n.c.
Puissance maximale
continue de chauffage
Pmax,c 2,5 kW Régulation électronique de l'apport de chaleur
avec indication de la température de la pièce
et/ou de l'extérieur
n.c.
Consommation de courant auxiliaire Apport de chaleur assisté par ventilateur n.c.
A puissance calorique
nominale
elmax 2,444 kW Type de chauffage/contrôle de la température de la
pièce
A puissance calorique
minimale
elmin 1,583 kW Chauffage à une seule vitesse, pas de contrôle
de la température ambiante
non
En mode veille elSB 0,5 W Deux vitesses ou plus réglables
manuellement, pas de contrôle de la
température ambiante
non
Contrôle de la température ambiante par
thermostat mécanique
non
Contrôle électronique de la température
ambiante
oui
Contrôle électronique de la température
ambiante et régulation par jour
non
Contrôle électronique de la température
ambiante et régulation par semaine
non
Autres options de régulation
Contrôle de la température ambiante avec
détection de présence
non
Contrôle de la température ambiante avec
détection de fenêtre ouverte
non
Avec option télécommande non
Avec contrôle du démarrage du chauffage non
Avec limitation de la durée de fonctionnement non
Avec globe noir capteur de température non
Coordonnées de contact Chal-Tec GmbH, Wallstraße 16, 10179, Berlin, Allemagne

43
FR
CONSIGNES DE SÉCURITÉ
• Les enfants de plus de 8 ans ainsi que les personnes aux capacités physiques
et mentales réduites ne doivent pas utiliser l’appareil à moins d’avoir assimilé
dans le détail les con- signes d‘utilisation et de sécurité données par la
personne chargée de les surveiller.
• Ne pas laisser les enfants jouer avec l’appareil.
• Les enfants ne peuvent nettoyer l’appareil que sous la surveillance d’un adulte.
• Tenir les enfants de moins de 3 ans éloignés de l’appareil et n’utiliser l’appareil
en présence d’enfants que s’ils sont sous surveillance.
Remarques sur l’emplacement et sur l’utilisation
• L’appareil peut devenir très chaud pendant son fonctionnement. Ainsi, le
placer à distance susante d’objets facilement inammables comme des
rideaux ou des meubles.
• Ne pas recouvrir l’appareil.
• Ne pas installer l’appareil directement sous une prise électrique.
• Ne pas brancher l’appareil à une minuterie externe ou à une prise
télécommandée pour éviter qu’il ne s’allume automatiquement.
• Ne pas installer l’appareil dans une pièce dans laquelle sont entreposés des
liquides facilement inammables ou explosifs.
• Si l’appareil est utilisé avec une rallonge électrique, veiller à dérouler
entièrement le câble.
• Ne pas brancher l’appareil sur une prise où d’autres appareils sont déjà
branchés.
• Ne pas installer l’appareil à proximité d’une baignoire, d’une douche ou d’un
bassin de natation.
• Si le cordon et la che d‘alimentation sont endommagés, les faire remplacer
par le fabricant, une entreprise spécialisée habilitée ou une personne
présentant une qualication analogue.
• Ne pas laisser l’appareil sans surveillance pendant son fonctionnement et en
tenir les enfants et les animaux domestiques à l’écart.
• Ne pas installer l’appareil sur un charriot ou sur une surface de laquelle il est
susceptible de chuter.
• Débrancher l’appareil après utilisation. Ne pas laisser longtemps l’appareil
sans surveillance. Ne pas débrancher la che de la prise en tirant sur le câble,
mais saisir fermement le corps de la che pour le faire.
• Installer l’appareil de sorte à ce que le ux d’air ne soit pas bloqué par d’autres
objets.
• La che d’alimentation est étanche lorsqu’elle n’est pas en utilisation. Pour
éviter toute électrocution ou tout courant de fuite, ne jamais utiliser l’appareil
avec des mains humides ou ne pas faire fonctionner l’appareil s’il y a de l’eau
sur le cordon d’alimentation.

44
FR
Mesures de sécurité spéciales
Vérier l’inscription sur le cordon d’alimentation avant de l’utiliser. En fonction du
cordon d’alimentation, cet appareil peut être utilisé dans différentes conditions
d’environnement :
Inscription Lieux où l’appareil peut être
utilisé :
Lieux ou l’appareil ne doit
pas être utilisé :
H07RN-F Domicile, entrepôts, ateliers,
chantiers et serres
H05RN-F Domicile, entrepôts, ateliers et
serres
Chantiers
H05RR-F Domicile, entrepôts et ateliers Chantiers et serres

45
FR
APERÇU DE L’APPAREIL
1 Panneau de commande 5 Interrupteur marche/arrêt
2 Capteur IR 6 Cordon d’alimentation
3 Sortie d’air 7 Socle
4 Entrée d’air 8 Vis à oreilles

46
FR
PANNEAU DE COMMANDE
TÉLÉCOMMANDE

47
FR
MONTAGE
1. Sortir les objets de l’emballage, de sorte à réunir les éléments suivants :
l’appareil de base, le pied de support, la télécommande et les vis à oreilles.
2. Poser l’appareil principal à plat sur une table de sorte à faire dépasser les
extrémités (cf. image 1)
3. Fixer les pieds au socle de l’appareil. Utiliser les vis à oreilles (cf. image 2)
4. Redresser l’appareil. L’installer sur une surface stable.
1
2
3

48
FR
MISE EN MARCHE
Éléments de commande
Interrupteur mar-
che/arrêt situé sur
le dessous
Panneau de commande (représentation schématique)
1. Appuyer sur l’interrupteur marche/arrêt situé à l’arrière de l’appareil. L’appareil
produit un bip sonore et se met en mode veille. Toutes les fonctions et tous les
achages sont encore éteints.
2. En mode de veille, aucun élément n’est encore aché sur le panneau de
commande hormis la touche . Appuyer sur pour démarrer l’appareil.
Appuyer dessus une nouvelle fois pour le faire entrer de nouveau en mode
veille.
En mode de fonctionnement, voici les touches de fonctions :
Basculer entre une puissance basse (1600 W) et une puissance
élevée (2500 W). En consommation basse, le symbole s’ache. En
consommation élevée, le symbole s’ache.
Allumer et éteindre l’oscillation pendant le fonctionnement de l’appareil.
L’achage de l’oscillation est éteint lorsque la rotation n’est pas active.
L’achage de l’oscillation est allumé lorsque la rotation est active.

49
FR
Réglage du temps pendant le fonctionnement de l’appareil (appuyer 1x)
• L’achage du temps s’allume. L’achage clignote à intervalles
de 0,5 secondes. À ce moment-là, appuyer sur les touches « UP (+) »
et « DOWN (-) » pour paramétrer le temps par paliers de 1 heure (1-12
heures).
• Appuyer de nouveau sur SET pour conrmer le temps paramétré
et quitter le réglage du minuteur. N’appuyer sur aucune touche ou
appuyer sur une touche autre que « UP (+) » et « DOWN (-) » pour
activer le minuteur après 5 secondes avec le temps réglé.
• Si le minuteur est réglé sur 0, l’appareil s’éteint et se met en mode
veille.
• Pour quitter le mode minuteur, appuyer de nouveau sur SET.
Réglage de la température (appuyer 2x pendant le fonctionnement de
l’appareil)
• L’achage de la température s’allume. L’achage clignote
deux fois par seconde. À ce moment-là, appuyer sur les touches « UP
(+) » et « DOWN (-) » pour paramétrer la température par paliers de
1 °C
(15-35 °C).
• Appuyer de nouveau sur SET pour conrmer la température
paramétrée et quitter le réglage de la température.
• N’appuyer sur aucune touche ou appuyer sur une touche autre que «
UP (+) » et « DOWN (-) » pour acher la température..
Fonctions de température
• Si la température ambiante descend en-dessous de -10 °C, l’achage indique
« LO ». Si la température ambiante s’élève au-dessus de 40 °C, l’achage
indique « HI ».
• L’appareil mesure la température ambiante 10 secondes après sa mise en
marche. Puis la fonction chauf- fante s’éteint si la température ambiante est
supérieure ou égale à la température paramétrée. L’achage s’éteint et le
ventilateur fonctionne encore pendant 10 secondes. La fonction de rotation
s’éteint égale- ment si celle-ci était allumée. Les autres témoins lumineux
restent à l’identique.
• Si la température ambiante baisse et si elle est inférieure de 2 °C par rapport
à la température paramétrée, l’appareil se met de nouveau à chauffer et la
fonction d’oscillation se met de nouveau en marche si celle-ci était activée. Les
autres témoins lumineux restent à l’identique.
• Si la température ambiante atteint la température préréglée de 25 °C,
l’appareil ne se remet en marche que si l’utilisateur a réglé la température au-
dessus de 25 °C.
• Si la fonction du minuteur et de température ont été paramétrés en même
temps, l’achage apparaît en boucle. L’achage de la température et du
temps s’alternent toutes les 30 secondes. Si le minuteur n’a pas été paramétré
ou s’il est en position « 0 », le temps ne sera pas aché.

50
FR
MAINTENANCE
Remplacement des piles de la télécommande
• Sortir le compartiment des piles de la télécommande
• Respecter les polarités et introduire une pile bouton CR2032 dans le
compartiment des piles.
• Réintroduire le compartiment des piles dans la télécommande.
Nettoyage
• Veiller à ce que l’appareil soit éteint avant de le nettoyer.
• Utiliser un chiffon propre et humide.
• Ne pas utiliser de produits d’entretien tels que du décapant, de l’essence, des
substances chimiques etc.

51
FR
INFORMATIONS SUR LE RECYCLAGE
S‘il existe une réglementation pour l‘élimination ou le
recyclage des appareils électriques et électroniques dans
votre pays, ce symbole sur le produit ou sur l‘emballage
indique que cet appareil ne doit pas être jeté avec les
ordures ménagères. Vous devez le déposer dans un point
de collecte pour le recyclage des équipements électriques
et électroniques. La mise au rebut conforme aux règles
protège l‘environnement et la santé de vos semblables
des conséquences négatives. Pour plus d‘informations
sur le recyclage et l‘élimination de ce produit, veuillez
contacter votre autorité locale ou votre service de
recyclage des déchets ménagers.
Ce produit contient des piles. S‘il existe une
réglementation pour l‘élimination ou le recyclage des
piles dans votre pays, vous ne devez pas les jeter avec les
ordures ménagères. Renseignez-vous sur les dispositions
locales relatives à la collecte des piles usagées. La mise au
rebut conforme aux règles protège l‘environnement et la
santé de vos semblables des conséquences négatives.
FABRICANT ET IMPORTATEUR (UK)
Fabricant :
Chal-Tec GmbH, Wallstraße 16, 10179 Berlin, Allemagne.
Importateur pour la Grande Bretagne :
Berlin Brands Group UK Ltd
PO Box 1145
Oxford, OX1 9UW
United Kingdom


53
IT
Gentile cliente,
La ringraziamo per aver acquistato il dispositivo. La
preghiamo di leggere attentamente le seguenti istruzioni
per l’uso e di seguirle per evitare possibili danni. Non ci
assumiamo alcuna responsabilità per danni scaturiti da una
mancata osservazione delle avvertenze di sicurezza e da
un uso improprio del dispositivo. Scansionare il codice QR
seguente, per accedere al manuale d’uso più attuale e per
ricevere informazioni sul prodotto.
INDICE
Scheda informativa del prodotto54
Avvertenze di sicurezza 55
Descrizione del prodotto 57
Pannello di controllo 58
Telecomando 58
Montaggio 59
Messa in funzione 60
Manutenzione 62
Avviso di smaltimento 63
Produttore e importatore (UK) 63
DATI TECNICI
Numero articolo 10029344
Dimensioni 32 x 113 cm
Alimentazione 220-240 V ~ 50 Hz
Potenza 1600 - 2500 W
Velocità 1,6 m/s

54
IT
SCHEDA INFORMATIVA DEL PRODOTTO
Identicazione del modello (i) 10029344
Indicazione Simbolo Valore Unità Indicazione Unità
Potenza termica Solo per gli apparecchi per il riscaldamento d'ambiente
locale elettrici ad accumulo: Tipo di controllo
dell´apporto termico
Potenza termica nominale Pnom kW Controllo manuale del carico termico con
termostato integrato
n.d.
Potenza termica minima
(valore indicativo)
Pmin kW Controllo manuale del carico termico con
riscontro della temperatura ambiente e/o
esterna
n.d.
Potenza termica massima
continua
Pmax,c kW Controllo elettronico del carico termico con
riscontro della temperatura ambiente e/o
esterna
n.d.
Consumo di elettricità ausiliaria Potenza termica con supporto del ventilatore n.d.
Per la potenza termica
nominale
elmax n.d. kW Tipo di potenza termica / controllo della temperatura
ambiente
Per la potenza termica
minima
elmin n.d. kW Potenza termica di un solo livello, senza
controllo della temperatura ambiente
no
In modalità di attesa elSB W Due o più livelli impostabili manualmente,
senza controllo della temperatura ambiente
no
Con controllo della temperatura ambiente
tramite termostato meccanico
no
Con controllo elettronico della temperatura
ambiente
si
Controllo elettronico della temperatura
ambiente e timer giornaliero
no
Controllo elettronico della temperatura
ambiente e timer settimanale
no
Altre opzioni di controllo
Controllo della temperatura ambiente con
rilevamento di presenza
no
Controllo della temperatura ambiente con
rilevamento di nestre aperte
no
Con opzione telecomando no
Con controllo di avvio adattabile no
Con limitazione del tempo di funzionamento no
Con sensore lampada nero no
Informazioni di contatto Chal-Tec GmbH, Wallstraße 16, 10179, Berlino, Germania

55
IT
AVVERTENZE DI SICUREZZA
• Questo dispositivo non deve essere utilizzato da persone (compresi i bambini)
con capacità siche, sensoriali o mentali ridotte e da persone che manchino
di esperienza e conoscenza del dispositivo, a meno che siano attentamente
sorvegliate o ben istruite relativamente all’utilizzo del dispositivo stesso da
parte di un supervisore responsabile della loro sicurezza.
• Prestare attenzione che i bambini non giochino con il dispositivo.
• I bambini possono pulire il dispositivo solo se sorvegliati.
• Tenere il dispositivo lontano dai bambini e sorvegliarli se si utilizza il
dispositivo in loro presenza.
Collocazione e utilizzo
• Il dispositivo può diventare molto caldo durante l´uso. Collocarlo pertanto
lontano da oggetti facilmente inammabili come tende o mobili.
• Non coprire il dispositivo.
• Non collocare il dispositivo direttamente sotto ad una presa.
• Non collegare il dispositivo ad un timer esterno o ad una presa con
telecomando.
• Non collocare il dispositivo in stanze dove sono conservati liquidi inammabili
o esplosivi.
• Se si utilizza il dispositivo con una prolunga, assicurarsi che il cavo di
alimentazione sia completamente srotolato.
• Non collegare il dispositivo ad una presa alla quale sono già collegati altri
apparecchi.
• Non collocare il dispositivo vicino ad una vasca da bagno, ad una doccia o ad
una piscina.
• Se il cavo di alimentazione o la spina sono danneggiati, farli sostituire dal
produttore o da un tecnico competente.
• Non lasciare incustodito il dispositivo mentre è in funzione. Tenere i bambini e
gli animali domestici lontano dal dispositivo.
• Non posizionare il dispositivo su un carrello o su una supercie dalla quale
può cadere.
• In caso di inutilizzo prolungato del dispositivo, staccare la spina dalla presa.
Non lasciare incustodito il dispositivo mentre è in funzione. Non tirare il cavo
di alimentazione per staccare la spina, bensì afferrare sempre la spina alla
base.
• Collocare il dispositivo in modo che il usso d‘aria non venga bloccato da altri
oggetti.
• La spina è impermeabile quando non è in uso. Per evitare scosse elettriche o
dispersione di corrente, non utilizzare mai il dispositivo con le mani bagnate e
non mettere in funzione il dispositivo se il cavo di alimentazione è bagnato.

56
IT
Avvertenze di sicurezza speciche
Prima dell´uso controllare l´indicazione sul cavo di alimentazione. In base al tipo di
cavo di alimentazione, il dispositivo può essere utilizzato in diversi ambienti:
Tipo Può essere utilizzato in: Non utilizzare in:
H07RN-F Ambienti domestici, depositi,
ocine, cantieri e serre.
H05RN-F Ambienti domestici, depositi,
ocine e serre.
Cantieri
H05RR-F Ambienti domestici, depositi e
ocine.
Cantieri e serre

57
IT
DESCRIZIONE DEL PRODOTTO
1 Pannello di controllo 5 On/off
2 Ricevitore a infrarossi 6 Cavo di rete
3 Uscita aria 7 Base d’appoggio
4 Entrata aria 8 Viti ad alette

58
IT
PANNELLO DI CONTROLLO
TELECOMANDO

59
IT
MONTAGGIO
1. Rimuovere i componenti dalla confezione, inclusi i seguenti componenti: unità
principale, base d’appoggio, telecomando e viti ad alette.
2. Posizionare l‘unità principale su un tavolo come mostrato nella gura 1.
3. Assemblare la base d’appoggio all’unità principale (vedi Figura 2). Per fare ciò,
utilizzare le viti ad alette.
4. Collocare il dispositivo in posizione verticale su una supercie stabile.
1
2
3

60
IT
MESSA IN FUNZIONE
Comandi
Interruttore on/off Pannello di controllo (rappresentazione schematica)
1. Premere l‘interruttore on/off posto sul retro del dispositivo. Un segnale
acustico avverte che il dispositivo è in modalità operatività ed è pronto per
l’uso. Tutte le funzioni e le spie sono ancora spente.
2. In modalità operatività, può essere premuto solo il tasto . Premere il tasto
e il dispositivo si mette in funzione. Se si preme il tasto nuovamente, l‘unità
torna alla modalità operatività.
Quando il dispositivo si mette in funzione, sono disponibili le seguenti:
Scegliere tra potenza bassa (1600 W) e potenza alta (2500 W). Per la
potenza bassa compare sul display . Per la potenza alta compare sul
display .
Accensione/spegnimento dell’oscillazione durante il funzionamento.
Premere il tasto: il dispositivo oscilla e la spia si accende. Premere di
nuovo il tasto: la funzione oscillazione e la spia si spengono.

61
IT
Impostare il timer durante il funzionamento (premere 1x)
• Il display dell’ora si accende. L‘indicatore lampeggia ad intervalli
di 0,5 secondi. Premere i tasti „UP (+)“ e „DOWN (-)” per impostare il
tempo a intervalli di 1 ora (1-12 ore).
• Premere di nuovo SET per confermare il tempo impostato e per uscire
dall’imposta- zione del timer. Se non si preme alcun un tasto oppure
un tasto diverso da „UP (+)” e
• „DOWN (-)”, il timer si attiva dopo 5 secondi con il tempo impostato.
• Se il timer è impostato su 0, il dispositivo si spegne e passa in
modalità standby.
• Per uscire dalla modalità timer, premere SET.
Regolare la temperatura (premere 2 volte durante il funzionamento)
• Il display della temperatura si accende e inizia a lampeggiare
due volte al secon- do. Premere i tasti „UP (+)“ e „DOWN (-)“per
impostare la temperatura a intervalli di 1°C (15-35 °C).
• Premere di nuovo SET per confermare la temperatura impostata e per
uscire dall’impo- stazione della temperatura.
• Se non si preme alcun tasto oppure un altro tasto ad eccezione di „UP
(+)“ e „DOWN (-)“, viene visualizzata la temperatura.
Funzionamento della temperatura
• Quando la temperatura scende sotto i -10°C, il display visualizza „LO“. Se la
temperatura ambiente è su- periore a 40 °C, il display visualizza „HI“.
• Solo 10 secondi dopo l‘accensione, il dispositivo misura la temperatura. La
funzione di riscaldamento si spegne se la temperatura ambiente è superiore
alla temperatura impostata oppure uguale. Il display si spegne e la ventola
continua a girare per 10 secondi. Se è stata attivata l’oscillazione, la spia
compare sul display. Le altre spie rimangono invariate.
• Se la temperatura ambiente scende e si trova 2°C al di sotto della temperatura
impostata, il dispositivo tor- na alla modalità di riscaldamento e anche
l’oscillazione si riattiva. Anche le altre spie si accendono di nuovo.
• Se la temperatura ambiente raggiunge la temperatura predenita di 25°C,
il dispositivo continua a funzio- nare se si è impostata una temperatura
superiore ai 25°C.
• Se si è impostato il timer e la modalità di temperatura contemporaneamente,
sul display appare un cer- chio. La visualizzazione della temperatura e del
tempo si alternano a intervalli di 30 secondi. Se il timer non è impostato
oppure si trova su „0“, il tempo non compare.

62
IT
MANUTENZIONE
Sostituzione della batteria del telecomando
• Aprire il vano batteria del telecomando.
• Assicurarsi che la polarità sia corretta e inserire una batteria a bottone CR2032
nel vano batteria.
• Reinserire il vano batteria nel telecomando.
Pulizia
• Assicurarsi che la spina sia disinserita prima di effettuare la pulizia.
• Usare un panno pulito e umido.
• Non usare per la pulizia detergenti aggressivi, prodotti chimici, benzina ecc.

63
IT
AVVISO DI SMALTIMENTO
Se nel proprio paese si applicano le regolamentazioni
inerenti lo smaltimento di dispositivi elettrici ed
elettronici, questo simbolo sul prodotto o sulla confezione
segnala che questi prodotti non possono essere
smaltiti con i riuti normali e devono essere portati a
un punto di raccolta di dispositivi elettrici ed elettronici.
Grazie al corretto smaltimento dei vecchi dispositivi si
tutela il pianeta e la salute delle persone da possibili
conseguenze negative. Informazioni riguardanti il riciclo
e lo smaltimento di questi prodotti si ottengono presso
l’amministrazione locale oppure il servizio di gestione dei
riuti domestici.
Il prodotto contiene batterie. Se nel proprio paese si
applicano le regolamentazioni inerenti lo smaltimento
di batterie, non possono essere smaltite con i normali
riuti domestici. Preghiamo di informarvi sulle
regolamentazioni vigenti sullo smaltimento delle batterie.
Grazie al corretto smaltimento dei vecchi dispositivi si
tutela l’ambiente e la salute delle persone da conseguenze
negative.
PRODUTTORE E IMPORTATORE (UK)
Produttore:
Chal-Tec GmbH, Wallstraße 16, 10179 Berlino, Germania.
Importatore per la Gran Bretagna:
Berlin Brands Group UK Ltd
PO Box 1145
Oxford, OX1 9UW
United Kingdom

-
 1
1
-
 2
2
-
 3
3
-
 4
4
-
 5
5
-
 6
6
-
 7
7
-
 8
8
-
 9
9
-
 10
10
-
 11
11
-
 12
12
-
 13
13
-
 14
14
-
 15
15
-
 16
16
-
 17
17
-
 18
18
-
 19
19
-
 20
20
-
 21
21
-
 22
22
-
 23
23
-
 24
24
-
 25
25
-
 26
26
-
 27
27
-
 28
28
-
 29
29
-
 30
30
-
 31
31
-
 32
32
-
 33
33
-
 34
34
-
 35
35
-
 36
36
-
 37
37
-
 38
38
-
 39
39
-
 40
40
-
 41
41
-
 42
42
-
 43
43
-
 44
44
-
 45
45
-
 46
46
-
 47
47
-
 48
48
-
 49
49
-
 50
50
-
 51
51
-
 52
52
-
 53
53
-
 54
54
-
 55
55
-
 56
56
-
 57
57
-
 58
58
-
 59
59
-
 60
60
-
 61
61
-
 62
62
-
 63
63
-
 64
64


Klarstein 53029344 El manual del propietario
- Tipo
- El manual del propietario
- Este manual también es adecuado para
en otros idiomas
- français: Klarstein 53029344 Le manuel du propriétaire
- italiano: Klarstein 53029344 Manuale del proprietario
- English: Klarstein 53029344 Owner's manual
- Deutsch: Klarstein 53029344 Bedienungsanleitung