Fanimation F2 LK El manual del propietario
- Tipo
- El manual del propietario

WARNING: To reduce the risk of fire or electric shock, this fan/light kit is suitable for use with solid-state speed controls.
CAUTION
To reduce the risk of fire and electric shock, this light kit
should be used only with Fanimation
Distinction™ series
models .
F2** Light Fitter & G2/G3 Glass Installation Instructions
READ AND SAVE THESE INSTRUCTIONS
F2 Weight: 0.95 lbs (0.43 kgs) G2 Weight: 2.36 lbs (1.07 kgs) G3 Weight: 2.59 lbs (1.18 kgs)
NOTE: Ceiling fan light kits are only meant to be used with Distinction™ ceiling fans. Do NOT install as a light
fixture.
NOTE: Installation shall be in accordance with the National Electrical Code, ANSI/NFPA 70-1999 and local codes.
WARNING: To reduce the risk of fire or electric shock, or injury to persons, unplug or disconnect the appliance from the power
supply before cleaning, user maintenance and servicing.
CAUTION
Turning off wall switch is not sufficient. To reduce the
risk of fire and electrical shock, be sure electricity is
turned off at the main fuse box to the fan before installing
the light kit.
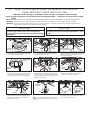
1. Remove the cover-switch assembly from the
inner-switch housing assembly by twisting in
the counterclockwise direction.
2. Remove the inner-switch housing assembly
from the adapter-switch housing assembly
by removing the two screws.
3. Remove one of the three screws in the
adapter-switch housing assembly and retain
the screw for Step 5. Slightly loosen the
remaining two screws.
Inner-Switch
Housing
Assembly
Inner-Switch
Housing
Assembly
Adapter-Switch
Housing
Assembly
Adapter-Switch
Housing
Adapter-Switch
Housing
Adapter-Switch
Housing Assembly
Cover-Switch
Assembly
Socket Plate
Assembly
Socket Plate
Assembly
Socket Plate
Assembly
Socket Plate
Assembly
Socket Plate
Assembly
Socket Plate
Assembly
Bulb
G2 Glass
G3 Opal Glass
Motor
4. Disassemble the socket plate assembly from
the adapter-switch housing by removing one
of the two screws and retain the screw for
Step 7. Slightly loosen the remaining screw.
5. Assemble the adapter-switch housing (from
the light fitter) to the housing support bracket
using the two key slots in the adapter-switch
housing. Replace the third screw and securely
tighten all three screws.
6. Connect the 2 single-pin connectors from the
socket plate assembly to the 2 single-pin
connectors from motor assembly.
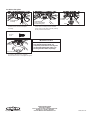
7. Assemble the socket plate assembly to 8. Insert light bulb into socket. 9. Assemble the glass to the socket plate assembly
by twisting in the clockwise direction. Don’t
force or over-tighten the glass.
Note: If you are installing the G3CL clear glass,
please disregard the next step and proceed to
step 10.
adapter-switch housing using the key slot.
Replace the second screw and securely
tighten the two screws.
Adapter-Switch
Housing

ʆ
WARNING
10983 Bennett Parkway
Zionsville, IN 46077
TROO)UHHFAX (866) 482-5215
Outside U.S. call (317) 733-4113
Visit Our Website www.fanimation.com
2015/10 V.01Copyright 2015 Fanimation
For G3CL clear glass
10. Fully assemble and tighten the provided
shoulder screws to the socket plate
assembly.
11. Securely attach and tighten the socket plate
screw cover assembly over the shoulder
screws in the socket plate assembly utilizing
the key slot twist-lock feature.
12. Insert light bulb into socket.
Socket Plate
Screw Cover Assembly
(from the G3CL glass)
G3CL HARDWARE USED:
Socket Plate
Assembly
Socket Plate
Assembly
Bulb
13. Assemble the glass to the socket plate
assembly by twisting in the clockwise
direction. Don’t force or over-tighten the glass.
G3CL Clear Glass
Shoulder
Screw
x 2
To avoid possible fire or shock, make
sure that the electrical wires are
completely inside the fan housing and
not pinched between the switch cup
housing and the switch cup flange.
Socket Plate
Assembly
Socket Plate
Assembly

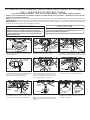
3. Extraiga uno de los tres tornillos de la cubierta
del adaptador del interruptor y guarde los tornillo
para el Paso 5. Afloje ligeramente los dos tornillos.
Carcasa del
adaptador
Carcasa del
adaptador
Bombilla
Vidrio G2
Vidrio ópalo G3
Motor
4. Desmonte la placa del conector de la carcasa
del adaptador extrayendo uno de los dos tornillos.
Guarde uno de los tornillos para el Paso 7.
Afloje ligeramente el tornillo restante.
7. Instale la placa del conector en la carcasa
del adaptador usando las ranuras claves. Vuelva
a colocar el otro tornillo y fije los dos tornillos.
5. Instale la carcasa del adaptador (de la
sujeción de la bombilla) en el soporte de la
carcasa usando las dos ranuras claves de la
carcasa del adaptador. Vuelva a colocar el
tercera tornillo y fije los tres tornillos
8. Introduzca la bombilla en la conexión. 9. Asegure el vidrio en la placa de conector
girándolo en el sentido de las agujas del reloj y
sin apretar demasiado.
Nota: Si va a instalar el cristal transparente
G3CL, sáltese el siguiente paso y siga en el
paso 10.
instalar el accesorio.
ADVERTENCIA: Para reducir el riesgo de incendios o descargas eléctricas, apto para usar con controles de velocidad de estado sólido.
LEA Y GUARDE ESTAS INSTRUCCIONES
Peso de F2: 0,43 kgs (0.95 lbs) Peso de G2: 1,07 kgs (2.36 lbs) Peso de G3: 1,18 kgs (2.59 lbs)
NOTA: Los kits de iluminación del ventilador de techo solo deben utilizarse con los Spitfire™ ventiladores de techo. NO LOS
instale como unidad de iluminación.
NOTA: La instalación debe realizarse según la regulación eléctrica nacional, las normas ANSI/NFPA 70-1999 y las normativas locales.
ADVERTENCIA: Para reducir el riesgo de incendios, descarga eléctricas o daños a personas, desconecte o desenchufe el dispositivo
de la fuente de alimentación antes de limpiarlo o repararlo.
PRECAUCIÓN
Apagar el interruptor de pared no es suficiente. A fin de
reducir el riesgo de incendios y descargas eléctricas,
asegúrese de que la electricidad esté desconectada en la
caja de fusibles principal al kit de iluminación antes de
PRECAUCIÓN
Para reducir el riesgo de incendios o descargas eléctricas,
utilice este kit de iluminación de Fanimation solo con los
modelos de ventilador Distinction .
™
6. Instale el conector de 2 clavijas desde placa
del conector conexión a la unidad del motor.
F2**sujeción de la bombilla y G2/G3 vidrio Instrucciones de instalación
1. Extraiga la cubierta del interruptor de la
carcasa interior girándola en el sentido contrario
a las agujas del reloj.
Cubierta interior
2. Extraiga la cubierta interior en la cubierta del
adaptador usando las ranuras claves.
Cubierta del
adaptador del
interruptor
Carcasa de la
cubierta del interruptor
Cubierta interior
Cubierta del adaptador
del interruptor
Placa del conector
Placa del
conector
Placa del
conector
Placa del
conector
Placa del
conector
Placa del
conector
Carcasa del
adaptador

10983 Bennett Parkway
Zionsville, IN 46077
TROO)UHHFAX (866) 482-5215
Outside U.S. call (317) 733-4113
Visit Our Website www.fanimation.com
2015/10 V.01Copyright 2015 Fanimation
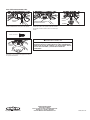
Para vidrio transparente G3CL
10. Instale y fije completamente los tornillos de
resalto suministrados en la placa de soporte.
11. Fije adecuadamente y fije la cubierta del
tornillo de la placa de soporte sobre los tornillos
de resalto usando la ranura clave con cierre por
torsión.
12. Introduzca la bombilla en la conexión.
G3CL Aditamentos utilizados:
Bombilla
G3CL
x 2
ʆ
ADVERTENCIA
Para evitar un posible incendio o descarga eléctrica,
asegúrese de que los cables eléctricos estén completamente
dentro de la carcasa del ventilador y no estén pisados entre la
carcasa del conmutador y el borde de la unidad del
conmutador.
Tornillo de hombro
13. Asegure el vidrio en la placa de conector
girándolo en el sentido de las agujas del reloj y
sin apretar demasiado.
Placa del
conector
Placa del
conector
Placa del
conector
Placa del
conector
Cubierta del tornillo de la placa de
soporte (del vidrio G3CL)
-
 1
1
-
 2
2
-
 3
3
-
 4
4


Fanimation F2 LK El manual del propietario
- Tipo
- El manual del propietario
en otros idiomas
- English: Fanimation F2 LK Owner's manual
Artículos relacionados
-
Fanimation F1 LK El manual del propietario
-
-
-
-
-
-