
Firmware Update Procedure for SR-300
Page.1 of 5
July, 2010
Subject: SR-300 Firmware Update
(Subwoofer integrated receiver for YHT-S300)
Yamaha is pleased to offer the following firmware update to ensure the best possible
performance and features for your Yamaha Subwoofer Integrated Receiver. This firmware
adds 3D video pass-through capability for the HDMI connections.
Requirements:
A computer capable of burning an audio CD
BD/DVD/CD player* with optical digital audio connection
*Note) CD PLAYER IS PREFERRED.
Some DVD players use digital filters, which affects the output signal of the
devices. This firmware update may not work with DVD players which use these
digital filters. CD player usually does not use these filters
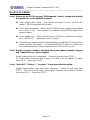
CHECK THE SERIAL NUMBER PRIOR TO THIS UPDATE
By checking the serial number, you’ll be able to know whether your SR-300 receiver needs
to be updated or not.
See page 2 for the exact location and list of affected serial numbers.
The following pages contain the procedures for this firmware update. The outline of the
update is as follows:
1. Create an update disc (Audio CD)
2. Connect digital audio with CD, DVD or BD player
3. Enter firmware update mode
4. Play the update disc (firmware update)
Note: Executing this update will RESET the settings including radio presets to
factory default.
< IMPORTANT NOTICE >
Do not attempt to update your Yamaha receiver using any other data file except those provided
directly from the Yamaha website.
Follow the instructions carefully and do not attempt any other procedures not specified in the
instructions provided by Yamaha.
Improperly updated products may cause improper operation, and any parts or service required
to restore proper operation will not be covered under the Yamaha Limited Warranty.

Firmware Update Procedure for SR-300
Page.2 of 5
Location of the serial number:
You can find the serial number at the rear left side of your SR-300 subwoofer integrated
receiver.
Affected Serial Numbers
The serial number consists of a letter followed by 6 numbers and 2 letters.
[Example: “Y121530ZP”].
Check the 5 numbers from the left. If they are the same or higher than the one below,
you DO NOT need to perform this update.
Y024930TV
Same or higher Unnecessary to perform update
Lower Need to be updated.
See following pages for instructions.

Firmware Update Procedure for SR-300
Page.3 of 5
Instructions for Firmware Update:
STEP1 CREATE UPDATE DISC
Download the firmware from Yamaha website.
Unzip and burn the WAV file onto CD-R/RW as an Audio-CD. This will be your
update disc.
If you need instructions on creating this firmware update CD, see your Personal
Computer ("PC") CD burning software instructions on how to burn WAV file as an
Audio CD.
Note:
Conventional CD burning software is
recommended. An audio CD burned by
Windows Media Player may not work.
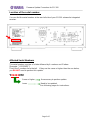
STEP2 CONNECT DIGITAL AUDIO WITH BD/DVD/CD PLAYER
Unplug the AC power cable of the SR-300 receiver from the wall outlet and power
off the BD/DVD/CD player. Then, connect the CD, DVD or BD player* to your
receiver using optical digital cable.
*It is recommended to remove all other connection from the player. If the player is
connected to another amplifier/receiver, make sure those components are powered off. Or
else, the loud digital communication sound output during the update could cause damage
to the speakers.
SR-300 Receiver
BD/DVD/CD Player*
Optical Digital Audio Cable

Firmware Update Procedure for SR-300
Page.4 of 5
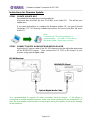
STEP3 ENTER FIRMWARE UPDATE MODE
Confirm that the AC cable is unplugged from the wall outlet.
Press and hold the [VOLUME +] button on the front panel and keep it pressed
while you plug the AC cable to the wall outlet. Once the front panel displays "F/W
Upgrader", release the [VOLUME +] button. Now your SR-300 receiver is
ready for firmware update.
Note: Executing this update will RESET the setting including radio presets to
factory default.
STEP4 START FIRMWARE UPDATE
Power on the BD/DVD/CD player.
Load and play the Firmware Update CD (Audio CD) on the BD/DVD/CD player.
“Found Header” will appear on the SR-300 receiver for few seconds. Then,
the firmware update starts. Rapidly changing numbers are displayed during the
update.
“Found Header” appears within 10 seconds from starting update disc playback.
In case display doesn’t change after 10 seconds, retry the update process again
from the beginning or check requirements for the update disc and connection.
See IN CASE OF ERROR for details.
When completed, “Update Success”, “Please...” and “Master off!!” are
displayed repeatedly. Turn off the power of SR-300 receiver.
Stop the BD/DVD/CD player, remove update disc and power off.
Congratulations!
You have completed the firmware update. Your SR-300 receiver is ready for normal use.
You may reconnect all connections to it’s original condition.
While update is in progress,
DO NOT interrupt the SR-300 receiver and the player by pressing any
buttons or switching off the power.
VOLUME +

Firmware Update Procedure for SR-300
Page.5 of 5
IN CASE OF ERROR
Case1 Display on the SR-300 receiver “F/W Upgrader” doesn’t change after playing
the update disc on the BD/DVD/CD player.
Check digital cable wiring. Only optical connection can be used for this
update. HDMI connection will not work.
Check digital out setting. When using DVD/BD players, make sure the digital
out is set to “PCM”. Once update is completed, reset DVD/BD player to its
original settings.
Check update disc. Make sure that your CD-R/RW is finalized and created
as an “AUDIO CD”. (playable on any CD player)
If all above are cleared and still having problems, your BD/DVD/CD player may
not be suited for this update. Try another BD/DVD/CD player or contact your
local authorized service center to update the SR-300 receiver for you.
Case2 Rapidly changing numbers displayed during the update suddenly stopped
and “Update Success” doesn’t appear.
Digital communication isn’t completed. Power off and retry from STEP3.
Or, check digital connection and if using a CD-RW, burn the update CD again
using CD-R. Retry from STEP3.
Case3 “Write NG!”, “Please…”, “try again.” is displayed after the update.
Digital communication may have been interfered. Power off and retry from
STEP3. If the result is the same, check digital connection and if using a CD-RW,
retry using CD-R. Retry from STEP1.
-
 1
1
-
 2
2
-
 3
3
-
 4
4
-
 5
5


En otros idiomas
- français: Yamaha YHT-S300 Manuel utilisateur
- italiano: Yamaha YHT-S300 Manuale utente
- English: Yamaha YHT-S300 User manual
- Deutsch: Yamaha YHT-S300 Benutzerhandbuch
- русский: Yamaha YHT-S300 Руководство пользователя
- Nederlands: Yamaha YHT-S300 Handleiding
- português: Yamaha YHT-S300 Manual do usuário
- dansk: Yamaha YHT-S300 Brugermanual
- polski: Yamaha YHT-S300 Instrukcja obsługi
- čeština: Yamaha YHT-S300 Uživatelský manuál
- svenska: Yamaha YHT-S300 Användarmanual
- Türkçe: Yamaha YHT-S300 Kullanım kılavuzu
- suomi: Yamaha YHT-S300 Ohjekirja
- română: Yamaha YHT-S300 Manual de utilizare
Documentos relacionados
-
Yamaha YSP-4100 Manual de usuario
-
Yamaha C022 Manual de usuario
-
Yamaha RX-V467 Manual de usuario
-
Yamaha HTR-4069 El manual del propietario
-
Yamaha AVENTAGE RX-A670 El manual del propietario
-
Yamaha RX-V583 El manual del propietario
-
Yamaha HTR-4071 El manual del propietario
-