Motorola Adventure Verizon Wireless Instrucciones de operación
- Categoría
- Teléfonos móviles
- Tipo
- Instrucciones de operación
Este manual también es adecuado para

User Guide
V C A S T P H O N E
V750
motorola
adventure
TM


1
HELLOMOTO
Introducing your new
motorola
adventure
TM
V750
CDMA wireless phone! It’s rugged and full of high performance
features:
Instant Communication
– With Verizon Wireless® Push to Talk, you can connect instantly with family and friends
with the push of a button. (PTT is network and subscription dependent and is not available in all areas. Your phone
must be registered to a Push to Talk server.)
Anywhere Entertainment
– Download and play V CAST music and videos. Use the music player to set your
playlist for your morning commute. Optimize your music listening experience with Bluetooth® stereo headphones
(sold separately).
Connect on Many Levels
– Whether it’s with work or friends, connect in a variety of ways—voice or text
message, downloads, or swapping an optional memory card—you’ll be on top of all the latest news and views
to share!
My Phone, My Way
– It’s your phone—make it that way. Customize your home screen with personal pictures,
change wallpapers, and use your favorite song as your ringtone.

2
Here’s a quick anatomy lesson.
Camera/
Video Key
Send Key
Make & answer calls.
Clear Key
Right Soft Key
Perform function in
lower right display.
Power/End Key
Turn phone on/off,
end calls, & exit
menus.
Microphone
Left Soft Key
Perform function in
lower left display.
4-Way Navigation Key
with Center Select
Press Center Select Key (M) to
open main menu.
Camera Lens
Music
Buttons:
Play/Pause
Skip Back/Rewind
Skip Forward/
Fast Forward
External Display
See incoming
call information, or
use as camera
viewfinder when
flip is closed.
Vibrate
Key
Earpiece

3
Your phone includes these side keys:
Smart/
Speakerphone Key
With flip closed,
press & hold
to lock/unlock
side keys.
With flip open,
press & hold to turn
speakerphone on/off.
Voice Command Key
Create voice records,
activate speech dialing
& voice commands.
Micro USB Port
Insert charger &
phone accessories.
Push to Talk Key
Volume Keys
Headphone Port

4
Motorola, Inc.
Consumer Advocacy Office
1307 East Algonquin Road
Schaumburg, IL 60196
www.hellomoto.com
Note:
Do not ship your phone to the above address. If you need to
return your phone for repairs, replacement, or warranty service,
please contact the Motorola Customer Support Center at:
1-800-331-6456 (United States)
1-888-390-6456 (TTY/TDD United States for hearing impaired)
1-800-461-4575 (Canada)
Certain mobile phone features are dependent on the capabilities
and settings of your service provider’s network. Additionally,
certain features may not be activated by your service provider,
and/or the provider’s network settings may limit the feature’s
functionality. Always contact your service provider about feature
availability and functionality. All features, functionality, and other
product specifications, as well as the information contained in this
user’s guide, are based upon the latest available information and
are believed to be accurate at the time of printing. Motorola
reserves the right to change or modify any information or
specifications without notice or obligation.
MOTOROLA and the Stylized M Logo are registered in the US
Patent & Trademark Office. All other product or service names are
the property of their respective owners. The Bluetooth trademarks
are owned by their proprietor and used by Motorola, Inc. under
license. Java and all other Java-based marks are trademarks or
registered trademarks of Sun Microsystems, Inc. in the U.S. and
other countries. Microsoft and Windows are registered trademarks
of Microsoft Corporation; and Windows XP and Windows Vista are
trademarks of Microsoft Corporation. Verizon Wireless® is a
registered trademark of Verizon Trademark Services, LLC. BREW is
a trademark of QUALCOMM Incorporated.
© 2008 Motorola, Inc. All rights reserved.
Caution:
Changes or modifications made in the radio phone, not
expressly approved by Motorola, will void the user’s authority to
operate the equipment.
Software Copyright Notice
The Motorola products described in this manual may include
copyrighted Motorola and third-party software stored in semiconductor
memories or other media. Laws in the United States and other
countries preserve for Motorola and third-party software providers
certain exclusive rights for copyrighted software, such as the exclusive
rights to distribute or reproduce the copyrighted software. Accordingly,
any copyrighted software contained in the Motorola products may not
be modified, reverse-engineered, distributed, or reproduced in any
manner to the extent allowed by law. Furthermore, the purchase of the
Motorola products shall not be deemed to grant either directly or by
implication, estoppel, or otherwise, any license under the copyrights,
patents, or patent applications of Motorola or any third-party software
provider, except for the normal, non-exclusive, royalty-free license to
use that arises by operation of law in the sale of a product.
Manual Number: 68000201058-D

contents
5
contents
menu map . . . . . . . . . . . . . . . . 7
Use and Care . . . . . . . . . . . . . . 9
essentials . . . . . . . . . . . . . . . . 10
about this guide. . . . . . . . . . 10
battery . . . . . . . . . . . . . . . . . 10
turn it on & off . . . . . . . . . . . 15
make a call . . . . . . . . . . . . . 16
answer a call . . . . . . . . . . . . 16
end a call . . . . . . . . . . . . . . . 16
store a phone number. . . . . 17
call a stored phone number. 17
basics . . . . . . . . . . . . . . . . . . . 18
main screen. . . . . . . . . . . . . 18
adjust volume . . . . . . . . . . . 21
change sound settings . . . . 21
handsfree . . . . . . . . . . . . . . 22
standalone mode. . . . . . . . . 23
change lock code . . . . . . . . . 24
lock & unlock phone. . . . . . . 24
lock side keys when
flip is closed. . . . . . . . . . . . . 26
manage memory . . . . . . . . . 26
TTY operation . . . . . . . . . . . 29
voice privacy . . . . . . . . . . . . 31
tips & tricks. . . . . . . . . . . . . . . 32
personalize . . . . . . . . . . . . . . . 33
sounds . . . . . . . . . . . . . . . . . 33
get ringtones . . . . . . . . . . . . 36
voice readout. . . . . . . . . . . . 37
answer options . . . . . . . . . . 37
wallpaper . . . . . . . . . . . . . . . 38
display themes . . . . . . . . . . 39
backlight. . . . . . . . . . . . . . . . 40
brightness . . . . . . . . . . . . . . 40
AGPS & your location. . . . . 41
AGPS limitations & tips . . . 42
more personalizing features 43
calls . . . . . . . . . . . . . . . . . . . . 47
redial a number . . . . . . . . . 47
automatic redial . . . . . . . . . 47
recent calls. . . . . . . . . . . . . 48
return missed calls. . . . . . . 50
speed dial. . . . . . . . . . . . . . 51
emergency calls. . . . . . . . . 52
AGPS during an
emergency call. . . . . . . . . . 52
international calls . . . . . . . . 53
voicemail . . . . . . . . . . . . . . 53
in-call options . . . . . . . . . . . 54
call times & data volumes . 54
more calling features . . . . . 57

6
contents
text entry . . . . . . . . . . . . . . . . 60
select entry mode. . . . . . . . 61
tap mode. . . . . . . . . . . . . . . 62
iTAP® mode . . . . . . . . . . . . 63
numeric mode. . . . . . . . . . . 64
symbol mode . . . . . . . . . . . 64
text entry tips . . . . . . . . . . . 64
push to talk . . . . . . . . . . . . . . 65
activate PTT mode . . . . . . . 65
PTT contacts & groups . . . . 66
PTT calls . . . . . . . . . . . . . . . 68
PTT tones . . . . . . . . . . . . . . 74
PTT indicators . . . . . . . . . . . 74
store a phone number . . . . 75
Push to Talk. . . . . . . . . . . . . 76
messages . . . . . . . . . . . . . . . . 77
send a multimedia
message . . . . . . . . . . . . . . . 77
receive a multimedia
message . . . . . . . . . . . . . . . 79
send a text message. . . . . . 80
view sent messages . . . . . . 80
read received message. . . . 81
view drafts. . . . . . . . . . . . . . 81
mobile IM . . . . . . . . . . . . . . 82
email . . . . . . . . . . . . . . . . . . 83
chat . . . . . . . . . . . . . . . . . . . 83
erase messages . . . . . . . . . 83
entertainment . . . . . . . . . . . . 85
get & play music . . . . . . . . . 85
record & play voice
records . . . . . . . . . . . . . . . 100
record & play video clips . . 102
take photos . . . . . . . . . . . . 104
download pictures. . . . . . . 106
tools . . . . . . . . . . . . . . . . . . . 107
contacts . . . . . . . . . . . . . . 107
voice recognition . . . . . . . . 112
personal organizer . . . . . . . 118
fun & games . . . . . . . . . . . 121
connections . . . . . . . . . . . . . 124
Bluetooth® connections . . 124
cable connections . . . . . . . 131
network . . . . . . . . . . . . . . . 132
service & repairs . . . . . . . . . 135
SAR Data. . . . . . . . . . . . . . . . 136
Safety Information . . . . . . . . 140
Industry Canada Notice. . . . 144
FCC Notice . . . . . . . . . . . . . . 144
Warranty . . . . . . . . . . . . . . . . 145
Hearing Aids. . . . . . . . . . . . . 148
WHO Information. . . . . . . . . 149
Registration . . . . . . . . . . . . . 150
Export Law . . . . . . . . . . . . . . 150
Recycling Information . . . . . 151
Perchlorate Label . . . . . . . . . 151
Privacy and Data Security . . 152
Driving Safety. . . . . . . . . . . . 153
index . . . . . . . . . . . . . . . . . . . 155

menu map
7
menu map
main menu
]
MEDIA CENTER*
• Music & Tones
• Picture & Video
•Games
• Mobile Web
•Browse & Download
• Extras
)
MESSAGING
• New Message
• Inbox
• Sent
•Drafts
•Voicemail
• Mobile IM*
• Email*
•Chat*
[
CONTACTS
• New Contact
• Contact List
• Groups
• New PTT Contact**
• PTT Contact List**
• PTT Groups**
• Speed Dials
• In Case of Emergency
*
RECENT CALLS
•Missed
• Received
• Dialed
•All
•View Timers
(
SETTINGS & TOOLS
• (see next page)
* optional services
** Options appear when optional PTT
service is enabled (
PTT Mode
is set to
On
and
phone is registered to a PTT server).

8
menu map
settings & tools menu
• My Account*
•Tools
• Voice Commands
• Calculators
• Calendar
•Alarm Clock
• World Clock
• Notepad
•BluetoothMenu
•Add New Device
• Sound Settings
• Call Sounds
• Alert Sounds
• Keypad Volume
• Service Alerts
• Power On/Off
• Voice Readout
• Display Settings
• Banner
• Backlight
• Brightness
• Wallpaper
• Display Themes
• Dial Fonts
•Clock Format
• Speed Dial Display
* requires Mobile Web service
• Phone Settings
• Standalone Mode
• Set Shortcut Keys
• Language
•Location
• Security
•System Select
•NAM Select
• Text Input
•Call Settings
• Answer Options
• Auto Retry
• TTY Mode
• One Touch Dial
• Voice Privacy
• DTMF Tones
• Hearing Aid
• PTT Mode
•Memory
• Save Options**
•Pictures
• Videos
• Sounds
• Phone Memory
• Phone Memory Usage
• My Pictures
• My Videos
• My Music
• My Sounds
•Card Memory**
•Card Memory Usage
• My Pictures
• My Videos
• My Music
• My Sounds
• Format Card
• Phone Info
• My Number
•SW/HW Version
• Icon Glossary
• Software Update
** available only when optional memory
card installed

Use and Care
9
Use and Care
Use and Ca re
To care for your Motorola phone, please keep it away from:
liquids of any kind dust and dirt
Don’t expose your phone to water, rain,
extreme humidity, sweat, or other moisture.
If it does get wet, don’t try to accelerate drying
with the use of an oven or dryer, as this may
damage the phone.
Don’t expose your phone to dust, dirt, sand,
food, or other inappropriate materials.
extreme heat or cold cleaning solutions
Avoid temperatures below 0°C/32°F or
above 45°C/113°F.
To clean your phone, use only a dry soft cloth.
Don’t use alcohol or other cleaning solutions.
microwaves the ground
Don’t try to dry your phone in a microwave
oven.
Don’t drop your phone.

10
essentials
essentials
about this guide
Note:
The instructions in this user’s guide are based
on a default
Display Theme
setting of
Vapor
(see page 39).
If you change
Display Theme
to a different setting,
instructions may differ.
battery
conserve battery charge
Using certain features can quickly deplete your
battery’s charge.
These features can include
symbols
This means a feature is
network/subscription dependent and may
not be available in all areas. Contact your
service provider for more information.
CAUTION:
Before using the
phone for the first time, read the
Important Safety and Legal
Information
included in the gray-
edged pages at the back of this
guide.
This means a feature requires an optional
accessory.
symbols

11
essentials
downloading music, replaying video clips, and
using Bluetooth® wireless connections.
You can conserve your battery’s charge by doing the
following:
•
Turn Bluetooth power off when not in use
(see page 126).
•
Turn off wallpaper (see page 38).
•
Reduce backlight display time (see page 40).
battery use & safety
IMPORTANT: HANDLE AND STORE BATTERIES
PROPERLY TO AVOID INJURY OR DAMAGE.
Most battery issues arise from improper handling of
batteries, and particularly from the continued use of
damaged batteries.
DON’Ts:
• Don’t disassemble, crush, puncture, shred,
or otherwise attempt to change the form of
your battery.
• Don’t let the phone or battery come in
contact with water.
Water can get into the
phone’s circuits, leading to corrosion. If the
phone and/or battery get wet, have them
checked by your carrier or contact Motorola
even if they appear to be working properly.
• Don’t allow the battery to touch metal
objects.
If metal objects, such as jewelry, stay
in prolonged contact with the battery contact
points, the battery could become very hot.
• Don’t place your battery near a heat
source.
Excessive heat can damage the
phone or the battery. High temperatures can
cause the battery to swell, leak, or
malfunction. Therefore:

12
essentials
•
Do
not
dry a wet or damp battery with an
appliance or heat source, such as a hair
dryer or microwave oven.
•
Avoid leaving your phone in your car in
high temperatures.
DOs:
• Do avoid dropping the battery or phone.
Dropping these items, especially on a hard
surface, can potentially cause damage.
• Do contact your service provider or
Motorola if your phone or battery has been
damaged from dropping or high
temperatures.
IMPORTANT: USE MOTOROLA ORIGINAL
PRODUCTS FOR QUALITY ASSURANCE AND
SAFEGUARDS.
To aid consumers in identifying
authentic Motorola batteries from non-original or
counterfeit batteries (that may not have adequate
safety protection), Motorola provides holograms on its
batteries. Consumers should confirm that any battery
they purchase has a “Motorola Original” hologram.
Motorola recommends you always use
Motorola-branded batteries and chargers.
Motorola
mobile devices are designed to work with Motorola
batteries. If you see a message on your display such
as
Invalid Battery
or
UnabletoCharge
, take the following steps:
•
Remove the battery and inspect it to confirm
that it has a “Motorola Original” hologram;
•
If there is no hologram, the battery is not a
Motorola battery;
•
If there is a hologram, replace the battery and
retry charging it;
•
If the message remains, contact a Motorola
Authorized Service Center.

13
essentials
Important:
Motorola’s warranty does not cover
damage to the phone caused by non-Motorola
batteries and/or chargers.
Warning:
Use of a non-Motorola battery or charger
may present a risk of fire, explosion, leakage, or other
hazard.
PROPER AND SAFE BATTERY DISPOSAL AND
RECYCLING
Proper battery disposal is not only important for
safety, it benefits the environment. Consumers may
recycle their used batteries in many retail or service
provider locations. Additional information on proper
disposal and recycling may be found on the Web:
•
www.motorola.com/recycling
•
www.rbrc.org/call2recycle/
(in English only)
Disposal:
Promptly dispose of used batteries
in accordance with local regulations. Contact
your local recycling center or national
recycling organizations for more information on how to
dispose of batteries.
Warning:
Never dispose of batteries in a fire because
they may explode.
install the battery
1
Press down and hold
the battery cover
release latch.
2
Lift the battery cover off
the phone.

14
essentials
3
With the gold contacts
facing down and at the
lower end of the
battery, insert the
battery, lower end first,
and push it completely into place.
4
To attach the battery
cover, insert the lower
end first, then press
down on the sides and
at the top to snap it
into place.
charge the battery
New batteries are not fully charged. Before you can
use your phone, you need to install and charge the
battery. Some batteries perform best after several full
charge/discharge cycles.
To charge using the charger:
1
Insert the charger into
the micro USB connector
on your phone as shown.
2
Plug the other end of the
charger into the
appropriate electrical outlet.
3
When your phone displays
Charge Complete
, remove
the charger.
Tip:
Motorola batteries have circuitry that protects the
battery from damage from overcharging.
When you charge the battery, the battery level
indicator at the upper right of the screen shows
charging progress. At least one segment of the
indicator must be visible to ensure full phone
functionality while charging.
1
2
3

15
essentials
To charge from your computer:
You can also charge your phone’s battery by
connecting a cable from your phone’s micro USB port
to a high-power USB connector on a computer (not a
low-power one, such as the USB connector on your
keyboard or bus-powered USB hub). Typically, USB
high-power connectors are located directly on your
computer.
Both your phone and your computer must be turned
on, and you must have correct software drivers
installed on your computer. Cables and software
drivers are available in Motorola Original
TM
data kits,
sold separately.
Notes for charging your phone’s battery:
•
When charging your battery, keep it near room
temperature. Never expose batteries to
temperatures below 0°C (32°F) or above 45°C
(113°F) when charging.
•
New batteries are not fully charged.
•
New batteries or batteries stored for a long
time may take more time to charge.
•
Motorola batteries and charging systems have
circuitry that protects the battery from
damage from overcharging.
turn it on & off
To turn on your phone
, press
and hold the Power/End Key (
%
)
until the display turns on.
The phone may require several
seconds to turn on. If prompted, use the keypad to
enter your four-digit unlock code (which, by default, is
the last four digits of your phone number) and press
the Center Select Key (
M
)(
OK
) to unlock the phone.
To turn off your phone
, press and hold the
Power/End Key (
%
).

16
essentials
make a call
Note:
For instructions on making Push to Talk calls,
see page 69.
Enter a phone number, Area Code first, if applicable,
and press the Send Key (
$
) to make a call.
To make a call outside the U.S.A.
, press and hold
*
until you see
+
. Next, press the number keys to dial
the
country code
and
phone number
, and then
press the Send Key (
$
).
answer a call
Note:
For instructions on answering Push to Talk calls,
see page 72.
When your phone rings and/or vibrates, press the
Send Key (
$
) to answer.
Tip:
You can set the phone to answer calls when you
open the flip (see page 38).
end a call
To hang up, press the Power/End Key (
%
).
You can also end a call by closing the flip,
if you are
not connected to a headset or a handsfree car kit
.
Closing the flip does not end:
•
a data connection using a USB cable to
connect the phone to a computer
•
a Push to Talk call
•
wallpapers, screen savers, banners, and other
similar applications
•
active BREW® download sessions, such as
downloading music or ringtones

17
essentials
store a phone number
To store a phone number when
PTT Mode is set to
Off
:
1
From the main screen, use the keypad to enter a
phone number and press the Left Soft
Key (
:
)(
Save
).
2
Select
Add New Contact
by pressing the Center Select
Key (
M
)(
OK
).
3
Use the Navigation Key (
N
) to scroll to an entry
type and press the Center Select Key (
M
)(
OK
).
4
Use the keypad to enter a name and other details
for the phone number and press the Center
Select Key (
M
)(
Save
) to store the number.
To edit or delete a
Contacts
entry, see page 108.
call a stored phone
number
Note:
For instructions on calling a PTT contact, see
page 69.
1
From the main screen, press the Right Soft
Key (
:
)(
Contacts
) to open the
CONTACT LIST
.
2
Scroll to the
Contacts
entry.
If the entry has more than one phone number,
press right or left on the Navigation Key (
N
) to
toggle between the numbers.
3
Press the Send Key (
$
) to call the entry.

18
basics
basics
See page 2 for a basic phone diagram.
main screen
The main screen appears when you turn on the phone.
Press the Center Select Key (
M
)(
MENU
) to open the
main menu. Soft Key labels show current soft key
functions. (For soft key locations, see page 2.)
Tip:
You can quickly select a menu option by pressing
the number for that option. For example, from the
SETTINGS & TOOLS
menu, press
5
to select
Display Settings
.
From the main screen, you can press up, down, left, or
right on the Navigation Key (
N
) to open these
shortcuts:
Note:
These are the default main screen shortcuts. To
customize these shortcuts, see page 46.
N
1
❙❙❙❙
❙❙❙❙
ò
1X
EV
Message
Contacts
12:45am
Tue, Aug 5, 2008
MENU
Date & Time
Left Soft Key
Label
Right Soft Key
Label
default Navigation Key direction & menu
up
MOBILE WEB
down
BLUETOOTH MENU
left
MUSIC & TONES
right
MEDIA CENTER

19
basics
You can set your phone to display or hide these menu
icons on the main screen (see page 45).
Your phone displays system status indicators:
alert/indicator
Signal Strength
EVDO indicator shows when phone is in EVDO
coverage area (necessary for V CAST services). 1X
indicator shows when phone is in 1X-RTT coverage
area. Number of bars shows strength of each signal.
N
1
❙❙❙❙
❙❙❙❙
ò
1X
EV
System Status
Indicators
Message
Contacts
10:45am
Tue, Aug 5, 2008
MENU
❙❙❙❙
❙❙❙❙
/
PTT Mode Indicator
Indicates whether phone is registered with a PTT
server. indicates phone is registered.
indicates phone is not registered.
2
Roaming
Indicates phone is roaming off your home network.
S
SSL
Indicates application verification is via SSL during a
download session.
6
Voice Privacy
Indicates
Voice Privacy
is
On
(see page 31).
L
Data Call, Tethered, or Embedded
WAP/BREW Application
Shows during data call, tethered mode, or
WAP/BREW application.
alert/indicator
1X
EV
❙❙❙❙
❙❙❙❙
❙❙❙❙
❙❙❙❙
1X
EV
❙❙❙❙
❙❙❙❙
❙❙❙❙
❙❙❙❙

20
basics
M
Dormant
Indicates phone is dormant and PPP session is
active.
9
No Service
Phone is in area with no service coverage.
8
TTY
Phone is in TTY mode.
t
Voice Call
Shows during an active voice call.
P
E911
Indicates
E911
is
On
.
O
Location On
Indicates
Location
is set to
On
.
alert/indicator
N
Battery Level
Shows battery strength. The more bars, the greater
the charge.
n
All Sounds Off
Indicates
Master Volume
is set to
Off
.
o
Alarm Only
Indicates
Master Volume
is set to
Alarm Only
.
r
Vibrate On
Indicates
Master Volume
is set to
Vibrate On
.
q
Speakerphone
Indicates handsfree speaker is on.
s
Missed Call
Indicates a call was missed.
alert/indicator

21
basics
adjust volume
Press the Volume Keys to:
•
turn off an incoming call alert
•
change the earpiece volume during calls
•
change the ringer volume from the main
screen (see page 21)
change sound settings
Press the Volume Keys up or
down to cycle the
MASTER
VOLUME
through
High
,
Medium High
,
Medium
,
Medium Low
,
Low
,
Vibrate Only
,
Alarm Only
, and
All Sounds Off
.
É
Message
Shows when you receive a new message.
x Calendar Event
Shows number of calendar appointments.
y
New Voicemail
Shows when a voicemail message is received.
l
Alarm On
Shows when an alarm has been set.
I
Bluetooth Connection Active
Indicates your phone is paired to another Bluetooth
device.
% OFF
Standalone Mode
Shows when your phone is in standalone mode.
alert/indicator

22
basics
handsfree
Note:
The use of wireless phones while driving may
cause distraction. Discontinue a call if you can’t
concentrate on driving. Additionally, the use of
wireless devices and their accessories may be
prohibited or restricted in certain areas. Always obey
the laws and regulations on the use of these products.
handsfree speaker
You can use your phone’s handsfree speaker to make
calls without holding the phone to your ear.
To activate the handsfree
speaker during a call
,
press and hold the
Smart/Speakerphone Key
(on the right side of the
phone—see page 2).
You will hear an audible alert, and your phone will
show the speakerphone indicator
q
and
SPEAKER PHONE
ON
on the main screen.
The handsfree speaker stays on until you press and
hold the Smart/Speakerphone Key again or turn off
the phone.
To turn off the handsfree speaker
, press and hold
the Smart/Speakerphone Key. Your phone will show
SPEAKER PHONE OFF
on the main screen.
To end the call
, press the Power/End Key (
%
).
You will hear an audible alert.
Note:
The handsfree speaker won’t work when your
phone is connected to a handsfree car kit or headset.
accessory volume settings
(car kit or headset)
To adjust volume of headsets or car kit accessories
that are enabled for Bluetooth wireless connections,

23
basics
press your phone’s Volume Keys up or down during an
active call.
standalone mode
Note:
Consult airline staff about the use of
Standalone
Mode
in flight. Turn off your phone whenever instructed
to do so by airline staff.
Use standalone mode to turn off your phone’s calling
features in locations where wireless phone use is
prohibited.
You cannot make or receive calls or use
Bluetooth in standalone mode
, but you can use your
phone’s other non-calling features.
1
From the main screen, press the Center Select
Key (
M
)(
MENU
) to open the menu.
2
Use the Navigation Key (
N
) to scroll to
( SETTINGS & TOOLS
and press the Center Select
Key (
M
)(
OK
).
3
Scroll to
Phone Settings
and press the Center Select
Key (
M
)(
OK
).
4
Press Center Select Key (
M
)(
OK
) to select
Standalone Mode
.
5
Select
On
and press the Center Select
Key (
M
)(
OK
).
When
Standalone Mode
is set to
On
, your phone displays
indicators and a message on the main screen:
%OFF K
N
Standalone Mode
MENU
Message
Contact
10:45am
Tue, Aug 5, 2008

24
basics
change lock code
Your phone’s four-digit
lock code
is originally set to the
last four digits of your phone number. To change the
lock code:
1
From the main screen, press the Center Select
Key (
M
)(
MENU
) to open the menu.
2
Use the Navigation Key (
N
) to scroll to
( SETTINGS & TOOLS
and press the Center Select
Key (
M
)(
OK
).
3
Scroll to
Phone Settings
and press the Center Select
Key (
M
)(
OK
).
4
Scroll to
Security
and press the Center Select
Key (
M
)(
OK
).
5
When prompted, enter the lock code and press
the Center Select Key (
M
)(
OK
).
6
Scroll to
Edit Codes
and press the Center Select
Key (
M
)(
OK
).
7
Scroll to
Phone Only
and press the Center Select
Key (
M
)(
OK
).
8
Enter the new four-digit lock code in the
Enter New
Code
entry area, then press down on the
Navigation Key (
N
) to move the cursor into the
Re-Enter New Code
entry area. Re-enter the new
four-digit lock code.
9
Press the Center Select Key (
M
)(
OK
).
lock & unlock phone
You can lock your phone to keep others from using it.
To lock or unlock your phone, you need the four-digit
lock code (which is originally set to the last four digits
of your phone number).
Note:
You can make emergency calls on a locked
phone (see page 52). A locked phone still rings or
vibrates for incoming calls or messages.

25
basics
To
manually lock
your phone:
1
From the main screen, press the Center Select
Key (
M
)(
MENU
) to open the menu.
2
Use the Navigation Key (
N
) to scroll to
( SETTINGS & TOOLS
and press the Center Select
Key (
M
)(
OK
).
3
Scroll to
Phone Settings
and press the Center Select
Key (
M
)(
OK
).
4
Scroll to
Security
and press the Center Select
Key (
M
)(
OK
).
5
When prompted, enter the lock code and press
the Center Select Key (
M
)(
OK
).
6
Scroll to
Lock Phone Now
and press the Center Select
Key (
M
)(
OK
).
To
automatically lock
your phone whenever you turn
it off:
1
From the main screen, press the Center Select
Key (
M
)(
MENU
) to open the menu.
2
Use the Navigation Key (
N
) to scroll to
( SETTINGS & TOOLS
and press the Center Select
Key (
M
)(
OK
).
3
Scroll to
Phone Settings
and press the Center Select
Key (
M
)(
OK
).
4
Scroll to
Security
and press the Center Select
Key (
M
)(
OK
).
5
When prompted, enter the lock code and press
the Center Select Key (
M
)(
OK
).
6
Scroll to
Phone Lock
and press the Center Select
Key (
M
)(
OK
).
7
Scroll to
On Power Up
and press the Center Select
Key (
M
)(
OK
).

26
basics
8
Press the Power/End Key (
%
) to return to the
main screen.
To unlock the phone
, enter the four-digit lock code in
the
Enter Lock Code
entry area and press the Center Select
Key (
M
)(
OK
).
lock side keys when flip
is closed
When the phone’s flip is closed, you can lock the side
keys to prevent accidental key presses.
To lock the side keys, press and hold the
smart/speakerphone key on the right side of the
phone (see page 2). Your phone shows
KEYPAD LOCKED
on
the main screen. To unlock the side keys, press and
hold the smart/speakerphone key again, or open
the flip.
manage memory
Note:
The microSD memory card is an
optional
accessory
, available separately.
You can store multimedia content such as songs and
photos on your phone’s internal memory or on a
removable microSD memory card.
Note:
If you download a copyrighted file to your phone
and store it on your memory card, you can use the file
only when your memory card is inserted in your
phone. You cannot send, copy, or change
copyrighted files.
install memory card
1
Remove the battery door from your phone
(see page 13).

27
basics
2
With the gold contacts
down, slide the
memory card into the
card slot and push the
card in completely.
3
Replace the battery door.
Caution:
Do not remove your memory card while your
phone is using it or writing files to it.
To remove the memory card
, press down lightly on
the card, then carefully pull it out.
set memory for multimedia
content
You can download and store multimedia content in
phone memory or on the memory card:
1
From the main screen, press the Center Select
Key (
M
)(
MENU
) to open the menu.
2
Use the Navigation Key (
N
) to scroll to
( SETTINGS & TOOLS
and press the Center Select
Key (
M
)(
OK
).
3
Scroll to
Memory
and press the Center Select
Key (
M
)(
OK
).
4
Scroll to
Save Options
and press the Center Select
Key (
M
)(
OK
).
5
Scroll to
Pictures
,
Videos
, or
Sounds
, and press the
Center Select Key (
M
)(
OK
).
6
Select
Phone Memory
or
Card Memory
and press the
Center Select Key (
M
)(
OK
).
view memory information
1
From the main screen, press the Center Select
Key (
M
)(
MENU
) to open the menu.
2
Use the Navigation Key (
N
) to scroll to
( SETTINGS & TOOLS
and press the Center Select
Key (
M
)(
OK
).

28
basics
3
Scroll to
Memory
and press the Center Select
Key (
M
)(
OK
).
4
Select
Phone Memory
or
Card Memory
and press the
Center Select Key (
M
)(
OK
).
5
Select
My Pictures
,
My Videos
,
My Music
, or
My Sounds
, and
press the Center Select Key (
M
)(
OK
).
If you selected
Phone Memory
in step 4, you will also
see
Phone Memory Usage
. If you selected
Card Memory
in
step 4, you will also see
Card Memory Usage
and
Format Card
.
move files from phone to memory
card
You can move files (such as photos, videos, sound,
and music files) to the memory card to free up phone
memory.
Note:
Moving a file to the memory card deletes it
from phone memory.
To move photos or video clips:
1
From the main screen, press right on the
Navigation Key (
N
) to open
] MEDIA CENTER
.
2
Use the Navigation Key (
N
) to scroll to
Picture & Video
and press the Center Select
Key (
M
)(
OK
).
3
Open the appropriate list (
My Pictures
or
My Videos
).
A memory card icon in the picture thumbnail or
next to a video file indicates that the file is stored
on the memory card.
An
f
in the picture thumbnail indicates that the
picture came preloaded on your phone and
cannot be moved to the memory card
.
If the picture or video is not marked with a
memory card icon, it is stored on the phone.
4
Scroll to the thumbnail of the picture or video clip
you want to move and press the Right Soft
Key (
:
)(
Options
).

29
basics
5
Select
Move
and press the Center Select
Key (
M
)(
OK
).
6
When the phone asks if you want to move the
file, select
Yes
and press the Center Select
Key (
M
)(
OK
) to confirm that you want to move
the file.
To move an audio clip that you recorded:
1
From the main screen, press left on the
Navigation Key (
N
) to access
MUSIC &TONES
.
2
Use the Navigation Key (
N
) to scroll to
My Sounds
and press the Center Select Key (
M
)(
OK
).
A memory card icon beside the file name of an
audio clip indicates that the audio clip is stored on
the memory card.
If the file name is not marked with a memory card
icon, the audio clip is stored on the phone.
3
Scroll to the file you want to move and press the
Right Soft Key (
:
)(
Options
).
4
Select
Move
and press the Center Select
Key (
M
)(
OK
).
5
When your phone asks if you want to move the
file, select
Yes
and press the Center Select
Key (
M
)(
OK
) to confirm that you want to move
the file.
TTY operation
You can use an optional teletypewriter (TTY) device
with your phone to send and receive calls. You must
plug the TTY device into the phone’s headset
connector and set the phone to operate in one of
three TTY modes.
Notes:
•
A TTY is a communication device used by
people who are hard of hearing or have a
speech impairment. TTY does not work from
mobile phone to mobile phone.

30
basics
•
Use a TSB-121 compliant cable (provided by
the TTY manufacturer) to connect the TTY
device to your phone. Your phone has a
2.5mm jack.
•
Set the phone to Medium volume level for
proper operation. If you experience a high
number of incorrect characters, adjust the
volume as needed to minimize the error rate.
•
For optimal performance, your phone should
be at least 12 inches (30 centimeters) from the
TTY device. Placing the phone too close to the
TTY device may cause high error rates.
set TTY mode
ù
When you set your phone to a TTY mode, it
operates in that mode whenever a TTY device is
connected.
1
From the main screen, press the Center Select
Key (
M
)(
MENU
) to open the menu.
2
Use the Navigation Key (
N
) to scroll to
( SETTINGS & TOOLS
and press the Center Select
Key (
M
)(
OK
).
3
Scroll to
Call Settings
and press the Center Select
Key (
M
)(
OK
).
4
Select
TTY Mode
and press the Center Select
Key (
M
)(
OK
).
TTY Mode
can include these options:
option
TTY Full
Transmit and receive TTY
characters.
TTY + Talk (VCO)
Receive TTY characters but transmit
by speaking into microphone.
TTY + Hear (HCO)
Transmit TTY characters but receive
by listening to earpiece.
TTY Off
All TTY modes are turned off.

31
basics
When your phone is in a TTY mode, your phone
displays the international TTY mode, the international
TTY symbol, and the mode setting during an active
TTY call.
return to voice mode
To return to standard voice mode, select
TTY OFF
from
the
TTY MODE
menu.
voice privacy
Encrypt outgoing voice calls and use secure channels
when available:
1
From the main screen, press the Center Select
Key (
M
)(
MENU
) to open the menu.
2
Use the Navigation Key (
N
) to scroll to
( SETTINGS & TOOLS
and press the Center Select
Key (
M
)(
OK
).
3
Scroll to
Call Settings
and press the Center Select
Key (
M
)(
OK
).
4
Scroll to
Voice Privacy
and press the Center Select
Key (
M
)(
OK
).
5
Select
On
and press the Center Select
Key (
M
)(
OK
).

32
tips & tricks
tips & tricks
From the main screen
(page 18), you can use
shortcuts:
To … Do t h i s …
lock side keys With the flip closed
, press and
hold the Smart/Speakerphone
Key (see page 2).
set phone to
vibrate
Press and hold the Vibrate
Key (
#
) to quickly set
MASTER
VOLUME
to
Vibrate Only
.
turn handsfree
speaker on/off
With the flip open
, press and
hold the Smart/Speakerphone
Key (see page 2).
see recent calls
Press the Send Key (
$
). Your
phone shows all recent dialed,
received, and missed calls.
call voicemail
Press and hold
1
.
change
ring volume
Press the Volume Keys up or
down (see page 2).
use voice
commands
With the flip open
, press the
Voice Command Key (see
page 3). Then use the
on-screen prompts.
record voice
records
Press and hold the Voice
Command Key (see page 3).
To … D o t h i s …

33
personalize
personalize
sounds
You can set how your phone alerts you to incoming
calls or other events.
master volume
From the home screen, press the Volume Keys (see
page 2) up or down to select the desired setting from
the
MASTER VOLUME
menu:
High
,
Medium High
,
Medium
,
Medium Low
,
Low
—Phone rings for
incoming calls and other events, depending on the
detail settings.
Vibrate Only
—Phone vibrates to indicate an incoming call.
Alarm Only
—Phone plays an audible alarm to alert you to
events. You can’t change detail settings for events.
All Sounds Off
—Phone does not alert you to incoming calls
and events.
sounds for calls, events, & alerts
Note:
MASTER VOLUME
must be set to
High
,
Medium High
,
Medium
,
Med Low
, or
Low
.
To set sounds for calls
:
1
From the main screen, press the Center Select
Key (
M
)(
MENU
) to open the menu.
2
Use the Navigation Key (
N
) to scroll to
( SETTINGS & TOOLS
and press the Center Select
Key (
M
)(
OK
).

34
personalize
3
Scroll to
Sound Settings
and press the Center Select
Key (
M
)(
OK
).
4
Select
Call Sounds
and press the Center Select
Key (
M
)(
OK
).
5
From the
CALL SOUNDS
menu, select
Call Ringtone
by
pressing the Center Select Key (
M
)(
OK
), then
scroll to a desired ringtone and press the Center
Select Key (
M
)(
OK
).
Note:
Press the Left Soft Key (
:
)(
Play
) to
preview the ringtone.
or
From the
CALL SOUNDS
menu, scroll to
Call Vibrate
and
press the Center Select Key (
M
)(
OK
), then scroll
to
On
or
Off
and press the Center Select
Key (
M
)(
OK
).
6
Press the Power/End Key (
%
) to return to the
main screen.
To set sounds for events (such as incoming
messages) or alerts
:
1
From the main screen, press the Center Select
Key (
M
)(
MENU
) to open the menu.
2
Use the Navigation Key (
N
) to scroll to
( SETTINGS & TOOLS
and press the Center Select
Key (
M
)(
OK
).
3
Scroll to
Sound Settings
and press the Center Select
Key (
M
)(
OK
).
4
Select
Alert Sounds
and press the Center Select
Key (
M
)(
OK
).
5
Scroll to
TXT Message
,
Pic-Video Message
,
Voicemail
,
Low
Battery
,
Missed Call
,
Emergency Tone
, or
PTT Alert
, and press
the Center Select Key (
M
)(
OK
).

35
personalize
6
Scroll to
Tone
and press the Center Select
Key (
M
)(
OK
), then scroll to a desired ringtone and
press the Center Select Key (
M
)(
OK
).
Note:
Press the Left Soft Key (
:
)(
Play
) to
preview the ringtone.
or
Scroll to
Vibrate
and press the Center Select
Key (
M
)(
OK
), then scroll to
On
or
Off
and press the
Center Select Key (
M
)(
OK
).
or
Scroll to
Reminder
and press the Center Select
Key (
M
)(
OK
), then scroll to
Once
,
Every 2 Minutes
,
Every 15 Minutes
, or
Off
, and press the Center Select
Key (
M
)(
OK
). (For all settings but
Off
, your phone
plays an audible beep at the interval you set.)
7
Press the Power/End Key (
%
) to return to the
main screen.
sounds for PTT calls
Note:
PTT Mode
must be set to
On
(see page 65) to use
PTT features.
Note:
MASTER VOLUME
must be set to
High
,
Medium High
,
Medium
,
Med Low
, or
Low
.
To set sounds for PTT calls
:
1
From the main screen, press the Center Select
Key (
M
)(
MENU
) to open the menu.
2
Use the Navigation Key (
N
) to scroll to
( SETTINGS & TOOLS
and press the Center Select
Key (
M
)(
OK
).
3
Scroll to
Sound Settings
and press the Center Select
Key (
M
)(
OK
).
4
Select
Alert Sounds
and press the Center Select
Key (
M
)(
OK
).
5
Select
PTT Alert
and press the Center Select
Key (
M
)(
OK
).

36
personalize
6
From the
PTT ALERT
menu, select
Tone
by pressing
the Center Select Key (
M
)(
OK
), then scroll to a
desired tone and press the Center Select
Key (
M
)(
OK
).
Note:
Press the Left Soft Key (
:
)(
Play
) to
preview the tone.
or
From the
PTT ALERT
menu, scroll to
Vibrate
and press
the Center Select Key (
M
)(
OK
), then scroll to
On
or
Off
and press the Center Select Key (
M
)(
OK
).
7
Press the Power/End Key (
%
) to return to the
main screen.
Tip:
You can also assign a PTT tone from the Media
Center. Go to
] MEDIA CENTER
>
Music & Tones
>
My Ringtones
, scroll to the tone you want and press the
Left Soft Key (
:
)(
Set As
), scroll to
Alert Sounds
and press
the Center Select Key (
M
)(
OK
), then scroll to
PTT Alert
and press the Center Select Key (
M
)(
OK
).
get ringtones
1
From the main screen, press left on the
Navigation Key (
N
) to access
MUSIC &TONES
.
2
Use the Navigation Key (
N
) to scroll to
Get New Ringtones
and press the Center Select
Key (
M
)(
OK
).
3
On the
GET NEW RINGTONES
screen, select
Get New Application
and press the Center Select
Key (
M
)(
OK
).
Your phone connects to the Media Center site
with ringtone collections. Follow the prompts on
the screen to browse ringtone lists and to select
and download a ringtone.
4
Press the Power/End Key (
%
) to return to the
main screen.
Note:
Normal airtime and/or carrier usage charges
apply.

37
personalize
voice readout
You can set your phone to
speak aloud
when you
press keys, receive a call with caller ID available,
or scroll through recent calls or contacts:
1
From the main screen, press the Center Select
Key (
M
)(
MENU
) to open the menu.
2
Use the Navigation Key (
N
) to scroll to
( SETTINGS & TOOLS
and press the Center Select
Key (
M
)(
OK
).
3
Scroll to
Sound Settings
and press the Center Select
Key (
M
)(
OK
).
4
Scroll to
Voice Readout
and press the Center Select
Key (
M
)(
OK
).
5
Select
Keypad Digits
,
Contact List Entries
,
Recent Call Entries
,
or
Caller ID Alert
and press the Center Select
Key (
M
)(
OK
).
6
If you selected
Keypad Digits
,
Contact List Entries
, or
Recent
Call Entries
, select
On
and press the Center Select
Key (
M
)(
OK
).
or
If you selected
Caller ID Alert
, select
Ring Only
,
Caller ID then
Ring
, or
Caller ID Repeat
, and press the Center Select
Key (
M
)(
OK
).
answer options
You can use different ways to answer an incoming call.
1
From the main screen, press the Center Select
Key (
M
)(
MENU
) to open the menu.
2
Use the Navigation Key (
N
) to scroll to
( SETTINGS & TOOLS
and press the Center Select
Key (
M
)(
OK
).

38
personalize
3
Scroll to
Call Settings
and press the Center Select
Key (
M
)(
OK
).
4
Select
Answer Options
and press the Center Select
Key (
M
)(
OK
).
wallpaper
Set a photo, picture, or animation as a wallpaper
(background) image in your main screen:
Note:
To use a picture as wallpaper, it must be in your
phone’s memory and not on a memory card.
1
From the main screen, press the Center Select
Key (
M
)(
MENU
) to open the menu.
2
Use the Navigation Key (
N
) to scroll to
( SETTINGS & TOOLS
and press the Center Select
Key (
M
)(
OK
).
3
Scroll to
Display Settings
and press the Center Select
Key (
M
)(
OK
).
4
Scroll to
Wallpaper
and press the Center Select
Key (
M
)(
OK
).
5
Scroll to
Main Screen
(the screen you see with the
flip open) or
Front Screen
the (screen you see with
options
Flip Open
Answer by opening the flip.
Any Key
Answer by pressing any key except
the Power/End Key (
%
). Pressing
the Power/End Key ignores the call.
Auto w/
Handsfree
Automatically answer incoming call
(works with headset, Bluetooth®
connections, and when phone is
operating in handsfree mode).

39
personalize
the flip closed) and press the Center Select
Key (
M
)(
OK
).
6
Scroll to a picture in
MY PICTURES
and press the
Center Select Key (
M
)(
OK
).
or
Press
Options
and select
Get New Pictures
to download a
picture (see page 106).
7
Press the Power/End Key (
%
) to return to the
main screen.
display themes
Set the overall look and feel of your phone’s display.
Note:
The instructions in this user’s guide are based
on a default
Display Theme
setting of
Vapor
. If you change
Display Theme
to a different setting, instructions may
differ.
1
From the main screen, press the Center Select
Key (
M
)(
MENU
) to open the menu.
2
Use the Navigation Key (
N
) to scroll to
( SETTINGS & TOOLS
and press the Center Select
Key (
M
)(
OK
).
3
Scroll to
Display Settings
and press the Center Select
Key (
M
)(
OK
).
4
Scroll to
Display Themes
and press the Center Select
Key (
M
)(
OK
).
5
Scroll to the name of a display theme.
6
Press the Center Select Key (
M
)(
SET
) to select
the theme as your phone’s display theme.
or
Press the Left Soft Key (
:
)(
Preview
) to view the
theme before selecting it. Press the Left Soft
Key (
:
)(
List
) to return to the list of display
themes.

40
personalize
7
Press the Power/End Key (
%
) to return to the
main screen.
backlight
Set how long the backlights for the main screen and
the keypad remain on, or reduce backlight display time
to extend battery life.
1
From the main screen, press the Center Select
Key (
M
)(
MENU
) to open the menu.
2
Use the Navigation Key (
N
) to scroll to
( SETTINGS & TOOLS
and press the Center Select
Key (
M
)(
OK
).
3
Scroll to
Display Settings
and press the Center Select
Key (
M
)(
OK
).
4
Scroll to
Backlight
and press the Center Select
Key (
M
)(
OK
).
5
Scroll to
Display
or
Keypad
and press the Center
Select Key (
M
)(
OK
).
6
Select the desired duration or mode and press
the Center Select Key (
M
)(
OK
).
Note:
When the keypad is locked (see page 24),
the backlight turns off after two seconds of
inactivity, regardless of the duration you set.
brightness
Set the brightness of your main screen:
1
From the main screen, press the Center Select
Key (
M
)(
MENU
) to open the menu.
2
Use the Navigation Key (
N
) to scroll to
( SETTINGS & TOOLS
and press the Center Select
Key (
M
)(
OK
).
3
Scroll to
Display Settings
and press the Center Select
Key (
M
)(
OK
).

41
personalize
4
Select
Brightness
and press the Center Select
Key (
M
)(
OK
).
5
Use the Navigation Key (
N
) to adjust the
brightness and press the Center Select
Key (
M
)(
OK
).
AGPS & your
location
Your phone can use the automatic location information
(ALI) feature, along with Assisted Global Positioning
System (AGPS) satellite signals, to tell the network
where you are physically located.
When ALI is set to
Location On
, your phone displays the
O
(ALI on) indicator. Services may use your known
location to provide useful information (for example,
driving directions, or the location of the nearest bank).
Your phone prompts you when the network or a
service asks for your location. You can refuse at this
point.
When ALI is set to
E911 Only
, your phone displays the
P
(ALI off) indicator, and the phone does not send
location information unless you call the emergency
phone number (such as 911).
1
From the main screen, press the Center Select
Key (
M
)(
MENU
) to open the menu.
2
Use the Navigation Key (
N
) to scroll to
( SETTINGS & TOOLS
and press the Center Select
Key (
M
)(
OK
).
3
Scroll to
Phone Settings
and press the Center Select
Key (
M
)(
OK
).
4
Scroll to
Location
and press the Center Select
Key (
M
)(
OK
).
5
Scroll to
Location On
or
E911 Only
.
6
Press the Center Select Key (
M
)(
OK
) to select the
setting.

42
personalize
AGPS limitations & tips
Your phone uses Assisted Global Positioning System
(AGPS) satellite signals to estimate your location. If
your phone cannot find strong satellite signals, your
AGPS might be slower, less accurate, or it might not
work at all. AGPS provides only an approximate
location, often within 150 feet (45 meters) but
sometimes much farther from your actual location.
To improve AGPS accuracy:
•
Go outside and away from underground
locations, covered vehicles, structures with
metal or concrete roofs, tall buildings, and
foliage. Indoor performance might improve
if you move closer to window, but some
window sun-shielding films can block
satellite signals.
•
Move away from radios, entertainment
equipment, and other electronic devices that
might interfere with or block AGPS satellite
signals.
•
If your phone has a retractable antenna,
extend the antenna.
•
Hold your phone away from your body, and
point the phone antenna toward the sky. Do
not cover the antenna area with your fingers.
AGPS uses satellites controlled by the U.S.
government and subject to changes implemented in
accordance with the Department of Defense AGPS
user policy and the Federal Radio Navigation Plan.
These changes might affect AGPS performance.

43
personalize
more personalizing
features
keypad volume
Note:
MASTER VOLUME
must be set to
High
,
Medium High
,
Medium
,
Medium Low
, or
Low
.
1
From the main screen, press the Center Select
Key (
M
)(
MENU
) to open the menu.
2
Use the Navigation Key (
N
) to scroll to
( SETTINGS & TOOLS
and press the Center Select
Key (
M
)(
OK
).
3
Scroll to
Sounds Settings
and press the Center Select
Key (
M
)(
OK
).
4
Scroll to
Keypad Volume
and press the Center Select
Key (
M
)(
OK
).
power on/off sounds
Note:
MASTER VOLUME
must be set to
High
,
Medium High
,
Medium
,
Medium Low
, or
Low
.
1
From the main screen, press the Center Select
Key (
M
)(
MENU
) to open the menu.
2
Use the Navigation Key (
N
) to scroll to
( SETTINGS & TOOLS
and press the Center Select
Key (
M
)(
OK
).
3
Scroll to
Sound Settings
and press the Center Select
Key (
M
)(
OK
).
4
Select
Power On
/
Power Off
and press the Center Select
Key (
M
)(
OK
).
5
Select
Power On
or
Power Off
and press the Center
Select Key (
M
)(
OK
).
6
Select
On
or
Off
and press the Center Select
Key (
M
)(
OK
).

44
personalize
languages
1
From the main screen, press the Center Select
Key (
M
)(
MENU
) to open the menu.
2
Use the Navigation Key (
N
) to scroll to
( SETTINGS & TOOLS
and press the Center Select
Key (
M
)(
OK
).
3
Scroll to
Phone Settings
and press the Center Select
Key (
M
)(
OK
).
4
Scroll to
Language
and press the Center Select
Key (
M
)(
OK
).
5
Select
English
or
Español
and press the Center Select
Key (
M
)(
OK
).
clock format
Set how your phone shows the current time:
1
From the main screen, press the Center Select
Key (
M
)(
MENU
) to open the menu.
2
Use the Navigation Key (
N
) to scroll to
( SETTINGS & TOOLS
and press the Center Select
Key (
M
)(
OK
).
3
Scroll to
Display Settings
and press the Center Select
Key (
M
)(
OK
).
4
Scroll to
Clock Format
and press the Center Select
Key (
M
)(
OK
).
5
Select
Main Clock
(main screen) or
Front Clock
(external
display) and press the Center Select Key (
M
)(
OK
).
6
Select
Analog
for a dial clock,
Digital 12
for a 12-hour
clock,
Large Digital 12
for a 12-hour clock displayed in
large numbers,
Digital 24
for a 24-hour clock,
Large
Digital 24
for a 24-hour clock displayed in large
numbers, or
Off
for no clock, and press the Center
Select Key (
M
)(
OK
).

45
personalize
banner
Create a heading to display on your phone’s
main screen:
1
From the main screen, press the Center Select
Key (
M
)(
MENU
) to open the menu.
2
Use the Navigation Key (
N
) to scroll to
( SETTINGS & TOOLS
and press the Center Select
Key (
M
)(
OK
).
3
Scroll to
Display Settings
and press the Center Select
Key (
M
)(
OK
).
4
Select
Banner
by pressing the Center Select
Key (
M
)(
OK
).
5
Select
Personal Banner
or
ERI Banner
and press the
Center Select Key (
M
)(
OK
).
6
If you selected
Personal Banner
, enter text and press
the Center Select Key (
M
)(
OK
).
show or hide menu icons
Show or hide menu icons in the main screen that you
can use as shortcuts to those menus:
1
From the main screen, press the Center Select
Key (
M
)(
MENU
) to open the menu.
2
Use the Navigation Key (
N
) to scroll to
( SETTINGS & TOOLS
and press the Center Select
Key (
M
)(
OK
).
3
Scroll to
Phone Settings
and press the Center Select
Key (
M
)(
OK
).
4
Scroll to
Set Shortcut Keys
and press the Center Select
Key (
M
)(
OK
).
5
Scroll to and select
Show Shortcuts
, then select
Show
or
Hide
, and press the Center Select Key (
M
)(
OK
).

46
personalize
change main screen icons
Change the menus selected with the Navigation Keys
in the main screen:
1
From the main screen, press the Center Select
Key (
M
)(
MENU
) to open the menu.
2
Use the Navigation Key (
N
) to scroll to
( SETTINGS & TOOLS
and press the Center Select
Key (
M
)(
OK
).
3
Scroll to
Phone Settings
and press the Center Select
Key (
M
)(
OK
).
4
Scroll to
Set Shortcut Keys
and press the Center Select
Key (
M
)(
OK
).
5
Select
Up Key
,
Down Key
,
Left Key
, or
Right Key
, scroll to
and select the menu you want to assign to that
key, and press the Center Select Key (
M
)(
OK
).

47
calls
calls
To make and answer calls, see page 16.
redial a number
1
Press the Send Key (
$
) to see the
ALL CALLS
list.
The
ALL CALLS
list includes PTT calls if
PTT Mode
is set
to
On
(see page 65) and the PTT contacts are
available for PTT calls. PTT calls are identified by
PTT call icons (see page 75).
2
Use the Navigation Key (
N
) to scroll to the entry
you want to call.
3 For voice calls
, press the Send Key (
$
) to redial
the number.
or
For PTT calls
, press the PTT Key or the Left Soft
Key (
:
)(
Alert
) to call the entry’s number.
(For more information on making a PTT call,
see page 69.)
Note:
The
ALL CALLS
list includes numbers that were
busy when you dialed.
automatic redial
When you receive a busy signal, your phone displays
Call Failed, Number Busy
.
With automatic redial, your phone automatically
redials the number for four minutes. When the call
goes through, your phone rings or vibrates once,
displays
Redial Successful
, and connects the call.

48
calls
You need to turn on automatic redial to use the
feature:
1
From the main screen, press the Center Select
Key (
M
)(
MENU
) to open the menu.
2
Use the Navigation Key (
N
) to scroll to
( SETTINGS & TOOLS
and press the Center Select
Key (
M
)(
OK
).
3
Scroll to
Call Settings
and press the Center Select
Key (
M
)(
OK
).
4
Select
Auto Retry
and press the Center Select
Key (
M
)(
OK
).
5
Select
On
and press the Center Select
Key (
M
)(
OK
).
When automatic redial is turned off, you can manually
activate it to redial a number. When you hear a fast
busy signal and see
Call Failed
, press the Send Key (
$
)
or
RETRY
to automatically redial.
recent calls
Your phone keeps lists of the calls you have received
and dialed, even if the calls didn’t connect. The most
recent calls are listed first. The oldest calls are deleted
as new calls are added.
Your phone’s recent calls lists include PTT calls if
PTT
Mode
is set to
On
(see page 65) and the PTT contacts are
available for PTT calls. PTT calls are identified in the
list by PTT call icons (see page 75).
Shortcut:
Press the Send Key (
$
) from the main
screen to view the
ALL CALLS
list.
1
From the main screen, press the Center Select
Key (
M
)(
MENU
) to open the menu.
2
Use the Navigation Key (
N
) to scroll to
* RECENT CALLS
and press the Center Select
Key (
M
)(
OK
).
3
Scroll to
Missed
,
Received
,
Dialed
, or
All
and press the
Center Select Key (
M
)(
OK
) to select the list.

49
calls
4
Scroll to an entry.
5 For voice calls
, press the Send Key (
$
) to call
the entry’s number,
or
press the Left Soft
Key (
:
)(
Message
) to send a message to the
entry’s number.
or
For PTT calls
, press the PTT Key or the Left Soft
Key (
:
)(
Alert
) to call the entry’s number. (For
more information on making a PTT call, see
page 69.)
or
Press the Center Select Key (
M
)(
OPEN
) to view
entry details.
or
Press the Right Soft Key (
:
)(
Options
) to perform
other actions on the entry.
The
Options
menu can include these options:
options
New Text
Message
Send a text message to the selected
call contact (see page 80).
New Picture
Message
Send a picture message to the selected
call contact (see page 77).
New Video
Message
Send a video message to the selected
call contact (see page 77).
Save
Create a
Contacts
entry for the call.
Note:
This option appears only if the
entry is not already in
Contacts
.
Details
View detailed information about the call.
Erase
Delete the selected entry (if the entry is
not locked).

50
calls
return missed calls
Your phone keeps a record of your missed calls. When
you miss a call, your phone displays the
s
(missed
call) indicator and
[Number] Missed Calls
.
To view missed calls immediately
:
1
Select
View Now
when you see the missed call
indicator, and press the Center Select
Key (
M
)(
OK
).
2
Use the Navigation Key (
N
) to scroll to an entry.
3 For voice calls
, press the Send Key (
$
) to call
the entry’s number,
or
press the Left Soft
Key (
:
)(
Message
) to send a message to the
entry’s number.
or
Press the Center Select Key (
M
)(
OPEN
) to view
entry details.
or
Press the Right Soft Key (
:
)(
Options
) to perform
other actions on the entry.
To view missed calls later
:
Select
View Later
when you see the missed calls
indicator. For more information on viewing and calling
missed calls, see page 48.
Lock/Unlock
Lock selected entry so it cannot be
erased. When you select
Unlock
, the
entry can be erased.
Erase All
Delete all unlocked entries.
View Timers
Go to the
View Timers
screen to see the
length of each call.
options

51
calls
speed dial
Note:
Speed dial number 1 is already assigned to your
voicemail number.
To assign a speed dial number to an entry
, see
page 109.
To see an entry’s speed dial number
:
1
From the main screen, press the Right Soft
Key (
:
)(
Contacts
) to open the
CONTACT LIST
.
2
Use the Navigation Key (
N
) to scroll to the entry
and press the Center Select Key (
M
)(
View
). The
speed dial number is displayed with the
U
icon.
To activate speed dialing
, you must set
One Touch Dial
to
On
:
1
From the main screen, press the Center Select
Key (
M
)(
MENU
) to open the menu.
2
Use the Navigation Key (
N
) to scroll to
( SETTINGS & TOOLS
and press the Center Select
Key (
M
)(
OK
).
3
Scroll to
Call Settings
and press the Center Select
Key (
M
)(
OK
).
4
Scroll to
One Touch Dial
and press the Center Select
Key (
M
)(
OK
).
5
Scroll to
On
and press the Center Select
Key (
M
)(
OK
).
To speed dial an entry
:
Call speed dial entries 1 through 9 by pressing and
holding the one-digit speed dial number for one
second.
For two-digit speed dial numbers, enter the first
number, then press and hold the second number for
one second.

52
calls
emergency calls
Your service provider programs one or more
emergency phone numbers, such as 911, that you can
call at any time,
even when your phone is locked
.
Note:
Check with your service provider, as emergency
numbers vary by country. Your phone may not work in
all locations, and sometimes an emergency call cannot
be placed due to network, environmental, or
interference issues. Do not solely rely on your
wireless phone for essential communications such as
medical emergencies.
To make an emergency call:
Turn your phone on, exit
any open application such as games, dial the
emergency number, then press the Send Key (
N
) to
call the emergency number.
AGPS during an
emergency call
When you make an emergency call, your phone can
use Assisted Global Positioning System (AGPS)
satellite signals to tell the emergency response center
your approximate location.
The AGPS feature has limitations, so always tell the
emergency response center your best knowledge of
your location. Remain on the phone for as long as the
emergency response center instructs you.
AGPS
might not work
for emergency calls:
•
Your phone’s AGPS feature must be turned on
(see page 41).
•
Your local emergency response center might
not process AGPS location information. For
details, contact your local authorities.

53
calls
For best results:
•
Go outside and away from underground
locations, covered vehicles, structures with
metal or concrete roofs, tall buildings, and
foliage. Indoor performance might improve if
you move closer to windows, but some
window sun shielding films can block satellite
signals.
•
Move away from radios, entertainment
equipment, and other electronic devices that
might interfere with or block AGPS satellite
signals.
If your phone cannot find strong AGPS satellite
signals, the location of the nearest cell tower in
contact with your phone is automatically provided to
the emergency response center.
international calls
If your phone service includes international
dialing, press and hold
*
to insert your local
international access code (indicated by
+
). Then, use
the keypad to dial the country code and
phone number.
voicemail
Your network stores the voicemail messages
you receive. When you
receive
a voicemail
message, your phone shows the voicemail message
indicator
y
.
Note:
Your service provider may include additional
information about using this feature.
Select
Listen Now
by pressing the Center Select
Key (
M
)(
OK
) to dial voicemail.
or

54
calls
Use the Navigation Key (
N
) to scroll to
Listen Later
, then
press the Center Select Key (
M
)(
OK
).
The voicemail message indicator (
y
) appears on the
bottom of the screen until you listen to your message
or until you go to
) MESSAGING
>
Voicemail
and press the
Left Soft Key (
:
)(
Clear
).
To check voicemail messages later
, press and
hold
1
to call your voicemail number, or go to
) MESSAGING
>
Voicemail
and press the Center Select
Key (
M
)(
OK
).
in-call options
During an active call, press
OPTIONS
to access these
options:
Note:
When your phone is connected to a Bluetooth
device during a call, you may also see
Audio to Phone
and
Disconnect Bluetooth
options. When your phone is in a TTY
mode (see page 29), you may also see a
TTY Setup
option.
call times & data
volumes
Network connection time
is the elapsed time from
the moment you connect to your service provider’s
network to the moment you end the call by pressing
the Power/End Key (
%
). This time includes busy
signals and ringing.
The amount of network connection time you track
on your resettable timer may not equal the
amount of time for which you are billed by your
service provider. For billing information, contact
your service provider.
Messaging Main Menu
Contact List Notepad
Recent Calls Voice Record
Bluetooth Menu

55
calls
call times
1
From the main screen, press the Center
Select Key (
M
)(
MENU
) to open the menu.
2
Use the Navigation Key (
N
) to scroll to
* RECENT CALLS
and press the Center Select
Key (
M
)(
OK
).
3
Scroll to
View Timers
and press the Center Select
Key (
M
)(
OK
).
4
Use the Navigation Key (
N
) to scroll through the
following categories:
Last Call
,
All Calls
,
Received Calls
,
Dialed Calls
,
Roaming Calls
, or
Lifetime Calls
. Press the Clear
Key (
&
) to return to the
Recent Calls
menu.
set in-call timer
1
From the main screen, press the Center
Select Key (
M
)(
MENU
) to open the menu.
2
Use the Navigation Key (
N
) to scroll to
( SETTINGS & TOOLS
and press the Center Select
Key (
M
)(
OK
).
3
Scroll to
Sound Settings
and press the Center Select
Key (
M
)(
OK
).
4
Scroll to
Service Alerts
and press the Center Select
Key (
M
)(
OK
).
5
Scroll to
Minute Beep
and press the Center Select
Key (
M
)(
OK
).
6
Scroll to
On
and press the Center Select
Key (
M
)(
OK
).
data volumes
1
From the main screen, press the Center
Select Key (
M
)(
MENU
) to open the menu.
2
Use the Navigation Key (
N
) to scroll to
* RECENT CALLS
and press the Center Select
Key (
M
)(
OK
).

56
calls
3
Scroll to
View Timers
and press the Center Select
Key (
M
)(
OK
).
4
Use the Navigation Key (
N
) to scroll through the
following categories:
Transmit Data
,
Received Data
,
Total Data
, or
Lifetime Data Counter
. Press the Clear
Key (
&
) to return to the
Recent Calls
menu.
reset timer
1
From the main screen, press the Center
Select Key (
M
)(
MENU
) to open the menu.
2
Use the Navigation Key (
N
) to scroll to
* RECENT CALLS
and press the Center Select
Key (
M
)(
OK
).
3
Scroll to
View Timers
and press the Center Select
Key (
M
)(
OK
).
4
Scroll to the timer you want to reset and press
the Left Soft Key (
:
)(
Reset
).
To reset all timers, press the Right Soft
Key (
:
)(
Reset All
).
5
Select
Yes
by pressing the Center Select
Key (
M
)(
OK
).
view last reset
1
From the main screen, press the Center
Select Key (
M
)(
MENU
) to open the menu.
2
Use the Navigation Key (
N
) to scroll to
* RECENT CALLS
and press the Center Select
Key (
M
)(
OK
).
3
Scroll to
View Timers
and press the Center Select
Key (
M
)(
OK
).
4
Scroll to
Last Reset
to view details.
5
When you are finished, press the Center Select
Key (
M
)(
OK
).

57
calls
more calling features
restrict features
1
Press the Center Select Key (
M
)(
MENU
) to
open the menu.
2
Use the Navigation Key (
N
) to scroll to
( SETTINGS TOOLS
and press the Center Select
Key (
M
)(
OK
).
3
Scroll to
Phone Settings
and press the Center Select
Key (
M
)(
OK
).
4
Scroll to
Security
and press the Center Select
Key (
M
)(
OK
).
5
When prompted, enter the lock code (see
page 24) and press the Center Select
Key (
M
)(
OK
).
6
Scroll to
Restrictions
and press the Center Select
Key (
M
)(
OK
).
7
When prompted, enter the lock code (see
page 24) and press the Center Select
Key (
M
)(
OK
).
8
Select
Location Setting
and press the Center Select
Key (
M
)(
OK
), then select
Unlock Setting
or
Lock Setting
.
or
Select
Calls
and press the Center Select
Key (
M
)(
OK
), then select
Incoming Calls
or
Outgoing Calls
.
or
Select
Messages
and press the Center Select
Key (
M
)(
OK
), then select
Incoming Msgs
or
Outgoing
Msgs
.
or
Select
Dial-Up Modem
and press the Center Select
Key (
M
)(
OK
), then select
Allow
or
Block
.

58
calls
9
Press the Power/End Key (
%
) to return to the
main screen.
insert special characters
While entering a number, press the Right Soft
Key (
:
)(
Options
) and select one of these options:
•
2-Sec Pause
—Your phone pauses for two
seconds before it dials the next digit.
•
Wait
—Your phone waits until the call connects,
then prompts you for confirmation before it
dials the next digit(s).
DTMF tones
Your phone can send Dual-tone multi-frequency
(DTMF) tones for calling card calls or to navigate
automated systems (such as banking by phone).
To set up DTMF tones
:
1
From the main screen, press the Center Select
Key (
M
)(
MENU
) to open the menu.
2
Use the Navigation Key (
N
) to scroll to
( SETTINGS & TOOLS
and press the Center Select
Key (
M
)(
OK
).
3
Scroll to
Call Settings
and press the Center Select
Key (
M
)(
OK
).
4
Scroll to
DTMF Tones
and press the Center Select
Key (
M
)(
OK
).
5
Select
Normal
or
Long
and press the Center Select
Key (
M
)(
OK
).
To send DTMF tones during a call
, press number
keys.

59
calls
hearing aid
If you use a hearing aid, set your phone for hearing aid
compatibility:
1
From the main screen, press the Center Select
Key (
M
)(
MENU
) to open the menu.
2
Use the Navigation Key (
N
) to scroll to
( SETTINGS & TOOLS
and press the Center Select
Key (
M
)(
OK
).
3
Scroll to
Call Settings
and press the Center Select
Key (
M
)(
OK
).
4
Scroll to
Hearing Aid
and press the Center Select
Key (
M
)(
OK
).
5
Select
On
and press the Center Select
Key (
M
)(
OK
).
Note:
For more information about hearing aid
compatibility, see “Hearing Aid Compatibility with
Mobile Phones” on page 148.

60
text entry
text entry
Some features allow you to enter text. This example
shows a
Contacts
entry screen:
This example shows an entry screen for creating a
text message:
N
SAVE
1
ò
❙❙❙❙
❙❙❙❙
1X
EV
Press the
Navigation
Key (N) to
scroll to more
options.
Press the Center Select Key
(M) (SAVE) to save the entry.
Press the Left
Soft Key (C) (Abc)
to change entry
mode.
Highlighted
Option
Name
x
Abc
Cancel
NEW CONTACT
Mobile 1
Home
g
Abc
Work
John
Abc
Options
SEND
Press the
Right Soft
Key (
C) (
Options
)
to view
Options
sub-menu.
Press the Center Select
Key (M) (
SEND
) to send
the message.
Press the Left
Soft Key (
C) (
Abc
)
to change text
entry modes.
Cursor indicates
insertion point.
To:
0/160
NEW TXT MESSAGE
Text:
1/7
555-2990
N
1
ò
❙❙❙❙
❙❙❙❙
1X
EV

61
text entry
select entry mode
Multiple entry modes make it easy for you to enter
names, numbers, and messages. The default mode is
Abc
(tap mode, first character of a sentence in
uppercase).
To select an entry mode from a text entry screen
,
press the Left Soft Key (
:
), then select an entry
mode.
You can select one of these entry modes:
entry modes
iTAP English
The phone predicts each word (in
English) as you press keys.
iTAP
Spanish
The phone predicts each word (in
Spanish) as you press keys.
Abc
Enter numbers and letters, first
character of a sentence in uppercase.
ABC
Enter numbers and letters, all characters
in uppercase (not available when editing
a contact).
123
Enter numbers only.
Symbols
Enter symbols.
Quick Text
Select and insert a prewritten message
(available only from the
NEW TXT MESSAGE
screen).
entry modes

62
text entry
When text mode is set to
ABC
or
Abc
, press
*
in any
text entry screen to toggle through these
capitalization options
:
When text mode is set to
iTAP English
or
iTAP Spanish
,
press
*
in any text entry screen to toggle between
these
capitalization options
:
tap mode
This is the standard mode for entering text on your
phone. Regular tap mode cycles through the letters,
numbers, and symbols of the key you press.
1
Press a key once to insert the first letter on the
key, twice for the second letter, and so on. If you
pause briefly, your phone accepts the last letter
displayed and waits for the next entry.
2
Enter the remaining characters in the same way.
Tip:
Press
#
to enter a space.
abc
no uppercase letters
Abc
first letter of a sentence in uppercase
ABC
all uppercase letters
entry
mode
capitalization options
iTAP English iTAPEn
first letter of sentence in
uppercase (English)
iTAPEN
all uppercase letters (English)
iTAPen
all lowercase letters (English)
iTAP
Spanish
iTAPEs
first letter of sentence in
uppercase (Spanish)
iTAPES
all uppercase letters (Spanish)
iTAPes
all lowercase letters (Spanish)
entry
mode
capitalization options

63
text entry
iTAP® mode
iTAP software provides a predictive text entry method
that combines your key presses into common words.
When you enter three or more letters in a row, your
phone may guess the rest of the word. For example, if
you enter
prog
, your phone might show:
If you want a different word (such as progress),
continue pressing keys to enter the remaining letters.
If you enter a word the phone does not recognize, the
phone stores it as a new word option. When you fill
memory space for new word options, your phone
deletes the oldest words to add new ones.
•
Press up or down on the Navigation Key (
N
)
to view other possible combinations, and
select the one you want.
•
Press right on the Navigation Key (
N
) to enter
the highlighted combination when it spells a
word. A space is inserted automatically after
the word.
•
To enter numbers quickly, press and hold a
number key to temporarily switch to numeric
mode. Press the number keys to enter the
numbers you want.
•
Press
1
to enter punctuation or
other characters.
N
1
ò
❙❙❙❙
❙❙❙❙
1X
EV
Press the Navigation
Key (
N
) right
to accept
pr ogr am
.
Enter a space
after
pr og
to keep
only
pr og
.
To:
This is a prog ram
18/160
iTAPEn
Options
SEND
NEW TXT MSG
Text:
1/7
555-2233

64
text entry
numeric mode
After selecting numeric mode, press number keys to
enter the numbers you want. When you finish
entering numbers, press the Left Soft Key (
:
)(
123
)
to switch to another entry mode.
symbol mode
In the
SYMBOLS
screen, use the Navigation Key (
N
)
to scroll to a symbol and press the Center Select
Key (
M
)(
OK
) to select it.
To search for additional symbols, press the Right Soft
Key (
:
)(
Next
) to page down to the next set of
symbols. Press the Left Soft Key (
:
)(
Prev
) to page
up to the previous set.
text entry tips
To enter a space
, press
#
.
To enter punctuation while entering text
, press
1
repeatedly to enter a punctuation mark or other
character.
To edit or delete text while entering text
, press
right on the Navigation Key (
N
) to move the cursor to
the right of text you want to edit. Press the Clear
Key (
&
) to delete the character to the left of the
cursor. Press and hold the Clear Key (
&
) to delete an
entire word.

65
push to talk
push to talk
Your phone supports Push to Talk (PTT),
which allows you to use your phone like a
walkie-talkie to communicate with an individual or
group of individuals who are also Verizon Wireless®
Push To Talk subscribers.
activate PTT mode
You must activate PTT mode to use the PTT functions
of your phone (for example, access the
PTT CONTACT LIST
,
send and receive PTT calls, etc.).
1
From the main screen, press the Center Select
Key (
M
)(
MENU
) to open the menu.
2
Use the Navigation Key (
N
) to scroll to
( SETTINGS & TOOLS
and press the Center Select
Key (
M
)(
OK
).
3
Scroll to
Call Settings
and press the Center Select
Key (
M
)(
OK
).
4
Scroll to
PTT Mode
and press the Center Select
Key (
M
)(
OK
).
5
Scroll to
On
and press the Center Select
Key (
M
)(
OK
).
The signal strength indicator reverses colors when
PTT
Mode
is set to
On
and the phone is registered with the
PTT server. indicates the phone is registered.
indicates the phone is not registered.
Yo u r
phone must be registered to make or receive PTT
calls.
1X
EV
❙❙❙❙
❙❙❙❙
❙❙❙❙
❙❙❙❙

66
push to talk
PTT contacts & groups
You can store PTT contacts to make private
(one-to-one) calls and create PTT groups to make
group calls.
add a PTT contact
Note:
PTT Mode
must be set to
On
(see page 65) to use
PTT features.
1
From the main screen, press the Center Select
Key (
M
)(
MENU
) to open the menu.
2
Press the Center Select Key (
M
)(
OK
) to select
[ CONTACTS
.
3
Use the Navigation Key (
N
) to scroll down to
New PTT Contact
and press the Center Select
Key (
M
)(
OK
).
4
Enter a name and ten-digit phone number for the
contact and press the Center Select
Key (
M
)(
SAVE
).
add groups
Note:
PTT Mode
must be set to
On
(see page 65) to use
PTT features.
1
From the main screen, press the Center Select
Key (
M
)(
MENU
) to open the menu.
2
Press the Center Select Key (
M
)(
OK
) to select
[ CONTACTS
.
3
Use the Navigation Key (
N
) to scroll down to
PTT Groups
and press the Center Select
Key (
M
)(
OK
).
4
Press the Left Soft Key (
:
)(
New
) to add a new
PTT group.
5
Enter a name for your group and press the Center
Select Key (
M
)(
SAVE
).
You will see
Update in Progress
followed by
PTT Group
Saved
.

67
push to talk
6
Scroll to the group you just created and press the
Center Select Key (
M
)(
View
) to view a list of PTT
contacts who can be added as group members.
7
Press the Center Select Key (
M
)(
Add
) to add new
members.
8
Select members from your PTT contacts by
pressing the Center Select Key (
M
)(
MARK
). When
finished adding members, press the Left Soft
Key (
:
)(
Done
). You will see
Update in Progress
,
followed by
PTT Group Updated
.
manage contacts & groups
To manage PTT contacts
:
Note:
PTT Mode
must be set to
On
(see page 65) to use
PTT features.
1
Press the PTT Key to access the
PTT CONTACT LIST
.
2
Use the Navigation Key (
N
) to scroll to an entry.
3
Press the Center Select Key (
M
)(
VIEW
) to see
contact details.
or
Press the Right Soft Key (
:
)(
Options
) to view
these options:
New PTT Contact
,
Copy to Contacts
,
Temp PTT
Group
,
Erase
,
Edit
,
Call
,
New Text Message
,
New Picture Message
,
New Video Message
,
Sort
.
Note:
You can edit only the name of a PTT
contact, not the number. To change the number,
you must first erase the old contact and then
create a new entry.
To manage PTT groups
:
Note:
PTT Mode
must be set to
On
(see page 65) to use
PTT features.
1
From the main screen, press the Center Select
Key (
M
)(
MENU
) to open the menu.
2
Press the Center Select Key (
M
)(
OK
) to select
[ CONTACTS
.

68
push to talk
3
Use the Navigation Key (
N
) to scroll down to
PTT Groups
and press the Center Select
Key (
M
)(
OK
).
4
Use the Navigation Key (
N
) to scroll to an entry.
5
Press the Center Select Key (
M
)(
VIEW
) to see
group details.
or
Press the Right Soft Key (
:
)(
Options
) to view
these options:
Rename
,
Erase
,
Add
,
Sort
.
PTT calls
Note:
PTT Mode
must be set to
On
(see page 65) to use
PTT features.
You can make a
private
PTT call or a
group
PTT call to
other Verizon Wireless® PTT subscribers.
A
private
PTT call is a one-to-one call to another
Verizon Wireless PTT subscriber that you initiate by
entering the recipient’s ten-digit number or by
selecting an entry in your
PTT CONTACT LIST
.
A
group
call is a call to all available members of
the selected group from your
PTT CONTACT LIST
or
PTT GROUPS
list.
You can make two types of PTT calls:
• Alert call
—When you place an alert call, the
PTT call recipient’s phone plays an audible
tone and displays a message indicating that
someone wants to speak to the recipient. The
recipient can accept or decline the call.
Alert
calls can’t be sent to groups.
• Barge call
—When you place a barge call, the
recipient’s phone plays an audible tone, and
the call automatically connects.

69
push to talk
PTT call basics
To s p e a k
during a PTT call, hold the PTT Key and
speak after the tone. Only one person can speak at a
time.
To let others speak
, release the PTT Key.
To end a call
, press the Power/End Key (
%
).
make a PTT call
Note:
To make PTT calls, you must set
PTT Mode
to
On
(see page 65).
barge call from PTT Contact List
1
Press the PTT Key to access your
PTT CONTACT LIST
.
2
Use the Navigation Key (
N
) to highlight the PTT
Contact entry you want to call.
3 Press and hold
the PTT Key, and listen for the
“OK to Talk” tone. The message
Connected to
will
appear on the main screen. Speak while holding
the PTT Key down.
4
Release the PTT Key when finished speaking.
This allows the called party to reply.
5
Press the Power/End Key (
%
) to end the call.
alert call from PTT Contact List
You can send an alert to any user with Verizon
Wireless PTT service. The called party may answer or
ignore the alert.
1
Press the PTT Key to access your
PTT CONTACT LIST
.
2
Use the Navigation Key (
N
) to highlight the PTT
Contact entry you want to call.
3
Press the Left Soft Key (
:
)(
Alert
). Your phone will
display
Press PTT Key to Alert
.
4
Press the PTT key to alert the selected individual.
Your phone plays “PTT Outgoing Alert” tones and
displays
Alerting
.

70
push to talk
If the called party answers the alert, your phone
displays
Listening to
, and you will hear the called
party speaking. If the called party chooses to
ignore the alert, or if the phone is unavailable to
accept a PTT call, your phone will display
Unavailable
.
When the called party is finished speaking, you
will hear the “Floor Available” tone, and your
phone will display
Connected to
.
5
Press and hold the PTT Key to talk.
6
Release the PTT Key when finished speaking.
This allows the called party to reply.
7
Press the Power/End Key (
%
) to end the call.
barge call from keypad
1
Enter the ten-digit wireless number of the Verizon
Wireless PTT subscriber you wish to contact.
2
Press the PTT Key. Listen for the “Okay to Talk”
tone. Your phone will display
Connected to
. Speak
while holding the PTT Key down.
If the wireless number you entered is included in
your PTT Contact List, the contact name will
replace the wireless number entered on the
screen when the call is initiated.
3
Release the PTT Key when finished speaking.
This allows the called party to reply.
4
Press the Power/End Key (
%
) to end the call.
alert call from keypad
1
Enter the ten-digit wireless number of the Verizon
Wireless PTT subscriber you wish to contact.
2
Press the Left Soft Key (
:
)(
Alert
).

71
push to talk
3
Press and release the PTT Key to alert the
individual.
Your phone plays the PTT “Outgoing Alert” tone
and displays
Alerting
. If the wireless number you
entered is included in your PTT Contact List, the
contact name will replace the wireless number
entered on the screen when the alert is initiated.
If the called party answers the alert, your phone
displays
Listening to
, and you will hear the called
party speaking. If the called party chooses to
ignore the alert, or if the phone is unavailable to
accept a PTT call, you will see
Unavailable
When the called party is finished speaking, your
phone plays the “Floor Available” tone and display
Connected to
.
4
Press and hold the PTT Key to talk.
5
Release the PTT Key when finished speaking.
This allows the called party to reply.
6
Press the Power/End Key (
%
) to end the call.
temporary group calls
You can set up a temporary group call to a set of PTT
contacts already in your PTT contact list. A temporary
group is a new group that you define for a single call
and is not stored as a group in the PTT contact list.
Note:
To make PTT calls, you must set
PTT Mode
to
On
(see page 65).
1
Press the PTT Key to access the
PTT Contact List
.
2
Press the Right Soft Key (
:
)(
Options
).
3
Select
Temp PTT Group
and press the Center Select
Key (
M
)(
OK
).
4
Press the Center Select Key (
M
)(
ADD
) to add new
members.

72
push to talk
5
Select members from your PTT contacts by
pressing the Center Select Key (
M
)(
MARK
). When
finished adding members, press the Left Soft
Key
:
)(
DONE
).
6
Press and hold the PTT Key to make a barge call
to the group you just defined.
Note:
After you define a temporary group for the first
time, your phone automatically includes the PTT
contacts from that group in the next temporary group
you define. For your next temporary group call, you
can add and remove PTT contacts as desired.
Tip:
If you decide you want to
keep a temporary
group
, you can save it as a permanent group: In the
TEMP PTT GROUP
screen, press the Right Soft
Key (
:
)(
Options
), then select
Save As PTT Group
and press
the Center Select Key (
M
)(
OK
).
answer a PTT call
Note:
To receive PTT calls, your must set
PTT Mode
to
On
(see page 65).
incoming barge call
When you receive a barge call, your phone plays the
“Barge” tone. You then hear the calling party
speaking. Your phone will display the calling party’s
wireless number. If the calling party’s number is saved
in your PTT Contact List, the contact name will replace
the wireless number on the screen.
1
Press and hold the PTT Key to talk.
2
Release the PTT Key to let the other party talk.
3
Press the Power/End Key (
%
) to end the call.

73
push to talk
incoming alert call
When you receive an alert, your phone plays a PTT
tone (see pages 35 and 74) and displays
Incoming Alert
,
along with the phone number or contact name of the
calling party. The PTT tone repeats until it is answered
or ignored, or until twenty seconds have passed.
1
You can choose to answer or ignore the alert.
To answer the alert
, press and hold the PTT Key,
and begin talking.
To ignore the alert
, press the
Right Soft Key (
:
)(
Ignore
).
2
Release the PTT Key to let the other party talk.
3
Press the Power/End Key (
%
) to end the call.
return the last PTT call
To quickly call the last PTT call that you dialed or
received
: Press and hold the PTT Key. The phone
finds the last call you made or received and makes
a barge call to that number.
handsfree speaker for PTT calls
Caution:
During an active PTT call, pressing the
Smart/Speakerphone Key,
with the flip closed
,
ends the call.
When you
make or receive a PTT call
, your phone
automatically uses the handsfree speaker (see
page 22) during the call unless you have set
Master
Volume
to
Vibrate Only
,
Alarm Only
, or
All Sounds Off
(see page 21).
Once on a PTT call, you can turn the speakerphone off
and on if you press and hold the Smart/Speakerphone
Key, with the flip open.

74
push to talk
PTT tones
Your phone plays
audible PTT tones
when:
•
you can speak during an active PTT call
(no one else is speaking)
•
you are receiving a barge call
•
you push a button while someone else on
the call is talking
•
you are receiving an alert call
•
you have originated an alert call
•
the phone you are calling is busy or
unavailable
•
when the floor is available for you to speak
PTT indicators
When you view PTT contacts and groups, the
following indicators beside the entries show their
availability
:
indicator & message status
. Individual avaliable
contact online
(available for PTT call)
à Individual unavailable
contact offline
(unavailable)
=
Group available
group online (available)
à Group unavailable
group offline
(unavailable)

75
push to talk
The following indicators show
PTT call status
: The following indicators show
recent PTT calls
:
store a phone number
To store a phone number when
PTT Mode is set to
On
:
1
From the main screen, use the keypad to enter a
phone number and press the Right Soft
Key (
:
)(
Options
).
2
Use the Navigation Key (
N
) to scroll to
Save
and
press the Center Select Key (
M
)(
OK
).
indicator & message
; Connecting to
contact
: Connected to
contact
;
Connecting to
group
+ Connected to
group
Talking to
contact
Á Talking to
group
\ Listening to
contact
_ Listening to
group
# Alerting
contact or group
% Call ended
contact or group
indicator status
@
received call from contact
>
received call from group
/
calling contact
?
calling group
{
missed call from contact or group

76
push to talk
3
To save the number in
Contacts
, use the Navigation
Key (
N
) to scroll to
Add New Contact
, press the
Center Select Key (
M
)(
OK
), then scroll to an entry
type and press the Center Select Key (
M
)(
OK
).
4
Use the keypad to enter a name and other details
for the number.
5
Press the Center Select Key (
M
)(
Save
) to store
the number.
Push to Talk
Push to Talk calls may only be made with other Verizon
Wireless® Push to Talk subscribers, and only from the
National Enhanced Services Rate and Coverage Area.
For optimal Push to Talk performance, all callers on a
Push to Talk session must have an EVDO capable
device and be receiving EVDO service. A Push to Talk
call is terminated by pressing
END
or will automatically
time out after ten (10) seconds of inactivity. While you
are on a Push to Talk call, voice calls received will go
directly to Voice Mail. When you are on a voice call,
you cannot receive a Push to Talk call. You cannot
prevent others who have your wireless phone number
from entering you into their Push to Talk contact list.
Only one person can speak at a time during Push to
Talk calls. When using your phone keypad to make a
Push to Talk call, you must enter the ten-digit phone
number of the called party. Presence information may
not be available for all Push to Talk contacts. The
timeliness of presence information may be impacted
by the network registration status of a Push to Talk
contact. Your Push to Talk service cannot be used for
any applications that tether your phone to computers
or other devices for any purpose. Push to Talk-capable
phone and service required.

77
messages
messages
send a multimedia
message
A multimedia message contains embedded media
objects (possibly including pictures, videos, sounds,
or voice records). You can send a multimedia message
to other Verizon Wireless® multimedia
messaging-capable phones and to other email
addresses.
create & send message
1
From the main screen, press the Left Soft
Key (
:
)(
Message
) to open
) MESSAGING
.
2
Press the Center Select Key (
M
)(
OK
) to select
New Message
.
3
Use the Navigation Key (
N
) to scroll to
Picture Message
or
Video Message
and press the Center
Select Key (
M
)(
OK
).
4
Use the keypad to enter a phone number, then
press the Center Select Key (
M
)(
OK
).
or
Press the Right Soft Key (
:
)(
Add
), then select
From Contacts
,
Recent Calls
, or
Groups
, and press the
Center Select Key (
M
). For each entry you want
to add, scroll to the entry and press the Center
Select Key (
M
)(
MARK
). Press the Left Soft
Key (
:
)(
Done
) when finished selecting entries.
5
Scroll to the
Text
entry area and use the keypad to
enter message text.

78
messages
6
For a picture message, scroll to the
Picture
entry
area and press the Left Soft Key (
:
)(
My Pics
).
or
For a video message, scroll to the
Video
entry box
and press the Left Soft Key (
:
)(
Videos
).
7
For a picture message, scroll to a picture and
press the Center Select Key (
M
)(
OK
).
or
For a video message, scroll to a video clip and
press the Center Select Key (
M
)(
OK
).
8
For a
Picture
message, scroll to the
Sound
entry area
and press the Left Soft Key (
:
)(
Sounds
).Then
scroll to a sound and press the Center Select
Key (
M
)(
OK
).
9
Scroll to
Subject
.
10
Use the keypad to enter the message subject.
or
Press the Right Soft Key (
:
)(
Options
), scroll to
Add
Quick Text
and press the Center Select Key (
M
)(
OK
).
Then select a
Quick Text
item as the message
subject and press the Center Select Key (
M
)(
OK
).
11
Press the Center Select Key (
M
)(
SEND
) to send
the message.
message options
While creating a multimedia message, press the Right
Soft Key (
:
)(
Options
) to select from the following
options:
option
Preview
View the current contents of the
message.
Save As Draft
Save the message to the
Drafts
folder.
Add Quick Text
Insert prewritten text.

79
messages
receive a multimedia
message
When you receive a multimedia message, your phone
displays a
NEW PIC/VIDEO MSG
notification, and plays an
alert sound.
To view the message immediately, scroll to
View Now
,
and press the Center Select Key (
M
). To save it in
your
Inbox
to view later, scroll to
View Later
and press the
Center Select Key (
M
).
To view messages in your Inbox:
1
From the main screen, press the Left Soft
Key (
:
)(
Message
) to open
) MESSAGING
.
2
Use the Navigation Key (
N
) to scroll to
Inbox
and
press the Center Select Key (
M
)(
OK
).
3
Scroll to the desired message.
4
Press the Center Select Key (
M
)(
OPEN
) to open
the message.
Multimedia messages that you receive can contain
different media objects:
•
Pictures and animations are displayed as you
read the message.
•
A sound file begins playing when its slide is
displayed. Use the Volume Keys to adjust the
volume as the sound file plays.
Priority Level
Set to
High
or
Normal
.
Remove
Picture/Remove
Video/Remove Sound
Remove the picture or video clip
previously added to the
message.
Validity Period
Specify how long the message
stays in the
Outbox
folder.
Add Slide
Add a page to the message.
Cancel Message
Cancel the message.
option

80
messages
send a text message
1
From the main screen, press the Left Soft
Key (
:
)(
Message
) to open
) MESSAGING
.
2
Select
New Message
by pressing the Center Select
Key (
M
)(
OK
).
3
Select
TXT Message
by pressing the Center Select
Key (
M
)(
OK
).
4
Use the keypad to enter a phone number, then
press the Center Select Key (
M
)(
OK
).
or
Press the Right Soft Key (
:
)(
Add
), then select
From Contacts
,
Recent Calls
, or
Groups
, and press the
Center Select Key (
M
) For each entry you want
to add, scroll to the entry and press the Center
Select Key (
M
)(
MARK
). Press the Left Soft
Key (
:
)(
Done
) when finished selecting entries.
5
With the flashing cursor in the
Text
entry area, use
the keypad to enter a message.
When you are entering text, you can press the
Right Soft Key (
:
)(
Options
) to perform other
actions with the message:
Save As Draft
,
Add Graphic
,
Add Sound
,
Add Quick Text
,
Priority Level
,
Validity Period
,
Cancel
Message
, or
Add Name Card
.
6
Send the message by pressing the Center Select
Key (
M
)(
SEND
).
view sent messages
1
From the main screen, press the Left Soft
Key (
:
)(
Message
) to open
) MESSAGING
.
2
Use the Navigation Key (
N
) to scroll to
Sent
and
press the Center Select Key (
M
)(
OK
).
3
Scroll to the message you want to view and press
the Center Select Key (
M
)(
OPEN
).

81
messages
4
Press the Right Soft Key (
:
)(
Options
) to perform
other actions on the message, such as
Forward
,
Resend
,
Lock
(to prevent deletion),
Add to Contacts
,
Erase
Sent
,
Message Info
, or
Sort By
.
Note:
The options you see may be different than
the options listed above.
read received
message
1
From the main screen, press the Left Soft
Key (
:
)(
Message
) to open
) MESSAGING
.
2
Use the Navigation Key (
N
) to scroll to
Inbox
and
press the Center Select Key (
M
)(
OK
).
3
Scroll to the message you want to read and press
the Center Select Key (
M
)(
OPEN
).
4
Press the Right Soft Key (
:
)(
Options
) to perform
other actions on the message, such as
Forward
,
Reply w. Copy
,
Save Quick Text
,
Lock
(to prevent deletion),
Message Info
, or
Compose Message
.
Note:
You may see other options depending on
the type of message received.
or
To make a voice call to the contact who sent the
message, press the Send Key (
$
).
or
To make a PTT barge call to a number in the
message, scroll to the number and press and hold
the PTT key. (For more information on making a
PTT barge call, see page 69.) The contact must be
a valid PTT subscriber.
view drafts
1
From the main screen, press the Left Soft
Key (
:
)(
Message
) to open
) MESSAGING
.

82
messages
2
Use the Navigation Key (
N
) to scroll to
Drafts
and
press the Center Select Key (
M
)(
OK
).
3
Scroll to the message you want to view and press
the Center Select Key (
M
)(
EDIT
).
or
To delete the message, press the Left Soft
Key (
:
)(
Erase
). To confirm deletion, scroll to
Yes
and press the Center Select Key (
M
)(
OK
).
or
Press the Right Soft Key (
:
)(
Options
) to perform
other actions on the message, such as
Send
,
Lock
,
and
Erase Drafts
(to erase all drafts).
Note:
Other options may be available depending
on the type of message you are viewing.
mobile IM
Note:
When you use Instant Messaging, on your
phone, normal airtime and/or carrier usage charges
apply.
Access your internet Instant Messaging account to
exchange messages in real time with family and
friends.
1
From the main screen, press the Left Soft
Key (
:
)(
Message
) to open
) MESSAGING
.
2
Use the Navigation Key (
N
) to scroll to
Mobile IM
and press the Center Select Key (
M
)(
OK
).
3
Scroll to your mobile IM account type and press
the Center Select Key (
M
).
4
Enter your name or account name and password
to sign in.

83
messages
email
Access your internet email account to exchange email
from your phone:
1
From the main screen, press the Left Soft
Key (
:
)(
Message
) to open
) MESSAGING
.
2
Use the Navigation Key (
N
) to scroll to
Email
and
press the Center Select Key (
M
)(
OK
).
3
Scroll to your email account type and press the
Center Select Key (
M
).
4
Enter your name or account name and password
to sign in.
chat
Note:
When you use your internet chat account on
your phone, normal airtime and/or carrier usage
charges apply.
Access your internet chat account to chat with family
and friends in real time:
1
From the main screen, press the Left Soft
Key (
:
)(
Message
) to open
) MESSAGING
.
2
Use the Navigation Key (
N
) to scroll to
Chat
and
press the Center Select Key (
M
)(
OK
).
3
Scroll to your Chat account type and press the
Center Select Key (
M
).
4
Enter your name or account name and password
to sign in.
erase messages
To erase all
read messages
from your inbox:
1
From the main screen, press the Left Soft
Key (
:
)(
Message
) to open
) MESSAGING
.
2
Press the Right Soft Key (
:
)(
Options
).

84
messages
3
Use the Navigation Key (
N
) to scroll to
Erase Inbox
or
Erase All
and press the Center Select
Key (
M
)(
OK
). Select
All Messages
or
Only Read Messages
and press the Center Select Key (
M
)(
OK
).
or
Use the Navigation Key (
N
) to scroll to
Erase Drafts
or
Erase Sent
and press the Center Select
Key (
M
)(
OK
). Select
Yes
or
No
and press the Center
Select Key (
M
)(
OK
).

85
entertainment
entertainment
get & play music
Use the
MUSIC & TONES
menu to:
•
get new music and tones
•
play saved music in
MY MUSIC
•
record new sounds
•
set music or tones as your ringtone
Tip:
Get to
MUSIC & TONES
quickly by pressing left on the
Navigation Key (
N
) from the main screen (see
page 18).
V CAST Music with Rhapsody
Note:
Your phone must be in an EVDO
coverage area to download music. If you are in an
EVDO coverage area, your phone displays the EV
symbol with at least one signal strength bar in the
status area of the screen (see page 19).
V CAST Music with Rhapsody is a digital music
service that lets you listen to millions of songs from
thousands of artists. Discover new and old favorites in
an extensive music catalog. Download V CAST Music
with Rhapsody to sync tracks, albums, and playlists to
your new compatible phone, while managing your
existing PC music library, all in one place.

86
entertainment
purchase songs on your phone
When you purchase music using your V CAST Music
with Rhapsody-capable phone*, you receive a second
copy of the music that you can download to your PC
using V CAST Music with Rhapsody on your PC.
1
From the main screen, press left on the
Navigation Key (
N
) to access
MUSIC &TONES
.
2
Select
VCAST Music
by pressing the Center Select
Key (
M
)(
OK
).
3
Browse or search the catalog to find the songs
you want.
To preview a song, highlight the song and press
the Left Soft Key (
:
)(
Preview
).
4
To buy a song, highlight the song and press the
Center Select Key (
M
)(
Buy
).
After you press
Buy
, your phone shows song
details and price.
5
Press the Center Select Key (
M
)(
Buy
) to confirm
your selection.
6
When you see
Download now?
on the main screen,
press the Center Select Key (
M
)(
OK
) to start the
downloading process, or press the Left Soft
Key (
:
) to download later.
7
When prompted to select a storage location,
scroll to
Phone Memory
or
Memory Card
and press the
Center Select Key (
M
) to begin downloading.
Your phone displays a status indicator. After
downloading, you must wait for the phone to
acquire the content license.
8
Press the Right Soft Key (
:
)(
Play
) to play the
downloaded song immediately.
or
* Per-song charges apply.

87
entertainment
Press the Left Soft Key (
:
)(
My Music
) to go to
MY MUSIC
.
or
Press the Center Select Key (
M
)(
OK
) to return to
the previously viewed music catalog.
transfer music from a
computer
You can use V CAST Music with Rhapsody to transfer
songs from a computer to your phone through a USB
cable connection. You can purchase these songs using
V CAST Music with Rhapsody or import them from
your CD collection.
computer system requirements
To transfer music from a computer to your phone
,
you need the Windows XP® or Windows Vista®
operating system and an active internet connection.
To download V CAST Music with Rhapsody for
free
:
1
From your computer’s web browser, go to
http://www.verizonwireless.com/music
.
2
Follow the on-screen instructions to select,
download, and install V CAST Music with
Rhapsody for your phone.
downloading and purchasing music using
V CAST Music with Rhapsody
To download copies of music purchased using
your phone
:
1
On your computer, launch V CAST Music with
Rhapsody.
2
Click on the “Log In” button, then log in by
entering your mobile phone number and
password.
For each V CAST Music with Rhapsody track
you’ve downloaded to your phone, you can

88
entertainment
download a copy to your computer at no
additional charge. Song tracks available for free
download will pop up when you complete the
login process.
3
Check the boxes beside the songs you wish to
download.
4
Select “Download Tracks.”
Downloading can take several minutes.
5
When downloading is complete, click on the “My
Library” tab in the V CAST Music with Rhapsody”
window to find and play the song(s) you
downloaded.
To buy music from the V CAST Music Store
:
1
On your computer, launch V CAST Music with
Rhapsody.
2
In the V CAST Music with Rhapsody window,
click on the “BUY MUSIC” tab.
3
Click on the “Log In” button, then log in by
entering your mobile phone number and
password.
If you have not registered yet, click on the
“Register” button, then follow the instructions to
register and get your password.
4
Browse or search the store to find the songs you
want.
To preview a song, click on the headset icon next
to the song title.
5
To buy a song, click on the “Purchase” or “Buy”
button next to the song title.
6
Repeat steps 4 and 5 to add more songs to your
shopping cart.
7
When you finish shopping, click on “MY
PURCHASES,” follow the on-screen instructions
to complete your purchase(s) and download the
song(s) you have purchased.

89
entertainment
Downloading can take several minutes.
8
When downloading is complete, click on the
“My Library” tab in the V CAST Music with
Rhapsody” window to find and play the song(s)
you downloaded.
To transfer the songs to your phone, see “sync music
from your PC to your V CAST Music with Rhapsody
phone” on page 90.
import songs from an audio CD
1
On your computer, launch V CAST Music with
Rhapsody.
2
Insert an audio CD into your computer’s CD ROM
drive.
3
If the “Music on My CD” window is not already
open in V CAST Music with Rhapsody, click on
the “MUSIC ON MY CD” tab.
The names of all the tracks on the CD are listed in
the window. (You may need to enter artist name
and other information for the tracks.)
4
Select the tracks you want to import or “Rip” by
clicking the check box next to them.
Select
all
tracks by checking the “Title” check box
at above the list of tracks.
5
Click on the “Rip CD” button.
The songs you selected are imported to the
V CAST Music Manager.
To transfer the songs to your phone, see “sync music
from your PC to your V CAST Music with Rhapsody
phone” on page 90.

90
entertainment
sync music from your PC to your
V CAST Music with Rhapsody phone
1 On your computer
, launch V CAST Music with
Rhapsody.
2
Connect the USB cable (purchased separately) to
your phone and to an available USB port on
your computer.
If this is the first time you have connected the
phone to a computer with a USB cable, additional
software drivers may be installed. (For more
information on using a USB cable connection, see
page 131.)
The
SYNC MUSIC V CAST MOBILE PHONE
screen appears on
your phone. Your phone should display
Connected
.
3 On your computer
, click on the “Sync List”
button to open an empty sync list.
4 On your computer
, drag each song you want to
sync “My Library” and drop it on the Rhapsody
mobile phone, listed under the “Sources” tab.
5 On your computer
, click “Sync now.”
You computer syncs the songs from the sync list
with your phone.
6 On your phone
, when synchronization is
complete, press the Power/End Key (
%
).
7
Disconnect the cable from the phone and the
computer.
You can now use your phone’s music player to play the
songs you transferred from your computer.

91
entertainment
play music—flip closed
When your phone’s flip is closed, you can use the
Music Buttons (see page 2) to control the music
player. To
activate the Music Buttons
, press any side
key except the PTT Key.
To turn the music player on and off and make
menu selections
:
Tip: When PTT is not active
(see page 65), press the
PTT key to turn on the music player.
To control music playback:
Music Buttons
turn music
player on
&off
Press &
hold
y
(for at least four
seconds).
scroll
up/down
through menu
Press &
release
Ï
or
Î
.
select menu
option
Press &
release
y
.
Music Buttons
pause/play
Press &
release
y
.
fast forward
Press &
hold
Ï
(for at least two
seconds).
skip to next
song
Press &
release
Ï
.
rewind
Press &
hold
Î
(for at least two
seconds).
skip back to
previous song
Press &
release
Î
.

92
entertainment
play music—flip open
1
From the main screen, press left on the
Navigation Key (
N
) to access
MUSIC &TONES
.
2
Use the Navigation Key (
N
) to scroll to
My Music
and press the Center Select Key (
M
)(
OK
).
3
Use the Navigation Key (
N
) to scroll to
Songs
and
press the Center Select Key (
M
)(
OK
).
4
Use the Navigation Key (
N
) to scroll to a song
and press the Center Select Key (
M
)(
Play
) to play
it.
The
HOME
,
SEARCH
, and
HELP
options appear on all screens
in
MY MUSIC
.
The
MY MUSIC
menu includes these options:
1. Genres
MY MUSIC
2. Artists
4. Songs
6. Inbox
8. Shuffle
3. Albums
5. Playlists
7. Play All
Shop Sync
OK
HOME SEARCH HELP
N
Press the Left Soft Key
(C) (Shop) to download
music from the V CAST
Music catalog.
Return to the
MY MUSIC
screen.
View help
information.
Find music on phone by
artist, album, or song title.
1
❙❙❙❙
❙❙❙❙
ò
1X
EV
Press the Right Soft Key
(C) (Sync) to synchronize MY
MUSIC with the digital music
library or another device.
option
Genres
Find & play music from a specific genre
(type of music) such as rock, jazz, or
blues.
Artists
Find & play music by a specific artist.
Albums
Find & play music from a specific album.
Note:
Even if you have only one song
from an album, the album is listed.
Songs
Find & play specific songs.

93
entertainment
•
Press the Clear Key (
&
) from any
MY MUSIC
screen to return to the previous screen.
•
Press the Power/End Key (
%
) from any
MY
MUSIC
screen to return to the main screen.
•
On screens that show a list of items (for
example, album titles), enter letters in the
Go To
area to jump directly to items beginning with
those letters.
music player controls
Use these keys to control the music player during
song playback
when the flip is open
:
Playlists
Play songs from personalized playlists
that you create.
Inbox
View alert notifications received when
new music from a selected artist is
available for download.
Play All
Play all songs in
MY MUSIC
in list order.
Shuffle
Play songs in
MY MUSIC
in random order.
option
controls with flip open
pause/play
To pause, press &
release
the
Center Select Key (
M
).
To resume play, press the
Center Select Key (
M
) again.
fast forward
Press &
hold
the Navigation
Key (
N
)
right
.
skip to next
song
Press &
release
the Navigation
Key (
N
)
right
.
rewind
Press &
hold
the Navigation
Key (
N
)
left
.
skip back to
previous song
Within first two seconds of
song, press &
release
the
Navigation Key (
N
)
left
.

94
entertainment
play an album
1
From the main screen, press left on the
Navigation Key (
N
) to access
MUSIC &TONES
.
2
Use the Navigation Key (
N
) to scroll to
My Music
and press the Center Select Key (
M
)(
OK
).
3
Select
Genres
,
Artists
, or
Albums
.
Note:
When you select an album from any genre,
artist, or album category, you can press the Right Soft
Key (
:
)(
Options
) to select from these options:
return to song
beginning
After first two seconds of song,
press &
release
the Navigation
Key (
N
)
left
.
turn off music
player
Press the Power/End Key (
%
).
controls with flip open
option
Play album
Play the selected album, beginning
with the first song.
Listeners also
liked
View a list of music
recommendations, based on the
song currently playing.
Move album
Move the album from the memory
card to the phone or from the phone
to the card.
Note:
This option appears only when
you have inserted a memory card
into the phone. This option is not
available for music purchased over
the air.

95
entertainment
From the
GENRES
screen
:
1
Select the
genre
you want by pressing the Center
Select Key (
M
)(
OK
).
2
Use the Navigation Key (
N
) to scroll to the
artist
you want and press the Center Select
Key (
M
)(
OK
).
3
Scroll to the
album
you want and press the Right
Soft Key (
:
)(
Options
).
(See page 94 for
OPTIONS
menu selections.)
4
Scroll to
Play album
and press the Center Select
Key (
M
)(
OK
).
From the
ARTISTS
screen
:
1
Use the Navigation Key (
N
) to scroll to the
artist
you want and press the Center Select
Key (
M
)(
OK
).
2
Scroll to the
album
you want to play and press
Right Soft Key (
:
)(
Options
).
Lock album
Lock the current album to prevent it
from being deleted.
Erase album
Remove the selected album from
MY MUSIC
.
Album info
Provide detailed information on the
current album, including the album
name, the artist, and the genre.
Rebuild Music
Database
Under normal conditions,
MY MUSIC
is
maintained automatically. If
MY MUSIC
behaves unexpectedly, use this
option to reinitialize it. This option
deletes the existing database and
creates a new one that contains all
currently installed music.
option

96
entertainment
(See page 94 for other
OPTIONS
menu selections.)
3
Select
Play album
by pressing the Center Select
Key (
M
)(
OK
).
From the
ALBUMS
screen
:
1
Use the Navigation Key (
N
) to scroll to the
album
you want.
2
Press the Right Soft Key (
:
)(
Options
).
(See page 94 for
OPTIONS
menu selections.)
3
Scroll to
Play album
and press the Center Select
Key (
M
)(
OK
).
From the
SONGS
screen
:
1
Use the Navigation Key (
N
) to scroll to the
song
you want.
2
Press the Center Select Key (
M
)(
Play
).
play all songs on phone
1
From the main screen, press left on the
Navigation Key (
N
) to access
MUSIC &TONES
.
2
Use the Navigation Key (
N
) to scroll to
My Music
and press the Center Select Key (
M
)(
OK
).
3
Scroll to
Play All
and press the Center Select
Key (
M
)(
OK
).
play music from a playlist
1
From the main screen, press left on the
Navigation Key (
N
) to access
MUSIC &TONES
.
2
Use the Navigation Key (
N
) to scroll to
My Music
and press the Center Select Key (
M
)(
OK
).
3
Scroll to
Playlists
and press the Center Select
Key (
M
)(
OK
).
To play an entire playlist
, scroll to the playlist you
want and press the Center Select Key (
M
)(
Play
).

97
entertainment
To play a song from a playlist
, scroll to the playlist
you want and press the Center Select Key (
M
)(
Play
),
then scroll to the song you want to play and press the
Center Select Key (
M
).
MY MUSIC options menus
When you scroll to a song
and press
Options
, your
phone displays these options:
option
Add to playlist
Add the selected song to a playlist.
Listeners also
liked
View a list of music
recommendations, based on the
current song playing.
Move song
Move the song from the memory
card to the phone or from the phone
to the card.
Note:
This option appears only when
you have inserted a memory card
into the phone. This option is not
available for music purchased over
the air.
Lock song
Prevent song from being deleted.
Erase song
Delete the selected song.
Erase all songs
Delete all songs from
MY MUSIC
.
Song info
View the following information for
the song: title, artist, album title,
genre, copyright year, duration, and
track number (if available).
option

98
entertainment
When you press
Options
while a song is playing
, your
phone displays these options:
Note:
The song is paused when you press
Options
.
You can also control the music player
with the flip
closed
! Simply begin song playback, close the flip,
and use the Music Buttons (see page 91).
listening tips
When you’re on the go, you can listen to your music
through a wired headset connected to the phone’s
micro USB port or by using a wireless headset (see
page 127).
Rebuild Music
Database
Under normal conditions,
MY MUSIC
is
maintained automatically. If
MY MUSIC
behaves unexpectedly, use this
option to reinitialize it. This option
deletes the existing music database
and creates a new one that contains
all currently installed music.
option
Play All
Play all songs in
MY MUSIC
in list order.
Shuffle
Play songs in
MY MUSIC
in random
order.
My Music
Return to the
MY MUSIC
menu.
option
Shop
Connect to the V CAST Music catalog
to download more songs.
Listeners also
liked
View a list of music
recommendations, based on the
current song playing.
Help
View information to help you use the
music player.
option

99
entertainment
Note:
You cannot charge your phone when a
micro USB headset is connected.
When the phone’s flip is open and you are not using a
wired or wireless headset, music is played through
the phone’s speaker.
create a playlist
1
From the main screen, press left on the
Navigation Key (
N
) to access
MUSIC &TONES
.
2
Use the Navigation Key (
N
) to scroll to
My Music
and press the Center Select Key (
M
)(
OK
).
3
Scroll to
Playlists
and press the Center Select
Key (
M
)(
OK
).
4
If playlists already exist, press the Right Soft
Key (
:
)(
Options
), then scroll to
Create Playlist
and
press the Center Select Key (
M
)(
OK
).
If no playlists exist, the
CREATE PLAYLIST
screen
appears.
5
Use the keypad to enter a title for the playlist on
the
CREATE PLAYLIST
screen and press the Center
Select Key (
M
)(
OK
).
6
Scroll to a desired song and press the Center
Select Key (
M
)(MARK
). Repeat this step for each
song you want to add.
7
When you have completed marking your song
selections, press the Right Soft Key (
:
)
Done
.
8
When finished adding songs to the playlist, press
the Clear Key (
&
) to return to the previous
screen or the Power/End Key (
%
) to return to
the main screen.

100
entertainment
edit a playlist
1
From the
PLAYLISTS
screen, scroll to the playlist you
want to edit and press the Right Soft
Key (
:
)(
Options
).
2
Use the Navigation Key (
N
) to scroll to
Edit playlist
and press the Center Select Key (
M
)(
OK
).
3
Edit the playlist as desired.
To change the order of songs in your playlist,
scroll to a song and press the Center Select
Key (
M
)(
Move
). Then scroll up or down to move
the song up or down in the playlist. When
finished, press the Center Select Key (
M
)(
Save
).
To delete a song, scroll to the song and press the
Left Soft Key (
:
)(
Remove
).
4
Press the Clear Key (
&
) to return to the previous
screen or Power/End Key (
%
) to return to the
main screen.
record & play voice
records
You can create a voice record that you can play back
later as a reminder for yourself.
create voice record
1
From the main screen, press left on the
Navigation Key (
N
) to access
MUSIC &TONES
.
2
Use the Navigation Key (
N
) to scroll to
My Sounds
and press the Center Select Key (
M
)(
OK
).
3
Select
Record New
and press the Center Select
Key (
M
)(
OK
).
4
Press the Center Select Key (
M
)(
OK
) to begin
recording, then press the Center Select
Key (
M
)(
STOP
) when finished.

101
entertainment
5
To save the voice record, press the Left Soft
Key (
:
)(
Save
).
To erase the voice record, press the Right Soft
Key (
:
)(
Erase
).
Tip:
To create a voice record quickly, press and hold
the Voice Command Key (on the right side of the
phone), then press the Center Select Key (
M
)(
OK
) to
begin recording. Press the Center Select
Key (
M
)(
STOP
) when finished. You can press the Left
Soft Key (
:
)(
Save
) to save it, press the Center Select
Key (
M
)(
SEND
) to send it, or press the Right Soft
Key (
:
)(
Erase
) to erase it. Press the Power/End
Key (
%
) to exit. When you see the message
Do you want
to exit?
, use the Navigation Key (
N
) to select
Yes
or
No
,
and press the Center Select Key (
M
(
OK
).
play voice record
1
From the main screen, press left on the
Navigation Key (
N
) to access
MUSIC &TONES
.
2
Use the Navigation Key (
N
) to scroll to
My Sounds
and press the Center Select Key (
M
)(
OK
).
3
Scroll to the file name of the desired voice record
and press the Center Select Key (
M
)(
PLAY
).
Tip:
You can rename voice records. In
My Sounds
, your
phone displays an
æ
indicator beside the names of
voice records that you created. Scroll to the voice
record you want to rename, press the Right Soft
Key (
:
)(
Options
), then scroll to and select
Rename
. Enter
the new name for the voice record and press the
Center Select Key (
M
)(
OK
). Your phone will display
SOUND NAME SAVED
.

102
entertainment
record & play video
clips
Your camera lens is on the back of your phone when
the phone is open (see page 1).
To get the clearest
video clips, wipe the lens clean with a soft, dry
cloth before you capture a video clip.
record a video clip
To activate your phone’s camcorder:
1
Press and hold the Camera/Video Key (
)
).
The active viewfinder image appears:
2
Point the camera lens at the video subject.
Press left and right on the Navigation Key (
N
) to
zoom in and out.
3
Press the Center Select Key (
M
)(
REC
) to begin
recording.
Press the Right Soft Key (
:
)(
Pause
) to temporarily
stop recording. Press the Right Soft
Key (
:
)(
Resume
) to continue.
176x144
Rec
00:00
Videos
N
0
P
<
❙❙❙❙
❙❙❙❙
1X
EV
Options
Press the
Right Soft
Key (C) (
Options
)
to view the
Options
menu.
Press the
Left Soft
Key (C) (
Videos
)
to view
MY VIDEOS
.
Press the Center Select
Key (M) (
REC
) to
begin
recording.
REC

103
entertainment
4
Press the Center Select Key (
M
)(
STOP
) to stop
recording.
5
Press the Left Soft Key (
:
)(
Save
) to save the
video clip.
or
Press the Center Select Key (
M
)(
SEND
) to save
the video clip and go to the
NEW VIDEO MESSAGE
screen.
or
Press the Right Soft Key (
:
)(
Erase
) to delete the
video clip and return to the active viewfinder.
adjust camcorder settings
When the camcorder is activated (but not recording),
press the Right Soft Key (
:
)(
Options
) to select from
these options:
option
Brightness
Adjust image brightness.
White
Balance
Adjust for different lighting.
Duration
Specify standard lengths for video clips
of
Short
(default, about 30 seconds),
Medium
,
Fit to Video Msg
(varies depending on
video settings), or
Long (Max Memory)
.
Resolution
Set recording resolution to
320x240
or
176x144
.
Color Effects
Scroll left or right to select
Normal
,
Antique
,
Black & White
, or
Negative
.
Switch
Storage
Device
Specify where you want to save video
clips (
Phone
or
Micro-SD Card
). This option is
available only when you have a memory
card inserted.

104
entertainment
play video clip
To play a video clip stored on your phone:
1
From the main screen, press right on the
Navigation Key (
N
) to access
] MEDIA CENTER
.
2
Use the Navigation Key (
N
) to scroll to
Picture & Video
and press the Center Select
Key (
M
)(
OK
).
3
Scroll to
My Videos
and press the Center Select
Key (
M
)(
OK
).
4
Scroll to the clip you want to play and press the
Center Select Key (
M
)(
PLAY
).
Press the Left Soft Key (
:
)(
Mute
) while the clip is
playing to mute the video clip sound. Press the
Left Soft Key (
:
)(
Unmute
) to turn sound on again.
take photos
Your phone has a 2 megapixel digital camera that can
take photos at up to 1600 x 1200 pixels resolution. You
can take a photo with your phone and send it in a
multimedia message to other wireless phone users.
When the phone’s flip is open, your camera lens is on
the back of your phone (see page 2).
To get the
clearest photos, wipe the lens clean with a soft,
dry cloth before you capture a photo.
take a photo
1
To activate the camera, press the Camera/Video
Key (
)
).

105
entertainment
The active viewfinder image appears on your
phone’s screen:
Press left and right on the Navigation Key (
N
) to
zoom in and out.
Press the Right Soft Key (
:
)(
Options
) to see more
options.
2
Point the camera lens at the camera subject and
press the Center Select Key (
M
)(
TAKE
).
3
Press the Center Select Key (
M
)(
SEND
) to save
the photo and go to the
NEW PICTURE MESSAGE
screen.
Press the Left Soft Key (
:
)(
Save
) to save the
picture in
MY PICTURES
.
Press the Right Soft Key (
:
)(
Erase
) to delete the
photo and return to the active viewfinder.
adjust camera settings
When the camera is active, press the Right Soft
Key (
:
)(
Options
) to select from these settings:
1600x1200
My Pics
N
0
P
TAK E
❙❙❙❙
❙❙❙❙
1X
EV
Options
Press the Center Select
Key (M) (
TAKE
) to
take a photo
.
Press the
Left Soft
Key (C) (
My Pics
)
to view
MY PICTURES
.
Press the
Right Soft
Key (C) (
Options
)
to view the
Options
menu.
option
Resolution
Set resolution to
1600x1200
,
1280x960
,
640x480
,
320x240
, or
Picture ID
.
Self Timer
Set the camera to take a photo
after a specific interval:
3 seconds
,
5 seconds,
or
10 seconds
. Or turn it off.
Brightness
Adjust image brightness by
scrolling left or right from
-2
to
2
.

106
entertainment
download pictures
1
From the main screen, press right on the
Navigation Key (
N
) to access
] MEDIA CENTER
.
2
Use the Navigation Key (
N
) to scroll to
Picture & Video
and press the Center Select
Key (
M
)(
OK
).
3
Scroll to
Get New Pictures
and press the Center Select
Key (
M
)(
OK
).
4
With
Get New Application
highlighted, press the Center
Select Key (
M
)(
OK
) to connect to
Media Center
.
Note:
Normal airtime and/or carrier usage charges
apply.
White Balance
Adjust for different lighting
conditions by scrolling left or
right to choose from
Auto
,
Sunny
,
Cloudy
,
Tungsten
,
Fluorescent
, or
Darkness
.
Shutter Sound
Activate a sound that plays when
you take a photo:
Shutter
,
Silent
,
Quack
, or
Boing
.
Color Effects
Scroll left or right to select
Normal
,
Antique
,
Black & White
, or
Negative
.
Fun Frame
Go to
ADD FUN FRAME
to select a
custom frame for your photo.
Switch Storage
Device
Specify where you want to save
pictures (
Phone
or
Micro-SD Card
). This
option is available only if you
have a memory card inserted.
option

107
tools
tools
contacts
Note:
The information in this chapter applies only to
contacts for voice calls. For information on entering
PTT contacts, see page 66.
emergency contact & personal
information
If you are injured, emergency workers may check your
phone for emergency contact information. Store the
phone numbers of relatives or friends as emergency
contacts.
1
From the main screen, press the Right Soft
Key (
:
)(
Contacts
) to open the
CONTACT LIST
.
2
Use the Navigation Key (
N
) to scroll to
In Case of
Emergency
and press the Center Select Key (
M
)(
OK
).
3
Scroll to
CONTACT 1
,
CONTACT 2
, or
CONTACT 3
, and press
the Center Select Key (
M
)(
ADD
).
To change an emergency contact
, scroll to the
contact and press the Right Soft Key (
:
)(
Options
),
then select
Re-assign
.
Note:
Select
Personal Info
to add personal
information that may assist emergency workers.
4
To
add a contact from the CONTACT LIST
,
select
From Contacts
, scroll to the contact you want to
add, and press the Center Select Key (
M
)(
OK
).
To
enter a new contact
, select
New Contact
, enter
the contact information, and press the Center
Select Key (
M
)(
SAVE
).

108
tools
create entry
1
From the main screen, press the Right Soft
Key (
:
)(
Contacts
) to open the
CONTACT LIST
.
2
Press the Right Soft Key (
:
)(
Options
).
3
Select
New Contact
by pressing the Center Select
Key (
M
)(
OK
).
4
Enter contact information and press the Center
Select Key (
M
)(
SAVE
).
edit entry
1
From the main screen, press the Right Soft
Key (
:
)(
Contacts
) to open the
CONTACT LIST
.
2
Use the Navigation Key (
N
) to scroll to the entry
and press the Left Soft Key (
:
)(
Edit
).
3
Edit the contact information and press the Center
Select Key (
M
)(
SAVE
).
view entry
1
From the main screen, press the Right Soft
Key (
:
)(
Contacts
) to open the
CONTACT LIST
.
2
Scroll to the entry and press the Center Select
Key (
M
)(
VIEW
).
To perform other actions on the entry, press the
Right Soft Key (
:
)(
Options
) and select
Send TXT
Message
,
Send Picture Message
,
Send Video Message
, or
Call
.
erase entry
1
From the main screen, press the Right Soft
Key (
:
)(
Contacts
) to open the
CONTACT LIST
.
2
Use the Navigation Key (
N
) to scroll to the entry
and press the Right Soft Key (
:
)(
Options
).
3
Scroll to
Erase
and press the Center Select
Key (
M
)(
OK
).
4
When the phone prompts
Erase Contact?
, scroll to
Yes
or
No
and press the Center Select Key (
M
)(
OK
).

109
tools
set speed dial number
Note:
To use speed dial to call a contact, see page 51.
To assign a speed dial number to a
Contacts
entry:
1
From the main screen, press the Right Soft
Key (
:
)(
Contacts
) to open the
CONTACT LIST
.
2
Use the Navigation Key (
N
) to scroll to the entry
and press the Left Soft Key (
:
)(
Edit
).
3
Scroll to the number to be assigned a speed dial
number and press the Right Soft Key (
:
)(
Options
).
4
Select
Set Speed Dial
by pressing the Center Select
Key (
M
)(
OK
).
5
Select an unassigned speed dial number and
press the Center Select Key (
M
)(
SET
).
6
When the phone prompts
Add Contact to Speed Dial?
,
use the Navigation Key (
N
) to select
Yes
and
press the Center Select Key (
M
)(
OK
).
7
Press the Center Select Key (
M
)(
SAVE
).
set default number for entry
To set the default number for a
Contacts
entry with
multiple numbers:
1
From the main screen, press the Right Soft
Key (
:
)(
Contacts
) to open the
CONTACT LIST
.
2
Use the Navigation Key (
N
) to scroll to the entry
and press the Left Soft Key (
:
)(
Edit
).
3
Scroll to the number to be set as the default
number and press the Right Soft Key (
:
)(
Options
).
4
Scroll to
Set As Default
and press the Center Select
Key (
M
)(
OK
).
5
When the phone prompts
Set as Default?
, use the
Navigation Key (
N
) to select
Yes
and press the
Center Select Key (
M
)(
OK
).

110
tools
assign ringtone to entry
When you assign a ringtone to a
Contacts
entry, your
phone plays that ringtone when you receive a call from
that contact.
1
From the main screen, press the Right Soft
Key (
:
)(
Contacts
) to open the
CONTACT LIST
.
2
Use the Navigation Key (
N
) to scroll to the entry
and press the Left Soft Key (
:
)(
Edit
).
3
Scroll to
Ringtone
and press the Left Soft
Key (
:
)(
Set
) to go to the
MY RINGTONES
menu.
4
Scroll to the desired ringtone and press the
Center Select Key (
M
)(
OK
).
5
Press the Center Select Key (
M
)(
SAVE
).
Note:
Master Volume
must be set to
High
,
Medium High
,
Medium
,
Medium Low
, or
Low
(see page 21).
assign picture to entry
When you assign a picture to a
Contacts
entry, your
phone displays that picture when you receive a call
from that contact.
1
From the main screen, press the Right Soft
Key (
:
)(
Contacts
) to open the
CONTACT LIST
.
2
Use the Navigation Key (
N
) to scroll to the entry
and press the Left Soft Key (
:
)(
Edit
).
3
Scroll to
Picture
and press the Left Soft
Key (
:
)(
Set
) to go to
MY PICTURES
.
4
Scroll to a picture and press the Center Select
Key (
M
)(
OK
).
5
Press the Center Select Key (
M
)(
SAVE
).
Tip:
You can also assign a picture by going to the
PICTURE & VIDEO
menu. From the home screen, press right
on the Navigation Key (
N
) to access
] MEDIA CENTER
,
and select
Picture & Video
. Next, scroll to
My Pictures
and
press the Center Select Key (
M
)(
OK
), then scroll to a

111
tools
picture and press the Right Soft Key (
:
)(
Options
).
Select
Set As
, then select
Picture ID
. Select the contact for
which you want the Picture ID to display and press the
Center Select Key (
M
)(
OK
). Your phone displays
PICTURE
SET AS PICTURE ID
.
download ringtone for an entry
You can download a ringtone to assign to a
Contacts
entry. When you receive a call from that entry, your
phone plays the ringtone you assigned.
1
From the main screen, press the Right Soft
Key (
:
)(
Contacts
) to open the
CONTACT LIST
.
2
Use the Navigation Key (
N
) to scroll to the entry
and press the Left Soft Key (
:
)(
Edit
).
3
Scroll to
Ringtone
and press the Left Soft
Key (
:
)(
Set
) to go to the
MY RINGTONES
menu.
4
Select
Get New App
and proceed to download and
save a ringtone.
Tip:
You can also download a ringtone from the
MUSIC &
TONES
menu. From the home screen, press right on the
Navigation Key (
N
) to access
] MEDIA CENTER
, and
select
Music & Tones
. Next, select
Get New Ringtones
, or select
My Ringtones
and then
Get New Application
.
add entries to group
To send a text message to many people at once, you
can create a group and add contact entries to it.
1
From the main screen, press the Center Select
Key (
M
)(
MENU
) to open the menu.
2
Press the Center Select Key (
M
)(
OK
) to select
[ CONTACTS
.
3
Use the Navigation Key (
N
) to scroll to
Groups
and
press the Center Select Key (
M
)(
OK
).
4
Scroll to the desired group name and press the
Right Soft Key (
:
)(
Options
).

112
tools
5
Scroll to
Add
and press the Center Select
Key (
M
)(
OK
).
6
On the
ADD CONTACTS
screen, scroll to each contact
you want to add and press the Center Select
Key (
M
)(
MARK
).
7
When you finish adding contacts to a group,
press the Left Soft Key (
:
)(
Done
).
Tip:
To add a
Contacts
entry to a group while editing the
entry, scroll to
Group
and press the Left Soft
Key (
:
)(
Set
).
add group
Add a new group as an entry on the
Groups
screen:
1
From the main screen, press the Center Select
Key (
M
)(
MENU
) to open the menu.
2
Press the Center Select Key (
M
)(
OK
) to select
[ CONTACTS
.
3
Use the Navigation Key (
N
) to scroll to
Groups
and
press the Center Select Key (
M
)(
OK
).
4
Press the Left Soft Key (
:
)(
New
).
5
Enter the name for the new group and press the
Center Select Key (
M
)(
SAVE
).
voice recognition
Your phone’s voice recognition feature lets you make
calls and complete other actions by speaking
commands to your phone.
voice recognition tips
•
When speaking the name of a
Contacts
entry,
say the name exactly as it is listed. For
example, to call the mobile number for an
entry named Bill Smith, say “Call Bill Smith
mobile.” (If the entry includes only one
number for Bill Smith, say “Call Bill Smith.”)

113
tools
•
Speak numbers at a normal speed and
volume, and pronounce each digit distinctly.
Avoid pausing between digits.
•
You can set your phone to play voice
command instructions through the
speakerphone by pressing the Voice
Command Key, which opens the
VOICE COMMANDS
menu. If you use the
Call
command to place a
call, audio plays through the phone’s earpiece
when the call connects. You can turn this
feature off (see page 117).
voice commands
1
With the phone flip closed, press and hold the
Voice Command Key on the right side of the
phone.
Note:
With the phone open, press and release
the Voice Command Key (see page 3). Pressing
and holding the key activates voice recording.
Your phone says
Please say a command
and displays a
list of voice commands.
2
Say one of the commands listed in the following
table. Your phone performs the corresponding
action.
feature
Call <Name or #>
Place a call to:
•
a
Contacts
entry whose name you speak
or
•
a phone number you speak
For example, when prompted to say a command,
say “Call Bill Smith mobile” or “Call 8475551212.”

114
tools
Send <MSG Type>
Send a text or picture message.
Say “Send text” or “Send picture,” then:
•
the name of a
Contacts
entry
or
•
a phone number
For instructions on sending a text or multimedia
message, see pages 77 and 80.
feature
Go To <Shortcut>
Access the menu or perform the action you specify:
Contacts
—Browse your contacts.
Recent Calls
—the recent calls list.
Messaging
—Access messages.
Media Center
—the Media Center menu.
Settings & Tools
—settings and tools.
Mobile Web
V CAST Video
—V CAST videos.
My Music
—your
My Music
.
Redial
or Call the last number you called.
feature

115
tools
Check <Item>
View the item on the screen that you say aloud:
Status
—coverage, signal strength, and battery
charge
Voicema il
—new voicemail messages
Messages
—newly received text or multimedia
messages
Missed Calls
—unanswered incoming calls
Time
—time and date
Signal Strength
—network connection strength
Battery
—battery charge
Volume
—ringer volume
feature
Contact <Name>
Look up a
Contacts
entry by saying the contact’s
name.
Play <Playlist>
Play a playlist with the music player by saying the
name of one of your playlists.
Note:
If you don’t have any music, the phone
returns to the home screen.
My Account
Launch Mobile Web and view your account options.
Help
Access help information for the voice recognition
feature.
feature

116
tools
voice recognition settings
To modify voice recognition settings:
1
With the phone open, press and release the Voice
Command Key on the right side of the phone.
Note:
With the phone closed, press and hold the
Voice Command Key.
2
Press the Right Soft Key (
:
) (
Settings
).
3
Use the Navigation Key (
N
) to scroll to the
desired option and press the Center Select
Key (
M
) (
OK
).
voice recognition settings
Digit Dial Readout
Set your phone to say numbers aloud as you press
them on the keypad.
Confirmation
If your phone is not sure that it has correctly
identified a name or number that you speak, it can
display up to three choices and prompt you to
confirm the correct one.
You can control when choice lists appear:
Automatic
—Display a list of choices from multiple
alternatives.
Always Confirm
—Always display a list of choices when
there are multiple alternatives.
Never Confirm
—Never display a choice list. The phone
chooses from the best alternatives.
voice recognition settings

117
tools
To access in-device help for a setting you speak, press
the Left Soft Key (
:
)(
Info
).
Sensitivity
You can fine tune your phone’s ability to recognize
voice commands. Select
Most Sensitive
,
Recommended
, or
Least Sensitive
.
If sensitivity is too strict
, your phone often rejects
voice commands and displays “Please repeat…”
or “No match found.” Select
Most Sensitive
.
If sensitivity is too forgiving
, you experience false
activations (indicating that the phone detects a
wrong match). Select
Least Sensitive
.
Adaptation
Follow the prompts on your screen to improve
recognition of spoken words. Adaptation takes
about sixty seconds and requires you to be in a
quiet place (no background noise).
voice recognition settings
Prompts
Mode
—Set whether your phone says
Prompts
,
Readout
(to read every word on the screen), or
Tones Only
.
Audio Playback
—Set how you want to hear prompts:
Automatic
detection,
Speakerphone
, or through your
Earpiece
.
Call Alert
For an incoming call, set whether you hear a
Ring Only
,
Caller ID + Ring
, or
Name Repeat
(repeat the name until you
answer or the call goes to voicemail).
voice recognition settings

118
tools
personal organizer
add calendar appointment
1
From the main screen, press the Center Select
Key (
M
)(
MENU
) to open the menu.
2
Use the Navigation Key (
N
) to scroll to
( SETTINGS & TOOLS
and press the Center Select
Key (
M
)(
OK
).
3
Scroll to
Tools
and press the Center Select
Key (
M
)(
OK
).
4
Scroll to
Calendar
and press the Center Select
Key (
M
)(
OK
).
5
Scroll to the desired date and press the Left Soft
Key (
:
)(
Add
).
6
Enter new appointment name and details. To
change the time, recurrence, or alert type, scroll
to the line and press the Left Soft Key (
:
)(
Set
).
7
To save the appointment, press the Center Select
Key (
M
)(
SAVE
).
see calendar appointment
1
From the main screen, press the Center Select
Key (
M
)(
MENU
) to open the menu.
2
Use the Navigation Key (
N
) to scroll to
( SETTINGS & TOOLS
and press the Center Select
Key (
M
)(
OK
).
3
Scroll to
Tools
and press the Center Select
Key (
M
)(
OK
).
4
Scroll to
Calendar
and press the Center Select
Key (
M
)(
OK
).
5
Scroll to the date of the appointment and press
the Center Select Key (
M
)(
VIEW
).
6
Press the Center Select Key (
M
)(
VIEW
) again to
see appointment details.

119
tools
set alarm clock
1
From the main screen, press the Center Select
Key (
M
)(
MENU
) to open the menu.
2
Use the Navigation Key (
N
) to scroll to
( SETTINGS & TOOLS
and press the Center Select
Key (
M
)(
OK
).
3
Scroll to
Tools
and press the Center Select
Key (
M
)(
OK
).
4
Scroll to
Alarm Clock
and press the Center Select
Key (
M
)(
OK
).
5
Scroll to
Alarm 1
,
Alarm 2
, or
Alarm 3
, and press the
Center Select Key (
M
)(
OK
).
6
Select
On
, and set the alarm time, recurrence, and
alert sound by scrolling to the category and
pressing the Left Soft Key (
:
)(
Set
).
7
Press the Center Select Key (
M
)(
SAVE
).
turn off alarm
When an alarm rings, press
Off
or the Power/End
Key (
%
) to turn it off.
view world clock
View current time in cities around the world:
1
From the main screen, press the Center Select
Key (
M
)(
MENU
) to open the menu.
2
Use the Navigation Key (
N
) to scroll to
( SETTINGS & TOOLS
and press the Center Select
Key (
M
)(
OK
).
3
Scroll to
Tools
and press the Center Select
Key (
M
)(
OK
).
4
Scroll to
World Clock
and press the Center Select
Key (
M
)(
OK
).
5
Use the Navigation Key (
N
) to scroll left or right
to the desired city.

120
tools
or
Press the Right Soft Key (
:
)(
Cities
) to view a list
of cities, then scroll to a city and press the Center
Select Key (
M
)(
OK
).
or
Press the Left Soft Key (
:
)(
Set DST
) to set
Daylight Savings Time for a city.
notepad
1
From the main screen, press the Center Select
Key (
M
)(
MENU
) to open the menu.
2
Use the Navigation Key (
N
) to scroll to
( SETTINGS & TOOLS
and press the Center Select
Key (
M
)(
OK
).
3
Scroll to
Tools
and press the Center Select
Key (
M
)(
OK
).
4
Scroll to
Notepad
and press the Center Select
Key (
M
)(
OK
).
Your phone displays the first few words of saved
notes in a list.
5
To
create a note
, press the Left Soft
Key (
:
)(
Add
). Enter text and press the Center
Select Key (
M
)(
SAVE
).
To
view a saved note
, scroll to the note and
press the Center Select Key (
M
)(
VIEW
).
calculators
1
From the main screen, press the Center Select
Key (
M
)(
MENU
) to open the menu.
2
Use the Navigation Key (
N
) to scroll to
( SETTINGS & TOOLS
and press the Center Select
Key (
M
)(
OK
).
3
Scroll to
Tools
and press the Center Select
Key (
M
)(
OK
).
4
Scroll to
Calculators
and press the Center Select
Key (
M
)(
OK
).

121
tools
5
For
basic calculator
functions, select
Basic Calculator
.
Use the keypad to enter numbers. To enter a
decimal, press
*
. To change to a positive or
negative, press
#
. Use the Navigation Key (
N
)
to select math functions. For more operators,
press the Right Soft Key (
:
)(
Operator
).
To
calculate a tip
, select
Tip Calculator
. Use the
keypad to enter the amount, the tip percentage,
and the number of ways the tip is to be split.
To enter a decimal, press
*
. To display the tax
amount, press the Right Soft Key (
:
)(
Options
) and
select
Display Tax
. Scroll to
Yes
and press the Center
Select Key (
M
)(
OK
).
fun & games
download game or
application
Download a
MEDIA CENTER
game or application:
1
From the main screen, press right on the
Navigation Key (
N
) to access
] MEDIA CENTER
.
2
Use the Navigation Key (
N
) to scroll to
Games
or
Browse & Download
and press the Center Select
Key (
M
)(
OK
).
3
Select
Get New Application
by pressing the Center
Select Key (
M
)(
OK
).
4
Select a category, application, and pricing option.
Normal airtime and/or carrier usage charges apply.

122
tools
launch game or application
1
From the main screen, press right on the
Navigation Key (
N
) to access
] MEDIA CENTER
.
2
Use the Navigation Key (
N
) to scroll to
Games
or
Browse & Download
and press the Center Select
Key (
M
)(
OK
).
3
Select the game or application you want to
launch.
Web sessions
From the main screen, press up on the
Navigation Key (
N
) to launch
MOBILE WEB
.
manage pictures
1
From the main screen, press right on the
Navigation Key (
N
) to access
] MEDIA CENTER
.
2
Use the Navigation Key (
N
) to scroll to
Picture & Video
and press the Center Select
Key (
M
)(
OK
).
3
Scroll to
My Pictures
and press the Center Select
Key (
M
)(
OK
) to view your pictures.
To view a picture, scroll to the picture and press the
Center Select Key (
M
)(
VIEW
).
While looking at a picture, press the Right Soft
Key (
:
)(
Options
) to see the following options:
Send
,
Set
As
,
To Online Album
,
Take New Picture
,
Get New Pictures
,
Rename
,
Move
,
Lock
,
Erase All
,
Slide Show
,
File Info
, or
Print
.
Note:
The options you see for pictures that you create
are different than the options you see for copyrighted
content such as the images that were preloaded on
your phone. You cannot send copyrighted content to
another person.

123
tools
manage video clips
1
From the main screen, press right on the
Navigation Key (
N
) to access
] MEDIA CENTER
.
2
Use the Navigation Key (
N
) to scroll to
Picture & Video
and press the Center Select
Key (
M
)(
OK
).
3
Scroll to
My Videos
and press the Center Select
Key (
M
)(
OK
) to view your video clips.
4
To play a video clip, scroll to the video clip and
press the Center Select Key (
M
)(
PLAY
).
From the
MY VIDEOS
screen, press the Right Soft
Key (
:
)(
Options
) to see the following options:
Send
,
Record Video
,
To Online Album
,
V CAST Videos
,
Rename
,
Move
,
Lock
,
Erase All
,
File Info
, or
Trim
.
Note:
The options you see for videos that you create
are different than the options you see for copyrighted
content. You cannot send copyrighted content to
another person.

124
connections
connections
Bluetooth® connections
Your phone supports Bluetooth wireless connections.
You can connect your phone with a Bluetooth headset
or car kit to make handsfree calls.
Note:
The use of wireless phones while driving may
cause distraction. Discontinue a call if you can’t
concentrate on driving. Additionally, the use of
wireless devices and their accessories may be
prohibited or restricted in certain areas. Always obey
the laws and regulations on the use of these products.
For maximum Bluetooth security
, you should
always connect Bluetooth devices in a safe, private
environment, away from other devices with Bluetooth
connection capabilities.
profiles supported
This section lists Bluetooth profiles currently
supported by this device.
Advanced Audio Device Profile (A2DP—Stereo
Bluetooth Profile)
—Allows a device such as a
Bluetooth enabled pair of headphones to receive
stereo audio data stream from a Bluetooth enabled
music player with the same profile.
Audio/Video Remote Control Profile
(AVRCP)
—Provides a standard interface to control
TVs, audio equipment, and similar devices. Allows a
single remote control (or other device) to control all of
the audio/video equipment to which a user has
access.

125
connections
Basic Imaging Profile (BIP)
—Defines how an
imaging device can be controlled remotely, how an
imaging device may print, and how an imaging device
can transfer images to a storage device. For example,
BIP enables a mobile phone to control a digital
camera.
Basic Printing Profile (BPP)
—Allows devices to send
text, emails, vCards, images, or other items to
printers. It does not need printer-specific drivers.
Dial Up Networking (DUN)
—Provides a standard to
access the Internet and other dial-up services with a
Bluetooth wireless connection.
Handsfree (HFP)
—Describes how a gateway device
can be used to place and receive calls for a handsfree
device. For example, a vehicle handsfree kit could use
a mobile phone as a gateway device.
Headset (HSP)
—Describes how a Bluetooth enabled
headset should communicate with a computer or
other Bluetooth enabled device, such as a mobile
phone.
OBEX profiles
—
•
Audio/Visual Control Transport Protocol Profile
(AVCTP) for controlling A/V devices.
•
Audio/Visual Distribution Profile (AVDTP) for
streaming audio and video
•
File Transfer Profile (FTP) and Object Push
Profile (OPP) for device-generated content
(image and video)
•
File Transfer Protocol (FTP) for phone to PC
transfers
•
Generic Audio/Video Distribution Profile
(GAVDP)
•
Object Push Profile (OPP) for vCard only

126
connections
Phone Book Access Profile (PBAP)
—Makes
information from a mobile phone’s phonebook
available to a handsfree device.
Serial Port Profile (SPP)
—Defines the protocols and
procedures to be used by devices using Bluetooth
connections for RS232 (or similar) serial cable emulation.
For more information about Bluetooth wireless
connections supported by this device, go to FAQ
www.verizonwireless.com/bluetooth
.
For information about vehicle compatibility, go to
www.verizonwireless.com/bluetoothchart
.
turn Bluetooth power on & off
1
From the main screen, press down on the
Navigation Key (
N
) to access the
BLUETOOTH MENU
.
2
Press the Left Soft Key (
:
) to turn Bluetooth
power
On
or
Off
.
Note:
To extend battery life, use this procedure to set
Bluetooth power to
Off
when not in use. Your phone
will not connect to devices until you set Bluetooth
power back to
On
and connect your phone with the
device again.
make phone visible to other
device
Allow an unknown Bluetooth device to discover your
phone:
1
From the main screen, press down on the
Navigation Key (
N
) to access the
BLUETOOTH MENU
.
2
Press the Right Soft Key (
:
)(
Options
).
3
Scroll to
Discovery Mode
and press the Center Select
Key (
M
)(
OK
).
4
Scroll to
On
and press the Center Select
Key (
M
)(
OK
).

127
connections
pair with a headset, handsfree
device, or PC
Note: If you use your Bluetooth headset with both
an audio device and your phone, use your phone’s
Bluetooth menus to connect the phone with the
headset.
If you establish the connection by pressing a
button on the headset, or if you allow the headset to
connect automatically by turning it on, you may
experience unexpected results.
Before you try to connect your phone with another
Bluetooth device
, make sure your phone’s Bluetooth
power is
On
. You can connect your phone with only one
device at a time.
1
From the main screen, press down on the
Navigation Key (
N
) to access the
BLUETOOTH MENU
.
2
Select
Add New Device
by pressing the Center Select
Key (
M
)(
OK
).
Note:
If Bluetooth power is not turned on, your
phone will display
Turn Bluetooth Power On?
. Press the
Center Select Key (
M
)(
OK
) to select
Yes
.
3
Make sure the Bluetooth device you are pairing
with is in discoverable mode (see the user’s guide
for the device).
4
Press the Center Select Key (
M
)(
OK
) to search for
available Bluetooth devices.
5
Use the Navigation Key (
N
) to scroll to and
highlight the device you want to connect to and
press the Center Select Key (
M
)(
PAIR
).

128
connections
6
Use the keypad to enter the PIN of the device you
want to pair with and press the Center Select
Key (
M
)(
OK
).
Note:
The default PIN code is usually 0000. Refer
to the Bluetooth accessory’s user guide for
additional information.
If the device requests permission to bond with your
phone, press the Center Select Key (
M
)(
YES
). When
the connection is made, the Bluetooth indicator
I
and a
Bluetooth
message display in the main screen.
transfer files
You can use a Bluetooth connection to transfer files
between your computer and phone.
Note:
Your computer’s Bluetooth interface may be
different.
1
Pair your phone and computer (see “pair with a
headset, handsfree device, or PC”).
2 On your computer
, right-click the Bluetooth icon
in your System Tray.
3
Select “Send a File.”
4
Click “Browse” to locate your phone name, and
then click “Next.”
5
Click “Browse” to locate the file you want to
transfer, and then click “Next.”
6 On your phone
, when prompted, press the
Center Select Key (
M
)(
ACCEPT
) to accept the file
transfer.
7
When you are finished transferring files, press the
Power/End Key (
%
) on your phone to close the
connection.
Note:
Breaking the link with your computer does not
turn off Bluetooth power on your phone. You might
want to turn Bluetooth power off to conserve battery
charge.

129
connections
connect with another phone
You can use a Bluetooth connection to transfer a
contact or file to another phone.
To transfer a contact to another phone
:
Note:
Make sure the phone receiving the entry has
Bluetooth power on and is in
Find Me
mode. The
receiving device must also be capable of receiving a
vCard. Not all Bluetooth devices have this capability.
1
From the main screen, press the Right Soft
Key (
:
)(
Contacts
) to open the
CONTACT LIST
.
2
Use the Navigation Key (
N
) to scroll to the entry
you want to transfer and press the Right Soft
Key (
:
)(
Options
).
3
Scroll to
Send Name Card
and press the Center Select
Key (
M
)(
OK
).
4
Scroll to
Bluetooth
and press the Center Select
Key (
M
)(
OK
).
5
Press the Center Select Key (
M
)(
SEND
).
6
Scroll to
[Add New Device]
or scroll to the device that
you want and press the Center Select
Key (
M
)(
PAIR
).
Note:
If your phone does not already have
Bluetooth power turned on, it prompts you to turn
it on.
7
If prompted, enter the default PIN code
0000
or
accept the transfer.
When the phones connect, the sending phone begins
the transfer. The receiving phone is prompted to
accept the transfer. When the receiving phone
accepts the transfer, the entry transfers.
To transfer a file to another phone
:
Note:
Make sure the phone receiving the file has
Bluetooth power on and is in
Find Me
mode. The
receiving phone must be capable of receiving the
file type.

130
connections
1
On your phone, select the file (such as a picture,
video, or sound) you want to transfer and press
the Right Soft Key (
:
)(
Options
).
2
Use the Navigation Key (
N
) to scroll to
Send
and
press the Center Select Key (
M
)(
OK
).
3
Scroll to
Bluetooth
and press the Center Select
Key (
M
)(
OK
).
4
Scroll to
[Add New Device]
or scroll to the device that
you want and press the Center Select
Key (
M
)(
OK
).
Note:
If your phone does not already have Bluetooth
power turned on, it prompts you to turn it on.
5
When your phone prompts you to confirm that
you want to send the file, select
Yes
by pressing
the Center Select Key (
M
)(
OK
).
6
If prompted, enter the default PIN code
0000
or
accept the transfer.
When the phones connect, the sending phone begins
the transfer. The receiving phone is prompted to
accept the transfer. When the receiving phone
accepts, the file is transferred.
connect to handsfree device
during a call
1
During a call, press the Right Soft
Key (
:
)(
Options
), then select
Bluetooth Menu
.
2
Use the Navigation Key (
N
) to scroll to
[Add New
Device]
or select the name of your handsfree device
if you have paired with it previously.
3
Press the Center Select Key (
M
)(
OK
).
4
If connecting to a new device, place the new
device in discoverable mode and press the Center
Select Key (
M
)(
OK
) on your phone.
5
When your phone finds your handsfree device,
press the Center Select Key (
M
)(
PAIR
).

131
connections
disconnect from a device
To disconnect from a device
while the phone
is idle
:
1
From the idle screen, press down on the
Navigation Key (
N
) to access the
BLUETOOTH MENU
.
2
Use the Navigation Key (
N
) to scroll to the name
of the device from which you want to disconnect.
3
Press the Center Select Key (
M
)(
DROP
).
4
When your phone asks if you want to disconnect,
select
Yes
and press the Center Select
Key (
M
)(
OK
).
To disconnect from a device
during an active call
:
1
Press the Right Soft Key (
:
)(
Options
).
2
Use the Navigation Key (
N
) to scroll to
Disconnect
Bluetooth
and press the Center Select Key (
M
)(
OK
).
cable connections
Your phone has a micro USB
port so you can connect it to
a computer.
•
Connect the phone
to a high-power USB
port on your computer (not a low-power one
such as the USB port on your keyboard or
bus-powered USB hub). Typically, USB
high-power ports are on your computer.
Note:
If you connect your phone to a
low-power USB port, the computer may not
recognize your phone.
•
Make sure both your phone and the computer
are turned on.

132
connections
network
network settings
1
From the main screen, press the Center
Select Key (
M
)(
MENU
) to open the menu.
2
Use the Navigation Key (
N
) to scroll to
( SETTINGS & TOOLS
and press the Center Select
Key (
M
)(
OK
).
3
Scroll to
Phone Settings
and press the Center Select
Key (
M
)(
OK
).
4
Scroll to
System Select
and press the Center Select
Key (
M
)(
OK
).
5
Scroll to
Set Mode
and press the Center Select
Key (
M
)(
OK
).
6
Scroll to
Home Only
or
Automatic
and press the Center
Select Key (
M
)(
OK
).
Note:
Other options may appear depending on
network availability.
call drop alerts
Set your phone to beep whenever the network
drops a call. (Because digital networks are so quiet,
the call drop alert may be your only sign that a call was
dropped.)
1
From the main screen, press the Center Select
Key (
M
)(
MENU
) to open the menu.
2
Use the Navigation Key (
N
) to scroll to
( SETTINGS & TOOLS
and press the Center Select
Key (
M
)(
OK
).
3
Scroll to
Sound Settings
and press the Center Select
Key (
M
)(
OK
).

133
connections
4
Scroll to
Service Alerts
and press the Center Select
Key (
M
)(
OK
).
5
Scroll to
Network Lost Tone
and press the Center
Select Key (
M
)(
OK
).
6
Select
On
and press the Center Select
Key (
M
)(
OK
).
call connect alerts
Set your phone to beep whenever an outgoing
call is connected:
1
From the main screen, press the Center Select
Key (
M
)(
MENU
) to open the menu.
2
Use the Navigation Key (
N
) to scroll to
( SETTINGS & TOOLS
and press the Center Select
Key (
M
)(
OK
).
3
Scroll to
Sound Settings
and press the Center Select
Key (
M
)(
OK
).
4
Scroll to
Service Alerts
and press the Center Select
Key (
M
)(
OK
).
5
Scroll to
Call Connect
and press the Center Select
Key (
M
)(
OK
).
6
Select
On
and press the Center Select
Key (
M
)(
OK
).
roaming alerts
Set phone to beep whenever the phone begins
roaming:
1
From the main screen, press the Center Select
Key (
M
)(
MENU
) to open the menu.
2
Use the Navigation Key (
N
) to scroll to
( SETTINGS & TOOLS
and press the Center Select
Key (
M
)(
OK
).
3
Scroll to
Sound Settings
and press the Center Select
Key (
M
)(
OK
).

134
connections
4
Scroll to
Service Alerts
and press the Center Select
Key (
M
)(
OK
).
5
Select
ERI
and press the Center Select
Key (
M
)(
OK
).
6
Select
On
and press the Center Select
Key (
M
)(
OK
).

135
service & repairs
service & repairs
If you have questions or need assistance, we're here
to help.
Go to
www.motorola.com/support
, where you can
select from a number of customer care options.
You can also contact the Motorola Customer
Support Center at 1-800-331-6456 (United States),
1-888-390-6456 (TTY/TDD United States for hearing
impaired), or 1-800-461-4575 (Canada).

136
SAR Data
Specific Absorption Rate Data
SAR Data
This model wireless phone meets the
government’s requirements for exposure
to radio waves.
Your wireless phone is a radio transmitter and receiver. It is
designed and manufactured not to exceed limits for exposure to
radio frequency (RF) energy set by the Federal Communications
Commission (FCC) of the U.S. Government and by the Canadian
regulatory authorities. These limits are part of comprehensive
guidelines and establish permitted levels of RF energy for the
general population. The guidelines are based on standards that
were developed by independent scientific organizations through
periodic and thorough evaluation of scientific studies. The
standards include a substantial safety margin designed to assure
the safety of all persons, regardless of age or health.
The exposure standard for wireless mobile phones employs a unit
of measurement known as the Specific Absorption Rate, or SAR.
The SAR limit set by the FCC and by the Canadian regulatory
authorities is 1.6 W/kg.
1
Tests for SAR are conducted using
standard operating positions accepted by the FCC and by Industry
Canada with the phone transmitting at its highest certified power
level in all tested frequency bands. Although the SAR is
determined at the highest certified power level, the actual SAR
level of the phone while operating can be well below the
maximum value. This is because the phone is designed to operate
at multiple power levels so as to use only the power required to
reach the network. In general, the closer you are to a wireless
base station, the lower the power output.
Before a phone model is available for sale to the public in the U.S.
and Canada, it must be tested and certified to the FCC and Industry
Canada that it does not exceed the limit established by each
government for safe exposure. The tests are performed in
positions and locations (e.g., at the ear and worn on the body)
reported to the FCC and available for review by Industry Canada.
The highest SAR value for this model phone when tested for use at
the ear is 1.45 W/kg, and when worn on the body, as described in
this user guide, is 0.73 W/kg. The SAR value for this product in its
data transmission mode (body-worn use) is 0.2 W/kg. (Body-worn
measurements differ among phone models, depending upon
available accessories and regulatory requirements).
2
While there may be differences between the SAR levels of various
phones and at various positions, they all meet the governmental
requirements for safe exposure. Please note that improvements to
this product model could cause differences in the SAR value for
later products; in all cases, products are designed to be within
the guidelines.

SAR Data
137
Additional information on Specific Absorption Rates (SAR) can be
found on the Cellular Telecommunications & Internet Association
(CTIA) Web site:
http://www.phonefacts.net
or the Canadian Wireless Telecommunications Association (CWTA)
Web site:
http://www.cwta.ca
1. In the United States and Canada, the SAR limit for mobile phones used
by the public is 1.6 watts/kg (W/kg) averaged over one gram of tissue.
The standard incorporates a substantial margin of safety to give
additional protection for the public and to account for any variations
in measurements.
2. The SAR information includes the Motorola testing protocol,
assessment procedure, and measurement uncertainty range
for this product.

138
SAR Data

139
Important Safety and
Legal Information

140
Safety Information
Safety and General Information
Safet y In formati on
This section contains important information on the safe and
efficient operation of your mobile device. Read this
information before using your mobile device.
Exposure to Radio Frequency (RF)
Energy
Your mobile device contains a transmitter and receiver. When it is
ON, it receives and transmits RF energy. When you communicate
with your mobile device, the system handling your call controls the
power level at which your mobile device transmits.
Your Motorola mobile device is designed to comply with local
regulatory requirements in your country concerning exposure of
human beings to RF energy.
Operational Precautions
For optimal mobile device performance, and to be sure that human
exposure to RF energy does not exceed the guidelines set forth in
the relevant standards, always follow these instructions and
precautions.
Product Operation
When placing or receiving a phone call, hold your mobile device
just like you would a landline phone.
If you wear the mobile device on your body, always place the
mobile device in a Motorola-supplied or approved clip, holder,
holster, case, or body harness. If you do not use a body-worn
accessory supplied or approved by Motorola, keep the mobile
device and its antenna at least 2.5 centimeters (1 inch) from your
body when transmitting.
Using accessories not supplied or approved by Motorola may
cause your mobile device to exceed RF energy exposure
guidelines. For a list of Motorola-supplied or approved
accessories, visit our Web site at:
www.motorola.com
.
RF Energy Interference/Compatibility
Nearly every electronic device is subject to RF energy interference
from external sources if inadequately shielded, designed, or
otherwise configured for RF energy compatibility. In some
circumstances your mobile device may cause interference with
other devices.

Safety Information
141
Follow Instructions to Avoid Interference
Problems
Turn off your mobile device in any location where posted notices
instruct you to do so.
In an aircraft, turn off your mobile device whenever instructed to
do so by airline staff. If your mobile device offers an airplane mode
or similar feature, consult airline staff about using it in flight.
Implantable Medical Devices
If you have an implantable medical device, such as a pacemaker or
defibrillator, consult your physician before using this mobile
device.
Persons with implantable medical devices should observe the
following precautions:
•
ALWAYS keep the mobile device more than
20 centimeters (8 inches) from the implantable medical
device when the mobile device is turned ON.
•
DO NOT carry the mobile device in the breast pocket.
•
Use the ear opposite the implantable medical device to
minimize the potential for interference.
•
Turn OFF the mobile device immediately if you have any
reason to suspect that interference is taking place.
Read and follow the directions from the manufacturer of your
implantable medical device. If you have any questions about using
your mobile device with your implantable medical device, consult
your healthcare provider.
Driving Precautions
The use of wireless phones while driving may cause distraction.
Discontinue a call if you can’t concentrate on driving.
Additionally, the use of wireless devices and their accessories may
be prohibited or restricted in certain areas. Always obey the laws
and regulations on the use of these products.
Responsible driving practices can be found in the “Smart Practices
While Driving” section in this guide (or separate guide).
Operational Warnings
Obey all posted signs when using mobile devices in public areas.
Potentially Explosive Atmospheres
Areas with potentially explosive atmospheres are often, but not
always, posted and can include fueling areas, such as below decks
on boats, fuel or chemical transfer or storage facilities, or areas
where the air contains chemicals or particles, such as grain dust,
or metal powders.
When you are in such an area, turn off your mobile device, and do
not remove, install, or charge batteries. In such areas, sparks can
occur and cause an explosion or fire.

142
Safety Information
Symbol Key
Your battery, charger, or mobile device may contain symbols,
defined as follows:
Batteries & Chargers
Caution: Improper treatment or use of batteries may present
a danger of fire, explosion, leakage, or other hazard. For
more information, see the “battery use & safety” section in
the user’s guide.
Keep Your Mobile Device and Its
Accessories Away From Small
Children
These products are not toys and may be hazardous to children. For
example:
•
A choking hazard may exist for small, detachable parts.
•
Improper use could result in loud sounds, possibly causing
hearing injury.
•
Improperly handled batteries could overheat and cause a
burn.
Glass Parts
Some parts of your mobile device may be made of glass. This glass
could break if the product is dropped on a hard surface or receives
a substantial impact. If glass breaks, do not touch or attempt to
remove. Stop using your mobile device until the glass is replaced
by a qualified service center.
Symbol Definition
Important safety information follows.
Do not dispose of your battery or mobile device
in a fire.
Your battery or mobile device may require
recycling in accordance with local laws. Contact
your local regulatory authorities for more
information.
Do not throw your battery or mobile device in
the trash.
Do not let your battery, charger, or mobile device
get wet.
Listening at full volume to music or voice
through a headset may damage your hearing.
032374o
032376o
032375o

Safety Information
143
Seizures/Blackouts
Some people may be susceptible to epileptic seizures or blackouts
when exposed to flashing lights, such as when playing video
games. These may occur even if a person has never had a previous
seizure or blackout.
If you have experienced seizures or blackouts, or if you have a
family history of such occurrences, please consult with your
physician before playing video games or enabling a flashing-lights
feature (if available) on your mobile device.
Discontinue use and consult a physician if any of the following
symptoms occur: convulsion, eye or muscle twitching, loss of
awareness, involuntary movements, or disorientation. It is always
a good idea to hold the screen away from your eyes, leave the
lights on in the room, take a 15-minute break every hour, and stop
use if you are tired.
Caution About High Volume Usage
Warning:
Exposure to loud noise from any source for
extended periods of time may affect your hearing.
The louder the volume sound level, the less time is
required before your hearing could be affected. To
protect your hearing:
•
Limit the amount of time you use headsets or headphones
at high volume.
•
Avoid turning up the volume to block out noisy
surroundings.
•
Turn the volume down if you can’t hear people speaking
near you.
If you experience hearing discomfort, including the sensation of
pressure or fullness in your ears, ringing in your ears, or muffled
speech, you should stop listening to the device through your
headset or headphones and have your hearing checked.
For more information about hearing, see our Web site at
www.motorola.com/hearingsafety
(in English only).
Repetitive Motion
When you repetitively perform actions such as pressing keys or
entering finger-written characters, you may experience occasional
discomfort in your hands, arms, shoulders, neck, or other parts of
your body. If you continue to have discomfort during or after such
use, stop use and see a physician.
[Mar0108]

144
Industry Canada Notice
Industry Canada Notice to Users
Indus try Canada Notice
Operation is subject to the following two conditions: (1) This
device may not cause interference and (2) This device must accept
any interference, including interference that may cause undesired
operation of the device. See RSS-GEN 7.1.5.
FCC Notice to Users
FCC Notice
The following statement applies to all products that have
received FCC approval. Applicable products bear the FCC
logo, and/or an FCC ID in the format FCC-ID:xxxxxx on the
product label.
Motorola has not approved any changes or modifications to this
device by the user. Any changes or modifications could void the
user’s authority to operate the equipment. See 47 CFR Sec. 15.21.
This device complies with part 15 of the FCC Rules. Operation is
subject to the following two conditions: (1) This device may not
cause harmful interference, and (2) this device must accept any
interference received, including interference that may cause
undesired operation. See 47 CFR Sec. 15.19(3).
This equipment has been tested and found to comply with the limits
for a Class B digital device, pursuant to part 15 of the FCC Rules.
These limits are designed to provide reasonable protection against
harmful interference in a residential installation. This equipment
generates, uses and can radiate radio frequency energy and, if not
installed and used in accordance with the instructions, may cause
harmful interference to radio communications. However, there is no
guarantee that interference will not occur in a particular installation.
If this equipment does cause harmful interference to radio or
television reception, which can be determined by turning the
equipment off and on, the user is encouraged to try to correct the
interference by one or more of the following measures:
•
Reorient or relocate the receiving antenna.
•
Increase the separation between the equipment and the
receiver.
•
Connect the equipment to an outlet on a circuit different
from that to which the receiver is connected.
•
Consult the dealer or an experienced radio/TV technician
for help.

Warranty
145
Motorola Limited Warranty for the United States and
Canada
Warranty
What Does this Warranty Cover?
Subject to the exclusions contained below, Motorola, Inc. warrants
its telephones, pagers, messaging devices, and consumer and
professional two-way radios (excluding commercial, government
or industrial radios) that operate via Family Radio Service or
General Mobile Radio Service, Motorola-branded or certified
accessories sold for use with these Products (“Accessories”) and
Motorola software contained on CD-ROMs or other tangible media
and sold for use with these Products (“Software”) to be free from
defects in materials and workmanship under normal consumer
usage for the period(s) outlined below. This limited warranty is a
consumer's exclusive remedy, and applies as follows to new
Motorola Products, Accessories and Software purchased by
consumers in the United States or Canada, which are accompanied
by this written warranty:
Products and Accessories
Products Covered Length of Coverage
Products and
Accessories
as
defined above, unless
otherwise provided for
below.
One (1) year
from the date of
purchase by the first consumer
purchaser of the product unless
otherwise provided for below.
Decorative
Accessories and
Cases.
Decorative
covers, bezels,
PhoneWrap™ covers
and cases.
Limited lifetime warranty
for the
lifetime of ownership by the first
consumer purchaser of the product.
Monaural Headsets.
Ear buds and boom
headsets that transmit
mono sound through a
wired connection.
Limited lifetime warranty
for the
lifetime of ownership by the first
consumer purchaser of the product.

146
Warranty
Exclusions
Normal Wear and Tear.
Periodic maintenance, repair and
replacement of parts due to normal wear and tear are excluded
from coverage.
Batteries.
Only batteries whose fully charged capacity falls below
80% of their rated capacity and batteries that leak are covered by
this limited warranty.
Abuse & Misuse.
Defects or damage that result from:
(a) improper operation, storage, misuse or abuse, accident or
neglect, such as physical damage (cracks, scratches, etc.) to the
surface of the product resulting from misuse; (b) contact with
liquid, water, rain, extreme humidity or heavy perspiration, sand,
dirt or the like, extreme heat, or food; (c) use of the Products or
Accessories for commercial purposes or subjecting the Product or
Accessory to abnormal usage or conditions; or (d) other acts which
are not the fault of Motorola, are excluded from coverage.
Use of Non-Motorola Products and Accessories.
Defects or
damage that result from the use of non-Motorola branded or
certified Products, Accessories, Software or other peripheral
equipment are excluded from coverage.
Unauthorized Service or Modification.
Defects or damages
resulting from service, testing, adjustment, installation,
maintenance, alteration, or modification in any way by someone
other than Motorola, or its authorized service centers, are
excluded from coverage.
Altered Products.
Products or Accessories with (a) serial
numbers or date tags that have been removed, altered or
obliterated; (b) broken seals or that show evidence of tampering;
(c) mismatched board serial numbers; or (d) nonconforming or
non-Motorola housings, or parts, are excluded from coverage.
Communication Services.
Defects, damages, or the failure of
Products, Accessories or Software due to any communication
service or signal you may subscribe to or use with the Products
Accessories or Software is excluded from coverage.
Software
Consumer and
Professional
Two-Way Radio
Accessories.
Ninety (90) days
from the date of
purchase by the first consumer
purchaser of the product.
Products and
Accessories that are
Repaired or
Replaced.
The balance of the original
warranty or for ninety (90) days
from the date returned to the
consumer, whichever is longer.
Products Covered Length of Coverage
Products Covered Length of Coverage
Software.
Applies only to physical
defects in the media that embodies
the copy of the software (e.g.
CD-ROM, or floppy disk).
Ninety (90) days
from
the date of purchase.

Warranty
147
Exclusions
Software Embodied in Physical Media.
No warranty is made
that the software will meet your requirements or will work in
combination with any hardware or software applications provided
by third parties, that the operation of the software products will be
uninterrupted or error free, or that all defects in the software
products will be corrected.
Software NOT Embodied in Physical Media.
Software that is
not embodied in physical media (e.g. software that is downloaded
from the internet), is provided “as is” and without warranty.
Who Is Covered?
This warranty extends only to the first consumer purchaser, and is
not transferable.
What Will Motorola Do?
Motorola, at its option, will at no charge repair, replace or refund
the purchase price of any Products, Accessories or Software that
does not conform to this warranty. We may use functionally
equivalent reconditioned/refurbished/pre-owned or new Products,
Accessories or parts. No data, software or applications added to
your Product, Accessory or Software, including but not limited to
personal contacts, games and ringer tones, will be reinstalled. To
avoid losing such data, software and applications please create a
back up prior to requesting service.
How to Obtain Warranty Service or
Other Information
You will receive instructions on how to ship the Products,
Accessories or Software, at your expense, to a Motorola
Authorized Repair Center. To obtain service, you must include: (a) a
copy of your receipt, bill of sale or other comparable proof of
purchase; (b) a written description of the problem; (c) the name of
your service provider, if applicable; (d) the name and location of the
installation facility (if applicable) and, most importantly; (e) your
address and telephone number.
USA Phones:
1-800-331-6456
Pagers:
1-800-548-9954
Two-Way Radios and Messaging
Devices:
1-800-353-2729
Canada All Products:
1-800-461-4575
TTY
1-888-390-6456
For
Accessories
and
Software
, please call the telephone
number designated above for the product with which they are
used.

148
Hearing Aids
What Other Limitations Are There?
ANY IMPLIED WARRANTIES, INCLUDING WITHOUT LIMITATION
THE IMPLIED WARRANTIES OF MERCHANTABILITY AND FITNESS
FOR A PARTICULAR PURPOSE, SHALL BE LIMITED TO THE
DURATION OF THIS LIMITED WARRANTY, OTHERWISE THE
REPAIR, REPLACEMENT, OR REFUND AS PROVIDED UNDER THIS
EXPRESS LIMITED WARRANTY IS THE EXCLUSIVE REMEDY OF
THE CONSUMER, AND IS PROVIDED IN LIEU OF ALL OTHER
WARRANTIES, EXPRESS OR IMPLIED. IN NO EVENT SHALL
MOTOROLA BE LIABLE, WHETHER IN CONTRACT OR TORT
(INCLUDING NEGLIGENCE) FOR DAMAGES IN EXCESS OF THE
PURCHASE PRICE OF THE PRODUCT, ACCESSORY OR SOFTWARE,
OR FOR ANY INDIRECT, INCIDENTAL, SPECIAL OR
CONSEQUENTIAL DAMAGES OF ANY KIND, OR LOSS OF
REVENUE OR PROFITS, LOSS OF BUSINESS, LOSS OF
INFORMATION OR DATA, SOFTWARE OR APPLICATIONS OR
OTHER FINANCIAL LOSS ARISING OUT OF OR IN CONNECTION
WITH THE ABILITY OR INABILITY TO USE THE PRODUCTS,
ACCESSORIES OR SOFTWARE TO THE FULL EXTENT THESE
DAMAGES MAY BE DISCLAIMED BY LAW.
Some states and jurisdictions do not allow the limitation or
exclusion of incidental or consequential damages, or
limitation on the length of an implied warranty, so the
above limitations or exclusions may not apply to you. This
warranty gives you specific legal rights, and you may also
have other rights that vary from state to state or from one
jurisdiction to another.
Laws in the United States and other countries preserve for
Motorola certain exclusive rights for copyrighted Motorola
software such as the exclusive rights to reproduce and distribute
copies of the Motorola software. Motorola software may only be
copied into, used in, and redistributed with, the Products
associated with such Motorola software. No other use, including
without limitation disassembly of such Motorola software or
exercise of the exclusive rights reserved for Motorola, is
permitted.
Hearing Aid Compatibility with Mobile Phones
Heari ng Aids
Some Motorola phones are measured for compatibility with
hearing aids. If the box for your particular model has “Rated for
Hearing Aids” printed on it, the following explanation applies.
When some mobile phones are used near some hearing devices
(hearing aids and cochlear implants), users may detect a buzzing,
humming, or whining noise. Some hearing devices are more

WHO Information
149
immune than others to this interference noise, and phones also
vary in the amount of interference they generate.
The wireless telephone industry has developed ratings for some of
their mobile phones, to assist hearing device users in finding
phones that may be compatible with their hearing devices. Not all
phones have been rated. Phones that are rated have the rating on
their box or a label on the box.
The ratings are not guarantees. Results will vary depending on the
user’s hearing device and hearing loss. If your hearing device
happens to be vulnerable to interference, you may not be able to
use a rated phone successfully. Trying out the phone with your
hearing device is the best way to evaluate it for your personal
needs.
M-Ratings:
Phones rated M3 or M4 meet FCC requirements and
are likely to generate less interference to hearing devices than
phones that are not labeled. M4 is the better/higher of the two
ratings.
T-Ratings:
Phones rated T3 or T4 meet FCC requirements and are
likely to be more usable with a hearing device’s telecoil (“T
Switch” or “Telephone Switch”) than unrated phones. T4 is the
better/higher of the two ratings. (Note that not all hearing devices
have telecoils in them.)
Hearing devices may also be measured for immunity to this type of
interference. Your hearing device manufacturer or hearing health
professional may help you find results for your hearing device. The
more immune your hearing aid is, the less likely you are to
experience interference noise from mobile phones.
Information from the World Health Organization
WHO In for mat ion
Present scientific information does not indicate the need for any
special precautions for the use of mobile phones. If you are
concerned, you may want to limit your own or your children’s RF
exposure by limiting the length of calls or by using handsfree
devices to keep mobile phones away from your head and body.
Source: WHO Fact Sheet 193
Further information:
http://www.who.int./peh-emf

150
Registration
Product Registration
Registrati on
Online Product Registration:
www.motorola.com/us/productregistration
Product registration is an important step toward enjoying your new
Motorola product. Registering permits us to contact you for
product or software updates and allows you to subscribe to
updates on new products or special promotions. Registration is not
required for warranty coverage.
Please retain your original dated sales receipt for your records. For
warranty service of your Motorola Personal Communications
Product you will need to provide a copy of your dated sales receipt
to confirm warranty status.
Thank you for choosing a Motorola product.
Export Law Assurances
Export Law
This product is controlled under the export regulations of the
United States of America and Canada. The Governments of the
United States of America and Canada may restrict the exportation
or re-exportation of this product to certain destinations. For further
information contact the U.S. Department of Commerce or the
Canadian Department of Foreign Affairs and International Trade.

Recycling Information
151
Caring for the Environment by Recycling
Rec ycling Information
This symbol on a Motorola product means the product
should not be disposed of with household waste.
Disposal of your Mobile Device and
Accessories
Please do not dispose of mobile devices or electrical accessories
(such as chargers, headsets, or batteries) with your household
waste. These items should be disposed of in accordance with the
national collection and recycling schemes operated by your local or
regional authority. Alternatively, you may return unwanted mobile
devices and electrical accessories to any Motorola Approved
Service Center in your region. Details of Motorola approved
national recycling schemes, and further information on Motorola
recycling activities can be found at:
www.motorola.com/recycling
Disposal of your Mobile Device
Packaging and User’s Guide
Product packaging and user’s guides should only be disposed of in
accordance with national collection and recycling requirements.
Please contact your regional authorities for more details.
California Perchlorate Label
Perchlorat e Label
Some mobile phones use an internal, permanent backup battery on
the printed circuit board that may contain very small amounts of
perchlorate. In such cases, California law requires the following
label:
“Perchlorate Material – special handling may apply. See
www.dtsc.ca.gov/hazardouswaste/perchlorate
.”
There is no special handling required by consumers.

152
Privacy and Data Security
Privacy and Data Security
Privacy and Data Securit y
Motorola understands that privacy and data security are important
to everyone. Because some features of your mobile device may
affect your privacy or data security, please follow these
recommendations to enhance protection of your information:
• Monitor access
—Keep your mobile device with you and
do not leave it where others may have unmonitored
access. Lock your device’s keypad where this feature is
available.
• Keep software up to date
—If Motorola or a
software/application vendor releases a patch or software
fix for your mobile device that updates the device’s
security, install it as soon as possible.
• Erase before recycling
—Delete personal information
or data from your mobile device prior to disposing of it or
turning it in for recycling. For step-by-step instructions on
how to delete all personal information from your device,
see the section entitled “master clear” or “delete data” in
the user’s guide.
Note:
For information on backing up your mobile device
data before erasing it, go to
www.motorola.com
and then
navigate to the “downloads” section of the consumer Web
page for “Motorola Backup” or “Motorola Phone Tools.”
• Understanding AGPS
—To provide location information
for emergency calls, certain Motorola mobile devices
incorporate Assisted Global Positioning System (AGPS)
technology. AGPS technology also can be used in
non-emergency applications to track and monitor a user’s
location—for example, to provide driving directions. Users
who prefer not to permit such tracking and monitoring
should avoid using such applications.
If you have further questions regarding how the use of your mobile
device may impact your privacy or data security, please contact
Motorola at
, or contact your service
provider.

Driving Safety
153
Smart Practices While Driving
Dri vin g Sa fety
Drive Safe, Call Smart
Check the laws and regulations on the use of mobile
devices and their accessories in the areas where you drive.
Always obey them. The use of these devices may be
prohibited or restricted in certain areas -- for example,
handsfree use only. Go to
www.motorola.com/callsmart
(in
English only) for more information.
Your mobile device lets you communicate by voice and
data—almost anywhere, anytime, wherever wireless service is
available and safe conditions allow. When driving a car, driving is
your first responsibility. If you choose to use your mobile device
while driving, remember the following tips:
• Get to know your Motorola mobile device and its
features such as speed dial and redial.
If available,
these features help you to place your call without taking
your attention off the road.
• When available, use a handsfree
device.
If possible, add an additional
layer of convenience to your mobile device
with one of the many Motorola Original
handsfree accessories available today.
• Position your mobile device within easy reach.
Be able to access your mobile device without removing
your eyes from the road. If you receive an incoming call at
an inconvenient time, if possible, let your voicemail
answer it for you.
• Let the person you are speaking with know you are
driving; if necessary, suspend the call in heavy
traffic or hazardous weather conditions.
Rain, sleet,
snow, ice, and even heavy traffic can be hazardous.
• Do not take notes or look up phone numbers while
driving.
Jotting down a “to do” list or going through your
address book takes attention away from your primary
responsibility—driving safely.
• Dial sensibly and assess the traffic; if possible,
place calls when your car is not moving or before
pulling into traffic.
If you must make a call while
moving, dial only a few numbers, check the road and your
mirrors, then continue.
• Do not engage in stressful or emotional conversations
that may be distracting.
Make people you are talking with
aware you are driving and suspend conversations that can
divert your attention away from the road.
• Use your mobile device to call for help.
Dial 911 or
other local emergency number in the case of fire, traffic
accident, or medical emergencies.*

154
Driving Safety
• Use your mobile device to help others in
emergencies.
If you see an auto accident, crime in
progress, or other serious emergency where lives are in
danger, call 911 or other local emergency number, as you
would want others to do for you.*
• Call roadside assistance or a special
non-emergency wireless assistance number when
necessary.
If you see a broken-down vehicle posing no
serious hazard, a broken traffic signal, a minor traffic
accident where no one appears injured, or a vehicle you
know to be stolen, call roadside assistance or other
special non-emergency wireless number.*
* Wherever wireless phone service is available.

index
155
index
A
accessories 10, 22
alert
sounds 33, 35
turn off 21
answer a call 16
attach a number 58
B
backlight 40
banner 45
battery 13
conserving 10
life, extending 126
battery life, extend 11
Bluetooth connection
description 124
brightness 40
C
cables 131
calculator 120
calendar 118
call
answer 16
drop alerts 132
end 16
make 16
missed 50
sounds 33, 35
timers 55
call timers 55
camcorder 102, 103
camera 3, 104
settings 105
Camera/Video Key 2
car kit 22
Center Select Key 2
chat 83
Clear Key 2, 64
clock 44
alarm, set 119
alarm, turn off 119
world 119
codes 24
conserve battery 10
Contacts
assign picture 110
assign ringtone 110
create entry 108
create group 111, 112
download ringtone 111
edit entry 108
erase entry 108
set default number 109

156
index
Contacts (continued)
set speed dial number 109
view entry 108
D
data volume 55
delete text 64
dial a phone number 16
dialed calls 48
display 18
display themes 39
draft message 81
DTMF tones 58
E
earpiece volume 21
email 83
emergency number 52
end a call 16
enter text 60
erase messages 83
event sounds 33, 35
export regulations 150
H
handsfree speaker 3, 22
headset 22
hearing aid 59
hearing aids 148
I
icons 18
indicators 18
international access code 53
iTAP text entry mode 63
K
keypad 43
L
languages 44
lens, cleaning 104
linking. See Bluetooth connection
lock
code 24
phone 24
M
main screen 18
main screen keys 46
make a call 16
master volume 33
megapixels 104
menu
icons 45
message 80
chat 83
draft 81
email 83
erase 83
Mobile IM 82
read 81
received 81
sent 80

index
157
message indicators
icons 18
micro USB port 3
missed calls 50
Mobile IM 82
music
downloading 85
playlist 99
Music Buttons 2
N
Navigation Key 2
network settings 132
notepad 120
numeric entry mode 64
O
optional accessory 10
optional feature 10
options
camera 105
video 103
P
pairing. See Bluetooth connection
perchlorate label 151
phonebook 58, 107
photo 122
picture 122
playlists 99
Power/End Key 2, 15, 16
PTT contact 66, 67
PTT group 66, 67
push to talk
activate PTT mode 65
add PTT contact 66
add PTT group 66
alert call 68
answer call 72
barge call 68
call, alert 68
call, barge 68
contact availability 74
make call 69
manage contacts & groups 67
temporary group 71
R
received
calls 48
message 81
recent calls 48
record video clip 102
records, voice 100
redial 47
reset timer 56
ringer volume 21
roaming alert 133
S
safety information 140
safety tips 153
Send Key 2, 16
sent message 80
service tones 133
set alarm clock 119

158
index
shortcuts 32
Smart/Speakerphone Key 3
Soft Keys 2, 18
sounds
settings 21, 33
turn off 43
speak keypad digits 37
speakerphone 22
symbol entry mode 64
T
take notes 120
talking phone 37
tap text entry mode 62
text
entry 60
message 80
text edit 64
timers 55, 56
tips & tricks 32
transfer music from computer 87
turn off alarm clock 119
turn off sounds 43
turn on/off 15
U
unanswered calls 50
unlock
code 24
phone 24
USB cables 131
V
V CAST
music 85
Vibrate Key 32
videos
clips 102, 123
settings 103
voice
privacy 31
records 100
Voice Command Key 3
voice recognition 112
voicemail 53
volume 21, 43
Volume Keys 3
W
wallpaper 38
warranty 145
WHO information 149
world clock 119
U.S. patent Re. 34,976

Guía del Usuario
T E LÉ F O N O V C A S T
V750
motorola
adventure
TM


1
HELLOMOTO
Presentamos el nuevo teléfono inalámbrico
motorola
adventure
™
V750
. Es resistente y está equipado con
funciones de alto rendimiento:
Comunicación instantánea
– con Verizon Wireless® Push to Talk, puede conectarse instantáneamente con
familiares y amigos pulsando un botón. (PTT depende de la red y de la suscripción, y no está disponible en todas
las áreas. Su teléfono debe estar registrado con un servidor Push to Talk.)
Entretenimiento en cualquier lugar
– descargue y reproduzca música y videos de V CAST. Use el reproductor de
música para ajustar la lista de reproducción para su viaje matinal. Optimice su experiencia de escuchar música con
audífonos estéreo Bluetooth® (se venden por separado).
Conéctese en muchos niveles
– ya sea con el trabajo o con amigos, conéctese de muchas formas, mediante voz,
mensajes de texto, descargas, intercambiando una tarjeta de memoria opcional. ¡Estará a la vanguardia de las
últimas noticias y vistas para compartir!
Mi teléfono, Mi manera –
es su teléfono; déjelo a su manera. Personalice la pantalla principal con imágenes
personales, cambie la imagen de fondo y use su canción favorita como tono de timbre.

2
Aquí le brindamos una rápida lección acerca de su anatomía.
Te cla de cámara/video
Te cla enviar
Realiza y contesta llamadas.
Te cla Borrar
Te cla programable
derecha
Realiza función en la parte
inferior derecha de la pantalla.
Te cla de
Encendido/fin
Encender y apagar
el teléfono, finalizar
las llamadas, salir
de menús.
Micrófono
Te cla programable
izquierda
Realiza función en
la parte inferior izquierda
de la pantalla.
Te cla de nave
gación de 4 direcciones
con selección central
Oprima la tecla de selección central (M)
para abrir el menú principal.
Lente de
la cámara
Botones
de música:
Reproducir/
Pausa
Retroceder/
Rebobinar
Omitir/
Adelantar
Pantalla externa
Ver información de
la llamada entrante o
usarla como visor de
la cámara cuando la
solapa está cerrada.
Te cla V ibrar
Auricular

3
El teléfono incluye las siguientes teclas laterales:
Tecla
inteligente/altavoz
Con la solapa cerrada,
mantenga oprimida para
bloquear o desbloquear las
teclas laterales.
Con la solapa abierta,
mantenga oprimida para
encender o apagar
el altavoz.
Tecla Comando de voz
Crear registros de voz,
activar marcado por voz y
comandos de voz.
Puerto micro USB
Conectar el cargador
y accesorios del
teléfono.
Tecla Push to Talk
Teclas de
volumen
Puerto del
audífono

4
Motorola, Inc.
Consumer Advocacy Office
1307 East Algonquin Road
Schaumburg, IL 60196
www.hellomoto.com
Nota:
no envíe el teléfono a la dirección anterior. Si necesita
devolver el teléfono para reparaciones, reemplazo o servicio de
garantía, comuníquese con el Centro de atención a clientes de
Motorola al:
1-800-331-6456 (Estados Unidos)
1-888-390-6456 (TTY/TDD Estados Unidos, para personas con
problemas de audición)
1-800-461-4575 (Canadá)
Algunas funciones del teléfono móvil dependen de las
capacidades y de la programación de la red de su proveedor de
servicio. Además, es posible que su proveedor de servicio no
active algunas funciones y/o que la programación de la red del
proveedor limite la funcionalidad de éstas. Siempre comuníquese
con su proveedor de servicio para conocer la funcionalidad y la
disponibilidad de las funciones. Todas las funciones, la
funcionalidad y otras especificaciones del producto, así como la
información incluida en esta guía del usuario, se basan en la
información más reciente disponible, la que se considera precisa
en el momento de la impresión. Motorola se reserva el derecho de
cambiar o modificar cualquier información o especificación sin
previo aviso ni obligación.
MOTOROLA y el Logotipo de la M Estilizada están registrados en
la Oficina de Patentes y Marcas Registradas de los Estados
Unidos. Todos los demás nombres de productos o de servicios
pertenecen a sus respectivos dueños. Las marcas comerciales
Bluetooth pertenecen a su propietario y son utilizadas por
Motorola, Inc. bajo licencia. Java y todas las demás marcas
basadas en Java son marcas comerciales o marcas comerciales
registradas de Sun Microsystems, Inc. en Estados Unidos y en
otros países. Microsoft y Windows son marcas comerciales
registradas de Microsoft Corporation; y Windows XP y
Windows Vista son marcas comerciales de Microsoft Corporation.
Verizon Wireless® es una marca registrada de Verizon Trademark
Services, LLC. BREW es una marca comercial de QUALCOMM
Incorporated.
© 2008 Motorola, Inc. Todos los derechos reservados.
Precaución:
los cambios o las modificaciones realizados en
el teléfono radio, no aprobados expresamente por Motorola,
invalidarán la autoridad del usuario para operar el equipo.
Aviso de derechos de autor de software
Los productos Motorola descritos en este manual pueden incluir
software protegido por derechos de autor de Motorola y de
terceros almacenado en las memorias de los semiconductores o en
otros medios. Las leyes de Estados Unidos y de otros países
reservan para Motorola y para otros proveedores de software
ciertos derechos exclusivos sobre el software protegido por
derechos de autor, como los derechos exclusivos para distribuir o
reproducir dicho software. En consecuencia, no podrá modificarse,
someterse a operaciones de ingeniería inversa, distribuirse ni

5
reproducirse de forma alguna, según lo permitido por la ley, ningún
software protegido por derechos de autor contenido en los
productos Motorola. Asimismo, no se considerará que la compra
de productos Motorola otorgue en forma directa, implícita, por
exclusión ni de ningún otro modo una licencia sobre los derechos
de autor, patentes o aplicaciones de patentes de Motorola ni de
ningún otro proveedor de software, excepto la licencia normal, no
exclusiva y sin regalías de uso que surge de las consecuencias
legales de la venta de un producto.
Número de manual: 68000201058-D

6
contenido
contenido
mapa de menús. . . . . . . . . . . . 9
Uso y cuidado . . . . . . . . . . . . 11
aspectos esenciales. . . . . . . . 12
acerca de esta guía. . . . . . . 12
batería. . . . . . . . . . . . . . . . . 12
encender y apagar . . . . . . . 18
realizar una llamada. . . . . . . 18
contestar una llamada. . . . . 19
finalizar una llamada . . . . . . 19
almacenar un número
telefónico . . . . . . . . . . . . . . 19
llamar a un número
telefónico almacenado . . . . 20
aspectos fundamentales. . . . 21
pantalla principal . . . . . . . . . 21
ajustar el volumen. . . . . . . . 25
cambiar la programación
de sonido . . . . . . . . . . . . . . 25
manos libres . . . . . . . . . . . . 26
modo independiente . . . . . . 27
cambiar código
de bloqueo . . . . . . . . . . . . . 28
bloquear y desbloquear el
teléfono. . . . . . . . . . . . . . . . 29
bloquear teclas laterales
cuando la solapa está
cerrada . . . . . . . . . . . . . . . . 30
administrar memoria . . . . . . 31
operación TTY . . . . . . . . . . . 34
conversación privada . . . . . . 36
consejos y trucos. . . . . . . . . . 37
personalizar . . . . . . . . . . . . . . 39
sonidos . . . . . . . . . . . . . . . . 39
obtener timbres. . . . . . . . . . 43
lectura de voz . . . . . . . . . . . 43
opciones para contestar . . . 44
fondo de pantalla . . . . . . . . . 45
mostrar temas . . . . . . . . . . . 45
luz de fondo. . . . . . . . . . . . . 46
brillo. . . . . . . . . . . . . . . . . . . 47
AGPS y su ubicación . . . . . . 47
limitaciones y consejos de
AGPS . . . . . . . . . . . . . . . . . . 48
más funciones de
personalización . . . . . . . . . . 49
llamadas . . . . . . . . . . . . . . . . . 54
remarcar un número . . . . . . 54
remarcado automático. . . . . 55
llamadas recientes. . . . . . . . 55

contenido
7
responder llamadas
perdidas. . . . . . . . . . . . . . . . 57
marcado rápido . . . . . . . . . . 58
llamadas de emergencia . . . 59
AGPS durante una llamada
de emergencia . . . . . . . . . . 60
llamadas internacionales . . . 61
correo de voz. . . . . . . . . . . . 61
opciones de llamada
entrante. . . . . . . . . . . . . . . . 62
tiempos de llamada y
volúmenes de datos . . . . . . 63
más funciones de llamada. . 65
ingreso de texto. . . . . . . . . . . 68
seleccionar modo
de ingreso . . . . . . . . . . . . . . 69
modo tap. . . . . . . . . . . . . . . 71
modo iTAP® . . . . . . . . . . . . 71
modo numérico. . . . . . . . . . 72
modo símbolo . . . . . . . . . . . 72
consejos para el ingreso de
texto . . . . . . . . . . . . . . . . . . 73
push to talk. . . . . . . . . . . . . . . 74
activar modo PTT. . . . . . . . . 74
contactos y grupos PTT. . . . 75
llamadas PTT . . . . . . . . . . . . 77
tonos de alerta PTT . . . . . . . 83
indicadores PTT . . . . . . . . . . 84
almacenar un número
telefónico. . . . . . . . . . . . . . . 85
Push to Talk . . . . . . . . . . . . . 86
mensajes. . . . . . . . . . . . . . . . . 87
enviar un mensaje
multimedia. . . . . . . . . . . . . . 87
recibir un mensaje
multimedia. . . . . . . . . . . . . . 89
enviar un mensaje de texto . 90
ver los mensajes enviados. . 91
leer mensaje recibido . . . . . 92
ver borradores . . . . . . . . . . . 92
IM móvil. . . . . . . . . . . . . . . 93
email . . . . . . . . . . . . . . . . . 94
chat . . . . . . . . . . . . . . . . . . 94
borrar mensajes . . . . . . . . . 95
entretenimiento . . . . . . . . . . 96
obtener y reproducir
música . . . . . . . . . . . . . . . . 96
grabar y reproducir
registros de voz . . . . . . . . . 113
grabar y reproducir
videoclips. . . . . . . . . . . . . . 115
tomar fotografías . . . . . . . . 118
descargar imágenes. . . . . 120
herramientas. . . . . . . . . . . . 121
contactos . . . . . . . . . . . . . 121
reconocimiento de voz. . . 128
organizador personal . . . . 134
diversión y juegos . . . . . . 138
conexiones . . . . . . . . . . . . . 141
conexiones Bluetooth® . . 141

8
contenido
conexiones de cable . . . . . 149
red. . . . . . . . . . . . . . . . . . . 149
servicio y reparaciones . . . . 152
Datos SAR . . . . . . . . . . . . . . 153
Información de seguridad. . 156
Aviso de Industry Canada. . 160
Aviso FCC. . . . . . . . . . . . . . . 161
Garantía . . . . . . . . . . . . . . . . 162
Prótesis auditivas . . . . . . . . 166
Información de la OMS . . . . 167
Registro . . . . . . . . . . . . . . . . 167
Ley de exportaciones . . . . . 168
Información de reciclaje . . . 168
Etiqueta de perclorato . . . . 169
Privacidad y seguridad de datos
169
Seguridad al conducir. . . . . 170
índice . . . . . . . . . . . . . . . . . . 172

mapa de menús
9
mapa de menús
menú principal
]
CENTRO DE MEDIOS*
• Música y tonos
• Imagen y video
• Juegos
• Acceso Web
• Exploración y descarga
• Extras
)
MENSAJERÍA
• Mensaje nuevo
• Buzón
•Enviado
• Borradores
• Correo de voz
•IM móvil*
• Email*
•Chat*
[
CONTACTOS
• Contacto nuevo
• Lista de contactos
• Grupos
• Nuevo contacto PTT**
• Lista de contactos PTT**
• Grupos PTT**
• Marcado rápido
• En caso de emergencia
*
LLAMS RECIENTES
• Perdidas
• Recibido
• Hechas
•Todo
• Ver cronómetros
(
PROGRAMACIÓN Y HERRAMIENTAS
• (consulte la página siguiente)
* servicios opcionales
** Aparecen opciones cuando el servicio
PTT opcional está habilitado (
Modo PTT
está
configurado en
Activado
y el teléfono está
registrado en un servidor PTT).

10
mapa de menús
menú programación y herramientas
•Micuenta*
• Herramientas
• Comandos de voz
• Calculadoras
• Calendario
• Despertador
• Reloj mundial
• Apuntes
• Menú Bluetooth
• Agregar disp nvo
• Programación de sonidos
• Sonidos de llamada
• Sonidos de alerta
• Volumen del teclado
• Alertas de servicio
• Encendido/Apagado
• Lectura de voz
• Prog pantalla
•Titular
• Luz de fondo
• Brillo
• Fondo de pantalla
• Mostrar temas
• Tamaños de letra de marcación
• Formato de reloj
• Pantalla de marcado rápido
* requiere servicio de Internet móvil
• Programación del teléfono
• Modo independiente
• Programar teclas de atajo
• Idioma
• Posición
• Seguridad
• Seleccionar sistema
• Selección NAM
• Ingreso de texto
• Programación de llamadas
• Opc para contestr
• Reintento automático
• Modo TTY
• Marcado con una tecla
• Privacidad voz
• Tonos DTMF
• Aparato auditivo
• Modo PTT
•Memoria
• Opciones de guardado**
• Imágenes
• Videos
• Sonidos
• Memoria del teléfono
• Uso de la memoria del
teléfono
• Mis imágenes
• Mis videos
•Mi música
• Mis sonidos
• Memoria de tarjeta**
• Uso de la memoria de la tarjeta
• Mis imágenes
• Mis videos
•Mi música
• Mis sonidos
• Formatear tarjeta
• Info del teléfono
• Mi número
• Versión SW/HW
• Glosario de iconos
• Actualización de software
** disponible sólo si está instalada la
tarjeta de memoria opcional

Uso y cuidado
11
Uso y cuidado
Uso y cui dado
Para proteger su teléfono Motorola, manténgalo alejado de:
todo tipo de líquidos polvo y suciedad
No exponga su teléfono al agua, a la lluvia, a la
humedad extrema, al sudor ni a otro tipo de
humedad. Si el teléfono se moja, no intente
acelerar el secado utilizando un horno o secador
de pelo, ya que puede dañar el dispositivo.
No exponga su teléfono al polvo, a la
suciedad, a arena, a alimentos ni a otros
materiales no apropiados.
calor o frío extremo soluciones de limpieza
Evite temperaturas inferiores a 0ºC/32ºF o
superiores a 45°C/113°F.
Para limpiar su teléfono, use sólo un paño
suave y seco. No use alcohol ni otras
soluciones de limpieza.
microondas el suelo
No intente secar su teléfono en un horno
microondas.
No deje caer su teléfono.

12
aspectos esenciales
aspectos esenciales
acerca de esta guía
Nota:
las instrucciones de esta guía de usuario se
basan en una configuración predeterminada de
Mostrar
tema
en
Vapor
(consulte la página 45). Si cambia
Mostrar
tema
a otra configuración, las instrucciones pueden
ser distintas.
batería
ahorrar energía de la batería
El uso de ciertas funciones puede consumir
rápidamente la carga de la batería.
Entre estas
símbolos
Esto significa que la función depende de la
red o de la suscripción, y es posible que no
esté disponible en todas las áreas. Para
obtener más información, comuníquese
con su proveedor de servicio.
PRECAUCIÓN: antes de usar el
teléfono por primera vez, lea la
Información legal y de seguridad
importante que se incluye en las
páginas de borde gris en la parte
posterior de esta guía.
Esto significa que la función requiere un
accesorio opcional.
símbolos

13
aspectos esenciales
funciones se incluyen descargar música,
reproducir videoclips y usar conexiones
inalámbricas Bluetooth®.
Puede ahorrar carga de la batería al hacer lo siguiente:
•
Desactive la función Bluetooth cuando no la
esté usando (consulte la página 143).
•
Desactive el fondo de pantalla (consulte la
página 45).
•
Baje el tiempo de la luz de fondo de la pantalla
(consulte la página 46).
uso y seguridad de las baterías
IMPORTANTE: MANIPULE Y ALMACENE
ADECUADAMENTE LAS BATERÍAS PARA EVITAR
LESIONES O DAÑOS.
La mayoría de los problemas
con las baterías surgen del manejo inadecuado de las
baterías y específicamente del uso continuo de
baterías dañadas.
RESTRICCIONES:
• No desarme, rompa, perfore, triture ni
intente cambiar de ningún otro modo la
forma de la batería.
• No permita que el teléfono ni la batería
entren en contacto con el agua.
El agua
puede entrar a los circuitos del teléfono, lo
que produce corrosión. Si el teléfono y/o la
batería se mojan, haga que el operador los
revise o comuníquese con Motorola, incluso si
parecen funcionar correctamente.
• No permita que la batería toque objetos
metálicos.
Si objetos de metal, como joyas,
permanecen en contacto prolongado con los
puntos de contacto de la batería, la batería se
puede calentar mucho.
• No ponga la batería cerca de una fuente de
calor.
El calor excesivo puede dañar el
teléfono o la batería. Las temperaturas altas

14
aspectos esenciales
pueden hacer que la batería se hinche, tenga
fugas o falle. Por lo tanto:
•No
seque una batería mojada o húmeda
con un electrodoméstico o una fuente de
calor externa, como un secador de pelo o
un horno microondas.
•
Evite dejar el teléfono dentro del
automóvil a altas temperaturas.
RECOMENDACIONES:
• Evite dejar caer la batería o el teléfono.
Dejar caer estos elementos, especialmente en
una superficie dura, puede provocar un daño
potencial.
• Comuníquese con el proveedor de servicios
o con Motorola si el teléfono o la batería se
dañan por caídas o altas temperaturas.
IMPORTANTE: USE PRODUCTOS ORIGINALES
MOTOROLA PARA ASEGURAR LA CALIDAD Y LA
SEGURIDAD.
Para ayudar a los consumidores para
distinguir las baterías auténticas de Motorola de
aquellas que no lo son o baterías falsificadas (que
pueden no tener una protección de seguridad
adecuada), Motorola pone hologramas en sus
baterías. Los consumidores deben confirmar que
cualquier batería que adquieran tenga el holograma
“Motorola Original”.
Motorola recomienda que siempre utilice baterías
y cargadores marca Motorola.
Los dispositivos
móviles Motorola están diseñados para funcionar con
baterías Motorola. Si ve en la pantalla un mensaje tal
como
Batería inválida
o
No puede cargar
, realice los siguientes
pasos:
•
Retire la batería y revísela para confirmar si
tiene el holograma “Motorola Original”
•
Si no tiene el holograma, la batería no es una
batería Motorola;

15
aspectos esenciales
•
Si tiene el holograma, vuelva a poner la batería
y vuelva a intentar cargarla;
•
Si el mensaje permanece, comuníquese con
un Centro de servicio Motorola autorizado.
Importante:
la garantía de Motorola no cubre daños
provocados al teléfono por el uso de baterías y/o
cargadores que no sean Motorola.
Advertencia:
el uso de una batería o cargador que no
sean de Motorola puede dar origen a un incendio, una
explosión, una fuga u otra situación de peligro.
RECICLAJE Y ELIMINACIÓN
ADECUADA Y SEGURA DE LA BATERÍA
La correcta eliminación de la batería no sólo es
importante por seguridad, además beneficia el medio
ambiente. Los clientes pueden reciclar las baterías
usadas en varios lugares dispuestos por los
distribuidores o el proveedor de servicios. En la Web
puede encontrar información adicional acerca de la
correcta eliminación y reciclaje:
•
www.motorola.com/recycling
•
www.rbrc.org/call2recycle/
(sólo en inglés)
Eliminación:
elimine inmediatamente las
baterías usadas de acuerdo a las normas
locales. Comuníquese con el centro local de
reciclaje o con organizaciones nacionales de reciclaje
para obtener más información acerca de cómo
desechar las baterías.
Advertencia:
jamás arroje las baterías al fuego, ya que
pueden explotar.

16
aspectos esenciales
instalar la batería
1
Mantenga oprimido el
seguro de liberación de
la cubierta de la
batería.
2
Retire la cubierta de la
batería del teléfono.
3
Con los contactos
dorados hacia arriba y
en el extremo inferior
de la batería, inserte la
batería, comenzando
con el extremo inferior, y empújela
completamente en su lugar.
4
Para colocar la cubierta
de la batería, inserte
primero el extremo
inferior y luego
oprímala por los lados
y en la parte superior para ajustarla en su lugar.
cargar la batería
Las baterías nuevas no están totalmente cargadas.
Antes de que pueda usar el teléfono, debe instalar
y cargar la batería. Algunas baterías tienen mejor
rendimiento después de varios ciclos completos
de carga y descarga.
Para cargar con el cargador:
1
Introduzca el cargador en
el conector micro USB
de su teléfono, tal como
aparece en la imagen.
1
2
3

17
aspectos esenciales
2
Conecte el otro extremo del cargador a una toma
de corriente adecuada.
3
Cuando el teléfono muestre
Carga completa
, retire el
cargador.
Consejo:
las baterías Motorola tienen circuitos que las
protegen contra daños por sobrecarga.
Cuando carga la batería, el indicador de nivel de la
batería en el extremo superior derecho de la pantalla
muestra el avance de la carga. Al menos un segmento
del indicador debe estar visible para asegurar una
funcionalidad completa del teléfono mientras se
carga.
Para cargar de la computadora:
También puede cargar la batería del teléfono al
conectar un cable entre el puerto micro-USB del
teléfono y un conector USB de alta potencia de una
computadora (no uno de baja potencia, como el
conector USB del teclado o de un hub USB
alimentado por bus). Comúnmente, los conectores
USB de alta potencia se encuentran directamente en
la computadora.
Tanto el teléfono como la computadora deben estar
encendidos y debe tener los controladores de
software correctos instalados en la computadora.
Los cables y los controladores de software están
disponibles en los equipos de datos Motorola
Original
TM
, que se venden por separado.
Para tener en cuenta al cargar la batería del
teléfono:
•
Cuando cargue la batería, manténgala a
temperatura ambiente. Nunca exponga las
baterías a temperaturas inferiores a 0 ºC
(32 ºF) ni superiores a 45 ºC (113 ºF).
•
Las baterías nuevas no están cargadas
totalmente.

18
aspectos esenciales
•
El proceso puede demorar más en las baterías
nuevas o almacenadas durante un período
prolongado.
•
Las baterías y los sistemas de carga Motorola
tienen circuitos que las protegen contra daños
por sobrecarga.
encender y apagar
Para encender el teléfono
,
mantenga oprimida la tecla de
encendido/fin (
%
) hasta que se
encienda la pantalla.
Es posible que el teléfono tarde varios segundos en
encenderse. Si se le solicita, utilice el teclado para
ingresar su código de desbloqueo de cuatro dígitos
(el número predeterminado corresponde a los últimos
cuatro dígitos de su número de teléfono) y oprima la
tecla de selección central (
M
)(
OK
) para desbloquear
el teléfono.
Para apagar el teléfono
, mantenga oprimida la tecla
de encendido/fin (
%
).
realizar una llamada
Nota:
para obtener instrucciones acerca de cómo
realizar llamadas Push to Talk, consulte la página 78.
Ingrese un número de teléfono, comenzando con el
código de área si corresponde, y oprima la tecla
Enviar (
$
) para realizar una llamada.
Para hacer una llamada fuera de los EE.UU.
,
mantenga oprimida la tecla
*
hasta ver
+
. Luego,
oprima las teclas numéricas para marcar el
código de
país
y
el número de teléfono
, y oprima la tecla
Enviar (
$
).

19
aspectos esenciales
contestar una llamada
Nota:
para obtener instrucciones acerca de cómo
contestar llamadas Push to Talk, consulte la página 82.
Cuando el teléfono timbre y/o vibre, oprima la tecla
Enviar (
$
) para contestar.
Consejo:
puede programe el teléfono para contestar
automáticamente las llamadas al abrir la solapa
(consulte la página 44).
finalizar una llamada
Para “colgar”, oprima la tecla de encendido/fin (
%
).
También puede finalizar una llamada al cerrar la solapa
si no está conectado a un audífono o un equipo
manos libres para automóvil, y no está usando el
altavoz
. Cerrar la solapa no finaliza:
•
una conexión de datos con un cable USB para
conectar el teléfono a una computadora;
•
una llamada Push to Talk;
•
fondos de pantalla, protectores de pantalla,
titulares y otras aplicaciones similares;
•
sesiones de descarga BREW® activas, tales
como descarga de música o tonos de timbre
almacenar un número
telefónico
Para almacenar un número de teléfono cuando
Modo
PTT está configurado en Desactivado
:
1
Utilice el teclado para ingresar un número de
teléfono en la pantalla principal y oprima la tecla
programable izquierda (
:
)(
Guardar
).
2
Seleccione
Agregar contacto nuevo
oprimiendo la tecla
de selección central (
M
)(
OK
).

20
aspectos esenciales
3
Use la tecla de navegación (
N
) para desplazarse
a un tipo de ingreso y oprima la tecla de selección
central (
M
)(
OK
).
4
Use el teclado para escribir un nombre y otros
detalles para el número telefónico y oprima la
tecla de selección central (
M
)(
Guardar
) para
almacenar el número.
Para modificar o borrar un ingreso de
Contactos
, consulte
la página 123.
llamar a un número
telefónico almacenado
Nota:
para obtener instrucciones sobre cómo llamar a
un contacto PTT, consulte la página 78.
1
En la pantalla principal, oprima la tecla
programable derecha (
:
)(
Contactos
) para abrir la
LISTA DE CONTACTOS
.
2
Desplácese al ingreso en
Contactos
.
Si el ingreso tiene más de un número telefónico,
oprima la tecla de navegación hacia la derecha o
izquierda (
N
) para cambiar entre los números.
3
Oprima la tecla Enviar (
$
) para llamar al ingreso.

21
aspectos fundamentales
aspectos fundamentales
Consulte la página 2 donde encontrará un diagrama
básico del teléfono.
pantalla principal
La pantalla principal aparece cuando enciende el
teléfono.
Oprima la tecla de selección central (
M
)(
MENÚ
) para
abrir el menú principal. Las Etiquetas de teclas
programables muestran las funciones actuales de las
teclas programables. (Para conocer las ubicaciones de
las teclas programables, consulte la página 2.)
Consejo:
puede seleccionar rápidamente una opción
de menú al oprimir el número correspondiente a la
opción que desea. Por ejemplo, en el menú
PROGRAMACIÓN Y HERRAMIENTAS
, oprima
5
para seleccionar
Prog pantalla
.
1
❙❙❙❙
❙❙❙❙
ò
1X
EV
N
Mensaje
Contactos
12:45am
Mar, 5 ago, 2008
MENÚ
Fecha y hora
Etiqueta
de tecla
programable
izquierda
Etiqueta
de tecla
programable
derecha

22
aspectos fundamentales
Desde la pantalla principal, puede oprimir la tecla de
navegación (
N
) hacia arriba, abajo, izquierda o
derecha para abrir los siguientes atajos:
Nota:
éstos son los atajos predeterminados de la
pantalla principal. Para personalizarlos, consulte la
página 52).
Puede programar el teléfono para que muestre u
oculte estos iconos de menú en la pantalla principal
(consulte la página 52).
El teléfono muestra los indicadores de estado del
sistema:
dirección predeterminada de la tecla de
navegación y menú
arriba
ACCESO WEB
abajo
MENÚ BLUETOOTH
izquierda
MÚSICA Y TONOS
derecha
CENTRO DE MEDIOS
alerta/indicador
Potencia de la señal
El indicador EVDO muestra cuando el teléfono está
en el área de cobertura de EVDO (necesaria para los
servicios V CAST). El indicador 1X muestra cuando
el teléfono está en el área de cobertura 1X-RTT. El
número de barras indica la intensidad de cada señal.
1
❙❙❙❙
❙❙❙❙
ò
1X
EV
N
Indicadores de
estado del
sistema
Mensaje
Contactos
10:45am
Mar, 5 ago, 2008
MENÚ
❙❙❙❙
❙❙❙❙

23
aspectos fundamentales
/
Indicador de modo PTT
Indica cuando el teléfono está registrado con un
servidor PTT. indica que el teléfono está
registrado. indica que el teléfono no está
registrado.
2
Roaming
Indica que el teléfono está fuera de la red local en
condición de roaming.
S
SSL
Indica que la verificación de aplicaciones se realiza a
través de SSL durante una sesión de descarga.
6
Privacidad voz
Indica cuando
Privacidad voz
está
Activado
(consulte la
página 36).
alerta/indicador
1X
EV
❙❙❙❙
❙❙❙❙
❙❙❙❙
❙❙❙❙
1X
EV
❙❙❙❙
❙❙❙❙
❙❙❙❙
❙❙❙❙
L
Llamada de datos, modo anclado o
aplicación WAP/BREW incorporada
Aparece durante una llamada de datos, modo
anclado o aplicación WAP/BREW.
M
Dormant
Indica que el teléfono está inactivo (dormant) y que
la sesión de PPP está activa.
9
Sin servicio
El teléfono está en un área sin cobertura de
servicio.
8
TTY
El teléfono está en la modalidad TTY.
t
Llamada de voz
Aparece durante una llamada de voz activa.
alerta/indicador

24
aspectos fundamentales
P
E911
Indica que
E911
está
Activado
.
O
Ubicación activada
Indica que la opción
Posición
está programada en
Activado
.
N
Nivel de batería
Muestra el nivel de carga de la batería. Mientras
más barras haya, mayor es la carga.
n
Todos los sonidos desactivados
Indica que la opción
Volumen principal
está programada
en
Desactivado
.
o
Sólo alarma
Indica que la opción
Volumen principal
está programada
en
Sólo alarma
.
alerta/indicador
r
Vibración activada
Indica que la opción
Volumen principal
está programada
en
Vibración activada
.
q
Altavoz
Indica que el altavoz del manos libres está
encendido.
s
Llamada perdida
Indica que perdió una llamada.
É
Mensajes
Aparece cuando se recibe un nuevo mensaje.
x Evento del calendario
Muestra la cantidad de citas en el calendario.
alerta/indicador

25
aspectos fundamentales
ajustar el volumen
Oprima las teclas de volumen para:
•
desactivar una alerta de llamada entrante
•
cambiar el volumen del auricular durante las
llamadas
•
cambiar el volumen del timbre desde la
pantalla principal (consulte la página 25)
cambiar la programación
de sonido
Oprima las teclas de volumen
arriba y abajo para recorrer el
VOLUMEN PRINCIPAL
a través de
Alto
,
Medio alto
,
Medio
,
Medio bajo
,
Bajo
,
Sólo vibración
,
Sólo alarma
y
Todos
los sonidos desactivados
.
y
Correo de voz nuevo
Aparece cuando se recibe un mensaje de correo
de voz.
l
Alarma activada
Muestra cuando se ha programado una alarma.
I
Conexión Bluetooth activa
Indica que el teléfono está asociado con otro
dispositivo Bluetooth.
% APAGADO
Modo independiente
Muestra cuando el teléfono está en modo
independiente.
alerta/indicador

26
aspectos fundamentales
manos libres
Nota:
el uso de teléfonos inalámbricos durante la
conducción puede ocasionar distracción. Corte la
llamada si no puede concentrarse en la conducción.
Además, el uso de dispositivos inalámbricos y sus
accesorios puede estar prohibido o restringido en
ciertas áreas. Obedezca siempre las leyes y las
regulaciones sobre el uso de estos productos.
altavoz del manos libres
Puede usar el altavoz del manos libres del teléfono
para hacer llamadas sin sostener el teléfono en la
oreja.
Para activar el altavoz del
manos libres durante una
llamada
, mantenga oprimida la
tecla inteligente/altavoz (al
costado derecho del teléfono,
consulte la página 2).
Escuchará una alerta de audio, y el teléfono mostrará
el indicador de altavoz
q
y
ALTAVOZ ACTIVADO
en la
pantalla principal.
El altavoz del manos libres permanece activado hasta
que vuelva a mantener oprimida la tecla
inteligente/altavoz o apague el teléfono.
Para apagar el altavoz del manos libres
mantenga
oprimida la tecla inteligente/altavoz. El teléfono
mostrará
ALTAVOZ DESACTIVADO
en la pantalla principal.
Para finalizar la llamada
, oprima la tecla de
encendido/fin (
%
). Escuchará una alerta de audio.
Nota:
el altavoz del manos libres no funcionará
cuando el teléfono esté conectado a un equipo manos
libres para automóvil o a un audífono.

27
aspectos fundamentales
programación del volumen de
accesorios (equipo para
automóvil o audífono)
Para ajustar el volumen de los audífonos o de los
accesorios del equipo para automóvil habilitados para
conexiones inalámbricas Bluetooth, oprima los
botones para subir o bajar el volumen de su teléfono
durante una llamada activa.
modo independiente
Nota:
consulte al personal de la aerolínea acerca del
uso del
Modo independiente
durante el vuelo. Apague el
teléfono cada vez que se lo indique el personal
del avión.
Use el modo independiente para desactivar las
funciones de llamada del teléfono en los lugares
donde se prohíbe el uso de teléfonos inalámbricos.
No puede hacer ni recibir llamadas ni usar
dispositivos inalámbricos Bluetooth en el modo
independiente
, pero puede usar el resto de las
funciones del teléfono que no se relacionan con las
llamadas.
1
En la pantalla principal, oprima la tecla de
selección central (
M
)(
MENÚ
) para abrir el menú.
2
Use la tecla de navegación (
N
) para desplazarse
a
( PROGRAMACIÓN Y HERRAMIENTAS
y oprima la tecla
de selección central (
M
)(
OK
).
3
Desplácese a
Programación del teléfono
y oprima la tecla
de selección central (
M
)(
OK
).
4
Oprima la tecla de selección central (
M
)(
OK
) para
seleccionar
Modo independiente
.
5
Seleccione
Activado
y oprima la tecla de selección
central (
M
)(
OK
).

28
aspectos fundamentales
Cuando
Modo independiente
está configurado en
Encendido
,
el teléfono muestra indicadores y un mensaje en la
pantalla principal:
cambiar código de
bloqueo
El
código de bloqueo
de cuatro dígitos está
programado como los últimos cuatro dígitos de su
número telefónico. Para cambiar el código de bloqueo:
1
En la pantalla principal, oprima la tecla de
selección central (
M
)(
MENÚ
) para abrir el menú.
2
Use la tecla de navegación (
N
) para desplazarse
a
( PROGRAMACIÓN Y HERRAMIENTAS
y oprima la tecla
de selección central (
M
)(
OK
).
3
Desplácese a
Programación del teléfono
y oprima la tecla
de selección central (
M
)(
OK
).
4
Desplácese a
Seguridad
y oprima la tecla de
selección central (
M
)(
OK
).
5
Cuando se le solicite, ingrese el código de
bloqueo y oprima la tecla de selección
central (
M
)(
OK
).
6
Desplácese a
Modificar códigos
y oprima la tecla de
selección central (
M
)(
OK
).
7
Desplácese a
Sólo teléfono
y oprima la tecla de
selección central (
M
)(
OK
).
8
Ingrese el nuevo código de bloqueo de cuatro
dígitos en el área de ingreso
Ingresar código nuevo
y
oprima la tecla de navegación hacia abajo (
N
)
para mover el cursor al área de ingreso
Reingresar
Modo independiente
MENÚ
Mensaje
Contactos
10:45am
Mar, 5 ago, 2008
N
%OFF K

29
aspectos fundamentales
código nuevo
. Vuelva a ingresar el nuevo código de
bloqueo de cuatro dígitos.
9
Oprima la tecla de selección central (
M
)(
OK
).
bloquear y desbloquear
el teléfono
Puede bloquear el teléfono para evitar que otros
lo usen. Para bloquear o desbloquear el teléfono,
necesita un código de cuatro dígitos (que
originalmente está programado como los últimos
cuatro dígitos de su número telefónico).
Nota:
puede realizar llamadas de emergencia con el
teléfono bloqueado (consulte la página 59). Un
teléfono bloqueado aún tendrá activado el timbre o
la vibración para llamadas o mensajes entrantes.
Para
bloquear manualmente
su teléfono:
1
En la pantalla principal, oprima la tecla de
selección central (
M
)(
MENÚ
) para abrir el menú.
2
Use la tecla de navegación (
N
) para desplazarse
a
( PROGRAMACIÓN Y HERRAMIENTAS
y oprima la tecla
de selección central (
M
)(
OK
).
3
Desplácese a
Programación del teléfono
y oprima la tecla
de selección central (
M
)(
OK
).
4
Desplácese a
Seguridad
y oprima la tecla de
selección central (
M
)(
OK
).
5
Cuando se le solicite, ingrese el código de
bloqueo y oprima la tecla de selección
central (
M
)(
OK
).
6
Desplácese a
Bloquear teléfono ahora
y oprima la tecla
de selección central (
M
)(
OK
).

30
aspectos fundamentales
Para
bloquear automáticamente
el teléfono cada vez
que lo apaga:
1
En la pantalla principal, oprima la tecla de
selección central (
M
)(
MENÚ
) para abrir el menú.
2
Use la tecla de navegación (
N
) para desplazarse
a
( PROGRAMACIÓN Y HERRAMIENTAS
y oprima la tecla
de selección central (
M
)(
OK
).
3
Desplácese a
Programación del teléfono
y oprima la tecla
de selección central (
M
)(
OK
).
4
Desplácese a
Seguridad
y oprima la tecla de
selección central (
M
)(
OK
).
5
Cuando se le solicite, ingrese el código de
bloqueo y oprima la tecla de selección
central (
M
)(
OK
).
6
Desplácese a
Bloq de teléfono
y oprima la tecla de
selección central (
M
)(
OK
).
7
Desplácese a
Al encender
y oprima la tecla de
selección central (
M
)(
OK
).
8
Oprima la tecla de encendido/fin (
%
) para volver
a la pantalla principal.
Para desbloquear el teléfono
, ingrese el código de
bloqueo de cuatro dígitos en el área de ingreso
Ing cód de
bloqueo
y oprima la tecla de selección central (
M
)(
OK
).
bloquear teclas laterales
cuando la solapa está
cerrada
Cuando la solapa del teléfono está cerrada, puede
bloquear las teclas laterales para evitar oprimirlas
accidentalmente.
Para bloquear las teclas laterales, mantenga oprimida
la tecla inteligente/altavoz al costado derecho del
teléfono (consulte la página 2). El teléfono muestra
TECLADO BLOQ
en la pantalla principal. Para desbloquear
las teclas laterales, mantenga oprimida la tecla
inteligente/altavoz nuevamente o abra la solapa.

31
aspectos fundamentales
administrar memoria
Nota:
la tarjeta de memoria microSD es un
accesorio
opcional
, disponible por separado.
Puede almacenar contenido multimedia, como por
ejemplo canciones y fotografías, en la memoria
interna del teléfono o en una tarjeta de memoria
microSD extraíble.
Nota:
si descarga un archivo con derechos de autor al
teléfono y lo almacena en la tarjeta de memoria,
puede usar el archivo sólo mientras la tarjeta de
memoria esté insertada en su teléfono. No puede
enviar, copiar ni cambiar archivos con derechos
de autor.
instalar una tarjeta de memoria
1
Saque la tapa de la batería del teléfono (consulte
la página 16).
2
Con los contactos
dorados hacia abajo,
introduzca la tarjeta de
memoria en la ranura
presionándola hasta
que se ajuste en su lugar completamente.
3
Vuelva a poner la puerta de la batería.
Precaución:
no saque la tarjeta de memoria mientras
el teléfono la esté usando o esté escribiendo archivos
en ella.
Para extraer la tarjeta de memoria
, oprímala
levemente y retírela con cuidado.
programar memoria para
contenido multimedia
Puede descargar y almacenar contenido multimedia
en la memoria del teléfono o en la tarjeta de memoria:
1
En la pantalla principal, oprima la tecla de
selección central (
M
)(
MENÚ
) para abrir el menú.

32
aspectos fundamentales
2
Use la tecla de navegación (
N
) para desplazarse
a
( PROGRAMACIÓN Y HERRAMIENTAS
y oprima la tecla
de selección central (
M
)(
OK
).
3
Desplácese a
Memoria
y oprima la tecla de
selección central (
M
)(
OK
).
4
Desplácese a
Opciones guardado
y oprima la tecla de
selección central (
M
)(
OK
).
5
Desplácese a
Imágenes
,
Videos
o
Sonidos
, y oprima la
tecla de selección central (
M
)(
OK
).
6
Seleccione
Memoria del teléfono
o
Tarjeta de memoria
y
oprima la tecla de selección central (
M
)(
OK
).
ver información de memoria
1
En la pantalla principal, oprima la tecla de
selección central (
M
)(
MENÚ
) para abrir el menú.
2
Use la tecla de navegación (
N
) para desplazarse
a
( PROGRAMACIÓN Y HERRAMIENTAS
y oprima la tecla
de selección central (
M
)(
OK
).
3
Desplácese a
Memoria
y oprima la tecla de
selección central (
M
)(
OK
).
4
Seleccione
Memoria del teléfono
o
Tarjeta de memoria
y
oprima la tecla de selección central (
M
)(
OK
).
5
Seleccione
Mis imágenes
,
Mis videos
,
Mi música
o
Mis sonidos
,
y oprima la tecla de selección central (
M
)(
OK
).
Si seleccionó
Memoria del teléfono
en el paso 4,
también verá
Uso de la memoria del teléfono
. Si seleccionó
Tarjeta de memoria
en el paso 4, también verá
Uso de la
tarjeta de memoria
y
Formatear tarjeta
.
mover archivos desde el teléfono a
la tarjeta de memoria
Puede mover archivos (tales como fotografías, videos,
sonidos y archivos de música) a la tarjeta de memoria
para desocupar la memoria del teléfono.
Nota:
al mover un archivo a la tarjeta de memoria,
el archivo se borra de la memoria del teléfono.

33
aspectos fundamentales
Para mover fotos o videoclips:
1
Desde la pantalla principal, oprima la tecla de
navegación hacia la derecha (
N
) para abrir
] CENTRO DE MEDIOS
.
2
Use la tecla de navegación (
N
) para desplazarse
a
Imagen y video
y oprima la tecla de selección
central (
M
)(
OK
).
3
Abra la lista adecuada (
Mis imágenes
o
Mis videos
).
Un icono de tarjeta de memoria en la imagen
miniatura o junto a un archivo de video indica que
el archivo está almacenado en la tarjeta de
memoria.
Un
f
en la imagen miniatura indica que la
imagen venía precargada en el teléfono y no
se puede mover a la tarjeta de memoria
.
Si la imagen o video no está marcado con un
icono de tarjeta de memoria, la imagen o video
está almacenado en el teléfono.
4
Desplácese a la miniatura de la imagen o videoclip
que desea mover y oprima la tecla programable
derecha (
:
)(
Opciones
).
5
Seleccione
Mover
y oprima la tecla de selección
central (
M
)(
OK
).
6
Cuando el teléfono pregunte si desea mover el
archivo, seleccione
Sí
y oprima la tecla de
selección central (
M
)(
OK
) para confirmar que
desea mover el archivo.
Para mover un clip de audio grabado:
1
Desde la pantalla principal, oprima la tecla de
navegación hacia la izquierda (
N
) para tener
acceso a
MÚSICA Y TONOS
.
2
Use la tecla de navegación (
N
) para desplazarse
a
Mis sonidos
y oprima la tecla de selección
central (
M
)(
OK
).

34
aspectos fundamentales
Un icono de tarjeta de memoria junto al nombre
de archivo de un clip de audio indica que el clip de
audio está almacenado en la tarjeta de memoria.
Si el nombre de archivo no está marcado con un
icono de tarjeta de memoria, el clip de audio está
almacenado en el teléfono.
3
Desplácese al archivo que desea mover y oprima
la tecla programable derecha (
:
)(
Opciones
).
4
Seleccione
Mover
y oprima la tecla de selección
central (
M
)(
OK
).
5
Cuando el teléfono pregunte si desea mover el
archivo, seleccione
Sí
y oprima la tecla de
selección central (
M
)(
OK
) para confirmar que
desea mover el archivo.
operación TTY
Puede usar un escritor de teletipos (TTY) opcional con
el teléfono para enviar y recibir llamadas. Debe
enchufar el dispositivo TTY en el conector para
audífonos del teléfono y programar el teléfono para
que opere en uno de los tres modos TTY.
Notas:
•
Un TTY es un dispositivo de comunicaciones
utilizado por personas que tienen dificultad
para oír o discapacidad del habla. TTY no
funciona de un teléfono móvil a otro
teléfono móvil.
•
Use un cable compatible con TSB-121
(proporcionado por el fabricante del dispositivo
TTY) para conectar el dispositivo TTY al teléfono.
Su teléfono tiene un conector de 2,5 mm.
•
Programe el volumen del teléfono en
programación media para una operación
correcta. Si recibe un alto número de
caracteres incorrectos, ajuste el volumen
según sea necesario para minimizar la tasa
de errores.

35
aspectos fundamentales
•
Para un rendimiento óptimo, el teléfono debe
estar al menos a 30 centímetros (12 pulgadas)
de distancia del dispositivo TTY. Si coloca el
teléfono demasiado cerca del dispositivo TTY,
puede originar una alta tasa de errores.
programar el modo TTY
ù
Cuando programa el teléfono en un modo TTY,
éste opera en ese modo cada vez que se conecta un
dispositivo TTY.
1
En la pantalla principal, oprima la tecla de
selección central (
M
)(
MENÚ
) para abrir el menú.
2
Use la tecla de navegación (
N
) para desplazarse
a
( PROGRAMACIÓN Y HERRAMIENTAS
y oprima la tecla
de selección central (
M
)(
OK
).
3
Desplácese a
Programación de llamada
y oprima la tecla
de selección central (
M
)(
OK
).
4
Seleccione
Modo TTY
y oprima la tecla de selección
central (
M
)(
OK
).
Modo TTY
puede incluir estas opciones:
Cuando el teléfono está en un modo TTY, el teléfono
muestra el modo internacional TTY, el símbolo
internacional TTY y la programación de modo durante
una llamada TTY activa.
volver al modo de voz
Para volver al modo de voz estándar, seleccione
TTY DESACTIVADO
en el menú
MODO TTY
.
opción
TTY completa
Transmitir y recibir caracteres TTY.
TTY+Hablar
(VCO)
Recibir caracteres TTY, pero
transmitir hablando al micrófono.
TTY+Escuchar
(HCO)
Transmitir caracteres TTY, pero
recibir escuchando el auricular.
TTY desactivado
Todos los modos TTY están
desactivados.

36
aspectos fundamentales
conversación privada
Encripte las llamadas de voz salientes y use canales
seguros cuando estén disponibles:
1
En la pantalla principal, oprima la tecla de
selección central (
M
)(
MENÚ
) para abrir el menú.
2
Use la tecla de navegación (
N
) para desplazarse
a
( PROGRAMACIÓN Y HERRAMIENTAS
y oprima la tecla
de selección central (
M
)(
OK
).
3
Desplácese a
Programación de llamada
y oprima la tecla
de selección central (
M
)(
OK
).
4
Desplácese a
Privacidad voz
y oprima la tecla de
selección central (
M
)(
OK
).
5
Seleccione
Encendido
y oprima la tecla de selección
central (
M
)(
OK
).

37
consejos y trucos
consejos y trucos
Desde la pantalla principal
(página 21), puede usar
los siguientes atajos:
para… haga esto…
bloquear teclas
laterales
Con la solapa cerrada
,
mantenga oprimida la tecla
inteligente/altavoz (consulte la
página 2).
programar el
teléfono para
vibración
Mantenga oprimida la tecla
Vibrar (
#
) para configurar
rápidamente el
VOLUMEN PRINCIPAL
en
Sólo vibración
.
activar y
desactivar el
altavoz del
manos libres
Con la solapa abierta
,
mantenga oprimida la tecla
inteligente/altavoz (consulte la
página 2).
ver llamadas
recientes
Oprima la tecla Enviar (
$
).
El teléfono muestra todas las
llamadas hechas, recibidas y
perdidas recientemente.
llamar a correo
de voz
Mantenga oprimida
1
.
cambiar el
volumen
del timbre
Oprima las teclas de volumen
arriba o abajo (consulte la
página 2).
usar comandos
de voz
Con la solapa abierta
, oprima
la tecla de comando de voz
(consulte la página 3). Luego,
siga las indicaciones en
pantalla.
para… haga esto…

38
consejos y trucos
grabar registros
de voz
Mantenga oprimida la tecla de
comando de voz (consulte la
página 3).
para… haga esto…

39
personalizar
personalizar
sonidos
Puede programar cómo el teléfono indica que tiene
llamadas entrantes u otros eventos.
volumen principal
En la pantalla principal, oprima las teclas de volumen
(consulte la página 2) arriba o abajo para seleccionar la
configuración deseada en el menú
VOLUMEN PRINCIPAL
:
Alto
,
Medio alto
,
Medio
,
Medio bajo
,
Bajo
: el teléfono timbra para
llamadas entrantes y otros eventos, según la
programación de detalle.
Sólo vibración
: el teléfono vibra para indicar que hay una
llamada entrante.
Sólo alarma
: el teléfono reproduce una alarma audible
para avisarle que hay eventos. No se puede cambiar la
configuración de detalles de los eventos.
Desactivar todos los sonidos
: el teléfono no le avisa que tiene
llamadas entrantes o eventos.
sonidos para llamadas, eventos y
alertas
Nota:
VOLUMEN PRINCIPAL
debe programarse en
Alto
,
Medio alto
,
Medio
,
Medio bajo
o
Bajo
.
Para programar sonidos para llamadas
:
1
En la pantalla principal, oprima la tecla de
selección central (
M
)(
MENÚ
) para abrir el menú.

40
personalizar
2
Use la tecla de navegación (
N
) para desplazarse
a
( PROGRAMACIÓN Y HERRAMIENTAS
y oprima la tecla
de selección central (
M
)(
OK
).
3
Desplácese a
Programación de sonidos
y oprima la tecla
de selección central (
M
)(
OK
).
4
Seleccione
Sonidos para llamadas
y oprima la tecla de
selección central (
M
)(
OK
).
5
En el menú
SONIDOS PARA LLAMADAS
, seleccione
Timbre
de llamada
oprimiendo la tecla de selección
central (
M
)(
OK
), luego desplácese al tono de
timbre deseado y oprima la tecla de selección
central (
M
)(
OK
).
Nota:
oprima la tecla programable
izquierda (
:
)(
Reprod
) para escuchar previamente
el tono de timbre.
o
En el menú
SONIDOS PARA LLAMADAS
, desplácese a
Vibración por llamada
y oprima la tecla de selección
central (
M
)(
OK
), luego desplácese a
Activado
o
Desactivado
y oprima la tecla de selección
central (
M
)(
OK
).
6
Oprima la tecla de encendido/fin (
%
) para volver
a la pantalla principal.
Para programar sonidos para eventos (como por
ejemplo, mensajes entrantes) o alertas
:
1
En la pantalla principal, oprima la tecla de
selección central (
M
)(
MENÚ
) para abrir el menú.
2
Use la tecla de navegación (
N
) para desplazarse
a
( PROGRAMACIÓN Y HERRAMIENTAS
y oprima la tecla
de selección central (
M
)(
OK
).
3
Desplácese a
Programación de sonidos
y oprima la tecla
de selección central (
M
)(
OK
).
4
Seleccione
Sonidos de alerta
y oprima la tecla de
selección central (
M
)(
OK
).

41
personalizar
5
Desplácese a
Mensaje TXT
,
Mensaje de imagen/video
,
Correo
de voz
,
Batería baja
,
Llamada perdida
,
Tono de emergencia
o
Alerta
PTT
y oprima la tecla de selección central (
M
)(
OK
).
6
Desplácese a
Tono
y oprima la tecla de selección
central (
M
)(
OK
), luego desplácese al tono de
timbre que desee y oprima la tecla de selección
central (
M
)(
OK
).
Nota:
oprima la tecla programable
izquierda (
:
)(
Reprod
) para escuchar previamente
el tono de timbre.
o
Desplácese a
Vibración
y oprima la tecla de
selección central (
M
)(
OK
), desplácese a
Activado
o
Desactivado
y oprima la tecla de selección
central (
M
)(
OK
).
o
Desplácese a
Recordatorio
y oprima la tecla de
selección central (
M
)(
OK
), luego desplácese a
Una vez
,
Cada 2 minutos
,
Cada 15 minutos
o
Desactivado
y
oprima la tecla de selección central (
M
)(
OK
).
(Con todas las opciones, excepto con
Desactivado
,
el teléfono reproducirá un bip audible en el
intervalo que programó.)
7
Oprima la tecla de encendido/fin (
%
) para volver
a la pantalla principal.
sonidos para llamada PTT
Nota:
para usar las functiones PTT, el Modo PTT debe
estar programado en Activado (consulte la página 74).
Nota:
VOLUMEN PRINCIPAL
debe programarse en
Alto
,
Medio alto
,
Medio
,
Medio bajo
o
Bajo
.
Para programar sonidos para llamadas PTT:
1
En la pantalla principal, oprima la tecla de
selección central (
M
)(
MENÚ
) para abrir el menú.

42
personalizar
2
Use la tecla de navegación (
N
) para desplazarse
a
( PROGRAMACIÓN Y HERRAMIENTAS
y oprima la tecla
de selección central (
M
)(
OK
).
3
Desplácese a
Programación de sonidos
y oprima la tecla
de selección central (
M
)(
OK
).
4
Seleccione
Sonidos de alerta
y oprima la tecla de
selección central (
M
)(
OK
).
5
Seleccione Alerta PTT y oprima la tecla de
selección central (
M
)(
OK
).
6
En el menú
ALERTA PTT
, seleccione
Tono
al oprimir la
tecla selección central (
M
)(
OK
), luego desplácese
al tono que desea y oprima la tecla selección
central (
M
)(
OK
),
Nota:
oprima la tecla programable
izquierda (
:
)(
Reprod
) para escuchar previamente
el tono.
o bien,
En el menú
ALERTA PTT
, desplacese a
Vibracion
y
oprima la tecla de selección central (
M
)(
OK
),
luego desplácese a
Activado
o
Desactivado
y oprima la
tecla de selección central (
M
)(
OK
)
7
Oprima la tecla de encendido/fin (
%
) para volver
a la pantalla principal.
Consejo:
También puede asignar un tono PTT
desde Centro de medios. Vaya a
] CENTRO
DE MEDIOS
>
Musica y tonos
>
Mis tonos de timbre
,
desplacése hasta el tono que desea y oprima la
tecla programable izquierda (
:
)(
Programar como
) ,
desplácese a
Sonidos de alerta
y orpima la tecla de
selección central (
M
)(
OK
), luego desplácese a
Alerta PTT
y oprima la tecla de selección
central (
M
)(
OK
).

43
personalizar
obtener timbres
1
Desde la pantalla principal, oprima la tecla de
navegación hacia la izquierda (
N
) para tener
acceso a
MÚSICA Y TONOS
.
2
Use la tecla de navegación (
N
) para desplazarse
a
Obtener tonos de timbre nuevos
y oprima la tecla de
selección central (
M
)(
OK
).
3
En la pantalla
OBTENER TONOS DE TIMBRE NUEVOS
,
seleccione
Obtener aplicación nueva
y oprima la tecla de
selección central (
M
)(
OK
).
El teléfono se conecta al sitio Centro de medios
con colecciones de tonos de timbre. Siga las
instrucciones en pantalla para explorar las listas
de timbres y seleccionar y descargar un timbre.
4
Oprima la tecla de encendido/fin (
%
) para volver
a la pantalla principal.
Nota:
se aplican los cargos normales por tiempo
aire y/o uso de portadora.
lectura de voz
Puede programar el teléfono para que
hable en voz
alta
cuando oprima teclas, reciba una llamada con
identificación disponible o para desplazarse por
llamadas recientes o contactos:
1
En la pantalla principal, oprima la tecla de
selección central (
M
)(
MENÚ
) para abrir el menú.
2
Use la tecla de navegación (
N
) para desplazarse
a
( PROGRAMACIÓN Y HERRAMIENTAS
y oprima la tecla
de selección central (
M
)(
OK
).
3
Desplácese a
Programación de sonidos
y oprima la tecla
de selección central (
M
)(
OK
).
4
Desplácese a
Lectura de voz
y oprima la tecla de
selección central (
M
)(
OK
).
5
Seleccione
Dígitos del teclado
,
Ingr lista contacto
,
Ingr de
llamadas recientes
o
Alert ID llam
, y oprima la tecla de
selección central (
M
)(
OK
).

44
personalizar
6
Si seleccionó
Dígitos del teclado
,
Ingr lista contacto
o
Ingr de
llamadas recientes
, seleccione
Activado
y oprima la tecla
de selección central (
M
)(
OK
).
o
Si seleccionó
Alerta ID llam
, seleccione
Sólo timbre
,
ID llam luego timbre
o
ID llam ID repetir
, y oprima la tecla de
selección central (
M
)(
OK
).
opciones para contestar
Puede utilizar distintos métodos para contestar una
llamada entrante.
1
En la pantalla principal, oprima la tecla de
selección central (
M
)(
MENÚ
) para abrir el menú.
2
Use la tecla de navegación (
N
) para desplazarse
a
( PROGRAMACIÓN Y HERRAMIENTAS
y oprima la tecla
de selección central (
M
)(
OK
).
3
Desplácese a
Programación de llamada
y oprima la tecla
de selección central (
M
)(
OK
).
4
Seleccione
Opc para contestr
y oprima la tecla de
selección central (
M
)(
OK
).
opciones
Solapa abierta
Contestar al abrir la solapa.
Cualquier tecla
Contestar al oprimir cualquier tecla,
excepto la tecla de
encendido/fin (
%
). Al oprimir la
tecla de encendido/fin se ignora la
llamada.
Auto c/
manos libres
Contestar automáticamente una
llamada entrante (funciona con
audífono, conexiones Bluetooth® y
cuando el teléfono opera en el
modo de manos libres).

45
personalizar
fondo de pantalla
Programe una fotografía, una imagen o una animación
como fondo de pantalla en la pantalla principal:
Nota:
para usar una fotografía como fondo de pantalla,
ésta debe estar en la memoria del teléfono y no en
una tarjeta de memoria.
1
En la pantalla principal, oprima la tecla de
selección central (
M
)(
MENÚ
) para abrir el menú.
2
Use la tecla de navegación (
N
) para desplazarse
a
( PROGRAMACIÓN Y HERRAMIENTAS
y oprima la tecla
de selección central (
M
)(
OK
).
3
Desplácese a
Programación de pantalla
y oprima la tecla
de selección central (
M
)(
OK
).
4
Desplácese a
Fondo de pantalla
y oprima la tecla de
selección central (
M
)(
OK
).
5
Desplácese a
Pantalla principal
(la pantalla que ve con
la solapa abierta) o
Pantalla frontal
(la pantalla que ve
con la solapa cerrada) y oprima la tecla de
selección central (
M
)(
OK
).
6
Desplácese a una imagen en
MIS IMÁGENES
y oprima
la tecla de selección central (
M
)(
OK
).
u
Oprima
Opciones
y seleccione
Obtener imágenes nuevas
para descargar una imagen (consulte la
página 120).
7
Oprima la tecla de encendido/fin (
%
) para volver
a la pantalla principal.
mostrar temas
Defina el aspecto general de la pantalla del teléfono.
Nota:
las instrucciones de esta guía de usuario se
basan en una configuración predeterminada de
Mostrar
tema
en
Vapor
. Si cambia
Mostrar tema
a otra configuración,
las instrucciones pueden ser distintas.

46
personalizar
1
En la pantalla principal, oprima la tecla de
selección central (
M
)(
MENÚ
) para abrir el menú.
2
Use la tecla de navegación (
N
) para desplazarse
a
( PROGRAMACIÓN Y HERRAMIENTAS
y oprima la tecla
de selección central (
M
)(
OK
).
3
Desplácese a
Programación de pantalla
y oprima la tecla
de selección central (
M
)(
OK
).
4
Desplácese a
Mostrar temas
y oprima la tecla de
selección central (
M
)(
OK
).
5
Desplácese al nombre del tema de la pantalla.
6
Oprima la tecla de selección
central (
M
)(
PROGRAMAR
) para seleccionar el tema
como tema de pantalla del teléfono.
u
Oprima la tecla programable izquierda (
:
)(
Vista
previa
) para ver el tema antes de seleccionarlo.
Oprima la tecla programable izquierda (
:
)(
Lista
)
para volver a la lista de temas de pantalla.
7
Oprima la tecla de encendido/fin (
%
) para volver
a la pantalla principal.
luz de fondo
Defina durante cuánto tiempo permanecerán
encendidas las luces de fondo de la pantalla principal y
del teclado, o reduzca el tiempo durante el que
permanecen encendidas para prolongar la duración de
la batería.
1
En la pantalla principal, oprima la tecla de
selección central (
M
)(
MENÚ
) para abrir el menú.
2
Use la tecla de navegación (
N
) para desplazarse
a
( PROGRAMACIÓN Y HERRAMIENTAS
y oprima la tecla
de selección central (
M
)(
OK
).
3
Desplácese a
Programación de pantalla
y oprima la tecla
de selección central (
M
)(
OK
).
4
Desplácese a
Luz de fondo
y oprima la tecla de
selección central (
M
)(
OK
).

47
personalizar
5
Desplácese a
Pantalla
o
Teclado
y oprima la tecla de
selección central (
M
)(
OK
).
6
Seleccione la duración o modo deseados y oprima
la tecla de selección central (
M
)(
OK
).
Nota:
cuando el teclado está bloqueado (consulte
la página 29), la luz de fondo se apaga después de
dos segundos de inactividad,
independientemente de la duración que
programe.
brillo
Defina el brillo de la pantalla principal:
1
En la pantalla principal, oprima la tecla de
selección central (
M
)(
MENÚ
) para abrir el menú.
2
Use la tecla de navegación (
N
) para desplazarse
a
( PROGRAMACIÓN Y HERRAMIENTAS
y oprima la tecla
de selección central (
M
)(
OK
).
3
Desplácese a
Programación de pantalla
y oprima la tecla
de selección central (
M
)(
OK
).
4
Seleccione
Brillo
y oprima la tecla de selección
central (
M
)(
OK
).
5
Use la tecla de navegación (
N
) para ajustar el
brillo y oprima la tecla de selección
central (
M
)(
OK
).
AGPS y su ubicación
El teléfono puede usar la función Información de
ubicación automática (ALI), junto con las señales
satelitales Sistema de posicionamiento global asistido
(AGPS), para indicarle a la red cuál es su ubicación
física.
Cuando la función ALI se programa en
Posición Act
, el
teléfono muestra el indicador
O
(ALI activada). Los
servicios pueden usar su ubicación conocida para
proporcionar información útil (por ejemplo,

48
personalizar
indicaciones viales o la ubicación del banco más
cercano). Cuando la red o un servicio soliciten su
ubicación, el teléfono se la pedirá. Puede negarse a
dar esta información.
Cuando la función ALI se programa en
Sólo E911
, el
teléfono muestra el indicador
P
(ALI desactivada) y
no envía información acerca de la ubicación, a menos
que llame al teléfono de emergencia (911, por
ejemplo).
1
En la pantalla principal, oprima la tecla de
selección central (
M
)(
MENÚ
) para abrir el menú.
2
Use la tecla de navegación (
N
) para desplazarse
a
( PROGRAMACIÓN Y HERRAMIENTAS
y oprima la tecla
de selección central (
M
)(
OK
).
3
Desplácese a
Programación del teléfono
y oprima la tecla
de selección central (
M
)(
OK
).
4
Desplácese a
Posición
y oprima la tecla de selección
central (
M
)(
OK
).
5
Desplácese a
Posición Act
o
Sólo E911
.
6
Oprima la tecla de selección central (
M
)(
OK
) para
seleccionar la programación.
limitaciones y consejos
de AGPS
Su teléfono utiliza las señales satelitales del Sistema
de posicionamiento global asistido (AGPS) para
calcular su ubicación. Si su teléfono no puede
encontrar señales satelitales intensas, el AGPS puede
ser más lento, menos exacto o no funcionar. El AGPS
sólo proporciona una ubicación aproximada, con
frecuencia dentro de 45 metros (150 pies) y, en
ocasiones, mucho más lejos de su ubicación real.
Para mejorar la exactitud del AGPS:
•
Salga o aléjese de las ubicaciones
subterráneas, los vehículos cubiertos, las
estructuras con techos de metal o de

49
personalizar
concreto, los edificios altos y el follaje de los
árboles. El rendimiento en espacios interiores
podría mejorar si se acerca a las ventanas; no
obstante, algunas películas de parasol para
ventanas pueden bloquear las señales
satelitales.
•
Aléjese de radios, equipos de entretenimiento
y otros dispositivos electrónicos que podrían
bloquear o interferir con las señales satelitales
del AGPS.
•
Si el teléfono tiene una antena retráctil,
extienda la antena.
•
Aleje el teléfono del cuerpo y apunte la antena
hacia el cielo. No cubra el área de la antena
con los dedos.
El AGPS emplea satélites controlados por el gobierno
de Estados Unidos y que están sujetos a los cambios
implementados de acuerdo con la política del usuario
AGPS del Departamento de Defensa y el Federal
Radio Navigation Plan. Estos cambios pueden afectar
el rendimiento del AGPS.
más funciones de
personalización
volumen del teclado
Nota:
VOLUMEN PRINCIPAL
debe programarse en
Alto
,
Medio alto
,
Medio
,
Medio bajo
o
Bajo
.
1
En la pantalla principal, oprima la tecla de
selección central (
M
)(
MENÚ
) para abrir el menú.
2
Use la tecla de navegación (
N
) para desplazarse
a
( PROGRAMACIÓN Y HERRAMIENTAS
y oprima la tecla
de selección central (
M
)(
OK
).
3
Desplácese a
Programación de sonidos
y oprima la tecla
de selección central (
M
)(
OK
).

50
personalizar
4
Desplácese a
Volumen del teclado
y oprima la tecla de
selección central (
M
)(
OK
).
activar/desactivar sonidos
Nota:
VOLUMEN PRINCIPAL
debe programarse en
Alto
,
Medio alto
,
Medio
,
Medio bajo
o
Bajo
.
1
En la pantalla principal, oprima la tecla de
selección central (
M
)(
MENÚ
) para abrir el menú.
2
Use la tecla de navegación (
N
) para desplazarse
a
( PROGRAMACIÓN Y HERRAMIENTAS
y oprima la tecla
de selección central (
M
)(
OK
).
3
Desplácese a
Programación de sonidos
y oprima la tecla
de selección central (
M
)(
OK
).
4
Seleccione
Encender
/
Apagar
y oprima la tecla de
selección central (
M
)(
OK
).
5
Seleccione
Encender
o
Apagar
y oprima la tecla de
selección central (
M
)(
OK
).
6
Seleccione
Encendido
o
Apagado
y oprima la tecla de
selección central (
M
)(
OK
).
idiomas
1
En la pantalla principal, oprima la tecla de
selección central (
M
)(
MENÚ
) para abrir el menú.
2
Use la tecla de navegación (
N
) para desplazarse
a
( PROGRAMACIÓN Y HERRAMIENTAS
y oprima la tecla
de selección central (
M
)(
OK
).
3
Desplácese a
Programación del teléfono
y oprima la tecla
de selección central (
M
)(
OK
).
4
Desplácese a
Idioma
y oprima la tecla de selección
central (
M
)(
OK
).
5
Seleccione
Inglés
o
Español
y oprima la tecla de
selección central (
M
)(
OK
).

51
personalizar
formato de reloj
Defina cómo el teléfono muestra la hora actual:
1
En la pantalla principal, oprima la tecla de
selección central (
M
)(
MENÚ
) para abrir el menú.
2
Use la tecla de navegación (
N
) para desplazarse
a
( PROGRAMACIÓN Y HERRAMIENTAS
y oprima la tecla
de selección central (
M
)(
OK
).
3
Desplácese a
Programación de pantalla
y oprima la tecla
de selección central (
M
)(
OK
).
4
Desplácese a
Formato de reloj
y oprima la tecla de
selección central (
M
)(
OK
).
5
Desplácese a
Reloj principal
(para la pantalla principal)
o
Reloj frontal
(para la pantalla externa), y oprima la
tecla de selección central (
M
)(
OK
).
6
Seleccione
Analógico
para ver un reloj analógico,
Digital de 12
para un reloj de 12 horas,
Grande digital de 12
para que aparezca un reloj de 12 de horas con
números grandes,
Digital de 24
para un reloj de 24
horas,
Grande digital de 24
para que aparezca un reloj
de 24 de horas con números grandes, o
Desactivado
para que no aparezca ningún reloj, y oprima la
tecla de selección central (
M
)(
OK
).
titular
Cree un encabezado para mostrarlo en la
pantalla principal del teléfono:
1
En la pantalla principal, oprima la tecla de
selección central (
M
)(
MENÚ
) para abrir el menú.
2
Use la tecla de navegación (
N
) para desplazarse
a
( PROGRAMACIÓN Y HERRAMIENTAS
y oprima la tecla
de selección central (
M
)(
OK
).
3
Desplácese a
Programación de pantalla
y oprima la tecla
de selección central (
M
)(
OK
).
4
Seleccione
Titular
oprimiendo la tecla de selección
central (
M
)(
OK
).

52
personalizar
5
Seleccione
Titular personal
o
Titular ERI
y oprima la tecla
de selección central (
M
)(
OK
).
6
Si seleccionó
Titular personal
, ingrese texto y oprima
la tecla de selección central (
M
)(
OK
).
mostrar u ocultar los iconos del
menú
Muestre u oculte iconos de menú en la pantalla
principal que puede usar como atajos para estos
menús:
1
En la pantalla principal, oprima la tecla de
selección central (
M
)(
MENÚ
) para abrir el menú.
2
Use la tecla de navegación (
N
) para desplazarse
a
( PROGRAMACIÓN Y HERRAMIENTAS
y oprima la tecla
de selección central (
M
)(
OK
).
3
Desplácese a
Programación del teléfono
y oprima la tecla
de selección central (
M
)(
OK
).
4
Desplácese a
Programar teclas de atajo
y oprima la tecla
de selección central (
M
)(
OK
).
5
Desplácese a
Mostrar atajos
y selecciónelo, luego
seleccione
Mostrar
u
Ocultar
y oprima la tecla de
selección central (
M
)(
OK
).
cambiar los iconos de la pantalla
principal
Cambie los menús seleccionados con las teclas de
navegación en la pantalla principal:
1
En la pantalla principal, oprima la tecla de
selección central (
M
)(
MENÚ
) para abrir el menú.
2
Use la tecla de navegación (
N
) para desplazarse
a
( PROGRAMACIÓN Y HERRAMIENTAS
y oprima la tecla
de selección central (
M
)(
OK
).
3
Desplácese a
Programación del teléfono
y oprima la tecla
de selección central (
M
)(
OK
).

53
personalizar
4
Desplácese a
Programar teclas de atajo
y oprima la tecla
de selección central (
M
)(
OK
).
5
Seleccione la
tecla arriba
,
tecla abajo
,
tecla izquierda
o
tecla
derecha
, desplácese a menú que desea asignar a
dicha tecla y selecciónelo, y oprima la tecla de
selección central (
M
)(
OK
).

54
llamadas
llamadas
Para realizar y contestar llamadas, consulte la
página 18.
remarcar un número
1
Oprima la tecla Enviar (
$
) para ver la lista de
TODAS LAS LLAMS
.
La lista
TODAS LAS LLAMS
incluye llamadas PTT si
Modo
PTT
está configurado en
Activado
(consulte la
página 74) y los contactos PTT están disponibles
para llamadas PTT. Las llamadas PTT se
identifican por iconos de llamada PTT (consulte
la página 85).
2
Use la tecla de navegación (
N
) para desplazarse
hasta el ingreso al que desea llamar.
3 Para llamadas de voz
, oprima la tecla Enviar (
$
)
para remarcar el número.
o
Para llamadas PTT
, oprima la tecla PTT o la tecla
programable izquierda (
:
)(
Alerta
) para llamar al
número del ingreso. (Para obtener más
información acerca de la realización de una
llamada PTT, consulte la página 78.)
Nota:
la lista
TODAS LAS LLAMADAS
incluye los números
que hayan estado ocupados cuando llamó.

55
llamadas
remarcado
automático
Cuando recibe una señal de ocupado, su teléfono
muestra
Llamada falló, número ocupado
.
Con el remarcado automático, su teléfono volverá a
marcar el número automáticamente durante cuatro
minutos. Cuando se procesa la llamada, su teléfono
timbra o vibra una vez, muestra
Remarcado exitoso
y
conecta la llamada.
Debe activar la remarcación automática para usar esta
función:
1
En la pantalla principal, oprima la tecla de
selección central (
M
)(
MENÚ
) para abrir el menú.
2
Use la tecla de navegación (
N
) para desplazarse
a
( PROGRAMACIÓN Y HERRAMIENTAS
y oprima la tecla
de selección central (
M
)(
OK
).
3
Desplácese a
Programación de llamada
y oprima la tecla
de selección central (
M
)(
OK
).
4
Seleccione
Reintento automático
y oprima la tecla de
selección central (
M
)(
OK
).
5
Seleccione
Encendido
y oprima la tecla de selección
central (
M
)(
OK
).
Cuando el remarcado automático está desactivado,
puede activarlo manualmente para remarcar un
número. Cuando escuche una señal de ocupado
rápida y vea
Llamada falló
, oprima la tecla Enviar (
$
)
o
REINTEN
para remarcar automáticamente.
llamadas recientes
Su teléfono mantiene listas de las llamadas recibidas y
hechas, incluso si las llamadas no se conectaron. Las
llamadas más recientes se muestran primero. Las
llamadas más antiguas se borran a medida que se
agregan otras nuevas.

56
llamadas
La lista de llamadas recientes del teléfono incluye las
llamadas PTT si
Modo PTT
está configurado en
Activado
(consulte la página 74) y los contactos PTT están
disponibles para llamadas PTT. Las llamadas PTT se
identifican en la lista por iconos de llamada PTT
(consulte la página 85).
Atajo:
oprima la tecla Enviar (
$
) en la pantalla
principal para ver la lista
TODAS LAS LLAMADAS
.
1
En la pantalla principal, oprima la tecla de
selección central (
M
)(
MENÚ
) para abrir el menú.
2
Use la tecla de navegación (
N
) para desplazarse
a
* LLAMS RECIENTES
y oprima la tecla de selección
central (
M
)(
OK
).
3
Desplácese a
Perdidas
,
Recibidas
,
Hechas
o
Todas
, y
oprima la tecla de selección central (
M
)(
OK
) para
seleccionar la lista.
4
Desplácese a un ingreso.
5 Para llamadas de voz
, oprima la tecla Enviar (
$
)
para llamar al número del ingreso,
u
oprima la
tecla programable izquierda (
:
)(
Mensaje
) para
enviar un mensaje al número del ingreso.
o
Para llamadas PTT
, oprima la tecla PTT o la tecla
programable izquierda (
:
)(
Alerta
) para llamar al
número del ingreso. (Para obtener más
información acerca de la realización de una
llamada PTT, consulte la página 78.)
u
Oprima la tecla de selección central (
M
)(
ABRIR
)
para ver detalles del ingreso.
u
Oprima la tecla programable derecha (
:
)(
Opciones
)
para realizar otras acciones en el ingreso.

57
llamadas
El menú
Opciones
puede incluir las siguientes opciones:
responder llamadas
perdidas
Su teléfono mantiene un registro de sus llamadas
perdidas. Cuando pierde una llamada, el teléfono
opciones
Mensaje de
texto nuevo
Enviar un mensaje de texto al contacto
de llamadas seleccionado (consulte la
página 90).
Nuevo
mensaje de
imagen
Enviar un mensaje de imagen al
contacto de llamadas seleccionado
(consulte la página 87).
Nuevo
mensaje de
video
Enviar un mensaje de video al contacto
de llamadas seleccionado (consulte la
página 87).
Guardar
Crear un ingreso de
Contactos
para la
llamada.
Nota:
esta opción sólo aparece si el
ingreso no está ya en
Contactos
.
Detalles
Ver información detallada acerca de la
llamada.
Borrar
Borrar el ingreso seleccionado (si no
está bloqueado).
Bloquear/
desbloquear
Bloquear el ingreso seleccionado para
que no se pueda borrar. Cuando
seleccione
Desbloquear
, el ingreso se
puede borrar.
Borrar todo
Borrar todos los ingresos
desbloqueados.
Ver
cronómetros
Ir a la pantalla
Ver cronómetros
para ver la
duración de cada llamada.
opciones

58
llamadas
muestra el indicador
s
(llamada perdida) y
[Número] Llamadas perdidas
.
Para ver llamadas perdidas inmediatamente
:
1
Seleccione
Ver ahora
cuando vea la alerta de
llamadas perdidas y oprima la tecla de selección
central (
M
)(
OK
).
2
Use la tecla de navegación (
N
) para desplazarse
al ingreso.
3 Para llamadas de voz
, oprima la tecla Enviar (
$
)
para llamar al número del ingreso,
u
oprima la
tecla programable izquierda (
:
)(
Mensaje
) para
enviar un mensaje al número del ingreso.
u
Oprima la tecla de selección central (
M
)(
ABRIR
)
para ver detalles del ingreso.
u
Oprima la tecla programable derecha (
:
)(
Opciones
)
para realizar otras acciones en el ingreso.
Para ver llamadas perdidas más adelante
:
Seleccione
Ver después
cuando vea el indicador de
llamada perdida. Para obtener más información sobre
cómo ver llamadas perdidas y devolverles la llamada,
consulte la página 55.
marcado rápido
Nota:
el número 1 de marcado rápido ya está
asignado al número del correo de voz.
Para asignar un número de marcado rápido a un
ingreso
, consulte la página 123.

59
llamadas
Para ver el número de marcado rápido de un
ingreso
:
1
En la pantalla principal, oprima la tecla
programable derecha (
:
)(
Contactos
) para abrir la
LISTA DE CONTACTOS
.
2
Use la tecla de navegación (
N
) para desplazarse
al ingreso y oprima la tecla de selección
central (
M
)(
Ver
). El número de marcado rápido
aparece con el icono
U
.
Para activar el marcado rápido
, debe configurar
Marcado con una tecla
en
Activado
:
1
En la pantalla principal, oprima la tecla de
selección central (
M
)(
MENÚ
) para abrir el menú.
2
Use la tecla de navegación (
N
) para desplazarse
a
( PROGRAMACIÓN Y HERRAMIENTAS
y oprima la tecla
de selección central (
M
)(
OK
).
3
Desplácese a
Programación de llamada
y oprima la tecla
de selección central (
M
)(
OK
).
4
Desplácese a
Marcado con una tecla
y oprima la tecla de
selección central (
M
)(
OK
).
5
Desplácese a
Activado
y oprima la tecla de
selección central (
M
)(
OK
).
Para poner un ingreso en marcado rápido
:
Para llamar a los ingresos de marcado rápido 1 al 9,
mantenga oprimido el número de marcado rápido de
un dígito durante un segundo.
Para números de marcado rápido de dos dígitos,
ingrese el primer número, luego mantenga oprimido el
segundo número durante un segundo.
llamadas de emergencia
Su proveedor de servicios programa uno o más
números de emergencia, como 911, a los cuales usted
puede llamar en cualquier momento,
incluso cuando
el teléfono está bloqueado
.

60
llamadas
Nota:
consulte al proveedor de servicio, ya que los
números de emergencia varían según el país. Es
posible que el teléfono no funcione en todas las
ubicaciones y, en ocasiones, una llamada de
emergencia puede no cursarse debido a problemas
con la red, ambientales o de interferencia. No confíe
solamente en el teléfono inalámbrico para
comunicaciones esenciales, tales como emergencias
médicas.
Para realizar una llamada de emergencia:
encienda
el teléfono, salga de cualquier aplicación abierta como
juegos, marque el número de emergencia, luego
oprima la tecla Enviar (
N
) para llamar al número de
emergencia.
AGPS durante una
llamada de
emergencia
Cuando realiza una llamada de emergencia, el teléfono
puede usar las señales satelitales del Sistema de
posicionamiento global asistido (AGPS) para indicar su
ubicación aproximada al centro de respuesta a
emergencias.
La función AGPS tiene limitaciones; por eso, entregue
siempre la información más completa de su ubicación
al centro de respuesta a emergencias. y permanezca
al teléfono el tiempo necesario para que le den
instrucciones.
El AGPS
podría no funcionar
para llamadas de
emergencia:
•
La función AGPS del teléfono debe estar
activada (consulte la página 47).

61
llamadas
•
Es posible que su centro de respuesta a
emergencias local no procese la información
de ubicación del AGPS. Para obtener detalles,
comuníquese con las autoridades locales.
Para obtener mejores resultados:
•
Salga o aléjese de las ubicaciones
subterráneas, los vehículos cubiertos, las
estructuras con techos de metal o de
concreto, los edificios altos y el follaje de los
árboles. El rendimiento en espacios interiores
podría mejorar si se acerca a las ventanas;
no obstante, algunas películas de parasol para
ventanas pueden bloquear las señales
satelitales.
•
Aléjese de radios, equipos de entretenimiento
y otros dispositivos electrónicos que podrían
bloquear o interferir con las señales satelitales
del AGPS.
Si el teléfono no puede encontrar señales satelitales
del AGPS intensas, se entrega automáticamente al
centro de respuesta a emergencias la ubicación de la
torre de telefonía celular más cercana que esté en
contacto con el aparato.
llamadas internacionales
Si su servicio telefónico incluye marcado
internacional, mantenga oprimida
*
para
ingresar el código de acceso internacional local (que
se indica con
+
). Luego, use el teclado para marcar el
código del país y el número telefónico.
correo de voz
La red almacena los mensajes del correo de
voz que usted recibe. Cuando
recibe
un
mensaje de correo de voz, el teléfono muestra el
indicador de mensajes de correo de voz
y
.

62
llamadas
Nota:
su proveedor de servicio puede incluir
información adicional acerca del uso de esta función.
Seleccione
Escuchar ahora
oprimiendo la tecla de selección
central (
M
)(
OK
) para llamar al correo de voz.
o
Use la tecla de navegación (
N
) para desplazarse a
Escuchar ahora
y luego oprima la tecla de selección
central (
M
)(
OK
).
El indicador de mensajes de correo de voz (
y
)
aparece en la parte inferior de la pantalla hasta que
usted escuche el mensaje, o hasta que vaya a
) MENSAJERÍA
>
Correo de voz
y oprima la tecla
programable izquierda (
:
)(
Borrar
).
Para revisar los mensajes del correo de voz en otro
momento
, mantenga oprimida
1
para llamar a su
número del correo de voz, o vaya a
) MENSAJERÍA
>
Correo de voz
y oprima la tecla de selección
central (
M
)(
OK
).
opciones de llamada
entrante
Durante una llamada activa, oprima
OPCIONES
para
acceder a las siguientes opciones:
Nota:
cuando el teléfono está conectado a un
dispositivo Bluetooth durante una llamada, es posible
que también vea las opciones
Audio para el teléfono
y
Desconectar Bluetooth
. Cuando el teléfono está en modo TTY
(consulte la página 34), también puede ver una opción
Configuración TTY
.
Mensajería Menú principal
Lista de contactos Apuntes
Llams recientes Registro de voz
Menú Bluetooth

63
llamadas
tiempos de llamada y
volúmenes de datos
Tiempo de conexión de red
es el tiempo transcurrido
desde el momento en que se conecta a la red de su
proveedor de servicio hasta el momento en que
termina la llamada al oprimir la tecla de
encendido/fin (
%
). Este tiempo incluye las señales de
ocupado y de timbre.
Es posible que el tiempo de conexión de red que
registra en su cronómetro reiniciable no sea igual
al tiempo que le factura su proveedor de servicio.
Para obtener información de facturación,
comuníquese con su proveedor de servicio.
duración de llamadas
1
En la pantalla principal, oprima la tecla de
selección central (
M
)(
MENÚ
) para abrir el menú.
2
Use la tecla de navegación (
N
) para desplazarse
a
* LLAMS RECIENTES
y oprima la tecla de selección
central (
M
)(
OK
).
3
Desplácese a
Ver cronómetros
y oprima la tecla de
selección central (
M
)(
OK
).
4
Use la tecla de navegación (
N
) para desplazarse
por las siguientes categorías:
Última llamada
,
Todas las
llamadas
,
Llams recibidas
,
Llamadas hechas
,
Llamadas de roaming
o
Duración de llams
. Oprima la tecla borrar (
&
) para
volver al menú
Llamadas recientes
.
programar cronómetro de
llamada
1
En la pantalla principal, oprima la tecla de
selección central (
M
)(
MENÚ
) para abrir el menú.
2
Use la tecla de navegación (
N
) para desplazarse
a
( PROGRAMACIÓN Y HERRAMIENTAS
y oprima la tecla
de selección central (
M
)(
OK
).

64
llamadas
3
Desplácese a
Programación de sonidos
y oprima la tecla
de selección central (
M
)(
OK
).
4
Desplácese a
Alertas de servicio
y oprima la tecla de
selección central (
M
)(
OK
).
5
Desplácese a
Bip por minuto
y oprima la tecla de
selección central (
M
)(
OK
).
6
Desplácese a
Activado
y oprima la tecla de
selección central (
M
)(
OK
).
volúmenes de datos
1
En la pantalla principal, oprima la tecla de
selección central (
M
)(
MENÚ
) para abrir el menú.
2
Use la tecla de navegación (
N
) para desplazarse
a
* LLAMS RECIENTES
y oprima la tecla de selección
central (
M
)(
OK
).
3
Desplácese a
Ver cronómetros
y oprima la tecla de
selección central (
M
)(
OK
).
4
Use la tecla de navegación (
N
) para desplazarse
por las siguientes categorías:
Transmitir datos
,
Datos
recibidos
,
Datos totales
o
Contador de datos de duración
. Oprima
la tecla borrar (
&
) para volver al menú
Llamadas
recientes
.
reiniciar cronómetro
1
En la pantalla principal, oprima la tecla de
selección central (
M
)(
MENÚ
) para abrir el menú.
2
Use la tecla de navegación (
N
) para desplazarse
a
* LLAMS RECIENTES
y oprima la tecla de selección
central (
M
)(
OK
).
3
Desplácese a
Ver cronómetros
y oprima la tecla de
selección central (
M
)(
OK
).
4
Desplácese al cronómetro que desee reiniciar y
oprima la tecla programable
izquierda (
:
)(
Reiniciar
).
Para reiniciar todos los cronómetros, oprima la
tecla programable derecha (
:
)(
Reiniciar todo
).

65
llamadas
5
Seleccione
Sí
al oprimir la tecla de selección
central (
M
)(
OK
).
ver último reinicio
1
En la pantalla principal, oprima la tecla de
selección central (
M
)(
MENÚ
) para abrir el menú.
2
Use la tecla de navegación (
N
) para desplazarse
a
* LLAMS RECIENTES
y oprima la tecla de selección
central (
M
)(
OK
).
3
Desplácese a
Ver cronómetros
y oprima la tecla de
selección central (
M
)(
OK
).
4
Desplácese a
Último reinicio
para ver detalles.
5
Cuando termine, oprima la tecla de selección
central (
M
)(
OK
).
más funciones de
llamada
restringir funciones
1
Oprima la tecla de selección
central (
M
)(
MENÚ
) para abrir el menú.
2
Use la tecla de navegación (
N
) para desplazarse
a
( PROGRAMACIÓN Y HERRAMIENTAS
y oprima la tecla
de selección central (
M
)(
OK
).
3
Desplácese a
Programación del teléfono
y oprima la tecla
de selección central (
M
)(
OK
).
4
Desplácese a
Seguridad
y oprima la tecla de
selección central (
M
)(
OK
).
5
Cuando se le solicite, ingrese el código de
bloqueo (consulte la página 28) y oprima la tecla
de selección central (
M
)(
OK
).

66
llamadas
6
Desplácese a
Restricciones
y oprima la tecla de
selección central (
M
)(
OK
).
7
Cuando se le solicite, ingrese el código de
bloqueo (consulte la página 28) y oprima la tecla
de selección central (
M
)(
OK
).
8
Seleccione
Program de posición
y oprima la tecla de
selección central (
M
)(
OK
), luego seleccione
Programación de desbloqueo
o
Programación de bloqueo
.
o
Seleccione
Llamadas
y oprima la tecla de selección
central (
M
)(
OK
), luego seleccione
Llams entrantes
o
Llams salientes
.
o
Seleccione
Mensajes
y oprima la tecla de selección
central (
M
)(
OK
), luego seleccione
Mensajes entrantes
o
Mensajes salientes
.
o
Seleccione
Módem de acceso telefónico
y oprima la tecla
de selección central (
M
)(
OK
), luego seleccione
Permitir
o
Bloquear
.
9
Oprima la tecla de encendido/fin (
%
) para volver
a la pantalla principal.
insertar caracteres especiales
Mientras ingresa un número, oprima la tecla
programable derecha (
:
)(
Opciones
) y seleccione una
de las siguientes opciones:
•
Pausa de 2 seg.
: el teléfono hace una pausa de dos
segundos antes de marcar el dígito siguiente.
•
Espera
: el teléfono espera hasta que la llamada
se conecta y luego solicita su confirmación
antes de marcar los siguientes dígitos.
tonos DTMF
El teléfono puede enviar Tonos de multifrecuencia de
doble tono (DTMF) para llamadas con tarjeta de

67
llamadas
llamada o para navegar en sistemas automatizados
(tales como banca telefónica).
Para configurar tonos DTMF
:
1
En la pantalla principal, oprima la tecla de
selección central (
M
)(
MENÚ
) para abrir el menú.
2
Use la tecla de navegación (
N
) para desplazarse
a
( PROGRAMACIÓN Y HERRAMIENTAS
y oprima la tecla
de selección central (
M
)(
OK
).
3
Desplácese a
Programación de llamada
y oprima la tecla
de selección central (
M
)(
OK
).
4
Desplácese a
Tonos DTMF
y oprima la tecla de
selección central (
M
)(
OK
).
5
Seleccione
Normal
o
Largo
y oprima la tecla de
selección central (
M
)(
OK
).
Para enviar tonos DTMF durante una llamada
,
oprima las teclas numéricas.
aparato auditivo
Si usa un aparato auditivo, programe el teléfono para
que sea compatible con el aparato auditivo.
1
En la pantalla principal, oprima la tecla de
selección central (
M
)(
MENÚ
) para abrir el menú.
2
Use la tecla de navegación (
N
) para desplazarse
a
( PROGRAMACIÓN Y HERRAMIENTAS
y oprima la tecla
de selección central (
M
)(
OK
).
3
Desplácese a
Programación de llamada
y oprima la tecla
de selección central (
M
)(
OK
).
4
Desplácese a
Aparato auditivo
y oprima la tecla de
selección central (
M
)(
OK
).
5
Seleccione
Encendido
y oprima la tecla de selección
central (
M
)(
OK
).
Nota:
para obtener más información acerca de la
compatibilidad del aparato auditivo, consulte
“Compatibilidad de prótesis auditivas con teléfono
móviles” en la página 166.

68
ingreso de texto
ingreso de texto
Algunas funciones le permiten ingresar texto.
El siguiente ejemplo muestra una pantalla de
ingreso de
Contactos
:
El siguiente ejemplo muestra una pantalla de ingreso
para crear un mensaje de texto:
GUARDAR
1
ò
❙❙❙❙
❙❙❙❙
1X
EV
N
Oprima la tecla
de navegación
(N) para
desplazarse a
más opciones.
Oprima la tecla de selección central
(M) (GUARDAR) para guardar la información
del ingreso.
Oprima la tecla
programable
izquierda (C) (Abc)
para cambiar el
modo de ingreso.
Opción
resaltada
Nombre
•
Abc
Cancelar
CONTACTO NUEVO
Móvil 1
Inicio
g
Abc
Trabajo
John
Abc
Opciones
ENVIAR
Oprima la tecla
programable
derecha (
C
)
(Opciones) para
ver el submenú
Opciones.
Oprima la tecla de selección
central (M) (ENVIAR) para
enviar el mensaje.
Oprima la tecla
programable
izquierda
(
C
) (
Abc
) para
cambiar
el modo de
ingreso de
texto.
El cursor indica
el punto de
inserción.
A:
0/160
MENSAJE DE TEXTO NUEVO
Texto:
1/7
555-2990
1
ò
❙❙❙❙
❙❙❙❙
1X
EV
N

69
ingreso de texto
seleccionar modo de
ingreso
Varios modos de ingreso facilitan la escritura de
nombres, números y mensajes. El modo
predeterminado es
Abc
(modo tap, con el primer
carácter de una oración en mayúscula).
Para seleccionar un modo de ingreso desde la
pantalla de ingreso de texto
, oprima la tecla
programable izquierda (
:
), y seleccione un modo
de ingreso.
Puede seleccionar uno de estos modos de ingreso
de texto:
modos de ingreso
iTAP en
inglés
El teléfono predice cada palabra (en
inglés) a medida que oprime las teclas.
iTAP en
español
El teléfono predice cada palabra (en
español) a medida que oprime las teclas.
Abc
Ingresar letras y números con el primer
carácter de una oración en mayúscula.
ABC
Ingresar letras y números con todos los
caracteres en mayúscula (no está
disponible cuando se edita un contacto).
123
Ingresar sólo números.
Símbolos
Ingresar símbolos.
Texto rápido
Seleccionar e insertar un mensaje
escrito previamente (sólo disponible en
la pantalla
CREAR MENSAJE DE TXT
).
modos de ingreso

70
ingreso de texto
Cuando el modo de texto está programado en
ABC
o
Abc
, oprima
*
en cualquier pantalla de ingreso de
texto para alternar entre estas
opciones de
mayúsculas
:
Cuando el modo de texto está programado en
iTAP
en inglés
o
iTAP en español
, oprima
*
en cualquier pantalla
de ingreso de texto para alternar entre estas
opciones
de mayúsculas
:
abc
letras minúsculas
Abc
primera letra de una frase en mayúscula
ABC
todas las letras mayúsculas
modo de
ingreso
opciones de mayúsculas
iTAP en
inglés
iTAPEn
primera letra de una frase en
mayúscula (inglés)
iTAPEN
todas las letras mayúsculas
(inglés)
iTAPen
todas las letras minúsculas
(inglés)
iTAP en
español
iTAPEs
primera letra de una frase en
mayúscula (español)
iTAPES
todas las letras mayúsculas
(español)
iTAPes
todas las letras minúsculas
(español)

71
ingreso de texto
modo tap
Éste es el modo estándar para ingresar texto en el
teléfono. El modo Tap regular se desplaza por las
letras, números y símbolos de la tecla que oprime.
1
Oprima la tecla una vez para insertar la primera
letra de la tecla en particular, dos veces para la
segunda letra y así sucesivamente. Si hace una
breve pausa, el teléfono acepta la última letra que
aparece en la pantalla y espera la próxima
entrada.
2
Ingrese los caracteres restantes de la misma
manera.
Consejo:
oprima
#
para ingresar un espacio.
modo iTAP®
El software iTAP brinda un método de ingreso de texto
predictivo que combina las pulsaciones de las teclas
para formar palabras comunes.
Cuando ingresa tres o más letras seguidas, el teléfono
puede adivinar el resto de la palabra. Por ejemplo, si
ingresa
prog
, el teléfono podría mostrar:
Si desea una palabra diferente (como progreso), siga
oprimiendo las teclas para ingresar el resto de los
caracteres.
1
ò
❙❙❙❙
❙❙❙❙
1X
EV
N
Oprima la tecla de
navegación (
N
) a la
derecha para aceptar
el programa. Ingrese
un espacio después
de pr og
para conservar
sólo pr og.
A:
Éste es un prog rama
18/160
iTAPEn
Opciones
ENVIAR
NVO MSJS TXT
Texto:
1/7
555-2233

72
ingreso de texto
Si ingresa una palabra que el teléfono no reconoce,
éste la guarda como una nueva opción de palabra.
Cuando llena el espacio en memoria para nuevas
opciones de palabra, el teléfono borra las palabras más
antiguas para agregar las nuevas.
•
Oprima la tecla de navegación (
N
) hacia
arriba o abajo para ver otras combinaciones
posibles, y seleccione la que desee.
•
Oprima la tecla de navegación hacia la
derecha (
N
) para ingresar la combinación
resaltada cuando deletrea una palabra.
Se insertará automáticamente un espacio
después de la palabra.
•
Para ingresar números en forma rápida,
mantenga oprimida una tecla numérica para
cambiar temporalmente al modo numérico.
Oprima las teclas numéricas para ingresar los
números que desea.
•
Oprima
1
para ingresar puntuación u
otros caracteres.
modo numérico
Después de seleccionar el modo numérico, oprima las
teclas numéricas para ingresar los números que
desee. Cuando termine de ingresar números, oprima
la tecla programable izquierda (
:
)(
123
) para cambiar a
otro modo de ingreso.
modo símbolo
En la pantalla
SÍMBOLOS
, use la tecla de navegación (
N
)
para desplazarse a un símbolo y oprima la tecla de
selección central (
M
)(
OK
) para seleccionarlo.
Para buscar símbolos adicionales, oprima la tecla
programable derecha (
:
)(
Siguiente
) para avanzar una
página hasta el siguiente conjunto de símbolos.

73
ingreso de texto
Oprima la tecla programable izquierda (
:
)(
Anterior
)
para retroceder una página hasta el conjunto anterior.
consejos para el ingreso
de texto
Para ingresar un espacio
, oprima
#
.
Para ingresar puntuaciones mientras ingresa texto
,
oprima
1
varias veces para ingresar un signo de
puntuación u otro carácter.
Para modificar o borrar texto mientras lo ingresa
,
oprima la tecla de navegación a la derecha (
N
) para
mover el cursor a la derecha del texto que desea
modificar. Oprima la tecla borrar (
&
) para borrar el
carácter que está a la izquierda del cursor. Mantenga
oprimida la tecla Borrar (
&
) para borrar la palabra
completa.

74
push to talk
push to talk
El teléfono admite Push to Talk (PTT), que
permite usar el teléfono como walkie-talkie
para comunicarse con una persona o grupo de
personas que también sean suscriptores de Verizon
Wireless® Push To Tal k.
activar modo PTT
Debe activar el modo PTT para usar las funciones PTT
del teléfono (por ejemplo, tener acceso a la
LISTA DE
CONTACTOS PTT
, enviar y recibir llamadas PTT, etc.).
1
En la pantalla principal, oprima la tecla de
selección central (
M
)(
MENÚ
) para abrir el menú.
2
Use la tecla de navegación (
N
) para desplazarse
a
( PROGRAMACIÓN Y HERRAMIENTAS
y oprima la tecla
de selección central (
M
)(
OK
).
3
Desplácese a
Programación de llamada
y oprima la tecla
de selección central (
M
)(
OK
).
4
Desplácese a
Modo PTT
y oprima la tecla de
selección central (
M
)(
OK
).
5
Desplácese a
Activado
y oprima la tecla de
selección central (
M
)(
OK
).
El indicador de intensidad de la señal invierte sus
colores cuando
Modo PTT
está configurado en
Activado
y el
teléfono está registrado con el servidor PTT.
indica que el teléfono está registrado.
indica que el teléfono no está registrado.
El
1X
EV
❙❙❙❙
❙❙❙❙
❙❙❙❙
❙❙❙❙

75
push to talk
teléfono debe estar registrado para realizar o
recibir llama das PTT.
contactos y grupos PTT
Puede almacenar Contactos PTT para realizar llamadas
privadas (de persona a persona) y crear Grupos PTT
para realizar llamadas grupales.
agregar un contacto PTT
Nota:
Modo PTT
debe estar configurado en
Activado
(consulte la página 74) para usar funciones de PTT.
1
En la pantalla principal, oprima la tecla de
selección central (
M
)(
MENÚ
) para abrir el menú.
2
Oprima la tecla de selección central (
M
)(
OK
) para
seleccionar
[ CONTACTS
.
3
Use la tecla de navegación (
N
) para desplazarse
a
Contacto PTT nuevo
y oprima la tecla de selección
central (
M
)(
OK
).
4
Ingrese un nombre y un número telefónico de
diez dígitos para el contacto y oprima la tecla de
selección central (
M
)(
GUARDAR
).
agregar grupos
Nota:
Modo PTT
debe estar configurado en
Activado
(consulte la página 74) para usar funciones de PTT.
1
En la pantalla principal, oprima la tecla de
selección central (
M
)(
MENÚ
) para abrir el menú.
2
Oprima la tecla de selección central (
M
)(
OK
) para
seleccionar
[ CONTACTS
.
3
Use la tecla de navegación (
N
) para desplazarse
a
Grupos PTT
y oprima la tecla de selección
central (
M
)(
OK
).

76
push to talk
4
Oprima la tecla programable izquierda (
:
)(
Nuevo
)
para agregar un nuevo grupo PTT.
5
Ingrese el nombre del grupo nuevo y oprima la
tecla de selección central (
M
)(
GUARDAR
).
Verá
Actualización en curso
seguido por
Grupo PTT guardado
.
6
Desplácese al grupo recién creado y oprima la tecla
de selección central (
M
)(
Ver
) para ver una lista de
contactos PTT que se pueden agregar al grupo.
7
Oprima la tecla de selección central (
M
)(
Agregar
)
para agregar nuevos miembros.
8
Seleccione miembros de ente los contactos PTT
oprimiendo la tecla de selección
central (
M
)(
MARCAR
). Cuando termine de agregar
miembros, oprima la tecla programable
izquierda (
:
)(
Listo
). Verá
Actualización en curso
seguido por
Grupo PTT actualizado
.
administrar contactos y grupos
Para administrar los contactos PTT
:
Nota:
Modo PTT
debe estar configurado en
Activado
(consulte la página 74) para usar funciones de PTT.
1
Oprima la tecla PTT para tener acceso a la
LISTA DE
CONTACTOS PTT
.
2
Use la tecla de navegación (
N
) para desplazarse
al ingreso.
3
Oprima la tecla de selección central (
M
)(
VER
)
para ver detalles del contacto.
u
Oprima la tecla programable derecha (
:
)(
Opciones
)
para ver estas opciones.
Nuevo contacto PTT
,
Copiar a
contactos
,
Grupo PTT temporal
,
Borrar
,
Modificar
,
Llamada
,
Mensaje
de texto nvo
,
Mensaje de imagen nvo
,
Mensaje de video nvo
,
Ordenar
.
Nota:
puede modificar sólo el nombre de un
contacto PTT, no el número. Para cambiar el

77
push to talk
número, primero debe borrar el contacto antiguo
y crear un nuevo ingreso.
Para administrar los Grupos PTT
:
Nota:
Modo PTT
debe estar configurado en
Activado
(consulte la página 74) para usar funciones de PTT.
1
En la pantalla principal, oprima la tecla de
selección central (
M
)(
MENÚ
) para abrir el menú.
2
Oprima la tecla de selección central (
M
)(
OK
) para
seleccionar
[ CONTACTS
.
3
Use la tecla de navegación (
N
) para desplazarse
a
Grupos PTT
y oprima la tecla de selección
central (
M
)(
OK
).
4
Use la tecla de navegación (
N
) para desplazarse
al ingreso.
5
Oprima la tecla de selección central (
M
)(
VER
)
para ver detalles del grupo.
u
Oprima la tecla programable derecha (
:
)(
Opciones
)
para ver estas opciones:
Cambiar nombre
,
Borrar
,
Agregar
,
Ordenar
.
llamadas PTT
Nota:
Modo PTT
debe estar configurado en
Activado
(consulte la página 74) para usar funciones de PTT.
Puede hacer una llamada PTT
privada
o una llamada
PTT
grupal
a otros suscriptores PTT de Verizon
Wireless®.
Una llamada PTT
privada
es una de persona a persona
a otro suscriptor PTT de Verizon Wireless PTT que
usted inicie, ingresando el número de diez dígitos del
destinatario o seleccionando un ingreso de la
LISTA DE
CONTACTOS PTT
.
Una llamada
grupal
es una llamada a todos los
miembros disponibles del grupo seleccionado desde
la
LISTA DE CONTACTOS PTT
o lista de
GRUPOS PTT
.

78
push to talk
Puede realizar dos tipos de llamadas PTT:
• Llamada de alerta
: cuando se hace una
llamada de alerta, el teléfono del destinatario
de la llamada PTT reproduce un tono audible y
muestra un mensaje que indica que alguien
desea hablar con él. El destinatario puede
aceptar o rechazar la llamada.
No se pueden
hacer llamadas de alerta a grupos.
• Llamada de monitoreo
: cuando se hace una
llamada de monitoreo, el teléfono del
destinatario reproduce un tono audible, y la
llamada se conecta automáticamente.
aspectos fundamentales de las
llamadas PTT
Para hablar
durante una llamada PTT, mantenga
oprimido el botón PTT y hable después del tono.
Sólo una persona puede hablar a la vez.
Para dejar que los demás hablen
, suelte el
botón PTT.
Para finalizar una llamada
, oprima la tecla de
encendido/fin (
%
).
realizar una llamada PTT
Nota:
para hacer llamadas PTT, debe configurar
Modo PTT
en
Activado
(consulte la página 74).
llamada de monitoreo desde la lista de
contactos PTT
1
Oprima la tecla PTT para tener acceso a la
LISTA DE
CONTACTOS PTT
.
2
Use la tecla de navegación (
N
) para resaltar el
ingreso de contacto PTT al que desea llamar.
3 Mantenga oprimida la
PTT tecla, y espere el
tono Listo para hablar. Aparecerá el mensaje
Conectado a
en la pantalla principal. Hable mientras
mantiene oprimida la tecla PTT.

79
push to talk
4
Suelte la tecla PTT cuando termine de hablar.
Esto permite que la parte a quien llama le
conteste.
5
Para finalizar la llamada, oprima la tecla de
encendido/fin (
%
).
llamada de alerta desde la lista de contactos
PTT
Puede enviar una alerta a cualquier usuario con el
servicio PTT de Verizon Wireless. La persona a la que
llamó puede contestar o ignorar la llamada.
1
Oprima la tecla PTT para tener acceso a la
LISTA DE
CONTACTOS PTT
.
2
Use la tecla de navegación (
N
) para resaltar el
ingreso de contacto PTT al que desea llamar.
3
Oprima la tecla programable izquierda (
:
)(
Alerta
).
El teléfono mostrará
Oprima la tecla PTT para alerta
.
4
Oprima la tecla PTT para alertar a la persona
seleccionada. El teléfono reproduce tonos de
“Alerta saliente de PTT” y muestra
Alertando
.
Si la persona a la que llamó responde a la alerta,
el teléfono muestra
Escuchando a
, y usted oirá a la
parte a quien llama hablando. Si la persona a la
que llamó decide ignorar la alerta, o si el teléfono
no puede aceptar una llamada PTT, el teléfono
mostrará
No disponible
.
Cuando la persona a la que llamó termina de
hablar, escuchará el tono “Piso disponible”, y el
teléfono mostrará
Conectado a
.
5
Mantenga oprimida la tecla PTT para hablar.
6
Suelte la tecla PTT cuando termine de hablar.
Esto permite que la parte a quien llama le
conteste.
7
Para finalizar la llamada, oprima la tecla de
encendido/fin (
%
).

80
push to talk
llamada de monitoreo desde el teclado
1
Ingrese el número celular de diez dígitos del
suscriptor PTT de Verizon Wireless con el que
desea comunicarse.
2
Oprima la tecla PTT. Escuche el tono Listo para
hablar. El teléfono mostrará
Conectado a
. Hable
mientras mantiene oprimida la tecla PTT.
Si el número celular que ingresó está incluido en
la lista de contactos PTT, el nombre del contacto
aparecerá en lugar del número celular ingresado
en la pantalla al momento de iniciar la llamada.
3
Suelte la tecla PTT cuando termine de hablar.
Esto permite que la parte a quien llama le
conteste.
4
Para finalizar la llamada, oprima la tecla de
encendido/fin (
%
).
llamada de alerta desde el teclado
1
Ingrese el número celular de diez dígitos del
suscriptor PTT de Verizon Wireless con el que
desea comunicarse.
2
Oprima la tecla programable izquierda (
:
)(
Alerta
).
3
Oprima y suelte la tecla PTT para alertar a la
persona.
El teléfono reproduce el tono PTT de “Alerta
saliente” y muestra
Alertando
. Si el número celular
que ingresó está incluido en la lista de contactos
PTT, el nombre del contacto reemplazará al
número celular ingresado en la pantalla al
momento de iniciar la alerta.
Si la parte a quien llama responde a la alerta, el
teléfono muestra
Escuchando a
, y usted oirá a la parte
a quien llama hablando. Si la persona a la que
llamó decide ignorar la alerta, o si el teléfono no
puede aceptar una llamada PTT, el teléfono
mostrará
No disponible
.

81
push to talk
Cuando la persona a la que llamó termina de
hablar, el teléfono reproduce el tono “Piso
disponible” y mostrará
Conectado a
.
4
Mantenga oprimida la tecla PTT para hablar.
5
Suelte la tecla PTT cuando termine de hablar.
Esto permite que la parte a quien llama le
conteste.
6
Para finalizar la llamada, oprima la tecla de
encendido/fin (
%
).
llamadas a grupos temporales
Puede configurar una llamada de grupo temporal para
un grupo de contactos PTT que ya estén en la lista de
contactos PTT. Un grupo temporal es un nuevo grupo
que se define para una sola llamada y no se almacena
como grupo en la lista de contactos PTT.
Nota:
para hacer llamadas PTT, debe configurar
Modo PTT
en
Activado
(consulte la página 74).
1
Oprima la tecla PTT para tener acceso a la
Lista de
contactos PTT
.
2
Oprima la tecla programable
derecha (
:
)(
Opciones
).
3
Seleccione
Grupo PTT temporal
y oprima la tecla de
selección central (
M
)(
OK
).
4
Oprima la tecla de selección central (
M
)(
AGREGAR
)
para agregar nuevos miembros.
5
Seleccione miembros de ente los contactos PTT
oprimiendo la tecla de selección
central (
M
)(
MARCAR
). Cuando termine de agregar
miembros, oprima la tecla programable
izquierda
:
)(
LISTO
).
6
Mantenga oprimida la tecla PTT para hacer una
llamada de monitoreo al grupo recién definido.
Nota:
después de definir un grupo temporal por
primera vez, el teléfono incluye automáticamente los
contactos PTT de dicho grupo en el siguiente grupo

82
push to talk
temporal que se defina. En su siguiente llamada grupal
temporal, puede agregar y quitar contactos PTT según
desee.
Consejo:
si decide que desea
mantener un grupo
temporal
, puede guardarlo como grupo permanente:
en la pantalla
GRUPO PTT TEMPORAL
, oprima la tecla
programable derecha (
:
)(
Opciones
), seleccione
Guardar
como grupo PTT
y oprima la tecla de selección
central (
M
)(
OK
).
contestar llamadas PTT
Nota:
para recibir llamadas PTT, debe configurar
Modo PTT
en
Activado
(consulte la página 74).
llamada de monitoreo entrante
Cuando recibe una llamada de monitoreo, el teléfono
reproduce el tono “Barge”. Entonces escuchará a la
persona a la que llamó. El teléfono mostrará el número
celular de la persona a la que llamó. Si el número de la
persona a la que llamó está guardado en la lista de
contactos PTT, el nombre del contacto aparecerá en
lugar del número celular en la pantalla.
1
Mantenga oprimida la tecla PTT para hablar.
2
Suelte la tecla PTT para dejar hablar a la otra
persona.
3
Para finalizar la llamada, oprima la tecla de
encendido/fin (
%
).
llamada de alerta entrante
Cuando recibe una alerta, el teléfono reproduce el
tono "Alerta PTT" (consulte las páginas 41 y 83) y
muestra
Alerta entrante
, junto con el número telefónico o
nombre del contacto de la persona que llama.
1
Puede elegir entre contestar la alerta o ignorarla.
Para contestar a la alerta
, mantenga oprimida la
tecla PTT y comience a hablar.
Para ignorar la
alerta
, oprima la tecla programable
derecha (
:
)(
Ignorar
).

83
push to talk
2
Suelte la tecla PTT para dejar hablar a la otra
persona.
3
Para finalizar la llamada, oprima la tecla de
encendido/fin (
%
).
regresar la última llamada PTT
Para llamar rápidamente a la última llamada PTT
que marcó o recibió
: mantenga oprimida la tecla PTT.
El teléfono busca la última llamada que hizo o recibió y
realiza una llamada de monitoreo a dicho número.
altavoz del manos libres para
llamadas PTT
Precaución:
durante una llamada PTT activa, al oprimir
la tecla inteligente/altavoz,
con la solapa cerrada
, se
finaliza la llamada.
Cuando usted
realiza o recibe una llamada PTT
, el
teléfono usa automáticamente el altavoz del manos
libres (consulte la página 26) durante la llamada a
menos que usted haya configurado
Volumen principal
en
Sólo vibración
,
Sólo alarma
, o
Todos los sonidos desactivados
(consulte
la página 25). Cuando en una Llamada PTT en curso,
puede encender y apagar el altavoz si mantenga
oprimida la Tecla inteligente/altavoz, con la solapa
abierta.
tonos de alerta PTT
El teléfono reproduce tonos de alerta PTT audibles
cuando:
•
usted puede hablar durante una llamada PTT
activa (cuando no hay nadie más hablando)
•
recibe una llamada de monitoreo
•
oprime un botón mientras otra persona que
participa en la llamada está hablando
•
usted recibe una llamada de alerta

84
push to talk
•
usted origina una llamada de alerta
•
el teléfono al que está llamando está ocupado
o no disponible
•
cuando el piso está disponible, permitiéndole
hablar
indicadores PTT
Cuando ve contactos y grupos PTT, los siguientes
indicadores junto a los ingresos muestran su
disponibilidad
:
Los siguientes indicadores muestran el
estado de las
llamadas PTT
:
indicador y mensaje estado
. Persona disponible
contacto en línea
(disponible para
llamada PTT)
à Persona no disponible
contacto fuera de línea
(no disponible)
=
Grupo disponible
grupo en línea
(disponible)
à Grupo no disponible
grupo fuera de línea (no
disponible)
indicador y mensaje
; Conectando a
contacto
: Conectado a
contacto
;
Conectando
al grupo
+ Conectado
al grupo
Hablando con
el contacto
Á Hablando con
el grupo
\ Escuchando a
contacto
indicador y mensaje estado

85
push to talk
Los siguientes indicadores muestran las llamadas
PTT
recientes
:
almacenar un número
telefónico
Para almacenar un número de teléfono cuando
Modo
PTT está configurado en Activado
:
1
Utilice el teclado para ingresar un número de
teléfono en la pantalla principal y oprima la tecla
programable derecha (
:
)(
Opciones
).
2
Use la tecla de navegación (
N
) para desplazarse
a
Guardar
y oprima la tecla de selección
central (
M
)(
OK
).
3
Para guardar el número en
Contactos
, use la tecla de
navegación (
N
) para desplazarse a
Agregar contacto
nuevo
, oprima la tecla de selección central (
M
)(
OK
),
luego desplácese a un tipo de ingreso y oprima la
tecla de selección central (
M
)(
OK
).
4
Use el teclado para ingresar un nombre y otros
detalles para el número.
_ Escuchando a
grupo
# Alertando
al contacto o grupo
% Terminó llamada
de contacto o grupo
indicador estado
@
llamada recibida del contacto
>
llamada recibida del grupo
/
llamar al contacto
?
llamar al grupo
{
llamada perdida del contacto o grupo
indicador y mensaje

86
push to talk
5
Oprima la tecla de selección central (
M
)(
Guardar
)
para almacenar el número.
Push to Talk
Las llamadas Push to Talk sólo se pueden efectuar con
otros suscriptores de Push to Talk de Verizon
Wireless®, y sólo desde el área de cobertura con
tarifas de servicio nacional optimizado extendido. Para
un rendimiento óptimo de Push to Talk, todas las
personas que llaman en una sesión Push to Talk deben
tener un dispositivo con capacidad EVDO y deben
estar recibiendo un servicio EVDO. Una llamada Push
to Talk se finaliza oprimiendo
FIN
, o finaliza
automáticamente después de (10) segundos de
inactividad. Durante una llamada Push to Talk, las
llamadas de voz recibidas irán directamente al correo
de voz. Durante una llamada de voz, no se pueden
recibir llamadas Push to Talk. No puede impedir que
otras personas que tengan su número de teléfono
celular lo ingresen en su lista de contactos Push to
Talk. Sólo una persona puede hablar a la vez durante
llamadas Push to Talk. Cuando usa el teclado del
teléfono para hacer una llamada Push to Talk, debe
ingresar el número telefónico de diez dígitos de la
persona a la que llama. La información de presencia
puede no estar disponible para todos los contactos
Push to Talk. Lo oportuno de la información de
presencia se puede ver afectado por el estado de
registro en la red de un contacto Push to Talk. El
servicio Push to Talk no se puede usar para ninguna
aplicación que ancle el teléfono a computadoras u
otros dispositivos para ningún propósito. Se necesita
un teléfono y un servicio con capacidad Push to Talk.

87
mensajes
mensajes
enviar un mensaje
multimedia
Un mensaje multimedia contiene objetos multimedia
incorporados (lo que puede incluir fotografías, videos,
sonidos o registros de voz). Puede enviar un mensaje
multimedia a otros teléfonos habilitados para
mensajería multimedia Verizon Wireless® y a otras
direcciones de email.
crear y enviar mensajes
1
En la pantalla principal, oprima la tecla
programable izquierda (
:
)(
Mensaje
) para abrir
) MENSAJERÍA
.
2
Oprima la tecla de selección central (
M
)(
OK
) para
seleccionar
Mensaje nuevo
.
3
Use la tecla de navegación (
N
) para desplazarse
a
Mensaje de imagen
o
Mensaje de video
y oprima la tecla de
selección central (
M
)(
OK
).
4
Use el teclado para ingresar un número telefónico
y luego oprima la tecla de selección
central (
M
)(
OK
).
u
Oprima la tecla programable derecha (
:
)(
Agregar
),
seleccione
Desde contactos
,
Llams recientes
o
Grupos
y
oprima la tecla de selección central (
M
). Para
cada ingreso que desee agregar, desplácese al
ingreso y oprima la tecla de selección
central (
M
)(
MARCAR
). Oprima la tecla programable
izquierda (
:
)(
Listo
) cuando termine de
seleccionar ingresos.

88
mensajes
5
Desplácese al área de ingreso de
Texto
y use el
teclado para escribir un mensaje de texto.
6
Para un mensaje con imagen, desplácese al área
de ingreso
Picture
y oprima la tecla programable
izquierda (
:
)(
Mis imágenes
).
o
Para un mensaje de video, desplácese al cuadro
de ingreso
Video
y oprima la tecla programable
izquierda (
:
)(
Videos
).
7
Para un mensaje con imagen, desplácese a una
imagen y oprima la tecla de selección
central (
M
)(
OK
).
o
Para ver un mensaje de video, desplácese hasta
el videoclip y oprima la tecla de selección
central (
M
)(
OK
).
8
Para un mensaje con
Imagen
, desplácese al área de
ingreso
Sonido
y oprima la tecla programable
izquierda (
:
)(
Sonidos
). Luego, desplácese hasta
un sonido y oprima la tecla de selección
central (
M
)(
OK
).
9
Desplácese a
Asunto
.
10
Use el teclado para escribir el asunto del
mensaje.
u
Oprima la tecla programable
derecha (
:
)(
Opciones
), desplácese a
Agregar texto
rápido
y oprima la tecla de selección
central (
M
)(
OK
). Luego seleccione un elemento
de
texto rápido
como el asunto del mensaje y oprima
la tecla de selección central (
M
)(
OK
).
11
Oprima la tecla de selección central (
M
)(
ENVIAR
)
para enviar el mensaje.

89
mensajes
opciones de mensaje
Mientras crea un mensaje multimedia, oprima la tecla
programable derecha (
:
)(
Opciones
) para seleccionar de
entre las siguientes opciones:
recibir un mensaje
multimedia
Cuando recibe un mensaje multimedia, el teléfono
muestra una notificación de
NVO MSJ IMAG/VIDEO
y
reproduce un sonido de alerta.
Para ver el mensaje inmediatamente, desplácese a
Ver
ahora
y oprima la tecla de selección central (
M
). Para
guardarlo en el
Buzón
para verlo después, desplácese a
Ver después
y oprima la tecla de selección central (
M
).
opción
Vista previa
Vea el contenido actual del
mensaje.
Guardar como borrador
Guarde el mensaje en la carpeta
Borradores
.
Agregar texto rápido
Insertar texto escrito
previamente.
Nivel prioritario
Programe como
Alto
o
Normal
.
Quitar imagen, Quitar
video, Quitar sonido
Quitar la imagen o videoclip
agregados anteriormente al
mensaje.
Periodo de validez
Especifique durante cuánto
tiempo el mensaje permanece
en la carpeta
Buzón de salida
.
Agregar diapositiva
Agregue una página al mensaje.
Cancelar mensaje
Cancele el mensaje.
opción

90
mensajes
Para ver mensajes del Buzón:
1
En la pantalla principal, oprima la tecla
programable izquierda (
:
)(
Mensaje
) para abrir
) MENSAJERÍA
.
2
Use la tecla de navegación (
N
) para desplazarse
a
Buzón
y oprima la tecla de selección
central (
M
)(
OK
).
3
Desplácese al mensaje que desea.
4
Oprima la tecla de selección central (
M
)(
ABRIR
)
para abrir el mensaje.
Los mensajes multimedia que recibe pueden contener
distintos objetos multimedia:
•
A medida que lee el mensaje se muestran
imágenes y animaciones.
•
Un archivo de sonido comienza a reproducirse
cuando aparece su diapositiva. Use las teclas
de volumen para ajustar el volumen mientras
se reproduce el archivo de sonido.
enviar un mensaje
de texto
1
En la pantalla principal, oprima la tecla
programable izquierda (
:
)(
Mensaje
) para abrir
) MENSAJERÍA
.
2
Seleccione
Mensaje nuevo
oprimiendo la tecla de
selección central (
M
)(
OK
).
3
Seleccione
Mensaje TXT
oprimiendo la tecla de
selección central (
M
)(
OK
).
4
Use el teclado para ingresar un número telefónico
y luego oprima la tecla de selección
central (
M
)(
OK
).
u
Oprima la tecla programable derecha (
:
)(
Agregar
),
seleccione
De contactos
,
Llams recientes
o
Grupos
, y oprima
la tecla de selección central (
M
). Para cada
ingreso que desee agregar, desplácese hasta el

91
mensajes
ingreso y oprima la tecla de selección
central (
M
)(
MARCAR
). Oprima la tecla programable
izquierda (
:
)(
Listo
) cuando termine de
seleccionar ingresos.
5
Con el cursor destellante en el área de ingreso de
Texto
, ingrese el mensaje mediante el teclado.
Cuando ingrese texto, puede oprimir la tecla
programable derecha (
:
)(
Opciones
) para realizar
otras acciones en el mensaje:
Guardar como borrador
,
Agregar gráfico
,
Agregar sonido
,
Agregar texto rápido
,
Nivel de
prioridad
,
Período de validez
,
Cancelar mensaje
o
Agregar tarjeta de
nombre
.
6
Envíe el mensaje oprimiendo la tecla de selección
central (
M
)(
ENVIAR
).
ver los mensajes
enviados
1
En la pantalla principal, oprima la tecla
programable izquierda (
:
)(
Mensaje
) para abrir
) MENSAJERÍA
.
2
Use la tecla de navegación (
N
) para desplazarse
a
Enviado
y oprima la tecla de selección
central (
M
)(
OK
).
3
Desplácese al mensaje que desee ver y oprima la
tecla de selección central (
M
)(
ABRIR
).
4
Oprima la tecla programable derecha (
:
)(
Opciones
)
para realizar otras acciones en el mensaje, como
Transferir
,
Reenviar
,
Bloquear
(para evitar eliminarlo),
Agregar a Contactos
,
Borrar enviado
,
Info de mensaje
o
Ordenar por
.
Nota:
las opciones que vea pueden ser diferentes
que las que las presentadas anteriormente.

92
mensajes
leer mensaje
recibido
1
En la pantalla principal, oprima la tecla
programable izquierda (
:
)(
Mensaje
) para abrir
) MENSAJERÍA
.
2
Use la tecla de navegación (
N
) para desplazarse
a
Buzón
y oprima la tecla de selección
central (
M
)(
OK
).
3
Desplácese al mensaje que desee leer y oprima la
tecla de selección central (
M
)(
ABRIR
).
4
Oprima la tecla programable derecha (
:
)(
Opciones
)
para realizar otras acciones en el mensaje, tales
como
Transferir
,
Respond c/ copia
,
Guardar texto rápido
,
Bloquear
(para evitar eliminarlo),
Info de mensaje
o
Redactar mensaje
.
Nota:
puede ver otras opciones dependiendo del
tipo de mensaje recibido.
o
Para hacer una llamada de voz al contacto que
envió el mensaje, oprima la tecla Enviar (
$
).
o
Para hacer una llamada PTT de monitores a un
número del mensaje, desplácese al número y
mantenga oprimida la tecla PTT. (Para obtener
más información acerca de la realización de una
llamada PTT de monitoreo, consulte la página 78.)
El contacto debe ser un suscriptor PTT válido.
ver borradores
1
En la pantalla principal, oprima la tecla
programable izquierda (
:
)(
Mensaje
) para abrir
) MENSAJERÍA
.
2
Use la tecla de navegación (
N
) para desplazarse
a
Borradores
y oprima la tecla de selección
central (
M
)(
OK
).

93
mensajes
3
Desplácese al mensaje que desee ver y oprima la
tecla de selección central (
M
)(
MODIFICAR
).
o
Para borrar el mensaje, oprima la tecla
programable izquierda (
:
)(
Borrar
). Para confirmar
la eliminación, desplácese a
Sí
y oprima la tecla de
selección central (
M
)(
OK
).
u
Oprima la tecla programable derecha (
:
)(
Opciones
)
para realizar otras acciones en el mensaje, tales
como
Enviar
,
Bloquear
y
Borrar borradores
(para borrar
todos los borradores).
Nota:
puede haber otras opciones disponibles
dependiendo del tipo de mensaje que vea.
IM móvil
Nota:
cuando usa mensajería instantánea, en el
teléfono, se aplican los cargos normales por tiempo
aire y/o uso de portadora.
Acceda a su cuenta de mensajería instantánea en
Internet para intercambiar mensajes en tiempo real
con su familia y amigos.
1
En la pantalla principal, oprima la tecla
programable izquierda (
:
)(
Mensaje
) para abrir
) MENSAJERÍA
.
2
Use la tecla de navegación (
N
) para desplazarse
a
IM móvil
y oprima la tecla de selección
central (
M
)(
OK
).
3
Desplácese al tipo de cuenta IM móvil que tiene y
oprima la tecla de selección central (
M
).
4
Ingrese su nombre o nombre de cuenta y
contraseña para conectarse.

94
mensajes
email
Acceda a su cuenta de correo electrónico en Internet
para intercambiar email desde el teléfono:
1
En la pantalla principal, oprima la tecla
programable izquierda (
:
)(
Mensaje
) para abrir
) MENSAJERÍA
.
2
Use la tecla de navegación (
N
) para desplazarse
a
Email
y oprima la tecla de selección
central (
M
)(
OK
).
3
Desplácese al tipo de cuenta de email que tiene y
oprima la tecla de selección central (
M
).
4
Ingrese su nombre o nombre de cuenta y
contraseña para conectarse.
chat
Nota:
cuando usa su cuenta de chat en Internet en el
teléfono, se aplican los cargos normales por tiempo
aire y/o uso de portadora.
Acceda a su cuenta de chat en Internet para conversar
en tiempo real con su familia y amigos:
1
En la pantalla principal, oprima la tecla
programable izquierda (
:
)(
Mensaje
) para abrir
) MENSAJERÍA
.
2
Use la tecla de navegación (
N
) para desplazarse
a
Chat
y oprima la tecla de selección
central (
M
)(
OK
).
3
Desplácese al tipo de cuenta de chat que tiene y
oprima la tecla de selección central (
M
).
4
Ingrese su nombre o nombre de cuenta y
contraseña para conectarse.

95
mensajes
borrar mensajes
Para borrar todos los
mensajes leídos
del buzón:
1
En la pantalla principal, oprima la tecla
programable izquierda (
:
)(
Mensaje
) para abrir
) MENSAJERÍA
.
2
Oprima la tecla programable
derecha (
:
)(
Opciones
).
3
Use la tecla de navegación (
N
) para desplazarse
a
Borrar buzón
o
Borrar todo
, y oprima la tecla de
selección central (
M
)(
OK
). Seleccione
Todos los
mensajes
o
Sólo mensajes leídos
y oprima la tecla de
selección central (
M
)(
OK
).
o
Use la tecla de navegación (
N
) para desplazarse
a
Borrar buzón
o
Borrar enviado
y oprima la tecla de
selección central (
M
)(
OK
). Seleccione
Sí
o
No
y
oprima la tecla de selección central (
M
)(
OK
).

96
entretenimiento
entretenimiento
obtener y reproducir
música
Use el menú
MÚSICA Y TONOS
para:
•
obtener música y tonos nuevos
•
reproducir música almacenada en
MI MÚSICA
•
grabar sonidos nuevos
•
configurar música o tonos como timbres
Consejo:
vaya a
MÚSICA Y TONOS
rápidamente al oprimir la
tecla de navegación (
N
) hacia la izquierda desde la
pantalla principal (consulte la página 21).
música V CAST con rapsodia
Nota:
el teléfono debe estar en un área de
cobertura EVDO para descargar música. Si se
encuentra en un área de cobertura EVDO, el teléfono
muestra el símbolo EV con al menos una barra de
intensidad de la señal en el área de estado de la
pantalla (consulte la página 22).
Música V CAST con rapsodia es un servicio de música
digital que le permite escuchar millones de canciones
de miles de artistas. Descubra nuevos y antiguos
favoritos en un extenso catálogo de música.
Descargue música V CAST con rapsodia para
sincronizar pistas, álbumes y listas de reproducción al
nuevo teléfono compatible, mientras administra la
biblioteca de música de la PC, todo en un sólo lugar.

97
entretenimiento
comprar canciones en el teléfono
Cuando compre música mediante un teléfono con
capacidad V CAST con rapsodia*, recibe una segunda
copia de la música que puede descargar al PC
mediante música V CAST con rapsodia en el PC.
1
Desde la pantalla principal, oprima la tecla de
navegación hacia la izquierda (
N
) para tener
acceso a
MÚSICA Y TONOS
.
2
Seleccione
Música V CAST
oprimiendo la tecla de
selección central (
M
)(
OK
).
3
Examine el catálogo para buscar las canciones
que desea.
Para obtener una vista previa de una canción,
resáltela y luego oprima la tecla programable
izquierda (
:
)(
Vista previa
).
4
Para comprar una canción, resáltela y oprima la
tecla de selección central (
M
)(
Comprar
).
Después de oprimir
Comprar
, el teléfono muestra
los detalles de la canción y el precio.
5
Oprima la tecla de selección central (
M
)(
Comprar
)
para confirmar la selección.
6
Cuando vea
¿Descargar ahora?
en la pantalla principal,
oprima la tecla de selección central (
M
)(
OK
) para
iniciar el proceso de descarga, u oprima la tecla
programable izquierda (
:
) para descargarla en
otro momento.
7
Cuando se le pida que seleccione una ubicación
de almacenamiento, desplácese a
Memoria del teléfono
o
Tarjeta de memoria
y oprima la tecla de selección
central (
M
) para comenzar la descarga.
El teléfono mostrará un indicador de estado.
Después de la descarga, debe esperar a que el
teléfono adquiera la licencia de contenido.
* Se cobra por cada canción.

98
entretenimiento
8
Oprima la tecla programable derecha (
:
)(
Reprod
)
para reproducir de inmediato la canción
descargada.
u
Oprima la tecla programable
izquierda (
:
)(
Mi música
) para ir a
MI MÚSICA
.
u
Oprima la tecla de selección central (
M
)(
OK
) para
volver al catálogo de música visto anteriormente.
transferir música desde una
computadora
Puede usar música V CAST con rapsodia para
transferir canciones de una computadora al teléfono
mediante una conexión de cable USB. Puede adquirir
estas canciones desde música V CAST con rapsodia o
importarlas desde su colección de CD.
requisitos de sistema para computadoras
Para transferir música desde una computadora al
teléfono
, necesita el sistema operativo
Windows XP® o Windows Vista® y una conexión
activa a Internet.
Para descargar música V CAST con rapsodia en
forma gratuita
:
1
En el explorador Web de la computadora, vaya a
http://www.verizonwireless.com/music
.
2
Siga las instrucciones en pantalla para
seleccionar, descargar e instalar música V CAST
con rapsodia para su teléfono.
descargar y comprar música mediante
música V CAST con rapsodia
Para descargar copias de música compradas
mediante el teléfono
:
1
En la computadora, inicie música V CAST con
rapsodia.

99
entretenimiento
2
Haga clic en el botón “Iniciar sesión”, luego inicie
sesión al ingresar el número de su teléfono
celular y contraseña.
Por cada pista de música V CAST con rapsodia
que descargue al teléfono, puede descargar una
copia a la computadora sin cargo adicional.
Aparecerán las pistas de música disponibles para
descarga gratuita cuando termine el proceso de
inicio de sesión.
3
Marque las casillas de las canciones que desea
descargar.
4
Seleccione “Descargar pistas”.
La descarga puede tardar varios minutos.
5
Cuando termine la descarga, haga clic en la ficha
“Mi biblioteca” en la ventana “música V CAST
con rapsodia” para buscar y reproducir canciones
que haya descargado.
Para comprar música de la tienda de música
VCAST
:
1
En la computadora, inicie música V CAST con
rapsodia.
2
En la ventana de música V CAST con rapsodia,
haga clic en la ficha “COMPRAR MÚSICA”.
3
Haga clic en el botón “Iniciar sesión”, luego inicie
sesión al ingresar el número de su teléfono
celular y contraseña.
Si todavía no se ha registrado, haga clic en el
botón “Registrar”, luego siga las instrucciones
para registrarse y obtener su contraseña.
4
Explore o busque en la tienda para encontrar las
canciones que desea.
Para obtener una vista previa de una canción,
haga clic en el icono audífono que está junto al
título de la canción.

100
entretenimiento
5
Para comprar una canción, haga clic en el botón
“Comprar” que está junto al título de la canción.
6
Repita los pasos 4 y 5 para agregar más
canciones al carro de compras.
7
Cuando termine de comprar, haga clic en “MIS
COMPRAS” y luego siga las instrucciones que
aparecen en la pantalla para completar la compra
y descargar las canciones que compró.
La descarga puede tardar varios minutos.
8
Cuando termine la descarga, haga clic en la ficha
“Mi biblioteca” en la ventana “música V CAST
con rapsodia” para buscar y reproducir canciones
que haya descargado.
Para transferir las canciones al teléfono, consulte
“sincronizar música de la PC al teléfono con música
V CAST con rapsodia” en la página 101.
importar canciones desde un CD de audio
1
En la computadora, inicie música V CAST con
rapsodia.
2
Inserte un CD de audio en la unidad de CD ROM
de la computadora.
3
Si la ventana “Música en mi CD” no está abierta
en música V CAST con rapsodia, haga clic en la
ficha “MÚSICA EN MI CD”.
En la ventana aparecen los nombres de todas las
pistas del CD. (Puede que deba ingresar el
nombre del artista y otra información para las
pistas.)
4
Seleccione las pistas que desee importar o
“copiar” marcando las casillas de verificación
correspondientes.
Seleccione
todas
las pistas marcando la casilla de
verificación “Título” en la parte superior de la lista
de pistas.

101
entretenimiento
5
Haga clic en el botón “Copiar CD”.
Las canciones que seleccionó se importan a
V CAST Music Manager.
Para transferir las canciones al teléfono, consulte
“sincronizar música de la PC al teléfono con música
V CAST con rapsodia” en la página 101.
sincronizar música de la PC al teléfono
con música V CAST con rapsodia
1 En la computadora
, inicie música V CAST con
rapsodia.
2
Conecte el cable USB (que se vende por
separado) al teléfono y a un puerto USB
disponible en la computadora.
Si es la primera vez que conecta el teléfono a una
computadora con un cable USB, puede que se
instalen controladores de software adicionales.
(Para obtener más información acerca del uso de la
conexión con cable USB, consulte la página 149.)
Aparece la pantalla
SINCRONIZAR TELÉFONO MÓVIL DE
MÚSICA V CAST
en el teléfono. En el teléfono debe
aparecer
Conectado
.
3 En la computadora
, haga clic en el botón “Lista
de sincronización” para abrir una lista de
sincronización vacía.
4 En la computadora
, arrastre y suelte las
canciones que desea sincronizar desde Mi
biblioteca al teléfono móvil con rapsodia, que
aparece en la ficha “Fuentes”.
5 En la computadora
, haga clic en “Sync now.”
La computadora sincroniza las canciones de la
lista de sincronización con el teléfono.
6 En el teléfono
, cuando la sincronización finalice,
oprima la tecla de encendido/fin (
%
).
7
Desconecte el cable del teléfono y de la
computadora.

102
entretenimiento
Ahora puede utilizar el reproductor de música del
teléfono para reproducir las canciones que transfirió
desde la computadora.
reproducir música (con solapa
cerrada)
Cuando la solapa del teléfono esté cerrada, puede
usar los botones de música (consulte la página 2) para
controlar el reproductor de música. Para
activar los
botones de música
, oprima cualquier tecla lateral,
excepto la tecla PTT.
Para encender y apagar el reproductor de música y
hacer selecciones de música
:
Consejo: cuando PTT no esté activo
(consulte la
página 74), oprima la tecla PTT para encender el
reproductor de música.
Para controlar la reproducción de música:
botones de música
encender y
apagar el
reproductor
de música
Mantenga
oprimida
y
(durante
al menos cuatro segundos).
desplazarse
hacia arriba o
abajo a través
del menú
Oprima y
suelte
Ï
o
Î
.
seleccionar la
opción del
menú
Oprima y
suelte
y
.
botones de música
reproducir/
pausa
Oprima y
suelte
y
.
botones de música

103
entretenimiento
reproducir música (con solapa
abierta)
1
Desde la pantalla principal, oprima la tecla de
navegación hacia la izquierda (
N
) para tener
acceso a
MÚSICA Y TONOS
.
2
Use la tecla de navegación (
N
) para desplazarse
a
Mi música
y oprima la tecla de selección
central (
M
)(
OK
).
adelantar
Mantén
oprimida
Ï
(durante al
menos dos segundos).
saltar a la
siguiente
canción
Oprima y
suelte
Ï
.
retroceder
Mantén
oprimida
Î
(durante al
menos dos segundos).
volver a la
canción
anterior
Oprima y
suelte
Î
.
botones de música
1. Géneros
MI MÚSICA
2. Artistas
4. Canciones
6. Buzón
8. Aleatorio
3. Álbumes
5. Listas de repr.
7. Reproducir todo
Tienda Sincronización
OK
INICIO HALLAR AYUDA
Oprima
la tecla
programable
izquierda (C)
(Tienda) para
descargar
música del
catálogo de
Música V
CAST.
Volvera
la pantalla
MI MÚSICA
.
Ver información
de ayuda.
Busque música en el teléfono por
artista, álbum o título de la canción.
1
❙❙❙❙
❙❙❙❙
ò
1X
EV
Oprima la tecla
programable
derecha (C)
(Sincronización) para
sincronizar
MI
MÚSICA
con la
biblioteca de
música digital
o con otro
dispositivo.
N

104
entretenimiento
3
Use la tecla de navegación (
N
) para desplazarse
a
Canciones
y oprima la tecla de selección
central (
M
)(
OK
).
4
Use la tecla de navegación (
N
) para desplazarse
a una canción y oprima la tecla de selección
central (
M
)(
REPROD
) para reproducirla.
Las opciones
PÁGINA PRINCIPAL
,
BUSCAR
y
AYUDA
aparecen
en todas las pantallas de
MÍ MÚSICA
.
El menú
MI MÚSICA
incluye las siguientes opciones:
opción
Géneros
Buscar y reproducir música de un
género específico (tipo de música) tal
como rock, jazz o blues.
Artistas
Buscar y reproducir música de un artista
específico.
Álbumes
Buscar y reproducir música de un álbum
específico.
Nota:
aunque sólo tenga una canción de
un álbum, el álbum aparece en la lista.
Canciones
Buscar y reproducir canciones específicas.
Listas de
repr.
Reproducir canciones desde listas de
reproducción personalizadas creadas
por usted.
Buzón
Vea las notificaciones de alerta recibidas
cuando haya música nueva de un artista
seleccionado disponible para descarga.
Reproducir
todo
Reproduzca todas las canciones de
MI
MÚSICA
en el orden en que aparece en
la lista.
Aleatorio
Reproduzca todas las canciones de
MI
MÚSICA
en orden aleatorio.
opción

105
entretenimiento
•
Oprima la tecla borrar (
&
) de cualquier
pantalla
MI MÚSICA
para volver a la pantalla
anterior.
•
Oprima la tecla de encendido/fin (
%
) desde
cualquier pantalla de
MI MÚSICA
para volver a la
pantalla principal.
•
En las pantallas que muestren una lista de
elementos (por ejemplo, títulos de álbum),
ingrese letras en el área
Ir a
para ir
directamente a los elementos que comienzan
con esas letras.
controles del reproductor de música
Utilice las siguientes teclas para controlar el
reproductor de música durante la reproducción de una
canción
con la solapa abierta
:
controles con la solapa abierta
reproducir/
pausa
Para dejar en pausa, oprima y
suelte
la tecla de selección
central (
M
).
Para reanudar la reproducción,
oprima la tecla de selección
central (
M
) nuevamente.
adelantar
Mantenga
oprimida
la tecla de
navegación (
N
)
hacia la
derecha
.
saltar a la
siguiente
canción
Oprima y
suelte
la tecla de
navegación (
N
)
a la derecha
.
retroceder
Mantenga
oprimida
la tecla de
navegación (
N
)
a la izquierda
.

106
entretenimiento
reproducción de un álbum
1
Desde la pantalla principal, oprima la tecla de
navegación hacia la izquierda (
N
) para tener
acceso a
MÚSICA Y TONOS
.
2
Use la tecla de navegación (
N
) para desplazarse
a
Mi música
y oprima la tecla de selección
central (
M
)(
OK
).
3
Seleccione
Géneros
,
Artistas
o
Álbumes
.
Nota:
cuando seleccione un álbum de cualquier
género, artista o categoría, puede oprimir la tecla
programable derecha (
:
)(
Opciones
) para seleccionar
entre estas opciones:
volver a la
canción anterior
En los primeros dos segundos
de una canción, oprima y
suelte
la tecla de navegación (
N
)
a la
izquierda
.
volver al inicio
de una canción
Después de los primeros dos
segundos de la canción, oprima
y
suelte
la tecla de
navegación (
N
)
a la izquierda
.
cerrar el
reproductor de
música
Oprima la tecla de
encendido/fin (
%
).
controles con la solapa abierta
opción
Reproducir
álbum
Reproduzca el álbum seleccionado,
comenzando por la primera canción.
A los oyentes
también les
gustó
Vea una lista de recomendaciones
musicales según la canción que se
esté reproduciendo actualmente.

107
entretenimiento
En la pantalla
GÉNEROS
:
1
Seleccione el
género
que desea oprimiendo la
tecla de selección central (
M
)(
OK
).
2
Use la tecla de navegación (
N
) para desplazarse
al
artista
que desea y oprima la tecla de selección
central (
M
)(
OK
).
3
Desplácese al
álbum
que desea y oprima la tecla
programable derecha (
:
)(
Opciones
).
Mover álbum
Mueva el álbum de la tarjeta de
memoria al teléfono o del teléfono a
la tarjeta de memoria.
Nota:
esta opción sólo aparece
cuando ha insertado una tarjeta de
memoria en el teléfono. Esta opción
no está disponible para música
comprada por aire.
Bloquear álbum
Bloquee el álbum actual para evitar
que se borre.
Borrar álbum
Elimine el álbum seleccionado de
MI MÚSICA
.
Info álbum
Obtenga información detallada sobre
el álbum actual, incluido el nombre
del álbum, el artista y el género.
opción
Reconstruir la
base de datos
de música
Bajo condiciones normales,
MI MÚSICA
se mantiene en forma automática.
Si
MI MÚSICA
se comporta en forma
inesperada, utilice esta opción para
reinicializarla. Esta opción elimina la
base de datos existente y crea una
nueva que contiene toda la música
actualmente instalada.
opción

108
entretenimiento
(Consulte la página 106 para conocer las
selecciones del menú
OPCIONES
)
4
Desplácese a
Reproducir álbum
y oprima la tecla de
selección central (
M
)(
OK
).
En la pantalla
ARTISTAS
:
1
Use la tecla de navegación (
N
) para desplazarse
al
artista
que desea y oprima la tecla de selección
central (
M
)(
OK
).
2
Desplácese al
álbum
que desea reproducir y
oprima la tecla programable derecha (
:
)(
Opciones
).
(Consulte la página 106 para conocer otras
selecciones del menú
OPCIONES
)
3
Seleccione
Reproducir álbum
oprimiendo la tecla de
selección central (
M
)(
OK
).
En la pantalla
ÁLBUMES
:
1
Use la tecla de navegación (
N
) para desplazarse
hasta el
álbum
que desea.
2
Oprima la tecla programable
derecha (
:
)(
Opciones
).
(Consulte la página 106 para conocer las
selecciones del menú
OPCIONES
)
3
Desplácese a
Reproducir álbum
y oprima la tecla de
selección central (
M
)(
OK
).
En la pantalla
CANCIONES
:
1
Use la tecla de navegación (
N
) para desplazarse
hasta la
canción
que desea.
2
Oprima la tecla de selección central (
M
)(
Reprod
).
reproducir todas las canciones en el
teléfono
1
Desde la pantalla principal, oprima la tecla de
navegación hacia la izquierda (
N
) para tener
acceso a
MÚSICA Y TONOS
.

109
entretenimiento
2
Use la tecla de navegación (
N
) para desplazarse
a
Mi música
y oprima la tecla de selección
central (
M
)(
OK
).
3
Desplácese a
Reproducir todo
y oprima la tecla de
selección central (
M
)(
OK
).
reproducir música desde una lista de
reproducción
1
Desde la pantalla principal, oprima la tecla de
navegación hacia la izquierda (
N
) para tener
acceso a
MÚSICA Y TONOS
.
2
Use la tecla de navegación (
N
) para desplazarse
a
Mi música
y oprima la tecla de selección
central (
M
)(
OK
).
3
Desplácese a
Listas de reproducción
y oprima la tecla de
selección central (
M
)(
OK
).
Para reproducir una lista de reproducción
completa
, desplácese hasta la lista de reproducción
que desea y oprima la tecla de selección
central (
M
)(
Reprod
).
Para reproducir una canción desde una lista de
reproducción
, desplácese a la lista de reproducción
que desea y oprima la tecla de selección
central (
M
)(
Reprod
), luego deslácese a la canción que
desee reproducir y oprima la tecla de selección
central (
M
).
menús de opciones MI MÚSICA
Al desplazarse hasta una canción
y oprimir
Opciones
,
el teléfono muestra las siguientes opciones:
opción
Agregar a lista
de reproducción
Agregue la canción seleccionada a
una lista de reproducción.
A los oyentes
también les
gustó
Vea una lista de recomendaciones
musicales según la canción que se
esté reproduciendo actualmente.

110
entretenimiento
Al oprimir
Opcnes
mientras se reproduce una canción
,
el teléfono muestra las siguientes opciones:
Mover canción
Mueva la canción desde la tarjeta de
memoria al teléfono o desde el
teléfono a la tarjeta de memoria.
Nota:
esta opción sólo aparece
cuando ha insertado una tarjeta de
memoria en el teléfono. Esta opción
no está disponible para música
comprada por aire.
Bloquear
canción
Impida que se elimine una canción.
Borrar canción
Borre la canción seleccionada.
Borre todas las
canciones
Elimine todas las canciones de
MI
MÚSICA
.
opción
Info de canción
Muestra la siguiente información de
la canción: título, artista, título de
álbum, género, año de copyright,
duración y número de pista (si está
disponible).
Reconstruir la
base de datos
de música
Bajo condiciones normales,
MI MÚSICA
se mantiene en forma automática. Si
MI MÚSICA
se comporta en forma
inesperada, utilice esta opción para
reinicializarla. Esta opción elimina la
base de datos de música existente y
crea una nueva que contiene toda la
música actualmente instalada.
opción

111
entretenimiento
Nota:
la canción queda en pausa al oprimir
Opcnes
. ¡También puede controlar el reproductor de música
con la solapa cerrada
! Simplemente comience la
reproducción de la canción, cierre la solapa y use los
botones de música (consulte la página 102).
consejos para escuchar
Cuando está en movimiento, puede escuchar música
con un audífono con cable conectado al puerto
micro-USB del teléfono o con los audífonos estéreo
inalámbricos (consulte la página 144).
Nota:
no puede cargar el teléfono cuando hay un
audífono micro USB conectado.
Cuando la solapa está abierta y no usa un audífono
con cable o inalámbrico, la música se reproduce a
través del altavoz del teléfono.
opción
Reproducir todo
Reproduzca todas las canciones de
MI
MÚSICA
en el orden en que aparece en
la lista.
Aleatorio
Reproduzca todas las canciones de
MI
MÚSICA
en orden aleatorio.
Mi música
Vuelva al menú
MÍ MÚSICA
.
Tienda
Conéctese al catálogo de Música
V CAST para descargar más
canciones.
A los oyentes
también les
gustó
Vea una lista de recomendaciones
musicales según la canción que se
esté reproduciendo actualmente.
Ayuda
Vea información que le ayudará a usar
el reproductor de música.

112
entretenimiento
crear una lista de reproducción
1
Desde la pantalla principal, oprima la tecla de
navegación hacia la izquierda (
N
) para tener
acceso a
MÚSICA Y TONOS
.
2
Use la tecla de navegación (
N
) para desplazarse
a
Mi música
y oprima la tecla de selección
central (
M
)(
OK
).
3
Desplácese a
Listas de reproducción
y oprima la tecla de
selección central (
M
)(
OK
).
4
Si ya existen listas de reproducción, oprima la
tecla programable derecha (
:
)(
Opciones
),
desplácese a
Crear lista de reproducción
y oprima la tecla
de selección central (
M
)(
OK
).
o
Si no hay ninguna lista de reproducción, aparece
en forma automática la pantalla
CREAR LISTA DE
REPRODUCCIÓN
.
5
Use el teclado para ingresar un título para la lista
de reproducción en la pantalla
CREAR LISTA DE
REPRODUCCIÓN
y oprima la tecla de selección
central (
M
)(
OK
).
6
Desplácese a la canción que desee y oprima la
tecla de selección central (
M
)(
MARCAR
). Repita
este paso para cada canción que desee agregar.
7
Cuando termine de marcar sus selecciones de
canciones, oprima la tecla programable
derecha (
:
)
Listo
.
8
Cuando termine de agregar canciones a la lista de
reproducción, oprima la tecla Borrar (
&
) para
volver a la pantalla anterior o la tecla de
encendido/fin (
%
) para volver a la pantalla
principal.

113
entretenimiento
modificar una lista de
reproducción
1
En la pantalla
LISTAS DE REPRODUCCIÓN
, desplácese a la
lista de reproducción que desea modificar y
oprima la tecla programable derecha (
:
)(
Opciones
).
2
Use la tecla de navegación (
N
) para desplazarse
a
Modificar lista de reproducción
y oprima la tecla de
selección central (
M
)(
OK
).
3
Modifique la lista de reproducción según lo
desee.
Para cambiar el orden de las canciones de la lista
de reproducción, desplácese a una canción y
oprima la tecla de selección central (
M
)(
Mover
).
Luego, desplácese hacia arriba o abajo para
mover la canción en la lista de reproducción.
Cuando termine, oprima la tecla de selección
central (
M
)(
Guardar
).
Para borrar una canción, desplácese a la canción y
oprima la tecla programable izquierda (
:
)(
Quitar
).
4
Oprima la tecla Borrar (
&
) para volver a la
pantalla anterior, o la tecla de encendido/fin (
%
)
para volver a la pantalla principal.
grabar y reproducir
registros de voz
Puede crear un registro de voz para reproducirlo
posteriormente como recordatorio personal.
crear un registro de voz
1
Desde la pantalla principal, oprima la tecla de
navegación hacia la izquierda (
N
) para tener
acceso a
MÚSICA Y TONOS
.
2
Use la tecla de navegación (
N
) para desplazarse
a
Mis sonidos
y oprima la tecla de selección
central (
M
)(
OK
).

114
entretenimiento
3
Seleccione
Grabar nuevo
y oprima la tecla de
selección central (
M
)(
OK
).
4
Oprima la tecla de selección central (
M
)(
OK
) para
comenzar a grabar y, cuando termine, oprima la
tecla de selección central (
M
)(
ALTO
).
5
Oprima la tecla programable izquierda (
:
)(
Guardar
)
para guardar el registro de voz.
Oprima la tecla programable derecha (
:
)(
Borrar
)
para borrar el registro de voz.
Consejo:
para crear rápidamente un registro de voz,
mantenga oprimida la tecla comando de voz (al lado
derecho del teléfono) y luego oprima la tecla de
selección central (
M
)(
OK
) para empezar a grabar.
Oprima la tecla de selección central (
M
)(
ALTO
) cuando
termine. Puede oprimir la tecla programable
izquierda (
:
)(
Guardar
) para guardarlo, la tecla de
selección central (
M
)(
ENVIAR
) para enviarlo o la tecla
programable derecha (
:
)(
Borrar
) para borrarlo. Oprima
la tecla de encendido/fin (
%
) para salir. Cuando vea el
mensaje
¿Desea salir?
, use la tecla de navegación (
N
)
para seleccionar
Sí
o
No
, y oprima la tecla de selección
central (
M
(
OK
).
reproducir un registro de voz
1
Desde la pantalla principal, oprima la tecla de
navegación hacia la izquierda (
N
) para tener
acceso a
MÚSICA Y TONOS
.
2
Use la tecla de navegación (
N
) para desplazarse
a
Mis sonidos
y oprima la tecla de selección
central (
M
)(
OK
).
3
Desplácese al nombre de archivo del registro de
voz que desee y oprima la tecla de selección
central (
M
)(
REPROD
).
Consejo:
puede cambiar el nombre de los registros de
voz. En
Mis sonidos
, el teléfono muestra un indicador
æ
junto a los nombres de los registros de voz que creó.
Desplácese al registro de voz cuyo nombre desee
cambiar, oprima la tecla programable

115
entretenimiento
derecha (
:
)(
Opciones
) y luego desplácese y seleccione
Cambiar nombre
. Ingrese el nuevo nombre del registro de
voz y oprima la tecla de selección central (
M
)(
OK
).
El teléfono mostrará
NOMBRE DE SONIDO GUARDADO
.
grabar y reproducir
videoclips
La lente de la cámara se encuentra en la parte
posterior del teléfono cuando está abierto (consulte la
página 1).
Para obtener los videoclips más nítidos,
limpie la lente con una tela suave y seca antes de
capturar el video.
grabar un videoclip
Para activar la videograbadora del teléfono:
1
Mantenga oprimida la tecla de cámara/video (
)
).
Aparece la imagen activa del visor:
2
Dirija la lente de la cámara hacia el objetivo del
video.
Oprima la tecla de navegación hacia la izquierda y
derecha (
N
) para acercarse o alejarse.
3
Oprima la tecla de selección central (
M
)(
GRABAR
)
para comenzar la grabación.
176x144
Grabar
00:00
Videos
N
0
P
<
❙❙❙❙
❙❙❙❙
1X
EV
Opciones
Oprima la tecla
programable
derecha (C)
(Opciones) para ver
el menú Opciones.
Oprima la tecla
programable
izquierda (C)
(
Videos
) para ver
MIS VIDEOS.
Oprima la tecla de selección
central (M) (GRABAR) para
comenzar la grabación.
GRAB

116
entretenimiento
Oprima la tecla programable derecha (
:
)(
Pausa
)
para detener temporalmente la grabación. Oprima
la tecla programable derecha (
:
)(
Reanudar
) para
continuar.
4
Oprima la tecla de selección central (
M
)(
ALTO
)
para dejar de grabar.
5
Oprima la tecla programable izquierda (
:
)(
Guardar
)
para guardar el videoclip.
u
Oprima la tecla de selección central (
M
)(
ENVIAR
)
para guardar el videoclip e ir a la pantalla
NUEVO MSJ
DE VIDEO
.
u
Oprima la tecla programable derecha (
:
)(
Borrar
)
para borrar el videoclip y volver al visor activo.
ajustar programación de la
videograbadora
Cuando la videograbadora esté activada (pero
no grabando), oprima la tecla programable
derecha (
:
)(
Opciones
) para seleccionar entre estas
opciones:
opción
Brillo
Ajuste el brillo de la imagen.
Balance
blanco
Ajuste una iluminación diferente.
Duración
Especifique las duraciones estándar
para videoclip
Corto
(predeterminado,
aproximadamente 30 segundos),
Medio
,
Ajustar a msj. de video
(varía según la
programación de video) o
Largo (máximo
de memoria)
.

117
entretenimiento
reproducir un videoclip
Para reproducir un videoclip guardado en el teléfono:
1
Desde la pantalla principal, oprima la tecla de
navegación hacia la derecha (
N
) para acceder a
] CENTRO DE MEDIOS
.
2
Use la tecla de navegación (
N
) para desplazarse
a
Imagen y video
y oprima la tecla de selección
central (
M
)(
OK
).
3
Desplácese a
Mis videos
y oprima la tecla de
selección central (
M
)(
OK
).
4
Desplácese al videoclip que desea reproducir y
oprima la tecla de selección central (
M
)(
REPROD
).
Oprima la tecla programable
izquierda (
:
)(
Silenciar
) mientras se reproduce el
videoclip para silenciar el sonido del videoclip.
Oprima la tecla programable
izquierda (
:
)(
Desilenciar
) para volver a activar el
sonido.
Resolución
Programe la resolución de grabación en
320x240
o
176x144
.
Efectos de
colores
Desplácese a la izquierda o derecha
para seleccionar
Normal
,
Antiguo
,
Blanco y
negro
o
Negativo
.
Cambiar
dispositivo
de almacena-
miento
Especifique dónde desea guardar los
videoclips (
Teléfono
o
Tarjeta Micro-SD
). Esta
opción sólo está disponible si tiene
instalada una tarjeta de memoria.
opción

118
entretenimiento
tomar fotografías
El teléfono tiene una cámara digital de 2 megapíxeles
que puede tomar fotografías de una resolución de
hasta 1600 x 1200 píxeles. Puede tomar una fotografía
con su teléfono y enviarla a otros usuarios de
teléfonos celulares en un mensaje multimedia.
Cuando la solapa del teléfono está abierta, la lente de
la cámara se encuentra en la parte posterior del
teléfono (consulte la página 2).
Para obtener las
fotografías más nítidas, limpie la lente con una tela
suave y seca antes de capturarla una foto.
tomar una fotografía
1
Para activar la cámara, oprima la tecla
cámara/video (
)
).
En la pantalla del teléfono aparece la imagen del
visor activo:
Oprima la tecla de navegación hacia la izquierda y
derecha (
N
) para acercarse o alejarse.
Oprima la tecla programable derecha (
:
)(
Opciones
)
para ver más opciones.
2
Dirija la lente de la cámara hacia el objetivo de la
cámara y oprima la tecla de selección
central (
M
)(
TOMR
).
1600x1200
Mis imágenes
N
0
P
TOMR
❙❙❙❙
❙❙❙❙
1X
EV
Opciones
Oprima la tecla de selección
central (M) (TOMR) para tomar
una fotografía.
Oprima la tecla
programable
izquierda (C)
(Mis imágenes)
para ver
MIS VIDEOS.
Oprima la tecla
programable
derecha (C)
(Opciones) para
ver el menú
Opciones.

119
entretenimiento
3
Oprima la tecla de selección central (
M
)(
ENVIAR
)
para guardar la fotografía e ir a la pantalla
NUEVO
MENSAJE DE IMAGEN
.
u
Oprima la tecla programable izquierda (
:
)(
Guardar
)
para guardar la imagen en
MIS IMÁGENES
.
u
Oprima la tecla programable derecha (
:
)(
Borrar
)
para borrar la fotografía y volver al visor activo.
ajustar la programación de la
cámara
Cuando la cámara esté activada, oprima la tecla
programable derecha (
:
)(
Opciones
) para seleccionar
entre estas programaciones:
opción
Resolución
Programa la resolución a
1600x1200
,
1280x960
,
640x480
,
320x240
o
ID de foto
.
Auto cronómetro
Programe la cámara para que
tome una fotografía después de
un intervalo de tiempo
específico:
3 segundos
,
5 segundos
o
10 segundos
. O apáguela.
Brillo
Para ajustar el brillo de la imagen,
desplácese a la izquierda o
derecha de
-2
a
2
.
Balance blanco
Para ajustarla a las distintas
condiciones de luz, desplácese a
la izquierda o derecha desde
Auto
,
Soleado
,
Nublado
,
Tungsteno
,
Fluorescente
o
Oscuridad
.

120
entretenimiento
descargar imágenes
1
Desde la pantalla principal, oprima la tecla de
navegación hacia la derecha (
N
) para acceder a
] CENTRO DE MEDIOS
.
2
Use la tecla de navegación (
N
) para desplazarse
a
Imagen y video
y oprima la tecla de selección
central (
M
)(
OK
).
3
Desplácese a
Obtener imágenes nuevas
y oprima la tecla
de selección central (
M
)(
OK
).
4
Con
Obtener aplicación nueva
resaltado, oprima la tecla
de selección central (
M
)(
OK
) para conectarse a
Centro de medios
.
Nota:
se aplican los cargos normales por tiempo aire
y/o uso de portadora.
Sonido de obturador
Active un sonido para que se
reproduzca cuando toma una
foto:
Obturador
,
Silencioso
,
Quack
o
Boing
.
Efectos de colores
Desplácese a la izquierda o a la
derecha para seleccionar
Normal
,
Antiguo
,
Blanco y negro
o
Negativo
.
Cuadros divertidos
Vaya a
AGREGAR CUADRO DIVERTIDO
para
seleccionar un cuadro
personalizado para la foto.
Cambiar dispositivo
de almacenamiento
Especifique dónde desea guardar
los imágenes (
Teléfono
o
Tarjeta
Micro-SD
). Esta opción sólo está
disponible si tiene instalada una
tarjeta de memoria.
opción

121
herramientas
herramientas
contactos
Nota:
la información de este capítulo sólo se aplica a
contactos de llamadas de voz. Para obtener
información acerca de cómo ingresar contactos PTT,
consulte la página 75.
contactos de emergencia e
información personal
Si está herido, el personal de emergencia puede
verificar el teléfono para obtener información para
contactos en caso de emergencia. Guarde números
de teléfono de parientes o amigos como contactos en
caso de emergencia.
1
En la pantalla principal, oprima la tecla
programable derecha (
:
)(
Contactos
) para abrir la
LISTA DE CONTACTOS
.
2
Use la tecla de navegación (
N
) para desplazarse
a
En caso de emergencia
y oprima la tecla de selección
central (
M
)(
OK
).
3
Desplácese a
CONTACTO 1
,
CONTACTO 2
o
CONTACTO 3
, y
oprima la tecla de selección central (
M
)(
AGREGAR
).
Para cambiar un contacto de emergencia
,
desplácese al contacto y oprima la tecla
programable derecha (
:
)(
Opciones
), luego
seleccione
Reasignar
.
Nota:
seleccione
Información personal
para agregar
información personal que pueda ayudar al
personal de emergencia.

122
herramientas
4
Para
agregar un contacto de la LISTA DE
CONTACTOS
, seleccione
Desde contactos
,
desplácese al contacto que desea agregar y
oprima la tecla de selección central (
M
)(
OK
).
Para
ingresar un nuevo contacto
, seleccione
Contacto nuevo
, ingrese la información de contacto y
oprima la tecla de selección central (
M
)(
GUARDAR
).
crear ingreso
1
En la pantalla principal, oprima la tecla
programable derecha (
:
)(
Contactos
) para abrir la
LISTA DE CONTACTOS
.
2
Oprima la tecla programable
derecha (
:
)(
Opciones
).
3
Seleccione
Contacto nuevo
oprimiendo la tecla de
selección central (
M
)(
OK
).
4
Ingrese información de contactos y oprima la
tecla de selección central (
M
)(
GUARDAR
).
modificar un ingreso
1
En la pantalla principal, oprima la tecla
programable derecha (
:
)(
Contactos
) para abrir la
LISTA DE CONTACTOS
.
2
Use la tecla de navegación (
N
) para desplazarse
al ingreso y oprima la tecla programable
izquierda (
:
)(
Modificar
).
3
Modifique la información de los contactos y
oprima la tecla de selección central (
M
)(
GUARDAR
).
ver ingreso
1
En la pantalla principal, oprima la tecla
programable derecha (
:
)(
Contactos
) para abrir la
LISTA DE CONTACTOS
.
2
Desplácese al ingreso y oprima la tecla de
selección central (
M
)(
VER
).
Para realizar otras acciones en el ingreso, oprima
la tecla programable derecha (
:
)(
Opciones
) y

123
herramientas
seleccione
Enviar mensaje de TEXTO
,
Enviar mensaje con imagen
,
Enviar mensaje de video
o
Llamada
.
borrar ingreso
1
En la pantalla principal, oprima la tecla
programable derecha (
:
)(
Contactos
) para abrir la
LISTA DE CONTACTOS
.
2
Use la tecla de navegación (
N
) para desplazarse
al ingreso y oprima la tecla programable
derecha (
:
)(
Opciones
).
3
Desplácese a
Borrar
y oprima la tecla de selección
central (
M
)(
OK
).
4
Cuando el teléfono le pregunte
¿Borrar contacto?
,
desplácese a
Sí
o
No
y oprima la tecla de selección
central (
M
)(
OK
).
programar número de marcado
rápido
Nota:
para utilizar el marcado rápido para llamar a un
contacto, consulte la página 58.
Para asignar un número de marcado rápido a un
ingreso de
Contactos
:
1
En la pantalla principal, oprima la tecla
programable derecha (
:
)(
Contactos
) para abrir la
LISTA DE CONTACTOS
.
2
Use la tecla de navegación (
N
) para desplazarse
al ingreso y oprima la tecla programable
izquierda (
:
)(
Modificar
).
3
Desplácese al número al que va a asignar un
número de marcado rápido y oprima la tecla
programable derecha (
:
)(
Opciones
).
4
Seleccione
Programar marcación rápida
oprimiendo la
tecla de selección central (
M
)(
OK
).

124
herramientas
5
Seleccione un número de marcado rápido no
asignado y oprima la tecla de selección
central (
M
)(
PROGRAMAR
).
6
Cuando el teléfono le pregunte
¿Agregar contacto a
marcado rápido?
, use la tecla de navegación (
N
) para
seleccionar
Sí
y oprima la tecla de selección
central (
M
)(
OK
).
7
Oprima la tecla de selección
central (
M
)(
GUARDAR
).
programar número
predeterminado para ingreso
Para programar el número predeterminado para un
ingreso de
Contactos
con varios números:
1
En la pantalla principal, oprima la tecla
programable derecha (
:
)(
Contactos
) para abrir la
LISTA DE CONTACTOS
.
2
Use la tecla de navegación (
N
) para desplazarse
al ingreso y oprima la tecla programable
izquierda (
:
)(
Modificar
).
3
Desplácese hasta el número que va a programar
como el número predeterminado y oprima la tecla
programable derecha (
:
)(
Opciones
).
4
Desplácese a
Programar como predeterminado
y oprima la
tecla de selección central (
M
)(
OK
).
5
Cuando el teléfono le pregunte
¿Programar como
predeterminado?
, use la tecla de navegación (
N
) para
seleccionar
Sí
y oprima la tecla de selección
central (
M
)(
OK
).
asignar un tono de timbre a un
ingreso
Al asignar un tono de timbre a un ingreso de
Contactos
, el
teléfono reproducirá el tono de timbre cuando reciba
una llamada del contacto.

125
herramientas
1
En la pantalla principal, oprima la tecla
programable derecha (
:
)(
Contactos
) para abrir la
LISTA DE CONTACTOS
.
2
Use la tecla de navegación (
N
) para desplazarse
al ingreso y oprima la tecla programable
izquierda (
:
)(
Modificar
).
3
Desplácese a
Tono de timbre
y oprima la tecla
programable izquierda (
:
)(
Programar
) para ir al
menú
MIS TONOS DE TIMBRE
.
4
Desplácese al tono de timbre que desee y oprima
la tecla de selección central (
M
)(
OK
).
5
Oprima la tecla de selección
central (
M
)(
GUARDAR
).
Nota:
Volumen principal
debe programarse en
Alto
,
Medio alto
,
Medio
,
Medio bajo
o
Bajo
(consulte la página 25).
asignar una imagen a un ingreso
Al asignar una imagen a un ingreso de
Contactos
, el
teléfono muestra esa imagen cuando recibe una llama
de dicho contacto.
1
En la pantalla principal, oprima la tecla
programable derecha (
:
)(
Contactos
) para abrir la
LISTA DE CONTACTOS
.
2
Use la tecla de navegación (
N
) para desplazarse
al ingreso y oprima la tecla programable
izquierda (
:
)(
Modificar
).
3
Desplácese a
Imagen
y oprima la tecla programable
izquierda (
:
)(
Programar
) para ir a
MIS IMÁGENES
.
4
Desplácese hasta una imagen y oprima la tecla de
selección central (
M
)(
OK
).
5
Oprima la tecla de selección
central (
M
)(
GUARDAR
).

126
herramientas
Consejo:
también puede asignar una imagen
mediante el menú
IMAGEN Y VIDEO
. En la pantalla
principal, oprima la tecla de navegación hacia la
derecha (
N
) para acceder a
] CENTRO DE MEDIOS
y
seleccione
Imagen y video
. Luego, desplácese a
Mis imágenes
y oprima la tecla de selección central (
M
)(
OK
), luego
desplácese a una imagen y oprima la tecla
programable derecha (
:
)(
Opciones
). Seleccione
Programar como
y luego
ID de imagen
. Seleccione el contacto
para el cual desea que se muestre la ID de imagen y
oprima la tecla de selección central (
M
)(
OK
). El
teléfono muestra
IMAGEN PROGRAMADA COMO ID IMAGEN
.
descargar tono de timbre para un
ingreso
Puede descargar un tono de timbre para asignarlo a un
ingreso de
Contactos
. Cuando reciba una llamada de ese
ingreso, el teléfono reproducirá el tono de timbre
asignado.
1
En la pantalla principal, oprima la tecla
programable derecha (
:
)(
Contactos
) para abrir la
LISTA DE CONTACTOS
.
2
Use la tecla de navegación (
N
) para desplazarse
al ingreso y oprima la tecla programable
izquierda (
:
)(
Modificar
).
3
Desplácese a
Tono de timbre
y oprima la tecla
programable izquierda (
:
)(
Programar
) para ir al
menú
MIS TONOS DE TIMBRE
.
4
Seleccione
Obtener aplic nva
, luego proceda a
descargar y guardar un tono de timbre.
Consejo:
también puede descargar un tono de timbre
desde el menú
MÚSICA Y TONOS
. En la pantalla principal,
oprima la tecla de navegación hacia la derecha (
N
)
para acceder al
] CENTRO DE MEDIOS
y seleccione
Música y
tonos
. A continuación, seleccione
Obtener tonos de timbre nuevos
o seleccione
Mis tonos de timbre
y seleccione
Obtener
aplicación nueva
.

127
herramientas
agregar ingresos a un grupo
Para enviar un mensaje de texto a varias personas a la
vez, puede crear un grupo y agregar ingresos de
contacto al grupo.
1
En la pantalla principal, oprima la tecla de
selección central (
M
)(
MENÚ
) para abrir el menú.
2
Oprima la tecla de selección central (
M
)(
OK
) para
seleccionar
[ CONTACTS
.
3
Use la tecla de navegación (
N
) para desplazarse
a
Grupos
y oprima la tecla de selección
central (
M
)(
OK
).
4
Desplácese hasta el nombre de grupo que desee
y oprima la tecla programable
derecha (
:
)(
Opcnes
).
5
Desplácese a
Agregar
y oprima la tecla de selección
central (
M
)(
OK
).
6
En la pantalla
AGREGAR CONTACTOS
, desplácese a cada
contacto que desee agregar y oprima la tecla de
selección central (
M
)(
MARCAR
).
7
Cuando termine de agregar contactos a un grupo,
oprima la tecla programable izquierda (
:
)(
Listo
).
Consejo:
para agregar un ingreso de
Contactos
a un
grupo mientras modifica ese ingreso, desplácese a
Grupo
y oprima la tecla programable
izquierda (
:
)(
Programar
).
agregar un grupo
Agregue un nuevo grupo como ingreso en la pantalla
Grupos
:
1
En la pantalla principal, oprima la tecla de
selección central (
M
)(
MENÚ
) para abrir el menú.
2
Oprima la tecla de selección central (
M
)(
OK
) para
seleccionar
[ CONTACTS
.

128
herramientas
3
Use la tecla de navegación (
N
) para desplazarse
a
Grupos
y oprima la tecla de selección
central (
M
)(
OK
).
4
Oprima la tecla programable izquierda (
:
)(
Nuevo
).
5
Ingrese el nombre del grupo nuevo y oprima la
tecla de selección central (
M
)(
GUARDAR
).
reconocimiento de voz
La función de reconocimiento de voz del teléfono le
permite hacer llamadas y completar otras acciones
diciendo comandos al teléfono.
sugerencias para el
reconocimiento de voz
•
Cuando diga el nombre de un ingreso de
Contactos
, pronúncielo tal como aparece en la
lista. Por ejemplo, para llamar al número móvil
de un ingreso llamado Bill Smith, diga “Llamar
Bill Smith móvil” (si el ingreso incluye un solo
número para Bill Smith, diga “Llamar Bill
Smith.”).
•
Diga los números a velocidad y volumen
normales, y pronuncie cada dígito claramente.
Evite hacer pausas entre dígitos.
•
Puede programar el teléfono para reproducir
instrucciones de comandos de voz por el
altavoz al oprimir la tecla de voz, que abre el
menú
COMANDOS DE VOZ
. Si usa el comando
Llamar
para hacer una llamada, el audio se
reproduce a través del auricular del teléfono
cuando la llamada se conecta. Puede
desactivar esta función (consulte la
página 133).

129
herramientas
comandos de voz
1
Con la solapa del teléfono cerrada, mantenga
oprimida la tecla Comando de voz en el costado
derecho del teléfono.
Nota:
con el teléfono abierto, oprima y suelte la
tecla Comando de voz (consulte la página 3).
Mantener oprimida la tecla activa la grabación de
voz.
El teléfono pronuncia
Diga un comando
y muestra una
lista de comandos de voz.
2
Diga uno de los comandos que aparecen en la
siguiente tabla. El teléfono realiza la acción
correspondiente.
función
Llamar <Nombre o #>
Haga una llamada:
•
a un ingreso de
Contactos
cuyo nombre
pronuncie
o
•
a un número telefónico que especifica
Por ejemplo, cuando se le solicite decir un
comando, diga “Llamar Bill Smith móvil” o “Llamar
8475551212”.

130
herramientas
Enviar <tipo de MSJE>
Envía un mensaje de texto o con imagen.
Diga “Enviar texto” o “Enviar imagen,” luego:
•
el nombre de un ingreso de
Contactos
o
•
un número telefónico
Para obtener instrucciones sobre cómo enviar un
mensaje de texto o multimedia, consulte las
páginas 87 y 90.
función
Ir a <Atajo>
Acceda al menú o realice la acción que especifique:
Contactos
: busque contactos.
Llamadas recientes
: la lista de llamadas recibidas.
Mensajería
: acceso a los mensajes.
Centro de medios
: el Centro de medios.
Programación y herramientas
: programaciones y
herramientas.
Acceso Web
Video V CAST
: videos V CAST.
Mi música
:
Mi música
.
Remarcar
o llamar al último número al que llamó.
función

131
herramientas
Revisar <elemento>
Vea al elemento en la pantalla que dijo en voz alta:
Estado
: cobertura, intensidad de la señal y carga de
la batería
Correo de voz
: mensajes nuevos en el correo de
voz
Mensajes
: mensajes de texto o multimedia
recibidos recientemente
Llamadas perdidas
: llamadas entrantes no
contestadas
Hora
: hora y fecha
Intensidad de la señal
: intensidad de la conexión
de red
Batería
: carga de la batería
Volume n
: volumen de timbre
función
Nombre <del contacto>
Busque un ingreso de
Contactos
al decir su nombre.
Reproducir <Lista de reproducción>
Reproduzca una lista de reproducción con el
reproductor de música diciendo el nombre de una
de sus listas de reproducción.
Nota:
si no tiene música, el teléfono vuelve a la
pantalla principal.
Mi cuenta
Iniciar Acceso Web y ver las opciones de la cuenta.
Ayuda
Obtenga acceso a información de ayuda sobre la
función de reconocimiento de voz.
función

132
herramientas
programación de reconocimiento
de voz
Para modificar la programación de reconocimiento
de voz:
1
Con el teléfono abierto, oprima y suelte la tecla
Comando de voz que está al lado derecho del
teléfono.
Nota:
con el teléfono cerrado, mantenga oprimida
la tecla Comando de voz.
2
Oprima la tecla programable derecha (
:
) (
Programación
).
3
Use la tecla de navegación (
N
) para desplazarse
a la opción deseada y oprima la tecla de selección
central (
M
) (
OK
).
programación de reconocimiento de voz
Lectura de marcar número
Programe el teléfono para que diga en voz alta los
números a medida que los oprime en el teclado.
Confirmación
Si el teléfono no está seguro de que identificó
correctamente un nombre o número que usted
diga, puede mostrar hasta tres opciones e indicarle
que confirme la correcta.
Puede controlar la aparición de las listas de opciones:
Automática
: vea una lista de opciones desde varias
alternativas.
Siempre confirmar
: siempre muestra una lista de
opciones cuando haya varias alternativas.
Nunca confirmar
: no mostrar nunca una lista de opciones.
El teléfono elige desde las mejores alternativas.
programación de reconocimiento de voz

133
herramientas
Sensibilidad
Puede ajustar la capacidad del teléfono de
reconocer comandos de voz. Seleccione
Más sensible
,
Recomendado
o
Menos sensible
.
Si la sensibilidad es demasiado estricta
,
el teléfono muchas veces rechaza los comandos
de voz y muestra “Favor, repetir…” o “No hay
coincidencias”. Seleccione
Más sensible
.
Si la sensibilidad es demasiado flexible
,
experimentará activaciones falsas (lo que indica que
el teléfono detecta una coincidencia errónea).
Seleccione
Menos sensible
.
programación de reconocimiento de voz
Adaptación
Siga las indicaciones que aparecen en la pantalla
para mejorar el reconocimiento de las palabras
dichas. La adaptación toma alrededor de sesenta
segundos y requiere que esté en un lugar silencioso
(sin ruido de fondo).
Instrucciones
Modo
: programe si el teléfono dice
Instrucciones
,
Lectura
(para leer cada palabra que aparece en la pantalla) o
Sólo tonos
.
Reproducción de audio
: programe cómo desea oír las
instrucciones: detección
Automática
,
Altavoz
o a través
del
Audífono
.
programación de reconocimiento de voz

134
herramientas
Para acceder a la ayuda incluida en el dispositivo para
una programación que diga, oprima la tecla
programable izquierda (
:
)(
Info
).
organizador personal
agregar cita a calendario
1
En la pantalla principal, oprima la tecla de
selección central (
M
)(
MENÚ
) para abrir el menú.
2
Use la tecla de navegación (
N
) para desplazarse
a
( PROGRAMACIÓN Y HERRAMIENTAS
y oprima la tecla
de selección central (
M
)(
OK
).
3
Desplácese a
Herramientas
y oprima la tecla de
selección central (
M
)(
OK
).
4
Desplácese a
Calendario
y oprima la tecla de
selección central (
M
)(
OK
).
5
Desplácese a la fecha que desea y oprima la tecla
programable izquierda (
:
)(
Agregar
).
6
Ingrese el nombre y los detalles de la cita nueva.
Para cambiar la hora, periodicidad o tipo de alerta,
desplácese a la línea y oprima la tecla
programable izquierda (
:
)(
Programar
).
7
Para guardar la cita oprima la tecla de selección
central (
M
)(
GUARDAR
).
Alerta de llamada
Para una llamada entrante, programe si desea oír
Sólo timbre
,
Id de llamada + timbre
o
Repetir nombre
(repite el
nombre hasta que conteste o la llamada pase al
correo de voz).
programación de reconocimiento de voz

135
herramientas
ver cita del calendario
1
En la pantalla principal, oprima la tecla de
selección central (
M
)(
MENÚ
) para abrir el menú.
2
Use la tecla de navegación (
N
) para desplazarse
a
( PROGRAMACIÓN Y HERRAMIENTAS
y oprima la tecla
de selección central (
M
)(
OK
).
3
Desplácese a
Herramientas
y oprima la tecla de
selección central (
M
)(
OK
).
4
Desplácese a
Calendario
y oprima la tecla de
selección central (
M
)(
OK
).
5
Desplácese a la fecha de la cita y oprima la tecla
de selección central (
M
)(
VER
).
6
Vuelva a oprimir la tecla de selección
central (
M
)(
VER
) para ver detalles de la cita.
programar despertador
1
En la pantalla principal, oprima la tecla de
selección central (
M
)(
MENÚ
) para abrir el menú.
2
Use la tecla de navegación (
N
) para desplazarse
a
( PROGRAMACIÓN Y HERRAMIENTAS
y oprima la tecla
de selección central (
M
)(
OK
).
3
Desplácese a
Herramientas
y oprima la tecla de
selección central (
M
)(
OK
).
4
Desplácese a
Despertador
y oprima la tecla de
selección central (
M
)(
OK
).
5
Desplácese a
Alarma 1
,
Alarma 2
o
Alarma 3
y oprima la
tecla de selección central (
M
)(
OK
).
6
Seleccione
Activado
y programe la hora,
periodicidad y sonido de la alarma desplazándose
a la categoría y oprimiendo la tecla programable
izquierda (
:
)(
Programar
).

136
herramientas
7
Oprima la tecla de selección
central (
M
)(
GUARDAR
).
desactivar la alarma
Cuando suena una alarma, oprima
Desactivado
o la tecla
de encendido/fin (
%
) para desactivarla.
ver reloj mundial
Vea la hora actual en varias ciudades del mundo:
1
En la pantalla principal, oprima la tecla de
selección central (
M
)(
MENÚ
) para abrir el menú.
2
Use la tecla de navegación (
N
) para desplazarse
a
( PROGRAMACIÓN Y HERRAMIENTAS
y oprima la tecla
de selección central (
M
)(
OK
).
3
Desplácese a
Herramientas
y oprima la tecla de
selección central (
M
)(
OK
).
4
Desplácese a
Reloj mundial
y oprima la tecla de
selección central (
M
)(
OK
).
5
Use la tecla de navegación (
N
) para desplazarse
a la izquierda o derecha hasta la ciudad que
desea.
u
Oprima la tecla programable derecha (
:
)(
Ciudades
)
para ver una lista de ciudades, desplácese a una
ciudad y oprima la tecla programable
izquierda (
M
)(
OK
).
u
Oprima la tecla programable
izquierda (
:
)(
Programar DST
) para programar el
horario de verano de una ciudad.
apuntes
1
En la pantalla principal, oprima la tecla de
selección central (
M
)(
MENÚ
) para abrir el menú.

137
herramientas
2
Use la tecla de navegación (
N
) para desplazarse
a
( PROGRAMACIÓN Y HERRAMIENTAS
y oprima la tecla
de selección central (
M
)(
OK
).
3
Desplácese a
Herramientas
y oprima la tecla de
selección central (
M
)(
OK
).
4
Desplácese a
Apuntes
y oprima la tecla de selección
central (
M
)(
OK
).
El teléfono muestra las primeras palabras de las
notas guardadas en una lista.
5
Para
crear una nota
, oprima la tecla programable
izquierda (
:
)(
Agregar
). Ingrese texto y oprima la
tecla de selección central (
M
)(
GUARDAR
).
Para
ver una nota guardada
, desplácese a la
nota y oprima la tecla de selección
central (
M
)(
VER
).
calculadoras
1
En la pantalla principal, oprima la tecla de
selección central (
M
)(
MENÚ
) para abrir el menú.
2
Use la tecla de navegación (
N
) para desplazarse
a
( PROGRAMACIÓN Y HERRAMIENTAS
y oprima la tecla
de selección central (
M
)(
OK
).
3
Desplácese a
Herramientas
y oprima la tecla de
selección central (
M
)(
OK
).
4
Desplácese a
Calculadoras
y oprima la tecla de
selección central (
M
)(
OK
).
5
Para funciones de
calculadora básica
,
seleccione
Calculadora básica
. Use el teclado para
escribir números. Para ingresar un decimal,
oprima
*
. Para cambiar a un positivo o negativo,
oprima
#
. Use la tecla de navegación (
N
) para
seleccionar funciones matemáticas. Para más
operadores, oprima la tecla programable
derecha (
:
)(
Operador
).

138
herramientas
Para
calcular una propina
, seleccione
Calculadora de
propinas
. Use el teclado para ingresar la cantidad, el
porcentaje de la propina y la cantidad en la que se
dividirá la propina. Para ingresar un decimal,
oprima
*
. Para mostrar el monto de impuesto,
oprima la tecla programable derecha (
:
)(
Opciones
)
y seleccione
Mostrar impuesto
. Desplácese a
Sí
y
oprima la tecla de selección central (
M
)(
OK
).
diversión y juegos
descargar juegos o
aplicaciones
Descargar un juego o aplicación de
CENTRO DE MEDIOS
:
1
Desde la pantalla principal, oprima la tecla de
navegación hacia la derecha (
N
) para acceder a
] CENTRO DE MEDIOS
.
2
Use la tecla de navegación (
M
) para desplazarse
a
Juegos
o
Exploración y descarga
, y oprima la tecla de
selección central (
M
)(
OK
).
3
Seleccione
Obtener aplicación nueva
oprimiendo la tecla
de selección central (
M
)(
OK
).
4
Seleccione una categoría, aplicación y opción de
precio. Se aplican los cargos normales por tiempo
aire y/o uso de portadora.
iniciar juegos o aplicaciones
1
Desde la pantalla principal, oprima la tecla
de navegación hacia la derecha (
N
) para acceder
a
] CENTRO DE MEDIOS
.
2
Use la tecla de navegación (
M
) para desplazarse
a
Juegos
o
Exploración y descarga
, y oprima la tecla de
selección central (
M
)(
OK
).
3
Seleccione el juego o aplicación que desea
ejecutar.

139
herramientas
sesiones Web
Desde la pantalla principal, oprima la tecla de
navegación (
N
) para iniciar
ACCESO WEB
.
administrar imágenes
1
Desde la pantalla principal, oprima la tecla
de navegación hacia la derecha (
N
) para acceder
a
] CENTRO DE MEDIOS
.
2
Use la tecla de navegación (
N
) para desplazarse
a
Imagen y video
y oprima la tecla de selección
central (
M
)(
OK
).
3
Desplácese a
Mis imágenes
y oprima la tecla de
selección central (
M
)(
OK
) para ver una lista de
imágenes.
Para ver una imagen, desplácese hasta la imagen y
oprima la tecla de selección central (
M
)(
VER
).
Mientras ve una imagen, oprima la tecla programable
derecha (
:
)(
Opciones
) para ver las siguientes opciones:
Enviar
,
Enviar como
,
A álbum en línea
,
Tomar fotografía nueva
,
Obtener
imágenes nuevas
,
Cambiar nombre
,
Mover
,
Bloquear
,
Borrar todo
,
Presentación de diapositivas
,
Información de archivo
o
Imprimir
.
Nota:
las opciones que vea para imágenes que cree
son diferentes de las que ve para contenidos con
derechos de autor, como las imágenes que venían
precargadas en el teléfono. No puede enviar a otra
persona contenido con derechos de autor.
administrar videoclips
1
Desde la pantalla principal, oprima la tecla
de navegación hacia la derecha (
N
) para acceder
a
] CENTRO DE MEDIOS
.
2
Use la tecla de navegación (
N
) para desplazarse
a
Imagen y video
y oprima la tecla de selección
central (
M
)(
OK
).
3
Desplácese a
Mis videos
y oprima la tecla de
selección central (
M
)(
OK
) para ver una lista de
videoclips.

140
herramientas
4
Para ver un videoclip, desplácese hasta éste y
oprima la tecla de selección central (
M
)(
REPROD
).
En la pantalla
MIS VIDEOS
, oprima la tecla programable
derecha (
:
)(
Opciones
) para ver las siguientes opciones:
Enviar
,
Grabar video
,
A álbum en línea
,
Videos V CAST
,
Cambiar nombre
,
Mover
,
Bloquear
,
Borrar todo
,
Información de archivo
o
Espacios
.
Nota:
las opciones que ve para videos que cree son
diferentes de las que ve para contenidos con derechos
de autor. No puede enviar a otra persona contenido
con derechos de autor.

141
conexiones
conexiones
conexiones Bluetooth®
Su teléfono admite conexiones inalámbricas
Bluetooth. Puede conectar el teléfono con un audífono
Bluetooth o con un equipo para automóvil para hacer
llamadas de manos libres.
Nota:
el uso de teléfonos inalámbricos durante la
conducción puede ocasionar distracción. Corte la
llamada si no puede concentrarse en la conducción.
Además, el uso de dispositivos inalámbricos y sus
accesorios puede estar prohibido o restringido en
ciertas áreas. Obedezca siempre las leyes y las
regulaciones sobre el uso de estos productos.
Para obtener seguridad máxima para Bluetooth
,
siempre debe conectar los dispositivos Bluetooth en
un entorno seguro y privado, alejado de otros
dispositivos con capacidades de conexión Bluetooth.
perfiles admitidos
Esta sección indica perfiles Bluetooth que este
dispositivo admite actualmente.
Perfil de dispositivo de audio avanzado (A2DP
perfil de Bluetooth estéreo)
: permite que un
dispositivo como un par de audífonos habilitados para
Bluetooth reciba flujo de datos de audio estéreo
desde un reproductor de música habilitado para
Bluetooth con el mismo perfil.
Perfil de control remoto de audio/video (AVRCP)
:
ofrece una interfaz estándar para controlar televisores,
equipos de audio y dispositivos similares. Permite que

142
conexiones
un solo control remoto (u otro dispositivo) controle
todos los equipos de audio y a los que tenga acceso
el usuario.
Perfil de imágenes básicas (BIP)
: define la forma en
que un dispositivo de imágenes se puede controlar en
forma remota, cómo puede imprimir y cómo puede
transferir imágenes a un dispositivo de
almacenamiento. Por ejemplo, BIP permite que un
teléfono móvil controle una cámara digital.
Perfil de impresión básica (BPP)
: permite que los
dispositivos envíen texto, emails, vCards, imágenes
u otros elementos para imprimir. No necesita
controladores específicos para impresoras.
Acceso telefónico a redes (DUN)
: proporciona un
estándar para acceder a Internet y a otros servicios de
acceso telefónico a redes con una conexión
inalámbrica Bluetooth.
Manos libres (HFP)
: describe cómo puede usarse un
dispositivo de gateway para hacer y recibir llamadas
para un dispositivo manos libres. Por ejemplo, un
equipo de manos libres para vehículo puede usar un
teléfono móvil como dispositivo de gateway.
Audífono (HSP)
: describe cómo debe comunicarse
un audífono habilitado para Bluetooth con una
computadora o con otro dispositivo habilitado para
Bluetooth, tal como un teléfono móvil.
Perfiles OBEX
:
•
Protocolo de control de audio y vídeo (AVCTP)
para controlar dispositivos de audio y video.
•
Protocolo de distribución de audio y vídeo
(AVDTP) para flujo de audio y video
•
Perfil de transferencia de archivos (FTP) y Perfil
Object Push (OPP) para contenido generado
por dispositivo (imagen y video)
•
Perfil de transferencia de archivos (FTP) para
transferencias desde el teléfono a la PC

143
conexiones
•
Perfil de distribución genérica de audio y vídeo
(GAVDP)
•
Perfil Object Push (OPP) sólo para vCard
Perfil de acceso a directorio telefónico (PBAP)
:
pone la información del directorio telefónico de un
teléfono móvil a disposición de un dispositivo
manos libres.
Perfil de puerto serie (SPP)
: define los protocolos y
procedimientos que usarán dispositivos que usen
conexiones Bluetooth para emulación de cable serial
RS232 (o similar).
Para obtener más información acerca de las
conexiones inalámbricas Bluetooth admitidas por este
dispositivo, vaya a la sección de preguntas frecuentes
www.verizonwireless.com/bluetooth
.
Para obtener información sobre compatibilidad con
vehículos, visite
www.verizonwireless.com/bluetoothchart
.
activar y desactivarBluetooth
1
Desde la pantalla principal, oprima la tecla de
navegación hacia la abajo (
N
) para tener acceso
al
MENÚ BLUETOOTH
.
2
Oprima la tecla programable izquierda (
:
) para
encender
o
apagar
Bluetooth.
Nota:
para prolongar la vida útil de la batería, use este
procedimiento para programar la conexión Bluetooth
en
Desactivado
cuando no esté en uso. El teléfono no se
conectará a dispositivos hasta que programe
nuevamente la conexión Bluetooth en
Activado
y vuelva
a conectar el teléfono al dispositivo.
teléfono visible para otros
dispositivos
Permita que un dispositivo Bluetooth desconocido
detecte su teléfono:

144
conexiones
1
Desde la pantalla principal, oprima la tecla de
navegación hacia la abajo (
N
) para tener acceso
al
MENÚ BLUETOOTH
.
2
Oprima la tecla programable
derecha (
:
)(
Opciones
).
3
Desplácese a
Modo de detección
y oprima la tecla de
selección central (
M
)(
OK
).
4
Desplácese a
Activado
y oprima la tecla de
selección central (
M
)(
OK
).
asociar con un audífono,
dispositivo manos libres o
computadora
Nota: si usa el audífono Bluetooth con un
dispositivo de audio y con el teléfono, use los
menús de Bluetooth del teléfono para conectar el
teléfono con el audífono.
Si establece la conexión
oprimiendo un botón del audífono, o si permite que el
audífono se conecte automáticamente al encenderse,
es posible que obtenga resultados inesperados.
Antes de intentar conectar el teléfono con otro
dispositivo Bluetooth
, asegúrese de que Bluetooth
esté
activado
en su teléfono. Puede conectar el teléfono
sólo a un dispositivo a la vez.
1
Desde la pantalla principal, oprima la tecla de
navegación hacia la abajo (
N
) para tener acceso
al
MENÚ BLUETOOTH
.
2
Seleccione
Agregar disp nvo
al oprimir la tecla de
selección central (
M
)(
OK
).
Nota:
si Bluetooth no está encendido, el teléfono
le preguntará
¿Activar de Bluetooth?
Oprima la tecla de
selección central (
M
)(
OK
) para seleccionar
Sí
.
3
Asegúrese de que el dispositivo Bluetooth con el
que se esté asociando esté en modo detectable
(consulte la guía del usuario del dispositivo).

145
conexiones
4
Oprima la tecla de selección central (
M
)(
OK
) para
buscar dispositivos Bluetooth disponibles.
5
Use la tecla de navegación (
N
) para desplazarse
y resaltar el dispositivo con el que desea
establecer conexión y oprima la tecla de selección
central (
M
)(
ASOCIACIÓN
).
6
Use el teclado para ingresar el PIN del dispositivo
con el que desea establecer la asociación y
oprima la tecla de selección central (
M
)(
OK
).
Nota:
el código PIN predeterminado es por lo
general 0000. Consulte la guía del usuario del
accesorio Bluetooth para obtener más
información.
Si el teléfono le pide permiso para vincularse con el
teléfono, oprima la tecla de selección central (
M
)(
SÍ
).
Una vez establecida la conexión, aparece el indicador
Bluetooth
I
y un mensaje
Bluetooth
en la pantalla
principal.
transferir archivos
Puede usar una conexión Bluetooth para transferir
archivos entre la computadora y el teléfono.
Nota:
la interfaz Bluetooth de su computadora puede
ser diferente.
1
Asociar el teléfono y la computadora (consulte
“asociar con un audífono, dispositivo manos
libres o computadora” ).
2 En la computadora
, haga clic con el botón
derecho en el icono Bluetooth de la bandeja del
sistema.
3
Seleccione “Enviar un archivo”.
4
Haga clic en “Navegar” para ubicar el nombre del
teléfono y haga clic en “Siguiente”.
5
Haga clic en “Navegar” para ubicar el archivo que
desee transferir y haga clic en “Siguiente”.

146
conexiones
6 En el teléfono
, cuando se le solicite, oprima la
tecla de selección central (
M
)(
ACEPTAR
) para
aceptar la transferencia del archivo.
7
Cuando termine de transferir archivos, oprima la
tecla de encendido/fin (
%
) en el teléfono para
cortar la conexión.
Nota:
interrumpir la vinculación con la computadora
no desactiva la conexión Bluetooth en el teléfono. Es
posible que desee desactivar la conexión Bluetooth
para conservar la carga de la batería.
conectarse a otro teléfono
Puede usar una conexión Bluetooth para transferir un
contacto o archivo a otro teléfono.
Para transferir un contacto a otro teléfono
:
Nota:
asegúrese de que el teléfono que recibe el
ingreso tenga activado Bluetooth y de que esté en
modo
Encuéntrame
. El dispositivo receptor también debe
ser capaz de recibir una vCard. No todos los
dispositivos Bluetooth tienen esta capacidad.
1
En la pantalla principal, oprima la tecla
programable derecha (
:
)(
Contactos
) para abrir la
LISTA DE CONTACTOS
.
2
Use la tecla de navegación (
N
) para desplazarse
al ingreso que desea transferir y oprima la tecla
programable derecha (
:
)(
Opciones
).
3
Desplácese a
Enviar tarjeta de nombre
y oprima la tecla
de selección central (
M
)(
OK
).
4
Desplácese a
Bluetooth
y oprima la tecla de
selección central (
M
)(
OK
).
5
Oprima la tecla de selección central (
M
)(
ENVIAR
).
6
Desplácese a
[Agregar disp nvo]
o al dispositivo que
desea y oprima la tecla de selección
central (
M
)(
ASOCIACIÓN
).
Nota:
si su teléfono no tiene ya activado
Bluetooth, el teléfono le indicará que lo active.

147
conexiones
7
Si se le solicita, ingrese el código PIN
predeterminado
0000
o acepte la transferencia.
Cuando los teléfonos se conectan, el teléfono de
envío comienza la transferencia, se le indica al
teléfono receptor que la acepte. Cuando el teléfono
receptor la acepta, el ingreso se transfiere.
Para transferir un archivo a otro teléfono
:
Nota:
asegúrese de que el teléfono que recibe el
archivo tenga activado Bluetooth y de que esté en
modo
Encuéntrame
. El teléfono receptor también debe ser
capaz de recibir el tipo de archivo.
1
En el teléfono, seleccione el archivo (como una
imagen, video o sonido) que desea transferir y
oprima la tecla programable derecha (
:
)(
Opciones
).
2
Use la tecla de navegación (
N
) para desplazarse
a
Enviar
y oprima la tecla de selección
central (
M
)(
OK
).
3
Desplácese a
Bluetooth
y oprima la tecla de
selección central (
M
)(
OK
).
4
Desplácese a
[Agregar disp nvo]
o al dispositivo que
desea y oprima la tecla de selección
central (
M
)(
OK
).
Nota:
si su teléfono no tiene ya activado Bluetooth, el
teléfono le indicará que lo active.
5
Cuando el teléfono le solicite confirmar el envío
del archivo, seleccione
SÍ
oprimiendo la tecla de
selección central (
M
)(
OK
).
6
Si se le solicita, ingrese el código PIN
predeterminado
0000
o acepte la transferencia.
Cuando los teléfonos se conectan, el teléfono de
envío comienza la transferencia y se le indica al
teléfono receptor que la acepte. Cuando el teléfono
receptor la acepta, el archivo se transfiere.

148
conexiones
conectar a un dispositivo
manos libres durante una
llamada
1
Durante una llamada, oprima la tecla programable
derecha (
:
)(
Opciones
) y seleccione el
Menú Bluetooth
.
2
Use la tecla de navegación (
N
) para desplazarse
a
[Agregar disp nvo]
o seleccione el nombre del
dispositivo manos libres si lo ha asociado
anteriormente.
3
Oprima la tecla de selección central (
M
)(
OK
).
4
Si se conecta a un dispositivo nuevo, colóquelo
en modo de detección y oprima la tecla de
selección central (
M
)(
OK
) en el teléfono.
5
Cuando el teléfono encuentra el dispositivo
manos libres, oprima la tecla de selección
central (
M
)(
ASOCIAR
).
desconectar de un dispositivo
Para desconectarse de un dispositivo
cuando
el teléfono está en reposo
:
1
Con la pantalla en reposo, oprima la tecla de
navegación hacia la abajo (
N
) para acceder al
MENÚ BLUETOOTH
.
2
Use la tecla de navegación (
N
) para desplazarse
al nombre del dispositivo del que desea
desconectarse.
3
Oprima la tecla de selección central (
M
)(
DESCONE
).
4
Cuando el teléfono pregunte si desea
desconectarse, seleccione
Sí
y oprima la tecla de
selección central (
M
)(
OK
).
Para desconectarse de un dispositivo
durante una
llamada activa
:
1
Oprima la tecla programable
derecha (
:
)(
Opciones
).

149
conexiones
2
Use la tecla de navegación (
N
) para desplazarse
a
Desconectar Bluetooth
, y oprima la tecla de selección
central (
M
)(
OK
).
conexiones de cable
El teléfono tiene un puerto
micro-USB, de modo que
puede conectarlo a una
computadora.
•
Conecte el teléfono a
un puerto USB de alta potencia en la
computadora (no a uno de baja potencia,
como el puerto USB del teclado o de un hub
USB alimentado por bus). Comúnmente, los
puertos USB de alta potencia están en la
computadora.
Nota:
si conecta el teléfono a un puerto USB
de baja potencia, es posible que la
computadora no reconozca el teléfono.
•
Compruebe que el teléfono y la computadora
estén encendidos.
red
programación de red
1
En la pantalla principal, oprima la tecla de
selección central (
M
)(
MENÚ
) para abrir el menú.
2
Use la tecla de navegación (
N
) para desplazarse
a
( PROGRAMACIÓN Y HERRAMIENTAS
y oprima la tecla
de selección central (
M
)(
OK
).
3
Desplácese a
Programación del teléfono
y oprima la tecla
de selección central (
M
)(
OK
).
4
Desplácese a
Seleccionar sistema
y oprima la tecla de
selección central (
M
)(
OK
).
5
Desplácese a
Programar modo
y oprima la tecla de
selección central (
M
)(
OK
).

150
conexiones
6
Seleccione
Sólo local
o
Automático
y oprima la tecla de
selección central (
M
)(
OK
).
Nota:
pueden aparecer otras opciones
dependiendo de la disponibilidad de la red.
alertas de llamada perdida
Programe el teléfono para que emita un bip
cada vez que la red pierda una llamada. (Debido a que
las redes digitales son tan silenciosas, la alerta de
llamada perdida puede ser el único signo de que se
perdió una llamada.)
1
En la pantalla principal, oprima la tecla de
selección central (
M
)(
MENÚ
) para abrir el menú.
2
Use la tecla de navegación (
N
) para desplazarse
a
( PROGRAMACIÓN Y HERRAMIENTAS
y oprima la tecla
de selección central (
M
)(
OK
).
3
Desplácese a
Programación de sonidos
y oprima la tecla
de selección central (
M
)(
OK
).
4
Desplácese a
Alertas de servicio
y oprima la tecla de
selección central (
M
)(
OK
).
5
Desplácese a
Tono de pérdida de red
y oprima la tecla de
selección central (
M
)(
OK
).
6
Seleccione
Encendido
y oprima la tecla de selección
central (
M
)(
OK
).
alertas de conexión de
llamada
Programe el teléfono para que emita un bip cada vez
que se conecte una llamada saliente:
1
En la pantalla principal, oprima la tecla de
selección central (
M
)(
MENÚ
) para abrir el menú.
2
Use la tecla de navegación (
N
) para desplazarse
a
( PROGRAMACIÓN Y HERRAMIENTAS
y oprima la tecla
de selección central (
M
)(
OK
).
3
Desplácese a
Programación de sonidos
y oprima la tecla
de selección central (
M
)(
OK
).

151
conexiones
4
Desplácese a
Alertas de servicio
y oprima la tecla de
selección central (
M
)(
OK
).
5
Desplácese a
Conexión de llamada
y oprima la tecla de
selección central (
M
)(
OK
).
6
Seleccione
Encendido
y oprima la tecla de selección
central (
M
)(
OK
).
alertas de roaming
Programe el teléfono para que emita un bip
cada vez que ingrese a roaming:
1
En la pantalla principal, oprima la tecla de
selección central (
M
)(
MENÚ
) para abrir el menú.
2
Use la tecla de navegación (
N
) para desplazarse
a
( PROGRAMACIÓN Y HERRAMIENTAS
y oprima la tecla
de selección central (
M
)(
OK
).
3
Desplácese a
Programación de sonidos
y oprima la tecla
de selección central (
M
)(
OK
).
4
Desplácese a
Alertas de servicio
y oprima la tecla de
selección central (
M
)(
OK
).
5
Seleccione
ERI
y oprima la tecla de selección
central (
M
)(
OK
).
6
Seleccione
Encendido
y oprima la tecla de selección
central (
M
)(
OK
).

152
servicio y reparaciones
servicio y reparaciones
Si tiene dudas o necesita asesoría, con gusto le
ayudaremos.
Visite el sitio
www.motorola.com/support
, donde podrá
seleccionar diferentes opciones de atención al cliente.
También puede comunicarse con el Centro de
atención a clientes de Motorola, llamando al
1-800-331-6456 (Estados Unidos), al 1-888-390-6456
(TTY/TDD en Estados Unidos, para personas con
problemas de audición) o al 1-800-461-4575 (Canadá).

Datos SAR
153
Datos de índice de absorción específico para
Estados Unidos
Datos SAR
El modelo de teléfono celular cumple con las
exigencias del gobierno para la exposición a
ondas de radio.
Su teléfono celular es un transmisor y receptor de radio. Se ha
diseñado y fabricado para no exceder los límites para la exposición
a la energía de radiofrecuencia (RF) establecidos por la Federal
Communications Commission (FCC) el Gobierno de Estados Unidos
y por los organismos reguladores de Canadá. Estos límites forman
parte de directrices globales y establecen los niveles permitidos
de energía RF para la población general. Las directrices se basan
en estándares preparados por organizaciones científicas
independientes mediante la evaluación periódica y exhaustiva de
estudios científicos. Los estándares incluyen un margen de
seguridad considerable destinado a garantizar la protección de
todas las personas, independientemente de su edad o salud.
El estándar de exposición para teléfonos celulares móviles emplea
una unidad de medición conocida como Índice de absorción
específico o SAR. El límite SAR establecido por la FCC y por los
organismos reguladores de Canadá es de 1,6 W/kg.
1
Las pruebas
de SAR se realizan utilizando posiciones de operación estándar
aceptadas por la FCC y por Industry Canada en que el teléfono
transmite con su nivel de potencia certificado más alto en todas
las bandas de frecuencia probadas. Aunque el índice SAR se
determina al nivel de potencia certificado más alto, el nivel real de
SAR del teléfono durante el funcionamiento puede encontrarse
muy por debajo del valor máximo. Esto se debe a que el teléfono
está diseñado para funcionar en niveles de potencia múltiples, de
modo que sólo usa la potencia necesaria para conectarse con la
red. En general, mientras más cerca se encuentre de una estación
base celular, menor será la potencia de salida.
Antes de que un modelo de teléfono esté disponible para la venta
al público de Estados Unidos y Canadá, debe ser probado y
certificado ante la FCC e Industry Canada para verificar que no
exceda el límite establecido por cada gobierno para la exposición
segura. Las pruebas se realizan en las posiciones y lugares (por
ejemplo, en la oreja y en el cuerpo) informados a la FCC y
disponibles para la revisión por Industry Canada. El valor de índice
SAR más alto para este modelo de teléfono en las pruebas para
uso en la oreja es de 1.45 W/kg y cuando se usa en el cuerpo,
como se describe en esta guía del usuario, es de 0.73 W/kg. El
valor SAR para este producto en el modo de transmisión de datos

154
Datos SAR
(uso cerca del cuerpo) es 0.2 W/kg (Las mediciones del teléfono
usado en el cuerpo difieren según el modelo de teléfono,
dependiendo de los accesorios disponibles y de las exigencias
de regulación).
2
Aunque puede haber diferencias entre los niveles de índice SAR de
los diferentes teléfonos y las distintas posiciones, todas cumplen
con las exigencias gubernamentales para exposición segura.Tenga
en cuenta que las mejoras a este modelo podrían ocasionar
diferencias en el índice SAR para los productos más nuevos,
de todas maneras, los productos se diseñan para que cumplan
con las directrices.
Se puede encontrar información adicional sobre Índices de
absorción específicos (SAR) en el sitio Web de Cellular
Telecommunications & Internet Association (CTIA):
http://www.phonefacts.net
o en el sitio Web de Canadian Wireless Telecommunications
Association (CWTA):
http://www.cwta.ca
1. En Estados Unidos y Canadá, el límite de SAR para teléfonos celulares
usados por el público es de 1,6 watts/kg (W/kg) promediados sobre un
gramo de tejido. El estándar incorpora un margen de seguridad
significativo que proporciona protección adicional al público y que
considera cualquier variación en las mediciones.
2.
La información sobre SAR incluye el protocolo de prueba, el procedimiento de
evaluación y la escala de incertidumbre de medición de Motorola para este
producto.

155
Información legal y de seguridad
importante

156
Información de seguridad
Información general y de seguridad
Inform ación de seguri dad
Esta sección contiene información importante sobre la
operación segura y eficiente de su dispositivo móvil. Lea
esta información antes de usar su dispositivo móvil.
Exposición a señales de
radio frecuencia (RF)
Su dispositivo móvil contiene un transmisor y un receptor. Cuando
está encendido, recibe y transmite señales de radio frecuencia
(RF). Cuando usted se comunica con el dispositivo móvil, el sistema
que administra las llamadas controla los niveles de potencia a los
que transmite el dispositivo.
El dispositivo móvil Motorola fue diseñado para cumplir con las
exigencias de regulación locales de su país respecto de la
exposición de seres humanos a las señales de RF.
Precauciones de operación
Con el fin de asegurar el rendimiento óptimo del dispositivo móvil
y mantener la exposición de seres humanos a las señales de RF
dentro de los límites establecidos en las reglamentaciones
correspondientes, respete siempre las siguientes instrucciones y
precauciones.
Operación del producto
Cuando realice o reciba una llamada telefónica, sostenga el
dispositivo móvil como si fuera un teléfono fijo.
Si lleva consigo el dispositivo móvil, colóquelo siempre en un
broche, soporte, portateléfonos, estuche o arnés para el cuerpo
provisto o aprobado por Motorola. Si usted no utiliza un accesorio
provisto o aprobado por Motorola, o si cuelga su dispositivo móvil
de una correa alrededor del cuello, mantenga el dispositivo y la
antena a no menos de 2,54 centímetros (1 pulgada) de su cuerpo al
transmitir señales.
El uso de accesorios no provistos o aprobados por Motorola puede
hacer que el dispositivo móvil exceda las reglamentaciones sobre
la exposición a las señales de RF. Si desea obtener una lista de los
accesorios provistos o aprobados por Motorola, visite nuestro sitio
Web en:
www.motorola.com
.
Interferencia y compatibilidad de
señales de RF
Casi todos los dispositivos electrónicos están sujetos a sufrir
interferencias por señales de RF desde fuentes externas si están
protegidos, diseñados o bien configurados incorrectamente para la
compatibilidad con señales de RF. En determinadas circunstancias,

Información de seguridad
157
el dispositivo móvil podría producir interferencia con otros
dispositivos.
Siga las instrucciones para evitar problemas de
interferencia
Apague el dispositivo móvil en todos los lugares donde existan
avisos consignados que señalen que debe hacerlo.
En un avión, apague el dispositivo móvil cada vez que se lo indique
el personal. Si el dispositivo móvil ofrece un modo de avión o una
función similar, consulte al personal acerca de su uso durante el
vuelo.
Dispositivos médicos implantables
Si tiene un dispositivo médico implantable, como un marcapasos o
desfibrilador, consulte a su médico antes de utilizar este
dispositivo móvil.
Las personas con dispositivos médicos implantables deben
observar las siguientes precauciones:
•
Mantener SIEMPRE el dispositivo móvil a más de
20 centímetros (8 pulgadas) del dispositivo médico
implantable cuando el dispositivo esté ENCENDIDO.
•
NO llevar el dispositivo móvil en el bolsillo de la camisa.
•
Usar el oído del lado opuesto al del dispositivo médico
implantable para minimizar la posibilidad de interferencia.
•
APAGAR inmediatamente el dispositivo móvil si se tiene
alguna razón para sospechar que se está produciendo
interferencia.
Lea y siga las instrucciones del fabricante de su dispositivo médico
implantable. Si tiene alguna pregunta acerca del uso del
dispositivo móvil con un dispositivo médico implantable, consulte
al profesional de la salud.
Precauciones al conducir
El uso de teléfonos inalámbricos durante la conducción puede
ocasionar distracción. Corte la llamada si no puede concentrarse
en la conducción.
Además, el uso de dispositivos inalámbricos y sus accesorios
puede estar prohibido o restringido en ciertas áreas. Obedezca
siempre las leyes y las regulaciones sobre el uso de estos
productos.
Podrá encontrar las prácticas para una conducción responsable en
la sección “Prácticas inteligentes al conducir” que se incluye en
esta guía (o guía separada).
Advertencias operacionales
Obedezca todas las señalizaciones al usar dispositivos móviles en
zonas públicas.

158
Información de seguridad
Atmósferas potencialmente explosivas
Con frecuencia, aunque no siempre, las zonas con atmósferas
potencialmente explosivas están señalizadas y pueden incluir
lugares de abastecimiento de combustible, tales como la cubierta
inferior de los barcos, instalaciones de almacenamiento o
transferencia de combustible o de productos químicos y zonas
donde el aire contiene productos químicos o partículas, tales como
grano en polvo, polvo o polvos de metal.
Cuando esté en una de estas zonas, apague el dispositivo móvil y
no retire, instale ni cargue las baterías. En estas zonas se pueden
producir chispas que pueden causar explosiones o incendios.
Tecla de símbolo
La batería, el cargador o el dispositivo móvil pueden incluir los
símbolos que se definen a continuación:
Baterías y cargadores
Precaución: el tratamiento o uso inadecuado de las
baterías puede dar origen a un incendio, una explosión,
una fuga u otra situación de peligro. Para obtener más
Símbolo Definición
Importante información de seguridad a
continuación.
No deseche la batería ni el dispositivo móvil en
el fuego.
Es posible que la batería o el dispositivo móvil
deban reciclarse de acuerdo con las leyes
locales. Comuníquese con las autoridades de
regulación locales para obtener más
información.
No arroje la batería ni el dispositivo móvil a la
basura.
No permita que la batería, cargador o
dispositivo móvil se humedezcan.
Escuchar música o voz con un audífono al
máximo de volumen puede ocasionar daños en
la audición.
032374o
032376o
032375o

Información de seguridad
159
información, consulte la sección “Uso y seguridad de las
baterías” en la guía del usuario.
Mantenga el dispositivo móvil y sus
accesorios alejados de los niños
pequeños
Estos productos no son juguetes y pueden ser peligrosos para los
niños. Por ejemplo:
•
Es posible que las piezas pequeñas y removibles
representen peligros de asfixia.
•
El uso inadecuado puede provocar sonidos fuertes, que
posiblemente dañen la audición.
•
Las baterías que no se manipulan correctamente pueden
sobrecalentarse o provocar quemaduras.
Partes de vidrio
Algunas partes de su dispositivo móvil pueden ser de vidrio. Este
vidrio se puede quebrar si el producto se deja caer en una
superficie dura o si recibe un impacto considerable. Si el vidrio se
quiebra, no lo toque ni intente quitarlo. Deje de usar el dispositivo
móvil hasta que el vidrio sea reemplazado por un centro de servicio
calificado.
Ataques o pérdida de conocimiento
Es posible que algunas personas sean susceptibles a sufrir
ataques o pérdida de conocimiento cuando se exponen a luces
destellantes, como por ejemplo al usar juegos de video. Esto
puede producirse incluso si la persona nunca ha sufrido este tipo
de ataques.
En caso de que haya experimentado ataques o pérdida de
conocimiento, o si tiene antecedentes familiares de dichos
problemas, consulte a su médico antes de usar juegos de video o
de activar la función de luces destellantes (si está disponible) del
dispositivo móvil.
Deje de usar el dispositivo y consulte a un médico si aparece
alguno de los siguientes síntomas: convulsiones, movimiento
ocular o muscular nervioso, pérdida de la conciencia, movimientos
involuntarios o desorientación. Si está cansado, siempre es
aconsejable mantener la pantalla alejada de los ojos, dejar las
luces encendidas en la habitación, tomar un descanso de 15
minutos a cada hora y dejar de usar el dispositivo.
Precaución sobre el uso con volumen
alto
Advertencia:
la exposición a ruidos fuertes de
cualquier tipo durante períodos prolongados de
tiempo puede afectar su capacidad auditiva. Mientras
mayor sea el nivel de sonido del volumen, menos

160
Aviso de Industry Canada
tiempo pasará antes de que se afecte su capacidad auditiva. Para
proteger su capacidad auditiva:
•
limite la cantidad de tiempo que utiliza los audífonos o
auriculares a volumen alto;
•
evite subir el volumen para abstraerse de entornos
ruidosos;
•
baje el volumen si no puede escuchar a las personas que
le hablan de cerca.
Si siente molestias en el oído, incluida la sensación de presión o
inflamación, timbres o sonidos distorsionados, debe dejar de
utilizar el dispositivo con los audífonos o auriculares y recibir
atención médica.
Para obtener más información acerca de la capacidad auditiva,
visite nuestro sitio Web en
www.motorola.com/hearingsafety
(sólo
en inglés).
Movimiento repetitivo
Cuando realiza acciones repetitivas, como oprimir teclas o ingresar
caracteres con los dedos, puede sufrir molestias ocasionales en
manos, brazos, hombros, cuello o en otras partes del cuerpo. Si
continúa sufriendo molestias durante o después del uso, deje de
usar el dispositivo y consulte a un médico.
[Mar0108]
Aviso de Industry Canada para los usuarios
Aviso de Industry Canada
Su funcionamiento está sujeto a las siguientes condiciones: (1)
Este dispositivo no puede provocar interferencia y (2) este
dispositivo debe aceptar cualquier interferencia, incluso aquella
que pudiera causar un funcionamiento no deseado del mismo
según. Consulte RSS-GEN 7.1.5.

Aviso FCC
161
Aviso de la FCC para los usuarios
Avi so F CC
La siguiente afirmación se aplica a todos los productos que
cuentan con la aprobación de la FCC. Los productos
correspondientes llevan el logotipo de la FCC y/o una ID de
la FCC con el formato FCC-ID:xxxxxx en la etiqueta del
producto.
Motorola no aprueba ningún cambio ni modificación del
dispositivo realizados por el usuario. Cualquier cambio o
modificación puede anular la autoridad del usuario para operar el
equipo. Consulte CFR 47 Sec. 15.21.
Este dispositivo cumple con la parte 15 de las Normas de la FCC.
Su funcionamiento está sujeto a las siguientes condiciones: (1)
este dispositivo no puede provocar interferencia dañina y (2) este
dispositivo debe aceptar cualquier interferencia recibida, incluso
aquella que pudiera provocar un funcionamiento no deseado.
Consulte CFR 47 Sec. 15.19(3).
Este equipo ha sido probado y se comprobó que cumple con los
límites para un dispositivo digital Clase B, en aplicación de lo
dispuesto en la parte 15 de las Normas de la FCC. Estos límites
están diseñados para proporcionar protección razonable contra
interferencia dañina en una instalación residencial. Este equipo
genera, usa y puede irradiar energía de radiofrecuencia y, si no se
instala y usa de acuerdo con las instrucciones, puede causar
interferencia dañina a las comunicaciones por radio. Sin embargo,
no se garantiza que no ocurra interferencia en una instalación en
particular. Si este equipo causa interferencia dañina en la
recepción de radio o televisión, lo que se puede descubrir
encendiendo y apagando el equipo, se aconseja al usuario que
intente corregir la interferencia siguiendo uno o más de los
procedimientos indicados a continuación:
•
Reoriente o ubique en otra parte la antena receptora.
•
Aumente la separación entre el equipo y el receptor.
•
Conecte el equipo a una toma de corriente o un circuito
distinto al cual está conectado el receptor.
•
Consulte con el distribuidor o con un técnico
experimentado de radio o TV para recibir ayuda.

162
Garantía
Garantía Limitada Motorola para Estados Unidos y Canadá
Garantía
¿Qué cubre esta garantía?
Sujeta a las exclusiones contenidas más abajo, Motorola, Inc.
garantiza contra defectos de materiales y mano de obra en
condiciones de uso normal, por el o los períodos indicados a
continuación, sus teléfonos, buscapersonas, dispositivos de
mensajería y radios de dos vías para consumidores y profesionales
(sin incluir radios comerciales, gubernamentales o industriales)
que funcionan a través del Servicio de radio familiar o del Servicio
general de radio móvil, accesorios certificados o de marca
Motorola vendidos para usarse con estos productos (“Accesorios”)
y software Motorola contenido en CDROM u otros medios
tangibles y vendidos para usarse con estos productos
(“Software”). Esta garantía limitada es un recurso exclusivo del
consumidor y se aplica de la manera siguiente a los nuevos
productos, accesorios y software Motorola que hayan comprado
los consumidores en Estados Unidos o Canadá y que estén
acompañados por esta garantía escrita:
Productos y accesorios
Productos cubiertos Duración de la cobertura
Los
Productos y
accesorios
antes
definidos, salvo que se
disponga lo contrario a
continuación.
Un (1) año
a partir de la fecha
de compra por parte del primer
comprador consumidor del
producto, a menos que se
disponga lo contrario a
continuación.
Accesorios y estuches
decorativos.
Cubiertas
decorativas, cubiertas
PhoneWrap™ y estuches.
Garantía de por vida
limitada
para el primer
comprador consumidor del
producto.
Audífonos
monoauriculares
Audífonos y auriculares que
transmiten sonido
monofónico a través de una
conexión alámbrica.
Garantía de por vida
limitada
para el primer
comprador consumidor del
producto.
Accesorios para radios
de dos vías para
consumidores y
profesionales.
Noventa (90) días
a partir de
la fecha de compra por parte
del primer comprador
consumidor del producto.

Garantía
163
Exclusiones
Uso y desgaste normal.
Se excluye de la cobertura el
mantenimiento, reparación y reemplazo periódicos de piezas
debido al uso y desgaste normal.
Baterías.
Esta garantía limitada sólo cubre las baterías cuya
capacidad cargada completa quede bajo el 80% de su capacidad
nominal y las baterías que presenten filtraciones.
Uso indebido y maltrato.
Se excluyen de la cobertura los
defectos o daños provocados por: (a) el manejo inadecuado,
almacenamiento, uso indebido o maltrato, accidente o descuido,
como daños físicos (hendiduras, rayones, etc.) en la superficie del
producto resultantes del uso indebido; (b) contacto con líquido,
agua, lluvia, humedad extrema o transpiración excesiva, arena,
polvo o similares, calor extremo o alimentos; (c) uso de los
productos o accesorios para propósitos comerciales o
sometimiento del producto o accesorio a uso o condiciones
anormales; u (d) otras acciones que no son responsabilidad de
Motorola.
Uso de productos y accesorios que no sean Motorola.
Se
excluyen de la cobertura los defectos que resulten del uso de
productos, accesorios, software u otros equipos periféricos que no
tengan marca ni certificación Motorola.
Servicio o modificación sin autorización.
Se excluyen de la
cobertura los defectos o daños que resulten del servicio, prueba,
ajuste, instalación, mantenimiento, alteración o modificación de
cualquier tipo realizados por personas ajenas a Motorola o sus
centros de servicio autorizados.
Productos alterados.
Se excluyen de la cobertura los productos
o accesorios (a) cuyos números de serie o etiquetas de fechas
hayan sido retirados, alterados o borrados; (b) con sellos rotos o
que muestren indicios de manipulación; (c) con números de serie
de tarjeta que no coincidan; o (d) cubiertas o piezas que no sean
Motorola o no cumplan sus normativas.
Servicios de comunicación.
Se excluyen de la cobertura los
defectos, daños o mal funcionamiento de los productos, accesorios
o software debido a cualquier servicio o señal de comunicación al
cual se pueda suscribir o usar con los productos, accesorios o
software.
Productos y accesorios
que se reparan o
reemplazan.
Lo que queda de la garantía
original o noventa (90) días
a partir de la fecha de
devolución al consumidor, lo
que sea mayor.
Productos cubiertos Duración de la cobertura

164
Garantía
Software
Exclusiones
Software soportado por medios físicos.
No se garantiza que el
software cumpla con sus requisitos ni funcione en combinación
con cualquier otro hardware o aplicaciones de software
proporcionados por terceros, que el funcionamiento de los
productos de software no tenga interrupciones ni errores ni que se
corregirán todos los defectos de los productos de software.
Software NO soportado por medios físicos.
El software no
soportado por medios físicos (por ejemplo, el software descargado
de Internet) se proporciona “tal como está” y no tiene garantía.
¿Quién está cubierto?
Esta garantía se extiende sólo al primer comprador consumidor y
no es transferible.
¿Qué hará Motorola?
Motorola, a su elección, reparará, reemplazará o reembolsará sin
cargos el precio de compra de cualquier producto, accesorio o
software que no cumpla con esta garantía. Podremos utilizar
productos, accesorios o piezas
reacondicionados/renovados/usados o nuevos que sean
funcionalmente equivalentes. No se reinstalará ninguno de los
datos, software ni aplicaciones que se hayan agregado al
producto, accesorio o software, incluido, pero no limitado a
contactos personales, juegos y tonos de timbre. Para evitar la
pérdida de estos datos, software y aplicaciones, cree una copia de
seguridad antes de solicitar servicio.
Cómo obtener servicio de garantía u
otra información
Productos cubiertos Duración de la
cobertura
Software.
Se aplica sólo a los
defectos físicos en los medios que
soportan la copia del software (por
ejemplo, CD-ROM, o disquete).
Noventa (90) días
a
partir de la fecha de
compra.
Estados
Unidos
Teléfonos:
1-800-331-6456
Buscapersonas:
1-800-548-9954
Radios de dos vías y dispositivos
de mensajería:
1-800-353-2729
Canadá Todos los productos:
1-800-461-4575

Garantía
165
Recibirá instrucciones sobre cómo enviar los productos, accesorios
o software, por su cuenta y cargo, al Centro de reparaciones
autorizado de Motorola. Para obtener servicio, debe incluir: (a) una
copia de su recibo, contrato de venta u otra prueba de compra
equivalente; (b) una descripción escrita del problema; (c) el nombre
de su proveedor de servicio, si corresponde; (d) el nombre y
ubicación del servicio de instalación (si corresponde) y lo que es
más importante; (e) su dirección y número telefónico.
¿Qué otras limitaciones existen?
TODA GARANTÍA IMPLÍCITA, INCLUIDAS SIN LIMITACIÓN LAS
GARANTÍAS IMPLÍCITAS DE COMERCIABILIDAD Y APTITUD PARA
UN PROPÓSITO EN PARTICULAR, SE DEBERÁ LIMITAR A LA
DURACIÓN DE ESTA GARANTÍA LIMITADA, DE LO CONTRARIO, LA
REPARACIÓN, REEMPLAZO O REEMBOLSO DISPUESTOS EN
VIRTUD DE ESTA GARANTÍA EXPRESA LIMITADA SERÁ EL
RECURSO EXCLUSIVO DEL CONSUMIDOR, SEGÚN SE DISPONE
EN LUGAR DE TODA OTRA GARANTÍA EXPRESA O IMPLÍCITA. EN
NINGÚN CASO MOTOROLA TENDRÁ RESPONSABILIDAD
CONTRACTUAL O EXTRACONTRACTUAL (INCLUIDA
NEGLIGENCIA) POR DAÑOS QUE SUPEREN EL PRECIO DE
COMPRA DEL PRODUCTO, ACCESORIO O SOFTWARE, O POR
CUALQUIER DAÑO INDIRECTO, IMPREVISTO, ESPECIAL O
RESULTANTE DE CUALQUIER TIPO O LA PÉRDIDA DE INGRESOS O
UTILIDADES, PÉRDIDA DE NEGOCIOS, PÉRDIDA DE
INFORMACIÓN O DATOS, SOFTWARE O APLICACIONES U OTRA
PÉRDIDA FINANCIERA QUE SURJAN DE LA CAPACIDAD O
INCAPACIDAD DE USAR LOS PRODUCTOS, ACCESORIOS O
SOFTWARE, O EN RELACIÓN CON LAS MISMAS, DENTRO DE LO
PERMITIDO POR LA LEY.
Algunos estados y jurisdicciones no permiten la limitación
o exclusión de daños imprevistos o resultantes ni la
limitación sobre la duración de una garantía implícita, de
modo que las limitaciones o exclusiones anteriores
probablemente no correspondan a su caso. Esta garantía le
otorga derechos legales específicos y también podría tener
otros derechos que varían de un estado a otro o de una
jurisdicción a otra.
Las leyes de Estados Unidos y otros países reservan para Motorola
ciertos derechos exclusivos sobre el software Motorola protegido
por derechos de autor, como los derechos exclusivos a reproducir y
distribuir copias del software Motorola. El software Motorola sólo
se podrá copiar, usar y redistribuir para los productos asociados a
dicho software Motorola. No se permite ningún otro uso, incluidos
sin limitaciones, el desmontaje de dicho software Motorola o el
ejercicio de los derechos exclusivos reservados para Motorola.
TTY
1-888-390-6456
Para
accesorios
y
software
, llame al número de teléfono
antes señalado, correspondiente al producto con el cual se
usan.

166
Prótesis auditivas
Compatibilidad de prótesis auditivas con teléfono móviles
Prótes is auditi vas
Se ha medido la compatibilidad de algunos teléfonos Motorola con
prótesis auditivas. Si la caja de su modelo tiene impresa la frase
“Con clasificación para prótesis auditivas”, se aplica la siguiente
explicación.
Cuando algunos teléfonos móviles se utilizan cerca de audífonos
(prótesis auditivas e implantes cocleares), es posible que los
usuarios detecten un zumbido, silbido o chirrido. Algunos
audífonos son más inmunes que otros a esta interferencia y los
distintos teléfonos también generan diferentes cantidades de
interferencia.
La industria de teléfonos inalámbricos ha desarrollado una
clasificación para algunos de sus teléfonos móviles, para ayudar a
los usuarios de audífonos a encontrar teléfonos que puedan ser
compatibles con sus dispositivos. No todos los teléfonos tienen
clasificación. Los teléfonos clasificados, tienen la clasificación
impresa en la caja o una etiqueta en ésta.
Las clasificaciones no están garantizadas. Los resultados variarán
dependiendo del audífono y de la pérdida de audición del usuario.
Si su audífono es vulnerable a la interferencia, es posible que no
pueda utilizar con éxito un teléfono clasificado. La mejor forma de
evaluar el teléfono según sus necesidades personales es probarlo
con el audífono.
Clasificaciones M:
los teléfonos que tienen la clasificación M3
o M4 cumplen con los requisitos de la FCC y es probable que
generen menos interferencia con audífonos que otros teléfonos no
clasificados. M4 es la mejor o más alta clasificación de las dos.
Clasificaciones T:
los teléfonos que tienen la clasificación T3 o
T4 cumplen con los requisitos de la FCC y es probable que sean
más utilizables con la bobina de un audífono (“bobina T” o “bobina
telefónica”) que los teléfonos no clasificados. T4 es la mejor o más
alta clasificación de las dos. (Tenga en cuenta que no todos los
audífonos tienen bobinas.)
Es posible que también se mida la capacidad de los audífonos en
cuanto a su inmunidad frente a este tipo de interferencia. Para
obtener información respecto a su audífono, consulte con el
fabricante o con el médico especialista. Mientras más inmune sea
la prótesis auditiva, menos probable es que experimente ruido de
interferencia con teléfonos móviles.

Información de la OMS
167
Información de la Organización Mundial de la Salud
Informa ción de la OMS
La información científica actual no indica la necesidad de tomar
precauciones especiales para usar teléfonos celulares. Si tiene
dudas, es posible que desee limitar su exposición, o la de sus
hijos, a las señales de radio frecuencia, limitando la duración de
las llamadas o usando dispositivos manos libres para mantener el
teléfono celular alejado de la cabeza o el cuerpo.
Fuente: OMS Hoja de datos 193
Para obtener más información:
http://www.who.int./peh-emf
Registro del producto
Registro
Registro del producto en línea:
www.motorola.com/us/productregistration
El registro del producto es un paso importante para disfrutar su
nuevo producto Motorola. El registro nos permite comunicarnos
con usted para informarle sobre actualizaciones de productos o
software y le permite suscribirse a actualizaciones de nuevos
productos o promociones especiales. El registro no se requiere
para efectos de la cobertura de la garantía.
Conserve en sus registros el recibo de compra original con la fecha
indicada en el mismo. Para obtener el servicio de garantía de su
producto de comunicaciones personales Motorola, debe
entregarnos una copia de su recibo de compra con la fecha para
confirmar el estado de la garantía.
Gracias por elegir un producto Motorola.

168
Ley de exportaciones
Garantías de la ley de exportaciones
Ley de expor tacione s
Este producto está controlado por las regulaciones de exportación
de Estados Unidos de Norteamérica y Canadá. Los gobiernos de
Estados Unidos de América y Canadá pueden restringir la
exportación o reexportación de este producto a ciertos destinos.
Para obtener más información, póngase en contacto con el
Departamento de Comercio de Estados Unidos o el Departamento
de Asuntos extranjeros y Comercio internacional de Canadá.
Reciclaje como medida para el cuidado del medioambiente
Información de reciclaj e
Este símbolo en un producto Motorola significa que el
producto no debe desecharse con la basura doméstica.
Eliminación del dispositivo móvil y los
accesorios
No deseche dispositivos móviles ni accesorios eléctricos, tales
como cargadores, audífonos o baterías, con la basura doméstica.
Estos productos se deben eliminar de acuerdo con los planes
nacionales de recolección y reciclaje que lleva a cabo la autoridad
local o regional. Como alternativa, puede deolver los dispositivos
móviles y los accesorios eléctricos no deseados a cualquier Centro
de servicio autorizado de Motorola de su región. Podrá encontrar
los detalles sobre los planes nacionales de reciclaje aprobados por
Motorola y más información acerca de las actividades de reciclaje
de la empresa en:
www.motorola.com/recycling
Eliminación del embalaje del
dispositivo móvil y guía del usuario
El embalaje del producto y las guías del usuario sólo se deben
eliminar de acuerdo con los requisitos nacionales de recolección y
reciclaje. Comuníquese con las autoridades regionales para
obtener más detalles.

Etiqueta de perclorato
169
Etiqueta de perclorato para California
Etiqueta de perclor at o
Algunos teléfonos móviles utilizan una batería de reserva interna
permanente en la placa de circuito impreso, que puede contener
cantidades muy pequeñas de perclorato. En esos casos, las leyes
de California exigen la siguiente etiqueta:
“Material con perclorato - Se puede necesitar manejo especial.
Visite
www.dtsc.ca.gov/hazardouswaste/perchlorate
.”
No existe necesidad de que los consumidores realicen un manejo
especial.
Privacidad y seguridad de datos
Privac idad y segur idad de da tos
Motorola entiende que la privacidad y seguridad de datos es
importante para todos. Dado que algunas funciones de su
dispositivo móvil pueden afectar su privacidad o la seguridad de
sus datos, siga estas recomendaciones para optimizar la
protección de su información:
• Controle el acceso
— Mantenga consigo el dispositivo
móvil y no lo deje en lugares en los que otras personas
puedan tener acceso no controlado a él. Bloquee
el teclado de su dispositivo si tiene disponible dicha
función.
• Mantenga actualizado el software
— Si Motorola o
un proveedor de software/aplicaciones lanza parches o
arreglo de software para su dispositivo móvil que
actualiza la seguridad del dispositivo, instálelo tan pronto
como le sea posible.
• Borre antes de reciclar
— Elimine la información o los
datos personales de su dispositivo móvil antes de
eliminarlo o entregarlo para su reciclaje. Si desea obtener
instrucciones paso a paso sobre cómo eliminar toda la
información personal de su dispositivo, consulte la
sección “borrado general” o “borrar datos” en la guía
del usuario.
Nota:
para obtener más información acerca del respaldo
de los datos del dispositivo móvil antes de borrarlos, visite
www.motorola.com
y navegue a la sección “descargas” de
la página Web para el consumidor para “Motorola
Backup” o “Motorola Phone Tools”.

170
Seguridad al conducir
• Conozca el AGPS
— Con el fin de ofrecer información
de ubicación para llamadas de emergencia, algunos
dispositivos móviles Motorola incorporan la tecnología
Sistema de posicionamiento global asistido (AGPS). La
tecnología AGPS también se puede usar con ciertas
aplicaciones que no son de emergencia para hacer un
seguimiento y monitorear la ubicación de un usuario, por
ejemplo, para proporcionar instrucciones de conducción.
Los usuarios que prefieran no permitir dicho seguimiento y
monitoreo deben evitar usar estas aplicaciones.
Si tiene alguna otra pregunta acerca de cómo el uso de su
dispositivo móvil puede afectar su privacidad o la seguridad de los
datos, comuníquese con Motorola a
o con su
proveedor de servicio.
Prácticas inteligentes durante la conducción
Seguri dad al cond ucir
Maneje seguro; llamada inteligente
Revise las leyes y regulaciones sobre el uso de teléfonos
inalámbricos y sus accesorios en las áreas en que
conduce. Obedézcalas siempre. Es posible que en ciertas
áreas el uso de estos dispositivos esté prohibido o
restringido
,
por ejemplo, sólo uso de manos libres. Vaya a
www.motorola.com/callsmart
(sólo en ingles) para obtener más
información.
Su teléfono inalámbrico le permite comunicarse por voz y datos
desde casi cualquier lugar, en cualquier momento y dondequiera
que exista servicio inalámbrico y las condiciones de seguridad lo
permitan. Recuerde que cuando conduce, eso es su primera
responsabilidad. Si decide usar el teléfono inalámbrico mientras
conduce, tenga presente los siguientes consejos:
• Conozca su teléfono inalámbrico Motorola y sus
funciones, como marcado rápido y remarcado.
Si
cuenta con ellas, estas funciones le permiten hacer
llamadas sin desviar la atención del camino.
• Si tiene un dispositivo de manos
libres, úselo.
Cuando sea posible,
agregue una capa adicional de
conveniencia al teléfono inalámbrico con
uno de los muchos accesorios manos libres
Motorola Original disponibles actualmente en el mercado.
• Ponga el teléfono al alcance.
Debe poder acceder al
teléfono inalámbrico sin sacar la vista del camino. Si
recibe una llamada entrante en un momento inoportuno,

Seguridad al conducir
171
de ser posible, deje que su correo de voz la conteste por
usted.
• Dígale a la persona con la que está hablando que
usted está manejando, si es necesario, suspenda la
llamada cuando haya mucho tráfico o cuando
existan condiciones climáticas peligrosas.
La lluvia,
el aguanieve, la nieve, el hielo e, incluso, el tráfico intenso
pueden ser peligrosos.
• No tome notas ni busque números de teléfono
mientras maneja.
Apuntar una lista de “cosas por hacer”
o revisar la agenda desvía la atención de su principal
responsabilidad: manejar en forma segura.
• Marque en forma sensata y evalúe el tráfico; de ser
posible, haga las llamadas cuando el automóvil no
está en movimiento o antes de entrar al tráfico.
Si
debe hacer una llamada mientras conduce, marque sólo
algunos números, mire el camino y los espejos y, luego,
continúe.
• No participe en conversaciones estresantes o
emocionales que lo puedan distraer.
Infórmele a la
persona que usted está conduciendo mientras habla y
suspenda cualquier conversación que pueda desviar su
atención del camino.
• Utilice el teléfono inalámbrico para solicitar ayuda.
Marque el 911-1-1 u otro número de emergencia local en
caso de incendio, accidente de tránsito o emergencias
médicas.*
• Utilice el teléfono inalámbrico para ayudar a otros
en casos de emergencia.
Si presencia un accidente
automovilístico, delito en curso u otra emergencia grave,
donde la vida de las personas esté en peligro, llame al
911-1-1 o a otro número de emergencia local, tal como
esperaría que otros hicieran por usted.*
• Llame a la asistencia en carretera o a un número
celular especial que no sea de emergencia cuando
sea necesario.
Si ve un vehículo averiado que no corre
peligros serios, una señal de tránsito rota, un accidente de
tránsito menor donde nadie resulta herido, o un vehículo
que fue robado, llame a asistencia en carretera o a un
número celular especial que no sea de emergencia.*
* Dondequiera que exista servicio de telefonía inalámbrica.

172
índice
índice
A
accesorio opcional 12
accesorios 12, 26
agregar un número 66
ahorrar batería 12
alerta
desactivar 25
sonidos 39
alerta de roaming 151
altavoz 26
altavoz del manos libres 3, 26
aparato auditivo 67
apuntes 136
atajos 37
audífono 26
B
batería 16
ahorrar 12
duración, prolongación 143
bloquear
código 28
teléfono 29
borrar mensajes 95
borrar texto 73
botones de música 2
brillo 47
C
cables 149
cables USB 149
calculadora 137
calendario 134, 135
cámara 3, 118
programación 119
chat 94
código de acceso internacional 61
códigos 28, 29
compatibilidad de prótesis
auditivas 166
consejos de seguridad 170
consejos y trucos 37
contacto PTT 75, 76
contactos
asignar imagen 125
asignar tono de timbre 124
borrar ingreso 123
crear ingreso 122
crear un grupo 127
descargar tono de timbre 126
modificar un ingreso 122

índice
173
programar número de marcado
rápido 123
programar número
predeterminado 124
ver ingreso 122
contestar una llamada 19
correo de voz 61
cronómetros 63, 64, 65
cronómetros de llamadas 63
D
desactivar el despertador 136
desactivar sonidos 50
desbloquear
código 29
teléfono 29
directorio telefónico 66, 121
E
email 94
encender/apagar 18
equipo para automóvil 26
etiqueta de perclorato 169
F
finalizar una llamada 19
fondo de pantalla 45
fotografía 139
función opcional 12
G
garantía 162
grabar un videoclip 115
grupo PTT 75, 76
I
iconos 21
idiomas 50
IM móvil 93
imagen 139
indicadores 21
indicadores de mensaje
iconos 21
información de la OMS 167
información de seguridad 156
ingresar texto 68
L
lente, limpieza 118
listas de reproducción 112
llamada
alertas de llamada perdida 150
contestar 19
cronómetros 63
fin 19
perdidas 57
realizar 18
sonidos 39
llamadas hechas 55
llamadas no contestadas 57
llamadas perdidas 57
llamadas recientes 55
luz de fondo 46

174
índice
M
marcar un número telefónico 18
megapíxeles 118
mensaje 90
borrador 92
borrar 95
chat 94
email 94
enviado 91
IM móvil 93
leído 92
recibido 92
mensaje en borrador 92
mensaje enviado 91
menú
iconos 52
modificar texto 73
modo de ingreso de símbolo 72
modo de ingreso de texto tap 71
modo de ingreso numérico 72
mostrar temas 45
música
descarga 96
lista de reproducción 112
N
número de emergencia 59
O
opciones
cámara 119
video 116
P
pantalla 21
pantalla principal 21
programación de red 149
programar despertador 135
pronunciar en voz alta dígitos del
teclado 43
puerto micro USB 3
push to talk
activar modo PTT 74
administrar contactos y grupos
76
agregar contacto PTT 75
agregar grupo PTT 75
contestar una llamada 82
disponibilidad del contacto 84
grupo temporal 81
llamada de alerta 78
llamada de monitoreo 78
llamada, alerta 78
llamada, monitoreo 78
realizar una llamada 78
R
realizar una llamada 18
recibido
llamadas 55
mensaje 92
reconocimiento de voz 128
registros, voz 113

índice
175
regulaciones de exportación 168
reiniciar cronómetro 64, 65
reloj 51
alarma, desactivar 136
alarma, programar 135
mundial 136
reloj mundial 136
remarcar 54
S
sonidos
desactivar 50
programación 25, 39
sonidos de evento 39
T
tecla Borrar 2, 73
tecla de cámara/video 2
tecla de encendido/fin 2, 18, 19
tecla de navegación 2
tecla de selección central 2
tecla Enviar 2, 18, 19
tecla inteligente/altavoz 3
tecla Vibrar 37
teclado 49
teclas de la pantalla principal 52
teclas de volumen 3
teclas programables 2, 21
teléfono con habla 43
texto
ingreso 68
mensaje 90
titular 51
tomar notas 136
tonos de servicio 150
tonos DTMF 66
transferir música desde una
computadora 98
V
V CAST
música 96
vida útil de la batería, prolongación
13
videograbadora 115, 116
videos
clips 115, 139
programación 116
volumen 25, 49
volumen de datos 64
volumen de timbres 25
volumen del auricular 25
volumen principal 39
voz
privada 36
registros 113
tecla Comando de voz 3
U.S. patent Re. 34,976

176
índice


www.motorola.com
C
M
Y
CM
MY
CY
CMY
K
v467108.A6.UG.Back.eps 9/11/2007 8:56:39 AM
-
 1
1
-
 2
2
-
 3
3
-
 4
4
-
 5
5
-
 6
6
-
 7
7
-
 8
8
-
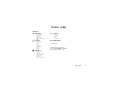 9
9
-
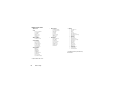 10
10
-
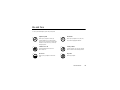 11
11
-
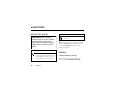 12
12
-
 13
13
-
 14
14
-
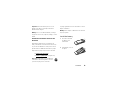 15
15
-
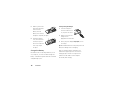 16
16
-
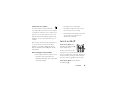 17
17
-
 18
18
-
 19
19
-
 20
20
-
 21
21
-
 22
22
-
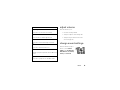 23
23
-
 24
24
-
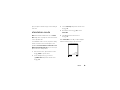 25
25
-
 26
26
-
 27
27
-
 28
28
-
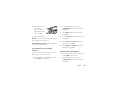 29
29
-
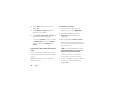 30
30
-
 31
31
-
 32
32
-
 33
33
-
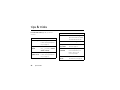 34
34
-
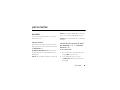 35
35
-
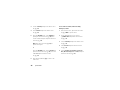 36
36
-
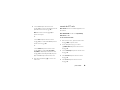 37
37
-
 38
38
-
 39
39
-
 40
40
-
 41
41
-
 42
42
-
 43
43
-
 44
44
-
 45
45
-
 46
46
-
 47
47
-
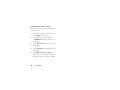 48
48
-
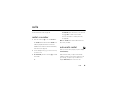 49
49
-
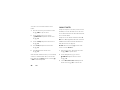 50
50
-
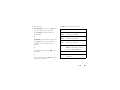 51
51
-
 52
52
-
 53
53
-
 54
54
-
 55
55
-
 56
56
-
 57
57
-
 58
58
-
 59
59
-
 60
60
-
 61
61
-
 62
62
-
 63
63
-
 64
64
-
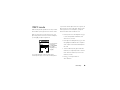 65
65
-
 66
66
-
 67
67
-
 68
68
-
 69
69
-
 70
70
-
 71
71
-
 72
72
-
 73
73
-
 74
74
-
 75
75
-
 76
76
-
 77
77
-
 78
78
-
 79
79
-
 80
80
-
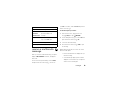 81
81
-
 82
82
-
 83
83
-
 84
84
-
 85
85
-
 86
86
-
 87
87
-
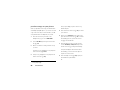 88
88
-
 89
89
-
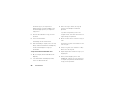 90
90
-
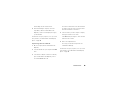 91
91
-
 92
92
-
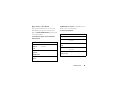 93
93
-
 94
94
-
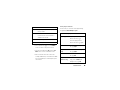 95
95
-
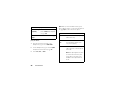 96
96
-
 97
97
-
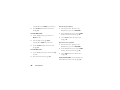 98
98
-
 99
99
-
 100
100
-
 101
101
-
 102
102
-
 103
103
-
 104
104
-
 105
105
-
 106
106
-
 107
107
-
 108
108
-
 109
109
-
 110
110
-
 111
111
-
 112
112
-
 113
113
-
 114
114
-
 115
115
-
 116
116
-
 117
117
-
 118
118
-
 119
119
-
 120
120
-
 121
121
-
 122
122
-
 123
123
-
 124
124
-
 125
125
-
 126
126
-
 127
127
-
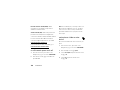 128
128
-
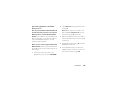 129
129
-
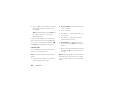 130
130
-
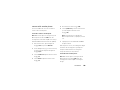 131
131
-
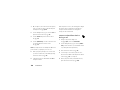 132
132
-
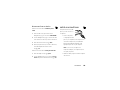 133
133
-
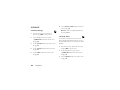 134
134
-
 135
135
-
 136
136
-
 137
137
-
 138
138
-
 139
139
-
 140
140
-
 141
141
-
 142
142
-
 143
143
-
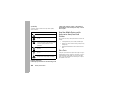 144
144
-
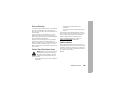 145
145
-
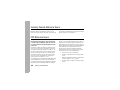 146
146
-
 147
147
-
 148
148
-
 149
149
-
 150
150
-
 151
151
-
 152
152
-
 153
153
-
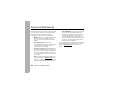 154
154
-
 155
155
-
 156
156
-
 157
157
-
 158
158
-
 159
159
-
 160
160
-
 161
161
-
 162
162
-
 163
163
-
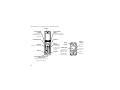 164
164
-
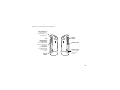 165
165
-
 166
166
-
 167
167
-
 168
168
-
 169
169
-
 170
170
-
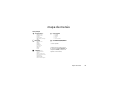 171
171
-
 172
172
-
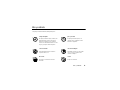 173
173
-
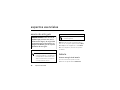 174
174
-
 175
175
-
 176
176
-
 177
177
-
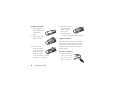 178
178
-
 179
179
-
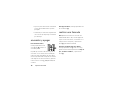 180
180
-
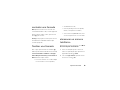 181
181
-
 182
182
-
 183
183
-
 184
184
-
 185
185
-
 186
186
-
 187
187
-
 188
188
-
 189
189
-
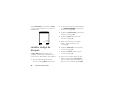 190
190
-
 191
191
-
 192
192
-
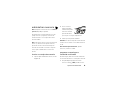 193
193
-
 194
194
-
 195
195
-
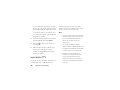 196
196
-
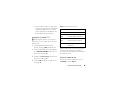 197
197
-
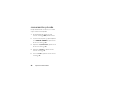 198
198
-
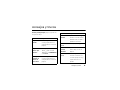 199
199
-
 200
200
-
 201
201
-
 202
202
-
 203
203
-
 204
204
-
 205
205
-
 206
206
-
 207
207
-
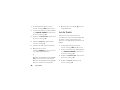 208
208
-
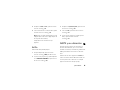 209
209
-
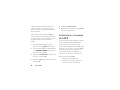 210
210
-
 211
211
-
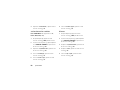 212
212
-
 213
213
-
 214
214
-
 215
215
-
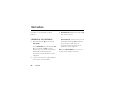 216
216
-
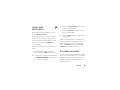 217
217
-
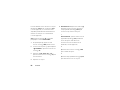 218
218
-
 219
219
-
 220
220
-
 221
221
-
 222
222
-
 223
223
-
 224
224
-
 225
225
-
 226
226
-
 227
227
-
 228
228
-
 229
229
-
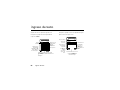 230
230
-
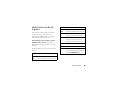 231
231
-
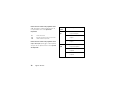 232
232
-
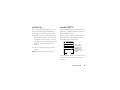 233
233
-
 234
234
-
 235
235
-
 236
236
-
 237
237
-
 238
238
-
 239
239
-
 240
240
-
 241
241
-
 242
242
-
 243
243
-
 244
244
-
 245
245
-
 246
246
-
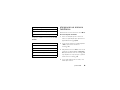 247
247
-
 248
248
-
 249
249
-
 250
250
-
 251
251
-
 252
252
-
 253
253
-
 254
254
-
 255
255
-
 256
256
-
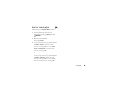 257
257
-
 258
258
-
 259
259
-
 260
260
-
 261
261
-
 262
262
-
 263
263
-
 264
264
-
 265
265
-
 266
266
-
 267
267
-
 268
268
-
 269
269
-
 270
270
-
 271
271
-
 272
272
-
 273
273
-
 274
274
-
 275
275
-
 276
276
-
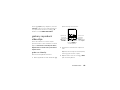 277
277
-
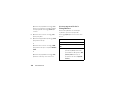 278
278
-
 279
279
-
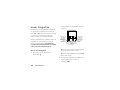 280
280
-
 281
281
-
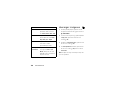 282
282
-
 283
283
-
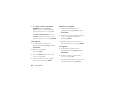 284
284
-
 285
285
-
 286
286
-
 287
287
-
 288
288
-
 289
289
-
 290
290
-
 291
291
-
 292
292
-
 293
293
-
 294
294
-
 295
295
-
 296
296
-
 297
297
-
 298
298
-
 299
299
-
 300
300
-
 301
301
-
 302
302
-
 303
303
-
 304
304
-
 305
305
-
 306
306
-
 307
307
-
 308
308
-
 309
309
-
 310
310
-
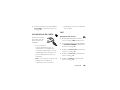 311
311
-
 312
312
-
 313
313
-
 314
314
-
 315
315
-
 316
316
-
 317
317
-
 318
318
-
 319
319
-
 320
320
-
 321
321
-
 322
322
-
 323
323
-
 324
324
-
 325
325
-
 326
326
-
 327
327
-
 328
328
-
 329
329
-
 330
330
-
 331
331
-
 332
332
-
 333
333
-
 334
334
-
 335
335
-
 336
336
-
 337
337
-
 338
338
-
 339
339
-
 340
340


Motorola Adventure Verizon Wireless Instrucciones de operación
- Categoría
- Teléfonos móviles
- Tipo
- Instrucciones de operación
- Este manual también es adecuado para
En otros idiomas
Documentos relacionados
-
Motorola adventure V750 Manual de usuario
-
-
Motorola MOTORAZR MOTORAZR V9m Manual de usuario
-
-
-
-
-
-
-