IPT Sink Company IPT2918P7636 Instrucciones de operación
- Categoría
- Artículos sanitarios
- Tipo
- Instrucciones de operación

11
Installation Instruction
Pull Down Kitchen Faucet
Model: 7636

2
*Specify Finish
23
24
25
26
1
2
3
4
5
6
7
8
9
10
11
12
13
14
15
16
17
18
19
20
21
22
23
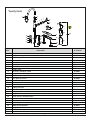
Block / Bloque
O-Ring / Aro tórico
Quick connect assembly/ Ensamblaje del conector rápido
O-ring / Aro tórico
Weights / Pesos
Plastic washer / Arandela plástica
Metal washer / Arandela metálica
Nut / Tuerca
Screw / Dispensador de jabón
PART
PIÈCE
DESCRIPTION PART#
N ° DE PIECE
1 Spray head and Hose / Cabezal rociador y manguera RP38241*
2 O-ring / Cartucho y tornillo RP60071
3 Wearable ring / Bonete RP70380
4 Cartridge / Cartucho RP20005
5 Bonnet / Bonete RP70394
6 Cap /Tapa RP80028*
DESCRIPTION
7 Screw / Dispensador de jabón RP50015
8 RP13390*
9
Handle / Llave
RP50002
10
Set screw / Tornillo de jación
RP80463*
11
Flange & Washer / Brida y arandela
RP80461*
12 RP80462
13
RP50071
14
RP56036
15
RP70421
16
RP60002
17
RP70429
18
RP60089
19
Base plate / Placa base
Bolt / Perno
Mounting nut / Tuerca
RP70223
20
RP64023
21
RP64024
22
RP56075
23
RP50004
Pump nut / Kit de bomba
Flange kit / Kit de brida
Bottle / Botella
Soap dispenser / Dispensador de jabón
24
25
26
27
Escutcheon / Placa protectora
RP46018
RP46019*
RP46002
RP46020*

3
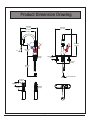
Product Dimension Drawing
71.7mm
[2.8in]
115.6mm
[4.5in]
50.8mm
[2.0in]
61.0mm
[2.4in]
270.8mm
[10.7in]
215.7mm
[8.5in]
15°
195.6mm
[7.7in]
801mm
[31.5in]
45°
45°
66.6mm
[2.6in]
255.6mm
[10.1in]
375.1mm
[14.8in]
MAX:59.3mm
[2.3in]
9/16-27UNS-2B
203.2mm
[8.0in]
23°

4
1
3b
3b
2a
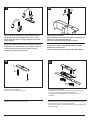
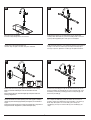
This faucet can be installed as 4 hole installation with the
escutcheon or as 2 hole installation with flange. If using
flange, begin with step 2a. If using escutcheon, begin with
step 3a.step 3b.
Este grifo se puede instalar con cuatro orificios con la placa
ornamental o con un dos orificio con un reborde. Si utiliza un
reborde, comience con el paso 3a. Si utiliza una placa
ornamental, comience con el paso 3b.
Optional Flange Installation
Before installation, ensure that the flange (1) is placed on the
bottom of the new faucet assembly (2).
Insert the faucet body through the hole in the sink.
Instalación del Reborde Opcional Antes de la instalación,
verifique que la brida (1) esté colocada sobre el fondo del
montaje de la nueva llave (2).
Inserta el cuerpo del grifo a través del orificio del fregadero.
2
1
Optional Escutcheon Installation
Screw the bolts (1) into the escutcheon (2).
Instalación de la Placa Ornamental Opcional
Atornilla los pernos (1) en la placa protectora (2).
2
1
1
3
2
Optional Escutcheon Installation
Ensure that the gasket (1) is pressed onto the escutcheon (2) before the
escutcheon (2) is installed over the three holes in the sink.
From underneath sink, hand tighten the mounting nuts (3). Do not
overtighten.
Instalación de la Placa Ornamental Opcional
Asegúrate de que la junta (1) esté presionada sobre la placa protectora (2)
antes de instalarla en los tres oricios del lavamanos.
Desde abajo del fregadero, ajusta manualmente la tuerca de montaje (3). No
aprietes demasiado.

4
5
5
3c
6
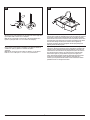
Push the quick connector (1) firmly upward and attach it to the receiving
block (2). Pull down moderately to ensure the connection has been
made.
After connecting the hose, install the weights (3) at the point of the hose
marking “weights here”.
Presiona firmemente el conector rápido (1) hacia arriba y fíjalo en el bloque
receptor (2). Hala hacia abajo ligeramente para asegurar que la conexión es
segura.
Después de conectar la manguera, coloque el contrapeso (3) en el punto de la
manguera marcado “weights here” ("instalar contrapeso aquí").
2
3
1
Weights
here
Weights
here
4
3
1
1
2
3
4
2
Optional Escutcheon Installation
Insert faucet body through the hole in escutcheon.
Instalación de la Placa Ornamental Opcional
Inserte el cuerpo del grifo en el oricio de la placa ornamental.
Install the plastic washer (1), and metal washer (2) onto the threaded
mounting shank. Thread the nut (3) onto the mounting shank. Lock the nut
(3) into position by tightening the screws (4). Do not overtighten.
Instala la arandela de plástico (1) y la arandela de metal (2) en el vástago de
montaje roscado. Enrosca la tuerca (3) en el vástago de montaje. Fija la
tuerca (3) en posición, apretando los tornillos (4). No aprietes demasiado.
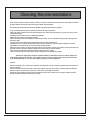
Insert the body assembly (1) through the selected hole in the sink. Secure
the body assembly to the sink with the nut (2). From under the sink, screw
the bottle (3) onto the body assembly (1) shank. Insert the pump (4) down
into the body assembly (1).
Coloca la pieza ensamblada (1) a través del oricio seleccionado en el
fregadero. Asegura el ensamblaje del cuerpo al fregadero con la tuerca (2).
Desde abajo del fregadero enrosca la botella (3) en el vástago del
ensamblaje (1) del cuerpo. Inserta la bomba (4) en el ensamblaje (1) del
cuerpo.

6
8
Important: After installation is completed, turn on hot and cold water supplies.
Check for leaks. Pull the hose assembly out of the spout and remove the spray head
by unscrewing it from the hose counterclockwise. Be sure to hold the end of the
hose down into the sink and turn the faucet on to the warm position where it mixes
hot and cold water. Flush water lines for one minute. This flushes away any debris
that could cause damage to internal parts. Check for leaks. Re-tighten any
connections if necessary, but do not overtighten. Reinstall spray head by hand
tightening it back onto the spray hose.
Importante: Luego de terminar la instalación, abre los suministros de agua
caliente y fría. Revisa si hay filtraciones. Retire el ensamblaje de la manguera del
conductor y retire el cabezal del rociador desenroscándolo de la manguera en el
sentido contrario a las manecillas del reloj. Asegúrese de apuntar con el extremo
de la manguera hacia el fregadero y gire la llave del grifo a la posición cálida,
donde mezcla el agua fría y el agua caliente. Deje que corra el agua por un
minuto. Esto enjuagará cualquier suciedad que podría dañar las piezas internas.
Controle que no haya filtraciones. Vuelva a ajustar las conexiones que lo
necesiten, pero sin ajustar demasiado. Vuelva a instalar el cabezal del rociador
ajustándolo a mano en la manguera del rociador.
9
Thread the nut (1) on the supply line onto the outlet of the water supply valve
(2) and tighten with a wrench. Do not overtighten.
NOTE: The hot side inlet tube is indicated by a label. Avoid twisting wires
together or placing the wires close to each other and damaging.
Enrosca la tuerca (1) de la línea de suministro en la salida de la válvula de
suministro de agua (2) y aprieta con una llave. No aprietes
demasiado.
NOTA: El tubo de entrada del agua caliente se identica con una etiqueta.
Evita enroscar los cables juntos o colocarlos cerca y evita dañarlos.

7
Today, modern sanitary and kitchen tapware, showers, accessories, washstands, tubs and consist of very different materials
to comply with the needs of the market with regard to design and functionality.
To avoid damage and product failures and not void Warranty please follow the below guideline.
•Only use cleaning material which is explicitly provided for this type of application.
•Never use cleaning materials, which contain hydrochloric acid, formic acid, chlorine pale lye or acetic acid, as they cause
considerable damage.
•Phosphorus acidic cleaners are only conditionally applicable.
•Mixing cleaning agents is not permitted, generally.
•Never use cleaning materials or appliances with an abrasive effect, such as unsuitable cleaning powders, sponge pads or
micro fiber cloths.
•The instructions of the cleaning agent manufacturers have to be followed absolutely.
•Cleaning has to be carried out with a specified cleaner dosage, contact time, object-related and adapted to the needs.
•The building up of calcifications has to be removed by cleaning regularly.
•When using spray cleaners, spray the cleaning solution onto a soft cloth or sponge, never directly onto the actual faucet, as
the atomized spray could enter openings and gaps in the faucet product and cause damage.
•After cleaning rinse thoroughly with clean water to remove any cleaner residue.
•The use of steam cleaners is not permitted. The high temperatures can damage the products.
•
Water hose supply lines should be inspected monthly for abrasions to the lines and any bulges that
could indicate weakness to the lines. These types of issues can cause ruptures to the supply lines that would
cause flooding/damage. Do your part and regularly inspect your water supply lines.
Important
Residues of toiletries such as liquid soaps, shampoos and shower gels, hair dyes, perfumes, aftershave and nail varnish can
also cause damage.
Here too: Carefully rinse with water after use to remove residues. Likewise, do not store any cleaning agents or chemicals
under the products, for example in a vanity unit, as the vapors may damage the products.
Components with damaged surfaces must be exchanged, otherwise there could be an injury danger. Damage caused by
improper treatment will not be covered by our warranty.
Cleaning Recommendations

General
LIMITED CONSUMER Warranty
is limited to products that are purchased by a consumer in the United States or Canada after November 1, 2015, and installed
in either the United States or in Canada.
WHO IS COVERED BY THE WARRANTY
This warranty extends to the original purchaser only. This warranty is non-transferable.
WHAT IS COVERED BY THE WARRANTY
duct
that proves defective because of improper workmanship and/or material, under normal installation, use, service and
LENGTH OF WARRANTY
Replacement or repaired parts of products will be covered for the term of this warranty, as stated in the following two
sentences. If you are a consumer who purchased the product for use primarily for personal, family or household purposes, this
warranty extends for two years. If you purchased the product for use for any other purpose, including, without limitation, a
commercial or industrial application purpose, this warranty is void. Any Commercial or Industrial use will automatically void
this warranty.
A. Conditions, malfunctions or damage not resulting from defects in material or workmanship.
B. Conditions, malfunctions or damage resulting from (1) normal wear and tear, improper installation, improper maintenance,
misuse, abuse, negligence, accident or alteration; (2) the use of abrasive or caustic cleaning agents or “no-rinse” cleaning
products, or the use of the product in any manner contrary to the product instructions; or (3) conditions in the home such as
excessive water pressure or any corrosion due to any and all chemical vapor/ off gassing to include chlorine vapor.
C. Labor and other expenses for disconnection, deinstallation, or return of the product for warranty service (including but not
limited to proper packaging and shipping costs), or for installation or reinstallation of the product.
liabilities and costs (including, without limitation, costs associated with experts, investigations, analysis, attorneys and other
professionals and services) this warranty is a comprehensive and explicit limit of liability and all items outside of it are not
consumer’s responsibility to determine the compliance.
TO OBTAIN WARRANTY PARTS OR INFORMATION
Contact
Imperial Pacic Trading LLC
4170 JVL Industrial Park Dr.
Marietta, GA 30066
Tel: 678-445-4638
Fax: 404-745-0434
Email: [email protected]
In requesting warranty service, you will need to provide:
1 The sales receipt or other evidence of the date and place of purchase.
2. A description of the problem.
3. Delivery of the product or the defective part, postage prepaid and carefully packed and insured. When warranty service is
completed, any repaired or replacement product or part will be returned to you postage prepaid.
8
Warranty conditions
-
 1
1
-
 2
2
-
 3
3
-
 4
4
-
 5
5
-
 6
6
-
 7
7
-
 8
8


IPT Sink Company IPT2918P7636 Instrucciones de operación
- Categoría
- Artículos sanitarios
- Tipo
- Instrucciones de operación
