Craftsman 32039588 El manual del propietario
- Categoría
- Herramientas eléctricas
- Tipo
- El manual del propietario

Operator's Manual
®
2.4 Amp 1/4 SHEET SANDER
Model No. 320.39588
°@°,D
LISTED
_WARNING" To reduce the risk of injury,
the user must read and understand the
Operator's Manual before using this product.
* WARRANTY
* SAFETY
* DESCRiPTiON
* ASSEMBLY
* OPERATION
* MAINTENANCE
* ESPANOL
Sears Brands Management Corporation, Hoffman Estates,
IL 60179 U.S.A.
www,craftsman,com

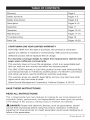
Warranty Page 2
Safety Symbols Pages 4-5
Safety Instructions Pages 6-8
Description Pages 9-10
Assembly Page 11
Operation Pages 12-16
Maintenance Pages 17-18
Troubleshooting Page 18
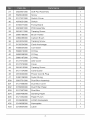
Parts List Pages 19-20
CRAFTSMAN ONE YEAR LiMiTED WARRANTY
FOR ONE YEAR from the date of purchase, this product is warranted
against any defects in material or workmanship. With proof of purchase,
defective product will be replaced free of charge.
For warranty coverage details to obtain free replacement, visit the web
page: www.craftsrnan.corn/warranty
This warranty does not cover the sandpaper, which is an expendable part
that can wear out from normal use within the warranty period.
This ONE YEAR warranty is void if this product is ever used while providing
commercial services or if rented to another person. For 90 DAY commercial
and rental use terms, see the Craftsman warranty web page.
This warranty gives you specific legal rights, and you may also have other
rights which vary from state to state.
Sears Brands Management Corporation, Hoffman Estates, IL 60179.
SAVE THESE INSTRUCTIONS!
READ ALL INSTRUCTIONS!
This 1/4sheet sander has many features for making its use more pleasant and
enjoyable. Safety, performance, and dependability have been given top priority
in the design of this product, making it easy to maintain and operate.
_, DANGER: People with electronic devices, such as pacemakers, should
consult their physician(s) before using this product. Operation of electrical
equipment in close proximity to a heart pacemaker could cause interference or
failure of the pacemaker.
2 © Sears Brands, LLC

_,WARNING: Some dust created by power sanding, sawing, grinding, drilling
and other construction activities contains chemicals known to the state of
California to cause cancer, birth defects or other reproductive harm. Some
examples of these chemicals are:
• Lead from lead-based paints
Crystalline silica from bricks and cement and other masonry products, and
Arsenic and chromium from chemically-treated lumber.
Your risk from these exposures varies, depending on how often you do this type
of work. To reduce your exposure to these chemicah work in a well ventilated
area, and work with approved safety equipment, such as those dust masks that
are specially designed to filter out microscopic particles.

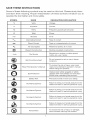
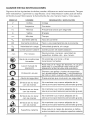
Thepurposeofsafetysymbolsistoattractyouattentiontopossibledangers.
Thesafetysymbolsandtheexplanationswiththemdeserveyourcareful
attentionandunderstanding.Thesymbolwarningsdonot,bythemselves,
eliminateanydanger.Theinstructionsandwarningstheygivearenosubstitutes
forproperaccidentpreventionmeasures.
,_, WARNING: Be sure to read and understand all safety instructions in this
manual, including all safety alert symbols such as "DANGER," "WARNING," and
"CAUTION" before using this tool. Failure to follow all instructions listed in this
manual may result in electric shock, fire, and/or serious personal injury.
SYMBOL SIGNAL MEANING
SAFETY ALERT SYMBOL: indicates DANGER, WARNmNG, or CAUTION; may
be used in conjunction with other symbols or pictographs.
,_ DANGER: Indicates a hazardous situation which, if not avoided, will result in
death or serious injury.
,_, WARNING: Indicates a hazardous situation which, if not avoided, could
result in death or serious injury.
_1_ CAUTION: Indicates a hazardous situation which, if not avoided, could
result in minor or moderate injury.
Damage prevention and Information Messages
These inform the user of important information and/or instructions that could
Beadto equipment or other property damage if they are not followed. Each
message is preceded by the word "NOTICE", as in the example below.
NOTICE: Equipment and/or property damage may result if these instructions are
not followed.
_WARNING: To ensure safety and reliability, all repairs should be performed
by a qualified service technician.
,_ WARNmNG: The operation of any power tools can result in
foreign objects being thrown into your eyes, which can result
in severe eye damage. Before beginning power tool operation,
always wear safety goggles or safety glasses with side shield
and a full face shield when needed. We recommend a Wide
Vision Safety Mask for use over eyeglasses or standard safety
glasses with side shields. Always use eye protection which is
marked to comply with ANSI Z87.1.

SAVE THESE iNSTRUCTiONS
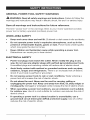
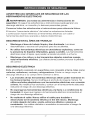
Some of these following symbols may be used on this tool. Please study them
and Beam their meaning. Proper interpretation of these symbols will allow you to
operate the tool better and more safely.
SYMBOL NAME DESIGNATION/EXPLANATION
V Volts Voltage
A Amperes Current
Hz Hertz Frequency (cycles per second)
W Watt Power
min Minutes Time
Alternating Current Type of current
Direct Current Type or a characteristic of current
n O No-load Speed Rotational speed, at no load
[] Class II Construction Double-insulated construction
.../min Per Minute Revolutions, strokes, surface speed,
orbits, etc., per minute
Wet Conditions Alert Do not expose to rain or use in damp
locations.
To reduce the risk of injury, user must
Read The Operator's Manual read and understand operator's manual
before using this product.
O Always wear safety goggles or safety
Eye Protection glasses with side shields and a fulI face
shield when operating this product.
Alert Precautions that involve
Safety your safety.
No=Hands Symbol Failure to keep your hands away from theblade will result in serious personal injury.
No=Hands Failure to keep your hands away from the
Symbol
blade will result in serious personal injury.
No-Hands Failure to keep your hands away from the
Symbol
blade will result in serious personal injury.
No-Hands Symbol Failure to keep your hands away from the
blade will result in serious personal injury.
Hot Surface To reduce the risk of injury or damage,
avoid contact with any hot surface.
5

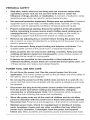
GENERAL POWER TOOL SAFETY WARNINGS
,_ WARNING: Read aft safety warnings and instructions. Failure to follow the
warnings and instructions may result in electric shock, fire and / or serious injury.
Save all warnings and instructions for future reference.
The term "power tool" in the warnings refers to your mains=operated (corded)
power tool or battery=operated (cordless) power tool.
WORK AREA SAFETY
• Keep work area clean and well lit. Cluttered or dark areas invite accidents.
• Do not operate power tools in explosive atmospheres, such as in the
presence of flammable liquids, gases or dust. Power tools create sparks
which may ignite the dust or fumes.
= Keep children and bystanders away while operating a power tool.
Distractions can cause you to lose control.
ELECTRICAL SAFETY
• Power tool plugs must match the outlet. Never modify the plug in any
way. Do not use any adaptor plugs with earthed (grounded) power tools.
Unmodified plugs and matching outlets will reduce risk of electric shock
• Avoid body contact with earthed or grounded surfaces such as pipes,
radiators, ranges and refrigerators. There is an increased risk of electric
shock if your body is earthed or grounded.
• Do not expose power tools to rain or wet conditions. Water entering a
power tool will increase the risk of electric shock.
• Do not abuse the cord. Never use the cord for carrying, pulling or
unplugging the power tool. Keep cord away from heat, oil, sharp edges or
moving parts. Damaged or entangled cords increase the risk of electric shock.
• When operating a power tool outdoors, use an extension cord suitable
for outdoor use. Use of a cord suitable for outdoor use reduces the risk of
electric shock.
if operating a power tool in a damp location is unavoidable, use a
ground fault circuit interrupter (GFCl} protected supply. Use of a GFCI
reduces the risk of electric shock.

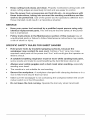
PERSONAL SAFETY
• Stay alert, watch what you are doing and use common sense when
operating a power tool. Do not use tool while tired or under the
influence of drugs, alcohol, or medication. A moment of inattention while
operating power tools may result in serious personal injury.
• Use personal protective equipment. Always wear eye protection. Protective
equipment such as dust mask, non-skid safety shoes, hard hat, or hearing
protection used for appropriate conditions will reduce personal injuries.
• Prevent unintentional starting. Ensure the switch is in the off-position
before connecting to power source and/or battery pack, picking up or
carrying the tool. Carrying power tools with your finger on the switch or
energizing in power tools that have the switch on invites accidents.
• Remove any adjusting key or wrench before turning the power tool
on. A wrench or a key left attached to a rotating part of the power tool may
result in personal injury.
• Do not overreach. Keep proper footing and balance at all times. This
enables better control of the power tool in unexpected situations.
• Dress properly. Do not wear loose clothing or jewelry. Keep your hair,
clothing and gloves away from moving parts. Loose clothes, jewelry or
long hair can be caught in moving parts.
• If devices are provided for the connection of dust extraction and
collection facilities, ensure these are connected and properly used. Use
of these devices can reduce dust-related hazards.
POWER TOOL USE AND CARE
• Do not force the power tool. Use the correct power tool for your
application. The correct power tool will do the job better and more safely at
the rate for which it was designed.
• Do not use the power tool if the switch does not turn it on and off. Any
power tool that cannot be controlled with the switch is dangerous and must
be repaired.
• Disconnect the plug from the power source andlor the battery pack
from the power tool before making any adjustments, changing
accessories, or storing power tools. Such preventive safety measures
reduce the risk of starting the power tool accidentally.
• Store idle power tools out of the reach of children and do not allow
persons unfamiliar with the power tool or these instructions to operate
the power tool. Power tools are dangerous in the hands of untrained users.
• Maintain power tools. Check for misalignment or binding of moving
parts, breakage of parts and any other condition that may affect the
power tool's operation, if damaged, have the power tool repaired
before use. Many accidents are caused by poorly maintained power tools.

Keepcuttingtoolssharpandclean.Properlymaintainedcuttingtoolswith
sharpcuttingedgesarelesslikelytobindandareeasiertocontrol.
Usethepower tool, accessories and tool bits etc., in accordance with
these instructions, taking into account the working conditions and the
work to be performed. Use of the power tool for operations different from
those intended could result in a hazardous situation.
SERVICE
Have your power tool serviced by a qualified repair person using only
identical replacement parts. This will ensure that the safety of the power
tool is maintained.
Follow instructions in the Maintenance section of this manual. Use of
unauthorized parts or failure to follow Maintenance instructions may create
a risk of shock or injury.
SPECiFiC SAFETY RULES FOR SHEET SANDER
Hold power tools by insulated gripping surfaces, because the
sandpaper may contact its own cord. Cutting a "live" wire may make
exposed metal parts of the power tool "live" and could give the operator an
electric shock.
* A suitable breathing respirator must be worn while sanding lead paint,
some woods and metal to avoid breathing the harmful/toxic dust or air.
* Always wear safety goggles and a dust mask when sanding, especially
sanding over-head.
* The machine is not suitable for wet sanding.
* Secure the workpiece. A workpiece clamped with clamping devices or in a
vice is held more secure than by hand.
* Make sure the sandpaper is not contacting the workpiece before the on/off
rocker switch is in the ON position.
* Do not leave the tool running. Operate the tool only when hand-held.

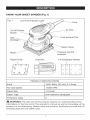
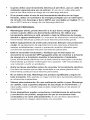
KNOWYOUR SHEET SANDER (Fig. 1)
Fig. 1 Live-Tool Indicator Light
Cord
On/Off Rocker
Switch
LED _ /
Worklight_
Platen /-
Vent
Dust-exhaust Port
per Clamp
Pressure-Control
Indicator
Paper Punch
\
Dust Box
1/4 Sandpaper Sheets
\
o o
o o o
o o
o o o
PRODUCT SPECIFICATIONS
Input 120V, 60Hz, AC only, 2.4 Amps
No-load Speed 14000 OPM
Paper Size 1/4 sheet
Paper Type Non-adhesive sandpaper
Protection Class II
,_ WARNING: The safe use of this product requires an understanding of the
information on the tool and in this operatoPs manual as welJ as knowledge of the
project you are attempting. Before using this product, familiarize yourself with all
operating features and safety rules.

ORBITAL MOTION
Orbital motion is ideal for fast cutting action when removing old finishes,
smoothing rough wood, cutting stock down to required dimensions or for
finishing surfaces to be painted. The sandpaper moves in tiny circles at a very
high speed, allowing the sander to move easily.
PRESSURE CONTROL
Your tool is equipped with pressure=control indicator lights. The indicator lights will
let you know if you areapplying the proper amount of pressure during operation.
DUST BOX
Translucent dust box with micro=fine filter provides for efficient dust control
and extraction.
DUST=EXHAUST PORT
The Dust=exhaust Port allows you to connect to a 1=1/4 in. diameter vacuum
hose to help keep the work area clean.
ON/OFF ROCKER SWITCH
The dust=sealed on/off rocker switch is conveniently located for easy control,
sealed to keep out dust for long life.
LED WORKLIGHT
The LEDworklight, located inthe front of the tool, illuminateswhen the rocker
switch is in the ON position. This feature provides extra light for increased visibility.
PAPER CLAMP
The sander has two paper clamps designed to secure standard sandpaper to
the platen.
PAPER PUNCH
The paper punch can be used to punch holes in sandpapers, to allow sanded
material to pass through the sheet sander into the dust box or through a vacuum.
LIVE=TOOL INDICATOR LIGHT
The LED indicator light illuminates green when the tool is plugged into a
power source.
i0

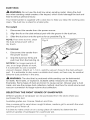
,&
,_b, WARNING: If any parts are broken or missing, do not attempt to plug or
operate the sheet sander until the broken or missing parts are replaced. Failure
to do so could result in possible serious injury.
_, WARNING: Do not attempt to modify this sander or create accessories not
recommended for use with this sheet sander. Any such alteration or modification is
misuse and could result in a hazardous condition leading to possible serious injury.
,_, WARNING: To prevent accidental starting that could cause serious personal
injury, always disconnect the sander from the power source when assembling
parts, making adjustments, installing or removing sandpaper, cleaning, or when
it is not in use.
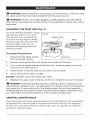
UNPACKING
* Carefully remove the tool and any accessories from the carton. Make sure
that all items listed in the packing list are included.
* Inspect the tool carefully to make sure that no breakage or damage
occurred during shipping.
* Do not discard the packing material until you have carefully inspected and
satisfactorily operated the tool.
* If any parts are damaged or missing, please return the tool to the place of
purchase.
PACKING LIST
1/4 sheet sander, 3 sandpapers (grit 60,120,220), dust box, paper punch and
operator's manual.
11

A
WARNING: To prevent accidental starting that could cause serious personal
injury, always disconnect the sander from the power source when assembling
parts, making adjustments, installing or removing sandpaper, cleaning, or when
it is not in use.
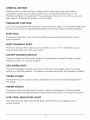
TURNING THE SANDER ON/OFF (Fig. 2)
To turn on the sander, connect the plug to an electrical outlet, and depress the
side of the rocker switch marked "F.
To turn it off, depress the side of the rocker switch marked "O'.
LED WORKLIGNT (Fig. 2)
The LED worklight, located in the
front of the tool, will turn on when
the rocker switch is in the ON (l)
position. This provides additional
Bighting on the surface of the
workpiece for operation. The LED
worklight will turn off when the
switch is in the OFF (O) position.
THE LIVE=TOOL INDICATOR
LIGHT (Fig. 3)
The sheet sander is equipped with
a Bive=tool indicator Bight. When the
tool is plugged into an electrical
supply, the live=tool indicator light
will illuminate green to remind you
that the tool is plugged in. When
the tool is unplugged, the indicator
light will turn off.
Fig. 2
Fig. 3
On/Off rocker
switch
LED worklight
I-
Live-tool I
indicator light
12

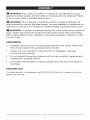
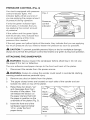
PRESSURE CONTROL (Fig. 4}
Your tool is equipped with pressure
control indicator lights. The
indicator lights will Betyou know if
you are applying the proper amount
of pressure during operation.
If only the green indicator Bight
illuminates, it indicates that you
are applying the correct amount
of pressure.
If the yellow and the green lights
both illuminate, they indicate that
you are applying a little more
pressure than needed.
Fig. 4
Pressure
control
indicator
If the red, green and yellow lights all illuminate, they indicate that you are applying
too much pressure and you need to Bessenthe pressure as soon as possible.
,_ CAUTION: To prevent possible personal injury or tool or workpiece damage,
always be sure that the pressure control illuminates only green during tool operation.
ATTACHING THE SANDPAPER
3.
4.
_WARNING: Always inspect the sandpaper before attaching it. Do not use
the paper if it is torn or defective.
The non=adhesive sandpaper clamps to the front and back of the platen.
1. Disconnect the sander from the power source.
WARNING: Failure to unplug the sander could result in accidental starting,
causing possible serious personal injury.
2. Remove any dust or debris from the platen.
The paper clamp levers are located on each side of the sander and are
locked into slots on top of the platen.
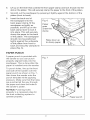
5.
Raise these two levers "up"
and disengage them from
the slots in the platen. This
will release the tension on
the paper clamps that hold
the paper in position on the
underside of the platen (Fig. 5).
Insert the front end of the
sandpaper approximately
1/2 in. under the front
paper clamp.
paper
clamp
Paper
clamp
lever
13

6.
7.
8.
Lift up on the lever that controls the front paper clamp and lock it back into the
slot on the platen. This will securely clamp the paper to the front of the platen.
Smooth out the sandpaper by pressing it tightly against the bottom of the
platen (front to back).
Insert the back end of
the sandpaper into the
back paper clamp, fit the
sandpaper as tightly as
possible, and lift up on the
back clamp lever to lock it
into place. This will securely
clamp the paper to the back
of the platen. The sandpaper
should now be positioned
tightly against the underside
of the platen from front to
back and securely clamped in
place (Fig. 6).
Fig. 6
Paper
goes
under the
clamp
Raise lever up
to clamp paper
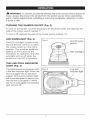
PAPER PUNCH
A paper punch is provided with
the sander so you can punch
properly aligned holes into the
sandpaper. This is done after the
paper is installed onto the sander.
To punch holes, line up the front
and side of the sander over the
paper punch as shown in Fig. 7,
then lower the sander onto the
punch template while applying
pressure. Make sure that the holes
are punched all the way through
the paper and clear the holes in
the sandeds platen.
NOTmCE: Punching holes
propedy is a necessary step for
the dust-collecting system to
operate properly.
Fig. 7
Paper punch
14

DUST BOX
,_ WARNING: Do not use the dust box when sanding metal. Using the dust
box when sanding metal creates a fire hazard, which could damage the tool and
lead to serious personal injury.
Your sheet sander is supplied with a dust box to help you keep the working area
clean. The dust box is ideal for smaller jobs.
To install:
1. Disconnect the sander from the power source.
2. Align the rib on the dust-exhaust port with the groove in the dust box.
3. Slide the dust box onto the port as far as possible (Fig. 8).
NOTE: From time to time, clean Fig. 8
the dust=exhaust port with a
dry brush.
To remove:
1. Disconnect the sander from
the power source.
2. Grip the dust box firmly and
pull it out from the tool (Fig. 8). Rib
NOTICE: For longer periods of
use, or on large pieces of work,
it is advisable to use a suitable
vacuum cleaner. Attach an 1=1/4 in. wet/dry=vacuum hose to the dust=exhaust
port. It is advisable to also wear a suitable dust mask, as there may be residual
airborne dust particles in the area.
,_ WARNING: The dust that is produced while sanding can be detrimental
to health, flammable, or explosive. Suitable safety measures are required.
Examples: Some types of dust are known to cause cancer. Always wear a dust
mask, and use the proper dust collection method: dust box for small volume and
vacuum connection for large volume dust collection.
SELECTING THE RIGHT GRADE OF SANDPAPER
Different grades of sandpaper can be purchased from the store where you
purchased the tool.
Available grades are: Coarse, Medium and Fine.
Use a coarse grit to sand down rough finishes, medium grit to smooth the work
and fine grit to finish off.
It is best to make a trial run on a scrap piece of material to determine the
optimum grades of sandpaper for a particular job.
15

SANDING
This sander can be used for most sanding operations on materials such as
wood, plastic, metal and painted surfaces.
_, WARNING: Do not touch sander vents after prolonged use; the gear box
could be very hot.
,_ WARNING: Wear safety goggles, dust mask, and hearing protection.
_1_ CAUTION: Clamp the workpiece to prevent it from moving during operating.
An unsecured workpiece could be thrown towards the operator causing injury.
1. Plug the sander to the power source.
_, WARNING: Before connecting the sander to power source, always check to
be sure that the switch is in the OFF (O) position. Failure to do so could result in
accidental starting of the sander, causing possible serious injury.
2. Start the sander and allow the motor build to its maximum speed.
,_ WARNING: Keep your head away from the sander and the sanding area.
Your hair could be drawn into the sander, causing serious injury.
3. Place the sander on the workpiece so that the sandpaper is fully in contact
with the workpiece.
4. For best sanding results, apply light pressure on the sander, but do not
force the tool. Check to make sure that the red pressure control indicator
never illuminates.
NOTICE: Applying additional pressure only slows the motor, rapidly wears
sandpaper, and greatly reduces sander speed. Excessive pressure will ovedoad
the motor, causing possible damage from motor overheating and can result in
inferior work.
5. Move the sander slowly, guiding it in a forward and backward motion.
The removal rate and the sanding pattern are determined by the choice of
sandpaper and the work surface.
6. Do not allow sanding on one spot too long as the sander's rapid action may
remove too much material, making the surface uneven.
7. Upon completion of the sanding operation, remove the sander from the
workpiece, turn the sander off and wait it comes to a complete stop before
putting it down.
8. Extended periods of sanding may tend to overheat the motor. If this occurs,
remove the sander from the workpiece and turn it off. Wait until the sander
comes to a complete stop before putting it down. Unplug the sander and
remove the sandpaper. Then, making sure to keep your hand away from the
vent area, turn the sander on and run it without load to cool the motor.
16

A
,d_ WARNING: Before cleaning or performing any maintenance, make sure that
the sheet sander has been disconnected from the power source.
,_ WARNING: Always wear safety goggles or safety glasses with side shields
when using compressed air to clean the tool. Ifthe operation is dusty, also wear a
dust mask.
CLEANING THE DUST BOX (Fig. 9)
For more efficient operation, empty
the dust box when it is no more
than half full. This will permit the
air to flow through the box better.
Always empty and clean the dust
box thoroughly when you've
finished sanding and before you
store the sander.
To empty the dust box
1. Disconnect the sheet sander
from the power source.
2.
Fig. 9
Upper cover
Filter
_st box
Remove the dust box from the sander and shake out the dust.
3. For a more thorough cleaning of the dust box, open the upper cover and
remove it from the dust box.
4. Gently shake or tap the dust box and the cover to empty.
5. Use a soft brush to clean the filter.
NOTICE: The filter cannot be rinsed with water.
6. Reattach the upper cover to the box, and firmly reinstall the box on the sander.
WARNING: Collected sanding dust from sanding surface coatings such as
polyurethanes, linseed oil, etc., can self-ignite in the sander dust box or elsewhere
and cause fire. To reduce the risk of fire, always empty the dust box frequently
while sanding and never store or leave a sander without totally emptying its dust
box. Also follow the recommendations of the coating manufacturers.
GENERAL MAINTENANCE
Avoid using solvents when cleaning plastic parts. Most plastics are susceptible
to damage from various types of commercial solvents and may be damaged
by their use. Use clean clothes to remove dirt, dust, oil, grease, etc. Keep all
ventilation openings clean.
i7

,_ WARNING: Do not at any time let brake fluids, gasoline, petroleum-based
products, penetrating oils, etc. come in contact with plastic parts. Chemicals can
damage, weaken or destroy plastic which may result in serious personal injury.
,_ WARNING: When servicing, use only identical replacement parts. Use of any
other parts may create a hazard or cause product damage. To ensure safety and
reliability, all repairs should be performed by a qualified service technician.
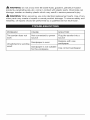
PROBLEM CAUSE
The sander does not Not connected to power
work source
Unsatisfactory sanding
result
Sandpaper is worn
Sandpaper is not suitable
for the workpiece
SOLUTION
Plug the sander into a
source
Replace with new
sandpaper
Use correct sandpaper
18

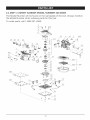
2.4 AMP 1/4 SHEET SANDER MODEL NUMBER 320.39588
The Model Number will be found on the nameplate of the tool Always mention
the Model Number when ordering parts for this tool
To order parts, call 1-888-331-4569°
3
19

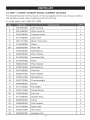
2.4 AMP 1/4 SHEET SANDER MODEL NUMBER 320.39588
The Model Number will be found on the nameplate of the tool Always mention
the Model Number when ordering parts for this tool
To order parts, call 1-888-331-4569°
3321697000 Left Housing
2 3321696000 Right Housing 1
3 5610248000 Tapping Screw 8
4 3127400000 LED Cover 1
5 3321721000 Motor Top Cover 1
6 2740350000 Stator 1
201 2823832000 Rotor Set 1
7 5700005000 Ball Bearing 1
8 5650050000 Plain Washer 1
9 3124643000 Insulated Pad 1
10 2751007000 Rotor 1
11 5650043000 Plain Washer 2
12 5700010000 Ball Bearing 1
13 3421538000 Dust Fan 1
14 5650044000 Plain Washer 1
15 5700014000 Ball Bearing 1
16 3520773000 Counterweight 1
17 5620069000 Screw 1
18 3127319000 Fan Baffle 1
19 3700137000 Flange Screw 2
20 3703578000 Felt ring 1
21 3121038000 Rubber Stick 1
22 5620504000 Screw 2
23 3402665000 Pad Support 2
24 3127318000 Base Plate 1
25 3402447000 Wire Hold 2
26 5630002000 Hexagon Nut 2
2O

2822801000 Soft Pad Assembly
28 5620040000 Screw 4
29 3127321000 Switch Cover 1
30 4870051000 Switch 1
31 3700577000 Fixing Board 1
32 2823861000 PCB Assembly 1
33 5610011000 Tapping Screw 4
34 2800186000 Brush Holder 2
35 4960285000 Carbon Brush 2
36 5610024000 Tapping Screw 2
37 3120234000 Cord Anchorage 1
38 4930004000 Connecter 1
39 5690013000 O Ring 2
40 5690268000 O Ring 1
41 5660187000 C Ring 1
42 3127374000 LED Cover 1
43 3127375000 Cover 1
44 5610013000 Tapping Screw 2
45 3121124000 Cord Guard 1
46 4810002000 Power Cord & Plug 1
47 2490136000 Nylon String 1
300 2823731000 Dust Box Assembly 1
301 3127366000 Dust Box Cover 1
302 3705602000 Dust Filter Paper 1
303 3127367000 Dust Box 1
304 2820409000 Sanding Paper 1
305 3121354000 Paper Punch 1
401 2243608000 LOGO Nameplate 1
402 2243608000 Nameplate 1
403 2243604000 Label 1
21

Manual del Propietario
®
LIJADORA DE 1/4 DE HOJA DE
2.4 Amp
Modelo N° 39588
LISTED * GARANTJA
• SEGURIDAD
_ADVERTENCIA: Para reducir el riesgo de • DESCRIPCION
lesiones, el usuario debe Jeer y comprender • MONThJE
el ManuaJ del Propietario antes de usar • OPERACION
este producto. • ESPANOL
Sears Brands Management Corporation, Hoffman Estates,
IL 60179 U.S.A.
www, craftsman,com

Garantia P&gina 23
Simbolos de Seguridad Paginas 25-26
Instrucciones de Seguridad Paginas 27-30
Descripcion Paginas 31-32
Montaje Pagina 33
Operacion Paginas 34-39
Mantenimiento Paginas 39-40
ldentificaci6n y Soluci6n de Problemas Pagina 40
GARANT|A LIMITADA DE UN Al_O CRAFTSMAN
DURANTE UN ANO desde la fecha de compra, este producto cuenta con
garantia contra cualquier clase de defectos de material o de mano de obra.
Mediante una prueba de compra, el producto defectuoso se reemplazara
sin costo alguno.
Si desea obtener detalles sobre la cobertura de garantia para obtener un
reemplazo sin costo, visite la p&gina web: www.craftsman.com/warranty
Esta garantia no cubre la papel de lija, porque es una pieza prescindible que
pueden desgastarse debido al uso normal dentro del periodo de garantia.
La presente garantia de UN ANO quedar& anulada si este producto se usa
para brindar servicios comerciales o si se alquila a terceros. Para consultar
los terminos de uso comercial y de alquiler de 90 DiAS, visite la pagina web
sobre garantia de Craftsman.
Esta garantia le otorga derechos legales especificos y usted puede contar
con otros derechos, que pueden variar de estado a estado.
Sears Brands Management Corporation, Hoffman Estates, IL 60179.
iGUARDE ESTAS INSTRUCCIONES!
iLEA TODAS LAS INSTRUCCIONES!
Esta lijadora para 1/4 de hoja cuenta con varias caracteristicas para hacer su
uso mas agradable y phcentero. Durante el dise_o de esta herramienta, la
seguridad, el rendimiento y la confiabilidad han sido las prioridades principales,
ademas de Basencillez de mantenimiento y de operaci6n.
23 © Sears Brands, LLC

,_ PEUGRO: La gente con los accesorios electronicos, como los
estimuladores cardiacos, deben consultar sus medicos antes de usar esto
producto. La operacion de los equipos electricos cerca de un estimulador
cardiaco puede causar la interferencia o la averia del estimulador cardiaco.
,_ ADVERTENOIA: Unos polvos creado pot lijadoras mecanicas, las sierras
mecanicas, las amoladoras electricas, los taladros y otras actividades de la
construccion contienen los elementos quimicos que son conocidos para el
estado de California de causar el cancer, los defectos de nacimientos o otros
daSos reproductores. Unos ejemplos de estos elementos quimicos estan:
• Plomo de la pintura con base de plomo
El silice cristalino de los ladrillos y cemento y otras productas de la
alba_ileria, y
• El arsenic y el cromo de la madera tratada quimicamente
Su riesgo de estas exposiciones varia, dependiente con que frecuencia haga
esto typo de trabajo. Para reducer su exposicion a estos elementos quimicos:
trabaje en un lugar bien ventilada, y trabaje con el equipo de seguridad, como
las mascaras antipolvo que han dise_ado especificamente para filtrar las
particulas microscopicas.
24

The El objeto de los s[mbolos de seguddad es atraer su atenci6n sobre posibles
peligros. Los simbolos de seguddad y las explicaciones junto a elias ameritan
su cuidadosa atenci6n y comprensi6n. Los s[mbolos de advertencia no eliminan
los peligros por s[ solos. Las instrucciones y advertencias que ofrecen no
reemplazan las medidas adecuadas de prevenci6n de accidentes.
_, ADVERTENCIA: AsegOrese de leer y comprender todas las instrucciones de
seguridad de este manual, incluyendo todos los simbolos de alerta de seguridad,
tales como "PELIGRO", "ADVERTENCIA" y "PRECAUCION" antes de utilizar esta
lijadora. No seguir todas las instrucciones listadas a continuaciOn puede generar
una descarga electrica, un incendio y/o graves lesiones corporales.
SIGNIFICADO DE LOS SJMBOLOS
SiMBOLO DE ALERTA DE SEGURIDAD: lndica PELIGRO, ADVERTENCIA O
PRECAUCION. Puede utilizarse en conjunto con otros simbolos u otros pictogramas.
,_ PELIGRO: Indica una situacion peligrosa que, si no se evita, puede provocar
la muerte o una lesion grave. Esta palabra debe limitarse a las stiuaciones.
ADVERTENClA: Indica una situacion peligrosa que, si no se evita, puede
provocar la muerte o una lesion grave.
,_ PRECAUClON: Indica una situacion peligrosa que, si no se evita, puede
provocar una lesion menor o moderada.
Mensajes de informaci6n y de prevenci6n de da5os
Estos informan al usuado sobre informaciones y/o instrucciones importantes que
podr[an provocar da6os al equipamiento o a la propiedad si no se siguen. Cada
mensaje est& precedido pot la palabra "AVlSO', como en el ejemplo siguiente:
AVlSO: Pueden provocarse da_os al equipamiento yio a la propiedad si no se
cumplen estas instrucciones.
ADVERTENCIA: Para garantizar la seguridad y la confiabilidad, todas las
reparaciones deben set efectuadas por un tecnico calificado.
_lk ADVERTENCIA: El funcionamiento de cualquier
herramienta electdca puede provocar el lanzamiento de objetos
en direcci6n de su rostro, y los consecuentes graves daBos
oculares. Antes de comenzar a utilizar la herramienta electrica,
siempre use gafas o lentes de seguridad con protecci6n lateral y
una protecci6n completa de rostro cuando sea necesario.
Recomendamos el uso de una m&scara de seguridad de visi6n
amplia sobre los anteojos o gafas de seguridad est&ndar con
protecci6n lateral. Siempre utilice protecci6n ocular con
certificaci6n decumplimiento con ANSI Z87.1.
25

GUARDE ESTAS INSTRUCCIONES
Algunos de los siguientes s[mbolos pueden utilizarse en esta herramienta. Tengaa
bien estudiarlos y aprender su significado. Una interpretaci6n adecuada de estos
s[mbolos le permitir#, operar la herramienta de una manera mejor y mas segura.
SJMBOLO NOMBRE DESIGNACION / EXPUCACION
V Voltios Voltaje
A Amperios Corriente
Hz Hercios Frecuencia (ciclos por segundo)
w Vatios Energia
min Minutos Tiempo
"_ Corriente alterna Tipo de corriente
Corriente continua Tipo o una caracteristica de la corriente
no Velocidad sin carga Velocidad giratoria, sin carga
[] Construcci6n Ctase II Construcci6n de dobte aislaci6n
.../min Por minuto Revoluciones, carreras, velocidad de
superficie, 6rbitas, etc., por minuto.
Aterta de condiciones No exponga a la Ituvia u otras
hOmedas Iocaciones hOmedas.
Para reducir et riesgo de lesiones, et usuario
Lea et manual de debe leer y comprender este manual de
operaci6n operaci6n antes de usar este producto.
O Siempre use gafas o lentes de seguridad
Protecci6n ocular con protecciones laterales y una protecci6n
de todo el rostro cuando utilice este producto.
dl_ Aterta de seguridad Precauciones que involucran su seguridad.
Simbolo de no tocar No mantener sus manos atejadas de la
con las manos sierra provocara lesiones personales graves.
Simbolo de no tocar No mantener sus manos atejadas de la
con las manos sierra provocara lesiones personales graves.
Simbolo de no tocar No mantener sus manos atejadas de la
con las manos sierra provocara lesiones personales graves.
Simbolo de no tocar No mantener sus manos atejadas de lacon las manos sierra provocara lesiones personales graves.
Superficie caliente Para reducir el riesgo de lesiones o daNos,
evite elcontacto con cualquier superficie caliente.
26

ADVERTENCIAS GENERALES DE SEGURIDAD DE LAS
HERRAMIENTAS EM=CTRICAS
,_ ADVERTENCIA: Lea todas las adverteneias e instrueciones de
seguridad. No seguir las advertencias e instrucciones puede generar una
descarga electrica, un incendio y/o lesiones personales graves.
Conserve todas Ins advertenc[as e instrucciones para referenc[a futura.
El termino "herramienta electrica" de todas ins advertencias listadas
a continuaci6n hacen referencia a herramientas electricas con cable o
herramientas electricas operadas a bateria (inal&mbdcas).
SEGURIDAD EN EL AREA DE TRABAJO
• Mantenga el &tea de trabajo iimpia y bien iluminada. Las areas
desordenadas u oscuras son propicias para los accidentes.
• No utilice herramientas el_ctricas en atm6sferas explosivas, como en
la presencia de liquidos inflamables, gases o polvillo. Las herramientas
electricas crean chispas, que pueden encender el polvillo o el humo.
= Mantenga a los niSos y a los transe_ntes alejados mientras maneja
esta herramienta el_ctrica. Las distracciones pueden provocar la perdida
de control.
SEGURIDAD EMeCTRICA
Evite el contacto corporal con superficies con conex[6n a tierra, tales como
caSer[as, radiadores, cocinas y refrigeradores. Existe un riesgo mayor de
descarga electrica si su cuerpo tiene conexi6n a tierra.
• Los enchufes de Ins herramientas el_etricas deben poder insertarse en
los tomacorrientes. Nunca modifique el enchufe de ninguna manera. No
utilice enchufes adaptadores con herramientas el_ctricas con conexi6n
a tierra. No modificar los enchufes y contar con el tomacorriente adecuado
reducir&n el riesgo de una descarga electrica.
• No exponga las herramientas el_ctricas a la Iluvia o a condiciones de
humedad. El agua que ingresa a la herramienta electrica incrementar& el
riesgo de una descarga electrica.
• No maltrate el cable. Nunca utilice el cable para trasladar o
desenchufar la herramienta ei_ctrica ni tire del mismo. Mantenga
el cable alejado del calor, aceite, extremos afilados o piezas en
movimiento. Los cables daSados o enredados incrementan el riesgo de
una descarga electrica.
27

= Cuando utiiice una herramienta el_ctrica ai aire libre, use un cable de
extensi6n especial para use al exterior. El uso de un cable adecuado
para el aire libre reduce el riesgo de una descarga electrica.
= Si no puede evitar el uso de una herramienta el_ctrica en un lugar
h_medo, utilice un suministro de energia protegido pot un interruptor
de circuito con descarga a tierra (GFCI, pot sus sigias en ingles). El uso
de un GFCI reduce el riesgo de una descarga electrica.
SEGURIDAD PERSONAL
• Mant_ngase alerta, preste atenci6n a Io que hace y tenga sentido
com_n cuando utilice una herramienta el_ctrica. No utilice una
herramienta el_ctrica si est_ cansado o bajo la influencia de drogas,
alcohol o alguna medicaci6n. Un momento de distracci6n mientras utilize
herramientas electricas puede provocar lesiones personales graves.
= Utilice equipamiento de protecci6n personal. Siempre use protecci6n
ocular. El equipamiento de seguridad como las m&scaras antipolvillo,
zapatos antideslizantes, cascos o protecci6n auditiva utilizados para
condiciones apropiadas reducir&n las lesiones personales.
= Evite el encendido involuntario. Verifique que el interruptor se
encuentre en la posici6n OFF (apagado) antes de conectar a la fuente
de energia y/o a la baterfa, levantar la herramienta o trasladarla.
Llevar herramientas electricas con el dedo sobre el interruptor o enchufar
herramientas que tienen el interruptor en la posici6n "ON" (encendido) es
una invitaci6n a sufrir un accidente.
• Quite las Ilaves ajustables antes de encender la herramienta el_ctrica.
Una Nave de tuercas que se deja conectada a una pieza giratoria de la
herramienta puede provocar lesiones personales.
= No se estire de m_s. Mantenga una postura equilibrada y segura en
todo momento. Esto permite un mejor control de la herramienta electrica
en situaciones inesperadas.
= Vfstase adecuadamente. No use vestimenta suelta o joyas. Mantenga
su cabello, ropa y guantes alejados de las piezas en movimiento. La
ropa suelta, joyas o cabello largo pueden engancharse en las piezas en
movimiento.
Si los dispositivos pueden conectarse a instalaciones de extracci6n
y recolecci6n de polvillo, aseg_rese de que se encuentren bien
conectados y se usen adecuadamente. El uso de estos dispositivos
puede reducir los riesgos relacionados con el polvillo.
28

USO Y CUIDADO DE LA HERRAMIENTA EUeCTRICA
No fuerce la herramienta el_ctrica. Use la herramienta el_ctrica
correcta para su aplicaci6n. La herramienta electrica correcta har& mejor
el trabajo y de manera mAs segura cuando se usa en la clasificacion para la
cual fue dise_ada.
No use la herramienta el_ctrica si el interruptor no puede eneenderla
(ON) o apagarla (OFF). Cualquier herramienta que no puede controlarse
mediante el interruptor es peligrosa y debe repararse.
Desconecte el enchufe de la fuente de energia y/o el paquete de
baterias desde la herramienta el6ctrica antes de realizar ajustes,
cambiar accesorios o almacenar herramientas el6ctricas. Dichas
medidas de seguridad preventivas reducen el riesgo de encender la
herramienta electrica de manera accidental.
= Guarde las herramientas el_ctricas fuera del aicance de los niSos y no
permita que personas que no saben usar la herramienta el_ctrica o que
no conocen lasinstrucciones ia operen. Las herramientas electricas son
peligrosas en manos de usuarios faltos de capacitacion.
= Realice mantenimiento de las herramientas el_ctricas. Controle que
las piezas en movimiento no est_n real alineadas y que no se traben,
la rotura de piezas y cualquier otra condici6n que pueda afectar el
funcionamiento de la herramienta ei_ctrica. Si est_ daSada, haga reparar
la herramienta antes de usarla. Muchos accidentes son provocados pot
herramientas que no ban recibido el mantenimiento adecuado.
= Mantenga las herramientas de corte afiiadas y limpias. Las herramientas
de corte bien mantenidas con extremos de corte afilados tienen menos
probabilidades de trabarse y son m&s f&ciles de controlar.
= Utilice la herramienta el_ctrica, accesorios, hojas de corte, etc. de
acuerdo con estas instrucciones y del modo concebido para este tipo
particular de herramienta el_ctrica, teniendo en cuenta las condiciones
de trabajo y el trabajo a realizar. El uso de la herramienta electrica para
operaciones diferentes de las previstas puede generar una situacion peligrosa.
SERVIClO
• Solicite a personal de reparaci6n calificado que realice el mantenimiento
y arreglos utilizando s61o las piezas de repuesto id_nticas. Esto asegurar&
el mantenimiento de la seguridad de la herramienta electrica.
= Siga las instrucciones de la Secci6n de Mantenimiento de este
manual. El uso de piezas no autorizadas o no seguir las instrucciones de
Mantenimiento pueden crear un desgo de descarga electrica o lesiones.
29

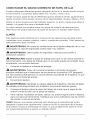
NORMAS ESPEC|FICAS DE SEGURIDAD PARA LA LIJADORA DE 1/4
DE HOJA
= Sostenga ias herramientas el_ctricas de sus superficies de agarre
aisladas cuando realice una operaci6n en la que la herramienta de
corte pueda hater contacto con cableado oculto o con su propio cable.
El contacto con un cable "cargado" provocar& que las piezas expuestas de
piezas de metal tambien se "carguen" y ejerzan una descarga electrica en el
operador.
= Debe utiiizarse un respirador adecuado mientras se est_ lijando pintura
con plomo, algunas maderas y metales para no respirar el polvilio o
aire nocivo/t6xico.
• Siempre utilice galas de seguridad y una m&scara anti-polvillo cuando
realice operaciones de lijado, especialmente en lugares m&s elevados.
= Esta m_quina no es adecuada para lijado h_medo.
= Fije la pieza de trabajo. Una pieza de trabajo sujeta mediante
dispositivos de sujeci6n o una prensa se sostiene mejor que a mano.
= Verifique que el papel de lija no haga contacto con la pieza de trabajo antes
de que el interruptor oscilante on/off (encendido/apagado) se encuentre en
la posici6n ON.
= No deje la herramienta en funcionamiento. Utilice la herramienta s61o
cuando la sostenga con sus manos.
3O

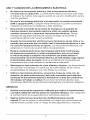
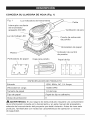
CONOZCA SU LIJADORA DE HOJA (Fig. 1}
Fig. 1 Luz indicadora de herramienta
Interruptor oscilante
de encendido/
apagado (On/Off)
Cable
de aire
Luz de trabajo LED
Puerto de extraccion
de polvillo
Platina
de papel
Indicador de control
de presion
Perforadora de papel Caja para polvillo Papel de lija
jo ;/ oo
o o o
o o
o o o
ESPECIFICACION DE PRODUCTO
Entrada 120V, 60Hz, AC, 2.4 Amps
Velocidad sin carga 14000 OPM
TamaSo de papel 1/4 de hoja
Tipo de papel Papel de lija no adhesivo
Clase de proteccion II
,_, ADVERTENCJA: El uso seguro de este producto requiere una comprensi6n
de la informaci6n incluida en la herramienta yen este manual del propietario,
adem&s del conocimiento del proyecto que esta iniciando. Antes de usar este
producto, familiaficese con todas las caractefisticas de operaci6n y normas
de seguridad.
3t

ORBITAL ALEATORIO
El movimiento orbital es ideal para una accion de corte r#.pido cuando remueve
acabados antiguos, suaviza madera aspera, recorta material para alcanzar Bas
dimensiones requefidas o para finalizar superficies para pintar. El papel de lija
se mueve en circulos peque_os a una velocidad muy alta, Boque permite que Ba
lijadora se desplace f#.cilmente.
CONTROL DE PRESION
Su herramienta se encuentra equipada con Buces indicadoras de control de
presi6n. Las luces indicadoras le se_alaran si est#. ejerciendo el nivel correcto de
presi6n durante el funcionamiento.
CAJA PARA POLVILLO
La caja para polvillo transparente con un filtro micro=fino bnnda un eficiente
control y extracci6n de polvillo.
PUERTO DE EXTRACCION DE POLVILLO
Le permite conectar la caja para polvillo o una manguera de vacio de 1=1/4 pulgo
de di#.metro para as[ mantener limpia el area de trabajo.
INTERRUPTOR OSCILANTE DE ENCENDIDO/APAGADO
El interruptor oscilante de encendido/apagado (on/off) se encuentra ubicado en
un lugar conveniente para un mejor control y esta sellado para evitar el ingreso
de polvillo, Io que prolonga la vida Otil de la herramienta.
LUZ DETRABAJO LED
La luz de trabajo LED, ubicada en el frente de la herramienta, se ilumina cuando
se presiona el interruptor de encendido (ON). Esta caracteristica ofrece luz extra
para Iograr una visibilidad mayor.
ABRAZADERA DE PAPEL
La lijadora cuenta con dos abrazaderas de papel dise_adas para fijar papel
est#.ndar a la platina.
PERFORADORA DE PAPEL
La perforadora de papel puede utilizarse para perforar odficios en papeles de
lija, a fin de que el material lijado pase a traves de la lijadora e ingrese a la caja
para polvillo o a traves de una aspiradora.
LUZ INDICADORA DE NERRAMIENTA ACTIVADA
Esta luz verde se encuentra siempre encendida cuando la lijadora est#.
enchufada a una fuente de energ[ao
32

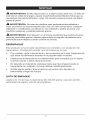
_, ADVERTENClA: Si falta alguna pieza o si alguna pieza estA rota, no trate de
enchufar el cable de energia u operar la perforadora/atomilladora hasta que se
reemplacen las piezas faltantes o rotas. No hacerlo puede provocar una lesion
personal grave.
ADVERTENClA: No trate de modificar esta perforadora/atornilladora o
crear accesorios no recomendados para usar con esta herramienta. Cualquier
alteracion o modificacion constituye un uso indebido y podria provocar una
condicion peligrosa y posibles lesiones graves.
,_ ADVERTENClA: Para prevenir un arranque accidental que podria provocar
lesiones personales graves, siempre desconecte el paquete de baterias de la
perforadora/atomilladora cuando cambie las brocas.
DESEMPAQUE
Este producto se ha enviado ensamblado pot completo, con excepci6n del
papel de lija y la bolsa para polvillo, que se incluyen en la caja.
* Con cuidado, quite la herramienta y los accesorios de la caja. AsegOrese de
que todos los elementos listados en el paquete esten incluidos.
* Inspeccione la herramienta con detenimiento para constatar que no hayan
ocurrido roturas o da_os durante el envio.
• No descarte el material de empaque hasta que haya inspeccionado la
herramienta con cuidado y la haya utilizado satisfactoriamente.
Si falta alguna pieza o alguna pieza se encuentra rota, devuelva la
herramienta al lugar de compra.
LISTA DE EMPAQUE
Lijadora de 1/4 de hoja, 3 papel de Bija(60,120,220 grano), caja para polvillo,
perforadora de papel y manual del propietario.
33

,_ ADVERTENClA: Para evitar un arranque accidental que podria provocar
lesiones personales graves, siempre desconecte la lijadora de la fuente de
energia cuando coloque piezas, realice ajustes, instale o quite el papel de lija,
efectOe la limpieza o cuando no la este utilizando.
ENCENDER/APAGARLA LA
LIJADORA (Fig. 2)
Para encender BaBijadora, conecte
el enchufe a un tomacorriente
y luego presione el lado del
interruptor oscilante marcado
como 'q". Para apagada, presione
el Badodel interruptor oscilante
marcado como "O'.
LUZ DE TRABAJO
LED (Fig. 2}
La Buzde trabajo LED, ubicada
en el frente de la lijadora, se
encender& cuando se presione
el interruptor ON (encendido)o La
luz de trabajo LED se apagar&
cuando se presione el interruptor
OFF (apagado)o La luz de trabajo
bdnda iluminaci6n adicional sobre
la superficie de la pieza de trabajo
para poder trabajar en areas de
baja iluminaci6n.
Fig. 2
Fig. 3
Interruptor
oscilante de
encendido/
apagado (On/Off)
Luz de
. trabajo LED
[ ]
Luz indicadora I
de herramienta
activada
LUZ mNDmCADORADE
HERRAMIENTA ACTIVADA (Fig. 3)
Cuando la herramienta se enchufa al suministro electrico, el indicador de luz
verde de herramienta activada se enciende para recordarle que la herramienta
se halla enchufadao Cuando se desenchufa Baherramienta, el indicador de
herramienta activada se apaga.
34

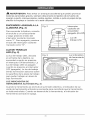
CONTROL DE
PRESION (Fig, 4}
Las indicador de control de
presi6n indicadoras le se_alar&n
si est& ejerciendo el nivel
correcto de presi6n durante el
funcionamiento.
Si s61o se ilumina la luz indicadora
verde, esto quiere decir que usted
est& ejerciendo el nivel correcto
de presi6n.
: c:do
de cont[ol __
de preston _
L ]
Si se encienden las luces
indicadoras amadlla y verde, esto quiere decir que usted est& ejerciendo un
poco mas de presi6n de la necesaria.
Si se encienden las luces indicadoras roja, amarilla y verde, esto quiere decir
que usted est& ejerciendo demasiada presi6n y debe disminuir la presi6n Io
antes posible.
_, PRECAUCI6N: Para evitar una posible lesion personal o daSos a la
herramienta o pieza de trabajo, siempre asegOrese de que el control de presion
encienda solo la luz verde durante el funcionamiento de la herramienta.
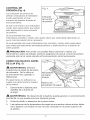
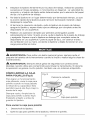
COMO COLOCAR EL PAPEL
DE LIJA (Fig. 5)
,_ ADVERTENClA: Siempre
inspeccione el papel de lija antes
de colocarlo. No Io utilice si
se encuentra roto, gastado o
defectuoso.
Abrazader
de papel
trasera
El papel de lija no adhesivo se
sujeta a la parte frontal y trasera Palanca de
de la platina, abrazadera de papel
1. Desconecte la lijadora para
detalles de la fuente de
energia.
ADVERTENCIA: No desenchufar la lijadora puede generar un accionamiento
accidental, Io que puede provocar lesiones graves.
2. Quite el polvillo o desechos de la placa base.
3. Las palancas de la abrazadera de papel se encuentran sobre ambos lados
de la lijadora y se traban en las ranuras ubicadas en la parte superior de
la platina.
35

4. Levante las dos palancas hacia "arriba" y quitelas de las ranuras de
la platina. Esto liberar& la tension sobre las abrazaderas de papel que
sostienen el papel en su posicion sobre el lado inferior de la platina.
5. Introduzca el extremo frontal del papel de lija a aproximadamente 1/2 pulg.
debajo de la abrazadera de papel frontal.
6. Levante la palanca que controla la abrazadera de papel frontal y trabela
de vuelta en la ranura de la platina. Esto fijara bien el papel al frente de
la platina.
7. Alise el papel de lija presion&ndolo con fuerza contra la parte inferior de la
platina (frente a parte trasera).
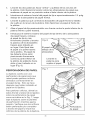
8. Introduzca el extremo trasero del papel de lija dentro de la abrazadera
de papel trasera, coloque
el papel de lija Io mas
firmemente posible y levante
la palanca de la abrazadera
trasera para trabarla en
su lugar. Esto fijara bien
el papel a la parte trasera
de la platina. El papel de
lija deberia ahora estar
posicionado firmemente
contra la parte inferior de
la platina de adelante hacia
atras y bien trabado en su
lugar (Fig. 6).
PERFORADORA DE PAPEL
La lijadora cuenta con una
perforadora de papel para que
usted pueda perforar odficios
alineados correctamente en
el papel de lija. Esto se hace
despues que haber instalado el
papel en la lijadora.
Para perforar orificios, alinee los
lados frontal y lateral de la lijadora
sobre la perforadora de papel
como se indica en la Fig. 7, luego
baje la lijadora sobre la plantilla
de perforaci6n mientras ejerce
presi6n. Verifique que los orificios
esten perforados pot completo
a traves del papel y limpie los
odficios de la platina de la lijadora.
Fig. 6
El papel va
debajo de la
abrazadera
Levante la
palanca para
sujetar el papel
Fig. 7
Perforadora
de papel
36

AViSO: Perforar Bosodficios en forma correcta es un paso necesario para que el
sistema de recolecci6n de polvillo funcione correctamente.
CAJA PARA POLVILLO
ADVERTENCIA: No utilice la caja para polvillo cuando lije metal. Utilizar la
caja para polvillo cuando lija metal provoca un riesgo de incendio, Io que podria
da_ar la herramienta y generar lesiones personales graves.
La lijadora de hora cuenta con una caja para polvillo para ayudado a mantener
el Area de trabajo limpia. La caja para polvillo es ideal para trabajos mAs
peque_os.
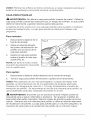
Para instalar:
1. Desconecte la lijadora de la
fuente de energia
2. Alinee el reborde elevado
del puerto de extraccion de
polvillo con la ranura de la
caja para polvillo.
3. Deslice la caja para polvillo
sobre el puerto Io masque
pueda (Fig. 8).
NOTA: De tanto en tanto, limpie
el puerto de extracci6n de polvillo
con un cepillo seco.
Fig. 8
Ranura
Para quitar:
1. Desconecte la lijadora orbital aleatoria de la fuente de energia
2. Tome la caja para polvillo firmemente y quitela de la herramienta.
AViSO: Para periodos de use mas prolongados, o piezas de trabajo mAs
grandes, se recomienda el use de una aspiradora de limpieza adecuada.
Coloque una manguera de vacio de 1=1/4 pulg. hOmeda!seca al puerto de
extracci6n de polvillo. Se recomienda el use de una mascara para polvillo, ya
que puedehaber particulas residuales de polvillo en el aire.
_1_ ADVERTENCIA: El polvillo que se produce durante el lijado puede ser
prejudicial para la salud, inflamable o explosive. Se requieren medidas de
seguridad adecuadas. Ejemplos: Algunas clases de polvillo pueden provocar
cancer. Siempre use una mascara para polvillo y utilice el metodo adecuado
de recoleccion de polvillo: La caja para polvillo para un volumen peque_o y la
conexion de vac[o para una recoleccion de polvillo de un volumen mayor.
37

COMO ELEGIR EL GRANO CORRECTO DE PAPEL DE LIJA
Pueden adquinrse diferentes grados de papel de [ija en la tienda donde compro
Baherramienta. Los grados disponibles son: Grueso, medio y fino.
Puede comprar papel de lija de diferentes granos desde la tienda, igualmente la
tienda comprar herramientas. Granos de Badisponibilidad: Grueso, Medio y Fino.
Utilice un grano grueso para lijar trabajos asperos, un grano medio para alisar el
trabajo y un grano fino para el acabado final.
Es mejor realizar una prueba sobre una pieza de material de descarte para
determinar los grados 6ptimos de papel de lija para un trabajo determinado.
LIJADO
Esta lijadora puede utilizarse en la mayor[a de las operaciones de Bijado sobre
matedales como madera, plastico, metal y superficies pintadas. Esta Bijadora es
adecuada para lijado h0medo.
_1_ ADVERTENOIA: No toque las ventilaciones de la lijadora despues de un uso
prolongado; la caja de engranajes podria estar muy caliente.
_1_ ADVERTENOIA: Utilice gafas de seguridad, mascara para polvillo y
proteccion auditiva..
_, PREOAUOION: Sujete la pieza de trabajo para que no se mueva durante el
funcionamiento. Una pieza de trabajo que no se sujete puede ser arrojada hacia
el operador, provocando lesiones.
1. Conectar la lijadora a la fuente de energia.
ADVERTENCIA: Antes de conectar la lijadora a la fuente de energia,
siempre verifique que el interruptor se encuentre en la posicion OFF (apagado)
(O). No hacerlo puede generar un accionamiento accidental de la lijadora, Io que
puede provocar lesiones graves.
2. Encienda la lijadora.
ADVERTENClA: Mantenga su cabeza alejada de la lijadora y del Area de lijado.
Su cabello podria engancharee con la lijadora, provocando leeionee graves.
3. Coloque la lijadora sobre la pieza de trabajo de modo que el papel de lija
eete en contacto total con la pieza de trabajo.
4. Para mejoree reeultadoe de lijado, ejerza una preeion ligera eobre la lijadora,
pero no fuerce la herramienta. Verifique que la luz indicadora roja de control
de preeion nunca ee encienda.
AVISO: Ejercer una presion adicional solo disminuye la velocidad del motor,
desgasta el papel mas rApidamente y reduce mucho la velocidad de la lijadora.
Una presi6n excesiva sobrecarga el motor, Io que posiblemente dafie el motor
pot sobrecalentamiento y genere un trabajo inferior.
38

5. Desplace la lijadora lentamente por la pieza de trabajo, realizando pasadas
sucesivas en lineas paralelas, o movimientos en diagonal. La velocidad de
remocion y el patron de lijado estan determinados por la eleccion del papel
de lija y la superficie de trabajo.
6. No deje la lijadora en un lugar determinado por demasiado tiempo, ya que
la accion rapida de la lijadora puede remover demasiado material y dejar
despareja la superficie.
7. AI terminar la operacion de lijado, quite la lijadora de la pieza de trabajo,
apague la lijadora y espere hasta que se detenga por completo antes de
depositarla en una superficie.
8. Realizar una operacion de lijado por periodos prolongados puede
sobrecalentar el motor. Si esto ocurre, quite la lijadora de la pieza de trabajo
y apaguela. Espere a que la lijadora se detenga por completo antes de
depositarla en una superficie. Quite el papel de lija y, sin obstruir el Area
de ventilacion con su mano, encienda la lijadora y dejela funcionar sin una
carga para enfriar el motor.
A
,_ ADVERTENClA: Para evitar una lesion personal grave, siempre quite el
paquete de baterias de la herramienta cuando la limpie o realice alguna clase de
mantenimiento.
,_ ADVERTENClA: Siempre utilice gafas de seguridad con protecciones
laterales cuando utilice aire comprimido para limpiar la herramienta. Si durante
la operacion se genera mucho polvillo, tambien use una mascara antipolvillo.
COMO LIMPIAR LA CAJA
PARA POLVILLO (Fig.9)
Para Iograr un funcionamiento
mas eficiente, vac[e la caja para
polvillo cuando no haya pasado
Bamitad de su capacidad. Esto
permitirA que el aire fiuya mejor a
traves de la caja.
Siempre vac[e y limpie bien la
caja para polvillo cuando haya
finalizado el lijado y antes de
guardar la lijadora.
Fig. 9
Colocar la cubierta
Filtro
_a para polvillo
Para vaciar la caja para polvillo
1. Desenchufe la lijadora.
2. Quite la caja para polvillo de la lijadora y elimine el polvillo.
39

3. Para Iograr una mejor limpieza de la caja para polvillo, Abra la cubierta
superior y quitela de la caja para polvillo.
4. Suavemente sacuda o golpee la caja para polvillo y la cubierta para vaciarla.
5. Use un cepillo suave para limpiar el filtro.
AVlSO: El filtro no puede enjuagarse con agua.
6. Vuelva a colocar la cubierta superior en la caja y vuelva a instalar la caja en
la lijadora firmemente.
,_, ADVERTENClA: El polvillo generado pot el lijado de superficies con
revestimientos tales como poliuretanos, aceite de linaza, etc. puede encenderse
en el interior de la bolsa para polvillo o en otro sitio y provocar un incendio.
Para reducir el riesgo de incendio, siempre vacie la bolsa para polvillo en
forma frecuente mientras realiza el lijado y nunca almacene o guarde la lijadora
sin haber vaciado por completo la bolsa para polvillo. Tambien siga las
recomendaciones del fabricante de revestimientos.
MANTENIMIENTO GENERAL
Evite usar solventes cuando limpie piezas pl&sticas. La mayor[a de los pl&sticos
son susceptibles a da_os pot parte de varios tipos de solventes comerciales y
pueden da_arse por su uso. Utilice pa_os para quitar suciedad, polvillo, aceite,
grasa, etc.
_, ADVERTENCIA: No permita bajo ninguna circunstancia que liquido de
frenos, gasolina, productos a base de petroleo, aceites penetrantes, etc. entren
en contacto con las piezas plasticas. Los quimicos pueden da_ar, debilitar o
destruir el plastico, Io que puede provocar una lesion personal grave.
_, ADVERTENCIA: Cuando realice un mantenimiento, solo utilice piezas de
repuesto identicas. El use de otras piezas puede generar un riesgo o provocar
da_os al producto. Para garantizar la seguridad y la confiabilidad, todas las
reparaciones deben ser efectuadas per un tecnico calificado.
PROBLEMA CAUSA
La lijadora no se
La lijadora no funciona encuentra enchufada en
una fuente de energia
Lijado con resultado
poco satisfactorio
El papel se lija
esta gastado
El papel de lija no es el
adecuado para la pieza
de trabajo
SOLUCION
Plug the sander into
a source
Coloque papel de
lija nuevo
Utilice el papel de
lija correcto
40

43_

42

43

1[ °
Product questions or problems?
1-888-331-4569
Customer Care Hot Line
Get answers to questions, troubleshoot problems,
order parts, or schedule repair service.
Para respuestas a preguntas o problemas, y ordenar
piezas o pedir servicio para la reparaci6n de su equipo.
TO help us help you, registeryour product at www.oraftsman.com/registration
Para poderte ayudar mejor, registra tu producto en www.craftsman.com!registration
Receive exclusive member benefits including special pricing and offers,
project sharing, expert advice, and SHOP YOUR WAY REWAROS!
Como miembro exclusivo, recibe diversos beneficios como ofertas, precios especiales, proyectos
nuevos, consejos de expertos y nuestro programa de puntos SHOP YOUR WAY REWARDS!
® Registered Trademark / TMTrademark of KCD IP, LLC in the United States, or Sears Brands, LLC in other countries
_.hMarca Registrada / r_ Marca de F&bdca de KCD IP, LLC en Estados Unidos, o Sears Brands, LLC in otros paises
44
-
 1
1
-
 2
2
-
 3
3
-
 4
4
-
 5
5
-
 6
6
-
 7
7
-
 8
8
-
 9
9
-
 10
10
-
 11
11
-
 12
12
-
 13
13
-
 14
14
-
 15
15
-
 16
16
-
 17
17
-
 18
18
-
 19
19
-
 20
20
-
 21
21
-
 22
22
-
 23
23
-
 24
24
-
 25
25
-
 26
26
-
 27
27
-
 28
28
-
 29
29
-
 30
30
-
 31
31
-
 32
32
-
 33
33
-
 34
34
-
 35
35
-
 36
36
-
 37
37
-
 38
38
-
 39
39
-
 40
40
-
 41
41
-
 42
42
-
 43
43
-
 44
44


Craftsman 32039588 El manual del propietario
- Categoría
- Herramientas eléctricas
- Tipo
- El manual del propietario
En otros idiomas
- English: Craftsman 32039588 Owner's manual