Commercial Electric 804834 Guía de instalación
- Tipo
- Guía de instalación

804834
8 87480 04834 6
1005 974 770
BRAND:
DESC. :
PACKAGE TYPE:
PART
UPC #:
SKU #:
DATE ROUND
DESIGNER:
PRINTED COLORS
Card
5.7087” w x 13.8987”h
11.09.20 1
Dieline
CMYK
PMS 541
PMS CG11
xxxxx
xxxxx
xxxxx
xxxxx
TP
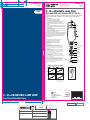
Lamp Accessories
Commercial Electric
LAMP
8–10
in
ADJUSTABLE LAMP HARP
Two-Piece Detachable Harp
1005 974 770 1005 974 770
DISTRIBUTED BY:
DISTRIBUIDO POR:
HOME DEPOT
2455 PACES FERRY RD.
ATLANTA, GA 30339
FOR ASSISTANCE, CALL:
SI NECESITA AYUDA, LLAME AL:
1-877-527-0313
HOMEDEPOT.COM
Recycle
Recicla
MODEL/MODELO 804834
BRASS
LATÓN
BRASS
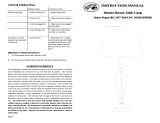
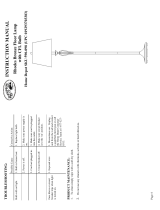
Use this lamp harp to replace a worn or broken part or when creating a new custom lamp.
Install and use this product according to your local electrical codes and regulations.
INSTRUCTIONS:
1. Turn off power supply before installation.
2. Remove finial, lamp shade and light bulb.
3. Lift both sleeves (Fig 1) at bottom of harp and squeeze
gently inward. Lift harp away from harp bottom.
4. Remove socket shell from cap by pressing where noted
on shell.
5. Remove wires from terminal screws of socket; mark wires
so they can be put back onto the same screws later. Untie
underwriter’s knot.
6. Replace harp bottom with new one, then reverse steps
above to complete lamp.
7. The lamp harp is adjustable between 8/9/10 inch. You can
adjust it to the size you need (Fig 2).
Be sure that all conductors are positioned under the head of the
terminal screws in a clockwise direction (Fig 3). When replacing
socket shell, snap into place with paper liner inside, then rock
back and forth slowly until clicks are heard to insure a safe
completed assembly.
Usar esta arpa de lámpara para reponer una pieza
rota o gastada o armar una nueva lámpara
personalizada. Instalar y usar este producto
cumpliendo con las regulaciones y códigos
eléctricos locales.
INSTRUCCIONES:
1. Antes de la instalación, apagar la fuente de corriente eléctrica.
2. Quitar el remate, la pantalla de la lámpara y la bombilla.
3. Levantar ambos casquillos (Fig 1) en la parte inferior del arpa y
apretar suavemente hacia dentro. Levantar el arpa alejándola de
su parte inferior.
4. Quitar de la tapa la carcasa del portabombillas presionado donde
se indique en la carcasa.
5. Retirar los cables de los tornillos terminales del portabombillas;
marcar aquellos para poder volver a ponerlos más tarde en los
mismos tornillos. Desatar el nudo de seguridad.
6. Reemplazar la parte inferior del arpa con una nueva y enseguida
proceder a la inversa con los pasos indicados más arriba para
completar la lámpara.
7. El arpa para lámpara se ajusta a 8, 9 y 10 plg. Puedes ajustarla al
tamaño que necesites (Fig 2).
Todos los conductores deben rodear bajo la cabeza de los tornillos
terminales, en sentido del reloj (Fig 3). Al reemplazar la carcasa del
portabombillas, colocarla a presión en su lugar con el forro de papel
dentro y enseguida balancearla lentamente hacia delante y hacia
atrás hasta escuchar el sonido de clics para garantizar que quede
completa y seguramente ensamblada.
Fig 3
STEPS TO ADJUST LENGTH OF THE HARP
Fig 2
PASOS PARA AJUSTAR EL LARGO DEL ARPA
3. Aim to the position you need. 4. Turn the 90° back on the fixing point
Tighten the screws till it fixed.
2. Turn 90° to the movable channel.1. Slightly loosen the fixing screws.
1. Afloja ligeramente los tornillos.
3. Coloca a la posición que necesitas.
4. Gira de regreso 90° al punto de fijación.
Aprieta el tornillo hasta que quede fijo.
2. Gira 90° al canal móvil.
Fig 1
Existing Lamp Nipple
Lamp
Socket Shell With Paper Liner
Socket Interior
Lock nut
Neck
Lamp Nipple
Harp Bottom
Terminal Screws
Underwriters Knot
Socket Cap
Sleeves
Harp
Boquilla actual
de la lámpara
Lámpara
Carcasa del portabombillas con
forro de papel
Interior del portabombillas
Contratuerca
Cuello
Boquilla de la lámpara
Parte inferior del arpa
Tornillos terminales
Nudo de seguridad
Tapa del portabombillas
Casquillos
Arpa
Finial
Threaded Stud
Remate
Taco roscado
8–10 in Adjustable Lamp Harp
Arpa ajustable para lámpara 20.32–25.4cm
Vendor ID: XXXXXX
Helvetica Condensed
5pt
Vendor is responsible for
updating the vendor id#
Vendor is responsible for
updating the Country of Origin
Country of Origin: XXXXXX
Helvetica Condensed
7pt
MADE IN VIETNAM
HECHO EN VIETNAM
-
 1
1

Commercial Electric 804834 Guía de instalación
- Tipo
- Guía de instalación
en otros idiomas
Artículos relacionados

Otros documentos
-
 Hampton Bay HD13660TLBSTC Instrucciones de operación
-
 Hampton Bay GTV7591A-2 Guía del usuario
-
 Hampton Bay HD09999TLBRZC Guía de instalación
-
 Hampton Bay HD09999TLBRZF Instrucciones de operación
-
 Hampton Bay HD09999FRBRZF Guía de instalación
-
Westinghouse 7002500 Guía de instalación
-
Portfolio LSTC04MT Manual de usuario
-
-
 Hampton Bay 18157-000 Guía de instalación


