Dell PowerEdge Express Flash NVMe PCIe SSD El manual del propietario
- Tipo
- El manual del propietario

Deploying the Dell PowerEdge Express Flash PCIe
SSD
CAUTION:
Many repairs may only be done by a certified service technician. You
should only perform troubleshooting and simple repairs as authorized in your product
documentation, or as directed by the online or telephone service and support team.
Damage due to servicing that is not authorized by Dell is not covered by your warranty.
Read and follow the safety instructions that came with the system.
NOTE:
For information on removing and reinstalling system parts, see the system-
specific Owner’s Manual at support.dell.com/manuals.
This document discusses a set of high level instructions on how to get started
and manage your Dell PowerEdge Express Flash Peripheral Component
Interconnect Express (PCIe) Solid State Device (SSD).
Setting Up Your PCIe SSD
All Dell PowerEdge Express Flash PCIe SSDs connect to the system board
through the PCIe SSD backplane. The backplane is mounted on the front-
chassis assembly of the system. PCIe SSD devices are supplied in device carriers
that are compatible with the PCIe SSD device bays.
CAUTION:
To ensure that you have the correct configuration for the PCIe SSD, see the
platform-specific Owner’s Manual at support.dell.com/manuals.
When you ordered the PCIe SSD with your system, with an operating system
pre-installed, the PCIe SSD is already configured and ready for use. If you are
installing a new operating system, follow the steps below:
1
Install the operating system on a storage device other than the PCIe SSD.
2
Install the PCIe SSD driver for your operating system.
NOTE:
To ensure that you have the current version of the driver, download the latest
Windows driver from support.dell.com.
• In Windows, install the driver by using the Dell Update Package (DUP).
• In Linux, install the driver by using the command:
rpm -ihv
<
driver rpm
package name
>.
rpm
.
2012–01

3
Reboot the system for the driver update to take effect.
Your device is now ready for use.
NOTE:
Dell OpenManage Server Administrator is required for device status LED to
operate correctly.
Using PCIe SSDs in a Windows or Linux-Based System
In Microsoft Windows-based systems, you can configure the PCIe SSD for use
from the Disk Management tool under the Storage section in the Server Manager.
In Linux-based systems, you can configure the PCIe SSD from the partitioning
tool by specifying or selecting the device name. The device name for PCIe SSDs
is /dev/rssdx, where x is the letter corresponding to each PCIe SSD in the system
(for example: /dev/rssda).
Use OpenManage Server Adminstrator in Windows or Linux for managing and
performing PCIe SSD related tasks.
Servicing Your PCIe SSD
Dell PowerEdge Express Flash PCIe SSDs support orderly hot swap allowing you
to add or remove a device without halting or rebooting the system in which the
devices are installed.
Removing a PCIe SSD from the System
If you need to remove or replace your PCIe SSD, you may remove the PCIe SSD
from the running system, through an orderly removal operation. This operation is
supported in Windows and Linux.
If you are removing a PCIe SSD from a system which is running, proceed to
step 1. Otherwise, skip to step 2.
CAUTION:
To prevent data loss, it is mandatory that you prepare the device for
removal before physically removing the device.
1
Use the
Prepare to Remove
task in the OpenManage Server Administrator to
safely remove a PCIe SSD from the system. This task causes the status LEDs
on the device to blink.
WARNING:
The identify LED pattern (blink operation) is the same LED pattern as prepare
for removal. When you initiate a prepare to remove operation, ensure that your PCIe SSD is
no longer accessible by the system before you physically remove the PCIe SSD.

You can safely remove the device from the operating system under the following
conditions after you use the Prepare to Remove task:
• The PCIe SSD is blinking the prepare for removal LED pattern.
• The PCIe SSD is no longer accessible by the operating system.
2
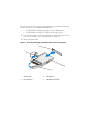
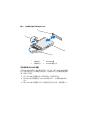
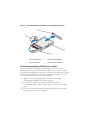
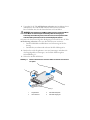
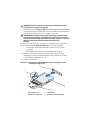
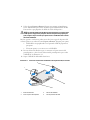
Press the release button on the front of the device carrier and open the device
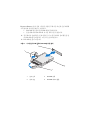
carrier release handle, to release the PCIe SSD. See Figure 1-1.
3
Slide out the PCIe SSD.
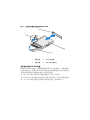
Figure 1-1. Removing and Installing a PCIe SSD in a Device From or Into the System
1 release button 2 PCIe SSD slot
3 top of the device 4 PCIe SSD carrier handle
4
3
1
2

Installing a PCIe SSD Device in the System
When installing a PCIe SSD device, ensure that the adjacent devices are fully
installed. Inserting a PCIe SSD device carrier and attempting to lock its lever
next to a partially installed carrier can damage the partially installed carrier's
shield spring, making it unusable.
1
Press the release button on the front of the PCIe SSD device carrier and open
the handle.
2
Slide the PCIe SSD device carrier into the PCIe SSD device bay until the
carrier contacts the backplane.
3
Close the PCIe SSD device carrier handle to lock the device in place. See
Figure 1-1.
___________________________
Information in this publication is subject to change without notice.
© 2012 Dell Inc. All rights reserved.
Reproduction of these materials in any manner whatsoever without the written permission of Dell Inc. is
strictly forbidden.
Trademarks used in this text: Dell™, the DELL logo, Dell Precision™, OptiPlex™, Latitude™,
PowerEdge™, PowerVault™, PowerConnect™, OpenManage™, EqualLogic™, KACE™,
FlexAddress™ and Vostro™ are trademarks of Dell Inc. Intel
®
, Pentium
®
, Xeon
®
, Core™ and Celeron
®
are registered trademarks of Intel Corporation in the U.S. and other countries. AMD
®
is a registered
trademark and AMD Opteron™, AMD Phenom™, and AMD Sempron™ are trademarks of Advanced
Micro Devices, Inc. Microsoft
®
, Windows
®
, Windows Server
®
, MS-DOS
®
and Windows Vista
®
are either
trademarks or registered trademarks of Microsoft Corporation in the United States and/or other countries.
Red Hat Enterprise Linux
®
and Enterprise Linux
®
are registered trademarks of Red Hat, Inc. in the United
States and/or other countries. Novell
®
is a registered trademark and SUSE ™ is a trademark of Novell Inc.
in the United States and other countries. Oracle
®
is a registered trademark of Oracle Corporation and/or
its affiliates. Citrix
®
, Xen
®
, XenServer
®
and XenMotion
®
are either registered trademarks or trademarks
of Citrix Systems, Inc. in the United States and/or other countries. VMware
®
, Virtual SMP
®
, vMotion
®
,
vCenter
®
, and vSphere
®
are registered trademarks or trademarks of VMWare, Inc. in the United States or
other countries.
Other trademarks and trade names may be used in this publication to refer to either the entities claiming
the marks and names or their products. Dell Inc. disclaims any proprietary interest in trademarks and trade
names other than its own.
2012–01 A00

部署 Dell PowerEdge Express Flash PCIe SSD
小心:
多数维修只能由经认证的维修技术人员进行。您只能根据产品说明文件
中的授权,或者在联机或电话服务和支持小组的指导下,进行故障排除和简单
的维修。未经 Dell 授权的维修所造成的损坏不在保修范围之内。请阅读并遵循
系统附带的安全说明。
注:
有关卸除和重新安装系统部件的信息,请参阅特定于系统的
Owner's Manual (用户手册),它位于 support.dell.com/manuals。
本文档讨论一系列有关如何开始使用和管理 Dell PowerEdge Express
Flash PCI Express (PCIe) 固态硬盘 (SSD) 的提纲挈领的说明。
设置 PCIe SSD
所有 Dell PowerEdge Express Flash PCIe SSD 均通过 PCIe SSD 背板连接到
系统主板。背板安装在系统的前端底架组件上。 PCIe SSD 设备在兼容
PCIe SSD 设备托架的设备托盘中提供。
小心:
为了确保正确配置 PCIe SSD,请参阅特定于平台的 Owner's Manual
(用户手册),它位于 support.dell.com/manuals。
如果您是随系统一起订购的
PCIe SSD
,并且预装了操作系统,那么
PCIe SSD
已经过配置并可随时使用。如果您是在安装新的操作系统,请遵循以下步骤:
1
在
PCIe SSD
以外的存储设备上安装操作系统。
2
为操作系统安装
PCIe SSD
驱动程序。
注:
为了确保您拥有最新版本的驱动程序,请从 support.dell.com 下载最新的
Windows 驱动程序。
•
在
Windows
中,通过使用
Dell Update Package (DUP)
安装驱动程序。
• 在 Linux 中,通过使用命令:rpm -ihv < 驱动程序 rpm 程序包
名称 >.rpm 来安装驱动程序。
3
重新引导系统以使驱动程序更新生效。
您的设备现已准备就绪可供使用。
注:
需要 Dell OpenManage Server Administrator 才能使设备状态 LED 指示灯
正常工作。
2012 – 01

在基于 Windows 或 Linux 系统中使用 PCIe SSD
在基于 Microsoft Windows 的系统中,您可以从 Server Manager (服务器管
理器)中 Storage (存储)部分下方的 Disk Management (磁盘管理)工具
内配置 PCIe SSD 以供使用。
在基于 Linux 的系统中,您可以从分区工具中通过指定或选择设备名称来
配置 PCIe SSD。 PCIe SSD 的设备名称为 /dev/rssdx,其中 x 是与系统中每
个 PCIe SSD 对应的字母 (例如:/dev/rssda)。
在
Windows
或
Linux
中使用
OpenManage Server Adminstrator
来管理和执行与
PCIe SSD
相关的任务。
维护 PCIe SSD
Dell PowerEdge Express Flash PCIe SSD 支持按顺序的热交换操作,允许您添
加或移除设备,而不必停止或重新引导安装该设备的系统。
从系统中移除 PCIe SSD
如果需要移除或更换 PCIe SSD,您可以通过按顺序的移除操作,从正在
运行的系统中移除 PCIe SSD。此操作在 Windows 和 Linux 中均受支持。
如果您要从正在运行的系统中移除 PCIe SSD,请继续步骤 1。否则,请跳
至步骤 2。
小心:
为了防止数据丢失,在实际移除设备之前,必须使设备做好移除准备。
1 在 OpenManage Server Administrator 中,使用 Prepare to Remove(准备
移除)任务从系统中安全地移除 PCIe SSD。该任务会导致设备上的状
态 LED 指示灯闪烁。
警告:
LED 识别模式 (闪烁操作)与准备移除的 LED 模式相同。当您发起准备移
除操作时,请确保在实际移除 PCIe SSD 之前,系统不再能够访问 PCIe SSD。
在以下情况下,您可以在使用 Prepare to Remove (准备移除)任务后从操作
系统中安全地移除设备:
• PCIe SSD
正在闪烁准备移除
LED
模式。
•
操作系统不再能够访问
PCIe SSD
。
2 按下设备托盘正面的释放按钮,然后打开设备托盘释放手柄以释放
PCIe SSD。请参阅图 1-1。
3
滑出
PCIe SSD
。


___________________________
本文中的信息如有更改,恕不另行通知。
© 2012 Dell Inc. 版权所有,翻印必究。
未经 Dell Inc. 书面许可,严禁以任何形式复制这些材料。
本文中所使用的商标:
Dell™
、
DELL
徽标、
Dell Precision™
、
OptiPlex™
、
Latitude™
、
PowerEdge™
、
PowerVault™
、
PowerConnect™
、
OpenManage™
、
EqualLogic™
、
KACE™
、
FlexAddress™
和
Vo s t r o ™
是
Dell Inc.
的商标。
Intel
®
、
Pentium
®
、
Xeon
®
、
Core™
和
Celeron
®
均为
Intel Corporation
在美国
和其他国家
/
地区的注册商标。
AMD
®
是
Advanced Micro Devices, Inc.
的
注册商标,
AMD Opteron™
、
AMD Phenom™
和
AMD Sempron™
是
Advanced Micro Devices, Inc.
的商标。
Microsoft
®
、
Windows
®
、
Windows Server
®
、
MS-DOS
®
和
Windows Vista
®
是
Microsoft
Corporation
在美国和
/
或其他国家
/
地区的商标或注册商标。
Red Hat Enterprise Linux
®
和
Enterprise Linux
®
是
Red Hat, Inc.
在美国和
/
或其他国家
/
地区的注册商标。
Novell
®
和
SUSE™
分
别是
Novell Inc.
在美国和其他国家
/
地区的注册商标和商标。
Oracle
®
是
Oracle Corporation
和
/
或
其子公司的注册商标。
Citrix
®
、
Xen
®
、
XenServer
®
和
XenMotion
®
是
Citrix Systems, Inc.
在美国和
/
或其他国家或地区的注册商标或商标。
VMware
®
、
Virtual SMP
®
、
vMotion
®
、
vCenter
®
和
vSphere
®
是
VMWare, Inc.
在美国或其他国家或地区的商标或注册商标。
本出版物中可能使用其他商标和商品名称来指拥有相应商标和商品名称的公司或其产品。
Dell Inc. 对不属于自己的商标和商品名称不拥有任何所有权。
2012
–
01 A00

部署 Dell PowerEdge Express Flash PCIe SSD
警示:
許多維修工作僅限由獲得認證的技術服務人員完成。您只能依照產品說
明文件中的授權說明,或在線上或電話服務和支援團隊的指導下,執行故障排
除和簡單的維修。未經 Dell 授權的維修若造成損壞,不在保固範圍之內。請閱
讀並遵循系統隨附的安全說明。
註:
如需卸下與重新安裝系統零件的資訊,請參閱 support.dell.com/manuals 上
系統專屬的 《擁有者手冊》。
這份文件就如何開始使用及管理 Dell PowerEdge Express Flash Peripheral
Component Interconnect Express (PCIe) 固態裝置 (SSD) 提供進階說明。
設定 PCIe SSD
所有 Dell PowerEdge Express Flash PCIe SSD 是經由 PCIe SSD 背板連接主機
板。背板裝載於系統的前底架組件。與 PCIe SSD 裝置支架相容的裝置機座
隨附 PCIe SSD 裝置。
警示:
若要確保 PCIe SSD 組態正確無誤,請參閱平台專屬的 《擁有者手冊》,
網址是 support.dell.com/manuals。
您隨預安裝作業系統之系統訂購的 PCIe SSD,PCIe SSD 已經設定且備妥可
供使用。如果您要安裝新的作業系統,請遵循以下步驟:
1
在
PCIe SSD
以外的儲存裝置安裝作業系統。
2
為系統安裝
PCIe SSD
驅動程式。
註:
若要確定驅動程式是最新版本,請從 support.dell.com 下載最新的 Windows
驅動程式。
•
在
Windows
中,使用
Dell Update Package (DUP)
安裝驅動程式。
•
在
Linux
中,使用這個命令安裝驅動程式:
rpm -ihv
<
driver rpm
package name
>.
rpm
。
3
重新啟動系統,驅動程式更新才會生效。
您的裝置現在可供使用。
註:
裝置狀態 LED 指示燈必須有 Dell OpenManage Server Administrator 才能運作
正確無誤。
2012 – 01

在 Windows 或 Linux 系統中使用 PCIe SSD
在 Microsoft Windows 系統中,您可以在 Server Manager ( 伺服器管理員 ) 之
Storage ( 儲存裝置 ) 部分下的 Disk Management Tool ( 磁碟管理工具 ) 設定要
使用的 PCIe SSD。
在 Linux 系統中,您可以指定或選取裝置名稱,從分割工具設定 PCIe SSD。
PCIe SSD 的裝置名稱是 /dev/rssdx,其中 x 是對應系統中每個 PCIe SSD 的字
母 ( 例如:/dev/rssda)。
在 Windows 或 Linux 中使用 OpenManage Server Adminstrator 管理與執行
PCIe SSD 相關工作。
維修 PCIe SSD
Dell PowerEdge Express Flash PCIe SSD 支援循序熱插拔,不用暫停或重新啟
動裝置安裝所在的系統,便可新增或移除裝置。
從系統移除 PCIe SSD
如果您必須移除或更換 PCIe SSD,可以從執行中系統,透過循序移除作業移
除 PCIe SSD。Windows 與 Linux 都支援這項作業。
如果要從執行中的系統卸下 PCIe SSD,請繼續執行步驟 1。否則請跳至
步驟 2。
警示:
您必須先將裝置為卸下做好準備,才能實際卸下裝置,以免資料遺失。
1
使用
OpenManage Server Administrator
中的準備卸下工作,才能從系統安
全卸下
PCIe SSD
。這項工作會導致裝置上的狀態
LED
閃爍。
警告:
LED 識別指示燈樣式 ( 閃爍作業 ) 的 LED 指示燈樣式與卸下的準備相同。
起始準備卸下作業時,先確定系統不再存取 PCIe SSD,再實際卸下 PCIe SSD。
使用準備卸下工作後,您可以在下列狀態從作業系統安全卸下裝置:
• PCIe SSD
正在閃爍準備卸下
LED
指示燈樣式。
•
作業系統不再存取
PCIe SSD
。
2
按下裝置機座前方的釋放按鈕,然後開啟裝置機座釋放手柄,釋放
PCIe
SSD
。請參閱圖
1-1
。
3
推出
PCIe SSD
。


___________________________
本出版品中的資訊如有變更,恕不另行通知。
©
2012 Dell Inc. 版權所有,翻印必究。
未經 Dell Inc. 的書面許可,嚴格禁止以任何形式複製這些內容。
本文中使用的商標:
Dell™
、
DELL
徽標、
Dell Precision™
、
OptiPlex™
、
Latitude™
、
PowerEdge™
、
PowerVault™
、
PowerConnect™
、
OpenManage™
、
EqualLogic™
、
KACE™
、
FlexAddress™
和
Vo s t r o ™
是
Dell Inc.
的商標。
Intel
®
、
Pentium
®
、
Xeon
®
、
Core™
和
Celeron
®
是
Intel Corporation
在美國
及其他國家
/
地區的商標或註冊商標。
AMD
®
是
Advanced Micro
Devices, Inc.
的註冊商標,而
AMD Opteron™
、
AMD Phenom™
及
AMD Sempron™
是
Advanced
Micro Devices, Inc.
的商標。
Microsoft
®
、
Windows
®
、
Windows Server
®
、
MS-DOS
®
及
Windows
Vista
®
是
Microsoft Corporation
在美國及
/
或其他國家
/
地區的商標或註冊商標。
Red Hat Enterprise
Linux
®
及
Enterprise Linux
®
為
Red Hat, Inc.
在美國及
/
或其他國家的註冊商標。
Novell
®
是
Novell Inc.
的註冊商標,
SUSE™
是
Novell Inc.
在美國及
/
或其他國家
/
地區的商標。
Oracle
®
是
Oracle Corporation
及
/
或其子公司的註冊商標。
Citrix
®
、
Xen
®
、
XenServer
®
和
XenMotion
®
是
Citrix Systems, Inc.
在美國及
/
或其他國家
/
地區的商標或註冊商標。
VMware
®
、
Virtual SMP
®
、
vMotion
®
、
vCenter
®
和
vSphere
®
是
VMWare, Inc.
在美國及
/
或其他國家
/
地區的商標或註冊商標。
本出版品中使用的其他商標及商品名稱,係指擁有這些商標及商品名稱的公司或其製造的產品。
Dell Inc. 對本公司之外的商標和產品名稱不擁有任何所有權。
2012 – 01 A00

Déploiement du périphérique SSD PCIe Express
Flash Dell PowerEdge
PRÉCAUTION :
la plupart des réparations ne peuvent être effectuées que par un
technicien de maintenance agréé. N'effectuez que les opérations de dépannage et les
petites réparations autorisées par la documentation de votre produit et suivez les
instructions fournies en ligne ou par téléphone par l'équipe de maintenance et
d'assistance technique. Tout dommage causé par une réparation non autorisée par
Dell est exclu de votre garantie. Lisez et respectez les consignes de sécurité fournies
avec le système.
REMARQUE :
pour en savoir plus sur le retrait et la réinstallation d'éléments
du système, consultez le Manuel du propriétaire qui se trouve sur le site
support.dell.com/manuals.
Ce document offre un ensemble d'instructions avancées concernant la mise
en route et la gestion de votre périphérique SSD (Solid State Device) PCIe
(Peripheral Component Interconnect Express) Express Flash Dell PowerEdge.
Configuration de votre SSD PCIe
Tous les périphériques SSD PCIe Dell Express Flash Dell PowerEdge se connectent
à la carte système via le fond de panier SSD PCIe. Le fond de panier est monté sur
l'ensemble du châssis avant du système. Les périphériques SSD PCIe sont fournis
dans des supports de périphérique compatibles avec les baies de périphérique
SSD PCIe.
PRÉCAUTION :
pour vous assurer que vous disposez de la bonne configuration
SSD PCIe, consultez le Manuel du propriétaire de cette plateforme à l'adresse
support.dell.com/manuals.
Si vous avez commandé le SSD PCIe avec votre système, avec un système
d'exploitation pré-installé, le SSD PCIe est déjà configuré et prêt à être utilisé.
Si vous êtes en train d'installer un nouveau système d'exploitation, procédez
comme suit :
1
Installez le système d'exploitation dans un périphérique de stockage autre
que le SSD PCIe.
01–2012

2
Installez le pilote SSD PCIe correspondant à votre système d'exploitation.
REMARQUE :
pour vous assurer que vous disposez du pilote le plus récent,
téléchargez le dernier pilote Windows depuis le site support.dell.com.
• Sous Windows, installez le pilote à l'aide du DUP (Dell Update Package -
Progiciel de mise à jour Dell).
• Sous Linux, installez le pilote à l'aide de la commande suivante :
rpm -ihv
<
nom du progiciel rpm du pilote
>.
rpm
.
3
Redémarrez le système pour que la mise à jour du pilote prenne effet.
Votre périphérique est maintenant prêt à être utilisé.
REMARQUE :
Dell OpenManage Server Administrator est nécessaire au bon
fonctionnement du voyant d'état du périphérique.
Utilisation de périphériques SSD PCIe dans un système Windows ou Linux
Dans un système Microsoft Windows, vous pouvez configurer le SSD PCIe pour
une utilisation depuis l'outil Disk Management (Gestion des disques) de la section
Storage (Stockage) de Server Manager (Gestionnaire de serveurs).
Dans un système Linux, vous pouvez configurer le SSD PCIe depuis l'outil de
partitionnement en indiquant ou sélectionnant le nom du périphérique. Le nom
des périphériques SSD PCIe est au format suivant : /dev/rssdx, où x est la lettre
correspondant à chaque SSD PCIe du système (par exemple : /dev/rssda).
Utilisez OpenManage Server Administrator sous Windows ou Linux pour gérer
les SSD PCIe et effectuer des tâches relatives à ces périphériques.
Entretien de votre SSD PCIe
Les SSD PCIe Express Flash Dell PowerEdge prennent en charge le remplacement
à chaud ordonné, ce qui vous permet d'ajouter ou de retirer un périphérique sans
interrompre ou redémarrer le système dans lequel les périphériques se trouvent
.
Retrait d'un périphérique SSD PCIe du système
Si vous avez besoin de retirer ou remplacer votre SSD PCIe, retirez-le du système
alors que celui-ci est sous tension via une opération de retrait ordonné. Cette
opération est prise en charge sous Windows et Linux.

Si vous retirez un SSD PCIe d'un système en cours de fonctionnement, passez
à l’étape 1. Sinon, procédez à l’étape 2.
PRÉCAUTION :
pour éviter toute perte de données, vous devez préparer le
périphérique au retrait avant de le retirer physiquement.
1
Utilisez la tâche
Prepare to Remove
(Préparation au retrait) d'OpenManage
Server Administrator pour retirer le SSD PCIe du système en toute sécurité.
Cette tâche fait clignoter les voyants du périphérique.
AVERTISSEMENT :
la séquence d'identification effectuée par les voyants (opération de
clignotement) est identique à celle effectuée pour la préparation au retrait. Lorsque vous
initialisez une opération de préparation au retrait, assurez-vous que le système ne peut
plus accéder au SSD PCIe avant le retrait physique de celui-ci.
Vous pouvez retirer le périphérique du système d'exploitation en toute sécurité
si les conditions suivantes sont présentes, une fois la tâche de Préparation au
retrait effectuée :
• Le SSD PCIe clignote selon la séquence de voyants correspondant à la
préparation au retrait.
• Le système d'exploitation ne peut plus accéder au SSD PCIe.
2
Appuyez sur le bouton de dégagement situé à l'avant du support du
périphérique et tournez la poignée de dégagement de ce dernier pour éjecter
le SSD PCIe. Voir la figure 1-1.
3
Sortez le SSD PCIe en le faisant glisser.

Figure 1-1. Retrait et installation d'un SSD PCIe dans un périphérique du système
Installation d'un périphérique SSD PCIe dans le système
Lors de l'installation d'un périphérique SSD PCIe, assurez-vous que les
périphériques adjacents sont pleinement installés. Si vous insérez un support
de périphérique SSD PCIe et tentez d'en verrouiller le levier alors qu'un support
voisin n'est que partiellement installé, vous risquez d'endommager le ressort
de protection de ce dernier et de le rendre inutilisable.
1
Appuyez sur le bouton de dégagement situé à l'avant du support
de périphérique SSD PCIe puis tournez la poignée.
2
Faites glisser le support de périphérique SSD PCIe dans la baie
correspondante jusqu'à ce que le support entre en contact avec le fond de
panier.
3
Fermez la poignée du support de périphérique SSD PCIe pour verrouiller
le périphérique en place. Voir la figure 1-1.
1 bouton de dégagement 2 emplacement de SSD PCIe
3 haut du périphérique 4 poignée du support SSD PCIe
4
3
1
2

___________________________
Les informations que contient cette publication sont sujettes à modification sans préavis.
© 2012 Dell Inc. Tous droits réservés.
La reproduction de ce document, de quelque manière que ce soit, sans l'autorisation écrite de Dell Inc.
est strictement interdite.
Marques utilisées dans ce document : Dell™, le logo DELL, Dell Precision™, OptiPlex™, Latitude™,
PowerEdge™, PowerVault™, PowerConnect™, OpenManage™, EqualLogic™, KACE™, FlexAddress™
et Vostro™ sont des marques de Dell Inc. Intel
®
, Pentium
®
, Xeon
®
, Core™ et Celeron
®
sont des marques
déposées d'Intel Corporation aux États-Unis et dans d'autres pays. AMD
®
est une marque déposée et
AMD Opteron™, AMD Phenom™ et AMD Sempron™ sont des marques d'Advanced Micro Devices, Inc.
Microsoft
®
, Windows
®
, Windows Server
®
, MS-DOS
®
et Windows Vista
®
sont des marques ou des marques
déposées de Microsoft Corporation aux États-Unis et/ou d'autres pays. Red Hat Enterprise Linux
®
et
Enterprise Linux
®
sont des marques déposées de Red Hat, Inc. aux États-Unis et/ou dans d'autres
pays. Novell
®
est une marque déposée et SUSE™ est une marque de Novell Inc. aux États-Unis et dans
d'autres pays. Oracle
®
est une marque déposée d'Oracle Corporation et/ou de ses filiales. Citrix
®
, Xen
®
,
XenServer
®
et XenMotion
®
sont des marques ou des marques déposées de Citrix Systems, Inc. aux
États-Unis et/ou dans d'autres pays. VMware
®
, Virtual SMP
®
, vMotion
®
, vCenter
®
et vSphere
®
sont
des marques déposées ou des marques de VMWare, Inc. aux États-Unis ou dans d'autres pays.
D'autres marques et noms commerciaux peuvent être utilisés dans cette publication pour faire référence
aux entités revendiquant la propriété de ces marques ou de ces noms de produits. Dell Inc. rejette tout
intérêt exclusif dans les marques et les noms commerciaux autres que les siens.
01–2012 A00


Einsatz des Dell PowerEdge Express Flash PCIe SSD
VORSICHTSHINWEIS:
Manche Reparaturarbeiten dürfen nur von qualifizierten
Servicetechnikern durchgeführt werden. Fehlerbehebungsmaßnahmen oder einfache
Reparaturen sollten Sie nur dann selbst vornehmen, wenn dies mit der Produktdoku-
mentation im Einklang steht oder Sie vom Team des Online- oder Telefonsupports dazu
aufgefordert werden. Schäden durch nicht von Dell genehmigte Wartungsver-suche
werden nicht durch die Garantie abgedeckt. Lesen und befolgen Sie die zu-sammen
mit dem System gelieferten Sicherheitshinweise.
ANMERKUNG:
Informationen zum Entfernen und neu Installieren der System-
komponenten finden Sie im Benutzerhandbuch zum System auf der Dell Support-
Website unter support.dell.com/manuals.
Dieses Dokument behandelt einen Satz von höheren Anweisungen über die
ersten Schritte und die Verwaltung Ihres Dell PowerEdge Express Flash
Peripheral Component Interconnect Express (PCIe) Solid State Device (SSD).
Einrichten Ihres PCIe SSD
Alle Dell PowerEdge Express Flash PCIe SSDs werden über die PCIe SSD-
Rückwandplatine mit der Systemplatine verbunden. Die Rückwandplatine wird am
Vorderteil des Systemgehäuses angebracht. PCIe SSD-Geräte werden in
Geräte-
trägern bereitgestellt, die mit den PCIe SSD-Gerätebuchten kompatibel sind.
VORSICHTSHINWEIS:
Um sicherzustellen, dass Sie die richtige Konfiguration für
das PCIe SSD haben, ziehen Sie das plattformspezifische Benutzerhandbuch unter
support.dell.com/manuals zu Rate.
Als Sie das PCIe SSD mit Ihrem System bestellten, mit einem vorinstallierten
Betriebssystem, war das PCIe SSD bereits konfiguriert und einsatzbereit.
Befolgen Sie zur Installation eines neuen Betriebssystems die folgenden Schritte:
1
Installieren Sie das Betriebssystem auf einem anderem Speichergerät und
nicht auf dem PCIe SSD.
2
Installieren Sie den PCIe SSD-Treiber für Ihr Betriebssystem.
ANMERKUNG:
Um sicherzustellen, dass Sie die aktuelle Version des Treibers haben,
laden Sie den neuesten Windows-Treiber von support.dell.com herunter.
2012–01

• In Windows installieren Sie den Treiber mit dem Dell-Aktuali-
sierungspaket (Dell Update Package, DUP).
• In Linux installieren Sie den Treiber mit dem Befehl:
rpm -ihv
<
driver rpm package name
>.
rpm
.
3
Starten Sie das System neu, um die Treiberaktualisierung zu übernehmen.
Das Gerät ist jetzt betriebsbereit.
ANMERKUNG:
Dell OpenManage Server Administrator ist erforderlich, damit das
Gerätestatus-LED ordnungsgemäß funktioniert.
Verwenden von PCIe SSDs in einem Windows- oder Linux-basierten System
In Microsoft Windows-basierten Systemen können Sie das PCIe SSD zum
Einsatz vom Festplattenverwaltungs-Tool unter dem Abschnitt Speicher im
Server Manager konfigurieren.
In Linux-basierten Systemen können Sie das PCIe SSD vom Partitionierungs-
Tool aus konfigurieren, indem Sie den Gerätenamen angeben oder auswählen.
Der Gerätename für PCIe SSDs ist /dev/rssdx, wobei x der Buchstabe ist, der
jeweils dem PCIe SSD im System entspricht (zum Beispiel: /dev/rssda).
Verwenden Sie OpenManage Server Adminstrator in Windows oder Linux zur
Verwaltung und Ausführung von Tasks im Zusammenhang mit PCIe SSD.
Wartung Ihres PCIe SSD
Dell PowerEdge Express Flash PCIe SSDs unterstützen ordnungsgemäße
Hot-Swaps, was es Ihnen ermöglicht, ein Gerät hinzuzufügen oder zu entfernen,
ohne das System, in dem die Geräte installiert sind, anzuhalten oder neu
zu starten.
Entfernen eines PCIe SSD aus dem System
Wenn Sie Ihr PCIe SSD entfernen oder ersetzen müssen, können Sie das
PCIe SSD aus dem laufenden System entfernen, und zwar durch einen
ordnungsgemäßen Entfernungsvorgang. Dieser Vorgang wird in Windows und
Linux unterstützt.
Falls Sie ein PCIe SSD aus einem laufenden System entfernen, gehen Sie zu
Schritt 1. Andernfalls fahren Sie jetzt mit Schritt 2 fort.
VORSICHTSHINWEIS:
Um den Datenverlust zu vermeiden, ist es obligatorisch, das
Gerät auf die Entfernung vorzubereiten, bevor Sie das Gerät physisch entfernen.

1
Verwenden Sie die Task
Auf Entfernung vorbereiten
im OpenManage Server
Administrator, um ein PCIe SSD sicher aus dem System zu entfernen.
Diese Task führt dazu, dass die Statusleuchten am Gerät blinken.
WARNUNG:
Das Identifizierungs-LED-Muster (Blinkvorgang) ist dasselbe LED-Muster
wie das Muster zur Vorbereitung auf die Entfernung. Wenn Sie den Vorgang zur
Vorbereitung auf die Entfernung starten, stellen Sie sicher, dass das System nicht mehr
auf Ihr PCIe SSD zugreifen kann, bevor Sie das PCIe SSD physisch entfernen.
Sie können das Gerät unter folgenden Bedingungen und nach Einsatz des Tasks
Auf Entfernung vorbereiten sicher aus dem Betriebssystem entfernen:
• Das PCIe SSD blinkt im LED-Muster zur Vorbereitung auf die Ent-
fernung.
• Das Betriebssystem kann nicht mehr auf das PCIe SSD zugreifen.
2
Drücken Sie auf die Freigabetaste vorne am Geräteträger, und öffnen Sie
den Freigabegriff des Geräteträgers, um das PCIe SSD freizugeben.
Siehe Abbildung 1-1.
3
Ziehen Sie das PCIe SSD heraus.
Abbildung 1-1. Entfernen und Installieren eines PCIe SSD in einem Gerät aus dem oder in
das System
1 Freigabetaste 2 PCIe SSD-Steckplatz
3 oben am Gerät 4 PCIe SSD-Trägergriff
4
3
1
2

Installation eines PCIe SSD-Geräts im System
Achten Sie beim Installieren eines PCIe SSD-Geräts darauf, dass die anliegenden
Geräte ganz installiert sind. Wenn Sie versuchen, einen PCIe SSD-Geräteträger
neben einem unvollständig eingesetzten Träger einzusetzen und zu verriegeln,
kann die Schirmfeder des nicht fest sitzenden Trägers beschädigt und
unbrauchbar gemacht werden.
1
Drücken Sie auf die Freigabetaste auf der Vorderseite des PCIe
SSD-Geräteträgers und öffnen Sie den Griff.
2
Schieben Sie den PCIe SSD-Geräteträger in die PCIe SSD-Gerätebucht,
bis der Träger die Rückwandplatine berührt.
3
Schließen Sie den Griff des PCIe SSD-Geräteträgers, um das Gerät fest-
zumachen. Siehe Abbildung 1-1.
___________________________
Die in diesem Dokument enthaltenen Informationen können sich ohne vorherige Ankündigung ändern.
© 2012 Dell Inc. Alle Rechte vorbehalten.
Die Vervielfältigung oder Wiedergabe dieser Materialien in jeglicher Weise ohne vorherige schriftliche
Genehmigung von Dell Inc. ist strengstens untersagt.
In diesem Text verwendete Warenzeichen: Dell™, das DELL-Logo, Dell Precision™, OptiPlex™,
Latitude™, PowerEdge™, PowerVault™, PowerConnect™, OpenManage™, EqualLogic™, KACE™,
FlexAddress™ und Vostro™ sind Warenzeichen von Dell Inc. Intel
®
, Pentium
®
, Xeon
®
, Core™ und
Celeron
®
sind eingetragene Warenzeichen von Intel Corporation in den USA und anderen Ländern.
AMD
®
ist eine eingetragene Marke und AMD Opteron™, AMD Phenom™ und AMD Sempron™ sind
Marken von Advanced Micro Devices, Inc. Microsoft
®
, Windows
®
und Windows Server
®
, MS-DOS
®
und Windows Vista
®
sind entweder Marken oder eingetragene Marken von Microsoft Corporation in den
Vereinigten Staaten und/oder anderen Ländern. Red Hat Enterprise Linux
®
und Enterprise Linux
®
sind
eingetragene Marken von Red Hat, Inc. in den USA und/oder anderen Ländern. Novell
®
ist eine
eingetragene Marke und SUSE™ ist eine Marke von Novell Inc. in den USA und anderen Ländern.
Oracle
®
ist eine eingetragene Marke der Oracle Corporation und/oder von ihren Tochterunternehmen.
Citrix
®
, Xen
®
, XenServer
®
und XenMotion
®
sind eingetragene Marken oder Marken von
Citrix Systems, Inc. in den USA und/oder anderen Ländern. VMware
®
, Virtual SMP
®
, vMotion
®
,
vCenter
®
und vSphere
®
sind eingetragene Marken oder Marken von VMWare, Inc. in den USA oder
anderen Ländern.
Alle anderen in dieser Publikation möglicherweise verwendeten Marken und Handelsbezeichnungen
beziehen sich entweder auf die entsprechenden Hersteller und Firmen oder auf deren Produkte. Dell Inc.
erhebt keinen Anspruch auf Markenzeichen und Handelsbezeichnungen mit Ausnahme der eigenen.
2012–01 A00

Dell PowerEdge Express Flash PCIe SSD
の導入
注意:
修理作業の多くは、認定されたサービス技術者のみが行うことができます。
製品マニュアルで許可されている範囲に限り、またはオンラインサービスもしくはテレ
ホンサービスとサポートチームの指示によってのみ、トラブルシューティングと簡単な
修理を行うようにしてください。デルで認められていない修理による損傷は、保証の対
象となりません。システムに付属のマニュアルの安全にお使いいただくための注意をお
読みになり、指示に従ってください。
メモ:
システム部品の取り付けおよび取り外しに関する情報は、デルサポートサイト
support.dell.com/manuals
でシステムの『ハードウェアオーナーズマニュアル』を
参照してください。
この文書は、
Dell PowerEdge Express Flash Peripheral Component
Interconnect Express
(
PCIe
)ソリッドステートドライブ(
SSD
)の使用および管
理について、ハイレベルの手順を説明します。
PCIe SSD のセットアップ
すべての
Dell PowerEdge Express Flash PCIe SSD
は、
PCIe SSD
バックプレーン
を介してシステム基板に接続されます。バックプレーンはシステムの前面シャーシ
アセンブリにマウントされます。
PCIe SSD
デバイスは、
SSD
デバイスベイと互換性
のあるデバイスキャリア内に搭載されます。
注意:
PCIe SSD 用に正しい設定がされていることを確認するには、
support.dell.com/manuals で、プラットフォーム特定の『オーナーズマニュアル』を参
照してください。
オペレーティングシステムが事前インストールされたシステムと同時に
PCIe SSD
を
ご注文いただいた場合、
PCIe SSD
はすでに設定され使用準備が完了しています。新
しくオペレーティングシステムをインストールする場合は、次の手順に従います。
1
PCIe SSD
以外のストレージデバイスにオペレーティングシステムをインストー
ルします。
2
お使いオペレーティングシステム用の
PCIe SSD
ドライバをインストールし
ます。
メモ:
最新のドライバがインストールされていることを確実にするために、
support.dell.com
から最新の
Windows
ドライバをダウンロードします。
• Windows
では、
Dell Update Package
(
DUP
)を使用してドライバを
インストールします。
• Linux
では、次のコマンドを使用してドライバをインストールします。
rpm -ihv < driver rpm package name >.rpm
2012–01

3
システムを再起動して、ドライバのアップデートを有効にします。
これでドライバの使用準備ができました。
メモ:
デバイスステータス
LED
が正しく動作するには、
Dell OpenManage Server
Administrator
が必要です。
Windows または Linux ベースのシステムでの PCIe SSD の使い方
Microsoft Windows
ベースのシステムでは、
Server Manager
(サーバーマネー
ジャ)の
Storage
(ストレージ)セクションにある、
Disk
Management
(ディ
スク管理)ツールから
PCIe SSD
を設定します。
Linux
ベースのシステムでは、デバイス名を指定または選択することで、
PCIe SSD
をパーティションツールから設定します。
PCIe SSD
のデバイス名は、
/
dev
/
rssd
x
となり、
x
はシステム内の各
PCIe SSD
に対応する文字です
(例えば、
/
dev
/
rssda
)。
Windows
または
Linux
で
PCIe SSD
に関連したタスクを管理および実行するには、
OpenManage Server Adminstrator
を使用します。
PCIe SSD のサービス
Dell PowerEdge Express Flash PCIe SSD
は正しいホットスワップをサポートして
おり、デバイスがインストールされているシステムを中断または再起動することな
く、そのデバイスを追加または取り外すことを可能にします。
システムからの PCIe SSD の取り外し
PCIe SSD
の取り外しまたは交換が必要な場合、正しい取り外し手順によって実行中
のシステムから
PCIe SSD
を取り外すことができます。この操作は
Windows
および
Linux
でサポートされています。
実行中のシステムから
PCIe SSD
を取り外す場合は、手順
1
に進みます。それ以外の
場合は、手順
2
に進みます。
注意:
データの損失を防ぐため、デバイスを物理的に取り外す前に、必ずデバイスで
取り外しの準備をしてください。
1
システムから安全に
PCIe SSD
を取り外すために、
OpenManage Server
Administrator
の
Prepare to Remove
(取り外しの準備)タスクを使用し
ます。このタスクにより、デバイスのステータス
LED
が点滅します。
警告:
識別 LED パターン(点滅動作)は取り外し準備と同じ LED パターンです。取り外
し操作の準備を開始する場合、
PCIe SSD を物理的に取り外す前に、システムが PCIe SSD
にアクセスできないことを確認してください。

Prepare to Remove
(取り外しの準備)タスクを使用した後、次の状態であれば
デバイスをオペレーティングシステムから安全に取り外すことができます。
• PCIe SSD
が取り外し準備
LED
パターンで点滅している。
•
オペレーティングシステムは
PCIe SSD
にアクセスできなくなっている。
2
デバイスキャリア前面のリリースボタンを押し、デバイスキャリアリリース
ハンドルを開いて
PCIe SSD
を解放します。図
1-1
を参照してください。
3
PCIe SSD
をスライドして取り出します。
図 1-1. システムからのまたはシステムへのデバイス内の PCIe SSD の取り外しおよび
取り付け
1
リリースボタン
2
PCIe SSD
スロット
3
デバイスの上部
4
PCIe SSD
キャリアハンドル
4
3
1
2

システムへの PCIe SSD デバイスの取り付け
PCIe SSD
デバイスを取り付ける場合、周辺のデバイスが完全に取り付けられている
ことを確認してください。
PCIe SSD
デバイスキャリアを挿入し、完全に装着されて
いないキャリアの隣のレバーをロックしようとすると、完全に装着されていない
キャリアのシールドのバネが損傷し、使用できなくなるおそれがあります。
1
PCIe SSD
デバイスキャリア前面のリリースボタンを押して、ハンドルを開き
ます。
2
PCIe SSD
デバイスキャリアを、キャリアがバックプレーンと接触するまで
PCIe SSD
デバイスベイに挿入します。
3
PCIe SSD
デバイスキャリアハンドルを締めて、デバイスを所定の位置にロック
します。
図
1-1
を参照してください。
___________________________
本書の内容は予告なく変更されることがあります。
© 2012 すべての著作権は Dell Inc. にあります。
Dell Inc. の書面による許可のない複製は、いかなる形態においても厳重に禁じられています。
本書で使用されている商標:Dell
™
、DELL のロゴ、Dell Precision
™
、OptiPlex
™
、Latitude
™
、
PowerEdge
™
、PowerVault
™
、PowerConnect
™
、OpenManage
™
、EqualLogic
™
、KACE
™
、
FlexAddress
™
、および Vo s t r o
™
は Dell Inc. の商標です。Intel
®
、Pentium
®
、Xeon
®
、Core
™
、および
Celeron
®
は、米国およびその他の国における Intel Corporation の登録商標です。 AMD
®
は Advanced Micro
Devices, Inc.
の登録商標です。AMD Opteron
™
、AMD Phenom
™
、および AMD Sempron
™
は Advanced
Micro Devices, Inc.
の商標です。Microsoft
®
、Windows
®
、Windows Server
®
、MS-DOS
®
、および
Windows Vista
®
は米国およびその他の国における Microsoft Corporation の商標または登録商標です。
Red Hat Enterprise Linux
®
および Enterprise Linux
®
は、米国およびその他の国における Red Hat, Inc. の
登録商標です。Novell
®
は、米国およびその他の国における Novell Inc. の登録商標です。SUSE
™
は、
米国およびその他の国における Novell Inc. の商標です。Oracle
®
は Oracle Corporation および / またはその
関連会社の登録商標です。
Citrix
®
、Xen
®
、XenServer
®
、XenMotion
®
は米国およびその他の国における
Citrix System, Inc.
の登録商標または商標です。VMware
®
、Virtual SMP
®
、vMotion
®
、vCenter
®
および
vSphere
®
は、米国またはその他の国における VMware, Inc. の登録商標または商標です。
商標または製品の権利を主張する事業体を表すためにその他の商標および社名が使用されていることがあり
ます。それらの商標や会社名は、一切
Dell Inc.
に帰属するものではありません。
2012–01 A00

Dell PowerEdge Express Flash PCIe SSD 배포
주의 :
대부분의
수리
작업은
공인된
서비스
기술자만
수행할
수
있습니다
.
사용
자는
제품
설명서에서
허가한
경우나
온라인
또는
전화서비스
/
지원팀에서
지시
한
경우에만
문제
해결
절차
및
단순
수리
작업을
수행할
수
있습니다
. Dell
의
승인
을
받지
않은
서비스
작업으로
인한
손상에
대해서는
보상을
받을
수
없습니다
.
시
스템과
함께
제공된
안전
지침을
읽고
따르십시오
.
주 :
시스템 부품 분리 및 재설치에 관한 내용은 support.dell.com/manuals 에서 해
당 시스템의 소유자 매뉴얼을 참조하십시오 .
이 문서는 Dell PowerEdge Express Flash Peripheral Component Interconnect
Express(PCIe) Solid State Device(SSD) 를 시작하고 관리하는 방법에 대한 높
은 수준의 지침을 제공합니다 .
PCIe SSD 설치
모든 Dell PowerEdge Express Flash PCIe SSD 는 PCIe SSD 후면판을 통해 시
스템 보드에 연결합니다 . 후면판은 시스템의 전면 섀시 어셈블리에 장착됩니
다 . PCIe SSD 장치는 PCIe SSD 장치 베이와 호환되는 장치 캐리어에 제공됩
니다 .
주의 :
구성이 PCIe SSD 에 올바른지 확인하려면 support.dell.com/manuals 에서
해당 플랫폼의 소유자 매뉴얼을 참조하십시오 .
시스템과 함께 운영 체제가 사전 설치된 PCIe SSD 를 주문한 경우 PCIe SSD
가 이미 구성되어 있고 사용할 수 있습니다 . 새 운영 체제를 설치하는 경우에
는 다음 단계를 따르십시오 .
1
PCIe SSD
가
아닌
스토리지
장치에
운영
체제를
설치합니다
.
2
운영
체제에
맞는
PCIe SSD
드라이버를
설치합니다
.
주 :
최신 버전의 드라이버가 있는지 확인하려면 support.dell.com 에서 최신
Windows 드라이버를 다운로드하십시오 .
• Windows
의
경우
DUP(Dell
업데이트
패키지
)
를
사용하여
드라이버를
설치합니다
.
• Linux
의
경우
rpm -ihv
<
driver rpm package name
>.
rpm
명령을
사용
하여
드라이버를
설치합니다
.
2012–01

3
드라이버
업데이트가
적용되도록
시스템을
재부팅합니다
.
이제
장치를
사용할
수
있습니다
.
주 :
장치 상태 LED 가 제대로 작동하려면 Dell OpenManage Server Administrator
가 필요합니다 .
Windows 또는 Linux 기반 시스템에서 PCIe SSD 사용
Microsoft Window 기반 시스템의 경우 Server Manager( 서버 관리자 ) 의
Storage( 스토리지 ) 섹션 아래에 있는 Disk Management( 디스크 관리 ) 도구
에서 사용할 PCIe SSD 를 구성할 수 있습니다 .
Linux 기반 시스템의 경우 장치 이름을 지정하거나 선택하여 파티셔닝 도구
에서 PCIe SSD 를 구성할 수 있습니다 . PCIe SSD 의 장치 이름은 /dev/rssdx
이며 , 여기서 x 는 시스템의 각 PCIe SSD 에 해당하는 문자입니다
( 예 : /
dev/rssda).
PCIe SSD 관련 작업을 관리하고 수행하려면 Windows 또는 Linux 에서
OpenManage Server Adminstrator 를 사용하십시오 .
PCIe SSD 서비스 제공
Dell PowerEdge Express Flash PCIe SSD 는 핫 스왑을 순서대로 지원하므로 장
치가 설치된 시스템을 중지하거나 재부팅하지 않고도 장치를 추가하거나 제
거할 수 있습니다 .
시스템에서 PCIe SSD 분리
PCIe SSD 를 분리하거나 교체해야 할 경우 순서에 따른 분리 작업을 통해 실
행 중인 시스템에서 PCIe SSD 를 분리할 수 있습니다 . 이 작업은 Windows 및
Linux 에서 지원됩니다 .
실행
중인
시스템에서
PCIe SSD
를
분리하는
경우에는
1
단계로
넘어가십시오
.
그렇지
않은
경우
2
단계로
건너뛰십시오
.
주의 :
데이터 손실을 방지하려면 장치를 물리적으로 분리하기 전에 장치 분리를
위해 준비해야 합니다 .
1
OpenManage Server Administrator
에서
Prepare to Remove
(분리 준비)
작업
을
사용하여
시스템에서
안전하게
PCIe SSD
를
분리합니다
.
이
작업을
수
행하면
장치의
LED
가
깜빡입니다
.
경고 :
식별 LED 패턴 ( 깜빡임 ) 은 분리 준비와 같은 LED 패턴입니다 . 분리 작업 준
비를 시작하는 경우 PCIe SSD 를 물리적으로 분리하기 전에 시스템에서 PCIe SSD
에 더 이상 액세스할 수 없는지 확인하십시오 .

Prepare to Remove( 분리 준비 ) 작업을 사용한 후에 다음 조건의 운영 체제에
서 안전하게 장치를 분리할 수 있습니다 .
• PCIe SSD
에서
분리
준비
LED
패턴이
깜빡입니다
.
•
운영
체제에서
PCIe SSD
에
더
이상
액세스할
수
없습니다
.
2
장치
캐리어
전면에
있는
분리
단추를
누르고
장치
캐리어
분리
핸들을
열
어
PCIe SSD
를
분리합니다
.
그림
1-1
을
참조하십시오
.
3
PCIe SSD
를
밀어
꺼냅니다
.
그림 1-1. 시스템 안팎으로 장치의 PCIe SSD 분리 및 설치
1
분리 단추
2
PCIe SSD 슬롯
3
장치 상단
4
PCIe SSD 캐리어 핸들
4
3
1
2

시스템에 PCIe SSD 장치 설치
PCIe SSD 장치를 설치할 때 인접 장치가 완전하게 설치되어 있는지 확인하십
시오 . 부분적으로 설치된 캐리어 옆에 PCIe SSD 장치 캐리어를 삽입하고 해
당 레버를 잠그면 부분적으로 설치된 캐리어의 실드 스프링이 손상되어 사용
하지 못할 수 있습니다 .
1
PCIe SSD
장치
캐리어
전면의
분리
단추를
누르고
핸들을
엽니다
.
2
캐리어가
후면판에
닿을
때까지
PCIe SSD
장치에
PCIe SSD
장치
캐리어를
밀어
넣습니다
.
3
PCIe SSD
장치
캐리어
핸들을
닫아
장치를
제자리에
고정합니다
.
그림
1-1
을
참조하십시오
.
___________________________
이 발행물에 수록된 정보는 사전 통보 없이 변경될 수 있습니다 .
© 2012 Dell Inc. 저작권 본사 소유 .
Dell Inc.
의
서면
승인
없이
어떠한
방식으로든
본
자료를
무단
복제하는
행위는
엄격히
금지됩니다
.
본
설명서에
사용된
상표
: Dell™, DELL
로고
, Dell Precision
™
, OptiPlex
™
, Latitude™, PowerEdge™,
PowerVault™, PowerConnect™, OpenManage™, EqualLogic™, KACE™, FlexAddress™
및
Vo s t r o ™
는
Dell Inc.
의
상표입니다
. Intel
®
, Pentium
®
, Xeon
®
, Core™
및
Celeron
®
미국
및
기타
국가에서
Intel Corporation
의
등록
상표입니다
. AMD
®
등록
상표이며
AMD Opteron™, AMD Phenom™,
및
AMD Sempron™
은
Advanced Micro Devices, Inc.
의
상표입니다
. Microsoft
®
, Windows
®
,
Windows Server
®
, MS-DOS
®
및
Windows Vista
®
미국
및
기타
국가에서
Microsoft Corporation
의
상표
또는
등록
상표입니다
. Red Hat Enterprise Linux
®
및
Enterprise Linux
는
미국
및
/
또는
기타
국가에서
Red Hat, Inc.
의
등록
상표입니다
.
미국
및
기타
국가에서
Novell
®
은
등록
상표이고
SUSE
™
는
Novell Inc.
의
상표입니다
. Oracle
®
은
Oracle Corporation
및
/
또는
계열사의
등록
상표입니다
. Citrix
®
,
Xen
®
, XenServer
®
및
XenMotion
®
은
미국
및
/
또는
기타
국가에서
Citrix Systems, Inc.
의
등록
상표
또
는
상표입니다
. VMware
®
, Virtual SMP
®
, vMotion
®
, vCenter
®
및
vSphere
®
는
미국
또는
기타
국가에
서
VMWare, Inc.
의
등록
상표
또는
상표입니다
.
본 발행물에서 특정 회사의 상표 및 회사 이름 또는 제품을 지칭하기 위해 기타 상표 및 상호를 사
용할 수도 있습니다 . Dell Inc. 는 자사가 소유하고 있는 것 이외에 기타 모든 상표 및 상호에 대한
어떠한 소유권도 없습니다 .
2012–01 A00

Развертывание Dell PowerEdge Express Flash
PCIe SSD
ВНИМАНИЕ:
Многие виды ремонта может выполнять только
сертифицированный специалист по обслуживанию. Пользователь может
устранять неисправности и выполнять простой ремонт только в том случае, если
это указано в документации по изделиям Dell, инструкциях интерактивной
справки или телефонной службы компании Dell. Гарантия не распространяется на
любые повреждения вследствие несанкционированного технического
обслуживания. Прочтите и выполняйте инструкции по технике безопасности,
которые входят в комплект поставки устройства.
ПРИМЕЧАНИЕ:
Сведения об установке и удалении частей системы см.
в
Руководстве по эксплуатации оборудования
на вебсайте техподдержки Dell по
адресу
support.dell.com/manuals
.
Данный документ содержит описание набора высокоуровневых инструкций
по началу работы и управлению вашим твердотельным накопителем (SSD)
Dell PowerEdge Express Flash Peripheral Component Interconnect Express (PCIe).
Настройка вашего PCIe SSDнакопителя
Все SSD-накопители Dell PowerEdge Express Flash PCIe подключаются к
системной плате через объединительную плату PCIe SSD. Объединительная
плата распо лагается на переднем блоке системы. PCIe SSD-устройства
поставляются в контейнерах, совместимых с отсеками для устройств PCIe SSD.
ВНИМАНИЕ:
Чтобы удостоверится в правильности конфигурации для PCIe SSD,
см.
Руководство по эксплуатации и обслуживанию
для конкретной платформы на
веб$сайте техподдержки Dell по адресу support.dell.com/manuals.
При заказе PCIe SSD вместе с вашей системой, на которой уже
предустановлена операционная система, PCIe SSD уже настроен и готов к
использованию. При установке новой операционной системы действуйте
следующим образом:
1
Установите операционную систему на накопительном устройстве,
отличном от PCIe SSD.
2
Установите драйвер PCIe SSD для вашей операционной системы.
2012–01

ПРИМЕЧАНИЕ:
Чтобы убедиться в использовании текущей версии драйвера,
загрузите обновленный драйвер для ОС Windows с сайта технической поддержки
Dell по адресу:
support.dell.com
.
•
В ОС Windows установите драйвер, используя Dell Update Package (DUP).
•
В ОС Linux, установите драйвер, используя команду:
rpm -ihv
<
driver
rpm package name
>.
rpm
.
3
Чтобы изменения, связанные с обновлением драйвера, вступили в силу,
перезапустите систему.
Теперь ваше устройство готово к использованию.
ПРИМЕЧАНИЕ:
Для правильной работы светодиода состояния устройства
требуется использование Dell OpenManage Server Administrator.
Использование PCIe SSDs в системах на основе ОС Windows или
ОС Linux
В системах на основе ОС Microsoft Windows вы можете настроить PCIe SSD для
использования с помощью инструмента Disk Management, расположенного в
разделе Storage в Server Manager.
В системах на основе ОС Linux вы можете настроить PCIe SSD, используя
инструмент разбиения, указав или выбрав имя устройства. Имя устройства
для PCIe SSDs – /dev/rssdx, где x – это буква, соответствующая каждому PCIe
SSD в системе (например: /
dev/rssda).
Для управления и осуществления задач в ОС Windows или ОС Linux,
связанных с PCIe SSD, используйте OpenManage Server Adminstrator.
Обслуживание вашего PCIe SSDнакопителя
SSD-накопитель Dell PowerEdge Express Flash PCIe надлежащим образом
поддерживает «горячую» замену, позволяя вам подключать или отключать
устройство без отключения или перезагрузки системы, в которой установлены
устройства.
Удаление PCIe SSD из cистемы
Если вам необходимо удалить или заменить ваш PCIe SSD, вы можете извлечь
PCIe SSD из работающей системы, соблюдая правильную последовательность
извлечения. Данная операция поддерживается в ОС Windows и ОС Linux.
Если вы извлекаете PCIe SSD из работающей системы, см. шаг 1. В противном
случае перейдите к шагу 2.

ВНИМАНИЕ:
Чтобы предотвратить потерю данных, необходимо подготовить
устройство до его физического извлечения.
1
Используйте задачу
Prepare to Remove
в OpenManage Server Administrator,
чтобы безопасно извлечь PCIe SSD из системы. Выполнение данной задачи
приводит к миганию светодиодов состояния устройства.
ОСТОРОЖНО:
Схема работы светодиодных индикаторов при идентификации
(порядок мигания) совпадает со схемой работы при подготовке к извлечению.
Если вы запускаете процедуру подготовки к извлечению, убедитесь, что ваш PCIe
SSD не используется системой перед физическим извлечением
PCIe SSD.
Вы можете безопасно удалить устройство из операционной системы после
использования задачи Prepare to Remove при следующих условиях:
•
Схема работы индикаторов PCIe SSD соответствует подготовке
к удалению.
•
PCIe SSD больше не используется операционной системой.
2
Нажмите кнопку извлечения, расположенную на передней панели
контейнера устройства и разблокируйте рукоятку открытия контейнера,
чтобы извлечь PCIe SSD. См.
Рис. 1-1.
3
Выдвиньте PCIe SSD.
Рисунок 1$1. Извлечение и установка PCIe SSD в устройство, входящее в состав
системы, или в саму систему
1
кнопка извлечения
2
слот PCIe SSD
3
верхняя часть устройства
4
рукоятка контейнера PCIe SSD
4
3
1
2

Установка устройства PCIe SSD в Систему
При установке устройства PCIe SSD в систему убедитесь, что соседние
устройства полностью установлены. Установка контейнера устройства PCIe
SSD и попытка зафиксировать его рукоятку рядом с частично установленным
контейнером может повредить пружину корпуса частично установленного
контейнера, сделав ее использование невозможным.
1
Нажмите кнопку извлечения, расположенную на передней панели
устройства PCIe SSD и разблокируйте рукоятку.
2
Установите устройство PCIe SSD в соответствующий отсек для устройства
PCIe SSD, чтобы контейнер пришел в соприкосновение с объединительной
платой.
3
Заблокируйте рукоятку контейнера устройства PCIe SSD, чтобы
зафиксировать его на своем месте. См.
Рис. 1-1.
___________________________
Информация, содержащаяся в данной публикации, может быть изменена без уведомления.
© 2012 Dell Inc. Все права защищены.
Воспроизведение материалов данного руководства в любой форме без письменного разрешения
корпорации Dell Inc. строго запрещается.
Товарные знаки, использованные в данном тексте: Dell™, логотип DELL, Dell Precision™,
OptiPlex™, Latitude™, PowerEdge™, PowerVault™, PowerConnect™, OpenManage™, EqualLogic™,
KACE™, FlexAddress™ и Vostro™ являются товарными знаками Dell Inc. Intel
®
, Pentium
®
, Xeon
®
,
Core™ и Celeron
®
являются охраняемыми товарными знаками корпорации Intel Corporation в США.
и в других странах. AMD
®
— охраняемый товарный знак, а AMD Opteron™, AMD Phenom™ и
AMD Sempron™ — товарные знаки корпорации Advanced Micro Devices, Inc. Microsoft
®
,
Windows
®
,
Windows Server
®
, MS-DOS
®
и Windows Vista
®
являются товарными знаками или
охраняемыми
товарными знаками корпорации Майкрософт в США и (или) других странах. Red Hat Enterprise
Linux
®
и Enterprise Linux
®
— охраняемые товарные знаки корпорации Red Hat, Inc. в Соединенных
Штатах и (или) других странах. Novell
®
— охраняемый товарный знак, а SUSE™ — товарный знак
корпорации Novell Inc. в Соединенных Штатах и других странах. Oracle
®
i — охраняемый товарный
знак корпорации Oracle Corporation и/или ее филиалов. Citrix
®
, Xen
®
и XenServer
®
и XenMotion
®
являются товарными знаками или охраняемыми товарными знаками компании Citrix System в США
в других странах. VMware
®
, Virtual SMP
®
, vMotion
®
, vCenter
®
, и vSphere
®
являются охраняемыми
товарными знаками или товарными знаками корпорации VMWare, Inc. в США и в других странах.
Прочие товарные знаки и названия продуктов могут использоваться в данной публикации для
обозначения компаний, заявляющих права на эти товарные знаки и названия, или продуктов этих
компаний. Dell Inc. не претендует на права собственности в отношении каких-либо товарных знаков
и
торговых наименований, кроме своих собственных.
2012–01 A00

Implementación del SSD PCIe Express Flash
Dell PowerEdge
PRECAUCIÓN:
muchas de las reparaciones sólo pueden realizarlas los técnicos de
servicio autorizados. El usuario debe llevar a cabo únicamente las tareas de solución
de problemas y las reparaciones sencillas autorizadas en la documentación del
producto o indicadas por el personal de servicio y asistencia en línea o telefónica.
La garantía no cubre los daños ocasionados por reparaciones que Dell no haya
autorizado. Lea y siga las instrucciones de seguridad entregadas con el sistema.
NOTA:
para obtener información sobre la extracción y reinstalación de piezas
del sistema, consulte el Manual del propietario del sistema en particular en
support.dell.com/manuals.
Este documento explica un conjunto de instrucciones de alto nivel sobre cómo
empezar y administrar su Dispositivo de estado sólido (SSD) de Interconexión
de componentes periféricos Express (PCIe) Express Flash Dell PowerEdge.
Instalación de su SSD PCIe
Todos los SSDs PCIe Express Flash Dell PowerEdge se conectan a la placa
base a través del plano posterior del SSD PCIe. El plano posterior se monta
en el ensamblaje del chasis frontal del sistema. Los dispositivos SSD PCIe
vienen en portadispositivos que son compatibles con los compartimentos para
dispositivos SSD PCIe.
PRECAUCIÓN:
para asegurarse de tener la configuración correcta para el SSD PCIe,
consulte el Manual del propietario de la plataforma en particular en
support.dell.com/manuals.
Al realizar el pedido del SSD PCIe con su sistema, con un sistema operativo
previamente instalado, el SSD PCIe viene configurado y listo para su uso.
Si está instalando un nuevo sistema operativo, siga los pasos a continuación:
1
Instale el sistema operativo en un dispositivo de almacenamiento que no sea
el SSD PCIe.
2
Instale el controlador del SSD PCIe para su sistema operativo.
NOTA:
para asegurarse de tener la versión actual del controlador, descargue el
controlador más reciente de Windows en support.dell.com.
01/2012

• En Windows, instale el controlador utilizando el Dell Update Package
(Paquete de actualización Dell - DUP).
• En Linux, instale el controlador mediante el comando:
rpm -ihv
<
driver
rpm package name
>.
rpm
.
3
Reinicie el sistema para que la actualización del controlador tenga efecto.
Ya puede utilizar su dispositivo.
NOTA:
se necesita Dell OpenManage Server Administrator para que el LED de estado
del dispositivo funcione correctamente.
Uso de los SSDs PCIe en un sistema basado en Linux o Windows
En sistemas basados en Microsoft Windows, se puede configurar el SSD PCIe para
utilizarlo desde la herramienta Administración de discos de la sección
Almacenamiento en el Administrador de servidores.
En sistemas basados en Linux, se puede configurar el SSD PCIe desde la
herramienta de particionamiento especificando o seleccionando el nombre del
dispositivo. El nombre del dispositivo para los SSDs PCIe es /
dev
/
rssd
x
, donde
x
es
la letra correspondiente a cada SSD PCIe SSD del sistema (por ejemplo: /
dev
/
rssda
).
Utilice OpenManage Server Administrator en Windows o Linux para administrar
y realizar tareas relacionadas con los SSDs PCIe.
Mantenimiento de su SSD PCIe
Los SSDs PCIe Express Flash Dell PowerEdge admiten los intercambios directos
ordenados, permitiendo la adición o extracción de dispositivos sin interrumpir ni
reiniciar el sistema en el que estén instalados los dispositivos.
Extracción de un SSD PCIe SSD del sistema
Si necesita extraer o reemplazar su SSD PCIe, puede extraer el SSD PCIe desde el
sistema que esté ejecutando, mediante una operación de extracción bien ordenada.
Windows y Linux admiten esta operación.
Si está extrayendo un SSD PCIe desde un sistema en ejecución, continúe al paso 1.
De lo contrario, vaya al paso 2.
PRECAUCIÓN:
para evitar la pérdida de datos, es obligatoria la preparación del
dispositivo para su extracción antes de extraer físicamente el dispositivo.

1
Utilice la tarea
Prepare to Remove
(Preparar para quitar) en OpenManage
Server Administrator para extraer de forma segura el SSD PCIe del sistema.
Esta tarea hace que parpadeen los LEDs de estado del dispositivo.
AVISO:
el patrón de identificación de LEDs (operación de parpadeo) es el mismo patrón
de LEDs que el de la preparación para quitar. Al iniciar una operación de preparar para
quitar, asegúrese de que el sistema ya no pueda acceder a su SSD PCIe antes de extraer
físicamente el SSD PCIe.
Bajo las siguientes condiciones podrá extraer de forma segura el dispositivo del
sistema operativo tras realizar la tarea Prepare to Remove (Preparar para quitar):
• El SSD PCIe está parpadeando con el patrón de LEDs de preparación
para quitar.
• El sistema operativo ya no tiene acceso al SSD PCIe.
2
Presione el botón de liberación que se encuentra en la parte anterior del
portadispositivos y abra el asa de liberación del portadispositivos para soltar
el SSD PCIe. Ver Ilustración 1-1.
3
Saque el SSD PCIe deslizándolo hacia fuera.
Ilustración 1-1. Extracción e instalación de un SSD PCIe de un dispositivo desde/en el sistema
1 Botón de liberación 2 Ranura del SSD PCIe
3 Parte superior del dispositivo 4 Asa del portador del SSD
4
3
1
2

Instalación de un dispositivo SSD PCIe en el sistema
Cuando instale un dispositivo SSD PCIe, asegúrese de que los dispositivos
adyacentes estén totalmente instalados. Si inserta un portadispositivos
SSD PCIe e intenta bloquear su palanca junto a un portador parcialmente
instalado, se puede dañar el muelle de protección del portador parcialmente
instalado y quedar inservible.
1
Presione el botón de liberación de la parte frontal del portadispositivos
SSD PCIe y abra el asa.
2
Inserte el portadispositivos SSD PCIe deslizándolo dentro del compartimento
para dispositivos SSD PCIe hasta que el portador entre en contacto con el
plano posterior.
3
Cierre el asa del portadispositivos SSD PCIe para fijar el dispositivo en su
sitio. Ver Ilustración 1-1.
___________________________
La información contenida en esta publicación puede modificarse sin previo aviso.
© 2012 Dell Inc. Todos los derechos reservados.
Queda estrictamente prohibida la reproducción de estos materiales en cualquier forma sin la autorización
por escrito de Dell Inc.
Marcas comerciales utilizadas en este texto: Dell™, el logotipo de DELL, Dell Precision™, OptiPlex™,
Latitude™, PowerEdge™, PowerVault™, PowerConnect™, OpenManage™, EqualLogic™, KACE™,
FlexAddress™ y Vostro™ son marcas comerciales de Dell Inc. Intel
®
, Pentium
®
, Xeon
®
, Core™ y Celeron
®
son marcas comerciales registradas de Intel Corporation en los Estados Unidos y en otros países. AMD
®
es
una marca comercial registrada y AMD Opteron™, AMD Phenom™ y AMD Sempron™ son marcas
comerciales de Advanced Micro Devices, Inc. Microsoft
®
, Windows
®
, Windows Server
®
, MS-DOS
®
y
Windows Vista
®
son marcas comerciales o marcas comerciales registradas de Microsoft Corporation en
Estados Unidos y/o en otros países. Red Hat Enterprise Linux
®
y Enterprise Linux
®
son marcas comerciales
registradas de Red Hat, Inc. en los Estados Unidos y/o en otros países. Novell
®
es una marca comercial
registrada y SUSE™ es una marca comercial de Novell Inc. en los Estados Unidos y en otros países.
Oracle
®
es una marca comercial registrada de Oracle Corporation y/o de sus filiales. Citrix
®
, Xen
®
,
XenServer
®
y XenMotion
®
son marcas comerciales o marcas comerciales registradas de Citrix Systems,
Inc.
en los Estados Unidos y/o en otros países. VMware
®
, Virtual SMP
®
, vMotion
®
, vCenter
®
y vSphere
®
son
marcas comerciales registradas o marcas comerciales de VMWare, Inc. en Estados Unidos o en otros países.
En esta publicación se pueden usar otras marcas y nombres comerciales para referirse a las entidades que
los poseen o a sus productos. Dell Inc. renuncia a cualquier interés sobre la propiedad de marcas y nombres
comerciales que no sean los suyos.
01/2012 A00
-
 1
1
-
 2
2
-
 3
3
-
 4
4
-
 5
5
-
 6
6
-
 7
7
-
 8
8
-
 9
9
-
 10
10
-
 11
11
-
 12
12
-
 13
13
-
 14
14
-
 15
15
-
 16
16
-
 17
17
-
 18
18
-
 19
19
-
 20
20
-
 21
21
-
 22
22
-
 23
23
-
 24
24
-
 25
25
-
 26
26
-
 27
27
-
 28
28
-
 29
29
-
 30
30
-
 31
31
-
 32
32
-
 33
33
-
 34
34
-
 35
35
-
 36
36
-
 37
37
-
 38
38


