
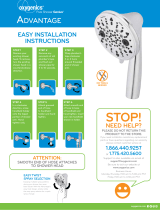
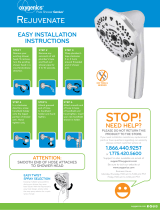
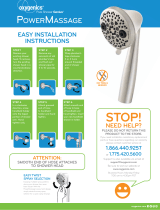
EASY INSTALLATION
INSTRUCTIONS
HERO
STOP!
NEED HELP?
PLEASE DO NOT RETURN THIS
PRODUCT TO THE STORE.
If you need installation assistance, replacement
parts or have questions regarding our warranty
please contact customer service at
1.866.440.9257
or 1.775.420.5600
Support is also available via email at
support@oxygenics.com
Be sure to visit our website at
www.oxygenics.com
Business Hours:
Monday-Thursday 7:00 am to 5:00 pm PST
Friday 7:00 am to 4:30 pm PST
EASY TWIST SPRAY
SELECTION
Enjoying multiple spray
patterns during your
shower has never
been easier. With
the Hero’s easy twist
design, simply rotate
the easy spray selector
for a quick spray change.
USING THE COMFORT CONTROL
Located on the back of the shower head, the comfort control
regulator eliminates sudden blasts of water. Note: The comfort control
is not a shut off valve. When turned to the lowest position, the shower
head continues to flow. This is a normal safety feature. Unit may be in
lowest flow position during shipping. Check the position of comfort control upon installation.
STEP 1
Remove your
existing shower
head. To remove,
turn the existing
shower head in a
counterclockwise
direction.
STEP 2
Remove any
remnants of old
plumber’s tape
and flush out
shower pipe for
5 to 10 seconds.
STEP 3
Wrap plumber’s
tape clockwise
3 or 4 turns
around threaded
end of shower
arm.
STEP 4
In a clockwise
direction, screw
handheld holder
onto the taped
portion of shower
arm. Hand
tighten only.
ATTENTION:
WASHERS
PRE-INSTALLED
IN HOSE ENDS
Washers must be inserted
into both hose ends for
proper installation.
STEP 5
Attach end
of hose to
handheld holder
and hand
tighten.
STEP 6
Attach other end
of hose to base
of handheld and
hand tighten.
Insert your new
handheld shower
in holder.

PASO 1
Quite su cabezal
de ducha
existente. Para la
extracción, gire el
cabezal de ducha
existente en el
sentido contrario a
las agujas del reloj.
PASO 2
Quite cualquier
remanente
de vieja cinta
de plomería y
enjuague el caño
de la ducha
durante 5 a 10
segundos.
PASO 3
Envuelva con
cinta de plomero
en el sentido de
las agujas del
reloj con 3 o 4
vuelvas alrededor
del brazo de
ducha.
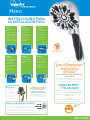
INSTRUCCIONES PARA
LA INSTALACIÓN FÁCIL
HERO
NO SE NECESITA
HERRAMIENTAS
SELECCIÓN DE LLUVIA
DE GIRO FÁCIL
Disfrutar de varios patrones
de lluvia durante su
ducha nunca fue más
fácil. Con el diseño de
giro fácil de la Hero, sólo
debe rotar el seleccionador
fácil de lluvia para un
cambio rápido de lluvia.
CÓMO USAR EL CONTROL DE CONFORT
Localizado atras del rociadór de ducha, el control de confort
no permite alta presión de agua de repente. NOTA: El control
de confort no para el agua completamente. Cuando esta por
la posición mas bajo, agua sigue corriendo. Es una característica
normal de seguridad. El control de confort puede estar en la posición mas bajo durante el
envío. Por favor asegurese de la posición del control de flujo al instalar.
ATENCIÓN:
LAS JUNTAS ESTAN
PRE-INSTALADO EN EL
EXTREMO DE LA MANGUERA
Las juntas tiene que insertarse a
los dos extremos de la manguera
para funcionar correctamente.
PASO 4
En la dirección
de las agujas del
reloj, enrosque
el sujetador
de mano a la
porción encintada
del brazo de
la ducha. Solo
ajuste a mano.
PASO 6
Fije el extremo
de la manguera a
la ducha portátil
y ajuste a mano.
Ponga la nueva
ducha portátil en
el sostén.
¡
DETÉNGASE!
¿
NECESITA
AYUDA?
NO DEVUELVA ESTE PRODUCTO
A LA TIENDA.
Si necesita asistencia de instalación, partes de
repuesto o si tiene preguntas sobre su garantía,
contacte a atención al cliente al
1.866.440.9257
o al
1.775.420.5600
También existe soporte disponible vía correo
electrónico al support@oxygenics.com
Asegúrese de visitar nuestro sitio web en
oxygenics.com
Horario de atención:
De lunes a jueves de 7:00 am a 5:00 pm PST
Viernes de 7:00 am a 4:30 pm PST
o
r
NO
SE
NEC
ESI
TA
HERRAMIENTA
S
a
PASO 5
Fije el extremo
de la manguera
al sostén y ajuste
a mano.
-
 1
1
-
 2
2


En otros idiomas
- English: Oxygenics 96188 Installation guide
Documentos relacionados
-
 Oxygenics 51488 Guía de instalación
-
 Oxygenics 52176 Guía de instalación
-
 Oxygenics 87446 Guía de instalación
-
 Oxygenics 95927 Guía de instalación
-
 Oxygenics 92720 Guía de instalación
-
 Oxygenics 82448 Guía de instalación
-
 Oxygenics 89146 Guía de instalación
-
 Oxygenics 88446 Guía de instalación
-
Oxygenics 25488 Guía de instalación


