
PRODUCT
WOODY’S CHAIR – HIGH WOODY’S CHAIR – MAINTENANCE
CAPTAIN’S CHAIR
© design by metrica
READ INSIDE
ASSEMBLY INSTRUCTIONS,
HOW TO USE, USEFUL TIPS
FOR KEEPING YOUR TOOL FOR
TOGETHERNESS IN SHAPE
LANGUAGES
EN – NL – DE – FR – IT – ES
MORE
WWW.EXTREMIS.COM

LANGUAGES
ENGLISH P. 3
contents p. 3
assembly woody’s chair p. 4
assembly high woody’s chair p. 5
maintenance p. 6
NEDERLANDS P. 9
inhoud p. 9
montage woody’s chair p. 10
montage high woody’s chair p. 11
onderhoud p. 12
DEUTSCH P. 15
inhalt p. 15
montage woody’s chair p. 16
montage high woody’s chair p. 17
pege p. 18
FRANÇAIS P. 21
contenu p. 21
montage woody’s chair p. 22
montage high woody’s chair p. 23
entretien p. 24
ITALIANO P. 27
contenuto p. 27
montaggio woody’s chair p. 28
montaggio high woody’s chair p. 29
manutenzione p. 30
ESPAÑOL P. 33
contenido p. 33
montaje woody’s chair p. 34
montaje high woody’s chair p. 35
mantenimiento p. 36
2 contents

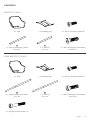
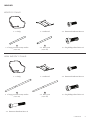
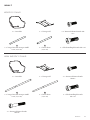
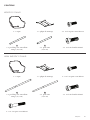
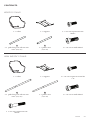
WOODY’S CHAIR
HIGH WOODY’S CHAIR
AB
AB
4 x hexagon socket bolt M6 x 35
2 x long leg with orange sticker
(73,9 cm)
2 x short leg
(72,2 cm)
4 x M8 x 25 hexagon socket button
head screw
1 x shell 1 x mounting plate 4 x M6 x 16 hexagon socket bolt
2 x long leg with orange sticker
(44,6 cm)
2 x short leg
(41,8 cm)
4 x M8 x 25 hexagon socket button
head screw
1 x shell 1 x mounting plate 4 x M6 x 16 hexagon socket bolt
CONTENTS
english 3

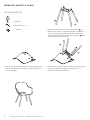
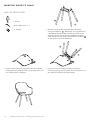
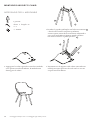
+/- 10 min.
A
A
B
B
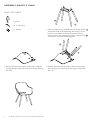
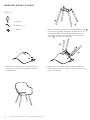
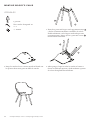
1. Take the 2 longest legs marked with the orange sticker
and attach them to the mounting plate using 2 socket
button screws M8x25 at the spots marked with an
orange sticker. Subsequently, attach the 2 shortest legs
to the other side of the mounting plate.
A
B
2. Put the shell upside down on a so surface with the
opening facing backwards so that you do not damage
the shell.
3. Position the frame on the shell as shown in the gure
above and fasten it by means of 4 hexagon socket bolts
M6 x 16.
ASSEMBLY WOODY’S CHAIR
WHAT YOU NEED
nr. 4 - 5 hex key
1 person
4 assembly woody’s chair + assembly high woody’s chair

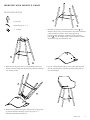
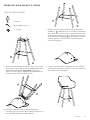
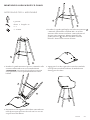
+/- 15 min.
A
A
B
B
A
B
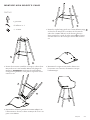
1. Take the 2 longest legs marked with the orange sticker
and attach them to the front of the mounting plate
using 2 socket bolts M6 x 35, as shown in the gure
above. Subsequently, attach the 2 shortest legs to
the other side of the mounting plate. Do not fully
tighten the bolts yet.
A
B
4. Position the frame on the shell as shown in the gure
above and fasten it by means of 4 hexagon socket bolts
M6 x 16.
2. Take the frame assembled in step 1 and attach it to the
mounting plate using 4 socket button head screws
M8x25 (CAUTION: make sure that the orange
stickers match). Now fully tighten all the bolts.
3. Put the shell upside down on a so surface with the
opening facing backwards so that you do not damage
the shell.
ASSEMBLY HIGH WOODY’S CHAIR
WHAT YOU NEED
1 person
nr. 4 - 7 hex key
english 5

MAINTENANCE
SHELL
Use common kitchen cleaning
products. Avoid using aggressive
products. ese surfaces are best
cleaned with a neutral cleaning
product diluted in water.
In case of stubborn stains, we
recommend using a magic sponge.
JATOBA
Jatoba wood requires little or no
maintenance. However, we strongly
advise you to remove persistent
dirt. To clean the wood you can
use special products (www.rmc-
extremis.be) or
simply a sti bristle brush and some
water. Be careful not to irreparably
damage the wood bres. For this
reason, never use a high pressure
cleaner as this will roughen
the wood’s smooth surface and
irreparably damage the wood’s
bres.
At rst, the wood will give o this
red
dye every time it comes into contact
with water. e dye that drips onto
the frame and the surface will
remain
water-soluble and will dissapear
entirely aer a while.
We strongly recommend that you
treat your wood for indoor use with
wood oil to protect it from stains.
When delivered, the wooden parts
of our products are untreated.
Exposure to sun and rain will
gradually change their colour to
silvery grey, and also roughen the
surface. If you want to somewhat
retain their original colour, you
should oil them once a year. We
recommend using RMC Hybrid
Wood Protector (www.rmc-
extremis.com). RMC products for
wood treatment are available all over
the world. Visit the website www.
rmc-extremis.com to nd a reseller
near you.
IMPORTANT!
Wood is a living matter and, in spite
of the superior quality provided
by jatoba, outdoors it constantly
has to adapt to extreme changes
in temperature and humidity.
Due to internal stress resulting
from these constant adaptations
the wood “warps”. is warping
can among other things lead to
cracking. Changes in colour or
wood structure may also appear.
ese characteristics are typical of
the material and by choosing this
material you accept them.
Should any cracks appear, you can
simply sand them down either
by hand using sandpaper or
by means of a hand sander. To
protect any galvanised or painted
parts, cover the edges with highly
robust masking tape. Use 80-grit
sandpaper and start at the vertical
side of the tabletop. Keep the hand
sander parallel to the edge of the
tabletop. Lightly sand the edge until
it is smooth again. Now sand the rest
of the tabletop. Make sure that you
always hold the hand sander parallel
to the tabletop. Do not only sand
the crack, but the entire tabletop to
obtain a uniform result. To avoid
burrs, sand the top edge of the
tabletop by hand. When you have
removed all the burrs, you can treat
the wood with hardwood furniture
oil or leave it untreated, depending
on the desired eect.
POWDER COATED LEGS
Clean with lukewarm water and
a milddetergent. DO NOT USE
abrasive scouring powders or
scourers as they will scratch the
surface.
CUSHION
First of all, prevent the cushion from
getting really dirty by storing it
indoors when not in use.
e best way to clean slightly dirty
cushions is to use a dry or slightly
damp cloth. Alternatively, you can
also use a vacuum cleaner with the
so brush attachment.
Remove stains by immediately
dabbing them gently with an
absorbent cloth. Stains on the edge
of the cushion can be removed by
gently dabbing with small circular
movements from the outside
towards the centre of the stain. Any
persisting stains can be treated
with a so sponge dipped in a
lukewarm soapy solution. If this
does not work, you can briey soak
the cushion in lukewarm water with
a stain remover. In any case, we
recommend that you always test this
rst on a part that is not visible and
that you always strictly follow the
manufacturer’s instructions. Do not
use bleach!
Do not launder the cushion in a
washing machine!
MAGIC SPONGE
Only use the Miraclean sponge when
normal cleaning with lukewarm
water, so soap and a normal sponge
isn’t sucient!
If stubborn stains remain visible
aer treatment according to the
instructions (see product manual),
you can use the MiraClean sponge
provided. Dip the sponge in water
and rub it over the stain. Do not
rub too hard with this sponge as
this might cause dull patches on a
surface.
ere is no need to use cleaning
products. Water alone is sucient.
6 maintenance

english 7
is sponge is made of melamine
resin and wears away with use. e
sponge is very easy to use and gives
results up to 26 times more quickly
than a traditional microbre cloth.
e magic sponge gets rid of most
stubborn stains without extra eort.
Never use this sponge on high-
gloss surfaces as it may cause dull
patches.
e magic sponge is the solution for
getting rid of stubborn stains such
as felt-tip pens, grease, scu marks,
limescale marks or coee and tea
stains. e magic sponge can be used
on tarpaulin fabric, plastic proles,
glass, steel, chrome, aluminium,
porcelain, articial leather and
many types of oor.
For more information, contact
Extremis: info@extremis.be
IMPORTANT
Stains should be removed
immediately with a clean, so
cloth, particularly in case of dark-
coloured liquids such as wine, ink,
coee, coke, oil and bird droppings.
If le to dry, these liquids may cause
permanent damage!

8 inhoud
LANGUAGES
ENGLISH P. 3
contents p. 3
assembly woody’s chair p. 4
assembly high woody’s chair p. 5
maintenance p. 6
NEDERLANDS P. 9
inhoud p. 9
montage woody’s chair p. 10
montage high woody’s chair p. 11
onderhoud p. 12
DEUTSCH P. 15
inhalt p. 15
montage woody’s chair p. 16
montage high woody’s chair p. 17
pege p. 18
FRANÇAIS P. 21
contenu p. 21
montage woody’s chair p. 22
montage high woody’s chair p. 23
entretien p. 24
ITALIANO P. 27
contenuto p. 27
montaggio woody’s chair p. 28
montaggio high woody’s chair p. 29
manutenzione p. 30
ESPAÑOL P. 33
contenido p. 33
montaje woody’s chair p. 34
montaje high woody’s chair p. 35
mantenimiento p. 36

nederlands 9
INHOUD
1 x schelp 1 x onderstel 4 x binnenzeskantbout M6 x 16
1 x schelp 1 x onderstel 4 x binnenzeskantbout M6 x 16
2 x lange poot met oranje sticker
(44,6 cm)
2 x korte poot
(41,8 cm)
4 x laagbolkopschroef M8 x 25
2 x lange poot met oranje sticker
(73,9 cm)
2 x korte poot
(72,2 cm)
4 x laagbolkopschroef M8 x 25
4 x binnenzeskantbout M6 x 35
WOODY’S CHAIR
HIGH WOODY’S CHAIR
AB
AB

10 montage woody’s chair + montage high woody’s chair
MONTAGE WOODY’S CHAIR
BENODIGDHEDEN
inbussleutel nr. 4 - 5
1 persoon
1. Neem de 2 langste poten met oranje sticker en
monteer deze d.m.v. 2 laagbolkopschroeven M8x25
aan het frame op de plaatsen gemarkeerd door een
oranje sticker. Monteer nu de 2 kortste poten aan
de andere zijde van het frame.
+/- 10 min.
2. Leg de schelp omgekeerd op een zachte ondergrond
met de opening naar achteren gericht zodat je deze
niet beschadigt.
3. Plaats nu het onderstel op de schelp zoals aangegeven
op bovenstaande tekening en bevestig d.m.v. 4
binnenzeskantbouten M6 x 16.
A
A
A
B
B
B

nederlands 11
MONTAGE HIGH WOODY’S CHAIR
BENODIGDHEDEN
inbussleutel nr. 4 - 7
1 persoon
1. Neem de 2 langste poten met oranje sticker en
monteer deze d.m.v. 2 bouten M6 x 35 aan de voorkant
van het onderste frame (zoals aangegeven op
bovenstaande tekening). Monteer nu de 2 kortste
poten aan de andere zijde van het onderste frame.
Draai deze nog niet helemaal aan.
+/- 15 min.
2. Monteer nu de poten d.m.v. 2 laagbolkopschroeven
M8x25 aan het frame op de plaatsen gemarkeerd door
een oranje sticker.
3. Leg de schelp omgekeerd op een zachte ondergrond
met de opening naar achteren gericht zodat je deze
niet beschadigt.
4. Plaats nu het onderstel op de schelp zoals aangegeven
op bovenstaande tekening en bevestig d.m.v. 4
binnenzeskantbouten M6 x 16.
A
A
A
B
B
B
A
B

12 onderhoud
ONDERHOUD
SCHELP
Reinigen met standaard
reinigingsmiddelen zoals met
gebruikt voor de keuken. Gebruik
geen aggressieve producten.
Het beste is om een neutraal
schoonmaakmiddel te gebruiken
voor het reinigen, verdund in water.
Voor hardnekkige verontreinigingen
raden we een wondersponsje aan.
JATOBA
Jatoba vraagt weinig tot geen
onderhoud. Wij raden u echter wel
aan om hardnekkige vuilresten te
verwijderen. Om het hout te
reinigen,
kunt u speciale producten (www.
rmc-extremis.be) gebruiken of
gewoon een harde borstel en wat
water. Zorg er echter voor dat u de
houtvezels niet beschadigt. Gebruik
daarom nooit een hogedrukreiniger.
Hierdoor wordt het gladde
oppervlak van het hout immers
ruwer en raken de houtvezels
onherstelbaar beschadigd.
Zoals vele andere houtsoorten bevat
Jatoba een wateroplosbare gomstof.
In het begin zal het hout deze fel
rode
kleurstof afscheiden telkens het met
water in contact komt. De op het
onderstel en de ondergrond
afgedropen kleurstof blij
wateroplosbaar en zal na zekere tijd
volledig verdwijnen.
We raden ten sterkste aan het hout
voor binnen gebruik in te oliën
tegen vlekken.
Bij levering zijn de houten
onderdelen van onze producten
onbehandeld. Door blootstelling aan
zonlicht en regen zullen ze geleidelijk
een grijs patina krijgen en zal hun
oppervlak ook ruwer worden. Als
u de oorspronkelijke kleur min
of meer wilt behouden, moet u
ze jaarlijks oliën. Hiervoor raden
wij RMC Hybrid Wood Protector
(www.rmc-extremis.com) aan.
De houtbeschermingsproducten
van RMC zijn overal ter wereld
verkrijgbaar. Kijk op www.rmc-
extremis.com voor een verkooppunt
in uw buurt.
BELANGRIJK!
Hout is een levende materie, en
ondanks de superieure kwaliteiten
van Iroko, moet het zich buiten
steeds aanpassen aan extreme
schommelingen van temperatuur en
vochtigheid. Hierdoor opgebouwde
interne spanningen doet het
materiaal “werken” of vervormen en
kan er mogelijk o.a. scheurvorming
veroorzaken. Ook kunnen er kleur-
en structuurverschillen voorkomen.
Deze kenmerken zijn typisch voor
het materiaal, die u door uw keuze
hiervoor accepteert.
U kan mogelijke scheuren
eenvoudig glad schuren met de
hand en een vel schuurpapier of
met een handschuurmachine.
Om de gegalvaniseerde of gelakte
onderdelen te beschermen, moet
u hun randen vooraf afplakken
met stevige afplakband. Gebruik
schuurpapier met korrel 80 en
begin bij de vertikale zijde van
het tafelblad. Houd de machine
evenwijdig aan de tafelrand. Schuur
lichtjes tot de rand weer egaal glad
is. Schuur nu het bovenblad. Let
er op dat u de machine evenwijdig
aan het tafelblad houdt. Behandel
niet enkel de gescheurde plaats,
maar gans uw blad om een egaal
resultaat te bekomen. Om bramen
te vermijden schuurt u de bovenste
rand van het tafelblad glad. Doe dit
deel met de hand. Als alle bramen
verwijderd zijn kan u, aankelijk
van het gewenste
eect, de tafel inoliën met hardhout
olie.
GEPOEDERCOAT FRAME
Reinigen met warm water en een
niet-schurend reinigingsmiddel,
droog daarna met een zachte doek.
Schuurmiddelen en schuursponsjes
mogen NIET gebruikt worden
teneinde krassen te voorkomen.
KUSSEN
Zorg er in eerste instantie voor dat
het kussen niet te vuild wordt door
het kussen binnenshuis te bewaren
als het niet gebruikt wordt.
Lichte verontreiniging wordt het
best verwijderd d.m.v. een droge of
licht vochtige doek. Eventueel mag
het kussen met een zachte borstel
gestofzuigd worden.
Verwijder vlekken door meteen
voorzichtig te deppen met een
absorberende doek. Vlekken aan de
randen kunnen gereinigd worden
door zachtjes in cirkelvormige
bewegingen te deppen naar het
midden van de vlek toe. Eventuele
resterende vlekken kunnen
gereinigd worden met een zachte
spons en een zeepsopje met lauw
water. Indien dit nog niet volstaat,
kan je het kussen even laten weken
in lauw water in combinatie met
een vlekken-verwijderaar. In alle
gevallen raden we aan om dit eerst
te testen op een niet zichtbare plaats
en steeds nauwkeurig de aangegeven
instructies van de leverancier op
te volgen. Gebruik echter nooit
bleekmiddelen!
Het kussen nooit in een wasmachine
wassen.

WONDERSPONSJE
Gebruik de Miraclean spons enkel
wanneer normaal reinigen met lauw
water, zachte zeep en een zachte
spons niet voldoende is.
Wanneer er na het reinigen (zie
handleiding van het product)
nog steeds hardnekkige vlekken
zichtbaar zijn, kun je deze eventueel
verwijderen met de bijgeleverde
sponsjes. Maak het sponsje wat
vochtig met gewoon water en wrijf
over de te reinigen vlekken. Wrijf
niet te hard aangezien dit matte
vlekken zou kunnen veroorzaken.
Het gebruik van
reinigingsmiddelen is overbodig.
Water volstaat.
De MiraClean is gemaakt van
melamine hars en slijt naarmate
gebruik. De spons is zeer eenvoudig
in gebruik en gee tot 26x sneller
resultaat in vergelijking met een
traditionele microvezeldoek.
De spons verwijdert de meest
hardnekkige vlekken zonder extra
moeite.
Niet gebruiken op glanzende
oppervlakken.
De MiraClean schuurspons is de
oplossing voor het verwijderen van
hardnekkig vlekken zoals
stivlekken, vet, schoenstrepen,
kalkvlekken, koeen theeaanslag.
De MiraClean kan gebruikt
worden op zeil, pvc, glas, staal,
chroom, aluminium, porselein,
kunststoeer, en diverse vloeren,
articial leather and many types of
oor.
Voor meer informatie, contacteer
Extremis via info@extremis.be
BELANGRIJK
Wij raden aan om vlekken
onmiddellijk te reinigen met een
schoon en zachte doek, in het
bijzonder sterk gekleurde stoen
zoals wijn, inkt, koe, coca-cola,
olie & vogelpoep. Zoniet kan een
permanente beschadiging ontstaan.
nederlands 13

LANGUAGES
ENGLISH P. 3
contents p. 3
assembly woody’s chair p. 4
assembly high woody’s chair p. 5
maintenance p. 6
NEDERLANDS P. 9
inhoud p. 9
montage woody’s chair p. 10
montage high woody’s chair p. 11
onderhoud p. 12
DEUTSCH P. 15
inhalt p. 15
montage woody’s chair p. 16
montage high woody’s chair p. 17
pege p. 18
FRANÇAIS P. 21
contenu p. 21
montage woody’s chair p. 22
montage high woody’s chair p. 23
entretien p. 24
ITALIANO P. 27
contenuto p. 27
montaggio woody’s chair p. 28
montaggio high woody’s chair p. 29
manutenzione p. 30
ESPAÑOL P. 33
contenido p. 33
montaje woody’s chair p. 34
montaje high woody’s chair p. 35
mantenimiento p. 36
14 inhalt

WOODY’S CHAIR
HIGH WOODY’S CHAIR
AB
AB
4 x Innensechskantschraube
M6x35
2 x langes Bein mit orangen Aul-
bern (73,9 cm)
2 x kurzes Bein
(72,2 cm)
4 x Flachrundkopfschraube
M8 x 25
1 x Sitzschale 1 x Untergestell 4 x Innensechskantschraube
M6x16
2 x langes Bein mit orangen Aul-
bern (44,6 cm)
2 x kurzes Bein
(41,8 cm)
4 x Flachrundkopfschraube M8 x 25
1 x Sitzschale 1 x Untergestell 4 x Innensechskantschraube M6
x 16
INHALT
deutsch 15

16 montage woody’s chair + montage high woody’s chair
MONTAGE WOODY’S CHAIR
+/- 10 min.
A
B
A
B
2. Legen Sie die Sitzschale umgekehrt mit der Önung
nach hinten auf einen weichen Untergrund, sodass Sie
die Schale nicht beschädigen.
3. Setzen Sie jetzt das Untergestell wie auf obiger
Zeichnung gezeigt auf die Schale und befestigen Sie sie
mit 4Innensechskantschrauben M6x16.
1. Nehmen Sie die beiden längeren Beine mit dem
orangen Auleber . Montieren Sie sie mithilfe der
2 Rundkopfschrauben M8x25 an den Stellen an den
Rahmen, die mit einem orangen Auleber markiert
sind. Montieren Sie jetzt die beiden kürzeren Beine
an der anderen Seite des Rahmens.
WAS SIE BRAUCHEN
inbusschlüssel Nr. 4 - 5
1 Person
A
B

MONTAGE HIGH WOODY’S CHAIR
+/- 15 min.
A
A
B
B
A
B
4. Setzen Sie jetzt das Untergestell wie auf obiger
Zeichnung gezeigt auf die Schale und befestigen Sie sie
mit 4 Innensechskantschrauben M6x16.
2. Nehmen Sie die montierten Beine vom 1. Schritt und
montieren Sie sie mit den 4 Flachrundkopfschrauben
M8x25 an den Rahmen (ACHTUNG: Sorgen Sie
dafür, dass die orangen Auleber übereinkommen).
Ziehen Sie jetzt alle Schrauben fest an.
3. Legen Sie die Sitzschale umgekehrt mit der Önung
nach hinten auf einen weichen Untergrund, sodass Sie
die Schale nicht beschädigen.
1. Nehmen Sie die 2 längeren Beine mit dem orangen
Auleber . Montieren Sie sie mit den 2 Schrauben
M6 x 35 an der Vorderseite des unteren Rahmens (wie
in obiger Zeichnung angegeben). Montieren Sie jetzt
die beiden kürzeren Beine an der anderen Seite des
unteren Rahmens. Ziehen Sie die Schrauben noch
nicht vollständig an.
WAS SIE BRAUCHEN
inbusschlüssel Nr. 4 - 7
1 persoon
deutsch 17
A
B

PFLEGE
SITZSHALE
Mit üblichen Reinigungsmitteln
säubern, wie sie auch in der Küche
verwendet werden. Verwenden
Sie keine aggressiven Produkte.
Am besten ist es, ein neutrales
Reinigungsmittel zu verwenden, das
mit Wasser verdünnt wird.
Bei hartnäckigen Flecken raten wir
zu einem Wunderschwamm.
JATOBA
Jatoba benötigen wenig oder
gar keine Pege. Wir empfehlen
Ihnen jedoch nachdrücklich,
anhaenden Schmutz zu entfernen.
Zur Reinigung des Holzes können
Sie Spezialprodukte (www.rmc-
extemis.be) oder einfach nur eine
harte Bürste und etwas Wasser
verwenden.
Achten Sie darauf, die Holzfasern
nicht irreparabel zu beschädigen.
Aus diesem Grund sollten Sie
niemals einen Hochdruckreiniger
verwenden, da dadurch die glatte
Oberäche des Holzes aufgeraut
wird und die Holzfasern irreparabel
beschädigt werden.
Am Anfang kann das Holz,
wenn es mit Wasser in Kontakt
kommt, diesen hellroten Farbsto
ausscheiden. Der auf das Gestell und
die Unteräche getrope Farbsto
ist nach wie vor wasserlöslich
und ist nach einiger Zeit völlig
verschwunden.
Wir raten unbedingt dazu, das
Holz
für die Verwendung in
Innenräumen zum Schutz vor
Flecken einzuölen.
Bei der Lieferung sind die Holzteile
unserer Produkte unbehandelt.
Wenn sie Sonne und Regen
ausgesetzt sind, werden sie mit
der Zeit eine silbergraue Farbe
annehmen und ihre Oberäche wird
rauer. Wenn Sie ihre ursprüngliche
Farbe zu einem gewissen Grad
bewahren wollen, sollten Sie sie
einmal jährlich ölen. Wir empfehlen
die Verwendung von RMC Hybrid
Wood Protector (www.rmc-
extremis.be). RMC-
Produkte zur Holzbehandlung sind
weltweit erhältlich. Auf der Webseite
www.rmc-extremis.com nden Sie
einen Händler in Ihrer Nähe
WICHTIG!
Jatobaholz ist ein lebendes Material,
das sich trotz seiner vorzüglichen
Eigenschaen ständig an extreme
Temperatur- und
chtigkeitsschwankungen
anzupassen hat, was für Spannungen
im Holz sorgt. Aufgrund dieser
Spannungen fängt das Holz zu
„arbeiten“ an, was zu Rissen sowie
Farb- und Strukturunterschieden
führt. Diese Eigenschaen sind
charakteristisch für das Material.
Wenn Sie sich für diese Holzart
entscheiden, müssen Sie diese
Eigenschaen einfach in Kauf
nehmen.
Eventuelle Risse können Sie
einfach mit der Hand und einem
Blatt Schleifpapier oder mit einer
Handschleifmaschine abschleifen.
Um verzinkte und gestrichende Teile
zu schützen, decken Sie die Kanten
mit sehr robustem Abdeckband.
Verwenden Sie Schleifpapier mit
80er Körnung und beginnen
Sie an der senkrechten Seite der
Tischplatte. Halten Sie die Maschine
plan an den Tischrand. Leicht
anschleifen, bis der Rand wieder
gleichmäßig glatt ist. Danach die
Oberseite der Tischplatte schleifen.
Achten Sie darauf, dass Sie die
Maschine plan auf die Tischplatte
aufsetzen. Schleifen Sie nicht nur die
gerissene Stelle, sondern die gesamte
Platte, um ein gleichmäßiges
Ergebnis zu erzielen. Um Grate zu
vermeiden, schleifen Sie den oberen
Rand der Tischplatte glatt. Schleifen
Sie diesen Teil mit der Hand. Wenn
alle Grate entfernt sind, können Sie
den Tisch je nach gewünschtem
Eekt mit Hartholzöl einölen.
PULVERBESCHICTET
UNTERGESTELL
Mit lauwarmem Wasser und einem
milden Reinigungsmittel reinigen,
danach mit einem weichen Tuch
abtrocknen. Scheuermittel und
Scheuerschwämme dürfen NICHT
verwendet werden, um Kratzer zu
vermeiden.
KISSEN
Achten Sie in erster Linie darauf,
dass das Kissen nicht zu schmutzig
wird. Bewahren Sie es deshalb
im Haus auf, wenn Sie es nicht
benötigen.
Entfernen Sie Flecken, indem Sie sie
gleich vorsichtig mit einem
saugfähigen Tuch abtupfen.
Flecken an den Rändern können
Sie reinigen, indem Sie vorsichtig
in kreisförmigen Bewegungen
in Richtung der Mitte des Flecks
tupfen. Eventuell noch verbleibende
Flecken können mit einem weichen
Schwamm und einer Seifenlauge
mit lauwarmem Wasser gereinigt
werden. Sollte das noch nicht
genügen, können Sie das Kissen eine
Weile in Kombination mit einem
Fleckenentferner in lauwarmem
Wasser einweichen lassen. In allen
Fällen raten wir Ihnen, dies erst
an einer nicht sichtbaren Stelle
zu testen und immer genau die
Anweisungen des Lieferanten zu
befolgen. Verwenden Sie jedoch
keinesfalls Bleichmittel!
Leichte Verunreinigungen entfernen
Sie am besten mit einem trockenen
oder leicht feuchten Tuch. Eventuell
darf das Kissen mit einer weichen
Bürste des Staubsaugers abgesaugt
werden.
18 pflege

deutsch 19
Das Kissen niemals in einer
Waschmaschine waschen!
WUNDERSCHAMM
Den Miraclean Wunderschamm
nur benutzen, wenn säubern mit
lauwarmem wasser, milder seife und
einem normalen schwamm nicht
reicht.
Wenn hartnäckige Flecken sichtbar
bleiben nach Behandlung (siehe
Gebrauchsanweisung des
Produktes), können Sie den
mitgelieferten Wunderschwamm
benutzen. Tauchen Sie den
Schwamm in Wasser und reiben Sie
über den Fleck. Reiben Sie nicht zu
hart mit diesem Schwamm um
matte Flecken zu vermeiden.
Sie brauchen kein andere
Reinigungsmittel. Wasser allein
reicht.
Dieser Schwamm ist aus
Melaminharz gefertigt und nutzt ab
nach Verwendung.
Der Schwamm ist sehr einfach zu
verwenden und gibt bis 26 Mal
schneller Erfolg als mit einem
traditionellen Mikrofasertuch.
Der Wunderschwamm säubert die
meisten hartnäckigen Flecken ohne
extra Mühe.
Den Schwamm nie auf Oberächen
in Hochglanz verwenden um matte
Flecken zu vermeiden.
Der Wunderschwamm ist die
Lösung gegen hartnäckige Flecken
wie Filzstie, Fett, Abriebspuren,
Kalkecken oder Kaee und
Tee Flecken. Den Schwamm
kann benutzt werden auf Plane,
Kunststoprole, Glass, Stahl,
Chrom, Aluminium, Porzellan,
Kunstleder und viele Arten von
Boden.
Für weitere Informationen, wenden
Sie sich Extremis: info@extremis.be
WICHTIG
Wit empfehlen Ihnen, Flecken
sofort mit einem sauberen, weichen
Tuch zu entfernen, insbesondere
bei farbintensiven Produkten wie
Wein, Tinte, Kaee, Coca-Cola, öl
und Vogelkot. Wenn Sie nicht daran
halten, kann dass zu bleibenden
Schäden führen.

LANGUAGES
ENGLISH P. 3
contents p. 3
assembly woody’s chair p. 4
assembly high woody’s chair p. 5
maintenance p. 6
NEDERLANDS P. 9
inhoud p. 9
montage woody’s chair p. 10
montage high woody’s chair p. 11
onderhoud p. 12
DEUTSCH P. 15
inhalt p. 15
montage woody’s chair p. 16
montage high woody’s chair p. 17
pege p. 18
FRANÇAIS P. 21
contenu p. 21
montage woody’s chair p. 22
montage high woody’s chair p. 23
entretien p. 24
ITALIANO P. 27
contenuto p. 27
montaggio woody’s chair p. 28
montaggio high woody’s chair p. 29
manutenzione p. 30
ESPAÑOL P. 33
contenido p. 33
montaje woody’s chair p. 34
montaje high woody’s chair p. 35
mantenimiento p. 36
20 contenu

WOODY’S CHAIR
HIGH WOODY’S CHAIR
AB
AB
4 x vis à six pans creux M6x35
2 x pied long avec autocollant
orange (73,9 cm)
2 x pied court
(72,2 cm)
4 x vis à tête bombée M8x25
1 x coque 1 x plaque de montage 4 x vis à six pans creux M6x16
2 x pied long avec autocollant
orange (44,6 cm)
2 x pied court
(41,8 cm)
4 x vis à tête bombée M8x25
1 x coque 1 x plaque de montage 4 x vis à six pans creux M6 x 16
CONTENU
français 21

22 montage woody’s chair + montage high woody’s chair
MONTAGE WOODY’S CHAIR
+/- 10 min.
A
A
B
B
2. Retournez la coque sur une surface douce avec
l’ouverture vers l’arrière, de manière à ne pas
l’endommager.
3. Positionnez ensuite le piètement comme indiqué sur
l’illustration ci-dessus, et xez au moyen de 4 vis à six
pans creux M6x16.
1. Prenez les 2 plus longs pieds avec l’autocollant orange
et xez-les à la plaque de montage au moyen de 2 vis à
tête bombée M8x25, aux endroits marqués par un
autocollant orange. Fixez ensuite les 2 pieds les plus
courts sur l’autre côté du cadre.
OUTILS
clé Allen n° 4 - 5
1 personne
A
B

MONTAGE HIGH WOODY’S CHAIR
+/- 15 min.
A
A
B
B
A
B
4. Positionnez ensuite le piètement comme indiqué sur
l’illustration ci-dessus, et xez au moyen de 4 vis à six
pans creux M6x16.
2. Prenez la structure assemblée à l’étape 1 et xez-la au
moyen de 4 vis à tête bombée M8x25 à la plaque de
montage (ATTENTION: ériez que les autocollants
orange correspondent). Vous pouvez à présent serrer
toutes les vis.
3. Retournez la coque sur un surface douce avec
l’ouverture vers l’arrière, de manière à ne pas
l’endommager.
1. Prenez les 2 plus longs pieds avec l’autocollant orange
et xez-les au moyen de 2 vis M6 x 35 à l’avant du
cadre bas (comme illustré sur le dessin ci-dessus).
Fixez ensuite les 2 pieds les plus courts sur l’autre
côté du cadre bas. Ne serrez pas encore tout à fait les
vis.
clé Allen n° 4 - 7
1 personne
OUTILS
français 23
A
B

ENTRETIEN
COQUE
Lavez le plateau et les bancs avec un
nettoyant ordinaire pour cuisine.
N’utilisez pas de produits agressifs.
Le mieux est d’utiliser un nettoyant
neutre dilué dans de l’eau.
Pour les saletés tenaces, nous
recommandons l’utilisation d’une
éponge magique.
JATOBA
Les bois Jatoba ne demandent que
peu ou pas d’entretien, mais nous
recommandons néanmoins
fortement d’enlever la saleté
persistante. Pour nettoyer le bois,
vous pouvez utiliser des produits
spéciaux (www.rmc-extremis.be) ou
tout simplement une brosse à poils
durs et un peu d’eau. Soyez attentif
à ne pas endommager les bres du
bois. N’utilisez dès lors jamais
de nettoyeur à haute pression car
cela rendrait la surface lisse du
bois rugueuse et endommagerait
irrémédiablement les bres du bois.
Comme beaucoup d’autres essences,
le Iroko contient une gomme soluble
à l’eau. Au début, le bois sécrétera ce
colorant rouge chaque fois qu’il entre
en contact avec l’eau. Le colorant
ainsi tombé sur le piètement et sur le
sol reste soluble à l’eau et disparaîtra
complètement après quelque temps.
Il est fortement recommandé de
huiler le bois à usage intérieur pour
le protéger contre les taches.
À la livraison, les parties en bois
de nos produits sont non traitées.
L’exposition au soleil et à la pluie
modiera progressivement leur
aspect et les rendra grisâtres.
Leur surface deviendra aussi plus
rugueuse. Si vous souhaitez leur
conserver leur couleur d’origine, il
faut les huiler une fois par an. Nous
recommandons l’utilisation de RMC
Hybrid Wood Protector (www.
rmc-extremis.com). Les produits
d’entretien du bois RMC sont
disponibles dans le monde entier.
Rendez-vous sur le site Web www.
rmc-extremis.com pour trouver un
revendeur dans vos environs
IMPORTANT !
Le bois est un matériau vivant; bien
que Jatoba soit un bois de qualité
supérieure, il doit s’adapter à des
variations extrêmes de températures
et à l’humidité. Cela crée des
tensions
internes qui font “travailler” le
matériau et peuvent causer entre
autres des ssures. Des diérences de
couleur et de structure peuvent aussi
apparaître. Ces caractéristiques sont
typiques du matériau, et vous les
acceptez par votre choix.
Vous pouvez poncer d’éventuelles
gries simplement à la main avec
une
feuille de papier émeri ou avec une
ponceuse manuelle. Protégez les
parties galvanisées ou peintes avec
du ruban de masquage. Utilisez
du papier émeri de grain 80, et
commencez sur la face verticale du
plateau de table. Tenez la machine
parallèlement au bord de la table.
Poncez légèrement jusqu’à ce que
le bord soit à nouveau parfaitement
lisse. Poncez à présent le dessus du
plateau. Veillez à tenir la machine
bien parallèle au plateau de table. Ne
vous limitez pas à la partie griée
mais poncez l’ensemble du plateau
an d’obtenir un résultat égal.
Pour éviter les arbes, lissez l’arête
supérieure du plateau. Eectuez
cette
partie-là à la main. Une fois que
toutes les barbes ont été enlevées,
vous pouvez, en fonction de l’eet
souhaité, huiler la table avec de
l’huile pour bois dur.
CADRE LAQUÉS
Nettoyage avec de l’eau tiède et un
détergent doux, Nettoyage avec de
l’eau tiède et un détergent doux,
séchage avec un chion doux. NE
PAS utiliser de poudre abrasive ou
d’éponge à récurer, an d’éviter les
gries.
COUSSIN
Avant tout, pour éviter que le coussin
ne se salisse excessivement, veillez à
le ranger à l’intérieur lorsqu’il n’est
pas utilisé.
Les souillures légères peuvent être
enlevées avec un chion sec ou
légèrement humide. Vous pouvez
éventuellement aspirer le coussin
avec une brosse douce.
Épongez immédiatement les taches
éventuelles avec un chion
absorbant. Les taches sur les bords
peuvent être nettoyées en exécutant
doucement des mouvements
circulaires vers le centre de la tache.
Le cas échéant, vous pouvez éliminer
les taches résiduelles avec une
éponge douce et une savonnée légère
à l’eau tiède. Si cela ne sut pas,
faites tremper le coussin brièvement
dans de l’eau tiède additionnée d’un
produit détachant. Quoi qu’il en
soit, nous vous recommandons de
toujours eectuer un test préalable
sur un endroit non visible, et de
toujours suivre scrupuleusement
les instructions du fournisseur.
N’utilisez en aucun cas d’agent de
blanchiment!
Ne lavez jamais le coussin en
machine !
24 entretien

français 25
ÉPONGE MIRACLE
Vous pouvez seulement utiliser
l’éponge miraclean si nettoyer avec
de l’eau tiède, savon doux et une
éponge normale n’est pas susant.
S’il y a encore des taches tenaces
visibles après nettoyer (voyez
le mode d’emploi du produit),
vous pouvez utiliser une éponge
MiraClean ci-incluse. Mouillez
l’éponge avec de l’eau et frottez les
taches. Ne frottez pas trop dur
parce que ça peut causer des taches
mattes.
L’usage des détergents n’est pas
nécessaire, l’eau sut.
Le MiraClean consiste de résine
mélanine et s’use après usage.
L’éponge est très facile à utiliser et
donne résultat jusqu’à 26x plus vite
par rapport au chion microbres.
L’éponge miracle enlève les
taches plus tenaces sans eort
supplémentaire.
N’utilisez pas sur les surfaces
brillantes.
L’éponge MiraClean est la solution
pour enlever les taches tenaces
comme des taches de marqueur, de
graisse, des marques de soulier, des
taches de chaux, de café et de thé.
Le MiraClean peut être utilisé sur
bâche, PVC, verre, acier, chrome,
aluminium, porcelaine, cuir
synthétique et des sols divers.
Pour plus d’informations, contactez
Extremis: info@extremis.be
IMPORTANT
Nous conseillons de laver
immédiatement les taches avec
un chion propre et doux, en
particulier en cas de taches très
colorées telles que vin, encre, café,
cola, huild et entes d’oiseaux.
À défaut de quoi, votre produit
risque de s’endommager de façon
permanente!

LANGUAGES
ENGLISH P. 3
contents p. 3
assembly woody’s chair p. 4
assembly high woody’s chair p. 5
maintenance p. 6
NEDERLANDS P. 9
inhoud p. 9
montage woody’s chair p. 10
montage high woody’s chair p. 11
onderhoud p. 12
DEUTSCH P. 15
inhalt p. 15
montage woody’s chair p. 16
montage high woody’s chair p. 17
pege p. 18
FRANÇAIS P. 21
contenu p. 21
montage woody’s chair p. 22
montage high woody’s chair p. 23
entretien p. 24
ITALIANO P. 27
contenuto p. 27
montaggio woody’s chair p. 28
montaggio high woody’s chair p. 29
manutenzione p. 30
ESPAÑOL P. 33
contenido p. 33
montaje woody’s chair p. 34
montaje high woody’s chair p. 35
mantenimiento p. 36
26 contenuto

WOODY’S CHAIR
HIGH WOODY’S CHAIR
AB
AB
4 x vite con esagono incassato
M6x35
2 x gamba lunga con adesivo aran-
cione (73,9 cm)
2 x gamba corta
(72,2 cm)
4 x vite a testa tonda M8x25
1 x seduta 1 x supporto 4 x vite con esagono incassato M6
x 16
2 x gamba lunga con adesivo aran-
cione (44,6 cm)
2 x gamba corta
(41,8 cm)
4 x vite a testa tonda M8x25
1 x seduta 1 x supporto 4 x vite con esagono incassato
M6x16
CONTENUTO
italiano 27

+/- 10 min.
A
A
B
B
1. Prendere le 2 gambe più lunghe con l’adesivo arancione
e ssarle alla struttura sui punti ugualmente
contrassegnati con un adesivo arancione utilizzando 2
viti a testa tonda M8x25. Montare quindi sull’altro
lato della struttura le 2 gambe più corte .
A
B
2. Appoggiare la seduta capovolta su una base morbida,
con l’apertura rivolta all’indietro, di modo da non
danneggiare la seduta.
3. Posizionare ora il supporto sulla seduta come indicato
nella gura sopra riportata e ssarlo con le 4 viti con
esagono incassato M6x16.
MONTAGGIO WOODY’S CHAIR
NECESSARIO PER IL MONTAGGIO
chiave a brugola nr.
4 - 5
1 persona
28 montaggio woody’s chair + montaggio high woody’s chair

+/- 15 min.
A
A
B
B
A
B
4. Posizionare ora il supporto sulla seduta come indicato
nella gura sopra riportata e ssarlo con le 4 viti con
esagono incassato M6x16.
2. Prendere le gambe montate al passo 1 e montarle sulla
struttura utilizzando 4 viti a testa tonda M8x25
(ATTENZIONE: assicurarsi che gli adesivi arancioni
corrispondano). Serrare quindi fermamente tutti i
bulloni.
3. Appoggiare la seduta capovolta su una base morbida,
con l’apertura rivolta all’indietro, di modo da non
danneggiare la seduta.
1. Prendere le 2 gambe più lunghe con l’adesivo arancione
e montarle utilizzando i 2 bulloni M6 x 35 sul lato
anteriore della struttura inferiore (come indicato nel
disegno sopra riportato). Montare quindi le due
gambe più corte sull’altro lato della struttura
inferiore. Non avvitare ancora del tutto.
MONTAGGIO HIGH WOODY’S CHAIR
NECESSARIO PER IL MONTAGGIO
chiave a brugola nr.
4 - 7
1 persona
italiano 29
A
B

MANUTENZIONE
SEDUTA
Pulire con detergenti standard come
quelli utilizzati per la cucina. Non
utilizzare prodotti aggressivi.
L’ideale è utilizzare un detergente
neutro diluito in acqua.
Per le macchie dicili consigliamo
di utilizzare un panno magico.
JATOBA
Il legno di Jatoba non richiedono
particolare manutenzione. Tuttavia,
consigliamo vivamente di rimuovere
lo sporco persistente. Per pulire il
legno è possibile utilizzare prodotti
specici (www.rmc-extremis.be) o
semplicemente una spazzola a setole
dure con un po’ d’acqua. Fare
attenzione a non danneggiare
irreparabilmente le bre del legno.
Per evitarlo, non utilizzare mai
un idropulitrice ad alta pressione,
che graerebbe la supercie
liscia del legno danneggiandone
irrimediabilmente le bre.
Come molte altre essenze, la Iroko
contiene una gomma idrosolubile.
Nel primo tempo dopo líacquisto
questo colorante rosso si liberer ogni
volta che la Jatoba entra a contatto
con líacqua. Il colorante sulle
gambe e sul suolo resta idrosolubile
e sparir‡ dunque completamente
dopo qualche tempo.
Consigliamo vivamente di oliare il
legno da utilizzare all’interno per
evitare le macchie.
Al momento della consegna, le parti
in legno dei nostri prodotti sono non
trattate. L’esposizione al sole e alla
pioggia ne modicherà
gradualmente
il colore a un grigio argentato,
rendendone inoltre ruvida la
supercie. Per preservarne il più
possibile il colore originale, le
parti andrebbero trattate con olio
una volta all’anno. Consigliamo di
utilizzare il prodotto RMC Hybrid
Wood Protector (www.rmc-
extremis.com). I prodotti RMC per
la cura del legno sono disponibili
in tutto il mondo. Per trovare il
rivenditore più vicino,
visitare il sito web www.rmc-
extremis.com
IMPORTANTE!
Il legno è un materiale vivo e,
nonostante sia un legno di qualità
superiore, all’aperto Jatoba deve
costantemente adattarsi alle
oscillazioni estreme di temperatura
e umidità. A causa delle tensioni
interne derivanti da questi
adattamenti il legno “si deforma” ed
è anche possibile che si creino delle
crepe. Possono anche determinarsi
variazioni nel colore e nella
struttura. Queste caratteristiche
sono tipiche del materiale:
scegliendolo, accettate anche queste
possibili variazioni.
Eventuali gra possono essere
eliminati semplicemente a mano
utilizzando della carta vetrata
oppure servendosi di una levigatrice
manuale. Per proteggere le parti
galvanizzate o verniciate, coprirne
i bordi con scotch di carta molto
resistente. Utilizzare carta vetrata a
grana 80 iniziando dal lato verticale
del piano del tavolo. Tenere la
levigatrice in posizione parallela
rispetto al bordo del tavolo. Levigare
leggermente nché il bordo è di
nuovo liscio e omogeneo. Levigare
quindi il ripiano. Fare attenzione a
mantenere la levigatrice in posizione
parallela rispetto alla supercie del
tavolo. Per ottenere un risultato
uniforme, non trattare soltanto
le parti danneggiate, ma l’intera
supercie. Per evitare imperfezioni,
levigare il bordo superiore del piano
del tavolo a mano. Quando tutte le
imperfezioni saranno state rimosse,
sarà possibile, a seconda dell’eetto
desiderato, trattare il tavolo con olio
per legno duro.
GAMBE VERNICATE
POLVORE
Pulire con acqua calda e un
detergente non abrasivo e quindi
ascuigare con un panno morbido.
NON utilizzare prodotti e spugnette
abrasivi per evitare di graare la
supercie.
CUSCINO
Prima di tutto assicurarsi che il
cuscino non si sporchi
eccessivamente, conservandolo al
chiuso quando non viene utilizzato.
Piccole impurità possono essere
eliminate agendo con un panno
asciutto o leggermente umido o,
eventualmente, agendo con un
aspirapolvere dotato di spazzola
morbida.
Eliminare le macchie
immediatamente tamponando
delicatamente con un panno
assorbente. Le macchie sui bordi
possono essere eliminate premendo
delicatamente con movimenti
circolari verso il centro della
macchia. Eventuali macchie residue
possono essere rimosse con una
spugna delicata imbevuta in acqua
tiepida saponata. Qualora non
fosse ancora suciente, mettere
brevemente a mollo il cuscino
in acqua tiepida applicando
uno smacchiatore. In ogni caso,
si consiglia di provare prima su
un punto nascosto del cuscino e
di seguire sempre attentamente
le istruzioni del fornitore. Non
candeggiare!
Non lavare mai il cuscino in
lavatrice!
30 manutenzione

italiano 31
SPUGNA MAGICA
Utilizzare la spugna Miraclean solo
quando non basta la normale pulizia
con acqua tiepida, sapone delicato e
una spugna morbida.
Quando, anche dopo la pulizia
(vedere il manuale del prodotto),
rimangono visibili macchie
ostinate, eventualmente si possono
rimuovere con le spugne in
dotazione. Inumidire la spugna solo
con acqua e stronare le macchie da
pulire. Non stronare troppo forte,
altrimenti potrebbero formarsi
macchie opache.
Non è necessario utilizzare
detergenti ma è suciente l’acqua.
La spugna MiraClean è realizzata in
resina melamminica e si consuma
con l’uso. La spugna è molto
semplice da utilizzare e raggiunge
i risultati desiderati 26 volte più
velocemente rispetto a un panno in
microbra tradizionale.
La spugna rimuove senza fatica
anche le macchie più ostinate.
Non utilizzare mai la spugna su
superci lucide.
La spugna MiraClean è la soluzione
ideale per la rimozione di macchie
ostinate, come quelle di pennarello,
grasso, segni di scarpe, macchie di
calcare, caè e tè. La spugna
MiraClean può essere utilizzata
sulla tela cerata, sui prolati in PVC,
vetro, acciaio, cromo, alluminio,
porcellana, pelle sintetica e diversi
tipi di pavimenti.
Per ulteriori informazioni,
contattare Extremis:
info@extremis.be
IMPORTANTE
Consigliamo di pulire le macchie
immediatamente con un panno
morbido e pulito, in particolare se
dovute a sostanze molto colorate
come vino, inchiostro, caè, coca-
cola, olio e escrementi di ucceli.
Diversamente la supercie potrebbe
essere danneggiata in modo
permanente.

LANGUAGES
ENGLISH P. 3
contents p. 3
assembly woody’s chair p. 4
assembly high woody’s chair p. 5
maintenance p. 6
NEDERLANDS P. 9
inhoud p. 9
montage woody’s chair p. 10
montage high woody’s chair p. 11
onderhoud p. 12
DEUTSCH P. 15
inhalt p. 15
montage woody’s chair p. 16
montage high woody’s chair p. 17
pege p. 18
FRANÇAIS P. 21
contenu p. 21
montage woody’s chair p. 22
montage high woody’s chair p. 23
entretien p. 24
ITALIANO P. 27
contenuto p. 27
montaggio woody’s chair p. 28
montaggio high woody’s chair p. 29
manutenzione p. 30
ESPAÑOL P. 33
contenido p. 33
montaje woody’s chair p. 34
montaje high woody’s chair p. 35
mantenimiento p. 36
32 contenido

WOODY’S CHAIR
HIGH WOODY’S CHAIR
AB
AB
4 x perno de cabeza hexagonal
interior M6x35
2 x pata larga con pegatina de color
naranja (73,9 cm)
2 x pata corta
(72,2 cm)
4 x tornillo de cabeza abombada
M10x70
1 x schelp 1 x onderstel 4 x perno de cabeza hexagonal
interior M6x16
2 x pata larga con pegatina de color
naranja (44,6 cm)
2 x pata corta
(41,8 cm)
4 x tornillo de cabeza abombada
M10x70
1 x concha 1 x armazón 4 x perno de cabeza hexagonal
interior M6x16
CONTENIDO
español 33

+/- 10 min.
A
A
B
B
2. Ponga la concha al revés en una supercie blanda con
la apertura hacia atrás para no dañar la concha.
3. Ahora ponga el soporte sobre la concha tal como se
ilustra en el dibujo superior y fíjelo mediante 4 pernos
de cabeza hexagonal interior M6x16.
1. Tome las 2 patas más largas con la pegatina naranja
y fíjelas al armazón mediante 2 tornillos de cabeza
abombada M8x25, en los lugares indicados por una
pegatina naranja. Ahora, je las 2 patas más cortas
al otro lado del armazón.
MONTAJE WOODY’S CHAIR
UTENSILOS
llave macho hexagonal nr.
4 - 5
1 persona
34 montaje woody’s chair + montaje high woody’s chair
A
B

+/- 15 min.
A
A
B
B
A
B
4. Ahora ponga el soporte sobre la concha tal como se
ilustra en el dibujo superior y fíjelo mediante 4 pernos
de cabezahexagonal interior M6x16.
2. Tome las patas jadas en el paso 1 y fíjelas al armazón
mediante 4 tornillos de cabeza abombada M8x25
(¡CUIDADO!: asegúrese de que las pegatinas naranjas
corresponden). Ahora atornille todos los pernos.
3. Ponga la concha al revés en una supercie blanda con
la apertura hacia atrás para no dañar la concha.
1. Tome las 2 patas más largas con la pegatina naranja
y fíjelas al frente del armazón inferior mediante 2
pernos M6x35 (como se muestra en la gura de arriba).
Ahora je las 2 patas más cortas al otro lado del
armazón. Todavía no apriete los pernos.
MONTAJE HIGH WOODY’S CHAIR
UTENSILOS
llave macho hexagonal nr.
4 - 7
1 persona
español 35
A
B

MANTENIMIENTO
CONCHA
Limpiar con los productos de
limpieza clásicos que se suelen
utilizar para la cocina. No utilice
productos agresivos. Conviene
utilizar un producto neutro para la
limpieza, diluido en agua.
Para la eliminación de suciedad
persistente, aconsejamos utilizar la
esponja mágica.
JATOBA
La madera de Jatoba necesitan
poco o ningún mantenimiento.
Sin embargo, está fuertemente
recomendado eliminar la suciedad
persistente. Para limpiar la
madera, puede emplear productos
especiales (www.rmc-extremis.
be) o simplemente un cepillo de
cerdas duras y agua. Evite dañar
irreparablemente las bras de la
madera. Por eso, nunca emplee una
manguera a presión; la supercie
lisa de la madera se puede
volver áspera y puede dañar
irreparablemente las bras de la
madera.
Al principio, la madera liberará un
tinte rojo cada vez que entre en
contactocon agua. El tinte que se
pueda ltrar a la estructura o la
supercie inferior sigue siendo
soluble, por lo que desaparecerá por
completo al cabo de cierto tiempo.
Es fuertemente recomendado
aceitar la madera para uso interior;
así se evitan manchas.
Las partes de madera de nuestros
productos se suministran sin
tratamiento. Expuestas al sol y a la
lluvia, adquirirán una pátina gris
plateada. Si quiere mantener más o
menos el color original, trátelas con
aceite una vez al año. Recomendamos
emplear RMC Hybrid Wood
Protector (www.rmc-extremis.
com). Los productos para el
tratamiento de madera RMC se
venden en el mundo entero. Visite
el sitio web www.rmc-extremis.be
para buscar un revendedor cerca de
usted.
¡IMPORTANTE!
La madera es un material vivo, por
lo que, a pesar de la calidad superior
de la Jatoba, se ve afectada por los
cambios bruscos de temperatura y
por la humedad. Como consecuencia
de las tensiones internas provocadas
por estas constantes adaptaciones,
la madera se alabea. Entre otras
cosas, este alabeo puede provocar
la aparición de grietas. Asimismo,
puede producirse cambios en el
color y en la estructura. Dado que
estas características son inherentes
al material, quien lo elige debe
aceptarlas.
Es posible lijar grietas a mano y con
papel de lija, o con una lijadora. Para
proteger las partes galvanizadas o
pintadas, cubra los bordes con cinta
de enmascarar muy robusta. Emplee
papel de lija de grano 80 y empiece
por el lado vertical del tablero.
Mantenga la lijadora paralela al
borde de la mesa. Lije ligeramente
hasta que el borde sea plano.
Ahora lije la parte superior. Cuide
de mantener la lijadora paralela
al tablero. No sólo trate la parte
agrietada, pero todo el tablero. Esto
asegura que el resultado es llano.
Para evitar barbas,
lije a mano el borde superior del
tablero. Una vez eliminadas las
barbas, puede tratar la mesa con
aceite para madera dura, en función
del efecto deseado.
PATAS ALLUMINIO CON
PINTURA EN POLVO
Limpiar con agua caliente y un
producto de limpieza no abrasivo,
luego secar con un trapo suave.
NO utilice abrasivos ni estropajos ya
que su uso puede producir rayas.
COJÍN
Procure que la colchoneta no se
ensucie demasiado guardándola
dentro de casa cuando no se usa.
Quite las manchas humedeciéndolas
inmediatamente y cuidadosamente
con un trapo absorbente. Las
manchas en los bordes pueden ser
limpiadas frotando con suavidad
en un movimiento circular hacia el
centro de la mancha. Las eventuales
otras manchas pueden ser limpiadas
con una esponja suave y una solución
de agua tibia y jabón. Si todavía no
es suciente, es posible poner la
colchoneta brevemente a remojar en
agua tibia con un quitamanchas. En
todos casos, recomendamos
probarlo primero en un lugar no
visible y seguir minuciosamente
las instrucciones indicadas
del proveedor. ¡Nunca utilice
decolorantes!
¡No lave nunca la colchoneta en una
lavadora!
Cuando está ligeramente sucia,
utilice un trapo seco o ligeramente
húmedo. Eventualmente puede
pasar sobre la colchoneta la
aspiradora utilizando el cepillo
suave.
36 mantenimiento

español 37
ESPONJA MÁGICA
Sólo emplee la esponja Miraclean
cuando una limpieza normal con
agua tibia, jabón suave y una esponja
suave no es suciente.
Si aún quedan manchas persistentes
después de la limpieza (véase el
manualdel producto), es posible
quitarlasmediante las esponjas
suministradas.
Humedezca la esponja con agua
regular y frote las manchas. Frote
ligeramente para evitar manchas
opacas.
No hace falta usar detergentes.
Basta emplear agua.
La esponja MiraClean está elaborada
con resina de melamina y se desgasta
conforme se usa. La esponja es muy
fácil en el empleo et da 26 veces más
rápido resultado que un paño de
microbras tradicional.
La esponja elimina las manchas las
más rebeldes sin esfuerzo especial.
No use nunca esta esponja para
supercies de alto brillo.
La esponja MiraClean es la solución
para eliminar manchas rebeldes,
como las producidas por
rotuladores, grasa, zapatos, cal,
café, té. Se puede utilizar la esponja
MiraClean en toldos, PVC, vidrio,
acero, cromo, aluminio, porcelana,
cuero sintético y diversos suelos.
Para obtener más información,
póngase en contacto con Extremis:
info@extremis.be
IMPORTANTE
Aconsejamos limpiar las manchas
inmediatamente con un trapo
limpio y suave, en particular las
manchas de sustancias fuertemente
coloreadas, tales como de vino,
tinta, café, cola, aceite y excrementos
de aves. Para evitar que se produzca
daño permanente.


www.extremis.com
Our headquarters:
Couthoflaan 20b
B-8972, Poperinge
info@extremis.com
+ 32 57 346020
Connect with us:
All rights reserved. Unless otherwise specified, all designs and photographs contained in this publication are copyright protected
and are the property of Extremis. No part of this publication may be copied or distributed without Extremis’ prior written consent.
The names of the authors of photographs to which we do not hold rights are mentioned here. We have done our utmost to provide a
comprehensive list of names. In the event of an alleged breach, please contact the editorial sta. © Extremis
20200228
-
 1
1
-
 2
2
-
 3
3
-
 4
4
-
 5
5
-
 6
6
-
 7
7
-
 8
8
-
 9
9
-
 10
10
-
 11
11
-
 12
12
-
 13
13
-
 14
14
-
 15
15
-
 16
16
-
 17
17
-
 18
18
-
 19
19
-
 20
20
-
 21
21
-
 22
22
-
 23
23
-
 24
24
-
 25
25
-
 26
26
-
 27
27
-
 28
28
-
 29
29
-
 30
30
-
 31
31
-
 32
32
-
 33
33
-
 34
34
-
 35
35
-
 36
36
-
 37
37
-
 38
38
-
 39
39
-
 40
40


Extremis Captain's high woody chair Manual de usuario
- Tipo
- Manual de usuario
- Este manual también es adecuado para
en otros idiomas
- français: Extremis Captain's high woody chair Manuel utilisateur
- italiano: Extremis Captain's high woody chair Manuale utente
- English: Extremis Captain's high woody chair User manual
- Deutsch: Extremis Captain's high woody chair Benutzerhandbuch
- Nederlands: Extremis Captain's high woody chair Handleiding