LG LUDP8908SN Manual de usuario
- Categoría
- Lavaplatos
- Tipo
- Manual de usuario

www.LGSIGNATURE.com
Copyright © 2020 LG Electronics Inc. All Rights Reserved.
OWNER'S MANUAL
DISHWASHER
MFL69261731
Read this owner's manual thoroughly before operating the appliance and keep it handy for
reference at all times.
LUDP890***
EN ENGLISH SP ESPAÑOL FC FRANÇAIS


TABLE OF CONTENTS
3
4 PRODUCT FEATURES
5 SAFETY INSTRUCTIONS
5 IMPORTANT SAFETY INSTRUCTIONS
10 PRODUCT OVERVIEW
10 Exterior Parts
11 Interior Parts
12 Accessories
13 INSTALLATION
13 Installation Parts and Tools
14 Installation Overview
14 Product Dimensions
14 Product Specifications
15 Preparing Cabinet Opening
16 Preparing Water and Electrical Connections
17 Preparing Dishwasher
18 Attaching Installation Brackets
19 Sliding Dishwasher into Cabinet Opening
21 Connecting Water Supply Line and Power
23 Connecting Drain Hose
25 Leveling Dishwasher
27 Securing Dishwasher to Cabinet Opening
28 Final Installation Check
29 OPERATION
29 Using the Appliance
30 Control Panel
31 Cycles
32 Options
33 Cycle/Option Guide
34 Loading the Dishwasher
34 Loading the Lower Rack
36 Loading the Silverware Basket
37 Loading the Upper Rack
40 Loading the Cutlery Rack
42 Adding Cleaning Agents
44 SMART FUNCTIONS
44 LG ThinQ Application
46 Smart Diagnosis™ Function
47 MAINTENANCE
47 Cleaning the Exterior
47 Cleaning the Interior
47 Seasonal Maintenance and Storage
48 Clogged Drain Air Gap or In-Sink Disposal
49 Cleaning the Filters
50 Cleaning the Spray Arms
51 TROUBLESHOOTING
51 FAQs: Frequently Asked Questions
54 Before Calling for Service
59 LIMITED WARRANTY
59 USA
63 CANADA
67 Warranty Exceptions (U.S. and Canada)
Rev.01_031220

4
PRODUCT FEATURES
PRODUCT FEATURES
QuadWash™ System
Multi-Motion lower spray arm shoots water in various directions and at optimized intensities to reach every
area of the tub. This system provides more powerful and complete cleaning coverage.
Inverter Direct Drive Motor
LG's experience in motor technology results in extraordinary functionality, with advanced features like the Dual
Zone option, whisper-quiet operation, energy efficiency, and durability.
The simple design and high build quality of the motor make it so reliable that it's covered for 10 years under
the warranty.
EasyRack Plus
This easy-to-use system of adjustable tines and rack height provides more flexibility and versatility when
loading dishes of various shapes and sizes.
Hybrid Drying System
This efficient drying system does not use a heating element during the drying process resulting in superior
energy efficiency and gentle care for dishes.
LG ThinQ™
Download the new LG smart phone app to set options, self-diagnose and troubleshoot problems with the
appliance, and access other useful features. This function uses Wi-Fi.
TrueSteam™ Technology
Tiny drops of purified water coat the surfaces of every dish from the steam that fills the tub, resulting in
sparkling clean dishes.

5
SAFETY INSTRUCTIONS
ENGLISH
SAFETY INSTRUCTIONS
READ ALL INSTRUCTIONS BEFORE USE
Your safety and the safety of others are very important.
We have provided many important safety messages in this manual and on your appliance. Always
read and follow all safety messages.
This is the safety alert symbol.
This symbol alerts you to potential hazards that can kill or injure you and others.
All safety messages will follow the safety alert symbol and either the word WARNING or
CAUTION. These words mean:
WARNING
You may be killed or seriously injured if you do not follow instructions.
CAUTION
You may be slightly injured or cause damage to the product if you do not follow instructions.
All safety messages will tell you what the potential hazard is, tell you how to reduce the chance of
injury, and tell you what may happen if the instructions are not followed.
IMPORTANT SAFETY INSTRUCTIONS
WARNING
To reduce the risk of explosion, fire, death, electric shock, scalding or injury to persons
when using this product, follow basic precautions, including the following:
INSTALLATION
• Connect to a properly rated, protected, and sized power circuit to avoid electrical overload.
• To reduce the risk of severe injury or death, follow all installation instructions.
• The appliance must be installed and electrically grounded by qualified service personnel in
accordance with local codes.
• Disconnect the power supply line, house fuse or circuit breaker before installing or servicing the
appliance.
• When moving or installing the product in a different location, call qualified service personnel for
installation and service.
• Keep packing materials out of the reach of children. Packaging material can be dangerous for
children. There is a risk of suffocation.
• Moving or installation of the appliance requires two or more people.
• This appliance is not designed for maritime use or for mobile installations such as in RVs, trailers, or
aircraft.

6
SAFETY INSTRUCTIONS
• Store and install the appliance where it will not be exposed to temperatures below freezing or
exposed to outdoor weather conditions.
• This appliance must be positioned near to an electrical power supply.
• Do not, under any circumstances, cut or remove the ground from the power supply line.
• When installing or moving the appliance, be careful not to pinch, crush, or damage the power supply
line.
• Do not install the appliance in humid spaces.
• Destroy the carton, plastic bag, and other packing materials after the appliance is unpacked.
Children might use them for play. Cartons covered with rugs, bedspreads, or plastic sheets can
become airtight chambers.
• Never attempt to operate this appliance if it is damaged, malfunctioning, partially disassembled, or
has missing or broken parts, including a damaged power supply line.
• Adhere to all industry recommended safety procedures including the use of long sleeved gloves and
safety glasses.
• The installer must ensure that the dishwasher is completely enclosed at the time of installation.
• Use new hoses when connecting the appliance to the water supply. Do not reuse old hoses.
• After installing, check the hose connection for leaks.
• Do not damage or place heavy items on the power supply line of the appliance.
OPERATION
• Repair or immediately replace all power supply lines that have become frayed or otherwise
damaged. Do not use a power supply line that shows cracks or abrasion damage along its length or
at either end.
• If you detect a strange sound, a chemical or burning smell, or smoke coming from the appliance,
unplug it immediately, and contact an LG Electronics customer information center.
• Never unplug the appliance by pulling on the power supply line.
• Do not use an extension cable or adapter with this appliance.
• Do not grasp the power supply line or touch the appliance controls with wet hands.
• Do not modify or extend the power cable.
• If the product has been submerged, contact an LG Electronics customer information center for
instructions before resuming use.
• Do not store or use gasoline or other flammable vapors and liquids in the vicinity of this or any other
appliance.
• Keep the area underneath and around your appliances free of combustible materials (lint, paper,
rags, etc.), gasoline, chemicals and other flammable vapors and liquids.
• This appliance is not intended for use by persons (including children) with reduced physical,
sensory or mental capabilities, or lack of experience and knowledge, unless they have been given
supervision or instruction concerning the use of the appliance by a person responsible for their
safety.
• If the electrical supply line is damaged, it must only be replaced by the manufacturer or its service
agent or a similar qualified person in order to avoid a hazard.
• Do not abuse, sit on, or stand on the door of the appliance.
• Read all instructions before using the appliance and save these instructions.
• Use this appliance only for its intended purpose.

7
SAFETY INSTRUCTIONS
ENGLISH
• Do not allow children to play on, in or with the appliance. Close supervision of children is necessary
when the appliance is used near children.
• Do not tamper with controls.
• In the event of a gas leak (propane gas, LP gas, etc.) do not operate this or any other appliance.
Open a window or door to ventilate the area immediately.
• Under certain conditions, hydrogen gas may be produced in a hot-water system that has not been
used for two weeks or more. HYDROGEN GAS IS EXPLOSIVE. If the hot-water system has not
been used for such a period, before using the appliance turn on all hot water faucets and let the
water flow from each for several minutes. This will release any accumulated hydrogen gas. As the
gas is flammable, do not smoke or use an open flame during this time.
• Fix the drain hose securely in place.
• Use only detergents or wetting agents recommended for use in a dishwasher and keep them out of
the reach of children.
• Do not let children eat detergent or dishwasher rinse agent.
• When loading items to be washed:
− Locate sharp items so that they are not likely to damage the door seal.
− Load sharp knives with the handles up to reduce the risk of cuts.
• Do not wash plastic items unless they are marked "dishwasher safe" or the equivalent. For plastic
items not so marked, check the manufacturer’s recommendations.
• Do not touch the HEATING ELEMENT during or immediately after use.
• Do not operate your dishwasher unless all ENCLOSURE panels are properly in place.
• Do not abuse, sit on, or stand on the door or dish rack of the dishwasher.
• Do not install or store the dishwasher where it will be exposed to weather conditions.
• After cleaning the dishes, turn off the faucet. Turn on the faucet again and check the connection
status of water supply hose before cleaning.
• Do not open the door while operating. For safety reasons, the drain pump operates if the door is
opened, resulting in a longer cycle time.
• Be careful not to catch your hand when closing the door of the product.
• Do not plug the dishwasher into a damaged outlet.
• Do not install or keep the dishwasher near electrical components or exposed flames.
• Do not wash dishes exposed to gasoline, solvents or other flammable materials.
• When cleaning, do not spray water on the product directly.
• Do not press buttons with a sharp object such as an awl or pin.
• Do not use solvent-based detergent.
• Do not come into contact with the steam outlet.
• Small parts, such as rack clips and filter retaining posts can be a choke hazard to small children if
removed from the dishwasher. Keep out of reach of small children.

8
SAFETY INSTRUCTIONS
MAINTENANCE
• Do not repair or replace any part of the appliance. All repairs and servicing must be performed by
qualified service personnel unless specifically recommended in this Owner’s Manual. Use only
authorized factory parts.
• Do not disassemble or repair the appliance by yourself.
• Remove any dust or foreign matter from the power supply line.
• Disconnect this appliance from the power supply before cleaning and attempting any user
maintenance. Turning the controls to the OFF position does not disconnect this appliance from the
power supply.
• Remove the door before the appliance is removed from service or discarded to avoid the danger of
children or small animals getting trapped inside.
• Unplug the appliance before cleaning to avoid the risk of electric shock.
• Before discarding the appliance, cut off the power supply line and destroy the appliance's control
panel.
GROUNDING INSTRUCTIONS
• For a permanently connected dishwasher: This appliance must be connected to a grounded metal,
permanent wiring system, or an equipment-grounding conductor must be run with the circuit
conductors and connected to the equipment-grounding terminal or lead to the appliance.
• Connect the ground wire to the green ground connector in the terminal box.
TIP OVER HAZARD
• Do not use the dishwasher until completely installed.
• Do not push down on the open dishwasher door.
• Failure to follow these instructions may result in serious injury or cuts.
SAVE THESE INSTRUCTIONS

9
SAFETY INSTRUCTIONS
ENGLISH
CAUTION
To reduce the risk of minor injury to persons, malfunction, or damage to the product or
property when using this product, follow basic precautions, including the following:
INSTALLATION
• Install the product on a firm and level floor.
• This dishwasher must be connected to a hot water supply with a temperature range between 120 °F
(49 °C) and 149 °F (65 °C). This temperature range provides the best washing results and shortest
cycle time. The temperature should not exceed 149°F (65 °C) to prevent damage to dishes.
• Do not put the drain hose under the dishwasher during installation.
OPERATION
• Do not place objects on top of the appliance.
• Turn off the water faucets and unplug the appliance if the appliance is to be left for an extended
period of time, such as during vacations.
• Do not store or spill liquid detergents, cleaners, or bleaches (chlorine bleach, oxygen bleach) on the
appliance. Doing so may result in corrosion, discoloration or damage to the surface of the appliance.
• Do not touch draining water which may be hot.
• If the drain hose and the water supply hose are frozen in winter, defrost before using the appliance.
• Do not put hands, feet, or metal objects below or behind the appliance.
• Do not put the drain hose under the dishwasher during installation.
MAINTENANCE
• If cooking oil is spilled on the exterior of the product, wipe it off immediately. Do not clean the exterior
of the product with cleaners which contain alcohol, thinners, bleach, benzene, flammable liquids, or
abrasives. These substances may discolor or damage the appliance.

10
PRODUCT OVERVIEW
PRODUCT OVERVIEW
Exterior Parts
a
Control Panel & Door Handle
b
Front Cover
c
Lower Cover
d
Shipping Brace
e
Safety Cover
f
SignaLight™ (some models)
g
Base
h
Leveling Feet
NOTE
• Do not remove the safety cover at any time.
• To ensure reliability, each LG dishwasher goes through thorough quality control before it leaves the
factory.
• You may find water droplets or water spots from this process inside your new dishwasher.
SignaLight™ (Front Display)
The top-control models have 3 indicator LEDs centered at the top of the front cover.
• Red : Error (See the Error Codes in Troubleshooting section.)
• White (steady): Normal operation.
• White (blinking): Cycle has been paused. (After four minutes in pause mode, the machine turns off.)
• Green: Cycle finished normally.
The default “ON” setting keeps the green light on until the door is opened. If the setting is changed to
“OFF”, the green light turns off after 90 seconds. To change the setting, turn the power on and press and
hold the High Temp button for 3 seconds until “ON” or “OFF” appears in the display. The setting is stored
until you change it.

11
PRODUCT OVERVIEW
ENGLISH
Interior Parts
a
Top Wash Impeller
b
Upper Spray Arm
c
Lower Spray Arm
d
Filtration System
e
Detergent and Rinse Aid Dispenser
f
Drying Vent Cover
g
Tub Light
h
Cutlery Rack
i
Upper Rack
j
Silverware Basket
k
Lower Rack
l
Steam nozzle
NOTE
• The silverware basket ships installed at the back
of the bottom rack. For best performance, install
it along the right side as shown in the Interior
Parts section.
• Remove all packing materials from the exterior
and interior of the dishwasher before installing
the appliance.
2
3
• Press the tab to remove the cable tie by hand.
Cutting the tie with a knife or scissors may
damage the rack or the silverware basket.

12
PRODUCT OVERVIEW
Accessories
Included Accessories
Installation brackets
(2ea)
Wood screws (4ea) Hose clamp (1ea) Sound insulation
sheet
Toe-Kick Front
(1ea)
Toe-Kick Rear
(1ea)
Bracket (2ea) Sound Baffle (1ea)
Pad (1ea) Strip (2ea) Damper (2ea)

13
INSTALLATION
ENGLISH
INSTALLATION
Installation Parts and Tools
Parts not Provided
Electrical cable Water supply tube Fittings for tube Coupler Electrical tape
Air gap
Wire nuts for
16-gauge wiring
Hose clamp
UL approved strain
relief
Tools Needed
Flat-blade
screwdriver
Phillips screwdriver
Hole saw min. 2½”
bit
Electrical drill Gloves
Safety glasses Adjustable wrench Tape measure Utility knife Level
¼” Square drive
wrench
Nipper Pliers Wire stripper Tubing cutter
⅜” Square drive
wrench + ½” Socket

14
INSTALLATION
Installation Overview
Preparing Cabinet Opening
Preparing Electrical Wiring
Preparing Water Supply Connection
Preparing the Dishwasher
Removing Lower Cover
Sliding the Dishwasher into Cabinet
Leveling the Dishwasher
Securing the Dishwasher to Countertop
Connecting the Drain Hose
Connecting Water Supply
Connecting Power
Final Check
Product Dimensions
Back view Side view
Water supply hose, drain hose and electric cable
should be passed through this area.
33 /16"
(846 mm)
5
23 /4" (603 mm)
3
4 /2"
(115 mm)
1
33 /8"
(854 mm)
5
2 /16" (75 mm)
15
20 /16" (512 mm)
3
24 /8" (625 mm)
5
4 /4" (120 mm)
3
9 /8"
(238 mm)
3
4 /16"
(119 mm)
5
/4"
(134 mm)
11
1
4 /2"
(115 mm)
1
26 /8 - 26 /16" (676 - 681 mm)
5 13
NOTE
• For easiest installation, see marked areas above for water and electrical clearances in base of
dishwasher.
Product Specifications
The appearance and specifications listed in this manual may vary due to constant product improvements.
Electrical requirement 120 V, 60 Hz AC only, minimum 15 A circuit breaker
Water pressure 20 - 80 psi (140 - 550 kPa)
Dimensions
23
3
/
4
"(W) X 24
5
/
8
"(D) X 33
5
/
8
"(H)
603 mm(W) X 625 mm(D) X 854 mm(H)
Inlet water temperature 120 °F (49 °C) minimum, 149 °F (65 °C) maximum
Net weight 95 lbs. (43.1 kg)

15
INSTALLATION
ENGLISH
Preparing Cabinet Opening
This dishwasher is designed to fit a standard
dishwasher opening. An opening may be needed
on both sides to route plumbing and electrical
connections.
• To ensure proper drainage, install the
dishwasher no more than 12 ft. (3.65 m) from
the sink.
• The location must have sufficient space for the
dishwasher door to open easily and provide at
least 0.1” (2 mm) between the dishwasher and
the cabinet sides.
• If installing the dishwasher in a corner, leave a
minimum of 2” (50 mm) between the dishwasher
and the adjacent wall.
• The adjacent wall must be free of obstructions.
• For flush installations only, you may remove the
cabinet brace
a
inside the cabinet.
1
Select a location as close to the sink as
possible for easy connections to water supply
line, drain hose and electrical connection.
2
To allow for proper clearance of plumbing and
electrical, use the template included with the
literature to determine the clearance on the
side of the cabinet where the cabinet meets
the back wall. Using a 2
1
/
2
” diameter hole saw,
drill a hole in the target area as shown on the
template.
3.5
''
2.5
''
4
''
WARNING
• Installation damage is not covered by the
warranty, and leaks caused by improper
installation may result in property damage.
• Do not use existing holes unless they are in
the target area.
• Failure to properly locate the hole for the
water and drain lines may prevent the
dishwasher from installing flush with the
cabinets and could result in kinked, pinched,
crushed, stressed or damaged lines.

16
INSTALLATION
Preparing Water and
Electrical Connections
There are 2 channels in the bottom of the
dishwasher for routing the water and electrical
connections. As shown in the bottom view below,
channel
a
is for the water supply line, and
channel
b
is for the electrical cable.
1
Turn off the house water supply and the circuit
breaker or dedicated power before connecting
the dishwasher.
2
Run the water supply line along the floor 6
1
/
2
– 7
3
/
4
” (165–197 mm) from the left side of
the opening and tape it in place in front of the
opening.
3
Run the electrical cable
c
along the floor
14–16” (356–406 mm) from the water supply
line
d
and tape it in place.
• The electrical outlet must be within 4 ft. (1.22
m) of either side of the dishwasher.
• The best location for the electrical conduit is
on the right side of the back wall. Re-route
the electrical cable before installation if the
electrical conduit pipe is longer than 3” (76
mm) and is centered on the back wall.
WARNING
Water Connection
• Do not reuse an old hose. Use only a new
hose when installing the dishwasher. The old
hose could leak or burst causing flooding and
property damage. Contact an LG Customer
Information Center for assistance in buying a
new hose.
Electrical Connection
• Use a time-delay fuse or circuit breaker.
• Operate this appliance with the correct
voltage as shown in this manual and on the
rating plate.
• The wiring must be grounded properly. If
in doubt, have it checked by a qualified
electrician.
• Connect the appliance using 3-wires,
including a ground wire.
• The appliance and outlet must be positioned
so that the plug is easily accessible.
• Do not use an extension cable or adapter
with this dishwasher.
• Do not overload the outlet with more than
one appliance.
• The included 16AWG wire nuts should be
used.
• It is the personal responsibility and obligation
of the product owner to have a proper outlet
installed by a qualified electrician.
CAUTION
• When connecting the dishwasher water
supply line to the house water supply, sealing
tape or compound should be used on pipe
threads to avoid leaks. Tape or compound
should not be used on compression fittings.
• Connect the dishwasher to a hot water
supply with a temperature range between
120 °F (49 °C) and 149 °F (65 °C). This
temperature range provides the best washing
results and shortest cycle time. To prevent
damage to dishes, the temperature should
not exceed 149 °F (65 °C).
• Water supply pressure must be between 20
psi and 80 psi (140–550 kPa). If the water
supply pressure exceeds 80 psi, a pressure
reducing valve must be installed. Otherwise
premature failure of the inlet valve may occur.

17
INSTALLATION
ENGLISH
Preparing Dishwasher
WARNING
• Do not remove safety cover
a
. Removal can
result in fire, electric shock or death.
Releasing Drain Hose
Remove the twist tie holding the drain hose to the
back of the shipping brace.
Removable Shipping Brace
The rear shipping brace can be removed if
additional clearance is needed when installing the
dishwasher under a low countertop.
Removing Lower Cover
1
Remove the screws at either side which attach
the lower cover to the dishwasher.
2
Remove the lower cover.
3
If there is insulation padding behind the lower
cover, remove it.
4
Set the parts aside until the installation is
complete.
CAUTION
• If you lay the dishwasher on its back, do so
carefully to avoid damaging the drain hose
and the tub.

18
INSTALLATION
Removing Packing Materials from
the Interior
Remove all packing materials from the interior of
the dishwasher before installing the appliance.
2
3
Attaching Installation
Brackets
For countertops made of wood or other material
that will not be damaged by drilling, use the metal
installation brackets provided.
For countertops made of granite, marble, or other
materials that could be damaged by drilling, use
the wood screws to attach the dishwasher to the
cabinet. See installation instructions in Securing
Dishwasher to Cabinet Opening.
NOTE
• Installation brackets and screws can be found in
the silverware basket.
1
Insert the tabbed end of the installation
brackets into the slots in the upper frame.
Rotate the brackets until the tabbed ends are
facing up.
2
Bend the tabs on the brackets to secure them
to the frame using a pair of needle nose pliers.

19
INSTALLATION
ENGLISH
Sliding Dishwasher into
Cabinet Opening
CAUTION
• Do not pull or lift the dishwasher using the
handle
a
. Doing so can damage the door
and hinges.
• Do not push the door of the dishwasher
with knees when sliding the dishwasher into
position. Doing so can damage the front cover.
• Do not push the top of the dishwasher. Doing
so can damage the interior of the dishwasher.
NOTE
• Open the door and grab the body frame and the
top front opening
b
of the tub to move or lift the
dishwasher.
1
Align the dishwasher with the opening. Make
sure the water supply line and electrical cable
are in the correct positions to slide into their
channels properly.
2
Smooth out or pad the edges of the hole
drilled for the water supply to avoid damaging
the drain hose.

20
INSTALLATION
3
Make sure the drain hose is straight before
feeding the end of it through the hole for the
water supply. As you slide the dishwasher
into the opening, you will want to slowly pull
on the drain hose from inside the cabinet
to take up some slack. Be careful not to
kink, pinch, crush or stress the drain hose
during installation to avoid leaking and water
damage.
4
Gradually slide the dishwasher into the
opening, making sure that the water supply
line and electrical cable are passing freely
through the channels and do not get caught
under the dishwasher.
• As you slide the dishwasher into the opening,
stop periodically (or have an assistant help)
to take up the slack by pulling the drain hose
farther into the cabinet.
CAUTION
• To avoid malfunctions or leakage, it is
important that the drain hose not get kinked,
pinched, stressed or crushed behind or under
the dishwasher or inside the neighboring
cabinet.
• Damage resulting from improper installation
is not covered under the warranty.
5
Remove the tape from the water supply line
and the electrical cable.

21
INSTALLATION
ENGLISH
Connecting Water Supply
Line and Power
Connecting Water Supply Line
1
With the home water supply turned off,
connect the water supply line to the inlet valve
on the left front of the dishwasher.
CAUTION
• Tape or compound should not be used on
dishwasher inlet valve.
2
Tighten the compression nut.
3
Slide the water supply line back through the
channel, pulling gently from inside the cabinet
to make sure the line is not kinked, pinched,
stressed or crushed.
Connecting Power
The dishwasher should have a dedicated properly
grounded branch circuit to connect the 3 wire
setup which includes the ground wire.
If a 3-prong power supply is used, it should be in
an accessible location adjacent to the dishwasher
within 4 ft. (1.22 m) of the dishwasher side and not
behind the dishwasher.
NOTE
• The best location for the electrical conduit is
on the right side of the back wall. Re-route the
electrical cable before installation if the electrical
conduit pipe is longer than 3” (76 mm) and is
centered on the back wall.
1
Turn off electrical power to the unit at the
circuit breaker.
2
Use a Phillips screwdriver to remove the screw
from the junction box cover and remove the
cover.
3
Use a Phillips screwdriver to remove 2 screws
a
.
4
Remove the junction box from the appliance.

22
INSTALLATION
5
Insert a strain relief
b
through the hole in the
junction box. Tighten the ring nut
c
to secure
it in place.
6
Insert the electrical cable through the hole in
the strain relief. Tighten 2 screws to secure the
cable.
7
Pull the existing wires through the openings
in the junction box. Tighten 2 screws
d
to
reassemble the junction box in the appliance.
8
Pair the white, black, and green wires to the
matching colored wires from the dishwasher.
Then twist on the provided wire nuts
e
tightly
to connect the corresponding wires.
9
Wrap electrical tape
f
around each
connection.
10
Fold the connected wires back into the
junction box and screw on the junction box
cover.
WARNING
• Verify that the black wire is hot (120 V). If
not, or if you are unsure of the power supply,
have it checked by a licensed electrician.
CAUTION
• Do not leave stripped wire exposed. Trim
stripped wire to fit completely inside wire
nuts.

23
INSTALLATION
ENGLISH
Connecting Drain Hose
If the end of the drain hose does not fit the drain
line, use a heat and detergent resistant adapter
(not supplied). These may be obtained from a local
plumbing supply store.
• Cut the adapter so the end matches the size of
the drain connection.
NOTE
• For drain hose installation, use the screw style
hose clamp provided with this dishwasher in the
silverware basket.
• If connecting the dishwasher’s drain hose to
the garbage disposal, be sure to follow your
garbage disposal’s manual for proper installation
instructions.
Drain Hose Requirements
• Follow local codes and ordinances.
• Do not exceed 12 ft. (3.65 m) distance to drain.
• Do not connect drain hoses from other
appliances to the dishwasher’s drain hose.
• If an extension drain hose is required, use a 5/8”
or 7/8” inside diameter, 2-3 ft. length hose and a
coupler
a
for connecting the two hose ends.
Connecting to Disposal without Air
Gap
The height of the drain hose end must be at least
12” (305 mm) and within 40” (1016 mm) from
the base of the dishwasher to avoid water being
siphoned from the tub.
1
Remove the knockout plug
a
on the disposal
with a hammer and screwdriver.
2
Remove the knockout plug
a
from the
disposal.
CAUTION
• If the knockout plug has not been removed,
the dishwasher will not be able to drain
properly.

24
INSTALLATION
3
Attach the drain hose to the disposal with the
hose clamp provided. Move the hose clamp
into position and tighten it with a flat-blade
screwdriver.
Connecting Waste Tee without Air
Gap
The height of the drain hose end must be at least
12” (305 mm) and within 40” (1016 mm) from
the base of the dishwasher to avoid water being
siphoned from the tub.
1
Remove the knockout plug with a hammer and
screwdriver.
CAUTION
• If the knockout plug has not been removed,
the dishwasher will not be able to drain
properly.
2
Attach the drain hose to the waste tee with
the hose clamp provided. Move the clamp
into position and tighten it with a flat-blade
screwdriver.
Connecting to Disposal or Waste Tee
with Air Gap
1
Remove the knockout plug with a hammer and
screwdriver.
2
Connect the end of the drain hose
a
to the air
gap
b
with the hose clamp provided. Move
the clamp into position and tighten it with a
flat-blade screwdriver.
• This avoids water being siphoned from the
tub.
3
If it is not connected, attach the rubber hose
connector to the disposal or waste tee with a
hose clamp (not provided).

25
INSTALLATION
ENGLISH
Leveling Dishwasher
Check that the dishwasher is level and adjust the
leveling feet if necessary.
CAUTION
• Failure to level the dishwasher may result in
leakage, problems closing the door, or noise.
• Where the cabinet opening is narrower than
recommended (see Preparing Cabinet
Opening), the dishwasher must be carefully
leveled and aligned so that the dishwasher
is supported fully by the 3 leveling feet and
is not hanging from the installation brackets.
Failure to do so can result in leaks from the
front of the dishwasher, AE errors, difficulty in
closing the door, or failure to operate.
Checking Leveling
To check that the tub is level from front to back,
remove the lower rack and pour 169 oz. (5 L)
of water into the bottom of the tub. The water
level should be near the center of both tub lower
indentations at the front.
With the lower rack removed, place a level on the
inside wall of the tub to check that the dishwasher
is level from side to side.
• If you do not have a level, try using a
smartphone level application instead.
Make sure that the gap between the tub walls and
the door liner is the same on either side.

26
INSTALLATION
Adjusting Leveling Feet
Adjust as needed until the dishwasher is
completely leveled.
Adjusting Front Leveling Feet
• Use a flat-blade screwdriver to turn the front
leveling feet and adjust the front of the tub.
• Turn the front leveling feet clockwise to raise the
front of the tub and counterclockwise to lower it.
• The adjustments work identically for both front
leveling feet.
When the flat-blade screwdriver is unavailable,
use a 1/4” square drive wrench(
a
) or 3/8” square
drive wrench(
b
) with 1/2” socket(
c
) to turn the
front leveling feet and adjust the front of the tub.
Adjust the front and rear leveling legs until they
are all in firm contact with the floor. Failure to level
the dishwasher may prevent the door from closing
properly and the dishwasher will not turn on.
Adjusting Rear Leveling Foot
• Use a Phillips screwdriver to adjust the rear
leveling foot and the rear of the tub using the
center screw at the base of the appliance in the
front.
• Turn the center screw clockwise to raise the rear
of the tub and counterclockwise to lower it.
NOTE
To avoid damaging the screw, do not use an
electric screwdriver.

27
INSTALLATION
ENGLISH
Securing Dishwasher to
Cabinet Opening
There are 2 options for securing the dishwasher. If
the countertop is made of wood or a material that
can safely be drilled into, secure the dishwasher
to the countertop with the provided brackets. If the
countertop is granite, marble, or a material that
cannot be drilled into, secure the dishwasher to
the cabinet frame with the provided wood screws.
CAUTION
• Ensure the dishwasher is level and all
leveling feet are in firm contact with the
floor before attaching the dishwasher to the
countertop or cabinet. If the dishwasher is
not leveled properly, the door may not close
properly or water may leak.
NOTE
• Installation brackets and screws can be found in
the silverware basket.
• Use a magnetic screwdriver.
• Cover the filter hole with towels to prevent
screws from falling down into the pump.
Securing Dishwasher to Countertop
Use the bracket screws provided to secure the
brackets at the top of the dishwasher to the
underside of the wood countertop.
If desired, the dishwasher can also be secured
to the cabinet frame using the instructions which
follow.
Securing Dishwasher to Cabinet
Frame
1
Remove the 2 plastic caps from the mounting
bracket access holes.
2
Drive a wood screw through the mounting
bracket and into the cabinet frame.
3
Reinstall the plastic caps.

28
INSTALLATION
Final Installation Check
Check if the dishwasher is properly installed.
1
Turn on the circuit breaker.
2
Turn on the house water supply.
3
Make sure that the door opens and closes
smoothly.
• If necessary, level the dishwasher again.
• If the door will not close, make sure the rack
is level.
• Make sure that all packaging materials have
been removed.
2
3
4
Power on the dishwasher and run a Turbo
cycle to verify proper operation.
5
Check for leaks at the drain hose and water
supply connection..
6
If a water leak is detected, press and hold the
Start button for 3 seconds to cancel the wash
cycle and automatically drain the water from
the dishwasher. Tighten all water connections
and run another cycle. Repeat until no leaks
are detected.
7
Replace the lower cover.
CAUTION
• Only install the lower cover provided with the
dishwasher. Do not install cabinet baseboard
a
as it may cause noise and leakage.
Installation Check Error Codes
Refer to the chart below before calling for service.
Error
Code
Possible Cause and Solution
OE
Error
Drain hose is kinked or pinched.
Feed the drain and water supply hoses
through the hole under the sink. Then
gradually slide the dishwasher into
the cabinet while pulling on the hoses
under the sink to take up any slack.
This helps avoid kinking the hoses or
trapping them beneath the dishwasher.
Drain hose is connected to the
disposal without removing the
knockout plug.
Remove the knockout plug from the
disposal.
Waste tee or disposal is clogged.
Remove knockout plug on the waste
tee or disposal.
IE
Error
Water supply line is kinked under
dishwasher.
Feed the drain and water supply hoses
through the hole under the sink. Then
gradually slide the dishwasher into
the cabinet while pulling on the hoses
under the sink to take up any slack.
This helps avoid kinking the hoses or
trapping them beneath the dishwasher.
House water supply is not turned on.
Turn the water faucet on.

29
OPERATION
ENGLISH
OPERATION
Using the Appliance
Before Using the Appliance
• Read the Important Safety Instructions.
• Connect to the hot water supply only. The water
supply temperature should be a minimum of
120°F (49°C) for better washing performance
and shorter cycle time.
• Follow the instructions for loading the
dishwasher to ensure effective cleaning.
• Remove insoluble items such as bones,
toothpicks, and pieces of paper while loading
the dishwasher.
When Loading the dishwasher
1
Only load items that are dishwasher-safe.
2
Remove solid, burned-on scraps from dishes
prior to loading in the dishwasher.
3
Place items with deep dish bottoms at an
angle to help water run off and speed the
drying process.
NOTE
• Do not load utensils that are not heat-resistant
or have decorative metal trim.
Quick Start
1
Load the dishes
Scrape the dishes free of excess food, bones,
and any other hard, non-soluble residue.
Pull each rack out and load the dishes as
described in this manual.
2
Measure the detergent
Using the guidelines in this manual, fill the
detergent cup with the recommended amount
of detergent and close the lid. If a prewash
is desired, the recess on top of the lid should
also be filled with detergent.
3
Close the door
4
Turn on the dishwasher
To turn on the display panel, press the Power
button.
5
Check the Rinse Refill
The Rinse Refill lamp will flash if the level
of rinse aid in the dishwasher is low. Add
rinse aid if the level is low to maintain the
effectiveness of the dry cycle.
6
Select the cycle and options
Select the cycle and options that best fit the
load by referring to the Cycle guide. The
display will show the estimated time for the
cycle and options selected.
7
Operate the dishwasher
• Method 1
− Press the Start button and then close the
door in less than four seconds to operate
the dishwasher. If the door is not closed
within four seconds, the white LED with
time flashes, an audible tone is heard, and
the cycle does not start.
• Method 2
− Close the door first and then press the Start
button to operate the dishwasher.
− If the door is opened during the cycle, the
dishwasher will stop. To resume the cycle,
see methods 1 and 2 above.
NOTE
• If the door is opened during the cycle and is
not closed within four seconds after selecting
the Start button, or if the door is closed
without pressing the Start button, the white
LED with time flashes, an audible tone is
heard, and the cycle does not start.
8
End of cycle
When the cycle is complete, a chime will
sound and the display will show End until
the door is opened or Power is pressed. To
save energy, press and hold High Temp for
three seconds to set the End display to
automatically turn off a few minutes after the
cycle ends.
CAUTION
• Do not open the door during operation or
immediately after it has completed the wash
cycle as the steam build up may cause
scalding as the door is opened.
NOTE
• Empty the lower rack first and then the upper
rack. This will avoid water dripping from the
upper rack onto dishes in the lower rack.
Auto-Off
The dishwasher automatically turns off after four
minutes of inactivity if paused or if no cycle is
started.

30
OPERATION
Control Panel
a
Power
• Press the Power button to turn power on
and off.
• After the cycle is complete, the power
automatically turns off for purposes of
safety and economy.
• If there is a power surge, power outage,
or disruption of any kind, power is
automatically turned off for safety.
• When power is connected again, it will turn
on automatically and resume the cycle.
b
Sanitized
• If the Steam option is added to a cycle,
the Sanitized indicator stays lit at the end
of the cycle if the dishes were properly
sanitized.
c
Digital Display
The digital display on the control panel
shows the ESTIMATED cycle time. When
the cycle and options are selected, the
display shows the total estimated time to
complete those selections. During operation,
the display shows the remaining estimated
operating time.
NOTE
• The estimated time shown on the display
does not include delay times for heating
water, etc.
• If Delay Start is selected, the display
shows the delay time in hours.
• Cycle time may vary depending on the soil
level of your load.
d
Rinse Refill
This lamp illuminates when the rinse aid level
is low. The LED automatically shuts off when
the rinse aid is refilled or the level is set to 0.
e
Start
• To operate the machine, either press Start
and close the door within four seconds or
close the door and press Start.
• If Start button is not pressed to start the
cycle, an alert will sound.
f
Cancel
The drain pump activates and the cycle
cancels. Once the dishwasher finishes
draining, the power turns off.
• Press and hold Start for three seconds to
activate.
g
Wi-Fi f
When the appliance is connected to the
internet through a home Wi-Fi network, this
icon illuminates.
• Press and hold Delay Start for
approximately three seconds to connect to
the network.
h
Chime On/Off
• To activate or deactivate the button
sounds, press the Half Load button for
three seconds. The error alert sound
cannot be turned off.
i
Control Lock CL
The Control Lock feature helps prevent
settings from being changed during a cycle.
Selecting this feature locks all of the buttons,
except for the Power button, on the control
panel. This feature does not lock the door.
• While a cycle is running, press and hold
Dual Zone for three seconds to activate or
deactivate Control Lock.
• To start a new cycle, deactivate Control
Lock.

31
OPERATION
ENGLISH
Cycles
Select your desired cycle.
Auto
This cycle senses the soil amount and soil
toughness and is optimized to achieve the best
cleaning.
Heavy
This cycle is for heavily soiled dishes and dishes
with hardened on soil. The Heavy cycle defaults to
the strongest spray intensity and uses it to wash
heavily soiled dishes.
Delicate
Use this cycle to clean delicate items such as fine
china and stemware.
Refresh
This cycle freshens up and warms dishes that
have been unused for a long time.
• Do not use detergent when using this cycle.
Normal
This cycle is for moderately soiled, everyday
loads. Select the Night Dry option if leaving
dishes overnight. Press and hold Extra Dry for
three seconds to activate Night Dry.
• After the cycle ends, the fan runs for an hour to
help vent the warm, moist air in the tub. You can
stop the fan by opening the door after the cycle
ends.
Turbo
This cycle will clean heavily soiled dishes in an
hour using slightly more energy and water.
• This cycle does not have drying. Select the
Extra Dry or Night Dry option or another cycle
for better drying.
Download Cycle
Use a dedicated cycle downloadable via Wi-Fi or
NFC.
NOTE
• Only the cycle code for the current Download
cycle appears on the appliance. See the
smartphone app for cycle codes, names, and
more information about the available cycles.
− Default Cycle : P1. Pots & Pans
Machine Clean
This cycle is for cleaning the inside of the
dishwasher. Use the cycle without dishes in the
machine. It eliminates residual soils, odor, white
spots, and other dirt. Add citric acid or another
cleaning agent for more effective results.
• Press and hold Heavy for three seconds to
activate.
NOTE
• The Machine Clean lamp flashes every 30
cycles. To activate or deactivate the icon, press
the Delicate button for three seconds.
Rinse
This cycle is a quick rinse for dishes that will not
be washed immediately. The cycle rinses dishes
that have excess soil to soften dried on residue.
Rinsing the dishes helps prevent odors in the
dishwasher. No detergent should be used.
• This cycle does not have drying.
• Press and hold Normal for three seconds to
activate.
Express
This cycle will quickly clean lightly soiled dishes.
(Time : 34 minutes)
• This cycle does not have drying. Select the
Extra Dry or Night Dry option or another cycle
for better drying.
• Press and hold Turbo for three seconds to
activate.

32
OPERATION
Options
Select the desired cycle button and then select the
options for that cycle.
Dual Zone
This option automatically sets the spray intensity
to soft for the upper spray arm and strong for
the lower spray arm. Place heavily soiled dishes
like plates and bowls in the lower rack and lightly
soiled dishes like cups and small plates in the
upper rack to get the best results.
Half Load
This option washes intensively by selecting the
upper or lower racks. For small loads, use just the
upper or lower rack to save energy and time. By
pressing the Half Load button, the settings f, g
and the cancellation of the Half Load option are
available.
Energy Saver
This option saves energy by reducing the wash
and rinse temperatures. Wash time is increased to
maintain wash performance. Do not use this cycle
with heavily soiled dishes.
Steam
This option adds steam at the start of the cycle to
improve wash performance. If the Steam option
is added to a cycle, the indicator ( )
stays lit at the end of the cycle if the dishes were
properly sanitized. If the dishwasher could not
properly sanitize the dishes because the Steam
option was not selected, the cycle was interrupted
or the water could not be heated to the required
temperature, the indicator will not light up at the
end of the cycle. Open and close the door or press
Power to turn the indicator off.
NOTE: This high temperature rinse sanitizes
dishes and glassware in accordance with the NSF/
ANSI Standard 184 for residential dishwashers.
Certified residential dishwashers are not intended
for use in licensed food establishments. Only
sanitizing cycles have been designed to meet
the requirements for soil removal and sanitization
efficacy. There is no intention, either directly or
indirectly, that all cycles on a certified machine
have passed the sanitization performance test.
High Temp
Raises the main wash temperature to improve
cleaning.
Extra Dry
Select the Extra Dry option for better drying
performance. This option adds extra drying time to
the cycle and raises the heated rinse temperature.
• When the rinse aid is empty, the Extra Dry
option is selected automatically.
Night Dry
Dishes are often left in the dishwasher overnight
after the cycle ends. This can result in the steam
inside the tub condensing on dishes, leaving them
wet. The Night Dry option runs the ventilation fan
periodically to help vent the steam from the tub.
• Press and hold Extra Dry for three seconds to
activate.
• The Night Dry option is selected by default for
all cycles for which it is available, except the
Normal cycle.
• To add the Night Dry option to the Normal
cycle, press and hold Extra Dry for 3 seconds.
Delay Start
The Delay Start feature delays the start of a
selected cycle. Each time the Delay Start button is
pressed, the delay time increases by an hour. The
delay time can be set from 1 to 12 hours, in one-
hour increments.

33
OPERATION
ENGLISH
Cycle/Option Guide
The cycle guide below shows the available options for each cycle.
Cycle Auto Heavy Delicate Refresh Normal Turbo Express Rinse
Machine
Clean
Soil Level
All
levels
heavy light light
All
levels
heavy light light
*Water Usage
13.8-
24.5L
3.6-6.5
gal
26.9-
32L
7.1-8.4
gal
19.7-
24.8L
5.2-6.6
gal
7.8L
2.1 gal
9.2-
25.9L
2.4-6.8
gal
27.5L
7.3 gal
20.4L
5.4 gal
6.8L
1.8 gal
12.3L
3.2 gal
**Wash Time with
Options (Mins.)
89 -
226
140 -
224
95 - 148 59 - 79 98 - 215
59 -
121
34 - 103 12 82
Available
Options
Dual Zone
Half Load
***Energy
Saver
High
Temp
Steam
Extra Dry
Night Dry
Delay
Start
* Actual water consumption will vary depending on soil level and hardness of water.
** The actual running time and cycle time displayed may change depending on options chosen, soil
level, water temperature, and hardness of water. Therefore, display time and actual running time can be
different.
*** Energy Saver cannot be used at the same time as Extra Dry or High Temp.
: Extra drying time only, no added high-temperature rinse.
: ON by default.
NOTE
• Options are not available for Download Cycle.

34
OPERATION
Loading the Dishwasher
The extra tall tub allows loading of dishes, pans, or
other utensils up to 14" high.
For effective washing performance, always follow
these instructions.
• Remove large particles of food debris from
plates including bones etc. before loading.
• Soak items with burnt on food prior to loading in
the dishwasher.
• Place deep pots or dishes upside down.
• Make sure that all items do not touch each
other.
Non-Dishwasher Safe Items
The combination of high water temperature and
dishwasher detergents may damage certain items.
Do not wash the following items in the dishwasher.
• Copper or anodised aluminium
• Hand painted silver or gold leaf crockery
• Wood or bone handled utensils
• Iron or non rust proof utensils
• Plastic items which are not dishwasher safe
• Expensive ware such as silver and dishes with
golden rings
• Fragile item such as crystal glasses
CAUTION
• Do not place pots or pans with plastic
handles in the appliance as the handles may
deteriorate due to the heat and detergent.
• Waterproof or long lasting lipstick smudges
on glasses may not be removed during the
wash.
Loading the Lower Rack
Loading 10 Place Settings
Loading 12 Place Settings
Lower Rack Loading Tips:
• Plates should be positioned upright and facing
the center of the rack and pots, pans and large
dishes must be turned upside down.
• Load dinner plates, dishes, soup bowls etc.
between the tines.
• Load cookie sheets, cake pans and other large
items on the sides or back of the rack. Loading
these items in the front of the dishwasher can
prevent the water spray from reaching the
detergent dispenser.
• Make sure that pot handles and other large
items do not stop the rotation of the spray arms.
• The lower rack should not be used for small
items such as cups, wine glasses, or small
plates. These items should be loaded in the
upper rack.
• Make sure that large items do not interfere
with the rotation of the spray arms, and do not
prevent the detergent dispenser from opening.

35
OPERATION
ENGLISH
Folding Down the Lower Tines
Fold tines down to fit larger dishes; pull tines back
up to fit smaller dishes.
Case 1
Case 2
Loading Dishes & Pots
Loading Pots & Bowls
NOTE
• The silverware basket ships installed at the back
of the bottom rack. For best performance, install
it along the right side as shown.

36
OPERATION
Loading the Silverware
Basket
The silverware basket has separators to avoid
scratching and tarnishing of delicate silverware.
Loading 10 Place Settings
1
5
4
4
4
4
4
5
5
5
5
3
3
6
2
2
3
3 4 6 5
5
5
5 1
5
4
4
4
4
3
2
6
2
2
2
2
2
2
Loading 12 Place Settings
1
5
4
4
4
4
4
5
5
1
5
3
6
2
3
3
4 6 5
5
1
5 1
5
4
4
4
42
6
2
2
2
2
2
2
Silverware Loading Tips:
• For best cleaning results, use the top separators
in the basket when loading silverware. The
separators will prevent nesting of silverware.
• Load sharp items, such as knives, pointing
down.
• When unloading the dishwasher, it is best to
start with the silverware basket. Doing so will
prevent water droplets from falling on your
silverware from the upper rack.
WARNING
• Be careful when loading and unloading sharp
items. Load sharp knives with the handles up
to reduce the risk of personal injury.

37
OPERATION
ENGLISH
Loading the Upper Rack
Loading 10 Place Settings
Loading 12 Place Settings
Upper Rack Loading Tips:
• Place cups and glasses in the rows between the
rack tines. Placing them over the rack tines can
lead to breakage and water spots.
• To avoid chipping, do not let stemware touch
other items.
• Place items so that the open end faces down for
cleaning and drying.
• Do not stack items on top of each other.
• Use the upper rack for small or delicate items
such as small plates, cups, saucers, glasses,
and dishwasher-safe plastic items.
• Cups, glasses, and bowls must be positioned
upside down.
• Extra cups or cooking utensils can be laid on
the fold down cup racks, which may also provide
support for long-stemmed glasses.
• Make sure items do not interfere with the
rotation of the spray arms above and below the
upper rack.
• When loading larger items in the upper rack,
such as wine glasses or taller cups, it may be
necessary to remove the cutlery rack if one is
present.
Loading the Cup Rack
Some models have cup racks that provide support
for long-stemmed glasses.
The cup racks can be folded up out of the way for
tall glasses.

38
OPERATION
Removing and Replacing Cup Racks
The left and right cup racks are interchangeable
and can be removed.
1
Slide cup rack down into its closed position.
2
Locate assembly slot on cup rack and firmly
pop rack off support bar on that side.
• The rack on the left pops free at the back.
The rack on the right pops free at the front.
Assembly slot
3
Slide cup rack off support bar on opposite
side.
4
Reverse instructions to replace cup rack.
Folding Down the Upper Tines
Fold tines down to fit larger dishes; pull tines back
up to fit smaller dishes.
Loading Dishes & Pots

39
OPERATION
ENGLISH
Height Adjustable Upper Rack
The upper rack adjusts up and down. Raise the
upper rack to allow items up to 14" tall in the lower
rack. Lower the upper rack to allow dishes up to
12" tall in the upper rack. The dishwasher ships
with the upper rack raised.
There are three available positions for adjusting
the height of the upper rack to create more space.
1
2
3
2
3
1
Lowering the Rack:
Hold the rack at the center of each side to support
its weight. Then, push the button on each side to
release the rack and lower it to the lower position.
Raising the Rack:
Lift the rack at the center of each side until the
rack locks into place in the upper position. It is not
necessary to lift the lock levers to raise the rack.
WARNING
• Before adjusting, ensure the rack is empty
of all dishes. Otherwise dishes may get
damaged or you may be injured.
NOTE
• Raise the upper rack without pushing the
buttons on each side. Pushing the buttons
when raising the rack will prevent the rack from
locking into position.
• To set the rack to the middle position, it may be
easier to lower the rack all the way down and
then raise each side of the rack individually until
it clicks into place.
• Before pushing the upper rack into the
dishwasher, ensure the rack height is the same
on both sides. If the height is not the same on
both sides, the dishwasher door will not shut
and the upper spray arm will not connect to the
water inlet.
• There is a 24
5
/
8
inch (56 mm) gain in height
when the upper rack is moved to the lower
position.
• After adjusting the rack levels, check that the
spray arms are free to rotate.
• With the lower position of the upper rack, check
if the bottom part of upper rack including spray
arm is not disturbing items on the lower rack.
• When the upper rack is in the lower position,
push in the upper rack first, and the lower rack
later.
• Pull out the lower rack first, and the upper rack
later.
• Raise the upper rack without pushing the
buttons on each side. Pushing the buttons
when raising the rack will prevent the rack from
locking into position.
• To set the rack to the middle position, it may be
easier to lower the rack all the way down and
then raise each side of the rack individually until
it clicks into place.

40
OPERATION
Removing the Snap-In Gliding Upper
Rack
These instructions are for models with snap-in
rack supports rather than wheeled rack supports.
CAUTION
• The snap-in upper rack should only be
removed for servicing. If you need to remove
the rack, wear gloves and handle the
screwdriver carefully to avoid personal injury
or damage to the dishwasher.
1
Pull the upper rack out until it stops. Remove
any contents from the rack.
2
To remove the front rack supports from the
rails, push the front hooks open with a flat-
blade screwdriver while pulling the front of the
rack up to snap the front rack support out of
the hooks. Repeat to snap the front support
out on the opposite side.
3
To remove the back rack supports from the
rails, hold a side rail with one hand, lift the
front of the rack, and firmly push the rack back
to snap the support out of the hooks in the
rear. Repeat on the opposite side.
4
To replace the rack, place the back rack
supports behind the rear hooks and pull the
rack forward to snap the supports into the
hooks. Then align the front rack supports with
the front hooks and push the front of the rack
down to snap the supports into the front hooks.
Loading the Cutlery Rack
The cutlery rack is best suited for flatware and
most cooking or serving utensils. It can also fit
small prep bowls and lids. The separators on the
cutlery racks help keep flatware separated to avoid
damage and improve cleaning.
NOTE
• For best cleaning performance, place flatware
in the silverware baskets. Heavily soiled utensils
or items with baked on foods should be placed
in the middle rack or spoon basket for best
performance.
Loading 10 Place Settings
CAUTION
• Do not place bowls in the center of the
cutlery rack. The door may not close
properly, resulting in leakage.

41
OPERATION
ENGLISH
Height Adjustable Tray
The tray on the left side can be adjusted to a high
or low position to accommodate utensils or cutlery
of different sizes. Remove dishes before adjusting
the tray. Adjust the tray by sliding the lever.
Removing the Cutlery Rack
The entire cutlery rack can be removed if more
space is needed on the upper rack for larger
items.
Always remove the cutlery from the rack before
removing the rack.
Pull the rack out to the end of the rails. Then, lift
the front of the rack so that the rollers clear the
stop on the end of the rail. The rack can now be
slid forward and removed from the rails.
WARNING
• Be careful when loading and unloading items
with sharp edges. Load sharp knives with the
blade down to reduce the risk of injury.

42
OPERATION
Adding Cleaning Agents
Adding Detergent to the Dispenser
• Remove the label on the dispenser prior to
running the dishwasher for the first time.
• The amount of detergent needed depends on
the cycle, load size, and soil level of dishes.
• Put detergent into the detergent compartment
before starting any cycle, except the Rinse
cycle.
1
Push the button on the dispenser lid to open
the cover.
2
Add dishwashing detergent to the main wash
compartment until the level is between the
lines marked 15 and 25.
• Fill to over the 25 line for hard water or
heavily soiled loads.
• Fill to the 15 line for soft water or lightly
soiled loads.
15
25
3
Push the detergent lid to slide the lid closed
until it clicks.
4
If a prewash is desired, fill the recessed
prewash compartment area on the lid with
detergent.
WARNING
• Dishwasher detergent and rinse aid
contain chemical components, like all other
household detergent. So, they must be kept
out of the reach of children.
CAUTION
• Use only detergent intended for dishwashers.
Incorrect detergent may cause the
dishwasher to fill with suds during operation.
Excess suds may reduce wash performance
and may cause the dishwasher to leak.
• To avoid damaging the dispenser, do not pull
up on the dispenser to close the dishwasher
door.
NOTE
• After completion of the wash program, check
whether the detergent was completely washed
out.
• Some dishwasher detergent tablets may
become stuck in the dispenser due to their
excessive size. Tablets can be placed onto the
base of the wash tub next to the filter before
starting the cycle.
• Too much detergent can leave a film on dishes
and in the dishwasher, resulting in poor wash
performance.
• If dishwasher detergent tablets are used without
liquid rinse aid, the dishes and dishwasher
interior will have excessive moisture. Select the
Extra Dry option for better drying performance.
• Using liquid rinse aid improves drying
performance by allowing water to drain off of
dishes after final rinse.
• Do not use detergent tablets for shorter wash
cycles. The tablet may not dissolve completely,
causing detergent residue on dishes and
inefficient cleaning.
• Using a wash booster helps remove spots,
residue, and the white film caused by hard
water. It does not help remove excess detergent
residue.

43
OPERATION
ENGLISH
Adding Rinse Aid to the Dispenser
The Rinse Refill indicator appears in the display
when more rinse aid is needed.
The use of rinse aid is recommended to prevent
water spots on dishes and to enhance drying
performance.
1
Open the rinse aid lid by lifting up the flap.
2
Add a liquid rinse aid to the maximum fill
level. The rinse aid should be settled in the
dispenser while filling, or air bubbles may
result in poor drying performance. Avoid
overfilling the dispenser.
3
Close the lid to lock the dispenser. Rinse aid is
dispensed automatically during the final rinse
cycle.
NOTE
• Only use liquid rinse aid in the dishwasher.
• Do not overfill the rinse aid dispenser.
• Wipe off any spilled rinse aid around the
dispenser.
Rinse Aid Dispenser Adjustment
The dispenser has five adjustment levels. The
dishwasher is programmed at the factory for a
rinse aid dispenser level of 2. This can be checked
and altered by using the buttons on the control
panel.
1
Ensure the appliance is off.
2
Press Dual Zone and Power simultaneously
to check the current setting.
3
Press Delay Start to change the rinse aid
dispenser setting. Each press of the button
changes the setting one step from L0 to L4.
4
Once the desired rinse aid dispenser setting is
selected, press Start to save.
NOTE
• Adjust the setting higher if you have hard water
and notice calcium buildup on your dishes.
• Setting the rinse aid control too low will
contribute to spotting and streaking on dishes
and poor drying performance.
• Setting the control too high can cause foaming,
which will cause poor wash performance.
Refilling the Rinse Aid
How often the dispenser needs to be refilled
depends on how often dishes are washed and the
rinse aid setting used.
• The Rinse Refill lamp flashes when more rinse
aid is needed, unless the rinse aid dispenser
setting is set to L0.

44
SMART FUNCTIONS
SMART FUNCTIONS
LG ThinQ Application
• This feature is only available on models with the
f or logo.
The LG ThinQ application allows you to
communicate with the appliance using a
smartphone.
LG ThinQ Application Features
Monitoring
Check the current status, cycle, options, running
time and cycle end time for the appliance on a
single screen.
Download Cycle
Download new and specialized cycles that are not
included in the standard cycles on the appliance.
Appliances that have been successfully connected
can download a variety of specialty cycles specific
to the appliance.
Only one cycle can be stored on the appliance at
a time.
Once cycle download is completed in the
appliance, the appliance keeps the downloaded
cycle until a new cycle is downloaded.
Machine Clean Coach
This function shows how many cycles remain
before It is time to run the Machine Clean cycle.
Smart Diagnosis™
This function provides useful information for
diagnosing and solving issues with the appliance
based on the pattern of use.
Settings
Set the Rinse Aid Dispenser Level, Machine Clean
Reminder, Signal Level and Clean Indicator Light.
When the cycle is complete or the appliance has
problems, you have the option of receiving push
notifications on a smart phone.
Push Alerts
Turn on the Push Alerts to receive appliance
status notifications.
The notifications are triggered even if the LG ThinQ
application is off.
NOTE
• If you change your wireless router, Internet
service provider, or password, delete
the connected appliance from the LG ThinQ
application and connect it again.
• This information is current at the time of
publication. The application is subject to change
for product improvement purposes without
notice to users.
• This feature is only available on some models.
Before Using LG ThinQ Application
1
Use a smartphone to check the strength of
the wireless router (Wi-Fi network) near the
appliance.
• If the distance between the appliance and the
wireless router is too far, the signal becomes
weak. It takes long time to register or fails to
install the application.
2
Turn off the Mobile data or Cellular Data on
your smartphone.
3
Connect your smartphone to the wireless
router.
NOTE
• To verify the Wi-Fi connection, check that the
Wi-Fi f icon on the control panel is lit.
• The appliance supports 2.4 GHz Wi-Fi networks
only. To check your network frequency, contact
your Internet service provider or refer to your
wireless router manual.
• LG ThinQ is not responsible for any network
connection problems or any faults, malfunctions,
or errors caused by network connection.
• The surrounding wireless environment can
make the wireless network service run slowly.

45
SMART FUNCTIONS
ENGLISH
• If the appliance is having trouble connecting
to the Wi-Fi network, it may be too far from
the router. Purchase a Wi-Fi repeater (range
extender) to improve the Wi-Fi signal strength.
• The network connection may not work properly
depending on the internet service provider.
• The Wi-Fi connection may not connect or may
be interrupted because of the home network
environment.
• If the appliance cannot be registered due to
problems with the wireless signal transmission,
unplug the appliance and wait about a minute
before trying again.
• If the firewall on your wireless router is enabled,
disable the firewall or add an exception to it.
• The wireless network name (SSID) should be a
combination of English letters and numbers. (Do
not use special characters.)
• Smartphone user interface (UI) may vary
depending on the mobile operating system (OS)
and themanufacturer.
• If the security protocol of the router is set
to WEP, you may fail to set up the network.
Change the security protocol (WPA2 is
recommended) and register the product again.
Installing LG ThinQ Application
Search for the LG ThinQ application from the
Google Play Store or Apple App Store on a smart
phone. Follow instructions to download and install
the application.
Wireless LAN Module Specifications
Model LCW-003
Frequency Range 2412 to 2462 MHz
Output Power
(Max)
< 30 dBm
FCC Notice
This equipment has been tested and found to
comply with the limits for a Class B digital device,
pursuant to Part 15 of the FCC Rules. These limits
are designed to provide reasonable protection
against harmful interference in a residential
installation. This equipment generates, uses,
and can radiate radio frequency energy and, if
not installed and used in accordance with the
instructions, may cause harmful interference
to radio communications. However, there is no
guarantee that interference will not occur in a
particular installation. If this equipment does
cause harmful interference to radio or television
reception, which can be determined by turning the
equipment off and on, the user is encouraged to
try to correct the interference by one or more of
the following measures:
• Reorient or relocate the receiving antenna.
• Increase the separation between the equipment
and the receiver.
• Connect the equipment to an outlet on a circuit
different from that to which the receiver is
connected.
• Consult the dealer or an experienced radio/TV
technician for help.
This device complies with part 15 of the FCC
Rules. Operation is subject to the following two
conditions:
1) This device may not cause harmful interference
and
2) This device must accept any interference
received, including interference that may cause
undesired operation of the device.
Any changes or modifications in construction of
this device which are not expressly approved by
the party responsible for compliance could void the
user’s authority to operate the equipment.
FCC RF Radiation Exposure Statement
This equipment complies with FCC radiation exposure
limits set forth for an uncontrolled environment. This
transmitter must not be co-located or operating in
conjunction with any other antenna or transmitter.

46
SMART FUNCTIONS
This equipment should be installed and operated
with a minimum distance of 20 cm (7.8 inches)
between the antenna and your body. Users must
follow the specific operating instructions for
satisfying RF exposure compliance.
Industry Canada Statement (For transmitter
module contained in this product)
This device contains licence-exempt transmitter(s)/
receiver(s) that comply with Innovation, Science
and Economic Development Canada’s licence-
exempt RSS(s). Operation is subject to the
following two conditions:
1) This device may not cause interference.
2) This device must accept any interference,
including interference that may cause undesired
operation of the device.
IC Radiation Exposure Statement
This equipment complies with IC radiation
exposure limits set forth for an uncontrolled
environment. This equipment should be installed
and operated with a minimum distance of 20 cm
(7.8 inches) between the antenna and your body.
NOTE
• THE MANUFACTURER IS NOT RESPONSIBLE
FOR ANY RADIO OR TV INTERFERENCE
CAUSED BY UNAUTHORIZED
MODIFICATIONS TO THIS EQUIPMENT. SUCH
MODIFICATIONS COULD VOID THE USER’S
AUTHORITY TO OPERATE THE EQUIPMENT.
Open Source Software Notice
Information
To obtain the source code under GPL, LGPL, MPL,
and other open source licenses, that is contained
in this product, please visit http://opensource.lge.
com. In addition to the source code, all referred
license terms, warranty disclaimers and copyright
notices are available for download.
LG Electronics will also provide open source code
to you on CD-ROM for a charge covering the cost
of performing such distribution (such as the cost
of media, shipping, and handling) upon email
request to [email protected]. This offer is valid
for three (3) years from the date on which you
purchased the product.
Smart Diagnosis™ Function
This feature is only available on models with the c
or d logo.
Use this feature to help you diagnose and solve
problems with your appliance.
NOTE
• For reasons not attributable to LGE’s
negligence, the service may not operate due to
external factors such as, but not limited to, Wi-Fi
unavailability, Wi-Fi disconnection, local app
store policy, or app unavailability.
• The feature may be subject to change without
prior notice and may have a different form
depending on where you are located.
Using LG ThinQ to Diagnose Issues
If you experience a problem with your Wi-
Fi equipped appliance, it can transmit
troubleshooting data to a smartphone using the LG ThinQ
application.
• Launch the LG ThinQ application and select
the Smart Diagnosis feature in the menu.
Follow the instructions provided in the LG ThinQ
application.
Using Audible Diagnosis to
Diagnose Issues
Follow the instructions below to use the audible
diagnosis method.
• Launch the LG ThinQ application and select the
Smart Diagnosis feature in the menu. Follow
the instructions for audible diagnosis provided in
the LG ThinQ application.
1
Hold the mouthpiece of your phone over the
Smart Diagnosis™ icon. Do not touch any
other buttons.
2
Press and hold Download Cycle until a
countdown displays on the appliance.
3
Keep the phone in place until the tone
transmission has finished.
4
Once the countdown is over and the tones
have stopped, resume your conversation with
the call center agent, who will then be able to
assist you using the information transmitted for
analysis.
NOTE
• For best results, do not move the phone while
the tones are being transmitted.

47
MAINTENANCE
ENGLISH
MAINTENANCE
To maintain performance and prevent trouble, it is
important to check the outside and inside of the
dishwasher, including filters and spray arms, at
regular intervals.
WARNING
• When cleaning the outside and inside of the
dishwasher, do not use benzene or thinner.
Otherwise, it may cause fire or explosion.
• To prevent injury during care and
maintenance or cleaning, wear gloves and/or
protective clothing.
NOTE
• If you have not used the dishwasher for a long
time, refresh the inside by running the Machine
Clean cycle without detergent. When the cycle
is finished, clean the inside and outside of
the dishwasher according to the Maintenance
instructions.
Cleaning the Exterior
• Do not use scrub pads or abrasive cleaners on
the exterior of the dishwasher.
• Most soil can be removed using a soft, damp
cloth or sponge. A mild soap can be used to
help release stubborn soil. Rinse and wipe dry
with a soft cloth after cleaning.
• Stainless steel surfaces can be polished using
a stainless steel cleaner. Follow the instructions
on the cleaner, and wipe in the direction of the
grain.
CAUTION
• If cooking oil is spilled on the exterior of the
product, wipe it off immediately. Do not clean
the exterior of the product with cleaners
which contain alcohol, thinners, bleach,
benzene, flammable liquids, or abrasives.
These substances may discolor or damage
the appliance.
Cleaning the Interior
• Clean the interior of the dishwasher periodically
with a soft, damp cloth or sponge to remove
food and dirt particles.
• To remove white spots and odor from inside
the dishwasher, run an empty cycle, without
detergent, with one cup of white vinegar in
a dishwasher safe glass or bowl placed on
the upper rack. (Vinegar is an acid and with
constant use it could damage the appliance.)
• Using Machine Clean
− Run the Machine Clean cycle once a month
or after every 30 cycles to eliminate residual
soil, odor, white spots and other dirt inside the
appliance.
1. Remove all dishes from the appliance.
2. Add 3 tbsp. (40 g) of citric acid to the
detergent dispenser or follow the manufacturer's
instructions if using a dishwasher cleaning
agent. Do not use dishwasher detergent.
3. Press and hold Heavy for 3 seconds to select
the Machine Clean cycle.
4. Press Start.
Seasonal Maintenance and
Storage
• If you will be absent for an extended period of
time during warmer months, close the water
valve and disconnect the power supply line, or
turn off the circuit breaker. Clean the filter, tub
and dispenser to prevent odor.
• If you will be absent for an extended period
of time during colder months and there is a
possibility of freezing temperatures, winterize
the water supply lines and the dishwasher itself.
Winterization must be performed by qualified
service personnel.

48
MAINTENANCE
Clogged Drain Air Gap or
In-Sink Disposal
Check the drain air gap or in-sink disposal if the
dishwasher is not draining well.
Cleaning the Air Gap
1
Turn off the dishwasher.
2
Remove the air gap cover and the plastic cap
underneath it.
3
Clean out any debris with a toothpick or brush.
4
Replace the plastic cap and air gap cover.
NOTE
• The drain air gap and disposal are external
plumbing devices that are not part of the
dishwasher.
• The warranty provided with the dishwasher does
not cover service costs directly associated with
the cleaning or repair of the external drain air
gap and disposal.

49
MAINTENANCE
ENGLISH
Cleaning the Filters
1
Remove the lower rack and position the
bottom spray arm so a wider vee is open to
the front.
2
Turn the inner filter counter-clockwise and take
out the assembled inner filter and stainless
steel filter.
• With the filters removed, check the sump
opening and remove any foreign materials, if
needed.
3
Clean the filters with a soft brush under
running water. Reassemble the filters before
reinstalling them.
4
To replace the assembled filters, position
the spray arm so the wider vee is toward the
front. Fit the filters back into the filter holder
and secure them by turning the inner filter
clockwise until it clicks into place.
WARNING
• Be cautious of sharp edges when handling
the stainless steel filter.
CAUTION
• Remove food residue caught in filters to
prevent the build up of odor-causing bacteria
and possible drainage problems.
NOTE
• For best wash performance, clean the filter after
each load. If food debris remains in the filter, it
may cause an odor.
• In areas with hard water, clean the filter at least
once a month with a soft brush.
• Clean the filters using non-abrasive materials
and warm running water.
• Make sure the filter is assembled correctly
before starting a cycle. When assembling, rotate
it firmly until it clicks.
Recommended Filter Cleaning Schedule
Number of Loads
Per Week
If you wash
dishes before
loading
If you scrape
and rinse dishes
before loading
If you only scrape
dishes before
loading
If you do not
scrape or rinse
dishes before
loading
1-3 Every 6 months Once a year Four times a year Once a month
4-7 Every 6 months Once a year Four times a year
Twice a month
(every 15 days)
8-12 Every 6 months Every 6 months Every 1.5 months Every week
13-14 Every 6 months Every 6 months Every 1.5 months Twice a week

50
MAINTENANCE
Cleaning the Spray Arms
If the spray arm holes are blocked by any food
residue, dishes may not be cleaned well due to
improper water spray.
It is recommended that the spray arms be cleaned
once every two weeks.
Cleaning the Lower Spray Arm
1
Make sure that the water jet holes are not
blocked by food particles.
2
If any food residue blocks the spray arm holes,
remove it with a pin or any sharp tool.
CAUTION
• To avoid breaking the rolling spray arm
sections, do not pull or manually rotate them.
Cleaning the Upper Spray Arm
1
Pull the upper rack forward. Make sure that
the water jet holes are not blocked by food
particles.
2
When cleaning is necessary, remove the upper
spray arm by turning the nut on the bottom of
the spray arm
1
/
8
turn counter-clockwise and
pulling down.
3
Remove food particles by rinsing or shaking
the spray arm.
4
If any food residue blocks the spray arm holes,
remove it with a pin or any sharp tool.
5
After removing the food residue, clean the
spray arms holes under running water.
6
After cleaning the upper spray arm, press it
up into place. Turn the nut
1
/
8
turn clockwise to
make sure that the nut locks back into place.
7
After assembly, check whether the spray arms
rotate freely.

51
TROUBLESHOOTING
ENGLISH
TROUBLESHOOTING
FAQs: Frequently Asked Questions
Q: Does this dishwasher require a rinse aid to be used?
A: Rinse aid is strongly recommended to enhance the drying performance of the dishwasher. In order to
be more energy efficient, the hybrid drying system does not use a heating element to assist in drying,
so a rinse aid plays an integral role in the drying process. If a rinse aid is not used, water may remain
on the dishes and the tub. Rinse aid helps to ensure that the majority of the water has been sheeted
off of the dishes at the end of the rinse and that the load is ready for the dry cycle.
Q: What can be done if my dishes have a cloudy, white film on them after a wash?
A: The cloudy film is usually caused by minerals in the water reacting with the dishwasher detergent.
First, be certain not to use too much detergent. Refer to Adding Detergent to the Dispenser section
for recommended detergent amounts. Add an extra rinse to the cycle. LG Dishwashers use less
water than traditional dishwashers, so adding an extra rinse aids in rinsing the film away. If the water
supply is hard, it may be necessary to add a performance booster that addresses the hard water
condition.
Q: How do I remove white film on the tub?
A: Measure 3 tbsp. (40 g) of citric acid powder and use it to fill the main detergent compartment. Run a
Machine Clean cycle. Do not use detergent.
Q: What steps can I take to improve drying results?
A: Drying performance is directly affected by the amount of heat that remains in the tub after the
heated rinse is performed. If your dishwasher is far away from your home’s hot water heater, it may
be necessary to run the hot water tap in the sink before starting a wash cycle, to ensure that cool
water is purged from the hot water lines. This will ensure your dishwasher has a consistent supply
of hot water from start to finish. Using the High Temp setting also aids in keeping the inner drum
temperature and dishes hotter before drying begins.
LG dishwashers are designed to be used in conjunction with a rinse aid. Using a rinse aid will
maximize the amount of water that has already been sheeted away from the dishes before the dry
cycle begins. If a rinse aid is used and the performance still needs a boost, adjust the amount of
rinse aid used. 2 is the default setting, but if necessary set the level to 3 so more rinse aid is used.
Water tends to bead rather than sheet off plastic and nonstick surfaces, making them more difficult
to dry. If washing plastic items in a Normal cycle, select the Extra Dry or Night Dry option or both for
better drying results. When the rinse aid is empty, the Extra Dry option is selected automatically.
Allow the dishwasher to completely finish the dry cycle before opening the door. If the door is opened
in the middle of the dry cycle, the heat that is necessary for the hybrid dry system to work will
escape. This will cause all of the dishes inside to remain wet once the cycle finishes.

52
TROUBLESHOOTING
Q: What is the hybrid drying system?
A: The dishwasher does not rely on a heating element for the drying process; instead, it relies on the
heat that is retained by the dishes and the tub during the wash and rinse cycles to turn the moisture
in the tub into humidity.
Warm, moist air in the dishwasher is then pulled into a condensing duct in the door by a fan. The
air then cools, which causes the humidity to condense. Room temperature air is also drawn into the
duct to help the air cool down faster. When this moisture condenses into a liquid, it is drained out.
NOTE
• Rinse aid is required to enhance the drying performance. If no rinse aid is used, water may
remain on the dishes and the tub.
Q: Why am I hearing a whistling sound from the dishwasher?
A: It is important to determine the duration of the noise and when it happens (what part of the cycle).
When water is drawn into the dishwasher, a whistling noise can be heard. This is normal. If the
water pressure is too high, it will be louder, so it may be necessary to adjust the water valve to
lower the pressure if the noise is too loud.
Q: What kinds of dishes can be placed in the dishwasher?
A: Ensure that the dishes you place in the dishwasher are dishwasher safe. Plastic dishware will not
dry as effectively as glass and metal dishware. Plastic items do not retain heat as well as glass and
metal dishware. Plastic cups and dishes may require some hand drying before being put away at
the end of the cycle.
Q: Can I perform a drain only cycle?
A: To drain standing water, press and hold Start for three seconds until the cycle stops. Once the
dishwasher finishes draining, the power turns off.
Q: Why does my dishwasher continuously chime if I open the door during a cycle or right after
the cycle has finished?
A: This is normal. The dishwasher is letting you know that the interior temperatures of the unit are hot
and to use caution when placing your hands inside. Once the unit has cooled down, the chiming will
stop.

53
TROUBLESHOOTING
ENGLISH
Q: What is Control Lock and how is it activated?
A: Control Lock is a feature that prevents the controls from being changed during the cycle. It
does not prevent the door from being opened or the unit from being powered off. To activate or
deactivate, press Dual Zone for three seconds.
Q: Can I add an extension to the drain hose?
A: If an extension drain hose is required, use
5
/
8
" or
7
/
8
" inside diameter, 2-3 ft. length hose and a
coupler for connecting the two hose ends.
Q: An LED is blinking, the machine is chiming, and the dishwasher won't start. What is wrong
with the dishwasher?
A: This is a safety feature. The door must be closed within four seconds of pressing the Start button.
If the door is not closed within four seconds, an LED flashes, an audible alert sounds, and the
dishwasher does not operate. To start the dishwasher, open the door and either close the door and
press Start (front controls) or press Start and close the door within four seconds (top controls).
Q: Before loading dishes, should I pre-rinse dishes?
A: No, you don't need to pre-rinse the dishes before loading especially if using the Normal and Auto
cycles. The dishwasher washes dishes clean without pre-rinsing.

54
TROUBLESHOOTING
Before Calling for Service
The appliance is equipped with an automatic error-monitoring system to detect and diagnose problems at
an early stage. If the appliance does not function properly or does not function at all, check the following
before you call for service.
Problem Possible Cause & Solution
Dishwasher will not
operate.
Start button is not pressed.
• Press the Start button.
Door is not completely closed.
• Make sure that the door is completely closed and latched.
Power supply or power supply line is not connected.
• Connect the power supply or power supply line properly.
Fuse is blown or circuit breaker tripped.
• Replace the fuse or reset the circuit breaker.
Control Lock is activated.
• Deactivate Control Lock.
Dishwasher operates
too long.
Dishwasher is connected to cold water.
• Check the water supply connection or water heater setting. (Heating cold
water takes longer.)
Odor
The previous cycle was stopped before completion and residual water
remains in the dishwasher.
• Turn on the power, run the Cancel cycle option to remove the residual
water, then run the Turbo cycle using detergent but with the dishwasher
empty.
There is food in the bottom of the unit or in the filter.
• Clean the filter and the interior according to the Maintenance section of the
owner’s manual.
Unwashed dishes are left in the unit for a long time.
• Cycle with one cup of white vinegar in a dishwasher safe glass or bowl
placed on the upper rack. (Vinegar is an acid, and with constant use it could
damage your appliance.)
Water remains in tub
after completion of
cycle.
Drain hose is kinked or clogged.
• Adjust hose or clear blockage.

55
TROUBLESHOOTING
ENGLISH
Problem Possible Cause & Solution
Food soil remains on
dishes.
Improper cycle selection.
• Select correct cycle based on soil level and type of dishware being washed.
Water temperature is too low.
• Check water supply connection or water heater setting.
Dishwashing detergent was not used.
• Use recommended detergent.
Low inlet water pressure.
• Water pressure should be between 20 and 80 psi.
Water jet holes on spray arms blocked.
• Clean the spray arms.
Improper loading of dishes.
• Make sure dishes do not block spray arm rotation or interfere with detergent
dispenser.
Filters are clogged.
• Clean filters.
Cloudiness on
glassware.
Combination of excessive detergent and hard water.
• Use less detergent and use a rinse aid to minimize the problem.
Black or gray marks on
dishes.
Aluminum items rubbing dishes during cycle.
• Reposition the dishes.
Yellow or brown film
on inside surfaces of
dishwasher.
Coffee or tea stains.
• Eliminate the stain by using a stain removal product.
Spots and filming on
dishes.
Low water temperature.
• Water supply should be at least 120 °F for best wash performance.
Overloading.
• Do not overload the dishwasher.
Improper loading.
• See the Operation section.
Insufficient water pressure.
• Water pressure should be between 20 and 80 psi.
Insufficient detergent.
• Add the recommended amount of detergent. See the Operation section.
Rinse aid dispenser is empty.
• Refill rinse aid dispenser.
Hard water buildup in the tub.
• Remove all dishes, silverware and silverware holder from dishwasher. Only
racks should remain in tub. For best results, use citric acid powder (can
be found in canning sections of most grocery stores or online). Measure 3
tablespoons (40 g) of citric acid powder. Fill main wash compartment with
measured powder. If you cannot find citric acid powder, pour approximately
one cup (200-300 mL) of white vinegar into shallow bowl and place in upper
rack. Run Machine Clean cycle. Do not use detergent.

56
TROUBLESHOOTING
Problem Possible Cause & Solution
Noise
Some level of noise is normal during operation.
• Detergent cover opening.
• Drain pump at the beginning of drain cycle.
The dishwasher is not level.
• Adjust leveling feet.
Nozzle arm knocking against dishes.
• Reposition the dishes.
Dishes don’t dry.
Rinse agent dispenser empty.
• Check and refill the rinse agent dispenser if empty.
Lamps do not
illuminate.
Power is not connected.
• Connect power supply.
Spray arms do not
rotate smoothly.
Holes of spray arms are blocked by food particles.
• Clean the holes of spray arms.
Upper rack is crooked.
Rack is poorly adjusted.
• See the Height Adjustable Upper Rack section.
Dishwasher
continuously chimes
when the door is
opened, during or
right after a cycle has
completed.
This is a safety measure. Contact with escaping steam or the hot
contents of the dishwasher could result in injury.
• Close the door until the dishwasher and dishes have cooled down. The
chiming will stop if the door is closed or the interior temperature has cooled.
Door does not close
completely.
Cutlery rack is not properly loaded.
• Push the door handle to close the door properly until it clicks.
Dishwasher chimes if
panel is touched during
operation.
Bumping into or touching the control panel during operation may result
in a disabled button sound. Only the Power, Start, and Control Lock
buttons are enabled during operation to prevent cycle settings from
being changed inadvertently.
• Button sounds can be turned off by pressing and holding Half Load for
three seconds.
• The end of cycle chime and safety alert sounds will still sound.
Dishwasher did not
finish cycle.
Door was opened during cycle.
• If the door is opened during a cycle, the Start key must be pressed within 4
minutes or the machine turns off and all settings are lost.
Leaking in front of unit
Dishwasher not leveled properly.
• Verify the unit is level from side to side and from front to back. See leveling
instructions in the Installation section.
Wrong detergent used.
• If excessive sudsing is causing the leak, allow the foam to subside for 24
hours then clean the inside of the tub with milk.

57
TROUBLESHOOTING
ENGLISH
Problem Possible Cause & Solution
Your home appliance
and smartphone is not
connected to the Wi-Fi
network.
The password for the Wi-Fi that you are trying to connect to is incorrect.
• Find the Wi-Fi network connected to your smartphone and remove it, then
registeryour appliance on LG ThinQ.
Mobile data for your smartphone is turned on.
• Turn off the Mobile data of your smartphone and register the appliance
using the Wi-Finetwork.
The wireless network name (SSID) is set incorrectly.
• The wireless network name (SSID) shouldbe a combination of English
letters andnumbers. (Do not use special characters.)
The router frequency is not 2.4 GHz.
• Only a 2.4 GHz router frequency issupported. Set the wireless router to
2.4 GHz and connect the appliance to the wireless router. To check the
router frequency, check with your Internet service provider or the router
manufacturer.
The distance between the appliance and the router is too far.
• If the distance between the appliance andthe router is too far, the signal
may be weakand the connection may not be configured correctly. Move the
location of the router so that it is closer to the appliance.
P1, P2, P3, or P4
appears in display.
The Download cycle is selected.
• This is not an error code. This code indicates the current Download cycle.
n:#, U:#, d:#, t#
appearsin display. (# =
a number)
Test mode is selected.
• This is not an error code. This code is used when testing the dishwasher.
Power the unit off and on and the code will disappear.
L0, L1, L2, L3 or L4
appears in display.
Rinse Aid Level setting mode is selected.
• This is not an error code. This code indicates the current rinse aid level. For
more information, refer to the Adding Cleaning Agents section.
CL appears in display.
• Control Lock is activated.
• This is not an error code. This code indicates that the control lock is
activated. Press and hold Dual Zone simultaneously for three seconds.

58
TROUBLESHOOTING
Error Codes
Problem Possible Cause & Solution
IE
Water inlet problem.
• Check for a clogged, kinked or frozen water inlet hose.
• Check water supply.
OE
Drainage Problem.
• Check for a clogged, kinked or frozen water drain hose.
Air gap or disposal is clogged.
• Clean air gap or disposal.
Filters are clogged.
• Clean Filters.
bE
Oversudsing caused by improper detergent, such as dish soap.
• Do not use hand dishwashing liquids. Only use detergents which are designed for use
in automatic dishwashers.
• To remove detergent residue in the tub, pour approximately 4-8 oz(100~200 mℓ) of milk
into a shallow bowl, place it in the upper rack and then run the appliance on the Auto
cycle.
Failure to level dishwasher.
• Make sure that the appliance is properly leveled.
AE
Water leakage
• Turn off the water supply to the dishwasher and call an LG Electronics Customer
Information Center at 1-800-984-6306 (U.S.A.) or 1-888-542-2623 (Canada).
• The dishwasher makes an alert sound for 10 seconds, and runs the drain pump
intermittently. If power is turned off to the machine, the machine powers back on
automatically until the AE error is resolved.
FE
Excessive Water supplied.
• Please call an LG Electronics Customer Information Center at 1-800-984-6306
(U.S.A.) 1-888-542-2623 (Canada).
HE
Heater circuit failure.
• Please call an LG Electronics Customer Information Center at 1-800-984-6306
(U.S.A.) 1-888-542-2623 (Canada).
tE
Thermistor failure.
• Please call an LG Electronics Customer Information Center at 1-800-984-6306
(U.S.A.) 1-888-542-2623 (Canada).
LE
Motor trouble
• Please call an LG Electronics Customer Information Center at 1-800-984-6306
(U.S.A.) 1-888-542-2623 (Canada).
NE
Vario motor trouble
• Please call an LG Electronics Customer Information Center at 1-800-984-6306
(U.S.A.) 1-888-542-2623 (Canada).

59
LIMITED WARRANTY
ENGLISH
LIMITED WARRANTY
USA
ARBITRATION NOTICE: THIS LIMITED WARRANTY CONTAINS AN ARBITRATION PROVISION
THAT REQUIRES YOU AND LG TO RESOLVE DISPUTES BY BINDING ARBITRATION INSTEAD OF
IN COURT, UNLESS YOU CHOOSE TO OPT OUT. IN ARBITRATION, CLASS ACTIONS AND JURY
TRIALS ARE NOT PERMITTED. PLEASE SEE THE SECTION TITLED “PROCEDURE FOR RESOLVING
DISPUTES” BELOW.
Should your LG Dishwasher fail due to a defect in materials or workmanship under normal home use,
during the warranty period set forth below, LG will at its option repair or replace the product. This limited
warranty is valid only to the original retail purchaser of the product and applies only when purchased and
used within the United States, including U.S. Territories. Proof of original retail purchase is required to
obtain warranty service under this limited warranty.
Warranty Period Scope of Warranty HOW SERVICE IS HANDLED
One (1) year from date of
original retail purchase
Labor / Parts
LG will also provide, free of charge, all labor
and on-site service to replace the defective
part.
Five (5) years from date of
original retail purchase
Main Control board* /
Racks
Main control board and dishwasher racks.
Customer will be responsible for any labor or
in-home service to replace defective parts.
Ten (10) years from date of
original retail purchase
Direct Drive Motor
Direct Drive motor. Customer will be
responsible for any labor or in-home service to
replace defective parts.
Limited Lifetime Tub
Stainless steel door liner and tub. Customer
will be responsible for any labor or in-home
service to replace defective parts.
*Main control board is located on the right bottom of the Dishwasher from the front view
• Replacement products and parts are warranted for the remaining portion of the original warranty period
or ninety (90) days, whichever is greater.
• Replacement products and parts may be new or remanufactured.
THIS WARRANTY IS IN LIEU OF ANY OTHER WARRANTY, EXPRESS OR IMPLIED, INCLUDING
WITHOUT LIMITATION, ANY WARRANTY OF MERCHANTABILITY OR FITNESS FOR A PARTICULAR
PURPOSE. TO THE EXTENT ANY IMPLIED WARRANTY IS REQUIRED BY LAW, IT IS LIMITED IN
DURATION TO THE EXPRESS WARRANTY PERIOD ABOVE. NEITHER THE MANUFACTURER NOR
ITS U.S. DISTRIBUTOR SHALL BE LIABLE FOR ANY INCIDENTAL, CONSEQUENTIAL, INDIRECT,
SPECIAL, OR PUNITIVE DAMAGES OF ANY NATURE, INCLUDING WITHOUT LIMITATION, LOST
REVENUES OR PROFITS, OR ANY OTHER DAMAGE WHETHER BASED IN CONTRACT, TORT, OR
OTHERWISE.
Some states do not allow the exclusion or limitation of incidental or consequential damages or limitations
on how long an implied warranty lasts, so the above exclusion or limitation may not apply to you. This
warranty gives you specific legal rights and you may also have other rights that vary from state to state.
THIS LIMITED WARRANTY DOES NOT COVER:
• Service trips to deliver, pick up, or install or repair the product; instruction to the customer on operation
of the product; repair or replacement of fuses or correction of wiring or plumbing, or correction of
unauthorized repairs/installation.
• Failure of the product to perform during power failures and interrupted or inadequate electrical service.
• Damage caused by leaky or broken water pipes, frozen water pipes, restricted drain lines, inadequate or
interrupted water supply or inadequate supply of air.

60
LIMITED WARRANTY
• Damage resulting from operating the product in a corrosive atmosphere or contrary to the instructions
outlined in the product’s owner’s manual.
• Damage to the product caused by accidents, pests and vermin, lightning, wind, fire, floods, or acts of
God.
• Damage or failure caused by unauthorized modification or alteration, or if it is used for other than the
intended purpose, or any water leakage where the unit was not properly installed.
• Damage or failure caused by incorrect electrical current, voltage, or plumbing codes, commercial
or industrial use, or use of accessories, components, or consumable cleaning products that are not
approved by LG.
• Damage caused by transportation and handling, including scratches, dents, chips, and/or other damage
to the finish of your product, unless such damage results from defects in materials or workmanship and
is reported within one (1) week of delivery.
• Damage or missing items to any display, open box, discounted, or refurbished product.
• Products with original serial numbers that have been removed, altered, or cannot be readily determined.
Model and serial numbers, along with original retail sales receipts, are required for warranty validation.
• Increases in utility costs and additional utility expenses.
• Repairs when your product is used for other than normal and usual household use (e.g. commercial
use, in offices and recreational facilities) or contrary to the instructions outlined in the product’s owner’s
manual.
• Costs associated with removal of your product from your home for repairs.
The cost of repair or replacement under these excluded circumstances shall be borne by the
consumer.
TO OBTAIN WARRANTY SERVICE AND ADDITIONAL INFORMATION
For additional product information, visit the LG website at http://www.LGSIGNATURE.com
For assistance using this product or to schedule service, contact LG Electronics at 1-800-984-6306.
For further assistance, write: LG Electronics, 201 James Record Road, Huntsville, Alabama 35813

61
LIMITED WARRANTY
ENGLISH
PROCEDURE FOR RESOLVING DISPUTES:
ALL DISPUTES BETWEEN YOU AND LG ARISING OUT OF OR RELATING IN ANY WAY TO THIS
LIMITED WARRANTY OR THE PRODUCT SHALL BE RESOLVED EXCLUSIVELY THROUGH BINDING
ARBITRATION, AND NOT IN A COURT OF GENERAL JURISDICTION. BINDING ARBITRATION
MEANS THAT YOU AND LG ARE EACH WAIVING THE RIGHT TO A JURY TRIAL AND TO BRING OR
PARTICIPATE IN A CLASS ACTION.
Definitions. For the purposes of this section, references to “LG” mean LG Electronics U.S.A., Inc., its
parents, subsidiaries and affiliates, and each of their officers, directors, employees, agents, beneficiaries,
predecessors in interest, successors, assigns and suppliers; references to “dispute” or “claim” shall
include any dispute, claim or controversy of any kind whatsoever (whether based in contract, tort, statute,
regulation, ordinance, fraud, misrepresentation or any other legal or equitable theory) arising out of or
relating in any way to the sale, condition or performance of the product or this Limited Warranty.
Notice of Dispute. In the event you intend to commence an arbitration proceeding, you must first notify
LG in writing at least 30 days in advance of initiating the arbitration by sending a letter to LG at LG
Electronics, USA, Inc. Attn: Legal Department- Arbitration 1000 Sylvan Ave, Englewood Cliffs 07632. You
and LG agree to engage in good faith discussions in an attempt to amicably resolve your claim. The notice
must provide your name, address, and telephone number; identify the product that is the subject of the
claim; and describe the nature of the claim and the relief being sought. If you and LG are unable to resolve
the dispute within 30 days, either party may proceed to file a claim for arbitration.
Agreement to Binding Arbitration and Class Action Waiver. Upon failure to resolve the dispute during
the 30 day period after sending written notice to LG, you and LG agree to resolve any claims between
us only by binding arbitration on an individual basis, unless you opt out as provided below. Any dispute
between you and LG shall not be combined or consolidated with a dispute involving any other person’s
or entity’s product or claim. More specifically, without limitation of the foregoing, any dispute between you
and LG shall not under any circumstances proceed as part of a class or representative action. Instead
of arbitration, either party may bring an individual action in small claims court, but that small claims court
action may not be brought on a class or representative basis.
Arbitration Rules and Procedures. To begin arbitration of a claim, either you or LG must make a written
demand for arbitration. The arbitration will be administered by the American Arbitration Association (“AAA”)
and will be conducted before a single arbitrator under the AAA’s Consumer Arbitration Rules that are in
effect at the time the arbitration is initiated (referred to as the “AAA Rules”) and under the procedures set
forth in this section. The AAA Rules are available online at www.adr.org/consumer. Send a copy of your
written demand for arbitration, as well as a copy of this provision, to the AAA in the manner described in
the AAA Rules. You must also send a copy of your written demand to LG at LG Electronics, USA, Inc.
Attn: Legal Department- Arbitration 1000 Sylvan Avenue Englewood Cliffs, NJ 07632. If there is a conflict
between the AAA Rules and the rules set forth in this section, the rules set forth in this section will govern.
This arbitration provision is governed by the Federal Arbitration Act. Judgment may be entered on the
arbitrator’s award in any court of competent jurisdiction. All issues are for the arbitrator to decide, except
that issues relating to the scope and enforceability of the arbitration provision and to the arbitrability of the
dispute are for the court to decide. The arbitrator is bound by the terms of this provision.
Governing Law. The law of the state of your residence shall govern this Limited Warranty and any
disputes between us except to the extent that such law is preempted by or inconsistent with applicable
federal law.

62
LIMITED WARRANTY
Fees/Costs. You do not need to pay any fee to begin an arbitration. Upon receipt of your written demand
for arbitration, LG will promptly pay all arbitration filing fees to the AAA unless you seek more than
$25,000 in damages, in which case the payment of these fees will be governed by the AAA Rules. Except
as otherwise provided for herein, LG will pay all AAA filing, administration and arbitrator fees for any
arbitration initiated in accordance with the AAA Rules and this arbitration provision. If you prevail in the
arbitration, LG will pay your attorneys’ fees and expenses as long as they are reasonable, by considering
factors including, but not limited to, the purchase amount and claim amount. Notwithstanding the
foregoing, if applicable law allows for an award of reasonable attorneys’ fees and expenses, an arbitrator
can award them to the same extent that a court would. If the arbitrator finds either the substance of your
claim or the relief sought in the demand is frivolous or brought for an improper purpose (as measured
by the standards set forth in Federal Rule of Civil Procedure 11(b)), then the payment of all arbitration
fees will be governed by the AAA Rules. In such a situation, you agree to reimburse LG for all monies
previously disbursed by it that are otherwise your obligation to pay under the AAA Rules. Except as
otherwise provided for, LG waives any rights it may have to seek attorneys’ fees and expenses from you if
LG prevails in the arbitration.
Hearings and Location. If your claim is for $25,000 or less, you may choose to have the arbitration
conducted solely on the basis of (1) documents submitted to the arbitrator, (2) through a telephonic
hearing, or (3) by an in-person hearing as established by the AAA Rules. If your claim exceeds $25,000,
the right to a hearing will be determined by the AAA Rules. Any in-person arbitration hearings will be held
at a location within the federal judicial district in which you reside unless we both agree to another location
or we agree to a telephonic arbitration.
Opt Out. You may opt out of this dispute resolution procedure. If you opt out, neither you nor LG can
require the other to participate in an arbitration proceeding. To opt out, you must send notice to LG no later
than 30 calendar days from the date of the first consumer purchaser’s purchase of the product by either: (i)
sending an e-mail to [email protected], with the subject line: “Arbitration Opt Out” or (ii) calling 1-800-980-
2973. You must include in the opt out e-mail or provide by telephone: (a) your name and address; (b) the
date on which the product was purchased; (c) the product model name or model number; and (d) the serial
number (the serial number can be found (i) on the product; or (ii) online by accessing https://www.lg.com/
us/support/repair-service/schedule-repair-continued and clicking on “Find My Model & Serial Number”).
You may only opt out of the dispute resolution procedure in the manner described above (that is, by e-mail
or telephone); no other form of notice will be effective to opt out of this dispute resolution procedure.
Opting out of this dispute resolution procedure will not affect the coverage of the Limited Warranty in any
way, and you will continue to enjoy the full benefits of the Limited Warranty. If you keep this product and do
not opt out, then you accept all terms and conditions of the arbitration provision described above.

63
LIMITED WARRANTY
ENGLISH
CANADA
ARBITRATION NOTICE: THIS LIMITED WARRANTY CONTAINS AN ARBITRATION PROVISION THAT
REQUIRES YOU AND LG TO RESOLVE DISPUTES BY BINDING ARBITRATION INSTEAD OF IN
COURT, UNLESS THE LAWS OF YOUR PROVINCE OR TERRITORY DO NOT PERMIT THAT, OR,
IN OTHER JURISDICTIONS, IF YOU CHOOSE TO OPT OUT. IN ARBITRATION, CLASS ACTIONS
AND JURY TRIALS ARE NOT PERMITTED. PLEASE SEE THE SECTION TITLED “PROCEDURE FOR
RESOLVING DISPUTES” BELOW.
WARRANTY: Should your LG Dishwasher (“Product”) fail due to a defect in material or workmanship
under normal home use during the warranty period set forth below, LG Canada will at its option repair
or replace the product upon receipt of proof of original retail purchase. This warranty is valid only to the
original retail purchaser of the product and applies only to a product distributed in Canada by LG Canada
or an authorized Canadian distributor thereof. The warranty only applies to Products located and used
within Canada. Coverage for “in Home” repairs, for products in-warranty, will be provided if the Product is
within a 150 km radius from the nearest authorized service center (ASC), as determined by LG Canada. If
your Product is located outside a 150 km radius from a ASC, as determined by LG Canada, it will be your
responsibility to bring the Product, at your sole expense, to the ASC for in-warranty repair.
WARRANTY PERIOD: (Note: If the original date of purchase can not be verified, the warranty will begin
sixty (60) days from the date of manufacture.)
Dishwasher
Extended Component Warranty (Parts Only) (Consumer will be charged
for Labor after One (1) year from the date of purchase.)
One (1) year from the date of
original retail purchase
Five (5) years from the date of
original retail purchase
Ten (10) years from the date of
original retail purchase
Labor / Parts
Main control board*, Rack,
Stainless Steel Door Liner, Tub
DD Motor
(internal/functional parts only)
* Main control board is located on the right bottom of the Dishwasher from the front view.
• Replacement products and parts are warranted for the remaining portion of the original warranty period
or ninety (90) days, whichever is greater.
• Replacement products and parts may be new or remanufactured.
• LG Authorized Service Center warranties their repair work for thirty (30) days.
LG CANADA’S SOLE LIABILITY IS LIMITED TO THE WARRANTY SET OUT ABOVE. EXCEPT
AS EXPRESSLY PROVIDED ABOVE, LG CANADA MAKES NO AND HEREBY DISCLAIMS ALL
OTHER WARRANTIES AND CONDITIONS RESPECTING THE PRODUCT, WHETHER EXPRESS
OR IMPLIED, INCLUDING, BUT NOT LIMITED TO, ANY IMPLIED WARRANTY OR CONDITION OF
MERCHANTABILITY OR FITNESS FOR A PARTICULAR PURPOSE, AND NO REPRESENTATIONS
SHALL BE BINDING ON LG CANADA. LG CANADA DOES NOT AUTHORIZE ANY PERSON TO
CREATE OR ASSUME FOR IT ANY OTHER WARRANTY OBLIGATION OR LIABILITY IN CONNECTION
WITH THE PRODUCT. TO THE EXTENT THAT ANY WARRANTY OR CONDITION IS IMPLIED BY LAW,
IT IS LIMITED TO THE EXPRESS WARRANTY PERIOD ABOVE. LG CANADA, THE MANUFACTURER
OR DISTRIBUTOR SHALL NOT BE LIABLE FOR ANY INCIDENTAL, CONSEQUENTIAL, SPECIAL,
DIRECT OR INDIRECT DAMAGES, LOSS OF GOODWILL, LOST PROFITS, PUNITIVE OR
EXEMPLARY DAMAGES OR ANY OTHER DAMAGE, WHETHER ARISING DIRECTLY OR INDIRECTLY
FROM ANY CONTRACTUAL BREACH, FUNDAMENTAL OR OTHERWISE, OR FROM ANY ACTS OR
OMISSIONS, TORT, OR OTHERWISE.
This warranty gives you specific legal rights. You may have other rights which may vary from province to
province depending on applicable provincial laws. Any term of this warranty that negates or varies any
implied condition or warranty under provincial law is severable where it conflicts with provincial law without
affecting the remainder of this warranty’s terms.

64
LIMITED WARRANTY
THIS LIMITED WARRANTY DOES NOT COVER:
• Service trips to deliver, pick up, or install the product; instructing a customer on operation of the product;
repair or replacement of fuses or correction of wiring or plumbing, or correction of unauthorized repairs/
installation.
• Failure of the product to perform during power failures and interruptions or inadequate electrical service.
• Damage caused by leaky or broken water pipes, frozen water pipes, restricted drain lines, inadequate or
interrupted water supply or inadequate supply of air.
• Damage resulting from operating the Product in a corrosive atmosphere or contrary to the instructions
outlined in the Product owner’s manual.
• Damage to the Product caused by accidents, pests and vermin, lightning, wind, fire, floods, or acts of
God.
• Damage or product failure caused by unauthorized modification or alteration, or use for other than its
intended purpose, or resulting from any water leakage due to improper installation.
• Damage or Product failure caused by incorrect electrical current, voltage, or plumbing codes,
commercial or industrial use, or use of accessories, components, or cleaning products that are not
approved by LG Canada.
• Damage caused by transportation and handling, including scratches, dents, chips, and/or other damage
to the finish of your product, unless such damage results from defects in materials or workmanship and
is reported within one (1) week of delivery.
• Damage or missing items to any display, open box, discounted, or refurbished Product.
• Products with original serial numbers that have been removed, altered, or cannot be readily determined.
Model and Serial numbers, along with original retail sales receipt, are required for warranty validation.
• Increases in utility costs and additional utility expenses.
• Replacement of light bulbs, filters, or any consumable parts.
• Repairs when your Product is used in other than normal and usual household use (including, without
limitation, commercial use, in offices or recreational facilities) or contrary to the instructions outlined in
the Product owner’s manual.
• Costs associated with removal of the Product from your home for repairs.
• The removal and reinstallation of the Product if it is installed in an inaccessible location or is not installed
in accordance with published installation instructions, including the Product owner’s and installation
manuals.
• Accessories to the Product such as door bins, drawers, handles, shelves, etc.. Also excluded are parts
besides those that were originally included with the Product.
• Damage resulting from the misuse, abuse, improper installation, repair, or maintenance of the Product.
Improper repair includes use of parts not approved or specified by LG Canada.
All costs associated with the above excluded circumstances shall be borne by the consumer.
For complete warranty details and customer assistance, please call or visit our website:
Call 1-888-542-2623 (7 A.M to 12 A.M, 365 days a year) and select the appropriate option from the menu,
or Visit our website at http://www.LGSIGNATURE.com

65
LIMITED WARRANTY
ENGLISH
PROCEDURE FOR RESOLVING DISPUTES:
EXCEPT WHERE PROHIBITED AT LAW, ALL DISPUTES BETWEEN YOU AND LG ARISING OUT
OF OR RELATING IN ANY WAY TO THIS LIMITED WARRANTY OR THE PRODUCT SHALL BE
RESOLVED EXCLUSIVELY THROUGH BINDING ARBITRATION, AND NOT IN A COURT OF GENERAL
JURISDICTION. EXCEPT WHERE PROHIBITED AT LAW, YOU AND LG BOTH IRREVOCABLY AGREE
TO WAIVE THE RIGHT TO A JURY TRIAL AND TO BRING OR PARTICIPATE IN A CLASS ACTION..
Definitions. For the purposes of this section, references to “LG” mean LG Electronics Canada, Inc., its
parents, subsidiaries and affiliates, and each of their officers, directors, employees, agents, beneficiaries,
predecessors in interest, successors, assigns and suppliers; references to “dispute” or “claim” shall
include any dispute, claim or controversy of any kind whatsoever (whether based in contract, tort, statute,
regulation, ordinance, fraud, misrepresentation or any other legal or equitable theory) arising out of or
relating in any way to the sale, condition or performance of the product or this Limited Warranty.
Notice of Dispute. In the event you intend to commence an arbitration proceeding, you must first notify
LG in writing at least 30 days in advance of initiating the arbitration by sending a letter to LGECI Legal
Team at 20 Norelco Drive, North York, Ontario, Canada M9L 2X6 (the “Notice of Dispute”). You and LG
agree to engage in good faith discussions in an attempt to amicably resolve your claim. The notice must
provide your name, address, and telephone number; identify the product that is the subject of the claim;
and describe the nature of the claim and the relief being sought. If you and LG are unable to resolve the
dispute within 30 days of LG’s receipt of the Notice of Dispute, the dispute shall be resolved by binding
arbitration in accordance with the procedure set out herein. You and LG both agree that, during the
arbitration proceeding, the terms (including any amount) of any settlement offer made by either you or LG
will not be disclosed to the arbitrator until the arbitrator determines the dispute.
Agreement to Binding Arbitration and Class Action Waiver. Upon failure to resolve the dispute during
the 30 day period after LG’s receipt of the Notice of Dispute, you and LG agree to resolve any claims
between you and LG only by binding arbitration on an individual basis, unless you opt out as provided
below, or you reside in a jurisdiction that prevents full application of this clause in the circumstances of the
claims at issue (in which case if you are a consumer, this clause will only apply if you expressly agree to
the arbitration). To the extent permitted by applicable law, any dispute between you and LG shall not be
combined or consolidated with a dispute involving any other person’s or entity’s product or claim. More
specifically, without limitation of the foregoing, except to the extent such a prohibition is not permitted at
law, any dispute between you and LG shall not under any circumstances proceed as part of a class or
representative action. Instead of arbitration, either party may bring an individual action in small claims
court, but that small claims court action may not be brought on a class or representative basis except to
the extent this prohibition is not permitted at law in your province or territory of jurisdiction as it relates to
the claims at issue between you and LG.
Arbitration Rules and Procedures. To begin arbitration of a claim, either you or LG must make a written
demand for arbitration. The arbitration will be private and confidential, and conducted on a simplified
and expedited basis before a single arbitrator chosen by the parties under the provincial or territorial
commercial arbitration law and rules of the province or territory of your residence. You must also send a
copy of your written demand to LG at LG Electronics, Canada, Inc., Attn: Legal Department- Arbitration,
20 Norelco Drive, North York, Ontario M9L 2X6. This arbitration provision is governed by your applicable
provincial or territorial commercial arbitration legislation. Judgment may be entered on the arbitrator’s
award in any court of competent jurisdiction. All issues are for the arbitrator to decide, except that, issues
relating to the scope and enforceability of the arbitration provision and to the arbitrability of the dispute are
for the court to decide. The arbitrator is bound by the terms of this provision.
Governing Law. The law of the province or territory of your purchase shall govern this Limited Warranty
and any disputes between you and LG except to the extent that such law is preempted by or inconsistent
with applicable federal or provincial/territorial law. Should arbitration not be permitted for any claim, action,
dispute or controversy between you and LG, you and LG attorn to the exclusive jurisdiction of the courts
of the province or territory of your purchase for the resolution of the claim, action, dispute or controversy
between you and LG.

66
LIMITED WARRANTY
Fees/Costs. You do not need to pay any fee to begin an arbitration. Upon receipt of your written demand
for arbitration, LG will promptly pay all arbitration filing fees unless you seek more than $25,000 in
damages, in which case the payment of these fees will be governed by the applicable arbitration rules.
Except as otherwise provided for herein, LG will pay all filing, administration and arbitrator fees for any
arbitration initiated in accordance with the applicable arbitration rules and this arbitration provision.
If you prevail in the arbitration, LG will pay your attorneys’ fees and expenses as long as they are
reasonable, by considering factors including, but not limited to, the purchase amount and claim amount.
Notwithstanding the foregoing, if applicable law allows for an award of reasonable attorneys’ fees and
expenses, an arbitrator can award them to the same extent that a court would. If the arbitrator finds either
the substance of your claim or the relief sought in the demand is frivolous or brought for an improper
purpose (as measured by the applicable laws), then the payment of all arbitration fees will be governed
by the applicable arbitration rules. In such a situation, you agree to reimburse LG for all monies previously
disbursed by it that are otherwise your obligation to pay under the applicable arbitration rules. Except as
otherwise provided for, LG waives any rights it may have to seek attorneys’ fees and expenses from you if
LG prevails in the arbitration.
Hearings and Location. If your claim is for $25,000 or less, you may choose to have the arbitration
conducted solely (1) on the basis of documents submitted to the arbitrator, (2) through a telephonic
hearing, or (3) by an in-person hearing as established by the applicable arbitration rules. If your claim
exceeds $25,000, the right to a hearing will be determined by the applicable arbitration rules. Any in-
person arbitration hearings will be held at the nearest, most mutually-convenient arbitration location
available within the province or territory in which you reside unless you and LG both agree to another
location or agree to a telephonic arbitration.
Opt Out. You may opt out of this dispute resolution procedure. If you opt out, neither you nor LG can
require the other to participate in an arbitration proceeding. To opt out, you must send notice to LG no later
than 30 calendar days from the date of the first consumer purchaser’s purchase of the product by either (i)
sending an e-mail to [email protected], with the subject line: “Arbitration Opt Out;” or (ii) calling 1-800-980-
2973. You must include in the opt out e-mail or provide by telephone: (a) your name and address; (b) the
date on which the product was purchased; (c) the product model name or model number; and (d) the serial
number (the serial number can be found (i) on the product; or (ii) online by accessing https://www.lg.com/
ca_en/support/repair-service/schedule-repair and clicking on “Find My Model & Serial Number”).
In the event that you “Opt Out”, the law of the province or territory of your residence shall govern this
Limited Warranty and any disputes between you and LG except to the extent that such law is preempted
by or inconsistent with applicable federal or provincial/territorial law. Should arbitration not be permitted for
any claim, action, dispute or controversy between you and LG, you and LG agree to attorn to the exclusive
jurisdiction of the courts of the province or territory of your residence for the resolution of the claim, action,
dispute or controversy between you and LG.
You may only opt out of the dispute resolution procedure in the manner described above (that is, by e-mail
or telephone); no other form of notice will be effective to opt out of this dispute resolution procedure.
Opting out of this dispute resolution procedure will not affect the coverage of the Limited Warranty in any
way, and you will continue to enjoy the full benefits of the Limited Warranty. If you keep this product and do
not opt out, then you accept all terms and conditions of the arbitration provision described above.
Conflict of Terms. In the event of a conflict or inconsistency between the terms of this Limited Warranty
and the End User License Agreement (“EULA”) in regards to dispute resolution, the terms of this Limited
Warranty shall control and govern the rights and obligations of the parties and shall take precedence over
the EULA.

67
LIMITED WARRANTY
ENGLISH
Warranty Exceptions (U.S. and Canada)
Poor wash results caused
by debris remaining in the
filter.
• Clean the filter regularly.
Poor wash results caused
by improper loading
or over stacking: wash
arm won't rotate or soap
dispenser is held closed.
• Make certain that no
dishes or utensils are
in the path of the spray
arms.
• Do not place one dish on
top of another.
Poor drying results caused
by lack of rinse aid.
• Use rinse aid or
combination detergent.
Water is not supplied
because the water tap is
not turned on.
IE error
• Check and turn on the
water tap.
Water is not supplied
because the inlet hose is
kinked.
IE error
• Reinstall the inlet hose.
Not draining because drain
hose is kinked.
OE error
• Reinstall the drain hose.
The knockout plug in the
garbage disposal is not
removed.
OE error
• Remove the plug on the
disposal.
The disposal or air gap is
blocked by debris.
OE error
• Clean the disposal or the
air gap.
Inlet valve and drain
hose connection problem
caused by improper
installation.
External leakage
• Reinstall the hose.

68
LIMITED WARRANTY
Door movement or closing
compromised by incorrect
leveling.
• Adjust the lower front
leveling legs to the
required height.
No power due to loose
connection of power
supply line or electrical
outlet problem.
• Reconnect the power
supply line or repair the
electrical outlet.
Pick-up, electrical wiring,
plumbing.
Installation
• You will be charged for
the installation.

www.LGSIGNATURE.com
Copyright © 2020 LG Electronics Inc. Todos los Derechos Reservados.
MANUAL DEL PROPIETARIO
LAVAVAJILLAS
Lea detenidamente el manual del propietario antes de poner el electrodoméstico en funcionamiento
y consérvelo a mano en todo momento para su referencia.


TABLA DE CONTENIDOS
3
4 CARACTERÍSTICAS DEL
PRODUCTO
5 INSTRUCCIONES DE
SEGURIDAD
5 INSTRUCCIONES IMPORTANTES DE
SEGURIDAD
10 DESCRIPCIÓN GENERAL DEL
PRODUCTO
10 Piezas exteriores
11 Piezas interiores
12 Accesorios
13 INSTALACIÓN
13 Piezas y herramientas para la instalación
14 Descripción general de la instalación
14 Dimensiones del producto
14 Especificaciones del producto
15 Preparación de la abertura para el gabinete
16 Preparación de las conexiones eléctricas y de
agua
17 Preparación del lavavajillas
18 Colocación de los soportes de instalación
19 Deslizamiento del lavavajillas en la abertura del
gabinete
21 Conexión de la línea de suministro de agua y
energía eléctrica
23 Conexión de la manguera de desagüe
25 Nivelado del lavavajillas
27 Sujeción del lavavajillas en la abertura del
gabinete
28 Verificación final de la instalación
29 FUNCIONAMIENTO
29 Uso del artefacto
30 Panel de control
31 Ciclos
32 Opciones
33 Guía de ciclos y opciones
34 Carga del lavavajillas
34 Carga en la bandeja inferior
36 Carga en el cesto para cubiertos
37 Carga en la bandeja superior
40 Carga del estante de cubiertos
42 Agregado de agentes de limpieza
44 FUNCIONES INTELIGENTES
44 Aplicación LG ThinQ
46 Función Smart Diagnosis ™ (Diagnóstico
Inteligente)
47 MANTENIMIENTO
47 Limpieza del exterior
47 Limpieza del interior
47 Mantenimiento estacional y almacenamiento
48 Trampa de aire del desagüe o triturador del
fregadero obstruidos
49 Limpieza de los filtros
50 Limpieza de los brazos rociadores
51 SOLUCIÓN DE PROBLEMAS
51 Preguntas frecuentes
54 Antes de llamar al servicio técnico
59 GARANTÍA LIMITADA
59 EE. UU.
63 Excepciones de garantía (EE. UU. y Canadá)

4
CARACTERÍSTICAS DEL PRODUCTO
CARACTERÍSTICAS DEL PRODUCTO
Sistema QuadWash™
Los brazos rociadores inferiores Multi-Motion esparcen el agua en diferentes direcciones y en intensidades
optimizadas para llegar a cada zona de la cuba. El sistema proporciona cobertura de limpieza más completa y de
mayor potencia.
Motor inversor Direct Drive
La experiencia de LG en tecnología de motores tiene como resultado una funcionalidad extraordinaria con
características de avanzada, tales como la opción Dual Zone, un funcionamiento silencioso, la eficiencia en el
consumo de energía y la durabilidad.
Su simple diseño y la alta calidad del motor lo hacen tan confiable que está cubierto por 10 años de garantía.
EasyRack Plus
Este sistema de alturas de bandejas y juntas separadoras ajustables es fácil de usar y brinda más flexibilidad y
versatilidad cuando se le carga vajilla de varias formas y tamaños.
Sistema de secado híbrido
Este eficiente sistema de secado no usa un elemento calentador durante el proceso de secado, lo que tiene como
resultado una eficiencia superior en el consumo de energía y un suave cuidado para su vajilla.
LG ThinQ™
Descargue la nueva aplicación de LG para teléfonos inteligentes para configurar las opciones, autodiagnosticar y
resolver problemas con el artefacto y acceda a otras características de gran utilidad. Esta funcion utiliza Wi-Fi.
Tecnología TrueSteam™
Pequeñas gotas de agua purificada cubren la superficie de cada plato desde el vapor que cubre la bañera,
ofreciendo como resultado platos limpios y brillantes.

5
INSTRUCCIONES DE SEGURIDAD
ESPAÑOL
INSTRUCCIONES DE SEGURIDAD
LEA TODAS LAS INSTRUCCIONES ANTES DE UTILIZAR
Su seguridad y la de los demás son muy importantes.
Tanto en este manual como en el equipo, hemos proporcionado muchos mensajes de seguridad
importantes. Siempre debe leer y respetar todos los mensajes de seguridad.
Este es el símbolo de alerta de seguridad.
Este símbolo le advierte sobre posibles riesgos que pueden ocasionar lesiones o la muerte a
usted o a otros.
El símbolo de alerta de seguridad siempre estará acompañado de las palabras "ADVERTENCIA"
o "PRECAUCIÓN" y seguido de un mensaje de seguridad importante. Estos términos significan lo
siguiente:
ADVERTENCIA
Podría sufrir lesiones graves o la muerte si no sigue las instrucciones.
PRECAUCIÓN
Podría sufrir lesiones leves o dañar el producto si no sigue las instrucciones.
Todos los mensajes de seguridad le indicarán cuál es el riesgo potencial, le indicarán cómo reducir la probabilidad
de lesiones y le proporcionarán información sobre qué podría suceder si no se siguen las instrucciones.
INSTRUCCIONES IMPORTANTES DE SEGURIDAD
ADVERTENCIA
Para disminuir el riesgo de explosiones, incendios, descargas eléctricas, quemaduras,
lesiones o muerte para las personas que usen este artefacto, siga las precauciones básicas,
incluidas las siguientes:
INSTALACIÓN
• Debe conectarse a un circuito de alimentación de clasificación y tamaño adecuados y debidamente
protegido para evitar la sobrecarga eléctrica.
• Para reducir el riesgo de lesiones graves o muerte, siga todas las instrucciones de instalación.
• El artefacto debe ser instalado y conectado a tierra por personal de servicio calificado, de acuerdo con los
códigos locales.
• Desconecte la línea de alimentación, el fusible del hogar o el interruptor de corriente antes de instalar o
reparar el artefacto.
• Cuando traslade o instale el producto en un lugar diferente, llame a personal de servicio calificado para la
instalación y el mantenimiento.
• Mantenga los materiales de empaque fuera del alcance de los niños. Los materiales de empaque pueden
ser peligrosos para los niños. Corren riesgo de asfixia.
• El traslado o la instalación del artefacto requieren de dos o más personas.
• Este artefacto no ha sido diseñado para ser usado en embarcaciones o instalaciones móviles, tales como
casas rodantes, remolques o aeronaves.

6
INSTRUCCIONES DE SEGURIDAD
• Almacene e instale el artefacto donde no esté expuesto a temperaturas bajo cero ni a la intemperie.
• Debe posicionar este artefacto cerca de una fuente de suministro eléctrico.
• En ninguna circunstancia debe cortar o quitar la tercera clavija (tierra) de la línea de alimentación.
• Cuando traslade o instale el aparato, tenga especial cuidado en no apretar, aplastar o dañar la línea de
alimentación.
• No instale el artefacto en lugares húmedos.
• Destruya el cartón, la bolsa de plástico y los demás materiales de empaque luego de desempacar el
artefacto. Estos materiales podrían utilizarlos los niños para jugar. Las cajas de cartón cubiertas con
tapetes, colchas o láminas plásticas pueden convertirse en cámaras herméticas.
• Nunca intente operar este artefacto si se encuentra dañado, si no funciona correctamente, si no está
ensamblado por completo o si tiene piezas faltantes o rotas, incluido una línea de alimentación dañada.
• Cumpla con todos los procedimientos de seguridad del sector recomendados, incluido el uso de guantes
de manga larga y gafas de seguridad.
• El instalador debe asegurarse de que el lavavajillas esté completamente cerrado al momento de la
instalación.
• Use mangueras nuevas cuando conecte el aparato al suministro de agua. No reutilice mangueras viejas.
• Después de instalar el lavavajillas, verifique que no haya fugas en la conexión de la manguera.
• No dañe la línea de alimentación del artefacto ni coloque objetos pesados sobre él.
FUNCIONAMIENTO
• Repare o reemplace de inmediato todas las líneas de alimentación deshilachados o dañados de otra
forma. No use un cable que exhiba roturas o abrasión en su longitud o en sus extremos.
• Si detecta un sonido extraño, olor a quemado o a químico, o humo provenientes del artefacto,
desconéctelo de inmediato y contáctese con un Centro de Información al Cliente de LG Electronics.
• Nunca desconecte el artefacto tirando de la línea de alimentación.
• No use un cable de extensión ni un adaptador con este artefacto.
• No sujete la línea de alimentación ni toque los controles del artefacto con las manos húmedas.
• No modifique ni extienda el cable de alimentación.
• Si el producto se ha mojado accidentalmente, comuníquese con el Centro de Información al Cliente de LG
Electronics para que le den instrucciones antes de reanudar el uso.
• No almacene ni use gasolina u otros líquidos o vapores inflamables cerca de este artefacto ni de ningún
otro.
• Mantenga el área debajo de los artefactos y sus alrededores libre de materiales combustibles (pelusa,
papel, trapos, etc.), gasolina, productos químicos y otros vapores o líquidos inflamables.
• Este artefacto no ha sido diseñado para ser utilizado por personas con capacidades físicas, sensoriales
o mentales disminuidas (incluidos niños) o que no cuenten con la experiencia o los conocimientos
necesarios para operarlo, salvo que una persona responsable de su seguridad les brinde la supervisión o
la instrucción pertinente en cuanto al uso del artefacto.
• Si se daña la línea de alimentación eléctrica, solo el fabricante está autorizado para reemplazarlo, o bien
su agente de servicio técnico o una persona de calificación similar para prevenir riesgos.
• No maltrate la puerta, no se siente ni se pare sobre ella.
• Lea todas las instrucciones antes de usar el artefacto y consérvelas.
• Use el artefacto únicamente para el fin previsto.

7
INSTRUCCIONES DE SEGURIDAD
ESPAÑOL
• No permita que los niños jueguen con el artefacto. Es necesario supervisar atentamente a los niños
cuando el artefacto esté en funcionamiento cerca de ellos.
• No utilice indebidamente los controles.
• En el caso de que se produzca una fuga de gas (gas propano, gas licuado de petróleo, etc.), no ponga
en funcionamiento este artefacto ni ningún otro. Abra una puerta o una ventana para ventilar el área de
inmediato.
• Bajo ciertas condiciones, podría producirse gas hidrógeno en un sistema de agua caliente que no ha sido
utilizado por dos semanas o más. EL GAS HIDRÓGENO ES EXPLOSIVO. Si el sistema de agua caliente
no se ha usado durante ese período de tiempo, abra todas las llaves de agua caliente y deje que fluya
varios minutos antes de usar el artefacto. Esto eliminará el gas hidrógeno acumulado. Dado que el gas
hidrógeno es inflamable, no fume ni use ninguna llama abierta durante este proceso.
• Fije la manguera de desagüe en su sitio de manera segura.
• Solo use detergentes y agentes de enjuague recomendados para lavavajillas. Mantenga dichos productos
fuera del alcance de los niños.
• No permita que los niños ingieran detergente o agentes de enjuague para vajilla.
• Cuando cargue objetos para su lavado:
− Cargue los objetos cortantes de tal forma que no dañen el sello de la puerta.
− Cargue los cuchillos filosos para disminuir el riesgo de interrupciones.
• No lave artículos de plástico a menos que contengan la indicación de que son "seguros para lavar con
lavavajillas" o una indicación equivalente. Para los artículos de plástico que no contengan tal indicación,
consulte las recomendaciones del fabricante.
• No toque el ELEMENTO CALENTADOR durante el uso o inmediatamente después.
• No ponga en funcionamiento el lavavajillas a menos que todos los paneles del CERRAMIENTO estén en
el lugar adecuado.
• No maltrate la puerta o las bandejas del lavavajillas, no se siente ni se pare sobre ellas.
• No instale ni almacene el lavavajillas en lugares expuestos a la intemperie.
• Después de limpiar la vajilla, cierre la llave. Vuelva a abrir la llave y revise el estado de la conexión de la
manguera de suministro de agua antes de limpiar.
• No abra la puerta durante la operación. Por motivos de seguridad, la bomba de purga opera si la puerta
está abierta, lo que tiene como resultado un tiempo de ciclo más largo.
• Tenga cuidado de no apretarse la mano al cerrar la puerta.
• No enchufe el lavavajillas en un tomacorriente dañado.
• No instale ni coloque el lavavajillas cerca de componentes eléctricos o llamas expuestas.
• No lave vajilla que haya estado expuesta a gasolina, solventes u otros materiales inflamables.
• Al limpiar, no rocíe agua directamente sobre el producto.
• No presione los botones con objetos punzantes o filosos como un alfiler o un punzón.
• No utilice detergente con base solvente.
• No haga contacto con la salida de vapor.
• Si se extraen del lavavajillas, las piezas pequeñas como los ganchos de las bandejas y los postes de
retención del filtro pueden presentar riesgo de asfixia para niños pequeños. Mantenga dichas piezas fuera
del alcance de los niños.

8
INSTRUCCIONES DE SEGURIDAD
MANTENIMIENTO
• No repare ni reemplace ninguna pieza del artefacto. Todas las reparaciones y el servicio de
mantenimiento deben ser realizados por un miembro del personal de servicio calificado, a menos que se
recomiende lo contrario en este Manual del propietario. Use solamente piezas de fábrica autorizadas.
• No desarme ni repare el artefacto por su cuenta.
• Quite el polvo o los materiales extraños de las clavijas de la línea de alimentación.
• Desconecte el artefacto del suministro eléctrico antes de limpiarlo o de realizar cualquier tipo de
mantenimiento que pueda realizar el usuario. Colocar los controles en la posición de apagado no
desconecta el artefacto del suministro eléctrico.
• Quite la puerta antes de sacar de servicio o desechar el artefacto para evitar el riesgo de que niños o
animales pequeños queden atrapados adentro.
• Desconecte el artefacto antes de limpiar para evitar el riesgo de descargas eléctricas.
• Antes de desechar el producto, corte la línea de alimentación y destruya el panel de control del producto.
INSTRUCCIONES DE CONEXIÓN A TIERRA
• Para conectar el lavavajillas de modo permanente: Este artefacto debe estar conectado a un sistema
permanente de cableado de metal con descarga a tierra, o bien debe instalarse un conductor de puesta a
tierra del equipo con los conductores de circuito y conectarse a un terminal de puesta a tierra del equipo o
a un extremo del dispositivo.
• Conecte el cable a tierra al conector a tierra de color verde en la caja de conexiones eléctricas.
RIESGO DE VUELCO
• No use el lavavajillas hasta que esté instalado por completo.
• No empuje hacia abajo la puerta del lavavajillas cuando esté abierta.
• El incumplimiento de estas instrucciones podría causar heridas o cortes graves.
GUARDE ESTAS INSTRUCCIONES

9
INSTRUCCIONES DE SEGURIDAD
ESPAÑOL
PRECAUCIÓN
Para reducir el riesgo de lesiones leves a las personas, así como de mal funcionamiento del
producto o de que el artefacto resulte dañado o la propiedad sufra daños ante la utilización
de este producto, siga las precauciones básicas, que incluyen las siguientes:
INSTALACIÓN
• Instale el producto sobre un piso firme y nivelado.
• El lavavajillas debe estar conectado a un suministro de agua caliente con un rango de temperatura entre
120 °F (49 °C) y 149 °F (65 °C). Este rango de temperatura brinda los mejores resultados de lavado y el
ciclo más corto. La temperatura no debe superar los 149 °F (65 °C) para evitar dañar la vajilla.
• No coloque la manguera de desagüe debajo del lavavajillas durante la instalación.
FUNCIONAMIENTO
• No coloque ningún objeto encima del artefacto.
• Cierre las llaves de agua y desconecte el artefacto si este no será usado por un periodo de tiempo
prolongado, por ejemplo, durante las vacaciones.
• No almacene ni vierta limpiadores, blanqueadores (blanqueador con cloro, blanqueador oxigenado, etc.)
ni detergentes líquidos encima del artefacto. Si lo hace, podría ocasionar corrosión, decoloración o daño
de la superficie del artefacto.
• No toque el agua de desagüe, ya que podría estar caliente.
• Si la manguera de desagüe y la manguera de suministro de agua se congelan en invierno, descongélelas
antes de usar el artefacto.
• No coloque las manos, pies u objetos metálicos debajo ni detrás del artefacto.
• No coloque la manguera de desagüe debajo del lavavajillas durante la instalación.
MANTENIMIENTO
• En caso de derramar aceite de cocina en el exterior del producto, límpielo de inmediato. No limpie el
exterior del producto con productos de limpieza que contengan alcohol, diluyentes, blanqueadores,
benceno, líquidos inflamables o abrasivos. Estas sustancias pueden decolorar o dañar el
electrodoméstico.

10
DESCRIPCIÓN GENERAL DEL PRODUCTO
DESCRIPCIÓN GENERAL DEL PRODUCTO
Piezas exteriores
a
Panel de control y manija de la puerta
b
Cubierta frontal
c
Cubierta inferior
d
Soporte de embalaje
e
Cubierta de seguridad
f
SignaLight™ (algunos modelos)
g
Base
h
Patas de nivelación
NOTA
• No retire la cubierta de seguridad en ningún momento.
• Para garantizar la fiabilidat, cada lavavajillas se somete a un extenso control de calidad antes de salir de
fábrica.
• Puede encontrar gotas de agua o manchas de agua como resultado de este proceso en su nuevo lavavajillas.
SignaLight™(pantalla frontal)
Los modelos con control superior cuentan con tres indicadores LED centrados en la parte superior de la
cubierta frontal.
• Roja: Error (consulte los Códigos de error en la sección Resolución de problemas).
• Blanca (fija): Funcionamiento normal.
• Blanca (parpadea) El ciclo se ha pausado. (Después de cuatro minutos en modo pausa, la máquina se
apaga).
• Verde: El ciclo finalizó normalmente.
La configuración predeterminada de “ON” mantiene la luz verde encendida hasta que se abre la puerta. Si la
configuración cambia a “OFF”, la luz verde se apaga después de 90 segundos. Para cambiar la configuración,
encienda el lavavajillas y mantenga presionado el botón de High Temp durante 3 segundos hasta que aparezca
“ON” u “OFF” en la pantalla. El ajuste se almacena hasta que se cambie.

11
DESCRIPCIÓN GENERAL DEL PRODUCTO
ESPAÑOL
Piezas interiores
a
Rotor superior de lavado
b
Brazo rociador superior
c
Brazo rociador inferior
d
Sistema de filtrado
e
Dispensador de detergente y
abrillantador
f
Cubierta de ventilación de secado
g
Luz del cuba
h
Bandeja para cubiertos
i
Bandeja superior
j
Cesto para cubiertos
k
Bandeja inferior
l
boquilla de vapor
NOTA
• El cesto para cubiertos se encuentra instalado
en la parte posterior del estante del fondo. Para
un mejor desempeño, instálelo a lo largo del lado
derecho, como se muestra en la sección Piezas
interiores.
• Retire todos los materiales de empaque del
exterior y el interior del lavavajillas antes de
instalar el artefacto.
2
3
• Presione la lengüeta para quitar la atadura del
cable con la mano. Cortar la atadura con un
cuchillo o tijeras puede dañar el estante o la
canasta de cubiertos.

12
DESCRIPCIÓN GENERAL DEL PRODUCTO
Accesorios
Accesorios incluidos
Soportes de
instalación
(2 unidades)
Tornillos para
madera (4 unidades)
Abrazadera para
manguera (1 unidad)
Lámina de
aislamiento acústico
cavidad para pies
frontal
(1 unidad)
cavidad para pies
trasero
(1 unidad)
Soporte
(2 unidades)
separador de sonido
(1 unidad)
Almohadilla
(1 unidad)
Tira
(2 unidades)
amortiguador
(2 unidades)

13
INSTALACIÓN
ESPAÑOL
INSTALACIÓN
Piezas y herramientas para la instalación
Piezas no incluidas
Cable eléctrico
Tubería de
suministro de agua
Accesorios para
tubería
Acoplador Cinta aislante
Trampa de aire
Tuercas para
cableado calibre 16
Abrazadera para
manguera
Aliviador de tensión
aprobado por UL
Herramientas necesarias
Destornillador de
hoja plana
Destornillador
Phillips
Broca con sierra de
perforación de 2½"
mín.
Taladro eléctrico Guantes
Gafas de seguridad Llave ajustable Cinta medidora Cuchilla Nivel
Llave con
accionamiento
cuadrado de ¼"
Tenazas Pinzas Pelacables Cortador de tubería
Llave con
accionamiento
cuadrado de ⅜” +
Casquillo de ½”

14
INSTALACIÓN
Descripción general de la instalación
Preparación de la abertura para el gabinete
Preparación del cableado eléctrico
Preparación de la conexión para el suministro de agua
Preparación del lavavajillas
Extracción de la cubierta inferior
Deslizamiento del lavavajillas en el gabinete
Nivelado del lavavajillas
Sujeción del lavavajillas al mostrador
Conexión de la manguera de desagüe
Conexión del suministro de agua
Conexión de la alimentación eléctrica
Verificación final
Dimensiones del producto
Vista posterior Vista lateral
La manguera de suministro de agua, la manguera de desagüe
y el cable eléctrico deben pasar a través de esta área.
33 /16"
(846 mm)
5
23 /4" (603 mm)
3
4 /2"
(115 mm)
1
33 /8"
(854 mm)
5
2 /16" (75 mm)
15
20 /16" (512 mm)
3
24 /8" (625 mm)
5
4 /4" (120 mm)
3
9 /8"
(238 mm)
3
4 /16"
(119 mm)
5
/4"
(134 mm)
11
1
4 /2"
(115 mm)
1
26 /8 - 26 /16" (676 - 681 mm)
5 13
NOTA
• Para una instalación más sencilla, observe las áreas marcadas arriba para los espacios libres
correspondientes a la línea eléctrica y la línea de suministro de agua en la base del lavavajillas.
Especificaciones del producto
La apariencia y las especificaciones detalladas en este manual podrían variar debido a mejoras constantes en
el producto.
Requisitos eléctricos 120 V CA, 60 Hz solo, interruptor de corriente mínimo de 15 A
Presión de agua 20-80 psi (140-550 kPa)
Dimensiones
23
3
/
4
" (A) X 24
5
/
8
" (P) X 33
5
/
8
" (A)
603 mm (A) X 625 mm (P) X 854 mm (L)
Temperatura de entrada 120 °F (49 °C) mínima, 149 °F (65 °C) máxima
Peso neto 95 lb (43.1 kg)

15
INSTALACIÓN
ESPAÑOL
Preparación de la abertura
para el gabinete
Este lavavajillas está diseñado para ajustarse a una
abertura estándar para lavavajillas. Es posible que
sea necesario hacer una abertura en ambos lados
para pasar las conexiones de fontanería y eléctricas.
• Para asegurar un desagüe adecuado, el
lavavajillas no se debe instalar a más de 12 pies
(3.65 m) de distancia del fregadero.
• La ubicación debe tener espacio suficiente para
que la puerta del lavavajillas se abra fácilmente y
debe dejarse una distancia de, al menos, 0.1” (2
mm) entre el lavavajillas y los lados del gabinete.
• Si instala el lavavajillas en un rincón, deje un
mínimo de 2” (50 mm) entre el lavavajillas y el
muro adyacente.
• El muro adyacente debe estar libre de obstáculos.
• Solamente para instalaciones al ras: puede retirar
el soporte del gabinete
a
del interior del gabinete.
1
Seleccione una ubicación tan cercana al
fregadero como sea posible para facilitar la
conexión de la línea de suministro de agua, la
manguera de desagüe y la conexión eléctrica.
2
Para dejar el espacio adecuado para tareas
de fontanería y electricidad, use la plantilla
incluida con el material impreso para determinar
el espacio libre del lado del gabinete donde el
lavavajillas hace contacto con el muro posterior.
Con una sierra de perforación de 2
1
/
2
” de
diámetro, haga un agujero en el área objetivo
según se muestra en la plantilla.
3.5
''
2.5
''
4
''
ADVERTENCIA
• El daño durante la instalación no está cubierto
por la garantía, y las fugas causadas por
la instalación inadecuada podrían dañar la
propiedad.
• No use los orificios existentes, a menos que se
encuentren en el área objetivo.
• Si no se realiza la perforación para las líneas
de agua y desagüe en las ubicaciones
adecuadas, esto podría impedir que el
lavavajillas quede al ras de los gabinetes y
podría plegar, aplastar, tensionar o dañar las
líneas.

16
INSTALACIÓN
Preparación de las conexiones
eléctricas y de agua
En la parte inferior del lavavajillas hay 2 canales por
los que se deben pasar las conexiones eléctricas
y de agua. Como se ilustra en la vista inferior a
continuación, el canal
a
es para la línea de suministro
de agua y el canal
b
es para el cable eléctrico.
1
Corte el suministro de agua de la vivienda y
apague el interruptor de corriente o la fuente de
energía dedicada antes de conectar el lavavajillas.
2
Pase la línea de suministro de agua a lo largo
del piso a 6
1
/
2
– 7
3
/
4
” (165–197 mm) del lado
izquierdo de la abertura y fíjela con cinta
adhesiva delante de la abertura.
3
Pase el cable eléctrico
c
a lo largo del piso a
14-16” (356-406 mm) de la línea de suministro
de agua
d
y fíjelo en su sitio con cinta adhesiva.
• El tomacorriente debe estar a 4 pies (1220 mm)
de cualquiera de los lados del lavavajillas.
• La mejor ubicación para el conducto eléctrico
es sobre el lado derecho de la pared posterior.
Redirija el cable eléctrico antes de realizar la
instalación en caso de que la longitud de la
tubería del conducto eléctrico sea mayor a 3”
(76 mm) y esté centrada en la pared posterior.
ADVERTENCIA
Conexión de agua
• No reutilice una manguera vieja. Emplee solo una
manguera nueva cuando instale el lavavajillas.
La manguera vieja podría presentar fugas o
explotar, causando inundaciones y daños a la
propiedad. Póngase en contacto con un Centro
de información al cliente de LG para obtener
ayuda en la compra de una nueva manguera.
Conexión eléctrica
• Utilice un interruptor de corriente o fusible de
acción retardada.
• Este artefacto debe operarse con el voltaje
correcto, que se indica en este manual y en la
placa de datos técnicos.
• El cableado debe tener una conexión a tierra
adecuada. Si tiene dudas, solicite que lo
verifique un electricista calificado.
• Conecte el artefacto con una conexión de 3
cables, incluido un cable de conexión a tierra.
• El artefacto y el tomacorriente deben colocarse
de manera que el enchufe sea de fácil acceso.
• No use un cable de extensión ni un adaptador
con este lavavajillas.
• No sobrecargue el tomacorriente con más de
un artefacto.
• Deben utilizarse las tuercas para cable 16AWG
que se incluyen.
• Es obligación y responsabilidad personal del
propietario del producto que un electricista
calificado instale un tomacorriente adecuado.
PRECAUCIÓN
• Cuando conecte la línea de suministro de agua del
lavavajillas al suministro de agua de la vivienda, se
debe usar cinta o compuesto de sellado en las roscas
de la tubería para evitar fugas. No se debe emplear
cinta ni compuesto en los accesorios de compresión.
• Conecte el lavavajillas a un suministro de agua
caliente con un rango de temperatura entre 120 °F
(49 °C) y 149 °F (65 °C). Este rango de temperatura
brinda los mejores resultados de lavado y el
ciclo más corto. Para evitar daños en la vajilla, la
temperatura no debe superar los 149 °F (65 °C).
• La presión del suministro de agua debe ser de entre
20 psi y 80 psi (de 140 a 550 kPa). Si la presión del
suministro de agua es mayor a 80 psi, debe instalarse
una válvula reductora de presión, de manera que se
evite el fallo prematuro de la válvula de entrada.

17
INSTALACIÓN
ESPAÑOL
Preparación del lavavajillas
ADVERTENCIA
• No retire la cubierta de seguridad
a
. Si lo
hace, puede ocasionar incendios, descargas
eléctricas o la muerte.
Para soltar la manguera de desagüe
Retire la atadura que sujeta la manguera de desagüe
a la parte posterior de la abrazadera de envío.
Abrazadera de envío removible
La abrazadera de envío trasera puede ser removida,
si es necesario más espacio libre, al instalar el
lavaplatos debajo de un mostrador bajo.
Extracción de la cubierta inferior
1
Retire los tornillos ubicados a ambos lados que
sujetan la cubierta inferior al lavavajillas.
2
Retire la cubierta inferior.
3
Si hubiera material aislante detrás de la cubierta
inferior, retírelo.
4
Reserve las piezas hasta que se complete la
instalación.
PRECAUCIÓN
• Si recuesta el lavaplatos por la parte trasera,
hágalo con precaución de no dañar la
manguera de drenaje y la cuba.

18
INSTALACIÓN
Retiro de los materiales de empaque
del interior
Retire todos los materiales de empaque del interior
del lavavajillas antes de instalarlo.
2
3
Colocación de los soportes
de instalación
Para mostradores de madera u otro material que no
se dañe al taladrar, utilice los soportes de instalación
metálicos suministrados.
Para mostradores de granito, mármol u otro material
que podría dañarse al taladrar, utilice los tornillos
para madera para sujetar el lavavajillas al gabinete.
Consulte las instrucciones de instalación en la
sección Sujeción del lavavajillas en la abertura del
gabinete.
NOTA
• Los soportes de instalación y los tornillos se
pueden encontrar en el cesto para cubiertos.
1
Inserte el extremo con lengüeta de los soportes
de instalación en las ranuras del bastidor
superior. Gire los soportes hasta que los
extremos con lengüeta queden hacia arriba.
2
Doble las lengüetas de los soportes con un par
de pinzas de punta para fijarlos al bastidor.

19
INSTALACIÓN
ESPAÑOL
Deslizamiento del lavavajillas
en la abertura del gabinete
PRECAUCIÓN
• No tire ni levante el lavavajillas usando la
manija
a
; hacerlo podría dañar la puerta y las
bisagras.
• No empuje la puerta del lavavajillas con las
rodillas cuando lo deslice en su lugar. Hacerlo
podría dañar la cubierta frontal.
• No empuje la parte superior del lavavajillas.
Hacerlo podría dañar el interior del artefacto.
NOTA
• Abra la puerta y sujete el bastidor del cuerpo del
lavavajillas y la abertura superior frontal
b
de la
cuba para mover o levantar el lavavajillas.
1
Alinee el lavavajillas con la abertura. Asegúrese
de que la línea de suministro de agua y el cable
eléctrico estén en la posición correcta para que
puedan deslizarse sin problemas en sus canales.
2
Suavice o acolche los bordes del orificio
taladrado para el paso de la línea de suministro
de agua a fin de evitar dañar la manguera de
desagüe.

20
INSTALACIÓN
3
Asegúrese de enderezar la manguera de
desagüe antes de insertar su extremo a través
del orificio para el suministro de agua. A medida
que desliza el lavavajillas en la abertura, es
conveniente que tire lentamente de la manguera
de desagüe desde el interior del gabinete
para enderezarla. Para evitar fugas o daños
ocasionados por el agua, tenga cuidado de no
plegar, aplastar o tensar demasiado la manguera
de desagüe durante la instalación.
4
Gradualmente, deslice el lavavajillas en la
abertura, asegurándose de que la línea de
suministro de agua y el cable eléctrico pasan
libremente por los canales y no quedan
atrapados bajo el lavavajillas.
• A medida que desliza el lavavajillas en la
abertura, deténgase periódicamente (o
solicítele a otra persona que lo ayude) para
tensar la manguera de desagüe, tirando de ella
hacia el interior del gabinete.
PRECAUCIÓN
• Para evitar fallas o fugas, es importante que
la manguera de desagüe no quede plegada,
tirante ni aplastada detrás o debajo del
lavavajillas o dentro del gabinete adyacente.
• La garantía no cubre los daños derivados de
una instalación inadecuada.
5
Retire la cinta de la línea de suministro de agua
y el cable eléctrico.

21
INSTALACIÓN
ESPAÑOL
Conexión de la línea de
suministro de agua y energía
eléctrica
Conexión de la línea de suministro
de agua
1
Con el suministro de agua de la vivienda cerrado,
conecte la línea de suministro de agua a la válvula de
entrada en la parte delantera izquierda del lavavajillas.
PRECAUCIÓN
• No se debe utilizar cinta ni compuesto en la
válvula de entrada del lavavajillas.
2
Apriete la tuerca de compresión.
3
Deslice la línea de suministro de agua en el
canal tirando suavemente desde el interior del
gabinete para asegurarse de que la línea no
quede plegada, tirante o aplastada.
Conexión de la alimentación eléctrica
El lavavajillas debe tener un circuito con la debida
conexión a tierra para conectar la configuración de 3
cables que incluye el cable a tierra.
Si se usa una línea de alimentación de 3 clavijas,
debe estar en un lugar accesible adyacente al
lavavajillas, a no más de 4 pies (1220 mm) del lado
del artefacto, nunca detrás del mismo.
NOTA
• La mejor ubicación para el conducto eléctrico
es sobre el lado derecho de la pared posterior.
Redirija el cable eléctrico antes de realizar la
instalación en caso de que la longitud de la tubería
del conducto eléctrico sea mayor a 3” (76 mm) y
esté centrada en la pared posterior.
1
Desde el interruptor de corriente, apague el
suministro de energía eléctrica que va a la
unidad.
2
Use un destornillador Phillips para quitar el
tornillo de la cubierta de la caja de empalmes y
retire la cubierta.
3
Utilice un destornillador Phillips para retirar 2
tornillos
a
.
4
Retire la caja de empalmes del artefacto.

22
INSTALACIÓN
5
Inserte el aliviador de tensión
b
a través del
orificio de la caja de empalmes. Apriete la tuerca
redonda
c
para asegurarlo en su sitio.
6
Inserte el cable eléctrico a través del orificio del
aliviador de tensión. Ajuste los 2 tornillos para
asegurarlo.
7
Tire de los cables existentes a través de las
aberturas de la caja de empalmes. Ajuste los 2
tornillos
d
para volver a ensamblar la caja de
empalmes en el artefacto.
8
Haga coincidir los cables blanco, negro y verde
con los cables de los colores correspondientes
del lavavajillas. Luego, gire las tuercas para
cables
e
suministradas y apriételas firmemente
para conectar los cables correspondientes.
9
Envuelva cada conexión con cinta aislante
f
.
10
Pliegue los cables conectados, introdúzcalos
nuevamente dentro de la caja de empalmes y
atornille la cubierta de la caja.
ADVERTENCIA
• Verifique que el cable negro esté caliente
(120 V). De no ser así o si no está seguro de
que haya suministro eléctrico, solicite que lo
verifique un electricista calificado.
PRECAUCIÓN
• No deje expuesto ningún cable pelado. Recorte
el cable pelado para que quepa completamente
dentro de las tuercas para cable.

23
INSTALACIÓN
ESPAÑOL
Conexión de la manguera de
desagüe
Si el extremo de la manguera de desagüe no se
adapta a la línea de desagüe, use un adaptador
resistente al calor y al detergente (no está incluido).
Este accesorio se puede comprar en una tienda local
de artículos de fontanería.
• Corte el adaptador para que el extremo coincida
con el tamaño de la conexión de desagüe.
NOTA
• Para la instalación de la manguera de desagüe,
use la abrazadera para manguera con tornillo
incluida en el cesto para cubiertos de este
lavavajillas.
• Si conecta la manguera de desagüe del
lavavajillas al triturador de basura, asegúrese de
seguir las instrucciones de instalación adecuadas
según el manual del triturador.
Requisitos para la manguera de
desagüe
• Cumpla los códigos y las ordenanzas locales.
• La distancia al desagüe no debe superar los
12 pies (3.65 m).
• No conecte mangueras de desagüe de otros
artefactos a la manguera de desagüe del
lavavajillas.
• Si es necesario utilizar una extensión en la
manguera de desagüe, use una manguera de
diámetro interior de 5/8” o 7/8” y de 2 a 3 pies
de longitud y un acople
a
para conectar los dos
extremos.
Conexión al triturador sin trampa de
aire
La altura del extremo de la manguera de desagüe
debe ser, como mínimo, de 12” (305 mm) y no
debe superar las 40” (1016 mm) desde la base del
lavavajillas para evitar que el agua haga sifón desde
la cuba.
1
Extraiga el tapón ciego
a
del triturador con un
martillo y un destornillador.
2
Retire el tapón ciego
a
del triturador.
PRECAUCIÓN
• Si no se ha extraído el tapón ciego, el
lavavajillas no podrá desagotar correctamente.

24
INSTALACIÓN
3
Sujete la manguera de desagüe al triturador
con la abrazadera para manguera suministrada.
Mueva la abrazadera a la posición correcta y
apriétela con un destornillador de hoja plana.
Conexión a la pieza en T para
desechos sin trampa de aire
La altura del extremo de la manguera de desagüe
debe ser, como mínimo, de 12” (305 mm) y no
debe superar las 40” (1016 mm) desde la base del
lavavajillas para evitar que el agua haga sifón desde
la cuba.
1
Extraiga el tapón ciego con un martillo y un
destornillador.
PRECAUCIÓN
• Si no se ha extraído el tapón ciego, el
lavavajillas no podrá desagotar correctamente.
2
Sujete la manguera de desagüe a la pieza en T
para desechos con la abrazadera para manguera
suministrada. Mueva la abrazadera a la posición
correcta y apriétela con un destornillador de hoja
plana.
Conexión al triturador o a la pieza
en T para desechos con trampa de
aire
1
Extraiga el tapón ciego con un martillo y un
destornillador.
2
Conecte el extremo de la manguera de desagüe
a
a la trampa de aire
b
con la abrazadera para
manguera suministrada. Mueva la abrazadera
a la posición correcta y apriétela con un
destornillador de hoja plana.
• Esto impide que el agua haga sifón desde la
cuba.
3
Si no está conectado, acople el conector de
la manguera de caucho a la pieza en T para
desechos o al triturador con una abrazadera para
manguera (no incluida).

25
INSTALACIÓN
ESPAÑOL
Nivelado del lavavajillas
Verifique que el lavavajillas esté nivelado y ajuste las
patas de nivelación si es necesario.
PRECAUCIÓN
• Si el lavavajillas no está bien nivelado, pueden
producirse fugas, problemas para cerrar la
puerta o ruidos.
• Si la abertura del gabinete es más angosta
de lo recomendado (ver Preparación de la
abertura del gabinete), el lavavajillas debe
nivelarse y alinearse cuidadosamente para que
este se apoye completamente en las 3 patas de
nivelación y no quede colgado de los soportes
de instalación. De lo contrario, el lavavajillas
puede no funcionar o pueden producirse fugas
desde la parte frontal del lavavajillas, errores
AE y dificultad para cerrar la puerta.
Cómo comprobar que el lavavajillas
esté nivelado
Para verificar que la cuba esté nivelada de adelante
hacia atrás, retire la bandeja inferior y vierta 169 oz.
(5 L) de agua en el fondo de la cuba. El nivel del
agua debe quedar cerca del centro de las dos
muescas inferiores que presenta la cuba en la parte
delantera.
Tras extraer la bandeja inferior, coloque un nivel
en la pared interior de la cuba para verificar que el
lavavajillas esté nivelado de lado a lado.
• Si no tiene un nivel, en su lugar puede utilizar una
aplicación de nivel de un teléfono inteligente.
Asegúrese de que el espacio entre las paredes de la
cuba y el revestimiento de la puerta sea el mismo de
cada lado.

26
INSTALACIÓN
Ajuste de las patas de nivelación
Ajuste según sea necesario hasta que el lavavajillas
esté completamente nivelado.
Ajuste de las patas de nivelación
delanteras
• Use un destornillador de punta plana para girar las
patas de nivelación delanteras y ajustar la parte
frontal de la cuba.
• Haga girar las patas de nivelación delanteras en
el sentido de las agujas del reloj para levantar la
parte frontal de la cuba y en el sentido contrario a
las agujas del reloj para bajarla.
• Los ajustes funcionan de la misma forma para
ambas patas de nivelación.
Si no dispone de un destornillador de punta plana,
use una llave con accionamiento cuadrado de ¼”
a
o una llave con accionamiento cuadrado de ⅜”
b
con casquillo de ½”
c
para girar las patas de
nivelación delanteras y ajustar el frente de la cuba.
Ajuste las patas de nivelación delanteras y traseras
hasta que hagan contacto firme con el piso. Si el
lavavajillas no está bien nivelado puede impedir que
la puerta cierre correctamente y el artefacto no se
encenderá.
Ajuste de la pata de nivelación trasera
• Use un destornillador Phillips para ajustar la pata
de nivelación trasera y la parte posterior de la cuba
girando el tornillo central que se encuentra en la
parte delantera de la base del artefacto.
• Haga girar el tornillo central en el sentido de las
agujas del reloj para levantar la parte posterior de
la cuba y en el sentido contrario a las agujas del
reloj para bajarla.
NOTA
Para evitar producir daños en el tornillo, no utilice un
destornillador eléctrico.

27
INSTALACIÓN
ESPAÑOL
Sujeción del lavavajillas en la
abertura del gabinete
Hay 2 opciones para sujetar el lavavajillas en su sitio.
Si el mostrador es de madera o de un material que
puede taladrarse con seguridad, sujete el lavavajillas
al mostrador con los soportes proporcionados. Si el
mostrador es de granito, mármol o un material que
no se puede taladrar, sujete el lavavajillas al bastidor
del gabinete con los tornillos para madera provistos.
PRECAUCIÓN
• Asegúrese de que el lavavajillas esté nivelado
y que todas las patas de nivelación estén en
contacto firme con el piso antes de fijar el
lavavajillas al mostrador o al gabinete. Si el
lavavajillas no está nivelado correctamente,
es posible que la puerta no se cierre de forma
adecuada o que haya fugas de agua.
NOTA
• Los soportes de instalación y los tornillos se
pueden encontrar en el cesto para cubiertos.
• Utilice un destornillador magnético.
• Cubra la boca del filtro con toallas para evitar que
los tornillos caigan dentro de la bomba.
Fijación del lavavajillas al mostrador
Use los tornillos para los soportes proporcionados
a fin de asegurar los soportes de la parte superior
del lavavajillas a la parte inferior del mostrador de
madera.
Si se desea, el lavavajillas también puede
asegurarse al marco del gabinete. Para ello, siga las
instrucciones a continuación.
Sujeción del lavavajillas al bastidor
del gabinete
1
Retire las 2 tapas plásticas de los orificios de
acceso en los soportes de montaje.
2
Coloque un tornillo para madera a través del
soporte de montaje y hacia el interior del bastidor
del gabinete.
3
Reinstale las tapas plásticas.

28
INSTALACIÓN
Verificación final de la
instalación
Verifique si el lavavajillas está instalado
correctamente.
1
Encienda el interruptor de corriente.
2
Abra el suministro de agua de la vivienda.
3
Asegúrese de que la puerta se abre y cierra
suavemente.
• Si es necesario, nivele el lavavajillas
nuevamente.
• Si la puerta no cierra, compruebe que la
bandeja esté nivelada.
• Asegúrese de que se hayan retirado todos los
materiales de empaque.
2
3
4
Encienda el lavavajillas y ejecute un ciclo Turbo
para verificar que el funcionamiento sea correcto.
5
Verifique si la manguera de desagüe o la
conexión de suministro de agua presentan fugas.
6
Si se detecta una fuga de agua, mantenga
presionado el botón Start durante 3 segundos
para cancelar el ciclo de lavado y desagotar
automáticamente el agua del lavavajillas. Ajuste
todas las conexiones de agua y ejecute otro
ciclo. Repita hasta que no se detecten fugas.
7
Vuelva a colocar la cubierta inferior.
PRECAUCIÓN
• Solo instale la cubierta inferior suministrada con
el lavavajillas. No instale el zócalo del gabinete
a
ya que esto podría ocasionar ruidos y fugas.
Códigos de error de verificación de
instalación
Consulte la siguiente tabla antes de solicitar servicio
técnico.
Código
de error
Causa posible y solución
Error OE
La manguera de desagüe está plegada o
presionada.
Inserte las mangueras de desagüe y suministro
a través del orificio bajo el fregadero.
Gradualmente, deslice el lavavajillas dentro
del gabinete mientras tira de las mangueras
por debajo del fregadero para tensarlas. Esto
sirve para evitar que las mangueras queden
plegadas o presionadas detrás del lavavajillas.
La manguera de desagüe está conectada al
triturador sin que se haya extraído el tapón
ciego.
Retire el tapón ciego del triturador.
La pieza en T para desechos o el triturador
están obstruidos.
Retire el tapón ciego de la pieza en T para
desechos o el triturador.
Error IE
La línea de suministro de agua está
plegada debajo del lavavajillas.
Inserte las mangueras de desagüe y suministro
a través del orificio bajo el fregadero.
Gradualmente, deslice el lavavajillas dentro
del gabinete mientras tira de las mangueras
por debajo del fregadero para tensarlas. Esto
sirve para evitar que las mangueras queden
plegadas o presionadas detrás del lavavajillas.
El suministro de agua de la vivienda no
está abierto.
Abra la llave de agua.

29
FUNCIONAMIENTO
ESPAÑOL
FUNCIONAMIENTO
Uso del artefacto
Antes de usar el artefacto
• Lea las Instrucciones importantes de seguridad.
• Conecte al suministro de agua caliente solamente.
La temperatura del suministro de agua debería
ser de un mínimo de 120 °F (49 °C) para un mejor
lavado y una duración más breve del ciclo.
• Siga las instrucciones para cargar el lavavajillas
para asegurar una limpieza eficaz.
• Quite los elementos insolubles como huesos,
palillos y pedazos de papel cuando cargue el
lavavajillas.
Cuando cargue el lavavajillas
1
Cargue solo objetos que sean aptos para
lavavajillas.
2
Retire los restos sólidos o quemados de la vajilla
antes de cargarla en el lavavajillas.
3
Coloque los objetos más profundos en un ángulo
para ayudar a que corra el agua y para contribuir
con la velocidad del proceso de secado.
NOTA
• No cargue utensilios que no sean resistentes al
calor o que tengan decoraciones en metal.
Comienzo rápido
1
Cargue la vajilla
Raspe la vajilla para retirar excesos de
alimentos, huesos y cualquier otro residuo sólido
insoluble. Tire de cada bandeja y cargue la vajilla
según se describe en este manual.
2
Mida el detergente
Use las pautas de este manual, llene el
recipiente para detergente con la cantidad
recomendada y cierre la tapa. Si desea prelavar,
también debe llenar con detergente el hueco
sobre la tapa.
3
Cierre la puerta
4
Encienda el lavavajillas
Para encender el panel de la pantalla, presione
el botón Power.
5
Verifique el abrillantador
La bombilla indicadora Rinse Refill parpadeará
si el nivel del abrillantador en el lavavajillas es
bajo. Agregue abrillantador si el nivel es bajo
para mantener la efectividad del ciclo de secado.
6
Seleccione el ciclo y las opciones
Seleccione el ciclo y las opciones que mejor se
adapten a la carga. Para ello, consulte la Guía de
ciclos. La pantalla mostrará el tiempo estimado
para el ciclo y las opciones seleccionados.
7
Operación del lavavajillas
• Método 1
− Presione el botón Start (Inicio) y luego cierre
la puerta antes de que transcurran cuatro
segundos para operar el lavavajillas. Si la puerta
no se cierra dentro de los cuatro segundos, la
luz LED blanca con la hora parpadea, suena
una alarma y el ciclo no se inicia.
• Método 2
− Cierre la puerta primero y luego presione el
botón Start (Inicio) para hacer funcionar el
lavavajillas.
− Si se abre la puerta durante el ciclo, el lavavajillas
se detendrá. Para reanudar el ciclo, consulte los
métodos 1 y 2 mencionados anteriormente.
NOTA
• Si se abre la puerta durante el ciclo y no se
cierra dentro de los cuatro segundos de haber
seleccionado el botón Start (Inicio), o si se
cierra la puerta sin presionar el botón Start, la
luz LED blanca con la hora parpadea, suena
una alarma y el ciclo no se inicia.
8
Fin de ciclo
Cuando el ciclo haya finalizado, se emitirá un
sonido y la pantalla mostrará End hasta que se
abra la puerta o hasta que se presione Power.
A fin de ahorrar energía, mantenga presionado
High Temp durante 3 segundos para configurar que
la visualización de End en la pantalla se apague
pocos minutos después de que finalice el ciclo.
PRECAUCIÓN
• No abra la puerta durante la operación ni
inmediatamente después de que se haya
completado el ciclo de lavado, ya que la
acumulación de vapor puede ocasionar
quemaduras cuando se abra la puerta.
NOTA
• Vacíe primero la bandeja inferior y luego la bandeja
superior. Esto evitará que el agua de la bandeja
superior caiga sobre la vajilla de la bandeja inferior.
Apagado automático
El lavavajillas se apaga automáticamente luego de
cuatro minutos de inactividad en caso de que se lo
pause o si no se inicia un ciclo.

30
INSTALACIÓN
Panel de control
a
Power
• Presione el botón Power para encender y
apagar el artefacto.
• Después de completar el ciclo, la energía
se apaga automáticamente por seguridad y
economía.
• Si se produce una sobrecarga eléctrica, un
apagón o una interrupción del suministro
eléctrico de cualquier clase, la energía se
apaga de manera automática por cuestiones
de seguridad.
• Cuando se vuelve a conectar la electricidad,
el artefacto se enciende automáticamente y
el ciclo se reanuda.
b
Sanitized (Desinfección)
• Si la opción de Steam se agrega a un ciclo, el
indicador permanece encendido al final del ciclo
si los platos se desinfectaron adecuadamente.
c
Digital Display (Pantalla digital)
La pantalla digital del panel de control muestra
el tiempo ESTIMADO del ciclo. Cuando se
seleccionan el ciclo y las opciones, la pantalla
muestra el tiempo estimativo total para
completar dichas selecciones. Durante el
funcionamiento, la pantalla muestra el tiempo
de funcionamiento estimativo restante.
NOTA
• El tiempo estimado en pantalla no incluye los
tiempos de retraso para calentar agua, etc.
• Si se selecciona Delay Start, la pantalla
muestra el tiempo de retraso en horas.
• El tiempo del ciclo podría variar según el
nivel de suciedad de su carga.
d
Recarga de Abrillantador
Esta bombilla se ilumina cuando el nivel de
abrillantador es bajo. La luz LED se apaga
automáticamente cuando el compartimiento
del abrillantador se vuelve a llenar o el nivel se
configura en 0.
e
Start (Inicio)
• Para operar la máquina puede presionar Start
y cerrar la puerta antes de que transcurran
cuatro segundos o cerrar la puerta y
presionar Start.
• Si el botón Start no es presionado para
iniciar el ciclo, sonará una alerta.
f
Cancel (Cancelar)
La bomba de desagüe se activa y se cancela el
ciclo. Después de que se termina de desagotar
el lavavajillas, se apaga la electricidad.
• Mantenga presionado el botón Start durante
tres segundos para activarlo.
g
Wi-Fi f
Cuando el artefacto está conectado a Internet a
través de una red Wi-Fi doméstica, este icono
se ilumina.
• Mantenga presionado Delay Start durante
aproximadamente 3 segundos para conectar
a la red.
h
Chime On/Off (Alarma encendida/apagada)
• Para activar o desactivar los sonidos
de los botones, presione el botón Half Load
durante tres segundos. El sonido de alerta
de error no pueden apagarse.
i
Control Lock (Bloqueo de control) CL
La función de Bloqueo de control ayuda a evitar
que se cambien los ajustes durante un ciclo.
La selección de esta función bloquea todos los
botones, excepto el botón Power del panel de
control. Esta función no bloquea la puerta.
• Mientras un ciclo está activo, mantenga
presionado Dual Zone por tres segundos
para activar o desactivar Cerradura de
Control.
• Para comenzar un nuevo ciclo, desactive el
Bloqueo de control.

31
INSTALACIÓN
ESPAÑOL
Ciclos
Seleccione el ciclo que desee.
Auto (Automático)
Este ciclo detecta la cantidad de suciedad y la
dificultad de la suciedad y se optimiza para lograr la
mejor limpieza.
Heavy (Pesado)
Este ciclo se utiliza para lavar vajilla con mucha
suciedad y con residuos endurecidos. El ciclo Heavy
está predeterminado para funcionar con la intensidad
de aspersión más elevada y se utiliza para lavar
vajilla muy sucia.
Delicate (Delicado)
Use este ciclo para limpiar elementos delicados,
como por ejemplo porcelana fina y copas.
Refresh (Refresh)
Este ciclo refresca y calienta platos que no han sido
utilizados durante mucho tiempo.
• No utilice detergente cuando utilice este ciclo.
Normal (Normal)
Este ciclo es para suciedad moderada, cargas de
todos los días. Seleccione la opción Night Dry
(Secado nocturno) si deja la vajilla en el lavavajillas
toda la noche. Mantenga presionado Extra Dry
durante 3 segundos para activar Night Dry (Secado
nocturno).
• Despúes de finalizado el ciclo, el ventilador trabaja
por una hora para ayudar a ventilar el aire caliente
y húmedo de la cuba. Puede detener el ventilador
abriendo la puerta luego de que el ciclo haya
finalizado.
Turbo (Turbo)
Este ciclo limpiará platos profundamente sucios en
una hora usando un poco más de energía y agua.
• Este ciclo no tiene secado. Seleccione la opción
Extra Dry o Night Dry u otro ciclo para un mejor
secado.
Download Cycle (Descarga de ciclo)
Use un ciclo dedicado que se puede descargar
mediante Wi-Fi o NFC.
NOTA
• Únicamente el código de ciclo para el
ciclo de Descarga en curso aparece en el
electrodoméstico. Consulte la aplicación del
teléfono inteligente para encontrar códigos,
nombres, y más información acerca de los ciclos
disponibles.
− Ciclo por defecto: P1. Caserolas.
Machine Clean (Limpieza de la
máquina)
Este ciclo es para limpiar el interior del lavavajillas.
Utilice este ciclo sin colocar vajilla en la máquina.
Elimina la suciedad residual, los olores, las manchas
blancas y otra suciedad. Agregue ácido cítrico u
otro agente limpiador para obtener resultados más
efectivos.
• Mantenga presionado el botón Heavy durante tres
segundos para activarlo.
NOTA
• La bombilla Machine Clean parpadea cada 30
ciclos. Para activar o desactivar el ícono, presione
el botón de Delicate durante tres segundos.
Rinse (Enjuague)
Este es un ciclo rápido para la vajilla que no se
lavará de inmediato. Este ciclo enjuaga la vajilla que
tiene suciedad en exceso para ablandar los residuos
secos. Enjuagar la vajilla evita la aparición de olores
en el lavavajillas. No debe utilizarse detergente.
• Este ciclo no tiene secado.
• Mantenga presionado el botón Normal durante
tres segundos para activarlo.
Express (Exprés)
Este ciclo limpiará rápidamente platos levemente
sucios. (Tiempo: 34 minutos)
• Este ciclo no tiene secado. Seleccione la opción
Extra Dry o Night Dry u otro ciclo para un mejor
secado.
• Mantenga presionado el botón Turbo durante tres
segundos para activarlo.

32
INSTALACIÓN
Opciones
Seleccione el botón del ciclo deseado y luego
seleccione las opciones para ese ciclo.
Dual Zone (Zona dual)
Esta opción automáticamente configura una
intensidad de aspersión suave en el brazo rociador
superior y fuerte en el brazo rociador inferior.
Coloque la vajilla muy sucia, como platos y tazones,
en la bandeja inferior y la vajilla con poca suciedad,
como tazas y platillos, en la bandeja superior para
obtener los mejores resultados.
Half Load (Media carga)
Esta opción lava intensamente al seleccionar la
bandeja superior o inferior. Para cargas pequeñas,
use solo la bandeja superior o la inferior para ahorrar
energía y tiempo. Si presiona el botón Half Load,
dispone de las configuraciones f, g y de la
posibilidad de cancelar la opción de Media carga.
Energy Saver (Ahorro de energía)
Esta opción ahorra energía al reducir las
temperaturas de lavado y enjuague. Se incrementa el
tiempo de lavado para mantener el rendimiento. No
utilice este ciclo con vajilla muy sucia.
Steam (Vapor)
Esta opción añade vapor al inicio del ciclo para
mejorar el rendimiento del lavado.Si la opción de
Steam se agrega a un ciclo, el indicador (
) permanece encendido al final del ciclo si los platos
se desinfectaron adecuadamente. Si el lavavajillas no
pudo desinfectar adecuadamente los platos porque
no se seleccionó la opción Steam, se interrumpió el
ciclo o el agua no pudo calentarse a la temperatura
requerida, el indicador no se encenderá al final del
ciclo. Abra y cierre la puerta o presione el botón de
Power para apagar el indicador.
NOTA: Este enjuague de alta temperatura desinfecta
los platos y la cristalería de acuerdo con el estándar
184 de NSF/ANSI para lavavajillas residenciales.
Los lavavajillas residenciales certificados no están
diseñados para ser utilizados en establecimientos
de alimentos autorizados. Solo los ciclos de
desinfección se han diseñado para cumplir con los
requisitos para la eliminación de suelos y la eficacia
de desinfección. No existe ninguna intención, directa
ni indirecta, de que todos los ciclos en una máquina
certificada hayan superado la prueba de rendimiento
de desinfección.
High Temp (Alta temperatura)
Eleva la temperatura de lavado principal para mejorar
la limpieza.
Extra Dry (Extra seco)
Seleccione la opción Extra Dry para un mejor
desempeño de secado. Esta opción agrega tiempo
de secado extra al ciclo e incrementa la temperatura
de enjuague caliente.
• Cuando la asistencia de enjuague está
vacante, la opción Extra Dry es seleccionada
automáticamente.
Night Dry (Secado nocturno)
A menudo, los platos quedan en el lavavajillas
durante toda la noche una vez que finaliza el ciclo.
Esto puede provocar que el vapor dentro de la cuba
se condense sobre la vajilla y la deje húmeda. La
opción Night Dry (Secado nocturno) hace que el
ventilador funcione periódicamente para ayudar a
ventilar el vapor de la cuba.
• Mantenga presionado el botón Extra Dry durante
tres segundos para activarlo.
• La opción de Night Dry se selecciona por defecto
con todos los ciclos para los que está disponible,
excepto para el ciclo Normal.
• Para agregar la opción de Night Dry al ciclo
Normal, Mantenga presionado Extra Dry por 3
segundos.
Delay Start (Inicio retardado)
La función Delay Start retarda el inicio de un ciclo
seleccionado. Cada vez que presione el botón
Delay Start, el tiempo de retardo aumenta en una
hora. Es posible configurar el tiempo de retardo entre
1 y 12 horas, en incrementos de una hora.

33
INSTALACIÓN
ESPAÑOL
Guía de ciclos y opciones
La guía de ciclos a continuación muestra las opciones disponibles para cada ciclo.
Ciclo
Auto
(Automático)
Heavy
(Pesado)
Delicate
(Delicado)
Refresh
(Refresh)
Normal
(Normal)
Turbo
(Turbo)
Express
(Exprés)
Rinse
(Enjuague)
Machine
Clean
(Limpieza
de la
máquina)
Nivel de suciedad
Todos los
niveles
alto bajo bajo
Todos los
niveles
alto bajo bajo
*Uso de agua
13.8-24.5L
3.6-6.5 gal
26.9-32L
7.1-8.4
gal
19.7-24.8L
5.2-6.6 gal
7.8L
2.1 gal
9.2-25.9L
2.4-6.8
gal
27.5L
7.3 gal
20.4L
5.4 gal
6.8L
1.8 gal
12.3L
3.2 gal
**Tiempo de Lavado con
Opciones (Mins.)
89 - 226 140 - 224 95 - 148 59 - 79 98 - 215
59 -
121
34 - 103 12 82
Opciones
disponibles
Dual Zone
(Zona dual)
Half Load
(Media carga)
***Energy
Saver (Ahorro
de energía)
High Temp
(Alta
temperatura)
Steam (Vapor)
Extra Dry
(Extra seco)
Night Dry
(Secado
nocturno)
Delay Start
(Inicio
retardado)
* El consumo real de agua variará según el nivel de suciedad y la dureza del agua.
** El tiempo actual de ejecución y el tiempo de ciclo mostrado pueden cambiar dependiendo de las opciones
seleccionadas, nivel del suelo, temperatura y dureza del agua. Por lo tanto, el tiempo mostrado y el de
ejecución actual podrían diferir.
*** El Ahorro de energía no puede utilizarse en simultáneo con las opciones de Extra seco o Alta temperatura.
: Tiempo de secado adicional solamente, sin agregado de enjuague de alta temperatura.
: ENCENDIDO por defecto.
NOTA
• No hay opciones disponibles para el Ciclo de descarga.

34
INSTALACIÓN
Carga del lavavajillas
La cuba extra alta permite la carga de platos,
sartenes u otros utensilios de hasta 14" de alto.
Para un resultado de lavado efectivo, siga siempre
instrucciones que se encuentran a continuación.
• Retire las partículas grandes de restos de comida
de los platos, incluidos huesos, etc., antes de
cargar el artefacto.
• Remoje los elementos que contengan alimentos
quemados antes de colocarlos en el lavavajillas.
• Coloque boca abajo los platos o recipientes
profundos.
• Asegúrese de que las piezas de la vajilla no se
toquen entre sí.
Objetos no adecuados para el
lavavajillas
La combinación de agua a altas temperaturas
y de detergentes para lavavajillas puede dañar
ciertos objetos. No lave los siguientes objetos en el
lavavajillas:
• Cobre o aluminio anodizado
• Vajilla pintada a mano con oro o plata
• Utensilios con mangos de madera o hueso
• Utensilios de hierro o de material que pueda
oxidarse
• Objetos de plástico que no sean aptos para
lavavajillas
• Vajilla costosa, como platería o loza con bordes
dorados
• Piezas frágiles como, por ejemplo, copas de cristal
PRECAUCIÓN
• No coloque ollas y sartenes con manijas
plásticas en el artefacto ya que las manijas
pueden deteriorarse debido al calor y al
detergente.
• Puede que no se quiten de los vasos las
manchas de lápiz labial de larga duración o a
prueba de agua.
Carga en la bandeja inferior
Carga de 10 posiciones
Carga de 12 posiciones
Sugerencias de carga para la
bandeja inferior:
• Las bandejas deben colocarse en posición
vertical y enfrentando al centro de la bandeja y las
ollas, sartenes y la vajilla de gran tamaño debe
colocarse invertida.
• Cargue bandejas de cena, platos, tazones de sopa,
recipientes, etc., entre las puntas separadoras.
• Cargue placas para hornear, moldes de pasteles
y otros objetos grandes en los laterales o la parte
posterior de la bandeja. Si carga estos objetos en la
parte frontal del lavavajillas, impedirán que el agua
por aspersión llegue al dispensador de detergente.
• Asegúrese de que las manijas de las ollas y otros
objetos grandes no detengan la rotación de los
brazos rociadores.
• La bandeja inferior no se debe usar para objetos
pequeños como tazas, vasos de vino o platos
pequeños. Estos objetos se deben cargar en la
bandeja superior.
• Asegúrese de que los objetos grandes no interfieran
con la rotación de los brazos rociadores y que no
impidan que el dispensador de detergente se abra.

35
INSTALACIÓN
ESPAÑOL
Plegado de las puntas separadoras
inferiores
Pliegue las puntas separadoras hacia abajo para acomodar
la vajilla más grande; despliegue las puntas separadoras
hacia arriba para acomodar la vajilla más pequeña.
Caso 1
Caso 2
Carga de platos y ollas
Carga de ollas y tazones
NOTA
• El cesto para cubiertos se encuentra instalado
en la parte posterior del estante del fondo. Para
un mejor desempeño, instálelo a lo largo del lado
derecho, como se muestra en la figura.

36
INSTALACIÓN
Carga en el cesto para
cubiertos
El cesto de cubiertos cuenta con separadores
para evitar que se raspen y manchen los cubiertos
delicados.
Carga de 10 posiciones
1
5
4
4
4
4
4
5
5
5
5
3
3
6
2
2
3
3 4 6 5
5
5
5 1
5
4
4
4
4
3
2
6
2
2
2
2
2
2
Carga de 12 posiciones
1
5
4
4
4
4
4
5
5
1
5
3
6
2
3
3
4 6 5
5
1
5 1
5
4
4
4
42
6
2
2
2
2
2
2
Sugerencias para la carga de
cubiertos:
• Para obtener mejores resultados de limpieza,
utilice los separadores superiores del cesto
cuando cargue los cubiertos. Los separadores
evitan que los cubiertos se amontonen.
• Cargue los objetos filosos, como por ejemplo los
cuchillos, apuntando hacia abajo.
• Cuando se descarga el lavavajillas, lo mejor es
comenzar por el cesto de cubiertos. Esto evitará
que caigan gotas de agua sobre los cubiertos
desde la bandeja superior.
ADVERTENCIA
• Tenga cuidado al cargar y descargar objetos
filosos. Cargue los cuchillos filosos con los
mangos hacia arriba para disminuir el riesgo de
lesiones personales.

37
INSTALACIÓN
ESPAÑOL
Carga en la bandeja superior
Carga de 10 posiciones
Carga de 12 posiciones
Sugerencias de carga para la
bandeja superior:
• Coloque las tazas y los vasos en las filas entre las
puntas separadoras. Colocarlos sobre las puntas
separadoras puede ocasionar quebraduras y/o
manchas de agua.
• Para evitar que se astillen, no permita que tengan
contacto con otros objetos.
• Ubique los elementos de manera que los extremos
abiertos queden orientados hacia abajo para
facilitar su limpieza y secado.
• No apile los objetos.
• Se recomienda utilizar la bandeja superior para
platos pequeños, tazas, platillos, vasos y objetos
de plástico aptos para lavavajillas.
• Las tazas, los vasos y los tazones se deben
orientar hacia abajo.
• Otras tazas o utensilios de cocina se pueden
colocar en las bandejas plegables para tazas, que
también se adaptan a copas.
• Asegúrese de que los objetos no interfieran con la
rotación de los brazos rociadores por arriba y por
debajo de la bandeja superior.
• Al cargar objetos grandes en la bandeja superior,
como vasos de vino o tazas altas, podría ser
necesario extraer la bandeja para cubiertos en
caso de que la hubiera.
Carga del porta copas
Algunos modelos cuentan con bandejas para tazas
donde pueden colocarse copas.
Las bandejas para tazas pueden plegarse hacia
arriba para dejar espacio para copas o vasos altos.

38
INSTALACIÓN
Retiro y colocación de los estantes
para tazas
Los estantes para tazas izquierdo y derecho son
intercambiables y pueden extraerse.
1
Deslice el estante para tazas hacia abajo, hasta
la posición de cerrado.
2
Ubique la ranura del ensamble del estante para
tazas y con firmeza haga salir la barra de soporte
de ese lado.
• El estante de la izquierda se libera en la parte
de atrás. El estante de la derecha se libera en
la parte de adelante.
Ranura del ensamble
3
Deslice el estante para tazas quitándolo de la
barra de soporte del lado opuesto.
4
Invierta las instrucciones para volver a colocar el
estante para tazas.
Plegado de las puntas separadoras
superiores
Pliegue las puntas separadoras hacia abajo para
acomodar la vajilla más grande; despliegue las
puntas separadoras hacia arriba para acomodar la
vajilla más pequeña.
Carga de platos y ollas

39
INSTALACIÓN
ESPAÑOL
Bandeja superior con altura
ajustable
La bandeja superior se ajusta hacia arriba y hacia
abajo. Suba la bandeja superior para dar lugar a
objetos de hasta 14" de altura en la bandeja inferior.
Baje la bandeja superior para dar lugar a objetos
de hasta 12" de altura en la bandeja superior. El
lavavajillas se envía con la bandeja superior subida.
Existen tres posiciones disponibles para ajustar
la altura de la bandeja superior a fin de crear más
espacio.
1
2
3
2
3
1
Para bajar la bandeja:
Sostenga la bandeja del centro de cada lado para
soportar su peso. Luego, presione el botón de cada
lado para soltar la bandeja y bájela hasta la posición
inferior.
Para subir la bandeja:
Levante la bandeja del centro de cada lado hasta
que la bandeja se trabe en la posición superior. No
es necesario levantar las palancas de bloqueo para
subir la bandeja.
ADVERTENCIA
• Antes de ajustar, asegúrese de que el estante
no contenga vajilla de ningún tipo. Si no
lo hace, se podrían dañar o usted podría
lastimarse.
NOTA
• Levante el estante superior sin presionar los
botones ubicados a cada lado. Si presiona los
botones cuando levanta el estante, no permitirá
que el estante quede fijo en su posición.
• Para ubicar el estante en la posición media, puede
resultar más fácil llevarlo por completo hasta abajo
y luego levantar cada lado de este individualmente
hasta que hagan clic en el lugar.
• Antes de empujar la bandeja superior en el
lavavajillas, asegúrese de que la altura de la
bandeja sea la misma en ambos lados. Si la altura
no es la misma en ambos lados, la puerta del
lavavajillas no cerrará y el brazo rociador superior
no se conectará con la entrada de agua.
• Hay un incremento de 24
5
/
8
pulgadas (56 mm) en
la altura disponible cuando el estante superior se
coloca en la posición más baja.
• Luego de ajustar los niveles de las bandejas,
verifique que los brazos rociadores no estén
impedidos de rotar.
• Con la bandeja superior en la posición inferior,
compruebe que la parte inferior de la bandeja
superior, que incluye el brazo rociador, no estorbe
los objetos que se encuentren en la bandeja
inferior.
• Cuando la bandeja superior se encuentre en la
posición inferior, empuje hacia adentro la bandeja
superior primero y la bandeja inferior después.
• Tire de la bandeja inferior primero y de la bandeja
superior después.
• Levante el estante superior sin presionar los
botones ubicados a cada lado. Si presiona los
botones cuando levanta el estante, no permitirá
que el estante quede fijo en su posición.
• Para ubicar el estante en la posición media, puede
resultar más fácil llevarlo por completo hasta abajo
y luego levantar cada lado de este individualmente
hasta que hagan clic en el lugar.

40
INSTALACIÓN
Removiendo el Estante de Encaje
Deslizable Superior
Estas instrucciones son más para modelos con estantes
encajables que para estantes de soportes con ruedas.
PRECAUCIÓN
• El estante superior encajable debe ser removido
únicamente para servicio. Si desea removerlo
utilice guantes y maneje el destornillador con
precaución para evitar lesiones personales o
daños a la lavadora de platos.
1
Jale el estante superior hasta que se detenga.
Remueva cualquier contenido en él.
2
Para remover los soportes delanteros del estante
de los rieles, abra los ganchos delanteros con un
destornillador de punta plana mientras levanta el
frente del estante para desencajar los soportes
delanteros de los ganchos. Repita para desencajar
los soportes delanteros en el lado opuesto.
3
Para remover los soportes traseros del estante de los
rieles, sostenga un riel lateral con una mano, levante
el frente del estante, y empújelo de nuevo firmemente
para desencajar el soporte de los ganchos en la parte
trasera. Repita en el lado opuesto.
4
Para remplazar el estante, coloque los
soportes del estante trasero detrás de los
ganchos laterales y empújelo hacia adelante
para cazar los soportes en los ganchos. Luego
alinee los soportes del estante delantero con
los ganchos delanteros y empuje la parte
frontal del estante hacia abajo para cazar los
soportes con los ganchos.
Carga del estante de
cubiertos
La bandeja para cubiertos es la más adecuada para
la cubertería y para la mayoría de los utensilios de
cocina. También puede alojar tazones pequeños y
tapas. Los separadores de las bandejas de cubiertos
ayudan a mantener la cubertería separada a fin de
evitar daños y mejorar la limpieza.
NOTA
• Para un mejor rendimiento de limpieza, coloque
la cubertería en los cestos para cubiertos. Los
utensilios más sucios o los elementos con comidas
quemadas deben ubicarse en el medio de la
bandeja o en el cesto para cucharas para lograr un
mejor rendimiento.
Carga de 10 posiciones
PRECAUCIÓN
• No coloque recipientes en el centro de la
bandeja para cubiertos. Es posible que
la puerta no cierre adecuadamente y se
produzcan fugas.

41
INSTALACIÓN
ESPAÑOL
Bandeja de altura ajustable
La bandeja del lado izquierdo puede ajustarse en
una posición alta o baja para acomodar utensilios
o cubiertos de diferentes tamaños. Retire la vajilla
antes de ajustar la bandeja. Ajuste la bandeja
deslizando la palanca.
Extracción de la bandeja para
cubiertos
La bandeja para cubiertos puede extraerse por
completo en caso de necesitar más espacio en la
bandeja superior para objetos más grandes.
Retire siempre la cubertería de la bandeja antes de
extraer dicha bandeja.
Tire de la bandeja hacia fuera hasta llegar al extremo
de los rieles. Luego, levante la parte frontal de
la bandeja para que los rodillos se destraben del
extremo del riel. Deslice la bandeja hacia adelante y
extráigala de los rieles.
ADVERTENCIA
• Tenga cuidado al cargar y descargar objetos
con bordes filosos. Cargue los cuchillos filosos
con la hoja hacia abajo para disminuir el riesgo
de lesiones personales.

42
INSTALACIÓN
Agregado de agentes de
limpieza
Cómo agregar detergente en el
dispensador
• Retire la etiqueta del dispensador antes de hacer
funcionar el lavavajillas por primera vez.
• La cantidad de detergente necesario depende del
ciclo, el tamaño de la carga y el nivel de suciedad
de la vajilla.
• Ponga el detergente en el compartimiento para
detergente antes de comenzar cualquier ciclo,
salvo para el ciclo de Enjuague.
1
Presione el botón de la tapa dispensadora para
abrir la cubierta.
2
Agregue detergente para lavavajillas en el
compartimiento principal hasta que el nivel se
encuentre entre las líneas marcadas en 15 y 25.
• Llénelo hasta por encima de la línea 25 en caso
de agua dura o cargas con suciedad extrema.
• Llénelo hasta la línea 15 en caso de agua
blanda o cargas con poca suciedad.
15
25
3
Empuje la tapa de detergente para que se cierre,
deslizándola hasta que haga un clic en el lugar.
4
Si desea efectuar un prelavado, llene con
detergente el área del compartimiento de
prelavado que hay en la tapa.
ADVERTENCIA
• El detergente y el abrillantador para lavavajillas
contienen componentes químicos, como todos
los detergentes de uso doméstico. Por lo tanto,
deben mantenerse fuera del alcance de los
niños.
PRECAUCIÓN
• Solamente utilice detergente especial para
lavavajillas. El detergente incorrecto podría
hacer que el lavavajillas presente espumación
durante el funcionamiento. La espumación
excesiva podría reducir el rendimiento de
lavado y generar fugas en el lavavajillas.
• Para evitar dañar el dispensador, no tire de
éste para cerrar la puerta del lavaplatos.
NOTA
• Una vez que finalice el programa de lavado,
compruebe que el detergente se haya utilizado por
completo.
• Algunas pastillas de detergente pueden quedarse
atascadas en el dispensador debido a su tamaño
excesivo. Las tabletas pueden colocarse sobre la
base de la cuba de lavado, junto al filtro, antes de
iniciar el ciclo.
• El exceso de detergente puede dejar una película
en la vajilla y en el lavavajillas, lo que resulta en un
mal lavado.
• Si se utilizan pastillas de detergente sin
abrillantador líquido, la vajilla y el interior del
lavavajillas tendrán una humedad excesiva.
Seleccione la opción Extra Dry para un mejor
resultado del secado.
• El uso de abrillantador líquido mejora el resultado
del secado al permitir que el agua se desagote por
completo de la vajilla después del enjuague final.
• No use tabletas de detergente para ciclos de
lavado más cortos. La tableta podría no disolverse
por completo, lo que dejaría residuos en la vajilla y
la limpieza sería ineficiente.
• El uso de un impulsor de lavado ayuda a remover
manchas, residuos y la película blanca causada
por el agua dura. No ayuda a remover el residuo
del exceso de detergente.

43
INSTALACIÓN
ESPAÑOL
Cómo agregar abrillantador en el
dispensador
El indicador de Rinse Refill aparece en la pantalla
cuando se necesita más abrillantador.
Se recomienda utilizar abrillantador para evitar que
queden marcas de agua en la vajilla y para mejorar
el rendimiento del secado.
1
Abra la tapa del abrillantador levantando la
lengüeta.
2
Agregue líquido abrillantador hasta el nivel
máximo de llenado. El abrillantador debe
asentarse en el dispensador mientras se
llena o pueden formarse burbujas de aire que
producirán resultados deficientes de secado.
Evite llenar el dispensador en exceso.
3
Cierre la tapa para bloquear el dispensador.
El abrillantador se dispensa automáticamente
durante el ciclo final de enjuague.
NOTA
• Utilice solamente abrillantador líquido en el
lavavajillas.
• No llene en exceso el dispensador de abrillantador.
• Limpie el abrillantador que se derrame alrededor
del dispensador.
Ajuste del dispensador de
abrillantador
El dispensador tiene cinco niveles de ajuste. El
lavavajillas se programa en la fábrica para un nivel
de dispensador de abrillantador de 2. Esto puede
comprobarse o modificarse mediante los botones del
panel de control.
1
Asegúrese de que el artefacto esté apagado.
2
Presione los botones Dual Zone y Power
simultáneamente para verificar el ajuste actual.
3
Presione Delay Start para cambiar el ajuste
del dispensador de abrillantador. Cada vez que
presione el botón, el nivel se irá modificando, de
Nivel 0 (L0) a Nivel 4 (L4).
4
Una vez que haya seleccionado el ajuste del
dispensador de abrillantador deseado, presione
Start para guardar.
NOTA
• Ajuste la configuración a un nivel más elevado si
tiene agua dura o si nota la formación de calcio en
su vajilla.
• Ajustar el control del abrillantador a un nivel
demasiado bajo producirá manchas y vetas en la
vajilla, así como también un bajo rendimiento de
secado.
• Ajustar el control a un nivel demasiado elevado
puede causar espumación, lo que resultará en un
mal lavado.
Recarga del abrillantador
La frecuencia con la que se debe recargar el
dispensador depende de la frecuencia con la que se
lave la vajilla y el ajuste de abrillantador utilizado.
• La bombilla Rinse Refill parpadea cuando es
necesario más abrillantador, a menos que el ajuste
del dispensador de abrillantador esté configurado
en L0.

44
FUNCIONES INTELIGENTES
FUNCIONES
INTELIGENTES
Aplicación LG ThinQ
• Esta característica solo está disponible en el
modelo con el logo f o .
La aplicación LG ThinQ le permite comunicarse con
el electrodoméstico utilizando un teléfono inteligente.
Funciones de la aplicación LG ThinQ
Monitorización
Compruebe el estado, el ciclo, las opciones, el
tiempo de operación y el tiempo de finalización del
ciclo del aparato en una sola pantalla.
Download Cycle (Descarga de ciclo)
Descargue ciclos nuevos y especiales que no se
encuentran incluidos en los ciclos básicos del artefacto.
Los artefactos que se encuentran correctamente
conectado tienen la posibilidad de descargar una
variedad de ciclos especiales específicos para ellos.
Solamente puede guardarse un ciclo a la vez en el
artefacto.
Una vez que se completa la descarga de un ciclo en
el artefacto, el producto mantiene el ciclo descargado
hasta que se descarga un nuevo ciclo.
Asistente de limpieza de la máquina
Esta función muestra cuántos ciclos quedan antes de
que se deba ejecutar el ciclo de Limpieza de la máquina.
Smart Diagnosis™
Esta función brinda información útil para diagnosticar
y resolver problemas con el producto conforme a su
patrón de uso.
Configuración
Ajuste el nivel de dispensador de abrillantador, el
recordatorio de limpieza de la máquina, el señal de
nivel y la luz indicadora de limpieza.
Tiene la opción de recibir notificaciones automáticas
en su teléfono inteligente cuando haya finalizado el
ciclo o cuando el artefacto presente problemas.
Alertas Emergentes
Active Push Alerts (Alertas emergentes) para recibir
notificaciones del estado del aparato.
Las notificaciones serán recibidas aunque la
aplicación de LG ThinQ esté desactivada.
NOTA
• Si cambia de enrutador inalámbrico, proveedor
de Internet o contraseña, borre el artefacto
conectado de la aplicación LG ThinQ y conéctelo
nuevamente.
• Esta información está actualizada en el momento
de su publicación. La aplicación está sujeta a
cambios, con fines de mejorar el producto, sin
previo aviso a los usuarios.
• Esta característica solamente está disponible en
algunos modelos.
Antes de usar la aplicación LG
ThinQ
1
Utilice un teléfono inteligente para verificar la
potencia del enrutador (Red Wi-Fi) cerca del
electrodoméstico.
• Si la distancia entre el electrodoméstico y el
enrutador inalámbrico es muy lejana, la señal
será débil. Toma mucho tiempo registrarse o
falla la instalación de la aplicación.
2
Desactive los Datos Móviles o Datos Celulares
en su teléfono inteligente.
3
Conecte su teléfono inteligente al enrutador
inalámbrico.
NOTA
• Para verificar la conexión Wi-Fi, verifique que el
ícono de conexión Wi-Fi f que se encuentra en el
panel de control esté encendido.
• El electrodoméstico funciona únicamente con
redes Wi-Fi de 2.4 GHz. Contacte a su proveedor
de servicios de internet o verifique el manual del
enrutador inalámbrico para revisar la frecuencia de
su red.
• LG ThinQ no es responsable por ningún problema
de conexión en red, falla, mal funcionamiento o
error causado por la conexión de red.

45
FUNCIONES INTELIGENTES
ESPAÑOL
• El entorno inalámbrico circundante puede hacer
que el servicio de red inalámbrica funcione
lentamente.
• Si el aparato tiene problemas para conectarse a la
red Wi-Fi, es posible que se encuentre demasiado
lejos del router. Adquiera un repetidor Wi-Fi
(extensor de alcance) para mejorar la intensidad
de la señal Wi-Fi.
• Según el proveedor de servicios de Internet,
la conexión de la red puede no funcionar
correctamente.
• Es posible que la conexión Wi-Fi no se conecte
o se interrumpa debido al entorno de la red
doméstica.
• Si no se puede registrar el artefacto por problemas
con la transmisión de la señal inalámbrica,
desconéctelo y espere alrededor de un minuto
previo a intentarlo de nuevo.
• Si el cortafuegos de su enrutador inalámbrico está
activado, desactivelo o añada una excepción a
éste.
• El nombre de la red inalámbrica (SSID) debe ser
una combinación de letras y números. (No utilice
símbolos especiales)
• Puede que la interfaz del usuario del teléfono
inteligente (UI) varíe dependiendo del sistema
operativo del móvil (os) y del fabricante.
• Es posible que no pueda establecer la
configuración de red si el protocolo de seguridad
del router está en WEP. Cambie el protocolo de
seguridad (se recomienda el WPA2) y registre el
producto nuevamente.
Instalación de la aplicación LG
ThinQ
Busque la aplicación LG ThinQ en la tienda Google
Play o App Store desde su teléfono inteligente.
Siga las instrucciones para descargar e instalar la
aplicación.
Especificaciones módulo LAN
inalámbrico
Modelo LCW-003
Rango de
frecuencia
2412~2462 MHz
Rango de
frecuencia (max.)
< 30 dBm
Aviso de la FCC
Este equipo fue probado y se determinó que cumple
con los límites para los dispositivos digitales de
Clase B, en conformidad con la parte 15 de las
normas de la FCC. Estos límites están diseñados
para ofrecer una protección razonable contra
interferencias dañinas en una instalación residencial.
Este equipo genera, usa y puede emitir energía de
radiofrecuencia y, si no se instala y utiliza de acuerdo
con las instrucciones, podría causar interferencias
dañinas a las comunicaciones por radio. Sin
embargo, no se garantiza que dicha interferencia no
pueda ocurrir en instalaciones particulares. Si este
equipo causa interferencia dañina a la recepción
de radio o televisión, que se puede determinar
encendiendo y apagando el equipo, se aconseja al
usuario intentar corregir la interferencia realizando
alguna de las siguientes acciones:
• Reorientar o reubicar la antena receptora.
• Aumentar la separación entre el equipo y el
receptor.
• Conectar el equipo a una toma de corriente en un
circuito diferente del utilizado por el receptor.
• Consultar al vendedor o a un técnico de radio/TV
con experiencia para solicitar ayuda.
El dispositivo cumple con la parte 15 de las Reglas FCC.
La operación está sujeta a las siguientes dos condiciones:
1) Este dispositivo no debe causar interferencia dañina, y
2) Este dispositivo debe aceptar cualquier
interferencia recibida, incluso aquellas que pudieran
causar un funcionamiento no deseado del dispositivo.
Cualquier cambio o modificación en la construcción
de este dispositivo, que no cuente con la aprobación
expresa de la parte responsable del cumplimiento,
puede anular la autorización del usuario para operarlo.
Declaración sobre exposición a la
radiación de RF de la FCC
Este equipo cumple con los límites de exposición a
la radiación de la FCC establecidos para entornos
no controlados. Este transmisor no se debe ubicar ni
operar junto con ninguna otra antena ni transmisor.

46
FUNCIONES INTELIGENTES
El equipo se debe instalar y operar con una distancia
mínima de 20 cm (7.8 pulg.) entre la antena y su
cuerpo. Los usuarios deben seguir las instrucciones
de operación específicas de manera tal de cumplir
con las normas de exposición a la RF.
Declaración de Industry Canada (Para el
módulo transmisor contenido en este
producto)
Este dispositivo contiene transmisores/receptores
exentos de licencia que cumplen con las RSS de
innovación, ciencia y desarrollo económico exentas
de licencia de Canadá. Su funcionamiento queda
sujeto a las siguientes condiciones:
1) Este dispositivo no debe causar interferencia.
2) Este dispositivo debe aceptar cualquier
interferencia recibida, incluso aquellas que pudieran
causar un funcionamiento no deseado del dispositivo.
Declaración sobre Exposición a
Radiación de la IC
Este equipo cumple con los límites de exposición
a la radiación de la IC establecidos para entornos
no controlados. Este equipo debe ser instalado y
operado con una distancia mínima de 20 cm (7.8
pulg.) entre la antena y su cuerpo.
NOTA
• EL FABRICANTE NO SE HACE
RESPONSABLE DE CUALQUIER
INTERFERENCIA DE TV O RADIO CAUSADA
POR MODIFICACIONES NO AUTORIZADAS
A ESTE EQUIPO. TALES MODIFICACIONES
PODRÍAN ANULAR LA AUTORIDAD DEL
USUARIO PARA PONER EL EQUIPO EN
FUNCIONAMIENTO.
Software de código abierto
Para obtener el código fuente bajo GPL, LGPL, MPL
y otras licencias de código abierto que contiene este
producto, visite http://opensource.lge.com. Además
del código fuente, se pueden descargar los términos
de la licencia, las anulaciones de la garantía y los
avisos de derechos de autor.
LG Electronics también le proporcionará el código
fuente abierto en un CD-ROM con un cargo que
cubra el costo de realizar tal distribución (como
el costo de los medios, el envío y el manejo)
con una previa solicitud por correo electrónico a
opensource@lge. com. Esta oferta es válida durante
tres (3) años a partir de la fecha de adquisición del
producto.
Función Smart Diagnosis ™
(Diagnóstico Inteligente)
Esta característica solo está disponible en el modelo
con el logo c o d.
Utilice esta función como ayuda para diagnosticar y
resolver problemas con su electrodoméstico.
NOTA
• Por motivos no atribuibles a la negligencia de
LGE, es posible que el servicio no pueda funcionar
debido a factores externos como por ejemplo, la
indisponibilidad de Wi-Fi, desconexión de Wi-
Fi, política de la tienda de aplicaciones local o
indisponibilidad de aplicaciones, entre otros.
• Esta función puede estar sujeta a cambios sin
previo aviso y puede tener una forma diferente
según dónde se encuentre ubicado.
Uso de LG ThinQ para diagnosticar
problemas
Si experimenta un problema con su electrodoméstico
equipado con Wi-Fi, este puede transmitir datos
sobre la resolución de problemas a un teléfono
inteligente con la aplicación LG ThinQ.
• Inicie la aplicación LG ThinQ y seleccione la
función Smart Diagnosis en el menú. Siga las
instrucciones provistas en la aplicación LG ThinQ.
Uso del diagnóstico audible para
diagnosticar problemas
Siga las instrucciones a continuación para utilizar el
método de diagnóstico audible.
• Inicie la aplicación LG ThinQ y seleccione la
función Smart Diagnosis en el menú. Siga las
instrucciones para el diagnóstico audible provistas
en la aplicación LG ThinQ.
1
Mantenga el micrófono del teléfono sobre el icono
Smart Diagnosis™. No toque ningún otro botón.
2
Mantenga presionado Download Cycle hasta que
se visualice una cuenta regresiva en el artefacto.
3
Mantenga el teléfono allí hasta que la
transmisión de tonos haya terminado.
4
Una vez que la cuenta regresiva haya terminado
y se hayan detenido los tonos, reanude su
conversación con el agente del centro de
atención, que podrá, entonces, ayudarlo a usar
la información transmitida para un análisis.
NOTA
• Para obtener resultados óptimos, no mueva el
teléfono mientras se transmitan los tonos.

47
MANTENIMIENTO
ESPAÑOL
MANTENIMIENTO
Para mantener el rendimiento y evitar problemas,
es importante verificar el exterior y el interior
del lavavajillas, incluidos los filtros y los brazos
rociadores, a intervalos regulares.
ADVERTENCIA
• Cuando limpie el exterior y el interior del
lavavajillas, no utilice benceno ni solvente. De
lo contrario, podría ocasionar un incendio o una
explosión.
• Para evitar lesiones físicas durante el cuidado
y el mantenimiento o limpieza, use guantes y/o
prendas protectoras.
NOTA
• Si no ha utilizado el lavavajillas durante mucho
tiempo, refresque el interior ejecutando un ciclo de
limpieza de la máquina sin detergente. Cuando el
ciclo haya finalizado, limpie el interior y el exterior
del lavavajillas siguiendo las instrucciones de la
sección Mantenimiento.
Limpieza del exterior
• No utilice escobillas ni limpiadores abrasivos para
limpiar el exterior del lavavajillas.
• La mayor parte de la suciedad se puede retirar con
un paño húmedo suave o una esponja. Se puede
usar un jabón suave para ayudar a desprender la
suciedad difícil. Enjuague y seque con un paño
suave después de la limpieza.
• Las superficies de acero inoxidable se pueden
pulir con un limpiador de acero inoxidable. Siga las
instrucciones del limpiador y limpie en la dirección
de la veta.
PRECAUCIÓN
• En caso de derramar aceite de cocina en el
exterior del producto, límpielo de inmediato. No
limpie el exterior del producto con productos
de limpieza que contengan alcohol, diluyentes,
blanqueadores, benceno, líquidos inflamables o
abrasivos. Estas sustancias pueden decolorar o
dañar el electrodoméstico.
Limpieza del interior
• Limpie el interior del lavavajillas periódicamente
con un trapo o una esponja suaves y humedecidos
para eliminar las partículas de alimentos y
suciedad.
• Para eliminar manchas blancas y olores del
interior del lavavajillas, ejecute un ciclo con la
máquina vacía, sin detergente, colocando la
cantidad correspondiente a una taza de vinagre
blanco en un recipiente apto para lavavajillas en el
estante superior. (El vinagre es un ácido y su uso
constante podría dañar el artefacto).
• Uso del ciclo Machine Clean(Limpieza de la
máquina)
− Ejecute el ciclo de Machine Clean (Limpieza de
la máquina) una vez al mes o después de cada
30 ciclos para eliminar la suciedad residual, el
olor, las manchas blancas y otra suciedad dentro
del aparato.
1. Retire todos los platos del aparato.
2. Agregue 3 cucharadas (40 g) de ácido cítrico al
dispensador de detergente o siga las instrucciones
del fabricante si usa un agente de limpieza para
lavavajillas. No use detergente para lavavajillas.
3. Mantenga presionado Heavy durante 3
segundos para seleccionar el ciclo Limpieza de la
máquina.
4. Presione Start(Inicio).
Mantenimiento estacional y
almacenamiento
• En caso de que vaya a ausentarse por un extenso
período de tiempo durante los meses más
calurosos, cierre la válvula de agua, desenchufe
la línea de alimentación o apague el interruptor de
corriente. Limpie el filtro, la cuba y el dosificador
para evitar olores.
• En caso de que vaya a ausentarse por un extenso
período de tiempo durante los meses más fríos
y exista la posibilidad de que haya temperaturas
heladas, prepare las líneas de suministro de
agua y el mismo lavavajillas para el invierno. La
preparación para el invierno debe ser realizada por
personal de servicio calificado.

48
MANTENIMIENTO
Trampa de aire del desagüe
o triturador del fregadero
obstruidos
Verifique la trampa de aire del desagüe o el
triturador del fregadero si el lavavajillas no desagota
correctamente.
Limpieza de la trampa de aire
1
Apague el lavavajillas.
2
Retire la cubierta de la trampa de aire y la tapa
plástica que se encuentra debajo.
3
Limpie quitando cualquier desecho con un palillo
o cepillo.
4
Vuelva a colocar la tapa plástica y la cobertura
de la trampa de aire.
NOTA
• La trampa de aire del desagüe y el triturador son
dispositivos de fontanería externos y no forman
parte del lavavajillas.
• La garantía del lavavajillas no cubre los costos de
servicio directamente relacionados con la limpieza
o la reparación de la trampa de aire de desagüe
externa y el triturador.

49
MANTENIMIENTO
ESPAÑOL
Limpieza de los filtros
1
Retire el estante inferior y coloque brazo rociador
del fondo de modo que se abra una V más
amplia hacia adelante.
2
Gire el filtro interno en sentido contrario a
las agujas del reloj y quite el filtro interno
ensamblado y el filtro de acero inoxidable.
• Con los filtros quitados, verifique la apertura del
sumidero y elimine cualquier material extraño,
si es necesario.
3
Limpie los filtros con un cepillo de cerdas suaves
bajo el chorro de agua. Ensamble de nuevo los
filtros antes de volver a instalarlos.
4
Para volver a colocar los filtros ensamblados,
coloque el brazo rociador de modo que la V más
amplia apunte hacia adelante. Encaje los filtros
nuevamente en el soporte de filtros y asegúrelos
haciendo girar el filtro interior en el sentido de las
agujas del reloj hasta que haga clic en su lugar.
ADVERTENCIA
• Tenga cuidado con los bordes filosos al
manipular el filtro de acero inoxidable.
PRECAUCIÓN
• Retire los restos de comida que se encuentren
atascados en los filtros para evitar la
acumulación de bacterias que generan malos
olores así como también posibles problemas en
el desagote.
NOTA
• Para lograr los mejores resultados de lavado,
limpie el filtro después de cada carga. Si el filtro
sigue sucio, puede causar olores.
• En áreas donde hay agua dura, limpie el filtro
utilizando un cepillo suave una vez al mes, como
mínimo.
• Limpie los filtros utilizando materiales no abrasivos
y agua corriente tibia.
• Asegúrese de que el filtro esté correctamente
ensamblado antes de comenzar un ciclo. Cuando
lo ensamble, rótelo con firmeza hasta que haga
clic.
Programa de limpieza del filtro recomendada
Cantidad de cargas
por semana
Si lava la vajilla
antes de cargarla
Si quita los
residuos y enjuaga
la vajilla antes de
cargarla
Si solo quita los
residuos de la
vajilla antes de
cargarla
Si no quita los
residuos y enjuaga
la vajilla antes de
cargarla
1-3 Cada 6 meses Una vez por año
Cuatro veces por
año
Una vez por mes
4-7 Cada 6 meses Una vez por año
Cuatro veces por
año
Dos veces por mes
(cada 15 días)
8-12 Cada 6 meses Cada 6 meses Cada 1.5 meses Todas las semanas
13-14 Cada 6 meses Cada 6 meses Cada 1.5 meses
Dos veces por
semana

50
MANTENIMIENTO
Limpieza de los brazos
rociadores
Si los orificios de los brazos rociadores se encuentran
bloqueados por algún residuo de comida, es posible
que la vajilla no se lave correctamente debido a que
el rociado no se efectuará de forma adecuada.
Se recomienda limpiar los brazos rociadores cada
dos semanas.
Limpieza del brazo rociador inferior
1
Asegúrese de que los orificios propulsores de agua
no estén obstruidos con partículas de alimentos.
2
Si algún residuo de comida bloquea los orificios
de los brazos rociadores, elimine la suciedad
utilizando un alfiler o alguna herramienta punzante.
PRECAUCIÓN
• Para evitar romper las secciones del brazo
atomizador rodante, no tire de ellas ni las rote
manualmente.
Limpieza del brazo rociador superior
1
Tire de la bandeja superior hacia fuera.
Asegúrese de que los orificios propulsores de
agua no estén obstruidos con partículas de
alimentos.
2
Cuando sea necesario realizar una limpieza,
extraiga el brazo rociador superior girando la
tuerca ubicada en la parte inferior del brazo
1
/
8
de
giro en sentido contrario a las agujas del reloj y
tire de él hacia abajo.
3
Enjuague o sacuda el brazo rociador para quitar
las partículas de alimentos.
4
Si algún residuo de comida bloquea los orificios
de los brazos rociadores, elimine la suciedad
utilizando un alfiler o alguna herramienta
punzante.
5
Cuando haya quitado los residuos de comida,
limpie los orificios de los brazos rociadores bajo
el chorro de agua.
6
Luego de limpiar el brazo rociador superior,
vuelva a colocarlo en su lugar. Gire la tuerca
1
/
8
de giro en sentido de las agujas del reloj
para asegurarse de que la tuerca se bloquee
nuevamente en su lugar.
7
Luego de ensamblar, verifique que los brazos
rociadores giren libremente.

51
SOLUCIÓN DE PROBLEMAS
ESPAÑOL
SOLUCIÓN DE PROBLEMAS
Preguntas frecuentes
P: ¿Es necesario utilizar un abrillantador?
R: Es muy recomendable utilizar un abrillantador para mejorar el rendimiento del secado del lavavajillas.
Para ganar eficiencia en el consumo de energía, el sistema de secado híbrido no utiliza un elemento de
calor para asistir el secado, de manera que el abrillantador cumple un rol crucial en dicho proceso. Si no
se usa abrillantador, podría quedar agua en la vajilla y en la cuba. El abrillantador ayuda a garantizar que
la mayor parte del agua sea removida de la vajilla al final del enjuague y que la carga esté lista para el
ciclo de secado.
P: ¿Qué puedo hacer si mi vajilla queda con una película turbia o blanca después del lavado?
R: En general, la película turbia se origina por los minerales del agua que reaccionan con el detergente del
lavavajillas. En primer lugar, asegúrese de no utilizar demasiado detergente. Consulte la sección Cómo
agregar detergente en el dispensador para conocer las cantidades recomendadas de detergente. Agregue
un enjuague extra al ciclo. Los lavavajillas LG utilizan menos agua que los lavavajillas tradicionales; por
lo tanto, agregar un enjuague extra ayuda a quitar la película. Si el agua de suministro es dura, podría
necesitarse un impulsor de rendimiento que trate la condición de agua dura.
P: ¿Cómo puedo quitar la película blanca del tambor?
R: Medir 3 cucharadas (40 g) de polvo de ácido cítrico y utilícelo para llenar el compartimento principal del
detergente. Ejecute el ciclo Machine Clean. No utilizar detergente.
P: ¿Qué pasos debo seguir para mejorar los resultados de secado?
R: El rendimiento del secado se ve directamente afectado por la cantidad de calor que permanece en la cuba
después de que se ejecuta el enjuague caliente. Si su lavavajillas se encuentra alejado del calentador de
agua de su casa, podría resultar necesario abrir la llave de agua caliente del fregadero antes de iniciar
el ciclo de lavado para asegurarse de que se purgue el agua fría de las líneas de agua caliente. Esto
garantizará que su lavavajillas tenga un suministro consistente de agua caliente desde el comienzo hasta
el final. La utilización del ajuste de Alta temperatura también ayuda a mantener la temperatura del tambor
interno y la vajilla más caliente antes de que se inicie el secado.
Los lavavajillas LG están diseñados para ser utilizados con abrillantador. El abrillantador maximiza la
cantidad de agua que se elimina de la vajilla antes de que comience el ciclo de secado. Si se utiliza un
abrillantador y el rendimiento aún necesita ser mejorado, ajuste la cantidad de abrillantador utilizada. Dos
(2) es el ajuste predeterminado, pero, de ser necesario, fíjelo el nivel en 3 para que se utilice más cantidad
de abrillantador.
El agua tiende a repeler en vez de extenderse en plástico y superficies antiadherentes, haciéndolas más
dificil de secar. Si lava artículos de plástico en el ciclo Normal seleccione la opción Extra Dry o Night Dry
o ambas para mejores resultados de secado. Cuando la asistencia de enjuague está vacante, la opción
Extra Dry es seleccionada automáticamente.
Permita que el lavavajillas finalice por completo el ciclo de secado antes de abrir la puerta. Si la puerta
se abre en el medio de un ciclo de secado, el calor necesario para el funcionamiento del sistema de
secado híbrido se fugará. Esto provocará que toda la vajilla que se encuentra en el interior del lavavajillas
permanezca húmeda cuando termine el ciclo.

52
SOLUCIÓN DE PROBLEMAS
P: ¿Qué es el sistema de secado híbrido?
R: El lavavajillas no utiliza un elemento de calentamiento para el proceso de secado, sino que el calor es
retenido por la vajilla y el compartimiento durante los ciclos de lavado y enjuague para luego convertir el
agua que se produce en la cuba en humedad.
El aire caliente y húmedo del lavavajillas se introduce en un conducto de condensación ubicado en la
puerta por medio de un ventilador. Luego, el aire se enfría y hace que la humedad se condense. El aire
a temperatura ambiente también se introduce en el conducto para ayudar a enfriar el aire más rápido.
Cuando la humedad se condensa en líquido, es desagotada.
NOTA
• Se requiere abrillantador para mejorar el rendimiento de secado. Si no se usa abrillantador, podría
quedar agua en la vajilla y en la cuba.
P: ¿Por qué se escucha un silbido?
R: Es importante determinar cuánto tiempo dura el ruido y cuándo aparece (en qué parte del ciclo). Cuando
ingresa el agua al lavavajillas, puede escucharse un silbido. Esto es normal. Cuando la presión de agua
es demasiado elevada, el sonido será más intenso; por lo cual, podría resultar necesario ajustar la
válvula de agua para disminuir la presión si el sonido es demasiado fuerte.
P: ¿Qué tipo de vajilla puede colocarse en el lavavajillas?
R: Asegúrese que la vajilla que coloque en el artefacto sea apta para lavavajillas. La vajilla plástica no
se seca de manera tan efectiva como la vajilla de cristal o de metal. Los objetos plásticos no retienen
tanto el calor como la vajilla de cristal o de metal. Las tazas y la vajilla de plástico podrían necesitar ser
secadas a mano antes de guardarlas al finalizar el ciclo.
P: ¿Puedo realizar solamente un ciclo de secado?
R: Para desagotar el agua estancada, mantenga presionado el botón Start durante tres segundos hasta
que el ciclo se detenga. Después de que se termina de desagotar el lavavajillas, se apaga la electricidad.
P: ¿Por qué mi lavavajillas emite un pitido continuo si abro la puerta durante o justo después de
finalizado un ciclo?
R: Esto es normal. El lavavajillas le informa que las temperaturas interiores de la unidad son altas y que
debe tener cuidado cuando coloque sus manos en su interior. Cuando la unidad se enfría, el pitido se
detiene.

53
SOLUCIÓN DE PROBLEMAS
ESPAÑOL
P: ¿Qué es el Bloqueo de control y cómo se activa?
R: El bloqueo Control Lock es una función que evita que se cambien los controles durante el ciclo. No
evita que se abra la puerta ni que se apague la unidad. Para activar o desactivar, presione Dual Zone
durante tres segundos.
P: ¿Puedo agregar una extensión a la manguera de desagüe?
R: Si es necesario utilizar una extensión en la manguera de desagüe, use una manguera de diámetro
interior de
5
/
8
" o
7
/
8
" y de 2 a 3 pies de longitud y un acople para conectar los dos extremos.
P: Una luz LED está parpadeando, la máquina está emitiendo un pitido y el lavavajillas no inicia el
lavado. ¿Qué le ocurre al lavavajillas?
R: Esta es una función de seguridad. La puerta se debe cerrar dentro de los cuatro segundos de haberse
presionado el botón Start. Si la puerta no se cierra a los cuatro segundos, parpadea una luz LED, suena
una alarma y el lavavajillas no funciona. Para que el lavavajillas comience a funcionar, abra la puerta
y luego ciérrela y presione Start (controles frontales) o presione Start y cierre la puerta antes de que
transcurran cuatro segundos (controles superiores).
P: Antes de cargar la vajilla, ¿debo enjuagarla?
R: No, no necesita enjuagar la vajilla antes de cargarla, en especial si utiliza los ciclos Normal y Automático.
El lavavajillas deja sus platos limpios sin necesidad de un enjuague previo.

54
SOLUCIÓN DE PROBLEMAS
Antes de llamar al servicio técnico
El artefacto está equipado con un sistema automático de monitoreo de errores para detectar y diagnosticar
problemas en una etapa temprana. Si el artefacto no funciona adecuadamente o si no funciona en absoluto,
verifique lo siguiente antes de solicitar servicio técnico.
Problema Causas posibles y solucion
El lavavajillas no
funciona.
No se presionó el botón Start.
• Presione el botón Start.
La puerta no está bien cerrada.
• Asegúrese de que la puerta esté bien cerrada y trabada.
El suministro de energía o la línea de alimentación no están conectados.
• Conecte el suministro de energía o la línea de alimentación adecuadamente.
El fusible está quemado o el interruptor de corriente está desactivado.
• Reemplace el fusible o restablezca el interruptor de corriente.
El bloqueo de control está activado.
• Desactive Control Lock (Bloqueo de control).
El lavavajillas funciona
por demasiado tiempo.
El lavavajillas está conectado al agua fría.
• Controle la conexión del suministro de agua o el ajuste de calentamiento del
agua. (Calentar el agua fría lleva más tiempo).
Olor.
El ciclo anterior se ha parado antes de su finalización y quedaron residuos
de agua en el lavavajillas.
• Encienda el aparato, ejecute la opción Cancelar ciclo para eliminar el agua
residual y efectúe un ciclo Turbo con detergente, pero con el lavavajillas vacío.
Hay alimentos en el fondo de la unidad o en el filtro.
• Limpie el filtro y el interior según la sección Mantenimiento del manual del
propietario.
Se deja vajilla sin lavar mucho tiempo en el lavavajillas.
• Haga un ciclo vacío con una taza de vinagre blanco en un vaso o recipiente
apto para lavavajillas colocado en la bandeja superior. (El vinagre es un ácido y
su uso constante podría dañar el aparato).
El agua permanece en el
compartimiento luego de
que el ciclo se completa.
La manguera de desagüe está plegada u obstruida.
• Ajuste la manguera o elimine el bloqueo.

55
SOLUCIÓN DE PROBLEMAS
ESPAÑOL
Problema Causas posibles y solucion
Quedan restos de
comida en la vajilla.
Selección inadecuada de ciclo.
• Seleccione el ciclo correcto según el nivel de suciedad y el tipo de vajilla a lavar.
La temperatura del agua es demasiado baja.
• Controle la conexión del suministro de agua o el ajuste de calentamiento del agua.
No se utilizó detergente para lavavajillas.
• Utilice el detergente recomendado.
Presión de agua de entrada insuficiente.
• La presión de agua debe ser de entre 20 y 80 psi.
Los orificios propulsores de agua de los brazos rociadores están bloqueados.
• Limpie los brazos rociadores.
Carga inadecuada de vajilla.
• Asegúrese de que la vajilla no bloquee la rotación de los brazos rociadores ni
interfieran con el dispensador de detergente.
Los filtros están obstruidos.
• Limpie los filtros.
Opacidad en la vajilla de
cristal.
Hay una combinación de exceso de detergente y agua dura.
• Use menos detergente y un abrillantador para minimizar el problema.
Marcas negras o grises
en la vajilla.
Los objetos de aluminio rozan contra la vajilla durante el ciclo.
• Reposicione la vajilla.
Película amarilla o
marrón en las superficies
internas del lavavajillas.
Manchas de té o café.
• Elimine las manchas utilizando un producto quita manchas.
Manchas y película en la
vajilla.
Baja temperatura del agua.
• El suministro de agua debe estar a 120 °F para un mejor rendimiento de lavado.
Sobrecarga.
• No sobrecargue el lavavajillas.
Carga inadecuada.
• Consulte la sección Operation (Funcionamiento).
Presión de agua insuficiente.
• La presión de agua debe ser de entre 20 y 80 psi.
Detergente insuficiente.
• Agregue la cantidad de detergente recomendada. Consulte la sección
Operation (Funcionamiento).
El dispensador del abrillantador está vacío.
• Recargue el dispensador del abrillantador.
Agua dura acumulada en la cuba.
• Retire toda la vajilla, los cubiertos y el cesto para cubiertos del lavavajillas. Deben
quedar únicamente los estantes en la cuba. Para obtener mejores resultados,
use ácido cítrico en polvo (se puede encontrar en la sección de enlatados de la
mayoría de los mercados o en Internet). Mida 3 cucharadas (40 g) de ácido cítrico
en polvo. Llene el compartimiento principal de lavado con el polvo que ha medido.
Si no puede conseguir ácido cítrico en polvo, vierta aproximadamente una taza
(200-300 ml) de vinagre blanco en un recipiente poco profundo y colóquelo en el
estante superior. Ejecute el ciclo de limpieza de la máquina. No utilice detergente.

56
SOLUCIÓN DE PROBLEMAS
Problema Causas posibles y solucion
Ruido.
Algunos ruidos son normales durante el funcionamiento.
• Abra la cubierta de detergente.
• Desagote la bomba al inicio del ciclo de desagüe.
El lavavajillas no se encuentra a nivel.
• Ajuste las patas de nivelación.
El brazo de la boquilla golpea contra la vajilla.
• Reposicione la vajilla.
La vajilla no se seca.
El dispensador del agente de enjuague está vacío.
• Controle y recargue el dispensador del agente de enjuague si está vacío.
Las lámparas no se
encienden.
La electricidad está desconectada.
• Conecte el suministro de energía.
Los brazos rociadores
no rotan normalmente.
Los orificios de los brazos rociadores están bloqueados con partículas de
comida.
• Limpie los orificios de los brazos rociadores.
La bandeja superior está
torcida.
La bandeja está mal ajustada.
• Consulte la sección Height Adjustable Upper Rack (Bandeja superior con
altura ajustable).
El lavavajillas emite un
pitido constante cuando
la puerta está abierta,
durante o justo luego de
que finaliza un ciclo.
Se trata de una medida de seguridad. El contacto con el vapor que surge del
interior o con contenidos del lavavajillas que se hallan a altas temperaturas
puede provocar lesiones.
• Cierre la puerta hasta que el lavavajillas y la vajilla se enfríen. El pitido
finalizará si se cierra la puerta o cuando disminuya la temperatura interior.
La puerta no se cierra
totalmente.
La bandeja para cubiertos no está cargada de manera adecuada.
• Presione la manija de la puerta para que esta se cierre correctamente hasta
que haga clic.
El lavavajillas emite un
pitido si se toca el panel
mientras está operando.
Si se choca o toca el panel de control cuando el artefacto está en
funcionamiento, puede producirse un sonido de botón desactivado.
Solo los botones Power, Start y Control Lock están activados durante
el funcionamiento para evitar que los ajustes de ciclo se cambien
accidentalmente.
• Puede apagar los sonidos de los botones manteniendo presionado Half Load
durante 3 segundos.
• Los sonidos de fin de ciclo y de alertas se seguirán emitiendo.
El lavavajillas no finalizó
el ciclo.
La puerta se abrió durante el ciclo.
• Si la puerta se abre durante un ciclo, debe presionarse el botón Start antes
de que transcurran 4 minutos o la máquina se apaga y se pierden todos los
ajustes.
Se producen pérdidas
desde la parte frontal de
la unidad.
El lavavajillas no está correctamente nivelado.
• Verifique que la unidad esté correctamente nivelada de lado a lado y de
adelante hacia atrás. Consulte las instrucciones para la nivelación en la sección
Instalación.
Detergente incorrecto.
• Si el espumado excesivo causa la fuga, deje que la espuma se asiente durante
24 horas y luego limpie el interior del tambor con leche.

57
SOLUCIÓN DE PROBLEMAS
ESPAÑOL
Problema Causas posibles y solucion
El electrodoméstico de
su hogar y su teléfono
inteligente no están
conectados a la red
Wi-Fi.
La contraseña para la red Wi-Fi a la que se está intentando conectar es
incorrecta.
• Busque la red Wi-Fi conectada a su teléfono inteligente y remuévala, luego
registre su electrodoméstico en LG ThinQ.
Red Móvil está activada en su teléfono inteligente.
• Desactive la Red Móvil en su teléfono inteligente y registre el electrodoméstico
utilizando la red Wi-Fi.
El nombre de la red inalámbrica (SSID) se ha configurado incorrectamente.
• El nombre de la red inalámbrica (SSID) debe ser una combinación de letras y
números. (No utilice símbolos especiales)
La frecuencia del enrutador no es de 2.4 GHz.
• Sólo se admite una frecuencia de enrutador de 2.4 GHz. Configure el enrutador
inalámbrico a 2.4 GHz y conecte el electrodoméstico a éste. Para verificar la
frecuencia del enrutador, consulte con su proveedor de servicios de internet o
con el fabricante del enrutador.
La distancia entre el enrutador y el electrodoméstico es muy grande.
• Si la distancia entre el electrodoméstico y el enrutador es muy grande, la
señal puede ser débil y puede que no se configure la conexión correctamente.
Reubique el enrutador a manera de que esté más cerca del electrodoméstico.
P1, P2, P3, o P4 aparece
en la pantalla.
El ciclo de Descarga está seleccionado.
• Éste no es un código de error. Éste código indica el ciclo de Descarga en curso.
n:#, U:#, d:#, t# aparece
en pantalla. (# = una
cantidad)
Modo prueba seleccionado.
• Éste no es un código de error. Este código se utiliza al probar el lavavajillas.
Apague y encienda la unidad y el código desaparecerá.
L0, L1, L2, L3 o L4
aparece en la pantalla.
El modo configuración Nivel de Asistencia de Enjuague se encuentra
seleccionado.
• Este no es un código de error. Este código indica el nivel de asistencia de
enjuague actual. Para obtener más información, consulte la sección Adding
Cleaning Agents (Agregado de agentes de limpieza).
CL aparece en la
pantalla.
• El bloqueo de control está activado.
• Éste no es un código de error. Este código indica que el bloqueo infantil
está activado. Mantenga presionado Dual Zone simultáneamente por tres
segundos.

58
SOLUCIÓN DE PROBLEMAS
Códigos de error
Problema Causas posibles y solucion
IE
Hay un problema en la entrada de agua.
• Controle que la manguera del agua no esté obstruida, plegada o congelada.
• Controle el suministro de agua.
OE
Hay un problema en el desagüe.
• Controle que la manguera de desagüe de agua no esté obstruida, plegada o congelada.
La trampa de aire o el triturador están obstruidos.
• Limpie la trampa de aire o el triturador.
Los filtros están obstruidos.
• Limpie los filtros.
bE
Exceso de espuma causada por el uso de un detergente inadecuado, como detergente
para vajillas.
• No utilice detergente para lavar vajillas a mano. Utilice solo detergentes diseñados para su
uso en lavavajillas automáticos.
• Para remover el residuo de detergente en la bañera, vierta aproximadamente 4-8 oz
(100~200 mℓ) de leche en un recipiente poco profundo, colóquelo en el estante superior y
ejecute el ciclo Auto en el electrodoméstico.
fallo al nivelar el lavaplatos.
• Asegúrese de que el electrodoméstico haya sido nivelado apropiadamente.
AE
Pérdida de agua.
• Corte el suministro de agua al lavavajillas y comuníquese con un Centro de Información al
Cliente de LG llamando al 1-800-984-6306 (EE. UU.) o al 1-888-542-2623 (Canadá).
• El lavavajillas emite un sonido de alerta durante 10 segundos y la bomba de desagüe
funciona de manera intermitente. Si se apaga el artefacto, este vuelve a encenderse
automáticamente hasta que se resuelve el error AE.
FE
Excesiva cantidad de agua.
• Comuníquese con un centro de información al cliente de LG Electronics llamando al:
1-800-984-6306 (EE. UU.) 1-888-542-2623 (Canadá).
HE
Fallas en el circuito de calentamiento.
• Comuníquese con un centro de información al cliente de LG Electronics llamando al:
1-800-984-6306 (EE. UU.) 1-888-542-2623 (Canadá).
tE
Fallas en el termistor.
• Comuníquese con un centro de información al cliente de LG Electronics llamando al:
1-800-984-6306 (EE. UU.) 1-888-542-2623 (Canadá).
LE
Problema con el motor.
• Comuníquese con un centro de información al cliente de LG Electronics llamando al:
1-800-984-6306 (EE. UU.) 1-888-542-2623 (Canadá).
NE
Problema con el motor Vario.
• Comuníquese con un centro de información al cliente de LG Electronics llamando al:
1-800-984-6306 (EE. UU.) 1-888-542-2623 (Canadá).

59
GARANTÍA LIMITADA
ESPAÑOL
GARANTÍA LIMITADA
EE. UU.
AVISO DE ARBITRAJE: ESTA GARANTÍA LIMITADA CONTIENE UNA CLÁUSULA DE ARBITRAJE QUE LE
DEMANDA A USTED Y A LG RESOLVER CONFLICTOS A TRAVÉS DE UN ARBITRAJE VINCULANTE EN
LUGAR DE HACERLO EN LA CORTE, A MENOS QUE USTED DECIDA NO PARTICIPAR. EN EL ARBITRAJE
NO ESTÁN PERMITIDAS LAS ACCIONES COLECTIVAS NI LOS JUICIOS CON JURADO. POR FAVOR, VEA
A CONTINUACIÓN LA SECCIÓN TITULADA “PROCEDIMIENTO PARA RESOLVER CONFLICTOS”.
Si el lavavajillas LG fallara debido a defectos de materiales o de fabricación en el uso doméstico normal,
durante el período de garantía que se establece a continuación, LG tendrá la opción de reparar o reemplazar el
producto. Esta garantía limitada solo es válida para el comprador minorista original del producto y será vigente
solo cuando se compre y use dentro de los Estados Unidos y de los territorios estadounidenses. Se exige el
comprobante de compra minorista original para solicitar servicio por garantía según esta garantía limitada.
Período de garantía Alcance de la garantía CÓMO SE MANEJA EL SERVICIO TÉCNICO
Un (1) año a partir de la fecha de
compra minorista original
Mano de obra / Piezas
LG también brindará, sin costo alguno, todos
los servicios de mano de obra y en sitio para
reemplazar la pieza defectuosa.
Cinco (5) años a partir de la
fecha de compra minorista
original
La placa control
principal* / Bandejas
La placa control principal y bandejas del
lavavajillas. El cliente será responsable del costo
de mano de obra o servicio en el hogar para
reemplazar las piezas defectuosas.
Diez (10) años a partir de la
fecha de compra minorista
original
Motor Direct Drive
Motor Direct Drive. El cliente será responsable
del costo de mano de obra o servicio en el hogar
para reemplazar las piezas defectuosas.
Garantía limitada de por vida Cuba
Revestimiento de acero inoxidable de la puerta
y la cuba. El cliente será responsable del costo
de mano de obra o servicio en el hogar para
reemplazar las piezas defectuosas.
*La placa control principal está ubicada en la parte inferior derecha del lavavajillas, desde la vista frontal.
• Los productos y las piezas de repuesto están garantizados durante el tiempo restante del período original de
garantía o noventa (90) días, lo que resulte mayor.
• Los productos y las piezas de repuesto pueden ser nuevos o reparados.
ESTA GARANTÍA REEMPLAZA CUALQUIER OTRA GARANTÍA, EXPRESA O IMPLÍCITA, LO QUE
INCLUYE SIN LÍMITE, LAS GARANTÍAS DE APTITUD COMERCIAL O IDONEIDAD PARA UN FIN EN
PARTICULAR. SALVO POR LAS GARANTÍAS IMPLÍCITAS EXIGIDAS POR LA LEY, SU DURACIÓN
ESTÁ LIMITADA AL PERÍODO DE GARANTÍA EXPRESO MENCIONADO ANTERIORMENTE. NI EL
FABRICANTE NI SU DISTRIBUIDOR EN LOS ESTADOS UNIDOS SERÁN RESPONSABLES DE NINGÚN
DAÑO INCIDENTAL, EMERGENTE, INDIRECTO NI PUNITIVO DE NINGÚN TIPO, LO QUE INCLUYE
SIN LÍMITE, INGRESOS O GANANCIAS PERDIDOS O CUALQUIER OTRO DAÑO CONTRACTUAL,
EXTRACONTRACTUAL O DE OTRO TIPO.
Algunos estados no permiten la exclusión o limitación de daños incidentales o emergentes, o limitaciones a la
duración de la garantía implícita, por lo que la exclusión o limitación anteriormente mencionadas podrían no
corresponder en su caso. Esta garantía le otorga derechos legales específicos y es posible que usted cuente
con otros derechos que varían según el estado.
ESTA GARANTÍA LIMITADA NO CUBRE LO SIGUIENTE:
• Viajes del servicio técnico para entregar, buscar, instalar o reparar el producto; instrucciones al cliente sobre
la operación del producto; reparación o reemplazo de fusibles o corrección de cableado o fontanería, o
corrección de reparaciones/instalaciones no autorizadas.

60
GARANTÍA LIMITADA
• Incapacidad del producto para funcionar debido a fallas e interrupciones del suministro eléctrico o a un
servicio eléctrico inadecuado.
• Daños causados por tuberías de agua rotas o con fugas, tuberías de agua congeladas, líneas de desagüe
restringidas, suministro de agua inadecuado o interrumpido, o suministro de aire inadecuado.
• Daños resultantes de operar el producto en una atmósfera corrosiva o contraria a las instrucciones detalladas
en el manual del propietario del producto.
• Daños al producto causados por accidentes, pestes y alimañas, rayos, viento, incendio, inundaciones o
hechos de fuerza mayor.
• Daños o fallas causados por modificaciones o alteraciones no autorizadas, o si se usa para otro fin que no
sea el previsto, o por fugas de agua donde la unidad no se haya instalado correctamente.
• Daños o fallas causados por corriente o voltaje eléctricos incorrectos, o por códigos de fontanería, por
uso comercial o industrial, o por uso de accesorios, componentes o productos de limpieza consumibles no
aprobados por LG.
• Daños causados por el transporte y el manejo, incluye rayas, muescas, astillado y otros daños al acabado del
producto, a menos que tales daños resulten de defectos de los materiales o de la fabricación y se informen
dentro del plazo de una (1) semana de la entrega.
• Daños o artículos faltantes a productos reacondicionados, comprados con descuento, con la caja abierta o
que hayan estado en exhibición.
• Productos cuyos números de serie originales hayan sido retirados, alterados o no se puedan determinar
fácilmente. Los números de serie y de modelo, junto con el comprobante de venta minorista original, son
necesarios para validar la garantía.
• Aumentos en los costos de los servicios públicos y otros gastos adicionales de dichos servicios.
• Reparaciones cuando el producto se use de otra forma que no sea uso doméstico usual y normal (p. ej., uso
comercial, en oficinas e instalaciones recreativas) o uso contrario a las instrucciones detalladas en el manual
del propietario del producto.
• Costos asociados con el retiro del producto de su casa para realizar reparaciones.
El costo de la reparación o el reemplazo en estas circunstancias excluidas estará a cargo del
consumidor.
PARA OBTENER SERVICIO EN GARANTÍA E INFORMACIÓN ADICIONAL
Para obtener más información sobre el producto, visite el sitio web de LG en http://www.LGSIGNATURE.com
Para obtener asistencia sobre el uso de este producto o para programar un servicio, comuníquese con LG
Electronics al 1-800-984-6306.
Para obtener más información, escriba a: LG Electronics, 201 James Record Road, Huntsville, Alabama 35813

61
GARANTÍA LIMITADA
ESPAÑOL
PROCEDIMIENTO PARA RESOLVER CONFLICTOS:
TODOS LOS CONFLICTOS ENTRE USTED Y LG QUE SURJAN FUERA DE O RELACIONADOS DE ALGUNA
MANERA CON ESTA GARANTÍA LIMITADA O CON EL PRODUCTO, SE RESOLVERÁN EXCLUSIVAMENTE
A TRAVÉS DE UN ARBITRAJE VINCULANTE Y NO EN UNA CORTE DE JURISDICCIÓN GENERAL.
ARBITRAJE VINCULANTE SIGNIFICA QUE USTED Y LG RENUNCIAN AL DERECHO DE UN JUICIO CON
JURADO Y A REALIZAR O PARTICIPAR EN UNA DEMANDA COLECTIVA.
Definiciones. Para el propósito de esta sección, las referencias a “LG” significan: LG Electronics U.S.A., Inc.,
sus empresas matrices, subsidiarias y filiales y cada uno de sus directivos, directores, empleados, agentes,
beneficiarios, predecesores en interés, sucesores, cesionarios y proveedores; las referencias a “conflicto” o
“reclamación” incluirán cualquier conflicto, reclamo o controversia de cualquier tipo, sin importar (ya sea basado
en contrato, agravio, estatuto, regulación, ordenanza, fraude, falsa representación o cualquier teoría legal o
equitativa) que surja de o esté relacionada con cualquier forma de venta, condición o desempeño del producto o
de esta Garantía Limitada.
Aviso de disputa. En caso de que usted desee iniciar un procedimiento de arbitraje, primero debe notificar a
LG por escrito al menos 30 días antes de iniciar el arbitraje enviando una carta a LG a LG Electronics, USA,
Inc. Atención: Legal Department- Arbitration 1000 Sylvan Ave, Englewood Cliffs 07632. Usted y LG aceptan
participar en discusiones de buena fe en un intento de resolver su reclamo de manera amistosa. En la carta
debe proporcionar su nombre, dirección y número de teléfono; identificar el producto que es objeto de la
reclamación; y describir la naturaleza del reclamo y el remedio que busca. Si usted y LG no pueden resolver la
disputa dentro de 30 días, cualquiera de las partes puede proceder a presentar una demanda de arbitraje.
Acuerdo de arbitraje vinculante y renuncia de demanda colectiva. En caso de no resolver la disputa
durante el período de 30 días después de enviar una notificación por escrito a LG, Usted y LG se comprometen
a resolver cualquier reclamo entre nosotros, solamente a través de arbitraje vinculante sobre una base
individual, a menos que usted se excluya, conforme a lo dispuesto a continuación. Cualquier conflicto
entre usted y LG no estarán combinados o consolidados con una controversia relacionada con cualquier
otro producto o reclamo de otra persona o entidad. Más específicamente y sin prejuicio de lo anterior, no
procederá bajo ninguna circunstancia cualquier disputa entre usted y LG como parte de una acción colectiva
o representativa. En lugar del arbitraje, cualquiera de las partes podrá iniciar una acción individual en la corte
de reclamos menores, pero tales acciones en la corte de reclamos menores no podrán ser realizadas en una
acción colectiva o representativa.
Normas y procedimientos de arbitraje. Para comenzar con el arbitraje de un reclamo, usted o LG deben
realizar una demanda escrita para arbitraje. El arbitraje será administrado por la Asociación Americana de
Arbitraje (AAA) y se llevará a cabo ante un árbitro único bajo las Normas de Arbitraje del Consumidor de la AAA,
que tienen efecto al momento de inicio del arbitraje (en adelante “Normas de la AAA”) y bajo los procedimientos
establecidos en esta sección. Las Normas de la AAA están disponibles en línea en www.adr.org/consumer.
Envíe una copia de su solicitud de arbitraje por escrito, así como una copia de esta disposición, a la AAA de la
forma descrita en las Normas de la AAA. También debe enviar una copia de su solicitud por escrito a LG en LG
Electronics, USA, Inc. Atención: Legal Department- Arbitration 1000 Sylvan Ave, Englewood Cliffs 07632. Si hay
un conflicto entre las Normas de la AAA y las reglas establecidas en esta sección, prevalecerán dichas reglas
de esta sección. Esta disposición de arbitraje se rige por la Ley Federal de Arbitraje. El juicio se puede introducir
en el laudo arbitral en cualquier tribunal de jurisdicción competente. Todos son temas para que el árbitro tome
sus decisiones, excepto aquellos asuntos relativos al alcance y aplicabilidad de la cláusula de arbitraje y de la
capacidad de arbitraje de la controversia para que el tribunal decida. El árbitro se regirá por los términos de esta
disposición.
Legislación vigente. La legislación del estado de su residencia regirá esta Garantía Limitada, así como todas
las disputas entre nosotros, salvo que sea invalidada o inconsistente con leyes federales aplicables.

62
GARANTÍA LIMITADA
Tarifas / Costos. Usted no debe pagar ninguna tarifa para comenzar un arbitraje. Al recibir su solicitud de
arbitraje por escrito, LG pagará todos los gastos administrativos rápidamente a la AAA, a menos que usted
solicite más de $25,000.00 por daños, en cuyo caso el pago de estos gastos se regirá por las Normas de la
AAA. Salvo disposición contraria prevista en el presente documento, LG pagará a la AAA todos los gastos
documentales, administrativos y de arbitraje para cualquier arbitraje iniciado, de conformidad con las Normas
de la AAA y esta disposición de arbitraje. Si usted prevalece en el arbitraje, LG pagará los honorarios y gastos
de sus abogados, siempre y cuando sean razonables, considerando factores que incluyen, entre otros, el monto
de la compra y el monto del reclamo. No obstante lo anterior, si la ley aplicable permite una adjudicación de
honorarios y gastos razonables de abogados, un árbitro puede otorgarlos en la misma medida que lo haría
un tribunal. Si el árbitro considera que la sustancia de su reclamo o la reparación solicitada en la demanda es
frívola o se utiliza para un propósito inadecuado (calificado según las normas establecidas en la Norma Federal
de Procedimiento Civil 11 (b)), el pago de todos los honorarios de arbitraje se regirá por las Normas de la AAA.
En tal situación usted se compromete a reembolsar a LG todos los fondos erogados previamente por ella, cuyo
pago es, por otra parte, su obligación, según las Normas de la AAA. Salvo disposición contraria, LG renuncia a
cualquier derecho que pudiera tener para solicitarle los honorarios y gastos de sus abogados, si LG prevalece
en el arbitraje.
Audiencias y ubicación. Si su reclamo es por $25,000 o menos, usted puede optar que el arbitraje sea
realizado únicamente sobre la base de: (1) documentos presentados al árbitro, (2) a través de una audiencia
telefónica o (3) por una audiencia en persona, según lo establecido por las Normas de la AAA. Si su reclamo
excede $25,000, el derecho a una audiencia estará determinado por las Normas de la AAA. Cualquier audiencia
de arbitraje en persona se realizará en un lugar dentro del distrito judicial federal en el cual resida, a menos que
ambos acuerden otra ubicación o estemos de acuerdo con el arbitraje telefónico.
Exclusión. Usted puede quedarse fuera de este procedimiento de resolución de la disputa. Si se excluye,
ni usted ni LG pueden solicitar al otro que participe en un procedimiento de arbitraje. Para excluirse usted
debe enviar una notificación a LG, en un lapso de hasta 30 días continuos, contados a partir de la fecha de la
primera compra del consumidor del producto, ya sea por: (i) el envío de un correo electrónico a optout@lge.
com con el siguiente Asunto: “Exclusión del arbitraje” o (ii) llamada al 1-800-980-2973. Debe incluir en el correo
electrónico de exclusión o suministrar por teléfono: (a) su nombre y dirección; (b) la fecha en la cual el producto
fue comprado; (c) el nombre o el número del modelo del producto; y (d) el número del serial (el número del
serial puede ser hallado (i) en el producto, o (ii) en la dirección de https://www.lg.com/us/support/repair-service/
schedule-repair-continued al hacer clic en “Find My Model & Serial Number”).
Sólo puede excluirse del procedimiento de resolución de conflictos en la forma descrita anteriormente (es decir,
por correo electrónico o por teléfono); ninguna otra forma de notificación será efectiva para hacerlo. Excluirse
de este procedimiento de resolución de controversias no afectará de ninguna manera la cobertura de la
Garantía Limitada, por lo que usted continuará disfrutando de todos sus beneficios. Si conserva este producto y
no se excluye, usted acepta todos los términos y condiciones de la cláusula de arbitraje descrita anteriormente.

63
GARANTÍA LIMITADA
ESPAÑOL
Excepciones de garantía (EE. UU. y Canadá)
Resultados deficientes
de lavado causados por
desechos remanentes en el
filtro.
• Limpie el filtro con
regularidad.
Resultados deficientes de
lavado causados por una
carga incorrecta o exceso de
apilado: el brazo de lavado
no gira o el dispensador de
jabón queda cerrado.
• Asegúrese de que no
haya vajilla ni utensilios
que bloqueen los brazos
rociadores.
• No apile la vajilla.
Resultados deficientes de
secado causados por falta
de abrillantador.
• Use abrillantador o
detergente combinado.
No se suministra agua
porque el grifo no está
abierto.
Error IE
• Verifique y abra la llave de
agua.
No hay suministro de agua,
porque la manguera de
entrada está plegada.
Error IE
• Vuelva a instalar la
manguera de entrada.
No hay desagüe porque la
manguera de desagüe está
plegada.
Error OE
• Vuelva a instalar la
manguera de desagüe.
El tapón ciego del triturador
no se ha extraído.
Error OE
• Retire el tapón del
triturador.
El triturador o la trampa de
aire están bloqueados por
desechos.
Error OE
• Limpie el triturador o la
trampa de aire.
Problema en la conexión
de la válvula de entrada y
la manguera de desagüe
causado por una instalación
inadecuada.
Fuga externa
• Reinstale la manguera.

64
GARANTÍA LIMITADA
Movimiento de la puerta o
cierre comprometido debido
a nivelación incorrecta.
• Ajuste las patas de
nivelación frontales
inferiores a la altura
requerida.
No hay energía eléctrica
debido a una conexión floja
de la línea de alimentación
o a un problema en el
tomacorriente eléctrico.
• Reconecte la línea de
alimentación o repare el
tomacorriente.
Retiro, cableado eléctrico,
fontanería.
Instalación
• Deberá pagar la
instalación.

www.LGSIGNATURE.com
Copyright © 2020 LG Electronics Inc. Tous droits réservés.
MANUEL DU PROPRIÉTAIRE
LAVE-VAISSELLE
Veuillez lire attentivement le présent manuel de lʼutilisateur avant de faire fonctionner lʼappareil et
conservez-le à portée de la main pour le consulter en tout temps.

TABLE DES MATIÈRES
2
3 CARACTÉRISTIQUES DU
PRODUIT
4 CONSIGNES DE SÉCURITÉ
4 CONSIGNES DE SÉCURITÉ IMPORTANTES
9 APERÇU DU PRODUIT
9 Pièces extérieures
10 Pièces intérieures
11 Accessoires
12 INSTALLATION
12 Piècesetoutilsrequispourlʼinstallation
13 Aperçudelʼinstallation
13 Dimensions du produit
13 Caractéristiquesduproduit
14 Préparerlʼouverturedelʼarmoire
15 Préparationdesraccordsdesconduitesd’eauet
dubranchementélectrique
16 Préparerlelave-vaisselle
17 Fixationdessupportsd’installation
18 Positionnementdulave-vaisselledans
l’ouverturedelʼarmoire
20 Raccordementdelʼalimentationeneauet
branchementélectrique
22 Raccordementdutuyaudevidange
24 Misedeniveaudulave-vaisselle
26 Fixationdulave-vaisselleàl’ouverturede
lʼarmoire
27 Dernièrevérificationdel’installation
28 FONCTIONNEMENT
28 Utilisationdelʼappareil
29 Panneaudecontrôle
30 Cycles
31 Options
32 Guide des options et des cycles
33 Chargementdulave-vaisselle
33 Chargementdupanierinférieur
35 Chargementdupanieràustensiles
36 Chargementdupaniersupérieur
39 Chargementdupanieràcouverts
41 Ajoutdʼagentsnettoyants
43 FONCTIONS INTELLIGENTES
43 ApplicationLGThinQ
45 FonctionnalitéSmartDiagnosis
MC
46 ENTRETIEN
46 Nettoyagedelʼextérieur
46 Nettoyagedelʼintérieur
46 Entretiensaisonnieretrangement
47 Coupureantirefoulementoubroyeurdʼévier
obstrué
48 Nettoyagedesfiltres
49 Nettoyagedesbrasdelavage
50 DÉPANNAGE
50 Foireauxquestions
53 Avantdʼappelerleréparateur
58 GARANTIE LIMITÉE
58 CANADA
62 Exceptionsàlagarantie(É.-U.etCanada)

3
CARACTÉRISTIQUESDUPRODUIT
FRANÇAIS
CARACTÉRISTIQUES DU PRODUIT
Système QuadWash
MC
Lebrasdelavageinférieuràmultiplesmouvementsprojettelʼeaudansplusieursdirectionsetàdesintensités
optimiséespouratteindretouteslespartiesdelacuve.Cesystèmeprocureunecouverturedelavagepuissanteet
complète.
Moteur à entraînement direct avec ondulateur
LʼexpériencedeLGentechnologiedesmoteurspermetdʼoffrirdesfonctionsavancéescommelʼoptionDualZone,
lefonctionnementsilencieux,lʼéconomiedʼénergieetladurabilité.
Lestylesimpleetlahautequalitédeconstructiondumoteurlerendentsifiablequʼilestcouvertparunegarantiede
10ans.
Système EasyRack Plus
Cesystèmederéglagedelahauteurdestigesetdespaniersestfacileàutiliseretfournitplusdeflexibilitéetde
polyvalencepourplacerdesplatsdetaillesetdeformatsvariés.
Système de séchage hybride
Cesystèmedeséchageefficacenʼutilisepasdʼélémentchauffantdurantleséchage,cequiapourrésultatune
économiedʼénergiesupérieureetuntraitementdouxpourlavaisselle.
LG ThinQ
MC
TéléchargezlanouvelleapplicationpourtéléphoneintelligentdeLGpourréglerlesoptions,exécuterun
autodiagnostic,trouverdessolutionsauxproblèmesdelʼappareiletaccédezàd’autresfonctionnalitésutiles.Cette
fonctionnécessiteuneconnexionWi-Fi.
Technologie TrueSteam
MC
Lavapeurremplitlacuveetrecouvrelasurfacedechaqueplatdeminusculesgouttesd’eaupurifiée,cequidonne
unevaisselleétincelantedepropreté.

4
CONSIGNES DE SÉCURITÉ
CONSIGNES DE SÉCURITÉ
LISEZ TOUTES LES CONSIGNES AVANT LʼUTILISATION
Il est très important dʼassurer votre sécurité et celle des autres.
Nousfournissonsdenombreuxconseilsdesécuritéimportantsdanscemanueletsurvotreappareil.Lisez
toujoursl’ensembledesmessagesdesécuritéetrespectez-les.
Ceciestlesymboledʼalertedesécurité.
Cesymboleestdestinéàvousalerterdesdangerspotentielspouvantentraînerlamortoudes
blessures.
Touslesmessagesdesécuritéserontprécédésdusymboledʼalertedesécuritéetduterme
AVERTISSEMENTouMISEENGARDE.Voicilemessagequecesmotsvéhiculent:
AVERTISSEMENTS
Vouspouvezêtretuéougrièvementblessésivousnesuivezpaslesconsignes.
MISES EN GARDE
Vouspouvezêtrelégèrementblesséoupouvezendommagerleproduitsivousnesuivezpasles
consignes.
Touslesmessagesdesécuritévousindiquerontquelestledangerpotentiel,commentréduirelesrisques
deblessuresetcequipeutseproduireencasdenon-respectdesconsignes.
CONSIGNES DE SÉCURITÉ IMPORTANTES
AVERTISSEMENTS
Pour réduire les risques dʼexplosion, dʼincendie, de mort, de décharge électrique, de brûlure
ou de blessures lors de lʼutilisation de lʼappareil, prenez les précautions élémentaires, y
compris les suivantes :
INSTALLATION
• Branchezlʼappareildansuncircuitélectriqueàprotection,àvaleursnominalesetdetailleadéquatespour
éviterunesurchargeélectrique.
• Pourréduirelerisquedeblessuregraveoudedécès,suiveztouteslesconsignesdʼinstallation.
• Lʼappareildoitêtreinstalléetmisàlaterreconformémentaucodedubâtimentlocalparlepersonnel
qualifié.
• Débranchezlecâbledʼalimentationélectrique,retirezlefusibleouéteignezledisjoncteuravant
lʼinstallationoulʼentretiendelʼappareil.
• Pourdéplacerouinstallerlʼappareildansunautreemplacement,faitesappelàuntechnicienqualifié.
• Gardezlematérieldʼemballagehorsdeportéedesenfants.Lematérieldʼemballageposeundangerpour
lesenfants.Ilyaunrisquedesuffocation.
• Aumoinsdeuxpersonnessontrequisespourdéplacerouinstallerlʼappareil.
• Cetappareilnʼestpasconçupourunusagenautiqueoumobile,commedansunvéhiculerécréatif,une
roulotteouunavion.

5
CONSIGNES DE SÉCURITÉ
FRANÇAIS
• Entreposezetinstallezlʼappareildansunendroitoùilneserapasexposéàdestempératuressousle
pointdecongélationniauxintempéries.
• Cetappareildoitêtreplacéprèsdʼunepriseélectrique.
• Vousnedevezenaucuncascouperouretirerlecâbledemiseàlaterreducâbledʼalimentation
électrique.
• Lorsquevousinstallezoudéplacezlʼappareil,faitesattentiondenepaspincer,écraser,niendommagerle
câbledʼalimentationélectrique.
• Nʼinstallezpaslʼappareildansunendroithumide.
• Détruisezlʼemballageencarton,lesacenplastiqueettoutautrematérieldʼemballageaprèsavoirdéballé
lʼappareil.Lesenfantspourraientjoueraveccesarticles.Lecarton,lorsquerecouvertdetapis,dedraps
oudepelliculedeplastique,peutsetransformerenchambreétanche.
• Nʼessayezjamaisdʼutilisercetappareilsʼilestendommagé,défectueuxoupartiellementdémonté,
sʼilmanquedespiècesousidespiècessontendommagées.Ceciconcerneégalementuncâble
dʼalimentationélectriqueabîmé.
• Respecteztouteslesprocéduresdesécuritérecommandéesdelʼindustrie,incluantleportdegantsà
longs poignets et de lunettes de sécurité.
• Lʼinstallateurdoitprendresoindeplacerlelave-vaisselledansunendroittotalementclosaumomentde
lʼinstallation.
• Utilisezdestuyauxneufspourraccorderlʼappareilàlʼalimentationeneau.Neréutilisezpasdestuyaux
usagés.
• Aprèslʼinstallation,vérifiersileraccordementdutuyaufuit.
• Neplacezpasdʼobjetslourdssurlecâbledʼalimentationélectriquedelʼappareiletnelʼabîmerpas.
FONCTIONNEMENT
• Réparezouremplacezimmédiatementtoutcâbledʼalimentationélectriquedénudéouendommagé.Nʼutilisezpas
uncâbleavecdesfissuresoudesdommagesdusàuneabrasionsursalongueurousurlʼunedesesextrémités.
• Silʼappareilproduitunbruitbizarre,uneodeurchimiqueoudebrûléoudelafumée,débranchez-le
immédiatementetcommuniquezavecleCentredʼinformationàlaclientèledeLGElectronics.
• Nedébranchezjamaislʼappareilentirantsurlecâbledʼalimentationélectrique.
• Nʼutilisezpasderallongeélectriquenidʼadaptateuraveccetappareil.
• Nesaisissezpaslecâbledʼalimentationélectriqueetnetouchezpaslesboutonsdelʼappareilavecles
mainsmouillées.
• Nemodifiezetneprolongezpaslecâbledʼalimentationélectrique.
• Silʼappareilaétéimmergé,communiquezavecleCentredʼinformationàlaclientèledeLGElectronics
pourobtenirdesdirectivesavantderecommenceràlʼutiliser.
• Nʼentreposezounʼutilisezpasdʼessenceoudʼautresvapeursinflammablesàproximitédecetappareilou
dʼautresappareils.
• Veillezàmaintenirlazonesituéeen-dessousetautourdevosappareilsélectroménagersdégagéede
matièrescombustibles(peluche/charpie,papier,chiffons,etc.),dʼessence,deproduitschimiqueset
dʼautresvapeursouliquidesinflammables.
• Cetappareilnʼestpasdestinéàêtreutilisépardespersonnes(incluantdesenfants)dontlescapacités
physiques,mentalesousensoriellessontréduites,ouquinʼontpaslʼexpérienceoulesconnaissances
pourlefaire,àmoinsdʼavoirreçudesinstructionsetdʼavoirétésuperviséesparunepersonne
responsabledeleursécurité.
• Silecâbledʼalimentationélectriqueestendommagé,ildoitêtreremplacéparlefabricantuniquement,par
sonagentdemaintenance,outoutepersonnequalifiée,afindʼévitertoutrisque.
• Neforcezpaslaporteetneposezpasvotrepoidssurlaportedelʼappareil.
• Liseztouteslesinstructionsavantdʼutiliserlʼappareiletconservezcesinstructions.
• Nʼutilisezlʼappareilquʼauxfinspourlesquellesilestconçu.

6
CONSIGNES DE SÉCURITÉ
• Nelaissezpasdesenfantsjouersur,dansouaveclʼappareil.Ilestnécessairedesurveillerétroitement
lesenfantslorsquelʼappareilfonctionneàproximitédʼeux.
• Nemodifiezpaslescommandes.
• Encasdefuitedegaz(propane,gaznaturel,etc.),nefaitespasfonctionnercetappareilnitoutautre
appareil.Ouvrezimmédiatementunefenêtreouuneportepouraérerlazone.
• Danscertainesconditions,delʼhydrogènepeutseformerdansunsystèmedʼeauchaudequipasété
utilisépendantdeuxsemainesouplus.LʼHYDROGÈNEESTUNGAZEXPLOSIF.Silesystèmedʼeau
chaudenʼapasservipendantunetelledurée,ouvreztouslesrobinetsdʼeauchaudeetlaissezlʼeau
coulerpendantplusieursminutesavantdʼutiliserlʼappareil.Cetteprocédurepermettradʼévacuertoute
tracedʼhydrogèneaccumulé.Commelʼhydrogèneestungazinflammable,nefumezpaspendantce
temps,etnʼutilisezpasdefeu.
• Fixezletuyaudevidangeenserrantfermement.
• Utilisezseulementlesdétergentsoulesagentsmouillantsrecommandéspouruneutilisationdansun
lavevaisselleetgardez-leshorsdelaportéedesenfants.
• Nelaissezpaslesenfantsingérerdudétergentouunproduitderinçagepourlave-vaisselle.
• Lorsduremplissagedulave-vaisselle:
− Placezlesobjetscoupantsdemanièreàcequʼilsnerisquentpasdʼendommagerlejointdelaporte.
− Placezlescouteauxpointuslemancheverslehautpourlimiterlerisquedeblessureparcoupures.
• Nelavezpasdʼarticlesenplastiquesaufsiceux-ciportentlʼindication«sansdangeraulave-vaisselle»
oulʼéquivalent.Danslecasdesarticlesenplastiqueneportantaucuneindication,consultezles
recommandationsdufabricant.
• NetouchezPASàlʼÉLÉMENTCHAUFFANTpendantouimmédiatementaprèslʼutilisation.
• Nemettezpaslelave-vaisselleenmarcheavantdʼavoircorrectementmisenplacelespanneauxdu
BOÎTIER.
• Neforcezpaslaporteetneposezpasvotrepoidssurlaporteousurlespaniersdulave-vaisselle.
• Installezourangezlelave-vaisselledansunlieunonexposéauxintempéries.
• Aprèslenettoyage,fermezlerobinet.Ouvrezlerobinetdenouveauetvérifiezlʼétatduraccordementdu
tuyaudʼalimentationeneauavantlenettoyage.
• Nʼouvrezpaslaportelorsdufonctionnement.Pourdesraisonsdesécurité,lapompedevidange
fonctionneencasdʼouverturedelaporte,cequientraîneuncyclepluslong.
• Fermezlaportedelʼappareilavecprudencepouréviterdʼaccrochervosmains.
• Nebranchezpaslelave-vaisselledansuneprisedecourantendommagée.
• Nʼinstallezpaslelave-vaisselleprèsdecomposantsélectriquesetnelemettezpasàproximitédʼunlieu
exposéauxflammes.
• Nelavezpasdeplatsexposésàlʼessence,auxsolvantsouàdʼautresmatièresinflammables.
• Pendantlenettoyage,nevaporisezpasdʼeaudirectementsurleproduit.
• Nʼappuyezpassurlestouchesàlʼaidedʼunobjetpointucommeunealêneouuneépingle.
• Nʼutilisezpasdedétergentsàbasedesolvants.
• Éviteztoutcontactaveclasortiedevapeur.
• Depetitespièces,commelespincesdegrilleetlesbutéesdesupportdufiltre,posentunrisquede
suffocationpourlesjeunesenfantssʼilssontretirésdulave-vaisselle.Gardez-leshorsdelaportéedes
jeunesenfants.

7
CONSIGNES DE SÉCURITÉ
FRANÇAIS
ENTRETIEN
• Neréparezpasetneremplacezpasdepiècedelʼappareil.Touslesentretiensetlesréparationsdoivent
êtrefaitspardupersonneldʼentretienqualifié,àmoinsdʼindicationscontrairesdansleprésentguidede
lʼutilisateur.Utilisezseulementdespiècesautoriséesparlefabricant.
• Nedésassemblezpasetneréparezpaslʼappareilvous-même.
• Retirezlapoussièreoutoutcorpsétrangerducâbledʼalimentationélectrique.
• Débranchezcetappareildelapriseélectriqueavantdelenettoyeretavanttoutetentativedʼentretien.
Lʼutilisationdupanneaudecommandepouréteindrelʼappareilnecoupepaslʼalimentation.
• Avantdemettrelalaveusehorsserviceouaurebut,retirez-enlaportepouréviterquedesenfantsoudes
petitsanimauxysoientaccidentellementenfermés.
• Débranchezlʼappareilavantdelenettoyerpouréviterlerisquededéchargeélectrique.
• Avantdemettrelʼappareilaurebut,coupezlecâbledʼalimentationélectriqueetdétruisezlepanneaude
commandesdelʼappareil.
CONSIGNES DE MISE À LA TERRE
• Pourunlave-vaissellebranchéenpermanence:Cetappareildoitêtreconnectéàunsystèmede
branchementpermanentenmétalreliéàlaterre,ouuncâbleisolantdelʼappareildoitêtrereliéàun
boîtierdejonctiondemiseàlaterresurlʼappareil.
• Branchezlefildemiseàlaterreàlaprisedemassevertesurleboîtierdejonction.
RISQUE DE BASCULEMENT
• Nʼutilisezpaslelave-vaisselleavantdelʼavoirinstallécomplètement.
• Nepoussezpaslaportedulave-vaisselleverslebasquandelleestouverte.
• Lenon-respectdecesconsignespeutentraînerdegravesblessuresoucoupures.
GARDEZ CES CONSIGNES

8
CONSIGNES DE SÉCURITÉ
MISES EN GARDE
Pour réduire les risques de blessures mineures, de pannes ou de dommages causés
à lʼappareil ou à la propriété lors de lʼutilisation de lʼappareil, prenez les précautions
élémentaires, y compris les suivantes :
INSTALLATION
• Installezleproduitsurunplancherfermeetauniveau.
• Celave-vaisselledoitêtreraccordéàunesourcedʼeauchaudedontlatempératuresesitueentre120°F
(49°C)et149°F(65°C).Cetteplagedetempératuresoffredemeilleursrésultatsdelavageetlesdurées
decyclelespluscourtes.Latempératurenedoitpasdépasser149°F(65°C)pouréviterdʼendommager
lavaisselle.
• Neplacezpasletuyaudevidangesouslelave-vaisselledurantlʼinstallation.
FONCTIONNEMENT
• Neplacezpasdʼobjetssurledessusdelʼappareil.
• Fermezlesrobinetsdʼeauetdébranchezlʼappareilsivousquittezvotrerésidencependantlongtemps,
commelorsquevouspartezenvoyage.
• Nerangezpasetnerenversezpaslesdétergentsliquides,lesnettoyantsoulesjavellisants(auchloreou
àlʼoxygène)surledessusdelʼappareil.Celapourraitentraînerdelacorrosion,deladécolorationoudes
dommagesàlasurfacedelʼappareil.
• Netouchezpasàlʼeaudevidange,quipeutêtrebrûlante.
• Siletuyaudevidangeetletuyaudʼalimentationeneaugèlentdurantlʼhiver,ilfautlesdégeleravant
dʼutiliserlʼappareil.
• Nemettezpasvosmains,vospiedsoudesobjetsmétalliquessousouderrièrelʼappareil.
• Neplacezpasletuyaudevidangesouslelave-vaisselledurantlʼinstallation.
ENTRETIEN
• Sidel’huiledecuissonestrenverséesurlasurfaceextérieuredel’appareil,essuyez-laimmédiatement.
Nenettoyezpaslasurfaceextérieuredel’appareilavecdesproduitsdenettoyagecontenantde
l’alcool,dudiluant,dujavellisant,dubenzène,duliquideinflammableoudessubstancesabrasives.Ces
substancespeuventdécolorerouendommagerl’appareil.

9
APERÇU DU PRODUIT
FRANÇAIS
APERÇU DU PRODUIT
Pièces extérieures
a
Panneaudecontrôleetpoignéedela
porte
b
Paroiavant
c
Paroiinférieure
d
Armaturedʼexpédition
e
Couvercle de sécurité
f
SignaLight
MC
(certainsmodèles)
g
Base
h
Pieds de nivellement
REMARQUE
• Neretirezjamaislecouvercledesécurité.
• Pourassurersafiabilité,chaquelave-vaisselleLGsubituncontrôledequalitéapprofondiavantdequitter
l’usine.
• Vouspouveztrouverdesgouttelettesd’eauoudestachesd’eaurésultantdeceprocessusdansvotre
nouveaulavevaisselle.
SignaLight
MC
(Écran avant)
Lesmodèlesavecdescommandessurledessussontdotésde3voyantsDELdʼétatsituésaucentredela
partiesupérieuredelaparoiavant.
• Rouge:Erreur(voirlescodesdʼerreurdanslasectionsurledépannage)
• Blanc(fixe):Fonctionnementnormal.
• Blanc(clignotant):Lecycleaétésuspendu.(Silecycleestsuspendupendantplusdequatreminutes,
lʼappareilsʼéteintautomatiquement.)
• Vert:Lecyclesʼestterminénormalement.
Leréglagepardéfaut«enmarche»(ON)maintientlevoyantvertalluméjusqu’àcequelaportesoitouverte.Si
leréglageestmodifiéà«enarrêt»(OFF),levoyantverts’éteintaprès90secondes.Pourchangerleréglage,
mettrel’appareilsoustensionpuisappuyezetmaintenezenfoncéelatouche«High Temp»pour3secondes
jusqu’àceque“ON”ou“OFF”apparaisseàl’afficheur.Leparamètreestenregistréjusqu’àcequevousle
changiez.

10
APERÇU DU PRODUIT
Pièces intérieures
a
Pompedelavagesupérieure
b
Brasdelavagesupérieur
c
Brasdelavageinférieur
d
Systèmedefiltrage
e
Distributeur de détergent et de produit
derinçage
f
Couvercledeventilationpourleséchage
g
Lumière de cuve
h
Panieràustensiles
i
Paniersupérieur
j
Panieràcouverts
k
Panierinférieur
l
Buseàvapeur
REMARQUE
• Lepanieràcouvertsestinstalléàlʼarrièredu
panierinférieurpourlʼexpéditiondelʼappareil.
Pourunrendementoptimal,installez-lesurlecôté
commeindiquédansleparagrapheconcernantles
pièces intérieures.
• Retireztoutlematérieldʼemballageàlʼintérieuret
àlʼextérieurdulave-vaisselleavantdelʼinstaller.
2
3
• Appuyezsurlalanguettepourretirermanuellement
lecollierdeserrage.Couperlecollierdeserrage
àl’aided’uncouteauoud’unepairedeciseaux
pourraitendommagerlepanierprincipaloule
panieràcouverts.

11
APERÇU DU PRODUIT
FRANÇAIS
Accessoires
Accessoires inclus
Supports
dʼinstallation(2)
Visàbois(4) Collierdeserrage
(1)
Feuilleinsonorisante
coupdepiedavant
(1)
coupdepiedarrière
(1)
Support(2) écraninsonore(1)
Coussinet(1) Bandelette(2) amortisseur(2)

12
INSTALLATION
INSTALLATION
Pièces et outils requis pour lʼinstallation
Pièces non fournies
Câbleélectrique
Tube
dʼalimentationeneau
Raccordspourtubes Coupleur Rubanisolant
Coupure
antirefoulement
Capuchonsde
connexion pour
câblesdecalibre16
Collierdeserrage
Serre-câbles
homologué UL
Outils nécessaires
Tournevisplat Tournevis Phillips
Scie-clocheà
lamede2½po
(6,35cm)min.
Perceuse électrique Gants
Lunettes de
protection
Cléajustable Rubanàmesurer Couteautoutusage Niveau
Cléàtêtecarrée
¼po(0,64cm)
Pincecoupante Pinces Pinceàdénuder Coupe-tube
Cléàtêtecarrée⅜
po+Douille½po

13
INSTALLATION
FRANÇAIS
Aperçu de lʼinstallation
Préparerlʼouverturedelʼarmoire
Préparerlecâblageélectrique
Préparerleraccorddʼalimentationeneau
Préparerlelave-vaisselle
Retirerlaparoiinférieure
Glisserlelave-vaisselledanslʼarmoire
Mettreàniveaulelave-vaisselle
Fixerlelave-vaisselleaucomptoir
Raccordementdutuyaudevidange
Raccordementdelʼalimentationeneau
Raccordementdelʼalimentationélectrique
Dernièrevérification
Dimensions du produit
Vuearrière Vuelatérale
Letuyaudʼalimentationeneau,letuyaudevidangeetle
câbleélectriquedoiventêtrepassésdanscetemplacement.
33 /16"
(846 mm)
5
23 /4" (603 mm)
3
4 /2"
(115 mm)
1
33 /8"
(854 mm)
5
2 /16" (75 mm)
15
20 /16" (512 mm)
3
24 /8" (625 mm)
5
4 /4" (120 mm)
3
9 /8"
(238 mm)
3
4 /16"
(119 mm)
5
/4"
(134 mm)
11
1
4 /2"
(115 mm)
1
26 /8 - 26 /16" (676 - 681 mm)
5 13
REMARQUE
• Pourfaciliterlʼinstallation,tenezcomptedeszonesdedégagementindiquéesci-dessusdanslabasedulave-
vaissellepourlesconduitesdʼeauetdʼélectricité.
Caractéristiques du produit
Lʼaspectetlescaractéristiquesénumérésdansleprésentmanuelpeuventvarierenraisondesconstantes
améliorationsapportéesauproduit.
Alimentation électrique 120VCA,60Hzuniquement,disjoncteur15Aminimum
Pression dʼeau 20à80psi(140à550kPa)
Dimensions
23
3
/
4
po(L)X24
5
/
8
po(P)X33
5
/
8
po(H)
603mm(largeur)x625mm(profondeur)x854mm(hauteur)
Température de lʼarrivée
dʼeau
120°F(49°C)minimum,149°F(65°C)maximum
Poids net 95lb(43,1kg)

14
INSTALLATION
Préparer lʼouverture de
lʼarmoire
Celave-vaisselleestconçupoursʼadapterà
uneouverturepourlave-vaissellestandard.Une
ouverturepeutêtrenécessairesurlesdeuxcôtés
pourinstallerlatuyauterieetlesraccordsélectriques.
• Pourassurerunevidangeefficace,lelave-
vaissellenedoitpasêtreinstalléàplusde
12pieds(3,65m)delʼévier.
• L’espacedoitêtresuffisantpourquelaportedu
lave-vaisselles’ouvrefacilement,etildoityavoir
aumoins0,1po(2mm)entrelelave-vaisselleet
lesparoisdel’armoire.
• Silelave-vaisselledoitêtreinstallédansuncoin,
ilestnécessairedeprévoiraumoins2po(50mm)
entrelelave-vaisselleetlemurcontigu.
• Lemurcontigudoitêtrelibredetouteobstruction.
• Pourlesinstallationsencastréesuniquement,
vouspouvezretirerlʼentretoise
a
àlʼintérieurde
lʼarmoire.
1
Choisissezlʼemplacementleplusprèspossible
delʼévierpourfaciliterlesraccordementsaux
conduitesdʼalimentationeneauetdevidange
ainsiqu’àlapriseélectrique.
2
Afindelaisserunjeusuffisantpourlatuyauterie
etlesconduitesélectriques,utilisezlegabarit
fournidanslesdocumentspourdéterminer
lʼespacenécessairesurlecôtéoùlʼarmoire
formeunangleaveclemurarrière.Àlʼaidedʼune
scie-clochede2
1
/
2
podediamètre,percezun
troudanslazoneciblecommeindiquédansle
gabarit.
3.5
''
2.5
''
4
''
AVERTISSEMENTS
• Lesdommagesoccasionnéspendant
l’installationnesontpascouvertsparla
garantie,etlesfuitesrésultantd’uneinstallation
inadéquatepeuvententraînerdesdommages
matériels.
• Nʼutilisezpaslesorificesexistantsàmoins
quʼilssetrouventdanslazonecible.
• Siletroupourlesconduitesd’eauetde
vidangen’estpascorrectementsitué,lelave-
vaissellepourraitnepasêtrebienalignéavec
lesarmoires,cequirisquedeplier,depincer,
d’écraser,decontraindreoud'endommagerles
conduites.

15
INSTALLATION
FRANÇAIS
Préparation des raccords des
conduites d’eau et du
branchement électrique
Aufonddulave-vaisselle,deuxcanauxpermettent
d’acheminerlesconduitesd’eauetlesconnexions
électriques.Commelemontrel’imageci-dessous,le
canal
a
estdestinéàlaconduited’eau,etlecanal
b
aucâbleélectrique.
1
Coupezl’alimentationeneaududomicileainsi
queledisjoncteuroul’alimentationdédiéeavant
debrancherlelave-vaisselle.
2
Faitespasserlaconduited’eaulelongdusolà
unedistancede6
1
/
2
à7
3
/
4
po(165à197mm)
ducôtégauchedel’ouvertureetfixez-laavecdu
rubanadhésifdevantl’ouverture.
3
Faitespasserlecâbleélectrique
c
le long du sol
àunedistancede14à16po(356à406mm)dela
conduited’eau
d
etfixez-leavecdurubanadhésif.
• Laprisedecourantdoitsetrouveràmoinsde
4pieds(1220mm)del’unoul’autredescôtés
dulave-vaisselle.
• Lemeilleuremplacementpourlaconduite
électriqueestdanslecôtédroitdelaparoi
arrière.Réacheminezlecâbleélectriqueavant
lʼinstallationsilaconduiteélectriquemesure
plusde3po(76mm)delongetestcentréesur
lemurdanslefonddelʼarmoire.
AVERTISSEMENTS
Raccordement de l’alimentation en eau
• Neréutilisezpasdevieuxtuyaux.Utilisez
uniquementdestuyauxneufslorsquevous
installezlelave-vaisselle.Lestuyauxusagés
pourraientfuirouéclater,causantdesinondations
etdesdommagesmatériels.Communiquezavec
lecentred’informationàlaclientèledeLGpour
obtenirdel’aidepourl’achatdetuyaux.
Branchement électrique
• Utilisezunfusibletemporiséouundisjoncteur.
• Utilisezcetappareilenrespectantlatension
électriqueappropriée,commeilestindiqué
danscemanueletsurlaplaquesignalétique.
• Lecâblagedoitêtrecorrectementmisàlaterre.Encas
dedoute,faites-levérifierparunélectricienqualifié.
• Branchezl’appareilàl’aided’uncâbleàtrois
fils,incluantunfildemiseàlaterre.
• L’appareiletlaprisedoiventêtrepositionnésde
sortequelaficheestfacilementaccessible.
• Nʼutilisezpasderallongeélectriqueni
dʼadaptateuraveccelave-vaisselle.
• Nesurchargezpaslaprisedecourantavec
plusd’unappareil.
• Lescapuchonsdeconnexion16AWGfournis
doiventêtreutilisés.
• Lepropriétairedel’appareilestresponsable
ettenudefaireinstalleruneprisedecourant
adéquateparunélectricienqualifié.
MISES EN GARDE
• Lorsduraccordementdesconduitesdʼeaudu
lave-vaisselleàlaconduited’eaududomicile,
unrubanouuncomposécouvre-jointdoitêtre
utilisésurlesfiletagesdetuyauxpouréviterles
fuites.Cerubanoucomposénedoitpasêtre
utilisésurlesraccordsàcompression.
• Raccordezlelave-vaisselleàunesourcedʼeau
chaudedontlatempératuresesitueentre
120°F(49°C)et149°F(65°C).Cetteplagede
températureoffredemeilleursrésultatsdelavage
et les durées de cycle les plus courtes. Pour
éviterdʼendommagerlesplats,latempératurene
doitpasdépasser149°F(65°C).
• Lapressiondesconduitesd’eaudoitsesituer
entre20et80psi(140et550kPa).Sila
pressiondesconduitesd’eauestsupérieureà
80psi,unrobinetréducteurdepressiondoitêtre
installé,àdéfautdequoiilpeuts’ensuivreune
défaillanceprématuréedelavanned’entrée.

16
INSTALLATION
Préparer le lave-vaisselle
AVERTISSEMENTS
• Neretirezjamaislecouvercledesécurité
a
.Lenon-respectdecetteconsignepeut
entraînerunincendie,unedéchargeélectrique
oulamort.
Libération du tuyau de vidange
Enlevezl’attachetorsadéequimaintientletuyaude
vidangeàl’arrièredel’armatured’expédition.
Armature dʼexpédition amovible
L’armatured’expéditionsituéeàl’arrièrepeutêtre
retiréesiunespacededégagementsupplémentaire
estnécessairelorsdel’installationdulave-vaisselle
sousuncomptoirbas.
Retirer la paroi inférieure
1
Retirezlesvislatéralesquifixentlecouvercle
inférieuraulave-vaisselle.
2
Retirezlecouvercleinférieur.
3
S’ilyaunrembourrageisolantàl’arrièredu
couvercleinférieur,retirez-le.
4
Mettezlespiècesdecôtéjusqu’àlafinde
l’installation.
MISES EN GARDE
• Sivouscouchezlelave-vaissellesurle
dos,faites-leavecprudencepouréviter
d’endommagerletuyaudevidangeetlacuve.

17
INSTALLATION
FRANÇAIS
Retrait des matériaux d’emballage
qui se trouvent à l’intérieur
Retireztoutlematérieldʼemballageàlʼintérieurdu
lave-vaisselleavantdelʼinstaller.
2
3
Fixation des supports
d’installation
Pourlescomptoirsdeboisoucomposésdʼautres
matériauxquinerisquentpasdʼêtreendommagés
parleperçage,utilisezlessupportsdʼinstallationen
métalfournis.
Pourlescomptoirsdegranite,demarbreou
composésdʼautresmatériauxquirisquentdʼêtre
endommagésparleperçage,utilisezlesvisàbois
pourfixerlelave-vaisselleàlʼarmoire.Voirles
directivesdʼinstallationdanslasectionFixation
sécuritaire du lave-vaisselle dans l’ouverture de
l’armoire.
REMARQUE
• Lessupportsetlesvisdʼinstallationpeuvent
égalementsetrouverdanslepanieràustensiles.
1
Insérezdanslesfentesducadresupérieur
l’extrémitédessupportsd’installationqui
comporteunelanguette.Tournezlessupports
jusqu’àcequelesextrémitésàlanguettesoient
tournéesverslehaut.
2
Pliezleslanguettespourlesfixeraucadreà
l’aided’unepinceàbeceffilé.

18
INSTALLATION
Positionnement du lave-vaisselle
dans l’ouverture de lʼarmoire
MISES EN GARDE
• Netirezpasounesoulevezpaslelave-
vaisselleparlapoignée
a
;celarisque
dʼendommagerlaporteetsescharnières.
• Nepoussezpassurlaportedulave-vaisselle
aveclesgenouxlorsquevouslefaitesglisser
enposition;celarisqued’endommagerle
couvercleavant.
• Nepoussezpaslehautdulave-vaisselle;cela
risqued’endommagerl’intérieurdel’appareil.
REMARQUE
• Ouvrezlaporteetsaisissezlebâtidelʼappareilet
lʼouvertureavantsupérieure
b
delacuvepour
déplacerousouleverlelave-vaisselle.
1
Alignezlelave-vaisselleavecl’ouverture.
Assurez-vousquelaconduited’eauetlecâble
électriquepeuventglissercorrectementdans
leurscanaux.
2
Lissezourembourrezlesbordsdutroupercé
pourl’alimentationeneauafindenepas
endommagerletuyaudevidange.

19
INSTALLATION
FRANÇAIS
3
Assurez-vousqueletuyaudevidangeest
droitavantd’enfairepasserl’extrémitédansle
troupercépourl’alimentationeneau.Pendant
quevousfaitesglisserlelave-vaisselledans
l’ouverture,tirezlentementsurletuyaude
vidangeàpartirdel’intérieurdel’armoirepour
enleverlejeu.Veillezànepasplier,pincer,
écraseroucontraindreletuyaudevidange
pendantl’installationpouréviterlesfuitesetles
dégâtsd’eau.
4
Faitesglisserprogressivementlelave-vaisselle
dansl’ouvertureenvousassurantquela
conduited’eauetlecâbleélectriquepassent
librementdanslescanauxetnerestentpaspris
souslelave-vaisselle.
• Arrêtezdedéplacerlelave-vaisselleàquelques
reprises(oudemandezdel’aide)pourenlever
lejeuentirantletuyaudevidangeplusloin
dansl’armoire.
MISES EN GARDE
• Pour éviter les dysfonctionnements ou les
fuites,ilestimportantqueletuyaudevidange
nesoitpasplié,pincé,contraintouécrasé
derrièreousouslelave-vaisselle,ouà
l’intérieurdel’armoireadjacente.
• Lesdommagesattribuablesàunemauvaise
installationnesontpascouvertsparlagarantie.
5
Enlevezlerubanadhésifdelaconduited’eauet
ducâbleélectrique.

20
INSTALLATION
Raccordement de
lʼalimentation en eau et
branchement électrique
Raccordement de lʼalimentation en eau
1
Aprèsavoircoupél’alimentationeneaudu
domicile,raccordezlaconduited’eauàlavanne
d’entréesituéeàl’avantgauchedulave-vaisselle.
MISES EN GARDE
• Évitezd’utiliserdurubanouunproduit
d’étanchéitésurlavanned’entréedulave-
vaisselle.
2
Serrezl’écrouàcompression.
3
Faitesglisserlaconduited’eaudanslecanal,en
tirantdoucementdepuisl’intérieurdel’armoire
pouréviterquelaconduitesoitpliée,pincée,
contrainteouécrasée.
Raccordement de lʼalimentation
électrique
Lelave-vaisselledoitêtrebranchéàuncircuitde
dérivationdédiéavecmiseàlaterre,adaptéàla
configurationà3brochesquicomprendlefildeterre.
Siunesourced’alimentationà3brochesestutilisée,elle
doitsetrouverdansunendroitaccessibleàproximitédu
lave-vaisselle,àmoinsde4pi(1220mm)ducôtédu
lave-vaisselleetnonderrièrelelave-vaisselle.
REMARQUE
• Lemeilleuremplacementpourlaconduite
électriqueestdanslecôtédroitdelaparoiarrière.
Réacheminezlecâbleélectriqueavantlʼinstallation
silaconduiteélectriquemesureplusde3po
(76mm)delongetestcentréesurlemurdansle
fonddelʼarmoire.
1
Coupezlʼalimentationélectriquedelʼappareilen
fermantledisjoncteur.
2
UtilisezuntournevisPhilipspourretirerlavis
ducouvercledelaboîtedejonctionetretirezle
couvercle.
3
Utilisezuntourneviscruciformepourenleverles
deux vis
a
.
4
Enlevezlaboîtedejonctiondel’appareil.

21
INSTALLATION
FRANÇAIS
5
Insérezunserre-câbles
b
danslaboîtede
jonctionenlefaisantpasserparletrou.Serrez
l’écrouàœil
c
pour le fixer.
6
Insérezlecâbleélectriquedansletrouduserre-
câbles.Serrezlesdeuxvispourfixerlecâble.
7
Tirezlesfilsexistantsparlesouverturesdela
boîtedejonction.Serrezlesdeuxvis
d
pour
replacerlaboîtedejonctiondansl’appareil.
8
Reliezlesfilsblanc,noiretvertauxfils
correspondantsdulave-vaisselle,puistournez
fermementlescapuchonsdeconnexionfournis
e
pourconnecterlesfilscorrespondants.
9
Enroulezchaqueconnexionderubanélectrique
f
.
10
Repliezlesfilsconnectésdanslaboîtede
jonctionetvissezlecouvercledelaboîtede
jonction.
AVERTISSEMENTS
• Vérifiezquelefilnoirestchaud(120V).Sice
nʼestpaslecas,ousivousnʼêtespassûrde
lʼalimentation,faitesvérifierlʼappareilparun
électricienautorisé.
MISES EN GARDE
• Nelaissezpasdefildénudéàlʼairlibre.
Coupezlefildénudépourquʼilentre
complètementàlʼintérieurdescapuchonsde
connexion.

22
INSTALLATION
Raccordement du tuyau de
vidange
Silʼextrémitédutuyaudevidangenʼestpasadaptée
àlaconduitedevidange,utilisezunadaptateur
résistantàlachaleuretaudétergent(nonfourni).
Vouspouvezlesobtenirdʼunmagasindefourniture
deplomberiedevotrelocalité.
• Coupezl’adaptateurdefaçonàcequel’extrémité
correspondeàlatailleduraccorddevidange.
REMARQUE
• Pourlʼinstallationdutuyaudevidange,utilisezle
collierdeserragefourniaveclelave-vaissellequi
setrouvedanslepanieràustensiles.
• Sivousraccordezletuyaudevidangedulave-
vaisselleàunbroyeuràdéchets,assurez-vous
derespecterlesinstructionsd’installationfournies
danslemanueldubroyeur.
Exigences pour le tuyau de vidange
• Suivezlesrèglementsdescodeslocauxetla
réglementationenvigueur.
• Neraccordezpasletuyauàplusde12pieds
(3,65m)delavidange.
• Neraccordezpasdetuyauxdevidangedʼautres
appareilsautuyaudevidangedulave-vaisselle.
• S’ilestnécessaired’utiliserunerallongede
tuyaudevidange,utilisezuntuyaud’undiamètre
intérieurde5/8poou7/8po,d’unelongueurde2
à3pieds,ainsiqu’uncoupleur
a
pourraccorder
lesdeuxextrémitésdutuyau.
Raccordement à un broyeur sans
coupure antirefoulement
Lʼextrémitédutuyaudevidangedoitêtreàune
hauteurdʼaumoins12po(305mm)etàmoinsde
40po(1016mm)delabasedulave-vaissellepour
éviterquelʼeaudelacuvenesoitsiphonnée.
1
Retirezlebouchondubroyeur
a
enlʼenfonçant
avecunmarteauetuntournevis.
2
Retirezlebouchondubroyeur
a
.
MISES EN GARDE
• Silebouchondutuyaudevidangenʼapasété
retiré,lelave-vaissellenepourrapassevider
correctement.

23
INSTALLATION
FRANÇAIS
3
Raccordezletuyaudevidangeaubroyeurà
lʼaideducollierdeserragefourni.Mettezce
dernierenpositionetserrez-leàl’aided’un
tournevisplat.
Raccordement à un té de vidange
sans coupure antirefoulement
Lʼextrémitédutuyaudevidangedoitêtreàune
hauteurdʼaumoins12po(305mm)etàmoinsde
40po(1016mm)delabasedulave-vaissellepour
éviterquelʼeaudelacuvenesoitsiphonnée.
1
Retirezlebouchonenlʼenfonçantavecun
marteauetuntournevis.
MISES EN GARDE
• Silebouchondutuyaudevidangenʼapasété
retiré,lelave-vaissellenepourrapassevider
correctement.
2
AttachezletuyaudevidangesurleraccordenT
devidangeàl’aideducollierdeserragefourni.
Mettezcedernierenpositionetserrez-leàl’aide
d’untournevisplat.
Raccordement à un broyeur ou à un
té de vidange avec coupure
antirefoulement.
1
Retirezlebouchonenlʼenfonçantavecun
marteauetuntournevis.
2
Raccordezl’extrémitédutuyaudevidange
a
au
broyeursanscoupureantirefoulement
b
àlʼaide
ducollierdeserragefourni.Mettezcedernieren
positionetserrez-leàl’aided’untournevisplat.
• Celapermettrad’éviterquel’eausoitsiphonnée
horsdelacuve.
3
Sicelan’estpasdéjàfait,fixezleraccordde
tuyauencaoutchoucautédevidangeouau
tédubroyeuràdéchetsàl’aided’uncollierde
serrage(nonfourni).

24
INSTALLATION
Mise de niveau du lave-
vaisselle
Vérifiezquelelave-vaisselleestdeniveauetajustez
lespiedsdenivellementsinécessaire.
MISES EN GARDE
• Unlave-vaissellequin’estpasdeniveau
peutprésenterdesfuites,desproblèmesde
fermeturedelaporteoudubruit.
• Lorsquel’ouverturedel’armoireestplus
étroitequecequiestrecommandé(voir
lasectionPréparation de l’ouverture de
l’armoire),veillezàsoigneusementniveler
etalignerlelave-vaisselledefaçonàcequ’il
soitentièrementsoutenuparlestroispieds
demiseàniveauetqu’ilnependepasparles
supports.Lenon-respectdecetteconsigne
pourraitentraînerdesfuitesd’eauàl’avantdu
lave-vaisselle,l’affichaged’erreursAE,des
problèmesdefermeturedelaporteoulenon-
fonctionnementdel’appareil.
Vérification du nivellement
Pourvérifierquelacuveestdeniveauenprofondeur,
retirezlepanierinférieuretversez169oz(5L)d’eau
danslefonddelacuve.Leniveaud’eaudevraitêtre
prèsducentredesdeuxentaillesinférieuresdela
cuve,àl’avant.
Aprèsavoirenlevélepanierinférieur,placezun
niveausurlaparoiintérieuredelacuvepourvérifier
quelelave-vaisselleestdeniveauenlargeur.
• Sivousn’avezpasdeniveau,essayezplutôt
d’utiliserl’applicationdeniveau
de votre téléphone intelligent.
Assurez-vousquel’espaceentrelesparoisdela
cuveetlerevêtementdeporteestlemêmede
chaquecôté.

25
INSTALLATION
FRANÇAIS
Réglage des pieds de nivellement
Ajustezlespiedsdenivellementaubesoinjusqu’àce
quelelave-vaissellesoitcomplètementdeniveau.
Réglage des pieds de nivellement avant
• Utilisezuntournevisplatpourréglerlespiedsde
nivellementavantetréglerlahauteurdelʼavantde
lʼappareil.
• Faitestournerlespiedsdenivellementavantdans
lesensdesaiguillesdʼunemontrepoursoulever
lʼavantdelʼappareiletdanslʼautresenspour
lʼabaisser.
• Leréglagesefaitdefaçonidentiquepourlesdeux
piedsdenivellementavant.
Sivousnedisposezpasd’untournevisplat,utilisez
unecléàtêtecarréede¼po(
a
)ouunecléàtête
carréede⅜po(
b
)etunedouillede½po(
c
)pour
réglerlespiedsdenivellementavantetréglerla
hauteurdel’avantdel’appareil.
Réglezlahauteurdespiedsdenivellementavantet
arrièreafinqu’ilssoienttousfermementencontact
aveclesol.Silelave-vaissellen’estpasdeniveau,la
portepourraitnepassefermercorrectement,cequi
empêcheraledémarragedel’appareil.
Réglage des pieds de nivellement
arrière
• UtilisezuntournevisPhilipspourréglerlespieds
denivellementarrièreenutilisantlaviscentraleà
labasedelʼappareil,àlʼavant.
• Faitestournerlaviscentraledanslesensdes
aiguillesdʼunemontrepoursouleverlʼarrièrede
lʼappareiletdanslʼautresenspourlʼabaisser.
REMARQUE
Pouréviterdʼendommagerlavis,nevousservezpas
dʼuntournevisélectrique.

26
INSTALLATION
Fixation du lave-vaisselle à
l’ouverture de lʼarmoire
Deuxoptionspermettentdesécuriserlelave-vaisselle.
Silecomptoirestfaitdeboisoud’unmatériauqui
peutêtrepercésansdanger,fixezlelave-vaisselleau
comptoiràl’aidedessupportsfournis.Silecomptoir
estfaitdegranite,demarbreoud’unmatériauquine
peutêtrepercé,fixezlelave-vaisselleaucadrede
l’armoireaveclesvisàboisfournies.
MISES EN GARDE
• Assurez-vousquelelave-vaisselleestde
niveauetquetouslespiedsdenivellementsont
fermementencontactaveclesolavantdefixer
lelave-vaisselleaucomptoirouàl’armoire.Si
l’appareiln’estpasdeniveau,laportepourrait
nepassefermercorrectementoudesfuites
d’eaupourraientseproduire.
REMARQUE
• Lessupportsetlesvisdʼinstallationpeuvent
égalementsetrouverdanslepanieràustensiles.
• Utilisezuntournevismagnétique.
• Couvrezlʼorificedufiltreavecdesserviettespour
éviterquelesvistombentdanslapompe.
Fixation sécuritaire du lave-vaisselle
au comptoir
Utilisezlesvisdefixationfourniespourfixerles
supportsduhautdulave-vaisselleàlafaceinférieure
du comptoir en bois.
Sivouslesouhaitez,vouspouvezégalementfixerle
lave-vaisselleaucadredel’armoireenrespectantles
instructionssuivantes.
Fixation du lave-vaisselle au cadre
de lʼarmoire
1
Retirezles2capuchonsenplastiquedestrous
d’accèsdusupportdemontage.
2
Insérezunevisàboisdanslesupport
dʼinstallationetdanslecadredelʼarmoire.
3
Réinstallezlescapuchonsenplastique.

27
INSTALLATION
FRANÇAIS
Dernière vérification de
l’installation
Vérifiezquelelave-vaisselleestbieninstallé.
1
Mettezledisjoncteursoustension.
2
Ouvrezlʼalimentationeneaududomicile.
3
Assurez-vousquelaportes’ouvreetsefermeen
douceur.
• Sinécessaire,mettezdenouveaulelave-
vaisselledeniveau.
• Silaportenesefermepas,assurez-vousque
lepanierestdeniveau.
• Assurez-vousquetouslesmatériaux
d’emballageontétéretirés.
2
3
4
Mettezlelave-vaisselleenmarcheet
démarrezuncycleTurbopourvérifierlebon
fonctionnement.
5
Vérifiezl’étanchéitédutuyaudevidangeetdu
raccordd’alimentationeneau.
6
Encasdefuited’eau,maintenezleboutonStart
enfoncépendant3secondespourannulerle
cycledelavageetviderautomatiquementl’eau
dulave-vaisselle.Resserreztouslesraccords
d’eaueteffectuezunautrecycle.Répétez
l’opérationjusqu’àcequ’aucunefuitenesoit
détectée.
7
Replacezlecouvercleinférieur.
MISES EN GARDE
• Nʼinstallezquelaparoiinférieurefournieaveclelave-
vaisselle.Nʼinstallezpaslesplinthesdesarmoires,
a
carcelapourraitproduiredubruitetcauserdesfuites.
Codes d’erreur lors de la vérification
de l’installation
Consultezletableauci-dessousavantd’effectuerun
appeldeservice.
Code
dʼerreur
Cause possible et solution
Erreur
OE
Le tuyau de vidange est plié ou pincé.
Faitespasserlestuyauxdevidangeet
dʼentréedʼeauparletrousouslʼévier.
Glissezensuitelelave-vaisselledoucement
danslʼarmoire,toutentirantsurlestuyaux
souslʼévierpouréviterdʼavoirdujeu.Cela
empêchelestuyauxdeseplieroudese
retrouvercoincéssouslelave-vaisselle.
Le tuyau de vidange a été raccordé au
broyeur à déchets sans que le bouchon ait
été enlevé.
Retirezlebouchondubroyeur.
Le té de vidange ou le broyeur est obstrué
.
Enlevezlebouchonsurletédevidangeou
surlebroyeuràdéchets.
Erreur
IE
Le tuyau d’alimentation en eau est plié
sous le lave-vaisselle.
Faitespasserlestuyauxdevidangeet
dʼentréedʼeauparletrousouslʼévier.
Glissezensuitelelave-vaisselledoucement
danslʼarmoire,toutentirantsurlestuyaux
souslʼévierpouréviterdʼavoirdujeu.Cela
empêchelestuyauxdeseplieroudese
retrouvercoincéssouslelave-vaisselle.
Le robinet d’alimentation en eau du
domicile est fermé.
Ouvrezlerobinet.

28
FONCTIONNEMENT
FONCTIONNEMENT
Utilisation de lʼappareil
Avant dʼutiliser lʼappareil
• Lisezlesconsignesdesécuritéimportantes.
• Raccordezlelave-vaisselleàlasourcedʼeau
chaudeseulement.Latempératuredelasource
dʼeaudoitêtredʼauminimum120°F(49°C)pour
unlavageoptimaletuntempsdecyclepluscourt.
• Suivezlesconsignesrelativesauchargementdu
lave-vaisselleafindʼassurerunnettoyageefficace.
• Retirezlesélémentsinsolublestelsquelesos,les
curedentsetlesmorceauxdepapierpendantle
chargementdulave-vaisselle.
Lors du chargement du lave-vaisselle
1
Nʼinsérezquedesobjetslavablesaulave-
vaisselle.
2
Retirezlesélémentssolidesetlesrésiduscuits
restéssurlesplatsavantdeleschargerdansle
lave-vaisselle.
3
Placezlesobjetsàfondcreuxenposition
inclinéepourpermettreàlʼeaudesʼécouleret
faciliterleséchage.
REMARQUE
• Nechargezpasdʼustensilesnonrésistantsàla
chaleurouornésdeborduresmétalliques.
Démarrage rapide
1
Chargez les plats
Retirezdesplatstoutrestedʼaliments,oset
autresrésidussolidesetnonsolubles.Tirez
chaquepanieretinsérezlesplatscommedécrit
danslemanuel.
2
Mesurez le détergent
Enrespectantlesdirectivesdecemanuel,
remplissezleverredelaquantitérecommandée
dedétergentetrefermezlecouvercle.Sivous
désirezeffectuerunprélavage,remplissez
égalementlebacsituésurlecouvercle.
3
Fermez la porte
4
Allumez le lave-vaisselle
Pourallumerlepanneaudʼaffichage,appuyez
sur le bouton Power.
5
Vérifiez le produit de rinçage
LʼindicateurRinse Refillclignotesileniveau
d’agentderinçagedulave-vaisselleestbas.
Ajoutezdavantaged’agentderinçagesile
niveauestbas,etce,afindemaintenirlʼefficacité
ducycledeséchage.
6
Sélectionnez le cycle et les options
Sélectionnezlecycleetlesoptionsquicorrespondent
lemieuxàlacharge,envousreportantauguide
surlasélectionducycle.Lʼécranafficheraletemps
estimé pour le cycle et les options choisies.
7
Faites fonctionner le lave-vaisselle
• Méthode 1
− AppuyezsurleboutonStart,puisfermezlaporte
dansundélaidequatresecondespourfaire
fonctionnerlelave-vaisselle.Silaporten’estpas
ferméedanscedélai,levoyantàDELblanche
indiquantletempssemetàclignoter,unetonalité
sefaitentendreetlecyclenedémarrepas.
• Méthode 2
− Refermezdʼabordlaporteetappuyezensuitesurle
bouton Startpourfairefonctionnerlelave-vaisselle.
− Silaporteestouvertedurantlecycle,lelave-
vaissellesʼarrêtera.Pourreprendrelecycle,
voirlesméthodes1et2ci-dessus.
REMARQUE
• Silaporteestouvertedurantlecycleetnʼest
pasreferméedansundélaidequatresecondes
aprèslasélectionduboutonStart,ousivous
refermezlaportesansappuyersurlebouton
Start,levoyantàDELblancheindiquantle
tempssemetàclignoter,unetonalitésefait
entendreetlecyclenedémarrepas.
8
Fin de cycle
Lorsquelecycleestterminé,unealarmeretentit
etlʼécranafficheEndjusquʼàcequelʼonouvre
laporteouappuiesurlatouchePower. Pour
économiserdelʼénergie,maintenezlatouche
High Tempenfoncéependanttroissecondes
pourréglerlʼaffichageafinquʼilsʼéteigne
automatiquementaprèsquelquesminutes
suivantlafinducycle.
MISES EN GARDE
• Nʼouvrezpaslaportependantle
fonctionnementouimmédiatementaprèsla
finducycledelavage,lavapeuraccumulée
pourraitcauserdesbrûluresaumomentde
lʼouverturedelaporte.
REMARQUE
• Videzdʼabordlepanierinférieur,puislepanier
supérieur.Celaéviteraquedelʼeaudégouttedepuis
lepaniersupérieursurlesplatsdupanierinférieur.
Auto-Off
Lelave-vaissellesʼéteintautomatiquementaprès
quatreminutesdʼinactivitésʼilestmisenpauseousi
aucuncyclenedémarre.

29
FONCTIONNEMENT
FRANÇAIS
Panneau de contrôle
a
Power
• AppuyezsurleboutonPowerpourallumer
ouéteindrelʼappareil.
• Unefoisquelecycleestterminé,lelave-
vaissellesemetautomatiquementhors
tensionauxfinsdesécuritéetdʼéconomie.
• Encasdesurtension,depannedecourant
oudʼinterruptiondetoutesorte,lʼalimentation
estautomatiquementcoupéepourdes
raisonsdesécurité.
• Lorsquelʼalimentationestraccordéedenouveau,
lʼappareilserallumeetlecyclereprend.
b
Sanitized (Désinfection)
• Sil’optiondeproductiondevapeurest
ajoutéeàuncycle,l’indicateurSANITIZED
(désinfection)demeurealluméàlafinducycle
silavaisselleaétécorrectementdésinfectée.
c
Digital Display (Affichage numérique)
Lʼaffichagenumériquesurlepanneaudecontrôle
indique le temps de cycle ESTIMÉ. Lorsque le
cycleetlesoptionssontsélectionnés,lʼécran
indiqueletempstotalestimépoureffectuer
cesprogrammes.Encoursdefonctionnement,
lʼécranindiqueletempsdeprogrammerestant.
REMARQUE
• Letempsestiméindiquéàlʼécranne
comprendpaslesdélaisdechauffagede
lʼeau,notamment.
• SilʼoptionDelay Startestsélectionnée,
lʼécranindiquelesheuresavantle
démarrageprogrammé.
• Laduréeducyclepeutvarierenfonctiondu
niveaudesaletédevotrevaisselle.
d
Ajout d’agent de rinçage
Cetindicateursʼilluminelorsqueleniveau
dʼagentderinçageestbas.LevoyantDEL
sʼéteintautomatiquementsiledistributeur
dʼagentderinçageestrempliousileniveauest
régléà0.
e
Start (démarrage)
• Pourfairefonctionnerlʼappareil,vouspouvez
appuyersurStartetfermerlaportedans
lesquatresecondesquisuiventoufermerla
porteetappuyersurStart.
• Sivousn’appuyezpassurlatoucheStart
pourdéclencherlecycle,unsignald’alerte
sefaitentendre.
f
Cancel (Annuler)
Lapompedevidangesʼactiveetlecycle
sʼannule.Unefoislʼeauévacuée,lelave-
vaissellesemethorstension.
• MaintenezleboutonStartenfoncépendant
troissecondespouractiverleréglage.
g
Wi-Fi f
Cetteicônesʼilluminesilʼappareilestconnecté
àInternetparlʼentremisedʼunréseauWi-Fi.
• MaintenezlatoucheDelay Start enfoncée
pendantenvirontroissecondespour
connecterlʼappareilauréseau.
h
Chime On/Off (Alarme activée/désactivée)
• Pouractiveroudésactiverlestonalités
desboutons,appuyezsurleboutonHalf Load
pendanttroissecondes.Latonalitédelʼalerte
dʼerreurnepeutpasêtredésactivée.
i
Control Lock (verrouillage des commandes) CL
LafonctionControlLockpermetdʼempêcher
quelesréglagesnesoientmodifiésencours
decycle.Lorsquecettefonctionestactivée,
touslesboutonsdupanneaudecontrôle
sontverrouillés,saufleboutonPower. Cette
fonctionneverrouillepaslaporte.
• Lorsqu’uncycleestencours,appuyezsur
Dual Zoneetmaintenezlatouchependant
troissecondespouractiveroudésactiverle
verrouillagedescommandes.
• Pourdémarrerunnouveaucycle,désactivez
lafonctiondeverrouillagedescommandes.

30
FONCTIONNEMENT
Cycles
Sélectionnezlecyclequevousdésirez.
Auto (Auto)
Cecycledétectelaquantitédesaletéetsa
résistanceetestoptimisépourobtenirlemeilleur
nettoyage.
Heavy (Très sale)
Cecycleconvientàlavaisselletrèssaleainsiquʼà
lavaisselledontlasaletéadurci.LecycleHeavy
estréglépardéfautàlapuissancedevaporisation
maximaleetutiliselapuissancedelavapeurpour
laverlavaisselletrèssale.
Delicate (Délicat)
Utilisezcecyclepournettoyerefficacementlesobjets
délicatstelsquelaporcelaineetlesverresàpied.
Refresh (Rafraîchir)
Cecyclerafraîchitetréchauffelavaissellequin’a
pasétéutiliséedepuislongtemps.
• N’utilisezpasdedétergentlorsquevousutilisezce
cycle.
Normal (Normal)
Cecycleconvientàlavaissellenormalementsale
quiestlavéetouslesjours.Sélectionnezlʼoption
Night Dry(séchagedenuit)pourlaisserlavaisselle
danslʼappareildurantlanuit.Maintenezlebouton
Extra Dryenfoncépendanttroissecondespour
activerleréglageNight Dry.
• Aprèslafinducycle,leventilateurfonctionne
pendantuneheurepouraideràéliminerl’airchaud
ethumidequisetrouvedanslacuve.Vouspouvez
arrêterleventilateurenouvrantlaporteaprèslafin
du cycle.
Turbo (Turbo)
Cecyclelaveralavaisselletrèssouilléeenuneheure
enutilisantunpeuplusd’eauetd’énergie.
• Cecyclenecomportepasd’optionde
séchage.SélectionnezlesoptionsExtra Dry
ou Night Dryouunautrecyclepourobtenirde
meilleursrésultatsdeséchage.
Download Cycle (Téléchargement
dʼun cycle)
UtiliseuncycledédiétéléchargeableparWi-Fiou
NFC.
REMARQUE
• Seullecodedecyclepourlecycletéléchargé
encourss’affichesurl’appareil.Consultez
l’applicationpourtéléphoneintelligentpour
connaîtrelescodesetlesnomsdecycles,etpour
obtenirdeplusamplesrenseignementssurles
cycles offerts.
− Cyclepardéfaut:P1.Casseroles
Machine Clean (nettoyage de
lʼappareil)
Cecyclesertànettoyerlʼintérieurdulave-vaisselle.
Utilisezlecyclesansmettredevaisselledans
lʼappareil.Iléliminelesrésidusdesaletés,les
odeurs,lestachesblanchesetautresimpuretés.
Ajoutezdelʼacidecitriqueouunautreagent
nettoyantpourplusdʼefficacité.
• MaintenezleboutonHeavyenfoncépendanttrois
secondespouractiverleréglage.
REMARQUE
• LʼindicateurMachine Clean clignote tous les 30
cycles.Pouractiveroudésactiverlʼicône,appuyez
surlatoucheDelicatependanttroissecondes.
Rinse (Rinçage)
Cecycleprocèdeàunrinçagerapidepourlesplats
quinevontpasêtrelavésimmédiatement.Cecycle
rincelesplatssalespourramollirlesdépôtsséchés.
Lerinçagedesplatspermetdʼéviterlesmauvaises
odeursdanslelave-vaisselle.Nepasutiliserde
détergent.
• Cecyclenecomportepasd’optiondeséchage.
• MaintenezleboutonNormalenfoncépendanttrois
secondespouractiverleréglage.
Express (Express)
Cecyclelaverarapidementlavaissellepeusouillée.
(Durée:34minutes)
• Cecyclenecomportepasd’optionde
séchage.SélectionnezlesoptionsExtra Dry
ou Night Dryouunautrecyclepourobtenirde
meilleursrésultatsdeséchage.
• MaintenezleboutonTurboenfoncépendanttrois
secondespouractiverleréglage.

31
FONCTIONNEMENT
FRANÇAIS
Options
Sélectionnezleboutonducycledésiré,puis
sélectionnezlesoptionspourcelui-ci.
Dual Zone (deux zones)
Cetteoptionrègleautomatiquementlʼintensitédela
vaporisationàdoucepourlebrasdelavagesupérieur
etàfortepourlebrasdelavageinférieur.Placezla
vaisselletrèssale,commelesassiettesetlesbols,
danslepanierinférieuretlavaissellelégèrement
sale,commelestassesetlespetitesassiettes,dans
lepaniersupérieurpourobtenirlesmeilleursrésultats.
Half Load (Demi-charge)
Cetteoptionoffreunlavageintensifetpermetde
sélectionnerlepaniersupérieurouinférieur.Pourles
petitescharges,utilisezsimplementlepaniersupérieur
oulepanierinférieurafindʼéconomiserdelʼénergie.En
appuyantsurleboutonHalf Load,lesréglagesf,g
etlʼannulationdelʼoptionHalfLoadsontdisponibles.
Energy Saver (économie dʼénergie)
Cetteoptionpermetdʼéconomiserlʼénergieenréduisant
lestempératuresdelavageetderinçage.Laduréede
lavageestprolongéepourconserverunlavageperformant.
Nʼutilisezpascecycleaveclesarticlestrèssales.
Steam (Vapeur)
Cetteoptionajoutedelavapeuraudébutducycle
danslebutd’améliorerlesrésultatsdelavage.
Sil’optiondeproductiondevapeurestajoutée
àuncycle,l’indicateur( )demeure
alluméàlafinducyclesilavaisselleaété
correctementdésinfectée.Silelave-vaissellen’a
paspudésinfectercorrectementlavaisselleparce
quel’optiondeproductiondevapeurn’apasété
sélectionnée,lecycleaétéinterrompuoul’eau
n’apaspuêtrechaufféeàlatempératurerequise,
l’indicateurnes’allumerapasàlafinducycle.
OuvrezetfermezlaporteouappuyezsurPower
pouréteindrel’indicateur.
REMARQUE:Lerinçageàtempératureélevée
permetdedésinfecterlavaisselleconformémentà
lanormeNSF/ANSI184relativeauxlave-vaisselle
résidentiels.Leslave-vaissellerésidentielscertifiés
nesontpasconçuspourêtreutilisésdansles
établissementsderestaurationautorisés.Seulsles
cycles de désinfection ont été conçus pour respecter
touteslesexigencesrelativesàl’éliminationde
lasaletéetàl’efficacitédeladésinfection.Les
cyclesd’unappareilcertifién’ontpasétéconçus,
directementouindirectement,pourréussirletestde
rendementdeladésinfection.
High Temp (Température élevée)
Augmentelatempératuredelavageprincipalepour
augmenterlʼefficacitédunettoyage.
Extra Dry (Séchage supplémentaire)
Sélectionnezl’optionExtra Dry pour obtenir de
meilleursrésultatsdeséchage.Cetteoptionpermet
d’ajouterdutempsdeséchageaucycleetd’éleverla
températurederinçage.
• Lorsqueledistributeurd’agentderinçage
estvide,l’optionExtra Dry est sélectionnée
automatiquement.
Night Dry (séchage de nuit)
Lavaisselleestsouventlaisséedanslelave-vaisselle
durantlanuitaprèslafinducycle.Celapeutfaire
ensortequelavapeuràlʼintérieurdelacuvese
condensesurlavaisselle,lalaissantmouillée.
LʼoptionNight Dryfaitfonctionnerleventilateur
périodiquementpouraideràévacuerlavapeurdela
cuve.
• MaintenezleboutonExtra Dryenfoncépendant
troissecondespouractiverleréglage.
• Pourtouslescyclesoùl’optionNight Dry est
offerte,celle-ciestsélectionnéepardéfaut,sauf
danslecasducycleNormal.
• Pourajouterl’optionNight Dry (Séchage de nuit)
aucyclenormal,appuyezsurlatoucheExtra Dry
etmaintenez-laenfoncéependant3secondes.
Delay Start (Démarrage programmé)
LafonctionDelayStartvouspermetdedifférerle
démarragedʼuncyclesélectionné.Chaquefoisquʼon
appuiesurleboutonDelay Start,ledélaiavantle
démarrageaugmentedʼuneheure.Ledélaiavantle
démarragepeutêtrerégléentre1à12heures,par
incrémentsdʼuneheure.

32
FONCTIONNEMENT
Guide des options et des cycles
Leguidedecycleci-dessousaffichelesréglagespardéfautetlesoptionsdisponiblespourchaquecycle.
Cycle
Auto
(Auto)
Heavy
(Très
sale)
Delicate
(Délicat)
Refresh
(Rafraîchir)
Normal
(Normal)
Turbo
(Turbo)
Express
(Express)
Rinse
(Rinçage)
Machine
Clean
(nettoyage
de lʼappareil)
Niveau de saleté
Tous
les
degrés
élevé bas bas
Tous les
degrés
élevé bas bas
Utilisation de lʼeau*
13,8à
24,5L
3,6à
6,5gal
26,9à
32 L
7,1à
8,4gal
19,7à
24,8L
5,2à
6,6gal
7,8L
2,1gal
9,2à
25,9L
2,4à
6,8gal
27,5L
7,3gal
20,4L
5,4gal
6,8L
1,8gal
12,3L
3,2gal
**Temps de lavage avec
options (min)
89-
226
140-
224
95-148 59-79 98-215 59-121 34-103 12 82
Options
disponibles
Dual Zone
(deux zones)
Half Load
(Demi-charge)
***Energy
Saver
(économie
dʼénergie)
High Temp
(Température
élevée)
Steam (Vapeur)
Extra Dry
(Séchage
supplémentaire)
Night Dry
(séchage de
nuit)
Delay Start
(Démarrage
programmé)
*Laconsommationréelledʼeauvarieraselonleniveaudesaletéetladuretédelʼeau.
**Letempsdefonctionnementetletempsdecycleeffectifsaffichéspeuventvarierenfonctiondel’option
choisie,leniveaudusol,latempératuredel’eauetladuretédel’eau.Parconséquent,letempsd’affichageetle
tempsdefonctionnementeffectifpeuventêtredifférents.
***LʼoptionEnergySavernepeutêtreutiliséeenmêmetempsquelesoptionsExtraDryouHighTemp.
:Duréedeséchageprolongéeseulement,aucunrinçageàtempératureélevéeajouté.
:Activépardéfaut.
REMARQUE
• Aucuneoptionnʼestproposéepourlecycledetéléchargement.

33
FONCTIONNEMENT
FRANÇAIS
Chargement du lave-vaisselle
Latrèsgrandecuvepeutcontenirdesplats,des
poêlesouautresaccessoiresdecuisineayantune
hauteurde14poucesetmoins.
Pourobtenirdesperformancesdelavageefficaces,
suiveztoujourslesdirectivessuivantes.
• Enlevezlesgrosdébrisalimentairesdesassiettes,
incluantlesos,etc.avantdechargerlavaisselle.
• Faitestremperlesarticlescomportantdesrésidus
d’alimentsbrûlésavantdelesmettreaulave-
vaisselle.
• Lescasserolesetlesplatsprofondsdoiventêtre
placésàlʼenvers.
• Assurez-vousquelesarticlesnesetouchentpas.
Objets nʼallant pas au lave-vaisselle
Lacombinaisondʼuneeautrèschaudeetde
détergentspourlave-vaissellepeutendommager
certainsarticles.Nemettezpaslesarticlessuivants
danslelave-vaisselle.
• Articlesencuivreouenaluminiumanodisé
• Vaissellepeinteàlamainavecdesfeuilles
dʼargentoudʼor
• Vaisselleavecdesmanchesenboisouenos
• Ustensilesenferouquitendentàrouiller
• Articlesenplastiquenonrecommandéspourle
lave-vaisselle
• Vaissellecoûteusecommedesplatsenargentet
delavaisselleavecuneborduredorée
• Articlesfragilescommedesverresdecristal
MISES EN GARDE
• Nemettezpasdecasserolesoudepoêlesavec
desmanchesenplastiquedanslʼappareil,car
lespoignéesrisquentdesedétérioreràcause
delachaleuretdudétergent.
• Lestachesderougeàlèvresrésistantàlʼeau
oudelongueduréesurlesverrespourraientne
paspartiraulavage.
Chargement du panier
inférieur
Réglages du chargement de10
couverts
Réglages du chargement de12
couverts
Conseils pour le chargement du
panier inférieur :
• Lesassiettesdoiventêtreplacéesenposition
verticaleetfairefaceaucentredupanieretles
casseroles,lespoêlesetlesgrandsplatsdoivent
êtreplacésàlʼenvers.
• Placezlesassiettes,lesplats,lesbolsàsoupeet
autresentrelestigesdupanier.
• Placezlesplaquesàbiscuits,lesmoulesà
gâteauxetautresgrandsobjetssurlescôtésou
àlʼarrièredupanier.Sivousplacezcesobjetsà
lʼavantdulave-vaisselle,celapeutempêcherlejet
dʼeaudʼatteindreledistributeurdedétergent.
• Assurez-vousquelesmanchesdescasseroleset
autresgrandsobjetsnʼempêchentpaslarotation
desbrasdelavage.
• Lepanierinférieurnedoitpasêtreutilisépourles
petitsobjets,notammentlestasses,lescoupesà
vinoulespetitesassiettes.Cesobjetsdoiventêtre
chargésdanslepaniersupérieur.
• Assurez-vousquelesobjetsvolumineuxnʼinterfèrent
pasaveclarotationdesbrasdelavageetnʼempêchent
paslʼouverturedudistributeurdedétergent.

34
FONCTIONNEMENT
Rabattre le râtelier inférieur
Pliezlesdentspourlogerlesgrandsplats;dépliez-
lespourlogerdepetitsplats.
Cas 1
Cas 2
Chargement des plats et des casseroles
Chargement des casseroles et des bols
REMARQUE
• Lepanieràcouvertsestinstalléàlʼarrièredu
panierinférieurpourlʼexpéditiondelʼappareil.Pour
obtenirunrendementoptimal,installez-lesurle
côtécommeindiquésurlʼillustration.

35
FONCTIONNEMENT
FRANÇAIS
Chargement du panier à
ustensiles
Lepanieràustensilespossèdedesséparateursafin
dʼéviterderayerouternirlesustensilesdélicats.
Réglages du chargement de10
couverts
1
5
4
4
4
4
4
5
5
5
5
3
3
6
2
2
3
3 4 6 5
5
5
5 1
5
4
4
4
4
3
2
6
2
2
2
2
2
2
Réglages du chargement de12
couverts
1
5
4
4
4
4
4
5
5
1
5
3
6
2
3
3
4 6 5
5
1
5 1
5
4
4
4
42
6
2
2
2
2
2
2
Conseils sur le chargement des
ustensiles :
• Pourunmeilleurnettoyage,utilisezlesséparateurs
supérieursdanslepanierpendantlechargement
desustensiles.Lesséparateursempêcherontles
ustensilesdesʼentasser.
• Chargezlesobjetspointus,commelescouteaux,
lapointeverslebas.
• Lorsquevousvidezlelave-vaisselle,ilvautmieux
commencerparlepanieràustensiles.Cela
empêcheainsilesgouttesdʼeaudetombersurvos
ustensilesdepuislepaniersupérieur.
AVERTISSEMENTS
• Soyezvigilantlorsquevouschargezou
déchargezdesobjetspointus.Placezles
couteauxpointusaveclemancheverslehaut
afinderéduirelerisquedeblessure.

36
FONCTIONNEMENT
Chargement du panier
supérieur
Réglages du chargement de10
couverts
Réglages du chargement de12
couverts
Conseils pour le chargement du
panier supérieur :
• Placezlestassesetverresdanslesrangéesentre
lesdentsdurâtelier.Sionlesplacepar-dessus
lesdentsdurâtelier,ilspeuventsebriserouporter
destachesdʼeaucalcaire.
• Pouréviterquʼilsnesefêlent,placezlesverresà
pieddefaçonàcequʼilsnesoientpasencontact
avecdʼautresobjets.
• Placezlesobjetsfaceouverteverslebaspour
assurerleurnettoyageetleurséchage.
• Nʼentassezpasdʼobjetslesunssurlesautres.
• Servez-vousdupaniersupérieurpourlesobjets
petitsoudélicatstelsquelespetitesassiettes,les
tasses,lessoucoupes,lesverresetlesobjetsen
plastiquelavablesenlave-vaisselle.
• Lestasses,verresetbolsdoiventêtreplacésà
lʼenvers.
• Lestassessupplémentairesoulesustensiles
decuisinepeuventêtreposéspar-dessusles
compartimentsàtassesrefermés,quipeuvent
aussiservirdesupportauxverresàlongpied.
• Assurez-vousquelesobjetsnʼempêchentpasla
rotationdesbrasdelavagesituésau-dessusetau-
dessousdupaniersupérieur.
• Lorsquevouschargezdesobjetsdegrandetaille
danslepaniersupérieur,commedescoupesàvin
oudestasseshautes,ilpeutêtrenécessairede
retirerlepanieràargenterie,sʼilyenaun.
Chargement du panier
Certainsmodèlessontéquipésdepanierspourles
tassesquifournissentunsupportpourlesverresà
long pied.
Lespanierspourlestassessereplientpourlaisser
delaplacepourlesgrandsverres.

37
FONCTIONNEMENT
FRANÇAIS
Retrait et remise en place des
paniers à tasses
Lespaniersàtassesdedroiteetdegauchesont
interchangeablesetpeuventêtreretirés.
1
Faitesglisserlepanierdanssapositionfermée.
2
Trouvezlarainuredefixationsurlepanierà
tassesettirezsurcecôtépourdégagerlepanier
delabarredesoutien.
• Lepanierducôtégauchesʼenlèveentirantà
lʼarrière.Lepanierducôtédroitsʼenlèveen
tirantàlʼavant.
Rainuredefixation
3
Faitesglisserlepanieràtassessurlabarrede
soutienducôtéopposé.
4
Procédezdelafaçoninversepourreplacerun
panier.
Rabattre le râtelier supérieur
Pliezlesdentspourlogerlesgrandsplats;dépliez-
lespourlogerdepetitsplats.
Chargement des plats et des casseroles

38
FONCTIONNEMENT
Panier supérieur à hauteur réglable
Lepaniersupérieurserègleverslehautetversle
bas.Relevezlepaniersupérieurpourplacerdes
objetsdʼunehauteurmaximalede14poucesdans
lepanierinférieur.Abaissezlepaniersupérieur
pourplacerdesplatsdʼunehauteurmaximalede
12poucesdanslepaniersupérieur.Lepanier
supérieurestrelevélorsdelʼexpédition.
Ilyatroispositionsdisponiblesderéglagedela
hauteurdupaniersupérieurpourcréerplusdʼespace.
1
2
3
2
3
1
Abaisser le panier :
Tenezlepanierparlemilieudechacundescôtésafin
demieuxsupportersonpoids.Appuyezensuitesur
lesboutonsdechaquecôtépourlibérerlepanieret
abaissez-leenpositionbasse.
Relever le panier :
Soulevezlepanierparlemilieudechacundeses
côtésjusquʼàcequelepaniersʼenclencheàla
positionélevée.Ilnʼestpasnécessairedesoulever
lesleviersdeverrouillagepourreleverlepanier.
AVERTISSEMENTS
• Avantdelerégler,assurez-vousquelepanier
necontientaucunevaisselle.Autrement,ils
pourraientêtreendommagés,ouvouspourriez
vous blesser.
REMARQUE
• Relevezlepaniersupérieursansappuyersurles
boutonsdechaquecôté.Appuyersurlesboutons
enrelevantlepaniervousempêcheradele
verrouillerenplace.
• Pourplacerlepanieràlapositioncentrale,ilpeut
êtrepréférabledelebaissercomplètement,puis
delereleverjusquʼàcequʼilsebloqueauniveau
souhaité.
• Avantderentrerlepaniersupérieurdanslelave-
vaisselle,assurez-vousquesahauteurestla
mêmedechaquecôté.Sicenʼestpaslecas,la
portedulave-vaisselleneserefermerapasetle
brasdelavagesupérieurneseraccorderapasà
lʼentréedʼeau.
• Ilyaungaindʼespacede24
5
/
8
po(56mm)
enhauteurlorsquelepaniersupérieurestàla
positionlaplusbasse.
• Aprèsavoirréglélahauteurdespaniers,assurez-
vousquelesbrasdelavagepeuventtourner
librement.
• Quandlepaniersupérieurestdanslaposition
basse,vérifiezsiledessousdupanier,incluant
lebrasdelavage,toucheauxarticlesdupanier
inférieur.
• Quandlepaniersupérieurestdanslaposition
basse,rentrezlepaniersupérieurenpremier,suivi
dupanierinférieur.
• Sortezlepanierinférieurenpremier,etlepanier
supérieur en second.
• Relevezlepaniersupérieursansappuyersurles
boutonsdechaquecôté.Appuyersurlesboutons
enrelevantlepaniervousempêcheradele
verrouillerenplace.
• Pourplacerlepanieràlapositioncentrale,ilpeut
êtrepréférabledelebaissercomplètement,puis
delereleverjusquʼàcequʼilsebloqueauniveau
souhaité.

39
FONCTIONNEMENT
FRANÇAIS
Retrait du panier supérieur
coulissant et encliquetable
Cesinstructionssontdestinéesauxmodèlesdotés
desupportsencliquetablesplutôtquedesupports
munis de roues.
MISES EN GARDE
• Lepaniersupérieurencliquetabledoitseulementêtre
retirélorsdel’entretiendel’appareil.Sivousdevez
retirerlepanier,assurez-vousdeporterdesgantset
manipulezsoigneusementletournevisafind’éviter
devousblesseroud’endommagerlelave-vaisselle.
1
Tirezlepaniersupérieurjusqu’àcequ’ilsoit
bloquédanslemouvement.Retireztousles
articlesquisetrouventdanslepanier.
2
Pourretirerdeleursrailslessupportsavantdu
panier,ouvrezlescrochetsavantàl’aided’un
tournevisàtêteplatetoutentirantl’avantdupanier
verslehaut;celavouspermettraderetirerdes
crochetslesupportavant.Répétezcetteétapepour
retirerlesupportavantsituédel’autrecôtédupanier.
3
Pourretirerdeleursrailslessupportsarrièredu
panier,tenezd’unemainl’undesrailssituéssur
lecôté,soulevezl’avantdupanieretpoussez
fermementlepanierversl’arrièrepourretirerdes
crochetslesupportarrière.Répétezcetteétape
pourretirerlesupportsituédel’autrecôtédupanier.
4
Pourreplacerlepanier,placezlessupportsarrière
derrièrelescrochetsarrièreettirezlepaniervers
l’avantpourplacerlessupportssurlescrochets.
Ensuite,alignezlessupportsavantdupanieravecles
crochetsavantetpoussezl’avantdupanierversle
baspourplacerlessupportssurlescrochetsavant.
Chargement du panier à
couverts
Lepanieràargenterieconvientidéalementaux
ustensilesplats,pourcuisineroupourservir.Il
convientégalementauxpetitsbolsetauxcouvercles.
Lesséparateursdespaniersàargenteriepermettent
demaintenirlesustensilesplatsséparésafindʼéviter
delesendommageretdʼaméliorerleurnettoyage.
REMARQUE
• Pourunnettoyageoptimal,placezlesassiettes
danslespaniersàargenterie.Lesustensilestrès
salesoulesplatsayantserviaufourdoiventêtre
placéssurlepanierdumilieuoudanslepanierà
cuillèrespourunmeilleurlavage.
Réglages du chargement de10
couverts
MISES EN GARDE
• Neplacezpaslesbolsaucentredupanierà
couverts.Laportepourraitnepassefermer
correctement,cequientraîneraitdesfuites.

40
FONCTIONNEMENT
Plateau à hauteur réglable
Leplateaudegauchepeutêtrerégléséparémentà
unepositionhauteoubassepourlogerdescouverts
oudesustensilesdedifférentestailles.Retirezles
platsavantderéglerlepositionnementduplateau.
Réglezlepositionnementduplateauenfaisant
glisser le levier.
Retrait du panier à argenterie
Lʼensembledupanieràargenteriepeutêtreretirési
plusdʼespaceestnécessairesurlepaniersupérieur
pourdesobjetslarges.
Retireztoujourslʼargenteriedupanieravantdʼenlever
celui-ci.
Tirezlepanierjusquʼàlʼextrémitédesrails.Puis
soulevezlʼavantdupanierafinquelesroulements
sedégagentdelabutéesituéeàlʼextrémitédurail.
Lepanierpeutmaintenantêtreglisséverslʼavantet
retirédesrails.
AVERTISSEMENTS
• Soyezvigilantlorsquevouschargezou
déchargezdesobjetsàbordstranchants.
Placezlescouteauxaiguiséslameverslebas
pour éviter le risque de blessure.

41
FONCTIONNEMENT
FRANÇAIS
Ajout dʼagents nettoyants
Ajout de détergent dans le
distributeur
• Retirezlʼétiquettesurledistributeuravantde
mettreenmarchelelave-vaissellepourla
première fois.
• Laquantitédedétergentvouluedépendducycle,
delachargeetduniveaudesaletédesplats.
• Placezledétergentdanslebacdedétergentavant
ledébutdʼuncycle,sauflecyclederinçage.
1
Appuyezsurleboutonducouvercledu
distributeurpourlʼouvrir.
2
Ajoutezdudétergentdanslecompartiment
principaljusquʼàcequelaquantitéverséese
situeentrelesmarques15et25.
• Dépassezlaligne25sivotreeauestdureou
pourleschargestrèssales.
• Leremplirjusquʼàlaligne15pourlʼeauadoucie
oupourleschargespeusales.
15
25
3
Faitesglisserlecouvercledudétergentjusquʼà
cequʼunclicindiquequʼilestbienfermé.
4
Sivoussouhaitezfaireunprélavage,remplissez
dedétergentlebacdeprélavagedanslazone
encastréesouslecouvercle.
AVERTISSEMENTS
• Ledétergentpourlave-vaisselleetlʼagentderinçage
contiennentdesproduitschimiques,commetousles
autresdétergentspourlamaison.Ilsdoiventdonc
êtrerangéshorsdelaportéedesenfants.
MISES EN GARDE
• Nʼutilisezquedudétergentconçupourleslave-
vaisselle.Lʼemploidʼundétergentinadéquatpeut
faireensortequelelave-vaisselleseremplisse
dʼeausavonneusependantlefonctionnement.
Lʼexcédentdʼeausavonneusepeutdiminuerla
performancedulave-vaisselleetcauserdesfuites.
• Pouréviterd’endommagerledistributeur,ne
tirezpasdessuslorsquevousfermezlaporte
dulave-vaisselle.
REMARQUE
• Aprèsavoirterminéleprogrammedelavage,
vérifiezsiledétergentaétécomplètementdissout.
• Certainespastillesdedétergentpourlave-vaisselle
peuventresterbloquéesdansledistributeurà
causedeleurgrosseurexcessive.Lespastilles
peuventêtreplacéesaufonddelacuvedelavage
prèsdufiltreavantdedémarrerlecycle.
• Unexcèsdedétergentpeutlaisserunfilmsurles
platsetdanslelave-vaisselle,cequidonneraun
lavagedemauvaisequalité.
• Sidespastillesdedétergentpourlave-vaisselle
sontutiliséessansproduitderinçage,unehumidité
excessivesʼaccumulerasurlavaisselleetlesparois
intérieuresdelʼappareil.SélectionnezlʼoptionExtra
Drypourunséchageencoreplusperformant.
• Lʼutilisationdeproduitderinçageaméliorele
rendementduséchageenpermettantàlʼeaude
sʼégoutterdelavaisselleaprèslerinçagefinal.
• Nʼutilisezpasdepastillesdedétergentpour
lescyclesdelavageraccourcis.Ilestpossible
quelapastillenesoitpasentièrementdissoute,
entraînantainsilaformationdʼunrésidude
détergentsurlesplatsetunmauvaisnettoyage.
• Utilisezunrenforçateurpourdétergentpouraider
àéliminerlestaches,lesrésidusetlefilmblanc
queproduitlʼeaudure.Ilnʼaidepasàéliminerles
résidus de détergent excessif.

42
FONCTIONNEMENT
Ajout de produit de rinçage dans le
distributeur
LevoyantRinse Refillsʼafficheàlʼécranlorsquʼilfaut
ajouterplusdʼagentderinçage.
Ilestrecommandédʼutiliserunagentderinçage
pourprévenirlestracesdʼeausurlesplatsetpour
améliorerleséchage.
1
Ouvrezlecouvercledelʼagentderinçageen
soulevantlerabat.
2
Ajoutezdelʼagentderinçageliquidejusquʼau
niveauderemplissagemaximal.Lʼagentde
rinçagedoitêtredéposédansledistributeur
pendantleremplissage,sinondesbullesdʼair
pourraientseformeretcauserunséchage
inefficace.Évitezdetropremplirledistributeur.
3
Fermezlecouverclepourverrouillerle
distributeur.Leproduitderinçageestdistribué
automatiquementaucoursduderniercyclede
rinçage.
REMARQUE
• Nʼutilisezqueduproduitderinçageliquidedansce
lave-vaisselle.
• Nesurchargezpasledistributeurdeproduitde
rinçage.
• Essuyeztoutagentderinçagequiseserait
déverséautourdudistributeur.
Réglage du distributeur de produit
de rinçage
Ledistributeurestdotédecinqniveauxderéglage.
Lelave-vaisselleestprogramméàlʼusinepourun
niveaududistributeurdʼagentderinçagede2.Vous
pouvezvérifieretchangerceniveauenutilisantles
boutonsdupanneaudecontrôle.
1
Assurez-vousquelʼappareilestéteint.
2
AppuyezsimultanémentsurlesboutonsDual
Zone et Powerpourvérifierleréglagecourant.
3
AppuyezsurDelay Startpourchangerleréglage
dudistributeurdʼagentderinçage.Chaquefois
quevousappuyezsurlebouton,leréglage
passeauniveausuivant,deL0àL4.
4
Unefoisqueleréglagedudistributeurdʼagentde
rinçagedésiréestsélectionné,appuyezsurStart
pourlesauvegarder.
REMARQUE
• Réglezledistributeuràunniveausupérieur
sivotreeauestdureetquevousobservezla
présencededépôtscalcairessurvosplats.
• Undistributeurdeproduitderinçagerégléà
unniveautropfaiblefavoriseralaformationde
tachesetdemarquessurlesplatsetdiminuerala
performanceduséchage.
• Unréglagetrophautpeutcauserlaformation
demousse,cequidiminueralaperformancedu
lavage.
Rechargement du produit de rinçage
Lafréquencederechargementduproduitderinçage
dépenddelafréquencedʼutilisationdulave-vaisselle
etduniveaudedistributionsélectionné.
• L’indicateurRinse Refillclignotequandilest
nécessaired’ajouterdavantaged’agentderinçage,
àmoinsqueleréglagedudistributeurd’agentde
rinçagesoit«L0».

43
FONCTIONS INTELLIGENTES
FRANÇAIS
FONCTIONS
INTELLIGENTES
Application LG ThinQ
• Cettefonctionnalitéestofferteuniquementsurles
modèlesportantlelogof ou .
L’applicationLG ThinQ vous permet de communiquer
avecl’appareilàl’aided’untéléphoneintelligent.
Caractéristiques de l’application LG
ThinQ
Suivi
Contrôlezl'étatactuel,lecycle,lesoptions,letemps
defonctionnementetl’heuredefindecyclepour
l’appareilsurunseuletmêmeécran.
Download Cycle (Téléchargement dʼun
cycle)
Téléchargezdescyclesnouveauxetspéciauxquine
fontpaspartiedescyclesdebasedelʼappareil.
Lesappareilsquiontétécorrectementconnecté
peuventtéléchargerunevariétédecyclesde
spécialitéspécifiquesàlʼappareil.
Onnepeutstockerquʼunseulcycleàlafoisdanslʼappareil.
Unefoislecycletéléchargédanslʼappareil,cedernierle
conservejusquʼàcequʼunnouveaucyclesoittéléchargé.
Aide au nettoyage de lʼappareil
Cettefonctionindiquelenombredecyclesrestants
avantquʼuncycledenettoyagedelʼappareilsoitrequis.
Smart Diagnosis
MC
Cette fonction fournit des renseignements utiles
pourdiagnostiqueretrésoudrelesproblèmesavec
lʼappareilensebasantsurleprofildʼutilisation.
Paramètres
Réglezleniveaududistributeurdeproduitde
rinçage,lerappelpourlenettoyagedelʼappareil,le
niveaudusignaletlevoyantindicateurdenettoyage.
Quandlecycleestterminéouquel’appareilades
problèmes,vousavezl’optionderecevoirdesalertes
instantanéessuruntéléphoneintelligent.
Notifications poussées
Activezl’optionPush Alerts pour recevoir des
notificationssurl’étatdel’appareil.
Lesnotificationssontdéclenchéesmêmesi
l'applicationLG ThinQ est éteinte.
REMARQUE
• Sivouschangezderouteursansfil,defournisseur
deserviceInternetoudemotdepasse,supprimez
l’appareilconnectédel’applicationLG ThinQ,puis
connectez-ledenouveau.
• Cetteinformationestàjouraumomentde
lapublication.L’applicationestsujetteàdes
modificationsàdesfinsd’améliorationduproduit,
etce,sansquel’utilisateurensoitpréalablement
avisé.
• Cettefonctionnalitéestoffertesurcertains
modèles seulement.
Avant d’utiliser l’application LG
ThinQ
1
Utilisezuntéléphoneintelligentpourvérifierla
forcedusignaldurouteursansfil(réseauWi-Fi)
àproximitédel’appareil.
• Siladistanceentrel’appareiletlerouteursans
filesttropgrande,l’intensitédusignals’affaiblit.
L’enregistrementpourraitprendredutemps,ou
l’installationdel’applicationpourraitéchouer.
2
DésactivezlesDonnées mobiles ou les
Données cellulaires sur votre téléphone
intelligent.
3
Connectezvotretéléphoneintelligentaurouteur
sansfil.
REMARQUE
• Pourconnaîtrel’étatduréseauWi-Fi,vérifiezque
l’icôneWi-Fi festalluméesurlepanneaude
commande.
• L’appareilprendseulementenchargelesréseaux
Wi-Fide2,4GHz.Pourvérifierlafréquencede
votreréseau,contactezvotrefournisseurde
servicesInternetoureportez-vousaumanuelde
votrerouteursansfil.

44
FONCTIONS INTELLIGENTES
• LG ThinQn’estpasresponsabledesproblèmes
deconnexionauréseauoudesdéfauts,
dysfonctionnementsouerreurscausésparla
connexionauréseau.
• L’environnementsansfilpeutcauserun
ralentissementdufonctionnementduréseausans
fil.
• Sil’appareiladesdifficultésàseconnecterau
réseauWi-Fi,ilestpeut-êtretroploindurouteur.
Procurez-vousunrépéteurWi-Fi(rallongede
portée)pouraméliorerlaforcedusignalWi-Fi.
• Laconnexionauréseaupourraitnepas
fonctionner correctement en fonction du
fournisseurd'accèsInternet.
• LaconnexionWi-Fipeutnepassefaireouêtre
interrompueàcausedel’environnementduréseau
domestique.
• Sil’appareilnepeutpasêtreenregistréenraison
deproblèmesliésàlatransmissiondusignalsans
fil,débranchezl’appareiletattendezenvironune
minuteavantderéessayer.
• Silepare-feudevotrerouteursansfilestactivé,
désactivez-leouajoutez-yuneexception.
• Lenomduréseausansfil(SSID)doitêtreune
combinaisondelettresetdechiffresanglais.
(N’utilisezpasdecaractèresspéciaux.)
• L’interfaceutilisateur(IU)dutéléphoneintelligent
peutvarierenfonctiondusystèmed’exploitation
(SE)mobileetdufabricant.
• Si le protocole de sécurité du routeur est configuré
sur WEP,laconfigurationduréseaupeut
échouer.Changezleprotocoledesécurité(nous
recommandonsWPA2)etenregistrerleproduità
nouveau.
Installation de application LG ThinQ
Àpartird’untéléphoneintelligent,cherchez
l’applicationLG ThinQdanslaboutiqueGooglePlay
oul’AppStored’Apple.Suivezlesdirectivespour
téléchargeretinstallerl’application.
Caractéristiques du module LAN
sans fil
Modèle LCW-003
Gamme de
fréquences
2412à2462MHz
Puissance de
sortie (Max.)
< 30 dBm
Avis de la FCC
Cetéquipementaététestéetjugéconformeauxlimites
d’unappareilnumériquedeclasseB,conformément
àlapartie15desrèglesdelaFCC.Ceslimitessont
établiespourfourniruneprotectionraisonnablecontreles
interférencesnuisiblesdansuneinstallationrésidentielle.
Cetéquipementproduit,utiliseetpeutémettrede
l’énergieradioélectriqueet,s’iln’estpasinstalléetutilisé
conformémentauxprésentesinstructions,peutcauserdes
interférencesnuisiblesauxcommunicationsradio.Quoi
qu’ilensoit,onnepeutpasgarantirquedesinterférences
neseproduirontpasdanscertainesinstallations.Sicet
appareilcausedesinterférencesnuisiblesàlaréception
dessignauxderadiooudetélévision,cequipeut
êtredéterminéenallumantetenéteignantl’appareil,
onencouragel’utilisateuràessayerdecorrigerces
interférencesparl’undesmoyenssuivants:
• Réorientezoudéplacezl’antennederéception.
• Augmentezladistanceséparantl’équipementdu
récepteur.
• Branchezl’appareilsuruncircuitélectrique
différentdeceluioùlerécepteurestbranché.
• Contactezvotrerevendeurouuntechnicienradio/
télévision expérimenté.
Cetappareilestconformeàlapartie15durèglement
delaFCCLefonctionnementestsoumisauxdeux
conditionssuivantes:
1)L’appareilnedoitpasproduiredebrouillage;et
2)l’appareildoitacceptertoutbrouillage
radioélectriquesubi,mêmesilebrouillageest
susceptibled’encompromettrelefonctionnement.
Toutchangementoutoutemodificationapportésà
cetappareiletquinesontpasapprouvésdemanière
expliciteparlefabricantsontsusceptiblesd’annuler
l’autoritédel’utilisateurquantàutiliserl’appareil.
Énoncé FCC sur l’exposition aux
radiations RF
Cetéquipementestconformeauxlimitesderadiation
delaFCCdéfiniespourunenvironnementnon
contrôlé.Cetappareiletsaousesantennesne
doiventpasêtrecolocalisésouopérésenconjonction
avectoutautreantenneoutransmetteur.

45
FONCTIONS INTELLIGENTES
FRANÇAIS
Cetappareildoitêtreinstalléetutilisédefaçonà
maintenirunedistanceminimalede20cm(7,8po)
entrel’antenneetl’utilisateur.Lesutilisateursdoivent
respecterlesdirectivesd’utilisationafindesatisfaireaux
critèresenmatièred’expositionauxrayonnementsRF.
Avis d’Industrie Canada (pour le module
de transmission compris dans ce
produit)
Cetappareilcontientdestransmetteursetdes
récepteursexemptsdelicenceetconformesaux
CNRd’Innovation,SciencesetDéveloppement
économiqueCanadaapplicablesauxappareilsradio
exemptsdelicence.L’exploitationestautoriséeaux
deuxconditionssuivantes:
1)Cetappareilnedoitpasprovoquerd'interférences.
2)Cetappareildoitacceptertouteslesinterférences,
ycompriscellespouvantentraînerson
dysfonctionnement.
Avis d’Industrie Canada sur l’exposition
aux rayonnements
Cetappareilestconformeauxlimitesd’expositionaux
rayonnementsd’IndustrieCanadapourunenvironnement
noncontrôlé.Cetappareildoitêtreinstallédefaçonà
garderunedistanceminimalede20cm(7,8po)entrela
sourcederayonnementetvotrecorps.
REMARQUE
• LEFABRICANTN’ESTPASRESPONSABLE
DESINTERFÉRENCESRADIOÉLECTRIQUES
CAUSÉES PAR DES MODIFICATIONS NON
AUTORISÉESAPPORTÉESÀCETAPPAREIL.DE
TELLES MODIFICATIONS POURRAIENT ANNULER
L’AUTORISATIONACCORDÉEÀL’UTILISATEUR
DEFAIREFONCTIONNERL’APPAREIL.
Informations sur les logiciels libres
Pourobtenirlecodesourceconformémentaux
dispositionsdelalicencepubliquegénérale,de
lalicencepubliquegénéralelimitée,delalicence
publiqueMozillaetdetouteautrelicencerégissant
leslogicielsàcodesourcelibrecontenusdanscet
appareil,visitezlesitehttp://opensource.lge.com.
Enplusducodesource,touteslesdispositionsde
licence,lesexonérationsdegarantieetlesavisde
droitsd’auteurspeuventaussiêtretéléchargés.
LGElectronicsmettraégalementàvotredisposition
lecodesourcelibresurCD-ROMpourunprix
couvrantlecoûtdeladistribution(coûtdusupport,
del’expéditionetdelamanutention)sursimple
demandeparcourrielàl’adresseopensource@lge.
com.Cetteoffreestvalablependanttrois(3)années
àcompterdeladated’achatduproduit.
Fonctionnalité Smart Diagnosis
MC
Cettefonctionnalitéestofferteuniquementsurles
modèlesportantlelogoc ou d.
Utilisezcettefonctionnalitépourvousaideràdiagnostiquer
etàrésoudrelesproblèmesqu’éprouvevotreappareil.
REMARQUE
• Pourdesraisonsnerelevantpasducontrôlede
LGE,leservicepourraitnepasfonctionnerenraison
defacteursexternes,notammentladisponibilitédu
Wi-Fi,laconnexionWi-Fi,lapolitiquedelaboutique
d’applicationsouladisponibilitédel’application.
• Lafonctionnalitépourraitêtremodifiéesans
préavisetpourraitavoiruneapparencedifférente
selonvotreemplacement.
Utilisation de l’application LG ThinQ
pour diagnostiquer les problèmes
Sivouséprouvezdesproblèmesavecvotreappareil
dotéduWi-Fi,vouspouveztransmettredesdonnées
dedépannagepartéléphoneintelligentàl’aidede
l’applicationLG ThinQ.
• Lancezl’applicationLG ThinQetsélectionnezla
fonctionnalitéSmart Diagnosisquisetrouvedans
lemenu.Suivezlesinstructionsindiquéesdans
l’applicationLG ThinQ.
Utilisation de la fonctionnalité de
diagnostic sonore pour
diagnostiquer les problèmes
Suivezlesinstructionsci-dessouspourutiliserla
fonctionnalitédediagnosticsonore.
• Lancezl’applicationLG ThinQetsélectionnezla
fonctionnalitéSmart Diagnosisquisetrouvedansle
menu.Suivezlesinstructionsrelativesaudiagnostic
sonoreindiquéesdansl’applicationLG ThinQ.
1
Tenezlemicrophonedevotretéléphoneprèsdel’icône
Smart Diagnosis
MC
.Netouchezàaucunautrebouton.
2
AppuyezsurleboutonDownload Cycle et
maintenez-lejusquʼàcequʼuncompteàrebours
sʼaffichesurlʼappareil.
3
Gardezletéléphoneenplacejusquʼàlafindela
transmission.
4
Unefoisledécompteterminéetlatonalitéarrêtée,
reprenezlaconversationaveclʼagentducentre
deservice,quiseraalorsenmesuredevousaider
grâceauxdonnéestransmisespourlʼanalyse.
REMARQUE
• Pourobtenirlesmeilleursrésultats,évitezdebouger
letéléphonependantlatransmissionsonore.

46
ENTRETIEN
ENTRETIEN
Pourmaintenirunebonneperformanceetéviterles
problèmes,ilestimportantdevérifierlʼextérieuret
lʼintérieurdulave-vaisselle,incluantlesfiltresetles
brasdelavage,àintervallesréguliers.
AVERTISSEMENTS
• Quandvousnettoyezlʼextérieuretlʼintérieur
dulave-vaisselle,nʼutilisezpasdebenzèneou
dediluant.Autrement,celapourraitcauserun
incendie ou une explosion.
• Pouréviterlesblessuresdurantlʼentretienetle
nettoyage,portezdesgantsoudesvêtements
de protection.
REMARQUE
• Sivousnʼavezpasutilisélelave-vaisselledepuis
unelonguepériode,exécutezlecycleMachine
Cleansansdétergentpourrafraîchirlʼintérieur.À
lafinducycle,nettoyezlʼintérieuretlʼextérieurdu
lave-vaisselleensuivantlesdirectivesdʼentretien.
Nettoyage de lʼextérieur
• N’utilisezpasdetamponsàrécurernide
nettoyantsabrasifssurlasurfaceextérieuredu
lave-vaisselle.
• Pouréliminerlasaletécourante,ilsuffitd’utiliser
un chiffon doux humide ou une éponge. Vous
pouvezégalementutiliserunsavondouxpour
aideràéliminerlasaletétenace.Rincezet
essuyezensuitelessurfacesavecunlingedoux.
• Vouspouvezpolirlessurfacesenacierinoxydable
àl’aided’unnettoyantpouracierinoxydable.
Suivezlesinstructionssurlenettoyant,puis
essuyezlasurfacedanslesensdugrain.
MISES EN GARDE
• Sidel’huiledecuissonestrenverséesurla
surfaceextérieuredel’appareil,essuyez-la
immédiatement.Nenettoyezpaslasurface
extérieuredel’appareilavecdesproduitsde
nettoyagecontenantdel’alcool,dudiluant,du
javellisant,dubenzène,duliquideinflammable
oudessubstancesabrasives.Cessubstances
peuventdécolorerouendommagerl’appareil.
Nettoyage de lʼintérieur
• Nettoyezlʼintérieurdulave-vaisselle
périodiquementàlʼaidedʼunchiffondouxet
humideoudʼuneépongepourenleverlesrésidus
alimentairesetlesimpuretés.
• Pouréliminerlestachesblanchesetlesodeurs
àlʼintérieurdulave-vaisselle,lancezuncycleà
videsansdétergentouavecunetassedevinaigre
blancdansunverreouunbolpourlave-vaisselle
placédanslepaniersupérieur.(Levinaigreest
unacideet,encasdʼutilisationintensive,ilrisque
dʼendommagerlʼappareil.)
• UtilisationducycleMachine Clean
− ExécutezlecycledeMachine Clean (nettoyage
delamachine)unefoisparmoisoutousles
30cyclespouréliminerlasaletérésiduelle,les
odeurs,lestachesblanchesetautressaletésà
l'intérieurdel'appareil.
1.Retireztouslesplatsdel'appareil.
2.Ajoutez3cuillèresàsoupe(40g)d'acide
citriquedansledistributeurdedétergentousuivez
lesinstructionsdufabricantsivousutilisezun
produitdenettoyagepourlave-vaisselle.N'utilisez
pasdedétergentpourlave-vaisselle.
3.AppuyezetmaintenezenfoncéHeavypendant
3 secondes pour sélectionner le cycle de
nettoyagedelamachine.
4.AppuyezStart(Démarrage).
Entretien saisonnier et
rangement
• Sivousvousabsentezpourunelonguepériode
durantlesmoislespluschauds,fermezlʼarrivée
dʼeauetdébranchezlecâbledʼalimentation
électrique,ouéteignezledisjoncteur.Nettoyez
lefiltre,lacuveetledistributeurpouréviterles
mauvaisesodeurs.
• Sivousvousabsentezpourunelonguepériode
durantlesmoisdelasaisonfroideetquele
tempsrisquedʼêtreglacial,préparezlesconduites
dʼalimentationeneauetlelave-vaissellepour
lʼhiver.Lapréparationpourlʼhiverdoitêtre
effectuéeparunprofessionnelqualifié.

47
ENTRETIEN
FRANÇAIS
Coupure antirefoulement ou
broyeur dʼévier obstrué
Vérifiezlacoupureantirefoulementoulebroyeur
dʼéviersilelave-vaissellenʼestpasbienvidangé.
Nettoyage de la coupure
antirefoulement
1
Éteignezlelave-vaisselle.
2
Retirezlecouvercledelacoupure
antirefoulementetlecapuchondeplastiquequi
est dessous.
3
Enleveztouslesdébrisavecuncure-dentou
une brosse.
4
Replacezlecapuchondeplastiqueetle
couvercledelacoupureantirefoulement.
REMARQUE
• Lacoupureantirefoulementetlebroyeursontdes
raccordsexternesàlatuyauteriequinefontpas
partieintégrantedulave-vaisselle.
• Lagarantiedulave-vaissellenecouvrepasles
fraisdeservicedirectementassociésaunettoyage
ouàlaréparationdelacoupureantirefoulement
externe et du broyeur.

48
ENTRETIEN
Nettoyage des filtres
1
Retirezlepanierinférieuretpositionnezlebras
devaporisationafinquʼuneouvertureenVplus
largesoitpointéeverslʼavant.
2
Tournezlefiltreintérieurdanslesensinverse
desaiguillesdʼunemontreetretirezlʼunité
assembléecomprenantlefiltreintérieuretlefiltre
enacierinoxydable.
• Unefoislesfiltresretirés,vérifiezl’ouverturedu
puisardetretireztoutesubstanceétrangère,si
telestlecas
3
Nettoyezlesfiltresavecunebrossedoucesous
lʼeaucourante.Rassemblezlesfiltresavantde
lesréinstaller.
4
Pourreplacerlesfiltresassemblés,positionnez
lebrasdevaporisationdefaçonàavoir
lʼouvertureenVpluslargepointéeverslʼavant.
Replacezlesfiltresdansleboîtieràfiltreset
fixez-lesenplaceentournantlefiltreintérieur
jusquʼàcequʼilsebloqueenplace.
AVERTISSEMENTS
• Prenezsoindenepastoucherauxbords
tranchantsdufiltreenacierinoxydablequand
vouslemanipulez.
MISES EN GARDE
• Retirezlesrésidusdʼalimentscoincésdansles
filtrespouréviterlʼaccumulationdebactéries
causantdesodeursetlesproblèmespossibles
devidange.
REMARQUE
• Pourdemeilleuresperformancesdelavage,
nettoyezlefiltreaprèschaquelavage.Sides
résidusalimentairesrestentdanslefiltre,ils
peuventcauserdemauvaisesodeurs.
• Enprésencedʼeaucalcaire,nettoyezlefiltreau
moinsunefoisparmoisàlʼaidedʼunebrosse
douce.
• Nettoyezlesfiltresàlʼaidedematériauxnon
abrasifsetdʼeautiède.
• Assurez-vousquelefiltreestbienassemblé
avantdedémarreruncycle.Durantlʼassemblage,
tournez-lefermementjusquʼàentendreunclic.
Horaire recommandé pour le nettoyage des filtres
Nombre de lavages
par semaine
Si vous lavez les
plats avant de les
placer dans le lave-
vaisselle
Si vous frottez
et rincez les
plats avant le
chargement
Si vous frottez
simplement les plats
avant le chargement
dans le lave-vaisselle
Si vous ne frottez
pas et ne rincez
pas les plats avant
le chargement
1-3 Tous les 6 mois Unefoisparan Quatrefoisparan Unefoisparmois
4-7 Tous les 6 mois Unefoisparan Quatrefoisparan
Deuxfoisparmois
(tousles15jours)
8-12 Tous les 6 mois Tous les 6 mois Tousles1,5mois Chaquesemaine
13-14 Tous les 6 mois Tous les 6 mois Tousles1,5mois
Deuxfoispar
semaine

49
ENTRETIEN
FRANÇAIS
Nettoyage des bras de lavage
Silestrousdubrasdelavagesontbloquéspardes
résidusalimentaires,lavaissellepourraitnepasêtre
biennettoyéeàcausedʼunjetdʼeauincorrect.
Ilestrecommandédenettoyerlesbrasdelavage
touteslesdeuxsemaines.
Nettoyage du bras de lavage
inférieur
1
Assurez-vousquelestrousdujetdʼeaunesont
pasbloquéspardesmiettesdenourriture.
2
Siunrésidualimentairebloquelestrousdubras
delavage,retirez-leavecuneépingleouunobjet
pointu.
MISES EN GARDE
• Pouréviterd’abîmerlesdifférentespiècesdu
gicleurrotatif,netirezpasdessusetneles
faitespastournermanuellement.
Nettoyage du bras de lavage
supérieur
1
Tirezlepaniersupérieurverslʼavant.Assurez-
vousquelestrousdujetdʼeaunesontpas
bloquéspardesmiettesdenourriture.
2
Siunnettoyageestnécessaire,retirezlegicleur
supérieurentournantl’écrousituéaubasdu
gicleur de
1
/
8
detourdanslesensinversedes
aiguillesd’unemontreetenletirantverslebas.
3
Rincezouagitezlebrasdelavagepourenlever
les miettes de nourriture.
4
Siunrésidualimentairebloquelestrousdubras
delavage,retirez-leavecuneépingleouunobjet
pointu.
5
Aprèsavoirenlevélerésidualimentaire,nettoyez
lesbrasdelavagesouslʼeaucourante.
6
Aprèsavoirnettoyélebrasdelavagesupérieur,
enfoncez-lepourleremettreenplace.Tournez
lʼécroudʼunhuitièmedetourhoraireetassurez-
vousquelʼécrouseverrouilledanssaposition
initiale.
7
Aprèslʼassemblage,vérifiezsilesbrasdelavage
tournent librement.

50
DÉPANNAGE
DÉPANNAGE
Foire aux questions
Q : Est-ce que lʼutilisation de ce lave-vaisselle nécessite un produit de rinçage?
R: Leproduitderinçageestfortementrecommandépouraméliorerlaperformancedeséchagedulave-
vaisselle.Afindʼéconomiserplusdʼénergie,cesystèmedeséchagehybridenʼutilisepasdʼélémentde
chauffagepourfavoriserleséchage.Leproduitderinçagejouedoncungrandrôledansleséchage.En
lʼabsencedeproduitderinçage,ilpeutresterdelʼeausurlesplatsetsurlacuve.Leproduitderinçage
permetdegarantirquelaplusgrandepartiedelʼeauaétéévacuéedesplatsàlafindurinçageetquele
chargementestprêtpourlecycledeséchage.
Q : Que puis-je faire si mes plats sont recouverts dʼun film brumeux et blanc après un lavage?
R: Lefilmbrumeuxestgénéralementcauséparlaréactiondesminérauxdelʼeauavecledétergentdu
lave-vaisselle.Assurez-vousdʼaborddenepastroputiliserdedétergent.ConsultezlasectionAjout
dedétergentdansledistributeurpourconnaîtrelesquantitésdedétergentrecommandées.Ajoutezun
rinçagesupplémentaireaucycle.Leslave-vaisselleLGnécessitentmoinsdʼeauqueleslave-vaisselle
traditionnels;parconséquent,unrinçagesupplémentaireaideàfairedisparaîtrelefilm.Silʼalimentation
eneaucontientducalcaire,ilpeutêtrenécessairedʼajouterunrenforçateurpourréglerleproblèmedes
marques.
Q : Comment puis-je faire disparaître la pellicule blanche dans la cuve?
R: Mesurez3cuillèresàsoupe(40g)d’acidecitriqueenpoudreetremplissezlecompartimentprincipalà
détergent.LancezlecycleMachine Clean.N’utilisezpasdedétergent.
Q : Quelles étapes puis-je suivre pour améliorer le séchage?
R: Laperformanceduséchageestdirectementattribuableàlachaleurrestantdanslacuveaprèslerinçage
àchaud.Sivotrelave-vaisselleestsituéloindevotrechauffe-eau,ilpeutêtrenécessairedʼouvrirle
robinetdʼeauchaudedelʼévieravantdecommenceruncycledelavage,afindʼassurerlʼévacuationde
lʼeaufroidedesconduites.Celagarantiraquevotrelave-vaissellereçoitdelʼeauchaudedudébutàlafin.
LeréglageHighTempaideégalementàmaintenirélevéelatempératuredelacuveinterneetcelledes
platsavantledébutduséchage.
Leslave-vaisselleLGsontconçuspourêtreutilisésavecunproduitderinçage.Leproduitdenettoyage
maximiselaquantitédʼeaudéjàévacuéedesplatsavantledébutducycledeséchage.Sivousutilisezun
produitderinçageetquelesperformancesnesontpassatisfaisantes,ajustezlemontantdeproduitde
rinçageenvoyé.Leréglagepardéfautestà2.Aubesoin,réglezceniveauà3pourutiliserplusdeproduit
derinçage.
L’eauatendanceàperlersurleplastiqueetlessurfacesantiadhésives,cequilesrendplusdifficilesà
sécher.Sivouslavezdesarticlesenplastiqueàl’aideducyclenormal,sélectionnezlesoptionsExtra
Dry ou Night Drypourobtenirdemeilleursrésultatsdeséchage;lesdeuxoptionspeuventégalement
êtrechoisiessimultanément.Lorsqueledistributeurd’agentderinçageestvide,l’optionExtra Dry est
sélectionnéeautomatiquement.
Laissezlelave-vaissellefinirlecycledeséchageavantdʼouvrirlaporte.Silaportesʼouvreencoursde
cycledeséchage,lachaleurnécessaireaufonctionnementdusystèmedeséchagehybridesʼéchappera.
Parconséquent,touslesplatsserontencorehumidesàlafinducycle.

51
DÉPANNAGE
FRANÇAIS
Q : Quʼest-ce que le système de séchage hybride?
R: Lelave-vaissellenesebasepassurunélémentdechauffagepourlaprocéduredeséchage;ilsebase
plutôtsurlachaleurretenueparlavaisselleetlacuvedurantlescyclesdelavageetderinçagepour
transformerlavapeurdʼeaudelacuveenhumidité.
Lʼairchaudethumidedulave-vaisselleestensuiteévacuéparunventilateurversuntuyaude
condensationsituédanslaporte.Lʼairserefroidit,cequicondenselʼhumidité.Lʼairdelapièceest
égalementventilédansletuyaupouraccélérerlerefroidissement.Lorsquelʼhumiditésecondenseen
eau,elleestévacuée.
REMARQUE
• Leproduitderinçageestnécessairepouraméliorerleséchage.Enlʼabsencedeproduitderinçage,il
peutresterdelʼeausurlesplatsetsurlacuve.
Q : Pourquoi le lave-vaisselle émet-il un sifflement?
R: Ilestimportantdedéterminerladuréedubruitetlemomentauquelilseproduit(quellepartieducycle).
Lorsquelʼeauestenvoyéedanslelave-vaisselle,unsifflementpeutseproduire.Celaestnormal.Si
lapressiondʼeauesttropforte,celui-ciseraplusfortetilserapeut-êtrenécessairedʼajusterlerobinet
dʼarrivéedʼeaupourfairebaisserlapressionsilebruitesttropfort.
Q : Quels types de plats peuvent être mis dans le lave-vaisselle?
R: Assurez-vousquelesplatsquevousmettezdanslelave-vaissellesontprévuspourcela.Lesplatsen
plastiquenesèchentpasaussiefficacementquelesplatsenverreetenmétal.Lesplatsenplastiquene
retiennentpaslachaleuraussiefficacementquelesplatsenverreetenmétal.Lesverresetlesplatsen
plastiquepeuventnécessiterunséchageàlamainavantdʼêtrerangésàlafinducycle.
Q : Puis-je effectuer un cycle de purge seulement?
R: Pourévacuerlʼeauquireste,appuyezetmaintenezleboutonStartpendanttroissecondesjusquʼàce
quelecyclesʼarrête.Unefoislʼeauévacuée,lelave-vaissellesemethorstension.
Q : Pourquoi mon lave-vaisselle sonne-t-il continuellement lorsque jʼouvre la porte en cours de cycle
ou juste après la fin dʼun cycle?
R: Celaestnormal.Lelave-vaissellevousavertitquelatempératureàlʼintérieurdelʼappareilesttrès
chaudeetdefaireattentionenplaçantvosmainsàlʼintérieur.Unefoisquelʼappareilarefroidi,lesignal
sonoresʼarrêtera.

52
DÉPANNAGE
Q : Quʼest-ce que Control Lock et comment lʼactive-t-on?
R: LafonctionnalitéControl Lock(verrouillagedescommandes)empêchelamodificationdescommandes
pendantuncycle.Ellen’empêchepaslaported’êtreouverteetn’empêchepasl’appareild’êtreéteint.
Pouractiveroudésactivercettefonctionnalité,appuyezsurDual Zone(deuxzones)pendanttrois
secondes.
Q : Puis-je ajouter une rallonge au tuyau de vidange?
R: Siunerallongedetuyaudevidangeestnécessaire,utilisezuntuyaude2ou3pieds(0,6à0,9m)
audiamètreintérieurde
5
/
8
po ou de
7
/
8
po(1,6cmou2,2cm)etuncoupleurpourraccorderlesdeux
extrémitésdetuyau.
Q : Un voyant à DEL clignote, lʼappareil émet un son et il ne démarre pas. Quʼest-ce qui ne va pas
avec le lave-vaisselle?
R: Ilsʼagitdʼunefonctiondesécurité.Laportedoitêtreferméedanslesquatresecondesaprèsavoir
appuyésurleboutonStart.Silaportenʼestpasferméedanslesquatresecondes,unvoyantDELse
metàclignoter,unetonalitésefaitentendreetlelave-vaissellenefonctionnepas.Pourdémarrerle
lave-vaisselle,ouvrezlaporteetvouspouvezsoitrefermerlaporteetappuyersurStart(commandes
frontales),soitappuyersurStartetrefermerlaportedanslesquatresecondessuivantes(commandes
surledessus).
Q : Avant de charger la vaisselle, est-ce que je dois la rincer?
R: Non,vousnʼavezpasbesoinderincerlavaisselleavantdelacharger,particulièrementsivousutilisez
lescyclesNormaletAuto.Lelave-vaissellerendlavaissellepropresansquevousayezàlarincerau
préalable.

53
DÉPANNAGE
FRANÇAIS
Avant dʼappeler le réparateur
Lʼappareilestéquipédʼunsystèmedesurveillancepourdétecteretdiagnostiquerlesproblèmesàunstade
précoce.Silʼappareilnefonctionnepascorrectementounefonctionnepasdutout,vérifiezleséléments
suivantsavantdʼappeleruntechnicien.
Problème Cause possible et solution
Le lave-vaisselle ne
fonctionne pas.
On nʼa pas appuyé sur le bouton Start.
• AppuyezsurleboutonStart.
La porte nʼest pas complètement fermée.
• Assurez-vousquelaporteestcomplètementferméeetverrouillée.
Lʼalimentation ou le câble dʼalimentation électrique nʼest pas raccordé(e).
• Raccordezlʼalimentationoulecâbledʼalimentationélectrique.
Le fusible est grillé ou le disjoncteur a basculé.
• Remplacezlefusibleouréenclenchezledisjoncteur.
Le verrouillage des commandes est activé.
• DésactivezlafonctionnalitéControl Lock(verrouillagedescommandes).
Le lave-vaisselle
fonctionne trop
longtemps.
Le lave-vaisselle est raccordé à lʼeau froide.
• Vérifiezleraccordementdelʼalimentationeneauouleréglageduchauffe-eau.
(Lechauffagedelʼeaufroideestpluslong.)
Odeur
Le cycle précédent a cessé avant la fin et lʼeau résiduelle reste dans le lave-
vaisselle.
• Allumezlʼappareil,exécutezlʼoptionAnnulerpourévacuerlʼeaurésiduelle,puis
exécutezlecycleTurboavecdudétergent,maisavecunlave-vaissellevide.
Des résidus alimentaires restent au fond de lʼappareil ou dans le filtre.
• NettoyezlefiltreetlʼintérieurcommeindiquéàlasectionEntretiendumanuel
dupropriétaire.
Des plats non lavés sont laissés dans lʼappareil pendant une période
prolongée.
• Exécutezuncycleavecunetassedevinaigreblancdansunverreouunbol
pourlave-vaisselleplacédanslepaniersupérieur.(Levinaigreestunacideet,
encasdʼutilisationintensive,ilrisquedʼendommagervotreappareil.)
De lʼeau reste dans la
cuve après la fin du
cycle.
Le tuyau de vidange est plié ou obstrué.
• Ajustezletuyauouenlevezcequifaitobstruction.

54
DÉPANNAGE
Problème Cause possible et solution
Il reste des résidus
dʼaliments sur les plats.
La sélection du cycle est inadéquate.
• Sélectionnezlecycleadéquatselonleniveaudesaletéetletypedevaisselleàlaver.
La température de lʼeau est trop basse.
• Vérifiezleraccordementdelʼalimentationeneauouleréglageduchauffe-eau.
Le détergent du lave-vaisselle nʼa pas été utilisé.
• Utilisezundétergentrecommandé.
La pression de lʼarrivée dʼeau est trop faible.
• Lapressiondelʼeaudoitsesituerentre20et80psi.
Les orifices du jet dʼeau des bras de lavage sont bloqués.
• Nettoyezlesbrasdelavage.
Chargement incorrect des plats.
• Assurez-vousquelesplatsnebloquentpaslarotationdesbrasdelavageet
nʼinterfèrentpasaveclʼouverturedudistributeurdedétergent.
Les filtres sont obstrués.
• Nettoyezlesfiltres.
Ternissures sur les
gobelets.
Trop de détergent et trop dʼeau dure.
• Utilisezmoinsdedétergentetunproduitderinçagepourlimiterleseffetsdeceproblème.
Marques noires ou
grises sur la vaisselle.
Les objets en aluminium frottent les plats pendant le cycle.
• Replacezlesplats.
Film jaune ou marron
sur les parois intérieures
du lave-vaisselle.
Taches de café ou de thé.
• Éliminezcestachesàlʼaidedʼunproduitdétachant.
Traces et film sur les
plats.
Température de lʼeau trop basse.
• Latempératuredelʼalimentationeneaudoitêtredʼaumoins120°F(49°C)
pourobtenirunlavageoptimal.
Surcharge.
• Nesurchargezpaslelave-vaisselle.
Chargement incorrect.
• ConsultezlasectionFonctionnement.
Pression dʼeau insuffisante.
• Lapressiondelʼeaudoitsesituerentre20et80psi.
Détergent insuffisant.
• Utilisezlaquantitédedétergentrecommandée.Consultezlasection
Fonctionnement.
Le distributeur de produit de rinçage est vide.
• Rechargezledistributeurdeproduitderinçage.
Accumulation dʼeau dure dans la cuve.
• Retireztouslesplats,lesustensilesetlesupportàustensilesdulave-vaisselle.Seuls
lespaniersdoiventresterdanslacuve.Pourdesrésultatsoptimaux,utilisezdela
poudredʼacidecitrique(enventedanslasectiondelamiseenconservedelaplupart
desépiceriesouenligne).Mesurez3cuillèresàsoupe(40g)depoudredʼacide
citrique.Remplissezlecompartimentprincipaldelapoudremesurée.Sivousnʼêtes
pasenmesuredevousprocurerdelapoudredʼacidecitrique,versezenvironune
tasse(200à300ml)devinaigreblancdansunbolpeuprofondetplacezcelui-cidans
lepaniersupérieur.ExécutezuncycleMachineClean.Nʼutilisezpasdedétergent.

55
DÉPANNAGE
FRANÇAIS
Problème Cause possible et solution
Bruit
Un certain niveau de bruit est normal pendant le fonctionnement.
• Ouvertureducouvercledubacdedétergent.
• Lapompedevidangeestactivéeaudébutducycledevidange.
Le lave-vaisselle nʼest pas à niveau.
• Réglezlespiedsdenivellement.
Un bras de lavage heurte les plats.
• Replacezlesplats.
Les plats ne sèchent
pas.
Le distributeur de produit de rinçage est vide.
• Vérifiezetremplissezledistributeurdeproduitderinçagesʼilestvide.
Les lampes ne
sʼallument pas.
Le bloc dʼalimentation nʼest pas branché.
• Branchezlʼalimentationélectrique.
Les bras de lavage ne
tournent pas rondement.
Les orifices des bras de lavage sont bloqués par les résidus alimentaires.
• Nettoyezlesorificesdesbrasdelavage.
Le panier supérieur nʼest
pas droit.
Le panier est mal réglé.
• ConsultezlasectionPanier supérieur à hauteur réglable.
Le lave-vaisselle émet
un signal sonore continu
lorsque la porte est
ouverte pendant un
cycle ou immédiatement
à la fin dʼun cycle.
Il sʼagit dʼune fonction de sécurité. Un contact avec de la vapeur qui
sʼéchappe ou des articles chauds dans le lave-vaisselle peut entraîner des
blessures.
• Fermezlaportejusquʼàcequelelave-vaisselleetsoncontenuaient
suffisammentrefroidi.Lesignalsonoresʼarrêteralorsquelaporteserafermée
oulorsquelatempératureintérieureauradiminué.
La porte ne se ferme pas
complètement.
Le panier à couverts n’est pas correctement inséré.
• Poussezlapoignéedelaportepourbienfermerlaportejusqu’àcequ’elle
s’enclenche.
Lorsquʼil est en marche,
le lave-vaisselle émet
un son si on touche au
panneau.
Le lave-vaisselle peut émettre un son de commande désactivée si vous vous
heurtez au panneau de commande ou y touchez durant le fonctionnement
de lʼappareil. Seules les touches Power, Start et Control Lock sont activées
durant le fonctionnement de lʼappareil pour empêcher le changement
accidentel de réglage de cycle.
• Vouspouvezdésactiverlestonalitésémisesparlestouchesenappuyantsur
Half Loadpendanttroissecondes.
• Lʼalarmedefindecycleetlestonalitésdʼalertesdesécuritédemeureront
fonctionnelles.
Le cycle de lavage a été
interrompu.
On a ouvert la porte durant le cycle.
• Silaporteestouvertedurantuncycle,ilfautappuyersurlatoucheStartdans
undélaide4minutesoulʼappareilsʼéteindraettouslesréglagesseront
annulés.
Il y a une fuite à lʼavant
de lʼappareil.
Le lave-vaisselle nʼa pas été installé de niveau.
• Assurez-vousquelʼappareilestinstallédeniveaudʼuncôtéàlʼautreetde
lʼavantàlʼarrière.Consultezlesinstructionsdenivellementdanslasection
Installation.
Utilisation du mauvais type de détergent.
• Siuneproductionexcessivedemoussecauseunefuite,laissezlaquantitéde
moussediminuerpendant24heures,puisnettoyezl’intérieurdelacuveavec
dulait.

56
DÉPANNAGE
Problème Cause possible et solution
Votre appareil
domestique et votre
téléphone intelligent ne
sont pas connectés au
réseau Wi-Fi.
Le mot de passe donnant accès au réseau Wi-Fi auquel vous essayez de
vous connecter est incorrect.
• TrouvezleréseauWi-Ficonnectéàvotretéléphoneintelligentetsupprimez-le,
puisenregistrezvotreappareilsurl’applicationLG ThinQ.
Les Données mobiles de votre téléphone intelligent sont activées.
• Désactivezlesdonnées mobilesdevotretéléphoneintelligentetenregistrez
l’appareilenutilisantleréseauWi-Fi.
Le nom du réseau sans fil (SSID) est erroné.
• Lenomduréseausansfil(SSID)doitêtreunecombinaisondelettresetde
chiffresanglais.(N’utilisezpasdecaractèresspéciaux.)
La fréquence du routeur n’est pas de 2,4 GHz.
• Seuleunefréquencederouteurde2,4GHzestpriseencharge.Réglezle
routeursansfilà2,4GHzetconnectez-yl’appareil.Pourconnaîtrelafréquence
durouteur,informez-vousauprèsdevotrefournisseurdeservicesInternetou
dufabricantdurouteur.
La distance entre l’appareil et le routeur est trop grande.
• Siladistanceentrel’appareiletlerouteuresttropgrande,lesignalpeutêtre
faibleetlaconnexionpeutnepasêtreconfiguréecorrectement.Déplacezle
routeurafinqu’ilsoitplusprèsdel’appareil.
P1, P2, P3 ou P4 apparaît
à l’écran.
Le cycle téléchargé est sélectionnée.
• Celan’estpasuncoded’erreur.Cecodeindiquelecycletéléchargéencours.
n:#, U:#, d:# ou t#
s’affiche à l’écran. (# =
un chiffre)
Le mode Test est sélectionné.
• Celan’estpasuncoded’erreur.Cecodeestemployélorsdelamiseàl’essai
dulavevaisselle.Éteignezl’appareil,puisrallumez-le,etlecodedisparaîtra.
L0, L1, L2, L3 ou L4
apparaît à l’écran.
Le mode de réglage du niveau d’agent de rinçage est sélectionné.
• Celan’estpasuncoded’erreur.Cecodeindiqueleniveauactueld’agent
derinçage.Pourobtenirdavantagederenseignements,veuillezconsulterla
section Ajout dʼagents nettoyants.
CL s’affiche à l’écran.
• Leverrouillagedescommandesestactivé.
• Celan’estpasuncoded’erreur.Cecodeindiquequeleverrouillagedesécurité
estactivé.MaintenezlesboutonsDual Zoneenfoncéspendanttroissecondes.

57
DÉPANNAGE
FRANÇAIS
Codes dʼerreur
Problème Cause possible et solution
IE
Problème dʼarrivée dʼeau.
• Vérifiezsiletuyaudʼarrivéedʼeauestobstrué,pliéougelé.
• Vérifiezlʼalimentationeneau.
OE
Problème de vidange.
• Vérifiezsiletuyaudevidangedelʼeauestobstrué,pliéougelé.
Obstruction de la coupure antirefoulement ou du broyeur.
• Nettoyezlacoupureantirefoulementoulebroyeur.
Les filtres sont obstrués.
• Nettoyezlesfiltres.
bE
Surplus de mousse causé par un détergent inadéquat, tel que du liquide vaisselle.
• N’utilisezpasdeliquidesvaisselleclassiques.Utilisezuniquementdesdétergentsconçus
pourêtreutilisésdansdeslave-vaissellesautomatiques.
• Pournettoyerlesrésidusdedétergentdelacuve,versezenviron4à8oz(100à200ml)
delaitdansunbolpeuprofondetplacez-ledanslepanierduhaut,puisdémarrezlecycle
automatiquedulave-vaisselle.
Incapacité de mettre le lave-vaisselle au niveau.
• Assurez-vousquel’appareilestadéquatementmisauniveau.
AE
Fuite dʼeau.
• Coupezlʼalimentationeneaudulave-vaisselleetcontactezunCentredʼinformationàla
clientèledeLGElectronicsencomposantle1800984-6306(É.-U.)oule1888542-2623
(Canada).
• Lelave-vaisselleémetunetonalitédʼalertependant10secondespuisactivelapompede
vidangedefaçonintermittente.Silʼalimentationélectriqueestinterrompue,lʼappareilse
rallumeautomatiquementjusquʼàcequelʼerreurAEsoitrésolue.
FE
Lʼalimentation en eau est trop grande.
• VeuillezappeleruncentredʼinformationàlaclientèledeLGElectronicsaunuméro
1800984-6306(États-Unis)1888542-2623(Canada).
HE
Circuit de chauffage défectueux.
• VeuillezappeleruncentredʼinformationàlaclientèledeLGElectronicsaunuméro
1800984-6306(États-Unis)1888542-2623(Canada).
tE
Défaillance du thermistor.
• VeuillezappeleruncentredʼinformationàlaclientèledeLGElectronicsaunuméro
1800984-6306(États-Unis)1888542-2623(Canada).
LE
Défaillance du moteur.
• VeuillezappeleruncentredʼinformationàlaclientèledeLGElectronicsaunuméro
1800984-6306(États-Unis)1888542-2623(Canada).
NE
Défaillance du moteur Vario.
• VeuillezappeleruncentredʼinformationàlaclientèledeLGElectronicsaunuméro
1800984-6306(États-Unis)1888542-2623(Canada).

58
GARANTIE LIMITÉE
GARANTIE LIMITÉE
CANADA
AVISD’ARBITRAGE:LAPRÉSENTEGARANTIELIMITÉECONTIENTUNEDISPOSITIONSUR
L’ARBITRAGEQUIEXIGEQUELERÈGLEMENTDESDIFFÉRENDSENTREVOUSETLGS’EFFECTUE
PARARBITRAGEEXÉCUTOIREPLUTÔTQUEDEVANTUNTRIBUNAL,ÀMOINSQUELESLOISDE
VOTREPROVINCEOUTERRITOIREL’INTERDISENTOUQUE,DANSUNAUTRETERRITOIREDE
COMPÉTENCE,VOUSVOUSPRÉVALIEZD’UNEOPTIONDERETRAIT.LESRECOURSCOLLECTIFSET
LESPROCÈSDEVANTJURYNESONTPASAUTORISÉSPARLEPROCESSUSD’ARBITRAGE.VEUILLEZ
VOUSRÉFÉRERCI-DESSOUSÀL’ARTICLE«PROCÉDUREDERÈGLEMENTDEDIFFÉREND».
GARANTIE:Sivotrelave-vaisselleLG(«lʼappareil»)tombeenpannesuiteàunedéfaillancematérielleouàunvice
defabricationdansdesconditionsnormalesdʼutilisationdomestiquedurantlapériodedegarantiedétailléeci-dessous,
LGCanadaseréserveledroitderéparerouderemplacerlʼappareilsousréceptiondelapreuvedʼachatoriginale.Cette
garantienesʼappliquequʼàlʼacheteuroriginaldelʼappareiletnʼestvalidequepourlesappareilsdistribuésauCanada
parLGCanadaouundistributeurcanadienautorisé.Lagarantienesʼappliquequʼauxproduitssituésetutilisésau
Canada.Lacouverturedesréparations“àdomicile”,pourproduitsengarantie,serafournieenautantqueleproduitse
trouvedansunrayonde150kmducentredeserviceautorisé(ASC)leplusprès,telquedéterminéparLGCanada.Si
votreproduitestsituéàl’extérieurd’unrayonde150kmducentredeservice,telquedéterminéparLGCanada,ilen
tiendradevotreresponsabilitéd’apporterl’appareil,àvosfrais,aucentredeservicepourlaréparationengarantie.
PÉRIODEDEGARANTIE:(Note:Siladatedʼachatoriginalenepeutêtrevérifiée,lagarantiecommencera
soixante(60)joursaprèsladatedefabrication.)
Lave-vaisselle
Garantieétenduedescomposants(piècesseulement)(Lamain-dʼoeuvre
seraàlachargeduclientun(1)anaprèsladatedʼachat.)
Un(1)anaprèsladatedʼachat
originaldelʼappareil.
Cinq(5)ansaprèsladatedʼachat
originaldelʼappareil
Dix(10)ansaprèsladatedʼachat
originaldelʼappareil.
Main-d'œuvre/pièces
Lebandeaudecontrôleprincipal*,
Panier,Contre-porteeninox,
Compartiment
Moteur DD
(piècesinternes/fonctionnelles
seulement)
*LebandeaudecontrôleprincipalestlocalisésurladroiteduLave-vaissellesurlavuedeface.
• Lesproduitsetpiècesderemplacementsontgarantispourlaportionrestantedelapériodedegarantie
originaleouquatre-vingt-dix(90)jours,selonlapériodelapluslongue.
• Lesproduitsetpiècesderemplacementpeuventêtreneufsouremisàneuf.
• LeCentredeserviceautoriséLGgarantitsesréparationspendanttrente(30)jours.
LASEULERESPONSABILITÉDELGCANADASELIMITEÀLAGARANTIEDÉFINIECI-DESSOUS.HORMIS
DANSLESCONDITIONSEXPLICITEMENTDÉFINIESAUXPRÉSENTES,LGCANADANEFAITAUCUNE
GARANTIEOUCONDITIONPARRAPPORTÀLʼAPPAREIL,QUʼELLESOITEXPRESSEOUIMPLICITE,Y
COMPRIS,SANSLIMITATION,TOUTEGARANTIEIMPLICITEDʼAPPLICATIONOUDECONFORMITÉÀUN
USAGEPARTICULIER,ETAUCUNEDÉCLARATIONNELIERALGCANADA.LGCANADANʼAUTORISE
PERSONNEÀCRÉEROUÀASSUMERUNEAUTREGARANTIEOURESPONSABILITÉPARRAPPORT
ÀCETAPPAREIL.DANSLESCASOÙUNEGARANTIEOUCONDITIONESTREQUISEPARLALOI,LA
DURÉEDECELLE-CIESTLIMITÉEÀLAPÉRIODEDEGARANTIEEXPRESSECI-DESSUS.LGCANADA,
LE FABRICANT OU SON DISTRIBUTEUR NE SAURAIENT ÊTRE RESPONSABLES DES DOMMAGES
INCIDENTS,CONSÉCUTIFS,SPÉCIAUX,DIRECTSOUINDIRECTS,PERTEDEVALEUR,DEBÉNÉFICES,
DOMMAGESPUNITIFSOUEXEMPLAIRESOUAUTRES,QUʼILSSURVIENNENTDIRECTEMENTOU
INDIRECTEMENTDʼUNERUPTUREDECONTRAT,ESSENTIELLEOUNON,OUDETOUTACTEOU
OMISSION,TORTOUAUTRE.
Cettegarantievousdonnedesdroitslégauxparticuliers.Dʼautresdroitspeuventvousêtreaccordésenfonction
devotrerégionetdesesloisapplicables.Touteconditiondecettegarantiequirejetteoumodifieunecondition
ougarantieimplicitedanslecadredesloisrégionalesestdissociablelorsquʼelleentreenconflitavecleslois
régionales,sansquecelanʼaffectelerestedesconditionsdecettegarantie.

59
GARANTIE LIMITÉE
FRANÇAIS
LA PRÉSENTE GARANTIE LIMITÉE NE COUVRE PAS CE QUI SUIT :
• Lesinterventionsdelivraison,depriseenchargeoudʼinstallationduproduit;lalivraisondeconseilsau
clientsurlefonctionnementdelʼappareil;laréparationouleremplacementdesfusiblesoulacorrectiondu
branchementélectriqueoudelaplomberie,oulacorrectionderéparationsoudʼinstallationsnonautorisées.
• Lapannedelʼappareilencasdepannedecourantoudʼarrivéeélectriqueinadaptée.
• Lesdommagescauséspardestuyauxdʼeauquifuientquisontinadaptésougelés,despetitstuyauxde
vidange,unearrivéedʼeauinadaptéeoucoupée,ouunearrivéedʼairinadaptée.
• Lesdommagesrésultantdufonctionnementdelʼappareilenatmosphèrecorrosiveoucontraireauxconsignes
détailléesdanslemanueldupropriétairedelʼappareil.
• Lesdommagesàlʼappareilcausésparunaccident,lesparasites,lafoudre,levent,unincendie,les
inondationsoulescatastrophesnaturelles.
• Lesdommagesoulespannesdelʼappareilcauséesparunemodificationoualtérationnonautorisée,ou
lʼusagedétourné,ourésultantdʼunefuitedʼeauliéeàunemauvaiseinstallation.
• Lesdommagesoupannesdelʼappareilcausésparuncourantélectriqueoudescodesdeplomberie
incorrects,ouunusagecommercialouindustrielinapproprié,ouuneutilisationdʼaccessoires,decomposants
oudeproduitsdenettoyagenonapprouvésparLGCanada.
• Lesdommagescausésparletransportetlamanutention,ycomprislesrayures,bosses,entaillesouautres
dommagesàlafinitiondelʼappareil,àmoinsquecesdommagesnerésultentdedéfautsdepièceoumain-
d’œuvreetsoientrapportésdanslapremièresemainesuivantlalivraison.
• Lesdommagesetlespiècesmanquantespourtoutproduitutiliséauxfinsdedémonstration,toutproduitdéjà
déballéavantl’achat,toutproduitvenduaurabaisettoutproduitremisàneuf.
• Lesappareilsdontlesnumérosdesérieoriginauxontétéenlevés,altérésounepeuventpasêtredéterminés
facilement.Lemodèleetlenumérodesérie,ainsiquelafacturedʼachatoriginale,sontnécessairesàla
validationdelagarantie.
• Lesaugmentationsdesfraisdefonctionnementetdesautresdépensesdefonctionnement.
• Leremplacementdesampoules,desfiltresoudesconsommables.
• Lesréparationslorsquevotreappareilestutilisédansdesconditionsautresquenormalesetdomestiques
(ycompris,sanslimitation,lʼutilisationcommerciale,dansdesbureauxoudesinstallationsrécréatives)ou
contrairesauxconsignesétabliesdanslemanueldupropriétairedelʼappareil.
• Lescoûtsassociésauretraitdelʼappareildevotrefoyerpourréparation.
• Leretraitetlaréinstallationdelʼappareilsʼilestsituédansunendroitinaccessibleousʼilnʼestpasinstallé
conformémentauxconsignesdʼinstallationspubliées,ycomprisdanslemanueldʼinstallationetdansle
manueldupropriétairedelʼappareil.
• Lesaccessoiresdelʼappareilcommelesbacsdeporte,lespaniers,lespoignées,lesétagères,etc.Les
piècesautresquecellesinclusesdansleproduitdʼoriginesontégalementexclues.
• Lesdommagesrésultantdelamauvaiseutilisation,installation,réparationouentretien,oudelʼabusde
lʼappareil.LamauvaiseréparationcomprendlʼutilisationdepiècesnonapprouvéesouindiquéesparLG
Canada.
Tous les frais associés aux circonstances dʼexclusion de garantie ci-dessus seront à la charge du client.
Pourconsulterlʼensembledesdétailsdelagarantieainsiquelʼassistanceàlaclientèle,veuilleznousappelerou
visiternotresiteWeb:
Sansfrais:1-888-542-2623(7hàminuit-l’annéelongue)etsélectionnezlʼoptionappropriéeaumenu,ou
Visitezlesitewebà:http://www.LGSIGNATURE.com

60
GARANTIE LIMITÉE
PROCÉDURE DE RÈGLEMENT DE DIFFÉREND:
SAUFLAOÙLALOIL’INTERDIT,TOUTDIFFÉRENDENTREVOUSETLGASSOCIÉDEQUELQUEFAÇON
QUECESOITÀLAPRÉSENTEGARANTIELIMITÉESERÈGLEEXCLUSIVEMENTPARARBITRAGE
EXÉCUTOIREPLUTÔTQUEDEVANTUNTRIBUNALDEDROITCOMMUN.SAUFLAOÙLALOIL’INTERDIT,
VOUSETLGRENONCEZIRRÉVOCABLEMENTÀTOUTDROITÀUNPROCÈSDEVANTJURY,AINSIQU’À
EXERCERUNRECOURSCOLLECTIFOUÀYPARTICIPER.
Définitions.Auxfinsduprésentarticle,«LG»désigneLGElectronicsCanadaInc.,sessociétésmères,
sesfilialesetsessociétésaffiliéesettousleursdirigeants,administrateurs,employés,agents,bénéficiaires,
détenteursprécédentsdesmêmesdroits,successeurs,cessionnairesetfournisseurs;«différend»et«
réclamation»englobenttoutdifférend,réclamationoulitigedequelquesortequecesoit(fondéssurune
responsabilitécontractuelle,délictuelle,légale,réglementaireoudécoulantd’uneordonnance,parfraude,
faussereprésentationousousquelquerégimederesponsabilitéquecesoit)découlantdequelquefaçonquece
soitdelavente,desconditionsoudel’exécutionduproduitoudelaprésenteGarantielimitée.
Avis de différend.Sivousprévoyezengageruneprocédured’arbitrage,vousdevezd’abordenvoyeràLG
unpréavisécritd’aumoins30joursàl’adressesuivante:ÉquipejuridiqueLGECI,NorelcoDrive,NorthYork,
Ontario,CanadaM9L2X6(l’«avisdedifférend»).VousetLGconvenezdediscuterentoutebonnefoipour
tenterderéglerledifférendàl’amiable.L’avisdoitmentionnervotrenom,votreadresse,votrenumérode
téléphone,leproduitfaisantl’objetdelaréclamation,lanaturedelaréclamationetlaréparationdemandée.
SivousetLGneparvenezpasàréglerledifférenddansles30jourssuivantlaréceptiondel’avisdedifférend
parLG,ledifférenddoitêtreréglépararbitrageexécutoireconformémentàlaprocédureétablieauxprésentes.
VousetLGconvenezque,toutaulongduprocessusd’arbitrage,lesmodalités(ycomprislesmontants)
detouteoffrederèglementformuléeparvousouparLGneserontpasdivulguéesàl’arbitreetresteront
confidentiellesàmoinsd’accordcontraireentrelesdeuxpartiesouquel’arbitrerègleledifférend.
Entente d’arbitrage exécutoire et renonciation à un recours collectif.Silaréclamationn’apuêtreréglée
dansles30jourssuivantlaréceptiondel’avisdedifférendparLG,vousetLGconvenezdeneréglerles
réclamationsvousopposantquepararbitrageexécutoireaucasparcas,àmoinsquevousvousprévaliez
del’optionderetraitévoquéeplushautouquevousrésidiezdansunterritoiredecompétencesquiinterditla
pleineapplicationdecetteclausedanslecasderéclamationsdecetype(danslequelcas,sivousêtesun
consommateur,cetteclausenes’appliqueraquesivousacceptezexpressémentl’arbitrage).Danslamesure
oùlaloienvigueurlepermet,aucundifférendentrevousetLGnepeutêtrecombinéouregroupéavecun
différendfaisantintervenirleproduitoularéclamationd’unepersonneouentitétierce.Plusprécisémentet
sanslimiterlaportéedecequiprécède,saufdanslamesureoùunetelleinterdictionn’estpasautoriséeen
droit,enaucuncasundifférendentrevousetLGnepeutêtretraitédanslecadred’unrecourscollectif.Aulieu
del’arbitrage,lespartiespeuventintenteruneactionindividuelledevantunecourdespetitescréances,mais
cetteactionnepeutpasêtreintentéedanslecadred’unrecourscollectif,saufdanslamesureoùunetelle
interdictionn’estpasautoriséeendroitdansvotreprovinceouterritoiredecompétencespouruneréclamation
encausequinousoppose.
Règles et procédures d’arbitrage.Poursoumettreuneréclamationàunarbitrage,l’unedesdeuxparties,soit
vousouLG,doitdéposerunedemandeécriteàceteffet.L’arbitrageestprivéetconfidentielets’effectueselon
uneprocéduresimplifiéeetaccéléréedevantunarbitreuniquechoisiparlespartiesconformémentauxlois
etrèglementsenvigueurportantsurl’arbitragecommercialdevotreprovinceouterritoirederésidence.Vous
devezégalementenvoyerunecopiedevotredemandeécriteàLGElectronicsCanadaInc.,LegalDepartment
-Arbitration,20NorelcoDrive,NorthYork,OntarioM9L2X6.Laprésentedispositionsurl’arbitrageestrégie
parlesloisetrèglementssurl’arbitragecommercialapplicablesdevotreprovinceouterritoire.Lasentence
arbitralepeutdonnerlieuàunjugementden’importequeltribunalcompétent.Touteslesdécisionsrelèventde
l’arbitre,àl’exceptiondesquestionsassociéesàlaportéeetàl’applicabilitédeladispositionsurl’arbitrageet
àl’arbitrabilitédudifférend,quisontduressortdutribunal.L’arbitreesttenuderespecterlesmodalitésdela
présente disposition.
Droit applicable.Lesloisdevotreprovinceouterritoirede’achatrégissentlaprésenteGarantielimitéeettout
différendentrenous,saufdanslamesureoùdetellesloissontsupplantéespardesloisfédérales,provinciales
outerritorialesapplicablesousontincompatiblesaveccesdernières.Sil’arbitragen’estpasautorisépour
régleruneréclamation,unepoursuite,undifférendouunlitigenousopposant,nousnousenremettronsàla
compétenceexclusivedestribunauxdevotreprovinceouterritoirede’achatcompétencepourlerèglementdela
réclamation,delapoursuite,dudifférendoudulitigenousopposant.

61
GARANTIE LIMITÉE
FRANÇAIS
Frais et coûts.Aucunsfraisnesontexigiblespourentameruneprocédured’arbitrage.Àlaréceptiondevotre
demanded’arbitrageécrite,LGréglerarapidementlatotalitédesfraisdedépôtdelademanded’arbitrage,sauf
sivousréclamezdesdommages-intérêtssupérieursà25000$.Danscecas,lepaiementdecesfraissera
régiparlesrèglesd’arbitrageapplicables.Saufdispositioncontraireauxprésentes,LGpaieratouslesfraisde
dépôtdedemandeetd’administrationainsiqueleshonorairesdel’arbitreconformémentauxrèglesd’arbitrage
applicablesetàlaprésentedispositionsurl’arbitrage.Sivousremportezl’arbitrage,LGrègleravosfraiset
honorairesjuridiquesaprèsavoirdéterminés’ilssontraisonnablesensefondantsurdesfacteurscomme,entre
autres,lemontantdel’achatetlemontantdelaréclamation.Sil’arbitrejugequelemotifdelaréclamationou
lesréparationsdemandéessontfutilesousefondentsurdesmotifsdéplacés(auregarddesloisapplicables),
lepaiementdetouslesfraisd’arbitrageserarégiparlesrèglesd’arbitrageapplicables.Dansuntelcas,vous
acceptezderembourseràLGlatotalitédesmontantsversésqu’ilvousrevientautrementdepayerenvertudes
règlesd’arbitrageapplicables.Saufdispositioncontraireetsielleremportel’arbitrage,LGrenonceàtousses
droitsdevousréclamerdesfraisethorairesjuridiques.
Audience et lieu de l’arbitrage.Sivotreréclamationestégaleouinférieureà25000$,vouspouvezopter
pourunarbitrageconduitselonl’unedesmodalitéssuivantesuniquement:1)surexamendesdocuments
remisàl’arbitre,2)paraudiencetéléphoniqueou3)paraudienceenpersonneselonlesdispositionsdesrègles
d’arbitrageapplicables.Sivotreréclamationdépasse25000$,ledroitàuneaudienceseradéfiniparlesrègles
d’arbitrageapplicables.Lesaudiencesarbitralesenpersonnesetiendrontàl’endroitleplusprocheetleplus
pratiquepourlesdeuxpartiessituédansvotreprovinceouvotreterritoirederésidence,saufsinousconvenons
mutuellementd’unautrelieuoud’unarbitragepartéléphone.
Option de retrait.Vouspouvezvousretirerdelaprésenteprocédurederèglementdedifférend.Danscecas,ni
vousniLGnepouvezimposeràl’autrepartiedeparticiperàuneprocédured’arbitrage.Pourvousprévaloirde
l’optionderetrait,vousdevezenvoyerunpréavisàLGdanslestrente(30)jourscivilsàcompterdeladatede
l’achatduproduitparlepremieracheteuri)dansuncourrieladresséà[email protected]etdontlaligned’objet
portelamention«Retraitdel’arbitrage»ouii)encomposantle1-800-980-2973.Quecesoitparcourrielou
partéléphone,vousdevrezdonnera)votrenometvotreadresse;b)ladated’achatduproduit;c)lenomoule
numérodemodèleduproduitetd)lenumérodesérie[qu’ilestpossibledetrouveri)surleproduitouii)enliqne
auhttps://www.lg.com/ca_fr/soutien/reparationgarantie/demande-reparation,Trouvermesnumérosdemodèleet
de série].
Sivousvousprévalezdel’optionderetrait,lesloisdevotreprovinceouterritoirederésidencerégissentla
présenteGarantielimitéeettoutdifférendentrenous,saufdanslamesureoùdetellesloissontsupplantées
pardesloisfédérales,provincialesouterritorialesapplicablesousontincompatiblesaveccesdernières.Si
l’arbitragen’estpasautorisépourrégleruneréclamation,unepoursuite,undifférendouunlitigenousopposant,
nousnousenremettronsàlacompétenceexclusivedestribunauxdevotreprovinceouterritoiredecompétence
pourlerèglementdelaréclamation,delapoursuite,dudifférendoudulitigenousopposant.
Vousnepouvezvousprévaloirdel’optionderetraitquedelamanièredécriteplushaut(c’est-à-direparcourriel
oupartéléphone).Aucunautretyped’avisneseraprisencomptepourleretraitdelaprésenteprocédurede
règlementdedifférend.Lefaitdeseretirerdelaprésenteprocédurederèglementdedifférendnecompromet
d’aucunefaçonlaprotectionaccordéeenvertudelaGarantielimitée,etvouscontinuerezàjouirdetousles
avantagesprévusparlaGarantielimitée.Sivousconservezceproduitsansvousprévaloirdel’optionderetrait,
vousacceptezlesconditionsgénéralesdeladispositionsurl’arbitrageénoncéeci-dessus.
Conflit de modalités.Encasdeconflitoud’incompatibilitéentrelesmodalitésdelaprésentegarantielimitée
etlecontratdelicenced’utilisation(CLU)encequiconcernelerèglementdesdifférends,lesmodalitésdela
présentegarantielimitéecontrôlentetrégissentlesdroitsetobligationsdespartiesetontpréséancesurleCLU.

62
GARANTIE LIMITÉE
Exceptions à la garantie (É.-U. et Canada)
Piètres résultats de lavage
attribuables à des impuretés
restées dans le filtre.
• Nettoyezlesfiltres
périodiquement.
Piètres résultats de lavage
attribuables à un chargement
incorrect ou excessif : le
bras de lavage ne tourne pas
ou le distributeur de savon
est obstrué.
• Assurez-vousquʼaucun
platniaucunustensile
nʼobstruelarotationdes
brasdelavage.
• Neplacezpasunplatau-
dessusdʼunautre.
Piètres résultats de séchage
attribuables à un manque de
produit de rinçage.
• Utilisezunproduitde
rinçageouundétergent
combiné.
Lʼeau nʼentre pas, car la
vanne dʼeau nʼest pas
ouverte.
Erreur IE
• Ouvrezlerobinetet
vérifiez-le.
Lʼeau nʼentre pas, car le
tuyau dʼarrivée dʼeau est
plié.
Erreur IE
• Réinstallezletuyau
dʼentréedʼeau.
Lʼeau nʼévacue pas, car le
tuyau de vidange est plié.
Erreur OE
• Réinstallezleboyau
dʼévacuation.
Le bouchon du broyeur à
déchets nʼest pas retiré.
Erreur OE
• Retirezlebouchondu
broyeur.
Des débris bloquent le
broyeur ou la coupure
antirefoulement.
Erreur OE
• Nettoyezlebroyeuroula
coupureantirefoulement.
Le raccordement de la
soupape dʼaspiration et
du tuyau de vidange est
problématique en raison
dʼune installation incorrecte.
Fuite externe
• Réinstallezletuyau.
La porte nʼouvre pas ou ne
ferme pas en raison dʼune
mauvaise mise à niveau.
• Réglezlespiedsde
nivellement inférieurs
avantàlahauteurrequise.

63
GARANTIE LIMITÉE
FRANÇAIS
Aucune alimentation
électrique en raison dʼun
câble dʼalimentation
électrique mal raccordé
ou dʼune prise électrique
défectueuse.
• Raccordezcorrectement
lecâbledʼalimentation
électriqueouréparezla
prisedecourant.
Livraison, câblage électrique,
plomberie.
Installation
• Lʼinstallationvoussera
facturée.

LG Customer Information Center
Register your product Online!
www.LGSIGNATURE.com
For inquiries or comments,
visit www.LGSIGNATURE.com or call:
1-800-984-6306
U.S.A.
1-888-542-2623
CANADA
-
 1
1
-
 2
2
-
 3
3
-
 4
4
-
 5
5
-
 6
6
-
 7
7
-
 8
8
-
 9
9
-
 10
10
-
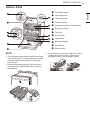 11
11
-
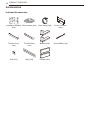 12
12
-
 13
13
-
 14
14
-
 15
15
-
 16
16
-
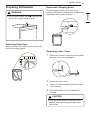 17
17
-
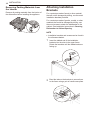 18
18
-
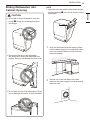 19
19
-
 20
20
-
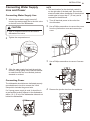 21
21
-
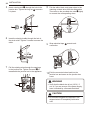 22
22
-
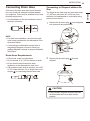 23
23
-
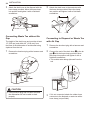 24
24
-
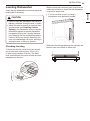 25
25
-
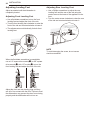 26
26
-
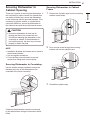 27
27
-
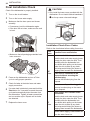 28
28
-
 29
29
-
 30
30
-
 31
31
-
 32
32
-
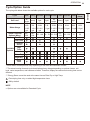 33
33
-
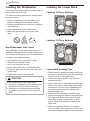 34
34
-
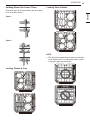 35
35
-
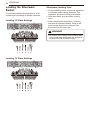 36
36
-
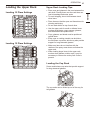 37
37
-
 38
38
-
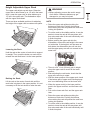 39
39
-
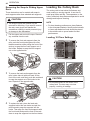 40
40
-
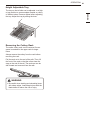 41
41
-
 42
42
-
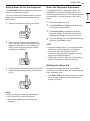 43
43
-
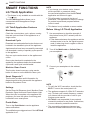 44
44
-
 45
45
-
 46
46
-
 47
47
-
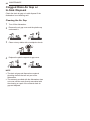 48
48
-
 49
49
-
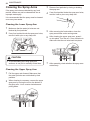 50
50
-
 51
51
-
 52
52
-
 53
53
-
 54
54
-
 55
55
-
 56
56
-
 57
57
-
 58
58
-
 59
59
-
 60
60
-
 61
61
-
 62
62
-
 63
63
-
 64
64
-
 65
65
-
 66
66
-
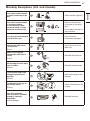 67
67
-
 68
68
-
 69
69
-
 70
70
-
 71
71
-
 72
72
-
 73
73
-
 74
74
-
 75
75
-
 76
76
-
 77
77
-
 78
78
-
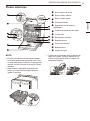 79
79
-
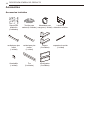 80
80
-
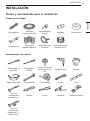 81
81
-
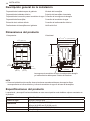 82
82
-
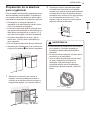 83
83
-
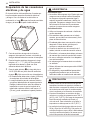 84
84
-
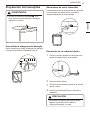 85
85
-
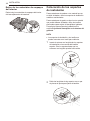 86
86
-
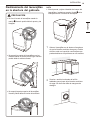 87
87
-
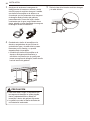 88
88
-
 89
89
-
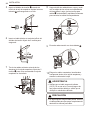 90
90
-
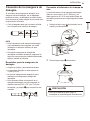 91
91
-
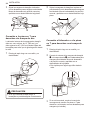 92
92
-
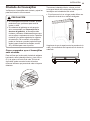 93
93
-
 94
94
-
 95
95
-
 96
96
-
 97
97
-
 98
98
-
 99
99
-
 100
100
-
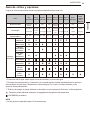 101
101
-
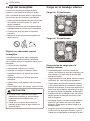 102
102
-
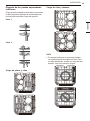 103
103
-
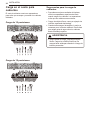 104
104
-
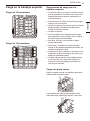 105
105
-
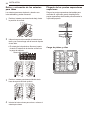 106
106
-
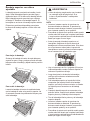 107
107
-
 108
108
-
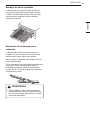 109
109
-
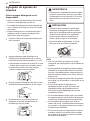 110
110
-
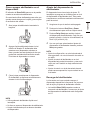 111
111
-
 112
112
-
 113
113
-
 114
114
-
 115
115
-
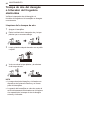 116
116
-
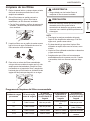 117
117
-
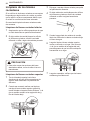 118
118
-
 119
119
-
 120
120
-
 121
121
-
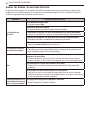 122
122
-
 123
123
-
 124
124
-
 125
125
-
 126
126
-
 127
127
-
 128
128
-
 129
129
-
 130
130
-
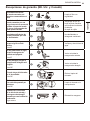 131
131
-
 132
132
-
 133
133
-
 134
134
-
 135
135
-
 136
136
-
 137
137
-
 138
138
-
 139
139
-
 140
140
-
 141
141
-
 142
142
-
 143
143
-
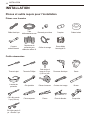 144
144
-
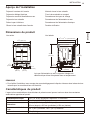 145
145
-
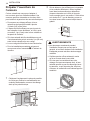 146
146
-
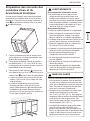 147
147
-
 148
148
-
 149
149
-
 150
150
-
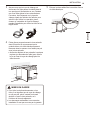 151
151
-
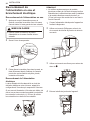 152
152
-
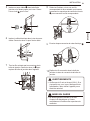 153
153
-
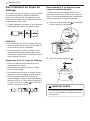 154
154
-
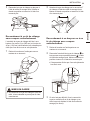 155
155
-
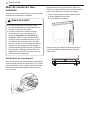 156
156
-
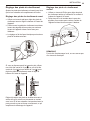 157
157
-
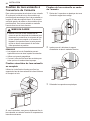 158
158
-
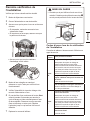 159
159
-
 160
160
-
 161
161
-
 162
162
-
 163
163
-
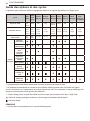 164
164
-
 165
165
-
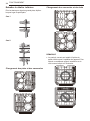 166
166
-
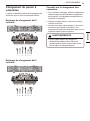 167
167
-
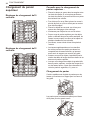 168
168
-
 169
169
-
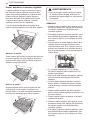 170
170
-
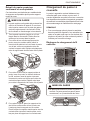 171
171
-
 172
172
-
 173
173
-
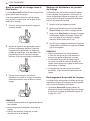 174
174
-
 175
175
-
 176
176
-
 177
177
-
 178
178
-
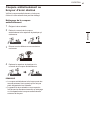 179
179
-
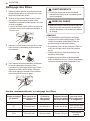 180
180
-
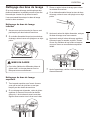 181
181
-
 182
182
-
 183
183
-
 184
184
-
 185
185
-
 186
186
-
 187
187
-
 188
188
-
 189
189
-
 190
190
-
 191
191
-
 192
192
-
 193
193
-
 194
194
-
 195
195
-
 196
196


LG LUDP8908SN Manual de usuario
- Categoría
- Lavaplatos
- Tipo
- Manual de usuario
en otros idiomas
- français: LG LUDP8908SN Manuel utilisateur
- English: LG LUDP8908SN User manual