Electrolux EGM6343YOK Manual de usuario
- Categoría
- Encimeras
- Tipo
- Manual de usuario


CONTENTS
1. SAFETY INFORMATION....................................................................................2
2. SAFETY INSTRUCTIONS..................................................................................5
3. INSTALLATION.................................................................................................. 7
4. PRODUCT DESCRIPTION.............................................................................. 11
5. DAILY USE....................................................................................................... 11
6. HINTS AND TIPS............................................................................................. 12
7. CARE AND CLEANING....................................................................................13
8. TROUBLESHOOTING......................................................................................15
9. TECHNICAL DATA...........................................................................................16
10. ENERGY EFFICIENCY.................................................................................. 17
WE’RE THINKING OF YOU
Thank you for purchasing an Electrolux appliance. You’ve chosen a product that
brings with it decades of professional experience and innovation. Ingenious and
stylish, it has been designed with you in mind. So whenever you use it, you can
be safe in the knowledge that you’ll get great results every time.
Welcome to Electrolux.
Visit our website to:
Get usage advice, brochures, trouble shooter, service and repair information:
www.electrolux.com/support
Register your product for better service:
www.registerelectrolux.com
Buy Accessories, Consumables and Original spare parts for your appliance:
www.electrolux.com/shop
CUSTOMER CARE AND SERVICE
Always use original spare parts.
When contacting our Authorised Service Centre, ensure that you have the
following data available: Model, PNC, Serial Number.
The information can be found on the rating plate.
Warning / Caution-Safety information
General information and tips
Environmental information
Subject to change without notice.
1. SAFETY INFORMATION
Before the installation and use of the appliance, carefully
read the supplied instructions. The manufacturer is not
responsible for any injuries or damages that are the
result of incorrect installation or usage. Always keep the
www.electrolux.com2

instructions in a safe and accessible location for future
reference.
1.1 Children and vulnerable people safety
• This appliance can be used by children aged from 8
years and above and persons with reduced physical,
sensory or mental capabilities or lack of experience
and knowledge if they have been given supervision or
instruction concerning the use of the appliance in a
safe way and understand the hazards involved.
• Children between 3 and 8 years of age and persons
with very extensive and complex disabilities shall be
kept away unless continuously supervised.
• Children of less than 3 years of age should be kept
away unless continuously supervised.
• Do not let children play with the appliance.
• Keep all packaging away from children and dispose of
it appropriately.
• Keep children and pets away from the appliance when
it operates or when it cools down. Accessible parts are
hot.
• If the appliance has a child safety device, it should be
activated.
• Children shall not carry out cleaning and user
maintenance of the appliance without supervision.
1.2 General Safety
• WARNING: The appliance and its accessible parts
become hot during use. Care should be taken to avoid
touching heating elements.
• Do not operate the appliance by means of an external
timer or separate remote-control system.
• WARNING: Unattended cooking on a hob with fat or
oil can be dangerous and may result in fire.
• NEVER try to extinguish a fire with water, but switch
off the appliance and then cover flame e.g. with a lid
or a fire blanket.
ENGLISH 3

• CAUTION: The cooking process has to be supervised.
A short term cooking process has to be supervised
continuously.
• WARNING: Danger of fire: Do not store items on the
cooking surfaces.
• Metallic objects such as knives, forks, spoons and lids
should not be placed on the hob surface since they
can get hot.
• Do not use a steam cleaner to clean the appliance.
• If the glass ceramic surface / glass surface is cracked,
switch off the appliance and unplug it from the mains.
In case the appliance is connected to the mains
directly using junction box, remove the fuse to
disconnect the appliance from power supply. In either
case contact the Authorised Service Centre.
• In case of hotplate glass breakage:
– shut immediately off all burners and any electrical
heating element and isolate the appliance from the
power supply,
– do not touch the appliance surface,
– do not use the appliance.
• If the supply cord is damaged, it must be replaced by
the manufacturer, an authorized Service or similarly
qualified persons in order to avoid a hazard.
• Where the appliance is directly connected to the
power supply, an all-pole isolating switch with a
contact gap is required. Complete disconnection in
compliance with the conditions specified in
overvoltage category III must be guaranteed. The
earth cable is excluded from this.
• When you route the mains cable, make sure that the
cable doesn't come into direct contact (for example
using insulating sleeving) with parts that can reach
temperatures of more than 50°C above room
temperature.
• WARNING: Use only hob guards designed by the
manufacturer of the cooking appliance or indicated by
the manufacturer of the appliance in the instructions
www.electrolux.com4

for use as suitable or hob guards incorporated in the
appliance. The use of inappropriate guards can cause
accidents.
2. SAFETY INSTRUCTIONS
This appliance is suitable for the
following markets: IT
2.1 Installation
WARNING!
Only a qualified person must
install this appliance.
WARNING!
Risk of injury or damage to
the appliance.
• Remove all the packaging.
• Do not install or use a damaged
appliance.
• Follow the installation instructions
supplied with the appliance.
• Keep the minimum distance from
other appliances and units.
• Always take care when moving the
appliance as it is heavy. Always use
safety gloves and enclosed footwear.
• Seal the cut surfaces with a sealant to
prevent moisture to cause swelling.
• Protect the bottom of the appliance
from steam and moisture.
• Do not install the appliance adjacent
to a door or under a window. This
prevents hot cookware falling from the
appliance when the door or the
window is opened.
• If the appliance is installed above
drawers make sure that the space,
between the bottom of the appliance
and the upper drawer, is sufficient for
air circulation.
• The bottom of the appliance can get
hot. Make sure to install a non-
combustible separation panel under
the appliance to prevent access to the
bottom.
2.2 Electrical Connection
WARNING!
Risk of fire and electric
shock.
• All electrical connections should be
made by a qualified electrician.
• The appliance must be earthed.
• Before carrying out any operation
make sure that the appliance is
disconnected from the power supply.
• Make sure that the parameters on the
rating plate are compatible with the
electrical ratings of the mains power
supply.
• Make sure the appliance is installed
correctly. Loose and incorrect
electricity mains cable or plug (if
applicable) can make the terminal
become too hot.
• Use the correct electricity mains
cable.
• Do not let the electricity mains cable
tangle.
• Make sure that a shock protection is
installed.
• Use the strain relief clamp on the
cable.
• Make sure the mains cable or plug (if
applicable) does not touch the hot
appliance or hot cookware, when you
connect the appliance to the near
sockets.
• Do not use multi-plug adapters and
extension cables.
• Make sure not to cause damage to
the mains plug (if applicable) or to the
mains cable. Contact our Authorised
Service Centre or an electrician to
change a damaged mains cable.
• The shock protection of live and
insulated parts must be fastened in
such a way that it cannot be removed
without tools.
• Connect the mains plug to the mains
socket only at the end of the
installation. Make sure that there is
ENGLISH 5

access to the mains plug after the
installation.
• If the mains socket is loose, do not
connect the mains plug.
• Do not pull the mains cable to
disconnect the appliance. Always pull
the mains plug.
• Use only correct isolation devices: line
protecting cut-outs, fuses (screw type
fuses removed from the holder), earth
leakage trips and contactors.
• The electrical installation must have
an isolation device which lets you
disconnect the appliance from the
mains at all poles. The isolation
device must have a contact opening
width of minimum 3 mm.
2.3 Gas connection
• All gas connections should be made
by a qualified person.
• Before installation, make sure that the
local distribution conditions (nature of
the gas and gas pressure) and the
adjustment of the appliance are
compatible.
• Make sure that there is air circulation
around the appliance.
• The information about the gas supply
is on the rating plate.
• This appliance is not connected to a
device, which evacuates the products
of combustion. Make sure to connect
the appliance according to current
installation regulations. Pay attention
to requirements regarding adequate
ventilation.
2.4 Use
WARNING!
Risk of injury, burns and
electric shock.
• Remove all the packaging, labelling
and protective film (if applicable)
before first use.
• Use this appliance in a household
environment.
• Do not change the specification of this
appliance.
• Make sure that the ventilation
openings are not blocked.
• Do not let the appliance stay
unattended during operation.
• Set the cooking zone to “off” after
each use.
• Do not put cutlery or saucepan lids on
the cooking zones. They can become
hot.
• Do not operate the appliance with wet
hands or when it has contact with
water.
• Do not use the appliance as a work
surface or as a storage surface.
• When you place food into hot oil, it
may splash.
WARNING!
Risk of fire and explosion
• Fats and oil when heated can release
flammable vapours. Keep flames or
heated objects away from fats and
oils when you cook with them.
• The vapours that very hot oil releases
can cause spontaneous combustion.
• Used oil, that can contain food
remnants, can cause fire at a lower
temperature than oil used for the first
time.
• Do not put flammable products or
items that are wet with flammable
products in, near or on the appliance.
WARNING!
Risk of damage to the
appliance.
• Do not keep hot cookware on the
control panel.
• Do not let cookware to boil dry.
• Be careful not to let objects or
cookware fall on the appliance. The
surface can be damaged.
• Do not activate the cooking zones
with empty cookware or without
cookware.
• Do not put aluminium foil on the
appliance.
• Cookware made of cast iron,
aluminium or with a damaged bottom
can cause scratches on the glass /
glass ceramic. Always lift these
objects up when you have to move
them on the cooking surface.
• Use only stable cookware with the
correct shape and diameter larger
than the dimensions of the burners.
• Make sure cookware is centrally
positioned on the burners.
www.electrolux.com6

• Make sure the flame does not go out
when you quickly turn the knob from
the maximum to the minimum
position.
• Use only the accessories supplied
with the appliance.
• Do not install a flame diffuser on the
burner.
• The use of a gas cooking appliance
results in the production of heat and
moisture. Provide good ventilation in
the room where the appliance is
installed.
• Prolonged intensive use of the
appliance may call for additional
ventilation, for example opening of a
window, or more effective ventilation,
for example increasing the level of
mechanical ventilation where present.
• This appliance is for cooking
purposes only. It must not be used for
other purposes, for example room
heating.
• Do not let acid liquids, for example
vinegar, lemon juice or limescale
remover, touch the hob. This can
cause matt patches.
• Discoloration of the enamel or
stainless steel has no effect on the
performance of the appliance.
2.5 Care and cleaning
WARNING!
Do not remove the buttons,
knobs or gaskets from the
control panel. Water may get
inside the appliance and
cause damage.
• Clean the appliance regularly to
prevent the deterioration of the
surface material.
• Deactivate the appliance and let it
cool down before you clean it.
• Disconnect the appliance from the
electrical supply before maintenance.
• Do not use water spray and steam to
clean the appliance.
• Clean the appliance with a moist soft
cloth. Only use neutral detergents. Do
not use any abrasive products,
abrasive cleaning pads, solvents or
metal objects.
• Do not clean the burners in the
dishwasher.
2.6 Service
• To repair the appliance contact an
Authorised Service Centre.
• Use original spare parts only.
2.7 Disposal
WARNING!
Risk of injury or suffocation.
• Contact your municipal authority for
information on how to discard the
appliance correctly.
• Disconnect the appliance from the
mains supply.
• Cut off the mains electrical cable
close to the appliance and dispose of
it.
• Flat the external gas pipes.
3. INSTALLATION
WARNING!
Refer to Safety chapters.
3.1 Before the installation
Before you install the hob, write down the
information bellow from the rating plate.
The rating plate is on the bottom of the
hob.
Model .......................................
PNC .........................................
Serial number ...........................
ENGLISH 7

3.2 Gas Connection
WARNING!
The following instructions
about installation,
maintenance and ventilation
must be carried out by
qualified personnel in
compliance with the
regulation in force (UNI-CIG
7129 - 7131). Make sure that
the kitchen is well ventilated:
keep natural ventilation
holes open (at least 100
cm²) or install a mechanical
extractor hood.
Choose fixed connections or use a
flexible pipe in stainless steel in
compliance with the regulation in force. If
you use flexible metallic pipes, be careful
they do not come in touch with mobile
parts or they are not squeezed. Also be
careful when the hob is put together with
an oven.
Make sure that the gas
supply pressure of the
appliance obeys the
recommended values.
If the supplied pressure has not the
specified value, it is necessary to
assemble a proper pressure regulator in
compliance with the standard UNI EN 88.
For Liquid Gas (LPG) the use of pressure
regulator is allowed only if they are in
compliance with UNI EN 12864. The
adjustable connection is fixed to the
comprehensive ramp by means of a
threaded nut G 1/2". Screw the parts
without force, adjust the connection in
the necessary direction and tighten
everything.
A B C
A. End of shaft with nut
B. Washer supplied with the appliance
C. Elbow supplied with the appliance
Rigid connection:
Carry out connection by using metal rigid
pipes (copper with mechanical end)
(UNI-CIG 7129).
Flexible connection:
Use a flexible pipe in stainless steel
(UNI-CIG 9891) with a maximum length 2
m.
WARNING!
When installation is
complete, make sure that
the seal of each pipe fitting
is correct. Use a soapy
solution, not a flame!
3.3 Injectors replacement
1. Remove the pan supports.
2. Remove the caps and crowns of the
burner.
3. With a socket spanner 7 remove the
injectors and replace them with the
ones which are necessary for the
type of gas you use (see table in
"Technical Data" chapter).
4. Assemble the parts, follow the same
procedure backwards.
5. Replace the rating plate (it is near the
gas supply pipe) with the one for the
new type of gas supply. You can find
this plate in the package supplied
with the appliance.
If the supply gas pressure is changeable
or different from the necessary pressure,
you must fit an applicable pressure
adjuster on the gas supply pipe.
3.4 Adjustment of minimum
level
To adjust the minimum level of the
burners:
1. Light the burner.
2. Turn the knob on the minimum
position.
3. Remove the knob .
4. With a thin screwdriver, adjust the
bypass screw position (A).
www.electrolux.com8

A
5. If you change:
• from natural gas G20 20 mbar to
liquid gas, fully tighten the bypass
screw in.
• from liquid gas to natural gas G20
20 mbar, undo the bypass screw
approximately 1/4 of a turn (1/2 of
a turn for Multi Crown burner).
WARNING!
Make sure the flame does
not go out when you quickly
turn the knob from the
maximum position to the
minimum position.
3.5 Electrical connection
• Make sure that the rated voltage and
type of power on the rating plate
agree with the voltage and the power
of the local power supply.
• This appliance is supplied with a
mains cable. It has to be supplied with
a correct plug which can hold the load
that the rating plate rates. Make sure
that you install the plug in a correct
socket.
• Always use a correctly installed
shockproof socket.
• Make sure that there is an access to
the mains plug after the installation.
• Do not pull the mains cable to
disconnect the appliance. Always pull
the mains plug.
• There is a risk of fire when the
appliance is in connection with an
extension cable, an adapter or a
multiple connection. Make sure that
the ground connection agrees with the
standards and regulations.
• Do not let the power cable to heat up
to a temperature higher than 90° C.
To prevent contact between the cable
and the appliance below the hob use the
clamps which are on the side of the
cabinet.
A
A. Rigid copper pipe or flexible pipe of
stainless steel
3.6 Connection cable
To replace the connection cable use only
the special cable or its equivalent. The
cable type is: H03V2V2-F T90.
Make sure that the cable section is
applicable to the voltage and the working
temperature. The yellow / green earth
wire must be approximately 2 cm longer
than the brown (or black) phase wire.
3.7 Assembly
1.
2.
ENGLISH 9

3.
min.
55 mm
min.
650 mm
560 mm
2
0
+
480 mm
2
0
+
min.
100 mm
30 mm
4.
5.
6.
B
A
A) supplied seal
B) supplied brackets
7.
CAUTION!
Install the appliance only on
a worktop with flat surface.
3.8 Installing hob under the
hood
If you install the hob under a
hood, please see the
installation instructions of the
hood for the minimum
distance between the
appliances.
3.9 Possibilities for insertion
The panel installed below the hob must
be easy to remove and let an easy
access in case a technical assistance
intervention is necessary.
Kitchen unit with door
min 20 mm
(max 150 mm)
30 mm
60 mm
B
A
A. Removable panel
B. Space for connections
Kitchen unit with oven
The electrical connection of the hob and
the oven must be installed separately for
safety reasons and to let easy remove
oven from the unit.
www.electrolux.com10

4. PRODUCT DESCRIPTION
4.1 Cooking surface layout
3
4
2
1
1
Semi-rapid burner
2
Multi Crown burner
3
Auxiliary burner
4
Control knobs
4.2 Control knob
Symbol Description
no gas supply / off posi‐
tion
Symbol Description
ignition position / maxi‐
mum gas supply
minimum gas supply
5. DAILY USE
WARNING!
Refer to Safety chapters.
5.1 Burner overview
$
%
'
&
$
%
'
&
A. Burner cap
B. Burner crown
C. Ignition candle
D. Thermocouple
5.2 Ignition of the burner
Always light the burner
before you put on the
cookware.
ENGLISH 11

WARNING!
Be very careful when you
use open fire in the kitchen
environment. The
manufacturer declines any
responsibility in case of the
flame misuse.
1. Push the control knob down and turn
it counterclockwise to the maximum
gas supply position ( ).
2. Keep the control knob pushed for
equal or less than 10 seconds. This
lets the thermocouple warm up. If
not, the gas supply is interrupted.
3. Adjust the flame after it is regular.
If after some tries the burner
does not light, check if the
crown and its cap are in
correct positions.
WARNING!
Do not keep the control knob
pushed for more than 15
seconds. If the burner does
not light after 15 seconds,
release the control knob,
turn it into off position and try
to light the burner again after
minimum 1 minute.
CAUTION!
In the absence of electricity
you can ignite the burner
without electrical device; in
this case approach the
burner with a flame, turn the
control knob counter-
clockwise to maximum gas
supply position and push it
down. Keep the control knob
pushed for equal or less
than 10 seconds to let the
thermocouple warm up.
If the burner accidentally
goes out, turn the control
knob to the off position and
try to light the burner again
after minimum 1 minute.
The spark generator can
start automatically when you
switch on the mains, after
installation or a power cut. It
is normal.
The hob is supplied with the
progressive valves. They
make the flame regulation
more precise.
5.3 Turning the burner off
To put the flame out, turn the knob to the
off position
.
WARNING!
Always turn the flame down
or switch it off before you
remove the pans from the
burner.
6. HINTS AND TIPS
WARNING!
Refer to Safety chapters.
6.1 Cookware
CAUTION!
Do not use cast iron pans,
clay or earthenware pots,
grill or toaster plates.
www.electrolux.com12

WARNING!
Do not put the same pan on
two burners.
WARNING!
Do not put unstable or
damaged pots on the burner
to prevent spills and injuries.
CAUTION!
Make sure that the bottoms
of pots do not stand too
close to the control knob,
otherwise the flame heats
the control knob up.
CAUTION!
Make sure that pot handles
are not above the front edge
of the cooktop.
CAUTION!
Make sure that the pots are
placed centrally on the
burner in order to get the
maximum stability and a
lower gas consumption.
CAUTION!
Liquids spilt during cooking
can cause the glass to
break.
6.2 Diameters of cookware
Use cookware with
diameters applicable to the
size of burners.
Burner Diameter of
cookware
(mm)
Multi Crown 180 - 260
Semi-rapid 120 - 220
Auxiliary 80 - 180
7. CARE AND CLEANING
WARNING!
Refer to Safety chapters.
7.1 General information
• Clean the hob after each use.
• Always use cookware with a clean
base.
• Scratches or dark stains on the
surface have no effect on how the hob
operates.
• Use a special cleaner suitable for the
surface of the hob.
WARNING!
Do not use knives, scrapers
or similar instruments to
clean the surface of the
glass or the rims of the
burners and the frame (if
applicable).
• Wash stainless steel parts with water,
and then dry them with a soft cloth.
7.2 Pan supports
The pan supports are not
resistant to washing in a
dishwasher. They must be
washed by hand.
1. Remove the pan supports to easily
clean the hob.
Be very careful when
you replace the pan
supports to prevent the
hob top from damage.
2. The enamel coating occasionally can
have rough edges, so be careful
when you wash the pan supports by
hand and dry them. If necessary,
remove stubborn stains with a paste
cleaner.
3. After you clean the pan supports,
make sure that they are in correct
positions.
4. For the burner to operate correctly,
make sure that the arms of the pan
ENGLISH 13

supports are aligned with the centre
of the burner.
7.3 Removing pan supports
To keep the pan supports in the correct
position, they are put on metal pins
installed in the rear side of the hob. For
easier cleaning, pan supports can be
removed from the hob. Lift up the pan
supports keeping them in horizontal
position as shown in the graphic.
Do not lift the pan supports
at an angle, as this will put
strain on the metal pins. This
can cause damage to the
pins and cause them to
break.
The shape of pan supports and the
amount of burners can be different in
other models of the appliance.
7.4 Cleaning the hob
• Remove immediately: melted plastic,
plastic foil, sugar and food with sugar,
otherwise, the dirt can cause damage
to the hob. Take care to avoid burns.
• Remove when the hob is
sufficiently cool: limescale rings,
water rings, fat stains, shiny metallic
discoloration. Clean the hob with a
moist cloth and a non-abrasive
detergent. After cleaning, wipe the
hob dry with a soft cloth.
• To clean the enamelled parts, caps
and crowns, wash them with warm
soapy water and dry them carefully
before you put them back on.
7.5 Cleaning the spark plug
This feature is obtained through a
ceramic ignition candle with a metal
electrode. Keep these components well
clean to prevent difficult lighting and
check that the burner crown holes are
not obstructed.
www.electrolux.com14

7.6 Periodic maintenance
Speak to your local Authorised Service
Centre periodically to check the
conditions of the gas supply pipe and the
pressure adjuster, if fitted.
8. TROUBLESHOOTING
WARNING!
Refer to Safety chapters.
8.1 What to do if...
Problem Possible cause Remedy
There is no spark when
you try to activate the
spark generator.
The hob is not connected
to an electrical supply or it
is connected incorrectly.
Check if the hob is correct‐
ly connected to the electri‐
cal supply.
The fuse is blown. Make sure that the fuse is
the cause of the malfunc‐
tion. If the fuse is blown
again and again, contact a
qualified electrician.
Burner cap and crown are
placed incorrectly.
Place the burner cap and
crown correctly.
The flame extinguishes im‐
mediately after ignition.
Thermocouple is not heat‐
ed up sufficiently.
After lightning the flame,
keep the knob pushed for
equal or less than 10 sec‐
onds.
The flame ring is uneven. Burner crown is blocked
with food residues.
Make sure that the injector
is not blocked and the
burner crown is clean.
8.2 If you cannot find a
solution...
If you cannot find a solution to the
problem yourself, contact your dealer or
an Authorised Service Centre. Give the
data from the rating plate. Make sure,
you operated the hob correctly. If not the
servicing by a service technician or
dealer will not be free of charge, also
during the warranty period. The
instructions about the Service Centre
and conditions of guarantee are in the
guarantee booklet.
ENGLISH 15

8.3 Labels supplied with the
accessories bag
Stick the adhesive labels as indicated
below:
MOD.
PROD.NO.
SER.NO
DATA
MOD.
PROD.NO.
SER.NO
DATA
MOD.
PROD.NO.
SER.NO.
03 IT
MADE IN ITALY
TYPE
IP20
0049
A B C
A. Stick it on Guarantee Card and send
this part (if applicable).
B. Stick it on Guarantee Card and keep
this part (if applicable).
C. Stick it on instruction booklet.
9. TECHNICAL DATA
9.1 Hob dimensions
Width 590 mm
Depth 520 mm
9.2 Bypass diameters
BURNER Ø BYPASS 1/100 mm
Multi Crown 57
Semi-rapid 35
Auxiliary 28
www.electrolux.com16

9.3 Other technical data
TOTAL POW‐
ER:
Gas original: G20 (2H) 20 mbar 8,9 kW
Gas replace‐
ment:
G30 (3+) 28-30 mbar 607 g/h
G31 (3+) 37 mbar 596 g/h
Electric supply: 220-240 V ~ 50-60 Hz
Appliance cate‐
gory:
II2H3+
Gas connec‐
tion:
G 1/2"
Appliance
class:
3
9.4 Gas burners for NATURAL GAS G20 20 mbar
BURNER NORMAL POWER
kW
MINIMUM POWER
kW
INJECTOR MARK
Multi Crown 3,9 1,4 146
Semi-rapid 2,0 0,6 96x
Auxiliary 1,0 0,33 70
9.5 Gas burners for LPG G30/G31 28-30/37 mbar
BURNER NORMAL
POWER
kW
MINIMUM
POWER
kW
INJECTOR
MARK
NOMINAL GAS FLOW g/h
G30 28-30
mbar
G31 37 mbar
Multi Crown 3,55 1,4 095 258 254
Semi-rapid 1,9 0,6 71 138 136
Auxiliary 1,0 0,33 50 73 71
10. ENERGY EFFICIENCY
10.1 Product information according to EU 66/2014
Model identification KGG6436K
Type of hob Built-in hob
Number of gas burners 4
ENGLISH 17

Energy efficiency per gas burner
(EE gas burner)
Left rear - Semi-rapid 54.8%
Right rear - Semi-rapid 54.8%
Right front - Auxiliary not applicable
Left front - Multi Crown 57.2%
Energy efficiency for the gas hob
(EE gas hob)
55.6%
EN 30-2-1: Domestic cooking appliances burning gas - Part 2-1 : Rational use of
energy - General
10.2 Energy saving
• Before use, make sure that the burners and pan supports are assembled correctly.
• Use cookware with diameters applicable to the size of burners.
• Center the pot on the burner.
• When you heat up water, use only the amount you need.
• If it is possible, always put the lids on the cookware.
• When the liquid starts to boil, turn down the flame to barely simmer the liquid.
• If it is possible, use a pressure cooker. Refer to its user manual.
11. ENVIRONMENTAL CONCERNS
Recycle materials with the symbol .
Put the packaging in relevant containers
to recycle it. Help protect the
environment and human health by
recycling waste of electrical and
electronic appliances. Do not dispose of
appliances marked with the symbol
with the household waste. Return the
product to your local recycling facility or
contact your municipal office.
www.electrolux.com18

INHALTSVERZEICHNIS
1. SICHERHEITSHINWEISE................................................................................19
2. SICHERHEITSANWEISUNGEN...................................................................... 22
3. MONTAGE........................................................................................................25
4. GERÄTEBESCHREIBUNG.............................................................................. 29
5. TÄGLICHER GEBRAUCH................................................................................29
6. TIPPS UND HINWEISE....................................................................................31
7. REINIGUNG UND PFLEGE............................................................................. 32
8. FEHLERSUCHE............................................................................................... 34
9. TECHNISCHE DATEN..................................................................................... 35
10. ENERGIEEFFIZIENZ..................................................................................... 36
WIR DENKEN AN SIE
Vielen Dank für Ihren Kauf eines Electrolux-Geräts. Sie haben ein Produkt
gewählt, das jahrzehntelange professionelle Erfahrung und Innovation mit sich
bringt. Das ausgeklügelte und stilvolle Produkt wurde für Sie entwickelt. So
können Sie jedes Mal, wenn Sie das Produkt verwenden, sicher sein, dass Sie
großartige Ergebnisse erzielen werden.
Willkommen bei Electrolux.
Besuchen Sie uns auf unserer Website, um:
Anwendungshinweise, Prospekte, Informationen zu Fehlerbehebung, Service
und Reparatur zu erhalten:
www.electrolux.com/support
Registrieren Sie Ihr Produkt, um einen erstklassigen Service zu erhalten:
www.registerelectrolux.com
Um Zubehör, Verbrauchsmaterial und Original-Ersatzteile für Ihr Gerät zu
kaufen:
www.electrolux.com/shop
KUNDENDIENST UND SERVICE
Verwenden Sie immer Original-Ersatzteile.
Halten Sie folgende Angaben bereit, wenn Sie sich an einen autorisierten
Kundendienst wenden: Modell, PNC, Seriennummer.
Die Daten finden Sie auf dem Typenschild.
Warnungs-/Sicherheitshinweise
Allgemeine Informationen und Empfehlungen
Informationen zum Umweltschutz
Änderungen vorbehalten.
1. SICHERHEITSHINWEISE
Lesen Sie vor der Montage und dem Gebrauch des
Geräts zuerst die Gebrauchsanleitung. Bei Verletzungen
oder Schäden infolge nicht ordnungsgemäßer Montage
DEUTSCH 19

oder Verwendung des Geräts übernimmt der Hersteller
keine Haftung. Bewahren Sie die Anleitung immer an
einem sicheren und zugänglichen Ort zum späteren
Nachschlagen auf.
1.1 Sicherheit von Kindern und schutzbedürftigen
Personen
• Das Gerät kann von Kindern ab 8 Jahren und
Personen mit eingeschränkten physischen,
sensorischen oder geistigen Fähigkeiten oder mit
mangelnder Erfahrung und/oder mangelndem Wissen
nur dann verwendet werden, wenn sie durch eine für
ihre Sicherheit zuständige Person beaufsichtigt
werden oder in die sichere Verwendung des Geräts
eingewiesen wurden und die mit dem Gerät
verbundenen Gefahren verstanden haben.
• Kinder zwischen 3 und 8 Jahren und Personen mit
schweren Behinderungen oder Mehrfachbehinderung
müssen vom Gerät ferngehalten werden, wenn sie
nicht ständig beaufsichtigt werden.
• Halten Sie Kinder unter 3 Jahren vom Gerät fern,
wenn sie nicht ständig beaufsichtigt werden.
• Kinder dürfen nicht mit dem Gerät spielen.
• Halten Sie sämtliches Verpackungsmaterial von
Kindern fern und entsorgen Sie es auf angemessene
Weise.
• Halten Sie Kinder und Haustiere während des
Betriebs oder der Abkühlphase vom Gerät fern.
Berührbare Teile sind heiß.
• Falls Ihr Gerät mit einer Kindersicherung ausgestattet
ist, empfehlen wir, diese einzuschalten.
• Kinder dürfen keine Reinigung und Wartung ohne
Beaufsichtigung durchführen.
1.2 Allgemeine Sicherheit
• WARNUNG: Das Gerät und die zugänglichen
Geräteteile werden während des Betriebs heiß. Seien
www.electrolux.com20

Sie vorsichtig und berühren Sie niemals die
Heizelemente.
• Schalten Sie das Gerät nicht über eine externe
Zeitschaltuhr oder eine separate Fernsteuerung ein.
• WARNUNG: Kochen mit Fett oder Öl auf einem
unbeaufsichtigten Kochfeld ist gefährlich und kann zu
einem Brand führen.
• Versuchen Sie NICHT einen Brand mit Wasser zu
löschen, sondern schalten Sie das Gerät aus und
bedecken Sie die Flamme mit einem Deckel oder
einer Feuerlöschdecke.
• VORSICHT: Der Kochvorgang muss überwacht
werden. Ein kurzer Kochvorgang muss kontinuierlich
überwacht werden.
• WARNUNG: Brandgefahr: Legen Sie keine
Gegenstände auf dem Kochfeld ab.
• Legen Sie keine Metallgegenstände wie Messer,
Gabeln, Löffel oder Topfdeckel auf die Oberfläche des
Kochfelds, da diese heiß werden können.
• Reinigen Sie das Gerät nicht mit einem
Dampfstrahlreiniger.
• Hat die Glaskeramik-/Glasoberfläche einen Sprung,
schalten Sie das Gerät aus und nehmen Sie es vom
Stromnetz. Falls das Gerät direkt mit dem Stromnetz
verbunden ist und nicht getrennt werden kann,
nehmen Sie die Sicherung für den Anschluss heraus,
um die Stromversorgung zu unterbrechen.
Verständigen Sie in jedem Fall den autorisierten
Kundendienst.
• Im Falle eines Glasbruchs der Kochplatte:
– Schalten Sie umgehend alle Brenner und
Heizelemente aus und trennen Sie das Gerät von
der Stromversorgung.
– Berühren Sie nicht die Geräteoberfläche.
– Benutzen Sie das Gerät nicht.
• Wenn das Netzkabel beschädigt ist, muss es vom
Hersteller, einem autorisierten Kundendienst oder
einer gleichermaßen qualifizierten Person
DEUTSCH 21

ausgetauscht werden, um Gefahrenquellen zu
vermeiden.
• Ist das Gerät direkt an die Stromversorgung
angeschlossen, wird ein allpoliger Netztrennschalter
mit einem Kontaktabstand benötigt. Es muss eine
vollständige Trennung entsprechend der
Überspannungskategorie III gewährleistet sein. Dies
gilt nicht für das Erdungskabel.
• Wenn Sie das Netzkabel verlegen, achten Sie darauf,
dass es keinen direkten Kontakt mit Teilen hat, die
Temperaturen erreichen können, die mehr als 50 °C
über der Raumtemperatur liegen. (Verwenden Sie
ansonsten Isolierschläuche.)
• WARNUNG: Verwenden Sie nur Schutzabdeckungen
des Herstellers des Kochgeräts, von ihm in der
Bedienungsanleitung als geeignete und empfohlene
Schutzabdeckungen oder die im Gerät enthaltene
Schutzabdeckung. Es besteht Unfallgefahr durch die
Verwendung ungeeigneter Schutzabdeckungen.
2. SICHERHEITSANWEISUNGEN
Dieses Gerät ist für folgende Märkte
geeignet: IT
2.1 Montage
WARNUNG!
Die Montage des Geräts darf
nur von einer qualifizierten
Fachkraft durchgeführt
werden.
WARNUNG!
Verletzungsgefahr sowie
Risiko von Schäden am
Gerät.
• Entfernen Sie das gesamte
Verpackungsmaterial.
• Montieren Sie ein beschädigtes Gerät
nicht und benutzen Sie es nicht.
• Halten Sie sich an die mitgelieferte
Montageanleitung.
• Die Mindestabstände zu anderen
Geräten und Küchenmöbeln sind
einzuhalten.
• Seien Sie beim Umsetzen des
Gerätes vorsichtig, da es sehr schwer
ist. Tragen Sie stets
Sicherheitshandschuhe und festes
Schuhwerk.
• Dichten Sie die Ausschnittskanten mit
einem Dichtungsmittel ab, um ein
Aufquellen durch Feuchtigkeit zu
verhindern.
• Schützen Sie die Geräteunterseite vor
Dampf und Feuchtigkeit.
• Installieren Sie das Gerät nicht direkt
neben einer Tür oder unter einem
Fenster. So kann heißes
Kochgeschirr nicht herunterfallen,
wenn die Tür oder das Fenster
geöffnet wird.
• Wird das Gerät über Schubladen
eingebaut, achten Sie darauf, dass
zwischen dem Geräteboden und der
oberen Schublade ein ausreichender
www.electrolux.com22

Abstand für die Luftzirkulation
vorhanden ist.
• Der Boden des Geräts kann heiß
werden. Achten Sie darauf eine
feuerfeste Trennplatte unter dem
Gerät anzubringen, damit der Boden
nicht zugänglich ist.
2.2 Elektrischer Anschluss
WARNUNG!
Brand- und
Stromschlaggefahr.
• Alle elektrischen Anschlüsse sind von
einem geprüften Elektriker
vorzunehmen.
• Das Gerät muss geerdet sein.
• Vor der Durchführung jeglicher
Arbeiten muss das Gerät von der
elektrischen Stromversorgung
getrennt werden.
• Stellen Sie sicher, dass die Daten auf
dem Typenschild mit den elektrischen
Nennwerten der Netzspannung
übereinstimmen.
• Vergewissern Sie sich, dass das
Gerät ordnungsgemäß installiert ist.
Lockere und unsachgemäße Kabel
oder Stecker (falls vorhanden) können
die Klemme überhitzen.
• Stellen Sie sicher, dass Sie das
richtige Kabel für den elektrischen
Netzanschluss verwenden.
• Achten Sie darauf, dass das
Netzkabel nicht lose hängt oder sich
verheddert.
• Sorgen Sie dafür, dass ein
Berührungsschutz installiert wird.
• Verwenden Sie die Zugentlastung für
das Kabel.
• Stellen Sie beim elektrischen
Anschluss des Gerätes sicher, dass
das Netzkabel oder ggf. der
Netzstecker nicht mit dem heißen
Gerät oder heißem Kochgeschirr in
Berührung kommt.
• Verwenden Sie keine
Mehrfachsteckdosen oder
Verlängerungskabel.
• Achten Sie darauf, Netzstecker (falls
vorhanden) und Netzkabel nicht zu
beschädigen. Wenden Sie sich zum
Austausch eines beschädigten
Netzkabels an unseren autorisierten
Kundendienst oder eine
Elektrofachkraft.
• Alle Teile, die gegen direktes
Berühren schützen, sowie die
isolierten Teile müssen so befestigt
werden, dass sie nicht ohne
Werkzeug entfernt werden können.
• Stecken Sie den Netzstecker erst
nach Abschluss der Montage in die
Steckdose. Stellen Sie sicher, dass
der Netzstecker nach der Montage
noch zugänglich ist.
• Falls die Steckdose lose ist, schließen
Sie den Netzstecker nicht an.
• Ziehen Sie nicht am Netzkabel, wenn
Sie das Gerät von der
Stromversorgung trennen möchten.
Ziehen Sie stets am Netzstecker.
• Verwenden Sie nur geeignete
Trenneinrichtungen: Überlastschalter,
Sicherungen (Schraubsicherungen
müssen aus dem Halter entfernt
werden können),
Fehlerstromschutzschalter und
Schütze.
• Die elektrische Installation muss eine
Trenneinrichtung aufweisen, mit der
Sie das Gerät allpolig von der
Stromversorgung trennen können. Die
Trenneinrichtung muss mit einer
Kontaktöffnungsbreite von
mindestens 3 mm ausgeführt sein.
2.3 Gasanschluss
• Der Gasanschluss muss von einer
Fachkraft ausgeführt werden.
• Vergewissern Sie sich vor der
Montage des Geräts, dass das von
Ihrem Gaswerk gelieferte Gas (Gasart
und Gasdruck) mit der Einstellung des
Geräts kompatibel ist.
• Stellen Sie sicher, dass die Luft um
das Gerät zirkulieren kann.
• Informationen über die
Gasversorgung finden Sie auf dem
Typenschild.
• Das Gerät darf nicht an einen Abzug
für Verbrennungsprodukte
angeschlossen werden. Das Gerät
muss gemäß der aktuell geltenden
Installationsbestimmungen
angeschlossen werden. Halten Sie
die Bestimmungen hinsichtlich der
Belüftung ein.
DEUTSCH 23

2.4 Verwendung
WARNUNG!
Verletzungs-, Verbrennungs-
und Stromschlaggefahr.
• Entfernen Sie vor dem ersten
Gebrauch das gesamte
Verpackungsmaterial, die Aufkleber
und Schutzfolie (falls vorhanden).
• Das Gerät ist für die Verwendung im
Haushalt vorgesehen.
• Nehmen Sie keine technischen
Änderungen am Gerät vor.
• Die Lüftungsöffnungen dürfen nicht
abgedeckt werden.
• Lassen Sie das Gerät bei Betrieb
nicht unbeaufsichtigt.
• Schalten Sie die Kochzonen nach
jedem Gebrauch aus.
• Legen Sie kein Besteck und keine
Topfdeckel auf die Kochzonen.
Anderenfalls werden sie sehr heiß.
• Bedienen Sie das Gerät nicht mit
feuchten oder nassen Händen oder
wenn es mit Wasser in Kontakt
gekommen ist.
• Benutzen Sie das Gerät nicht als
Arbeits- oder Abstellfläche.
• Wenn Sie Nahrungsmittel in heißes Öl
geben, kann dieses spritzen.
WARNUNG!
Brand- und
Explosionsgefahr
• Erhitzte Öle und Fette können
brennbare Dämpfe freisetzen. Halten
Sie Flammen und erhitzte
Gegenstände beim Kochen mit Fetten
und Ölen von diesen fern.
• Die von sehr heißem Öl freigesetzten
Dämpfe können eine Selbstzündung
verursachen.
• Bereits verwendetes Öl kann
Lebensmittelreste enthalten und
schon bei niedrigeren Temperaturen
eher einen Brand verursachen als
frisches Öl.
• Laden Sie keine entflammbaren
Produkte oder Gegenstände, die mit
entflammbaren Produkten benetzt
sind, in das Gerät und stellen Sie
solche nicht in die Nähe oder auf das
Gerät.
WARNUNG!
Risiko von Schäden am
Gerät.
• Stellen Sie kein heißes Kochgeschirr
auf das Bedienfeld.
• Lassen Sie das Kochgeschirr nicht
leerkochen.
• Lassen Sie keine Gegenstände oder
Kochgeschirr auf das Gerät fallen. Die
Oberfläche könnte beschädigt
werden.
• Schalten Sie die Kochzonen niemals
ein, wenn sich kein Kochgeschirr
darauf befindet, oder wenn das
Kochgeschirr leer ist.
• Legen Sie keine Alufolie auf das
Gerät.
• Kochgeschirr aus Gusseisen,
Aluminium oder mit beschädigten
Böden kann die Glas- bzw.
Glaskeramikoberfläche verkratzen.
Heben Sie das Kochgeschirr stets an,
wenn Sie es auf der Kochfläche
umsetzen möchten.
• Verwenden Sie nur standfestes
Kochgeschirr mit der richtigen Form
und einem Durchmesser, der größer
als der der Brenner ist.
• Achten Sie darauf das Kochgeschirr
mittig auf die Brenner zu stellen.
• Vergewissern Sie sich, dass die
Flamme nicht erlischt, wenn Sie den
Einstellknopf schnell von der
höchsten zur niedrigsten Stufe
drehen.
• Verwenden Sie ausschließlich das mit
dem Gerät gelieferte Zubehör.
• Setzen Sie keinen Wärmeverteiler auf
den Brenner.
• Beim Gebrauch eines Gaskochfelds
entsteht Wärme und Feuchtigkeit.
Sorgen Sie für eine ausreichende
Belüftung in dem Raum, in dem das
Gerät aufgestellt ist.
• Bei längerer Benutzung des Gerätes
kann eine zusätzliche Belüftung
erforderlich werden, zum Beispiel
durch Öffnen eines Fensters oder die
Erhöhung der Absaugleistung der
Abzugshaube, falls vorhanden.
• Dieses Gerät ist nur zum Kochen
bestimmt. Jeder andere Gebrauch ist
als bestimmungsfremd anzusehen,
zum Beispiel das Beheizen eines
Raums.
www.electrolux.com24

• Lassen Sie keine säurehaltigen
Flüssigkeiten wie Essig, Zitronensaft
oder kalklösende Reinigungsmittel mit
dem Kochfeld in Berührung kommen.
Diese könnten matte Flecken
verursachen.
• Verfärbungen der Email- oder
Edelstahlbeschichtung haben keine
Auswirkung auf die Leistung des
Geräts.
2.5 Reinigung und Pflege
WARNUNG!
Entfernen Sie nicht die
Tasten, Knöpfe oder
Dichtungen vom Bedienfeld.
Wasser könnte in das Gerät
gelangen und es
beschädigen.
• Reinigen Sie das Gerät regelmäßig,
um eine Verschlechterung des
Oberflächenmaterials zu verhindern.
• Schalten Sie das Gerät vor dem
Reinigen aus und lassen Sie es
abkühlen.
• Trennen Sie das Gerät vor
Wartungsarbeiten von der
Spannungsversorgung.
• Reinigen Sie das Gerät nicht mit
Wasserspray oder Dampf.
• Reinigen Sie das Gerät mit einem
weichen, feuchten Tuch. Verwenden
Sie ausschließlich Neutralreiniger.
Benutzen Sie keine Scheuermittel,
scheuernde
Reinigungsschwämmchen,
Lösungsmittel oder
Metallgegenstände.
• Reinigen Sie die Brenner nicht im
Geschirrspüler.
2.6 Service
• Wenden Sie sich zur Reparatur des
Geräts an einen autorisierten
Kundendienst.
• Verwenden Sie ausschließlich
Originalersatzteile.
2.7 Entsorgung
WARNUNG!
Verletzungs- und
Erstickungsgefahr.
• Für Informationen zur
ordnungsgemäßen Entsorgung des
Geräts wenden Sie sich an die
zuständige kommunale Behörde vor
Ort.
• Trennen Sie das Gerät von der
Stromversorgung.
• Schneiden Sie das Netzkabel in der
Nähe des Geräts ab, und entsorgen
Sie es.
• Drücken Sie die äußeren Gasrohre
flach.
3. MONTAGE
WARNUNG!
Siehe Kapitel
Sicherheitshinweise.
3.1 Vor der Montage
Notieren Sie vor der Montage des
Kochfelds folgende Daten, die Sie auf
dem Typenschild finden. Das
Typenschild ist auf dem Boden des
Kochfelds angebracht.
Modell ...........................
Produktnummer
(PNC) ........................................
Seriennummer ............
DEUTSCH 25

3.2 Gasanschluss
WARNUNG!
Die in nachstehender
Anleitung beschriebenen
Installations- und
Wartungsarbeiten sowie die
Belüftung müssen von
Fachpersonal unter
Beachtung der geltenden
Bestimmungen (UNI-CIG
7129 - 7131) ausgeführt
werden. Stellen Sie sicher,
dass die Küche gut belüftet
ist: Halten Sie natürliche
Belüftungsöffnungen von
mindestens 100 cm² offen
oder installieren Sie eine
mechanische Abzugshaube.
Je nach geltenden Bestimmungen kann
der Anschluss fest oder durch
Verwendung eines flexiblen
Edelstahlrohrs erfolgen. Bei Verwendung
flexibler Metallrohre muss darauf
geachtet werden, dass sie nicht mit
beweglichen Teilen in Kontakt kommen
oder eingeklemmt werden können. Wenn
das Kochfeld mit einem Backofen
installiert wird, muss ebenfalls vorsichtig
vorgegangen werden.
Achten Sie darauf, dass der
Gasdruck des Geräts den
empfohlenen Werten
entspricht.
Entspricht der gelieferte Druck nicht dem
angegebenen Wert, muss ein geeigneter
Druckregler gemäß der Norm UNI EN 88
installiert werden. Im Fall von Flüssiggas
(LPG) ist die Verwendung eines
Druckreglers nur erlaubt, wenn er der
Norm UNI EN 12864 entspricht. Das
verstellbare Anschlussstück wird an dem
Gasanschluss mit einer G 1/2"
Gewindemutter befestigt. Verschrauben
Sie die Teile ohne Kraftanwendung,
bringen Sie das Anschlussstück in die
benötigte Richtung und schrauben Sie
alle Teile fest.
A B C
A.
Schaftende mit Mutter
B. Mitgelieferte Beilagscheibe
C. Mitgelieferter Rohrbogen
Fester Anschluss:
Führen Sie den Anschluss mit festen
Metallrohren (Kupfer mit mechanischem
Endstück) aus (UNI-CIG 7129).
Flexibler Anschluss:
Verwenden Sie ein flexibles
Edelstahlrohr (UNI-CIG 9891) mit einer
maximalen Länge von 2 m.
WARNUNG!
Überprüfen Sie nach der
Installation, ob alle
Anschlussstücke dicht sind.
Verwenden Sie eine
Seifenlösung und keine
Flamme!
3.3 Austauschen der Düsen
1. Nehmen Sie die Topfträger ab.
2. Nehmen Sie Brennerdeckel und
Brennerkronen ab.
3. Entfernen Sie die Düsen mit einem
Steckschlüssel 7 und ersetzen Sie
sie durch für die verwendete Gasart
geeignete Düsen (siehe Tabelle im
Abschnitt „Technische Daten“).
4. Bringen Sie die Teile wieder an.
Führen Sie dazu die obigen Schritte
in umgekehrter Reihenfolge aus.
5. Ersetzen Sie das Typenschild (in der
Nähe der Gasversorgungsleitung)
durch das Typenschild für die neue
Gasart. Das Typenschild ist im
Beipack des Geräts enthalten.
Wenn der Gasdruck der Gasversorgung
schwankt oder nicht dem erforderlichen
Druckwert entspricht, muss ein
geeigneter Druckregler im Gaszufuhrrohr
montiert werden.
www.electrolux.com26

3.4 Einstellen der niedrigsten
Stufe
So stellen Sie die niedrigste Stufe der
Brenner ein:
1. Zünden Sie den Brenner.
2. Drehen Sie den Knopf auf die
kleinste Flamme.
3. Entfernen Sie den Knopf .
4. Stellen Sie mit einem kleinen
Schraubendreher die Bypass-
Schraubenposition (A) ein.
A
5. Bei Umstellung:
• von Erdgas G20 20 mbar auf
Flüssiggas, ziehen Sie die
Bypass-Schraube bis zum
Anschlag an.
• Von Flüssiggas auf Erdgas G20
20 mbar, drehen Sie die Bypass-
Schraube ca. 1/4 Umdrehung (1/2
Umdrehung für den Multikronen-
Brenner zurück.
WARNUNG!
Vergewissern Sie sich, dass
die Flamme nicht erlischt,
wenn Sie den Einstellknopf
schnell von der höchsten zur
niedrigsten Stufe drehen.
3.5 Elektroanschluss
• Vergewissern Sie sich, dass die
Netzspannung und -frequenz in Ihrer
Region mit den auf dem Typenschild
angegebenen Anschlusswerten
übereinstimmen.
• Das Gerät wird mit einem Netzkabel
geliefert. Dazu muss ein passender
Stecker verwendet werden, der für die
auf dem Typenschild angegebene
Gesamtstromaufnahme ausgelegt ist.
Achten Sie darauf, den Stecker in
eine passende Steckdose zu stecken.
• Schließen Sie das Gerät nur an eine
ordnungsgemäß installierte
Schutzkontaktsteckdose an.
• Stellen Sie sicher, dass der
Netzstecker nach der Montage noch
zugänglich ist.
• Ziehen Sie nicht am Netzkabel, wenn
Sie das Gerät von der
Stromversorgung trennen möchten.
Ziehen Sie stets am Netzstecker.
• Es besteht Brandgefahr, wenn das
Gerät mit einem Verlängerungskabel,
Adapter oder an eine
Mehrfachsteckdose angeschlossen
wird. Stellen Sie sicher, dass die
Erdverbindung den Normen und
Vorschriften entspricht.
• Das Netzkabel darf nicht heißer als
90 °C werden.
Um einen Kontakt des Kabels mit dem
Gerät unter dem Kochfeld zu vermeiden,
verwenden Sie die Haken auf den Seiten
des Gehäuses.
A
A. Festes Kupferrohr oder flexibles
Edelstahlrohr
3.6 Anschlusskabel
Ersetzen Sie das Anschlusskabel
ausschließlich durch das spezielle Kabel
oder ein gleichwertiges Kabel. Kabeltyp:
H03V2V2-F T90.
Vergewissern Sie sich, dass der
Kabelquerschnitt für die Spannung und
Betriebstemperatur geeignet ist. Der
gelb-grüne Erdleiter muss ca. 2 cm
länger als der braune (bzw. schwarze)
Phasenleiter sein.
DEUTSCH 27

3.7 Montage
1.
2.
3.
min.
55 mm
min.
650 mm
560 mm
2
0
+
480 mm
2
0
+
min.
100 mm
30 mm
4.
5.
6.
B
A
A) Mitgelieferte Dichtung
B) Mitgelieferte Klammern
7.
VORSICHT!
Montieren Sie das Gerät nur
in einer flachen
Arbeitsplatte.
3.8 Montage des Kochfelds
unter der Dunstabzugshaube
Wird das Kochfeld unter
einer Abzugshaube montiert,
sehen Sie in der
Montageanleitung der
Abzugshaube nach, welcher
Mindestabstand zwischen
den Geräten eingehalten
werden muss.
www.electrolux.com28

3.9 Einbaumöglichkeiten
Die unter dem Kochfeld eingebaute
Platte muss sich leicht entfernen lassen
und einen einfachen Zugang
ermöglichen, falls eine Reparatur
erforderlich wird.
Küchenschrank mit Tür
min 20 mm
(max 150 mm)
30 mm
60 mm
B
A
A. Entfernbare Platte
B. Raum für Anschlüsse
Küchenschrank mit Backofen
Kochfeld und Backofen müssen aus
Sicherheitsgründen über separate
elektrische Anschlüsse verfügen. Der
Backofen muss sich leicht aus dem
Küchenschrank entfernen lassen.
4. GERÄTEBESCHREIBUNG
4.1 Kochfeldanordnung
3
4
2
1
1
Normalbrenner
2
Multikronen-Brenner
3
Hilfsbrenner
4
Einstellknöpfe
4.2 Einstellknopf
Symbol Beschreibung
Keine Gaszufuhr/ausge‐
schaltet
Symbol Beschreibung
Zündstellung/maximale
Gaszufuhr
minimale Gaszufuhr
5. TÄGLICHER GEBRAUCH
WARNUNG!
Siehe Kapitel
Sicherheitshinweise.
DEUTSCH 29

5.1 Brennerübersicht
$
%
'
&
$
%
'
&
A. Brennerdeckel
B. Brennerkrone
C. Zündkerze
D. Thermoelement
5.2 Zünden des Brenners
Zünden Sie den Brenner
stets vor dem Aufsetzen des
Kochgeschirrs.
WARNUNG!
Seien Sie bei der
Verwendung von offenem
Feuer in der Küche
besonders vorsichtig. Der
Hersteller übernimmt bei
Missachtung der
Sicherheitsbestimmungen
beim Umgang mit offenem
Feuer keinerlei Haftung.
1. Drücken Sie den Einstellknopf hinein
und drehen Sie ihn gegen den
Uhrzeigersinn auf die Position für die
maximale Gaszufuhr ( ).
2. Halten Sie den Einstellknopf bis zu
10 Sekunden lang gedrückt. In dieser
Zeit wird das Thermoelement
erwärmt. Andernfalls wird die
Gaszufuhr unterbrochen.
3. Stellen Sie die Flamme ein, sobald
sie ruhig brennt.
Falls sich der Brenner nach
einigen Versuchen nicht
zünden lässt, überprüfen
Sie, ob die Brennerkrone
und der zugehörige
Brennerdeckel korrekt
sitzen.
WARNUNG!
Halten Sie den Knopf nicht
länger als 15 Sekunden
gedrückt. Sollte der Brenner
nach 15 Sekunden nicht
zünden, lassen Sie den
Knopf los, und drehen Sie
ihn in die Aus-Position.
Warten Sie dann mindestens
eine Minute, bevor Sie den
Brenner erneut zünden.
www.electrolux.com30

VORSICHT!
Wenn kein Strom zur
Verfügung steht, können Sie
den Brenner auch ohne
Strom zünden. Bringen Sie
eine Flamme in die Nähe
des Brenners, drehen Sie
den entsprechenden Knopf
entgegen dem Uhrzeigersinn
auf die höchste Stufe und
drücken Sie ihn dann hinein.
Halten Sie den Einstellknopf
höchstens 10 Sekunden
gedrückt, um das
Thermoelement zu
erwärmen.
Sollte der Brenner zufällig
ausgehen, drehen Sie den
Knopf in die Aus-Position
und versuchen Sie ihn nach
einer Minute erneut zu
zünden.
Nach dem Einschalten der
Stromversorgung, nach der
Installation oder nach einem
Stromausfall wird der
Funkengenerator
möglicherweise automatisch
eingeschaltet. Das ist
normal.
Das Kochfeld wird mit
Ventilen mit einem stetigen
Stellverhalten geliefert. Sie
ermöglichen eine präzisere
Einstellung der Flamme.
5.3 Abschalten des Brenners
Drehen Sie zum Abschalten des
Brenners den Knopf in die Aus-Position
.
WARNUNG!
Bevor Sie das Kochgeschirr
vom Brenner nehmen,
drehen Sie die Flamme
herunter oder drehen Sie sie
ganz ab.
6. TIPPS UND HINWEISE
WARNUNG!
Siehe Kapitel
Sicherheitshinweise.
6.1 Kochgeschirr
VORSICHT!
Verwenden Sie kein
Kochgeschirr aus
Gusseisen, Ton oder
Steingut und keine Grill-
oder Sandwichplatten.
WARNUNG!
Kochen Sie nicht mit einem
Kochgeschirrteil auf zwei
Brennern gleichzeitig.
WARNUNG!
Stellen Sie keine
beschädigten Töpfe oder
solche, die nicht standfest
sind, auf den Brenner, um
ein Verschütten und
Verletzungen zu vermeiden.
VORSICHT!
Achten Sie darauf, dass sich
die Topfböden nicht zu nahe
am Einstellknopf befinden,
da anderenfalls die Flamme
den Einstellknopf erhitzen
könnte.
DEUTSCH 31

VORSICHT!
Achten Sie darauf, dass die
Topfgriffe nicht über den
vorderen Rand des
Kochfelds hinausragen.
VORSICHT!
Stellen Sie zur Reduzierung
des Gasverbrauchs und im
Interesse einer größeren
Stabilität die Töpfe mittig auf
den Brenner.
VORSICHT!
Heiße Flüssigkeiten, die
während des Kochens
verschüttet werden, können
zum Zerspringen der
Glasplatte führen.
6.2 Durchmesser des
Kochgeschirrs
Verwenden Sie nur
Kochgeschirr mit einem
Durchmesser, der der Größe
der Brenner entspricht.
Brenner Durchmesser
des Kochge‐
schirrs (mm)
Multikronen-Brenner 180 - 260
Normalbrenner 120 - 220
Hilfsbrenner 80 - 180
7. REINIGUNG UND PFLEGE
WARNUNG!
Siehe Kapitel
Sicherheitshinweise.
7.1 Allgemeine Informationen
• Reinigen Sie das Kochfeld nach
jedem Gebrauch.
• Verwenden Sie stets Kochgeschirr mit
sauberen Böden.
• Kratzer oder dunkle Flecken auf der
Oberfläche beeinträchtigen die
Funktionsfähigkeit des Kochfelds
nicht.
• Verwenden Sie einen Spezialreiniger
zur Reinigung der
Kochfeldoberfläche.
WARNUNG!
Verwenden Sie keine
Messer, Schaber oder
ähnliche Gegenstände zum
Reinigen der Glasplatte oder
der Zwischenräume
zwischen den Außenringen
der Brenner und dem
Gehäuse (sofern
vorhanden).
• Reinigen Sie Edelstahlteile mit
Wasser und wischen Sie sie mit
einem weichen Tuch trocken.
7.2 Topfträger
Die Topfträger sind nicht
spülmaschinenfest. Sie
müssen von Hand gereinigt
werden.
1. Entfernen Sie die Topfträger, um die
Reinigung des Kochfelds zu
erleichtern.
Seien Sie beim
Wiederaufsetzen der
Topfträger vorsichtig, um
Beschädigungen der
Oberseite der Kochstelle
zu vermeiden.
2. Wenn Sie die Topfträger von Hand
spülen und trocknen, seien Sie
vorsichtig, da durch das Emaillieren
gelegentlich raue Kanten entstehen
können. Entfernen Sie hartnäckige
Flecken ggf. mit einer
Reinigungspaste.
3. Vergewissern Sie sich, dass Sie die
Topfträger nach der Reinigung
wieder ordnungsgemäß eingesetzt
haben.
4. Damit der Brenner korrekt
funktioniert, stellen Sie sicher, dass
sich die Arme der Topfträger in der
Mitte des Brenners befinden.
www.electrolux.com32

7.3 Abnehmen der Topfträger
Die Topfträger werden auf Metallstiften,
die sich hinten auf dem Kochfeld
befinden, in Position gehalten. Um die
Reinigung zu erleichtern, können die
Topfträger abgenommen werden. Heben
Sie die Topfträger in waagerechter Lage
siehe Abbildung.
Nehmen Sie die Topfträger
nicht in geneigter Position
ab, da sonst die Metallstifte
belastet werden. Die Stifte
könnten beschädigt werden
und abbrechen.
Die Form der Topfträger und die
Brenneranzahl kann bei anderen
Gerätemodellen variieren.
7.4 Reinigen des Kochfelds
• Folgendes muss sofort entfernt
werden: Geschmolzener Kunststoff,
Plastikfolie, Zucker und zuckerhaltige
Lebensmittel. Anderenfalls können die
Verschmutzungen das Kochfeld
beschädigen. Achten Sie darauf, dass
sich niemand Verbrennungen zuzieht.
• Folgendes kann nach
ausreichender Abkühlung des
Kochfelds entfernt werden: Kalk-
und Wasserränder, Fettspritzer und
metallisch schimmernde
Verfärbungen. Reinigen Sie das
Kochfeld mit einem feuchten Tuch
und nicht scheuernden
Reinigungsmittel. Wischen Sie das
Kochfeld nach der Reinigung mit
einem weichen Tuch trocken.
• Reinigen Sie die emaillierten Teile,
die Brennerdeckel und Brennerkronen
mit warmen Seifenwasser und
trocknen Sie diese sorgfältig ab,
bevor Sie sie wieder einsetzen.
7.5 Reinigen der Zündkerze
Diese Funktion erfolgt über eine
Keramikzündkerze mit Metallelektrode.
Halten Sie zur Vermeidung von
Zündschwierigkeiten diese Bauteile
immer sauber; kontrollieren Sie
außerdem, ob die Düsen der
Brennerkrone verstopft sind.
7.6 Regelmäßige Wartung
Lassen Sie regelmäßig vom Ihrem
autorisierten Kundendienst den Zustand
des Gasversorgungsrohrs und, falls
DEUTSCH 33

installiert, die Funktionstüchtigkeit des
Druckreglers überprüfen.
8. FEHLERSUCHE
WARNUNG!
Siehe Kapitel
Sicherheitshinweise.
8.1 Was tun, wenn...
Störung Mögliche Ursache Abhilfe
Es wird kein Funke er‐
zeugt, wenn Sie versu‐
chen, den Funkenerzeuger
zu verwenden.
Das Kochfeld ist nicht oder
nicht ordnungsgemäß an
die Spannungsversorgung
angeschlossen.
Prüfen Sie, ob das Koch‐
feld ordnungsgemäß an
die Spannungsversorgung
angeschlossen ist.
Die Sicherung ist durchge‐
brannt.
Vergewissern Sie sich,
dass die Sicherung der
Grund für die Störung ist.
Brennt die Sicherung wie‐
derholt durch, wenden Sie
sich an eine zugelassene
Elektrofachkraft.
Brennerdeckel und Bren‐
nerkrone sitzen nicht rich‐
tig.
Bringen Sie die Brenner‐
krone und den Brennerde‐
ckel in die richtige Position.
Die Flamme erlischt gleich
nach der Zündung wieder.
Das Thermoelement ist
nicht ausreichend erwärmt.
Halten Sie den Knopf nach
dem Entzünden etwa 10
Sekunden lang gedrückt.
Der Flammenring ist un‐
gleichmäßig.
Die Brennerkrone ist mit
Speiseresten verstopft.
Sorgen Sie dafür, dass die
Düse nicht blockiert und
die Brennerkrone sauber
ist.
8.2 Wenn Sie das Problem
nicht lösen können...
Wenn Sie das Problem nicht selbst lösen
können, wenden Sie sich an Ihren
Händler oder einen autorisierten
Kundendienst. Geben Sie die Daten, die
Sie auf dem Typenschild finden, an.
Vergewissern Sie sich, dass Sie das
Kochfeld korrekt bedient haben. Wenn
Sie das Gerät falsch bedient haben, fällt
auch während der Garantiezeit für die
Reparatur durch einen Techniker oder
Händler eine Gebühr an. Die
Informationen zum Kundendienst und die
Garantiebedingungen finden Sie im
Garantieheft.
www.electrolux.com34

8.3 Im Zubehörbeutel
mitgelieferte Aufkleber
Bringen Sie die Aufkleber, wie unten
gezeigt, an:
MOD.
PROD.NO.
SER.NO
DATA
MOD.
PROD.NO.
SER.NO
DATA
MOD.
PROD.NO.
SER.NO.
03 IT
MADE IN ITALY
TYPE
IP20
0049
A B C
A. Kleben Sie ihn auf die Garantiekarte
und verschicken Sie diesen Teil (falls
vorhanden).
B. Kleben Sie ihn auf die Garantiekarte
und behalten Sie diesen Teil (falls
vorhanden).
C. Kleben Sie ihn auf die
Gebrauchsanleitung.
9. TECHNISCHE DATEN
9.1 Abmessungen des Kochfelds
Breite 590 mm
Tiefe 520 mm
9.2 Bypassdurchmesser
BRENNER Ø BYPASS 1/100 mm
Multikronen-Brenner 57
Normalbrenner 35
Hilfsbrenner 28
DEUTSCH 35

9.3 Sonstige technische Daten
GESAMTLEIS‐
TUNG:
Gas - Origi‐
nal:
G20 (2H) 20 mbar 8,9 kW
Gas - Ersatz: G30 (3+) 28-30 mbar 607 g/h
G31 (3+) 37 mbar 596 g/h
Netzanschluss: 220 - 240 V ~ 50 - 60 Hz
Gerätekatego‐
rie:
II2H3+
Gasanschluss: G 1/2"
Geräteklasse: 3
9.4 Gasbrenner für ERDGAS G20 20 mbar
BRENNER NORMALLEIS‐
TUNG kW
MINDESTLEIS‐
TUNG kW
INJEKTORMARKE
Multikronen-Bren‐
ner
3,9 1,4 146
Normalbrenner 2,0 0,6 96x
Hilfsbrenner 1,0 0,33 70
9.5 Gasbrenner für LPG G30/G31 28-30/37 mbar
BRENNER NORMAL‐
LEISTUNG
kW
MINDEST‐
LEISTUNG
kW
INJEKTOR‐
MARKE
NENNGASDURCHFLUSS g/
Std.
G30 28-30
mbar
G31 37 mbar
Multikro‐
nen-Bren‐
ner
3,55 1,4 095 258 254
Normal‐
brenner
1,9 0,6 71 138 136
Hilfsbrenner 1,0 0,33 50 73 71
10. ENERGIEEFFIZIENZ
10.1 Produktinformationen gemäß EU 66/2014
Modellidentifikation KGG6436K
Kochfeldtyp Einbau-Kochfeld
Anzahl der Gasbrenner 4
www.electrolux.com36

Energieeffizienz pro Gasbrenner
(EE gas burner)
Hinten links – Normalbrenner 54,8 %
Hinten rechts – Normalbren‐
ner
54,8 %
Vorne rechts – Hilfsbrenner nicht zutreffend
Vorne links – Multikronen-
Brenner
57,2 %
Energieeffizienz des Gaskoch‐
felds
(EE gas hob)
55.6%
EN 30-2-1: Haushalt-Kochgeräte für gasförmige Brennstoffe - Teil 2-1: Rationelle
Energienutzung - Allgemeines
10.2 Energie sparen
• Achten Sie vor dem Gebrauch darauf, dass die Brenner und Topfträger richtig
zusammengebaut sind.
• Verwenden Sie nur Kochgeschirr mit einem Durchmesser, der der Größe der
Brenner entspricht.
• Stellen Sie den Topf mittig auf den Brenner.
• Wenn Sie Wasser erwärmen, verwenden Sie nur die benötigte Menge.
• Decken Sie Kochgeschirr, wenn möglich, mit einem Deckel ab.
• Drehen Sie, sobald die Flüssigkeit zu kochen beginnt, die Flamme so weit zurück,
dass die Flüssigkeit nur leicht köchelt.
• Verwenden Sie nach Möglichkeit einen Dampfkochtopf. Beachten Sie seine
Bedienungsanleitung.
11. UMWELTTIPPS
Recyceln Sie Materialien mit dem
Symbol . Entsorgen Sie die
Verpackung in den entsprechenden
Recyclingbehältern. Recyceln Sie zum
Umwelt- und Gesundheitsschutz
elektrische und elektronische Geräte.
Entsorgen Sie Geräte mit diesem Symbol
nicht mit dem Hausmüll. Bringen Sie
das Gerät zu Ihrer örtlichen
Sammelstelle oder wenden Sie sich an
Ihr Gemeindeamt.
DEUTSCH 37

CONTENIDO
1. INFORMACIÓN SOBRE SEGURIDAD............................................................ 38
2. INSTRUCCIONES DE SEGURIDAD................................................................41
3. INSTALACIÓN..................................................................................................44
4. DESCRIPCIÓN DEL PRODUCTO................................................................... 47
5. USO DIARIO.....................................................................................................48
6. CONSEJOS...................................................................................................... 49
7. MANTENIMIENTO Y LIMPIEZA.......................................................................50
8. SOLUCIÓN DE PROBLEMAS..........................................................................52
9. DATOS TÉCNICOS..........................................................................................53
10. EFICACIA ENERGÉTICA...............................................................................54
PENSAMOS EN USTED
Gracias por adquirir un electrodoméstico Electrolux. Ha elegido un producto que
lleva décadas de experiencia e innovación profesionales. Ingenioso y elegante,
ha sido diseñado pensando en usted. Así pues, cada vez que lo utilice, puede
tener la seguridad de que obtendrá siempre excelentes resultados.
Le damos la bienvenida a Electrolux.
Visite nuestro sitio web para:
Obtener consejos, folletos, soluciones a problemas e información de servicio y
reparación:
www.electrolux.com/support
Registrar su producto para recibir un mejor servicio:
www.registerelectrolux.com
Comprar accesorios, artículos de consumo y piezas de recambio originales
para su aparato:
www.electrolux.com/shop
ATENCIÓN AL CLIENTE Y SERVICIO
Le recomendamos que utilice recambios originales.
Cuando se ponga en contacto con nuestro Centro de servicio técnico, asegúrese
de tener los siguientes datos disponibles: Modelo, código numérico del producto
(PNC), número de serie.
La información se encuentra en la placa de características.
Advertencia / Precaución - Información sobre seguridad
Información general y consejos
Información relativa al medioambiente
Salvo modificaciones.
1. INFORMACIÓN SOBRE SEGURIDAD
Antes de instalar y utilizar el aparato, lea atentamente
las instrucciones facilitadas. El fabricante no se hace
responsable de lesiones o daños producidos como
www.electrolux.com38

resultado de una instalación o un uso incorrectos:
Conserve siempre estas instrucciones en lugar seguro y
accesible para futuras consultas.
1.1 Seguridad de niños y personas vulnerables
• Este aparato puede ser utilizado por niños de 8 años
en adelante y personas cuyas capacidades físicas,
sensoriales o mentales estén disminuidas o que
carezcan de la experiencia y conocimientos
suficientes para manejarlo, siempre que cuenten con
las instrucciones o la supervisión sobre el uso del
electrodoméstico de forma segura y comprendan los
riesgos.
• Es necesario mantener alejados a los niños entre 3 y
8 años, así como a las personas con minusvalías
importantes y complejas, salvo que estén bajo
supervisión continua.
• Es necesario mantener alejados a los niños de menos
de 3 años salvo que estén bajo supervisión continua.
• No deje que los niños jueguen con el aparato.
• Mantenga todo el material de embalaje fuera del
alcance de los niños y deséchelo de forma adecuada.
• Mantenga a los niños y mascotas alejados del aparato
cuando esté funcionando o se esté enfriando. Las
piezas accesibles están calientes.
• Si este aparato tiene un bloqueo de seguridad para
niños, debe activarlo.
• La limpieza y mantenimiento de usuario del aparato
no podrán ser realizados por niños sin supervisión.
1.2 Seguridad general
• ADVERTENCIA: El aparato y las piezas accesibles se
calientan mucho durante el funcionamiento. Preste
mucha atención para no tocar las resistencias.
• No accione el aparato con un temporizador externo ni
con un sistema de mando a distancia independiente.
ESPAÑOL 39

• ADVERTENCIA: Cocinar con grasa o aceite sin estar
presente puede resultar peligroso, ya que podría
ocasionarse un incendio.
• NUNCA intente apagar un fuego con agua; apague el
aparato y cubra la llama con una tapa o una manta
ignífuga.
• ATENCIÓN: El proceso de cocción debe ser
supervisado. Un proceso de cocción breve debe estar
permanentemente supervisado.
• ADVERTENCIA: Peligro de incendio: No utilice las
superficies de cocción para almacenar alimentos.
• No deje objetos metálicos, como cuchillos, tenedores,
cucharas o tapas sobre la superficie de cocción para
evitar que se calienten.
• No utilice un limpiador a vapor para limpiar el aparato.
• Si la superficie de vitrocerámica/cristal está agrietada,
apague el aparato y desenchúfelo de la red eléctrica.
Si el aparato está conectado directamente a la red
eléctrica mediante una caja de empalmes, quite el
fusible para desconectarlo de la alimentación
eléctrica. En cualquier caso, diríjase al servicio técnico
autorizado.
• En caso de rotura del cristal de la encimera:
– apague inmediatamente todos los quemadores y
cualquier resistencia y aísle el aparato de la
alimentación eléctrica,
– no toque la superficie del aparato,
– no utilice el aparato.
• Si el cable eléctrico sufre algún daño, el fabricante, su
servicio técnico autorizado o un profesional tendrán
que cambiarlo para evitar riesgos.
• Donde el aparato esté directamente conectado a la
fuente de alimentación, se precisa un interruptor
aislador omnipolar con abertura entre contactos. Ha
de garantizarse una desconexión completa según las
condiciones especificadas en la categoría III de
sobretensión. El cable de tierra queda excluido de
esto.
www.electrolux.com40

• Cuando tienda el cable de corriente, asegúrese (por
ejemplo mediante conductos aislantes) de que no
entra en contacto directo con piezas que puedan
superar la temperatura ambiente en más de 50°C.
• ADVERTENCIA: Utilice exclusivamente protecciones
para la placa de cocción diseñadas por el fabricante
del aparato o indicadas en sus instrucciones de uso
como apropiadas, o bien las protecciones incluidas
con el aparato. El uso de protectores inadecuados
puede provocar accidentes.
2. INSTRUCCIONES DE SEGURIDAD
Este aparato es adecuado para los
siguientes mercados: IT
2.1 Instalación
ADVERTENCIA!
Sólo un técnico cualificado
puede instalar el aparato.
ADVERTENCIA!
Podría sufrir lesiones o
dañar el aparato.
• Retire todo el embalaje.
• No instale ni utilice un aparato
dañado.
• Siga las instrucciones de instalación
suministradas con el aparato.
• Respete siempre la distancia mínima
entre el aparato y los demás
electrodomésticos y mobiliario.
• Tenga cuidado al mover el aparato,
porque es pesado. Utilice siempre
guantes de protección y calzado
cerrado.
• Proteja las superficies cortadas con
un material sellante para evitar que la
humedad las hinche.
• Proteja la parte inferior del aparato
del vapor y la humedad.
• No instale el aparato junto a una
puerta ni debajo de una ventana. De
esta forma se evita que los utensilios
de cocina calientes caigan del
aparato cuando la puerta o la ventana
estén abiertas.
• Cuando instale el aparato encima de
cajones, asegúrese de que hay
suficiente espacio entre la parte
inferior del aparato y el cajón superior
para que circule el aire.
• La base del aparato se puede
calentar. Asegúrese de colocar un
panel de separación incombustible
bajo el aparato para evitar acceder a
la base.
2.2 Conexión eléctrica
ADVERTENCIA!
Riesgo de incendios y
descargas eléctricas.
• Todas las conexiones eléctricas
deben realizarlas electricistas
cualificados.
• El aparato debe conectarse a tierra.
• Antes de efectuar cualquier tipo de
operación, compruebe que el aparato
esté desenchufado de la corriente
eléctrica.
• Asegúrese de que los parámetros de
la placa de características son
compatibles con los valores eléctricos
del suministro eléctrico.
• Asegúrese de que el aparato está
instalado correctamente. Un cable de
red o enchufe (en su caso) flojo o
inadecuado puede provocar que el
terminal se caliente en exceso.
• Utilice el cable de red eléctrica
adecuado.
• Coloque los cables eléctricos de
forma que no se puedan enredar.
ESPAÑOL 41

• Asegúrese de que hay instalada una
protección contra descargas
eléctricas.
• Establezca la descarga de tracción
del cable.
• Asegúrese de que el cable o el
enchufe (en su caso) no toquen el
aparato caliente ni utensilios de
cocina calientes cuando conecte el
aparato a las tomas cercanas.
• No utilice adaptadores de enchufes
múltiples ni cables prolongadores.
• Asegúrese de no provocar daños en
el enchufe (en su caso) ni en el cable
de red. Póngase en contacto con un
electricista o con nuestro servicio
técnico para cambiar un cable
dañado.
• Los mecanismos de protección contra
descargas eléctricas de componentes
con corriente y aislados deben fijarse
de forma que no puedan aflojarse sin
utilizar herramientas.
• Conecte el enchufe a la toma de
corriente únicamente cuando haya
terminado la instalación. Asegúrese
de tener acceso al enchufe del
suministro de red una vez finalizada
la instalación.
• Si la toma de corriente está floja, no
conecte el enchufe.
• No desconecte el aparato tirando del
cable de conexión a la red. Tire
siempre del enchufe.
• Use únicamente dispositivos de
aislamiento apropiados: línea con
protección contra los cortocircuitos,
fusibles (tipo tornillo que puedan
retirarse del soporte), dispositivos de
fuga a tierra y contactores.
• La instalación eléctrica debe tener un
dispositivo de aislamiento que permita
desconectar el aparato de todos los
polos de la red. El dispositivo de
aislamiento debe tener una apertura
de contacto con una anchura mínima
de 3 mm.
2.3 Conexión del gas
• Todas las conexiones de gas deben
realizarse por personal cualificado.
• Antes de realizar la instalación,
asegúrese de que las condiciones de
distribución locales (tipo y presión del
gas) son compatibles con los
requisitos del aparato.
• Compruebe que el aire circula
libremente alrededor del aparato.
• La placa de características contiene
información sobre el suministro de
gas.
• Este aparato no está conectado a un
dispositivo que evacua los productos
de combustión. Asegúrese de
conectar el aparato según la
normativa de instalación vigente.
Preste atención a los requisitos sobre
ventilación adecuada.
2.4 Uso del aparato
ADVERTENCIA!
Riesgo de lesiones,
quemaduras y descargas
eléctricas.
• Retire todo el embalaje, las etiquetas
y la película protectora (en su caso)
antes del primer uso.
• Utilice este aparato en entornos
domésticos.
• No cambie las especificaciones de
este aparato.
• Cerciórese de que los orificios de
ventilación no están obstruidos.
• No deje nunca el aparato desatendido
mientras está en funcionamiento.
• Apague las zonas de cocción
después de cada uso.
• No coloque cubiertos ni tapaderas
sobre las zonas de cocción. Pueden
alcanzar temperaturas elevadas.
• No utilice el aparato con las manos
mojadas ni cuando entre en contacto
con el agua.
• No utilice el aparato como superficie
de trabajo ni de almacenamiento.
• Cuando se coloca comida en aceite
caliente, éste puede saltar.
ADVERTENCIA!
Riesgo de incendio y
explosiones
• Las grasas o aceites calientes
pueden generar vapores inflamables.
Mantenga las llamas u objetos
calientes alejados de grasas y aceites
cuando cocine con ellos.
www.electrolux.com42

• Los vapores que liberan los aceites
muy calientes pueden provocar
combustiones imprevistas.
• El aceite usado, que puede contener
restos de alimentos, puede provocar
incendios a temperaturas más bajas
que el aceite que se utiliza por
primera vez.
• No coloque productos inflamables ni
objetos mojados con productos
inflamables dentro, cerca o encima
del aparato.
ADVERTENCIA!
Podría dañar el aparato.
• No coloque ningún utensilio de cocina
caliente en el panel de control.
• No deje que el contenido de los
utensilios de cocina hierva hasta
evaporarse.
• Evite la caída de objetos o utensilios
de cocina en el aparato. La superficie
puede dañarse.
• No encienda las zonas de cocción sin
utensilios de cocina o con éstos
vacíos.
• No coloque papel de aluminio sobre
el aparato.
• Los utensilios de cocina de hierro o
aluminio fundido, o que tengan la
base dañada, pueden arañar el cristal
o la vitrocerámica. Levante siempre
estos objetos cuando tenga que
moverlos sobre la superficie de
cocción.
• Utilice únicamente utensilios de
cocina estables con forma adecuada
y diámetro superior al tamaño de los
quemadores.
• Asegúrese de que los utensilios de
cocina están bien centrados sobre los
quemadores.
• Asegúrese de que la llama no se
apaga cuando gire rápidamente el
mando de la posición máxima a la
mínima.
• Utilice únicamente los accesorios
suministrados con el aparato.
• No instale en el quemador un difusor
de llamas.
• El uso de un aparato de cocina de
gas genera calor y humedad.
Disponga de buena ventilación en la
sala donde instale el aparato.
• El uso intensivo y prolongado del
aparato puede exigir mayor
ventilación; por ejemplo, la apertura
de una ventana o una ventilación más
eficaz, por ejemplo, el aumento del
nivel de ventilación mecánica, si se
dispone de ella.
• Este aparato está diseñado
exclusivamente para cocinar. No
debe utilizarse para otros fines, por
ejemplo, como calefacción.
• No permita que líquidos ácidos, como
por ejemplo vinagre, zumo de limón o
desincrustantes de cal toquen la
placa de cocción. De lo contrario,
podrían aparecer manchas opacas.
• La pérdida de color del esmalte o el
acero inoxidable no afecta al
rendimiento del aparato.
2.5 Mantenimiento y limpieza
ADVERTENCIA!
No quite los botones, perillas
o juntas del panel de control.
Puede entrar agua en el
interior del aparato y causar
daño.
• Limpie periódicamente el aparato
para evitar el deterioro del material de
la superficie.
• Apague el aparato y déjelo enfriar
antes de limpiarlo.
• Desconecte el aparato de la red
eléctrica antes de realizar el
mantenimiento.
• No utilice pulverizadores ni vapor de
agua para limpiar el aparato.
• Limpie el aparato con un paño suave
humedecido. Utilice solo detergentes
neutros. No utilice productos
abrasivos, estropajos duros,
disolventes ni objetos de metal.
• No lave los quemadores en el
lavavajillas.
2.6 Asistencia
• Para reparar el aparato, póngase en
contacto con un centro de servicio
autorizado.
• Utilice solamente piezas de recambio
originales.
ESPAÑOL 43

2.7 Eliminación
ADVERTENCIA!
Existe riesgo de lesiones o
asfixia.
• Póngase en contacto con las
autoridades locales para saber cómo
desechar correctamente el aparato.
• Desconecte el aparato de la red.
• Corte el cable eléctrico cerca del
aparato y deséchelo.
• Aplaste los tubos de gas externos.
3. INSTALACIÓN
ADVERTENCIA!
Consulte los capítulos sobre
seguridad.
3.1 Antes de la instalación
Antes de instalar la placa de cocción,
anote la información siguiente de la
placa de características. La placa de
características está situada en la parte
inferior de la placa de cocción.
Modelo .......................................
PNC .........................................
Número de
serie ...........................
3.2 Conexión de gas
ADVERTENCIA!
Las siguientes instrucciones
de montaje, mantenimiento y
ventilación las debe llevar a
cabo personal cualificado de
acuerdo con las normas en
vigor (UNI-CIG 7129 - 7131).
Asegúrese de que la cocina
esté bien ventilada:
mantenga abiertas las
salidas de ventilación natural
(100 cm² como mínimo) o
instale una campana
extractora.
Elija conexiones fijas o utilice un tubo
flexible de acero inoxidable que cumpla
la normativa vigente. Si utiliza tubos
metálicos flexibles, tenga cuidado de que
no entren en contacto con las partes
móviles ni estén retorcidos. Preste
también atención cuando la placa se
instale junto con un horno.
Asegúrese de que la presión
del suministro de gas del
aparato cumple los valores
recomendados.
Si la presión suministrada no alcanza el
valor especificado, es necesario montar
un regulador de presión adecuado de
conformidad con la norma UNI EN 88.
Respecto al gas líquido (GLP), el uso de
un regulador de presión únicamente está
autorizado si cumple la norma UNI EN
12864. La conexión ajustable se fija a la
rampa por medio de una tuerca roscada
G 1/2". Atornille las piezas sin fuerza,
ajuste la conexión en la dirección
adecuada y apriete todo.
A B C
A. Extremo del eje con tuerca
B. Arandela suministrada con el aparato
C. Codo suministrado con el aparato
Conexión rígida:
Realice la conexión con tubos de metal
rígidos (cobre con extremo mecanizado)
(UNI-CIG 7129).
Conexión flexible:
Utilice un tubo flexible de acero
inoxidable (UNI-CIG 9891) con una
longitud máxima de 2 m.
www.electrolux.com44

ADVERTENCIA!
Cuando la instalación esté
terminada, asegúrese de
que el sello de cada racor
del tubo es correcto. Utilice
una solución jabonosa,
nunca una llama.
3.3 Sustitución de los
inyectores
1. Retire los soportes para sartenes.
2. Retire las tapas y las coronas del
quemador.
3. Con una llave tubular del 7,
desatornille y retire los inyectores y
sustitúyalos por los adecuados al tipo
de gas que va a utilizar (consulte la
tabla del capítulo “Datos técnicos”).
4. Vuelva a montar las piezas siguiendo
el procedimiento anterior en orden
inverso.
5. Sustituya la placa de características
(situada cerca del tubo de suministro
de gas) por la correspondiente al
nuevo tipo de suministro de gas.
Encontrará esta placa en el embalaje
del aparato.
Si la presión del suministro de gas se
puede cambiar o es diferente de la
necesaria, debe instalar un regulador de
presión adecuado en el tubo del
suministro de gas.
3.4 Ajuste del nivel mínimo
Para ajustar el nivel mínimo de los
quemadores:
1. Encienda el quemador.
2. Gire el mando hasta la posición
mínima.
3. Retire el mando .
4. Con un destornillador plano, ajuste la
posición del tornillo de derivación (A).
A
5. Si cambia:
• de gas natural G20 de 20 mbares
a gas líquido, apriete totalmente
el tornillo de derivación.
• de gas líquido a gas natural G20
de 20 mbar, desatornille el tornillo
de derivación aproximadamente
1/4 de vuelta (1/2 vuelta para el
quemador de multi corona).
ADVERTENCIA!
Asegúrese de que la llama
no se apaga cuando gire
rápidamente el mando de la
posición máxima a la
posición mínima.
3.5 Conexión eléctrica
• Asegúrese de que el voltaje nominal y
el tipo de suministro que indica la
placa de datos técnicos coinciden con
los del lugar donde se va a instalar el
aparato.
• Este aparato se suministra con un
cable de alimentación. Debe estar
equipado con un enchufe adecuado
capaz de soportar la carga indicada
en la placa de características.
Asegúrese de instalar el enchufe en
una toma correcta.
• Utilice siempre una toma con
aislamiento de conexión a tierra
correctamente instalada.
• Asegúrese de tener acceso al
enchufe del suministro de red una vez
finalizada la instalación.
• No desconecte el aparato tirando del
cable de conexión a la red. Tire
siempre del enchufe.
• Hay riesgo de incendio si se conecta
el aparato con un cable de
prolongación, adaptador o conexión
múltiple. Asegúrese de que la
conexión a tierra cumple los
reglamentos y las normas vigentes.
• No deje que el cable de alimentación
se caliente a más de 90° C.
Para evitar el contacto entre el cable y el
aparato instalado bajo la placa de
cocción, utilice las abrazaderas del
lateral del armario.
ESPAÑOL 45

A
A. Tubo de cobre rígido o tubo flexible
de acero inoxidable
3.6 Cable de conexión
Si desea cambiar el cable de conexión,
utilice únicamente el cable especial o su
equivalente. El tipo de cable es:
H03V2V2-F T90.
Asegúrese de que la sección de cable
sea adecuada para la tensión y la
temperatura de funcionamiento. El cable
de puesta a tierra de color amarillo/verde
debe ser unos 2 cm más largo que el
cable de fase marrón (o negro).
3.7 Montaje
1.
2.
3.
min.
55 mm
min.
650 mm
560 mm
2
0
+
480 mm
2
0
+
min.
100 mm
30 mm
4.
5.
6.
B
A
A) capa impermeabilizante
B) abrazaderas suministradas
www.electrolux.com46

7.
PRECAUCIÓN!
Coloque el aparato
únicamente sobre encimeras
de superficie plana.
3.8 Instalación de la placa bajo
la campana
Si instala la placa de cocción
debajo de una campana,
consulte las instrucciones de
instalación de la campana
para confirmar la distancia
mínima necesaria entre los
aparatos.
3.9 Posibilidades de inserción
El panel instalado debajo de la placa
debe poder retirarse fácilmente y permitir
el acceso en caso de que sea necesario
realizar una intervención de asistencia
técnica.
Unidad de cocina con puerta
min 20 mm
(max 150 mm)
30 mm
60 mm
B
A
A. Panel extraíble
B. Espacio para las conexiones
Unidad de cocina con horno
La conexión eléctrica de la encimera y el
horno debe instalarse por separado para
garantizar la seguridad y poder retirar
fácilmente el horno de la unidad.
4. DESCRIPCIÓN DEL PRODUCTO
4.1 Disposición de las zonas de cocción
3
4
2
1
1
Quemador semi rápido
2
Quemador de multi corona
3
Quemador auxiliar
4
Mandos de control
4.2 Mando de control
Símbolo Description
Sin suministro de gas /
posición de apagado
Símbolo Description
Posición de encendido /
suministro de gas máxi‐
mo
ESPAÑOL 47

Símbolo Description
suministro mínimo de
gas
5. USO DIARIO
ADVERTENCIA!
Consulte los capítulos sobre
seguridad.
5.1 Descripción general del
quemador
$
%
'
&
$
%
'
&
A. Tapa del quemador
B. Corona del quemador
C. Bujía de encendido
D. Termopar
5.2 Encendido del quemador
Encienda siempre el
quemador antes de colocar
los utensilios de cocina.
ADVERTENCIA!
Tenga mucho cuidado
cuando utilice el fuego
destapado en el entorno de
la cocina. El fabricante
declina toda responsabilidad
en caso de uso indebido de
la llama.
1. Presione el mando y gírelo hacia la
izquierda hasta la posición máxima
de suministro de gas (
).
2. Mantenga pulsado el mando durante
unos 10 segundos como máximo. De
esta forma se calienta el termopar.
De lo contrario, el suministro de gas
se interrumpe.
3. Ajuste la llama después de que se
normalice.
Si el quemador no se
enciende tras varios
intentos, compruebe que la
corona y la tapa del
quemador están bien
colocados.
ADVERTENCIA!
No mantenga pulsado el
mando durante más de 15
segundos. Si el quemador
no se enciende al cabo de
15 segundos, suelte el
mando de control, gírelo
hasta la posición de
apagado y espere al menos
1 minuto antes de volver a
intentar encender el
quemador.
www.electrolux.com48

PRECAUCIÓN!
Si no hay suministro
eléctrico podrá encender el
quemador sin necesidad del
dispositivo eléctrico; en este
caso arrime una llama al
quemador, gire el mando de
control pertinente hacia la
izquierda hasta la posición
de máxima salida de gas y
empújelo hacia abajo.
Manténgalo presionado
durante unos 10 segundos
como máximo; de esta
forma el termopar se
calentará.
Si el quemador se apaga
accidentalmente, gire el
mando de control hasta la
posición de apagado y
espere al menos 1 minuto
antes de volver a intentar
encenderlo.
Cuando se enciende la
corriente, tras la instalación
o después de un corte en el
suministro eléctrico, suele
ser normal que el generador
de las chispas se active
automáticamente. Esto es
correcto.
La placa se suministra con
las válvulas progresivas.
Hacen más precisa la
regulación de la llama.
5.3 Apagado del quemador
Para apagar la llama, gire el mando
hasta la posición de apagado
.
ADVERTENCIA!
Recuerde que debe bajar o
apagar la llama antes de
retirar los recipientes del
quemador.
6. CONSEJOS
ADVERTENCIA!
Consulte los capítulos sobre
seguridad.
6.1 Utensilios de cocina
PRECAUCIÓN!
No utilice sartenes de hierro
fundido, fuentes de barro
cocido o de cerámica ni
placas de grill o de
tostadora.
ADVERTENCIA!
No coloque un mismo
recipiente en dos
quemadores.
ADVERTENCIA!
No coloque recipientes
inestables o deformados en
los quemadores para evitar
salpicaduras y lesiones.
PRECAUCIÓN!
Asegúrese de que las bases
de los recipientes no estén
demasiado cerca de los
mandos de control, de lo
contrario la llama calentaría
los mandos.
PRECAUCIÓN!
Asegúrese de que las asas
de los utensilios no
sobresalgan del borde
delantero de la placa de
cocción.
PRECAUCIÓN!
Asegúrese de que los
recipientes estén centrados
sobre los quemadores para
obtener la máxima
estabilidad y reducir el
consumo de gas.
ESPAÑOL 49

PRECAUCIÓN!
Los líquidos derramados
durante la cocción pueden
hacer que se rompa el
cristal.
6.2 Diámetro de los utensilios
de cocina
Utilice utensilios de cocina
con diámetros adecuados
para el tamaño de los
quemadores.
Quemador Diámetro de
los recipien‐
tes (mm)
Multi corona 180 - 260
Semi rápido 120 - 220
Auxiliar 80 - 180
7. MANTENIMIENTO Y LIMPIEZA
ADVERTENCIA!
Consulte los capítulos sobre
seguridad.
7.1 Información general
• Limpie la placa después de cada uso.
• Utilice siempre recipientes cuya base
esté limpia.
• Los arañazos o las marcas oscuras
en la superficie no afectan al
funcionamiento normal de la placa.
• Utilice un limpiador especial para la
superficie de la placa.
ADVERTENCIA!
No utilice cuchillos,
rascadores o instrumentos
similares para limpiar la
superficie del cristal o entre
los anillos de los
quemadores y el marco (en
su caso).
• Lave las partes de acero inoxidable
con agua y séquelas a fondo con un
paño suave.
7.2 Soportes para sartenes
Los soportes para sartenes
no son resistentes al lavado
en lavavajillas. Deben
lavarse a mano.
1. Retire los soportes para sartenes
para facilitar la limpieza de la placa
de cocción.
Tenga mucho cuidado
cuando cambie los
soportes para sartenes
para evitar dañar la
parte superior de la
placa de cocción.
2. El revestimiento de esmalte puede
tener los bordes rugosos; tenga
cuidado al lavar y secar a mano los
soportes para sartenes. Si fuera
necesario, elimine las manchas
difíciles con un limpiador en pasta.
3. Después de limpiar los soportes para
sartenes, asegúrese de colocarlos en
la posición correcta.
4. A fin de que los quemadores
funcionen correctamente, asegúrese
de que los brazos de los soportes
para sartenes estén alineados con el
centro del quemador.
www.electrolux.com50

7.3 Extracción de los soportes
para sartenes
Los soportes para sartenes se
mantienen en la posición correcta
porque se colocan en pasadores
metálicos instalados en la parte posterior
de la placa de cocción. Para facilitar la
limpieza, los soportes para sartenes
pueden retirarse de la placa de cocción.
Levante los soportes para sartenes
manteniéndolos en posición horizontal
como se muestra en el gráfico.
No levante los soportes para
sartenes en ángulo, porque
ejercerá presión en los
pasadores metálicos. Esto
podría dañar los pasadores
y romperlos.
La forma de los soportes para sartenes y
la cantidad de quemadores pueden ser
diferentes en otros modelos del aparato.
7.4 Limpieza de la placa
• Elimine de inmediato: restos
fundidos de plástico, recubrimientos
de plástico, azúcar y alimentos que
contengan azúcar, la suciedad puede
dañar la placa. Tenga cuidado para
evitar quemaduras.
• Elimine cuando el aparato se haya
enfriado: restos de cal, marcas de
agua, manchas de grasa y
decoloraciones metálicas. Limpie la
placa de cocción con un paño suave
humedecido con agua y detergente
no abrasivo. Después de limpiar,
seque la placa de cocción con un
paño suave.
• Para limpiar las partes esmaltadas,
las tapas y las coronas, utilice agua
jabonosa templada y séquelas
cuidadosamente antes de volver a
colocarlas en su sitio.
7.5 Limpieza de la bujía de
encendido
Esta función se obtiene a través de una
bujía de encendido cerámica con un
electrodo metálico. Mantenga siempre
limpios estos componentes para evitar
problemas de encendido y asegúrese de
que los orificios de la corona del
quemador no estén obstruidos.
7.6 Mantenimiento periódico
Haga revisar la instalación de gas y el
ajustador de presión, si lo hubiera,
regularmente y por el Centro de servicio
autorizado.
ESPAÑOL 51

8. SOLUCIÓN DE PROBLEMAS
ADVERTENCIA!
Consulte los capítulos sobre
seguridad.
8.1 Qué hacer si...
Problema Posible causa Solución
No hay chispa cuando se
intenta activar el genera‐
dor de chispas.
La placa no está conecta‐
da a un suministro eléctri‐
co o está mal conectada.
Compruebe si la placa se
ha conectado correcta‐
mente a la red eléctrica.
Ha saltado el fusible. Compruebe si el fusible es
la causa del fallo de fun‐
cionamiento. Si el fusible
se funde repetidamente,
consulte a un electricista
cualificado.
La tapa y la corona del
quemador no están bien
colocadas.
Coloque correctamente la
corona y la tapa del que‐
mador.
La llama se apaga justo
después de encenderse.
El termopar no está lo sufi‐
cientemente caliente.
Después de encender la
llama, mantenga pulsado
el mando durante unos 10
segundos como máximo.
El anillo de llama no es
uniforme.
La corona del quemador
está bloqueada con restos
de comida.
Asegúrese de que el in‐
yector no esté bloqueado y
de que la corona del que‐
mador esté limpia.
8.2 Si no encuentra una
solución...
Si no logra subsanar el problema,
póngase en contacto con su distribuidor
o el centro de servicio técnico. Facilite la
información de la placa de
características. Asegúrese de que
maneja la placa de cocción
adecuadamente. De lo contrario, el
personal del servicio técnico o del
distribuidor facturará la reparación
efectuada, incluso en el caso de que el
aparato se encuentre en periodo de
garantía. Las instrucciones sobre
servicio técnico y condiciones de
garantía se encuentran en el folleto de
garantía que se suministra con el
aparato.
www.electrolux.com52

8.3 Etiquetas incluidas en la
bolsa de accesorios
Pegue las etiquetas adhesivas como se
muestra a continuación:
MOD.
PROD.NO.
SER.NO
DATA
MOD.
PROD.NO.
SER.NO
DATA
MOD.
PROD.NO.
SER.NO.
03 IT
MADE IN ITALY
TYPE
IP20
0049
A B C
A. Péguela en la etiqueta de garantía y
envíe esta parte (en su caso).
B. Péguela en la etiqueta de garantía y
guarde esta parte (en su caso).
C. Péguela en el manual de
instrucciones.
9. DATOS TÉCNICOS
9.1 Dimensiones de la placa de cocción
Ancho 590 mm
Fondo 520 mm
9.2 Diámetros de derivación
QUEMADOR Ø DERIVACIÓN 1/100 mm
Multi corona 57
Semi rápido 35
Auxiliar 28
ESPAÑOL 53

9.3 Otros datos técnicos
POTENCIA TO‐
TAL:
Gas original: G20 (2H) 20 mbar 8,9 kW
Sustitución
de gas:
G30 (3+) 28-30 mbar 607g/h
G31 (3+) 37 mbar 596g/h
Suministro
eléctrico:
220-240 V ~ 50-60 Hz
Categoría de
aparato:
II2H3+
Conexión de
gas:
G 1/2"
Clase de apara‐
to:
3
9.4 Quemadores de gas para GAS NATURAL G20 a 20 mbar
QUEMADOR POTENCIA NOR‐
MAL kW
POTENCIA MÍNI‐
MA kW
MARCA DEL IN‐
YECTOR
Multi corona 3,9 1,4 146
Semi rápido 2,0 0,6 96x
Auxiliar 1,0 0,33 70
9.5 Quemadores de gas para GLP G30/G31 28-30/37 mbar
QUEMA‐
DOR
POTENCIA
NORMAL
kW
POTENCIA
MÍNIMA
kW
MARCA
DEL INYEC‐
TOR
CAUDAL DE GAS NOMI‐
NAL g/h
G30 28-30
mbar
G31 37 mbar
Multi corona 3,55 1,4 095 258 254
Semi rápido 1,9 0,6 71 138 136
Auxiliar 1,0 0,33 50 73 71
10. EFICACIA ENERGÉTICA
10.1 Información de producto según EU 66/2014
Identificación del modelo KGG6436K
Tipo de placa de cocción Placa empotrada
Número de quemadores de gas 4
www.electrolux.com54

Eficiencia energética por quema‐
dor de gas
(EE gas burner)
Parte trasera izquierda: semi‐
rrápido
54,8 %
Parte trasera derecha: semi‐
rrápido
54,8 %
Parte delantera derecha: auxi‐
liar
no aplicable
Parte delantera izquierda: co‐
rona múltiple
57,2 %
Eficiencia energética de la enci‐
mera de gas
(EE gas hob)
55.6%
EN 30-2-1: Aparatos domésticos de cocción que utilizan combustibles gaseosos -
Parte 2-1: Uso racional de la energía - General
10.2 Bajo consumo energético
• Antes de su uso, asegúrese de que los quemadores y los soportes están
correctamente montados.
• Utilice utensilios de cocina con diámetros adecuados para el tamaño de los
quemadores.
• Centre la olla en el quemador.
• Cuando caliente agua, utilice solo la cantidad que necesite.
• En la medida de lo posible, cocine siempre con los utensilios de cocina tapados.
• Cuando el líquido comience a hervir, reduzca la llama de tal forma que el líquido
siga cociendo.
• Si es posible, utilice una olla a presión. Consulte el manual del usuario.
11. ASPECTOS MEDIOAMBIENTALES
Recicle los materiales con el símbolo .
Coloque el material de embalaje en los
contenedores adecuados para su
reciclaje. Ayude a proteger el medio
ambiente y la salud pública, así como a
reciclar residuos de aparatos eléctricos y
electrónicos. No deseche los aparatos
marcados con el símbolo junto con los
residuos domésticos. Lleve el producto a
su centro de reciclaje local o póngase en
contacto con su oficina municipal.
*
ESPAÑOL 55

www.electrolux.com/shop
867356994-A-502020
Transcripción de documentos
KGG6436K EN DE ES Hob Kochfeld Placa de cocción User Manual Benutzerinformation Manual de instrucciones 2 19 38 2 www.electrolux.com CONTENTS 1. SAFETY INFORMATION....................................................................................2 2. SAFETY INSTRUCTIONS..................................................................................5 3. INSTALLATION.................................................................................................. 7 4. PRODUCT DESCRIPTION.............................................................................. 11 5. DAILY USE....................................................................................................... 11 6. HINTS AND TIPS............................................................................................. 12 7. CARE AND CLEANING....................................................................................13 8. TROUBLESHOOTING......................................................................................15 9. TECHNICAL DATA...........................................................................................16 10. ENERGY EFFICIENCY.................................................................................. 17 WE’RE THINKING OF YOU Thank you for purchasing an Electrolux appliance. You’ve chosen a product that brings with it decades of professional experience and innovation. Ingenious and stylish, it has been designed with you in mind. So whenever you use it, you can be safe in the knowledge that you’ll get great results every time. Welcome to Electrolux. Visit our website to: Get usage advice, brochures, trouble shooter, service and repair information: www.electrolux.com/support Register your product for better service: www.registerelectrolux.com Buy Accessories, Consumables and Original spare parts for your appliance: www.electrolux.com/shop CUSTOMER CARE AND SERVICE Always use original spare parts. When contacting our Authorised Service Centre, ensure that you have the following data available: Model, PNC, Serial Number. The information can be found on the rating plate. Warning / Caution-Safety information General information and tips Environmental information Subject to change without notice. 1. SAFETY INFORMATION Before the installation and use of the appliance, carefully read the supplied instructions. The manufacturer is not responsible for any injuries or damages that are the result of incorrect installation or usage. Always keep the ENGLISH 3 instructions in a safe and accessible location for future reference. 1.1 Children and vulnerable people safety • • • • • • • • This appliance can be used by children aged from 8 years and above and persons with reduced physical, sensory or mental capabilities or lack of experience and knowledge if they have been given supervision or instruction concerning the use of the appliance in a safe way and understand the hazards involved. Children between 3 and 8 years of age and persons with very extensive and complex disabilities shall be kept away unless continuously supervised. Children of less than 3 years of age should be kept away unless continuously supervised. Do not let children play with the appliance. Keep all packaging away from children and dispose of it appropriately. Keep children and pets away from the appliance when it operates or when it cools down. Accessible parts are hot. If the appliance has a child safety device, it should be activated. Children shall not carry out cleaning and user maintenance of the appliance without supervision. 1.2 General Safety • • • • WARNING: The appliance and its accessible parts become hot during use. Care should be taken to avoid touching heating elements. Do not operate the appliance by means of an external timer or separate remote-control system. WARNING: Unattended cooking on a hob with fat or oil can be dangerous and may result in fire. NEVER try to extinguish a fire with water, but switch off the appliance and then cover flame e.g. with a lid or a fire blanket. 4 www.electrolux.com • • • • • • • • • • CAUTION: The cooking process has to be supervised. A short term cooking process has to be supervised continuously. WARNING: Danger of fire: Do not store items on the cooking surfaces. Metallic objects such as knives, forks, spoons and lids should not be placed on the hob surface since they can get hot. Do not use a steam cleaner to clean the appliance. If the glass ceramic surface / glass surface is cracked, switch off the appliance and unplug it from the mains. In case the appliance is connected to the mains directly using junction box, remove the fuse to disconnect the appliance from power supply. In either case contact the Authorised Service Centre. In case of hotplate glass breakage: – shut immediately off all burners and any electrical heating element and isolate the appliance from the power supply, – do not touch the appliance surface, – do not use the appliance. If the supply cord is damaged, it must be replaced by the manufacturer, an authorized Service or similarly qualified persons in order to avoid a hazard. Where the appliance is directly connected to the power supply, an all-pole isolating switch with a contact gap is required. Complete disconnection in compliance with the conditions specified in overvoltage category III must be guaranteed. The earth cable is excluded from this. When you route the mains cable, make sure that the cable doesn't come into direct contact (for example using insulating sleeving) with parts that can reach temperatures of more than 50°C above room temperature. WARNING: Use only hob guards designed by the manufacturer of the cooking appliance or indicated by the manufacturer of the appliance in the instructions ENGLISH 5 for use as suitable or hob guards incorporated in the appliance. The use of inappropriate guards can cause accidents. 2. SAFETY INSTRUCTIONS This appliance is suitable for the 2.2 Electrical Connection following markets: IT WARNING! Risk of fire and electric shock. 2.1 Installation WARNING! Only a qualified person must install this appliance. WARNING! Risk of injury or damage to the appliance. • • • • • • • • • • Remove all the packaging. Do not install or use a damaged appliance. Follow the installation instructions supplied with the appliance. Keep the minimum distance from other appliances and units. Always take care when moving the appliance as it is heavy. Always use safety gloves and enclosed footwear. Seal the cut surfaces with a sealant to prevent moisture to cause swelling. Protect the bottom of the appliance from steam and moisture. Do not install the appliance adjacent to a door or under a window. This prevents hot cookware falling from the appliance when the door or the window is opened. If the appliance is installed above drawers make sure that the space, between the bottom of the appliance and the upper drawer, is sufficient for air circulation. The bottom of the appliance can get hot. Make sure to install a noncombustible separation panel under the appliance to prevent access to the bottom. • • • • • • • • • • • • • • All electrical connections should be made by a qualified electrician. The appliance must be earthed. Before carrying out any operation make sure that the appliance is disconnected from the power supply. Make sure that the parameters on the rating plate are compatible with the electrical ratings of the mains power supply. Make sure the appliance is installed correctly. Loose and incorrect electricity mains cable or plug (if applicable) can make the terminal become too hot. Use the correct electricity mains cable. Do not let the electricity mains cable tangle. Make sure that a shock protection is installed. Use the strain relief clamp on the cable. Make sure the mains cable or plug (if applicable) does not touch the hot appliance or hot cookware, when you connect the appliance to the near sockets. Do not use multi-plug adapters and extension cables. Make sure not to cause damage to the mains plug (if applicable) or to the mains cable. Contact our Authorised Service Centre or an electrician to change a damaged mains cable. The shock protection of live and insulated parts must be fastened in such a way that it cannot be removed without tools. Connect the mains plug to the mains socket only at the end of the installation. Make sure that there is 6 www.electrolux.com • • • • access to the mains plug after the installation. If the mains socket is loose, do not connect the mains plug. Do not pull the mains cable to disconnect the appliance. Always pull the mains plug. Use only correct isolation devices: line protecting cut-outs, fuses (screw type fuses removed from the holder), earth leakage trips and contactors. The electrical installation must have an isolation device which lets you disconnect the appliance from the mains at all poles. The isolation device must have a contact opening width of minimum 3 mm. • • • • • WARNING! Risk of fire and explosion • 2.3 Gas connection • • • • • All gas connections should be made by a qualified person. Before installation, make sure that the local distribution conditions (nature of the gas and gas pressure) and the adjustment of the appliance are compatible. Make sure that there is air circulation around the appliance. The information about the gas supply is on the rating plate. This appliance is not connected to a device, which evacuates the products of combustion. Make sure to connect the appliance according to current installation regulations. Pay attention to requirements regarding adequate ventilation. 2.4 Use WARNING! Risk of injury, burns and electric shock. • • • • • Remove all the packaging, labelling and protective film (if applicable) before first use. Use this appliance in a household environment. Do not change the specification of this appliance. Make sure that the ventilation openings are not blocked. Do not let the appliance stay unattended during operation. Set the cooking zone to “off” after each use. Do not put cutlery or saucepan lids on the cooking zones. They can become hot. Do not operate the appliance with wet hands or when it has contact with water. Do not use the appliance as a work surface or as a storage surface. When you place food into hot oil, it may splash. • • • Fats and oil when heated can release flammable vapours. Keep flames or heated objects away from fats and oils when you cook with them. The vapours that very hot oil releases can cause spontaneous combustion. Used oil, that can contain food remnants, can cause fire at a lower temperature than oil used for the first time. Do not put flammable products or items that are wet with flammable products in, near or on the appliance. WARNING! Risk of damage to the appliance. • • • • • • • • Do not keep hot cookware on the control panel. Do not let cookware to boil dry. Be careful not to let objects or cookware fall on the appliance. The surface can be damaged. Do not activate the cooking zones with empty cookware or without cookware. Do not put aluminium foil on the appliance. Cookware made of cast iron, aluminium or with a damaged bottom can cause scratches on the glass / glass ceramic. Always lift these objects up when you have to move them on the cooking surface. Use only stable cookware with the correct shape and diameter larger than the dimensions of the burners. Make sure cookware is centrally positioned on the burners. ENGLISH • • • • • • • • Make sure the flame does not go out when you quickly turn the knob from the maximum to the minimum position. Use only the accessories supplied with the appliance. Do not install a flame diffuser on the burner. The use of a gas cooking appliance results in the production of heat and moisture. Provide good ventilation in the room where the appliance is installed. Prolonged intensive use of the appliance may call for additional ventilation, for example opening of a window, or more effective ventilation, for example increasing the level of mechanical ventilation where present. This appliance is for cooking purposes only. It must not be used for other purposes, for example room heating. Do not let acid liquids, for example vinegar, lemon juice or limescale remover, touch the hob. This can cause matt patches. Discoloration of the enamel or stainless steel has no effect on the performance of the appliance. 2.5 Care and cleaning WARNING! Do not remove the buttons, knobs or gaskets from the control panel. Water may get inside the appliance and cause damage. 3. INSTALLATION WARNING! Refer to Safety chapters. 3.1 Before the installation Before you install the hob, write down the information bellow from the rating plate. The rating plate is on the bottom of the hob. Model ....................................... PNC ......................................... Serial number ........................... • • • • • • Clean the appliance regularly to prevent the deterioration of the surface material. Deactivate the appliance and let it cool down before you clean it. Disconnect the appliance from the electrical supply before maintenance. Do not use water spray and steam to clean the appliance. Clean the appliance with a moist soft cloth. Only use neutral detergents. Do not use any abrasive products, abrasive cleaning pads, solvents or metal objects. Do not clean the burners in the dishwasher. 2.6 Service • • To repair the appliance contact an Authorised Service Centre. Use original spare parts only. 2.7 Disposal WARNING! Risk of injury or suffocation. • • • • 7 Contact your municipal authority for information on how to discard the appliance correctly. Disconnect the appliance from the mains supply. Cut off the mains electrical cable close to the appliance and dispose of it. Flat the external gas pipes. 8 www.electrolux.com 3.2 Gas Connection WARNING! The following instructions about installation, maintenance and ventilation must be carried out by qualified personnel in compliance with the regulation in force (UNI-CIG 7129 - 7131). Make sure that the kitchen is well ventilated: keep natural ventilation holes open (at least 100 cm²) or install a mechanical extractor hood. Choose fixed connections or use a flexible pipe in stainless steel in compliance with the regulation in force. If you use flexible metallic pipes, be careful they do not come in touch with mobile parts or they are not squeezed. Also be careful when the hob is put together with an oven. Make sure that the gas supply pressure of the appliance obeys the recommended values. If the supplied pressure has not the specified value, it is necessary to assemble a proper pressure regulator in compliance with the standard UNI EN 88. For Liquid Gas (LPG) the use of pressure regulator is allowed only if they are in compliance with UNI EN 12864. The adjustable connection is fixed to the comprehensive ramp by means of a threaded nut G 1/2". Screw the parts without force, adjust the connection in the necessary direction and tighten everything. C. Elbow supplied with the appliance Rigid connection: Carry out connection by using metal rigid pipes (copper with mechanical end) (UNI-CIG 7129). Flexible connection: Use a flexible pipe in stainless steel (UNI-CIG 9891) with a maximum length 2 m. WARNING! When installation is complete, make sure that the seal of each pipe fitting is correct. Use a soapy solution, not a flame! 3.3 Injectors replacement 1. Remove the pan supports. 2. Remove the caps and crowns of the burner. 3. With a socket spanner 7 remove the injectors and replace them with the ones which are necessary for the type of gas you use (see table in "Technical Data" chapter). 4. Assemble the parts, follow the same procedure backwards. 5. Replace the rating plate (it is near the gas supply pipe) with the one for the new type of gas supply. You can find this plate in the package supplied with the appliance. If the supply gas pressure is changeable or different from the necessary pressure, you must fit an applicable pressure adjuster on the gas supply pipe. 3.4 Adjustment of minimum level To adjust the minimum level of the burners: 1. Light the burner. 2. Turn the knob on the minimum position. 3. Remove the knob . 4. With a thin screwdriver, adjust the bypass screw position (A). A B C A. End of shaft with nut B. Washer supplied with the appliance ENGLISH A 9 A 5. If you change: • from natural gas G20 20 mbar to liquid gas, fully tighten the bypass screw in. • from liquid gas to natural gas G20 20 mbar, undo the bypass screw approximately 1/4 of a turn (1/2 of a turn for Multi Crown burner). WARNING! Make sure the flame does not go out when you quickly turn the knob from the maximum position to the minimum position. 3.5 Electrical connection Make sure that the rated voltage and type of power on the rating plate agree with the voltage and the power of the local power supply. • This appliance is supplied with a mains cable. It has to be supplied with a correct plug which can hold the load that the rating plate rates. Make sure that you install the plug in a correct socket. • Always use a correctly installed shockproof socket. • Make sure that there is an access to the mains plug after the installation. • Do not pull the mains cable to disconnect the appliance. Always pull the mains plug. • There is a risk of fire when the appliance is in connection with an extension cable, an adapter or a multiple connection. Make sure that the ground connection agrees with the standards and regulations. • Do not let the power cable to heat up to a temperature higher than 90° C. To prevent contact between the cable and the appliance below the hob use the clamps which are on the side of the cabinet. A. Rigid copper pipe or flexible pipe of stainless steel 3.6 Connection cable To replace the connection cable use only the special cable or its equivalent. The cable type is: H03V2V2-F T90. Make sure that the cable section is applicable to the voltage and the working temperature. The yellow / green earth wire must be approximately 2 cm longer than the brown (or black) phase wire. 3.7 Assembly 1. • 2. 10 www.electrolux.com 7. 3. min. 100 mm min. 650 mm min. 55 mm 30 mm 480+02 mm 560+02 mm 4. CAUTION! Install the appliance only on a worktop with flat surface. 3.8 Installing hob under the hood If you install the hob under a hood, please see the installation instructions of the hood for the minimum distance between the appliances. 5. 3.9 Possibilities for insertion The panel installed below the hob must be easy to remove and let an easy access in case a technical assistance intervention is necessary. Kitchen unit with door 6. 30 mm A A 60 mm min 20 mm (max 150 mm) B B A) supplied seal B) supplied brackets A. Removable panel B. Space for connections Kitchen unit with oven The electrical connection of the hob and the oven must be installed separately for safety reasons and to let easy remove oven from the unit. ENGLISH 4. PRODUCT DESCRIPTION 4.1 Cooking surface layout 1 2 1 2 3 4 Semi-rapid burner Multi Crown burner Auxiliary burner Control knobs 3 4 4.2 Control knob Symbol Symbol Description Description ignition position / maxi‐ mum gas supply no gas supply / off posi‐ tion minimum gas supply 5. DAILY USE WARNING! Refer to Safety chapters. $ 5.1 Burner overview % $ & ' % & ' A. B. C. D. Burner cap Burner crown Ignition candle Thermocouple 5.2 Ignition of the burner Always light the burner before you put on the cookware. 11 12 www.electrolux.com WARNING! Be very careful when you use open fire in the kitchen environment. The manufacturer declines any responsibility in case of the flame misuse. 1. Push the control knob down and turn it counterclockwise to the maximum gas supply position ( ). 2. Keep the control knob pushed for equal or less than 10 seconds. This lets the thermocouple warm up. If not, the gas supply is interrupted. 3. Adjust the flame after it is regular. If after some tries the burner does not light, check if the crown and its cap are in correct positions. WARNING! Do not keep the control knob pushed for more than 15 seconds. If the burner does not light after 15 seconds, release the control knob, turn it into off position and try to light the burner again after minimum 1 minute. If the burner accidentally goes out, turn the control knob to the off position and try to light the burner again after minimum 1 minute. The spark generator can start automatically when you switch on the mains, after installation or a power cut. It is normal. The hob is supplied with the progressive valves. They make the flame regulation more precise. 5.3 Turning the burner off To put the flame out, turn the knob to the off position . WARNING! Always turn the flame down or switch it off before you remove the pans from the burner. CAUTION! In the absence of electricity you can ignite the burner without electrical device; in this case approach the burner with a flame, turn the control knob counterclockwise to maximum gas supply position and push it down. Keep the control knob pushed for equal or less than 10 seconds to let the thermocouple warm up. 6. HINTS AND TIPS WARNING! Refer to Safety chapters. 6.1 Cookware CAUTION! Do not use cast iron pans, clay or earthenware pots, grill or toaster plates. ENGLISH WARNING! Do not put the same pan on two burners. WARNING! Do not put unstable or damaged pots on the burner to prevent spills and injuries. CAUTION! Make sure that the bottoms of pots do not stand too close to the control knob, otherwise the flame heats the control knob up. CAUTION! Make sure that pot handles are not above the front edge of the cooktop. 13 CAUTION! Liquids spilt during cooking can cause the glass to break. 6.2 Diameters of cookware Use cookware with diameters applicable to the size of burners. Burner Diameter of cookware (mm) Multi Crown 180 - 260 Semi-rapid 120 - 220 Auxiliary 80 - 180 CAUTION! Make sure that the pots are placed centrally on the burner in order to get the maximum stability and a lower gas consumption. 7. CARE AND CLEANING WARNING! Refer to Safety chapters. 7.1 General information • • • • Clean the hob after each use. Always use cookware with a clean base. Scratches or dark stains on the surface have no effect on how the hob operates. Use a special cleaner suitable for the surface of the hob. WARNING! Do not use knives, scrapers or similar instruments to clean the surface of the glass or the rims of the burners and the frame (if applicable). • Wash stainless steel parts with water, and then dry them with a soft cloth. 7.2 Pan supports The pan supports are not resistant to washing in a dishwasher. They must be washed by hand. 1. Remove the pan supports to easily clean the hob. Be very careful when you replace the pan supports to prevent the hob top from damage. 2. The enamel coating occasionally can have rough edges, so be careful when you wash the pan supports by hand and dry them. If necessary, remove stubborn stains with a paste cleaner. 3. After you clean the pan supports, make sure that they are in correct positions. 4. For the burner to operate correctly, make sure that the arms of the pan 14 www.electrolux.com supports are aligned with the centre of the burner. 7.3 Removing pan supports To keep the pan supports in the correct position, they are put on metal pins installed in the rear side of the hob. For easier cleaning, pan supports can be removed from the hob. Lift up the pan supports keeping them in horizontal position as shown in the graphic. Do not lift the pan supports at an angle, as this will put strain on the metal pins. This can cause damage to the pins and cause them to break. The shape of pan supports and the amount of burners can be different in other models of the appliance. 7.4 Cleaning the hob • • • Remove immediately: melted plastic, plastic foil, sugar and food with sugar, otherwise, the dirt can cause damage to the hob. Take care to avoid burns. Remove when the hob is sufficiently cool: limescale rings, water rings, fat stains, shiny metallic discoloration. Clean the hob with a moist cloth and a non-abrasive detergent. After cleaning, wipe the hob dry with a soft cloth. To clean the enamelled parts, caps and crowns, wash them with warm soapy water and dry them carefully before you put them back on. 7.5 Cleaning the spark plug This feature is obtained through a ceramic ignition candle with a metal electrode. Keep these components well clean to prevent difficult lighting and check that the burner crown holes are not obstructed. ENGLISH 7.6 Periodic maintenance Speak to your local Authorised Service Centre periodically to check the 15 conditions of the gas supply pipe and the pressure adjuster, if fitted. 8. TROUBLESHOOTING WARNING! Refer to Safety chapters. 8.1 What to do if... Problem Possible cause Remedy There is no spark when you try to activate the spark generator. The hob is not connected to an electrical supply or it is connected incorrectly. Check if the hob is correct‐ ly connected to the electri‐ cal supply. The fuse is blown. Make sure that the fuse is the cause of the malfunc‐ tion. If the fuse is blown again and again, contact a qualified electrician. Burner cap and crown are placed incorrectly. Place the burner cap and crown correctly. The flame extinguishes im‐ Thermocouple is not heat‐ mediately after ignition. ed up sufficiently. After lightning the flame, keep the knob pushed for equal or less than 10 sec‐ onds. The flame ring is uneven. Make sure that the injector is not blocked and the burner crown is clean. Burner crown is blocked with food residues. 8.2 If you cannot find a solution... If you cannot find a solution to the problem yourself, contact your dealer or an Authorised Service Centre. Give the data from the rating plate. Make sure, you operated the hob correctly. If not the servicing by a service technician or dealer will not be free of charge, also during the warranty period. The instructions about the Service Centre and conditions of guarantee are in the guarantee booklet. 16 www.electrolux.com 8.3 Labels supplied with the accessories bag Stick the adhesive labels as indicated below: A B MOD. MOD. PROD.NO. PROD.NO. SER.NO SER.NO DATA DATA C MOD. PROD.NO. SER.NO. 0049 TYPE IP20 03 IT MADE IN ITALY A. Stick it on Guarantee Card and send this part (if applicable). B. Stick it on Guarantee Card and keep this part (if applicable). C. Stick it on instruction booklet. 9. TECHNICAL DATA 9.1 Hob dimensions Width 590 mm Depth 520 mm 9.2 Bypass diameters BURNER Ø BYPASS 1/100 mm Multi Crown 57 Semi-rapid 35 Auxiliary 28 ENGLISH 17 9.3 Other technical data TOTAL POW‐ ER: Electric supply: Gas original: G20 (2H) 20 mbar 8,9 kW Gas replace‐ ment: G30 (3+) 28-30 mbar 607 g/h G31 (3+) 37 mbar 596 g/h 220-240 V ~ 50-60 Hz Appliance cate‐ II2H3+ gory: Gas connec‐ tion: G 1/2" Appliance class: 3 9.4 Gas burners for NATURAL GAS G20 20 mbar BURNER NORMAL POWER MINIMUM POWER kW kW INJECTOR MARK Multi Crown 3,9 1,4 146 Semi-rapid 2,0 0,6 96x Auxiliary 1,0 0,33 70 9.5 Gas burners for LPG G30/G31 28-30/37 mbar BURNER NORMAL POWER kW MINIMUM POWER kW INJECTOR MARK Multi Crown 3,55 1,4 Semi-rapid 1,9 Auxiliary 1,0 NOMINAL GAS FLOW g/h G30 28-30 mbar G31 37 mbar 095 258 254 0,6 71 138 136 0,33 50 73 71 10. ENERGY EFFICIENCY 10.1 Product information according to EU 66/2014 Model identification KGG6436K Type of hob Built-in hob Number of gas burners 4 18 www.electrolux.com Energy efficiency per gas burner (EE gas burner) Left rear - Semi-rapid 54.8% Right rear - Semi-rapid 54.8% Right front - Auxiliary not applicable Left front - Multi Crown 57.2% Energy efficiency for the gas hob (EE gas hob) 55.6% EN 30-2-1: Domestic cooking appliances burning gas - Part 2-1 : Rational use of energy - General 10.2 Energy saving • • • • • • • Before use, make sure that the burners and pan supports are assembled correctly. Use cookware with diameters applicable to the size of burners. Center the pot on the burner. When you heat up water, use only the amount you need. If it is possible, always put the lids on the cookware. When the liquid starts to boil, turn down the flame to barely simmer the liquid. If it is possible, use a pressure cooker. Refer to its user manual. 11. ENVIRONMENTAL CONCERNS Recycle materials with the symbol . Put the packaging in relevant containers to recycle it. Help protect the environment and human health by recycling waste of electrical and electronic appliances. Do not dispose of appliances marked with the symbol with the household waste. Return the product to your local recycling facility or contact your municipal office. DEUTSCH 19 INHALTSVERZEICHNIS 1. SICHERHEITSHINWEISE................................................................................19 2. SICHERHEITSANWEISUNGEN...................................................................... 22 3. MONTAGE........................................................................................................25 4. GERÄTEBESCHREIBUNG.............................................................................. 29 5. TÄGLICHER GEBRAUCH................................................................................29 6. TIPPS UND HINWEISE....................................................................................31 7. REINIGUNG UND PFLEGE............................................................................. 32 8. FEHLERSUCHE............................................................................................... 34 9. TECHNISCHE DATEN..................................................................................... 35 10. ENERGIEEFFIZIENZ..................................................................................... 36 WIR DENKEN AN SIE Vielen Dank für Ihren Kauf eines Electrolux-Geräts. Sie haben ein Produkt gewählt, das jahrzehntelange professionelle Erfahrung und Innovation mit sich bringt. Das ausgeklügelte und stilvolle Produkt wurde für Sie entwickelt. So können Sie jedes Mal, wenn Sie das Produkt verwenden, sicher sein, dass Sie großartige Ergebnisse erzielen werden. Willkommen bei Electrolux. Besuchen Sie uns auf unserer Website, um: Anwendungshinweise, Prospekte, Informationen zu Fehlerbehebung, Service und Reparatur zu erhalten: www.electrolux.com/support Registrieren Sie Ihr Produkt, um einen erstklassigen Service zu erhalten: www.registerelectrolux.com Um Zubehör, Verbrauchsmaterial und Original-Ersatzteile für Ihr Gerät zu kaufen: www.electrolux.com/shop KUNDENDIENST UND SERVICE Verwenden Sie immer Original-Ersatzteile. Halten Sie folgende Angaben bereit, wenn Sie sich an einen autorisierten Kundendienst wenden: Modell, PNC, Seriennummer. Die Daten finden Sie auf dem Typenschild. Warnungs-/Sicherheitshinweise Allgemeine Informationen und Empfehlungen Informationen zum Umweltschutz Änderungen vorbehalten. 1. SICHERHEITSHINWEISE Lesen Sie vor der Montage und dem Gebrauch des Geräts zuerst die Gebrauchsanleitung. Bei Verletzungen oder Schäden infolge nicht ordnungsgemäßer Montage 20 www.electrolux.com oder Verwendung des Geräts übernimmt der Hersteller keine Haftung. Bewahren Sie die Anleitung immer an einem sicheren und zugänglichen Ort zum späteren Nachschlagen auf. 1.1 Sicherheit von Kindern und schutzbedürftigen Personen • • • • • • • • Das Gerät kann von Kindern ab 8 Jahren und Personen mit eingeschränkten physischen, sensorischen oder geistigen Fähigkeiten oder mit mangelnder Erfahrung und/oder mangelndem Wissen nur dann verwendet werden, wenn sie durch eine für ihre Sicherheit zuständige Person beaufsichtigt werden oder in die sichere Verwendung des Geräts eingewiesen wurden und die mit dem Gerät verbundenen Gefahren verstanden haben. Kinder zwischen 3 und 8 Jahren und Personen mit schweren Behinderungen oder Mehrfachbehinderung müssen vom Gerät ferngehalten werden, wenn sie nicht ständig beaufsichtigt werden. Halten Sie Kinder unter 3 Jahren vom Gerät fern, wenn sie nicht ständig beaufsichtigt werden. Kinder dürfen nicht mit dem Gerät spielen. Halten Sie sämtliches Verpackungsmaterial von Kindern fern und entsorgen Sie es auf angemessene Weise. Halten Sie Kinder und Haustiere während des Betriebs oder der Abkühlphase vom Gerät fern. Berührbare Teile sind heiß. Falls Ihr Gerät mit einer Kindersicherung ausgestattet ist, empfehlen wir, diese einzuschalten. Kinder dürfen keine Reinigung und Wartung ohne Beaufsichtigung durchführen. 1.2 Allgemeine Sicherheit • WARNUNG: Das Gerät und die zugänglichen Geräteteile werden während des Betriebs heiß. Seien DEUTSCH • • • • • • • • • • 21 Sie vorsichtig und berühren Sie niemals die Heizelemente. Schalten Sie das Gerät nicht über eine externe Zeitschaltuhr oder eine separate Fernsteuerung ein. WARNUNG: Kochen mit Fett oder Öl auf einem unbeaufsichtigten Kochfeld ist gefährlich und kann zu einem Brand führen. Versuchen Sie NICHT einen Brand mit Wasser zu löschen, sondern schalten Sie das Gerät aus und bedecken Sie die Flamme mit einem Deckel oder einer Feuerlöschdecke. VORSICHT: Der Kochvorgang muss überwacht werden. Ein kurzer Kochvorgang muss kontinuierlich überwacht werden. WARNUNG: Brandgefahr: Legen Sie keine Gegenstände auf dem Kochfeld ab. Legen Sie keine Metallgegenstände wie Messer, Gabeln, Löffel oder Topfdeckel auf die Oberfläche des Kochfelds, da diese heiß werden können. Reinigen Sie das Gerät nicht mit einem Dampfstrahlreiniger. Hat die Glaskeramik-/Glasoberfläche einen Sprung, schalten Sie das Gerät aus und nehmen Sie es vom Stromnetz. Falls das Gerät direkt mit dem Stromnetz verbunden ist und nicht getrennt werden kann, nehmen Sie die Sicherung für den Anschluss heraus, um die Stromversorgung zu unterbrechen. Verständigen Sie in jedem Fall den autorisierten Kundendienst. Im Falle eines Glasbruchs der Kochplatte: – Schalten Sie umgehend alle Brenner und Heizelemente aus und trennen Sie das Gerät von der Stromversorgung. – Berühren Sie nicht die Geräteoberfläche. – Benutzen Sie das Gerät nicht. Wenn das Netzkabel beschädigt ist, muss es vom Hersteller, einem autorisierten Kundendienst oder einer gleichermaßen qualifizierten Person 22 www.electrolux.com • • • ausgetauscht werden, um Gefahrenquellen zu vermeiden. Ist das Gerät direkt an die Stromversorgung angeschlossen, wird ein allpoliger Netztrennschalter mit einem Kontaktabstand benötigt. Es muss eine vollständige Trennung entsprechend der Überspannungskategorie III gewährleistet sein. Dies gilt nicht für das Erdungskabel. Wenn Sie das Netzkabel verlegen, achten Sie darauf, dass es keinen direkten Kontakt mit Teilen hat, die Temperaturen erreichen können, die mehr als 50 °C über der Raumtemperatur liegen. (Verwenden Sie ansonsten Isolierschläuche.) WARNUNG: Verwenden Sie nur Schutzabdeckungen des Herstellers des Kochgeräts, von ihm in der Bedienungsanleitung als geeignete und empfohlene Schutzabdeckungen oder die im Gerät enthaltene Schutzabdeckung. Es besteht Unfallgefahr durch die Verwendung ungeeigneter Schutzabdeckungen. 2. SICHERHEITSANWEISUNGEN Dieses Gerät ist für folgende Märkte • geeignet: IT 2.1 Montage WARNUNG! Die Montage des Geräts darf nur von einer qualifizierten Fachkraft durchgeführt werden. WARNUNG! Verletzungsgefahr sowie Risiko von Schäden am Gerät. • • • Entfernen Sie das gesamte Verpackungsmaterial. Montieren Sie ein beschädigtes Gerät nicht und benutzen Sie es nicht. Halten Sie sich an die mitgelieferte Montageanleitung. • • • • • Die Mindestabstände zu anderen Geräten und Küchenmöbeln sind einzuhalten. Seien Sie beim Umsetzen des Gerätes vorsichtig, da es sehr schwer ist. Tragen Sie stets Sicherheitshandschuhe und festes Schuhwerk. Dichten Sie die Ausschnittskanten mit einem Dichtungsmittel ab, um ein Aufquellen durch Feuchtigkeit zu verhindern. Schützen Sie die Geräteunterseite vor Dampf und Feuchtigkeit. Installieren Sie das Gerät nicht direkt neben einer Tür oder unter einem Fenster. So kann heißes Kochgeschirr nicht herunterfallen, wenn die Tür oder das Fenster geöffnet wird. Wird das Gerät über Schubladen eingebaut, achten Sie darauf, dass zwischen dem Geräteboden und der oberen Schublade ein ausreichender DEUTSCH • Abstand für die Luftzirkulation vorhanden ist. Der Boden des Geräts kann heiß werden. Achten Sie darauf eine feuerfeste Trennplatte unter dem Gerät anzubringen, damit der Boden nicht zugänglich ist. 2.2 Elektrischer Anschluss WARNUNG! Brand- und Stromschlaggefahr. • • • • • • • • • • • • Alle elektrischen Anschlüsse sind von einem geprüften Elektriker vorzunehmen. Das Gerät muss geerdet sein. Vor der Durchführung jeglicher Arbeiten muss das Gerät von der elektrischen Stromversorgung getrennt werden. Stellen Sie sicher, dass die Daten auf dem Typenschild mit den elektrischen Nennwerten der Netzspannung übereinstimmen. Vergewissern Sie sich, dass das Gerät ordnungsgemäß installiert ist. Lockere und unsachgemäße Kabel oder Stecker (falls vorhanden) können die Klemme überhitzen. Stellen Sie sicher, dass Sie das richtige Kabel für den elektrischen Netzanschluss verwenden. Achten Sie darauf, dass das Netzkabel nicht lose hängt oder sich verheddert. Sorgen Sie dafür, dass ein Berührungsschutz installiert wird. Verwenden Sie die Zugentlastung für das Kabel. Stellen Sie beim elektrischen Anschluss des Gerätes sicher, dass das Netzkabel oder ggf. der Netzstecker nicht mit dem heißen Gerät oder heißem Kochgeschirr in Berührung kommt. Verwenden Sie keine Mehrfachsteckdosen oder Verlängerungskabel. Achten Sie darauf, Netzstecker (falls vorhanden) und Netzkabel nicht zu beschädigen. Wenden Sie sich zum Austausch eines beschädigten Netzkabels an unseren autorisierten • • • • • • 23 Kundendienst oder eine Elektrofachkraft. Alle Teile, die gegen direktes Berühren schützen, sowie die isolierten Teile müssen so befestigt werden, dass sie nicht ohne Werkzeug entfernt werden können. Stecken Sie den Netzstecker erst nach Abschluss der Montage in die Steckdose. Stellen Sie sicher, dass der Netzstecker nach der Montage noch zugänglich ist. Falls die Steckdose lose ist, schließen Sie den Netzstecker nicht an. Ziehen Sie nicht am Netzkabel, wenn Sie das Gerät von der Stromversorgung trennen möchten. Ziehen Sie stets am Netzstecker. Verwenden Sie nur geeignete Trenneinrichtungen: Überlastschalter, Sicherungen (Schraubsicherungen müssen aus dem Halter entfernt werden können), Fehlerstromschutzschalter und Schütze. Die elektrische Installation muss eine Trenneinrichtung aufweisen, mit der Sie das Gerät allpolig von der Stromversorgung trennen können. Die Trenneinrichtung muss mit einer Kontaktöffnungsbreite von mindestens 3 mm ausgeführt sein. 2.3 Gasanschluss • • • • • Der Gasanschluss muss von einer Fachkraft ausgeführt werden. Vergewissern Sie sich vor der Montage des Geräts, dass das von Ihrem Gaswerk gelieferte Gas (Gasart und Gasdruck) mit der Einstellung des Geräts kompatibel ist. Stellen Sie sicher, dass die Luft um das Gerät zirkulieren kann. Informationen über die Gasversorgung finden Sie auf dem Typenschild. Das Gerät darf nicht an einen Abzug für Verbrennungsprodukte angeschlossen werden. Das Gerät muss gemäß der aktuell geltenden Installationsbestimmungen angeschlossen werden. Halten Sie die Bestimmungen hinsichtlich der Belüftung ein. 24 www.electrolux.com 2.4 Verwendung WARNUNG! Verletzungs-, Verbrennungsund Stromschlaggefahr. • • • • • • • • • • Entfernen Sie vor dem ersten Gebrauch das gesamte Verpackungsmaterial, die Aufkleber und Schutzfolie (falls vorhanden). Das Gerät ist für die Verwendung im Haushalt vorgesehen. Nehmen Sie keine technischen Änderungen am Gerät vor. Die Lüftungsöffnungen dürfen nicht abgedeckt werden. Lassen Sie das Gerät bei Betrieb nicht unbeaufsichtigt. Schalten Sie die Kochzonen nach jedem Gebrauch aus. Legen Sie kein Besteck und keine Topfdeckel auf die Kochzonen. Anderenfalls werden sie sehr heiß. Bedienen Sie das Gerät nicht mit feuchten oder nassen Händen oder wenn es mit Wasser in Kontakt gekommen ist. Benutzen Sie das Gerät nicht als Arbeits- oder Abstellfläche. Wenn Sie Nahrungsmittel in heißes Öl geben, kann dieses spritzen. WARNUNG! Brand- und Explosionsgefahr • • • • Erhitzte Öle und Fette können brennbare Dämpfe freisetzen. Halten Sie Flammen und erhitzte Gegenstände beim Kochen mit Fetten und Ölen von diesen fern. Die von sehr heißem Öl freigesetzten Dämpfe können eine Selbstzündung verursachen. Bereits verwendetes Öl kann Lebensmittelreste enthalten und schon bei niedrigeren Temperaturen eher einen Brand verursachen als frisches Öl. Laden Sie keine entflammbaren Produkte oder Gegenstände, die mit entflammbaren Produkten benetzt sind, in das Gerät und stellen Sie solche nicht in die Nähe oder auf das Gerät. WARNUNG! Risiko von Schäden am Gerät. • • • • • • • • • • • • • • Stellen Sie kein heißes Kochgeschirr auf das Bedienfeld. Lassen Sie das Kochgeschirr nicht leerkochen. Lassen Sie keine Gegenstände oder Kochgeschirr auf das Gerät fallen. Die Oberfläche könnte beschädigt werden. Schalten Sie die Kochzonen niemals ein, wenn sich kein Kochgeschirr darauf befindet, oder wenn das Kochgeschirr leer ist. Legen Sie keine Alufolie auf das Gerät. Kochgeschirr aus Gusseisen, Aluminium oder mit beschädigten Böden kann die Glas- bzw. Glaskeramikoberfläche verkratzen. Heben Sie das Kochgeschirr stets an, wenn Sie es auf der Kochfläche umsetzen möchten. Verwenden Sie nur standfestes Kochgeschirr mit der richtigen Form und einem Durchmesser, der größer als der der Brenner ist. Achten Sie darauf das Kochgeschirr mittig auf die Brenner zu stellen. Vergewissern Sie sich, dass die Flamme nicht erlischt, wenn Sie den Einstellknopf schnell von der höchsten zur niedrigsten Stufe drehen. Verwenden Sie ausschließlich das mit dem Gerät gelieferte Zubehör. Setzen Sie keinen Wärmeverteiler auf den Brenner. Beim Gebrauch eines Gaskochfelds entsteht Wärme und Feuchtigkeit. Sorgen Sie für eine ausreichende Belüftung in dem Raum, in dem das Gerät aufgestellt ist. Bei längerer Benutzung des Gerätes kann eine zusätzliche Belüftung erforderlich werden, zum Beispiel durch Öffnen eines Fensters oder die Erhöhung der Absaugleistung der Abzugshaube, falls vorhanden. Dieses Gerät ist nur zum Kochen bestimmt. Jeder andere Gebrauch ist als bestimmungsfremd anzusehen, zum Beispiel das Beheizen eines Raums. DEUTSCH • • Lassen Sie keine säurehaltigen Flüssigkeiten wie Essig, Zitronensaft oder kalklösende Reinigungsmittel mit dem Kochfeld in Berührung kommen. Diese könnten matte Flecken verursachen. Verfärbungen der Email- oder Edelstahlbeschichtung haben keine Auswirkung auf die Leistung des Geräts. 2.5 Reinigung und Pflege WARNUNG! Entfernen Sie nicht die Tasten, Knöpfe oder Dichtungen vom Bedienfeld. Wasser könnte in das Gerät gelangen und es beschädigen. • • • • • Reinigen Sie das Gerät regelmäßig, um eine Verschlechterung des Oberflächenmaterials zu verhindern. Schalten Sie das Gerät vor dem Reinigen aus und lassen Sie es abkühlen. Trennen Sie das Gerät vor Wartungsarbeiten von der Spannungsversorgung. Reinigen Sie das Gerät nicht mit Wasserspray oder Dampf. Reinigen Sie das Gerät mit einem weichen, feuchten Tuch. Verwenden Sie ausschließlich Neutralreiniger. 3. MONTAGE WARNUNG! Siehe Kapitel Sicherheitshinweise. 3.1 Vor der Montage Notieren Sie vor der Montage des Kochfelds folgende Daten, die Sie auf dem Typenschild finden. Das Typenschild ist auf dem Boden des Kochfelds angebracht. Modell ........................... Produktnummer (PNC) ........................................ Seriennummer ............ • Benutzen Sie keine Scheuermittel, scheuernde Reinigungsschwämmchen, Lösungsmittel oder Metallgegenstände. Reinigen Sie die Brenner nicht im Geschirrspüler. 2.6 Service • • Wenden Sie sich zur Reparatur des Geräts an einen autorisierten Kundendienst. Verwenden Sie ausschließlich Originalersatzteile. 2.7 Entsorgung WARNUNG! Verletzungs- und Erstickungsgefahr. • • • • Für Informationen zur ordnungsgemäßen Entsorgung des Geräts wenden Sie sich an die zuständige kommunale Behörde vor Ort. Trennen Sie das Gerät von der Stromversorgung. Schneiden Sie das Netzkabel in der Nähe des Geräts ab, und entsorgen Sie es. Drücken Sie die äußeren Gasrohre flach. 25 26 www.electrolux.com 3.2 Gasanschluss WARNUNG! Die in nachstehender Anleitung beschriebenen Installations- und Wartungsarbeiten sowie die Belüftung müssen von Fachpersonal unter Beachtung der geltenden Bestimmungen (UNI-CIG 7129 - 7131) ausgeführt werden. Stellen Sie sicher, dass die Küche gut belüftet ist: Halten Sie natürliche Belüftungsöffnungen von mindestens 100 cm² offen oder installieren Sie eine mechanische Abzugshaube. Je nach geltenden Bestimmungen kann der Anschluss fest oder durch Verwendung eines flexiblen Edelstahlrohrs erfolgen. Bei Verwendung flexibler Metallrohre muss darauf geachtet werden, dass sie nicht mit beweglichen Teilen in Kontakt kommen oder eingeklemmt werden können. Wenn das Kochfeld mit einem Backofen installiert wird, muss ebenfalls vorsichtig vorgegangen werden. Achten Sie darauf, dass der Gasdruck des Geräts den empfohlenen Werten entspricht. Entspricht der gelieferte Druck nicht dem angegebenen Wert, muss ein geeigneter Druckregler gemäß der Norm UNI EN 88 installiert werden. Im Fall von Flüssiggas (LPG) ist die Verwendung eines Druckreglers nur erlaubt, wenn er der Norm UNI EN 12864 entspricht. Das verstellbare Anschlussstück wird an dem Gasanschluss mit einer G 1/2" Gewindemutter befestigt. Verschrauben Sie die Teile ohne Kraftanwendung, bringen Sie das Anschlussstück in die benötigte Richtung und schrauben Sie alle Teile fest. A B C A. Schaftende mit Mutter B. Mitgelieferte Beilagscheibe C. Mitgelieferter Rohrbogen Fester Anschluss: Führen Sie den Anschluss mit festen Metallrohren (Kupfer mit mechanischem Endstück) aus (UNI-CIG 7129). Flexibler Anschluss: Verwenden Sie ein flexibles Edelstahlrohr (UNI-CIG 9891) mit einer maximalen Länge von 2 m. WARNUNG! Überprüfen Sie nach der Installation, ob alle Anschlussstücke dicht sind. Verwenden Sie eine Seifenlösung und keine Flamme! 3.3 Austauschen der Düsen 1. Nehmen Sie die Topfträger ab. 2. Nehmen Sie Brennerdeckel und Brennerkronen ab. 3. Entfernen Sie die Düsen mit einem Steckschlüssel 7 und ersetzen Sie sie durch für die verwendete Gasart geeignete Düsen (siehe Tabelle im Abschnitt „Technische Daten“). 4. Bringen Sie die Teile wieder an. Führen Sie dazu die obigen Schritte in umgekehrter Reihenfolge aus. 5. Ersetzen Sie das Typenschild (in der Nähe der Gasversorgungsleitung) durch das Typenschild für die neue Gasart. Das Typenschild ist im Beipack des Geräts enthalten. Wenn der Gasdruck der Gasversorgung schwankt oder nicht dem erforderlichen Druckwert entspricht, muss ein geeigneter Druckregler im Gaszufuhrrohr montiert werden. DEUTSCH 3.4 Einstellen der niedrigsten Stufe So stellen Sie die niedrigste Stufe der Brenner ein: 1. Zünden Sie den Brenner. 2. Drehen Sie den Knopf auf die kleinste Flamme. 3. Entfernen Sie den Knopf . 4. Stellen Sie mit einem kleinen Schraubendreher die BypassSchraubenposition (A) ein. A 5. Bei Umstellung: • von Erdgas G20 20 mbar auf Flüssiggas, ziehen Sie die Bypass-Schraube bis zum Anschlag an. • Von Flüssiggas auf Erdgas G20 20 mbar, drehen Sie die BypassSchraube ca. 1/4 Umdrehung (1/2 Umdrehung für den MultikronenBrenner zurück. WARNUNG! Vergewissern Sie sich, dass die Flamme nicht erlischt, wenn Sie den Einstellknopf schnell von der höchsten zur niedrigsten Stufe drehen. 3.5 Elektroanschluss • • Vergewissern Sie sich, dass die Netzspannung und -frequenz in Ihrer Region mit den auf dem Typenschild angegebenen Anschlusswerten übereinstimmen. Das Gerät wird mit einem Netzkabel geliefert. Dazu muss ein passender Stecker verwendet werden, der für die auf dem Typenschild angegebene Gesamtstromaufnahme ausgelegt ist. Achten Sie darauf, den Stecker in eine passende Steckdose zu stecken. 27 • Schließen Sie das Gerät nur an eine ordnungsgemäß installierte Schutzkontaktsteckdose an. • Stellen Sie sicher, dass der Netzstecker nach der Montage noch zugänglich ist. • Ziehen Sie nicht am Netzkabel, wenn Sie das Gerät von der Stromversorgung trennen möchten. Ziehen Sie stets am Netzstecker. • Es besteht Brandgefahr, wenn das Gerät mit einem Verlängerungskabel, Adapter oder an eine Mehrfachsteckdose angeschlossen wird. Stellen Sie sicher, dass die Erdverbindung den Normen und Vorschriften entspricht. • Das Netzkabel darf nicht heißer als 90 °C werden. Um einen Kontakt des Kabels mit dem Gerät unter dem Kochfeld zu vermeiden, verwenden Sie die Haken auf den Seiten des Gehäuses. A A. Festes Kupferrohr oder flexibles Edelstahlrohr 3.6 Anschlusskabel Ersetzen Sie das Anschlusskabel ausschließlich durch das spezielle Kabel oder ein gleichwertiges Kabel. Kabeltyp: H03V2V2-F T90. Vergewissern Sie sich, dass der Kabelquerschnitt für die Spannung und Betriebstemperatur geeignet ist. Der gelb-grüne Erdleiter muss ca. 2 cm länger als der braune (bzw. schwarze) Phasenleiter sein. 28 www.electrolux.com 3.7 Montage 5. 1. 6. A 2. B 7. A) Mitgelieferte Dichtung B) Mitgelieferte Klammern 3. min. 100 mm min. 650 mm min. 55 mm 30 mm 480+02 mm 4. 560+02 mm VORSICHT! Montieren Sie das Gerät nur in einer flachen Arbeitsplatte. 3.8 Montage des Kochfelds unter der Dunstabzugshaube Wird das Kochfeld unter einer Abzugshaube montiert, sehen Sie in der Montageanleitung der Abzugshaube nach, welcher Mindestabstand zwischen den Geräten eingehalten werden muss. DEUTSCH 3.9 Einbaumöglichkeiten Die unter dem Kochfeld eingebaute Platte muss sich leicht entfernen lassen und einen einfachen Zugang ermöglichen, falls eine Reparatur erforderlich wird. Küchenschrank mit Tür A. Entfernbare Platte B. Raum für Anschlüsse Küchenschrank mit Backofen Kochfeld und Backofen müssen aus Sicherheitsgründen über separate elektrische Anschlüsse verfügen. Der Backofen muss sich leicht aus dem Küchenschrank entfernen lassen. 30 mm min 20 mm (max 150 mm) A 60 mm B 4. GERÄTEBESCHREIBUNG 4.1 Kochfeldanordnung 1 2 1 2 3 4 Normalbrenner Multikronen-Brenner Hilfsbrenner Einstellknöpfe 3 4 4.2 Einstellknopf Symbol Beschreibung Keine Gaszufuhr/ausge‐ schaltet 5. TÄGLICHER GEBRAUCH WARNUNG! Siehe Kapitel Sicherheitshinweise. Symbol Beschreibung Zündstellung/maximale Gaszufuhr minimale Gaszufuhr 29 30 www.electrolux.com 5.1 Brennerübersicht $ % & ' $ % & ' A. B. C. D. Brennerdeckel Brennerkrone Zündkerze Thermoelement 5.2 Zünden des Brenners Zünden Sie den Brenner stets vor dem Aufsetzen des Kochgeschirrs. WARNUNG! Seien Sie bei der Verwendung von offenem Feuer in der Küche besonders vorsichtig. Der Hersteller übernimmt bei Missachtung der Sicherheitsbestimmungen beim Umgang mit offenem Feuer keinerlei Haftung. 1. Drücken Sie den Einstellknopf hinein und drehen Sie ihn gegen den Uhrzeigersinn auf die Position für die maximale Gaszufuhr ( ). 2. Halten Sie den Einstellknopf bis zu 10 Sekunden lang gedrückt. In dieser Zeit wird das Thermoelement erwärmt. Andernfalls wird die Gaszufuhr unterbrochen. 3. Stellen Sie die Flamme ein, sobald sie ruhig brennt. Falls sich der Brenner nach einigen Versuchen nicht zünden lässt, überprüfen Sie, ob die Brennerkrone und der zugehörige Brennerdeckel korrekt sitzen. WARNUNG! Halten Sie den Knopf nicht länger als 15 Sekunden gedrückt. Sollte der Brenner nach 15 Sekunden nicht zünden, lassen Sie den Knopf los, und drehen Sie ihn in die Aus-Position. Warten Sie dann mindestens eine Minute, bevor Sie den Brenner erneut zünden. DEUTSCH VORSICHT! Wenn kein Strom zur Verfügung steht, können Sie den Brenner auch ohne Strom zünden. Bringen Sie eine Flamme in die Nähe des Brenners, drehen Sie den entsprechenden Knopf entgegen dem Uhrzeigersinn auf die höchste Stufe und drücken Sie ihn dann hinein. Halten Sie den Einstellknopf höchstens 10 Sekunden gedrückt, um das Thermoelement zu erwärmen. Sollte der Brenner zufällig ausgehen, drehen Sie den Knopf in die Aus-Position und versuchen Sie ihn nach einer Minute erneut zu zünden. Das Kochfeld wird mit Ventilen mit einem stetigen Stellverhalten geliefert. Sie ermöglichen eine präzisere Einstellung der Flamme. 5.3 Abschalten des Brenners Drehen Sie zum Abschalten des Brenners den Knopf in die Aus-Position . WARNUNG! Bevor Sie das Kochgeschirr vom Brenner nehmen, drehen Sie die Flamme herunter oder drehen Sie sie ganz ab. Nach dem Einschalten der Stromversorgung, nach der Installation oder nach einem Stromausfall wird der Funkengenerator möglicherweise automatisch eingeschaltet. Das ist normal. 6. TIPPS UND HINWEISE WARNUNG! Siehe Kapitel Sicherheitshinweise. 6.1 Kochgeschirr VORSICHT! Verwenden Sie kein Kochgeschirr aus Gusseisen, Ton oder Steingut und keine Grilloder Sandwichplatten. WARNUNG! Kochen Sie nicht mit einem Kochgeschirrteil auf zwei Brennern gleichzeitig. 31 WARNUNG! Stellen Sie keine beschädigten Töpfe oder solche, die nicht standfest sind, auf den Brenner, um ein Verschütten und Verletzungen zu vermeiden. VORSICHT! Achten Sie darauf, dass sich die Topfböden nicht zu nahe am Einstellknopf befinden, da anderenfalls die Flamme den Einstellknopf erhitzen könnte. 32 www.electrolux.com VORSICHT! Achten Sie darauf, dass die Topfgriffe nicht über den vorderen Rand des Kochfelds hinausragen. VORSICHT! Stellen Sie zur Reduzierung des Gasverbrauchs und im Interesse einer größeren Stabilität die Töpfe mittig auf den Brenner. VORSICHT! Heiße Flüssigkeiten, die während des Kochens verschüttet werden, können zum Zerspringen der Glasplatte führen. 6.2 Durchmesser des Kochgeschirrs Verwenden Sie nur Kochgeschirr mit einem Durchmesser, der der Größe der Brenner entspricht. Brenner Durchmesser des Kochge‐ schirrs (mm) Multikronen-Brenner 180 - 260 Normalbrenner 120 - 220 Hilfsbrenner 80 - 180 7. REINIGUNG UND PFLEGE WARNUNG! Siehe Kapitel Sicherheitshinweise. 7.1 Allgemeine Informationen • • • • Reinigen Sie das Kochfeld nach jedem Gebrauch. Verwenden Sie stets Kochgeschirr mit sauberen Böden. Kratzer oder dunkle Flecken auf der Oberfläche beeinträchtigen die Funktionsfähigkeit des Kochfelds nicht. Verwenden Sie einen Spezialreiniger zur Reinigung der Kochfeldoberfläche. WARNUNG! Verwenden Sie keine Messer, Schaber oder ähnliche Gegenstände zum Reinigen der Glasplatte oder der Zwischenräume zwischen den Außenringen der Brenner und dem Gehäuse (sofern vorhanden). • Reinigen Sie Edelstahlteile mit Wasser und wischen Sie sie mit einem weichen Tuch trocken. 7.2 Topfträger Die Topfträger sind nicht spülmaschinenfest. Sie müssen von Hand gereinigt werden. 1. Entfernen Sie die Topfträger, um die Reinigung des Kochfelds zu erleichtern. Seien Sie beim Wiederaufsetzen der Topfträger vorsichtig, um Beschädigungen der Oberseite der Kochstelle zu vermeiden. 2. Wenn Sie die Topfträger von Hand spülen und trocknen, seien Sie vorsichtig, da durch das Emaillieren gelegentlich raue Kanten entstehen können. Entfernen Sie hartnäckige Flecken ggf. mit einer Reinigungspaste. 3. Vergewissern Sie sich, dass Sie die Topfträger nach der Reinigung wieder ordnungsgemäß eingesetzt haben. 4. Damit der Brenner korrekt funktioniert, stellen Sie sicher, dass sich die Arme der Topfträger in der Mitte des Brenners befinden. DEUTSCH 33 Die Form der Topfträger und die Brenneranzahl kann bei anderen Gerätemodellen variieren. 7.3 Abnehmen der Topfträger Die Topfträger werden auf Metallstiften, die sich hinten auf dem Kochfeld befinden, in Position gehalten. Um die Reinigung zu erleichtern, können die Topfträger abgenommen werden. Heben Sie die Topfträger in waagerechter Lage siehe Abbildung. 7.4 Reinigen des Kochfelds • • Nehmen Sie die Topfträger nicht in geneigter Position ab, da sonst die Metallstifte belastet werden. Die Stifte könnten beschädigt werden und abbrechen. • Folgendes muss sofort entfernt werden: Geschmolzener Kunststoff, Plastikfolie, Zucker und zuckerhaltige Lebensmittel. Anderenfalls können die Verschmutzungen das Kochfeld beschädigen. Achten Sie darauf, dass sich niemand Verbrennungen zuzieht. Folgendes kann nach ausreichender Abkühlung des Kochfelds entfernt werden: Kalkund Wasserränder, Fettspritzer und metallisch schimmernde Verfärbungen. Reinigen Sie das Kochfeld mit einem feuchten Tuch und nicht scheuernden Reinigungsmittel. Wischen Sie das Kochfeld nach der Reinigung mit einem weichen Tuch trocken. Reinigen Sie die emaillierten Teile, die Brennerdeckel und Brennerkronen mit warmen Seifenwasser und trocknen Sie diese sorgfältig ab, bevor Sie sie wieder einsetzen. 7.5 Reinigen der Zündkerze Diese Funktion erfolgt über eine Keramikzündkerze mit Metallelektrode. Halten Sie zur Vermeidung von Zündschwierigkeiten diese Bauteile immer sauber; kontrollieren Sie außerdem, ob die Düsen der Brennerkrone verstopft sind. 7.6 Regelmäßige Wartung Lassen Sie regelmäßig vom Ihrem autorisierten Kundendienst den Zustand des Gasversorgungsrohrs und, falls 34 www.electrolux.com installiert, die Funktionstüchtigkeit des Druckreglers überprüfen. 8. FEHLERSUCHE WARNUNG! Siehe Kapitel Sicherheitshinweise. 8.1 Was tun, wenn... Störung Mögliche Ursache Abhilfe Es wird kein Funke er‐ zeugt, wenn Sie versu‐ chen, den Funkenerzeuger zu verwenden. Das Kochfeld ist nicht oder nicht ordnungsgemäß an die Spannungsversorgung angeschlossen. Prüfen Sie, ob das Koch‐ feld ordnungsgemäß an die Spannungsversorgung angeschlossen ist. Die Sicherung ist durchge‐ brannt. Vergewissern Sie sich, dass die Sicherung der Grund für die Störung ist. Brennt die Sicherung wie‐ derholt durch, wenden Sie sich an eine zugelassene Elektrofachkraft. Brennerdeckel und Bren‐ nerkrone sitzen nicht rich‐ tig. Bringen Sie die Brenner‐ krone und den Brennerde‐ ckel in die richtige Position. Die Flamme erlischt gleich nach der Zündung wieder. Das Thermoelement ist Halten Sie den Knopf nach nicht ausreichend erwärmt. dem Entzünden etwa 10 Sekunden lang gedrückt. Der Flammenring ist un‐ gleichmäßig. Die Brennerkrone ist mit Speiseresten verstopft. 8.2 Wenn Sie das Problem nicht lösen können... Wenn Sie das Problem nicht selbst lösen können, wenden Sie sich an Ihren Händler oder einen autorisierten Kundendienst. Geben Sie die Daten, die Sie auf dem Typenschild finden, an. Vergewissern Sie sich, dass Sie das Kochfeld korrekt bedient haben. Wenn Sorgen Sie dafür, dass die Düse nicht blockiert und die Brennerkrone sauber ist. Sie das Gerät falsch bedient haben, fällt auch während der Garantiezeit für die Reparatur durch einen Techniker oder Händler eine Gebühr an. Die Informationen zum Kundendienst und die Garantiebedingungen finden Sie im Garantieheft. DEUTSCH 8.3 Im Zubehörbeutel mitgelieferte Aufkleber Bringen Sie die Aufkleber, wie unten gezeigt, an: A B MOD. MOD. PROD.NO. PROD.NO. SER.NO SER.NO DATA DATA C MOD. PROD.NO. SER.NO. 0049 TYPE IP20 03 IT MADE IN ITALY A. Kleben Sie ihn auf die Garantiekarte und verschicken Sie diesen Teil (falls vorhanden). B. Kleben Sie ihn auf die Garantiekarte und behalten Sie diesen Teil (falls vorhanden). C. Kleben Sie ihn auf die Gebrauchsanleitung. 9. TECHNISCHE DATEN 9.1 Abmessungen des Kochfelds Breite 590 mm Tiefe 520 mm 9.2 Bypassdurchmesser BRENNER Ø BYPASS 1/100 mm Multikronen-Brenner 57 Normalbrenner 35 Hilfsbrenner 28 35 36 www.electrolux.com 9.3 Sonstige technische Daten GESAMTLEIS‐ TUNG: Gas - Origi‐ nal: G20 (2H) 20 mbar 8,9 kW Gas - Ersatz: G30 (3+) 28-30 mbar 607 g/h G31 (3+) 37 mbar Netzanschluss: 220 - 240 V ~ 50 - 60 Hz Gerätekatego‐ rie: II2H3+ Gasanschluss: G 1/2" Geräteklasse: 3 596 g/h 9.4 Gasbrenner für ERDGAS G20 20 mbar BRENNER NORMALLEIS‐ TUNG kW MINDESTLEIS‐ TUNG kW INJEKTORMARKE Multikronen-Bren‐ ner 3,9 1,4 146 Normalbrenner 2,0 0,6 96x Hilfsbrenner 1,0 0,33 70 9.5 Gasbrenner für LPG G30/G31 28-30/37 mbar BRENNER NORMAL‐ MINDEST‐ INJEKTOR‐ LEISTUNG LEISTUNG MARKE kW kW NENNGASDURCHFLUSS g/ Std. G30 28-30 mbar G31 37 mbar Multikro‐ nen-Bren‐ ner 3,55 1,4 095 258 254 Normal‐ brenner 1,9 0,6 71 138 136 0,33 50 73 71 Hilfsbrenner 1,0 10. ENERGIEEFFIZIENZ 10.1 Produktinformationen gemäß EU 66/2014 Modellidentifikation KGG6436K Kochfeldtyp Einbau-Kochfeld Anzahl der Gasbrenner 4 DEUTSCH Energieeffizienz pro Gasbrenner (EE gas burner) Hinten links – Normalbrenner 54,8 % Hinten rechts – Normalbren‐ ner 54,8 % Vorne rechts – Hilfsbrenner nicht zutreffend Vorne links – MultikronenBrenner 57,2 % Energieeffizienz des Gaskoch‐ felds (EE gas hob) 37 55.6% EN 30-2-1: Haushalt-Kochgeräte für gasförmige Brennstoffe - Teil 2-1: Rationelle Energienutzung - Allgemeines 10.2 Energie sparen • • • • • • • Achten Sie vor dem Gebrauch darauf, dass die Brenner und Topfträger richtig zusammengebaut sind. Verwenden Sie nur Kochgeschirr mit einem Durchmesser, der der Größe der Brenner entspricht. Stellen Sie den Topf mittig auf den Brenner. Wenn Sie Wasser erwärmen, verwenden Sie nur die benötigte Menge. Decken Sie Kochgeschirr, wenn möglich, mit einem Deckel ab. Drehen Sie, sobald die Flüssigkeit zu kochen beginnt, die Flamme so weit zurück, dass die Flüssigkeit nur leicht köchelt. Verwenden Sie nach Möglichkeit einen Dampfkochtopf. Beachten Sie seine Bedienungsanleitung. 11. UMWELTTIPPS Recyceln Sie Materialien mit dem Entsorgen Sie Geräte mit diesem Symbol Symbol . Entsorgen Sie die Verpackung in den entsprechenden Recyclingbehältern. Recyceln Sie zum Umwelt- und Gesundheitsschutz elektrische und elektronische Geräte. nicht mit dem Hausmüll. Bringen Sie das Gerät zu Ihrer örtlichen Sammelstelle oder wenden Sie sich an Ihr Gemeindeamt. 38 www.electrolux.com CONTENIDO 1. INFORMACIÓN SOBRE SEGURIDAD............................................................ 38 2. INSTRUCCIONES DE SEGURIDAD................................................................41 3. INSTALACIÓN..................................................................................................44 4. DESCRIPCIÓN DEL PRODUCTO................................................................... 47 5. USO DIARIO.....................................................................................................48 6. CONSEJOS...................................................................................................... 49 7. MANTENIMIENTO Y LIMPIEZA.......................................................................50 8. SOLUCIÓN DE PROBLEMAS..........................................................................52 9. DATOS TÉCNICOS..........................................................................................53 10. EFICACIA ENERGÉTICA...............................................................................54 PENSAMOS EN USTED Gracias por adquirir un electrodoméstico Electrolux. Ha elegido un producto que lleva décadas de experiencia e innovación profesionales. Ingenioso y elegante, ha sido diseñado pensando en usted. Así pues, cada vez que lo utilice, puede tener la seguridad de que obtendrá siempre excelentes resultados. Le damos la bienvenida a Electrolux. Visite nuestro sitio web para: Obtener consejos, folletos, soluciones a problemas e información de servicio y reparación: www.electrolux.com/support Registrar su producto para recibir un mejor servicio: www.registerelectrolux.com Comprar accesorios, artículos de consumo y piezas de recambio originales para su aparato: www.electrolux.com/shop ATENCIÓN AL CLIENTE Y SERVICIO Le recomendamos que utilice recambios originales. Cuando se ponga en contacto con nuestro Centro de servicio técnico, asegúrese de tener los siguientes datos disponibles: Modelo, código numérico del producto (PNC), número de serie. La información se encuentra en la placa de características. Advertencia / Precaución - Información sobre seguridad Información general y consejos Información relativa al medioambiente Salvo modificaciones. 1. INFORMACIÓN SOBRE SEGURIDAD Antes de instalar y utilizar el aparato, lea atentamente las instrucciones facilitadas. El fabricante no se hace responsable de lesiones o daños producidos como ESPAÑOL 39 resultado de una instalación o un uso incorrectos: Conserve siempre estas instrucciones en lugar seguro y accesible para futuras consultas. 1.1 Seguridad de niños y personas vulnerables • • • • • • • • Este aparato puede ser utilizado por niños de 8 años en adelante y personas cuyas capacidades físicas, sensoriales o mentales estén disminuidas o que carezcan de la experiencia y conocimientos suficientes para manejarlo, siempre que cuenten con las instrucciones o la supervisión sobre el uso del electrodoméstico de forma segura y comprendan los riesgos. Es necesario mantener alejados a los niños entre 3 y 8 años, así como a las personas con minusvalías importantes y complejas, salvo que estén bajo supervisión continua. Es necesario mantener alejados a los niños de menos de 3 años salvo que estén bajo supervisión continua. No deje que los niños jueguen con el aparato. Mantenga todo el material de embalaje fuera del alcance de los niños y deséchelo de forma adecuada. Mantenga a los niños y mascotas alejados del aparato cuando esté funcionando o se esté enfriando. Las piezas accesibles están calientes. Si este aparato tiene un bloqueo de seguridad para niños, debe activarlo. La limpieza y mantenimiento de usuario del aparato no podrán ser realizados por niños sin supervisión. 1.2 Seguridad general • • ADVERTENCIA: El aparato y las piezas accesibles se calientan mucho durante el funcionamiento. Preste mucha atención para no tocar las resistencias. No accione el aparato con un temporizador externo ni con un sistema de mando a distancia independiente. 40 www.electrolux.com • • • • • • • • • • ADVERTENCIA: Cocinar con grasa o aceite sin estar presente puede resultar peligroso, ya que podría ocasionarse un incendio. NUNCA intente apagar un fuego con agua; apague el aparato y cubra la llama con una tapa o una manta ignífuga. ATENCIÓN: El proceso de cocción debe ser supervisado. Un proceso de cocción breve debe estar permanentemente supervisado. ADVERTENCIA: Peligro de incendio: No utilice las superficies de cocción para almacenar alimentos. No deje objetos metálicos, como cuchillos, tenedores, cucharas o tapas sobre la superficie de cocción para evitar que se calienten. No utilice un limpiador a vapor para limpiar el aparato. Si la superficie de vitrocerámica/cristal está agrietada, apague el aparato y desenchúfelo de la red eléctrica. Si el aparato está conectado directamente a la red eléctrica mediante una caja de empalmes, quite el fusible para desconectarlo de la alimentación eléctrica. En cualquier caso, diríjase al servicio técnico autorizado. En caso de rotura del cristal de la encimera: – apague inmediatamente todos los quemadores y cualquier resistencia y aísle el aparato de la alimentación eléctrica, – no toque la superficie del aparato, – no utilice el aparato. Si el cable eléctrico sufre algún daño, el fabricante, su servicio técnico autorizado o un profesional tendrán que cambiarlo para evitar riesgos. Donde el aparato esté directamente conectado a la fuente de alimentación, se precisa un interruptor aislador omnipolar con abertura entre contactos. Ha de garantizarse una desconexión completa según las condiciones especificadas en la categoría III de sobretensión. El cable de tierra queda excluido de esto. ESPAÑOL • • 41 Cuando tienda el cable de corriente, asegúrese (por ejemplo mediante conductos aislantes) de que no entra en contacto directo con piezas que puedan superar la temperatura ambiente en más de 50°C. ADVERTENCIA: Utilice exclusivamente protecciones para la placa de cocción diseñadas por el fabricante del aparato o indicadas en sus instrucciones de uso como apropiadas, o bien las protecciones incluidas con el aparato. El uso de protectores inadecuados puede provocar accidentes. 2. INSTRUCCIONES DE SEGURIDAD Este aparato es adecuado para los • siguientes mercados: IT 2.1 Instalación ADVERTENCIA! Sólo un técnico cualificado puede instalar el aparato. ADVERTENCIA! Podría sufrir lesiones o dañar el aparato. • • • • • • • • Retire todo el embalaje. No instale ni utilice un aparato dañado. Siga las instrucciones de instalación suministradas con el aparato. Respete siempre la distancia mínima entre el aparato y los demás electrodomésticos y mobiliario. Tenga cuidado al mover el aparato, porque es pesado. Utilice siempre guantes de protección y calzado cerrado. Proteja las superficies cortadas con un material sellante para evitar que la humedad las hinche. Proteja la parte inferior del aparato del vapor y la humedad. No instale el aparato junto a una puerta ni debajo de una ventana. De esta forma se evita que los utensilios de cocina calientes caigan del aparato cuando la puerta o la ventana estén abiertas. • Cuando instale el aparato encima de cajones, asegúrese de que hay suficiente espacio entre la parte inferior del aparato y el cajón superior para que circule el aire. La base del aparato se puede calentar. Asegúrese de colocar un panel de separación incombustible bajo el aparato para evitar acceder a la base. 2.2 Conexión eléctrica ADVERTENCIA! Riesgo de incendios y descargas eléctricas. • • • • • • • Todas las conexiones eléctricas deben realizarlas electricistas cualificados. El aparato debe conectarse a tierra. Antes de efectuar cualquier tipo de operación, compruebe que el aparato esté desenchufado de la corriente eléctrica. Asegúrese de que los parámetros de la placa de características son compatibles con los valores eléctricos del suministro eléctrico. Asegúrese de que el aparato está instalado correctamente. Un cable de red o enchufe (en su caso) flojo o inadecuado puede provocar que el terminal se caliente en exceso. Utilice el cable de red eléctrica adecuado. Coloque los cables eléctricos de forma que no se puedan enredar. 42 www.electrolux.com • • • • • • • • • • • Asegúrese de que hay instalada una protección contra descargas eléctricas. Establezca la descarga de tracción del cable. Asegúrese de que el cable o el enchufe (en su caso) no toquen el aparato caliente ni utensilios de cocina calientes cuando conecte el aparato a las tomas cercanas. No utilice adaptadores de enchufes múltiples ni cables prolongadores. Asegúrese de no provocar daños en el enchufe (en su caso) ni en el cable de red. Póngase en contacto con un electricista o con nuestro servicio técnico para cambiar un cable dañado. Los mecanismos de protección contra descargas eléctricas de componentes con corriente y aislados deben fijarse de forma que no puedan aflojarse sin utilizar herramientas. Conecte el enchufe a la toma de corriente únicamente cuando haya terminado la instalación. Asegúrese de tener acceso al enchufe del suministro de red una vez finalizada la instalación. Si la toma de corriente está floja, no conecte el enchufe. No desconecte el aparato tirando del cable de conexión a la red. Tire siempre del enchufe. Use únicamente dispositivos de aislamiento apropiados: línea con protección contra los cortocircuitos, fusibles (tipo tornillo que puedan retirarse del soporte), dispositivos de fuga a tierra y contactores. La instalación eléctrica debe tener un dispositivo de aislamiento que permita desconectar el aparato de todos los polos de la red. El dispositivo de aislamiento debe tener una apertura de contacto con una anchura mínima de 3 mm. 2.3 Conexión del gas • • Todas las conexiones de gas deben realizarse por personal cualificado. Antes de realizar la instalación, asegúrese de que las condiciones de distribución locales (tipo y presión del • • • gas) son compatibles con los requisitos del aparato. Compruebe que el aire circula libremente alrededor del aparato. La placa de características contiene información sobre el suministro de gas. Este aparato no está conectado a un dispositivo que evacua los productos de combustión. Asegúrese de conectar el aparato según la normativa de instalación vigente. Preste atención a los requisitos sobre ventilación adecuada. 2.4 Uso del aparato ADVERTENCIA! Riesgo de lesiones, quemaduras y descargas eléctricas. • • • • • • • • • • Retire todo el embalaje, las etiquetas y la película protectora (en su caso) antes del primer uso. Utilice este aparato en entornos domésticos. No cambie las especificaciones de este aparato. Cerciórese de que los orificios de ventilación no están obstruidos. No deje nunca el aparato desatendido mientras está en funcionamiento. Apague las zonas de cocción después de cada uso. No coloque cubiertos ni tapaderas sobre las zonas de cocción. Pueden alcanzar temperaturas elevadas. No utilice el aparato con las manos mojadas ni cuando entre en contacto con el agua. No utilice el aparato como superficie de trabajo ni de almacenamiento. Cuando se coloca comida en aceite caliente, éste puede saltar. ADVERTENCIA! Riesgo de incendio y explosiones • Las grasas o aceites calientes pueden generar vapores inflamables. Mantenga las llamas u objetos calientes alejados de grasas y aceites cuando cocine con ellos. ESPAÑOL • • • Los vapores que liberan los aceites muy calientes pueden provocar combustiones imprevistas. El aceite usado, que puede contener restos de alimentos, puede provocar incendios a temperaturas más bajas que el aceite que se utiliza por primera vez. No coloque productos inflamables ni objetos mojados con productos inflamables dentro, cerca o encima del aparato. • • • ADVERTENCIA! Podría dañar el aparato. • • • • • • • • • • • • No coloque ningún utensilio de cocina caliente en el panel de control. No deje que el contenido de los utensilios de cocina hierva hasta evaporarse. Evite la caída de objetos o utensilios de cocina en el aparato. La superficie puede dañarse. No encienda las zonas de cocción sin utensilios de cocina o con éstos vacíos. No coloque papel de aluminio sobre el aparato. Los utensilios de cocina de hierro o aluminio fundido, o que tengan la base dañada, pueden arañar el cristal o la vitrocerámica. Levante siempre estos objetos cuando tenga que moverlos sobre la superficie de cocción. Utilice únicamente utensilios de cocina estables con forma adecuada y diámetro superior al tamaño de los quemadores. Asegúrese de que los utensilios de cocina están bien centrados sobre los quemadores. Asegúrese de que la llama no se apaga cuando gire rápidamente el mando de la posición máxima a la mínima. Utilice únicamente los accesorios suministrados con el aparato. No instale en el quemador un difusor de llamas. El uso de un aparato de cocina de gas genera calor y humedad. Disponga de buena ventilación en la sala donde instale el aparato. • 43 El uso intensivo y prolongado del aparato puede exigir mayor ventilación; por ejemplo, la apertura de una ventana o una ventilación más eficaz, por ejemplo, el aumento del nivel de ventilación mecánica, si se dispone de ella. Este aparato está diseñado exclusivamente para cocinar. No debe utilizarse para otros fines, por ejemplo, como calefacción. No permita que líquidos ácidos, como por ejemplo vinagre, zumo de limón o desincrustantes de cal toquen la placa de cocción. De lo contrario, podrían aparecer manchas opacas. La pérdida de color del esmalte o el acero inoxidable no afecta al rendimiento del aparato. 2.5 Mantenimiento y limpieza ADVERTENCIA! No quite los botones, perillas o juntas del panel de control. Puede entrar agua en el interior del aparato y causar daño. • • • • • • Limpie periódicamente el aparato para evitar el deterioro del material de la superficie. Apague el aparato y déjelo enfriar antes de limpiarlo. Desconecte el aparato de la red eléctrica antes de realizar el mantenimiento. No utilice pulverizadores ni vapor de agua para limpiar el aparato. Limpie el aparato con un paño suave humedecido. Utilice solo detergentes neutros. No utilice productos abrasivos, estropajos duros, disolventes ni objetos de metal. No lave los quemadores en el lavavajillas. 2.6 Asistencia • • Para reparar el aparato, póngase en contacto con un centro de servicio autorizado. Utilice solamente piezas de recambio originales. 44 www.electrolux.com 2.7 Eliminación ADVERTENCIA! Existe riesgo de lesiones o asfixia. • • • • Desconecte el aparato de la red. Corte el cable eléctrico cerca del aparato y deséchelo. Aplaste los tubos de gas externos. Póngase en contacto con las autoridades locales para saber cómo desechar correctamente el aparato. 3. INSTALACIÓN ADVERTENCIA! Consulte los capítulos sobre seguridad. 3.1 Antes de la instalación Antes de instalar la placa de cocción, anote la información siguiente de la placa de características. La placa de características está situada en la parte inferior de la placa de cocción. Modelo ....................................... PNC ......................................... Número de serie ........................... 3.2 Conexión de gas ADVERTENCIA! Las siguientes instrucciones de montaje, mantenimiento y ventilación las debe llevar a cabo personal cualificado de acuerdo con las normas en vigor (UNI-CIG 7129 - 7131). Asegúrese de que la cocina esté bien ventilada: mantenga abiertas las salidas de ventilación natural (100 cm² como mínimo) o instale una campana extractora. Elija conexiones fijas o utilice un tubo flexible de acero inoxidable que cumpla la normativa vigente. Si utiliza tubos metálicos flexibles, tenga cuidado de que no entren en contacto con las partes móviles ni estén retorcidos. Preste también atención cuando la placa se instale junto con un horno. Asegúrese de que la presión del suministro de gas del aparato cumple los valores recomendados. Si la presión suministrada no alcanza el valor especificado, es necesario montar un regulador de presión adecuado de conformidad con la norma UNI EN 88. Respecto al gas líquido (GLP), el uso de un regulador de presión únicamente está autorizado si cumple la norma UNI EN 12864. La conexión ajustable se fija a la rampa por medio de una tuerca roscada G 1/2". Atornille las piezas sin fuerza, ajuste la conexión en la dirección adecuada y apriete todo. A B C A. Extremo del eje con tuerca B. Arandela suministrada con el aparato C. Codo suministrado con el aparato Conexión rígida: Realice la conexión con tubos de metal rígidos (cobre con extremo mecanizado) (UNI-CIG 7129). Conexión flexible: Utilice un tubo flexible de acero inoxidable (UNI-CIG 9891) con una longitud máxima de 2 m. ESPAÑOL • ADVERTENCIA! Cuando la instalación esté terminada, asegúrese de que el sello de cada racor del tubo es correcto. Utilice una solución jabonosa, nunca una llama. • 3.4 Ajuste del nivel mínimo Para ajustar el nivel mínimo de los quemadores: 1. Encienda el quemador. 2. Gire el mando hasta la posición mínima. 3. Retire el mando . 4. Con un destornillador plano, ajuste la posición del tornillo de derivación (A). A 5. Si cambia: de gas natural G20 de 20 mbares a gas líquido, apriete totalmente el tornillo de derivación. de gas líquido a gas natural G20 de 20 mbar, desatornille el tornillo de derivación aproximadamente 1/4 de vuelta (1/2 vuelta para el quemador de multi corona). ADVERTENCIA! Asegúrese de que la llama no se apaga cuando gire rápidamente el mando de la posición máxima a la posición mínima. 3.3 Sustitución de los inyectores 1. Retire los soportes para sartenes. 2. Retire las tapas y las coronas del quemador. 3. Con una llave tubular del 7, desatornille y retire los inyectores y sustitúyalos por los adecuados al tipo de gas que va a utilizar (consulte la tabla del capítulo “Datos técnicos”). 4. Vuelva a montar las piezas siguiendo el procedimiento anterior en orden inverso. 5. Sustituya la placa de características (situada cerca del tubo de suministro de gas) por la correspondiente al nuevo tipo de suministro de gas. Encontrará esta placa en el embalaje del aparato. Si la presión del suministro de gas se puede cambiar o es diferente de la necesaria, debe instalar un regulador de presión adecuado en el tubo del suministro de gas. 45 3.5 Conexión eléctrica • Asegúrese de que el voltaje nominal y el tipo de suministro que indica la placa de datos técnicos coinciden con los del lugar donde se va a instalar el aparato. • Este aparato se suministra con un cable de alimentación. Debe estar equipado con un enchufe adecuado capaz de soportar la carga indicada en la placa de características. Asegúrese de instalar el enchufe en una toma correcta. • Utilice siempre una toma con aislamiento de conexión a tierra correctamente instalada. • Asegúrese de tener acceso al enchufe del suministro de red una vez finalizada la instalación. • No desconecte el aparato tirando del cable de conexión a la red. Tire siempre del enchufe. • Hay riesgo de incendio si se conecta el aparato con un cable de prolongación, adaptador o conexión múltiple. Asegúrese de que la conexión a tierra cumple los reglamentos y las normas vigentes. • No deje que el cable de alimentación se caliente a más de 90° C. Para evitar el contacto entre el cable y el aparato instalado bajo la placa de cocción, utilice las abrazaderas del lateral del armario. 46 www.electrolux.com A 3. min. 100 mm min. 650 mm min. 55 mm 30 mm 480+02 mm A. Tubo de cobre rígido o tubo flexible de acero inoxidable 560+02 mm 4. 3.6 Cable de conexión Si desea cambiar el cable de conexión, utilice únicamente el cable especial o su equivalente. El tipo de cable es: H03V2V2-F T90. Asegúrese de que la sección de cable sea adecuada para la tensión y la temperatura de funcionamiento. El cable de puesta a tierra de color amarillo/verde debe ser unos 2 cm más largo que el cable de fase marrón (o negro). 5. 3.7 Montaje 1. 6. A 2. B A) capa impermeabilizante B) abrazaderas suministradas ESPAÑOL 47 el acceso en caso de que sea necesario realizar una intervención de asistencia técnica. 7. Unidad de cocina con puerta 30 mm A PRECAUCIÓN! Coloque el aparato únicamente sobre encimeras de superficie plana. 3.8 Instalación de la placa bajo la campana Si instala la placa de cocción debajo de una campana, consulte las instrucciones de instalación de la campana para confirmar la distancia mínima necesaria entre los aparatos. 60 mm min 20 mm (max 150 mm) B A. Panel extraíble B. Espacio para las conexiones Unidad de cocina con horno La conexión eléctrica de la encimera y el horno debe instalarse por separado para garantizar la seguridad y poder retirar fácilmente el horno de la unidad. 3.9 Posibilidades de inserción El panel instalado debajo de la placa debe poder retirarse fácilmente y permitir 4. DESCRIPCIÓN DEL PRODUCTO 4.1 Disposición de las zonas de cocción 1 2 1 2 3 4 Quemador semi rápido Quemador de multi corona Quemador auxiliar Mandos de control 3 4 4.2 Mando de control Símbolo Description Sin suministro de gas / posición de apagado Símbolo Description Posición de encendido / suministro de gas máxi‐ mo 48 www.electrolux.com Símbolo Description suministro mínimo de gas 5. USO DIARIO ADVERTENCIA! Consulte los capítulos sobre seguridad. 5.1 Descripción general del quemador $ % & ' $ % & ' A. B. C. D. Tapa del quemador Corona del quemador Bujía de encendido Termopar 5.2 Encendido del quemador Encienda siempre el quemador antes de colocar los utensilios de cocina. ADVERTENCIA! Tenga mucho cuidado cuando utilice el fuego destapado en el entorno de la cocina. El fabricante declina toda responsabilidad en caso de uso indebido de la llama. 1. Presione el mando y gírelo hacia la izquierda hasta la posición máxima de suministro de gas ( ). 2. Mantenga pulsado el mando durante unos 10 segundos como máximo. De esta forma se calienta el termopar. De lo contrario, el suministro de gas se interrumpe. 3. Ajuste la llama después de que se normalice. Si el quemador no se enciende tras varios intentos, compruebe que la corona y la tapa del quemador están bien colocados. ADVERTENCIA! No mantenga pulsado el mando durante más de 15 segundos. Si el quemador no se enciende al cabo de 15 segundos, suelte el mando de control, gírelo hasta la posición de apagado y espere al menos 1 minuto antes de volver a intentar encender el quemador. ESPAÑOL PRECAUCIÓN! Si no hay suministro eléctrico podrá encender el quemador sin necesidad del dispositivo eléctrico; en este caso arrime una llama al quemador, gire el mando de control pertinente hacia la izquierda hasta la posición de máxima salida de gas y empújelo hacia abajo. Manténgalo presionado durante unos 10 segundos como máximo; de esta forma el termopar se calentará. Si el quemador se apaga accidentalmente, gire el mando de control hasta la posición de apagado y espere al menos 1 minuto antes de volver a intentar encenderlo. Cuando se enciende la corriente, tras la instalación o después de un corte en el suministro eléctrico, suele ser normal que el generador de las chispas se active automáticamente. Esto es correcto. La placa se suministra con las válvulas progresivas. Hacen más precisa la regulación de la llama. 5.3 Apagado del quemador Para apagar la llama, gire el mando hasta la posición de apagado . ADVERTENCIA! Recuerde que debe bajar o apagar la llama antes de retirar los recipientes del quemador. 6. CONSEJOS ADVERTENCIA! Consulte los capítulos sobre seguridad. 6.1 Utensilios de cocina PRECAUCIÓN! No utilice sartenes de hierro fundido, fuentes de barro cocido o de cerámica ni placas de grill o de tostadora. ADVERTENCIA! No coloque un mismo recipiente en dos quemadores. ADVERTENCIA! No coloque recipientes inestables o deformados en los quemadores para evitar salpicaduras y lesiones. PRECAUCIÓN! Asegúrese de que las bases de los recipientes no estén demasiado cerca de los mandos de control, de lo contrario la llama calentaría los mandos. PRECAUCIÓN! Asegúrese de que las asas de los utensilios no sobresalgan del borde delantero de la placa de cocción. PRECAUCIÓN! Asegúrese de que los recipientes estén centrados sobre los quemadores para obtener la máxima estabilidad y reducir el consumo de gas. 49 50 www.electrolux.com PRECAUCIÓN! Los líquidos derramados durante la cocción pueden hacer que se rompa el cristal. 6.2 Diámetro de los utensilios de cocina Quemador Diámetro de los recipien‐ tes (mm) Multi corona 180 - 260 Semi rápido 120 - 220 Auxiliar 80 - 180 Utilice utensilios de cocina con diámetros adecuados para el tamaño de los quemadores. 7. MANTENIMIENTO Y LIMPIEZA ADVERTENCIA! Consulte los capítulos sobre seguridad. 7.1 Información general • • • • Limpie la placa después de cada uso. Utilice siempre recipientes cuya base esté limpia. Los arañazos o las marcas oscuras en la superficie no afectan al funcionamiento normal de la placa. Utilice un limpiador especial para la superficie de la placa. ADVERTENCIA! No utilice cuchillos, rascadores o instrumentos similares para limpiar la superficie del cristal o entre los anillos de los quemadores y el marco (en su caso). • Lave las partes de acero inoxidable con agua y séquelas a fondo con un paño suave. 7.2 Soportes para sartenes Los soportes para sartenes no son resistentes al lavado en lavavajillas. Deben lavarse a mano. 1. Retire los soportes para sartenes para facilitar la limpieza de la placa de cocción. Tenga mucho cuidado cuando cambie los soportes para sartenes para evitar dañar la parte superior de la placa de cocción. 2. El revestimiento de esmalte puede tener los bordes rugosos; tenga cuidado al lavar y secar a mano los soportes para sartenes. Si fuera necesario, elimine las manchas difíciles con un limpiador en pasta. 3. Después de limpiar los soportes para sartenes, asegúrese de colocarlos en la posición correcta. 4. A fin de que los quemadores funcionen correctamente, asegúrese de que los brazos de los soportes para sartenes estén alineados con el centro del quemador. ESPAÑOL 7.3 Extracción de los soportes para sartenes Los soportes para sartenes se mantienen en la posición correcta porque se colocan en pasadores metálicos instalados en la parte posterior de la placa de cocción. Para facilitar la limpieza, los soportes para sartenes pueden retirarse de la placa de cocción. Levante los soportes para sartenes manteniéndolos en posición horizontal como se muestra en el gráfico. 51 La forma de los soportes para sartenes y la cantidad de quemadores pueden ser diferentes en otros modelos del aparato. 7.4 Limpieza de la placa • • No levante los soportes para sartenes en ángulo, porque ejercerá presión en los pasadores metálicos. Esto podría dañar los pasadores y romperlos. • Elimine de inmediato: restos fundidos de plástico, recubrimientos de plástico, azúcar y alimentos que contengan azúcar, la suciedad puede dañar la placa. Tenga cuidado para evitar quemaduras. Elimine cuando el aparato se haya enfriado: restos de cal, marcas de agua, manchas de grasa y decoloraciones metálicas. Limpie la placa de cocción con un paño suave humedecido con agua y detergente no abrasivo. Después de limpiar, seque la placa de cocción con un paño suave. Para limpiar las partes esmaltadas, las tapas y las coronas, utilice agua jabonosa templada y séquelas cuidadosamente antes de volver a colocarlas en su sitio. 7.5 Limpieza de la bujía de encendido Esta función se obtiene a través de una bujía de encendido cerámica con un electrodo metálico. Mantenga siempre limpios estos componentes para evitar problemas de encendido y asegúrese de que los orificios de la corona del quemador no estén obstruidos. 7.6 Mantenimiento periódico Haga revisar la instalación de gas y el ajustador de presión, si lo hubiera, regularmente y por el Centro de servicio autorizado. 52 www.electrolux.com 8. SOLUCIÓN DE PROBLEMAS ADVERTENCIA! Consulte los capítulos sobre seguridad. 8.1 Qué hacer si... Problema Posible causa Solución No hay chispa cuando se intenta activar el genera‐ dor de chispas. La placa no está conecta‐ da a un suministro eléctri‐ co o está mal conectada. Compruebe si la placa se ha conectado correcta‐ mente a la red eléctrica. Ha saltado el fusible. Compruebe si el fusible es la causa del fallo de fun‐ cionamiento. Si el fusible se funde repetidamente, consulte a un electricista cualificado. La tapa y la corona del quemador no están bien colocadas. Coloque correctamente la corona y la tapa del que‐ mador. La llama se apaga justo después de encenderse. El termopar no está lo sufi‐ Después de encender la cientemente caliente. llama, mantenga pulsado el mando durante unos 10 segundos como máximo. El anillo de llama no es uniforme. La corona del quemador está bloqueada con restos de comida. 8.2 Si no encuentra una solución... Si no logra subsanar el problema, póngase en contacto con su distribuidor o el centro de servicio técnico. Facilite la información de la placa de características. Asegúrese de que maneja la placa de cocción adecuadamente. De lo contrario, el personal del servicio técnico o del Asegúrese de que el in‐ yector no esté bloqueado y de que la corona del que‐ mador esté limpia. distribuidor facturará la reparación efectuada, incluso en el caso de que el aparato se encuentre en periodo de garantía. Las instrucciones sobre servicio técnico y condiciones de garantía se encuentran en el folleto de garantía que se suministra con el aparato. ESPAÑOL 8.3 Etiquetas incluidas en la bolsa de accesorios Pegue las etiquetas adhesivas como se muestra a continuación: A B MOD. MOD. PROD.NO. PROD.NO. SER.NO SER.NO DATA DATA C MOD. PROD.NO. SER.NO. 0049 TYPE IP20 03 IT MADE IN ITALY A. Péguela en la etiqueta de garantía y envíe esta parte (en su caso). B. Péguela en la etiqueta de garantía y guarde esta parte (en su caso). C. Péguela en el manual de instrucciones. 9. DATOS TÉCNICOS 9.1 Dimensiones de la placa de cocción Ancho 590 mm Fondo 520 mm 9.2 Diámetros de derivación QUEMADOR Ø DERIVACIÓN 1/100 mm Multi corona 57 Semi rápido 35 Auxiliar 28 53 54 www.electrolux.com 9.3 Otros datos técnicos Gas original: POTENCIA TO‐ Sustitución TAL: de gas: G20 (2H) 20 mbar 8,9 kW G30 (3+) 28-30 mbar 607g/h G31 (3+) 37 mbar 596g/h Suministro eléctrico: 220-240 V ~ 50-60 Hz Categoría de aparato: II2H3+ Conexión de gas: G 1/2" Clase de apara‐ 3 to: 9.4 Quemadores de gas para GAS NATURAL G20 a 20 mbar QUEMADOR POTENCIA NOR‐ MAL kW POTENCIA MÍNI‐ MA kW MARCA DEL IN‐ YECTOR Multi corona 3,9 1,4 146 Semi rápido 2,0 0,6 96x Auxiliar 1,0 0,33 70 9.5 Quemadores de gas para GLP G30/G31 28-30/37 mbar QUEMA‐ DOR POTENCIA POTENCIA MARCA CAUDAL DE GAS NOMI‐ NORMAL MÍNIMA DEL INYEC‐ NAL g/h kW kW TOR G30 28-30 G31 37 mbar mbar Multi corona 3,55 1,4 095 258 254 Semi rápido 1,9 0,6 71 138 136 Auxiliar 0,33 50 73 71 1,0 10. EFICACIA ENERGÉTICA 10.1 Información de producto según EU 66/2014 Identificación del modelo KGG6436K Tipo de placa de cocción Placa empotrada Número de quemadores de gas 4 ESPAÑOL Parte trasera izquierda: semi‐ rrápido 55 54,8 % Parte trasera derecha: semi‐ 54,8 % Eficiencia energética por quema‐ rrápido dor de gas Parte delantera derecha: auxi‐ no aplicable (EE gas burner) liar Parte delantera izquierda: co‐ rona múltiple Eficiencia energética de la enci‐ mera de gas (EE gas hob) 57,2 % 55.6% EN 30-2-1: Aparatos domésticos de cocción que utilizan combustibles gaseosos Parte 2-1: Uso racional de la energía - General 10.2 Bajo consumo energético • • • • • • • Antes de su uso, asegúrese de que los quemadores y los soportes están correctamente montados. Utilice utensilios de cocina con diámetros adecuados para el tamaño de los quemadores. Centre la olla en el quemador. Cuando caliente agua, utilice solo la cantidad que necesite. En la medida de lo posible, cocine siempre con los utensilios de cocina tapados. Cuando el líquido comience a hervir, reduzca la llama de tal forma que el líquido siga cociendo. Si es posible, utilice una olla a presión. Consulte el manual del usuario. 11. ASPECTOS MEDIOAMBIENTALES Recicle los materiales con el símbolo . Coloque el material de embalaje en los contenedores adecuados para su reciclaje. Ayude a proteger el medio ambiente y la salud pública, así como a reciclar residuos de aparatos eléctricos y * electrónicos. No deseche los aparatos marcados con el símbolo junto con los residuos domésticos. Lleve el producto a su centro de reciclaje local o póngase en contacto con su oficina municipal. 867356994-A-502020 www.electrolux.com/shop-
 1
1
-
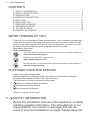 2
2
-
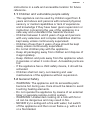 3
3
-
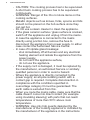 4
4
-
 5
5
-
 6
6
-
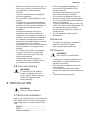 7
7
-
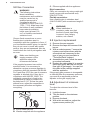 8
8
-
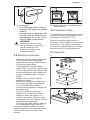 9
9
-
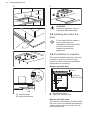 10
10
-
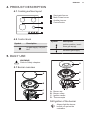 11
11
-
 12
12
-
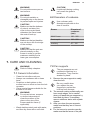 13
13
-
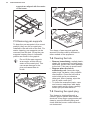 14
14
-
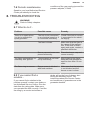 15
15
-
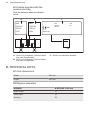 16
16
-
 17
17
-
 18
18
-
 19
19
-
 20
20
-
 21
21
-
 22
22
-
 23
23
-
 24
24
-
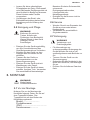 25
25
-
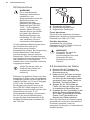 26
26
-
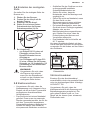 27
27
-
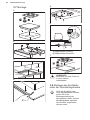 28
28
-
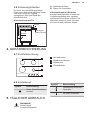 29
29
-
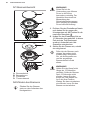 30
30
-
 31
31
-
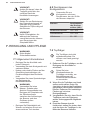 32
32
-
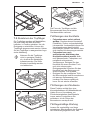 33
33
-
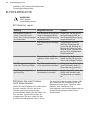 34
34
-
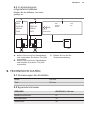 35
35
-
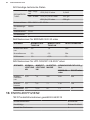 36
36
-
 37
37
-
 38
38
-
 39
39
-
 40
40
-
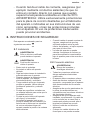 41
41
-
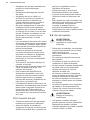 42
42
-
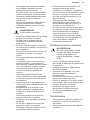 43
43
-
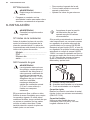 44
44
-
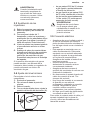 45
45
-
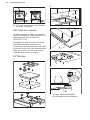 46
46
-
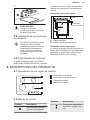 47
47
-
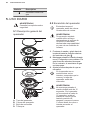 48
48
-
 49
49
-
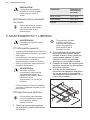 50
50
-
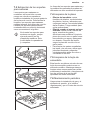 51
51
-
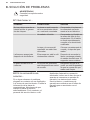 52
52
-
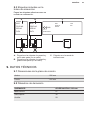 53
53
-
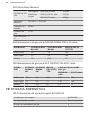 54
54
-
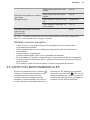 55
55
-
 56
56


Electrolux EGM6343YOK Manual de usuario
- Categoría
- Encimeras
- Tipo
- Manual de usuario
En otros idiomas
- English: Electrolux EGM6343YOK User manual
- Deutsch: Electrolux EGM6343YOK Benutzerhandbuch
Documentos relacionados
-
Electrolux PQ645UX Manual de usuario
-
-
Electrolux RGG6741NOX Manual de usuario
-
-
-
Electrolux PQX320V Manual de usuario
-
-
-
-