Samsung HL-T6756W Manual de usuario
- Categoría
- Televisores LCD
- Tipo
- Manual de usuario

Register your product at www.samsung.com/global/register
Record your Model and Serial number here for future reference.
▪ Model _______________ ▪ Serial No. _______________
Owner’s Instructions
HL-T5656W
HL-T6156W
HL-T6756W
DLP TV
BN68-00630D-Eng_1.indd 1 2007-04-09 ソタネト 8:13:51

English - 2
© 2007 Samsung Electronics Co., Ltd. All rights reserved.
A Guide to Digital TV
● What is Digital Television?
Digital television (DTV) is a new way of transmitting high quality video and audio to your TV set. Using DTV, broadcasters can
transmit high definition TV (HDTV) images, Dolby digital surround audio, and new services such as multicasting (transmitting
more than one program on the same TV channel) and datacasting. Several of these services can be combined into a single digital
broadcast.
Digital Television Services
● Digital Picture Quality
DTV programs are transmitted in two different formats. The first is Standard Definition Television (SDTV) and the second is High
Definition Television (HDTV).
●
SDTV program formats include 480-line interlaced (480i) and 480-line progressive (480p) video. 480i programs are essentially
a digital version of our current analog TV programs, while the 480p format offers improved image detail over 480i. Some 480p
programs are broadcast in widescreen and are comparable to progressive-scan DVD movies in image quality.
●
HDTV program formats include 1080-line interlaced (1080i) and 720-line progressive (720p). Both HDTV formats are always
broadcast in widescreen, and offer much higher picture quality than SDTV.
●
Dolby Surround Sound
With DTV, you can listen to a variety of Dolby digital audio formats from Dolby Surround 2.0 to Dolby Digital 5.1 surround, using
your home audio system. Many HDTV programs are now broadcast with DD 5.1 soundtracks.
BN68-00630D-Eng_1.indd 2 2007-04-09 ソタネト 6:49:41

English - 3
Q&A
1. Is the antenna I use for existing TV reception good enough for DTV?
Over-the-air (OTA) digital TV broadcasting uses the same channels as analog TV and works well with many existing TV antennas.
However, DTV broadcast channel assignments are different than analog channels. You should find out whether your local DTV
broadcasts are on VHF (channels 2-13) or UHF (channels 14-69) to see if you need a different antenna.
If your DTV channels are on UHF and you already get good UHF reception, your present antenna may work fine. The same holds
true for VHF DTV reception. Note that in some markets, both VHF and UHF channels are used for DTV broadcasts.
You can find out the latest DTV channel assignments for your area by browsing selected Internet web sites such as www.titantv.
com, www.10000watts.com, and www.fcc.gov.
2. How difficult is it to receive DTV signals indoors?
This depends on whether your local DTV stations are running full power or not and how close your location is to the transmission
tower. DTV receivers do not require as much signal as analog TV receivers to produce high-quality images and sound.
Once the DTV signal level exceeds a certain threshold at the receiver, the digital video and audio data is decoded at the same
quality it was originally encoded for broadcast.
This is a big advantage for DTV over analog TV - there is no noise, ghosting, static, or scratchy audio.
3. How can I connect an antenna in my townhouse, co-operative apartment, condominium,
or apartment?
The Federal Communications Commission’s OTARD Rule (part of the Telecommunications Act of 1996) allows residents of
condominiums, townhouse, or members of neighborhood associations to put up outside antennas for reception of broadcast TV
signals as long as those antennas are not located in common areas and are no more than 12’ in height.
Residents of rental units (apartments, etc.) are not covered by the OTARD rules and will have to use indoor antennas to receive
DTV broadcasts. It is possible that the landlord of an apartment complex can provide broadcast DTV signals via a master TV
antenna system to each apartment.
4. Can I connect my DTV set-top receiver to my cable TV service?
Cable TV systems use a different method for transmitting digital TV programs that is currently incompatible with broadcast DTV set-
top receivers. So you will still need to use an outdoor or indoor antenna to receive OTA broadcast DTV programs.
The good news is that you won’t have to pay a monthly or per-program charge to watch OTA DTV and HDTV programs. They’re
free, unlike subscription satellite TV or premium cable TV. All you need is an antenna and a DTV set-top receiver to enjoy clear,
sharp widescreen images and high-quality audio.
BN68-00630D-Eng_1.indd 3 2007-04-09 ソタネト 6:49:41

English - 4
General Information
■
Viewing Position .......................................................5
■
List of Features .........................................................6
■
Checking Parts .........................................................6
■
Viewing the Control Panel ........................................7
■
Viewing the Connection Panel .................................8
■
Remote Control ......................................................10
■
Installing Batteries in the Remote Control .............. 11
Connections
■
Connecting VHF and UHF Antennas ...................... 11
■
Connecting Cable TV .............................................12
■
Connecting a VCR ..................................................13
■
Connecting a Camcorder .......................................14
■
Connecting a DVD Player/Set-Top Box ..................14
■
Connecting a DVD Player/Set-Top Box via HDMI .. 15
■
Connecting a DVD Player/Set-Top Box via DVI .....15
■
Connecting a Digital Audio System ........................ 16
■
Connecting an Amplifier/
DVD Home Theater - Analog ..................................
16
■
Connecting a PC ....................................................17
Operation
■
Turning the TV On and Off ..................................... 17
■
Plug & Play Feature ...............................................18
■
Changing Channels ................................................19
■
Adjusting the Volume ..............................................20
■
Viewing the Display ................................................20
■
Viewing the Menus .................................................20
■
Navigating Menus by Using the Menu Map ............21
■
Memorizing the Channels .......................................21
■
Setting Up Your Remote Control ............................22
■
To Select the Source ..............................................27
■
To Edit the Input Source Name ..............................27
Picture Control
■
Using Automatic Picture Settings ........................... 28
■
Making Detailed Picture Settings ...........................30
■
Changing the Screen Size ......................................31
■
Digital Noise Reduction ..........................................32
■
DNIe (Digital Natural Image engine) ......................32
■
Setting the Active Color ..........................................33
■
Setting the Color Gamut .........................................33
■
Adjusting the Screen Position ................................34
■
Freezing the Picture ...............................................34
Sound Control
■
Using Automatic Sound Settings ............................34
■
Customizing the Sound ..........................................35
■
Setting up DNSe (Digital Natural Sound engine) ...36
■
Choosing a Multi-Channel Sound
(MTS) Track - Digital ..............................................
37
■
Choosing a Multi-Channel Sound
(MTS) Track - Analog .............................................
37
■
Automatic Volume Control ...................................... 38
■
Selecting the Internal Mute .....................................38
Channel Control
■
Clearing Scrambled Channels
- Digital ................... 39
■
Adding and Erasing Channels ................................39
■
Setting Your Favorite Channels ..............................40
■
Viewing the Channel Lists ......................................41
■
Labeling Channels - Analog ...................................41
■
Setting the Default Channel List Mode ................... 42
■
Fine Tuning Analog Channels - Analog .................. 42
■
Checking the Digital-Signal Strength - Digital ........43
■
LNA (Low Noise Amplifier) ......................................43
Function Description
■
Selecting a Menu Language ...................................44
■
Setting the Time .....................................................44
■
Using the Game Mode ...........................................46
■
Using the V-Chip ....................................................47
■
Viewing Closed Captions
(On-Screen Text Messages) - Digital .....................
53
■
Viewing Closed Captions
(On-Screen Text Messages) -
Analog ....................54
■
Menu Transparency Level ......................................55
■
Setting the Blue Screen Mode ................................55
■
Adjusting the Melody Sound ...................................56
■
Using the Color Weakness Enhancement Feature
...56
■
Setting the HDMI Black Level .................................57
■
Setting the Film Mode - Analog .............................. 58
■
Setting the Function Help .......................................58
■
Upgrading the Software ..........................................59
PC Display
■
Using Your TV as a Computer (PC) Display .......... 60
■
Display Modes ........................................................61
■
Setting up the TV with your PC ..............................62
■
Changing the Picture Size (PC Mode) ...................64
■
Setting the Home Theater PC ................................64
Appendix
■
Identifying Problems ...............................................65
■
Replacing the Lamp ...............................................66
■
Cleaning and Maintaining Your TV ......................... 67
■
Using Your TV in Another Country .......................... 67
■
Technical Specifications .........................................68
■
Picture Calibration Guide .......................................69
Symbols
☛ ➢
Press
Important
Note
One-Touch
Button
Contents
BN68-00630D-Eng_1.indd 4 2007-04-09 ソタネト 6:49:42

English - 5
General Information
Viewing Position
To optimize your viewing comfort, please follow the guidelines below for viewing distance.
If viewing for an extended period of time, sit as far back from the screen as possible.
➢
When installing the product, make sure to keep
it away from the wall (more than 10cm / 4inches)
for ventilation purposes.
Poor ventilation may cause an increase in the
internal temperature of the product, resulting
in a shortened component life and degraded
performance.
< Top view> < Side view>
56˝ screen :
At least 6.6 feet
61˝ screen :
At least 7.2 feet
67˝ screen :
At least 8 feet
56˝ screen :
At least 6.6 feet
61˝ screen :
At least 7.2 feet
67˝ screen :
At least 8 feet
BN68-00630D-Eng_1.indd 5 2007-04-09 ソタネト 6:49:43

English - 6
Checking Parts
Owner’s Instructions Remote Control
(BP59-00123A)/
AAA Batteries
Warranty Card/
Registration Card/
Safety Guide Manual/
Quick Guide Manual
Power Cord
(3903-000144A)
Cloth-Clean
Sold Separately
Replacement Lamp
For purchasing a replacement
lamp, ask at a nearby service
center.
• Use authorized lamps only.
The company cannot guarantee
the quality of the product if an
unauthorized lamp is used.
S-Video Cable Video Cable Antenna Cable
Component Cables
Audio Cables
D-Sub Cable PC Audio Cable HDMI/DVI Cable HDMI Cable Optical Cable
3.5 mm Stereo
mini-plug/2RCA
Cable
List of Features
Your TV is designed and engineered using the latest technology. It is a full-featured, high-performance unit that exceeds
industry standards. In addition, it has these special features:
● Easy-to-operate remote control
● Dynamic menus and Navigating menus by using the menu map
● Easy-to-use on-screen menu system you can access from the TV panel or remote control
● Automatic timer to turn the TV on and off at any time you choose
● Adjustable picture and sound settings and the ability to memorize your favorite settings
● Automatic channel tuning for up to 181 channels
● A special filter to reduce or eliminate reception problems
● Fine tuning control for the sharpest picture possible
● A built-in multi-channel sound decoder for stereo and bilingual listening
● Built-in, dual channel speakers
● A special sleep timer
● Widescreen TV with adjustable image size
● Life-like clear images provided by DNle technology
● My Color Control mode to correspond with your color preference
● Color Weakness mode
● Digital Input jack
● Digital Audio Output (OPTICAL) jack
● Theater Game Mode
● Easy-to-use channel list menu.
BN68-00630D-Eng_1.indd 6 2007-04-09 ソタネト 6:49:50

English - 7
Viewing the Control Panel
Buttons on the Lower-Right Part of the Panel
The buttons on the lower-right panel control your TV’s basic features, including the on-screen menu.
To use the more advanced features, you must use the remote control.
Continued...
➢
The product color and shape may vary depending on the model.
HL-T6756W
HL-T5656W
HL-T6156W
BN68-00630D-Eng_1.indd 7 2007-04-09 ソタネト 6:49:55

English - 8
1
POWER
Press to turn the TV on and off.
2
Remote Control Sensor
Aim the remote control towards this spot on the TV.
3
Indicator Lights
Blinks and turns off when the power is on and lights up
in stand-by mode.
4
SOURCE
Toggles between all the available input sources
(TV, AV1, AV2, AV3, S-Video1, S-Video2, S-Video3,
Component1, Component2, PC, HDMI1, or
HDMI2/DVI).
5
MENU
Press to see an on-screen menu of your TV’s features.
6
+ VOL –
Press to increase or decrease the volume.
In the on-screen menu, use the + VOL – buttons as
you would use the ◄ and ► buttons on the remote
control.
7
CH
Press to change channels.
In the on-screen menu, use the CH buttons as
you would use the ▲ and ▼ buttons on the remote
control.
8
(ENTER)
Press to confirm a selection.
Indicator Light Key
( : On, : Blinking, : Off)
STAND BY/TEMP TIMER LAMP Indication
Standby state.
The picture will automatically appear in about 15 seconds.
Auto Timer ON/OFF has been set and the set will automatically be turned on in about 15 seconds.
A cooling fan inside the set is not operating normally.
Lamp cover on the rear of the set is not properly shut.
Check if the ventilation hole on the rear of the set is blocked, because if the inner temperature is too
high, the power will shut off.
Lamp may be defective. Please contact a certified technician.
➢
● It takes about 30 seconds for the TV to warm up, so normal brightness may not appear immediately.
● The TV has a fan to keep the inside lamp from overheating. You’ll occasionally hear it working.
➢
● You can use the channel selection buttons to switch on the TV when it is in standby mode depending on the model.
● When using the on-screen menu the volume adjustment and channel selection buttons have the same function as the
▲/▼/◄/► buttons on the remote control.
● If the remote control no longer works or you have lost it, you can use controls on the panel of the TV.
Viewing the Connection Panel
Side Panel Jacks
Use the right side panel jacks to connect a component that is used only occasionally (a camcorder or video game, for example). The
product color and shape may vary depending on the model.
1
S-VIDEO
Connect an S-Video signal from an S-VHS VCR or DVD player.
2
VIDEO
Connect the video signal from a camcorder or video game.
3
AUDIO (L/R)
Connect the audio signal from a camcorder or video game.
Continued...
BN68-00630D-Eng_1.indd 8 2007-04-09 ソタネト 6:49:57

English - 9
Rear Panel Jacks
Use the rear panel jacks to connect A/V components that will be connected continuously, such as VCR or DVD players.
For more information on connecting equipment, see pages 11~17.
➢
The product color and shape may vary depending on the model.
1
DVI IN (AUDIO-L/R)
Connect to the DVI audio output jack of an external device.
2
DIGITAL AUDIO OUT (OPTICAL)
Connect to a Digital Audio component.
3
SERVICE 2
For service only.
4
S-VIDEO (AV IN 1, 2)
Video input for external devices with an
S-Video output, such as a Camcorder or VCR.
5
VIDEO/AUDIO-L/R (AV OUT)
Video/Audio outputs for external devices.
➢ Video output is not available in Component, PC, and
HDMI.
6
COMPONENT IN 1, 2
Video (Y/PB/PR) and audio (L-AUDIO-R) component inputs.
7
POWER IN
Connect the supplied power cord.
8
ANT 1 IN (CABLE)/ANT 2 IN (AIR)
75Ω Coaxial connector for Air/Cable Network.
9
HDMI IN 1
Connect to the HDMI jack of a device with HDMI output.
0
HDMI2/DVI IN
Connect to the HDMI jack of a device with HDMI output.
This input can also be used as a DVI connection with
separate analog audio inputs. An optional HDMI/DVI cable
will be necessary to make this connection.
When using an optional HDMI/DVI adapter, the DVI analog
audio inputs on your TV allow you to receive left and right
audio from your DVI device.
!
SERVICE 1
This jack is for software upgrade.
@
VIDEO/AUDIO-L/R (AV IN 1, 2)
Video input for external devices, such as a Camcorder or
VCR.
#
PC IN
Connect to the video output jack on your PC.
$
PC AUDIO IN
Connect to the audio output jack on your PC.
BN68-00630D-Eng_1.indd 9 2007-04-09 ソタネト 6:49:59

English - 10
Remote Control
You can use the remote control up to a distance of about 23 feet from the TV. When using the remote, always point it directly
at the TV. You can also use your remote control to operate your VCR, Cable box, DVD player, or Set-Top Box.
1
POWER
Turns the TV on and off.
2
Numeric Buttons
Press to directly select a channel.
3
–
Press to select additional channels
being broadcast by the same station.
For example, to select channel “54-3”,
press “54”, then press “–” and “3”.
4
CH LIST
Used to display Channel Lists on the
screen.
5
ANTENNA
Press to select “Air” or “Cable”.
6
VOL +, VOL –
Press to increase or decrease the
volume.
7
MUTE
Press to temporarily cut off the sound.
8
MENU
Displays the main on-screen menu.
9
RETURN
Returns to the previous menu.
0
S.MODE
Press to select the sound mode.
!
P.MODE
Press to select the picture mode.
@
SLEEP
Press to select a preset time interval
for automatic shut off.
#
GAME
Press to select the Theater Game
mode except for the TV mode.
$
MTS
Press to choose Stereo, Mono or
Separate Audio Program (SAP
broadcast).
%
SET
Sets the remote to control your TV,
VCR, Cable, DVD, or Set-Top Box.
^
TV, DVD, STB, CABLE, VCR
Press to operate your TV, DVD, STB,
CABLE (box), or VCR.
&
SOURCE
Press to display all of the available
video sources.
*
Press to activate the backlight of the
VOL, CH and the active source button
(TV, DVD, CABLE, STB, VCR) on the
remote control.
(
PRE-CH
Tunes to the previous channel.
)
FAV.CH
Press to switch to your favorite
channels.
a
HDMI
Selects the HDMI mode directly.
b
VCR/DVD Functions
- Rewind
- Stop
- Play/Pause
- Fast Forward
c
CH , CH
Press to change channels.
d
EXIT
Press to exit from the menu.
e
UP▲/DOWN▼/LEFT◄/RIGHT►/
ENTER
Use to select on-screen menu items
and change menu values.
f
INFO
Press to display information on the TV
screen.
g
CAPTION
Controls the caption decoder.
h
STILL
Press to stop the action during a
particular scene.
Press again to resume normal video.
i
Color buttons
Press to add or delete channels and to
store channels to the favorite channel
list in the Channel List menu.
(See pages 39~42)
j
P.SIZE
Press to change the screen size.
k
ADD/DEL
Use to store and delete channels to/
from memory.
l
DNSe
DNSe enhances the sound quality,
automatically controls output, and
prevents sound distortion.
Press this button to set it On or Off.
(See page 36)
m
RESET
When your remote control does not
work, change the batteries and press
the RESET button for 2-3 seconds
before use.
➢
The performance of the remote control may be affected by bright light.
➢
This is a special remote control for the visually impaired persons, and has Braille points on the POWER, Channel, Volume, STOP,
and PLAY/PAUSE buttons.
BN68-00630D-Eng_1.indd 10 2007-04-09 ソタネト 8:12:36

English - 11
Installing Batteries in the Remote Control
1 Lift the cover at the back of the remote control upward as shown in the figure.
2 Install two AAA size batteries.
➢
● Make sure to match the “+” and “–” ends of the batteries with the diagram inside the
compartment.
● Do not mix battery types, i.e. alkaline and manganese.
3 Close the cover as shown in the figure.
➢
Remove the batteries and store them in a cool and dry place if you won’t be using the remote
control for a long time. The remote control can be used up to about 23 feet from the TV.
(Assuming typical TV usage, the batteries last for about one year.)
➢
If the remote control doesn’t work! Check the following
1. Is the TV power on?
2. Are the plus and minus ends of the batteries reversed?
3. Are the batteries drained?
4. Is there a power cut, or is the power cord unplugged?
5. Is there a special fluorescent light or a neon sign nearby?
Connections
Connecting VHF and UHF Antennas
If your antenna has a set of leads that look like this, see “Antennas with 300 Ω Flat Twin
Leads” below.
If your antenna has one lead that looks like this, see “Antennas with 75 Ω Round Leads”.
If you have two antennas, see “Separate VHF and UHF Antennas”.
Antennas with 300 Ω Flat Twin Leads
If you are using an off-air antenna (such as a roof antenna or “rabbit ears”) that has 300 Ω twin flat leads, follow the
directions below.
1 Place the wires from the twin leads under the screws on a 300-75 Ω adapter (not supplied).
Use a screwdriver to tighten the screws.
2 Plug the adaptor into the ANT 1 IN (CABLE) or ANT 2 IN (AIR) terminal on the rear of the TV.
Antennas with 75 Ω Round Leads
1 Plug the antenna lead into the ANT 1 IN (CABLE) or ANT 2 IN (AIR) terminal on the rear of the
TV.
Separate VHF and UHF Antennas
If you have two separate antennas for your TV (one VHF and one UHF), you must combine the two antenna signals before
connecting the antennas to the TV. This procedure requires an optional combiner-adaptor (available at most electronics
shops).
1 Connect both antenna leads to the combiner.
2 Plug the combiner into the ANT 1 IN (CABLE) or ANT 2 IN (AIR) terminal on the bottom of the
rear panel.
BN68-00630D-Eng_1.indd 11 2007-04-09 ソタネト 6:50:08

English - 12
Connecting Cable TV
To connect to a cable TV system, follow the instructions below.
Cable without a Cable Box
1 Plug the incoming cable into the ANT 1 IN (CABLE) terminal on the rear of the TV.
➢
Because this TV is cable-ready, you do not need a cable box to view unscrambled cable
channels.
Connecting to a Cable Box that Descrambles All Channels
1 Find the cable that is connected to the ANT OUT terminal on your cable box.
➢
This terminal might be labeled “ANT OUT”, “VHF OUT” or simply, “OUT”.
2 Connect the other end of this cable to the ANT 1 IN (CABLE) terminal on the rear of the TV.
Connecting to a Cable Box that Descrambles Some Channels
If your cable box descrambles only some channels (such as premium channels), follow the instructions below. You will need
a two-way splitter, an RF (A/B) switch, and four lengths of Antenna cable. (These items are available at most electronics
stores.)
1 Find and disconnect the cable that is connected
to the ANT IN terminal on your cable box.
➢
This terminal might be labeled “ANT IN”,
“VHF IN” or simply, “IN”.
2 Connect this cable to a two-way splitter.
3 Connect an Antenna cable between an OUTPUT
terminal on the splitter and the IN terminal on the
cable box.
4 Connect an Antenna cable between the ANT OUT
terminal on the cable box and the B–IN terminal
on the RF(A/B) switch.
5 Connect another cable between the other OUT
terminal on the splitter and the A–IN terminal on
the RF (A/B) switch.
6 Connect the last Antenna cable between the OUT
terminal on the RF (A/B) switch and the ANT 1 IN
(CABLE) terminal on the rear of the TV.
After you have made this connection, set the A/B switch to the “A” position for normal viewing. Set the A/B switch to the “B” position to
view scrambled channels. (When you set the A/B switch to “B”, you will need to tune your TV to the cable box’s output channel, which
is usually channel 3 or 4.)
Splitter
Incoming
cable
Splitter
Cable Box
Incoming
cable
Splitter
Cable Box
RF (A/B)
Switch
Incoming
cable
Splitter
Cable Box
Incoming
cable
RF (A/B)
Switch
Incoming
cable
Splitter
Cable Box
RF (A/B)
Switch
TV Rear
ANT OUT
ANT IN
ANT IN
BN68-00630D-Eng_1.indd 12 2007-04-09 ソタネト 6:50:13

English - 13
Connecting a VCR
Video Connection
These instructions assume that you have already connected your TV to an antenna or a cable TV system (according to the
instructions on pages 11~12). Skip step 1 if you have not yet connected to an antenna or a cable system.
1 Unplug the cable or antenna from
the rear of the TV
2 Connect the cable or antenna to
the ANT IN terminal on the rear of
the VCR.
3 Connect an Antenna Cable
between the ANT OUT terminal
on the VCR and the ANT 1 IN
(CABLE) or ANT 2 IN (AIR)
terminal on the TV.
4 Connect a Video Cable between
the AV IN 1 [VIDEO] (or AV IN 2
[VIDEO]) jack on the TV and the
VIDEO OUT jack on the VCR.
5 Connect Audio Cables between the
AV IN 1 [L-AUDIO-R] (or AV IN 2
[L-AUDIO-R]) jacks on the TV and
the AUDIO OUT jacks on the VCR.
➢
If you have a “mono”
(non-stereo) VCR, use a
Y-connector (not supplied) to
hook up to the right and left
audio input jacks of the TV. If
your VCR is stereo, you must
connect two cables.
➢
Each VCR has a different panel configuration.
➢
When connecting a VCR, match the color of the connection terminal to the cable.
S-Video Connection
Your Samsung TV can be connected
to the S-Video jack of a VCR.
(This connection delivers a better
picture when compared to the
regular video connection above.)
1 To begin, follow steps 1–3 in the
previous section to connect the
antenna or cable to your VCR and
your TV.
2 Connect an S-Video Cable
between the AV IN 1 [S-VIDEO]
(or AV IN 2 [S-VIDEO]) jack on the
TV and the S-VIDEO OUT jack on
the VCR.
3 Connect Audio Cables between the
AV IN 1 [L-AUDIO-R] (or AV IN 2
[L-AUDIO-R]) jacks on the TV and
the AUDIO OUT jacks on the VCR.
➢
Each VCR has a different panel configuration.
➢
When connecting a VCR, match the color of the connection terminal to the cable.
➢
Some games may be displayed with a cut off picture when the TV is connected to a game player.
2
TV Rear Panel
VCR
TV Rear Panel
VCR
1
Antenna cable(Not supplied)
3
Audio cable(Not supplied)
5
Video cable(Not supplied)
4
Antenna cable(Not supplied)
1
Audio cable(Not supplied)
3
S-Video cable(Not supplied)
2
1
BN68-00630D-Eng_1.indd 13 2007-04-09 ソタネト 6:50:17

English - 14
Connecting a Camcorder
The side panel jacks on your TV make it easy to connect a camcorder to your TV.
They allow you to view the camcorder tapes without using a VCR
1 Connect a Video Cable or
S-Video Cable between the AV
IN 3 [VIDEO] or [S-VIDEO] jack
on the TV and the VIDEO OUT
(or S-VIDEO OUT) jack on the
camcorder.
2 Connect Audio Cables between the
AV IN 3 [L-AUDIO-R] jacks on the
TV and the AUDIO OUT jacks on
the camcorder.
➢
Each Camcorder has a different
panel configuration.
➢
When connecting a Camcorder,
match the color of the connection
terminal to the cable.
Connecting a DVD Player/Set-Top Box
The rear panel jacks on your TV make it easy to connect a DVD player/Set-Top Box.
1 Connect a Component Cables
between the COMPONENT IN 1
[Y, PB, PR] (or COMPONENT IN 2
[Y, PB, PR]) jacks on the TV and
the COMPONENT OUT [Y, PB, PR]
jacks on the DVD Player/Set-Top
Box.
2 Connect Audio Cables between the
COMPONENT IN 1 [L-AUDIO-R]
(or COMPONENT IN 2
[L-AUDIO-R]) jacks on the TV and
the AUDIO OUT jacks on the DVD
player/Set-Top Box.
➢
Component video separates the video into Y (Luminance (brightness), PB (Blue) and PR (Red) for enhanced video quality.
Be sure to match the component video and audio connections.
For example, if connecting the video cable to COMPONENT IN, connect the audio cable to COMPONENT IN also.
➢
Each DVD Player/Set-Top box has a different panel configuration.
➢
When connecting a DVD Player/Set-Top box, match the color of the connection terminal to the cable.
TV Side Panel
Camcorder
or
TV Rear Panel
DVD Player/Set-Top Box
Audio cable(Not supplied)
2
Video cable(Not supplied)
1
S-Video cable(Not supplied)
1
Audio cable(Not supplied)
2
Component cable(Not supplied)
1
BN68-00630D-Eng_1.indd 14 2007-04-09 ソタネト 6:50:25

English - 15
Connecting a DVD Player/Set-Top Box via DVI
This connection can only be made if there is a DVI Output jack on the external device.
1 Connect a HDMI/DVI Cable or
DVI-HDMI Adapter between the
HDMI2/DVI IN jack on the TV and
the DVI OUT jack on the DVD
Player/
Set-Top Box.
2 Connect Audio Cables between the
DVI IN [L-AUDIO-R] jacks on the
TV and the AUDIO OUT jacks on
the DVD Player/Set-Top Box.
➢
Each DVD Player/Set-Top box has
a different panel configuration.
➢
When connecting a DVD Player/
Set-Top box, match the color of the
connection terminal to the cable.
Connecting a DVD Player/Set-Top Box via HDMI
This connection can only be made if there is an HDMI Output jack on the external device.
1 Connect an HDMI Cable between
the HDMI IN 1 on the TV and the
HDMI OUT jack on the DVD Player/
Set-Top Box.
What is HDMI?
● HDMI, or high-definition multimedia interface, is a next-generation interface that enables the transmission of digital audio and video
signals using a single cable.
● “Multimedia interface” is a more accurate name for it especially because it allows multiple channels of digital audio (5.1 channels).
The difference between HDMI and DVI is that the HDMI device is smaller in size, has the HDCP (High Bandwidth Digital Copy
Protection) coding feature installed, and supports multi-channel digital audio.
➢
Each DVD Player/Set-top box has a different panel configuration.
➢
When connecting a DVD Player/Set-top box, match the color of the connection terminal to the cable.
➢
When connecting via HDMI, you do not need to connect Audio Cables. You only need to connect Audio cables when connecting
via HDMI/DVI.
➢
The external devices that support lower versioned HDMI mode may not implement sound output for the TV with the latest HDMI
version (HDMI 1.3).
In this case, connect to HDMI2/DVI IN and DVI IN [R-AUDIO-L] on the back panel of the TV.
➢
Part of lower versioned HDMI cables may cause annoying flickers or no screen display.
In this case use the cable that supports the latest HDMI version (HDMI 1.3).
TV Rear Panel
DVD Player/Set-Top Box
HDMI Cable(Not supplied)
1
DVD Player/
Set-Top Box
TV Rear Panel
HDMI/DVI Cable(Not supplied)
1
Audio Cable(Not supplied)
2
BN68-00630D-Eng_1.indd 15 2007-04-09 ソタネト 6:50:31

English - 16
Connecting a Digital Audio System
The rear panel jacks on your TV make it easy to connect a Digital Audio System to your TV.
1 Connect an Optical Cable
between the DIGITAL AUDIO OUT
(OPTICAL) jack on the TV and
the Digital Audio Input jack on the
Digital Audio System.
When a Digital Audio System is
connected to the DIGITAL AUDIO
OUT (OPTICAL) terminal:
Decrease the volume of the TV,
and adjust the volume level with
the audio system’s volume control.
➢
Each Digital Audio System has a
different panel configuration.
➢
5.1CH audio is possible when the
TV is connected to an external
device supporting 5.1CH.
What is OPTICAL?
● Converts the electric signal into an optical light signal, and transmits it through glass fibers. S/PDIF is a transmission system of
digital audio in the form of a light wave that uses a glass conductor.
Connecting an Amplifier/DVD Home Theater - Analog
1 Connect Audio Cables between
the AV OUT [L-AUDIO-R] jacks on
the TV and AUDIO IN [L-AUDIO-R]
jacks on the Amplifier/DVD Home
Theater.
When an audio amplifier is
connected to the AV OUT
[L-AUDIO-R] terminals: Decrease
the volume of the TV, and adjust
the volume level with the amplifier’s
volume control.
➢
Each Amplifier/DVD Home Theater
has a different panel configuration.
➢
When connecting an Amplifier/DVD
Home Theater, match the color
of the connection terminal to the
cable.
TV Rear Panel
Optical Cable (Not supplied)
1
Digital Audio System
TV Rear Panel
Audio Cable (Not supplied)
1
Amplifier/
DVD Home Theater
BN68-00630D-Eng_1.indd 16 2007-04-09 ソタネト 6:50:36

English - 17
Connecting a PC
Using the D-Sub Cable
1 Connect a D-Sub Cable between
the PC IN [PC] jack on the TV
and the PC output jack on your
computer.
2 Connect a PC Audio Cable
between the PC IN [AUDIO] jack
on the TV and the Audio Out
jack of the sound card on your
computer.
Using the HDMI/DVI Cable
1 Connect a HDMI/DVI Cable
between the HDMI2/DVI IN jack on
the TV and the PC output jack on
your computer.
2 Connect a 3.5 mm Stereo mini-
plug/2RCA Cable between the DVI
IN [L-AUDIO-R] jack on the TV and
the Audio Out jack of the sound
card on your computer.
➢
Each PC has a different panel configuration.
➢
When connecting a PC, match the color of the connection terminal to the cable.
Operation
Turning the TV On and Off
Press the POWER button on the remote control.
You can also use the POWER button on the TV.
➢
It may take a while when your TV starts.
TV Rear Panel
PC
PC Audio Cable (Not supplied)
2
D-Sub Cable (Not supplied)
1
Using the D-Sub Cable
Using the HDMI/DVI Cable
TV Rear Panel
PC
3.5 mm Stereo mini-plug/2RCA Cable
(Not supplied)
2
HDMI/DVI Cable (Not supplied)
1
BN68-00630D-Eng_1.indd 17 2007-04-09 ソタネト 6:50:42

English - 18
Plug & Play Feature
When the TV is initially powered on, basic settings proceed automatically and subsequently:
1 Press the POWER button on the remote control.
The message Menu language, Shop Mode, Channels and Time will be set. is
automatically displayed.
Press the ENTER button, then the message Select the language of the OSD. is
displayed.
2 Press the ◄ or ► button to select a language, then press the ENTER button.
3 Press the ◄ or ► button to select Shop or Home, then press the ENTER button.
➢
The default selection is Home.
➢
We recommend setting the TV to Home mode for the best picture in your home
environment.
➢
Shop mode is only intended for use in retail environments.
➢
If the unit is accidentally set to Shop mode and you want to return to Dynamic (Home)
mode, press the Volume button and then hold down the
MENU button for five seconds
on the TV panel.
4 Press the ◄ or ► button to memorize the channels of the selected connection, then press
the ENTER button.
➢
If the antenna is connected to ANT 1 IN (CABLE), select Cable and if it is connected
to ANT 2 IN (AIR), select Air.
➢
If both ANT 1 IN (CABLE) and ANT 2 IN (AIR) are connected, select the Air+Cable.
➢
In Cable mode, you can select the correct analog signal source among STD, HRC,
and IRC by pressing the ◄ or ► button, then press the ENTER button. If you have
Digital cable, select the signal source for both Analog and Digital.
Contact your local cable company to identify the type of cable system that exists in
your particular area.
5 The TV will begin memorizing all of the available channels.
After all the available channels are stored, the Auto program menu reappears.
Press the ENTER button when channel memorization is complete.
The message Set the Clock Mode. is displayed.
➢
To stop the search before it has finished, press the ENTER button with stop selected.
6 Press the ◄ or ► button to select Manual for setting the current time manually, then press
the ENTER button. The message Enter the current date and time. is displayed.
➢
If you select Auto, Set to daylight saving time. is displayed, then go to step 9.
(If you want to set the time automatically, skip to step 9.)
7 Press the ◄ or ► button to move to Month, Day, Year, Hour, or Min.
Set the date and time you want by pressing the ▲ or ▼ button, then press the ENTER
button.
➢
You can set the month, day, year, hour, and minute directly by pressing the number
buttons on the remote control.
8 The message Enjoy your watching. is displayed.
When you have finished, press the ENTER button.
➢
Even if the ENTER button is not pressed, the message will automatically disappear
after several seconds.
Continued...
Plug & Play
Select the antennas to memorize
Air Cable Air+Cable
Enter Skip
Plug & Play
Auto Program in Progress.
Cable 3
10%
Stop
Enter
Skip
Plug & Play
Selects the cable system.
Analog
Digital
STD HRC IRC
STD HRC IRC
Enter Skip
Plug & Play
Set the Clock Mode.
Auto Manual
Enter Skip
Plug & Play
Enjoy your watching.
OK
Plug & Play
Select the language of the OSD.
English Español Français
Enter Skip
Plug & Play
Select Home Mode when installing this TV at
home.
Shop Home
Enter Skip
Plug & Play
Enter the current date and time.
Enter Skip
Month / Day / Year Hour / Min
--
/
--
/
---- --
:
--
--
▲
▼
Adjust
Plug & Play
Menu language, Shop Mode, Channels and Time
will be set.
Start
Enter
Exit
BN68-00630D-Eng_1.indd 18 2007-04-09 ソタネト 6:50:53

English - 19
Setting the Clock Automatically
9 Press the ◄ or ► button to select Off or On, then the ENTER button.
The message Select the time zone in which you live. is displayed.
10 Press the ▲ or ▼ button to highlight the time zone for your local area (and to move the
highlight to the appropriate time zone on the map of the United States).
Press the ENTER button.
If clock is not automatically set, see pages 44~45 to set the clock.
11 The message Enjoy your watching. is displayed.
When you have finished, press the ENTER button.
➢
Even if the ENTER button is not pressed, the message will automatically disappear
after several seconds.
If you want to reset this feature...
1 Press the MENU button.
Press the ◄ or ► button to select Setup, then press the ENTER button.
2 Press the ▲ or ▼ button to select Plug & Play, then press the ENTER button.
For further details on setting up options, refer to the page 18.
➢
The Plug & Play feature is only available in the TV mode.
Changing Channels
Using the Channel Buttons
Press the CH or CH button to change channels.
➢
When you press the CH or CH button, the TV changes channels in sequence.
You will see all the channels that the TV has memorized. (The TV must have memorized at
least three channels). You will not see channels that were either erased or not memorized.
See page
22 to memorize channels.
Using the Number Buttons
Use the number buttons to quickly tune to any channel.
Press the number buttons to go directly to a channel.
For example, to select channel 27, press “2,” then “7.”
The TV will change channels when you press the second number.
Using the “
-
” Button
The “
-
” button is used to select stations that broadcast a digital signal.
For example, for Channel 7-1, press “7”, then “-”, and then “1”.
➢
HD indicates the TV is receiving a Digital High Definition signal.
SD indicates the TV is receiving a Standard Definition signal.
➢
For quick channel change, press the number buttons, then press the ENTER button.
Using the PRE-CH Button to select the Previous Channel
Press the PRE-CH button.
The TV will switch to the last channel viewed.
➢
To quickly switch between two channels that are far apart, tune to one channel, then use
the number button to select the second channel. Then use the PRE-CH button to quickly
alternate between them.
Plug & Play
Set to daylight saving time.
On Off
Enter Skip
Plug & Play
Enjoy your watching.
OK
Plug & Play
Select the time zone in which you live.
Enter Skip
Newfoundland
Atlantic
Eastern
Central
Mountain
Pacific
Alaska
Hawaii
BN68-00630D-Eng_1.indd 19 2007-04-09 ソタネト 6:50:57

English - 20
Adjusting the Volume
Press the VOL + or VOL – button to increase or decrease the volume.
Using the Mute Button
At any time, you can cut off the sound using the MUTE button.
1 Press the MUTE button and the sound cuts off.
The word Mute is displayed on the screen.
2 To turn mute off, press the MUTE button again, or simply press the VOL + or VOL – button.
Viewing the Display
The display identifies the current channel and the status of certain audio-video settings.
Press the INFO button on the remote control.
Viewing the Menus
1 With the power on, press the MENU button.
The main menu will appear at the bottom of the screen.
There are seven menu groups: Picture, Sound, Channel, Setup, Input, Application,
and Menu Map.
2 Press the ◄ or ► button, then press the ENTER button to select an item you want in the
menu. Press the ▲/▼/◄/►/ENTER button to display, change, or use the selected items.
Select Return by pressing the ▲ or ▼ button, then press the ENTER button to return to the
previous menu.
Press the EXIT button to exit.
No Time Information
Air
3
Picture
Enter
Picture
Mode
Contrast
100
Brightness
45
Sharpness
75
Color
55
Tint
G50 R50
Color Tone
Detailed Settings
Size
Return
Dynamic
Cool1
16:9
Enter
Sets the picture options.
Picture
BN68-00630D-Eng_1.indd 20 2007-04-09 ソタネト 6:51:06

English - 21
Memorizing the Channels
Your TV can memorize and store all of the available channels for both air and cable channels. After the available channels
are memorized, use the CH and CH button to scan through the channels. This eliminates the need to change channels
by entering the channel digits. There are three steps for memorizing channels: selecting a broadcast source, memorizing the
channels(automatic) and adding or deleting channels(manual).
Selecting the Video Signal-source
Before your television can begin memorizing the available channels, you must specify the type of signal source that is
connected to the TV(i.e. an air or a cable system).
1 Press the MENU button.
Press the ◄ or ► button to select Channel, then press the ENTER button.
Press the ▲ or ▼ button to select Antenna, then press the ENTER button.
2 Press the ▲ or ▼ button to select Air or Cable, then press the ENTER button.
Continued...
Navigating Menus by Using the Menu Map
Using the Menu Map of the main menu enables you to view all menus and select a function quickly.
You can select any menu by using the menu map.
1 Press the MENU button.
The main menu will appear at the bottom of the
screen.
2 Press the ◄ or ► button to select Menu Map,
then press the ENTER button. The menu map will
appear.
3 Press the ▲/▼/◄/► button to select a menu,
then press the ENTER button. The selected menu
will appear.
4 Press the ▲/▼/◄/►/ENTER buttons to display,
change, or use the selected items.
➢
Red button: Toggles between alphabetical order display and functional order display.
Green button: Moves to the previous page.
Yellow button: Moves to the next page.
ENTER button: Moves to the selected menu.
Press the EXIT button to exit.
Channel
Enter
Channel
Return
Antenna
Auto Program
Clear Scrambled Channel
Channel List
Fine Tune
Signal Strength
LNA
Air
On
Channel
Enter
Channel
Return
Antenna
Auto Program
Clear Scrambled Channel
Channel List
Fine Tune
Signal Strength
LNA
Cable
On
Air
Cable
Mode І Contrast І Brightness І Shapness І Color І Tint
Color Tone І Detailed Settings І Size І Digital NR І DNIe
Active Color І Color Gamut І Position І Reset
Alphabetical Order
Next Page
Picture
Sound
Channel
Mode І DNSe І Preferred Language І Multi-Track Sound
Auto Volume І Internal Mute
Antenna І Auto Program І Clear Scrambled Channel І Channel List
Fine Tune І Signal Strength І LNA
Menu Map
1/2
Enter Return
Setup
Plug & Play І Language І Clock І Sleep Timer І Timer 1 І Timer 2
BN68-00630D-Eng_1.indd 21 2007-04-09 ソタネト 6:51:11

English - 22
Setting Up Your Remote Control
After your remote control has been properly set up, your remote control can operate in five different modes: TV, VCR, Cable,
DVD, or Set-Top Box. Pressing the corresponding button on the remote control allows you to switch among these modes,
and control whichever piece of equipment you choose.
➢
The remote control might not be compatible with all DVD Players, VCRs, Cable boxes, and Set-Top Boxes.
Setting Up the Remote to Operate Your VCR
1 Turn off your VCR.
2 Press the VCR button on your TV’s remote control.
3 Press the SET button on your TV’s remote control.
4 Using the number buttons on your remote control, enter three digits of the VCR code listed
on page 24 of this manual for your brand of VCR. Make sure you enter three digits of the
code, even if the first digit is a “0”. (If more than one code is listed, try the first one.)
5 Press the POWER button on the remote control. Your VCR should turn on if your remote is
set up correctly.
If your VCR does not turn on after set-up, repeat steps 2, 3 and 4, but try one of the other
codes listed for your brand of VCR. If no other codes are listed, try each VCR code, 000
through 080.
Note on Using Remote Control Modes: VCR
When your remote control is in
VCR mode, the volume buttons still control your TV’s volume.
Continued...
Storing Channels in Memory (Automatic Method)
3 Press the ▲ or ▼ button to select Auto Program, then press the ENTER button.
4 Press the ◄ or ► button to select an antenna connection, then press the ENTER button.
➢
Air: “Air” antenna signal.
Cable: “Cable” antenna signal.
Air+Cable: “Air” and “Cable” antenna signals.
➢
If the antenna is connected to ANT 1 IN (CABLE), select Cable and if it is connected to
ANT 2 IN (AIR), select Air.
➢
If both ANT 1 IN (CABLE) and ANT 2 IN (AIR) are connected, select the Air+Cable.
➢
If you selected Air, then go to step 6.
5 Press the ◄ or ► to select the correct analog signal source among STD, HRC, and IRC,
then press the ENTER button. If you have Digital cable, select the signal source for both
Analog and Digital.
➢
STD, HRC, and IRC identify various types of cable TV systems.
Contact your local cable company to identify the type of cable system that exists in
your particular area. At this point the signal source has been selected.
6 The TV begins memorizing all available stations.
When pressing the ENTER button during a storing process, the message Would you like
to stop the auto channel selection? is displayed. Select Yes by pressing the ◄ or ►
button.
Press the EXIT button to exit.
➢
The TV must be connected to an antenna/cable in order to receive digital TV signals.
Even if a particular channel is deleted from the memory, you can always tune to that
channel directly by using the number buttons on the remote control.
➢
All available DTV and analog channels are automatically stored in memory.
It takes approximately 3 to 10 minutes to memorize channels.
Auto Program
Select the antennas to memorize
Air Cable Air+Cable
Enter Return
Auto Program
Auto Program in Progress.
Cable 3
10%
Stop
Enter
Return
Auto Program
Selects the cable system.
Analog
Digital
STD HRC IRC
STD HRC IRC
Enter Return
Auto Program
Would you like to stop the auto channel
selection?
Cable 3
10%
Yes No
Enter
Return
BN68-00630D-Eng_1.indd 22 2007-04-09 ソタネト 6:51:13

English - 23
Setting Up the Remote to Operate Your Cable Box
1 Turn off your cable box.
2 Press the CABLE button on your TV’s remote control.
3 Press the SET button on your TV’s remote control.
4 Using the number buttons on your remote control, enter three digits of the cable box code
listed on page 25 of this manual for your brand of cable box. Make sure you enter three
digits of the code, even if the first digit is a “0”. (If more than one code is listed, try the first
one.)
5 Press the POWER button on the remote control.
Your cable box should turn on if your remote is set up correctly.
If your cable box does not turn on after set-up, repeat steps 2, 3 and 4, but try one of the
other codes listed for your brand of cable box. If no other codes are listed, try each code, 000
through 046.
Note on Using Remote Control Modes: Cable Box
When your remote control is in
CABLE mode, the volume buttons still control your TV’s
volume.
Setting Up the Remote to Operate Your DVD
1 Turn off your DVD.
2 Press the DVD button on your TV’s remote control.
3 Press the SET button on your TV’s remote control.
4 Using the number buttons on your remote control, enter three digits of the DVD code listed
on page 26 of this manual for your brand of DVD. Make sure you enter three digits of the
code, even if the first digit is a “0”. (If more than one code is listed, try the first one.)
5 Press the POWER button on the remote control.
Your DVD should turn on if your remote is set up correctly.
If your DVD does not turn on after set-up, repeat steps 2, 3 and 4, but try one of the other codes
listed for your brand of DVD. If no other codes are listed, try each code, 000 through 141.
Note on Using Remote Control Modes: DVD
When your remote control is in
DVD mode, the volume buttons still control your
TV’s volume.
Setting Up the Remote to Operate Your Set Top Box
1 Turn off your STB.
2 Press the STB button on your TV’s remote control.
3 Press the SET button on your TV’s remote control.
4 Using the number buttons on your remote control, enter three digits of the STB code listed
on page 25 of this manual for your brand of STB. Make sure you enter three digits of the
code, even if the first digit is a “0”. (If more than one code is listed, try the first one.)
5 Press the POWER button on the remote control.
Your STB should turn on if your remote is set up correctly.
If your STB does not turn on after set-up, repeat steps 2, 3 and 4, but try one of the other
codes listed for your brand of STB. If no other codes are listed, try each code, 000 through 074.
Note on Using Remote Control Modes: STB
When your remote control is in
STB mode, the volume buttons still control your TV’s volume.
Continued...
BN68-00630D-Eng_1.indd 23 2007-04-09 ソタネト 6:51:18

English - 24
Remote Control Codes
VCR
Brand
SAMSUNG
ADMIRAL
AIWA
AKAI
AUDIO DYNAMICS
BELL&HOWELL
BROKSONIC
CANDLE
CANON
CITIZEN
COLORTYME
CRAIG
CURTIS MATHES
DAEWOO
DB
DIMENSIA
DYNATECH
ELECTROHOME
EMERSON
FISHER
FUNAI
GENERAL ELECTRIC
GO VIDEO
LG(Goldstar)
HARMAN KARDON
HITACHI
INSTANT REPLAY
JC PENNEY
JCL
KENWOOD
KLH
LIOYD
LOGIK
LXI
JVC
MAGNAVOX
MARANTZ
MARTA
KONIA
ORION
MEI
MEMOREX
MGA
MIDLAND
MINOLTA
Code
000 001 002 003 004 005 077 078 079
020
025
004 027 032
007 026
018
022
002 003 006 008 015 055
021 056
002 003 006 008 015 055
007
002 024
002 007 008 017 021 025 056 064 066
003 010 011 012 013 014 015 016
007 026
017
025
034
001 003 006 021 022 025 030 032 034
040 047 050 052 060 063 065 066 067
069 073
018 024 028 029 048 051 061
025
002 005 017 021 056
002
006 007 008 009 010
007
019 025 041 042 074
021
002 007 018 019 021 026 037 041
054 056
007 008 018 021 026 037
007 008 018 026 037
070
025
038
025
081 082 083
021 056 059
007 008 018 021 026 037 062
006
036
073 074 075 076
021
006 021 024 025
034
005
019 041 075
Brand
MITSUBISHI
MONTGOMERY WARD
MTC
MULTITECH
NEC
OPTIMUS
PANASONIC
PENTAX
PENTEX RESEARCH+
PHILCO
PHILIPS
PIONEER
PORTLAND
PROSCAN
QUARTZ
QUASAR
RADIO SHACK/
REALISTIC
RCA
SANSUI
SANYO
SCOTT
SEARS
SHARP
SHIMTOM
SIGNATURE
SONY
SYLVANIA
SYMPHONIC
TANDY
TASHIKA
TATUNG
TEAC
TECHNICS
TEKNIKA
TMK
TOSHIBA
TOTEVISION
UNITECH
VECTOR RESEARCH
VICTOR
VIDEO CONCEPTS
VIDEOSONIC
WARDS
YAMAHA
ZENITH
Code
019 034 041 046
020
002 025
002 005 025 038
007 008 018 026 037 062 064
020
021 056 071 072
019 041 075
008
021 056 059
021 080
019 026 039 053
015 049 055
017
018
021 056
006 018 020 021 024 025 029 034
048 056
002 017 019 021 035 041 043 057
068 076
026
018 024
003 047 052 067
006 018 019 024 028 029 041 048 051
020 034 045 015
027 033 038 058
025
027 033 044
021 025 056 059
025
018 025
006
037
025 037 068
021
006 021 025 031
066
003 019 029 051 052
002 006
002
007 026
026
007 026
002
002 003 006 019 020 021 024 025 034
038 041
007 008 018 026 037
023 027 033
Continued...
BN68-00630D-Eng_1.indd 24 2007-04-09 ソタネト 6:51:29

English - 25
Brand
SAMSUNG
GI
HAMLIN
HITACHI
JERROLD
MACOM
MAGNAVOX
OAK
PANASONIC
PHILIPS
PIONEER
RCA
REGAL
Code
000 001 002 003 004 005 006 007
041
003 024 031
025 030
038 039
025 030
019 023 028
026
003 022 027 037 044
019 021 023 028
004 018 020 044
014 022 040
003
Brand
REGENCY
SA
SCIENTIFIC ATLAN
SPRUCER
STARGATE 2000
SYLVANIA
TEXSCAN
TOCOM
UNIVERSAL
VIEWSTAR
WARNER AMEX
ZENITH
Code
015 023
042 043
042 043
022
036
016
016
032
033 034
019 021 023 028
046
017 029 035 037 045
CABLE BOX
Product
Ground wave STB
Satellite STB
CABLE STB
STB DVD COMBO
Satellite STB HDD COMBO Standard
Code
001 002
003
004
008
009
Product
Satellite STB HDD COMBO Premium
CABLE STB HDD COMBO Standard
CABLE STB HDD COMBO Premium
Ground wave STB HDD COMBO Standard
Ground wave STB HDD COMBO Premium
Code
010
011
012
013
014
SAMSUNG SET-TOP BOX
Brand
ALPHASTAR
ANAM
CHANNEL MASTER
CROSSDIGITAL
CHAPARRAL
DIRECT TV
DAEWOO
DISH NETWORK SYSTEM
DISHPRO
DRAKE
DX ANTENNA
ECHOSTAR
EXPRESSVU
GOI
GE
GENERAL INSTRUMENT
HTS
HOME CABLE
HITACHI
HUGHES NETWORK
IQ
IQ PRISM
JANEIL
JERROID
JVC
Code
023
043
018 034
019
035
015 016 017 019 022 045 060
061 062 065 066 067 068
074
069 070
069
018 024 032
027
025 069 070 071
069
069
065
046 047 048 063 064
069
056
022
015 017
020
020
059
063
069 070
Brand
LG(Goldstar)
MAGNAVOX
MEMOREX
MOTOROLA
MACOM
MITSUBISHI
NEXT LEVEL
PHILIPS
PRIMESTAR
PANASONIC
PAYSAT
PROSCAN
RCA
RADIOSHACK
REALISTIC
STS
STAR TRAK
SKY
SKY LIFE
SHACK
STAR CHOICE
SONY
TOSHIBA
ULTIMATE TV
UNIDEN
ZENITH
Code
044 073
016 021 036 038 039 040 041 042
016
064
018
015
047 048 064
015 016 017 021 033 036 038 039
040 041 042 067
046 049 050 063
058 059 061 062
016
065 066
051 052 053 065 066
064
057
020 027
026
031
005 006 007
064
064
054 060
015 017 028 029 030 072
060 066
016 021 037 055 056 057
024 031 068
SET-TOP BOX
Continued...
BN68-00630D-Eng_1.indd 25 2007-04-09 ソタネト 6:51:29

English - 26
Product
DVD
DVDR
BD Record
VCR COMBO
VCR Record
DHR COMBO
Code
000 001 002
003 004
005 006
007 008 009 010 011
012
013
Product
Home Theater VCR COMBO
HDD Record COMBO
TWIN TRAY COMBO
STB DVD COMBO
DVD Receiver
AV Receiver
Code
014 015 016
017
018
019
020
021
SAMSUNG DVD
Brand
ANAM
AUDIOVOX
AUDIOLOGIC
ANABA
APEX DIGITAL
AIWA
BROKSONIC
BLAUPUNKT
B&K
CURTIS MATHES
CYBER HOME
CLARION
CIRRUS
CINEVISION
DAEWOO
DENON
FARENHEIT
FISHER
GPX
GO VIDEO
GE
GREENHILL
HITACHI
HITEKER
HOYO
HARMAN / KARDON
IRT
INTEGRA
JBL
JVC
JATON
KENWOOD
KISS
KONKA
KLH
LG(Goldstar)
LOEWE
LASONIC
MOBILE AUTHORITY
MEMOREX
MALATA
MAGNAVOX
MINTEK
MONYKA
Code
030
075
085
072
070 071 074 086 083 084 088
111 112
114
062
074
122 123
027
065 077 078 079 082
080 125
081
095
066
146
067 068
090
060
061 089 133 135
069 074
074
064 113
071
073
091 110
089
092
091
022 033 115 116
073
051 108 109
073
059 100 106 107
074 075
025 031
057
058
054
055
056
076 093
074 094
073
Brand
NORCENT
NEXT BASE
NEC
NANTAUS
NESA
OPTOMEDIA ELECTRONICS
OPTIVIEW
ONKYO
PHILCO
PRINCETON
PROSCAN
PANASONIC
PHILIPS
ROTEL
RIO
RCA
RAITE
ROWA
SAMPO
SONY
SHERWOOD
SVA
SYLVANIA
SHARP
SANSUI
SANYO
SHINSONIC
SANYO
THOMSON
TOSHIBA
TECHNICS
TVIEW
TOKAI
TEAC
TECHWOOD
TREDEX
URBAN CONCEPTS
VENTURER
VOCOPRO
YAMAHA
YAMAKAWA
XWAVE
ZENITH
Code
048 049 050
052
053
144
074
105
072
076 092 119
044 045
046 047
023
024 034 124 134 136 137 138
036 076
117 118
120
023 035 074 075 131 132
073
038
104
026 029 126 127 128 129
130 141
039 041
042
043 093
140
062
062
094
090
145
028 062 076
139
072
073
096
097
098 099 101
076
075
102
032 063
040 073
103
076 121
DVD
BN68-00630D-Eng_1.indd 26 2007-04-09 ソタネト 6:51:30

English - 27
To Select the Source
Use to select TV or other external input sources such as DVD players, VCRs, etc. connected to the TV.
1 Press the MENU button.
Press the ◄ or ► button to select Input, then press the ENTER button.
Press the ▲ or ▼ button to select Source List, then press the ENTER button.
2 Press the ▲ or ▼ button to select a signal source, then press the ENTER button.
➢
You can choose between the following sets of jacks: TV, AV1, AV2, S-Video1,
S-Video2, Component1, Component2, PC, HDMI1, or HDMI2/DVI on the TV’s rear
panel and AV3 or S-Video3 on the TV’s side panel.
➢
HDMI1 or HDMI2/DVI input can only be selected when the external device is turned
on and connected via HDMI.
➢
You can choose only those external devices that are connected to the TV.
Press the SOURCE button on the remote control to view an external signal source.
To Edit the Input Source Name
Name the external device connected to the input jacks to make your input source selection easier.
1 Press the MENU button.
Press the ◄ or ► button to select Input, then press the ENTER button.
Press the ▲ or ▼ button to select Edit Name, then press the ENTER button.
2 Press the ▲ or ▼ button to select AV1, AV2, AV3, S-Video1, S-Video2, S-Video3,
Component1, Component2, PC, HDMI1, or HDMI2/DVI input jack, then press the ENTER
button.
3 Press the ▲ or ▼ button to select VCR, DVD, D-VHS, Cable STB, HD STB, Satellite STB,
PVR STB, AV Receiver, DVD Receiver, Game, Camcorder, DVD Combo, DVD HDD
Recorder, PC, Internet TV Recv., Interactive TV Recv., VOD STB, or TV input source,
then press the ENTER button.
Press the EXIT button to exit.
Input
Enter
Source List
TV
AV1
AV2
AV3
S-Video1
S-Video2
S-Video3
Component1
Component2
----
----
----
----
----
----
----
----
Return
Input
Enter
Edit Name
AV1
AV2
AV3
S-Video1
S-Video2
S-Video3
Component1
Component2
PC
----
----
----
----
----
----
----
----
----
Return
Input
Enter
Edit Name
Return
AV1
AV2
AV3
S-Video1
S-Video2
S-Video3
Component1
Component2
PC
----
----
VCR
DVD
D-VHS
Cable STB
HD STB
Satellite STB
PVR STB
Input
Enter
Input
Source List ►
Edit Name
TV
Return
Input
Enter
Input
Source List
Edit Name ►
TV
Return
BN68-00630D-Eng_1.indd 27 2007-04-09 ソタネト 6:51:31

English - 28
Picture Control
Using Automatic Picture Settings
Your TV has three automatic picture settings (“Dynamic”, “Standard”, “Movie”) that are preset at the factory.
You can activate a Picture Setting by making a selection from the menu.
1 Press the MENU button.
Press the ENTER button to select Picture.
Press the ▲ or ▼ button to select Mode, then press the ENTER button.
2 Press the ▲ or ▼ button to select Dynamic, Standard, or Movie, then press the ENTER
button.
Choose Dynamic to increase the clarity and sharpness of the picture.
Choose Standard for general TV watching mode.
Choose Movie when watching movies.
Press the P.MODE button on the remote control to select one of the standard picture
settings.
3 Press the ▲ or ▼ button to select Contrast, Brightness, Sharpness, Color, or Tint, then
press the ENTER button.
4 Press the ◄ or ► button to decrease or increase the value of a particular item.
Press the ENTER button.
➢
● In PC mode, only the Contrast and Brightness can be selected.
● Each adjusted setting will be stored separately according to its input mode.
● When you make changes to Contrast, Brightness, Sharpness, Color, or Tint,
OSD color will also be adjusted accordingly.
Continued...
Picture
Enter
Picture
Mode
Contrast
100
Brightness
45
Sharpness
75
Color
55
Tint
G50 R50
Color Tone
Detailed Settings
Size
Return
Dynamic
Cool1
16:9
Picture
Enter
Picture
Mode
Contrast
100
Brightness
45
Sharpness
75
Color
55
Tint
G50 R50
Color Tone
Detailed Settings
Size
Return
Dynamic
Cool1
16:9
Dynamic
Standard
Movie
Picture
Enter
Picture
Mode
Contrast
100
Brightness
45
Sharpness
75
Color
55
Tint
G50 R50
Color Tone
Detailed Settings
Size
Return
Dynamic
Cool1
16:9
▲
Contrast
▼
100
Picture
Enter ReturnAdjust
BN68-00630D-Eng_2.indd 28 2007-04-09 ソタネト 6:53:59

English - 29
5 Press the ▲ or ▼ button to select Color Tone, then press the ENTER button.
6 Press the ▲ or ▼ button to select Cool2, Cool1, Normal, Warm1, or Warm2, then press
the ENTER button.
➢
When the picture mode is set to Dynamic or Standard, Warm1 and Warm2 cannot
be selected.
Resetting the Picture Settings to the Factory Defaults
7 Press the ▲ or ▼ button to select Reset, then press the ENTER button.
Press the ▲ or ▼ button to select OK or Cancel then press the ENTER button.
Press the EXIT button to exit.
➢
Each picture mode can be reset.
Picture
Enter
Picture
Mode
Contrast
100
Brightness
45
Sharpness
75
Color
55
Tint
G50 R50
Color Tone
Detailed Settings
Size
Return
Dynamic
Cool1
16:9
Picture
Enter
Picture
Mode
Contrast
100
Brightness
45
Sharpness
75
Color
55
Tint
G50 R50
Color Tone
Detailed Settings
Size
Return
Dynamic
Cool1
OK
16:9
Cool2
Cool1
Normal
Warm1
Warm2
Picture
Enter
Picture
Tint
G50 R50
Color Tone
Detailed Settings
Size
Digital NR
DNIe
Active Color
Color Gamut
Position
Reset
Cool1
16:9
Auto
On
Normal
On
OK
OK
Cancel
BN68-00630D-Eng_2.indd 29 2007-04-09 ソタネト 6:54:03

English - 30
Making Detailed Picture Settings
You can set detailed picture settings.
1 Press the MENU button.
Press the ENTER button to select Picture.
Press the ▲ or ▼ button to select Detailed Settings, then press the ENTER button.
2 Select the required option by pressing the ▲ or ▼ button, then press the ENTER button.
3 When you are satisfied with your setting, press the ENTER button.
Press the EXIT button to exit.
➢
When the picture mode is set to Standard or Movie, Detailed Settings can be selected.
➢
If DNIe is set to Off and the picture mode is in Dynamic or Standard mode, the Detailed
Settings cannot be selected.
● Black Adjust: Off/Low/Medium/High
You can directly select the black level on the screen to adjust the screen depth.
● Dynamic Contrast: Off/Low/Medium/High
You can adjust the screen contrast so that the optimal contrast is provided.
● Gamma: -3 ~ +3
You can adjust the Primary Color Intensity.
Press the ◄ or ► button until you reach the optimal setting.
● White Balance: -10 ~ +10
You can adjust the color temperature for more natural picture colors.
Press the ◄ or ► button until you reach the optimal setting.
● My Color Control: Red/Green/Blue/Yellow/Pink/Reset
This setting can be adjusted to suit your personal preferences.
Red/Blue/Green/Yellow/Pink: Changing the adjustment value will refresh the adjusted screen.
Select the required option by pressing the ▲ or ▼ button, then press the ENTER button.
Press the ◄ or ► button until you reach the optimal setting.
Reset: The previously adjusted colors will be reset to the factory defaults.
● Edge Enhancement: Off/On
You can emphasize object boundaries.
Picture
Enter
Picture
Mode
Contrast
80
Brightness
50
Sharpness
50
Color
50
Tint
G50 R50
Color Tone
Detailed Settings ►
Size
Return
Standard
Cool1
16:9
Picture
Enter
Return
Detailed Settings
Black Adjust
Dynamic Contrast
Gamma
+1
White Balance
0
My Color Control
Edge Enhancement
Medium
Medium
On
BN68-00630D-Eng_2.indd 30 2007-04-09 ソタネト 6:54:04

English - 31
Changing the Screen Size
You can select the picture size which best corresponds to your viewing requirements.
1 Press the MENU button.
Press the ENTER button to select Picture.
Press the ▲ or ▼ button to select Size, then press the ENTER button.
2 Press the ▲ or ▼ button to select the screen format you want, then press the ENTER
button.
Press the EXIT button to exit.
16:9: Sets the picture to 16:9 wide mode.
Zoom1: Magnifies the size of the picture on the screen.
Zoom2: Expands the Zoom1 format picture.
Wide Fit : Enlarges the aspect ratio of the picture to fit the entire screen.
4:3 : Sets the picture to 4:3 normal mode.
Just Scan : Use the function to see the full image without any truncation when
DTV(1080i), HDMI (1080i, 1080p) or Component (1080i, 1080p) signals
are input.
Press the P.SIZE button on the remote control to change the picture size.
16:9
Sets the picture to 16:9 wide mode.
Zoom1
Magnifies the size of the picture on
the screen.
Zoom2
Expands the Zoom1 format picture.
Wide Fit
Enlarges the aspect ratio of the
picture to fit the entire screen.
4:3
Sets the picture to 4:3 normal mode.
Just Scan
Use the function to see the full
image without any truncation when
DTV(1080i), HDMI (1080i, 1080p) or
Component (1080i, 1080p) signals
are input.
➢
● You can select the 16:9, 4:3, Wide Fit and Just Scan screen sizes in the Component (1080i, 1080p), HDMI (1080i, 1080p),
or DTV (1080i) mode.
● In DTV (720p), Component (720p) or HDMI (720p) mode, any of 16:9, 4:3 and Wide Fit can be selected.
● In Analog TV, AV, S-VIDEO, Component (480i, 480p), HDMI (480i, 480p), or DTV (480i, 480p) mode, any of 16:9, Zoom1,
Zoom2, and 4:3 can be selected.
● In Zoom1, Zoom2 and Wide Fit modes, you can move the picture on the screen by pressing the ▲ or ▼ button.
● Each adjusted setting will be stored separately according to its input mode.
● When watching an HD(High Definition 720p, 1080i, 1080p) signal, you can use Wide Fit.
Wide Fit sets the optimum picture format by expanding it both horizontally and vertically. For example, you can reset the
picture in 4:3 format to 16:9.
Picture
Enter
Picture
Mode
Contrast
100
Brightness
45
Sharpness
75
Color
55
Tint
G50 R50
Color Tone
Detailed Settings
Size
Return
Dynamic
Cool1
16:9
Picture
Enter
Picture
Mode
Contrast
100
Brightness
45
Sharpness
75
Color
55
Tint
G50 R50
Color Tone
Detailed Settings
Size
Return
Dynamic
Cool1
OK
16:9
16:9
Zoom1
Zoom2
Wide Fit
4:3
Just Scan
BN68-00630D-Eng_2.indd 31 2007-04-09 ソタネト 6:54:09

English - 32
Digital Noise Reduction
If the broadcast signal received by your TV is weak, you can activate the Digital Noise Reduction feature to help reduce any
static and ghosting that may appear on the screen.
1 Press the MENU button.
Press the ENTER button to select Picture.
Press the ▲ or ▼ button to select Digital NR, then press the ENTER button.
2 Press the ▲ or ▼ button to select Off, Low, Medium, High, or Auto, then press the
ENTER button.
Press the EXIT button to exit.
➢
The Digital NR function is available in all modes except PC.
Off: Switches the Digital NR function off.
Low: Sets Digital NR to low.
Medium: Sets Digital NR to mid range.
High : Sets Digital NR to high.
Auto : Reduces the noise of the picture automatically.
DNIe (Digital Natural Image engine)
This TV includes the DNIe function so as to provide a high visual quality. If you set DNIe to on, you can view the screen with
the DNIe feature activated. If you set the DNIe to Demo, you can view the applied DNIe and normal pictures on the screen, for
demonstration purposes. Using this function, you can view the difference in the visual quality.
1 Press the MENU button.
Press the ENTER button to select Picture.
Press the ▲ or ▼ button to select DNIe, then press the ENTER button.
➢
This function doesn’t work when the Input Source is PC.
2 Press the ▲ or ▼ button to select Off, Demo, or On, then press the ENTER button.
Press the EXIT button to exit.
Off: Switches off the DNIe mode.
Demo: The screen before applying DNIe appears on the left and the screen after
applying DNIe appears on the right.
On: Switches on the DNIe mode.
➢
The DNIe function is not supported in the Movie mode. (It is inactivated.)
➢
DNIe
TM
(Digital Natural Image engine)
This feature brings you more a detailed image with detail, contrast and white
enhancement.
Picture
Enter
Picture
OK
Tint
G50 R50
Color Tone
Detailed Settings
Size
Digital NR
DNIe
Active Color
Color Gamut
Position
Reset
Cool1
16:9
Auto
On
Normal
On
Picture
Enter
Picture
OK
Tint
G50 R50
Color Tone
Detailed Settings
Size
Digital NR
DNIe
Active Color
Color Gamut
Position
Reset
Cool1
16:9
Low
On
Normal
Off
Cool1
OK
Low
Off
Low
Medium
High
Auto
Picture
Enter
Picture
OK
Tint
G50 R50
Color Tone
Detailed Settings
Size
Digital NR
DNIe
Active Color
Color Gamut
Position
Reset
Cool1
16:9
Auto
On
Normal
On
Picture
Enter
Picture
OK
Tint
G50 R50
Color Tone
Detailed Settings
Size
Digital NR
DNIe
Active Color
Color Gamut
Position
Reset
Cool1
16:9
Auto
On
Normal
Off
Off
Demo
On
BN68-00630D-Eng_2.indd 32 2007-04-09 ソタネト 6:54:24

English - 33
Setting the Color Gamut
You can choose your favorite color gamut. Color gamut means a color matrix made up with the basic colors of Red, Green
and Blue.
1 Press the MENU button.
Press the ENTER button to select Picture.
Press the ▲ or ▼ button to select Color Gamut, then press the ENTER button.
2 Press the ▲ or ▼ button to select Normal, or sRGB, then press the ENTER button.
Press the EXIT button to exit.
Normal: Normal Color Gamut offers flat and natural color tone.
sRGB: Supports color tone of sRGB format.
Setting the Active Color
If you turn on this option, the colors of the sky and grass will be stronger and clearer for a more vivid on-screen picture.
1 Press the MENU button.
Press the ENTER button to select Picture.
Press the ▲ or ▼ button to select Active Color, then press the ENTER button.
2 Press the ▲ or ▼ button to select Off or On, then press the ENTER button.
Press the EXIT button to exit.
➢
This function is not available in PC mode.
➢
When you select Standard or Movie in Picture Mode, the Active Color automatically
changes to Off and it is deactivated. When the Picture Mode is set to Dynamic, the
Active Color is activated regardless of the value of Picture Mode.
Picture
Enter
Picture
OK
Tint
G50 R50
Color Tone
Detailed Settings
Size
Digital NR
DNIe
Active Color
Color Gamut
Position
Reset
Cool1
16:9
Auto
On
Normal
On
Picture
Enter
Picture
Tint
G50 R50
Color Tone
Detailed Settings
Size
Digital NR
DNIe
Active Color
Color Gamut
Position
Reset
Cool1
16:9
Auto
On
Normal
Off
Off
On
OK
Picture
Enter
Picture
OK
Tint
G50 R50
Color Tone
Detailed Settings
Size
Digital NR
DNIe
Active Color
Color Gamut
Position
0
Reset
Cool1
16:9
Auto
On
Normal
On
Picture
Enter
Picture
OK
Tint
G50 R50
Color Tone
Detailed Settings
Size
Digital NR
DNIe
Active Color
Color Gamut
Position
Reset
Cool1
16:9
Auto
On
Normal
On
Normal
sRGB
BN68-00630D-Eng_2.indd 33 2007-04-09 ソタネト 6:54:25

English - 34
Adjusting the Screen Position
You can adjust the horizontal and vertical position of the screen.
1 Press the MENU button.
Press the ENTER button to select Picture.
Press the ▲ or ▼ button to select Position, then press the ENTER button.
2 Press the ▲/▼/◄/► button to adjust the screen position.
Press the EXIT button to exit.
Freezing the Picture
Press the STILL button to freeze a moving picture. (Normal sound will still be heard.)
To cancel this function, press the STILL button again or press any button on the remote control.
Sound Control
Using Automatic Sound Settings
Your TV has automatic sound settings (“Standard”, “Music”, “Movie”, “Speech”, and “Custom”) that are preset at the factory.
Or, you can select “Custom”, which automatically recalls your personalized sound settings.
1 Press the MENU button.
Press the ◄ or ► button to select Sound, then press the ENTER button.
Press the ▲ or ▼ button to select Mode, then press the ENTER button.
2 Press the ▲ or ▼ button to select Mode, then press the ENTER button.
Press the ▲ or ▼ button to select Standard, Music, Movie, Speech, or Custom sound
setting, then press the ENTER button.
Press the EXIT button to exit.
Choose Standard for the standard factory settings.
Choose Music when watching music videos or concerts.
Choose Movie when watching movies.
Choose Speech when watching a show that is mostly dialog (i.e., news).
Choose Custom to recall your personalized settings (See page 35).
Press the S.MODE button on the remote control to select one of the standard sound
settings.
Sound
Enter
Sound
Mode ►
DNSe
Preferred Language
Multi-Track Sound
Auto Volume
Internal Mute
Return
Off
English
Stereo
Off
Off
Picture
Enter
Picture
OK
Tint
G50 R50
Color Tone
Detailed Settings
Size
Digital NR
DNIe
Active Color
Color Gamut
Position ►
Reset
Cool1
16:9
Auto
On
Normal
On
Position
Move Enter Return
▼
▼
▲
▼
Sound
Enter
Mode
Reset
OK
Return
Balance 100Hz 300Hz 1kHz 3kHz 10kHz
Standard
Music
Movie
Speech
Custom
Mode
BN68-00630D-Eng_2.indd 34 2007-04-09 ソタネト 6:54:29

English - 35
Customizing the Sound
The sound settings can be adjusted to suit your personal preference.
(Alternatively, you can use one of the “automatic” settings.)
1 Press the MENU button.
Press the ◄ or ► button to select Sound, then press the ENTER button.
Press the ▲ or ▼ button to select Mode, then press the ENTER button.
2 Press the ▲ or ▼ button to select Mode, then press the ENTER button.
Press the ▲ or ▼ button to select a particular item (Standard, Music, Movie, Speech,
Custom), then press the ENTER button.
3 Press the ▲ or ▼ button.
Press the ◄ or ► button to select a particular frequency to adjust, then press the ENTER
button.
Press the ▲ or ▼ button to increase or decrease the level of the particular frequency, then
press the ENTER button.
➢
● L/R Sound Balance Adjustment :
To adjust the sound balance of the L/R speakers.
● Bandwidth Adjustment (100Hz, 300Hz, 1kHz, 3kHz, 10kHz) :
To adjust the level of different bandwidth frequencies.
Resetting the Equalizer Settings to the Factory Defaults
4 Press the ▲ or ▼ button to select Reset, then press the ENTER button.
Press the ▲ or ▼ button to select OK or Cancel then press the ENTER button.
Press the EXIT button to exit.
➢
The equalizer resets to the factory defaults.
Sound
Enter
Mode
Mode
Return
Balance 100Hz 300Hz 1kHz 3kHz 10kHz
Reset
OK
Standard
OK
Cancel
Sound
Enter
Mode
Mode
Reset
OK
Return
Balance 100Hz 300Hz 1kHz 3kHz 10kHz
Custom
Sound
Enter
Mode
Reset
OK
Return
Balance 100Hz 300Hz 1kHz 3kHz 10kHz
Standard
Music
Movie
Speech
Custom
Mode
BN68-00630D-Eng_2.indd 35 2007-04-09 ソタネト 6:54:33

English - 36
Setting up DNSe (Digital Natural Sound engine)
DNSe enhances the sound quality, automatically controls output, and prevents sound distortion.
1 Press the MENU button.
Press the ◄ or ► button to select Sound, then press the ENTER button.
Press the ▲ or ▼ button to select DNSe, then press the ENTER button.
2 Press the ▲ or ▼ button to select Off or On, then press the ENTER button.
Press the EXIT button to exit.
Press the DNse button on the remote control to select On or Off.
Sound
Enter
Sound
Mode
DNSe
Preferred Language
Multi-Track Sound
Auto Volume
Internal Mute
Return
Off
English
Stereo
Off
Off
Sound
Enter
Sound
Mode
DNSe
Preferred Language
Multi-Track Sound
Auto Volume
Internal Mute
Return
Off
English
Stereo
Off
Off
Off
On
BN68-00630D-Eng_2.indd 36 2007-04-09 ソタネト 6:54:34

English - 37
Choosing a Multi-Channel Sound (MTS) Track - Analog
Depending on the particular program being broadcast, you can listen to Mono, Stereo, or SAP.
Multi-Track Sound
1 Press the MENU button.
Press the ◄ or ► button to select Sound, then press the ENTER button.
Press the ▲ or ▼ button to select Multi-Track Sound, then press the ENTER button.
2 Press the ▲ or ▼ button to select a setting you want, then press the ENTER button.
Press the EXIT button to exit.
Choose Mono for channels that are broadcasting in mono, or if you are having
difficulty receiving a stereo signal.
Choose Stereo for channels that are broadcasting in stereo.
Choose SAP to listen to the Separate Audio Program, which is usually a foreign-
language translation.
Press the MTS button on the remote control repeatedly to select Mono, Stereo, or
SAP.
Choosing a Multi-Channel Sound (MTS) Track - Digital
The digital-TV transmission system is capable of simultaneous transmission of many audio tracks (for example, simultaneous
translations of the program into foreign languages). The availability of these additional “multitracks” depends upon the
program.
Preferred Language
1 Press the MENU button.
Press the ◄ or ► button to select Sound, then press the ENTER button.
Press the ▲ or ▼ button to select Preferred Language, then press the ENTER button.
2 Press the ▲ or ▼ button to choose the language (English, Spanish, or French) you want,
then press the ENTER button.
Press the EXIT button to exit.
➢
You can only select the language among the actual languages being broadcast.
Press the MTS button on the remote control to listen in a language other than the
preferred language.
Sound
Enter
Sound
Mode
DNSe
Preferred Language
Multi-Track Sound
Auto Volume
Internal Mute
Return
On
English
Stereo
Off
Off
Sound
Enter
Sound
Mode
DNSe
Preferred Language
Multi-Track Sound
Auto Volume
Internal Mute
Return
Off
English
Stereo
Off
Off
Sound
Enter
Sound
Mode
DNSe
Preferred Language
Multi-Track Sound
Auto Volume
Internal Mute
Return
Off
English
Stereo
Off
English
Spanish
French
Sound
Enter
Sound
Mode
DNSe
Preferred Language
Multi-Track Sound
Auto Volume
Internal Mute
Return
On
English
Stereo
Off
Off
Mono
Stereo
SAP
BN68-00630D-Eng_2.indd 37 2007-04-09 ソタネト 6:54:36

English - 38
Automatic Volume Control
Reduces the difference in volume level among broadcasters.
1 Press the MENU button.
Press the ◄ or ► button to select Sound, then press the ENTER button.
Press the ▲ or ▼ button to select Auto Volume, then press the ENTER button.
2 Press the ▲ or ▼ button to select Off or On, then press the ENTER button.
Press the EXIT button to exit.
Selecting the Internal Mute
Sound output from the TV speakers is muted. This is useful when you want to listen to audio through your sound system
instead of the TV.
1 Press the MENU button.
Press the ◄ or ► button to select Sound, then press the ENTER button.
Press the ▲ or ▼ button to select Internal Mute, then press the ENTER button.
2 Press the ▲ or ▼ button to select Off or On, then press the ENTER button.
Press the EXIT button to exit.
➢
● The left/right audio outputs and digital audio outputs (Optical) remain enabled.
● The VOL +, VOL -, MUTE and S.MODE buttons do not operate when the Internal
Mute is set to On.
Internal Speakers Audio Out (Optical OUT) Audio Out (L/R OUT)
TV, AV,
S-Video
Component,
PC
HDMI
TV, AV,
S-Video
Component,
PC
HDMI
TV, AV,
S-Video
Component,
PC
HDMI
Internal Mute
Off
Speaker
Available
Speaker
Available
Speaker
Available
Speaker
Available
Speaker
Available
Sound not
output
Sound not
output
Sound not
output
Sound not
output
Internal Mute
On
Sound not
output
Sound not
output
Sound not
output
Sound
Available
Sound
Available
Sound not
output
Sound
Available
Sound
Available
Sound
Available
Video
No Signal
Sound not
output
Sound not
output
Sound not
output
Sound not
output
Sound not
output
Sound not
output
Sound not
output
Sound not
output
Sound not
output
When Internal Mute is set to On, Sound menu except Multi-Track Sound cannot be adjusted.
Sound
Enter
Sound
Mode
DNSe
Preferred Language
Multi-Track Sound
Auto Volume
Internal Mute
Return
Off
English
Stereo
Off
Off
Sound
Enter
Sound
Mode
DNSe
Preferred Language
Multi-Track Sound
Auto Volume
Internal Mute
Return
Off
English
Stereo
Off
Off
Off
On
Sound
Enter
Sound
Mode
DNSe
Preferred Language
Multi-Track Sound
Auto Volume
Internal Mute
Return
Off
English
Stereo
Off
Off
Off
On
Sound
Enter
Sound
Mode
DNSe
Preferred Language
Multi-Track Sound
Auto Volume
Internal Mute
Return
Off
English
Stereo
Off
Off
BN68-00630D-Eng_2.indd 38 2007-04-09 ソタネト 6:54:41

English - 39
Channel Control
Clearing Scrambled Channels
- Digital
The Clear Scrambled Channel function is used to filter out scrambled channels after Auto Program is completed. It removes
the scrambled channels from the list by tuning the digital cable channels. This process may take up to 20-30 minutes.
1 Press the MENU button.
Press the ◄ or ► button to select Channel, then press the ENTER button.
Press the ▲ or ▼ button to select Clear Scrambled Channel, then press the ENTER
button. It searches scrambled channels, which are to be removed from the list.
To stop searching scrambled channels;
Press the ▼ button to select Stop, then press the ENTER button.
Press the ◄ or ► button to select Yes, then press the ENTER button.
2 When the scrambled channel searching is completed, press the ENTER button.
Press the EXIT button to exit.
Adding and Erasing Channels
You can add or delete a channel to display the channels you want.
To use the Channel List function, first run Auto Program (see pages 21~22).
1 Press the MENU button.
Press the ◄ or ► button to select Channel, then press the ENTER button.
Press the ▲ or ▼ button to select Channel List, then press the ENTER button.
2 Press the ▲ or ▼ button to select Added, then press the ENTER button.
Continued...
Channel
Enter
Channel
Return
Antenna
Auto Program
Clear Scrambled Channel ►
Channel List
Fine Tune
Signal Strength
LNA
Cable
On
Clear Scrambled Channel
Removing Scrambled Channel.
DTV Cable 3-1
10%
Stop
Enter
Return
Clear Scrambled Channel
Stop Searching Scrambled Channel.
DTV Cable 3-1
10%
Yes No
Enter
Return
Channel
Enter
Channel
Return
Antenna
Auto Program
Clear Scrambled Channel
Channel List ►
Fine Tune
Signal Strength
LNA
Air
On
Channel List
All
Added ►
Favorite
Default List Mode
All
Return
Channel
Enter
BN68-00630D-Eng_2.indd 39 2007-04-09 ソタネト 6:54:42

English - 40
3 Press the ▲/▼/◄/► buttons to select a channel to add, then press the ENTER button.
4 Press the ▲ or ▼ button to select Add, then press the ENTER button to add the channel.
The symbol appears prior to the corresponding channel number.
Press the ▲ or ▼ button to select Return, then press the ENTER button to return.
➢
All added channels will be shown on Added menu.
5 Press the ▲/▼/◄/► buttons to select a channel to delete, then press the ENTER button.
Press the ▲ or ▼ button to select Delete, then press the ENTER button to delete the
channel.
Press the EXIT button to exit.
Red (P.MODE) button: Press repeatedly to select All Channel List, Added
Channel List, or Favorite Channel List.
Green (S.MODE) button: Press to add all channels deleted.
Yellow (STILL) button: Press to delete all channels memorized.
Press the ADD/DEL button on the remote control.
Press the CH and CH button to select the channel to be added or deleted, then
press the ENTER button.
Setting Your Favorite Channels
You can set channels you watch frequently as favorites.
1 Press the MENU button.
Press the ◄ or ► button to select Channel, then press the ENTER button.
Press the ▲ or ▼ button to select Channel List, then press the ENTER button.
2 Press the ▲ or ▼ button to select All or Added, then press the ENTER button.
3 Press the ▲/▼/◄/► buttons to select a channel as a favorite channel, then press the
ENTER button.
Press the CH and CH button to display the next channel list page.
4 Press the ▲ or ▼ button to select Favorite, then press the ENTER button.
The “ ” symbol will be highlighted and the channel will be set as a Favorite.
To cancel your Favorite channel selection, press the ENTER button until the “ ” symbol
disappears.
Press the EXIT button to exit.
➢
Only memorized channels can be set as favorite channels.
➢
All favorite channels will be shown on the Favorite menu.
To select the favorite channels you have set up, press the FAV.CH button on the
remote control.
Added Channel List
DTV Air 5-1
List Mode
2
5-1
8
11-1
14
17
20-1
4
7-1
10-1
13-1
16
19
22-1
Enter Return
Channel List
21
Watch
Add
Delete
Name
Favorite
Return
Add All
Delete All
1/2
Added Channel List
DTV Air 5-1
2
5-1
8
11-1
14
17
20-1
4
7-1
10-1
13-1
16
19
22-1
Enter Return
Channel List
21
Watch
Add
Delete
Name
Favorite
Return
List Mode
Delete All
Added
1/2
Channel
Enter
Channel
Return
Antenna
Auto Program
Clear Scrambled Channel
Channel List ►
Fine Tune
Signal Strength
LNA
Air
On
Channel List
All ►
Added
Favorite
Default List Mode
All
Return
Channel
Enter
All Channel List
DTV Air 5-1
2
5-1
8
11-1
14
17
20-1
4
7-1
10-1
13-1
16
19
22-1
Enter Return
Channel List
21
Watch
Add
Delete
Name
Favorite
Return
List Mode
Delete All
Added
1/2
Favorite
BN68-00630D-Eng_2.indd 40 2007-04-09 ソタネト 6:54:46

English - 41
Labeling Channels - Analog
Channels can labeled so that their call letters appear whenever the channel is selected.
1 Press the MENU button.
Press the ◄ or ► button to select Channel, then press the ENTER button.
Press the ▲ or ▼ button to select Channel List, then press the ENTER button.
2 Press the ▲ or ▼ button to select All, then press the ENTER button.
3 Press the ▲/▼/◄/► buttons to select the channel to be assigned a new name, then press
the ENTER button.
4 Press the ▲ or ▼ button to select Name, then press the ENTER button.
Press the ▲ or ▼ button to select a letter, a number or a blank. (Results in this
sequence: A~Z, 0~.9, +, -,
, /, blank).
Press the ◄ or ► button to switch to the next field, which will be selected.
Select a second letter or digit by pressing the ▲ or ▼ button, as above.
Repeat the process to select the last three digits. When you have finished, press the
ENTER button to assign the new name.
To erase the assigned new name, press and hold the ▲ or ▼ button until a blank
appears.
Press the EXIT button to exit.
➢
The names of digital broadcasting channels are automatically assigned and thus cannot be assigned by users.
Viewing the Channel Lists
You can display a list of all channels, added channels or your favorite channels.
1 Press the MENU button.
Press the ◄ or ► button to select Channel, then press the ENTER button.
Press the ▲ or ▼ button to select Channel List, then press the ENTER button.
2 Press the ▲ or ▼ button to select All, Added, or Favorite, then press the ENTER button.
To toggle between your all channels, add channels, or favorite channels, use the red
(P.MODE) button on the remote control.
Red (P.MODE) button: Press repeatedly to select All Channel List, Added
Channel List, or Favorite Channel List.
Channel
Enter
Channel
Return
Antenna
Auto Program
Clear Scrambled Channel
Channel List ►
Fine Tune
Signal Strength
LNA
Air
On
Channel List
All ►
Added
Favorite
Default List Mode
All
Return
Channel
Enter
All Channel List
Air 2
2
5-1
8
11-1
14
17
20-1
4
7-1
10-1
13-1
16
19
22-1
Enter Return
Channel List
21
Watch
Add
Delete
Name
Favorite
Return
List Mode
Delete All
Added
1/2
Channel
Enter
Channel
Return
Antenna
Auto Program
Clear Scrambled Channel
Channel List ►
Fine Tune
Signal Strength
LNA
Air
On
Channel List
All ►
Added
Favorite
Default List Mode
All
Return
Channel
Enter
Added Channel List
DTV Air 5-1
2
5-1
8
11-1
14
17
20-1
4
7-1
10-1
13-1
16
19
22-1
Enter Return
Channel List
3
6-1
9-1
12
15
18-1
21
List Mode
Delete All
Added
1/2
Page
A
Adjust
BN68-00630D-Eng_2.indd 41 2007-04-09 ソタネト 6:54:51

English - 42
Setting the Default Channel List Mode
You can set All, Added, or Favorite to be the Default List that appears when you press the CH LIST button.
1 Press the MENU button.
Press the ◄ or ► button to select Channel, then press the ENTER button.
Press the ▲ or ▼ button to select Channel List, then press the ENTER button.
2 Press the ▲ or ▼ button to select Default List Mode, then press the ENTER button.
Press the ▲ or ▼ button to select All, Added, or Favorite, then press the ENTER button.
Press the EXIT button to exit.
➢
The channel list you want to appear when you press the CH LIST button.
All: Shows All the channels when you press the CH LIST button on the remote
control.
Added: Shows Added channels when you press CH LIST button on the remote
control.
Favorite: Shows Favorite channels when you press CH LIST button on the remote
control.
Press the CH LIST button on the remote control to bring up the channel lists.
Fine Tuning Analog Channels - Analog
Use fine tuning to manually adjust a particular channel for optimal reception.
1 Press the MENU button.
Press the ◄ or ► button to select Channel, then press the ENTER button.
Press the ▲ or ▼ button to select Fine Tune, then press the ENTER button.
2 Press the ▲ or ▼ button. Press the ◄ or ► button to adjust the fine tuning.
3 To store the fine tuning setting in the TV’s memory, press the ENTER button.
4 To reset the fine tuning setting, press the ▲ or ▼ button to select Reset, then press the
ENTER button.
Press the ▲ or ▼ button to select OK or Cancel, then press the ENTER button.
Press the EXIT button to exit.
➢
Only analog TV channels can be fine tuned.
➢
“
” will appear next to the number of fine-tuned channels.
Channel
Enter
Channel
Return
Antenna
Auto Program
Clear Scrambled Channel
Channel List ►
Fine Tune
Signal Strength
LNA
Air
On
Channel List
All
Added
Favorite
Default List Mode
All
Return
Channel
Enter
All
Added
Favorite
Channel
Enter
Channel
Return
Antenna
Auto Program
Clear Scrambled Channel
Channel List
Fine Tune ►
Signal Strength
LNA
Air
On
Channel
Enter
Fine Tune
Air 7 *
+3
Reset
OK
Return
Adjust
Channel
Enter
Fine Tune
Air 7 *
+3
Reset
OK
Return
OK
Cancel
BN68-00630D-Eng_2.indd 42 2007-04-09 ソタネト 6:54:53

English - 43
LNA (Low Noise Amplifier)
If the TV is operating in a weak-signal area, sometimes the LNA function can improve the reception (a low-noise preamplifier
boosts the incoming signal).
1 Press the MENU button.
Press the ◄ or ► button to select Channel, then press the ENTER button.
Press the ▲ or ▼ button to select LNA, then press the ENTER button.
2 Press the ▲ or ▼ button to select Off or On, then press the ENTER button.
Press the EXIT button to exit.
➢
If the picture is noisy with the LNA set to On, select Off.
➢
The LNA setting must be made separately for each channel.
Checking the Digital-Signal Strength - Digital
Unlike analog channels, which can vary in reception quality from “snowy” to clear, digital (HDTV) channels have either perfect
reception quality or you will not receive them at all. So, unlike analog channels, you cannot fine tune a digital channel.
You can, however, adjust your antenna to improve the reception of available digital channels.
1 Press the MENU button.
Press the ◄ or ► button to select Channel, then press the ENTER button.
Press the ▲ or ▼ button to select Signal Strength, then press the ENTER button.
2 If the signal strength meter indicates that the signal is weak, physically adjust your antenna
to increase the signal strength.
Continue to adjust the antenna until you find the best position with the strongest signal.
Press the EXIT button to exit.
Channel
Enter
Channel
Return
Antenna
Auto Program
Clear Scrambled Channel
Channel List
Fine Tune
Signal Strength
LNA
Air
On
Channel
Enter
Channel
Return
Antenna
Auto Program
Clear Scrambled Channel
Channel List
Fine Tune
Signal Strength
LNA
Air
On
Off
On
Channel
Enter
Channel
Return
Antenna
Auto Program
Clear Scrambled Channel
Channel List
Fine Tune
Signal Strength ►
LNA
Air
On
Channel
Enter
Signal Strength
Return
BN68-00630D-Eng_2.indd 43 2007-04-09 ソタネト 6:54:56

English - 44
Function Description
Selecting a Menu Language
1 Press the MENU button.
Press the ◄ or ► button to select Setup, then press the ENTER button.
Press the ▲ or ▼ button to select Language, then press the ENTER button.
2 Press the ▲ or ▼ button to select : English, Español, or Français, then press the ENTER
button.
Press the EXIT button to exit.
Continued...
Setting the Time
Setting the clock is necessary in order to use the various timer features of the TV.
Also, you can check the time while watching the TV. (Just press the INFO button.)
Option 1: Setting the Clock Automatically
The Clock can be set automatically if you are receiving a digital signal.
1 Press the MENU button.
Press the ◄ or ► button to select Setup, then press the ENTER button.
Press the ▲ or ▼ button to select Clock, then press the ENTER button.
2 Press the ▲ or ▼ button to select Clock Mode, then press the ENTER button.
Press the ▲ or ▼ button to select Auto, then press the ENTER button.
3 Press the ▲ or ▼ button to select Time Zone, then press the ENTER button.
Press the ▲ or ▼ button to highlight the time zone for your local area (and to move the
highlight to the appropriate time zone on the map of the United States), then press the
ENTER button.
Setup
Enter
Plug & Play
Language
Clock
Sleep Timer
Timer 1
Timer 2
Timer 3
Game Mode
V-Chip
English
Return
Setup
Off
Inactivated
Inactivated
Inactivated
Off
Setup
Enter
Plug & Play
Language
Clock
Sleep Timer
Timer 1
Timer 2
Timer 3
Game Mode
V-Chip
English
Return
Setup
Inactivated
Inactivated
Inactivated
Off
English
Español
Français
Setup
Enter
Clock
Off
Return
Month / Day / Year
-- / -- / ----
Hour / Min
-- : -- --
Clock Mode
Clock Set
Time Zone
DST
Manual
Auto
Setup
Enter
Plug & Play
Language
Clock ►
Sleep Timer
Timer 1
Timer 2
Timer 3
Game Mode
V-Chip
English
Return
Setup
Off
Inactivated
Inactivated
Inactivated
Off
Time Zone
Select the time zone in which you live.
Enter Return
Newfoundland
Atlantic
Eastern
Central
Mountain
Pacific
Alaska
Hawaii
Move
BN68-00630D-Eng_2.indd 44 2007-04-09 ソタネト 6:54:58

English - 45
Continued...
4 Press the ▲ or ▼ button to select DST (Daylight Saving Time), then press the ENTER
button.
Press the ▲ or ▼ button to select Off or On, then press the ENTER button.
Press the EXIT button to exit.
➢
Depending on the broadcast station and signal, the auto time may not be set correctly.
If this occurs, set the time manually.
➢
Antenna or Cable must be connected in order to set the time automatically.
Option 2: Setting the Clock Manually
1 Press the MENU button.
Press the ◄ or ► button to select Setup, then press the ENTER button.
Press the ▲ or ▼ button to select Clock, then press the ENTER button.
2 Press the ▲ or ▼ button to select Clock Mode, then press the ENTER button.
Press the ▲ or ▼ button to select Manual, then press the ENTER button.
3 Press the ▲ or ▼ button to select Clock Set, then press the ENTER button.
4 Press the ◄ or ► button to move to Month, Day, Year, Hour, or Min.
Set the date and time you want by pressing the ▲ or ▼ button, then press the ENTER
button.
Press the EXIT button to exit.
➢
The current time will appear every time you press the INFO button.
➢
You can set the month, day, year, hour, and minute directly by pressing the number
buttons on the remote control.
Setting the Sleep Timer
The sleep timer automatically shuts off the TV after a preset time (30, 60, 90, 120, 150 and 180 minutes).
1 Press the MENU button.
Press the ◄ or ► button to select Setup, then press the ENTER button.
Press the ▲ or ▼ button to select Sleep Timer, then press the ENTER button.
The Sleep Timer menu is displayed.
2 Press the ▲ or ▼ button to select the minute, then press the ENTER button.
To cancel the set sleep timer:
Press the ▲ or ▼ button to select Off, then press the ENTER button.
Press the EXIT button to exit.
Press the SLEEP button on the remote control until the appropriate time interval
appears (any of the preset values from “30 min” to “180 min”).
Setup
Enter
Clock
Off
Return
Month / Day / Year
-- / -- / ----
Hour / Min
-- : -- --
Clock Mode
Clock Set
Time Zone
DST
Manual
Auto
Setup
Enter
Clock
Off
Return
Month / Day / Year Hour / Min
Clock Mode
Clock Set
Time Zone
DST
--
/
--
/
---- --
:
--
--
Adjust
▲
▼
Manual
Setup
Enter
Clock
Return
Month / Day / Year
-- / -- / ----
Hour / Min
-- : -- --
Clock Mode
Clock Set
Time Zone
DST
Off
Off
On
Auto
-- : -- --
Sleep Timer : 90 min.
Setup
Enter
Plug & Play
Language
Clock
Sleep Timer
Timer 1
Timer 2
Timer 3
Game Mode
V-Chip
English
Return
Setup
Off
Off
Off
Off
30 min
60 min
90 min
120 min
150 min
180 min
BN68-00630D-Eng_2.indd 45 2007-04-09 ソタネト 6:55:01

English - 46
Setting the On/Off Timer
Use this feature to set the TV to turn on or off at a desired time.
1 Press the MENU button.
Press the ◄ or ► button to select Setup, then press the ENTER button.
Press the ▲ or ▼ button to select Timer 1, Timer 2, or Timer 3, then press the ENTER
button.
The Timer 1, Timer 2, or Timer 3 menu is displayed.
2 Press the ◄ or ► button to select the required item below.
Press the ▲ or ▼ button to adjust to the setting satisfied.
Press the EXIT button to exit.
On Time: Select hour, minute, am/pm, and Inactivate/Activate.
(To activate timer with the setting satisfied, set to Activate.)
Off Time: Select hour, minute, am/pm, and Inactivate/Activate.
(To activate timer with the setting satisfied, set to Activate.)
Repeat: Select Once, Everyday, Mon ~ Fri, Mon ~ Sat, or Sat~Sun.
Volume: Select the required volume level.
Contents: When the On Time is active, you can turn on a specific channel or play
back contents such as photo or audio files. (Make sure that an USB device is
connected to your TV.)
➢
Auto Power Off
When you set the timer On, the Television will eventually turn off if no controls are operated
for 3 hours after the TV was turned on by timer. This function is only available in timer On
mode and prevents overheating, which may occur if a TV is on for too long time.
Using the Game Mode
When connecting to a game console such as PlayStation
TM
or Xbox
TM
, you can enjoy a more realistic gaming experience by
selecting game menu.
1 Press the MENU button.
Press the ◄ or ► button to select Setup, then press the ENTER button.
Press the ▲ or ▼ button to select Game Mode, then press the ENTER button.
2 Press the ▲ or ▼ button to select Off, Adventure, Sports, or Standard, then press the ENTER
button.
Press the EXIT button to exit.
Off : It cancels the game mode.
Adventure : It provides clear images for the game implementing dark area such as cave
and room.
Sports : It synchronizes image and sound when implementing fast moving pictures like
sports games.
Standard : Use this function in general cases.
➢
Restrictions on Game Mode (Caution)
● To disconnect the game console and connect another external device, set Game Mode to
Off in the Setup menu.
● If you display the TV menu in Game Mode, the screen shakes slightly.
● The mark ( ) appears on the screen which means that Game Mode is On with the
selected source.
➢
If Game Mode is On
● Picture Mode is automatically changed to Game and users cannot change the mode.
● Sound Mode in the Sound menu is deactivated. Adjust the sound using the equalizer.
● The Reset in the Sound menu is activated. Reset function initializes the Equalizer settings
to the factory default setting.
● The Channel menu is deactivated.
➢
Game Mode is not available in TV mode.
➢
If the picture is poor when external device is connected to TV, check if Game Mode is On. Set Game Mode to Off and connect
external devices.
Setup
Enter
Plug & Play
Language
Clock
Sleep Timer
Timer 1 ►
Timer 2
Timer 3
Game Mode
V-Chip
English
Return
Setup
Off
Inactivated
Inactivated
Inactivated
Off
On Time
Timer 1
Repeat Volume
Contents
Off Time
Return
Adjust
12 : 00 am Inactivate
12 : 00 am Inactivate
Once 10
TV Cable 3
Source
Contents
Music
Photo
Antenna Channel
Return
Adjust
TV
Cable
3
None
None
Setup
Enter
Plug & Play
Language
Clock
Sleep Timer
Timer 1
Timer 2
Timer 3
Game Mode
V-Chip
English
Return
Setup
Off
Inactivated
Inactivated
Inactivated
Off
Setup
Enter
Plug & Play
Language
Clock
Sleep Timer
Timer 1
Timer 2
Timer 3
Game Mode
V-Chip
English
Return
Setup
Off
Off
Off
Off
Off
Adventure
Sports
Standard
BN68-00630D-Eng_2.indd 46 2007-04-09 ソタネト 6:55:05

English - 47
Continued...
Using the V-Chip
The
V-Chip feature automatically locks out programs that are deemed inappropriate for children. The user must enter a PIN
(personal ID number) before any of the V-Chip restrictions are set up or changed.
➢
V-Chip function is not available in HDMI or component mode.
How to Enable/Disable the V-Chip
1 Press the MENU button.
Press the ◄ or ► button to select Setup, then press the ENTER button.
Press the ▲ or ▼ button to select V-Chip, then press the ENTER button.
2 Press the ▲ or ▼ button.
Press the number buttons to enter your current 4-digit PIN.
➢
The default PIN for a new TV set is “0-0-0-0”.
3 The V-Chip menu is displayed.
Press the ▲ or ▼ button to select V
-Chip Lock. To enable the V-Chip feature, press
the ENTER button so that the V-Chip Lock field is On. (Pressing the ▲ or ▼ button will
alternate between On and Off.) Press the ENTER button.
Press the EXIT button to exit.
V-Chip
Setup
Enter
Enter PIN
Return
*
V-Chip
V-Chip Lock
TV Parental Guidelines
MP
AA Rating
Canadian English
Canadian French
Downloadable U.S.Rating
Change PIN
Off
Return
Setup
Enter
Off
On
Setup
Enter
V-Chip ►
Caption
Menu
Transparency
Blue Screen
Melody
Color
Weakness
PC
Home
Theater PC
HDMI Black Level
Film Mode
Setup
Medium
Off
Off
Normal
Off
Medium
BN68-00630D-Eng_2.indd 47 2007-04-09 ソタネト 6:55:07

English - 48
Continued...
Setting Up Your Personal ID Number (PIN)
1 Press the MENU button.
Press the ◄ or ► button to select Setup, then press the ENTER button.
Press the ▲ or ▼ button to select V-Chip, then press the ENTER button.
2 Press the ▲ or ▼ button.
Press the number buttons to enter your current 4-digit PIN.
➢
The default PIN for a new TV set is “0-0-0-0”.
3 The V-Chip menu is displayed.
Press the ▲ or ▼ button to select Change PIN, then press the ENTER button.
4 The Change PIN screen will appear. Press the ▲ or ▼ button.
Press the number buttons to enter your current 4-digit PIN.
Choose any 4 digits for your PIN and enter them.
Re-enter the same 4 digits. The message PIN is changed successfully. is displayed, then
your PIN has been memorized.
Press the EXIT button to exit.
➢
If you forget the PIN, press the remote-control buttons in the following sequence,
which resets the pin to 0-0-0-0 : Power Off. → Mute → 8 → 2 → 4 → Power On.
<for USA models only>
<for Canada models only>
V-Chip
V-Chip Lock
TV Parental Guidelines
MPAA Rating
Canadian English
Canadian French
Downloadable U.S.Rating
Change PIN ►
On
Return
Setup
Enter
Return
Setup
Enter
Change PIN
Enter Current PIN
Enter new PIN.
*
Confirm new PIN.
V-Chip
Setup
Enter
Enter PIN
Return
*
V-Chip
V-Chip Lock
TV Parental Guidelines
MPAA Rating
Downloadable U.S.Rating
Change PIN ►
On
Return
Setup
Enter
Setup
Enter
V-Chip ►
Caption
Menu Transparency
Blue Screen
Melody
Color Weakness
PC
Home Theater PC
HDMI Black Level
Film Mode
Setup
Medium
Off
Off
Normal
Off
Medium
BN68-00630D-Eng_2.indd 48 2007-04-09 ソタネト 6:55:08

English - 49
Continued...
How to Set up Restrictions Using “TV Parental Guidelines”
First, set up a personal identification number (PIN), and enable the V-Chip. (See previous
section.) Parental restrictions can be set up using either of two methods: The TV
guidelines or the MPAA rating.
1 Press the MENU button.
Press the ◄ or ► button to select Setup, then press the ENTER button.
Press the ▲ or ▼ button to select V-Chip, then press the ENTER button.
2 Press the ▲ or ▼ button.
Press the number buttons to enter your current 4-digit PIN.
➢
The default PIN for a new TV set is “0-0-0-0”.
3 The V-Chip menu is displayed.
Press the ▲ or ▼ button to select TV Parental Guidelines, then press the ENTER button.
4 The TV Parental Guidelines screen will appear.
Press the ▲ or ▼ button to select one of the six aged based categories:
TV-Y:
TV-Y7:
TV-G:
TV-PG:
TV-14:
TV-MA:
All children. The themes and elements in this program are specifically
designed for a very young audience, including children from ages two to
six.
Directed to older children. The themes and elements in this program may
include mild physical or comedic violence, or may frighten children under
the age of seven.
General audience. It contains little or no violence, no strong language, and
little or no sexual dialog or situations.
Parental guidance suggested. This program may contain infrequent coarse
language, limited violence, some suggestive sexual dialog and situations.
Parents strongly cautioned. This program may contain sophisticated
themes, sexual content, strong language and more intense violence.
Mature audiences only. This program may contain mature themes, profane
language, graphic violence and explicit sexual content.
V-Chip
V-Chip Lock
TV Parental Guidelines ►
MPAA Rating
Canadian English
Canadian French
Downloadable U.S.Rating
Change PIN
On
Return
Setup
Enter
V-Chip
Setup
Enter
Enter PIN
Return
*
Setup
Enter
V-Chip ►
Caption
Menu Transparency
Blue Screen
Melody
Color Weakness
PC
Home Theater PC
HDMI Black Level
Film Mode
Setup
Medium
Off
Off
Normal
Off
Medium
BN68-00630D-Eng_2.indd 49 2007-04-09 ソタネト 6:55:09

English - 50
5 At this point, one of the TV-Ratings is selected. Press the ENTER button. Depending on
your existing setup, the “ ” symbol will be selected. (Blank = Unblocked, = Blocked)
While “ ” is selected, press the ENTER button to block or unblock the category. To select
a different TV-Rating, press the ▲ or ▼ button and then repeat the process.
FV:
V:
S:
Fantasy violence.
Violence.
Sexual situation.
L:
D:
ALL:
Adult language.
Sexually suggestive dialog.
Lock all TV ratings.
➢
Allow All: Press to unlock all TV ratings.
Block All: Press to lock all TV ratings.
➢
The TV-Y, TV-Y7, TV-G, TV-PG, TV-14, and TV-MA have additional options.
See the next step to change any of the following sub-ratings:
➢
The V-Chip will automatically block certain categories that are “more restrictive”.
For example, if you block TV-Y category, then TV-Y7 will automatically be blocked.
Similarly, if you block the TV-G category, then all the categories in the “young adult”
group will be blocked (TV-G, TV-PG, TV-14, and TV-MA). The subratings (D, L, S, V)
work together similarly. (See next section.)
6 How to set the FV, D, L, S and V sub-ratings. First, select one of these TV-Ratings: TV-Y, TV-Y7, TV-G, TV-PG, TV-14, or TV-MA
(See Step 4), and press the ENTER button.
The “ ” symbol will be displayed for each sub-rating. While “ ” is selected, press the ► button to go to a sub rating.
Press the ENTER button to block the sub rating. To select a different TV-Rating, press the ▲ or ▼ button and then repeat the
process.
Press the ▲ or ▼ button to select Return, then press the ENTER button.
➢
The V-chip will automatically block certain categories that are “more restrictive”.
For example, if you block L sub-rating in TV-PG, then the L sub-ratings in TV-14 and TV-MA will automatically be blocked.
➢
These categories consist of two separate groups: TV-Y and TV-Y7 (young children through age 7), and TV-G through TV-MA
(everybody else). The restrictions for these two groups work independently: If a household includes very young children as well as
young adults, the TV guidelines must be set up separately for each age group.
How to Set up Restrictions Using “MPAA Ratings”
The MPAA rating system uses the Motion Picture Association of America (MPAA) system, and its main application is for
movies. When the V-Chip lock is on, the TV will automatically block any programs that are coded with objectionable ratings
(either MPAA or TV-Ratings).
7 Press the ▲ or ▼ button to select MPAA Rating, then press the ENTER button.
8 The MPAA Rating screen will appear.
Press the ▲ or ▼ button to select an appropriate restriction.
Press the ENTER button to activate the restriction selected.
The “ ” symbol is indicated. While “ ” is selected, press the ENTER button to block or
unblock the category.
Press the ▲ or ▼ button to select Return, then press the ENTER button.
G:
PG:
PG-13:
R:
NC-17:
X:
NR:
General audience (no restriction).
Parental guidance suggested.
Parents strongly cautioned.
Restricted. Children under 17 should be accompanied by an adult.
No children under age 17.
Adults only.
Not rated.
➢
Allow All: Press to unlock all TV ratings
Block All: Press to lock all TV ratings.
➢
The V-Chip will automatically block any category that is “more restrictive”.
For example, if you block the PG-13 category, then R, NC-17, and X will automatically
be blocked also.
Continued...
V-Chip
V-Chip Lock
TV Parental Guidelines
MPAA Rating ►
Canadian English
Canadian French
Downloadable U.S.Rating
Change PIN
On
Return
Setup
Enter
Setup
Enter
MPAA Rating
Return
Allow All Block All
Setup
Enter
TV Parental Guidelines
Return
Allow All Block All
BN68-00630D-Eng_2.indd 50 2007-04-09 ソタネト 6:55:10

English - 51
How to Set up Restrictions Using “Canadian English” (for Canada Models)
9 Press the ▲ or ▼ button to select Canadian English, then press the ENTER button.
10 The Canadian English screen will appear.
Press the ▲ or ▼ button to select an appropriate restriction.
Press the ENTER button to activate the restriction selected. The “ ” symbol is indicated.
Press the ▲ or ▼ button to select Return, then press the ENTER button.
C:
C8+:
G:
PG:
14+:
18+:
Programming intended for children under age 8.
Programming generally considered acceptable for children 8 years and over
to watch on their own.
General programming, suitable for all audiences.
Parental guidance.
Programming contains themes or content which may not be suitable for
viewers under the age of 14.
Adult programming.
➢
Allow All: Press to unlock all TV ratings.
Block All: Press to lock all TV ratings.
➢
The V-Chip will automatically block any category that is “more restrictive”.
For example, if you block the G category, then PG, 14+, and 18+ will automatically be
blocked also.
How to Set up Restrictions Using “Canadian French” (for Canada Models)
11 Press the ▲ or ▼ button to select Canadian French, then press the ENTER button.
12 The Canadian French screen will appear.
Press the ▲ or ▼ button to select an appropriate restriction.
Press the ENTER button to activate the restriction selected. The “ ” symbol is indicated.
Press the ▲ or ▼ button to select Return, then press the ENTER button.
G:
8 ans+:
13 ans+:
16 ans+:
18 ans+:
General.
Not recommended for young children.
Programming may not be suitable for children under the age of 13.
Programming is not suitable for children under the age of 16.
Programming restricted to adults.
➢
Allow All: Press to unlock all TV ratings.
Block All: Press to lock all TV ratings.
➢
The V-Chip will automatically block any category that is “more restrictive”.
For example, if you block 8 ans+ category, then 13 ans+, 16 ans+ and 18 ans+ will
automatically be blocked also.
V-Chip
V-Chip Lock
TV Parental Guidelines
MPAA Rating
Canadian English
Canadian French ►
Downloadable U.S.Rating
Change PIN
On
Return
Setup
Enter
Setup
Enter
Canadian French
Return
Allow All Block All
V-Chip
V-Chip Lock
TV Parental Guidelines
MPAA Rating
Canadian English ►
Canadian French
Downloadable U.S.Rating
Change PIN
On
Return
Setup
Enter
Setup
Enter
Canadian English
Return
Allow All Block All
BN68-00630D-Eng_2.indd 51 2007-04-09 ソタネト 6:55:12

English - 52
Using the V-Chip for Digital Channels
Parental restriction information can be used while watching DTV channels.
13 Press the ▲ or ▼ button to select Downloadable U.S. Rating, then press the ENTER
button.
➢
If information is not downloaded from the broadcasting station, the Downloadable U.S.
Rating menu is deactivated.
➢
Parental restriction information is automatically downloaded while watching DTV
channels. It may take several seconds.
➢
The Downloadable U.S. Rating menu is available for use after information is
downloaded from the broadcasting station. However, depending on the information
from the broadcasting station, it may not be available for use.
14 The Downloadable U.S. Rating screen will appear.
Press the ▲ or ▼ button to select an appropriate restriction.
Press the ENTER button to activate the restriction selected. The “ ” symbol is indicated.
Press the EXIT button to exit.
➢
Allow All: Press to unlock all TV ratings.
Block All: Press to lock all TV ratings.
➢
Parental restriction levels differ depending on the broadcasting station.
➢
The default menu name and downloadable US rating changes depending on the
downloaded information.
➢
Even if you set the on-screen display to your desired language, the Downloadable U.S.
Rating menu will appear in English only.
➢
The rating will automatically block certain categories that are more restrictive.
➢
The rating titles (for example: Humor Level..etc) and TV ratings (for example: DH, MH,
H..etc) may differ depending on the broadcasting station.
Rating title
The number of
current rating
information
The number of all
rating information
V-Chip
V-Chip Lock
TV Parental Guidelines
MPAA Rating
Canadian English
Canadian French
Downloadable U.S.Rating ►
Change PIN
On
Return
Setup
Enter
Setup
Enter
Downloadable U.S. Rating
Return
►
1 / 2
DH
MH
H
VH
EH
Humor Level
Allow All Block All
BN68-00630D-Eng_2.indd 52 2007-04-09 ソタネト 6:55:13

English - 53
Viewing Closed Captions (On-Screen Text Messages) - Digital
The Digital Captions function operates on digital channels.
1 Press the MENU button.
Press the ◄ or ► button to select Setup, then press the ENTER button.
Press the ▲ or ▼ button to select Caption, then press the ENTER button.
2 Press the ▲ or ▼ button to select Caption, then press the ENTER button.
Press the ▲ or ▼ button to select On, then press the ENTER button.
3 Press the ▲ or ▼ button to select Caption Mode, then press the ENTER button.
Press the ▲ or ▼ button to select submenu (Default, Service1~Service6, CC1~CC4, or
Text1~Text4) you want, then press the ENTER button.
4 Press the ▲ or ▼ button to select Digital Caption Options, then press the ENTER button.
➢
Digital Caption Options are available only when Default and Service1~Service6
can be selected in Caption Mode
.
➢
Service1~Service6 in digital caption mode may not be available depending on the
broadcast.
5 Press the ▲ or ▼ button to select the desired caption option, then press the ENTER
button. Press the ▲ or ▼ button to select the desired sub-menu options (see options
below), then press the ENTER button.
Press the EXIT button to exit.
➢
The availability of captions depends on the program being broadcast.
➢
Default means to follow the standard set by the broadcaster.
➢
Foreground and Background cannot be set to have the same color.
➢
Foreground Opacity and Background Opacity cannot be both set to Transparent.
Size: This option consists of Default, Small, Standard, and Large.
Font Style: This option consists of Default, Style0 ~ Style 7. You can change the font you want.
Foreground Color: This option consists of Default, White, Black, Red, Green, Blue, Yellow,
Magenta, and Cyan. You can change the color of the letter.
Background Color: This option consists of Default, White, Black, Red, Green, Blue, Yellow,
Magenta, and Cyan. You can change the background color of the caption.
Foreground Opacity: This option consists of Default, Transparent, Translucent, Solid, and
Flashing. You can change the opacity of the letter.
Background Opacity: This option consists of Default, Transparent, Translucent, Solid, and
Flashing. You can change the background opacity of the caption.
Return to Default: This option sets each of Size, Font Style, Foreground Color, Background
color, Foreground Opacity, and Background Opacity to its default.
Press the CAPTION button on the remote control to select On or Off.
Setup
Enter
Caption
Return
Caption
Caption Mode
Digital Caption Options
Default
Service1
Service2
Enter
Digital Caption Options
Size
Font Style
Foreground Color
Background Color
Foreground Opacity
Background Opacity
Return to Default
Default
Default
Default
Default
Default
Default
Return
Setup
Setup
Enter
Caption
Return
Caption
Caption Mode
Digital Caption Options
Off
On
Setup
Enter
V-Chip
Caption ►
Menu Transparency
Blue Screen
Melody
Color Weakness
PC
Home Theater PC
HDMI Black Level
Film Mode
Setup
Medium
Off
Off
Normal
Off
Medium
BN68-00630D-Eng_2.indd 53 2007-04-09 ソタネト 6:55:14

English - 54
Viewing Closed Captions (On-Screen Text Messages) - Analog
The Analog Caption function operates in either analog TV channel mode or external signal mode.
(Depending on the broadcasting signal, the Analog Caption function may operate on digital channels.)
1 Press the MENU button.
Press the ◄ or ► button to select Setup, then press the ENTER button.
Press the ▲ or ▼ button to select Caption, then press the ENTER button.
2 Press the ▲ or ▼ button to select Caption, then press the ENTER button.
Press the ▲ or ▼ button to select On, then press the ENTER button.
3 Press the ▲ or ▼ button to select Caption Mode, then press the ENTER button.
Press the ▲ or ▼ button to select submenu (Default, CC1~CC4, or Text1~Text4) you
want, then press the ENTER button.
Press the EXIT button to exit.
CC1: The Primary Synchronous Caption Service. These are captions in the primary
language that must be in sync with the sound, preferably matched to a specific
frame.
CC2: The Special Non-Synchronous Use Captions. This channel carries data that is
intended to augment information carried in the program.
CC3: Secondary Synchronous Caption Service. Alternate program-related caption
data, typically second language captions.
CC4: Special Non-Synchronous Use Captions. Similar to CC2.
Text1: First Text Service. This may be various non-program related data.
Text2: Second Text Service. Additional data, usually not program related.
Text3/Text4: Third and Fourth Text Services. These data channels should be used
only if Text1 and Text2 are not sufficient.
➢
● The default is the caption mode provided by broadcasters.
● The Caption feature doesn’t work in COMPONENT, PC, HDMI(DVI) modes.
● The availability of captions depends on the program being broadcast.
● When the Caption is not available to view, change the setup value to CC1 and such.
Press the CAPTION button on the remote control to select On or Off.
Setup
Enter
Caption
Return
Caption
Caption Mode
Digital Caption Options
Off
On
Setup
Enter
Caption
Return
Caption
Caption Mode
Digital Caption Options
Default
CC1
CC2
Setup
Enter
V-Chip
Caption ►
Menu Transparency
Blue Screen
Melody
Color Weakness
PC
Home Theater PC
HDMI Black Level
Film Mode
Setup
Medium
Off
Off
Normal
Off
Medium
BN68-00630D-Eng_2.indd 54 2007-04-09 ソタネト 6:55:17

English - 55
Menu Transparency Level
Adjusts the transparency of the menu screen.
1 Press the MENU button.
Press the ◄ or ► button to select Setup, then press the ENTER button.
Press the ▲ or ▼ button to select Menu Transparency, then press the ENTER button.
2 Press the ▲ or ▼ button to select level, then press the ENTER button.
Press the EXIT button to exit.
Setting the Blue Screen Mode
If no signal is being received or the signal is very weak, a blue screen automatically replaces the noisy picture background.
If you wish to continue viewing the poor picture, you must set the “Blue Screen” mode to “Off”.
1 Press the MENU button.
Press the ◄ or ► button to select Setup, then press the ENTER button.
Press the ▲ or ▼ button to select Blue Screen, then press the ENTER button.
2 Press the ▲ or ▼ button to select Off or On, then press the ENTER button.
Press the EXIT button to exit.
➢
Blue Screen is displayed when there is no signal from an external device, regardless
of the Blue Screen Setting.
Setup
Enter
V-Chip
Caption
Menu Transparency
Blue Screen
Melody
Color Weakness
PC
Home Theater PC
HDMI Black Level
Film Mode
Setup
Medium
Off
Off
Normal
Off
Medium
Setup
Enter
V-Chip
Caption
Menu Transparency
Blue Screen
Melody
Color Weakness
PC
Home Theater PC
HDMI Black Level
Film Mode
Setup
Medium
Off
Off
Normal
Off
Medium
Setup
Enter
V-Chip
Caption
Menu Transparency
Blue Screen
Melody
Color Weakness
PC
Home Theater PC
HDMI Black Level
Film Mode
Setup
Medium
Off
Off
Normal
Off
Medium
Off
On
Setup
Enter
V-Chip
Caption
Menu Transparency
Blue Screen
Melody
Color Weakness
PC
Home Theater PC
HDMI Black Level
Film Mode
Setup
Medium
Off
Off
Normal
Off
Medium
High
Medium
Low
Opaque
BN68-00630D-Eng_2.indd 55 2007-04-09 ソタネト 6:55:19

English - 56
Using the Color Weakness Enhancement Feature
This feature adjusts the Red, Green or Blue color to compensate for the user’s particular color weakness.
1 Press the MENU button.
Press the ◄ or ► button to select Setup, then press the ENTER button.
Press the ▲ or ▼ button to select Color Weakness, then press the ENTER button.
2 Press the ▲ or ▼ button to select Color Weakness, then press the ENTER button.
3 Press the ▲ or ▼ button to select On, then press the ENTER button.
4 Press the ▲ or ▼ button to select a color to be adjusted, then press the ENTER button.
Press the ◄ or ► button to adjust the value of the color selected.
➢
You can also select these options (Red, Green, or Blue) by pressing the ▲ or ▼
button.
Press the EXIT button to exit.
Adjusting the Melody Sound
The TV power on/off melody sound can be adjusted.
1 Press the MENU button.
Press the ◄ or ► button to select Setup, then press the ENTER button.
Press the ▲ or ▼ button to select Melody, then press the ENTER button.
2 Press the ▲ or ▼ button to select Off, Low, Medium, or High, then press the ENTER
button.
Press the EXIT button to exit.
▲
Red
▼
0
Color Weakness
Setup
Enter
Color Weakness
Return
Color Weakness Off
Red
0
Green
0
Blue
0
On
Setup
Enter
Color Weakness
Return
Color Weakness Off
Red
0
Green
0
Blue
0
Off
On
Manufactured under license from Dolby Laboratories. Dolby and the double-D
symbol are trademarks of Dolby Laboratories.
TRADEMARK & LABEL LICENSE NOTICE
Setup
Enter
V-Chip
Caption
Menu Transparency
Blue Screen
Melody
Color Weakness
PC
Home Theater PC
HDMI Black Level
Film Mode
Setup
Medium
Off
Off
Normal
Off
Medium
Setup
Enter
V-Chip
Caption
Menu Transparency
Blue Screen
Melody
Color Weakness
PC
Home Theater PC
HDMI Black Level
Film Mode
Setup
Medium
Off
Off
Normal
Off
Medium
Off
Low
Medium
High
Setup
Enter
V-Chip
Caption
Menu Transparency
Blue Screen
Melody
Color Weakness ►
PC
Home Theater PC
HDMI Black Level
Film Mode
Setup
Medium
Off
Off
Normal
Off
Medium
BN68-00630D-Eng_2.indd 56 2007-04-09 ソタネト 6:55:21

English - 57
Setting the HDMI Black Level
Using this function, you can adjust the image quality when the screen burn (appearance of black level, low contrast, low
color, etc.) is encountered by the HDMI input for RGB limited range (16 to 235).
1 Press the MENU button.
Press the ◄ or ► button to select Setup, then press the ENTER button.
Press the ▲ or ▼ button to select HDMI Black Level, then press the ENTER button.
2 Press the ▲ or ▼ button to select Normal or Low, then press the ENTER button.
Press the EXIT button to exit.
➢
This function is active only when the externel input connects to HDMI (RGB signals).
Setup
Enter
Blue Screen
Melody
Color Weakness
PC
Home Theater PC
HDMI Black Level
Film Mode
Function Help
SW Upgrade
Setup
Off
Off
Normal
Medium
Off
On
Setup
Enter
Blue Screen
Melody
Color Weakness
PC
Home Theater PC
HDMI Black Level
Film Mode
Function Help
SW Upgrade
Setup
Off
Off
Low
Medium
Off
On
Normal
Low
BN68-00630D-Eng_2.indd 57 2007-04-09 ソタネト 6:55:22

English - 58
Setting the Film Mode - Analog
You can automatically sense and process film signals and adjust the picture for optimum quality.
1 Press the MENU button.
Press the ◄ or ► button to select Setup, then press the ENTER button.
Press the ▲ or ▼ button to select Film Mode, then press the ENTER button.
2 Press the ▲ or ▼ button to select Off or On, then press the ENTER button.
Press the EXIT button to exit.
➢
Film Mode is avliable in TV (analog), AV, and S-Video modes.
Setting the Function Help
Displays help on the menu functions.
1 Press the MENU button.
Press the ◄ or ► button to select Setup, then press the ENTER button.
Press the ▲ or ▼ button to select Function Help, then press the ENTER button.
2 Press the ▲ or ▼ button to select Off or On, then press the ENTER button.
Press the EXIT button to exit.
➢
The Function Help default setting is On.
Setup
Enter
Blue Screen
Melody
Color Weakness
PC
Home Theater PC
HDMI Black Level
Film Mode
Function Help
SW Upgrade
Setup
Off
Off
Normal
Medium
Off
In Watching
Off
On
Setup
Enter
Blue Screen
Melody
Color Weakness
PC
Home Theater PC
HDMI Black Level
Film Mode
Function Help
SW Upgrade
Setup
Off
Off
Normal
Medium
Off
On
Setup
Enter
Blue Screen
Melody
Color Weakness
PC
Home Theater PC
HDMI Black Level
Film Mode
Function Help
SW Upgrade
Setup
Off
Off
Normal
Medium
Off
In Watching
Off
On
Setup
Enter
Blue Screen
Melody
Color Weakness
PC
Home Theater PC
HDMI Black Level
Film Mode
Function Help
SW Upgrade
Setup
Off
Off
Normal
Medium
Off
On
BN68-00630D-Eng_2.indd 58 2007-04-09 ソタネト 6:55:23

English - 59
Upgrading the Software
Samsung call center at 1-800-SAMSUNG to receive information about downloading upgrades and using a USB drive.
Upgrades will be possible by connecting a USB drive to the USB port located on the rear of your TV.
1 Insert a USB drive containing the firmware upgrade into the USB Upgrade Port on the rear
of the TV.
2 Press the MENU button.
Press the ◄ or ► button to select Setup, then press the ENTER button.
Press the ▲ or ▼ button to select SW Upgrade, then press the ENTER button.
The message Scanning for USB... It may take up to 30 seconds. is displayed.
Please be careful to not disconnect the power or remove the USB drive while upgrades are being
applied.
The TV will shut off and turn on automatically after completing the firmware upgrade.
Please check the firmware version after the upgrades are complete.
➢
The firmware and upgrade process may be different by country and region.
USB drive
Scanning for USB...
It may take up to 30 seconds.
Software Upgrade
Setup
Enter
Blue Screen
Melody
Color Weakness
PC
Home Theater PC
HDMI Black Level
Film Mode
Function Help
SW Upgrade ►
Setup
Off
Off
Normal
Medium
Off
On
BN68-00630D-Eng_2.indd 59 2007-04-09 ソタネト 6:55:23

English - 60
PC Display
Using Your TV as a Computer (PC) Display
Setting Up Your PC Software (Based on Windows XP)
The Windows display-settings for a typical computer are shown below. The actual screens on your PC will probably be
different, depending upon your particular version of Windows and your particular video card. However, even if your actual
screens look different, the same basic set-up information will apply in almost all cases. (If not, contact your computer
manufacturer or Samsung Dealer.)
1 First, click on Control Panel on the Windows start menu.
2 When the control panel window appears, click on Appearance and Theme and a display
dialog-box will appear.
3 When the control panel window appears, click on Display and a display dialog-box will
appear.
4 Navigate to the Settings tab on the display dialog-box.
The correct size setting (resolution)
Optimum: 1920 x 1080 pixels
If a vertical-frequency option exists on your display settings dialog box, the correct value is
60 or 60 Hz. Otherwise, just click OK and exit the dialog box.
BN68-00630D-Eng_3.indd 60 2007-04-09 ソタネト 7:00:59

English - 61
Display Modes
If the signal from the system equals the standard signal mode, the screen is adjusted automatically. If the signal from the
system doesn’t equal the standard signal mode, adjust the mode by referring to your videocard user guide; otherwise there
may be no video. For the display modes listed below, the screen image has been optimized during manufacture.
D-Sub Input
Video Signal
Resolution
(Dot X Line)
Horizontal
frequency (KHz)
Vertical
frequency (Hz)
Horizontal
Polarity
Vertical
Polarity
IBM
640 x 350
31.46 70.08 P N
720 x 400
31.46 70.08 N P
640 x 480
31.46 59.94 N N
VESA
640 x 480
35.00 70.00 P P
37.86 72.80 N N
37.50 75.00 N N
800 x 600
37.87 60.31 P P
43.75 70.00 P P
48.07 72.18 P P
46.87 75.00 P P
1024 x 768
48.36 60.00 N N
56.47 70.06 N N
57.67 72.00 P P
79.99 75.02 P P
1152 x 864
53.70 60.00 N P
63.00 70.00 N P
64.87 72.00 N P
67.50 75.00 P P
1280 x 960
60.00 60.00 P P
69.93 70.00 P P
72.07 72.00 P P
75.23 75.00 N P
1280 x 1024
63.98 60.02 P P
74.62 70.00 N N
76.82 72.00 N N
79.97 75.02 P P
1920 x 1080
66.58 60.00 P N
HDMI/DVI Input
Video Signal
Resolution
(Dot X Line)
Horizontal
frequency (KHz)
Vertical
frequency (Hz)
Horizontal
Polarity
Vertical
Polarity
IBM
640 x 350 31.47 70.00 P N
720 x 400
31.47 70.00 N P
CEA-861B
640 x 480
31.47 60.00 N N
800 x 600
37.88 60.00 P P
1024 x 768
48.36 60.00 N N
1280 x 1024
63.98 60.00 P P
1920 x 1080
67.50 60.00 P N
(N: Negative / P: Positive)
➢
● When this TV is used as a PC display, 32-bit color is supported.
● Depending on the manufacturer, your PC display screen might appear different. (and depending on your particular version of
Windows.) Check your PC instruction book for information about connecting your PC to a TV.
● If a vertical and horizontal frequency-select mode exists, select 60Hz (vertical) and 66.58KHz (horizontal).
● In some cases, abnormal signals (such as stripes) might appear on the TV screen when the PC power is turned off (or if the PC
is disconnected). If so, press the SOURCE button on the remote control or SOURCE button on the side panel to enter a VIDEO
mode. Also, make sure that the PC is connected.
BN68-00630D-Eng_3.indd 61 2007-04-09 ソタネト 7:01:00

English - 62
Setting up the TV with your PC
How to Auto Adjust
Use the Auto Adjust function to have the TV set automatically adjust the video signals it receives from the PC.
The function also automatically fine-tunes the settings and adjusts the frequency values and positions.
➢
Change to the PC mode first.
1 Press the MENU button.
Press the ◄ or ► button to select Setup, then press the ENTER button.
Press the ▲ or ▼ button to select PC, then press the ENTER button.
2 Press the ▲ or ▼ button to select Auto Adjustment, then press the ENTER button.
The message Auto Adjustment in progress. Please wait. appears on the screen and the
picture adjustments are automatically activated.
Ad justing the Screen Quality
The purpose of the picture quality adjustment is to remove or reduce picture noise. If the noise is not removed by fine tuning
alone, then do the frequency adjustments to the utmost and fine tune again. After the noise has been reduced, re-adjust the
picture so that it is aligned on the center of the screen.
➢
Change to the PC mode first.
3 Press the ▲ or ▼ button to select Image Lock, then press the ENTER button.
4 Press the ▲ or ▼ button to select Coarse or Fine, then press the ENTER button.
Press the ◄ or ► button to adjust the screen quality, then press the ENTER button.
➢
This feature may change the width of the image. If necessary, adjust the position to
center.
5 Select Return by pressing the ▲ or ▼ button, then press the ENTER button to return to the
previous menu.
Continued...
Setup
Enter
PC
Image Lock
Position
Auto Adjustment
Image Reset
Resolution
1152x864 @60Hz
Return
Auto Adjustment in progress.
Please Wait.
Setup
Enter
PC
Image Lock ►
Position
Auto Adjustment
Image Reset
Resolution
1152x864 @60Hz
Return
Setup
Image Lock
Coarse
50
Fine
31
Return
Enter
Adjust
Setup
Enter
Blue Screen
Melody
Color Weakness
PC ►
Home Theater PC
HDMI Black Level
Film Mode
Function Help
SW Upgrade
Setup
Off
Off
Normal
Medium
Off
On
BN68-00630D-Eng_3.indd 62 2007-04-09 ソタネト 7:01:01

English - 63
Changing the Screen Position
After connecting the TV to your PC, adjust the position of the screen if it is not well-aligned.
➢
Change to the PC mode first.
6 Press the ▲ or ▼ button to select Position, then press the ENTER button.
7 Press the ▲ or ▼ button to adjust the Vertical Position.
Press the ◄ or ► button to adjust the Horizontal Position.
Press the ENTER button.
Initializing the Image Settings
You can reset the previously adjusted settings to the factory defaults.
➢
Change to the PC mode first.
8 Press the ▲ or ▼ button to select Image Reset, then press the ENTER button.
9 The message Image Reset is completed. appears on the screen.
Viewing the Current Resolution
You can get the resolution information of your PC.
➢
Change to the PC mode first.
10 Press the ▲ or ▼ button to select Resolution.
The resolution information is displayed on the screen.
Press the EXIT button to exit.
➢
To change the resolution, see page 61.
Setup
Enter
PC
Image Lock
Position ►
Auto Adjustment
Image Reset
Resolution
1152x864 @60Hz
Return
Setup
Enter
PC
Image Lock
Position
Auto Adjustment
Image Reset
Resolution
1152x864 @60Hz
Return
Image Reset is completed.
Position
Move Enter Return
▼
▼
▲
▼
Setup
Enter
PC
Image Lock
Position
Auto Adjustment
Image Reset
Resolution
1152x864 @60Hz
Return
BN68-00630D-Eng_3.indd 63 2007-04-09 ソタネト 7:01:02

English - 64
Changing the Picture Size (PC Mode)
You can select the picture size which best corresponds to your viewing requirements.
1 Press the MENU button.
Press the ENTER button to select Picture.
Press the ▲ or ▼ button to select Size, then press the ENTER button.
2 Press the ▲ or ▼ button to select the screen format you want, then press the ENTER
button.
Press the EXIT button to exit.
Wide TV: Sets the picture in Wide TV format.
Wide PC: Set the picture in Wide PC format.
4:3 : Set the picture in 4:3 format
Press the P.SIZE button on the remote control to change the picture size.
➢
Wide PC: The picture position ( , ) and size ( ) adjustment are available by
pressing the ▲/▼/◄/► button.
Setting the Home Theater PC
You can view higher quality pictures by configuring the screen settings in PC Mode. If you set the Home Theater PC function
to On, you can configure the Detailed Settings (when Picture Mode is set to Standard or Movie) as in PC Mode.
1 Press the MENU button.
Press the ◄ or ► button to select Setup, then press the ENTER button.
Press the ▲ or ▼ button to select Home Theater PC, then press the ENTER button.
2 Press the ▲ or ▼ button to select Off or On, then press the ENTER button.
Press the EXIT button to exit.
➢
This function is available only in PC mode.
Picture
Enter
Picture
Mode
Contrast
80
Brightness
55
Sharpness
50
Color
60
Tint
G50 R50
Color Tone
Detailed Settings
Size
Return
Dynamic
Cool1
Wide PC
Picture
Enter
Picture
Mode
Contrast
80
Brightness
55
Sharpness
50
Color
60
Tint
G50 R50
Color Tone
Detailed Settings
Size
Return
Dynamic
Cool1
Wide PC
Wide TV
Wide PC
4:3
Wide PC
▲
▼
Setup
Enter
Blue Screen
Melody
Color Weakness
PC
Home Theater PC
HDMI Black Level
Film Mode
Function Help
SW Upgrade
Setup
Off
Off
Normal
Medium
Off
On
Setup
Enter
Blue Screen
Melody
Color Weakness
PC
Home Theater PC
HDMI Black Level
Film Mode
Function Help
SW Upgrade
Setup
Off
Off
Normal
Medium
Off
On
Off
On
BN68-00630D-Eng_3.indd 64 2007-04-09 ソタネト 7:01:04

English - 65
Appendix
Identifying Problems
If the TV seems to have a problem, first try this list of possible problems and solutions.
If none of these troubleshooting tips apply, call your nearest Samsung service center.
Problem Possible Solution
Poor picture quality. - Try another channel.
- Adjust the antenna.
- Check all wire connections.
Poor sound quality. - Try another channel.
- Adjust the antenna.
No picture or sound. - Try another channel.
- Press the
SOURCE button.
- Make sure the TV is plugged in.
- Check the antenna connections.
- Make sure the MUTE button is off.
No sound or sound is too low at
maximum volume.
First, check the volume of units connected to your TV (digital broadcasting receiver, DVD,
cable broadcasting receiver, VCR, etc.). Then, adjust the TV volume accordingly.
Picture rolls vertically. Check all connections.
The TV operates erratically. Unplug the TV for 30 seconds, then try operating it again.
The TV won’t turn on. Make sure the wall outlet is working.
Remote control malfunctions - Replace the remote control batteries.
- Clean the upper edge of the remote control(transmission window).
- Check the battery terminals.
- Press the TV button to put your remote control in the TV mode.
- Make sure the remote has batteries.
- Check that the “+” and “-” ends of the batteries are inserted correctly.
Digital broadcasting screen problem. Please check the digital signal strength and input antenna.
The image is too light or too dark. - Adjust the Brightness and Contrast.
- Adjust the Fine tuning.
The visual qualities of digital channels
vary.
The visual qualities of digital channels may vary depending on the original production
method(analog or digital).
- If the original production method is digital: High visual quality program.
- If the original production method is analog: The digital program displayed on the screen is
originally an analog program which has been converted to digital.
The visual quality is of an SD(Standard Definition) grade.
Although the TV caption shows HD,
the visual quality is not satisfactory.
The HD(High Definition) caption that appears when switching channels or when pressing the
Information button on the remote control means the selected channel is a digital channel.
If the broadcasting station converts an analog signal into digital and transmits the signal, the
visual quality may not be perfect.
➢
The display panel used for the DLP TV is composed of many tiny pixels.
These pixels may occasionally appear on the screen.
BN68-00630D-Eng_3.indd 65 2007-04-09 ソタネト 7:01:07

English - 66
Replacing the Lamp
Why do I need to replace the lamp?
● The lamp used in a DLP TV has a limited lifespan. For the best screen quality it needs to be replaced periodically.
After replacing the lamp, the screen quality will be bright and clear as new.
When do I need to replace it?
● It should be replaced when the screen becomes darker, less clear or when all three LEDs on the front (TIMER, LAMP, & STAND
BY/TEMP) are flashing.
Check before lamp replacement
● The lamp must be the same code number and type.
● The lamp type is indicated on the rear of the TV. It is also indicated on the lamp case.
● After checking the code number for the lamp, give the code number to the store where you purchased the TV or to a Samsung
Service center.
Caution
● Replace with the correct code numbered lamp to avoid damage to the TV.
● Turn the power off and wait for 30 minutes before replacing the lamp as it will be hot.
● Do not touch the glass part of the lamp with your bare hands and do not insert any foreign object inside the cover as it may cause
poor screen quality, electric shock or fire.
● Do not place the old lamp near flammable objects or within the reach of children.
● Be sure to connect this TV directly to an AC wall outlet. If the TV’s AC plug is connected to a cable box or other source, it will not
allow for proper cool down time.
➢
For replacement, you will need a 5.91-Inch screwdriver and a pair of gloves.
1 Unplug the TV, then use a screwdriver to remove the screws.
2 Remove the Lamp cover.
3 Remove the Lamp cover duct holding the word clip and pulling
it out.
4 Remove the screw securing the Lamp by using a screwdriver.
5 Separate the Lamp from the engine by holding the handle and
pulling it out.
➢
● Be sure the replacement Lamp is the same type.
● After replacing the lamp, align the lamp cover with the groove and secure the screws.
● The TV will not turn on if the lamp cover is not correctly closed (as this will activate the protective circuit).
BN68-00630D-Eng_3.indd 66 2007-04-09 ソタネト 7:01:08

English - 67
Cleaning and Maintaining Your TV
Please follow these guidelines to get the maximum performance from your TV.
Placement
● Do not put the TV near extremely hot, cold, humid or dusty places.
● Do not place the TV near appliances with electric motors that create magnetic fields, such as vacuum cleaners.
● Keep the ventilation openings clear; do not place the TV on a soft surface, such as cloth or paper.
● Place the TV in a vertical position only.
Liquids
● Do not handle liquids near or on the TV. Liquids that spill into it can cause serious damage.
Cabinet
● Never open the cabinet or touch the parts inside.
● Wipe your TV with a clean, dry cloth. Never use water, cleaning fluids, wax, or chemicals.
● This DLP TV projects the image onto a large screen by applying an optical system.
If you place the TV set face down, it might cause a problem because dirt, or some other contaminant may become attached to the
inside of the TV set.
Temperature
● If your TV is suddenly moved from a cold to a warm place, unplug the power cord, and allow at least two hours for moisture that
may have formed inside the unit to dry completely.
Using Your TV in Another Country
If you plan to take your TV with you to a foreign country, please be aware of the different
television systems that are in use around the world. A TV designed for one system may not work
properly with another system due to differences in the TV channel frequencies.
BN68-00630D-Eng_3.indd 67 2007-04-09 ソタネト 7:01:09

English - 68
Technical Specifications
The descriptions and characteristics in this booklet are given for information purposes only and are subject to modification
without notice.
Model Name HL-T5656W HL-T6156W HL-T6756W
Screen Size (Diagonal) 56 inch 61 inch 67 inch
PC Resolution 1920 X 1080 @ 60Hz
Sound (Output) 10W x 2
Dimension (W x H x D)
50.9 x 35.7 x 16.3 inches
(1292 x 906 x 415 mm)
55.3 x 38.6 x 17.6 inches
(1405 x 981 x 448 mm)
62.4 x 44.3 x 19.1 inches
(1586 x 1124 x 486 mm)
Weight 73.4 lbs(33.3 Kg) 79.4 lbs(36 Kg) 109.8 lbs(49.8 Kg)
Environmental Considerations
Operating Temperature
Operating Humidity
Storage Temperature
Storage Humidity
50 °F to 104 °F (10 °C to 40 °C)
10% to 80%, non-condensing
-4 °F to 113 °F (-20 °C to 45 °C)
5% to 95%, non-condensing
➢
This device is a Class B digital apparatus.
➢
Design and specifications are subject to change without prior notice.
➢
For the power supply and Power Consumption, refer to the label attached to the product.
BN68-00630D-Eng_3.indd 68 2007-04-09 ソタネト 8:18:25

English - 69
The GNU General Public License (GPL)
Version 2, June 1991
Copyright (C) 1989, 1991 Free Software Foundation, Inc.
59 Temple Place, Suite 330, Boston, MA 02111-1307 USA
Everyone is permitted to copy and distribute verbatim copies
of this license document, but changing it is not allowed.
Preamble
The licenses for most software are designed to take away your freedom to share and change it. By contrast, the GNU General Public License is intended to
guarantee your freedom to share and change free software--to make sure the software is free for all its users. This General Public License applies to most
of the Free Software Foundation’s software and to any other program whose authors commit to using it. (Some other Free Software Foundation software is
covered by the GNU Library General Public License instead.) You can apply it to your programs, too.
When we speak of free software, we are referring to freedom, not price. Our General Public Licenses are designed to make sure that you have the freedom
to distribute copies of free software (and charge for this service if you wish), that you receive source code or can get it if you want it, that you can change
the software or use pieces of it in new free programs; and th at you know you can do these things.
To protect your rights, we need to make restrictions that forbid anyone to deny you these rights or to ask you to surrender the rights. These restrictions
translate to certain responsibilities for you if you distribute copies of the software, or if you modify it.
For example, if you distribute copies of such a program, whether gratis or for a fee, you must give the recipients all the rights that you have. You must make
sure that they, too, receive or can get the source code. And you must show them these terms so they know their rights.
We protect your rights with two steps: (1) copyright the software, and (2) offer you this license which gives you legal permission to copy, distribute and/or
modify the software.
Also, for each author’s protection and ours, we want to make certain that everyone understands that there is no warranty for this free software. If the
software is modified by someone else and passed on, we want its recipients to know that what they have is not the original, so that any problems introduced
by others will not reflect on the original authors’ reputations.
Finally, any free program is threatened constantly by software patents. We wish to avoid the danger that redistributors of a free program will individually
obtain patent licenses, in effect making the program proprietary. To prevent this, we have made it clear that any patent must be licensed for everyone’s free
use or not licensed at all.
The precise terms and conditions for copying, distribution and modification follow.
TERMS AND CONDITIONS FOR COPYING, DISTRIBUTION AND MODIFICATION
0. This License applies to any program or other work which contains a notice placed by the copyright holder saying it may be distributed under the terms
of this General Public License. The “Program”, below, refers to any such program or work, and a “work based on the Program” means either the Program
or any derivative work under copyright law: that is to say, a work containing the Program or a portion of it, either verbatim or with modifications and/or
translated into another language. (Hereinafter, translation is included without limitation in the term “modification”.) Each licensee is addressed as “you”.
Activities other than copying, distribution and modification are not covered by this License; they are outside its scope. The act of running the Program is not
restricted, and the output from the Program is covered only if its contents constitute a work based on the Program (independent of having been made by
running the Program). Whether that is true depends on what the Program does.
1. You may copy and distribute verbatim copies of the Program’s source code as you receive it, in any medium, provided that you conspicuously and
appropriately publish on each copy an appropriate copyright notice and disclaimer of warranty; keep intact all the notices that refer to this License and to
the absence of any warranty; and give any other recipients of the Program a copy of this License along with the Program.
You may charge a fee for the physical act of transferring a copy, and you may at your option offer warranty protection in exchange for a fee.
2. You may modify your copy or copies of the Program or any portion of it, thus forming a work based on the Program, and copy and distribute such
modifications or work under the terms of Section 1 above, provided that you also meet all of these conditions:
a) You must cause the modified files to carry prominent notices stating that you changed the files and the date of any change.
b) You must cause any work that you distribute or publish, that in whole or in part contains or is derived from the Program or any part thereof, to be
licensed as a whole at no charge to all third parties under the terms of this License.
c) If the modified program normally reads commands interactively when run, you must cause it, when started running for such interactive use in the
most ordinary way, to print or display an announcement including an appropriate copyright notice and a notice that there is no warranty (or else,
saying that you provide a warranty) and that users may redistribute the program under these conditions, and telling the user how to view a copy of
this License. (Exception: if the Program itself is interactive but does not normally print such an announcement, your work based on the Program is not
required to print an announcement.)
Continued...
This product uses parts of the software from the Independent JPEG Group.
This product uses parts of the software owned by the Freetype Project (www.freetype.org).
This product uses some software programs which are distributed under the GPL/LGPL license. Accordingly, the following GPL and
LGPL software source codes that have been used in this product can be provided after asking to [email protected].
GPL software: Linux Kernel, Busybox, Binutils
LGPL software: Glibc
BN68-00630D-Eng_3.indd 69 2007-04-09 ソタネト 7:01:09

English - 70
These requirements apply to the modified work as a whole. If identifiable sections of that work are not derived from the Program, and can be reasonably
considered independent and separate works in themselves, then this License, and its terms, do not apply to those sections when you distribute them as
separate works. But when you distribute the same sections as part of a whole which is a work based on the Program, the distribution of the whole must be
on the terms of this License, whose permissions for other licensees extend to the entire whole, and thus to each and every part regardless of who wrote it.
Thus, it is not the intent of this section to claim rights or contest your rights to work written entirely by you; rather, the intent is to exercise the right to control
the distribution of derivative or collective works based on the Program.
In addition, mere aggregation of another work not based on the Program with the Program (or with a work based on the Program) on a volume of a storage
or distribution medium does not bring the other work under the scope of this License.
3. You may copy and distribute the Program (or a work based on it, under Section 2) in object code or executable form under the terms of Sections 1 and 2
above provided that you also do one of the following:
a) Accompany it with the complete corresponding machine-readable source code, which must be distributed under the terms of Sections 1 and 2
above on a medium customarily used for software interchange; or,
b) Accompany it with a written offer, valid for at least three years, to give any third party, for a charge no more than your cost of physically performing
source distribution, a complete machine-readable copy of the corresponding source code, to be distributed under the terms of Sections 1 and 2 above
on a medium customarily used for software interchange; or,
c)
Accompany it with the information you received as to the offer to distribute corresponding source code. (This alternative is allowed only for
noncommercial distribution and only if you received the program in object code or executable form with such an offer, in accord with Subsection b
above.)
The source code for a work means the preferred form of the work for making modifications to it. For an executable work, complete source code means
all the source code for all modules it contains, plus any associated interface definition files, plus the scripts used to control compilation and installation of
the executable. However, as a special exception, the source code distributed need not include anything that is normally distributed (in either source or
binary form) with the major components (compiler, kernel, and so on) of the operating system on which the executable runs, unless that component itself
accompanies the executable.
If distribution of executable or object code is made by offering access to copy from a designated place, then offering equivalent access to copy the source
code from the same place counts as distribution of the source code, even though third parties are not compelled to copy the source along with the object
code.
4. You may not copy, modify, sublicense, or distribute the Program except as expressly provided under this License. Any attempt otherwise to copy, modify,
sublicense or distribute the Program is void, and will automatically terminate your rights under this License. However, parties who have received copies, or
rights, from you under this License will not have their licenses terminated so long as such parties remain in full compliance.
5. You are not required to accept this License, since you have not signed it. However, nothing else grants you permission to modify or distribute the
Program or its derivative works. These actions are prohibited by law if you do not accept this License. Therefore, by modifying or distributing the Program
(or any work based on the Program), you indicate your acceptance of this License to do so, and all its terms and conditions for copying, distributing or
modifying the Program or works based on it.
6. Each time you redistribute the Program (or any work based on the Program), the recipient automatically receives a license from the original licensor to
copy, distribute or modify the Program subject to these terms and conditions. You may not impose any further restrictions on the recipients’ exercise of the
rights granted herein. You are not responsible for enforcing compliance by third parties to this License.
7. If, as a consequence of a court judgment or allegation of patent infringement or for any other reason (not limited to patent issues), conditions are
imposed on you (whether by court order, agreement or otherwise) that contradict the conditions of this License, they do not excuse you from the conditions
of this License. If you cannot distribute so as to satisfy simultaneously your obligations under this License and any other pertinent obligations, then as a
consequence you may not distribute the Program at all. For example, if a patent license would not permit royalty-free redistribution of the Program by all
those who receive copies directly or indirectly through you, then the only way you could satisfy both it and this License would be to refrain entirely from
distribution of the Program.
If any portion of this section is held invalid or unenforceable under any particular circumstance, the balance of the section is intended to apply and the
section as a whole is intended to apply in other circumstances.
It is not the purpose of this section to induce you to infringe any patents or other property right claims or to contest validity of any such claims; this section
has the sole purpose of protecting the integrity of the free software distribution system, which is implemented by public license practices. Many people have
made generous contributions to the wide range of software distributed through that system in reliance on consistent application of that system; it is up to the
author/donor to decide if he or she is willing to distribute software through any other system and a licensee cannot impose that choice.
This section is intended to make thoroughly clear what is believed to be a consequence of the rest of this License.
8. If the distribution and/or use of the Program is restricted in certain countries either by patents or by copyrighted interfaces, the original copyright holder
who places the Program under this License may add an explicit geographical distribution limitation excluding those countries, so that distribution is
permitted only in or among countries not thus excluded. In such case, this License incorporates the limitation as if written in the body of this License.
9. The Free Software Foundation may publish revised and/or new versions of the General Public License from time to time. Such new versions will be
similar in spirit to the present version, but may differ in detail to address new problems or concerns.
Each version is given a distinguishing version number. If the Program specifies a version number of this License which applies to it and “any later version”,
you have the option of following the terms and conditions either of that version or of any later version published by the Free Software Foundation. If the
Program does not specify a version number of this License, you may choose any version ever published by the Free Software Foundation.
Continued...
BN68-00630D-Eng_3.indd 70 2007-04-09 ソタネト 7:01:09

English - 71
10. If you wish to incorporate parts of the Program into other free programs whose distribution conditions are different, write to the author to ask for
permission. For software which is copyrighted by the Free Software Foundation, write to the Free Software Foundation; we sometimes make exceptions for
this. Our decision will be guided by the two goals of preserving the free status of all derivatives of our free software and of promoting the sharing and reuse
of software generally.
NO WARRANTY
11. BECAUSE THE PROGRAM IS LICENSED FREE OF CHARGE, THERE IS NO WARRANTY FOR THE PROGRAM, TO THE EXTENT PERMITTED
BY APPLICABLE LAW. EXCEPT WHEN OTHERWISE STATED IN WRITING THE COPYRIGHT HOLDERS AND/OR OTHER PARTIES PROVIDE
THE PROGRAM “AS IS” WITHOUT WARRANTY OF ANY KIND, EITHER EXPRESSED OR IMPLIED, INCLUDING, BUT NOT LIMITED TO, THE
IMPLIED WARRANTIES OF MERCHANTABILITY AND FITNESS FOR A PARTICULAR PURPOSE. THE ENTIRE RISK AS TO THE QUALITY AND
PERFORMANCE OF THE PROGRAM IS WITH YOU. SHOULD THE PROGRAM PROVE DEFECTIVE, YOU ASSUME THE COST OF ALL NECESSARY
SERVICING, REPAIR OR CORRECTION.
12. IN NO EVENT UNLESS REQUIRED BY APPLICABLE LAW OR AGREED TO IN WRITING WILL ANY COPYRIGHT HOLDER, OR ANY OTHER
PARTY WHO MAY MODIFY AND/OR REDISTRIBUTE THE PROGRAM AS PERMITTED ABOVE, BE LIABLE TO YOU FOR DAMAGES, INCLUDING
ANY GENERAL, SPECIAL, INCIDENTAL OR CONSEQUENTIAL DAMAGES ARISING OUT OF THE USE OR INABILITY TO USE THE PROGRAM
(INCLUDING BUT NOT LIMITED TO LOSS OF DATA OR DATA BEING RENDERED INACCURATE OR LOSSES SUSTAINED BY YOU OR THIRD
PARTIES OR A FAILURE OF THE PROGRAM TO OPERATE WITH ANY OTHER PROGRAMS), EVEN IF SUCH HOLDER OR OTHER PARTY HAS
BEEN ADVISED OF THE POSSIBILITY OF SUCH DAMAGES.
END OF TERMS AND CONDITIONS
How to Apply These Terms to Your New Programs
If you develop a new program, and you want it to be of the greatest possible use to the public, the best way to achieve this is to make it free software which
everyone can redistribute and change under these terms.
To do so, attach the following notices to the program. It is safest to attach them to the start of each source file to most effectively convey the exclusion of
warranty; and each file should have at least the “copyright” line and a pointer to where the full notice is found.
One line to give the program’s name and a brief idea of what it does.
Copyright (C) <year> <name of author>
This program is free software; you can redistribute it and/or modify it under the terms of the GNU General Public License as published by the Free
Software Foundation; either version 2 of the License, or (at your option) any later version.
This program is distributed in the hope that it will be useful, but WITHOUT ANY WARRANTY; without even the implied warranty of
MERCHANTABILITY or FITNESS FOR A PARTICULAR PURPOSE. See the GNU General Public License for more details.
You should have received a copy of the GNU General Public License along with this program; if not, write to the Free Software Foundation, Inc., 59
Temple Place, Suite 330, Boston, MA 02111-1307 USA
Also add information on how to contact you by electronic and paper mail.
If the program is interactive, make it output a short notice like this when it starts in an interactive mode:
Gnomovision version 69, Copyright (C) year name of author Gnomovision comes with ABSOLUTELY NO WARRANTY; for details type `show w’. This
is free software, and you are welcome to redistribute it under certain conditions; type `show c’ for details.
The hypothetical commands `show w’ and `show c’ should show the appropriate parts of the General Public License. Of course, the commands you use
may be called something other than `show w’ and `show c’; they could even be mouse-clicks or menu items--whatever suits your program.
You should also get your employer (if you work as a programmer) or your school, if any, to sign a “copyright disclaimer” for the program, if necessary. Here
is a sample; alter the names:
Yoyodyne, Inc., hereby disclaims all copyright interest in the program `Gnomovision’ (which makes passes at compilers) written by James Hacker.
signature of Ty Coon, 1 April 1989
Ty Coon, President of Vice
This General Public License does not permit incorporating your program into proprietary programs. If your program is a subroutine library, you may consider
it more useful to permit linking proprietary applications with the library. If this is what you want to do, use the GNU Library General Public License instead of
this License.
Continued...
BN68-00630D-Eng_3.indd 71 2007-04-09 ソタネト 7:01:09

English - 72
GNU Lesser General Public License (LGPL)
Version 2.1, February 1999
Copyright (C) 1991, 1999 Free Software Foundation, Inc. 59 Temple Place, Suite 330, Boston, MA 02111-1307 USA Everyone is permitted to copy and
distribute verbatim copies of this license document, but changing it is not allowed.
[This is the first released version of the Lesser GPL. It also counts as the successor of the GNU Library Public License, version 2, hence the version
number 2.1.]
Preamble
The licenses for most software are designed to take away your freedom to share and change it. By contrast, the GNU General Public Licenses are intended
to guarantee your freedom to share and change free software--to make sure the software is free for all its users.
This license, the Lesser General Public License, applies to some specially designated software packages--typically libraries--of the Free Software
Foundation and other authors who decide to use it. You can use it too, but we suggest you first think carefully about whether this license or the ordinary
General Public License is the better strategy to use in any particular case, based on the explanations below.
When we speak of free software, we are referring to freedom of use, not price. Our General Public Licenses are designed to make sure that you have the
freedom to distribute copies of free software (and charge for this service if you wish); that you receive source code or can get it if you want it; that you can
change the software and use pieces of it in new free programs; and that you are informed that you can do these things.
To protect your rights, we need to make restrictions that forbid distributors to deny you these rights or to ask you to surrender these rights. These
restrictions translate to certain responsibilities for you if you distribute copies of the library or if you modify it.
For example, if you distribute copies of the library, whether gratis or for a fee, you must give the recipients all the rights that we gave you. You must make
sure that they, too, receive or can get the source code. If you link other code with the library, you must provide complete object files to the recipients, so that
they can relink them with the library after making changes to the library and recompiling it. And you must show them these terms so they know their rights.
We protect your rights with a two-step method: (1) we copyright the library, and (2) we offer you this license, which gives you legal permission to copy,
distribute and/or modify the library.
To protect each distributor, we want to make it very clear that there is no warranty for the free library. Also, if the library is modified by someone else and
passed on, the recipients should know that what they have is not the original version, so that the original author’s reputation will not be affected by problems
that might be introduced by others.
Finally, software patents pose a constant threat to the existence of any free program. We wish to make sure that a company cannot effectively restrict the
users of a free program by obtaining a restrictive license from a patent holder. Therefore, we insist that any patent license obtained for a version of the
library must be consistent with the full freedom of use specified in this license.
Most GNU software, including some libraries, is covered by the ordinary GNU General Public License. This license, the GNU Lesser General Public
License, applies to certain designated libraries, and is quite different from the ordinary General Public License. We use this license for certain libraries in
order to permit linking those libraries into non-free programs.
When a program is linked with a library, whether statically or using a shared library, the combination of the two is legally speaking a combined work, a
derivative of the original library. The ordinary General Public License therefore permits such linking only if the entire combination fits its criteria of freedom.
The Lesser General Public License permits more lax criteria for linking other code with the library.
We call this license the “Lesser” General Public License because it does Less to protect the user’s freedom than the ordinary General Public License. It
also provides other free software developers Less of an advantage over competing non-free programs. These disadvantages are the reason we use the
ordinary General Public License for many libraries. However, the Lesser license provides advantages in certain special circumstances.
For example, on rare occasions, there may be a special need to encourage the widest possible use of a certain library, so that it becomes a de-facto
standard. To achieve this, non-free programs must be allowed to use the library. A more frequent case is that a free library does the same job as widely
used non-free libraries. In this case, there is little to gain by limiting the free library to free software only, so we use the Lesser General Public License.
In other cases, permission to use a particular library in non-free programs enables a greater number of people to use a large body of free software. For
example, permission to use the GNU C Library in non-free programs enables many more people to use the whole GNU operating system, as well as its
variant, the GNU/Linux operating system.
Although the Lesser General Public License is Less protective of the users’ freedom, it does ensure that the user of a program that is linked with the Library
has the freedom and the wherewithal to run that program using a modified version of the Library.
The precise terms and conditions for copying, distribution and modification follow. Pay close attention to the difference between a “work based on the
library” and a “work that uses the library”. The former contains code derived from the library, whereas the latter must be combined with the library in order to
run.
TERMS AND CONDITIONS FOR COPYING, DISTRIBUTION AND MODIFICATION
0. This License Agreement applies to any software library or other program which contains a notice placed by the copyright holder or other authorized party
saying it may be distributed under the terms of this Lesser General Public License (also called “this License”). Each licensee is addressed as “you”.
A “library” means a collection of software functions and/or data prepared so as to be conveniently linked with application programs (which use some of
those functions and data) to form executables.
The “Library”, below, refers to any such software library or work which has been distributed under these terms. A “work based on the Library” means either
the Library or any derivative work under copyright law: that is to say, a work containing the Library or a portion of it, either verbatim or with modifications
and/or translated straightforwardly into another language. (Hereinafter, translation is included without limitation in the term “modification”.)
Continued...
BN68-00630D-Eng_3.indd 72 2007-04-09 ソタネト 7:01:09

English - 73
“Source code” for a work means the preferred form of the work for making modifications to it. For a library, complete source code means all the source code
for all modules it contains, plus any associated interface definition files, plus the scripts used to control compilation and installation of the library.
Activities other than copying, distribution and modification are not covered by this License; they are outside its scope. The act of running a program using
the Library is not restricted, and output from such a program is covered only if its contents constitute a work based on the Library (independent of the use of
the Library in a tool for writing it). Whether that is true depends on what the Library does and what the program that uses the Library does.
1. You may copy and distribute verbatim copies of the Library’s complete source code as you receive it, in any medium, provided that you conspicuously
and appropriately publish on each copy an appropriate copyright notice and disclaimer of warranty; keep intact all the notices that refer to this License and
to the absence of any warranty; and distribute a copy of this License along with the Library.
You may charge a fee for the physical act of transferring a copy, and you may at your option offer warranty protection in exchange for a fee.
2. You may modify your copy or copies of the Library or any portion of it, thus forming a work based on the Library, and copy and distribute such
modifications or work under the terms of Section 1 above, provided that you also meet all of these conditions:
a) The modified work must itself be a software library.
b) You must cause the files modified to carry prominent notices stating that you changed the files and the date of any change.
c) You must cause the whole of the work to be licensed at no charge to all third parties under the terms of this License.
d) If a facility in the modified Library refers to a function or a table of data to be supplied by an application program that uses the facility, other than as
an argument passed when the facility is invoked, then you must make a good faith effort to ensure that, in the event an application does not supply
such function or table, the facility still operates, and performs whatever part of its purpose remains meaningful.
(For example, a function in a library to compute square roots has a purpose that is entirely well-defined independent of the application. Therefore,
Subsection 2d requires that any application-supplied function or table used by this function must be optional: if the application does not supply it, the
square root function must still compute square roots.)
These requirements apply to the modified work as a whole. If identifiable sections of that work are not derived from the Library, and can be reasonably
considered independent and separate works in themselves, then this License, and its terms, do not apply to those sections when you distribute them as
separate works. But when you distribute the same sections as part of a whole which is a work based on the Library, the distribution of the whole must be
on the terms of this License, whose permissions for other licensees extend to the entire whole, and thus to each and every part regardless of who wrote it.
Thus, it is not the intent of this section to claim rights or contest your rights to work written entirely by you; rather, the intent is to exercise the right to
control the distribution of derivative or collective works based on the Library.
In addition, mere aggregation of another work not based on the Library with the Library (or with a work based on the Library) on a volume of a storage
or distribution medium does not bring the other work under the scope of this License.
3. You may opt to apply the terms of the ordinary GNU General Public License instead of this License to a given copy of the Library. To do this, you must
alter all the notices that refer to this License, so that they refer to the ordinary GNU General Public License, version 2, instead of to this License. (If a newer
version than version 2 of the ordinary GNU General Public License has appeared, then you can specify that version instead if you wish.) Do not make any
other change in these notices.
Once this change is made in a given copy, it is irreversible for that copy, so the ordinary GNU General Public License applies to all subsequent copies and
derivative works made from that copy.
This option is useful when you wish to copy part of the code of the Library into a program that is not a library.
4. You may copy and distribute the Library (or a portion or derivative of it, under Section 2) in object code or executable form under the terms of Sections 1
and 2 above provided that you accompany it with the complete corresponding machine-readable source code, which must be distributed under the terms of
Sections 1 and 2 above on a medium customarily used for software interchange.
If distribution of object code is made by offering access to copy from a designated place, then offering equivalent access to copy the source code from the
same place satisfies the requirement to distribute the source code, even though third parties are not compelled to copy the source along with the object
code.
5. A program that contains no derivative of any portion of the Library, but is designed to work with the Library by being compiled or linked with it, is called a
“work that uses the Library”. Such a work, in isolation, is not a derivative work of the Library, and therefore falls outside the scope of this License.
However, linking a “work that uses the Library” with the Library creates an executable that is a derivative of the Library (because it contains portions of
the Library), rather than a “work that uses the library”. The executable is therefore covered by this License. Section 6 states terms for distribution of such
executables.
When a “work that uses the Library” uses material from a header file that is part of the Library, the object code for the work may be a derivative work of the
Library even though the source code is not. Whether this is true is especially significant if the work can be linked without the Library, or if the work is itself a
library. The threshold for this to be true is not precisely defined by law.
If such an object file uses only numerical parameters, data structure layouts and accessors, and small macros and small inline functions (ten lines or less
in length), then the use of the object file is unrestricted, regardless of whether it is legally a derivative work. (Executables containing this object code plus
portions of the Library will still fall under Section 6.)
Continued...
BN68-00630D-Eng_3.indd 73 2007-04-09 ソタネト 7:01:10

English - 74
Otherwise, if the work is a derivative of the Library, you may distribute the object code for the work under the terms of Section 6. Any executables containing
that work also fall under Section 6, whether or not they are linked directly with the Library itself.
6. As an exception to the Sections above, you may also combine or link a “work that uses the Library” with the Library to produce a work containing portions
of the Library, and distribute that work under terms of your choice, provided that the terms permit modification of the work for the customer’s own use and
reverse engineering for debugging such modifications.
You must give prominent notice with each copy of the work that the Library is used in it and that the Library and its use are covered by this License. You
must supply a copy of this License. If the work during execution displays copyright notices, you must include the copyright notice for the Library among
them, as well as a reference directing the user to the copy of this License. Also, you must do one of these things:
a) Accompany the work with the complete corresponding machine-readable source code for the Library including whatever changes were used
in the work (which must be distributed under Sections 1 and 2 above); and, if the work is an executable linked with the Library, with the complete
machine-readable “work that uses the Library”, as object code and/or source code, so that the user can modify the Library and then relink to produce
a modified executable containing the modified Library. (It is understood that the user who changes the contents of definitions files in the Library will not
necessarily be able to recompile the application to use the modified definitions.)
b) Use a suitable shared library mechanism for linking with the Library. A suitable mechanism is one that (1) uses at run time a copy of the library
already present on the user’s computer system, rather than copying library functions into the executable, and (2) will operate properly with a modified
version of the library, if the user installs one, as long as the modified version is interface-compatible with the version that the work was made with.
c) Accompany the work with a written offer, valid for at least three years, to give the same user the materials specified in Subsection 6a, above, for a
charge no more than the cost of performing this distribution.
d) If distribution of the work is made by offering access to copy from a designated place, offer equivalent access to copy the above specified materials
from the same place.
e) Verify that the user has already received a copy of these materials or that you have already sent this user a copy.
For an executable, the required form of the “work that uses the Library” must include any data and utility programs needed for reproducing the executable
from it. However, as a special exception, the materials to be distributed need not include anything that is normally distributed (in either source or binary
form) with the major components (compiler, kernel, and so on) of the operating system on which the executable runs, unless that component itself
accompanies the executable.
It may happen that this requirement contradicts the license restrictions of other proprietary libraries that do not normally accompany the operating system.
Such a contradiction means you cannot use both them and the Library together in an executable that you distribute.
7. You may place library facilities that are a work based on the Library side-by-side in a single library together with other library facilities not covered by this
License, and distribute such a combined library, provided that the separate distribution of the work based on the Library and of the other library facilities is
otherwise permitted, and provided that you do these two things:
a) Accompany the combined library with a copy of the same work based on the Library, uncombined with any other library facilities. This must be
distributed under the terms of the Sections above.
b) Give prominent notice with the combined library of the fact that part of it is a work based on the Library, and explaining where to find the
accompanying uncombined form of the same work.
8. You may not copy, modify, sublicense, link with, or distribute the Library except as expressly provided under this License. Any attempt otherwise to copy,
modify, sublicense, link with, or distribute the Library is void, and will automatically terminate your rights under this License. However, parties who have
received copies, or rights, from you under this License will not have their licenses terminated so long as such parties remain in full compliance.
9. You are not required to accept this License, since you have not signed it. However, nothing else grants you permission to modify or distribute the Library
or its derivative works. These actions are prohibited by law if you do not accept this License. Therefore, by modifying or distributing the Library (or any
work based on the Library), you indicate your acceptance of this License to do so, and all its terms and conditions for copying, distributing or modifying the
Library or works based on it.
10. Each time you redistribute the Library (or any work based on the Library), the recipient automatically receives a license from the original licensor to
copy, distribute, link with or modify the Library subject to these terms and conditions. You may not impose any further restrictions on the recipients’ exercise
of the rights granted herein. You are not responsible for enforcing compliance by third parties with this License.
11.
If, as a consequence of a court judgment or allegation of patent infringement or for any other reason (not limited to patent issues), conditions are
imposed on you (whether by court order, agreement or otherwise) that contradict the conditions of this License, they do not excuse you from the conditions
of this License. If you cannot distribute so as to satisfy simultaneously your obligations under this License and any other pertinent obligations, then as a
consequence you may not distribute the Library at all. For example, if a patent license would not permit royalty-free redistribution of the Library by all those
who receive copies directly or indirectly through you, then the only way you could satisfy both it and this License would be to refrain entirely from distribution
of the Library.
If any portion of this section is held invalid or unenforceable under any particular circumstance, the balance of the section is intended to apply, and the
section as a whole is intended to apply in other circumstances.
It is not the purpose of this section to induce you to infringe any patents or other property right claims or to contest validity of any such claims; this section
has the sole purpose of protecting the integrity of the free software distribution system which is implemented by public license practices. Many people have
made generous contributions to the wide range of software distributed through that system in reliance on consistent application of that system; it is up to the
author/donor to decide if he or she is willing to distribute software through any other system and a licensee cannot impose that choice.
Continued...
BN68-00630D-Eng_3.indd 74 2007-04-09 ソタネト 7:01:10

English - 75
This section is intended to make thoroughly clear what is believed to be a consequence of the rest of this License.
12. If the distribution and/or use of the Library is restricted in certain countries either by patents or by copyrighted interfaces, the original copyright holder
who places the Library under this License may add an explicit geographical distribution limitation excluding those countries, so that distribution is permitted
only in or among countries not thus excluded. In such case, this License incorporates the limitation as if written in the body of this License.
13. The Free Software Foundation may publish revised and/or new versions of the Lesser General Public License from time to time. Such new versions will
be similar in spirit to the present version, but may differ in detail to address new problems or concerns.
Each version is given a distinguishing version number. If the Library specifies a version number of this License which applies to it and “any later version”,
you have the option of following the terms and conditions either of that version or of any later version published by the Free Software Foundation. If the
Library does not specify a license version number, you may choose any version ever published by the Free Software Foundation.
14. If you wish to incorporate parts of the Library into other free programs whose distribution conditions are incompatible with these, write to the author
to ask for permission. For software which is copyrighted by the Free Software Foundation, write to the Free Software Foundation; we sometimes make
exceptions for this. Our decision will be guided by the two goals of preserving the free status of all derivatives of our free software and of promoting the
sharing and reuse of software generally.
NO WARRANTY
15. BECAUSE THE LIBRARY IS LICENSED FREE OF CHARGE, THERE IS NO WARRANTY FOR THE LIBRARY, TO THE EXTENT PERMITTED
BY APPLICABLE LAW. EXCEPT WHEN OTHERWISE STATED IN WRITING THE COPYRIGHT HOLDERS AND/OR OTHER PARTIES PROVIDE
THE LIBRARY “AS IS” WITHOUT WARRANTY OF ANY KIND, EITHER EXPRESSED OR IMPLIED, INCLUDING, BUT NOT LIMITED TO, THE
IMPLIED WARRANTIES OF MERCHANTABILITY AND FITNESS FOR A PARTICULAR PURPOSE. THE ENTIRE RISK AS TO THE QUALITY AND
PERFORMANCE OF THE LIBRARY IS WITH YOU. SHOULD THE LIBRARY PROVE DEFECTIVE, YOU ASSUME THE COST OF ALL NECESSARY
SERVICING, REPAIR OR CORRECTION.
16. IN NO EVENT UNLESS REQUIRED BY APPLICABLE LAW OR AGREED TO IN WRITING WILL ANY COPYRIGHT HOLDER, OR ANY OTHER
PARTY WHO MAY MODIFY AND/OR REDISTRIBUTE THE LIBRARY AS PERMITTED ABOVE, BE LIABLE TO YOU FOR DAMAGES, INCLUDING ANY
GENERAL, SPECIAL, INCIDENTAL OR CONSEQUENTIAL DAMAGES ARISING OUT OF THE USE OR INABILITY TO USE THE LIBRARY (INCLUDING
BUT NOT LIMITED TO LOSS OF DATA OR DATA BEING RENDERED INACCURATE OR LOSSES SUSTAINED BY YOU OR THIRD PARTIES OR A
FAILURE OF THE LIBRARY TO OPERATE WITH ANY OTHER SOFTWARE), EVEN IF SUCH HOLDER OR OTHER PARTY HAS BEEN ADVISED OF
THE POSSIBILITY OF SUCH DAMAGES.
END OF TERMS AND CONDITIONS
How to Apply These Terms to Your New Libraries
If you develop a new library, and you want it to be of the greatest possible use to the public, we recommend making it free software that everyone can
redistribute and change. You can do so by permitting redistribution under these terms (or, alternatively, under the terms of the ordinary General Public
License).
To apply these terms, attach the following notices to the library. It is safest to attach them to the start of each source file to most effectively convey the
exclusion of warranty; and each file should have at least the “copyright” line and a pointer to where the full notice is found.
<one line to give the library’s name and an idea of what it does.> Copyright (C) <year> <name of author>
This library is free software; you can redistribute it and/or modify it under the terms of the GNU Lesser General Public License as published by the
Free Software Foundation; either version 2.1 of the License, or (at your option) any later version.
This library is distributed in the hope that it will be useful, but WITHOUT ANY WARRANTY; without even the implied warranty of MERCHANTABILITY
or FITNESS FOR A PARTICULAR PURPOSE. See the GNU Lesser General Public License for more details.
You should have received a copy of the GNU Lesser General Public License along with this library; if not, write to the Free Software Foundation, Inc.,
59 Temple Place, Suite 330, Boston, MA 02111-1307 USA
Also add information on how to contact you by electronic and paper mail.
You should also get your employer (if you work as a programmer) or your school, if any, to sign a “copyright disclaimer” for the library, if necessary. Here is
a sample; alter the names:
Yoyodyne, Inc., hereby disclaims all copyright interest in the library `Frob’ (a library for tweaking knobs) written by James Random Hacker.
signature of Ty Coon, 1 April 1990
Ty Coon, President of Vice
That’s all there is to it!
BN68-00630D-Eng_3.indd 75 2007-04-09 ソタネト 7:01:10

Gane premios cuando registre su producto en
www.samsung.com/global/register
Apunte aquí los números de serie y modelo para consultas futuras.
▪ Modelo _______________ ▪ Nº serie. _______________
Manual de instrucciones
HL-T5656W
HL-T6156W
HL-T6756W
DLP TV
BP68-00630D-Spa_1.indd 1 2007-04-09 ソタネト 8:21:32

Español - 2
© 2007 Samsung Electronics Co., Ltd. All rights reserved.
Guía para la TV Digital
● Qué es la televisión digital?
La televisión digital (DTV) es una nueva forma de transmitir vídeo y audio de calidad al equipo de TV. Con la DTV, las emisoras
pueden transmitir imágenes de TV de alta definición (HDTV), audio digital Dolby Surround y nuevos servicios como multiemisión
(transmisión de más de un programa en el mismo canal de TV) y emisión de datos. Algunos de estos servicios pueden combinarse
en una emisión digital única.
Servicios de la televisión digital
● Calidad de imagen digital
Los programas de DTV se transmiten en dos formatos diferentes: Televisión de definición estándar (SDTV) y Televisión de alta
definición (HDTV).
● Los formatos de programas
SDTV incluyen vídeo entrelazado de 480 líneas (480i) y el vídeo progresivo de 480 líneas (480p).
Los programas 480i son esencialmente una versión digital de programas actuales de TV analógicos, mientras que los formatos
480p ofrecen un detalle de imagen mejorado por encima de 480i. Algunos programas 480p se emiten en pantalla panorámica y son
comparables en calidad con películas en DVD de exploración progresiva.
● Los formatos de programas
HDTV incluyen vídeo entrelazado de 1080 líneas (1080i) y el vídeo progresivo de 720 líneas (720p).
Ambos formatos HDTV siempre se emiten en pantalla panorámica y ofrecen una calidad de imagen mucho más alta que SDTV.
●
Sonido Dolby Surround
Con DTV, se puede escuchar una variedad de formatos de audio Dolby digital desde Dolby Surround 2.0 a Dolby Digital 5.1
Surround, en el sistema de audio de casa. Muchos programas ahora se emiten con bandas sonoras en DD 5.1.
BP68-00630D-Spa_1.indd 2 2007-04-09 ソタネト 7:02:33

Español - 3
Preguntas y respuestas
1. Es la antena que utiliza para recepción de TV lo suficientemente buena para DTV?
funciona bien con muchas antenas de TV existentes. Sin embargo, las asignaciones de canales de las emisiones de DTV son
diferentes que los canales analógicos. Debe descubrir si las emisiones de DTV locales están en VHF (canales 2-13) o UHF
(canales 14-69) para ver si necesita una antena diferente.
Si los canales de DTV están en UHF y ya cuenta con una buena recepción de UHF, su antena actual puede que funcione
correctamente. Lo mismo sucede para la recepción de DTV en VHF. Tenga en cuenta que en algunos mercados, ambos canales
VHF y UHF se utilizan para emisiones de DTV.
Puede descubrir las últimas asignaciones de canales de DTV para su área buscando en páginas Web de Internet como www.
titantv.com, www.10000watts.com y www.fcc.gov.
2. Cuál es la dificultad de recibir señales de DTV en interiores?
Esto depende de si las estaciones locales de DTV están funcionando a toda potencia y la cercanía de su ubicación a la torre de
transmisión. El receptor de DTV no requiere tanta señal como los receptores de TV digital para producir imágenes y sonido de alta
calidad.
Una vez que el nivel de señal de DTV sobrepase cierto umbral en el receptor, los datos de vídeo y audio digital se decodifican con
la misma calidad con la que fue codificada originalmente para su transmisión.
Esto es una gran ventaja para DTV sobre TV analógica, no hay interferencias, imágenes duplicadas, estáticas o audio rayado.
3. Cómo puedo conectar una antena en mi comunidad, apartamento o piso?
La norma OTARD de la Comisión Federal de Comunicaciones (parte de la Ley de Telecomunicaciones de 1996) permite a los
residentes de pisos, apartamentos, comunidades o miembros de una asociación de vecinos, colocar antenas exteriores para la
recepción de señales de TV de emisión siempre y cuando dichas antenas no estén ubicadas en áreas comunes y no estén a más
de 12’ de altura.
Los residentes de pisos de alquiler (apartamentos, etc.) no están cubiertos por las normas OTARD y tendrán que utilizar antenas
interiores para recibir emisiones de DTV. Es posible que el propietario de un complejo de apartamentos pueda proporcionar
señales de DTV de emisiones a través de un sistema de antena de TV a cada apartamento.
4. Puedo conectar mi receptor del decodificador de DTV a mi servicio de TV de cable?
Los sistemas de TV por cable utilizan un método diferente para transmitir programas de TV digital que es actualmente incompatible
con receptores de decodificador de DTV de emisión. Por tanto, tendrá que utilizar una antena exterior o interior para recibir
programas de DTV de emisión OTA.
Las buenas noticias son que no tiene que pagar una tarifa mensual o por programa para ver DTV OTA y programas HDTV. Son
gratuitos, a diferencia de la TV por satélite de suscripción o la TV por cable. Todo lo que necesita es una antena y un receptor de
decodificador de DTV para disfrutar de imágenes claras y nítidas en pantalla panorámica e imágenes de audio de gran calidad.
BP68-00630D-Spa_1.indd 3 2007-04-09 ソタネト 7:02:33

Español - 4
Índice
INFORMACIÓN GENERAL
■
Posición de visualización .........................................5
■
Características .........................................................6
■
Comprobación de los componentes ......................... 6
■
Aspecto general del panel de control .......................7
■
Aspecto general del panel de conexiones ................8
■
Mando a distancia ..................................................10
■
Instalación de las pilas en el mando a distancia .... 11
CONEXIONES
■
Conexión de las antenas de VHF y UHF ............... 11
■
Conexión de TV por cable ......................................12
■
Conexión de un aparato de vídeo ..........................13
■
Conexión de una videocámara ...............................14
■
Conexión de un reproductor de DVD/decodificador
.14
■
Conexión a un reproductor de DVD/decodificador
a través de HDMI ...................................................15
■
Conexión a un reproductor de DVD/decodificador
a través de DVI .......................................................15
■
Conexión de un sistema de audio digital ................16
■
Conexión de un amplificador/DVD para
Home Cinema - Analógico ......................................
16
■
Conexión a un PC ..................................................17
FUNCIONAMIENTO
■
Encendido y apagado del televisor ........................17
■
Función Plug & Play ...............................................18
■
Cambio de canales .................................................19
■
Ajuste del volumen .................................................20
■
Visualización de la pantalla ....................................20
■
Visualización de los menús ....................................20
■
Exploración de los menús con el mapa de menús
...21
■
Memorización de canales .......................................21
■
Configuración del mando a distancia ..................... 22
■
Para seleccionar la fuente ......................................27
■
Para editar el nombre de la fuente de entrada ....... 27
CONTROL DE LA IMAGEN
■
Utilización de los ajustes de imagen automáticos .. 28
■
Configuración detallada de los valores de la imagen 30
■
Cambio del tamaño de la pantalla .......................... 31
■
Reducción digital de ruido ......................................32
■
DNIe (Digital Natural Image engine
(motor digital de imágenes naturales)) ................... 32
■
Configuración del color activo ................................ 33
■
Configuración de la gama cromática ...................... 33
■
Ajuste de la posición de la pantalla ........................34
■
Congelación de la imagen actual ...........................34
CONTROL DEL SONIDO
■
Utilización de los parámetros de sonido automáticos
. 34
■
Personalización del sonido ..................................... 35
■
Configuración de DNSe (Digital Natural Sound
engine-Motor de sonido digital natural)
....................36
■
Elección de una pista sonora multicanal (MTS)
- Digital ...................................................................37
■
Elección de una pista sonora multicanal (MTS)
- Analogica ..............................................................
37
■
Control automático de volumen .............................. 38
■
Selección del silencio interno .................................38
CONTROL DE LOS CANALES
■
Supresión de los canales codificados digitales ......39
■
Adición y borrado de canales .................................39
■
Ajuste de los canales favoritos ............................... 40
■
Visualización de las listas de canales .................... 41
■
Etiquetado de canales - Analogica .........................41
■
Configuración del modo Lista de canales
predeterminada ......................................................42
■
Sintonización fina de los canales analógicos
- Analogica ..............................................................
42
■
Comprobación de la potencia de la señal digital
- Digital ...................................................................43
■
LNA
(Low Noise Amplifier - Amplificador de ruido bajo)
...43
DESCRIPCIÓN DE LAS FUNCIONES
■
Selección del idioma de los menús ........................44
■
Configuración de la hora ........................................44
■
Uso del Modo juego ...............................................46
■
Uso del V-Chip .......................................................47
■
Visualización de subtítulos
(mensajes de texto en pantalla) - Digital ................53
■
Visualización de subtítulos
(mensajes de texto en pantalla) - Analogica ..........54
■
Nivel de transparencia de los menús ..................... 55
■
Ajuste del modo Pantalla Azul ................................ 55
■
Ajuste del sonido de la melodía .............................56
■
Uso de la función de mejora Defect. de Color ........ 56
■
Configuración del Nivel de negro HDMI .................57
■
Ajuste de la función Modo película - Analogica ...... 58
■
Ajuste de Función de Ayuda ...................................58
■
Actualización del software ...................................... 59
PANTALLA DE PC
■
Uso del televisor como pantalla del PC ................. 60
■
Modos de visualización ..........................................61
■
Ajuste del televisor con el ordenador ..................... 62
■
Cambio del tamaño de imagen (modo PC) ............64
■
Configuración de PC para Home Cinema ..............64
APÉNDICE
■
Identificación de problemas .................................... 65
■
Sustitución de la lámpara .......................................66
■
Limpieza y mantenimiento del TV .......................... 67
■
Uso del televisor en otro país ................................. 67
■
Especificaciones técnicas ......................................68
Símbolos
☛ ➢
Pulse
Importante
Nota
Botón de una
pulsación
BP68-00630D-Spa_1.indd 4 2007-04-09 ソタネト 7:02:34

Español - 5
Información general
Posición de visualización
Para conseguir la mejor calidad de visualización, siga las directrices siguientes referentes a la distancia de visualización.
Siéntese lo más lejos posible de la pantalla si va a mirarla durante un período prolongado.
➢
Cuando instale el producto sepárelo de la pared (más
de 10 cm) para facilitar la ventilación.
Una ventilación inadecuada puede causar un
aumento de la temperatura interna del producto
que da como resultado que los componentes
tengan una vida útil más corta y el rendimiento
sea menor.
<Vista superior> <Vista lateral>
Pantalla de 56˝:
Al menos a 2 metros
Pantalla de 61˝:
Al menos a 2.2 metros
Pantalla de 67˝:
Al menos a 2.4 metros
Pantalla de 56˝:
Al menos a 2 metros
Pantalla de 61˝:
Al menos a 2.2 metros
Pantalla de 67˝:
Al menos a 2.4 metros
BP68-00630D-Spa_1.indd 5 2007-04-09 ソタネト 7:02:34

Español - 6
Comprobación de los componentes
Manual de
instrucciones
Mando a distancia/
(BP59-00123A)/
pilas AAA
Tarjeta de garantía/
Tarjeta de registro/
Manual de seguridad/
Manual de referencia rápida/
Cable de
alimentación
(3903-000144)
Paño de
limpieza
Se vende por separado
Lamp de recambio
Para comprar una lámpara de
recambio, acuda al servicio técnico
más cercano.
• Utilice solamente lámparas
autorizadas.
La empresa no puede garantizar
la calidad del producto si
se utiliza una lámpara no
autorizada.
Cable de S-Vídeo
Cable de vídeo
Cable de la antena
Cables de componentes
Cables de audio
Cable D-Sub
Cable de audio de PC
Cable HDMI/DVI Cable HDMI Cable óptico
Cable estéreo de
3,5 mm/2 RCA
Características
Este televisor se ha diseñado utilizando la tecnología y la ingeniería más avanzadas. Se trata de un aparato que reúne las
más altas prestaciones y las funciones más completas gracias a las cuales supera los estándares del sector. Además, posee
las siguientes características especiales:
● Mando a distancia fácil de usar
● Menús dinámicos en los que es fácil desplazarse
● Sencillo sistema de menús en pantalla accesibles desde el panel frontal, el panel lateral derecho o el mando a distancia
● Temporizador automático que enciende y apaga el televisor a la hora que usted desee.
● Valores de sonido e imagen ajustables y posibilidad de memorizar los ajustes favoritos.
● Sintonización automática de hasta 181 canales.
● Filtro especial para reducir o eliminar los problemas de recepción
● Control de ajuste fino para conseguir la mejor imagen posible
● Decodificador de sonido multicanal integrado para escucha en estéreo o bilingüe
● Altavoces integrados de doble canal
● Temporizador de desconexión especial
● Televisor panorámico con tamaño de imagen ajustable
● Imágenes tan claras como en vivo proporcionadas por la tecnología DNle
● Modo Mi ctrl de color para adaptar éste a sus preferencias.
● Función de mejora de los defectos del color
● Toma de entrada digital
● Toma de salida de audio digital (ÓPTICO)
● Modo Juego de teatro
● Menú para gestionar canales sencillo y práctico
BP68-00630D-Spa_1.indd 6 2007-04-09 ソタネト 7:02:40

Español - 7
Aspecto general del panel de control
Botones de la parte inferior derecha del panel
Los botones del panel inferior derecho controlan las funciones básicas del televisor, incluido el menú en pantalla.
Para utilizar las funciones más avanzadas debe usarse el mando a distancia.
➢
El color y la forma del producto pueden variar según el modelo.
Continúa…
HL-T6756W
HL-T5656W
HL-T6156W
BP68-00630D-Spa_1.indd 7 2007-04-09 ソタネト 7:02:45

Español - 8
1
Botón de encendido
Púlselo para encender o apagar el TV.
2
Sensor del mando a distancia
El mando a distancia debe dirigirse hacia este punto
del televisor.
3
Indicadores luminosos
Parpadean y se apagan cuando se enciende el
aparato y se iluminan en el modo en espera.
4
SOURCE
Cambia entre todas las fuentes de entrada disponibles
(TV, AV1, AV2, AV3, S-Video1, S-Video2, S-Video3,
Componente1, Componente2, PC, HDMI1 o
HDMI2/DVI).
5
MENU
Púlselo para ver un menú en pantalla con las opciones
del televisor.
6
+ VOL –
Púlselos para subir o bajar el volumen.
En el menú en pantalla, utilice los botones
+ VOL –
de igual modo que los botones ◄ y ► del
mando a distancia.
7
CH
Permiten cambiar de canal.
En el menú en pantalla, utilice los botones CH
de igual modo que los botones ▲ y ▼ del mando a
distancia.
8
(ENTER)
Se pulsa para confirmar una selección.
Leyenda para las luces indicadoras
( : Encendido, : Parpadeo, : Apagado)
STAND BY/TEMP TIMER LAMP Indicación
Televisor en modo de espera.
La imagen aparecerá automáticamente en unos 15 segundos.
El temporizador automático de conexión/desconexión está programado y el televisor se encenderá
automáticamente en unos 15 segundos.
Uno de los ventiladores de refrigeración del interior del aparato no funciona bien.
La cubierta de las lámparas de la parte trasera del aparato no está bien cerrada.
Compruebe que no está obstruida la entrada de ventilación de la parte posterior del aparato; dado
que la temperatura interior es elevada, se apagará el aparato.
Puede que la lámpara esté defectuosa. Póngase en contacto con un técnico certificado.
➢
● El televisor tarda unos 30 segundos en calentarse, por lo que el brillo normal puede no aparecer inmediatamente.
● El televisor dispone de un ventilador para evitar que se recaliente la lámpara interior. De vez en cuando, lo oirá ponerse en
funcionamiento.
➢
● Según el modelo, puede utilizar los botones de selección de canales para encender el TV cuando esté en modo de espera.
● Al utilizar el menú en pantalla, los botones de ajuste de volumen y de selección de canales tienen la misma función que los
botones ▲/▼/◄/► del mando a distancia.
● Si el mando a distancia deja de funcionar o lo ha perdido, puede utilizar los controles del panel del TV.
Aspecto general del panel de conexiones
Tomas del panel lateral
Estas tomas se utilizan para conectar un componente que sólo se utiliza de vez en cuando (una videocámara o un videojuego, por
ejemplo). El color y la forma del producto pueden variar según el modelo.
1
S-VIDEO
Se utiliza para conectar una señal de S-Vídeo procedente de un aparato de vídeo
S-VHS o de un reproductor de DVD.
2
VIDEO
Se utiliza para conectar una señal de vídeo procedente de una videocámara o un
videojuego.
3
AUDIO (L/R)
Se utiliza para conectar una señal de audio procedente de una videocámara o un
videojuego.
BP68-00630D-Spa_1.indd 8 2007-04-09 ソタネト 7:02:47

Español - 9
Tomas del panel posterior
Use las tomas del panel posterior para conectar componentes de A/V que estarán disponibles permanentemente, como un vídeo o un
reproductor de DVD. Si precisa información sobre la conexión de equipos, consulte las páginas 11-17.
➢
El color y la forma del producto pueden variar según el modelo.
1
DVI IN (AUDIO-L/R)
Conéctelas con la toma de salida de audio DVI de un
dispositivo externo.
2
DIGITAL AUDIO OUT (OPTICAL)
Se conecta a un componente de audio digital.
3
SERVICE 2
Sólo para servicio.
4
S-VIDEO (AV IN 1, 2)
Entrada de vídeo para dispositivos externos con salida de
S-Vídeo, como una videocámara o un aparato de vídeo.
5
VIDEO/AUDIO-L/R (AV OUT)
Salidas de vídeo/audio para dispositivos externos.
➢ La salida de vídeo no está disponible en Component,
PC y HDMI.
6
COMPONENT IN 1, 2
Entradas de componentes para imagen (Y/PB/PR) y sonido
(L-AUDIO-R).
7
Entrada de alimentación
Conexión para el cable de alimentación suministrado.
8
ANT 1 IN (CABLE)/ANT 2 IN (AIR)
Conector coaxial de 75Ω para antena o red por cable.
9
HDMI IN 1
Conexión HDMI de un dispositivo que tenga salida HDMI.
0
HDMI2/DVI IN
Se conecta a la toma HDMI de un dispositivo que tenga
salida HDMI. Estas entradas se pueden utilizar también
como una conexión DVI con entradas de señales de audio
analógicas independientes. Para realizar esta conexión se
requiere un cable opcional HDMI/DVI. Cuando se usa un
adaptador HDMI/DVI, las entradas de señales de audio
analógicas DVI del televisor permiten recibir señales de
audio por las entradas derecha e izquierda desde un
dispositivo DVI.
!
SERVICE 1
Esta toma es para actualizaciones de software.
@
VIDEO/AUDIO-L/R (AV IN 1, 2)
Entrada de vídeo para dispositivos externos, como una
videocámara o un aparato de vídeo.
#
PC IN
Conéctela al conector de salida de vídeo del PC.
$
PC AUDIO IN
Conéctela a la toma de salida de audio del PC.
BP68-00630D-Spa_1.indd 9 2007-04-09 ソタネト 7:02:48

Español - 10
Mando a distancia
Puede utilizar el mando a una distancia de hasta 7 metros del televisor. Al usarlo, apunte directamente al televisor. También
se puede utilizar el mando a distancia para hacer funcionar el aparato de vídeo, el decodificador de cable, el reproductor de
DVD y el decodificador.
1
POWER
Enciende y apaga el televisor.
2
Botones Numericos
Pulse para seleccionar directamente
un canal.
3
–
Pulse para seleccionar canales
adicionales (digitales y analógicos)
emitidos por la misma emisora. Por
ejemplo, para seleccionar el canal
“54-3”, pulse “54”, “–” y “3”.
4
CH LIST
Se usa para mostrar las listas de
canales en la pantalla.
5
ANTENNA
Pulse este botón para seleccionar
“AIRE” o “CABLE”.
6
VOL +, VOL –
Permiten subir o bajar el volumen.
7
MUTE
Púlselo para cortar temporalmente el
sonido.
8
MENU
Muestra el menú principal en pantalla.
9
RETURN
Vuelve al menú anterior.
0
S.MODE
Púlselo para seleccionar el modo de
sonido.
!
P.MODE
Púlselo para seleccionar el modo de
imagen.
@
SLEEP
Púlselo para seleccionar un intervalo
prefijado para la desconexión
automática.
#
GAME
Pulse para seleccionar varias opciones
de Game (Juego).
$
MTS
Púlselo para elegir estéreo, mono o
un programa de audio independiente
(emisión SAP).
%
SET
Permite configurar el mando a
distancia para controlar el televisor,
el aparato de vídeo, el reproductor de
DVD y el receptor de televisión digital
o de cable.
^
TV, DVD, STB, CABLE, VCR
Púlselos para controlar el televisor,
el reproductor de DVD, el receptor
de televisión digital o de cable o el
aparato de vídeo.
&
SOURCE
Púlselo para ver todas las fuentes de
vídeo disponibles.
*
Pulse para encender la luz de fondo
de VOL, CH y activar el botón de
fuente (TV, DVD, CABLE, STB, VCR)
en el mando a distancia.
(
PRE-CH
Sintoniza el canal anterior.
)
FAV.CH
Pulse este botón para sintonizar sus
canales favoritos.
a
HDMI
Selecciona directamente el modo
HDMI.
b
Funciones de VÍDEO/DVD
- Rebobinar
- Parar
- Reproducir/Pausa
- Avance rápido
c
CH , CH
Se pulsan para cambiar de canal.
d
EXIT
Púlselo para salir del menú.
e
ARRIBA▲/ABAJO▼/IZQUIERDA◄/
DERECHA►/ENTER
Sirve para seleccionar los elementos
del menú en pantalla y cambiar los
valores del menú.
f
INFO
Púlselo para mostrar información en la
pantalla del televisor.
g
CAPTION
Controla el decodificador de subtítulos.
h
STILL
Se pulsa para detener la acción
durante una determinada escena.
Pulse de nuevo para recuperar la
visualización normal.
i
Botones de colores
Púlselos para añadir o borrar canales
y para guardarlos en la lista de
canales favoritos, en el menú Lista de
canales. (Consulte la página 39~42)
j
P.SIZE
Púlselo para cambiar el tamaño de la
pantalla.
k
ADD/DEL
Se utiliza para almacenar y borrar
canales en la memoria.
l
DNSe
DNSe mejora la calidad del sonido,
controla las salidas automáticamente e
impide la distorsión del sonido. Pulse
este botón para ajustar esta función en
Encendido o en Apagado.
(Consulte la página 36.)
m
RESET
Si el mando a distancia no funciona,
cambie las pilas y pulse el botón
RESET durante 2-3 segundos antes
de utilizarlo.
➢
El exceso de luz puede influir en el rendimiento del mando a distancia.
➢
Es un mando a distancia especial para personas con discapacidades visuales; presenta puntos Braille en los botones de
encendido, de canales, del volumen, de parar, de reproducir y de pausa.
BP68-00630D-Spa_1.indd 10 2007-04-09 ソタネト 8:22:18

Español - 11
Instalación de las pilas en el mando a distancia
1 Levante la tapa de la parte posterior del mando a distancia, como se muestra en la ilustración.
2 Instale dos baterías de tamaño AAA.
➢
● Asegúrese de respetar los extremos “+” y “–” de las pilas indicados en el diagrama del
interior del compartimento.
● No mezcle distintos tipos de pilas, por ejemplo alcalinas y de manganeso.
3 Cierre la tapa, como se muestra en la ilustración.
➢
Si no va a utilizar el mando a distancia durante mucho tiempo, quite las pilas y guárdelas
en un lugar fresco y seco. El mando a distancia se puede utilizar hasta una distancia de 7
metros del televisor. (Suponiendo un uso normal del TV, las pilas duran aproximadamente un
año.)
➢
Si el mando a distancia no funciona! efectúe estas comprobaciones
1. Está encendido el televisor?
2. Están intercambiados los polos positivos y negativos de las pilas?
3. Se han agotado las pilas?
4. Ha habido un corte de energía o se ha desenchufado el cable?
5. Hay en las proximidades un fluorescente o un neón?
Conexiones
Conexión de las antenas de VHF y UHF
Si su antena tiene un juego de cables con este aspecto, consulte “Antenas con cables
planos dobles de 300 ohmios” a continuación.
Si la antena tiene un cable con este aspecto, consulte “Antenas con cables coaxiales de 75
ohmios”. Si tiene dos antenas, consulte “Antenas VHF y UHF independientes”.
Antenas con cables planos dobles de 300 ohmios
Si utiliza una antena externa (de azotea o de “cuernos”) de cables planos dobles de 300 ohmios, siga las indicaciones
siguientes.
1 Coloque los hilos del cable doble bajo los tornillos del adaptador de 300 a 75 ohmios (no
suministrado). Apriete los tornillos con un destornillador.
2 Enchufe el adaptador en el terminal ANT 1 IN (CABLE) o ANT 2 IN (AIR) de la parte lateral del
televisor.
Antenas de 75 ohmios con cable coaxial
1 Enchufe el cable de la antena en el terminal ANT 1 IN (CABLE) o ANT 2 IN (AIR) de la parte
lateral del televisor.
Antenas de VHF y UHF independientes
Si dispone de dos antenas independientes para el televisor (una de VHF y otra de UHF), deberá combinar las señales de
ambas antenas antes de conectarlas al televisor. Este procedimiento requiere un combinador-adaptador opcional (disponible
en la mayoría de tiendas de electrónica).
1 Conecte los dos cables de antena al combinador.
2 Enchufe el adaptador en el terminal ANT 1 IN (CABLE) o ANT 2 IN (AIR) en la parte inferior del
panel lateral televisor.
BP68-00630D-Spa_1.indd 11 2007-04-09 ソタネト 7:02:56

Español - 12
Conexión de TV por cable
Para conectar a un sistema de TV por cable, siga estas instrucciones.
Cable sin decodificador
1 Enchufe el cable de entrada en el terminal ANT 1 IN (CABLE) en el lateral del televisor.
➢
Dado que el TV tiene previsto el uso de televisión por cable, no se necesita un
decodificador para ver canales de cable no codificados.
Conexión al decodificador que decodifica todos los canales
1 Busque el cable conectado al terminal ANT OUT del decodificador.
➢
Este terminal puede estar marcado con la inscripción “ANT OUT”, “VHF OUT” o,
sencillamente, ”OUT”.
2 Enchufe el otro extremo del cable en el terminal ANT 1 IN (CABLE) en el lateral del televisor.
Conexión al decodificador que decodifica algunos canales
Si su decodificador decodifica únicamente algunos canales (como, por ejemplo, canales de suscripción), siga las
instrucciones que se incluyen a continuación. Necesitará un separador de señales de dos vías, un conmutador RF (A/B) y
cuatro extensiones de cable de antena. (Estos artículos están disponibles en la mayoría de las tiendas de electrónica.)
1 Busque y desconecte el cable conectado al
terminal ANT IN de su decodificador de cable.
➢
Este terminal puede estar marcado con
la inscripción “ANT IN”, “VHF IN” o,
sencillamente, ”IN”.
2 Conecte este cable al separador de señales.
3 Conecte un cable de antena entre un terminal
OUTPUT del separador y el terminal IN del
decodificador.
4 Conecte un cable de antena entre el terminal
ANT OUT del decodificador y el terminal B-IN del
conmutador RF(A/B).
5 Conecte un cable coaxial entre el otro terminal
OUT del separador y el terminal A-IN del
conmutador RF (A/B).
6 Conecte el último cable de antena entre el
terminal OUT del conmutador RF (A/B) y el
terminal ANT 1 IN (CABLE) en el lateral del
televisor.
Una vez realizada esta conexión, ajuste el conmutador A/B a la posición “A” para la visualización normal. Si desea ver canales
codificados, coloque el conmutador A/B en la posición “B”. (Cuando ajuste el conmutador A/B en la posicion “B”, necesitara sintonizar
el TV con el canal de salida del receptor de cable, que normalmente es el canal 3 o 4).
Separador de señales
Cable de
entrada
Separador
de señales
Decodificador de cable
Cable de
entrada
Separador
de señales
Decodificador de cable
Conmutador
RF (A/B)
Cable de
entrada
Separador
de señales
Decodificador de cable
Cable de
entrada
Conmutador
RF (A/B)
Cable de
entrada
Separador
de señales
Decodificador de cable
Conmutador
RF (A/B)
Panel posterior del TV
ANT OUT
ANT IN
ANT IN
BP68-00630D-Spa_1.indd 12 2007-04-09 ソタネト 7:03:00

Español - 13
Conexión de un aparato de vídeo
Conexión de vídeo
En estas instrucciones se asume que ya ha conectado el TV a una antena o a un sistema de TV por cable (de acuerdo con las
instrucciones de las páginas 11 y 12). Ignore el paso 1 si aún no ha conectado una antena o un sistema de cable.
1 Desenchufe el cable o la antena
del lateral del televisor.
2 Conecte el cable o la antena al
terminal ANT IN en el lateral del
aparato de vídeo.
3 Conecte un cable de antena
entre el terminal ANT OUT del
reproductor de vídeo y el terminal
ANT 1 IN (CABLE) o ANT 2 IN
(AIR) del televisor.
4 Conecte un cable de vídeo entre la
toma AV IN 1 [VIDEO] (o AV IN 2
[VIDEO]) del TV y la toma VIDEO
OUT del aparato de vídeo.
5 Conecte cables de audio entre las
tomas AV IN 1 [L-AUDIO-R] (o AV
IN 2 [L-AUDIO-R]) del televisor y
las tomas AUDIO OUT del aparato
de vídeo.
➢
Si tiene un vídeo “mono” (sin
estéreo), use el conector Y (no
suministrado) para conectar
las tomas de entrada de audio
derecha e izquierda del TV.
Si el vídeo es estéreo, tendrá
que conectar dos cables.
➢
Cada aparato de vídeo tiene una configuración diferente del panel.
➢
Cuando conecte un aparato de vídeo, debe hacer coincidir los colores del terminal de conexión y del cable.
Conexión de S-Vídeo
Este televisor Samsung se puede
conectar a una toma S-Video de un
aparato de vídeo.
(Esta conexión proporciona una
calidad de imagen mejor que una
conexión normal de vídeo.)
1 Para empezar, siga los pasos 1 a 3
del apartado anterior para conectar
la antena o el sistema de cable al
vídeo y al TV.
2 Conecte un cable S-Vídeo entre
la toma AV IN 1 [S-VIDEO] (o AV
IN 2 [S-VIDEO]) del televisor y la
toma S-VIDEO OUT del aparato de
vídeo.
3 Conecte cables de audio entre las
tomas AV IN 1 [L-AUDIO-R] (o AV
IN 2 [L-AUDIO-R]) del televisor y
las tomas AUDIO OUT del aparato
de vídeo.
➢
Cada aparato de vídeo S-VHS tiene una configuración diferente del panel.
➢
Cuando conecte un aparato de vídeo, debe hacer coincidir los colores del terminal de conexión y del cable.
➢
Cuando el televisor está conectado a una consola de videojuegos, algunas imágenes de éstos pueden verse cortadas.
2
Panel posterior del TV
Reproductor de Vídeo
Cable de antena (no suministrado)
3
Cable de audio (no suministrado)
5
Cable de vídeo (no suministrado)
4
Panel posterior del TV
Reproductor de Vídeo
1
Cable de antena (no suministrado)
1
Cable de audio (no suministrado)
3
Cable de S-Vídeo (no suministrado)
2
1
BP68-00630D-Spa_1.indd 13 2007-04-09 ソタネト 7:03:04

Español - 14
Conexión de una videocámara
Los conectores del panel lateral del TV facilitan la conexión a una videocámara.
Así podrá ver las cintas de la cámara de vídeo sin usar un reproductor.
1 Conecte un cable de vídeo o de
S-Vídeo entre la toma AV IN 3
[VIDEO] o [S-Video] del televisor
y la toma VIDEO OUT de la
videocámara.
2 Conecte cables de audio entre las
tomas AV IN 3 [L-AUDIO-R] del
televisor y las tomas AUDIO OUT
de la cámara de vídeo.
➢
Cada videocámara tiene una
configuración diferente del panel.
➢
Cuando conecte una videocámara,
debe hacer coincidir los colores del
terminal de conexión y del cable.
Conexión de un reproductor de DVD/decodificador
Los conectores del panel posterior del TV facilitan la conexión a un reproductor de DVD/decodificador.
1 Conecte un cable de componente
entre las tomas COMPONENT
IN 1 [Y, PB, PR] (o COMPONENT
IN 2 [Y, PB, PR]) del televisor y
las tomas COMPONENT OUT [Y,
PB, PR] del reproductor de DVD/
decodificador.
2 Conecte los cables de audio entre
las tomas de COMPONENT IN 1
[L-AUDIO-R] (o COMPONENT IN
2 [L-AUDIO-R]) del televisor y las
tomas AUDIO OUT del reproductor
de DVD/decodificador.
➢
El video de componentes divide las señales de vídeo en Y (luminancia (brillo)), PB (azul) y PR (rojo) para mejorar la calidad del
vídeo.
Las conexiones de audio y de vídeo de componentes deben coincidir.
Por ejemplo, si se conecta el cable de vídeo a COMPONENT IN, conecte también el cable de audio a la misma entrada
COMPONENT IN.
➢
Cada reproductor de DVD o decodificador tiene una configuración diferente del panel.
➢
Cuando conecte un reproductor de DVD o un decodificador, debe hacer coincidir los colores del terminal de conexión y del cable.
Panel lateral del TV
Videocámara
o
Panel posterior del TV
Reproductor de DVD/
decodificador
Cable de audio (no suministrado)
2
Cable de vídeo (no suministrado)
1
Cable de S-Vídeo (no suministrado)
1
Cable de audio
(no suministrado)
2
Cable de componentes (no suministrado)
1
BP68-00630D-Spa_1.indd 14 2007-04-09 ソタネト 7:03:11

Español - 15
Conexión a un reproductor de DVD/decodificador a través de DVI
Esta conexión sólo se puede realizar si hay una toma de salida de DVI en el dispositivo externo.
1 Conecte un cable de HDMI/DVI o
un adaptador de DVI-HDMI entre
la toma HDMI2/DVI IN del televisor
y la toma DVI OUT del reproductor
de DVD/decodificador.
2 Conecte cables de audio entre
las tomas DVI IN [L-AUDIO-R] del
televisor y las tomas AUDIO OUT
del reproductor DVD/decodificador.
➢
Cada reproductor de DVD o decodificador tiene una configuración diferente del panel.
➢
Cuando conecte un reproductor de DVD o decodificador, debe hacer coincidir los colores del terminal de conexión y del cable.
Conexión a un reproductor de DVD/decodificador a través de HDMI
Esta conexión sólo se puede realizar si hay una toma de salida de HDMI en el dispositivo externo.
1 Conecte un cable HDMI entre la
toma HDMI IN 1 del televisor y la
toma HDMI OUT del reproductor
DVD/decodificador.
Qué es HDMI?
● HDMI, o interfaz multimedia de alta definición, es una interfaz de la siguiente generación que permite la transmisión de señales
digitales de audio y de vídeo mediante un solo cable.
● La denominación “interfaz multimedia” es la más adecuada, especialmente porque permite varios canales de sonido digital
(canales 5.1). La diferencia entre los dispositivos HDMI y DVI es que el HDMI es más pequeño, tiene instalada la función de
codificación HDCP (protección alta de la copia digital del ancho de banda) y es compatible con el sonido digital de varios canales.
➢
Cada reproductor de DVD o decodificador tiene una configuración diferente del panel.
➢
Cuando conecte un reproductor de DVD o un decodificador, debe hacer coincidir los colores del terminal de conexión y del cable.
➢
Al conectarse a través de un HDMI, no necesita conectar cables de audio. Sólo necesita conectar cables de audio al conectarse a
través de un HDMI/DVI.
➢
Los dispositivos externos que admiten el modo HDMI de versiones inferiores puede que no implementen la salida de sonido del
televisor con la última versión HDMI (HDMI 1.3).
En tal caso, conecte HDMI2/DVI IN y DVI IN [R-AUDIO-L] en el panel lateral del televisor.
➢
Algunos de los cables HDMI de versiones inferiores pueden causar parpadeos molestos o que la pantalla no se vea.
En este caso use un cable que admita la última versión HDMI (HDMI 1.3).
Panel posterior del TV
Reproductor de DVD/
decodificador
Cable HDMI (no suministrado)
1
Reproductor de DVD/
decodificador
Panel posterior del TV
Cable HDMI/DVI (no suministrado)
1
Cable de audio (no suministrado)
2
BP68-00630D-Spa_1.indd 15 2007-04-09 ソタネト 7:03:16

Español - 16
Conexión de un sistema de audio digital
Las tomas del panel posterior del televisor facilitan la conexión de un sistema de audio digital al televisor.
1 Conecte un cable óptico entre
la toma DIGITAL AUDIO OUT
(OPTICAL) del televisor y la toma
Digital Audio Input del sistema de
audio digital.
Cuando conecte un sistema de
audio digital al terminal DIGITAL
AUDIO OUT (OPTICAL):
Baje el volumen del televisor y
ajuste el nivel de volumen con el
control del volumen del sistema
de audio.
➢
Cada sistema de audio digital tiene
una configuración diferente del
panel.
➢
El audio de 5,1 canales es posible
cuando el televisor está conectado
a un dispositivo externo que
admita 5,1 canales.
Qué quiere decir OPTICAL?
● Convierte la señal eléctrica en señal de luz óptica y la transmite a través de fibra óptica. S/PDIF es un sistema de transmisión de
audio digital en el formato de una onda de luz que utiliza un conductor de vidrio.
Conexión de un amplificador/DVD para Home Cinema - Analógico
1 Conecte cables de audio entre las
tomas AV OUT [L-AUDIO-R] del
televisor y las tomas AUDIO IN
[L-AUDIO-R] del amplificador/DVD
para cine en casa.
Cuando un amplificador de audio
se conecta a los terminales AV
OUT [L-AUDIO-R]: Disminuya el
volumen del TV y ajuste el nivel del
volumen con el control del volumen
de los amplificadores.
➢
Cada amplificador/sistema de
DVD para cine en casa tiene una
configuración diferente del panel.
➢
Cuando conecte un amplificador
o un sistema de DVD para Home
Cinema, debe hacer coincidir los
colores del terminal de conexión y
del cable.
Panel posterior del TV
Cable óptico (no suministrado)
1
Sistema de audio digital
Panel posterior del TV
Cable de audio (no suministrado)
1
Amplificador/
DVD para Home Cinema
BP68-00630D-Spa_1.indd 16 2007-04-09 ソタネト 7:03:20

Español - 17
Conexión a un PC
Uso del cable D-Sub
1 Conecte un cable D-Sub entre la
toma PC IN [PC] del televisor y la
toma de salida PC del ordenador.
2 Conecte un cable de audio PC
entre la toma PC IN [AUDIO] del
televisor y la toma de salida de
audio de la tarjeta de sonido del
ordenador.
Uso del cable HDMI/DVI
1 Conecte un cable HDMI/DVI entre
la toma HDMI1 del televisor y la
toma de salida PC del ordenador.
2 Conecte un cable estéreo de 3,5
mm minienchufe/2 RCA entre la
toma de entrada DVI IN
[L-AUDIO-R] del televisor y la
toma de salida de audio de la
tarjeta de sonido del ordenador.
➢
Cada ordenador tiene una configuración diferente del panel.
➢
Cuando conecte un ordenador, debe hacer coincidir los colores del terminal de conexión y del cable.
Funcionamiento
Encendido y apagado del televisor
Pulse el botón POWER del mando a distancia.
Tambien puede usar el boton POWER del televisor.
➢
El televisor puede tardar unos segundos en encenderse.
Panel posterior del TV
PC
Cable de audio PC (no suministrado)
2
Cable D-Sub (no suministrado)
1
Uso del cable D-Sub
Uso del cable HDMI/DVI
Panel posterior del TV
PC
Cable estéreo de 3,5 mm/2 RCA
(no suministrado)
2
Cable HDMI/DVI (no suministrado)
1
BP68-00630D-Spa_1.indd 17 2007-04-09 ソタネト 7:03:25

Español - 18
Función Plug & Play
Cuando el televisor se enciende por primera vez, los valores se inician correlativamente de forma automática:
1 Pulse el botón POWER del mando a distancia.
Se muestra automáticamente el mensaje Se ajustarán idioma del Menú, modo
Comercio, canales y hora.
Pulse el botón ENTER y aparecerá automáticamente el menú Seleccionar el idioma del
Menú en pantalla..
2 Pulse los botones ◄ o ► para seleccionar un idioma y, a continuación, pulse el botón
ENTER.
3 Pulse los botones ◄ o ► para seleccionar Comercio o Domicilio y, a continuación, pulse
el botón ENTER.
➢
La selección predeterminada es Domicilio.
➢
Es recomendable configurar el televisor en el modo Domicilio para obtener la mejor
imagen en un entorno doméstico.
➢
El modo Comercio sólo es necesario en los entornos comerciales.
➢
Si la unidad se ha configurado accidentalmente en el modo Comercio y se desea
volver al modo Dinámico (Domicilio), se debe pulsar el botón del volumen y, a
continuación, mantener pulsado durante cinco segundos el botón MENU del panel
del televisor.
4 Pulse los botones ◄ o ► para memorizar los canales de la conexión seleccionada y pulse
el botón ENTER.
➢
Si la antena está conectada a ANT 1 IN (CABLE), seleccione Cable; si está
conectada a ANT 2 IN (AIR), seleccione Aire.
➢
Si ANT 1 IN (CABLE) y ANT 2 IN (AIR) están conectadas, seleccione Aire+Cable.
➢
En el modo Cable, puede seleccionar la fuente de señal analógica correcta entre
STD, HRC e IRC pulsando los botones ◄ o ►; a continuación, pulse el botón
ENTER. Si tiene un cable digital, seleccione la fuente de señal analógica y digital.
Póngase en contacto con su proveedor de cable para saber el tipo de sistema de
cable existente en su zona.
5 El televisor empezará a memorizar todos los canales disponibles.
Una vez guardados todos los canales disponibles, volverá a aparecer el menú Prog. Auto.
Pulse el botón ENTER cuando se complete la memorización de canales.
Aparece el mensaje Configure en modo Reloj..
➢
Para detener la búsqueda antes de que finalice, pulse el botón ENTER con Detener
seleccionado.
6 Pulse los botones ◄ o ► para seleccionar Manual para ajustar la hora manualmente y, a
continuación, pulse el botón ENTER. Se muestra el mensaje Escriba la fecha y la hora..
➢
Si selecciona Auto, se muestra Seleccionar si no observa el horario de verano..;
a continuación, vaya al paso 9. (Si desea ajustar la hora automáticamente, vaya al
paso 9.)
7 Pulse los botones ◄ o ► para desplazarse a Mes, Día, Año, Hora o Min.
Seleccione la fecha y la hora que desee pulsando los botones ▲ o ▼; pulse después el
botón ENTER.
➢
Puede ajustar el mes, el día, el año, la hora y el minuto directamente pulsando los
botones numéricos del mando a distancia.
8 Aparecerá el mensaje Disfrutar su vision..
Cuando termine, pulse el botón ENTER.
➢
Aunque no pulse el botón ENTER, el mensaje desaparecerá automáticamente
después de algunos segundos.
Continúa…
Plug & Play
Se ajustarán idioma del Menú, modo Comercio, canales y
hora.
Iniciar
Ingresar
Salir
Plug & Play
Seleccionar las antenas que desea memorizar
Aire Cable Aire+Cable
Ingresar
Omitir
Plug & Play
La programación automática está en progreso.
Cable 3
10%
Detener
Ingresar
Omitir
Plug & Play
Seleccione sistema de cable.
analógico
digital
STD HRC IRC
STD HRC IRC
Ingresar
Omitir
Plug & Play
Configure en modo Reloj.
Auto Manual
Ingresar
Omitir
Plug & Play
Disfrutar su vision.
Aceptar
Plug & Play
Seleccionar el idioma del Menú en pantalla.
English Español Français
Ingresar
Omitir
Plug & Play
Seleccione el modo Domicilio si instala el TV en
casa.
Comercio Domicilio
Ingresar
Omitir
Plug & Play
Escriba la fecha y la hora.
Ingresar
Omitir
Mes / Día / Año Hora / Min
--
/
--
/
---- --
:
--
--
▲
▼
Ajustar
BP68-00630D-Spa_1.indd 18 2007-04-09 ソタネト 7:03:36

Español - 19
Ajuste automático del reloj
9 Pulse los botones ◄ o ► para seleccionar Apagado o Encendido y pulse el botón
ENTER.
Aparece el mensaje Seleccione la zona horaria en la que se encuentra..
10 Pulse los botones ▲ o ▼ para resaltar la zona horaria del área local (y para mover la
selección a la zona horaria apropiada en el mapa de Estados Unidos).
Pulse el botón ENTER.
Si el reloj no se configura automáticamente, consulte las páginas 44~45 para ajustarlo.
11 Aparecerá el mensaje Disfrutar su vision..
Cuando termine, pulse el botón ENTER.
➢
Aunque no pulse el botón ENTER, el mensaje desaparecerá automáticamente
después de algunos segundos.
Si desea reiniciar esta función...
1 Pulse el botón MENU.
Pulse los botones ◄ o ► para seleccionar Configuración y pulse el botón ENTER.
2 Pulse los botones ▲ o ▼ para seleccionar Plug & Play y pulse el botón ENTER.
Si desea más detalles sobre las opciones de configuración, consulte la página 17.
➢
La función Plug & Play está disponible sólo en el modo TV.
Cambio de canales
Utilización de los botones de canal
Pulse los botones CH o CH para cambiar de canal.
➢
Al pulsar los botones CH o CH , el televisor cambia los canales secuencialmente.
Verá todos los canales memorizados en el televisor. (Debe haber un mínimo de tres
canales memorizados.) No verá los canales eliminados o no memorizados.
Consulte la página 22 para la memorización de los canales.
Utilización de los botones numéricos
Utilice los botones numéricos para cambiar rápidamente de canal.
Utilice los botones numéricos para ir directamente a un canal.
Por ejemplo, para seleccionar el canal 27 pulse “2” y “7”.
El televisor cambiará de canal cuando pulse el segundo número.
Uso del botón “
-
”
El botón “
-
” se utiliza para seleccionar emisoras que emitan con señal digital.
Por ejemplo, para seleccionar el canal 7-1, pulse “7”, “-” y “1”.
➢
HD indica que el televisor está recibiendo una señal digital de alta definición.
SD indica que el televisor está recibiendo una señal de definición estándar.
➢
Pulse los botones numéricos y después el botón ENTER para cambiar rápidamente de
canal.
Utilización del botón PRE-CH para seleccionar el canal anterior
Pulse el botón PRE-CH.
El televisor cambiará al último canal visualizado.
➢
Para cambiar rápidamente de un canal a otro que no es correlativo, sintonice un canal y
utilice el botón numérico para seleccionar el segundo canal. A continuación, utilice el botón
PRE-CH para alternar rápidamente entre ambos.
Plug & Play
Seleccionar si no observa el horario de verano.
Encendido Apagado
Ingresar
Omitir
Plug & Play
Disfrutar su vision.
Aceptar
Plug & Play
Seleccione la zona horaria en la que se encuentra.
Ingresar
Omitir
Newfoundland
Atlántico
Este
Central
Montañas
Pacífico
Alaska
Hawaii
BP68-00630D-Spa_1.indd 19 2007-04-09 ソタネト 7:03:39

Español - 20
Ajuste del volumen
Pulse los botones VOL + o VOL – para aumentar o reducir el volumen.
Utilización del botón MUTE
Puede interrumpir el sonido en cualquier momento pulsando el botón MUTE.
1 Pulse el botón MUTE y se desconectará el sonido.
En la esquina inferior izquierda de la pantalla aparecerá la palabra Silencio.
2 Para recuperar el sonido, vuelva a pulsar el boton MUTE o pulse los botones
VOL + o VOL –.
Visualización de la pantalla
La pantalla identifica el canal actual y el estado de algunos ajustes de audio-vídeo.
Pulse el botón INFO en el mando a distancia.
Visualización de los menús
1 Con el aparato encendido, pulse el botón MENU.
El menú principal aparece en la parte inferior de la pantalla.
Existen seis grupos de menús: Imagen, Sonido, Canal, Configuración, Entrada,
Aplicación y Mapa de menús.
2 Pulse los botones ◄ o ► para seleccionar el elemento deseado y pulse el botón ENTER.
Pulse los botones ▲/▼/◄/►/ENTER para ver, cambiar o usar las opciones seleccionadas.
Seleccione Regresar pulsando los botones ▲ o ▼ y, a continuación, pulse el botón
ENTER para volver al menú anterior.
Pulse el botón EXIT para salir.
No inform.hora
Aire
3
Picture
Ingresar
Imagen
Modo
Contraste
100
Luminosidad
45
Definición
75
Color
55
Tinte
V50 R50
Tono Color
Configuración detallada
Tamaño
Regresar
Dinámico
Frío1
16:9
Ingresar
Define las opciones de la imagen.
Picture
BP68-00630D-Spa_1.indd 20 2007-04-09 ソタネト 7:03:47

Español - 21
Memorización de canales
El TV puede memorizar y almacenar todos los canales disponibles, tanto aéreos como de cable. Una vez memorizados los
canales disponibles, use los botones CH y CH para explorarlos. De este modo no es necesario introducir dígitos para
cambiar los canales. La memorización de canales implica tres pasos: seleccionar una emisora de origen, memorizar los
canales (automático) y añadir o borrar canales (manual).
Selección del origen de la señal de vídeo
Antes de memorizar los canales disponibles, es preciso indicar el tipo de origen de la señal conectada al televisor (es decir,
antena o sistema de cable).
1 Pulse el botón MENU.
Pulse los botones ◄ o ► para seleccionar Canal y pulse el botón ENTER.
Pulse los botones ▲ o ▼ para seleccionar Antena y pulse el botón ENTER.
2 Pulse los botones ▲ o ▼ para seleccionar Aire o Cable y pulse el botón ENTER.
Continúa…
Exploración de los menús con el mapa de menús
Mediante la opción Mapa de menús del menú principal se pueden ver todos los menús y seleccionar una función
rápidamente.
Con el mapa de menús se puede seleccionar cualquier menú.
1 Pulse el botón MENU.
El menú principal aparece en la parte inferior de
la pantalla.
2 Pulse los botones ◄ o ► para seleccionar Mapa
de menús y pulse el botón ENTER. Aparece el
mapa de menús.
3 Pulse los botones ▲/▼/◄/► para seleccionar un
menú y pulse el botón ENTER. Aparece el menú
seleccionado.
4 Pulse los botones ▲/▼/◄/►/ENTER para ver,
cambiar o usar las opciones seleccionadas.
➢
Botón rojo: Intercambia la visualización alfabética por la funcional y viceversa.
Botón verde: permite ir a la página anterior.
Botón amarillo: permite ir a la página siguiente.
Botón ENTER: se accede al menú seleccionado.
Pulse el botón EXIT para salir.
Channel
Ingresar
Canal
Regresar
Antena
Prog. Auto
Borrar canal encriptado
Lista de canales
Sintonia Fina
Intensidad señal
LNA
Aire
Encendido
Channel
Ingresar
Canal
Regresar
Antena
Prog. Auto
Borrar canal encriptado
Lista de canales
Sintonia Fina
Intensidad señal
LNA
Cable
Encendido
Aire
Cable
Modo І Contraste І Luminosidad І Definición І Color І Tinte
Tono Color І Configuración detallada І Tamaño І Digital NR І DNIe
Color activo І Gama cromática І Position І Reiniciar
Orden alfabético
Página siguiente
Imagen
Sonido
Canal
Modo І DNSe І Idioma preferido І Sonido Multi-track
Vol.Auto І Silenc. Int
Antena І Prog. Auto І Borrar canal encriptado І Lista de canales
Sintonia Fina І Intensidad señal І LNA
Mapa de menús
1/2
Ingresar Regresar
Configuración
Plug&Play І Idioma І Reloj І Temporizador І Temporizador 1
BP68-00630D-Spa_1.indd 21 2007-04-09 ソタネト 7:03:54

Español - 22
Configuración del mando a distancia
Una vez configurado correctamente el mando a distancia, éste puede funcionar en cinco modos diferentes: TV, VCR, Cable,
DVD o Set- Top Box. Pulsando el botón correspondiente del mando a distancia podrá cambiar de un modo a otro y controlar
cualquiera de estos equipos.
➢
El mando a distancia quizá no sea compatible con todos los reproductores de DVD, vídeos, decodificadores y receptores de TV
digital.
Configuración del mando a distancia para controlar el vídeo
1 Apague el vídeo.
2 Pulse el botón VCR del mando a distancia del televisor.
3 Pulse el botón SET del mando a distancia del televisor.
4 Si utiliza los botones numéricos del mando a distancia, introduzca tres dígitos del
código del reproductor de vídeo que puede encontrar en la página 24 de este manual
correspondientes a su marca de reproductor de vídeo. Debe introducir los tres dígitos,
aunque el primero sea un “0”. (Si en la relación hay más de un código, introduzca el
primero.)
5 Pulse el botón POWER del mando a distancia. El vídeo debería encenderse si el mando
está correctamente configurado.
Si el vídeo no se enciende, repita los pasos 2, 3 y 4, pero pruebe con otro de los códigos
indicados para la marca de su vídeo. Si no aparece ningún otro código, pruebe con todos los
códigos de vídeo, desde el 000 hasta el 080.
Nota sobre el uso de los modos del mando a distancia: APARATO DE VÍDEO
Cuando el mando a distancia esté en el modo VCR, los botones de volumen seguirán
controlando el volumen del televisor.
Continúa…
Almacenamiento de los canales en la memoria (método automático).
3 Pulse los botones ▲ o ▼ para seleccionar Prog. Auto y pulse el botón ENTER.
4 Pulse los botones ◄ o ► para seleccionar la conexión de la antena y pulse el botón
ENTER.
➢
Aire : señal de antena aérea
Cable : señal de antena por cable
Aire+Cable : señales de antena “Aire” y “Cable”
➢
Si la antena está conectada a ANT 1 IN (CABLE), seleccione Cable; si está
conectada a ANT 2 IN (AIR), seleccione Aire.
➢
Si ANT 1 IN (CABLE) y ANT 2 IN (AIR) están conectadas, seleccione Aire + Cable.
➢
Si ha seleccionado Aire, vaya al paso 6.
5 Pulse ◄ o ► para seleccionar la fuente de señal analógica correcta entre STD, HRC e IRC
y, a continuación, pulse el botón ENTER. Si tiene un cable digital, seleccione la fuente de
señal analógico y digital.
➢
STD, HRC e IRC identifican los distintos tipos de sistemas de TV por cable.
Póngase en contacto con su proveedor de cable para conocer el tipo de sistema de
cable de su zona. En este momento ya se ha seleccionado el origen de la señal.
6 El televisor empieza a memorizar todas las emisoras disponibles.
Si se pulsa el botón ENTER durante un proceso de almacenamiento, se muestra el
mensaje Desea interrumpir la programación automática?.
Seleccione Sí pulsando los botones ◄ o ►.
Pulse el botón EXIT para salir.
➢
El TV debe estar conectado a una antena aérea o de cable para recibir señales de
la TV digital. Aunque se haya eliminado un canal de la memoria, siempre se puede
sintonizar dicho canal directamente mediante los botones numéricos del mando a
distancia.
➢
Todos los canales analógicos y digitales disponibles se almacenan automáticamente
en la memoria.
Se tarda de 3 a 10 minutos en memorizar los canales.
Prog. Auto
Seleccionar las antenas que desea memorizar
Aire Cable Aire+Cable
Ingresar
Regresar
Prog. Auto
La programación automática está en progreso.
Cable 3
10%
Detener
Ingresar
Regresar
Prog. Auto
Seleccione sistema de cable.
analógico
digital
STD HRC IRC
STD HRC IRC
Ingresar Regresar
Prog. Auto
Desea interrumpir la programación
automática?
Cable 3
10%
Sí No
Ingresar
Regresar
BP68-00630D-Spa_1.indd 22 2007-04-09 ソタネト 7:03:56

Español - 23
Configuración del mando a distancia para controlar el decodificador de cable
1 Apague el decodificador de cable.
2 Pulse el botón CABLE del mando a distancia del televisor.
3 Pulse el botón SET del mando a distancia del televisor.
4 Mediante los botones numéricos del mando a distancia, introduzca los tres dígitos del
código de decodificador de cable correspondientes a la marca de su decodificador, que
aparece en la lista de la página 25 de este manual. Debe introducir los tres dígitos, aunque
el primero sea un “0”. (Si en la relación hay más de un código, introduzca el primero.)
5 Pulse el botón POWER del mando a distancia.
El decodificador de cable debería encenderse si el mando está correctamente configurado.
Si el decodificador no se enciende, repita los pasos 2, 3 y 4, pero pruebe con otro de los
códigos indicados para la marca de su decodificador. Si no aparece ningún otro código,
inténtelo con cada uno de ellos, del 000 al 046.
Nota sobre el uso de los modos del mando a distancia: Decodificador de cable
Cuando el mando a distancia esté en el modo
CABLE, los botones de volumen seguirán
controlando el volumen del televisor.
Configuración del mando a distancia para controlar el DVD
1 Apague el DVD.
2 Pulse el botón DVD del mando a distancia del televisor.
3 Pulse el botón SET del mando a distancia del televisor.
4 Mediante los botones numéricos del mando a distancia, introduzca los tres dígitos del
código del DVD correspondientes a la marca de su DVD, que aparece en la lista de la
página 26 de este manual. Debe introducir los tres dígitos, aunque el primero sea un “0”.
(Si en la relación hay más de un código, introduzca el primero.)
5 Pulse el botón POWER del mando a distancia.
El DVD debería encenderse si el mando está correctamente configurado.
Si el vídeo no se enciende, repita los pasos 2, 3 y 4, pero pruebe con otro de los códigos
indicados para la marca de su DVD. Si no se enumeran otros códigos, pruebe con cada
código, desde 000 hasta 141.
Nota sobre el uso de los modos del mando a distancia: DVD
Cuando el mando a distancia esté en el modo DVD, los botones de volumen seguirán
controlando el volumen del televisor.
Configuración del mando a distancia para utilizarlo con el receptor de televisión digital
1 Encienda el receptor de televisión digital.
2 Pulse el botón STB del mando a distancia del televisor.
3 Pulse el botón SET del mando a distancia del televisor.
4 Si utiliza los botones numéricos del mando a distancia, introduzca tres dígitos del
código del receptor de TV digital que puede encontrar en la página 25 de este manual
correspondientes a su marca de receptor digital. Debe introducir los tres dígitos, aunque el
primero sea un “0”. (Si en la relación hay más de un código, introduzca el primero.)
5 Pulse el botón POWER del mando a distancia.
El decodificador debería encenderse si el mando está correctamente configurado.
Si el receptor de televisión digital no se enciende, repita los pasos 2, 3 y 4, pero pruebe con
otro de los códigos indicados para la marca de su receptor de televisión digital.
Si no aparece ningún otro código, inténtelo con cada uno de ellos, del 000 al 074.
Nota sobre el uso de los modos del mando a distancia: STB
Cuando el mando a distancia esté en el modo STB, los botones de volumen seguirán
controlando el volumen del televisor
Continúa…
BP68-00630D-Spa_1.indd 23 2007-04-09 ソタネト 7:04:01

Español - 24
Códigos del mando a distancia
APARATO DE VÍDEO
Marca
SAMSUNG
ADMIRAL
AIWA
AKAI
AUDIO DYNAMICS
BELL&HOWELL
BROKSONIC
CANDLE
CANON
CITIZEN
COLORTYME
CRAIG
CURTIS MATHES
DAEWOO
DB
DIMENSIA
DYNATECH
ELECTROHOME
EMERSON
FISHER
FUNAI
GENERAL ELECTRIC
GO VIDEO
LG(Goldstar)
HARMAN KARDON
HITACHI
INSTANT REPLAY
JC PENNEY
JCL
KENWOOD
KLH
LIOYD
LOGIK
LXI
JVC
MAGNAVOX
MARANTZ
MARTA
KONIA
ORION
MEI
MEMOREX
MGA
MIDLAND
MINOLTA
Código
000 001 002 003 004 005 077 078 079
020
025
004 027 032
007 026
018
022
002 003 006 008 015 055
021 056
002 003 006 008 015 055
007
002 024
002 007 008 017 021 025 056 064 066
003 010 011 012 013 014 015 016
007 026
017
025
034
001 003 006 021 022 025 030 032 034
040 047 050 052 060 063 065 066 067
069 073
018 024 028 029 048 051 061
025
002 005 017 021 056
002
006 007 008 009 010
007
019 025 041 042 074
021
002 007 018 019 021 026 037 041
054 056
007 008 018 021 026 037
007 008 018 026 037
070
025
038
025
081 082 083
021 056 059
007 008 018 021 026 037 062
006
036
073 074 075 076
021
006 021 024 025
034
005
019 041 075
Marca
MITSUBISHI
MONTGOMERY WARD
MTC
MULTITECH
NEC
OPTIMUS
PANASONIC
PENTAX
PENTEX RESEARCH+
PHILCO
PHILIPS
PIONEER
PORTLAND
PROSCAN
QUARTZ
QUASAR
RADIO SHACK/
REALISTIC
RCA
SANSUI
SANYO
SCOTT
SEARS
SHARP
SHIMTOM
SIGNATURE
SONY
SYLVANIA
SYMPHONIC
TANDY
TASHIKA
TATUNG
TEAC
TECHNICS
TEKNIKA
TMK
TOSHIBA
TOTEVISION
UNITECH
VECTOR RESEARCH
VICTOR
VIDEO CONCEPTS
VIDEOSONIC
WARDS
YAMAHA
ZENITH
Código
019 034 041 046
020
002 025
002 005 025 038
007 008 018 026 037 062 064
020
021 056 071 072
019 041 075
008
021 056 059
021 080
019 026 039 053
015 049 055
017
018
021 056
006 018 020 021 024 025 029 034
048 056
002 017 019 021 035 041 043 057
068 076
026
018 024
003 047 052 067
006 018 019 024 028 029 041 048 051
020 034 045 015
027 033 038 058
025
027 033 044
021 025 056 059
025
018 025
006
037
025 037 068
021
006 021 025 031
066
003 019 029 051 052
002 006
002
007 026
026
007 026
002
002 003 006 019 020 021 024 025 034
038 041
007 008 018 026 037
023 027 033
Continúa…
BP68-00630D-Spa_1.indd 24 2007-04-09 ソタネト 7:04:09

Español - 25
Marca
SAMSUNG
GI
HAMLIN
HITACHI
JERROLD
MACOM
MAGNAVOX
OAK
PANASONIC
PHILIPS
PIONEER
RCA
REGAL
Código
000 001 002 003 004 005 006 007
041
003 024 031
025 030
038 039
025 030
019 023 028
026
003 022 027 037 044
019 021 023 028
004 018 020 044
014 022 040
003
Marca
REGENCY
SA
SCIENTIFIC ATLAN
SPRUCER
STARGATE 2000
SYLVANIA
TEXSCAN
TOCOM
UNIVERSAL
VIEWSTAR
WARNER AMEX
ZENITH
Código
015 023
042 043
042 043
022
036
016
016
032
033 034
019 021 023 028
046
017 029 035 037 045
DECODIFICADOR DE CABLE
Producto
Ground wave STB
Satellite STB
CABLE STB
STB DVD COMBO
Satellite STB HDD COMBO Standard
Código
001 002
003
004
008
009
Producto
Satellite STB HDD COMBO Premium
CABLE STB HDD COMBO Standard
CABLE STB HDD COMBO Premium
Ground wave STB HDD COMBO Standard
Ground wave STB HDD COMBO Premium
Código
010
011
012
013
014
RECEPTOR DE TV DIGITAL DE SAMSUNG
Marca
ALPHASTAR
ANAM
CHANNEL MASTER
CROSSDIGITAL
CHAPARRAL
DIRECT TV
DAEWOO
DISH NETWORK SYSTEM
DISHPRO
DRAKE
DX ANTENNA
ECHOSTAR
EXPRESSVU
GOI
GE
GENERAL INSTRUMENT
HTS
HOME CABLE
HITACHI
HUGHES NETWORK
IQ
IQ PRISM
JANEIL
JERROID
JVC
Código
023
043
018 034
019
035
015 016 017 019 022 045 060
061 062 065 066 067 068
074
069 070
069
018 024 032
027
025 069 070 071
069
069
065
046 047 048 063 064
069
056
022
015 017
020
020
059
063
069 070
Marca
LG(Goldstar)
MAGNAVOX
MEMOREX
MOTOROLA
MACOM
MITSUBISHI
NEXT LEVEL
PHILIPS
PRIMESTAR
PANASONIC
PAYSAT
PROSCAN
RCA
RADIOSHACK
REALISTIC
STS
STAR TRAK
SKY
SKY LIFE
SHACK
STAR CHOICE
SONY
TOSHIBA
ULTIMATE TV
UNIDEN
ZENITH
Código
044 073
016 021 036 038 039 040 041 042
016
064
018
015
047 048 064
015 016 017 021 033 036 038 039
040 041 042 067
046 049 050 063
058 059 061 062
016
065 066
051 052 053 065 066
064
057
020 027
026
031
005 006 007
064
064
054 060
015 017 028 029 030 072
060 066
016 021 037 055 056 057
024 031 068
RECEPTOR DIGITAL
Continúa…
BP68-00630D-Spa_1.indd 25 2007-04-09 ソタネト 7:04:09

Español - 26
Producto
DVD
DVDR
BD Record
VCR COMBO
VCR Record
DHR COMBO
Código
000 001 002
003 004
005 006
007 008 009 010 011
012
013
Producto
Home Theater VCR COMBO
HDD Record COMBO
TWIN TRAY COMBO
STB DVD COMBO
DVD Receiver
AV Receiver
Código
014 015 016
017
018
019
020
021
DVD DE SAMSUNG
Marca
ANAM
AUDIOVOX
AUDIOLOGIC
ANABA
APEX DIGITAL
AIWA
BROKSONIC
BLAUPUNKT
B&K
CURTIS MATHES
CYBER HOME
CLARION
CIRRUS
CINEVISION
DAEWOO
DENON
FARENHEIT
FISHER
GPX
GO VIDEO
GE
GREENHILL
HITACHI
HITEKER
HOYO
HARMAN / KARDON
IRT
INTEGRA
JBL
JVC
JATON
KENWOOD
KISS
KONKA
KLH
LG(Goldstar)
LOEWE
LASONIC
MOBILE AUTHORITY
MEMOREX
MALATA
MAGNAVOX
MINTEK
MONYKA
Código
030
075
085
072
070 071 074 086 083 084 088
111 112
114
062
074
122 123
027
065 077 078 079 082
080 125
081
095
066
146
067 068
090
060
061 089 133 135
069 074
074
064 113
071
073
091 110
089
092
091
022 033 115 116
073
051 108 109
073
059 100 106 107
074 075
025 031
057
058
054
055
056
076 093
074 094
073
Marca
NORCENT
NEXT BASE
NEC
NANTAUS
NESA
OPTOMEDIA ELECTRONICS
OPTIVIEW
ONKYO
PHILCO
PRINCETON
PROSCAN
PANASONIC
PHILIPS
ROTEL
RIO
RCA
RAITE
ROWA
SAMPO
SONY
SHERWOOD
SVA
SYLVANIA
SHARP
SANSUI
SANYO
SHINSONIC
SANYO
THOMSON
TOSHIBA
TECHNICS
TVIEW
TOKAI
TEAC
TECHWOOD
TREDEX
URBAN CONCEPTS
VENTURER
VOCOPRO
YAMAHA
YAMAKAWA
XWAVE
ZENITH
Código
048 049 050
052
053
144
074
105
072
076 092 119
044 045
046 047
023
024 034 124 134 136 137 138
036 076
117 118
120
023 035 074 075 131 132
073
038
104
026 029 126 127 128 129
130 141
039 041
042
043 093
140
062
062
094
090
145
028 062 076
139
072
073
096
097
098 099 101
076
075
102
032 063
040 073
103
076 121
DVD
BP68-00630D-Spa_1.indd 26 2007-04-09 ソタネト 7:04:10

Español - 27
Para seleccionar la fuente
Úselo para seleccionar TV u otras fuentes de entrada externas como reproductores de DVD, vídeos, etc., conectados al
televisor.
1 Pulse el botón MENU.
Pulse los botones ◄ o ► para seleccionar Entrada y pulse el botón ENTER.
Pulse los botones ▲ o ▼ para seleccionar Lista de Origen y pulse el botón ENTER.
2 Pulse los botones ▲ o ▼ para seleccionar una fuente de señal y pulse el botón ENTER.
➢
Puede elegir entre los siguientes conjuntos de tomas: TV, AV1, AV2, S-Video1,
S-Video2, Component1, Component2, PC, HDMI1, HDMI2/DVI en el panel posterior
del televisor y AV3 o S-Video3 en el panel lateral del televisor.
➢
Sólo se puede seleccionar la entrada de HDMI1 o HDMI2/DVI si el dispositivo externo
está encendido y conectado a través del HDMI.
➢
Puede elegir solamente los dispositivos externos que estén conectados al televisor.
Pulse el botón SOURCE del mando a distancia para ver una fuente de señal externa.
Para editar el nombre de la fuente de entrada
Dé un nombre al dispositivo externo conectado en las tomas de entrada; de esta manera será más fácil seleccionar el
dispositivo de entrada.
1 Pulse el botón MENU.
Pulse los botones ◄ o ► para seleccionar Entrada y pulse el botón ENTER.
Pulse los botones ▲ o ▼ para seleccionar Editar Nombre y pulse el botón ENTER.
2 Pulse los botones ▲ o ▼ para seleccionar la toma de entrada AV1, AV2, S-Video1,
S-Video2, S-Video3, Componente1, Componente2, PC, HDMI1 o HDMI2/DVI y, a
continuación, pulse el botón ENTER.
3 Pulse los botones ▲ o ▼ para seleccionar la fuente de entrada Vídeo, DVD, D-VHS,
Cable STB, HD STB, Satélite STB, PVR STB, Receptor AV, Receptor DVD, Juego,
Filmadora, DVD Combo, Recorder DVD HDD, PC, Televisor Internet, Televisor
interact., STB VOD o TV), y después pulse el botón ENTER.
Pulse el botón EXIT para salir.
Input
Ingresar
Lista de Origen
TV
AV1
AV2
AV3
S-Video1
S-Video2
S-Video3
Componente1
Componente2
----
----
----
----
----
----
----
----
Regresar
Input
Ingresar
Editar Nombre
AV1
AV2
AV3
S-Video1
S-Video2
S-Video3
Componente1
Componente2
PC
----
----
----
----
----
----
----
----
----
Regresar
Input
Ingresar
Editar Nombre
Regresar
AV1
AV2
AV3
S-Video1
S-Video2
S-Video3
Componente1
Componente2
PC
----
----
Vídeo
DVD
D-VHS
Cable STB
HD STB
Satélite STB
PVR STB
Input
Ingresar
Entrada
Lista de Origen ►
Editar Nombre
TV
Regresar
Input
Ingresar
Entrada
Lista de Origen
Editar Nombre ►
TV
Regresar
BP68-00630D-Spa_1.indd 27 2007-04-09 ソタネト 7:04:11

Español - 28
Control de la imagen
Utilización de los ajustes de imagen automáticos
El televisor tiene tres ajustes de imagen automáticos (“Dinámico”, “Normal” y “Cine”) preajustados en fábrica.
Se puede activar un ajuste de la imagen seleccionándolo en el menú.
1 Pulse el botón MENU.
Pulse el botón ENTER para seleccionar Imagen.
Pulse los botones ▲ o ▼ para seleccionar Modo y pulse el botón ENTER.
2 Pulse los botones ▲ o ▼ para seleccionar Dinámico, Normal o Cine y pulse el botón
ENTER.
Elija Dinámico para aumentar la claridad y nitidez de la imagen.
Seleccione Normal para el modo de visualización general del televisor.
Elija Cine cuando esté viendo una película.
Pulse el botón P.MODE del mando a distancia para seleccionar uno de los ajustes de
imagen estándar.
3 Pulse los botones ▲ o ▼ para seleccionar Contraste, Luminosidad, Definición, Color o
Tinte y pulse el botón ENTER.
4 Pulse los botones ◄ o ► para reducir o aumentar el valor de una opción concreta.
Pulse el botón ENTER.
➢
● En el modo PC, sólo se pueden seleccionar las opciones Contraste y
Luminosidad.
● Cada valor ajustado se almacenará por separado según su modo de entrada.
● Cuando realiza los cambios en Contraste, Luminosidad, Definición, Color o
Tinte, el color de la visualización en pantalla se ajusta automáticamente.
Continúa…
Picture
Ingresar
Imagen
Modo
Contraste
100
Luminosidad
45
Definición
75
Color
55
Tinte
V50 R50
Tono Color
Configuración detallada
Tamaño
Regresar
Dinámico
Frío1
16:9
Picture
Ingresar
Imagen
Modo
Contraste
100
Luminosidad
45
Definición
75
Color
55
Tinte
V50 R50
Tono Color
Configuración detallada
Tamaño
Regresar
Dinámico
Frío1
16:9
Dinámico
Normal
Cine
Picture
Ingresar
Imagen
Modo
Contraste
100
Luminosidad
45
Definición
75
Color
55
Tinte
V50 R50
Tono Color
Configuración detallada
Tamaño
Regresar
Dinámico
Frío1
16:9
▲
Contraste
▼
100
Imagen
Ingresar Regresar
Ajustar
BP68-00630D-Spa_2.indd 28 2007-04-09 ソタネト 7:07:50

Español - 29
5 Pulse los botones ▲ o ▼ para seleccionar Tono Color y pulse el botón ENTER.
6 Pulse los botones ▲ o ▼ para seleccionar Frío2, Frío1, Normal, Tibio1 o Tibio2 y pulse
el botón ENTER.
➢
Cuando el modo de imagen está ajustado en Dinámico o Normal, no se puede
seleccionar ni Tibio1 ni Tibio2
.
Reajuste de valores de la imagen a los valores predefinidos de fábrica
7 Pulse los botones ▲ o ▼ para seleccionar Reiniciar y pulse el botón ENTER.
Pulse los botones ▲ o ▼ para seleccionar Aceptar o Cancelar y pulse el botón ENTER.
Pulse el botón EXIT para salir.
➢
Se puede reajustar cada modo de imagen.
Picture
Ingresar
Imagen
Modo
Contraste
100
Luminosidad
45
Definición
75
Color
55
Tinte
V50 R50
Tono Color
Configuración detallada
Tamaño
Regresar
Dinámico
Frío1
16:9
Picture
Ingresar
Imagen
Modo
Contraste
100
Luminosidad
45
Definición
75
Color
55
Tinte
G50 R50
Tono Color
Configuración detallada
Tamaño
Regresar
Dinámico
Frío1
Aceptar
16:9
Frío2
Frío1
Normal
Tibio1
Tibio2
Picture
Ingresar
Imagen
Tinte
V50 R50
Tono Color
Detailed Settings
Size
Digital NR
DNIe
Color activo
Gama cromática
Posición
Reiniciar
Frío1
16:9
Auto
Encendido
Normal
Apagado
OK
Aceptar
Cancelar
BP68-00630D-Spa_2.indd 29 2007-04-09 ソタネト 7:07:54

Español - 30
Configuración detallada de los valores de la imagen
Puede realizar una configuración detallada de los valores de la imagen.
1 Pulse el botón MENU.
Pulse el botón ENTER para seleccionar Imagen.
Pulse los botones ▲ o ▼ para seleccionar Configuración detallada y pulse el botón
ENTER.
2 Seleccione la opción necesaria pulsando los botones ▲ o ▼ y, a continuación, pulse el botón
ENTER.
3 Cuando esté satisfecho con los ajustes, pulse el botón ENTER.
Pulse el botón EXIT para salir.
➢
Cuando el modo de la imagen está ajustado en Normal o Cine, se puede seleccionar
Configuración detallada
.
➢
Si DNIe está configurado como Apagado y el modo de la imagen es el modo Dinámico o
Normal, la Configuración detallada no se puede seleccionar.
● Ajuste del negro: Apagado/Bajo/Medio/Alto
Se puede seleccionar directamente el nivel de negro en la pantalla para ajustar la profundidad de ésta.
● Contraste Dinám.: Apagado/Bajo/Medio/Alto
Se puede ajustar el contraste de la pantalla para conseguir un contraste óptimo.
● Gamma: -3 ~ +3
Se puede ajustar la intensidad de los colores primarios.
Pulse los botones ◄ o ► hasta llegar al valor óptimo.
● Balance de blanco: -10 ~ +10
Se puede ajustar la temperatura del color para conseguir colores más naturales.
Pulse los botones ◄ o ► hasta llegar al valor óptimo.
● Mi Ctrl de Color: Rojo/Verde/Azul/Amarillo/Rosa/Reiniciar
Este valor puede ajustarse para que se adapte a sus preferencias personales.
Rojo/Verde/Azul/Amarillo/Rosa: El cambio del valor de ajuste renovará la pantalla ajustada.
Seleccione la opción necesaria pulsando los botones ▲ o ▼ y, a continuación, pulse el botón ENTER.
Pulse los botones ◄ o ► hasta llegar al valor óptimo.
Reiniciar : Los colores anteriormente ajustados se reiniciarán con los valores predefinidos de fábrica.
● Edge Enhancement: Apagado/Encendido
Permite acentuar los bordes de los objetos.
Picture
Ingresar
Imagen
Modo
Contraste
80
Luminosidad
50
Definición
50
Color
50
Tinte
V50 R50
Tono Color
Configuración detallada ►
Tamaño
Regresar
Normal
Frío1
16:9
Picture
Ingresar
Regresar
Configuración detallada
Ajuste del negro
Contraste Dinám.
Gamma
+1
Balance de blanco
0
Mi Ctrl de Color
Edge Enhancement
Medio
Medio
Encendido
BP68-00630D-Spa_2.indd 30 2007-04-09 ソタネト 7:07:55

Español - 31
Cambio del tamaño de la pantalla
Puede seleccionar el tamaño de imagen que mejor se adapte a sus requisitos de visualización.
1 Pulse el botón MENU.
Pulse el botón ENTER para seleccionar Imagen.
Pulse los botones ▲ o ▼ para seleccionar Tamaño y pulse el botón ENTER.
2 Pulse los botones ▲ o ▼ para seleccionar el formato de pantalla que desea y pulse el
botón ENTER.
Pulse el botón EXIT para salir.
16:9: Establece la imagen en modo panorámico 16:9.
Zoom1: Aumenta el tamaño de la imagen en la pantalla.
Zoom2: Amplía el formato de la imagen Zoom1.
Ajuste Ancho: Amplía la relación de aspecto de la imagen para que se ajuste al
ancho total de la pantalla.
4:3: Ajusta la imagen en modo normal 4:3.
Sólo buscar: Use esta función para ver la imagen completa sin cortes cuando la
entrada de la señal sea DTV(1080i), HDMI (1080i, 1080p) o Componente (1080i,
1080p).
Pulse el botón P.SIZE del mando a distancia para cambiar el tamaño de la imagen.
16:9
Establece la imagen en modo
panorámico 16:9.
Zoom1
Aumenta el tamaño de la imagen en
la pantalla.
Zoom2
Amplía el formato de la imagen
Zoom1.
Ajuste Ancho
Amplía la relación de aspecto de la
imagen para que se ajuste al ancho
total de la pantalla.
4:3
Ajusta la imagen en modo normal
4:3.
Sólo buscar
Use esta función para ver la imagen
completa sin cortes cuando la
entrada de la señal sea DTV (1080i),
HDMI (1080i, 1080p) o Componente
(1080i, 1080p).
➢
● Puede seleccionar los tamaños de pantalla 16:9, 4:3 y Ajuste Ancho en los modos Componente (1080i, 1080p), HDMI (1080i,
1080p) o DTV (1080i).
● En los modos DTV (720p), Componente (720p) o HDMI (720p), se puede seleccionar entre 16:9, 4:3 y Ajuste Ancho.
● En los modos Analogica TV, AV, S-VIDEO, Component(480i, 480p), HDMI(480i, 480p), o DTV(480i, 480p), se puede
seleccionar entre 16:9, Zoom1, Zoom2, 4:3.
● En los modos Zoom1, Zoom2 y Ajuste Ancho, se puede desplazar la imagen por la pantalla pulsando los botones ▲ o ▼.
● Cada valor ajustado se almacenará por separado según su modo de entrada.
● Cuando se ve una señal HD (alta definición 720p,1080i, 1080p), se puede usar la opción Ajuste Ancho.
La opción Ajuste Ancho ajusta el formato óptimo de la imagen ampliando ésta horizontal y verticalmente. Por ejemplo,
puede restablecer la imagen del formato 4:3 al formato 16:9.
Picture
Ingresar
Imagen
Modo
Contraste
100
Luminosidad
45
Definición
75
Color
55
Tinte
V50 R50
Tono Color
Configuración detallada
Tamaño
Regresar
Dinámico
Frío1
16:9
Picture
Ingresar
Imagen
Modo
Contraste
100
Luminosidad
45
Definición
75
Color
55
Tinte
V50 R50
Tono Color
Configuración detallada
Tamaño
Regresar
Dinámico
Frío1
Aceptar
16:9
16:9
Zoom1
Zoom2
Ajuste Ancho
4:3
Sólo buscar
BP68-00630D-Spa_2.indd 31 2007-04-09 ソタネト 7:08:00

Español - 32
Reducción digital de ruido
Si la señal de emisión que recibe el televisor es débil, puede activarse la función de reducción digital del ruido (Digital Noise
Reduction) para reducir la estática y las imágenes superpuestas que pueden aparecer en la pantalla.
1 Pulse el botón MENU.
Pulse el botón ENTER para seleccionar Imagen.
Pulse los botones ▲ o ▼ para seleccionar Digital NR y pulse el botón ENTER.
2 Pulse los botones ▲ o ▼ para seleccionar Apagado, Bajo, Medio, Alto, o Auto y pulse el
botón ENTER.
Pulse el botón EXIT para salir.
➢
La función Digital NR está disponible en todos los modos excepto PC.
Apagado: Apaga la función Digital NR.
Bajo: Ajusta Digital NR en el nivel bajo.
Medio: Ajusta Digital NR en el nivel medio.
Alto : Ajusta Digital NR en el nivel alto.
Auto : Reduce automáticamente el ruido de la imagen.
DNIe (Digital Natural Image engine (motor digital de imágenes naturales))
Este televisor incluye la función DNIe con el fin de conseguir una gran calidad visual. Si ajusta DNIe en Encendido, podrá ver
la pantalla con la función DNIe activada. Si establece DNIe como Demo, podrá ver en la pantalla una imagen normal y con el
modo DNIe aplicado para realizar la demostración. Mediante esta función podrá ver la diferencia en la calidad visual.
1 Pulse el botón MENU.
Pulse el botón ENTER para seleccionar Imagen.
Pulse los botones ▲ o ▼ para seleccionar DNIe y pulse el botón ENTER.
➢
Esta función no se activa si la fuente de entrada es PC.
2 Pulse los botones ▲ o ▼ para seleccionar Apagado, Demo o Encendido y pulse el botón
ENTER.
Pulse el botón EXIT para salir.
Apagado : Desactiva el modo DNIe.
Demo : La pantalla aparece a la izquierda antes de aplicar DNIe y a la derecha tras
aplicar DNIe.
Encendido : Activa el modo DNIe.
➢
La función DNle no se admite en el modo Cine. (Está desactivada.)
➢
DNIe
TM
(Digital Natural Image engine)
Esta función proporciona una imagen más detallada con mejora de los
detalles, del contraste y de los blancos.
Picture
Ingresar
Imagen
Tinte
V50 R50
Tono Color
Detailed Settings
Size
Digital NR
DNIe
Color activo
Gama cromática
Posición
Reiniciar
Frío1
16:9
Auto
Encendido
Normal
Apagado
Aceptar
Picture
Ingresar
Imagen
Tinte
V50 R50
Tono Color
Detailed Settings
Size
Digital NR
DNIe
Color activo
Gama cromática
Posición
Reiniciar
Frío1
16:9
Auto
Encendido
Normal
Apagado
Aceptar
Frío1
Aceptar
Bajo
Apagado
Bajo
Medio
Alto
Auto
Apagado
Demo
Encendido
Picture
Ingresar
Imagen
Aceptar
Tono Color
Configuración detallada
Tamaño
Digital NR
DNIe
Color activo
Gama cromática
Horizontal Position
0
Vertical Position
0
Reiniciar
Frío1
16:9
Auto
Encendido
Normal
Apagado
Picture
Ingresar
Imagen
Tinte
V50 R50
Tono Color
Detailed Settings
Size
Digital NR
DNIe
Color activo
Gama cromática
Posición
Reiniciar
Frío1
16:9
Auto
Encendido
Normal
Apagado
Aceptar
BP68-00630D-Spa_2.indd 32 2007-04-09 ソタネト 7:08:19

Español - 33
Configuración de la gama cromática
Se puede seleccionar la gama cromática favorita. La gama cromática es una matriz de color compuesta por los colores
básicos rojo, verde y azul.
1 Pulse el botón MENU.
Pulse el botón ENTER para seleccionar Imagen.
Pulse los botones ▲ o ▼ para seleccionar Gama cromática y pulse el botón ENTER.
2 Pulse los botones ▲ o ▼ para seleccionar Normal o sRGB y pulse el botón ENTER.
Pulse el botón EXIT para salir.
Normal: La gama cromática normal proporciona tonos de color planos y naturales.
sRGB: Admite tonos de color del formato sRGB.
Configuración del color activo
Si activa esta opción, los colores del cielo y del césped se ven más sólidos y claros y la imagen de la pantalla aparece más
vívida.
1 Pulse el botón MENU.
Pulse el botón ENTER para seleccionar Imagen.
Pulse los botones ▲ o ▼ para seleccionar Color activo y pulse el botón ENTER.
2 Pulse los botones ▲ o ▼ para seleccionar Apagado o Encendido y pulse el botón
ENTER.
Pulse el botón EXIT para salir.
➢
Esta función no está disponible en el modo PC.
➢
Cuando se selecciona Normal o Cine en el modo Imagen, la opción Color activo
cambia automáticamente a Apagado y se desactiva. Cuando en el modo Imagen
se selecciona Dinámico, la opción Color activo se activa sin tener en cuenta la
configuración de Imagen.
Picture
Ingresar
Imagen
Tinte
V50 R50
Tono Color
Detailed Settings
Size
Digital NR
DNIe
Color activo
Gama cromática
Posición
Reiniciar
Frío1
16:9
Auto
Encendido
Normal
Apagado
Aceptar
Picture
Ingresar
Imagen
Tinte
V50 R50
Tono Color
Detailed Settings
Size
Digital NR
DNIe
Color activo
Gama cromática
Posición
Reiniciar
Frío1
16:9
Auto
Encendido
Normal
Apagado
Aceptar
Picture
Ingresar
Imagen
Tinte
V50 R50
Tono Color
Detailed Settings
Size
Digital NR
DNIe
Color activo
Gama cromática
Posición
Reiniciar
Frío1
16:9
Auto
Encendido
Normal
Apagado
Aceptar
Apagado
Encendido
Picture
Ingresar
Imagen
Tinte
V50 R50
Tono Color
Detailed Settings
Size
Digital NR
DNIe
Color activo
Gama cromática
Posición
Reiniciar
Frío1
16:9
Auto
Encendido
Normal
Apagado
Aceptar
Normal
sRGB
BP68-00630D-Spa_2.indd 33 2007-04-09 ソタネト 7:08:20

Español - 34
Ajuste de la posición de la pantalla
Puede ajustar la posición horizontal y vertical de la pantalla.
1 Pulse el botón MENU.
Pulse el botón ENTER para seleccionar Imagen.
Pulse los botones ▲ o ▼ para seleccionar Posición y pulse el botón ENTER.
2 Pulse los botones ▲/▼/◄/► para ajustar la posición de la pantalla.
Pulse el botón EXIT para salir.
Congelación de la imagen actual
Pulse el botón STILL para congelar la imagen en movimiento. (Se seguirá oyendo el sonido
normal.)
Para cancelar esta función, vuelva a pulsar el botón STILL o pulse cualquier botón del mando
a distancia.
Control del sonido
Utilización de los parámetros de sonido automáticos
El TV tiene valores de sonido automáticos (“Normal”, “Música”, “Cine”, “Diálogo” y “Favorito” preajustados de fábrica.
Puede seleccionar “Favorito”, que recupera automáticamente los valores de sonido personalizados.
1 Pulse el botón MENU.
Pulse los botones ◄ o ► para seleccionar Sonido y pulse el botón ENTER.
Pulse los botones ▲ o ▼ para seleccionar Modo y pulse el botón ENTER.
2 Pulse los botone ▲ o ▼ para seleccionar Modo y pulse el botón ENTER.
Pulse los botones ▲ o ▼ para seleccionar el ajuste de sonido Normal, Música, Cine,
Diálogo o Favorito y, a continuación, pulse el botón ENTER.
Pulse el botón EXIT para salir.
Elija Normal para los ajustes predefinidos de fábrica.
Elija Música para ver vídeos musicales o conciertos.
Elija Cine cuando vea películas.
Elija Diálogo para ver una presentación que tenga sobre todo diálogo (es decir,
noticias).
Elija Favorito para recuperar los ajustes personales (Consulte la página 35).
Pulse el botón S.MODE del mando a distancia para seleccionar uno de los ajustes de
sonido estándar.
Sound
Ingresar
Sonido
Modo ►
DNSe
Idioma preferido
Sonido Multi-track
Vol.Auto
Silenc. Int
Regresar
Apagado
Inglés
Estéreo
Apagado
Apagado
Sound
Ingresar
Modo
Reiniciar
Aceptar
Regresar
Balance 100Hz 300Hz 1kHz 3kHz 10kHz
D
I
Modo
Normal
Música
Cine
Diálogo
Favorito
Picture
Ingresar
Imagen
Tinte
V50 R50
Tono Color
Detailed Settings
Size
Digital NR
DNIe
Color activo
Gama cromática
Posición ►
Reiniciar
Frío1
16:9
Auto
Encendido
Normal
Apagado
Aceptar
Posición
Mover
Ingresar Regresar
▼
▼
▲
▼
BP68-00630D-Spa_2.indd 34 2007-04-09 ソタネト 7:08:25

Español - 35
Personalización del sonido
Los parámetros de sonido pueden ajustarse para que se adapten a sus preferencias personales.
(De manera alternativa, puede usar uno de los ajustes automáticos.)
1 Pulse el botón MENU.
Pulse los botones ◄ o ► para seleccionar Sonido y pulse el botón ENTER.
Pulse los botones ▲ o ▼ para seleccionar Modo y pulse el botón ENTER.
2 Pulse los botone ▲ o ▼ para seleccionar Modo y pulse el botón ENTER.
Pulse los botones ▲ o ▼ para seleccionar una opción concreta (Normal, Música, Cine,
Diálogo o Favorito) y pulse el botón ENTER.
3 Pulse el botón ▲ o ▼.
Pulse los botones ◄ o ► para seleccionar la frecuencia que desee ajustar y pulse el botón
ENTER.
Pulse los botones ▲ o ▼ para aumentar o reducir el nivel de una frecuencia concreta y
pulse el botón ENTER.
➢
● Ajuste de balance de sonido I/D:
Para ajustar el balance de sonido de los altavoces I/D.
● Ajuste del ancho de banda (100Hz, 300Hz, 1kHz, 3kHz, 10kHz) :
Para ajustar el nivel de las diferentes frecuencias de ancho de banda.
Reajuste de la configuración del ecualizador a los valores predefinidos de fábrica
4 Pulse los botones ▲ o ▼ para seleccionar Reiniciar y pulse el botón ENTER.
Pulse los botones ▲ o ▼ para seleccionar Aceptar o Cancelar y pulse el botón ENTER.
Pulse el botón EXIT para salir.
➢
El ecualizador restablece los ajustes predeterminados de fábrica.
Sound
Ingresar
Modo
Modo
Regresar
Balance 100Hz 300Hz 1kHz 3kHz 10kHz
Reiniciar
Aceptar
Normal
Aceptar
Cancelar
Sound
Ingresar
Modo
Modo
Reiniciar
Aceptar
Regresar
Balance 100Hz 300Hz 1kHz 3kHz 10kHz
Favorito
D
I
D
I
Sound
Ingresar
Modo
Reiniciar
Aceptar
Regresar
Balance 100Hz 300Hz 1kHz 3kHz 10kHz
D
I
Modo
Normal
Música
Cine
Diálogo
Favorito
BP68-00630D-Spa_2.indd 35 2007-04-09 ソタネト 7:08:31

Español - 36
Configuración de DNSe (Digital Natural Sound engine-Motor de sonido digital natural)
DNSe mejora la calidad del sonido, controla las salidas automáticamente e impide la distorsión del sonido.
1 Pulse el botón MENU.
Pulse los botones ◄ o ► para seleccionar Sonido y pulse el botón ENTER.
Pulse los botones ▲ o ▼ para seleccionar DNSe y pulse el botón ENTER.
2 Pulse los botones ▲ o ▼ para seleccionar Apagado o Encendido y pulse el botón
ENTER.
Pulse el botón EXIT para salir.
Pulse el botón DNSe del mando a distancia para seleccionar Encendido o Apagado.
Sound
Ingresar
Sonido
Modo
DNSe
Idioma preferido
Sonido Multi-track
Vol.Auto
Silenc. Int
Regresar
Apagado
Inglés
Estéreo
Apagado
Apagado
Sound
Ingresar
Sonido
Modo
DNSe
Idioma preferido
Sonido Multi-track
Vol.Auto
Silenc. Int
Regresar
Apagado
Inglés
Estéreo
Apagado
Apagado
Apagado
Encendido
BP68-00630D-Spa_2.indd 36 2007-04-09 ソタネト 7:08:33

Español - 37
Elección de una pista sonora multicanal (MTS) - Analogica
En función del programa concreto emitido, puede escuchar en modo mono o estéreo o escuchar un programa de audio
secundario (SAP).
Sonido Multi-track
1 Pulse el botón MENU.
Pulse los botones ◄ o ► para seleccionar Sonido y pulse el botón ENTER.
Pulse los botones ▲ o ▼ para seleccionar Sonido Multi-track y pulse el botón ENTER.
2 Pulse los botones ▲ o ▼ para seleccionar un ajuste que desee y después pulse el botón
ENTER.
Pulse el botón EXIT para salir.
Elija Mono para canales que emiten en monoaural o si tiene dificultades con la
recepción de señales estéreo.
Elija Estéreo para canales que emiten en estéreo.
Elija SAP para escuchar el Programa de audio independiente, que normalmente es
una traducción de otro idioma.
Pulse varias veces el botón MTS del mando a distancia para seleccionar Mono,
Estéreo o SAP.
Elección de una pista sonora multicanal (MTS) - Digital
El sistema de transmisión de TV digital permite transmitir simultáneamente muchas pistas de audio (por ejemplo,
traducciones simultáneas del programa en otros idiomas). La disponibilidad de estas “multipistas” adicionales depende del
programa.
Idioma preferido
1 Pulse el botón MENU.
Pulse los botones ◄ o ► para seleccionar Sonido y pulse el botón ENTER.
Pulse los botones ▲ o ▼ para seleccionar Idioma preferido y pulse el botón ENTER.
2 Pulse los botones ▲ o ▼ para elegir el idioma que desee (Inglés, Español o Francés) y
pulse el botón ENTER.
Pulse el botón EXIT para salir.
➢
Sólo se puede seleccionar uno de los idiomas que ofrece la emisora.
Puede escuchar en un idioma que no sea el favorito pulsando el botón MTS del
mando a distancia.
Sound
Ingresar
Sonido
Modo
DNSe
Idioma preferido
Sonido Multi-track
Vol.Auto
Silenc. Int
Regresar
Apagado
Inglés
Estéreo
Apagado
Apagado
Sound
Ingresar
Sonido
Modo
DNSe
Idioma preferido
Sonido Multi-track
Vol.Auto
Silenc. Int
Regresar
Apagado
Inglés
Estéreo
Apagado
Apagado
Sound
Ingresar
Sonido
Modo
DNSe
Idioma preferido
Sonido Multi-track
Vol.Auto
Silenc. Int
Regresar
Apagado
Inglés
Estéreo
Apagado
Apagado
Inglés
Español
Francés
Sound
Ingresar
Sonido
Modo
DNSe
Idioma preferido
Sonido Multi-track
Vol.Auto
Silenc. Int
Regresar
Apagado
Inglés
Estéreo
Apagado
Apagado
Mono
Estéreo
SAP
BP68-00630D-Spa_2.indd 37 2007-04-09 ソタネト 7:08:36

Español - 38
Control automático de volumen
Reduce las diferencias en el nivel de volumen entre las emisoras.
1 Pulse el botón MENU.
Pulse los botones ◄ o ► para seleccionar Sonido y pulse el botón ENTER.
Pulse los botones ▲ o ▼ para seleccionar Vol. Auto y pulse el botón ENTER.
2 Pulse los botones ▲ o ▼ para seleccionar Apagado o Encendido y pulse el botón
ENTER.
Pulse el botón EXIT para salir.
Selección del silencio interno
Se silencia la salida de sonido de los altavoces del televisor. Es útil si desea escuchar el audio a través de su sistema de
sonido y no a través del televisor.
1 Pulse el botón MENU.
Pulse los botones ◄ o ► para seleccionar Sonido y pulse el botón ENTER.
Pulse los botones ▲ o ▼ para seleccionar Silenc. Int y pulse el botón ENTER.
2 Pulse los botones ▲ o ▼ para seleccionar Apagado o Encendido y pulse el botón
ENTER.
Pulse el botón EXIT para salir.
➢
● Las salidas de audio izquierda y derecha y de audio digital (Optical) permanecen
activadas.
● Los botones VOL +, VOL -, MUTE y S.MODE no funcionan si Silenc. Int está
establecido en Encendido.
Altavoces internos Audio Out Optical(Optical OUT) Audio Out (L/R OUT)
TV, AV,
S-Video
Component,
PC
HDMI
TV, AV,
S-Video
Component,
PC
HDMI
TV, AV,
S-Video
Component,
PC
HDMI
Silencio
interno
apagado
Altavoz
disponible
Altavoz
disponible
Altavoz
disponible
Altavoz
disponible
Altavoz
disponible
Sin salida
de sonido
Sin salida
de sonido
Sin salida de
sonido
Sin salida
de sonido
Silencio
interno
activado
Sin salida
de sonido
Sin salida de
sonido
Sin salida
de sonido
Sonido
disponible
Sonido
disponible
Sin salida
de sonido
Sonido
disponible
Sonido
disponible
Sonido
disponible
Sin señal del
vídeo
Sin salida
de sonido
Sin salida de
sonido
Sin salida
de sonido
Sin salida
de sonido
Sin salida de
sonido
Sin salida
de sonido
Sin salida
de sonido
Sin salida de
sonido
Sin salida
de sonido
Cuando Silenc. Int se ajusta en Encendido, el único menú de sonido que se puede ajustar es Multi-track Options.
Sound
Ingresar
Sonido
Modo
DNSe
Idioma preferido
Sonido Multi-track
Vol.Auto
Silenc. Int
Regresar
Apagado
Inglés
Estéreo
Apagado
Apagado
Sound
Ingresar
Sonido
Modo
DNSe
Idioma preferido
Sonido Multi-track
Vol.Auto
Silenc. Int
Regresar
Apagado
Inglés
Estéreo
Apagado
Apagado
Apagado
Encendido
Sound
Ingresar
Sonido
Modo
DNSe
Idioma preferido
Sonido Multi-track
Vol.Auto
Silenc. Int
Regresar
Apagado
Inglés
Estéreo
Apagado
Apagado
Apagado
Encendido
Sound
Ingresar
Sonido
Modo
DNSe
Idioma preferido
Sonido Multi-track
Vol.Auto
Silenc. Int
Regresar
Apagado
Inglés
Estéreo
Apagado
Apagado
BP68-00630D-Spa_2.indd 38 2007-04-09 ソタネト 7:08:42

Español - 39
Control de los canales
Supresión de los canales codificados digitales
La función Borrar canal encriptado se usa para filtrar los canales codificados después de realizar una búsqueda automática.
Borra los canales encriptados de la lista sintonizando los canales digitales por cable. Puede tardar de 20 a 30 minutos.
1 Pulse el botón MENU.
Pulse los botones ◄ o ► para seleccionar Canal y pulse el botón ENTER.
Pulse los botones ▲ o ▼ para seleccionar Borrar canal encriptado y pulse el botón
ENTER. Busca los canales encriptados para borrarlos de la lista.
Para detener la búsqueda de canales codificados:
Pulse el botón ▼ para seleccionar Detener y pulse el botón ENTER.
Pulse el botón ◄ o ► para seleccionar Sí y pulse el botón ENTER.
2 Una vez completada la búsqueda de los canales encriptados, pulse el botón ENTER.
Pulse el botón EXIT para salir.
Adición y borrado de canales
Puede añadir o suprimir un canal para que se muestren los canales que desee.
Para utilizar la función Lista de canales antes se ha de ejecutar Prog. Auto (consulte las páginas 21 y 22).
1 Pulse el botón MENU.
Pulse los botones ◄ o ► para seleccionar Canal y pulse el botón ENTER.
Pulse los botones ▲ o ▼ para seleccionar Lista de canales y pulse el botón ENTER.
2 Pulse los botones ▲ o ▼ para seleccionar Agregado y, a continuación, pulse el botón
ENTER.
Continúa…
Channel
Ingresar
Canal
Regresar
Antena
Prog. Auto
Borrar canal encriptado ►
Lista de canales
Sintonia Fina
Intensidad señal
LNA
Cable
Encendido
Borrar canal encriptado
Eliminando canal encriptado.
DTV Cable 3-1
10%
Detener
Ingresar
Regresar
Borrar canal encriptado
Detener la búsqueda del canal encriptado
DTV Cable 3-1
10%
Sí No
Ingresar
Regresar
Channel
Ingresar
Canal
Regresar
Antena
Prog. Auto
Borrar canal encriptado
Lista de canales ►
Sintonia Fina
Intensidad señal
LNA
Aire
Encendido
Lista de canales
Todos
Agregado ►
Favoritos
Modo Lista predet.
Todos
Regresar
Channel
Ingresar
BP68-00630D-Spa_2.indd 39 2007-04-09 ソタネト 7:08:44

Español - 40
3 Pulse los botones ▲/▼/◄/► para seleccionar el canal que desee añadir y, a continuación,
pulse el botón ENTER.
4 Pulse los botones ▲ o ▼ para seleccionar Añadir y, a continuación, pulse el botón
ENTER.
El símbolo aparece antes del número de canal correspondiente.
Pulse los botones ▲ o ▼ para seleccionar Regresar y, a continuación, pulse el botón
ENTER.
➢
Todos los canales seleccionados se mostrarán en el menú Agregado.
5 Pulse los botones ▲/▼/◄/► para seleccionar el canal que desee borrar y, a continuación,
pulse el botón ENTER.
Pulse los botones ▲ o ▼ para seleccionar Borrar y, a continuación, pulse el botón ENTER
para suprimir el canal.
Pulse el botón EXIT para salir.
Botón rojo (P.MODE): Púlselo varias veces para seleccionar Lista canales entera,
Lista canales añadida o Lista canales favoritos.
Botón verde (S.MODE): Púlselo para añadir todos los canales borrados.
Botón amarillo (STILL): Púlselo para borrar todos los canales memorizados.
Pulse el botón ADD/DEL del mando a distancia.
Pulse los botones CH y CH para seleccionar el canal que desee añadir o
borrar y, a continuación, pulse el botón ENTER.
Ajuste de los canales favoritos
Puede configurar como favoritos los canales que vea con más frecuencia.
1 Pulse el botón MENU.
Pulse los botones ◄ o ► para seleccionar Canal y pulse el botón ENTER.
Pulse los botones ▲ o ▼ para seleccionar Lista de canales y pulse el botón ENTER.
2 Pulse los botones ▲ o ▼ para seleccionar Todos o Agregado y, a continuación, pulse el
botón ENTER.
3 Pulse los botones ▲/▼/◄/► para seleccionar un canal como favorito y pulse el botón
ENTER.
Pulse los botones CH y CH para mostrar la página siguiente de la lista de canales.
4 Pulse los botones ▲ o ▼ para seleccionar Favoritos y, a continuación, pulse el botón
ENTER.
Se resaltará el símbolo “ ” y el canal se configurará como favorito.
Si desea cancelar la selección de un canal como favorito, pulse el botón ENTER hasta que
el símbolo “ ” desaparezca.
Pulse el botón EXIT para salir.
➢
Sólo pueden seleccionarse como favoritos los canales memorizados.
➢
Todos los canales seleccionados se mostrarán en el menú Favoritos.
Si desea seleccionar los canales favoritos que ha configurado, pulse el botón FAV.CH
en el mando a distancia.
Lista canales añadida
DTV Aire 5-1
Modo Lista
2
5-1
8
11-1
14
17
20-1
4
7-1
10-1
13-1
16
19
22-1
Ingresar Regresar
Lista de canales
21
Observar
Añadir
Borrar
Nombre
Favoritos
Regresar
Añadir todos
Borrar todos
1/2
Lista canales añadida
DTV Aire 5-1
2
5-1
8
11-1
14
17
20-1
4
7-1
10-1
13-1
16
19
22-1
Ingresar Regresar
Lista de canales
21
Observar
Añadir
Borrar
Nombre
Favoritos
Regresar
Modo Lista
Borrar todos
Agregado
1/2
Channel
Ingresar
Canal
Regresar
Antena
Prog. Auto
Borrar canal encriptado
Lista de canales ►
Sintonia Fina
Intensidad señal
LNA
Aire
Encendido
Lista de canales
Todos ►
Agregado
Favoritos
Modo Lista predet.
Todos
Regresar
Channel
Ingresar
Lista canales entera
DTV Aire 5-1
2
5-1
8
11-1
14
17
20-1
4
7-1
10-1
13-1
16
19
22-1
Ingresar Regresar
Lista de canales
21
Observar
Añadir
Borrar
Nombre
Favoritos
Regresar
Modo Lista
Borrar todos
Agregado
1/2
Favoritos
BP68-00630D-Spa_2.indd 40 2007-04-09 ソタネト 7:08:50

Español - 41
Etiquetado de canales - Analogica
Los canales se pueden etiquetar con el propósito de que cuando éstos se seleccionan se pueda ver su nombre.
1 Pulse el botón MENU.
Pulse los botones ◄ o ► para seleccionar Canal y pulse el botón ENTER.
Pulse los botones ▲ o ▼ para seleccionar Lista de canales y pulse el botón ENTER.
2 Pulse los botones ▲ o ▼ para seleccionar Todos y, a continuación, pulse el botón ENTER.
3 Pulse los botones ▲/▼/◄/► para seleccionar el canal al que se va a asignar un nuevo
nombre y, a continuación, pulse el botón ENTER.
4 Pulse los botones ▲ o ▼ para seleccionar Nombre y pulse el botón ENTER.
Pulse los botones ▲ o ▼ para seleccionar una letra, un número o un espacio en
blanco. (Da como resultado esta secuencia: A~Z, 0~9, +, -,
, /, espacio en blanco.)
Pulse los botones ◄ o ► para pasar al siguiente campo, que quedará seleccionado.
Seleccione una segunda letra o dígito pulsando los botones ▲ o ▼, como antes.
Repita el proceso para seleccionar los tres últimos dígitos. Cuando haya terminado,
pulse el botón ENTER para asignar el nombre nuevo.
Si desea borrar el nuevo nombre asignado, mantenga pulsados los botones ▲ o ▼
hasta que aparezca un espacio vacío.
Pulse el botón EXIT para salir.
➢
Los nombres de los canales emitidos digitalmente están asignados automáticamente y no pueden asignarlos los usuarios.
Visualización de las listas de canales
Se pueden ver las listas de todos los canales, de los añadidos y de los favoritos.
1 Pulse el botón MENU.
Pulse los botones ◄ o ► para seleccionar Canal y pulse el botón ENTER.
Pulse los botones ▲ o ▼ para seleccionar Lista de canales y pulse el botón ENTER.
2 Pulse los botones ▲ o ▼ para seleccionar Todos, Agregado o Favoritos y, a
continuación, pulse el botón ENTER.
Para alternar entre todos los canales, los añadidos o los favoritos, pulse el botón rojo
(P.MODE) del mando a distancia.
Botón rojo (P.MODE): Púlselo varias veces para seleccionar Lista canales entera,
Lista canales añadida o Lista canales favoritos.
Channel
Ingresar
Canal
Regresar
Antena
Prog. Auto
Borrar canal encriptado
Lista de canales ►
Sintonia Fina
Intensidad señal
LNA
Aire
Encendido
Lista canales entera
Aire 2
2
5-1
8
11-1
14
17
20-1
4
7-1
10-1
13-1
16
19
22-1
Ingresar Regresar
Lista de canales
21
Observar
Añadir
Borrar
Nombre
Favoritos
Regresar
Modo Lista
Borrar todos
Agregado
1/2
Channel
Ingresar
Canal
Regresar
Antena
Prog. Auto
Borrar canal encriptado
Lista de canales ►
Sintonia Fina
Intensidad señal
LNA
Aire
Encendido
Lista canales añadida
DTV Aire 5-1
2
5-1
8
11-1
14
17
20-1
4
7-1
10-1
13-1
16
19
22-1
Ingresar Regresar
Lista de canales
3
6-1
9-1
12
15
18-1
21
Modo Lista
Borrar todos
Agregado
1/2
Página
A
Lista de canales
Todos ►
Agregado
Favoritos
Modo Lista predet.
Todos
Regresar
Channel
Ingresar
Lista de canales
Todos ►
Agregado
Favoritos
Modo Lista predet.
Todos
Regresar
Channel
Ingresar
Ajustar
BP68-00630D-Spa_2.indd 41 2007-04-09 ソタネト 7:08:56

Español - 42
Configuración del modo Lista de canales predeterminada
Puede configurar Todos, Añadir o Favoritos para que se vean en la lista predeterminada que aparece cuando se pulsa el
botón CH LIST.
1 Pulse el botón MENU.
Pulse los botones ◄ o ► para seleccionar Canal y pulse el botón ENTER.
Pulse los botones ▲ o ▼ para seleccionar Lista de canales y pulse el botón ENTER.
2 Pulse los botones ▲ o ▼ para seleccionar Modo Lista predet. y, a continuación, pulse el
botón ENTER.
Pulse los botones ▲ o ▼ para seleccionar Todos, Agregado o Favoritos; a continuación,
pulse el botón ENTER.
Pulse el botón EXIT para salir.
➢
La lista de canales que desea que aparezca al pulsar el botón CH LIST.
Todos: Muestra todos los canales cuando se pulsa el botón CH LIST del mando a
distancia.
Agregado: Muestra todos los canales añadidos cuando se pulsa el botón CH LIST
del mando a distancia.
Favoritos: Muestra los canales favoritos cuando se pulsa el botón CH LIST del
mando a distancia.
También puede pulsar el botón CH LIST del mando a distancia para mostrar las listas
de canales.
Sintonización fina de los canales analógicos - Analogica
Utilice la sintonización fina para ajustar manualmente un determinado canal a fin de que la recepción sea óptima.
1 Pulse el botón MENU.
Pulse los botones ◄ o ► para seleccionar Canal y pulse el botón ENTER.
Pulse los botones ▲ o ▼ para seleccionar Sintonia Fina y pulse el botón ENTER.
2 Pulse el botón ▲ o ▼. Pulse los botones ◄ o ► para ajustar la sintonización fina.
3 Para memorizar la sintonía fina en la memoria del televisor, pulse el botón ENTER.
4 Para reiniciar la sintonización fina, pulse el botón ▲ o ▼ para seleccionar Reiniciar y
pulse el botón ENTER.
Pulse los botones ▲ o ▼ para seleccionar Aceptar o Cancelar y pulse el botón ENTER.
Pulse el botón EXIT para salir.
➢
Sólo puede ajustarse la sintonización de los canales de televisión analógicos.
➢
El simbolo “
” aparecerá junto al nombre de los canales cuya sintonización se haya
ajustado.
Channel
Ingresar
Canal
Regresar
Antena
Prog. Auto
Borrar canal encriptado
Lista de canales ►
Sintonia Fina
Intensidad señal
LNA
Aire
Encendido
Lista de canales
Todos
Agregado
Favoritos
Modo Lista predet.
Todos
Regresar
Channel
Ingresar
Todos
Agregado
Favoritos
Channel
Ingresar
Canal
Regresar
Antena
Prog. Auto
Borrar canal encriptado
Lista de canales
Sintonia Fina ►
Intensidad señal
LNA
Aire
Encendido
Channel
Ingresar
Sintonia Fina
Aire 7 *
+3
Reiniciar
Aceptar
Regresar
Ajustar
Channel
Ingresar
Sintonia Fina
Aire 7 *
+3
Reiniciar
Aceptar
Regresar
Aceptar
Cancelar
BP68-00630D-Spa_2.indd 42 2007-04-09 ソタネト 7:08:58

Español - 43
Comprobación de la potencia de la señal digital - Digital
A diferencia de los canales analógicos, cuya calidad de recepción puede variar desde “nebuloso” a claro, los canales
digitales (HDTV) tienen una calidad de recepción perfecta o no se reciben en absoluto. Por tanto, a diferencia de los canales
analógicos, no puede sintonizar ningún canal digital. Puede, no obstante, ajustar la antena para mejorar la recepción de los
canales digitales disponibles.
1 Pulse el botón MENU.
Pulse los botones ◄ o ► para seleccionar Canal y pulse el botón ENTER.
Pulse los botones ▲ o ▼ para seleccionar Intensidad señal y, a continuación, pulse el
botón ENTER.
2 Si el medidor de potencia de señal indica que la señal es débil, ajuste físicamente su
antena para incrementar la potencia de la señal.
Continúe ajustando la antena hasta que encuentre la mejor posición con la señal más
potente.
Pulse el botón EXIT para salir.
LNA (Low Noise Amplifier - Amplificador de ruido bajo)
Si el televisor está funcionando en una zona con señal débil, la función LNA puede mejorar la recepción (un amplificador
previo de bajo ruido refuerza la señal entrante).
1 Pulse el botón MENU.
Pulse los botones ◄ o ► para seleccionar Canal y pulse el botón ENTER.
Pulse los botones ▲ o ▼ para seleccionar LNA y pulse el botón ENTER.
2 Pulse los botones ▲ o ▼ para seleccionar Apagado o Encendido y pulse el botón
ENTER.
Pulse el botón EXIT para salir.
➢
Si la imagen tiene distorsiones con el LNA definido en Encendido, seleccione
Apagado.
➢
Los ajustes de LNA deben hacerse por separado para cada canal.
Channel
Ingresar
Canal
Regresar
Antena
Prog. Auto
Borrar canal encriptado
Lista de canales
Sintonia Fina
Intensidad señal
LNA
Aire
Encendido
Channel
Ingresar
Canal
Regresar
Antena
Prog. Auto
Borrar canal encriptado
Lista de canales
Sintonia Fina
Intensidad señal
LNA
Aire
Encendido
Apagado
Encendido
Channel
Ingresar
Canal
Regresar
Antena
Prog. Auto
Borrar canal encriptado
Lista de canales
Sintonia Fina
Intensidad señal ►
LNA
Aire
Encendido
Channel
Ingresar
Intensidad señal
Regresar
BP68-00630D-Spa_2.indd 43 2007-04-09 ソタネト 7:09:01

Español - 44
Configuración de la hora
El ajuste del reloj es necesario para utilizar las distintas funciones de temporización del
televisor. Además, podrá ver la hora mientras ve la televisión. (Pulse el botón INFO.)
Opción 1: Ajuste automático del reloj
El reloj puede ajustarse automáticamente cuando se recibe una señal digital.
1 Pulse el botón MENU.
Pulse los botones ◄ o ► para seleccionar Configuración y pulse el botón ENTER.
Pulse los botones ▲ o ▼ para seleccionar Reloj y pulse el botón ENTER.
2 Pulse los botones ▲ o ▼ para seleccionar Modo Reloj y pulse el botón ENTER.
Pulse los botones ▲ o ▼ para seleccionar Auto y pulse el botón ENTER.
3 Pulse los botones ▲ o ▼ para seleccionar Zona Tiempo y pulse el botón ENTER.
Pulse los botones ▲ o ▼ para resaltar la zona horaria del área local (y para mover la
selección a la zona horaria apropiada en el mapa de Estados Unidos) y después pulse el
botón ENTER.
Descripción de las funciones
Selección del idioma de los menús
1 Pulse el botón MENU.
Pulse los botones ◄ o ► para seleccionar Configuración y pulse el botón ENTER.
Pulse los botones ▲ o ▼ para seleccionar Idioma y pulse el botón ENTER.
2 Pulse los botones ▲ o ▼ para seleccionar English, Español o Français y pulse el botón
ENTER.
Pulse el botón EXIT para salir.
Continúa…
Setup
Ingresar
Plug & Play
Idioma
Reloj
Temporizador
Temporizador 1
Temporizador 2
Temporizador 3
Modo del juego
V-Chip
Español
Regresar
Configuración
Apagado
Desactivado
Desactivado
Desactivado
Apagado
Setup
Ingresar
Plug & Play
Idioma
Reloj
Temporizador
Temporizador 1
Temporizador 2
Temporizador 3
Modo del juego
V-Chip
Español
Regresar
Configuración
Desactivado
Desactivado
Desactivado
Desactivado
Apagado
English
Español
Français
Setup
Ingresar
Reloj
Apagado
Regresar
Mes / Día / Año
-- / -- / ----
Hora /
Min
-- : -- --
Modo Reloj
Config. Reloj
Zona Tiempo
Tiempo Verano
Manual
Auto
Setup
Ingresar
Plug & Play
Idioma
Reloj ►
Temporizador
Temporizador 1
Temporizador 2
Temporizador 3
Modo del juego
V-Chip
Español
Regresar
Configuración
Apagado
Desactivado
Desactivado
Desactivado
Apagado
Zona Tiempo
Seleccionar la zona horaria en la que vive
Ingresar Regresar
Newfoundland
Atlántico
Este
Central
Montañas
Pacífico
Alaska
Hawaii
Mover
BP68-00630D-Spa_2.indd 44 2007-04-09 ソタネト 7:09:02

Español - 45
Continúa…
4 Pulse los botones ▲ o ▼ para seleccionar Tiempo Verano y pulse el botón ENTER.
Pulse los botones ▲ o ▼ para seleccionar Apagado o Encendido y pulse el botón
ENTER.
Pulse el botón EXIT para salir.
➢
Según la estación emisora y la señal, puede que el ajuste automático de la hora no se
realice correctamente.
En este caso, ajuste la hora manualmente.
➢
La recepción mediante antena o cable debe estar conectada para poder ajustar la
hora automáticamente.
Opción 2: Ajuste manual del reloj
1 Pulse el botón MENU.
Pulse los botones ◄ o ► para seleccionar Configuración y pulse el botón ENTER.
Pulse los botones ▲ o ▼ para seleccionar Reloj y pulse el botón ENTER.
2 Pulse los botones ▲ o ▼ para seleccionar Modo Reloj y pulse el botón ENTER.
Pulse los botones ▲ o ▼ para seleccionar Manual y después pulse el botón ENTER.
3 Pulse los botones ▲ o ▼ para seleccionar Config. Reloj y pulse el botón ENTER.
4 Pulse los botones ◄ o ► para desplazarse a Mes, Día, Año, Hora, o Min.
Seleccione la fecha y la hora que desee pulsando los botones ▲ o ▼; pulse después el
botón ENTER.
Pulse el botón EXIT para salir.
➢
La hora actual aparecerá siempre que se pulse el botón INFO.
➢
Puede ajustar el mes, el día, el año, la hora y el minuto directamente pulsando los
botones numéricos del mando a distancia.
Ajuste del temporizador de desconexión
El temporizador de desconexión apaga automáticamente el televisor después de un
período prefijado (30, 60, 90, 120, 150 y 180 minutos).
1 Pulse el botón MENU.
Pulse los botones ◄ o ► para seleccionar Configuración y pulse el botón ENTER.
Pulse los botones ▲ o ▼ para seleccionar Temporizador y pulse el botón ENTER.
Aparece el menú Temporizador.
2 Pulse los botones ▲ o ▼ para seleccionar los minutos y pulse el botón ENTER.
Para cancelar el temporizador de desconexión:
Pulse los botones ▲ o ▼ para seleccionar Apagado y, a continuación, pulse el botón
ENTER.
Pulse el botón EXIT para salir.
Pulse el botón SLEEP del mando a distancia hasta que aparezca el intervalo de
tiempo deseado (cualquiera de los valores prefijados, desde “30 min” hasta
“180 min”.
Setup
Ingresar
Reloj
Apagado
Regresar
Mes / Día / Año
-- / -- / ----
Hora / Min
-- : -- --
Modo Reloj
Config. Reloj
Zona Tiempo
Tiempo Verano
Manual
Auto
Setup
Ingresar
Reloj
Apagado
Regresar
Mes / Día / Año Hora / Min
Modo Reloj
Config. Reloj
Zona Tiempo
Tiempo Verano
--
/
--
/
---- --
:
--
--
Ajustar
▲
▼
Manual
Setup
Ingresar
Reloj
Regresar
Mes / Día / Año
-- / -- / ----
Hora / Min
-- : -- --
Modo Reloj
Config. Reloj
Zona Tiempo
Tiempo Verano
Apagado
Apagado
Encendido
Auto
-- : -- --
Temporizador : 90 min
Setup
Ingresar
Plug & Play
Idioma
Reloj
Temporizador
Temporizador 1
Temporizador 2
Temporizador 3
Modo del juego
DLP® 3D/Dual-View
Español
Regresar
Configuración
Desactivado
Desactivado
Desactivado
Apagado
Apagado
Apagado
Apagado
30 min
60 min
90 min
120 min
150 min
180 min
BP68-00630D-Spa_2.indd 45 2007-04-09 ソタネト 7:09:04

Español - 46
Activación y desactivación del temporizador
Utilice esta función para que el televisor se encienda o apague a una hora concreta.
1 Pulse el botón MENU.
Pulse los botones ◄ o ► para seleccionar Configuración y pulse el botón ENTER.
Pulse el botón ▲ o ▼ para seleccionar Temporizador 1, Temporizador 2 o
Temporizador 3 y pulse el botón ENTER.
Aparecerá el menú Temporizador 1, Temporizador 2 o Temporizador 3.
2 Pulse los botones ◄ o ► para seleccionar el elemento deseado.
Pulse los botones ▲ o ▼ para ajustar el valor.
Pulse el botón EXIT para salir.
T.de encendido: Seleccione la hora, los minutos, am/pm y Inactivo/Activar.
(Para activar el temporizador con la configuración deseada, establézcalo en
Activado.)
T. de apagado: Seleccione la hora, los minutos, am/pm y Inactivo/Activar.
(Para activar el temporizador con la configuración deseada, establézcalo en
Activado.)
Repetir: Seleccione Una vez, Cada día, Lun ~ Vie, Lun ~ Sáb, Sáb~Dom.
Volumen: Seleccione el nivel de volumen deseado.
Contents: Cuando la opción Hora de encendido está activa, se puede encender
un canal determinado o reproducir contenidos como archivos de fotos o de audio.
(Compruebe que haya un dispositivo USB conectado al televisor.)
➢
Apagado automático
Si el temporizador se ajusta en Encendido, el televisor se apagará si no se pulsa
ningún botón durante 3 horas, después que el temporizador lo haya puesto en marcha.
Esta función sólo está disponible en el modo Encendido del temporizador y evita el
recalentamiento que se puede producir si un televisor está encendido durante demasiado tiempo.
Uso del Modo juego
Si se conecta a una consola de videojuegos como PlayStation
TM
o Xbox
TM
, podrá disfrutar de una experiencia más realista
seleccionando el menú de juegos.
1 Pulse el botón MENU.
Pulse los botones ◄ o ► para seleccionar Configuración y pulse el botón ENTER.
Pulse los botones ▲ o ▼ para seleccionar Modo del juego y pulse el botón ENTER.
2 Pulse los botones ▲ o ▼ para seleccionar Apagado, Aventura, Deportes o Normal y pulse el
botón ENTER.
Pulse el botón EXIT para salir.
Apagado : Cancela el modo de juego.
Aventura : Proporciona imágenes claras en las zonas oscuras del juego, como en las
cuevas y las habitaciones.
Deportes : Sincroniza la imagen y el sonido en las imágenes que se mueven rápidamente,
como en los deportes.
Normal : Use esta función en condiciones normales.
➢
Restricciones sobre el Modo del juego (precauciones)
● Si desea desconectarse de la consola de videojuegos y conectarse a otro dispositivo
externo, ajuste la opción Modo del juego como Apagado en el menú de configuración.
● Si ve la televisión en Modo del juego, la pantalla tiembla ligeramente.
● La marca ( ) que aparece en la pantalla indica que la opción Modo del juego está
activa con la fuente seleccionada.
➢
Si Modo del juego está configurado como Encendido
● El modo Imagen cambia automáticamente a Modo Juego y los usuarios no pueden
cambiar el modo.
● El modo Sonido del menú Sound se desactiva. Debe ajustar el sonido mediante el
ecualizador.
● El modo Reiniciar del menú Sonido se activa. La función Reiniciar inicializa la
configuración del ecualizador con los valores predeterminados de fábrica.
● Se visualiza el menú Canal.
➢
Modo juego no está disponible en el modo de TV.
➢
Si la calidad de la imagen es deficiente cuando un dispositivo externo está conectado a TV, compruebe si la opción Modo del
juego está configurada como Encendido. Configure Modo del juego como Apagado y conecte los dispositivos externos.
Setup
Ingresar
Plug & Play
Idioma
Reloj
Temporizador
Temporizador 1 ►
Temporizador 2
Temporizador 3
Modo del juego
V-Chip
Español
Regresar
Configuración
Apagado
Desactivado
Desactivado
Desactivado
Apagado
Hora de encendido
Temporizador 1
Repetir Volumen
Contents
Hora de apagado
Regresar
Ajustar
12 : 00 am Inactivo
12 : 00 am Inactivo
Lun ~ Sáb 10
TV Cable 3
Origen
Contents
Música
Fotos
Antena Canal
Regresar
Ajustar
TV
Cable
3
Ninguno
Ninguno
Setup
Ingresar
Plug & Play
Idioma
Reloj
Temporizador
Temporizador 1
Temporizador 2
Temporizador 3
Modo del juego
V-Chip
Español
Regresar
Configuración
Apagado
Desactivado
Desactivado
Desactivado
Apagado
Setup
Ingresar
Plug & Play
Idioma
Reloj
Temporizador
Temporizador 1
Temporizador 2
Temporizador 3
Modo del juego
V-Chip
Español
Regresar
Configuración
Apagado
Desactivado
Desactivado
Apagado
Apagado
Apagado
Apagado
Aventura
Deportes
Normal
BP68-00630D-Spa_2.indd 46 2007-04-09 ソタネト 7:09:08

Español - 47
Continúa…
Uso del V-Chip
La opción V-Chip bloquea automáticamente los programas que no se consideran apropiados para los menores. El usuario
debe introducir primero un código PIN (número de identificación personal) para configurar o cambiar las limitaciones de
V-Chip.
➢
La función V-Chip no está disponible en los modos HDMI o componente.
Activación/desactivación de V-Chip
1 Pulse el botón MENU.
Pulse los botones ◄ o ► para seleccionar Configuración y pulse el botón ENTER.
Pulse los botones ▲ o ▼ para seleccionar V-Chip y pulse el botón ENTER.
2 Pulse el botón ▲ o ▼.
Pulse los botones numéricos para introducir el número PIN actual de 4 dígitos.
➢
El número PIN predeterminado del nuevo equipo de TV es “0-0-0-0”.
3 Aparecerá el menú V-Chip.
Pulse los botones ▲ o ▼ para seleccionar Bloqueo V-Chip. Para activar la función
V-Chip, pulse el botón ENTER para que el campo Bloqueo V-Chip se ajuste en
Encendido. (Si se pulsan los botones ▲ o ▼ se alterna entre Encendido y Apagado.)
Pulse el botón ENTER.
Pulse el botón EXIT para salir.
V-Chip
Setup
Ingresar
Ingresar Código
Regresar
*
V-Chip
Bloqueo V-Chip
Guías pater. TV
Clas. MPAA
Inglés Canadiense
Francés Canadiense
Clasificación U.S. Descargable
Cambiar Código
Regresar
Setup
Ingresar
Apagado
Encendido
Setup
Ingresar
V-Chip ►
Subtítulo
Transpar. del menú
Pantalla Azul
Melodía
Defect. de color
PC
PC Home Cinema
N.neg HDMI
Modo película
Configuración
Medio
Apagado
Apagado
Normal
Apagado
Medio
BP68-00630D-Spa_2.indd 47 2007-04-09 ソタネト 7:09:09

Español - 48
Continúa…
Configuración del código de identificación personal (PIN)
1 Pulse el botón MENU.
Pulse los botones ◄ o ► para seleccionar Configuración y pulse el botón ENTER.
Pulse los botones ▲ o ▼ para seleccionar V-Chip y pulse el botón ENTER.
2 Pulse el botón ▲ o ▼.
Pulse los botones numéricos para introducir el número PIN actual de 4 dígitos.
➢
El número PIN predeterminado del nuevo equipo de TV es “0-0-0-0”.
3 Aparecerá el menú V-Chip.
Pulse los botones ▲ o ▼ para seleccionar Cambiar Código y pulse el botón ENTER.
4 Aparecerá la pantalla Cambiar Código. Pulse el botón ▲ o ▼.
Pulse los botones numéricos para introducir el número PIN actual de 4 dígitos.
Escriba un nuevo código PIN de 4 dígitos.
Vuelva a escribir los 4 dígitos. Se muestra el mensaje Códiogo cambiado, a continuación
el PIN se memoriza.
Pulse el botón EXIT para salir.
➢
Si olvida el PIN, pulse los botones del mando a distancia en la siguiente secuencia
para reiniciar el código PIN a 0-0-0-0 : POWER (Apag.) → MUTE → 8 → 2 → 4 →
POWER (Enc.).
<sólo para modelos de Estados Unidos>
<sólo para modelos de Canadá>
V-Chip
Bloqueo V-Chip
Guías pater. TV
Clas. MPAA
Inglés Canadiense
Francés Canadiense
Clasificación U.S. Descargable
Cambiar Código ►
Encendido
Regresar
Setup
Ingresar
Regresar
Setup
Ingresar
Cambiar Código
Escribir Código Actual
Ingresar Nuevo Código
*
Confirmar Nuevo Código
V-Chip
Setup
Ingresar
Ingresar Código
Regresar
*
V-Chip
Bloqueo V-Chip
Guías pater. TV
Clas. MPAA
Clasificación U.S. Descargable
Cambiar Código ►
Encendido
Regresar
Setup
Ingresar
Setup
Ingresar
V-Chip ►
Subtítulo
Transpar. del menú
Pantalla Azul
Melodía
Defect. de color
PC
PC Home Cinema
N.neg HDMI
Modo película
Configuración
Medio
Apagado
Apagado
Normal
Apagado
Medio
BP68-00630D-Spa_2.indd 48 2007-04-09 ソタネト 7:09:10

Español - 49
Continúa…
Configuración de las restricciones mediante las “Guías pater. TV”
En primer lugar, configure un código de identificación personal (PIN) y active la función
V-Chip. (Consulte la sección anterior.) Las limitaciones pueden configurarse de dos
formas: Guía de programas o Clasificación MPAA.
1 Pulse el botón MENU.
Pulse los botones ◄ o ► para seleccionar Configuración y pulse el botón ENTER.
Pulse los botones ▲ o ▼ para seleccionar V-Chip y pulse el botón ENTER.
2 Pulse el botón ▲ o ▼.
Pulse los botones numéricos para introducir el número PIN actual de 4 dígitos.
➢
El número PIN predeterminado del nuevo equipo de TV es “0-0-0-0”.
3 Aparecerá el menú V-Chip.
Pulse los botones ▲ o ▼ para seleccionar Guías pater. TV y pulse el botón ENTER.
4 Aparecerá la pantalla Guías pater. TV.
Pulse los botones ▲ o ▼ para seleccionar una de las seis categorías basadas en la edad:
TV-Y:
TV-Y7:
TV-G:
TV-PG:
TV-14:
TV-MA:
Todos los niños. Los temas y elementos de este programa están
diseñados específicamente para audiencia muy joven, incluidos niños de
edad entre los dos y seis años.
Dirigido a niños más mayores. Los temas y elementos de este programa
pueden incluir violencia física o cómica suave, o puede asustar a niños
con una edad inferior a los 7 años.
Audiencia general. Contiene poca o ninguna violencia, no hay lenguaje
fuerte, ninguno o escasos diálogos y situaciones sexuales.
Supervisión paterna. Este programa puede contener lenguaje obsceno
poco frecuente, violencia limitada, diálogo y situaciones sexuales
sugerentes.
Menores acompañados de un adulto. Este programa puede contener
temas sofisticados, contenido sexual, lenguaje fuerte y violencia más
intensa.
Sólo para adultos. Este programa puede contener temas para adultos,
lenguaje inapropiado, violencia gráfica y contenido sexual explícito.
V-Chip
Bloqueo V-Chip
Guías pater. TV ►
Clas. MPAA
Inglés Canadiense
Francés Canadiense
Clasificación U.S. Descargable
Cambiar Código
Encendido
Regresar
Setup
Ingresar
V-Chip
Setup
Ingresar
Ingresar Código
Regresar
*
Setup
Ingresar
V-Chip ►
Subtítulo
Transpar. del menú
Pantalla Azul
Melodía
Defect. de color
PC
PC Home Cinema
N.neg HDMI
Modo película
Configuración
Medio
Apagado
Apagado
Normal
Apagado
Medio
BP68-00630D-Spa_2.indd 49 2007-04-09 ソタネト 7:09:11

Español - 50
5 En este punto, ya se habrá seleccionado una de las clasificaciones de televisión. Pulse el
botón ENTER. Dependiendo de la configuración existente, se seleccionará el símbolo “ ”.
(En blanco = Desbloqueada, = Bloqueada)
Con “ ” seleccionado, pulse el botón ENTER para bloquear o desbloquear la categoría.
Para seleccionar una clasificación diferente, pulse los botones ▲ o ▼ y repita el proceso.
FV:
V:
S:
Violencia y fantasía.
Violencia.
Situación sexual.
L:
D:
ALL:
Lenguaje adulto.
Diálogo de contenido sexual.
Bloquea todas las clasificaciones de TV.
➢
Perm. Todo : Se pulsa para desbloquear todos los programas de televisión.
Bolq. Todo : Se pulsa para bloquear todos los programas de televisión.
➢
Las categorías TV-Y, TV-Y7, TV-G, TV-PG, TV-14 y TV-MA disponen de opciones
adicionales.
Consulte el siguiente paso para cambiar cualquiera de las siguientes clasificaciones
secundarias:
➢
El V-Chip bloqueará automáticamente ciertas categorías que son “más restrictivas”.
Por ejemplo, si bloquea la categoría TV-Y, TV-Y7 se bloqueará automáticamente. De forma parecida, si bloquea la categoría
TV-G, todas las categorías del grupo “adolescente” quedarán bloqueadas (TV-G, TV-PG, TV-14 y TV-MA). Las clasificaciones
secundarias (D, L, S, V) funcionan de forma parecida. Consulte la siguiente sección.
6 Cómo establecer las categorías secundarias FV, D, L, S y V. Primero, seleccione una de las clasificaciones de TV: TV-Y, TV-Y7,
TV-G, TV-PG, TV-14 o TV-MA (consulte el paso 4) y pulse el botón ENTER.
Por cada subclasificación aparecerá un símbolo “ ”. Con “ ” seleccionado, pulse el botón ► para ir a la subclasificación.
Pulse el botón ENTER para bloquear la subclasificación. Para seleccionar una clasificación diferente, pulse los botones ▲ o ▼ y
repita el proceso.
Pulse los botones ▲ o ▼ para seleccionar Regresar y pulse el botón ENTER.
➢
El V-Chip bloqueará automáticamente ciertas categorías que son “más restrictivas”.
Por ejemplo, si bloquea la subclasificación L en TV-PG, las subclasificaciones L en TV-14 y TV-MA se bloquearán
automáticamente.
➢
Estas categorías se dividen en dos grupos: TV-Y y TV-Y7 (niños pequeños y niños a partir de 7 años), y TV-G a TV-MA (todos los
demás). Las limitaciones para estos grupos funcionan de forma independiente. Si en la familia hay niños muy pequeños y adultos
jóvenes, la opción Guía de programas para padres debe configurarse por separado para grupo de edad.
Cómo configurar las limitaciones utilizando “Clas. MPAA”
El sistema de clasificación MPAA utiliza el sistema de la Motion Picture Association of America (Asociación americana de
cinematografía) y se aplica principalmente en las películas. Cuando el bloqueo V-Chip está activado, el televisor bloquea
automáticamente cualquier programa que tenga una determinada clasificación (ya sea según la clasificación MPAA o según
la guía de programas de TV).
7 Pulse los botones ▲ o ▼ para seleccionar Clas. MPAA y pulse el botón ENTER.
8 Aparecerá la pantalla Clas. MPAA.
Pulse el botón ▲ o ▼ para seleccionar la restricción apropiada:
Pulse el botón ENTER para activar la restricción seleccionada.
Se indica el símbolo “ ”. Con “ ” seleccionado, pulse el botón ENTER para bloquear o
desbloquear la categoría.
Pulse los botones ▲ o ▼ para seleccionar Regresar y pulse el botón ENTER.
G:
PG:
PG-13:
R:
NC-17:
X:
NR:
Audiencia general (sin limitaciones).
Se sugiere supervisión paterna.
Menores acompañados de un adulto.
Restringidos. Menores de 17 acompañados por un adulto.
Mayores de 17 años.
Sólo adultos.
Sin clasificar.
➢
Perm. Todo : Se pulsa para desbloquear todos los programas de televisión.
Bolq. Todo : Se pulsa para bloquear todos los programas de televisión.
➢
El V-Chip bloqueará automáticamente cualquier categoría que sea “más restrictiva”.
Por ejemplo, si bloquea la categoría PG-13, también se bloquearán automáticamente R,
NC-17 y X.
Continúa…
V-Chip
Bloqueo V-Chip
Guías pater. TV
Clas. MPAA ►
Inglés Canadiense
Francés Canadiense
Clasificación U.S. Descargable
Cambiar Código
Encendido
Regresar
Setup
Ingresar
Setup
Ingresar
Clas. MPAA
Regresar
Perm. Todo Bloq. Todo
Setup
Ingresar
Guías pater. TV
Regresar
Perm. Todo Bloq. Todo
BP68-00630D-Spa_2.indd 50 2007-04-09 ソタネト 7:09:12

Español - 51
Cómo configurar las limitaciones utilizando el sistema inglés canadiense (para modelos de Canadá)
9 Pulse los botones ▲ o ▼ para seleccionar Inglés Canadiense y pulse el botón ENTER.
10 Aparecerá la pantalla Inglés Canadiense.
Pulse el botón ▲ o ▼ para seleccionar la restricción apropiada:
Pulse el botón ENTER para activar la restricción seleccionada. Se indica el símbolo “ ”.
Pulse los botones ▲ o ▼ para seleccionar Regresar y pulse el botón ENTER.
C:
C8+:
G:
PG:
14+:
18+:
Programación para niños menores de 8 años.
Programación generalmente considerada aceptable para niños mayores de 8
años sin acompañamiento de adultos.
Programación general, ideal para todas las audiencias.
Supervisión paterna.
La programación contiene temas y contenido que puede que no sea
adecuada para menores de 14 años.
Programación para adultos.
➢
Perm. Todo : Se pulsa para desbloquear todos los programas de televisión.
Bolq. Todo : Se pulsa para bloquear todos los programas de televisión.
➢
El V-Chip bloqueará automáticamente cualquier categoría que sea “más restrictiva”.
Por ejemplo, si bloquea la categoría G, automáticamente también se bloqueará PG,
14+ y 18+.
Cómo configurar las limitaciones utilizando el sistema francés canadiense (para modelos de Canadá)
11 Pulse los botones ▲ o ▼ para seleccionar Francés Canadiense y pulse el botón ENTER.
12 Aparecerá la pantalla Francés Canadiense.
Pulse el botón ▲ o ▼ para seleccionar la restricción apropiada:
Pulse el botón ENTER para activar la restricción seleccionada. Se indica el símbolo “ ”.
Pulse los botones ▲ o ▼ para seleccionar Regresar y pulse el botón ENTER.
G:
8 ans+:
13 ans+:
16 ans+:
18 ans+:
General.
No recomendada para niños pequeños.
Es posible que la programación no sea adecuada para niños menores de
13 años.
La programación no es adecuada para niños menores de 16 años.
Programación restringida para adultos.
➢
Perm. Todo : Se pulsa para desbloquear todos los programas de televisión.
Bolq. Todo : Se pulsa para bloquear todos los programas de televisión.
➢
El V-Chip bloqueará automáticamente cualquier categoría que sea “más restrictiva”.
Por ejemplo, si bloquea la categoría 8 ans+, también se bloquearán automáticamente
13 ans+, 16 ans+ y 18 ans+.
V-Chip
Bloqueo V-Chip
Guías pater. TV
Clas. MPAA
Inglés Canadiense
Francés Canadiense ►
Clasificación U.S. Descargable
Cambiar Código
Encendido
Regresar
Setup
Ingresar
Setup
Ingresar
Francés Canadiense
Regresar
Perm. Todo Bloq. Todo
V-Chip
Bloqueo V-Chip
Guías pater. TV
Clas. MPAA
Inglés Canadiense ►
Francés Canadiense
Clasificación U.S. Descargable
Cambiar Código
Encendido
Regresar
Setup
Ingresar
Setup
Ingresar
Inglés Canadiense
Regresar
Perm. Todo Bloq. Todo
BP68-00630D-Spa_2.indd 51 2007-04-09 ソタネト 7:09:13

Español - 52
Uso de V-Chip (V-Chip) con los canales digitales
La información de la restricción de bloqueo se puede usar mientras se ven los canales
DTV.
13 Pulse los botones ▲ o ▼ para seleccionar Clasificación U.S. Descargable y pulse el
botón ENTER.
➢
Si la información no se descarga desde la emisora, el menú Clasificación U.S.
Descargable está desactivado.
➢
La información de la restricción de bloqueo se puede descargar automáticamente
mientras se ven los canales DTV. Esto puede tardar algunos segundos.
➢
El menú Clasificación U.S. Descargable está disponible después de que la
información se haya descargado desde la emisora. Sin embargo, según el tipo de
información de la emisora, el menú podría no estar disponible para su uso.
14 Aparecerá la pantalla Clasificación U.S. Descargable .
Pulse el botón ▲ o ▼ para seleccionar la restricción apropiada:
Pulse el botón ENTER para activar la restricción seleccionada. Se indica el símbolo “ ”.
Pulse el botón EXIT para salir.
➢
Perm. Todo: Se pulsa para desbloquear todos los programas de televisión.
Bloq. Todo: Se pulsa para bloquear todos los programas de televisión.
➢
Los niveles de restricción de bloqueo difieren según la emisora.
➢
El nombre de menú predeterminado y la clasificación EE.UU. descargable cambian
según la información descargada.
➢
Aunque configure la visualización en pantalla en su propio idioma, el menú
Clasificación U.S. Descargable siempre lo verá en inglés.
➢
La clasificación bloqueará automáticamente las categorías que sean más restrictivas.
➢
Los títulos de clasificación (por ejemplo: Nivel humor, etc) y las clasificaciones de televisión (por ejemplo, DH, MH, H, etc.)
pueden diferir según la emisora.
Título de clasificación
El número del título
de clasificación
actual
El número de toda
la información de
clasificación
V-Chip
Bloqueo V-Chip
Guías pater. TV
Clas. MPAA
Inglés Canadiense
Francés Canadiense
Clasificación U.S. Descargable
►
Cambiar Código
Encendido
Return
Setup
Ingresar
Setup
Ingresar
Clasificación U.S. Descargable
Regresar
►
1 / 2
DH
MH
H
VH
EH
Humor Level
Perm. Todo Bloq. Todo
BP68-00630D-Spa_2.indd 52 2007-04-09 ソタネト 7:09:14

Español - 53
Visualización de subtítulos (mensajes de texto en pantalla) - Digital
La función digital Subtítulo funciona en canales digitales.
1 Pulse el botón MENU.
Pulse los botones ◄ o ► para seleccionar Configuración y pulse el botón ENTER.
Pulse los botones ▲ o ▼ para seleccionar Subtítulo y pulse el botón ENTER.
2 Pulse los botones ▲ o ▼ para seleccionar Subtítulo y pulse el botón ENTER.
Pulse los botones ▲ o ▼ para seleccionar Encendido y pulse el botón ENTER.
3 Pulse los botones ▲ o ▼ para seleccionar Modo de Subtítulo y pulse el botón ENTER.
Pulse los botones ▲ o ▼ para seleccionar el submenú que desee (Programado,
Servicio1~Servicio6, CC1~CC4 o Texto1~Texto4) y después pulse el botón ENTER.
4 Pulse los botones ▲ o ▼ para seleccionar Opciones – Subtítulos Dig. y pulse el botón
ENTER.
➢
Opciones – Subtítulos Dig. sólo está disponible cuando se puede seleccionar
Programado y Servicio1~ Servicio6 en Modo de Subtítulo.
➢
Los modos de subtitulación digital Servicio1~Servicio6 pueden no estar disponibles
según el tipo de emisión.
5 Pulse los botones ▲ o ▼ para seleccionar la opción de subtítulo que desee y, a
continuación,
pulse el botón ENTER.
Pulse los botones ▲ o ▼ para seleccionar las opciones de submenú que desee (vea las
opciones más abajo) y, a continuación, pulse el botón ENTER.
Pulse el botón EXIT para salir.
➢
La disponibilidad de los subtítulos depende del programa que se esté emitiendo.
➢
La opción Programado significa que se sigue el estándar establecido por el emisor.
➢
Las opciones Color de primer plano y Color de fondo no se pueden ajustar con el mismo color.
➢
Opacidad de primer plano y Opacidad de fondo no pueden ajustarse a la vez en Transparente.
Tamaño: Esta opción se compone de Programado, Pequeño, Normal y Grande.
Tipo de Letra: Esta opción se compone de Programado y Estilo0 ~ Estilo7. Puede cambiar el
tipo de letra que desee.
Color de primer plano: Esta opción se compone de Programado, Blanco, Negro, Rojo, Verde,
Azul, Amarillo, Magenta y Cián. Puede cambiar el color del texto.
Color de fondo: Esta opción se compone de Programado, Blanco, Negro, Rojo, Verde, Azul,
Amarillo, Magenta y Cián. Puede cambiar el color del fondo de los subtítulos.
Opacidad de primer plano: Esta opción se compone de Programado, Transparente,
Traslúcido, Sólido e Intermitente. Puede cambiar la opacidad del texto.
Opacidad de fondo: Esta opción se compone de Programado, Transparente, Traslúcido,
Sólido e Intermitente. Puede cambiar la opacidad del fondo de los subtítulos.
Regresar al Predeter.: Esta opción reajusta las opciones Tamaño, Tipo de Letra, Color de
primer plano, Color de fondo, Opacidad de primer plano y Opacidad de fondo a sus valores
predeterminados.
Pulse el botón CAPTION del mando a distancia para seleccionar Encendido o
Apagado.
Setup
Ingresar
Subtítulo
Regresar
Subtítulo
Modo de Subtítulo
Opciones – Subtítulos Dig.
Programado
Servicio1
Servicio2
Ingresar
Opciones – Subtítulos Dig.
Tamaño
Tipo de Letra
Color de primer plano
Color de fondo
Opacidad de primer plano
Opacidad de fondo
Regresar al Predeter.
Programado
Programado
Programado
Programado
Programado
Programado
Regresar
Setup
Setup
Ingresar
Subtítulo
Regresar
Subtítulo
Modo de Subtítulo
Opciones – Subtítulos Dig.
Apagado
Encendido
Setup
Ingresar
V-Chip
Subtítulo ►
Transpar. del menú
Pantalla Azul
Melodía
Defect. de color
PC
PC Home Cinema
N.neg HDMI
Modo película
Configuración
Medio
Apagado
Apagado
Normal
Apagado
Medio
BP68-00630D-Spa_2.indd 53 2007-04-09 ソタネト 7:09:15

Español - 54
Visualización de subtítulos (mensajes de texto en pantalla) - Analogica
La función analógica Subtítulo funciona en un modo de canal de TV analógico o en modo de fuente externa.
(Dependiendo de la señal de transmisión, la función analógica Subtítulo puede funcionar en canales digitales.)
1 Pulse el botón MENU.
Pulse los botones ◄ o ► para seleccionar Configuración y pulse el botón ENTER.
Pulse los botones ▲ o ▼ para seleccionar Subtítulo y pulse el botón ENTER.
2 Pulse los botones ▲ o ▼ para seleccionar Subtítulo y pulse el botón ENTER.
Pulse los botones ▲ o ▼ para seleccionar Encendido y pulse el botón ENTER.
3 Pulse los botones ▲ o ▼ para seleccionar Modo de Subtítulo y pulse el botón ENTER.
Pulse los botones ▲ o ▼ para seleccionar el submenú que desee (Programado,
CC1~CC4 o Texto1~Texto4) y después pulse el botón ENTER.
Pulse el botón EXIT para salir.
CC1: El servicio primario de subtítulos sincronizados. Son subtítulos en el idioma
principal que debe estar sincronizado con el sonido, preferiblemente que coincida
con la secuencia específica.
CC2: Subtítulos especiales de uso no sincronizado. Este canal transporta datos que
están destinados a ampliar la información del programa.
CC3: Servicio de subtítulos secundarios sincronizados. Datos alternativos de
subtítulos relacionados con el programa, típicamente subtítulos del segundo idioma.
CC4: Subtítulos especiales de uso no sincronizado. Similar a CC2.
Texto1: Primer servicio de texto. Se puede tratar de varios datos no relacionados
con programa alguno.
Texto2: Segundo servicio de texto. Datos adicionales, normalmente sin relación con
programa alguno.
Texto3/Texto4: Tercer y cuarto servicios de texto. Estos canales de datos sólo se
usan si los anchos de banda de datos de Texto1 y Texto2 no son suficientes.
➢
● El modo de subtítulos predeterminado es el proporcionado por las emisoras.
● La función Subtítulo no está disponible en los modos COMPONENTE, PC, HDMI(DVI).
● La disponibilidad de los subtítulos depende del programa que se esté emitiendo.
Pulse el botón CAPTION del mando a distancia para seleccionar Encendido o
Apagado.
Setup
Ingresar
Subtítulo
Regresar
Subtítulo
Modo de Subtítulo
Opciones – Subtítulos Dig.
Apagado
Encendido
Setup
Ingresar
Subtítulo
Regresar
Subtítulo
Modo de Subtítulo
Opciones – Subtítulos Dig.
Programado
CC1
CC2
Setup
Ingresar
V-Chip
Subtítulo ►
Transpar. del menú
Pantalla Azul
Melodía
Defect. de color
PC
PC Home Cinema
N.neg HDMI
Modo película
Configuración
Medio
Apagado
Apagado
Normal
Apagado
Medio
BP68-00630D-Spa_2.indd 54 2007-04-09 ソタネト 7:09:18

Español - 55
Nivel de transparencia de los menús
Ajusta la transparencia de la pantalla de menús.
1 Pulse el botón MENU.
Pulse los botones ◄ o ► para seleccionar Configuración y pulse el botón ENTER.
Pulse los botones ▲ o ▼ para seleccionar Transpar. del menú y pulse el botón ENTER.
2 Pulse los botones ▲ o ▼ para seleccionar el nivel y pulse el botón ENTER.
Pulse el botón EXIT para salir.
Ajuste del modo Pantalla Azul
Si no se recibe ninguna señal o ésta es muy débil, una pantalla azul sustituye de forma automática la imagen con
interferencias. Si desea continuar viendo la imagen deficiente, debe definir el modo “Pantalla Azul” en “Apagado”.
1 Pulse el botón MENU.
Pulse los botones ◄ o ► para seleccionar Configuración y pulse el botón ENTER.
Pulse los botones ▲ o ▼ para seleccionar Pantalla Azul y pulse el botón ENTER.
2 Pulse los botones ▲ o ▼ para seleccionar Apagado o Encendido y pulse el botón
ENTER.
Pulse el botón EXIT para salir.
➢
La pantalla azul aparece cuando no existe señal desde un dispositivo externo,
independientemente del ajuste de Pantalla Azul.
Setup
Ingresar
V-Chip
Subtítulo
Transpar. del menú
Pantalla Azul
Melodía
Defect. de color
PC
PC Home Cinema
N.neg HDMI
Modo película
Configuración
Medio
Apagado
Apagado
Normal
Apagado
Alto
Medio
Bajo
Opaco
Setup
Ingresar
V-Chip
Subtítulo
Transpar. del menú
Pantalla Azul
Melodía
Defect. de color
PC
PC Home Cinema
N.neg HDMI
Modo película
Configuración
Medio
Apagado
Apagado
Normal
Apagado
Medio
Setup
Ingresar
V-Chip
Subtítulo
Transpar. del menú
Pantalla Azul
Melodía
Defect. de color
PC
PC Home Cinema
N.neg HDMI
Modo película
Configuración
Medio
Apagado
Apagado
Normal
Apagado
Medio
Setup
Ingresar
V-Chip
Subtítulo
Transpar. del menú
Pantalla Azul
Melodía
Defect. de color
PC
PC Home Cinema
N.neg HDMI
Modo película
Configuración
Medio
Apagado
Apagado
Normal
Apagado
Medio
Apagado
Encendido
BP68-00630D-Spa_2.indd 55 2007-04-09 ソタネト 7:09:21

Español - 56
Uso de la función de mejora Defect. de Color
Esta función ajusta los colores rojo, verde o azul para compensar las deficiencias particulares que presentan algunos
usuarios en la visualización de los colores.
1 Pulse el botón MENU.
Pulse los botones ◄ o ► para seleccionar Configuración y pulse el botón ENTER.
Pulse los botones ▲ o ▼ para seleccionar Defect. de color y pulse el botón ENTER.
2 Pulse los botones ▲ o ▼ para seleccionar Defect. de color y pulse el botón ENTER.
3 Pulse los botones ▲ o ▼ para seleccionar Encendido y pulse el botón ENTER.
4 Pulse los botones ▲ o ▼ para seleccionar el color que vaya a ajustarse y pulse el botón
ENTER.
Pulse los botones ◄ o ► para ajustar el valor de un color seleccionado.
➢
Seleccione la opcióndeseada (Rojo, Verde o Azul) pulsando los botones ▲ o ▼.
Pulse el botón EXIT para salir.
Ajuste del sonido de la melodía
El sonido de la melodía del encendido y del apagado del televisor se puede configurar.
1 Pulse el botón MENU.
Pulse los botones ◄ o ► para seleccionar Configuración y pulse el botón ENTER.
Pulse los botones ▲ o ▼ para seleccionar Melodía y pulse el botón ENTER.
2 Pulse los botones ▲ o ▼ para seleccionar Apagado, Bajo, Medio o Alto y pulse el botón
ENTER.
Pulse el botón EXIT para salir.
Fabricado bajo licencia de Dolby Laboratories. “Dolby” y el símbolo con una
doble D son marcas registradas de Dolby Laboratories.
AVISO DE LICENCIA DE MARCA COMERCIAL Y ETIQUETA
▲
Rojo
▼
0
Defect. de color
Setup
Ingresar
Defect. de color
Regresar
Defect. de color
Apagado
Rojo
0
Verde
0
Azul
0
Encendido
Setup
Ingresar
Defect. de color
Regresar
Defect. de color Apagado
Rojo
0
Verde
0
Azul
0
Apagado
Encendido
Setup
Ingresar
V-Chip
Subtítulo
Transpar. del menú
Pantalla Azul
Melodía
Defect. de color
PC
PC Home Cinema
N.neg HDMI
Modo película
Configuración
Medio
Apagado
Apagado
Normal
Apagado
Medio
Setup
Ingresar
V-Chip
Subtítulo
Transpar. del menú
Pantalla Azul
Melodía
Defect. de color
PC
PC Home Cinema
N.neg HDMI
Modo película
Configuración
Medio
Apagado
Apagado
Normal
Apagado
Medio
Apagado
Bajo
Medio
Alto
Setup
Ingresar
V-Chip
Subtítulo
Transpar. del menú
Pantalla Azul
Melodía
Defect. de color ►
PC
PC Home Cinema
N.neg HDMI
Modo película
Configuración
Medio
Apagado
Apagado
Normal
Apagado
Medio
BP68-00630D-Spa_2.indd 56 2007-04-09 ソタネト 7:09:22

Español - 57
Configuración del Nivel de negro HDMI
Use esta función cuando la pantalla se vea demasiado clara en el modo HDMI. (por la entrada HDMI para un rango RGB
limitado de 16 a 235)
1 Pulse el botón MENU.
Pulse los botones ◄ o ► para seleccionar Configuración y pulse el botón ENTER.
Pulse los botones ▲ o ▼ para seleccionar N.neg HDMI y pulse el botón ENTER.
2 Pulse los botones ▲ o ▼ para seleccionar Normal o Bajo y pulse el botón ENTER.
Pulse el botón EXIT para salir.
➢
Esta función sólo está activa cuando se conecta una entrada externa a HDMI (señales
RGB).
Setup
Ingresar
Pantalla Azul
Melodía
Defect. de color
PC
PC Home Cinema
N.neg HDMI
Modo película
Función de Ayuda
Actualización del software
Configuración
Apagado
Apagado
Normal
Medio
Apagado
Encendido
Setup
Ingresar
Pantalla Azul
Melodía
Defect. de color
PC
PC Home Cinema
N.neg HDMI
Modo película
Función de Ayuda
Actualización del software
Configuración
Apagado
Apagado
Normal
Medio
Apagado
Encendido
Normal
Bajo
BP68-00630D-Spa_2.indd 57 2007-04-09 ソタネト 7:09:23

Español - 58
Ajuste de la función Modo película - Analogica
Puede detectar y procesar automáticamente las señales de las películas y ajustar la imagen para conseguir una calidad
óptima.
1 Pulse el botón MENU.
Pulse los botones ◄ o ► para seleccionar Configuración y pulse el botón ENTER.
Pulse los botones ▲ o ▼ para seleccionar Modo película y pulse el botón ENTER.
2 Pulse los botones ▲ o ▼ para seleccionar Apagado o Encendido y pulse el botón ENTER.
Pulse el botón EXIT para salir.
➢
Modo película está disponible en los modos TV (analógica), AV y S-Vídeo.
Ajuste de Función de Ayuda
Muestra la ayuda sobre las funciones del menú.
1 Pulse el botón MENU.
Pulse los botones ◄ o ► para seleccionar Configuración y pulse el botón ENTER.
Pulse los botones ▲ o ▼ para seleccionar Función de Ayuda y pulse el botón ENTER.
2 Pulse los botones ▲ o ▼ para seleccionar Apagado o Encendido y pulse el botón
ENTER.
Pulse el botón EXIT para salir.
➢
El valor predeterminado de Función de Ayuda es Encendido.
Setup
Ingresar
Pantalla Azul
Melodía
Defect. de color
PC
PC Home Cinema
N.neg HDMI
Modo película
Función de Ayuda
Actualización del software
Configuración
Apagado
Apagado
Normal
Medio
Apagado
Viendo la TV
Apagado
Encendido
Setup
Ingresar
Pantalla Azul
Melodía
Defect. de color
PC
PC Home Cinema
N.neg HDMI
Modo película
Función de Ayuda
Actualización del software
Configuración
Apagado
Apagado
Normal
Medio
Apagado
Viendo la TV
Apagado
Encendido
Setup
Ingresar
Pantalla Azul
Melodía
Defect. de color
PC
PC Home Cinema
N.neg HDMI
Modo película
Función de Ayuda
Actualización del software
Configuración
Apagado
Apagado
Normal
Medio
Apagado
Encendido
Setup
Ingresar
Pantalla Azul
Melodía
Defect. de color
PC
PC Home Cinema
N.neg HDMI
Modo película
Función de Ayuda
Actualización del software
Configuración
Apagado
Apagado
Normal
Medio
Apagado
Encendido
BP68-00630D-Spa_2.indd 58 2007-04-09 ソタネト 7:09:24

Español - 59
Actualización del software
Póngase en contacto con el centro de llamadas de Samsung en 1-800-SAMSUNG para recibir información acerca de la
descarga de las actualizaciones y del uso de un controlador USB. Las actualizaciones se pueden realizar conectando una
unidad USB al puerto USB situado en la parte posterior del televisor.
1 Inserte una unidad USB que contenga la actualización del firmware en el puerto de
actualización USB de la parte posterior del televisor.
2 Pulse el botón MENU.
Pulse los botones ◄ o ► para seleccionar Configuración y pulse el botón ENTER.
Pulse los botones ▲ o ▼ para seleccionar Actualización del software y pulse el botón
ENTER.
Se muestra el mensaje Explorando USB… Puede tardar hasta 30 segundos..
No desconecte la alimentación ni retire la unidad USB mientras se aplican las
actualizaciones.
El televisor se apagará y se encenderá automáticamente después de completar la
actualización del firmware.
Después de realizar la actualización compruebe la versión del firmware.
➢
El firmware y el proceso de actualización pueden ser diferentes en cada país o región.
Unidad USB
Explorando USB…
Puede tardar hasta 30 segundos.
Actualización del software
Setup
Ingresar
Pantalla Azul
Melodía
Defect. de color
PC
PC Home Cinema
N.neg HDMI
Modo película
Función de Ayuda
Actualización del software ►
Configuración
Apagado
Apagado
Normal
Medio
Apagado
Encendido
BP68-00630D-Spa_2.indd 59 2007-04-09 ソタネト 7:09:25

Español - 60
Pantalla de PC
Uso del televisor como pantalla del PC
Configuración del software del PC (Basándose en Windows XP)
A continuación se muestra la configuración de visualización de Windows para un ordenador típico. Pero las pantallas reales
del PC serán probablemente diferentes, dependiendo de la versión determinada de Windows y de la tarjeta de vídeo concreta.
Aunque las pantallas reales sean diferentes, la información de configuración básica que se aplica en casi todos los casos es
la misma. (En caso contrario, póngase en contacto con el fabricante del ordenador o con el distribuidor de Samsung.)
1 Primero, haga clic en Panel de control en el menú Inicio de Windows.
2 Cuando aparezca la ventana del panel de control, haga clic en Apariencia y temas y
aparecerá un cuadro de diálogo.
3 Cuando aparezca la ventana del panel de control, haga clic en Pantalla y aparecerá un
cuadro de diálogo.
4 Seleccione la ficha Configuración del cuadro de diálogo.
Configuración correcta del tamaño (resolución)
Óptimo: 1920 x 1080 píxeles
Si existe una opción de frecuencia vertical en el cuadro de diálogo de configuración de
la pantalla, el valor correcto es de 60 o 60 Hz. En caso contrario, haga clic en Aceptar y
salga del cuadro de diálogo.
BP68-00630D-Spa_3.indd 60 2007-04-09 ソタネト 7:20:01

Español - 61
Modos de visualización
Si la señal del sistema es igual al modo de señal estándar, la pantalla se ajusta automáticamente. Si la señal del sistema no
es igual al modo de señal estándar, ajuste el modo consultando la guía del usuario de la tarjeta de vídeo; de lo contrario,
puede no haber señal de vídeo. La imagen de pantalla se ha optimizado durante la fabricación para los siguientes modos de
visualización.
Entrada D-Sub
Señal de vídeo
Resolución
(Puntos por línea)
Frecuencia
horizontal [kHz]
Frecuencia
vertical [Hz]
Polaridad
horizontal
Polaridad
vertical
IBM
640 x 350
31.46 70.08 P N
720 x 400
31.46 70.08 N P
640 x 480
31.46 59.94 N N
VESA
640 x 480
35.00 70.00 P P
37.86 72.80 N N
37.50 75.00 N N
800 x 600
37.87 60.31 P P
43.75 70.00 P P
48.07 72.18 P P
46.87 75.00 P P
1024 x 768
48.36 60.00 N N
56.47 70.06 N N
57.67 72.00 P P
79.99 75.02 P P
1152 x 864
53.70 60.00 N P
63.00 70.00 N P
64.87 72.00 N P
67.50 75.00 P P
1280 x 960
60.00 60.00 P P
69.93 70.00 P P
72.07 72.00 P P
75.23 75.00 N P
1280 x 1024
63.98 60.02 P P
74.62 70.00 N N
76.82 72.00 N N
79.97 75.02 P P
1920 x 1080
66.58 60.00 P N
Entrada HDMI/DVI
Señal de vídeo
Resolución
(Puntos por línea)
Frecuencia
horizontal [kHz]
Frecuencia
vertical [Hz]
Polaridad
horizontal
Polaridad
vertical
IBM
640 x 350
31.47 70.00 P N
720 x 400
31.47 70.00 N P
CEA-861B
640 x 480
31.47 60.00 N N
800 x 600
37.88 60.00 P P
1024 x 768
48.36 60.00 N N
1280 x 1024
63.98 60.00 P P
1920 x 1080
67.50 60.00 P N
(N: Negativo / P: Positivo)
➢
● Cuando se utiliza este televisor como pantalla de PC, se admite el modo de color de 32 bits.
● Dependiendo del fabricante, la pantalla del PC podría tener un aspecto distinto (también según la versión específica de
Windows que tenga instalada). Consulte en el manual de instrucciones de su PC la información acerca de la conexión del PC a
un televisor.
● Si existe el modo de selección de frecuencia vertical y horizontal, seleccione 60 Hz (vertical) y 66.58 kHz (horizontal).
● En algunos casos pueden aparecer señales anormales en la pantalla del televisor (rayas, por ejemplo) cuando se apaga el PC
(o si se desconecta de la pantalla). Si fuera así, pulse el botón SOURCE del mando a distancia o el botón SOURCE del panel
lateral para entrar en el modo de VÍDEO. Compruebe también que el PC esté conectado.
BP68-00630D-Spa_3.indd 61 2007-04-09 ソタネト 7:20:02

Español - 62
Ajuste del televisor con el ordenador
Cómo realizar un ajuste automático
Mediante la función Ajuste automático (Auto Adjust) se puede establecer que el televisor se ajuste automáticamente de
acuerdo con las señales de vídeo que recibe del ordenador.
Esta función también ajusta automáticamente la configuración, los valores de frecuencia y la posición.
➢
Debe cambiar al modo PC en primer lugar.
1 Pulse el botón MENU.
Pulse los botones ◄ o ► para seleccionar Configuración y pulse el botón ENTER.
Pulse los botones ▲ o ▼ para seleccionar PC y pulse el botón ENTER.
2 Pulse los botones ▲ o ▼ para seleccionar Ajuste Automático y pulse el botón ENTER.
El mensaje Ajuste Autom. en Progreso. Espere por favor. aparecerá en la pantalla y se
activarán automáticamente los ajustes de imagen.
Ajuste de la calidad de la imagen
El objetivo del ajuste de la calidad de imagen es eliminar o reducir las interferencias. Si no se eliminan mediante la
sintonización fina, ajuste lo más posible la frecuencia y vuelva a realizar la sintonización fina. Cuando se hayan reducido las
interferencias, vuelva a ajustar la imagen de forma que esté centrada en la pantalla.
➢
Debe cambiar al modo PC en primer lugar.
3 Pulse los botones ▲ o ▼ para seleccionar Fijar la Imagen y pulse el botón ENTER.
4 Pulse los botones ▲ o ▼ para seleccionar Grueso o Fino y pulse el botón ENTER.
Pulse los botones ◄ o ► para seleccionar la calidad de imagen que desee ajustar y, a
continuación, pulse el botón ENTER.
➢
Esta opción puede cambiar la anchura de la imagen. Si es necesario, ajuste la
posición al centro.
5 Seleccione Regresar pulsando los botones ▲ o ▼ y, a continuación, pulse el botón
ENTER para volver al menú anterior.
Continúa…
Setup
Ingresar
PC
Fijar la Imagen
Posición
Ajuste Automático
Reiniciar Imagen
Resolución
1152x864 @60Hz
Regresar
Ajuste Autom. en Progreso.
Espere por favor.
Setup
Ingresar
PC
Fijar la Imagen ►
Posición
Ajuste Automático
Reiniciar Imagen
Resolución
1152x864 @60Hz
Regresar
Setup
Fijar la Imagen
Grueso
50
Fino
31
Regresar
Ingresar
Ajustar
Setup
Enter
Pantalla Azul
Melodía
Defect. de color
PC ►
PC Home Cinema
N.neg HDMI
Modo película
Función de Ayuda
Actualización del software
Configuración
Apagado
Apagado
Normal
Medio
Apagado
Encendido
BP68-00630D-Spa_3.indd 62 2007-04-09 ソタネト 7:20:03

Español - 63
Cambio de la posición de la pantalla
Una vez conectado el televisor al PC, ajuste la posición de la imagen si no está bien alineada.
➢
Debe cambiar al modo PC en primer lugar.
6 Pulse los botones ▲ o ▼ para seleccionar Posición y pulse el botón ENTER.
7 Pulse los botones ▲ o ▼ para ajustar la posición vertical.
Pulse los botones ◄ o ► para ajustar la posición horizontal.
Pulse el botón ENTER.
Inicialización de los ajustes de imagen
La configuración previamente ajustada se puede restablecer con los valores
predeterminados de fábrica.
➢
Debe cambiar al modo PC en primer lugar.
8 Pulse los botones ▲ o ▼ para seleccionar Reiniciar Imagen y pulse el botón ENTER.
9 Aparecerá en pantalla el mensaje Reinicio imagen completado.
Visualización de la resolución actual
Puede conseguir información sobre la resolución del PC.
➢
Debe cambiar al modo PC en primer lugar.
10 Pulse los botones ▲ o ▼ para seleccionar Resolución.
En la pantalla se muestra la inform ación sobre la resolución.
Pulse el botón EXIT para salir.
➢
Para cambiar la resolución, consulte las página 61.
Setup
Ingresar
PC
Fijar la Imagen
Posición ►
Ajuste Automático
Reiniciar Imagen
Resolución
1152x864 @60Hz
Regresar
Setup
Ingresar
PC
Fijar la Imagen
Posición
Ajuste Automático
Reiniciar Imagen
Resolución
1152x864 @60Hz
Regresar
Reinicio imagen completado
Posición
Mover
Ingresar Regresar
▼
▼
▲
▼
Setup
Ingresar
PC
Fijar la Imagen
Posición
Ajuste Automático
Reiniciar Imagen
Resolución
1152x864 @60Hz
Return
BP68-00630D-Spa_3.indd 63 2007-04-09 ソタネト 7:20:04

Español - 64
Cambio del tamaño de imagen (modo PC)
Puede seleccionar el tamaño de imagen que mejor se adapte a sus requisitos de visualización.
1 Pulse el botón MENU.
Pulse el botón ENTER para seleccionar Imagen.
Pulse los botones ▲ o ▼ para seleccionar Tamaño y pulse el botón ENTER.
2 Pulse el botón ▲ o ▼ para seleccionar el formato de pantalla que desea y pulse el botón
ENTER.
Pulse el botón EXIT para salir.
TV Ancho: Ajusta la imagen en formato TV ancho.
PC Ancho: Ajusta la imagen en formato PC ancho.
4:3 : Ajusta la imagen en un formato de 4:3.
Pulse el botón P.SIZE del mando a distancia para cambiar el tamaño de la imagen.
➢
PC Ancho: Los ajustes de la posición de la imagen ( , ) y del tamaño ( ) están
disponibles pulsando los botones ▲/▼/◄/►.
Configuración de PC para Home Cinema
Se pueden ver las imágenes con más calidad cuando se configuran los valores de la pantalla en el modo PC. Si se establece
la función PC Home Cinema, se pueden configurar los valores de Configuración detallada (cuando el modo Imagen está
ajustado en Normal o Cine) como en el modo PC.
1 Pulse el botón MENU.
Pulse los botones ◄ o ► para seleccionar Configuración y pulse el botón ENTER.
Pulse los botones ▲ o ▼ para seleccionar PC Home Cinema y pulse el botón ENTER.
2 Pulse los botones ▲ o ▼ para seleccionar Apagado o Encendido y pulse el botón ENTER.
Pulse el botón EXIT para salir.
➢
Esta función sólo está disponible en el modo PC.
Setup
Enter
Pantalla Azul
Melodía
Defect. de color
PC
PC Home Cinema
N.neg HDMI
Modo película
Función de Ayuda
Actualización del software
Configuración
Apagado
Apagado
Normal
Medio
Apagado
Encendido
Setup
Enter
Pantalla Azul
Melodía
Defect. de color
PC
PC Home Cinema
N.neg HDMI
Modo película
Función de Ayuda
Actualización del software
Configuración
Apagado
Apagado
Normal
Medio
Apagado
Encendido
Apagado
Encendido
Picture
Ingresar
Imagen
Modo
Contraste
80
Luminosidad
55
Definición
50
Color
60
Tinte
V50 R50
Tono Color
Configuración detallada
Tamaño
Regresar
Dinámico
Frío1
PC Ancho
Picture
Ingresar
Imagen
Modo
Contraste
100
Luminosidad
45
Definición
75
Color
55
Tinte
V50 R50
Tono Color
Configuración detallada
Tamaño
Regresar
Dinámico
Frío1
Aceptar
16:9
TV Ancho
PC Ancho
4:3
PC Ancho
▲
▼
BP68-00630D-Spa_3.indd 64 2007-04-09 ソタネト 7:20:05

Español - 65
Apéndice
Identificación de problemas
Si cree que el televisor tiene un problema, compruebe primero esta lista de posibles problemas y soluciones.
Si ninguno de los consejos funciona, póngase en contacto con el centro técnico de Samsung autorizado más cercano.
Problema Posible solución
Mala calidad de imagen. - Pruebe con otro canal.
- Ajuste la antena.
- Compruebe todas las conexiones de cables.
Sonido de mala calidad. - Pruebe con otro canal.
- Ajuste la antena.
No hay imagen ni sonido. - Pruebe con otro canal.
- Pulse el botón
SOURCE.
- Compruebe que el televisor esté conectado.
- Compruebe las conexiones de la antena.
- Asegúrese de que no haya pulsado el botón MUTE.
No hay sonido o se oye demasiado
bajo con el volumen al máximo.
Primero, revise el volumen de los aparatos conectados al televisor (receptor de emisión
digital, DVD, receptor de cable, vídeo, etc.). A continuación, ajuste el volumen del televisor
según corresponda.
La imagen se mueve verticalmente. Compruebe todas las conexiones.
El televisor funciona de forma
inestable.
Desconecte durante 30 segundos y vuelva a intentarlo.
El televisor no se enciende. Compruebe que la toma de la pared funciona.
El mando a distancia no funciona
correctamente.
- Sustituya las pilas del mando a distancia.
- Limpie el borde superior del mando a distancia (ventana de transmisión).
- Compruebe los terminales de las pilas.
- Pulse el botón TV del mando a distancia para ponerlo en el modo TV.
- Asegúrese de que el mando a distancia tenga pilas.
- Compruebe que los polos “+” y “-” de las pilas estén correctamente colocados.
Problema en pantalla con la emisión
digital.
Compruebe la potencia de la señal digital y la antena de entrada.
La imagen es demasiado clara o
demasiado oscura.
- Ajuste el brillo y el contraste.
- Realice un ajuste preciso.
La calidad visual de los canales
digitales puede variar.
La calidad visual de los canales digitales puede variar según el método original de
producción (analógico o digital).
- Si el método de producción original es digital: programa con calidad visual muy alta.
- Si el método de producción original es analógico: El programa digital mostrado en la
pantalla es originalmente un programa analógico que se ha convertido a digital.
La calidad visual es de grado SD(Standard Definition).
Aunque el subtítulo del televisor
muestre HD, la calidad visual no es
satisfactoria.
El subtítulo HD (High Definition) que aparece al cambiar de canal o al pulsar el botón INFO
del mando a distancia significa que el canal seleccionado es un canal digital.
Si la emisora convierte una señal analógica en digital y la transmite, es posible que la calidad
visual no sea perfecta.
➢
El panel de visualización que utiliza el televisor DLP posee una gran cantidad de minúsculos píxeles.
Estos píxeles pueden aparecer ocasionalmente en la pantalla.
BP68-00630D-Spa_3.indd 65 2007-04-09 ソタネト 7:20:07

Español - 66
Sustitución de la lámpara
Por qué tengo que sustituir la lámpara?
● La lámpara que se utiliza en el televisor DLP tiene una vida limitada. Para obtener la mejor calidad en pantalla, debe sustituirse
periódicamente. Después de sustituir la lámpara, la calidad de la pantalla será más brillante y más clara al ser nueva.
Cuándo tengo que sustituirla?
● Debe sustituirse cuando la pantalla se oscurezca, sea menos clara o cuando los tres indicadores LED de la parte frontal (TIMER,
LAMP y STAND BY/TEMP) parpadeen.
Compruebe antes de realizar la sustitución de la lámpara.
● La lámpara debe tener el mismo código y ser del mismo tipo.
● El tipo de lámpara se indica en el lado derecho del TV. También se indica en la caja de la lámpara.
● Después de comprobar el código de la lámpara, facilite el código a la tienda en la que adquirió el TV o al Centro de Servicio técnico
de Samsung.
Precaución
● Coloque una lámpara con el código correcto para evitar daños en el TV.
● Apague y espere 30 minutos antes de sustituir la lámpara, ya que estará caliente.
● No toque el cristal con las manos desnudas ni inserte objetos extraños dentro de la cubierta ya que puede reducir la calidad de la
pantalla o producir descargas eléctricas o incendio.
● No coloque la lámpara antigua cerca de objetos inflamables ni la deje al alcance de los niños.
● Debe conectar este televisor directamente a una toma de corriente CA. Si la clavija AC del televisor está conectada a un
decodificador o a otra fuente, no se permitirá que se enfríe durante el tiempo necesario.
➢
Para sustituirla, necesita un destornillador de 15 cm y un par de guantes.
1 Desconecte el TV y utilice un destornillador para retirar el
tornillo.
2 Retire la cubierta de la lámpara.
3 Para retirar el conducto de la cubierta de la lámpara sujete el
gancho y extráigalo.
4 Retire el tornillo que fija la lámpara con un destornillador.
5 Separe la lámpara del aparato sujetando el asa y tirando hacia
fuera.
➢
● Asegúrese de que la lámpara de repuesto sea del mismo modelo.
● Después de sustituir la lámpara, alinee la cubierta de la lámpara con la ranura y apriete el tornillo.
● El TV no se encenderá si no se cierra correctamente la cubierta de la lámpara (ya que ésta activará el circuito de protección).
BP68-00630D-Spa_3.indd 66 2007-04-09 ソタネト 7:20:09

Español - 67
Limpieza y mantenimiento del TV
Siga estas indicaciones para obtener el máximo rendimiento de su televisor.
Colocación
● No sitúe el televisor cerca de lugares muy calientes, fríos, húmedos o polvorientos.
● No coloque el TV cerca de aparatos con motores eléctricos que crean campos magnéticos, como las aspiradoras.
● Mantenga despejadas las aberturas de ventilación; no coloque el TV sobre una superficie blanda, como tela o papel.
● Coloque el TV sólo en posición vertical.
Líquidos
● No manipule líquidos encima o cerca del televisor. Si se derraman líquidos en el interior se pueden producir averías graves.
Exterior
● Nunca abra la unidad o toque las piezas del interior.
● Limpie el televisor con un paño limpio y seco. Nunca utilice agua, líquidos limpiadores, cera ni productos químicos.
● Para obtener la mejor calidad de imagen, no coloque componentes encima del televisor.
● Este televisor DLP proyecta la imagen en una pantalla de gran tamaño aplicando un sistema óptico.
Si coloca el televisor boca abajo, podrían producirse problemas porque puede pegarse suciedad u otras partículas contaminantes
en el interior del televisor.
Temperatura
● Si el TV se traslada de repente de un lugar frío a uno cálido, deje desconectado el cable de alimentación durante como mínimo dos
horas para que la humedad que se haya podido formar dentro de la unidad pueda secarse completamente.
Uso del televisor en otro país
Si va a llevar el televisor a un país extranjero, recuerde que hay diferentes sistemas de televisión en el mundo. Un televisor
diseñado para un sistema quizá no funcione correctamente con otro debido a las diferencias en las frecuencias de los
canales de televisión.
BP68-00630D-Spa_3.indd 67 2007-04-09 ソタネト 7:20:09

Español - 68
Especificaciones técnicas
Las descripciones y las características de este folleto se facilitan con fines informativos solamente y están sujetas a
modificación sin previo aviso.
Nombre del modelo HL-T5656W HL-T6156W HL-T6756W
Tamaño de pantalla (diagonal) 56 pulg 61 pulg 67 pulg
Resolución del PC 1920 x 1080 a 60 Hz
Sonido (Salida) 10W x 2
Dimensiones (An. x Al. x Pr.)
50,9 x 35,7 x 16,3 pulg.
(1292 x 906 x 415 mm)
55,3 x 38,6 x 17,6 pulg.
(1405 x 981 x 448 mm)
62,4 x 44,3 x 19,1 pulg.
(1586 x 1124 x 486 mm)
Peso 33,3 Kg 36 Kg 49,8 Kg
Consideraciones
medioambientales
Temperatura de funcionamiento
Humedad de funcionamiento
Temperatura de almacenamiento
Humedad en almacenamiento
Entre 50 °F y 104 °F (10 °C y 40 °C)
10% al 80%, sin condensación
Entre -4 °F y 113 °F (-20 °C y 45 °C)
5% al 95%, sin condensación
➢
Este dispositivo es un aparato digital de la Clase B.
➢
El diseño y las especificaciones pueden cambiar sin previo aviso.
➢
Para conocer la fuente de alimentación y el consumo de energía, consulte la etiqueta adherida al producto.
BP68-00630D-Spa_3.indd 68 2007-04-09 ソタネト 8:20:24

Contact SAMSUNG WORLD-WIDE
If you have any questions or comments relating to Samsung products, please contact the SAMSUNG customer care center.
Contacte con SAMSUNG WORLD-WIDE
Si tiene alguna pregunta o comentario referente a nuestros productos, por favor contacte con nuestro Servicio de Atención al Cliente.
Country
Customer Care Center
Web Site
Address
CANADA 1-800-SAMSUNG (7267864) www.samsung.com/ca
Samsung Electronics Canada Inc., Customer Service
55 Standish Court Mississauga, Ontario L5R 4B2
Canada
Samsung Electronique Canada Inc., Service à la Clientèle
55 Standish Court Mississauga, Ontario L5R 4B2
Canada
U.S.A 1-800-SAMSUNG (7267864) www.samsung.com
Samsung Electronics America, Inc.
105 Challenger Road
Ridgefield Park, NJ 07660-0511
BP68-00630D-00
BN68-00630D-Eng_3.indd 76 2007-04-09 ソタネト 7:01:10
-
 1
1
-
 2
2
-
 3
3
-
 4
4
-
 5
5
-
 6
6
-
 7
7
-
 8
8
-
 9
9
-
 10
10
-
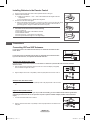 11
11
-
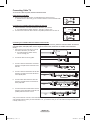 12
12
-
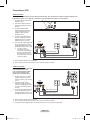 13
13
-
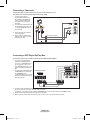 14
14
-
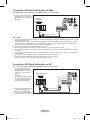 15
15
-
 16
16
-
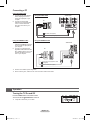 17
17
-
 18
18
-
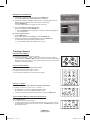 19
19
-
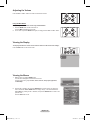 20
20
-
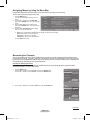 21
21
-
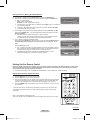 22
22
-
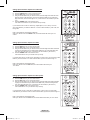 23
23
-
 24
24
-
 25
25
-
 26
26
-
 27
27
-
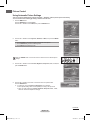 28
28
-
 29
29
-
 30
30
-
 31
31
-
 32
32
-
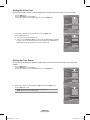 33
33
-
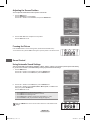 34
34
-
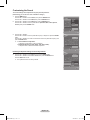 35
35
-
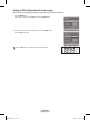 36
36
-
 37
37
-
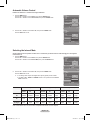 38
38
-
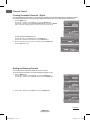 39
39
-
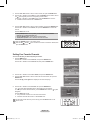 40
40
-
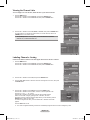 41
41
-
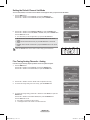 42
42
-
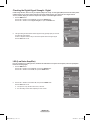 43
43
-
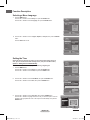 44
44
-
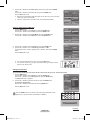 45
45
-
 46
46
-
 47
47
-
 48
48
-
 49
49
-
 50
50
-
 51
51
-
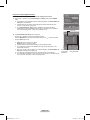 52
52
-
 53
53
-
 54
54
-
 55
55
-
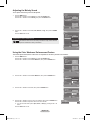 56
56
-
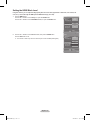 57
57
-
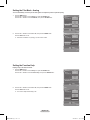 58
58
-
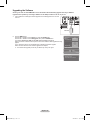 59
59
-
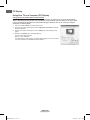 60
60
-
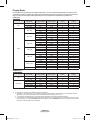 61
61
-
 62
62
-
 63
63
-
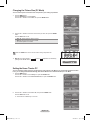 64
64
-
 65
65
-
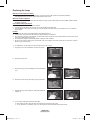 66
66
-
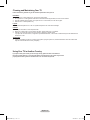 67
67
-
 68
68
-
 69
69
-
 70
70
-
 71
71
-
 72
72
-
 73
73
-
 74
74
-
 75
75
-
 76
76
-
 77
77
-
 78
78
-
 79
79
-
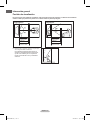 80
80
-
 81
81
-
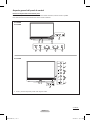 82
82
-
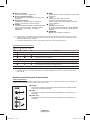 83
83
-
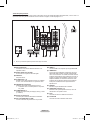 84
84
-
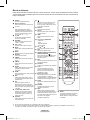 85
85
-
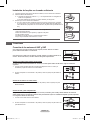 86
86
-
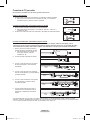 87
87
-
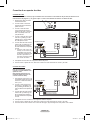 88
88
-
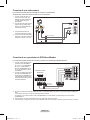 89
89
-
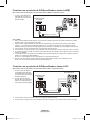 90
90
-
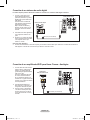 91
91
-
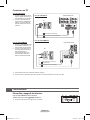 92
92
-
 93
93
-
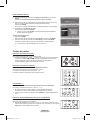 94
94
-
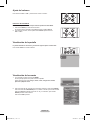 95
95
-
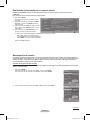 96
96
-
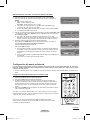 97
97
-
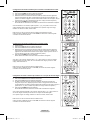 98
98
-
 99
99
-
 100
100
-
 101
101
-
 102
102
-
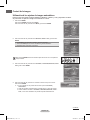 103
103
-
 104
104
-
 105
105
-
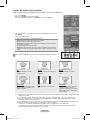 106
106
-
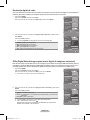 107
107
-
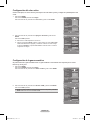 108
108
-
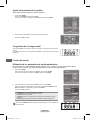 109
109
-
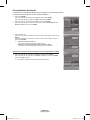 110
110
-
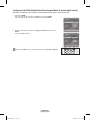 111
111
-
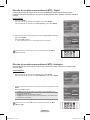 112
112
-
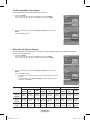 113
113
-
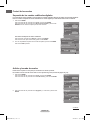 114
114
-
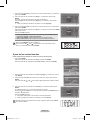 115
115
-
 116
116
-
 117
117
-
 118
118
-
 119
119
-
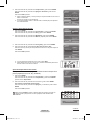 120
120
-
 121
121
-
 122
122
-
 123
123
-
 124
124
-
 125
125
-
 126
126
-
 127
127
-
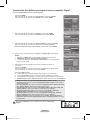 128
128
-
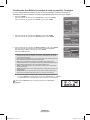 129
129
-
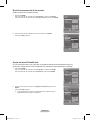 130
130
-
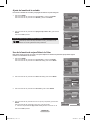 131
131
-
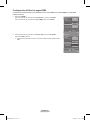 132
132
-
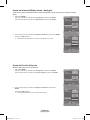 133
133
-
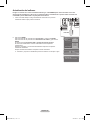 134
134
-
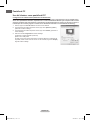 135
135
-
 136
136
-
 137
137
-
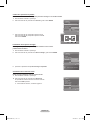 138
138
-
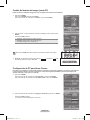 139
139
-
 140
140
-
 141
141
-
 142
142
-
 143
143
-
 144
144


Samsung HL-T6756W Manual de usuario
- Categoría
- Televisores LCD
- Tipo
- Manual de usuario
en otros idiomas
- English: Samsung HL-T6756W User manual
Artículos relacionados
-
Samsung HL-T5676S Manual de usuario
-
-
-
-
-
-
-
-
Samsung HL-T5689S Manual de usuario
-