Britax B-MOBILE Manual de usuario
- Categoría
- Cochecitos
- Tipo
- Manual de usuario
Este manual también es adecuado para
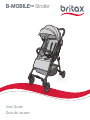
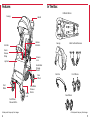
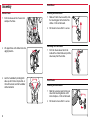
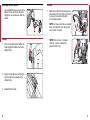
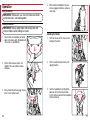
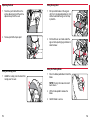
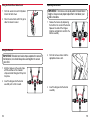
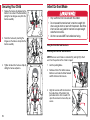
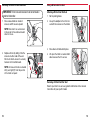
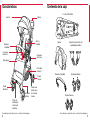
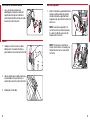
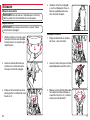
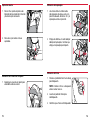
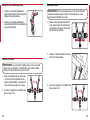
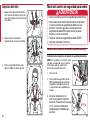
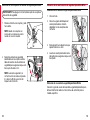
El Britax B-Mobile Stroller es una carriola ligera y fácil de maniobrar diseñada para bebés desde el nacimiento hasta las 55 libras. Cuenta con un marco de aluminio resistente, ruedas delanteras giratorias con bloqueo de giro, un asiento reclinable de varias posiciones y un arnés de seguridad de 5 puntos. La carriola también incluye una capota extraíble para proteger a tu bebé del sol y la lluvia, y una cesta de almacenamiento debajo del asiento para guardar pañales, juguetes y otros artículos esenciales.
El Britax B-Mobile Stroller es una carriola ligera y fácil de maniobrar diseñada para bebés desde el nacimiento hasta las 55 libras. Cuenta con un marco de aluminio resistente, ruedas delanteras giratorias con bloqueo de giro, un asiento reclinable de varias posiciones y un arnés de seguridad de 5 puntos. La carriola también incluye una capota extraíble para proteger a tu bebé del sol y la lluvia, y una cesta de almacenamiento debajo del asiento para guardar pañales, juguetes y otros artículos esenciales.


-
 1
1
-
 2
2
-
 3
3
-
 4
4
-
 5
5
-
 6
6
-
 7
7
-
 8
8
-
 9
9
-
 10
10
-
 11
11
-
 12
12
-
 13
13
-
 14
14
-
 15
15
-
 16
16
-
 17
17
-
 18
18
-
 19
19
-
 20
20
-
 21
21
-
 22
22
-
 23
23
-
 24
24
-
 25
25
-
 26
26
-
 27
27
-
 28
28


Britax B-MOBILE Manual de usuario
- Categoría
- Cochecitos
- Tipo
- Manual de usuario
- Este manual también es adecuado para
El Britax B-Mobile Stroller es una carriola ligera y fácil de maniobrar diseñada para bebés desde el nacimiento hasta las 55 libras. Cuenta con un marco de aluminio resistente, ruedas delanteras giratorias con bloqueo de giro, un asiento reclinable de varias posiciones y un arnés de seguridad de 5 puntos. La carriola también incluye una capota extraíble para proteger a tu bebé del sol y la lluvia, y una cesta de almacenamiento debajo del asiento para guardar pañales, juguetes y otros artículos esenciales.
en otros idiomas
- English: Britax B-MOBILE User manual
Artículos relacionados
-
Britax B-Free Guía del usuario
-
-
-
-
-
-
-
-
-