Acer B326HUL El manual del propietario

Categoría
Televisores
Tipo
El manual del propietario
LCD monitor
B326HUL
LCD Monitor Quick Setup Guide
English
Acer LCD Monitor Quick Start Guide (QSG)
Important safety instructions
Please read the following instructions carefully.
1. To clean the LCD monitor screen: Be sure that your monitor is electrically rated to operate with the AC power available in your
location.
• Turn off the LCD monitor and unplug the power cord.
• Spray a non-solvent cleaning solution onto a rag and clean the screen gently.
2. Do not place the LCD monitor near a window. Exposing the monitor to rain, moisture or sunlight can severely damage it.
3. Do not apply pressure to the LCD screen. Excessive pressure may cause permanent damage to the display.
4. Do not remove the cover or attempt to service this unit yourself. An authorized technician should perform servicing of any
nature.
5. Store the LCD monitor in a room with a temperature of -20° to 60° C (-4° to140° F). Storing the LCD monitor outside this range
may result in permanent damage.
6. Immediately unplug your monitor and call an authorized technician if any of the following circumstances occur:
• Monitor-to-PC signal cable is frayed or damaged.
• Liquid spills onto the LCD monitor or the monitor is exposed to rain.
• The LCD monitor or case is damaged.
Attaching the monitor to the base
1. Remove the monitor from the packaging.
2. Attach the footstand to the base. (for selected models)
3. Turn clockwise to lock. Ensure that the base in locked onto the stand. (for selected models)
4. Secure the base to the stand by turning the screw using the intergrated tab or a suitable coin. (for selected models)
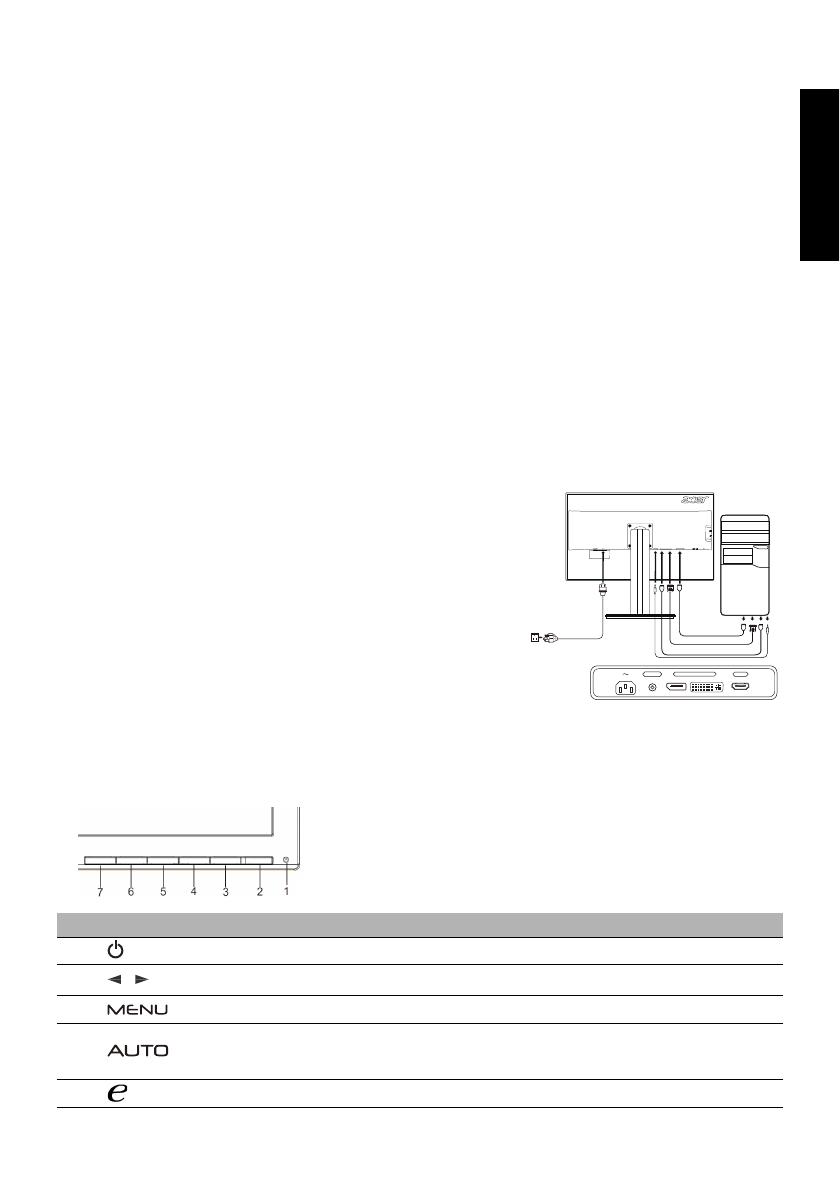
Connecting Your Monitor to a Computer
1. Turn off your monitor and unplug your computer’s power cord.
2. 2-1 Connect HDMI Cable (Only HDMI-input model)
a. Make sure both the monitor and computer are powered-OFF.
b. Connect the HDMI cable to the computer.
2-2 Connect Digital Cable (Only Dual-input model)
a. Make sure both the monitor and computer are powered-OFF.
b. Connect one end of the 24-pin DVI cable to the back of the
monitor and connect the other end to the computer's port.
2-3 Connect DP Cable (Only DP-input model)
a. Make sure both the monitor and computer are powered-OFF.
b. Connect the DP cable to the computer.
3. Connect the Audio Cable. (Only Audio-Input Model) (Optional)
4. Insert the monitor power cable into the power port at the back of the
monitor.
5. Plug the power cords of your computer and your monitor into a
nearby electrical outlet.
6. Select Power-off USB charge ON/OFF to enable/disable Power-off USB
charge function.
External Controls
No. Icon Item Description
1, 2
Power button/
indicator
Turns the monitor on/off.
Blue indicates power on. Amber indicates standby/power saving mode.
3, 4 Minus / plus
If the OSD is active, press the Minus or Plus button to toggle between the
OSD options.
5 OSD functions Press to view the OSD. Press again to enter a selection in the OSD.
6
Auto adjust
button / exit
If the OSD is active, press Auto to exit the OSD. Once the OSD is inactive,
press Auto and the monitor will automatically optimize the display position,
focus, and clock of your display.
7 Empowering key
Press the Empowering Key to open the Acer eColor Management OSD and
access the scenario modes.
POWER
AUDIO IN DP DVI-D IN HDMI HDMI
DP
DVI
HDMI
AUDIO IN DP
HDMI
DVI-D IN
/
LCD Monitor Quick Setup Guide
English
Regulations and safety notices
FCC notice
This device has been tested and found to comply with the limits for a Class B digital device pursuant to Part 15
of the FCC rules. These limits are designed to provide reasonable protection against harmful interference in a
residential installation. This device generates, uses, and can radiate radio frequency energy and, if not installed
and used in accordance with the instructions, may cause harmful interference to radio communications.
However, there is no guarantee that interference will not occur in a particular installation. If this device does
cause harmful interference to radio or television reception, which can be determined by turning the device off
and on, the user is encouraged to try to correct the interference by one or more of the following measures:
Reorient or relocate the receiving antenna.
Increase the separation between the device and receiver.
Connect the device into an outlet on a circuit different from that to which the receiver is connected.
Consult the dealer or an experienced radio/television technician for help.
CE declaration of Conformity
Hereby, Acer Inc., declares that this LCD monitor is in compliance with the essential requirements and other
relevant provisions of EMC Directive 2004/108/EC, Low Voltage Directive 2006/95/EC, and RoHS Directive 2011/
65/EU and Directive 2009/125/EC with regard to establishing a framework for the setting of ecodesign
requirements for energy-related product.
Notice: Shielded cables
All connections to other computing devices must be made using shielded cables to maintain compliance with
EMC regulations.
Notice: Peripheral devices
Only peripherals (input/output devices, terminals, printers, etc.) certified to comply with the Class B limits may
be attached to this equipment. Operation with non-certified peripherals is likely to result in interference to
radio and TV reception.
Caution
Changes or modifications not expressly approved by the manufacturer could void the user authority, which is
granted by the Federal Communications Commission, to operate this product.
Operation conditions
This device complies with Part 15 of the FCC Rules. Operation is subject to the following two conditions: (1) this
device may not cause harmful interference, and (2) this device must accept any interference received, including
interference that may cause undesired operation.
Notice: Canadian users
This Class B digital apparatus complies with Canadian ICES-003.
Remarque à l'intention des utilisateurs canadiens
Cet appareil numérique de la classe B est conforme a la norme NMB-003 du Canada.
Disposal of Waste Equipment by Users in Private Household in the European Union
This symbol on the product or on its packaging indicates that this product must not be disposed of
with your other household waste. Instead, it is your responsibility to dispose of your waste
equipment by handing it over to a designated collection point for the recycling of waste electrical
and electronic equipment. The separate collection and recycling of your waste equipment at the
time of disposal will help to conserve natural resources and ensure that it is recycled in a manner
that protects human health and the environment. For more information about where you can
drop off your waste equipment for recycling, please contact your local city office, your household
waste disposal service or the shop where you purchased the product.
Warning Message for Magnet
Certain electronic devices such as hard drives, USB devices, tablet computers,laptops,
cellphones, watches, earphones, speakers, credit cards, magnetic ID cards, etc. are
sensitive to magnetic fields and may be damaged permanently or temporarily
disabled if exposed to a magnetic field that is too strong. Electronic devices should
not be put close to or directly on the magnetic area of monitor base.
LCD Monitor Quick Setup Guide
English
SPECIFICATION
Find manuals and other documents for your Acer product on the official Acer support website.
LCD Panel Driving system TFT Color LCD
Size 32”W (81 cm)
Pixel pitch 0.277 mm (H) x 0.277 mm (V)
Brightness
300 cd/m
2
(Typical)
Contrast 100000000:1 Max (ACM)
Viewable angle 178° (H) 178° (V) (CR=10)
Response time 6 ms (GTG)
Panel Type VA
Video R,G, B Analog Interface
H-Frequency 30 kHz - 80 kHz
V-Frequency 55 - 75 Hz
Display Colors 16.7M Colors
Dot Clock 170 MHz
Max. Resolution 2560 x 1440 @ 60 Hz
Plug & Play VESA DDCCI/DDC2B
Power consumption (at 200 nits) On Mode 45W (typ.)
Sleep Mode 0.49W (typ.)
Off Mode 0.4W (typ.)
Input Connector HDMI 19 pin (Only HDMI-Input Model)
DVI-D 24 pin (Only Dual-Input Model)
DP (Only DP-Input Model)
Input Video Signal HDMI signal (Only HDMI-Input Model)(Optional)
Digital signal (Only Dual-Input Model)
DP (Only DP-Input Model)(Optional)
Speakers 2W x 2 (Only Audio-Input Model)(Optional)
USB USB 3.0 x 4
Maximum Screen Size Horizontal: 708.4 mm
Vertical: 398.5 mm
Power Source 100-240V, 50/60 Hz
Environmental Considerations Operating Temp: 5° to 35°C
Storage Temp: -20° to 60°C
Operating Humidity: 10% to 85%
Dimensions 737.9 (W) x 473.4~ 623.4 (H) x 266.5 (D) mm
Weight (N. W.) 15.3 kg Unit (net)
Mechanism spec Tilt: -5° to +25° (Only at the highest point can 25 degrees of recline be offered for
the angle of elevation.)
Swivel: -60° to +60°
Height adjustment: 0 mm to 150 mm
Detachable foot stand: Yes (Detachable foot stand with screw release)
External Controls: Switch / Buttons Power Button
Left() /Right()
MENU/ENTER
Auto/ Exit
E(Empowering) Key
Functions Contrast
Brightness
Focus
Clock
H. Position
V. Position
(Warm) Color
(Cool) Color
RGB Color temperature
Language
OSD position. timeout
Auto configuration (only
Analog input model)
Wide mode (Full/Aspect)
ACM On/Off
Input signal Selection (only
Dual input model)
DDCCI On/Off
Display information
Reset
Exit
* All specifications are subject to change without notice.
Regulatory Compliance
ME61
UA.TR.002
MU.T0T00.002
4J.2DH01.011
¤ÙèÁ×Í¡ÒÃμÑ駤èÒÍÂèÒ§àÃçǢͧ¨ÍÀÒ¾ LCD
ä·Â
¤ÙèÁ×Í¡ÒÃãªé§Ò¹¨ÍáÍÅ«Õ´Õ Acer ©ºÑºÂèÍ (QSG)
¤Óá¹Ð¹Ó´éÒ¹¤ÇÒÁ»ÅÍ´ÀÑ·ÕèÊÓ¤Ñ
¡ÃسÒÍèÒ¹¤Óá¹Ð¹ÓμèÍ仹ÕéÍÂèÒ§¶Õè¶éǹ
1. ¡Ò÷ӤÇÒÁÊÐÍÒ´¨ÍáÍÅ«Õ´Õ: μÃǨÊͺãËéá¹èã¨ÇèÒ¨ÍÀÒ¾ÃкآéÍÁÙÅ´éҹ俿éÒ ÇèÒÊÒÁÒöãªé§Ò¹ä´é¡Ñºáç´Ñ¹ä¿¿éÒ AC ·ÕèãªéÍÂÙèã¹»ÃÐà·È¢Í§¤Ø³
• »Ô´¨ÍáÍÅ«Õ´ÕáÅжʹ»ÅÑê¡ä¿ÍÍ¡
• ©Õ´¹éÓÂÒ·Ó¤ÇÒÁÊÐÍÒ´·ÕèäÁèãªèÊÒÃÅÐÅÒÂŧº¹¼éÒáÅÐàªç´·Ó¤ÇÒÁÊÐÍҴ˹éÒ¨ÍàºÒæ
2. ÍÂèÒÇÒ§¨ÍáÍÅ«Õ´ÕäÇéã¡Åé˹éÒμèÒ§ ¡ÒÃãËé¨ÍÊÑÁ¼ÑʡѺ¹éÓ½¹ ¤ÇÒÁª×é¹ËÃ×ÍáʧᴴÊÒÁÒöÊÃéÒ§¤ÇÒÁàÊÕÂËÒÂÍÂèÒ§Ãعáç¡ÑºË¹éÒ¨Íä´é
3. ÍÂèÒÍÍ¡áç¡´º¹¨ÍáÍÅ«Õ´Õ¡Òö١áç¡´ÁÒ¡à¡Ô¹ä»ÍÒ¨·ÓãËéà¡Ô´¤ÇÒÁàÊÕÂËÒ·ÕèäÁèÍÒ¨«èÍÁá«Áä´é¡ÑºË¹éÒ¨Í
4. ÍÂèҶʹ½Ò¤ÃͺËÃ×;ÂÒÂÒÁá¡é䢨ÍáÍÅ«Õ´Õ´éÇÂμ¹àͧ ãËéªèÒ§¼ÙéàªÕèÂǪÒà»ç¹¼Ù
é´Óà¹Ô¹¡ÒÃá¡éä¢
5. à¡çº¨ÍáÍÅ«Õ´Õã¹Ëéͧ·ÕèÁÕÍسËÀÙÁÔ -20
°CÖ§ 60°C ͧÈÒà«Åà«ÕÂÊ (-4°FÖ§ 140°F ͧÈÒ¿Òàùäιì)
¡ÒÃà¡çºÃÑ¡ÉÒ¨ÍáÍūմչ͡à˹×ͨҡªèǧÍسËÀÙÁԴѧ¡ÅèÒÇÍÒ¨Ê觼ÅàÊÕÂËÒ·ÕèäÁèÍÒ¨«èÍÁá«Áä´é¡ÑºË¹éÒ¨Í
6. ¶Í´»ÅÑê¡Ë¹éҨͧ͢¤Ø³·Ñ¹·ÕáÅÐãËéªèÒ§¼ÙéàªÕèÂǪҷӡÒÃá¡éä¢ËÒ¡ÁÕʶҹ¡Òóìã´æ μèÍ仹Õéà¡Ô´¢Öé¹
• ÊÒÂà¤àºÔÅÊè§ÊÑ−−Ò³ÃÐËÇèÒ§¨ÍáÍūմաѺ¾Õ«ÕËÅØ´ÅØèÂËÃ×ÍàÊÕÂËÒÂ
• ¢Í§àËÅÇˡô¨ÍáÍÅ«Õ´ÕËÃ×ͨÍÊÑÁ¼ÑʡѺ¹éÓ½¹
• ¨ÍáÍÅ«Õ´ÕËÃ×ÍμÑÇà¤Ã×èͧ¢Í§¨ÍàÊÕÂËÒÂ
¡ÒûÃСͺÁ͹ÔàμÍÃìà¢éҡѺ°Ò¹
1. ¹Ó¨ÍÁ͹ÔàμÍÃìÍÍÍ¡¨Ò¡ºÃèØÀѳ±ì
2. àÊÕº¢ÒμÑé§à¢éҡѺ°Ò¹ÇÒ§ (ÊÓËÃѺÃØè¹·ÕèÃкØ)
3. ËÁعμÒÁà¢çÁ¹ÒÌÔ¡Òà¾×èÍÅçͤ μÃǨÊͺãËéá¹èã¨ÇèÒ°Ò¹Åçͤà¢éҡѺ¢ÒμÑé§áÅéÇ (ÊÓËÃѺÃØè¹·ÕèÃкØ)
4. ÂÖ´°Ò¹à¢éҡѺ¢ÒμÑé§â´Â¡ÒâѹʡÃÙâ´Âãªéá·çº·ÕèÁÕãËéËÃ×ÍàËÃÕ·ÕèÁÕ¢¹Ò´àËÁÒÐÊÁ (ÊÓËÃѺÃØè¹·ÕèÃкØ)
¡ÒÃàª×èÍÁμèͨÍÀÒ¾¢Í§¤Ø³à¢éҡѺ¤ÍÁ¾ÔÇàμÍÃì
1. »Ô´à¤Ã×èͧ¤ÍÁ¾ÔÇàμÍÃì¢Í§¤Ø³áÅéǶʹÊÒÂ俢ͧà¤Ã×èͧ¤ÍÁ¾ÔÇàμÍÃì
2. 2-1 àª×èÍÁμèÍÊÒ HDMI (੾ÒÐÃØè¹ HDMI-input)
a. μÃǨÊͺãËéá¹èã¨ÇèÒ·Ñ駨ÍÀÒ¾áÅФÍÁ¾ÔÇàμÍÃì»Ô´à¤ÃÍ×è§ÍÂÙè
b. àª×èÍÁμèÍÊÒÂà¤àºÔÅ HDMI ä»Âѧ¤ÍÁ¾ÔÇàμÍÃì
2-2 àª×èÍÁμèÍÊÒ´ԨÔμÍÅ (੾ÒÐÃØè¹ Dual-input)
a. μÃǨÊͺãËéá¹èã¨ÇèÒ·Ñ駨ÍÀÒ¾áÅФÍÁ¾ÔÇàμÍÃì»Ô´à¤ÃÍ×è§ÍÂÙè
b. àª×èÍÁμèÍ»ÅÒ´éҹ˹Ö觢ͧÊÒÂà¤àºÔÅ DVI 24 ¾Ô¹à¢éҡѺ´éÒ¹ËÅѧ¢Í§¨ÍÀÒ¾
áÅÐàª×èÍÁμèÍ»ÅÒÂÍÕ¡´éҹ˹Öè§ä»Âѧ¾ÍÃìμ¢Í§¤ÍÁ¾ÔÇàμÍÃì
2-3 àª×èÍÁμèÍÊÒ DP (੾ÒÐÃØè¹ DP-input)
a. μÃǨÊͺãËéá¹è
ã¨ÇèÒ·Ñ駨ÍÀÒ¾áÅФÍÁ¾ÔÇàμÍÃì»Ô´à¤ÃÍ×è§ÍÂÙè
b. àª×èÍÁμèÍÊÒÂà¤àºÔÅ DP ä»Âѧ¤ÍÁ¾ÔÇàμÍÃì
3. àª×èÍÁμèÍÊÒÂà¤àºÔÅàÊÕ§ (੾ÒÐÃØè¹·ÕèÁÕÍÔ¹¾ØμàÊÕ§à·èÒ¹Ñé¹) (ÍØ»¡Ã³ì«×éÍà¾ÔèÁ)
4. àÊÕºÊÒÂä¿Á͹ÔàμÍÃìà¢éҡѺ¾ÍÃìμÊÒÂä¿·Õè´éÒ¹ËÅѧ¢Í§Á͹ÔàμÍÃì
5. àÊÕºÊÒÂ俢ͧ¤ÍÁ¾ÔÇàμÍÃìáÅÐÁ͹ÔàμÍÃì¢Í§¤Ø³à¢éҡѺàμéÒàÊÕº俿éÒ·ÕèÍÂÙèã¡Åé
6. àÅ×Í¡ Power-off USB charge ON/OFF à¾×èÍà»Ô´/»Ô´¿Ñ§¡ìªÑè¹ Power-off USB charge
¡ÒäǺ¤ØÁÀÒ¹͡
ËÁÒÂàÅ¢ äͤ͹ ÃÒ¡Òà ÃÒÂÅÐàÍÕ´
1, 2 »ØèÁ/Åѡɳìà»Ô´à¤Ã×èͧ
à»Ô´/»Ô´¨ÍÀÒ¾
ÊÕ¹éÓà§Ô¹ ËÁÒ¤ÇÒÁÇèÒà»Ô´à¤Ã×èͧ ÊÕàËÅ×ͧ ËÁÒ¶֧âËÁ ´Êáμ¹´ìºÒÂ/¡ÒûÃÐËÂÑ´¾Åѧ§Ò¹
3, 4 ź/ºÇ¡ ËÒ¡ OSD à»Ô´ãªé§Ò¹ÍÂÙèãËé¡´»ØèÁźËÃ×ͺǡà¾×èÍÊÅѺÃÐËÇèÒ§μÑÑÇàÅ×Í¡ OSD
5¿Ñ§¡ìªÑ蹡Ò÷ӧҹ¢Í§ OSD ¡´à¾×èÍ´Ù OSD ¡´ÍÕ¡¤ÃÑé§à¾×èÍ·Ó¡ÒÃàÅ×Í¡μÑÑÇàÅ×Í¡ã¹ OSD
POWER
AUDIO IN DP DVI-D IN HDMI HDMI
DP
DVI
HDMI
AUDIO IN DP
HDMI
DVI-D IN
/
¤ÙèÁ×Í¡ÒÃμÑ駤èÒÍÂèÒ§àÃçǢͧ¨ÍÀÒ¾ LCD
ä·Â
¡®¢éͺѧ¤ÑºáÅлÃСÒÈ´éÒ¹¤ÇÒÁ»ÅÍ´ÀÑÂ
»ÃСÒÈ FCC
ÍØ»¡Ã³ì¹Õéä´éÃѺ¡Ò÷´Êͺ áÅоºÇèÒÊÍ´¤Åéͧ¡Ñº¢éͨӡѴÊÓËÃѺÍØ»¡Ã³ì´Ô¨ÔμÍŤÅÒÊ B «Öè§μç¡ÑºÊèǹ·Õè 15 ¢Í§¡®¢éͺѧ¤Ñº FCC ¢éÍ
¨Ó¡Ñ´àËÅèÒ¹Õéä´éÃѺ¡ÒÃÍ͡Ẻ à¾×èÍãËé¡Òûéͧ¡Ñ¹·ÕèÊÁàËμØÊÁ¼ÅμèÍ¡ÒÃú¡Ç¹·Õèà»ç¹ ÍѹμÃÒÂ㹡ÒÃμÔ´μÑ駺ÃÔàdz·Õè¾Ñ¡ÍÒÈÑ ÍØ»¡Ã³ì¹ÕéÊÃéÒ§ ãªé
áÅÐÊÒÁÒöá¼èÃѧÊÕ¾Åѧ§Ò¹¤ÇÒÁ¶ÕèÇÔ·ÂØ áÅжéÒäÁèä´é μÔ´μÑé§áÅÐãªéμÒÁ·ÕèÃкØã¹¢Ñé¹μ͹¡ÒÃãªé§Ò¹ ÍÒ¨¡èÍãËéà¡Ô´¡ÒÃú¡Ç¹·Õèà»ç¹ÍѹμÃÒ μèÍ¡ÒÃÊ×èÍÊÒ÷ҧÇÔ·ÂØ
ÍÂèÒ§äáçμÒÁ äÁè
ÁÕ¡ÒÃÃѺ»ÃСѹÇèÒ ¡ÒÃú¡Ç¹¨ÐäÁèà¡Ô´¢Öé¹ã¹¡ÒÃμÔ´μÑé§áºº¾ÔàÈÉ ¶éÒÍØ»¡Ã³ìà»ç¹ÊÒàËμØ ãËéà¡Ô´¡ÒÃú¡Ç¹·Õèà»ç¹ÍѹμÃÒ μèÍ¡ÒÃÃѺ¤Å×è¹ÇÔ·ÂØ
áÅÐâ·Ã·ÑÈ¹ì «Öè§ÊÒÁÒöÃкØä´éâ´Â¡ÒûԴáÅÐà»Ô´ÍØ»¡Ã³ì ¼Ùéãªé¤ÇþÂÒÂÒÁá¡é䢡ÒÃú¡Ç¹â´ÂãªéÇÔ¸Õ¡ÒÃ˹Öè§ËÃ×Í ËÅÒÂÇÔ¸Õ¡ÒÃμèÍ仹ÕéÃèÇÁ¡Ñ¹:
»ÃѺ·ÔÈ·Ò§ ËÃ×Íà»ÅÕè¹μÓá˹è§àÊÒÍÒ¡ÒÈÃѺÊÑ−−Ò³
à¾ÔèÁÃÐÂÐËèÒ§ÃÐËÇèÒ§ÍØ»¡Ã³ìáÅÐà¤Ã×èͧÃѺ
àª×èÍÁμèÍÍØ»¡Ã³ìã¹àμéÒàÊÕº俿éÒ·ÕèÁÕǧ¨Ãáμ¡μèÒ§¨Ò¡·Õèãªéàª×èÍÁμè͡Ѻà¤Ã×èͧÃѺÊÑ−−Ò³
»ÃÖ¡ÉÒμÑÇá·¹¨Ó˹èÒ ËÃ×ͪèҧ෤¹Ô¤ÇÔ·ÂØ/â·Ã·Ñȹì·ÕèÁÕ»ÃÐʺ¡Òóìà¾×èͤ͢ÇÒÁªèÇÂàËÅ×Í
¤íÒàμ×͹ : ÊÒ·ÕèÁÕ©¹Ç¹ËØéÁ
¡ÒÃàª×èÍÁμèÍ·Ñé§ËÁ´ä»ÂѧÍØ»¡Ã³ì¤ÍÁ¾ÔÇàμÍÃìÍ×è¹ μéͧ·Óâ´ÂãªéÊÒÂà¤àºÔÅ·ÕèÁÕ©¹Ç¹ËØéÁ à¾×èÍÃÑ¡ÉÒ¤ÇÒÁ ÊÍ´¤Åéͧ¡Ñº¡®¢éͺѧ¤Ñº EMC
¤íÒàμ×͹ : ÍØ»¡Ã³ìμè;èǧ
¤Ø³ÊÒÁÒöμèÍ੾ÒÐÍØ»¡Ã³ìμè;èǧ (ÍØ»¡Ã³ìÍÔ¹¾Øμ/àÍÒμì¾Øμ, à·ÍÃìÁÔ¹ÑÅ, à¤Ã×èͧ¾ÔÁ¾ì, ÏÅÏ) ·Õèä´éÃѺ¡ÒÃÃѺÃͧ μÒÁ¢éÍ¡Ó˹´¤ÅÒÊ B à¢éҡѺÍØ»¡Ã³ì¹Õéà·èÒ¹Ñé¹
¡Ò÷ӧҹ¡ÑºÍØ»¡Ã³ìμè;èǧ·ÕèäÁèä´éÃѺ¡ÒÃÃѺÃͧÁÑ¡à»ç¹¼ÅãËéà¡Ô´¡ÒÃú¡Ç¹¡Ñº¡ÒÃÃѺÊÑ−−Ò³ÇÔ·ÂØáÅÐ TV
¢éͤÇÃÃÐÇѧ
¡ÒÃà»ÅÕè¹á»Å§ ËÃ×Í´Ñ´á»Å§ã´æ ·ÕèäÁèä´éÃѺ¡ÒÃÃѺÃͧÍÂèÒ§ªÑ´á¨é§¨Ò¡¼Ùé¼ÅÔμ ÍÒ¨·ÓãËéÊÔ·¸Ôì㹡ÒÃãªé¼ÅÔμÀѳ±ì¹Õé¢Í§¼Ùéãªé «Öè§ä´éÃѺ¨Ò¡
¤³Ð¡ÃÃÁ¡ÒáÒÃÊ×èÍÊÒÃáË觪ÒμÔ¶×Íà»ç¹âÁ¦Ð
à§×è͹䢡Ò÷íÒ§Ò¹
ÍØ»¡Ã³ì¹ÕéÊÍ´¤Åéͧ¡ÑºÊèǹ·Õè 15 ¢Í§¡®¢éͺѧ¤Ñº FCC ¡Ò÷ӧҹà»ç¹ä»μÒÁà§×è͹ä¢Êͧ¢éÍμèÍ仹Õé: (1) ÍØ»¡Ã³ì¹ÕéμéͧäÁè¡èÍãËéà¡Ô´¡Òà ú¡Ç¹·Õèà»ç¹ÍѹμÃÒ áÅÐ
(2) ÍØ»¡Ã³ì¹Õéμéͧ·¹μèÍ¡ÒÃú¡Ç¹·Õèä´éÃѺ ÃÇÁ·Ñé§ ¡ÒÃú¡Ç¹·ÕèÍÒ¨¡èÍãËéà¡Ô´¡Ò÷ӧҹ·ÕèäÁè¾Ö§»ÃÐʧ¤ì ¤íÒàμ×͹ : ¼Ùéãªé§Ò¹ã¹á¤¹Ò´Ò
ÍØ»¡Ã³ì´Ô¨ÔμÍŤÅÒÊ B ¹Õé ÊÍ´¤Åéͧ¡ÑºÁÒμðҹ ICES-003 ¢Í§á¤¹Ò´Ò
Remarque l'intention des utilisateurs canadiens
Cet appareil numerique de la classe B est conforme a la norme NMB-003 du Canada.
¡ÒáíҨѴËÅÍ´ä¿
¡Ò÷Ôé§ÍØ»¡Ã³ì·ÕèàÊÕÂáÅéÇâ´Â¼Ùéãªé·ÑèÇä»ÀÒÂ㹺éÒ¹ÊèǹμÑÇã¹ÊËÀÒ¾ÂØâû
ÊÑÅѡɳì¹Õ麹¼ÅÔμÀѳ±ìËÃ×ͺ¹¡ÅèͧºÃèؼÅÔμÀѳ±ì à»ç¹¡ÒÃÃкØÇèÒμéͧäÁè·Ô駼ÅÔμÀѳ±ì¹Õé»Ð»¹¡Ñº¢Í§àÊÕ·ÑèÇä»ÀÒÂ㹺éÒ¹
¤Ø³ÁÕ˹éÒ·ÕèÃѺ¼Ô´ªÍºã¹¡Ò÷Ôé§ÍØ»¡Ã³ì·ÕèàÊÕÂáÅéÇâ´Â¡ÒùÓä»Êè§Âѧ¨Ø´à¡çºÃǺÃÇÁ·Õè¡Ó˹´äÇé ÊÓËÃѺ¡ÒÃÃÕä«à¤ÔÅÍØ»¡Ã³ìä¿¿éÒ
áÅÐÍÔàÅç¡·Ã͹ԡÊì·ÕèàÊÕÂáÅéÇ ¡ÒÃà¡çºá¡¨Ò¡¡Ñ¹ áÅСÒÃÃÕä«à¤ÔÅÍØ»¡Ã³ì·ÕèàÊÕÂáÅéÇã¹¢³Ð·Õè·Ôé§ ¨ÐªèÇÂ͹ØÃÑ¡Éì·ÃѾÂҡøÃÃÁªÒμÔ
áÅЪèÇÂãËéá¹èã¨ÇèÒÍØ»¡Ã³ì¶Ù¡¹Óä»ÃÕä«à¤ÔÅã¹ÅѡɳзÕèªèÇ»éͧ¡Ñ¹ÊØ¢ÀÒ¾¢Í§Á¹Ø
ÉÂìáÅÐÊÔè§áÇ´ÅéÍÁ ÊÓËÃѺ¢éÍÁÙÅà¾ÔèÁàμÔÁà¡ÕèÂÇ
¡ÑºÊ¶Ò¹·Õè«Ö觤سÊÒÁÒö¹ÓÍØ»¡Ã³ì·ÕèàÊÕÂáÅéÇä»·Ôé§à¾×èÍ·Ó¡ÒÃÃÕä«à¤ÔÅ â»Ã´μÔ´μèÍÊӹѡ§Ò¹·éͧ¶Ôè¹ ã¹»ÃÐà·È¢Í§¤Ø³, ºÃÔ¡ÒÃ
à¡çº¢Í§àÊÕÂÀÒÂ㹺éÒ¹¢Í§¤Ø³ ËÃ×ÍÃéÒ¹¤éÒ·Õè¤Ø³«×éͼÅÔμÀѳ±ìÁÒ
¢éͤÇÒÁàμ×͹ÊÓËÃѺ Magnet
ÍØ»¡Ã³ìÍÔàÅç¡·Ã͹ԡÊìºÒ§ª¹Ô´àªè¹ ÎÒÃì´ä´Ãì¿, ÍØ»¡Ã³ì USB, ¤ÍÁ¾ÔÇàμÍÃìá·çºàÅçμ, áÅç»·çÍ», â·ÃÈѾ·ìÁ×Ͷ×Í,
¹ÒÌÔ¡Ò¢éÍÁ×Í, Ëٿѧ, ÅÓ⾧, ºÑμÃà¤Ã´Ôμ, ºÑμà ID áÁèàËÅç¡ Ï
ÁÕ¤ÇÒÁÍè͹äËÇμèÍʹÒÁáÁèàËÅç¡áÅÐÍÒ¨ä´éÃѺ¤ÇÒÁàÊÕÂËÒÂÍÂèÒ§¶ÒÇÃ
ËÃ×ÍÍÒ¨äÁèÊÒÁÒöãªé§Ò¹ä´éªÑèǤÃÒÇËÒ¡ä´éÊÑÁ¼ÑʡѺʹÒÁáÁèàËÅç¡·Õèáçà¡Ô¹ä» äÁè¤ÇÃãËéÍØ»¡Ã³ìÍÔàÅç¡·Ã͹ԡÊìμèÒ§æ
ÍÂÙèã¡ÅéËÃ×ÍÊÑÁ¼ÑʡѺʹÒÁáÁèàËÅç¡â´Â·ÕèÍÂÙèºÃÔàdz¢ÒμÑ駢ͧ¨ÍÁ͹ÔàμÍÃìâ´Âμç
ØèÁ»ÃѺÍÑμâ¹ÁÑμÔÔ/ÍÍ¡
ËÒ¡ OSD à»Ô´ãªé§Ò¹ÍÂÙèãËé¡´ Auto à¾×èÍÍÍ¡¨Ò¡ OSD àÁ×èÍ OSD ¹Ñé¹»Ô´¡ÒÃãªé§Ò¹ÍÂÙèãËé¡´ Auto
áÅéǨÍáÊ´§¼Å¨Ð·Ó¡ÒûÃѺ¤èÒμÓá˹觡ÒÃáÊ´§¼Å â¿¡ÑÊ
áÅÐÊÑ−−Ò³¹ÒÌԡҢͧ¨ÍáÊ´§¼Å¢Í§¤Ø³¹Ñé¹ãËéàËÁÒÐÊÁ·ÕèÊØ´â´ÂÍÑμâ¹ÁÑμÔ
ØèÁ Empowering ¡´»ØèÁ Empowering à¾×èÍà»Ô´ OSD ¢Í§ Acer eColor Management áÅéÇà¢éÒãªé§Ò¹âËÁ´ÀÒ¾¨ÓÅͧ
ËÁÒÂàÅ¢ äͤ͹ ÃÒ¡Òà ÃÒÂÅÐàÍÕ´
¤ÙèÁ×Í¡ÒÃμÑ駤èÒÍÂèÒ§àÃçǢͧ¨ÍÀÒ¾ LCD
ä·Â
¢éÍÁÙŨÓà¾ÒÐ
¾º¤ÙèÁ×ÍáÅÐàÍ¡ÊÒÃÍ×è¹æ ÊÓËÃѺ¼ÅÔμÀѳ±ì Acer ¢Í§¤Ø³ä´éº¹àÇçºä«·ìÊÓËÃѺ¡ÒÃʹѺʹعÍÂèÒ§à»ç¹·Ò§¡Òâͧ Acer
¨ÍáÊ´§¼Å LCD Ãкº¡ÒÃáÊ´§¼Å LCD ¨ÍÊÕ TFT
¢¹Ò´ 32W (81 cm)
¢¹Ò´¾Ô¡à«Å 0.277 ÁÁ. (á¹Ç¹Í¹) x 0.277 ÁÁ. (á¹ÇμÑé§)
¤ÇÒÁÊÇèÒ§
300 cd/m
2
ÑèÇä»)
¤ÇÒÁ¤ÁªÑ´ 100000000:1 ÊÙ§ÊØ´ (ACM)
ÁØÁÁͧ¡ÒÃÃѺªÁ 178° (H) 178° (V) (CR=10)
ÃÐÂÐàÇÅÒμͺʹͧ 6 ÁÔÅÅÔÇÔ¹Ò·Õ (GTG´)
ª¹Ô´Ë¹éÒ¨Í VA
ÇÔ´ÕâÍ ÍÔ¹àμÍÃì࿫͹ÒÅçÍ¡ R, G, B
¤ÇÒÁ¶Õèá¹Ç¹Í¹ 30 kHz - 80 kHz
¤ÇÒÁ¶Õèá¹ÇμÑé§ 55 - 75 Hz
¡ÒÃáÊ´§¼ÅÊÕ 16.7 ÅéÒ¹ÊÕ
ÊÑ−−Ò³¹ÒÌÔ¡Ò 170 MHz
¤ÇÒÁÅÐàÍÕ´ÊÙ§ÊØ´ 2560 x 1440 @ 60 Hz
»ÅÑê¡&à¾ÅÂì VESA DDCCI/DDC2B
¡ÒÃãªé¾Åѧ§Ò¹ (·Õè 200 nits) âËÁ´à»Ô´ãªé§Ò¹ 45W (·ÑèÇä»)
âËÁ´ÊÅÕ»0.49W (·ÑèÇä»)
âËÁ´»Ô´0.4W (·ÑèÇä»)
¢ÑéÇμèÍÍÔ¹¾Øμ HDMI 19 ¾Ô¹ (੾ÒÐÃع·ÕèÁÕÍÔ¹¾Øμ HDMI à·Ò¹Ñé¹)
DVI-D 24 ¾Ô¹ (੾ÒÐÃØè¹·ÕèÁÕÍÔ¹¾Øμà·èÒ¹Ñé¹)
DP (੾ÒÐÃع·ÕèÁÕÍÔ¹¾Øμ DP à·Ò¹Ñé¹)
ÊÑ−−Ò³ÇÔ´ÕâÍà¢éÒÊÑ−−Ò³ HDMI (੾ÒÐÃع·ÕèÁÕÍÔ¹¾Ø
μ HDMI à·Ò¹Ñé¹) (ÍØ»¡Ã³ì«×éÍà¾ÔèÁ)
ÊÑ−−Ò³´Ô¨ÔμÍÅ(àξÒÐÃØè¹·ÕèÁÕÍÔ¹¾Øμ¤Ùèà·èÒ¹Ñé¹)
DP (੾ÒÐÃع·ÕèÁÕÍÔ¹¾Øμ DP à·Ò¹Ñé¹) (ÍØ»¡Ã³ì«×éÍà¾ÔèÁ)
ÅÓ⾧ 2W x 2 (੾ÒÐÃØè¹·ÕèÁÕÍÔ¹¾ØμàÊÕ§à·èÒ¹Ñé¹) (ÍØ»¡Ã³ì«×éÍà¾ÔèÁ)
USB USB 3.0 x 4
¢¹Ò´Ë¹éÒ¨ÍÊÙ§ÊØ´ á¹Ç¹Í¹: 708.4 mm
á¹ÇμÑé§: 398.5 mm
áËÅ觾Åѧ§Ò¹ 100-240V, 50/60 Hz
¢é;ԨÒóÒà¡ÕèÂǡѺÊÔè§áÇ´ÅéÍÁ ÍسËÀÙÁÔ¢³Ð·Ó§Ò¹: 5°Ö§ 35°C
ÍسËÀÙÁÔ¢³Ðà¡çºÃÑ¡ÉÒ: -20°Ö§ 60°C
¤ÇÒÁª×é¹¢³Ð·Ó§Ò¹: 10% ¶Ö§ 85%
¢¹Ò´ 737.9 (¡) x 473.4 ~ 623.4 (Ê) x 266.5 (Å) ÁÁ.
¹éÓ˹ѡ (¹éÓ˹ѡÊØ·¸Ô) μÑÇà¤Ã×èͧ 15.3 ¡¡.(ÊØ·¸Ô)
¢Ñ
ÍÁÙÅÍØ»¡Ã³ì ¡ÒÃàÍÕ§: -5°Ö§ +25° (੾ÒзÕè¨Ø´ÊÙ§ÊØ´à·èÒ¹Ñé¹·ÕèÊÒÁÒö»ÃѺà͹ÁØÁà§Âä»´éÒ¹ËÅѧä´é 25 ͧÈÒ)
᡹ËÁع: +60°Ö§ -60°
»ÃѺÃдѺ¤ÇÒÁÊÙ§: 0 mm ~ 150 mm
¢ÒμÑé§áºº¶Í´ä´: ¢ÒμÑé§áºº¶Í´ä´é¾ÃéÍÁÊ¡ÃÙ»ÅèÍÂ
μÑǤǺ¤ØÁÀÒ¹͡: ÊÇÔμ«ìØèÁ»ØèÁ¾ÒÇàÇÍÃì »ØèÁÍÑμâ¹ÁÑμÔ/ÍÍ¡
«éÒÂ(
) /¢ÇÒ() »ØèÁ E (àÍçÁ¾ÒÇàÇÍÃìÃÔè§)
MENU/ENTER »ØèÁÍÔ¹¾Øμ
¿Ñ§¡ìªÑè¹ ¤ÇÒÁ¤ÁªÑ´
¤ÇÒÁÊÇèÒ§
â¿¡ÑÊ
¹ÒÌÔ¡Ò
μÓá˹è§á¹Ç¹Í¹
μÓá˹è§á¹ÇμÑé§
(ͺÍØè¹) ÊÕ
(àÂç¹) ÊÕ
ÍسËÀÙÁÔÊÕ RGB
ÀÒÉÒ
μÓáË¹è§ OSD ä·ÁìàÍÒμì
¡Ó˹´¤èÒÍÑμâ¹ÁÑμÔ©¾ÒÐ
ÃØè¹ÍÔ¹¾Øμ͹ÒÅçÍ¡à·èÒ¹Ñé¹)
âËÁ´äÇμì
ACM à»Ô´ / »Ô´
¡ÒÃàÅ×Í¡ÊÑ−−Ò³ÍÔ¹¾Øμ( ੾ÒÐ
ÃØè¹ÍÔ¹¾Øμ¤Ùèà·èÒ¹Ñé¹)
DDCCI à»Ô´ / »Ô´
¢éÍÁÙŨÍáÊ´§¼Å
ÃÕà«çμ
ÍÍ¡
* ¢éÍÁÙŨÓà¾ÒзÑé§ËÁ´·ÕèáÊ´§´éÒ¹ÅèÒ§ ÍÒ¨à»ÅÕè¹àà»Å§â´ÂäÁèμéͧá¨é§ãËé·ÃÒº
¤ÇÒÁÊÍ´¤Åéͧ¡ÑºÃÐàºÕº¢éͺѧ¤Ñº
ME61
UA.TR.002
Monitor LCD - Petunjuk Singkat Pemasangan
Bahasa Indonesia
Panduan Ringkas Acer LCD Monitor
Petunjuk penting tentang keselamatan
Baca petunjuk berikut dengan cermat.
1. Untuk membersihkan layar monitor LCD: Pastikan monitor dioperasikan dengan daya AC yang sesuai dengan tempat Anda.
• Matikan monitor LCD, lalu lepaskan kabel daya.
• Semprotkan cairan pembersih yang lembut pada kain, kemudian bersihkan layar secara perlahan.
2. Jangan letakkan monitor LCD di dekat jendela. Membiarkan monitor terkena hujan, uap air, atau sinar matahari dapat
menyebabkan kerusakan fatal.
3. Jangan tekan layar LCD Tekanan yang berlebihan dapat menyebabkan kerusakan permanen pada layar.
4. Jangan lepaskan penutup atau berupaya memperbaiki sendiri monitor ini. Setiap perbaikan harus dilakukan oleh teknisi
resmi.
5. Letakkan monitor LCD dalam ruangan dengan suhu -20º hingga 60º C (-4º hingga 140º F). Meletakkan monitor LCD di luar
rentang suhu tersebut dapat menyebabkan kerusakan permanen.
6. Segera lepaskan sambungan monitor, kemudian hubungi teknisi resmi jika terjadi kondisi sebagai berikut:
• Kabel sinyal monitor ke PC terbakar atau rusak.
• Monitor LCD terkena cairan atau atau monitor terkena hujan.
• Monitor LCD atau casing rusak.
Memasang monitor pada dudukan
1. Ambil monitornya dari dalam kemasannya.
2. Pasang standar kaki dengan bagian dasarnya. (untuk model terpilih)
3. Putar searah jarum jam untuk mengunci. Pastikan bagian dasar terkunci dengan standarnya. (untuk model terpilih)
4. Amankan bagian dasar dengan standarnya dengan memutar sekrupnya menggunakan tab terpadu atau coin yang tepat.
(untuk model terpilih)
Menghubungkan Monitor ke Komputer
1. Matikan komputer dan cabut kabel daya komputer.
2. 2-1 Hubungkan Kabel HDMI (Hanya model HDMI-Input)
a. Pastikan bahwa power layar monitor dan komputer
dalamkeadaan mati.
b. Sambungkan kabel HDMI ke komputer.
2-2 Menghubungkan kabel DVI (Model Dual-Input)
a. Pastikan bahwa power layar monitor dan komputer dalam
keadaan mati.
b. Hubungkan ujung kabel DVI 24-pin ke bagian belakang moni
tor dan hubungkan ujung lainnya ke port DVI komputer.
2-3 Hubungkan Kabel DP (Hanya model DP-Input)
a. Pastikan bahwa power layar monitor dan komputer
dalamkeadaan mati.
b. Sambungkan kabel DP ke komputer.
3. Sambungkan Kabel Audio. (Hanya untuk Model-Input-Audio) (Opsional)
4. Sambungkan kabel daya monitor ke port daya di bagian belakang
monitor.
5. Sambungkan kabel daya komputer dan monitor ke stopkontak yang terdekat.
6. Pilih pengisi USB Tanpa Daya AKTIF/NONAKTIF untuk mengaktifkan/menonaktifkan fungsi pengisian USB Tanpa Daya.
Kontrol eksternal
NO. Ikon Item Keterangan
1, 2
Tombol/indikator daya
Menghidupkan dan mematikan monitor. Biru menunjukkan daya hidup
Kuning menunjukkan mode siaga/hemat daya.
3, 4 Minus / plus
Jika OSD aktif, tekan tombol Minus atau Plus untuk menggantiganti
pilihan OSD tersebut.
5
Fungsi OSD
Tekan untuk melihat fungsi OSD. Tekan lagi untuk memasukkan pilihan
pada OSD.
6
Tombol Pengaturan
Otomatis/Keluar
Jika OSD (Menu Pada Layar) aktif, tekan Auto untuk keluar dari OSD.
Setelah OSD tidak aktif, tekan Auto dan monitor secara otomatis akan
mengoptimalkan posisi tampilan, fokus, dan jam tampilan.
7
Empowering Key
Tekan tombol Empowering Key untuk membuka OSD Acer eColor
Management dan mengakses mode skenario.
POWER
AUDIO IN DP DVI-D IN HDMI HDMI
DP
DVI
HDMI
AUDIO IN DP
HDMI
DVI-D IN
/
Monitor LCD - Petunjuk Singkat Pemasangan
Bahasa Indonesia
SPESIFIKASI
Cari manual dan dokumen lainnya untuk produk Acer Anda di situs web dukungan Acer resmi.
Panel LCD
Sistem drive LCD TFT Berwarna
Ukuran 32"W (81 cm)
Pitch piksel 0,277 mm (H) x 0,277 mm (V)
Kecerahan
300 cd/m
2
(Normal)
Kontras 100000000:1 Maksimum (ACM)
Sudut tampilan 178° (H) 178° (V) (CR=10)
Waktu respons 6 ms (GTG)
Jenis Panel VA
Video Antarmuka Analog R, G, B
Frekuensi H 30 kHz - 80 kHz
Frekuensi V 55 - 75 Hz
Warna Layar 16,7M Warna
Dot Clock 170 MHz
Resolusi Maksimum 2560 x 1440 @ 60 Hz
Plug & Play VESA DDCCI/DDC2B
Pemakaian daya (pada 200 nits)
Mode Hidup 45W (typ.)
Mode Tidur 0,49W (typ.)
Mode Nonaktif 0,4W (typ.)
Konektor Input
HDMI 19 pin (Hanya Model HDMI-Input)
DVI-D 24 pin (Hanya Model Input Ganda)
DP (Hanya model DP-Input)
Sinyal Video Input
Sinyal HDMI (Hanya Model HDMI-Input) (Opsional)
Sinyal digital (Hanya Model Input Ganda)
DP (Hanya model DP-Input) (Opsional)
Speakers 2W x 2 (Hanya untuk Model-Input-Audio)(Opsional)
USB USB 3,0 x 4
Ukuran Layar Maksimum
Horizontal: 708,4 mm
Vertikal: 398,5 mm
Catu Daya 100-240V, 50/60 Hz
Informasi Tentang Lingkungan
Suhu Pengoperasian: 5°C hingga 35°C
Suhu Penyimpanan: -20°C hingga 60°C
Kelembaban Pengoperasian: 10% hingga 85%
Dimensi 737,9 (P) x 473,4 ~ 623,4 (T) x 266,5 (L) mm
Berat (N. W.) Unit 15,3 kg (bersih)
Spesifikasi mekanisme
Miring: -5° hingga +25° (Posisi kemiringan 25 derajat yang ditawarkan untuk sudut elevasi
hanya pada titik tertinggi.)
Putar: +60° hingga -60°
Penyesuaian ketinggian: 0 mm hingga 150 mm
Dudukan kaki yang dapat dilepas: Dudukan kaki yang dapat dilepas dengan sekrup
pelepas
Kontrol Eksternal:
Sakelar/Tombol
Tombol Daya
Kiri(
)/Kanan ()
MENU/ENTER
Otomatis/Keluar
E(Empowering) Key
Fungsi
Kontras
Kecerahan
Fokus
Jam
Posisi H.
Posisi V.
(Hangat) Warna
(Dingin) Warna
Temperatur Warna RGB
Bahasa
Posisi OSD. batas waktu
Konfigurasi otomatis (hanya
model input Analog)
Mode lebar (Penuh/Aspek)
ACM Aktif/Tidak
Aktif Pilihan sinyal Input (hanya
model input Ganda)
DDCCI Aktif/Tidak
Aktif lnformasi layar
Atur Ulang
Keluar
* Semua spesifikasi dapat berubah tanpa pemberitahuan sebelumnya.
Kesesuaian Terhadap Peraturan
ME61
UA.TR.002
LCD モニ - クイックトアップ
日本語
Acer LCD モニ クイ・セップ QSG
安全 注意
以下 注意事項 お読 い。
1. LCD 掃除 地域利用可能 AC 電源 作動 電気的 定格 とを
確認 す。
• LCD モニタの電 オフ ドを抜
溶剤 い洗剤 い布 画面 い。
2. LCD モニ に置かないでく 直射日光 や雨、 湿気 破損 故障 す。
3. LCD 画面 圧力 過重 な圧力 る恐 す。
4. カバーをり外したり、したり しない ださ 修理は、 弊社 依頼 い。
5. LCD モニ -20°C 60°C てく ださ 範囲以外場所 保管は、 永久的 破損
れが す。
6. 状況 場合 電源 弊社 連絡
モニ PC 破損 場合。
• LCD 液体 れ込 場合。
• LCD 破損 場合。
モニを台取り付ける
1. モニを箱から取り出
2. スタンドースにり付 ( 一部 )
3. ベー に回 ベー れて か確認し ( 一部の )
4. インドラーまた ンな使 スタンドをしっ かり ースにしま ( 一部 )
モニ ピュする
1. コンをオ さい
2. 2-1 HDMI ケー の接 (HDMI- 入力 )
a. モニター ンピュターのを必 てく ださ
b. HDMI ケー ルを 続し
2-2 DVI 接続 ル入力 ル)
a. モニター ンピュターのを必 てく ださ
b. 24 ピン DVI ルの方の端を 背面に続し う一
の端 DVI ポー
2-3 DP ケー ルの接 DP- 入力 み)
a. モニター ンピュターのを必 てく ださ
b. DP ケー ルを 続し
3. オー ケー ルを オー オ入力 ルの み)
ン)
4. 電源 背面 電源 挿入 す。
5. ピュ モニの電 ドを、 のコ ンセントし込
6. 電源 USB 充電機能 有効 / 無効 機能 / オフ
外部
番号 アイ アイ 説明
1 2
電源 /
インジケ
す。 い点灯 電源
します レン バイ/ 省電力 す。
3 4 マイ/ プラ
OSD 有効 場合、 マイまたプラボタ ンを押す
OSD オプシ ンを切り替えるこ ができま
5
OSD 機能 OSD が表 れま 一度 OSD の選に入
6
自動調整 / 終了
OSD が有効に 自動を押す OSD を終 OSD
が無効の 自動 自動的 位置、
フォーカ ロックをます
7
Empowering キー
Empowering キー 押し Acer eColor Management OSD を開き、
リオ
POWER
AUDIO IN DP DVI-D IN HDMI HDMI
DP
DVI
HDMI
AUDIO IN DP
HDMI
DVI-D IN
/
LCD モニ - クイットップ
日本語
仕様
Acer 製品 説明書 Acer 公式 サイトかだけ
LCD パネ
駆動
TFT カラ LCD
サイ
32"W 81 cm
ピク ピッ
0.277 mm (水平 x 0.277 mm (垂直
輝度 300 cd/m
2
(標準
コントラ
100000000:1 最大値 ACM
可視角度
178°( 178°( )(CR=10
レスポンスタ
6 ms (GTG)
パネル
VA
ビデオ
R, G, B ァナ ターフェ
H- 周波数
30 kHz-80 kHz
V- 周波数
55 - 75 Hz
表示
16.7 百萬色
ドッ ロッ
170 MHz
最高解像度
2560 x 1440 @ 60 Hz
プラグ & プレ
VESA DDCCI/DDC2B
消費電 200 場合)
オン
45W typ.
スリープモード
0.49W typ.
オフ / スタ バィ
モー
0.4W typ.
入カ ネク
HDMI 19 ピン(HDMI- 入カ )
DVI-D 24 ピン モデルのみ
DP DP- 入カ
入力 信号
HDMI 信号 (HDMI- 入カ )( ォプ )
ル信号 ル入 み)
DP
DP- 入カ ルの )(ョン
スピ ーカ 2W x 2 (オ ディ オ入力 ルの み)
USB USB 3.0 x 4
最大画面
水平 708.4 mm
垂直 398.5 mm
電源
100-240V, 50/60 Hz
設置環境
操作温度 5°C ~ 35°C
保存用温度 -20°C ~ 60°C
操作湿度 10% ~ 85%
寸法
737.9 (幅 x 473.4 ~ 623.4 (高 x 266.5 (奥行 mm
重量 N.W. 15.3 本体 (正量
機械の 仕様
傾き -5°~
+25° (25 度に 傾斜 い位置設定 必要 す。 )
回転 +60°~
-60°
調整 0 mm ~ 150 mm
取リ し可能フ 取リ外し可能なフ ( ネジ取り外し )
外部
スィ / ボタ
電源
左( / 右(
消音 / 入力
自動 / 終了
E Empowering 一キ
機能
コントラ
輝度
フォーカスト
クロック
水平位置
垂直位置
(暖
(冷
RGB 色温度
言語
OSD 意図。
自動設定
入カ ルの
ヮィード / ァスぺクト)
ACM オン / 才フ
信号選択
入カ ルの
DDCCI オン/ オフ
表示情報
リッセ
終了
* 仕様 将来予告 変更 す。
法規制の 遵守
ME61
UA.TR.002
ENERGY STAR
®
Acer’s ENERGY STAR qualified products save you money by reducing energy
costs and helps protect the environment without sacrificing features or
performance. Acer is proud to offer our customers products with the ENERGY
STAR mark.
What is ENERGY STAR?
Products that are ENERGY STAR qualified use less energy and prevent
greenhouse gas emissions by meeting strict energy efficiency guidelines set by the
U.S. Environmental Protection Agency. Acer is committed to offer products and
services worldwide that help customers save money, conserve energy and improve
the quality of our environment. The more energy we can save through energy
efficiency, the more we reduce greenhouse gases and the risks of climate change.
More information refers to http://www.energystar.gov or http://www.energystar.gov/
powermangement
Acer ENERGY STAR qualified products:
• Produce less heat and reduce cooling loads, and warmer climates.
• Automatically go into “display sleep” and “computer sleep” mode after 15 and 30
minute of inactivity respectively.
• Wake the monitor when it is in Active Off mode, move the mouse or press any
keyboard key.
• Computers will save more than 80% energy at “sleep” mode.
ENERGY STAR and the ENERGY STAR mark are registered U.S. marks
MU.T0T00.002
4J.2DH01.011
LCD monitor
B326HUL
LCD Monitor Quick Setup Guide
English
Acer LCD Monitor Quick Start Guide (QSG)
Important safety instructions
Please read the following instructions carefully.
1. To clean the LCD monitor screen: Be sure that your monitor is electrically rated to operate with the AC power available in your
location.
• Turn off the LCD monitor and unplug the power cord.
• Spray a non-solvent cleaning solution onto a rag and clean the screen gently.
2. Do not place the LCD monitor near a window. Exposing the monitor to rain, moisture or sunlight can severely damage it.
3. Do not apply pressure to the LCD screen. Excessive pressure may cause permanent damage to the display.
4. Do not remove the cover or attempt to service this unit yourself. An authorized technician should perform servicing of any
nature.
5. Store the LCD monitor in a room with a temperature of -20° to 60° C (-4° to140° F). Storing the LCD monitor outside this range
may result in permanent damage.
6. Immediately unplug your monitor and call an authorized technician if any of the following circumstances occur:
• Monitor-to-PC signal cable is frayed or damaged.
• Liquid spills onto the LCD monitor or the monitor is exposed to rain.
• The LCD monitor or case is damaged.
Attaching the monitor to the base
1. Remove the monitor from the packaging.
2. Attach the footstand to the base. (for selected models)
3. Turn clockwise to lock. Ensure that the base in locked onto the stand. (for selected models)
4. Secure the base to the stand by turning the screw using the intergrated tab or a suitable coin. (for selected models)
Connecting Your Monitor to a Computer
1. Turn off your monitor and unplug your computer’s power cord.
2. 2-1 Connect HDMI Cable (Only HDMI-input model)
a. Make sure both the monitor and computer are powered-OFF.
b. Connect the HDMI cable to the computer.
2-2 Connect Digital Cable (Only Dual-input model)
a. Make sure both the monitor and computer are powered-OFF.
b. Connect one end of the 24-pin DVI cable to the back of the
monitor and connect the other end to the computer's port.
2-3 Connect DP Cable (Only DP-input model)
a. Make sure both the monitor and computer are powered-OFF.
b. Connect the DP cable to the computer.
3. Connect the Audio Cable. (Only Audio-Input Model) (Optional)
4. Insert the monitor power cable into the power port at the back of the
monitor.
5. Plug the power cords of your computer and your monitor into a
nearby electrical outlet.
6. Select Power-off USB charge ON/OFF to enable/disable Power-off USB
charge function.
External Controls
No. Icon Item Description
1, 2
Power button/
indicator
Turns the monitor on/off.
Blue indicates power on. Amber indicates standby/power saving mode.
3, 4 Minus / plus
If the OSD is active, press the Minus or Plus button to toggle between the
OSD options.
5 OSD functions Press to view the OSD. Press again to enter a selection in the OSD.
6
Auto adjust
button / exit
If the OSD is active, press Auto to exit the OSD. Once the OSD is inactive,
press Auto and the monitor will automatically optimize the display position,
focus, and clock of your display.
7 Empowering key
Press the Empowering Key to open the Acer eColor Management OSD and
access the scenario modes.
POWER
AUDIO IN DP DVI-D IN HDMI HDMI
DP
DVI
HDMI
AUDIO IN DP
HDMI
DVI-D IN
/
LCD Monitor Quick Setup Guide
English
Regulations and safety notices
FCC notice
This device has been tested and found to comply with the limits for a Class B digital device pursuant to Part 15
of the FCC rules. These limits are designed to provide reasonable protection against harmful interference in a
residential installation. This device generates, uses, and can radiate radio frequency energy and, if not installed
and used in accordance with the instructions, may cause harmful interference to radio communications.
However, there is no guarantee that interference will not occur in a particular installation. If this device does
cause harmful interference to radio or television reception, which can be determined by turning the device off
and on, the user is encouraged to try to correct the interference by one or more of the following measures:
Reorient or relocate the receiving antenna.
Increase the separation between the device and receiver.
Connect the device into an outlet on a circuit different from that to which the receiver is connected.
Consult the dealer or an experienced radio/television technician for help.
CE declaration of Conformity
Hereby, Acer Inc., declares that this LCD monitor is in compliance with the essential requirements and other
relevant provisions of EMC Directive 2004/108/EC, Low Voltage Directive 2006/95/EC, and RoHS Directive 2011/
65/EU and Directive 2009/125/EC with regard to establishing a framework for the setting of ecodesign
requirements for energy-related product.
Notice: Shielded cables
All connections to other computing devices must be made using shielded cables to maintain compliance with
EMC regulations.
Notice: Peripheral devices
Only peripherals (input/output devices, terminals, printers, etc.) certified to comply with the Class B limits may
be attached to this equipment. Operation with non-certified peripherals is likely to result in interference to
radio and TV reception.
Caution
Changes or modifications not expressly approved by the manufacturer could void the user authority, which is
granted by the Federal Communications Commission, to operate this product.
Operation conditions
This device complies with Part 15 of the FCC Rules. Operation is subject to the following two conditions: (1) this
device may not cause harmful interference, and (2) this device must accept any interference received, including
interference that may cause undesired operation.
Notice: Canadian users
This Class B digital apparatus complies with Canadian ICES-003.
Remarque à l'intention des utilisateurs canadiens
Cet appareil numérique de la classe B est conforme a la norme NMB-003 du Canada.
Disposal of Waste Equipment by Users in Private Household in the European Union
This symbol on the product or on its packaging indicates that this product must not be disposed of
with your other household waste. Instead, it is your responsibility to dispose of your waste
equipment by handing it over to a designated collection point for the recycling of waste electrical
and electronic equipment. The separate collection and recycling of your waste equipment at the
time of disposal will help to conserve natural resources and ensure that it is recycled in a manner
that protects human health and the environment. For more information about where you can
drop off your waste equipment for recycling, please contact your local city office, your household
waste disposal service or the shop where you purchased the product.
Warning Message for Magnet
Certain electronic devices such as hard drives, USB devices, tablet computers,laptops,
cellphones, watches, earphones, speakers, credit cards, magnetic ID cards, etc. are
sensitive to magnetic fields and may be damaged permanently or temporarily
disabled if exposed to a magnetic field that is too strong. Electronic devices should
not be put close to or directly on the magnetic area of monitor base.
LCD Monitor Quick Setup Guide
English
SPECIFICATION
Find manuals and other documents for your Acer product on the official Acer support website.
LCD Panel Driving system TFT Color LCD
Size 32”W (81 cm)
Pixel pitch 0.277 mm (H) x 0.277 mm (V)
Brightness
300 cd/m
2
(Typical)
Contrast 100000000:1 Max (ACM)
Viewable angle 178° (H) 178° (V) (CR=10)
Response time 6 ms (GTG)
Panel Type VA
Video R,G, B Analog Interface
H-Frequency 30 kHz - 80 kHz
V-Frequency 55 - 75 Hz
Display Colors 16.7M Colors
Dot Clock 170 MHz
Max. Resolution 2560 x 1440 @ 60 Hz
Plug & Play VESA DDCCI/DDC2B
Power consumption (at 200 nits) On Mode 45W (typ.)
Sleep Mode 0.49W (typ.)
Off Mode 0.4W (typ.)
Input Connector HDMI 19 pin (Only HDMI-Input Model)
DVI-D 24 pin (Only Dual-Input Model)
DP (Only DP-Input Model)
Input Video Signal HDMI signal (Only HDMI-Input Model)(Optional)
Digital signal (Only Dual-Input Model)
DP (Only DP-Input Model)(Optional)
Speakers 2W x 2 (Only Audio-Input Model)(Optional)
USB USB 3.0 x 4
Maximum Screen Size Horizontal: 708.4 mm
Vertical: 398.5 mm
Power Source 100-240V, 50/60 Hz
Environmental Considerations Operating Temp: 5° to 35°C
Storage Temp: -20° to 60°C
Operating Humidity: 10% to 85%
Dimensions 737.9 (W) x 473.4~ 623.4 (H) x 266.5 (D) mm
Weight (N. W.) 15.3 kg Unit (net)
Mechanism spec Tilt: -5° to +25° (Only at the highest point can 25 degrees of recline be offered for
the angle of elevation.)
Swivel: -60° to +60°
Height adjustment: 0 mm to 150 mm
Detachable foot stand: Yes (Detachable foot stand with screw release)
External Controls: Switch / Buttons Power Button
Left() /Right()
MENU/ENTER
Auto/ Exit
E(Empowering) Key
Functions Contrast
Brightness
Focus
Clock
H. Position
V. Position
(Warm) Color
(Cool) Color
RGB Color temperature
Language
OSD position. timeout
Auto configuration (only
Analog input model)
Wide mode (Full/Aspect)
ACM On/Off
Input signal Selection (only
Dual input model)
DDCCI On/Off
Display information
Reset
Exit
* All specifications are subject to change without notice.
Regulatory Compliance
ME61
UA.TR.002
液晶显示器快速安装指南
简体中文
Acer LCD 显示器快速入门指南 QSG
重要的安全须知
请仔细阅读下面的使用说明
1. 清洁 LCD 显示器屏幕:首先确认使用的电源线符合你所使用的地区标准。
关闭 LCD 显示器电源,拔掉电源线。
将非溶解性清洁液喷洒到抹布上,轻轻擦拭屏幕。
2. 不要将 LCD 显示器放置在窗户附近。显示器遭受雨淋、受潮或阳光直接照射时可能导致严重损坏。
3. 不要按压 LCD 屏幕。过分用力按压可能导致显示屏永久性损坏。
4. 不要卸下机盖或尝试自行维修本机器。应由经过授权的技术人员执行各种维修任务
5. LCD 显示器存放在温度为 -20° C 60° C -4° F 140° F)的房间内。在此范围之外存放 LCD 显示器时,可能导致永久性损坏。
6. 若出现下列情形,应立即拔掉显示器电源,并与经过授权的技术人员联系:
显示器与 PC 之间的信号线磨损或损坏。
液体溅到 LCD 显示器上或者显示器遭受雨淋。
• LCD 显示器或机壳损坏。
安装显示器底座
1. 从包装中取出显示器。
2. 将支脚架连接到底座。 ( 对所选型号 )
3. 顺时针旋转可锁定。 确保底座锁定到支架。 ( 对所选型号 )
4. 使用自带的翼片或合适的硬币旋转螺丝,将底座固定到支架。 ( 对所选型号 )
将显示器连接计算机
1. 关闭计算器,并拔下电源线。
2. 2-1 连接 HDMI 线 (仅限 HDMI 输入型号)
a. 请确定显示器与电脑的电源都已经关闭。
b. HDMI 线连接到计算机。
2-2 连接数字线 (仅限双输入型号)
a. 请确定显示器与电脑的电源都已经关闭。
b. 24pin DVI 缆线的一端接到显示器的后方,将另一 端连接到计算
机的 DVI 端口上。
2-3 连接 DP 线 (仅限 DP 输入型号)
a. 请确定显示器与电脑的电源都已经关闭。
b. DP 线连接到计算机。
3. 连接音频线 (仅限于音频输入型号)(选配件)
4. 将显示器电源线插入显示器背面的电源端口。
5. 将计算机和显示器的电源线插入旁边的电源插座。
6. 选择 Power-off USB charge ON/OFF 以启用 / 禁用 Power-off USB charge (电源关闭时 USB 充电)功能。
外部控制
MM.T0T00.004
4J.2DH01.031
编号 图标 项目 描述
1, 2
电源开关 / 指示灯
打开或关闭显示器的电源。
蓝色表示已打开电源。橘黄色表示处于待机 / 节能模式。
3, 4
减号 / 加号 如果 OSD 处于活动状态,按减号加号按钮可在 OSD 选项中进行切换。
5
OSD 功能 按下时查看 OSD。再按一次进入 OSD 中的选择项。
6
自动调整 / 退出
显示 OSD 时,按自动退出 OSD。若未显 OSD,按自动时显示器自动优化显
示位置、聚焦和显示时钟。
7
Empowering 键按Empowering 键打开 Acer eColor Management OSD 并进入方案模式。
POWER
AUDIO IN DP DVI-D IN HDMI HDMI
DP
DVI
HDMI
AUDIO IN DP
HDMI
DVI-D IN
/
液晶显示器快速安装指南
简体中文
监管和安全声明
FCC 声明
经测试,本设备符合 FCC 规则第 15 部分对 B 类数字设备的限制规定。这些限制用于提供合理的保护措施,以防 该设备在住宅区安装时产
生有害干扰。本设备产生、使用并辐射射频能量,如果未遵照说明进行安装和使用,可能 会对无线电通信产生干扰。
但也不能保证在特定的安装中不会产生干扰的问题。如果本设备确实对无线电或电视接收造成干扰 (可以通过开关 设备来确定),建议用
户采取以下一种或多种措施排除干扰:
重新调整接收天线的方向或位置。
增大本设备与接收器的间距。
将设备电源连接到不同于接收器所连接到的电路的电源插座上。
咨询经销商或有经验的无线电 / 电视机技术人员以获取帮助。
注意:屏蔽电缆
所有到其它计算设备的连接都必须使用屏蔽电缆,以便符合 EMC 法规的要求。
注意:外设
只有经过认证,符合 B 类限制的外设 (输入 / 输出设备、终端、打印机等)才可连接到本设备。使用未认证的外设 可能会造成无线电和电
视接收的干扰。
注意
任何未经制造商明确批准的改动或修改,都可能使用户丧失由联邦通讯委员会赋予的操作本产品之权利。
操作条件
本设备符合 FCC 规则第 15 部分。操作符合以下两个条件:1)本设备不会造成有害干扰,2)本设备必须能够承 受收到的干扰,包括
任何可能会造成操作异常的干扰。
注意:加拿大用户
B 数字设备符合 Canadian ICES-003 的规范。
Remarque l'intention des utilisateurs canadiens
Cet appareil numrique de la classe B est conforme a la norme NMB-003 du Canada
《废弃电器电子产品回收处理管理条例》提示性说明
为了更好地关爱及保护地球,当用户不再需要此产品或产品寿命终止时,请遵守国家废弃电器电子产品回收处理相关法律法规,将其交给
当地具有国家认可的回收处理资质的厂商进行回收处理。
欧盟地区家庭用户废旧设备的废弃
产品或其包装上的此符号表示该产品不得与其它家庭垃圾一起废弃。废弃废旧设备时,您有责任将其送交专门回收废旧电
气和电子设备的回收点。废弃时分类收集和回收废旧设备有助于节省自然资源,确保以保护人类健康和环境的方式进行回
收利用。有关废旧设备回收点的详细信息,请与您当地的市政机构、家庭垃圾处理服务机构或产品的销售店联系。
有关磁场的警告信息
某些电子设备 (如硬盘、 USB 设备、平板电脑、笔 记本电脑、手机、手表、耳机、扬声器、信用卡、磁
ID 卡等)对磁场非常敏感,如果暴露在过强的磁场中可能会永久性损坏或暂时禁用。电子设备不能靠
近或直接放在显示器底座的 磁场区域。
液晶显示器快速安装指南
简体中文
依据中国 《电子信息产品污染控制管理办法》,简称 《管理办法》或 China RoHS》之规定,列出 宏碁电子信息产品中可能含有的有毒或有害物质的名称及含量于以下表格中。
显示器 (液晶及 CRT
零部件名称
有毒有害物质或元素
铅(Pb 汞(Hg 镉(Cd
六价铬 Cr
6+
多溴联苯 PBB
多溴二苯醚
PBDE
金属结构件
X O O O O O
塑料结构件
O O O O O O
电路板组件 *
X O O O O O
液晶显示屏 / 灯管
X X O O O O
CRT 显示屏 / 灯管
X O O O O O
电源模块
X O O O O O
电源线
O O O O O O
外部信号连接线
X O O O O O
喇叭
X O O O O O
*:电路板组件包括印刷电路板及其构成的零部件,如电阻、电容、集成电路、连接器等
:表示该有毒有害物质在该部件所有均质材料中的含量均在 《电子信息产品中有毒有害物质的限量要求标准》规定的限量要求以下
× :表示该有毒有害物质至少存在於该部件的某一均质材料中 , 是因为目前业界还没有的可替代技术 , 以致含量虽然超出 《电子信 息产品中有毒有害物质的限量要求标准》规定的限
量要求;但仍然符合欧盟 RoHS 指令所容许的豁外条款及电池指令的要求 .
液晶显示器快速安装指南
简体中文
规格
在官方的 Acer 支持网站上查找 Acer 产品的手册及其它文档。
LCD 面板
驱动系统
TFT 彩色 LCD
尺寸
32"W 81 cm
像素点距
0.277 mm H x 0.277 mm V
亮度 300 cd/m
2
(典型值)
对比
100000000:1 最大値 ACM
可视角度
178° (水平) 178° (垂直)CR=10
响应时间
6 ms (GTG)
面板类型
VA
视频
R G B 模拟接口
水平频率
30 kHz - 80 kHz
垂直频率
55 - 75 Hz
显示颜色数
16.7 M
点时钟
170 MHz
最大分辨率
2560 x 1440 @ 60 Hz
即插即用
VESA DDCCI/DDC2B
功耗 200 尼特)
开启模式
45W typ.
休眠模式
0.49W typ.
关闭模式 0.4W typ.
输入接口
HDMI 19 针型接头 ( 选配件 )
DVI-D 24 (仅限于双输入型号)
DP (仅限于 DP 输入型号)
输入视频信号
HDMI 信号 (仅限于 HDMI 输入型号) ( 选配件 )
数字信号 (仅限于双输入型号)
DP (仅限于 DP 输入型号)(选配件)
喇叭
2W x 2 (仅限于音频输入型号)(选配件)
USB USB 3.0 x 4
最大屏幕尺寸
水平:708.4 mm
垂直:398.5 mm
电源
100-240V 50/60 Hz
环境条件
工作温度:5°
C 35° C
存储温度:-20° C 60° C
工作湿度:10% 85%
外形尺寸
737.9 W x 473.4 ~ 623.4 H x 266.5 D mm
重量 (净重)
本机 15.3 kg (净重)
机械规格
倾斜:-5°到+25° ( 仅在最高点能提供后仰 25 度的仰角 )
旋转:+60°到-60°
高度调整:0 mm ~ 150 mm
可分离底座:旋转卸下螺丝可分离底座
外部控制
开关 / 按钮
电源按钮
向左 / 向右
菜单 / 确定
自动 / 退出
E Empowering)键
功能
对比
亮度
聚焦
时钟
水平位置
垂直位置
(暖)色
(冷)色
RGB 色温
语言
OSD 位置超时
自动配置 (仅限于模拟输入型号)
宽幅模式 (全屏 / 宽高比)
ACM /
输入信号选择 (仅限于
双输入型号)
DDCCI /
显示信息
重置
退出
* 所有规格如有变更,恕不另行通知。
管制认证
ME61
UA.TR.002
液晶顯示器快速設定說明書
繁體中文
Acer LCD 顯示器快速使用指南 QSG
重要安全指示
請謹慎閱讀下方指示。
1. 欲清潔 LCD 顯示器螢幕:請確定您的液晶顯示器所使用的電源適合您當地的交流電源。
LCD 顯示器關閉並拔除電源線。
將非溶劑清潔液噴於軟布並輕輕擦拭螢幕。
2. 請勿將 LCD 顯示器置於窗戶附近。 使顯示器暴露於雨水、潮濕或日光會嚴重損害顯示器。
3. 請勿使 LCD 螢幕受壓。 過大的壓力可能對顯示器造成永久損害。
4. 請勿移除機殼或嘗試自行維修裝置, 應由專業合格的維修人員執行維修工作。
5. 請將 LCD 存放於 -20°C 60°C -4°F 140° F)溫度的房間。 LCD 顯示其存放於此範圍外之處可能導致永久損害。
6. 若任何下列情況發生,請立即拔除您的顯示器並聯絡專業合格的維修人員。
顯示器至電腦的訊號線磨損或毀壞。
液體濺到 LCD 顯示器上或顯示器暴露於雨水。
• LCD 顯示器或機殼損壞。
將顯示器安裝於底座
1. 從包裝取出顯示器。
2. 將腳架安裝到底座。 ( 視型號而定 )
3. 順時針轉動以鎖定。 確定底座鎖定在支架上。 ( 視型號而定 )
4. 使用整合調整片或大小合適的硬幣轉動螺絲,將底座固定在支架上。 ( 視型號而定 )
將液晶顯示器連接到電腦上
1. 關閉電腦並拔除電腦的電源線。
2. 2-1 連接 HDMI ( 僅針對 HDMI 輸入機型 )
a. 請確定液晶顯示器與電腦的電源都已經關閉。
b. 請將 HDMI 線連接到電腦圖像顯示卡接口上。
2-2 連接數位訊號線 ( 僅適用於雙重輸入機型 )
a. 請確定液晶顯示器與電腦的電源都已經關閉。
b. 24 pin DVI 纜線的一端連接到液晶顯示器的後方, 將另一端連接到
電腦的 DVI 連接埠上。
2-3 連接 DP ( 僅針對 DP 輸入機型 )
a. 請確定液晶顯示器與電腦的電源都已經關閉。
b. 請將 DP 線連接到電腦圖像顯示卡接口上。
3. 連接音訊線 ( 僅適用於音訊輸入機型 ) ( 選用 )
4. 將顯示器電源線插入顯示器背後的電源埠。
5. 將您電腦與顯示器的電源線插入附近的電力插座。
6. 選取開啟 / 關閉關機 USB 充電,以啟用 / 停用關機 USB 充電功能。
外部控制項
編號 圖示 項目 說明
1, 2
電源鍵 / 指示燈
開啟 / 關閉監視器。
藍色表示電源開啟。琥珀色表示待機 / 省電模式。
3, 4
/ 加如 OSD,按下 Minus Plus 鍵即可切換 OSD 選項。
5
OSD 功能 按下即可檢視 OSD 再次按下即可進 OSD 中的選項。
6
自動調整鍵 / 退出
如果啟動 OSD,按下 AUTO 即可退出 OSD 一旦關閉 OSD,按下 AUTO 顯示
器即可自動最佳化顯示的位置、焦距及顯示的時脈。
7
Empowering
按下 Empowering 鍵即可開啟 Acer eColor Management OSD 並存取場景模
式。
POWER
AUDIO IN DP DVI-D IN HDMI HDMI
DP
DVI
HDMI
AUDIO IN DP
HDMI
DVI-D IN
/
液晶顯示器快速設定說明書
繁體中文
法規和安全性公告
FCC 公告
本裝置經過測試,並符合美國聯邦通訊委員會 FCC)規則第 15 部份中有關 B 類數位裝置的規定。這些限制旨在對居民住宅安裝提供合
理的保護,以防有害干擾。本裝置產生並使用射頻能量,如果沒有依照指示安裝和使用,可能會對無線電通訊造成有害干擾。
然而,我們不能保證在特定環境中安裝本裝置不會帶來任何干擾。如果本裝置已對無線電或電視接收造成有害干擾,使用者可透過以下一
種或多種措施來改善干擾狀況:
重新調整收訊天線的方向或位置。
增加本裝置和接收器之間的距離。
將本裝置的插頭連接到與接收器不同的電源插座上
尋求經銷商或有經驗的無線電 / 電視技術人員的協助。
公告:屏蔽纜線
所有連接皆使用屏蔽纜線以確保符合 EMC 條例的規定。
公告:週邊裝置
本設備僅能安裝符合 Class B 限制的合格週邊裝置 (輸入 / 輸出裝置、端子、印表機等)。使用不合格的週邊裝置可能對收音機和電視訊號
的接收產生干擾。
小心
未經製造商明確許可的改裝會導致使用者喪失聯邦通訊委員會授予使用者操作本產品的權利。
操作條件
本裝置符合 FCC 規則第 15 部份的規定。操作程序受限於以下兩個條件:1)本裝置不得產生有害干擾,且 2)本裝置必須承受任何接
收到的干擾,包括可能導致意外操作的干擾。
公告: 加拿大使用者
B 級數位裝置符合加拿大 ICES-003 法規的要求。
Remarque l'intention des utilisateurs canadiens
Cet appareil numrique de la classe B est conforme a la norme NMB-003 du Canada.
歐盟地區家庭使用者對廢棄設備的處置
產品或包裝上貼有此符號表示本產品必須與其他的家庭廢棄物分開處理。 此外,您必須負責將廢棄設備交付至指定的收集
處,以回收廢棄的電子電機設備。 分類集中並回收廢棄設備將有助於維護天然資源,並確保設備的回收方式不會危害人體
健康及環境。 如需廢棄設備回收處理地點的詳細資訊,請洽詢當地的辦公室、家庭廢棄物處理中心或購買產品的店家。
磁場警告訊息
特定電子裝置,例如硬碟、USB 裝置、平板電腦、筆記型電腦、手機、手錶、耳機、喇叭、信用卡、磁條
ID 卡等,皆對磁場很敏感,並且如果曝露在過強的磁場中,可能會永久受損或暫時無法使用。電子裝置不
應放在靠近螢幕底座的磁性區域,或直接擺放其上。
液晶顯示器快速設定說明書
繁體中文
產品規格表
請在 Acer 官方支援網站尋找 Acer 產品的手冊和其他文件。
LCD 面板 驪動系統 TFT 彩色 LCD
尺寸
32"W (81 cm)
像素程度 0.277 mm ( 水平 ) x 0.277mm ( 垂直 )
亮度
300 cd/m
2
( 典型 )
對比 100000000:1 最大值 (ACM)
可視角度 178°( 水平 ) 178°( 垂直 ) (CR=10)
回應時間
6 ms (GTG)
面板類型
VA
視訊 RGB 類比介面
水平頻率
30 kHz - 80 kHz
垂直頻率
55 - 75 Hz
顯示色彩 16.7 M
點時脈
170 MHz
最大解析度
2560 x 1440 @ 60 Hz
隨插即用
VESA DDCCI/DDC2B
功耗 (200 nits) 開啟模式
45W (typ.)
睡眠模式
0.49W (typ.)
關閉模式
0.4W (typ.)
輸入連接器 HDMI 19 ( HDMI 輸入機型 )
DVI-D 24 ( 僅雙輸入機型 )
DP ( DP 輸入機型 )
輸入影像訊號 HDMI 信號 ( HDMI 輸入機型 ) ( 選用 )
數位訊號 ( 僅雙輸入機型 )
DP ( DP 輸入機型 ) ( 選用 )
揚聲器 2W x 2 ( 僅適用於音訊輸入機型 )( 選用 )
USB USB 3.0 x 4
最大螢幕尺寸 水平:
708.4mm
垂直:398.5mm
電源 100-240V50/60 Hz
環境考量 運作溫度:5°C 35°C
儲存溫度:-20°C 60°C
運作濕度:10% 85%
尺寸 737.9 ( ) x 473.4 ~ 623.4 ( ) x 266.5 ( ) mm
重量 ( 淨重 ) 15.3 公斤 ( 淨重 )
技術規格 傾斜:-5° +25° ( 僅在最高點能提供後仰 25 度的仰角 )
旋轉:+60° -60°
高度調整:0 mm 150 mm
可分離式支架:旋開螺絲即可拆解的支撐架。
外部控制: 開關 / 按鍵 電源鍵
(
) / ()
選單 / 確認
自動 I 退出
E (Empowering)
功能 對比
亮度
對焦
時脈
水平位置
垂直位置
( ) 色調
( ) 色調
RGB 色溫
語言
功能表位置。逾時
自動設定
( 類比輸入模式適用 )
寬螢幕模式 ( 全螢幕 / 螢幕比例 )
超高動態對比開 /
訊號輸入選擇
( 雙輸入模式適用 )
標準分辨率開 /
顯示資訊
重置
退出
* 設計與規格若有變更,恕不另行通知。
法規遵循
ME61
UA.TR.002
ENERGY STAR
®
Acer’s ENERGY STAR qualified products save you money by reducing energy
costs and helps protect the environment without sacrificing features or
performance. Acer is proud to offer our customers products with the ENERGY
STAR mark.
What is ENERGY STAR?
Products that are ENERGY STAR qualified use less energy and prevent
greenhouse gas emissions by meeting strict energy efficiency guidelines set by the
U.S. Environmental Protection Agency. Acer is committed to offer products and
services worldwide that help customers save money, conserve energy and improve
the quality of our environment. The more energy we can save through energy
efficiency, the more we reduce greenhouse gases and the risks of climate change.
More information refers to http://www.energystar.gov or http://www.energystar.gov/
powermangement
Acer ENERGY STAR qualified products:
• Produce less heat and reduce cooling loads, and warmer climates.
• Automatically go into “display sleep” and “computer sleep” mode after 15 and 30
minute of inactivity respectively.
• Wake the monitor when it is in Active Off mode, move the mouse or press any
keyboard key.
• Computers will save more than 80% energy at “sleep” mode.
ENERGY STAR and the ENERGY STAR mark are registered U.S. marks
MM.T0T00.004
4J.2DH01.031
LCD monitor
B326HUL
LCD モニ - クイットップ
日本語
Acer LCD モニター  ク イッ QSG
このAcer LCD お買 い上 す。 使用の 「本書」 ユー
ル」 お読 安全 使用 い。
使用 注意事項
使用 本書 「安全 注意」 い。
使いいだく ために 「ユマニ 「ユマニ アル
「使用上 注意事項」 確認 上、 安全 使用 い。
「保証書」 本書 大切 保管 い。
使用中 不具合 症状 発生 場合は、 使用 中止 弊社
ご連絡く い。
ユー 入手方法
環境保全 観点 電子化 ユー ルの 提供 す。
ユー ル」 公式
公式 ル」 該当製品 選択 い。
内容 予告 更新 変更 場合 す。 了承 い。
質問、 不明点等 弊社 連絡 い。
安全 注意
記載 内容は、 危害、 財産等 損害 防止 事項 す。
理解 安全 使用
本書 危険 度合 や程度 記号 説明 す。
死亡 や重傷 重大な結果
い内容 す。
死亡 や重傷 重大な結果
恐れが容で
傷害 や家屋 家財 損害
内容
LCD モニ - クイットップ
日本語
安全 注意
異常、 故障 使用 中止 電源 い。
煙が出た、 臭が 変な音がる。
画像 い、 い。
内部 液体、 異物
変形、 変色、 溶解 見受
損傷、 損壊
◎電
じる、折、加・改、重せる、挟、鋭、足
損傷 切断 利用
や布で取 い、 い、 い。
電源 確実 み、 足配線 い。
電源 定期的 い。
長期間使用 い場合は、 電源 い。
水などの液の発生す の近く 使用し いでく
高温 多湿 場所 (浴室 車内 使用
温度変化 い場所 加熱機器等) 使用 い。
の手の届 囲で使用し いで
本機器内部 金属 や燃 異物 い。
不安定 場所 設置
お客様 修理、 分解、 改造、 行為絶対
免責事項
地震、 自然災害、 火災、 第三者 行為、 事故、 お客様 故意 過失、 誤用、 他異常 な条件下
使用 損害 当社は一切責任
記載内容 損害 当社は一切 責任
接続機器 組合 誤動作 動作不能、 誤操作 損害 当社一切責任
本製品 使用中、 は使用不能 付随的な損害 当社一切責任を
警告
LCD モニ - クイットップ
日本語
LCD 特性 特記事項
以下 症状は、 LCD 特性 起因 故障 不具合 了承
•LCD 非常 精密度 い技術 製造 画面一部 点灯 い画素 や、 常時点灯 画素
が存合が
表示 画像パ 画面の 多少 発生 場合 す。
•LCD 長時間静止画 表示 場合、 残像 す。
他、 詳細事項 ル」 参照
付属品確認
注意 付属品 製品
詳細 公式 ムペ
注意 電源 付属 利用 い。 本機器以外 製品 流用 や、 販電源 代用
わないで
台座
1.) 梱包箱 本体 台座 い。
2.) 台座を 水平 安定 場所 本体 右回 す。
3.) 台座 確認 台座底面 固定
モニターにパソ ンをする
1. コンをオード さい
2. 2-1 HDMI ケー の接 (HDMI- 入力 )
a. モニター ンピュターのを必 てく ださ
b. HDMI ケー ルを 続し
2-2 DVI 接続 ル入力 ル)
a. モニター ンピュターのを必 てく ださ
b. 24 ピン DVI ルの方の端を 背面に続し う一
の端 DVI ポー
2-3 DP 接続。 DP- 入力 み)
a. モニター ンピュターのを必 てく ださ
b. DP ケー ルを 続し
3. 接続 す。 入力 み) (オプ
ショ
4. 電源 背面 電源 挿入 す。
5. ピュ モニの電 ドを、 のコ ンセントし込
6. 電源 USB 充電機能 有効 / 無効 機能 / オフ
しま
モニー本
台座
電源
(日本国内用)
オー
ケー
(オプショ ン)
HDMI
ケー
(オプショ ン)
DVI
ケー
(オプショ ン)
DP
ケー
(オプショ ン)
USB
ケー
(オプショ ン)
クイック
アッ
POWER
AUDIO IN DP DVI-D IN HDMI HDMI
DP
DVI
HDMI
AUDIO IN DP
HDMI
DVI-D IN
LCD モニ - クイットップ
日本語
制御 説明
1   内蔵 み機能    各機能の 詳細 ユー ル」 い。
磁場 注意
本製品 台座部分 微弱 箇所 箇所 や、 付近 ハー
ブ、 USB メモクレードID 類、 携帯電話、 時計、
ジタ ラ、 カー
他、 磁気 い電子機器類
完全 損傷 正常使用 可能性 す。
本書 内容一部、 転載 す。
本書 内容 予告 変更 す。
本書 内容 一誤 等、 弊社 連絡 い。
1
電源 電源
2
電源
ステ LED
ステ LED 青色点灯 場合 正常稼働中 状態
黄色点灯 場合は、 状態 す。
3 7
ショ
OSD メニュタン
どの 押し も、 イコ 示さ
指定 機能起動 す。
OSD 起動時、 表示 実行 す。
3
Input
音量調節  
方向
表示 時、 「入力切替機能」 実行 す。
「音量調節」 選択 音量 す。 1
OSD 起動時、 表示 方向
4
音量調節
音量調節  
方向
表示 時、 「音量調節」 す。 1
「音量調節」 選択 音量 す。 1
OSD 起動時、 表示 方向
5
OSD 表示 時、 OSD メニ ます
6 AUTO
表示 時、 「自動調節機能」 実行 す。
7
e ボタ ショ イコ ンを表 eDisplay Management 機能」 起動 す。
Magnet
日本語
仕様
Acer 製品 説明書 Acer 公式 サイトかだけます
MU.T0T00.005
4J.2DH01.041
LCD パネ
駆動
TFT カラ LCD
サイ
32"W 81 cm
ピク ピッ
0.277 mm (水平 x 0.277 mm (垂直
輝度 300 cd/m
2
(標準
コントラ
100000000:1 最大値 ACM
可視角度
178°( 178°( )(CR=10
レスポンスタ
6 ms (GTG)
パネル
VA
ビデオ
R, G, B ァナ ターフェ
H- 周波数
30 kHz-80 kHz
V- 周波数
55 - 75 Hz
表示
16.7 百萬色
ドッ ロッ
170 MHz
最高解像度
2560 x 1440 @ 60 Hz
プラグ & プレ
VESA DDCCI/DDC2B
消費電 200 場合)
オン
45W typ.
スリープモード
0.49W typ.
オフ / スタ バィ
モー
0.4W typ.
入カ ネク
HDMI 19 ピン(HDMI- 入カ )
DVI-D 24 ピン モデルのみ
DP DP- 入カ
入力 信号
HDMI 信号 (HDMI- 入カ )( ォプ )
ル信号 ル入 み)
DP
DP- 入カ ルの )(ョン
スピ ーカ 2W x 2 (オ ディ オ入力 ルの み)
USB USB 3.0 x 4
最大画面
水平 708.4 mm
垂直 398.5 mm
電源
100-240V, 50/60 Hz
設置環境
操作温度 5°C ~ 35°C
保存用温度 -20°C ~ 60°C
操作湿度 10% ~ 85%
寸法
737.9 (幅 x 473.4 ~ 623.4 (高 x 266.5 (奥行 mm
重量 N.W. 15.3 本体 (正量
機械の 仕様
傾き -5°~
+25° (25 度に 傾斜 い位置設定 必要 す。 )
回転 +60°~
-60°
調整 0 mm ~ 150 mm
取リ し可能フ 取リ外し可能なフ ( ネジ取り外し )
外部
スィ / ボタ
電源
左( / 右(
消音 / 入力
自動 / 終了
E Empowering 一キ
機能
コントラ
輝度
フォーカスト
クロック
水平位置
垂直位置
(暖
(冷
RGB 色温度
言語
OSD 意図。
自動設定
入カ ルの
ヮィード / ァスぺクト)
ACM オン / 才フ
信号選択
入カ ルの
DDCCI オン/ オフ
表示情報
リッセ
終了
* 仕様 将来予告 変更 す。
法規制の 遵守
ME61
UA.TR.002
LCD monitor
B326HUL
LCD Monitor Quick Setup Guide
English
Acer LCD Monitor Quick Start Guide (QSG)
Important safety instructions
Please read the following instructions carefully.
1. To clean the LCD monitor screen: Be sure that your monitor is electrically rated to operate with the AC power available in your
location.
• Turn off the LCD monitor and unplug the power cord.
• Spray a non-solvent cleaning solution onto a rag and clean the screen gently.
2. Do not place the LCD monitor near a window. Exposing the monitor to rain, moisture or sunlight can severely damage it.
3. Do not apply pressure to the LCD screen. Excessive pressure may cause permanent damage to the display.
4. Do not remove the cover or attempt to service this unit yourself. An authorized technician should perform servicing of any
nature.
5. Store the LCD monitor in a room with a temperature of -20° to 60° C (-4° to140° F). Storing the LCD monitor outside this range
may result in permanent damage.
6. Immediately unplug your monitor and call an authorized technician if any of the following circumstances occur:
• Monitor-to-PC signal cable is frayed or damaged.
• Liquid spills onto the LCD monitor or the monitor is exposed to rain.
• The LCD monitor or case is damaged.
Attaching the monitor to the base
1. Remove the monitor from the packaging.
2. Attach the footstand to the base. (for selected models)
3. Turn clockwise to lock. Ensure that the base in locked onto the stand. (for selected models)
4. Secure the base to the stand by turning the screw using the intergrated tab or a suitable coin. (for selected models)
Connecting Your Monitor to a Computer
1. Turn off your monitor and unplug your computer’s power cord.
2. 2-1 Connect HDMI Cable (Only HDMI-input model)
a. Make sure both the monitor and computer are powered-OFF.
b. Connect the HDMI cable to the computer.
2-2 Connect Digital Cable (Only Dual-input model)
a. Make sure both the monitor and computer are powered-OFF.
b. Connect one end of the 24-pin DVI cable to the back of the
monitor and connect the other end to the computer's port.
2-3 Connect DP Cable (Only DP-input model)
a. Make sure both the monitor and computer are powered-OFF.
b. Connect the DP cable to the computer.
3. Connect the Audio Cable. (Only Audio-Input Model) (Optional)
4. Insert the monitor power cable into the power port at the back of the
monitor.
5. Plug the power cords of your computer and your monitor into a
nearby electrical outlet.
6. Select Power-off USB charge ON/OFF to enable/disable Power-off USB
charge function.
External Controls
No. Icon Item Description
1, 2
Power button/
indicator
Turns the monitor on/off.
Blue indicates power on. Amber indicates standby/power saving mode.
3, 4 Minus / plus
If the OSD is active, press the Minus or Plus button to toggle between the
OSD options.
5 OSD functions Press to view the OSD. Press again to enter a selection in the OSD.
6
Auto adjust
button / exit
If the OSD is active, press Auto to exit the OSD. Once the OSD is inactive,
press Auto and the monitor will automatically optimize the display position,
focus, and clock of your display.
7 Empowering key
Press the Empowering Key to open the Acer eColor Management OSD and
access the scenario modes.
POWER
AUDIO IN DP DVI-D IN HDMI HDMI
DP
DVI
HDMI
AUDIO IN DP
HDMI
DVI-D IN
/
LCD Monitor Quick Setup Guide
English
Regulations and safety notices
FCC notice
This device has been tested and found to comply with the limits for a Class B digital device pursuant to Part 15
of the FCC rules. These limits are designed to provide reasonable protection against harmful interference in a
residential installation. This device generates, uses, and can radiate radio frequency energy and, if not installed
and used in accordance with the instructions, may cause harmful interference to radio communications.
However, there is no guarantee that interference will not occur in a particular installation. If this device does
cause harmful interference to radio or television reception, which can be determined by turning the device off
and on, the user is encouraged to try to correct the interference by one or more of the following measures:
Reorient or relocate the receiving antenna.
Increase the separation between the device and receiver.
Connect the device into an outlet on a circuit different from that to which the receiver is connected.
Consult the dealer or an experienced radio/television technician for help.
CE declaration of Conformity
Hereby, Acer Inc., declares that this LCD monitor is in compliance with the essential requirements and other
relevant provisions of EMC Directive 2004/108/EC, Low Voltage Directive 2006/95/EC, and RoHS Directive 2011/
65/EU and Directive 2009/125/EC with regard to establishing a framework for the setting of ecodesign
requirements for energy-related product.
Notice: Shielded cables
All connections to other computing devices must be made using shielded cables to maintain compliance with
EMC regulations.
Notice: Peripheral devices
Only peripherals (input/output devices, terminals, printers, etc.) certified to comply with the Class B limits may
be attached to this equipment. Operation with non-certified peripherals is likely to result in interference to
radio and TV reception.
Caution
Changes or modifications not expressly approved by the manufacturer could void the user authority, which is
granted by the Federal Communications Commission, to operate this product.
Operation conditions
This device complies with Part 15 of the FCC Rules. Operation is subject to the following two conditions: (1) this
device may not cause harmful interference, and (2) this device must accept any interference received, including
interference that may cause undesired operation.
Notice: Canadian users
This Class B digital apparatus complies with Canadian ICES-003.
Remarque à l'intention des utilisateurs canadiens
Cet appareil numérique de la classe B est conforme a la norme NMB-003 du Canada.
Disposal of Waste Equipment by Users in Private Household in the European Union
This symbol on the product or on its packaging indicates that this product must not be disposed of
with your other household waste. Instead, it is your responsibility to dispose of your waste
equipment by handing it over to a designated collection point for the recycling of waste electrical
and electronic equipment. The separate collection and recycling of your waste equipment at the
time of disposal will help to conserve natural resources and ensure that it is recycled in a manner
that protects human health and the environment. For more information about where you can
drop off your waste equipment for recycling, please contact your local city office, your household
waste disposal service or the shop where you purchased the product.
Warning Message for Magnet
Certain electronic devices such as hard drives, USB devices, tablet computers,laptops,
cellphones, watches, earphones, speakers, credit cards, magnetic ID cards, etc. are
sensitive to magnetic fields and may be damaged permanently or temporarily
disabled if exposed to a magnetic field that is too strong. Electronic devices should
not be put close to or directly on the magnetic area of monitor base.
LCD Monitor Quick Setup Guide
English
SPECIFICATION
Find manuals and other documents for your Acer product on the official Acer support website.
LCD Panel Driving system TFT Color LCD
Size 32”W (81 cm)
Pixel pitch 0.277 mm (H) x 0.277 mm (V)
Brightness
300 cd/m
2
(Typical)
Contrast 100000000:1 Max (ACM)
Viewable angle 178° (H) 178° (V) (CR=10)
Response time 6 ms (GTG)
Panel Type VA
Video R,G, B Analog Interface
H-Frequency 30 kHz - 80 kHz
V-Frequency 55 - 75 Hz
Display Colors 16.7M Colors
Dot Clock 170 MHz
Max. Resolution 2560 x 1440 @ 60 Hz
Plug & Play VESA DDCCI/DDC2B
Power consumption (at 200 nits) On Mode 45W (typ.)
Sleep Mode 0.49W (typ.)
Off Mode 0.4W (typ.)
Input Connector HDMI 19 pin (Only HDMI-Input Model)
DVI-D 24 pin (Only Dual-Input Model)
DP (Only DP-Input Model)
Input Video Signal HDMI signal (Only HDMI-Input Model)(Optional)
Digital signal (Only Dual-Input Model)
DP (Only DP-Input Model)(Optional)
Speakers 2W x 2 (Only Audio-Input Model)(Optional)
USB USB 3.0 x 4
Maximum Screen Size Horizontal: 708.4 mm
Vertical: 398.5 mm
Power Source 100-240V, 50/60 Hz
Environmental Considerations Operating Temp: 5° to 35°C
Storage Temp: -20° to 60°C
Operating Humidity: 10% to 85%
Dimensions 737.9 (W) x 473.4~ 623.4 (H) x 266.5 (D) mm
Weight (N. W.) 15.3 kg Unit (net)
Mechanism spec Tilt: -5° to +25° (Only at the highest point can 25 degrees of recline be offered for
the angle of elevation.)
Swivel: -60° to +60°
Height adjustment: 0 mm to 150 mm
Detachable foot stand: Yes (Detachable foot stand with screw release)
External Controls: Switch / Buttons Power Button
Left() /Right()
MENU/ENTER
Auto/ Exit
E(Empowering) Key
Functions Contrast
Brightness
Focus
Clock
H. Position
V. Position
(Warm) Color
(Cool) Color
RGB Color temperature
Language
OSD position. timeout
Auto configuration (only
Analog input model)
Wide mode (Full/Aspect)
ACM On/Off
Input signal Selection (only
Dual input model)
DDCCI On/Off
Display information
Reset
Exit
* All specifications are subject to change without notice.
Regulatory Compliance
ME61
UA.TR.002
ENERGY STAR
®
Acer’s ENERGY STAR qualified products save you money by reducing energy
costs and helps protect the environment without sacrificing features or
performance. Acer is proud to offer our customers products with the ENERGY
STAR mark.
What is ENERGY STAR?
Products that are ENERGY STAR qualified use less energy and prevent
greenhouse gas emissions by meeting strict energy efficiency guidelines set by the
U.S. Environmental Protection Agency. Acer is committed to offer products and
services worldwide that help customers save money, conserve energy and improve
the quality of our environment. The more energy we can save through energy
efficiency, the more we reduce greenhouse gases and the risks of climate change.
More information refers to http://www.energystar.gov or http://www.energystar.gov/
powermangement
Acer ENERGY STAR qualified products:
• Produce less heat and reduce cooling loads, and warmer climates.
• Automatically go into “display sleep” and “computer sleep” mode after 15 and 30
minute of inactivity respectively.
• Wake the monitor when it is in Active Off mode, move the mouse or press any
keyboard key.
• Computers will save more than 80% energy at “sleep” mode.
ENERGY STAR and the ENERGY STAR mark are registered U.S. marks
MU.T0T00.001
4J.2DH01.001
LCD-Monitor Kurzanleitung
Deutsch
Acer LCD-Monitor - Kurzanleitung
Wichtige Sicherheitshinweise
Bitte lesen Sie die folgenden Anweisungen aufmerksam durch.
1. Reinigen des LCD-Monitors: Vergewissern Sie sich, dass der Netzstrom in Ihrer Umgebung mit der Stromversorgung für Ihren
Monitor übereinstimmt.
• Schalten Sie den LCD-Monitor aus und ziehen Sie das Netzkabel aus der Steckdose.
• Sprühen Sie eine milde Reinigungslösung auf ein Tuch und wischen Sie den Bildschirm behutsam ab.
2. Stellen Sie den LCD-Monitor nicht in der Nähe eines Fensters auf. Wird der Monitor Regen, Feuchtigkeit oder direkter Sonne-
neinstrahlung ausgesetzt, können schwere Schäden daran auftreten.
3. Üben Sie keinen Druck auf den LCD-Bildschirm aus. Übermäßiger Druck kann zu dauernhaften Schäden an der Anzeige
führen.
4. Entfernen Sie nicht die Abdeckung und versuchen Sie nicht, dieses Gerät selbst zu reparieren. Reparaturarbeiten jeglicher Art
sollten nur von einem autorisierten Techniker vorgenommen werden.
5. Lagern Sie den LCD-Monitor in einem Raum mit einer Temperatur zwischen -20º C bis +60º C (-4° bis 140° F). Das Lagern des
LCD-Monitors in Temperaturen außerhalb dieses Bereichs kann zu dauerhaften Schäden am Gerät führen.
6. Schließen Sie den Monitor umgehend von der Stromversorgung ab und verständigen Sie einen autorisierten Techniker, wenn
einer der folgenden Umstände eintritt:
• Das Signalkabel zwischen dem Monitor und dem PC ist ausgefranst oder beschädigt.
• Auf den LCD-Monitor wurde Flüssigkeit verschüttet, oder der Monitor wurde Regen ausgesetzt.
• Das Gehäuse des LCD-Monitors wurde beschädigt.
Befestigen des Monitors am Standfuß
1. Nehmen Sie den Monitor aus der Verpackung.
2. Bringen Sie den Ständer am Sockel an. (ausgewählte Modelle)
3. Zum Verriegeln in Uhrzeigerrichtung drehen. Stellen Sie sicher, dass der Sockel fest auf dem Ständer angebracht ist. (ausgewählte
Modelle)
4. Befestigen Sie den Sockel am Ständer, indem Sie die Schraube durch die Vertiefung oder einer passenden Münze drehen. (ausgewählte
Modelle)
Anschließen des Monitors an einen Computer
1. Schalten Sie den Computer aus und trennen Sie das Netzkabel ab.
2. 2-1 HDMI-kabels anschließen (nur HDMI-Eingangs-Modell)
a. Vergewissern Sie sich, dass sowohl Monitor als auch Computer
AUSgeschaltet sind.
b. Schließen Sie das HDMI-kabel an den Computer an.
2-2 Digitalkabel(nur Modell mit Doppeleingang)
a. Vergewissern Sie sich, dass sowohl Monitor als auch Computer
AUSgeschaltet sind.
b. Verbinden Sie ein Ende des 24-pol. DVI-Kabels mit der Rückseite des
Monitors und das andere Ende mit dem DVI-Anschluss des Computers.
2-3 DP-kabels anschließen (nur DP-Eingangs-Modell)
a. Vergewissern Sie sich, dass sowohl Monitor als auch Computer
AUSgeschaltet sind.
b. Schließen Sie das DP-kabel an den Computer an.
3. Audiokabel anschließen (Nur bei Modellen mit optionalem Audioeingang.)
4. Schließen Sie das Netzkabel des Monitors an die Netzbuchse an der Rückseite des
Monitors an.
5. Schließen Sie das Netzkabel des Computers und des Monitors an eine Steckdose in der Nähe an.
6. Wählen Sie USB laden bei ausgeschaltetem Gerät EIN/AUS, um die USB Ladefunktion bei ausgeschaltetem Gerät zu aktivieren/
deaktivieren.
Externe Bedienung
Nr. Symbol Element Beschreibung
1, 2
Ein- / Aus-Taste / Anzeige
Schaltet den Monitor ein und aus.
Bau: Eingeschaltet. Orange: Bereitschaft/Energiesparen.
3, 4
Minus / Plus
Wenn das OSD aktiv ist, drücken Sie auf die Taste Minus oder Plus, um
zwischen OSD-Optionen zu wechseln.
5
OSD-Funktionen
Drücken Sie hier, um das OSD aufzurufen. Drücken Sie erneut, um eine
Auswahl im OSD zu treffen.
6
Auto Adjust-Taste / Exit
Wenn das OSD (Bildschirmmenü) aktiv ist, drücken Sie auf Auto, um es
auszublenden. Wenn das OSD nicht aktiv ist, drücken Sie auf Auto, um den
Monitor automatisch die Anzeigeposition, den Fokus und den Takt der
Anzeige optimieren zu lassen.
7
Empowering-Taste
Drücken Sie auf die Empowering-Taste, um das Acer eColor Management-
OSD zu öffnen und auf unterschiedliche Modi zuzugreifen.
POWER
AUDIO IN DP DVI-D IN HDMI HDMI
DP
DVI
HDMI
AUDIO IN DP
HDMI
DVI-D IN
/
LCD-Monitor Kurzanleitung
Deutsch
Hinweise zu Vorschriften und zu Ihrer Sicherheit
FCC-Hinweis
Dieses Gerät wurde getestet und als mit den Grenzwerten für Digitalgeräte der Klasse B gemäß Teil 15 der FCC-Regularien
übereinstimmend befunden. Diese Grenzwerte wurden geschaffen, um angemessenen Schutz gegen Störungen beim Betrieb in
Wohngebieten zu gewährleisten. Dieses Gerät erzeugt, verwendet und kann Hochfrequenzenergie abstrahlen und kann - falls
nicht in Übereinstimmung mit den Bedienungsanweisungen installiert und verwendet - Störungen der Funkkommunikation
verursachen.
Allerdings ist nicht gewährleistet, dass es in bestimmten Installationen nicht zu Störungen kommt. Falls dieses Gerät Störungen
des Radio- oder Fernsehempfangs verursachen sollte, was leicht durch Aus- und Einschalten des Gerätes herausgefunden werden
kann, wird dem Anwender empfohlen, die Störung durch eine oder mehrere der folgenden Maßnahmen zu beseitigen:
Neuausrichtung oder Neuplatzierung der Empfangsantenne(n).
Vergrößern des Abstands zwischen Gerät und Empfänger.
Anschluss des Gerätes an einen vom Stromkreis des Empfängers getrennten Stromkreis.
Hinzuziehen des Händlers oder eines erfahrenen Radio-/Fernsehtechnikers.
CE-Konformitätserklärung
Hiermit er klärt die Acer Inc., dass dies er LCD-Monitor die wesentlichen Anforderungen und sons tigen Vor gaben der EMV-
Richtlinie 2004/108/EG, der Niederspannungs richt linie 2006/95/EG, der RoHS-Richt linie 2011/65/EU und der Richt linie 2009/125/
EG im Hinblick auf die Anforderungen an umwel tf reundliches Design erfüll t.
Hinweis: Abgeschirmte Kabel
Sämtliche Verbindungen zu anderen Computergeräten müssen zur Einhaltung der EMV-Bestimmungen über abgeschirmte Kabel
hergestellt werden.
Hinweis: Peripheriegeräte
An dieses Gerät dürfen nur Peripheriegeräte (Eingabe-/Ausgabegeräte, Endgeräte, Drucker, usw.) angeschlossen werden, die
nachweislich die Grenzwerte der Klasse B einhalten. Der Betrieb mit nicht zertifizierten Peripheriegeräten führt mit hoher
Wahrscheinlichkeit zu Störungen des Radio- und Fernsehempfangs.
Vorsicht
Änderungen oder Modifikationen, die nicht ausdrücklich vom Hersteller zugelassen sind, können die durch die Federal
Communications Commission (FCC) erteilte Berechtigung zum Betrieb des Gerätes erlöschen lassen.
Betriebsbedingungen
Dieses Gerät erfüllt Teil 15 der FCC-Regularien. Der Betrieb unterliegt den folgenden beiden Voraussetzungen: (1) Dieses Gerät
darf keine Störungen verursachen, und (2) dieses Gerät muss jegliche empfangenen Störungen hinnehmen, einschließlich
Störungen, die zu unbeabsichtigtem Betrieb führen können.
Hinweis: Anwender in Kanada
Dieses Digitalgerät der Klasse B erfüllt die Richtlinien der Canadian ICES-003.
Remarque l'intention des utilisateurs canadiens
Cet appareil numérique de la classe B est conforme à la norme NMB-003 du Canada.
Entsorgung von Gerätemüll von Benutzern in privaten Haushalten in der
Europäischen Gemeinschaft
Dieses Symbol auf dem Produkt oder auf der Verpackung bedeutet, dass dieses Produkt nicht zusammen mit
Ihrem anderen Hausmüll entsorgt werden darf. Stattdessen sind Sie dafür verantwortlich, Ihren Gerätemüll
dadurch zu entsorgen, dass Sie ihn zu einer ausgewiesenen Sammelstelle für Wiederaufbereitung von zu
verschrottenden Elektro- und Elektronikgeräten bringen. Die getrennte Sammlung und Wiederaufbereitung Ihres
zu entsorgenden Gerätemülls hilft bei der Schonung natürlicher Ressourcen und stelt sicher, dass er auf eine Weise
wiederaufbereitet wird, die dem Schutz der menschlichen Gesundheit und der Umgebung dient. Informationen
über Sammelstellen für Wiederaufbereitung auf Gerätemüll erhalten Sie bei Ihrer städtischen Behörde, dem
Entsorgungsdienst für Hausmüll oder dem Geschäft, in dem Sie das Produkt kauften.
Warnhinweis für Magnet
Bestimmte Elektrogeräte wie z.B. Festplatten, USB-Geräte, Tablet-Computer, Laptops,
Mobiltelefone, Uhren, Kopfhörer, Lautsprecher, Kreditkarte, magnetische Ausweiskarten usw. sind
empfindlich gegenüber Magnetfeldern und könnten dauerhaft beschädigt oder vorübergehend
deaktiviert werden, wenn sie einem zu starken Magnetfeld ausgesetzt wurden. Elektrogeräte
dürfen nicht in die Nähe oder direkt auf den magnetischen Bereich des Monitorsockels gestellt
werden.
LCD-Monitor Kurzanleitung
Deutsch
SPEZIFIKATIONEN
Handbücher und andere Dokumente für Ihr Acer-Produkt finden Sie auf der offiziellen Support-Website von
Acer.
LCD-Bildschirm
Anzeigetechnik TFT-Farb-LCD
Größe 32"W (81 cm)
Pixelabstand 0,277 mm (H) x 0,277 mm (V)
Helligkeit
300 cd/m
2
(Standard)
Kontrast 100000000:1 Max. (ACM)
Blickwinkel 178° (H) 178° (V) (CR=10)
Reaktionszeit 6 ms (GTG)
Anzeigetyp VA
Video R, G, B, analoge Schnittstelle
H-Frequenz 30 kHz - 80 kHz
V-Frequenz 55 - 75 Hz
Anzeigefarben 16,7 Millionen
Farben Pixeltakt 170 MHz
Max. Auflösung 2560 x 1440 bei 60 Hz
Plug & Play VESA DDCCI/DDC2B
Leistungsaufnahme (bei 200 Nits)
Ein-Modus 45W (typ. )
Schlaf-Modus 0,49W (typ. )
Aus-Modus 0,4W (typ. )
Eingangsanschluss
HDMI 19-polig (nur HDMI-Eingangs-Modell)
DVI-D 24-polig (nur Modell mit zwei Eingängen)
DP (nur DP-Eingangs-Modell)
Videoeingangssignal
HDMI signal (nur HDMI-Eingangs-Modell) (optionalem)
Digrtalsignal (nur bei Modell mit zwei Eingängen)
DP (nur DP-Eingangs-Modell) (optionalem)
Lautsprecher 2W x 2 (Nur bei Modellen mit optionalem Audioeingang) (optionaleme)
USB USB 3,0 x 4
Max. Bildgröße
Horizontal: 708,4 mm
Vertikal: 398,5 mm
Stromversorgung 100-240V, 50/60 Hz
Umgebungsbedingungen
Betriebstemperatur: 5° C bis 35° C
Lagertemperatur: -20° C bis 60° C
Betriebsluftfeuchtigkeit: 10 % bis 85 %
Abmessungen 737,9 (B) x 473,4~ 623,4 (H) x 266,5 (T) mm
Gewicht (netto) 15,3 kg (Gerät)
Mechanische Spez.
Neigen: -5° bis +25° (Nur am höchsten Punkt kann ein Neigungswinkel von 25 Grad für das
Herausziehen erzielt werden.)
Schwenken:+60° bis -60°
Höhenverstellung: 0 mm bis 150 mm
Abnehmbarer Standfuß: Abnehmbarer Standfuß mit Schraubverbindung
Externe Bedienelemente:
Schalter/Taste
Netzschalter
Links() / Rechts()
MENÜ/EINGABE
Autom. / Beenden
E(Empowering)-Taste
Funktion
Kontrast
Helligkeit
Fokus
Takt
H. Position
V. Position
(Warm) Farbe
(Kühl) Farbe
RGB-Farbtemperatur
Sprache
OSD-Position.
Autom. Konfiguration (nur
Modell mit Analogeingang)
Breitbildmodus (Voll/Seitenverhältnis)
ACM Ein/Aus
Wahl des Eingangssignals (nur
Modell mit Dual-Eingang)
DDCCI Ein/Aus
Anzeigeinformationen Zurücksetzen
Beenden
Auszeit
* Sämtliche technischen Daten können ohne Ankündigung geändert werden.
Behördliche Bestimmungen
ME61
UA.TR.002
Guía de instalación rápida del monitor LCD
Español
Guía de inicio rápido (QSG) del Monitor Acer LCD
Instrucciones importantes de seguridad
Lea detenidamente estas instrucciones de seguridad.
1. Para limpiar la pantalla del monitor LCD: Asegúrese de que el voltaje del monitor sea el adecuado para funcionar con la alimentación CA
disponible en su ubicación.
• Apague el monitor y desconecte el cable prolongador.
• Pulverice una solución de limpieza no disolvente sobre un paño y limpie suavemente la pantalla.
2. No coloque el monitor LCD cerca de una ventana. Exponer el monitor a la lluvia, la humedad o la luz solar directa podría dañarlo severa-
mente.
3. No aplique presión sobre la superficie del monitor LCD. Una presión excesiva podría causar daños permanentes sobre la pantalla.
4. No retire la cubierta ni intente reparar el monitor personalmente. Las reparaciones de cualquier naturaleza deberán ser realizadas por un
técnico autorizado.
5. Conserve el monitor LCD en una sala con una temperatura de -20º a 60ºC (-4º a 140ºF). Conservar el monitor LCD a temperaturas que
excedan estos límites podría provocar daños permanentes.
6. Desconecte inmediatamente su monitor y llame a un técnico autorizado si concurre cualquiera de las siguientes circunstancias:
• El cable de señal del monitor al PC está quemado o dañado.
• Se ha derramado líquido en el monitor LCD o el monitor se ha expuesto a la lluvia.
• El monitor LCD o su carcasa están dañados.
Colocar el monitor sobre la base
1. Saque el monitor del embalaje.
2. Acople el soporte de pie a la base. (para modelos seleccionados)
3. Gire en la dirección de las agujas del reloj para bloquear. Asegúrese de que la base está fijada en el soporte. (para modelos seleccionados)
4. Fije la base al soporte girando el tornillo con ayuda de la ficha integrada o con una moneda adecuada. (para modelos seleccionados)
Conexión del monitor con una computadora
1. Apague el monitor y desenchufe el cable de alimentación del ordenador.
2. 2-1 Cable HDMI (sólo modelos con entrada HDMI)
a. Asegúrese de que tanto el monitor como la computadora estén
apagado.
b. Conecte el cable HDMI al equipo.
2-2 Cable Digital (Sólo en modelos con entrada dual)
a. Asegúrese de que tanto el monitor como la computadora estén
apagado.
b. Conecte un extremo del cable DVI de 24 contanctos a la parte trasera
del monitor y conecte el otro extremo al puerto DVI del equipo.
2-3 Cable DP (sólo modelos con entrada DP)
a. Asegúrese de que tanto el monitor como la computadora estén
apagado.
b. Conecte el cable DP al equipo.
3. Conecte el cable de audio (Sólo modelo con entrada de audio) (Opcional)
4. Inserte el cable de alimentación del monitor en el puerto de alimentación
situado en la parte trasera del monitor.
5. Conecte los cables de alimentación de su equipo y su monitor a una toma
eléctrica cercana.
6. Seleccione Power-off USB charge ON/OFF (Apagar carga USB activada/desactivada) para activar/desactivar esta función.
External Controls
Icono Elemento Descripción
1, 2
Interruptor de
alimentación/Indicador
LED de alimentación
Para encender o apagar el monitor.
Se enciende cuando el interruptor de alimentación está encendido.
3, 4 Menos/Más
Si la visualización en pantalla está activa, pulse los botones Menos o
Más para alternar las diferentes opciones de visualización en pantalla.
5
Funciones de
visualización en pantalla
Pulse este botón para activar el menú OSD.
6 Ajuste automático / Salir
Si el menú OSD está activo, pulse Auto para salir de él. Una vez inactivo
el menú OSD, pulse el botón Auto para que el monitor optimice
automáticamente la posición de la pantalla, el enfoque y el reloj de su
pantalla.
7 Empowering (Encender)
Cuando el menú OSD está apagado, pulse este botón para abrir el OSD
Acer eColor Management y acceder a los modos de escenario.
POWER
AUDIO IN DP DVI-D IN HDMI HDMI
DP
DVI
HDMI
AUDIO IN DP
HDMI
DVI-D IN
/
Guía de instalación rápida del monitor LCD
Español
Avisos de Seguridad y Mantenimiento
Aviso FCC
Este equipo ha sido probado y se considera que cumple con los límites para un dispositivo digital de Clase B, según la sección 15 de las
Normativas FCC. Estos límites están diseñados para proporcionar una protección adecuada contra interferencias dañinas en una instalación
residencial. Este equipo genera, usa y puede irradiar energía con frecuencias de radio y, si no se instala y usa de acuerdo con las instrucciones,
puede causar interferencias dañinas para las comunicaciones de radio.
Sin embargo, no hay ninguna garantía de que estas interferencias no ocurran en una instalación particular. Si este equipo causa interferencias
en la recepción de radio o telev isión, lo que puede determinarse encendiendo y apagando el dispositivo, se anima al usuario a intentar
corregir las interferencias mediante uno o más de los siguientes métodos.
Reoriente o recoloque la antena receptora.
Aumente la distancia entre el equipo y el receptor.
Conecte el equipo a una toma de corriente de un circuito diferente del circuito al que está conectado el receptor.
Consulte con su vendedor o con un técnico de radio/TV ex perimentado para recibir ayuda.
Declaración de Conformidad CE
Por la presente, Acer Inc. declara que este monitor LCD satisface los requisitos fundamentales y demás disposiciones relacionadas de la
Directiva EMC 2004/108/EC, la Directiva de baja tensión 2006/95/EC, la Directiva RoHS 2011/65/EU y la Directiva 2009/125/EC sobre la
instauración de un marco para el establecimiento de requisitos de diseño ecológico aplicables a los productos relacionados con la energía.
Aviso: Cables blindados
Todas las conexiones a otros dispositivos informáticos deben realiz arse mediante cables blindados para mantener el cumplimiento de las
normativas EMC.
Aviso: Dispositivos Periféricos
Sólo pueden conectarse a este equipo los periféricos (de entrada/salida, terminales, impresoras, etc) con certificación de cumplimiento con los
límites de Clase B. Es probable que el uso de periféricos no certificados resulte en interferencias en la recepción de radio y TV.
Precaución
Los cambios o modificaciones que no hayan sido aprobados ex presamente por el fabricante podrían invalidar la autoridad del usuario para
usar este producto. Esto está aprobado por la Comisión Federal de Comunicaciones.
Condiciones de uso
Este dispositivo cumple con la Sección 15 de las Normas FCC. Su uso está sujeto a las siguientes dos condiciones. (1) Este dispositivo no debe
causar interferencias dañinas, y (2) este dispositivo debe aceptar cualquier interferencia recibida, incluyendo interferencias que puedan causar
un funcionamiento no deseado.
Aviso: Usuarios canadienses
Este aparato digital Clase B cumple con el ICES -003 Canadiense.
Remarque l'intention des utilisateurs canadiens
Cet appareil numérique de la classe B est conforme à la norme NMB-003 du Canada.
Desecho de equipos eléctricos y electrónicos por parte de usuarios en
viviendas particulares de la Unión Europea
Este símbolo en el producto o en su embalaje indica que el producto no deberá ser desechado junto con los otros residuos de
la vivienda. En cambio, es su responsabilidad deshacerse del equipo depositándolo en un punto de recolección designado
para el reciclaje de desechos eléctricos y electrónicos. La recolección por separado y el reciclaje de los desechos eléctricos y
electrónicos ayudarán a conservar los recursos naturales y a garantizar que serán reciclados de forma que se proteja la salud
humana y el medio ambiente. Para obtener más información acerca de los lugares de recolección de los desechos eléctricos y
electrónicos para su reciclaje, póngase en contacto la oficina municipal local, con el servicio de desecho de residuos
domésticos o con el negocio en donde adquirió el producto.
Mensaje de aviso para campos magnéticos
Algunos dispositivos electrónicos tales como unidades de disco duro, dispositivos USB, tabletas, portátiles,
teléfonos móviles, relojes, audífonos, altavoces, tarjetas de crédito, documentos de DNI magnéticos, etc., son
sensibles a campos magnéticos y pueden resultar dañados permanentemente o desactivarse temporalmente
si se exponen a campos magnéticos demasiado intensos. Los dispositivos electrónicos no deben colocarse
cerca o directamente en la zona magnética de la base del monitor.
Guía de instalación rápida del monitor LCD
Español
CARACTERÍSTICAS TÉCNICAS
Encuentre manuales y otros documentos sobre su producto Acer en el sitio web de asistencia oficial de Acer.
Panel LCD
Sistema de
presentación
LCD Color TFT
Tamaño 32"W (81 cm)
Tamaño de pixel 0,277 mm (H) x 0,277 mm (V)
Brillo
300 cd/m
2
(Típico)
Contraste 100000000:1 Máx (ACM)
Angulo visible 178° (H) 178° (V) (CR=10)
Tiempo de respuesta 6 ms (GTG)
Tipo de panel VA
Grabación de Interfaz analógica R, G, B
Frecuencia H 30 kHz - 80 kHz
Frecuencia V 55 - 75 Hz
Colores en pantalla 16,7 M Colores
Reloj de punto 170 MHz
Resolución máx. 2560 x 1440 @ 60 Hz
Plug And Play VESA DDCCI/DDC2B
Consumo eléctrico (a 200 nits)
Modo Activado 45W (typ.)
Modo de suspensión 0,49W (typ.)
Apagado 0,4W (typ.)
Conector de entrada
HDMI de 19 terminales (sólo modelos con entrada HDMI)
DVI-D de 24 terminales (sólo modelo de entrada dual)
DP (sólo modelos con entrada DP)
Señal de entrada de video
Señal HDMI (sólo modelos con entrada HDMI) (Opcional)
Señal digital (sólo modelo de entrada dual)
DP (sólo modelos con entrada DP) (Opcional)
Altavoz 2W x 2 (Sólo modelo con entrada de audio)(Opcional)
USB USB 3,0 x 4
Tamaño máximo de pantalla
Horizontal: 708,4 mm
Vertical: 398,5 mm
Fuente de alimentación 100-240V, 50/60 Hz
Consideraciones medioambientales
Temperatura operativa: 5°C a 35°C
Temperatura de almacenamiento: -20°C a 60°C
Humedad operativa: 10% a 85%
Dimensiones 737,9 (A) x 473,4~ 623,4 (H) x 266,5 (P) mm
Peso (P. N.) 15,3kg por Unidad (neto)
Especificación del mecanismo
Inclinación: -5° a +25° (Solo en el punto más alto se ofrecen 25 grados de reclinado para el
ángulo de elevación.)
Balanceo: +60° a -60°
Ajuste de altura: 0 mm to 150 mm
Soporte desinstalable: Soporte desinstalable con liberación de tornillo
Externa Controles:
Inteligente/Botón
Botón de Encendido
Izquierdo()/ Derecho()
MENÚ/INTRO
Automático / Salir
Botón E (Empowering)
Función
Contraste
Brillo
Enfoque
Reloj
Posición H.
Posición V.
Color (Cálido)
Color (Frío)
Temperatura de Color RGB
Idioma
Posición OSD. tiempo de espera
Configuración automática (sólo
modelo de entrada analógica)
Modo Ancho (Completo/Aspecto)
Encendido/Apagado ACM
Selección de señal de entrada (sólo
Modelo de entrada dual)
Encendido/Apagado DDCCI
Información de Pantalla
Restablecer
Salir
* Las especificaciones técnicas se encuentran sujetas a cambios sin aviso previo.
Homologaciones
ME61
UA.TR.002
Guide de démarrage rapide du moniteur LCD
Français
Guide de démarrage rapide du moniteur LCD Acer
Importantes instructions de sécurité
Veuillez lire attentivement les instructions suivantes.
1. Pour nettoyer l’écran du moniteur LCD : Assurez-vous que votre moniteur est dans la bonne norme électrique d’alimentation
CA disponible dans votre région.
• Éteignez le moniteur LCD et débranchez le cordon d’alimentation.
• Vaporisez une solution de nettoyage sans solvant sur un chiffon et essuyez doucement l’écran.
2. Ne placez pas le moniteur LCD près d’une fenêtre. L’exposition du moniteur à la pluie, l’humidité ou la lumière de soleil peut
l’endommager sérieusement.
3. N’appliquez pas de pression sur l’écran LCD. Une pression excessive peut endommager de façon permanente l’écran.
4. N’enlevez pas le couvercle et n’essayez pas de réparer l’unité vous-même. Seul un technicien agrée est habilité à effectuer des
réparations.
5. Stockez l’écran LCD dans une pièce dont la température est comprise entre -20° et 60°C (-4° et 140°F). Stocker le moniteur LCD
dans un environnement dont les températures sont hors plage, peut l’endommager de façon permanente.
6. Débranchez immédiatement votre moniteur et appelez un technicien agrée dans les situations suivantes :
• Le câble signal reliant le moniteur au PC est éraillé ou endommagé.
• Du liquide a coulé sur le moniteur LCD ou le moniteur a été exposé à la pluie.
• Le moniteur LCD ou le bâti est endommagé.
Fixation du moniteur à la base
1. Retirez le moniteur de l’emballage.
2. Fixez le moniteur le pied de la base à la base. (pour certains modèles)
3. Tournez dans le sens horaire pour verrouiller. Assurez-vous que la base est verrouillée sur le pied. (pour certains modèles)
4. Fixez la base au pied en tournant la vis à l’aide de l’onglet intégré ou une pièce de monnaie appropriée. (pour certains modèles)
Connecter votre moniteur à un ordinateur
1. Éteignez votre ordinateur et débranchez le câble d’alimentation de votre
ordinateur.
2. 2-1 Connectez le Câble HDMI (uniquement modèle entrée HDMI)
a. Assurez-vous que le moniteur et l’ordinateur soient bien éteints.
b. Branchez le câble HDMI à l’ordinateur.
2-2 Connectez le Câble numérique (Modéle Double entrée uniquement)
a. Assurez-vous que le moniteur et l’ordinateur soient bien éteints.
b. Connectez l’une des extrémités du câble DVI 24 broches sur l’arriére du
moniteur et connectez l’autre extrémité sur le port DVI de l’ordinateur.
2-3 Connectez le Câble DP (uniquement modèle entrée DP)
a. Assurez-vous que le moniteur et l’ordinateur soient bien éteints.
b. Branchez le câble DP à l’ordinateur.
3. Branchez le câble audio (Modèle avec une entrée audio seulement) (Optionnel).
4. Insérez le câble d’alimentation du moniteur dans le port alimentation, à l’arrière
du moniteur.
5. Branchez les cordons d’alimentation de votre ordinateur et de votre moniteur
dans la prise de courant la plus proche.
6. Sélectionnez charge USB hors tension ACT/DÉS pour activer/désactiver la fonction de charge USB hors tension.
Commande externe
Icône Élément Description
1, 2
Bouton/Témoin
d’alimentation
Pour allumer ou éteindre le moniteur.
Bleu indique qu’il est allumé. Orange indique qu’il est en mode veille/économie
d’énergie.
3, 4
Moins/Plus
Si le menu OSD est actif, appuyez le bouton Moins ou Plus pour basculer entre les
options du menu OSD.
5
Fonctions OSD
Appuyez pour afficher le menu OSD. Appuyez à nouveau pour entrer une sélection
dans le menu OSD.
6
Bouton de réglage
automatique/Quitter
Si le menu OSD est actif, appuyez Auto pour quitter le menu OSD. Lorsque le menu
OSD est inactif, appuyez Auto et le moniteur optimisera automatiquement la
position de l’affichage, la mise au point et l’horloge de votre affichage.
7
Touche Empowering
Appuyez la « touche Empowering » pour ouvrir le menu OSD de Acer eColor
Management et accéder aux modes de scénario.
POWER
AUDIO IN DP DVI-D IN HDMI HDMI
DP
DVI
HDMI
AUDIO IN DP
HDMI
DVI-D IN
/
Guide de démarrage rapide du moniteur LCD
Français
Réglementations et avis de sécurité
Avis FCC
Cet appareil a fait l’objet de tests et répond aux limites prévues pour un appareil numérique de classe B conformément à la Partie
B des réglementations FCC. Ces limites ont été définies de façon à garantir une protection raisonnable contre les interférences
nocives dans une installation résidentielle. Cet appareil génère, utilise et peut émettre une énergie de radiofréquence. Si son
installation et son utilisation ne sont pas conformes aux instructions, il peut générer des interférences nocives pour les
communications radio.
L’absence d’interférence dans une installation particulière n’est cependant pas garantie. Si cet appareil génère une interférence
gênante pour la réception de radiocommunications ou d’ondes télévisées, ce qu’il est possible de déterminer en mettant hors
tension puis à nouveau sous tension l’appareil, l’utilisateur est encouragé à corriger l’interférence en appliquant une ou plusieurs
des mesures suivantes :
Réorienter ou déplacer l’antenne de réception.
Éloigner l’appareil du récepteur.
Brancher l’appareil à une prise appartenant à un circuit différent de celui où est branché le récepteur.
Consulter le fournisseur ou un technicien spécialisé en radio émission et en télévision pour obtenir de l’aide.
Déclaration de conformité CE
Par la présente, Acer Inc. déclare que cet écran LDC est conforme aux principales exigences et autresdispositions pertinentes de la
Directive CEM 2004/108/CE ; de la Directive Basse tension 2006/95/CE, de la Directive RoHS 2011/65/EU et la Directive 2009/125/CE
établissant un cadre pour la fixation d’exigences en matiére d’écoconception applicables aux produits liés à l’energie.
Avis : câbles blindés
Pour répondre aux réglementations CEM, tous les branchements avec d’autres appareils informatiques doivent être réalisés avec
des câbles blindés.
Avis : appareils périphériques
Seuls les périphériques (appareils d’entrée/de sortie, terminaux, imprimantes, etc.) certifiés conformes aux limites de la Classe B,
peuvent être branchés à cet équipement. L’utilisation de périphériques non certifiés peut générer des interférences sur la
réception des radiocommunications et des ondes télévisées.
Attention
Toute modification n’ayant pas fait l’objet d’une autorisation explicite du fabricant, annihile l’autorité de l’utilisateur, accordée
par la Commission Fédérale des Communications, à faire fonctionner ce produit.
Conditions de fonctionnement
Cet appareil est conforme à la Partie 15 des Réglementations FCC. Son fonctionnement est soumis aux deux conditions suivantes :
(1) cet appareil ne doit pas générer d’interférences nocives, et (2) cet appareil doit accepter les interférences reçues, y compris les
interférences qui pourraient provoquer un fonctionnement non désiré.
Avis : utilisateurs canadiens
Cet appareil numérique de classe B est conforme à la norme ICES-003 du Canada.
Remarque l'intention des utilisateurs canadiens
Cet appareil numérique de la classe B est conforme à la norme NMB-003 du Canada.
Élimination des appareils mis au rebut par les ménages dans l’Union
européenne
Le symbole apposé sur ce produit ou sur son emballage indique que ce produit ne doit pas être jeté avec les
déchets ménagers ordinaires. Il est de votre responsabilité de mettre au rebut vos appareils en les déposant dans
les centres de collecte publique désignés pour le recyclage des équipements électriques et électroniques. La
collecte et le recyclage de vos appareils mis au rebut indépendamment du reste des déchets contribue à la
préservation des ressources naturelles et garantit que ces appareils seront recyclés dans le respect de la santé
humaine et de l’environnement. Pour obtenir plus d’informations sur les centres de collecte et de recyclage des
appareils mis au rebut, veuillez contacter les autorités locales de votre région, les services de collecte des ordures
ménagères ou le magasin dans lequel vous avez acheté ce produit.
Message d’avertissement pour l’aimant
Certains appareils électroniques comme les disques durs, périphériques USB, ordinateurs tablettes,
ordinateurs portables, téléphones portables, montres, écouteurs, haut-parleurs, cartes de crédit,
cartes d’identité magnétiques, etc., sont sensibles aux champs magnétiques et peuvent être
endommagés de façon permanente ou temporairement désactivés s’ils sont exposés à un champ
magnétique qui est trop fort. Les appareils électroniques ne doivent pas être mis à proximité ou
directement sur la surface magnétique de la base du moniteur.
Guide de démarrage rapide du moniteur LCD
Français
SPÉCIFICATIONS
Trouvez les manuels et autres documents pour votre produit Acer sur le site Web de support officiel Acer.
Écran LCD
Système
d'entraînement
LCD couleur TFT
Taille 32"W (81 cm)
Pas de masque 0,277 mm (H) x 0,277 mm (V)
Luminosité
300 cd/m
2
(Type)
Contraste 100000000:1 Max (ACM)
Angle de vue 178° (H) 178° (V) (CR=10)
Temps de réponse 6 ms (GTG)
Type de panneau VA
Vidéo Interface analogique R, V, B
Fréquence
horizontale
30 kHz - 80 kHz
Fréquence verticale 55 - 75 Hz
Couleurs affichées 16,7 M couleurs
Fréquence de balayage 170 MHz
Résolution maximale 2560 x 1440 @ 60 Hz
Plug & Play VESA DDCCI/DDC2B
Consommation d'énergie (à 200
cd/m
2
)
Mode Activé 45W (typ.)
Mode veille 0,49W (typ.)
Mode Désactivé 0,4W (typ.)
Connecteur d'entrée
HDMI 19 broches (uniquement modèle entrée HDMI)
DVI-D 24 broches (Uniquement sur le modèle à double entrée)
DP (uniquement modèle entrée DP)
Signal vidéo d'entrée
HDMI signal (uniquement modèle entrée HDMI) (Optionnel)
Signal numérique (uniquement sur le modèle à double entrée)
DP (uniquement modèle entrée DP) (Optionnel)
Haut-parleurs 2W x 2 (Modèle avec une entrée audio seulement)(Optionnel)
USB USB 3,0 x 4
Taille maximale de l'écran
Horizontalement : 708,4 mm
Verticalement : 398,5 mm
Source d'alimentation 100-240V, 50 / 60 Hz
Environnement
Température de fonctionnement : 5°C à 35°C
Température de stockage : -20°C à 60°C
Humidité en fonctionnement : 10% à 85%
Dimensions 737,9 (L) x 473,4~ 623,4 (H) x 266,5 (P) mm
Poids (poids net) 15,3 kg l’nuité (net)
Spécifications de Mécanisme
Pente : -5° à +25° (L’inclinaison de 25 degrés ne peut être offerte qu’au plus haut point
pour l’angle d’élévation.)
Faire pivoter : +60° à -6
Éminence réglage : 0 mm à 150 mm
Détachable pied étre situé : Pied détachable avec vis de libération
Extérieur Commandes:
Commutateur/
Bouton
Bouton d'alimentation
Gauche () /Droite ()
MENU/ENTRER
Auto/Quitter
Touche E (Empowering)
Fonction
Contraste
Luminosité
Mise au point
Horloge
Position H
Position V
(Chaud) Couleur
(Froid) Couleur
Temp. couleurs RVB
Langue
Position, durée de l'OSD
Configuration auto (seulement
pour le modèle avec une entrée
analoglque)
Mode Large (Plein/Aspect)
ACM Activé/Désactivé
Sélection du signal d'entrée (seulement
pour le modèle avec deux entrées)
DDCCI Activé/Désactivé
Affichage des informations
Réinitialiser
Quitter
* Ces spécifications peuvent être modifiées sans préavis.
Conformité réglementaire
ME61
UA.TR.002
Жидкокристаллический монитор - Краткое руководство
Русский
Краткое руководство пользователя ЖК-монитора Acer
Важные инструкции по технике безопасности
Внимательно прочтите настоящие инструкции.
1. Очистка экрана ЖК-монитора: Убедитесь в том. что напряжение питания монитора соответствует параметрам сети
переменного тока вашего региона.
Выключите ЖК-монитор и отсоедините кабель питания.
Распылите нерастворяющий чистящий раствор на ткань и аккуратно очистите экран.
2. Не устанавливайте ЖК-монитор рядом с окном. Воздействие дождя, влаги
и прямых солнечных лучей может серьезно
повредить монитор.
3. Не надавливайте на ЖК-экран. Избыточное давление может вызвать неустранимое повреждение дисплея.
4. Запрещается снимать крышку и самостоятельно выполнять техническое обслуживание и ремонт данного прибора. Любое
техническое обслуживание должен выполнять специалист авторизованного сервисного центра.
5. Хранить ЖК-монитор следует в помещении с температурой от -20° до 60° C (от -4° до 140° F). Хранение ЖК-монитора при
температурах за пределами этого диапазона может вызвать его неустранимое повреждение.
6. Незамедлительно отключите монитор от электрической сети и вызовите специалиста авторизованного сервисного центра
при любом из перечисленных ниже обстоятельств.
Сигнальный кабель от монитора к компьютеру изношен или поврежден.
На ЖК-монитор была пролита жидкость, или монитор подвергся воздействию дождя.
ЖК-монитор или его корпус поврежден.
Установка монитора на основание
1. Извлеките монитор из упаковки.
2. Прикрепите опорную подставку к основанию. (для определенных моделей)
3. Для фиксации поверните по часовой стрелке. Убедитесь, что подставка зафиксирована в основании. (для определенных
моделей)
4. Закрепите подставку в основании, завернув винт прилагаемой пластинкой или подходящей монетой. (для определенных
моделей)
Подключение монитора к компьютеру
1. Выключите компьютер и отсоедините от него шнур питания.
2. 2-1 Подсоедините кабеля HDMI (только моделей с входом HDMI)
a. Убедитесь в том, что и монитор, и компьютер отключены от сети.
b. Подключите кабель HDMI ко компьютеру.
2-2 Подсоедините кабеля DVI (модель с двумя входами)
a. Убедитесь в том, что и монитор, и компьютер отключены от сети.
b. Подключите один конец 24-контактного кабеля DVI к задней
панели монитора, а второй конец кабеля - к порту DVI
компьютера.
2-3 Подсоедините кабеля DP (только моделей с входом DP)
a. Убедитесь в том, что и монитор, и компьютер отключены от сети.
b. Подключите кабель DP ко компьютеру.
3. Подключите аудиокабель (Только модель с аудиовходом) (опция)
4. Подсоедините кабель питания монитора к гнезду питания на задней
панели монитора.
5. Подключите кабели питания компьютера и монитора к ближайшей
электрической розетке.
6. Для параметра "Зарядка по USB при выключенном питании" выберите значение ВКЛ./ОТКЛ., чтобы активировать/отключить
функцию зарядки по USB при выключенном питании.
Внешнее управление
No. Значок Элемент Описание
1, 2
Сетевая кнопка/Сетевой
индикатор
Нажмите эту кнопку, чтобы включить или выключить сетевое питание.
Загорается, указывая включение питания.
3, 4
Минус/Плюс
Если экранное меню активно, то для переключения пунктов экранного
меню нажимайте кнопку минус или плюс.
5
Функции экранного меню Нажмите эту кнопку для отображения экранного меню.
6
Кнопка автоматической
настройки / Выход
При отображении экранного меню нажмите кнопку «Auto» для выхода
из экранного меню. При неактивном экранного меню нажмите кнопку
«Auto», и монитор автоматически выберет оптимальные настройки
положения изображения, фокусировки и частоты для дисплея.
7
Включение
При отключенном экранном меню нажмите эту кнопку для выбора
режима сценария.
POWER
AUDIO IN DP DVI-D IN HDMI HDMI
DP
DVI
HDMI
AUDIO IN DP
HDMI
DVI-D IN
/
Жидкокристаллический монитор - Краткое руководство
Русский
Технические характеристики
Загрузить руководства и другие документы для вашего продукта Acer можно с официального веб-сайта
поддержки компании Acer.
ЖК-панель
Управляющая
система
Цветной ЖК-дисплей на тонкопленочных транзисторах (TFT)
Размер 32"W (81 cm)
Размер пиксела 0,277 (по горизонтали) x 0,277 (по вертикали) мм
Яркость
300 кд/м
2
(типовая)
Контрастность 100000000:1 Максимум (ACM)
Угол обзора 178° (по горизонтали) 178° (по вертикали) (CR=10)
Время отклика 6 мс (GTG)
Тип панели VA
Видео Аналоговый интерфейс R, G, B
Частота строчной
развертки
30 - 80 кГц
Частота кадровой
развертки
55 - 75 Гц
Число отображаемых цветов 16,7 миллионов
Полоса пропускания 170 МГц
Максимальное разрешение 2560 x 1440 при частоте кадров 60 Гц
Plug & Play VESA DDCCI/DDC2B
Потребляемая мощность (при
яркости 200 нит)
Режим Вкл.45W (typ.)
Спящий режим 0,49W (typ.)
Режим отключения 0,4W (typ.)
Входной разъем
19-контактный HDMI (только моделей с входом HDMI)
24-контактный DVI-D (только модели c двумя входами)
DP (только моделей с входом DP)
Входной видеосигнал
Сигнал HDMI (только моделей с входом HDMI)(опция)
Цифровой сигнал (только модели c двумя входами)
DP (только моделей с входом DP)(опция)
Громкоговорители 2W x 2 (Т олько модель с аудиовходом) (опция)
USB USB 3,0 x 4
Видимая область экрана
Ширина: 708,4 мм
Высота: 398,5 мм
Источник питания 100-240V, 50/60
Гц
Условия окружающей среды
Температура эксплуатации: от 5 до 35°С
Температура хранения: от -20 до 60°С
Относительная влажность эксплуатации: 10 - 85%
Габариты 737,9 x 473,4~ 623,4 x 266,5 мм (Ш х В х Г)
Bec (вес нетто) 15,3 кг (прибор, нетто)
Характеристики механизма
Наклон: -5° до +25° ( Максимальный допустимый угол наклона составляет 25 градусов.)
Поворот: +60° до -60°
Регулировка высоты: 0 мм до 150 мм
Съемная подставка: Съемная подставка с
фиксирующим винтом
Внешние органы управления:
Переключатель/
Выключатель
Кнопка Power (Питание)
Влево()/Вправо()
MENU/ENTER
Auto/Exit (Авто/Выход)
Клавиша доступа (Empowering)
Функция
Контрастность
Яркость
Фокусировка
Часы
Положение по горизонтали
Положение по вертикали
(Теплый) цвет
(Холодный) цвет
Цветовая температура RGB
Язык
Время отключения экранного меню
Автоконфигурация (только
для модели c аналоговым входом)
Широкоэкранный режим ( Полный/Формат)
Вкл. /Выкл. АСМ (
автоподстройка
контраста)
Выбор входного сигнала (только
для модели с двумя входами)
Вкл. /Выкл. DDCCI
Сведения o дисплее
Сброс
Выход
* Технические характеристики могут изменяться без уведомления.
Соответствие нормативным требованиям
ME61
UA.TR.002
LCD    
ةيبرعلا
Acer LCD    


LCD 1
LCD


LCD 2

LCD 3


 4
LCD140-460-20LCD 5


 6

LCD
LCD
  
 1
 2
 3
 4
   
 1
HDMIHDMI 2-1  2
a
HDMIb
 2-2
a
b

DPDP 2-3
a
DPb
 3
 4
 5
USBUSB 6
POWER
AUDIO IN DP DVI-D IN HDMI HDMI
DP
DVI
HDMI
AUDIO IN DP
HDMI
DVI-D IN
 

21


43
/
OSDOSD
5
OSDOSDOSD
6

OSDOSDOSD


7

LCD    
ةيبرعلا
  
FCC
FCC15










CE
LCDAcer



EMC







2115













Magnet
USB



LCD    
ةيبرعلا

LCDTFTLCD
32


2
300
ACM
CR=10
GTG6
VA
BGR
30
7555

170


20045


HDMI19 HDMI
24DVI-D
DPDP

HDMIHDMI

DPDP
22
USB


240-100


%10


25

1500


tu


E








RGB

OSD


ACM

DDCCI





ME61
UA.TR.002
AcerAcer
MU.T0T00.001
4J.2DH01.001
LCD monitor
B326HUL
LCD Monitor Quick Setup Guide
English
Acer LCD Monitor Quick Start Guide (QSG)
Important safety instructions
Please read the following instructions carefully.
1. To clean the LCD monitor screen: Be sure that your monitor is electrically rated to operate with the AC power available in your
location.
• Turn off the LCD monitor and unplug the power cord.
• Spray a non-solvent cleaning solution onto a rag and clean the screen gently.
2. Do not place the LCD monitor near a window. Exposing the monitor to rain, moisture or sunlight can severely damage it.
3. Do not apply pressure to the LCD screen. Excessive pressure may cause permanent damage to the display.
4. Do not remove the cover or attempt to service this unit yourself. An authorized technician should perform servicing of any
nature.
5. Store the LCD monitor in a room with a temperature of -20° to 60° C (-4° to140° F). Storing the LCD monitor outside this range
may result in permanent damage.
6. Immediately unplug your monitor and call an authorized technician if any of the following circumstances occur:
• Monitor-to-PC signal cable is frayed or damaged.
• Liquid spills onto the LCD monitor or the monitor is exposed to rain.
• The LCD monitor or case is damaged.
Attaching the monitor to the base
1. Remove the monitor from the packaging.
2. Attach the footstand to the base. (for selected models)
3. Turn clockwise to lock. Ensure that the base in locked onto the stand. (for selected models)
4. Secure the base to the stand by turning the screw using the intergrated tab or a suitable coin. (for selected models)
Connecting Your Monitor to a Computer
1. Turn off your monitor and unplug your computer’s power cord.
2. 2-1 Connect HDMI Cable (Only HDMI-input model)
a. Make sure both the monitor and computer are powered-OFF.
b. Connect the HDMI cable to the computer.
2-2 Connect Digital Cable (Only Dual-input model)
a. Make sure both the monitor and computer are powered-OFF.
b. Connect one end of the 24-pin DVI cable to the back of the
monitor and connect the other end to the computer's port.
2-3 Connect DP Cable (Only DP-input model)
a. Make sure both the monitor and computer are powered-OFF.
b. Connect the DP cable to the computer.
3. Connect the Audio Cable. (Only Audio-Input Model) (Optional)
4. Insert the monitor power cable into the power port at the back of the
monitor.
5. Plug the power cords of your computer and your monitor into a
nearby electrical outlet.
6. Select Power-off USB charge ON/OFF to enable/disable Power-off USB
charge function.
External Controls
No. Icon Item Description
1, 2
Power button/
indicator
Turns the monitor on/off.
Blue indicates power on. Amber indicates standby/power saving mode.
3, 4 Minus / plus
If the OSD is active, press the Minus or Plus button to toggle between the
OSD options.
5 OSD functions Press to view the OSD. Press again to enter a selection in the OSD.
6
Auto adjust
button / exit
If the OSD is active, press Auto to exit the OSD. Once the OSD is inactive,
press Auto and the monitor will automatically optimize the display position,
focus, and clock of your display.
7 Empowering key
Press the Empowering Key to open the Acer eColor Management OSD and
access the scenario modes.
POWER
AUDIO IN DP DVI-D IN HDMI HDMI
DP
DVI
HDMI
AUDIO IN DP
HDMI
DVI-D IN
/
LCD Monitor Quick Setup Guide
English
Regulations and safety notices
FCC notice
This device has been tested and found to comply with the limits for a Class B digital device pursuant to Part 15
of the FCC rules. These limits are designed to provide reasonable protection against harmful interference in a
residential installation. This device generates, uses, and can radiate radio frequency energy and, if not installed
and used in accordance with the instructions, may cause harmful interference to radio communications.
However, there is no guarantee that interference will not occur in a particular installation. If this device does
cause harmful interference to radio or television reception, which can be determined by turning the device off
and on, the user is encouraged to try to correct the interference by one or more of the following measures:
Reorient or relocate the receiving antenna.
Increase the separation between the device and receiver.
Connect the device into an outlet on a circuit different from that to which the receiver is connected.
Consult the dealer or an experienced radio/television technician for help.
CE declaration of Conformity
Hereby, Acer Inc., declares that this LCD monitor is in compliance with the essential requirements and other
relevant provisions of EMC Directive 2004/108/EC, Low Voltage Directive 2006/95/EC, and RoHS Directive 2011/
65/EU and Directive 2009/125/EC with regard to establishing a framework for the setting of ecodesign
requirements for energy-related product.
Notice: Shielded cables
All connections to other computing devices must be made using shielded cables to maintain compliance with
EMC regulations.
Notice: Peripheral devices
Only peripherals (input/output devices, terminals, printers, etc.) certified to comply with the Class B limits may
be attached to this equipment. Operation with non-certified peripherals is likely to result in interference to
radio and TV reception.
Caution
Changes or modifications not expressly approved by the manufacturer could void the user authority, which is
granted by the Federal Communications Commission, to operate this product.
Operation conditions
This device complies with Part 15 of the FCC Rules. Operation is subject to the following two conditions: (1) this
device may not cause harmful interference, and (2) this device must accept any interference received, including
interference that may cause undesired operation.
Notice: Canadian users
This Class B digital apparatus complies with Canadian ICES-003.
Remarque à l'intention des utilisateurs canadiens
Cet appareil numérique de la classe B est conforme a la norme NMB-003 du Canada.
Disposal of Waste Equipment by Users in Private Household in the European Union
This symbol on the product or on its packaging indicates that this product must not be disposed of
with your other household waste. Instead, it is your responsibility to dispose of your waste
equipment by handing it over to a designated collection point for the recycling of waste electrical
and electronic equipment. The separate collection and recycling of your waste equipment at the
time of disposal will help to conserve natural resources and ensure that it is recycled in a manner
that protects human health and the environment. For more information about where you can
drop off your waste equipment for recycling, please contact your local city office, your household
waste disposal service or the shop where you purchased the product.
Warning Message for Magnet
Certain electronic devices such as hard drives, USB devices, tablet computers,laptops,
cellphones, watches, earphones, speakers, credit cards, magnetic ID cards, etc. are
sensitive to magnetic fields and may be damaged permanently or temporarily
disabled if exposed to a magnetic field that is too strong. Electronic devices should
not be put close to or directly on the magnetic area of monitor base.
LCD Monitor Quick Setup Guide
English
SPECIFICATION
Find manuals and other documents for your Acer product on the official Acer support website.
LCD Panel Driving system TFT Color LCD
Size 32”W (81 cm)
Pixel pitch 0.277 mm (H) x 0.277 mm (V)
Brightness
300 cd/m
2
(Typical)
Contrast 100000000:1 Max (ACM)
Viewable angle 178° (H) 178° (V) (CR=10)
Response time 6 ms (GTG)
Panel Type VA
Video R,G, B Analog Interface
H-Frequency 30 kHz - 80 kHz
V-Frequency 55 - 75 Hz
Display Colors 16.7M Colors
Dot Clock 170 MHz
Max. Resolution 2560 x 1440 @ 60 Hz
Plug & Play VESA DDCCI/DDC2B
Power consumption (at 200 nits) On Mode 45W (typ.)
Sleep Mode 0.49W (typ.)
Off Mode 0.4W (typ.)
Input Connector HDMI 19 pin (Only HDMI-Input Model)
DVI-D 24 pin (Only Dual-Input Model)
DP (Only DP-Input Model)
Input Video Signal HDMI signal (Only HDMI-Input Model)(Optional)
Digital signal (Only Dual-Input Model)
DP (Only DP-Input Model)(Optional)
Speakers 2W x 2 (Only Audio-Input Model)(Optional)
USB USB 3.0 x 4
Maximum Screen Size Horizontal: 708.4 mm
Vertical: 398.5 mm
Power Source 100-240V, 50/60 Hz
Environmental Considerations Operating Temp: 5° to 35°C
Storage Temp: -20° to 60°C
Operating Humidity: 10% to 85%
Dimensions 737.9 (W) x 473.4~ 623.4 (H) x 266.5 (D) mm
Weight (N. W.) 15.3 kg Unit (net)
Mechanism spec Tilt: -5° to +25° (Only at the highest point can 25 degrees of recline be offered for
the angle of elevation.)
Swivel: -60° to +60°
Height adjustment: 0 mm to 150 mm
Detachable foot stand: Yes (Detachable foot stand with screw release)
External Controls: Switch / Buttons Power Button
Left() /Right()
MENU/ENTER
Auto/ Exit
E(Empowering) Key
Functions Contrast
Brightness
Focus
Clock
H. Position
V. Position
(Warm) Color
(Cool) Color
RGB Color temperature
Language
OSD position. timeout
Auto configuration (only
Analog input model)
Wide mode (Full/Aspect)
ACM On/Off
Input signal Selection (only
Dual input model)
DDCCI On/Off
Display information
Reset
Exit
* All specifications are subject to change without notice.
Regulatory Compliance
ME61
UA.TR.002
Acer America Corporation
333 West San Carlos St., San Jose
Suite 1500
CA 95110, U. S. A.
Tel : 254-298-4000
Fax : 254-298-4147
www.acer.com
Federal Communications Commission
Declaration of Conformity
This device complies with Part 15 of the FCC Rules. Operation is subject to the following two conditions:
(1) this device may not cause harmful interference, and (2) this device must accept any interference received,
including interference that may cause undesired operation.
The following local Manufacturer /Importer is responsible for this declaration:
MU.T0T00.003
4J.2DH01.021
Product: LCD Monitor
Model Number: B326HUL
SKU Number: B326HUL xxxxxx
(“x” = 0~9, a ~ z, or A ~ Z)
Name of Responsible Party: Acer America Corporation
Address of Responsible Party:
333 West San Carlos St.
Suite 1500
San Jose, CA 95110
U. S. A.
Contact Person: Acer Representative
Phone No.: 254-298-4000
Fax No.: 254-298-4147
Guía de instalación rápida del monitor LCD
Español
Guía de inicio rápido (QSG) del Monitor Acer LCD
Instrucciones importantes de seguridad
Lea detenidamente estas instrucciones de seguridad.
1. Para limpiar la pantalla del monitor LCD: Asegúrese de que el voltaje del monitor sea el adecuado para funcionar con la alimentación CA
disponible en su ubicación.
• Apague el monitor y desconecte el cable prolongador.
• Pulverice una solución de limpieza no disolvente sobre un paño y limpie suavemente la pantalla.
2. No coloque el monitor LCD cerca de una ventana. Exponer el monitor a la lluvia, la humedad o la luz solar directa podría dañarlo severa-
mente.
3. No aplique presión sobre la superficie del monitor LCD. Una presión excesiva podría causar daños permanentes sobre la pantalla.
4. No retire la cubierta ni intente reparar el monitor personalmente. Las reparaciones de cualquier naturaleza deberán ser realizadas por un
técnico autorizado.
5. Conserve el monitor LCD en una sala con una temperatura de -20º a 60ºC (-4º a 140ºF). Conservar el monitor LCD a temperaturas que
excedan estos límites podría provocar daños permanentes.
6. Desconecte inmediatamente su monitor y llame a un técnico autorizado si concurre cualquiera de las siguientes circunstancias:
• El cable de señal del monitor al PC está quemado o dañado.
• Se ha derramado líquido en el monitor LCD o el monitor se ha expuesto a la lluvia.
• El monitor LCD o su carcasa están dañados.
Colocar el monitor sobre la base
1. Saque el monitor del embalaje.
2. Acople el soporte de pie a la base. (para modelos seleccionados)
3. Gire en la dirección de las agujas del reloj para bloquear. Asegúrese de que la base está fijada en el soporte. (para modelos seleccionados)
4. Fije la base al soporte girando el tornillo con ayuda de la ficha integrada o con una moneda adecuada. (para modelos seleccionados)
Conexión del monitor con una computadora
1. Apague el monitor y desenchufe el cable de alimentación del ordenador.
2. 2-1 Cable HDMI (sólo modelos con entrada HDMI)
a. Asegúrese de que tanto el monitor como la computadora estén
apagado.
b. Conecte el cable HDMI al equipo.
2-2 Cable Digital (Sólo en modelos con entrada dual)
a. Asegúrese de que tanto el monitor como la computadora estén
apagado.
b. Conecte un extremo del cable DVI de 24 contanctos a la parte trasera
del monitor y conecte el otro extremo al puerto DVI del equipo.
2-3 Cable DP (sólo modelos con entrada DP)
a. Asegúrese de que tanto el monitor como la computadora estén
apagado.
b. Conecte el cable DP al equipo.
3. Conecte el cable de audio (Sólo modelo con entrada de audio) (Opcional)
4. Inserte el cable de alimentación del monitor en el puerto de alimentación
situado en la parte trasera del monitor.
5. Conecte los cables de alimentación de su equipo y su monitor a una toma
eléctrica cercana.
6. Seleccione Power-off USB charge ON/OFF (Apagar carga USB activada/desactivada) para activar/desactivar esta función.
External Controls
Icono Elemento Descripción
1, 2
Interruptor de
alimentación/Indicador
LED de alimentación
Para encender o apagar el monitor.
Se enciende cuando el interruptor de alimentación está encendido.
3, 4 Menos/Más
Si la visualización en pantalla está activa, pulse los botones Menos o
Más para alternar las diferentes opciones de visualización en pantalla.
5
Funciones de
visualización en pantalla
Pulse este botón para activar el menú OSD.
6 Ajuste automático / Salir
Si el menú OSD está activo, pulse Auto para salir de él. Una vez inactivo
el menú OSD, pulse el botón Auto para que el monitor optimice
automáticamente la posición de la pantalla, el enfoque y el reloj de su
pantalla.
7 Empowering (Encender)
Cuando el menú OSD está apagado, pulse este botón para abrir el OSD
Acer eColor Management y acceder a los modos de escenario.
POWER
AUDIO IN DP DVI-D IN HDMI HDMI
DP
DVI
HDMI
AUDIO IN DP
HDMI
DVI-D IN
/
Guía de instalación rápida del monitor LCD
Español
Avisos de Seguridad y Mantenimiento
Aviso FCC
Este equipo ha sido probado y se considera que cumple con los límites para un dispositivo digital de Clase B, según la sección 15 de las
Normativas FCC. Estos límites están diseñados para proporcionar una protección adecuada contra interferencias dañinas en una instalación
residencial. Este equipo genera, usa y puede irradiar energía con frecuencias de radio y, si no se instala y usa de acuerdo con las instrucciones,
puede causar interferencias dañinas para las comunicaciones de radio.
Sin embargo, no hay ninguna garantía de que estas interferencias no ocurran en una instalación particular. Si este equipo causa interferencias
en la recepción de radio o telev isión, lo que puede determinarse encendiendo y apagando el dispositivo, se anima al usuario a intentar
corregir las interferencias mediante uno o más de los siguientes métodos.
Reoriente o recoloque la antena receptora.
Aumente la distancia entre el equipo y el receptor.
Conecte el equipo a una toma de corriente de un circuito diferente del circuito al que está conectado el receptor.
Consulte con su vendedor o con un técnico de radio/TV ex perimentado para recibir ayuda.
Declaración de Conformidad CE
Por la presente, Acer Inc. declara que este monitor LCD satisface los requisitos fundamentales y demás disposiciones relacionadas de la
Directiva EMC 2004/108/EC, la Directiva de baja tensión 2006/95/EC, la Directiva RoHS 2011/65/EU y la Directiva 2009/125/EC sobre la
instauración de un marco para el establecimiento de requisitos de diseño ecológico aplicables a los productos relacionados con la energía.
Aviso: Cables blindados
Todas las conexiones a otros dispositivos informáticos deben realiz arse mediante cables blindados para mantener el cumplimiento de las
normativas EMC.
Aviso: Dispositivos Periféricos
Sólo pueden conectarse a este equipo los periféricos (de entrada/salida, terminales, impresoras, etc) con certificación de cumplimiento con los
límites de Clase B. Es probable que el uso de periféricos no certificados resulte en interferencias en la recepción de radio y TV.
Precaución
Los cambios o modificaciones que no hayan sido aprobados ex presamente por el fabricante podrían invalidar la autoridad del usuario para
usar este producto. Esto está aprobado por la Comisión Federal de Comunicaciones.
Condiciones de uso
Este dispositivo cumple con la Sección 15 de las Normas FCC. Su uso está sujeto a las siguientes dos condiciones. (1) Este dispositivo no debe
causar interferencias dañinas, y (2) este dispositivo debe aceptar cualquier interferencia recibida, incluyendo interferencias que puedan causar
un funcionamiento no deseado.
Aviso: Usuarios canadienses
Este aparato digital Clase B cumple con el ICES -003 Canadiense.
Remarque l'intention des utilisateurs canadiens
Cet appareil numérique de la classe B est conforme à la norme NMB-003 du Canada.
Desecho de equipos eléctricos y electrónicos por parte de usuarios en
viviendas particulares de la Unión Europea
Este símbolo en el producto o en su embalaje indica que el producto no deberá ser desechado junto con los otros residuos de
la vivienda. En cambio, es su responsabilidad deshacerse del equipo depositándolo en un punto de recolección designado
para el reciclaje de desechos eléctricos y electrónicos. La recolección por separado y el reciclaje de los desechos eléctricos y
electrónicos ayudarán a conservar los recursos naturales y a garantizar que serán reciclados de forma que se proteja la salud
humana y el medio ambiente. Para obtener más información acerca de los lugares de recolección de los desechos eléctricos y
electrónicos para su reciclaje, póngase en contacto la oficina municipal local, con el servicio de desecho de residuos
domésticos o con el negocio en donde adquirió el producto.
Mensaje de aviso para campos magnéticos
Algunos dispositivos electrónicos tales como unidades de disco duro, dispositivos USB, tabletas, portátiles,
teléfonos móviles, relojes, audífonos, altavoces, tarjetas de crédito, documentos de DNI magnéticos, etc., son
sensibles a campos magnéticos y pueden resultar dañados permanentemente o desactivarse temporalmente
si se exponen a campos magnéticos demasiado intensos. Los dispositivos electrónicos no deben colocarse
cerca o directamente en la zona magnética de la base del monitor.
Guía de instalación rápida del monitor LCD
Español
CARACTERÍSTICAS TÉCNICAS
Encuentre manuales y otros documentos sobre su producto Acer en el sitio web de asistencia oficial de Acer.
Panel LCD
Sistema de
presentación
LCD Color TFT
Tamaño 32"W (81 cm)
Tamaño de pixel 0,277 mm (H) x 0,277 mm (V)
Brillo
300 cd/m
2
(Típico)
Contraste 100000000:1 Máx (ACM)
Angulo visible 178° (H) 178° (V) (CR=10)
Tiempo de respuesta 6 ms (GTG)
Tipo de panel VA
Grabación de Interfaz analógica R, G, B
Frecuencia H 30 kHz - 80 kHz
Frecuencia V 55 - 75 Hz
Colores en pantalla 16,7 M Colores
Reloj de punto 170 MHz
Resolución máx. 2560 x 1440 @ 60 Hz
Plug And Play VESA DDCCI/DDC2B
Consumo eléctrico (a 200 nits)
Modo Activado 45W (typ.)
Modo de suspensión 0,49W (typ.)
Apagado 0,4W (typ.)
Conector de entrada
HDMI de 19 terminales (sólo modelos con entrada HDMI)
DVI-D de 24 terminales (sólo modelo de entrada dual)
DP (sólo modelos con entrada DP)
Señal de entrada de video
Señal HDMI (sólo modelos con entrada HDMI) (Opcional)
Señal digital (sólo modelo de entrada dual)
DP (sólo modelos con entrada DP) (Opcional)
Altavoz 2W x 2 (Sólo modelo con entrada de audio)(Opcional)
USB USB 3,0 x 4
Tamaño máximo de pantalla
Horizontal: 708,4 mm
Vertical: 398,5 mm
Fuente de alimentación 100-240V, 50/60 Hz
Consideraciones medioambientales
Temperatura operativa: 5°C a 35°C
Temperatura de almacenamiento: -20°C a 60°C
Humedad operativa: 10% a 85%
Dimensiones 737,9 (A) x 473,4~ 623,4 (H) x 266,5 (P) mm
Peso (P. N.) 15,3kg por Unidad (neto)
Especificación del mecanismo
Inclinación: -5° a +25° (Solo en el punto más alto se ofrecen 25 grados de reclinado para el
ángulo de elevación.)
Balanceo: +60° a -60°
Ajuste de altura: 0 mm to 150 mm
Soporte desinstalable: Soporte desinstalable con liberación de tornillo
Externa Controles:
Inteligente/Botón
Botón de Encendido
Izquierdo()/ Derecho()
MENÚ/INTRO
Automático / Salir
Botón E (Empowering)
Función
Contraste
Brillo
Enfoque
Reloj
Posición H.
Posición V.
Color (Cálido)
Color (Frío)
Temperatura de Color RGB
Idioma
Posición OSD. tiempo de espera
Configuración automática (sólo
modelo de entrada analógica)
Modo Ancho (Completo/Aspecto)
Encendido/Apagado ACM
Selección de señal de entrada (sólo
Modelo de entrada dual)
Encendido/Apagado DDCCI
Información de Pantalla
Restablecer
Salir
* Las especificaciones técnicas se encuentran sujetas a cambios sin aviso previo.
Homologaciones
ME61
UA.TR.002
Guide de démarrage rapide du moniteur LCD
Français
Guide de démarrage rapide du moniteur LCD Acer
Importantes instructions de sécurité
Veuillez lire attentivement les instructions suivantes.
1. Pour nettoyer l’écran du moniteur LCD : Assurez-vous que votre moniteur est dans la bonne norme électrique d’alimentation
CA disponible dans votre région.
• Éteignez le moniteur LCD et débranchez le cordon d’alimentation.
• Vaporisez une solution de nettoyage sans solvant sur un chiffon et essuyez doucement l’écran.
2. Ne placez pas le moniteur LCD près d’une fenêtre. L’exposition du moniteur à la pluie, l’humidité ou la lumière de soleil peut
l’endommager sérieusement.
3. N’appliquez pas de pression sur l’écran LCD. Une pression excessive peut endommager de façon permanente l’écran.
4. N’enlevez pas le couvercle et n’essayez pas de réparer l’unité vous-même. Seul un technicien agrée est habilité à effectuer des
réparations.
5. Stockez l’écran LCD dans une pièce dont la température est comprise entre -20° et 60°C (-4° et 140°F). Stocker le moniteur LCD
dans un environnement dont les températures sont hors plage, peut l’endommager de façon permanente.
6. Débranchez immédiatement votre moniteur et appelez un technicien agrée dans les situations suivantes :
• Le câble signal reliant le moniteur au PC est éraillé ou endommagé.
• Du liquide a coulé sur le moniteur LCD ou le moniteur a été exposé à la pluie.
• Le moniteur LCD ou le bâti est endommagé.
Fixation du moniteur à la base
1. Retirez le moniteur de l’emballage.
2. Fixez le moniteur le pied de la base à la base. (pour certains modèles)
3. Tournez dans le sens horaire pour verrouiller. Assurez-vous que la base est verrouillée sur le pied. (pour certains modèles)
4. Fixez la base au pied en tournant la vis à l’aide de l’onglet intégré ou une pièce de monnaie appropriée. (pour certains modèles)
Connecter votre moniteur à un ordinateur
1. Éteignez votre ordinateur et débranchez le câble d’alimentation de votre
ordinateur.
2. 2-1 Connectez le Câble HDMI (uniquement modèle entrée HDMI)
a. Assurez-vous que le moniteur et l’ordinateur soient bien éteints.
b. Branchez le câble HDMI à l’ordinateur.
2-2 Connectez le Câble numérique (Modéle Double entrée uniquement)
a. Assurez-vous que le moniteur et l’ordinateur soient bien éteints.
b. Connectez l’une des extrémités du câble DVI 24 broches sur l’arriére du
moniteur et connectez l’autre extrémité sur le port DVI de l’ordinateur.
2-3 Connectez le Câble DP (uniquement modèle entrée DP)
a. Assurez-vous que le moniteur et l’ordinateur soient bien éteints.
b. Branchez le câble DP à l’ordinateur.
3. Branchez le câble audio (Modèle avec une entrée audio seulement) (Optionnel).
4. Insérez le câble d’alimentation du moniteur dans le port alimentation, à l’arrière
du moniteur.
5. Branchez les cordons d’alimentation de votre ordinateur et de votre moniteur
dans la prise de courant la plus proche.
6. Sélectionnez charge USB hors tension ACT/DÉS pour activer/désactiver la fonction de charge USB hors tension.
Commande externe
Icône Élément Description
1, 2
Bouton/Témoin
d’alimentation
Pour allumer ou éteindre le moniteur.
Bleu indique qu’il est allumé. Orange indique qu’il est en mode veille/économie
d’énergie.
3, 4
Moins/Plus
Si le menu OSD est actif, appuyez le bouton Moins ou Plus pour basculer entre les
options du menu OSD.
5
Fonctions OSD
Appuyez pour afficher le menu OSD. Appuyez à nouveau pour entrer une sélection
dans le menu OSD.
6
Bouton de réglage
automatique/Quitter
Si le menu OSD est actif, appuyez Auto pour quitter le menu OSD. Lorsque le menu
OSD est inactif, appuyez Auto et le moniteur optimisera automatiquement la
position de l’affichage, la mise au point et l’horloge de votre affichage.
7
Touche Empowering
Appuyez la « touche Empowering » pour ouvrir le menu OSD de Acer eColor
Management et accéder aux modes de scénario.
POWER
AUDIO IN DP DVI-D IN HDMI HDMI
DP
DVI
HDMI
AUDIO IN DP
HDMI
DVI-D IN
/
Guide de démarrage rapide du moniteur LCD
Français
Réglementations et avis de sécurité
Avis FCC
Cet appareil a fait l’objet de tests et répond aux limites prévues pour un appareil numérique de classe B conformément à la Partie
B des réglementations FCC. Ces limites ont été définies de façon à garantir une protection raisonnable contre les interférences
nocives dans une installation résidentielle. Cet appareil génère, utilise et peut émettre une énergie de radiofréquence. Si son
installation et son utilisation ne sont pas conformes aux instructions, il peut générer des interférences nocives pour les
communications radio.
L’absence d’interférence dans une installation particulière n’est cependant pas garantie. Si cet appareil génère une interférence
gênante pour la réception de radiocommunications ou d’ondes télévisées, ce qu’il est possible de déterminer en mettant hors
tension puis à nouveau sous tension l’appareil, l’utilisateur est encouragé à corriger l’interférence en appliquant une ou plusieurs
des mesures suivantes :
Réorienter ou déplacer l’antenne de réception.
Éloigner l’appareil du récepteur.
Brancher l’appareil à une prise appartenant à un circuit différent de celui où est branché le récepteur.
Consulter le fournisseur ou un technicien spécialisé en radio émission et en télévision pour obtenir de l’aide.
Déclaration de conformité CE
Par la présente, Acer Inc. déclare que cet écran LDC est conforme aux principales exigences et autresdispositions pertinentes de la
Directive CEM 2004/108/CE ; de la Directive Basse tension 2006/95/CE, de la Directive RoHS 2011/65/EU et la Directive 2009/125/CE
établissant un cadre pour la fixation d’exigences en matiére d’écoconception applicables aux produits liés à l’energie.
Avis : câbles blindés
Pour répondre aux réglementations CEM, tous les branchements avec d’autres appareils informatiques doivent être réalisés avec
des câbles blindés.
Avis : appareils périphériques
Seuls les périphériques (appareils d’entrée/de sortie, terminaux, imprimantes, etc.) certifiés conformes aux limites de la Classe B,
peuvent être branchés à cet équipement. L’utilisation de périphériques non certifiés peut générer des interférences sur la
réception des radiocommunications et des ondes télévisées.
Attention
Toute modification n’ayant pas fait l’objet d’une autorisation explicite du fabricant, annihile l’autorité de l’utilisateur, accordée
par la Commission Fédérale des Communications, à faire fonctionner ce produit.
Conditions de fonctionnement
Cet appareil est conforme à la Partie 15 des Réglementations FCC. Son fonctionnement est soumis aux deux conditions suivantes :
(1) cet appareil ne doit pas générer d’interférences nocives, et (2) cet appareil doit accepter les interférences reçues, y compris les
interférences qui pourraient provoquer un fonctionnement non désiré.
Avis : utilisateurs canadiens
Cet appareil numérique de classe B est conforme à la norme ICES-003 du Canada.
Remarque l'intention des utilisateurs canadiens
Cet appareil numérique de la classe B est conforme à la norme NMB-003 du Canada.
Élimination des appareils mis au rebut par les ménages dans l’Union
européenne
Le symbole apposé sur ce produit ou sur son emballage indique que ce produit ne doit pas être jeté avec les
déchets ménagers ordinaires. Il est de votre responsabilité de mettre au rebut vos appareils en les déposant dans
les centres de collecte publique désignés pour le recyclage des équipements électriques et électroniques. La
collecte et le recyclage de vos appareils mis au rebut indépendamment du reste des déchets contribue à la
préservation des ressources naturelles et garantit que ces appareils seront recyclés dans le respect de la santé
humaine et de l’environnement. Pour obtenir plus d’informations sur les centres de collecte et de recyclage des
appareils mis au rebut, veuillez contacter les autorités locales de votre région, les services de collecte des ordures
ménagères ou le magasin dans lequel vous avez acheté ce produit.
Message d’avertissement pour l’aimant
Certains appareils électroniques comme les disques durs, périphériques USB, ordinateurs tablettes,
ordinateurs portables, téléphones portables, montres, écouteurs, haut-parleurs, cartes de crédit,
cartes d’identité magnétiques, etc., sont sensibles aux champs magnétiques et peuvent être
endommagés de façon permanente ou temporairement désactivés s’ils sont exposés à un champ
magnétique qui est trop fort. Les appareils électroniques ne doivent pas être mis à proximité ou
directement sur la surface magnétique de la base du moniteur.
Guide de démarrage rapide du moniteur LCD
Français
SPÉCIFICATIONS
Trouvez les manuels et autres documents pour votre produit Acer sur le site Web de support officiel Acer.
Écran LCD
Système
d'entraînement
LCD couleur TFT
Taille 32"W (81 cm)
Pas de masque 0,277 mm (H) x 0,277 mm (V)
Luminosité
300 cd/m
2
(Type)
Contraste 100000000:1 Max (ACM)
Angle de vue 178° (H) 178° (V) (CR=10)
Temps de réponse 6 ms (GTG)
Type de panneau VA
Vidéo Interface analogique R, V, B
Fréquence
horizontale
30 kHz - 80 kHz
Fréquence verticale 55 - 75 Hz
Couleurs affichées 16,7 M couleurs
Fréquence de balayage 170 MHz
Résolution maximale 2560 x 1440 @ 60 Hz
Plug & Play VESA DDCCI/DDC2B
Consommation d'énergie (à 200
cd/m
2
)
Mode Activé 45W (typ.)
Mode veille 0,49W (typ.)
Mode Désactivé 0,4W (typ.)
Connecteur d'entrée
HDMI 19 broches (uniquement modèle entrée HDMI)
DVI-D 24 broches (Uniquement sur le modèle à double entrée)
DP (uniquement modèle entrée DP)
Signal vidéo d'entrée
HDMI signal (uniquement modèle entrée HDMI) (Optionnel)
Signal numérique (uniquement sur le modèle à double entrée)
DP (uniquement modèle entrée DP) (Optionnel)
Haut-parleurs 2W x 2 (Modèle avec une entrée audio seulement)(Optionnel)
USB USB 3,0 x 4
Taille maximale de l'écran
Horizontalement : 708,4 mm
Verticalement : 398,5 mm
Source d'alimentation 100-240V, 50 / 60 Hz
Environnement
Température de fonctionnement : 5°C à 35°C
Température de stockage : -20°C à 60°C
Humidité en fonctionnement : 10% à 85%
Dimensions 737,9 (L) x 473,4~ 623,4 (H) x 266,5 (P) mm
Poids (poids net) 15,3 kg l’nuité (net)
Spécifications de Mécanisme
Pente : -5° à +25° (L’inclinaison de 25 degrés ne peut être offerte qu’au plus haut point
pour l’angle d’élévation.)
Faire pivoter : +60° à -6
Éminence réglage : 0 mm à 150 mm
Détachable pied étre situé : Pied détachable avec vis de libération
Extérieur Commandes:
Commutateur/
Bouton
Bouton d'alimentation
Gauche () /Droite ()
MENU/ENTRER
Auto/Quitter
Touche E (Empowering)
Fonction
Contraste
Luminosité
Mise au point
Horloge
Position H
Position V
(Chaud) Couleur
(Froid) Couleur
Temp. couleurs RVB
Langue
Position, durée de l'OSD
Configuration auto (seulement
pour le modèle avec une entrée
analoglque)
Mode Large (Plein/Aspect)
ACM Activé/Désactivé
Sélection du signal d'entrée (seulement
pour le modèle avec deux entrées)
DDCCI Activé/Désactivé
Affichage des informations
Réinitialiser
Quitter
* Ces spécifications peuvent être modifiées sans préavis.
Conformité réglementaire
ME61
UA.TR.002
Guia de instalação rápida do monitor de LCD
Português
Manual de Iniciação Rápida do Monitor LCD Acer (GIN)
Instruções de segurança importantes
Por favor leia as seguintes instruções atentamente.
1. Para limpar o ecrã do monitor LCD: Certifique-se que o monitor esteja classificado eletricamente para operar com a alimen-
tação de corrente alternada (CA) disponível no local de instalação.
• Desligue o monitor LCD e desconecte o cabo de alimentação.
• Borrife uma solução de limpeza não solvente num pano e limpe o ecrã cuidadosamente.
2. Não coloque o monitor LCD junto a uma janela. Expor o monitor a chuva, humidade, ou luz solar pode danificá-lo seriamente.
3. Não exerça pressão sobre ecrã do LCD. Pressão excessiva pode causar danos permanentes ao ecrã.
4. Não remova a tampa ou tente proceder a qualquer reparação desta unidade por si próprio. Somente um técnico autorizado
deverá proceder a reparações de qualquer tipo.
5. Guarde o monitor LCD numa sala com uma temperatura entre os -20º a os 60º C (-4º a 140º F). Guardar o monitor LCD em
ambientes além destes limites pode resultar em danos permanentes.
6. Desligue o seu monitor da alimentação imediatamente ou chame um técnico autorizado se ocorrer alguma das seguintes
situações:
• O cabo de ligação Monitor-PC estiver desgastado ou danificado.
• For entornado algum liquido sobre o monitor LCD ou o monitor for exposto a chuva.
• O monitor LCD ou a caixa exterior estiverem danificados.
Acoplar o monitor à base
1. Remova o monitor da embalagem.
2. Prenda o suporte do pé à base. (apenas para modelos selecionados)
3. Rode no sentido dos ponteiros do relógio, para travar. Certifique-se que a base está travada no suporte. (apenas para modelos
selecionados)
4. Prenda a base ao suporte rodando o parafuso com a lingueta integrada, ou moeda adequada. (apenas para modelos selecio-
nados)
Conexão do monitor ao computador
1. Desligue o seu computador e desligue o respectivo cabo de alimentação.
2. 2-1 Cabo HDMI (somente Modelo de Entrada HDMI)
a. Certifique-se de que tanto o monitor como o computador estão
desligados.
b. Ligue o cabo HDMI ao computador.
2-2 Ligue o cabo DVI. (Modelo de Dupla Entrada)
a. Certifique-se de que tanto o monitor como o computador estão
desligados.
b. Conecte uma extremidade ao cabo DVI de 24 pinos na parte traseira do
monitor e conecte a outra extremidade à porta DVI do computador.
2-3 Cabo DP (somente Modelo de Entrada DP)
a. Certifique-se de que tanto o monitor como o computador estão
desligados.
b. Ligue o cabo DP ao computador.
3. Conecte o Cabo de Áudio. (Somente Modelo de Entrada Áudio)(Opcional)
4. Insira o cabo de alimentação do monitor na porta de alimentação na parte
posterior do monitor.
5. Conecte os cabos de alimentação do seu computador e do monitor a uma tomada de rede.
6. Seleccione Power-off USB charge ON/OFF para activar/desactivar a função de carga USB quando desligado.
Controlo externo
N.º Ícone Item Descrição
1, 2
Botão/indicador de
alimentação
Liga/desliga o monitor. O LED azul indica que a alimentação está ligada. O
LED âmbar assinala o modo de suspensão/modo de poupança de energia.
3, 4 Menos/Mais
Se o OSD estiver activo, prima o botão Menos ou o botão Mais para
alternar as opções do OSD.
5 Funções OSD
Prima para visualizar o OSD. Prima novamente para introduzir uma
selecção no OSD.
6
Botão de Auto-ajuste/
Sair
Se o OSD (texto no ecrã) estiver activo, prima Auto para sair do OSD.
Quando o OSD estiver inactivo, prima Auto e o monitor optimiza
automaticamente a posição do ecrã, o foco e o relógio.
7 Botão Empowering
Pressione a Tecla Empowering para abrir o OSD de Acer eColor
Management e aceder aos modos de cenário.
POWER
AUDIO IN DP DVI-D IN HDMI HDMI
DP
DVI
HDMI
AUDIO IN DP
HDMI
DVI-D IN
/
Guia de instalação rápida do monitor de LCD
Português
ESPECIFICAÇÕES
Encontre manuais e outros documentos para o seu produto Acer no site de suporte oficial da Acer.
Painel LCD
Sistema de guia TFT LCD a Cores
Tamanho 32"W (81 cm)
Distância entre pixéis 0,277 mm (H) x 0,277 mm (V)
Brilho
300 cd/m
2
(Típico)
Contraste 100000000:1 Máx. (ACM)
Angulo de
visualização
178° (H) 178° (V) (CR=10)
Tempo de resposta 6 ms (GTG)
Tipo de Painel VA
Vídeo Interface analógica R, G, B
Frequência H 30 kHz - 80 kHz
Frequência V 55 - 75 Hz
Cores de visualização 16,7M Colors
Relógio de pixel 170 MHz
Resolução Máxima 2560 x 1440 @ 60 Hz
Plug & Play VESA DDCCI/DDC2B
Consumo de energia (a 200 nits)
Modo ligado 45W (typ.)
Modo de Suspensão 0,49W (typ.)
Modo Desligado 0,4W (typ.)
Conector de Entrada
HDMI 19 pinos (somente Modelo de Entrada HDMI)
DVI-D 24 pinos (Somente Modelo Entrada Dupla)
DP (somente Modelo de Entrada DP)
Sinal de Vídeo de Entrada
Sinal HDMI (somente Modelo de Entrada HDMI) (Opcional)
Sinal digital (Somente Modelo Entrada Dupla)
DP (somente Modelo de Entrada DP) (Opcional)
Altifalantes 2W x 2 (Somente Modelo de Entrada Áudio)(Opcional)
USB USB 3,0 x 4
Tamanho Máximo do Ecrã
Horizontal: 708,4 mm
Vertical: 398,5 mm
Fonte de Alimentação 100-240V, 50/60 Hz
Considerações Ambientais
Temperatura de Funcionamento: 5°C a 35°C
Temperatura de Armazenamento: -20°C a 60°C
Humidade de Funcionamento: 10% a 85%
Dimensões 737,9 (L) x 473,4 ~ 623,4 (A) x 266,5 (D) mm
Peso (N. W.) 15,3 kg Unidade (net)
Especificações do MecanismoInclinação
Vertical: -5° a +25° (Apenas no ponto mais elevado podem ser oferecidos 25 graus de
inclinação como ângulo de elevação.)
Inclinação Horizontal: +60° a -60
Ajuste de altura: 0 mm a 150 mm
Suporte de pé destacável: Suporte de pé destacável com fixação por parafuso
Externo Controlos:
Tomada/Botao
Botão de energia
Esquerda ()/Direita()
MENU/ENTER
Auto/ Sair
Tecla E (Empowering)
Função
Contraste
Brilho
Focagem
Relógio
Posição horizontal
Posição vertical
Cor (Quente)
Cor (Fria)
Temperatura de cor RGB
Idioma
Posição e tempo limite do menu OSD
Auto configuração (apenas
modelo de entrada analógica)
Modo panorâmico (Total/Aspecto)
ACM Ligado/Desligado
Selecção de sinal de entrada (apenas
modelo de entrada dupla)
DDCCI Ligado/Desligado
Exibir informações
Reiniciar
Sair
* Todas as especificações estão sujeitas a alteração sem aviso prévio.
Conformidade Regulatória
ME61
UA.TR.002
ENERGY STAR
®
Acer’s ENERGY STAR qualified products save you money by reducing energy
costs and helps protect the environment without sacrificing features or
performance. Acer is proud to offer our customers products with the ENERGY
STAR mark.
What is ENERGY STAR?
Products that are ENERGY STAR qualified use less energy and prevent
greenhouse gas emissions by meeting strict energy efficiency guidelines set by the
U.S. Environmental Protection Agency. Acer is committed to offer products and
services worldwide that help customers save money, conserve energy and improve
the quality of our environment. The more energy we can save through energy
efficiency, the more we reduce greenhouse gases and the risks of climate change.
More information refers to http://www.energystar.gov or http://www.energystar.gov/
powermangement
Acer ENERGY STAR qualified products:
• Produce less heat and reduce cooling loads, and warmer climates.
• Automatically go into “display sleep” and “computer sleep” mode after 15 and 30
minute of inactivity respectively.
• Wake the monitor when it is in Active Off mode, move the mouse or press any
keyboard key.
• Computers will save more than 80% energy at “sleep” mode.
ENERGY STAR and the ENERGY STAR mark are registered U.S. marks

Transcripción de documentos

LCD monitor B326HUL Acer LCD Monitor Quick Start Guide (QSG) Important safety instructions 1. 2. 3. 4. 5. 6. To clean the LCD monitor screen: Be sure that your monitor is electrically rated to operate with the AC power available in your location. • Turn off the LCD monitor and unplug the power cord. • Spray a non-solvent cleaning solution onto a rag and clean the screen gently. Do not place the LCD monitor near a window. Exposing the monitor to rain, moisture or sunlight can severely damage it. Do not apply pressure to the LCD screen. Excessive pressure may cause permanent damage to the display. Do not remove the cover or attempt to service this unit yourself. An authorized technician should perform servicing of any nature. Store the LCD monitor in a room with a temperature of -20° to 60° C (-4° to140° F). Storing the LCD monitor outside this range may result in permanent damage. Immediately unplug your monitor and call an authorized technician if any of the following circumstances occur: • Monitor-to-PC signal cable is frayed or damaged. • Liquid spills onto the LCD monitor or the monitor is exposed to rain. • The LCD monitor or case is damaged. Attaching the monitor to the base 1. 2. 3. 4. Remove the monitor from the packaging. Attach the footstand to the base. (for selected models) Turn clockwise to lock. Ensure that the base in locked onto the stand. (for selected models) Secure the base to the stand by turning the screw using the intergrated tab or a suitable coin. (for selected models) Connecting Your Monitor to a Computer 1. Turn off your monitor and unplug your computer’s power cord. 2. 2-1 Connect HDMI Cable (Only HDMI-input model) a. Make sure both the monitor and computer are powered-OFF. b. Connect the HDMI cable to the computer. 2-2 Connect Digital Cable (Only Dual-input model) a. Make sure both the monitor and computer are powered-OFF. b. Connect one end of the 24-pin DVI cable to the back of the monitor and connect the other end to the computer's port. 2-3 Connect DP Cable (Only DP-input model) a. Make sure both the monitor and computer are powered-OFF. b. Connect the DP cable to the computer. 3. Connect the Audio Cable. (Only Audio-Input Model) (Optional) 4. Insert the monitor power cable into the power port at the back of the monitor. 5. Plug the power cords of your computer and your monitor into a nearby electrical outlet. 6. Select Power-off USB charge ON/OFF to enable/disable Power-off USB charge function. POWER AUDIO IN DP DVI-D IN HDMI HDMI HDMI DVI DP AUDIO IN DP DVI-D IN HDMI External Controls No. Icon Item Description Power button/ indicator Turns the monitor on/off. Blue indicates power on. Amber indicates standby/power saving mode. Minus / plus If the OSD is active, press the Minus or Plus button to toggle between the OSD options. 5 OSD functions Press to view the OSD. Press again to enter a selection in the OSD. 6 Auto adjust button / exit 7 Empowering key 1, 2 3, 4 / If the OSD is active, press Auto to exit the OSD. Once the OSD is inactive, press Auto and the monitor will automatically optimize the display position, focus, and clock of your display. Press the Empowering Key to open the Acer eColor Management OSD and access the scenario modes. LCD Monitor Quick Setup Guide English Please read the following instructions carefully. Regulations and safety notices This device has been tested and found to comply with the limits for a Class B digital device pursuant to Part 15 of the FCC rules. These limits are designed to provide reasonable protection against harmful interference in a residential installation. This device generates, uses, and can radiate radio frequency energy and, if not installed and used in accordance with the instructions, may cause harmful interference to radio communications. However, there is no guarantee that interference will not occur in a particular installation. If this device does cause harmful interference to radio or television reception, which can be determined by turning the device off and on, the user is encouraged to try to correct the interference by one or more of the following measures:  Reorient or relocate the receiving antenna.  Increase the separation between the device and receiver.  Connect the device into an outlet on a circuit different from that to which the receiver is connected.  Consult the dealer or an experienced radio/television technician for help. CE declaration of Conformity Hereby, Acer Inc., declares that this LCD monitor is in compliance with the essential requirements and other relevant provisions of EMC Directive 2004/108/EC, Low Voltage Directive 2006/95/EC, and RoHS Directive 2011/ 65/EU and Directive 2009/125/EC with regard to establishing a framework for the setting of ecodesign requirements for energy-related product. Notice: Shielded cables All connections to other computing devices must be made using shielded cables to maintain compliance with EMC regulations. Notice: Peripheral devices Only peripherals (input/output devices, terminals, printers, etc.) certified to comply with the Class B limits may be attached to this equipment. Operation with non-certified peripherals is likely to result in interference to radio and TV reception. Caution Changes or modifications not expressly approved by the manufacturer could void the user authority, which is granted by the Federal Communications Commission, to operate this product. Operation conditions This device complies with Part 15 of the FCC Rules. Operation is subject to the following two conditions: (1) this device may not cause harmful interference, and (2) this device must accept any interference received, including interference that may cause undesired operation. Notice: Canadian users This Class B digital apparatus complies with Canadian ICES-003. Remarque à l'intention des utilisateurs canadiens Cet appareil numérique de la classe B est conforme a la norme NMB-003 du Canada. Disposal of Waste Equipment by Users in Private Household in the European Union This symbol on the product or on its packaging indicates that this product must not be disposed of with your other household waste. Instead, it is your responsibility to dispose of your waste equipment by handing it over to a designated collection point for the recycling of waste electrical and electronic equipment. The separate collection and recycling of your waste equipment at the time of disposal will help to conserve natural resources and ensure that it is recycled in a manner that protects human health and the environment. For more information about where you can drop off your waste equipment for recycling, please contact your local city office, your household waste disposal service or the shop where you purchased the product. Warning Message for Magnet Certain electronic devices such as hard drives, USB devices, tablet computers,laptops, cellphones, watches, earphones, speakers, credit cards, magnetic ID cards, etc. are sensitive to magnetic fields and may be damaged permanently or temporarily disabled if exposed to a magnetic field that is too strong. Electronic devices should not be put close to or directly on the magnetic area of monitor base. LCD Monitor Quick Setup Guide English FCC notice SPECIFICATION Driving system TFT Color LCD Size 32”W (81 cm) Pixel pitch 0.277 mm (H) x 0.277 mm (V) Brightness 300 cd/m2 (Typical) Contrast 100000000:1 Max (ACM) Viewable angle 178° (H) 178° (V) (CR=10) Response time 6 ms (GTG) Panel Type VA Video R,G, B Analog Interface H-Frequency 30 kHz - 80 kHz V-Frequency 55 - 75 Hz Display Colors 16.7M Colors Dot Clock 170 MHz Max. Resolution 2560 x 1440 @ 60 Hz Plug & Play VESA DDCCI/DDC2B Power consumption (at 200 nits) On Mode 45W (typ.) Sleep Mode 0.49W (typ.) Off Mode English LCD Panel 0.4W (typ.) Input Connector HDMI 19 pin (Only HDMI-Input Model) DVI-D 24 pin (Only Dual-Input Model) DP (Only DP-Input Model) Input Video Signal HDMI signal (Only HDMI-Input Model)(Optional) Digital signal (Only Dual-Input Model) DP (Only DP-Input Model)(Optional) Speakers 2W x 2 (Only Audio-Input Model)(Optional) USB USB 3.0 x 4 Maximum Screen Size Horizontal: 708.4 mm Vertical: 398.5 mm Power Source 100-240V, 50/60 Hz Environmental Considerations Operating Temp: 5° to 35°C Storage Temp: -20° to 60°C Operating Humidity: 10% to 85% Dimensions 737.9 (W) x 473.4~ 623.4 (H) x 266.5 (D) mm Weight (N. W.) 15.3 kg Unit (net) Mechanism spec Tilt: -5° to +25° (Only at the highest point can 25 degrees of recline be offered for the angle of elevation.) Swivel: -60° to +60° Height adjustment: 0 mm to 150 mm Detachable foot stand: Yes (Detachable foot stand with screw release) External Controls: Switch / Buttons Power Button Left() /Right() MENU/ENTER Auto/ Exit E(Empowering) Key Functions Contrast Brightness Focus Clock H. Position V. Position (Warm) Color (Cool) Color RGB Color temperature Language OSD position. timeout Auto configuration (only Analog input model) Wide mode (Full/Aspect) ACM On/Off Input signal Selection (only Dual input model) DDCCI On/Off Display information Reset Exit * All specifications are subject to change without notice. Regulatory Compliance ME61 UA.TR.002 Find manuals and other documents for your Acer product on the official Acer support website. LCD Monitor Quick Setup Guide MU.T0T00.002 4J.2DH01.011 ¤ÙèÁ×Í¡ÒÃãªé§Ò¹¨ÍáÍÅ«Õ´Õ Acer ©ºÑºÂèÍ (QSG) ¤Óá¹Ð¹Ó´éÒ¹¤ÇÒÁ»ÅÍ´ÀÑ·ÕèÊÓ¤Ñ− ä·Â ¡ÃسÒÍèÒ¹¤Óá¹Ð¹ÓμèÍ仹ÕéÍÂèÒ§¶Õè¶éǹ 1. ¡Ò÷ӤÇÒÁÊÐÍÒ´¨ÍáÍÅ«Õ´Õ: μÃǨÊͺãËéá¹èã¨ÇèÒ¨ÍÀÒ¾ÃкآéÍÁÙÅ´éҹ俿éÒ ÇèÒÊÒÁÒöãªé§Ò¹ä´é¡Ñºáç´Ñ¹ä¿¿éÒ AC ·ÕèãªéÍÂÙèã¹»ÃÐà·È¢Í§¤Ø³ • »Ô´¨ÍáÍÅ«Õ´ÕáÅжʹ»ÅÑê¡ä¿ÍÍ¡ • ©Õ´¹éÓÂÒ·Ó¤ÇÒÁÊÐÍÒ´·ÕèäÁèãªèÊÒÃÅÐÅÒÂŧº¹¼éÒáÅÐàªç´·Ó¤ÇÒÁÊÐÍҴ˹éÒ¨ÍàºÒæ 2. ÍÂèÒÇÒ§¨ÍáÍÅ«Õ´ÕäÇéã¡Åé˹éÒμèÒ§ ¡ÒÃãËé¨ÍÊÑÁ¼ÑʡѺ¹éÓ½¹ ¤ÇÒÁª×é¹ËÃ×ÍáʧᴴÊÒÁÒöÊÃéÒ§¤ÇÒÁàÊÕÂËÒÂÍÂèÒ§Ãعáç¡ÑºË¹éÒ¨Íä´é 3. ÍÂèÒÍÍ¡áç¡´º¹¨ÍáÍÅ«Õ´Õ¡Òö١áç¡´ÁÒ¡à¡Ô¹ä»ÍÒ¨·ÓãËéà¡Ô´¤ÇÒÁàÊÕÂËÒ·ÕèäÁèÍÒ¨«èÍÁá«Áä´é¡ÑºË¹éÒ¨Í 4. ÍÂèҶʹ½Ò¤ÃͺËÃ×;ÂÒÂÒÁá¡é䢨ÍáÍÅ«Õ´Õ´éÇÂμ¹àͧ ãËéªèÒ§¼ÙéàªÕèÂǪÒ−à»ç¹¼Ùé´Óà¹Ô¹¡ÒÃá¡éä¢ 5. à¡çº¨ÍáÍÅ«Õ´Õã¹Ëéͧ·ÕèÁÕÍسËÀÙÁÔ -20°C ¶Ö§ 60°C ͧÈÒà«Åà«ÕÂÊ (-4°F ¶Ö§ 140°F ͧÈÒ¿Òàùäιì) ¡ÒÃà¡çºÃÑ¡ÉÒ¨ÍáÍūմչ͡à˹×ͨҡªèǧÍسËÀÙÁԴѧ¡ÅèÒÇÍÒ¨Ê觼ÅàÊÕÂËÒ·ÕèäÁèÍÒ¨«èÍÁá«Áä´é¡ÑºË¹éÒ¨Í 6. ¶Í´»ÅÑê¡Ë¹éҨͧ͢¤Ø³·Ñ¹·ÕáÅÐãËéªèÒ§¼ÙéàªÕèÂǪÒ−·Ó¡ÒÃá¡éä¢ËÒ¡ÁÕʶҹ¡Òóìã´æ μèÍ仹Õéà¡Ô´¢Öé¹ • ÊÒÂà¤àºÔÅÊè§ÊÑ−−Ò³ÃÐËÇèÒ§¨ÍáÍūմաѺ¾Õ«ÕËÅØ´ÅØèÂËÃ×ÍàÊÕÂËÒ • ¢Í§àËÅÇˡô¨ÍáÍÅ«Õ´ÕËÃ×ͨÍÊÑÁ¼ÑʡѺ¹éÓ½¹ • ¨ÍáÍÅ«Õ´ÕËÃ×ÍμÑÇà¤Ã×èͧ¢Í§¨ÍàÊÕÂËÒ ¡ÒûÃСͺÁ͹ÔàμÍÃìà¢éҡѺ°Ò¹ 1. 2. 3. 4. ¹Ó¨ÍÁ͹ÔàμÍÃìÍÍÍ¡¨Ò¡ºÃèØÀѳ±ì àÊÕº¢ÒμÑé§à¢éҡѺ°Ò¹ÇÒ§ (ÊÓËÃѺÃØè¹·ÕèÃкØ) ËÁعμÒÁà¢çÁ¹ÒÌÔ¡Òà¾×èÍÅçͤ μÃǨÊͺãËéá¹èã¨ÇèÒ°Ò¹Åçͤà¢éҡѺ¢ÒμÑé§áÅéÇ (ÊÓËÃѺÃØè¹·ÕèÃкØ) ÂÖ´°Ò¹à¢éҡѺ¢ÒμÑé§â´Â¡ÒâѹʡÃÙâ´Âãªéá·çº·ÕèÁÕãËéËÃ×ÍàËÃÕÂ−·ÕèÁÕ¢¹Ò´àËÁÒÐÊÁ (ÊÓËÃѺÃØè¹·ÕèÃкØ) ¡ÒÃàª×èÍÁμèͨÍÀÒ¾¢Í§¤Ø³à¢éҡѺ¤ÍÁ¾ÔÇàμÍÃì 1. »Ô´à¤Ã×èͧ¤ÍÁ¾ÔÇàμÍÃì¢Í§¤Ø³áÅéǶʹÊÒÂ俢ͧà¤Ã×èͧ¤ÍÁ¾ÔÇàμÍÃì 2. 2-1 àª×èÍÁμèÍÊÒ HDMI (੾ÒÐÃØè¹ HDMI-input) a. μÃǨÊͺãËéá¹èã¨ÇèÒ·Ñ駨ÍÀÒ¾áÅФÍÁ¾ÔÇàμÍÃì»Ô´à¤ÃÍ×è§ÍÂÙè b. àª×èÍÁμèÍÊÒÂà¤àºÔÅ HDMI ä»Âѧ¤ÍÁ¾ÔÇàμÍÃì 2-2 àª×èÍÁμèÍÊÒ´ԨÔμÍÅ (੾ÒÐÃØè¹ Dual-input) a. μÃǨÊͺãËéá¹èã¨ÇèÒ·Ñ駨ÍÀÒ¾áÅФÍÁ¾ÔÇàμÍÃì»Ô´à¤ÃÍ×è§ÍÂÙè b. àª×èÍÁμèÍ»ÅÒ´éҹ˹Ö觢ͧÊÒÂà¤àºÔÅ DVI 24 ¾Ô¹à¢éҡѺ´éÒ¹ËÅѧ¢Í§¨ÍÀÒ¾