
In the United States: BOBRICK WASHROOM EQUIPMENT, INC.
New York: 200 Commerce Drive, Clifton Park, NY 12065-1350 • Tel: (518) 877-7444 • Fax: (518)-877-5029
Los Angeles: 6901 Tujunga Ave, North Hollywood, CA 91605-6213 • Tel: (818) 982-9600 • Fax: (818)-503-9287
or email customerservice@bobrick.com
In Canada: BOBRICK WASHROOM EQUIPMENT COMPANY
45 Rolark Drive, Scarborough, Ontario M1R 3B1 • Eastern Canada: Tel: (877) 423-6555 • Fax: (877) 423-8555
• Western Canada: Tel: (877) 423-6444 • Fax: (877) 423-8444 or email customerservice@bobrick.com
© 2019 by Bobrick Washroom Equipment, Inc.
Form No. 3944-69 Revised 9/16/19 Printed in U.S.A.
INSTRUCTIONS FOR REPLACING 3944-52, FOLDED TOWEL DISPENSER MODULE
BOBRICK MODELS B-3942, B-3944, 3947, AND 813061 CONVERTIBLE PAPER TOWEL DISPENSER AND WASTE RECEPTACLE
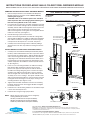
Upper Left Side
Keyhole Slot
3981-25 Carriage Bolt
3981-24 Hex Nut Lock
(Mounting Hardware)
Folded Towel
Dispenser Module
Hinge Pin
Cabinet
3981-25 Carriage Bolt
3961-24 Washer Lock Nut
Left Side Upper Keyhole Slot
REMOVING EXISTING FOLDED TOWEL DISPENSER MODULE
1. Unlock and open the door of the Folded Towel Dispenser
Module and remove any paper towels. Remove door by
removing the hinge pin.
CAUTION: If door is not removed special care should be
taken to prevent door from swinging when removing last
bolt and causing Module to fall out of cabinet.
2. Loosen but do not remove the four 3961-24 Washer Lock Nuts
located on the left back and right side of the Modular Housing
Assembly until the 3961-25 Carriage Bolt can be moved. The
3961-24 Hex Lock Nut should not be removed from the
3961-25 Carriage Bolt, ensuring that the Carriage Bolt will not
fall into the wall cavity. (See Figure 1)
3. Hold the Housing in place with one hand.
4. Remove the mounting hardware, the 3961-25 Carriage Bolt
with the 3961-24 Washer Lock Nut, by sliding them toward the
hole until the head of the carriage bolt can move through the
round portion of the keyhole slot. Put aside, four places.
5. Carefully remove the housing from the cabinet by sliding it
down past the lower door stop and then rotating out from the
bottom.
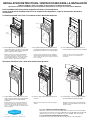
INSTALLING NEW FOLDED TOWEL DISPENSER MODULE
1. Carefully insert the Folded Towel Dispenser Module (without
the door) under and behind the lower door stop in the cabinet
until it touches the cabinet flanges. Slide up keeping the right
side of the housing parallel with the right side of the cabinet
supporting it from underneath with both hands. Make sure to
keep the back of the housing against the back flanges of the
cabinet and position the module so that the keyhole slots line
up. (See Figure 2)
2. Insert one set of mounting hardware, the 3961-25 Carriage
Bolt with the 3961-24 Washer Lock Nut, into the round
portion of the upper left side keyhole slot with the head of
the 3961-25 Carriage Bolt going in first. Position the square
shoulder of the 3961-25 Carriage Bolt so that it is parallel
with the straight sides of the keyhole slot and slide the entire
assembly as far over as it will go. The square shoulder of the
3961-25 Carriage Bolt should be in contact with the end of the
rectangular slot in the flange to ensure proper seating of the
mounting hardware. (See Figures 3 & 4).
3. Tighten down the 3961-24 Washer Lock Nut. The mounting
hardware should not move when tugged. Do Not overtighten
the washer lock nuts.
4. Install the rest of the mounting hardware as described in steps
2 & 3 for the other keyhole slots.
5. Install the door using the hinge pin provided.
NOTE: Waste capacity of these units can be changed by
ordering Bobrick part numbers:
367-60 (12-Gallon Waste Receptacle Module)
368-60 (18-Gallon Waste Receptacle Module)
313061-8 (6-Gallon Waste Receptacle Module)
Figure 1
Figure 2
Figure 3
Figure 4
TOOL REQUIRED TO REMOVE LOCK NUT
TOOL NAME TOOL SIZE
Nut Driver 3/8"
or
Socket Wrench with 3" minimum extension 3/8"

In the U.S.A.: BOBRICK WASHROOM EQUIPMENT, INC.
200 Commerce Drive, Clifton Park, New York 12065-1350 • Tel: (518) 877-7444 • FAX: 518-877-5029
11611 Hart Street, North Hollywood, California 91605-5882 • Tel: (818) 982-9600 • FAX: 818-503-1102
100 Bobrick Drive, Jackson, Tennessee 38301-5625 • Tel: (731) 424-7000 • FAX: 731-424-7800
In Canada: BOBRICK WASHROOM EQUIPMENT COMPANY
45 Rolark Drive, Scarborough, Ontario M1R 3B1 • Tel: (416) 298-1611 • FAX: 416-298-6351
© 2009 by Bobrick Washroom Equipment, Inc.
Form No. 3944-163 Revised 10/09* Printed in U.S.A.
INSTALLATION INSTRUCTIONS / INSTRUCCIONES PARA LA INSTALACIóN
Bobrick LinerMate™ Trash Liner Holder for ClassicSeries™ 12-Gallon Waste Models
Porta-bolsas de basura LinerMate™ para los receptáculos de desperdicios de 12-gal. de la serie Classic de Bobrick
Inserte el porta-bolsas LinerMate 3944-134 en el receptáculo de desperdicios y siga las instrucciones brindadas a
continuación:.
Extraiga el porta-bolsas de basura LinerMate del
interior del receptáculo de desperdicios y haga
descansar la pieza plástica o colgador sobre el borde
superior delantero del mismo, con ayuda de las
muescas situadas a ambos lados del colgador.
Coloque la bolsa de basura dentro del LinerMate y
ajústela alrededor del borde del colgador, doblándola
sobre el mismo. Puede hacer un nudo para sujetar la
bolsa en su lugar.
Levante el porta-bolsas de basura LinerMate e
introdúzcalo de nuevo en el receptáculo de
desperdicios.
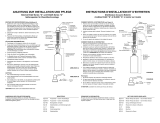
To Install Disposable Trash Liner / Para colocar la bolsa desechable de basura
Extraiga el porta-bolsas de basura LinerMate del
interior del receptáculo de desperdicios y hágalo
descansar sobre el borde superior delantero del
mismo, con ayuda de las muescas situadas a ambos
lados del colgador.
Quite la bolsa de alrededor del borde del colgador y
anúdela.
Extraiga la bolsa de basura por la parte de arriba del
LinerMate, o levante el LinerMate y saque la bolsa de
basura por debajo.
To Remove Filled Trash Liner / Para sacar la bolsa llena de basura
Insert LinerMate 3944-134 into waste receptacle and follow as instructed below:
1). Pull LinerMate Trash Liner Holder up and
forward. Rest Sleeve of holder over front edge
of waste receptacle with notches engaged on
top front edge of waste receptacle.
2). Place plastic trash liner into LinerMate and fold
over and around Sleeve. A knot may be tied in
bag at bottom of Sleeve to secure bag in place.
3). Lift LinerMate Trash Liner Holder from rest
position and place down into waste receptacle.
1). Pull LinerMate up and forward. Rest on front
edge of waste receptacle by engaging bottom
notches of Sleeve on top edge of waste
receptacle.
2). Remove edges of disposable trash liner and
tie a knot.
3). Pull trash liner out from top or lift LinerMate
up and pull liner from below LinerMate.
Waste
Receptacle
Sleeve
Notch
Trash Liner
Sleeve
-
 1
1
-
 2
2


en otros idiomas
- English: Bobrick 496 Installation guide
Artículos relacionados
-
 Bobrick B-822 Guía de instalación
-
 Bobrick B-710 Guía de instalación
-
 Bobrick B-715 Guía de instalación
-
 Bobrick B-7125 InstaDry Installation Instructions Manual
-
 Bobrick B-778 Guía de instalación
-
Bobrick B-750 Guía de instalación
-
 Bobrick B-7120 230V Guía de instalación
-
Bobrick B-8221 Guía de instalación


