Char-Griller 2121 Manual de usuario
- Categoría
- Barbacoas
- Tipo
- Manual de usuario

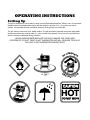
OPERATING INSTRUCTIONS
Setting Up
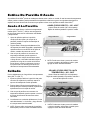
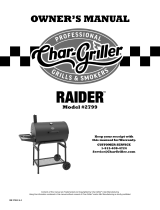
This grill is designed for use outdoors, away from any ammable materials. When in use, it is important
that there are no overhead obstructions and that the grill is at least 12 ft. (~4 m) from any wall or
surface. It is important that the ventilation openings of the grill are not obstructed.
The grill must be used on a level, stable surface. The grill should be protected from direct wind drafts
and protected from any trickling water (i.e. rain or water from gutters). Do not move the grill while hot,
and do not leave unattended during operation.
NEVER EXCEED 500°F BECAUSE THIS WILL DAMAGE THE FINISH AND
CONTRIBUTE TO RUST. PAINT IS NOT WARRANTED AND WILL REQUIRE TOUCH-UP.
THIS UNIT IS NOT WARRANTED AGAINST RUST.
12 FEET
(~4 M)
N
O
O
V
E
R
H
E
A
D
O
B
S
T
R
U
C
T
I
O
N
CAUTION
CAUTION
HOT
DO NOT MOVE
DO NOT MOVE

Lighting Instructions
There are a few methods to light your charcoal grill, depending on the materials you prefer to use.
Using a charcoal chimney is the Char-Griller
®
preferred method for speed and convenience but igniting
your lump charcoal or briquettes directly in the grill is a great way to get cooking as well.
NOTE:
• Do not use lighter uid, gasoline, kerosene, alcohol or other accelerant for lighting charcoal due to
ammability, risk of bodily injury and potential to leave a distasteful avor in your food.
• If necessary, use tongs to move coals for even heat.
• Always wear gloves when handling grill grates, charcoal grate, or adjusting coals.
Charcoal Chimney
1. Remove your grill grates and set them to side
2. Fill your charcoal chimney ¾ of the way full with
briquettes or lump charcoal
3. Set re starter on charcoal grate, light and then
place the charcoal chimney directly on top of the
re starter
4. Coals will re upward from bottom to top
5. After coals on top of chimney are ignited (usually
10-15 minutes) dump the coals over the charcoal
grate and replace your grill grates
Fire Starters
1. Remove your grill grates and set them to side
2. Pour approximately 3lbs (approx. 50-60 briquettes)
of charcoal directly on to your charcoal grate and
stack together in a pile
3. Insert re starter into the middle of the charcoal pile
so that it is slightly covered and light
4. After the charcoal has thoroughly ignited, typically
glowing red or gray in color, use tongs to spread
them out and replace your grill grates

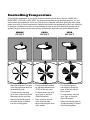
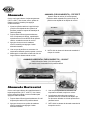
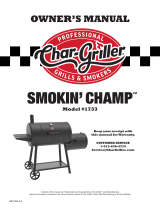
Controlling Temperature
Controlling the temperature of your grill is all about controlling the air ow to the re. MORE AIR =
MORE HEAT. LESS AIR = LESS HEAT. By opening and closing the top and side dampers, you can
easily control the temperature of your grill. The amount of charcoal used when grilling can also greatly
impact your ability to control temperature. Dampers may need to be adjusted during the cook to account
for changes in weather like wind or to accommodate for more or less fuel. When rst learning how to
operate your grill, always use the same amount of charcoal to best learn your grill’s damper control.
SMOKE
150°-250°F
• Control airow as needed,
by adjusting dampers from
1/3-2/3 of the way open
• For best results, start with
up to 2 lbs. of charcoal
(30-40 Briquettes)
• Place coals on one half
of the charcoal grate -
adjust charcoal grate level
to the middle
SEAR
450°-500°F
• For maximum airow,
both dampers should be
open all the way with air
owing freely
• For best results, start with
up to 3 lbs. of charcoal
(50-60 Briquettes)
• Adjust the charcoal grate to
its highest setting or closest
to the cooking grates
• Start with dampers 1/4 or less
of the way open and adjust as
needed during cook
• For best results, start with
up to 2 lbs. of charcoal (30-40
Briquettes) and/or wood fuel
• Adjust the charcoal grate to
its lowest setting or farthest
from the cooking grates
GRILL
300°-450°F

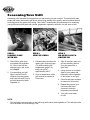
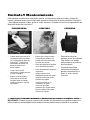
Seasoning Your Grill
Seasoning is an important rst step before you start cooking on your new grill. This process will help
protect the interior and exterior grill nish, reduce food sticking to the grates, reduce unnatural avors,
and help prevent the grates from rusting. Char-Griller
®
recommends using axseed oil for seasoning
your grill but most food grade oils (canola, grapeseed, vegetable, safower, etc) will work as well.
STEP 1
LIGHTLY COAT
WITH OIL
1. Char-Griller
®
grills come
pre-coated with vegetable
oil. If this is the rst time
seasoning your grill, move
on to Step 2
2. If re-seasoning your grill,
lightly coat ALL interior
surfaces (including grates
and inside of barrel) of your
grill with axseed or other
vegetable oil
STEP 2
HEAT UP GRILL
1. Following the instructions for
lighting your charcoal (page
C-2) and controlling the
temperature (page C-6),
bring your grill to
approximately 450°F
2. Once at temperature, allow
grill surfaces to season for
20 minutes
STEP 3
RE-APPLY OIL TO
GRATES 5X
1. After 20 minutes, open your
grill and carefully remove
your grill grates with a
grate lifter
2. Using a brush, re-coat both
sides of your grates with
axseed or other vegetable
oil and return to your grill
3. Close lid and allow surfaces
to season for 20 minutes
4. Repeat this process up to
ve times (Add more
charcoal to maintain
temperature as needed)
5. Your grill is now ready
for use
NOTE:
• You can lightly coat the exterior of the grill body (while warm) with vegetable oil. This will extend the
life of the nish, much like waxing a car.

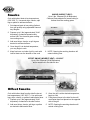
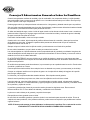
Direct Heat
SEAR (HI-TEMP DIRECT HEAT) - 450°-500°F
Up to 3 lbs. Charcoal (50-60 Briquettes)
Charcoal Grate adjusted to highest setting or
close to the cooking grates
Indirect Heat Direct Heat
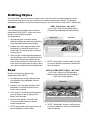
Grilling Styles
Your Char-Griller
®
grill can be used to smoke, grill or sear your food. By using temperature zones,
charcoal and wood avor, you can customize your culinary experience as desired. The following
descriptions provide four of the most common ways you can cook with your Char-Griller
®
charcoal grill.
Sear
Quickly cook with direct heat at high
temperatures (450°-500°F).
1. Set charcoal grate to high setting (closest
to grill grates) using adjustable charcoal
tray hangers
2. Prepare up to 3 lbs (approximately 50-60
briquettes) of lit charcoal spread evenly
across charcoal grate.
3. Once the grill is at the desired temperature,
you may begin to cook by placing food
directly over the coals.
4. Food will cook quickly. Cook each side
3-4 minutes and then bring to desired
internal temperature.
5. NOTE: Always sear with the grill lid open to
prevent damage to exterior nish.
Grill
Cook with direct and indirect heat at medium
temperatures (300°-450°F). Utilize a two zone
set up to cook at different speeds
and temperatures.
1. Set charcoal grate to medium setting
(halfway between grill grates and grill body)
using adjustable charcoal tray hangers
2. Prepare up to 2 lbs (approximately 30-40
briquettes) of lit charcoal spread evenly
across HALF the charcoal grate creating 2
Cooking Zones.
3. Once the grill is at the desired temperature,
you may begin to cook. First place food over
direct heat, cooking each side as desired.
After initially cooking over direct heat, move
to the cool zone (see picture at right) to bring
your food to the desired internal temperature.
4. NOTE: Wood chips, chunks or split logs may
be used in addition to charcoal to add smoke
avor as desired.
GRILL (Direct Heat) - 300°-450°F
Up to 2 lbs. Charcoal (30-40 Briquettes)
Charcoal Grate adjusted to medium setting
6. NOTE: Wood chips, chunks or split logs may
be used in addition to charcoal to add smoke
avor as desired.

Water Pan
(optional)
Drip Pan
(optional)
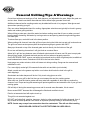
Smoke
Cook with indirect heat at low temperatures
(150°-250° F). Use wood chips, chunks, split
logs or pellets to add smoke avor
1. Set charcoal grate to low setting (farthest
from grill grates) using adjustable charcoal
tray hangers
2. Prepare up to 2 lbs (approximately 30-40
briquettes) of charcoal spread evenly
across HALF the charcoal grate creating
two cooking zones
3. Add wood chips, chunks, or split logs as
desired to add smoke avor
4. Once the grill is to desired temperature,
you may begin to cook
5. Keep food over cool side of grill to cook with
indirect heat over the duration of the cook
Cook with indirect heat from the side re box at
low temperatures (150°-250° F). Use split wood
logs, chips, chunks, or pellets to add smoke avor
1. Prepare up to 2 lbs (approximately 30-40
briquettes) of charcoal in the side re box
2. Add wood chips, chunks, split logs or pellets
as desired to add smoke avor
3. Once the grill is at the desired temperature,
begin to cook
4. Food placed closer to the side re box will
cook faster than food placed on the opposite
side of the grill
5. NOTE: Opening the smoking chamber will
extend cooking time.
OFFSET SMOKE (INDIRECT HEAT) - 150-250°F
Up to 2 lbs. Charcoal (30-40 Briquettes)
and or wood fuel in the side re box
Offset Smoke
Cool Zone
Water Pan
(optional)
6. NOTE: Opening the smoking chamber will
extend cooking time.
SMOKE (INDIRECT HEAT) -
Up to 2 lbs. Charcoal (30-40 Briquettes)
Charcoal Grate adjusted to lowest setting or
farthest from the cooking grates

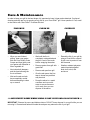
Care & Maintenance
In order to keep your grill in the best shape, it’s important to keep it clean and maintained. Continued
cleaning and care are key to ensuring a long life for your Char-Griller
®
grill. Have questions? Call, email
or chat online with Char-Griller
®
Customer Service!
** ONLY EMPTY ASHES WHILE GRILL IS NOT IS USE AND COOL TO TOUCH **
IMPORTANT: Charcoal is porous and holds moisture. DO NOT leave charcoal in your grill while you are
not using it. Charcoal and ashes left inside the ash pan may reduce the life of your grill.
FINISH UP
• When you are nished
grilling, clean your grates
with the Char-Griller
®
Grate
Scrape and then lightly coat
your grates with axseed or
other vegetable oil
• Next close both dampers
and the hood allowing the
re to suffocate
• Wait until coals and ash
have completely cooled
before attempting to clean
up or remove
CLEAN UP
• Wait until the re is
completely extinguished and
the grill is cool to the touch
before emptying the ashes
• Remove grates from grill with
grate lifter
• Remove ash pan from grill
• Give the ash pan a few rm
taps to loosen any ash that
may be stuck
• Dump the ashes in a metal
container and cover with
water to ensure there are
no lit coals, then you can
dispose of the ashes
COVER UP
• Extend the life of your grill by
using a Char-Griller
®
custom
t grill cover to protect it from
the elements
• Weather resistant polyester
material protects against
birds, dust, wind, rain
and snow

Control heat with amount and type of fuel, dual dampers, and adjustable re grate. Adjust re grate one
end at a time. Wood burns hotter than charcoal. More airow helps generate more heat.
Additional charcoal and/or smoking woods may be added while cook is in progress. Wear gloves and
apron when operating your grill.
Only use natural hardwoods intend for cooking. Appropriate selections can typically be found in grocery
stores and outdoor grilling retailers.
When utilizing a water pan, check the water level when cooking more than 4 hours or when you can’t
hear the water simmering. Add water by moving meat over and pouring water through cooking grates
into water pan.
To reduce are-ups, cook with hood in the down position.
When cooking with charcoal, leave the grill hood open during the initial start up and until coals ash over.
The grill hood must remain open anytime the temperature gauge is greater than 500°F.
Always put charcoal on top of the charcoal grate and not directly into the bottom of the grill.
Do not use self-starting charcoal as it will give food an unnatural avor.
Ashes left in grill too long between uses will absorb moisture and will cause rust. Be sure to empty ash
after grill has cooled. Uncoated steel and cast-iron will rust when not properly cared for.
On the EXTERIOR PAINT, remove rust with wire brush and touch up with a high heat paint, available at
most hardware/auto stores. Rustoleum
®
#241169 is the best color match.
Heat gauge may retain moisture, which will steam out during cooking. Gauge can be removed and
calibrated in oven.
For a more tightly sealed grill, ll unwanted holes with nuts and bolts (not included).
Attach a metal can to the grease cup holder or on bottom shelf under the hole in the grill to
catch drippings.
Smokestack and side dampers will be hot. Only touch using gloves or mitts.
Before you use your grill for the rst time you must season the cast iron cooking grates.
After each use, coat the interior grates and bare metal with vegetable oil while warm to reduce the
chance of rust. Proper and regular seasoning will protect against rust and extend the life of your grill and
cooking grates.
Grill will drip oil during the seasoning process and for several uses afterwards, this is normal.
Never exceed 500°F because this will damage the nish and contribute to rust.
Paint is not warranted and will require touch up.
This grill is not warranted against rust.
DO NOT use lighter uid, gasoline, kerosene, alcohol or other accelerant for lighting charcoal. Use of
any of these or similar products could cause an explosion possibly leading to severe bodily injury.
NOTE: Smoke may escape from areas other than the smokestack. This will not affect cooking
CHAR-GRILLER
®
DOES NOT ACCEPT RETURNS ON USED GRILLS.
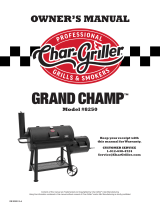
General Grilling Tips & Warnings

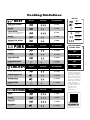
Cooking Guidelines
AVG. COOKING TIMEHEAT LEVELHEAT TYPE
SEAFOOD
LARGE
SHRIMP
4-6 MIN.
1 1/2 OUNCES
SCALLOP
4-6 MIN.
1-INCH THICK
FISH, FILET
5-10 MIN.
1 POUND
FISH, WHOLE
15-20 MIN.
AVG. COOKING TIMEHEAT LEVELHEAT TYPE
CHICKEN
4 OUNCES - BONELESS, SKINLESS
CHICKEN BREAST OR THIGH
8-12 MIN.
3-6 OUNCES - BONE-IN*
CHICKEN THIGH OR LEG
35-45 MIN.
10-12 OUNCES - BONE-IN*
CHICKEN BREAST
35-45 MIN.
8 POUNDS
WHOLE CHICKEN*
3-5 HOURS
AVG. COOKING TIMEHEAT LEVELHEAT TYPE
PORK
1-INCH THICK
PORK CHOP, MEDIUM
8-10 MIN.
8 POUNDS
PORK SHOULDER/BUTT
12 HOURS
3-OUNCE LINK
SAUSAGE
10-13 MIN.
1 POUND
PORK TENDERLOIN
15-20 MIN.
AVG. COOKING TIMEHEAT LEVELHEAT TYPE
BEEF
1-INCH THICK - FILET MIGNON, RIBEYE,
NEW YORK STRIP & PORTERHOUSE
STEAK, MEDIUM
6-8 MIN.
1-INCH THICK
SKIRT STEAK, MEDIUM
4-6 MIN.
3/4 - INCH THICK
BURGER
8-10 MIN.
4 OUNCES
HOT DOG
5-7 MIN.
1-INCH THICK
HANGER STEAK, MEDIUM
8-10 MIN.
*BONE-IN CHICKEN SHOULD INITIALLY BE COOKED OR “BROWNED” OVER DIRECT HEAT FOR SEVERAL MINUTES BEFORE BEING TRANSFERRED TO INDIRECT HEAT.
USDA SAFE MINIMAL
INTERNAL TEMPS
145°F
FISH & SHELLFISH:
160°F
GROUND BEEF OR PORK:
165°F
CHICKEN:
BEEF OR PORK STEAKS
OR CHOPS:
145°F
Cook times outlined in this
chart are general guidelines
that may vary depending or
desired doneness, thickness,
amount of each item being
cooked, grill or grilling style,
ambient temperature and/or
weather. Char-Griller
®
recommends always using
a cooking thermometer to
gauge the internal
temperature of all
meat products.
DIRECT
HEAT
INDIRECT
HEAT
LOW HEAT
150°-250°F
MEDIUM HEAT
300°-450°F
HIGH HEAT
450°-550°F+
SMOKE
HEAT KEY
APPROX. 90 MIN / LB.
FIND MORE
RECIPES AT
CHARGRILLER.COM

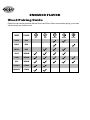
ENHANCE FLAVOR
Wood Pairing Guide
Different wood varieties possess different avors and Char-Griller
®
recommends pairing your woods
with the meats you intend to cook.
WOOD FLAVOR
ALDER MILD
PECAN MEDIUM
STRONGMESQUITE
MILDMAPLE
MEDIUMOAK
STRONGHICKORY
MEDIUMAPPLE
MILDCHERRY
VEGGIES
SEAFOOD
POULTRYPORKBEEF

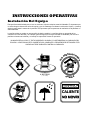
INSTRUCCIONES OPERATIVAS
Instalación Del Equipo
Esta parrillera está diseñada para el uso en exteriores, lejos de cualquier material inamable. Es importante que
no exista ninguna obstrucción arriba del equipo y que se mantenga una distancia mínima de 12 pies (~4 metros)
desde la parte lateral o trasera de la parrillera. Es importante que las aperturas de ventilación de la parrillera no
sean obstruidas.
La parrillera debe ser usada en una supercie nivelada y estable. La parrillera debe ser protegida de las
corrientes de viento directas y de cualquier goteo de agua (lluvia o agua residual de canaletas). No mueva la
parrillera mientras esté caliente y no la deje sin supervisión durante su operación.
NUNCA EXCEDA LOS 500 °F. ESTO DAÑARÍA EL ACABADO Y CONTRIBUIRÍA A LA OXIDACIÓN DEL
EQUIPO. LA PINTURA NO ESTÁ CUBIERTA POR LA GARANTÍA Y REQUERIRÁ DE RETOQUES. ESTA
UNIDAD NO TIENE GARANTÍA CONTRA LA OXIDACIÓN.
PRECAUCIÓN
PRECAUCIÓN
CALIENTE
NO MOVER
NO MOVER
4 METROS
(~12 PIES)
A
R
R
I
B
A
S
I
N
O
B
S
T
R
U
C
C
I
O
N
E
S

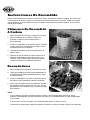
Instrucciones De Encendido
Existen varios métodos para encender su parrillera a carbón, dependiendo del tipo de material que preera usar.
La chimenea de encendido a carbón es el método de encendido preferido de Char-Griller
®
debido a su rapidez
y practicidad pero encender carbón en trozos o briquetas directamente en la parrillera también es un excelente
método de encendido.
NOTA:
• No use uido de encendido, gasolina, querosén. alcohol u otro acelerador para encender el carbón,
debido a la inamabilidad, el riesgo de lesiones corporales y la posibilidad de dejar un sabor desagradable
en su comida.
• Si es necesario, utilice pinzas para mover las brasas para obtener un fuego uniforme.
• Siempre utilice guantes para manejar las rejillas de la parrillera, la rejilla del carbón o para mover las brasas.
Chimenea De Encendido
A Carbón
1. Retire las rejillas de la parrillera y colóquelas a un lado
2. Llene su chimenea de encendido a carbón con
briquetas o carbón en trozos hasta alcanzar ¾
de su capacidad
3. Coloque el encendedor en la rejilla de carbón, encienda
y luego posicione la chimenea de encendido a carbón
directamente sobre el encendedor
4. La brasa se encenderá en dirección ascendente, de
abajo a arriba
5. Después de que las brasas en la parte superior de la
chimenea se enciendan (usualmente en unos 10-15
minutos), vierta las brasas sobre la rejilla de carbón y
coloque nuevamente las rejillas de la parrillera
Encendedores
1. Retire las rejillas de la parrillera y colóquelas a un lado
2. Vierta aproximadamente 3 libras (aproximadamente 50
a 60 briquetas) de carbón directamente sobre la rejilla
de carbón y apílelo
3. Inserte el encendedor en el medio de la pila de carbón,
de modo que esté ligeramente cubierta y enciéndala
4. Una vez que el carbón se haya encendido por completo,
generalmente cuando esté de color rojo o gris, use las
pinzas para moverlo de lado al otro y coloque las rejillas
de la parrillera

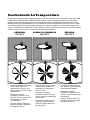
Controlando La Temperatura
El control de la temperatura de su parrillera se basa en el control del ujo del aire que llega al fuego. MÁS AIRE
= MÁS FUEGO. MENOS AIRE = MENOS FUEGO. Al abrir y cerrar la compuerta superior y las compuertas
laterales, puede controlar fácilmente la temperatura de su parrillera. La cantidad de carbón durante el asado
también puede inuir signicativamente en su capacidad de control de temperatura. Durante la cocción, puede
ser necesario ajustar las compuertas para responder ante cualquier cambio en el tiempo meteorológico como
vientos o variaciones del combustible. Cuando aprenda a operar su parrillera, use siempre la misma cantidad de
carbón para que conozca cómo controlar las compuertas de su parrillera.
AHUMADO
150°-250°F
• Controle el ujo de aire, según
sea necesario, ajustando la
apertura de las compuertas
entre 1/3 a 2/3.
• Para obtener mejores
resultados, comiencen con no
más de 2 libras de carbón (30 a
40 briquetas)
• Coloque los carbones en una
mitad de la rejilla de carbón:
ajuste la rejilla de carbón a la
posición media.
SELLADO
450°-500°F
• Para tener el máximo ujo de
aire, ambas compuertas deben
estar totalmente abiertas.
• Para obtener mejores
resultados, comiencen con no
más de 3 libras de carbón (50 a
60 briquetas)
• Ajuste la rejilla de carbón a la
posición más alta o cercana a
las rejillas de cocción.
• Comience ajustando la apertura
de las compuertas a una
apertura igual o menor a 1/4 y
ajuste durante la cocción, según
sea necesario.
• Para obtener mejores
resultados, comience con no
más de 2 libras de carbón (30 a
40 briquetas) y/o madera
de combustible
• Ajuste la rejilla de carbón a la
posición más baja o alejada de
las rejillas de cocción
ASADO A LA PARRILLA
300°-450°F

Curando Su Parrillera
Curar la parrilla es un paso importante que llevar a cabo antes de comenzar a cocinar en su nueva parrillera.
Este proceso ayudará a proteger el acabado interior y exterior de la parrillera, reducirá la cantidad de alimentos
pegados a las rejillas, reducirá los sabores poco naturales y ayudará a evitar la oxidación de las rejillas.
Char-Griller
®
recomienda el uso de aceite de linaza para curar su parrillera, pero la mayoría de los aceites
de grado alimenticio (canola, semilla de uva, vegetal, cártamo, etc.) funcionarán.
PASO 1
CUBRA LIGERAMENTE
CON ACEITE
1. Las parrilleras Char-Griller
®
están cubiertas con aceite
vegetal. Si es la primera vez
que cura a su parrillera, pase
al Paso 2.
2. Si está volviendo a curar su
parrillera, cubra ligeramente
TODAS las supercies interiores
(incluyendo rejillas e interior del
barril) de su parrillera con aceite
de linaza u otro aceite vegetal.
PASO 2
CALIENTE LA
PARRILLERA
1. Siga las instrucciones para
encender su carbón (página
C-2) y controlar la temperatura
(página C-6) y lleve su parrillera
a una temperatura aproximada
de 450 °F.
2. Una vez que alcance la
temperatura, permita que las
supercies de la parrillera se
curen durante 20 minutos.
PASO 3
VUELVA A APLICAR
ACEITE A LAS REJILLAS
(REPITA 5 VECES)
1. Después de 20 minutos,
abra su parrillera y retire
cuidadosamente las rejillas con
un levantador de rejillas.
2. Vuelva a aplicar aceite de linaza
u otro aceite vegetal sobre
ambas caras de las rejillas y
vuélvalas a colocar dentro
de la parrillera.
3. Cierre la tapa y permita que las
supercies se curen durante
20 minutos
4. Repita este procedimiento
hasta cinco veces (agregue
más carbón para mantener la
temperatura, según
sea necesario).
5. Su parrillera está lista para
ser utilizada.
NOTA:
• Usted puede cubrir ligeramente el exterior del cuerpo de la parrillera (mientras está caliente) con
aceite vegetal. Esto extenderá la vida útil del acabado, similar a cuando pule un carro.

Fuego directo
SELLADO (FUEGO DIRECTO A ALTA
TEMPERATURA) - 450°- 500°F
Hasta 3 libras de carbón (50 a 60 briquetas)
Rejilla de carbón ajustada a la posición más alta o
cerca de las rejillas de cocción
Estilos De Parrilla O Asado
Su parrillera Char-Griller
®
puede ser usada para ahumar, asar o sellar su comida. Al usar las zonas de temperatura,
carbón y sabor a madera, puede personalizar la experiencia culinaria a su gusto. Las siguientes descripción le
explican las cuatro formas más comunes en que puede cocinar con su parrillera a carbón Char-Griller
®
.
Sellado
Cocine rápidamente con fuego directo a temperaturas
altas (450 °F a 500 °F).
1. Ajuste la rejilla de carbón a la posición alta (más
cerca de las rejillas de la parrillera) usando el
soporte de bandejas de carbón ajustable.
2. Prepare hasta 3 libras (aproximadamente 50 a
60 briquetas) de carbón encendido, repartiéndolo
equitativamente en la rejilla de carbón.
3. Una vez que la parrillera se encuentre a la
temperatura deseada, puede empezar a cocinar
al colocar los alimentos directamente sobre
las brasas.
4. Los alimentos se cocinarán rápidamente. Cocine
cada lado durante 3 o 4 minutos y luego llévelos
a la temperatura interna deseada.
5. NOTA: Siempre selle con la tapa de la parrillera
abierta para prevenir el daño al acabado exterior.
Fuego indirecto Fuego directo
Asado A La Parrilla
Cocine con fuego directo e indirecto a temperaturas
medias (300 °F a 450 °F). Utilice una conguración
de dos zonas para cocinar a diferentes velocidades
y temperaturas.
1. Ajuste la rejilla de carbón a la posición
media (entre las rejillas y el cuerpo de la
parrillera) usando el soporte de bandejas de
carbón ajustable.
2. Prepare hasta 2 libras (aproximadamente 30 a
40 briquetas) de carbón encendido, repartiéndolo
equitativamente en una MITAD de la rejilla de
carbón, creando dos zonas de cocción.
3. Una vez que la parrillera se encuentre a la
temperatura deseada, puede empezar a
cocinar. Primero coloque los alimentos sobre
el fuego directo, cocinando cada lado según su
preferencia. Luego de la cocción inicial sobre
fuego directo, mueva los alimentos a la zona
fría (vea la foto a la derecha) para llevar sus
alimentos a la temperatura interna deseada.
4. NOTA: Puede usar virutas y trozos de madera
o troncos cortados, adicionales al carbón, para
agregar el sabor ahumado deseado.
ASADO (FUEGO DIRECTO) - 300°- 450°F
Hasta 2 libras de carbón (30 a 40 briquetas)
Rejilla de carbón ajustada a la posición media
6. NOTA: Puede usar virutas y trozos de madera
o troncos cortados, adicionales al carbón, para
agregar el sabor ahumado deseado.

Cool Zone
Bandeja de Agua
(opcional)
Bandeja de Agua
(opcional)
Bandeja colectora
(opcional)
Ahumado
Cocine con fuego indirecto a bajas temperaturas
(150°F a 250°F). Use virutas, trozos, pellets de
madera o troncos cortados para agregar
el sabor ahumado
1. Ajuste la rejilla de carbón a la posición baja
(posición más alejada de las rejillas de la
parrillera) usando el soporte de bandejas de
carbón ajustable.
2. Prepare hasta 2 libras (aproximadamente
30 a 40 briquetas) de carbón, repartiéndolo
equitativamente en una MITAD de la rejilla de
carbón, creando dos zonas de cocción.
3. Agregue virutas, trozos de madera o
troncos cortados para agregar el sabor
ahumado deseado
4. Una vez que la parrillera se encuentre a la
temperatura deseada, puede empezar a cocinar
5. Mantenga la comida sobre el lado más frío con
fuego indirecto durante toda la cocción.
Cocine con fuego indirecto de la parrillera lateral a
bajas temperaturas (150 °F a 250 °F). Use virutas,
trozos, pellets de madera o troncos cortados para
agregar el sabor ahumado.
1. Prepare hasta 2 libras (aproximadamente 30 a 40
briquetas) de carbón en la parrillera lateral.
2. Agregue virutas, trozos, pellets de madera o
troncos cortados para agregar el sabor
ahumado deseado.
3. Una vez que la parrillera se encuentre a la
temperatura deseada, empiece a cocinar.
4. Los alimentos ubicados más cerca de la
parrillera lateral se cocinarán más rápido que
los alimentos ubicados en el lado opuesto de la
parrillera lateral.
5. NOTA: Abrir la cámara de ahumado extenderá el
tiempo de cocción.
AHUMADO HORIZONTAL (FUEGO INDIRECTO) - 150-250°F
Hasta 2 libras de carbón (30 a 40 briquetas)
y/o madera como combustible en la parrillera lateral
Ahumado Horizontal
6. NOTA: Abrir la cámara de ahumado extenderá el
tiempo de cocción.
AHUMADO (FUEGO INDIRECTO) - 150°-250°F
Hasta 2 libras de carbón (30 a 40 briquetas)
Rejilla de carbón ajustada a la posición baja o la
posición más alejada de las rejillas de cocción

Cuidado Y Mantenimiento
Para mantener la parrillera en condiciones óptimas, es importante mantenerla limpia y cuidada. El
cuidado y limpieza continua son la clave para garantizar la larga vida útil de las parrilleras Char-Griller
®
¿Tiene alguna pregunta? ¡Llame, envíe un correo electrónico o chatee en línea con el departamento de
atención al cliente de Char-Griller
®
!
** SOLO VACÍE LAS CENIZAS MIENTRAS LA PARRILLERA NO SE USE Y ESTE FRÍA AL TACTO **
IMPORTANTE: El carbón es poroso y conserva la humedad. NO deje carbón en su parrillera cuando no la
utilice. El carbón y cenizas dejados en la bandeja de cenizas pueden reducir la vida útil de su parrillera.
FINALIZANDO
• Cuando termine de cocinar en
la parrillera, limpie sus rejillas
con el Raspador de rejillas de
Char-Griller
®
y luego cubra
ligeramente sus rejillas con
aceite de linaza u otro
aceite vegetal.
• Luego, cierre las dos
compuertas y la tapa para que
el fuego se apague.
• Espere a que las brasas y
las cenizas se enfríen por
completo antes de intentar
limpiar la parrillera o remover
los residuos
LIMPIEZA
• Espere que el fuego se haya
extinguido por completo y la
parrilla esté fría al tacto antes
de vaciar las cenizas.
• Retire las rejillas de la parrillera
con el levantador de rejillas.
• Retire la bandeja de cenizas de
la parrillera.
• Golpee ligeramente la
bandeja de cenizas para soltar
cualquier ceniza que pueda
permanecer pegada.
• Vierta las cenizas en un
contenedor de metal y
cubra con agua para
garantizar que ninguna brasa
está encendida; luego podrá
eliminar las cenizas.
CUBIERTA
• Extienda la vida de su
parrillera al usar una cubierta
Char-Griller
®
a la medida
para proteger a su parrillera
de la intemperie.
• El material de poliéster
resistente a la intemperie
protege contra las aves, el
polvo, el viento, la lluvia
y la nieve.

Controle la temperatura mediante la cantidad y tipo de combustible, las compuertas duales y la rejilla ajustable
para combustible. Ajuste un extremo de la rejilla a la vez. La madera calienta más que el carbón. Un mayor ujo
de aire equivale a una mayor temperatura.
Puede agregar carbón y/o leña para ahumar mientras cocine. Use guantes y delantal cuando opere su parrillera.
Solo use leñas naturales destinadas para la cocina. Generalmente, puede encontrar leña seleccionada en tiendas
de comestibles y minoristas de artículos para parrillas al aire libre.
Si utiliza una bandeja de agua, revise el nivel del agua cuando cocina durante más de cuatro horas o cuando no
puede escuchar el agua hervir. Agregue agua moviendo la carne hacia un lado y vertiendo el agua a la bandeja
de agua a través de las rejillas de cocción.
Para reducir las llamaradas, cocine con la tapa cerrada.
Cuando cocine con carbón, deje la tapa de la parrillera abierta durante el encendido y hasta que las cenizas
de las brasas se acumulen. La tapa de la parrillera debe permanecer abierta cada vez que el medidor de
temperatura marca más de 500 °F.
Siempre coloque el carbón sobre la rejilla de carbón y no directamente en el fondo de la parrillera.
No use carbón instantáneo ya que le dará un sabor poco natural a la comida.
Las cenizas dejadas en el parrillera durante mucho tiempo absorberán la humedad y se oxidarán. Asegúrese de
vaciar la bandeja de cenizas después de que la parrillera se ha enfriado. El hierro fundido y el acero sin cubrir se
oxidarán si no se le da el cuidado adecuado.
En la PINTURA EXTERIOR, remueva el óxido con un cepillo de alambre y retoque con una pintura para altas
temperaturas, disponible en la mayoría de las tiendas de herramientas/vehículos. Rustoleum
®
#241169 es el color
de pintura más parecido.
El medidor de temperatura puede humedecerse, lo que causará que se empañe durante la cocción. Puede retirar
el medidor y calibrarlo en el horno.
Para una parrillera más hermética, llene cualquier hueco no deseado con pernos y tuercas extras (no incluidos).
Coloque un recipiente metálico en el recipiente de grasa o en la repisa inferior debajo del agujero de la parrilla
para recoger cualquier gota.
La chimenea y las compuertas laterales estarán calientes. Solo tóquelas usando guantes.
Antes de usar la parrillera por primera vez, debe curar las rejillas de cocción de hierro colado.
Luego de cada uso, cubra las rejillas internas y el metal desnudo con aceite vegetal, mientras estén calientes,
para reducir la oxidación. El curado adecuado y regular protegerá la parrilla contrala oxidación y extenderá la vida
de su parrillera y rejillas de cocción.
La parrillera goteará aceite durante el proceso de curado y durante los siguientes usos. Esto es normal.
Nunca exceda los 500 °F. Esto dañaría el acabado y contribuiría con la oxidación.
La pintura no está cubierta por la garantía y requerirá de retoques.
Esta parrillera no tiene garantía contra el óxido.
No use uido de encendido, gasolina, querosén. alcohol u otro acelerador para encender el carbón. El uso de
cualquiera de estos productos, o de productos similares, puede causar una explosión que posiblemente conlleve
a graves lesiones.
Consejos Y Advertencias Generales Sobre La Parrillera
NOTA: El humo puede escapar de áreas distintas a la chimenea de la parrillera. Eso no afectará la cocción.
CHAR-GRILLER
®
NO ACEPTA DEVOLUCIONES DE PARRILLERAS USADAS.

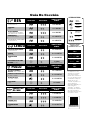
Guía De Cocción
PRODUCTOS
DEL MAR
GRANDE
CAMARÓN
4 A 6 MINUTOS
1,5 ONZAS
VIEIRA
4 A 6 MINUTOS
1 PULGADA DE GROSOR
PESCADO, FILET
5 A 10 MINUTOS
1 LIBRA
PESCADO, ENTERO
15 A 20 MINUTOS
TIEMPO DE COCCIÓN
PROMEDIO
NIVEL DE CALOR TIPO DE CALOR
POLLO
4 ONZAS - SIN HUESO, SIN PIEL
PEC HUGA O ANTEMUSLO
DE POLLO
8 A 12 MINUTOS
3 A 6 ONZAS - CON HUESO*
ANTEMUSLO O MUSLO DE POLLO
35 A 45 MINUTOS
10 A 12 ONZAS - CON HUESO*
PECHUGA DE POLLO
35 A 45 MINUTOS
8 LIBRAS
POLLO ENTERO*
3 A 5 HORAS
TIEMPO DE COCCIÓN
PROMEDIO
NIVEL DE CALOR TIPO DE CALOR
CERDO
1 PULGADA DE GROSOR
CHULETA DE CERDO, MEDIANA
8 A 10 MINUTOS
8 POUNDS
PALETA/CABEZAS DE LOMO
DE CERDO
12 HORAS
TIRA DE 3 ONZAS
CHORIZO
10 A 13 MINUTOS
1 LIBRA
LOMO DE CERDO
15 A 20 MINUTOS
TIEMPO DE COCCIÓN
PROMEDIO
NIVEL DE CALOR TIPO DE CALOR
TIEMPO DE COCCIÓN
PROMEDIO
NIVEL DE CALOR TIPO DE CALOR
RES
1 PULGADA DE GROSOR - FILET MIGNON,
RIBEYE, NEW YORK STRIP Y PORTERHOUSE
BISTEC, MEDIANO
6 A 8 MINUTOS
1 PULGADA DE GROSOR
BISTEC DE FALDA, MEDIANO
4 A 6 MINUTOS
3/4 DE PULGADA DE GROSOR
HAMBURGUESA
8 A 10 MINUTOS
4 ONZAS
SALCHICHA
5 A 7 MINUTOS
1 PULGADA DE GROSOR
BISTEC DE ARRACHERA GALLO O HANGER STEAK, MEDIANO
8 A 10 MINUTOS
*EL POLLO CON HUESO SE DEBE COCINAR O “DORAR” PRIMERO A FUEGO DIRECTO POR UNOS MINUTOS ANTES DE PASARLO A FUEGO INDIRECTO.
TEMPERATURAS INTERNAS
MÍNIMAS ADECUADAS
RECOMENDADAS POR EL USDA
145°F
PESCADOS Y MARISCOS:
165°F
POLLO:
BISTECS O CHULETAS DE
RES O CERDO:
145°F
CARNE DE RES O CERDO
MOLIDA:
160°F
Los tiempos de cocción
mostrados en este gráfico
representan una guía y
pueden variar en función de
la cocción deseada, el grosor,
la cantidad de cada tipo de
alimento que se está
cocinando, la parrillera o el
estilo de parrilla, la
temperatura ambiental y/o el
tiempo atmosférico.
Char-Griller
®
recomienda
usar siempre un termómetro
de cocina para medir la
temperatura interna de todos
los productos cárnicos.
FUEGO
DIRECTO
FUEGO
INDIRECTO
FUEGO BAJO
150°- 250°F
FUEGO MEDIO
300°- 450°F
FUEGO ALTO
450°- 550°F+
AHUMADO
LEYENDA DE FUEGO
APROX. 90 MINUTOS POR LIBRA
ENCUENTRA MÁS
RECETAS EN
CHARGRILLER.COM

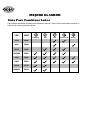
MEJORE EL SABOR
Guía Para Combinar Leñas
Las distintas variedades de leña poseen diferentes sabores y Char-Griller
®
recomienda combinar su
leña con las carnes que desea cocinar.
LEÑA SABOR
ALISO SUAVE
PECAN MEDIO
FUERTE MEZQUITE
SUAVE ARCE
MEDIO ROBLE
FUERTE JICORIA
MEDIO MANZANO
SUAVE CEREZO
VEGETALES
PRODUCTOS DEL MAR
POLLO CERDO CARNE DE RES
-
 1
1
-
 2
2
-
 3
3
-
 4
4
-
 5
5
-
 6
6
-
 7
7
-
 8
8
-
 9
9
-
 10
10
-
 11
11
-
 12
12
-
 13
13
-
 14
14
-
 15
15
-
 16
16
-
 17
17
-
 18
18
-
 19
19
-
 20
20


Char-Griller 2121 Manual de usuario
- Categoría
- Barbacoas
- Tipo
- Manual de usuario
En otros idiomas
- English: Char-Griller 2121 User manual
Documentos relacionados
Otros documentos
-
 Char Griller E1016 El manual del propietario
-
CharGriller 2130 El manual del propietario
-
-
 Char Griller 2799 El manual del propietario
-
 Char Griller 1733 El manual del propietario
-
-
-
 Char Griller 8250 El manual del propietario


