
RÉGLAGE DE LA DATE ET DE L’HEURE
RÉGLAGE DE L’AIGUILLE DE L’INDICATEUR
SÉLECTIONNER
MARÉE/TEMPÉRATURE
HEURE DES MARÉES
THERMOMÈTRE
ÉTALONNAGE DE LA BOUSSOLE
Register your product
at www.timex.com
W-225
314-095000
NA
Enregistrez votre produit à
www.timex.com
W-225 314-095000 NA
Registre su producto en
www.timex.com
W-225 314-095000 NA
THANK YOU FOR PURCHASING YOUR TIMEX® WATCH.
EXTENDED WARRANTY
Available in U.S. only.
Extend your warranty for an additional 4 years from date of purchase for $5. You can
pay with AMEX, Discover, Visa or MasterCard by calling 1 800-448-4639 during normal business hours.
Payment must be made within 30 days of purchase. Name, address, telephone number, purchase date, and
5-digit model number required. You can also mail a check for $5 to: Timex Extended Warranty, P.O. Box 1676,
Dept. EF, Little Rock, AR 72203.
Please read instructions carefully to understand how to operate your Timex® watch.
Your model may not
have all of the features described in this booklet.
OVERVIEW
MERCI D’AVOIR ACHETÉ VOTRE MONTRE TIMEX®.
GARANTIE
ÉTENDUE
Proposée aux États-Unis seulement.
La garantie peut être prolongée pour une période additionnelle de
4 ans à compter de la date d’achat pour la somme de 5 $. Vous pouvez effectuer ce paiement avec AMEX,
Discover, Visa ou MasterCard en composant le 1-800-448-4639 durant les heures normales d’ouverture. Le
paiement doit être effectué dans les 30 jours qui suivent l’achat. Indiquer les nom, adresse, numéro de
téléphone, date d’achat et numéro de modèle à 5 chiffres. Il est également possible d’envoyer un chèque de
5 $ US par courrier à : Timex Extended Warranty, P.O. Box 1676, Dept. EF, Little Rock, AR 72203.
Lire les instructions attentivement pour bien comprendre le fonctionnement de cette montre Timex®.
Il est
possible que ce modèle ne présente pas toutes les fonctions décrites dans le dépliant.
GRACIAS POR LA COMPRA DE SU RELOJ TIMEX®.
GARANTÍA
EXTENDIDA
Disponible solamente en EUA.
Extienda su garantía por 4 años más a partir de la fecha de compra por $5.
Puede pagar con AMEX, Discover, Visa o MasterCard llamando al 1 800-448-4639 en horas normales de ofici-
na. El pago deberá efectuarse dentro de los 30 días siguientes a la fecha de compra. Indique el nombre,
dirección, número de teléfono, fecha de compra y número de modelo (5 dígitos). También puede enviar un
cheque de $5 por correo a: Timex Extended Warranty, P.O. Box 1676, Dept. EF, Little Rock, AR 72203.
Por favor lea atentamente las instrucciones para saber cómo funciona su reloj Timex®.
Su reloj tal vez no
posea todas las funciones descritas en este folleto.
DESCRIPCIÓN GENERAL
DECLINATION SCALE
INDICATOR HAND
COMPASS
TURNING COMPASS RING
TEMPERATURE
SCALE
TEMP
MIDDLE-SET DATE
OUT-SET
TIME
CROWN
TIDE
TIDE SCALE
DATE
ÉCHELLE DE
DÉCLINAISON
AIGUILLE
INDICATRICE
BOUSSOLE
BAGUE
TOURNANTE
ÉCHELLE DE TEMPÉRATURE
TEMPÉRATURE
CENTRE-RÉGLAGE DE LA DATE
SORTIE-RÉGLAGE DE L’HEURE
COURONNE
MARÉE
ÉCHELLE DES MARÉES
DATE
ESCALA DE DECLINACIÓN
AGUJA INDICADORA
BRÚJULA
ANILLO GIRATORIO
ESCALA DE TEMPERATURA
TEMPERATURA
MEDIO-FIJAR LA FECHA
AFUERA-FIJAR LA HORA
CORONA
MAREA
ESCALA DE LA MAREA
FECHA
NOTE: Watch is shipped with guard around crown. Remove guard and push crown in to start.
Compass
must be calibrated before using to ensure accuracy and avoid improper headings.
See COMPASS
CALIBRATION. Go to www.timex.com/expedition for help.
Watch incorporates magnetic sensor technology of Precision Navigation Inc., Mountain View, CA.
SET DATE AND TIME
Pull crown to MIDDLE position and turn until correct date appears. After setting date, pull crown all the way
out and turn until correct time is shown. Ensure correct AM/PM setting by verifying that date changes at
midnight, not noon. Push crown in when done. Adjust date after months with fewer than 31 days.
INDICATOR HAND ADJUSTMENT
Pull crown all the way out. Indicator hand should point to 12 o’clock. If it does not, press either TIDE or TEMP
push button to move hand until it points to 12 o’clock. TIDE and TEMP push buttons move hand clockwise
and counterclockwise, respectively. Hold push button to move hand fast. Push crown in when done.
TIDE/TEMPERATURE SELECTION
Indicator hand shows either tide or temperature constantly. When temperature is shown, press TIDE push
button to select tide clock. Hand moves to low tide and then to current tide. When tide is shown, press TEMP
push button to select thermometer. Hand moves to beginning of thermometer scale and then to current
temperature.
TIDE CLOCK
For tide clock, indicator hand always rotates clockwise, so tide is rising when hand is pointing left and falling
when pointing right. Number of hours to next high/low tide is shown on tide scale.
The primary factor in determining tides is moon position. Tide clock uses moon position to predict high and
low tides, which are 6 hours and 12.5 minutes apart.
Tides are also influenced by sun position and shape of shoreline, so tide clock cannot precisely give times of
high and low tides. Periodic adjustment may be necessary.
To set tide clock, pull crown to MIDDLE position. Press either TIDE or TEMP push button to move hand to
current tide. TIDE and TEMP push buttons move hand clockwise and counterclockwise, respectively. Push
crown in when done.
For tide information, go to www.timex.com/expedition
THERMOMETER
When worn on wrist, thermometer reading is affected by body heat. For more accurate readings, remove
watch and put in shade for at least several minutes.
Watch can measure water temperature also, if submerged. Be sure to select temperature display before
placing watch in water, as buttons should not be pressed when watch is underwater.
Thermometer readings are taken every minute, and more frequently, if temperature is changing.
COMPASS CALIBRATION
Since a compass uses the earth’s magnetic field, you must be aware of large metallic objects, such as
vehicles or bridges, or objects that give off electromagnetic radiation, such as TVs or PCs, which could affect
the magnetic field around the watch. If compass is calibrated near such objects, it will only work properly in
that same location. If compass is calibrated away from such objects, it will not work properly near them.
For best results, calibrate in area of intended use.
In calibrating and taking headings, it is important, as with all compasses, to keep compass level. Calibrating
or taking a heading when watch is not level can result in large errors. Also avoid areas that may exhibit
higher than normal concentrations of hard and soft iron, as they may cause inaccurate headings. Whenever a
heading is suspect, recalibrate.
Do not store watch near any source of magnetism, such as computers, appliances, or TVs, as watch can take
on a magnetic charge, yielding inaccurate headings.
To calibrate compass, pull crown to MIDDLE position. Keep watch level or place on level surface (if band
interferes, place watch on inverted cup). Watch may be face down, but take care to protect watch face. Press
COMPASS push button to begin. Indicator hand rotates two revolutions to remind you to rotate watch. While
level,
SLOWLY
rotate watch two revolutions,
taking at least 15 seconds per revolution. This is critical in
achieving proper calibration.
When done, press any push button, keeping watch level. Indicator hand moves back and forth to
acknowledge end of calibration and then moves to current declination angle setting (see DECLINATION
ANGLE for more information). If you do not wish to set declination angle, push crown in. Otherwise, to have
watch automatically compensate for declination angle, turn compass ring until north is at 12 o’clock. Press
either TIDE or TEMP push button to move indicator hand east (+) or west (-) to point to your location’s
declination angle (see table below) using declination scale. Hold push button to move hand fast.
Push crown in when done.
COMPASS OPERATION
Normally, compass is off and indicator hand shows tide or temperature.
Compass must be calibrated prior to use and calibration should be performed in the area of intended use;
see COMPASS CALIBRATION. If compass has not been calibrated since battery replacement, attempting to
activate compass causes watch to rotate indicator hand once and play melody to remind you to calibrate.
While holding watch level, press COMPASS push button to activate compass. Indicator hand moves to point
north. If watch is turned, indicator hand will continue to move, always pointing north. After 20 seconds,
compass will automatically turn off and hand will return to its normal operation. This conserves battery life.
Press COMPASS push button at any time to keep compass on for another 20 seconds.
NOTE: While compass is on, INDIGLO® night-light may flicker slightly when on. This is normal, as night-light
must be turned off briefly during compass readings to maintain accuracy. Also, second hand moves in
two-second increments while compass is on.
REMARQUE : La couronne de la montre est protégée pour l’expédition. Retirer le capot de protection et
enfoncer la couronne pour mettre en marche.
La boussole doit être étalonnée avant utilisation pour
garantir sa précision et éviter les erreurs d’orientation.
Se reporter à ÉTALONNAGE DE LA BOUSSOLE.
Consulter www.timex.com/expedition pour assistance.
La montre utilise un système de capteurs magnétiques fabriqué par Precision Navigation, Inc., Mountain
View, Californie.
Tirer la couronne en position CENTRE et tourner jusqu’à afficher la date courante. Après avoir réglé la date,
tirer la COURONNE complètement et tourner jusqu’à afficher l’heure exacte. S’assurer que le réglage
matin/soir (AM/PM) est correct en vérifiant que la date change à minuit et non à midi. Enfoncer la couronne
pour valider. Régler la date après les mois comptant moins de 31 jours.
Tirer la couronne complètement. L’aiguille de l’indicateur devrait indiquer 12 heures. Sinon, appuyer sur le bouton
poussoir MARÉE ou TEMPÉRATURE pour faire avancer l’aiguille jusqu’à ce qu’elle indique 12 heures. Les boutons
poussoirs pour MARÉE et TEMPÉRATURE font avancer respectivement l’aiguille dans le sens des aiguilles d’une
montre et inversement. Tenir le bouton poussoir enfoncé pour la faire avancer rapidement. Enfoncer la couronne
pour valider.
L’aiguille de l’indicateur montre en permanence soit la marée, soit la température. Lorsque la température
est indiquée, appuyer sur le bouton poussoir MARÉE pour sélectionner l’heure des marées. L’aiguille indique
d’abord la marée basse puis la marée actuelle. Lorsque la marée est indiquée, appuyer sur le bouton
poussoir TEMPÉRATURE pour sélectionner le thermomètre. L’aiguille se place au début de l’échelle des
températures et indique ensuite la température courante.
Dans ce mode, l’aiguille de l’indicateur se déplace toujours dans le sens des aiguilles d’une montre. Ainsi,
la marée est montante lorsque l’aiguille pointe vers la gauche et descendante lorsque l’aiguille pointe vers la
droite. Le nombre d’heures jusqu’à la prochaine marée haute/basse est indiqué sur l’échelle des marées.
La position de la lune est un facteur primordial quant à la détermination des marées. Dans ce mode, la
montre se réfère à la position de la lune pour calculer les heures des marées hautes et basses, celles-ci sont
espacées de 6 heures et 12,5 minutes.
Les marées sont aussi influencées par la position du soleil et la forme du littoral, la montre ne peut donc pas
indiquer avec précision les heures des marées hautes et basses. Des ajustements périodiques peuvent être
nécessaires.
Pour étalonner le mode heure des marées, tirer la couronne en position CENTRE. Appuyer sur le bouton
poussoir MARÉE ou TEMPÉRATURE pour placer l’aiguille sur la marée actuelle. Les boutons poussoirs pour
MARÉE et TEMPÉRATURE font avancer respectivement l’aiguille dans le sens des aiguilles d’une montre et
inversement. Enfoncer la couronne pour valider.
Pour obtenir des informations sur les marées, aller sur le site www.timex.com/expedition
Lorsque la montre est portée au poignet, la mesure par le thermomètre est influencée par la chaleur
corporelle. Pour obtenir des mesures plus précises, enlever la montre et la placer à l’ombre pendant au
moins plusieurs minutes.
La montre peut également mesurer la température de l’eau si elle y est plongée. Veiller à sélectionner
l’affichage de la température avant de placer la montre dans l’eau car les boutons ne doivent pas être
enfoncés sous l’eau.
Les mesures par le thermomètre sont prises toutes les minutes, et plus fréquemment encore si la
température est en train de changer.
Une boussole utilise le champ magnétique terrestre ; par conséquent, il importe d’éviter d’être à proximité de
grands objets métalliques (automobiles, ponts, etc.) ou autres objets produisant un rayonnement électroma-
gnétique, tels que téléviseurs ou ordinateurs, susceptible d’affecter le champ magnétique autour de la montre.
Si la boussole est étalonnée à proximité de tels objets, elle ne fonctionnera correctement qu’à cet endroit. Si
la boussole est étalonnée loin de tels objets, elle ne fonctionnera pas correctement près d’eux.
Pour de
meilleurs résultats, étalonner à l’endroit où elle sera utilisée.
Lors de l’étalonnage et des mesures ultérieures, il importe, comme avec toutes les boussoles, de maintenir la
montre dans un plan horizontal. Procéder à l’étalonnage ou à des mesures alors que la montre n’est pas en
position horizontale peut causer des erreurs importantes. Veiller également à éviter les endroits susceptibles de
présenter des concentrations de fer de roche ou industriel supérieures à la normale, dont l’effet pourrait produire
des mesures inexactes. En présence de toute mesure suspecte, effectuer un nouvel étalonnage.
Veiller à ne pas ranger la montre à proximité d’une quelconque source magnétique (ordinateurs, appareils
électriques, téléviseurs, etc.) car cela pourrait l’aimanter et fausser les mesures ultérieures.
Pour étalonner la boussole, tirer la couronne en position CENTRE. Tenir la montre en position horizontale ou
la poser sur une surface plane (si le bracelet gêne, la poser sur une tasse tournée à l’envers). La montre peut
être posée à l’envers à condition d’en protéger la face. Appuyer sur le bouton poussoir BOUSSOLE pour
commencer. L’aiguille de l’indicateur effectue deux tours complets pour vous rappeler de faire pivoter la
montre. Tenir la montre à plat et effectuer
LENTEMENT
deux tours complets,
en comptant 15 secondes
environ par tour. Ceci est essentiel pour obtenir un étalonnage correct.
Une fois les rotations terminées, appuyer sur tout bouton poussoir, tout en maintenant la montre à
l’horizontale. L’aiguille oscille pour confirmer que l’étalonnage est terminé et indique ensuite l’angle de
déclinaison courant (voir ANGLE DE DÉCLINAISON pour plus d’informations). Si le réglage de l’angle de
déclinaison n’est pas souhaité, enfoncer la couronne. Pour que la boussole tienne compte automatiquement
de l’angle de déclinaison, faire tourner la bague jusqu’à ce que le nord soit à 12 heures. Appuyer sur le
bouton poussoir MARÉE ou TEMPÉRATURE pour déplacer l’aiguille vers l’est (+) ou l’ouest (-) afin d’indiquer
l’angle de déclinaison de l’endroit présent (voir tableau ci-dessous) à l’aide de l’échelle de déclinaison. Tenir
le bouton poussoir enfoncé pour la faire avancer rapidement. Enfoncer la couronne pour valider.
NOTA: El reloj se entrega con un protector alrededor de la corona. Quite el protector y pulse la corona hacia
adentro para comenzar. La brújula debe ser calibrada antes de su uso para asegurar la exactitud y evitar
rumbos incorrectos. Ver CALIBRACIÓN DE LA BRÚJULA. Vaya a www.timex.com/expedition por ayuda.
El reloj incorpora tecnología magnética sensorial de Precision Navigation, Inc., Mountain View, CA.
FIJANDO FECHA Y HORA
Jale la corona hasta el punto MEDIO y gírela hasta cuando aparezca la fecha correcta. Después de fijar la
fecha, jale la corona totalmente hacia afuera y gírela hasta la hora correcta. Asegúrese del momento
correcto AM/PM (mañana/tarde) verificando que la fecha cambie a la medianoche y no al mediodía. Pulse la
corona hacia adentro cuando termine. Ajuste la fecha después de meses con menos de 31 días.
AJUSTANDO LA AGUJA INDICADORA
Jale la corona totalmente hacia afuera. La aguja indicadora debe señalar las 12 en punto. Si no las señala,
pulse cualquiera de los botones MAREA o TEMPERATURA hasta que la aguja marque las 12 en punto. Los
botones MAREA y TEMPERATURA mueven la aguja en el sentido de las manecillas del reloj y a la inversa,
respectivamente. Sostenga el botón de activación para mover la aguja con rapidez. Pulse la corona hacia
adentro cuando termine.
SELECCIÓN DE MAREA/TEMPERATURA
La aguja indicadora muestra de continuo tanto la marea como la temperatura. Cuando se muestra la
temperatura, pulse el botón MAREA para seleccionar el reloj de marea. La aguja se mueve a marea baja y
luego a la marea actual. Cuando se muestra la marea, pulse el botón TEMPERATURA para seleccionar el
termómetro. La aguja se mueve al comienzo del termómetro y luego a la temperatura actual.
RELOJ DE MAREA
Para el reloj de marea, la aguja indicadora siempre rota en el sentido de las manecillas del reloj, de modo
que la marea va subiendo cuando la aguja señala a la izquierda y bajando cuando señala a la derecha. El
número de horas para la siguiente marea alta/baja se muestra en la escala de marea.
El factor primordial para determinar las mareas es la posición de la luna. El reloj de marea usa la posición de
la luna para predecir mareas altas y bajas, que se encuentran separadas por 6 horas y 12.5 minutos.
Las mareas también están influenciadas por la posición del sol y la forma del contorno de la costa, por
consiguiente el reloj no puede dar con precisión las horas de las mareas altas y bajas. Se pudieran necesitar
ajustes periódicos.
Para calibrar el reloj de marea, jale la corona hacia el MEDIO. Pulse cualquiera de los botones MAREA o
TEMPERATURA para mover la aguja a la marea actual. Los botones MAREA y TEMPERATURA mueven la aguja
en el sentido de las manecillas del reloj y a la inversa, respectivamente. Pulse la corona hacia adentro
cuando termine.
Para información de marea, vaya a www.timex.com/expedition
TERMÓMETRO
Cuando está puesto en la muñeca, la lectura del termómetro es afectada por el calor corporal. Para lograr
una lectura más exacta, quítese el reloj y déjelo a la sombra por unos minutos.
El reloj también puede medir la temperatura del agua cuando está sumergido. Recuerde seleccionar la
pantalla para temperatura antes de introducir el reloj en el agua, puesto que los botones no deben pulsarse
mientras el reloj esté sumergido.
Las lecturas del termómetro se toman a cada minuto, y con más frecuencia si la temperatura está cambiando.
CALIBRACIÓN DE LA BRÚJULA
Dado que la brújula usa el campo magnético de la Tierra, usted debe tener cuidado de objetos metálicos
grandes tales como vehículos o puentes, u objetos que emitan radiación electromagnética como televisores
y computadoras, porque podrían afectar el campo magnético alrededor del reloj. Si la brújula es calibrada
cerca de tales objetos, sólo funcionará apropiadamente en ese mismo lugar. Si la brújula es calibrada lejos de
tales objetos, no funcionará apropiadamente en la cercanía de ellos. Para óptimos resultados, haga la cali-
bración en el área donde va a ser usada.
Al calibrar y tomar rumbos es importante, como con todas las brújulas, mantener la brújula a nivel. Calibrar y
tomar un rumbo cuando el reloj no está a nivel pudiera resultar en errores grandes. Hay que evitar también
áreas que pudieran exhibir concentraciones de hierro duro y suave más altas de lo normal, pues pueden
ocasionar rumbos incorrectos. Cuando un rumbo no infunda confianza, vuelva a calibrar.
No guarde el reloj cerca de alguna fuente de magnetismo como computadoras, electrodomésticos o
televisores, pues el reloj puede recoger la carga magnética y conducir a rumbos inexactos.
Para calibrar la brújula, jale la corona hacia el MEDIO. Mantenga el reloj a nivel o colóquelo sobre una
superficie nivelada (si la pulsera interfiere, colóquelo sobre un vaso invertido). El reloj pudiera estar bocabajo,
pero tome precauciones para proteger el cristal. Pulse el botón BRÚJULA para comenzar. La aguja de la
brújula gira dos vueltas para recordarle a usted rotar el reloj. Todavía a nivel, dé dos rotaciones al reloj
LENTAMENTE, tomando al menos 15 segundos por rotación. Esto es muy importante para lograr una calibración
adecuada.
Cuando haya acabado, oprima cualquier botón de activación, manteniendo el reloj a nivel. La aguja de la
brújula se mueve hacia atrás y hacia adelante para señalar el fin de la calibración y enseguida se mueve
hacia el ángulo de declinación en uso (ver ÁNGULO DE DECLINACIÓN para más información). Si usted no
desea ajustar el ángulo de declinación, pulse la corona hacia adentro. De otro modo, para hacer que el reloj
compense automáticamente el ángulo de declinación, mueva el anillo giratorio de la brújula hasta que el
Norte esté en las 12 en punto. Oprima cualquiera de los botones MAREA o TEMPERATURA para mover la
aguja de la brújula hacia el Este (+) u Oeste (-) y apuntar hacia el ángulo de declinación de su posición (ver la
tabla de abajo) usando la escala de declinación. Sostenga el botón de activación para mover la aguja con
rapidez. Pulse la corona hacia adentro cuando termine.
FUNCIONAMIENTO
DE
LA
BRÚJULA
Normalmente, la brújula está apagada y la aguja muestra la marea o la temperatura.
La brújula debe ser calibrada antes del uso y la calibración debe realizarse en el área donde va a ser usada;
ver CALIBRACIÓN DE LA BRÚJULA. Si no se ha calibrado la brújula desde cuando se reemplazó la pila,
intentar activarla ocasiona que el reloj rote la aguja de la brújula una vez y toque una melodía para
recordarle hacer la calibración.
Mientras mantiene el reloj a nivel, oprima el botón BRÚJULA para activar la brújula. La aguja se mueve y
apunta hacia el Norte. Si se gira el reloj, la aguja indicadora continuará moviéndose, apuntando siempre al
VUE D’ENSEMBLE

Water-Resistance Depth
30m/98ft
50m/164ft
100m/328ft
p.s.i.a. * Water Pressure Below Surface
60
86
160
Profondeur d’étanchéité
30m/98 (ft/pi)
50m/164(ft/pi)
100m/328(ft/pi)
Pression de l’eau sous la surface en p.s.i.a.*
60
86
160
Profundidad de Resistencia al Agua
30m/98pies
50m/164pies
100m/328pies
Presión del agua por debajo de la superficie, en p.s.i.a.*
60
86
160
UTILISATION DE LA BOUSSOLE
ANGLE DE DÉCLINAISON
Pour plus de renseignements sur les déclinaisons magnétiques, consulter www.timex.com/expedition
VEILLEUSE
INDIGLO®
AJUSTEMENT DU BRACELET
ÉTANCHÉITÉ
PILE
USING THE COMPASS
Once compass is activated, as described above, there are two typical ways to use it.
Which way am I headed?
Hold watch so that 12 o’clock is in direction of your travel. Turn compass ring
until indicator hand is pointing to north on ring. Your heading is direction on ring at 12 o’clock.
Which way should I go?
If you know the direction you want to go (e.g., NE), turn compass ring until that
direction appears at 12 o’clock. Hold watch so that you are facing 12 o’clock. Then, turn your body until
indicator hand points to north on compass ring. You are now facing the direction you want to go.
DECLINATION ANGLE
A compass needle points to “magnetic north,” which may be slightly different from “true north,” which is
used on maps. This difference, called the “declination angle,” which varies around the globe, is typically small
and can be ignored in many cases. However, if you wish to compensate for this difference, there are two
ways to do so. You can do it manually by turning the compass ring so that indicator hand points to your
declination angle (see table below) instead of north, using declination scale on compass ring. Or, you may
have the watch automatically compensate by setting your declination angle after compass calibration; see
COMPASS CALIBRATION. With proper declination angle set, indicator hand will point to true north.
Declination angles for major world cities (W is negative and E is positive on declination scale).
Anchorage . . . . . . . . . . . . . .20E London . . . . . . . . . . . . . . . . .2W Rio De Janeiro ...................... 22W
Atlanta . . . . . . . . . . . . . . . . .
.4W
Little Rock . . . . . . . . . . . . . . .1E
San
Francisco ........................ 15E
Bombay . . . . . . . . . . . . . . . . .1W Livingston, MT . . . . . . . . . . .13E Seattle ................................... 18E
Boston . . . . . . . . . . . . . . . . .15W Munich . . . . . . . . . . . . . . . . . .2E Shanghai ................................ 5W
Calgary . . . . . . . . . . . . . . . . .16E New York City . . . . . . . . . . .13W Toronto ................................. 11W
Chicago . . . . . . . . . . . . . . . . .3W Orlando . . . . . . . . . . . . . . . . .5W Vancouver ............................. 18E
Denver . . . . . . . . . . . . . . . . . .9E Oslo . . . . . . . . . . . . . . . . . . . .1E Washington DC .................... 11W
Jerusalem . . . . . . . . . . . . . . . .4E Paris . . . . . . . . . . . . . . . . . . .1W Waterbury, CT ...................... 14W
For more magnetic declination information go to www.timex.com/expedition
INDIGLO® NIGHT-LIGHT
Press crown to illuminate watch face. Electroluminescent
technology used in the INDIGLO® night-light illuminates entire watch face at night and in low light conditions.
FONCTIONNEMENT DE LA BOUSSOLE
La boussole est normalement inactive et l’aiguille indique la marée ou la température.
La boussole doit être étalonnée avant usage, à l’endroit où elle sera utilisée ; voir ÉTALONNAGE DE LA
BOUSSOLE. Si la boussole est activée sans avoir été étalonnée après remplacement de la pile, l’aiguille effectue
une rotation complète et la montre fait entendre une mélodie pour rappeler qu’un étalonnage est nécessaire.
Tout en maintenant la montre à l’horizontale, appuyer sur le bouton poussoir BOUSSOLE pour activer la
boussole. L’aiguille se déplace et pointe vers le nord. Si on tourne la montre, l’aiguille indicatrice se déplace,
pointant toujours vers le nord. Après 20 secondes, la boussole s’arrête automatiquement et l’aiguille reprend
son fonctionnement habituel. Ceci permet de prolonger l’autonomie de la pile. Appuyer sur le bouton
poussoir BOUSSOLE à tout moment pour garder la boussole activée pendant 20 secondes de plus.
REMARQUE : Lorsque la boussole est activée, il se peut que la lumière de la veilleuse INDIGLO® clignote
légèrement quand elle est allumée. Ceci est normal, car la veilleuse doit s’éteindre brièvement pour
permettre à la boussole de produire des mesures précises. Par ailleurs, en mode boussole, la trotteuse
avance par intervalles de deux secondes.
Une fois la boussole activée conformément aux instructions ci-dessus, on peut l’utiliser de deux façons.
Dans quelle direction vais-je ?
Tenir la montre de sorte que 12 heures pointent dans la direction de
déplacement. Tourner la bague jusqu’à ce que l’aiguille indicatrice s’aligne sur le point nord indiqué sur la
bague. Le cap suivi correspond à la position 12 heures sur la bague.
Dans quelle direction dois-je aller ?
Lorsque la direction à suivre est connue (NE, par ex.), tourner la bague
jusqu’à ce que celle-ci corresponde à 12 heures. Tenir la montre de manière à faire face à la direction
correspondant à 12 heures. Tourner ensuite sur soi-même jusqu’à aligner l’aiguille indicatrice avec la marque
du nord sur la bague. On se retrouve alors face à la direction de déplacement souhaitée.
L’aiguille d’une boussole pointe vers le nord magnétique, qui peut être légèrement différent du nord
géographique utilisé sur les cartes. Cette différence, appelée « angle de déclinaison », varie à travers le
monde ; elle est généralement négligeable et on peut l’ignorer dans de nombreux cas. Cependant, si on
souhaitez tenir compte de cette différence, il y a deux façons de le faire. Manuellement, en tournant la bague
jusqu’à ce que l’aiguille indique l’angle de déclinaison (voir table ci-dessous) plutôt que le nord, à l’aide de
l’échelle de déclinaison située sur la bague de la boussole. Ou automatiquement, en réglant l’angle de
déclinaison après avoir étalonné la boussole ; voir ÉTALONNAGE DE LA BOUSSOLE. Une fois que l’angle de
déclinaison approprié est réglé, l’aiguille pointe vers le nord vrai.
Angles
de déclinaison des principales villes au monde (W est négatif et E est positif sur l’échelle de déclinaison).
Norte. Después de 20 segundos, la brújula se apagará automáticamente y la aguja retornará a su operación
normal. Esto alarga la duración de la pila. Oprima el botón BRÚJULA en cualquier momento para mantener la
brújula funcionando por otros 20 segundos.
NOTA: Mientras la brújula esté funcionando, la luz nocturna INDIGLO® puede titilar un poco cuando se activa.
Esto es normal, puesto que la luz nocturna debe apagarse brevemente mientras se lee la brújula para
mantener la exactitud. Igualmente, la manecilla de segundos se mueve en incrementos de dos segundos
cuando la brújula está funcionando.
USANDO LA BRÚJULA
Estando la brújula activada, según lo explicado anteriormente, hay dos maneras típicas de proceder para usarla.
¿Hacia dónde voy? Sostenga el reloj de modo que las 12 en punto estén en la dirección de su viaje. Rote el
anillo giratorio hasta que la aguja indicadora apunte al Norte en el anillo. Su rumbo es la dirección en el anillo
a las 12 en punto.
¿Cuál ruta debo seguir? Si sabe la dirección a donde desea ir (p.e.,NE), rote el anillo giratorio hasta que la
dirección aparezca a las 12 en punto. Sostenga el reloj de modo que usted esté colocado a las 12 en punto.
Enseguida, gire su cuerpo hasta que la aguja indicadora señale hacia el Norte en el anillo giratorio. Ahora
usted está colocado en la dirección que desea seguir.
ÁNGULO DE DECLINACIÓN
La aguja de la brújula apunta al “Norte magnético”, el cual pudiera ser ligeramente diferente del “Norte
verdadero” que figura en los mapas. Esta diferencia, llamada “ángulo de declinación” y que varía alrededor
del mundo, es por lo general pequeña y puede ser ignorada en muchos casos. Sin embargo, si usted desea
compensar por esta diferencia, hay dos maneras de proceder. Usted lo puede hacer manualmente rotando el
anillo giratorio, de tal modo que la aguja indicadora apunte hacia su ángulo de declinación (ver la tabla de
abajo) y no hacia el Norte, usando las escalas de declinación en el anillo de la brújula. O, usted puede hacer
que el reloj compense automáticamente ajustando su ángulo de declinación después de calibrar la brújula;
ver CALIBRACIÓN DE LA BRÚJULA. Habiendo ajustado apropiadamente el ángulo de declinación, la aguja
indicadora apuntará al Norte verdadero.
Ángulos de declinación para ciudades del mundo (W es negativo y E positivo en la escala de declinación).
BRACELET
ADJUSTMENT
FOLDOVER
CLASP
BRACELET
Find spring bar that connects bracelet to clasp. Using a pointed tool (Fig. 1), push spring bar in and gently
twist bracelet to disengage. Determine wrist size, then insert spring bar in correct bottom hole (Fig. 2). Push
down on spring bar, align with top hole and release to lock in place (Fig. 3).
BRACELET
LINK
REMOVAL
Fig.
1
Fig.
2
Fig.
3
Removing Links:
Place bracelet upright and insert pointed tool in opening of link.
Push pin forcefully in direction of arrow until link is detached (pins are designed to be
difficult to remove). Repeat until desired number of links are removed.
Reassembly:
Rejoin bracelet parts. Push pin back into link in opposite direction of
arrow. Press pin down securely into bracelet until it is flush.
SOLID
LINK
BRACELET
Removing Links:
Using a very small screwdriver, remove screws by turning counter-
clockwise. Repeat until desired number of links are removed. Do not remove links
adjacent to clasp.
Reassembly:
Rejoin bracelet parts and insert screw in end of opening where it was
removed. Turn screw clockwise until tight and flush with bracelet.
BARREL LINK BRACELET WITH SCREW HEAD PINS
Removing Links:
Removable links have arrows. Use one screwdriver near tail of
arrow to prevent pin from turning. Using another screwdriver, remove screw at
end near head of arrow by turning it counterclockwise. After removing screw, slide
pin out. Repeat for second pin in link.
Reassembly:
Rejoin bracelet parts and insert pin in end of opening where it was
removed. Turn screw and other end clockwise until tight and flush with bracelet.
WATER RESISTANCE
If your watch is water-resistant, meter marking or
(
O
)
is indicated.
*pounds per square inch absolute
WARNING: TO
MAINTAIN
WATER-RESISTANCE,
DO
NOT
PRESS
ANY
BUTTONS
UNDER
WATER.
1.
Watch is water-resistant only as long as lens, push buttons and case remain intact.
2.
Watch is not a diver watch and should not be used for diving.
3.
Rinse watch with fresh water after exposure to salt water.
BATTERY
Timex strongly recommends that a retailer or jeweler replace battery
. Battery type is on watch back. If
present, push/short internal reset switch after replacing battery. Battery life estimates are based on certain
assumptions regarding usage; battery life may vary depending on actual usage.
DO NOT DISPOSE OF BATTERY IN FIRE. DO NOT RECHARGE. KEEP LOOSE BATTERIES AWAY FROM CHIL-
DREN.
Appuyer sur la couronne pour illuminer le cadran de la montre. La technologie électroluminescente
utilisée dans la veilleuse INDIGLO® permet d’illuminer toute la
face de la montre la nuit et dans des conditions de faible éclairage.
BRACELET À FERMOIR DÉPLIANT
Trouver la barrette à ressort qui attache le bracelet au fermoir. À l’aide d’un outil pointu (Fig. 1), enfoncer la
barrette et faire pivoter délicatement le bracelet pour le dégager. Déterminer la taille du poignet puis
introduire la barrette à ressort dans l’orifice inférieur correspondant (Fig. 2). Enfoncer la barrette, l’aligner sur
l’orifice supérieur puis la relâcher pour la mettre en place (Fig. 3).
DÉMONTAGE
DE
MAILLONS
DU
BRACELET
Fig.
1
Fig.
2
Fig.
3
Démontage de maillons :
Placer le bracelet verticalement et introduire un outil
pointu dans l’ouverture du maillon. Pousser fortement la goupille dans le sens de la
flèche jusqu’à détacher le maillon (les goupilles sont conçues pour résister à
l’extraction). Répéter jusqu’à ce que le nombre souhaité de maillons soit démonté.
Remontage :
Mettre les pièces du bracelet en place. Pousser la goupille dans le
maillon dans le sens opposé à la flèche. Enfoncer la goupille jusqu’à ce qu’elle ne dépasse plus du bracelet.
BRACELET À MAILLONS MASSIFS
Démontage de maillons :
À l’aide d’un très petit tournevis, extraire les vis en tournant
dans le sens inverse des aiguilles d’une montre. Répéter jusqu’à ce que le nombre
souhaité de maillons soit démonté. Ne pas démonter les maillons attachés au fermoir.
Remontage :
Mettre les pièces du bracelet en place et introduire la vis du côté où
elle a été extraite. La tourner dans le sens des aiguilles d’une montre jusqu’à ce
qu’elle ne dépasse plus du bracelet.
BRACELET À MAILLON TUBULAIRE AVEC GOUPILLES À VIS
Démontage de maillons :
Les maillons démontables comportent des flèches.
Utiliser un tournevis du côté de la base de la flèche pour empêcher la goupille de
tourner. À l’aide d’un autre tournevis, déposer la vis du côté de la tête de la flèche
en tournant dans le sens inverse des aiguilles d’une montre. Après avoir déposé la
vis, extraire la goupille. Répéter pour la seconde goupille du maillon.
Remontage :
Mettre les pièces du bracelet en place et introduire la goupille du
côté où elle a été extraite. Tourner la vis de l’autre côté dans le sens des aiguilles
d’une montre jusqu’à ce qu’elle ne dépasse plus du bracelet.
Si la montre est étanche, la profondeur maximale ou le symbole
(
O
)
est indiqué.
*livres par pouce carré (abs.)
ATTENTION
:
POUR
PRÉSERVER
L’ÉTANCHÉITÉ,
NE
PAS
ENFONCER
LES
BOUTONS
SOUS
L’EAU.
1. La montre est étanche aussi longtemps que le verre, les boutons et le boîtier sont intacts.
2. La montre n’est pas conçue pour la plongée. Ne pas l’utiliser dans ces conditions.
3.
Rincer à l’eau douce après tout contact avec l’eau de mer.
Timex recommande fortement de faire changer la pile par un détaillant ou un bijoutier.
Le type de pile
est indiqué au dos de la montre. S’il est présent, appuyer sur le bouton « internal reset » (remise à zéro
interne) après avoir remplacé la pile. L’estimation de la durée de vie de la pile est basée sur certaines
hypothèses quant à l’usage ; la durée réelle peut varier selon l’utilisation de la montre.
NE PAS JETER LA PILE AU FEU. NE PAS RECHARGER LA PILE. GARDER LES PILES HORS DE LA PORTÉE
DES ENFANTS.
Pulse la corona para iluminar la esfera del reloj. La tecnología electroluminiscente
y utilizada por la luz nocturna INDIGLO® ilumina toda la esfera del reloj por la
noche y en condiciones de poca visibilidad.
AJUSTE DE LA PULSERA
PULSERA CON BROCHE PLEGABLE
Localice el perno de resorte que conecta la pulsera al broche. Utilizando una herramienta puntiaguda
(Fig. 1), empuje hacia dentro la barra de resorte y gire suavemente la pulsera para desacoplarla. Determine el
tamaño de la muñeca y después introduzca la barra de resorte en el agujero inferior correcto (Fig. 2). Empuje
hacia abajo la barra de resorte, alinéela con el agujero superior y suéltela para que encaje en su sitio (Fig. 3).
REMOCIÓN
DE
ESLABONES
DE
LA
PULSERA
Fig.
1
Fig.
2
Fig.
3
Cómo quitar los eslabones: Coloque la pulsera en posición vertical e introduzca la
herramienta puntiaguda en la abertura del eslabón. Empuje el pasador con fuerza en
el sentido de la flecha hasta que el eslabón se suelte (los pasadores están diseñados
para ser difíciles de quitar). Repita el procedimiento hasta que haya quitado el
número deseado de eslabones.
Reensamblaje: Vuelva a unir las piezas de la pulsera. Empuje el pasador de vuelta al interior del eslabón en
sentido contrario al indicado por la flecha. Presione hacia abajo el pasador hasta que se acople firmemente
en la pulsera y quede a ras.
PULSERA
DE
ESLABONES
MACIZOS
Cómo quitar los eslabones: Utilizando un destornillador muy pequeño, quite los
tornillos girándolos en sentido contrario al de las manecillas del reloj. Repita el
procedimiento hasta que haya quitado el número deseado de eslabones. No quite los
eslabones adyacentes al broche.
Reensamblaje: Vuelva a unir las piezas de la pulsera e introduzca el tornillo en el
extremo de la abertura de donde se quitó. Gire el tornillo en el sentido de las agujas
del reloj hasta que esté apretado y al ras con la pulsera.
PULSERA DE ESLABONES CILÍNDRICOS CON PASADORES ATORNILLABLES
Cómo quitar los eslabones: Los eslabones removibles tienen flechas. Utilice un
destornillador cerca de la cola de la flecha para que el pasador no gire. Utilizando
otro destornillador, quite el tornillo en el extremo de la punta de la flecha girándolo
en sentido contrario al de las manecillas del reloj. Después de quitar el tornillo,
empuje hacia afuera el pasador. Repita el procedimiento para el segundo pasador.
Reensamblaje: Vuelva a unir las piezas de la pulsera e introduzca el pasador en el
extremo de la abertura de donde se quitó. Gire el tornillo en el sentido de las manecillas
del reloj hasta que esté apretado y a ras con la pulsera.
RESISTENCIA AL AGUA
Si
su
reloj
es
resistente
al
agua, se
indicarán
los
metros
o
aparecerá
el
símbolo
(
O
).
*libras por pulgada cuadrada absoluta
ADVERTENCIA: PARA MANTENER LA RESISTENCIA AL AGUA, NO PULSE NINGÚN BOTÓN
BAJO EL AGUA.
1. El reloj es resistente al agua solamente mientras el cristal, los botones y la caja permanezcan intactos.
2. El reloj no es un reloj de buzo y no debe utilizarse para bucear.
3. Enjuague el reloj con agua fresca después de haber estado expuesto al agua salada.
PILA
Timex recomienda encarecidamente que un minorista o un joyero cambien la pila. El tipo de pila está indicado al
respaldo de la caja. Si existiera, pulse brevemente el interruptor interno de reinicio después de reemplazar la
pila. Las estimaciones de duración de la pila se basan en ciertas suposiciones relacionadas con el uso; la
duración de la pila puede variar dependiendo del uso real.
NO TIRE LA PILA AL FUEGO. NO LA RECARGUE. MANTENGA LAS PILAS SUELTAS FUERA DEL
ALCANCE DE LOS NIÑOS.
GARANTÍA
INTERNACIONAL
DE
TIMEX
(GARANTÍA LIMITADA EN EUA – VEA LA PARTE DELANTERA DEL FOLLETO DE INSTRUCCIONES
RESPECTO A LOS TÉRMINOS DE LA OFERTA DE GARANTÍA PROLONGADA)
Timex Corporation garantiza su reloj TIMEX® contra defectos de fabricación por un período de UN AÑO a partir de la fecha
de compra original. Timex y sus sucursales en todo el mundo respaldan esta Garantía Internacional.
Cabe aclarar que Timex tiene la libertad de optar por reparar el reloj con componentes nuevos o reacondicionados e
inspeccionados, y también podría optar por reemplazarlo por un modelo idéntico o similar. IMPORTANTE — OBSERVE POR
FAVOR QUE ESTA GARANTÍA NO CUBRE DEFECTOS O DAÑOS A SU RELOJ:
1)
después de vencido el plazo de la garantía;
2)
si el reloj inicialmente no se compró a un distribuidor autorizado de Timex;
3)
si las reparaciones efectuadas no las hizo Timex;
4)
si son consecuencia de accidentes, manipulación no autorizada o abuso; y
5)
por cristal, correa o pulsera, caja, accesorios o pila. Timex podría cobrar por el cambio de cualquiera de estas partes.
ESTA GARANTÍA SE OFRECE EN FORMA EXCLUSIVA Y EN LUGAR DE CUALQUIER OTRA GARANTÍA, SEA EXPRESA O IMPLÍCITA,
INCLUSIVE TODA GARANTÍA IMPLÍCITA PARA FINES COMERCIALES O DE ADECUACIÓN A FINES PARTICULARES. TIMEX NO
ASUME
NINGUNA
RESPONSABILIDAD
POR
PERJUICIOS
DIRECTOS,
INDIRECTOS
NI
ESPECIALES.
En
ciertos
países
y
estados
no
se permiten limitaciones de las garantías implícitas ni exclusiones o limitaciones de perjuicios, por lo cual las limitaciones
mencionadas anteriormente podrían no aplicarse en su caso particular. Esta garantía le otorga derechos establecidos por ley,
pero usted también podría tener otros derechos que difieren de un país a otro, o de un estado a otro.
Para solicitar los servicios incluidos en la garantía, devolver el reloj a Timex, a una de sus sucursales o al comercio minorista
adonde se compró el reloj, adjuntando el Cupón de Reparación que originalmente viene con el mismo. En EUA y Canadá se
puede adjuntar el original del Cupón de Reparación del Reloj o una nota en la que figure su nombre, domicilio, número de
teléfono y fecha y lugar de compra. Para cubrir el costo de envío, adjunte el siguiente importe (este importe no es para el
pago de la reparación): En EUA, un cheque o giro por valor de US $ 7.00 (dólares estadounidenses); en Canadá, un cheque
certificado o giro por valor de CAN $6.00 (dólares canadienses); en el Reino Unido, un cheque certificado o giro por valor de
UK £ 2.50 (libras). En otros países, Timex se encargará de cobrarle el importe por gastos de envío. NUNCA INCLUYA CON EL
RELOJ UNA MALLA O BANDA ESPECIAL NI NINGÚN OTRO ARTÍCULO DE VALOR PERSONAL.
En EUA, por favor llame al 1-800-448-4639 para obtener información adicional sobre la garantía. En Canadá, llamar al número
1-800-263-0981. En Brasil, al +55 (11) 5572 9733. En México, al 01-800-01-060-00. En América Central, Países del Caribe,
Bermuda
y
Bahamas,
al
(501)
370-5775
(EUA).
En
Asia,
al
852-2815-0091.
En
el
Reino
Unido,
al
44
020
8687
9620.
En
Portugal,
al 351 212 946 017. En Francia, al 33 3 81 63 42 00. En Alemania, al 49 7 231 494140. En Medio Oriente y África, al
971-4-310850. En otras áreas, consulte al vendedor local de Timex o al distribuidor de Timex sobre la garantía. En Canadá,
EUA y en otros lugares, algunos distribuidores de Timex podrían proporcionarle un sobre con la dirección y el franqueo pre-
viamente pagado para que envíe el reloj a reparación.
©2005 Timex Corporation. TIMEX es una marca comercial registrada de Timex Corporation. INDIGLO es una marca
registrada de Indiglo Corporation en EUA y otros países.
LUZ NOCTURNA INDIGLO®
Para información adicional sobre declinación magnética vaya a www.timex.com/expedition
Rio de Janeiro ............................. 22W
San
Francisco............................... 15E
Seattle .......................................... 18E
Shanghai ....................................... 5W
Toronto ........................................ 11W
Vancouver .................................... 18E
Washington DC ........................... 11W
Waterbury, CT ............................. 14W
Londres ...................................2W
Little Rock ................................ 1E
Livingston, MT ....................... 13E
Munich ..................................... 2E
Ciudad de Nueva York ..........13W
Orlando ...................................5W
Oslo ......................................... 1E
París .......................................1W
Anchorage ........................................ 20E
Atlanta .............................................. 4W
Bombay ............................................ 1W
Boston ............................................ 15W
Calgary ............................................. 16E
Chicago ............................................ 3W
Denver ................................................ 9E
Jerusalén ............................................ 4E
Londres . . . . . . . . . . . . . . . . . . . . . .2W Rio de Janeiro............................. 22W
Little Rock . . . . . . . . . . . . . . . . . . .
.1E
San
Francisco ...............................15E
Livingston, MT . . . . . . . . . . . . . . . .13E Seattle ..........................................18E
Munich . . . . . . . . . . . . . . . . . . . . . . .2E Shanghai ...................................... 5W
New York . . . . . . . . . . . . . . . . . . .13W Toronto ....................................... 11W
Orlando . . . . . . . . . . . . . . . . . . . . . .5W Vancouver ....................................18E
Oslo . . . . . . . . . . . . . . . . . . . . . . . . .1E Washington DC .......................... 11W
Paris . . . . . . . . . . . . . . . . . . . . . . . .1W Waterbury, CT ............................ 14W
Anchorage ................................... 20E
Atlanta .......................................... 4W
Mumbai ........................................ 1W
Boston........................................ 15W
Calgary ....................................... 16E
Chicago ........................................ 3W
Denver .......................................... 9E
Jérusalem ..................................... 4E
GARANTIE
INTERNATIONALE TIMEX
(GARANTIE LIMITÉE – É.-U. – PRIÈRE DE SE REPORTER À LA COUVERTURE DU LIVRET D’INSTRUCTION
POUR LES MODALITÉS DE L’OFFRE DE GARANTIE PROLONGÉE)
Votre montre TIMEX® est garantie contre les défauts de fabrication par Timex Corporation pour une période d’UN AN,
à compter de la date d’achat. Timex ainsi que ses filiales du monde entier honoreront cette garantie internationale.
Timex se réserve le droit de réparer votre montre en y installant des composants neufs ou révisés, ou bien de la remplacer
par un modèle identique ou similaire. IMPORTANT — CETTE GARANTIE NE COUVRE PAS LES DÉFAUTS OU
L’ENDOMMAGEMENT DE VOTRE MONTRE :
1)
après l’expiration de la période de garantie ;
2)
si la montre n’a pas été achetée initialement chez un revendeur Timex agréé ;
3)
résultant de travaux de réparation non effectués par Timex ;
4)
s’il s’agit d’un accident, falsification ou abus ;
5)
s’il s’agit du verre ou cristal, du bracelet ou brassard, du boîtier, des accessoires ou de la pile. Le remplacement de
ces pièces peut vous être facturé par Timex.
CETTE GARANTIE AINSI QUE LES RECOURS PRÉVUS DANS LES PRÉSENTES SONT EXCLUSIFS ET REMPLACENT TOUTE AUTRE
GARANTIE
EXPRESSE
OU
IMPLICITE, Y
COMPRIS TOUTE
GARANTIE
IMPLICITE
DE
QUALITÉ
MARCHANDE
ET
D’ADAPTATION
À
UN
USAGE
PARTICULIER.
TIMEX
N’EST
RESPONSABLE
D’AUCUN
DOMMAGE
PARTICULIER,
ACCESSOIRE
OU
INDIRECT.
Certains états ou provinces n’autorisent pas les limitations de garanties implicites et n’autorisent pas les exclusions ou
limitations pour des dommages, auquel cas lesdites limitations pourraient ne pas vous concerner. Les modalités de la
présente garantie vous donnent des droits légaux précis et vous pouvez également vous prévaloir d’autres droits qui
varient d’un état ou d’une province à l’autre.
Pour obtenir le service garanti, retourner la montre à Timex, à une de ses filiales ou au détaillant Timex où il a été acheté.
Inclure un coupon de réparation original dûment rempli ou, aux É.-U. et au Canada, le coupon original ou une déclaration
écrite comprenant votre nom, adresse, numéro de téléphone ainsi que la date et le lieu d’achat. Veuillez inclure la somme
suivante avec votre montre pour couvrir les frais de poste et de manutention (ce ne sont pas des frais de réparation) : un
chèque ou mandat de 7,00 $ É.U. aux États-Unis, de 6,00 $ CAN au Canada et de 2,50 £ au Royaume-Uni. Dans les autres
pays, Timex vous facturera les frais de poste et de manutention. N’INCLUEZ JAMAIS DANS VOTRE ENVOI UN BRACELET
SPÉCIAL OU AUTRE ARTICLE AYANT UNE VALEUR SENTIMENTALE.
Aux É.-U. veuillez composer le 1-800-448-4639 pour plus de renseignements sur la garantie. Au Canada, composer le
1-800-263-0981. Au Brésil, composer le +55 (11) 5572 9733. Au Mexique, composer le 01-800-01-060-00. En Amérique cen-
trale, les Caraïbes, les Bermudes et les Bahamas, composer le (501) 370-5775 (É.-U.). En Asie, composer le 852-2815-0091.
Au R.U., composer le 44 020 8687 9620. Au Portugal, composer le 351 212 946 017. En France, composer le 33 3 81 63 42 00.
En Allemagne, composer le 49 7 231 494140. Au Moyen-Orient et en Afrique, composer le 971-4-310850. Dans les autres
régions, veuillez contacter votre détaillant ou distributer Timex pour des renseignements sur la garantie. Au Canada, aux
É.-U. et en certains autres endroits, les détaillants Timex participants peuvent vous faire parvenir un emballage pré-adressé
et pré-affranchi pour vous faciliter l’envoi de la montre à l’atelier de réparation.
©2005 Timex Corporation. TIMEX est une marque déposée de Timex Corporation. INDIGLO est une marque déposée d’Indiglo
Corporation aux États-Unis et dans d’autres pays.
TIMEX
INTERNATIONAL
WARRANTY
(U.S. – LIMITED WARRANTY – PLEASE SEE FRONT OF INSTRUCTION BOOKLET
FOR TERMS OF EXTENDED WARRANTY OFFER)
Your TIMEX® watch is warranted against manufacturing defects by Timex Corporation for a period of ONE YEAR from the
original purchase date. Timex and its worldwide affiliates will honor this International Warranty.
Please note that Timex may, at its option, repair your watch by installing new or thoroughly reconditioned and inspected
components or replace it with an identical or similar model. IMPORTANT — PLEASE NOTE THAT THIS WARRANTY DOES
NOT COVER DEFECTS OR DAMAGES TO YOUR WATCH:
1)
after the warranty period expires;
2)
if the watch was not originally purchased from an authorized Timex retailer;
3)
from repair services not performed by Timex;
4)
from accidents, tampering or abuse; and
5)
lens or crystal, strap or band, watch case, attachments or battery. Timex may charge you for replacing any of these
parts.
THIS WARRANTY AND THE REMEDIES CONTAINED HEREIN ARE EXCLUSIVE AND IN LIEU OF ALL OTHER WARRANTIES,
EXPRESS OR IMPLIED, INCLUDING ANY IMPLIED WARRANTY OF MERCHANTABILITY OR FITNESS FOR PARTICULAR PURPOSE.
TIMEX
IS
NOT
LIABLE
FOR ANY
SPECIAL, INCIDENTAL
OR
CONSEQUENTIAL
DAMAGES. Some
countries
and
states
do
not
allow limitations on implied warranties and do not allow exclusions or limitations on damages, so these limitations may
not apply to you. This warranty gives you specific legal rights and you may also have other rights which vary from country
to country and state to state.
To obtain warranty service, please return your watch to Timex, one of its affiliates or the Timex retailer where the watch
was purchased, together with a completed original Watch Repair Coupon or, in the U.S. and Canada only, the completed
original Watch Repair Coupon or a written statement identifying your name, address, telephone number and date and place
of purchase. Please include the following with your watch to cover postage and handling (this is not a repair charge): a US$
7.00 check or money order in the U.S.; a CAN$6.00 cheque or money order in Canada; and a UK£2.50 cheque or money
order in the U.K. In other countries, Timex will charge you for postage and handling. NEVER INCLUDE A SPECIAL WATCH-
BAND OR ANY OTHER ARTICLE OF PERSONAL VALUE IN YOUR SHIPMENT.
For the U.S., please call 1-800-448-4639 for additional warranty information. For Canada, call 1-800-263-0981. For Brazil,
call +55 (11) 5572 9733. For Mexico, call 01-800-01-060-00. For Central America, the Caribbean, Bermuda and the Bahamas,
call (501) 370-5775 (U.S.). For Asia, call 852-2815-0091. For the U.K., call 44 020 8687 9620. For Portugal, call 351 212 946
017. For France, call 33 3 81 63 42 00. For Germany, call 49 7 231 494140. For the Middle East and Africa, call 971-4-310850.
For other areas, please contact your local Timex retailer or Timex distributor for warranty information. In Canada, the U.S.
and in certain other locations, participating Timex retailers can provide you with a postage-paid, pre-addressed Watch
Repair Mailer for your convenience in obtaining factory service.
©2005 Timex Corporation. TIMEX is a registered trademark of Timex Corporation. INDIGLO is a registered trademark of
Indiglo Corporation in the US. and other countries.

OBRIGADO POR TER COMPRADO UM RELÓGIO TIMEX®.
Leia as instruções cuidadosamente para poder compreender o modo de
funcionamento do seu relógio Timex®.
O seu modelo poderá não dispor
de todas as funções descritas neste livro.
PERSPECTIVA
GERAL
ESCALA DE
ESCALA DE
DECLINAÇÃO
TEMPERATURA
PONTEIRO
INDICADOR
TEMP
MEIO-ACERTAR A DATA
FORA-ACERTAR A HORA
COROA
(CROWN)
BÚSSOLA
(COMPASS)
MARÉ
ESCALA DAS MARÉS
RODAR O ANEL
DA BÚSSOLA
DATA
NOTA: O relógio é embalado com uma guarda à volta da coroa. Para começar a
utilizar o relógio retire a guarda e empurre a coroa para dentro.
A bússola
deve de ser calibrada antes de ser utilizada para assegurar precisão e
evitar indicações de direcção inexactas.
Ver a CALIBRAÇÃO DA BÚSSOLA.
Vá ao site www.timex.com/expedition para obter ajuda.
O relógio incorpora a tecnologia de sensor magnético da Precision Navigation,
Inc., Mountain View, CA.
ACERTAR A DATA E A HORA
Puxe a coroa para a posição DO MEIO e rode-a até aparecer a data correcta.
Depois de acertar a data, puxe a coroa completamente para fora e rode-a até
aparecer a hora correcta. Assegure a definição correcta de AM/PM verificando
que a data muda à meia-noite, não ao meio-dia. Quando terminar, empurre a
coroa para dentro. Ajuste a data nos meses com menos de 31 dias.
REGULAÇÃO DO PONTEIRO INDICADOR
Puxe a coroa completamente para fora. O ponteiro indicador deve apontar
para as 12 horas. Se isso não acontecer, carregue num dos botões TIDE ou
TEMP para mover o ponteiro até este apontar para as 12 horas. Os botões de
pressão TIDE (MARÉ) e TEMP fazem mover o ponteiro respectivamente no
sentido dos ponteiros do relógio e no sentido contrário ao dos ponteiros do
relógio. Mantenha o botão carregado para mover o ponteiro mais rapidamente.
Quando terminar, empurre a coroa para dentro.
SELECÇÃO DE MARÉ E TEMPERATURA
O ponteiro indicador mostra constantemente a maré ou a temperatura.
Quando a temperatura estiver a ser apresentada, carregue no botão TIDE para
seleccionar o relógio das marés. O ponteiro desloca-se para a maré baixa e a
seguir para a maré actual. Quando a maré estiver a ser apresentada, carregue
no botão TEMP para seleccionar o termómetro. O ponteiro desloca-se para o
início da escala do termómetro e a seguir para a temperatura actual.
RELÓGIO DAS MARÉS
Para o relógio das marés, o ponteiro indicador roda sempre no sentido dos
ponteiros do relógio, assim a maré está a subir quando o ponteiro está a
apontar para a esquerda e a descer quando o ponteiro está a apontar para a
direita. Na escala das marés é apresentado o número de horas que faltam
para a próxima maré alta ou maré baixa.
O factor principal para a determinação das marés é a posição da lua. O relógio
das marés utiliza a posição da lua para prever as marés alta e baixa, cuja
diferença é de 6 horas e 12,5 minutos.
As marés também são influenciadas pela posição do sol e pela forma da linha
da costa, por isso o relógio das marés não pode determinar com exactidão as
horas a que ocorrem a maré alta e a maré baixa. Poderá ser necessário fazer
um ajustamento periódico.
Para acertar o relógio das marés, puxe a coroa para a posição DO MEIO.
Carregue num dos botões TIDE ou TEMP para mover o ponteiro para a maré
actual. Os botões de pressão TIDE (MARÉ) e TEMP fazem mover o ponteiro
respectivamente no sentido dos ponteiros do relógio e no sentido contrário ao
dos ponteiros do relógio. Quando terminar, empurre a coroa para dentro.
Para ver informações sobre as marés, visite o site www.timex.com/expedition
TERMÓMETRO
Se o relógio for usado no pulso, os valores indicados pelo termómetro são
afectados pelo calor corporal. Para obter valores exactos da temperatura,
tire o relógio e deixe-o à sombra durante alguns minutos.
O relógio também pode medir a temperatura da água, se estiver submerso.
Não se esqueça de seleccionar o mostrador da temperatura antes de colocar
o relógio na água, porque os botões não devem ser carregados quando o
relógio está dentro de água.
Os valores da temperatura são medidos de minuto a minuto e, com maior
frequência, se forem detectadas alterações na temperatura.
CALIBRAÇÃO DA BÚSSOLA
Uma vez que a bússola utiliza o campo magnético da Terra, deve ter cuidado
com os objectos metálicos de grandes dimensões, tais como, veículos ou
pontes ou objectos que emitem radiações electromagnéticas, como
televisores ou computadores, que podem afectar o campo magnético à volta
do relógio. Se a bússola for calibrada na proximidade desses objectos, só
funcionará correctamente nesse mesmo local. Se a bússola for calibrada longe
desses objectos, não funcionará correctamente na proximidade dos mesmos.
Para obter os melhores resultados, efectue a calibração na zona onde
pretende utilizar a bússola.
Durante a calibração e a determinação de direcções é importante, como em
todas as bússolas, manter a bússola nivelada. Se a calibração ou a determi-
nação de direcções for feita quando a bússola não está nivelada, os resultados
podem apresentar erros significativos. Evite também as zonas onde possam
existir concentrações superiores ao normal de minério de ferro e ferro
industrial, pois elas podem causar leituras inexactas. Se desconfiar que a
determinação de direcção não está correcta, volte a calibrar a bússola.
Não guarde o relógio perto de uma fonte magnética, tal como, computadores,
electrodomésticos ou televisores, porque o relógio poderá adquirir uma carga
magnética e produzir leituras de determinação de direcção inexactas.
Para calibrar a bússola, puxe a coroa para a posição do MEIO. Mantenha o
relógio nivelado ou coloque-o sobre uma superfície nivelada (se a correia do
relógio atrapalhar, coloque o relógio sobre um copo virado para baixo). O
relógio pode ser colocado com o mostrador virado para baixo, mas nesse caso
tenha cuidado para proteger o mostrador. Carregue no botão de pressão da
BÚSSOLA para iniciar a calibração. O ponteiro indicador executa duas
revoluções para o lembrar de rodar o relógio. Com o relógio nivelado, rode-o
LENTAMENTE
duas voltas completas,
demorando pelo menos 15 segundos
em cada revolução. Isto é absolutamente essencial para conseguir uma
Quando terminar, carregue em qualquer botão de pressão, mantendo o relógio
nivelado. O ponteiro indicador roda para trás e para a frente para assinalar o
fim da calibração e a seguir move-se para o ângulo de declinação actualmente
definido (para mais informações consulte DECLINATION ANGLE – ÂNGULO DE
DECLINAÇÃO). Se não desejar definir o ângulo de declinação, empurre a coroa
para dentro. Caso contrário, para que o relógio compense automaticamente o
ângulo de declinação, rode o anel da bússola até o norte apontar para as
12 horas. Carregue num dos botões TIDE ou TEMP para mover o ponteiro
indicador para Este (+) ou Oeste (-) para apontar para o ângulo de declinação
do local (ver a tabela abaixo) utilizando a escala de declinação. Mantenha o
botão carregado para mover o ponteiro mais rapidamente. Quando terminar,
empurre a coroa para dentro.
OPERAÇÃO DA BÚSSOLA
Normalmente, a bússola está desligada e o ponteiro indicador mostra a maré
ou a temperatura
Antes de ser utilizada, a bússola deve ser calibrada e a calibração deve ser
efectuada na zona onde se pretende utilizá-la; ver CALIBRAÇÃO DA BÚSSOLA.
Se a bússola não tiver sido calibrada desde que a bateria foi substituída, a
tentativa de activar a bússola faz com que o ponteiro indicador rode uma vez
e soa uma melodia para o lembrar que é preciso calibrar a bússola.
Mantendo o relógio nivelado, carregue no botão de pressão da BÚSSOLA para
a activar. O ponteiro indicador move-se para apontar o norte. Se o relógio for
rodado, o ponteiro indicador move-se também, continuando a apontar para o
norte. Depois de 20 segundos, a bússola desligará automaticamente e o
ponteiro voltará para a operação normal. Isto permite poupar a bateria.
Carregue no botão de pressão da BÚSSOLA em qualquer momento para
manter a bússola activada durante outros 20 segundos.
NOTA: Quando a bússola está activada, a luz nocturna INDIGLO® poderá piscar
ligeiramente, se estiver activada. Isto é normal, porque a luz nocturna deve
desactivar-se brevemente durante as leituras da bússola para manter a
exactidão das mesmas. O ponteiro dos segundos move-se também em
incrementos de dois segundos enquanto a bússola estiver ligada.
UTILIZAR A BÚSSOLA
Uma vez activada a bússola, dispõe de duas maneias típicas de a utilizar,
tal como está descrito anteriormente.
Para que direcção estou a ir?
Mantenha o relógio de forma a que as
12 horas apontem na direcção para a qual se desloca. Rode o anel da bússola
até o ponteiro indicador apontar para o norte no anel. A direcção indicada no
anel na posição das 12 horas é a direcção para a qual se desloca.
Que direcção devo tomar?
Se conhecer a direcção para onde quer ir (por
exemplo, NE), rode o anel da bússola até essa direcção se situar na posição
das 12 horas. Segure no relógio de forma a você ficar virado para as 12 horas.
A seguir, rode o seu corpo até o ponteiro indicador apontar para o norte no
anel da bússola. Agora você está virado para a direcção para onde deseja ir.
ÂNGULO DE DECLINAÇÃO (DECLINATION ANGLE)
O ponteiro da bússola aponta para o “norte magnético”, que pode ser
ligeiramente diferente do “norte verdadeiro” utilizado nos mapas. Esta
diferença, chamada o “ângulo de declinação”, que varia com os locais do
globo, é normalmente pequena e pode ser ignorada na maior parte dos casos.
No entanto, se desejar efectuar a compensação desta diferença, pode fazê-lo
de duas maneiras. Pode fazê-lo manualmente rodando o anel da bússola de
forma a que o ponteiro indicador aponte para o ângulo de declinação do local
onde se encontra (ver tabela abaixo) em vez de apontar para o Norte,
utilizando a escala de declinação do anel da bússola. Ou pode optar por deixar
o relógio proceder automaticamente à compensação definindo o seu ângulo
de declinação depois de ter efectuado a calibração da bússola; ver
CALIBRAÇÃO DA BÚSSOLA. Com o ângulo de declinação corretamente
definido, o ponteiro indicador apontará para o Norte verdadeiro.
Ângulos de declinação para as principais cidades do mundo (na escala de
declinação, W representa um valor negativo e E um valor positivo).
Anchorage . . . . .20E Londres . . . . . . . . . . . . . .2W Rio de Janeiro ............ 22W
Atlanta . . . . . . . .4W Little Rock . . . . . . . . . . . .1E São Francisco .............. 15E
Bombaim . . . . . .1W Livingston, MT . . . . . . . .13E Seattle ........................ 18E
Boston . . . . . . .15W Munique . . . . . . . . . . . . . .2E Xangai.......................... 5W
Calgary . . . . . . .16E Nova Iorque . . . . . . . . .13W Toronto ...................... 11W
Chicago . . . . . . .3W Orlando . . . . . . . . . . . . . .5W Vancouver ................... 18E
Denver . . . . . . . . .9E Oslo . . . . . . . . . . . . . . . . .1E Washington DC .......... 11W
Jerusalém . . . . . .4E Paris . . . . . . . . . . . . . . . .1W Waterbury, CT ............ 14W
Para mais informações sobre declinação magnética, visite www.timex.com/expedition
LUZ NOCTURNA INDIGLO®
Carregue na coroa para iluminar o mostrador do relógio. A tecnologia
electroluminescente patenteada (Pat. EUA 4.527.09 e 4.775.964) usada na luz
nocturna INDIGLO® ilumina o mostrador inteiro do relógio à noite e em
condições de fraca luminosidade.
AJUSTAR A BRACELETE
BRACELETE DE DOBRAR E ENCAIXAR
Procure a vareta de mola que liga a bracelete ao fecho de encaixe. Com uma
ferramenta aguçada (Fig. 1), empurre a vareta de mola para dentro e torça
suavemente a bracelete para desengatar. Avalie o tamanho do pulso e depois
enfie a vareta de mola no orifício de baixo correcto (Fig. 2). Empurre a vareta
de mola para baixo, alinhe-a com o orifício de cima e depois solte-a para que
encaixe no lugar (Fig. 3).
RETIRAR UM ELO DA BRACELETE
Fig. 1
Fig. 2
Fig. 3
Retirar os elos:
Coloque a bracelete verticalmente e enfie
uma ferramenta aguçada na abertura do elo. Empurre a
vareta com força na direcção da seta até que o elo se
solte (as varetas foram projectadas de modo a serem
difíceis de retirar). Repita esta operação até ter retirado
o número de elos desejados.
Voltar a montar:
Volte a juntar as peças da bracelete. Empurre a vareta de
volta para dentro do elo na direcção oposta à da seta. Carregue na vareta para
baixo e para dentro do elo até ficar bem presa e nivelada com a bracelete.
BRACELETE COM ELOS MACIÇOS
Retirar os elos:
Utilizando uma chave de parafusos muito
pequena (de relojoeiro), retire os parafusos rodando no
sentido contrário ao dos ponteiros do relógio. Repita esta
operação até ter retirado o número de elos desejados.
Não retire os elos adjacentes ao fecho.
Voltar a montar:
Volte a juntar as duas extremidades da
bracelete e enfie o parafuso na abertura da extremidade de onde o tirou. Rode
o parafuso no sentido dos ponteiros do relógio até ficar bem apertado e
nivelado com a bracelete.
O CILINDRO LIGA A BRACELETE COM A VARETAS COM CABEÇA
DE PARAFUSO
Retirar os elos:
Os elos removíveis têm setas. Utilize uma
chave de parafusos próximo da extremidade inferior da
seta para evitar que a vareta rode. Utilizando outra chave
de parafusos, retire o parafuso da extremidade próxima da
cabeça da seta e rode-a no sentido contrário ao dos
ponteiros do relógio. Depois de retirar o parafuso, faça
deslizar a vareta para fora. Repita a mesma operação para
a segunda vareta do elo.
Voltar a montar:
Volte a juntar as duas extremidades da bracelete e enfie a
vareta na abertura da extremidade de onde a tirou. Rode o parafuso e a outra
extremidade no sentido dos ponteiros do relógio até ficar bem apertado e
nivelado com a bracelete.
RESISTÊNCIA À ÁGUA
Se o seu relógio for resistente à água, ele indicará os metros ou
(
O
)
*pressão absoluta em libras por polegada quadrada
AVISO: PARA MANTER A RESISTÊNCIA À ÁGUA, NÃO CARREGUE EM
NENHUM BOTÃO DEBAIXO DE ÁGUA.
1.
O relógio é resistente à água apenas enquanto a lente, os botões e a caixa
se mantiverem intactos.
2.
O relógio não é um relógio de mergulho e não deverá ser usado para mergulhar.
3.
Depois de exposição a água salgada, lave o relógio com água doce.
PILHA
A Timex recomenda vivamente que a pilha seja substituída por um
relojoeiro ou joalheiro.
O tipo de pilha vem indicado na parte de trás do
relógio. Depois de substituir a pilha, carregue no interruptor interno de reset,
se este existir. A vida da pilha é estimada assumindo certas características de
uso; a duração da pilha variará, dependendo do seu uso real.
NÃO DEITE A PILHA VELHA NO FOGO. NÃO RECARREGUE A PILHA.
MANTENHA AS BATERIAS FORA DO ALCANCE DAS CRIANÇAS.
calibração correcta.
Water-Resistance Depth
30m/98ft
50m/164ft
100m/328ft
p.s.i.a. * Water Pressure Below Surface
60
86
160
THANK YOU FOR PURCHASING YOUR TIMEX® WATCH.
EXTENDED WARRANTY
Available in U.S. only.
Extend your warranty for an additional 4 years from
date of purchase for $5. You can pay with AMEX, Discover, Visa or MasterCard
by calling 1 800-448-4639 during normal business hours. Payment must be
made within 30 days of purchase. Name, address, telephone number, purchase
date, and 5-digit model number required. You can also mail a check for $5 to:
Timex Extended Warranty, P.O. Box 1676, Dept. EF, Little Rock, AR 72203.
Please read instructions carefully to understand how to operate your Timex®
watch.
Your model may not have all of the features described in this
booklet.
OVERVIEW
DECLINATION
SCALE
INDICATOR
HAND
TEMPERATURE
SCALE
TEMP
MIDDLE-SET DATE
OUT-SET
TIME
CROWN
COMPASS
TURNING
COMPASS RING
TIDE
TIDE SCALE
DATE
NOTE: Watch is shipped with guard around crown. Remove guard and push
crown in to start.
Compass must be calibrated before using to ensure
accuracy and avoid improper headings. See COMPASS CALIBRATION. Go to
www.timex.com/expedition for help.
Watch incorporates magnetic sensor technology of Precision Navigation Inc.,
Mountain View, CA.
SET DATE AND TIME
Pull crown to MIDDLE position and turn until correct date appears. After setting
date, pull crown all the way out and turn until correct time is shown. Ensure
correct AM/PM setting by verifying that date changes at midnight, not noon.
Push crown in when done. Adjust date after months with fewer than 31 days.
INDICATOR HAND ADJUSTMENT
Pull crown all the way out. Indicator hand should point to 12 o’clock. If it does
not, press either TIDE or TEMP push button to move hand until it points to
12 o’clock. TIDE and TEMP push buttons move hand clockwise and
counterclockwise, respectively. Hold push button to move hand fast. Push
crown in when done.
TIDE/TEMPERATURE SELECTION
Indicator hand shows either tide or temperature constantly. When temperature
is shown, press TIDE push button to select tide clock. Hand moves to low tide
and then to current tide. When tide is shown, press TEMP push button to
select thermometer. Hand moves to beginning of thermometer scale and then
to current temperature.
TIDE CLOCK
For tide clock, indicator hand always rotates clockwise, so tide is rising when
hand is pointing left and falling when pointing right. Number of hours to next
high/low tide is shown on tide scale.
The primary factor in determining tides is moon position. Tide clock uses moon
position to predict high and low tides, which are 6 hours and 12.5 minutes
apart.
Tides are also influenced by sun position and shape of shoreline, so tide clock
cannot precisely give times of high and low tides. Periodic adjustment may be
necessary.
To set tide clock, pull crown to MIDDLE position. Press either TIDE or TEMP
push button to move hand to current tide. TIDE and TEMP push buttons move
hand clockwise and counterclockwise, respectively. Push crown in when done.
For tide information, go to www.timex.com/expedition
THERMOMETER
When worn on wrist, thermometer reading is affected by body heat. For more
accurate readings, remove watch and put in shade for at least several minutes.
Watch can measure water temperature also, if submerged. Be sure to select
temperature display before placing watch in water, as buttons should not be
pressed when watch is underwater.
Thermometer readings are taken every minute, and more frequently, if
temperature is changing.
COMPASS CALIBRATION
Since a compass uses the earth’s magnetic field, you must be aware of large
metallic objects, such as vehicles or bridges, or objects that give off
electromagnetic radiation, such as TVs or PCs, which could affect the magnetic
field around the watch. If compass is calibrated near such objects, it will only
work properly in that same location. If compass is calibrated away from such
objects, it will not work properly near them.
For best results, calibrate in
area of intended use.
In calibrating and taking headings, it is important, as with all compasses, to
keep compass level. Calibrating or taking a heading when watch is not level
can result in large errors. Also avoid areas that may exhibit higher than normal
concentrations of hard and soft iron, as they may cause inaccurate headings.
Whenever a heading is suspect, recalibrate.
Do not store watch near any source of magnetism, such as computers,
appliances, or TVs, as watch can take on a magnetic charge, yielding inaccu-
rate headings.
To calibrate compass, pull crown to MIDDLE position. Keep watch level or place
on level surface (if band interferes, place watch on inverted cup). Watch may
be face down, but take care to protect watch face. Press COMPASS push
button to begin. Indicator hand rotates two revolutions to remind you to rotate
watch. While level,
SLOWLY
rotate watch two revolutions,
taking at least
15 seconds per revolution. This is critical in achieving proper calibration.
When done, press any push button, keeping watch level. Indicator hand moves
back and forth to acknowledge end of calibration and then moves to current
declination angle setting (see DECLINATION ANGLE for more information). If you
do not wish to set declination angle, push crown in. Otherwise, to have watch
automatically compensate for declination angle, turn compass ring until north
is at 12 o’clock. Press either TIDE or TEMP push button to move indicator hand
east (+) or west (-) to point to your location’s declination angle (see table
below) using declination scale. Hold push button to move hand fast. Push
crown in when done.
COMPASS OPERATION
Normally, compass is off and indicator hand shows tide or temperature.
Compass must be calibrated prior to use and calibration should be performed
in the area of intended use; see COMPASS CALIBRATION. If compass has not
been calibrated since battery replacement, attempting to activate compass
causes watch to rotate indicator hand once and play melody to remind you to
calibrate.
While holding watch level, press COMPASS push button to activate compass.
Indicator hand moves to point north. If watch is turned, indicator hand will
continue to move, always pointing north. After 20 seconds, compass will
automatically turn off and hand will return to its normal operation. This
conserves battery life. Press COMPASS push button at any time to keep
compass on for another 20 seconds.
NOTE: While compass is on, INDIGLO® night-light may flicker slightly when on.
This is normal, as night-light must be turned off briefly during compass
readings to maintain accuracy. Also, second hand moves in two-second
increments while compass is on.
USING THE COMPASS
Once compass is activated, as described above, there are two typical ways to
use it.
Which way am I headed?
Hold watch so that 12 o’clock is in direction of
your travel. Turn compass ring until indicator hand is pointing to north on ring.
Your heading is direction on ring at 12 o’clock.
Which way should I go?
If you know the direction you want to go (e.g., NE),
turn compass ring until that direction appears at 12 o’clock. Hold watch so
that you are facing 12 o’clock. Then, turn your body until indicator hand points
to north on compass ring. You are now facing the direction you want to go.
DECLINATION ANGLE
A compass needle points to “magnetic north,” which may be slightly different
from “true north,” which is used on maps. This difference, called the “declina-
tion angle,” which varies around the globe, is typically small and can be
ignored in many cases. However, if you wish to compensate for this difference,
there are two ways to do so. You can do it manually by turning the compass
ring so that indicator hand points to your declination angle (see table below)
instead of north, using declination scale on compass ring. Or, you may have the
watch automatically compensate by setting your declination angle after com-
pass calibration; see COMPASS CALIBRATION. With proper declination angle
set, indicator hand will point to true north.
Declination angles for major world cities (W is negative and E is positive on
declination scale).
INDIGLO® NIGHT-LIGHT
Press crown to illuminate watch face. Patented (U.S. pat. 4,527,096 and
4,775,964) electroluminescent technology used in the INDIGLO® night-light
illuminates entire watch face at night and in low light conditions.
BRACELET ADJUSTMENT
FOLDOVER CLASP BRACELET
Find spring bar that connects bracelet to clasp. Using a pointed tool (Fig. 1),
push spring bar in and gently twist bracelet to disengage. Determine wrist size,
then insert spring bar in correct bottom hole (Fig. 2). Push down on spring bar,
align with top hole and release to lock in place (Fig. 3).
BRACELET LINK REMOVAL
Fig. 1
Fig. 2
Fig. 3
Removing Links:
Place bracelet upright and insert pointed
tool in opening of link. Push pin forcefully in direction of
arrow until link is detached (pins are designed to be
difficult to remove). Repeat until desired number of links
are removed.
Reassembly:
Rejoin bracelet parts. Push pin back into link in opposite
direction of arrow. Press pin down securely into bracelet until it is flush.
SOLID LINK BRACELET
Removing Links:
Using a very small screwdriver, remove
screws by turning counterclockwise. Repeat until desired
number of links are removed. Do not remove links
adjacent to clasp.
Reassembly:
Rejoin bracelet parts and insert screw in
end of opening where it was removed. Turn screw
clockwise until tight and flush with bracelet.
BARREL LINK BRACELET WITH SCREW HEAD PINS
Removing Links:
Removable links have arrows. Use one
screwdriver near tail of arrow to prevent pin from turning.
Using another screwdriver, remove screw at end near head
of arrow by turning it counterclockwise. After removing
screw, slide pin out. Repeat for second pin in link.
Reassembly:
Rejoin bracelet parts and insert pin in end of
opening where it was removed. Turn screw and other end
clockwise until tight and flush with bracelet.
WATER RESISTANCE
If your watch is water-resistant, meter marking or
(
O
)
is indicated.
*pounds per square inch absolute
WARNING: TO MAINTAIN WATER-RESISTANCE, DO NOT PRESS ANY
BUTTONS UNDER WATER.
1.
Watch is water-resistant only as long as lens, push buttons and case remain
intact.
2.
Watch is not a diver watch and should not be used for diving.
3.
Rinse watch with fresh water after exposure to salt water.
BATTERY
Timex strongly recommends that a retailer or jeweler replace battery.
Battery type is on watch back. If present, push/short internal reset switch after
replacing battery. Battery life estimates are based on certain assumptions
regarding usage; battery life may vary depending on actual usage.
DO NOT DISPOSE OF BATTERY IN FIRE. DO NOT RECHARGE. KEEP
LOOSE BATTERIES AWAY FROM CHILDREN.
www.timex.com
W-225 314-095002 EU
Anchorage ......... 20E
London ........................... 2W
Rio De Janeiro ............22W
Atlanta ................ 4W
Little Rock........................ 1E
San
Francisco ..............15E
Bombay .............. 1W
Livingston, MT ............... 13E
Seattle ........................18E
Boston .............. 15W
Munich ............................. 2E
Shanghai..................... 5W
Calgary .............. 16E
New York City ............... 13W
Toronto ......................11W
Chicago .............. 3W
Orlando........................... 5W
Vancouver ...................18E
Denver ................. 9E
Oslo ................................. 1E
Washington DC ..........11W
Jerusalem ............ 4E
Paris ............................... 1W
Waterbury, CT............14W
For more magnetic declination information go to
www.timex.com/expedition
Profundidade de resistência à águaPressão da água abaixo da superfície (em p.s.i.a.*)
30m/98 pés
60
50m/164 pés
86
100m/328 pés
160
Anchorage .......... 20E
Atlanta................. 4W
Bombay............... 1W
Boston .............. 15W
Calgary .............. 16E
Chicago ............... 3W
Denver ................. 9E
Jerusalén.............. 4E
Londres . . . . . . . . . . . . . .2W Rio de Janeiro .............22W
Little Rock . . . . . . . . . . . .1E San Francisco .............. 15E
Livingston, MT . . . . . . . .13E Seattle ......................... 18E
Munich . . . . . . . . . . . . . . .2E Shanghai ..................... 5W
Ciudad de Nueva York .13W Toronto ......................11W
Orlando . . . . . . . . . . . . . .5W Vancouver ................... 18E
Oslo . . . . . . . . . . . . . . . . .1E Washington DC ..........11W
París . . . . . . . . . . . . . . . .1W Waterbury, CT ............14W
Para información adicional sobre declinación magnética vaya a
www.timex.com/expedition
Profundidad de Resistencia
al Agua
30m/98pies
50m/164pies
100m/328pies
Presión del agua por debajo
de la superficie, en p.s.i.a.*
60
86
160
GRACIAS POR LA COMPRA DE SU RELOJ TIMEX®.
Por favor lea atentamente las instrucciones para saber cómo funciona su reloj
Timex®.
Su reloj tal vez no posea todas las funciones descritas en este
folleto.
ESCALA
DE DECLINACIÓN
ESCALA
DE
TEMPERATURA
AGUJA
INDICADORA
TEMPERATURA
MEDIO-FIJAR LA FECHA
AFUERA-FIJAR LA HORA
CORONA
BRÚJULA
MAREA
ESCALA DE LA MAREA
ANILLO
GIRATORIO
FECHA
NOTA: El reloj se entrega con un protector alrededor de la corona. Quite el
protector y pulse la corona hacia adentro para comenzar.
La brújula debe
ser calibrada antes de su uso para asegurar la exactitud y evitar
rumbos incorrectos. Ver CALIBRACIÓN DE LA BRÚJULA. Vaya a
www.timex.com/expedition por ayuda.
El reloj incorpora tecnología magnética sensorial de Precision Navigation, Inc.,
Mountain View, CA.
Jale la corona hasta el punto MEDIO y gírela hasta cuando aparezca la fecha
correcta. Después de fijar la fecha, jale la corona totalmente hacia afuera y
gírela hasta la hora correcta. Asegúrese del momento correcto AM/PM
(mañana/tarde) verificando que la fecha cambie a la medianoche y no al
mediodía. Pulse la corona hacia adentro cuando termine. Ajuste la fecha
después de meses con menos de 31 días.
Jale la corona totalmente hacia afuera. La aguja indicadora debe señalar las
12 en punto. Si no las señala, pulse cualquiera de los botones MAREA o
TEMPERATURA hasta que la aguja marque las 12 en punto. Los botones
MAREA y TEMPERATURA mueven la aguja en el sentido de las manecillas del
reloj y a la inversa, respectivamente. Sostenga el botón de activación para
mover la aguja con rapidez. Pulse la corona hacia adentro cuando termine.
La aguja indicadora muestra de continuo tanto la marea como la temperatura.
Cuando se muestra la temperatura, pulse el botón MAREA para seleccionar el
reloj de marea. La aguja se mueve a marea baja y luego a la marea actual.
Cuando se muestra la marea, pulse el botón TEMPERATURA para seleccionar el
termómetro. La aguja se mueve al comienzo del termómetro y luego a la
temperatura actual.
Para el reloj de marea, la aguja indicadora siempre rota en el sentido de las
manecillas del reloj, de modo que la marea va subiendo cuando la aguja señala
a la izquierda y bajando cuando señala a la derecha. El número de horas para
la siguiente marea alta/baja se muestra en la escala de marea.
El factor primordial para determinar las mareas es la posición de la luna. El
reloj de marea usa la posición de la luna para predecir mareas altas y bajas,
que se encuentran separadas por 6 horas y 12.5 minutos.
Las mareas también están influenciadas por la posición del sol y la forma del
contorno de la costa, por consiguiente el reloj no puede dar con precisión las
horas de las mareas altas y bajas. Se pudieran necesitar ajustes periódicos.
Para calibrar el reloj de marea, jale la corona hacia el MEDIO. Pulse cualquiera
de los botones MAREA o TEMPERATURA para mover la aguja a la marea actual.
Los botones MAREA y TEMPERATURA mueven la aguja en el sentido de las
manecillas del reloj y a la inversa, respectivamente. Pulse la corona hacia
adentro cuando termine.
Para información de marea, vaya a www.timex.com/expedition
Cuando está puesto en la muñeca, la lectura del termómetro es afectada por
el calor corporal. Para lograr una lectura más exacta, quítese el reloj y déjelo a
la sombra por unos minutos.
El reloj también puede medir la temperatura del agua cuando está sumergido.
Recuerde seleccionar la pantalla para temperatura antes de introducir el reloj
en el agua, puesto que los botones no deben pulsarse mientras el reloj esté
sumergido.
Las lecturas del termómetro se toman a cada minuto, y con más frecuencia si
la temperatura está cambiando.
Dado que la brújula usa el campo magnético de la Tierra, usted debe tener
cuidado de objetos metálicos grandes tales como vehículos o puentes,
u objetos que emitan radiación electromagnética como televisores y
computadoras, porque podrían afectar el campo magnético alrededor del reloj.
Si la brújula es calibrada cerca de tales objetos, sólo funcionará
apropiadamente en ese mismo lugar. Si la brújula es calibrada lejos de tales
objetos, no funcionará apropiadamente en la cercanía de ellos.
Para óptimos
resultados, haga la calibración en el área donde va a ser usada.
Al calibrar y tomar rumbos es importante, como con todas las brújulas,
mantener la brújula a nivel. Calibrar y tomar un rumbo cuando el reloj no está
a nivel pudiera resultar en errores grandes. Hay que evitar también áreas que
pudieran exhibir concentraciones de hierro duro y suave más altas de lo
normal, pues pueden ocasionar rumbos incorrectos. Cuando un rumbo no
infunda confianza, vuelva a calibrar.
No guarde el reloj cerca de alguna fuente de magnetismo como
computadoras, electrodomésticos o televisores, pues el reloj puede recoger la
carga magnética y conducir a rumbos inexactos.
Para calibrar la brújula, jale la corona hacia el MEDIO. Mantenga el reloj a nivel
o colóquelo sobre una superficie nivelada (si la pulsera interfiere, colóquelo
sobre un vaso invertido). El reloj pudiera estar bocabajo, pero tome
precauciones para proteger el cristal. Pulse el botón BRÚJULA para comenzar.
La aguja de la brújula gira dos vueltas para recordarle a usted rotar el reloj.
Todavía a nivel, dé dos rotaciones al reloj
15 segundos por rotación. Esto es muy importante para lograr una
calibración adecuada.
Cuando haya acabado, oprima cualquier botón de activación, manteniendo el
reloj a nivel. La aguja de la brújula se mueve hacia atrás y hacia adelante para
señalar el fin de la calibración y enseguida se mueve hacia el ángulo de
declinación en uso (ver ÁNGULO DE DECLINACIÓN para más información). Si
usted no desea ajustar el ángulo de declinación, pulse la corona hacia adentro.
De otro modo, para hacer que el reloj compense automáticamente el ángulo
de declinación, mueva el anillo giratorio de la brújula hasta que el Norte esté
en las 12 en punto. Oprima cualquiera de los botones MAREA o TEMPERATURA
para mover la aguja de la brújula hacia el Este (+) u Oeste (-) y apuntar hacia el
ángulo de declinación de su posición (ver la tabla de abajo) usando la escala
de declinación. Sostenga el botón de activación para mover la aguja con
rapidez. Pulse la corona hacia adentro cuando termine.
Normalmente, la brújula está apagada y la aguja muestra la marea o la
temperatura.
La brújula debe ser calibrada antes del uso y la calibración debe realizarse en
el área donde va a ser usada; ver CALIBRACIÓN DE LA BRÚJULA. Si no se ha
calibrado la brújula desde cuando se reemplazó la pila, intentar activarla
ocasiona que el reloj rote la aguja de la brújula una vez y toque una melodía
para recordarle hacer la calibración.
Mientras mantiene el reloj a nivel, oprima el botón BRÚJULA para activar la
brújula. La aguja se mueve y apunta hacia el Norte. Si se gira el reloj, la aguja
indicadora continuará moviéndose, apuntando siempre al Norte. Después de
20 segundos, la brújula se apagará automáticamente y la aguja retornará a su
operación normal. Esto alarga la duración de la pila. Oprima el botón BRÚJULA
en cualquier momento para mantener la brújula funcionando por otros
20 segundos.
NOTA: Mientras la brújula esté funcionando, la luz nocturna INDIGLO® puede
titilar un poco cuando se activa. Esto es normal, puesto que la luz nocturna
debe apagarse brevemente mientras se lee la brújula para mantener la
exactitud. Igualmente, la manecilla de segundos se mueve en incrementos de
dos segundos cuando la brújula está funcionando.
Estando la brújula activada, según lo explicado anteriormente, hay dos
maneras típicas de proceder para usarla.
¿Hacia dónde voy?
Sostenga el reloj de modo que las 12 en punto estén en la
dirección de su viaje. Rote el anillo giratorio hasta que la aguja indicadora
apunte al Norte en el anillo. Su rumbo es la dirección en el anillo a las 12 en
punto.
¿Cuál ruta debo seguir?
Si sabe la dirección a donde desea ir (p.e.,NE), rote
el anillo giratorio hasta que la dirección aparezca a las 12 en punto. Sostenga
el reloj de modo que usted esté colocado a las 12 en punto. Enseguida, gire su
cuerpo hasta que la aguja indicadora señale hacia el Norte en el anillo
giratorio. Ahora usted está colocado en la dirección que desea seguir.
La aguja de la brújula apunta al “Norte magnético”, el cual pudiera ser
ligeramente diferente del “Norte verdadero” que figura en los mapas. Esta
diferencia, llamada “ángulo de declinación” y que varía alrededor del mundo,
es por lo general pequeña y puede ser ignorada en muchos casos. Sin
embargo, si usted desea compensar por esta diferencia, hay dos maneras
de proceder. Usted lo puede hacer manualmente rotando el anillo giratorio,
de tal modo que la aguja indicadora apunte hacia su ángulo de declinación (ver
la tabla de abajo) y no hacia el Norte, usando las escalas de declinación en el
anillo de la brújula. O, usted puede hacer que el reloj compense
automáticamente ajustando su ángulo de declinación después de calibrar la
brújula; ver CALIBRACIÓN DE LA BRÚJULA. Habiendo ajustado apropiadamente
el ángulo de declinación, la aguja indicadora apuntará al Norte verdadero.
Ángulos de declinación para ciudades del mundo (W es negativo y E positivo
en la escala de declinación).
Pulse la corona para iluminar la esfera del reloj. La tecnología
electroluminiscente patentada (patente 4.527.096 y 4.775.964 en EUA) y
utilizada por la luz nocturna INDIGLO® ilumina toda la esfera del reloj por la
noche y en condiciones de poca visibilidad.
PULSERA CON BROCHE PLEGABLE
Localice el perno de resorte que conecta la pulsera al broche. Utilizando una
herramienta puntiaguda (Fig. 1), empuje hacia dentro la barra de resorte y gire
suavemente la pulsera para desacoplarla. Determine el tamaño de la muñeca y
después introduzca la barra de resorte en el agujero inferior correcto (Fig. 2).
Empuje hacia abajo la barra de resorte, alinéela con el agujero superior y
suéltela para que encaje en su sitio (Fig. 3).
REMOCIÓN DE ESLABONES DE LA PULSERA
Fig. 1
Fig. 2
Fig. 3
Cómo quitar los eslabones:
Coloque la pulsera en
posición vertical e introduzca la herramienta puntiaguda en
la abertura del eslabón. Empuje el pasador con fuerza en el
sentido de la flecha hasta que el eslabón se suelte (los
pasadores están diseñados para ser difíciles de quitar).
Repita el procedimiento hasta que haya quitado el número deseado de
eslabones.
Reensamblaje:
Vuelva a unir las piezas de la pulsera. Empuje el pasador de
vuelta al interior del eslabón en sentido contrario al indicado por la flecha.
Presione hacia abajo el pasador hasta que se acople firmemente en la pulsera
y quede a ras.
PULSERA DE ESLABONES MACIZOS
Cómo quitar los eslabones:
Utilizando un destornillador
muy pequeño, quite los tornillos girándolos en sentido
contrario al de las manecillas del reloj. Repita el
procedimiento hasta que haya quitado el número deseado
de eslabones. No quite los eslabones adyacentes al
broche.
Reensamblaje:
Vuelva a unir las piezas de la pulsera e
introduzca el tornillo en el extremo de la abertura de donde se quitó. Gire el
tornillo en el sentido de las agujas del reloj hasta que esté apretado y al ras
con la pulsera.
PULSERA DE ESLABONES CILÍNDRICOS CON PASADORES
ATORNILLABLES
Cómo quitar los eslabones:
Los eslabones removibles
tienen flechas. Utilice un destornillador cerca de la cola de
la flecha para que el pasador no gire. Utilizando otro
destornillador, quite el tornillo en el extremo de la punta de
la flecha girándolo en sentido contrario al de las manecillas
del reloj. Después de quitar el tornillo, empuje hacia afuera
el pasador. Repita el procedimiento para el segundo
pasador.
Reensamblaje:
Vuelva a unir las piezas de la pulsera e introduzca el pasador
en el extremo de la abertura de donde se quitó. Gire el tornillo en el sentido de
las manecillas del reloj hasta que esté apretado y a ras con la pulsera.
Si
su
reloj
es
resistente
al
agua, se indicarán
los metros
o aparecerá
el
símbolo
(
O
).
*libras por pulgada cuadrada absoluta
ADVERTENCIA: PARA MANTENER LA RESISTENCIA AL AGUA, NO
PULSE NINGÚN BOTÓN BAJO EL AGUA.
1.
El reloj es resistente al agua solamente mientras el cristal, los botones y la
caja permanezcan intactos.
2.
El reloj no es un reloj de buzo y no debe utilizarse para bucear.
3.
Enjuague el reloj con agua fresca después de haber estado expuesto al
agua salada.
Timex recomienda encarecidamente que un minorista o un joyero
cambien la pila.
El tipo de pila está indicado al respaldo de la caja. Si
existiera, pulse brevemente el interruptor interno de reinicio después de
reemplazar la pila. Las estimaciones de duración de la pila se basan en ciertas
suposiciones relacionadas con el uso; la duración de la pila puede variar
dependiendo del uso real.
NO TIRE LA PILA AL FUEGO. NO LA RECARGUE. MANTENGA LAS
PILAS SUELTAS FUERA DEL ALCANCE DE LOS NIÑOS.
PILA
RESISTENCIA AL AGUA
AJUSTE DE LA PULSERA
LUZ NOCTURNA INDIGLO®
ÁNGULO DE DECLINACIÓN
USANDO LA BRÚJULA
FUNCIONAMIENTO DE LA BRÚJULA
LENTAMENTE
,
tomando al menos
CALIBRACIÓN DE LA BRÚJULA
TERMÓMETRO
RELOJ DE MAREA
SELECCIÓN DE MAREA/TEMPERATURA
AJUSTANDO LA AGUJA INDICADORA
FIJANDO FECHA Y HORA
DESCRIPCIÓN GENERAL
Anchorage ......... 20E
Atlanta ................ 4W
Mumbai ............... 1W
Boston .............. 15W
Calgary .............. 16E
Chicago .............. 3W
Denver ................. 9E
Jérusalem ............ 4E
Londres . . . . . . . . . . . . . .2W Rio de Janeiro ............ 22W
Little Rock . . . . . . . . . . . .1E San Francisco .............. 15E
Livingston, MT . . . . . . . .13E Seattle ........................ 18E
Munich . . . . . . . . . . . . . . .2E Shanghai ...................... 5W
New York . . . . . . . . . . .13W Toronto ...................... 11W
Orlando . . . . . . . . . . . . . .5W Vancouver ................... 18E
Oslo . . . . . . . . . . . . . . . . .1E Washington DC .......... 11W
Paris . . . . . . . . . . . . . . . .1W Waterbury, CT ............ 14W
Pour plus de renseignements sur les déclinaisons magnétiques, consulter
www.timex.com/expedition
Profondeur d’étanchéité
30m/98 (ft/pi)
50m/164(ft/pi)
100m/328(ft/pi)
Pression de l’eau sous la surface en p.s.i.a.*
60
86
160
MERCI D’AVOIR ACHETÉ VOTRE MONTRE TIMEX®.
Lire les instructions attentivement pour bien comprendre le fonctionnement
de cette montre Timex®.
Il est possible que ce modèle ne présente pas
toutes les fonctions décrites dans le dépliant.
ÉCHELLE DE
DÉCLINAISON
ÉCHELLE DE
TEMPÉRATURE
AIGUILLE
INDICATRICE
TEMPÉRATURE
CENTRE-RÉGLAGE DE LA DATE
SORTIE-RÉGLAGE DE L’HEURE
COURONNE
BOUSSOLE
MARÉE
BAGUE
TOURNANTE
ÉCHELLE DES MARÉES
DATE
REMARQUE : La couronne de la montre est protégée pour l’expédition. Retirer
le capot de protection et enfoncer la couronne pour mettre en marche.
La
et éviter les erreurs d’orientation.
Se reporter à ÉTALONNAGE DE LA
BOUSSOLE. Consulter www.timex.com/expedition pour assistance.
La montre utilise un système de capteurs magnétiques fabriqué par Precision
Navigation, Inc., Mountain View, Californie.
Tirer la couronne en position CENTRE et tourner jusqu’à afficher la date
courante. Après avoir réglé la date, tirer la COURONNE complètement et
tourner jusqu’à afficher l’heure exacte. S’assurer que le réglage matin/soir
(AM/PM) est correct en vérifiant que la date change à minuit et non à midi.
Enfoncer la couronne pour valider. Régler la date après les mois comptant
moins de 31 jours.
Tirer la couronne complètement. L’aiguille de l’indicateur devrait indiquer
12 heures. Sinon, appuyer sur le bouton poussoir MARÉE ou TEMPÉRATURE pour
faire avancer l’aiguille jusqu’à ce qu’elle indique 12 heures. Les boutons poussoirs
pour MARÉE et TEMPÉRATURE font avancer respectivement l’aiguille dans le sens
des aiguilles d’une montre et inversement. Tenir le bouton poussoir enfoncé pour
la faire avancer rapidement. Enfoncer la couronne pour valider.
L’aiguille de l’indicateur montre en permanence soit la marée, soit la tempéra-
ture. Lorsque la température est indiquée, appuyer sur le bouton poussoir
MARÉE pour sélectionner l’heure des marées. L’aiguille indique d’abord la
marée basse puis la marée actuelle. Lorsque la marée est indiquée, appuyer
sur le bouton poussoir TEMPÉRATURE pour sélectionner le thermomètre.
L’aiguille se place au début de l’échelle des températures et indique ensuite la
température courante.
Dans ce mode, l’aiguille de l’indicateur se déplace toujours dans le sens des
aiguilles d’une montre. Ainsi, la marée est montante lorsque l’aiguille pointe
vers la gauche et descendante lorsque l’aiguille pointe vers la droite. Le
nombre d’heures jusqu’à la prochaine marée haute/basse est indiqué sur
l’échelle des marées.
La position de la lune est un facteur primordial quant à la détermination des
marées. Dans ce mode, la montre se réfère à la position de la lune pour
calculer les heures des marées hautes et basses, celles-ci sont espacées de
6 heures et 12,5 minutes.
Les marées sont aussi influencées par la position du soleil et la forme du littoral,
la montre ne peut donc pas indiquer avec précision les heures des marées
hautes et basses. Des ajustements périodiques peuvent être nécessaires.
Pour étalonner le mode heure des marées, tirer la couronne en position
CENTRE. Appuyer sur le bouton poussoir MARÉE ou TEMPÉRATURE pour placer
l’aiguille sur la marée actuelle. Les boutons poussoirs pour MARÉE et
TEMPÉRATURE font avancer respectivement l’aiguille dans le sens des aiguilles
d’une montre et inversement. Enfoncer la couronne pour valider.
Pour obtenir des informations sur les marées, aller sur le site
www.timex.com/expedition
Lorsque la montre est portée au poignet, la mesure par le thermomètre est
influencée par la chaleur corporelle. Pour obtenir des mesures plus précises,
enlever la montre et la placer à l’ombre pendant au moins plusieurs minutes.
La montre peut également mesurer la température de l’eau si elle y est
plongée. Veiller à sélectionner l’affichage de la température avant de placer la
montre dans l’eau car les boutons ne doivent pas être enfoncés sous l’eau.
Les mesures par le thermomètre sont prises toutes les minutes, et plus
fréquemment encore si la température est en train de changer.
Une boussole utilise le champ magnétique terrestre ; par conséquent, il importe
d’éviter d’être à proximité de grands objets métalliques (automobiles, ponts,
etc.) ou autres objets produisant un rayonnement électromagnétique, tels que
téléviseurs ou ordinateurs, susceptible d’affecter le champ magnétique autour
de la montre. Si la boussole est étalonnée à proximité de tels objets, elle ne
fonctionnera correctement qu’à cet endroit. Si la boussole est étalonnée loin de
tels objets, elle ne fonctionnera pas correctement près d’eux.
Pour de
meilleurs résultats, étalonner à l’endroit où elle sera utilisée.
Lors de l’étalonnage et des mesures ultérieures, il importe, comme avec toutes
les boussoles, de maintenir la montre dans un plan horizontal. Procéder à
l’étalonnage ou à des mesures alors que la montre n’est pas en position horizon-
tale peut causer des erreurs importantes. Veiller également à éviter les endroits
susceptibles de présenter des concentrations de fer de roche ou industriel
supérieures à la normale, dont l’effet pourrait produire des mesures inexactes. En
présence de toute mesure suspecte, effectuer un nouvel étalonnage.
Veiller à ne pas ranger la montre à proximité d’une quelconque source
magnétique (ordinateurs, appareils électriques, téléviseurs, etc.) car cela
pourrait l’aimanter et fausser les mesures ultérieures.
Pour étalonner la boussole, tirer la couronne en position CENTRE. Tenir la
montre en position horizontale ou la poser sur une surface plane (si le bracelet
gêne, la poser sur une tasse tournée à l’envers). La montre peut être posée à
l’envers à condition d’en protéger la face. Appuyer sur le bouton poussoir
BOUSSOLE pour commencer. L’aiguille de l’indicateur effectue deux tours
complets pour vous rappeler de faire pivoter la montre. Tenir la montre à plat
et effectuer
LENTEMENT
deux tours complets,
en comptant 15 secondes
environ par tour. Ceci est essentiel pour obtenir un étalonnage correct.
Une fois les rotations terminées, appuyer sur tout bouton poussoir, tout en
maintenant la montre à l’horizontale. L’aiguille oscille pour confirmer que
l’étalonnage est terminé et indique ensuite l’angle de déclinaison courant
(voir ANGLE DE DÉCLINAISON pour plus d’informations). Si le réglage de l’angle
de déclinaison n’est pas souhaité, enfoncer la couronne. Pour que la boussole
tienne compte automatiquement de l’angle de déclinaison, faire tourner la
bague jusqu’à ce que le nord soit à 12 heures. Appuyer sur le bouton poussoir
MARÉE ou TEMPÉRATURE pour déplacer l’aiguille vers l’est (+) ou l’ouest (-) afin
d’indiquer l’angle de déclinaison de l’endroit présent (voir tableau ci-dessous) à
l’aide de l’échelle de déclinaison. Tenir le bouton poussoir enfoncé pour la faire
avancer rapidement. Enfoncer la couronne pour valider.
La boussole est normalement inactive et l’aiguille indique la marée ou la
température.
La boussole doit être étalonnée avant usage, à l’endroit où elle sera utilisée ;
voir ÉTALONNAGE DE LA BOUSSOLE. Si la boussole est activée sans avoir
été étalonnée après remplacement de la pile, l’aiguille effectue une rotation
complète et la montre fait entendre une mélodie pour rappeler qu’un
étalonnage est nécessaire.
Tout en maintenant la montre à l’horizontale, appuyer sur le bouton poussoir
BOUSSOLE pour activer la boussole. L’aiguille se déplace et pointe vers le nord.
Si on tourne la montre, l’aiguille indicatrice se déplace, pointant toujours vers
le nord. Après 20 secondes, la boussole s’arrête automatiquement et l’aiguille
reprend son fonctionnement habituel. Ceci permet de prolonger l’autonomie
de la pile. Appuyer sur le bouton poussoir BOUSSOLE à tout moment pour
garder la boussole activée pendant 20 secondes de plus.
REMARQUE : Lorsque la boussole est activée, il se peut que la lumière de la
veilleuse INDIGLO® clignote légèrement quand elle est allumée. Ceci est
normal, car la veilleuse doit s’éteindre brièvement pour permettre à la
boussole de produire des mesures précises. Par ailleurs, en mode boussole,
la trotteuse avance par intervalles de deux secondes.
Une fois la boussole activée conformément aux instructions ci-dessus, on peut
l’utiliser de deux façons.
Dans quelle direction vais-je ?
Tenir la montre de sorte que 12 heures
pointent dans la direction de déplacement. Tourner la bague jusqu’à ce que
l’aiguille indicatrice s’aligne sur le point nord indiqué sur la bague. Le cap suivi
correspond à la position 12 heures sur la bague.
Dans quelle direction dois-je aller ?
Lorsque la direction à suivre est connue
(NE, par ex.), tourner la bague jusqu’à ce que celle-ci corresponde à 12 heures.
Tenir la montre de manière à faire face à la direction correspondant à 12 heures.
Tourner ensuite sur soi-même jusqu’à aligner l’aiguille indicatrice avec la marque
du nord sur la bague. On se retrouve alors face à la direction de déplacement
souhaitée.
L’aiguille d’une boussole pointe vers le nord magnétique, qui peut être
légèrement différent du nord géographique utilisé sur les cartes. Cette
différence, appelée « angle de déclinaison », varie à travers le monde ; elle est
généralement négligeable et on peut l’ignorer dans de nombreux cas.
Cependant, si on souhaitez tenir compte de cette différence, il y a deux façons
de le faire. Manuellement, en tournant la bague jusqu’à ce que l’aiguille
indique l’angle de déclinaison (voir table ci-dessous) plutôt que le nord, à l’aide
de l’échelle de déclinaison située sur la bague de la boussole. Ou automatique-
ment, en réglant l’angle de déclinaison après avoir étalonné la boussole ; voir
ÉTALONNAGE DE LA BOUSSOLE. Une fois que l’angle de déclinaison approprié
est réglé, l’aiguille pointe vers le nord vrai.
Angles de déclinaison des principales villes au monde (W est négatif et E est
positif sur l’échelle de déclinaison).
Appuyer sur la couronne pour illuminer le cadran de la montre. La technologie
électroluminescente brevetée (brevets américains n° 4,527,096 et 4,775,964)
utilisée dans la veilleuse INDIGLO® permet d’illuminer toute la face de la
montre la nuit et dans des conditions de faible éclairage.
BRACELET À FERMOIR DÉPLIANT
Trouver la barrette à ressort qui attache le bracelet au fermoir. À l’aide d’un
outil pointu (Fig. 1), enfoncer la barrette et faire pivoter délicatement le
bracelet pour le dégager. Déterminer la taille du poignet puis introduire la
barrette à ressort dans l’orifice inférieur correspondant (Fig. 2). Enfoncer la
barrette, l’aligner sur l’orifice supérieur puis la relâcher pour la mettre en
place (Fig. 3).
DÉMONTAGE DE MAILLONS DU BRACELET
Fig. 1
Fig. 2
Fig. 3
Démontage de maillons :
Placer le bracelet verticalement
et introduire un outil pointu dans l’ouverture du maillon.
Pousser fortement la goupille dans le sens de la flèche
jusqu’à détacher le maillon (les goupilles sont conçues
pour résister à l’extraction). Répéter jusqu’à ce que le
nombre souhaité de maillons soit démonté.
Remontage :
Mettre les pièces du bracelet en place. Pousser la goupille dans
le maillon dans le sens opposé à la flèche. Enfoncer la goupille jusqu’à ce
qu’elle ne dépasse plus du bracelet.
BRACELET À MAILLONS MASSIFS
Démontage de maillons :
À l’aide d’un très petit
tournevis, extraire les vis en tournant dans le sens inverse
des aiguilles d’une montre. Répéter jusqu’à ce que le
nombre souhaité de maillons soit démonté. Ne pas
démonter les maillons attachés au fermoir.
Remontage :
Mettre les pièces du bracelet en place et
introduire la vis du côté où elle a été extraite. La tourner dans le sens des
aiguilles d’une montre jusqu’à ce qu’elle ne dépasse plus du bracelet.
BRACELET À MAILLON TUBULAIRE AVEC GOUPILLES À VIS
Démontage de maillons :
Les maillons démontables com-
portent des flèches. Utiliser un tournevis du côté de la base
de la flèche pour empêcher la goupille de tourner. À l’aide
d’un autre tournevis, déposer la vis du côté de la tête de la
flèche en tournant dans le sens inverse des aiguilles d’une
montre. Après avoir déposé la vis, extraire la goupille.
Répéter pour la seconde goupille du maillon.
Remontage :
Mettre les pièces du bracelet en place et introduire la goupille
du côté où elle a été extraite. Tourner la vis de l’autre côté dans le sens des
aiguilles d’une montre jusqu’à ce qu’elle ne dépasse plus du bracelet.
Si la montre est étanche, la profondeur maximale ou le symbole
(
O
)
est
indiqué.
*livres par pouce carré (abs.)
ATTENTION : POUR PRÉSERVER L’ÉTANCHÉITÉ, NE PAS ENFONCER
LES BOUTONS SOUS L’EAU.
1.
La montre est étanche aussi longtemps que le verre, les boutons et le
boîtier sont intacts.
2.
La montre n’est pas conçue pour la plongée. Ne pas l’utiliser dans ces
conditions.
3.
Rincer à l’eau douce après tout contact avec l’eau de mer.
Timex recommande fortement de faire changer la pile par un détaillant
ou un bijoutier.
Le type de pile est indiqué au dos de la montre. S’il est
présent, appuyer sur le bouton « internal reset » (remise à zéro interne) après
avoir remplacé la pile. L’estimation de la durée de vie de la pile est basée sur
certaines hypothèses quant à l’usage ; la durée réelle peut varier selon
l’utilisation de la montre.
NE PAS JETER LA PILE AU FEU. NE PAS RECHARGER LA PILE.
GARDER LES PILES HORS DE LA PORTÉE DES ENFANTS.
PILE
ÉTANCHÉITÉ
AJUSTEMENT DU BRACELET
VEILLEUSE
INDIGLO®
ANGLE DE DÉCLINAISON
UTILISATION DE LA BOUSSOLE
FONCTIONNEMENT DE LA BOUSSOLE
ÉTALONNAGE DE LA BOUSSOLE
THERMOMÈTRE
HEURE DES MARÉES
SÉLECTIONNER
MARÉE/TEMPÉRATURE
RÉGLAGE DE L’AIGUILLE DE L’INDICATEUR
RÉGLAGE DE LA DATE ET DE L’HEURE
boussole doit être étalonnée avant utilisation pour garantir sa précision
VUE D’ENSEMBLE

Anchorage .......... 20E
Atlanta ................ 4W
Bombay .............. 1W
Boston .............. 15W
Calgary .............. 16E
Chicago .............. 3W
Denver ................. 9E
Jeruzalem ............ 4E
Londen ............................ 2W
Little Rock ........................ 1E
Livingston, MT ................ 13E
München .......................... 2E
New York City ................ 13W
Orlando ........................... 5W
Oslo ................................. 1E
Parijs .............................. 1W
Rio de Janeiro ........... 22W
San
Francisco ............ 15E
Seattle ....................... 18E
Shanghai .................... 5W
Toronto ..................... 11W
Vancouver ................. 18E
Washington DC ........ 11W
Waterbury, CT .......... 14W
Ga voor meer informatie over magnetische miswijzing naar
www.timex.com/expedition
Waterbestendige diepte
30 m/98 ft
50 m/164 ft
100 m/328 ft
p.s.i.a. * Waterdruk onder oppervlak
60
86
160
WIJ
DANKEN
U VOOR
DE AANKOOP VAN
UW TIMEX®
HORLOGE.
Lees de instructies goed door zodat u weet hoe u uw Timex® horloge moet
bedienen.
Het is mogelijk dat uw model niet alle functies heeft die in dit
boekje worden beschreven.
MISWIJZINGSSCHAAL
TEMPERATUURSCHAAL
RODE
WIJZER
TEMP
MIDDEN-DATUM
INSTELLEN
UIT-TIJD INSTELLEN
KROON
KOMPAS
DRAAIBARE
KOMPASRING
GETIJ
GETIJSCHAAL
DATUM
OPMERKING: Het horloge wordt met een beschermer rond de kroon geleverd.
Verwijder de beschermer en druk op de kroon om te starten.
Het kompas
moet vóór het gebruik ervan worden gekalibreerd om nauwkeurigheid
te verzekeren en een verkeerde koers te vermijden.
Zie KOMPAS
KALIBREREN. Ga naar www.timex.com/expedition als u hulp nodig hebt.
Het horloge maakt gebruik van magnetische-sensortechnologie van Precision
Navigation Inc. in Mountain View, CA.
Trek de kroon tot de MIDDELSTE stand en draai hem totdat de juiste datum
verschijnt. Nadat u de datum hebt ingesteld, trekt u de kroon helemaal naar
buiten en draait u hem tot de juiste tijd wordt weergegeven. Verzeker u van de
juiste instelling voor AM/PM door te controleren of de datum om middernacht
en niet om twaalf uur ‘s middags verandert. Druk de kroon naar binnen wanneer
u klaar bent. Stel de datum bij na maanden met minder dan 31 dagen.
Trek de kroon helemaal naar buiten. De rode wijzer hoort naar 12 uur te
wijzen. Als dat niet het geval is, drukt u op de drukknop GETIJ of TEMP om de
wijzer te draaien totdat deze naar 12 uur wijst. De drukknoppen GETIJ en TEMP
draaien de wijzer respectievelijk met de klok mee en tegen de klok in. Houd de
drukknop ingedrukt om de wijzer snel te draaien. Druk de kroon naar binnen
wanneer u klaar bent.
De rode wijzer toont continu het getij of de temperatuur. Wanneer de
temperatuur wordt getoond, drukt u op de drukknop GETIJ om de getijklok te
selecteren. De wijzer draait naar eb en dan naar het huidige getij. Wanneer het
getij wordt getoond, drukt u op de drukknop TEMP om de thermometer te
selecteren. De wijzer draait naar het begin van de thermometerschaal en dan
naar de huidige temperatuur.
Voor de getijklok draait de rode wijzer altijd met de klok mee zodat het vloed
wordt wanneer de wijzer naar links wijst en het eb wordt wanneer de wijzer
naar rechts wijst. Het aantal uren tot volgende vloed/eb wordt op de
getijschaal getoond.
De belangrijkste factor voor het bepalen van getijden is de stand van de maan.
De getijklok gebruikt de stand van de maan om vloed en eb te voorspellen,
die 6 uur en 12,5 minuten van elkaar zijn.
De getijden worden ook door de stand van zon en de vorm van de kustlijn
beïnvloed, zodat de getijklok niet precies de tijd van eb en vloed kan geven.
Periodieke bijstelling kan nodig zijn.
Voor het instellen van de getijklok trekt u de kroon naar de MIDDELSTE stand.
Druk op de drukknop GETIJ of TEMP om de wijzer naar het huidige getij te
draaien. De drukknoppen GETIJ en TEMP draaien de wijzer respectievelijk met de
klok mee en tegen de klok in. Druk de kroon naar binnen wanneer u klaar bent.
Ga naar www.timex.com/expedition voor informatie over getijden.
Wanneer het horloge om de pols wordt gedragen, wordt de temperatuur die
door de thermometer wordt aangewezen, door lichaamswarmte beïnvloed.
Voor nauwkeurigere waarden doet u het horloge af en legt u het minstens
enkele minuten in de schaduw.
Het horloge kan ook de watertemperatuur meten als het ondergedompeld wordt.
Zorg dat u het temperatuurdisplay selecteert voordat u het horloge in het water
plaatst, omdat de knoppen onder water niet mogen worden ingedrukt.
De temperatuur wordt elke minuut genomen en vaker als de temperatuur
verandert.
Omdat een kompas gebruik maakt van het magnetische veld van de aarde,
moet u zich bewust zijn van grote metalen voorwerpen zoals auto’s en
bruggen, of voorwerpen die elektromagnetische straling afgeven zoals tv’s en
pc’s die op het magnetische veld rond het horloge van invloed kunnen zijn. Als
het kompas in de buurt van dergelijke voorwerpen wordt gekalibreerd, werkt
het alleen naar behoren op diezelfde plek. Als het kompas uit de buurt van
dergelijke voorwerpen wordt gekalibreerd, werkt het niet naar behoren nabij
deze voorwerpen.
Voor de beste resultaten kalibreert u het kompas nabij
de plek van beoogd gebruik.
Bij het kalibreren en het aflezen van de koers is het belangrijk, zoals bij alle
kompassen, om het kompas horizontaal te houden. Het kalibreren of het aflezen
van de koers terwijl het horloge niet horizontaal is, kan grote fouten tot gevolg
hebben. Vermijd ook plaatsen die hogere dan normale concentraties hard en
zacht ijzer hebben omdat ze onnauwkeurige koersen kunnen veroorzaken.
Steeds wanneer een koers twijfelachtig is, moet u opnieuw kalibreren.
Berg het horloge niet op nabij een bron van magnetisme zoals computers,
huishoudelijke apparaten of tv’s omdat het horloge een magnetische lading
kan krijgen met als gevolg onnauwkeurige koersen.
Voor het kalibreren van het kompas trekt u de kroon naar de MIDDELSTE
stand. Houd het horloge horizontaal of plaats het op een horizontaal oppervlak
(als het bandje in de weg zit, plaatst u het horloge op een omgekeerd kopje).
De wijzerplaat mag naar beneden gericht zijn maar bescherm hem wel goed.
Druk op de drukknop KOMPAS om te beginnen. De rode wijzer draait tweemaal
rond om u eraan te herinneren het horloge te draaien. Terwijl het horloge hori-
zontaal is, draait u het
LANGZAAM
tweemaal rond,
waarbij u er elke keer
minstens 15 seconden over doet om het rond te draaien. Dit is zeer
belangrijk om de juiste kalibratie te verkrijgen.
Wanneer u klaar bent, houdt u het horloge horizontaal en drukt u op om
het even welke drukknop. De rode wijzer beweegt heen en weer om het
einde van het kalibreren aan te geven en beweegt vervolgens naar de
huidige miswijzingsinstelling (zie MISWIJZING voor meer informatie). Als u de
miswijzing niet wilt instellen, drukt u op de kroon. Anders, als u wilt dat het
horloge automatisch miswijzing compenseert, draait u de kompasring tot het
noorden bij 12 uur is. Druk op de drukknop GETIJ of TEMP om de rode wijzer
naar het oosten (+) of westen (-) te verplaatsen zodat hij naar de miswijzing
van uw locatie wijst (zie de onderstaande tabel) met behulp van de
miswijzingsschaal. Houd de drukknop ingedrukt om de wijzer snel te draaien.
Druk de kroon naar binnen wanneer u klaar bent.
Normaliter is het kompas uit en toont de rode wijzer het getij of de temperatuur.
Het kompas moet vóór gebruik worden gekalibreerd en dit moet worden
gedaan op de plaats van beoogd gebruik; zie KOMPAS KALIBREREN. Als het
kompas niet gekalibreerd is sinds de batterij is vervangen, draait het horloge,
wanneer u probeert het kompas te activeren, de rode wijzer eenmaal rond en
speelt het een melodietje om u eraan te herinneren dat het kompas gekalibreerd
moet worden.
Terwijl u het horloge horizontaal houdt, drukt u op de drukknop KOMPAS om
het kompas te activeren. De rode wijzer beweegt en wijst naar het noorden.
Als het horloge wordt gedraaid, blijft de rode wijzer bewegen en wijst hij
steeds naar het noorden. Na 20 seconden gaat het kompas automatisch uit en
keert de wijzer naar de normale stand terug. Hierdoor gaat de batterij langer
mee. Druk op elk gewenst moment op de drukknop KOMPAS om het kompas
nog 20 seconden aan te laten staan.
OPMERKING: Terwijl het kompas aan staat, kan het INDIGLO® nachtlicht een
beetje flikkeren wanneer het aan is. Dit is normaal omdat het nachtlicht even
uitgezet moet worden tijdens het aflezen van het kompas om nauwkeurig te
blijven. Ook draait de secondewijzer in stappen van twee seconden terwijl het
kompas aan staat.
Als het kompas eenmaal geactiveerd is, zoals hierboven beschreven, kunt u
het op twee manieren gebruiken.
Op welke koers ben ik?
Houd het horloge zodanig dat 12 uur in de richting is
waar u heen gaat. Draai de kompasring totdat de rode wijzer naar het noorden
op de ring wijst. Uw koers is de richting op de ring bij 12 uur.
Welke kant moet ik op gaan?
Als u de richting weet waarin u wilt gaan
(bv. NO), draait u de kompasring totdat die richting (NE) bij 12 uur verschijnt.
Houd het horloge zo dat u in de richting van 12 uur kijkt. Draai uw lichaam
vervolgens totdat de rode wijzer naar het noorden op de kompasring wijst.
Nu kijkt u in de richting waarin u wilt gaan.
Een kompasnaald wijst naar het “magnetische noorden” dat enigszins kan
verschillen van het “ware noorden” dat op kaarten wordt gebruikt. Dit verschil,
de “miswijzing” genoemd, die rond de aardbol verschilt, is gewoonlijk klein
en kan in veel gevallen worden genegeerd. Als u dit verschil echter wilt
compenseren, kunt u dit op twee manieren doen: U kunt dit met de hand doen
door de kompasring zo te draaien dat de rode wijzer naar uw miswijzing
(zie de onderstaande tabel) wijst in plaats van naar het noorden. Gebruik
daarbij de miswijzingsschaal op de kompasring. Of u kunt het horloge
automatisch laten compenseren door uw miswijzing na het kalibreren van
het kompas in te stellen; zie KOMPAS KALIBREREN. Wanneer de juiste
miswijzing is ingesteld, wijst de rode wijzer naar het ware noorden.
Miswijzingen voor grote steden in de wereld (W is negatief en E is positief op
de miswijzingsschaal).
Druk op de kroon om de wijzerplaat van het horloge te verlichten. De in het
INDIGLO® nachtlicht gebruikte, gepatenteerde elektroluminescentietechnologie
(Amerikaanse octrooien 4,527,096 en 4,775,964) verlicht de gehele wijzerplaat
van het horloge ‘s nachts en wanneer er weinig licht is.
ARMBAND MET KLAPSLUITING
Zoek het veerstaafje op waarmee de armband aan de sluiting vastzit. Druk het
veerstaafje met een puntig stuk gereedschap (Fig. 1) naar binnen en draai de
armband voorzichtig los. Meet de pols en steek het veerstaafje in het juiste
onderste gat (Fig. 2). Druk het veerstaafje naar beneden, breng het in lijn met
het bovenste gat en laat het los zodat het vast komt te zitten (Fig. 3).
ARMBANDSCHAKELS VERWIJDEREN
Fig. 1
Fig. 2
Fig. 3
Schakels verwijderen:
Zet de armband rechtop en steek een
puntig stuk gereedschap in de opening van de schakel. Duw
de pen krachtig in de richting van de pijl totdat de schakel los
is (de pennen zijn met opzet moeilijk te verwijderen). Herhaal
dit tot het gewenste aantal schakels verwijderd is.
Weer in elkaar zetten:
Maak de onderdelen van de armband weer aan elkaar
vast. Duw de pen terug in de schakel in de richting tegengesteld aan de pijl. Druk
de pen stevig naar beneden in de armband totdat de pen er niet meer uitsteekt.
ARMBAND MET DICHTE SCHAKELS
Schakels verwijderen:
Verwijder de schroeven met een
zeer kleine schroevendraaier door ze tegen de klok in te
draaien. Herhaal dit tot het gewenste aantal schakels
verwijderd is. Verwijder geen schakels naast de sluiting.
Weer in elkaar zetten:
Zet de onderdelen van de
armband weer in elkaar en steek een schroef in het einde
van de opening waar de schroef verwijderd was. Draai de
schroef met de klok mee totdat hij vastzit en vlak met de armband ligt.
ARMBAND MET HOLLE SCHAKELS EN PENNEN MET SCHROEFKOP
Schakels verwijderen:
Op de verwijderbare schakels staat een pijltje. Houd
een schroevendraaier nabij de achterkant van het pijltje om te voorkomen dat
de pen draait. Verwijder met een andere schroevendraaier het schroefje aan
het einde nabij de punt van het pijltje door dit tegen de klok in te draaien.
Schuif de pen eruit nadat het schroefje is verwijderd.
Herhaal dit voor de tweede pen in de schakel.
Weer in elkaar zetten:
Zet de onderdelen van de armband
weer in elkaar en steek de pen in het einde van de opening
waar de pen verwijderd was. Draai het schroefje en het
andere einde met de klok mee totdat hij vastzit en vlak met
de armband ligt.
Als het horloge waterbestendig is, wordt de metermarkering of
(
O
)
aangegeven.
*lb per vierkante inch absoluut
WAARSCHUWING: DRUK ONDER WATER OP GEEN ENKELE KNOP
OPDAT HET HORLOGE WATERBESTENDIG BLIJFT.
1.
Het horloge is alleen waterbestendig zo lang het glas, de drukknoppen en
de kast intact blijven.
2.
Het horloge is geen duikershorloge en mag niet voor duiken worden
gebruikt.
3.
Spoel het horloge met zoet water af nadat het aan zout water is
blootgesteld.
Timex raadt ten sterkste aan om de batterij door een winkelier of
juwelier te laten vervangen.
Het type batterij vindt u aan de achterkant van
het horloge. Druk op de inwendige terugstelschakelaar, indien aanwezig, nadat
de batterij is vervangen. De geschatte levensduur van de batterij is op
bepaalde veronderstellingen met betrekking tot het gebruik gebaseerd;
de levensduur van de batterij varieert al naargelang het werkelijke gebruik.
DE BATTERIJ NIET IN HET VUUR WEGGOOIEN. NIET OPLADEN. LOSSE
BATTERIJEN UIT DE BUURT VAN KINDEREN HOUDEN.
BATTERIJ
WATERBESTENDIGHEID
ARMBAND AFSTELLEN
INDIGLO® NACHTLICHT
MISWIJZING
HET KOMPAS GEBRUIKEN
WERKING VAN KOMPAS
KOMPAS KALIBREREN
THERMOMETER
GETIJKLOK
GETIJ/TEMPERATUUR SELECTEREN
RODE WIJZER AFSTELLEN
DATUM EN TIJD INSTELLEN
OVERZICHT
Anchorage ...............20E
Atlanta ..................... 4W
Bombay.................... 1W
Boston.................... 15W
Calgary ....................16E
Chicago .................... 3W
Denver .......................9E
Jerusalem ..................4E
London .................................... 2W
Little Rock ................................ 1E
Livingston, MT ....................... 13E
München .................................. 2E
New York City ...................... 13W
Orlando ................................... 5W
Oslo .......................................... 1E
Paris ........................................ 1W
Rio De Janeiro ................. 22W
San Francisco ................... 15E
Seattle ............................... 18E
Schanghai .......................... 5W
Toronto............................. 11W
Vancouver ......................... 18E
Washinton DC ................. 11W
Waterbury, CT ................. 14W
Mehr Information zur magnetischen Deklination unter www.timex.com/expedition
Wasserbeständigkeit/Tiefe
30m/98ft
50m/164ft
100m/328ft
p.s.i.a. *
Wasserdruck
60
86
160
WIR DANKEN FÜR DEN KAUF IHRER TIMEX® UHR.
Bitte lesen Sie die Gebrauchsanweisung für Ihre Timex® Uhr genau durch.
Ihre Uhr besitzt eventuell nicht alle der hier aufgeführten Funktionen.
DEKLINATIONSSKALA
TEMPERATURSKALA
INDIKATOR
(Kompassnadel)
TEMP
MITTELPOSITION-
DATUM EINSTELLEN
AUSSENPOSITION-
ZEIT EINSTELLEN
KRONE
KOMPASS
GEZEIT
GEZEITENSKALA
DREHBARER
KOMPASSRING
DATUM
HINWEIS: Die Uhr wird mit gesicherter Krone ausgeliefert. Schutz entfernen
und Krone hineindrücken.
Kompass muss vor der Benutzung kalibriert
werden, damit Genauigkeit gewährleistet ist und falsche Richtungsan-
gaben vermieden werden.
Siehe KOMPASSKALIBRIERUNG. Hilfe finden Sie
unter www.timex.com/expedition.
Ein Bestandteil der Uhr ist die Magnetsensortechnik von Precision Navigation
Inc., Mountain View (Kalifornien).
Krone bis zur MITTEL-Position herausziehen und drehen, bis das korrekte
Datum erscheint. Nach Einstellen des Datums, Krone vollständig herausziehen
und drehen, bis die richtige Uhrzeit erscheint. AM/PM so einstellen, dass sich
das Datum um Mitternacht - und nicht mittags - ändert. Nach Einstellung
Krone wieder hineindrücken. Bei Monaten mit weniger als 31 Tagen Datum
anpassen.
Krone vollständig herausziehen. Indikator muss auf 12 Uhr zeigen. Falls nicht,
entweder GEZEITEN oder TEMP drücken, bis Zeiger auf 12 Uhr zeigt. GEZEITEN-
und TEMP-Knöpfe bewegen den Zeiger entweder im oder gegen den
Uhrzeigersinn. Knopf gedrückt halten, damit Zeiger sich schneller bewegt.
Nach Einstellung Krone wieder hineindrücken.
Indikator zeigt entweder Gezeiten oder Temperatur kontinuierlich an. Ist die
Temperatur angezeigt, GEZEITEN-Knopf drücken, um Gezeitenoption zu wählen.
Zuerst wird Ebbe, dann der aktuelle Stand angezeigt. Sind Gezeiten angezeigt,
TEMP-Knopf drücken, um Thermometer zu wählen. Beginnt mit niedrigsten
Temperaturen, dann wird die aktuelle Temperatur angezeigt.
Der Indikator der Gezeitenuhr dreht sich immer im Uhrzeigersinn: Flut wird
durch links stehenden Zeiger und Ebbe durch rechts stehenden Zeiger
gekennzeichnet. Anzahl der Stunden bis zur nächsten Ebbe/Flut ist auf der
Gezeitenskala sichtbar.
Die Gezeiten werden in erster Linie durch die Position des Mondes bestimmt.
Die Gezeitenuhr verwendet die Mondposition zur Berechnung von Ebbe und
Flut, die im Abstand von 6 Stunden und 12,5 Minuten wechseln.
Da Gezeiten auch von Sonnenposition und Küstenformation abhängen, kann
die Uhr die genaue Zeit von Ebbe und Flut nicht bestimmen. Zeitweiliges
Anpassen könnte erforderlich sein.
Um die Gezeitenuhr einzustellen, Krone bis zur MITTEL-Position herausziehen.
Entweder GEZEITEN oder TEMP drücken, um Zeiger auf die jetzige Gezeit
einzustellen. GEZEITEN- und TEMP-Knöpfe bewegen den Zeiger entweder im
oder gegen den Uhrzeigersinn. Nach Einstellung Krone wieder hineindrücken.
Für Information zu den Gezeiten siehe www.timex.com/expedition
Wird die Uhr am Arm getragen, beeinflusst Körperwärme die Temperaturmes-
sung. Um genauere Messungen zu erzielen, die Uhr abnehmen und mindestens
einige Minuten lang in den Schatten legen.
Die Uhr kann auch Wassertemperatur messen. Darauf achten, dass der
Temperaturmodus gewählt ist, bevor die Uhr ins Wasser getaucht wird,
da unter Wasser keine Knöpfe gedrückt werden sollten.
Thermometermessungen werden jede Minute vorgenommen; öfter bei
wechselnder Temperatur.
Da ein Kompass sich nach dem Magnetfeld der Erde richtet, sollte auf große
Metallobjekte, wie Fahrzeuge, Brücken oder Gegenstände mit elektromag-
netischer Strahlung (Fernseher und Computer), geachtet werden, da sie das
die Uhr umgebende Magnetfeld beeinflussen können. Wird der Kompass in der
Nähe derartiger Objekte kalibriert, funktioniert er nur an dieser Stelle korrekt.
Wird der Kompass woanders kalibriert, so funktioniert er in der Nähe solcher
Objekte nicht korrekt .
Beste Ergebnisse werden erzielt, wenn die
Kalibrierung im Bereich der beabsichtigten Verwendung erfolgt.
Es ist wichtig, den Kompass bei der Kalibrierung und Richtungsfindung eben
zu halten. Anderenfalls kann es zu beträchtlichen Ungenauigkeiten führen.
Bereiche mit übermäßiger Konzentration von Eisen und Weicheisen sind zu
meiden, da es zu ungenauen Richtungsangaben kommen könnte. Bei suspekten
Richtungsangaben nochmals kalibrieren.
Uhr nicht in der Nähe von magnetischen Quellen aufbewahren (Computer,
Haushaltsgeräte und Fernseher), da eine Magnetisierung der Uhr zu ungenauen
Richtungsangaben führen könnte.
Zum Kalibrieren des Kompasses die Krone zur MITTEL-Position herausziehen.
Halten Sie die Uhr eben oder legen Sie sie auf eine ebene Oberfläche (falls das
Armband hinderlich sein sollte, legen Sie die Uhr auf eine umgekehrte Tasse).
Wird die Uhr mit dem Glas nach unten hingelegt, sollte das Glas geschützt wer-
den. Drücken Sie KOMPASS, um zu beginnen. Die Kompassnadel dreht sich
zweimal, um daran zu erinnern, dass die Uhr gedreht werden muss. Während
die Uhr eben ist, drehen Sie die Uhr
LANGSAM
zweimal,
wobei jede
Umdrehung mindestens 15 Sekunden dauern sollte. Für genaue
Kalibrierung ist dies äußerst wichtig.
Drücken Sie anschließend eine der Drucktasten und halten Sie die Uhr eben.
Die Kompassnadel bewegt sich hin und zurück und zeigt somit das Ende der
Kalibrierung an. Anschließend bewegt sie sich zur aktuellen Deklinationswinkel-
Einstellung ( für weitere Informationen, siehe DEKLINATIONSWINKEL). Wenn der
Deklinationswinkel nicht eingestellt werden soll, die Krone hineindrücken.
Anderenfalls kann die Uhr den Deklinationswinkel automatisch ausgleichen,
indem der Kompassring gedreht wird, bis Norden auf 12 Uhr zeigt. Entweder
GEZEITEN oder TEMP drücken und die Kompassnadel nach Osten (+) oder
Westen (-) bewegen, um mit Hilfe der Deklinationsskala auf den Deklinations-
winkel Ihres Standortes zu zeigen (siehe nachstehende Tabelle). Knopf
gedrückt halten, damit Zeiger sich schneller bewegt. Nach Einstellung Krone
wieder hineindrücken.
Wenn Kompass ausgestellt ist, zeigt die Nadel entweder Gezeit oder
Temperatur.
Vor dem Betrieb muss der Kompass kalibriert werden, und die Kalibrierung
sollte im Bereich der beabsichtigten Verwendung durchgeführt werden (siehe
KOMPASS KALIBRIEREN). Bei Aktivierung des Kompasses dreht sich der
Indikator einmal und eine Melodie erinnert an Kalibrierung, falls der Kompass
nach dem letzten Batteriewechsel nicht neu kalibriert wurde.
Zwecks Aktivierung drücken Sie KOMPASS, während Sie die Uhr eben halten.
Die Kompassnadel bewegt sich und zeigt auf Norden. Wird die Uhr gedreht,
dreht sich auch die Kompassnadel und zeigt stets auf Norden. Nach
20 Sekunden schaltet der Kompass automatisch ab, und die Kompassnadel
kehrt zu ihrer ursprünglichen Funktion zurück. Dadurch wird die Batterie
geschont. Jederzeit KOMPASS drücken, um den Kompass weitere 20 Sekunden
lang zu aktivieren.
HINWEIS: Während der Kompass aktiviert ist, könnte das INDIGLO®-Nachtlicht
im eingeschalteten Zustand leicht flimmern. Das ist normal, da das Nachtlicht
während der Kompassmessung kurzfristig ausgeschaltet werden muss, um
Genauigkeit zu gewährleisten. Im Kompassmodus bewegt sich der
Sekundenzeiger in Schritten von zwei Sekunden.
Es gibt zwei Arten, den Kompass zu benutzen, nachdem er wie oben
beschrieben aktiviert wurde.
In welche Richtung bewege ich mich?
Halten Sie die Uhr so, dass 12 Uhr in
die Richtung zeigt, in die Sie sich bewegen. Drehen Sie den Kompassring, bis
die Kompassnadel am Ring auf Norden zeigt. Ihre Richtung entspricht der
12 Uhr-Position auf dem Ring.
In welche Richtung soll ich gehen?
Wenn Sie die Richtung kennen
(z. B. NO), drehen Sie den Kompassring, bis diese Richtung in der
12-Uhr-Position erscheint. Halten Sie die Uhr so, dass Sie 12 Uhr ansehen.
Drehen Sie sich anschließend, bis die Kompassnadel am Kompassring auf
Norden zeigt. Jetzt haben die gewünschte Richtung direkt vor sich.
Eine Kompassnadel zeigt auf den „magnetischen Norden“, was von dem auf
Karten verwendeten, geografischen Norden geringfügig abweichen kann.
Dieser Unterschied, der auch „Deklinationswinkel“ genannt wird und je nach
Standort variiert, ist üblicherweise gering und kann in den meisten Fällen
ignoriert werden. Falls Sie diesen Unterschied jedoch ausgleichen möchten,
können Sie das auf zwei Arten durchführen. Sie können dies manuell
ausgleichen, indem Sie den Kompassring unter Verwendung der Deklinations-
skala auf dem Kompassring drehen, bis die Kompassnadel auf Ihren Deklinations-
winkel (siehe nachstehende Tabelle) und nicht auf Norden zeigt. Oder Sie
können die Uhr automatisch ausgleichen, indem Sie den Deklinationswinkel
nach der Kompasskalibrierung einstellen (siehe KOMPASS KALIBRIEREN). Wenn
der Deklinationswinkel richtig eingestellt wurde, wird die Kompassnadel auf die
geografische Nordrichtung zeigen.
Deklinationswinkel für einige Weltstädte (W ist negativ und E ist positiv auf der
Deklinationsskala).
Krone drücken, um Zifferblatt zu beleuchten. Die für das INDIGLO® Nachtlicht
verwendete patentierte Elektroleuchttechnik (U.S. Patente 4.527.096 und
4.775.964) beleuchtet das gesamte Zifferblatt bei Nacht und Dunkelheit.
ARMBAND MIT FALTSCHLIESSE
Finden Sie die Feder, die das Armband mit dem Verschluss verbindet. Drücken
Sie die Feder mit einem spitzen Gegenstand herunter (Abb. 1), und drehen Sie
das Armband leicht, bis es sich löst. Passen Sie das Armband Ihrem
Handgelenk an, und setzen Sie die Feder in das entspechende Loch an der
Unterseite ein (Abb. 2). Feder herunterdrücken und in das Loch an der
Oberseite gleiten lassen, um das Armband zu befestigen (Abb. 3).
ENTFERNEN VON ARMBANDGLIEDERN
Abb. 1
Abb. 2
Abb. 3
Glieder entfernen:
Armband aufrecht stellen und mit
einem spitzen Gegenstand in die Gliedöffnung stechen.
Stift in Pfeilrichtung kräftig herausdrücken, bis Glied sich
löst. (Stifte sollen sich schwer entfernen lassen.)
Wiederholen, bis die gewünschte Anzahl von Gliedern
entfernt ist.
Zusammenfügen:
Armbandteile zusammensetzen. Stift in entgegengesetzter
Pfeilrichtung wieder in das Glied setzen. Stift hineindrücken, bis er sicher sitzt.
GLIEDERARMBAND
Glieder entfernen:
Mit einem kleinen Schraubenzieher
die Schrauben gegen den Uhrzeigersinn entfernen.
Wiederholen, bis die gewünschte Anzahl von Gliedern
entfernt ist. Glieder, die sich direkt an der Schließe
befinden, nicht entfernen.
Zusammenfügen:
Armbandteile wieder zusammensetzen
und Schraube im Uhrzeigersinn wieder eindrehen. Schraube im Uhrzeigersinn
festdrehen, bis sie sicher sitzt.
FEDERKERNARMBAND MIT SCHRAUBENSTIFT
Glieder entfernen:
Auf den abnehmbaren Gliedern sind
Pfeile zu sehen. Armbandglied am unteren Teil des Pfeiles
mit einem Schraubenzieher festhalten, damit es sich nicht
dreht. Mit einem zweiten Schraubenzieher oberhalb des
Pfeiles die Schraube gegen den Uhrzeigersinn heraus-
drehen. Nach dem Entfernen der Schraube, den Stift her-
ausziehen. Mit dem Stift des zweiten Gliedes wiederholen.
Zusammenfügen:
Armbandteile wieder zusammensetzen und Schraube im
Uhrzeigersinn wieder eindrehen. Schraube im Uhrzeigersinn festdrehen, bis sie
wieder sicher im Armband sitzt.
Wasserdichte Uhren sind mit Tiefenangabe in Metern oder mit
(
O
)
gekennzeichnet.
*pounds per square inch absolute
ACHTUNG: UM WASSERBESTÄNDIGKEIT ZU BEWAHREN, UNTER
WASSER KEINE KNÖPFE DRÜCKEN.
1.
Die Uhr ist nur wasserdicht, solange Glas, Knöpfe und Gehäuse intakt sind.
2.
Dies ist keine Taucheruhr und sie sollte nicht zum Tauchen benutzt werden.
3.
Nach Kontakt mit Salzwasser Uhr mit klarem Wasser abspülen.
Timex empfiehlt dringend, die Batterie nur von einem Händler oder
Juwelier auswechseln zu lassen.
Der Batterietyp ist auf der Rückseite der
Uhr angegeben. Nach Batterieaustausch den Reset-Knopf drücken, falls
vorhanden. Die Lebensdauer der Batterie wird aufgrund bestimmter
Durchschnittswerte geschätzt und ist abhängig vom tatsächlichen Gebrauch.
BATTERIE NICHT INS FEUER WERFEN. NICHT WIEDERAUFLADBAR.
BATTERIEN VON KINDERN FERNHALTEN.
BATTERIE
WASSERBESTÄNDIGKEIT
ARMBAND ANPASSEN
INDIGLO®-NACHTLICHT
DEKLINATIONSWINKEL
BENUTZUNG DES KOMPASSES
KOMPASSFUNKTIONEN
KOMPASS KALIBRIEREN
THERMOMETER
GEZEITENUHR
GEZEITEN/TEMPERATUR
INDIKATOR EINSTELLEN
DATUM UND UHRZEIT EINSTELLEN
ÜBERBLICK
GRAZIE DI AVERE ACQUISTATO UN OROLOGIO TIMEX®.
Si prega di leggere attentamente le istruzioni per capire come usare l’orologio
Timex®.
Il modello in dotazione potrebbe non disporre di tutte le funzioni
descritte in questo opuscolo.
PANORAMICA
SCALA
DECLINAZIONE
SCALA
TEMPERATURA
LANCETTA
INDICATRICE
TEMP
INTERMEDIO - IMPOSTA DATA
IN FUORI - IMPOSTA ORA
CORONA
BUSSOLA
MAREA
SCALA MAREA
ANELLO BUSSOLA
GIREVOLE
DATA
NOTA: l’orologio viene spedito con una protezione attorno alla corona. Togliere
la protezione e spingere in dentro la corona per iniziare.
La bussola va
calibrata prima dell’uso per assicurarne la precisione ed evitare letture
inaccurate. Vedere CALIBRAZIONE DELLA BUSSOLA Andare a
www.timex.com/expedition per ottenere assistenza.
L’orologio incorpora la tecnologia con sensore magnetico della Precision
Navigation Inc., Mountain View, California, USA.
COME IMPOSTARE DATA E ORA
Estrarre la corona nella posizione INTERMEDIA e girarla finché non appare la
data giusta. Dopo aver impostato la data, tirare la corona completamente in
fuori e girarla fino ad ottenere l’ora giusta. Assicurare la corretta impostazione
di AM/PM (mattina/pomeriggio) verificando che la data cambi alla mezzanotte,
e non a mezzogiorno. Spingere in dentro la corona quando si finisce. Regolare
la data dopo i mesi che hanno meno di 31 giorni.
COME REGOLARE LA LANCETTA INDICATRICE
Estrarre completamente la corona. L’ago della lancetta deve puntare sulle ore
12. In caso contrario, premere il pulsante MAREA o TEMP per spostare la lancetta
in modo che punti in tale direzione . I pulsanti MAREA e TEMP spostano rispettiva-
mente la lancetta in senso orario e antiorario. Tenere premuto il pulsante per far
spostare la lancetta rapidamente. Spingere in dentro la corona quando si finisce.
SELEZIONE DI MAREA/TEMPERATURA
La lancetta indicatrice mostra costantemente la marea o la temperatura.
Quando viene mostrata la temperatura, premere il pulsante MAREA per
selezionare l’orologio della marea. La lancetta si sposta sulla bassa marea e
poi sulla marea corrente. Quando viene mostrata la marea, premere il pulsante
TEMP per selezionare il termometro. La lancetta si sposta all’inizio della scala
del termometro e poi sulla temperatura corrente.
OROLOGIO DELLA MAREA
Per l’orologio della marea, la lancetta indicatrice ruota sempre in senso orario,
quindi la marea si sta alzando quando la lancetta punta a sinistra e sta calando
quando la lancetta punta a destra. Il numero di ore che mancano alla successiva
alta/bassa marea è indicato sulla scala della marea.
Il fattore primario che determina le maree è la posizione della luna. L’orologio
della marea si basa sulla posizione della luna per predire l’alta e la bassa
marea, che sono ad una distanza reciproca di 6 ore e 12,5 minuti.
Le maree sono influenzate anche dalla posizione del sole e dalla forma della
linea costiera, quindi l’orologio della marea non può dare un orario preciso
dell’alta e della bassa marea. Potrebbe essere necessario regolare periodica-
mente l’orologio della marea.
Per impostare l’orologio della marea, estrarre la corona nella posizione
INTERMEDIA. Premere il pulsante MAREA o TEMP per spostare la lancetta sulla
marea corrente. I pulsanti MAREA e TEMP spostano rispettivamente la lancetta
in senso orario e antiorario. Spingere in dentro la corona quando si finisce.
Per informazioni sulle maree, andare al sito www.timex.com/expedition
TERMOMETRO
Quando il termometro viene indossato al polso, la sua lettura viene influenzata
dal calore corporeo. Per letture più accurate, togliersi l’orologio e metterlo
all’ombra per svariati minuti.
L’orologio è in grado di misurare anche la temperatura dell’acqua, se sommerso.
Assicurarsi di selezionare il display della temperatura prima di mettere
l’orologio nell’acqua, in quanto non si deve premere alcun pulsante mentre
l’orologio si trova sott’acqua.
Le letture del termometro vengono registrate ogni minuto, e con più frequenza
se la temperatura sta cambiando.
CALIBRAZIONE
DELLA
BUSSOLA
Poiché una bussola utilizza il campo magnetico della Terra, si deve essere
consapevoli della presenza di grandi oggetti metallici, come automobili o ponti,
o di oggetti che emettono radiazioni elettromagnetiche, come la TV o i PC,
che potrebbero influenzare il campo magnetico che circonda l’orologio. Se la
bussola viene calibrata in prossimità di tali oggetti, funzionerà adeguatamente
solo nello stesso luogo. Se la bussola viene calibrata lontano da tali oggetti,
non funzionerà adeguatamente in loro prossimità.
Per ottenere i risultati
migliori, calibrare la bussola nella zona in cui si desidera utilizzarla.
Nel calibrare e nell’usare la bussola per le letture, è importante, come nel caso
di tutte le bussole, mantenerla a livello. In caso contrario, si può incorrere in
gravi errori di lettura. Evitare inoltre, per non ottenere letture inaccurate, zone
in cui potrebbero essere presenti concentrazioni superiori al normale di ferro
dolce o magnetizzazione permanente. Se una lettura appare sospetta, va
eseguita una nuova calibrazione.
Non conservare l’orologio in prossimità di fonti di magnetismo, come computer,
elettrodomestici o TV, in quanto l’orologio può assumere una carica magnetica
e dare letture inaccurate.
Per calibrare la bussola, estrarre la corona nella posizione INTERMEDIA. Tenere
l’orologio a livello o metterlo su una superficie piana (se il cinturino interferisce
con il posizionamento, appoggiare l’orologio su una tazza rovesciata).
L’orologio può essere appoggiato sul quadrante, ma fare attenzione a
proteggere il quadrante stesso. Per iniziare, premere il pulsante BUSSOLA. La
lancetta indicatrice ruota di due giri per ricordare all’utente di ruotare
l’orologio. Mentre l’orologio è livellato,
LENTAMENTE
fargli eseguire due giri,
impiegando per ogni giro almeno 15 secondi. Questo accorgimento è di
importanza fondamentale per una calibrazione adeguata.
Al termine, premere qualsiasi pulsante, mantenendo l’orologio a livello. La
lancetta indicatrice si sposta avanti e indietro, per segnalare la fine della
calibrazione, e poi si sposta sull’impostazione corrente dell’angolo di
declinazione (vedere ANGOLO DI DECLINAZIONE per ulteriori informazioni).
Se non si desidera impostare l’angolo di declinazione, spingere in dentro la
corona. Altrimenti, perché l’orologio esegua la compensazione automatica per
l’angolo di declinazione, girare l’anello della bussola finché il nord non si trova
in corrispondenza delle ore 12. Premere il pulsante MAREA o TEMP per
spostare la lancetta indicatrice ad est (+) o a ovest (-) per puntare sull’angolo
di declinazione del luogo dove ci si trova (vedere la tabella sotto) usando la
scala di declinazione. Tenere premuto il pulsante per far spostare la lancetta
rapidamente. Spingere in dentro la corona quando si finisce.
FUNZIONAMENTO DELLA BUSSOLA
Normalmente, la bussola è spenta e la lancetta indicatrice indica la marea o la
temperatura.
La bussola deve essere calibrata prima dell’uso, e la calibrazione va eseguita
nella zona dove si intende usare la bussola (vedere la sezione CALIBRAZIONE
DELLA BUSSOLA). Se la bussola non è stata calibrata da quando si è sostituita
la batteria, se si cerca di attivare la bussola l’orologio fa ruotare la lancetta
indicatrice una volta e riproduce una musichetta per ricordare all’utente di
eseguire la calibrazione.
Tenendo l’orologio a livello, premere il pulsante BUSSOLA per attivare la
bussola. L’ago della bussola si sposta per puntare a nord. Se l’orologio viene
girato, la lancetta indicatrice continuerà a spostarsi, sempre puntando verso
nord. Dopo 20 secondi, la bussola si spegne automaticamente e la lancetta
ritorna al suo funzionamento normale. In questo modo si risparmia il consumo
della batteria. Premere il pulsante BUSSOLA in qualsiasi momento per attivare
la bussola per altri 20 secondi.
NOTA: mentre la bussola è attiva, l’illuminazione del quadrante INDIGLO®
potrebbe tremolare leggermente quando si accende. Questo è un fatto
normale, in quanto l’illuminazione del quadrante deve essere spenta
momentaneamente durante le letture della bussola per permettere una lettura
accurata. Inoltre, la lancetta dei secondi si sposta in incrementi di due secondi
mentre la bussola è attivata.
USO DELLA BUSSOLA
Una volta attivata la bussola, come descritto sopra, sono due i modi in cui essa
viene normalmente usata.
In che direzione sto andando?
Tenere l’orologio in modo che la direzione in
cui ci si sta muovendo sia quella delle ore 12. Girare l’anello della bussola
finché l’ago virtuale non punta a nord sull’anello. La direzione in cui ci si sta
muovendo è la direzione indicata sull’anello in corrispondenza delle ore 12.
In che direzione devo andare?
Se si conosce la direzione verso la quale si
desidera andare (per es., NE), girare l’anello della bussola finché quella
direzione non appare in corrispondenza delle ore 12. Tenere in mano l’orologio
in modo da essere rivolti verso le ore 12. Quindi, girarsi finché la lancetta
indicatrice non punta a nord sull’anello della bussola. Ora si è rivolti verso la
direzione nella quale ci si vuole spostare.
ANGOLO DI DECLINAZIONE
Un ago di bussola punta su un “nord magnetico”, che potrebbe essere legger-
mente diverso dal “nord geografico” che viene usato nelle cartine geografiche.
Questa differenza, detta “angolo di declinazione”, e che varia a seconda di
dove ci si trova nel mondo, è di solito piccola ed in molti casi può essere
ignorata. Tuttavia, se si desidera compensare tale differenza, si dispone di due
modi per farlo. Lo si può fare manualmente, girando l’anello della bussola in
modo che la lancetta indicatrice punti sul proprio angolo di declinazione
(vedere la tabella sotto) invece che sul nord, usando la scala di declinazione
sull’anello della bussola. Oppure si può fare eseguire la compensazione
automatica dall’orologio, impostando il proprio angolo di declinazione dopo
aver calibrato la bussola; vedere CALIBRAZIONE DELLA BUSSOLA. Una volta
impostato l’angolo di declinazione appropriato, la lancetta indicatrice punterà
sul nord geografico.
Angoli di declinazione per le principali città del mondo (W è negativo ed E è
positivo sulla scala di declinazione).
ILLUMINAZIONE DEL QUADRANTE INDIGLO®
Premere la corona per illuminare il quadrante dell’orologio. La tecnologia
elettroluminescente brevettata (brevetti statunitensi 4,527,096 e 4,775,964)
impiegata nell’illuminazione del quadrante INDIGLO® illumina l’intero
quadrante dell’orologio di notte e in condizioni di scarsa luminosità.
REGOLAZIONE DEL BRACCIALE
BRACCIALE CON FERMAGLIO RIPIEGABILE
Individuare la barretta a molla che collega il bracciale al fermaglio. Servendosi
di un attrezzo a punta (Fig. 1), spingere in dentro la barretta a molla e torcere
delicatamente il bracciale per staccarlo. Determinare la misura del polso,
quindi inserire la barretta a molla nel corrispondente foro inferiore (Fig. 2).
Premere la barretta a molla, allinearla con il foro superiore, quindi rilasciarla
per bloccare il bracciale in posizione (Fig. 3).
RIMOZIONE DELLE MAGLIE DEL BRACCIALE
Fig. 1
Fig. 2
Fig. 3
Rimozione delle maglie:
mettere in piedi il bracciale ed
inserire un attrezzo a punta nell’apertura della maglia.
Spingere con forza lo spillo in direzione della freccia finché
la maglia non si stacca (gli spilli sono difficili da rimuovere).
Ripetere l’operazione finché non si è rimosso il numero
desiderato di maglie.
Rimontaggio:
riunire le parti del bracciale. Spingere di nuovo lo spillo nella
maglia, in direzione opposta alla freccia. Premere con fermezza lo spillo nel
bracciale finché non resta a filo con esso.
BRACCIALE A MAGLIE PIENE
Rimozione delle maglie:
servendosi di un cacciavite
molto piccolo, rimuovere le viti girandole in senso
antiorario. Ripetere l’operazione finché non si è rimosso
il numero desiderato di maglie. Non rimuovere le maglie
adiacenti al fermaglio.
Rimontaggio:
riunire le parti del bracciale ed inserire la
vite all’estremità dell’apertura dalla quale era stata rimossa. Avvitare bene la
vite girandola in senso orario finché non resta a filo con il bracciale.
BRACCIALE A MAGLIE CILINDRICHE CON SPILLI A TESTA AVVITABILE
Rimozione delle maglie:
le maglie rimovibili presentano
frecce. Usare un cacciavite vicino alla coda della freccia
per evitare che lo spillo possa girare. Con un altro
cacciavite, rimuovere la vite in prossimità della punta della
freccia, girandola in senso antiorario. Dopo aver rimosso la
vite, far scivolare fuori lo spillo. Ripetere l’operazione per il
secondo spillo nella maglia.
Rimontaggio:
riunire le parti del bracciale ed inserire lo spillo all’estremità
dell’apertura dalla quale era stato rimosso. Avvitare la vite e l’altra estremità
girando in senso orario finché non resta ben fissa e a filo con il bracciale.
RESISTENZA ALL’ACQUA
Se l’orologio è resistente all’acqua, presenta il numero dei metri di resistenza o
il contrassegno
(
O
).
*libbre per pollice quadrato assolute
AVVERTENZA: PER SALVAGUARDARE L’MPERMEABILITA’
DELL’OROLOGIO, NON PREMERE ALCUN PULSANTE SOTT’ACQUA.
1.
L’orologio è resistente all’acqua purché lente, pulsanti e cassa siano intatti.
2.
L’orologio non è un orologio da subacquea e non va usato a tale scopo.
3.
Risciacquare l’orologio con acqua dolce dopo l’esposizione all’acqua marina.
BATTERIA
La Timex raccomanda caldamente di portare l’orologio da un
dettagliante o un gioielliere per far cambiare la batteria.
Il tipo di batteria
richiesto è indicato sul retro dell’orologio. Se è presente un interruttore di
ripristino interno, spingerlo dopo aver sostituito la batteria. Le stime sulla
durata della batteria si basano su determinati presupposti relativi all’uso;
la durata della batteria varia a seconda dell’uso effettivo dell’orologio.
NON GETTARE LE BATTERIE NEL FUOCO. NON RICARICARLE.
MANTENERE LE BATTERIE SFUSE FUORI DALLA PORTATA DEI
BAMBINI.
INTERNATIONALE GARANTIE VAN TIMEX
(VS – BEPERKTE GARANTIE – ZIE DE VOORKANT VAN HET INSTRUCTIEBOEKJE
VOOR DE VOORWAARDEN VAN HET AANBOD VOOR VERLENGDE GARANTIE)
Het TIMEX® horloge heeft een garantie van de Timex Corporation voor gebreken in fabricage
gedurende een periode van EEN JAAR vanaf de oorspronkelijke aankoopdatum. Timex en gelieerde
ondernemingen over de hele wereld erkennen deze internationale garantie.
Timex mag, naar eigen keuze, het horloge repareren door nieuwe of grondig gereviseerde en
geïnspecteerde componenten te installeren of het vervangen door een identiek of gelijksoortig
model. BELANGRIJK — DEZE GARANTIE DEKT GEEN GEBREKEN OF SCHADE AAN HET
HORLOGE:
1)
nadat de garantietermijn is verlopen;
2)
als het horloge oorspronkelijk niet bij een erkende Timex-winkelier is gekocht;
3)
als gevolg van reparaties die niet door Timex zijn uitgevoerd;
4)
als gevolg van ongelukken, knoeien of misbruik; en
5)
het glas, de band, de kast, de accessoires of de batterij. Timex kan het vervangen van deze
onderdelen in rekening brengen.
DEZE GARANTIE EN HET HIERIN UITEENGEZETTE VERHAAL ZIJN EXCLUSIEF EN KOMEN IN DE PLAATS
VAN ALLE ANDERE GARANTIES, UITDRUKKELIJK OF IMPLICIET, MET INBEGRIP VAN IMPLICIETE
GARANTIE VAN VERKOOPBAARHEID OF GESCHIKTHEID VOOR EEN BEPAALD DOEL. TIMEX IS NIET
AANSPRAKELIJK
VOOR
SPECIALE,
INCIDENTELE
OF
GEVOLGSCHADE.
Sommige
landen
en
staten
staan geen beperkingen toe met betrekking tot impliciete garanties en staan geen uitsluitingen of
beperkingen met betrekking tot schade toe, zodat deze beperkingen wellicht niet voor u van
toepassing zijn. Deze garantie geeft u specifieke wettelijke rechten en u kunt ook andere rechten
hebben die van land tot land en van staat tot staat verschillen.
Voor het verkrijgen van service onder de garantie dient u uw horloge naar Timex, een van de
gelieerde ondernemingen of de Timex-winkelier waar het horloge gekocht is, te retourneren, samen
met een ingevulde, originele reparatiebon van het horloge of, alleen in de VS en Canada, de
ingevulde originele reparatiebon van het horloge of een schriftelijke verklaring waarin uw naam,
adres, telefoonnummer en datum en plaats van aankoop worden vermeld. Wilt u het volgende met
uw horloge sturen voor port en behandeling (dit zijn geen reparatiekosten): een cheque of
postwissel voor US$7,00 in de VS; een cheque of postwissel voor CAN$6,00 in Canada; en een
cheque of postwissel voor UK£2,50 in het V.K. In andere landen zal Timex port en behandeling in
rekening brengen. STUUR NOOIT EEN SPECIAAL HORLOGEBANDJE OF ENIG ANDER ARTIKEL VAN
PERSOONLIJKE WAARDE MEE.
Voor de VS kunt u 1-800-448-4639 bellen voor meer informatie over de garantie. Voor Canada belt
u 1-800-263-0981. Voor Brazilië +55 (11) 5572 9733. Voor Mexico 01-800-01-060-00. Voor Midden-
Amerika, het Caribische gebied, Bermuda en de Bahamas (501) 370-5775 (VS). Voor Azië
852-2815-0091. Voor het V.K. 44 020 8687 9620. Voor Portugal 351 212 946 017. Voor Frankrijk
33 3 81 63 42 00. Voor Duitsland 49 7 231 494140. Voor het Midden-Oosten en Afrika 971-4-310850.
Voor andere gebieden kunt u contact opnemen met uw plaatselijke Timex-winkelier of -distributeur
voor informatie over de garantie. In Canada, de VS en sommige andere locaties kunnen deelne-
mende Timex winkeliers u een voorgeadresseerde, franco horlogereparatie-enveloppe verschaffen
voor het verkrijgen van service van de fabriek.
©2005 Timex Corporation. TIMEX is een gedeponeerd handelsmerk van de Timex Corporation.
INDIGLO is een gedeponeerd handelsmerk van de Indiglo Corporation in de VS en andere landen.
TIMEX
INTERNATIONALE
GARANTIE
(U.S.A. – EINGESCHRÄNKTE GARANTIE – SIEHE VORDERSEITE DER GEBRAUCHSANWEISUNG
FÜR ANGEBOTSBEDINGUNGEN EINER ERWEITERTEN GARANTIE)
Für Ihre TIMEX®-Uhr übernimmt die Timex Corporation eine Garantie auf Herstellungsmängel für die
Dauer EINES JAHRES vom Original-Verkaufsdatum. Timex und ihre Partner weltweit erkennen diese
internationale Garantie an.
Bitte beachten Sie, dass Timex nach eigenem Ermessen die Uhr durch Installieren neuer oder
gründlich überholter und überprüfter Komponenten reparieren bzw. durch ein identisches oder
ähnliches Modell ersetzen kann.
WICHTIG — BITTE BEACHTEN SIE, DASS SICH DIESE GARANTIE
NICHT AUF MÄNGEL ODER SCHÄDEN IHRER UHR BEZIEHT:
1)
wenn die Garantiezeit abgelaufen ist;
2)
wenn das Produkt ursprünglich nicht von einem autorisierten TIMEX-Händler gekauft wurde;
3)
wenn Reparaturen nicht von TIMEX durchgeführt wurden;
4)
wenn diese durch Unfälle, unbefugte Eingriffe oder unsachgemäße Behandlung entstanden
sind; und
5)
wenn Glas, Gurt oder Armband, Uhrengehäuse, Zubehör oder Batterie betroffen sind. Timex
kann den Ersatz dieser Teile in Rechnung stellen.
DIESE GARANTIE UND DIE DARIN ENTHALTENEN RECHTSMITTEL SCHLIESSEN ALLE ANDERWEITIGEN
GARANTIEN AUS UND ERSETZEN DIESE; UNABHÄNGIG DAVON; OB ES SICH DABEI UM
AUSDRÜCKLICHE ODER STILLSCHWEIGENDE GARANTIEN HANDELT, INKLUSIVE JEGLICHER
STILLSCHWEIGENDER GARANTIEN IN BEZUG AUF MARKTFÄHIGKEIT ODER EIGNUNG FÜR EINEN
BESTIMMTEN
ZWECK.
TIMEX
HAFTET
NICHT
FÜR
SONDER-,
NEBEN-
ODER
FOLGESCHÄDEN.
Einige
Länder und Bundesstaaten erlauben keine Einschränkungen stillschweigender Garantien und keine
Einschränkungen von Schadensersatzansprüchen, so dass diese Einschränkungen nicht unbedingt
auf Sie zutreffen. Diese Garantie gibt Ihnen bestimmte Rechte. Darüber hinaus haben Sie u.U.
weitere Rechte, die je nach Land oder Bundesstaat unterschiedlich sind.
Um den Garantie-Service in Anspruch zu nehmen, senden Sie Ihre Uhr an Timex, einen Timex-Partner
oder den Timex-Einzelhändler, bei dem Sie die Uhr gekauft haben, mit ausgefülltem Original-
Reparaturschein als Anlage. Ausschließlich für USA und Kanada: legen Sie den ausgefüllten Original-
Reparaturschein oder eine schriftliche Erklärung mit Namen, Adresse, Telefonnummer, Ort und
Kaufdatum bei. Schicken Sie zusammen mit Ihrer Uhr folgenden Betrag für Porto- und Verpackung
ein (hierbei handelt es sich nicht um Reparaturkosten): in den USA, Scheck oder Zahlungsanweisung
über US$ 7,00; in Kanada, Scheck oder Zahlungsanweisung über CAN$ 6,00 und in GB, Scheck oder
Zahlungsanweisung über UK£ 2,50. In allen anderen Ländern stellt Timex die Porto- und
Verpackungskosten in Rechnung. KEINE BESONDEREN ARMBÄNDER ODER ANDERE ARTIKEL MIT
PERSÖNLICHEM WERT
BEIFÜGEN.
Innerhalb der USA erhalten Sie zusätzliche Garantieinformation unter der Nummer 1-800-448-4639.
Für Kanada wählen Sie 1-800-263-0981, für Brasilien +55 (11) 5572 9733, für Mexiko 01-800-01-060-00,
für Zentralamerika, die Karibik, Bermuda und die Bahamas (501) 370 5775 (USA). Für Asien wählen
Sie 852-2815-0091, für GB 44 020 8687 9620, für Portugal 351 212 946 017, für Frankreich 33 3 81
63 42 00, für Deutschland 49 7 231 494140, für den mittleren Osten und Afrika 971-4-310850. Für
alle anderen Länder wenden Sie sich für Garantieinformation bitte an Ihren örtlichen Timex-
Einzelhändler oder Timex-Generalvertreter. In Kanada, den USA und anderen bestimmten Standorten
können teilnehmende Timex-Händler Ihnen einen frankierten und adressierten Versandumschlag für
die Rücksendung der Uhr zur Verfügung stellen.
©2005 Timex Corporation. TIMEX ist eine eingetragene Marke der Timex Corporation. INDIGLO ist
eine eingetragene Marke der Indiglo Corporation in den USA und in anderen Ländern.
GARANZIA
INTERNAZIONALE TIMEX
(U.S.A.
–
GARANZIA
LIMITATA
–
PER
I
TERMINI
DELL’OFFERTA
DI
GARANZIA
ESTESA
LEGGERE
LA
PRIMA PAGINA DEL LIBRETTO DI ISTRUZIONI)
L’orologio TIMEX® è garantito contro difetti di produzione dalla Timex Corporation per un periodo di
UN ANNO dalla data di acquisto originaria. Timex e le sue affiliate di tutto il mondo onoreranno
questa Garanzia Internazionale.
Si prega di notare che la Timex potrà, a sua discrezione, riparare l’orologio installando componenti
nuovi o accuratamente ricondizionati e ispezionati, oppure sostituirlo con un modello identico o
simile.
IMPORTANTE — SI PREGA DI NOTARE CHE QUESTA GARANZIA NON COPRE I DIFETTI O
I DANNI ALL’OROLOGIO:
1)
dopo la scadenza del periodo di garanzia;
2)
se l’orologio non era stato acquistato originariamente presso un dettagliante autorizzato
Timex;
3)
causati da servizi di riparazione non eseguiti da Timex;
4)
causati da incidenti, manomissione o abuso; e
5)
a lenti o cristallo, cinturino in pelle o a catena, cassa dell’orologio, periferiche o batteria. La
Timex potrebbe addebitare al cliente la sostituzione di una qualsiasi di queste parti.
QUESTA GARANZIA ED I RIMEDI IN ESSA CONTENUTI SONO ESCLUSIVI E SOSTITUISCONO TUTTE LE
ALTRE GARANZIE, ESPRESSE O IMPLICITE, INCLUSA QUALSIASI GARANZIA IMPLICITA DI
COMMERCIABILITÀ
O
IDONEITÀ
AD
UN
USO
PARTICOLARE.
LA
TIMEX
NON
È
RESPONSABILE
DI
NESSUN
DANNO
SPECIALE, INCIDENTALE
O
CONSEQUENZIALE. Alcuni
Paesi
e
Stati
non
permettono
limitazioni su garanzie implicite e non permettono esclusioni o limitazioni sui danni; pertanto queste
limitazioni potrebbero non pertenere al cliente. Questa garanzia dà al cliente diritti legali specifici, e
il cliente potrebbe avere anche altri diritti, che variano da Paese a Paese e da Stato a Stato.
Per ottenere il servizio sotto garanzia, si prega di restituire l’orologio alla Timex, ad una delle sue
affiliate o al rivenditore Timex dove è stato acquistato l’orologio, insieme al Buono di riparazione
originale compilato o, solo negli U.S.A. e nel Canada, insieme al Buono di riparazione compilato o una
dichiarazione scritta indicante nome, indirizzo, numero di telefono e data e luogo dell’acquisto. Si
prega di includere quanto segue con l’orologio al fine di coprire le spese di spedizione e gestione
(non si tratta di addebiti per la riparazione): un assegno o un vaglia da US$ 7,00 negli U.S.A.; un
assegno o vaglia da CAN$ 6,00 in Canada; un assegno o vaglia da UK£ 2,50 nel Regno Unito. Negli
altri Paesi, la Timex addebiterà il cliente per le spese di spedizione e la gestione. NON ALLEGARE MAI
ALLA SPEDIZIONE UN CINTURINO SPECIALE O QUALSIASI ALTRO ARTICOLO DI VALORE PERSONALE.
Per gli U.S.A., si prega di chiamare il numero 1-800-448-4639 per ulteriori informazioni sulla garanzia.
Per il Canada, chiamare l’1-800-263-0981. Per il Brasile, chiamare lo +55 (11) 5572 9733. Per il
Messico, chiamare lo 01-800-01-060-00. Per l’America Centrale, i Caraibi, le Isole Bermuda e le Isole
Bahamas, chiamare il (501) 370-5775 (U.S.A.). Per l’Asia, chiamare l’852-2815-0091. Per il Regno
Unito, chiamare il 44 020 8687 9620. Per il Portogallo, chiamare il 351 212 946 017. Per la Francia,
chiamare il 33 3 81 63 42 00. Per la Germania, chiamare il 49 7 231 494140. Per il Medio Oriente e
l’Africa, chiamare il 971-4-310850. Per altre aree, si prega di contattare il rivenditore o distributore
Timex di zona per ottenere informazioni sulla garanzia. In Canada, negli Stati Uniti ed in certe altre
località, i dettaglianti Timex partecipanti possono fornire al cliente una busta di spedizione
preindirizzata e preaffrancata per la riparazione dell’orologio, per facilitare al cliente l’ottenimento del
servizio in fabbrica.
© 2005 Timex Corporation. TIMEX è un marchio depositato della Timex Corporation. INDIGLO è un
marchio della Indiglo Corporation depositato negli Stati Uniti ed in altri Paesi.
GARANTIA
INTERNACIONAL
DA
TIMEX
(EUA – GARANTIA LIMITADA – VEJA NA PARTE FRONTAL DO LIVRO DE INSTRUÇÕES
AS CONDIÇÕES DA OFERTA DE GARANTIA LIMITADA)
O seu relógio TIMEX® está garantido contra defeitos de fabrico pela Timex Corporation pelo período
de UM ANO a contar da data da compra original. A Timex e as suas filiais em todo o mundo honrarão
esta Garantia Internacional.
É favor notar que a Timex pode, à sua escolha, reparar o seu relógio instalando componentes novos
ou completamente recondicionados e inspeccionados ou substitui-lo por um modelo idêntico ou
semelhante. IMPORTANTE — NOTE QUE ESTA GARANTIA NÃO COBRE DEFEITOS OU DANOS
NO RELÓGIO:
1)
depois do período de garantia ter expirado;
2)
se o relógio não tiver sido originalmente comprado num revendedor autorizado da TIMEX;
3)
resultantes de serviços de reparação não efectuados pela Timex;
4)
resultantes de acidentes, modificações ilícitas do relógio ou manipulação abusiva do mesmo; e
5)
nem cobre danos na lente ou cristal, correia ou bracelete, caixa do relógio, acessórios ou
pilha. A Timex poderá cobrar pela substituição de qualquer uma destas peças.
ESTA GARANTIA E OS RECURSOS AQUI CONTIDOS SÃO EXCLUSIVOS E SUBSTITUEM QUAISQUER
OUTRAS GARANTIAS, EXPRESSAS OU IMPLÍCITAS, INCLUINDO QUALQUER GARANTIA IMPLÍCITA DE
COMERCIABILIDADE
OU ADEQUAÇÃO A
UM
FIM
PARTICULAR. A TIMEX
NÃO
SERÁ
RESPONSÁVEL
POR QUAISQUER DANOS
ESPECIAIS, INCIDENTAIS OU
DE CONSEQUÊNCIA. Alguns países
ou estados
não permitem limitações de garantias implícitas e não permitem quaisquer exclusões ou limitações
sobre os danos, por isso estas limitações poderão não se aplicar ao seu caso. Esta garantia
confere-lhe direitos legais específicos e poderá ter outros direitos que variam de um país ou de um
estado para o outro.
Para obter o serviço de garantia, devolva o seu relógio à Timex, a uma das suas filiais ou ao
revendedor autorizado da Timex onde o relógio foi comprado, juntamente com o Cupão de
Reparação do Relógio original, devidamente preenchido ou, apenas nos Estados Unidos e no
Canadá, o Cupão de Reparação do Relógio original devidamente preenchido ou uma declaração
escrita identificando o seu nome, morada, número de telefone e data e local da compra. Junte ao
seu relógio o seguinte pagamento para despesas de envio (não se trata de despesas de reparação
do relógio): nos Estados Unidos, um cheque ou vale postal de US$7.00; no Canadá, um cheque ou
vale postal de CAN$6.00; e no Reino Unido, um cheque ou vale postal de UK£2.50. Nos outros país-
es, a Timex cobrar-lhe-á as despesas de porte e envio. NUNCA INCLUA NA ENCOMENDA QUALQUER
ITEM ESPECIAL, TAL COMO UMA BRACELETE OU OUTRO ARTIGO DE VALOR PESSOAL.
Nos Estados Unidos, telefone para 1-800-448-4639 para obter informações adicionais sobre
a garantia. No Canadá, telefone para 1-800-263-0981. No Brasil, telefone para +55 (11) 5572 9733.
No México, telefone para 01-800-01-060-00. Na América Central, nas Caraíbas, nas Bermudas e nas
Bahamas, telefone para (501) 370-5775 (EUA). Na Ásia, telefone para 852-2815-0091. No Reino
Unido, telefone para 44 020 8687 9620. Em Portugal, telefone para 351 212 946 017. Na França,
telefone para 33 3 81 63 42 00. Na Alemanha, telefone para 49 7231 494140. No Médio Oriente e na
África, telefone para 971-4-310850. Noutras áreas, por favor contacte o seu revendedor autorizado
da Timex local ou o distribuidor Timex para obter mais informações sobre a garantia. No Canadá,
EUA e outros locais específicos, para sua comodidade na obtenção dos serviços de assistência da
fábrica, os revendedores autorizados da Timex participantes poderão fornecer-lhe um Postal para
Reparação do Relógio pré-endereçado e com porte pago.
©2005 Timex Corporation. TIMEX é uma marca comercial registada da Timex Corporation. INDIGLO
é uma marca comercial registada da Indiglo Corporation nos Estados Unidos e noutros países.
GARANTÍA
INTERNACIONAL
DE TIMEX
(GARANTÍA LIMITADA EN EUA – VEA LA PARTE DELANTERA DEL FOLLETO DE INSTRUCCIONES
RESPECTO A LOS TÉRMINOS DE LA OFERTA DE GARANTÍA PROLONGADA)
Timex Corporation garantiza su reloj TIMEX® contra defectos de fabricación por un período de UN
AÑO a partir de la fecha de compra original. Timex y sus sucursales en todo el mundo respaldan esta
Garantía Internacional.
Cabe aclarar que Timex tiene la libertad de optar por reparar el reloj con componentes nuevos o
reacondicionados e inspeccionados, y también podría optar por reemplazarlo por un modelo
idéntico o similar. IMPORTANTE — OBSERVE POR FAVOR QUE ESTA GARANTÍA NO CUBRE
DEFECTOS O DAÑOS A SU RELOJ:
1)
después de que vence el plazo de la garantía;
2)
si el reloj inicialmente no se compró a un distribuidor de TIMEX autorizado;
3)
si las reparaciones efectuadas no las hizo Timex;
4)
si son consecuencia de accidentes, manipulación no autorizada o abuso; y
5)
cristal, correa o pulsera, caja, accesorios o pila. Timex podría cobrar por el cambio de
cualquiera de estas partes.
ESTA GARANTÍA SE OFRECE EN FORMA EXCLUSIVA Y EN LUGAR DE CUALQUIER OTRA GARANTÍA,
SEA EXPRESA O IMPLÍCITA, INCLUSIVE TODA GARANTÍA IMPLÍCITA PARA FINES COMERCIALES O DE
ADECUACIÓN
A
FINES
PARTICULARES.
TIMEX
NO
ASUME
NINGUNA
RESPONSABILIDAD
POR
PERJUICIOS DIRECTOS, INDIRECTOS NI ESPECIALES. En ciertos países y estados no se permiten
limitaciones de las garantías implícitas ni exclusiones o limitaciones de perjuicios, por lo cual las
limitaciones mencionadas anteriormente podrían no aplicarse en su caso particular. Esta garantía le
otorga derechos establecidos por ley, pero usted también podría tener otros derechos que difieren
de un país a otro, o de un estado a otro.
Para solicitar los servicios incluidos en la garantía, devolver el reloj a Timex, a una de sus sucursales
o al comercio minorista adonde se compró el reloj, adjuntando el Cupón de Reparación que
originalmente viene con el mismo. En EUA y Canadá se puede adjuntar el original del Cupón de
Reparación del Reloj o una nota en la que figure su nombre, domicilio, número de teléfono y fecha
y lugar de compra. Para cubrir el costo de envío, adjunte el siguiente importe (este importe no es
para el pago de la reparación): En EUA, un cheque o giro por valor de US $ 7.00 (dólares
estadounidenses); en Canadá, un cheque certificado o giro por valor de CAN $6.00 (dólares
canadienses); en el Reino Unido, un cheque certificado o giro por valor de UK £ 2.50 (libras). En otros
países, Timex se encargará de cobrarle el importe por gastos de envío. NO INCLUYA CON EL RELOJ
UNA MALLA O BANDA ESPECIAL NI NINGÚN OTRO ARTÍCULO DE VALOR PERSONAL.
En EUA, por favor llame al 1-800-448-4639 para obtener información adicional sobre la garantía. En
Canadá, llamar al número 1-800-263-0981. En Brasil, al +55 (11) 5572 9733. En México, al
01-800-01-060-00. En América Central, Países del Caribe, Bermuda y Bahamas, al (501) 370-5775
(EUA). En Asia, al 852-2815-0091. En el Reino Unido, al 44 020 8687 9620. En Portugal, al 351 212 946 017.
En Francia, al 33 3 81 63 42 00. En Alemania, al 49 7 231 494140. En Medio Oriente y África, al
971-4-310850. En otras áreas, consulte al vendedor local de Timex o al distribuidor de Timex sobre
la garantía. En Canadá, EUA y en otros lugares, algunos distribuidores de Timex podrían
proporcionarle un sobre con la dirección y el franqueo previamente pagado para que envíe el reloj
a reparación.
©2005 Timex Corporation. TIMEX es una marca comercial registrada de Timex Corporation. INDIGLO
es una marca registrada de Indiglo Corporation en EUA y otros países.
GARANTIE
INTERNATIONALE
TIMEX
(GARANTIE LIMITÉE – É.-U. – PRIÈRE DE SE REPORTER À LA COUVERTURE DU LIVRET
D’INSTRUCTION
POUR
LES
MODALITÉS
DE
L’OFFRE
DE
GARANTIE
PROLONGÉE)
Votre montre TIMEX® est garantie contre les défauts de fabrication par Timex Corporation pour une
période d’UN AN, à compter de la date d’achat. Timex ainsi que ses filiales du monde entier
honoreront cette garantie internationale.
Timex se réserve le droit de réparer votre montre en y installant des composants neufs ou révisés,
ou bien de la remplacer par un modèle identique ou similaire. IMPORTANT — CETTE GARANTIE NE
COUVRE PAS LES DÉFAUTS OU L’ENDOMMAGEMENT DE VOTRE MONTRE :
1)
après l’expiration de la période de garantie ;
2)
si la montre n’a pas été achetée chez un revendeur TIMEX agréé ;
3)
si la réparation n’a pas été faite par Timex ;
4)
s’il s’agit d’un accident, falsification ou abus ;
5)
s’il s’agit du verre ou cristal, du bracelet ou brassard, du boîtier, des accessoires ou de la pile.
Le remplacement de ces pièces peut vous être facturé par Timex.
CETTE GARANTIE AINSI QUE LES RECOURS PRÉVUS DANS LES PRÉSENTES SONT EXCLUSIFS ET
REMPLACENT TOUTE AUTRE
GARANTIE
EXPRESSE
OU
IMPLICITE, Y
COMPRIS TOUTE
GARANTIE
IMPLICITE DE QUALITÉ MARCHANDE ET D’ADAPTATION À UN USAGE PARTICULIER. TIMEX N’EST
RESPONSABLE
D’AUCUN
DOMMAGE
PARTICULIER,
ACCESSOIRE
OU
INDIRECT.
Certains
états
ou
provinces n’autorisent pas les limitations de garanties implicites et n’autorisent pas les exclusions
ou limitations pour des dommages, auquel cas lesdites limitations pourraient ne pas vous concerner.
Les modalités de la présente garantie vous donnent des droits légaux précis et vous pouvez
également vous prévaloir d’autres droits qui varient d’un état ou d’une province à l’autre.
Pour obtenir le service garanti, retourner la montre à Timex, à une de ses filiales ou au détaillant
Timex où il a été acheté. Inclure un coupon de réparation original dûment rempli ou, aux É.-U. et au
Canada, le coupon original ou une déclaration écrite comprenant votre nom, adresse, numéro de
téléphone ainsi que la date et le lieu d’achat. Veuillez inclure la somme suivante avec votre montre
pour couvrir les frais de poste et de manutention (ce ne sont pas des frais de réparation) : un chèque
ou mandat de 7,00 $ É.U. aux États-Unis, de 6,00 $ CAN au Canada et de 2,50 £ au Royaume-Uni.
Dans les autres pays, Timex vous facturera les frais de poste et de manutention. N’INCLUEZ JAMAIS
DANS
VOTRE
ENVOI
UN
BRACELET
SPÉCIAL
OU
AUTRE
ARTICLE
AYANT
UNE
VALEUR
SENTIMENTALE.
Aux É.-U. veuillez composer le 1-800-448-4639 pour plus de renseignements sur la garantie. Au
Canada, composer le 1-800-263-0981. Au Brésil, composer le +55 (11) 5572 9733. Au Mexique,
composer le 01-800-01-060-00. En Amérique centrale, les Caraïbes, les Bermudes et les Bahamas,
composer le (501) 370-5775 (É.-U.). En Asie, composer le 852-2815-0091. Au R.U., composer le
44 020 8687 9620. Au Portugal, composer le 351 212 946 017. En France, composer le 33 3 81 63 42 00.
En Allemagne, composer le 49 7 231 494140. Au Moyen-Orient et en Afrique, composer le
971-4-310850. Dans les autres régions, veuillez contacter votre détaillant ou distributer Timex pour
des renseignements sur la garantie. Au Canada, aux É.-U. et en certains autres endroits, les
détaillants Timex participants peuvent vous faire parvenir un emballage pré-adressé et pré-affranchi
pour vous faciliter l’envoi de la montre à l’atelier de réparation.
©2005 Timex Corporation. TIMEX est une marque déposée de Timex Corporation. INDIGLO est une
marque déposée d’Indiglo Corporation aux États-Unis et dans d’autres pays.
TIMEX
INTERNATIONAL
WARRANTY
(U.S. – LIMITED WARRANTY – PLEASE SEE FRONT OF INSTRUCTION BOOKLET
FOR TERMS OF EXTENDED WARRANTY OFFER)
Your TIMEX® watch is warranted against manufacturing defects by Timex Corporation for a period
of ONE YEAR from the original purchase date. Timex and its worldwide affiliates will honor this
International Warranty.
Please note that Timex may, at its option, repair your watch by installing new or thoroughly
reconditioned and inspected components or replace it with an identical or similar model.
IMPORTANT — PLEASE NOTE THAT THIS WARRANTY DOES NOT COVER DEFECTS OR DAMAGES
TO YOUR WATCH:
1)
after the warranty period expires;
2)
if the watch was not originally purchased from an authorized Timex retailer;
3)
from repair services not performed by Timex;
4)
from accidents, tampering or abuse; and
5)
lens or crystal, strap or band, watch case, attachments or battery. Timex may charge you for
replacing any of these parts.
THIS WARRANTY AND THE REMEDIES CONTAINED HEREIN ARE EXCLUSIVE AND IN LIEU OF ALL OTHER
WARRANTIES,
EXPRESS
OR
IMPLIED,
INCLUDING
ANY
IMPLIED
WARRANTY
OF
MERCHANTABILITY
OR
FITNESS
FOR
PARTICULAR
PURPOSE.
TIMEX
IS
NOT
LIABLE
FOR
ANY
SPECIAL,
INCIDENTAL
OR
CONSEQUENTIAL DAMAGES. Some countries and states do not allow limitations on implied
warranties and do not allow exclusions or limitations on damages, so these limitations may not
apply to you. This warranty gives you specific legal rights and you may also have other rights which
vary from country to country and state to state.
To obtain warranty service, please return your watch to Timex, one of its affiliates or the Timex
retailer where the watch was purchased, together with a completed original Watch Repair Coupon
or, in the U.S. and Canada only, the completed original Watch Repair Coupon or a written statement
identifying your name, address, telephone number and date and place of purchase. Please include
the following with your watch to cover postage and handling (this is not a repair charge): a US$ 7.00
check or money order in the U.S.; a CAN$6.00 cheque or money order in Canada; and a UK£2.50
cheque or money order in the U.K. In other countries, Timex will charge you for postage and
handling. NEVER INCLUDE A SPECIAL WATCHBAND OR ANY OTHER ARTICLE OF PERSONAL VALUE IN
YOUR SHIPMENT.
For the U.S., please call 1-800-448-4639 for additional warranty information. For Canada, call
1-800-263-0981. For Brazil, call +55 (11) 5572 9733. For Mexico, call 01-800-01-060-00. For Central
America, the Caribbean, Bermuda and the Bahamas, call (501) 370-5775 (U.S.). For Asia, call
852-2815-0091. For the U.K., call 44 020 8687 9620. For Portugal, call 351 212 946 017. For France,
call 33 3 81 63 42 00. For Germany, call 49 7 231 494140. For the Middle East and Africa, call
971-4-310850. For other areas, please contact your local Timex retailer or Timex distributor for
warranty information. In Canada, the U.S. and in certain other locations, participating Timex retailers
can provide you with a postage-paid, pre-addressed Watch Repair Mailer for your convenience in
obtaining factory service.
©2005 Timex Corporation. TIMEX is a registered trademark of Timex Corporation. INDIGLO is a
registered trademark of Indiglo Corporation in the US. and other countries.
Anchorage ..........20E
Londra ............................ 2W
Rio De Janeiro ...........22W
Atlanta ................ 4W
Little Rock ....................... 1E
San
Francisco ............. 15E
Bombay .............. 1W
Livingston, MT ............... 13E
Seattle........................ 18E
Boston .............. 15W
Monaco di Baviera ........... 2E
Shanghai .................... 5W
Calgary ...............16E
New York ...................... 13W
Toronto .....................11W
Chicago .............. 3W
Orlando........................... 5W
Vancouver .................. 18E
Denver................. 9E
Oslo ................................. 1E
Washington DC .........11W
Gerusalemme . . .4E
Parigi .............................. 1W
Waterbury, CT ...........14W
Per ulteriori informazioni sulla declinazione magnetica, andare al sito
www.timex.com/expedition
Profondità di immersione p.s.i.a.
*
Pressione dell’acqua sotto la superficie
30 m/98 piedi
60
50 m/164 piedi
86
100 m/328 piedi
160

www.timex.com
W-225 314-095001 AS
THANK YOU FOR PURCHASING YOUR TIMEX® WATCH.
EXTENDED WARRANTY
Available in U.S. only.
Extend your warranty for an additional 4 years from date of purchase for $5. You can
pay with AMEX, Discover, Visa or MasterCard by calling 1 800-448-4639 during normal business hours.
Payment must be made within 30 days of purchase. Name, address, telephone number, purchase date, and
5-digit model number required. You can also mail a check for $5 to: Timex Extended Warranty, P.O. Box 1676,
Dept. EF, Little Rock, AR 72203.
Please read instructions carefully to understand how to operate your Timex® watch.
Your model may not
have all of the features described in this booklet.
OVERVIEW
DECLINATION SCALE
INDICATOR HAND
TEMPERATURE
SCALE
TEMP
MIDDLE-SET DATE
OUT-SET
TIME
CROWN
COMPASS
TURNING COMPASS RING
TIDE
TIDE SCALE
DATE
NOTE: Watch is shipped with guard around crown. Remove guard and push crown in to start.
Compass
must be calibrated before using to ensure accuracy and avoid improper headings.
See COMPASS
CALIBRATION. Go to www.timex.com/expedition for help.
Watch incorporates magnetic sensor technology of Precision Navigation Inc., Mountain View, CA.
SET DATE AND TIME
Pull crown to MIDDLE position and turn until correct date appears. After setting date, pull crown all the way
out and turn until correct time is shown. Ensure correct AM/PM setting by verifying that date changes at
midnight, not noon. Push crown in when done. Adjust date after months with fewer than 31 days.
INDICATOR HAND ADJUSTMENT
Pull crown all the way out. Indicator hand should point to 12 o’clock. If it does not, press either TIDE or TEMP
push button to move hand until it points to 12 o’clock. TIDE and TEMP push buttons move hand clockwise
and counterclockwise, respectively. Hold push button to move hand fast. Push crown in when done.
TIDE/TEMPERATURE SELECTION
Indicator hand shows either tide or temperature constantly. When temperature is shown, press TIDE push
button to select tide clock. Hand moves to low tide and then to current tide. When tide is shown, press TEMP
push button to select thermometer. Hand moves to beginning of thermometer scale and then to current
temperature.
TIDE CLOCK
For tide clock, indicator hand always rotates clockwise, so tide is rising when hand is pointing left and falling
when pointing right. Number of hours to next high/low tide is shown on tide scale.
The primary factor in determining tides is moon position. Tide clock uses moon position to predict high and
low tides, which are 6 hours and 12.5 minutes apart.
Tides are also influenced by sun position and shape of shoreline, so tide clock cannot precisely give times of
high and low tides. Periodic adjustment may be necessary.
To set tide clock, pull crown to MIDDLE position. Press either TIDE or TEMP push button to move hand to
current tide. TIDE and TEMP push buttons move hand clockwise and counterclockwise, respectively. Push
crown in when done.
For tide information, go to www.timex.com/expedition
THERMOMETER
When worn on wrist, thermometer reading is affected by body heat. For more accurate readings, remove
watch and put in shade for at least several minutes.
Watch can measure water temperature also, if submerged. Be sure to select temperature display before
placing watch in water, as buttons should not be pressed when watch is underwater.
Thermometer readings are taken every minute, and more frequently, if temperature is changing.
COMPASS CALIBRATION
Since a compass uses the earth’s magnetic field, you must be aware of large metallic objects, such as
vehicles or bridges, or objects that give off electromagnetic radiation, such as TVs or PCs, which could affect
the magnetic field around the watch. If compass is calibrated near such objects, it will only work properly in
that same location. If compass is calibrated away from such objects, it will not work properly near them.
For best results, calibrate in area of intended use.
In calibrating and taking headings, it is important, as with all compasses, to keep compass level. Calibrating
or taking a heading when watch is not level can result in large errors. Also avoid areas that may exhibit
higher than normal concentrations of hard and soft iron, as they may cause inaccurate headings. Whenever a
heading is suspect, recalibrate.
Do not store watch near any source of magnetism, such as computers, appliances, or TVs, as watch can take
on a magnetic charge, yielding inaccurate headings.
To calibrate compass, pull crown to MIDDLE position. Keep watch level or place on level surface (if band
interferes, place watch on inverted cup). Watch may be face down, but take care to protect watch face. Press
COMPASS push button to begin. Indicator hand rotates two revolutions to remind you to rotate watch. While
level,
SLOWLY
rotate watch two revolutions,
taking at least 15 seconds per revolution. This is critical
in achieving proper calibration.
When done, press any push button, keeping watch level. Indicator hand moves back and forth to
acknowledge end of calibration and then moves to current declination angle setting (see DECLINATION
ANGLE for more information). If you do not wish to set declination angle, push crown in. Otherwise, to have
watch automatically compensate for declination angle, turn compass ring until north is at 12 o’clock. Press
either TIDE or TEMP push button to move indicator hand east (+) or west (-) to point to your location’s
declination angle (see table below) using declination scale. Hold push button to move hand fast.
Push crown in when done.
COMPASS OPERATION
Normally, compass is off and indicator hand shows tide or temperature.
Compass must be calibrated prior to use and calibration should be performed in the area of intended use;
see COMPASS CALIBRATION. If compass has not been calibrated since battery replacement, attempting to
activate compass causes watch to rotate indicator hand once and play melody to remind you to calibrate.
While holding watch level, press COMPASS push button to activate compass. Indicator hand moves to point
north. If watch is turned, indicator hand will continue to move, always pointing north. After 20 seconds,
compass will automatically turn off and hand will return to its normal operation. This conserves battery life.
Press COMPASS push button at any time to keep compass on for another 20 seconds.
NOTE: While compass is on, INDIGLO® night-light may flicker slightly when on. This is normal, as night-light
must be turned off briefly during compass readings to maintain accuracy. Also, second hand moves in
two-second increments while compass is on.

Water-Resistance Depth
30m/98ft
50m/164ft
100m/328ft
p.s.i.a. * Water Pressure Below Surface
60
86
160
USING THE COMPASS
Once compass is activated, as described above, there are two typical ways to use it.
Which way am I headed?
Hold watch so that 12 o’clock is in direction of your travel. Turn compass ring
until indicator hand is pointing to north on ring. Your heading is direction on ring at 12 o’clock.
Which way should I go?
If you know the direction you want to go (e.g., NE), turn compass ring until that
direction appears at 12 o’clock. Hold watch so that you are facing 12 o’clock. Then, turn your body until
indicator hand points to north on compass ring. You are now facing the direction you want to go.
DECLINATION ANGLE
A compass needle points to “magnetic north,” which may be slightly different from “true north,” which is
used on maps. This difference, called the “declination angle,” which varies around the globe, is typically small
and can be ignored in many cases. However, if you wish to compensate for this difference, there are two
ways to do so. You can do it manually by turning the compass ring so that indicator hand points to your
declination angle (see table below) instead of north, using declination scale on compass ring. Or, you may
have the watch automatically compensate by setting your declination angle after compass calibration; see
COMPASS CALIBRATION. With proper declination angle set, indicator hand will point to true north.
Declination angles for major world cities (W is negative and E is positive on declination scale).
Anchorage . . . . . . . . . . . . . .20E London . . . . . . . . . . . . . . . . .2W Rio De Janeiro ...................... 22W
Atlanta . . . . . . . . . . . . . . . . .
.4W
Little Rock . . . . . . . . . . . . . . .1E
San
Francisco ........................ 15E
Bombay . . . . . . . . . . . . . . . . .1W Livingston, MT . . . . . . . . . . .13E Seattle ................................... 18E
Boston . . . . . . . . . . . . . . . . .15W Munich . . . . . . . . . . . . . . . . . .2E Shanghai ................................ 5W
Calgary . . . . . . . . . . . . . . . . .16E New York City . . . . . . . . . . .13W Toronto ................................. 11W
Chicago . . . . . . . . . . . . . . . . .3W Orlando . . . . . . . . . . . . . . . . .5W Vancouver ............................. 18E
Denver . . . . . . . . . . . . . . . . . .9E Oslo . . . . . . . . . . . . . . . . . . . .1E Washington DC .................... 11W
Jerusalem . . . . . . . . . . . . . . . .4E Paris . . . . . . . . . . . . . . . . . . .1W Waterbury, CT ...................... 14W
For more magnetic declination information go to
www.timex.com/expedition
INDIGLO® NIGHT-LIGHT
Press crown to illuminate watch face. Patented (U.S. pat. 4,527,096 and 4,775,964) electroluminescent
technology used in the INDIGLO® night-light illuminates entire watch face at night and in low light conditions.
BRACELET
ADJUSTMENT
FOLDOVER
CLASP
BRACELET
Find spring bar that connects bracelet to clasp. Using a pointed tool (Fig. 1), push spring bar in and gently
twist bracelet to disengage. Determine wrist size, then insert spring bar in correct bottom hole (Fig. 2). Push
down on spring bar, align with top hole and release to lock in place (Fig. 3).
BRACELET
LINK
REMOVAL
Fig.
1
Fig.
2
Fig.
3
Removing Links:
Place bracelet upright and insert pointed tool in opening of link.
Push pin forcefully in direction of arrow until link is detached (pins are designed to be
difficult to remove). Repeat until desired number of links are removed.
Reassembly:
Rejoin bracelet parts. Push pin back into link in opposite direction of
arrow. Press pin down securely into bracelet until it is flush.
SOLID
LINK
BRACELET
Removing Links:
Using a very small screwdriver, remove screws by turning counter-
clockwise. Repeat until desired number of links are removed. Do not remove links
adjacent to clasp.
Reassembly:
Rejoin bracelet parts and insert screw in end of opening where it was
removed. Turn screw clockwise until tight and flush with bracelet.
BARREL LINK BRACELET WITH SCREW HEAD PINS
Removing Links:
Removable links have arrows. Use one screwdriver near tail of
arrow to prevent pin from turning. Using another screwdriver, remove screw at
end near head of arrow by turning it counterclockwise. After removing screw, slide
pin out. Repeat for second pin in link.
Reassembly:
Rejoin bracelet parts and insert pin in end of opening where it was
removed. Turn screw and other end clockwise until tight and flush with bracelet.
WATER RESISTANCE
If your watch is water-resistant, meter marking or
(
O
)
is indicated.
*pounds per square inch absolute
WARNING: TO
MAINTAIN
WATER-RESISTANCE,
DO
NOT
PRESS
ANY
BUTTONS
UNDER
WATER.
1.
Watch is water-resistant only as long as lens, push buttons and case remain intact.
2.
Watch is not a diver watch and should not be used for diving.
3.
Rinse watch with fresh water after exposure to salt water.
BATTERY
Timex strongly recommends that a retailer or jeweler replace battery
. Battery type is on watch back.
If present, push/short internal reset switch after replacing battery. Battery life estimates are based on certain
assumptions regarding usage; battery life may vary depending on actual usage.
DO NOT DISPOSE OF BATTERY IN FIRE. DO NOT RECHARGE. KEEP LOOSE BATTERIES AWAY FROM
CHILDREN.
TIMEX
INTERNATIONAL
WARRANTY
(U.S. – LIMITED WARRANTY – PLEASE SEE FRONT OF INSTRUCTION BOOKLET
FOR TERMS OF EXTENDED WARRANTY OFFER)
Your TIMEX® watch is warranted against manufacturing defects by Timex Corporation for a period of ONE YEAR from the
original purchase date. Timex and its worldwide affiliates will honor this International Warranty.
Please note that Timex may, at its option, repair your watch by installing new or thoroughly reconditioned and inspected com-
ponents or replace it with an identical or similar model. IMPORTANT — PLEASE NOTE THAT THIS WARRANTY DOES NOT
COVER DEFECTS OR DAMAGES TO YOUR WATCH:
1)
after the warranty period expires;
2)
if the watch was not originally purchased from an authorized Timex retailer;
3)
from repair services not performed by Timex;
4)
from accidents, tampering or abuse; and
5)
lens or crystal, strap or band, watch case, attachments or battery. Timex may charge you for replacing any of these
parts.
THIS WARRANTY AND THE REMEDIES CONTAINED HEREIN ARE EXCLUSIVE AND IN LIEU OF ALL OTHER WARRANTIES, EXPRESS
OR IMPLIED, INCLUDING ANY IMPLIED WARRANTY OF MERCHANTABILITY OR FITNESS FOR PARTICULAR PURPOSE. TIMEX IS
NOT LIABLE FOR ANY SPECIAL, INCIDENTAL OR CONSEQUENTIAL DAMAGES. Some countries and states do not allow
limitations on implied warranties and do not allow exclusions or limitations on damages, so these limitations may not apply
to you. This warranty gives you specific legal rights and you may also have other rights which vary from country to country
and state to state.
To obtain warranty service, please return your watch to Timex, one of its affiliates or the Timex retailer where the watch was
purchased, together with a completed original Watch Repair Coupon or, in the U.S. and Canada only, the completed original
Watch Repair Coupon or a written statement identifying your name, address, telephone number and date and place of
purchase. Please include the following with your watch to cover postage and handling (this is not a repair charge): a US$ 7.00
check or money order in the U.S.; a CAN$6.00 cheque or money order in Canada; and a UK£2.50 cheque or money order in
the U.K. In other countries, Timex will charge you for postage and handling. NEVER INCLUDE A SPECIAL WATCHBAND OR ANY
OTHER ARTICLE OF PERSONAL VALUE IN YOUR SHIPMENT.
For the U.S., please call 1-800-448-4639 for additional warranty information. For Canada, call 1-800-263-0981. For Brazil, call
+55 (11) 5572 9733. For Mexico, call 01-800-01-060-00. For Central America, the Caribbean, Bermuda and the Bahamas, call
(501) 370-5775 (U.S.). For Asia, call 852-2815-0091. For the U.K., call 44 020 8687 9620. For Portugal, call 351 212 946 017.
For France, call 33 3 81 63 42 00. For Germany, call 49 7 231 494140. For the Middle East and Africa, call 971-4-310850. For
other areas, please contact your local Timex retailer or Timex distributor for warranty information. In Canada, the U.S. and in
certain other locations, participating Timex retailers can provide you with a postage-paid, pre-addressed Watch Repair Mailer
for your convenience in obtaining factory service.
©2005 Timex Corporation. TIMEX is a registered trademark of Timex Corporation. INDIGLO is a registered trademark of Indiglo
Corporation in the US. and other countries.

-
 1
1
-
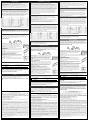 2
2
-
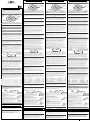 3
3
-
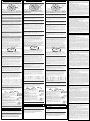 4
4
-
 5
5
-
 6
6
-
 7
7


en otros idiomas
- français: Timex T2N721 Mode d'emploi
- italiano: Timex T2N721 Guida utente
- English: Timex T2N721 User guide
- Deutsch: Timex T2N721 Benutzerhandbuch
- Nederlands: Timex T2N721 Gebruikershandleiding
- português: Timex T2N721 Guia de usuario
Artículos relacionados
-
Timex W-225 Manual de usuario
-
-
Timex Intelligent Quartz FlyBack Chrono-Compass Manual de usuario
-
-
-
-
-