Chemglass CG-1995-20 El manual del propietario
- Tipo
- El manual del propietario

Instruction Manual
Manuale di istruzioni
Manuel d’instructions
Manual de instrucciones
Bedienungsanleitung
操作指南
AREC Connect Heating Magnetic Stirrer
F20500550, F20510550
General Information / Informazioni Generali / Informations Générales / Información General / Allgemeine Hinweise / 基本信息
Before using the unit, please read the following instruction manual carefully.
Prima dell’utilizzo dello strumento si raccomanda di leggere attentamente il seguente manuale operativo.
Avant d’utiliser l’instrument, il est recommandé de lire attentivement le présent manuel d’instructions.
Antes de utilizar el instrumento, le recomendamos que lea con atención el siguiente manual de instrucciones.
Bitte lesen Sie vor Inbetriebnahme des Geräts diese Bedienungsanleitung sorgfältig durch.
使用前请仔细阅读以下使用说明书。
Caution, hot surface!
Attenzione, superficie calda!
Attention, surface chaude!
Prudencia, superficie caliente!
Vorsicht, heiße Oberfläche!
注意:加热面高温
Do not dispose of this equipment as urban waste, in accordance with EEC directive 2012/19/UE.
Non smaltire l’apparecchiatura come rifiuto urbano, secondo quanto previsto dalla Direttiva 2012/19/UE.
Ne pas recycler l’appareil comme déchet solide urbain, conformément à la Directive 2012/19/UE.
No tirar el equipo en los residuos urbanos, como exige la Directiva 2012/19/UE.
Dieses Gerät unterliegt der Richtlinie 2012/19/UE und darf nicht mit dem normalen Hausmüll entsorgt werden.
按照EEC指令2002/96/CE,不要将该设备作为城市垃圾处理。
The product can be used with flammable liquids.
Il prodotto può essere utilizzato con liquidi infiammabili.
Le produit peut être utilisé avec des liquides inflammables.
El producto puede utilizarse con líquidos inflamables.
Das Produkt kann mit brennbaren Flüssigkeiten verwendet warden.
本产品可与易燃液体混合使用。

This unit must be used for laboratory applications indoor only.
The manufacturer declines all responsibility for any use of the unit that does not comply with these instructions. If the product is used in a
not specified way by the manufacturer or with non specified accessories, product's safety may be compromised.
Questo strumento deve essere utilizzato solo per applicazioni di laboratorio per uso interno.
La società produttrice declina ogni responsabilità sull’impiego non conforme alle istruzioni degli strumenti. Se il prodotto viene utilizzato in
un modo non specificato o con accessori non specificati dal costruttore stesso, la sicurezza del prodotto potrebbe essere compromessa.
Cet instrument ne peut être utilisé pour les applications de laboratoire à l'intérieur seulement.
Le fabriquant décline toute responsabilité en cas d’utilisation non conforme aux instructions concernant ces instruments. Si le produit est
utilisé d'une manière non spécifiée par le fabricant ou accessoires non spécifiés, la sécurité du produit peut être compromise.
Este dispositivo sólo debe utilizarse para aplicaciones de laboratorio para uso interno.
El fabricante declina toda responsabilidad por el uso no conforme a las instrucciones de los dispositivos. Si se utiliza el producto de una
manera no especificada o con accesorios no especificados de el fabricante, la seguridad del producto puede estar comprometida.
Dieses Gerät muss nur für Laboranwendungen verwendet werden.
Der Hersteller lehnt jede Haftung für unsachgemäße Verwendung oder Nichtbeachtung dieser Bedienungsanleitung ab. Wenn das
Produkt in einer Weise verwendet wird, die nicht vom Hersteller oder mit unsachgemäßer Zubehör angegeben, kann das Produkt die
Sicherheit beeinträchtigt werden.
这种装置只能在室内实验室使用。
制造商拒绝对任何不按照这些指示使用该装置的行为承担任何责任。如果产品是由制造商以未指定的方式使用或与未指定的配件一起使用,
产品的安全可能会受到危害。
This unit has been designed and manufactured in compliance with the following standards:
Lo strumento è stato progettato e costruito in accordo con le seguenti norme:
L’instrument a été conçu et fabriqué conformément aux normes suivantes:
El dispositivo se ha sido diseñado y fabricado de acuerdo con las siguientes normas:
Das Gerät wurde in Übereinstimmung mit folgenden Normen entwickelt und gebaut:
这种装置的设计和制造符合下列标准:
Safety requirements for electrical equipment for measurement, control and for laboratory use
Prescrizioni di sicurezza per apparecchi elettrici di misura, controllo e per l’utilizzo in laboratorio
Règles de sécurité pour appareils électriques de mesurage, de régulation et de laboratoire
Prescripciones de seguridad para equipos eléctricos de medición, control y su uso en laboratorio
Sicherheitsbestimmungen für elektrische Mess-, Steuer-, Regel- und Laborgeräte
测量,控制和实验室用电气设备的安全要求
IEC/EN 61010-1
IEC/EN 61010-2-051
IEC/EN 61010-2-010
Electrical equipment for laboratory use
UL 61010-1
General requirement - Canadian electrical code
CAN/CSA-C22.2 No.61010-1
VELP reserves the right to modify the characteristics of its products with the aim to constantly improving their quality.
Nell’impegno di migliorare costantemente la qualità dei prodotti, VELP si riserva la facoltà di variarne le caratteristiche.
Dans le but d’améliorer constamment la qualité de ses produits, VELP se réserve le droit d’apporter des modifications aux
caractéristiques de ceux-ci.
VELP se reserva el derecho de modificar las características de productos con el fin de mejorar constantemente su calidad.
VELP behält sich zum Zwecke der ständigen Verbesserung der Produktqualität das Recht auf Änderung der Geräteeigenschaften vor.
VELP保留修改其产品特性的权利,以不断提高其质量。

Safety Regulations / Norme di Sicurezza / Consignes de Securité / Advertencias de Seguridad / Sicherheitshinweise / 安全法规
The plug disconnects the instrument. Therefore, place the instrument where it can be quickly disconnected.
La spina è il mezzo di disconnessione dell’apparecchio. Pertanto, non posizionare l’apparecchio in modo che sia difficile azionare il mezzo
di disconnessione.
Le bouchon est le moyen de déconnexion de l'appareil. Par conséquent, placer l'appareil où il peut être rapidement débranché.
El enchufe es el medio de desconexión del dispositivo. No coloque el dispositivo en una forma que es difícil de desconectar.
Der Stecker trennt das Gerät. Daher Stellen Sie das Instrument, wo es schnell getrennt werden kann.
仪器插头可插拔。请将仪器放置在可快速插拔电源的地方。
Use only the power supply cable provided with the instrument.
Utilizzare solo il cavo di alimentazione fornito con lo strumento.
Utilisez uniquement le câble d'alimentation fournis avec l’instrument.
Utilizar únicamente el cable de alimentación suministrado con el instrumento.
Verwenden Sie nur das mit dem Gerät gelieferte Stromkabel verwenden.
Hotplate temperature: up to 550 °C.
Temperatura piastra riscaldante: fino a 550 °C.
Température de la plaque chauffante: jusqu'à 550 °C.
Temperatura de la placa calefactora: hasta 550 °C.
Temperaturbereich Heizplatte: bis zu 550 °C.
加热板表面高温:达550 °C。
The heated solution may release toxic, dangerous or poisonous gases. Adequate safety measures must be taken, in accordance with the
safety regulations in force, including the presence of hood and personal protective equipment (masks, gloves, goggles, etc.).
Le sostanze riscaldate potrebbero emanare gas tossici e/o pericolosi e/o velenosi. Adeguate misure di sicurezza devono essere prese, in
accordo con le normative di sicurezza dei prodotti in lavorazione e/o vigenti nei laboratori, compresa la presenza di cappe aspiranti e
mezzi di protezione individuale (maschere, guanti, occhiali, camici, ecc.).
La solution chauffée peut libérer gaz toxiques ou dangereux. Des mesures de sécurité adéquates doivent être prises, en conformité avec
les règlements de sécurité en vigueur, compris la présence de la hotte de laboratoire et équipements de protection individuelle (masques,
gants, lunettes, etc.).
Las sustancias calentadas pueden emitir tóxicos o peligrosos gas. Medidas de seguridad adecuadas deben ser adoptadas, de acuerdo
con las normas de seguridad vigentes en los laboratorios, incluyendo la presencia de la campana de humos y el equipo de protección
personal (mascarillas, guantes, gafas, etc.)
Die erwärmte Lösung kann giftige oder gefährliche Gase freigeben. Angemessene Sicherheitsmaßnahmen zu treffen, werden in
Übereinstimmung mit den geltenden Sicherheitsvorschriften, einschließlich der Anwesenheit Dunstabzug und persönliche
Schutzausrüstungen (Masken, Handschuhe, Schutzbrille, etc.).
加热后的溶液可能会释放出有毒、危险或有毒的气体。必须根据现行的安全规定,采取适当的安全措施,包括配备防护罩和个人防护装备(
面罩、手套、护目镜等)。
The vessel must be made of a suitable material to withstand the foreseen temperature.
Il contenitore del prodotto in lavorazione dovrà essere compatibile con la temperatura utilizzata.
Le contenant du produit en cours de traitement doit être compatible avec la température utilisée.
El recipiente debe estar hecho de un material adecuado para soportar la temperatura necearia.
Das Gefäß muss aus einem Material bestehen, das die vorgesehene Temperatur ausgelegt ist.
容器必须由适当的材料制成,以承受预期的温度。
Magnetic field doesn’t interfere with the function of cardiac pacemakers or data media if they are farther than 20 cm to the instrument.
Il campo magnetico non influisce su pacemaker o dispositivi di supporto dati se posti a più di 20 cm di distanza dalla piastra riscaldante.
Le champ magnétique n’affecte pas les stimulateurs cardiaques ou les dispositifs de support de données s’ils sont placés à plus de 20 cm
de la plaque chauffante.
El campo magnético no afecta a los marcapasos cardíacos ni a los dispositivos de soporte de datos cuando esos últimos se colocan a
más de 20 cm de distancia de la placa calefactora
Das Magnetfeld stört nicht die Funktion von Herzschrittmachern oder Datenträgern, wenn diese weiter als 20 cm vom Gerät entfernt sind.
如果心脏起搏器距离仪器超过20厘米,磁场不会干扰其功能
Position the instrument on a flat surface, with a distance from the wall of 30 cm (at least).
Posizionare lo strumento su superfici piane, ad una distanza dalle pareti di almeno 30 cm.
Positionner l'appareil sur une surface plat, avec une distance de la paroi de 30 cm (au moins).
Coloque la unidad sobre una superficie plana, con una distancia de la pared de 30 cm (por lo menos).
Stellen Sie das Gerät auf einer ebenen Fläche mit einem Abstand zur Wand von 30 cm (mindestens).
将仪器放置在一个水平平台上,与墙壁的距离至少为30厘米。

Do not use explosive and dangerous materials for which the equipment is not designed for. The stirrer must not be used in explosive
atmospheres, in bain-marie and to stir combustible liquids that have a low combustion temperature. The product is intended for use with
very small quantities of flammable liquids or flammable liquids that have a fire point higher than 935 °C and a flash point higher than 910
°C.
Vietato l’uso con materiale esplosivo e pericoloso per cui l’apparecchio non è progettato. L’agitatore non può essere impiegato in
atmosfere esplosive, a bagno maria e per agitare liquidi combustibili a bassa temperatura di combustione. Il prodotto è inteso per essere
usato con quantità molto limitate di liquidi infiammabili o con liquidi infiammabili con fire point maggiore di 935 °C e flash point maggiore di
910 °C.
Ne pas utiliser avec des matières explosives et dangereuses pour lesquelles l'équipement n'est pas conçu. L'agitateur ne peut pas être
utilisé dans des atmosphères explosives, dans un bain d'eau et pour remuer les combustibles liquides avec la température de combustion
bas. Le produit est destiné à être utilisé avec de très petites quantités de liquides inflammables ou de liquides inflammables ayant un point
d'incendie supérieur à 935 °C et un point d'éclair supérieur à 910 °C.
No debe utilizarse con materiales explosivos ni peligrosos para los que el equipo no está diseñado. El agitador no puede ser utilizado en
ambientes explosivos, en baño de agua ni para agitar combustibles con una baja temperatura de combustión. El producto está destinado
a ser utilizado con cantidades reducidas de líquidos inflamables o con líquidos inflamables que tengan un punto de ignición superior a
935 °C y con un punto de inflamación superior a 910 °C.
Nicht mit explosivem Material zu verwenden, für die das Gerät nicht ausgelegt ist. Das Gerät kann nicht in explosionsgefährdeten
Bereichen eingesetzt werden, in einem Wasserbad und rühren für flüssige Brennstoffe mit niedrigen Verbrennungstemperatur. Das
Produkt ist für den Einsatz mit sehr geringen Mengen an brennbaren Flüssigkeiten oder brennbaren Flüssigkeiten mit einem Brandpunkt
von mehr als 935 ° C und einem Flammpunkt über 910 °C vorgesehen.
不要与非本设备设计的爆炸或危险材料一起使用。搅拌器不得用于爆炸性环境、水浴装置或搅拌燃烧温度低的可燃液体。本产品适用于极少
量的易燃液体或燃点高于935°C、闪火点高于910°C的易燃液体。
The unit is fitted with two fuses (2xT5 A L 250 V (for 230V), 2xT8 A 250 V (for 115 V)), found in the socket on the back. To replace one or
more disconnect the mains cable and, using a screwdriver, lift up the small cover on the fuse box.
Lo strumento è dotato di due fusibili (2xT5 A L 250 V (for 230V), 2xT8 A 250 V (for 115 V)), annessi alla presa posta sul lato posteriore.
Per la sostituzione, disconnettere il cavo di alimentazione, e con un cacciavite fare leva nell’intaglio dello sportellino portafusibili.
L'appareil est équipé de deux fusibles (2xT5 A L 250 V (for 230V), 2xT8 A 250 V (for 115 V)), qui se trouvent dans la douille placée sur le
dos. Pour remplacer, débranchez le cordon d'alimentation et, à l'aide d'un tournevis, soulever le petit couvercle sur la boîte à fusibles.
El instrumento está equipado con dos fusibles (2xT5 A L 250 V (for 230V), 2xT8 A 250 V (for 115 V)), que se adjuntan a la toma en la
parte posterior. Para reemplazar, use un destornillador para hacer palanca en la muesca de la tapa de la puerta.
Zwei Sicherungen (2xT5 A L 250 V (for 230V), 2xT8 A 250 V (for 115 V)) ausgestattet sind, in die Buchse an der Rückseite positioniert
werden. So ersetzen Sie eine oder mehrere der Sicherungen entfernen Sie die Anschlussbuchse und mit einem Schraubendreher, heben
Sie die kleine Abdeckung auf dem Sicherungskasten.
该设备装有两个保险丝 (2xT5 A L 250 V (for 230V), 2xT8 A 250 V (for 115 V)),
位于背面的插座中。要更换一个或多个保险丝,请断开电源线,用螺丝刀撬开保险丝盒上的保护盖。
It is responsibility of the user appropriately decontaminate the instrument in case of dangerous substances fall on or in it accordingly to the
safety datasheet of substances used and to the current laboratories safety standards. It is not possible to decontaminate the product
under steam.
It is also responsibility of the user to use substances for cleaning or decontaminating which do not react with internal parts of the
instrument or with the material contained in it. In case of doubts on the compatibility of a cleaning solution, contact the manufacturer or
local distributor.
È responsabilità dell’utilizzatore un’appropriata decontaminazione in caso di versamento di sostanze pericolose sul o dentro l’apparecchio
in accordo con le schede di sicurezza delle sostanze utilizzate e agli standard di sicurezza in vigore nei laboratori. Non è possibile
decontaminare il prodotto con corrente di vapore.
È inoltre responsabilità dell’utilizzatore l’uso di sostanze decontaminanti o per la pulizia che non producano pericolo a causa di reazioni
con parti dell’apparecchio o con il materiale in esso contenuto. In caso di dubbio sulla compatibilità di un agente pulente o
decontaminante, contattare il produttore o un distributore locale.
Est responsabilité de l'utilisateur la décontamination en cas de déversement de matières dangereuses sur ou à l'intérieur de l'équipement
conformément à la fiche de données de sécurité des substances utilisées et aux normes de sécurité actuelles des laboratoires. Il n'est
pas possible de décontaminer le produit sous la vapeur.
Est responsabilité de l'utilisateur à utiliser des substances qui ne produisent pas de danger pour le nettoyage ou de décontamination, qui
ne réagissent pas avec les parties internes de l'appareil ou avec la matière qu'il contient. En cas de doute sur la compatibilité d'une
solution de nettoyage, contactez le fabricant ou le distributeur local.
Es responsabilidad del usuario una descontaminación adecuada en caso de derrame de sustancias peligrosas en o dentro el equipo
de acuerdo con las fichas de seguridad de las sustancias utilizadas y las normas de seguridad vigentes en los laboratorios. No es posible
descontaminar el producto con corriente de vapor.
Es responsabilidad del usuario también utilizar sustancias que no producen peligro para limpiar o descontaminar, que no reaccionan con
las partes internas del instrumento ni con el material contenido en él. En caso de duda sobre la compatibilidad de una solución de
limpieza, póngase en contacto con el fabricante o el distribuidor local.
Der Benutzer ist dafür verantwortlich, für die ordnungsgemäße Dekontamination beim Freiwerden gefährlicher Stoffe auf oder im Inneren
des Geräts entsprechend dem Sicherheitsdatenblatt der verwendeten Stoffe und Labors auf die aktuellen Sicherheitsstandards. Es ist
nicht möglich, das Produkt unter Dampf zu dekontaminieren.
Der Benutzer ist dafür verantwortlich, für die Reinigung oder Dekontaminierungsmitteln, die nicht mit internen Teile des Gerätes oder mit
dem Material in ihm enthaltenen reagieren. Im Zweifelsfall über die Vereinbarkeit einer Reinigungslösung den Hersteller, den Vertreiber
oder den Händler.
当危险物质落在仪器上或仪器内时,使用者有责任根据所使用物质的安全资料和现行实验室的安全标准,对仪器进行适当的清洁。禁止使用
蒸汽对本设备进行去污。
使用者亦有责任使用不会与仪器内部部件或仪器结构材料发生反应的物质进行清洁或去污。如果对清洁溶液的兼容性有疑问,请与制造商或
当地经销商联系。


Contents / Indice / Index / Índice / Inhalt / 目录
1. INTRODUCTION .............................................................................................................................................................. 1
2. INSTALLATION ................................................................................................................................................................ 2
3. OPERATION .................................................................................................................................................................... 2
4. SETTING MODE .............................................................................................................................................................. 4
5. ERROR AND WARNING MESSAGES ............................................................................................................................ 5
6. VELP ERMES CLOUD PLATFORM CONFIGURATION ................................................................................................. 5
7. MAINTENANCE ............................................................................................................................................................... 6
8. TECHNICAL DATA .......................................................................................................................................................... 6
1. INTRODUZIONE .............................................................................................................................................................. 7
2. INSTALLAZIONE ............................................................................................................................................................. 8
3. FUNZIONAMENTO .......................................................................................................................................................... 8
4. MODALITA IMPOSTAZIONE PARAMETRI................................................................................................................... 10
5. MESSAGGI DI ERRORE E ATTENZIONE .................................................................................................................... 11
6. CONFIGURAZIONE PIATTAFORMA IN CLOUD ERMES ............................................................................................ 11
7. MANUTENZIONE ........................................................................................................................................................... 12
8. CARATTERISTICHE TECNICHE .................................................................................................................................. 12
1. INTRODUCTION ............................................................................................................................................................ 13
2. INSTALLATION .............................................................................................................................................................. 14
3. FONCTIONNEMENT ..................................................................................................................................................... 14
4. PROGRAMMATION DES PARAMETRES .................................................................................................................... 16
5. MESSAGES D’ERREUR ............................................................................................................................................... 17
6. CONFIGURATION DE LA PLATE-FORME CLOUD ERMES ....................................................................................... 17
7. MAINTENANCE ............................................................................................................................................................. 18
8. CARACTERISTIQUES TECHNIQUES .......................................................................................................................... 18
1. INTRODUCCIÓN ........................................................................................................................................................... 19
2. INSTALACIÓN ............................................................................................................................................................... 20
3. FUNCIONAMIENTO ....................................................................................................................................................... 20
4. MODO DE AJUSTE ....................................................................................................................................................... 22
5. MENSAJES ERROR ...................................................................................................................................................... 23
6. CONFIGURACIÓN DE LA PLATAFORMA DE NUBE ERMES ..................................................................................... 23
7. MANTENIMIENTO ......................................................................................................................................................... 24
8. DATOS TÉCNICOS ....................................................................................................................................................... 24
1. EINLEITUNG .................................................................................................................................................................. 25
2. AUFSTELLUNG ............................................................................................................................................................. 26
3. BETRIEB ........................................................................................................................................................................ 26
4. EINSTELLMODUS ......................................................................................................................................................... 28
5. FEHLERMELDUNGEN .................................................................................................................................................. 29
6. KONFIGURATION DER CLOUD-PLATTFORM ERMES .............................................................................................. 29
7. INSTANDHALTUNG ...................................................................................................................................................... 30
8. TECHNISCHE ANGABEN ............................................................................................................................................. 30

1. 介绍 ................................................................................................................................................................................ 31
2. 安装 ................................................................................................................................................................................ 32
3. 运行 ................................................................................................................................................................................ 32
4. 设置模式 ......................................................................................................................................................................... 35
5. 错误和警告信息 .............................................................................................................................................................. 36
6. VELP ERMES云平台配置 .............................................................................................................................................. 36
7. 维护 ................................................................................................................................................................................ 37
8. 技术参数 ......................................................................................................................................................................... 38
9. ACCESSORIES / ACCESSORI / ACCESSOIRES / ACCESORIOS / ZUBEHÖR / 配件 .............................................. 39
10. WIRING DIAGRAM / SCHEMA ELETTRICO / SCHÉMA ÉLECTRIQUE / ESQUEMA ELÉCTRICO / SCHALTPLAN /
线路图 ............................................................................................................................................................................. 40
11. DECLARATION OF CONFORMITY / DICHIARAZIONE DI CONFORMITA / DECLARATION DE CONFORMITE /
DECLARACIÓN DE CONFORMIDAD / KONFORMITÄTSERKLÄRUNG / 符合性声明 ...................................... 41
12. DECLARATION OF CONFORMITY ........................................................................................................................ 42


1
1. Introduction
The AREC Connect heating magnetic stirrer with ceramic plate is used to heat and mix liquids inside a suitable container
placed on the ceramic plate. The stirring is possible thanks to a magnetic drive stir bar placed into the vessel.
The instrument is used in the laboratory for general use and for all those applications that require a precise regulation of the
stirring speed and of the heating plate temperature.
The ceramic heating plate allows to reach higher temperature than a traditional aluminium heating plate; furthermore, the
ceramic is an inert and very hard material, so it offers great resistance to almost any type of chemical or mechanical
aggression keeping the surface characteristics unaltered over time.
The heating plate works up to 550 °C.
The powerful brushless motor is able to stir from 30 up to 1700 rpm.
SpeedServo technology maintains constant speed as viscosity changes.
The instrument is equipped with advanced functions as auto-reverse of the stirring direction, intermittent mode programs
and integrated timer to meet users’ workflow and safety lock feature to avoid possible alteration of the working conditions.
The AREC Connect can work in combination with the Pt100 external probe for precise and accurate control of the sample
temperature.
The integrated Wi-Fi module transmits and receives information in order to monitor and control the unit through the VELP
Ermes cloud platform.
1
Ceramic heating plate
A
Probe led
2
Main switch
B
Wi-Fi led
3
Speed control knob
C
Temperature setpoint led
4
Temperature control knob
D
Timer led
5
Display
E
Autoreverse led
F
Intermittent mode led
G
Menu and lock button
Note: it’s important to choose the most suitable magnetic stirring bar related to the type and the quantity of the liquid to be
stirred as well as to the type of the beaker. Size and shape of the magnetic stir bar determines the stirring efficiency at any
given speed. The stirring bar which satisfies most applications is code A00000356 (8 x 40 mm).
EN

2
2. Installation
• Unpacking
➢ Check the integrity of the unit after unpacking
• The box includes
➢ AREC Connect, Heating Magnetic Stirrer
➢ Instruction manual
➢ Magnetic stir bar
➢ Power supply cable
• Installation
➢ Place the unit on a non-flammable surface
➢ Make sure that the technical specification of the unit and the power supply line are the same
➢ Make sure that the electrical network is grounded
➢ Make sure that the main switch is on position “0” (OFF)
➢ Connect the instrument to an easily accessible socket (compliant with the current safety norms), using only the
provided power supply cable
Note: keep the power supply cable far away from the hot plate.
➢ Place the container with the liquid and the stir bar on the stirring plate
3. Operation
Power-up
• Turn the unit on using the main switch
• The display shows the software version and the last setpoint values
If the set starting mode is StOP (see chap. 4), the heating and the stirring functions are not active and both displays
show OFF. Otherwise, the unit starts working at the last set temperature and speed setpoints.
Stirring
• Rotate the right knob to set the stirring speed
• Push the knob to start stirring
• The display shows the current motor speed
• Push the knob to stop stirring
Heating
• Rotate the left knob to set the heating plate temperature
• Push the knob to start heating
• The display shows the current heating plate temperature for 3 seconds and the setpoint for 1 second
Note: when the display shows the temperature setpoint, the dedicated led (C) is on.
• Push the knob to stop stirring
Note: if the heating function is not active and the heating plate temperature is more than 50 °C, the display shows
the blinking message “Hot”. This warning is not active if the instrument is not powered.

3
Timer, autoreverse and intermittent mode functions
Press the central button repeatedly to access in sequence the following function menus:
• Timer
➢ Rotate the right knob to set the timer (hours/minutes)
➢ Press it to confirm
Note: when the timer is set, the dedicated led (D) is on. When the countdown starts, the led is blinking.
Note: select
HHnn
to disable the function.
After the timer has elapsed, the heating will be stopped (if Time Heat is OFF, see chap. 4), the stirring will be
stopped (if Time Sped is OFF, see chap. 4) and the display will show End.
• Autoreverse
➢ Rotate the right knob to set the autoreverse time (minutes/seconds)
➢ Press it to confirm
Note: when the autoreverse is set, the dedicated led (E) is on.
Note: select
nnSS
to disable the function.
The rotation direction will change after each set interval time.
• Intermittent mode
➢ Rotate the right knob to set the run time of the intermittent mode (minutes/seconds)
➢ Press it to confirm
➢ Rotate the knob to set the pause time of the intermittent mode (minutes/seconds)
➢ Press it to confirm
Note: when the intermittent mode is set, the dedicated led (F) is on during the run time and it is blinking during the
pause time.
Note: select
nnSS
to disable the function.
The stirring function will be interrupted cyclically.
To exit the function menu, push the central button again or do not press any buttons/knobs for 5 seconds.
Note: each function can be set individually or in combination with the others.
Lock function
• While the unit is working, push the central button for 3 seconds to enable the lock function.
If the lock function is enabled, it is not possible to change the work conditions.
The led around the central button blinks if the knobs or the central button are pressed/rotated.
• Push the central button for 3 seconds to disable the function.
External probe connection
• Turn off the instrument using the main switch
• Screw the threaded support rod into its seat on the back of the instrument (optional)
• Fasten the clamp onto the support rod (optional)
• Place the external temperature probe into the clamp (optional); then place it into the sample contained inside the
flask
• Plug the probe into the dedicated socket on the back of the instrument
• Turn the unit on using the main switch
When the external probe is connected, the dedicated led (A) is on.
The heating function works as descripted above but the settable and showed temperature will be that read by the external
probe.

4
4. Setting mode
Press both knobs for 3 seconds when heating and stirring are OFF to access the setting mode.
Use the “menu” buttons to browse through the available menus, listed below.
Press the speed control knob to access the selected menu. Then, turn the knob to modify the value of the parameter (when
it is possible). Press the knob to confirm.
To exit the setting mode, do not press any buttons/knobs for 10 seconds or press both knobs at the same time.
Text shown
Default value
Range
Menu’s name and description
Display 1
Display 2
TENP
LINt
550 °C
OFF, 50 ÷ 550 °C
10 °C steps
Heating plate temperature limit
It limits the maximum value of temperature setpoint for the heating
plate.
If OFF is selected, the heating function is “disabled”.
SPEd
LINt
1700
100 ÷ 1700 rpm
100 rpm steps
Stirring speed limit
It limits the maximum value of speed setpoint for the motor.
Strt
NOdE
StOP
StOP – run
Starting mode
➢ StOP: when the instrument is powered, the heating and the
stirring functions are not active and both displays show OFF
➢ run: when the instrument is powered, it starts working at the last
temperature and speed setpoints
CtrL
tyPE
FINE
FInE - FASt
Thermoregulation mode with external probe
➢ FINE: good and optimized temperature control, minimized
overshoot and oscillations, slow rise in temperature
➢ FASt: fast rise in temperature, increased overshoot
PrOb
ALar
On
On - OFF
External probe safety alarm
It allows to enable / disable AL 6 and AL 7 error messages (see
chap. 5).
PrOb
CAL
0.0 °C
-10 ÷ +10 °C
0,1 °C steps
Probe calibration
It allows to align the external temperature probe reading to a
reference thermometer.
tINE
Strt
SNAP
SNAP - SEtP
Starting mode of timer countdown
➢ SNAP: the timer countdown starts as soon as one function
(heating, stirring) is active
➢ SEtP: the timer countdown starts when temperature setpoint is
reached
tINE
SPEd
On
On - OFF
Keep stirring at timer end
If On is selected, the stirring function remains active when the timer
countdown ends.
tINE
HEAt
OFF
On - OFF
Keep heating at timer end
If On is selected, the heating function remains active when the timer
countdown ends.
ANBt
CAL
0.0 °C
-10 ÷ +10 °C
0,1 °C steps
Heating plate probe calibration
It allows to align the heating plate probe reading to a reference
thermometer.
COun
NOtO
---
Motor and heating element operating time
It shows motor and heating element operating times.
Operating times are showed in hours up to 9999 hours (around 416
days). Then they are showed in days (a digits’ decimal point is
turned on).
COun
HEAt
UIFI
NO
YES – NO
Wi-Fi connection
It allows to enable / disable the Wi-Fi connection.
rSEt
NO
YES – NO
Reset
It allows to reset all the system settings to the default values.
OtC
cFG
---
One time code
It shows the One Time Code during the registration of the device on
the VELP Ermes cloud platform.
StAr
AP
NO
YES – NO
Access point
It allows to enable / disable the Access Point mode of the Wi-Fi
connection.

5
5. Error and warning messages
When the display shows an error message, the instrument’s functions are stopped automatically.
AL1
Heating plate overtemperature
AL2
Excessive heating time
AL3
The stirring system doesn’t run correctly
AL4
External probe overtemperature
Only if the external probe is connected
AL6
Slow temperature increase read by the external probe
Only if the external probe is connected and
if PrOb ALAr is On
AL7
Fast temperature decrease read by the external probe
To remove the error message, restart the instrument.
If the alarm persists on the display, please contact VELP Scientifica’s technical service department.
6. VELP Ermes cloud platform configuration
VELP Ermes is a revolutionary cloud platform that transforms and improves your laboratory experience.
VELP Ermes creates a connected ecosystem of devices, people and data that transmit information between each other
cutting down distances and expanding your scientific potential.
VELP Ermes collects and stores your data with the maximum level of encryption following the highest cyber-security
standards.
• Activate VELP Ermes account:
➢ Go to www.velp.com through your internet browser
➢ Create your VELP account or login if you already have it
➢ Access to your profile page and select “Configure Your VELP Ermes Account”.
Activate your VELP Ermes account after having accepted Terms and Conditions.
➢ You will receive an email containing your ID, Password and a link to proceed to VELP Ermes authentication at
the email address that you entered during the registration
➢ At the first login on VELP Ermes platform, a new password will be requested
• Connect the heating magnetic stirrer to your Wi-Fi network:
➢ Turn on the AREC Connect
➢ Enable the Wi-Fi connection and the access point mode as descripted above
➢ Using a PC, tablet or smartphone select the VELP_AREC_(Product Code)_(Serial Number) network available on
the Wi-Fi list
➢ Open a web browser on your PC, tablet or smartphone; insert 192.168.4.1 into the address bar and press “Enter”
Enter “admin” as User ID and “velp_ermes” as Password
➢ Configure the laboratory Wi-Fi network parameters. Then press “Push” to confirm.
NOTE: if necessary, contact your IT specialist to get all your laboratory Wi-Fi connection details
➢ Wait until the Wi-Fi led stops blinking (it has to be constantly ON)
NOTE: if the led is still blinking after 2 minutes, please try to repeat the procedure and check that the network
parameters are correct
• Register the heating magnetic stirrer on VELP Ermes platform:
➢ On the AREC Connect, access the One Time Code (OTC) setting menu as descripted above
➢ On the PC, tablet or smartphone, login on VELP Ermes with your account and select “Device Registration”
➢ Enter the AREC Connect product code, serial number and purchase date.
Press “Next”
➢ Enter the One Time Code showed on the display of the AREC.
Press “Next” and wait for the connection
NOTE: if the OTC is not showed on the display of the AREC, please try to repeat the procedure and check that
the network parameters are correct
➢ Give a name to the AREC Connect and enter the address where the instrument is located
Press “Next”
➢ Assign the AREC Connect to an existing virtual laboratory or create a new one through “Laboratory
Management”
At the end of the procedure, you will be able to monitor and control the connected heating magnetic stirrer through
“Instruments” menu.
NOTE: the instrument can be connected only to a 2.4 GHz Wi-Fi network.
NOTE: for further information, please visit VELP website.

6
7. Maintenance
No routine or extraordinary maintenance is necessary except periodically cleaning.
Cleaning
Disconnect the unit from the power supply and use a cloth dampened with a non-flammable non-aggressive detergent.
Repair
Repairs must be carried out by authorized Velp personnel only.
The instrument must be transported using the original shockproof packaging when freight forwarders, couriers or other are
taking care of the unit transport. Follow the indications on the original packaging (e.g. place the instrument on a pallet).
It is the responsibility of the user, to properly decontaminate the unit in case of hazardous substances remaining on the
surface or interior of the device. If in doubt about the compatibility of a cleaning or decontamination product, contact the
manufacturer or distributor.
8. Technical data
General features
Model
F20500550
F20510550
Voltage
230 V – 50/60 Hz
115 V – 60 Hz
Power input
800 W
Current consumption
3.5 A
7 A
Dimensions (WxHxD)
203 x 94 x 344 mm (8 x 3.7 x 13.5 in)
Weight
3.3 kg (7.3 lb)
Construction material
Technopolymer
Working in continuous
Admitted
Maximum load on the plate
25 kg
Noisiness
<< 80 dBa
Environmental temperature admitted
+5…+40 °C
Storage temperature admitted
-10…+60 °C
Max humidity
80%
Overvoltage category
II
Pollution degree CEI EN61010-1
2
Max altitude
2000 m
Heating
Heating plate power output
770 W
Heating plate dimensions
180 x 180 mm (7 x 7 in)
Temperature range
0 ÷ 550 °C (1 °C steps)
Temperature resolution
1 °C
Heating plate construction material
Ceramic
External probe
Type
Pt100 Class A – Ø 3mm
Temperature range
0 ÷ 300 °C (1 °C steps)
Temperature resolution
1 °C
Accuracy
± 0.5 °C *
Electrical data
3.3 VDC – 1 W (max)
Stir
Stirring capacity
20 L H2O
Speed range
30 ÷ 1700 rpm (5 rpm steps)
Speed resolution
1 rpm
Motor type
BLDC
Autoreverse / Intermittent mode
5 s ÷ 99 min 59 s (1 s steps)
Motor rating output
10 W
Timer
Countdown range
1 min ÷ 99 h 59 min (1 min steps)
Counters
Motor
Operating hours
Heating element
Wi-Fi
Frequency
2.4 GHz
Protocol
802.11 b/g/n
Power output
17.5 ÷ 20 dBm @ 11b mode
* in the following conditions: 800 ml water in 1 liter glass beaker (diameter 105 mm), stirring bar 8 x 40 mm, 600 rpm, 50 °C.

7
1. Introduzione
L’agitatore magnetico riscaldante con piastra ceramica, AREC Connect, è utilizzato per riscaldare e mescolare liquidi
all’interno di un contenitore adeguato posizionato sopra la piastra ceramica. L’agitazione avviene mediante trascinamento
magnetico di un’ancoretta posta sul fondo del contenitore.
Lo strumento è una soluzione adatta per tutte quelle applicazioni che richiedono una precisa regolazione della velocità di
agitazione e della temperatura della piastra riscaldante.
La piastra ceramica permette di raggiungere temperature più elevate rispetto ad una piastra in alluminio; inoltre, essendo la
ceramica un materiale inerte e molto duro, è pressoché resistente a tutte le aggressioni chimiche e meccaniche
mantenendo inalterate nel tempo le caratteristiche superficiali.
La piastra riscaldante può raggiungere 550 °C.
Il motore brushless consente di agitare ad una velocità regolabile da 30 a 1700 rpm.
La tecnologia SpeedServo permette di mantenere la velocità costante a fronte di variazioni della viscosità.
Lo strumento è dotato di funzioni avanzate come l’inversione automatica del senso di rotazione, la modalità intermittente e il
timer integrato per soddisfare le esigenze degli operatori e della funzione di blocco per evitare variazioni indesiderate delle
impostazioni.
L’AREC Connect può funzionare in combinazione con la sonda esterna Pt100 per consentire una precisa e accurata
termoregolazione del campione.
Il modulo Wi-Fi integrato trasmette e riceve informazioni al fine di monitorare e controllare lo strumento attraverso la
piattaforma in cloud VELP Ermes.
1
Piastra riscaldante in ceramica
A
Led sonda esterna
2
Interruttore generale
B
Led Wi-Fi
3
Manopola per impostazione agitazione
C
Led setpoint temperatura
4
Manopola per impostazione temperatura
D
Led timer
5
Display
E
Led autoreverse
F
Led modalità intermittente
G
Tasto menu e blocco
Nota: è importante scegliere l’ancoretta magnetica più adeguata al tipo di liquido in agitazione e al tipo di becher utilizzato.
La dimensione e la forma dell’ancoretta magnetica influiscono sull’efficienza dell’agitazione. L’ancoretta che soddisfa la
maggior parte delle applicazioni è la A00000356 (8 x 40 mm).
IT

8
2. Installazione
• Rimozione dall’imballo
➢ Controllare l’integrità dello strumento dopo averlo rimosso dall’imballo
• La scatola include
➢ AREC Connect, agitatore magnetico riscaldante
➢ Manuale di istruzioni
➢ Ancoretta magnetica
➢ Cavo di alimentazione
• Installazione
➢ Posizionare lo strumento su un banco da laboratorio
➢ Verificare che i dati di targa dello strumento corrispondano a quelli disponibili alla presa di energia elettrica
➢ Assicurarsi che l’impianto elettrico sia messo a terra
➢ Assicurarsi che l’interruttore generale sia sulla posizione di “0” (OFF)
➢ Collegare lo strumento ad una presa facilmente accessibile (conforme alle norme di sicurezza), utilizzando
esclusivamente il cavo di alimentazione fornito.
Nota: tenere il cavo di alimentazione lontano dalla piastra riscaldante.
➢ Posizionare il contenitore con il liquido e l’ancoretta magnetica sulla superfice di appoggio dello strumento
3. Funzionamento
Accensione
• Accendere lo strumento mediante interruttore generale
• Il display mostra la versione software e gli ultimi valori di setpoint impostati
Se la modalità di funzionamento al riavvio è StOP (vedi cap. 4), le funzioni riscaldamento e agitazione non sono
attive ed entrambi i display visualizzano OFF. Altrimenti, lo strumento funziona utilizzando gli ultimi valori di setpoint
impostati.
Agitazione
• Ruotare la manopola di destra per impostare la velocità di agitazione
• Premere la manopola per avviare l’agitazione
• Il display mostra la velocità del motore corrente
• Premere la manopola per fermare l’agitazione
Riscaldamento
• Ruotare la manopola di sinistra per impostare la temperatura di lavoro della piastra
• Premere la manopola per avviare il riscaldamento
• Il display mostra la temperatura della piastra corrente per 3 secondi e il valore di setpoint per 1 secondo
Nota: quando il display mostra il setpoint temperatura, il rispettivo led (C) si accende
• Premere la manopola per interrompere il riscaldamento
Nota: se la funzione riscaldamento non è attiva e la temperatura della piastra è maggiore di 50 °C, il display mostra
la scritta “Hot” lampeggiante. Questa segnalazione non è attiva se lo strumento non è alimentato.

9
Timer, autoreverse e modalità intermittente
Premere il tasto centrale ripetutamente per accedere in sequenza ai seguenti menù impostazione:
• Timer
➢ Ruotare la manopola di destra per impostare il timer (ore/minuti)
➢ Premere la manopola per confermare
Nota: quando il timer è impostato, il rispettivo led (D) si accende. Quando il conto alla rovescia ha inizio, il led
lampeggia.
Nota: impostare
HHnn
per disabilitare questa funzione.
Allo scadere del timer, il riscaldamento verrà interrotto (se Time Heat è OFF, vedi cap. 4), l’agitazione verrà
interrotta (se Time Sped è OFF, vedi cap. 4) e il display mostrerà la scritta “End”.
• Autoreverse
➢ Ruotare la manopola di destra per impostare il tempo di autoreverse (minuti/secondi)
➢ Premere la manopola per confermare
Nota: quando la funzione autoreverse è attiva, il rispettivo led (E) si accende.
Nota: impostare
nnSS
per disabilitare questa funzione.
Il senso di rotazione verrà invertito ogni intervallo di tempo impostato.
• Modalità intermittente
➢ Ruotare la manopola di destra per impostare il tempo di funzionamento della modalità intermittente
(minuti/secondi)
➢ Premere la manopola per confermare
➢ Ruotare la manopola di destra per impostare il tempo di pausa della modalità intermittente (minuti/secondi)
➢ Premere la manopola per confermare
Nota: quando la modalità intermittente è impostata, il rispettivo led (F) è acceso durante il tempo di funzionamento
ed è lampeggiante durante il tempo di pausa.
Nota: impostare
nnSS
per disabilitare questa funzione.
L’agitazione verrà interrotta ciclicamente.
Per uscire da questo menù, premere nuovamente il tasto centrale o non premere alcun tasto/manopola per 5 secondi.
Nota: ciascuna funzione può essere impostata individualmente o in combinazione con le altre.
Blocco
• Mentre lo strumento sta funzionando, premere il tasto centrale per 3 secondi per abilitare la funzione di blocco.
Con il blocco attivo, non è possibile cambiare le impostazioni di lavoro.
Il led attorno al tasto centrale lampeggia se le manopole o il tasto centrale vengono premuti/ruotati.
• Premere il tasto centrale per 3 secondi per disabilitare questa funzione.
Collegamento della sonda esterna
• Spegnere lo strumento mediante interruttore generale
• Avvitare l’asta di sostegno filettata nell’apposita sede posta sul retro dello strumento (facoltativo)
• Posizionare il morsetto di supporto sull’asta (facoltativo)
• Collocare la sonda esterna nel morsetto (facoltativo); dopodiché, posizionarla all’interno del campione contenuto in
un apposito contenitore
• Inserire il connettore della sonda nella presa dedicata posta sul retro dello strumento
• Accendere lo strumento mediante interruttore generale
Quando la sonda esterna è collegata, il rispettivo led (A) si accende.
La funzione riscaldamento funziona come descritto sopra, ma la temperatura impostabile e visualizzata sarà quella letta
dalla sonda esterna.

10
4. Modalità impostazione parametri
Premere entrambe le manopole quando riscaldamento e agitazione non sono attivi per accedere alla modalità impostazione
parametri.
Utilizzare il tasto centrale “menu” per scorrere tra i menù disponibili, elencati in seguito.
Premere la manopola di destra per accedere al menù selezionato. Dopodiché, ruotare la manopola per modificare il valore
del parametro (quando possibile). Premere la manopola per confermare.
Per uscire da questa modalità, non premere alcun tasto/manopola per 10 secondi oppure premere entrambe le manopole
contemporaneamente.
Testo visualizzato
Valore di default
Range
Nome del menù e descrizione
Display 1
Display 2
TENP
LINt
550 °C
OFF, 50 ÷ 550 °C
Step da 10 °C
Fondo-scala temperatura piastra
Permette di limitare il massimo valore di setpoint temperatura
piastra impostabile.
Selezionando OFF, la funzione riscaldamento viene “disabilitata”.
SPEd
LINt
1700
100 ÷ 1700 rpm
Step da 100 rpm
Fondo-scala velocità di agitazione
Permette di limitare il massimo valore di setpoint velocità
impostabile.
Strt
NOdE
StOP
StOP – run
Modalità di funzionamento al riavvio
➢ StOP: all’accensione dello strumento, le funzioni
riscaldamento e agitazione non sono attive ed entrambi i
display visualizzano OFF
➢ run: all’accensione dello strumento, vengono mantenute le
impostazioni precedenti per riscaldamento e agitazione
CtrL
tyPE
FINE
FInE - FASt
Modalità termoregolazione con sonda esterna
➢ FINE: regolazione temperatura ottimizzata, overshoot e
oscillazioni minimizzati, lento aumento della temperatura
➢ FASt: veloce aumento della temperatura, overshoot e
oscillazioni maggiori
PrOb
ALar
On
On - OFF
Allarmi sonda esterna
Permette di abilitare / disabilitare gli allarmi AL 6 e AL 7 (vedi
cap. 5).
PrOb
CAL
0.0 °C
-10 ÷ +10 °C
Step da 0,1 °C
Calibrazione sonda esterna
Permette l’allineamento della lettura della sonda di temperatura
esterna con un termometro di riferimento.
tINE
Strt
SNAP
SNAP - SEtP
Modalità di avvio timer
➢ SNAP: il conto alla rovescia inizia appena una delle due
funzioni (riscaldamento, agitazione) è attiva
➢ SEtP: il conto alla rovescia inizia quando viene raggiunta la
temperatura impostata
tINE
SPEd
On
On - OFF
Proseguimento agitazione a fine timer
Selezionando On, la funzione agitazione rimane attiva allo
scadere del timer.
tINE
HEAt
OFF
On - OFF
Proseguimento riscaldamento a fine timer
Selezionando On, la funzione riscaldamento rimane attiva allo
scadere del timer.
ANBt
CAL
0.0 °C
-10 ÷ +10 °C
Step da 0,1 °C
Calibrazione termocoppia della piastra riscaldante
Permette l’allineamento della lettura della sonda di temperatura
della piastra riscaldante con un termometro di riferimento.
COun
NOtO
---
Tempo di funzionamento motore ed elemento riscaldante
Visualizza i tempi di funzionamento di motore e resistenza.
I tempi di lavoro sono visualizzati in ore fino a 9999 ore (circa
416 giorni). Dopodiché, vengono visualizzati in giorni (il punto
decimale di un digit del display viene acceso).
COun
HEAt
UIFI
NO
YES – NO
Connessione Wi-Fi
Permette di abilitare / disabilitare la connessione Wi-Fi.
rSEt
NO
YES – NO
Reset
Permette di ripristinare i valori di default per tutti i parametri.
OtC
cFG
---
Codice univoco di sicurezza
Visualizza il codice univoco di sicurezza durante la registrazione
dello strumento sulla piattaforma in cloud VELP Ermes.
StAr
AP
NO
YES – NO
Access point
Permette di abilitare / disabilitare la modalità Access Point della
connessione Wi-Fi

11
5. Messaggi di errore e attenzione
Quando il display mostra un messaggio di allarme, in automatico le funzioni dello strumento vengono bloccate.
AL1
Sovra-temperatura della piastra riscaldante
AL2
Tempo di riscaldamento eccessivo
AL3
Anomalia del sistema di agitazione
AL4
Sovra-temperatura della sonda esterna
Solo se la sonda esterna è connessa
AL6
Lento incremento di temperatura letto dalla sonda esterna
Solo se la sonda esterna è connessa e
se PrOb ALAr è On
AL7
Rapida diminuzione di temperature letta dalla sonda esterna
Per rimuovere il messaggio di errore, riavviare lo strumento.
Se l’allarme persiste sul display, contattare il servizio di assistenza tecnica di VELP Scientifica.
6. Configurazione piattaforma in cloud Ermes
VELP Ermes è una piattaforma in cloud rivoluzionaria in grado di trasformare e migliorare la tua esperienza di laboratorio.
VELP Ermes crea un ecosistema connesso di strumenti, persone e dati; trasmette informazioni tra di essi abbattendo le
distanze ed accelera i processi scientifici.
VELP Ermes raccoglie e memorizza i tuoi dati con il massimo livello di crittografia seguendo i più alti standard di sicurezza
informatica.
• Attivazione dell’account Ermes:
➢ Accedi al sito www.velp.com utilizzando un browser internet
➢ Crea il tuo account VELP o accedi se ne hai già uno
➢ Accedi alla tua pagina personale e seleziona “Configura account VELP ERMES”
Attiva il tuo account Ermes dopo aver accettato termini e condizioni
➢ Riceverai una email contenente le tue credenziali di accesso e un link per accedere alla piattaforma Ermes
all’indirizzo mail utilizzato in fase di registrazione
➢ Al primo login, verrà richiesto di cambiare la password
• Connessione dell’AREC alla rete Wi-Fi:
➢ Accendi l’AREC Connect
➢ Abilita la connessione Wi-Fi e la modalità Access Point come descritto sopra
➢ Utilizzando un PC, tablet o smartphone seleziona la rete VELP_AREC_(Codice Prodotto)_(Numero di Serie)
disponibile nell’elenco delle connessioni Wi-Fi attive
➢ Apri un browser internet su PC, tablet o smartphone; inserisci 192.168.4.1 nella barra degli indirizzi e premi
“Invio”
Inserire “admin” come User ID e “velp_ermes” come Password
➢ Configura i parametri della connessione Wi-Fi del laboratorio. Dopodiché, premi “Push” per confermare.
NOTA: se necessario, contatta il tecnico IT per conoscere tutti i parametri della rete Wi-Fi
➢ Attendi che il led Wi-Fi smetta di lampeggiare (deve rimanere accesso fisso)
NOTA: se dopo più di 2 minuti, il led lampeggia ancora, ripetere la procedura assicurandosi della correttezza dei
parametri di rete
• Registrazione dell’AREC sulla piattaforma Ermes:
➢ Sull’AREC, accedi al menù “Codice univoco di sicurezza” come descritto sopra
➢ Da PC, tablet o smartphone, accedi alla piattaforma Ermes utilizzando il tuo account e seleziona il menù
“Registrazione Strumenti”
➢ Inserisci il codice prodotto, il numero di serie e la data di acquisto dell’AREC Connect.
Premi “Next”
➢ Inserisci il codice univoco di sicurezza visualizzato sul display dello strumento.
Premi “Next” e attendi la conferma dell’avvenuta registrazione
NOTA: se il codice univoco di sicurezza non viene mostrato sul display dell’AREC, ripetere la procedura
assicurandosi della correttezza dei parametri di rete
➢ Assegna un nome ad AREC Connect e inserisci l’indirizzo dove lo strumento è situato
Premi “Next”
➢ Aggiungi l’AREC Connect ad un laboratorio virtuale già esistente o creandone uno nuovo tramite il menù
“Gestione Laboratori”
Al termine della procedura, sarà possibile monitorare e controllare AREC Connect tramite il menu “Strumenti”.
NOTA: lo strumento può essere connesso esclusivamente ad una rete Wi-Fi con banda 2.4 GHz.
NOTA: per informazioni aggiuntive, vedere la sezione dedicata sul sito VELP.

12
7. Manutenzione
La manutenzione ordinaria e straordinaria non è prevista salvo la pulizia periodica.
Pulizia
Scollegare lo strumento dall’alimentazione e pulire con un panno inumidito con detergenti non infiammabili e non aggressivi.
Riparazione
Eventuali riparazioni dovranno essere eseguite soltanto da parte di personale autorizzato Velp.
Il trasporto dello strumento tramite spedizionieri, corrieri o altro, deve essere effettuato utilizzando l'imballo originale antiurto
di cui lo strumento è dotato quando spedito da nuovo. Seguire le istruzioni eventualmente riportate sullo stesso (es.
pallettizzare).
È responsabilità dell'utente procedere alla decontaminazione dell'unità nel caso in cui sostanze pericolose rimangano sulla
superficie o all'interno del dispositivo. In caso di dubbi sulla compatibilità di un prodotto per la pulizia o la decontaminazione,
contattare il produttore o il distributore.
8. Caratteristiche tecniche
Caratteristiche generali
Modelli
F20500550
F20510550
Alimentazione
230 V – 50/60 Hz
115 V – 60 Hz
Potenza assorbita
800 W
Corrente assorbita
3.5 A
7 A
Dimensioni (LxLxH)
203 x 94 x 344 mm (8 x 3.7 x 13.5 in)
Peso
3.3 kg (7.3 lb)
Materiale di costruzione
Tecnopolimero
Funzionamento in continuo
Ammesso
Massimo carico sulla piastra
25 kg
Rumorosità
<< 80 dBa
Temperatura ambiente ammessa
+5…+40 °C
Temperatura di stoccaggio ammessa
-10…+60 °C
Umidità max ammessa
80%
Categoria di sovratensione
II
Grado di inquinamento CEI EN61010-1
2
Altitudine massima
2000 m
Riscaldamento
Potenza della piastra riscaldante
770 W
Dimensioni della piastra riscaldante
180 x 180 mm (7 x 7 in)
Range di temperatura impostabile
0 ÷ 550 °C (step da 1 °C)
Risoluzione temperatura
1 °C
Materiale di costruzione della piastra
Ceramica
Sonda esterna
Tipo
Pt100 Classe A – Ø 3 mm
Range di temperatura impostabile
0 ÷ 300 °C (step da 1 °C)
Risoluzione temperatura
1 °C
Accuratezza
± 0.5 °C *
Dati elettrici
3.3 VDC – 1 W (max)
Agitazione
Capacità di agitazione
20 L H2O
Range di velocità impostabile
30 ÷ 1700 rpm (step da 5 rpm)
Risoluzione velocità
1 rpm
Tipo di motore
BLDC
Autoreverse / Modalità intermittente
5 s ÷ 99 min 59 s (step da 1 s)
Potenza motore
10 W
Timer
Range conto alla rovescia impostabile
1 min ÷ 99 h 59 min (step da 1 min)
Contatori
Motore
Ore di funzionamento
Elemento riscaldante
Wi-Fi
Frequenza
2.4 GHz
Protocollo
802.11 b/g/n
Potenza
17.5 ÷ 20 dBm @ 11b mode
* nelle seguenti condizioni: 800 ml di acqua in becher di vetro da 1 litro (diametro 105 mm), ancoretta 8 x 40 mm, 600 rpm,
50 °C.

13
1. Introduction
L'agitateur magnétique chauffant AREC Connect avec plaque en céramique est utilisé pour chauffer et mélanger des
liquides à l'intérieur d'un récipient approprié placé sur la plaque en céramique. L'agitation est possible grâce à un barreau
d'agitation à entraînement magnétique placé dans le récipient.
L’instrument est utilisé en laboratoire pour les usages quotidiens pour toutes les applications nécessitant une régulation
précise de la vitesse d'agitation et de la température de la plaque chauffante.
La plaque chauffante en céramique permet d'obtenir des températures plus élevées qu'avec une plaque traditionnelle en
aluminium; de plus, la céramique est une matière inerte et résiste à pratiquement tous les types d'agressions chimique ou
mécanique; les caractéristiques de sa surface ne s'altèrent pas avec le temps.
La plaque chauffante fonctionne jusqu'à 550 °C.
La puissance du moteur sans balai permet une agitation de 30 à 1 700 tr/min.
La technologie SpeedServo maintient une vitesse constante lorsque la viscosité change.
L'instrument est équipé de fonctions avancées telles que l'inversion automatique du sens de brassage, des programmes de
mode intermittent et une minuterie intégrée pour répondre au flux de travail des utilisateurs et un dispositif de verrouillage
de sécurité pour éviter toute altération éventuelle des conditions de travail.
L’appareil AREC Connect peut fonctionner en combinaison avec la sonde externe Pt100 pour un contrôle précis et exact de
la température de l'échantillon.
Le module Wi-Fi intégré transmet et reçoit des informations afin de surveiller et de contrôler l'instrument via la plate-forme
cloud VELP Ermes.
1
Plaque chauffante en céramique
A
Led sonde
2
Interrupteur général
B
Led Wi-Fi
3
Bouton de vitesse d'agitation
C
Led point de consigne température
4
Bouton de température
D
Led minuterie
5
Écran
E
Led autoreverse
F
Led mode intermittent
G
Bouton de menu et de verrouillage
Remarque: Il est important de choisir le barreaux magnétique le mieux adapté au type de liquide à agiter et au type de
bécher utilisé. La taille et la forme du barreau d’agitation magnétique déterminent l'efficacité de l'agitation à une vitesse
donnée. Le barreau d'agitation qui répond à la plupart des applications est le code A00000356 (8 x 40 mm).
FR

14
2. Installation
• Retrait de l’emballage
➢ Vérifier l'intégrité de l'instrument après avoir retiré l'emballage
• La boite comprend
➢ AREC Connect, Agitateur Magnétique Chauffant
➢ Manuel d'instructions
➢ Barreau magnétique
➢ Cable de alimentación
• Installation
➢ Placez l'instrument sur une surface non inflammable
➢ S'assurer que les spécifications techniques de l'appareil et de la ligne d'alimentation électrique sont identiques
➢ S'assurer que le réseau électrique est mis à la terre
➢ S’assurer que l'interrupteur principal est sur la position « 0 » (OFF)
➢ Brancher l'appareil à une prise facilement accessible (conforme aux normes de sécurité en vigueur), en utilisant
uniquement le câble d'alimentation fourni
Remarque : maintenir le câble d'alimentation à distance de la plaque chauffante.
➢ Placer le récipient avec le liquide et le barreau d'agitation sur la plaque d'agitation
3. Fonctionnement
Mise sous tension
• Mettre l'appareil en marche à l'aide de l'interrupteur principal
• L'écran affiche la version du logiciel et les dernières valeurs de consigne
Si le mode de démarrage réglé est StOP (voir chap. 4), les fonctions de chauffage et d'agitation ne sont pas actives
et les deux écrans affichent OFF. Sinon, l'appareil commence à fonctionner avec les dernières valeurs de consigne
de température et de vitesse.
Agitation
• Tourner le bouton de droite pour régler la vitesse d'agitation
• Enfoncer le bouton pour démarrer l’agitation
• L'écran affiche la vitesse actuelle du moteur
• Enfoncer le bouton pour arrêter l’agitation
Chauffage
• Tourner le bouton de gauche pour régler la température de la plaque chauffante
• Enfoncer le bouton pour activer le chauffage
• L'écran affiche la température actuelle de la plaque chauffante pendant 3 secondes et le point de consigne pendant
1 seconde
Remarque : lorsque l'écran affiche le point de consigne de la température, le voyant lumineux (C) est allumé.
• Enfoncer le bouton pour arrêter le chauffage
Remarque : si la fonction de chauffage n'est pas active et que la température de la plaque chauffante est
supérieure à 50 °C, l'écran affiche le message clignotant « Hot » (chaud). Cet avertissement n'est pas actif si
l'appareil n'est pas sous tension.

15
Fonctions de minuterie, d'inversion automatique et de mode intermittent
Appuyer à plusieurs reprises sur le bouton central pour accéder successivement aux menus de fonctions suivants :
• Minuterie
➢ Tourner le bouton de droite pour régler la minuterie (heures/minutes)
➢ L’enfoncer pour confirmer
Remarque : lorsque la minuterie est activée, le voyant (D) est allumé. Lorsque le compte à rebours démarre, le
voyant clignote.
Remarque: sélectionnez
HHnn
pour désactiver la fonction.
Une fois le temps écoulé, le chauffage s'arrête (si Time Heat est sur OFF, voir chap. 4), l'agitation s'arrête (si Time
Speed est sur OFF, voir chap. 4) et l'écran affiche End.
• Inversion automatique
➢ Tourner le bouton de droite pour régler le temps auto-reverse (minutes/secondes)
➢ L’enfoncer pour confirmer
Remarque: lorsque l'auto-reverse est réglé, le voyant (E) est allumé.
Remarque: sélectionnez
NNSS
pour désactiver la fonction.
Le sens de rotation change après chaque intervalle de temps défini.
• Mode intermittent
➢ Tourner le bouton droit pour régler la durée de fonctionnement du mode intermittent (minutes/secondes)
➢ L’enfoncer pour confirmer
➢ Tourner le bouton pour régler le temps de pause du mode intermittent (minutes/secondes)
➢ L’enfoncer pour confirmer
Remarque: lorsque le mode intermittent est activé, le voyant (F) est allumé pendant le temps de fonctionnement et
clignote pendant le temps de pause.
Remarque: sélectionnez
NNSS
pour désactiver la fonction.
La fonction de brassage sera interrompue de manière cyclique.
Pour quitter le menu des fonctions, appuyer à nouveau sur le bouton central ou n’enfoncer aucun bouton/touche pendant 5
secondes.
Remarque: chaque fonction peut être réglée individuellement ou en combinaison avec les autres..
Fonction de verrouillage
• Lors du fonctionnement de l'appareil, appuyer sur le bouton central pendant 3 secondes pour activer la fonction de
verrouillage.
Si la fonction de verrouillage est activée, il n'est pas possible de modifier les conditions de travail.
Le voyant lumineux autour du bouton central clignote si les touches ou le bouton central sont enfoncés/tournés.
• Appuyer sur le bouton central pendant 3 secondes pour désactiver la fonction.
Connexion de la sonde externe
• Éteindre l'appareil à l'aide de l'interrupteur principal
• Visser la tige de support filetée dans son logement à l'arrière de l'appareil (optionnel)
• Fixer la pince sur la tige de support (optionnel)
• Placer la sonde de température externe dans la pince (optionnel); puis la placer dans l'échantillon contenu à
l'intérieur du flacon
• Brancher la sonde dans la prise prévue à l'arrière de l'appareil
• Mettre l'appareil en marche à l'aide de l'interrupteur principal
Lorsque la sonde externe est connectée, le voyant lumineux (A) est allumé.
La fonction de chauffage fonctionne comme décrit ci-dessus mais la température programmable et affichée sera celle lue
par la sonde externe.

16
4. Programmation des paramètres
Appuyer sur les deux boutons pendant 3 secondes lorsque le chauffage et l'agitation sont désactivés pour accéder au mode
de réglage.
Utiliser les boutons « menu » pour parcourir les menus disponibles, énumérés ci-dessous.
Enfoncer le bouton de commande de la vitesse pour accéder au menu sélectionné. Puis, tourner le bouton pour modifier la
valeur du paramètre (quand c’est possible). Enfoncer le bouton pour confirmer.
Pour quitter le mode de réglage, n’appuyer sur aucun bouton/touche pendant 10 secondes ou appuyer sur les deux boutons
en même temps.
Texte affiché
Valeur par
défaut
Plage
Nom du menu et description
Écran 1
Écran 1
TENP
LINt
550 °C
OFF, 50 ÷ 550 °C
Pas de 10 °C
Limite de température de la plaque chauffante
Il limite la valeur maximale de la température de consigne de la
plaque chauffante.
Si OFF est sélectionné, la fonction de chauffage est « désactivée ».
SPEd
LINt
1700
100 ÷ 1700 tr/min
Pas de 100 tr/min
Limite de la vitesse d'agitation
Il limite la valeur de consigne maximale de la vitesse du moteur.
Strt
NOdE
StOP
StOP – run
Mode de démarrage
➢ StOP : lorsque l’appareil est sous tension, les fonctions de
chauffage et d'agitation ne sont pas actives et les deux écrans
affichent OFF
➢ run : lorsque l'appareil est sous tension, il se met à fonctionner
avec les dernières valeurs de consigne de température et de
vitesse
CtrL
tyPE
FINE
FInE - FASt
Mode de régulation thermique avec sonde externe
➢ FINE : bon contrôle et optimisation de la température,
dépassement et oscillations minimisés, montée en température
lente
➢ FASt : augmentation rapide de la température, dépassement
accru
PrOb
ALar
On
On - OFF
Alarme de sécurité pour la sonde externe
Il permet d'activer/désactiver les messages d'erreur AL 6 et AL 7
(voir chap. 5).
PrOb
CAL
0.0 °C
-10 ÷ +10 °C
Pas de 0,1 °C
Étalonnage de la sonde
Il permet d'aligner la lecture de la sonde de température externe sur
un thermomètre de référence.
tINE
Strt
SNAP
SNAP - SEtP
Mode de démarrage du décompte de la minuterie
➢ SNAP: le décompte de la minuterie démarre dès qu'une fonction
(chauffage, agitation) est active
➢ SEtP : le décompte de la minuterie commence lorsque la valeur
de consigne de la température est atteinte
tINE
SPEd
On
On - OFF
Maintien de l’agitation à la fin du décompte de la minuterie
Si l'option On est sélectionnée, la fonction d'agitation reste active à
la fin du décompte de la minuterie.
tINE
HEAt
OFF
On - OFF
Maintien du chauffage à la fin du décompte de la minuterie
Si l'option On est sélectionnée, la fonction de chauffage reste active
à la fin du décompte de la minuterie.
ANBt
CAL
0.0 °C
-10 ÷ +10 °C
Pas de 0,1 °C
Étalonnage de la sonde de la plaque chauffante
Il permet d'aligner la lecture de la sonde de la plaque chauffante sur
un thermomètre de référence.
COun
NOtO
---
Motor and heating element operating time
It shows motor and heating element operating times.
Operating times are showed in hours up to 9999 hours (around 416
days). Then they are showed in days (a digits’ decimal point is
turned on).
COun
HEAt
UIFI
NO
YES – NO
Connexion Wi-Fi
Permet d’activer / désactiver la connexion Wi-Fi
rSEt
NO
YES – NO
Reset (Réinitialisation)
Permet de restaurer les valeurs par défaut de tous les paramètres.
OtC
cFG
---
Code unique de sécurité
Affiche le code unique de sécurité lors de l'enregistrement de
l'instrument sur la plate-forme cloud VELP Ermes
StAr
AP
NO
YES – NO
Access point
Permet d’activer / désactiver le mode Access Point (Point d’accès)
de la connexion Wi-Fi

17
5. Messages d’erreur
Si l’affichage indique l’un des messages d’erreur suivants, les fonctions de l'appareil sont automatiquement verrouille.
AL1
Surchauffe de la plaque chauffante
AL2
Temps de chauffage excessif
AL3
Le système d’agitation ne fonctionne pas correctement
AL4
Surchauffe de la sonde externe
Uniquement si la sonde externe est connectée
AL6
Augmentation lente de la température lue par la sonde externe
Uniquement si la sonde externe est connectée et
si PrOb ALAr est sur On
AL7
Fast temperature decreasing read by the external probe
Pour supprimer une alarme, vous devez éteindre et le rallumer.
Si l'alarme persiste à l'écran, s'il vous plaît contacter le plus proche service technique VELP Scientifica.
6. Configuration de la plate-forme cloud Ermes
VELP Ermes est une plate-forme cloud révolutionnaire, capable de transformer et d'améliorer votre expérience de
laboratoire.
VELP Ermes crée un écosystème connecté d'instruments, de personnes et de données ; cette plate-forme transmet des
informations entre eux en réduisant les distances et en accélérant les processus scientifiques.
VELP Ermes collecte et stocke vos données avec le plus haut niveau de cryptage, en respectant les normes de sécurité
informatique les plus strictes.
• Activation du compte Ermes :
➢ Accédez au site www.velp.com à l'aide d'un navigateur Internet
➢ Créez votre compte VELP ou connectez-vous si vous en avez déjà un
➢ Accédez à votre page personnelle et sélectionnez « Configurer compte VELP ERMES »
Activez votre compte Ermes après avoir accepté les termes et conditions
➢ Vous recevrez un courriel, contenant vos identifiants de connexion, ainsi qu’un lien pour accéder à la plate-forme
Ermes, à l'adresse email utilisée lors votre l'inscription
➢ Lors de la première connexion, vous serez invité à modifier votre mot de passe
• Connexion de l'agitateur magnétique chauffant au réseau Wi-Fi :
➢ Allumez le AREC Connect
➢ Activez la connexion Wi-Fi et le mode Access Point (Point d'accès), comme décrit ci-dessus
➢ À l'aide d'un PC, d'une tablette ou d'un smartphone, sélectionnez le réseau VELP_AREC_(Code produit)_(
Numéro de série), disponible dans la liste des connexions Wi-Fi actives
➢ Ouvrez un navigateur Internet sur un PC, une tablette ou un smartphone; saisissez 192.168.4.1 dans la barre
d'adresse et appuyez sur « Entrée »
Insérer « admin » comme nom d'utilisateur et « velp_ermes » comme mot de passe
➢ Configurez les paramètres de la connexion Wi-Fi du laboratoire. Puis, appuyez sur « Push » pour confirmer.
Remarque: si nécessaire, contactez le technicien informatique pour connaître tous les paramètres du réseau Wi-
Fi
➢ Attendez que la LED Wi-Fi cesse de clignoter (elle doit rester allumée)
Remarque: si, après plus de 2 minutes, la LED clignote toujours, répétez la procédure en vous assurant que les
paramètres du réseau sont corrects
• Enregistrement de l'agitateur magnétique chauffant sur la plate-forme Ermes :
➢ Sur le AREC Connect, accédez au menu « Code unique de sécurité », comme décrit plus haut
➢ Depuis un PC, une tablette ou un smartphone, accédez à la plate-forme Ermes en utilisant votre compte et
sélectionnez le menu « Enregistrement Outils »
➢ Saisissez le code du produit, le numéro de série et la date d'achat du AREC Connect.
Cliquez sur « Suivant »
➢ Entrez le code unique de sécurité, affiché sur l'écran de l'agitateur.
Cliquez sur « Suivant » et attendez la confirmation de l'enregistrement
Remarque: si le code unique de sécurité n'apparaît pas sur l'écran du AREC, répétez la procédure en vous
assurant que les paramètres du réseau sont corrects
➢ Attribuez un nom à AREC Connect et saisissez l'adresse où se trouve l'instrument
Cliquez sur « Suivant »
➢ Ajoutez le AREC Connect à un laboratoire virtuel existant ou créez-en un nouveau via le menu « Gestion
Laboratoires »
À la fin de la procédure, vous pourrez surveiller et contrôler le AREC Connect via le menu « Outils ».
Remarque: l'agitateur ne peut être connecté qu'à un réseau Wi-Fi avec bande 2,4 GHz.
Remarque: pour plus d'informations, veuillez consulter la section dédiée sur le site VELP.

18
7. Maintenance
Aucun entretien ordinaire ou extraordinaire n’est prévu excepté le nettoyage périodique de l’instrument.
Nettoyage
Une fois l’alimentation électrique coupée, le nettoyage est à réaliser avec un chiffon imbibé de détergents ininflammables et
non agressifs.
Réparations
Les réparations ne doivent être effectuées que par du personnel Velp autorisé.
Le transport de l'instrument par des transitaires, des messagers ou autres, doit être effectué dans son emballage d'origine
résistant aux chocs, dont il est doté lors de son expédition de neuf. Suivez les instructions, le cas échéant, sur la même
chose (par exemple, la palettisation).
Il est de la responsabilité de l'utilisateur de décontaminer correctement l'unité en cas de substances dangereuses restant
sur la surface ou à l'intérieur de l'appareil. En cas de doute sur la compatibilité d'un produit de nettoyage ou de
décontamination, contactez le fabricant ou le distributeur.
8. Caractéristiques techniques
Général
Modèles
F20500550
F20510550
Alimentation
230 V – 50/60 Hz
115 V – 60 Hz
Consommation d'énergie
800 W
Consommation de courant
3.5 A
7 A
Dimensions (LxLxH)
203 x 94 x 344 mm (8 x 3.7 x 13.5 in)
Poids
3.3 kg (7.3 lb)
Matériau de construction
Technopolymère
Fonctionnement continu
Admis
Charge maximale sur la plaque
25 kg
Bruit
<< 80 dBa
Température ambiante admissible
+5…+40 °C
Température de stockage admissible
-10…+60 °C
Humidité maximale admissible
80%
Catégorie de surtension
II
Degré de pollution CEI EN61010-1
2
Altitude maximale
2000 m
Chauffage
Puissance plaque chauffante
770 W
Taille de la plaque chauffante
180 x 180 mm (7 x 7 in)
Plage de température réglable
0 ÷ 550 °C (pas de 1 °C)
Résolution de lecture de la température
1 °C
Matériau de construction plaque chauffante
Céramique
Sonde externe
Type
Pt100 Classe A – Ø 3mm
Plage de température réglable
0 ÷ 300 °C (pas de 1 °C)
Résolution de lecture de la température
1 °C
Précision
± 0.5 °C *
Données électriques
3.3 VDC – 1 W (max)
Agitation
Capacité à remuer
20 L H2O
Plage de vitesse réglable
30 ÷ 1700 tr/min (pas de 5 tr/min)
Résolution de lecture de l'agitation
1 tr/min
Type de moteur
BLDC
Inversion automatique / Mode intermittent
5 s ÷ 99 min 59 s (pas de1 s)
Puissance du moteur fournie
10 W
Minuterie
Plage de décompte
1 min ÷ 99 h 59 min (pas de 1 min)
Compteurs
Moteur
Heures d'opération
Résistance
Wi-Fi
Fréquence
2.4 GHz
Protocole
802.11 b/g/n
Puissance
17.5 ÷ 20 dBm @ 11b mode
* dans les conditions suivantes : 800 ml d'eau dans un bécher en verre de 1 litre (diamètre 105 mm), barreau d'agitation 8 x
40 mm, 600 tr/min, 50 °C.

19
1. Introducción
El agitador magnético con calefacción AREC Connect con placa cerámica se utiliza para calentar y mezclar líquidos que se
encuentren dentro de un recipiente adecuado encima de la placa cerámica. La agitación es posible gracias a un agitador
mangético colocado dentro del recipiente.
El instrumento es la mejor solución para todas aquellas aplicaciones que requieren de un control preciso de la velocidad de
agitación y de la temperatura de la placa de calentamiento.
La placa de calefacción de cerámica permite temperaturas de trabajo más altas que el aluminio tradicional. Además, la
cerámica es inerte y muy resistente a todos los ataques químicos y mecánicos, manteniendo inalteradas las características
de la superficie.
La placa calefactora llega hasta 550°C.
El potente motor brushless puede agitar desde 30 hasta 1700 rpm.
La tecnología SpeedServo mantiene una velocidad constante aunque cambie la viscosidad.
El instrumento está equipado con funciones avanzadas como la inversión automática de la dirección de agitación,
programas de modo intermitente y temporizador integrado para satisfacer el flujo de trabajo de los usuarios y la función de
bloqueo de seguridad para evitar posibles alteraciones de las condiciones de trabajo.
El AREC Connect puede funcionar en combinación con la sonda externa Pt100 para un control preciso y exacto de la
temperatura de la muestra.
El módulo WiFi integrado transmite y recibe información a fin de supervisar y controlar el instrumento a través de la
plataforma de nube VELP Ermes.
1
Placa de calefacción de cerámica
A
Led sonda
2
Interruptor general
B
Led Wi-Fi
3
Botón control de velocidad
C
Led temperatura establecida
4
Botón control de temperatura
D
Led timer
5
Pantalla
E
Led rotación inversa
F
Led modo intermitente
G
Menú y botón de bloqueo
Nota: es importante escoger el agitador magnético adecuado en relación con la cantidad y el líquido a agitar, así como con
el tipo de vaso de precipitados. El tamaño y la forma del agitador magnético determinan la eficiencia de agitación a
cualquier velocidad. El agitador magnético que satisface la mayoría de las aplicaciones es el código A00000356 (8 x 40
mm).
ES

20
2. Instalación
• Desembalaje
➢ Compruebe la integridad de la unidad después de desembalarla
• El paquete incluye
➢ AREC Connect, Agitador Magnético Calefactor
➢ Manual de instrucciones
➢ Agitador magnético
➢ Cable de alimentación
• Instalación
➢ Coloque la unidad sobre una superficie no inflamable
➢ Asegúrese de que los valores de las características de la placa corresponden a los de la fuente de alimentación
➢ Asegúrese de que la red eléctrica está conectada a tierra
➢ Asegúrese de que el interruptor principal está en la posición “0” (OFF)
➢ Conecte el instrumento a un enchufe de fácil acceso (que cumpla con las normas de seguridad vigentes),
utilizando únicamente el cable de alimentación que viene con el instrumento
Nota: mantenga el cable de alimentación alejado de la placa calefactora
➢ Coloque el recipiente con el líquido y el agitador sobre la placa de agitación
3. Funcionamiento
Encendido
• Encienda el instrumento con el interruptor principal
• La pantalla muestra la versión del software y los últimos valores establecidos
Si el modo de arranque configurado es StOP (ver cap. 4), las funciones de calentamiento y agitación no están
activas y ambas pantallas muestran OFF. De lo contrario, el instrumento agitará y calentará según los últimos
valores establecidos.
Agitación
• Gire el botón derecho para configurar la velocidad de agitación
• Presione el botón para que empiece la agitación
• La pantalla muestra la velocidad actual de agitación
• Presione el botón para parar la agitación
Calentamiento
• Gire el botón izquierdo para configurar la temperatura de la placa
• Presione el botón para que empiece el calentamiento
• La pantalla muestra la temperatura actual de la placa durante 3 segundo y la temperatura establecida durante 1
segundo
Nota: cuando la pantalla muestra la temperatura establecida, el led (C) está encendido.
• Presione el botón para parar el calentamiento
Nota: si la función del calentamiento no está activa y la temperatura de la placa de calentamiento es superior a
50°C, la pantalla muestra el mensaje "Hot" parpadeante. Esta advertencia no está activa si el instrumento no está
encendido.

21
Funciones de temporizador, rotación inversa y modo intermitente
Presione el botón central repetidamente para acceder a los siguientes menús:
• Temporizador
➢ Gire el botón derecho para configurar el temporizador (horas / minutos)
➢ Presiónelo para confirmar
Nota: cuando el temporizador está configurado, el LED (D) está encendido. Cuando comienza la cuenta atrás, el
led parpadea.
Nota: seleccione
HHnn
para desactivar la función.
Una vez pasado el tiempo, el calentamiento se detendrá (si Time Heat está OFF, ver el cap. 4), la agitación se
detendrá (si Time Sped está OFF, ver el capítulo 4) y la pantalla mostrará OFF.
• Rotación inversa
➢ Gire el botón derecho para configurar el tiempo de autoreverse (minutos / segundos)
➢ Presiónelo para confirmar
Nota: cuando se configura el autoreverse, el led (E) está encendido.
Nota: seleccione
NNSS
para desactivar la función.
La dirección de rotación cambiará después de cada tiempo de intervalo establecido.
• Modo intermitente
➢ Gire el botón derecho para configurar el tiempo del modo intermitente (minutos/segundos)
➢ Presiónelo para confirmar
➢ Gire el botón derecho para configurar el tiempo del pausa intermitente (minutos/segundos)
➢ Presiónelo para confirmar
Nota: cuando se establece el modo intermitente, el led (F) está encendido durante el tiempo de ejecución y
parpadea durante el tiempo de pausa.
Nota: seleccione
NNSS
para desactivar la función.
La función de agitación se interrumpirá cíclicamente.
Para salir del menú, vuelva a pulsar el botón central o no pulse ningún botón/mando durante 5 segundos.
Nota: cada función puede ser establecida individualmente o en combinación con las otras.
Función de bloqueo
• Mientras la unidad está funcionando, presione el botón central durante 3 segundos para habilitar la función de
bloqueo.
Si la función de bloqueo está activada, no es posible cambiar las condiciones de trabajo.
El led alrededor del botón central parpadean si se presionan/giran los botones o el botón centra.
• Presionar el botón central durante 3 segundos para desactivar la función.
Conexión de la sonda externa
• Apague el instrumento desde el interruptor principal
• Atornille el soporte de rosca en la parte posterior del instrumento (opcional)
• Fije la abrazadera al soporte fijado a la parte trasera del instrumento (opcional)
• Ponga la sonda de temperatura externa en la abrazadera (opcional); luego colóquela dentro del matraz con la
muestra
• Enchufe la sonda en el enchufe de la parte posterior del instrumento
• Encienda el instrumento con el interruptor principal
Cuando la sonda externa está conectada, el LED (A) está encendido.
El calentamiento funciona como se describe arriba, pero la temperatura establecida y mostrada será la que lea la sonda
externa.

22
4. Modo de ajuste
Presione los dos botones durante 3 segundos cuando el calentamiento y la agitación estén OFF para acceder al modo de
configuración.
Utilice los botones de "menú" para navegar por los menús disponibles, que se enumeran a continuación.
Presione el botón derecho para acceder al menú seleccionado. Luego, gire el botón para modificar el valor del parámetro
(cuando sea posible). Presionelo para confirmar el valor.
Para salir del modo de configuración, no presione ningún botón durante 10 segundos o presione ambos botones al mismo
tiempo.
Texto visualizado
Valor
prestable-cido
Rango
Nombre del menú y descripción
Pantalla 1
Pantalla 2
TENP
LINt
550 °C
OFF, 50 ÷ 550 °C
Paso de 10 °C
Límite de temperature de la placa calefactora
Limita el valor máximo de temperature que puede alcanzar la
placa.
Si está seleccionado OFF, la función calentamiento está
“deshabilitada”.
SPEd
LINt
1700
100 ÷ 1700 rpm
Paso de 100 rpm
Límite de velocidad de agitación
El valor máximo de la velocida de agitación.
Strt
NOdE
StOP
StOP – run
Modo de inicio
➢ StOP: cuando el instrumento se enciende, las funciones de
calentamiento y agitación no están activas y ambas
pantallas muestran OFF
➢ run: cuando el instrumento se enciende, comienza a trabajar
siguiendo los últimos valores establecidos de agitación y
temperatura.
CtrL
tyPE
FINE
FInE - FASt
Modo de termorregulación con sonda externa
➢ FINE: control de temperatura bueno y optimizado, mínimas
oscilaciones térmicas, aumento lento de la temperatura
➢ FASt: aumento rápido de la temperatura, mayores
oscilaciones térmicas.
PrOb
ALar
On
On - OFF
Alarma de seguridad de la sonda externa
Permite habilitar/deshabilitar los mensajes de error AL 6 y AL 7
(ver capítulo 5).
PrOb
CAL
0.0 °C
-10 ÷ +10 °C
Paso de 0,1 °C
Calibración de la sonda
Permite alinear la lectura de la sonda de temperatura externa a
un termómetro de referencia.
tINE
Strt
SNAP
SNAP - SEtP
Modo de inicio de la cuenta atrás
➢ SNAP: la cuenta atrás del temporizador inicia tan pronto
como una función (calentamiento, agitación) se activa
➢ SEtP: la cuenta atrás comienza cuando se alcanza el valor
establecido de temperatura
tINE
SPEd
On
On - OFF
Mantenimiento de la agitación al finalizar la cuenta atrás
Si está seleccionado On, la agitación permanece activa cuando
finaliza la cuenta atrás
tINE
HEAt
OFF
On - OFF
Mantenimiento del calentamiento al finalizar la cuenta atrás
Si está seleccionado On, la calefacción permanece activa
cuando finaliza la cuenta atrás
ANBt
CAL
0.0 °C
-10 ÷ +10 °C
Paso de 0,1 °C
Calibración de la sonda de la placa calefactora
Permite alinear la lectura de la sonda de la placa calefactora con
un termómetro de referencia.
COun
NOtO
---
Tiempo de funcionamiento del motor y de la calefacción
Muestra los tiempos de funcionamiento del motor y del elemento
calefactor.
Los tiempos de funcionamiento se muestran en horas hasta
9999 horas (alrededor de 416 días). Luego, se muestran en días
(se activa el punto decimal).
COun
HEAt
UIFI
NO
YES – NO
Conexión WiFi
Permite habilitar/dishabilitar la conexión WiFi
rSEt
NO
YES – NO
Reset (Restablecimiento)
Permite restablecer los valores preestablecidos para todos los
parámetros.
OtC
cFG
---
Código unívoco de seguridad
Muestra el código unívoco de seguridad durante el registro del
aparato en la plataforma de nube VELP Ermes
StAr
AP
NO
YES – NO
Access point (Punto de acceso)
Permite habilitar/dishabilitar la modalidad Access Point de la
conexión WiFi

23
5. Mensajes error
Cuando en la pantalla aparece un mensaje de alarma, las funciones de la unidad son automáticamente bloqueade.
AL1
Sobretemperatura de la placa calefactora
AL2
Tiempo de calentamiento excesivo
AL3
El sistema de agitación no funciona correctamente
AL4
Sobretemperatura sonda externa
Solo si la sonda externa está conectada
AL6
Aumento lento de temperatura leído por la sonda externa
Solo si la sonda externa está conectada y
si PrOb ALAr está On
AL7
Disminución rápida de temperatura leída por la sonda externa
Para eliminar una alarma, apagar y volver a encender la unidad.
Si la alarma persiste en la pantalla, póngase en contacto con el servicio técnico VELP Scientifica mas cercano.
6. Configuración de la plataforma de nube Ermes
VELP Ermes es una plataforma de nube revolucionaria capaz de transformar y mejorar su experiencia de laboratorio.
VELP Ermes crea un ecosistema conectado de aparatos, personas y datos; transmite información entre éstos reduciendo
las distancias y acelera los procesos científicos.
VELP Ermes recopila y memoriza sus datos con el máximo nivel de criptografía respetando las normas de seguridad
informática más estrictas.
• Activación de la cuenta Ermes:
➢ Acceda al sitio www.velp.com utilizando un navegador de Internet
➢ Cree su cuenta VELP o, si ya tiene una, proceda al acceso
➢ Acceda a su página personal y seleccione “Configurar cuenta VELP ERMES”
Active su cuenta Ermes tras haber aceptado los términos y las condiciones
➢ Recibirá un correo electrónico que contiene sus credenciales de acceso y un enlace para acceder a la
plataforma Ermes en la dirección de correo utilizada en la fase del registro
➢ Durante el primer inicio de sesión, el sistema le pedirá que cambie la contraseña
• Conexión del agitador magnético calefactor a la red WiFi:
➢ Encienda el AREC Connect
➢ Habilite la conexión WiFi y la modalidad Access Point tal como hemos descrito antes
➢ Utilizando un PC, tableta o teléfono inteligente, seleccione la red VELP_AREC_(Código del producto)_(Número
de Serie) disponible en la lista de las conexiones WiFi activas
➢ Abra un navegador de Internet en el PC, tableta o teléfono inteligente; introduzca 192.168.4.1 en la barra de las
direcciones y presione “Enviar”
Introduzca “admin” como ID de usuario y “velp_ermes” come contraseña
➢ Configure los parámetros de la conexión WiFi del laboratorio. Después, presione “Push” para confirmar.
Nota: si es necesario, póngase en contacto con el técnico IT para conocer todos los parámetros de la red WiFi
➢ Espere hasta que el led WiFi deje de parpadear (debe permanecer encendido fijo)
Nota: si después de 2 minutos, el led parpadea aún, repita el procedimiento asegurándose de la corrección de
los parámetros de red
• Registro del agitador magnético calefactor en la plataforma Ermes:
➢ En el AREC Connect, acceda al menú “Código unívoco de seguridad” tal como hemos indicado más arriba
➢ Desde un PC, tableta o teléfono inteligente, acceda a la plataforma Ermes utilizando su cuenta y seleccione el
menú “Registro Instrumentos”
➢ Introduzca el código del producto, el número de serie y la fecha de compra del AREC Connect.
Presione “Next” (Siguiente)
➢ Introduzca el código unívoco de seguridad que aparece en la pantalla del agitador.
Presione “Next” (Siguiente) y espere hasta la confirmación del registro efectivo
Nota: si el código unívoco de seguridad no aparece en la pantalla del AREC Connect, repita el procedimiento
asegurándose de que los parámetros de red sean correctos
➢ Asigne un nombre al AREC Connect e introduzca la dirección donde está situado el aparato
Presione “Next” (Siguiente)
➢ Añada el AREC Connect a un laboratorio virtual ya existente o creando uno nuevo mediante el menú “Gestión
Laboratorios”
Al concluir el procedimiento, podrá supervisar y controlar el AREC Connect mediante el menú “Instrumentos”.
Nota: el agitador solo puede conectarse a una red WiFi con banda de 2,4 GHz.
Nota: para más información, consulte la sección específica en el sitio VELP.

24
7. Mantenimiento
El mantenimiento ordinario y extraordinario no está previsto excepto para la limpieza periódica del aparato.
Limpieza
Desconecte la unidad de la fuente de alimentación y utilice un paño húmedo con un detergente ni agresivo ni inflamable.
Reparaciones
Las reparaciones solo podrá realizarlas personal autorizado de Velp.
El aparato debe transportarse en su embalaje original y deben respetarse todas las instrucciones contenidas en el embalaje
original (p. ej. paletizado).
Es responsabilidad del usuario descontaminar la unidad en el caso de que haya restos de sustancias peligrosas tanto en la
superficie como en el interior del equipo. En caso de duda sobre la compatibilidad de los productos a usar para limpieza y/o
descontaminacion, contacte con su distribuidor o con fabricante.
8. Datos técnicos
Características
generales
Modelos
F20500550
F20510550
Fuente de alimentación
230 V – 50/60 Hz
115 V – 60 Hz
Entrada de alimentación
800 W
Consumo de corriente
3.5 A
7 A
Medidas (LxAxA)
203 x 94 x 344 mm (8 x 3.7 x 13.5 in)
Peso
3.3 kg (7.3 lb)
Material de fabricación
Tecnopolímero
Funcionamiento continuo
Admitido
Carga máxima en la placa
25 kg
Nivel de ruido
<< 80 dBa
Temperatura ambiente admitida
+5…+40 °C
Temperatura de almacenamiento admitida
-10…+60 °C
Humedad máx.
80%
Categoría de sobrevoltaje
II
Grado de contaminación CEI EN61010-1
2
Altitud máx.
2000 m
Calefacción
Potencia de salida de la placa calefactora
770 W
Dimensiones de la placa de calentamiento
180 x 180 mm (7 x 7 in)
Rango de temperatura programable
0 ÷ 550 °C (paso de 1 °C)
Resolución de lectura de temperatura
1 °C
Material de construcción
Cerámica
Sonda Externa
Tipo
Pt100 Clase A – Ø 3mm
Rango de temperatura programable
0 ÷ 300 °C (paso de 1 °C)
Resolución de lectura de temperatura
1 °C
Precisión
± 0.5 °C *
Datos eléctricos
3.3 VDC – 1 W (max)
Agitación
Capacidad de agitación
20 L H2O
Rango de agitación programable
30 ÷ 1700 rpm (paso de 5 rpm)
Resolución de lectura de agitación
1 rpm
Tipo de motor
BLDC
Rotación inversa / Modo intermitente
5 s ÷ 99 min 59 s (paso de 1 s)
Potencia nominal del motor
10 W
Temporizador
Rango de cuenta atrás
1 min ÷ 99 h 59 min (paso de 1 min)
Contadores
Motor
Horas de trabajo
Resistencia
Wi-Fi
Frecuencia
2.4 GHz
Protocolo
802.11 b/g/n
Potencia
17.5 ÷ 20 dBm @ 11b mode
* en las siguientes condiciones: 800 ml de agua en un vaso de precipitados de vidrio de 1 litro (diámetro 105 mm), agitador
magnético 8 x 40 mm, 600 rpm, 50 °C.

25
1. Einleitung
Der Heizmagnetrührer AREC Connect mit Keramikplatte dient zum Erhitzen und Mischen von Flüssigkeiten in einem
geeigneten Behälter, der auf die Keramikplatte gestellt wird. Das Rühren erfolgt durch einen magnetisch angetriebenen
Rührstabs, der in den Behälter eingesetzt wird.
Das Gerät im Labor ganz allgemein und für alle Anwendungen eingesetzt, bei denen eine exakt eingestellte
Rührgeschwindigkeit erforderlich ist und die Flüssigkeiten erwärmt werden müssen.
Mit der keramischen Heizplatte können höhere Temperaturen als mit einer herkömmlichen Aluminium-Heizplatte erreicht
werden; außerdem ist die Keramik ein inertes und sehr hartes Material, so dass sie eine große Beständigkeit gegen fast alle
Arten von chemischen oder mechanischen Einwirkungen bietet und die Oberflächeneigenschaften im Laufe der Zeit
unverändert bleiben.
Die Heizplatte funktioniert bis zu 550 °C.
Der leistungsstarke bürstenlose Motor kann von 30 bis zu 1700 U/min rühren.
Die SpeedServo-Technologie hält die Geschwindigkeit konstant, wenn sich die Viskosität ändert.
Das Gerät verfügt über fortschrittliche Funktionen wie automatische Umkehrung der Rührrichtung, Programme für den
intermittierenden Betrieb und einen integrierten Timer, um dem Arbeitsablauf der Anwender gerecht zu werden, sowie über
eine Sicherheitssperre, um eine mögliche Änderung der Arbeitsbedingungen zu vermeiden.
Das AREC Connect kann in Kombination mit dem externen Pt100-Fühler zur präzisen und genauen Regelung der
Probentemperatur eingesetzt werden.
Das integrierte Wi-Fi-Modul sendet und empfängt Informationen, um das Gerät über die Cloud-Plattform VELP Ermes zu
überwachen und zu steuern.
1
Keramische Heizplatte
A
Temperaturfühler-LED
2
Hauptschalter
B
Wi-Fi-LED
3
Geschwindigkeitsregler
C
LED für die eingestellte Temperatur
4
Temperaturregler
D
Timer-LED
5
Display
E
Autoreverse-LED
F
Intermittierender Modus-LED
G
Menü- und Sperrtaste
Hinweis: Es ist wichtig, den am besten geeigneten Magnetrührstab in Bezug auf die Menge und die zu rührende Flüssigkeit
und den Typ des Bechers zu wählen. Die Größe und Form des Rührfisches bestimmt bei einer bestimmten Geschwindigkeit
die Rührleistung. Der Rührfisch mit der Größe Ø 8 x 40 mm (A00000356) ist für die meisten Anwendungen geeignet.
DE

26
2. Aufstellung
• Entfernen der Verpackung
➢ Nachdem das Gerät aus der Verpackung genommen wurde, bitte überprüfen, ob es unversehrt ist
• Kartoninhalt
➢ Magnetrührer mit Heizfunktion AREC Connect
➢ Bedienungsanleitung
➢ Magnetischer Rührfisch
➢ Netzteil
• Erstaufstellung
➢ Das Gerät auf eine nicht-brennbare Fläche stellen
➢ Überprüfen Sie, ob die Daten auf dem Typenschild des Geräts den Angaben der Steckdose entsprechen
➢ Stellen Sie sicher, dass das elektrische Netz geerdet ist
➢ Stellen Sie sicher, dass der Hauptschalter auf Stellung „0“ (OFF) steht
➢ Schließen Sie das Gerät nur mit dem mitgelieferten Netzkabel an eine leicht zugängliche (und den geltenden
Sicherheitsnormen entsprechende) Steckdose an
Hinweis: Halten Sie das Netzkabel weit von der Heizplatte entfernt.
➢ Stellen Sie den Behälter mit der Flüssigkeit und den Rührstab auf die Rührplatte
3. Betrieb
Einschalten
• Schalten Sie das Gerät mit dem Hauptschalter ein
• Das Display zeigt die Software-Version und die letzten Sollwerte an
Ist der eingestellte Startmodus StOP (siehe Kap. 4), sind die Funktionen Heizen und Rühren nicht aktiv und beide
Displays zeigen OFF. Andernfalls beginnt das Gerät mit den letzten Temperatur- und Drehzahlsollwerten zu
arbeiten.
Rühren
• Drehen Sie den rechten Drehknopf, um die Rührgeschwindigkeit einzustellen
• Auf den Regler drücken, um mit dem Rühren zu beginnen
• Das Display zeigt die aktuelle Motordrehzahl an
• Auf den Regler drücken, um den Rührvorgang zu stoppen
Heizen
• Drehen Sie den linken Drehknopf, um die Temperatur der Heizplatte einzustellen
• Auf den Regler drücken, um die Heizfunktion einzuschalten
• Das Display zeigt 3 Sekunden lang die momentane Heizplattentemperatur und 1 Sekunde lang den Sollwert an
Hinweis: Wenn das Display den Temperatur-Sollwert anzeigt, leuchtet die zugehörige LED (C).
• Auf den Regler drücken, um den Heizfunktion zu stoppen
Hinweis: Wenn die Heizfunktion nicht aktiv ist und die Heizplattentemperatur mehr als 50 °C beträgt, zeigt das
Display die blinkende Meldung „Hot“ an. Dieser Warnhinweis wird nicht angezeigt, wenn das Gerät nicht
eingeschaltet ist.

27
Timer, Autoreverse und intermittierender Modus-Funktionen
Drücken Sie mehrmals die mittlere Taste, um nacheinander die folgenden Funktionsmenüs aufzurufen:
• Timer
➢ Drehen Sie den rechten Drehknopf, um den Timer einzustellen (Stunden/Minuten)
➢ Drücken, um zu bestätigen
Hinweis: Wenn der Timer eingestellt ist, leuchtet die entsprechende LED (D). Wenn der Countdown beginnt, blinkt
die LED.
Hinweis: wählen Sie
HHnn
, um die Funktion zu deaktivieren.
Nach Ablauf des Timers wird der Heizvorgang gestoppt (wenn Time Heat auf OFF steht, siehe Kap. 4), der
Rührvorgang wird gestoppt (wenn Time Speed auf OFF steht, siehe Kap. 4) und im Display wird End angezeigt.
• Autoreverse
➢ Drehen Sie den rechten Drehknopf, um die Autoreverse-Zeit (Minuten/Sekunden) einzustellen
➢ Drücken, um zu bestätigen
Hinweis: Wenn Autoreverse eingestellt ist, leuchtet die zugehörige LED (E).
Hinweis: wählen Sie
NNSS
, um die Funktion zu deaktivieren.
Die Drehrichtung ändert sich nach jeder eingestellten Intervallzeit.
• Intermittierender Modus
➢ Drehen Sie den rechten Drehknopf, um die Laufzeit des intermittierenden Betriebs einzustellen
(Minuten/Sekunden)
➢ Drücken, um zu bestätigen
➢ Drehen Sie den Drehknopf, um die Pausenzeit des intermittierenden Betriebs einzustellen (Minuten/Sekunden)
➢ Drücken, um zu bestätigen
Hinweis: Wenn der intermittierende Betrieb eingestellt ist, leuchtet die entsprechende LED (F) während der Laufzeit
und blinkt während der Pausenzeit.
Hinweis: wählen Sie
NNSS
, um die Funktion zu deaktivieren.
Die Rührfunktion wird zyklisch unterbrochen.
Um das Funktionsmenü zu verlassen, drücken Sie erneut die mittlere Taste oder betätigen Sie 5 Sekunden lang keine
Tasten/Knöpfe.
Hinweis: Jede Funktion kann einzeln oder in Kombination mit den anderen eingestellt werden.
Sperrfunktion
• Drücken Sie bei eingeschaltetem Gerät die mittlere Taste für 3 Sekunden, um die Sperrfunktion zu aktivieren.
Wenn die Sperrfunktion aktiviert ist, ist es nicht möglich, die Arbeitsbedingungen zu ändern.
Der Led um die mittlere Taste blinken, wenn die Knöpfe oder die mittlere Taste gedrückt/gedreht werden.
• Drücken Sie die mittlere Taste für 3 Sekunden, um die Funktion zu deaktivieren.
Externer Fühleranschluss
• Das Gerät am Hauptschalter ausschalten
• Die Haltestange mit dem Gewinde in die Öffnung an der Rückseite des Gerätes schrauben (freiwillig)
• Die Klemme an der Haltestange befestigen (freiwillig)
• Stecken Sie den externen Temperaturfühler in die Klemme (freiwillig); dann legen Sie ihn in die im Kolben
enthaltene Probe
• Den Fühler in den zugehörigen Anschluss an der Rückseite des Gerätes stecken
• Schalten Sie das Gerät mit dem Hauptschalter ein
Wenn der externe Fühler angeschlossen ist, leuchtet die zugehörige LED (A).
Die Heizfunktion funktioniert wie oben beschrieben, aber die einstellbare und angezeigte Temperatur ist die, die vom
externen Fühler abgelesen wird.

28
4. Einstellmodus
Wenn die Heiz- und die Rührfunktion ausgeschaltet sind, beide Knöpfe 3 Sekunden lang drücken, um den Einstellmodus
aufzurufen.
Verwenden Sie die "Menü"-Tasten, um durch die verfügbaren, unten aufgeführten Menüs zu blättern.
Drücken Sie den Drehzahlregler, um das ausgewählte Menü aufzurufen. Drehen Sie dann den Regler, um den Wert des
Parameters zu ändern (wenn dies möglich ist). Auf den Regler drücken, um zu bestätigen.
Um den Einstellmodus zu verlassen, betätigen Sie 10 Sekunden lang keine Tasten/Regler oder drücken Sie beide Regler
gleichzeitig.
Angezeigter Text
Standard-
wert
Bereich
Name des Menüs und Beschreibung
Display 1
Display 2
TENP
LINt
550 °C
OFF, 50 ÷ 550 °C
10 °C-Schritt
Temperaturgrenze der Heizplatte
Mit diesem Parameter wird der max. einstellbare Wert für die
Temperatur der Heizplatte eingestellt.
Wenn OFF gewählt ist, ist die Heizfunktion „deaktiviert“.
SPEd
LINt
1700
100 ÷ 1700 U/Min
100 U/Min-Schritt
Grenzwert der Rührdrehzahl
Der Parameter begrenzt den Höchstwert des Drehzahlsollwerts für
den Motor.
Strt
NOdE
StOP
StOP – run
Start-Modus
➢ STOP: wenn das Gerät eingeschaltet wird, sind die Heiz- und
Rührfunktionen nicht aktiv und beide Displays zeigen OFF
➢ run: wenn das Gerät eingeschaltet ist, beginnt es mit den letzten
Temperatur- und Drehzahlsollwerten zu arbeiten
CtrL
tyPE
FINE
FInE - FASt
Temperaturregelungs-Modus mit externem Fühler
➢ FINE: gute und optimierte Temperaturregelung, Minimierung von
Überschwingen und Oszillationen, langsamer Anstieg der
Temperatur
➢ FAST: schneller Temperaturanstieg, erhöhtes Überschwingen
PrOb
ALar
On
On - OFF
Sicherheitsalarm für den externen Fühler
Ermöglicht die Aktivierung / Deaktivierung der Fehlermeldungen AL
6 und AL 7 (siehe Kap. 5).
PrOb
CAL
0.0 °C
-10 ÷ +10 °C
0,1 °C-Schritt
Kalibrierung des Fühlers
Ermöglicht den Abgleich des Messwertes des externen
Temperaturfühlers mit einem Referenzthermometer.
tINE
Strt
SNAP
SNAP - SEtP
Startmodus des Timercountdowns
➢ SNAP: der Timercountdown startet, sobald eine Funktion
(Heizen, Rühren) aktiv ist
➢ SetP: Der Timer beginnt, die Zeit rückwärts zu zählen, sobald
der Sollwert erreicht ist
tINE
SPEd
On
On - OFF
Weiterrühren bei Timerende
Wenn On ausgewählt ist, bleibt die Rührfunktion nach Ablauf des
Timercountdowns aktiv.
tINE
HEAt
OFF
On - OFF
Weiterheizen bei Timerende
Wenn On ausgewählt ist, bleibt die Heizfunktion nach Ablauf des
Timercountdowns aktiv.
ANBt
CAL
0.0 °C
-10 ÷ +10 °C
0,1 °C-Schritt
Kalibrierung des Heizplattenfühlers
Ermöglicht den Abgleich des Messwertes der Heizplatte mit einem
Referenzthermometer.
COun
NOtO
---
Motor and heating element operating time
It shows motor and heating element operating times.
Operating times are showed in hours up to 9999 hours (around 416
days). Then they are showed in days (a digits’ decimal point is
turned on).
COun
HEAt
UIFI
NO
YES – NO
Wi-Fi-Verbindung
Damit kann die Wi-Fi-Verbindung aktiviert/deaktiviert werden
rSEt
NO
YES – NO
Reset
Ermöglicht das Wiederherstellen der Standardwerte für alle
Parameter.
OtC
cFG
---
Eindeutiger Sicherheitscode
Zeigt den eindeutigen Sicherheitscode an, wenn das Gerät auf der
Cloud-Plattform VELP Ermes registriert wird
StAr
AP
NO
YES – NO
Zugangspunkt
Damit kann der Zugangspunkt-Modus der Wi-Fi-Verbindung
aktiviert/deaktiviert werden

29
5. Fehlermeldungen
Wenn das Display eine Fehlermeldung zeigt, sperrt es automatisch die Funktionen des Geräts.
AL1
Übertemperatur der Heizplatte
AL2
Heizzeit zu lang
AL3
Das Rührsystem funktioniert nicht ordnungsgemäß
AL4
Übertemperatur des externen Fühlers
Nur wenn der externe Fühler angeschlossen ist
AL6
Der externe Fühler hat einen Temperaturanstieg gemessen
Nur wenn der externe Fühler angeschlossen ist und
wenn PrOb ALAr auf On steht
AL7
Fast temperature decreasing read by the external probe
Um einen Alarm zu löschen, müssen Sie schalten das Gerät aus und wieder ein
Wenn eine Fehlermeldung auf dem Display angezeigt wird, bitte an den Technischen Kundendienst von VELP Scientifica
wenden.
6. Konfiguration der Cloud-Plattform Ermes
VELP Ermes ist eine revolutionäre Cloud-Plattform, mit der Sie Ihre Laborerfahrung transformieren und verbessern können.
VELP Ermes schafft ein vernetztes Ökosystem aus Geräten, Menschen und Daten. Es überträgt Informationen zwischen
ihnen, indem es Entfernungen überwindet und wissenschaftliche Prozesse beschleunigt.
VELP Ermes sammelt und speichert Ihre Daten mit der höchsten Verschlüsselungsstufe gemäß den höchsten
IT-Sicherheitsstandards.
• Aktivierung des Ermes-Kontos:
➢ Öffnen Sie die Seite www.velp.com über einen Internetbrowser
➢ Erstellen Sie Ihr VELP-Konto oder melden Sie sich an, wenn Sie bereits ein Konto haben
➢ Greifen Sie auf Ihre persönliche Seite zu und wählen Sie „VELP ERMES-Konto konfigurieren“
Aktivieren Sie Ihr Ermes-Konto, nachdem Sie die Allgemeinen Geschäftsbedingungen akzeptiert haben
➢ Sie erhalten eine E-Mail an die E-Mail-Adresse, die Sie bei der Registrierung verwendet haben, mit Ihren
Anmeldeinformationen und einem Link für den Zugriff auf die Ermes-Plattform
➢ Bei der ersten Anmeldung werden Sie aufgefordert, Ihr Passwort zu ändern
• Verbindung des Magnetrührer mit Heizfunktion mit dem Wi-Fi-Netzwerk:
➢ Schalten Sie AREC Connect ein
➢ Aktivieren Sie die Wi-Fi-Verbindung und den Zugangspunkt-Modus wie oben beschrieben
➢ Wählen Sie mit einem PC, Tablet oder Smartphone das in der Liste der aktiven Wi-Fi-Verbindungen verfügbare
Netzwerk VELP_AREC_(Product Code)_ (Seriennummer) aus
➢ Öffnen Sie einen Internetbrowser auf einem PC, Tablet oder Smartphone. Geben Sie 192.168.4.1 in die
Adressleiste ein und drücken Sie „Eingabe“
Geben Sie „admin“ als Benutzer-ID und „velp_ermes“ als Passwort ein
➢ Konfigurieren Sie die Parameter der Wi-Fi-Verbindung des Labors. Drücken Sie danach zur Bestätigung auf
„Push“.
Hinweis: Wenden Sie sich bei Bedarf für alle Parameter des Wi-Fi-Netzwerks an den IT-Techniker
➢ Warten Sie, bis die Wi-Fi-LED aufhört zu blinken (ein Dauerlicht muss eingeschaltet bleiben)
Hinweis: Wenn die LED nach mehr als 2 Minuten noch immer blinkt, wiederholen Sie den Vorgang, um
sicherzustellen, dass die Netzwerkparameter korrekt sind
• Registrierung des Magnetrührer mit Heizfunktion auf der Ermes-Plattform:
➢ Greifen Sie im AREC Connect wie oben beschrieben auf das Menü „Eindeutiger Sicherheitscode“ zu
➢ Greifen Sie von einem PC, Tablet oder Smartphone aus mit Ihrem Konto auf die Ermes-Plattform zu und wählen
Sie das Menü „Geräteregistrierung“
➢ Geben Sie den Produktcode, die Seriennummer und das Kaufdatum von AREC Connect ein.
„Weiter“ drücken
➢ Geben Sie den eindeutigen Sicherheitscode ein, der auf dem AREC-Display angezeigt wird.
Klicken Sie auf „Weiter“ und warten Sie auf die Bestätigung der erfolgten Registrierung
Hinweis: Wenn der eindeutige Sicherheitscode nicht auf dem AREC-Display angezeigt wird, wiederholen Sie
den Vorgang, um sicherzustellen, dass die Netzwerkparameter korrekt sind
➢ Weisen Sie AREC Connect einen Namen zu und geben Sie die Adresse des Geräts ein
„Weiter“ drücken
➢ Fügen Sie AREC Connect zu einem bestehenden virtuellen Labor hinzu oder erstellen Sie ein neues Labor über
das Menü „Laborverwaltung“
Am Ende des Vorgangs kann AREC Connect über das Menü „Geräte“ überwacht und gesteuert werden.
Hinweis: Der Magnetrührer kann nur mit einem 2,4-GHz-Band-Wi-Fi-Netzwerk verbunden werden.
Hinweis: Weitere Informationen finden Sie im entsprechenden Abschnitt auf der VELP-Website.

30
7. Instandhaltung
Abgesehen von einer regelmäßigen Reinigung gemäß der nachfolgenden Hinweise benötigt das Gerät keine gewöhnliche
oder außergewöhnliche Wartung.
Reinigung
Den Netzstecker des Gerätes ziehen und es dann mit einem feuchten Tuch reinigen, hierzu ein nicht-entzündliches, mildes
Reinigungsmittel verwenden.
Reparaturen
Reparaturen dürfen ausschließlich von dazu befugtem Personal von VELP ausgeführt werden.
Das Gerät muss in seiner Originalverpackung transportiert werden und alle auf dieser Verpackung angegebenen
Anweisungen sind zu beachten (z. B. Transport auf einer Palette).
Es liegt in der Verantwortung des Benutzers, das Gerät ordnungsgemäß zu dekontaminieren, falls gefährliche Substanzen
auf der Oberfläche oder im Inneren des Geräts verbleiben. Wenn Sie Zweifel an der Verträglichkeit eines Reinigungs- oder
Dekontaminationsprodukts haben, wenden Sie sich an den Hersteller oder Händler.
8. Technische Angaben
Allgemeine
Merkmale
Modelle
F20500550
F20510550
Stromversorgung
230 V – 50/60 Hz
115 V – 60 Hz
Eingangsleistung
800 W
Stromaufnahme
3.5 A
7 A
Abmessungen (B x H x T)
203 x 94 x 344 mm (8 x 3.7 x 13.5 in)
Gewicht
3.3 kg (7.3 lb)
Material
Technopolymer
Dauerbetrieb
Zulässig
Max. zulässiges Gewicht auf der Platte
25 kg
Geräuschpegel
<< 80 dBa
Zulässige Umgebungstemperatur
+5…+40 °C
Zulässige Aufbewahrungstemperatur
-10…+60 °C
Max. Luftfeuchte
80%
Überspannungskategorie
II
Verschmutzungsgrad nach DIN EN 61010-1
2
Max. Höhe ü. NN
2000 m
Heizen
Heizleistung
770 W
Abmessungen der Heizplatte
180 x 180 mm (7 x 7 in)
Programmierbarer Temperaturbereich
0 ÷ 550 °C (1 °C-Schritt)
Temperaturauflösung
1 °C
Material
Keramik
Externer Fühler
Art
Pt100 Klasse A – Ø 3mm
Programmierbarer Temperaturbereich
0 ÷ 300 °C (1 °C-Schritt)
Temperaturauflösung
1 °C
Genauigkeit
± 0.5 °C *
Elektrik
3.3 VDC – 1 W (max)
Rühren
Rührleistung
20 L H2O
Programmiere Rührgeschwindigkeit
30 ÷ 1700 U/Min (5 U/Min-Schritt)
Drehzahlauflösung
1 U/Min
Motortyp
BLDC
Autoreverse / Intermittierender Modus
5 s ÷ 99 min 59 s (1 s-Schritt)
Nennleistung des Motors
10 W
Timer
Countdownbereich
1 min ÷ 99 h 59 min (1 min-Schritt)
Zähler
Motorzähler
Betriebsstunden
Heizelement
Wi-Fi
Frequenz
2.4 GHz
Protokolle
802.11 b/g/n
Ausgangsleistung
17.5 ÷ 20 dBm @ 11b mode
* unter folgenden Bedingungen: 800 ml Wasser in einem 1 l-Becherglas (Durchmesser 105 mm), Rührstab 8 x 40 mm, 600
U/Min, 50 °C.

31
1. 介绍
带陶瓷板的AREC
Connect加热磁力搅拌器用于加热和混合放置在陶瓷板上的合适容器内的液体。通过放置在容器中的磁力搅拌子,使搅拌成为
可能。
该仪器可用于实验室的一般用途和所有需要精确调节搅拌速度和加热板温度的应用。
与传统的铝制加热板相比,陶瓷加热板可以达到更高的温度;此外,陶瓷是一种惰性和非常坚硬的材料,因此它具有很强的
耐腐蚀性,几乎可以抵抗任何类型的化学或机械侵蚀,保持表面特性长期不变。
该加热板的工作温度高达550°C。
强大的无刷电机能够从30转/分到1700转/分进行搅拌。
SpeedServo技术能在粘度变化时保持恒定的转速。
该仪器配备了先进的功能,如自动反转搅拌方向,间歇模式程序和集成的定时器,以满足用户的工作流程和安全锁定功能,
以避免可能的工作条件改变。
AREC Connect可与Pt100外置探针配合使用,精确控制样品温度。
集成的Wi-Fi模块可以传输和接收信息,以便通过VELP Ermes云平台来监测和控制设备。
1
陶瓷加热板
A
探针指示灯
2
主开关
B
Wi-Fi 指示灯
3
速度控制旋钮
C
温度设定点指示灯
4
温度控制旋钮
D
定时器指示灯
5
显示屏
E
自动反转指示灯
F
间歇模式指示灯
G
菜单和锁定按钮
注
:
选择最合适的磁力搅拌子是非常重要的,它与被搅拌的液体数量和液体以及烧杯的类型有关。磁力搅拌子的尺寸和形状决定
了在任何给定速度下的搅拌效率。满足大多数应用的磁力搅拌子货号是
A00000356
(
8 x 40 mm
)。
中文

32
2. 安装
• 开箱
➢ 开箱后检查设备的完整性
• 包装箱里包括
➢ AREC Connect加热磁力搅拌器
➢ 说明书
➢ 磁力搅拌子
➢ 电源线
• 安装
➢ 将设备放在非易燃的表面上。
➢ 确保设备和电源线的技术规格一致。
➢ 确保插座电网接地
➢ 确保仪器主开关处于 "0 "位置(关闭)。
只需使用随机的电源线,将仪器连接到便于使用的插座上(符合当前的安全标准)。
注
:
请将电源线远离加热板。
➢ 将装有液体的容器和搅拌子放在搅拌器上。
3. 运行
开机
• 使用主开关打开设备
• 显示屏显示软件版本和最后的设定值。
如果设定的启动模式为StOP(见第4章),则加热和搅拌功能无效,且两个显示屏均显示OFF。否则,设备将以最后
的温度和速度设定点开始工作。
搅拌
• 旋转右旋钮,设置搅拌速度。
• 按下旋钮,开始搅拌
• 显示屏显示当前电机速度
• 按下旋钮,停止搅拌
加热
• 旋转左侧旋钮,设置加热板温度。
• 按下旋钮,开始加热
• 显示当前加热板温度持续3秒,设定温度点持续1秒。
注
:
当显示屏显示温度设定点时,对应指示灯
(C)
亮。
• 按下旋钮,停止加热
注
:
如果加热功能未启动,且加热板温度超过 50 °C,则显示屏显示闪烁的信息
"Hot"。如果仪器未通电,则该警告无效

33
定时、自动反转和间歇模式功能。
反复按下中间按钮,依次进入以下功能菜单。:
• 定时器
➢ 旋转右旋钮,设置定时器(时/分)。
➢ 按击进行确认
注
:
当定时器被设定时,专用指示灯(
D
)亮起。当倒计时开始时,对应指示灯闪烁
注
:
选择
"HHnn "
关闭该功能
计时器结束后,加热将停止(如果加热时间设为OFF关闭,请参见第4章),搅拌将停止(如果加热速度设为OFF关闭
,请参见第4章),显示屏将显示End结束。
• 自动反转
➢ 旋转右旋钮,设置自动反转时间(分/秒)。
➢ 按击进行确认
注
:
当设置自动反转时,对应指示灯
(E)
亮起。
注
:
选择
nnSS
关闭该功能。
每隔一段时间,转动方向就会改变。
• 间歇模式
➢ 旋转右旋钮,设置间歇模式的运行时间(分/秒)。
➢ 按击进行确认
➢ 旋转旋钮,设置间歇模式的暂停时间(分/秒)。
➢ 按击进行确认
注
:
当设置为间歇模式时,对应指示灯
(F)
在运行时亮起,在暂停时闪烁。
注
:
选择
nnSS
关闭该功能
搅拌功能将循环中断
要退出功能菜单,请再次按下中央按钮或在5秒钟内不要按任何按钮/旋钮。
注
:
每项功能可以单独设置,也可以与其他功能组合设置
锁定功能
• 在设备工作时,长按中间按钮3秒,启用锁定功能。
如果启用锁定功能,则无法改变工作条件。
如果按下/旋转旋钮或中间按钮,中央按钮周围的指示灯会闪烁。
• 按下中间按钮3秒,关闭该功能。

34
外部探针连接
• 使用仪器主开关关闭仪器
• 将螺纹支撑杆拧到仪器背面的基座上。(非强制的)
• 将固定夹固定在支撑杆上 (非强制的)
• 将外部温度探针放入固定夹中 (非强制的),然后将其放入烧杯内的样品中。
• 将探针插口插入仪器背面的专用插座中
• 使用仪器主开关打开设备
当连接外部探针时,对应指示灯(A)亮。
加热功能的工作原理如上所述,但可设置和显示的温度将是外部探针读取的温度。

35
4. 设置模式
当加热和搅拌关闭时,同时按两个旋钮3秒,进入设置模式。
使用 "菜单 "按钮浏览下面列出的可用菜单。
按速度控制旋钮进入所选菜单。然后,转动旋钮,修改参数值(如果该参数可以修改)。按击旋钮确认。
要退出设置模式,请不要按任何按钮/旋钮10秒钟或同时按两个旋钮。
参数显示
默认值
范围
菜单的名称和说明
显示1
显示2
TENP
LINt
550 °C
OFF, 50 – 550 °C
10℃ 步进
设置最大温度范围
➢ 限制了加热板温度设定值的最大值。
➢ 如果设置了“OFF”,则无法对温度控制旋钮执行任何操作
SPEd
LINt
1700
100 – 1700 rpm
100转/分
设置最大转速范围:
限制电机速度设定值的最大值
Strt
NOdE
StOP
StOP – run
设置启动模式:
➢ 停止:仪器开机后,两个显示器上都显示“关”
➢ 运行:仪器开机后,执行最后一次工作的设置参数
CtrL
tyPE
FINE
FInE - FASt
用外部探头设置控制温度:
➢ 好:缓慢的达到温度设置值,优化过冲
➢ 快:快速的达到温度设定值,易过冲
PrOb
ALar
On
On - OFF
外部探针安全报警
允许启用/禁用:AL 6和AL 7错误信息(见第5章)。
PrOb
CAL
0.0 °C
-10 – +10 °C
0.1℃步进
探针校准
允许将外部温度探针的读数与参考温度计进行校准。
tINE
Strt
SNAP
SNAP - SEtP
设置启动倒计时:
➢ SNAP: 开启当某个主要功能(温度/速度)开启时,开始倒计时
➢ SEtP: 当达到温度设定值后开始倒计时。
tINE
SPEd
On
On - OFF
计时结束后继续搅拌:
如果“on”,则在计时结束后继续搅拌
tINE
HEAt
OFF
On - OFF
计时结束后继续加热:
如果“on”,则在计时结束后继续加热
ANBt
CAL
0.0 °C
-10 – +10 °C
0.1℃步进
加热板探头校准:
允许通过计量温度计量设备对加热板温度探头进行校准。
COun
NOtO
---
电机和加热元件工作时间
显示了电机和加热元件的运行时间。
工作时间以小时为单位,最多可显示至9999小时(约416天)。
然后以天为单位显示(数字的小数点开启)。
COun
HEAt
UIFI
NO
YES – NO
无线网络连接
允许启用/禁用Wi-Fi连接。
rSEt
NO
YES – NO
重置
允许将所有系统设置重置为默认值。
OtC
cFG
---
一次性代码
它显示了在VELP Ermes云平台上注册设备时的一次性代码。
StAr
AP
NO
YES – NO
接入点
允许启用/禁用Wi-Fi连接的接入点模式。

36
5. 错误和警告信息
当显示屏显示错误信息时,仪器的功能将自动停止。
AL1
加热板超温
AL2
加热时间过长
AL3
搅拌系统不能正常运行。
AL4
外部探针温度过高或在仪器开启时探针未连接
只有在连接了外部探针的情况下
AL6
通过外部探针读取温度缓慢上升
只有在连接了外部探针并且
如果PrOb ALAr为On
AL7
通过外部探针读取温度快速下降
要删除错误信息,请重新启动仪器。
如果警报持续显示,请联系VELP的技术服务部门。
6. VELP Ermes云平台配置
VELP Ermes是一个革命性的物联网云平台,它改变并改善了您的实验室体验。
VELP Ermes创建了一个由设备、人员和数据组成的互联生态系统,相互之间的信息传输缩短了距离,扩大了您的科学潜力。
VELP Ermes以最高的网络安全标准收集和存储您的数据。
• 激活VELP Ermes账户:
➢ 通过您的互联网浏览器访问www.velp.com
➢ 创建您的VELP账户或登录(如果您已经有了账户)
➢ 进入您的个人资料页面,选择 "配置您的VELP Ermes账户"。
接受条款和条件后,激活您的VELP Ermes账户。
➢ 您将收到一封电子邮件,其中包含您的ID,密码和链接,以便您在注册时输入电子邮件地址进行VELP
Ermes认证。
➢ 在第一次登录VELP Ermes平台时,会要求输入新的密码。
• 将加热磁力搅拌器连接到您的Wi-Fi网络。:
➢ 打开AREC Connect开关
➢ 启用Wi-Fi连接和上文所述的接入点模式。
➢ 使用电脑、平板电脑或智能手机选择Wi-Fi列表中可用的VELP_AREC_(产品代码)_(序列号)网络。
➢ 在PC、平板电脑或智能手机上打开网页浏览器; 在地址栏中输入192.168.4.1并按 "Enter "键。
输入用户名 "admin "和密码 "velp_ermes"。
➢ 配置实验室Wi-Fi网络参数。然后按 "Push "确认
注
:
如有必要,请与您的
IT
专家联系,以获得所有实验室
Wi-Fi
连接的详细信息。
➢ 等到Wi-Fi指示灯停止闪烁(必须一直处于ON状态)。
注
:
如果
2
分钟后
LED
灯仍在闪烁,请尝试重复该步骤并检查网络参数是否正确。

37
• 在VELP Ermes平台上注册加热磁力搅拌器。:
➢ 在AREC connect上,进入一次性代码(OTC)设置菜单,如上所述。
➢ 在电脑、平板电脑或智能手机上,用您的账户登录VELP Ermes并选择 "设备注册"
➢ 输入AREC连接产品代码、序列号和购买日期。
按 “Next”
➢ 输入AREC显示屏上显示的一次性代码。
按 “Next”,等待连接
注
:
如果在
AREC
的显示屏上没有显示
OTC
,请尝试重复该步骤,检查网络参数是否正确。
➢ 给AREC Connect起一个名字,并输入仪器所在的地址。
按 “Next”
➢ 通过 "实验室管理 "将AREC连接分配到现有的虚拟实验室或创建一个新的实验室。
在程序结束时,您可以通过 "仪器 "菜单监测和控制所连接的加热磁力搅拌器。
注
:
仪器只能连接到
2.4 GHz
的
Wi-Fi
网络。
注
:
更多信息,请见
VELP
网站。
7. 维护
除定期清洁外,无需进行常规或特殊维护。
清洁
断开设备与电源的连接,并使用一块用非易燃非腐蚀性洗涤剂擦拭过的布。
維修
维修工作必须由Velp授权人员进行。
当货运代理、快递公司或其他负责单位运输时,必须使用原防震包装运输仪器。遵循原包装上的说明(例如,将仪器放在托
盘上)。
用户有责任在设备表面或内部残留有害物质的情况下,对设备进行适当的去污。如果对清洁或去污产品的兼容性有疑问,请
联系制造商或经销商。

38
8. 技术参数
基本参数
型号
F20500550
F20510550
电压
230 V – 50/60 Hz
115 V – 60 Hz
功率
800 W
电流消
3.5 A
7 A
尺寸(宽x高x深)
203 x 94 x 344 mm (8 x 3.7 x 13.5 in)
重量
3.3 kg (7.3 lb)
材质
高科技聚合物材质
连续工作
具备
加热板上最大负载
25 kg
噪声
<< 80 dBa
允许的环境温度
+5…+40 °C
储藏温度
-10…+60 °C
最大湿度
80%
过电压类别
II
污染等级 CEI EN61010-1
2
最大海拔
2000 m
加热
加热板功率输出
770 W
加热板尺寸
180 x 180 mm (7 x 7 in)
温度范围
0 ÷ 550 °C (1 °C 步进)
温度分辨率
1 °C
加热板结构材料
陶瓷
外部探针
种类
Pt100 A级--直径3毫米
温度范围
0 ÷ 300 °C (1 °C 步进)
温度分辨率
1 °C
准确度
± 0.5 °C *
电气数据
3.3 VDC - 1 W (最大)
搅拌
搅拌能力
20 L 水
速度范围
30-1700转/分(5转/分)
速度分辨率
1转/分
电机类型
BLDC
自动反转/间歇模式
5秒-99分59秒(1秒每步进)
电机额定输出
10 W
定时器
倒计时范围
1分钟-99小时59分钟(1分钟每步进)
计数
电机
工作时间
加热元件
Wi-Fi
频率
2.4 GHz
协议
802.11 b/g/n
功率输出
17.5 ÷ 20 dBm @ 11b mode
* 在以下条件下。800毫升水装在1升玻璃烧杯(直径105毫米)中,搅拌子8x40毫米,600转/分,50℃。

39
9. Accessories / Accessori / Accessoires / Accesorios / Zubehör / 配件
A00000355
Magnetic disc stir bar, Ø 20 x 10 mm / Ancoretta magnetica a disco, Ø20x10 mm /
Barreau d’agitation magnétique, Ø 20 x 10 mm / Agitador Magnético Disco, Ø 20 x 10 mm /
Magnetische Rührscheibe Ø 20 x 10 mm / 磁力搅拌子,Ø 20 x 10 mm。
A00000356
Magnetic stir bar Ø 8 x 40 mm / Ancoretta magnetica Ø 8 x 40 mm / Barreau magnétique Ø 8 x 40 mm /
Agitador magnéticor Ø 8 x 40 mm / Magnetischer Rührfisch Ø 8 x 40 mm /磁力搅拌子Ø 8 x 40 mm
A00000387
Magnetic stir bar Ø 8 x 50 mm / Ancoretta magnetica Ø 8 x 50 mm / Barreau magnétique Ø 8 x 50 mm /
Agitador magnéticor Ø 8 x 50 mm / Magnetischer Rührfisch Ø 8 x 50 mm / 磁力搅拌子 Ø 8 x 50 mm
A00001056
Magnetic stir bar Ø 6 x 35 mm / Ancoretta magnetica Ø 6 x 35 mm / Barreau magnétique Ø 6 x 35 mm /
Agitador magnéticor Ø 6 x 35 mm / Magnetischer Rührfisch Ø 6 x 35 mm / 磁力搅拌子Ø 6 x 35 mm
A00001061
Magnetic stir bar Ø 10 x 60 mm / Ancoretta magnetica Ø 10 x 60 mm / Barreau magnétique Ø 10 x 60 mm /
Agitador magnéticor Ø 10 x 60 mm / Magnetischer Rührfisch Ø 10 x 60 mm / 磁力搅拌子 Ø 10 x 60 mm
A00000258
Hemispheric bowl for 100 ml flasks / Calotta sferica per palloni 100 ml / Calotte sphérique pour ballons 100 ml /
Copa esférica para balones 100 ml / Adapter für 100 ml-Rundkolben / 用于100毫升烧瓶的半球碗
A00000273
Hemispheric bowl for 50 ml flasks / Calotta sferica per palloni 50 ml / Calotte sphérique pour ballons 50 ml /
Copa esférica para balones 50 ml / Adapter für 50 ml-Rundkolben / 用于50毫升烧瓶的半球碗
A00001071
Hemispheric bowl for 250 ml flasks / Calotta sferica per palloni 250 ml / Calotte sphérique pour ballons 250 ml /
Copa esférica para balones 250 ml / Adapter für 250 ml-Rundkolben / 用于250毫升烧瓶的半球碗
A00001072
Hemispheric bowl for 500 ml flasks / Calotta sferica per palloni 500 ml / Calotte sphérique pour ballons 500 ml /
Copa esférica para balones 500 ml / Adapter für 500 ml-Rundkolben / 用于500毫升烧瓶的半球碗
A00001073
Hemispheric bowl for 1000 ml flasks / Calotta sferica per palloni 1000 ml / Calotte sphérique pour ballons 1000 ml /
Copa esférica para balones 1000 ml / Adapter für 1000 ml-Rundkolben / 用于1000毫升烧瓶的半球碗
A00000280
Clamp with probe support / Morsetto con supporto sonda / Pince avec support de sonde /
Abrazadera con soporte para sonda Pt100 / Fühlerhalterung / 带探针支撑的夹具
A00000268
Temperature probe AISI 316 Ti Ø 3 mm / Sonda temperatura in AISI 316 Ti Ø 3 mm /
Sonde de température en AISI 316 Ti Ø 3 mm / Temp. Probe AISI 316 Ti Ø 3 mm /
Temp.-Fühler AISI 316 Ti Ø 3 mm /温度探针 AISI 316 Ti Ø 3 mm
A00000349
Temperature probe glass-coated Ø 5 mm / Sonda temperatura in vetro Ø 5 mm /
Sonde de température en verre Ø 5 mm / Sonda Temperatura en Vidrio Ø 5 mm /
Glasbeschichteter Temp.-Fühler Ø 5 mm / 玻璃涂层温度探针 Ø 5 mm
A00001069
Support rod / Asta di sostegno / Hampe de soutien / Asta soporte / Haltestange / 支撑杆
A00000382
Extension for support rod / Estensione per asta di sostegno / Extension pour tige de support /
Extensión para barra de soporte / Verlängerung für Haltestange / 支撑杆的延伸装置
A00000421
IQ/OQ Manual / Manuale IQ/OQ / IQ/OQ Manual / IQ/OQ Manual / IQ/OQ Manual / IQ/OQ手册
MULTI

40
10. Wiring diagram / Schema elettrico / Schéma électrique / Esquema eléctrico / Schaltplan /
线路图
1
Panel socket with fuses / Presa pannello con fusibili / Prise de courant du panneau avec fusibles / Panel con fusibles /
Buchse für Bedienfeld mit Sicherungen / 带保险丝的面板插座
2
Main switch / Interruttore generale / Interrupteur général / Interruptor general / Netzschalter / 电源 主开关
3
Electric motor / Motore elettrico / Moteur électrique / Motor eléctrico / Elektromotor / 电动机
4
Main board / Scheda elettronica / Carte électronique / Tarjeta electrónica / Elektronische Karte / 主板
5
Display board / Scheda display / Panneau d’affichage / Placa de la pantalla / Displayfeld / 显示板
6
Thermocouple / Termocoppia / Thermocouple / Termopar / Thermoelement / 热电偶
7
Heating element / Elemento riscaldante / Elément de chauffage / Elemento de calefacción / Heizkörper /
加热元件
8
Socket for external probe / Presa per sonda esterna / Prise pour sonde externe / Toma para sonda externa external /
Buchse für externen Fühler / 外部探针插座

41
11. Declaration of conformity / Dichiarazione di conformità / Déclaration de conformité /
Declaración de conformidad / Konformitätserklärung / 符合性声明
We, the manufacturer VELP Scientifica, under our responsibility declare that the product is manufactured in conformity with
the following standards:
Noi, casa costruttrice VELP SCIENTIFICA, dichiariamo sotto la ns. responsabilità che il prodotto è conforme alle seguenti
norme:
Nous, VELP Scientifica, déclarons sous notre responsabilité que le produit est conforme aux normes suivantes:
Nosotros casa fabricante, VELP Scientifica, declaramos bajo nuestra responsabilidad que el producto es conforme con las
siguientes normas:
Der Hersteller, VELP Scientifica, erklärt unter eigener Verantwortung, dass das Gerät mit folgenden Normen übereinstimmt:
我们VELP Scientifica作为制造商,在我们的责任下声明,该产品的制造符合以下标准:
EN 61010-1
Safety requirements for electrical equipment for measurement, control, and laboratory use
Part 1: General requirements
EN 61010-2-010
Particular requirements for laboratory equipment for the heating of material
EN 61010-2-051
Particular requirements for laboratory equipment for mixing and stirring
EN 62479
Assessment of the compliance of low-power electronic and electrical equipment with the
basic restrictions related to human exposure to electromagnetic fields (10 MHz to 300 GHz)
ETSI EN 301 489-1 V2.2.3
Electromagnetic compatibility (EMC) standard for radio equipment and services;
Part 1: Common technical requirements
ETSI EN 301 489-17 V3.2.4
ElectroMagnetic Compatibility (EMC) standard for radio equipment and services;
Part 17: Specific conditions for Broadband Data Transmission Systems
EN 61326-1
Electrical equipment for measurement, control and laboratory use - EMC requirements -
Part 1: General requirements
ETSI EN 300 328 V2.2.2
Wideband transmission systems; Data transmission equipment operating in the 2,4 GHz
band
and satisfies the essential requirements of the following directives:
e soddisfa i requisiti essenziali delle direttive:
et qu’il satisfait les exigences essentielles des directives:
y cumple con los requisitos esenciales de las directivas:
und den Anforderungen folgender Richtlinien entspricht:
并满足以下指令的基本要求:
2006/42/EC
Machinery directive
2014/53/EU
Radio Equipment directive (RED)
2015/863/EU (RoHS III)
Restriction of the use of certain hazardous substances
2012/19/EU (WEEE)
Waste of electric and electronic equipment
plus modifications / più modifiche / plus modifications / más sucesivas modificaciones / in der jeweils gültigen Fassung /
加修改.
Notified body: Nemko S.p.A. (NB 2051)
EU Type Certificate: 2051-RED-211502

42
12. Declaration of conformity
We, the manufacturer VELP Scientifica, under our responsibility declare that the product is manufactured in conformity with
the following regulations:
S.I. 2017/1206
Radio Equipment Regulations 2017
according to the relevant designated standards:
EN 61010-1
Safety requirements for electrical equipment for measurement, control, and laboratory use
Part 1: General requirements
EN 61010-2-010
Particular requirements for laboratory equipment for the heating of material
EN 61010-2-051
Particular requirements for laboratory equipment for mixing and stirring
EN 62479
Assessment of the compliance of low-power electronic and electrical equipment with the
basic restrictions related to human exposure to electromagnetic fields (10 MHz to 300 GHz)
ETSI EN 301 489-1 V2.2.3
Electromagnetic compatibility (EMC) standard for radio equipment and services;
Part 1: Common technical requirements
ETSI EN 301 489-17 V3.2.4
ElectroMagnetic Compatibility (EMC) standard for radio equipment and services;
Part 17: Specific conditions for Broadband Data Transmission Systems
EN 61326-1
Electrical equipment for measurement, control and laboratory use - EMC requirements -
Part 1: General requirements
ETSI EN 300 328 V2.2.2
Wideband transmission systems; Data transmission equipment operating in the 2,4 GHz
band
and satisfies the essential requirements of regulations:
S.I. 2008/1597
Supply of Machinery (Safety) Regulations 2008
S.I. 2012/3032
Restriction of the Use of Certain Hazardous Substances in Electrical and Electronic
Equipment Regulations 2012
S.I. 2013/3113
Waste Electrical and Electronic Equipment Regulations 2013
plus modifications.
Notified body: Nemko North America Inc. (NB 1622)
UK Type Certificate: 1622-UK-432035


Thank you for having chosen VELP!
Established in 1983, VELP is today one of the world’s
leading manufacturer of analytical instruments and
laboratory equipment that has made an impact on the
world-wide market with Italian products renowned for
innovation, design and premium connectivity. VELP
works according to ISO 9001, ISO 14001 and OHSAS
18001 Quality System Certification.
Our instruments are manufactured in Italy according
to the IEC 1010-1 and CE regulation.
Our product lines:
Grazie per aver scelto VELP!
Fondata nel 1983, VELP è oggi tra i leader mondiali nella
produzione di strumenti analitici e apparecchiature da
laboratorio grazie ai suoi prodotti italiani rinomati per
innovazione, design e connettività.
VELP opera secondo le norme della Certificazione del
Sistema Qualità ISO 9001, ISO 14001 e OHSAS 18001.
Tutti i nostri strumenti vengono costruiti in Italia in
conformità alle norme internazionali IEC 1010-1 e alle
regole della marcatura CE.
Le nostre Linee di prodotti:
Analytical instruments
Elemental Analyzers
Digestion Units
Distillation Units
Solvent Extractors
Fiber Analyzers
Dietary Fiber Analyzers
Oxidation Stability Reactor
Consumables
Analytical Instruments
Analizzatori Elementari
Digestori e Mineralizzatori
Distillatori
Estrattori a Solventi
Estrattori di Fibra
Estrattori di Fibra Dietetica
Reattore di Ossidazione
Consumabili
Laboratory Equipment
Magnetic Stirrers
Heating Magnetic Stirrers
Heating Plates
Overhead stirrers
Vortex mixers
Homogenizers
COD Thermoreactors
BOD and Respirometers
Cooled Incubators
Flocculators
Overhead Shakers
Turbidimeter
Radiation Detector
Open Circulating Baths
Pumps
Laboratory Equipment
Agitatori Magnetici
Agitatori Magnetici Riscaldanti
Piastre Riscaldanti
Agitatori ad Asta
Agitatori Vortex
Omogeneizzatori
Termoreattori COD
BOD e Analizzatori Respirometrici
Frigotermostati e Incubatori
Flocculatori
Mescolatore Rotativo
Torbidimetro
Rilevatore di Radiazioni
Bagni Termostatici
Pompe
www.velp.com
VELP Scientifica Srl
20865 Usmate (MB) ITALY
Via Stazione, 16
Tel. +39 039 62 88 11
Fax. +39 039 62 88 120
Distributed by:
We respect the environment by printing our manuals on recycled paper.
Rispettiamo l’ambiente stampando i nostri manuali su carta riciclata.
10008470/A4
-
 1
1
-
 2
2
-
 3
3
-
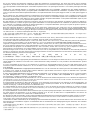 4
4
-
 5
5
-
 6
6
-
 7
7
-
 8
8
-
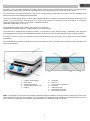 9
9
-
 10
10
-
 11
11
-
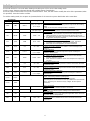 12
12
-
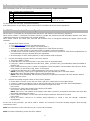 13
13
-
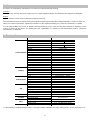 14
14
-
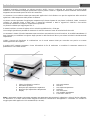 15
15
-
 16
16
-
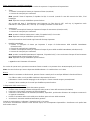 17
17
-
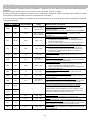 18
18
-
 19
19
-
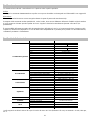 20
20
-
 21
21
-
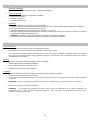 22
22
-
 23
23
-
 24
24
-
 25
25
-
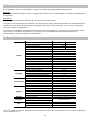 26
26
-
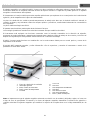 27
27
-
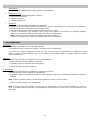 28
28
-
 29
29
-
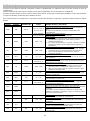 30
30
-
 31
31
-
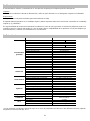 32
32
-
 33
33
-
 34
34
-
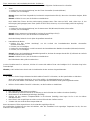 35
35
-
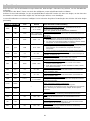 36
36
-
 37
37
-
 38
38
-
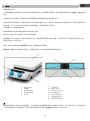 39
39
-
 40
40
-
 41
41
-
 42
42
-
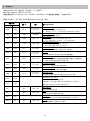 43
43
-
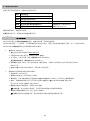 44
44
-
 45
45
-
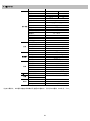 46
46
-
 47
47
-
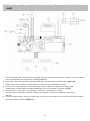 48
48
-
 49
49
-
 50
50
-
 51
51
-
 52
52


Chemglass CG-1995-20 El manual del propietario
- Tipo
- El manual del propietario
en otros idiomas
Artículos relacionados
Otros documentos
-
 Velp Scientifica HSC Manual de usuario
-
 VELP Scientific F20510011 El manual del propietario
-
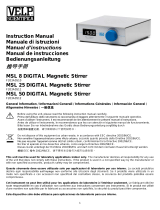 Velp Scientifica MSL Digital Manual de usuario
-
 VELP Scientific F20510051 El manual del propietario
-
 VELP Scientific SA20510061 El manual del propietario
-
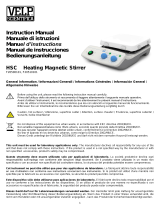 VELP Scientific F20500101 El manual del propietario
-
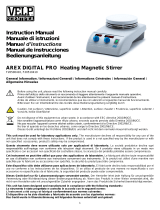 VELP Scientific VSI-SC20510410 El manual del propietario
-
VELP Scientific F20510162 El manual del propietario
-
 VELP Scientific VSI-SA20500465 El manual del propietario
-
Chief CMA360 Instrucciones de operación


