Ariens 96146000400 El manual del propietario
- Categoría
- Cortadoras de césped
- Tipo
- El manual del propietario
Este manual también es adecuado para

A160H22
(96146000)
Owner's Manual
430859 Rev. 1 03.31.10 BY
• EspaSol, p. 18
Printed in U.S.A.

Safety Rules .......................................... 2-4
Product Specifications .............................. 4
Assembly / Pre-Operation ........................ 5
Operation ............................................. 6-10
Maintenance Schedule ........................... 11
Maintenance ...................................... 11-14
Service and Adjustments ................... 14-15
Storage .............................................. 16-17
Troubleshooting ................................. 17-18
Repair Parts....................................... 36-43
Warranty ................................................. 44
IMPORTANT: This cutting machine is
capable of amputating hands and feet and
throwing objects. Failure to observe the
following safety instructions could result in
serious injury or death.
=q,Look for this symbol to point out impor-
tant safety precautions, tt means
CAUTION!!! BECOME ALERT!
• Do not operate the machine while under
the influence of alcohol or drugs.
• Never operate machine in wet grass.
Always be sure of your footing: keep a
firm hold on the handle; walk, never run.
• Disengage the self-propelled mech-
anism or drive clutch on mowers so
equipped before starting the engine.
° Ifthe equipment should start to vibrate
abnormally, stop the engine (motor) and
check immediately for the cause. Vibra-
tion is generally a warning of trouble.
° Always wear safety goggles or safety
glasses with side shields when operating
mower.
II. SLOPE OPERATION
Slopes are a major factor related to slip &
fall accidents which can result in severe
injury'.All slopes require extra caution. If
you feel uneasy on a slope, do not mow it.
DO:
° Mow across the face of slopes: never
up and down. Exercise extreme caution
when changing direction on slopes.
- Remove obstacles such as rocks, tree
limbs, etc.
• Watch for holes, ruts, or bumps. Tall
grass can hide obstacles.
DO NOT:
° Do not trim near drop-offs, ditches or
embankments. The operator could lose
footing or balance.
• Do not trim excessively steep slopes.
• Do not mow on wet grass. Reduced
footing could cause slipping.
III. CHILDREN
Tragic accidents can occur if the operator
is not alert to the presence of children.
Children are often attracted to the machine
and the mowing activity. Never assume
that children will remain where you last
saw them.
° Keep children out of the trimming area
and under the watchful care of another
responsible adult.
• Be alert and turn machine off if children
enter the area.
• Before and while walking backwards,
look behind and down for small children.
• Never allow children to operate the
machine.
° Use extra care when approaching blind
comers, shrubs, trees, or other objects
that may obscure vision.
IV. SAFE HANDLING OF GASOLINE
Use extreme care in handling gasoline.
Gasoline is extremely flammable and the
vapors are explosive.
Extinguish all cigarettes,cigars, pipes
and other sources of ignition.
• Use only an approved container.
• Never remove gas cap or add fuel with
the engine running. Allow engine tocool
before refueling.
° Never refuel the machine indoors.
° Never store the machine or fuel contain-
er where there is an open flame, spark
or pilotlight such as a water heater or
on other appliances.
• Never fill containers inside a vehicle, on
a truck or trailer bed with a plastic liner,
Always place containers on the ground
away from your vehicle before filling.
• Remove gas-powered equipment from
the truck or trailer and refuel it on the
ground. If this isnot possible, then
refuel such equipment with a portable
container, rather than from a gasoline
dispenser nozzle.
° Keep the nozzle in contact with the rim
of the fuel tank or container opening at
all times until fueling is complete. Do
not use a nozzle lock-open device.
= If fuel isspilled on clothing,change
clothing immediately.
• Never overfill fuel tank. Replace gas
cap and tighten securely.
V, GENERAL SERVICE
° Never runa machine insidea closed
area.
° Never make adjustments or repairs with
the engine (motor) running. Disconnect
the spark plug wire, and keep the wire
away from the plugto prevent accidental
starting.
• Keep nuts and bolts, especially blade
attachment bolts, tight and keep equip-
ment in good condition.
• Never tamper with safety devices.
Check their proper operation regularly.
• Keep machine free of grass, leaves, or
other debris build-up. Clean oil or fuel
spillage. Allow machine to cool before
storing.
• Stop and inspect the equipment if you
strike an object. Repair, if necessary,
before restarting.
• Never attempt to make wheel height
adjustments while the engine is running.

Grasscatchercomponentsaresubject
towear,damage,anddeterioration,
whichcouldexposemovingpartsor
allowobjectstobethrown.Frequently
checkcomponentsandreplacewith
manufacturer'srecommendedparts,
whennecessary.
• Mowerbladesaresharpandcancut.
Wraptheblade(s)orweargloves,and
useextracautionwhenservicingthem.
° Donotchangetheenginegovernorset-
tingoroverspeedtheengine.
° Maintainorreplacesafetyandinstruc-
tionlabels,asnecessary.
&WARNING;Thislawnmowerisequippedwithaninternalcombustionengineand
shouldnotbeusedonornearanyunimprovedforest-covered,brush-coveredor
grass-coveredlandunlesstheengine'sexhaustsystemisequippedwithaspark
arrestermeetingapplicablelocalorstatelaws(ifany).Ifasparkarresterisused,it
shouldbemaintainedineffectiveworkingorderbytheoperator.
InthestateofCaliforniatheabove is required by law (Section 4442 of the California
Public Resources Code). Other states may have similar laws. Federal laws apply on
federal lands.
.... i
Serial Number:
Date of Purchase:
Gasoline Capacity / Type: 0,94 Litres (Unleaded Regular)
Oil Capacity: 0,5 Litres
Oil Type (API SG-SL): SAE 30 (above 0°C/32°F) or SAE 10W-30
Spark Plug (Gap: 0,76 mm) NGK BPR6ES
Valve Clearance (± 0.04 mm): Intake: 0.015 mm; Exhaust: 0.020 mm
Blade Bolt Torque: 35-40 ft. Ibs,
The model and serial numbers will be found on a decal on the rear of the lawn mower
housing. Record both serial number and date of purchase in space provided above,
4

Read these instructions and this manual in
its entirety before you attempt to assemble
or operate your new lawn mower.
IMPORTANT: This lawn mower is shipped
WITHOUT OIL OR GASOLINE in the
engine.
Your new lawn mower has been assem-
bled at the factory with the exception of
those parts left unassembbd for shipping
purposes. To ensure safe and proper
operation of your lawn mower, all parts
and hardware you assemble must be tight-
ened securely. Use the correct tools as
necessary to ensure proper tightness. All
parts such as nuts, washers, bolts, etc.,
necessary to complete the assembly have
been placed in the parts bag.
TO REMOVE MOWER FROM
CARTON
1. Remove loose parts includedwith
mower.
2. Cut down two end comers of carton
and lay end panet down fiat.
3. Remove all packing materials except
padding between upper and lower
handle and padding holding operator
presence control bar to upper handle,
4. Roll lawn mower out of carton and
check carton thoroughly for additional
loose parts.
HOW TO SET UP YOUR MOWER
TO UNFOLD HANDLE
IMPORTANT: Unfoldhandle carefullyso
as notto pinch or damage controlcables.
1. Raise handles until lower handle sec-
tion locks into place in mowing posi-
tion.
2. Remove protective padding, raise up-
per handle section into place on lower
handle and tighten both handle knobs.
3. Remove handle padding holding
operator presence control bar to upper
handle.
Your lawn mower handle can be adjusted
for your mowing comfort. Refer to "AD-
JUST HANDLE" in the Service and Adjust-
ments section of this manual.
Operator MOWING
POSITION
control bar
Upper
UP handle
Handle
knob
Lower handle
TO ASSEMBLE GRASS CATCHER
1. Put grass catcher frame into grass bag
with rigid part of bag on the bottom.
Make sure the frame handle is outside
of the bag top+
2. Slip vinyl bindings over frame.
NOTE: If vinyl bindings are too stiff, hold
them in warm water for afew minutes. If
bag gets wet, let it dry before using.
Frame
handle
Vinyl Frame
bindings ,t opening
TO INSTALL ATTACHMENTS
Your lawnmower was shippedready to be
used as a mulcher. To convert mower to
bagging or discharging, see '_ro CON-
VERT MOWER" in the Operation section
of this manual.
5

KNOW YOUR LAWN MOWER
READ THIS OWNER'S MANUAL AND ALL SAFETY RULES BEFORE OPERATING
YOUR LAWN MOWER. Compare the illustrations with your ]awn mower to familiarize
yourself with the location of various controls and adjustments. Save this manual for
future reference.
ill
These symbols may appear on your lawn mower or in literature supplied with the
product. Learn and understand their meaning.
CAUTION ENGINE ENGINE FAST SLOW CHOKE FUEL OIL DANGER, KEEP HANDS
OR WARNING ON OFF AND FEET AWAY
,n,niHllli nlll,ll ill i i
Drive
control
bar
Operator presence control bar
Handle knob
Starter
handle Gasoline filler cap
G rass
cat(
Fuel valve lever
Engine oil
with dipstick
filter
Muffle
uster
Housin (on each wheel)
IMPORTANT: This lawn mower is shipped WITHOUT OIL OR GASOLINE in the engine.
MEETS CPSC SAFETY REQUIREMENTS
Our rotarywalk-behind powerlawnmowers conformto the safety standards ofthe
American NationalStandards Instituteand the U.S, Consumer Product Safety Com-
mission. _I_WARNING: The blade turnswhen the engine is running.
i iii ill I I liUillli Ill
Operator presence control bar - must Muicher door - allowsconversionto
be held down tothe handle tostart the discharging or baggingoperation,
engine, Release tostop the engine. Drive control bar- usedto engage
Starter handle - used for starting engine, power-propelledforward motionof mower.
6

Theoperationofanylawn
mowercanresultinforeign
objectsthrownintotheeyes,
which can result in severe
eye damage. Always wear
safety glasses or eye shields while oper-
ating your lawn mower or performing any
adjustments or repairs. We recommend a
standard safetyglasses orwide visionsafety
mask worn over spectacles.
HOW TO USE YOUR LAWN MOWER
ENGINE SPEED
The engine speed was set at the factory
for optimumperformance.Speed is not
adjustable.
ENGINE ZONE CONTROL
,I#_CAUTION: Federat regulationsrequire
an engine controlto be installedonthis
lawn mower inorder to minimizethe
risk of blade contactinjury. Do not under
any circumstancesattemptto defeat the
function ofthe operator control.The blade
turnswhen the engine is running.
• Your lawn mower isequippedwith an
operatorpresence controlbar which
requiresthe operatorto be positioned
behind the lawn mower handle tostart
and operate the lawn mower.
TO OPERATE DRIVE SYSTEM
• To start forward motion, liftdrive con-
trolbar up tohandle.
• To stop forward motion, release drive
control bar.
IMPORTANT: Always keep drive control
fully engaged against handle when in use.
Operator
presence
control bar
DRIVECONTROLENGAGED
DRIVE CONTROL DISENGAGED
TO ADJUST CUTTING HEIGHT
Raise wheels for lowcut and lowerwheels
for high cut, adjustcuttingheightto suit
your requirements.Medium positionis
bestfor most lawns.
, To change cuttingheight, squeeze ad-
juster lever toward wheel. Move wheel
up ordown tosuityourrequirements.Be
sure all wheels are in the same setting.
NOTE: Adjuster is properly positioned
when plate tab inserts into hole in lever,
Also, 9-position adjusters (if so equipped)
allow lever to be positioned between the
plate tabs.
LEVERBACKWARD Platetab
TO LOWERMOWER
LEVERFORWARDTO RAISEMOWER Lever
TO ATTACH GRASS CATCHER
1. Liftthe rear door ofthe Iawn mower
and place the grass catcher frame side
hooksonto the door pivotpins.
2. The grasscatcheris securedto the
lawn mower housingwhen the rear
door islowered ontothe grass catcher
frame,
_kCAUTION: Do not run your lawn
mower without mulcher plate or plug, clip-
ping deflector or approved grass catcher
in place. Never attempt to operate the
lawn mower with the rear door removed or
propped open.
Rear
Grass
catcher
handle
\
Catcher frame hook
TO EMPTY GRASS CATCHER
1. Liftup on grass catcher usingthe
frame handle.
2. Remove grass catcher with clippings
from under lawn mower handle.
3. Empty clippings from bag.
NOTE: Do not drag the bag when emp-
7 tying; it willcause unnecessary wear.

Grass
catcher
TO CONVERT MOWER
Your lawnmower was shipped ready to be
used as a mulcher. To convertto bagging
or discharging:
REAR BAGGING
• Open rear door and remove mulcher
plug. Store mulcher plug in a safe
place.
• You can now installthe grass catcher or
optional clipping deflector.
• To convert to mulching or discharging
operation, install mulcher plug into rear
discharge opening of mower.
Mulcher plug
SIDE DISCHARGING
• Mulcher plug must be installedinto rear
discharge opening of mower.
- Open mulcher door and install dis-
charge deflector under door as shown.
• Mower is now ready for discharging
operation.
• To convert to mulching or bagging
operation, discharge deflector must be
removed and mulcher door closed.
\
\
/
Openmulcherdoor
Discharge deflector
SIMPLE STEPS TO REMEMBER WHEN
CONVERTING YOUR LAWN MOWER
FOR MULCHING -
1. Rear muicher plug installed.
2. Mulcher door closed.
FOR REAR BAGGING -
1. Rear mulcher plug removed.
2. Grass catcher installed.
3. Mulcher door closed.
FOR SIDE DISCHARGING -
1. Rear mulcher plug installed.
2. Discharge deflector installed.
_CAUTION: Do not run your lawn
mower without mutcher plug or approved
grass catcher in place. Never attempt to
operate the lawn mower with the rear door
removed or propped open.
8

BEFORE STARTING ENGINE
ADD OIL
Your lawnmower isshipped without oil in
the engine. For type and grade of oil to
use, see "ENGINE" in the Maintenance
section of this manual.
A CAUTION: DO NOT overfill engine with
oil, or it will smoke on startup,
1. Be sure lawnmoweris level.
2. Remove oil fill cap/dipstick from oil fill
spout.
3, You recieve a container of oil with the
unit. S]owly pour the entire container
down the oil fill spout into the engine,
4. Insert and tighten oil fill cap/dipstick.
IMPORTANT:
• Check oil level before each use, Add oil
if needed. Fill to full line on dipstick.
• Change the oil after every 25 hours of
operation or each season, You may
need to change the oil more often
under dusty, dirty conditions, See "TO
CHANGE ENGINE OIL_in the Mainte-
nance section of this manual
ADD GASOLINE
• Fill fuel tank to bottom of tank filler neck.
Do not overfill. Usefresh, clean, regular
unleaded gasoline with a minimum of
87 octane, Do not mix oil with gasoline.
Purchase fuel in quantities that can be
used within 30 days to assure fuel fresh-
ness,
_, CAUTION: Wipe off any spilled oil or
fuel. Do not store, spill or use gasoline
near an open flame.
_1_CAUTION: Alcohol blended fuels
(called gasohol or using ethanol or metha-
nol) can attract moisture which leads to
separation and formation of acids during
storage. Acidic gas can damage the fuel
system of an engine while in storage. To
avoid engine problems, the fuel system
should be emptied before storage of 30
days or longer, Empty the gas tank, start
the engine and let it run until the fuel lines
and carburetor are empty. Use fresh fuel
next season. See Storage Instructions for
additional information. Never use engine
or carburetor cleaner products in the fuel
tank or permanent damage may occur,
TO STOP ENGINE
• To stop engine, release operator pres-
ence controlbar. Wait untilblade and
all moving parts have stopped and turn
fuel valve to OFF position ifyou do not
intendto restart the engine soon.
TO START ENGINE
NOTE; Due to protectivecoatings on the
engine, a small amountof smoke may be
presentduring the initialuse of the product
and should be considerednormal.
1. Be sure fuel valve is inthe ON po-
sition.
2. Move choke lever toON (I\1 ) position.
3. Hold operator presence controlbar
down to the handle and pull starter
handle quickly. Do not allow starter
rope to snap back.
NOTE: The choke lever automatically
begins moving to the OFF position when
operator presence control bar is held
down to handle.
_OFF_ Chokelever
ON OFF _
uelvalvelever

MOWING TIPS
CAUTION: Do not use de-thatcher
blade attachments on your mower. Such
attachments are hazardous, wilt damage
your mower and could void your warranty.
• Under certain conditions, such as very
tall grass, it may be necessary to raise
the height of cut to reduce pushing
effort and to keep from overloading the
engine and leavingclumps of grass clip-
pings, It may also be necessary to re-
duce ground speed and!or run the lawn
mower over the area a second time.
• For extremely heavy cutting, reduce the
width of cut by overlapping previously
cut path and mow slowly.
• For better grass bagging and most cut-
ting conditions, the engine speed should
be set in the FAST position.
• Pores in cloth grass catchers can be-
come filled with dirt and dust with use
and catchers will collect less grass. To
prevent this, regularly hose catcher off
with water and let dry before using.
• Keep top of engine around starter clear
and clean of grass clippings and chaff.
This wi]I help engine air flow and extend
engine life,
MULCHING MOWING TIPS
IMPORTANT: For best performance,
keep mower housing free of built-up
grass and trash. See "CLEANING" in the
Maintenance section of this manual.
• The special mulching blade willrecut
the grass clippings many times and
reduce them in size so that as they fall
onto the lawn they will disperse into
the grass and not be noticed. Also, the
mulched grass will biodegrade quickly
to provide nutrients for the lawn. Always
mulch with your highest engine (blade)
speed as this will provide the best recut-
ting action of the blades.
• Avoid cutting your lawn when it is wet.
Wet grass tends to form clumps and
interferes with the mulching action. The
best time to mow your lawn is the early
afternoon. At this time the grass has
dried, yet the newly cut area will not be
exposed to direct sunlight.
° For best resu]ts, adjust the lawn mower
cutting height so that the lawn mower
cuts off only the top one-third of the
grass blades. Ifthe lawn is overgrownit
will be necessary to raise the height of
cut to reduce pushingeffort and to keep
from overloading the engine and leaving
clumps of mulched grass. For extremely
heavy grass, reduce your width of cut
by overlapping previouslycut path and
mow slowly.
MAX I/3
• Certain types of grass and grass
conditions may require that an area be
mulched a second time to completely
hide the clippings. When doing asec-
ond cut, mow across (perpendicular) to
the first cut path.
• Change your cutting pattern from week
to week. Mow north to south one week
then change to east to west the next
week. This wilt help prevent matting and
graining of the lawn.
10

MAINTENANCE eEFORE
EACH
SCHEDULE USE
i i, NIII
Check for Loose Fasteners
_ Clean / Inspect Grass Catcher *
V'
Check Tires l# #
_ Check Drive Wheels V'
i
clean Lawn Mower ....
M Clean under Drive Cover "**
O Check Drive Belt 1PuUeys *"
Check"/Sharpe_ /RePiace Blade
FI Lubrication
CIean and Recharge Battery **
ii
Check Engine Oil level I_
NE Change Engine Oil
Clean Air Filter
? Inspect Muffler
N Replace Spark Plug
E Replace Air Filter Paper Cartridge
Empty fuel system or add Stabilizer
* (if So equipped)
** Electric-Start mowers
*** Power-PropelJed mowers
**** Use e sol.per
to clean under deck
AFTER
EACH
USE
ii
10
HOURS
iiii
EVERY
25 HOURS
OR SEASON
EVERY
100
HOURS
v'
BEFORE
STORAGE
v'
,,, If
v'
'if '"
V, ,,,
V's
V_ ......
,,,v' v_,,
..... V_r2
V_ ,, , L
,V ..... '
t4
v'
1 - Change more often ifoperatingundera heavyload orin high outdoortemperatures.
2 - Service more often it operating in dirty or dusty conditions,
3 - Replace blades more often when mowing in sandy soIL
4 - Charge 4B hours at end of season,
5 - And after each 5 hours of use,
GENERAL RECOMMENDATIONS
The warrantyon this lawn mower does not
cover itemsthat have been subjected to
operatorabuse or negligence. To receive
full valuefrom the warranty, operator must
maintainunit as instructedin this manual.
Some adjustmentswill need to be made
periodicallyto properly maintain your unit.
At least once a season, check tosee if
you should make any ofthe adjustments
described in the Service and Adjustments
sectionofthis manual.
• At least oncea year, replacethe spark
plug, clean or replace air filter element
and check blade for wear. A new spark
plug and clean!new air filter element
assure proper air-fuel mixture and help
your engine run better and last longer.
• Follow the maintenance schedule in this
manual.
BEFORE EACH USE
• Check engine oil level.
• Check for loose fasteners.
LUBRICATION
Keep unit well lubricated
(See "LUBRICATION CHART").
LUBRICATION CHART
Wheel
adjuster (on
each wheel)
Engine oil
Mulcher
door hingepin
O Rear door
hinge
Handle bracket mounting pins
_ Spray lubricant
See "ENGINE" in Maintenance section.
IMPORTANT: Do not oil or grease plastic
wheel bearings. Viscous lubricants will
attractdustand dirtthatwill shorten the lifeof
the self-lubricating bearings. Ifyou feel they
must belubricated, use only adry,powdered
11graphite type lubricant sparingly.

LAWN MOWER
Always observe safety rules when per-
forming any maintenance.
TIRES
° Keep tires free of gasoline, oil, or insect
control chemicals which can harm rubber.
• Avoid stumps, stones, deep ruts, sharp
objects and other hazards that may
cause tire damage.
DRIVE WHEELS
Check front drive wheels each time before
you mow to be sure they move freely.
The wheels not turning freely means trash,
grass cuttings, etc. areinthe drive wheel area
and must be cleaned to free drive wheels.
If necessary to clean the drive wheels, be
sure to clean both front wheels.
1. Remove hubcaps, Iocknuts & washers.
2. Remove wheels from wheel adjusters.
3. Remove any trash or grass cuttings
from inside the dust cover, pinion and/
or drive wheel gear teeth.
4. Put wheels back in place.
NOTE: If after cleaning, the drive wheels
do not turn freely, contact a qualified
service center.
BLADE CARE
For best results, blade must be kept sharp.
eplace a bent or damaged blade.
CAUTION: Use ontya replacement blade
approved bythe manufacturerofyourmower.
Using a blade not approved by the manu-
facturer of your mower is hazardous, could
damage your mowerand void your warranty.
TO REMOVE BLADE
1. Disconnect spark plug wire from spark
plug and place wire where it cannot
come in contact with plug.
2. Turn lawn mower on its side. Make
sure air filter and carburetor are up.
3. Use a wood block between blade and
mower housing to prevent blade from
turning when removing blade bolt.
NOTE: Protect your hands with gloves
and/or wrap blade with heavy cloth.
4. Remove blade bolt by turning counter-
clockwise.
5. Remove blade & attaching hardware
(bolt, lock washer & hardened washer).
TO REPLACE BLADE
1. Position blade on the blade adapter
aligning the two (2) holes in the blade
with the raised lugs on the adapter.
2. Be sure the trailing edge of blade (oppo-
site sharp edge) is uptoward the engine.
3. Install the blade bolt with the lock
washer and hardened washer into
blade adapter and crankshaft.
12
4. Use block of wood between blade and
lawn mower housing and tighten the
blade bolt, turning clockwise.
Recommendedtighteningtorque:35-40ft.lbs.
IMPORTANT: Blade bolt is heat treated.
If bolt needs replacing, replace only with
approved bolt shown in the Repair Parts
section of this manual.
Bladeadapter Ke_
Lockwasher _
Blade Hardened
bolt washer & \
Trailing edge"
Crankshaft
_ _,_,. keyway
_, _/" Belt
Crankshaft retainer
TO SHARPEN BLADE
NOTE: We do not recommend sharpening
the blade - but if you do, be sure the blade
is balanced. Care should be taken to keep
the blade balanced.An unbalanced bladewill
causeeventual damage tomower or engine.
• The blade can be sharpened with a file
or on a grinding wheel. Do not attempt
to sharpen while on the mower.
° To check blade balance, drive a nail into
a beam or wall. Leave about one inch of
the straight nail exposed. Place center
hole of blade over the head of the nail.
If blade is balanced, it should remain in
a horizontal position. If either end of the
blade moves downward, sharpen the
heavy end until the blade is balanced.
GRASS CATCHER
• The grass catcher may be hosed with
water, but must be dry when used.
° Check your grass catcher often for dam-
age or deterioration, Through normal
use it will wear. Ifcatcher needs replac-
ing, replace only with approved replace-
ment catcher shown in the Repair Parts
section of this manual. Give the lawn
mower model number when ordering.
GEAR CASE
• To keep your drive system working
properly, the gear case and area around
the drive should be kept clean and free
of trash build-up. Clean under the drive
cover twice aseason.
• The gear case isfilled with lubricant tothe
proper level at the factory. The only time
the lubricant needs attention is if service
has been performed on the gear case.
• If lubricant is required, use only Texaco
Starplex Premium 1Grease, Part No.
750369. Do not substitute.

ENGINE
Maintenance, repair, or replacement of the
emission control devices and systems, which
are being done at the customers expense,
may be performed by any non-road engine
repair establishment or individual. Warranty
repairs must be performed byan authorized
engine manufacturer's service outlet.
LUBRICATION
Use only high quality detergent oil rated
with API service classification SG-SL.
Selectthe oil'sSAE viscosity grade according
to your expected operating temperature.
...... SAE'WSCOSJTYG_OES
r
"F -_ 0 30 3_ 40 6o 8_ 1_
"o _3o .2o _to o lo _o 30 4_
TEMPERATURE RANG_ ANTICIPATED BEFORE NEXT 13i_CHANGE --
NOTE: Multi-viscosityoils(5W30, 10W30
etc.) improvestarting in cold weather,and
you shouldcheck your engine oillevelfre-
quentlytoavoid possible enginedamage
from runninglow on oil.
Change the oil after every 25 hours of op-
eration or at least once a year if the fawn
mower is not used for 25 hours in one
year. Check the crankcase oil level before
starting the engine and after each five (5)
hours ofcontinuous use. Tighten ollplug
securely each time you check the oil level.
TO CHANGE ENGINE OIL
NOTE: Before tipping lawn mower to drain
oil, empty fuel tank by running engine until
fuel tank is empty.
1. Disconnect spark plug wire from spark
plug and place wire where it cannot
come in contact with plug.
2. Remove oil fill cap/dipstick; lay aside
on a clean surface.
3. Tip lawn mower on its side as shown
and drain oil into a suitable container.
Rock lawn mower back and forth to re-
move any oil trapped inside of engine.
5. Fillengine with oil. SIowty pouroil
downthe oil fill spout into the engine.
6. Wait oneminute to allow oil tosettle.
Use guage on oil fi, cap/dipstickfor
checkinglevel. Insert dipstick into
the tube and rest the oi!fill cap onthe
tube. DO NOT thread the cap intothe
tubewhen taking reading.
Oilfiltcap/ /_ "_ _-JL_"
dipstick L_'_-_"'-_
Upper_ _\
mark--.'--_ \
Lower j _/-/'
mark
7. Continue adding small amounts of
oil and recheckingthe dipstick until it
reads full. DO NOT overfill, or engine
willsmoke onstartup.
8. Always be sure to retighten oil fill cap/
dipstick before starting engine.
9. Reconnect spark plug wire to plug.
AIR FILTER
Your engine willnot runproperlyand may
be damaged by using a dirty air fiJter.
Replacethe air filter every 100 hoursof
operationor every season, whichever oc-
curs first. Service air cleaner more often
under dusty conditions.
TO CLEAN AIR FILTER
I. Remove cover.
2. Carefully remove cartridge.
3. Clean by gently tapping on a flat sur-
face. tf very dirty, replace cartridge.
_i,CAUTION: Petroleum solvents, such as
kerosene, are not to be used to clean car-
tridge. They may cause deterioration of the
cartridge. Do not oilcartridge. Do not use
pressurized air to clean or dry cartridge.
4. tnsta[I cartridge, then replace cover.
Tab
4. Wipe offany spilled oil from lawn
moweror side of engine. !3

MUFFLER
inspect and replace corroded muffler as it
could create a fire hazard and/or damage.
SPARK PLUG
Replace spark plug at the beginning of
each mowing season or after every 100
hours of operation, whichever occurs
first. Spark plug type and gap setting
are shown in the "PRODUCT SPECIFIC-
ATIONS" section of this manual
CLEANING
IMPORTANT: For best performance,
keep mower housing free of built-grass
and trash. Clean the underside of your
mower after each use.
_ILCAUTION: Disconnect spark plug wire
from spark plug and placewire where it
cannot come in contact with plug.
• Clean the underside of your lawnmower
by scraping to remove build-up of grass
and trash.
• Clean engine often to keep trash from
accumulating. A clogged engine runs
hotter and shortens engine life.
- Keep finished surfaces and wheels free
of all gasoline, oil, etc.
• We do not recommend using a garden
hose to clean lawn mower unless the
electrical system, muffler, air filter and
carburetor are covered to keep water
out. Water inengine can result in short-
ened engine life.
CLEAN UNDER DRIVE COVER
Clean underdrive coverat least twice a
season. Scrape underside of cover with
puttyknife or similar toolto remove any
build-up of trash or grass on underside of
drive cover.
WARNING: Toavoid serious injury,
before performing any service and
adjustments:
t. Release control bar and stop engine.
2. Make sure the blade and all moving
parts have completely stopped.
3. Disconnect spark plug wire from spark
plug and place wire where it cannot
come in contact with plug,
LAWN MOWER
TO ADJUST CUTTING HEIGHT
See 'q'O ADJUST CUTTING HEIGHT" in
the Operation section of this manual.
REAR DEFLECTOR
The rear deflector, attached between the
rear wheels of your mower, isprovided to
minimize the possibility that objects will
be thrown out of the rear of the mower
into the operator mowing position, If the
deflector becomes damaged, it should be
replaced.
TO REMOVE DRIVE BELT
1, Remove drive cover.
2. Remove belt from gearcase pulley by
pushing down on arm and rolling belt
off pulley.
3. Turn lawn mower on its side with air
filter and carburetor down,
4. Remove blade and blade adapter.
PUSH
Drive
cover
TO REPLACE DRIVE BELT
5. Place new drive belt on blade adapter.
6. Route the other end of the new drive
belt through hole in housing.
7. Reinstall blade and blade adapter.
8, Return mowerto upright position,
9. Push down on arm, install new belt on
gearcase pulley. Release arm slowly,
NOTE=Always use factory approved belt
to assure properfit and long life.
10. Reinstall drive cover.
Bladeada Crankshaft
Lockwasher
Iade T"
bolt Hardened elf
washer edge retainer
14

TO ADJUST HANDLE
The handle can be mounted in a highor
low position. The mounting holes in the
bottom of lower handle are off center for
raising or lowering the handle.
1. Remove upper handle and wire tie(s)
securing cabJe(s) to lower handle,
2. Remove hairpin cotters from lower
handle bracket mounting pin,
3. Squeeze lower handle in to remove it
from mounting pins.
4. Turn lower handle over to raise or
lower handle.
5. Squeeze lower handle in and position
holes onto mounting pins on handle
bracket.
6. Reassemble upper handle and all parts
removed from lower handle.
SQUEEZE
TO ADJUST
Lower
__-__ Mounting
Handle
/bracket
Mowing ¢_._ Mowing /~_
position
t I '/
I / /
I
Hairpin Handle
ENGINE
Maintenance, repair, or replacement of
the emission control devices and systems,
which are being done at the customersex-
pense, may be performed by any non-road
engine repair establishment or individual.
Warranty repairs must be performed by an
authorized engine manufacturer's service
outJet.
ENGINE SPEED
Your engine speed has been factory set.
Do not attempt to increase engine speed
or it may result in personal injury. Ifyou
believe that the engine is running too
fast or too slow, take your lawn mower to
a qualified service center for repair and
adjustment.
CARBURETOR
Your carburetor is not adjustable. If your
engine does not operate properly due to
suspected carburetor problems, take your
lawn mower to a qualified service center
for repair and/or adjustment.
IMPORTANT: Never tamper with the
engine governor, which is factory set for
proper engine speed, Overspeeding
the engine above the factory high speed
setting can be dangerous. Ifyou think
the engine-governed high speed needs
adjusting, contact a qualified service
center, which has proper equipment and
experience to make any necessary adjust-
ments.
pin
LOW POSITION
HIGH POSITION
ROTATE
15

Immediately prepare your lawn mower for
storage at the end of the season or if the
unit will not be used for 30 days or more.
LAWN MOWER
When lawn mower is to be stored for a
periodof time, clean it thoroughly, remove
all dirt, grease, leaves, etc. Store in a
clean, dry area.
1. Clean entire lawn mower (See
"CLEANING" in the Maintenance sec-
tion of this manual).
2. Lubricate as shown inthe Maintenance
section of this manual.
3. Be sure that all nuts, bolts, screws, and
pins are securely fastened. Inspect
moving parts for damage, breakage
and wear. Replace if necessary.
4. Touch up all rusted or chipped paint
surfaces; sand lightly before painting.
HANDLE
You can fold your mower handle forstorage.
1. Squeeze the bottom ends of the lower
handle toward each other until the
lower handle clears the handle bracket,
then move handle forward.
2. Loosen upper handle mounting bolts
enough to allow upper handle to be
folded back.
IMPORTANT: When folding the handle
for storage or transportation, be sure to
fo_dthe handle as shown or you may dam-
age the control cables.
° When setting up your handle from the
storage position, the lower handle will
automatically lock intomowing position.
SQUEEZE
TO FOLD
Operator MOWING
POSITION
control bar
FOLD
FORWARD Upper
FOR handle
STORAGE
Handle
knob
Lower handle
ENGINE
FUEL SYSTEM
IMPORTANT: Itis importantto prevent
gum deposits from forming in essential
fuel system parts such as carburetor, fuel
filter, fuel hose, or tank during storage.
Alcohol blended fuels (called gasohol or
using ethanol or methanol) can attract
moisture which leads to separation and
formation of acids during storage. Acidic
gas can damage the fuel system of an
engine while in storage.
° Empty the fuel tank by Starting the en-
gine and letting it run until the fuel lines
and carburetor are empty.
° Never use engine or carburetor cleaner
products in the fuel tank or permanent
damage may occur.
° Use fresh fuel next season.
NOTE: Fuel stabilizer is an acceptable
alternative in minimizing the formation of
fuel gum deposits during storage. Add
stabilizer to gasoline in fuel tank or stor-
age container. Always follow the mix ratio
found on stabilizer container. Run engine
at least 10 minutes after adding stabilizer
to allow the stabilizer to reach the car-
buretor. Do not empty the gas tank and
carburetor ifusing fuel stabilizer,
ENGINE OIL
Drain oil (with engine warm)and replace
with clean engine oil. (See "ENGINE" in
the Maintenance section of this manual).
16

CYLINDER
1. Remove spark plug.
2, Pour one ounce (29 ml) of oil through
spark plug hole into cylinder,
3. Pull starter handle slowly a few times
to distribute oil,
4. Replace with new spark plug.
OTHER
• Do not store gasoline from one season
to another.
• Replace your gasoline can if your can
starts to rust. Rust and/or dirt in your
gasoline wil!cause problems.
• If possible, store your unit indoors and
cover it to protect it from dust and dirt.
• Cover your unit with a suitable protec-
tive cover that does not retain moisture.
Do not use plastic, Plastic cannot
breathe, which allows condensation to
form and will cause your unit to rust.
IMPORTANT: Never cover mower whi_e
engine and exhaust areas are still warm,
_CAUTION: Never store the lawn
mower with gasoline {n the tank inside a
building where fumes may reach an open
flame or spark. Alfow the engine to cool
before storing in any enclosure,
TROUBLESHOOTING -See appropriate section in manual unless directed
to a qualified service center.
PROBLEM CAUSE
Does not start 1. Dirty air filter.
2. Out of fuel.
3. Stale fuel.
4. Water in fuel.
5. Spark plug wire is
disconnected.
6. Bad spark plug.
7. Loose blade or broken
blade adapter.
8. Control bar in released
position.
9. Control bar defective,
10.Fuel valve lever (if so
equipped) in OFF position.
11.Weak battery (if equipped).
12.Disconnected battery
connector (if equipped).
13.Blown fuse (if equipped).
Loss Of power 1. Rear of lawn mower
housing or cutting blade
dragging in heavy grass.
2. Cutting too much grass.
3. Dirty'air filter.
4. Buildup of grass, leaves,
and trash under mower.
5. Too much oil in engine.
6. Walking speed too fast.
CORRECTION
1.
2.
3.
4.
5,
Clean/replace air filter.
Fill fuel tank.
Empty fuel tank and refill tan_
with fresh, clean gasoline,
Empty fuel tank and refill tan_,
with fresh, clean gasoline.
Connect wire to plug.
6. Replace spark plug.
7, Tighten blade bolt or
replace blade adapter.
8. Depress control bar to
handle.
9. Replace control bar.
10,Turn fuel valve lever
to the ON position.
11.Charge battery.
12,Connect battery to engine.
13.Replace fuse.
1. Raise cutting height,
2. Raise cuttingheight,
3. Clean/replace air filter.
4. Clean underside of mower
housing.
5. Check oil level.
6. Cut at slower walking speed.
17

TROUBLESHOOTING - See appropriate section in manual unless directed
to a qualified service center.
PROBLEM
Poor cut -
uneven
Excessive
vibration
Starter rope
hard to pull
Grass catcher
not filling
(If so equipped)
Hard to push
Loss of drive
or slowing of
drive speed
CAUSE
1. Worn, bent or loose blade.
2. Wheel heights uneven.
3. Buildup of grass, Jeaves
and trash under mower.
1. Worn, bent or loose blade,
2. Bent engine crankshaft.
1.
Engine flywheel brake ison
when control bar is released.
2, Bent engine crankshaft,
3. Blade adapter broken.
4. Blade dragging in grass,
1. Cutting height too low.
2. Lift on blade worn off.
3. Catcher not venting air.
1. Grass is too high or wheel
height istoo low.
2. Rear of lawn mower
housing or cutting blade
dragging in grass,
3. Grass catcher too full.
4, Handle height position not
right for you.
1. Belt wear.
2. Belt off of pulley.
3. Drive cable worn or broken,
4. "Loose" drive control system.
CORRECTION
1. Replace blade, Tighten
blade bolt.
2. Set all wheels at same
height.
3. Clean underside of
mower housing.
1. Reptace blade. Tighten
blade bolt,
2, Contact a qualified service
center.
1, Depress control bar to
upper handle before
pulling starter rope.
2. Contact a qualified service
center.
3. Replace blade adapter.
4. Move lawn mower to cut
grass or to hard surface.
I. Raise cutting height.
2. Replace blade.
3. Clean grass catcher.
1. Raise cutting height.
2, Raise rear of lawn mower
housing one (1) setting
higher.
3. Empty grass catcher.
4. Adjust handle height to suit,
1. Check/replace drive belt.
2, Check/reinstall drive belt.
3. Replace drive cable,
4. Adjust drive control.
I8

Reglas de Seguridad ................................ 19-21
Especificaciones del Producto....................... 21
Montaje / Pre-Operacibn ............................... 22
Operaci6n ................................................. 23-26
Programa de Mantenimiento ......................... 27
Mantenimiento .......................................... 27-31
Servicio y Adjustes ................................... 31-32
Atmacenamiento ....................................... 33-34
ldentificaci6n de problemas ...................... 34-35
Partes de repuesto .................................. 36-43
Garantfa ......................................................... 44
IMPORTANTE: Esta maquina cortadaora es
capaz de amputar las manos y los manos y
los pies y de lanzar objetos. Si no se observan
las instruccionea de seguridad siguientee se
pueden producir iesiones graves o la muerte,
_Busque este simboloque sefiala las precau-
clones de seguridad de importancia, Quiere
decir - iiiATENCION!!! iltESTE ALERTO!!!
SU SEGUR1DAD ESTA COMPROMETIDA.
_I,ADVERTENCIA: Siempre desconecte el
alambre de fa bujra y p6nga]o donde no pueda
entrar en contactocon la bujfa, para evitar et
arranque pot accidente, durante la preparaci6n,
el transporte, elajuste o cuando se hacen
reparaciones.
#:_,ADVERTENCtA: Los bornes, terminaEes y
accesorios relalivos de la bater_acontienen
piomo o oompuestos de plomo, productos
qufmicosconocidosen el Estado de California
comocausa de c_ncer y defectosal nacimiento
u otrosdaSos reproductivos. Lavar laa manos
spu_s de manlpularlos.
PRECAUCION: El tubode escape del motor,
algunos de sus constituyentesyalgunos com-
ponentes del vehieulo contienen o desprenden
productosqufmicos conocidosen el Estado de
California oomooausa de c&ncery defectos a!
nacimientou otrosdafios reproductivos.
_i3_PRECAUCI6N: El silenciador y otras piezas
del motor ltegan a sre extremadamente calien-
tes durante fa operaci6n y siguen siendo cali-
entes despu_s de que el motor haya parado,
Para evitar quemaduras severas, perrnanezca
tejos de estas &teas.
I. OPERACION
• Antes de empezar, debe familiarizarse
completamente con los controles yet uso
correcto de la maquina. Para esto, debe leer
y comprencler todas las instrucciones que
aparecen en la maquina yen los manuales
de operaci6n.
• No ponga las manos o los pies oerca o
debajo de las partes rotatorias. Mant_ngase
siempre lejos de la abertura de la descarga.
• Permita que solamente las personas re-
sponsables que est_n familiadzadas con las
instrucciones operen la mdquina.
• Despeje el _rea de objetos tales como pie-
dras, juguetes, alambres, huesos, palos, etc.
que pueden ser recogidos y lanzados por las
cuchillas.
• AsegL_reseque el _.reano se hallen per-
sonas, antes de segar. Pare la mdquina si
alguien entra en el _rea.
° No opere la maquina sin zapatos o con san-
da]ias abiertas. P6ngase siempre zapatos
s6lidos.
• No tire de la segadora hacia atria a menos
que sea absolutamente necesario. Mire
siempre hacia abajo y hacia detr_s antes y
mientras que se rnueve hacia atrb,s.
,, Nunca dirigir el material descargado hacia
las personas. Evitardescargar matedal
contra paredes o barreras. El material puede
retornar al operador. Para la cuchilla cuando
se pasa por superficies de grava.
• No opere la segadora sin los respectivos
resguardos, las placas, el recogedor de
c6sped u otros aditamentos dise ados para
su proteccidn y seguridad.
• Refi6rase alas instrucciones del fabricante
para el funcionamiento e instalaci6n de
accesodos. Use L_nicamenteaccesodos
aprobados por el fabricante.
° Detenga lacuchitla o las cuchillas cuando
cruce pot calzadas, calles o caminos de
grava.
• Parar el motor cada vez que se abandona el
aparato, antes de limpiar la segadora o de
remover residuos del tubo.
• Apagar el motor y esperar hasta que las
cuchillas est_n completamente paradas
antes de remover el receptor de hierba,
• Segar solamente con luz de] dia o con una
buena luz artificial.
• No opere la m&quina bajo ta influencia del
alcohol o de las drogas.
19

° Nunca opere Ia maquina cuando Ia hierba
est_ mojada. Aeegerese siempre de tener
buena tracci6n ensus pies; mantenga el
mango firmemente y camine; nunca corra.
° Desconectar el mecanismo de propulsi6n
aut6noma o el embrague de transmisi6n en
las segadoras que Iotienen antes de poner
en marcha el motor.
° Si el equipo empezara a vibrar de una
manera anormal, pare el motor y revise de
inmediato para averiguar la causa. General-
mente la vibraci6n suele indicar que existe
alguna averfa.
° Siempre use gafas de seguddad o anteojos
con protecci6n lateral cuando opere ia sega-
dora.
It, OPERACION SOBRE LAS CUESTAS
Los accidentes ocurren con m_.sfrecuencia en
las cuestas. Estos accidentes ocurren debido a
resbaladas o cafdas, lascuales pueden resultar
en graves lesienes. Operar la recortadora en
cuestas requiere mayor concentraci6n, Si se
siente inseguro en una cuesta, no Ia recorte.
HACER:
• Puede recortar a trav_s de la superficie de
la cuesta, nunca hacia arriba y hacia abajo,
Proceda con extrema precauci6n cuando
cambie de direcci6n en las cuestas.
° Renueva todos los objetos extrafios, tales
come guijarros, ramas, etc,
• Debe prestar atenci6n a hoyos, baches o
protuberancias. Recuerde que la hierba atta
puede esconder obst_culos.
NO HACER:
° No recorte cerca de pendientes, zanjas o
terraplenes. EI operador puede perder la
traccion en los pies o et equilibrio.
• No recorte cuestas demasiado inclinadas.
° No recorte en hierba mojada. La reducci6n
en la tracci6n de la pisada puede causar
resbalones.
iii. NIt'lOS
Se pueden produciraccidentes tr&gicossi el
operador no presta atenci6n a la presencia
de los nifios, A menudo, los nifiosse sienten
atraidos per la m&quina y per la actividad de
la siega, Nunca suponga que los nifiosvan a
permanecer en e] mismo lugar donde toe vie
per L_ltimavez.
° Mantenga a los nifios alejados del _rea de
la siega y bajo el cuidado estricto de otra
persona adulta responsable.
- Est_ alerta y apague la m&quina si hay nifios
que entran al &tea.
* Antes y cuando este retrocediendo, mire
hacia atr_s y hacia abajo para verificar si hay
nifios pequefios.
° Nunca permita que los nifios operen la m_-
quina.
° Tenga un cuidado extra cuando se acerque
a esquinas deride no hay visibilidad, a los
arbustos, _rboles u otros objetos que pueden
inteffedr con su Iinea de vision.
IV. MANEJO SEGURO DE GASOLINA
Usar mucha atenci6n cuando se maneja gaso-
lina. La gasolina es extremamente inflamable y
los vapores son explosives.
° Apagar redes loscigarri]los,cigarros, pipasy
otras fuentes de ignici6n.
• Usar solo un contenedor apropiado.
° Nunca quitar el tap6n de la gasolina oaSadir
carburantecon el motor en marcha. Esperar
que el motorse enfrie antes de repostar la
gasolina.
° Nunca repostar Ia m_iquina at interior de un
local.
° Nunca guardar la m&quina o el contenedor
de gasolina donde hay una llama abierta,
chispa o luz piloto come una caldera u otros
dispositivos.
° Nunca llenar contenedores en un vehfculo, en
un cami6n o caravana con un forro de pl_.stico.
Colocar siempre los contenedores en el suelo
lejos de su vehicuIo antes de Ilenar.
• Quitar equipos que funcionan con gasolina
del cami6n o caravana y repostar en el
suelo. Si esto no es posible, repostar dicho
equipo con un contenedor port_til, m,_sbien
que con una tobera de gasolina.
- Mantener la tobera en contacto con e[ bordo
del dep6sito de carburante e de la apertura
del contenedor siempre hasta terminar el
abastecimiento, No usar un dispositivo de
cierre-apertura de ta tobera.
° Si el carburante cae en la ropa que se Iteva,
cambiarsela inmediatamente.
• Nunca llenar en exceso el dep6sito de
carburante. Colocar el tap6n de la gasolina y
apretar de mode seguro,
V. SERVIClO
• Nunca haga funcionar una m_quina dentro
de un _rea cerrada,
• Nunca haga ajustes o reparaciones mientras
el motor est_ en marcha. Desconecte el
cable de la bujia, y mant_ngalo a cierta
distancia de 6sta para prevenir un arranque
accidental.
• Mantenga las tuercas y los pemos, espe-
cialmente los pemos del aocesodode ta
cuchilla, apretados y mantenga e] equipo en
buenas condiciones.
° Nunca manipule de forma indebida los
dispositivos de seguridad. Controle regular-
mente su funcionamiento correcto.
° Mantenga la m_.quina libre de hierba, hojas
u otras acumulaciones de desperdicio,
Limpie los derrames de aceite o combustible.
Permita que la m_.quina se enfrfe antes de
almacenarla.
• Pare e inspeccione el equipo si le pega a un
objeto. Flep&relo, si es necesario, antes de
hacedo arrancar.
° En ning0n case hay que regular la altura de
las ruedas mientras el motor est_ en marcha.
2O

• Los componentes del receptor de la hierba
van sujetos a desgaste, daSos y deterioro,
que pueden exponer las partes en mov-
irniento o permitir que objetos seen dispara-
dos. Controlar frecuentemente y cuando sea
necesado sustituir con partes aconsejadas
pot et fabdcante.
• Las cuchillas de la segadora est_n afiladas
y pueden cortar. Cubrir las hojas o Ilevar
guantes, y utilizer precauciones especiales
cuando se efectt_amantenimiento sobre las
mismas.
• No carnbie el ajuste del regulador del motor
ni exceda su velocidad.
• Mantener o sustituir las etiquetas de
seguridad e instrucciones, cuando sea
necesario.
_ADVERTENClA-- Este segadora viene equipedo con un motor de combusti6n interne y no se
debe user sobre, ocerca, de un terreno no desarrolfado cubierto de bosques, de arbustos o de
c6sped, o menos que el sistema de escape del motor venga equipado con un arnortiguador de
chispas que cumpla con tas leyes locales o estatal_s (si existen). Si se usa un amortiguador de
chispas, el operador debe mantenerlo en condiciones de trabajo eficientes.
En el estado de California, la ley exige Io anterior (SecciSn 4442 del "Califomfa Public Re-
sources God#'). Otros estados pueden contar con otras leyes parecidas, Las leyes federales
se aplican en la tierras federales.
iNQmero de Sede:
Fecha de Compra;
Capacidad y Tipo de Gasolina: 0.94 Litres (Regular sin Plomo)
Capacidad de Aceite: 0,5 Litres
Tipo de Aceite (API SG-SL): SAE 30 (Debajo 0°C/32°F) o SAE 10W30
Buj[a (Abertura: .076 mm) NGK BPR6ES
Tolerancia de V_lvula (4-0.004 mm) Admisi6n: 0.015 mm; Descarga: 0.020 mm
Torsi6n del Perno de la Cuchilla: 35-40 ft. lbs.
° El ndmerodelnodeloy el desertese encuentranen lacalcomaniaadjuntaa ]apartetrasera
de lacaja dela segadora.Deberegistrartantoel n6merode eeriecomela fechade compray
mantengarosenunlugarseguroparerefenciaenel futuro.
21

Lea estas instrucciones y este manual completamente antes de tratar de montar u operar su sega-
dora nueva.
IMPOFITANTE: Este cortac6sped viene StN ACEITE O GASOLINA en el motor.
Su segadora nueva ha side montada en la f_brica con la excepci6n de aquellas partes que se de-
jaron sin montar per razones de envio. Todas las partes come lastuercas, las arandelas, los pemos,
etc,, que son nscesarias para completar el montaje han side colocadas en Ia bolsa de partes. Para
asegurarse que su segadora funcione en forma segura y adecuada, todas las partes y los art[culos
de ferreteria que se monten tienen que set apretados seguramente. Use las herramientas correctas,
come sea necesado, para asegurar que se aprieten adecuadamente.
PARA REMOVER LA SEGADORA DE
LA CAJA DE CARTON
1. Remueva Ias partes sueltas que se incluyen
con Iasegadora.
2. Cortelas dos esquinasdelos extremes delacaja
de cart6n y tienda el panel del extreme plane.
3, Remueva rode el material de empaque, ex-
cepto lacuria entre el mango superior y 61
inferior, y la curia que sujeta la barra de los
control que exige la presencia del operador
junto con el mango superior.
4. Haga rodar Ia segadora hacia afuera de la
caja de cart6n y revisela cuidadosamente
para verificar si todavia quedan partes
sueltas adicionales.
COMe PREPARAR SU SEGADORA
PARA DESDOBLAR EL MANGO
IMPORTANTE: Despiiegue el mangocon
touche cuidado para no pellizcar o dafiar los
cables de control.
1. Levante los mangos basra que la secci6n
del mango inferior se asegure en su lugar,
en Ia posici6n para segar.
2. Remuevatacufiaprotectora, tevante[aeecci6n
de[mango superior basra su lugaren el mango
inferior, y apriete ambas manillas deI mango,
3. Remueva [a curia del mango que sujeta la
barra de los control que exige la presencia
del eperador junto con el mango superior.
El mango de Ia segadora puede ajustarse
seg_n le acomode para segar. Refierase a
"AJUSTE DEL MANGO" en la secci6n de
Servicio y Ajustes de este manual.
Barra de POSICION
que sxige ta PARA
presencia del SEGAR
operador
PARA MONTAR EL RECOGEDOR DE
ClaSPED
t. Ponga et bastidor del recogedor de cesped
en la bolsa del c_sped con la parte rigida
de Iabolsa en la parts inferior, Aseg_rese
que el mango deI bastidor este en el exte-
rior de la parte superior de [a bolsa.
2. Deslice los sujetadores de vinilo sobre el
bastidor.
AVlSO: Si los sujetadores de vinilo est,_nmuy
duros, metalos en agua caliente per a[gunos
rninutos. Si se moja la bolsa, d_jela que se
seque antes de usarla.
Mango del
bast[dor del
recogedor
Sujetadore.,
devinilo
Abenura
deI bastidor
PARA INSTALAR LOS ACCESORIOS
Susegadora fue enviada lista para usarse
come una acolehadora de capa vegetal. Para
eonvedifla de mode que pueda ensacar o
descargar, refi6rase a "PARA GONVERTtR LA
SEGADORA" en Iasecci6n de Operaci6n de
este manual.
LEVANTAR
Mango
superior
Manilla deI
mango
Mango Inferior
22

FAMILIARICESE CON SU SEGADORA
LEA ESTE MANUAL DEL DUENO Y LAS REGLAS DE SEGURiDAD ANTES DE OPARAR SU
SEGADORA, Compare las itustraciones con su segadora pare familiadzarse con la ubicaci6nde
los diversos ¢ontroies y ajustes. Guarde este manual para referencia en ei future,
ill _,,,,,iiiii i i i i immmllll,ii ill
Estos sfmbolos pueden apareser sobre su segadora o en la literatura proporclonada con el
producto. Aprenda y comprenda sus significados.
ATTENC|(_N 0 MOTOR MOTOR R/_PtDO LENTO ESTRANGU GeM- ACEITE PELIGRO, GUARDE LAS
ADVERTENC]A ENCENDIDO APAGADO LAOI_)N BUSTIBLE MANES Y LOS PIES LEJOS
,,,,,,,,i,,_,Hu ii i i i ,,,,,H i i i i i,i iH i i
Barra de
controlde Ia
impulsiSn
Barra de control que exige la
presencia de] operador
Manillade] mango
Tapa det deposito
de Ia gasoline
Recogedor
V_lvula del combustible
3uj_a
de aire
de aciete del motor
oon varilla
indicadora de nivel
Silenciador
Puerta de la acolche la tmpuisi6n
Ajustadorde
la rueda (en
cada rueda)
IMPORTANTE: Este cortac_sped viene SIN ACEITE O GASOLINA en motor.
iii iiiiH IIIIII I IIIII J IIIIIII IIIIIIIIIIIIIIIIII
CUMPLE CON LOS REQUISITES DE SEGURIDAD DE LA CPSC
Las segodoras a motor, que se eonducen desde Ia parte de atr&s,rotatodas,cumplen con los
est_ndares de segurid,_ddelAmerican National Standards instituteyde la U.S. Consumer Product
Safety Commission. dlBI,PRECAUCION: La cuchiilagira cuandoel motor est&funcionando.
i iiiiiiiiiiiiiiiii [ iiiiii I iiiiii iiii iiiiiiiiiiiiJ[]i j
Barra de control que exlge la presencia del Puerta de la acolchadora - permite {a
operador - tiene que sujetarse abajo, junto conversi6npare la operaciSnde descarga o
con el mango, pare hecer arrancar el motor, ensacado.
Su61telapara parer el motor. Barra de control de la impulsion -se usa
Cord6n arrancador - se usa pare hacer ar- para enganchar la segadora pare movimJento
rancar el motor. 23ha¢ia adelante impulsada a motor.

Laoperaci6ndecualquier
segadorapuedehacerque
saltenobjetosextraSosdentsode
susojos,foquepuedeproducir
daSosgravesen6stos.Siempre
useanteojosdeseguridadoprotecci6npara
losojosmientrasoperesusegadoraocuando
hagaajustes o reparaciones. Recomendamos
galas o una mascara de seguridad de visi6n
amplia de seguridad usada sobre las gafas.
COMe USAR SU SEGADORA
VELOCIDAD DEL MOTOR
La velocidad del motor se estableci6 en la f,_-
bsica para un rendimiento 6ptimo. La velocidad
no se puede ajustar.
NTROL DE ZONA DEL MOTOR
PRECAUCI6N: Las regulaciones federales
exigen que se instale uncentre] pasael motor
en esta segadora para reducir a un mfnimo el
riesgo de Iesionarse debido aI contacto con la
cuchilla. Per ningtin motive trate de eliminar
la funci6n del control del operador. La cuchilla
gira cuando el motor est_ funcionando.
• Su segadora viene equipada con una barra
de controles que exigen la presencia del
operador, Io que requiere que el operador
est,, detrds del mango de la segadora para
haceda arrancar y operarla.
PARA EL IMPULSION
- Para comenzar la marcha hacia adelante,
levantar Ia basra de mando hasta el mango,
. Para paras el movimiento hacia adelante,
alivie la barra de control de la impulsion.
IMPORTANTE: Durante la utilizaci6n, guarde
siempre Ia barra de control de Ia impulsion en
contra del mango,
Barra con control
que exige ta
presencia del
operador
CONTROL DE LA IMPULSION ENGRANCHAR
CONTROL DE LA IMPULSI6N DESENGANCHADO
PARA AJUSTAR LA ALTURA DE CORTI=
Levante tas ruedas para el corte bajo y baje las
ruedas pasael corte alto., ajuste la alturade
corte para que se acomode a sus requisites.La
posici6n deI medio es la meier para la mayorfa
de losc_spedes.
° Para cambiar la altura de corte, empuje la
palanca del ajustador hacia la rueda. Mueva
la rueda hacJa ardba o haciaabajo de mode
que se acomode a sus requisites, Aseg_rese
que todas las ruedas queden igualmente
ajustadas,
AVtSO: El ajustador esta corsectamente
colocado cuando las orejas de la placa est&n
insertadas en el agujero del mango. Tambi6n,
los ajustes de 9 posiciones (si equipado) per-
miten que el mango pueda ser movido entre las
orejas de Ia placa.
PALANCAHACIAATR._.S Manc
PARABAJARELCORTACESPED
dela
placa
PALANCA"---_;._.F
HACIA
ADELANTEPARALEVANTARELCORTACi_SPED
PARA MONTAR Y ADJUNTAR EL RECOGE-
DOR DE ClaSPED
1, Levante la puerta trasera deI cortac6sped
y colocar los ganchos del asmazon de la
recolectora de hierba en los pasadores de[
quicio de Ia puerta.
2. El recogedor de c6sped queda asegurado
en la caja de la segadora cuando se baja la
puerla trasera para descansar en el basti-
dl_ dor del recogedor de c6sped.
PRECAUCtON: No haga funcionar su sega-
dora sin el planco o tap6n de Iaacolchadesa,
el desviador de recortes o sin el recogedor de
c6sped, aprobados, en su lugar. Nunca trate de
operar iasegadora cuando se ha removido la
puerta trasera o cuando est_ un poco abierta.
Pasador del _Jincio Puerta
Mango del
ba_ordet
recogedorde
c_sped
Gancho lateral
bastidor deI recegedor
24

PARA VACIAR EL RECOGEDOR DE ClaSPED
1. Levante el recogedor de c6sped usando el
mango deI bastidor.
2. Remueva et recogedor de c_sped, con losre-
cortes, de debajo del mango de ta segadora.
3. Vacfe toe recortes de la bolsa.
AVISO; No arrastre la boIsa cuando la vacfe;
se )rodu¢ir& un desgaste innecesario.
PARA CONVERTIR LA SEGADORA
Su segadora rueenviada tista para usarse
como acolchadora de capa vegetal. Para
convertfda a una operaci6n de ensacado o de
descarga:
SEGADORAS CON DESGARGA TRASERA
* Abra la puerta trasera y remueva la tap6n
acolchadora. Gudrdela en un Iugar seguro.
- Ahora puede instalar el recogedor o eI des-
viador de recortes opcional.
, Para volver a la operaci6n de acolohamiento
o descarga, el tap6n acolchador en Iaaber-
tufa de deecarga de ta segadora.
Tap6nde
SEGADORAS CON DESCARGA LATERAL
• La tapSn acolchadora debe ser instalada ad-
entro de Ia abertura de la descarga trasera,
• Abra la protecci6n contra la desca_ga y
instale el desviador de contra la descarga
debajo de la protecci6n corno se muestra.
• La segadora esta lista para la operaci6n de
la descarga.
• Para convertir a la operaciOn de ensacado
o de descarga, el desviador de la descarga
debe set removido y la proteccibncontra la
descarga debe eslar cerrada.
Abm la protecc_n
contra la descarga
Desviador
de la descarga
25
PASOS $1MPLES DE RECORDAR
CUANDO CONVIERTA SU SEGADORA
PARA AGOLCHAMIENTO -
1. La plancha acolchadora trasera instalada.
2. La protecci6n contra la descarga cerrada.
PARA ENSACAMIENTO TRASERO -
1. La plancha acolchadora trasera removida.
2. Recogedor del c_sped instalado.
3. La protecci6n contra ta descarga cerrada.
PARA DESCARGA LATERAL-
1. La plancha acolchadora trasera instalada.
La desviador de la de$carga instalada,
PRECAUCION: No haga funcionar su
segadora sin la plata de laacolchadora o sin
el recogedor c_.sped aprobados en su lugar.
Nunca trate de operar Ia segadora cuando se
halla removTdo la puerta trasera o cuando se
ha removido a puerta trasera o cuando est_ un
pocoabierta.

ANTESDEHACERARRANCAREL
MOTOR
AGREGUE ACEITE
Su segadora fue enviada sin aceite en el motor.
Pare el tipo y el grado del aceite a utilizer, yea
el "MOTOR" en la seccidn deI Mantenimiento
de este manual.
_I=PREOAUCI()N: NO sobrellene e! motor con
aceite, o fumar& pesa demante deI silenciador
cuando Io valla a arrancar.
1. Asegt_rese que ta segadora est_ nivelada.
2. Remueva la varila medidora de aceite deItubo
de desarga de aceite.
3. Usted recibe un envase de aceite con la
unidad. Vierta Ientamente el envase entero
de aceite en el tubo de relleno deI motor.
4. Inserte yapriete la varilla medidora de aceite.
IMPORTANTE:
• Revise el nivel det eceite antes de cada uso.
Agregue aceite sies necesado. Llene haste la
Ifnea de Ileno en la vadlla medidora de nivel.
° Cambie el aceite despu_s de 25 horas de
operaci6n o una vez pot ternporada. Puede
necesitar cambiar el aceite m&s a menudo
cuando las condiciones son polvorosas o su-
cias. Vea "PARA CAMBIAR ELACEITE DEL
MOTOR" en la seccion de Mantenimiento de
este manual.
Tapadel deposito _r- Tapedel
deaceite __',,_._ _ rellenador
con f" _# 0%._=_1.._ degasolina
nivel
Marca Maroa "X_%_ .lJJ v _..._...._
superior ir=ferior"_
AGREGUE GASOLINA
° Llene el estanque de combustible hasta Ia
parle inferior del cuelto de relleno deI es-
tanque de gasolina. No Io llene demasiado.
Use gasoline regular, sin plomo, nueva y Iim-
pie con el mfnimo de 87 octanos. No mezcle
el aceite con la gasoline. Pare asegurar
que la gasoline utilizada sea fresca compre
estanques los cuales puedan ser uti]izados
if durante los prirneros 30 dies,
PRECAUClON: Limpie el aceite o el
combustible derramado. No almacene, derrame
o use gasoline cerca de una llama expuesta.
_kPRECAUCI6N: Los combustibles
mezclados con alcohol (conocidos corno
gasohol, o el uso de etanol o metanoI) pueden
atraer la humedad, la que conduce a la
separaci6n y formacion de _icidos durante el
almacenamiento. La gasoline acfdica puede
daSar el sistema del combustible de un motor
durante el almacenamiento. Para evitar los
problemas con el motor, se debe vaciar el
sistema det combustible antes de guardado
por un pedodo de 30 dfas o rn__s.Vacfe el
estanque del combustible, haga ar rancar el
motor y h_galo funcionar hasta que las Ifneas
deI combustible y el carburador queden vacfos.
La pr6xima temporada use combustible nuevo.
Yea las Instrucciones Para El Almacenamiento
pare m&s informaci6n. Nunca use productos de
Iirnpieza pare el motor opara el carburador en
el estanque del combustible pues se pueden
producir daSos permanentes.
PARA PARAR EL MOTOR
° Para parar el motor y si no intenta ponerlo en
marcha de nuevo, alivie ]a barra de control
que exige la presencia del operador. Espere
hasta que ]a cuchillaytodas las piezas m6-
viles se hallan parado y mueva lav&Ivuladel
combustible ala posicionAPAGADO (OFF).
PARA HACER ARRANCAR EL MOTOR
AVtSO: Debidoalas capas protectorasdeI mo-
tor, unacantidad pequeSa de humo puede as-
tar presente durante el uso inicial deI producto
y se debe considerar normal.
1. Asegurase que v_.Ivula del combustible est_
en la posici6n ON.
2. Mueva la palanca de la eatrangulaci6n ala
posici6n de ON (ikl).
3. Sujete la barra de controles que exigen la
presencia del operador abajo en el mango
y tire el mango del arrancador r_pidamente.
No permita que el cordSn arrancador se
devuelva abruptamente.
AVlSO, La palanca de la estrangulaci6n
comienza a moverse autom&ticamente ala
posici6n de APAGADO (OFF) cuando la barra
del control de la presencia del operador se
mantiene hacia el mango.
APAGADO Palar_cadela
V&lvula del combustible
26

ONSEJOS PARA SEGAR
RECAUCION: No utitizar dispositivos antF
paja de la hoja en la segadora ya que estos
accesorios son peligrosos, pueden daSar su
segadora y anular su garantfa.
• 8ajo ciedas condioiones, tal como c_sped
muy alto, puede set necosaflo el elevar ta
altura del corte para reducir el esfuerzo
necesario para empujar Ia segadora y para
evitar sobrecargar el motor, dejando mort-
tones de recortes de c_sped. Puede que sea
necosario reducir la velocldad del recorrido
y/o haga funcionar la segadora sobre el drea
por segunda vez.
° Para un torte muy pesado, reduzca el ancho
del corte pasando parcialmente por encima
deI lugar anteriormente cortado y siegue
lentamente.
• Para un mejor ensacado del c_sped y para fa
mayoda de las condiciones de corte, {avelo-
cidad del motor debe ajustarse a la posici6n
de R.4PIDO.
° Los poros en los recogedores de c_sped de
te{a pueden ,enarse con mugre y po[vo con
el uso y los recogedores recaudar_.n menos
cesped. Para evitar este, roc{e el recogedor
con la manguera de agua regularmente y
d_jelo secarse antes de usarlo.
• Mantenga la parte superior del motor, aired-
edor del arrancador, despejada y sin recortes
de c6sped y paja. Esto ayudar& el flujo del
atre del motor y extenderd su duraci6n.
CONSEJOS PARA SEGAR Y ACOL-
CHAR
tMPORTANTE: Para obtener el meier
rendimiento mantenga la oaja de Is segadora
sin acumulacion de cesped y basura. Vea
"LIMPIEZA" en la seccion de Mantenimento de
este manual.
• La cuchilta acolchadora especial va a voIver
a corlar los recortes de c_sped muchas
veces, y los reduce en tamaSo, de modo que
sise caen en el c_sped se van a dispesar
entre 6ste y no se van a notar. Tambi6n, el
c6sped acolchado se va a deshacer rdpidam-
ente entregando substancias nutritivas para
el c_sped. Siempre acolche con la velocidad
det motor (cuchilla) rods alta, pues asf se
obtendr& la mejor acciSn de recede de las
cuchillas.
• Evite cortar el cesped cuando este mojado.
El c6sped mojado tiende aformar montones
e interfiere con la acci6n de acolchado.
La mejor hora para segar el c_sped es
temprano en la tarde. A esa hora 6ate se ha
secado y el ,_rea reci_n cortada no quedard
expuesta al sol directo.
• Para obtener los mejores resultados, ajuste
la altura del corte de la segadora de modo
que _sta corte solamente el tercio superior
de las hojas de ¢_sped, En el caso de que el
c6sped haya crecido demasiado, puede ser
necesario el elevar la a[tura del corte para
reducir el esfuerzo necesario para empujar la
segadora y para evitar sobrecargar el motor,
dejando montones de recortes de c_sped.
Para un cesped muy pesado, reduzca el an-
cho del corte pasando per encima del lugar
anteriormente cortado y siegue lentamente.
II||lil|l/,41
MAX 113
" Ciertos tipos de c_sped y sus condiciones
pueden exigir que un &rea tenga que set
acolchada pot segunda vez para esconder
completamente los recodes. Cuando se haga
el segundo code, siegue atravesado (en
forma perpendicular) a la pasada del primer
code.
• Cambie au patr6n de corte de eemana a
semana. Siegue de node a sur una semana
y luego cambie de este a oeste ta pr6xima
semana. Esto evitar& que el c_sped se
enrede y cambie de direcci6n.
27

PROGRAMADE
MANTENIMIENTO
ii
Flevisar si hay Sujetado_s $ue,_tos
Controlar los Neum_ticos
G ;conlrolar Ias Ruedas Mortices -÷
A LJmpiar la Seg_dota ....
D Limpiar debaio laCubierta de la Transmisi_rt *'"
iO Revlsar la_ Correas y]as Poleas Impuls=d=s ""
R Revisor / Afilar / Carnbiar la Cuchilla
A Lubrica¢i6n
Limpiar / Rec_rgaf l° Balerla "*
,,,,,,,,,
Revisar el oive_ del Aceite
M Cambiar el Aaeite deI motor
O Limpiar el Fi]tro de Air°
T Inspeccionm" el Silenc;iador
O .Ca,mbiar FaBUiia
R Cambia, alCartuchode Papeld_{FilI'_'"dJAi(o
Vaciat' eI Bi_tema del carbularltB
O a_ad{r Un estabil{zador de carburante.
ANTES CADA CADA CADA ANTESDE[
DECADA DECADA I0 25HORASO 100 ALMACE-
USO U$O HORASTEMPORADAHORAS NAM|ENTO
ill H IjIIH /J
v' v'
v' v'
v'
v' v'
i/
v'
V'3
..... Ve
v' v_
v_
v_,_....
v_
v'
v'
* {st vlene equip°do) 1 - Cembiar m&s a menudo cua_do se epere bajo ca_ga pesada o en atnbientes con altos temper°tufa°.
** Segad_ra_ cor_Artanque El_ctricQ 2 - Dar seNic_o m,_ _ men,do cuarido s° oper° °n _ot_d_ciooes s_cias o polvorosa, s.
*** Segadoras con Poder Propulsor 3 * Cambie los cl,_chilras m=ts a men,do cuando s_gt_e err terret_o _._enoso.
* *** Utilizar una rasq_et° pat_ limpial' 4-Ca_garpoT48horasalfinr_elatempor_d;_.
debajo de I_ ¢_bietta del cortac6sped 5 - Y despu68 de 5 ho_s de f_t_cionamieoto.
RECOMENDACIONES GENERALES
La garantia de esta segadora no cubre los
articulos que han esIado sujetos al abuso o a
la negligencia del operador. Par° recibir todo
el valor de la garantia, el operador tiene que
mantener la segadora seg_n Ias instrucciones
descritas eneste manual.
Hay algunos ajustes que se tienen que hacer
en form° peri6dica para poder mantener su
unidad adecuadamente.
AI menos una vez cad° estaci6n comprobar
si es necesario efectuar los ajustes descritos
en las secciones de Servicio y Ajustes de este
manual.
• Una vez al a5o, cambie la bujia, limpie o
°amble el elemento del filtro de air° y revise
si la cuchitla est_ desgastada. Una bujia
nueva y un etemento del filtro de air° limpio/
nuevo aseguran la mezcla de aire-com-
bustible adecuada y ayudan a que su motor
funcione mejor y que dure ma_s.
o Siga el programa de mantenimiento en este
manual.
TABLA DE LUBRICACION
(_ Ajustador
de la rued°
(_) Aceite
de] motor
acol-
chadora
_) Bisagra de
3uerta traser
(_) Clavija de montaje deI puntal deI mango
ANTES DE CADA USO
• Revise el niveI deI aceite del motor.
• Revise si hay sujetadores sueltos.
LUBRICACION
Mantenga Iaunidad bien lubricada
(veala '3"ABLA DE LUBRICACION").
(_ Rocie el lubricant°
(_ Vea "MOTOR" en ia section de MantenimJento
IMPORTANTE: No aceite o engrase los roda-
mientos de la rueda de plastico. Los lubdcantes
viscosos atearan polvo y mugre, Ioacortara la
duracion de los rodamientos autolubricanles. Si
cree que tienen que lubricarse, use los°monte
un lubricant° tipo crafito, de polvo seco, en
forma moderada.
28

SEGADORA
Siempre observe Ias reglas de seguridad cu-
ando haga el mantenimiento.
LLANTAS
• Mantenga las Ilantas sin gasolina, aceite o
substancias qufmicas para control de insec-
toe que pueden daOar Iagoma.
• Evite los tocones, Ias piedras, lasgdetas pro-
fundas, los objetosafilados y otros peligros
que pueden dafiar a las Ilantas.
RUEDAS DE IMPULSION
Revise las ruedas de impulsi6n delanteras cada
vez antes de segar, para asegurarse de que se
mueven libremente.
Si Ias ruedas no giran libremente quiere decir
que hay basura, recortes de cesped, etc. en el
,_reade las ruedas de impulsion y tienen que
limpiarse para liberaflas.
Es necesario limpiar las ruedas de impulsion;
revise ambas ruedas delanteras,
1. Remueva los tapacubos, tas tuercas de
segufidad y las arandeIas.
2. Remueva las ruedas de los ajustadores de
las ruedas.
3. Remueva la basura y los recortes de
cesped de dentro de la cubierta contra
et polvo, pifiOn y/o de los dientes de los
engranajes de las ruedas de impulsion.
4. Ponga las ruedas de vuelta en su )ugar.
AVI30: Si despu_s de Iimpiar las ruedas de
impulsion no giran {ibremente, p6ngase en con-
tacto con su centre de servicio cualificado.
CUIDADO DE LA CUCHILLA
Para obtener los mejores resultados, la cuchilla
de la segadora tienen que mantenerse afitada,
Cambie la cuchilla doblada o daOada.
_PRECAUCION: Usar solamente la hoja
de repuesto aprobada per el fabricante de Su
cortacOsped. Usar una hoja no aprobada per et
fabricante de su cortac_sped es peligroso, pu-
ede daOar su cortac_sped y anular su garantfa.
PARA REMOVER LA CUCHILLA
1. Desconecte elalambre detabujfay pOnga_oen
donde no pueda entrar encontactocon dsta.
2. Haga descansar la segadora en su lade.
Asegttrese que el fittro de aire y que el
carburador queden mirando hacia ardba.
3. Use un bioque de madera entre la cuchilla
y la caja de la segadora para evitar que la
cuchi]la gire cuando se Iequite el perno.
AVISO: Proteja sus manes con guantes y/o
envuelva ta cuchiUa con una teta gruesa.
4. Remueva el perno de la cuchilla gir_ndolo
en el sentido contrario en que giran las
manillas deI reloj.
5. Remueva la cuchi_lay los adiCUlOSde fer-
reterfa adjuntadores (el perno, Iaarandela
de seguridad y ]a arandela endurecida).
AV|SO: Remueva el adaptador de la cuchilla y
revise el cube interior de Ia ranura del adaptador
de lacuchitla. Laranura tieneque estar en buenas
condiciones para que funcione en forma adec-
uada. Cambie etadaptador si estd daOado.
PARA CAMBIAR LA CUCHILLA
1. Ponga el adaptador de la cuchilla en el
cigueBal deJmotor. Asegerese que la 29
ranura deladaptador y que el chavetero de]
ciguefial esten alineados.
2. Ponga la cuchilla en el adaptador de dsta
aiineando los dos (2)agujeros en la cuchilla
con las salientes elevadas en el adaptador.
3. Aseg_rese de que el borde de salida de
Ia cuchilra (opuesto aI horde afilado) estd
hacia arriba hacia el motor.
4. Instale el pemo de la cuchilla con la aran-
dela de seguridad y la arandela endurecida
en el adaptador de la cuchilla y el cigue_aL
5. Use un bloque de madera entre la cuchiJla
y la caja de la segadora y apdete el pemo
de la cuchilla gir&ndolo en e]sentido en que
giran las manillas del reloj.
* La torsion para apretar recomendada es de
35 - 40 pies libras.
IMPORTANTE: El perno de Ia cuchilla es
tratado a calo, Si es necesario sustituir toe
pernos, sustituirlos sOlo con pemos aprobados
mostrados en la secciOn Partes de Reparaci6n
de este manual.
Adaptadorde Ranum
Iacuchilla
seguridad _ _1 li_,
Chaveterodal
cigL=enaf
, _-_// c_on
_nal decorrea
PARA AFILAR LA OUCHILLA
AVISO: No recomendamos elafilar la cuchilla
- pero si io hace, aseg_rese de que quede
balanceada. Se tiene que tener cuidado de
manteneda balanceada. Una cuchilla que no
est& balanoeada va a producireventualmente
da_o en la segadora o en el motor.
° La cuchilra puede afilarse con una lima o en
una rueda rectificadora. No trate de afilarta
mientras se encuentra en la segadora.
° Para rev]sar et balance de la cuchilta,clave
un clave en una viga o en la pared. Deje
alrededor de una pulgada de un clave recto
expuesto. Ponga el agujero central de ta
Cuchillasobre la cabeza del clave. Si la
cuchilla est_ batanceada debe permanecer
en la posici6n horizonta!. Si cuaiquiera de
los extremes de la cuchilla se mueve hacia
abajo, afile el extreme pesado hasta que
_sta quede balanceada.
RECOGt=DOR DE CESPED
• El recogedor de c_sped puede ser rociado
con el agua de Ia manguera pero tiene que
estar seco cuando se vaya a user,
° Revise su recogedor de cesped a menudo
para verificar si est,_daSado o deteriorado.
Se va a desgastar con e] uso normal. Si se
necesita cambiar et recogedor, c&mbielo
solamente per uno que sea aprobado por el
fabricante. D6 el ndmero del modelo de ta
segadora cuando Ioordene.

CAJA DE ENGRANAJES
• Para mantener el sistema de impulsi6n
funcionando en forma adecuada, la caja
de engranajes y eJ_rea a]rededor de la
impulsi6n tienen que mantenerse limpias y
sin acumulaci6n de basura. Limpie debajo
de la cubierta de la impulsi6n dos veces por
temporada.
° La caja de engranajes se Ilena con lubricante
hasta el nivel adecuado en la fabrica. La
_nica vez que el Iubdcante necesita atenci6n
es cuando se le ha prestado servicio a Ia
caja de engranajes.
• Si se necesita Iubficante, use solamente
Grasa Texaco Starplex Premium 1, Parte No.
750369. No use substitutos.
MOTOR
El mantenimiento, la reparaci6n, o el reemplazo
de cualquier disposJtivos o sistemas del control
de Ia emisi6n, los cuales sean hechos at costo
deI cliente, pueden set realizados pot cualquier
individuoo establecimiento de reparaci6n de
motor. Los reparos que caen bajo garant[a
deben ser realizadoe pot un establecimiento de
servicio de reparaci6n de motor autorizado.
LUBRIOAOION
Use solamente aeeite de detergente de alta call-
dad cJasificado con laclasificaci6n SG-SL de ser-
vicio API. Se]eccione lacalidad de viscosidad SAE
seg_n su temperatura de operaci6n esperada.
CALtDAOES DE ViSCOSIOAO DE SAE
f P , I
_f -_ o _ _2 ,_ 6o _ too
_A_o_TE_'E_A'ru_A_mc_PAD^A_ESr_ p_ox_MoCAMe_O0_kc_n"
AVISO: LOSaceites de muitiviscosidad (5W30,
10W30, etc,) mejoran el arranque en clima frio,
y revise el nivel del aceite deI motor menudo,
para evitar un posible daSo en el motor, deb[do
a que no tiene sufic[ente aceite.
Cambie el aceite despu_,s de 25 horas de
operaci6n o pot 1omenos una vez aI aSo si la
segadora se utiiiza menos 25 horas el aSo.
Revise el nivel del aceite del carter antes de
armncar el motor y despu_s de cada cinco (5)
horas de uso continuado. Apriete el tapSn del
aceite en forma segura cada vez que revise el
nivel del aceite.
PARA CAMBIAR EL ACEITE DEL MOTOR
AVISO: Antes de indinar la segadora para dre-
nat el aceite, drene el tanque de combustible
haciendo correr elmotor hasta que et tanque
est_ vac]o.
1. Desconecte el alambre de la bujia y
p6ngalo de modo que no pueda entrar en
contacto con 6sta.
2. Remueva la tapa del dep6sito del aceite;
d_jela a un Iado en una superfide limpia,
3. Incline Iacortadora de c_sped por este
costado tal como se muestra y purgue el
ace[te en un recipiente id6neo. Mueva Ia
segadora de atr_s para ade[ante para re-
mover todo e] aceite que se haya quedado
atrapado dentro de] motor.
4,
5.
6.
Limpie todo el aceite derramado en la sega-
dora yen el lado del motor.
Rellene el motor con aceite. Vierta lenta-
mente el aceite en el tubo de relleno del
motor.
Permita que el aceite se asiente. Use un
medidor en la tapa/vadlla indicadora del
nivel para relteno del aceite para revisar el
nive]. Inserte Iavadlla indicadora de nivel
en e]tubo, y haga descansar la tapa de]
dep6sito para relleno del aceite en el tubo
al leer las medidas. NO enrosque el tapOn
cuando este tomando una Iectura.
Tapa del
deposito de
aceite con
varilla de
nivel _
Marca _'_
superlor_
Marca- ._
inferior
\
7. ContinUe agregando cantidades pequeas
de aceite yvuelva a inepeccionar la varitla
medidora basra que lea fleno (FULL). NO
sobrellene el motor con aceite, o fumar&
cuando Iovalia a arrancar.
8. Asegerese de apretar la varilla medidora
deI aceite antes de arrancar et motor.
9. Vuelva a conectar el alambre de la buj(a a
_sta.
FILTRO DE AIRE
Su motor puede sufdr avefias y funcionar de
manera incorrecta con un filtro del aire sucio.
Sustituir el papel det cartucho una vez al aSo o
tras 100 horas de funcionamiento, m_.sa menu-
do si se utiliza en condiciones de suciedad y
poJvoparticurares. No lave el_tro de aire.
PARA LIMPIAR EL FILTRO DE AIRE
1. Remueva]a cubierta.
2, Cuidadosamente, remueva e]cartucho.
3. Limpielo golpe&ndolo suavemente en una
supefficie plana. Si est& muy sucio cambie
el cartucho.
_I, PRECAUCI6N: Los solventes de petr61eo,
tales oomo el keroseno, no se deben usar para
limpiar el cartucho. Pueden producir el deted-
oro de 6ste. No aceite el cartucho. No use aire
30a presi6n para limpiarlo o secarlo.

4. Instale elcartucho, Iuego vuelva a porter la
cubierta,
Oreja
Caducho
Cubierta del fi[tro
SILENCIADOR
inspeccione y cambie el silenciador si est,_
corrofdo puede producir un peligro de incendlo
yio da5o.
eUJfA
Gamble el bujia al cornienzode cada tempo-
rada de siege o despu_s de cada 100 horas
de operaci6n, 1oque suceda primero. El tipo
de bujfa y el ajuste de la abertura aparecen en
"ESPEOIFICACIONES DEL PRODUCTO" en la
secci6n de Mantenimiento de este manual,
LIMPIEZA
IMPORTANTE: Pare obtenerelmejor rendimineto,
mantenga la caja dela segadorasin acurnulacion
de cesped y basura. Limpie]a parte de abajo de
su segadora despues de cada uso.
4_IPRECAUCl6N: Desconecte el alarnbre de
la bujfa y p6ngalo en donde no pueda entrar en
contacto con _sta.
• Haga descansar Ia segadora en su lado.
AsegL_rese que el filtro de aire y que el carbu-
rador queden mirando haoia arriba. Limpie la
parte inferiorde su segadora rasp&ndola pare
remover la acumulaci6n de c_sped y basura.
° Lirnpie el motor a menudo pare evitar que
se acumute la basura. Un motor tapado fun-
ciona rnds caliente y se aoorta su duraci6n.
• Mantenga las superficiespulidas y las rue-
das sin gasolina, aceite, etc.
° No recomendamos el usode una manguera
de jardfn para lirnpiar ]a segadora a menos
que el sistema electrico, el silenciador, el
filtro de aire y el carburador est_n tapados
pare evitar que les entre e[ ague, El ague en
el motor puede acortar la duraci6n de _ste,
LIMPIE DEBAJO DE LA CUBIERTA DE LA
IMPULSI(_N
Limpie debajo de ]a cubierta de la impulsi6n
por Io menos dos veces carla temporada.
Raspe debajo de la oubierta con un cuchillo
para masilla o con une herramienta parecida,
pare remover toda aeumulaci6n de c_sped o
basura en ia parte inferior de la cubierta de la
impulsi6n.
_IADVERTENCIA: Pare evitar lesi6nes serias,
antes de dar calquierservico o de hacer
ajustes:
I. Suelte la barra de control y pare el motor.
2. AsegL_reseque la cuchilla y que todas las
partes movibles se hayan detenido eomple-
tarnente.
3. Desconecte el alambre de la bujfa y p6n-
galo en donde no pueda entrar en contacto
con _sta.
SEGADORA
PARA AJUSTAR LA ALTURA DE CORTE
Vea "PARA AJUSTAR LA ALTURA DE CORTE"
en la secci6n de Operaci6n de este manual.
DESVIADOR TRASERO
Se proporcionaun desvlador trasero,adjunto
entre las ruedas traseras de su segadora, para
reducira un mfnimo la posibilidadque objetos
sean lanzados hacia afuera de la parte trasera
de la segadora, en la posici6n en donde se
encuentra el operador. Sise daSael desviador
debe cambiarse.
PARA REMOVER CORREA DE IMPULSI(_N
1. Rernueva Ia cubiertade la impulsibn.
2. Remueva la correa de la polea de la caja de
engranajes ernpujandohacia abajo.
3. Haga descansar la segadora en su lado
con el filtro de afre y el carburadormirando
hacia arriba.
4. Remueva la cuchillay ta adaptador de la
cuchilfa,
EMPUJAR
Cubierta de
la impulsion
Polea
PARA CAMBIAR CORREA DE IMPULSI6N
5. Colocar [a nueva correa de mando en la
adaptador de ia cuchilla.
6. Colocar la otra extremidad de la nueva
eorrea de rnando a trav_s del orificio en el
bastidor.
7. Reinstale ta euchilla y la adaptador de Ia
cuchilla.
8. Vuelva lasegadora ala posicl6n vertical,
9. Empujando hacia abajo a lnstale la correa
nueva a la polea de la caja de engranajes.
NOTA: Siernpre use la correa aprobada por ]a
f&brica para asegurarse que calce y dure.
10. Reinstale lacubierta de la irnpulsi6n.
31

Adaptadorde Ranura -- Chaveterodel
la c_chilla _ _----""_.` _iguenal
Arandelade "_a_ _'
seguridad _ \a'lI(a9_
Perno Aranclela Ir tt"_._lj,
dela endurecida \_\
cuchilla Bordedesalida" "6nd correa
PARA AJUSTAR EL MANGO
El mango puede set montado a una posici6n
alta o baja. Los agujeros de montaje en el
mango inferior est_n fuera del centro para
levantar y bajar el mango.
1. Remueva el mango supedor y conexibne(s) el
asegurar 61(los) cable(s) al mango inferior.
2. Rernueva las ctavijas de horquJlla de la
clavija de montaje del puntal del mango.
3. Apreite el mango infedorhaciadentro para
rernoverto de las clavijas de montaje.
4. Gire el mango inferior pot encima para
levantar o bajar el mango,
5. Vuelva a montar las clavijas de horqui]la pot
encirna de tasclavijas de montaje.
6. Vuelva a montar el mango superior y todas
tas partes removidas del mango inferior.
APRtETE
PARA AJUSTE
Mang_
Pun{al
Clavijade horquilla
f- x.'_ • -
POSICi6n t PoslcJ6n _<_
parasegar I I parasegar / /
I t I
i t t
,I '/
t_ J
dehorqu_'_ Iti..--de,mango>>. ,i _._' It
montaje_ ! -=,,, t
POSICIONBAJA POSICIONALTA
Mango
GIRAR
MOTOR
El mantenimiento, la reparaci6n, o eI reemplazo
de cualquier dispositivos o sistemas del control
de la emisi6n, los ouales sean heohos aI costo
del oliente, pueden ser realizados por cualquier
individuo o estableoimiento de reparacidn de
motor. Los reparos que caen bajo garant{a
deben ser realizados por un establecimiento de
servicio de reparaci6n de motor autorizado.
VELOCIDAD DEL MOTOR
La velocidad de] motor ha sido ajustada en
la fAbrica. No trate de aumentar la velocidad
del motor pues se pueden producir lesiones
personales. Si cree que el motor est_ funciona-
ndo demasiado r&pido o dernasiado lento, Ileve
su segadora a mas con su centro de servicio
cualificado.
CARBURADOR
Su carburador tiene un chorro principalfijo no
ajustable para controlar la mezcla. Si su motor
no est& funcionando en forma adecuada debido
a problemas que se sospecha vienen de]
carburador, [Ieve su segadora a contacto con
su centro de servicio cualificado para repararla
y/o ajustarla.
IMPORTANTE: Nunca manipule el regulador
del motor, el que ha sido ajustado en ta f,_brica
para Ia velocidad deI motor adecuada. Puede
ser peligroso hacer funcionar el motor a una
velocidad por sobre eI ajuste de alta velocidad
de la fabrica. Si cree que la velocidad alta
regulada deI motor necesita ajuste,eontacto con
su centro de servicio cuatificado, eI que cuenta
con eI equipo adecuado y laexperiencia para
hacer los ajustes necesarios.
32

Inmediatamente prepare su segadora para el almacenamiento at final de cada temporada o si la
unidad no se va a usar per 30 dfas o m&s.
SEGADORA
Cuando se va a guardar Jasegadora per ciarto
per{ode de tiempo, limpiela cuidadosamente,
remueva toda la mugre, la grasa, {ashojas, etc.
Gudrdela en un &rea limpia y seca.
1. Limpie toda la segadora (Vea "LIMPIEZ_A"
en la secci6n de Mantenimento de este
manual).
2. Lubdquela seg_n se muestra en ta secci6n
de Mantenimento de este manual.
3. Aseg_rese de qua todas las tuercas y
clavijas y todos los pemos y tomillos est6n
apretados en foma segura, lnspeccione
las partes qua se mueven para verificar si
est,_ndaSadas, quebradas o desgastadas.
C_mbielas si es necesado.
4. Retoque todas las superficies que est_n
oxidadas o con la pintura picada; use una
Iija antes de pintar.
MANGO
Puede doblar el mango de su segadora para el
almacenamiento.
1. Apdete los extremes inferiores del mango
infer{or entre s( hasta qua eI mango inferior
quede separado del puntal del mango,
luego mu_valo hacia adelante.
2. Suelte los pemos de montaje del mango su-
perior Io suficiente come para permitir qua
eI mango superior se pueda doblar hacia
arras.
IMPORTANTE: Cuando dobie el mango para el
a{maceaamiento o el transporte, asegerese qua
]o dobie seg_n se muestra o purde da_ar los
cables de control.
° Cuando prepare sus mangos a partir de
la posici6n de atmacenamiento, el mango
inferior autom_ticamente se asegurard en Ia
posici6n para segar.
Barrade control POSICION
que PARA
presenciadel SEGAR
operador
DOBLAR
HACIA
ADELANTE
PARA
ALMACENAR
Mango
superior
Manilla del
mango
Mango inferior""-'-t_lj
MOTOR
SISTEMA DE COMBUSTIBLE
IMPORTANTE: ES importante evitar que
se formen depositos de coma en partes
fundamentales del sistemade combustible tales
come el carburador, el filtro deI combustible,
la mangura del combustible o en el estanque
durante e] almacenamiento. Los combustibles
mezclados con afcohoJ(conocido come
gasohol o que tienen etanol o metanol)
Pueden atraer humedad, lo que conduce a la
separacion y a la formaciSn de acidos durante
el almacenamiento. La gasolina acida puede
danar el sistema de combustible de un motor
durante el perido de almacenamiento.
• Vaciar el depSsito del carburante poniendo
en marcha el motor y dej_.ndolo funcionar
hasta que el carburante termine y el
carburador est_ vac{o.
• Nunca use los productos para limpieza del
carburador odel motor en el estanque de
combustible pues se pueden producirdafios
permanentes.
• Use combustible nuevo la pr6xima tempo-
rada.
AVISO: El estabilizador de combustible es una
altemativa aceptable para reduoira un minimo
la formacibn de dep6sitos de goma en el com-
bustible durante el per[odede almacenamiento.
Agregue estabilizador a la gasolina en el
estanque de combustible o en el envase para et
alrnacenamiento. Siempre siga la proporci6nde
mezcla que se encuentra en el envase deJesta-
bilizador. Haga funcionar el motor per Io menos
10 minutes despu_s de agregar el estabilizador,
para permitir que este iEegueal carburador. No
drene Ia gasolina det estanque de gasolina y el
carburador si se est_ usando estabiiizadorde
combustible.
ACEITE DEL MOTOR
Mangoinferior Drene el aceite (con el motor caliente) y cdm o
bielo con aceite de motor limpio. (Vea "MO-
TOR" en la secci6n de Mantenimento de este
manual.)
33

ClUNDRO
1. Remueva la buj{a.
2. Vac{e una onza (29 ml) de aceite a trav_s
del agujero de fabujia en el cilindro.
3. Tire la manilla de arranque lentamente unas
cuantas veces para distribuir el aceite.
4. Vuelva a rnontar la nueva buj_a.
OTROS
• No guarde la gasoIina de una temporada a la
otra.
• Cambie el envase de la gasolina si se empie-
za a oxidar. La oxidaciSn y/o Ia mugre en su
gasolina producirdn problemas.
• Si es posible, guarde su unidad en un recinto
cerrado y c,3brala para protegerla contra el
polvo y la mugre.
• Cubra su unidad con un forro protector
adecuado que no retenga Ia humedad. No
use plastico. El pl_stico no puede respirar, Io
qua permite la formaciSn de condensaci6n,
]o qua producir& la oxidaciSn de su unidad.
IMPORTANTE: Nunca cubra la segadora
mientras el motor y las areas de escape todavia
estan calientes.
,t_PRECAUCI6N: Nunca almacene la
segadora con gasolina en el estanque dentro
de un edificio en donde los gases pueden
alcanzar una llama expuesta o una chispa.
Permita qua se enfrfe el motor antes de
almacenarta en algt_nrecinto cerrado.
SOLUCION DE PROBLEMAS - Vea la seccibn apropiada en el manual amenos que
est_ dirigido a
PROBLEMA
No arranca 1.
2.
3.
4.
un centro de servico cualificado.
CAUSA
Filtro de aire sucio.
Sin combustible.
Combustible rancio.
Agua en el combustible.
5. Alambre de fa bu|ia desconectado.
6. Bujfa mala.
7. Cuchi!la suelta o adaptador
de Ia cuchilla quebrado.
8. Barra de control en la
posici6n suelta.
9. Barra de control defectuosa.
10. V__lvutadel combustible (si equ-
ipada) esta en la posiciSn OFF.
11. Bateria d_bi (si equipada).
12. Desconecte el conector
de la bateria (si equipada).
CORRECCION
1, Limpie/cambie el filtro de aire.
2. Llene el estanque de combustible,
3. Vaciar el estanque yvuelva a Jlenar-
Io concombustible limpio y nuevo.
4. Vaciar el estanque y vuelva a llenar-
Io con combustible limpio y nuevo.
5. Conecte el alambre a Ia bujfa.
6. Cambie la bujia.
7. Apriete el perno de la cuchilla
cambie etadaptador de la cuchilla.
8. Presione la barra de control
hacia el mango.
9. Cambie la barra de control.
10, Gire a Ia v_.lvula det combustible
a la posiciSnON.
11. Cague [a bateria,
12. Conecte la baterfa at motor.
34

SOLUCION DE PROBLEMAS - Vea la secci6n apropiada en el manual amenos que
est_ dirigido a un centre de service cualificado,
PROBLEMA
Falta de
fuerza
Mal corte-
disparejo
Vibract6n
excesiva
CORRECCJ6N
1. 1. Eleve la altura de corte.
2.
3.
4.
i5.
6,
2.
3,
1,
2.
Cord6n 1,
arrancador
diffcil de tirar
2.
3.
4,
Recogedor de 1.
cdsped no se 2.
Ilena (si vlene
equipado) 3.
Dificl! de 1.
empujar
2.
3.
4.
P6rdida de
impulsl6n
o retardase
de la
velocidad
CAUSA
CuchiUadesgastada, doblada
o sue[ta.
Altura de las ruedas dispareja.
Vetocidad de! motor lenta.
Acumulaci6n de c_sped, hojas o
basura debajo de la segadora.
Demasiado aceite en motor.
Velocidad de recorddo
demasiado r_pida.
Cuchilla desgastada, doblada
o suelta.
Altura de las ruedas dispareja.
Acumulaci6n de c_sped, hojas o
basura debajo de ta segadora.
Cuchilla desgastada, doblada
o suelta.
CigueSal del motor doblado.
El freno del volante del motor
est& aplicado cuando se
suelta la barra de control.
CigueSal de] motor doblado.
Adaptador de Ia cuchilla quebrado.
La cuchilla se arrastra en
el c_sped.
Altura de corte demasiado baja.
Levantamiento de la cuchilla
desgastado.
Recogedor sin ventilaci6n de aire.
El c_sped est,. demasiado alto o la
altura de la rueda demasiado baja.
Parte trasera de Ia
cajaJcuchillade la segadora
arrastrdndose en el c_sped.
Recogedor de c6sped
demasiado Ileno.
Posici6n de Ia altura del mango
no adecuada para usted.
1. Desgaste de la correa.
2. La correa estd fuera de la polea.
3. Cable de la impulsi6n usado o rote.
4. Et sistema de controlde]
mecanismo impulsor"suelto".
2. Eleve la altura de corte,
3. Umpie/cambie el filtro de aire.
4. Limpie la parte inferior de la
caja de la segadora.
5. Revise et niveldet aceite.
6. Corte a una velocidad de
recorrido rods lenta.
1. Cambie la cuchilla.Apriete el perno
de la cuchilla_
2. Ajuste todas las ruedas a la misma
altura.
3. Lirnpie la parte infedor de la
caja de la segadora.
1. Cambie fa cuchilla.Apdete el
perno de lacuchilla.
2. P6ngase en contacto con su centre
de servicio cualificado.
1. Presione ]abarra de control
hacia el mango superior antes
de tirar el cordbn arrancador.
i2. P6ngase en contacto con su centre
de servicio cualificado.
3. Cambie el adaptador de la cuchilla,
4. Mueva la segadora a un fugar
en donde el c_sped ha side
cortado o a una superficie firme
para hacer arrancar el motor.
1. Eleve la attura de torte.
2. Cambie las cuchitlas.
3.
t.
2.
3.
4.
1.
2.
3.
4,
Limpie el recogedor de c6sped.
Eteve la altura de corte.
Eleve la parte trasera de la caja de
lasegadora (1) un Iugar mds alto.
Vao/e el recogedor de c_sped.
Ajuste la attura del mango de
mode que le acomode.
Revise/cambie correa de imputsi6n.
Revise/vuelva a instalar la
Cambie el cable de la impulsi6n.
Ajuste el control del mecanismo
impulsor.
35

\
/
/
\
/
36

A
o
_o
_D
O_
0C
ILl
Z
d
.=:
I,I.
1
o
¢0
<
re
ILl
m
z
,4
LLI
13
O
LLI
O
:E
Z
..,4
>-
CC
O
0C
_ - _< _ o ._
"r 00 x _ _ e,-
m $,-I o c o 0-_ _ _ _ o._
o _ o° g
o x x x
gNN R NN NNb_N: N N_NN _o
=::,- ,=_ = "a
:_×_a _ _= _ v_ -
_50 _ >,
.co_ _.'_ _ _'_ _ _
o
_00_0_
o _,==
-_o_ ......
8 _" _ o
I- . X X X XX
a7
XXXX
__0_
o
>o
o_
E
E
E_
_o
,N o
=;
_g
g_
_N
8w
Z--
lal
_g
o
8
Z
o

cO
38

o
o
o
o
o
o')
n'-
ILl
fn
Z
d
d
I.L
Z
0
1.1.1
Z
W
0
ILl
0
Z
..I
0
z
0
F-
I,tl
o
md
_z
wO
_z
z
0
F-
n-
O
tU
=d
_d
vZ
39
m
_o
E
g
_o
°-___
8_
_o
E
0

HONDA 4-CYCLE ENGINE MODELNUMBERGCV160-LAS3A
i i i UlL,]U_IUWIvl_uLU,lUUULL
LABEL 1
FAN COVER I/
AiR CLEANER J
CHOKE !
3
,..... 1
._.k_j
f2
CARBURETORI
--8
RECOIL STARTER I.........................
40

HONDA 4-CYCLE ENGINE MODEL NUMBER GCV160-LAS3A
IIIIIIIIIIIIIIIIIHII II I[ II I I IIII II I
LABELS
KEY PART
NO. NO.
3 8311029
9 7400187
DESCRIPTION
Label, Warning
Mark, Choke Indication
DESCRIPTION
Spring, Cable Return
Lever, Choke
Spring, Choke Lever
Rod, Stop
Bolt, Flange #6 x 20 (CT200)
CHOKE
KEY PART
NO. NO.
1 8575755
2 8449506
3 8575763
4 7229867
5 0671552
CAMSHAFT PULLEY
KEY PART
NO. NO. DESCRIPTION
1 7049679 Pulley, Camshaft
2 5580063 Shaft, Cam Pulley
3 7058985 Belt, Timing(84HU7 G200)
4 7526122 RockerArm, Intake Valve
5 7526130 RockerArm, Exhaust Valve
6 5580105 Shaft, RockerArm
7 7647118 Valve, Intake
8 5580121 Valve, Exhaust
9 5580139 Spring, Valve
10 7526148 Retainer, Valve Spring
11 0294819 Screw, TappetAdjusting
12 0004598 Nut, TappetAdjusting
13 6315873 ORing 6.8 x 1.9 (ARAI)
14 6839831 Seal, ValveStem
FAN COVER
KEY PART
NO. NO. DESCRIPTION
3 3683646 Rubber Supporter (107 ram)
5 7425770 Cock Assembly, Fuel NO.
6 2084903 Filter, Fuel 1
7 8571986 Tank, Fuel 2
8 8571994 Seal, Fuel Filler Neck 3
9 8572000 Clip, Tank Mounting 5
I0 8572018 RubberA, Tank Mounting 6
11 8572026 Rubber B, Tank Mounting 8
12 8572034 Nut, Tank Mounting A)
13 8572042 Cap Assembly, Fuel Tank 9
14 8572059 Gauge, Fuel Level 10
16 8572075 Tube, Fuel Tank 13
17 7425804 Tube, Fuel 14
19 8581894 Cover, Fan (T89) 15
20 5580527 Collar, Fan Cover 16
21 6978399 Collar, Fuel Cock 19
23 5581004 Bolt, Stud 20
26 0671636 Screw, Washer Head #5 x 10 22
29 0250647 Clip, Tube (B8)
30 0250985 Clip, Tube (B10)
33 0053595 Clip. Tube (Cll) 24
CARBURETOR
KEY PART
NO.
3088416
5580162
3465879
1672187
1441518
8313900
7934714
5580220
5580238
5580246
4581120
5580253
5580535
0639419
0635474
0635482
0636126
8953895
DESCRIPTION
Gasket Set
FloatSet
Chamber Set, Float
Screw Set, Drain
Screw Set
Carburetor Asssembly (BB62Z
Valve, Float
Nozzle, Main
Insulator, Carburetor
Gasket, Insulator
Gasket, Carburetor
Gasket, Carburetor
Guide, Air
Screw, Pan Head #5 x 6
Jet, Main #60
Jet, Main #62
Jet, Main #65
Chamber Set, Float
RECOIL STARTER
KEY PART
NO. NO. DESCRIPTION
1 8140147 Starter Assembly, Recoil
8 5580634 Grip, Starter
9 8106791 Rope, Recoil Starter
11 6478812 Nut, Flange 6 mm
AIR CLEANER
KEY PART
NO. NO.
1 5580154
2 8236440
3 5580410
5 5664560
6 7745011
7 5580964
8 2374742
DESCRIPTION
Tube, Breather
Element, Air Cleaner
Case Assembly, Air Cleaner
Packing,Air Cleaner
Cover,Air Cleaner
Bolt, Flange #6 x 86 (CT200)
Bolt, Flange #6 x I4
41

HONDA4-CYCLEENGINE
CYLINDER BARREL ]
CRANKSHAFT_
MODEL NUMBER GCV160-LAS3A
PISTON CONNECTING ROD J
4
5
FLYWHEEL
42

HONDA 4-CYCLE ENGINE MODEL NUMBER GCV160-LAS3A
FLYWHEEL
KEY PART
NO. NO. DESCRIPTION
1 1240845 Grommet A, Rear Cover
2 0348433 Key, Special, Woodruff #25 x
18
4 5580659 Coil Assembly, ignition
5 5580667 Flywheel Assembly
7 6869630 Arm, Governor
8 7229859 Rod, Governor
9 6315816 Cord, Stop Switch
10 5580683 Switch Assembly, Engine Stop
11 7526155 Holder, Wire
12 5580352 Spring, Throttle Return
13 7301591 Brake Sub-Assembly
14 2488187 Bolt, Flange #6 x 45 (CT200)
15 5580790 Spring, Brake Lever
16 2418671 Bolt, Governor Arm
17 0471623 Nut, Flange 6ram
18 0803619 Bolt, Flange #6 x 14 (CT200)
19 1725050 Bolt, Flange #6 x 23 (CT200)
20 0442038 Nut, Special 14 mm
21 0485946 Screw, Washer Head #4xt2
22 1510361 Washer, Plain 4ram
CYLINDER BARREL
KEY PART
NO. NO. DESCRIPTION
1 7809890 Barrel Assembly, Cylinder
3 5579990 Cover, Head
4 5580006 Cover Comp., Breather
5 0636845 Bolt, Flange #6 x 12 (CT200)
6 0803619 Bolt, Flange #6 x 14 (CT200)
7 5581038 OilSeat 25Ax62x6
8 1441112 Plug, Spark(BPR6ES) (NGK)
PISTON / CONNECTING ROD
KEY PART
NO. NO. DESCRIPTION
1 8571945 Piston
2 1426576 Pin, Piston
3 8270217 RodAssembly, Connecting
4 1431055 Bolt,Connecting Rod
5 2605517 Clip, Piston Pin 13 mm
6 8571937 RingSet, Piston (Teikoku)
CRANKSHAFT
KEY PART
NO. NO. DESCRIPTION
3 5664495 Crankshaft Comp.
5 5581012 Washer, Thrust
OIL PAN
KEY PART
NO. NO. DESCRIPTION
1 6771489 PanAssembly, Oil
2 1452754 Gasket, Oil Fillercap
4 5664503 Extension, Oil Filler
5 5664511 Washer, Extension Lock
6 5716915 Gauge Assembly, Oil Level
8 6384341 Shaft, Governor Holder
9 6384333 Governor Assembly
I0 5580287 Weight, Governor
11 5580295 Holder, Governor Weight
12 1427244 Pin, GovemorWeight
13 1427251 Slider, Governor
14 5580303 Shaft, Governor Arm
15 0803619 Bolt, Flange #6 x t4 {CT200)
16 0748111 Bolt, Flange #6 x 25
18 2413862 Washer, Thrust 6 mm
19 2456697 Clip, Governor Holder
20 5581046 OilSeat 28x41,25x6
22 1377704 ORing 14,Sx2A(NOK)
23 0345900 Washer, Plain 6 mm
25 0115527 Pin, Lock 8ram
26 1417369 DoweIPin #8x20
MUFFLER
KEY PART
NO. NO. DESCRIPTION
1 8213597 Kit, Spark Arraster
2 5580485 Muffler,Complete
3 7377062 Protector,Muffler
5 5656012 Spark Arrester
6 5611397 Plate, Arraster Number
7 5737457 Gasket, Muffler
8 5580972 Bolt,Flange #6 x 79 (CT200)
9 0636845 Bolt, Flange #6 x 12 (CT200)
11 14.31121 Screw, Tapping #4x6
43

LIMITED WARRANTY
The Manufacturer warrants to the original consumer purchaserthatthis product as
manufactured is free from defects in materials and workmanship. For a period of
two (2) years from date of purchaseby the original consumer purchaser, we will re-
pair or replace, at our option, without charge for parts or labor incurred in replacing
parts, any part which we find to be defective due to materials or workmanship. This
Warranty is subject to the following limitations and exclusions.
1.This warranty does not apply to the engine, transaxle/transmission components,
battery (except as noted below) or components parts thereof. Please refer to the
applicable manufacturer's warranty on these items.
2.Transportation charges for the movement of any power equipment unit Orat-
tachment are the responsibility of the purchaser. Transportation chargesfor any
parts submitted for replacement under this warranty must be paid by the pur-
chaser unless such return is requested by the manufacturer.
3. Battery Warranty: On products equipped with a Battery, we will replace, without
charge to you, any battery which we find to be defective in manufacture, during
the first ninety (90) days of ownership. After ninety (90) days, we will exchange
the Battery, chargingyou 1/12 of the price of a new Battery for each full month
from the date of the original sale. Battery must be maintained in accordance with
the instructions furnished.
4.The Warranty period for any products used for rental or commercialpurposes is
limited to 45 days from the date of original purchase.
5.This Warranty applies only to products which have been properly assembled,
adjusted, operated, and maintained inaccordance with the instructions furnished.
This Warranty does notapply to any product which has been subjected to al-
teration, misuse, abuse, improper assembly or installation, delivery damage, or to
normal wear of the product.
6. Exclusions: Excluded from this Warranty are belts, blades, blade adapters, nor-
mal wear, normal adjustments, standard hardware and normal maintenance.
7. In the event you have a claim under this Warranty, you must return the product to
an authorized service dealer.
Should you have any unanswered questions concerning this Warranty, contact:
HOP in Canada contact:
Customer Service Department HOP
9335 Harris Corners Parkway Customer Service Department
Charlotte, NC 28269 USA 5855 Terry Fox Way
Mississauga, Ontario L5V 3E4
giving the model number, serial number and date of purchase of your product and
the name and address of the authorized dealer from whom it was purchased,
THIS WARRANT'-( DOES NOT APPLY TO INCIDENTAL OR CONSEQUENTIAL
DAMAGES AND ANY IMPLIED WARRANTIES ARE LIMITED TO THE SAME
TIME PERIODS STATED HEREIN FOR OUR EXPRESSED WARRANTIES.
Some areas do not allow the limitation of consequential damages or limitations
of how long an impliedWarranty may last, so the above limitations or exclusions
may not apply to you. This Warranty gives you specific legal rights, and you may
have other rights which vary from locale to locale.
This is a limitedWarranty within the meaning of that term as defined in the Mag-
nuson-Moss Act of t975.
-
 1
1
-
 2
2
-
 3
3
-
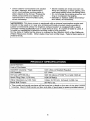 4
4
-
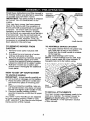 5
5
-
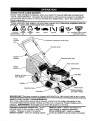 6
6
-
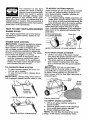 7
7
-
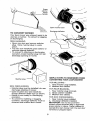 8
8
-
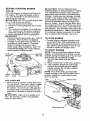 9
9
-
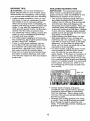 10
10
-
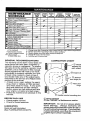 11
11
-
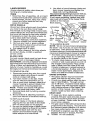 12
12
-
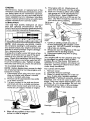 13
13
-
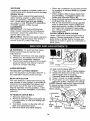 14
14
-
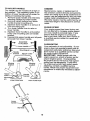 15
15
-
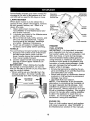 16
16
-
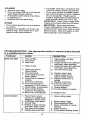 17
17
-
 18
18
-
 19
19
-
 20
20
-
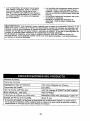 21
21
-
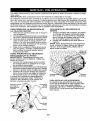 22
22
-
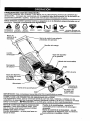 23
23
-
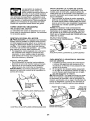 24
24
-
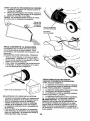 25
25
-
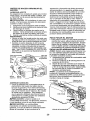 26
26
-
 27
27
-
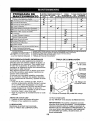 28
28
-
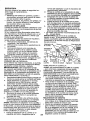 29
29
-
 30
30
-
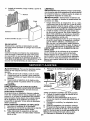 31
31
-
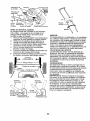 32
32
-
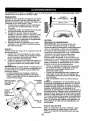 33
33
-
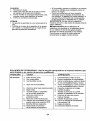 34
34
-
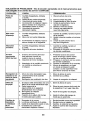 35
35
-
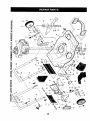 36
36
-
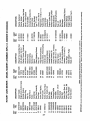 37
37
-
 38
38
-
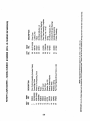 39
39
-
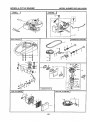 40
40
-
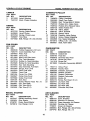 41
41
-
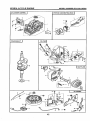 42
42
-
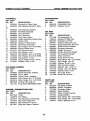 43
43
-
 44
44


Ariens 96146000400 El manual del propietario
- Categoría
- Cortadoras de césped
- Tipo
- El manual del propietario
- Este manual también es adecuado para
En otros idiomas
- English: Ariens 96146000400 Owner's manual