Glacier Bay HD67392W-6B04 Guía de instalación
- Categoría
- Artículos sanitarios
- Tipo
- Guía de instalación

THANK YOU
INSTALLATION AND CARE GUIDE
Questions, problems, missing parts?
Before returning to the store, call Glacier Bay Customer Service
8 a.m. - 7 p.m., EST, Monday - Friday
9 a.m. - 6 p.m., EST, Saturday
1-855-HD-GLACIER (1-855-434-5224)
HOMEDEPOT.COM/GLACIERBAY
EDGEWOOD 8 IN. WIDESPREAD 2-HANDLE
HIGH-ARC BATHROOM FAUCET
faucet. We strive to continually create quality products designed to enhance your home. Visit us online to see
our full line of products available for your home improvement needs. Thank you for choosing Glacier Bay!
8/2019 REV.02THD
Model#
HD67392W-6B04
HD67392W-6A01
HD67392W-6027D
SKU#
125344
304367704
300640773
80g
(mm) 280x216
16
6
(mm) 216x140
+
A
-
-

2
Table of Contents
Important Information ..............................2
Warranty ...................................................2
Pre-Installation .........................................2
Planning Installation ..............................2
Package Contents ..................................3
Installation ................................................4
Care and Cleaning ....................................10
Troubleshooting ........................................10
Service Parts
...........................................
11
Important Information
□ Observe all local plumbing and building codes.
□ Cover the sink drain to avoid losing any parts.
□ Review the care and cleaning section included in this guide.
Pre-Installation
PLANNING INSTALLATION
Before beginning the installation of this product, ensure all parts are present. Compare parts with the Package
Contents list. If any part is missing or damaged, do not attempt to install the product. Contact Customer Service
for replacement parts.
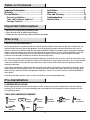
TOOLS AND HARDWARE REQUIRED
Tools and Hardware Required ...............2
Operation...................................................9
Phillips
screwdriver
Basin
wrench
Adjustable
wrench
Safety
goggles
Channel
lock pliers
(2) Supply
lines
SILICONE
Silicone
sealant
HacksawPliers
Warranty
LIMITED LIFETIME WARRANTY
Glacier Bay products are manufactured with superior quality standards and workmanship and are backed by our
limited lifetime warranty. Glacier Bay products are warranted to the original consumer purchaser to be free of
defects in materials or workmanship. We will replace FREE OF CHARGE any product or parts that proves defective.
Simply, return the product / part to any of The Home Depot retail locations or call 1-855-HD-GLACIER (1-855-434-
5224) to receive the replacement item. Proof of purchase (original sales receipt) from the original consumer
purchaser must be made available for all Glacier Bay warranty claims.
This warranty excludes incidental/inconsequential damages and failures due to misuse, abuse or normal wear and
tear. This warranty excludes all industrial, commercial and business usage, whose purchasers are hereby extended
a ve year limited warranty from the date of purchase, with all other terms of this warranty applying except the
duration of warranty.
Some states and provinces do not allow the exclusion or limitation of incidental or consequential damages, so the
above limitations may not apply to you. This warranty gives you specic legal rights and you may also have other
rights that vary from state to state and province to province. Please see a store or contact 1-855-HD-GLACIER for
more details.
Contact the Customer Service Team at 1-855-434-5224 or visit www.HomeDepot.com.

3
Pre-Installation (continued)
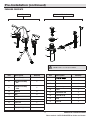
PACKAGE CONTENTS
Part Description Quantity
A 1
B
Handle assembly
- Hot
1
C
Handle assembly
- Cold
1
I Quick connect hose 1
Faucet body
D 2
E Nut 2
F Screw 4
Washer
G 2
H Lock nut 1
Washer
Part Description Quantity
Faucet Assembly
ClickInstall Drain Assembly
NOTE: *Items J - N come pre-assembled.
J 1Pop up stopper
K 1
L 1Rubber washer
M 1Lock nut
N 1Drain body
O 1Joint
P 1Horizontal rod
Q 1Lift rod strap
S 1Lift rod
R 1Clip
HOMEDEPOT.COM/GLACIERBAY
Please contact 1-855-HD-GLACIER for further assistance.
J*
K*
L*
M*
Q
R
N*
O
P
S
C
A
B
I
G
H
D
E
F

4
Installation
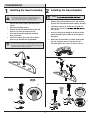
1
Installing the faucet assembly
CAUTION: Always shut off the water supply before
removing an existing faucet or replacing any part of a
faucet. Open the faucet handle to relieve water pressure
and ensure that the water is completely shut off.
□ Place the faucet (A) through the mounting
holes in the sink.
□ Secure the faucet (A) to the sink using the
washers (G) and lock nut (H) provided.
2
Installing the faucet handles
□ Remove the preassembled nuts (E) and washers
(D) from the hot and cold faucet handles (B and C).
□ Insert the hot faucet handle (B) to the left of the
spout and cold faucet handle (C) to the right of
the spout.
NOTE:
□ Shut off the water supply. Remove the old
faucet.
□ Clean the mounting surface.
□ Loosen the screws (F) on the nuts (E) until the
ends of the screws (F) a
the nuts (E).
□ Attach the faucet handles (B and C) underneath
the sink using the washers (D) and nuts (E).
Securely tighten the screws (F) on the nuts (E).
□ Remove the preassembled lock nut (H) and
washers (G) from the new faucet (A).
NOTE: Ensure that the hole for the lift rod faces toward
the rear of the sink during installation. When you insert the
lift rod (S), the lift rod (S) can go through the faucet (A) and
down into the slot of the washers (G).
A
H
G
H
1
2
A
3
D
D
3
3
2
2
B
C
1
F
E
1
4
4
E
4
F
5
E
F
E
F

5
Installation (continued)
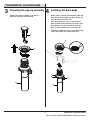
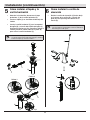
4
Installing the drain body
□ Apply silicone sealant (not included) under the
drain ange (K) and place the drain ange (K)
into the drain hole of the sink.
□ From underneath the sink, screw the drain
body (N) onto the drain ange (K). Ensure that
the opening (1) for the ball rod on the drain
body (N) faces towards the rear of the sink.
3
Preparing the pop-up assembly
□ Remove the pop-up stopper (J) and drain
ange (K) from the drain body (N).
□ Tighten the rubber washer (L) and lock nut (M)
on the drain body (N). Hand-tighten only.
HOMEDEPOT.COM/GLACIERBAY
Please contact 1-855-HD-GLACIER for further assistance.
J
K
N
1
2
K
L
M
SILI
N
1

6
Installation (continued)
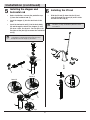
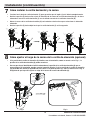
5
Installing the stopper and
horizontal rod
□ Insert the stopper (J) into the drain hole in the
sink.
□ Before installation, unscrew the protective cap
(1) from the horizontal rod (P).
6
□ Slide the lift rod (S) down into the lift rod
strap (Q) through the faucet (A) until it clicks
into the lift rod strap (Q).
Installing the lift rod
□ Insert the horizontal rod (P) into the drain body
(N) and through the hole of the stopper (J) until
you hear a click. See insert 2. You can press the
two sides of the joint (O) to remove the horizontal
rod (P).
NOTE: For easier removal and cleaning, rotate the stopper
(J) 90 degrees so that the horizontal rod (P) does not go
through the hole in the stopper (J). See insert 3.
Insert 3
Insert 2
1
1
P
2
N
J
3
O
P
N
O
NOTE: If a shorter lift rod (S) is required for your
installation, you may call Glacier Bay Customer Service
for assistance.
2
S
Q
S
Q
1
S
A

7
Installation (continued)
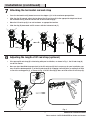
8
Adjusting the length of lift rod strap (optional)
□
If the pop up lift rod strap (Q) is interfering with your installation, as shown in Fig. 1, the lift rod strap (Q)
can be cut shorter.
□
Once you have identied the proper hole in the lift rod strap (Q) that is necessary for your installation, you
may cut off the bottom portion (1) of the lift rod strap (Q) by snapping it off with pliers or cutting it off with
a saw at the cutting point (2), as shown in Fig. 2. Ensure the clip (R) does not slide off the lift rod strap (Q).
HOMEDEPOT.COM/GLACIERBAY
Please contact 1-855-HD-GLACIER for further assistance.
7
□ Slide the clip (R) upward, adjust the location of the lift rod strap (Q) to the appropriate height and insert
the horizontal rod (P) with the correct hole of the lift rod strap (Q).
□ Move the lift rod strap (Q) in or out to choose an appropriate location.
□ Press the horizontal rod (P) down to ensure the stopper (J) is in the maximum open position.
Attaching the horizontal rod and strap
□ Slide the clip (R) downward until it secures with the horizontal rod (P).
Hole
5
P
J
R
Q
1
2
3
3
P
J
R
Q
R
4
4
P
J
R
Q
Fig. 1 Fig. 2
Q
1
2
Q
Q
R

8
Installation (continued)
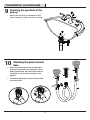
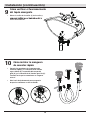
9
Checking the operation of the
pop-up
□ Operate the lift rod (S) up and down to verify
that the stopper (J) opens and closes correctly.
10
Attaching the quick connect
hose
□ Attach the quick connect hose (I) connections
to the hot faucet handle (B) connection, faucet
body (A) connection, and cold faucet handle (C)
connection. Push until the connections snap
together.
□ Pull down moderately to ensure the connections
have been made.
3
2
J
S
1
C
I
A
B

9
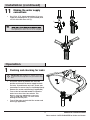
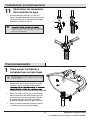
11
Making the water supply
connections
□ Use 1/2 in. I.P.S. faucet connections (2), or use
supply line coupling nuts (3) (not included) with
a 3/8 in. O.D. ball-nose riser (1).
NOTE: Before tightening the faucet connector to the water
This will prevent the supply tube from moving or twisting
when tightening the faucet connector. Do not overtighten.
Installation (continued)
HOMEDEPOT.COM/GLACIERBAY
Please contact 1-855-HD-GLACIER for further assistance.
Operation
1
Flushing and checking for leaks
IMPORTANT: After installation is complete, remove the
aerator from the faucet (A) with a coin (1) to ush the water
lines.
□ Ensure the faucet (A) handles are in the off
position and turn on the water supply to check
for leaks. If you discover any leaks, check your
connections to ensure they are installed properly.
□ Remove the aerator and housing (if applicable).
Turn on the hot and cold handles to allow the
water to run for at least one minute. This
damage to internal parts.
□ Turn off the water and reinstall the aerator and
housing (if applicable).
3
1
2
A
1

10
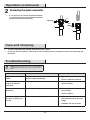
2
Removing the quick connector
□ If it is necessary to remove the quick connector
(1), squeeze the tabs (2) on the quick connector
and then pull down to disconnect.
Care and Cleaning
□ To clean, wipe down with a damp cloth and dry with a towel.
□ Do not use abrasive cleaners, steel wool, or harsh chemicals when cleaning this faucet, or the warranty will
be voided.
Operation (continued)
Troubleshooting
Problem Possible Cause Solution
There are leaks from the
handle.
The bonnet nut has come loose and/or the
washer is dirty or damaged.
□ Tighten the bonnet nut.
□ Clean or replace the washer.
The aerator has an
irregular or reduced
water ow.
□ Remove the aerator and
check for debris.
The water will not shut off
completely.
The cartridge is dirty or broken. □ Remove the handle to check
the cartridge.
□ Clean or replace.
The aerator is dirty or mis-tted.
NOTE: Refer to the service parts section in this manual for
a detailed drawing showing the location of the parts listed
below.
There is leaking from the
sink drain at the base of
the sink.
The sink has a rough or irregular surface. □ Apply additional silicone sealant
to the beveled side of the drain
ange.
□ Retighten and test for leaks.
Squeeze
Pull
down
2
1
1

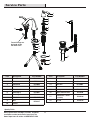
11
Service Parts
*Specify Finish
Many replacement cartridges, aerators, and drain
assemblies can be purchased at your local The
Home Depot store or online at HOMEDEPOT.COM
Faucet ID tags can
be found on the
hot water inlet
17
18
1
2
3
4
5
6
7
8
9
10
11
12
13
14
15
16
Part Description Part Number
1 RP13149*
2 Set screw RP50002
3
4
Connector RP50003
5
6
Inverter RP64044
7
Cartridge H RP20067
Cartridge C RP20068
8
Handle
Nut
RP56137
O-ring RP60002
Part Description Part Number
9
10
Washer
RP64147
12
Screw
13
14
15
16
Washer RP64193
Lock nut RP56062
Bonnet nut RP70193
Block RP70421
Quick connect hose RP70430
17
ClickInstall™ drain
assembly
RP40228*
18 Lift rod RP40234*
11 Aerator RP30209

Questions, problems, missing parts?
Before returning to the store, call Glacier Bay Customer Service
8 a.m. - 7 p.m., EST, Monday - Friday
9 a.m. - 6 p.m., EST, Saturday
1-855-HD-GLACIER (1-855-434-5224)
HOMEDEPOT.COM/GLACIERBAY
Retain this manual for future use.

GRACIAS
GUÍA DE USO Y MANTENIMIENTO
¿Problemas, preguntas o piezas faltantes?
Antes de regresar a la tienda, llama al servicio al cliente de
Glacier Bay de lunes a viernes entre 8 a.m. y 7 p.m. y los
sábados entre 9 a.m. y 6 p.m.(hora estándar del Este)
1-855-HD-GLACIER (1-855-434-5224)
HOMEDEPOT.COM/GLACIERBAY
EDGEWOOD MEZCLADORA PARA BAÑO, DE ARCO
ALTO, CON 2 MANERALES Y PIEZA EXTENDIDA DE 8"
Agradecemos la conanza que has depositado en Glacier Bay al comprar este grifo para lavamanos. Nos esforzamos
por crear continuamente productos de calidad diseñados para mejorar tu hogar. Visítanos en Internet para ver
nuestra línea completa de productos disponibles para las necesidades de mejoras de tu hogar. ¡Gracias por
elegir a Glacier Bay!
Modelo núm.
HD67392W-6B04
HD67392W-6A01
HD67392W-6027D
SKU núm.
125344
304367704
300640773

14
Información importante
□ Cumple con todos los códigos locales de construcción y de plomería.
□ Cubre el drenaje del lavabo para evitar que se pierda alguna pieza.
□ Consulta la sección de mantenimiento y limpieza incluida en esta guía.
HERRAMIENTAS Y HERRAJES NECESARIOS
Tabla de contenido
Información importante .........................14
Garantía...................................................14
Pre-instalación .......................................14
.............14
Herramientas y herrajes necesarios ....14
Contenido del paquete .........................15
Instalación ..............................................16
Funcionamiento ......................................21
Cuidado y limpieza ................................22
Piezas de repuesto ................................23
Planicación de la instalación
Solución de problemas ...........................22
Pre-instalación
PLANIFICACIÓN DE LA INSTALACIÓN
Antes de comenzar la instalación de este producto, asegúrate de que no falta ninguna pieza. Compara las piezas
con la lista de Contenido del paquete. Si falta alguna pieza o está dañada, no intentes instalar el producto.
Comunícate con el servicio al cliente para piezas de repuesto.
Destornillador
Phillips
Llave para
grifería
Llave
ajustable
Gafas de
seguridad
Pinzas
ajustables
Líneas de
suministro
SILICONE
Sellador de
silicona
Sierra para
metales
Alicate
Garantía
GARANTÍA DE POR VIDA LIMITADA
Los productos de Glacier Bay están fabricados con normas y mano de obra de calidad superior y están respaldados
por nuestra garantía de por vida limitada. Los productos de Glacier Bay están garantizados al comprador consumidor
original de estar libres de defectos en materiales o mano de obra. Reemplazaremos LIBRE DE CARGOS cualquier
producto o pieza que se demuestre está defectuosa. Símplemente, devuelva el producto a cualquiera de las
ubicaciones de venta al detalle de The Home Depot o llame al 1-855-HD-GLACIER (1-855-434-5224) para recibir el
artículo de reemplazo. La prueba de compra (recibo de venta original) del comprador consumidor original debe estar
disponible para todos los reclamos de garantía de Glacier Bay.
Esta garantía excluye daños y fallos incidentales/consecuenciales debido al mal uso, abuso o desgaste normal por
el uso. Esta garantía excluye todos los usos industriales, comerciales y de negocios, a cuyos compradores por la
presente, se les ha ampliado una garantía limitada de cinco años a partir de la fecha de compra, con todos los otros
artículos de esta garantía que aplican excepto la duración de la garantía.
Algunos estados y provincias no permiten la exclusión o la limitación de los daños incidentales o consecuenciales,
por lo tanto, las limitaciones y exclusiones anteriores podrían no aplicar a usted. Esta garantía le otorga derechos
legales especícos y también puede tener otros derechos que varían de un estado a otro. Por favor, vaya a una
tienda o llame al 1-855-HD-GLACIER para más detalles.
Póngase en contacto con el Equipo de Servicio al Cliente llamando al 1-855-434-5224 o visite www.HomeDepot.com.

15
Pre-instalación (continuación)
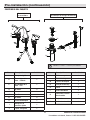
CONTENIDO DEL PAQUETE
Pieza Descripción Cantidad
A 1
B
Ensamblaje de la
llave - Caliente
1
C
Ensamblaje de la
llave - Fría
1
I
Manguera de
conector rápido
1
Cuerpo del grifo
D 2
E Tuerca 2
F Tornillo 4
Arandela
G 2
H Tuerca de bloqueo 1
Arandela
Pieza Descripción Cantidad
NOTA: *Los artículos J - N vienen preensamblados.
Ensamblaje de
la mezcladora
J 1Tapón emergente
K 1Brida emergente
L 1Arandela de goma
M 1Tuerca de bloqueo
N 1Cuerpo del drenaje
O 1Junta
P 1Varilla horizontal
Q 1
Correa de la varilla
de elevación
S 1Varilla de elevación
R 1Sujetador
HOMEDEPOT.COM/GLACIERBAY
Para obtener asistencia, llama al 1-855-HD-GLACIER.
Ensamblaje de desagüe ClickInstall
J*
K*
L*
M*
Q
R
N*
O
P
S
C
A
B
I
G
H
D
E
F

16
Instalación
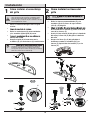
1
Cómo instalar el ensamblaje
del grifo
□
montaje del lavabo.
□ Asegura el grifo (A) al lavamanos con la
arandelas (G) y la contratuerca (H) suministradas.
2
Cómo instalar las llaves del
grifo
□ Retira las tuercas preensambladas (E) y las
arandelas (D) de las llaves de agua caliente
y fría (B y C) del grifo.
□ Inserta la llave caliente (B) del grifo a la izquierda
del caño y la llave fría (C) del grifo a la derecha
del caño.
NOTA:
una etiqueta.
□
los extremos de los tornillos (F) estén al ras de la
cara de las tuercas (E).
□ Asegura las llaves (B y C) del grifo bajo el
lavamanos usando las arandelas (D) y las
tuercas (E). Aprieta bien los tornillos (F) en las
tuercas (E).
□ Retira las contratuerca (H) preensambladas
y las arandelas (G) del grifo (A) nuevo.
□ Cierra el suministro de agua. Retira el grifo
anterior.
□
PRECAUCIÓN: Cierra siempre el suministro de agua
antes de retirar un grifo existente o reemplazar alguna
parte del mismo. Abre la llave del grifo para liberar la
presión de agua y asegúrate de que el suministro de agua
esté completamente cerrado.
NOTA:
esté frente a la parte trasera del lavamanos durante la
instalación. Cuando insertes la varilla de elevación (S),
esta (S) tiene que pasar a través del grifo (A) y hacia abajo
dentro de la ranura de las arandelas (G).
A
H
G
H
1
2
A
3
D
D
3
3
2
2
B
C
1
F
E
1
E
F
E
F
4
4
E
4
F
5

17
Instalación (continuación)
4
Cómo instalar el cuerpo del
drenaje
□ Aplica sellador de silicona (no incluido) debajo
de la brida del drenaje (K) y coloca ésta dentro
del oricio de drenaje del lavabo.
□ Desde la parte inferior del lavabo, enrosca el
cuerpo del drenaje (N) en la brida del drenaje (K).
Asegúrate de que la abertura (1) para la varilla
de bola del cuerpo del drenaje (N) esté frente
a la parte posterior del lavabo.
3
Cómo preparar el ensamblaje
emergente
□ Retira el tapón emergente (J) y la brida del
desagüe (K) del cuerpo del desagüe (N).
□ Aprieta la arandela de goma (L) y la tuerca
de bloqueo (M) en el cuerpo del drenaje (N).
Ajusta sólo con la mano.
HOMEDEPOT.COM/GLACIERBAY
Para obtener asistencia, llama al 1-855-HD-GLACIER.
J
K
N
1
2
K
L
M
SILI
N
1

□ Antes de la instalación, desenrosca la tapa
protectora (1) de la varilla horizontal (P).
18
Instalación (continuación)
5
Cómo instalar el tapón y la
varilla horizontal
□ Inserta el tapón (J) en el oricio del drenaje del
lavabo.
□ Inserta la varilla horizontal (P) en el cuerpo del
desagüe (N) y a través del oricio del tapón (J)
hasta que escuches un clic. Consulta el folleto 2.
Puedes presionar ambos lados de la junta (O)
para retirar la varilla horizontal (P).
Folleto 3
Folleto 2
6
□ Desliza la varilla de elevación (S) hacia abajo
en la correa de la varilla (Q) y a través del
grifo (A) hasta que haga clic dentro de la
correa (Q).
Cómo instalar la varilla de
elevación
NOTA: Para retirar y limpiar más fácilmente, gira el tapón
(J) a 90º de manera que la varilla horizontal (P) no atraviese
el oricio del tapón (J). Consulta el folleto 3.
NOTA: Si necesitas una varilla de elevación (S) más corta
para tu instalación, puedes llamar al Servicio al Cliente de
Glacier Bay para recibir ayuda.
1
1
P
2
N
J
3
O
P
N
O
2
S
Q
S
Q
1
S
A

Oricio
19
Instalación (continuación)
7
Cómo instalar la varilla horizontal y la correa
□ Desliza la presilla (R) hacia arriba, ajusta la ubicación de la correa de la varilla de elevación (Q) a la altura
adecuada e inserta la varilla horizontal (P) con el oricio correcto de la varilla de elevación (Q).
□ Mueve la correa de la varilla de elevación (Q) hacia adentro o hacia afuera para seleccionar la ubicación
adecuada.
□ Desliza la presilla (R) hacia abajo hasta que la varilla horizontal (P) esté asegurada.
□ Presiona hacia abajo la varilla horizontal (P) para garantizar que el tapón (J) esté abierto completamente.
Fig. 1 Fig. 2
8
Cómo ajustar el largo de la correa de la varilla de elevación (opcional)
□
Si la presilla de la varilla de elevación (Q) interere con tu instalación, como se muestra en la Fig. 1, la
presilla de la varilla de elevación (Q) puede recortarse.
□
Una vez que hayas identicado el oricio adecuado en la presilla de la varilla de elevación (Q) que es
necesario para tu instalación, puedes recortar la porción inferior (1) de la presilla de la varilla de elevación
(Q) partiendo con alicates o cortando con una sierra en el punto de corte (2), como se muestra en la Fig. 2.
Asegúrate de que la presilla (R) no se salga de la correa de la varilla de elevación (Q).
HOMEDEPOT.COM/GLACIERBAY
Para obtener asistencia, llama al 1-855-HD-GLACIER.
5
P
J
R
Q
1
2
3
3
P
J
R
Q
R
4
4
P
J
R
Q
Q
1
2
Q
Q
R

20
Instalación (continuación)
9
Cómo verificar el funcionamiento
del tapón emergente
□ Mueve la varilla de elevación (S) hacia arriba y
cierra correctamente.
10
Cómo instalar la manguera
de conector rápido
□ Conecta las conexiones de la manguera de
conector rápido (I) a la conexión de la llave de
agua caliente (B), la conexión del cuerpo del
grifo (A) y a la conexión de la llave de agua fría (C).
Presiona hasta que las conexiones se aseguren
entre sí.
□ Hala hacia abajo levemente para asegurarte
de que las conexiones se han realizado.
3
2
J
S
1
C
I
A
B

21
11
Cómo hacer las conexiones
del suministro de agua
□ Usa conexiones de grifos de 1/2" IPS (2) o
tuercas de acoplamiento de líneas de suministro
(3) (no incluidas) con un tubo montante de bola
de diámetro exterior de 3/8" (1).
NOTA: Antes de apretar el conector del grifo al suministro
colocando una segunda llave . Esto evitará que la tubería de
suministro se mueva o gire cuando aprietes el conector del
grifo. No aprietes demasiado.
Instalación (continuación)
HOMEDEPOT.COM/GLACIERBAY
Para obtener asistencia, llama al 1-855-HD-GLACIER.
Funcionamiento
1
Cómo purgar las tuberías y
comprobar que no haya fugas
IMPORTANTE: Después de terminar la instalación, retira
el aireador del grifo (A) con una moneda (1) para descargar
las líneas de agua.
□ Asegúrate de que las llaves del grifo (A) estén
cerradas y abre el suministro del agua para
asegurarte de que estén instaladas adecuadamente.
□ Retira el aireador y la carcasa (si corresponde).
Abre los manerales del suministro de agua fría
y caliente y deja que corran durante al menos
un minuto cada una. Esto elimina cualquier
desecho que pudiera dañar las piezas internas.
□ Cierra el suministro de agua y vuelve a colocar
el aireador y la carcasa (si corresponde).
3
1
2
A
1

22
2
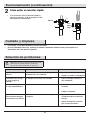
Cómo quitar el conector rápido
□ Si es necesario, retira el conector rápido (1),
aprieta las pestañas (2) de la manguera y hala
hacia abajo para desconectar.
Aprieta
Hala
hacia
abajo
Funcionamiento (continuación)
Cuidado y limpieza
□ Para limpiar, usa un paño húmedo y seca con una toalla.
□ No uses limpiadores abrasivos, esponjas de alambre o productos químicos fuertes para limpiar esta
mezcladora, pues ello anulará la garantía.
Solución de problemas
Problema Posible causa Solución
Hay ltración por el
maneral.
La tuerca del bonete se ha aojado y/o la
arandela está sucia o dañada.
□ Aprieta la tuerca del bonete.
□ Limpia la arandela o reemplázala.
El aireador tiene un ujo
de agua irregular o
reducido.
□ Retira el aireador y verica si
hay suciedades.
El suministro de agua no
se corta completamente.
El cartucho está sucio o dañado. □ Retira la llave para revisar el
cartucho.
□ Limpia o reemplaza.
El aireador está sucio o mal instalado.
NOTA: Consulta la sección de piezas de repuesto de este
manual para ver un dibujo detallado que muestra la
ubicación de las piezas enumeradas a continuación.
Hay una ltración
proveniente del desagüe
del lavamanos en su base.
El lavamanos tiene una supercie rugosa
o irregular.
□ Aplica más sellador de silicona
al lado biselado de la brida del
drenaje.
□ Aprieta nuevamente y verica
que no haya ltraciones.
2
1
1

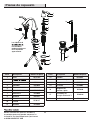
Piezas de repuesto
Las etiquetas de
la mezcladora
pueden encontrarse
en la entrada de
agua caliente.
23
Muchos cartuchos de repuesto, aireadores y
ensamblajes de drenaje pueden comprarse en
tu tienda de The Home Depot local o por internet
en WWW.HOMEDEPOT.COM
17
18
1
2
3
4
5
6
7
8
9
10
11
12
13
14
15
16
Pieza Descripción Número de pieza
1 RP13149*
2
RP50002
3
4
Conector RP50003
5
6
Invertidor RP64044
7
Cartucho H RP20067
Cartucho C RP20068
8
Llave
Tuerca
RP56137
Aro tórico RP60002
Pieza Descripción Número de pieza
9
10
Arandela
RP64147
12
Tornillo
13
14
15
16
Arandela RP64193
Tuerca de bloqueo RP56062
Tuerca del bonete RP70193
Bloque RP70421
17
Manguera de
conector rápido
RP70430
18
Ensamblaje de
desagüe ClickInstall™
RP40228*
Varilla de elevación RP40234*
11
Aireador RP30209

¿Problemas, preguntas o piezas faltantes?
Antes de regresar a la tienda, llama al servicio al cliente de
Glacier Bay de lunes a viernes entre 8 a.m. y 7 p.m. y los
sábados entre 9 a.m. y 6 p.m.(hora estándar del Este)
1-855-HD-GLACIER (1-855-434-5224)
HOMEDEPOT.COM/GLACIERBAY
Conserva este manual para uso futuro.
-
 1
1
-
 2
2
-
 3
3
-
 4
4
-
 5
5
-
 6
6
-
 7
7
-
 8
8
-
 9
9
-
 10
10
-
 11
11
-
 12
12
-
 13
13
-
 14
14
-
 15
15
-
 16
16
-
 17
17
-
 18
18
-
 19
19
-
 20
20
-
 21
21
-
 22
22
-
 23
23
-
 24
24


Glacier Bay HD67392W-6B04 Guía de instalación
- Categoría
- Artículos sanitarios
- Tipo
- Guía de instalación
En otros idiomas
Documentos relacionados
-
Glacier Bay HD67211W-6A01 Guía de instalación
-
-
-
-
-
-
Glacier Bay HD67091W-6B04 Guía de instalación
-
-
-
