VITRUM DESIGN 0KE050T10 Instrucciones de operación
- Tipo
- Instrucciones de operación

Per modicare la schermata principale utilizzare l’icona a forma di matita in alto
a destra. I PIN di default sono “9999” per l’Amministratore e “1234” per l’Utente
(modicabili).
Per aggiungere una applicazione al menu, premere “+” in alto, selezionare una
app tra quelle disponibili, scegliere l’icona ed inserire la descrizione.
Tramite pulsante di congurazione, in alto a sinistra, è possibile accedere alle
seguenti impostazioni:
1. “PIN Amministratore” e “PIN Utente”: mostra il PIN attuale e permette
di modicarlo;
2. “Seleziona background”: permette di selezionare lo sfondo della pagina
principale
3. “Non visualizzare logo”: permette di scegliere se visualizzare o meno il
logo Eelectron nella schermata principale
4. “Impostazioni Android”: permette di accedere alle impostazioni del
sistema operativo
5. “Congurazioni rete”: congura i parametri di rete LAN, potendo
impostare un indirizzamento statico (il dispositivo opera in DHCP di
predenito)
6. “Aggiornamento Firmware”: permette di aggiornare il rmware del
dispositivo, se disponibile tramite internet
7. “Timer spegnimento schermo”: permette di congurare un tempo dopo
cui spegnere lo schermo se inutilizzato;
8. “Reboot del dispositivo”: riavvia il dispositivo
9. “Esci dall’App”: permette di uscire dall’ambiente menu, e passare
all’ambiente graco del sistema operativo, ad esempio per installare
nuove applicazioni.
ATTENZIONE: si sconsiglia di modicare il valore predenito di luminosità dello
schermo (40%), onde evitare il danneggiamento del dispositivo. Si consiglia
inoltre di attivare lo spegnimento del display dopo un tempo non superiore ai 60
secondi, per prolungare la vita operativa del pannello.
Congurazione
1. Installare la scatola da incasso a muro, in base al modello di dispositivo
(Vedere SCATOLE E DIMENSIONI)
2. Applicare la cornice in dotazione sopra la scatola a muro
3. L’alimentazione avviene tramite POE (Power Over Ethernet).
4. In assenza di uno switch POE, prevedere un POE INJECTOR
5. Collegare la rete al touch Horizone e ssarlo a parete, utilizzando le viti
laterali per vincolarlo alla cornice
Installazione
IT EN DE
0KE050T10 | 0KE050T11
IP Touch Panel 5” Bianco / Nero KNX
IP Touch Panel 5” White / Black KNX
IP-Touchpanel 5” Weiß / Schwarz KNX“
Panel táctil IP 5” KNX blanco / negro
0KE080T10 | 0KE080T11
IP Touch Panel 8” Bianco / Nero KNX
IP Touch Panel 8” White / Black KNX
IP-Touchpanel 8” Weiß / Schwarz KNX“
Panel táctil IP 8” KNX blanco / negro
ES
Vitrum Design s.r.l
Via Filippo Brunelleschi 16, 20146, milano, Italia.
Tel +39.02.6556.0373 | P.I. 10785030966 |
rev 1.0 210727
Conguarazoine Horizone touch screen
Per accedere a Horizone da Horizone Touch Screen, aprire la app “Horizone” e
congurarla come nella gura di esempio sottostante:
To change the main screen use the pencil icon in the upper right corner. The
default PIN are “9999” for the Administrator and “1234” for the User.
To add an application to the menu, press the symbol “+” at the top, select an app
from those available, choose an icon and type the description.
Through the conguration button, at the top left, you can access the following
settings
1. “Administrator PIN” and “User PIN”: shows the current PIN and allows
you to change it;
2. “Select background”: allows you to select the background of the main
page
3. “Do not display logo”: allows you to choose whether or not to display the
Eelectron logo on the main screen
4. “Android Settings”: allows you to access the operating system settings
5. “Network congurations”: congures the LAN network parameters, being
able to set a static addressing (by default the device operates in DHCP
mode)
6. “Firmware Update”: allows you to update the rmware of the device, if
available via the Internet
7. “Screen off timer”: allows you to congure a time after which to turn off
the screen when device is not used;
8. “Reboot device”: reboot the device
9. “Exit the App”: allows you to exit the menu environment, and switch to
the graphic environment of the operating system, for example to install
new applications.
ATTENTION: it is recommended to not change the default value of screen
brightness (40%), in order to avoid damaging the device. It is also advisable
to turn the display off automatically after a time not exceeding 60 seconds, to
extend the operating life of the panel.
Conguration
1. Install the ush-mounted box, according to the device model (See
BOXES AND DIMENSIONS)
2. Apply the supplied frame over the wall box
3. Power is supplied via POE (Power Over Ethernet).
4. If a POE switch is not available, provide a POE INJECTOR
5. Connect the net to the Horizone touch and x it to the wall, using the
lateral screws to secure it to the frame
Installation
Conguration Horizone touch screen
To access Horizone web services from the Horizone Touch Screen, open the
“Horizone” app and congure it as in the example gure below:
Um den Hauptbildschirm zu ändern, verwenden Sie das bleistiftförmige Symbol
oben rechts. Die Standard-PINs sind “9999” für den Administrator und “1234”
für den Benutzer (bearbeitbar).
Um eine Anwendung zum Menü hinzuzufügen, drücken Sie oben auf “+”,
wählen Sie eine der verfügbaren Apps aus, wählen Sie das Symbol und geben
Sie die Beschreibung ein.
Über die Kongurationsschaltäche oben links können Sie auf folgende
Einstellungen zugreifen:
1. „Administrator-PIN“ und „Benutzer-PIN“: zeigt die aktuelle PIN und
ermöglicht deren Änderung;
2. „Hintergrund auswählen“: Ermöglicht die Auswahl des Hintergrunds der
Hauptseite
3. „Logo nicht anzeigen“: Ermöglicht Ihnen auszuwählen, ob das Eelectron-
Logo auf dem Hauptbildschirm angezeigt werden soll oder nicht
4. „Android-Einstellungen“: Ermöglicht den Zugriff auf die
Betriebssystemeinstellungen
5. “Netzwerkkongurationen”: Kongurieren Sie die LAN-
Netzwerkparameter, können Sie eine statische Adressierung einstellen
(das Gerät arbeitet standardmäßig in DHCP)
6. „Firmware Update“: ermöglicht Ihnen, die Geräte-Firmware zu
aktualisieren, falls über das Internet verfügbar
7. „Bildschirm-Aus-Timer“: Ermöglicht Ihnen, eine Zeit zu kongurieren,
nach der der Bildschirm ausgeschaltet wird, wenn er nicht verwendet
wird;
8. „Geräteneustart“: startet das Gerät neu
9. “App beenden”: Ermöglicht Ihnen, die Menüumgebung zu verlassen
und in die grasche Umgebung des Betriebssystems zu wechseln, um
beispielsweise neue Anwendungen zu installieren.
ACHTUNG: Es wird nicht empfohlen, den Standardhelligkeitswert des
Bildschirms (40%) zu ändern, um Schäden am Gerät zu vermeiden. Es ist auch
Konguration
1. Installieren Sie die Unterputzdose an der Wand, je nach Gerätemodell
(Siehe GEHÄUSE UND ABMESSUNGEN)
2. Bringen Sie den mitgelieferten Rahmen über dem Mauerkasten an
3. Die Stromversorgung erfolgt über POE (Power Over Ethernet).
4. Falls kein POE-Schalter vorhanden ist, stellen Sie einen POE-INJEKTOR
bereit
5. Verbinden Sie das Netzwerk mit dem Horizone touch und befestigen Sie
es an der Wand, indem Sie es mit den seitlichen Schrauben am Rahmen
befestigen
Installation
Horizone Touchscreen-Konguration
Um über den Horizon-Touchscreen auf Horizon zuzugreifen, öffnen Sie die App
„Horizone“ und kongurieren Sie diese wie in der folgenden Beispielabbildung:
Para cambiar la pantalla principal, use el ícono con forma de lápiz en la parte
superior derecha. Los PIN predeterminados son “9999” para el administrador y
“1234” para el usuario (editable).
Para agregar una aplicación al menú, presione “+” en la parte superior,
seleccione una aplicación de las disponibles, elija el icono e ingrese la
descripción.
Usando el botón de conguración, en la parte superior izquierda, puede
acceder a las siguientes conguraciones:
1. “PIN de administrador” y “PIN de usuario”: muestra el PIN actual y le
permite cambiarlo;
2. “Seleccionar fondo”: le permite seleccionar el fondo de la página principal
3. “No mostrar logotipo”: le permite elegir si desea mostrar o no el logotipo
de Eelectron en la pantalla principal
4. “Conguración de Android”: le permite acceder a la conguración del
sistema operativo
5. “Conguraciones de red”: congura los parámetros de la red LAN,
pudiendo establecer un direccionamiento estático (el dispositivo opera
en DHCP por defecto)
6. “Actualización de rmware”: le permite actualizar el rmware del
dispositivo, si está disponible a través de Internet
7. “Temporizador de apagado de pantalla”: le permite congurar un tiempo
después del cual apagar la pantalla si no está en uso;
8. “Reinicio del dispositivo”: reinicia el dispositivo.
9. “Salir de la aplicación”: le permite salir del entorno del menú y cambiar al
entorno gráco del sistema operativo, por ejemplo, para instalar nuevas
aplicaciones.
ATENCIÓN: no se recomienda cambiar el valor de brillo predeterminado de la
pantalla (40%), para evitar daños en el dispositivo. También es aconsejable
apagar la pantalla después de un tiempo no superior a 60 segundos, para
prolongar la vida útil del panel.
Conguración
1. Instalar la caja de empotrar en la pared, según modelo de dispositivo
(Ver CAJAS Y DIMENSIONES)
2. Aplique el marco suministrado sobre la caja de pared.
3. La energía se suministra a través de POE (Power Over Ethernet).
4. En ausencia de un interruptor POE, proporcione un INYECTOR POE
5. Conecta la red al Horizone touch y fíjala a la pared, usando los tornillos
laterales para jarla al marco
Instalación
Pantalla táctil Conguarazoine Horizone
Para acceder a Horizon desde la pantalla táctil de Horizon, abra la aplicación
“Horizone” y congúrela como en la gura de ejemplo a continuación:

SMALTIMENTO
Il simbolo del cassonetto barrato indica che il prodotto alla ne della propria vita utile
deve essere raccolto separatamente dagli altri riuti. AI termine dell’utilizzo, l’utente
dovrà farsi carico di conferire il prodotto ad un idoneo centro di raccolta differenziata oppure
di riconsegnarlo al rivenditore all’atto dell’acquisto di un nuovo prodotto. L’adeguata raccolta
differenziata per l’avvio successivo dell’apparecchiatura dimessa al riciclaggio contribuisce ad
evitare possibili effetti negativi sull’ambiente e sulla salute e favorisce il reimpiego e/o riciclo dei
materiali di cui è composta l’apparecchiatura.
DISPOSAL
The crossed-out bin symbol on the equipment or packaging means the product must
not be included with other general waste at the end of its working life. The user must
take the worn product to a sorted waste centre, or return it to the retailer when purchasing a
new one. An efcient sorted waste collection for the environmentally friendly disposal of the used
device, or its subsequent recycling, helps avoid the potential negative effects on the environment
and people’s health, and encourages the re-use and/or recycling of the construction materials
Powered by eelectron spa
Via Monteverdi 6
I-20025 Legnano (MI) - Italia
Tel: +39 0331 500802 Fax: +39 0331 564826
Email: [email protected] Web: www.eelectron.com
IT EN DE
ENTSORGUNG
Das Symbol des mit X gekennzeichneten Behälters zeigt an, dass das Produkt am Ende
seiner Nutzungsdauer getrennt von anderen Abfällen gesammelt werden muss. Am
Ende der Nutzungsdauer müssen Sie das Produkt zu einer entsprechenden Sammelstelle bringen
oder es beim Kauf eines neuen Produkts an Ihren Händler zurückgeben. Die ordnungsgemäße
Abfalltrennung für ein späteres Recycling der Ausrüstung trägt dazu bei, mögliche nachteilige
Auswirkungen auf Umwelt und Gesundheit zu vermeiden und die Wiederverwendung und / oder
Wiederverwertung der Materialien der Ausrüstung zu fördern.
ES
ELIMINACIÓN
El símbolo del contenedor tachado indica que el producto al nal de su vida útil debe
ser recogido de manera separada de los demás residuos. Al nalizar el uso, el usuario
se deberá hacer cargo de entregar el producto a un centro de recogida selectiva adecuado o
entregarlo al vendedor al momento de la compra de un nuevo producto. La recogida selectiva
adecuada para la entrega sucesiva del aparato obsoleto al reciclado contribuye a evitar posibles
efectos negativos tanto para el medio ambiente como para la salud y favorece el reutilizo y/o
reciclado de los materiales de los cuales está compuesto el aparato.
NOTE
Assicurarsi in particolare di:
1. selezionare “Zyk” come rete di casa;
2. inserire l’indirizzo IP di Horizone anche nelle impostazioni remote;
3. deselezionare l’HTTPS nelle impostazioni remote.
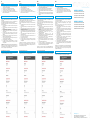
Scatole e dimensioni
0KE050T10 0KE080T10
Ingombro 81x132x14 224x149x16
Scatola Scatola da incasso
2M (es: BTicino
502E)
Scatola tonda d.60
(es: Gewiss 24232)
Scatola da incasso
3M (es: BTicino
503E) nello stessa
Scatola da incasso
BTicino 16204
ULTERIORI INFORMAZIONI
Per uso domestico solo in interni. L’apparato richiede alimentazione costante e
non va inteso come dispositivo di sicurezza.
In particular, be sure to:
1. select “Zyk” as home network;
2. enter the IP address of Horizone also in the remote settings;
3. Deselect HTTPS in remote settings.
Boxes and dimensions
0KE050T10 0KE080T10
Dimensions 81x132x14 224x149x16
Boxes Inwall box 2M (ex:
BTicino 502E)
Round box Ø60 (es:
Gewiss 24232)
Inwall box 3M (ex:
BTicino 503E) same
mounting direction
Inwall box BTicino
16204
ULTERIORI INFORMAZIONI
Per uso domestico solo in interni. L’apparato richiede alimentazione costante e
non va inteso come dispositivo di sicurezza.
Stellen Sie insbesondere sicher, dass:
1. wählen Sie „Zyk“ als Heimnetzwerk;
2. geben Sie die Horizone-IP-Adresse auch in den Remote-Einstellungen
ein;
3. deaktivieren Sie HTTPS in den Remote-Einstellungen.
Boxen und Abmessungen
0KE050T10 0KE080T10
Fußabdruck 81x132x14 224x149x16
Kasten 2M Unterputzdose
(zB: BTicino 502E)
Runddose d.60 (zB:
Gewiss 24232)
3M Unterputzdose
(Bsp.: BTicino 503E)
im selben
BTicino 16204
Unterputzdose
WEITERE INFORMATIONEN
Nur für den Heimgebrauch im Innenbereich. Das Gerät benötigt konstant Strom
und ist nicht als Sicherheitseinrichtung gedacht.
En particular, asegúrese de que:
1. seleccione “Zyk” como red doméstica;
2. ingrese la dirección IP de Horizone también en la conguración remota;
3. anule la selección de HTTPS en la conguración remota.
Cajas y dimensiones
0KE050T10 0KE080T10
Huella 81x132x14 224x149x16
Caja Caja de empotrar 2M
(ej .: BTicino 502E)
Caja redonda d.60 (ej
.: Gewiss 24232)
Caja de empotrar 3M
(ej .: BTicino 503E)
en el mismo
BTicino 16204 caja
de empotrar
MÁS INFORMACIÓN
Solo para uso doméstico en interiores. El dispositivo requiere energía constante
y no está diseñado como un dispositivo de seguridad.
-
 1
1
-
 2
2

