HoMedics SS-4510 Manual de usuario
- Categoría
- Relojes de alarma
- Tipo
- Manual de usuario

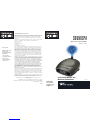
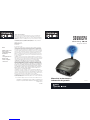
Auto-Set Clock Radio
Projects Time
Instruction Manual and
Warranty Information SS-4510
©2010 HoMedics, Inc. y sus compañías afiliadas, reservados todos los derechos.
HoMedics® y Sound Spa® son marcas registradas de HoMedics, Inc. y sus compañías afiliadas.
Reservados todos los derechos.
IB-SS4510
GARANTÍA LIMITADA POR UN AÑO
HoMedics vende sus productos con la intención de que no tengan defectos de fabricación ni de mano
de obra por un plazo de un año a partir de la fecha de compra original, con las siguientes excepciones.
HoMedics garantiza que sus productos no tendrán defectos de material ni de mano de obra bajo
condiciones de uso y servicio normales. Esta garantía se extiende únicamente a consumidores y no a
distribuidores.
Para obtener servicio para su producto HoMedics, envíe por correo el producto y su recibo de compra
fechado (como comprobante de compra), con franqueo pago, a la siguiente dirección:
HoMedics Service Center
Dept. 168, Suite 3
43155 West Nine Mile Rd.
Novi, MI 48375
No se aceptarán pagos contra entrega.
HoMedics no autoriza a nadie, incluyendo, pero sin limitarse a, distribuidores, posteriores consumi-
dores compradores del producto a un distribuidor, o compradores remotos, a obligar a HoMedics de
forma alguna más allá de las condiciones aquí establecidas. La garantía de este producto no cubre
daños causados por uso inadecuado o abuso, accidente, conexión de accesorios no autorizados,
alteración del producto, instalación inadecuada, reparaciones o modificaciones no autorizadas, uso
inadecuado de la fuente de energía/electricidad, cortes de energía, caída del producto, funcionamiento
incorrecto o daño de una pieza de funcionamiento debido al no cumplimiento del mantenimiento
recomendado por el fabricante, daños durante el transporte, robo, descuido, vandalismo, condiciones
climáticas, pérdida de uso en el período durante el cual el producto está en una instalación de repa-
ración o a la espera de piezas o reparación, o cualquier otra condición, sin importar cual sea, que se
encuentre fuera del control de HoMedics.
Esta garantía es válida únicamente si el producto es comprado y operado en el país en el cual se com-
pró el producto. Un producto que requiera modificaciones o adaptación para habilitar su funcionamien-
to en cualquier país que no sea aquél para el que fue diseñado, fabricado, aprobado y/o autorizado, o la
reparación de productos dañados por estas modificaciones no están cubiertos bajo esta garantía.
LA GARANTÍA AQUÍ ESTABLECIDA SERÁ LA ÚNICA Y EXCLUSIVA GARANTÍA. NO HABRÁ NINGUNA
OTRA GARANTÍA EXPRESA NI IMPLÍCITA, INCLUYENDO NINGUNA GARANTÍA DE COMERCIALIZACIÓN
O APTITUD NI NINGUNA OTRA OBLIGACIÓN POR PARTE DE LA COMPAÑÍA CON RESPECTO A
PRODUCTOS CUBIERTOS POR ESTA GARANTÍA. HOMEDICS NO TENDRÁ RESPONSABILIDAD
ALGUNA POR NINGÚN DAÑO INCIDENTAL, CONSECUENTE NI ESPECIAL. BAJO NINGÚN CONCEPTO
ESTA GARANTÍA REQUERIRÁ MÁS QUE LA REPARACIÓN O CAMBIO DE ALGUNA PIEZA O PIEZAS
QUE SE HALLEN DEFECTUOSAS DENTRO DEL PERÍODO DE VIGENCIA DE ESTA GARANTÍA. NO
SE EFECTUARÁN REEMBOLSOS. SI NO HAY PIEZAS DE REPUESTO DISPONIBLES PARA LOS
MATERIALES DEFECTUOSOS, HOMEDICS SE RESERVA EL DERECHO DE REALIZAR SUSTITUCIONES
EN VEZ DE REPARAR O CAMBIAR.
Esta garantía no se extiende a la compra de productos abiertos, usados, reparados, embalados otra vez
y/o abiertos y vueltos a cerrar, incluyendo entre otras cosas la venta de dichos productos en sitios de
remate por Internet y/o la venta de dichos productos por revendedores o mayoristas. Todas y cada una
de las garantías cesarán y terminarán inmediatamente con respecto a cualquier producto o pieza del
mismo que estén reparados, cambiados, alterados o modificados sin el consentimiento previo explícito
y por escrito de HoMedics.
Esta garantía le proporciona derechos legales específicos. Es posible que usted tenga derechos
adicionales que pueden variar de un estado a otro. Debido a las regulaciones de ciertos estados,
es posible que algunas de las limitaciones y exclusiones no se apliquen en su caso.
Por más información con respecto a nuestra línea de productos en los EE.UU., visítenos en:
www.homedics.com
El manual
en español
empieza a la
página 11
SOUNDSPA®
Dirección postal:
HoMedics Service Center,
Dept. 168, Suite 3
43155 West Nine Mile Rd.
Novi, MI 48375
correo electrónico:
cservice@homedics.com
Lunes - Viernes
8:30am - 5:00pm (EST)
1.800.466.3342

23
Create your perfect sleep environment.
Thank you for purchasing SoundSpa, the HoMedics acoustic relaxation machine.
This, like the entire HoMedics product line, is built with high-quality craftsmanship
to provide you years of dependable service. We hope that you will find it to be the
finest product of its kind.
SoundSpa helps create your perfect sleep environment. Fall asleep to any of its six
calming sounds, then wake to nature sounds, radio or alarm. SoundSpa can also
mask distractions to improve your concentration while you read, work or study.
IMPORTANT SAFETY INSTRUCTIONS:
When using an electrical appliance, basic precautions should always be
followed, including the following:
READ ALL INSTRUCTIONS BEFORE USING
DANGER
- To reduce the risk of electric shock:
• Always unplug the appliance from the electrical outlet immediately after using and
before cleaning.
• Do not reach for an appliance that has fallen into water. Unplug it immediately.
•
Do not place or store appliance where it can fall or be pulled into a tub or sink. Do not
place in or drop into water or other liquid.
WARNING - To reduce the risk of burns, fire, electric shock or injury to persons:
• Close supervision is necessary when this appliance is used by or near children, invalids
or disabled persons.
• Use this appliance only for its intended use as described in this manual. Do not use
attachments not recommended by HoMedics; specifically any attachments not
provided with the unit.
• Never operate this appliance if it has a damaged cord, plug, cable or housing.
If it is not working properly, if it has been dropped or damaged, return
it to HoMedics Service Center for examination and repair.
• Keep cord away from heated surfaces.
• Never drop or insert any object into any opening.
• Do not operate where aerosol (spray) products are being used or where oxygen
is being administered.
• Do not carry this appliance by power cord or use cord as handle.
• To disconnect, remove plug from outlet.
• This appliance is designed for indoor use only. Do not use outdoors.
• Only set on dry surfaces. Do not place on surface wet from water or cleaning
solvents.
SAVE THESE INSTRUCTIONS
Caution – Please read all instructions
carefully before operating.
• Never leave the appliance unattended, especially if children are present.
• Never cover the appliance when it is in operation.
• This unit should not be used by children without adult supervision.
• Always keep the cord away from high temperature and fire.
• Do not lift, carry, hang, or pull the product by the power cord.
• If the adaptor sustains damage, you must stop using this product immediately and
contact the HoMedics Service Center. (See the warranty section for the HoMedics
address.)
Caution: All
servicing of
this product
must be
performed by
authorized
HoMedics
Service
Personnel
only.

5
4
SoundSpa Clock Radio Features
• 6NatureSounds:RainForest,Ocean,Thunder,SummerNight,RainandWaterFall
• AM/FMradiowithalarmandsnooze
• Automatictimeset
• Threegentle-wakeoptions–radio,beeptoneornaturesounds
• Easy-to-readclockwithLCDdisplay
• Projectionfeatureprojectstimeontheceilinginasoothingbluelight
• Auto-timerletsyouchoosehowlongyoulisten–15,30,45or60minutesorcontinuously
• Volumecontroladjuststhevolumeoftheradio,beepornaturesounds
Assembly and Instructions for Use
1.Unpacktheproductandchecktomakesureeverythingisincluded(Fig1).
2.ThisunitispoweredbyaDCadaptor,whichisincluded.
3.AttachtheDCadaptortothejacklocatedonthebackoftheunit(Fig3)andinsertthecordintoa
120Vhouseholdoutlet.
4.Adjustclockregiontoyourlocation.ClockwillautomaticallysetthecurrentEasternStandardTime.
5.Replacethebackupbatterywhenlowbatteryindicatorappears.Toinstallanewbattery,insertone
CR2032batteryintothebottomcompartmentwiththe+sidetowardsyou.Replacecoverandsnap
intoplace.
Setting the Clock (in case of battery backup failure)
1.PressandholdtheDATE/TIMEbuttonfor3secconds(Fig2).Theyearwillbegintoflash.
2.Whiletheyearisflashing,pressthe+buttontoincreasetheyear.Pressthe–buttontodecrease
theyear.Oncethecorrectyearisset,presstheDATE/TIMEbuttonagaintosetthemonthandday.
PressagaintoAdjustthehour.Pressagaintoadjusttheminute.
NOTE:PMindicatorwillappearontheleftsideoftheclockfaceforeveninghours(Fig3).IfthePM
indicatorisnotilluminated,thehourissettoAM.Besuretosetthetimeforthecorrect
12-hourperiod-AM(morning)orPM(evening).
NOTE:After10seconds,thetimewillstopflashinganditwillbeset.
3.PresstheBACKLIGHTHIGH/LOWbutton(Fig2)tochoosebetweenhighandlowclockbrightness.
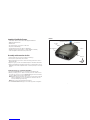
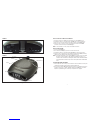
FIGURE 1
TUNER
FOCUS KNOB
SOUNDS
VOLUME
SNOOZE BUTTON
ADAPTOR
TIME ROTATION KNOB

6 7
Listening to Nature Sounds
1.TurnonnaturesoundsbypressingtheSOUNDSbutton(Fig1).
2.Toadjustthevolume,turntheVOLUMEknob(Fig1)toyourdesiredlevel.
3.CyclethroughtothedesiredsoundbypressingtheSOUNDSbutton(Fig1).
4.WhenfinishedlisteningtothesoundsyoumayturnthemoffbypressingthePOWERbutton,or
switchtotheradiobypressingRADIO(Fig3).
NOTE: Whentheunitisturnedonitwillalwaysdefaulttothelastmodeused.
Listening to the Radio
1.PresstheRADIObutton(Fig3).
2.RotatetheTUNER(Fig1)toselectaradiostation.
3.Toadjustthevolume,turntheVOLUMEknob(Fig1)toyourdesiredlevel.
4.WhenfinishedlisteningtotheradioyoumayturnitoffbypressingthePOWERbutton,orswitchtoa
naturesoundbypressingthecorrespondingbutton(Fig3).
NOTE:Tochangebetweenbands,presstheRADIObutton(Fig3).
WhenFMbandisselected,aFMIndicatorwillappearontheleftsideoftheclockface
(Fig.3).IftheFMindicatorisnotilluminated,thebandissettoAM.Theunitwilldefaultto
FMband.Theunitwillalwaysdefaulttothelastbandused.
Using the Auto-Timer
1. Whenthepowerisonandyouarelisteningtoanaturesoundortheradioyou
maysetatimersotheunitwillautomaticallyturnoff.
2.TogglethroughtheTIMERbutton(Fig3)untilthetimeofyourchoice,15,30,45or60minutes,
showsontheclockface.TheTIMERindicatorwillappearontheleftsideoftheclockfacetoconfirm
thatthetimerisset.
FIGURE 2
HOUR
POWER
AL SET
-
AL MODE
MINUTE
FIGURE 3
TIMER
RADIO
TIMER
+
PM

Setting and Using the Alarm
1. PresstheALSETbutton(Fig3).Thealarmhourwillflash.
2. Whilethetimeisflashingpress+button(Fig3)untilyoureachthecorrecthour.Thenpress
the-button(Fig4)untilyoureachthedesiredminute.
3. After10secondsthealarmsettimewillstopflashinganditwillbeprogrammed,oryoumaypress
theALARMSETbutton.
NOTE: ThePMindicatoralsoappliestothealarm.Youcanreviewthealarmsettinganytimeby
pressingtheALARMSETbutton.
4. Toactivatethealarmyoumaychooseoneof3wakeoptions:
a. TowaketoRADIO(Fig.3)presstheALMODEbutton(Fig.3)once.Youmayleaveitonthe
currentstationoradjusttheTUNER.
b.TowaketoaSOUND,presstheALMODEbuttonasecondtime.Itwillsettothelastsound
youlistenedto.Ifyouwishtochangeit,pressthesoundyouwishtowaketoandthenpress
thePOWERbutton(Fig3).
c. TowaketoBEEP,presstheALMODEbuttonathirdtime.
NOTE: TheALARMMODEindicator(RADIO/SOUND/BEEP)willappearontherightsideoftheclock
face(Fig.3),andwillindicatethatthealarmisset.
5.Whenthealarmsounds,thecorrespondingALARMindicator(RADIO/SOUND/BEEP)blinks.
Youmayeither:
a. SNOOZE:PresstheSNOOZEbutton(Fig1).Yoursleeptimewillbeextendedby9minutes.
Youmayusethisfeatureuntilyouturnthealarmoff.
b.RESET:TurnthealarmoffbypressingANYbuttonontheunit,exceptfortheSNOOZEbutton
(Fig1).Thealarmclockwillautomaticallyresetforthenextdayinitscurrentmode.The
correspondingALARMindicator(RADIO/SOUND/BEEP)willindicatethis.Ifyouwishtochange
thewakemodefollowstep1underSetting and Using the Alarm.
c. OFF:Tocompletelyturnoffthealarmsoitisnotsetforthenextday,continuetopresstheAL
MODEbuttonuntilalltheALARMindicators(RADIO/SOUND/BEEP)arealloff.
NOTE: Ifthealarmsoundsfor30minutescontinuouslyitwillautomaticallyturnoffandresetforthe
nextday.
Using the Projection Feature
1. Toturntheprojectionfeatureon,pressthePROJECTON/OFFbuttononthebackoftheunit(Fig2).
Thetimeisnowprojectedontheceiling.Pressthebuttonagaintoturnoffprojectionfeature.
NOTE:IftheprojectionfeatureisoffyoumaypresstheSNOOZEbutton(Fig1)totrigger5seconds
ofprojection.
2.Toturntheangleofthetimethatappearsontheceiling,rotatetheTIMEROTATIONKNOB(Fig.1)
untilyouhavereachedyourdesiredresult.
NOTE:TheTIMEROTATIONKNOBwillrotateupto350degrees.
3.Tofocusthetimeontheceiling,rotatetheFOCUSKNOB(Fig1)untilyouhavereachedyourdesired
result.
4.Theangleoftheprojectorcanbeadjustedbyanglingforwardorbackward.
8 9
Setting the Time/Date
NOTE: Thisunitfeaturesautomatictimeset.Theunitispreprogrammedwiththecurrentdateand
easternstandardtime.UsetheTIMEZONEslideswitch(Fig2)tochangetoyourtimezone
(E-EST,C-CST,M-MST,P-PST).Thetime/datewillonlyneedtoberesetifthebackupbattery
fails.Thebelowinformationshouldbeusediftheautomatictimeisnotcorrect.
1. PressandholdtheHOURbuttonfor5seconds(Fig3).Thetimewillbegintoflash.
2. Whilethetimeisflashing,presstheHOURbuttonuntilyoureachthecorrecthour.Thenpressthe
MINUTEbutton(Fig3)untilyoureachthecorrectminute.
NOTE: PMindicatorwillappearontheleftsideoftheclockfaceforeveninghours(Fig3).Ifthe
PMindicatorisnotilluminated,thehourissettoAM.Besuretosetthetimeforthecorrect12-hour
period—AM(morning)orPM(evening).
NOTE: After5seconds,thetimewillstopflashinganditwillbeset.
3. PresstheBACKLIGHTHIGH/LOWbutton(Fig2)tochoosebetweenhighandlowclockbrightness.
4. Intheeventofbatteryandpowerfailure,youwillneedtoresetthealarm.
Maintenance
To Store
Youmaystoretheunitinitsboxoracool,dryplace.
To Clean
Wipeoffdustwithadampcloth.NEVERuseliquidsorabrasivecleanertoclean.
Modificationsnotauthorizedbythemanufacturermayvoidusersauthoritytooperatethisdevice.
NOTE: ThisequipmenthasbeentestedandfoundtocomplywiththelimitsforaClassBdigitaldevice,
pursuanttoPart15oftheFCCRules.Theselimitsaredesignedtoprovidereasonableprotection
againstharmfulinterferenceinaresidentialinstallation.Thisequipmentgenerates,usesandcan
radiateradiofrequencyenergyand,ifnotinstalledandusedinaccordancewiththeinstructions,
maycauseharmfulinterferencetoradiocommunications.However,thereisnoguaranteethat
interferencewillnotoccurinaparticularinstallation.Ifthisequipmentdoescauseharmful
interferencetoradioortelevisionreception,whichcanbedeterminedbyturningtheequipment
offandon,theuserisencouragedtotrytocorrecttheinterferencebyoneormoreofthe
followingmeasures:
• Reorientorrelocatethereceivingantenna.
• Increasetheseparationbetweentheequipmentandreceiver.
• Connecttheequipmentintoanoutletonacircuitdifferentfromthattowhichthereceiveris
connected.
• Consultthedealeroranexperiencedradio/TVtechnicianforhelp
NOTE: ThemanufacturerisnotresponsibleforanyradioorTVinterferencecausedbyunauthorized
modificationstothisequipment.Suchmodificationscouldvoidtheusersauthoritytooperatethe
equipment.

©2010 HoMedics, Inc. and its affiliated companies, all rights reserved. HoMedics® and
Sound Spa® are registered trademarks of HoMedics, Inc. and its affiliated companies.
All rights reserved.
IB-SS4510
LIMITED ONE YEAR WARRANTY
HoMedics sells its products with the intent that they are free of defects in manufacture and
workmanship for a period of one year from the date of original purchase, except as noted
below. HoMedics warrants that its products will be free of defects in material and workmanship
under normal use and service. This warranty extends only to consumers and does not extend to
Retailers.
To obtain warranty service on your HoMedics product, mail the product and your dated sales
receipt (as proof of purchase), postpaid, to the following address:
HoMedics Service Center
Dept. 168, Suite 3
43155 West Nine Mile Rd.
Novi, MI 48375
No COD’s will be accepted.
HoMedics does not authorize anyone, including, but not limited to, Retailers, the subsequent
consumer purchaser of the product from a Retailer or remote purchasers, to obligate HoMedics
in any way beyond the terms set forth herein. This warranty does not cover damage caused by
misuse or abuse; accident; the attachment of any unauthorized accessory; alteration to the prod-
uct; improper installation; unauthorized repairs or modifications; improper use of electrical/power
supply; loss of power; dropped product; malfunction or damage of an operating part from failure
to provide manufacturer’s recommended maintenance; transportation damage; theft; neglect;
vandalism; or environmental conditions; loss of use during the period the product is at a repair
facility or otherwise awaiting parts or repair; or any other conditions whatsoever that are beyond
the control of HoMedics.
This warranty is effective only if the product is purchased and operated in the country in which the
product is purchased. A product that requires modifications or adoption to enable it to operate in any
other country than the country for which it was designed, manufactured, approved and/or authorized,
or repair of products damaged by these modifications is not covered under this warranty.
THE WARRANTY PROVIDED HEREIN SHALL BE THE SOLE AND EXCLUSIVE WARRANTY.
THERE SHALL BE NO OTHER WARRANTIES EXPRESS OR IMPLIED INCLUDING ANY IMPLIED
WARRANTY OF MERCHANTABILITY OR FITNESS OR ANY OTHER OBLIGATION ON THE PART
OF THE COMPANY WITH RESPECT TO PRODUCTS COVERED BY THIS WARRANTY. HOMEDICS
SHALL HAVE NO LIABILITY FOR ANY INCIDENTAL, CONSEQUENTIAL OR SPECIAL DAMAGES. IN
NO EVENT SHALL THIS WARRANTY REQUIRE MORE THAN THE REPAIR OR REPLACEMENT OF
ANY PART OR PARTS WHICH ARE FOUND TO BE DEFECTIVE WITHIN THE EFFECTIVE PERIOD
OF THE WARRANTY. NO REFUNDS WILL BE GIVEN. IF REPLACEMENT PARTS FOR DEFECTIVE
MATERIALS ARE NOT AVAILABLE, HOMEDICS RESERVES THE RIGHT TO MAKE PRODUCT
SUBSTITUTIONS IN LIEU OF REPAIR OR REPLACEMENT.
This warranty does not extend to the purchase of opened, used, repaired, repackaged and/or
resealed products, including but not limited to sale of such products on Internet auction sites and/
or sales of such products by surplus or bulk resellers. Any and all warranties or guarantees shall
immediately cease and terminate as to any products or parts thereof which are repaired, replaced,
altered, or modified, without the prior express and written consent of HoMedics.
This warranty provides you with specific legal rights. You may have additional rights which may
vary from state to state. Because of individual state regulations, some of the above limitations and
exclusions may not apply to you.
For more information regarding our product line in the USA, please visit: www.homedics.com Manual de instrucciones e
Información de garantía SS-4510
Radio Reloj AM/FM
Proyecta la hora
SOUNDSPA®
Mail To:
HoMedics Service Center,
Dept. 168, Suite 3
43155 West Nine Mile Rd.
Novi, MI 48375
e-mail:
cservice@homedics.com
Monday - Friday
8:30am - 5:00pm (EST)
1.800.466.3342

1 2
Cree su ambiente perfecto para dormir.
Gracias por comprar SoundSpa, la máquina de relajación acústica de HoMedics.
Éste, al igual que toda la línea de productos HoMedics, está fabricado con mano de
obra de alta calidad para brindarle años de servicio confiable. Esperamos que le
parezca el mejor producto de su clase.
SoundSpa lo ayuda a crear su ambiente perfecto para dormir. Duérmase con
cualquiera de sus seis sonidos relajantes y luego despiértese con los sonidos de la
naturaleza, la radio o la alarma. SoundSpa también puede enmascarar distracciones
para mejorar su concentración mientras lee, trabaja o estudia.
IMPORTANTES INSTRUCCIONES DE SEGURIDAD:
Cuando utiliza un artefacto eléctrico, siempre se deben seguir ciertas
precauciones básicas, incluyendo lo siguiente:
LEA TODAS LAS INSTRUCCIONES ANTES DE USAR
PELIGRO
- Para reducir el riesgo de choque eléctrico:
• Siempre desenchufe el artefacto del tomacorriente inmediatamente después de
usarlo y antes de limpiarlo.
• No intente tomar un artefacto que haya caído al agua. Desenchúfelo de inmediato.
• No coloque ni guarde un artefacto donde pueda caerse o ser tirado hacia una tina
o lavamanos. No lo coloque ni lo deje caer en agua ni en ningún otro líquido.
ADVERTENCIA - Para reducir el riesgo de quemaduras, incendio, choque eléctrico
o lesiones a las personas:
• Es necesaria una supervisión estricta cuando lo usan niños o personas inválidas o
incapacitadas o cuando está próximo a ellos.
• Utilice este artefacto sólo para el uso para el cual está diseñado y como se describe en
este manual. No use accesorios no recomendados por HoMedics, especialmente si no han
sido incluidos con la unidad.
1 3
• Nunca haga funcionar este aparato si tiene el cordón, el enchufe, el cable o el
armazón dañado. Si no está funcionando adecuadamente, si se ha caído o
dañado, envíelo al Centro de servicio de HoMedics para que sea examinado
y reparado.
• Mantenga el cable alejado de superficies calientes.
• Nunca lo deje caer ni inserte ningún objeto en ninguna abertura.
• No lo haga funcionar donde se utilizan productos de rociado por aerosol o donde
se está administrando oxígeno.
• No lleve este artefacto tomado del cable, ni use el cable como manija.
• Para desconectarlo, quite el enchufe del tomacorriente.
• Este artefacto está diseñado únicamente para usarlo en interiores. No lo use en
exteriores.
• Colóquelo únicamente sobre superficies secas. No lo coloque sobre una superficie
mojada con agua o solventes de limpieza.
GUARDE ESTAS INSTRUCCIONES
Precaución: sírvase leer todas las instrucciones con atención antes
de poner en funcionamiento.
• Nunca deje el artefacto sin vigilancia, especialmente si hay niños presentes.
• Nunca cubra el artefacto mientras está en funcionamiento.
• Esta unidad no debe ser utilizada por niños sin la supervisión de un adulto.
• Siempre mantenga el cable alejado de las temperaturas altas y el fuego.
• No levante, lleve, cuelgue ni jale el producto tomándolo del cable de corriente.
• Si el adaptador sufre daños, debe dejar de usar este producto de inmediato y pon
erse en contacto con el Centro de servicio de HoMedics. (Consulte en la sección
de garantía la dirección de HoMedics.)
Precaución:
todo el man-
tenimiento y
reparación
de este pro-
ducto debe
ser realizado
únicamente
por Personal
de servicio
autorizado de
HoMedics.

1 4
Características del radio reloj SoundSpa
• 6sonidosdelanaturaleza:bosquetropical,océano,truenos,nochedeverano,lluviaycascada
• RadioAM/FMconalarmayalarmaderepetición
• Configuraciónautomáticadelahora
• Tresopcionesparadespertarsesuavemente;radio,pitidoosonidosdelanaturaleza
• RelojfácildeleerconpantallaLCD
• Funcióndeproyecciónqueproyectalahoraeneltechoconunaluzazulrelajante
• Eltemporizadorautomáticolepermiteelegircuántotiempoescuchar:15,30,45ó60minutosode
formacontinua
• Elcontroldelvolumenajustaelvolumendelaradio,elpitidoolossonidosdelanaturaleza
Armado e instrucciones de uso
1. Desempaqueelproductoyasegúresedequetodoestáincluido(Fig.1).
2. EstaunidadestáalimentadaporunadaptadordeCC,elcualseincluye.
3. ConecteeladaptadordeCCalenchufehembraubicadoenlapartetraseradelaunidad(Fig.3)y
enchufeelcableauntomacorrientedomésticode120V.
4. Ajustelaregióndelrelojasuubicación.Elrelojautomáticamentefijarálahoraactualestándar
delEste
5. Cambielapiladerespaldocuandoaparezcaelindicadordepilabaja.Paracolocarunanuevapila,
introduzcaunapilaCR2032enelcompartimientoinferiorconellado+haciausted.Vuelvaacolocar
latapaypresiónelahastaquecalceensulugar.
Ajuste del reloj (en caso de fallo de la pila de respaldo)
1.Presioneymantengapresionadoelbotónfecha/hora(DATE/TIME)durante3segundos(Fig.2).El
añocomenzaráaparpadear.
2.Mientraselañoestáparpadeando,presioneelbotón+paraaumentarelaño.Presioneelbotón–
paradisminuirelaño.Unavezfijoelañocorrecto,presioneelbotónfecha/hora(DATE/TIME)
nuevamenteparafijarelmesyeldía.Presionenuevamenteparaajustarlahora.Presione
nuevamenteparaajustarlosminutos.
NOTA: paralashorasdelatardeynoche,apareceráelindicadordep.m.(PM)sobreelladoizquierdo
delapantalladelreloj(Fig.3).SielindicadordePMnoestáiluminado,lahorafijadaesa.m.
(AM).Asegúresedeconfigurarlahoraparaelperíodode12horascorrecto:AM(mañana)o
PM(tarde).
NOTA: despuésde10segundos,lahoradejarádeparpadearyquedaráconfigurada.
3.Presioneelbotóndeiluminaciónalta/bajadefondo(BACKLIGHTHIGH/LOW)(Fig.2)paraelegirentre
unbrilloaltoobajodelreloj.
1 5
FIGURA 1
SINTONIZADOR
RUEDA DE ENFOQUE
SONIDOS
VOLUMEN
SNOOZE BOTÓN
ADAPTADOR
TIEMPO DE ROTACIÓN DE LA PERILLA

1 6 1 7
Para escuchar los sonidos de la naturaleza
1. Enciendalossonidosdelanaturalezapresionandoelbotóndesonidos(SOUNDS)(Fig.1).
2. Paraajustarelvolumen,girelaperilladevolumen(VOLUME)(Fig.1)hastaelnivelquedesee.
3. Realiceuncicloporlossonidosdeseadospresionandoelbotóndesonidos(SOUNDS)(Fig.1).
4. Cuandoyanodeseeescucharlossonidos,puedeapagarlospresionandoelbotónPOWER
(encendido)ocambiaralaradiopresionandoRADIO(Fig.3).
NOTA: cuandolaunidadseencienda,siemprevolveráalúltimomodousado.
Para escuchar la radio
1. PresioneelbotónRADIO(Fig.3).
2. Gireelsintonizador(TUNER)(Fig.1)paraseleccionarunaestaciónderadio.
3. Paraajustarelvolumen,girelaperilladevolumen(VOLUME)(Fig.1)hastaelnivelquedesee.
4. Cuandoyanodeseeescucharlaradio,puedeapagarlapresionandoelbotónPOWER(encendido)o
cambiaraunsonidonaturalpresionandoelbotóncorrespondiente(Fig.3).
NOTA: paracambiarentrebandas,presioneelbotónRADIO(Fig.3).Cuandoseseleccionalabanda
FM,apareceunindicadodeFMenelladoizquierdodelapantalladelreloj(Fig.3).Siel
indicadordeFMnoestáiluminado,labandafijadaesAM.LaunidadactivarálabandaFMde
formapredeterminada.Launidadsiemprevolverádeformapredeterminadaalaúltimabanda
usada.
Uso del temporizador automático
1. Cuandoeldispositivoestáencendidoyestáescuchandounsonidodelanaturalezaolaradio,puede
configuraruntemporizadorparaquelaunidadseapagueautomáticamente.
2. ActiveydesactiveelbotónTIMER(temporizador)(Fig.3)hastaqueenlapantalladelrelojaparezca
eltiempodesupreferencia,15,30,45ó60minutos.ElindicadordeTIMERapareceráenellado
izquierdodelapantalladelrelojparaconfirmarqueeltemporizadorestáconfigurado.
FIGURA 2
HORA
PODER
AL AJUSTE
-
AL MODO
MINUTO
FIGURA 3
RADIO
TEMPORIZADOR
TEMPORIZADOR
+
PM

1 8 1 9
Configuración de la hora/fecha
NOTA: estaunidadcuentaconajusteautomáticodelahora.Launidadestápreprogramadaconla
fechayhoraestándardelEste.Useelinterruptordehusoshorarios(TIMEZONE)(Fig.2)para
cambiarsuhusohorario(E-EST,C-CST,M-MST,P-PST).Lahora/fechasólodebevolvera
configurarsesifallalapiladerespaldo.Lainformaciónqueapareceacontinuacióndebeusarse
silahoraautomáticanoescorrecta.
1. Presioneymantengapresionadoelbotóndelahora(HOUR)durante5segundos(Fig.3).Lahora
comenzaráaparpadear.
2. Mientraslahoraestáparpadeando,presioneelbotóndelahora(HOUR)hastaquelleguealahora
correcta.Luegopresioneelbotóndelosminutos(MINUTE)(Fig.3)hastaquelleguealosminutos
correctos.
NOTA: paralashorasdelatardeynoche,apareceráelindicadordep.m.(PM)sobreelladoizquierdo
delapantalladelreloj(Fig.3).SielindicadordePMnoestáiluminado,lahorafijadaesa.m.
(AM).Asegúresedeconfigurarlahoraparaelperíodode12horascorrecto:AM(mañana)o
PM(tarde).
NOTA: despuésde5segundos,lahoradejarádeparpadearyquedaráconfigurada.
3. Presioneelbotóndeiluminaciónalta/bajadefondo(BACKLIGHTHIGH/LOW)(Fig.2)paraelegir
entreunbrilloaltoobajodelreloj.
4. Encasodequefallelapilaynohayaenergía,deberávolverafijarlaalarma.
Mantenimiento
Para guardar
Puedealmacenarlaunidadensucajaoenunlugarfrescoyseco.
Para limpiar
Quiteelpolvoconunpañohúmedo.NUNCAuselíquidosnilimpiadoresabrasivosparalimpiarla.
Lasmodificacionesnoautorizadasporelfabricantepuedenanularlaautoridaddelusuarioparautilizar
esteproducto.
NOTA: esteequipohasidoprobadoysehaobservadoquecumpleconloslímitesparaundispositivo
digitaldeClaseB,conformealaparte15delasreglasdelaFCC.Estoslímitesestán
diseñadosparaproporcionarunaprotecciónrazonablecontralainterferencianocivaenuna
instalaciónresidencial.Esteequipogenera,utilizaypuedeirradiarenergíadefrecuenciade
radioy,sinoseinstalayseutilizasiguiendolasinstrucciones,puedecausarinterferencia
nocivaenlascomunicacionesderadio.Sinembargo,nohaygarantíadequenoseproducirá
interferenciaenunainstalaciónenparticular.Siesteequipocausainterferencianocivaenla
recepciónderadiootelevisión,quepuededetectarseencendiendoyapagandoelequipo,
aconsejamosalusuarioqueintentecorregirlainterferenciatomandounaomásdelas
siguientesmedidas:
• Vuelvaaorientaroaubicarlaantenaderecepción.
• Aumentelaseparaciónentreelequipoyelreceptor.
• Conecteelequipoenuntomacorrientedeotrocircuitodondenoestéconectadoelreceptor.
• Consulteconeldistribuidoroconuntécnicoexpertoenradio/televisiónparaobtenerayuda.
NOTA: elfabricantenoesresponsabledeningunainterferenciaderadiootelevisiónprovocadapor
modificacionesnoautorizadasaesteequipo.Dichasmodificacionespodríananularlaautoridad
delusuarioparautilizarelequipo.
Cómo configurar y usar la alarma
1. Presioneelbotóndeconfiguracióndelaalarma(ALSET)(Fig.3).Lahoradelaalarmaparpadeará.
2. Mientraslahoraestáparpadeando,presioneelbotón+(Fig.3)hastaquelleguealahoracorrecta.
Luego,presioneelbotón-(Fig.4)hastaquelleguealosminutoscorrectos.
3. Despuésde10segundos,lahorafijadadelaalarmadejarádeparpadearylamismaestará
programada,opuedepresionarelbotónALARMSET.
NOTA: elindicadordePMtambiénseaplicaalaalarma.Puederevisarlaconfiguracióndelaalarma
encualquiermomentopresionandoelbotónALARMSET.
4. Paraactivarlaalarmapuedeelegirunade3opcionesparadespertarse:
a. ParadespertarseconlaRADIO(Fig.3)presioneelbotóndemododealarma(ALMODE)
(Fig.3)unavez.Puededejarlaenlaestaciónactualoajustarelsintonizador(TUNER).
b. Paradespertarconunsonido(SOUND),presioneelmododealarma(ALMODE)unasegunda
vez.Fijarálahoraalúltimosonidoqueescuchó.Sideseacambiarlo,presioneelsonido
quedeseeescucharparadespertarsecomotonodealarmaydespuéspresioneelbotónPOWER
(encendido)(Fig.3).
c. Paradespertarconunpitido(BEEP),presioneelmododealarma(ALMODE)porterceravez.
NOTA: elindicadordemododealarma(RADIO/SOUND/BEEP)apareceráenelladoderechodela
pantalladelreloj(Fig.3)eindicaráquelaalarmaestáactivada.
5. Cuandosuenalaalarma,elindicadordealarmacorrespondiente(RADIO/SOUND/BEEP)parpadea.
Ustedpuedeyasea:
a. ALARMA DE REPETICIÓN:Presionarelbotóndealarmaderepetición(SNOOZE)(Fig.1).Su
tiempoparadormitarseextenderápor9minutos.Puedecontinuarutilizandoestacaracterística
hastaqueustedapaguelaalarma.
b. REESTABLECER:ApaguelaalarmapresionandoCUALQUIERbotóndelaunidad,exceptoel
botónSNOOZE(Fig.1).Elrelojdespertadorsereiniciaráautomáticamenteparaeldíasiguiente
ensumodoactual.Elindicadorcorrespondientedealarma(RADIO/SOUND/BEEP)indicaráesto.
Sideseacambiarelmododedespertarsigaelpaso1deCómoconfiguraryusarlaalarma.
c. APAGAR:Paraapagarporcompletolaalarmadeformaquenoquedefijaparaeldíasiguiente,
continúepresionandoelbotóndeALMODEhastaquelosindicadoresdealarma(RADIO/
SOUND/BEEP)esténtodosapagados.
NOTA: silaalarmasuenadurante30minutosdeformacontinua,seapagaráautomáticamenteyse
reiniciaráparaeldíasiguiente.
Uso de la característica de proyección
1. Paraencenderlacaracterísticadeproyección,presioneelbotónproyectarencendido/apagado
(PROJECTON/OFF)ubicadoenlaparteposteriordelaunidad(Fig.2).Ahoraseproyectalahoraen
eltecho.Presioneelbotónnuevamenteparaapagarlacaracterísticadeproyección.
NOTA: silacaracterísticadeproyecciónestádesactivada,puedepresionarelbotóndealarmade
repetición(SNOOZE)(Fig.1)paradispararlaproyeccióndurante5segundos.
2. Paragirarelángulodelahoraqueapareceráeneltecho,girelaperilladerotacióndelahora(TIME
ROTATION)(Fig.1)hastaquellegueasuresultadodeseado.
NOTA: laperilladerotacióndelahora(TIMEROTATION)giraráhasta350grados.
3. Paraenfocarlahoraeneltecho,girelaperilladeenfoque(FOCUS)(Fig.1)hastalograrelresultado
deseado.
4. Elángulodelproyectorsepuedeajustarinclinándolohaciaadelanteohaciaatrás.
-
 1
1
-
 2
2
-
 3
3
-
 4
4
-
 5
5
-
 6
6
-
 7
7
-
 8
8
-
 9
9
-
 10
10


HoMedics SS-4510 Manual de usuario
- Categoría
- Relojes de alarma
- Tipo
- Manual de usuario
en otros idiomas
- English: HoMedics SS-4510 User manual
Artículos relacionados
-
HoMedics SS-5500 Instruction book
-
-
-
-
-
-
HoMedics SoundSpa Fusion Instruction book
-
-