Kodak FLIK HD10 Manual de usuario
- Categoría
- Proyectores
- Tipo
- Manual de usuario

EN | 1
KODAK FLIK HD10
SMART PROJECTOR
PROYECTOR INTELIGENTE PROJECTEUR INTELLIGENT
INTELLIGENTER PROJEKTOR PROIETTORE INTELLIGENTE
User Manual
Manual del usuario | Manuel de l'utilisateur |
Bedienungsanleitung | Manuale Utente

2
ENGLISH | Pg.3
FRENCH | Pg. 63
GERMAN | Pg. 93
ITALIAN | Pg. 123
SPANISH | Pg. 33

EN | 3
INTRODUCTION
Thank you for purchasing the KODAK FLIK HD10 Smart Projector. This User Guide is
intended to provide you with guidelines to ensure that operation of this product is safe
and does not pose risk to the user. Any use that does not conform to the guidelines
described in this User Guide may void the limited warranty.
Please read all directions carefully before using the product and retain this guide
for reference. This product is intended for household use only. It is not intended for
commercial use.
This product is covered by a limited one-year warranty. Coverage is subject to limits
and exclusions. See warranty for details.

4 | EN
SPECIFICATIONS
Product type: Projector
Product length: 5.6”
Product width: 5.8”
Product height: 7.4”
Net weight: 4.2 lbs.
Native resolution: 1920 x 1080p
Power input: 110 – 240 V, 50 - 60 Hz 22.4 A
Rated voltage: AC 90 – 260 V, 50 - 60 MHz
Display technology: 3.5” LCD TFT panel
Lens: 3-piece glass lens
Color temperature: 8000K ± (1000K)
Brightness: 200 ANSI lumens
Light source: LED 100 W
Light source life: 50,000 hours
Contrast ratio: 2000:1
Aspect ratio: 16:9 & 4.3
Throw ratio: 1.37
Adjustment mode: Manual focus
Keystone correction: Auto keystone and 4
core correction
Uniformity: 90%
Fan operating sound: < 35 dB
Projection screen size: 60” - 150”
Projection distance: 39.4” – 157.5” (1 m - 4 m)
Image input modes: HDMI input x 1, USB
input x 1
Speakers: Dual 5-watt speakers
Audio out: 3.5 mm
Audio format: MPEG Audio Layers 1, 2 & 3,
MPEG4 Audio AAC LC, AAC LC + SBR Level
2, AAC 5.1, HE AAC Level 2 & Level 4
Photo format: HD JPEG, BMP, PNG
USB format: FAT, FAT32, NTFS, EXFAT
Video format: 4:3 and 16:9 aspect ratio 480i,
480p, 576i, 576p, 720p, 1080i, 1080p24,
1080p30, 1080p60 HEVC H.265 MPEG4,
MP@ML, MP@HL proiles AV1, VC1 / VP8
VP9 HDR10, HDR10+, HLG
Connectivity: Bluetooth 4.2, Wi-Fi 2.4 GHz/
5GHz
Power source required: Yes (plug-in power)
Installation required: No
Adult assembly required: No
Additional tools required: No
Country of origin: China
Warranty included: Yes

EN | 5
PACKAGE CONTENTS
SAFETY PRECAUTIONS
• KODAK FLIK HD10 Smart Projector
• Power cord & AC adapter
• Remote control
• HDMI cable
• User guide
• Do not attempt to disassemble this device for any reason.
• Do not store the projector in areas where it will be exposed to high temperatures,
humidity, or direct sunlight. Exposure to any or all of these could permanently
damage the projector.
• Never handle the projector with damp or wet hands. This could damage the projector
or create the risk of electric shock.
• Keep the projector out of the reach of children.
• Never point the projector at someone else’s face or look directly into the projector
light. The light is bright and could cause damage.
• Do not use products such as alcohol, gasoline, diluent, or any other organic solvent
when cleaning or attempting to clean this product.
• Do not use this device in an environment where it will be exposed to heavy dust or

6 | EN
humidity/moisture.
• Never drop or shake the projector, as this could cause it to malfunction or
permanently damage the inside parts.
• Do not use the projector while bathing or in a shower.
• Do not place or store the projector where it can fall or be pulled into a tub or sink.
• Do not place, drop, or submerge the projector in water or any other liquid.
• If the projector somehow falls into the water despite you taking all of the above
precautions, please do not reach into the water to retrieve it. Unplug it immediately
and then retrieve it.
• Take care that objects and liquids do not fall or spill onto the projector.
• Improper maintenance can result in injuries or damage to the device.
• Do not make any repairs to the device by yourself. Only have your device repaired by
an authorized service center.
• Power o the device and remove it from the power supply before cleaning the
exterior. Use a soft, dry cloth to clean the device.
⚠WARNING: This product contains chemicals known to the State of California to
cause cancer and birth defects or other reproductive harm.
For more information: www.P65Warnings.ca.gov

EN | 7
PRODUCT OVERVIEW
FRONT BACK
1
2
3 8
4 5 6 7

8 | EN
TOP
9
10
1. Lens
2. Feet
3. IR receiver
4. AC port
5. USB port
6. 3.5 mm audio port
7. AV port
8. HDMI port
9. Power button
10. Manual focus wheel

EN | 9
REMOTE CONTROL VIEW
1. Power button
2. Bookmark button
3. GOOGLE assistant button
4. OK button
5. Back button
6. Mute button
7. Volume up (+) button
8. Volume down (-) button
9. YOUTUBE button
10. PRIME VIDEO button
11. Projector settings button
12. ANDROID TV settings button
13. Navigation buttons
14. TV button
15. Home button
16. Channel up (+) button
17. Channel down (-) button
18. NETFLIX button
19. GOOGLE Play button
111
212
3
413
514
615
716
817
918
10 19

10 | EN
INSTALL BATTERIES INTO THE REMOTE CONTROL
SET UP THE PROJECTOR
1. Press down and slide o the battery cover.
2. Insert the two (2) AAA batteries into the battery compartment.
3. Place the battery cover back on the remote control.
1. Place the projector in front of a suitable projection screen or wall.
2. Connect the AC adapter to the power cord.
3. Then, connect the power jack of the AC adapter to the projector.
4. Connect the wall plug of the power cord to a wall outlet. The LED indicator on the
back of the projector will light up red.

EN | 11
PAIR THE REMOTE CONTROL
SET UP ANDROID TV ON THE PROJECTOR
Power on the projector and the remote control should automatically pair with the
projector.
For manual pairing, press and hold the Back and Home buttons simultaneously
for ive (5) seconds. The LED light on the remote control will begin to lash. When the
pairing is complete, the LED light on the remote control will remain on without lashing.
You should now see a blue checkmark on your screen. Remember to always point your
remote control towards the projector and not the screen.
There are two methods for setting up ANDROID TV on your projector:
Method 1: Set Up with an ANDROID Phone
1. When your projector says, “Quickly set up your projector with your ANDROID phone?”
use the remote control to choose “Continue” or “Yes.”
2. Open the GOOGLE app on your ANDROID phone.
3. Type or say, “Set up my device.”
4. Follow the instructions on your phone until you get a code. Enter the code on the

12 | EN
projector.
5. On your phone, tap the name of the projector when it shows up.
6. To inish the setup, follow the instructions on your projector.
Method 2: Set Up with the Remote Control
1. When your projector says, “Quickly set up your projector with your ANDROID phone?”
use the remote control to choose “Skip.”
2. Next, open the ANDROID TV™ settings by pressing the ANDROID TV™ Settings
button on the remote control.
3. Then, go to Network and select your Wi-Fi® Network.
4. Enter your password and wait for the projector to connect to your network.
5. Then go to Account and select Add Account.
6. Enter your email address and conirm.
7. Enter your password and conirm.
If successfully logged in, your email address will appear under the Account option. You
will now be able to enjoy your ANDROID TV™ apps.

EN | 13
NAVIGATING YOUR PROJECTOR
PROJECTOR SETTINGS
When the projector unit is powered on, the ANDROID TV™ home menu will load
automatically. The home menu is the starting point for all operations with your projector.
When the unit is powered on, the home menu will load automatically.
• Press the Bookmark button to add or remove content from your “Play Next” list.
• Press the ANDROID TV™ Settings button to pull up the settings sidebar for
options such as device name, account options, network connection, and more.
• Press the Home button to return to the home menu at any time,
• Press the TV button to exit the pop-up settings window.
Press the Projector Settings button to display the pop-up settings
window. The pop-up settings windows will show signal, display, sound, and
system options.
Signal: Navigate to this icon and press the OK button to select. This will
access the Signal window where you can select an input source.
Display: Navigate to this icon and press the OK button to select. This will
access the Display window where you can adjust display settings like
projection mode and auto keystone.

14 | EN
Sound: Navigate to this icon and press the OK button to select. This will access the
Sound window where you can adjust sound settings like sound mode and sound
channel.
System: Navigate to this icon and press the OK button to select. This will access the
System window where you can adjust projector settings like language, timer, and more.
SIGNAL WINDOW
The input source will be displayed. Navigate to the input you wish to select and press the
OK button to conirm.
DISPLAY WINDOW
Your display settings will be displayed. Navigate to the setting option you wish to change
and press the OK button to conirm your selection.

EN | 15
Manual Keystone – Adjust the keystone manually.
Auto Keystone – Turn the auto keystone on or o.
Projection Mode – Select between front projection, front ceiling projection, rear front
projection, or rear ceiling projection.
• Front: The projector is placed on a table in front of the screen. This is the most
common way to position the projector for quick setup and portability.
• Front ceiling: The projector is suspended upside-down in front of the screen. A
ceiling/wall mount kit is required (not included).
• Rear: The projector is placed on a table behind the screen. A special rear projector
screen is required (not included).
• Rear ceiling: The projector is suspended upside-down from behind the screen. A
special rear projector screen and ceiling/wall mount kit are required (not included).
NOTES:
For more control over projector height, you can place it on a tripod (sold separately).
The distance between the projector lens and the screen determines the projector
screen size.
Project Ratio – Select or adjust the aspect ratio.

16 | EN
Image Mode – Select the image mode of the projection or customize to adjust speciic
settings.
SOUND WINDOW
Your sound settings will be displayed. Navigate to the setting option you wish to change
and press the OK button to conirm your selection.
Sound Mode – Select between standard, music, movie, or user.

EN | 17
Sound Channel – Select between Audio Return Channel (ARC) or TV options.
Touch Tone – Turn touch tone on or o.
SYSTEM WINDOW
Your system settings will be displayed. Navigate to the setting option you wish to change
and press the OK button to conirm your selection.
Language – Select between multiple languages to use for the projector.
Menu Exit – Select an exit menu time setting.
System Info – View system information.

18 | EN
Window Location – Adjust the location of the window.
Time O – Set a timer for when the projector will turn o.
Factory Reset – Reset the projector back to default factory settings.

EN | 19
SET UP THE REMOTE CONTROL ON YOUR PHONE
CAST CONTENT FROM YOUR DEVICE TO THE PROJECTOR
1. Open the GOOGLE TV app on your ANDROID phone.
2. Tap “Remote.” Then, tap “Scanning for devices.”
3. Choose your device.
4. To complete pairing, follow the instructions on your phone and projector.
5. After pairing, you can use your phone as your projector remote control or use the
included remote control.
1. Connect your device (ex. phone, tablet, or laptop) to the same Wi-Fi® network as your
projector.
2. Open a CHROMECAST-enabled app that has the content you want to cast.
3. In the app, ind and select “Cast.”
4. On your device, select the name of your projector.
5. When Cast symbol changes color, you’re successfully connected.

20 | EN
MIRROR OR STREAM VIDEO FROM YOUR IOS DEVICES TO
THE PROJECTOR
First, you’ll need to install AirPlay on your projector. Install the AirScreen app from
GOOGLE PLAY to enable AirPlay on your projector. Once completed, follow these steps
to mirror or stream video from your iOS device.
Screen Mirroring from IPHONE or IPAD:
1. Make sure that your iOS device and projector are on the same Wi-Fi® network. Your
phone’s hotspot is also acceptable.
2. Swipe down on your phone home screen to display the control console and tap the
AirPlay icon.
3. Select the device you want to cast to.
Screen Mirroring from MAC:
1. Make sure that your MAC and projector are on the same Wi-Fi® network. Your phone’s
hotspot is also acceptable.
2. Click the AirPlay icon on the MAC and select your projector to start mirroring. The
AirPlay icon in the menu bar will turn blue when AirPlay is active.
3. To stop mirroring, click the AirPlay icon again and then select “Turn AirPlay O”.
Note: For MACBOOK AIR, MACBOOK PRO, and IMAC, the AirPlay icon will only be
displayed in the menu bar when AirPlay mirroring is available.
Streaming Video from IPHONE or IPAD:
1. Make sure that your iOS device and projector are on the same Wi-Fi® network. Your

EN | 21
phone’s hotspot is also acceptable.
2. Open the streaming apps you want to cast on the projector and select a video to play.
3. Click the AirPlay or cast icons in the top right corner to cast to the projector.
NOTE: Be aware that copyrighted content from HULU, NETFLIX, and other similar
services CANNOT be mirrored or screencast. To view copyrighted content from these
services, download and use the oicial apps directly through the projector.
PAIRING EXTERNAL DEVICES VIA BLUETOOTH®
ADJUSTING FOCUS
External headphones or speakers can be paired to the projector via BLUETOOTH®.
Follow these steps to connect BLUETOOTH® headphones or speakers:
1. First, open the ANDROID TV™ settings by pressing the ANDROID TV™ Settings button
on the remote control.
2. Next, select “Remote & Accessories” and then select “Add Accessory.”
3. Activate pairing mode on the device you want to connect.
4. Select the device you want to connect from the list.
5. Wait for the two devices to successfully pair together.
If the image on the screen appears fuzzy or unfocused when you turn the projector on,
use the focus wheel on the top to correct the image. Move the wheel left or right until

22 | EN
GOOGLE ASSISTANT
CONNECTING EXTERNAL DEVICES
With GOOGLE ASSISTANT, you can navigate through the apps and streaming services
using your voice.
1. Press the GOOGLE ASSISTANT button to activate GOOGLE’s voice-powered
virtual assistant.
2. On the projection screen, an introduction will appear. Follow the steps to inish setup.
Once the Assistant is set up, press the GOOGLE ASSISTANT button to ask your question
or to give a command.
USB Drives
To access photos, videos, or music stored on any USB drive, simply insert the removable
storage device into the corresponding port on the back of the projector. A pop-up File
Commander window will appear asking if you want to access the connected storage
device. Select “OK” and browse through the File Commander program to ind your
videos and photos on your storage device.
the image appears sharp and clear.
NOTE: For best performance, the projector must be located a minimum distance of 3.5
feet (1 meter) from the screen.

EN | 23
HDMI Compatible Devices
When using an HDMI-compatible device, such as a laptop, personal computer,
smartphone, tablet, or video game console, connect an HDMI cable from the device
to your projector to access photos, videos, or music. Then, press the Projector Settings
button and under “Signal,” select “HDMI.”
For some devices, you will require an HDMI-to-HDMI cable and/or adapters, which you
will need to purchase separately. For your convenience, we’ve compiled this table of
devices and adapters you will need for speciic device formats.
Device Additional Cable or Adapter Needed
1 Devices with HDMI port HDMI to HDMI cable
2 Devices with mini-HDMI
port Mini-HDMI to HDMI adapter – HDMI to HDMI
cable
3Devices with micro-HDMI
port Micro-HDMI to HDMI adapter – HDMI to HDMI
cable
4 iOS devices with
lightning port Lightning digital AV adapter – HDMI to HDMI
cable
5 iOS devices with USBC
port USBC digital AV multiport adapter – HDMI to
HDMI cable
6 Devices with USBC port USBC to HDMI adapter – HDMI to HDMI cable
7 Devices with USBC port USBC to HDMI cable

24 | EN
TROUBLESHOOTING
If you cannot play your GOOGLE PLAY movies, TV shows, or music on ANDROID TV™
screen, here are a few troubleshooting solutions you can try:
Check your Wi-Fi® Connection
1. From the ANDROID TV™ home menu, press the ANDROID TV™ Settings button.
2. Under “Network,” select a network.
3. Follow the onscreen instructions.
4. Open one of your apps.
5. Play your video, music, or game again.
Make Sure your System is Up to Date
1. From the ANDROID TV™ home menu, press the ANDROID TV™ Settings button.
2. Select “About.” Next, go to “System Software Update,” and select “Software Update.”
3. Install any available updates, then play your video, music, or game again.
Restart your Device
1. From the ANDROID TV™ home menu, press the ANDROID TV™ Settings button.
2. Select “About” and then, select “Restart.”
3. Once the system restarts, play your video, music, or game again.
Check which Account you’re Using
1. From the ANDROID TV™ home menu, press the ANDROID TV™ Settings button.

EN | 25
2. Under “Accounts”, check to make sure you are signed into your ANDROID TV™
account.
Sync your Account
1. From the ANDROID TV™ home menu, press the ANDROID TV™ Settings button.
2. Under “Accounts,” select your account.
3. Then, select “Sync Now.”
4. Play your video, music, or game again.
Clear your App Data & Cache
1. From the ANDROID TV™ home menu, press the ANDROID TV™ Settings button.
2. Select “Apps.”
3. Under “System Apps,” select the app, go to “Clear Data,” and conirm “Clear Cache.”
4. Play your video, music, or game again.
The ANDROID TV™ interface on this projector screen will be unusable if the remote
control stops working. Here are a few possible solutions for ixing the remote control:
• Check the batteries. Replace the batteries and see if the remote control is operational
with new batteries.
• The remote control may not be paired with the projector. To pair the remote control,
press and hold the Back and Home buttons at the same time for ive (5) seconds. The
LED light on the remote control will begin to lash. When the pairing is complete, the
LED light on the remote control will remain on without lashing.
• There may be something wrong with the hardware of the remote control. Please call
customer service to request a replacement remote control.

26 | EN
FREQUENTLY ASKED QUESTIONS
Can I sideload ANDROID apps to the projector?
Yes, you can. Note, there are more than 7,000 native apps on GOOGLE PLAY you can
download directly to the projector. For apps not available on GOOGLE PLAY, download
the APK ile and install them on a USB drive. Make sure the File Explorer app is installed
on the projector, so your USB drive is recognized.
What should I do if my HDMI has no signal?
1. Use a dierent HDMI cable.
2. Connect the projector with another device with your HDMI cable.
3. Disconnect from the projector and try connecting your device with your TV via HDMI.
4. Adjust the HDMI output resolution/Hz of the connected device to match your TV.
How do I connect external speakers to the projector?
This projector can also be connected to external sound output devices, including
headphones and speakers; when connected to external speakers, the built-in speaker
system is disabled.
To connect external speakers:
1. Use a 3.5 mm audio cable or an adapter (not provided) to connect your headphones
or external speaker.
2. Connect the other end of the audio cable to the AUX port on the projector.
For BLUETOOTH speakers, go to Settings, then Remote & Accessories, and select Add
Accessory.

EN | 27
How do I play videos without Wi-Fi®?
1. Download videos to a USB drive.
2. Install the File Explorer app from the GOOGLE PLAY STORE on the projector.
3. Install a media player app such as VLC or KODI.
4. Plug in the USB drive into the projector to play your videos.
What capacity of USB drives does the projector support?
The projector supports USB drives with or below 128 GB and 1080p @ 60 Hz content.
The disk format needs to be NTFS, FAT, or FAT32.
*Format supports:
• Documents: .txt
• Photos: JPG (.jpg, .jpeg), PNG (.png), BMP (.bmp)
• Music: MP3 (.mp3), AAC (.aac)
• Video: AV1, XVID (.avi), MPEG4 (3gp, mp4), H.263 (3g2, .avi, .mkv, .webm, 3gp, mp4)
How do I play movies from my USB with the projector?
1. Download the File Commander app from GOOGLE PLAY.
2. Insert the USB storage device into the projector.
3. Select the music, 1080p videos, or photos from the USB drive that you want to play.
4. Open them with a multimedia player app such as VLC or KODI. If you don’t have an
app, download one from GOOGLE PLAY.

28 | EN
CUSTOMER SERVICE
Should you experience any problems with your product, please contact us before
returning the item to the place of purchase. We’re here to help!
U.S. Support: kodak@camarketing.com, 8445161539
International Support: kodakintl@camarketing.com, 8445161540

EN | 29
LIMITED WARRANTY TO ORIGINAL CONSUMER
This KODAK FLIK HD10 Smart Projector (“Product”), including any accessories included in the original packaging, as
supplied and distributed new by an authorized retailer is warranted by C&A Marketing, Inc. (the “Company”) to the original
consumer purchaser only, against certain defects in material and workmanship (“Warranty”) as follows:
To receive Warranty service, the original consumer purchaser must contact the Company or its authorized service
provider for problem determination and service procedures. Proof of purchase in the form of a bill of sale or receipted
invoice, evidencing that the Product is within the applicable Warranty period(s), MUST be presented to the Company or its
authorized service provider in order to obtain the requested service.
Service options, parts availability, and response times may vary and may change at any time. In accordance with
applicable law, the Company may require that you furnish additional documents and/or comply with registration
requirements before receiving warranty service. Please contact our customer service for details on obtaining warranty
service:
USA: kodak@camarketing.com, 8445161539
International: kodakintl@camarketing.com, +18445161540
Shipping expenses to the Company’s Return Facility are not covered by this warranty, and must be paid by the consumer.
The consumer likewise bears all risk of loss or further damage to the Product until delivery to said facility.
EXCLUSIONS AND LIMITATIONS
The Company warrants the Product against defects in materials and workmanship under normal use for a period of ONE
(1) YEAR from the date of retail purchase by the original end-user purchaser (“Warranty Period”). If a hardware defect arises
and a valid claim is received within the Warranty Period, the Company, at its sole option and to the extent permitted by law,
will either (1) repair the Product defect at no charge, using new or refurbished replacement parts, (2) exchange the Product
with a Product that is new or which has been manufactured from new or serviceable used parts and is at least functionally
equivalent to the original device, or (3) refund the purchase price of the Product.
A replacement Product or part thereof shall enjoy the warranty of the original Product for the remainder of the Warranty
Period, or ninety (90) days from the date of replacement or repair, whichever provides you longer protection. When a
Product or part is exchanged, any replacement item becomes your property, while the replaced item becomes the
Company’s property. Refunds can only be given if the original Product is returned.
This Warranty does not apply to:
(a) Any non-KODAK FLIK HD10 Smart Projector product, hardware or software, even if packaged or sold with the Product;
(b) Damage caused by use with non-KODAK FLIK HD10 Smart Projector products;
(c) Damage caused by accident, abuse, misuse, lood, ire, earthquake, or other external causes;
(d) Damage caused by operating the Product outside the permitted or intended uses described by the Company;
(e) Damage caused by third-party services;

30 | EN
(f) A Product or part that has been modiied to alter functionality or capability without the written permission of the
Company;
(g) Consumable parts, such as batteries, fuses, and bulbs;
(h) Cosmetic damage; or
(i) If any KODAK FLIK HD10 Smart Projector serial number has been removed or defaced.
This Warranty is valid only in the country where the consumer purchased the Product, and only applies to Products
purchased and serviced in that country.
The Company does not warrant that the operation of the Product will be uninterrupted or error-free. The Company is not
responsible for damage arising from your failure to follow instructions relating to its use.
NOTWITHSTANDING ANYTHING TO THE CONTRARY AND TO THE MAXIMUM EXTENT PERMITTED BY APPLICABLE
LAW, THE COMPANY PROVIDES THE PRODUCT “ASIS” AND “ASAVAILABLE” FOR YOUR CONVENIENCE AND THE
COMPANY AND ITS LICENSORS AND SUPPLIERS EXPRESSLY DISCLAIM ALL WARRANTIES AND CONDITIONS,
WHETHER EXPRESSED, IMPLIED, OR STATUTORY, INCLUDING THE WARRANTIES OF MERCHANTABILITY, FITNESS FOR
A PARTICULAR PURPOSE, TITLE, QUIET ENJOYMENT, ACCURACY, AND NONINFRINGEMENT OF THIRDPARTY RIGHTS.
THE COMPANY DOES NOT GUARANTEE ANY SPECIFIC RESULTS FROM THE USE OF THE PRODUCT, OR THAT THE
COMPANY WILL CONTINUE TO OFFER OR MAKE AVAILABLE THE PRODUCT FOR ANY PARTICULAR LENGTH OF TIME.
THE COMPANY FURTHER DISCLAIMS ALL WARRANTIES AFTER THE EXPRESS WARRANTY PERIOD STATED ABOVE.
YOU USE THE PRODUCT AT YOUR OWN DISCRETION AND RISK. YOU WILL BE SOLELY RESPONSIBLE FOR (AND THE
COMPANY DISCLAIMS) ANY AND ALL LOSS, LIABILITY, OR DAMAGES RESULTING FROM YOUR USE OF THE PRODUCT.
NO ADVICE OR INFORMATION, WHETHER ORAL OR WRITTEN, OBTAINED BY YOU FROM THE COMPANY OR THROUGH
ITS AUTHORIZED SERVICE PROVIDERS SHALL CREATE ANY WARRANTY.
IN NO EVENT WILL THE COMPANY’S TOTAL CUMULATIVE LIABILITY ARISING FROM OR RELATED TO THE PRODUCT,
WHETHER IN CONTRACT OR TORT OR OTHERWISE EXCEED THE FEES ACTUALLY PAID BY YOU TO THE COMPANY
OR ANY OF ITS AUTHORIZED RESELLERS FOR THE PRODUCT AT ISSUE IN THE LAST YEAR FROM YOUR PURCHASE.
THIS LIMITATION IS CUMULATIVE AND WILL NOT BE INCREASED BY THE EXISTENCE OF MORE THAN ONE INCIDENT
OR CLAIM. THE COMPANY DISCLAIMS ALL LIABILITY OF ANY KIND OF ITS LICENSORS AND SUPPLIERS. IN NO EVENT
WILL THE COMPANY OR ITS LICENSORS, MANUFACTURERS, AND SUPPLIERS BE LIABLE FOR ANY INCIDENTAL, DIRECT,
INDIRECT, SPECIAL, PUNITIVE, OR CONSEQUENTIAL DAMAGES (SUCH AS, BUT NOT LIMITED TO, DAMAGES FOR LOSS
OF PROFITS, BUSINESS, SAVINGS, DATA, OR RECORDS) CAUSED BY THE USE, MISUSE, OR INABILITY TO USE THE
PRODUCT.
Nothing in these terms shall attempt to exclude liability that cannot be excluded under applicable law. Some countries,
states, or provinces do not allow the exclusion or limitation of incidental or consequential damages or allow limitations on
warranties, so certain limitations or exclusions may not apply to you. This warranty gives you speciic legal rights, and you
may have other rights that vary from state to state or province to province. Contact your authorized retailer to determine if
another warranty applies.

EN | 31
Kodak does NOT manufacture this Product or provide any Warranty or support.
www.kodakphotoplus.com
⚠WARNING: This product contains chemicals known to the State of California to cause cancer and birth defects or other
reproductive harm.
The KODAK trademark, logo, and trade dress are used under license from Eastman Kodak Company.
GOOGLE PLAY is a trademark of GOOGLE LLC.
ANDROID TV is a trademark of GOOGLE LLC.
NETFLIX is a registered trademark of NETFLIX, INC.
PRIME VIDEO is a trademark of AMAZON TECHNOLOGIES, INC.
YOUTUBE is a trademark of GOOGLE LLC.
APPLE, AIRPRINT, IPOD, IPHONE, IPAD, APP STORE, MAC, MACINTOSH, and OS X are trademarks of APPLE INC. in the U.S.
and other countries.
BLUETOOTH is a trademark of BLUETOOTH SIG, Inc. USA.
Wi-Fi, WPA, and WPA2 are trademarks of Wi-Fi Alliance in the U.S. and/or other countries.
HDMI, the HDMI logo, and High-Deinition Multimedia Interface are trademarks or registered trademarks of HDMI
Licensing, LLC in the United States and/or other countries.
All other products, brand names, company names, and logos are trademarks of their respective owners, used merely to
identify their respective products, and are not meant to connote any sponsorship, endorsement, or approval.
Distributed by C&A Marketing, Inc., 114 Tived Lane East, Edison, NJ 08837 USA.
© 2023. C&A IP Holdings LLC. All Rights Reserved. Made in China.

32 | EN

ES | 33
INTRODUCCIÓN
Gracias por adquirir el proyector inteligente KODAK FLIK HD10. El objetivo de esta
Guía del usuario es proporcionarle directrices para garantizar que el funcionamiento
de este producto sea seguro y no suponga ningún riesgo para el usuario. Cualquier
uso que no se ajuste a las directrices descritas en esta Guía del usuario puede anular
la garantía limitada.
Lea atentamente todas las instrucciones antes de utilizar el producto y conserve esta
guía como referencia. Este producto está destinado únicamente al uso doméstico. No
está destinado a un uso comercial.
Este producto está cubierto por una garantía limitada de un año. La cobertura está
sujeta a límites y exclusiones. Consulte la garantía para más detalles.

34 | ES
ESPECIFICACIONES
Tipo de producto: Proyector
Longitud del producto: 5,6
Anchura del producto: 5,8
Altura del producto: 7,4
Peso neto: 4,2 lbs.
Resolución nativa 1920 x 1080p
Entrada de alimentación: 110 - 240 V, 50 - 60 Hz
22,4 A
Tensión nominal: CA 90 - 260 V, 50 - 60 MHz
Tecnología de visualización: panel LCD TFT de 3,5
Lente: lente de cristal de 3 piezas
Temperatura de color: 8000K ± (1000K)
Brillo: 200 ANSI lúmenes
Fuente de luz: LED 100 W
Vida útil de la fuente de luz: 50.000 horas
Relación de contraste: 2000:1
Relación de aspecto: 16:9 y 4.3
Relación de proyección: 1,37
Modo de ajuste: Enfoque manual
Corrección trapezoidal: Corrección trapezoidal
automática y 4 corrección trapezoidalvvv
Uniformidad: 90%
Sonido de funcionamiento del ventilador < 35 dB
Tamaño de la pantalla de proyección: 60” - 150
Distancia de proyección: 39,4” - 157,5” (1 m - 4 m)
Modos de entrada de imagen: Entrada HDMI x 1, USB
entrada x 1
Altavoces: Altavoces duales de 5 vatios
Salida de audio: 3,5 mm
Formato de audio: MPEG Audio Capas 1, 2 y 3,
MPEG- 4 Audio AAC LC, AAC LC + SBR Nivel 2,
AAC 5.1, HE AAC Nivel 2 y Nivel 4
Formato fotográico: HD JPEG, BMP, PNG
Formato USB: FAT, FAT32, NTFS, EXFAT
Formato de vídeo: Relación de aspecto 4:3 y 16:9
480i, 480p, 576i, 576p, 720p, 1080i, 1080p24,
1080p30, 1080p60 HEVC H.265 MPEG4,
MP@ML, MP@HL periles AV1, VC1 / VP8 / VP9
HDR10, HDR10+, HLG
Conectividad: Bluetooth 4.2, Wi-Fi 2,4 GHz/5 GHz
Fuente de alimentación necesaria: Sí
(alimentación por enchufe)
Requiere instalación: No
Requiere montaje por parte de un adulto: No
Se necesitan herramientas adicionales: No
País de origen: China
Garantía incluida: Sí
Duración de la garantía: 1 año

ES | 35
CONTENIDO DEL PAQUETE
PRECAUCIONES DE SEGURIDAD
• Proyector inteligente KODAK FLIK HD10
• Cable de alimentación y adaptador de CA
• Mando a distancia
• Cable HDMI
• No intente desmontar este aparato por ningún motivo.
• No guarde el proyector en zonas donde vaya a estar expuesto a altas temperaturas,
humedad o luz solar directa. La exposición a cualquiera de estos factores o a todos
ellos podría dañar el proyector de forma permanente.
• No manipule nunca el proyector con las manos húmedas o mojadas. Esto podría
dañar el proyector o crear el riesgo de una descarga eléctrica.
• Mantenga el proyector fuera del alcance de los niños.
• Nunca apunte con el proyector a la cara de otra persona ni mire directamente a la luz
del proyector. La luz es brillante y podría causar daños.
• No utilice productos como alcohol, gasolina, diluyente o cualquier otro disolvente
orgánico cuando limpie o intente limpiar este producto.
• No utilice este aparato en un entorno en el que vaya a estar expuesto a mucho polvo

36 | ES
o humedad.
• No deje caer ni sacuda nunca el proyector, ya que podría provocar su mal
funcionamiento o dañar permanentemente las piezas internas.
• No utilice el proyector mientras se baña o se ducha.
• No coloque ni guarde el proyector donde pueda caerse o ser arrastrado hacia una
bañera o un lavabo.
• No coloque, deje caer ni sumerja el proyector en agua ni en ningún otro líquido.
• Si el proyector cae de algún modo al agua a pesar de que haya tomado todas
las precauciones anteriores, no introduzca la mano en el agua para recuperarlo.
Desenchúfelo inmediatamente y recupérelo después.
• Tenga cuidado de que no caigan o se derramen objetos o líquidos sobre el proyector.
• Un mantenimiento inadecuado puede provocar lesiones o daños en el aparato.
• No realice ninguna reparación en el aparato por su cuenta. Encargue la reparación de
su aparato únicamente a un centro de servicio autorizado.
• Apague el aparato y desconéctelo de la fuente de alimentación antes de limpiar el
exterior. Utilice un paño suave y seco para limpiar el aparato.
⚠ADVERTENCIA: Este producto contiene sustancias químicas que, según el
Estado de California, provocan cáncer y defectos de nacimiento u otros daños
reproductivos.
Para más información: www.P65Warnings.ca.gov

ES | 37
DESCRIPCIÓN DEL PRODUCTO
PARTE DELANTERA PARTE TRASERA
1
2
3 8
4 5 6 7

38 | ES
ARRIBA
9
10
1. Lente
2. Pies
3. Receptor IR
4. Puerto de CA
5. Puerto USB
6. Puerto de audio de 3,5 mm
7. Puerto AV
8. Puerto HDMI
9. Botón de encendido
10. Rueda de enfoque manual

ES | 39
VISTA DEL MANDO A DISTANCIA
1. Botón de encendido
2. Botón de favoritos
3. Botón del asistente de GOOGLE
4. Botón OK
5. Botón Atrás
6. Botón de silencio
7. Botón para subir el volumen (+)
8. Botón para bajar el volumen (-)
9. Botón YOUTUBE
10. Botón PRIME VIDEO
11. Botón de ajustes del proyector
12. Botón de ajustes de ANDROID TV
13. Botones de navegación
14. Botón TV
15. Botón Home
16. Botón de canal hacia arriba (+)
17. Botón de canal abajo (-)
18. Botón NETFLIX
19. Botón GOOGLE PLAY
111
212
3
413
514
615
716
817
918
10 19

40 | ES
INSTALAR LAS PILAS EN EL MANDO A DISTANCIA
INSTALAR EL PROYECTOR
1. Presione hacia abajo y deslice la tapa de las pilas.
2. Inserte las dos (2) pilas AAA en el compartimento de las pilas.
3. Vuelva a colocar la tapa de las pilas en el mando a distancia.
1. Coloque el proyector frente a una pantalla de proyección o pared adecuada.
2. Conecte el adaptador de CA al cable de alimentación.
3. A continuación, conecte la clavija de alimentación del adaptador de CA al proyector.
4. Conecte la clavija del cable de alimentación a una toma de corriente. El indicador
LED de la parte posterior del proyector se iluminará en rojo.

ES | 41
EMPAREJAR EL MANDO A DISTANCIA
CONFIGURAR ANDROID TV EN EL PROYECTOR
Encienda el proyector y el mando a distancia debería emparejarse automáticamente
con el proyector.
Para el emparejamiento manual, mantenga pulsados los botones Atrás y Home
simultáneamente durante cinco (5) segundos. La luz LED del mando a distancia
comenzará a parpadear. Cuando el emparejamiento se haya completado, la luz LED del
mando a distancia permanecerá encendida sin parpadear. Ahora debería ver una marca
de veriicación azul en su pantalla. Recuerde apuntar siempre el mando a distancia hacia
el proyector y no hacia la pantalla.
Existen dos métodos para conigurar ANDROID TV en su proyector:
Método 1: Conigurar con un teléfono Android
1. Cuando el proyector le diga “¿Ajustar rápidamente el proyector con su teléfono
ANDROID?” utilice el mando a distancia para elegir “Continuar” o “Sí”.
2. Abra la aplicación de GOOGLE en su teléfono ANDROID.
3. Escriba o diga “Conigurar mi dispositivo”.
4. Siga las instrucciones del teléfono hasta obtener un código. Introduzca el código en
el proyector.

42 | ES
5. En su teléfono, pulse el nombre del proyector cuando aparezca.
6. Para inalizar la coniguración, siga las instrucciones del proyector.
Método 2: Coniguración con el mando a distancia
1. Cuando el proyector le diga: “¿Ajustar rápidamente el proyector con su teléfono
ANDROID?”
utilice el mando a distancia para elegir “Omitir”.
2. A continuación, abra los ajustes de Android TV™ pulsando el botón Ajustes de
ANDROID TV™ del el mando a distancia.
3. A continuación, vaya a Red y seleccione su red Wi-Fi®.
4. Introduzca su contraseña y espere a que el proyector se conecte a su red.
5. A continuación, vaya a Cuenta y seleccione Añadir cuenta.
6. Introduzca su dirección de correo electrónico y conirme.
7. Introduzca su contraseña y conirme.
Si ha iniciado sesión correctamente, su dirección de correo electrónico aparecerá en la
opción Cuenta. Usted ahora podrá disfrutar de sus aplicaciones ANDROID TV™”.

ES | 43
NAVEGANDO POR SU PROYECTOR
AJUSTES DEL PROYECTOR
Al encender la unidad de proyector, el menú de inicio de ANDROID TV™ se cargará
automáticamente. El menú de inicio es el punto de partida para todas las operaciones
con su proyector. Cuando se encienda la unidad, el menú de inicio se cargará
automáticamente.
• Pulse el botón Favoritos para añadir o eliminar contenidos de su lista “Reproducir
siguiente”
• Pulse el botón Coniguración de ANDROID TV™ para desplegar la barra lateral de
coniguración de opciones como el nombre del dispositivo, las opciones de cuenta,
la conexión de red, etc.
• Pulse el botón Inicio para volver al menú de inicio en cualquier momento,
• Pulse el botón TV para salir de la ventana emergente de ajustes.
Pulse el botón Ajustes del proyector para mostrar la ventana emergente
de ajustes. La ventana emergente de ajustes mostrará las opciones de señal,
visualización, sonido y sistema.
Señal: Navegue hasta este icono y pulse el botón OK para seleccionarlo.
Accederá a la ventana Señal donde podrá seleccionar una fuente de
entrada.
Pantalla: Navegue hasta este icono y pulse el botón OK para seleccionarlo.
Accederá a la ventana Pantalla donde podrá ajustar la coniguración de la

44 | ES
pantalla, como el modo de proyección y la distorsión trapezoidal automática.
Sonido: Navegue hasta este icono y pulse el botón OK para seleccionarlo. De este
modo accederá a la ventana Sonido, donde podrá ajustar la coniguración de sonido,
como el modo y el canal de sonido.
Sistema: Navegue hasta este icono y pulse el botón OK para seleccionarlo. Accederá a
la ventana Sistema donde podrá ajustar la coniguración del proyector como el idioma,
el temporizador, etc.
VENTANA DE SEÑAL
Aparecerá la fuente de entrada. Navegue hasta la entrada que desee seleccionar y pulse
el botón OK para conirmar.
VENTANA DE VISUALIZACIÓN
Se mostrarán los ajustes de visualización. Navegue hasta la opción de ajuste que desee
cambiar y pulse el botón OK para conirmar su selección.

ES | 45
Keystone Manual – Ajuste la distorsión trapezoidal manualmente.
Corrección Trapezoidal Automática – Active o desactive la corrección trapezoidal
automática.
Modo de Proyección – Seleccione entre proyección frontal, proyección frontal de
techo, proyección frontal trasera o proyección trasera de techo.
Frontal: El proyector se coloca sobre una mesa delante de la pantalla. Esta es la forma
más común de colocar el proyector para una rápida coniguración y portabilidad.
• Frontal techo: El proyector se suspende boca abajo delante de la pantalla. Se
requiere un kit de montaje en techo/pared (no incluido).
• Posterior: El proyector se coloca sobre una mesa detrás de la pantalla. Se requiere
una pantalla especial para proyector trasero (no incluida).
• Techo trasero: El proyector se suspende boca abajo por detrás de la pantalla. Se
requiere una pantalla especial para proyector trasero y un kit de montaje en techo/
pared (no incluidos).
NOTAS:
Para controlar mejor la altura del proyector, puede colocarlo sobre un trípode (se vende
por separado).

46 | ES
La distancia entre el objetivo del proyector y la pantalla determina el tamaño de la
pantalla del proyector.
Relación de Proyección – Seleccione o ajuste la relación de aspecto.
Modo de Imagen – Seleccione el modo de imagen de la proyección o personalícelo
para ajustar parámetros especíicos.
VENTANA DE SONIDO
Se mostrarán sus ajustes de sonido. Navegue hasta la opción de ajuste que desee
cambiar y pulse el botón OK para conirmar su selección.
Modo de Sonido – Seleccione entre estándar, música, película o usuario.

ES | 47
Canal de Sonido – Seleccione entre las opciones Canal de retorno de audio (ARC) o TV.
Tono Táctil – Active o desactive el tono táctil.
VENTANA DEL SISTEMA
Aparecerán los ajustes de su sistema. Navegue hasta la opción de ajuste que desee
cambiar y pulse el botón OK para conirmar su selección.
Idioma – Seleccione entre varios idiomas a utilizar para el proyector.
Menú Salida – Seleccione un ajuste de tiempo del menú de salida.
Información del Sistema – Vea la información del sistema.

48 | ES
Ubicación de la ventana – Ajuste la ubicación de la ventana.
Hora de apagado – Establezca un temporizador para cuando se apague el proyector.
Restablecimiento de fábrica – Restablecer el proyector a los ajustes predeterminados
de fábrica

ES | 49
CONFIGURAR EL CONTROL REMOTO EN SU TELÉFONO
TRANSFIERA CONTENIDOS DE SU DISPOSITIVO AL PROYECTOR
1. Abra la aplicación GOOGLE TV en su teléfono ANDROID.
2. Pulse “Mando a distancia”. A continuación, toque “Buscar dispositivos”.
3. Elija su dispositivo.
4. Para completar el emparejamiento, siga las instrucciones del teléfono y del proyector.
5. Después del emparejamiento, puede utilizar su teléfono como mando a distancia del
proyector o utilizar elmando a distancia incluido”.
1. Conecte su dispositivo (por ejemplo, teléfono, tableta u ordenador portátil) a la
misma red Wi-Fi® que su proyector.
2. Abra una aplicación habilitada para CHROMECAST que tenga el contenido que
desea transmitir.
3. En la aplicación, busque y seleccione “Transmitir”.
4. En su dispositivo, seleccione el nombre de su proyector.
5. Cuando el símbolo de Cast cambie de color, se habrá conectado correctamente.

50 | ES
REFLEJE O TRANSMITA VÍDEO DESDE SUS DISPOSITIVOS
IOS AL PROYECTOR
En primer lugar, deberá instalar AirPlay en su proyector. Instale la aplicación AirScreen
desde GOOGLE PLAY para habilitar AirPlay en su proyector. Una vez completado, siga
estos pasos para relejar o transmitir vídeo desde su dispositivo iOS.
Screen Mirroring desde IPHONE o IPAD:
1. Asegúrese de que su dispositivo iOS y el proyector están en la misma red Wi-Fi®. El
hotspot de su teléfono también es aceptable.
2. Deslice el dedo hacia abajo en la pantalla de inicio de su teléfono para mostrar la
consola de control y pulse el icono AirPlay.
3. Seleccione el dispositivo al que desea transmitir.
Screen Mirroring desde MAC:
1. Asegúrese de que su Mac y el proyector están en la misma red Wi-Fi®. El hotspot de su
teléfono también es aceptable.
2. Haga clic en el icono AirPlay del Mac y seleccione el proyector para iniciar la
duplicación. El icono AirPlay de la barra de menús se volverá azul cuando AirPlay esté
activo.
3. Para detener la duplicación, haga clic de nuevo en el icono AirPlay y seleccione
“Desactivar AirPlay”.
Nota: En los MACBOOK AIR, MACBOOK PRO e IMAC, el icono de AirPlay sólo aparecerá
en la barra de menús cuando esté disponible la duplicación AirPlay.
Streaming de vídeo desde IPHONE o IPAD:
1. Asegúrese de que su dispositivo iOS y el proyector están en la misma red Wi-Fi®. El

ES | 51
hotspot de su teléfono también es aceptable.
2. Abra las aplicaciones de streaming que desea emitir en el proyector y seleccione un
vídeo para reproducir.
3. Haga clic en los iconos AirPlay o cast en la esquina superior derecha para emitir al
proyector.
NOTA: Tenga en cuenta que los contenidos protegidos por derechos de autor de HULU,
NETFLIX y otros servicios similares NO PUEDEN relejarse ni emitirse en pantalla. Para ver
contenidos protegidos por derechos de autor de estos servicios descargue y utilice las
aplicaciones oiciales directamente a través del proyector.
EMPAREJAMIENTO DE DISPOSITIVOS EXTERNOS MEDIANTE BLUETOOTH
AJUSTE DEL ENFOQUE
Los auriculares o altavoces externos pueden conectarse al proyector a través de
BLUETOOTH®. Siga estos pasos para conectar auriculares o altavoces BLUETOOTH®:
1. En primer lugar, abra los ajustes de ANDROID TV™ pulsando el botón Ajustes de
ANDROID TV™ del mando a distancia.
2. A continuación, seleccione “Mando a distancia y accesorios” y luego “Añadir
accesorio.”
3. Active el modo de emparejamiento en el dispositivo que desee conectar.
4. Seleccione de la lista el dispositivo que desea conectar.
5. Espere a que los dos dispositivos se emparejen correctamente.
Si la imagen de la pantalla aparece borrosa o desenfocada al encender el proyector,
utilice la rueda de enfoque situada en la parte superior para corregir la imagen. Mueva la

52 | ES
ASISTENTE DE GOOGLE
CONEXIÓN DE DISPOSITIVOS EXTERNOS
Con GOOGLE ASSISTANT, puede navegar por las aplicaciones y los servicios de
streaming utilizando su voz.
1. Pulse el botón Asistente de GOOGLE para activar el asistente virtual por voz de
GOOGLE.
2. En la pantalla de proyección aparecerá una introducción. Siga los pasos para inalizar
la coniguración.
Una vez conigurado el Asistente, pulse el botón Asistente de GOOGLE para formular su
pregunta o dar una orden.
Unidades USB
Para acceder a las fotos, vídeos o música almacenados en cualquier unidad USB,
sólo tiene que insertar el dispositivo de almacenamiento extraíble en el puerto
correspondiente de la parte posterior del proyector. Aparecerá una ventana emergente
de File Commander preguntándole si desea acceder al dispositivo de almacenamiento
conectado. Seleccione “Aceptar” y navegue por el programa File Commander para
encontrar sus vídeos y fotos en el dispositivo de almacenamiento.
rueda hacia la izquierda o hacia la derecha hasta que la imagen aparezca nítida y clara.
NOTA: Para obtener el mejor rendimiento, el proyector debe estar situado a una
distancia mínima de 1 metro (3,5 pies) de la pantalla.

ES | 53
Dispositivos compatibles con HDMI
Cuando utilice un dispositivo compatible con HDMI, como un ordenador portátil, un
ordenador personal, un smartphone, una tableta o una consola de videojuegos, conecte
un cable HDMI del dispositivo al proyector para acceder a fotos, vídeos o música. A
continuación, pulse el botón Ajustes del proyector y en Señal”, seleccione “HDMI”.
Para algunos dispositivos, necesitará un cable HDMI a HDMI y/o adaptadores, que
deberá adquirir por separado. Para su comodidad, hemos recopilado esta tabla de
dispositivos y adaptadores que necesitará para formatos de dispositivos especíicos.
Dispositivo Cable o adaptador adicional necesario
1Dispositivos con puerto
HDMI Cable HDMI a HDMI
2Dispositivos con puerto
mini-HDMI Adaptador de mini-HDMI a HDMI - Cable de
HDMI a HDMI
3Dispositivos con puerto
micro-HDMI Adaptador micro-HDMI a HDMI - Cable HDMI
a HDMI
4 Dispositivos iOS con
puerto Lightning Adaptador AV digital lightning - Cable HDMI a
HDMI
5 Dispositivos iOS con
puerto USBC Adaptador AV digital USBC - Cable HDMI a
HDMI
6Dispositivos con puerto
USBC Adaptador USBC a HDMI - Cable HDMI a
HDMI
7Dispositivos con puerto
USBC Cable USBC a HDMI

54 | ES
SOLUCIÓN DE PROBLEMAS
Si no puede reproducir sus películas, programas de televisión o música de GOOGLE
PLAY en la pantalla de ANDROID TV™, aquí tiene algunas soluciones que puede probar:
Compruebe su conexión Wi-Fi
1. En el menú de inicio de ANDROID TV™, pulse el botón Coniguración de ANDROID
TV™.
2. En “Red”, seleccione una red.
3. Siga las instrucciones que aparecen en pantalla.
4. Abra una de sus aplicaciones.
5. Vuelva a reproducir su vídeo, música o juego.
Asegúrese de que su sistema está actualizado
1. En el menú de inicio de ANDROID TV™, pulse el botón Coniguración de ANDROID
TV™.
2. Seleccione “Acerca de”. A continuación, vaya a “Actualización de software del
sistema” y seleccione “Actualización de software”.
3. Instale las actualizaciones disponibles y, a continuación, vuelva a reproducir su vídeo,
música o juego.
Reinicie su dispositivo
1. En el menú de inicio de Android TV™, pulse el botón Coniguración de ANDROID
TV™.
2. Seleccione “Acerca de” y luego, seleccione “Reiniciar”
3. Una vez reiniciado el sistema, vuelva a reproducir su vídeo, música o juego.

ES | 55
Compruebe qué cuenta está utilizando
1. En el menú de inicio de ANDROID TV™, pulse el botón Coniguración de ANDROID
TV™.
2. En “Cuentas”, compruebe que ha iniciado sesión en su cuenta de ANDROID TV™.
Sincronizar su cuenta
1. En el menú de inicio de ANDROID TV™, pulse el botón Coniguración de ANDROID
TV™.
2. En “Cuentas”, seleccione su cuenta..
3. A continuación, seleccione “Sincronizar ahora”.
4. Vuelva a reproducir su vídeo, música o juego.
Borrar los datos y la memoria caché de su aplicación
1. En el menú de inicio de ANDROID TV™, pulse el botón Coniguración de ANDROID
TV™.
2. Seleccione “Apps”.
3. En “Apps del sistema”, seleccione la app, vaya a “Borrar datos” y conirme “Borrar
caché.”
4. Vuelva a reproducir su vídeo, música o juego.
La interfaz ANDROID TV™ de la pantalla de este proyector quedará inutilizable si el
mando a distancia deja de funcionar. He aquí algunas posibles soluciones para arreglar
el mando a distancia:
• Compruebe las pilas. Cambie las pilas y compruebe si el mando a distancia funciona
con pilas nuevas.
• Puede que el mando a distancia no esté emparejado con el proyector. Para emparejar
el mando a distancia, mantenga pulsados los botones Atrás e Inicio al mismo tiempo

56 | ES
PREGUNTAS FRECUENTES
¿Puedo cargar lateralmente aplicaciones ANDROID en el proyector?
Sí, puede hacerlo. Tenga en cuenta que hay más de 7.000 aplicaciones nativas en
GOOGLE PLAY que puede descargar directamente en el proyector. Para las apps no
disponibles en GOOGLE PLAY, descargue el archivo APK e instálelas en una unidad USB.
Asegúrese de que la aplicación Explorador de archivos está instalada en el proyector,
para que su unidad USB sea reconocida.
¿Qué debo hacer si mi HDMI no tiene señal?
1. Utilice un cable HDMI diferente..
2. Conecte el proyector con otro dispositivo con su cable HDMI.
3. Desconecte del proyector e intente conectar su dispositivo con su televisor a través
de HDMI.
4. Ajuste la resolución/Hz de salida HDMI del dispositivo conectado para que coincida
con su televisor.
¿Cómo conecto unos altavoces externos al proyector?
Este proyector también puede conectarse a dispositivos de salida de sonido externos,
incluidos auriculares y altavoces; cuando se conecta a altavoces externos, el sistema de
altavoces incorporado se desactiva.
Para conectar altavoces externos:
1. Utilice un cable de audio de 3,5 mm o un adaptador (no suministrado) para conectar
los auriculares o el altavoz externo.
2. Conecte el otro extremo del cable de audio al puerto AUX del proyector.

ES | 57
Para los altavoces BLUETOOTH, vaya a Ajustes, luego a Mando a distancia y accesorios y
seleccione Añadir accesorio.
¿Cómo reproduzco vídeos sin Wi-Fi®?
1. Descargue los vídeos en una unidad USB.
2. Instale la aplicación Explorador de archivos de GOOGLE PLAY STORE en el proyector.
3. Instale una app de reproducción multimedia como VLC o KODI.
4. Conecte la unidad USB al proyector para reproducir sus vídeos.
¿Qué capacidad de unidades USB admite el proyector?
El proyector admite unidades USB de 128 GB o menos y contenidos 1080p @ 60 Hz.
El formato del disco tiene que ser NTFS, FAT o FAT32.
*Formato compatible:
• Documentos: .txt
• Fotos: JPG (.jpg, .jpeg), PNG (.png), BMP (.bmp)
• Música: MP3 (.mp3), AAC (.aac)
• Vídeo: AV1, XVID (.avi), MPEG4 (3gp, mp4), H.263 (3g2, .avi, .mkv, .webm, 3gp, mp4)
¿Cómo reproduzco películas desde mi USB con el proyector?
1. Descargue la aplicación File Commander de GOOGLE PLAY.
2. Inserte el dispositivo de almacenamiento USB en el proyector.
3. Seleccione la música, los vídeos 1080p o las fotos de la unidad USB que desee
reproducir.
4. Ábralos con una aplicación de reproducción multimedia como VLC o KODI. Si no
tiene una aplicación, descargue una de GOOGLE PLAY.

58 | ES
ATENCIÓN AL CLIENTE
Si tiene algún problema con su producto, póngase en contacto con nosotros antes
de devolver el artículo al lugar de compra. ¡Estamos aquí para ayudarle! Asistencia en
EE.UU.: kodak@camarketing.com, 8445161539
Asistencia internacional: kodakintl@camarketing.com, 8445161540

ES | 59
GARANTÍA LIMITADA AL CONSUMIDOR ORIGINAL
Este proyector inteligente KODAK FLIK HD10 (“Producto”), incluidos todos los accesorios incluidos en el embalaje original,
suministrado y distribuido nuevo por un minorista autorizado, está garantizado por C&A Marketing, Inc. (la “Empresa”)
únicamente al comprador consumidor original, contra determinados defectos de materiales y mano de obra (“Garantía”)
según se indica a continuación:
Para recibir el servicio de Garantía, el comprador consumidor original debe ponerse en contacto con la Compañía o
con su proveedor de servicio autorizado para la determinación del problema y los procedimientos de servicio. Deberá
presentarse a la Empresa o a su proveedor de servicios autorizado un comprobante de compra en forma de factura de
venta o factura recibida, que demuestre que el Producto se encuentra dentro del(los) período(s) de Garantía aplicable(s),
con el in de obtener el servicio de Garantía. proveedor de servicios autorizado para obtener el servicio solicitado.
Las opciones de servicio, la disponibilidad de piezas y los tiempos de respuesta pueden variar y pueden cambiar en
cualquier momento. De conformidad con ley aplicable, la Compañía puede requerir que usted proporcione documentos
adicionales y/o cumpla con los requisitos de registro requisitos antes de recibir el servicio de garantía. Póngase en
contacto con nuestro servicio de atención al cliente para obtener más detalles sobre la obtención de la garantía servicio:
EE.UU.: kodak@camarketing.com, 8445161539
Internacional: kodakintl@camarketing.com, +18445161540
Los gastos de envío al servicio de devoluciones de la empresa no están cubiertos por esta garantía y deben ser abonados
por el consumidor.
El consumidor asume asimismo todo riesgo de pérdida o daño ulterior del Producto hasta su entrega en dicho centro..
EXCLUSIONES Y LIMITACIONES
La Empresa garantiza el Producto contra defectos de materiales y mano de obra en condiciones normales de uso durante
un período de UN (1) AÑO a partir de la fecha de compra al por menor por el comprador original usuario inal (“Período
de Garantía”). Si surge un defecto de hardware y se recibe una reclamación válida dentro del Periodo de Garantía, la
Empresa, a su entera discreción y en la medida en que lo permita la ley, (1) reparará el defecto del Producto sin cargo
alguno, utilizando piezas de repuesto nuevas o reacondicionadas, (2) cambiará el Producto por otro nuevo o que haya sido
fabricado con piezas nuevas o usadas reparables y que sea al menos funcionalmente equivalente al dispositivo original, o
(3) reembolsará el precio de compra del Producto. Un Producto de sustitución o una pieza del mismo gozará de la garantía
del Producto original durante el resto del Periodo de Garantía, o noventa (90) días a partir de la fecha de sustitución o
reparación, lo que le proporcione mayor protección. Cuando se cambia un Producto o una pieza, el artículo de sustitución
pasa a ser de su propiedad, mientras que el artículo sustituido pasa a ser propiedad de la propiedad de la Empresa. Sólo
se podrán realizar reembolsos si se devuelve el Producto original.
Esta Garantía no se aplica a:
(a) Cualquier producto, hardware o software que no sea el Proyector Inteligente FLIK HD10 deKODAK, incluso si está
empaquetado o se vende con el Producto;

60 | ES
(b) Daños causados por el uso con productos que no sean el Proyector Inteligente FLIK HD10 de KODAK;
(c) Daños causados por accidente, abuso, mal uso, inundación, incendio, terremoto u otras causas externas;
(d) Daños causados por el funcionamiento del Producto fuera de los usos permitidos o previstos descritos por la
Compañía;
(e) Daños causados por servicios de terceros;
(f) Un Producto o pieza que haya sido modiicado para alterar su funcionalidad o capacidad sin el permiso por escrito de la
Compañía;
(g) Piezas consumibles, como baterías, fusibles y bombillas;
(h) Daños cosméticos; o
(i) Si se ha eliminado o desigurado el número de serie del Proyector inteligente KODAK FLIK HD10.
Esta Garantía sólo es válida en el país en el que el consumidor adquirió el Producto, y sólo se aplica a los Productos
adquiridos y reparados en dicho país. La Empresa no garantiza que el funcionamiento del Producto sea ininterrumpido o
esté libre de errores. La Empresa no se hace responsable de los daños derivados del incumplimiento por su parte de las
instrucciones relativas a su uso.
NO OBSTANTE CUALQUIER DISPOSICIÓN EN CONTRARIO Y EN LA MEDIDA MÁXIMA PERMITIDA POR LA LEGISLACIÓN
APLICABLE, LA EMPRESA PROPORCIONA EL PRODUCTO “TAL CUAL” Y “SEGÚN ESTÉ DISPONIBLE” PARA SU
COMODIDAD Y LA EMPRESA Y SUS LICENCIANTES Y PROVEEDORES RENUNCIAN EXPRESAMENTE A TODAS
LAS GARANTÍAS Y CONDICIONES, YA SEAN EXPRESAS, IMPLÍCITAS O LEGALES, INCLUIDAS LAS GARANTÍAS DE
COMERCIABILIDAD, IDONEIDAD PARA UN FIN DETERMINADO, TITULARIDAD, DISFRUTE TRANQUILO, PRECISIÓN Y
NO INFRACCIÓN DE DERECHOS DE TERCEROS. LA EMPRESA NO GARANTIZA NINGÚN RESULTADO ESPECÍFICO
DERIVADO DEL USO DEL PRODUCTO, NI QUE LA EMPRESA CONTINUARÁ OFRECIENDO O PONIENDO A DISPOSICIÓN
EL PRODUCTO DURANTE UN PERIODO DE TIEMPO DETERMINADO. LA EMPRESA RECHAZA ADEMÁS TODA GARANTÍA
POSTERIOR AL PERIODO DE GARANTÍA EXPRESA INDICADO ANTERIORMENTE.
USTED UTILIZA EL PRODUCTO A SU PROPIA DISCRECIÓN Y RIESGO. USTED SERÁ EL ÚNICO RESPONSABLE (Y LA
EMPRESA RENUNCIA A ELLO) DE CUALQUIER PÉRDIDA, RESPONSABILIDAD O DAÑO RESULTANTE DE SU USO DEL
PRODUCTO. NINGÚN CONSEJO O INFORMACIÓN, YA SEA ORAL O ESCRITO, OBTENIDO POR USTED DE LA EMPRESA
O A TRAVÉS DE SUS PROVEEDORES DE SERVICIOS AUTORIZADOS CREARÁ GARANTÍA ALGUNA.
EN NINGÚN CASO LA RESPONSABILIDAD TOTAL ACUMULATIVA DE LA EMPRESA DERIVADA DE O RELACIONADA
CON EL PRODUCTO, YA SEA CONTRACTUAL O EXTRACONTRACTUAL O DE OTRO TIPO, EXCEDERÁ LAS TARIFAS
REALMENTE PAGADAS POR USTED A LA EMPRESA O A CUALQUIERA DE SUS DISTRIBUIDORES AUTORIZADOS POR
EL PRODUCTO EN CUESTIÓN EN EL ÚLTIMO AÑO DESDE SU COMPRA. ESTA LIMITACIÓN ES ACUMULATIVA Y NO SE
VERÁ INCREMENTADA POR LA EXISTENCIA DE MÁS DE UN INCIDENTE O RECLAMACIÓN. LA EMPRESA DECLINA TODA
RESPONSABILIDAD DE CUALQUIER TIPO DE SUS LICENCIANTES Y PROVEEDORES. EN NINGÚN CASO LA EMPRESA
O SUS LICENCIANTES, FABRICANTES Y PROVEEDORES SERÁN RESPONSABLES DE NINGÚN DAÑO INCIDENTAL,
DIRECTO, INDIRECTO, ESPECIAL, PUNITIVO O CONSECUENTE (COMO, ENTRE OTROS, DAÑOS POR PÉRDIDA DE
BENEFICIOS, NEGOCIO, AHORROS, DATOS O REGISTROS) CAUSADOS POR EL USO, MAL USO O INCAPACIDAD DE
USO DEL PRODUCTO.
Nada de lo dispuesto en estas condiciones intentará excluir la responsabilidad que no pueda excluirse en virtud de la
legislación aplicable. Algunos países, estados o provincias no permiten la exclusión o limitación de daños incidentales o

ES | 61
Kodak NO fabrica este Producto ni proporciona ninguna Garantía o soporte.
www.kodakphotoplus.com
⚠ADVERTENCIA: Este producto contiene sustancias químicas conocidas por el Estado de California como causantes de
cáncer y defectos de nacimiento u otros daños reproductivos.
La marca, el logotipo y la imagen comercial de Kodak se utilizan bajo licencia de Eastman Kodak Company.
GOOGLE PLAY es una marca comercial de GOOGLE LLC.
ANDROID TV es una marca comercial de GOOGLE LLC.
NETFLIX è un marchio registrato di NETFLIX, INC.
PRIME VIDEO es una marca comercial de AMAZON TECHNOLOGIES, INC..
YOUTUBE es una marca comercial de GOOGLE LLC.
APPLE, AIRPRINT, IPOD, IPHONE, IPAD, APP STORE, MAC, MACINTOSH y OS X son marcas comerciales de APPLE INC. en
EE.UU. y otros países.
BLUETOOTH es una marca comercial de BLUETOOTH SIG, Inc. EE.UU.
Wi-Fi, WPA y WPA2 son marcas comerciales de Wi-Fi Alliance en EE.UU. y/o en otros países.
HDMI, el logotipo HDMI y High-Deinition Multimedia Interface son marcas comerciales o marcas registradas de HDMI
Licensing, LLC en Estados Unidos y/o en otros países.
Todos los demás productos, nombres de marcas, nombres de empresas y logotipos son marcas comerciales de sus
respectivos propietarios, se utilizan simplemente para identiicar sus respectivos productos y no pretenden connotar
ningún patrocinio, respaldo o aprobación.
Distribuido por C&A Marketing, Inc., 114 Tived Lane East, Edison, NJ 08837 EE.UU.
© 2023. C&A IP Holdings LLC. Todos los derechos reservados. Fabricado en China.
consecuentes ni permiten limitaciones en las garantías, por lo que es posible que ciertas limitaciones o exclusiones no se
apliquen en su caso. Esta garantía le otorga derechos legales especíicos, y usted puede tener otros derechos que varían
de un estado a otro o de una provincia a otra. Póngase en contacto con su distribuidor autorizado para determinar si se
aplica otra garantía.

62 | EN

FR | 63
INTRODUCTION
Nous vous remercions d’avoir acheté le projecteur intelligent KODAK FLIK HD10. Ce
Guide de l’utilisateur a pour but de vous fournir des directives ain de garantir que
l’utilisation de ce produit est sûre et ne présente aucun risque pour l’utilisateur. Toute
utilisation qui n’est pas conforme aux directives décrites dans ce Guide de l’utilisateur
peut annuler la garantie limitée.
Veuillez lire attentivement toutes les directives avant d’utiliser le produit et conserver
ce guide à titre de référence. Ce produit est destiné à un usage domestique
uniquement. Il n’est pas destiné à un usage commercial.
Ce produit est couvert par une garantie limitée d’un an. La couverture est soumise à
des limites et des exclusions. Voir la garantie pour plus de détails.

64 | FR
SPÉCIFICATIONS
Type de produit : Projecteur
Longueur du produit : 5,6 pouces
Largeur du produit : 5,8 pouces
Hauteur du produit : 7,4 pouces
Poids net : 4,2 lbs.
Résolution native : 1920 x 1080p
Entrée d’alimentation : 110 - 240 V, 50 - 60 Hz 22,4 A
Tension nominale : CA 90 - 260 V, 50 - 60 MHz
Technologie d’aichage : Panneau LCD TFT de 3,5
pouces
Lentille : lentille en verre en 3 parties
Température de couleur : 8000K ± (1000K)
Luminosité : 200 lumens ANSI
Source lumineuse : LED 100 W
Durée de vie de la source lumineuse : 50 000 heures
Rapport de contraste : 2000:1
Rapport d’aspect : 16:9 et 4.3
Rapport de projection : 1,37
Mode de réglage : Mise au point manuelle
Keystone correction : Correction automatique de la
distorsion trapézoïdale et 4 correction du noyau
Uniformité : 90
Bruit de fonctionnement du ventilateur : < 35 dB
Dimensions de l’écran de projection : 60” - 150
Distance de projection : 39,4” - 157,5” (1 m - 4 m)
Modes d’entrée d’image : Entrée HDMI x 1, USB entrée
x 1
Haut-parleurs : Deux haut-parleurs de 5 watts
Sortie audio : 3,5 mm
Format audio : Couches audio MPEG 1, 2 et 3, MPEG4
Audio AAC LC, AAC LC + SBR Niveau 2, AAC 5.1, HE
AAC Niveau 2 et Niveau 4
Format photo : HD JPEG, BMP, PNG
Format USB : FAT, FAT32, NTFS, EXFAT
Format vidéo : Format 4:3 et 16:9 480i, 480p, 576i, 576p,
720p, 1080i, 1080p24, 1080p30, 1080p60 HEVC
H.265 MPEG4, MP@ML, MP@HL proils AV1, VC1 /
VP8 / VP9 HDR10, HDR10+, HLG
Connectivité : Bluetooth 4.2, Wi-Fi 2.4 GHz/5 GHz
Source d’alimentation requise : Oui
(alimentation par prise)
Installation requise : Non
Assemblage par un adulte requis : Non
Outils supplémentaires requis : Non
Pays d’origine : Chine
Garantie incluse : Oui
Durée de la garantie : 1 an

FR | 65
CONTENU DE L’EMBALLAGE
PRÉCAUTIONS DE SÉCURITÉ
• Projecteur intelligent KODAK FLIK HD10
• Cordon d’alimentation et adaptateur
secteur
• Télécommande
• Câble HDMI
• Guide de l’utilisateur
• N’essayez pas de démonter cet appareil pour quelque raison que ce soit.
• Ne rangez pas le projecteur dans des endroits où il sera exposé à des températures
élevées, à l’humidité ou à la lumière directe du soleil. L’exposition à l’un ou l’autre de
ces éléments pourrait endommager le projecteur de façon permanente.
• Ne manipulez jamais le projecteur avec des mains humides ou mouillées. Cela
pourrait endommager le projecteur ou créer un risque d’électrocution.
• Gardez le projecteur hors de portée des enfants.
• Ne dirigez jamais le projecteur vers le visage d’une autre personne et ne regardez
jamais directement dans la lumière du projecteur. La lumière est vive et pourrait
causer des dommages.
• N’utilisez pas de produits tels que l’alcool, l’essence, le diluant ou tout autre solvant
organique pour nettoyer ou tenter de nettoyer cet appareil.

66 | FR
• N’utilisez pas cet appareil dans un environnement où il sera exposé à une forte
poussière ou à l’humidité.
• Ne laissez jamais tomber ou ne secouez jamais le projecteur, car cela pourrait
entraîner un dysfonctionnement ou endommager déinitivement les pièces internes.
• N’utilisez pas le projecteur en prenant un bain ou une douche.
• Ne placez pas ou ne stockez pas le projecteur à un endroit où il peut tomber ou être
tiré dans une baignoire ou un évier.
• Ne placez pas, ne laissez pas tomber ou n’immergez pas le projecteur dans l’eau ou
tout autre liquide.
• Si le projecteur tombe dans l’eau alors que vous avez pris toutes les précautions
ci-dessus, ne mettez pas la main dans l’eau pour le récupérer. Débranchez-le
immédiatement et récupérez-le ensuite.
• Veillez à ce que des objets et des liquides ne tombent pas ou ne se renversent pas
sur le projecteur.
• Un entretien incorrect peut entraîner des blessures ou endommager l’appareil.
• N’eectuez aucune réparation sur l’appareil par vous-même. Faites réparer votre
appareil uniquement par un centre de service agréé.
• Mettez l’appareil hors tension et débranchez-le avant de nettoyer l’extérieur. Utilisez
un chion doux et sec pour nettoyer l’appareil.
⚠WARNING: Ce produit contient des produits chimiques connus dans l’État de
Californie pour provoquer des cancers et des anomalies congénitales ou d’autres
troubles de la reproduction. Pour plus d’informations : www.P65Warnings.ca.gov

FR | 67
PRÉSENTATION DU PRODUIT
Avant Arrière
1
2
3 8
4 5 6 7

68 | FR
HAUT
9
10
1. Objectif
2. Pieds
3. Récepteur IR
4. Port CA
5. Port USB
6. Port audio 3,5 mm
7. Port AV
8. Port HDMI
9. Bouton d’alimentation
10. Molette de mise au point manuelle

FR | 69
VUE DE LA TÉLÉCOMMANDE
1. Bouton d’alimentation
2. Bouton de signet
3. Bouton de l’assistant GOOGLE
4. Bouton OK
5. Bouton Retour
6. Bouton Muet
7. Bouton d’augmentation du volume (+)
8. Bouton de réduction du volume (-)
9. Bouton YOUTUBE
10. Bouton PRIME VIDEO
11. Bouton Paramètres du projecteur
12. Bouton des paramètres de la télévision
ANDROID
13. Boutons de navigation
14. Bouton TV
15. Bouton d’accueil
16. Bouton d’augmentation de la chaîne (+)
17. Bouton de descente des chaînes (-)
18. Bouton NETFLIX
19. Bouton V
111
212
3
413
514
615
716
817
918
10 19

70 | FR
INSTALLER LES PILES DANS LA TÉLÉCOMMANDE
INSTALLATION DU PROJECTEUR
1. Appuyez sur le couvercle des piles et faites-le glisser pour le retirer.
2. Insérez les deux (2) piles AAA dans le compartiment à piles.
3. Replacez le couvercle des piles sur la télécommande.
1. placez le projecteur devant un écran de projection approprié ou un mur.
2. Connectez l’adaptateur secteur au cordon d’alimentation.
3. Ensuite, connectez la prise d’alimentation de l’adaptateur CA au projecteur.
4. Branchez la iche murale du cordon d’alimentation à une prise murale. L’indicateur LED
à l’arrière du
l’arrière du projecteur s’allume en rouge.

FR | 71
APPARIER LA TÉLÉCOMMANDE
CONFIGURER ANDROID TV SUR LE PROJECTEUR
Mettez le projecteur sous tension et la télécommande devrait s’apparier
automatiquement avec le projecteur.
Pour un jumelage manuel, appuyez simultanément sur les boutons Back et
Home et maintenez-les enfoncés pendant cinq (5) secondes. Le voyant DEL de la
télécommande se met à clignoter. Lorsque le jumelage est terminé, le voyant DEL de
la télécommande reste allumé sans clignoter. Vous devriez maintenant voir une coche
bleue sur votre écran. N’oubliez pas de toujours diriger votre télécommande vers le
projecteur et non vers l’écran.
Il existe deux méthodes pour conigurer ANDROID TV sur votre projecteur :
Méthode 1 : Coniguration avec un téléphone ANDROID
1. Lorsque votre projecteur indique “Conigurer rapidement votre projecteur avec votre
téléphone ANDROID ?”
utilisez la télécommande pour choisir “Continuer” ou “Oui”.
2. Ouvrez l’application GOOGLE sur votre téléphone ANDROID.
3. Tapez ou dites “Conigurer mon appareil”.

72 | FR
4. Suivez les instructions sur votre téléphone jusqu’à ce que vous obteniez un code.
Saisissez le code sur le projecteur
5. sur votre téléphone, appuyez sur le nom du projecteur lorsqu’il s’aiche.
6. Pour terminer la coniguration, suivez les instructions sur votre projecteur.
Méthode 2 : Coniguration avec la télécommande
1. Lorsque votre projecteur indique “Conigurer rapidement votre projecteur avec votre
téléphone ANDROID ?”
utilisez la télécommande pour choisir “Sauter”.
2. Ensuite, ouvrez les paramètres ANDROID TV™ en appuyant sur le bouton Paramètres
ANDROID TV™ de la
la télécommande.
3. Ensuite, allez dans Réseau et sélectionnez votre réseau Wi-Fi®.
4. Saisissez votre mot de passe et attendez que le projecteur se connecte à votre réseau.
5. Ensuite, allez dans Compte et sélectionnez Ajouter un compte.
6. Saisissez votre adresse électronique et conirmez.
7. Saisissez votre mot de passe et conirmez.
Si vous vous êtes connecté avec succès, votre adresse e-mail apparaîtra sous l’option
Compte. Vous allez maintenant pouvoir proiter de vos applications ANDROID TV™.”

FR | 73
NAVIGATION DANS VOTRE PROJECTEUR
PARAMÈTRES DU PROJECTEUR
Lorsque l’unité du projecteur est mise sous tension, le menu d’accueil ANDROID TV™
se charge automatiquement. Le menu d’accueil est le point de départ de toutes les
opérations avec votre projecteur. Lorsque l’unité est mise sous tension, le menu d’accueil
se charge automatiquement.
• Appuyez sur le bouton Signet pour ajouter ou supprimer du contenu de votre liste
“Lecture suivante”.
• Appuyez sur le bouton ANDROID TV™ Settings pour faire apparaître la barre
latérale des paramètres pour des options telles que le nom de l’appareil, les options
de compte, la connexion réseau, etc.
• Appuyez sur le bouton Accueil pour revenir au menu d’accueil à tout moment,
• Appuyez sur le bouton TV pour quitter la fenêtre contextuelle des paramètres.
Appuyez sur le bouton Paramètres du projecteur pour aicher la fenêtre
contextuelle des paramètres. La fenêtre contextuelle des paramètres aiche
les options de signal, d’aichage, de son et de système.
Signal: Naviguez jusqu’à cette icône et appuyez sur le bouton OK pour
la sélectionner. Vous accéderez ainsi à la fenêtre Signal où vous pourrez
sélectionner une source d’entrée.
Aichage: Naviguez jusqu’à cette icône et appuyez sur le bouton OK pour la
sélectionner. Ceci accédera à la fenêtre Aichage où vous pouvez ajuster les
paramètres d’aichage comme le mode de projection et l’auto keystone.

74 | FR
Son: Naviguez jusqu’à cette icône et appuyez sur le bouton OK pour la sélectionner.
Vous accéderez ainsi à la fenêtre “Son” où vous pourrez régler les paramètres du son
comme le mode et le canal du son.
Système: Naviguez jusqu’à cette icône et appuyez sur le bouton OK pour la
sélectionner. Ceci accédera à la fenêtre Système où vous pouvez ajuster les paramètres
du projecteur comme la langue, la minuterie, et plus.
FENÊTRE DES SIGNAUX
La source d’entrée s’aiche. Naviguez jusqu’à l’entrée que vous souhaitez sélectionner et
appuyez sur la touche OK pour conirmer.
FENÊTRE D’AFFICHAGE
Vos paramètres d’aichage seront aichés. Naviguez jusqu’à l’option de réglage que
vous souhaitez modiier et appuyez sur la touche OK pour conirmer votre sélection.

FR | 75
Manual Keystone – Réglez manuellement la distorsion trapézoïdale.
Auto Keystone – Activez ou désactivez la correction trapézoïdale automatique.
Mode de projection – Sélectionnez entre projection avant, projection avant plafond,
projection arrière avant ou projection arrière plafond.
- Avant : Le projecteur est placé sur une table en face de l’écran. C’est la façon la plus
courante de positionner le projecteur pour une installation rapide et la portabilité.
- Plafond avant : Le projecteur est suspendu à l’envers devant l’écran. Un kit de ixation
plafond/mur est nécessaire (non inclus).
- Arrière : Le projecteur est placé sur une table derrière l’écran. Un écran spécial pour
projecteur arrière est nécessaire (non inclus).
- Plafond arrière : Le projecteur est suspendu à l’envers derrière l’écran. Un écran spécial
pour rétroprojecteur et un kit de montage plafond/mur sont nécessaires (non inclus).
NOTES:
Pour un meilleur contrôle de la hauteur du projecteur, vous pouvez le placer sur un
trépied (vendu séparément).
La distance entre l’objectif du projecteur et l’écran détermine la taille de l’écran du
projecteur.

76 | FR
Project Ratio – Sélectionnez ou réglez le rapport d’aspect.
Mode Image – Sélectionnez le mode image de la projection ou personnalisez pour
ajuster des paramètres spéciiques.
FENÊTRE SONORE
Vos paramètres sonores s’aichent. Naviguez jusqu’à l’option de réglage que vous
souhaitez modiier et appuyez sur le bouton OK pour conirmer votre sélection.
Sound Mode – Sélectionnez entre standard, musique, ilm ou utilisateur.

FR | 77
Sound Channel – Sélectionnez entre les options Audio Return Channel (ARC) ou TV.
Touch Tone – Pour activer ou désactiver la tonalité tactile.
FENÊTRE DU SYSTÈME
Vos paramètres système s’aichent. Naviguez jusqu’à l’option de réglage que vous
souhaitez modiier et appuyez sur le bouton OK pour conirmer votre sélection.
Langue – Sélectionnez entre plusieurs langues à utiliser pour le projecteur.

78 | FR
Menu Exit – Sélectionnez un réglage de l’heure de sortie du menu.
System Info – Aicher les informations du système.
Window Location – Réglez l’emplacement de la fenêtre.
Time O – Déinissez une minuterie pour le moment où le projecteur s’éteindra.
Factory Reset – Réinitialise le projecteur aux paramètres d’usine par défaut.

FR | 79
CONFIGURER LA TÉLÉCOMMANDE SUR VOTRE TÉLÉPHONE
DIFFUSER LE CONTENU DE VOTRE APPAREIL VERS LE PROJECTEUR
1. Ouvrez l’application GOOGLE TV sur votre téléphone ANDROID.
2. Appuyez sur “Télécommande”. Puis, appuyez sur “Recherche d’appareils”.
3. Choisissez votre appareil.
4. Pour terminer le jumelage, suivez les instructions sur votre téléphone et votre
projecteur.
5. Après le jumelage, vous pouvez utiliser votre téléphone comme télécommande de
votre projecteur ou utiliser la ttélécommande incluse
1. connectez votre appareil (ex. téléphone, tablette ou ordinateur portable) au même
réseau Wi-Fi® que votre projecteur.
2. Ouvrez une application compatible avec CHROMECAST qui contient le contenu que
vous souhaitez diuser.
3. Dans l’application, trouvez et sélectionnez “Cast”.
4. Sur votre appareil, sélectionnez le nom de votre projecteur.
5. Lorsque le symbole Cast change de couleur, vous êtes connecté avec succès.

80 | FR
MIROIR OU FLUX VIDÉO DE VOS APPAREILS IOS VERS LE
PROJECTEUR
Tout d’abord, vous devez installer AirPlay sur votre projecteur. Installez l’application
AirScreen depuis GOOGLE PLAY pour activer AirPlay sur votre projecteur. Une fois
l’installation terminée, suivez les étapes suivantes pour créer un miroir ou un lux vidéo à
partir de votre appareil iOS.
Miroir d’écran depuis un IPHONE ou un IPAD:
1. Assurez-vous que votre appareil iOS et le projecteur se trouvent sur le même réseau
Wi-Fi®. Le hotspot de votre téléphone est également acceptable.
2. Balayez vers le bas sur l’écran d’accueil de votre téléphone pour aicher la console de
commande et appuyez sur l’icône AirPlay.
3. Sélectionnez l’appareil vers lequel vous souhaitez eectuer la diusion.
Miroir d’écran depuis un MAC:
1. Assurez-vous que votre MAC et votre projecteur se trouvent sur le même réseau Wi-
Fi®. Le hotspot de votre téléphone est également acceptable.
2. Cliquez sur l’icône AirPlay sur le MAC et sélectionnez votre projecteur pour
commencer la mise en miroir. L’icône AirPlay dans la barre de menu devient bleue
lorsque AirPlay est actif.
3. Pour arrêter la mise en miroir, cliquez à nouveau sur l’icône AirPlay, puis sélectionnez
“Désactiver AirPlay”.
Remarque : Pour MACBOOK AIR, MACBOOK PRO et IMAC, l’icône AirPlay ne s’aiche
dans la barre de menus que lorsque la mise en miroir AirPlay est disponible.
Streaming vidéo depuis un IPHONE ou un IPAD:
1. Assurez-vous que votre appareil iOS et le projecteur se trouvent sur le même réseau

FR | 81
Wi-Fi®. Le hotspot de votre téléphone est également acceptable.
2. Ouvrez les applications de streaming que vous souhaitez diuser sur le projecteur et
sélectionnez une vidéo à lire.
3. Cliquez sur les icônes AirPlay ou cast dans le coin supérieur droit pour eectuer la
diusion sur le projecteur.
REMARQUE : Sachez que le contenu protégé par des droits d’auteur de HULU, NETFLIX et d’autres services
similaires NE PEUT PAS être relété ou diusé sur le projecteur. Pour visualiser le contenu protégé par des
droits d’auteur de ces services, téléchargez et utilisez les applications oicielles directement via le projecteur
JUMELAGE DE PÉRIPHÉRIQUES EXTERNES VIA BLUETOOTH®
RÉGLAGE DE LA MISE AU POINT
1. Des écouteurs ou des haut-parleurs externes peuvent être appariés au projecteur
via BLUETOOTH®. Suivez les étapes suivantes pour connecter un casque ou des
enceintes BLUETOOTH® :
2. Tout d’abord, ouvrez les paramètres ANDROID TV™ en appuyant sur le bouton
Paramètres ANDROID TV™ de la télécommande.
3. Ensuite, sélectionnez “Télécommande et accessoires”, puis “Ajouter un accessoire”.
4. Activez le mode d’appairage sur l’appareil que vous souhaitez connecter.
5. Sélectionnez l’appareil que vous voulez connecter dans la liste.
6. Attendez que les deux appareils se jumellent avec succès.
Si l’image à l’écran semble loue ou non focalisée lorsque vous allumez le projecteur,
utilisez la roue de mise au point sur le dessus pour corriger l’image. Déplacez la roue

82 | FR
ASSISTANT GOOGLE
CONNEXION DE PÉRIPHÉRIQUES EXTERNES
Avec GOOGLE ASSISTANT, vous pouvez naviguer dans les applications et les services
de streaming à l’aide de votre voix.
1. Appuyez sur le bouton GOOGLE ASSISTANT pour activer l’assistant virtuel à
commande vocale de GOOGLE.
2. Sur l’écran de projection, une introduction s’aiche. Suivez les étapes pour terminer la
coniguration.
Une fois l’assistant coniguré, appuyez sur le bouton GOOGLE ASSISTANT pour poser
votre question ou donner une commande.
Clés USB
Pour accéder aux photos, vidéos ou musiques stockées sur n’importe quel lecteur
USB, il suit d’insérer le périphérique de stockage amovible dans le port correspondant
à l’arrière du projecteur. Une fenêtre pop-up File Commander apparaîtra pour vous
demander si vous voulez accéder au périphérique de stockage connecté. Sélectionnez
“OK” et naviguez dans le programme File Commander pour trouver vos vidéos et photos
sur votre périphérique de stockage.
vers la gauche ou la droite jusqu’à ce que l’image apparaisse nette et claire.
REMARQUE : Pour des performances optimales, le projecteur doit être placé à une
distance minimale de 1 mètre (3,5 pieds) de l’écran.

FR | 83
Appareils compatibles HDMI
Lorsque vous utilisez un appareil compatible HDMI, tel qu’un ordinateur portable, un
ordinateur personnel, un smartphone, une tablette ou une console de jeux vidéo,
connectez un câble HDMI de l’appareil à votre projecteur pour accéder aux photos, aux
vidéos ou à la musique. Ensuite, appuyez sur le bouton Paramètres du projecteur et sous
Signal”, sélectionnez “HDMI”. Pour certains appareils, vous aurez besoin d’un câble HDMI
à HDMI et/ou d’adaptateurs, que vous devrez acheter séparément. Pour vous faciliter
la tâche, nous avons compilé ce tableau des dispositifs et adaptateurs dont vous aurez
besoin pour des formats de dispositifs spéciiques.
Appareil Câble ou adaptateur supplémentaire
nécessaire
1 Appareils avec port HDMI Câble HDMI vers HDMI
2 Appareils avec port mini-
HDMI Adaptateur Mini-HDMI vers HDMI - Câble
HDMI vers HDMI
3 Appareils avec port
micro-HDMI Adaptateur Micro-HDMI vers HDMI - Câble
HDMI vers HDMI
4 Appareils iOS avec port
lightning Adaptateur AV numérique Lightning - câble
HDMI à HDMI
5 Appareils iOS avec port
USBC Adaptateur AV numérique multiport USBC -
Câble HDMI vers HDMI “6 Appareils avec port
USBC
6 Appareils avec port
USBC Adaptateur USBC vers HDMI - Câble HDMI
vers HDMI
7 Appareils avec port
USBC Câble USBC vers HDMI

84 | FR
DÉPANNAGE
Si vous ne parvenez pas à lire vos ilms, émissions de télévision ou musiques GOOGLE
PLAY sur l’écran ANDROID TV™, voici quelques solutions de dépannage que vous
pouvez essayer:
Vériiez votre connexion Wi-Fi
1. Dans le menu d’accueil d’Android TV™, appuyez sur le bouton Paramètres d’ANDROID
TV™.
2. Sous “ Réseau “, sélectionnez un réseau.
3. Suivez les instructions à l’écran.
4. Ouvrez l’une de vos applications.
5. Lancez à nouveau votre vidéo, votre musique ou votre jeu.
Assurez-vous que votre système est à jour
1. À partir du menu d’accueil d’Android TV™, appuyez sur le bouton Paramètres
d’ANDROID TV™.
2. Sélectionnez “À propos”. Ensuite, allez dans “Mise à jour du logiciel du système”, puis
sélectionnez “Mise à jour du logiciel”.
3. Installez toutes les mises à jour disponibles, puis lisez à nouveau votre vidéo, votre
musique ou votre jeu.
Redémarrez votre appareil
1. Dans le menu d’accueil d’ANDROID TV™, appuyez sur le bouton Paramètres
d’ANDROID TV™.

FR | 85
2. Sélectionnez “À propos”, puis sélectionnez “Redémarrer”.
3. Une fois le système redémarré, lancez à nouveau votre vidéo, votre musique ou votre jeu
Vériiez quel compte vous utilisez
1. Dans le menu d’accueil d’ANDROID TV™, appuyez sur le bouton Paramètres d’ANDROID
TV™.
2. Sous “Comptes”, vériiez que vous êtes connecté à votre compte ANDROID TV™.
Synchroniser votre compte
1. À partir du menu d’accueil d’ANDROID TV™, appuyez sur le bouton ANDROID TV™
Paramètres.
2. Sous “ Comptes “, sélectionnez votre compte.
3. Ensuite, sélectionnez “Synchroniser maintenant”.
4. Lisez à nouveau votre vidéo, votre musique ou votre jeu.
Eacer les données et le cache de votre application
1. À partir du menu d’accueil d’ANDROID TV™, appuyez sur le bouton ANDROID TV™
Settings.
2. Sélectionnez “Apps”.
3. Sous “Apps système”, sélectionnez l’app, allez dans “Eacer les données” et conirmez
“Eacer le cache”.
4. Lisez à nouveau votre vidéo, votre musique ou votre jeu.
L’interface ANDROID TV™ de cet écran de projecteur sera inutilisable si la télécommande ne
fonctionne plus. Voici quelques solutions possibles pour réparer la télécommande:
- Vériiez les piles. Remplacez les piles et voyez si la télécommande est opérationnelle avec des piles neuves.
- La télécommande n’est peut-être pas appariée avec le projecteur. Pour jumeler la télécommande, appuyez simultanément sur les boutons Back et
Home et maintenez-les enfoncés pendant cinq (5) secondes. Le voyant de la télécommande se met à clignoter. Lorsque le jumelage est terminé, le
voyant DEL de la télécommande reste allumé sans clignoter.
- Il se peut qu’il y ait un problème avec le matériel de la télécommande. Veuillez appeler le service clientèle pour demander une télécommande de
remplacement.

86 | FR
QUESTIONS FRÉQUEMMENT POSÉES
Puis-je charger latéralement des applications ANDROID sur le projecteur ?
Oui, vous le pouvez. Notez qu’il existe plus de 7 000 applications natives sur GOOGLE
PLAY que vous pouvez télécharger directement sur le projecteur. Pour les applications
qui ne sont pas disponibles sur GOOGLE PLAY, téléchargez le ichier APK et installez-
les sur une clé USB. Assurez-vous que l’application File Explorer est installée sur le
projecteur, ain que votre clé USB soit reconnue.
Que dois-je faire si mon HDMI n’a pas de signal?
1. Utilisez un autre câble HDMI.
2. Connectez le projecteur à un autre appareil avec votre câble HDMI.
3. Déconnectez-vous du projecteur et essayez de connecter votre appareil avec votre
téléviseur via HDMI.
4. Réglez la résolution/Hz de la sortie HDMI de l’appareil connecté pour qu’elle
corresponde à celle de votre téléviseur.
Comment puis-je connecter des haut-parleurs externes au projecteur?
Ce projecteur peut également être connecté à des périphériques de sortie sonore
externes, y compris des casques et des haut-parleurs ; lorsqu’il est connecté à des haut-
parleurs externes, le système de haut-parleurs intégré est désactivé.
intégré est désactivé. Pour connecter des haut-parleurs externes :
1. Utilisez un câble audio de 3,5 mm ou un adaptateur (non fourni) pour connecter votre
casque ou votre haut-parleur externe.
2. Connectez l’autre extrémité du câble audio au port AUX du projecteur.

FR | 87
Pour les haut-parleurs BLUETOOTH, allez dans Paramètres, puis dans Télécommande et
accessoires, et sélectionnez Ajouter un accessoire.
Comment lire des vidéos sans Wi-Fi®?
1. Téléchargez les vidéos sur un lecteur USB.
2. Installez l’application File Explorer depuis le GOOGLE PLAY Store sur le projecteur.
3. Installez une application de lecteur multimédia telle que VLC ou KODI.
4. Branchez le lecteur USB dans le projecteur pour lire vos vidéos.
Quelle capacité de clés USB le projecteur prend-il en charge?
Le projecteur prend en charge les disques USB d’une capacité inférieure ou égale à 128
Go et les contenus 1080p @ 60 Hz.
Le format du disque doit être NTFS, FAT ou FAT32.
*Format pris en charge :
• - Documents : .txt
• - Photos : JPG (.jpg, .jpeg), PNG (.png), BMP (.bmp)
• - Musique : MP3 (.mp3), AAC (.aac)
• - Vidéo : AV1, XVID (.avi), MPEG4 (3gp, mp4), H.263 (3g2, .avi, .mkv, .webm, 3gp, mp4)
Comment lire des ilms depuis mon USB avec le projecteur?
1. Téléchargez l’application File Commander depuis GOOGLE PLAY.
2. Insérez le périphérique de stockage USB dans le projecteur.
3. Sélectionnez la musique, les vidéos 1080p ou les photos du lecteur USB que vous
souhaitez lire.
4. Ouvrez-les avec une application de lecteur multimédia telle que VLC ou KODI. Si vous
n’avez pas d’application, téléchargez-en une sur GOOGLE PLAY.

88 | FR
SERVICE CLIENTÈLE
Si vous rencontrez un quelconque problème avec votre produit, veuillez nous contacter
avant de renvoyer l’article au lieu d’achat. Nous sommes là pour vous aider ! Assistance
aux États-Unis : kodak@camarketing.com, 8445161539
Assistance internationale : kodakintl@camarketing.com, 8445161540

FR | 89
GARANTIE LIMITÉE AU CONSOMMATEUR ORIGINAL
Ce projecteur intelligent KODAK FLIK HD10 (“ Produit “), y compris tous les accessoires inclus dans l’emballage d’origine,
tel que fourni et distribué à l’état neuf par un détaillant agréé, est garanti par C&A Marketing, Inc. (la “ Société “) à l’acheteur
consommateur d’origine uniquement, contre certains défauts de matériaux et de fabrication (“ Garantie “) comme suit :
Pour bénéicier du service de la Garantie, l’acheteur consommateur original doit contacter la Société ou son fournisseur
de services agréé pour la détermination du problème et les procédures de service. Une preuve d’achat sous la forme
d’un acte de vente ou d’une facture acquittée, attestant que le Produit est compris dans la ou les périodes de Garantie
applicables, DOIT être présentée à la Société ou à son fournisseur de services agréé ain d’obtenir le service demandé.
Les options de service, la disponibilité des pièces et les délais d’intervention peuvent varier et peuvent être modiiés à tout
moment. Conformément à la loi applicable, la société peut exiger que vous fournissiez des documents supplémentaires
et/ou que vous vous conformiez à des d’enregistrement avant de bénéicier du service de garantie. Veuillez contacter
notre service clientèle pour obtenir des détails sur l’obtention de la garantie.
service de garantie :
USA : kodak@camarketing.com, 8445161539
International : kodakintl@camarketing.com, +18445161540
Les frais d’expédition vers le centre de retour de la société ne sont pas couverts par cette garantie et doivent être payés par
le consommateur.
De même, le consommateur supporte tous les risques de perte ou de dommages supplémentaires au produit jusqu’à la
livraison à ladite installation.
EXCLUSIONS ET LIMITATIONS
La Société garantit le Produit contre tout défaut matériel et de fabrication dans des conditions normales d’utilisation
pendant une période de UN (1) AN à compter de la date d’achat au détail par l’acheteur utilisateur inal initial (“ Période
de garantie “). Si un défaut matériel survient et qu’une réclamation valide est reçue pendant la Période de garantie, la
Société, à sa seule discrétion et dans la mesure permise par la loi, (1) réparera gratuitement le défaut du Produit en utilisant
des pièces de rechange neuves ou remises à neuf, (2) échangera le Produit avec un Produit neuf ou qui a été fabriqué à
partir de pièces neuves ou d’occasion en état de marche et qui est au moins fonctionnellement équivalent au dispositif
d’origine, ou (3) remboursera le prix d’achat du Produit. Un Produit ou une pièce de remplacement bénéicie de la
garantie du Produit d’origine pour le reste de la Période de garantie, ou quatre-vingt-dix (90) jours à compter de la date
de remplacement ou de réparation, selon ce qui vous ore la plus longue protection. Lorsqu’un Produit ou une pièce est
échangé(e), tout article de remplacement devient votre propriété, tandis que l’article remplacé devient la Société. Les
remboursements ne peuvent être eectués que si le Produit original est retourné.
Cette Garantie ne s’applique pas à :
(a) Tout produit, matériel ou logiciel autre que le projecteur intelligent FLIK HD10 de KODAK, même s’il est emballé ou
vendu avec le Produit ;

90 | FR
(b) Les dommages causés par l’utilisation de produits autres que le projecteur FLIK HD10 Smart Projector de KODAK ;
(c) Dommages causés par un accident, un abus, une mauvaise utilisation, une inondation, un incendie, un tremblement
de terre ou toute autre cause externe ;
(d) Dommages causés par l’utilisation du Produit en dehors des utilisations autorisées ou prévues décrites par la Société ;
(e) Les dommages causés par des services tiers ;
(f) Un Produit ou une pièce qui a été modiié pour altérer sa fonctionnalité ou sa capacité sans l’autorisation écrite de la
Société ;
(g) Les pièces consommables, telles que les piles, les fusibles et les ampoules ;
(h) Des dommages esthétiques ; ou
(i) Si un numéro de série du projecteur intelligent KODAK FLIK HD10 a été retiré ou déiguré.
Cette Garantie n’est valable que dans le pays où le consommateur a acheté le Produit, et ne s’applique qu’aux Produits
achetés et entretenus dans ce pays. La Société ne garantit pas que le fonctionnement du Produit sera ininterrompu ou
sans erreur. La Société n’est pas responsable des dommages résultant de votre manquement à suivre les instructions
relatives à son utilisation.
NONOBSTANT TOUTE DISPOSITION CONTRAIRE ET DANS LA MESURE MAXIMALE PERMISE PAR LA LOI APPLICABLE,
LA SOCIETE FOURNIT LE PRODUIT “EN L’ETAT”, “TEL QUEL” ET “TEL QUE DISPONIBLE” POUR LES BESOINS DE
L’UTILISATEUR. ET “TEL QUE DISPONIBLE” POUR VOTRE COMMODITÉ ET LA SOCIÉTÉ ET SES CONCÉDANTS DE
LICENCE ET FOURNISSEURS DÉCLINENT EXPRESSÉMENT TOUTE GARANTIE ET CONDITION, QU’ELLE SOIT EXPLICITE,
IMPLICITE OU STATUTAIRE, Y COMPRIS LES GARANTIES DE QUALITÉ MARCHANDE, D’ADÉQUATION À UN USAGE
PARTICULIER, DE TITRE, DE JOUISSANCE PAISIBLE, D’EXACTITUDE ET DE NONVIOLATION DES DROITS DE TIERS.
LA SOCIETE NE GARANTIT PAS DE RESULTATS SPECIFIQUES DE L’UTILISATION DU PRODUIT, NI QUE LA SOCIETE
CONTINUERA A OFFRIR OU A RENDRE DISPONIBLE LE PRODUIT PENDANT UNE PERIODE DE TEMPS SPECIFIQUE. LA
SOCIÉTÉ DÉCLINE ÉGALEMENT TOUTE GARANTIE APRÈS LA PÉRIODE DE GARANTIE EXPRESSE INDIQUÉE CIDESSUS.
VOUS UTILISEZ LE PRODUIT À VOTRE PROPRE DISCRÉTION ET À VOS RISQUES. VOUS SEREZ SEUL RESPONSABLE
(ET LA SOCIÉTÉ DÉCLINE) DE TOUTE PERTE, RESPONSABILITÉ OU DOMMAGE RÉSULTANT DE VOTRE UTILISATION
DU PRODUIT. AUCUN CONSEIL NI AUCUNE INFORMATION, QU’ILS SOIENT ORAUX OU ÉCRITS, OBTENUS PAR VOUS
AUPRÈS DE LA SOCIÉTÉ OU PAR L’INTERMÉDIAIRE DE SES FOURNISSEURS DE SERVICES AGRÉÉS NE SAURAIENT
CRÉER UNE QUELCONQUE GARANTIE.
EN AUCUN CAS, LA RESPONSABILITÉ TOTALE CUMULÉE DE LA SOCIÉTÉ DÉCOULANT DE OU LIÉE AU PRODUIT,
QUE CE SOIT DANS LE CADRE D’UN CONTRAT, D’UN DÉLIT OU AUTRE, NE DÉPASSERA LES FRAIS EFFECTIVEMENT
PAYÉS PAR VOUS À LA SOCIÉTÉ OU À L’UN DE SES REVENDEURS AUTORISÉS POUR LE PRODUIT EN QUESTION
AU COURS DE LA DERNIÈRE ANNÉE À COMPTER DE VOTRE ACHAT. CETTE LIMITATION EST CUMULATIVE ET NE
SERA PAS AUGMENTÉE PAR L’EXISTENCE DE PLUS D’UN INCIDENT OU D’UNE RÉCLAMATION. LA SOCIÉTÉ DÉCLINE
TOUTE RESPONSABILITÉ DE QUELQUE NATURE QUE CE SOIT DE SES CONCÉDANTS ET FOURNISSEURS. EN
AUCUN CAS LA SOCIETE OU SES CONCÉDANTS, FABRICANTS ET FOURNISSEURS NE POURRONT ETRE TENUS
RESPONSABLES DE TOUT DOMMAGE ACCESSOIRE, DIRECT, INDIRECT, SPÉCIAL, PUNITIF OU CONSÉCUTIF (TEL
QUE, MAIS SANS S’Y LIMITER, LES DOMMAGES POUR PERTE DE PROFITS, D’AFFAIRES, D’ÉCONOMIES, DE DONNÉES
OU D’ENREGISTREMENTS) CAUSÉS PAR L’UTILISATION, LA MAUVAISE UTILISATION OU L’INCAPACITÉ D’UTILISER LE
PRODUIT.

FR | 91
Kodak ne fabrique PAS ce produit et ne fournit aucune garantie ou assistance..
www.kodakphotoplus.com
⚠WARNING: Ce produit contient des produits chimiques connus de l’État de Californie pour provoquer des cancers et
des anomalies congénitales ou d’autres troubles de la reproduction.
La marque, le logo et l’habillage commercial Kodak sont utilisés sous licence par Eastman Kodak Company.
GOOGLE PLAY est une marque de commerce de GOOGLE LLC.
ANDROID TV est une marque de commerce de GOOGLE LLC.
NETFLIX est une marque déposée de NETFLIX, INC.
PRIME VIDEO est une marque commerciale d’ AMAZON TECHNOLOGIES, INC.
YOUTUBE est une marque de commerce de GOOGLE LLC.
APPLE, AIRPRINT, IPOD, IPHONE, IPAD, APP STORE, MAC, MACINTOSH et OS X sont des marques commerciales d’ APPLE
INC. aux États-Unis et dans d’autres pays.
BLUETOOTH est une marque de commerce de BLUETOOTH SIG, Inc. AUX ÉTATSUNIS.
Wi-Fi, WPA et WPA2 sont des marques commerciales de Wi-Fi Alliance aux États-Unis et/ou dans d’autres pays.
HDMI, le logo HDMI et High-Deinition Multimedia Interface sont des marques commerciales ou des marques déposées
de HDMI Licensing, LLC aux États-Unis et/ou dans d’autres pays.
Tous les autres produits, noms de marque, noms de société et logos sont des marques de commerce de leurs
propriétaires respectifs, utilisées uniquement pour identiier leurs produits respectifs, et ne sont pas destinées à suggérer
un parrainage, une approbation ou un agrément.
Distribué par C&A Marketing, Inc. 114 Tived Lane East, Edison, NJ 08837 USA. © 2023. C&A IP Holdings LLC. Tous droits
réservés. Fabriqué en Chine.
Rien dans ces conditions ne doit tenter d’exclure la responsabilité qui ne peut être exclue en vertu de la loi applicable.
Certains pays, états ou provinces n’autorisent pas l’exclusion ou la limitation des dommages accessoires ou indirects ou
autorisent la limitation des garanties, de sorte que certaines limitations ou exclusions peuvent ne pas s’appliquer à vous.
Cette garantie vous donne des droits légaux spéciiques, et vous pouvez avoir d’autres droits qui varient d’un état à l’autre
ou d’une province à l’autre. Contactez votre revendeur agréé pour déterminer si une autre garantie s’applique.

92

DE | 93
EINFÜHRUNG
ielen Dank, dass Sie sich für den KODAK FLIK HD10 Smart Projector entschieden
haben. Dieses Benutzerhandbuch soll Ihnen Richtlinien an die Hand geben, die
sicherstellen, dass der Betrieb dieses Produkts sicher ist und keine Gefahr für den
Benutzer darstellt. Jede Verwendung, die nicht den in diesem Benutzerhandbuch
beschriebenen Richtlinien entspricht, kann zum Erlöschen der beschränkten Garantie
führen.
Bitte lesen Sie alle Anweisungen sorgfältig durch, bevor Sie das Produkt verwenden,
und bewahren Sie diese Anleitung zum Nachschlagen auf. Dieses Produkt ist nur für
den Hausgebrauch bestimmt.
Es ist nicht für den kommerziellen Gebrauch bestimmt. Für dieses Produkt gilt
eine eingeschränkte Garantie von einem Jahr. Der Versicherungsschutz unterliegt
Einschränkungen und Ausschlüssen. Siehe Garantie für Details.

94 | DE
SPEZIFIKATIONEN
Produkttyp: Projektor
Produktlänge: 5.6”
Breite des Produkts: 5.8”
Produkt-Höhe: 7.4”
Nettogewicht: 4.2 lbs.
Native Aulösung: 1920 x 1080p
Stromaufnahme: 110 - 240 V, 50 - 60 Hz 22,4 A
Nennspannung: AC 90 - 260 V, 50 - 60 MHz
Anzeigetechnik: 3,5” LCD TFTPanel
Linse: 3-teilige Glaslinse
Farbtemperatur: 8000K ± (1000K)
Helligkeit: 200 ANSI Lumen
Lichtquelle: LED 100 W
Lebensdauer der Lichtquelle: 50.000 Stunden
Kontrastverhältnis: 2000:1
Bildseitenverhältnis: 16:9 & 4.3
Wurfweite: 1.37
Einstellungsmodus: Manueller Fokus
Trapezkorrektur: Automatische Trapezkorrektur und 4
Kern-Korrektur
Gleichmäßigkeit: 90%
Betriebsgeräusch des Lüfters: < 35 dB
Größe der Projektionsläche: 60” - 150”
Projektionsabstand: 39,4” - 157,5” (1 m - 4 m)
Bild-Eingangsmodi: HDMIEingang x 1, USB Eingang x 1
Lautsprecher: Zwei 5Watt-Lautsprecher
Audio-Ausgang: 3,5 mm
Audioformat: MPEG Audio Layers 1, 2 & 3, MPEG4 Audio
AAC LC, AAC LC + SBR Level 2, AAC 5.1, HE AAC Level
2 & Level 4
Fotoformate: HD JPEG, BMP, PNG
USB format: FAT, FAT32, NTFS, EXFAT
Video format: 4:3 and 16:9 aspect ratio 480i, 480p, 576i,
576p, 720p, 1080i, 1080p24, 1080p30, 1080p60 HEVC
H.265 MPEG4, MP@ML, MP@HL proiles AV1, VC1 /
VP8 / VP9 HDR10, HDR10+, HLG
Konnektivität: Bluetooth 4.2, Wi-Fi 2,4 GHz/5 GHz
Stromquelle erforderlich: Ja (Steckernetzteil)
Installation erforderlich: Nein
Montage durch Erwachsene erforderlich: Nein
Zusätzliche Werkzeuge erforderlich: Nein
Herkunftsland: China
Inklusive Garantie: Ja
Garantiedauer: 1 Jahr

DE | 95
PACKUNGSINHALT
SICHERHEITSVORKEHRUNGEN
• KODAK FLIK HD10 Smart Projector
• Netzkabel und Netzadapter
• Fernbedienung
• HDMIKabel
• Benutzerhandbuch
• Versuchen Sie auf keinen Fall, das Gerät zu zerlegen.
• Bewahren Sie den Projektor nicht an Orten auf, an denen er hohen Temperaturen,
Feuchtigkeit oder direktem Sonnenlicht ausgesetzt ist. Diese Einlüsse können den
Projektor dauerhaft beschädigen.
• Fassen Sie den Projektor niemals mit feuchten oder nassen Händen an. Dies könnte
den Projektor beschädigen oder das Risiko eines elektrischen Schlages verursachen.
• Halten Sie den Projektor außerhalb der Reichweite von Kindern.
• Richten Sie den Projektor niemals auf das Gesicht einer anderen Person und schauen
Sie nicht direkt in das Licht des Projektors. Das Licht ist hell und könnte Schäden
verursachen.
• Verwenden Sie keine Produkte wie Alkohol, Benzin, Verdünnungsmittel oder
andere organische Lösungsmittel, wenn Sie dieses Gerät reinigen oder zu reinigen

96 | DE
versuchen.
• Verwenden Sie dieses Gerät nicht in einer Umgebung, in der es starkem Staub oder
Feuchtigkeit ausgesetzt ist.
• Lassen Sie den Projektor nicht fallen und schütteln Sie ihn nicht, da dies zu
Fehlfunktionen oder dauerhaften Schäden an den Innenteilen führen kann.
• Verwenden Sie den Projektor nicht beim Baden oder unter der Dusche.
• Stellen oder lagern Sie den Projektor nicht so, dass er in eine Wanne oder ein
Waschbecken fallen oder gezogen werden kann.
• Stellen Sie den Projektor nicht in Wasser oder andere Flüssigkeiten, lassen Sie ihn
nicht fallen und tauchen Sie ihn nicht in diese ein.
• Wenn der Projektor trotz aller Vorsichtsmaßnahmen ins Wasser fällt, greifen Sie bitte
nicht ins Wasser, um ihn zu bergen. Ziehen Sie sofort den Netzstecker und bergen
Sie ihn dann.
• Achten Sie darauf, dass keine Gegenstände oder Flüssigkeiten auf den Projektor
fallen oder verschüttet werden.
• Unsachgemäße Wartung kann zu Verletzungen oder Schäden am Gerät führen.
• Nehmen Sie keine Reparaturen am Gerät selbst vor. Lassen Sie Ihr Gerät nur von
einem autorisierten Service-Center reparieren.
• Schalten Sie das Gerät aus und trennen Sie es von der Stromversorgung, bevor Sie
das Gehäuse reinigen. Verwenden Sie ein weiches, trockenes Tuch, um das Gerät zu
reinigen.
⚠WARNUNG: Dieses Produkt enthält Chemikalien, die im Staat Kalifornien als
krebserregend, geburtsschädigend oder fortplanzungsgefährdend bekannt sind.
Für weitere Informationen: www.P65Warnings.ca.gov

DE | 97
PRODUKTÜBERSICHT
Vorderseite Rückseite
1
2
3 8
4 5 6 7

98 | DE
Oben
9
10
1. Objektiv
2. Füße
3. IREmpfänger
4. ACAnschluss
5. USBAnschluss
6. 3,5 mm Audio-Anschluss
7. AVAnschluss
8. HDMIAnschluss
9. Einschalttaste
10. Manuelles Fokusrad

DE | 99
ANSICHT DER FERNBEDIENUNG
1. die Power-Taste
2. Lesezeichen-Taste
3. GOOGLE Assistent-Taste
4. OKTaste
5. Zurück-Taste
6. Stummschalttaste
7. Taste Lauter (+)
8. Taste Lautstärke verringern (-)
9. YOUTUBETaste
10. PRIME VIDEOTaste
11. Schaltläche Projektoreinstellungen
12. Schaltläche Android TV-
Einstellungen
13. Navigationstasten
14. T VTaste
15. Home-Taste
16. Taste Kanal hoch (+)
17. Taste Kanal abwärts (-)
18. NETFLIXTaste
19. GOOGLE PLAYTaste
111
212
3
413
514
615
716
817
918
10 19

100 | DE
EINLEGEN DER BATTERIEN IN DIE FERNBEDIENUNG
AUFSTELLEN DES PROJEKTORS
1. drücken Sie nach unten und schieben Sie die Batterieabdeckung ab.
2. Legen Sie die zwei (2) AAABatterien in das Batteriefach ein.
3. Setzen Sie den Batteriefachdeckel wieder auf die Fernbedienung.
1. stellen Sie den Projektor vor einer geeigneten Projektionsläche oder Wand auf.
2. Schließen Sie das Netzteil an das Netzkabel an.
3. Verbinden Sie dann die Netzbuchse des Netzteils mit dem Projektor.
4. Schließen Sie den Netzstecker des Netzkabels an eine Steckdose an. Die LEDAnzeige
auf der Rückseite des Projektors leuchtet rot auf.

DE | 101
KOPPELN DER FERNBEDIENUNGL
ANDROID TV AUF DEM PROJEKTOR EINRICHTEN
Schalten Sie den Projektor ein und die Fernbedienung sollte sich automatisch mit dem
Projektor verbinden.
Für eine manuelle Kopplung halten Sie die Tasten Zurück und Home gleichzeitig fünf (5)
Sekunden lang gedrückt. Die LEDLeuchte auf der Fernbedienung beginnt zu blinken.
Wenn die Kopplung abgeschlossen ist, leuchtet die LEDAnzeige auf der Fernbedienung,
ohne zu blinken. Sie sollten nun ein blaues Häkchen auf Ihrem Bildschirm sehen. Denken
Sie daran, Ihre Fernbedienung immer auf den Projektor und nicht auf die Leinwand zu
richten.
“Es gibt zwei Methoden, ANDROID TV auf Ihrem Projektor einzurichten:
Methode 1: Einrichten mit einem ANDROIDTelefon
1. Wenn Ihr Projektor sagt: “Richten Sie Ihren Projektor schnell mit Ihrem ANDROID-
Telefon ein?”
wählen Sie mit der Fernbedienung “Weiter” oder “Ja”.
2. Önen Sie die GOOGLEApp auf Ihrem ANDROIDTelefon.
3. Geben Sie ein oder sagen Sie: “Mein Gerät einrichten”.

102 | DE
4. Folgen Sie den Anweisungen auf Ihrem Telefon, bis Sie einen Code erhalten. Geben
Sie den Code auf dem Projektor ein.”
5. tippen Sie auf Ihrem Telefon auf den Namen des Projektors, wenn er angezeigt wird.
6. Um die Einrichtung abzuschließen, folgen Sie den Anweisungen auf Ihrem Projektor.
Methode 2: Einrichten mit der Fernbedienung
1. Wenn Ihr Projektor sagt: “Richten Sie Ihren Projektor schnell mit Ihrem ANDROID-
Telefon ein?”
wählen Sie mit der Fernbedienung “Überspringen”.
2. Önen Sie dann die ANDROID TV™-Einstellungen, indem Sie die Taste ANDROID TV™-
Einstellungen auf der
der Fernbedienung drücken.
3. Gehen Sie dann zu Netzwerk und wählen Sie Ihr Wi-Fi® Netzwerk aus.
4. Geben Sie Ihr Passwort ein und warten Sie, bis sich der Projektor mit Ihrem Netzwerk
verbindet.
5. Gehen Sie dann zu Konto und wählen Sie Konto hinzufügen.
6. Geben Sie Ihre EMail-Adresse ein und bestätigen Sie.
7. Geben Sie Ihr Passwort ein und bestätigen Sie es.
Wenn Sie sich erfolgreich angemeldet haben, wird Ihre EMail-Adresse unter der Option
Konto angezeigt. Sie können nun Ihre ANDROID TV™-Apps nutzen.

DE | 103
NAVIGIEREN IHRES PROJEKTORS
PROJEKTOR-EINSTELLUNGEN
Wenn der Projektor eingeschaltet wird, wird das ANDROID TV™ Home-Menü
automatisch geladen. Das Home-Menü ist der Ausgangspunkt für alle Operationen mit
Ihrem Projektor. Wenn das Gerät eingeschaltet wird, wird das Home-Menü automatisch
geladen.
• Drücken Sie die Taste Lesezeichen, um Inhalte zu Ihrer Liste “Nächste
Wiedergabe” hinzuzufügen oder zu entfernen.
• Drücken Sie die Taste ANDROID TV™ Einstellungen, um die
Einstellungsseitenleiste mit Optionen wie Gerätename, Kontooptionen,
Netzwerkverbindung und mehr aufzurufen.
• Drücken Sie die Home-Taste, um jederzeit zum Home-Menü zurückzukehren,
• Drücken Sie die Taste TV, um das Popup-Einstellungsfenster zu verlassen.
Drücken Sie auf die Schaltläche Projektoreinstellungen, um das Popup-
Einstellungsfenster anzuzeigen. Die Popup-Einstellungsfenster zeigen
Signal-, Anzeige-, Ton- und Systemoptionen an.
Signal: Navigieren Sie zu diesem Symbol und drücken Sie zur Auswahl
die OKTaste. Dadurch wird das Fenster Signal geönet, in dem Sie eine
Eingangsquelle auswählen können.
Anzeige: Navigieren Sie zu diesem Symbol und drücken Sie die OK-
Taste, um es auszuwählen. Dies önet das Fenster Anzeige, in dem Sie

104 | DE
Anzeigeeinstellungen wie Projektionsmodus und automatische Trapezkorrektur
vornehmen können.
Ton: Navigieren Sie zu diesem Symbol und drücken Sie zur Auswahl die OKTaste.
Dies önet das Fenster Ton, in dem Sie Toneinstellungen wie Tonmodus und Tonkanal
vornehmen können.
System: Navigieren Sie zu diesem Symbol und drücken Sie die OKTaste, um es
auszuwählen. Dies önet das Fenster System, in dem Sie Projektoreinstellungen wie
Sprache, Timer und mehr vornehmen können.
SIGNALFENSTER
Die Eingangsquelle wird angezeigt. Navigieren Sie zu dem Eingang, den Sie auswählen
möchten, und drücken Sie zur Bestätigung die OKTaste.
DISPLAYFENSTER
Ihre Anzeigeeinstellungen werden angezeigt. Navigieren Sie zu der Einstellungsoption,
die Sie ändern möchten, und drücken Sie die OKTaste, um Ihre Auswahl zu bestätigen.

DE | 105
Manuelle Trapezkorrektur – Passen Sie die Trapezkorrektur manuell an.
Automatische Trapezkorrektur – Schalten Sie die automatische Trapezkorrektur ein
oder aus.
Projektionsmodus – Wählen Sie zwischen Aufprojektion, Deckenprojektion,
Aufprojektion nach hinten oder Deckenprojektion nach hinten.
- Vorne: Der Projektor wird auf einem Tisch vor der Leinwand aufgestellt. Dies ist die
gebräuchlichste Art, den Projektor für eine schnelle Einrichtung und Mobilität aufzustellen.
- Vordere Decke: Der Projektor wird kopfüber vor der Leinwand aufgehängt. Ein Decken-/
Wandbefestigungskit ist erforderlich (nicht im Lieferumfang enthalten).
- Hinten: Der Projektor wird auf einem Tisch hinter der Leinwand aufgestellt. Eine spezielle
Projektionswand für die Rückseite ist erforderlich (nicht im Lieferumfang enthalten).
- Hintere Decke: Der Projektor wird kopfüber hinter der Leinwand aufgehängt. Sie benötigen
eine spezielle Projektionswand für die Rückseite und ein Decken-/Wandmontageset (nicht im
Lieferumfang enthalten).
HINWEISE:

106 | DE
Um die Höhe des Projektors besser kontrollieren zu können, können Sie ihn auf ein Stativ
stellen (separat erhältlich).
Der Abstand zwischen dem Projektorobjektiv und der Projektionsläche bestimmt die
Größe der Projektionsläche.
Projektionsverhältnis – Wählen Sie das Seitenverhältnis aus oder passen Sie es an.
Bildmodus – Wählen Sie den Bildmodus für die Projektion oder passen Sie bestimmte
Einstellungen an.
TONFENSTER
Ihre Toneinstellungen werden angezeigt. Navigieren Sie zu der Einstellungsoption, die
Sie ändern möchten, und drücken Sie die OKTaste, um Ihre Auswahl zu bestätigen.
Tonmodus – Wählen Sie zwischen Standard, Musik, Film oder Benutzer.

DE | 107
Tonkanal – Wählen Sie zwischen den Optionen Audio Return Channel (ARC) oder TV.
Tastenton – Schalten Sie den Tastenton ein oder aus.
SYSTEMFENSTER
Ihre Systemeinstellungen werden angezeigt. Navigieren Sie zu der Einstellungsoption,
die Sie ändern möchten und drücken Sie die OKTaste, um Ihre Auswahl zu bestätigen.
Sprache – Wählen Sie zwischen mehreren Sprachen für den Projektor.
Menü beenden – Wählen Sie eine Zeiteinstellung für das Verlassen des Menüs.

108 | DE
System Info – Zeigt Systeminformationen an.
Fensterposition – Passen Sie die Position des Fensters an.
Ausschaltzeit – Stellen Sie einen Timer ein, wann sich der Projektor ausschalten soll.
Werkseinstellung – Setzt den Projektor auf die Werkseinstellungen zurück.

DE | 109
EINRICHTEN DER FERNBEDIENUNG AUF IHREM TELEFON
INHALTE VON IHREM GERÄT AUF DEN PROJEKTOR ÜBERTRAGEN
1. önen Sie die GOOGLE TVApp auf Ihrem ANDROIDTelefon.
2. Tippen Sie auf “Fernbedienung”. Tippen Sie dann auf “Nach Geräten scannen”.
3. Wählen Sie Ihr Gerät.
4. Um die Kopplung abzuschließen, folgen Sie den Anweisungen auf Ihrem Telefon und
Ihrem Projektor.
5. Nach der Kopplung können Sie Ihr Telefon als Fernbedienung für Ihren Projektor
verwenden oder die mitgelieferte Fernbedienung verwenden
1. verbinden Sie Ihr Gerät (z.B. Telefon, Tablet oder Laptop) mit demselben Wi-Fi®
Netzwerk wie Ihren Projektor.
2. Önen Sie eine CHROMECAST-fähige App mit dem Inhalt, den Sie übertragen
möchten.
3. Suchen Sie in der App nach “Cast” und wählen Sie es aus.
4. Wählen Sie auf Ihrem Gerät den Namen Ihres Projektors.
5. Wenn sich das Cast-Symbol verfärbt, sind Sie erfolgreich verbunden.

110 | DE
SPIEGELN ODER STREAMEN SIE VIDEOS VON IHREN IOS-
GERÄTEN AUF DEN PROJEKTOR
En primer lugar, deberá instalar AirPlay en su proyector. Instale la aplicación AirScreen
desde GOOGLE PLAY para habilitar AirPlay en su proyector. Una vez completado, siga
estos pasos para relejar o transmitir vídeo desde su dispositivo iOS.
Screen Mirroring desde IPHONE o IPAD:
1. Stellen Sie sicher, dass sich Ihr iOSGerät und der Projektor im selben Wi-Fi® Netzwerk
beinden. Der Hotspot Ihres Telefons ist ebenfalls akzeptabel.
2. Wischen Sie auf dem Startbildschirm Ihres Telefons nach unten, um die Steuerkonsole
anzuzeigen, und tippen Sie auf das AirPlay-Symbol.
3. Wählen Sie das Gerät aus, auf das Sie übertragen möchten.
Screen Mirroring vom MAC aus:
1. Vergewissern Sie sich, dass sich Ihr MAC und Ihr Projektor im selben Wi-Fi® Netzwerk
beinden. Der Hotspot Ihres Telefons ist ebenfalls akzeptabel.
2. Klicken Sie auf das AirPlay-Symbol auf dem MAC und wählen Sie Ihren Projektor aus,
um die Spiegelung zu starten. Das AirPlay-Symbol in der Menüleiste wird blau, wenn
AirPlay aktiv ist.
3. Um die Spiegelung zu beenden, klicken Sie erneut auf das AirPlay-Symbol und wählen
Sie dann “AirPlay ausschalten”.
Hinweis: Beim MACBOOK AIR, MACBOOK PRO und IMAC wird das AirPlay-Symbol in der
Menüleiste nur angezeigt, wenn AirPlay-Spiegelung verfügbar ist.
Video-Streaming vom IPHONE oder IPAD:
1. Stellen Sie sicher, dass sich Ihr iOSGerät und der Projektor im selben Wi-Fi®

DE | 111
Netzwerk beinden. Der Hotspot Ihres Telefons ist ebenfalls akzeptabel.
2. önen Sie die Streaming-Apps, die Sie auf den Projektor werfen möchten, und
wählen Sie ein Video aus, das Sie abspielen möchten.
3. Klicken Sie auf die AirPlay- oder Cast-Symbole in der oberen rechten Ecke, um das
Video an den Projektor zu übertragen.
HINWEIS: Beachten Sie, dass urheberrechtlich geschützte Inhalte von HULU, NETFLIX und anderen
ähnlichen Diensten NICHT gespiegelt oder per Screencast übertragen werden können. Um urheberrechtlich
geschützte Inhalte von diesen Diensten zu sehen,laden Sie die oiziellen Apps herunter und verwenden Sie
sie direkt über den Projektor.
EXTERNE GERÄTE ÜBER BLUETOOTH KOPPELN®
EINSTELLEN DER SCHÄRFE
Externe Kophörer oder Lautsprecher können über BLUETOOTH® mit dem Projektor
gekoppelt werden. Gehen Sie wie folgt vor, um BLUETOOTH®-Kophörer oder
-Lautsprecher anzuschließen:
1. Önen Sie zunächst die ANDROID TV™-Einstellungen, indem Sie die Taste ANDROID
TV™-Einstellungen auf der Fernbedienung drücken.
2. Wählen Sie dann “Fernbedienung & Zubehör” und anschließend “Zubehör
hinzufügen”.
3. Aktivieren Sie den Pairing-Modus auf dem Gerät, das Sie verbinden möchten.
4. Wählen Sie das Gerät, das Sie verbinden möchten, aus der Liste aus.
5. Warten Sie, bis die beiden Geräte erfolgreich miteinander gekoppelt sind
Wenn das Bild auf der Leinwand beim Einschalten des Projektors verschwommen oder
unscharf erscheint, verwenden Sie das Fokusrad auf der Oberseite, um das Bild zu

112 | DE
GOOGLE ASSISTENT
ANSCHLIESSEN EXTERNER GERÄTE
Mit GOOGLE ASSISTANT können Sie mit Ihrer Stimme durch die Apps und Streaming-
Dienste navigieren.
1. Drücken Sie die GOOGLE ASSISTANTTaste, um den sprachgesteuerten virtuellen
Assistenten von GOOGLE zu aktivieren.
2. Auf dem Projektionsbildschirm wird eine Einführung angezeigt. Folgen Sie den
Schritten, um die Einrichtung abzuschließen.
Sobald der Assistent eingerichtet ist, drücken Sie die Taste GOOGLE Assistant, um Ihre
Frage zu stellen oder einen Befehl zu gebent.
USBLaufwerke
Um auf Fotos, Videos oder Musik zuzugreifen, die auf einem USBLaufwerk gespeichert
sind, stecken Sie das Wechseldatenträger einfach in den entsprechenden Anschluss
an der Rückseite des Projektors. Es erscheint ein Popup-Fenster File Commander, in
dem Sie gefragt werden, ob Sie auf das angeschlossene Speichermedium zugreifen
möchten. Wählen Sie “OK” und durchsuchen Sie das File Commander-Programm, um
Ihre Videos und Fotos auf dem Speichermedium zu inden.
korrigieren. Bewegen Sie das Rad nach links oder rechts, bis das Bild scharf und klar
erscheint.
HINWEIS: Um eine optimale Leistung zu erzielen, muss der Projektor mindestens 1 Meter
(3,5 Fuß) von der Leinwand entfernt stehen.

DE | 113
HDMI-kompatible Geräte
Wenn Sie ein HDMI-kompatibles Gerät verwenden, z. B. einen Laptop, einen PC, ein
Smartphone, ein Tablet oder eine Videospielkonsole, schließen Sie ein HDMIKabel von
dem Gerät an Ihren Projektor an, um auf Fotos, Videos oder Musik zuzugreifen. Drücken
Sie dann die Taste Projektoreinstellungen und wählen Sie unter Signal” die Option
“HDMI”.
Für einige Geräte benötigen Sie ein HDMI-zu-HDMIKabel und/oder Adapter, die Sie
separat kaufen müssen. Zu Ihrer Erleichterung haben wir diese Tabelle mit den Geräten
und Adaptern zusammengestellt, die Sie für bestimmte Geräteformate benötigen.”
Gerät Zusätzlich benötigtes Kabel oder Adapter
1 Geräte mit HDMI-
Anschluss HDMI-zu-HDMIKabel
2 Geräte mit Mini-HDMI-
Anschluss Mini-HDMI-auf-HDMIAdapter - HDMI-auf-
HDMIKabel
3Geräte mit Micro-HDMI-
Anschluss Micro-HDMI-auf-HDMIAdapter - HDMI-auf-
HDMIKabel
4iOSGeräte mit Lightning-
Anschluss Lightning digitaler AVAdapter - HDMI auf
HDMIKabel
5 iOSGeräte mit USBC-
Anschluss Digitaler AVMultiport-Adapter USBC - HDMI-
auf-HDMIKabel
6 Geräte mit USBC-
Anschluss USBC zu HDMIAdapter - HDMI zu HDMI-
Kabel
7 Geräte mit USBC-
Anschluss USBC-auf-HDMIKabel

114 | DE
FEHLERSUCHE
Wenn Sie Ihre GOOGLE PLAYFilme, TVSendungen oder Musik nicht auf dem ANDROID
TV™-Bildschirm abspielen können, inden Sie hier einige Lösungen zur Fehlerbehebung:
Überprüfen Sie Ihre Wi-Fi® Verbindung
1. Drücken Sie im ANDROID TV™-Startmenü die Taste ANDROID TV™-Einstellungen.
2. Wählen Sie unter “Netzwerk” ein Netzwerk aus.
3. Folgen Sie den Anweisungen auf dem Bildschirm.
4. Önen Sie eine Ihrer Anwendungen.
5. Spielen Sie Ihr Video, Ihre Musik oder Ihr Spiel erneut ab.
Stellen Sie sicher, dass Ihr System auf dem neuesten Stand ist
1. Drücken Sie im ANDROID TV™-Startmenü die Taste ANDROID TV™-Einstellungen.
2. Wählen Sie “Über”. Gehen Sie dann zu “System Software Update” und wählen Sie
“Software Update”.
3. Installieren Sie alle verfügbaren Updates und spielen Sie dann Ihr Video, Ihre Musik
oder Ihr Spiel erneut ab.
Starten Sie Ihr Gerät neu
1. Drücken Sie im ANDROID TV™-Startmenü die Taste ANDROID TV™-Einstellungen.
2. Wählen Sie “Über” und dann “Neu starten”.
3. Sobald das System neu gestartet ist, spielen Sie Ihr Video, Ihre Musik oder Ihr Spiel
erneut ab.

DE | 115
Prüfen Sie, welches Konto Sie verwenden
1. Drücken Sie im ANDROID TV™-Startmenü die Taste ANDROID TV™-Einstellungen.
2. Vergewissern Sie sich unter “Konten”, dass Sie bei Ihrem ANDROID TV™-Konto
angemeldet sind.
Ihr Konto synchronisieren
1. Drücken Sie im ANDROID TV™-Startmenü die Taste ANDROID TV™-Einstellungen.
2. Wählen Sie unter “Konten” Ihr Konto aus.
3. Wählen Sie dann “Jetzt synchronisieren”.
4. Spielen Sie Ihr Video, Ihre Musik oder Ihr Spiel erneut ab.
Löschen Sie Ihre App-Daten und den Cache
1. Drücken Sie im ANDROID TV™ Home-Menü die Taste ANDROID TV™ Einstellungen.
2. Wählen Sie “Apps”.
3. Wählen Sie unter “System-Apps” die App aus, gehen Sie zu “Daten löschen” und
bestätigen Sie “Cache löschen”.
4. Spielen Sie Ihr Video, Ihre Musik oder Ihr Spiel erneut ab..
Die ANDROID TV™-Oberläche auf diesem Projektorbildschirm ist unbrauchbar, wenn
die Fernbedienung nicht mehr funktioniert. Hier sind einige mögliche Lösungen für die
Reparatur der Fernbedienung:
- Überprüfen Sie die Batterien. Tauschen Sie die Batterien aus und prüfen Sie, ob die Fernbedienung mit
neuen Batterien funktioniert.
- Die Fernbedienung ist möglicherweise nicht mit dem Projektor gekoppelt. Um die Fernbedienung zu
koppeln, halten Sie die Tasten Zurück und Home gleichzeitig fünf (5) Sekunden lang gedrückt. Die
LEDLeuchte auf der Fernbedienung beginnt zu blinken. Wenn die Kopplung abgeschlossen ist, leuchtet die
LEDAnzeige auf der Fernbedienung, ohne zu blinken.
- Möglicherweise liegt ein Problem mit der Hardware der Fernbedienung vor. Bitte rufen Sie den
Kundendienst an, um eine Ersatzfernbedienung anzufordern.

116 | DE
HÄUFIG GESTELLTE FRAGEN
Kann ich Android-Apps auf den Projektor laden?
Ja, das können Sie. Beachten Sie, dass es mehr als 7.000 native Apps auf GOOGLE
PLAY gibt, die Sie direkt auf den Projektor herunterladen können. Für Apps, die nicht bei
GOOGLE PLAY verfügbar sind, laden Sie die APKDatei herunter und installieren Sie sie
auf einem USBLaufwerk. Stellen Sie sicher, dass die App File Explorer auf dem Projektor
installiert ist, damit Ihr USBLaufwerk erkannt wird.
Was soll ich tun, wenn mein HDMI kein Signal hat?
1. Verwenden Sie ein anderes HDMIKabel.
2. Verbinden Sie den Projektor über Ihr HDMIKabel mit einem anderen Gerät.
3. Trennen Sie die Verbindung zum Projektor und versuchen Sie, Ihr Gerät über HDMI mit
Ihrem Fernseher zu verbinden.
4. Stellen Sie die HDMIAusgangsaulösung/Hz des angeschlossenen Geräts so ein, dass
sie mit Ihrem Fernsehgerät übereinstimmt.
Wie schließe ich externe Lautsprecher an den Projektor an?
Dieser Projektor kann auch an externe Tonausgangsgeräte angeschlossen werden,
einschließlich Kophörer und Lautsprecher.
System deaktiviert. So schließen Sie externe Lautsprecher an:
1. Verwenden Sie ein 3,5-mm-Audiokabel oder einen Adapter (nicht mitgeliefert), um
Ihren Kophörer oder externen Lautsprecher anzuschließen.
2. Schließen Sie das andere Ende des Audiokabels an den AUXAnschluss des Projektors
an.

DE | 117
Für BLUETOOTHLautsprecher gehen Sie zu Einstellungen, dann Fernbedienung &
Zubehör und wählen Sie Zubehör hinzufügen
Wie kann ich Videos ohne Wi-Fi® abspielen?
1. Laden Sie Videos auf ein USBLaufwerk herunter.
2. Installieren Sie die App File Explorer aus dem GOOGLE PLAY STORE auf dem
Projektor.
3. Installieren Sie eine Media-Player-App wie VLC oder KODI.
4. Schließen Sie das USBLaufwerk an den Projektor an, um Ihre Videos abzuspielen.
Welche Kapazität von USBLaufwerken unterstützt der Projektor?
Der Projektor unterstützt USBLaufwerke mit einer Kapazität von 128 GB oder weniger
und 1080p @ 60 Hz Inhalte.
Das Festplattenformat muss NTFS, FAT oder FAT32 sein.
*Format unterstützt:
• - Dokumente: .txt
• - Fotos: JPG (.jpg, .jpeg), PNG (.png), BMP (.bmp)
• - Musik: MP3 (.mp3), AAC (.aac)
• - Video: AV1, XVID (.avi), MPEG4 (3gp, mp4), H.263 (3g2, .avi, .mkv, .webm, 3gp, mp4)
Wie kann ich Filme von meinem USBAnschluss mit dem Projektor abspielen?
1. Laden Sie die File Commander App von GOOGLE PLAY herunter.
2. Schließen Sie das USBSpeichergerät an den Projektor an.
3. Wählen Sie die Musik, 1080p-Videos oder Fotos auf dem USBLaufwerk aus, die Sie
abspielen möchten.
4. Önen Sie sie mit einer Multimedia-Player-App wie VLC oder KODI. Wenn Sie keine
App haben, laden Sie eine von GOOGLE PLAY herunter.

118 | DE
KUNDENBETREUUNG
Sollten Sie Probleme mit Ihrem Produkt haben, kontaktieren Sie uns bitte, bevor Sie
den Artikel an die Verkaufsstelle zurückschicken. Wir sind für Sie da! U.S. Kundendienst:
kodak@camarketing.com, 8445161539
Internationale Unterstützung: kodakintl@camarketing.com, 8445161540

DE | 119
EINGESCHRÄNKTE GARANTIE FÜR DEN ERSTKÄUFER
Dieser KODAK FLIK HD10 Smart Projector (“Produkt”), einschließlich des in der Originalverpackung enthaltenen
Zubehörs, wird von C&A Marketing, Inc. (das “Unternehmen”) nur dem Erstkäufer gegen bestimmte Material- und
Verarbeitungsfehler (“Garantie”) wie folgt garantiert:
Um die Garantieleistungen in Anspruch zu nehmen, muss sich der Erstkäufer an das Unternehmen oder einen von ihm
autorisierten Dienstleister wenden, um das Problem zu klären und den Service in Anspruch zu nehmen. Ein Kaufnachweis
in Form eines Kaubelegs oder einer quittierten Rechnung, aus dem hervorgeht, dass sich das Produkt innerhalb der
geltenden Garantiezeit(en) beindet, MUSS dem Unternehmen oder seinem autorisierten Serviceanbieter vorgelegt
werden, um den gewünschten Service zu erhalten.
Serviceoptionen, Ersatzteilverfügbarkeit und Reaktionszeiten können variieren und sich jederzeit ändern. In
Übereinstimmung mit geltendem Recht kann das Unternehmen verlangen, dass Sie zusätzliche Dokumente einreichen
und/oder Anforderungen erfüllen, bevor Sie Garantieleistungen erhalten. Wenden Sie sich bitte an unseren Kundendienst,
um Einzelheiten zur Inanspruchnahme von Garantieleistungen Service:
USA: kodak@camarketing.com, 8445161539
International: kodakintl@camarketing.com, +18445161540
Die Versandkosten für die Rücksendung an das Unternehmen sind nicht durch diese Garantie abgedeckt und müssen
vom Verbraucher getragen werden.
Der Verbraucher trägt auch das gesamte Risiko des Verlusts oder der weiteren Beschädigung des Produkts bis zur
Lieferung an die genannte Einrichtung.
AUSSCHLÜSSE UND BESCHRÄNKUNGEN
Das Unternehmen garantiert, dass das Produkt bei normalem Gebrauch für einen Zeitraum von EINEM (1) JAHR ab dem
Datum des Einzelhandelskaufs durch den ursprünglichen Endverbraucherkäufer (“Garantiezeit”) frei von Material- und
Verarbeitungsfehlern ist. Wenn ein Hardwaredefekt auftritt und innerhalb der Garantiezeit eine gültige Reklamation
eingeht, wird das Unternehmen nach eigenem Ermessen und im gesetzlich zulässigen Rahmen entweder (1) den
Produktdefekt kostenlos reparieren, indem es neue oder generalüberholte Ersatzteile verwendet, (2) das Produkt
gegen ein Produkt austauschen, das neu ist oder aus neuen oder brauchbaren gebrauchten Teilen hergestellt wurde
und dem Originalgerät funktionell mindestens gleichwertig ist, oder (3) den Kaufpreis des Produkts erstatten. Für ein
ausgetauschtes Produkt oder ein Teil davon gilt die Garantie des Originalprodukts für den Rest der Garantiezeit oder
neunzig (90) Tage ab dem Datum des Austauschs oder der Reparatur, je nachdem, was Ihnen einen längeren Schutz
bietet. Wenn ein Produkt oder ein Teil davon ausgetauscht wird, geht der Ersatzartikel in Ihr Eigentum über, während der
ersetzte Artikel in das Eigentum des Eigentum des Unternehmens. Erstattungen können nur gewährt werden, wenn das
Originalprodukt zurückgegeben wird.
Diese Garantie gilt nicht für:
(a) Produkte, Hardware oder Software, die nicht von KODAK FLIK HD10 Smart Projector stammen, auch wenn sie
zusammen mit dem Produkt verpackt oder verkauft wurden;

120 | DE
(b) Schäden, die durch die Verwendung von Nicht-KODAK FLIK HD10 Smart Projector Produkten verursacht wurden;
(c) Schäden, die durch Unfall, Missbrauch, Fehlgebrauch, Überschwemmung, Feuer, Erdbeben oder andere äußere
Ursachen verursacht wurden;
(d) Schäden, die durch den Betrieb des Produkts außerhalb der vom Unternehmen beschriebenen zulässigen oder
beabsichtigten Verwendungszwecke verursacht werden;
(e) Schäden, die durch Dienstleistungen Dritter verursacht wurden;
f) Ein Produkt oder ein Teil, das ohne schriftliche Genehmigung des Unternehmens modiiziert wurde, um die
Funktionalität oder Leistungsfähigkeit zu verändern;
(g) Verschleißteile, wie Batterien, Sicherungen und Glühbirnen;
(h) Kosmetische Schäden; oder
(i) Wenn die Seriennummer des KODAK FLIK HD10 Smart Projector entfernt oder unkenntlich gemacht wurde.
Diese Garantie ist nur in dem Land gültig, in dem der Verbraucher das Produkt erworben hat, und gilt nur für Produkte,
die in diesem Land gekauft und gewartet wurden. Das Unternehmen garantiert nicht, dass der Betrieb des Produkts
ununterbrochen oder fehlerfrei ist. Das Unternehmen haftet nicht für Schäden, die dadurch entstehen, dass Sie die
Anweisungen zur Verwendung des Produkts nicht befolgen.
UNGEACHTET ALLER GEGENTEILIGEN ANGABEN UND IM GRÖSSTMÖGLICHEN GESETZLICH ZULÄSSIGEN UMFANG
STELLT DAS UNTERNEHMEN DAS PRODUKT “WIE BESEHEN” DAS UNTERNEHMEN UND SEINE LIZENZGEBER UND
LIEFERANTEN LEHNEN AUSDRÜCKLICH ALLE GEWÄHRLEISTUNGEN UND BEDINGUNGEN AB, OB AUSDRÜCKLICH,
STILLSCHWEIGEND ODER GESETZLICH, EINSCHLIESSLICH DER GEWÄHRLEISTUNG DER MARKTGÄNGIGKEIT,
DER EIGNUNG FÜR EINEN BESTIMMTEN ZWECK, DES RECHTSANSPRUCHS, DES UNGESTÖRTEN GENUSSES, DER
GENAUIGKEIT UND DES NICHTVERSTOSSES GEGEN RECHTE DRITTER. DAS UNTERNEHMEN ÜBERNIMMT KEINE
GARANTIE FÜR BESTIMMTE ERGEBNISSE AUS DER VERWENDUNG DES PRODUKTS ODER DAFÜR, DASS DAS
UNTERNEHMEN DAS PRODUKT FÜR EINEN BESTIMMTEN ZEITRAUM WEITERHIN ANBIETEN ODER ZUR VERFÜGUNG
STELLEN WIRD. DAS UNTERNEHMEN LEHNT AUSSERDEM ALLE GARANTIEN NACH DER OBEN GENANNTEN
AUSDRÜCKLICHEN GARANTIEZEIT AB.
SIE VERWENDEN DAS PRODUKT NACH EIGENEM ERMESSEN UND AUF EIGENE GEFAHR. SIE TRAGEN DIE ALLEINIGE
VERANTWORTUNG FÜR ALLE VERLUSTE, HAFTUNGEN ODER SCHÄDEN, DIE SICH AUS DER NUTZUNG DES
PRODUKTS ERGEBEN (UND DAS UNTERNEHMEN LEHNT DIESE AB). KEINE RATSCHLÄGE ODER INFORMATIONEN, OB
MÜNDLICH ODER SCHRIFTLICH, DIE SIE VON DER FIRMA ODER IHREN AUTORISIERTEN DIENSTLEISTERN ERHALTEN,
BEGRÜNDEN EINE GARANTIE.
IN KEINEM FALL ÜBERSTEIGT DIE GESAMTE KUMULATIVE HAFTUNG DES UNTERNEHMENS, DIE SICH AUS DEM
PRODUKT ERGIBT ODER DAMIT IN ZUSAMMENHANG STEHT, SEI ES AUS VERTRAG ODER UNERLAUBTER HANDLUNG
ODER AUS ANDEREN GRÜNDEN, DIE GEBÜHREN, DIE SIE IM LETZTEN JAHR AB IHREM KAUF TATSÄCHLICH AN DAS
UNTERNEHMEN ODER EINEN SEINER AUTORISIERTEN HÄNDLER FÜR DAS BETREFFENDE PRODUKT BEZAHLT HABEN.
DIESE EINSCHRÄNKUNG IST KUMULATIV UND WIRD DURCH MEHR ALS EINEN VORFALL ODER ANSPRUCH NICHT
ERHÖHT. DAS UNTERNEHMEN SCHLIESST JEGLICHE HAFTUNG SEINER LIZENZGEBER UND LIEFERANTEN AUS. IN
KEINEM FALL SIND DAS UNTERNEHMEN ODER SEINE LIZENZGEBER, HERSTELLER UND LIEFERANTEN HAFTBAR FÜR
ZUFÄLLIGE, DIREKTE, INDIREKTE, BESONDERE SCHÄDEN, STRAFSCHADENSERSATZ ODER FOLGESCHÄDEN (WIE Z.B.,
ABER NICHT BESCHRÄNKT AUF SCHÄDEN FÜR ENTGANGENEN GEWINN, GESCHÄFTSVERLUSTE, EINSPARUNGEN,
DATEN ODER AUFZEICHNUNGEN) DIE DURCH DIE VERWENDUNG, DEN MISSBRAUCH ODER DIE UNFÄHIGKEIT ZUR

DE | 121
Kodak stellt dieses Produkt NICHT her und bietet auch keine Garantie oder Unterstützung an.
www.kodakphotoplus.com
⚠WARNUNG: Dieses Produkt enthält Chemikalien, die dem Staat Kalifornien als krebserregend, geburtsschädigend oder
fortplanzungsgefährdend bekannt sind.
Die Marke, das Logo und die Aufmachung von Kodak werden unter Lizenz von Eastman Kodak Company verwendet.
GOOGLE PLAY ist eine Marke von GOOGLE LLC..
ANDROID TV ist eine Marke von GOOGLE LLC.
NETFLIX ist eine eingetragene Marke von NETFLIX, INC.
PRIME VIDEO ist eine Marke von Amazon Technologies, Inc.
YOUTUBE ist eine Marke von GOOGLE LLC.
APPLE, AIRPRINT, IPOD, IPHONE, IPAD, APP STORE, MAC, MACINTOSH und OS X sind Marken von APPLE INC. in den
U.S.A. und anderen Ländern.
BLUETOOTH ist eine Marke von BLUETOOTH SIG, Inc. USA.
Wi-Fi, WPA und WPA2 sind Marken der Wi-Fi Alliance in den USA und/oder anderen Ländern.
HDMI, das HDMILogo und High-Deinition Multimedia Interface sind Marken oder eingetragene Marken von HDMI
Licensing, LLC in den USA und/oder anderen Ländern.
Alle anderen Produkte, Markennamen, Firmennamen und Logos sind Warenzeichen der jeweiligen Eigentümer und
werden lediglich zur Identiizierung der jeweiligen Produkte verwendet und sind nicht als Sponsoring, Befürwortung oder
Genehmigung zu verstehen.
Vertrieben von C&A Marketing, Inc. 114 Tived Lane East, Edison, NJ 08837 USA. © 2023. C&A IP Holdings LLC. Alle Rechte
vorbehalten. Hergestellt in China.
VERWENDUNG DES PRODUKTS VERURSACHT WURDEN..
Keine Bestimmung dieser Bedingungen zielt darauf ab, eine Haftung auszuschließen, die nach geltendem Recht nicht
ausgeschlossen werden kann. In einigen Ländern, Staaten oder Provinzen ist der Ausschluss oder die Beschränkung von
Neben- oder Folgeschäden oder die Beschränkung von Garantien nicht zulässig, so dass bestimmte Beschränkungen
oder Ausschlüsse für Sie möglicherweise nicht gelten. Diese Garantie gibt Ihnen bestimmte Rechte, und Sie haben
möglicherweise weitere Rechte, die von Staat zu Staat oder Provinz zu Provinz variieren. Wenden Sie sich an Ihren
autorisierten Händler, um festzustellen, ob eine andere Garantie gilt.

122

IT | 123
INTRODUZIONE
Grazie per aver acquistato il Proiettore intelligente KODAK FLIK HD10. Questa Guida
per l’utente ha lo scopo di fornire le linee guida per garantire che il funzionamento
di questo prodotto sia sicuro e non comporti rischi per l’utente. Qualsiasi uso non
conforme alle linee guida descritte in questa Guida per l’utente può invalidare la
garanzia limitata.
egga attentamente tutte le indicazioni prima di utilizzare il prodotto e conservi
questa guida come riferimento. Questo prodotto è destinato esclusivamente all’uso
domestico. Non è destinato all’uso commerciale
Questo prodotto è coperto da una garanzia limitata di un anno. La copertura è
soggetta a limiti ed esclusioni. Per i dettagli, consulti la garanzia.

124 | IT
SPECIFICHE TECNICHE
Tipo di prodotto: Proiettore
Lunghezza del prodotto: 5,6”.
Larghezza del prodotto: 5,8”.
Altezza del prodotto: 7,4”.
Peso netto: 4,2 libbre.
Risoluzione nativa: 1920 x 1080p
Ingresso di alimentazione: 110 - 240 V, 50 - 60 Hz
22,4 A
Tensione nominale: AC 90 - 260 V, 50 - 60 MHz
Tecnologia di visualizzazione: pannello LCD TFT da
3,5 pollici
Lente: lente in vetro a 3 pezzi
Temperatura di colore: 8000K ± (1000K)
Luminosità: 200 ANSI lumen
Sorgente luminosa: LED 100 W
Durata della sorgente luminosa: 50.000 ore
Rapporto di contrasto: 2000:1
Rapporto d’aspetto: 16:9 & 4.3
Rapporto di proiezione: 1,37
Modalità di regolazione: Messa a fuoco manuale
Correzione trapezoidale: Correzione trapezoidale
automatica e correzione 4 correzione del nucleo
Uniformità: 90%
Suono di funzionamento della ventola: < 35 dB
Dimensioni dello schermo di proiezione: 60” - 150”
Distanza di proiezione: 39,4” - 157,5” (1 m - 4 m)
Modalità di ingresso immagine: Ingresso HDMI x 1,
ingresso USB x 1
Altoparlanti: Doppi altoparlanti da 5 watt
Uscita audio: 3,5 mm
Formato audio: Livelli audio MPEG 1, 2 e 3, MPEG4 Audio
AAC LC, AAC LC + SBR Livello 2, AAC 5.1, HE AAC
Livello 2 e Livello 4
Formato foto: HD JPEG, BMP, PNG
Formato USB: FAT, FAT32, NTFS, EXFAT
Formato video: Formato 4:3 e 16:9 480i, 480p, 576i,
576p, 720p, 1080i, 1080p24, 1080p30, 1080p60 HEVC
H.265 MPEG4, MP@ML, MP@HL proili AV1, VC1 / VP8
/ VP9 HDR10, HDR10+, HLG
Connettività: Bluetooth 4.2, Wi-Fi 2.4 GHz/5 GHz
Fonte di alimentazione necessaria: Sì
(alimentazione plug-in)
Installazione necessaria: No
È richiesto l’assemblaggio da parte di un adulto: No
Sono necessari altri strumenti: No
Paese di origine: Cina
Garanzia inclusa: Sì

IT | 125
CONTENUTO DELLA CONFEZIONE
MISURE DI SICUREZZA
• Proiettore intelligente KODAK FLIK HD10
• Cavo di alimentazione e adattatore CA
• Telecomando
• Cavo HDMI
• Guida Utente
• Non cerchi di smontare questo dispositivo per nessun motivo.
• Non conservi il proiettore in aree in cui sarà esposto a temperature elevate, umidità o
luce solare diretta. L’esposizione a uno o più di questi fattori potrebbe danneggiare il
proiettore in modo permanente.
• Non maneggiare mai il proiettore con le mani umide o bagnate. Ciò potrebbe
danneggiare il proiettore o creare il rischio di scosse elettriche.
• Tenga il proiettore fuori dalla portata dei bambini.
• Non punti mai il proiettore verso il viso di un’altra persona e non guardi direttamente
nella luce del proiettore. La luce è luminosa e potrebbe causare danni.
• Non utilizzi prodotti come alcol, benzina, diluenti o altri solventi organici quando
pulisce o tenta di pulire questo prodotto.
• Non utilizzi questo dispositivo in un ambiente in cui sia esposto a molta polvere o

126 | IT
umidità.
• Non faccia mai cadere o scuotere il proiettore, perché ciò potrebbe causare un
malfunzionamento o danneggiare in modo permanente le parti interne.
• Non utilizzi il proiettore durante il bagno o la doccia.
• Non collochi o conservi il proiettore in un luogo in cui possa cadere o essere
trascinato in una vasca o in un lavandino.
• Non metta, lasci cadere o immerga il proiettore nell’acqua o in qualsiasi altro liquido.
• Se il proiettore in qualche modo cade nell’acqua nonostante l’adozione di tutte le
precauzioni di cui sopra, non si immerga nell’acqua per recuperarlo. Lo scolleghi
immediatamente e poi lo recuperi.
• Faccia attenzione che oggetti e liquidi non cadano o si rovescino sul proiettore.
• Una manutenzione impropria può provocare lesioni o danni al dispositivo.
• Non eettuare da soli riparazioni al dispositivo. Fai riparare il tuo dispositivo solo da un
centro di assistenza autorizzato.
• Spegnere il dispositivo e rimuoverlo dall’alimentazione prima di pulire l’esterno.
Utilizzare un panno morbido e asciutto per pulire il dispositivo.
⚠WARNING: Attenzione: questo prodotto contiene sostanze chimiche note allo
Stato della California per causare cancro e difetti di nascita o altri danni riproduttivi.
Per maggiori informazioni: www.P65Warnings.ca.gov

IT | 127
PRODUCT OVERVIEW
Parte anteriore Indietro
1
2
3 8
4 5 6 7

128 | IT
In alto
9
10
1. Lente
2. Piedi
3. Ricevitore IR
4. Porta AC
5. Porta USB
6. Porta audio da 3,5 mm
7. Porta AV
8. Porta HDMI
9. Pulsante di accensione
10. Rotella per la messa a fuoco manuale.

IT | 129
VISTA DEL TELECOMANDO
1. Pulsante di accensione
2. Pulsante Segnalibro
3. Pulsante Assistente GOOGLE
4. Pulsante OK
5. Pulsante Indietro
6. Pulsante Mute
7. Pulsante di aumento del volume (+)
8. Pulsante di riduzione del volume (-)
9. Pulsante YOUTUBE
10. Pulsante PRIME VIDEO
11. Pulsante Impostazioni del proiettore
12. Pulsante impostazioni ANDROID TV
13. Pulsanti di navigazione
14. Pulsante TV
15. Pulsante Home
16. Pulsante Canale su (+)
17. Pulsante Canale giù (-)
18. Pulsante NETFLIX
19. Pulsante GOOGLE PLAY
111
212
3
413
514
615
716
817
918
10 19

130 | IT
INSTALLARE LE BATTERIE NEL TELECOMANDO
IMPOSTAZIONE DEL PROIETTORE
1. Prema verso il basso e faccia scivolare via il coperchio della batteria.
2. Inserisca le due (2) batterie AAA nel vano batterie.
3. Rimetta il coperchio del vano batterie sul telecomando.
1. Collochi il proiettore davanti a uno schermo di proiezione o a una parete adeguati.
2. Colleghi l’adattatore AC al cavo di alimentazione.
3. Quindi, colleghi il jack di alimentazione dell’adattatore CA al proiettore.
4. Colleghi la spina del cavo di alimentazione a una presa di corrente. L’indicatore LED sul
retro del posteriore del proiettore si accenderà di rosso.

IT | 131
ACCOPPIARE IL TELECOMANDO
IMPOSTAZIONE DI ANDROID TV SUL PROIETTORE
Accenda il proiettore e il telecomando si accoppierà automaticamente con il proiettore.
Per l’accoppiamento manuale, tenga premuti i pulsanti Indietro e Home
contemporaneamente per cinque (5) secondi. La luce del LED sul telecomando inizierà
a lampeggiare. Quando l’associazione è completa, la luce LED sul telecomando rimarrà
accesa senza lampeggiare. Dovrebbe ora vedere un segno di spunta blu sullo schermo.
Si ricordi di puntare sempre il telecomando verso il proiettore e non verso lo schermo.
Esistono due metodi per conigurare ANDROID TV sul suo proiettore:
Metodo 1: Impostazione con un telefono ANDROID
1. Quando il proiettore dice: “Conigurare rapidamente il proiettore con il telefono
ANDROID?”
usi il telecomando per scegliere “Continua” o “Sì”.
2. Apra l’applicazione GOOGLE sul suo telefono ANDROID.
3. Digiti o dica: “Imposta il mio dispositivo”.
4. Segua le istruzioni sul telefono ino a ottenere un codice. Inserisca il codice sul

132 | IT
proiettore.
“Metodo 2: Impostazione con il telecomando
1. Quando il proiettore dice: “Conigurare rapidamente il proiettore con il suo telefono
ANDROID?”
utilizzi il telecomando per scegliere “Salta”.
2. Quindi, apra le impostazioni di ANDROID TV™ premendo il pulsante Impostazioni
ANDROID TV™ sul telecomando.
3. Quindi, vada su Rete e selezioni la sua Rete Wi-Fi®.
4. Inserisca la password e attenda che il proiettore si colleghi alla sua rete.
5. Quindi vada su Account e selezioni Aggiungi Account.
6. Inserisca il suo indirizzo e-mail e confermi.
7. Inserisca la sua password e confermi.
Se l’accesso è riuscito, il suo indirizzo e-mail apparirà sotto l’opzione Account. Ora potrà
sarà ora in grado di utilizzare le applicazioni di ANDROID TV™”.

IT | 133
NAVIGAZIONE DEL PROIETTORE
IMPOSTAZIONI DEL PROIETTORE
Quando l’unità del proiettore viene accesa, il menu iniziale di ANDROID TV™ si carica
automaticamente. Il menu iniziale è il punto di partenza per tutte le operazioni con il
proiettore. Quando l’unità è accesa, il menu iniziale si carica automaticamente.
• Prema il pulsante Segnalibro per aggiungere o rimuovere contenuti dall’elenco
“Riproduzione successiva.
• Prema il pulsante Impostazioni ANDROID TV™ per visualizzare la barra laterale
delle impostazioni per opzioni come il nome del dispositivo, le opzioni dell’account, la
connessione di rete e altro ancora.
• Prema il pulsante Home per tornare al menu iniziale in qualsiasi momento,
• Premere il pulsante TV per uscire dalla inestra pop-up delle impostazioni.
Prema il pulsante Impostazioni del proiettore per visualizzare la inestra
pop-up delle impostazioni. Le inestre pop-up delle impostazioni mostrano le
opzioni di segnale, visualizzazione, suono e sistema.
Segnale: Si sposti su questa icona e prema il pulsante OK per selezionarla.
In questo modo accederà alla inestra Segnale, dove potrà selezionare una
sorgente di ingresso.
Display: Si sposti su questa icona e prema il pulsante OK per selezionarla.
Accederà alla inestra Display, dove potrà regolare le impostazioni del

134 | IT
display, come la modalità di proiezione e il keystone automatico.
Suono: Si sposti su questa icona e prema il pulsante OK per selezionarla. In questo
modo accederà alla inestra Suono, dove potrà regolare le impostazioni audio, come la
modalità e il canale audio.
Sistema: Si sposti su questa icona e prema il pulsante OK per selezionarla. Accederà
alla inestra Sistema, dove potrà regolare le impostazioni del proiettore, come la lingua, il
timer e altro ancora.
FINESTRA SEGNALE
Verrà visualizzata la sorgente di ingresso. Si sposti sull’ingresso che desidera selezionare
e prema il pulsante OK per confermare.
FINESTRA DI VISUALIZZAZIONE
Verranno visualizzate le impostazioni del display. Si sposti sull’opzione di impostazione
che desidera modiicare e prema il pulsante OK per confermare la selezione.

IT | 135
Keystone manuale – Regola manualmente il keystone.
Trapezio automatico – Attiva o disattiva il trapezio automatico.
Modalità di proiezione – Selezioni tra proiezione frontale, proiezione frontale a soitto,
proiezione frontale posteriore o proiezione posteriore a soitto.
• Frontale: Il proiettore è posizionato su un tavolo davanti allo schermo. Questo è
il modo più comune di posizionare il proiettore per una rapida conigurazione e
portabilità.
• Frontale a soitto: Il proiettore è sospeso a testa in giù davanti allo schermo. È
necessario un kit di montaggio a soitto/muro (non incluso).
• Posteriore: Il proiettore viene posizionato su un tavolo dietro lo schermo. È necessario
uno speciale schermo per proiettore posteriore (non incluso).
• Soitto posteriore: Il proiettore è sospeso a testa in giù dietro lo schermo. Sono
necessari uno speciale schermo per proiettore posteriore e un kit di montaggio a
soitto/muro (non inclusi).
NOTES:
Per un maggiore controllo sull’altezza del proiettore, può posizionarlo su un treppiede

136 | IT
(venduto separatamente).
La distanza tra l’obiettivo del proiettore e lo schermo determina le dimensioni dello
schermo del proiettore.
.
Rapporto di proiezione – Seleziona o regola il rapporto di aspetto.
Modalità Immagine – Seleziona la modalità immagine della proiezione o personalizza
per regolare impostazioni speciiche.
FINESTRA SUONO
Verranno visualizzate le impostazioni audio. Si sposti sull’opzione di impostazione che
desidera modiicare e prema il pulsante OK per confermare la selezione.
Modalità audio – Selezioni tra standard, musica, ilm o utente.

IT | 137
Canale audio – Selezioni tra le opzioni Canale di ritorno audio (ARC) o TV.
Tono tattile – Attiva o disattiva il tono tattile.
FINESTRA SISTEMA
Verranno visualizzate le impostazioni del sistema. Si sposti sull’opzione di impostazione
che desidera modiicare e prema il pulsante OK per confermare la selezione.
Lingua – Selezioni una delle lingue multiple da utilizzare per il proiettore.

138 | IT
Menu Exit – Selezionare un’impostazione temporale del menu di uscita.
Informazioni sul sistem – Visualizza le informazioni sul sistema..
Posizione inestra – Regola la posizione della inestra.
Tempo di spegnimento – Imposta un timer per stabilire quando il proiettore si
spegnerà.
Reset di fabbrica – Ripristina il proiettore alle impostazioni di fabbrica predeinite.

IT | 139
IMPOSTARE IL TELECOMANDO SUL SUO TELEFONO
PROIETTI IL CONTENUTO DAL SUO DISPOSITIVO AL PROIETTORE
1. Apra l’applicazione GOOGLE TV sul suo telefono ANDROID.
2. Tocca “Telecomando”. Quindi, tocchi “Scansione dei dispositivi”.
3. Scelga il suo dispositivo.
4. Per completare l’associazione, segua le istruzioni sul telefono e sul proiettore.
5. Dopo l’accoppiamento, può utilizzare il telefono come telecomando del proiettore o
utilizzare il telecomando incluso. telecomando in dotazione.
1. Colleghi il suo dispositivo (es. telefono, tablet o computer portatile) alla stessa rete Wi-
Fi® del proiettore.
2. Apra un’applicazione abilitata a CHROMECAST che contiene i contenuti che desidera
proiettare.
3. Nell’app, trovi e selezioni “Cast”.
4. Sul suo dispositivo, selezioni il nome del suo proiettore.
5. Quando il simbolo Cast cambia colore, la connessione è avvenuta con successo.

140 | IT
EFFETTUI IL MIRRORING O LO STREAMING DI VIDEO DAI
SUOI DISPOSITIVI IOS AL PROIETTORE
Per prima cosa, dovrà installare AirPlay sul suo proiettore. Installi l’applicazione AirScreen
da GOOGLE PLAY per abilitare AirPlay sul suo proiettore. Una volta completata
l’operazione, segua questi passaggi per eseguire il mirroring o lo streaming video dal suo
dispositivo iOS.
Screen Mirroring da IPHONE o IPAD:
1. Si assicuri che il dispositivo iOS e il proiettore siano sulla stessa rete Wi-Fi®. Anche
l’hotspot del telefono è accettabile.
2. Scorra il dito verso il basso sulla schermata iniziale del telefono per visualizzare la
console di controllo e tocchi l’icona AirPlay.
3. Selezioni il dispositivo su cui desidera eettuare il cast.
Screen Mirroring da MAC:
1. Si assicuri che il MAC e il proiettore siano sulla stessa rete Wi-Fi®. Anche l’hotspot del
suo telefono è accettabile.
2. Clicchi sull’icona AirPlay sul MAC e selezioni il proiettore per avviare il mirroring. L’icona
AirPlay nella barra dei menu diventa blu quando AirPlay è attivo.
3. Per interrompere il mirroring, clicchi nuovamente sull’icona AirPlay e poi selezioni
“Disattiva AirPlay”.
Nota: per MACBOOK AIR, MACBOOK PRO e IMAC, l’icona AirPlay sarà visualizzata nella
barra dei menu solo quando è disponibile il mirroring AirPlay.
Streaming video da IPHONE o IPAD:

IT | 141
1. Si assicuri che il dispositivo iOS e il proiettore siano sulla stessa rete Wi-Fi®. Anche
l’hotspot del telefono è accettabile.
2. Apra le applicazioni di streaming che desidera proiettare sul proiettore e selezioni un
video da riprodurre
3. Clicchi sulle icone AirPlay o cast nell’angolo in alto a destra per eseguire il cast sul
proiettore.
NOTA: Tenga presente che i contenuti protetti da copyright di HULU, NETFLIX e altri servizi simili NON
POSSONO essere riprodotti in mirroring o screencast. Per visualizzare i contenuti protetti da copyright di
questi servizi, scarichi e utilizzi le applicazioni uiciali direttamente attraverso il proiettore.
ACCOPPIAMENTO DI DISPOSITIVI ESTERNI VIA BLUE-
REGOLAZIONE DELLA MESSA A FUOCO
Le cuie o gli altoparlanti esterni possono essere accoppiati al proiettore tramite
BLUETOOTH®. Segua questi passaggi per collegare le cuie o gli altoparlanti
BLUETOOTH ®:
1. Innanzitutto, apra le impostazioni di ANDROID TV™ premendo il pulsante Impostazioni
ANDROID TV™ sul telecomando.
2. Quindi, selezioni “Telecomando e accessori” e poi “Aggiungi accessorio”.
3. Attivi la modalità di accoppiamento sul dispositivo che desidera collegare.
4. Selezioni il dispositivo che desidera collegare dall’elenco.
5. Attenda che i due dispositivi si accoppino con successo.
Se l’immagine sullo schermo appare sfocata o non messa a fuoco quando accende
il proiettore, utilizzi la rotella di messa a fuoco sulla parte superiore per correggere

142 | IT
ASSISTENTE GOOGLE
COLLEGAMENTO DI DISPOSITIVI ESTERNI
Con GOOGLE ASSISTANT, può navigare tra le app e i servizi di streaming utilizzando la
voce.
1. Prema il pulsante Assistente GOOGLE per attivare l’assistente virtuale a comando
vocale di GOOGLE.
2. Sullo schermo di proiezione, apparirà un’introduzione. Segua i passaggi per
completare la conigurazione. Una volta conigurato l’Assistente, prema il pulsante
Assistente GOOGLE per porre la sua domanda o per dare un comando
Unità USB
Per accedere a foto, video o musica memorizzati su qualsiasi unità USB, è suiciente
inserire il dispositivo di archiviazione rimovibile nella porta corrispondente sul retro del
proiettore. Apparirà una inestra pop-up di File Commander che le chiederà se desidera
accedere al dispositivo di archiviazione collegato. Selezioni “OK” e sfogli il programma
File Commander per trovare i video e le foto sul dispositivo di archiviazione.
l’immagine. Sposti la rotella a sinistra o a destra inché l’immagine non appare nitida e
chiara.
NOTA: per ottenere le migliori prestazioni, il proiettore deve essere collocato ad una
distanza minima di 1 metro dallo schermo.

IT | 143
Dispositivi compatibili HDMI
Quando utilizza un dispositivo compatibile HDMI, come un computer portatile, un
personal computer, uno smartphone, un tablet o una console per videogiochi, colleghi
un cavo HDMI dal dispositivo al proiettore per accedere a foto, video o musica. Quindi,
prema il pulsante Impostazioni del proiettore e alla voce Segnale”, selezioni “HDMI”. Per
alcuni dispositivi, è necessario un cavo HDMIHDMI e/o adattatori, che dovrà acquistare
separatamente. Per comodità, abbiamo compilato questa tabella di dispositivi e
adattatori necessari per i formati speciici dei dispositivi.
Dispositivo Additional Cable or Adapter Needed
1 Dispositivi con porta
HDMI Cavo HDMI a HDMI
2 Dispositivi con porta
mini-HDMI Adattatore da mini-HDMI a HDMI - Cavo da
HDMI a HDMI
3 Dispositivi con porta
micro-HDMI Adattatore da micro-HDMI a HDMI - Cavo da
HDMI a HDMI
4 Dispositivi iOS con porta
Lightning Adattatore AV digitale Lightning - Cavo da
HDMI a HDMI
5 Dispositivi iOS con porta
USBC Adattatore AV digitale USBC multiporta -
Cavo da HDMI a HDMI
6 Dispositivi con porta
USBC Adattatore da USBC a HDMI - Cavo da HDMI
a HDMI
7 Dispositivi con porta
USBC Cavo USBC a HDMI

144 | IT
RISOLUZIONE DEI PROBLEMI
Se non riesce a riprodurre i suoi ilm, programmi TV o musica di GOOGLE PLAY sullo
schermo di ANDROID TV™, ecco alcune soluzioni di risoluzione dei problemi che può
provare:
Controllare la connessione Wi-Fi
1. Dal menu iniziale di ANDROID TV™, prema il pulsante Impostazioni di ANDROID TV™.
2. Sotto “Rete”, selezioni una rete.
3. Segua le istruzioni sullo schermo.
4. Apra una delle sue applicazioni.
5. Riproduca il video, la musica o il gioco.
Assicurarsi che il suo sistema sia aggiornato
1. Dal menu iniziale di ANDROID TV™, prema il pulsante Impostazioni di ANDROID TV™.
2. Selezioni “Informazioni”. Quindi, vada a “Aggiornamento software del sistema” e
selezioni “Aggiornamento software”.
3. Installi gli aggiornamenti disponibili, quindi riproduca il video, la musica o il gioco..
Riavviare il dispositivo
1. Dal menu iniziale di ANDROID TV™, prema il pulsante Impostazioni di ANDROID TV™.
2. Selezioni “Informazioni” e poi “Riavvia”.
3. Una volta riavviato il sistema, riproduca il video, la musica o il gioco.

IT | 145
Veriicare quale conto sta utilizzando
1. Dal menu iniziale di ANDROID TV™, prema il pulsante Impostazioni di ANDROID TV™.
2. Alla voce “Account”, veriichi di aver eettuato l’accesso al suo account ANDROID TV™.
Sincronizzare il suo account
1. Dal menu iniziale di ANDROID TV™, prema il pulsante Impostazioni di ANDROID TV™.
2. Sotto “Account”, selezioni il suo account.
3. Quindi, selezioni “Sincronizza ora”.
4. Riproduca il video, la musica o il gioco
Clear your App Data & Cache
1. Dal menu iniziale di ANDROID TV™, prema il pulsante Impostazioni di ANDROID TV™.
2. Selezioni “Applicazioni”.
3. Sotto “App di sistema”, selezioni l’app, vada su “Cancella dati” e confermi “Cancella
cache”.
4. Riproduca il video, la musica o il gioco.
L’interfaccia di ANDROID TV™ su questo schermo proiettore sarà inutilizzabile se
il telecomando smette di funzionare. Ecco alcune possibili soluzioni per riparare il
telecomando:
• Controlli le batterie. Sostituisca le batterie e veriichi se il telecomando è operativo con le nuove batterie.
• Il telecomando potrebbe non essere accoppiato al proiettore. Per accoppiare il telecomando, tenga premuti
contemporaneamente i pulsanti Indietro e Home per cinque (5) secondi.
• Il LED sul telecomando inizierà a lampeggiare. Una volta completata l’associazione, la luce del LED sul
telecomando rimarrà accesa senza lampeggiare.
• - Potrebbe esserci un problema nell’hardware del telecomando. Chiami il servizio clienti per richiedere un
telecomando sostitutivo

146 | IT
DOMANDE FREQUENTI
Posso caricare in sideload le applicazioni Android sul proiettore?
Sì, è possibile. Si noti che ci sono più di 7.000 applicazioni native su GOOGLE PLAY che
può scaricare direttamente sul proiettore. Per le app non disponibili su GOOGLE PLAY,
scarichi il ile APK e lo installi su un’unità USB. Si assicuri che l’applicazione File Explorer
sia installata sul proiettore, in modo che l’unità USB venga riconosciuta.
Cosa devo fare se il mio HDMI non ha segnale?
1. Utilizzi un altro cavo HDMI.
2. Colleghi il proiettore con un altro dispositivo con il suo cavo HDMI.
3. Si scolleghi dal proiettore e provi a collegare il suo dispositivo alla TV tramite HDMI.
4. Regoli la risoluzione/Hz dell’uscita HDMI del dispositivo collegato in modo che
corrisponda al suo televisore.
Come si collegano gli altoparlanti esterni al proiettore?
Questo proiettore può essere collegato anche a dispositivi di uscita audio esterni, tra cui
cuie e altoparlanti; quando è collegato ad altoparlanti esterni, il sistema di altoparlanti
incorporato viene disabilitato.
sistema di altoparlanti incorporato viene disattivato. Per collegare gli altoparlanti esterni:
1. Utilizzi un cavo audio da 3,5 mm o un adattatore (non fornito) per collegare le cuie o
l’altoparlante esterno.
2. Colleghi l’altra estremità del cavo audio alla porta AUX del proiettore.
Per gli altoparlanti BLUETOOTH, vada su Impostazioni, poi su Telecomando e accessori e
selezioni Aggiungi accessorio

IT | 147
Come faccio a riprodurre i video senza Wi-Fi®?
1. Scarichi i video su un’unità USB.
2. Installi l’applicazione File Explorer dal GOOGLE PLAY Store sul proiettore.
3. Installi un’applicazione di media player come VLC o KODI.
4. Colleghi l’unità USB al proiettore per riprodurre i suoi video.
Quale capacità di unità USB supporta il proiettore?
Il proiettore supporta unità USB con capacità pari o inferiore a 128 GB e contenuti a
1080p @ 60 Hz.
Il formato del disco deve essere NTFS, FAT o FAT32.
*Il formato supporta:
- Documenti: .txt
- Foto: JPG (.jpg, .jpeg), PNG (.png), BMP (.bmp)
- Musica: MP3 (.mp3), AAC (.aac)
- Video: AV1, XVID (.avi), MPEG4 (3gp, mp4), H.263 (3g2, .avi, .mkv, .webm, 3gp, mp4)
Come faccio a riprodurre i ilmati dalla mia USB con il proiettore?
1. Scarichi l’applicazione File Commander da GOOGLE PLAY.
2. Inserisca il dispositivo di archiviazione USB nel proiettore.
3. Selezioni la musica, i video 1080p o le foto dall’unità USB che desidera riprodurre.
4. Li apra con un’applicazione di riproduzione multimediale come VLC o KODI. Se non
dispone di un’applicazione, ne scarichi una da GOOGLE PLAY

148 | IT
SERVIZIO CLIENTI
In caso di problemi con il prodotto, la preghiamo di contattarci prima di restituire
l’articolo al luogo di acquisto. Siamo qui per aiutarla! Assistenza negli Stati Uniti:
kodak@camarketing.com, 8445161539
Assistenza internazionale: kodakintl@camarketing.com, 8445161540.

IT | 149
GARANZIA LIMITATA AL CONSUMATORE ORIGINALE
Questo proiettore intelligente KODAK FLIK HD10 (“Prodotto”), compresi gli accessori inclusi nella confezione originale,
come fornito e distribuito nuovo da un rivenditore autorizzato, è garantito da C&A Marketing, Inc. (la “Società”) solo
all’acquirente consumatore originale, contro determinati difetti di materiale e di lavorazione (“Garanzia”) come segue:
Per ricevere il servizio di Garanzia, l’acquirente originale deve contattare l’Azienda o il suo fornitore di servizi autorizzato per
la determinazione del problema e le procedure di assistenza. La prova di acquisto sotto forma di fattura di vendita o fattura
quietanzata, che attesti che il Prodotto rientra nel periodo o nei periodi di Garanzia applicabili, DEVE essere presentata alla
Società o al suo fornitore di servizi autorizzato per ottenere la Garanzia. fornitore di servizi autorizzato al ine di ottenere il
servizio richiesto.
Le opzioni di assistenza, la disponibilità dei ricambi e i tempi di risposta possono variare e possono cambiare in qualsiasi
momento. In conformità alla legge applicabile, l’Azienda può richiedere che lei fornisca ulteriori documenti e/o che
soddisi i requisiti di registrazione prima di ricevere l’assistenza in garanzia.prima di ricevere l’assistenza in garanzia. Per
maggiori dettagli sull’ottenimento dell’assistenza in garanzia, contatti il nostro servizio clienti.garanzia:
USA: kodak@camarketing.com, 8445161539
Internazionale: kodakintl@camarketing.com, +18445161540
Le spese di spedizione alla Struttura di restituzione dell’Azienda non sono coperte da questa garanzia e devono essere
pagate dal consumatore. Il consumatore si assume anche tutti i rischi di perdita o di ulteriore danneggiamento del
Prodotto ino alla consegna a tale struttura.
ESCLUSIONI E LIMITAZIONI
La Società garantisce il Prodotto contro i difetti di materiali e di lavorazione in condizioni di uso normale per un periodo di
UN (1) ANNO dalla data di acquisto al dettaglio da parte dell’acquirente inale originale (“Periodo di garanzia”). Se si veriica
un difetto hardware e viene ricevuto un reclamo valido entro il Periodo di Garanzia, la Società, a sua esclusiva discrezione
e nella misura consentita dalla legge, provvederà a (1) riparare gratuitamente il difetto del Prodotto, utilizzando parti di
ricambio nuove o ricondizionate, (2) sostituire il Prodotto con un Prodotto nuovo o fabbricato con parti nuove o usate
riparabili e almeno funzionalmente equivalente al dispositivo originale, oppure (3) rimborsare il prezzo di acquisto del
Prodotto.
Prodotto originale per il resto del Periodo di garanzia, o per novanta (90) giorni dalla data di sostituzione o riparazione, a
seconda di quale sia il periodo di protezione più lungo. Quando un Prodotto o una parte viene sostituita, qualsiasi articolo
sostitutivo diventa di sua proprietà, mentre l’articolo sostituito diventa di proprietà dell’Azienda. proprietà dell’Azienda. I
rimborsi possono essere eettuati solo se il Prodotto originale viene restituito.
La presente Garanzia non si applica a:
(a) Qualsiasi prodotto, hardware o software non KODAK FLIK HD10 Smart Projector, anche se confezionato o venduto con
il Prodotto;
(b) Danni causati dall’uso con prodotti non KODAK FLIK HD10 Smart Projector;

150 | IT
(c) danni causati da incidenti, abusi, uso improprio, inondazioni, incendi, terremoti o altre cause esterne;
(d) Danni causati dall’utilizzo del Prodotto al di fuori degli usi consentiti o previsti descritti dalla Società;
(e) danni causati da servizi di terzi;
(f) Un Prodotto o una parte che sia stata modiicata per alterare la funzionalità o la capacità senza l’autorizzazione scritta
della Società;
(g) Parti consumabili, come batterie, fusibili e lampadine;
(h) Danni estetici; o
(i) se il numero di serie del Proiettore intelligente KODAK FLIK HD10 è stato rimosso o cancellato.
La presente Garanzia è valida solo nel Paese in cui il consumatore ha acquistato il Prodotto e si applica solo ai Prodotti
acquistati e sottoposti a manutenzione in tale Paese. La Società non garantisce che il funzionamento del Prodotto sia
ininterrotto o privo di errori. L’Azienda non è responsabile per i danni derivanti dalla mancata osservanza delle istruzioni
relative al suo utilizzo.
NONOSTANTE QUALSIASI DISPOSIZIONE CONTRARIA E NELLA MISURA MASSIMA CONSENTITA DALLA LEGGE
APPLICABILE, LA SOCIETÀ FORNISCE IL PRODOTTO “COSÌ COM’È”. E “COME DISPONIBILE” PER COMODITÀ
DELL’UTENTE E L’AZIENDA E I SUOI LICENZIATARI E FORNITORI DECLINANO ESPRESSAMENTE TUTTE LE GARANZIE E LE
CONDIZIONI, SIANO ESSE ESPRESSE, IMPLICITE O DI LEGGE, INCLUSE LE GARANZIE DI COMMERCIABILITÀ, IDONEITÀ
PER UNO SCOPO PARTICOLARE, TITOLO, TRANQUILLO GODIMENTO, ACCURATEZZA E NON VIOLAZIONE DI DIRITTI
DI TERZI. L’AZIENDA NON GARANTISCE ALCUN RISULTATO SPECIFICO DERIVANTE DALL’USO DEL PRODOTTO, NÉ
CHE L’AZIENDA CONTINUERÀ A OFFRIRE O RENDERE DISPONIBILE IL PRODOTTO PER UN DETERMINATO PERIODO
DI TEMPO. L’AZIENDA DECLINA INOLTRE TUTTE LE GARANZIE DOPO IL PERIODO DI GARANZIA ESPLICITA SOPRA
INDICATO.
LEI UTILIZZA IL PRODOTTO A SUA DISCREZIONE E A SUO RISCHIO. LEI SARÀ L’UNICO RESPONSABILE DI (E L’AZIENDA
DECLINA) QUALSIASI PERDITA, RESPONSABILITÀ O DANNO DERIVANTE DALL’USO DEL PRODOTTO. NESSUN
CONSIGLIO O INFORMAZIONE, ORALE O SCRITTA, OTTENUTA DALL’AZIENDA O ATTRAVERSO I SUOI FORNITORI DI
SERVIZI AUTORIZZATI, CREERÀ ALCUNA GARANZIA.
IN NESSUN CASO LA RESPONSABILITÀ TOTALE CUMULATIVA DELL’AZIENDA DERIVANTE DA O CORRELATA AL
PRODOTTO, SIA PER CONTRATTO CHE PER ILLECITO O ALTRO, SUPERERÀ LE TARIFFE EFFETTIVAMENTE PAGATE
DA LEI ALL’AZIENDA O A UNO DEI SUOI RIVENDITORI AUTORIZZATI PER IL PRODOTTO IN QUESTIONE NELL’ULTIMO
ANNO DALL’ACQUISTO. QUESTA LIMITAZIONE È CUMULATIVA E NON SARÀ AUMENTATA DALL’ESISTENZA DI
PIÙ DI UN INCIDENTE O RECLAMO. L’AZIENDA DECLINA OGNI RESPONSABILITÀ DI QUALSIASI TIPO DEI SUOI
LICENZIATARI E FORNITORI. IN NESSUN CASO L’AZIENDA O I SUOI LICENZIATARI, PRODUTTORI E FORNITORI SARANNO
RESPONSABILI DI DANNI INCIDENTALI, DIRETTI, INDIRETTI, SPECIALI, PUNITIVI O CONSEQUENZIALI (QUALI, A TITOLO
ESEMPLIFICATIVO MA NON ESAUSTIVO, DANNI PER PERDITA DI PROFITTI, AFFARI, RISPARMI, DATI O REGISTRAZIONI)
CAUSATI DALL’USO, DALL’ABUSO O DALL’IMPOSSIBILITÀ DI UTILIZZARE IL PRODOTTO.
Nulla in questi termini cercherà di escludere la responsabilità che non può essere esclusa ai sensi della legge applicabile.
Alcuni Paesi, Stati o province non consentono l’esclusione o la limitazione dei danni incidentali o consequenziali, né
consentono limitazioni delle garanzie, pertanto alcune limitazioni o esclusioni potrebbero non essere applicabili a lei.
Questa garanzia le conferisce diritti legali speciici e potrebbe avere altri diritti che variano da stato a stato o da provincia a
provincia. Si rivolga al rivenditore autorizzato per determinare se si applica un’altra garanzia.

IT | 151
Kodak NON produce questo Prodotto e non fornisce alcuna garanzia o assistenza.
www.kodakphotoplus.com
⚠Attenzione: questo prodotto contiene sostanze chimiche note allo Stato della California per causare cancro e difetti di
nascita o altri danni riproduttivi.
Il marchio, il logo e la veste commerciale Kodak sono utilizzati su licenza di Eastman Kodak Company.
GOOGLE PLAY è un marchio di GOOGLE LLC.
ANDROID TV è un marchio di GOOGLE LLC.
NETFLIX è un marchio registrato di NETFLIX, Inc.
PRIME VIDEO è un marchio di AMAZON TECHNOLOGIES, INC.
YOUTUBE è un marchio di GOOGLE LLC.
APPLE, AIRPRINT, IPOD, IPHONE, IPAD, APP STORE, MAC, MACINTOSH e OS X sono marchi di APPLE Inc. negli Stati Uniti e
in altri Paesi.
BLUETOOTH è un marchio di BLUETOOTH SIG, Inc. USA.
Wi-Fi, WPA e WPA2 sono marchi di Wi-Fi Alliance negli Stati Uniti e/o in altri Paesi.
HDMI, il logo HDMI e High-Deinition Multimedia Interface sono marchi o marchi registrati di HDMI Licensing, LLC negli
Stati Uniti e/o in altri Paesi.
Tutti gli altri prodotti, nomi di marchi, nomi di aziende e loghi sono marchi dei rispettivi proprietari, utilizzati solo per
identiicare i rispettivi prodotti e non sono intesi come sponsorizzazioni, avalli o approvazioni.
Distribuito da C&A Marketing, Inc., 114 Tived Lane East, Edison, NJ 08837 USA. © 2023. C&A IP Holdings LLC. Tutti i diritti
riservati. Prodotto in Cina.

152 | EN
-
 1
1
-
 2
2
-
 3
3
-
 4
4
-
 5
5
-
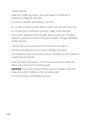 6
6
-
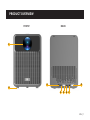 7
7
-
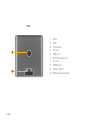 8
8
-
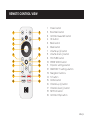 9
9
-
 10
10
-
 11
11
-
 12
12
-
 13
13
-
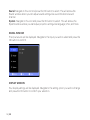 14
14
-
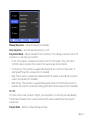 15
15
-
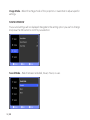 16
16
-
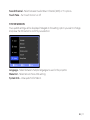 17
17
-
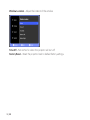 18
18
-
 19
19
-
 20
20
-
 21
21
-
 22
22
-
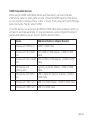 23
23
-
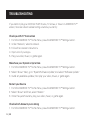 24
24
-
 25
25
-
 26
26
-
 27
27
-
 28
28
-
 29
29
-
 30
30
-
 31
31
-
 32
32
-
 33
33
-
 34
34
-
 35
35
-
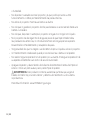 36
36
-
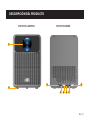 37
37
-
 38
38
-
 39
39
-
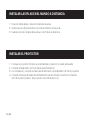 40
40
-
 41
41
-
 42
42
-
 43
43
-
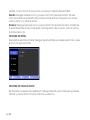 44
44
-
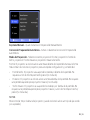 45
45
-
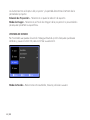 46
46
-
 47
47
-
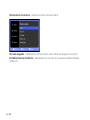 48
48
-
 49
49
-
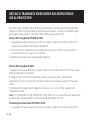 50
50
-
 51
51
-
 52
52
-
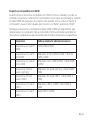 53
53
-
 54
54
-
 55
55
-
 56
56
-
 57
57
-
 58
58
-
 59
59
-
 60
60
-
 61
61
-
 62
62
-
 63
63
-
 64
64
-
 65
65
-
 66
66
-
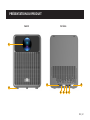 67
67
-
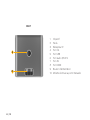 68
68
-
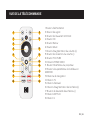 69
69
-
 70
70
-
 71
71
-
 72
72
-
 73
73
-
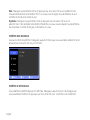 74
74
-
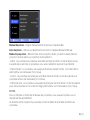 75
75
-
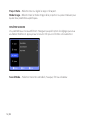 76
76
-
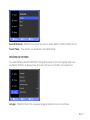 77
77
-
 78
78
-
 79
79
-
 80
80
-
 81
81
-
 82
82
-
 83
83
-
 84
84
-
 85
85
-
 86
86
-
 87
87
-
 88
88
-
 89
89
-
 90
90
-
 91
91
-
 92
92
-
 93
93
-
 94
94
-
 95
95
-
 96
96
-
 97
97
-
 98
98
-
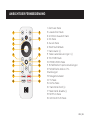 99
99
-
 100
100
-
 101
101
-
 102
102
-
 103
103
-
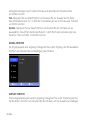 104
104
-
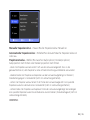 105
105
-
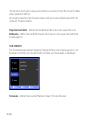 106
106
-
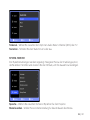 107
107
-
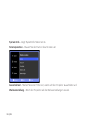 108
108
-
 109
109
-
 110
110
-
 111
111
-
 112
112
-
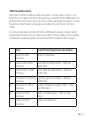 113
113
-
 114
114
-
 115
115
-
 116
116
-
 117
117
-
 118
118
-
 119
119
-
 120
120
-
 121
121
-
 122
122
-
 123
123
-
 124
124
-
 125
125
-
 126
126
-
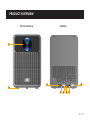 127
127
-
 128
128
-
 129
129
-
 130
130
-
 131
131
-
 132
132
-
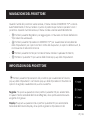 133
133
-
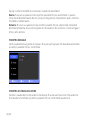 134
134
-
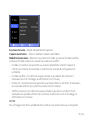 135
135
-
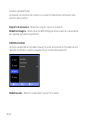 136
136
-
 137
137
-
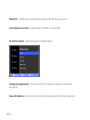 138
138
-
 139
139
-
 140
140
-
 141
141
-
 142
142
-
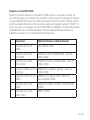 143
143
-
 144
144
-
 145
145
-
 146
146
-
 147
147
-
 148
148
-
 149
149
-
 150
150
-
 151
151
-
 152
152


Kodak FLIK HD10 Manual de usuario
- Categoría
- Proyectores
- Tipo
- Manual de usuario
en otros idiomas
- français: Kodak FLIK HD10 Manuel utilisateur
- italiano: Kodak FLIK HD10 Manuale utente
- English: Kodak FLIK HD10 User manual
- Deutsch: Kodak FLIK HD10 Benutzerhandbuch