LG LDF9810ST El manual del propietario
- Categoría
- Lavaplatos
- Tipo
- El manual del propietario

1-800-243-0000
24 HOURS A DAY, 7 DAYS A WEEK FOR LG CUSTOMER SERVICE
Dishwasher
MODEL :LDF9810ST/LDF9810WW/LDF9810BB
carefully. It provides
ation, use and maintenance.
of your machine
dealer if your machine
dealer,
)r service assistance, call
7 days per week) and choose
and have your product type,
ld ZIP code; or visit our web site
gservice.com
i¸i

• Ultra Large Capacity
If you raise the upper rack, you can load large dishes (Max. 14 in.) in the lower
rack. The tall tub provides the clearance to handle large dishes as welt as
overall large capacity. LG dishwashers let you load very large items in the
upper and lower racks.
• Removable Cutlery Rack
Third level cutlery rack makes it easy to load and unload flatware and cooking
utensils.
Trays can be adjusted or removed to make more room for regular upper rack
items.
• Slim Direct Motor TM
The new Slim Direct Motor TMis inverter-controlled. Wash power is controlled
based on program selection. It also offers high energy efficiency to minimize
energy use.
• Hybrid Drying System
This is one of the best performance solutions for drying dishes because it
Dry minimizes venting humid air to the outside of the dishwasher. In addition, this
A_r system ensures better drying results compared to the condensing drying
system while minimizing energy consumption.
Mixed
Air
• Vario Spray System
to
• Self-Cleaning Filter
.o Soil Sensor
_Mesh
Because the water spray is alternated between the upper and lower
racks, all the power from the motor is directed to only one rack at a time which
allows superior performance and reduced consumption of water and
electricity.
For best wash results, the self-cleaning filter system continuously cleans the
water as it circulates. Your LG dishwasher has a self-cleaning filter that grinds
food into small particles before it goes down the drain.

• Dual Intensity TMWash Cycle
The spray intensity of the upper and lower racks is programmable by the
consumer. You can select wash power based on soil level. For example, by
selecting Soft Spray for the upper rack and Strong Spray for the lower rack,
you can wash delicate items like stemware on the upper rack
while washing pots and pans on the lower rack.
• Steam Washing and Steam Delicate TM
Adding STEAM to the wash cycles enhances wash performance with very little
additional water or energy consumption. The SteamDelicate TMcycle can be
used for cleaning delicate item such as china or stem ware.
Light Touch Buttons and Blue LCD
The light touch buttons on the control panel make selections easy and
convenient, while the blue LCD display clearly displays the selected cycle and
options.
PART 1. IMPORTANT SAFETY INSTRUCTIONS ............................................................... 4~8
PART 2. PARTS OF YOUR DISHWASHER ............................................................................. 9
OPERATING INSTRUCTIONS
PART 3. FUNCTIONS OF CONTROL PANEL ................................................................. 10~11
PART 4. PROGRAM ................................................................................................................ 12
PART 5. USING YOUR DISHWASHER ............................................................................. 13~18
PART 6. CARE AND MAINTENANCE .................................................................................... 19
PART 7. OPERATING SEQUENCE ........................................................................................ 20
PART 8. TROUBLESHOOTING ............................................................................................. 21
ii i ii ii ii ii ii ii ii

READ ALL INSTRUCTIONS BEFORE USE
Your safety and the safety of others is very important.
We have provided many important safety messages in this manual and on
your appliance. Always read and obey all safety messages.
This is the safety alert symbol.
This symbol alerts you to potential hazards that can killor hurt you and others.
All safety messages will follow the safety alert symbol and either the word DANGER or WARNING.
These words mean:
You can be killed or seriously injured ifyou don't immediately follow
instructions.
You can be killed or seriously injured ifyou don't follow instructions.
All safety messages will tell you what the potential hazard is, tell you how the reduce the chance of injury, and
tell you what can happen ifthe instructions are not followed.
WARNING TipOver Hazard
Do not put excessive downward force on the open door prior to installation as this could cause damage to
the unit or cause it to tip over. The dishwasher should not be used before installation has been completed
in accordance with the instructions in the installation manual.
WARNING Electrical Shock Hazard
Not following these instructions can result in death, fire, or electrical shock.
The dishwasher MUST be grounded.
Connect the ground wire to green ground connector in terminal box.
Do not use an extension cord.

READ ALL INSTRUCTIONS BEFORE USE
For your safety,the informa_on in this manual must be followed to minim ze
fi re Orexplosion, el_ic sh_k, orto prevent property d_age, personal injury, 0r
Ia,WARNING To reducethe risk of fire, electric sh_k' or injuryto persons when using th s
appliance, follow basic p[ecau_0ns, including the f01!0wing-
f
WARNING - When using your dishwasher, follow basic precautions, including the following:
a) Read all instructions before using the dishwasher.
b) Use the dishwasher only for its intended function.
c) Use only detergents or wetting agents recommended for use in a dishwasher and keep them out
of the reach of children.
d) When loading items to be washed:
1) locate sharp items so that they are not likely to damage the door seal; and
2) load sharp knives with the handles up to reduce the risk of cut-type injuries.
e) Do not wash plastic items unless they are marked "dishwasher safe" or the equivalent. For plastic
items not so marked, check the manufacturer's recommendations.
i)
Note • This statement may be omitted for an appliance that employs a heating element that is
located or guarded such that melted plastic items are not likely to contact it.
f) Do not touch the heating element during or immediately after use.
g) Do not operate your dishwasher unless all enclosure panels are properly in place.
h) Do not tamper with the controls.
i) Do not abuse, sit on, or stand on the door or dish rack of the dishwasher.
j) To reduce the risk of injury, do not allow children to play in or on the dishwasher.
k) Under certain conditions, hydrogen gas may be produced in a hot-water system that has not been
used for two weeks or more. HYDROGEN GAS IS EXPLOSIVE. If the hot-water system has not
been used for such a period, before using the dishwasher turn on all hot-water faucets and let the
water flow from each for several minutes. This wilt release any accumulated hydrogen gas. As the
gas is flammable, do not smoke or use an open flame during this time.
Remove the door to the washing compartment when removing an old dishwasher from service or
discarding it.

I kWARNING To reduce the risk of fire, electric sh_k' 0r injury to persons when using this q
appliance, follow basic precau_ons, including the following.
7p
FTs/zJw,7
u
s
_k_LJj
The dishwasher is designed
for standard household
current (120 Volts AC, 60
Hz.) Before connecting the
dishwasher, ensure the
outlet or cable is properly
!u edandgrounde :..................
Not being grounded may
cause breakdowns or electric
shocks.
Do not install or store the
dishwasher where it will be
exposed to the weather.
It may cause an electric
shock, fire, malfunction
and deformation.
Do not damage the power
cord itself or place heavy
objects on the cord.
Power cord damage may
cause fire and electric shock.
Place the dishwasher on
even and solid floor.
Uneven surface may cause
abnormal noise.
Do not grasp the power
cord or switch with wet
hands. Do not use a
damaged power cord, plug
or socket.
.................................................................
It may cause electric
shock.
Most installations are hard-wired. This will
imply it is acceptable for the customer to set up
the dishwasher as a portable appliance. This
would apply only in cases where the dishwasher
is plugged in to an outlet under the sink.
Disassembly or repair
should be conducted by
experienced service
persons.
Improper disassembly or repair
could head to product failure or
electrical shock.
After installation, check the
hose connection.
'[.'oo'se'n'ed"con'neci'i'on"ma'y.........
cause water leakage leading to
property damage.
For a permanently connected dishwasher: |
This appliancemustbeconnectedtoa groundedmetal,permanentwiringsystemor an equipment-groundingconductormust
J
berunwith thecircuitconductorsandconnectedto theequipment-groundingterminalor leadontheappliance.
Detailed installation instructions are contained in the installation instruction manual included with your
dishwasher. Be sure to read observe all instructions in the installation manual.

I WAR NING Toreduce the risk of fire, electric sh_k, or injury to persons when using this
appliance, follow basic precau_ons, including the following.
\ ...........
Do not allow children or pets
to play on the door or inside
the dishwasher.
Do not allow children to
hang on the door because
the door may fling open and
they may be injured.
Children may fall off.
Pets or children may be
wounded by rotating parts
or suffocated inside the tub.
Don't leave racks out of
dishwasher.
.................................................................
Children may play inside
a dishwasher.
P
Gasolne Alcohol
f .....
Do not store or use
combustible materials,
gasoline or other flammable
vapors and liquids in or
around dishwasher.
It may cause fire.
Do not splash water on to
the dishwasher.
It may cause fire and electric
shock.
When dishwasher is not in
use for a long time, close
the water valve.
It may cause water leakage.
Use only detergents or
wetting agents
recommended for use in a
dishwasher and keep them
out of the reach of children.
Improper detergents may
cause malfunctions, electric
shock, or fire due to
excessive suds.
Keep the dishwasher away
from electric stoves,
candles, or other heat
sources.
It may cause melting of some
parts or fire.
Dishwasher should be
unpacked and moved by 2
or more persons due to its
of heavy weight.
Dropping or crashing the
product may cause injury to
people or breakage of the
dishwasher.
Do not press the button
with sharp edged devices
like a screwdriver or a pin.
It may cause electric
shock or malfunctions.

IA,WARNING To reduce the dsk of fire, elec_ic sh_k' 0r injury to persons when using this _
appliance, follow basic precau_ons, including the following.
WARNING ChildSafety
• Controls may be locked using CHILD LOCK mode to prevent settings from being changed by children.
• Keep children away from detergents and rinse-aids. Store chemicals properly and safely.
• Do not allow children to operate the dishwasher.
• Young children should be supervised to ensure that they do not play with the appliance.
WARNING Concerning the Power Cord
Most appliances shoutd be connected to a dedicated circuit; that is, a single outlet circuit which powers
only that appliance and has no additional outlets or branch circuits. Check the specification page of this
owner's manual to be certain. Do not overload walt outlets. Overloaded wall outlets, loose or damaged wall
outlets, extension cords, frayed power cords, or damaged or cracked wire insulation are dangerous.
Periodically examine the cord of your appliance, and if its appearance indicates damage or deterioration,
unplug it, discontinue use of the appliance, and have the cord replaced with an exact replacement part by
an authorized service person. Protect the power cord from physical or mechanical abuse, such as being
twisted, kinked, pinched, closed in a door, or walked upon. Pay particular attention to plugs, wall outlets,
and the point where the cord exits the appliance. Any of these conditions could result in electric shock or
fire.
...............................................................................................o, cuto,,
_1 box, packaging, plastic break down the button
bags, and extruded parts.
polystyrene. _ .................................................................
ii"siopieveniitTedeaitTiiom .... _",_ It'StOstop the reuse of
_,_ product and parts.
suffocation is caused by the
vinyl and styrofoam.
SAVE THESE INSTRUCTIONS

O Control Panel O Lower Spray Arm
O Door Handle O Detergent & Rinse Aid Dispenser
O Front Cover • Vapor Vent Cover
O Lower Cover O Tub Lamp (lllumiTub TM) _
O Leveling Foot O Cutlery Rack
• Side Cabinet • Upper Rack
O Base O Cutlery Basket
O Top Spray Arm O Lower Rack
O Upper Spray Arm • Blue LCD Display
@ Removable Tines • Power Button
• Steam Nozzle
IllumiTub TMcomes on when the door is opened. It goes off when the door is closed.
Specifications
• Power Supply: 120V, 60Hz AC only, minimum 15A circuit breaker.
• Water Pressure: 20 - 120 psi (140 - 830 kPa)
• Size (WxDxH): 23 7/8" x 25" x 33 7/8"
(606 mm x 635 mm x 860 mm)
• Minimum Recommended Inlet Water Temperature: 120°F (49 °C)
• Weight: 128 Ibs. (58 kg)
The appearance and specifications are subject to change without
notice.

iiill
SOAK
POWERSCRUB
NORMAL
STEAM DELICATE
This cycle is for very heavily soiled loads including pots, pans,
and casserole dishes, which may have cooked on food.
This cycle is for normally soiled, every day loads.
This cycle is for normally soiled, every day loads.
This cycle is for washing delicate items like china or stemware.
This cycle is for quick wash of lightly soiled, recently used dishes, and
QUICK
cutlery.
RINSE ONLY This cycle is just for rinsing dishes quickly. No detergent is used.
STEAM
Press the STEAM button to add steam to the selected cycle for added cleaning
power.
NOTE :Steam can only be added to the following cycles:
SOAK, POWER SCRUB, NORMAL.
Repeated pressing of the RINSE key will select Sanitary(_16o'F),
Extra Rinse(R ÷ ) or both.
RINSE
Select the spray intensity that matches your cleaning needs.
SPRAY Repeated pressing of the SPRAY key will select Strong ( _ ), Medium ( _: ) or
Soft ( -_,;).
For smaller loads, use this option to wash only the upper or lower rack to save
HALF LOAD energy.
Press HALF LOAD repeatedly to select either the upper or lower rack.
DELAY START
Use this option to start the dishwasher at a later time.
Press DELAY START repeatedly to delay the beginning of the selected cycle.
Each press of the button will increase the delay time by one hour. Maximum
delay is 24 hours.
Only the sanitary cycle is designed to meet sanitization standards'. There is no intention, either directly or
indirectly, that any other cycle will meet sanitization standards'.

O O • 00 •
@
@
,E,,
0
O
O
UPPER
LOWER
[]
Fj t3.Q e.3
Q .Ct l_l
STEAM OPTION INDICATOR
Indicates that the STEAM option has been selected. The symbol will blink while
steam is being injected into the dishwasher.
RINSE INDICATOR
It shows configuration of rinse option.
The ( _160"F) symbol indicates that sanitary rinse has been selected.
The symbol blinks during the cycle ifthe sanitary temperature has been achieved.
Once the cycle has ended, the symbol will be steady if the sanitary temperature has
been achieved. (See NOTE below.)
The ( R÷ ) symbol indicates that an extra rinse has been added to the selected cycle.
SPRAY INDICATOR
Indicates the selected spray intensity: Strong ( _ ), Medium ((_;) or Soft ( -S;,).
HALF LOAD INDICATOR
Each press of the HALF LOAD key cycles between upper rack only and lower rack
only.
When DUAL INTENSITY TMis selected, both lights will be and one will be blinking.
The spray intensity for the blinking rack can be adjusted independently.
CHILD LOCK
This symbol will be visible when Child Lock is activated.
RINSE AID
The symbol will be activated when the rinse aid needs to be refilled
TIME REMAINING
Indicates normal run time for the cycle selected.
During the cycle, the estimated time remaining for the selected cycle will be
displayed
CANCEL
CHILDLOCK
To cancel a running cycle, open the door, then press and hold the STEAM
DELICATE and NORMAL buttons together for 3 seconds.
The drain pump will be activated and the cycle will be canceled.
To lock/unlock the buttons, press SPRAY and RINSE simultaneously for 3 seconds.
When CHILD LOCK is set, the CHILD LOCK indicator will appear and all buttons are
disabled.
This high temperature rinse sanitizes dishware and glassware in accordance with NSF/ANS1 Standard 184for
Residential Dishwashers. Certified residential dishwashers are not intended for licensed food establishments.
ii i ii ii ii ii ii ii ii

Cycle WASH RINSE
Rinse1 i Rinse2i Heating DRY Water
, , Rinse (gal/L)
I I
I I
, , 1621:
iiiiiiiiiiiiiiiiiiiiiiiiiiiiiiii i! !!!i !i! i i !i!i!ii!ii!ii!ii!ii!ii!ii! i i !i!!i!!i!!i!!i!!i!!ii!i!!ii!i!!i ! !!i!! !! !i!i!ii!ii!ii!ii!iiiiiiiiiiiiiiiiiiiiiiiiiiiiiiii ii ii ii ii i i iiiiiii i i i i ! ! ! ! ! ! !!!!!!i
!!i ii i i ililililililililililililililililililililili
i ! i i iiiiiiiiiiiiiiiiiiiiiiiiiiiiiiiiiiiiiii!!! iiiiiiiiii i iiiiiiiiiiiiiiiiii!ii!i!!!!!iiiiiiiiiiiiiiiiiiiiiiiiiiiiiiiiiiiiiiiiiiiiiiiiiiiiiiiiiiiiiii!!!! !!i!i
:
I
i
Pre.WashI Main
Wash
I
1201: ',140_149_F
49°C : 60_65°0
I
, , 72oc
I I
I I
, , 68°C
I I
,,
, 1491:
, 65oc
I I
, , 1543=
I I
I
I
I
, , 68°C
I I
i i
' ' 1401:
I I
: : 60°C
I I
I I
I I
I
I
I
I
I
I I
5.5~9.2/
21~35
5.5~9.2/
21~35
2.6~6.9/
10~26
5.5_6.9/
21_26
5.5/21
Time
(min)
143_191
123~171
110_135
93
74
Option
Rinse Steam
Usable Usable
Usable Usable
Usable Usable
Usable Usable
Usable Disable
1.3/ 5 14 Disable Disable
The spray intensity of the upper and lower racks is programmable by the consumer. You can select
wash power based on soil level.
For example by selecting Soft Spray for the upper rack and Strong Spray for the lower rack, you can
wash delicate items like stemware on the upper rack while washing pots and pans on the lower rack.
1. Press SPRAY key for 3 second then, indicator UPPER turn on and off.
2. Press SPRAY key to set the intensity for upper rack.
(Strong/Medium/Soft/Off)
3. Press HALF LOAD key to confirm intensity of upper rack.
4. Press SPRAY key to set the intensity for lower rack
(Strong/Medium/soft/off)
5. Press HALF LOAD key to confirm intensity of lower rack.
6. Select other options.
7. Close the door.
8. Dishwasher starts.
]2

Before using the dishwasher, please
read the Important Safety Instructions.
Water supply temperature should be a minimum
of 120°F (49°0) for better washing and
reasonable cycle time.
For this reason, use hot water faucet only.
It is also important that the dishwasher is loaded
according to instructions for the effective cleaning.
When loading your dishwasher, make sure that
insoluble items such as bones, toothpicks, and
pieces of paper have been removed.
When loading the dishwasher, observe the
following general guidelines;
1. Deep based items should be placed at an
angle to help water run off and dry properly.
2. Remove solid, burnt-on scraps from dishes
prior to loading in the dishwasher.
3.Load only items which are dishwasher safe.
Please avoid utensils that are non-heat
resistant, metal decorated, etc.
Loading the Lower Rack
The extra tall tub allows loading of dishes, pans
or other utensils that are up to 14 inches in size.
Do/tot obstruct the rotation of the spray
arms. Make sure large items do not prevent
the detergent dispenser j_om opening.
The lower rack is best loaded with dinner plates,
soup bowls, dishes, pots, pans, lids and even a
grill tray. Plates should be positioned upright and
facing the center of the rack. Pots, pans, and
large dishes must be turned so that the inside is
facing downward.
Sample 10-place setting, lower rack
Basically, the lower rack is not meant to load
small items like cups, wine glasses, or small
plates. These items should be loaded on the
upper rack for proper distribution. Racks are
designed to hold even the most delicate items
securely in place as welt as tall items.
Sample 12-place setting, lower rack
Cutlery Basket
Cutlery and knife rack has separators to avoid
scratching and tarnishing of your delicate cutlery.
The basket can be divided into three separate
baskets which can be used on both the upper
and lower levels. If you have only a small load of
cutlery, the baskets can be removed, leaving
extra space for other plates.
,4\ WARN ING
Be careful when loading and unloading
sharp-edged items. Load sharp knives with
the handles up in order to reduce the risk of
injury.

ii i
Removable Tines
If you need to wash large items, you can remove Do not load thermally weak items of Plastic, Crystal,
the tines from the lower rack. and Gold rimed in [_ont of'the steam nozzle.
Adjustable angular tines
The plate supports in the lower and upper racks
can be folded down. Based on the size and
shape of the dishes, you can adjust the angle of
the tines to five different positions.
Loading the Upper Rack
The upper rack is best loaded with more delicate
items, small plates, cutlery basket, cups, glasses,
and dishwasher safe plastic items. Plates should
be positioned upwards with the plate bottom
facing the front of the rack. Cups, glasses, and
bowls must be positioned upside down. Extra
cups or cooking utensils can be laid on the fold-
down cup racks which may also provide support
for long stem glasses. Take care not to obstruct
the rotation of the spray arms above and below
the upper rack.
Use caution when adjusting angular tines and apply
gentle.[brce.
Hard Stained Dish Loading
If you want to wash hard stained dish, load the
dish in front of the steam nozzle. The steam
nozzle can easily remove hard stain on the dish
with hot steam.
Sample lO-place setting, upper rack
Sample 12-place setting, upper rack
14

Height Adjustable UpperRack for 14-inch.
lower rack capacity
The upper rack adjusts up and down to let you put
tall and oversized items on it. The racks can be
adjusted to allow 14-inch plates on the bottom rack
or the upper rack will allow 12-inch dishes.
To raise the rack
Raise the upper rack by lifting the rack at the
middle of each side ( _ marked position) until
the rack locks in place.
To lower the rack
Hold the rack in the middle of each side to support
the weight of the rack, then lift the lever on each
side to release the rack and lower it.
( _'- marked position).
....
,_, _7 >;_....
........'_'_:_i_-_:_;
After adjusting, check that the spray arm b j_ee to rotate
without being stopped by dishes loaded on the upper or
lower racks. Do not adjust the rack when # is"loaded
with dishes.
CAUTION
Non Dishwasher-SafeItems
The combination of high water temperature
and dishwasher detergents may damage
certain items. Therefore we do not recommend
using the dishwasher to wash the following items:
• Handpainted silver or gold leaf crockery
• Wood-or bone-handled
• Iron or non-rustproof utensils
• Plastic items which are not dishwasher safe.
Half Loading Option
Inthe event that you do not have enough dishes for
a full load, you can simply load dishes in the upper
rack or in the lower rack only. You can then wash
either rack separately by selecting the half load
option. This will bring about savings in hot water,
electricity, and time.
Removing the Upper Rack
The upper rack canbe removed to make more room
in the lowerrack.
To remove the upper rack
1. Pull the upper rack out until it stops.
2. Squeeze the tab of the retainer at the end of each
side rail and remove it.
Be careful not to allow the upper rack to fall off the
rails while removing the retainers.
3. Pull the upper rack out of the slides.
Squeeze Tab
Always remove dishes.[_om the upper rack beJbre
removing the rack.
15

ii i
Loading the cutlery Rack
The cutlery rack is best suited for flatware and
most cooking or serving utensils.
The separators on the cutlery racks help keep
flatware separated to avoid damage and improve
cleaning.
HeightAdjustabletray
Each side tray can be adjusted to a high or tow
position independently to accommodate different
sizes of utensils.
Each tray is adjusted by lifting out and rotating the
tray front to back.
®
Sample 10-place setting.
Knife, fork, and spoon handles should be
positioned between the tines.
Removable Rack
The entire cutlery rack can be removed if more
space is needed on the upper rack for larger items.
Always remove cutlety.fi'om the rack belbre removing
the rack.
If the handles of your
flatware are too thick,
then reverse the pieces
so the handles face the
other direction.
Pull the rack out.
/i\ WARN ING
Be careful when loading and unloading
sharp-edged items. Load sharp knives with
the handles up in order to reduce the risk of
injury.

Adding detergent to dispenser
• Detergent must be put into the detergent chamber
before starting every cycle except when Rinse Only
is selected.
• Ifyour dishes are only moderately dirty, you may be
able to use less detergent than recommended.
• The detergent chamber holds 1.4 oz (40g) when full.
B is not necessat 7 tofill the compartment to capacity.
Simply use the recommetuled amount of detergent.
• The amount of detergent depends on the program,
dish load and soil level. Refer to the table below and
adjust these recommended amounts as necessary
for your load.
CYCLE
Soak
Power Scrub
Normal
Steam Delicate
Quick
Rinse only
AMOUNT OF DETERGENT
PRE-WASH
compartment
Full (0.35 oz)
Full (0.35 oz)
None
None
None
None
MAIN WASH
compartment
Full (1.05 oz)
Full (1.05 oz)
Full (0.7 oz)
Full (0.3 oz)
Full (0.7 oz)
None
Filling the dispenser
1. Push latch to open.
2. Add detergent to the main wash compartment.
(See the table for the amount of detergent.)
Do not add detergent [br the Rinse Only cycle.
For main wash ]
3. If needed, add detergent to pre-wash
compartment.
CAUTION
For pre-wash ]
Detergent Information
Use only the detergent intended for household
dishwashers or the dishwasher may fill with suds
during operation. Suds may reduce washing
performance and could cause the unit to leak.
(Hand-Wash detergent is not allowed for this
dishwasher.)
4. Close the cover. (The cover will click shut.)
Too much detergent can leave a.fihn on dishes.

ii i
Adding Rinse Aid to dispenser
The use of rinse aid is required to prevent possible
spots on dishes water droplets remaning after the
completion of the wash cycle and to enhance the
performance of the dry cycle.
Only liquid Hnse aid can be used for this dishwasher.
• Filling Rinse Aid
1. Rotate the round cap counterclockwise and
remove it.
• Rinse Aid Amount Setting
The factory setting is at level 3, which is where you
can expect the best performance under most
conditions. Setting the rinse aid control to a setting
that is too low will contribute to spotting and
streaking of the dishes and poor drying performance.
Setting the control too high can cause foaming which
will cause poor wash performace or failure.
1. Remove the cap.
2. Rotate adjuster to the desired setting.
Rinse-Aid :;: _,
Indicator 0 ',','_:"--O 1
Adjust Lever
_ (Rinse)
2. Add a liquid rinse aid to the maximum level.
(Max. 4.8 oz (145ml))
• Refilling Rinse Aid
4.8 oz (145ml) is the capacity of the rinse aid
dispenser. How often you need to refill the rinse aid
dispenser depends on your washing habits such as
the number of washes per month and which rinse
aid setting you use. The indicator light wilt inform you
when the rinse aid level is low. The indicator light will
stay on when you close the door to start a cycle.
3. Replace and lock the cap.
4. Rinse aid will be automatically dispensed during
the final rinse cycle.
18

For best results, it is important to periodically check and care for the filters and spray arms.
_,WARNING: To prevent any possible injury during care and maintenance/cleaning, be sure to wear
gloves and/or protective clothing.
Cleaning metallic parts
Clean the dishwasher with a cloth or sponge.
Ifyour dishwasher has a stainless steel door panel, we
recommend the use of a quality stainless steel cleaner.
The stainless steel tub has a tendency to build up
cloudy film on its surface, especially when using hard
water.
Cleaning Spray Arms
- Lower Spray Arm
• Check that the water jet holes are not blocked by
food particles.
• When cleaning is necessary, remove the spray arm
by pulling up.
• Clean the spray arm and replace it by pushing down
to snap it in place. Be sure spray arm turns freely
after installation.
- Top Spray Arm
• Make sure the water jet holes are not blocked by
food particles.
• When cleaning is necessary, remove the arm by
disassembling the hook from the bracket which
holds the top spray arm assembly to the tub.
• Clean the spray arm and replace it.
- Upper Spray Arm
• Pull the upper rack forward. Make sure the water
jet holes are not blocked by food particles.
• Ifcleaning becomes necessary, remove the spray
arm by turning the nut on the bottom of the spray
arm 1/8th turn counterclockwise and pulling down.
(See illustrations below)
• Clean the spray arm and replace it in the reverse
order. Make sure the nut locks back in place (1/8th
turn).
Seasonal Maintenance and Storage
- During the summer season, if you will be absent for
extended periods of time, it is recommended that you
close the water valve and unplug power cord or shut
off the circuit breaker.
- During the winter season, if there is a possibility of
freezing temperatures, it is recommended that you
winterize the water supply lines and the product
itself.
ii i ii ii ii ii ii ii ii

1. Load the dishes.
Remove any scraps of food in advance. Pull
the lower rack out and load the dishes and
cutlery in and push it all the way back. Pull
the upper rack out and load the cups,
glasses, etc.
2. Turn on the dishwasher.
When ready to run a cycle, open the door and
press the power button. The dishwasher
defaults to the normal cycle.
6. Close the door. The dishwasher
starts automatically after a
slight delay.
7. At the end of the Program.
End is displayed on the digital display for a
few seconds and a tone will sound, signaling
program completion. The dishwasher
automatically switches off for safety and
energy savings.
3. Check rinse-aid.
The indicator lights will illuminate if the rinse
aid level is low.
The estimated remaining time will be displayed, ff the
door b opened daring operation, the dishwasher stops'.
Once the door is dosed, the program will mstal_t[_vm
the point where # stopped.
one, this will avoid water dripping from the
upper rack onto the dishes in the lower one.
.
.
Measure the detergent.
Add the required amount of detergent into the
dispenser. Close the detergent dispenser lid.
Setting the program.
Select desired program and options.
Before starting, the display window will show
the estimated running time of the selected
program. If the number of dishes fills only one
rack, you can use the Half Load option. For
example, if you load dishes only on the upper
rack, you adjust the Half Load button to the
upper rack.
Remember to load all dishes into the
selected rack.
The estimated remaining time wilt be
displayed.
If the door is opened during operation, the
dishwasher stops.
Once the door is closed, the program will
restart from the point where it stopped.
In general,it is not advisable t0 oPen the door
whi!e the dishwasher is running, If the doo r is
opened, a safety device stop s the machine:
Care should be taken whe n opening the door
immediately following the cycle! as steam may
escape.
Auto-Off
_,,,,,,,,,,,,,,,,,,,:Dual IntensityTMWash Cycle
Course Selection -_ Press SPRAY key for 3
sec. -_SPRAY selection for upper spray
(Strong/Medium/soft/off) -_ Press HALF LOAD
to select lower rack -_ SPRAY selection for
lower spray(Strong/Medium/soft/off) _ Check
selection by press HALF LOAD _ Another
option -_ Door Closed -_ Start

Doorisnotcompletelyclosed.
Powersupplyisnotconnected.
Fuseisblown.
Unitconnectedto coldwater,
Previouscyclewasstoppedbeforecomplete.
Drainhoseiskinkedorclogged.
Impropercycleselection
Watertemperatureislow,
Dishwashingdetergentwasnotused.
Lowinletwaterpressure
Waterjetholesofsprayarmsblocked.
Improperdishloading
Lowwatertemperature
Wrongdetergentamountused
Overloading
Improperloading
Insufficientwaterpressure
Insufficientdetergent
Rinse aid dispenser empty,
Extremlyhard water
Some levelofnoise is normal.
YourDishwasherisn'tlevel,
Nozzlearmknocksagainstthedishes.
Combinationofexcessivedetergentand
softwater
Aluminumitemsrubdishesduringcycle.
Coffeeorteasoils
Rinseagentdispenserempty.
Powerisnotconnected.
Fuseisblownorcircuitbreakeristripped.
Theholesofsprayarmsisblockedbyfood
particles.
Rackispoorlyadjusted.
Panelissoiledbyfoodordetergent
Operatingwithrubbergloves
Waterinlettrouble
Drainagetrouble
Excessivewatersupplied
Waterleakagetrouble
HeaterCircuitFailure
Thermistortroubleorveryhighinletwater
temperature.(over194°F)
Checkthedooriscompletelyclosedandlatched.
Connectpowersupplyproperly,
Replacefuseorresetcircuitbreaker.
Checkwatersupplyconnectionorwaterheatersetting,
(Heatingcoldwatertakeslonger),
OperateQuickWashcyclewithdetergentswithoutloadingdishes.
Adjusthoseorclearblockage,
Selectcorrectcyclebasedon dishtypesandsoiltoughness.
Checkwatersupplyconnectionorwaterheatersetting.
Userecommendeddetergents,
Waterpressureshouldrangebetween20~ 120psi.
Cleanthearm.
Dishesshouldn'tinterruptarmrotationanddetergentdispensing.
Suppliedwatertemperatureshouldbe minimum120°Ffor
thebestwashingperformance,
Usetherecommendedamountofdetergent,
Loadtheproperamountofdishes.
Rearrangedishesreferringtophotosonpages10and11.
Adjustwaterpressurebetween20and120psi,
Addtherecommededamountofdetergentreferringto
detergentinstructions.
Refilltherinseaiddispenser.
Installhomewatersoftener,
Detergentcoveropening.
Drainpumpatthe beginningofdraincycle.
Adjusttheinstallation,
Repositionyourdishes.
Underloadthedishwasherandusea rinseaidto minimize
thisprocess,
Removealuminummarkingswithamildcleaner.
Eliminatethesoilbyusingastainremovalproduct,
Checkandrefilltherinseagentifempty.
Connectpowersupply.
Replacefuseandrepaircircuitbreaker.
Cleanthe holesofthesprayarms,
Adjusttheupperrackproperlyreferringtopage12.
Cleanthepanel
Operatewithbarehands
Checkcloggingofwaterinlethose(orhosekinkorfreezing).
Checkwatersupply.
Checkcloggingofwaterdrainhose(orkinkorfreezing).
PleasecallyourAuthorizedServiceCenteror
LGECustomerServiceat 1-800-243-0000.
If you have followed this troubleshooting guide and the problem persists, or the problem you are experiencing is not
listed here, please call LGE Customer Service at 1-800-243-0000.
21
ii i ii ii ii ii ii ii ii

iiiill ii i_
ii i iiiii
Your LG Dishwasher will be repaired or replaced, at LG's option, if it proves to be defective in material or
workmanship under normal use, during the warranty period ("Warranty Period") set forth below, effective from the
date ("Date of Purchase") of original consumer purchase of the product. This warranty is good only to the original
purchaser of the product and effective only when used in the United States, including Alaska, Hawaii and U.S.
Territories.
WARRANTY PERIOD:
LABOR: One Year from the Date of Purchase.
PARTS (except as listed below): 2 Years from the Date of
Purchase.
Electronic Control Board: 5 Years from the Date of
Purchase.
Dishwasher Rack: 5 Years from the Date of Purchase.
Stainless Steel Door Liner and Tub: Lifetime (as long
as owned by the original purchaser)
Replacement Units and Repair Parts may be new or
factory remanufactured.
Replacement Units and Repair Parts are warranted for the
remaining portion of the original unit's warranty period.
HOW SERVICE IS HANDLED:
In-Home Service: Please retain dealer's dated bill
of sale or delivery ticket as evidence of the Date of
Purchase for proof of warranty, and submit a copy
of the bill of sale to the service person at the time
warranty service is provided.
Please call 1-800-243-0000 and choose the
appropriate option to locate your nearest LG
Authorized Service Center.
Or visit our website at : http://www.lgservice.com.
THIS WARRANTY IS IN LIEU OF ANY OTHER WARRANTY, EXPRESS OR IMPLIED, INCLUDING WITHOUT
LIMITATION, ANY WARRANTY OF MERCHANTABILITY OR FITNESS FOR A PARTICULAR PURPOSE. TO
THE EXTENT ANY IMPLIED WARRANTY IS REQUIRED BY LAW, IT IS LIMITED IN DURATION TO THE
EXPRESS WARRANTY PERIOD ABOVE. NEITHER THE MANUFACTURER NOR ITS U.S. DISTRIBUTOR
SHALL BE LIABLE FOR ANY INCIDENTAL, CONSEQUENTIAL, INDIRECT, SPECIAL, OR PUNITIVE
DAMAGES OF ANY NATURE, INCLUDING WITHOUT LIMITATION, LOST REVENUES OR PROFITS, OR
ANY OTHER DAMAGE WHETHER BASED IN CONTRACT, TORT, OR OTHERWISE. Some states do not allow
the exclusion or limitation of incidental or consequential damages or limitations on how long an implied warranty
lasts, so the above exclusion or limitation may not apply to you. This warranty gives you specific legal rights and
you may also have other rights that vary from state to state.
THIS LIMITED WARRANTY DOES NOT APPLY TO:
• Service trips to your home to deliver, pick up, and/or install the product, instruct, or replace house fuses or
correct wiring, or correction of unauthorized repairs.
• Damages or operating problems that result from misuse, abuse, operation outside environmental specifications
or contrary to the requirements of precautions in the Operating Guide, accident, vermin, fire, flood, improper
installation, acts of God, unauthorized modification or alteration, incorrect electrical current or voltage, or
commercial use, or use for other than intended purpose.
The cost of repair or replacement under these excluded circumstances shall be borne by the consumer.
CUSTOMER INTERACTIVE CENTER NUMBERS
To obtain Customer Assistance, Product Cal11-800-243-0000 (24 hours a day, 365daysper
Information. Or Dealer or Authorized Service year) and select the appropriate option from the menu.
Center location. Or visit our website at : http://www.lgservice.com
TO CONTACT LG ELECTRONICS BY MAIL:
LG Customer Interactive Center
P.O. Box 240007
201 James Record Road
Huntsville, Alabama 35824
ATTN: CIC
22

ii i ii ii ii ii ii ii ii

LG Electronics Inc.
P/No.: MFL30149746

1-800-243-0000
Para el Servicio LG (Atencion a Clientes) disponibles las 24 horas al dia los 7
dias de la semana
hALL,-,CUSJAR O
LAVAVAJILLAS
MODELO : LDF9810ST/LDF9810WW/LDF9810BB
,,haatencion el presente manual.
_stalarlo y realizar su mantenimiento
consultas futuras. Guarde el
_arato e indique esta
de reparacion.
n o reparacion mas cercano
al funcionamiento del
1-800-243-0000 (24 horas al dia,
del menzJ.
numero de serie y codigo postal

• Gran capacidad
Si levanta la bandeja superior, podra lavar platos grandes en la bandeja
inferior (max. 14.00 in). El gran tamaSo de la tina permite lavar vajittas y
baterias de cocina. Los lavavajillas LG le permiten colocar elementos de gran
tamaSo en ias bandejas tanto superior como inferior.
• Bandeja extraible para cubiertos
La bandeja para cubiertos del tercer nivel facilita la carga y descarga de
platos, cubiertos y utensitios de cocina. Las bandejas se pueden ajustar o
quitar para tener mas espacio en la bandeja superior.
• Peque_o motor de propulsion directa (Slim Direct motor ,M)
Contamos con un pequeSo motor de propulsi6n directa (Slim Direct motor TM)
innovador y de reciente introducci6n. Esta controtado mediante propulsores
inversos. La potencia de lavado se controla de acuerdo al programa
seleccionado. Tambien posee una gran eficacia energetica para minimizar las
perdidas de energia.
• Sistema de secado hibrido
Es una de las soluciones de mayor rendimiento para secar los platos porque
minimiza ia salida de aire hQmedo fuera del lavavajittas. Ademas, este
sistema asegura mejores resultados de secado en comparaci6n con el
sistema de secado por condensaci6n y a ta vez reduce el consumo de
energia.
• Sistema vario-spray
AI
brazo
Gracias a que el agua putverizada es alternada entre la Bandeja Superior y la
Inferior, toda la potencia del motor se dirige cada vez hacia una sola bandeja
por to que se Iogra un mayor rendimiento y un menor consumo de agua y
eiectricidad.
• Filtro auto-limpiable
.,S...... d .... iedad Para obtener mejores resuttados, el lavavajitlas de LG cuenta con un sistema
de filtro de auto-limpieza ya que limpia progresivamente et agua a medida que
circula. El filtro de auto-timpieza posee un mecanismo de rejiltas que pulveriza
los alimentos antes de que entren en el sistema de desagQe.
la fina

• El Ciclo de Lavado Dual Intensity _M
La intensidad del rociador tanto en la bandeja superior como inferior puede
ser programada por et usuario. Puede seleccionar el programa deseado
segQn la suciedad. Por ejemplo, si selecciona un rociado suave para la
bandeja superior y un rociado fuerte para la bandeja inferior le permiten lavar
elementos delicados como cristaler(a en la bandeja superior mientras lava
ollas y sartenes en la bandeja inferior.
• Lavado con vapor y Steam Delicate TM
ASadir STEAM (vapor) a los ciclos de lavado mejora el rendimiento de( lavado
con muy poco consumo adicional de agua o energ(a.
Pantalla tactil y LCD azul
Los botones tactiles del panel de control facilitan las selecciones y son muy
c6modos, mientras que la pantalla LCD azul muestra claramente el cic)o y )as
opciones seleccionadas.
PARTE1. INSTRUCCIONES IMPORTANTES DE SEGURIDAD ......................................... 4~8
PARTE2. PARTES DEL LAVAVAJILLAS ................................................................................. 9
PARTE3. FUNCIONES DEL PANEL DE CONTROL ....................................................... 10~11
PARTE4. PROGRAMA ............................................................................................................ 12
PARTE5. USO DEL LAVAVAJILLAS ................................................................................ 13~18
PARTE6. MANTENIMIENTO Y CUIDADOS ............................................................................ 19
PARTE7. SECUENCIA DE FUNCIONAMIENTO ................................................................... 20
PARTE8. GU(A DE RESOLUCIC)N DE PROBLEMAS .................................................... 21~22
ii i ii ii ii ii ii ii ii

LEA TODAS LA INSTRUCCIONES ANTES DE USAR
ADVERTENCIAPor SuSeguridad debe seguir la informaci6n indicada en este manual para
minimizar el riesgo de incendio o explosi6n, descarga el_;trica, 0 p_a prevenir
dar3os a la propiedad, lesiones personales o muerte.
SU SEGURIDAD Y LA DE LOS DEMAS SON DE SUMA IMPORTANCIA.
En este manual y en su electrodomestico figuran muchos mensajes
importantes de seguridad. Lea y cumpla siempre con todos los mensajes de
seguridad.
I_stees el simbolo de alerta de seguridad.
El mismo alerta sobre potenciales riesgos de muerte o heridas tanto para usted como para otras
personas.
Todos los mensajes de seguridad estaran a continuaci6n del simbolo de alerta de seguridad y con
la palabra PELIGRO o ADVERTENCIA.
Estas palabras significan:
Corre riesgo de muerte o de sufrir heridas serias si no sigue las
instrucciones inmediatamente.
Corre riesgo de muerte o de sufrir heridas serias si no sigue las
instrucciones
Todos los mensajes de seguridad le indicaran cu_.les el riesgo potential, le dir_tnc6mo redudr las
posiblidades de sufrir heridas y qu6 puede suceder si no se siguen las instrucciones.
ADVERTENCIATrucospara evitar peligros
No fuercedemasiado haciaabajo la puertacuandoeste abierta:podria da_arlao romped& Ullice el lavavajillassolo cuando
Iohaya instaladopor completo.
ADVERTENCIAPeligrode choqueel_ctdco
Si no sigue estas instrucciones, podria sufrir daSos, incendios o un choque electrico.
Lavavajillas con toma de tierra electrica.
Conecte el cable de toma de tierra al conector de tierra de color verde de la caja de terminales.
No utilice extensiones electricas.

LEA TODAS LA INSTRUCCIONES ANTES DE USAR
ADVERTENCIAPor Su Seguridad debe seguir la informaci6n indicada en este manual para
minimizar el riesgo de incendio o explosi6n, descarga el_;trica, 0 p_a prevenir
dar3os a la propiedad, lesiones personales o muerte.
ADVERTENCIAPara minimizar el riesg0 de incendio o explosi6n, descarga el_trica,
o para prevenir lesiones personales cuando use electrodomesticos se deben
seguir precauciones b&sicas de seguridad, incluyendo las siguientes.
ADVERTENCIA - AI utilizar el lavaplatos siga estas instrucciones de seguridad basicas:
a) Lea todas las instrucciones antes de utitizar el lavaplatos.
b) Utilice el lavaplatos s61o para el uso para el que esta diseSado.
c) Utilice s61o detergentes o similares recomendados para lavaplatos y mantengalos fuera del
alcance de los niSos.
d) AI cargar el lavaplatos:
1) coloque los objetos puntiagudos de forma que no daSen el sellado de la puerta; y
2) coloque los cuchiltos con el mango hacia arriba para reducir el riesgo de cortarse.
e) No lave ptastico a no ser que tengan la marca de "lavable en lavaplatos" o similar. En el caso de
plasticos sin esta marca, siga las recomendaciones del fabricante.
Nota: El anterior punto puede omitirse en el caso de que et aparato contenga una pieza
calentadora colocada de forma que el plastico no pueda Ilegar a ella.
f) No toque la pieza calentadora durante o despues del uso.
g) No utilice el lavaplatos si los paneles de cierre no estan todos en su sitio.
h) No manipute los controles.
i) No se siente encima, no se apoye en la puerta ni en la bandeja de platos del lavaplatos, haga un
mal uso del lavavajillas.
j) Para reducir el riesgo de da5os personales, no permita que los ni5os jueguen dentro o encima del
lavaplatos.
k) Bajo ciertas condiciones, podria aparecer gas de hidr6geno en un sistema de agua caliente que
no se ha utilizado en un par de semanas o ma.s. EL GAS DE HIDROGENO ES EXPLOSlVO. Si
el sistema de agua caliente no se ha utilizado en este periodo de tiempo, antes de utilizar el
lavaplatos, abra todos los grifos de agua caliente y deje que satga agua durante unos minutos.
Asi se liberara un posible gas de hidr6geno acumulado. Ya que el gas es inflamable, no fume o
deje una hornilla abierta durante este tiempo.
I) Saque la puerta del compartimiento de lavado mientras se haga un servicio o se deseche el
producto.

H
H
ADVERTENClAPara minirnizar el riesg0 de incendio 0 explosi6n descarga el_i_,
o para prevenir lesiones personales cuando use e!ectrodomesticos, se deben
seguir precauciones b&sicas de seguridad, incluyendo las siguientes. 9
f ...................................................................................................
El lavavajillas funciona
unicamente a 120 V.
Antes de conectar el cable
de alimentacion,
compruebe que esta
conectado a tierra y a un
.cor!.oc!.rcu.!to....................................
La ausencia de conexiones a
tierra,pueden ocasionar
avenas o choques electricos.
No instale o almacene el
lavavajillas en lugares
expuestos a las
condiciones climaticas.
Puede causar choque
electrico, incendio, mal
funcionamiento o
deformaci6n.
No dahe el cable ni coloque
........
Si se dafia el cable, pueden
producirse incendios o
choque electrico.
Coloque el lavavajillas en
una superficie lisa y solida.
Evitara que se produzcan
ruidos y vibraciones
anormales.
\ ........... J
1_ _
........................................................................................................J
No agarre el cable ni el
enchufe con las manos
mojadas, y no utilice
cables, enchufes ni tomas
que se encuentren
dahados.
Puede sufrir choque electrico.
El desmontaje y las
revisiones deben ser
realizados por expertos.
.................................................................
Si desmonta o repara de
manera incorrecta el aparato,
podrian producirse fallos o
descargas electricas.
Luego de la instalacion,
revise las conexiones de
.!odos..!os.mangu.!!os:.................
Si la conexi6n estA suelta, el
agua se escaparia,
ocasionando graves dafios.
En el caso de lavavajillas que vayan a estar conectados permanentemente : |
Este electrodom6stico debe estar conectado a un sistema de cableado o equipo permanentes. El conductor
J
de toma de tierra debe funcionar con los conductos de circuito y conectarse a la terminal o carga de toma de
tierra del aparato.

ADVERTENClAPara minimizar el riesg0 de incendio 0 explosi6n descarga el6c_'i_,
o para prevenir lesiones personales cuando use electrodomesticos, se deben
_guir precauciones basicas de seguridad, inc!uyendo las siguientes.
y .......
Gasolne Alcohol
\ .................................................................................J
Delergentes normales
\, .....
Nodejequelos niSoso los / %_,_______T...._ ......
animales domesticosjueguen '_iii'
encima de la puertaoden_ro _,,-_ I_ __1_-'-);_
del lavavajillas,
Nodejequelos niSosse
cuelguendel asa,porquela
pu,ertap,odriaceder,abrirsey
.g..o.!.p.ear!es............................................
LosniSospuedencaerse.
Losanimalesdomesticoso los
niSos pueden resultar heridos por
las partes giratorias, o asfixiarse ,,_
dentro del _ambor.
No almacene ni utilice
materiales combustibles,
gasolina u otros vapores y
liquidos inflamables junto
al electrodomestico.
Podria causar un incendio.
No salpique agua al
lavavajillas.
Puede producir un incendio o
un choque electrico.
Si no va a utilizar el
lavavajillas durante un
largo periodo de tiempo,
cierre la valvula del agua.
.................................................................
Si cierra la va.lvula, evitara.
desperdicio de agua.
Utilice solamente detergentes o agentes
humectantes recomendados para uso en
lavavajillas y mantengalos alejados del
alcance de los nifios.
Los detergentes normales pueden hacer que
el electrodomestico funcione mal, ocasionar
un choque
electrico o incendio debido al exceso de
espuma.
No saque las bandejas del
lavavajillas.
Los ni_os podrian ponerse a
jugar dentro del lavavajillas.
Los niSos pueden resultar
lesionados jugando con los
estantes.
Mantenga el lavavajillas
alejado de estufas
electricas, velas o cualquier
elemento inflamable.
.................................................................
Algunas de las piezas se
podrian fundir, o prender fuego.
Debido a su elevado peso,
el lavavajillas deberia ser
desembalado y movido por
mas de dos personas.
.................................................................
Dejar caer o tirar al piso el
producto puede causar
lesiones a personas o romper
el lavaplatos.
No apriete los botones con
objetos puntiagudos, como
destornilladores o agujas.
.................................................................
Puede producirse un cheque
electrico o mal
funcionamiento,

ADVERTENClAPara minimiza_"el riesgo de incendio o explosi6n, descarga el_i_,
o para prevenir lesiones personales cuando use electrodomesticos, se deben
_guir precauciones basicas de seguridad, inc!uyendo las siguientes.
ADVERTENClASeguridad para ni_os
• Se pueden bloquear los mandos utilizando la modalidad Child Lock (Bioqueo para ni_os) con el fin de
evitar que los ni_os cambien los par&metros del lavavajiflas.
• Mantenga los detergentes fuera del alcance de los ni_os.
• No permita que los ni_os manejen el lavavajiflas.
• Se debe controtar a los niRos pequeRos para asegurarse de que no juegan con el electrodomestico
ADVERTENClAcon respecto al cable de alimentacion
La mayoda de los aparatos recomiendan que se les coloque en un circuito dedicado, es decir:
un circuito con una sola salida que alimente Qnicamente a ese aparato y no tenga otras salidas o
derivaciones. Compruebe la p&gina de especificaciones de este manual de instrucciones para
asegurarse. No cargue demasiado los enchufes de las paredes. Los enchufes sobrecargados, sueltos o
da_ados, el uso de extensiones electricas, cables deshilachados, rotos o da_ados son peligrosos. Si
sucediera cualquiera de estas situaciones, se podria producir un choque electrico o un incendio.
Examine peri6dicamente el cable del aparato, y si por su aspecto piensa que podria estar da_ado o
deteriorado, desenchQfelo, deje de usar el aparato y haga que un tecnico autorizado cambie el cable por
otro exactamente igual. Proteja el cable del abuso fisico o mec&nico, para que no se enrolle, se
peflizque, se quede trabado con una puerta o sea pisoteado. Preste una especial atencion a enchufes,
tomas de corriente y el punto por donde sale el cable del electrodomestico.
_1 roducto, como el vinilo o
poliestireno para evitar
peligros.
...............
muerte por asfixia por el vinilo
o el poliestireno.
Corte el cable del enchufe y
separe las partes de los
botones.
Asi se evita la reutilizacion de
estas partes.
GUARDE ESTAS INSTRUCCIONES

O Panel de control O Brazo pulverizador inferior
O Asa de la puerta @ Distribuidor auxiliar de detergente y
O Tapa delantera aclarado
O Tapa de ventilaci6n de vapor
O Tapa inferior O La.mpara de la tina (lllumiTub TM)_
O Pata niveladora @ Bandeja para cubiertos
O Armario lateral • Bandeja superior
O Base @ Cesta para cubiertos
@ Brazo putverizador supremo _) Bandeja inferior
• Brazo putverizador superior • Pantalla de visualizaci6n superior
@ Separadores desmontables • Bot6n de encendido
• Boquilla del vapor
IllumiTub TMse enciende cuando la puerta esta abierta. Y se apaga
cuando la puerta est#. cerrada.
Especificaciones
• Alimentaci6n: solamente 120V, 60Hz AC
• Presi6n del agua: 20 - 120 psi (140 - 830 kPa)
• Tama_o (WxDxH): 23 7/8" x 25" x 33 7/8"
(606mm x 635mm x 860mm)
• Temperatura minima recomendada del agua de entrada : 120°F (49 °C)
• Peso: 128 Ibs. (58 kgs)
El aspecto y las especificaciones estb.n sujetos a cambios sin necesidad
de que el fabricante Io autorice.

iiill
Este ciclo es para cargas muy sucias, como ollas, sartenes
y cacerolas, que pueden tener residuos secos de comida.
SOAK
(Prelavado)
POWER SCRUB
Este ciclo es para la vajilla muy sucia.
(Intensivo)
NORMAL Este ciclo es para la vajilla diaria con suciedad normal.
STEAM DELICATE Este ciclo sirve para lavar articulos delicados como la porcelana o la
(Lavado delicado) cristaleria.
QUICK Este ciclo permite lavar r&pidamente platos y cubiertos
(R&pido) poco sucios y recien utilizados.
RINSE ONLY Este ciclo se utiliza solamente para un enjuague ra.pidode
(Solo enjuagado) los platos. No se utiliza detergente.
STEAM
(Vapor)
Pulse el boton STEAM para afiadir vapor al ciclo seleccionado para
mayor potencia de lavado.
NOTA: El vapor solo puede afiadirse a estos ciclos:
SOAK, POWER SCRUB, NORMAL.
RINSE (Higienico/ Cada vez que pulse el boton Rinse (enjuagado) podr& elegir entre
Extra enjuagado) Sanitary ( &16orhigienico), Extra Rinse ( R÷ Extra enjuagado) o ambos.
SPRAY (Intensidad Seleccione la intensidad del rociado que mejor encaje con sus
necesidades de limpieza. Si pulsa repetidamente la tecla SPRAY,
de rociado) se seleccionar& Fuerte ( _ ), Medic ( _; ) o Suave (-:_").
Para cargas ma.spequefias, utilice esta opcion para lavar solamente la
HALF LOAD bandeja superior o inferior para ahorrar energia.
(Media carga) Pulse HALF LOAD repetidamente para seleccionar el estante superior
o inferior.
DELAY START
(Retrasar inicio)
Utilice esta opcion para encender el lavaplatos posteriormente.
Pulse DELAY START repetidamente para retrasar el inicio del ciclo
seleccionado. Cada vez que se pulse el boton aumentara el tiempo de
retraso en una hora. El retraso maximo es 24 horas.
Solamente el ciclo sanitario est# diset_ado para cumplir los est#ndares de esterilizaci6n. No existe ninguna
intenci6n, directa o indirecta, de que todos los ciclos cumplan con los estdndares de esterilizaci6n.

O O • OO •
@
@
d
O
O
O
UPPER
LOWER
m
Ofn.l 0
clO.8o
OPCION DE INDICADOR DE VAPOR
Indica que se ha seleccionado la opcion STEAM.
Este simbolo parpadeara, mientras se introduce vapor en el lavaplatos.
INDICADOR DE ENJUAGUE
Muestra la configuracion de la opcion de enjuague.
El simbolo ( _160"F) indica que se ha seleccionado la aclaracion por esterilizacion.
El simbolo parpadea durante el ciclo si se ha alcanzado la temperatura de
esterilizacion. Acabado el ciclo, el simbolo permanecer& fijo si se ha alcanzado la
temperatura de esterilizacion. (Vease la NOTA abajo.) El simbolo ( R+ ) indica que
se ha afiadido un enjuague adicional al ciclo seleccionado.
INDICADOR DE ROClADO
tndica la intensidad escogida entre Fuerte (_-_), Media(G; ) o Suave (-3,',).
INDICADOR DE MEDIA CARGA
Cada vez que pulse la tecla HALF LOAD se cambia solamente entre la bandeja
superior o la bandeja inferior. Cuando se selecciona DUAL INTENSITY TM,las dos
luces se encenderan, pero una parpadear&. La intensidad del rociador de la bandeja
seleccionada se puede ajustar independientemente.
BLOQUEO PARA NINOS
Este simbolo ser_.visible cuando se active la proteccion para nifios.
ENJUAGUE EXTRA
Este simbolo estar& activado cuando necesite rellenarse el ciclo de enjuague extra.
TIEMPO RESTANTE
Indica el tiempo restante del ciclo seleccionado.
Durante este ciclo, se mostrar& el tiempo estimado restante para el siguiente ciclo.
CANCELAR
BLOQUEO
PARANINOS
•Cuando desee detener el lavavajillas, pulse los botones Normal y Steam Delicate
al mismo tiempo durante 3 segundos.
•La bomba de drenaje se activara, y el ciclo se cancelara..
•BIoquee los botones de control durante el funcionamiento del ciclo para evitar
cambios en los ajustes.
•Para bloquear / desbloquear, pulse Spray y Rinse al mismo tiempo durante 3
segundos.
La alta temperatura enjuaga, desinfecta platos y cristaleria de acuerdo con la norma NSF/ANSI
STANDARD 184 para Lavavajillas Residenciales. Los certificados residenciales del lavavajillas no
aplican para establecimientos de comida.
ii i Z Z Z Z Z Z Z

LAVADO ENJUAGUE SECA Agua
Ciclo Prelavad:Lavado . ;_ • ^;Enjuague DO (gal/L)
o iprincipalEnjuague11_-njuagueziencaliente
1201= ',140q491=
' _ 5.5-9.2/
21_35
49oC ',60_65°C
I I I
I
iiiiiiiiiiiiiiiiiii_!i_i_!!_i_!;_i_ii_ii_ii_ii_ii_ii_ii_ii_ii_i_!_iiiii!!_ii_i_!i!!i!!i!!i!!i!!i!!i!!i_!i_!i_!i_!i!_i;i;i;i;i;i;i;i;i;i;i;i;i;i_ii_ii!_!_!!_!!_!!_!!_!!_!!_!!_!!_!!_!!_!!_!!_!!_!!_!!_!_!!_i_i
:,'
,,
I
I
I
I
I
I
I
I
I
i
I
I
I
I
I
I
I
I
I
I
I
I
I
I
I
i
I
I
I
I
I
I
I
I
I
I
I
68°C
1491=
65°C
1541=
68°0
1401=
60oc
5.5_9.2/
21_35
2.6~6.9/
10~26
5.5_6.9/
21_26
5.5/21
1.3/5
Tiempo
(rain)
143q91
123_171
110q35
93
74
14
Opci6n
Aclarado Vapor
Activar Activar
Activar Activar
Activar Activar
Activar Activar
Activar Desactivar
Desactivar Desactivar
La intensidad del rociador de la bandeja superior e inferior puede programafla el consumidor. Puede
escoger la potencia de lavado segen la suciedad del plato.
Por ejemplo, si escoge rociador suave para la bandeja superior y et rociador fuerte para el inferior,
puede lavar objetos delicados como los vasos en la bandeja superior mientras lava cacerolas y
sartenes en la inferior.
1. Pulse la tecla SPRAY durante tres segundos y a continuaci6n, el indicador UPPER se encendera y
se apagar&
2. Pulse la tecla SPRAY para ajustar la intensidad de rociado de la bandeja superior
(Fuerte/Media/Suave/Apagado)
3. Pulse ta tecla HALF LOAD para confirmar la intensidad de la bandeja superior.
4. Pulse la tecla SPRAY para ajustar la intensidad de rociado de la bandeja inferior
(Fuerte/Media/Suave/Apagado)
5. Pulse la tecla HALF LOAD para confirmar la intensidad de la bandeja inferior.
6. Seleccione otras opciones.
7. Cierre la puerta.
8. Se activara el tavaplatos.
]2

Antesde usarsu lavavajillas,favorde leer
las Instrucciones Importantes de
Seguridad.
Para Iograroptimos resultados en el Invade de la vajilla,
y una duracion razonabledel ciclo, el agua deberi tener
una temperatura de 120°F(49°0) al entrar en la
lavavajillas. Pereste motive, recomendamos utilice
solamente el grifo del agua caliente. Tambien es
importante que Ilene el lavavajillassegOnIns
instrucciones para una limpieza eficaz.
AImemento de Ilenarel lavavajillas, compruebe que los
plates y utensilios no tienen elementos indisolubles,
come huesos, cfiscaras, palillos, etc.
Cuando cargue el lavavajillas, observe Ins pautas
generales:
1. Los objetos hondos deberin colocarse en un ingulo
adecuado que facilite la correcta caida del agua para
una buena limpieza y un secado adecuado.
2. Retire losrestos solidos o quemados de los objetos
antes de meterlos en el lavavajillas.
3. Meta en el lavavajillas unicamenteobjetos aptos para
lavavajillas.
Evite introducir uteasilios no resisteates al calor, que
lleven decoraciones de metal, etc.
Carga de la bandeja inferior
La tina extra alta permite la carga de plates,sartenes y
otros utensilios con un tamafio superior a 14 pulgadas.
No obstruya la rotacida de losbrazos pulverizadores.
Compruebe que no hay objetos largos que impidan
la apertura del dispensador de detergente.
Los objetos que se deben colocar en la cesta inferior son
los plates planes, plates para sopa, plates hondos,
cazuelas, sartenes, tapas e incluso la rejilla de la parrilla.
Los plates deben colocarse en posicion vertical y
mirando hacia el centre de la bandeja. Las cazuelas,
sartenes y plates grandes deben colocarse en posicion
invertida.
Bisicamente, la bandeja inferior no esti destinada para
la carga de objetos pequefios, come tazas, vases de vine
o plates pequefios, que estarin mejor colocados en la
bandeja superior.
12 servicios colocados en la bandeja inferior
La cesta para cubiertos
Las bandejas estin disefiadas para sujetar incluso los
elementos mils delicados de forma segura en su sitio, asi
como platos altos,tazones, tazas, etc. Ademis, nuestra
bandeja para cubiertos y cuchillos dispone de
separadores que impiden que la cuberteria delicada se
ralle o deslustre. La cesta se puede dividir en tres cestas
independientes, que se pueden utilizar tanto en la
bandeja superior como en la inferior, y si solamente tiene
que lavar unos pocos cubiertos, las cestas se pueden
sacar para dejar espacio libre para mils platos.
Tenga cuidadocualdo metay saqueobjetosafilados.Los
cuchillos afilados debea colocarse con el mango hacia
arriba,para reducirel riesgodecortarse.
10 servicios colocados en la bandeja inferior.
.......................................... 13

ii i
Separadores desmontables
Si desea lavar muchos platos grandes, podra hacerlo
sacando los separadores de la bandeja principal.
No cargarlos articulos termalmeate d(biles del pl6stico, del
cristal y del oro bordeados delante del iayector de vapor.
Separadores angulares ajustables
Lossoportes para platos de las bandejas superior e
inferiorson plegables. SegOnel tamafio y las formas de
los platos,podra ajustar el angulo en 5 posicionesde los
separadores.
Carga de la bandeja superior
Es mejorcargar la bandeja superior con los objetos mas
delicados, platos pequeflos, cubiertos de gran tamafio,
tazas, vasos y objetos de plastico aptos para lavavajillas.
Los platos deben ser colocados en posicion vertical con
la parte inferior de los mismos mirando hacia el frente de
la bandeja. Lastazas, vasos y tazones deben colocarse
bocaabajo. Lastazas y losutensilios de cocina se
pueden poner en los soportes plegables para tazas, que
tambien pueden servir de apoyo para los vasos altos.
Tenga cuidado de no obstruir la rotacion del brazo
rociadorque se encuentra debajo de la bandeja superior.
\
Teaga cuidado cuaado ajuste los separadores aagulares; no
losfuerce demasiado.
10 servicios colocados en la bandeja superior
Cargamento del plato manchado duro
Si deseas lavar el plato dificilmente manchado,
cargar el plato delante del inyector de vapor.
El inyector de vapor puede quitar fa.citmente la
mancha dura en el plato con vapor caliente.
12 servicios colocados en la bandeja superior
14

Bandeja superior de alturaajustable para
platosde 14 in.(en algunosmodelos)
El lavavajillas LG tiene el orgullo de indicarlecomo meter
platos de 14 in. La bandeja superior se mueve hacia
arriba o hacia abajo para poder colocar objetos altos y de
tamafio considerable. Los lavavajillas LG se ajustan Io
suficiente para que quepan platos de 14 in. en la bandeja
inferior, y de 12 in. en la bandeja superior.
Para subir la cesta
Empuje la bandeja hacia arriba, sujetandola por el centro
de sus lados (punto marcado con _t_) hasta que se
bloquee.
Para bajar la bandeja
Sujete la bandeja por la partecentral de cada lado para
soportar su pesoy, a continuacion, levante la palancade
cada lado para soltar la bandejay bajelo.
(punto marcadocon _ ).
Despu(s de ajustar la batdeja, compruebe que el brazo rociador
puede girar libremente, sin que sea detenido por los platos
colocados en la bandeja superior. No ajuste /as bandejas cuando
tengan platos dentru.
r
Atencibn
Objetos que nose puedenintroduciren ellavavajillas
Lacombinaciondealtastemperaturasconel detergente
paralavavajillaspodriadaSardeterminadosobjetos,porIo
querecomendamosnointroduciren el lavavajillaslos
siguientesproductos:
•Vajillaspintadasa manoconla.minasdeoro o plata
• Utensiliosde maderao hueso
• Utensiliosde hierroo de unmaterialfa.cilmenteoxidable
•Objetosde pla.sticonoaptospara ellavavajillas
Opcionpara mediacarga
Si notienesuficientesplatosparaunacargacompleta,
puedecargarlosplatossolamenteen la bandejasuperioro
en lainferior.A continuacionpuedelavarcadabandejapor
separadooseleccionandola opcionde mediacarga.Con
estaopcionseahorraaguacaliente,electricidadytiempo.
Retirarla bandejasuperior
La bandejasuperiorsepuederetirarparaliberarespacioen
la bandejainferior.
Pararetirarla bandejasuperior:
1.Jalela bandejasuperiorhastaquese detenga.
2.Aprietela leng0etadeltope alfinalde cadaladodel riely
extra_igalo.Aseguresede que labandejasuperiorno se
salede losrielesmientrasextrae lostopes.
3.Saquela bandejasuperiorde losrieles.
Apretar pesta_a
No retire la bandeja superior si tiene platos dentro. Su peso
elevado puede hacer que se le caiga la bandeja, asi que vaciela
antes de retirarla.
15

ii i
Carga de la bandeja para cubiertos
La bandeja para cubiertos es perfecta para
muchos utensilios de cocina y de servicio.
Los separadores de las bandejas para cubiertos
ayudan a mantener los utensilios de cocina
separados para evitar dafios y mejorar la limpieza.
10servicioscolocadosenlabandejasuperior
Los mangos de cuchillos, tenedores y cucharas
deben colocarse entre los dientes.
Bandeja de altura ajustable
Cada lado de la bandeja se puede ajustar a una
posici6n ya sea alta o baja de forma independiente
para acomodar utensilios de diversos tamafios.
Cada bandeja se ajusta levantando y girando la
bandeja hacia adelante y hacia atras.
Bandeja extraible
Si desea colocar utensilios grandes, debera sacar la
bandeja de cubiertos para dejar espacio extra.
Siempre saque los cubiet_tos de la batuteja antes de sacarla.
Si et mango de los
cubiertos es demasiado
grueso, deberan
cotocarse al reves.
Saque la bandeja.
/i\ ADVERTENCIA
Cuidado con la carga y descarga de objetos
puntiagudos. Cargue los objetos puntiagudos
con el mango hacia arriba para reducir el
riesgo de dafios personales.

C0mo afiadirdetergenteen el dosificador
• Debecolocarel detergenteen sucompartimientoantesde
comenzarcadacicloexceptocuandoseseleccioneelciclo
de SOloEnjuague.
• Paradeterminarlacantidadadecuadade detergente,le
pedimosquesigalasinstruccionesdelfabricanteque
aparecenen el manual.
• Silosplatosno estanexcesivamentesucios,podrautilizar
menosdetergentedel recomendado.
• Elcompartimentodeldetergenteadmitecomomaximo1.4
oz (40g).
• Lacantidadde detergentedependedel programaydel
nOmerode platos.Consultela tablaguia de la parte
inferior.
CICLO
CANTIDAD DE DETERGENTE
PRELAVADO
Soak 0.35 oz
Power Scrub 0.35 oz
Normal Sin detergente
Steam Delicate Sin detergente
Quick Sin detergente
Rinse only Sin detergente
LAVADO
PRINCIPAL
1.05 oz
1.05 oz
0.7 oz
0.3 oz
0.7 oz
Sin detergente
jJ Advertencia
Informacion sobre el detergente
Utilicesolamenteel detergenteindicadoparalavavajillas
domesticos,de Iocontrario,el lavavajillaspuedeIlenarse
deespumaduranteel funcionamiento.Laespumapuede
reducirel rendimientode lavadoy, sihubieramucha
espumadentrodel lavavajillas,estase derramaray
mojarael suelo.(Nosedebe utilizarundetergente
corrienteparalasmanos.)
Como Ilenar el dosificador
1.Tire del pasador para abrir el compartimento.
2. Eche el detergente adecuado en el compartimento
principal. (consulte la tabia para conocer ia
cantidad adecuada de detergente.)
No a_ada detergente en el ciclo de aclarado.
Paraellavadoprincipal
3. Si es necesario, afiada detergente en el
compartimento de prelavado.
Paraelprelavado
4. Cierre la tapa.(escucharA un clic}
Q
Si pone demasiado detergente, quedardn residuos en
los platos.

ii i
Como afiadir el pulidor en el dosificador
El prop6sito det pulidor es evitar posibles manchas
en los platos durante la operaci6n de secado.
Este lavavajillas admire t'micamente pulidor liquido.
• Para Ilenar con pulidor liquido
1. Gire tatapa redonda en el sentido contrario alas
agujas del reloj y retirela.
• Ajuste de la cantidad del pulidor
Por fabricaci6n, el ajuste de la dosis viene fijado en 3
niveles que ofrecen el mayor rendimiento en
condiciones normales. Si ajusta el control del
enjuague extra en un nivet muy bajo, apareceran
manchas y sombras en los platos y provocara, un
desempefio pobre en el secado. Si ajusta el control
demasiado alto, se formara espuma que provocara
fallos o un desempefio pobre en el lavado.
1. Retire la tapa.
2. Gire la flecha del indicador a la posici6n que
desee.
2. Llene el compartimento hasta et nivel ma.ximo con
un abrillantador (maximo 4.8 oz (145ml)).
3. Vuetva a colocar la tapa y cierrela.
Indicador de
abrillantador 0
_Nivel de ajuste
b_ (a_rillantador)
• Para el rellenado con pulidor liquido
El dosificador del pulidor tiene una capacidad de 4.8
oz. (145mi). La configuracion de f&brica es de 3
niveles para esos 4.8 oz. (145ml). El periodo de
relleno depende de los habitos de lavado como la
cantidad de lavados mensuales o el tipo de ajuste de
enjuague extra que seleccione. Pero no tiene que
preocuparse gracias al indicador de reltenado, que le
informa cuando tiene que hacerto. Si hay poco
pulidor, la luz del indicador se encender& cuando
cierra la puerta del lavavajillas.
4. El putidor se despachar& automaticamente
durante el 01timo ciclo de enjuague.
18

Para obtener los mejores resultados, es importante revisary cuidar perbdicamente losfiltros y brazes
rociadores.
ParaprevenirCualquieida_00 accidenteal memento derealizarla limpieza0
I_' ADvlItR3"I_NclA mantenimientoeel lavavajillas,asegQresede usa_"guantes. )
Limpieza de las piezas metalicas
Algunaspiezasexterioreso interioressepuedenlimpiarcon un
trapoo unaesponja.Si sulavaplatoscuentaconun panelen la
puertade aceroinoxidable,recomendamosusarun limpiador
de buenacalidadespecializadoen estematerial.Latinade
aceroinoxidabletienetendenciaa acumularempafioen la
superficie,especialmenteconuna presionfuertedel agua.
Limpieza de los brazes rociaderes
- Brazepulverizadorinferior
•Compruebeque losagujerosde propulsbndel agua nohan
sidobloqueadoscontrozosde comida.
•Cuandolimpieel brazerociador,saquelojalandolohacia
arriba.
• Limpieel brazedelrociadory cAmbieloempujandohacia
abajo paracolocarloensusitio.Aseguresedeque el brazo
del rociadorgireconfacilidadluegode la instalacion.
- Brazerociadorubicadoenla cima
•Compruebeque losagujerosde propulsiondelagua no
hansidebloqueadoscontrozosde comida.
• Paralimpiarel braze,saquelodesmontandoel ganchodel
soportequefijael brazea la tina.
• Limpieel brazepulverizadory vuelvaa colocarlo.
- Brazemciadorsuperior
•Jalela bandejasuperiorhaciadelante.Compruebeque los
agujerosde propulsbnde aguano hansidebloqueados
controzosdecomida.
• Sinecesitalimpiarlo,extraigael brazedel rociadorgirando
latuercade la parteinferiordelbrazedel rociador1/8de
vueltaen el sentidocontrariode lasagujasdel relojytire
de 61haciaabajo.(Consultelassiguientesilustraciones)
• Limpieel brazepulverizadory vuelvaa colocarloen
sentidoinverse.Compruebequeha apretadolatuerca
firmemente!
Mantenimiento de temporada
- Duranteel verano,si novaa estarencasa duranteun largo
periododetiempo,recomendamosquecierrelavalvuladel
agua,y quedesenchufeel aparato.
- Duranteel invierno,sila temperaturaambientedellugar
dondeseencuentrael lavavajillasIlegacasi algradede
congelacion,recomendamosqueacondicioneparael
inviernolasvias de suministrodeagua yprotejasu
electrodomestico.
ii i ii ii ii ii ii ii ii

•
=
=
Carguelosplatos.
Primero, quite los restosde comida. Saque la
bandeja inferiory coloque los platos y la vajilla en la
bandeja, empujandola hacia atras. Saque la bandeja
superior y ordene lastazas, vasos, etc. Empuje la
bandeja.
Conecteel lavavajillas.
Cuando este listo para realizar un ciclo, abra la puerta
y pulse el botonde encendido. El lavavajillas pasa
automaticamente al ciclo normal.
Compruebe si tiene pulidor.
La luz del indicador se encendera si el nivel de
enjuague extra es bajo.
El tiempo que aparece en la ventana de la pantalla empezar6
a disminuir de minuto en minuto. Si se abriera la puerta
durante la ejecuci6n del programa, el lavavajillas se detendrdt.
Una vez que se haya cerrado la puerta, se reanudardt el
programa en el punto en que se interrumpi6.
=
=
Medida del detergente.
Afiada la cantidad necesaria de detergente en el
dosificador. Cierre la tapa del dosificador de
detergente.
Seleccion del programa.
Seleccione el programay las opciones que desee.
Antes de que empiece el ciclo, la pantalla mostrara el
tiempo estimado para el programa seleccionado. Si
los utensilioscaben solamente en una bandeja,
puede seleccionar la opcion de Media Carga. Por
ejemplo, si carga platos solamente en la bandeja
superior, ajuste el boton de mediacarga a la bandeja
superior.
=
=
Cierrela puerta.El lavavajillas
comienzaautomaticamenteluego
de un pequefioretraso.
AI finalizar el programa de lavado.
Tras acabar el programa, aparecera End (fin)en la
pantalladigital durante unossegundos y un zumbido
le comunicara que el programa ha finalizado.
El lavavajillas se apagara automaticamente por
motivos de seguridad y para ahorrar energia
Vacie la bandeja inferior en primer lugar y, a
c0ntinuaci6n, la bandeja superi0rl c0n esto,
evitar& el goteo de agua desde la bandeja
superior sobre los platos situados en la inferior.
Advertencia
En t6rminos generales, no es aconsejable abrir
la puerta mientras el aparato se encuentre en
funcionamiento; no obstante, si se abre la
puerta, un dispositivo de seguridad hace que el
aparato se detenga.
Hay que tenet mucho cuidado si se abre la
puerta durante la fase de calor o
inmediatamente despu6s de terminar un
programa, puesto que se podda liberar vapor.
Apagadoautom_itico
Si el lavavajillas esta encendido, pero no se
selecciona ning0n programa o no se cierra la
puerta tras seleccionar un programa
transcurridos 10 minutos, se apagar_.
ElCiclodeLavadoDualIntensityTM
Selecci6n de curso _ Pulse la tecla SPRAY
durante 3 seg. -_Selecci6n de SPRAY para
el elemento superior (fuerte/medio/suave/
apagado) -_Pulse HALF LOAD para
seleccionar la bandeja inferior -_Selecci6n de
SPRAY para el rociado inferior(fuerte/medio/
suave/apagado) -, Compruebe la selecci6n
presionando HALF LOAD -_Otra opci6n -_
Puerta cerrada -_ Inicio

Lapuertanoesta_cerradadeltodo.
Nose haseleccionadounciclo.
Nosehaconectadolacorrienteelectrica.
Nohayagua.
Elfusiblehafallado.
Unidadconedada alaguafria.
Elcicloanteriorsedetuvoantesde
completarse.
LamangueradedesagDeest&
dobladao atascada.
Eleccioninadecuadadel programa.
Latemperaturadelaguaesbaja.
Cantidaderroneade detergente.
Bajapresiondelaguade entrada.
Losagujerosde propulsiondelagua
de losbrazosrociadoresest&n
bloqueados.
Losplatossehancolocadodeforma
incorrecta.
Bajatemperaturadelagua.
Cantidaderroneade detergente.
Sobrecarga.
Cargamalrepartida.
Presiondelagua insuficiente.
Detergenteinsuficiente.
Eldosificadordelpulidorestavacio.
Presiondemasiadofuertedelagua.
Ciertonivelde ruidoesnormal.
Ellavavajillasnoesta_enposicion
horizontal.
Elbrazode la boquillagolpeacontra
losplatos.
Compruebeque lapuertaest&completamentecerrada
yconseguro.
Seleccioneel cidodeseado.
Conectecorrectamentelacorriente.
Compruebequeelgrifodelaguaestaconectadocorrectamente.
Cambieelfusibleo arregleelcortocircuito.
Reviselaconexiondel suministrodeaguao el ajuste
delcalentadorde agua.(Calentarelaguatardamas
tiempo).
Utiliceel programade soloenjuaguehastaque haya
metidotodoslosplatos.
Ajustelamanguerao eliminelaobstruccion.
Seleccioneel programacorrecto,dependiendodeltipo
de vajillayIoadeheridode lasuciedad.
Latemperaturadelaguadebeseral menosde 120°F.
Utilicelacantidaddedetergenterecomendada.
Lapresiondelaguadeberiaoscilarentre20-120psi.
Umpieel brazo.
Losplatosno deberianinterrumpirlarotaciondelbrazo,
ni laaperturadeldosificadorde detergente.
Latemperaturadelaguadebeseral menosde 120°F
paraobtenermejoresresultados.
Utilicelacantidaddedetergenterecomendada.
Carguela cantidadadecuadade platos.
Reorganicelosplatosconsultandoeldibujode las
p&ginas10y 11.
Ajustelapresiondel aguaentre20y 120psi.
ASadalacantidadadecuadadedetergente,
consultandolasinstrucciones.
Relleneeldosificadordel pulidor.
Instaleunpositivodomesticoparareducirlapresiondelagua.
Aperturadelatapadeldetergente.SonidodeldesagDe
al principiodelcido dedrenado.
Ajustelainstalacion.
Coloquede nuevolosplatos.
ii i ii ii ii ii ii ii ii

Combinaciondeexcesode detergente Vacieel lavaplatosy utiliceunabrillantadorpara
yaguacon pocapresion, minimizaresteproceso.
Losobjetosdealuminiohanrayadolos Eliminelasmarcasdealuminioconunlimpiador
31atosduranteelprogram& suave.
Manchasdecafeo t& Eliminelamanchaconun productoquitamanchas.
Eldep6sitodel pulidorest&vaci6. Reviseyrelleneeldep6sitodel pulidorsiesta_vacio.
La corrientenoesta_conectada.El Conede lacorriente.Sustituyaelfusibleyrepareelcorto
fusiblehafalladoo seha realizadoun circuito.
cortocircuito.
El montajedelbrazopulverizadorest#_ Umpielosagujerosdelosbrazosrociadores.
bloqueadoporparticulasdecomida.
La bandejaesta_malajustada. Ajustela bandejasuperiorcorrectamente,
consultandola p&gina12.
Enel panelquedanrastrosde Umpieel panel
comidao detergente.
Trabajoconguantesde pl&stico. Trabajesinusarguantes.
Problemasconlaentradadeagua. Compruebequenose hayatapadola mangueradel
agua(queesteretorcidao congelada).Compruebesino
sedebea uncortedelsuministrode agua.
Problemasdedrenaje. Compruebequenose hayatapadola mangueradel
agua(queesteretorcidao congelada).
Sesuministrademasiadaagua.
Problemasconfugasde agua.
FallodelCircuitodelCalentador.
Problemasconeltermostato.
Uamealserviciotecnico.(1-800-243-0000)
Si ha seguido la guia para la resolucion de problemas y no se ha resuelto el problem& o si el problemaexistente no
aparece en la list& pongase en contacto con el servicio de atencion al cliente de LGE Ilamando al 1-800-243-0000.

Su lavavajillas LG ser#. reparada o reemplazada, a consideracion de LG, si prueba ser defectuosa por fabricacion
o en ejecucion dentro de un uso normal, dentro del periodo de garantfa ("periodo de garanfia') descrito en la
parte inferior, efectivo desde la fecha ("fecha de compra') de la compra del producto por el consumidor. Esta
garanfia limitada es efectiva 0nicamente para el comprador original del producto, y efectivo 0nicamente si ha sido
usado en los Estados Unidos, incluyendo Alaska, Hawai y territorio norteamericano.
PEFIJODO DE GAFIANTJA:
Vigencia: 1 a_o desde la fecha de compra.
PARTES (exceptuando la siguiente lista): 2 afios desde
la fecha de compra.
Piezas para el panel de control electr6nico: 5 a_os
desde la fecha de compra,
Piezas para el bastidor del lavavajillas: 5 afios
desde la fecha de compra.
Piezas para el revestimiento de la puerta de acero
inoxidable o la Cubeta: De por vida.
Las unidades reemplazadas y reparadas pueden ser
nuevas o refabricadas por la f_tbrica.
Las unidades reemplazadas y reparadas tienen el
mismo tiempo restante de garantia que el producto
original.
COMO SE MANEJA EL SERVIClO :
Servicio a domicilio: Pot favor conserve el
recibo del lugar donde realiz6 su compra como
evidencia de la fecha en que el producto fue
adquirido para validar el periodo de garantfa, y
tenga una copia del recibo para la persona de
servicio que la atienda en el momento en que
necesite aplicar su garantfa.
Por favor Ilame al 1-800-243-0000 y escoja la
opcion apropiada para Iocalizar el Centro de
Servicio Autorizado LG mas cercano a usted
O visite nuestra pa.ginade Internet en
http://www,lgservice,com,
ESTA GARANTJA REEMPLAZA CUALQUIER OTRA GARANTJA, EXPRESA O IMPLICITA, INCLUYENDO SIN
LIMITACION CUALQUIER GARANTJA DE VENTA DE MERCANCIA O CONVENIENCIA PARA PROPOSITOS
PARTICULARES. EN EL EXTENDIDO CUALQUIER GARANTJA IMPLICITA ES REQUERIDA POR LEY, ES
LIMITADA EN DURACION AL PERIODO DE GARANTIA EXPRESA EN LA PARTE INFERIOR. NI EL
FABRICANTE NI SUS DISTRIUBUIDORES EN LOS EUA PUEDEN SER RESPONSABLES DE NINGUN
DAI_IO INCIDENTAL. CONSECUENCIAL, INDIRECTO, ESPECIAL O PUNITIVO DE NINGUNA NATURALEZA,
INCLUYENDO SIN LIMITACION, PERDIDAS DE GANANCIAS O CUALQUIER OTRO DAI_O AUNQUE ESTE
BASADO EN CONTRATO O AGRAVIO. Algunos estados no permiten la exclusion o limitacion de da_os
incidentales o consecuenciales en el tiempo va.lido de la garantfa asf que la exclusion mencionada en la parte de
arriba puede que no aplique para usted. Esta garanfia le da derechos legales especificos y puede que usted
tenga otros derechos adema.s de los mencionados que varian de estado en estado.
ESTA GARANTJA LIMITADA NO APLICA A:
• Viajes de Servicio a su casa para Ilevar, recoger y/o instalar el producto, instruir o reponer fusibles o conectar
correctamente cables, o la correccion de reparaciones no autorizadas; y
• DaSos o problemas operacionales como resultado de un mal uso, abuso, operacion dentro de un ambiente no
especificado o contrario a los requerimientos o precauciones en la Guia Operacional, accidentes, plagas,
incendios, inundaciones, instalacion inapropiada, actos de Dios, alteraciones o modificaciones desautorizadas,
voltaje incorrecto, uso comercial, o para el uso de otros fines que no sean los propositos para los que rue
diseSado. El costo de reparaciones o reemplazos que son excluidos de estas circunstancias, deben set
asumidos pot el consumidor.
NOMEROS CENTRALES INTERATIVOS PARA EL CLIENTE
Para obtener Asistencia al Consumidor Informacion Llame al 1-800-243-0000 (24 horas al dia, 365 dfas
de Producto, O centros de Servicio Autorizados, al aSo) y seleccione la opcion apropiada del ment_.
O visite nuestra pagina de internet en
http://www.lgservice.com
PARA CONTACTAR A LG Electronics POR MAIL:
LG Customer Interactive Center
P,O, Box 240007
201 James Record Road
Huntsville, Alabama 35824
ATTN: ClC
ii i M M M M M M M

LG Electronics Inc.
N° de Ref.: MFL30149746
-
 1
1
-
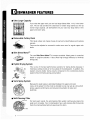 2
2
-
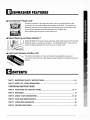 3
3
-
 4
4
-
 5
5
-
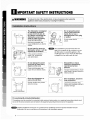 6
6
-
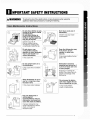 7
7
-
 8
8
-
 9
9
-
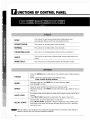 10
10
-
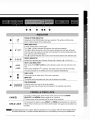 11
11
-
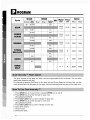 12
12
-
 13
13
-
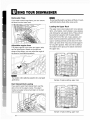 14
14
-
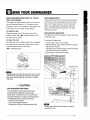 15
15
-
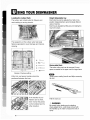 16
16
-
 17
17
-
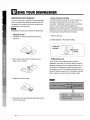 18
18
-
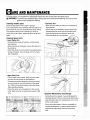 19
19
-
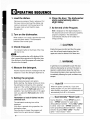 20
20
-
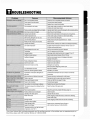 21
21
-
 22
22
-
 23
23
-
 24
24
-
 25
25
-
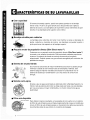 26
26
-
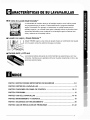 27
27
-
 28
28
-
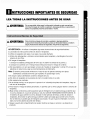 29
29
-
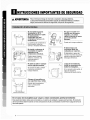 30
30
-
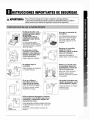 31
31
-
 32
32
-
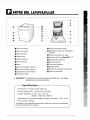 33
33
-
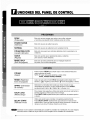 34
34
-
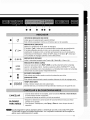 35
35
-
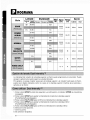 36
36
-
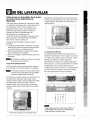 37
37
-
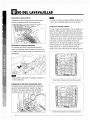 38
38
-
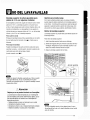 39
39
-
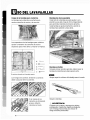 40
40
-
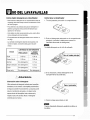 41
41
-
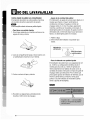 42
42
-
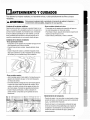 43
43
-
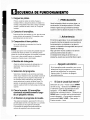 44
44
-
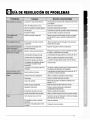 45
45
-
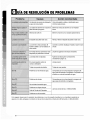 46
46
-
 47
47
-
 48
48


LG LDF9810ST El manual del propietario
- Categoría
- Lavaplatos
- Tipo
- El manual del propietario
en otros idiomas
- English: LG LDF9810ST Owner's manual
Artículos relacionados
-
LG LDF8812ST El manual del propietario
-
LG Electronics LDF9810ST Manual de usuario
-
LG LDF8072ST El manual del propietario
-
LG LSDF9962ST El manual del propietario
-
LG 8806084006028 El manual del propietario
-
LG LDS5811BB El manual del propietario
-
LG LSDF9962ST/00 El manual del propietario
-
LG LDF7774BD/00 El manual del propietario
-
LG LD-6300TB El manual del propietario
-