Haier WS120GA El manual del propietario
- Categoría
- Enfriadores de bebidas
- Tipo
- El manual del propietario
Este manual también es adecuado para

Wine Cellar
EN
IT
ES
DE
FR
NL
CZ
PL
WS120GA WS190GA

Names of Wine Cellar Components
Top wine shelf
Wine shelves
Adjustable
foot screw
Glass door
Master control panel
WS120GA WS190GA
(117bottlecapacity) (189bottlecapacity)
2

3
Heading 1
EN
IMPORTANT SAFEGUARDS ............................................................. 4
Installing Your Wine Cellar.............................................................. 5
Unpacking Your Wine Cellar ............................................................................................. 5
Leveling Your Wine Cellar ................................................................................................. 5
Proper Air Circulation........................................................................................................ 5
Electrical Requirement ...................................................................................................... 6
Install Limitations............................................................................................................... 6
Use of Extension Cord....................................................................................................... 6
Initial Setup ......................................................................................................................... 6
Introduction to Primary Functions of the Appliance ..................... 7
1.Temperature Adjustment ............................................................................................. 7
2.Interior Light ...................................................................................................................... 7
3.“°F/°C” Conversion. ....................................................................................................... 7
4.Door opening alarm ...................................................................................................... 8
5.Temperature Power-Off Memory ..................................................................................... 8
6.Power ................................................................................................................................ 8
Precautions for Use of Wine Cellar................................................. 9
Automatic Defrosting......................................................................................................... 9
Shelving............................................................................................................................. 10
Normal Operating Sounds You May H
ear ..................................................................... 10
TroubleShooting ............................................................................ 12
Technical Data ............................................................................ 13
Table Of Contents
Page
Proper Wine Cellar Care and Cleaning ......................................... 11
Packing List ............................................................................ 13

4
Heading 1
This appliance is intended to be used exclusively for the storage of wine.
When using this appliance, always exercise basic safety precautions,
including the following:
1. Read all of the instructions before using this appliance.
2. Use this appliance only for its intended purpose as described in this use
and care guide.
3. This wine cellar must be properly installed in accordance with the
installation instructions before it is used. See grounding instructions in the
installation section.
4. It is intended strictly for household usesuch as
– staff kitchen areas in shops, offices and other working environments;
– farm houses and by clients in hotels, motels and other residential type
environments;
– bed and breakfast type environments;
– catering and similar non-retail applications.
5. This appliance can be used by children aged from 8 years and
above and persons with reduced physical, sensory or mental capabilities or
lack of experience and knowledge if they have been given supervision or
instruction concerning use of the appliance in a safe way and understand
the hazards involved. Children shall not play with the appliance.
6. The appliance must be positioned so that the plug is accessible.
7. If the supply cord is damaged, it must be replaced by the manufacturer, its
8. Keep ventilation openings, in the appliance enclosure or in the built-in
structure, clear of obstruction.
9. Do not use mechanical devices or other means to accelerate the defrosting
process, other than those recommended by the manufacturer.
10. Do not damage the refrigerant circuit.
11. Do not use electrical appliances inside the food storage compartments
of the appliance, unless they are of the type recommended by the
manufacturer.
12. If the light is damaged, it must be replaced by the manufacturer, its service
13. This appliance is intended to be used exclusively for the storage of wine.
15. Risk of child entrapment. Before you throw away your old wine cellar, take
off the doors. Leave the shelves in place so that children may not easily
climb inside.
14.
propellant in this appliance.
IMPORTANT SAFEGUARDS
16. Please contact the service agent to dispose the appliance because the
flammable refrigerant and flammable blowing gas was used.
17. Refrigerants are flammable , should be careful when you do the installation,
handling, servicing.

5
Heading 1
EN
Installing Your Wine Cellar
Unpacking Your Wine Cellar
1. Remove all packaging material. This includes the foam base and all adhesive tape holding
the wine cellar accessories inside and outside.
2. Inspect and remove any remains of packing, tape or printed materials before powering on the
wine cellar.
Leveling Your Wine Cellar
• Your wine cellar has four leveling legs which are located in the front and rear corners of your
wine cellar.
• Leveling legs can be adjusted by turning them clockwise to raise your wine cellar or by turning
them counterclockwise to lower your wine cellar. The wine cellar door will close easier when
the leveling legs are extended.
Proper Air Circulation
•
install it in a location where there is proper air circulation, plumbing and electrical connections.
• The following are recommended clearances around the wine cellar:
Sides ................4" (100mm)
Top ...................4" (100mm)
Back .................4" (100mm)
•
Note: If your wine cellar has been tilted for any reason, wait 24 hours before plugging it in.
More than
10 cm
from the top
More than
10 cm
from the right
High Low
Adjustable
foot screw
More
than
10 cm
from the rear
More than
10 cm
from
the left

6
Heading 1
Electrical Requirement
• Make sure there is a suitable power Outlet (220-240V, 15 amps outlet) with proper grounding
to power the wine cellar.
• An independent and exclusive standard outlet with reliable grounding shall be used for the
wine cellar by matching its 3-pin plug including the grounding pin,which shall never be removed
or disconnected with the grounding wire in any circumstances.
Install Limitations
• Do not install your wine cellar in any location not properly insulated or heated e.g. garage etc.
Your wine cellar was not laid to operate if the ambient temperature is below 10°C.
• Select a suitable location for the wine cellar on a hard even surface away from direct
sunlight or heat source e.g. radiators, baseboard heaters, cooking appliances etc.
unevenness should be corrected with the leveling legs located on the front and rear bottom
corners of the wine cellar.
• Your wine cellar is designed for free-standing installation only. It is not designed for built-in
application.
Use of Extension Cord
• Avoid the use of an extension cord because of potential safety hazards under certain
conditions. If it is necessary to use an extension cord, use only a 3-wire extension cord that
has a plug with 2 round pins and 1 slot and an outlet with 2 slots and 1 round pin that will
accept the plug. The marked rating of the extension cord must be equal to or greater than the
electrical rating of the appliance.
Initial Setup
Once you have plugged the unit into an electrical outlet, let the unit run for at least 30 minutes
to acclimatize itself before making any adjustments. During this time, depending on the internal
temperature, the red or white wine light will stay on for the upper compartment and red or white wine
light will stay on for the lower compartment. The LED display will show the current internal temperature.

7
Heading 1
EN
Introduction to Primary Functions of the Appliance
1.
Temperature Adjustments
To set the temperature hold the button for about 3 seconds. Then the temperature
display of IN.T° flashes . Press the or button to increase or decrease the
temperature setting. Once the desired temperature is attained, press the button.
2.
Control Panel
The temperature range of display panel is 5~20°C(41~68°F).
The default setting temperature is 12°C(54°F).
You can set the temperature according to your wine storage requirements.
Interior Light
Compliment the look of your collection, a soft light has been built into the wine cellar.
Simply push the button and the light comes on, push again for off.
When door is open the light will go on. Upon closing the door, light will go off.
3.
“°F/°C” Conversion
Press and hold for 3 seconds, the displayed temperature in Fahrenheit degree
and °F character will convent to temperature in Celsius degree and “°C” character.
Press and hold for 3 seconds again, the temperature in Celsius degree
and “°C” character will convert to temperature in Fahrenheit degree and “°F” character.
Temperature
Adjustment
(up)
Light
SET
Power
Temperature
Adjustment
(down)
SET LIGHT
POWER
OUT.T° IN.T°

8
Heading 1
4.
Door opening alarm
In case the door is kept open for over 1 min, buzzer will be beeping to give an alarm till
the door is closed or any key on display panel can be operated and then the buzzer will
stop beeping.
5.
6.
Power
Temperature Power-Off Memory
In case of a power outage, the cellar will automatically save the set temperature.
After power recovery,it will run based on the temperature set before the power
outage while other functions will return to the default status.
Holding the key for 3 seconds, the main power will turn off (power for all electrical
devices inside will be cut off and the whole appliance will be in standby).
If the device is off, the power can be turned on by holding the key for 3 seconds,
and then all icons on the display screen will turn on.

9
Heading 1
EN
Do not place too much wine in the cellar so
as not to exceed the bearing capacity of the
wine shelves. Do not place more than four
layers of wine on each shelf. The number of
wine bottles should not exceed four layers on
each shelf, and the bearing capacity of the wine
shelves should not exceed 35kg.
Before placing the bottles inside the wine
shelves are completely stable.
bottle protrudes from the shelves in order
to prevent bottles hitting the glass door
upon closing.
Precautions for Use of Wine Cellar
Automatic Defrosting
The way in which wines continue to mature depends on the ambient conditions. The quality of
the lower area of the rear wall of the appliance to ensure that the air through put remains at an
optimum quality.
CAUTION
a year. Filters can be obtained from your dealer.
Insert with the handle in a vertical position. Turn it to the
right and insert.
This appliance has an automatic defrosting function.
During use, ensure that the drainage hole is unblocked so
the drainage hole into the water receiver
inside the cellar cabin.
Regularly clean water tank at the bottom of the compartments; use a dry
cloth to absorb water inside the water tank and wipe down them (clean them every three
months as suggested).

10
Heading 1
Shelving
• The shelves are designed for appearance and easy cleaning. Larger bottles or Magnums can
be more easily accommodated at the cross shelves at the bottom of the cellar.
• There are some shelves for easy storage and removal of your wine.
Normal Operating Sounds You May Hear
• Water flowing sound or slight vibrations that are the result of the refrigerant
circulating through the cooling coils.
• The compressor will click when it cycles on and off.

11
Heading 1
EN
Cleaning and Maintenance
Warning:
To avoid electric shock always unplug your wine cellar before cleaning. Ignoring
this warning may result in death or injury.
Caution:
Before using cleaning products, always read and follow manufacturer's
instructions and warnings to avoid personal injury or product damage.
General:
• Prepare a cleaning solution of 3-4 tablespoons of baking soda mixed with warm
water. Use sponge or soft cloth, dampened with the cleaning solution, to wipe
down your wine cellar.
• Rinse with clean warm water and dry with a soft cloth.
• Do not use harsh chemicals, abrasives, ammonia, chlorine bleach, concentrated
detergents, solvents or metal scouring pads. SOME of these chemicals may
dissolve, damage and/or discolor your wine cellar.
Door Gaskets:
• Clean door gaskets every three months.
Gaskets must be kept clean and pliable to assure a proper seal.
• Petroleum jelly applied lightly on the hinge side of gaskets will keep the gasket
pliable and assure a good seal.
Wine Shelf:
If the wine shelf was accidentally sprinkled with wine or water droplets, please
use 300-400 sandpaper to polish, then use soft cloth to wipe down the sawdust.
Do not use towel or soft cloth with water.
Power Interruptions
• Occasionally there may be power interruptions due to thunderstorms or other causes.
Remove the power cord from AC outlet when a power outage occurs. When power has
been restored, replug power cord to AC outlet.
Vacation and Moving Care
• For long vacations or absences, unplug the wine cellar and clean the wine cellar and
door gaskets. Leave doors open, so air can
circulate inside.
• When moving always move the wine cellar vertically. Do not move with the unit lying
down, as possible damage to the sealed system could occur.
Note: After moving, wait for 24 hours before plugging in the wine cellar.
Proper Wine Cellar Care and Cleaning

12
Heading 1
Wine Cellar Does Not Operate:
• Check if wine cellar is plugged in.
• Check if there is power in the AC outlet, by checking the circuit breaker.
Wine appears too warm:
• Frequent door openings.
• Allow time for recently added wine to reach desired temperature.
• Check gaskets for proper seal.
• Please contact the service agent to clean condenser coils.
• Adjust temperature control to colder setting.
Wine temperature is too cold:
• If temperature control setting is too cold, adjust to a warmer setting.
Wine cellar runs too frequently:
• This may be normal to maintain constant temperature during high temperature and humid days.
• Doors may have been opened frequently or for an extended period of time.
• Please contact the service agent to clean condenser coils.
• Check gasket for proper seal.
• Check to see if doors are completely closed.
Moisture build up on interior or exterior of the wine cellar:
• This is normal during high humidity periods.
• Prolonged or frequent door openings.
• Check door gaskets for proper seal.
Wine cellar door does not shut properly:
• Level the wine cellar.
• Check for blockages e.g. wine bottles, shelves.
Do not dispose of electrical appliances as unsorted
municipal waste, use separate collection facilities.
Contact you local government for information
regarding the collection systems available. If
dumps, hazardous substances can leak into the
groundwater and get into the food chain, damaging
your health and well-being. When replacing old
appliances with new ones, the retailer is legally
obligated to take back your old appliance for
disposals at least free of charge.
TroubleShooting

13
Heading 1
EN
Technical Data•Packing List
Technical Data
Packing List
This appliance is being developed continuously. We reserve the right to change the components
of the wine cellar without notice.
Model Climate Tape
Available
Capacity
(l)
Rated
Voltage (V)
Rated
Frequency
(Hz)
Input Power
(W)
WS120GA I 220 220-240 50 110
WS190GA I 385 220-240 50 100
Temperature
Range
(°C)
Refrigerant
(R600a)
(g)
Supply Cord
Connection
Mode
Weight
(kg)
Noise
(Acoustic
Power Level)
dB (A)
Overall Dimension
(Depth × Width ×Height)
(mm)
5-20 45 Y 69 38 639×595×1,265
5-20 75 Y 94 38 639×595×1,850
Remarks:
1. According to international standards, if the climate is an SN-ST type, the ambient temperature for use of the
wine cellar ranges between 10°C and 38°C.
2.
"Noise (acoustic power level)" marked in the technica
l
data refers to a situation in which the semi-anechoic
rubber cushion as thick as 5 mm to 6 mm is placed inside. It can run for at least 30 minutes after the door is
closed. A test will be conducted after stable running (excluding startup and shutdown). Ground noise will be
tested at 1 m from the front, rear, left and right surfaces of the wine cellar respectively.
During use, it is normal that the actual noise is different from the marked noise due to the effects of the
type of wine stored in the wine cellar, ambient noise, door opening and closing, compressor startup and
shutdown, etc.
room is set up as thick as specified according to national standards,in the case of an empty wine cellar,a resilient
User
Guide
Information
Kit
Wine
shelves
Through-
hole Pin
Key
WS120GA 1 1 4 1 2
WS190GA 1 1 7 1 2
Name
Quantity
Product Model
SN-ST
SN-ST
Electric Shock
Resistance
Type

14
Intestazione 1
Nomi dei componenti della cantina
Ripiano
superiore
per i vini
Ripiani
per vino
Sportello in vetro
Filtro ai carboni attivi
Vite del piede
regolabile
Pannello di controllo
principale
(capacità:
117 bottiglie)
(capacità:
189 bottiglie)
WS120GA WS190GA

15
Intestazione 1
IT
MISURE DI SICUREZZA IMPORTANTI ........................................... 16
Installazione della cantina............................................................ 17
Disimballaggio della cantina per vini ............................................................................ 17
Messa in piano della cantina per vini ............................................................................ 17
Circolazione adeguata dell'aria...................................................................................... 17
Requisiti elettrici .............................................................................................................. 18
Limitazioni per l'installazione......................................................................................... 18
Utilizzo di cavi di prolunga.............................................................................................. 18
urazione iniziale.................................................................................................... 18
Introduzione alle funzioni fondamentali dell'apparecchio........... 19
1.Regolazioni della temperatura ..................................................................................... 19
2.Luce interna ....................................................................................................... 19
3.Conversione “°F/°C” ...................................................................................................19
4.Allarme apertura porta ..................................................................................................20
5.Memoria di spegnimento temperatura.........................................................................20
6.Potenza ............................ ................................................................................. 20
Precauzioni per l'uso della cantina............................................... 21
Sbrinamento automatico................................................................................................. 21
Ripiani................................................................................................................................ 22
Rumori durante il funzionamento .................................................................................. 22
Pulizia e manutenzione corrette della cantina per vini ............................................... 23
Risoluzione dei problemi............................................................... 24
Dati tecnici
Lista di imballaggio
...................................................................... 25
Sommario
Pagina
...................................................................... 25

16
Intestazione 1
Questo apparecchio è concepito per essere utilizzato esclusivamente
per la conservazione del vino.
Durante l'utilizzo dell'apparecchio, seguire sempre le precauzioni di
sicurezza basilari, tra cui:
1. Leggere tutte le istruzioni prima di utilizzare l'apparecchio.
2. Utilizzare l'apparecchio solo per lo scopo previsto, in base a quanto
descritto nella presente guida relativa all'utilizzo e alla manutenzione.
3. Prima dell'utilizzo, la cantina per vini deve essere accuratamente installata
in conformità alle istruzioni di installazione fornite. Vedere le istruzioni sulla
messa a terra nella sezione relativa all'installazione.
4. L'apparecchio è destinato esclusivamente all'uso domestico. Se utilizzato
per scopi industriali o commerciali, assicurarsi di osservare le normative in
materia. L'apparecchio può essere utilizzato da bambini di età superiore
oppure con mancanza di esperienza e conoscenza, solo se sorvegliati
o se adeguatamente istruiti in merito all'utilizzo sicuro dell'apparecchio
e agli eventuali rischi connessi. Non lasciare che i bambini giochino con
l'apparecchio. Le operazioni di pulizia e di manutenzione non dovranno
essere volte da bambini senza la supervisione di un adulto.
5. Posizionare l'apparecchio in modo che la spina sia facilmente accessibile.
6. Se il cavo di alimentazione è danneggiato, contattare il produttore, un
al
7. Mantenere libere da ostruzioni le aperture di ventilazione nell'involucro
dell'apparecchio o nella struttura a incasso.
8. Non utilizzare nessuno strumento per accelerare il processo di
sbrinamento, ad eccezione di quelli consigliati dal produttore.
9. Non danneggiare il circuito del refrigeratore.
10. Non utilizzare apparecchi elettrici nei vani di conservazione degli alimenti,
ad eccezione di quelli di tipo consigliato dal produttore.
11. In caso di danneggiamento, la spia deve essere sostituita dal produttore,
12. Questo apparecchio è concepito per essere utilizzato esclusivamente per
la conservazione del vino.
13. Rischio di intrappolamento bambini. Prima di disfarsi di una vecchia
cantina per vini, è opportuno rimuovere gli sportelli. Non rimuovere i ripiani
per evitare che i bambini possano introdursi all'interno.
14. Non conservare sostanze esplosive come bombolette di aerosol con
MISURE DI SICUREZZA IMPORTANTI

17
Intestazione 1
IT
Installazione della cantina
Disimballaggio della cantina per vini
1. Rimuovere tutto il materiale di imballaggio, inclusa la base in schiuma e il nastro adesivo che
2. Ispezionare e rimuovere eventuali rimanenze dell'imballaggio o di nastro e qualsiasi materiale
stampato prima dell'accensione della cantina.
Messa in piano della cantina per vini
• La cantina è dotata di quattro piedini per la messa in piano, posizionati agli angoli anteriori
e
• I piedini possono essere regolati, ruotandoli in senso orario per alzare la cantina e in senso
antiorario per abbassarla. L'estensione completa dei piedini agevola la chiusura e l'apertura
dello sportello.
Circolazione adeguata dell'aria
• Per garantire il funzionamento ottimale della cantina, è necessario installare l'apparecchio
in una posizione che consenta un'adeguata circolazione dell'aria e in cui siano presenti
i collegamenti elettrici e l'impianto idraulico corretti.
• Spazio libero consigliato attorno alla cantina:
Lati ........................... 100 mm
Piano superiore ........ 100 mm
Retro ........................ 100 mm
• Non sovraccaricare la cantina per consentire un corretto raffreddamento del vino.
Nota: se, per qualche motivo, la cantina è stata inclinata, attendere 24 ore prima di collegarla
all'alimentazione.
Più di
10 cm
dalla parte superiore
Più di
10 cm
dalla
parte destra
Stringere Allentare
Vite del
piede
regolabile
Più di
10 cm
dalla parte
posteriore
Più di
10 cm
dalla parte
sinistra

18
Intestazione 1
Requisiti elettrici
• V, 15 amp) con messa a terra
corretta, per l'alimentazione della cantina.
• Evitare l'utilizzo di adattatori tripolari o l'adattamento a una presa bipolare eliminando il polo
della messa a terra. Si tratta di un'operazione pericolosa poiché elimina la messa a terra
necessaria per la cantina, con conseguente pericolo di scosse elettriche.
Limitazioni per l'installazione
• Non installare la cantina in luoghi non adeguatamente isolati o riscaldati, ad esempio nei
garage. La cantina non è predisposta per il funzionamento a temperature inferiori ai 10°C.
•
luce diretta del sole e lontana da fonti di calore, come radiatori, riscaldatori a zoccolo,
apparecchiature per la cucina ecc. Eventuali dislivelli del pavimento possono essere
compensati regolando i piedini posizionati agli angoli anteriori e posteriori della cantina.
• La cantina è progettata per essere installata solo autonomamente e non in strutture
a incasso.
Utilizzo di cavi di prolunga
• Evitare l'utilizzo di cavi di prolunga che, in alcune condizioni, possono causare potenziali
rischi per la sicurezza. Se è necessario utilizzare un cavo di prolunga, utilizzare solo un cavo
di prolunga trifase con spina di tipo europeo (2 terminali e un foro) e una presa apposita in
grado di accettare la presa. La tensione elettrica del cavo deve essere uguale o superiore a
quella indicata per l'apparecchio.
Configurazione iniziale
Dopo aver collegato l'unità a una presa elettrica, lasciarla in funzione per almeno 30 minuti per
stabilizzare la temperatura, prima di procedere con le regolazioni desiderate. Durante tale intervallo
di tempo, a seconda della temperatura interna, la luce dei vini rossi o bianchi resterà accesa per
lo scomparto superiore e l'altra resterà accesa per lo scomparto inferiore. Sul display LED verrà
visualizzata la temperatura interna corrente.

19
Heading 1
IT
Introduzione alle funzioni primarie dell’apparecchiatura
1
.
Regolazioni della temperatura
Per impostare la temperatura tenere premuto il pulsante per circa 3 secondi. Quindi il
display della temperatura di IN.T° lampeggia. Premere il pulsante o per aumentare
o ridurre l’impostazione di temperatura. Dopo aver raggiunto la temperatura desiderata,
premere il pulsante .
2.
Pannello di controllo...........
La gamma di temperatura del pannello del display è 5~20°C(41~68°F).
La temperatura di impostazione predefinita è di 12°C(54°F).
Luce interna
A completamento della vostra collezione, abbiamo aggiunto una luce tenue nella
cantinetta dei vini. Basta premere il pulsante e si accende la luce, premere
nuovamente per spegnerla.Quando la porta è aperta la luce si accende.
Alla chiusura della porta la luce si spegne.
3.
Conversione “°F/°C”
Premere e tenere premuto per 3 secondi, la temperatura visualizzata in Fahrenheit e
il carattere °F convertiranno la temperatura in gradi Celsius insieme al carattere “°C”.
Premere e tenere premuto nuovamente per 3 secondi; la temperatura in gradi Celsius
e il carattere “°C” convertiranno la temperatura in gradi Fahrenheit insieme al carattere “°F”.
Temperatura
Regolazione
(su
)
Luce
forno
IMPOSTA
POTENZA
( giù
)
Temperatura
Regolazione
Sarà possibile impostare la temperatura a seconda dei propri requisiti per la conservazione
del vino.
SET LIGHT
POWER
OUT.T° IN.T°

20
Heading 1
4.
Allarme apertura porta
Qualora la porta venga tenuta aperta per più di 1 minuto, il cicalino continuerà a
emettere dei bip come allarme fino a che non verrà chiusa la porta o qualsiasi tasto
sul pannello display non potrà essere usato e poi il cicalino smetterà di fare bip.
5.
6.
Potenza
Memoria di spegnimento temperatura
In caso di black-out la cantinetta salva in modo automatico la temperatura impostata.
Dopo il ripristino della corrente, funzionerà sulla base della temperatura impostata
prima del black-out mentre le altre funzioni tornando allo stato predefinito..
Tenendo premuto il tasto per 3 secondi, l’alimentazione principale si spegne
(l’alimentazione per tutti i dispositivi interni verrà disattivata e il dispositivo sarà in
standby).Se il dispositivo è spento, l’alimentazione potrà essere attivata tenendo
premuto il tasto per 3 secondi, e poi tutte le icone sulla schermata del display
si accendono.

21
Intestazione 1
IT
Non depositare nella cantina quantità di vino
troppo elevate, in modo da non superare la
capacità di portata dei ripiani. Non collocare
posizionare più di quattro livelli di bottiglie su ogni
ripiano; il peso massimo consentito su ogni
portabottiglie è di 35 kg.
Prima di posizionare le bottiglie nella cantina,
stabili.
alcuna bottiglia per evitare che lo sportello di
vetro vi sbatta contro durante la chiusura.
Precauzioni per l'uso della cantina
Sbrinamento automatico
La maturazione del vino dipende dalle condizioni ambientali. Pertanto, la qualità dell'aria
è decisiva per preservare la qualità dei vini riposti nella cantina. In basso, sulla parete posteriore
sempre ottimale.
ATTENZIONE!
all'anno, richiedendolo al proprio rivenditore.
e rimuoverlo.
Inserirlo con la maniglia in posizione verticale. Avvitarlo
verso destra e inserirlo.
quattro
Questo apparecchio è dotato di funzione di
scongelamento automatico. Durante l'uso, verificare
che tale foro non sia otturato, in modo da consentire
all'acqua di sbrinamento di fluire correttamente
nell'apposita vaschetta della cantina.
Pulire con regolarità le vaschette per la racconta dell'acqua nella parte posteriore degli scomparti
superiore e inferiore. Utilizzare un panno asciutto per assorbire l'acqua presente nelle vaschette
(si consiglia di effettuare la pulizia ogni tre mesi).

22
Intestazione 1
Ripiani
• I ripiani sono progettati per una presentazione ottimale e una facile pulizia. Le bottiglie più
grandi o Magnum possono essere sistemate più facilmente sui ripiani orizzontali in basso.
• Alcuni ripiani consentono di sistemare e rimuovere le bottiglie più facilmente.
Rumori durante il funzionamento
• Gorgoglio dell'acqua o leggere vibrazioni causate dalla circolazione del liquido attraverso la
serpentina di raffreddamento.
• Il controllo del termostato emette un "clic" quando si accende e si spegne.

23
Intestazione 1
IT
Pulizia e manutenzione
Attenzione:
per evitare scosse elettriche, scollegare sempre il cavo di alimentazione della
cantina prima delle operazioni di pulizia. Il mancato rispetto di tale avvertenza
può causare lesioni gravi o morte.
Attenzione:
prima di utilizzare prodotti per la pulizia, leggere e attenersi sempre alle
persone o danni al prodotto.
Informazioni generali:
• Preparare una soluzione detergente sciogliendo 3-4 cucchiai di bicarbonato di
sodio in acqua calda. Utilizzare una spugna o un panno morbido inumiditi con
la soluzione per detergere la cantina.
• Risciacquare con acqua calda pulita e asciugare con un panno morbido.
• Non utilizzare sostanze chimiche, abrasivi, ammoniaca, candeggina,
detergenti concentrati, solventi o spugnette metalliche. ALCUNI prodotti
chimici potrebbero dissolversi e danneggiare o scolorire la cantina.
Guarnizioni dello sportello:
• pulire le guarnizioni dello sportello ogni tre mesi, seguendo le istruzioni
garantire la perfetta aderenza.
• Una leggera applicazione di vasellina sulla cerniera delle guarnizioni aiuterà
a
Portabottiglie:
se il portabottiglie viene accidentalmente bagnato da gocce d'acqua o vino,
utilizzare della carta vetrata da 300-400 per pulire, quindi utilizzare un panno
morbido per rimuovere la segatura. Non utilizzare un asciugamano o un
panno morbido con acqua.
Interruzioni di corrente
•
Rimuovere il cavo di alimentazione dalla presa CA in caso di interruzione della corrente
elettrica. Una volta che la corrente elettrica è stata ripristinata, reinserire il cavo di
alimentazione alla presa CA.
Manutenzione in caso di vacanze e trasporti
• In caso di periodi di assenza prolungati, scollegare la spina e pulire la cantina e le
guarnizioni dello sportello seguendo le istruzioni indicate nella sezione relativa alla pulizia
generale. Lasciare gli sportelli aperti per consentire la circolazione dell'aria all'interno
dell'apparecchio.
• Per il trasporto dell'apparecchio, mantenere la cantina sempre in posizione verticale.
sistema di sigillatura.
Nota: dopo il trasporto, attendere 24 ore prima di ricollegare il cavo di alimentazione
dell'apparecchio.
Pulizia e manutenzione corrette della cantina per vini

24
Intestazione 1
La cantina non funziona:
•
•
Vino troppo caldo:
• Aperture frequenti dello sportello.
•
• Controllare che le guarnizioni siano perfettamente aderenti.
• Pulire la bobina del condensatore.
• Regolare la temperatura su un valore più basso.
Vino troppo freddo:
• Se la temperatura è impostata su un valore troppo basso, aumentare il valore.
La cantina si attiva troppo frequentemente.
• Tale condizione potrebbe essere normale per mantenere la temperatura costante in giornate molto
calde e umide.
• Sportelli aperti troppo di frequente e per lungo tempo.
• Pulire la bobina del condensatore.
•
•
della cantina:
• Non è insolito in periodi molto umidi.
• Aperture frequenti o prolungate dello sportello.
•
Lo sportello della cantina non si chiude correttamente.
• Controllare la messa in piano della cantina.
•
urbani indifferenziati; utilizzare impianti per la
raccolta differenziata. Contattare le autorità locali
per informazioni sui sistemi di raccolta disponibili.
Se gli elettrodomestici vengono smaltiti in discarica,
potrebbero fuoriuscire sostanze pericolose che,
disperse nell'ambiente, possono entrare nella
catena alimentare, provocando danni alla salute.
Quando si sostituisce un vecchio elettrodomestico
con uno nuovo, il rivenditore è obbligato a farsi
carico gratuitamente dello smaltimento del vecchio
elettrodomestico.
Risoluzione dei problemi

WS120GA
WS190GA
1 1 4 1 2
1 1 7 1 2
WS120GA
WS190GA
I 220 220-240 50 110
I 385 220-240 50 100
5-20 45 Y 69 38 639×595×1,265
5-20 75 Y 94 38 639×595×1,850
SN-ST
SN-ST
25
Intestazione 1
IT
Dati tecnici•Lista di imballaggio
Dati tecnici
Lista di imballaggio
L'impegno per migliorare questo apparecchio è costante. Pertanto il produttore si riserva il diritto
Guida
per
l'utente
Kit
informazioni
Ripiani
per vino
Scovolino Chiave
Modello
Tipo di
clima
T di resistenza
alle scosse
elettriche
Capacità
disponibile
(l)
Tensione
nominale
(V)
Frequenza
nominale
(Hz)
Alimentazione
(W)
Intervallo di
temperatura
(°C)
Refrigerante
(R600a)
(g)
Modalità di
collegamento
cavo di
alimentazione
Peso
(kg)
Livello di
rumore (livello di
potenza sonora)
dB (A)
Dimensioni generali
(Profondità ×
Larghezza × Altezza)
(mm)
Importante:
1. In base agli standard internazionali, se il clima è di tipo SN-ST, la temperatura ambientale per l'uso della
cantina è compresa in un intervallo da 10 °C e 38°C.
2. "Il livello di rumore (livello di potenza sonora)" indicato nei dati tecnici si riferisce all'installazione in un
vuota, dotata di un cuscinetto di gomma resistente di spessore compreso tra 5 e 6 mm. Il livello di rumore
viene misurato per almeno 30 minuti dopo la chiusura dello sportello. Durante il normale funzionamento
verrà eseguito un test (escluse le fasi di accensione e spegnimento). Il livello di rumore del pavimento verrà
Durante l'uso, è normale che il rumore effettivo differisca dal rumore rilevato, a causa degli effetti del
tipo di vino conservato nella cantina, al rumore ambientale, all'apertura e alla chiusura dello sportello,
all'accensione e allo spegnimento del compressore e così via.
Nome
Quantità
Modello
prodotto

26
Heading 1
Nombres de componentes de la bodega
Estante
superior para
el vino
Bandejas
de vino
Puerta de cristal
Filtro de carbón activado
Pie
atornillado
ajustable
Panel de control principal
(Capacidad para
117 botellas)
(Capacidad para
189 botellas)
WS120GA WS190GA

27
Heading 1
ES
ADVERTENCIAS DE SEGURIDAD................................................... 28
Instalación de la bodega............................................................... 29
Desembalaje de la bodega .............................................................................................. 29
Nivelación de la bodega .................................................................................................. 29
Ventilación......................................................................................................................... 29
Requisitos eléctricos ...................................................................................................... 30
Limitaciones de la instalación........................................................................................ 30
Uso de la regleta de extensión ....................................................................................... 30
Con
........................................................................................................30
Introducción a las funciones principales del aparato.................. 31
1.Ajustes de temperatura ............................................................................. 31
2.Luz interna ................................................................................ 31
3.Conversión de “°F/°C”.................................................................................................. 31
4.Alarma de puerta abierta ........................................................................................... 32
5.Memoria de apagado de la temperatura ..................................................................... 32
6.Potencia ............................................................................................................ 32
Precauciones de uso de la bodega............................................... 33
Desescarchado automático ............................................................................................ 33
Estantes.............................................................................................................................34
Ruidos de funcionamiento normales ............................................................................34
Cuidado y limpieza de la bodega ................................................................................... 35
Solución de problemas.................................................................. 36
Datos técnicos•Lista del paquete................................................. 37
Índice de contenido
Página

28
Heading 1
El uso previsto de este electrodoméstico es el almacenamiento de vino.
Asegúrese de tomar las debidas precauciones de seguridad antes de
utilizar el aparato:
1. Lea estas instrucciones con detenimiento antes de utilizar la bodega
por primera vez.
2. Utilice este aparato sólo para el uso que se describe en esta guía de uso
y mantenimiento.
3. Instale la bodega siguiendo las instrucciones de instalación proporcionadas
antes de utilizar el producto. Consulte las instrucciones de conexión
enumeradas en la sección dedicada a la instalación.
4. Este producto está diseñado exclusivamente para uso doméstico. En caso
las normativas y regulaciones pertinentes. Este aparato puede ser utilizado
por niños de 8 años en adelante y por personas con capacidad física,
psíquica o sensorial reducida, o bien, faltas de experiencia y conocimiento
si se realiza bajo supervisión o se les ha dado instrucciones acerca del
uso del aparato de forma segura y comprenden los riesgos que entraña.
Los niños no deben jugar con el aparato. La limpieza y el mantenimiento
por parte del usuario no será llevada a cabo por niños sin supervisión.
5. El aparato debe situarse de manera que el enchufe quede accesible.
6. Si el cable de alimentación se daña, deberá sustituirlo el fabricante, un
pueda ocurrir un accidente.
7. Mantenga las aperturas de ventilación libres de obstrucciones en el recinto
donde esté colocado el aparato o en la estructura donde esté encastrado.
8. No intente acelerar el proceso de descongelación haciendo uso de
un dispositivo mecánico ni por ningún otro medio que no sea el que
recomiende el fabricante exclusivamente.
9. No dañe el circuito refrigerante.
10. No utilice aparatos eléctricos en el interior de los compartimentos de
almacenamiento de alimentos del aparato, salvo que sean del tipo
recomendado por el fabricante.
11. Si la iluminación sufre algún daño, deberá sustituirla el fabricante, un
pueda ocurrir un accidente.
12. El uso previsto de este electrodoméstico es el almacenamiento de vino.
13. Evite que los menores se queden atrapados en el aparato. Antes de
deshacerse de su antigua bodega, retire las puertas. Coloque los estantes
de la misma en un lugar seguro para evitar que los menores puedan
introducirse dentro del aparato.
14. No almacene sustancias explosivas como latas de aerosoles con
ADVERTENCIAS DE SEGURIDAD

29
Heading 1Instalación de la bodega
ES
Desembalaje de la bodega
1. Retire todo el material de embalaje. Retire la base de espuma y la cinta adhesiva que sujeta
los accesorios interiores y exteriores de la bodega.
2. Revise y elimine cualquier resto de embalaje, cinta o materiales impresos antes de conectar
la bodega.
Nivelación de la bodega
• La bodega cuenta con cuatro patas de nivelación ubicadas en las esquinas delanteras
y traseras del aparato. Coloque la bodega en el lugar adecuado y, a continuación, proceda
a su nivelación.
• Si desea ajustar las patas de nivelación, gírelas en el sentido de las agujas del reloj para
subir la bodega o en dirección contraria para bajarla. La puerta de la bodega se cerrará con
más facilidad cuando se hayan extendido las patas de nivelación.
Ventilación
•
garantice la circulación de aire sin obstáculos y cerca de conexiones eléctricas y tuberías.
• Se recomienda dejar los siguientes espacios mínimos alrededor de la bodega:
Laterales .................. 100 mm
Parte superior .......... 100 mm
Parte trasera ............ 100 mm
• Si desea que el sistema de refrigeración funcione correctamente, no sobrecargue la bodega.
Nota: si la bodega se ha inclinado por cualquier motivo, espere 24 horas antes de volver
a conectarla.
Más de
10 cm
desde la parte superior
Más de
10 cm
desde
la parte derecha
Alto Bajo
Pie
atornillado
ajustable
Más de
10
cm
desde la
parte trasera
Más de
10 cm
desde la parte
izquierda

30
Heading 1
Requisitos eléctricos
• Compruebe que dispone de una toma de corriente (220 - 240 V, enchufe de 15 A) y una toma
de tierra adecuadas antes de encender la bodega.
• Evite utilizar ladrones de tres enchufes o cortar la tercera toma de tierra para adaptar una
toma de dos enchufes. Es una práctica muy peligrosa ya que no proporciona la toma de
tierra que necesita la bodega y podría causar una descarga eléctrica.
Limitaciones de la instalación
• No instale la bodega en lugares que no se encuentren convenientemente aislados o climatizados,
por ejemplo un garaje, etc. La bodega no ha sido diseñada para funcionar si la temperatura
ambiente es inferior a 10 °C.
•
resistente que se encuentre protegida de la radiación solar directa o de las fuentes de calor,
por ejemplo radiadores, calentadores, aparatos de cocina, etc. Puede corregir cualquier
desnivelación del suelo gracias a las patas de nivelación ubicadas en las esquinas delanteras
y traseras de la bodega.
• La bodega ha sido diseñada exclusivamente para una instalación independiente. No ha sido
diseñada para integrarse en otras aplicaciones.
Uso de la regleta de extensión
• Evite el uso de regletas de extensión ya que pueden representar un riesgo para la salud en
determinadas condiciones. Si necesita utilizar una regleta de extensión, utilice sólo una que
disponga de toma de tierra y que sea adecuada para el enchufe del aparato. La capacidad
de la regleta de extensión debe ser igual o superior a la capacidad eléctrica del aparato.
Configuración inicial
Cuando haya conectado la unidad a una toma de corriente, déjela funcionar durante al menos
30 minutos para que se aclimate antes de realizar los ajustes necesarios. Durante este tiempo,
en función de la temperatura interior, la luz de vino tinto o blanco permanecerá encendida para
el compartimento superior y el compartimento inferior. El indicador LED mostrará la temperatura
interna actual.

31
ES
Introducción a las funciones primarias del aparato
1.
Ajustes de temperatura
Para ajustar la temperatura, mantenga pulsado el botón durante unos 3 segundos.
A continuación, la indicación de temperatura de IN.T ° parpadeará . Pulse el botón
o para aumentar o disminuir el ajuste de temperatura. Una vez alcanzada la
temperatura deseada, pulse el botón .
2.
Panel de control
El rango de temperatura del panel es 5~20 °C(41~68 °F).
La temperatura de ajuste predeterminada es 12 °C(54 °F).
Luz interna
Elogie el aspecto de su colección, una luz suave se ha construido en la cava de vinos.
Solo pulse el botón para encender la luz, pulse de nuevo para apagarla.
Cuando la puerta está abierta, la luz se encenderá. Al cerrar la puerta, la luz se apagará.
3.
Conversión de “°F/°C”
Pulse y mantenga pulsado durante 3 segundos, la temperatura mostrada en grados
Fahrenheit y el símbolo ° F se convertirá a la temperatura en grados Celsius y el símbolo
"° C". Pulse y mantenga pulsado durante 3 segundos, la temperatura mostrada en
grados Celsius y el símbolo "° C" carácter se convertirá a la temperatura en grados
Fahrenheit y el símbolo ° F.
Temperatura
Ajuste
(arriba)
LuzCONJUNTO POTENCIA
(abajo)
Temperatura
Ajuste
Usted puede fijar la temperatura según sus requisitos del almacenaje del vino.
SET LIGHT
POWER
OUT.T° IN.T°

32
Heading 1
4.
Alarma de puerta abierta
En caso de que la puerta se mantenga abierta durante más de 1 minuto, el zumbador
emitirá un pitido para dar una alarma hasta que la puerta se cierre o cualquier tecla
en el panel de visualización se puede operar y luego el zumbador dejará de sonar.
5.
6.
Potencia
Memoria de apagado de la temperatura
En caso de corte de energía, la cava guardará automáticamente la temperatura
programada. Después de la recuperación de energía, se ejecutará en función de la
temperatura establecida antes de la interrupción de la alimentación, mientras que
otras funciones volverán al estado predeterminado.
.
Al mantener pulsada la tecla durante 3 segundos, la alimentación principal se
apagará (la alimentación eléctrica de todos los dispositivos eléctricos en el interior se
cortará y todo el aparato estará en modo de espera).
Si el dispositivo está apagado, la alimentación se puede encender al mantener pulsada
la tecla durante 3 segundos y, a continuación, todos los iconos de la pantalla
se encenderán.

33
Heading 1
No coloque demasiado vino en la bodega para
no sobrepasar la capacidad de carga de los
estantes. No coloque más de cuatro capas de vino
en cada estante. El número de botellas de vino
no debe superar las cuatro capas en cada balda
ni
soportar una capacidad superior a 35 kg.
Antes de colocar las botellas dentro de
completamente estables.
Además, compruebe si cualquier botella
sobresale de los estantes para evitar que
las botellas golpeen la puerta de cristal al
cerrarla.
Precauciones de uso de la bodega
Desescarchado automático
ES
La forma en la que los vinos siguen madurando depende de las condiciones ambientales. La
calidad del aire es, por lo tanto, determinante para la conservación del vino. Se ha colocado un
aire mantenga una calidad óptima.
PRECAUCIÓN
solicitar al distribuidor.
y extráigalo.
Introdúzcalo con el tirador en posición vertical. Gírelo hacia
la derecha e introdúzcalo.
Este aparato dispone de una función de desescarchado automático.
Durante su uso, asegúrese de que el orificio de
drenaje no está bloqueado para que el agua
generada durante el desescarchado fluya con
facilidad a través del orificio de drenaje hasta
el receptor de agua del interior de la cabina
de la bodega.
Limpie con regularidad los receptores de agua de la parte inferior de los compartimentos superior
e inferior; utilice un paño seco para absorber el agua del interior de los receptores de agua
y límpielos (realice esta operación cada tres meses, como se sugiere).

34
Heading 1
Estantes
• Los estantes han sido diseñados para mejorar el aspecto físico del aparato y facilitar su
limpieza. Las botellas más grandes o de tamaño Magnum se adaptan con más facilidad a los
estantes de rejilla situados en la parte posterior de la bodega.
• Existen varios estantes para facilitar el almacenamiento y la extracción del vino.
Ruidos de funcionamiento normales
• Los ruidos de gorgoteo o burbujeo y las ligeras vibraciones son el resultado de la circulación
del refrigerante a través del serpentín de refrigeración.
• El control del termostato hace un clic cuando se activa y desactiva.

35
Heading 1
ES
Limpieza y mantenimiento
Advertencia:
Desconecte la bodega antes de limpiarla para reducir el riesgo de
descarga eléctrica. No prestar atención a estas precauciones podría
causar lesiones graves o la muerte.
Precaución:
Lea las instrucciones y advertencias del fabricante antes de utilizar
productos de limpieza para evitar daños personales o en el producto.
General:
• Prepare una solución limpiadora de 3-4 cucharadas de bicarbonato de
sodio mezclado con agua tibia. Humedezca una esponja o un paño
suave con la solución y limpie la bodega.
• Aclare el aparato con agua tibia y séquelo con un paño suave.
• No utilice productos químicos, abrasivos, amoniaco, blanqueadores
con cloro, detergentes concentrados, disolventes o estropajos de
metal. ALGUNAS de estas sustancias químicas podrían disolver, dañar
o decolorar la bodega.
Juntas de la puerta:
• Limpie las juntas de la puerta cada tres meses de acuerdo con las
para que la puerta se cierre correctamente.
• Puede aplicar un poco de vaselina en las bisagras de las juntas para
cierren correctamente.
Botellero:
Si el botellero se mancha con gotas de vino o agua, utilice papel de lija
de 300-400 para pulirlo. Después, utilice un trapo suave para limpiar el
serrín. No utilice una toalla o un trapo suave con agua.
Cortes en el suministro eléctrico
• De forma ocasional, pueden producirse cortes en el suministro eléctrico debido a tormentas
eléctricas o a otras causas. En ese caso, debe retirar el cable de alimentación de la toma
de corriente. Una vez que se restablezca el suministro, vuelva a conectar el cable de
alimentación a la toma de corriente.
Cuidado durante las vacaciones y traslados
• En caso de no usar el aparato durante un tiempo prolongado, desconecte y limpie la
bodega y las juntas de la puerta tal como se indica en la sección"Limpieza general".
Deje
• Cuando vaya a mover el aparato, transpórtelo siempre en posición vertical. Si lo
transporta en posición horizontal podría provocar daños en el sistema de cierre.
Nota: una vez trasladado el aparato, espere 24 horas antes de volver a conectarlo.
Cuidado y limpieza de la bodega

36
Heading 1
La bodega no funciona:
• Compruebe si el aparato se encuentra enchufado.
• Examine el disyuntor para comprobar si hay suministro en la toma de corriente.
La temperatura del vino es demasiado alta:
• Reduzca la frecuencia de apertura de las puertas.
• Espere a que el vino que acaba de almacenar alcance la temperatura deseada.
• Compruebe que las juntas de la puerta cierran correctamente.
• Limpie el condensador.
• Disminuya la temperatura de la bodega.
La temperatura del vino es demasiado baja:
• Aumente la temperatura de la bodega.
La bodega se pone en marcha con demasiada frecuencia:
• La bodega siempre intenta mantener la temperatura óptima, por lo que es normal que esto suceda
durante periodos de altas temperaturas o humedad.
• También puede deberse a la frecuencia o a la duración de la apertura de las puertas.
• Limpie el condensador.
• Compruebe que las juntas de la puerta cierran correctamente.
• Compruebe que las puertas están completamente cerradas.
Se acumula humedad en el interior o en el exterior de la bodega:
• Es normal en periodos de alta humedad.
• Reduzca la frecuencia de apertura de las puertas y no las mantenga abiertas durante mucho tiempo.
• Compruebe que las juntas de la puerta cierran correctamente.
Las puertas de la bodega no se cierran correctamente:
• Nivele la bodega.
• Compruebe si la puerta está bloqueada, por ejemplo, por alguna botella de vino o un estante.
No deseche aparatos los eléctricos como si se
instalaciones correspondientes de reciclaje. Póngase
en contacto con la administración local para obtener
información relacionada con el sistema de recogida
de material para reciclaje. Si los aparatos eléctricos
se desechan en vertederos o basureros normales, las
a las aguas subterráneas y llegar así hasta la cadena
alimenticia, con el consiguiente daño para la salud
de la población. Si desea sustituir su aparato antiguo
por otro nuevo, el comerciante que se lo vendió
está obligado por ley a recogerlo para su posterior
reciclaje y sin coste alguno para el usuario.
Solución de problemas

7
4
WS105GA 1 1 1 2
WS171GA 1 1 1 2
4
7
5-20 45 Y 69 38 639×595×1,265
5-20 75 Y 94 38 639×595×1,850
WS120GA I 220 220-240 50 110
WS190GA I 385 220-240 50 100
SN-ST
SN-ST
37
Heading 1
Datos técnicos•Lista del paquete
Datos técnicos
Lista del paquete
Este aparato se está desarrollando continuamente. Nos reservamos el derecho a cambiar los
componentes de la bodega sin previo aviso.
Manual
del
usuario
Kit de
información
Bandejas
de vino
Pasador Llave
Modelo
Tipo de
clima
Tipo de resistencia
a descargas
eléctricas
Capacidad
disponible
(l)
Voltaje
nominal (V)
Frecuencia
nominal (Hz)
Potencia de
entrada (W)
Intervalo de
temperaturas
(°C)
Refrigerante
(R600a)
(g)
Modo de conexión
del cable de
alimentación
Peso
(kg)
Ruido (nivel
de potencia
acústica)
dB (A)
Dimensiones totales
(profundidad ×
anchura × altura)
(mm)
Comentarios:
1. De acuerdo con las normas internacionales, si el clima es de tipo SN-ST, la temperatura ambiente para el
uso de la bodega de vinos oscila entre 10 °C y 38 °C.
2.
una bodega de vino vacía, se coloca una almohadilla de goma elástica con un espesor de 5 mm a 6 mm en
el interior. Puede funcionar durante al menos 30 minutos tras cerrar la puerta. Se llevará a cabo una prueba
tras funcionar de forma estable (excepto en el encendido y apagado). El ruido a tierra se comprueba a 1 m
Durante el uso, es normal que el ruido real sea diferente del indicado, debido a los efectos del tipo de vino
almacenado en la bodega, el ruido ambiente, la apertura y cierre de la puerta, el encendido y apagado del
compresor, etc.
Nombre
Cantidad
Modelo de
producto
ES

38
Überschrift 1
Bauteilbezeichnungen des Weinkühlschranks
Oberstes
Weinfach
Weinregale
Glastür
Verstellbare
Hauptbedienfeld
(Fassungsvermögen:
117 Flaschen)
(Fassungsvermögen:
189 Flaschen)
WS120GA WS190GA

39
Überschrift 1
DE
WICHTIGE SICHERHEITSHINWEISE ............................................. 40
Weinkühlschrank installieren........................................................ 41
Weinkühlschrank auspacken........................................................................................... 41
Weinkühlschrank ausrichten ........................................................................................... 41
Ausreichende Luftzirkulation........................................................................................... 41
Elektrische Anforderungen.............................................................................................. 42
Installationsbeschränkungen .......................................................................................... 42
Verlängerungskabel.......................................................................................................... 42
Erste Verwendung............................................................................................................. 42
Einführung in die Grundfunktionen des Geräts ............................ 43
1.Temperaturregelung ...................................................................................................... 43
2.Innenbeleuchtung ...................................................................................................... 43
3.“°F/°C” Umstellung ............................................................................................... 43
4.Warnton bei offener Tür ............................................................................................... 44
5.Speichern der Temperatur bei Stromausfall ................................................................ 44
6.Netzschalter (Power) ............................................................................................. 44
Warnhinweise zur Verwendung des Weinkühlschranks............... 45
Abtauautomatik................................................................................................................. 45
Ablagefächer .....................................................................................................................46
Regulär auftretende Betriebsgeräusche......................................................................... 46
............................... 47
Fehlerbehebung............................................................................. 48
Technische Daten ...................................... ................................... 49
Inhaltsverzeichnis
Seite
Packliste ........................................................................................ 49

40
Überschrift 1
Dieses Gerät ist ausschließlich für die Lagerung von Wein vorgesehen.
Bitte beachten Sie bei der Verwendung dieses Geräts stets die
grundsätzlichen Sicherheitshinweise:
1. Lesen Sie alle Anweisungen vor der Verwendung des Geräts durch.
2. Verwenden Sie dieses Gerät nur für seinen vorgesehenen Zweck und
3. Dieser Weinkühlschrank muss vor der Verwendung ordnungsgemäß und
entsprechend den Installationsanweisungen installiert werden. Lesen Sie
die Hinweise zur Erdung im Installationsabschnitt.
4. Sie ist ausschließlich für den Hausgebrauch bestimmt
- in Küchen für Mitarbeiter in Länden, Büros und anderen gewerblichen
Bereichen;
- in landwirtschaftlichen Anwesen;
- von Kunden in Hotels, Motels und anderen Wohneinrichtungen;
- in Frühstückspensionen
6. Das Gerät muss so aufge stellt werden, dass der Stecker zugänglich ist.
7. Wenn das Netzkabel beschädigt ist, muss es vom Hersteller, seinem
werden, um Gefahren zu vermeiden.
8.
Halten Sie die Belüftungsöffnungen im Gerätegehäuse oder im
Geräteinneren frei.
9. Verwenden Sie zum Beschleunigen des Abtauprozesses nur
vom Hersteller empfohlene mechanische Geräte oder Mittel.
10. Beschädigen Sie nicht den Kühlkreislauf.
11. Verwenden Sie keine Elektrogeräte im Inneren der Kühlfächer, außer
wenn diese speziell vom Hersteller für diesen Zweck vorgesehen sind.
12. Wenn die Beleuchtung beschädigt ist, muss sie vom Hersteller, seinem
werden, um Gefahren zu vermeiden.
13. Dieses Gerät ist ausschließlich für die Lagerung von Wein vorgesehen.
15. Spielende Kinder können sich im Gerät einsperren. Nehmen Sie vor der
Entsorgung des alten Weinkühlschranks die Türen ab. Nehmen Sie die
Ablagefächer nicht heraus, um zu vermeiden, dass spielende Kinder in
das Gerät hineinklettern.
14. Lagern Sie keine Explosivstoffe wie Aerosoldosen mit einem brennbaren
Treibmittel.
WICHTIGE SICHERHEITSHINWEISE
5. Dieses Gerät kann von Kindern ab 8 Jahren und darüber sowie von Personen
mit verringerten physischen, sensorischen oder mentalen Fähigkeiten oder
Mangel an Erfahrung und Wissen benutzt werden, wenn sie beaufsichtigt oder
bezüglich des sicheren Gebrauchs des Gerätes unterwiesen wurden und die
daraus resultierenden Gefahren verstehen. Kinder dürfen nicht mit dem
Gerät spielen. Reinigung und Benutzer-Wartung dürfen nicht von Kindern ohne
Beaufsichtigung durchgeführt werden.
16.Bitte setzen Sie sich zwecks der Geräteentsorgung mit dem Kundendienst in
Verbindung, da das entflammbare Kühlmittel und das entflammbare Treibgas
verwendet wurde.
17.Das im Gerät enthaltene Kältemittel ist brennbar. Bitte achten Sie beim Aufstellen,
Transprotieren, Peparieren und Entsorgen des Gerätes darauf, dass keine
Teile des Kältemittelkreislaufs beschädigt werden.

41
Überschrift 1
Weinkühlschrank installieren
DE
Weinkühlschrank auspacken
1. Entfernen Sie das gesamte Verpackungsmaterial. Dazu gehören das Styroporteil und das
Klebeband, mit dem die Zubehörteile des Weinkühlschranks innen und außen befestigt sind.
2. Stellen Sie vor dem Einstecken des Weinkühlschranks sicher, dass alle Verpackungsteile,
Klebebänder und Drucketiketten entfernt wurden.
Weinkühlschrank ausrichten
• Die vier Füße an allen vier Ecken des Weinkühlschranks sind verstellbar. Richten Sie den
Weinkühlschrank nach der Aufstellung am endgültigen Ort in der Waagerechten aus.
• Wenn Sie die verstellbaren Füße im Uhrzeigersinn drehen, wird der Weinkühlschrank
angehoben. Wenn Sie die Füße gegen den Uhrzeigersinn drehen, wird der Weinkühlschrank
abgesenkt. Die Kühlschranktür lässt sich einfacher schließen, wenn die verstellbaren Füße
ausgezogen sind.
Ausreichende Luftzirkulation
•
er an einem Ort mit ausreichender Luftzirkulation und angemessenen Leitungs- und
Elektroverbindungen aufgestellt werden.
• Um den Weinkühlschrank sollten die folgenden Abstände eingehalten werden:
Seiten ............... 100 mm (4 Zoll)
Oben ................100 mm (4 Zoll)
Hinten ..............100 mm (4 Zoll)
• Überfüllen Sie den Weinkühlschrank nicht, um eine ordnungsgemäße Kühlung
zu gewährleisten.
Hinweis: Wenn Ihr Weinkühlschrank aus bestimmten Gründen gekippt wurde, warten Sie
24 Stunden, bevor Sie ihn einstecken.
Mehr als
10 cm
von oben
Mehr als
10 cm
von rechts
Höher Niedriger
Verstellbare
Fußschraube
Mehr als
10 cm
von
hinten
Mehr als
10 cm
von
links

42
Überschrift 1
Elektrische Anforderungen
• Sorgen Sie dafür, dass eine geeignete Steckdose (220-240 V, 15 A) mit ordnungsgemäßer
Erdung für den Weinkühlschrank zur Verfügung steht.
• Eine unabhängige und exklusive Standardausführung mit zuverlässiger Erdung ist für den Weinkeller
durch Abstimmung seines 3-poligen Steckers mit em Erdungsstift zu verwenden, der unter keinen
Umständen mit dem Erdungsdraht abgezogen oder abgetrennt werden darf.
Installationsbeschränkungen
• Installieren Sie den Weinkühlschrank nicht an Orten, die nicht ordnungsgemäß isoliert oder
beheizt sind, z. B. Garagen. Der Weinkühlschrank darf nicht bei einer Umgebungstemperatur
unter 10 °C betrieben werden.
• Wählen Sie für den Weinkühlschrank einen geeigneten Aufstellort auf einer stabilen,
geraden Fläche aus, und schützen Sie ihn vor direktem Sonnenlicht oder Wärmequellen
wie Heizkörpern, Heizleisten, Kochgeräten usw. Unebenheiten am Boden können mit den
vorderen und hinteren verstellbaren Füßen des Weinkühlschranks ausgeglichen werden.
• Der Weinkühlschrank eignet sich nur zur freistehenden Montage und nicht als Einbaugerät.
Verlängerungskabel
• Vermeiden Sie die Verwendung eines Verlängerungskabels aufgrund der unter
bestimmten Bedingungen auftretenden Sicherheitsrisiken. Falls sich der Einsatz eines
Verlängerungskabels nicht umgehen lässt, verwenden Sie ausschließlich dreipolige
Verlängerungskabel mit einem Schutzkontaktstecker und einer passenden Steckdose.
Die auf dem Verlängerungskabel angegebene Leistung muss mindestens der elektrischen
Leistung des Geräts entsprechen.
Erste Verwendung
Lassen Sie das Gerät nach dem Anschließen an die Steckdose mindestens 30 Minuten laufen, damit
es sich akklimatisiert. Nehmen Sie erst dann Ihre Einstellungen vor. Währenddessen leuchtet je nach
Innentemperatur das Rot- oder Weißweinlicht für das obere Fach sowie das Rot- oder Weißweinlicht
für das untere Fach. Die LED-Anzeige zeigt dabei die aktuelle Innentemperatur an.

43
Heading 1
DE
Einführung in die wichtigsten Funktionen des Geräts
1
.
Temperatureinstellung
Zum Einstellen der Temperatur halten Sie den -Knopf etwa 3 Sekunden lang gedrückt.
Daraufhin beginnt die Temperaturanzeige IN.T° zu blinken. Drücken Sie jeweils entweder
auf den Knopf oder , um die eingestellte Temperatur zu erhöhen oder zu senken.
Nach Erreichen der gewünschten Temperatur drücken Sie auf den Knopf .
2.
Bedienfeld
Der Temperaturbereich des Anzeigefelds liegt zwischen 5~20°C(41~68°F).
Die Standardeinstellung der Temperatur beträgt 12°C(54°F).
Innenbeleuchtung
Um Ihre Sammlung ins rechte Licht zu rücken wurde eine weiche Beleuchtung in den
Weinkühler eingebaut. Einfaches Drücken des Knopfes schaltet die Beleuchtung ein,
erneutes Drücken schaltet sie aus.Bei geöffneter Tür geht das Licht an. Sobald die Tür
geschlossen wird, erlischt das Licht.
3.
“°F/°C” Umstellung
Halten Sie 3 Sekunden lang gedrückt - die angezeigte Temperatur in Grad Fahrenheit
sowie der Buchstabe °F werden in Grad Celsius und den Buchstaben “°C” umgewandelt.
Halten Sie erneut 3 Sekunden lang gedrückt - die angezeigte Temperatur in Grad Celsius
sowie der Buchstabe “°C” werden in Grad Fahrenheit und den Buchstaben "°F" umgewandelt.
Temperatur
Anpassung
(rauf)
Lampe
EINSTELLEN
NETZ-
SCHALTER
Temperatur
Anpassung
(runter)
Sie können die Temperatur entsprechend Ihren Anforderungen für die Weinlagerung
einstellen.
SET LIGHT
POWER
OUT.T° IN.T°

44
Heading 1
4.
Warnton bei offener Tür
Steht die Tür länger als 1 min lang offen, ertönt ein Alarmton bis die Tür geschlossen
wird oder bis eine beliebige Taste auf dem Anzeigefeld betätigt wird.
5.
6.
Netzschalter (Power)
Speichern der Temperatur bei Stromausfall
Im Falle eines Stromausfalls speichert der Weinkühler automatisch die eingestellte
Temperatur. Sobald der Strom zurückkehrt, wird der Betrieb mit der vor dem Stromausfall
eingestellten Temperatur wieder aufgenommen, während für andere Funktionen die
Standardeinstellungen aktiviert werden.
.
Das Halten der Taste für 3 Sekunden schaltet die Hauptstromversorgung aus (die
Stromversorgung aller elektrischen Vorrichtungen wird abgeschaltet und das gesamte
Gerät schaltet in den Standby-Betrieb).
Wenn das Gerät ausgeschaltet ist, kann die Stromversorgung durch Drücken der Taste
für 3 Sekunden wieder eingeschaltet werden, woraufhin alle Symbole auf dem Anzeigefeld
ihre Funktion aufnehmen.

45
Überschrift 1
den Kühlschrank, um das Tragvermögen der
Weinfächer nicht zu überschreiten. Legen Sie
pro Fach nicht mehr als vier Lagen Flaschen
darf vier Lagen auf jedem Fach nicht
überschreiten bzw. sollte das Tragvermögen
der Weinfächer 35 kg nicht überschreiten.
Prüfen Sie, ob die Weinfächer fest
sitzen, bevor Sie die Flaschen in den
Weinkühlschrank legen.
Prüfen Sie außerdem, ob Flaschen aus den
Fächern hervorragen, um zu verhindern,
dass Flaschen beim Schließen der Tür
gegen das Glas stoßen.
Warnhinweise zur Verwendung des Weinkühlschranks
Abtauautomatik
DE
Der fortlaufende Reifeprozess des Weins hängt von der Umgebung ab. Die Luftqualität ist daher
angebracht, um sicherzustellen, dass der Luftdurchsatz qualitativ beständig bleibt.
ACHTUNG
Wir empfehlen, den Filter einmal im Jahr zu
ersetzen. Filter sind bei Ihrem Händler erhältlich.
Wechseln des Filters:
Fassen Sie den Filter am Griff. Drehen Sie ihn nach links,
und nehmen Sie ihn heraus.
Einsetzen des Filters:
Setzen Sie ihn am Griff in senkrechter Position ein. Drehen
Sie ihn nach rechts, und setzen Sie ihn ein.
Dieses Gerät verfügt über eine automatische
Abtaufunktion. Stellen Sie sicher, dass die
Ablauföffnung frei ist, sodass das Tauwasser
ungehindert durch die Ablauföffnung in den
Wasserbehälter im Innenraum des Kühlschranks
fließen kann.
Reinigen Sie regelmäßig die Wasserbehälter unterhalb des oberen und unteren Fachs; verwenden
Sie ein trockenes Tuch, um das Wasser in den Wasserbehältern aufzusaugen und abzuwischen
(reinigen Sie die Wasserbehälter wie beschrieben alle drei Monate).

46
Überschrift 1
Ablagefächer
• Die Ablagefächer sind für eine ansprechende Präsentation der Flaschen und einfache
Querablagen im unteren Bereich des Weinkühlschranks aufbewahren.
• Einige Ablagefächer wurden speziell für die einfache Lagerung und Entnahme Ihrer
Regulär auftretende Betriebsgeräusche
• Wasserfließender Schall oder leichte Vibrationen sind das Ergebnis des Kältemittels,
das durch die Kühlschlagen zirkuliert.
• Der Kompressorklickt, wennerein- und ausgeschaltetwird.

47
Überschrift 1
DE
Reinigung und Wartung
Warnung:
Um Stromschläge zu vermeiden, sollten Sie vor der Reinigung stets den
Netzstecker ziehen. Die Missachtung dieser Warnung kann zu Verletzungen
oder zum Tod führen.
Achtung:
Lesen und beachten Sie vor der Verwendung von Reinigungsprodukten stets
die Anweisungen und Warnhinweise des Herstellers, um Verletzungen oder
Produktschäden zu vermeiden.
Allgemein:
• Stellen Sie eine Reinigungslösung aus 3-4 Esslöffeln Natron und warmem
Wasser her. Wischen Sie den Weinkühlschrank mit einem mit der
Reinigungslösung befeuchteten Schwamm oder weichen Tuch ab.
• Wischen Sie mit sauberem, warmem Wasser nach, und trocknen Sie das Gerät
mit einem weichen Tuch.
• Verwenden Sie keine aggressiven Reinigungs- oder Scheuermittel bzw.
kein Ammoniak, keine Chlorbleiche, keine konzentrierten Reinigungs- oder
Lösungsmittel und keine Topfreiniger. EINIGE dieser Mittel enthalten chemische
Substanzen, durch die der Weinkühlschrank beschädigt bzw. verfärbt werden
könnte.
Türdichtungen:
• Saubere Türdichtunggen alle drei Monate.
Für eine ordnungsgemäße Abdichtung müssen die Dichtungen
stets sauber und geschmeidig sein.
• Wenn Sie etwas Vaseline auf die Scharnierseite der Dichtungen auftragen,
bleiben die Dichtungen geschmeidig und funktionsfähig.
Weinfach:
Falls auf das Weinfach ausversehen Wein- oder Wassertropfen gelangt
zu polieren, und verwenden Sie dann ein weiches Tuch, um den Staub zu
entfernen. Verwenden Sie kein Handtuch oder weiches Tuch mit Wasser.
Stromausfälle
• Bisweilen kann es aufgrund von Gewittern oder anderen Ursachen zu Stromausfällen
kommen. Ziehen Sie das Netzkabel bei einem Stromausfall ab. Wenn die
Stromversorgung wiederhergestellt ist, können Sie das Netzkabel wieder einstecken.
Pflege während des Urlaubs oder beim Umzug
• Wenn Sie länger verreisen, sollten Sie den Netzstecker des Weinkühlschranks ziehen und
alle Flächen sowie die Türdichtungen gemäß den Anweisungen in Abschnitt „Allgemein“
reinigen. Lassen Sie die Tür geöffnet, sodass Luft im Inneren zirkulieren kann.
• Im Falle eines Umzugs sollte der Weinkühlschrank immer vertikal transportiert werden.
Transportieren Sie das Gerät nicht liegend, da dadurch das geschlossene System
beschädigt werden könnte.
Hinweis: Warten Sie 24 Stunden nach einem Transport, bevor Sie den Netzstecker
einstecken.

48
Überschrift 1
Der Weinkühlschrank funktioniert nicht:
• Überprüfen Sie, ob Sie der Netzstecker des Weinkühlschranks eingesteckt ist.
• Überprüfen Sie, ob die Steckdose Strom führt, indem Sie den Schutzschalter kontrollieren.
Der Wein ist zu warm:
•
• Geben Sie kürzlich hinzugefügtem Wein ausreichend Zeit, auf die gewünschte Temperatur abzukühlen.
• Überprüfen Sie, ob die Türdichtungen ordnungsgemäß schließen.
• Die Dichtungen müssen sauber und biegsam gehalten werden, um eine ordnungsgemäße Abdichtung
zu gewährleisten.
• Stellen Sie eine niedrigere Temperatur ein.
Der Wein ist zu kalt:
• Erhöhen Sie die Temperatur, wenn diese zu kalt eingestellt ist.
• An heißen und feuchten Tagen kann dies normal sein, um eine konstante Temperatur sicherzustellen.
•
• Die Dichtungen müssen sauber und biegsam gehalten werden, um eine ordnungsgemäße
Abdichtung zu gewährleisten.
• Überprüfen Sie, ob die Türdichtung ordnungsgemäß schließt.
• Kontrollieren Sie, ob die Tür vollständig geschlossen ist.
Feuchtigkeitsbildung innen oder außen am Weinkühlschrank:
• Dies ist normal, wenn die Luftfeuchtigkeit hoch ist.
•
• Überprüfen Sie, ob die Türdichtungen ordnungsgemäß schließen.
Die Weinkühlschranktür schließt nicht ordnungsgemäß:
• Richten Sie den Weinkühlschrank in der Waagerechten aus.
• Kontrollieren Sie, ob die Tür blockiert wird, z.
Entsorgen Sie elektrische Geräte nicht im Hausmüll,
sondern mit dem Sondermüll. Informieren Sie sich
bei den entsprechenden Behörden vor Ort über die
Entsorgungssysteme. Wenn elektrische Geräte auf
Mülldeponien entsorgt werden, können schädliche
Stoffe ins Grundwasser und so in die Nahrungskette
gelangen. Dies kann zu Gesundheitsschäden führen.
Wenn Sie alte Geräte durch neue ersetzen, so ist
gebührenfrei zur Entsorgung zurückzunehmen.
Fehlerbehebung

WS120GA 1 1 4 1 2
WS190GA 1 1 7 1 2
49
Technische Daten•Packliste
Technische Daten
Packliste
Dieses Gerät wird ständig weiterentwickelt. Wir behalten uns das Recht vor, die Bauteile des
Weinkühlschranks ohne Vorankündigung zu ändern.
Bedie-
nungsan-
leitung
Infokit
Weinregale
Schlüssel
Modell Klimatyp
Stromschlag-
Widerstandstyp
Fassungsver-
mögen (l)
Nennspan-
nung (V)
Nennfre-
quenz (Hz)
Eingangs-
leistung (W)
turbereich
(°C)
(R600a)
(g)
Netzkabel-
Anschlussart
Gewicht
(kg)
Geräuschpegel
dB (A)
Gesamtabmessungen
(Tiefe × Weite × Höhe)
(mm)
Anmerkungen:
1. Gemäß internationaler Normen liegt die Umgebungstemperatur für den Gebrauch des Weinkühlschranks
beim Klimatyp SN-ST zwischen 10 °C und 38 °C.
2.
den nationalen Normen. Im Fall eines leeren Weinkühlschranks wird dieser mit 5 mm bis 6 mm dickem
gummigefedertem Polster ausgelegt. Nach Schließen der Tür kann er mindestens 30 Minuten lang betrieben
werden. Nach stabilem Betrieb (An- und Abschalten ausgenommen) wird ein Test durchgeführt. Das
Grundgeräusch wird jeweils aus 1
des Weinkühlschranks gemessen.
Während des Gebrauchs ist es normal, dass ein Unterschied zwischen dem tatsächlichen Geräuschpegel
und dem gemessen Geräuschpegel besteht, da letzterer durch die Art des Weins, der im Weinkühlschrank
gelagert wird, die Umgebungsgeräusche, das Öffnen und Schließen der Tür, das An- und Abschalten des
Name
Menge
Produktmodell
DE
WS120GA I 220 220-240 50 110
WS190GA I 385
220-240 50 100
5-20 45 Y 69 38 639×595×1,265
5-20 75 Y 94 38 639×595×1,850
SN-ST
SN-ST
Ablaufstift

50
En-tête 1
Nom des éléments de la cave à vin
Clayette
à bouteilles
supérieure
Clayettes
à vin
Porte en verre
Filtre à charbon actif
Vis réglable
du pied
Panneau central
de commande
(capacité de
117 bouteilles)
(capacité de
189 bouteilles)
WS120GA WS190GA

51
En-tête 1
FR
MESURES DE SÉCURITÉ IMPORTANTES ...................................... 52
Installation de votre cave à vin..................................................... 53
Déballage de votre cave à vin ......................................................................................... 53
Mise à niveau de votre cave à vin................................................................................... 53
Circulation de l'air ............................................................................................................53
Exigences électriques ..................................................................................................... 54
Restrictions d'installation...............................................................................................54
Utilisation d'une rallonge ................................................................................................ 54
Première mise en route....................................................................................................54
Présentation des fonctions principales de l'appareil................... 55
1.Réglages de la température .........................................................................................55
2.Éclairage intérieur ........................................................................................... 55
3.Conversion « °F/°C » ................................................................................................55
4.Alarme d’ouverture de la porte ....................................................................................56
5.Fonction de mémorisation de température en cas de coupure ...............................56
6.Alimentation ............................................................................................................. 56
Précautions liées à l'utilisation de la cave à vin.......................... 57
Dégivrage automatique ................................................................................................... 57
Clayettes............................................................................................................................58
Bruits normaux de fonctionnement...............................................................................58
E
ntretien et nettoyage de la cave à vin.......................................................................... 59
Nettoyage et entretien .....................................................................................................59
Coupures de courant .......................................................................................................59
Précautions en cas d'absence et de déplacement de l'appareil ................................ 59
Dépannage..................................................................................... 60
Informations techniques•Contenu de l'emballage ....................... 61
Table des matières
Page

52
En-tête 1
Cet appareil est exclusivement destiné au stockage de bouteilles de vin.
Lorsque vous utilisez cet appareil, prenez toujours les mesures de
précaution de base suivantes :
1. Lisez l'ensemble des instructions avant d'utiliser cet appareil.
2. Utilisez cet appareil uniquement pour l'usage auquel il est destiné et
conformément aux indications du présent mode d'emploi.
3. Cette cave à vin doit être installée conformément aux instructions
d'installation avant toute utilisation. Voir les instructions de mise à la terre
dans la section consacrée à l'installation.
4. L'appareil est destiné uniquement à un usage domestique. En cas d'usage
normes et réglementations correspondantes. Cet appareil peut être utilisé
par des enfants âgés de 8 ans et plus, par des personnes aux capacités
physiques, sensorielles ou mentales réduites, ainsi que par des personnes
ne disposant pas de l'expérience ou des connaissances nécessaires,
des instructions leur permettant d'utiliser l'appareil en toute sécurité et s'ils
comprennent les dangers inhérents à une telle utilisation. Les enfants ne
doivent pas jouer avec cet appareil. Le nettoyage et l'entretien ne doivent
pas être effectués par des enfants sans supervision.
5.
6. Si le cordon d'alimentation est endommagé, il convient de le faire
remplacer par le fabricant, un agent de service après-vente ou une
7.
structure encastrable doivent être libres de toute obstruction.
8. N'utilisez pas d'appareils mécaniques ou tout autre moyen pour accélérer
le dégivrage, à l'exception de ceux recommandés par le fabricant.
9. N'endommagez pas le circuit de réfrigération.
10. N'utilisez pas d'appareils électriques à l'intérieur des compartiments de
stockage des aliments de l'appareil, sauf s'ils correspondent au type
recommandé par le fabricant.
11. Si l'éclairage est endommagé, il convient de le faire remplacer par
le fabricant, un agent de service après-vente ou une personne de
12. Cet appareil est exclusivement destiné au stockage de bouteilles de vin.
13. Un enfant pourrait s'y enfermer. Démontez les portes de votre cave à vin
d'empêcher les enfants de grimper dans l'appareil.
14. N'entreposez pas de substances explosives, telles que des bombes
MESURES DE SÉCURITÉ IMPORTANTES

53
En-tête 1
FR
Installation de votre cave à vin
Déballage de votre cave à vin
1. Retirez tous les éléments d'emballage, y compris la base en mousse et les rubans adhésifs qui
maintiennent les accessoires de la cave à vin en place à l'intérieur et à l'extérieur de l'appareil.
2. Inspectez et retirez les résidus éventuels d'emballage, de ruban adhésif ou de matériaux
imprimés avant de mettre la cave à vin sous tension.
Mise à niveau de votre cave à vin
• Votre cave à vin est équipée de quatre pieds réglables situés aux angles avant et arrière de
l'app
• Vous pouvez ajuster la hauteur des pieds réglables en les tournant dans le sens des aiguilles
d'une montre (pour élever l'appareil) ou dans le sens contraire (pour abaisser l'appareil).
La porte de la cave à vin se fermera plus facilement si les pieds réglables sont déployés.
Circulation de l'air
•
bien ventilé et équipé de raccordements de plomberie et électriques adéquats.
• Nous vous recommandons de laisser les espaces de dégagement suivants autour de la
cave à vin :
Côtés ...............100 mm
Haut ................. 100 mm
Arrière ..............100 mm
•
Remarque : si votre cave à vin s'est trouvée en position inclinée pour quelque raison que ce
soit, attendez 24 heures avant de la brancher.
Plus de
10 cm
du haut
Plus de
10 cm
de la droite
Haut Bas
Vis réglable
du pied
Plus
de
10 cm
de l'arrière
Plus de
10 cm
de
la gauche

54
En-tête 1
Exigences électriques
• Assurez-vous de disposer d'une prise de courant adéquate (220-240 V, 15 A) reliée à la terre
pour brancher la cave à vin.
• Evitez d'utiliser des adaptateurs à trois broches ou de couper la broche de mise à la terre
n'assure pas la mise à la terre de la cave à vin et peut provoquer des chocs électriques.
Restrictions d'installation
• fé
(garage, etc.). Cette cave à vin n'a pas été conçue pour fonctionner à une température
ambiante inférieure à 10 °C.
• Installez la cave à vin dans un endroit adapté, sur une surface dure et plane à l'abri de la
lumière directe du soleil et de toute source de chaleur (radiateurs, plinthes chauffantes,
appareils de cuisson, etc.). Toute irrégularité du sol doit être corrigée à l'aide des pieds
réglables, situés aux quatre coins avant et arrière de l'appareil.
• Votre cave à vin est conçue pour une installation sur pieds uniquement. Elle ne peut pas
être encastrée.
Utilisation d'une rallonge
• Evitez d'utiliser une rallonge, vous risqueriez de compromettre la sécurité de l'appareil dans
certaines conditions. Si vous avez besoin d'une rallonge, utilisez uniquement une rallonge
électrique indiquée sur la rallonge doit être supérieure ou égale à celle de l'appareil.
Première mise en route
Une fois l'appareil branché sur une prise de courant, laissez-le fonctionner pendant au moins 30 minutes
avant d'effectuer le moindre réglage et ainsi le laisser s'acclimater à son environnement. Pendant ce
temps, en fonction de la température interne, le voyant du vin rouge ou blanc reste allumé pour le
compartiment supérieur et le voyant du vin rouge ou blanc reste allumé pour le compartiment inférieur.
L'écran LED indique la température interne actuelle.

55
FR
Présentation des fonctions principales de l’appareil
1.
Réglages de la température
Pour régler la température, appuyez sur le bouton et maintenez-le enfoncé pendant
3 secondes. L’icône de température du IN.T clignote ensuite. Appuyez sur le bouton
ou pour augmenter ou réduire la température. Une fois la température souhaitée
atteinte, appuyez sur le bouton .
2.
Panneau de commande
La plage de température du panneau d’affichage est comprise entre 5 et 20° C(41 et 68° F).
La température par défaut est de 12° C (54° F).
Éclairage intérieur
Sublimez l’apparence de votre collection grâce l’éclairage fin installé dans votre cellier.
Il vous suffit d’appuyer sur le bouton pour l’allumer, et d’appuyer à nouveau sur le
bouton pour l’éteindre.Lorsque la porte est ouverte, la lumière s’allume. Une fois la
porte fermée, la lumière s’éteint.
3.
Conversion « °F/°C »
Appuyez sur et maintenez-le enfoncé pendant 3 secondes ; la température affichée
en degré Fahrenheit symbolisé par « °F » se convertit en degré Celsius symbolisé
par « °C ». Appuyez à nouveau sur et maintenez-le enfoncé pendant 3 secondes ;
la température affichée en degré Celsius symbolisé par « °C » se convertit en degré
Fahrenheit symbolisé par « °F ».
ÉclairageDÉFINIR ALIMENTATION
Température
Réglage
(haut)
Température
Réglage
(bas)
Vous pouvez régler la température en fonction de vos exigences en matière de stockage du vin.
SET LIGHT
POWER
OUT.T° IN.T°

56
Heading 1
4.
Alarme d’ouverture de la porte
Si la porte reste ouverte pendant plus de 1 min, une alarme se déclenche et ne s’arrête
que lorsque vous refermez la porte ou appuyez sur une touche du panneau d’affichage.
5.
6.
Alimentation
Fonction de mémorisation de température en cas de coupure
En cas de panne de courant, le cellier enregistre automatiquement la température réglée.
Une fois l’alimentation rétablie, il se met en marche en tenant compte de la température
réglée avant la panne de courant tandis que les autres fonctions retournent aux
réglages par défaut.
.
Appuyez sur la touche et maintenez-la enfoncée pendant 3 secondes ; l’alimentation
principale s’arrête (tous les dispositifs internes s’arrêtent et l’appareil se met en veille).
Si l’appareil est éteint, vous pouvez rétablir l’alimentation en appuyant sur la touche et
en la maintenant enfoncée pendant 3 secondes ; toutes les icônes de l’écran s’allument.

57
En-tête 1
FR
Ne placez pas trop de bouteilles de vin dans la
cave pour ne pas dépasser la capacité d'accueil
des clayettes à bouteilles. Ne placez pas plus
de quatre couches de bouteilles sur chaque
clayette. Chaque clayette ne doit pas comporter
plus de quatre rangées de bouteilles de vin, pour
une capacité d'accueil maximale de 35 kg.
Avant de placer les bouteilles dans la cave
sont complètement stables.
dépasse des étagères pour éviter qu'elles
ne heurtent la vitre de la porte lorsque vous
refermez cette dernière.
Précautions liées à l'utilisation de la cave à vin
Dégivrage automatique
La manière dont le vin vieillit dépend des conditions ambiantes. La qualité de l'air est donc
inférieure de la paroi arrière de l'appareil pour permettre à l'air de conserver une qualité optimale.
ATTENTION
Nous vous recommandons de remplacer
:
et retirez-le.
Insertion :
Tournez-le sur la droite et insérez-le.
Cet appareil dispose d'une fonction de dégivrage
automatique.
Pendant l'utilisation de la cave à vin, vérifiez que l'orifice
de vidange n'est pas bloqué pour laisser l'eau
de dégivrage couler doucement au travers de
l'orifice de vidange jusqu'au récepteur d'eau situé
à l'intérieur de la cabine de la cave.
Nettoyez régulièrement les récepteurs d'eau en bas des compartiments supérieur et inférieur ;
utilisez un chiffon sec pour absorber l'eau qui se trouve à l'intérieur des récepteurs d'eau et
séchez-les (cette opération doit être effectuée tous les trois mois).

58
En-tête 1
Clayettes
• Les clayettes sont conçues pour offrir une esthétique agréable et faciliter le nettoyage. Les
bouteilles de grande taille ou les Magnums peuvent être plus facilement stockées sur les
clayettes transversales situées dans la partie basse de la cave à vin.
• Certaines clayettes vous permettent de stocker et de sortir facilement vos bouteilles de vin.
Bruits normaux de fonctionnement
• En circulant dans le circuit de refroidissement, le réfrigérant peut émettre des bruits de
bouillonnement, des gargouillements ou de légères vibrations.
• Le thermostat émet un clic lorsqu'il s'enclenche, de même que lorsqu'il s'arrête.

59
En-tête 1
FR
Nettoyage et entretien
Attention :
Pour éviter tout risque d'électrocution, débranchez toujours votre cave à vin
avant de la nettoyer. Le non-respect de cette consigne peut provoquer des
blessures graves ou mortelles.
Attention :
Avant d'utiliser des produits nettoyants, lisez et respectez les instructions et les
mises en garde du fabricant pour éviter tout dommage corporel ou matériel.
Général :
• Préparez une solution nettoyante en mélangeant 3-4 cuillères à café de
bicarbonate de soude dans de l'eau chaude. Utilisez une éponge ou un chiffon
doux imbibé de cette solution pour essuyer votre cave à vin.
• Rincez à l'eau chaude puis séchez avec un chiffon doux.
• N'utilisez pas de produits chimiques abrasifs, d'ammoniaque, d'eau de Javel,
de détergents concentrés, de solvants ou de tampons à récurer en métal.
CERTAINS de ces produits chimiques risquent de dissoudre, d'endommager
et/ou de décolorer votre cave à vin.
Joints de porte :
• Nettoyez les joints de porte tous les trois mois conformément aux instructions
étanchéité optimale.
• Appliquez un peu de vaseline sur la charnière des joints pour conserver cette
Clayette à bouteilles horizontale :
Si des gouttelettes de vin ou d'eau se sont accidentellement déposées
sur la clayette à bouteilles, polissez-la à l'aide de papier de verre (grain
300-400), puis essuyez les résidus au moyen d'un chiffon doux. N'utilisez
pas une serviette ou un chiffon imbibé d'eau.
Coupures de courant
• Des coupures de courant peuvent survenir en cas d'orage ou dans d'autres circonstances.
En cas de panne de courant, débranchez le câble d'alimentation de la prise secteur. Une
fois le courant rétabli, rebranchez-le.
Précautions en cas d'absence et de déplacement
de l'appareil
• Si vous partez en vacances ou que vous vous absentez pendant une période prolongée,
débranchez la cave à vin et nettoyez-la entièrement (y compris les joints de porte) en
respectant les instructions de nettoyage détaillées dans le paragraphe « Instructions
générales
.
• Lorsque vous déplacez la cave à vin, maintenez-la toujours en position verticale.
Ne déplacez pas l'appareil en position horizontale, vous risqueriez d'endommager le
système d'étanchéité.
Remarque : une fois la cave à vin déplacée, attendez 24 heures avant de la brancher
à nouveau.
Entretien et nettoyage de la cave à vin

60
En-tête 1
La cave à vin ne fonctionne pas :
•
•
Le vin ne semble pas assez frais :
• Les portes sont ouvertes trop fréquemment.
• Les bouteilles de vin rangées récemment dans l'appareil ont besoin d'un certain temps pour atteindre
la température souhaitée.
•
• Nettoyez le condenseur.
• Diminuez le réglage de la température.
La température du vin est trop basse :
• Si le réglage de la température est trop bas, augmentez-le.
La cave à vin se met en route trop fréquemment :
• Cela peut être normal car l'appareil doit maintenir une température constante pendant les périodes de
forte chaleur et d'humidité.
• Les portes ont été ouvertes trop souvent ou pendant une période prolongée.
• Nettoyez le condenseur.
•
•
De l'humidité se forme à l'intérieur ou à l'extérieur de la cave à vin :
• Cela est normal pendant les périodes de forte humidité.
• Les portes sont ouvertes trop souvent ou pendant une période prolongée.
•
La porte de la cave à vin ne se ferme pas correctement :
• Mettez la cave à vin à niveau.
• Assurez-vous qu'aucun objet ne bloque la fermeture des portes, p. ex., des bouteilles de vin ou
des clayettes.
Ne jetez pas les appareils électriques dans vos
déchets domestiques non triés ; ayez recours aux
dispositifs de tri sélectif. Contactez votre mairie
pour obtenir les informations au sujet des systèmes
de collecte disponibles. Si les appareils électriques
sont stockés dans des décharges ou des dépotoirs
sauvages, des substances dangereuses peuvent
la chaîne alimentaire et nuire à la santé et au bien-être
de la population. Lors du remplacement d'appareils
usagers par de nouveaux modèles, le revendeur est
légalement tenu de reprendre gratuitement l'ancien
produit pour sa mise au rebut.
Dépannage

61
En-tête 1
FR
Informations techniques•Contenu de l'emballage
Informations techniques
Contenu de l'emballage
Des améliorations sont apportées en continu à cet appareil. Nous nous réservons le droit de
Mode
d'emploi
Kit
d'information
Clayettes
à vin
Touche
Modèle
Choc électrique
Type de
résistance
Capacité
disponible
(l)
Tension
nominale
(V)
Fréquence
nominale
(Hz)
Puissance
d'entrée (W)
Plage de
température
(°C)
Réfrigérant
(R600a)
(g)
Mode de
branchement
du cordon
d'alimentation
Poids (kg)
Bruit (niveau
de puissance
acoustique)
dB (A)
Encombrement
(profondeur ×
largeur × hauteur)
(mm)
Remarques :
1. Conformément aux normes internationales, si le climat est de type SN-ST, la température ambiante pour le
fonctionnement de la cave à vin est comprise entre 10 °C et 38 °C.
2. La mention « Bruit » (niveau de puissance acoustique) indiqué dans les informations techniques se rapporte
: si la cave à vin est vide, un
coussin en caoutchouc résilient d'une épaisseur de 5 mm à 6 mm est placé à l'intérieur. Elle peut fonctionner
pendant au moins 30 minutes une fois la porte fermée. Un test sera réalisé une fois le fonctionnement
stabilisé (hors démarrage et arrêt). Le bruit de fond sera testé à 1 m des surfaces avant, arrière, gauche et
droite de la cave à vin.
Pendant l'utilisation, il est normal que le bruit réel soit différent du bruit indiqué en raison des effets
provoqués par le type de vin conservé dans la cave à vin, le bruit ambiant, l'ouverture et la fermeture des
portes, le démarrage et l'arrêt du compresseur, etc.
Nom
Quantité
Modèle
WS120GA I 220 220-240 50 110
WS190GA I 385
220-240 50 100
5-20 45 Y 69 38 639×595×1,265
5-20 75 Y 94 38 639×595×1,850
SN-ST
SN-ST
Type de climat
WS120GA 1 1 1 2
WS190GA 1 1 1 2
Epingle
7
4

62
Koptekst 1
Onderdelen van de wijnkast
Bovenste
wijnschap
Wijnrekken
Glazen deur
Filter met actieve koolstof
Verstelbare
pootschroef
Hoofdbedieningspaneel
(ruimte voor
117 )
(ruimte voor
189 )
WS120GA WS190GA

63
Koptekst 1
NL
BELANGRIJKE VOORZORGSMAATREGELEN................................ 64
Uw wijnkast installeren ................................................................ 65
De wijnkast uitpakken...................................................................................................... 65
De wijnkast waterpas zetten ........................................................................................... 65
Juiste luchtcirculatie ....................................................................................................... 65
Elektriciteitsbenodigdheden ..........................................................................................66
Installatiebeperkingen.....................................................................................................66
Gebruik van verlengsnoer...............................................................................................66
Eerste gebruik ..................................................................................................................66
Inleiding tot de hoofdfuncties van de wijnkast............................ 67
1.Temperatuur aanpassingen ......................................................................................... 67
2.Interne verlichting ............................................................................................................. 67
3.“°F/°C” conversie .......................................................................................................... 67
4.Deur opening alarm .......................................................................................................68
5.Temperatuur uitschakeling geheugen .........................................................................68
6.Stroom .............................................................................................................................68
Voorzorgsmaatregelen voor gebruik van wijnkast....................... 69
Automatisch ontdooien...................................................................................................69
Schappen........................................................................................................................... 70
Operationele geluiden die u zou kunnen horen ........................................................... 70
Onderhoud e
n reiniging van de wijnkast ...................................................................... 71
Problemen oplossen...................................................................... 72
Technische gegevens•Paklijst...................................................... 73
Inhoudsopgave
Pagina

64
Koptekst 1
Dit apparaat is exclusief bedoeld voor het opslaan van wijn.
Houd altijd de standaard voorzorgsmaatregelen in acht bij het gebruik
van dit apparaat, zoals:
1. Lees alle instructies voor het gebruik van dit apparaat.
2. Gebruik dit apparaat alleen waarvoor het is bedoeld, zoals beschreven in
deze handleiding.
3. Deze wijnkast moet voor gebruik correct worden geïnstalleerd in
overeenstemming met de installatie-instructies. Lees voor het aarden de
instructies in de installatiesectie.
4. Dit apparaat is strikt bedoeld voor huishoudelijk gebruik. Houd rekening
met de normen en voorschriften als u van plan bent het apparaat voor
industriële of commerciële doeleinden te gebruiken. Dit apparaat is
niet bedoeld voor gebruik door kinderen vanaf 8 jaar of door personen
met verminderde fysieke, zintuiglijke of mentale capaciteiten en zonder
voorkennis of ervaring, tenzij dit onder toezicht gebeurt of als zij duidelijke
instructies omtrent veilig gebruik en mogelijke gevaren hebben gekregen.
Laat kinderen niet met het apparaat spelen. Laat kinderen het apparaat
niet zonder toezicht reinigen of onderhoud plegen aan het apparaat.
5. Het apparaat moet zo worden geplaatst dat de stekker toegankelijk is.
6. Als het elektriciteitssnoer is beschadigd, moet het worden vervangen
door de fabrikant, een vertegenwoordiger van de fabrikant die bevoegd
is onderhoud te plegen of een vergelijkbare bevoegde persoon om risico
te voorkomen .
7. Houd de ventilatieopeningen in de behuizing van het apparaat of in de
ingebouwde structuur vrij van obstakels.
8. Gebruik geen mechanische apparaten of andere middelen om het
ontdooien te versnellen, tenzij deze door de fabrikant zijn aanbevolen.
9. Beschadig het koelmiddelcircuit niet.
10. Gebruik geen elektrische apparaten binnen de opslagcompartimenten in
het apparaat, tenzij ze van een door de fabrikant aanbevolen type zijn.
11. Als de verlichting is beschadigd, moet deze worden vervangen door
de fabrikant, een vertegenwoordiger van de fabrikant die bevoegd is
onderhoud te plegen of een vergelijkbare bevoegde persoon om risico
te voorkomen.
12. Dit apparaat is exclusief bedoeld voor het opslaan van wijn.
13. Let op: kinderen kunnen zichzelf hierin opsluiten. Haal de deuren van uw
oude wijnkast voor u het apparaat wegdoet. Laat de planken zitten zodat
kinderen niet naar binnen kunnen klimmen.
14. Bewaar geen explosieve stoffen zoals spuitbussen met een ontvlambare
inhoud in dit apparaat.
BELANGRIJKE VOORZORGSMAATREGELEN

65
Koptekst 1
NL
Uw wijnkast installeren
De wijnkast uitpakken
1. Verwijder al het verpakkingsmateriaal. Ook de schuimbasis en het plakband waarmee de
accessoires aan de binnen- en buitenkant van de wijnkast zijn bevestigd.
2. Controleer op resterende verpakking, plakband of bedrukte materialen voordat u de
wijnkast inschakelt.
De wijnkast waterpas zetten
• De wijnkast heeft vier verstelbare poten aan de voor- en achterzijde. Nadat u de wijnkast op
de juiste plaats hebt gezet, kunt u de wijnkast waterpas afstellen.
• Als de wijnkast niet waterpas staat, kunnen de verstelbare poten worden gebruikt. Zet de
wijnkast hoger door ze rechtsom te draaien en lager door ze linksom te draaien. De deur van
de wijnkast sluit gemakkelijker als de verstelbare poten zijn uitgeschoven.
Juiste luchtcirculatie
•
een plaats waar er goede luchtcirculatie is, en tevens leidingen en elektrische voorzieningen
aanwezig zijn.
• Het wordt aangeraden om de volgende ruimtes rondom de wijnkast in acht te nemen:
Zijkanten .......... 100 mm
Bovenzijde ....... 100 mm
Achterzijde .......100 mm
• Voor goede koeling is het van belang dat u niet meer in de wijnkast plaatst dan mogelijk is.
Opmerking: als uw wijnkast om wat voor reden dan ook op zijn kant of schuin heeft gestaan,
mag u deze pas na 24 uur weer inschakelen.
Minstens
10 cm
vrijhouden aan bovenzijde
Minstens
10 cm
vrijhouden
aan rechterzijde
Hoger Lager
Verstelbare
pootschroef
Minstens
10 cm
vrijhouden aan
achterzijde
Minstens
10 cm
vrijhouden aan
linkerzijde

66
Koptekst 1
Elektriciteitsbenodigdheden
• Zorg dat er een geschikt stopcontact is (220-240 V, 15 Amp) dat correct geaard is om de
wijnkast van stroom te voorzien.
• Vermijd het gebruik van een stekker met drie pinnen of het bewerken van de aarding van
de stekker zodat deze in het stopcontact past. Dit is zeer gevaarlijk, biedt geen effectieve
aarding voor de wijnkast en kan resulteren in een elektrische schok.
Installatiebeperkingen
• Installeer uw wijnkast niet in een locatie die niet naar behoren is geïsoleerd of verwarmd,
zoals een garage. Uw wijnkast is niet bedoeld voor gebruik in een omgevingstemperatuur die
lager is dan 10 °C.
• Kies een geschikte locatie voor de wijnkast op een harde, gelijkmatige ondergrond en buiten
het bereik van zonlicht of warmtebronnen (radiatoren, plintconvectoren, kookapparatuur,
etc.). De verstelbare poten aan de voor- en achterkant moeten worden gebruikt om eventuele
oneffenheden in de vloer op te heffen.
• De wijnkast dient vrijstaand te worden geplaatst. De wijnkast is niet geschikt als
inbouwapparatuur.
Gebruik van verlengsnoer
• Vermijd het gebruik van een verlengsnoer vanwege het veiligheidsrisico dat het met zich
meebrengt. Als het gebruik van een verlengsnoer benodigd is, gebruik dan uitsluitend een
3-draads verlengsnoer dat beschikt over een stekker met twee ronde pinnen en een gat en
een stopcontact met twee gaten en een pin waarop een dergelijke stekker past. Zorg ervoor
dat de maximale spanning van het verlengsnoer overeenkomt met of hoger is dan de indicatie
op het apparaat.
Eerste gebruik
Zodra u het product hebt aangesloten op een stopcontact laat u het ten minste 30 minuten acclimatiseren
voordat u het apparaat afstelt. Gedurende deze tijd, afhankelijk van de binnentemperatuur, blijft
het lampje voor rode of witte wijn branden voor het bovenste compartiment en blijft het lampje voor
rode of witte wijn branden voor het onderste compartiment. Op de LED-display wordt de actuele
binnentemperatuur weergegeven.

67
NL
Inleiding in de voornaamste functies van het apparaat
1
.
Temperatuur aanpassingen
Houd de knop 3 seconden ingedrukt om de temperatuur in te stellen. Daarna knippert
de temperatuurweergave IN.T°. Druk op de of knoppen om de temperatuurwaarde
te verhogen of te verlagen. Zodra de gewenste temperatuur wordt bereikt, drukt u op de
knop.
2.
Bedieningspaneel
Het temperatuurbereik van het scherm is 5~20°C (41 ~ 68°F).
De standaard temperatuurinstelling is 12°C(54°F ) .
Interne verlichting
Om uw collectie beter in beeld te brengen, is een zacht licht ingewerkt in de wijnkelder.
Druk gewoon op de knop en het licht wordt ingeschakeld. Druk opnieuw in om het uit te
schakelen.Als de deur open is, schakelt het licht in. Wanneer de deur gesloten wordt,
schakelt het licht uit.
3
.
“°F/°C” conversie
Houd ingedrukt gedurende 3 seconden. De weergegeven temperatuur in Fahrenheit
en het °F teken wordt geconverteerd in graden Celsius en het “°C” teken verschijnt.
Houd de knop opnieuw ingedrukt gedurende 3 seconden. De weergegeven
temperatuur in graden Celsius wordt geconverteerd in Fahrenheit en het °F teken verschijnt.
Temperatuur
Aanpassing
(omhoog)
LichtINSTELLING STROOM
Temperatuur
Aanpassing
(omlaag)
U kunt de temperatuur instellen in overeenstemming met uw wijn opslagvereisten.
SET LIGHT
POWER
OUT.T° IN.T°

68
Heading 1
4.
Deur opening alarm
Als de deur langer dan 1 minuut wordt open gehouden, weerklinkt een geluidssignaal tot de
deur gesloten wordt of men kan een toets indrukken op het bedieningspaneel om het
geluidssignaal te stoppen.
5.
6.
Stroom
Temperatuur uitschakeling geheugen
In het geval van een stroompanne slaat de kelder automatisch de ingestelde
temperatuur op. Wanneer de stroom hersteld wordt, behoudt de kelder de ingestelde
temperatuur voorafgaand aan de stroompanne terwijl andere functies terugkeren
naar de standaardstatus.
.
Als men de toets 3 seconden ingedrukt houdt, schakelt de stroom uit (de stroom
voor alle elektrische apparaten wordt onderbroken en het volledige apparaat schakelt
over op stand-by).Als het apparaat uitgeschakeld is, kan de stroom worden
ingeschakeld door de toets 3 seconden ingedrukt te houden. Daarna worden alle
pictogrammen op het scherm ingeschakeld.

69
Koptekst 1
NL
Plaats niet te veel wijn in de wijnkast, zodat
het draagvermogen van de wijnschappen niet
wordt overschreden. Plaats niet meer dan vier
lagen per schap. Het draagvermogen van de
wijnschappen is niet groter dan 35 kg.
plaatst, of de wijnschappen volledig stabiel zijn.
schappen steekt, om te voorkomen dat
deur sluit.
Voorzorgsmaatregelen voor gebruik van wijnkast
Automatisch ontdooien
De manier waarop wijn blijft rijpen is afhankelijk van de omgevingsomstandigheden. De kwaliteit
van de lucht is dus doorslaggevend voor het conserveren van de wijn. In het onderste gedeelte
te zorgen dat de luchtdoorvoer van optimale kwaliteit blijft.
LET OP
te vervangen. Filters zijn verkrijgbaar bij
uw leverancier.
Dit apparaat is uitgerust met een automatisch
ontdooisysteem.
Zorg ervoor dat deze afvoeropening
tijdens gebruik is gedeblokkeerd, zodat dooiwater
geleidelijk door de afvoeropening naar de
wateropvangbak in de wijnkast kan stromen.
Maak de reservoirs voor wateropvang onderin het bovenste en het onderste compartiment
regelmatig schoon; gebruik een droge doek om water in de reservoirs te absorberen en veeg de
reservoirs af (reinig ze elke drie maanden op de aangegeven wijze).

70
Koptekst 1
Schappen
•
gemakkelijk op de horizontale schappen onderin de kast.
•
weer uit het apparaat worden gehaald.
Operationele geluiden die u zou kunnen horen
• Kokend water, klokkende geluiden of lichte trillingen als gevolg van de circulerende
koelvloeistof.
• De thermostaatbediening klikt wanneer de temperatuurfunctie wordt in- of uitgeschakeld.

71
Koptekst 1
NL
Reinging en onderhoud
Waarschuwing:
verwijder voordat u de wijnkast gaat schoonmaken, altijd eerst de stekker
van de wijnkast uit het stopcontact om elektrische schokken te vermijden. Het
negeren van deze waarschuwing kan letsel of overlijden tot gevolg hebben.
Let op:
lees voordat u schoonmaakproducten gebruikt altijd eerst de instructies en
waarschuwingen van de fabrikant om letsel en schade te voorkomen.
Algemeen:
• Los 3 à 4 eetlepels soda op in warm water. Gebruik een spons of
een vochtige zachte doek en reinig uw wijnkast met het zelfgemaakte
schoonmaakmiddel.
• Spoel af met warm water en maak het droog met een zachte doek.
• Gebruik geen schuurmiddelen, agressieve schoonmaakmiddelen, ammoniak,
bleekmiddel met chloor, geconcentreerde wasmiddelen, oplosmiddelen of
metalen pannenspons. Deze chemicaliën kunnen het oppervlak van uw
wijnkast vervormen, beschadigen en/of verkleuren.
Deurafdichting:
• reinig de deurafdichting elke drie maanden volgens de algemene instructies.
goed afsluiten.
• Smeer een klein hoeveelheid vaseline op scharnierzijde van de
Wijnschap:
wanneer er wijn- of waterdruppels op het wijnschap vallen, schuur het dan
op met schuurpapier met korrelgrootte 300 - 400 en veeg het stof af met een
zachte doek. Gebruik geen vochtige handdoek of zachte doek.
Stroomonderbrekingen
• Houd rekening met stroomonderbrekingen door onweer of andere oorzaken. Verwijder
het elektriciteitssnoer uit het stopcontact in het geval van stroomuitval. Sluit het
elektriciteitssnoer opnieuw aan op het stopcontact zodra er weer stroom is.
Vakantie en verplaatsen
• Verwijder de stekker uit het stopcontact bij lange afwezigheid en reinig de wijnkast en
deurafdichtingen zoals vermeld in het gedeelte 'Algemene reiniging'. Houd de deuren
open zodat de lucht binnenin kan circuleren.
• Als u de wijnkast verplaatst, moet u deze te allen tijden verticaal houden. Verplaats
het product niet als het op de achterkant ligt. Dit kan schade toebrengen aan de
interne onderdelen.
Opmerking: wacht na het verplaatsen van de wijnkast ten minste 24 uur voordat u deze
weer inschakelt.
Onderhoud en reiniging van de wijnkast

72
Koptekst 1
Wijnkast werkt niet
• Controleer of de wijnkast is aangesloten.
• Controleer of er stroom staat op het AC-stopcontact door de zekering te controleren.
Wijn is te warm:
• Deur gaat te vaak open.
• Geef nieuwe wijn in de wijnkast de tijd om de gewenste temperatuur te bereiken.
• Controleer of de deurafdichtingen goed sluiten.
• Reinig de condensatiespoelen.
• Verlaag de temperatuur.
Wijn is te koud:
• Als de wijn te koud is, kunt u de temperatuurinstellingen aanpassen.
Wijnkast staat te vaak aan:
• Dit kan nodig zijn om de temperatuur constant te houden op warme en vochtige dagen.
• Deuren zijn vaak geopend of hebben langere tijd opengestaan.
• Reinig de condensatiespoelen.
• Controleer of deurafdichting goed sluit.
• Controleer of de deuren volledig sluiten.
Vochtophoping aan binnenkant of buitenkant van de wijnkast:
• Dit is normaal tijdens perioden van hoge luchtvochtigheid.
• Deur staat lang open of wordt regelmatig geopend.
• Controleer of deurafdichtingen goed sluiten.
Deur van wijnkast sluit niet goed:
• Zet de wijnkast waterpas.
•
Dank elektrische apparaten niet af bij ongescheiden
huisafval. Maak gebruik van de hiervoor bestemde
ophaaldiensten. Neem contact op met de plaatselijke
instanties voor informatie over de beschikbare
ophaaldiensten. Als elektrische apparaten op
een afvalstortplaats terechtkomen, kunnen er
schadelijke stoffen in het grondwater lekken en in de
voedselketen terecht komen. Dit heeft gevolgen voor
uw gezondheid en welzijn. Bij het vervangen van
oude apparaten door nieuwe, is de winkelier wettelijk
verplicht om gratis de afvoer van uw oude apparaat
te verzorgen.
Problemen oplossen

73
Koptekst 1
NL
Technische gegevens•Paklijst
Technische gegevens
Paklijst
Dit apparaat wordt voortdurend ontwikkeld. Wij behouden het recht voor om de onderdelen van
de wijnkast zonder aankondiging vooraf te wijzigen.
Gebruikers-
handleiding
Informa-
tiepakket
Wijnrekken
Plugpen
Type resistentie
tegen elektrische
schokken
Beschikbare
capaciteit
(l)
Nominale
spanning
(V)
Nominale
frequentie
(Hz)
vermogen
(W)
Tempera-
tuurbereik
(°C)
Koelmiddel
(R600a)
(g)
Netsnoeraan-
sluitingsmodus
Gewicht
(kg)
Geluid
(akoestische
geluidsemissie)
dB (A)
Totale afmeting
(diepte × breedte ×
hoogte) (mm)
Opmerkingen:
1. Volgens internationale normen moet in een klimaat van het type SN-ST de omgevingstemperatuur voor
gebruik van de wijnkast variëren tussen 10 °C en 38 °C.
2. "Geluid (akoestisch geluidsniveau)" aangegeven in de technische gegevens heeft betrekking op een situatie
normen. In het geval van een lege wijnkast wordt hierin een veerkrachtig rubberen kussen van 5 mm tot
6 mm dikte geplaatst. De wijnkast kan minstens 30 minuten draaien nadat de deur gesloten is. Een test wordt
uitgevoerd na een periode van stabiel functioneren (exclusief opstarten en uitschakelen). De achtergrondruis
wordt gemeten op 1 m van de voorzijde, achterzijde en linker- en rechterkant van de
wijnkast.
Tijdens gebruik is het normaal dat het werkelijke geluid verschilt van het in de tabel aangegeven
geluidsniveau ten gevolge van de effecten van het type wijn dat is opgeslagen in de wijnkast, het
omgevingsgeluid, het openen en sluiten van de deur, het opstarten en uitschakelen van de compressor, enz.
Naam
Hoeveel-
heid
Productmodel
WS120GA I 220
220-240 50 110
WS190GA I 385
220-240 50 100
5-20 45 Y 69 38 639×595×1,265
5-20 75 Y 94 38 639×595×1,850
SN-ST
SN-ST
KlimaattypeModel
WS120GA 1 1 1 2
WS190GA 1 1 1 2
4
7
Toets

74
Nadpis 1
Názvy součástí vinotéky
Horní police
na víno
Vino
police
Skleněné dveře
Nastavitelný
šroub nožky
Hlavní ovládací panel
(kapacita 117 lahví) (kapacita 189 lahví)
WS120GA WS190GA

75
Nadpis 1
CZ
DŮLEŽITÉ BEZPEČNOSTNÍ POKYNY............................................ 76
Instalace vinotéky......................................................................... 77
Rozbalení vinotéky........................................................................................................... 77
Vyrovnání vinotéky .......................................................................................................... 77
Správná cirkulace vzduchu.............................................................................................77
Požadavky na elektrickou síť ......................................................................................... 78
Požadavky na umístění.................................................................................................... 78
Použití prodlužovacího kabelu ....................................................................................... 78
Počáteční nastavení......................................................................................................... 78
Úvod do základních funkcí zařízení .............................................. 79
1.Nastavení teploty ......................................................................................................... 79
2.Vnitřní osvětlení ..........................................................................................................79
3.Převod “°F/°C” .............................................................................................................. 79
4.Alarm při otevřených dveřích .......................................................................................80
5.Paměť Teploty vypnutí proudu ...................................................................................80
6.Tlačítko zapnutí .............................................................................................................80
Bezpečnostní opatření pro používání vinotéky ............................ 81
Automatické odmrazování .............................................................................................. 81
Ukládání do polic.............................................................................................................. 82
Běžné provozní zvuky, které můžete zaznamenat ....................................................... 82
Řádná údrž
ba a čištění vinotéky.................................................................................... 83
Odstraňování závad....................................................................... 84
Technické údaje•Seznam součástí v balení ................................. 85
Obsah
Strana

76
Nadpis 1
Toto zařízení je určeno výhradně ke skladování vína.
Při používání tohoto zařízení vždy dodržujte základní bezpečnostní
opatření včetně těch následujících:
1. Než začnete toto zařízení používat, přečtěte si všechny pokyny.
2. Zařízení používejte pouze k zamýšlenému účelu, tak jak je popsán v tomto
návodu k užívání a údržbě zařízení.
3. Tato vinotéka musí být před použitím řádně instalována v souladu s pokyny
k instalaci. Viz pokyny k uzemnění v části o instalaci.
4. Je určena pouze pro domácí použití. Jestliže je používána pro průmyslové
nebo komerční účely, je třeba dodržovat příslušné normy a předpisy.
Toto zařízení mohou používat děti od 8 let věku a osoby s omezenými
tělesnými, smyslovými nebo duševními schopnostmi nebo nedostatkem
zkušeností a znalostí, pokud jsou pod dozorem nebo byly poučeny
o bezpečném používání zařízení a uvědomují si související rizika. Děti si
nesmí se zařízením hrát. Děti nesmí bez dozoru provádět čištění a údržbu.
5. Zařízení musí být umístěno tak, aby byla elektrická zástrčka dobře
přístupná.
6. Napájecí kabel musí být v případě poškození vyměněn výrobcem,
se předešlo bezpečnostním rizikům.
7. Větrací otvory v krytu nebo ve vnitřní konstrukci zařízení nesmí být zakryté.
8. K urychlení procesu odmrazování nepoužívejte žádné mechanické ani jiné
prostředky, než jaké doporučuje výrobce.
9. Nepoškoďte okruh chladiva.
10. V prostorech pro skladování jídla v zařízení nepoužívejte elektrická
zařízení, pokud se nejedná o typ doporučovaný výrobcem.
11. Světlo musí být v případě poškození vyměněno výrobcem, servisním
bezpečnostním rizikům.
12. Toto zařízení je určeno výhradně ke skladování vína.
13. Riziko uvíznutí dítěte v zařízení. Jestliže se chystáte zbavit staré vinotéky,
sundejte z ní dveře. Police nechte na svém místě, aby se dovnitř nemohly
snadno dostat děti.
14. Neskladujte v tomto zařízení výbušné látky, například aerosolové nádoby
s hořlavou pohonnou hmotou.
DŮLEŽITÉ BEZPEČNOSTNÍ POKYNY

77
Nadpis 1Instalace vinotéky
CZ
Rozbalení vinotéky
1. Odstraňte všechen obalový materiál. Ten zahrnuje i pěnový podstavec a veškerou lepicí
pásku, jíž jsou uvnitř i zvenčí připevněny doplňky vinotéky.
2. Před zapnutím vinotéku důkladně prohlédněte a odstraňte všechny zbytky obalů, pásky nebo
tištěných materiálů.
Vyrovnání vinotéky
• Vinotéka má čtyři vyrovnávací nožky, které jsou umístěny v předních a zadních rozích.
Jakmile vinotéku řádně umístíte na zvolené místo, můžete ji vyrovnat.
• Vyrovnávací nožky mohou být uzpůsobeny točením po směru hodinových ručiček, pokud
potřebujete vinotéku zvednout, nebo proti směru hodinových ručiček, pokud ji potřebujete
snížit. Dveře vinotéky se snáze zavírají, když jsou nožky prodloužené.
Správná cirkulace vzduchu
• Maximální výkonnost vinotéky, pro kterou byla navržena, zajistíte její instalací na místo se
správnou cirkulací vzduchu, instalacemi a elektrickým připojením.
• Okolo vinotéky doporučujeme ponechat níže uvedené mezery:
Po stranách ...... 4" (100 mm)
Nahoře .............4" (100 mm)
Vzadu ............... 4" (100 mm)
• Pokud má vinotéka správně plnit svou chladicí funkci, nesmí být přeplněná.
Poznámka: Jestliže se vinotéka z jakéhokoli důvodu převrhne, zapojte ji znovu až po
24 hodinách.
Více než
10 cm
nahoře
Více než
10 cm
zprava
Nahoru Dolů
Nastavitelný
šroub nožky
Více než
10 cm
zezadu
Více než
10 cm
zleva

78
Nadpis 1
Požadavky na elektrickou síť
• Pro napájení vinotéky zajistěte vhodnou zásuvku (220–240 V, 15 A) s řádným uzemněním.
• Nepoužívejte adaptéry pro zástrčky se třemi kolíky, ani neuřezávejte třetí kolík uzemnění,
aby bylo zástrčku možné použít do zásuvky určené pro dvoukolíkovou zástrčku. Tento
nebezpečný postup ponechá vinotéku bez účinného uzemnění a může tak vzniknout
nebezpečí úrazu elektrickým proudem.
Požadavky na umístění
• Neinstalujte vinotéku na místo, které není řádně izolované či vytápěné (například garáž
apod.). Vinotéka není určena k provozu při okolní teplotě nižší než 10 °C.
• Zvolte pro vinotéku vhodné umístění na tvrdém rovném povrchu, tak aby nebyla vystavena
přímému slunečnímu záření a nenacházela se v blízkosti zdrojů tepla, jako jsou např.
radiátory, lištové vytápění, varná zařízení apod. Případnou nerovnost podlahy je třeba
vyrovnat pomocí vyrovnávacích nožek umístěných v předních a zadních rozích vinotéky.
• Vinotéka byla navržena jako volně stojící spotřebič. Není určena k vestavění.
Použití prodlužovacího kabelu
• Vzhledem k potenciálním bezpečnostním rizikům, které mohou za určitých podmínek nastat,
se vyhněte použití prodlužovacího kabelu. Jestliže je použití prodlužovacího kabelu nutné,
použijte výhradně třívodičový prodlužovací kabel s dvoukolíkovou zástrčkou a jedním otvorem
a jednokolíkovou zásuvkou a dvěma otvory. Vyznačené parametry (maximální zatížení)
prodlužovacího kabelu musí být stejné nebo vyšší než elektrické parametry zařízení.
Počáteční nastavení
Po zapojení spotřebiče do elektrické zásuvky jej ponechte alespoň 30 minut spuštěný, aby se mohl
aklimatizovat, než provedete jakékoli změny nastavení. V závislosti na vnitřní teplotě zůstane po tuto
dobu svítit světlo červeného nebo bílého vína pro horní oddíl a světlo červeného nebo bílého vína pro
spodní oddíl. Displej LED bude zobrazovat aktuální vnitřní teplotu.

79
CZ
Úvod do primárních funkcí spotřebiče
1.
Nastavení teploty
Pro nastavení teploty podržte tlačítko po dobu cca 3 sekund. Pak začne blikat displej
teploty IN.T °. Stiskněte tlačítko nebo pro zvýšení nebo snížení hodnoty teploty.
Jakmile je dosaženo požadované teploty, stiskněte tlačítko .
2.
Ovládací panel
Teplotní rozsah zobrazovacího panelu je 5~20°C(41~68°F).
Teplota nastavená od výroby je 12°C(54°F).
Vnitřní osvětlení
Pro zpříjemnění vzhledu vaší sbírky, do chladiče vína bylo zabudované jemné světlo.
Jednoduše stiskněte tlačítko a světlo se rozsvítí, stiskněte znovu pro vypnutí.
Při otevření dveří se světlo zapne. Po zavření dveří světlo zhasne.
3.
Převod “°F/°C”
Stiskněte a podržte po dobu 3 sekund, zobrazí se teplota ve stupních Fahrenheita
a znak °F se promění na teplotu ve stupních Celsia a znak "°C". Opět stiskněte a podržte
po dobu 3 sekund, zobrazí se teplota ve stupních Celsia a znak °C se promění na
teplotu ve stupních Fahrenheita a znak "°F".
Světlo
NASTAVENÍ NAPÁJENÍ
Teplota
Nastavení
(nahoře)
Teplota
Nastavení
(dolů)
Můžete nastavit teplotu dle Vašich požadavků na uchovávání vína.
SET LIGHT
POWER
OUT.T° IN.T°

80
Heading 1
4.
Alarm při otevřených dveřích
V případě, že jsou dveře otevřené déle než 1 minutu, bude bzučák pípat jako alarm,
dokud se dveře nezavřou nebo se na panelu displeje nestiskne libovolné tlačítko,
následně bzučák přestane pípat.
5.
6.
Tlačítko zapnutí
Paměť Teploty vypnutí proudu
V případě výpadku proudu, chladnička na víno automaticky uloží nastavenou teplotu.
Po obnovení dodávky proudu, bude v provozu podle teploty nastavené před výpadkem
napájení, dokud se ostatní funkce vrátí do výchozího stavu..
Podržením tlačítka po dobu 3 sekund, se hlavní napájení vypne (energie pro všechny
elektrické přístroje uvnitř se vypne a celý přístroj bude v pohotovostním režimu).
Pokud je zařízení vypnuto, napájení je možné zapnout podržením tlačítka na 3 sekundy,
následně se rozsvítí všechny ikony na displeji.

81
Nadpis 1
Neumisťuje do vinotéky příliš velké množství
vína, abyste nepřekročili maximální zátěž polic
na víno. Na jednu polici neumisťujte více než
čtyři vrstvy lahví. Počet lahví by neměl v každé
polici přesáhnout čtyři vrstvy nebo by zátěž polic
na víno neměla překročit 35 kg.
Před umístěním lahví do vinotéky se ujistěte,
zda jsou police na víno zcela stabilní.
Dále se také ujistěte, že žádná lahev z police
nevyčnívá, abyste zabránili nárazu lahví do
skleněných dveří při zavření vinotéky.
Bezpečnostní opatření pro používání vinotéky
Automatické odmrazování
CZ
Způsob zrání vína závisí na vnějších podmínkách. Kvalita vzduchu je tedy pro zachování vína
, který
zajišťuje, že procházející vzduch si udržuje optimální kvalitu.
UPOZORNĚNÍ
Filtry lze zakoupit u vašeho prodejce.
vyjměte jej.
držadlem ve vertikální pozici. Otočte jím
doprava a vložte jej.
Tento spotřebič má funkci automatického
odmrazování. Během používání zajistěte, aby byl
odvodňovací otvor průchozí a voda vzniklá
odmrazováním jím mohla volně protékat do nádržky
na vodu uvnitř skříně vinotéky.
Pravidelně čistěte nádržky na vodu umístěné ve spodní části horního a dolního oddílu.
Suchým hadříkem vysušte vodu uvnitř nádržek a následně je otřete (čistěte je podle pokynů
každé tři měsíce).

82
Nadpis 1
Ukládání do polic
• Police byly navrženy s důrazem na vzhled a jednoduché čištění. Rozměrnější láhve nebo
velké láhve o objemu 1,5 l lze snáze uložit na příčné police ve spodní části vinotéky.
• Jsou tu také police pro snadné ukládání a vyjímání vašich vín.
Běžné provozní zvuky, které můžete zaznamenat
• Zvuk vařící vody, bublání nebo lehké vibrace jsou způsobeny oběhem chladiva
v chladicím okruhu.
• Ovladač termostatu při zapínání a vypínání vždy cvakne.

83
Nadpis 1
CZ
Čištění a údržba
Varování:
Před čištěním vinotéku vždy nejprve odpojte od sítě, abyste předešli riziku
elektrického šoku. Neuposlechnutí tohoto varování může způsobit smrt
nebo úraz.
Upozornění:
Před použitím čisticích přípravků si vždy přečtěte instrukce a upozornění
výrobce a řiďte se jimi, abyste předešli osobnímu úrazu nebo poškození
výrobku.
Všeobecné:
• Připravte si čisticí roztok ze 3–4 lžic jedlé sody rozmíchaných v teplé
vodě. Houbou nebo měkkým hadříkem namočeným v čisticím roztoku
vinotéku omyjte.
• Následně ji otřete čistou teplou vodou a osušte čistým hadříkem.
• Nepoužívejte silné chemikálie, abraziva, čpavky, chlorové bělidlo,
koncentrované saponáty, rozpouštědla ani kovové drátěnky. NĚKTERÉ
z těchto chemikálií mohou způsobit narušení, poškození a/nebo změnu barvy
vaší vinotéky.
Těsnění dveří:
• Čistěte těsnění dveří každé tři měsíce podle obecných pokynů. Těsnění
musí být udržováno v čistém a pružném stavu, aby bylo zajištěno řádné
přiléhání dveří.
• Pružnost a správnou funkci těsnění zajistí vazelína nanesená v tenké vrstvě
na stranu u závěsů.
Police na víno:
Pokud bude police na víno náhodně polita vínem nebo kapkami vody,
použijte na vyleštění police brusný papír 300-400 a poté pomocí měkkého
hadříku setřete piliny. Nepoužívejte utěrku nebo hadřík namočený ve vodě.
Přerušení dodávky proudu
• Příležitostně může dojít k přerušení dodávky proudu způsobeného bouřkou nebo jinými
příčinami. Jestliže dojde k výpadku dodávky elektrické energie, vyjměte napájecí kabel
ze zásuvky střídavého proudu. Až bude dodávka proudu obnovena, zapojte opět napájecí
kabel do zásuvky střídavého proudu.
Péče v případě dovolené a stěhování
• V případě delší dovolené nebo nepřítomnosti vinotéku odpojte a vyčistěte ji včetně těsnění
dveří podle návodu v části „Celkový úklid“. Dveře nechte otevřené, aby mohl uvnitř
cirkulovat vzduch.
• Při stěhování vinotéku vždy přesunujte ve svislé poloze. Nepřemisťujte spotřebič položený
na podlaze – mohlo by dojít k poškození uzavřeného systému.
Poznámka: Po přestěhování počkejte 24 hodin, než vinotéku opět zapojíte do zásuvky.
Řádná údržba a čištění vinotéky

84
Nadpis 1
Vinotéka nefunguje:
• Zkontrolujte, zda je vinotéka zapojená do zásuvky.
• Kontrolou elektrického jističe ověřte, zda je zásuvka střídavého proudu pod napětím.
Víno je příliš teplé:
• Časté otevírání dveří.
• Jestliže jste víno do vinotéky uložili teprve nedávno, dopřejte mu čas, aby mohlo dosáhnout
požadované teploty.
• Zkontrolujte přiléhavost těsnění.
• Vyčistěte okruh kondenzátoru.
• Upravte nastavenou teplotu na nižší hodnotu.
Víno je příliš studené:
• Pokud je ovládání teploty nastaveno na příliš nízkou hodnotu, upravte nastavení na vyšší teplotu.
Vinotéka se spouští příliš často:
• Může se jednat o normální jev při udržování konstantní teploty během horkých a vlhkých dní.
• Je možné, že jsou příliš často nebo na příliš dlouhou dobu otvírány dveře.
• Vyčistěte okruh kondenzátoru.
• Zkontrolujte přiléhavost těsnění.
• Zkontrolujte, zda jsou dveře úplně dovřené.
Na vnitřním nebo vnějším povrchu vinotéky se hromadí vlhkost:
• Za velmi vlhkého počasí jde o běžný jev.
• Dveře jsou otevírány často nebo na dlouhou dobu.
• Zkontrolujte přiléhavost těsnění dveří.
Dveře vinotéky se nedovírají:
• Vyrovnejte vinotéku.
• Zkontrolujte, zda nejsou dveře blokovány např. lahvemi nebo policemi.
Elektrické spotřebiče nevyhazujte do netříděného
komunálního odpadu: využijte zařízení pro tříděný
sběr odpadu. Informace o dostupných způsobech
sběru odpadu získáte u místní samosprávy. Pokud
jsou elektrické spotřebiče odvezeny na skládky nebo
zavážky, mohou nebezpečné látky prosáknout do
podzemních vod a následně se dostat do potravního
řetězce a poškodit vaše zdraví. Když nahrazujete
staré spotřebiče novými, je prodejce většinou
povinen přijmout vaše staré spotřebiče a zařídit jejich
likvidaci, a to přinejmenším zdarma.
Odstraňování závad

85
Nadpis 1
Technické údaje•Seznam součástí v balení
Technické údaje
Seznam součástí v balení
Tento spotřebič je průběžně vyvíjen. Ponecháváme si právo změnit součásti vinotéky bez
předchozího upozornění.
Uživatelská
příručka
Informační
balíček
Vino
police
Zasunovací
kolík
Klíč
Model
Typklimatu
Typ odolnosti vůči
elektrickému šoku
Dostupná
kapacita
(l)
Jmenovité
napětí (V)
Jmenovitý
kmitočet
(Hz)
Příkon (W)
Rozsah
teploty
(°C)
Chladivo
(R600a)
(g)
Typ připojení
napájecího
kabelu
Hmotnost
(kg)
Hluk (úroveň
akustického výkonu)
dB (A)
Celkové rozměry
(hloubka × šířka × výška)
(mm)
Poznámky:
1. Podle mezinárodních standardů znamená typ klimatu SN-ST, že okolní teplota pro použití vinotéky se
pohybuje mezi 10 °C a 38 °C.
2. „Hluk (úroveň akustického výkonu)“ označená v technických údajích se vztahuje k situaci, kdy je částečně
izolovaná místnost nastavená podle mezinárodních standardů, vinotéka je prázdná a do vinotéky je vložen
5–6mm pružný gumový polštář. Může být spuštěna po dobu alespoň 30 minut po zavření dveří. Test bude
proveden po stabilním provozu (mimo spuštění a vypnutí). Pozemní hluk bude testován ve vzdálenosti 1 m
od předního, zadního, levého a pravého povrchu vinotéky.
Je normální, že skutečný hluk se od označeného hluku liší, vzhledem k vlivu typu vína uskladněného ve
vinotéce, okolního hluku, otevírání a zavírání dveří, spouštění a vypínání kompresoru apod.
Název
Množství
Model produktu
CZ
WS120GA I 220 220-240 50 110
WS190GA I 385
220-240 50 100
5-20 45 Y 69 38 639×595×1,265
5-20 75 Y 94 38 639×595×1,850
SN-ST
SN-ST
WS120GA 1 1 1 2
WS190GA 1 1 1 2
4
7

86
Heading 1
Nazwa elementów chłodziarki
Górna półka
na wino
Wino
police
Drzwiczki szklane
Regulowana
śruba
Główny panel
sterowania
(pojemność
117 butelek)
(pojemność
189 butelek)
WS120GA WS190GA

87
Heading 1
PL
INFORMACJE DOTYCZĄCE BEZPIECZEŃSTWA............................ 88
Instalacja chłodziarki.................................................................... 89
Rozpakowywanie chłodziarki do wina .......................................................................... 89
Poziomowanie chłodziarki .............................................................................................. 89
Właściwy obieg powietrza .............................................................................................. 89
Wymagania elektryczne .................................................................................................. 90
Ograniczenia instalacyjne............................................................................................... 90
Używanie przedłużacza...................................................................................................90
Ust
............................................................................90
Wprowadzenie do głównych funkcji urządzenia........................... 91
1.Regulacja temperatury.................................................................................................. 91
2.Oświetlenie wewnętrzne .............................................................................................. 91
3.Konwersja „°F/°C”.......................................................................................................... 91
4.Alarm otwartych drzwi .................................................................................................. 92
5.Pamięć temperatury przy wyłączeniu ........................................................................... 92
6.Zasilanie .......................................................................................................................... 92
Środki ostrożności podczas używania chłodziarki....................... 93
Automatyczne rozmrażanie ............................................................................................ 93
Półki ................................................................................................................................... 94
Odgłosy prawidłowej pracy, jakie mogą być słyszalne .............................................. 94
Właściwe czyszczenie i konserwacja chłodziarki .......................................................95
Rozwiązywanie problemów........................................................... 96
Dane techniczne•Lista opakowania.............................................. 97
Spis treści
Strona

88
Heading 1
Niniejsze urządzenie jest przeznaczone wyłącznie do przechowywania wina.
Zawsze stosuj podstawowe zasady bezpieczeństwa podczas korzystania
z niniejszego urządzenia, takie jak:
1. Przed rozpoczęciem użytkowania chłodziarki, zapoznaj się dokładnie
z jej instrukcją obsługi.
2. Używaj chłodziarki tylko i wyłączne zgodnie z jej przeznaczeniem,
opisanym w niniejszej instrukcji.
3. Przed użyciem chłodziarka musi zostać prawidłowo zainstalowana,
zgodnie z instrukcją instalacji. Sprawdź instrukcję uziemienia urządzenia
w części dotyczącej jego instalacji.
4. Chłodziarka jest przeznaczona wyłącznie do użytku domowego. Jeżeli
używasz jej w celach przemysłowych lub komercyjnych, przestrzegaj
właściwych norm i przepisów. Z urządzenia mogą korzystać dzieci
w
sensorycznych lub umysłowych. Osoby nieposiadające dostatecznej
wiedzy bądź doświadczenia mogą korzystać z urządzenia pod nadzorem
lub pod warunkiem, że zostały przeszkolone pod kątem bezpiecznej
obsługi urządzenia i rozumieją wynikające z tego zagrożenia. Dzieci
nie powinny bawić się urządzeniem. Dzieci nie powinny bez nadzoru
wykonywać czynności związanych z czyszczeniem i konserwacją.
5. Urządzenie należy ustawić tak, aby umożliwiać dostęp do wtyczki.
6. Jeżeli przewód zasilający jest uszkodzony, musi zostać wymieniony przez
producenta, jego serwisanta lub inną osobę posiadającą odpowiednie
7. Należy utrzymywać pełną drożność otworów wentylacyjnych w obudowie
lub wbudowanych w urządzenie.
8. W celu przyśpieszenia procesu rozmrażania nie wolno używać żadnych
urządzeń mechanicznych innych niż zalecane przez producenta.
9. Nie wolno uszkodzić obwodu czynnika chłodniczego.
10. Wewnątrz komór chłodziarki służących do przechowywania żywności nie
wolno używać żadnych urządzeń elektrycznych, o ile nie są to urządzenia
zalecane przez jej producenta.
11. Jeżeli oświetlenie jest uszkodzone, musi zostać wymienione przez
producenta, jego serwisanta lub inną osobę posiadającą odpowiednie
12. Niniejsze urządzenie jest przeznaczone wyłącznie do przechowywania wina.
13. Ryzyko uwięzienia dziecka. Przed pozbyciem się starej chłodziarki,
zdemontuj drzwiczki. Pozostaw półki wewnątrz, aby uniemożliwić dziecku
dostanie się do środka.
14. W opisywanym urządzeniu nie należy przechowywać substancji
wybuchowych, takich jak puszki aerozoli z łatwopalną zawartością.
INFORMACJE DOTYCZĄCE BEZPIECZEŃSTWA

89
Heading 1
Instalacja chłodziarki
PL
Rozpakowywanie chłodziarki do wina
1. Usuń wszystkie elementy opakowania. Dotyczy to podłoża piankowego oraz taśmy
samoprzylepnej, trzymającej elementy wyposażenia dodatkowego chłodziarki, w środku
i na zewnątrz.
2. Przed podłączeniem chłodziarki do prądu upewnij się, że wszelkie pozostałości opakowania,
taśma klejąca lub wydrukowane materiały zostały usunięte.
Poziomowanie chłodziarki
• Chłodziarka posiada nóżki poziomujące, znajdujące się w narożnikach z przodu i z tyłu
urządzenia. Poziomowanie należy wykonać po wcześniejszym, prawidłowym umieszczeniu
chłodziarki w jej miejscu docelowym.
• Nóżki poziomujące można regulować przekręcając je zgodnie z ruchem wskazówek zegara,
aby podwyższyć chłodziarkę lub przeciwnie do ruchu wskazówek zegara, aby ją obniżyć.
Drzwiczki chłodziarki zamykają się łatwiej przy podniesionych nóżkach poziomujących.
Właściwy obieg powietrza
• Aby upewnić się, że chłodziarka pracuje z maksymalną wydajnością, umieść ją w miejscu
z właściwym obiegiem powietrza oraz dostępem do połączeń wodno-kanalizacyjnych
i elektrycznych.
• Zalecana przestrzeń wokół chłodziarki:
Boki ..................4" (100 mm)
Góra .................4" (100 mm)
Tył .................... 4" (100 mm)
• Aby zapewnić właściwe chłodzenie nie należy przepełniać chłodziarki.
Uwaga: Jeżeli chłodziarka uległa przechyleniu z jakiegokolwiek powodu, odczekaj 24 godziny
przed jej podłączeniem.
Ponad
10 cm
od góry
Ponad
10 cm
od prawej
Wysoko Nisko
Regulowana
śruba
ustawcza
Ponad
10 cm
od tyłu
Ponad
10 cm
od lewej

90
Heading 1
Wymagania elektryczne
• Upewnij się, że gniazdko elektryczne do podłączenia chłodziarki ma odpowiednie parametry
(220-240 V, 15 A) i jest prawidłowo uziemione.
• Unikaj stosowania trójbolcowych wtyków przejściowych. Nie usuwaj bolca uziemiającego,
aby umożliwić podłączenie wtyczki do gniazdka bez uziemienia. Takie rozwiązanie stanowi
zagrożenie, ponieważ nie zapewnia prawidłowego uziemienia chłodziarki i może doprowadzić
do porażenia prądem.
Ograniczenia instalacyjne
• Nie należy instalować chłodziarki w miejscu, które nie jest odpowiednio wentylowane, np.
w garażu. Chłodziarka nie będzie działać, jeśli temperatura otoczenia wynosi poniżej 10°C.
• Ustaw chłodziarkę na równym i solidnym podłożu, w miejscu nienasłonecznionym oraz
z dala od źródeł ciepła, takich jak piece, grzejniki i kuchenki. Nierówności można zniwelować
regulując wysokość nóżek, znajdujących się w narożnikach z przodu i z tyłu urządzenia.
• Chłodziarka została zaprojektowana do instalacji wyłącznie jako urządzenie wolnostojące.
Nie jest ona przeznaczona do zabudowy.
Używanie przedłużacza
• Unikaj używania przedłużacza z powodu możliwości wystąpienia zagrożenia w określonych
warunkach. Jeśli konieczne jest użycie przedłużacza, należy użyć przedłużacza trzyżyłowego
z dwoma bolcami i jednym otworem oraz pasującego do wtyczki gniazdka, z dwoma otworami
i jednym bolcem. Moc nominalna przedłużacza musi być większa lub równa mocy nominalnej
urządzenia.
Ustawienia konfiguracji początkowej
Po podłączeniu urządzenia do gniazdka elektrycznego, przed wykonaniem jakichkolwiek regulacji,
pozostaw je uruchomione przez co najmniej 30 minut, w celu dostosowania do warunków otoczenia.
W tym czasie w zależności od temperatury wewnętrznej, czerwona lub biała kontrolka wina zaświeci się
w górnej komorze i dolnej komorze. Dioda LED wskaże bieżącą temperaturę wewnętrzną.

91
PL
Wprowadzenie do podstawowych funkcji urządzenia
1.
Regulacja temperatury
Aby ustawić temperaturę przytrzymaj przycisk przez około 3 sekundy. Następnie,
na wyświetlaczu temperatury zamiga IN.T°. Naciśnij przycisk lub , aby zwiększyć
lub zmniejszyć ustawienie temperatury. Gdy znajdziesz żądaną temperaturę, naciśnij
przycisk .
2.
Panel kontrolny
Zakres temperatury panelu wyświetlacza wynosi 5 ~ 20°C (41 ~ 68°F).
Domyślne ustawienie temperatury to 12°C (54°F).
Oświetlenie wewnętrzne
Miękkie światło zostało wbudowane w piwniczkę na wina, aby dopełnić wygląd Twojej
kolekcji. Wystarczy nacisnąć przycisk i zapali się dioda, należy nacisnąć ponownie,
aby ją wyłączyć.Gdy otworzy się drzwi, światło zapali się. Po zamknięciu drzwi,
światło zgaśnie.
3.
Konwersja „°F/°C”
Naciśnij i przytrzymaj przez 3 sekundy, a temperatura wyświetlana w stopniach
Fahrenheita i znak °F zmieni się na stopnie Celsjusza i znak „°C”. Naciśnij i ponownie
przytrzymaj przez 3 sekundy, a temperatura wyświetlana w stopniach Celsjusza i
znak „°C” zmieni się na stopnie Fahrenheita i znak °F.
PodświetlenieUSTAW ZASILANIE
Temperatura
Regulacja
(w górę)
Temperatura
Regulacja
(w dół)
Można ustawić temperaturę przechowywania wina w zależności od potrzeb.
SET LIGHT
POWER
OUT.T° IN.T°

92
Heading 1
4.
Alarm otwartych drzwi
W przypadku, gdy drzwi pozostaną otwarte na dłużej niż 1 minutę, zacznie
rozbrzmiewać sygnał dźwiękowy, który wyłączy się po zamknięciu drzwi lub po
naciśnięciu dowolnego przycisku na panelu wyświetlacza.
5.
6.
Zasilanie
Pamięć temperatury przy wyłączeniu
W przypadku przerwy w zasilaniu, piwniczka automatycznie zapamięta ustawioną
temperaturę. Po przywróceniu zasilania, będzie ona pracować w temperaturze
ustawionej przed awarią, podczas gdy inne funkcje powrócą do stanu domyślnego..
Przytrzymaj klawisz przez 3 sekundy, a zasilanie zostanie wyłączone (zasilanie
wszystkich urządzeń elektrycznych wewnątrz zostaną odcięte i całe urządzenie
przejdzie w tryb czuwania).
Jeśli urządzenie jest wyłączone, zasilanie może być włączone przez przytrzymanie
klawisza przez 3 sekundy - zaświecą się wszystkie ikony na wyświetlaczu.

93
Heading 1
Nie należy umieszczać w chłodziarce zbyt dużo
wina, aby nie przekroczyć nośności półek. Nie
należy umieszczać więcej niż cztery warstw
butelek na każdej półce. Liczba butelek wina nie
powinna przekraczać cztery warstw ułożonych
na każdej z półek, ani maksymalnego udźwigu
półki wynoszącego 35 kg.
Przed umieszczeniem butelek wewnątrz
chłodziarki należy się upewnić, że półki są
całkowicie stabilne.
Ponadto należy potwierdzić, że żadna
z butelek nie wystaje z półki i nie uderzy
w szklane drzwiczki podczas zamykania.
Środki ostrożności podczas używania chłodziarki
Automatyczne rozmrażanie
PL
Dojrzewanie wina zależy od warunków otoczenia. Jakość powietrza jest w związku z tym
tylnej ścianki w celu zapewnienia, że powietrze ma optymalną jakość.
UWAGA
uzyskać u dealera.
i wsuń.
Urządzenie ma funkcję automatycznego
odszraniania. JPodczas użytkowania należy się
upewnić, że otwór spustowy jest odblokowany,
aby woda po odszranianiu przepływała przez
otwór do zbiornika na wodę wewnątrz chłodziarki.
Należy regularnie czyścić zbiorniki na wodę w dolnej części górnej i dolnej komory, używając
suchej szmatki do wycierania (czyścić co trzy miesiące).

94
Heading 1
Półki
• Półki zostały zaprojektowane, aby zapewnić łatwe czyszczenie i atrakcyjny wygląd.
Większe butelki lub butelki typu Magnum (1,5 l) możesz łatwo ułożyć na półkach
poprzecznych w dolnej części chłodziarki.
• Chłodziarka posiada również półki do ułatwionego przechowywania i wyciągania wina.
Odgłosy prawidłowej pracy, jakie mogą być
słyszalne
• Wrzenie wody, bulgotanie lub delikatne wibracje są efektem krążenia czynnika chłodzącego
w spiralach chłodzących.
• Układ kontrolny termostatu klika podczas włączania i wyłączania się.

95
Heading 1
PL
Czyszczenie i konserwacja
Ostrzeżenie:
Aby uniknąć porażenia prądem zawsze odłącz chłodziarkę od gniazdka
przed przystąpieniem do jej czyszczenia. Zignorowanie tej zasady może
spowodować obrażenia lub śmierć.
Uwaga:
Przed zastosowaniem środków czyszczących koniecznie zapoznaj się
z zaleceniami i ostrzeżeniami producenta, aby uniknąć obrażeń ciała
i uszkodzenia produktu.
Ogólne:
• Przygotuj roztwór czyszczący składający się z 3-4 łyżeczek sody oczyszczonej
i wody. Do przetarcia chłodziarki używaj gąbki lub miękkiej szmatki,
zamoczonej w roztworze czyszczącym.
• Opłucz czystą, letnią wodą, a następnie osusz miękką szmatką.
• Nie używaj żrących chemikaliów, szorstkich materiałów, wybielaczy na bazie
chloru, zagęszczonych detergentów, rozpuszczalników ani myjek drucianych.
Niektóre z tych środków chemicznych mogą doprowadzić do uszkodzenia,
odbarwienia lub rozpuszczenia elementów chłodziarki.
Uszczelki drzwi:
• Uszczelki drzwi należy czyścić do trzy miesiące, zgodnie z ogólnymi
instrukcjami. Aby zapewnić szczelność, uszczelki muszą być czyste i miękkie.
• Zastosowanie niewielkiej ilość wazeliny na uszczelki (od strony zawiasów)
utrzyma je w dobrym stanie i zapewni prawidłowe uszczelnienie.
Półka na wino:
w przypadku zabrudzenia półki winem lub powstania zacieków z kropel
wody, do polerowania należy stosować papier ścierny o gramaturze 300-400,
a następnie przetrzeć miękką szmatką usuwając trociny. Nie należy stosować
ręcznika ani miękkiej szmatki nasączonej wodą.
Przerwy w dopływie prądu
• Z powodu burz lub innych przyczyn mogą wystąpić przerwy w dopływie prądu.
W przypadku braku prądu odłącz przewód zasilania od gniazdka elektrycznego prądu
zmiennego. Po wznowieniu dopływu prądu podłącz przewód zasilana ponownie do
gniazdka elektrycznego prądu zmiennego.
Okres urlopu i przenoszenie chłodziarki
• W przypadku wyjazdu lub długiej nieobecności odłącz chłodziarkę i wyczyść ją wraz
z uszczelkami drzwiczek, jak opisano w sekcji „Czyszczenie ogólne”. Pozostaw drzwiczki
otwarte, aby umożliwić przepływ powietrza.
• Przenosząc chłodziarkę zawsze trzymaj ją w pozycji pionowej. Nie przenoś chłodziarki
w pozycji leżącej, gdyż może to uszkodzić szczelność układu.
Uwaga: Po przeniesieniu chłodziarki odczekaj 24 godziny przed ponownym jej podłączeniem.
Właściwe czyszczenie i konserwacja chłodziarki

96
Heading 1
Chłodziarka nie działa:
• Sprawdź, czy chłodziarka jest podłączona.
• Sprawdź, czy w gniazdku elektrycznym prądu zmiennego jest zasilanie, sprawdzając mechanizmy
zabezpieczające.
Wina mają zbyt wysoką temperaturę:
• Częste otwieranie drzwiczek.
• Aby uzyskać pożądaną temperaturę pozostaw niedawno umieszczone butelki w chłodziarce na
dłuższy czas.
• Sprawdź szczelność uszczelek.
• Wyczyść rurki skraplacza.
• Zmniejsz temperaturę w ustawieniach kontroli temperatury.
Temperatura wina jest zbyt niska:
• Jeżeli temperatura w ustawieniach kontroli temperatury jest zbyt niska, zmień ustawienie na wyższe.
Chłodziarka uruchamia się zbyt często:
• W dni o wysokiej temperaturze i wilgotności może być to objaw prawidłowy, aby utrzymać stałą
temperaturę w chłodziarce.
• Drzwiczki mogły być często otwierane lub pozostawione otwarte przez dłuższy czas.
• Wyczyść rurki skraplacza.
• Sprawdź szczelność uszczelek.
• Sprawdź, czy drzwiczki są prawidłowo zamknięte.
Gromadzenie się wilgoci wewnątrz lub na zewnątrz chłodziarki:
• Jest to normalne podczas okresów wysokiej wilgotności.
• Zbyt długie lub zbyt częste otwieranie drzwiczek.
• Sprawdź szczelność uszczelek drzwiczek.
Drzwiczki chłodziarki nie zamykają się prawidłowo:
• Wypoziomuj chłodziarkę.
• Sprawdź, czy nic nie blokuje drzwiczek (np. butelki, półki).
Nie wyrzucaj urządzeń elektrycznych jako zwykłych,
niesortowanych odpadów komunalnych, korzystaj
ze specjalnych punktów odbioru zużytego sprzętu.
Aby uzyskać więcej informacji dotyczących punktów
odbioru skontaktuj się z lokalnymi władzami.
Utylizacja urządzeń elektrycznych na wysypiskach
śmieci może doprowadzić do przenikania
niebezpiecznych substancji do wód gruntowych,
a tym samym do łańcucha pokarmowego, szkodząc
zdrowiu i dobremu samopoczuciu. Wymieniając
stare urządzenie elektryczne na nowe, sprzedawca
jest prawnie zobowiązany do odebrania starego
urządzenia i jego utylizacji, bez naliczania
dodatkowych kosztów.
Rozwiązywanie problemów

97
Heading 1
Dane techniczne•Lista opakowania
Dane techniczne
Lista opakowania
Urządzenie jest stale rozwijane. Zachowujemy prawo do zmieniania komponentów chłodziarki bez
informowania o tym fakcie.
Podręcznik
użytkownika
Zestaw
informacyjny
Wino
police
Zatyczka
Model Typ klimatu
Porażenie
prądem Typ
oporu
Dostępna
pojemność
(l)
Napięcie
znamionowe
(V)
Częstotliwość
znamionowa
(Hz)
Moc
wejściowa
(W)
Zakres
temperatury
(°C)
Chłodziwo
(R600a)
(g)
Tryb
połączenia
kabla
Waga (kg)
Halas
(poziom mocy
akustycznej)
dB (A)
Ogólne wymiary
(głębokość ×
szerokość × wysokość)
(mm)
Uwagi:
1. Zgodnie z normami międzynarodowymi, jeśli klimat ma typ SN-ST, temperatura otoczenia dla chłodziarki
ma zakres od 10°C do 38°C.
2. "Hałas (poziom mocy akustycznej)" w danych technicznych odnosi się do sytuacji, w której komora
bezodbiciowa została ustawiona zgodnie z normami międzynarodowymi z użyciem pustej chłodziarki
i gumowej poduszki o grubości 5 mm do 6 mm wewnątrz. Może to trwać przynajmniej 30 minut po
zamknięciu drzwiczek. Test zostanie przeprowadzony po stabilnej pracy (z wyłączeniem uruchomienia
i wyłączenia). Hałas na ziemi będzie testowany w odległości 1 m od powierzchni przedniej, tylnej, lewej
i prawej chłodziarki.
Podczas eksploatacji normalne jest odchylenie faktycznego hałasu od znamionowego na skutek efektów
wywoływanych przez przechowywane wino, hałas otoczenia, otwieranie i zamykanie drzwi itd.
Nazwa
Ilość
Model produktu
PL
WS120GA I 220
220-240 50 110
WS190GA I 385
220-240 50 100
5-20 45 Y 69 38 639×595×1,265
5-20 75 Y 94 38 639×595×1,850
SN-ST
SN-ST
WS120GA 1 1 1 2
WS180GA 1 1 1 2
4
7
Przycisk

0070512622A
Version: 2020Version B
Private No.:
0070512622A
Manufacturer Code:
V14513
Transcripción de documentos
EN Wine Cellar IT ES DE FR NL CZ PL WS120GA WS190GA Names of Wine Cellar Components Master control panel Top wine shelf Glass door Wine shelves Adjustable foot screw WS120GA (117bottle capacity) 2 WS190GA (189bottle capacity) Table OfHeading Contents1 Page IMPORTANT SAFEGUARDS ............................................................. 4 Installing Your Wine Cellar.............................................................. 5 EN Unpacking Your Wine Cellar ............................................................................................. 5 Leveling Your Wine Cellar ................................................................................................. 5 Proper Air Circulation........................................................................................................ 5 Electrical Requirement ...................................................................................................... 6 Install Limitations............................................................................................................... 6 Use of Extension Cord....................................................................................................... 6 Initial Setup ......................................................................................................................... 6 Introduction to Primary Functions of the Appliance ..................... 7 1.Temperature Adjustment ............................................................................................. 7 2.Interior Light ...................................................................................................................... 7 3.“°F/°C” Conversion . ....................................................................................................... 7 4.Door opening alarm ...................................................................................................... 8 5.Temperature Power-Off Memory ..................................................................................... 8 6.Power ................................................................................................................................ 8 Precautions for Use of Wine Cellar................................................. 9 Automatic Defrosting......................................................................................................... 9 Shelving............................................................................................................................. 10 Normal Operating Sounds You May Hear ..................................................................... 10 Proper Wine Cellar Care and Cleaning ......................................... 11 TroubleShooting ............................................................................ 12 Technical Data ............................................................................ 13 Packing List ............................................................................ 13 3 Heading 1 SAFEGUARDS IMPORTANT This appliance is intended to be used exclusively for the storage of wine. When using this appliance, always exercise basic safety precautions, including the following: 1. Read all of the instructions before using this appliance. 2. Use this appliance only for its intended purpose as described in this use and care guide. 3. This wine cellar must be properly installed in accordance with the installation instructions before it is used. See grounding instructions in the installation section. 4. It is intended strictly for household usesuch as – staff kitchen areas in shops, offices and other working environments; – farm houses and by clients in hotels, motels and other residential type environments; – bed and breakfast type environments; – catering and similar non-retail applications. 5. This appliance can be used by children aged from 8 years and above and persons with reduced physical, sensory or mental capabilities or lack of experience and knowledge if they have been given supervision or instruction concerning use of the appliance in a safe way and understand the hazards involved. Children shall not play with the appliance. 6. The appliance must be positioned so that the plug is accessible. 7. If the supply cord is damaged, it must be replaced by the manufacturer, its 8. Keep ventilation openings, in the appliance enclosure or in the built-in structure, clear of obstruction. 9. Do not use mechanical devices or other means to accelerate the defrosting process, other than those recommended by the manufacturer. 10. Do not damage the refrigerant circuit. 11. Do not use electrical appliances inside the food storage compartments of the appliance, unless they are of the type recommended by the manufacturer. 12. If the light is damaged, it must be replaced by the manufacturer, its service 13. This appliance is intended to be used exclusively for the storage of wine. 14. propellant in this appliance. 15. Risk of child entrapment. Before you throw away your old wine cellar, take off the doors. Leave the shelves in place so that children may not easily climb inside. 16. Please contact the service agent to dispose the appliance because the flammable refrigerant and flammable blowing gas was used. 17. Refrigerants are flammable , should be careful when you do the installation, handling, servicing. 4 Installing Your Wine Heading Cellar1 Unpacking Your Wine Cellar 1. Remove all packaging material. This includes the foam base and all adhesive tape holding the wine cellar accessories inside and outside. 2. Inspect and remove any remains of packing, tape or printed materials before powering on the wine cellar. Leveling Your Wine Cellar • Your wine cellar has four leveling legs which are located in the front and rear corners of your wine cellar. • Leveling legs can be adjusted by turning them clockwise to raise your wine cellar or by turning them counterclockwise to lower your wine cellar. The wine cellar door will close easier when the leveling legs are extended. Proper Air Circulation • install it in a location where there is proper air circulation, plumbing and electrical connections. • The following are recommended clearances around the wine cellar: Sides ................ 4" (100mm) Top ................... 4" (100mm) Back ................. 4" (100mm) • Mor than e from 10 cm the rear More than 10 cm from the left More than 10 cm from the top More than 10 cm from the right Adjustable foot screw High Low Note: If your wine cellar has been tilted for any reason, wait 24 hours before plugging it in. 5 EN Heading 1 Electrical Requirement • Make sure there is a suitable power Outlet (220-240V, 15 amps outlet) with proper grounding to power the wine cellar. • An independent and exclusive standard outlet with reliable grounding shall be used for the wine cellar by matching its 3-pin plug including the grounding pin,which shall never be removed or disconnected with the grounding wire in any circumstances. Install Limitations • Do not install your wine cellar in any location not properly insulated or heated e.g. garage etc. Your wine cellar was not laid to operate if the ambient temperature is below 10°C. • Select a suitable location for the wine cellar on a hard even surface away from direct sunlight or heat source e.g. radiators, baseboard heaters, cooking appliances etc. unevenness should be corrected with the leveling legs located on the front and rear bottom corners of the wine cellar. • Your wine cellar is designed for free-standing installation only. It is not designed for built-in application. Use of Extension Cord • Avoid the use of an extension cord because of potential safety hazards under certain conditions. If it is necessary to use an extension cord, use only a 3-wire extension cord that has a plug with 2 round pins and 1 slot and an outlet with 2 slots and 1 round pin that will accept the plug. The marked rating of the extension cord must be equal to or greater than the electrical rating of the appliance. Initial Setup Once you have plugged the unit into an electrical outlet, let the unit run for at least 30 minutes to acclimatize itself before making any adjustments. During this time, depending on the internal temperature, the red or white wine light will stay on for the upper compartment and red or white wine light will stay on for the lower compartment. The LED display will show the current internal temperature. 6 Introduction to Primary Functions of theHeading Appliance1 Control Panel Temperature Temperature Adjustment Adjustment (up) (down) OUT.T° SET SET IN.T° Light Power LIGHT POWER EN The temperature range of display panel is 5~20°C(41~68°F). The default setting temperature is 12°C(54°F). You can set the temperature according to your wine storage requirements. 1 . Temperature Adjustments To set the temperature hold the display of IN.T° flashes . Press the 2. or button to increase or decrease the temperature setting. Once the desired temperature is attained, press the button. Interior Light Compliment the look of your collection, a soft light has been built into the wine cellar. Simply push the 3. button for about 3 seconds. Then the temperature button and the light comes on, push again for off. When door is open the light will go on. Upon closing the door, light will go off. “°F/°C” Conversion Press and hold for 3 seconds, the displayed temperature in Fahrenheit degree and °F character will convent to temperature in Celsius degree and “°C” character. Press and hold for 3 seconds again, the temperature in Celsius degree and “°C” character will convert to temperature in Fahrenheit degree and “°F” character. 7 Heading 1 4.Door opening alarm In case the door is kept open for over 1 min, buzzer will be beeping to give an alarm till the door is closed or any key on display panel can be operated and then the buzzer will stop beeping. 5.Temperature Power-Off Memory In case of a power outage, the cellar will automatically save the set temperature. After power recovery,it will run based on the temperature set before the power outage while other functions will return to the default status. 6.Power Holding the key for 3 seconds, the main power will turn off (power for all electrical devices inside will be cut off and the whole appliance will be in standby). If the device is off, the power can be turned on by holding the and then all icons on the display screen will turn on. 8 key for 3 seconds, Heading 1 Precautions for Use of Wine Cellar Do not place too much wine in the cellar so as not to exceed the bearing capacity of the wine shelves. Do not place more than four layers of wine on each shelf. The number of wine bottles should not exceed four layers on each shelf, and the bearing capacity of the wine shelves should not exceed 35kg. Before placing the bottles inside the wine shelves are completely stable. EN bottle protrudes from the shelves in order to prevent bottles hitting the glass door upon closing. Automatic Defrosting This appliance has an automatic defrosting function. During use, ensure that the drainage hole is unblocked so the drainage hole into the water receiver inside the cellar cabin. Regularly clean water tank at the bottom of the compartments; use a dry cloth to absorb water inside the water tank and wipe down them (clean them every three months as suggested). The way in which wines continue to mature depends on the ambient conditions. The quality of the lower area of the rear wall of the appliance to ensure that the air through put remains at an optimum quality. CAUTION a year. Filters can be obtained from your dealer. Insert with the handle in a vertical position. Turn it to the right and insert. 9 Heading 1 Shelving • The shelves are designed for appearance and easy cleaning. Larger bottles or Magnums can be more easily accommodated at the cross shelves at the bottom of the cellar. • There are some shelves for easy storage and removal of your wine. Normal Operating Sounds You May Hear • Water flowing sound or slight vibrations that are the result of the refrigerant circulating through the cooling coils. • The compressor will click when it cycles on and off. 10 Proper Wine Cellar Care andHeading Cleaning1 Cleaning and Maintenance Warning: Caution: General: Door Gaskets: Wine Shelf: To avoid electric shock always unplug your wine cellar before cleaning. Ignoring this warning may result in death or injury. Before using cleaning products, always read and follow manufacturer's instructions and warnings to avoid personal injury or product damage. • Prepare a cleaning solution of 3-4 tablespoons of baking soda mixed with warm water. Use sponge or soft cloth, dampened with the cleaning solution, to wipe down your wine cellar. • Rinse with clean warm water and dry with a soft cloth. • Do not use harsh chemicals, abrasives, ammonia, chlorine bleach, concentrated detergents, solvents or metal scouring pads. SOME of these chemicals may dissolve, damage and/or discolor your wine cellar. • Clean door gaskets every three months. Gaskets must be kept clean and pliable to assure a proper seal. • Petroleum jelly applied lightly on the hinge side of gaskets will keep the gasket pliable and assure a good seal. If the wine shelf was accidentally sprinkled with wine or water droplets, please use 300-400 sandpaper to polish, then use soft cloth to wipe down the sawdust. Do not use towel or soft cloth with water. Power Interruptions • Occasionally there may be power interruptions due to thunderstorms or other causes. Remove the power cord from AC outlet when a power outage occurs. When power has been restored, replug power cord to AC outlet. Vacation and Moving Care • For long vacations or absences, unplug the wine cellar and clean the wine cellar and door gaskets. Leave doors open, so air can circulate inside. • When moving always move the wine cellar vertically. Do not move with the unit lying down, as possible damage to the sealed system could occur. Note: After moving, wait for 24 hours before plugging in the wine cellar. 11 EN Heading 1 TroubleShooting Wine Cellar Does Not Operate: • Check if wine cellar is plugged in. • Check if there is power in the AC outlet, by checking the circuit breaker. Wine appears too warm: • • • • • Frequent door openings. Allow time for recently added wine to reach desired temperature. Check gaskets for proper seal. Please contact the service agent to clean condenser coils. Adjust temperature control to colder setting. Wine temperature is too cold: • If temperature control setting is too cold, adjust to a warmer setting. Wine cellar runs too frequently: • • • • • This may be normal to maintain constant temperature during high temperature and humid days. Doors may have been opened frequently or for an extended period of time. Please contact the service agent to clean condenser coils. Check gasket for proper seal. Check to see if doors are completely closed. Moisture build up on interior or exterior of the wine cellar: • This is normal during high humidity periods. • Prolonged or frequent door openings. • Check door gaskets for proper seal. Wine cellar door does not shut properly: • Level the wine cellar. • Check for blockages e.g. wine bottles, shelves. Do not dispose of electrical appliances as unsorted municipal waste, use separate collection facilities. Contact you local government for information regarding the collection systems available. If dumps, hazardous substances can leak into the groundwater and get into the food chain, damaging your health and well-being. When replacing old appliances with new ones, the retailer is legally obligated to take back your old appliance for disposals at least free of charge. 12 Heading Technical Data•Packing List1 Technical Data Model WS120GA Electric Shock Climate Tape Resistance Type I SN-ST Available Capacity (l) Rated Voltage (V) 220 220-240 50 110 220-240 50 100 WS190GA SN-ST I 385 Temperature Range (°C) Refrigerant (R600a) (g) Supply Cord Connection Mode Weight (kg) Rated Input Power Frequency (W) (Hz) EN Noise Overall Dimension (Acoustic (Depth × Width ×Height) Power Level) (mm) dB (A) 5-20 45 Y 69 38 639×595×1,265 5-20 75 Y 94 38 639×595×1,850 Remarks: 1. According to international standards, if the climate is an SN-ST type, the ambient temperature for use of the wine cellar ranges between 10°C and 38°C. 2. "Noise (acoustic power level)" marked in the technical data refers to a situation in which the semi-anechoic room is set up as thick as specified according to national standards,in the case of an empty wine cellar,a resilient rubber cushion as thick as 5 mm to 6 mm is placed inside. It can run for at least 30 minutes after the door is closed. A test will be conducted after stable running (excluding startup and shutdown). Ground noise will be tested at 1 m from the front, rear, left and right surfaces of the wine cellar respectively. During use, it is normal that the actual noise is different from the marked noise due to the effects of the type of wine stored in the wine cellar, ambient noise, door opening and closing, compressor startup and shutdown, etc. Packing List This appliance is being developed continuously. We reserve the right to change the components of the wine cellar without notice. Quantity Name User Guide Information Kit Wine shelves Throughhole Pin Key Product Model WS120GA 1 1 4 1 2 WS190GA 1 1 7 1 2 13 Intestazione 1 Nomi dei componenti della cantina Pannello di controllo principale Ripiano superiore per i vini Sportello in vetro Ripiani per vino Vite del piede regolabile Filtro ai carboni attivi WS120GA (capacità: 117 bottiglie) 14 WS190GA (capacità: 189 bottiglie) Sommario1 Intestazione Pagina MISURE DI SICUREZZA IMPORTANTI ........................................... 16 Installazione della cantina............................................................ 17 Disimballaggio della cantina per vini ............................................................................ 17 Messa in piano della cantina per vini ............................................................................ 17 IT Circolazione adeguata dell'aria...................................................................................... 17 Requisiti elettrici .............................................................................................................. 18 Limitazioni per l'installazione......................................................................................... 18 Utilizzo di cavi di prolunga.............................................................................................. 18 urazione iniziale.................................................................................................... 18 Introduzione alle funzioni fondamentali dell'apparecchio ........... 19 1.Regolazioni della temperatura..................................................................................... 19 2.Luce interna ....................................................................................................... 19 3.Conversione “°F/°C” ................................................................................................... 19 4.Allarme apertura porta .................................................................................................. 20 5.Memoria di spegnimento temperatura ......................................................................... 20 6.Potenza ............................ ................................................................................. 20 Precauzioni per l'uso della cantina............................................... 21 Sbrinamento automatico................................................................................................. 21 Ripiani................................................................................................................................ 22 Rumori durante il funzionamento .................................................................................. 22 Pulizia e manutenzione corrette della cantina per vini ............................................... 23 Risoluzione dei problemi ............................................................... 24 Dati tecnici ...................................................................... 25 Lista di imballaggio ...................................................................... 25 15 MISURE DI SICUREZZA IMPORTANTI Intestazione 1 Questo apparecchio è concepito per essere utilizzato esclusivamente per la conservazione del vino. Durante l'utilizzo dell'apparecchio, seguire sempre le precauzioni di sicurezza basilari, tra cui: 1. Leggere tutte le istruzioni prima di utilizzare l'apparecchio. 2. Utilizzare l'apparecchio solo per lo scopo previsto, in base a quanto descritto nella presente guida relativa all'utilizzo e alla manutenzione. 3. Prima dell'utilizzo, la cantina per vini deve essere accuratamente installata in conformità alle istruzioni di installazione fornite. Vedere le istruzioni sulla messa a terra nella sezione relativa all'installazione. 4. L'apparecchio è destinato esclusivamente all'uso domestico. Se utilizzato per scopi industriali o commerciali, assicurarsi di osservare le normative in materia. L'apparecchio può essere utilizzato da bambini di età superiore oppure con mancanza di esperienza e conoscenza, solo se sorvegliati o se adeguatamente istruiti in merito all'utilizzo sicuro dell'apparecchio e agli eventuali rischi connessi. Non lasciare che i bambini giochino con l'apparecchio. Le operazioni di pulizia e di manutenzione non dovranno essere volte da bambini senza la supervisione di un adulto. 5. Posizionare l'apparecchio in modo che la spina sia facilmente accessibile. 6. Se il cavo di alimentazione è danneggiato, contattare il produttore, un al 7. Mantenere libere da ostruzioni le aperture di ventilazione nell'involucro dell'apparecchio o nella struttura a incasso. 8. Non utilizzare nessuno strumento per accelerare il processo di sbrinamento, ad eccezione di quelli consigliati dal produttore. 9. Non danneggiare il circuito del refrigeratore. 10. Non utilizzare apparecchi elettrici nei vani di conservazione degli alimenti, ad eccezione di quelli di tipo consigliato dal produttore. 11. In caso di danneggiamento, la spia deve essere sostituita dal produttore, 12. Questo apparecchio è concepito per essere utilizzato esclusivamente per la conservazione del vino. 13. Rischio di intrappolamento bambini. Prima di disfarsi di una vecchia cantina per vini, è opportuno rimuovere gli sportelli. Non rimuovere i ripiani per evitare che i bambini possano introdursi all'interno. 14. Non conservare sostanze esplosive come bombolette di aerosol con 16 Installazione della cantina1 Intestazione Disimballaggio della cantina per vini 1. Rimuovere tutto il materiale di imballaggio, inclusa la base in schiuma e il nastro adesivo che 2. Ispezionare e rimuovere eventuali rimanenze dell'imballaggio o di nastro e qualsiasi materiale stampato prima dell'accensione della cantina. Messa in piano della cantina per vini IT • La cantina è dotata di quattro piedini per la messa in piano, posizionati agli angoli anteriori e • I piedini possono essere regolati, ruotandoli in senso orario per alzare la cantina e in senso antiorario per abbassarla. L'estensione completa dei piedini agevola la chiusura e l'apertura dello sportello. Circolazione adeguata dell'aria • Per garantire il funzionamento ottimale della cantina, è necessario installare l'apparecchio in una posizione che consenta un'adeguata circolazione dell'aria e in cui siano presenti i collegamenti elettrici e l'impianto idraulico corretti. • Spazio libero consigliato attorno alla cantina: Lati ........................... 100 mm Piano superiore........ 100 mm Retro ........................ 100 mm • Non sovraccaricare la cantina per consentire un corretto raffreddamento del vino. Più dalladi 10 c post parte m erio re Più di 10 cm dalla parte sinistra Più di 10 cm dalla parte superiore Più di 10 cm dalla parte destra Vite del piede regolabile Stringere Allentare Nota: se, per qualche motivo, la cantina è stata inclinata, attendere 24 ore prima di collegarla all'alimentazione. 17 Intestazione 1 Requisiti elettrici • V, 15 amp) con messa a terra corretta, per l'alimentazione della cantina. • Evitare l'utilizzo di adattatori tripolari o l'adattamento a una presa bipolare eliminando il polo della messa a terra. Si tratta di un'operazione pericolosa poiché elimina la messa a terra necessaria per la cantina, con conseguente pericolo di scosse elettriche. Limitazioni per l'installazione • Non installare la cantina in luoghi non adeguatamente isolati o riscaldati, ad esempio nei garage. La cantina non è predisposta per il funzionamento a temperature inferiori ai 10°C. • luce diretta del sole e lontana da fonti di calore, come radiatori, riscaldatori a zoccolo, apparecchiature per la cucina ecc. Eventuali dislivelli del pavimento possono essere compensati regolando i piedini posizionati agli angoli anteriori e posteriori della cantina. • La cantina è progettata per essere installata solo autonomamente e non in strutture a incasso. Utilizzo di cavi di prolunga • Evitare l'utilizzo di cavi di prolunga che, in alcune condizioni, possono causare potenziali rischi per la sicurezza. Se è necessario utilizzare un cavo di prolunga, utilizzare solo un cavo di prolunga trifase con spina di tipo europeo (2 terminali e un foro) e una presa apposita in grado di accettare la presa. La tensione elettrica del cavo deve essere uguale o superiore a quella indicata per l'apparecchio. Configurazione iniziale Dopo aver collegato l'unità a una presa elettrica, lasciarla in funzione per almeno 30 minuti per stabilizzare la temperatura, prima di procedere con le regolazioni desiderate. Durante tale intervallo di tempo, a seconda della temperatura interna, la luce dei vini rossi o bianchi resterà accesa per lo scomparto superiore e l'altra resterà accesa per lo scomparto inferiore. Sul display LED verrà visualizzata la temperatura interna corrente. 18 Introduzione alle funzioni primarie dell’apparecchiatura Heading 1 Pannello di controllo........... Temperatura Regolazione Temperatura Regolazione (su ) ( giù ) OUT.T° IMPOSTA SET IN.T° Luce forno POTENZA LIGHT POWER IT La gamma di temperatura del pannello del display è 5~20°C(41~68°F). La temperatura di impostazione predefinita è di 12°C(54°F). Sarà possibile impostare la temperatura a seconda dei propri requisiti per la conservazione 1 del vino. . Regolazioni della temperatura Per impostare la temperatura tenere premuto il pulsante per circa 3 secondi. Quindi il display della temperatura di IN.T° lampeggia. Premere il pulsante o per aumentare o ridurre l’impostazione di temperatura. Dopo aver raggiunto la temperatura desiderata, premere il pulsante 2. Luce interna . A completamento della vostra collezione, abbiamo aggiunto una luce tenue nella cantinetta dei vini. Basta premere il pulsante e si accende la luce, premere nuovamente per spegnerla.Quando la porta è aperta la luce si accende. 3. Alla chiusura della porta la luce si spegne. Conversione “°F/°C” Premere e tenere premuto per 3 secondi, la temperatura visualizzata in Fahrenheit e il carattere °F convertiranno la temperatura in gradi Celsius insieme al carattere “°C”. Premere e tenere premuto nuovamente per 3 secondi; la temperatura in gradi Celsius e il carattere “°C” convertiranno la temperatura in gradi Fahrenheit insieme al carattere “°F”. 19 Heading 1 4.Allarme apertura porta Qualora la porta venga tenuta aperta per più di 1 minuto, il cicalino continuerà a emettere dei bip come allarme fino a che non verrà chiusa la porta o qualsiasi tasto sul pannello display non potrà essere usato e poi il cicalino smetterà di fare bip. 5.Memoria di spegnimento temperatura In caso di black-out la cantinetta salva in modo automatico la temperatura impostata. Dopo il ripristino della corrente, funzionerà sulla base della temperatura impostata prima del black-out mentre le altre funzioni tornando allo stato . predefinito. 6.Potenza Tenendo premuto il tasto per 3 secondi, l’alimentazione principale si spegne (l’alimentazione per tutti i dispositivi interni verrà disattivata e il dispositivo sarà in standby).Se il dispositivo è spento, l’alimentazione potrà essere attivata tenendo premuto il tasto si accendono. 20 per 3 secondi, e poi tutte le icone sulla schermata del display Intestazione 1 Precauzioni per l'uso della cantina Non depositare nella cantina quantità di vino troppo elevate, in modo da non superare la capacità di portata dei ripiani. Non collocare quattro posizionare più di quattro livelli di bottiglie su ogni ripiano; il peso massimo consentito su ogni portabottiglie è di 35 kg. Prima di posizionare le bottiglie nella cantina, stabili. alcuna bottiglia per evitare che lo sportello di vetro vi sbatta contro durante la chiusura. Sbrinamento automatico Questo apparecchio è dotato di funzione di scongelamento automatico. Durante l'uso, verificare che tale foro non sia otturato, in modo da consentire all'acqua di sbrinamento di fluire correttamente nell'apposita vaschetta della cantina. Pulire con regolarità le vaschette per la racconta dell'acqua nella parte posteriore degli scomparti superiore e inferiore. Utilizzare un panno asciutto per assorbire l'acqua presente nelle vaschette (si consiglia di effettuare la pulizia ogni tre mesi). La maturazione del vino dipende dalle condizioni ambientali. Pertanto, la qualità dell'aria è decisiva per preservare la qualità dei vini riposti nella cantina. In basso, sulla parete posteriore sempre ottimale. ATTENZIONE! all'anno, richiedendolo al proprio rivenditore. e rimuoverlo. Inserirlo con la maniglia in posizione verticale. Avvitarlo verso destra e inserirlo. 21 IT Intestazione 1 Ripiani • I ripiani sono progettati per una presentazione ottimale e una facile pulizia. Le bottiglie più grandi o Magnum possono essere sistemate più facilmente sui ripiani orizzontali in basso. • Alcuni ripiani consentono di sistemare e rimuovere le bottiglie più facilmente. Rumori durante il funzionamento • Gorgoglio dell'acqua o leggere vibrazioni causate dalla circolazione del liquido attraverso la serpentina di raffreddamento. • Il controllo del termostato emette un "clic" quando si accende e si spegne. 22 Pulizia e manutenzione corrette dellaIntestazione cantina per vini1 Pulizia e manutenzione Attenzione: Attenzione: per evitare scosse elettriche, scollegare sempre il cavo di alimentazione della cantina prima delle operazioni di pulizia. Il mancato rispetto di tale avvertenza può causare lesioni gravi o morte. prima di utilizzare prodotti per la pulizia, leggere e attenersi sempre alle IT persone o danni al prodotto. Informazioni generali: • Preparare una soluzione detergente sciogliendo 3-4 cucchiai di bicarbonato di sodio in acqua calda. Utilizzare una spugna o un panno morbido inumiditi con la soluzione per detergere la cantina. • Risciacquare con acqua calda pulita e asciugare con un panno morbido. • Non utilizzare sostanze chimiche, abrasivi, ammoniaca, candeggina, detergenti concentrati, solventi o spugnette metalliche. ALCUNI prodotti chimici potrebbero dissolversi e danneggiare o scolorire la cantina. Guarnizioni dello sportello: • pulire le guarnizioni dello sportello ogni tre mesi, seguendo le istruzioni garantire la perfetta aderenza. • Una leggera applicazione di vasellina sulla cerniera delle guarnizioni aiuterà a Portabottiglie: se il portabottiglie viene accidentalmente bagnato da gocce d'acqua o vino, utilizzare della carta vetrata da 300-400 per pulire, quindi utilizzare un panno morbido per rimuovere la segatura. Non utilizzare un asciugamano o un panno morbido con acqua. Interruzioni di corrente • Rimuovere il cavo di alimentazione dalla presa CA in caso di interruzione della corrente elettrica. Una volta che la corrente elettrica è stata ripristinata, reinserire il cavo di alimentazione alla presa CA. Manutenzione in caso di vacanze e trasporti • In caso di periodi di assenza prolungati, scollegare la spina e pulire la cantina e le guarnizioni dello sportello seguendo le istruzioni indicate nella sezione relativa alla pulizia generale. Lasciare gli sportelli aperti per consentire la circolazione dell'aria all'interno dell'apparecchio. • Per il trasporto dell'apparecchio, mantenere la cantina sempre in posizione verticale. sistema di sigillatura. Nota: dopo il trasporto, attendere 24 ore prima di ricollegare il cavo di alimentazione dell'apparecchio. 23 Risoluzione dei 1problemi Intestazione La cantina non funziona: • • Vino troppo caldo: • • • • • Aperture frequenti dello sportello. Controllare che le guarnizioni siano perfettamente aderenti. Pulire la bobina del condensatore. Regolare la temperatura su un valore più basso. Vino troppo freddo: • Se la temperatura è impostata su un valore troppo basso, aumentare il valore. La cantina si attiva troppo frequentemente. • Tale condizione potrebbe essere normale per mantenere la temperatura costante in giornate molto calde e umide. • Sportelli aperti troppo di frequente e per lungo tempo. • Pulire la bobina del condensatore. • • della cantina: • Non è insolito in periodi molto umidi. • Aperture frequenti o prolungate dello sportello. • Lo sportello della cantina non si chiude correttamente. • Controllare la messa in piano della cantina. • urbani indifferenziati; utilizzare impianti per la raccolta differenziata. Contattare le autorità locali per informazioni sui sistemi di raccolta disponibili. Se gli elettrodomestici vengono smaltiti in discarica, potrebbero fuoriuscire sostanze pericolose che, disperse nell'ambiente, possono entrare nella catena alimentare, provocando danni alla salute. Quando si sostituisce un vecchio elettrodomestico con uno nuovo, il rivenditore è obbligato a farsi carico gratuitamente dello smaltimento del vecchio elettrodomestico. 24 Dati tecnici•Lista di imballaggio1 Intestazione Dati tecnici Tdi resistenza Capacità alle scosse disponibile elettriche (l) Tipo di clima Modello Tensione nominale (V) Frequenza Alimentazione nominale (W) (Hz) WS120GA SN-ST I 220 220-240 50 110 WS190GA SN-ST I 385 220-240 50 100 IT Intervallo di Refrigerante temperatura (R600a) (°C) (g) Modalità di collegamento cavo di alimentazione Peso (kg) Livello di rumore (livello di potenza sonora) dB (A) Dimensioni generali (Profondità × Larghezza × Altezza) (mm) 5-20 45 Y 69 38 639×595×1,265 5-20 75 Y 94 38 639×595×1,850 Importante: 1. In base agli standard internazionali, se il clima è di tipo SN-ST, la temperatura ambientale per l'uso della cantina è compresa in un intervallo da 10 °C e 38°C. 2. "Il livello di rumore (livello di potenza sonora)" indicato nei dati tecnici si riferisce all'installazione in un vuota, dotata di un cuscinetto di gomma resistente di spessore compreso tra 5 e 6 mm. Il livello di rumore viene misurato per almeno 30 minuti dopo la chiusura dello sportello. Durante il normale funzionamento verrà eseguito un test (escluse le fasi di accensione e spegnimento). Il livello di rumore del pavimento verrà Durante l'uso, è normale che il rumore effettivo differisca dal rumore rilevato, a causa degli effetti del tipo di vino conservato nella cantina, al rumore ambientale, all'apertura e alla chiusura dello sportello, all'accensione e allo spegnimento del compressore e così via. Lista di imballaggio L'impegno per migliorare questo apparecchio è costante. Pertanto il produttore si riserva il diritto Quantità Nome Modello prodotto Guida per l'utente Kit informazioni Ripiani per vino Scovolino Chiave WS120GA 1 1 4 1 2 WS190GA 1 1 7 1 2 25 Heading 1 Nombres de componentes de la bodega Panel de control principal Estante superior para el vino Puerta de cristal Bandejas de vino Pie atornillado ajustable Filtro de carbón activado WS120GA (Capacidad para 117 botellas) 26 WS190GA (Capacidad para 189 botellas) Índice de contenido Heading 1 Página ADVERTENCIAS DE SEGURIDAD................................................... 28 Instalación de la bodega............................................................... 29 Desembalaje de la bodega .............................................................................................. 29 Nivelación de la bodega .................................................................................................. 29 Ventilación......................................................................................................................... 29 Requisitos eléctricos ...................................................................................................... 30 ES Limitaciones de la instalación........................................................................................ 30 Uso de la regleta de extensión ....................................................................................... 30 Con ........................................................................................................ 30 Introducción a las funciones principales del aparato.................. 31 1.Ajustes de temperatura 2.Luz interna ............................................................................. 31 ................................................................................ 31 3.Conversión de “°F/°C”.................................................................................................. 31 4.Alarma de puerta abierta ........................................................................................... 32 5.Memoria de apagado de la temperatura ..................................................................... 32 6.Potencia ............................................................................................................ 32 Precauciones de uso de la bodega............................................... 33 Desescarchado automático ............................................................................................ 33 Estantes............................................................................................................................. 34 Ruidos de funcionamiento normales ............................................................................ 34 Cuidado y limpieza de la bodega ................................................................................... 35 Solución de problemas.................................................................. 36 Datos técnicos•Lista del paquete................................................. 37 27 Heading 1 ADVERTENCIAS DE SEGURIDAD El uso previsto de este electrodoméstico es el almacenamiento de vino. Asegúrese de tomar las debidas precauciones de seguridad antes de utilizar el aparato: 1. Lea estas instrucciones con detenimiento antes de utilizar la bodega por primera vez. 2. Utilice este aparato sólo para el uso que se describe en esta guía de uso y mantenimiento. 3. Instale la bodega siguiendo las instrucciones de instalación proporcionadas antes de utilizar el producto. Consulte las instrucciones de conexión enumeradas en la sección dedicada a la instalación. 4. Este producto está diseñado exclusivamente para uso doméstico. En caso las normativas y regulaciones pertinentes. Este aparato puede ser utilizado por niños de 8 años en adelante y por personas con capacidad física, psíquica o sensorial reducida, o bien, faltas de experiencia y conocimiento si se realiza bajo supervisión o se les ha dado instrucciones acerca del uso del aparato de forma segura y comprenden los riesgos que entraña. Los niños no deben jugar con el aparato. La limpieza y el mantenimiento por parte del usuario no será llevada a cabo por niños sin supervisión. 5. El aparato debe situarse de manera que el enchufe quede accesible. 6. Si el cable de alimentación se daña, deberá sustituirlo el fabricante, un pueda ocurrir un accidente. 7. Mantenga las aperturas de ventilación libres de obstrucciones en el recinto donde esté colocado el aparato o en la estructura donde esté encastrado. 8. No intente acelerar el proceso de descongelación haciendo uso de un dispositivo mecánico ni por ningún otro medio que no sea el que recomiende el fabricante exclusivamente. 9. No dañe el circuito refrigerante. 10. No utilice aparatos eléctricos en el interior de los compartimentos de almacenamiento de alimentos del aparato, salvo que sean del tipo recomendado por el fabricante. 11. Si la iluminación sufre algún daño, deberá sustituirla el fabricante, un pueda ocurrir un accidente. 12. El uso previsto de este electrodoméstico es el almacenamiento de vino. 13. Evite que los menores se queden atrapados en el aparato. Antes de deshacerse de su antigua bodega, retire las puertas. Coloque los estantes de la misma en un lugar seguro para evitar que los menores puedan introducirse dentro del aparato. 14. No almacene sustancias explosivas como latas de aerosoles con 28 Instalación de la Heading bodega1 Desembalaje de la bodega 1. Retire todo el material de embalaje. Retire la base de espuma y la cinta adhesiva que sujeta los accesorios interiores y exteriores de la bodega. 2. Revise y elimine cualquier resto de embalaje, cinta o materiales impresos antes de conectar la bodega. Nivelación de la bodega • La bodega cuenta con cuatro patas de nivelación ubicadas en las esquinas delanteras y traseras del aparato. Coloque la bodega en el lugar adecuado y, a continuación, proceda a su nivelación. • Si desea ajustar las patas de nivelación, gírelas en el sentido de las agujas del reloj para subir la bodega o en dirección contraria para bajarla. La puerta de la bodega se cerrará con más facilidad cuando se hayan extendido las patas de nivelación. Ventilación • garantice la circulación de aire sin obstáculos y cerca de conexiones eléctricas y tuberías. • Se recomienda dejar los siguientes espacios mínimos alrededor de la bodega: Laterales .................. 100 mm Parte superior .......... 100 mm Parte trasera ............ 100 mm • Si desea que el sistema de refrigeración funcione correctamente, no sobrecargue la bodega. Más cm d de 10 part esde l e tra a sera Más de 10 cm desde la parte izquierda Más de 10 cm desde la parte superior Más de 10 cm desde la parte derecha Pie atornillado ajustable Alto Bajo Nota: si la bodega se ha inclinado por cualquier motivo, espere 24 horas antes de volver a conectarla. 29 ES Heading 1 Requisitos eléctricos • Compruebe que dispone de una toma de corriente (220 - 240 V, enchufe de 15 A) y una toma de tierra adecuadas antes de encender la bodega. • Evite utilizar ladrones de tres enchufes o cortar la tercera toma de tierra para adaptar una toma de dos enchufes. Es una práctica muy peligrosa ya que no proporciona la toma de tierra que necesita la bodega y podría causar una descarga eléctrica. Limitaciones de la instalación • No instale la bodega en lugares que no se encuentren convenientemente aislados o climatizados, por ejemplo un garaje, etc. La bodega no ha sido diseñada para funcionar si la temperatura ambiente es inferior a 10 °C. • resistente que se encuentre protegida de la radiación solar directa o de las fuentes de calor, por ejemplo radiadores, calentadores, aparatos de cocina, etc. Puede corregir cualquier desnivelación del suelo gracias a las patas de nivelación ubicadas en las esquinas delanteras y traseras de la bodega. • La bodega ha sido diseñada exclusivamente para una instalación independiente. No ha sido diseñada para integrarse en otras aplicaciones. Uso de la regleta de extensión • Evite el uso de regletas de extensión ya que pueden representar un riesgo para la salud en determinadas condiciones. Si necesita utilizar una regleta de extensión, utilice sólo una que disponga de toma de tierra y que sea adecuada para el enchufe del aparato. La capacidad de la regleta de extensión debe ser igual o superior a la capacidad eléctrica del aparato. Configuración inicial Cuando haya conectado la unidad a una toma de corriente, déjela funcionar durante al menos 30 minutos para que se aclimate antes de realizar los ajustes necesarios. Durante este tiempo, en función de la temperatura interior, la luz de vino tinto o blanco permanecerá encendida para el compartimento superior y el compartimento inferior. El indicador LED mostrará la temperatura interna actual. 30 Introducción a las funciones primarias del aparato Panel de control Temperatura Temperatura Ajuste Ajuste (arriba) (abajo) OUT.T° CONJUNTO SET IN.T° Luz POTENCIA LIGHT POWER ES El rango de temperatura del panel es 5~20 °C(41~68 °F). La temperatura de ajuste predeterminada es 12 °C(54 °F). . Usted puede fijar la temperatura según sus requisitos del almacenaje del vino. 1 Ajustes de temperatura Para ajustar la temperatura, mantenga pulsado el botón durante unos 3 segundos. A continuación, la indicación de temperatura de IN.T ° parpadeará . Pulse el botón o para aumentar o disminuir el ajuste de temperatura. Una vez alcanzada la temperatura deseada, pulse el botón . 2. Luz interna Elogie el aspecto de su colección, una luz suave se ha construido en la cava de vinos. Solo pulse el botón para encender la luz, pulse de nuevo para apagarla. Cuando la puerta está abierta, la luz se encenderá. Al cerrar la puerta, la luz se apagará. 3. Conversión de “°F/°C” Pulse y mantenga pulsado durante 3 segundos, la temperatura mostrada en grados Fahrenheit y el símbolo ° F se convertirá a la temperatura en grados Celsius y el símbolo "° C". Pulse y mantenga pulsado durante 3 segundos, la temperatura mostrada en grados Celsius y el símbolo "° C" carácter se convertirá a la temperatura en grados Fahrenheit y el símbolo ° F. 31 Heading 1 4.Alarma de puerta abierta En caso de que la puerta se mantenga abierta durante más de 1 minuto, el zumbador emitirá un pitido para dar una alarma hasta que la puerta se cierre o cualquier tecla en el panel de visualización se puede operar y luego el zumbador dejará de sonar. 5.Memoria de apagado de la temperatura En caso de corte de energía, la cava guardará automáticamente la temperatura programada. Después de la recuperación de energía, se ejecutará en función de la temperatura establecida antes de la interrupción de la alimentación, mientras que . otras funciones volverán al estado predeterminado. 6.Potencia Al mantener pulsada la tecla durante 3 segundos, la alimentación principal se apagará (la alimentación eléctrica de todos los dispositivos eléctricos en el interior se cortará y todo el aparato estará en modo de espera). Si el dispositivo está apagado, la alimentación se puede encender al mantener pulsada la tecla durante 3 segundos y, a continuación, todos los iconos de la pantalla se encenderán. 32 Heading 1 Precauciones de uso de la bodega No coloque demasiado vino en la bodega para no sobrepasar la capacidad de carga de los estantes. No coloque más de cuatro capas de vino en cada estante. El número de botellas de vino no debe superar las cuatro capas en cada balda ni soportar una capacidad superior a 35 kg. Antes de colocar las botellas dentro de completamente estables. Además, compruebe si cualquier botella sobresale de los estantes para evitar que las botellas golpeen la puerta de cristal al cerrarla. ES Desescarchado automático Este aparato dispone de una función de desescarchado automático. Durante su uso, asegúrese de que el orificio de drenaje no está bloqueado para que el agua generada durante el desescarchado fluya con facilidad a través del orificio de drenaje hasta el receptor de agua del interior de la cabina de la bodega. Limpie con regularidad los receptores de agua de la parte inferior de los compartimentos superior e inferior; utilice un paño seco para absorber el agua del interior de los receptores de agua y límpielos (realice esta operación cada tres meses, como se sugiere). La forma en la que los vinos siguen madurando depende de las condiciones ambientales. La calidad del aire es, por lo tanto, determinante para la conservación del vino. Se ha colocado un aire mantenga una calidad óptima. PRECAUCIÓN solicitar al distribuidor. y extráigalo. Introdúzcalo con el tirador en posición vertical. Gírelo hacia la derecha e introdúzcalo. 33 Heading 1 Estantes • Los estantes han sido diseñados para mejorar el aspecto físico del aparato y facilitar su limpieza. Las botellas más grandes o de tamaño Magnum se adaptan con más facilidad a los estantes de rejilla situados en la parte posterior de la bodega. • Existen varios estantes para facilitar el almacenamiento y la extracción del vino. Ruidos de funcionamiento normales • Los ruidos de gorgoteo o burbujeo y las ligeras vibraciones son el resultado de la circulación del refrigerante a través del serpentín de refrigeración. • El control del termostato hace un clic cuando se activa y desactiva. 34 Cuidado y limpieza de Heading la bodega1 Limpieza y mantenimiento Advertencia: Precaución: General: Juntas de la puerta: Desconecte la bodega antes de limpiarla para reducir el riesgo de descarga eléctrica. No prestar atención a estas precauciones podría causar lesiones graves o la muerte. Lea las instrucciones y advertencias del fabricante antes de utilizar productos de limpieza para evitar daños personales o en el producto. • Prepare una solución limpiadora de 3-4 cucharadas de bicarbonato de sodio mezclado con agua tibia. Humedezca una esponja o un paño suave con la solución y limpie la bodega. • Aclare el aparato con agua tibia y séquelo con un paño suave. • No utilice productos químicos, abrasivos, amoniaco, blanqueadores con cloro, detergentes concentrados, disolventes o estropajos de metal. ALGUNAS de estas sustancias químicas podrían disolver, dañar o decolorar la bodega. • Limpie las juntas de la puerta cada tres meses de acuerdo con las para que la puerta se cierre correctamente. • Puede aplicar un poco de vaselina en las bisagras de las juntas para Botellero: cierren correctamente. Si el botellero se mancha con gotas de vino o agua, utilice papel de lija de 300-400 para pulirlo. Después, utilice un trapo suave para limpiar el serrín. No utilice una toalla o un trapo suave con agua. Cortes en el suministro eléctrico • De forma ocasional, pueden producirse cortes en el suministro eléctrico debido a tormentas eléctricas o a otras causas. En ese caso, debe retirar el cable de alimentación de la toma de corriente. Una vez que se restablezca el suministro, vuelva a conectar el cable de alimentación a la toma de corriente. Cuidado durante las vacaciones y traslados • En caso de no usar el aparato durante un tiempo prolongado, desconecte y limpie la bodega y las juntas de la puerta tal como se indica en la sección"Limpieza general". Deje • Cuando vaya a mover el aparato, transpórtelo siempre en posición vertical. Si lo transporta en posición horizontal podría provocar daños en el sistema de cierre. Nota: una vez trasladado el aparato, espere 24 horas antes de volver a conectarlo. 35 ES Heading de 1 problemas Solución La bodega no funciona: • Compruebe si el aparato se encuentra enchufado. • Examine el disyuntor para comprobar si hay suministro en la toma de corriente. La temperatura del vino es demasiado alta: • • • • • Reduzca la frecuencia de apertura de las puertas. Espere a que el vino que acaba de almacenar alcance la temperatura deseada. Compruebe que las juntas de la puerta cierran correctamente. Limpie el condensador. Disminuya la temperatura de la bodega. La temperatura del vino es demasiado baja: • Aumente la temperatura de la bodega. La bodega se pone en marcha con demasiada frecuencia: • La bodega siempre intenta mantener la temperatura óptima, por lo que es normal que esto suceda durante periodos de altas temperaturas o humedad. • También puede deberse a la frecuencia o a la duración de la apertura de las puertas. • Limpie el condensador. • Compruebe que las juntas de la puerta cierran correctamente. • Compruebe que las puertas están completamente cerradas. Se acumula humedad en el interior o en el exterior de la bodega: • Es normal en periodos de alta humedad. • Reduzca la frecuencia de apertura de las puertas y no las mantenga abiertas durante mucho tiempo. • Compruebe que las juntas de la puerta cierran correctamente. Las puertas de la bodega no se cierran correctamente: • Nivele la bodega. • Compruebe si la puerta está bloqueada, por ejemplo, por alguna botella de vino o un estante. No deseche aparatos los eléctricos como si se instalaciones correspondientes de reciclaje. Póngase en contacto con la administración local para obtener información relacionada con el sistema de recogida de material para reciclaje. Si los aparatos eléctricos se desechan en vertederos o basureros normales, las a las aguas subterráneas y llegar así hasta la cadena alimenticia, con el consiguiente daño para la salud de la población. Si desea sustituir su aparato antiguo por otro nuevo, el comerciante que se lo vendió está obligado por ley a recogerlo para su posterior reciclaje y sin coste alguno para el usuario. 36 Heading Datos técnicos•Lista del paquete1 Datos técnicos Tipo de resistencia Capacidad Voltaje Frecuencia Potencia de a descargas disponible nominal (V) nominal (Hz) entrada (W) eléctricas (l) Modelo Tipo de clima WS120GA SN-ST I 220 220-240 50 110 WS190GA SN-ST I 385 220-240 50 100 Peso (kg) Ruido (nivel de potencia acústica) dB (A) Intervalo de Refrigerante Modo de conexión temperaturas (R600a) del cable de (°C) (g) alimentación Dimensiones totales 5-20 45 Y 69 38 (profundidad × anchura × altura) (mm) 639×595×1,265 5-20 75 Y 94 38 639×595×1,850 Comentarios: 1. De acuerdo con las normas internacionales, si el clima es de tipo SN-ST, la temperatura ambiente para el uso de la bodega de vinos oscila entre 10 °C y 38 °C. 2. una bodega de vino vacía, se coloca una almohadilla de goma elástica con un espesor de 5 mm a 6 mm en el interior. Puede funcionar durante al menos 30 minutos tras cerrar la puerta. Se llevará a cabo una prueba tras funcionar de forma estable (excepto en el encendido y apagado). El ruido a tierra se comprueba a 1 m Durante el uso, es normal que el ruido real sea diferente del indicado, debido a los efectos del tipo de vino almacenado en la bodega, el ruido ambiente, la apertura y cierre de la puerta, el encendido y apagado del compresor, etc. Lista del paquete Este aparato se está desarrollando continuamente. Nos reservamos el derecho a cambiar los componentes de la bodega sin previo aviso. Nombre Cantidad Manual del usuario Kit de información Bandejas de vino Pasador WS105GA 1 1 4 41 2 WS171GA 1 1 7 71 2 Modelo de producto Llave 37 ES Überschrift 1 Bauteilbezeichnungen des Weinkühlschranks Hauptbedienfeld Oberstes Weinfach Glastür Weinregale Verstellbare WS120GA WS190GA (Fassungsvermögen: (Fassungsvermögen: 117 Flaschen) 189 Flaschen) 38 Inhaltsverzeichnis Überschrift 1 Seite WICHTIGE SICHERHEITSHINWEISE ............................................. 40 Weinkühlschrank installieren........................................................ 41 Weinkühlschrank auspacken........................................................................................... 41 Weinkühlschrank ausrichten ........................................................................................... 41 Ausreichende Luftzirkulation........................................................................................... 41 Elektrische Anforderungen .............................................................................................. 42 Installationsbeschränkungen .......................................................................................... 42 Verlängerungskabel.......................................................................................................... 42 DE Erste Verwendung............................................................................................................. 42 Einführung in die Grundfunktionen des Geräts ............................ 43 1.Temperaturregelung ...................................................................................................... 43 2.Innenbeleuchtung 3.“°F/°C” Umstellung ...................................................................................................... 43 ............................................................................................... 43 4.Warnton bei offener Tür ............................................................................................... 44 5.Speichern der Temperatur bei Stromausfall................................................................ 44 6.Netzschalter (Power) ............................................................................................. 44 Warnhinweise zur Verwendung des Weinkühlschranks............... 45 Abtauautomatik ................................................................................................................. 45 Ablagefächer ..................................................................................................................... 46 Regulär auftretende Betriebsgeräusche......................................................................... 46 ............................... 47 Fehlerbehebung ............................................................................. 48 Technische Daten ...................................... ................................... 49 Packliste ........................................................................................ 49 39 WICHTIGE SICHERHEITSHINWEISE Überschrift 1 Dieses Gerät ist ausschließlich für die Lagerung von Wein vorgesehen. Bitte beachten Sie bei der Verwendung dieses Geräts stets die grundsätzlichen Sicherheitshinweise: 1. Lesen Sie alle Anweisungen vor der Verwendung des Geräts durch. 2. Verwenden Sie dieses Gerät nur für seinen vorgesehenen Zweck und 3. Dieser Weinkühlschrank muss vor der Verwendung ordnungsgemäß und 4. 5. 6. 7. entsprechend den Installationsanweisungen installiert werden. Lesen Sie die Hinweise zur Erdung im Installationsabschnitt. Sie ist ausschließlich für den Hausgebrauch bestimmt - in Küchen für Mitarbeiter in Länden, Büros und anderen gewerblichen Bereichen; - in landwirtschaftlichen Anwesen; - von Kunden in Hotels, Motels und anderen Wohneinrichtungen; - in Frühstückspensionen Dieses Gerät kann von Kindern ab 8 Jahren und darüber sowie von Personen mit verringerten physischen, sensorischen oder mentalen Fähigkeiten oder Mangel an Erfahrung und Wissen benutzt werden, wenn sie beaufsichtigt oder bezüglich des sicheren Gebrauchs des Gerätes unterwiesen wurden und die daraus resultierenden Gefahren verstehen. Kinder dürfen nicht mit dem Gerät spielen. Reinigung und Benutzer-Wartung dürfen nicht von Kindern ohne Beaufsichtigung durchgeführt werden. Das Gerät muss so aufge stellt werden, dass der Stecker zugänglich ist. Wenn das Netzkabel beschädigt ist, muss es vom Hersteller, seinem werden, um Gefahren zu vermeiden. 8. Halten Sie die Belüftungsöffnungen im Gerätegehäuse oder im Geräteinneren frei. 9. Verwenden Sie zum Beschleunigen des Abtauprozesses nur vom Hersteller empfohlene mechanische Geräte oder Mittel. 10. Beschädigen Sie nicht den Kühlkreislauf. 11. Verwenden Sie keine Elektrogeräte im Inneren der Kühlfächer, außer wenn diese speziell vom Hersteller für diesen Zweck vorgesehen sind. 12. Wenn die Beleuchtung beschädigt ist, muss sie vom Hersteller, seinem werden, um Gefahren zu vermeiden. 13. Dieses Gerät ist ausschließlich für die Lagerung von Wein vorgesehen. 14. Lagern Sie keine Explosivstoffe wie Aerosoldosen mit einem brennbaren Treibmittel. 15. Spielende Kinder können sich im Gerät einsperren. Nehmen Sie vor der Entsorgung des alten Weinkühlschranks die Türen ab. Nehmen Sie die Ablagefächer nicht heraus, um zu vermeiden, dass spielende Kinder in das Gerät hineinklettern. 16.Bitte setzen Sie sich zwecks der Geräteentsorgung mit dem Kundendienst in Verbindung, da das entflammbare Kühlmittel und das entflammbare Treibgas verwendet wurde. 17.Das im Gerät enthaltene Kältemittel ist brennbar. Bitte achten Sie beim Aufstellen, Transprotieren, Peparieren und Entsorgen des Gerätes darauf, dass keine Teile des Kältemittelkreislaufs beschädigt werden. 40 Weinkühlschrank installieren1 Überschrift Weinkühlschrank auspacken 1. Entfernen Sie das gesamte Verpackungsmaterial. Dazu gehören das Styroporteil und das Klebeband, mit dem die Zubehörteile des Weinkühlschranks innen und außen befestigt sind. 2. Stellen Sie vor dem Einstecken des Weinkühlschranks sicher, dass alle Verpackungsteile, Klebebänder und Drucketiketten entfernt wurden. Weinkühlschrank ausrichten • Die vier Füße an allen vier Ecken des Weinkühlschranks sind verstellbar. Richten Sie den Weinkühlschrank nach der Aufstellung am endgültigen Ort in der Waagerechten aus. • Wenn Sie die verstellbaren Füße im Uhrzeigersinn drehen, wird der Weinkühlschrank angehoben. Wenn Sie die Füße gegen den Uhrzeigersinn drehen, wird der Weinkühlschrank abgesenkt. Die Kühlschranktür lässt sich einfacher schließen, wenn die verstellbaren Füße ausgezogen sind. Ausreichende Luftzirkulation • er an einem Ort mit ausreichender Luftzirkulation und angemessenen Leitungs- und Elektroverbindungen aufgestellt werden. • Um den Weinkühlschrank sollten die folgenden Abstände eingehalten werden: Seiten ............... 100 mm (4 Zoll) Oben ................ 100 mm (4 Zoll) Hinten .............. 100 mm (4 Zoll) • Überfüllen Sie den Weinkühlschrank nicht, um eine ordnungsgemäße Kühlung zu gewährleisten. Mehr als 10 cm von oben Meh 10 c r als hinte m von n Mehr als 10 cm von links Mehr als 10 cm von rechts Verstellbare Fußschraube Höher Niedriger Hinweis: Wenn Ihr Weinkühlschrank aus bestimmten Gründen gekippt wurde, warten Sie 24 Stunden, bevor Sie ihn einstecken. 41 DE Überschrift 1 Elektrische Anforderungen • Sorgen Sie dafür, dass eine geeignete Steckdose (220-240 V, 15 A) mit ordnungsgemäßer Erdung für den Weinkühlschrank zur Verfügung steht. • Eine unabhängige und exklusive Standardausführung mit zuverlässiger Erdung ist für den Weinkeller durch Abstimmung seines 3-poligen Steckers mit em Erdungsstift zu verwenden, der unter keinen Umständen mit dem Erdungsdraht abgezogen oder abgetrennt werden darf. Installationsbeschränkungen • Installieren Sie den Weinkühlschrank nicht an Orten, die nicht ordnungsgemäß isoliert oder beheizt sind, z. B. Garagen. Der Weinkühlschrank darf nicht bei einer Umgebungstemperatur unter 10 °C betrieben werden. • Wählen Sie für den Weinkühlschrank einen geeigneten Aufstellort auf einer stabilen, geraden Fläche aus, und schützen Sie ihn vor direktem Sonnenlicht oder Wärmequellen wie Heizkörpern, Heizleisten, Kochgeräten usw. Unebenheiten am Boden können mit den vorderen und hinteren verstellbaren Füßen des Weinkühlschranks ausgeglichen werden. • Der Weinkühlschrank eignet sich nur zur freistehenden Montage und nicht als Einbaugerät. Verlängerungskabel • Vermeiden Sie die Verwendung eines Verlängerungskabels aufgrund der unter bestimmten Bedingungen auftretenden Sicherheitsrisiken. Falls sich der Einsatz eines Verlängerungskabels nicht umgehen lässt, verwenden Sie ausschließlich dreipolige Verlängerungskabel mit einem Schutzkontaktstecker und einer passenden Steckdose. Die auf dem Verlängerungskabel angegebene Leistung muss mindestens der elektrischen Leistung des Geräts entsprechen. Erste Verwendung Lassen Sie das Gerät nach dem Anschließen an die Steckdose mindestens 30 Minuten laufen, damit es sich akklimatisiert. Nehmen Sie erst dann Ihre Einstellungen vor. Währenddessen leuchtet je nach Innentemperatur das Rot- oder Weißweinlicht für das obere Fach sowie das Rot- oder Weißweinlicht für das untere Fach. Die LED-Anzeige zeigt dabei die aktuelle Innentemperatur an. 42 Einführung in die wichtigsten Funktionen des Geräts Heading 1 Bedienfeld Temperatur Anpassung (runter) Temperatur Anpassung (rauf) OUT.T° IN.T° EINSTELLEN Lampe SET LIGHT NETZSCHALTER DE POWER Der Temperaturbereich des Anzeigefelds liegt zwischen 5~20°C(41~68°F). Die Standardeinstellung der Temperatur beträgt 12°C(54°F). Sie können die Temperatur entsprechend Ihren Anforderungen für die Weinlagerung einstellen. 1 . Temperatureinstellung Zum Einstellen der Temperatur halten Sie den -Knopf etwa 3 Sekunden lang gedrückt. Daraufhin beginnt die Temperaturanzeige IN.T° zu blinken. Drücken Sie jeweils entweder auf den Knopf oder , um die eingestellte Temperatur zu erhöhen oder zu senken. Nach Erreichen der gewünschten Temperatur drücken Sie auf den Knopf 2. Innenbeleuchtung . Um Ihre Sammlung ins rechte Licht zu rücken wurde eine weiche Beleuchtung in den Weinkühler eingebaut. Einfaches Drücken des Knopfes schaltet die Beleuchtung ein, erneutes Drücken schaltet sie aus.Bei geöffneter Tür geht das Licht an. Sobald die Tür 3. geschlossen wird, erlischt das Licht. “°F/°C” Umstellung Halten Sie 3 Sekunden lang gedrückt - die angezeigte Temperatur in Grad Fahrenheit sowie der Buchstabe °F werden in Grad Celsius und den Buchstaben “°C” umgewandelt. Halten Sie erneut 3 Sekunden lang gedrückt - die angezeigte Temperatur in Grad Celsius sowie der Buchstabe “°C” werden in Grad Fahrenheit und den Buchstaben "°F" umgewandelt. 43 Heading 1 4. Warnton bei offener Tür Steht die Tür länger als 1 min lang offen, ertönt ein Alarmton bis die Tür geschlossen wird oder bis eine beliebige Taste auf dem Anzeigefeld betätigt wird. 5. Speichern der Temperatur bei Stromausfall Im Falle eines Stromausfalls speichert der Weinkühler automatisch die eingestellte Temperatur. Sobald der Strom zurückkehrt, wird der Betrieb mit der vor dem Stromausfall eingestellten Temperatur wieder aufgenommen, während für . andere Funktionen die Standardeinstellungen aktiviert werden. 6. Netzschalter (Power) Das Halten der Taste für 3 Sekunden schaltet die Hauptstromversorgung aus (die Stromversorgung aller elektrischen Vorrichtungen wird abgeschaltet und das gesamte Gerät schaltet in den Standby-Betrieb). Wenn das Gerät ausgeschaltet ist, kann die Stromversorgung durch Drücken der Taste für 3 Sekunden wieder eingeschaltet werden, woraufhin alle Symbole auf dem Anzeigefeld ihre Funktion aufnehmen. 44 Überschrift 1 Warnhinweise zur Verwendung des Weinkühlschranks den Kühlschrank, um das Tragvermögen der Weinfächer nicht zu überschreiten. Legen Sie pro Fach nicht mehr als vier Lagen Flaschen darf vier Lagen auf jedem Fach nicht überschreiten bzw. sollte das Tragvermögen der Weinfächer 35 kg nicht überschreiten. Prüfen Sie, ob die Weinfächer fest sitzen, bevor Sie die Flaschen in den Weinkühlschrank legen. Prüfen Sie außerdem, ob Flaschen aus den Fächern hervorragen, um zu verhindern, dass Flaschen beim Schließen der Tür gegen das Glas stoßen. DE Abtauautomatik Dieses Gerät verfügt über eine automatische Abtaufunktion. Stellen Sie sicher, dass die Ablauföffnung frei ist, sodass das Tauwasser ungehindert durch die Ablauföffnung in den Wasserbehälter im Innenraum des Kühlschranks fließen kann. Reinigen Sie regelmäßig die Wasserbehälter unterhalb des oberen und unteren Fachs; verwenden Sie ein trockenes Tuch, um das Wasser in den Wasserbehältern aufzusaugen und abzuwischen (reinigen Sie die Wasserbehälter wie beschrieben alle drei Monate). Der fortlaufende Reifeprozess des Weins hängt von der Umgebung ab. Die Luftqualität ist daher angebracht, um sicherzustellen, dass der Luftdurchsatz qualitativ beständig bleibt. ACHTUNG Wir empfehlen, den Filter einmal im Jahr zu ersetzen. Filter sind bei Ihrem Händler erhältlich. Wechseln des Filters: Fassen Sie den Filter am Griff. Drehen Sie ihn nach links, und nehmen Sie ihn heraus. Einsetzen des Filters: Setzen Sie ihn am Griff in senkrechter Position ein. Drehen Sie ihn nach rechts, und setzen Sie ihn ein. 45 Überschrift 1 Ablagefächer • Die Ablagefächer sind für eine ansprechende Präsentation der Flaschen und einfache Querablagen im unteren Bereich des Weinkühlschranks aufbewahren. • Einige Ablagefächer wurden speziell für die einfache Lagerung und Entnahme Ihrer Regulär auftretende Betriebsgeräusche • Wasserfließender Schall oder leichte Vibrationen sind das Ergebnis des Kältemittels, das durch die Kühlschlagen zirkuliert. • Der Kompressorklickt, wennerein- und ausgeschaltetwird. 46 Überschrift 1 Reinigung und Wartung Warnung: Achtung: Allgemein: Um Stromschläge zu vermeiden, sollten Sie vor der Reinigung stets den Netzstecker ziehen. Die Missachtung dieser Warnung kann zu Verletzungen oder zum Tod führen. Lesen und beachten Sie vor der Verwendung von Reinigungsprodukten stets die Anweisungen und Warnhinweise des Herstellers, um Verletzungen oder Produktschäden zu vermeiden. • Stellen Sie eine Reinigungslösung aus 3-4 Esslöffeln Natron und warmem Wasser her. Wischen Sie den Weinkühlschrank mit einem mit der Reinigungslösung befeuchteten Schwamm oder weichen Tuch ab. • Wischen Sie mit sauberem, warmem Wasser nach, und trocknen Sie das Gerät mit einem weichen Tuch. • Verwenden Sie keine aggressiven Reinigungs- oder Scheuermittel bzw. kein Ammoniak, keine Chlorbleiche, keine konzentrierten Reinigungs- oder Lösungsmittel und keine Topfreiniger. EINIGE dieser Mittel enthalten chemische Substanzen, durch die der Weinkühlschrank beschädigt bzw. verfärbt werden könnte. Türdichtungen: • Saubere Türdichtunggen alle drei Monate. Für eine ordnungsgemäße Abdichtung müssen die Dichtungen stets sauber und geschmeidig sein. • Wenn Sie etwas Vaseline auf die Scharnierseite der Dichtungen auftragen, bleiben die Dichtungen geschmeidig und funktionsfähig. Weinfach: Falls auf das Weinfach ausversehen Wein- oder Wassertropfen gelangt zu polieren, und verwenden Sie dann ein weiches Tuch, um den Staub zu entfernen. Verwenden Sie kein Handtuch oder weiches Tuch mit Wasser. Stromausfälle • Bisweilen kann es aufgrund von Gewittern oder anderen Ursachen zu Stromausfällen kommen. Ziehen Sie das Netzkabel bei einem Stromausfall ab. Wenn die Stromversorgung wiederhergestellt ist, können Sie das Netzkabel wieder einstecken. Pflege während des Urlaubs oder beim Umzug • Wenn Sie länger verreisen, sollten Sie den Netzstecker des Weinkühlschranks ziehen und alle Flächen sowie die Türdichtungen gemäß den Anweisungen in Abschnitt „Allgemein“ reinigen. Lassen Sie die Tür geöffnet, sodass Luft im Inneren zirkulieren kann. • Im Falle eines Umzugs sollte der Weinkühlschrank immer vertikal transportiert werden. Transportieren Sie das Gerät nicht liegend, da dadurch das geschlossene System beschädigt werden könnte. Hinweis: Warten Sie 24 Stunden nach einem Transport, bevor Sie den Netzstecker einstecken. 47 DE Fehlerbehebung Überschrift 1 Der Weinkühlschrank funktioniert nicht: • Überprüfen Sie, ob Sie der Netzstecker des Weinkühlschranks eingesteckt ist. • Überprüfen Sie, ob die Steckdose Strom führt, indem Sie den Schutzschalter kontrollieren. Der Wein ist zu warm: • • Geben Sie kürzlich hinzugefügtem Wein ausreichend Zeit, auf die gewünschte Temperatur abzukühlen. • Überprüfen Sie, ob die Türdichtungen ordnungsgemäß schließen. • Die Dichtungen müssen sauber und biegsam gehalten werden, um eine ordnungsgemäße Abdichtung zu gewährleisten. • Stellen Sie eine niedrigere Temperatur ein. Der Wein ist zu kalt: • Erhöhen Sie die Temperatur, wenn diese zu kalt eingestellt ist. • An heißen und feuchten Tagen kann dies normal sein, um eine konstante Temperatur sicherzustellen. • • Die Dichtungen müssen sauber und biegsam gehalten werden, um eine ordnungsgemäße Abdichtung zu gewährleisten. • Überprüfen Sie, ob die Türdichtung ordnungsgemäß schließt. • Kontrollieren Sie, ob die Tür vollständig geschlossen ist. Feuchtigkeitsbildung innen oder außen am Weinkühlschrank: • Dies ist normal, wenn die Luftfeuchtigkeit hoch ist. • • Überprüfen Sie, ob die Türdichtungen ordnungsgemäß schließen. Die Weinkühlschranktür schließt nicht ordnungsgemäß: • Richten Sie den Weinkühlschrank in der Waagerechten aus. • Kontrollieren Sie, ob die Tür blockiert wird, z. Entsorgen Sie elektrische Geräte nicht im Hausmüll, sondern mit dem Sondermüll. Informieren Sie sich bei den entsprechenden Behörden vor Ort über die Entsorgungssysteme. Wenn elektrische Geräte auf Mülldeponien entsorgt werden, können schädliche Stoffe ins Grundwasser und so in die Nahrungskette gelangen. Dies kann zu Gesundheitsschäden führen. Wenn Sie alte Geräte durch neue ersetzen, so ist gebührenfrei zur Entsorgung zurückzunehmen. 48 Technische Daten•Packliste Technische Daten Modell Klimatyp Stromschlag- FassungsverWiderstandstyp mögen (l) Nennspannung (V) Nennfre- Eingangsquenz (Hz) leistung (W) WS120GA SN-ST I 220 220-240 50 110 WS190GA SN-ST I 385 220-240 50 100 turbereich (°C) (R600a) (g) NetzkabelAnschlussart Gewicht (kg) Gesamtabmessungen Geräuschpegel (Tiefe × Weite × Höhe) dB (A) (mm) 5-20 45 Y 69 38 639×595×1,265 5-20 75 Y 94 38 639×595×1,850 DE Anmerkungen: 1. Gemäß internationaler Normen liegt die Umgebungstemperatur für den Gebrauch des Weinkühlschranks beim Klimatyp SN-ST zwischen 10 °C und 38 °C. 2. den nationalen Normen. Im Fall eines leeren Weinkühlschranks wird dieser mit 5 mm bis 6 mm dickem gummigefedertem Polster ausgelegt. Nach Schließen der Tür kann er mindestens 30 Minuten lang betrieben werden. Nach stabilem Betrieb (An- und Abschalten ausgenommen) wird ein Test durchgeführt. Das Grundgeräusch wird jeweils aus 1 des Weinkühlschranks gemessen. Während des Gebrauchs ist es normal, dass ein Unterschied zwischen dem tatsächlichen Geräuschpegel und dem gemessen Geräuschpegel besteht, da letzterer durch die Art des Weins, der im Weinkühlschrank gelagert wird, die Umgebungsgeräusche, das Öffnen und Schließen der Tür, das An- und Abschalten des Packliste Dieses Gerät wird ständig weiterentwickelt. Wir behalten uns das Recht vor, die Bauteile des Weinkühlschranks ohne Vorankündigung zu ändern. Menge Name Bedienungsanleitung Infokit Weinregale Ablaufstift Schlüssel Produktmodell WS120GA 1 1 4 1 2 WS190GA 1 1 7 1 2 49 En-tête 1 Nom des éléments de la cave à vin Panneau central de commande Clayette à bouteilles supérieure Porte en verre Clayettes à vin Vis réglable du pied 50 Filtre à charbon actif WS120GA WS190GA (capacité de 117 bouteilles) (capacité de 189 bouteilles) Table des matières En-tête 1 Page MESURES DE SÉCURITÉ IMPORTANTES ...................................... 52 Installation de votre cave à vin..................................................... 53 Déballage de votre cave à vin ......................................................................................... 53 Mise à niveau de votre cave à vin................................................................................... 53 Circulation de l'air ............................................................................................................ 53 Exigences électriques ..................................................................................................... 54 Restrictions d'installation............................................................................................... 54 Utilisation d'une rallonge ................................................................................................ 54 Première mise en route.................................................................................................... 54 Présentation des fonctions principales de l'appareil................... 55 FR 1.Réglages de la température ......................................................................................... 55 2.Éclairage intérieur 3.Conversion « °F/°C » ........................................................................................... 55 ................................................................................................ 55 4.Alarme d’ouverture de la porte .................................................................................... 56 5.Fonction de mémorisation de température en cas de coupure ............................... 56 6.Alimentation ............................................................................................................. 56 Précautions liées à l'utilisation de la cave à vin.......................... 57 Dégivrage automatique ................................................................................................... 57 Clayettes............................................................................................................................ 58 Bruits normaux de fonctionnement............................................................................... 58 Entretien et nettoyage de la cave à vin.......................................................................... 59 Nettoyage et entretien ..................................................................................................... 59 Coupures de courant ....................................................................................................... 59 Précautions en cas d'absence et de déplacement de l'appareil ................................ 59 Dépannage..................................................................................... 60 Informations techniques•Contenu de l'emballage ....................... 61 51 En-tête 1 DE SÉCURITÉ IMPORTANTES MESURES Cet appareil est exclusivement destiné au stockage de bouteilles de vin. Lorsque vous utilisez cet appareil, prenez toujours les mesures de précaution de base suivantes : 1. Lisez l'ensemble des instructions avant d'utiliser cet appareil. 2. Utilisez cet appareil uniquement pour l'usage auquel il est destiné et conformément aux indications du présent mode d'emploi. 3. Cette cave à vin doit être installée conformément aux instructions d'installation avant toute utilisation. Voir les instructions de mise à la terre dans la section consacrée à l'installation. 4. L'appareil est destiné uniquement à un usage domestique. En cas d'usage normes et réglementations correspondantes. Cet appareil peut être utilisé par des enfants âgés de 8 ans et plus, par des personnes aux capacités physiques, sensorielles ou mentales réduites, ainsi que par des personnes ne disposant pas de l'expérience ou des connaissances nécessaires, des instructions leur permettant d'utiliser l'appareil en toute sécurité et s'ils comprennent les dangers inhérents à une telle utilisation. Les enfants ne doivent pas jouer avec cet appareil. Le nettoyage et l'entretien ne doivent pas être effectués par des enfants sans supervision. 5. 6. Si le cordon d'alimentation est endommagé, il convient de le faire remplacer par le fabricant, un agent de service après-vente ou une 7. structure encastrable doivent être libres de toute obstruction. 8. N'utilisez pas d'appareils mécaniques ou tout autre moyen pour accélérer le dégivrage, à l'exception de ceux recommandés par le fabricant. 9. N'endommagez pas le circuit de réfrigération. 10. N'utilisez pas d'appareils électriques à l'intérieur des compartiments de stockage des aliments de l'appareil, sauf s'ils correspondent au type recommandé par le fabricant. 11. Si l'éclairage est endommagé, il convient de le faire remplacer par le fabricant, un agent de service après-vente ou une personne de 12. Cet appareil est exclusivement destiné au stockage de bouteilles de vin. 13. Un enfant pourrait s'y enfermer. Démontez les portes de votre cave à vin d'empêcher les enfants de grimper dans l'appareil. 14. N'entreposez pas de substances explosives, telles que des bombes 52 Installation de votre cave En-tête à vin1 Déballage de votre cave à vin 1. Retirez tous les éléments d'emballage, y compris la base en mousse et les rubans adhésifs qui maintiennent les accessoires de la cave à vin en place à l'intérieur et à l'extérieur de l'appareil. 2. Inspectez et retirez les résidus éventuels d'emballage, de ruban adhésif ou de matériaux imprimés avant de mettre la cave à vin sous tension. Mise à niveau de votre cave à vin • Votre cave à vin est équipée de quatre pieds réglables situés aux angles avant et arrière de l'app • Vous pouvez ajuster la hauteur des pieds réglables en les tournant dans le sens des aiguilles d'une montre (pour élever l'appareil) ou dans le sens contraire (pour abaisser l'appareil). La porte de la cave à vin se fermera plus facilement si les pieds réglables sont déployés. Circulation de l'air FR • bien ventilé et équipé de raccordements de plomberie et électriques adéquats. • Nous vous recommandons de laisser les espaces de dégagement suivants autour de la cave à vin : Côtés ............... 100 mm Haut ................. 100 mm Arrière .............. 100 mm • Plus de 10 cm du haut Plus de1 de l' 0 cm arriè re Plus de 10 cm de la gauche Plus de 10 cm de la droite Vis réglable du pied Haut Bas Remarque : si votre cave à vin s'est trouvée en position inclinée pour quelque raison que ce soit, attendez 24 heures avant de la brancher. 53 En-tête 1 Exigences électriques • Assurez-vous de disposer d'une prise de courant adéquate (220-240 V, 15 A) reliée à la terre pour brancher la cave à vin. • Evitez d'utiliser des adaptateurs à trois broches ou de couper la broche de mise à la terre n'assure pas la mise à la terre de la cave à vin et peut provoquer des chocs électriques. Restrictions d'installation • fé (garage, etc.). Cette cave à vin n'a pas été conçue pour fonctionner à une température ambiante inférieure à 10 °C. • Installez la cave à vin dans un endroit adapté, sur une surface dure et plane à l'abri de la lumière directe du soleil et de toute source de chaleur (radiateurs, plinthes chauffantes, appareils de cuisson, etc.). Toute irrégularité du sol doit être corrigée à l'aide des pieds réglables, situés aux quatre coins avant et arrière de l'appareil. • Votre cave à vin est conçue pour une installation sur pieds uniquement. Elle ne peut pas être encastrée. Utilisation d'une rallonge • Evitez d'utiliser une rallonge, vous risqueriez de compromettre la sécurité de l'appareil dans certaines conditions. Si vous avez besoin d'une rallonge, utilisez uniquement une rallonge électrique indiquée sur la rallonge doit être supérieure ou égale à celle de l'appareil. Première mise en route Une fois l'appareil branché sur une prise de courant, laissez-le fonctionner pendant au moins 30 minutes avant d'effectuer le moindre réglage et ainsi le laisser s'acclimater à son environnement. Pendant ce temps, en fonction de la température interne, le voyant du vin rouge ou blanc reste allumé pour le compartiment supérieur et le voyant du vin rouge ou blanc reste allumé pour le compartiment inférieur. L'écran LED indique la température interne actuelle. 54 Présentation des fonctions principales de l’appareil Panneau de commande Température Température Réglage Réglage (haut) (bas) OUT.T° IN.T° DÉFINIR Éclairage SET LIGHT FR ALIMENTATION POWER La plage de température du panneau d’affichage est comprise entre 5 et 20° C(41 et 68° F). La température par défaut est de 12° C (54° F). Vous pouvez régler la température en fonction de vos exigences en matière de stockage du vin. . 1 Réglages de la température Pour régler la température, appuyez sur le bouton et maintenez-le enfoncé pendant 3 secondes. L’icône de température du IN.T clignote ensuite. Appuyez sur le bouton ou pour augmenter ou réduire la température. Une fois la température souhaitée atteinte, appuyez sur le bouton 2. Éclairage intérieur . Sublimez l’apparence de votre collection grâce l’éclairage fin installé dans votre cellier. Il vous suffit d’appuyer sur le bouton pour l’allumer, et d’appuyer à nouveau sur le bouton pour l’éteindre.Lorsque la porte est ouverte, la lumière s’allume. Une fois la porte fermée, la lumière s’éteint. 3. Conversion « °F/°C » Appuyez sur et maintenez-le enfoncé pendant 3 secondes ; la température affichée en degré Fahrenheit symbolisé par « °F » se convertit en degré Celsius symbolisé par « °C ». Appuyez à nouveau sur et maintenez-le enfoncé pendant 3 secondes ; la température affichée en degré Celsius symbolisé par « °C » se convertit en degré Fahrenheit symbolisé par « °F ». 55 Heading 1 4.Alarme d’ouverture de la porte Si la porte reste ouverte pendant plus de 1 min, une alarme se déclenche et ne s’arrête que lorsque vous refermez la porte ou appuyez sur une touche du panneau d’affichage. 5.Fonction de mémorisation de température en cas de coupure En cas de panne de courant, le cellier enregistre automatiquement la température réglée. Une fois l’alimentation rétablie, il se met en marche en tenant compte de la température réglée avant la panne de courant tandis que les autres fonctions . retournent aux réglages par défaut. 6.Alimentation Appuyez sur la touche et maintenez-la enfoncée pendant 3 secondes ; l’alimentation principale s’arrête (tous les dispositifs internes s’arrêtent et l’appareil se met en veille). Si l’appareil est éteint, vous pouvez rétablir l’alimentation en appuyant sur la touche en la maintenant enfoncée pendant 3 secondes ; toutes les icônes de l’écran s’allument. 56 et En-tête 1 Précautions liées à l'utilisation de la cave à vin Ne placez pas trop de bouteilles de vin dans la cave pour ne pas dépasser la capacité d'accueil des clayettes à bouteilles. Ne placez pas plus de quatre couches de bouteilles sur chaque clayette. Chaque clayette ne doit pas comporter plus de quatre rangées de bouteilles de vin, pour une capacité d'accueil maximale de 35 kg. Avant de placer les bouteilles dans la cave sont complètement stables. dépasse des étagères pour éviter qu'elles ne heurtent la vitre de la porte lorsque vous refermez cette dernière. FR Dégivrage automatique Cet appareil dispose d'une fonction de dégivrage automatique. Pendant l'utilisation de la cave à vin, vérifiez que l'orifice de vidange n'est pas bloqué pour laisser l'eau de dégivrage couler doucement au travers de l'orifice de vidange jusqu'au récepteur d'eau situé à l'intérieur de la cabine de la cave. Nettoyez régulièrement les récepteurs d'eau en bas des compartiments supérieur et inférieur ; utilisez un chiffon sec pour absorber l'eau qui se trouve à l'intérieur des récepteurs d'eau et séchez-les (cette opération doit être effectuée tous les trois mois). La manière dont le vin vieillit dépend des conditions ambiantes. La qualité de l'air est donc inférieure de la paroi arrière de l'appareil pour permettre à l'air de conserver une qualité optimale. Nous vous recommandons de remplacer ATTENTION : et retirez-le. Insertion : Tournez-le sur la droite et insérez-le. 57 En-tête 1 Clayettes • Les clayettes sont conçues pour offrir une esthétique agréable et faciliter le nettoyage. Les bouteilles de grande taille ou les Magnums peuvent être plus facilement stockées sur les clayettes transversales situées dans la partie basse de la cave à vin. • Certaines clayettes vous permettent de stocker et de sortir facilement vos bouteilles de vin. Bruits normaux de fonctionnement • En circulant dans le circuit de refroidissement, le réfrigérant peut émettre des bruits de bouillonnement, des gargouillements ou de légères vibrations. • Le thermostat émet un clic lorsqu'il s'enclenche, de même que lorsqu'il s'arrête. 58 En-tête Entretien et nettoyage de la cave à vin1 Nettoyage et entretien Attention : Attention : Général : Joints de porte Pour éviter tout risque d'électrocution, débranchez toujours votre cave à vin avant de la nettoyer. Le non-respect de cette consigne peut provoquer des blessures graves ou mortelles. Avant d'utiliser des produits nettoyants, lisez et respectez les instructions et les mises en garde du fabricant pour éviter tout dommage corporel ou matériel. • Préparez une solution nettoyante en mélangeant 3-4 cuillères à café de bicarbonate de soude dans de l'eau chaude. Utilisez une éponge ou un chiffon doux imbibé de cette solution pour essuyer votre cave à vin. • Rincez à l'eau chaude puis séchez avec un chiffon doux. • N'utilisez pas de produits chimiques abrasifs, d'ammoniaque, d'eau de Javel, de détergents concentrés, de solvants ou de tampons à récurer en métal. CERTAINS de ces produits chimiques risquent de dissoudre, d'endommager et/ou de décolorer votre cave à vin. : • Nettoyez les joints de porte tous les trois mois conformément aux instructions étanchéité optimale. • Appliquez un peu de vaseline sur la charnière des joints pour conserver cette Clayette à bouteilles horizontale : Si des gouttelettes de vin ou d'eau se sont accidentellement déposées sur la clayette à bouteilles, polissez-la à l'aide de papier de verre (grain 300-400), puis essuyez les résidus au moyen d'un chiffon doux. N'utilisez pas une serviette ou un chiffon imbibé d'eau. Coupures de courant • Des coupures de courant peuvent survenir en cas d'orage ou dans d'autres circonstances. En cas de panne de courant, débranchez le câble d'alimentation de la prise secteur. Une fois le courant rétabli, rebranchez-le. Précautions en cas d'absence et de déplacement de l'appareil • Si vous partez en vacances ou que vous vous absentez pendant une période prolongée, débranchez la cave à vin et nettoyez-la entièrement (y compris les joints de porte) en respectant les instructions de nettoyage détaillées dans le paragraphe « Instructions . générales • Lorsque vous déplacez la cave à vin, maintenez-la toujours en position verticale. Ne déplacez pas l'appareil en position horizontale, vous risqueriez d'endommager le système d'étanchéité. Remarque : une fois la cave à vin déplacée, attendez 24 heures avant de la brancher à nouveau. 59 FR En-tête 1 Dépannage La cave à vin ne fonctionne pas : • • Le vin ne semble pas assez frais : • Les portes sont ouvertes trop fréquemment. • Les bouteilles de vin rangées récemment dans l'appareil ont besoin d'un certain temps pour atteindre la température souhaitée. • • Nettoyez le condenseur. • Diminuez le réglage de la température. La température du vin est trop basse : • Si le réglage de la température est trop bas, augmentez-le. La cave à vin se met en route trop fréquemment : • Cela peut être normal car l'appareil doit maintenir une température constante pendant les périodes de forte chaleur et d'humidité. • Les portes ont été ouvertes trop souvent ou pendant une période prolongée. • Nettoyez le condenseur. • • De l'humidité se forme à l'intérieur ou à l'extérieur de la cave à vin : • Cela est normal pendant les périodes de forte humidité. • Les portes sont ouvertes trop souvent ou pendant une période prolongée. • La porte de la cave à vin ne se ferme pas correctement : • Mettez la cave à vin à niveau. • Assurez-vous qu'aucun objet ne bloque la fermeture des portes, p. ex., des bouteilles de vin ou des clayettes. Ne jetez pas les appareils électriques dans vos déchets domestiques non triés ; ayez recours aux dispositifs de tri sélectif. Contactez votre mairie pour obtenir les informations au sujet des systèmes de collecte disponibles. Si les appareils électriques sont stockés dans des décharges ou des dépotoirs sauvages, des substances dangereuses peuvent la chaîne alimentaire et nuire à la santé et au bien-être de la population. Lors du remplacement d'appareils usagers par de nouveaux modèles, le revendeur est légalement tenu de reprendre gratuitement l'ancien produit pour sa mise au rebut. 60 En-tête 1 Informations techniques•Contenu de l'emballage Informations techniques Modèle Type de climat Choc électrique Capacité Type de disponible résistance (l) Tension nominale (V) Fréquence Puissance nominale d'entrée (W) (Hz) WS120GA SN-ST I 220 220-240 50 110 WS190GA SN-ST I 385 220-240 50 100 Plage de température (°C) Réfrigérant (R600a) (g) Mode de Bruit (niveau branchement de puissance Poids (kg) du cordon acoustique) d'alimentation dB (A) Encombrement (profondeur × largeur × hauteur) (mm) 5-20 45 Y 69 38 639×595×1,265 5-20 75 Y 94 38 639×595×1,850 FR Remarques : 1. Conformément aux normes internationales, si le climat est de type SN-ST, la température ambiante pour le fonctionnement de la cave à vin est comprise entre 10 °C et 38 °C. 2. La mention « Bruit » (niveau de puissance acoustique) indiqué dans les informations techniques se rapporte : si la cave à vin est vide, un coussin en caoutchouc résilient d'une épaisseur de 5 mm à 6 mm est placé à l'intérieur. Elle peut fonctionner pendant au moins 30 minutes une fois la porte fermée. Un test sera réalisé une fois le fonctionnement stabilisé (hors démarrage et arrêt). Le bruit de fond sera testé à 1 m des surfaces avant, arrière, gauche et droite de la cave à vin. Pendant l'utilisation, il est normal que le bruit réel soit différent du bruit indiqué en raison des effets provoqués par le type de vin conservé dans la cave à vin, le bruit ambiant, l'ouverture et la fermeture des portes, le démarrage et l'arrêt du compresseur, etc. Contenu de l'emballage Des améliorations sont apportées en continu à cet appareil. Nous nous réservons le droit de Quantité Nom Mode Kit d'emploi d'information Clayettes à vin Epingle Touche Modèle WS120GA 1 1 4 1 2 WS190GA 1 1 7 1 2 61 Koptekst 1 Onderdelen van de wijnkast Hoofdbedieningspaneel Bovenste wijnschap Glazen deur Wijnrekken Verstelbare pootschroef Filter met actieve koolstof WS120GA (ruimte voor 117 ) 62 WS190GA (ruimte voor 189 ) Inhoudsopgave Koptekst 1 Pagina BELANGRIJKE VOORZORGSMAATREGELEN................................ 64 Uw wijnkast installeren ................................................................ 65 De wijnkast uitpakken...................................................................................................... 65 De wijnkast waterpas zetten ........................................................................................... 65 Juiste luchtcirculatie ....................................................................................................... 65 Elektriciteitsbenodigdheden .......................................................................................... 66 Installatiebeperkingen..................................................................................................... 66 Gebruik van verlengsnoer............................................................................................... 66 Eerste gebruik .................................................................................................................. 66 Inleiding tot de hoofdfuncties van de wijnkast ............................ 67 1.Temperatuur aanpassingen ......................................................................................... 67 2.Interne verlichting ............................................................................................................. 67 NL 3.“°F/°C” conversie .......................................................................................................... 67 4.Deur opening alarm ....................................................................................................... 68 5.Temperatuur uitschakeling geheugen ......................................................................... 68 6.Stroom ............................................................................................................................. 68 Voorzorgsmaatregelen voor gebruik van wijnkast....................... 69 Automatisch ontdooien ................................................................................................... 69 Schappen........................................................................................................................... 70 Operationele geluiden die u zou kunnen horen ........................................................... 70 Onderhoud en reiniging van de wijnkast ...................................................................... 71 Problemen oplossen ...................................................................... 72 Technische gegevens•Paklijst ...................................................... 73 63 Koptekst 1 BELANGRIJKE VOORZORGSMAATREGELEN Dit apparaat is exclusief bedoeld voor het opslaan van wijn. Houd altijd de standaard voorzorgsmaatregelen in acht bij het gebruik van dit apparaat, zoals: 1. Lees alle instructies voor het gebruik van dit apparaat. 2. Gebruik dit apparaat alleen waarvoor het is bedoeld, zoals beschreven in deze handleiding. 3. Deze wijnkast moet voor gebruik correct worden geïnstalleerd in overeenstemming met de installatie-instructies. Lees voor het aarden de instructies in de installatiesectie. 4. Dit apparaat is strikt bedoeld voor huishoudelijk gebruik. Houd rekening met de normen en voorschriften als u van plan bent het apparaat voor industriële of commerciële doeleinden te gebruiken. Dit apparaat is niet bedoeld voor gebruik door kinderen vanaf 8 jaar of door personen met verminderde fysieke, zintuiglijke of mentale capaciteiten en zonder voorkennis of ervaring, tenzij dit onder toezicht gebeurt of als zij duidelijke instructies omtrent veilig gebruik en mogelijke gevaren hebben gekregen. Laat kinderen niet met het apparaat spelen. Laat kinderen het apparaat niet zonder toezicht reinigen of onderhoud plegen aan het apparaat. 5. Het apparaat moet zo worden geplaatst dat de stekker toegankelijk is. 6. Als het elektriciteitssnoer is beschadigd, moet het worden vervangen door de fabrikant, een vertegenwoordiger van de fabrikant die bevoegd is onderhoud te plegen of een vergelijkbare bevoegde persoon om risico te voorkomen . 7. Houd de ventilatieopeningen in de behuizing van het apparaat of in de ingebouwde structuur vrij van obstakels. 8. Gebruik geen mechanische apparaten of andere middelen om het ontdooien te versnellen, tenzij deze door de fabrikant zijn aanbevolen. 9. Beschadig het koelmiddelcircuit niet. 10. Gebruik geen elektrische apparaten binnen de opslagcompartimenten in het apparaat, tenzij ze van een door de fabrikant aanbevolen type zijn. 11. Als de verlichting is beschadigd, moet deze worden vervangen door de fabrikant, een vertegenwoordiger van de fabrikant die bevoegd is onderhoud te plegen of een vergelijkbare bevoegde persoon om risico te voorkomen. 12. Dit apparaat is exclusief bedoeld voor het opslaan van wijn. 13. Let op: kinderen kunnen zichzelf hierin opsluiten. Haal de deuren van uw oude wijnkast voor u het apparaat wegdoet. Laat de planken zitten zodat kinderen niet naar binnen kunnen klimmen. 14. Bewaar geen explosieve stoffen zoals spuitbussen met een ontvlambare inhoud in dit apparaat. 64 Uw wijnkast installeren Koptekst 1 De wijnkast uitpakken 1. Verwijder al het verpakkingsmateriaal. Ook de schuimbasis en het plakband waarmee de accessoires aan de binnen- en buitenkant van de wijnkast zijn bevestigd. 2. Controleer op resterende verpakking, plakband of bedrukte materialen voordat u de wijnkast inschakelt. De wijnkast waterpas zetten • De wijnkast heeft vier verstelbare poten aan de voor- en achterzijde. Nadat u de wijnkast op de juiste plaats hebt gezet, kunt u de wijnkast waterpas afstellen. • Als de wijnkast niet waterpas staat, kunnen de verstelbare poten worden gebruikt. Zet de wijnkast hoger door ze rechtsom te draaien en lager door ze linksom te draaien. De deur van de wijnkast sluit gemakkelijker als de verstelbare poten zijn uitgeschoven. Juiste luchtcirculatie • een plaats waar er goede luchtcirculatie is, en tevens leidingen en elektrische voorzieningen aanwezig zijn. • Het wordt aangeraden om de volgende ruimtes rondom de wijnkast in acht te nemen: Zijkanten .......... 100 mm Bovenzijde ....... 100 mm Achterzijde ....... 100 mm • Voor goede koeling is het van belang dat u niet meer in de wijnkast plaatst dan mogelijk is. Min vrijh stens 1 acht ouden 0 cm erzij aan de Minstens 10 cm vrijhouden aan linkerzijde Minstens 10 cm vrijhouden aan bovenzijde Minstens 10 cm vrijhouden aan rechterzijde Verstelbare pootschroef Hoger Lager Opmerking: als uw wijnkast om wat voor reden dan ook op zijn kant of schuin heeft gestaan, mag u deze pas na 24 uur weer inschakelen. 65 NL Koptekst 1 Elektriciteitsbenodigdheden • Zorg dat er een geschikt stopcontact is (220-240 V, 15 Amp) dat correct geaard is om de wijnkast van stroom te voorzien. • Vermijd het gebruik van een stekker met drie pinnen of het bewerken van de aarding van de stekker zodat deze in het stopcontact past. Dit is zeer gevaarlijk, biedt geen effectieve aarding voor de wijnkast en kan resulteren in een elektrische schok. Installatiebeperkingen • Installeer uw wijnkast niet in een locatie die niet naar behoren is geïsoleerd of verwarmd, zoals een garage. Uw wijnkast is niet bedoeld voor gebruik in een omgevingstemperatuur die lager is dan 10 °C. • Kies een geschikte locatie voor de wijnkast op een harde, gelijkmatige ondergrond en buiten het bereik van zonlicht of warmtebronnen (radiatoren, plintconvectoren, kookapparatuur, etc.). De verstelbare poten aan de voor- en achterkant moeten worden gebruikt om eventuele oneffenheden in de vloer op te heffen. • De wijnkast dient vrijstaand te worden geplaatst. De wijnkast is niet geschikt als inbouwapparatuur. Gebruik van verlengsnoer • Vermijd het gebruik van een verlengsnoer vanwege het veiligheidsrisico dat het met zich meebrengt. Als het gebruik van een verlengsnoer benodigd is, gebruik dan uitsluitend een 3-draads verlengsnoer dat beschikt over een stekker met twee ronde pinnen en een gat en een stopcontact met twee gaten en een pin waarop een dergelijke stekker past. Zorg ervoor dat de maximale spanning van het verlengsnoer overeenkomt met of hoger is dan de indicatie op het apparaat. Eerste gebruik Zodra u het product hebt aangesloten op een stopcontact laat u het ten minste 30 minuten acclimatiseren voordat u het apparaat afstelt. Gedurende deze tijd, afhankelijk van de binnentemperatuur, blijft het lampje voor rode of witte wijn branden voor het bovenste compartiment en blijft het lampje voor rode of witte wijn branden voor het onderste compartiment. Op de LED-display wordt de actuele binnentemperatuur weergegeven. 66 Inleiding in de voornaamste functies van het apparaat Bedieningspaneel Temperatuur Temperatuur Aanpassing Aanpassing (omhoog) (omlaag) OUT.T° INSTELLING SET IN.T° Licht LIGHT NL STROOM POWER Het temperatuurbereik van het scherm is 5~20°C (41 ~ 68°F). De standaard temperatuurinstelling is 12°C(54°F ) . U kunt de temperatuur instellen in overeenstemming met uw wijn opslagvereisten. . 1 Temperatuur aanpassingen Houd de knop 3 seconden ingedrukt om de temperatuur in te stellen. Daarna knippert de temperatuurweergave IN.T°. Druk op de of knoppen om de temperatuurwaarde te verhogen of te verlagen. Zodra de gewenste temperatuur wordt bereikt, drukt u op de knop. 2. Interne verlichting Om uw collectie beter in beeld te brengen, is een zacht licht ingewerkt in de wijnkelder. Druk gewoon op de knop en het licht wordt ingeschakeld. Druk opnieuw in om het uit te schakelen.Als de deur open is, schakelt het licht in. Wanneer de deur gesloten wordt, 3. “°F/°C” conversie schakelt het licht uit. Houd ingedrukt gedurende 3 seconden. De weergegeven temperatuur in Fahrenheit en het °F teken wordt geconverteerd in graden Celsius en het “°C” teken verschijnt. Houd de knop opnieuw ingedrukt gedurende 3 seconden. De weergegeven temperatuur in graden Celsius wordt geconverteerd in Fahrenheit en het °F teken verschijnt. 67 Heading 1 4.Deur opening alarm Als de deur langer dan 1 minuut wordt open gehouden, weerklinkt een geluidssignaal tot de deur gesloten wordt of men kan een toets indrukken op het bedieningspaneel om het geluidssignaal te stoppen. 5.Temperatuur uitschakeling geheugen In het geval van een stroompanne slaat de kelder automatisch de ingestelde temperatuur op. Wanneer de stroom hersteld wordt, behoudt de kelder de ingestelde temperatuur voorafgaand aan de stroompanne terwijl andere . functies terugkeren naar de standaardstatus. 6.Stroom Als men de toets 3 seconden ingedrukt houdt, schakelt de stroom uit (de stroom voor alle elektrische apparaten wordt onderbroken en het volledige apparaat schakelt over op stand-by).Als het apparaat uitgeschakeld is, kan de stroom worden ingeschakeld door de toets 3 seconden ingedrukt te houden. Daarna worden alle pictogrammen op het scherm ingeschakeld. 68 Koptekst 1 Voorzorgsmaatregelen voor gebruik van wijnkast Plaats niet te veel wijn in de wijnkast, zodat het draagvermogen van de wijnschappen niet wordt overschreden. Plaats niet meer dan vier lagen per schap. Het draagvermogen van de wijnschappen is niet groter dan 35 kg. plaatst, of de wijnschappen volledig stabiel zijn. schappen steekt, om te voorkomen dat deur sluit. NL Automatisch ontdooien Dit apparaat is uitgerust met een automatisch ontdooisysteem. Zorg ervoor dat deze afvoeropening tijdens gebruik is gedeblokkeerd, zodat dooiwater geleidelijk door de afvoeropening naar de wateropvangbak in de wijnkast kan stromen. Maak de reservoirs voor wateropvang onderin het bovenste en het onderste compartiment regelmatig schoon; gebruik een droge doek om water in de reservoirs te absorberen en veeg de reservoirs af (reinig ze elke drie maanden op de aangegeven wijze). De manier waarop wijn blijft rijpen is afhankelijk van de omgevingsomstandigheden. De kwaliteit van de lucht is dus doorslaggevend voor het conserveren van de wijn. In het onderste gedeelte te zorgen dat de luchtdoorvoer van optimale kwaliteit blijft. LET OP te vervangen. Filters zijn verkrijgbaar bij uw leverancier. 69 Koptekst 1 Schappen • gemakkelijk op de horizontale schappen onderin de kast. • weer uit het apparaat worden gehaald. Operationele geluiden die u zou kunnen horen • Kokend water, klokkende geluiden of lichte trillingen als gevolg van de circulerende koelvloeistof. • De thermostaatbediening klikt wanneer de temperatuurfunctie wordt in- of uitgeschakeld. 70 Koptekst Onderhoud en reiniging van de wijnkast1 Reinging en onderhoud Waarschuwing: verwijder voordat u de wijnkast gaat schoonmaken, altijd eerst de stekker van de wijnkast uit het stopcontact om elektrische schokken te vermijden. Het negeren van deze waarschuwing kan letsel of overlijden tot gevolg hebben. lees voordat u schoonmaakproducten gebruikt altijd eerst de instructies en waarschuwingen van de fabrikant om letsel en schade te voorkomen. Let op: Algemeen: • • Los 3 à 4 eetlepels soda op in warm water. Gebruik een spons of een vochtige zachte doek en reinig uw wijnkast met het zelfgemaakte schoonmaakmiddel. Spoel af met warm water en maak het droog met een zachte doek. Gebruik geen schuurmiddelen, agressieve schoonmaakmiddelen, ammoniak, bleekmiddel met chloor, geconcentreerde wasmiddelen, oplosmiddelen of metalen pannenspons. Deze chemicaliën kunnen het oppervlak van uw wijnkast vervormen, beschadigen en/of verkleuren. reinig de deurafdichting elke drie maanden volgens de algemene instructies. • goed afsluiten. Smeer een klein hoeveelheid vaseline op scharnierzijde van de • • Deurafdichting: Wijnschap: NL wanneer er wijn- of waterdruppels op het wijnschap vallen, schuur het dan op met schuurpapier met korrelgrootte 300 - 400 en veeg het stof af met een zachte doek. Gebruik geen vochtige handdoek of zachte doek. Stroomonderbrekingen • Houd rekening met stroomonderbrekingen door onweer of andere oorzaken. Verwijder het elektriciteitssnoer uit het stopcontact in het geval van stroomuitval. Sluit het elektriciteitssnoer opnieuw aan op het stopcontact zodra er weer stroom is. Vakantie en verplaatsen • Verwijder de stekker uit het stopcontact bij lange afwezigheid en reinig de wijnkast en deurafdichtingen zoals vermeld in het gedeelte 'Algemene reiniging'. Houd de deuren open zodat de lucht binnenin kan circuleren. • Als u de wijnkast verplaatst, moet u deze te allen tijden verticaal houden. Verplaats het product niet als het op de achterkant ligt. Dit kan schade toebrengen aan de interne onderdelen. Opmerking: wacht na het verplaatsen van de wijnkast ten minste 24 uur voordat u deze weer inschakelt. 71 Koptekst 1oplossen Problemen Wijnkast werkt niet • Controleer of de wijnkast is aangesloten. • Controleer of er stroom staat op het AC-stopcontact door de zekering te controleren. Wijn is te warm: • • • • • Deur gaat te vaak open. Geef nieuwe wijn in de wijnkast de tijd om de gewenste temperatuur te bereiken. Controleer of de deurafdichtingen goed sluiten. Reinig de condensatiespoelen. Verlaag de temperatuur. Wijn is te koud: • Als de wijn te koud is, kunt u de temperatuurinstellingen aanpassen. Wijnkast staat te vaak aan: • • • • • Dit kan nodig zijn om de temperatuur constant te houden op warme en vochtige dagen. Deuren zijn vaak geopend of hebben langere tijd opengestaan. Reinig de condensatiespoelen. Controleer of deurafdichting goed sluit. Controleer of de deuren volledig sluiten. Vochtophoping aan binnenkant of buitenkant van de wijnkast: • Dit is normaal tijdens perioden van hoge luchtvochtigheid. • Deur staat lang open of wordt regelmatig geopend. • Controleer of deurafdichtingen goed sluiten. Deur van wijnkast sluit niet goed: • Zet de wijnkast waterpas. • Dank elektrische apparaten niet af bij ongescheiden huisafval. Maak gebruik van de hiervoor bestemde ophaaldiensten. Neem contact op met de plaatselijke instanties voor informatie over de beschikbare ophaaldiensten. Als elektrische apparaten op een afvalstortplaats terechtkomen, kunnen er schadelijke stoffen in het grondwater lekken en in de voedselketen terecht komen. Dit heeft gevolgen voor uw gezondheid en welzijn. Bij het vervangen van oude apparaten door nieuwe, is de winkelier wettelijk verplicht om gratis de afvoer van uw oude apparaat te verzorgen. 72 Koptekst 1 Technische gegevens•Paklijst Technische gegevens Type resistentie Beschikbare Klimaattype tegen elektrische capaciteit schokken (l) Model Nominale spanning (V) Nominale frequentie vermogen (Hz) (W) WS120GA SN-ST I 220 220-240 50 110 WS190GA SN-ST I 385 220-240 50 100 Gewicht (kg) Geluid (akoestische geluidsemissie) dB (A) Temperatuurbereik (°C) Koelmiddel Netsnoeraan(R600a) sluitingsmodus (g) Totale afmeting (diepte × breedte × hoogte) (mm) 5-20 45 Y 69 38 639×595×1,265 5-20 75 Y 94 38 639×595×1,850 NL Opmerkingen: 1. Volgens internationale normen moet in een klimaat van het type SN-ST de omgevingstemperatuur voor gebruik van de wijnkast variëren tussen 10 °C en 38 °C. 2. "Geluid (akoestisch geluidsniveau)" aangegeven in de technische gegevens heeft betrekking op een situatie normen. In het geval van een lege wijnkast wordt hierin een veerkrachtig rubberen kussen van 5 mm tot 6 mm dikte geplaatst. De wijnkast kan minstens 30 minuten draaien nadat de deur gesloten is. Een test wordt uitgevoerd na een periode van stabiel functioneren (exclusief opstarten en uitschakelen). De achtergrondruis wordt gemeten op 1 m van de voorzijde, achterzijde en linker- en rechterkant van de wijnkast. Tijdens gebruik is het normaal dat het werkelijke geluid verschilt van het in de tabel aangegeven geluidsniveau ten gevolge van de effecten van het type wijn dat is opgeslagen in de wijnkast, het omgevingsgeluid, het openen en sluiten van de deur, het opstarten en uitschakelen van de compressor, enz. Paklijst Dit apparaat wordt voortdurend ontwikkeld. Wij behouden het recht voor om de onderdelen van de wijnkast zonder aankondiging vooraf te wijzigen. Hoeveelheid Naam Gebruikers- Informahandleiding tiepakket Wijnrekken Plugpen Toets Productmodel WS120GA 1 1 4 1 2 WS190GA 1 1 7 1 2 73 Nadpis 1 Názvy součástí vinotéky Hlavní ovládací panel Horní police na víno Skleněné dveře Vino police Nastavitelný šroub nožky WS120GA WS190GA (kapacita 117 lahví) (kapacita 189 lahví) 74 Nadpis Obsah1 Strana DŮLEŽITÉ BEZPEČNOSTNÍ POKYNY............................................ 76 Instalace vinotéky......................................................................... 77 Rozbalení vinotéky........................................................................................................... 77 Vyrovnání vinotéky .......................................................................................................... 77 Správná cirkulace vzduchu............................................................................................. 77 Požadavky na elektrickou síť ......................................................................................... 78 Požadavky na umístění.................................................................................................... 78 Použití prodlužovacího kabelu ....................................................................................... 78 Počáteční nastavení......................................................................................................... 78 Úvod do základních funkcí zařízení .............................................. 79 1.Nastavení teploty ......................................................................................................... 79 2.Vnitřní osvětlení .......................................................................................................... 79 3.Převod “°F/°C” .............................................................................................................. 79 4.Alarm při otevřených dveřích ....................................................................................... 80 5.Paměť Teploty vypnutí proudu ................................................................................... 80 CZ 6.Tlačítko zapnutí ............................................................................................................. 80 Bezpečnostní opatření pro používání vinotéky ............................ 81 Automatické odmrazování .............................................................................................. 81 Ukládání do polic.............................................................................................................. 82 Běžné provozní zvuky, které můžete zaznamenat ....................................................... 82 Řádná údržba a čištění vinotéky.................................................................................... 83 Odstraňování závad ....................................................................... 84 Technické údaje•Seznam součástí v balení ................................. 85 75 Nadpis 1 BEZPEČNOSTNÍ POKYNY DŮLEŽITÉ Toto zařízení je určeno výhradně ke skladování vína. Při používání tohoto zařízení vždy dodržujte základní bezpečnostní opatření včetně těch následujících: 1. Než začnete toto zařízení používat, přečtěte si všechny pokyny. 2. Zařízení používejte pouze k zamýšlenému účelu, tak jak je popsán v tomto návodu k užívání a údržbě zařízení. 3. Tato vinotéka musí být před použitím řádně instalována v souladu s pokyny k instalaci. Viz pokyny k uzemnění v části o instalaci. 4. Je určena pouze pro domácí použití. Jestliže je používána pro průmyslové nebo komerční účely, je třeba dodržovat příslušné normy a předpisy. Toto zařízení mohou používat děti od 8 let věku a osoby s omezenými tělesnými, smyslovými nebo duševními schopnostmi nebo nedostatkem zkušeností a znalostí, pokud jsou pod dozorem nebo byly poučeny o bezpečném používání zařízení a uvědomují si související rizika. Děti si nesmí se zařízením hrát. Děti nesmí bez dozoru provádět čištění a údržbu. 5. Zařízení musí být umístěno tak, aby byla elektrická zástrčka dobře přístupná. 6. Napájecí kabel musí být v případě poškození vyměněn výrobcem, se předešlo bezpečnostním rizikům. 7. Větrací otvory v krytu nebo ve vnitřní konstrukci zařízení nesmí být zakryté. 8. K urychlení procesu odmrazování nepoužívejte žádné mechanické ani jiné prostředky, než jaké doporučuje výrobce. 9. Nepoškoďte okruh chladiva. 10. V prostorech pro skladování jídla v zařízení nepoužívejte elektrická zařízení, pokud se nejedná o typ doporučovaný výrobcem. 11. Světlo musí být v případě poškození vyměněno výrobcem, servisním bezpečnostním rizikům. 12. Toto zařízení je určeno výhradně ke skladování vína. 13. Riziko uvíznutí dítěte v zařízení. Jestliže se chystáte zbavit staré vinotéky, sundejte z ní dveře. Police nechte na svém místě, aby se dovnitř nemohly snadno dostat děti. 14. Neskladujte v tomto zařízení výbušné látky, například aerosolové nádoby s hořlavou pohonnou hmotou. 76 Instalace vinotéky Nadpis 1 Rozbalení vinotéky 1. Odstraňte všechen obalový materiál. Ten zahrnuje i pěnový podstavec a veškerou lepicí pásku, jíž jsou uvnitř i zvenčí připevněny doplňky vinotéky. 2. Před zapnutím vinotéku důkladně prohlédněte a odstraňte všechny zbytky obalů, pásky nebo tištěných materiálů. Vyrovnání vinotéky • Vinotéka má čtyři vyrovnávací nožky, které jsou umístěny v předních a zadních rozích. Jakmile vinotéku řádně umístíte na zvolené místo, můžete ji vyrovnat. • Vyrovnávací nožky mohou být uzpůsobeny točením po směru hodinových ručiček, pokud potřebujete vinotéku zvednout, nebo proti směru hodinových ručiček, pokud ji potřebujete snížit. Dveře vinotéky se snáze zavírají, když jsou nožky prodloužené. Správná cirkulace vzduchu • Maximální výkonnost vinotéky, pro kterou byla navržena, zajistíte její instalací na místo se správnou cirkulací vzduchu, instalacemi a elektrickým připojením. • Okolo vinotéky doporučujeme ponechat níže uvedené mezery: Po stranách ...... 4" (100 mm) Nahoře ............. 4" (100 mm) Vzadu ............... 4" (100 mm) • Pokud má vinotéka správně plnit svou chladicí funkci, nesmí být přeplněná. CZ Více než 10 cm nahoře Více 10 c než zeza m du Více než 10 cm zleva Více než 10 cm zprava Nastavitelný šroub nožky Nahoru Dolů Poznámka: Jestliže se vinotéka z jakéhokoli důvodu převrhne, zapojte ji znovu až po 24 hodinách. 77 Nadpis 1 Požadavky na elektrickou síť • Pro napájení vinotéky zajistěte vhodnou zásuvku (220–240 V, 15 A) s řádným uzemněním. • Nepoužívejte adaptéry pro zástrčky se třemi kolíky, ani neuřezávejte třetí kolík uzemnění, aby bylo zástrčku možné použít do zásuvky určené pro dvoukolíkovou zástrčku. Tento nebezpečný postup ponechá vinotéku bez účinného uzemnění a může tak vzniknout nebezpečí úrazu elektrickým proudem. Požadavky na umístění • Neinstalujte vinotéku na místo, které není řádně izolované či vytápěné (například garáž apod.). Vinotéka není určena k provozu při okolní teplotě nižší než 10 °C. • Zvolte pro vinotéku vhodné umístění na tvrdém rovném povrchu, tak aby nebyla vystavena přímému slunečnímu záření a nenacházela se v blízkosti zdrojů tepla, jako jsou např. radiátory, lištové vytápění, varná zařízení apod. Případnou nerovnost podlahy je třeba vyrovnat pomocí vyrovnávacích nožek umístěných v předních a zadních rozích vinotéky. • Vinotéka byla navržena jako volně stojící spotřebič. Není určena k vestavění. Použití prodlužovacího kabelu • Vzhledem k potenciálním bezpečnostním rizikům, které mohou za určitých podmínek nastat, se vyhněte použití prodlužovacího kabelu. Jestliže je použití prodlužovacího kabelu nutné, použijte výhradně třívodičový prodlužovací kabel s dvoukolíkovou zástrčkou a jedním otvorem a jednokolíkovou zásuvkou a dvěma otvory. Vyznačené parametry (maximální zatížení) prodlužovacího kabelu musí být stejné nebo vyšší než elektrické parametry zařízení. Počáteční nastavení Po zapojení spotřebiče do elektrické zásuvky jej ponechte alespoň 30 minut spuštěný, aby se mohl aklimatizovat, než provedete jakékoli změny nastavení. V závislosti na vnitřní teplotě zůstane po tuto dobu svítit světlo červeného nebo bílého vína pro horní oddíl a světlo červeného nebo bílého vína pro spodní oddíl. Displej LED bude zobrazovat aktuální vnitřní teplotu. 78 Úvod do primárních funkcí spotřebiče Ovládací panel Teplota Nastavení (nahoře) Teplota Nastavení (dolů) OUT.T° NASTAVENÍ SET IN.T° Světlo LIGHT CZ NAPÁJENÍ POWER Teplotní rozsah zobrazovacího panelu je 5~20°C(41~68°F). Teplota nastavená od výroby je 12°C(54°F). . Můžete nastavit teplotu dle Vašich požadavků na uchovávání vína. 1 Nastavení teploty Pro nastavení teploty podržte tlačítko teploty IN.T °. Stiskněte tlačítko po dobu cca 3 sekund. Pak začne blikat displej nebo pro zvýšení nebo snížení hodnoty teploty. Jakmile je dosaženo požadované teploty, stiskněte tlačítko 2. Vnitřní osvětlení . Pro zpříjemnění vzhledu vaší sbírky, do chladiče vína bylo zabudované jemné světlo. Jednoduše stiskněte tlačítko 3. a světlo se rozsvítí, stiskněte znovu pro vypnutí. Při otevření dveří se světlo zapne. Po zavření dveří světlo zhasne. Převod “°F/°C” Stiskněte a podržte po dobu 3 sekund, zobrazí se teplota ve stupních Fahrenheita a znak °F se promění na teplotu ve stupních Celsia a znak "°C". Opět stiskněte a podržte po dobu 3 sekund, zobrazí se teplota ve stupních Celsia a znak °C se promění na teplotu ve stupních Fahrenheita a znak "°F". 79 Heading 1 4.Alarm při otevřených dveřích V případě, že jsou dveře otevřené déle než 1 minutu, bude bzučák pípat jako alarm, dokud se dveře nezavřou nebo se na panelu displeje nestiskne libovolné tlačítko, následně bzučák přestane pípat. 5.Paměť Teploty vypnutí proudu V případě výpadku proudu, chladnička na víno automaticky uloží nastavenou teplotu. Po obnovení dodávky proudu, bude v provozu podle teploty nastavené před výpadkem napájení, dokud se ostatní funkce vrátí do výchozího stavu.. 6.Tlačítko zapnutí Podržením tlačítka po dobu 3 sekund, se hlavní napájení vypne (energie pro všechny elektrické přístroje uvnitř se vypne a celý přístroj bude v pohotovostním režimu). Pokud je zařízení vypnuto, napájení je možné zapnout podržením tlačítka následně se rozsvítí všechny ikony na displeji. 80 na 3 sekundy, Nadpis 1 Bezpečnostní opatření pro používání vinotéky Neumisťuje do vinotéky příliš velké množství vína, abyste nepřekročili maximální zátěž polic na víno. Na jednu polici neumisťujte více než čtyři vrstvy lahví. Počet lahví by neměl v každé polici přesáhnout čtyři vrstvy nebo by zátěž polic na víno neměla překročit 35 kg. Před umístěním lahví do vinotéky se ujistěte, zda jsou police na víno zcela stabilní. Dále se také ujistěte, že žádná lahev z police nevyčnívá, abyste zabránili nárazu lahví do skleněných dveří při zavření vinotéky. Automatické odmrazování CZ Tento spotřebič má funkci automatického odmrazování. Během používání zajistěte, aby byl odvodňovací otvor průchozí a voda vzniklá odmrazováním jím mohla volně protékat do nádržky na vodu uvnitř skříně vinotéky. Pravidelně čistěte nádržky na vodu umístěné ve spodní části horního a dolního oddílu. Suchým hadříkem vysušte vodu uvnitř nádržek a následně je otřete (čistěte je podle pokynů každé tři měsíce). Způsob zrání vína závisí na vnějších podmínkách. Kvalita vzduchu je tedy pro zachování vína , který zajišťuje, že procházející vzduch si udržuje optimální kvalitu. UPOZORNĚNÍ Filtry lze zakoupit u vašeho prodejce. vyjměte jej. držadlem ve vertikální pozici. Otočte jím doprava a vložte jej. 81 Nadpis 1 Ukládání do polic • Police byly navrženy s důrazem na vzhled a jednoduché čištění. Rozměrnější láhve nebo velké láhve o objemu 1,5 l lze snáze uložit na příčné police ve spodní části vinotéky. • Jsou tu také police pro snadné ukládání a vyjímání vašich vín. Běžné provozní zvuky, které můžete zaznamenat • Zvuk vařící vody, bublání nebo lehké vibrace jsou způsobeny oběhem chladiva v chladicím okruhu. • Ovladač termostatu při zapínání a vypínání vždy cvakne. 82 Řádná údržba a čištěníNadpis vinotéky1 Čištění a údržba Varování: Upozornění: Všeobecné: Těsnění dveří: Police na víno: Před čištěním vinotéku vždy nejprve odpojte od sítě, abyste předešli riziku elektrického šoku. Neuposlechnutí tohoto varování může způsobit smrt nebo úraz. Před použitím čisticích přípravků si vždy přečtěte instrukce a upozornění výrobce a řiďte se jimi, abyste předešli osobnímu úrazu nebo poškození výrobku. • Připravte si čisticí roztok ze 3–4 lžic jedlé sody rozmíchaných v teplé vodě. Houbou nebo měkkým hadříkem namočeným v čisticím roztoku vinotéku omyjte. • Následně ji otřete čistou teplou vodou a osušte čistým hadříkem. • Nepoužívejte silné chemikálie, abraziva, čpavky, chlorové bělidlo, koncentrované saponáty, rozpouštědla ani kovové drátěnky. NĚKTERÉ z těchto chemikálií mohou způsobit narušení, poškození a/nebo změnu barvy vaší vinotéky. • Čistěte těsnění dveří každé tři měsíce podle obecných pokynů. Těsnění musí být udržováno v čistém a pružném stavu, aby bylo zajištěno řádné přiléhání dveří. • Pružnost a správnou funkci těsnění zajistí vazelína nanesená v tenké vrstvě na stranu u závěsů. Pokud bude police na víno náhodně polita vínem nebo kapkami vody, použijte na vyleštění police brusný papír 300-400 a poté pomocí měkkého hadříku setřete piliny. Nepoužívejte utěrku nebo hadřík namočený ve vodě. Přerušení dodávky proudu • Příležitostně může dojít k přerušení dodávky proudu způsobeného bouřkou nebo jinými příčinami. Jestliže dojde k výpadku dodávky elektrické energie, vyjměte napájecí kabel ze zásuvky střídavého proudu. Až bude dodávka proudu obnovena, zapojte opět napájecí kabel do zásuvky střídavého proudu. Péče v případě dovolené a stěhování • V případě delší dovolené nebo nepřítomnosti vinotéku odpojte a vyčistěte ji včetně těsnění dveří podle návodu v části „Celkový úklid“. Dveře nechte otevřené, aby mohl uvnitř cirkulovat vzduch. • Při stěhování vinotéku vždy přesunujte ve svislé poloze. Nepřemisťujte spotřebič položený na podlaze – mohlo by dojít k poškození uzavřeného systému. Poznámka: Po přestěhování počkejte 24 hodin, než vinotéku opět zapojíte do zásuvky. 83 CZ Nadpis 1 Odstraňování závad Vinotéka nefunguje: • Zkontrolujte, zda je vinotéka zapojená do zásuvky. • Kontrolou elektrického jističe ověřte, zda je zásuvka střídavého proudu pod napětím. Víno je příliš teplé: • Časté otevírání dveří. • Jestliže jste víno do vinotéky uložili teprve nedávno, dopřejte mu čas, aby mohlo dosáhnout požadované teploty. • Zkontrolujte přiléhavost těsnění. • Vyčistěte okruh kondenzátoru. • Upravte nastavenou teplotu na nižší hodnotu. Víno je příliš studené: • Pokud je ovládání teploty nastaveno na příliš nízkou hodnotu, upravte nastavení na vyšší teplotu. Vinotéka se spouští příliš často: • • • • • Může se jednat o normální jev při udržování konstantní teploty během horkých a vlhkých dní. Je možné, že jsou příliš často nebo na příliš dlouhou dobu otvírány dveře. Vyčistěte okruh kondenzátoru. Zkontrolujte přiléhavost těsnění. Zkontrolujte, zda jsou dveře úplně dovřené. Na vnitřním nebo vnějším povrchu vinotéky se hromadí vlhkost: • Za velmi vlhkého počasí jde o běžný jev. • Dveře jsou otevírány často nebo na dlouhou dobu. • Zkontrolujte přiléhavost těsnění dveří. Dveře vinotéky se nedovírají: • Vyrovnejte vinotéku. • Zkontrolujte, zda nejsou dveře blokovány např. lahvemi nebo policemi. Elektrické spotřebiče nevyhazujte do netříděného komunálního odpadu: využijte zařízení pro tříděný sběr odpadu. Informace o dostupných způsobech sběru odpadu získáte u místní samosprávy. Pokud jsou elektrické spotřebiče odvezeny na skládky nebo zavážky, mohou nebezpečné látky prosáknout do podzemních vod a následně se dostat do potravního řetězce a poškodit vaše zdraví. Když nahrazujete staré spotřebiče novými, je prodejce většinou povinen přijmout vaše staré spotřebiče a zařídit jejich likvidaci, a to přinejmenším zdarma. 84 Technické údaje•Seznam součástíNadpis v balení1 Technické údaje Model Typklimatu Dostupná Typ odolnosti vůči kapacita elektrickému šoku (l) Jmenovité napětí (V) Jmenovitý kmitočet (Hz) Příkon (W) WS120GA SN-ST I 220 220-240 50 110 WS190GA SN-ST I 385 220-240 50 100 Rozsah teploty (°C) Chladivo (R600a) (g) Typ připojení napájecího kabelu 5-20 45 Y 69 38 639×595×1,265 5-20 75 Y 94 38 639×595×1,850 Celkové rozměry Hluk (úroveň Hmotnost (kg) akustického výkonu) (hloubka × šířka × výška) (mm) dB (A) Poznámky: 1. Podle mezinárodních standardů znamená typ klimatu SN-ST, že okolní teplota pro použití vinotéky se pohybuje mezi 10 °C a 38 °C. 2. „Hluk (úroveň akustického výkonu)“ označená v technických údajích se vztahuje k situaci, kdy je částečně izolovaná místnost nastavená podle mezinárodních standardů, vinotéka je prázdná a do vinotéky je vložen 5–6mm pružný gumový polštář. Může být spuštěna po dobu alespoň 30 minut po zavření dveří. Test bude proveden po stabilním provozu (mimo spuštění a vypnutí). Pozemní hluk bude testován ve vzdálenosti 1 m od předního, zadního, levého a pravého povrchu vinotéky. Je normální, že skutečný hluk se od označeného hluku liší, vzhledem k vlivu typu vína uskladněného ve vinotéce, okolního hluku, otevírání a zavírání dveří, spouštění a vypínání kompresoru apod. Seznam součástí v balení Tento spotřebič je průběžně vyvíjen. Ponecháváme si právo změnit součásti vinotéky bez předchozího upozornění. Množství Název Uživatelská Informační příručka balíček Vino police Zasunovací kolík Klíč Model produktu WS120GA 1 1 4 1 2 WS190GA 1 1 7 1 2 85 CZ Heading 1 Nazwa elementów chłodziarki Główny panel sterowania Górna półka na wino Drzwiczki szklane Wino police Regulowana śruba WS120GA (pojemność 117 butelek) 86 WS190GA (pojemność 189 butelek) Spis treści1 Heading Strona INFORMACJE DOTYCZĄCE BEZPIECZEŃSTWA............................ 88 Instalacja chłodziarki.................................................................... 89 Rozpakowywanie chłodziarki do wina .......................................................................... 89 Poziomowanie chłodziarki .............................................................................................. 89 Właściwy obieg powietrza .............................................................................................. 89 Wymagania elektryczne .................................................................................................. 90 Ograniczenia instalacyjne............................................................................................... 90 Używanie przedłużacza................................................................................................... 90 Ust ............................................................................ 90 Wprowadzenie do głównych funkcji urządzenia ........................... 91 1.Regulacja temperatury.................................................................................................. 91 2.Oświetlenie wewnętrzne .............................................................................................. 91 3.Konwersja „°F/°C”.......................................................................................................... 91 4.Alarm otwartych drzwi .................................................................................................. 92 5.Pamięć temperatury przy wyłączeniu ........................................................................... 92 6.Zasilanie .......................................................................................................................... 92 Środki ostrożności podczas używania chłodziarki....................... 93 PL Automatyczne rozmrażanie ............................................................................................ 93 Półki ................................................................................................................................... 94 Odgłosy prawidłowej pracy, jakie mogą być słyszalne .............................................. 94 Właściwe czyszczenie i konserwacja chłodziarki ....................................................... 95 Rozwiązywanie problemów........................................................... 96 Dane techniczne•Lista opakowania.............................................. 97 87 INFORMACJE Heading 1 DOTYCZĄCE BEZPIECZEŃSTWA Niniejsze urządzenie jest przeznaczone wyłącznie do przechowywania wina. Zawsze stosuj podstawowe zasady bezpieczeństwa podczas korzystania z niniejszego urządzenia, takie jak: 1. Przed rozpoczęciem użytkowania chłodziarki, zapoznaj się dokładnie z jej instrukcją obsługi. 2. Używaj chłodziarki tylko i wyłączne zgodnie z jej przeznaczeniem, opisanym w niniejszej instrukcji. 3. Przed użyciem chłodziarka musi zostać prawidłowo zainstalowana, zgodnie z instrukcją instalacji. Sprawdź instrukcję uziemienia urządzenia w części dotyczącej jego instalacji. 4. Chłodziarka jest przeznaczona wyłącznie do użytku domowego. Jeżeli używasz jej w celach przemysłowych lub komercyjnych, przestrzegaj właściwych norm i przepisów. Z urządzenia mogą korzystać dzieci w sensorycznych lub umysłowych. Osoby nieposiadające dostatecznej wiedzy bądź doświadczenia mogą korzystać z urządzenia pod nadzorem lub pod warunkiem, że zostały przeszkolone pod kątem bezpiecznej obsługi urządzenia i rozumieją wynikające z tego zagrożenia. Dzieci nie powinny bawić się urządzeniem. Dzieci nie powinny bez nadzoru wykonywać czynności związanych z czyszczeniem i konserwacją. 5. Urządzenie należy ustawić tak, aby umożliwiać dostęp do wtyczki. 6. Jeżeli przewód zasilający jest uszkodzony, musi zostać wymieniony przez producenta, jego serwisanta lub inną osobę posiadającą odpowiednie 7. Należy utrzymywać pełną drożność otworów wentylacyjnych w obudowie lub wbudowanych w urządzenie. 8. W celu przyśpieszenia procesu rozmrażania nie wolno używać żadnych urządzeń mechanicznych innych niż zalecane przez producenta. 9. Nie wolno uszkodzić obwodu czynnika chłodniczego. 10. Wewnątrz komór chłodziarki służących do przechowywania żywności nie wolno używać żadnych urządzeń elektrycznych, o ile nie są to urządzenia zalecane przez jej producenta. 11. Jeżeli oświetlenie jest uszkodzone, musi zostać wymienione przez producenta, jego serwisanta lub inną osobę posiadającą odpowiednie 12. Niniejsze urządzenie jest przeznaczone wyłącznie do przechowywania wina. 13. Ryzyko uwięzienia dziecka. Przed pozbyciem się starej chłodziarki, zdemontuj drzwiczki. Pozostaw półki wewnątrz, aby uniemożliwić dziecku dostanie się do środka. 14. W opisywanym urządzeniu nie należy przechowywać substancji wybuchowych, takich jak puszki aerozoli z łatwopalną zawartością. 88 Instalacja chłodziarki Heading 1 Rozpakowywanie chłodziarki do wina 1. Usuń wszystkie elementy opakowania. Dotyczy to podłoża piankowego oraz taśmy samoprzylepnej, trzymającej elementy wyposażenia dodatkowego chłodziarki, w środku i na zewnątrz. 2. Przed podłączeniem chłodziarki do prądu upewnij się, że wszelkie pozostałości opakowania, taśma klejąca lub wydrukowane materiały zostały usunięte. Poziomowanie chłodziarki • Chłodziarka posiada nóżki poziomujące, znajdujące się w narożnikach z przodu i z tyłu urządzenia. Poziomowanie należy wykonać po wcześniejszym, prawidłowym umieszczeniu chłodziarki w jej miejscu docelowym. • Nóżki poziomujące można regulować przekręcając je zgodnie z ruchem wskazówek zegara, aby podwyższyć chłodziarkę lub przeciwnie do ruchu wskazówek zegara, aby ją obniżyć. Drzwiczki chłodziarki zamykają się łatwiej przy podniesionych nóżkach poziomujących. Właściwy obieg powietrza • Aby upewnić się, że chłodziarka pracuje z maksymalną wydajnością, umieść ją w miejscu z właściwym obiegiem powietrza oraz dostępem do połączeń wodno-kanalizacyjnych i elektrycznych. • Zalecana przestrzeń wokół chłodziarki: Boki .................. 4" (100 mm) Góra ................. 4" (100 mm) Tył .................... 4" (100 mm) • Aby zapewnić właściwe chłodzenie nie należy przepełniać chłodziarki. PL Ponad 10 cm od góry Pon 10 c ad od t m yłu Ponad 10 cm od lewej Ponad 10 cm od prawej Regulowana śruba ustawcza Wysoko Nisko Uwaga: Jeżeli chłodziarka uległa przechyleniu z jakiegokolwiek powodu, odczekaj 24 godziny przed jej podłączeniem. 89 Heading 1 Wymagania elektryczne • Upewnij się, że gniazdko elektryczne do podłączenia chłodziarki ma odpowiednie parametry (220-240 V, 15 A) i jest prawidłowo uziemione. • Unikaj stosowania trójbolcowych wtyków przejściowych. Nie usuwaj bolca uziemiającego, aby umożliwić podłączenie wtyczki do gniazdka bez uziemienia. Takie rozwiązanie stanowi zagrożenie, ponieważ nie zapewnia prawidłowego uziemienia chłodziarki i może doprowadzić do porażenia prądem. Ograniczenia instalacyjne • Nie należy instalować chłodziarki w miejscu, które nie jest odpowiednio wentylowane, np. w garażu. Chłodziarka nie będzie działać, jeśli temperatura otoczenia wynosi poniżej 10°C. • Ustaw chłodziarkę na równym i solidnym podłożu, w miejscu nienasłonecznionym oraz z dala od źródeł ciepła, takich jak piece, grzejniki i kuchenki. Nierówności można zniwelować regulując wysokość nóżek, znajdujących się w narożnikach z przodu i z tyłu urządzenia. • Chłodziarka została zaprojektowana do instalacji wyłącznie jako urządzenie wolnostojące. Nie jest ona przeznaczona do zabudowy. Używanie przedłużacza • Unikaj używania przedłużacza z powodu możliwości wystąpienia zagrożenia w określonych warunkach. Jeśli konieczne jest użycie przedłużacza, należy użyć przedłużacza trzyżyłowego z dwoma bolcami i jednym otworem oraz pasującego do wtyczki gniazdka, z dwoma otworami i jednym bolcem. Moc nominalna przedłużacza musi być większa lub równa mocy nominalnej urządzenia. Ustawienia konfiguracji początkowej Po podłączeniu urządzenia do gniazdka elektrycznego, przed wykonaniem jakichkolwiek regulacji, pozostaw je uruchomione przez co najmniej 30 minut, w celu dostosowania do warunków otoczenia. W tym czasie w zależności od temperatury wewnętrznej, czerwona lub biała kontrolka wina zaświeci się w górnej komorze i dolnej komorze. Dioda LED wskaże bieżącą temperaturę wewnętrzną. 90 Wprowadzenie do podstawowych funkcji urządzenia Panel kontrolny Temperatura Regulacja (w górę) Temperatura Regulacja (w dół) OUT.T° USTAW SET IN.T° Podświetlenie ZASILANIE PL POWER LIGHT Zakres temperatury panelu wyświetlacza wynosi 5 ~ 20°C (41 ~ 68°F). Domyślne ustawienie temperatury to 12°C (54°F). Można ustawić temperaturę przechowywania wina w zależności od potrzeb. . 1 Regulacja temperatury Aby ustawić temperaturę przytrzymaj przycisk przez około 3 sekundy. Następnie, na wyświetlaczu temperatury zamiga IN.T°. Naciśnij przycisk lub , aby zwiększyć lub zmniejszyć ustawienie temperatury. Gdy znajdziesz żądaną temperaturę, naciśnij przycisk . 2. Oświetlenie wewnętrzne Miękkie światło zostało wbudowane w piwniczkę na wina, aby dopełnić wygląd Twojej kolekcji. Wystarczy nacisnąć przycisk i zapali się dioda, należy nacisnąć ponownie, aby ją wyłączyć.Gdy otworzy się drzwi, światło zapali się. Po zamknięciu drzwi, światło zgaśnie. 3. Konwersja „°F/°C” Naciśnij i przytrzymaj przez 3 sekundy, a temperatura wyświetlana w stopniach Fahrenheita i znak °F zmieni się na stopnie Celsjusza i znak „°C”. Naciśnij i ponownie przytrzymaj przez 3 sekundy, a temperatura wyświetlana w stopniach Celsjusza i znak „°C” zmieni się na stopnie Fahrenheita i znak °F. 91 Heading 1 4.Alarm otwartych drzwi W przypadku, gdy drzwi pozostaną otwarte na dłużej niż 1 minutę, zacznie rozbrzmiewać sygnał dźwiękowy, który wyłączy się po zamknięciu drzwi lub po naciśnięciu dowolnego przycisku na panelu wyświetlacza. 5.Pamięć temperatury przy wyłączeniu W przypadku przerwy w zasilaniu, piwniczka automatycznie zapamięta ustawioną temperaturę. Po przywróceniu zasilania, będzie ona pracować w temperaturze ustawionej przed awarią, podczas gdy inne funkcje powrócą . do stanu domyślnego. 6.Zasilanie Przytrzymaj klawisz przez 3 sekundy, a zasilanie zostanie wyłączone (zasilanie wszystkich urządzeń elektrycznych wewnątrz zostaną odcięte i całe urządzenie przejdzie w tryb czuwania). Jeśli urządzenie jest wyłączone, zasilanie może być włączone przez przytrzymanie klawisza 92 przez 3 sekundy - zaświecą się wszystkie ikony na wyświetlaczu. Heading 1 Środki ostrożności podczas używania chłodziarki Nie należy umieszczać w chłodziarce zbyt dużo wina, aby nie przekroczyć nośności półek. Nie należy umieszczać więcej niż cztery warstw butelek na każdej półce. Liczba butelek wina nie powinna przekraczać cztery warstw ułożonych na każdej z półek, ani maksymalnego udźwigu półki wynoszącego 35 kg. Przed umieszczeniem butelek wewnątrz chłodziarki należy się upewnić, że półki są całkowicie stabilne. Ponadto należy potwierdzić, że żadna z butelek nie wystaje z półki i nie uderzy w szklane drzwiczki podczas zamykania. Automatyczne rozmrażanie Urządzenie ma funkcję automatycznego odszraniania. JPodczas użytkowania należy się upewnić, że otwór spustowy jest odblokowany, aby woda po odszranianiu przepływała przez otwór do zbiornika na wodę wewnątrz chłodziarki. PL Należy regularnie czyścić zbiorniki na wodę w dolnej części górnej i dolnej komory, używając suchej szmatki do wycierania (czyścić co trzy miesiące). Dojrzewanie wina zależy od warunków otoczenia. Jakość powietrza jest w związku z tym tylnej ścianki w celu zapewnienia, że powietrze ma optymalną jakość. UWAGA uzyskać u dealera. i wsuń. 93 Heading 1 Półki • Półki zostały zaprojektowane, aby zapewnić łatwe czyszczenie i atrakcyjny wygląd. Większe butelki lub butelki typu Magnum (1,5 l) możesz łatwo ułożyć na półkach poprzecznych w dolnej części chłodziarki. • Chłodziarka posiada również półki do ułatwionego przechowywania i wyciągania wina. Odgłosy prawidłowej pracy, jakie mogą być słyszalne • Wrzenie wody, bulgotanie lub delikatne wibracje są efektem krążenia czynnika chłodzącego w spiralach chłodzących. • Układ kontrolny termostatu klika podczas włączania i wyłączania się. 94 Właściwe czyszczenie i konserwacjaHeading chłodziarki1 Czyszczenie i konserwacja Ostrzeżenie: Uwaga: Ogólne: Uszczelki drzwi: Półka na wino: Aby uniknąć porażenia prądem zawsze odłącz chłodziarkę od gniazdka przed przystąpieniem do jej czyszczenia. Zignorowanie tej zasady może spowodować obrażenia lub śmierć. Przed zastosowaniem środków czyszczących koniecznie zapoznaj się z zaleceniami i ostrzeżeniami producenta, aby uniknąć obrażeń ciała i uszkodzenia produktu. • Przygotuj roztwór czyszczący składający się z 3-4 łyżeczek sody oczyszczonej i wody. Do przetarcia chłodziarki używaj gąbki lub miękkiej szmatki, zamoczonej w roztworze czyszczącym. • Opłucz czystą, letnią wodą, a następnie osusz miękką szmatką. • Nie używaj żrących chemikaliów, szorstkich materiałów, wybielaczy na bazie chloru, zagęszczonych detergentów, rozpuszczalników ani myjek drucianych. Niektóre z tych środków chemicznych mogą doprowadzić do uszkodzenia, odbarwienia lub rozpuszczenia elementów chłodziarki. • Uszczelki drzwi należy czyścić do trzy miesiące, zgodnie z ogólnymi instrukcjami. Aby zapewnić szczelność, uszczelki muszą być czyste i miękkie. • Zastosowanie niewielkiej ilość wazeliny na uszczelki (od strony zawiasów) utrzyma je w dobrym stanie i zapewni prawidłowe uszczelnienie. w przypadku zabrudzenia półki winem lub powstania zacieków z kropel wody, do polerowania należy stosować papier ścierny o gramaturze 300-400, a następnie przetrzeć miękką szmatką usuwając trociny. Nie należy stosować ręcznika ani miękkiej szmatki nasączonej wodą. Przerwy w dopływie prądu • Z powodu burz lub innych przyczyn mogą wystąpić przerwy w dopływie prądu. W przypadku braku prądu odłącz przewód zasilania od gniazdka elektrycznego prądu zmiennego. Po wznowieniu dopływu prądu podłącz przewód zasilana ponownie do gniazdka elektrycznego prądu zmiennego. Okres urlopu i przenoszenie chłodziarki • W przypadku wyjazdu lub długiej nieobecności odłącz chłodziarkę i wyczyść ją wraz z uszczelkami drzwiczek, jak opisano w sekcji „Czyszczenie ogólne”. Pozostaw drzwiczki otwarte, aby umożliwić przepływ powietrza. • Przenosząc chłodziarkę zawsze trzymaj ją w pozycji pionowej. Nie przenoś chłodziarki w pozycji leżącej, gdyż może to uszkodzić szczelność układu. Uwaga: Po przeniesieniu chłodziarki odczekaj 24 godziny przed ponownym jej podłączeniem. 95 PL Rozwiązywanie problemów Heading 1 Chłodziarka nie działa: • Sprawdź, czy chłodziarka jest podłączona. • Sprawdź, czy w gniazdku elektrycznym prądu zmiennego jest zasilanie, sprawdzając mechanizmy zabezpieczające. Wina mają zbyt wysoką temperaturę: • Częste otwieranie drzwiczek. • Aby uzyskać pożądaną temperaturę pozostaw niedawno umieszczone butelki w chłodziarce na dłuższy czas. • Sprawdź szczelność uszczelek. • Wyczyść rurki skraplacza. • Zmniejsz temperaturę w ustawieniach kontroli temperatury. Temperatura wina jest zbyt niska: • Jeżeli temperatura w ustawieniach kontroli temperatury jest zbyt niska, zmień ustawienie na wyższe. Chłodziarka uruchamia się zbyt często: • W dni o wysokiej temperaturze i wilgotności może być to objaw prawidłowy, aby utrzymać stałą temperaturę w chłodziarce. • Drzwiczki mogły być często otwierane lub pozostawione otwarte przez dłuższy czas. • Wyczyść rurki skraplacza. • Sprawdź szczelność uszczelek. • Sprawdź, czy drzwiczki są prawidłowo zamknięte. Gromadzenie się wilgoci wewnątrz lub na zewnątrz chłodziarki: • Jest to normalne podczas okresów wysokiej wilgotności. • Zbyt długie lub zbyt częste otwieranie drzwiczek. • Sprawdź szczelność uszczelek drzwiczek. Drzwiczki chłodziarki nie zamykają się prawidłowo: • Wypoziomuj chłodziarkę. • Sprawdź, czy nic nie blokuje drzwiczek (np. butelki, półki). Nie wyrzucaj urządzeń elektrycznych jako zwykłych, niesortowanych odpadów komunalnych, korzystaj ze specjalnych punktów odbioru zużytego sprzętu. Aby uzyskać więcej informacji dotyczących punktów odbioru skontaktuj się z lokalnymi władzami. Utylizacja urządzeń elektrycznych na wysypiskach śmieci może doprowadzić do przenikania niebezpiecznych substancji do wód gruntowych, a tym samym do łańcucha pokarmowego, szkodząc zdrowiu i dobremu samopoczuciu. Wymieniając stare urządzenie elektryczne na nowe, sprzedawca jest prawnie zobowiązany do odebrania starego urządzenia i jego utylizacji, bez naliczania dodatkowych kosztów. 96 Dane techniczne•Lista opakowania Heading 1 Dane techniczne Porażenie Dostępna Napięcie Częstotliwość Moc prądem Typ pojemność znamionowe znamionowa wejściowa oporu (l) (V) (Hz) (W) Model Typ klimatu WS120GA SN-ST I 220 220-240 50 110 WS190GA SN-ST I 385 220-240 50 100 Waga (kg) Halas (poziom mocy akustycznej) dB (A) Zakres temperatury (°C) Tryb Chłodziwo połączenia (R600a) kabla (g) Ogólne wymiary (głębokość × szerokość × wysokość) (mm) 5-20 45 Y 69 38 639×595×1,265 5-20 75 Y 94 38 639×595×1,850 Uwagi: 1. Zgodnie z normami międzynarodowymi, jeśli klimat ma typ SN-ST, temperatura otoczenia dla chłodziarki ma zakres od 10°C do 38°C. 2. "Hałas (poziom mocy akustycznej)" w danych technicznych odnosi się do sytuacji, w której komora bezodbiciowa została ustawiona zgodnie z normami międzynarodowymi z użyciem pustej chłodziarki i gumowej poduszki o grubości 5 mm do 6 mm wewnątrz. Może to trwać przynajmniej 30 minut po zamknięciu drzwiczek. Test zostanie przeprowadzony po stabilnej pracy (z wyłączeniem uruchomienia i wyłączenia). Hałas na ziemi będzie testowany w odległości 1 m od powierzchni przedniej, tylnej, lewej i prawej chłodziarki. Podczas eksploatacji normalne jest odchylenie faktycznego hałasu od znamionowego na skutek efektów wywoływanych przez przechowywane wino, hałas otoczenia, otwieranie i zamykanie drzwi itd. PL Lista opakowania Urządzenie jest stale rozwijane. Zachowujemy prawo do zmieniania komponentów chłodziarki bez informowania o tym fakcie. Ilość Nazwa Podręcznik użytkownika Zestaw informacyjny Wino police Zatyczka Przycisk Model produktu WS120GA 1 1 4 1 2 WS180GA 1 1 7 1 2 97 0070512622A Version: 2020Version B Private No.: 0070512622A Manufacturer Code:V14513-
 1
1
-
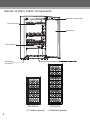 2
2
-
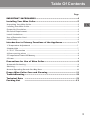 3
3
-
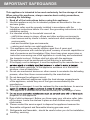 4
4
-
 5
5
-
 6
6
-
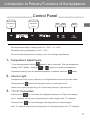 7
7
-
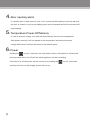 8
8
-
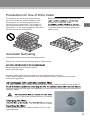 9
9
-
 10
10
-
 11
11
-
 12
12
-
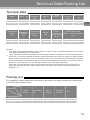 13
13
-
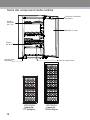 14
14
-
 15
15
-
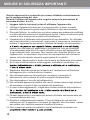 16
16
-
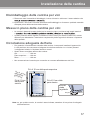 17
17
-
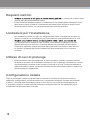 18
18
-
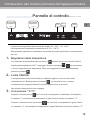 19
19
-
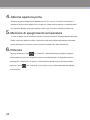 20
20
-
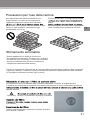 21
21
-
 22
22
-
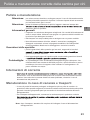 23
23
-
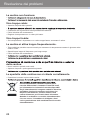 24
24
-
 25
25
-
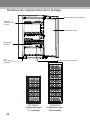 26
26
-
 27
27
-
 28
28
-
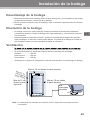 29
29
-
 30
30
-
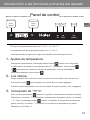 31
31
-
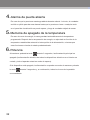 32
32
-
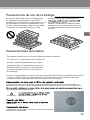 33
33
-
 34
34
-
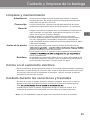 35
35
-
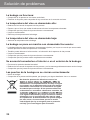 36
36
-
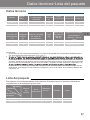 37
37
-
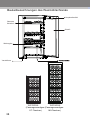 38
38
-
 39
39
-
 40
40
-
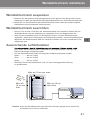 41
41
-
 42
42
-
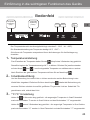 43
43
-
 44
44
-
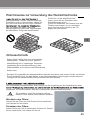 45
45
-
 46
46
-
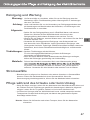 47
47
-
 48
48
-
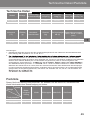 49
49
-
 50
50
-
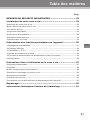 51
51
-
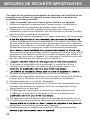 52
52
-
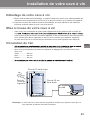 53
53
-
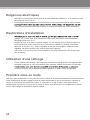 54
54
-
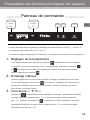 55
55
-
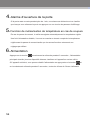 56
56
-
 57
57
-
 58
58
-
 59
59
-
 60
60
-
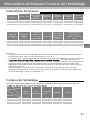 61
61
-
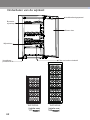 62
62
-
 63
63
-
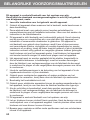 64
64
-
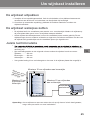 65
65
-
 66
66
-
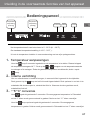 67
67
-
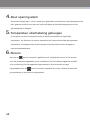 68
68
-
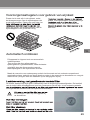 69
69
-
 70
70
-
 71
71
-
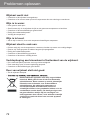 72
72
-
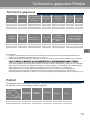 73
73
-
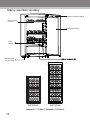 74
74
-
 75
75
-
 76
76
-
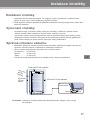 77
77
-
 78
78
-
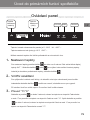 79
79
-
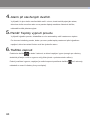 80
80
-
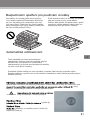 81
81
-
 82
82
-
 83
83
-
 84
84
-
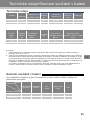 85
85
-
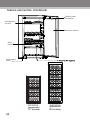 86
86
-
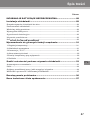 87
87
-
 88
88
-
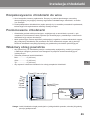 89
89
-
 90
90
-
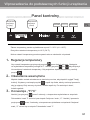 91
91
-
 92
92
-
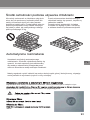 93
93
-
 94
94
-
 95
95
-
 96
96
-
 97
97
-
 98
98


Haier WS120GA El manual del propietario
- Categoría
- Enfriadores de bebidas
- Tipo
- El manual del propietario
- Este manual también es adecuado para
en otros idiomas
- français: Haier WS120GA Le manuel du propriétaire
- italiano: Haier WS120GA Manuale del proprietario
- English: Haier WS120GA Owner's manual
- Deutsch: Haier WS120GA Bedienungsanleitung
- Nederlands: Haier WS120GA de handleiding
- polski: Haier WS120GA Instrukcja obsługi
- čeština: Haier WS120GA Návod k obsluze