MD Sports BBG022_087M Instrucciones de operación
- Tipo
- Instrucciones de operación

Instrucciones De Ensamblaje
Assembly Instructions
MODEL/MODELO
BBG022_087M
WM.COM
www.medalsports.com877-472-4296
Please mention model # BBG022_087M _V1

English Español
This product is covered by a limited warranty that is
effective for 90 days from the date of purchase. If, during
the limited warranty period, a part is found to be
defective or breaks, we will offer replacement parts at
no cost to you, the customer. The only exceptions to the
warranty include mainframes, table tops, playing
surfaces, batteries or tools.
The above warranty will not apply in cases of damages
due to improper usage, alteration, misuse, abuse,
accidental damage or neglect.
This Limited Warranty gives you specific legal rights and
you may also have other rights vary from one State
(province) to another.
A PURCHASE RECEIPT (or other proof of purchase) will
be required before any warranty service is initiated. For
all requests for warranty service, please feel free to
contact our Consumer Service Department.
Please be aware of your product’s Limited Warranty for
the return/refund policy from the store, We, at Medal
Sports, cannot handle the product which is out of
product’s limited warranty since we only provide
available parts. Thank you!
PLEASE CONTACT US BEFORE RETURNING THE
PRODUCT TO THE STORE!
Este producto está cubierto por una garantía efectiva
de 90 días a partir de la fecha de su compra. Durante el
periódo límite de la garantía, si una parte defectuosa o
quebrada es encontrada, nosotros ofreceremos una
reparación o un reemplazo de la partes sin ningún costo
para ud, nuestro cliente. Las únicas excepciones de la
garantía incluyen unidad principals, tableros de mesa,
superficies, pilas o herramientas.
La susodicha garantía no se aplicará en los casos de
daños y perjuicios debido al uso impropio, la alteración,
el mal uso, el abuso, el daño accidental o la negligencia.
Esta garantía limitada le da a usted derechos legales
específicos, usted también puede tener otros derechos
que varían de un estado (provincia) a otro.
EL RECIBO DE LA COMPRA (U otra prueba de compra)
sería requerida antes que cualquier servicio de garantía
fuera iniciada. Para todo pedido por servicio de
garantía, por favor siéntase libre de ponerse en contacto
con nuestro Departamento de Servicio de Consumidor.
Por favor tenga atención sobre el Límite de Garantía de
su producto de la política de vuelta/reembolsa desde la
tienda, Nosotros, Medal Sports, no podemos manejar el
producto que está fuera del límite de garantía ya que
proporcionamos solamente partes disponibles. ¡Gracias!
¡POR FAVOR PÓNGASE EN CONTACTO CON
NOSOTROS ANTES DE DEVOLVER EL PRODUCTO A LA
TIENDA!
GARANTÍA LIMITA DE 90 DIASLIMITED 90 DAYS WARRANTY
MD SPORTS
877-472-4296
BBG022_087M 1 (Continúe en la siguiente página)(Continued on the next page) www.medalsports.com
www.medalsports.com
DO NOT RETURN TO STORE NO DEVOLVERLO A LA TIENDA
WE ARE READY
TO HELP
ESTAMOS LISTOS
PARA AYUDAR
Customer Service
Toll Free
Servicio al Cliente
Llamados gratuitos
Please Contact Por favor Contacto
Mon.-Fri.,
9:00 a.m. to 5:00 p.m. EST
Lunes a Viernes,
9:00 a.m. a 5:00 p.m. ET
For additional resources and
Frequently Asked Questions,
please visit us at
Por mayor información y
preguntas frecuentes, favor
visitarnos en

Power Tools: Set to Low Torque
/ Herramientas eléctricas:
Establecer bajo par de torsión
High Torque Over Tightened
/ Alto par más estrictas
This product is intended for INDOOR use only.
Please do not sit, climb or lean on the product.
Please do not drag the product when moving it in
order to avoid damaging the legs.
Please only use spray furniture polish to clean the
exterior surfaces of the product.
This is not a child's toy, adult supervision is required
for children playing this game.
1.
2.
3.
4.
5.
Este producto está destinado para el uso INTERIOR
solamente.
Por favor no sientes, subas o inclínes el producto.
Por favor no arrastres el producto cuando está
moviendo para evitar el daño sobre las piernas.
Por favor use solamente spray para muebles para
limpiar la superficie exterior del producto.
Esto no es un juguete de niños, se requieren la
supervisión adulta para niños cuando esté jugando al
juego.
1.
2.
3.
4.
5.
English Español
HERRAMIENTAS NECESARIASTOOLS REQUIRED
- Not Included
- Not Included
- Included
- Included
RECOMMENDED RECOMENDADO
IMPORTANT NOTICE! ¡AVISO IMPORTANTE!
Adult Assembly Required.
CHOKING HAZARD - This item contains small parts.
Not suitable for children under 3 years.
El ensamblaje debe ser realizado por un adulto.
PELIGRO DE ASFIXIA - Este artículo contiene piezas
pequeñas. No es apto para niños menores de 3 años de
edad.
WARNING ADVERTENCIA
Phillips Screwdriver
Standard (Flat Head
Screwdriver)
Wrench
Allen Key
Electric Screwdrivers may be helpful
during assembly; however, please set a low
torque and use extreme caution.
Los destornilladores eléctricos pueden ser
de gran ayuda durante el ensamblado; sin
embargo, por favor ajuste el par de giro
bajo y sea extremadamente precavido.
Destornillador Phillips
Destornillador de Cabeza
Plana
Llave Inglesa
Llave Allen
- No incluido
- No incluido
- Incluido
- Incluido
BBG022_087M www.medalsports.com2 (Continúe en la siguiente página)(Continued on the next page)
X2
At least 2 adults needed
Se necesitan al menos 2
adultos
No children in assembly
area
No deben estar los niños
en el area de ensamble
Keep away from pets in
assembly area
Mantener alejados a los
animales domesticos del
area de ensamble
Do not use or keep
product outdoors. For
indoor use only. No
wet/humid conditions.
No usar o guardar el
producto en el exterior.
Solo para uso en interior.
No utilizar ni guardar el
producto en lugares
humedos o mojados

23
x2
FOR FIG. 11
End Cap - A Gorra Final - A
17
x2
FOR FIG. 8
18
x2
FOR FIG. 8
19
x2
FOR FIG. 10
20
x2
FOR FIG. 15
21
x1
FOR FIG. 7
BBG022_087M www.medalsports.com3 (Continúe en la siguiente página.)(Continued on the next page.)
English Español
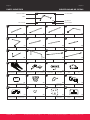
IDENTIFICADOR DE PIEZASPARTS IDENTIFIER
15
x2
FOR FIG. 9
16
x1
FOR FIG. 15
Tube - 9 Tubo - 9
9
x2
FOR FIG. 5
Tube - 10 Tubo - 10
10
x2
FOR FIG. 6
Tube - 11 Tubo - 11
11
x1
FOR FIG . 6
Tube - 12 Tubo - 12
12
x1
FOR FIG . 13
Tube - 5 Tubo - 5
5
x1
FOR FIG. 2
13
x1
FOR FIG. 5
Tube - 6 Tubo - 6
6
x1
FOR FIG. 2
Tube - 7 Tubo - 7
7
x2
FOR FIG. 1
Tube - 8 Tubo - 8
8
x2
FOR FIG. 1
22
x1
FOR FIG. 7
Tube - 2 Tubo - 2
2
x2
FOR FIG. 1
Tube - 3 Tubo - 3
3
x1
FOR FIG. 1
Tube - 4 Tubo - 4
4
x1
FOR FIG. 1
Tube - 1 Tubo - 1
1
x2
FOR FIG. 5
PART NUMBER FIG NUMBER
QUANTITY
PART NAME
PART
PART NAME
Paddle Sensor
Sensor de Paleta
Control Box
Caja de Control
Con Cable
25
x1
FOR FIG. 7
Electronic
Scorer
Marcador
Electrónico
24
x1
FOR FIG. 17
Target Mat
Alfombra
de Destino
Rim Aro
Rim Support
Placa Plástica de
Soporte de Rampa
Backboard
Tablero
de Canasta
Tube - 13 Tubo - 13
14
x1
FOR FIG. 12
Ball Return Net
Red de Retorno
de Baloncesto
HOME
VISITOR
TIME
Electronic
Scorer Face Plate
Placa Frontal
de Marcador
Self - Stick Strap
Correa de
Auto - Vara
Rim Net
Red

Push
Button
Botón de
presión
P1
x9
FOR FIG. 1, 2, 6
Plastic
Pole Insert
Encaje de
Poste Plástico
P2
x2
FOR FIG. 5
Pole Holder Soporte de Tubo
P5
x2
FOR FIG. 6
P3
x2
FOR FIG. 2
P4
x4
FOR FIG. 1
HARDWARE
HARDWARE
PIEZAS PREINSTALADASPRE-INSTALLED PARTS
BBG022_087M www.medalsports.com4 (Continúe en la siguiente página.)(Continued on the next page.)
English Español
ACCESORIOSACCESSORIES
Locking Pin End Cap - B Gorra Final - B
Clavija
de cerradura
Air Pump Bomba de Aire
27
x1
Basketball Baloncesto
26
x3
FOR FIG. 17 FOR FIG. 17
Football Fútbol
28
x2
Baseball Béisbol
29
x2
Needle / Aguja
27
A1
x64
FOR FIG. 3, 4, 5, 8, 9, 11,
13, 14
FOR FIG. 15
A2
x16
FOR FIG. 8, 9
A4
x4
FOR FIG. 11, 14
A6
x2
FOR FIG. 5
A7
x32
FOR FIG. 3, 4, 5, 8, 9, 11,
13, 14
A5
x4
FOR FIG. 3, 4
A3
x6
FOR FIG. 4, 5, 13
A8
x4
FOR FIG. 7
A10
x1
A11
x1
A9
x2
M6 Washer
Arandela M6
M6x20mm Bolt
Perno
M6x20mm
M6x30mm Bolt
Perno
M6x30mm
M6x42mm Bolt
Perno
M6x42mm
M6x48mm Bolt
Perno
M6x48mm
M6x35mm Bolt
Perno
M6x35mm
M6 Nut Tuerca M6
3.5x10mm Bolt
Perno
3.5X10mm
4x28mm Bolt
Perno
4X28mm
Wrench
Llave Inglesa
Allen Key Llave Allen

ANTES DE MONTARBEFORE ASSEMBLY
BBG022_087M www.medalsports.com5 (Continúe en la siguiente página.)(Continued on the next page.)
Please inspect and layout all the POLES and parts Favor revisar y trazar todos los HOYOS y piezas
English Español
HOME
VISITOR
TIME
x2
x2
x1 x2x2
x1
x1 x1
1
7
15
20
21 22
x1
25
x1
24
16
17 18 19
2
8
9 10 11 12 13 14
6
3 4 5
x2
23
x2
Find a clean, level place to begin the assembly of your
product.
Verify that you have all listed parts as shown on the
part list pages. If any parts are missing, call our
customer service.
1.
2.
Encuentre un lugar limpio y nivelado para comenzar
el ensamblaje del producto.
Compruebe que tenga todas las piezas que se
muestran en la lista de piezas. Si falta alguna pieza,
llame a nuestro servicio al cliente.
1.
2.

FIG. 2
BBG022_087M www.medalsports.com6 (Continúe en la siguiente página.)(Continued on the next page.)
x1
5
x2
P3
Pre-installed
x1
6
x1
P1
Pre-installed
MONTAJEASSEMBLY
English Español
P4 P4
P4
2
4
2
3
7
8
P1
FIG. 1
x2
8
x2
2
x1
3
x1
4
x4
P1
Pre-installed
x4
P4
Pre-installed
x2
7
P3
5
6
P1
P1

MONTAJEASSEMBLY
BBG022_087M www.medalsports.com7 (Continúe en la siguiente página.)(Continued on the next page.)
English Español
FIG. 3
x4
x1
x2
A1
A10
x1
A11
A7
x2
A5
3
4
2
2
5
6
A1
A7
A5

FIG. 4
BBG022_087M www.medalsports.com8 (Continúe en la siguiente página.)(Continued on the next page.)
MONTAJEASSEMBLY
English Español
x4
x1
x1
A7
A10
A11
x8
A1
x2
x2
A3
A5
A5
A1
A7
A7
A3
3
4
2
2
7
5
6
7
8
8
A1

BBG022_087M www.medalsports.com9 (Continúe en la siguiente página.)(Continued on the next page.)
MONTAJEASSEMBLY
English Español
Pre-installed
FIG. 5
1
13
9
P2
x2
x1
x2
x2
13
2
1
2
1
13
2
A7
A1
A1
A6
9
A7
P2
P2
9
Punched hole
/ Agujero Perforado
9
A3
x2
x2
x8
A3
A6
A1
x4
x1
x1
A7
A10
A11

BBG022_087M www.medalsports.com10 (Continúe en la siguiente página.)(Continued on the next page.)
MONTAJEASSEMBLY
English Español
Pre-installed
Pre-installed
x2
x2
x1
x4
FIG. 6
10
P5
11
P1
9
9
Long / Largo
Short / Corto
10
11
10
P5
P5
P1
11
10
P1
1

BBG022_087M www.medalsports.com11 (Continúe en la siguiente página.)(Continued on the next page.)
MONTAJEASSEMBLY
English Español
x1
x1
x4
x1
FIG. 7
25
22
A8
21
TIME
VISITOR
HOME
A8
22
21
25
HOME
VISITOR
TIME
FIG. 8
x2
17
x2
18
x16
x8
A1
A2
x8
x1
x1
A7
A10
A11
TIME
VISITOR
HOME
17
21
A1
A2
A1
18
A7
Note: Ensure that washers are used on
both sides of the backboard.
/ Nota: Asegurar que las arandelas se
usen en los dos lados de la placa trasera.
Note: DO NOT over tighten bolts.
/ Nota: QUE NO aprietes cerrojos.

BBG022_087M www.medalsports.com12 (Continúe en la siguiente página.)(Continued on the next page.)
MONTAJEASSEMBLY
English Español
A
B
C
17
17
17
19
19
19
17
19
19
Note: Attach the part with
larger meshes to the rim.
/ Nota: Adjunta la parte con
mallas más grandes al cerco.
x2
x8
x8
x16
FIG. 9
15
A2
A7
A1
x1
x1
A10
A11
FIG. 10
x2
19
TIME
VISITOR
HOME
TIME
VISITOR
HOME
15
A2
A7
A1
A1
Note: Connect Paddle Sensor
(15) to the backboard.
/ Nota: Conecte el Sensor de la
Paleta (15) a la tabla trasera.

BBG022_087M www.medalsports.com13 (Continúe en la siguiente página.)(Continued on the next page.)
MONTAJEASSEMBLY
English Español
x2
x4
x2
x2
x1
x1
23
A1
A4
A7
A10
A11
FIG. 11
21
23
1
A1
A7
A4
TIME
VISITOR
HOME
P3
Note: With the help of another
adult, attach the Backboard
(21) to the Top Tubes - 1 (1).
/ Nota: Con la ayuda del otro
adulto, Fije el Tablero de la
Canasta (21) al Tubos - 1 (1).
Note: Please do not use any bolts on the
Backboard at this step. The Bolts will be
added later for the Ramp Tab (See FIG. 14).
/ Nota: No utilices ningún cerrojos en los
agujeros en el Respaldo en este paso. Los
Cerrojos se añadirán más tarde para la
Etiqueta de Rampa (Vea la FIG. 14).

BBG022_087M www.medalsports.com14 (Continúe en la siguiente página.)(Continued on the next page.)
MONTAJEASSEMBLY
English Español
x1
14
FIG. 12
14
1
Connect Velcro
Strap here.
/ Conecte la Correa
de Velcro aquí.
Note: Slide in the elastic straps onto
Tube - 1, then slide the sleeves of the Ball
Return Net (14) onto tubes at the top.
/ Nota: Deslice las correas elásticas sobre
el Tubo - 1, luego deslice las mangas de
la Red de Retorno de Bola (14) sobre los
Tubos en la parte superior
Note: To secure the Ball Return Net (14)
to Tube - 1 (1), attach the elastic straps
over the nuts as shown in FIG. 12.
/ Nota: Para asegurar la Red de
Retorno de Bola (14) al Tubo - 1 (1),
adjunta las correas elásticas sobre las
tuercas como muestrado en la FIG. 12.
14
11

BBG022_087M www.medalsports.com15 (Continúe en la siguiente página.)(Continued on the next page.)
MONTAJEASSEMBLY
English Español
x1
x2
x2
x1
x1
12
A3
A7
A10
A11
FIG. 13
x4
A1
14
12
A1
A7
12
A3
11
11
14
12
Note: After the elastic straps are bound to Tube 11 (11),
Slide Tube - 12 (12) into the sleeve of the Ball Return Net,
then attach it to Tube - 11 (11) as shown in FIG. 13. Fasten
the Bolt (A3) with the Allen Key to finish this step.
/ Nota: Después de que las correas elásticas estén
botado al Tubo - 11 (11), deslice el Tubo 12 (12) dentro de
la manga de la Red de Retorno de Bola y luego la sujeta
al tubo - 11 (11) como mostrado en la FIG. 13. Ajuste el
Cerrojo (A3) con la llave Allen para finalizar este paso.

BBG022_087M www.medalsports.com16 (Continúe en la siguiente página.)(Continued on the next page.)
MONTAJEASSEMBLY
English Español
x2
x2
x1
x1
A4
A7
A10
A11
FIG. 14
x4
A1
21
14
Back View
/ Vista trasera
14
21
12
Ramp Tab
/ Lengüeta
de Rampa
Back View
/ Vista trasera
A1
1
2
21
14
A1
A7
A4
14
21
Note: At each bottom hole of the backboard, attach
the ramp tabs on Ball Return Net (14) using Bolts
(A4), Washers (A1) and Nuts (A7) as shown in FIG. 14.
/ Nota: En cada hoyo inferior deltablero de la canasta,
fije las lengüetas de la rampa de Red de Retorno de
Baloncesto (14) usando Pernos (A4), Arandelas (A1)y
Tuercas (A7) como se indica en FIG. 14.
Note: Please note Tube - 12 (12) is in
front while attaching ball return
Net to backboard.
/ Nota: Tenga en cuenta que el
Tubo - 12 (12) está en la parte
delantera mientras une la red de
retorno de la bola al tablero trasero.

BBG022_087M www.medalsports.com17 (Continúe en la siguiente página.)(Continued on the next page.)
MONTAJEASSEMBLY
English Español
x1
x2
16
20
FIG. 15
FIG. 16
x2
A9
14
Control Wire
/ Cable de Control
A9
11
16
14
Control Wire
/ Cable de Control
11
20
Note: Run the rest of the Control Wire through
the loops on the Ball Return Net (14). Place the
Control Wire on the Tube - 11 (11) using the
Self-Stick Straps (20) as shown in FIG. 15.
/ Nota: Gire el resto del Cable de Control por
las curvas de la Red de Retorno de Baloncesto
(14). Coloque el Cable de Control sobre el Tubo
- 11 (11) usando las Correas de Auto-Vara (20)
como mostrado en la FIG. 15.
Control Wire
/ Cable de Control
Electronic Scorer
/ Marcador Electrónico
Sensor wire
/ Cable de sensor
25
15
16
15
16
25
Note: Insert the Control Wire and the
Sensor Wires into the Electronic Scorer (25).
/ Nota: Inserte el Cable de Control y el Cable
de sensor al Marcador Electrónico (25).

BBG022_087M www.medalsports.com18 (Continúe en la siguiente página.)(Continued on the next page.)
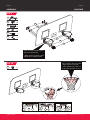
STEP 1
STEP 3
STEP 2
CÓMO PLEGAR EL
JUEGO PARA GUARDARLO
HOW TO FOLD THE
GAME FOR STORAGE
English Español
IMPORTANT!
¡IMPORTANTE!
Make sure to use the
Locking Pin (P3) when folded.
Asegúrese, use los Clavijas de
cerradura (P3) cuando está
doblado.
P3
11
Note: Push Tube - 11 (11)
upwards to fold.
/ Nota: Empuje el tubo - 11
(11) hacia arriba para plegar.
P3
Note: Folding the basketball game -
First remove the Locking Pin (P3).
Repeat the steps for the other side.
/ Nota: Plegando el juego de baloncesto
- Mueva primero los Pines de Cierre (P3).
Repita los pasos para el otro lado.
Note: The locking pin (P3) needs to be removed from its
original position when the game is being used before
insertion to the new position when folded.
/ Nota: El clavija de cerradura (P3) debe ser removido de
su posición original cuando el juego está siendo utilizado
antes de la inserción a la nueva posición plegada.

BBG022_087M www.medalsports.com19 (Continúe en la siguiente página.)(Continued on the next page.)
ENSAMBLADURA DE BÉISBOL & FÚTBOLBASEBALL & FOOTBALL ASSEMBLY
English Español
x1
x2
x2
24
28
29
FIG. 17
24
10 9&
24
Note: Connect all 4 Knots on the Target
Mat (24) to the Basketball Frame.
/ Nota: Conecte los 4 nudos sobre la
Alfombra de Destino (24) al Marco de
Béisbol.
28
29

OPERACIÓN DEL MARCADOR ELECTRÓNICOELECTRONIC SCORER OPERATION
BBG022_087M www.medalsports.com19 (Continúe en la siguiente página.)(Continued on the next page.)
English Español
Battery Box: Unscrew the bolt using a screwdriver and
open the battery box. Insert 3 “AA” batteries ( not
included) in the order of polarity as shown on the inside
cover. Then close the cover using a screwdriver.
Batteries must be installed according to the correct
polarization (+ and -) required.
Please clean the battery contacts and also those of
the device prior to battery installation.
If the game will not be used for a long period of time,
we recommend that the batteries should be
removed.
a.
b.
c.
Caja de Batería: Desatornille el cerrojo por usando un
destornillador y abra la Caja de Batería, inserte 3 “AA”
baterias (no incluido) al orden de polaridad como
mostrado el interno de la Caja de Batería. Y luegp
atornille sobre la cubierta usando un destornillador.
Las baterías deben estar instaladas de acuerdo con
las correctas polaridades (+ y -) como requerido.
Favor de limpiar los contactos de las baterías y
también aquells del dispositivo antes de instalar la
batería.
Si no jugará el juego por un largo período de tiempo,
recomendamos que quite las baterias.
a.
b.
c.
BATTERY INSTALLATION INSTALACIÓN DE BATERÍA
Press "ON / OFF" to activate the scorer.
Scoreboard "HOME" shows "01" (pre - set game 1).
Press "SELECT UP and DOWN" to select a game.
Press "PLAY" to enter the selected game mode.
Press "SOUND" to switch the sound ON / OFF while playing.
Press "PAUSE" to pause or start time counting.
Press and hold the "ON / OFF" button for 3 seconds to turn
off the scorer.
Press and hold the "RESET" button for 3 seconds to reset
the game.
Note: If no shot is made or no button is pressed in 15 mins,
the scorer will be turned off automatically.
Presione “ON / OFF” para activar el marcador.
El Marcador " HOME" indica "01" (juego 1 pre - fijado).
Presione " SELECT UP and DOWN" para seleccionar el
juego.
Presione "PLAY"para entrar al modo de juego seleccionado.
Presione "SOUND" para cambiar prender o apagar el ON /
OFF
cuando está jugando.
Presione "PAUSE" para apagar o iniciar el contado el
tiempo.
Oprima y detenga la perilla "ENCENDIDO / APAGADO" por
3 segundos para apagar la tabla de puntaje.
Oprima y detenga la perilla " RESET " por 3 segundos para
resetear el juego.
Nota: Si no se ha realizado tiros o presionado el botón en 15
minutos, el marcador se apagará automáticamente.
CONTROL BOX OPERATION OPERACIÓN DE CAJA DE CONTROL
REMINDING: ATENCIÓN:
Requires 3 “AA” batteries (not included).
Do not mix old and new batteries.
Do not mix alkaline, standard (carbon zinc), or
rechargeable (nickel-cadmium) batteries.
1.
2.
3.
Requiere 3 “AA” baterias (no incluido).
No mezcles baterias viejas y nuevas.
No mezcles baterias alkalina, estándar (carbón, zinc), o
recargable (níquel - cadmio).
1.
2.
3.
WARNING
ADVERTENCIA
INCOMPLETE NUMBERS ARE DISPLAYED ON
SCORER SCREEN
LOS NÚMEROS
INCOMPLETOS ESTÁN MOSTRADOS
EN LA PANTALLA DEL MARCADOR
• Low Battery Warning: When the battery level is very low, a
"BATTERY LOW" voice will ring out 3 times by the scorer.
• Please check the battery charge is sufficient.
• Please replace the battery.
• Advertencia de Batería Baja:Cuando el nivel de la batería
está muy bajo, una voz de "BATTERY LOW" sonará 3 veces
por el marcador.
• Por favor, revise la carga de batería si fuere suficiente.
• Por favor cambia la batería.

1. BEAT THE TIME CLOCK 1. GANE AL RELOJ DE TIEMPO
Press "PLAY" to enter game 1.
Press "UP/Down" to select single/multiple players
(P1/P2/P3/P4).
Press "PLAY" after the number of players is selected.
Press "UP/Down" to select playing time, 30/45/60
seconds.
Press "PLAY" to begin the game.
Scoreboard "HOME" display shows Players 1 and 3.
Scoreboard "VISITOR" display shows Players 2 and 4.
All shots are worth 2 points until the final 10 seconds,
where each shot counts 3 points. After a player's
game is over, there is a 5 second countdown to the
next player's game. The player with the most points
scored wins. (The LED will flash on the player with
the highest score).
Press "PLAY" to restart this game.
•
•
•
•
•
•
•
•
•
Presione "PLAY" para entrar al juego 1.
Presione "UP/Down" para seleccionar
jugadores
único/múltiple (P1/P2/P3/P4).
Presione "PLAY" después que el número de jugador
fuera seleccionado.
Presione "UP/Down" para seleccionar el tiempo de
juego, 30/45/60 segundos.
Presione "PLAY" para iniciar el juego.
La tabla de puntaje de "HOME" muestra los Jugadores
1 y 3.
La tabla de puntaje de "VISITOR" muestra los
Jugadores 2 y 4.
Todo tiro vale 2 puntos hasta los finales 10 segundos,
cuando 1 tiro vale 3 puntos. Al fin del juego, viene una
cuenta atrás por 5 segundos para el juego del
siguiente jugador. El jugador con más puntos en la
tabla ganará. (El LED queda intermitente para el
jugador con el más alto puntaje).
Presione "PLAY" para reiniciar este juego.
•
•
•
•
•
•
•
•
•
Presione "PLAY" para entrar al juego 2.
Presione "UP/Down" para seleccionar jugadores
único/múltiple (P1/P2/P3/P4).
Presione "PLAY" después que el número de jugador
fuera seleccionado.
Presione "UP/Down" para seleccionar el tiempo de
juego, 30/45/60 segundos.
Presione "PLAY" para iniciar el juego.
La tabla de puntaje de "HOME" muestra los
Jugadores 1 y 3.
La tabla de puntaje de "VISITOR" muestra los
Jugadores 2 y 4.
Todos los tiros marcados se cuentan 3 puntos.
Al fin del juego, viene una cuenta atrás por 5
segundos para el juego del siguiente jugador. El
jugador con más puntos en la tabla ganará. (El LED
queda intermitente para el jugador con el más alto
puntaje).
Presione "PLAY" para reiniciar este juego.
•
•
•
•
•
•
•
•
•
•
•
Press "PLAY" to enter game 2.
Press "UP/Down" to select single/multiple players
(P1/P2/P3/P4).
Press "PLAY" after the number of players is selected.
Press "UP/Down" to select playing time, 30/45/60
seconds.
Press "PLAY" to begin the game.
Scoreboard "HOME" display shows Players 1 and 3.
Scoreboard "VISITOR" display shows Players 2 and 4.
All shots made count 3 points.
After a player's game is over, there is a 5 second
countdown to the next player's game. The player
with the most points scored wins (The LED will flash
on the player with the highest score).
Press "PLAY" to restart this game.
•
•
•
•
•
•
•
•
•
•
2. 3 POINT, BEAT THE CLOCK 2. 3 PUNTOS, AL SONAR EL RELOJ
Presione "PLAY" para entrar al juego 3.
Presione "UP/Down" para seleccionar jugadores
único/múltiple (P2/P4).
Presione "PLAY" para iniciar este juego.
Por un tiro logrado en la canasta del "HOME", el
"HOME" logra 2 puntos y el "VISITOR" logra -2 puntos.
Por un tiro logrado en la canasta del "VISITOR", el
"VISITOR" logra 2 puntos y el "HOME" logra -2 puntos.
El primer jugador logrando 10 puntos gana el juego.
Presione "PLAY" para reiniciar este juego.
•
•
•
•
•
•
•
Press "PLAY" to enter game 3.
Press "UP/Down" to select multiple players (P2/P4).
Press "PLAY" to begin the game.
For a shot made in the "HOME" hoop, "HOME" scores
2 points and "VISITOR" scores -2 points.
For a shot made in the "VISITOR" hoop, "VISITOR"
scores 2 points and "HOME" scores -2 points.
The first player to score 10 points wins the game.
Press "PLAY" to restart this game.
•
•
•
•
•
•
•
3. BATTLE BACK 3. BATALLAR EN CONTRA
OPCIONES DE JUEGOGAME OPTIONS
BBG022_087M www.medalsports.com20 (Continúe en la siguiente página.)(Continued on the next page.)
English Español

4. HORSE 4. CABALLO
Presione "PLAY" para entrar al juego 5.
Presione "UP/Down" para seleccionar jugadores
único/múltiple (P1/P2/P3/P4).
Presione "PLAY" para iniciar este juego.
La puntuación del jugador se mostrará en el lado de
“HOME”. Los puntos a obtener se muestran en el lado
de “VISITOR”.
El tiempo de juego predeterminado es de 40
segundos.
Una vez se alcance el Punto de Control (24/52/68/86
puntos), se añadirá tiempo adicional (10/20/10/20
segundos) y se muestra el siguiente Punto de
Control.
Al fin del juego, viene una cuenta atrás por 5
segundos para el juego del siguiente jugador.
El jugador con más puntos en la tabla ganará. (El
LED queda intermitente para el jugador con el más
alto puntaje).
El juego se acaba cuando un jugador marca 98
puntos.
Presione "PLAY" para reiniciar este juego.
•
•
•
•
•
•
•
•
•
•
Press "PLAY" to enter game 5.
Press "UP/Down" to select single/multiple players
(P1/P2/P3/P4).
Press "PLAY" to begin the game.
Player’s score is displayed on the “HOME” side. The
points to achieve is displayed on the “VISITOR” side.
Playing time is pre-set at 40 seconds.
And once the Check-Point (24/52/68/86 points) is
reached, additional time (10/20/10/20 seconds) will
be added to the clock and the next Checkpoint is
displayed.
After a player's game is over, there is a 5 second
countdown to the next player's game.
The player with the most points scored wins. (The
LED will flash on the player with the highest score).
Game is finished when a player scores 98 points.
Press "PLAY" to restart this game.
•
•
•
•
•
•
•
•
•
•
5. CHECK POINT 5. CONTROL DE PUNTO
Press "PLAY" to enter game 4.
Press "UP/Down" to select multiple players
(P2/P3/P4).
Press "PLAY" after the number of players is selected.
Player has to make a shot in 2 seconds.
The first player is allowed to shoot at any hoop
(HOME or VISITOR). If first player scores in 2 seconds,
no letter is given. The game continues for the next
player. The scoreboard will display "next player
(P2/P3/P4)" and the LED will flash twice in a second.
After the LED flash, the next player has to duplicate
the shot in the same hoop selected by the first
player.
If the first player doesn't score in 2 seconds, the
player receives the letter "H" which will display on
the scoreboard. The same player continues until a
basket is scored. If the player keeps missing, the
letters "O" followed by "R", "S" and "E" are received.
Once the letter "E" is received, the player is out.
The first player to spell "HORSE" loses. Steps d., e. and
f. are repeated until the game is finished.
The last player to spell "HORSE" wins.
Press "PLAY" to restart this game.
a.
b.
c.
d.
e.
f.
g.
h.
i.
a.
b.
c.
d.
e.
f.
g.
h.
i.
Presione "PLAY" para entrar al juego 4.
Presione "UP/Down" para seleccionar jugadores
único/múltiple (P2/P3/P4).
Presione "PLAY" después que el número de jugador
fuera seleccionado.
El jugador tiene que marcar un tiro en2 segundos.
Al primer jugador se le permite tirar en cualquier aro
(HOME o VISITOR). Si el primer jugador marca en 2
segundos, no se le da la letra. El Juego continúa para
el siguiente jugador. En Marcador se visualizará "next
player (P2/P3/P4)" y el LED parpadeará dos veces en
un segundo. Luego del LED intermitente, el
siguiente jugador tiene que duplicar el tiro en el
mismo aro seleccionados por el primer jugador.
Si el primer jugador no logra puntos en 2 segundos,
el jugador recibirá la letra "H" que aparece en la tabla
de puntaje. El mismo jugador continúa hasta que el
cesto logre puntos. Si el jugador sigue perdiendo, la
letra "O" seguida por las "R", "S" y "E" se recibirá. Una
vez la letra "E" se reciba, el jugador quedará afuera.
El primer jugador en deletrear "HORSE" pierde. Los
pasos d., e. y f se repiten hasta el fin del juego.
El ultimo jugador en deletrear "HORSE" gana.
Presione "PLAY" para reiniciar este juego.
OPCIONES DE JUEGOGAME OPTIONS
BBG030_018E www.medalsports.com12 (Continúe en la siguiente página.)(Continued on the next page.)
English Español
OPCIONES DE JUEGOGAME OPTIONS
BBG022_087M www.medalsports.com21 (Continúe en la siguiente página.)(Continued on the next page.)
English Español

6. AROUND THE WORLD 6. ENTORNO AL MUNDO
Presione "PLAY" para entrar al juego 7.
Presione "UP/Down" para seleccionar jugadores
único/múltiple (P1/P2/P3/P4).
Presione "PLAY" después que el número de jugador
fuera seleccionado.
Presione "UP/Down" para seleccionar el tiempo de
juego, 30/45/60 segundos.
Presione "PLAY" para iniciar el juego.
La tabla de puntaje del "HOME" muestra “jugador”; La
tabla de puntaje del "VISITOR" muestra los puntos.
Haga un tiro en el cesto del "HOME" cuando el LED
queda intermitente en "HOME"; 2 puntos logrados
aparecerán en "HOME".
Haga un tiro en el cesto del "VISITOR" cuando el LED
queda intermitente en "VISITOR"; 2 puntos logrados
aparecerán en "VISITOR".
Al fin del juego, viene una cuenta atrás por 5 segundos
para el juego del siguiente jugador.
El jugador con más puntos en la tabla ganará. (El LED
queda intermitente para el jugador con el más alto
puntaje).
Presione "PLAY" para reiniciar este juego.
•
•
•
•
•
•
•
•
•
•
•
Press "PLAY" to enter game 7.
Press "UP/Down" to select single/multiple players
(P1/P2/P3/P4).
Press "PLAY" after the number of player is selected.
Press "UP/Down" to select playing time, 30/45/60
seconds.
Press "PLAY" to begin the game.
Scoreboard "HOME" display shows"player"; Scoreboard
"VISITOR" display shows points.
Make a shot in the "HOME" hoop when the LED is
flashing on"HOME"; 2 points scored will be displayed on
"HOME".
Make a shot in the "VISITOR" hoop when the LED is
flashing on"VISITOR"; 2 points scored will be displayed
on “VISITOR".
After a player's game is over, there is a 5 second
countdown to the next player's game.
The player with the most points scored wins. (The LED
will flash on the player with the highest score).
Press "PLAY" to restart this game.
•
•
•
•
•
•
•
•
•
•
•
•
•
•
•
•
•
•
7. LEFT AND RIGHT SHOOT 7. TIRO IZQUIERDA Y DERECHA
Presione "PLAY" para entrar al juego 8.
Presione "UP/Down" para seleccionar jugadores
único/múltiple (P1/P2/P3/P4).
Presione "PLAY" después que el número de jugador
fuera seleccionado.
Presione "UP/Down" para seleccionar el tiempo de
juego, 30/45/60 segundos.
Presione "PLAY" para iniciar el juego.
La tabla de puntaje de "HOME" muestra los Jugadores 1
y 3.
La tabla de puntaje de "VISITOR" muestra los Jugadores
2 y 4.
Todo tiro vale 2 puntos hasta los finales 10 segundos,
cuando 1 tiro vale 3 puntos.
Al fin del juego, viene una cuenta atrás por 5 segundos
para el juego del siguiente jugador.
El jugador con más puntos en la tabla ganará. (El LED
queda intermitente para el jugador con el más alto
puntaje).
Presione "PLAY" para reiniciar este juego.
•
•
•
•
•
•
•
•
•
•
•
Press "PLAY" to enter game 8.
Press "UP/Down" to select single/multiple players
(P1/P2/P3/P4).
Press "PLAY" after the number of players is selected.
Press "UP/Down" to select playing time, 30/45/60
seconds.
Press "PLAY" to begin the game.
Scoreboard "HOME" display shows Players 1 and 3.
Scoreboard "VISITOR" display shows Players 2 and 4.
All shots are worth 2 points until the final 10 seconds,
where each shot counts 3 points.
After a player's game is over, there is a 5 second
countdown to the next player's game.
The player with the most points scored wins (The LED
will flash on the player with the highest score).
Press "PLAY" to restart this game.
•
•
•
•
•
•
•
•
•
•
•
8. ONE TO ONE 8. UNO A UNO
Press "PLAY" to enter game 6.
Press "UP/Down" to select single/multiple players
(P1/P2/P3/P4).
Press "PLAY" after the number of players is selected.
Scoreboard "HOME" display shows Player 1/2/3/4;
"VISITOR" display shows the points scored.
Once 10 points have been scored OR 99 seconds have
elapsed, the game ends for that player and a 5 second
countdown to the next player's game begins.
The player who finishes the game in the shortest time
wins (The LED will flash on the winner).
Press "PLAY" to restart this game.
•
•
•
•
•
•
•
Presione "PLAY" para entrar al juego 6.
Presione "UP/Down" para seleccionar jugadores
único/múltiple (P1/P2/P3/P4).
Presione "PLAY" después que el número de jugador
fuera seleccionado.
La tabla de puntaje de "HOME" muestra Jugador 1/2/3/4’
y la de "VISITOR" muestra los puntos logrados.
Una vez se logren 10 puntos Ó pasados los 99 segundos,
el juego finaliza para el jugador y se dan 5 segundos en
cuenta atrás al juego del siguiente jugador.
El jugador que termine el juego en el menos tiempo
gana el juego (el LED queda intermitente por el
ganador).
Presione "PLAY" para reiniciar este juego.
OPCIONES DE JUEGOGAME OPTIONS
BBG022_087M www.medalsports.com22 (Continúe en la siguiente página.)(Continued on the next page.)
English Español

Changes or modifications not expressly approved by the
party responsible for compliance could void the user’s
authority to operate the equipment.
Los cambios o modificaciones no expresamente
aprobado por la parte responsable del cumplimiento
podrían anular la autoridad del usuario para operar el
equipo.
WARNING ADVERTENCIA
This equipment has been tested and found to comply
with the limits for a Class B digital device, pursuant to
Part 15 of the FCC Rules. These limits are designed to
provide reasonable protection against harmful
interference in a residential installation. This equipment
generates, uses and can radiate radio frequency energy
and, if not installed and used in accordance with the
instructions, may cause harmful interference to radio
communications. However, there is no guarantee that
interference will not occur in a particular installation. If
this equipment does cause harmful interference to
radio or television reception, which can be determined
by turning the equipment off and on, the user is
encouraged to try to correct the interference in one or
more of the following measures:
This device complies with the part 15 of the FCC rules.
Operation is subject to the following two conditions:
(1) This device may not cause harmful interference, and (2)
This device must accept any interference received, including
interference that may cause undesired operation.
This Class B digital apparatus complies with Canadian
ICES-003.
Este equipo ha sido probado y encontrado para cumplir
con los límites para el dispositivo digital de Clase B, de
conformidad con la Parte 15 de las Reglas de FCC. Estos
límites son diseñados para proporcionar protección
razonable contra la interferencia dañosa en una
instalación residencial. Este equipo genera, usa y podría
irradiar la energía de radiofrecuencia y, si no fuera
instalado y usado conforme con las instrucciones,
podría causar interferencia dañosa para la
comunicación de radio. Sin embargo, no está
garantizado que la interferencia no ocurrirá en una
instalación particular. Si este equipo realmente causado
interferencia dañosa a la radio o la recepción de
televisión, podría ser determinada por girando el
equipo off y on, el usuario está animado de corregir la
interferencia por una o más siguientes medidas:
NOTE NOTA
Reoriente o recoloque la antena de recepción.
Incremente la separación entre el equipo y el
receptor.
Conecte el equipo a una salida del circuito diferente
que el que está conectado con el receptor.
Consulte el proveedor o un técnico experienciado de
radio/televisión por ayudas.
•
•
•
•
Reorient or relocate the receiving antenna.
Increase the separation between the equipment
and receiver.
Connect the equipment into an outlet on a circuit
different from that of the receiver is connected.
Consult the dealer or an experienced radio/TV
technician for help.
•
•
•
•
RENUNCIADISCLAIMER
BBG022_087M www.medalsports.com23 (La ultima página)(The last page)
English Español

www.medalsports.com
-
 1
1
-
 2
2
-
 3
3
-
 4
4
-
 5
5
-
 6
6
-
 7
7
-
 8
8
-
 9
9
-
 10
10
-
 11
11
-
 12
12
-
 13
13
-
 14
14
-
 15
15
-
 16
16
-
 17
17
-
 18
18
-
 19
19
-
 20
20
-
 21
21
-
 22
22
-
 23
23
-
 24
24
-
 25
25
-
 26
26


MD Sports BBG022_087M Instrucciones de operación
- Tipo
- Instrucciones de operación
en otros idiomas
Artículos relacionados
-
MD Sports BBG022_087M Instrucciones de operación
-
-
-
-
-
-
-
-
-