Lo siento, pero no puedo extraer la información sobre el Dell PowerEdge 860 del texto proporcionado. El texto proporcionado es acerca de cómo instalar la tarjeta DRAC 4/P en un sistema Dell PowerEdge. No contiene información sobre las capacidades del Dell PowerEdge 860.
Lo siento, pero no puedo extraer la información sobre el Dell PowerEdge 860 del texto proporcionado. El texto proporcionado es acerca de cómo instalar la tarjeta DRAC 4/P en un sistema Dell PowerEdge. No contiene información sobre las capacidades del Dell PowerEdge 860.

www.dell.com | support.dell.com
About Cautions
CAUTION: A CAUTION indicates a potential for property damage, personal injury, or death.
Installing the DRAC 4/P
NOTICE: Read these installation instructions before installing your DRAC 4/P expansion card.
CAUTION: Many repairs may only be done by a certified service technician. You should only perform
troubleshooting and simple repairs as authorized in your product documentation, or as directed by the
online or telephone service and support team. Damage due to servicing that is not authorized by Dell is
not covered by your warranty. Read and follow the safety instructions that came with the product.
This document provides special instructions for installing the Dell™ Remote Access Controller 4/P
(DRAC 4/P) card into a Dell PowerEdge™ system.
CAUTION: To help prevent damage to the DRAC 4/P card, ensure that the system is unplugged from its
AC power source before installing the card.
1
Shutdown the system and unplug it from its AC power source.
Your system’s
Product Information Guide
provides a sequence of safety steps that you should
perform before opening the cover of your system, including turning off the system and
disconnecting it from its AC power source. However, the DRAC 4/P card can be damaged if it
is installed in the system that is turned off, but still attached to its AC power supply. Ensure
that the system is unplugged from its AC power supply before installing the DRAC 4/P card.
2
Open the system. See "Opening the System" in the
Installation and Troubleshooting Guide
for
instructions.
3
Determine which expansion slot is most appropriate for the DRAC 4/P card.
Ideally, the DRAC 4/P card should be installed in the PCI expansion slot nearest the RAC
connector on the system board. See "System Board Connectors" in "Jumpers, Switches, and
Connectors" in the
Installation and Troubleshooting Guide
for an illustration of your system
board’s connectors.
4
Connect the DRAC 4/P card interface cable from the card to the system’s RAC connector on
the system board. See Figure 1.
NOTE: The interface cable and connectors are keyed and can be connected only one way.
5
Install the DRAC 4/P card into expansion slot:
a
Position the DRAC 4/P card so that the card-edge connector aligns with the system-board
card connector on the system board. See Figure 1.
September 2004

www.dell.com | support.dell.com
b
Insert the card-edge connector firmly into the system-board card connector until the card
is fully seated.
NOTE: Some systems use a plastic bar to secure the expansion-card bracket to the back panel
instead of a screw.
c
Install the screw that secures the expansion-card bracket to the back panel.
6
Close the system. See "Closing the System" in the
Installation and Troubleshooting Guide
for
instructions.
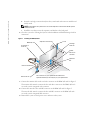
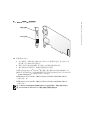
Figure 1. Installing the DRAC 4/P Card
7
Connect the monitor cable to the card video connector on the DRAC 4/P card. See Figure 2.
The monitor cable must be connected to the card video connector on the DRAC 4/P card—
not to the system’s integrated video connector.
8
Connect the network to the card NIC connector on the DRAC 4/P card. See Figure 2.
The network cable must be connected to the card NIC connector on the DRAC 4/P card—
not to the system’s integrated NIC connector.
9
Reattach the system to its AC power source and turn on the system.
DRAC 4/P card
system-
board card
connector
screw
expansion-card bracket
expansion
slot
interface cable
RAC connector
card-interface
connector
card-edge
connector
The connectors on your system board and the actual
expansion slot that you use may vary on your system board.

www.dell.com | support.dell.com
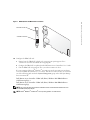
Figure 2. DRAC 4/P Video and NIC Connector Locations
10
Configure the DRAC 4/P card:
a
During boot, the DRAC 4/P <Ctrl><d> setup program option appears. Press
<Ctrl><d> and enter the DRAC 4/P setup program.
b
Configure the DRAC 4/P as explained in the
Dell Remote Access Controller 4 User’s Guide.
c
Exit the DRAC 4/P setup program. The system then continues its boot.
If you are running a Microsoft
®
Windows
®
operating system, the operating system detects
several new DRAC 4/P-related devices as it starts. The drivers for those devices are located in
one of the following paths under the
Systems Management
group on the
Dell OpenManage
Server Assistant
CD:
Dell: Remote Access Controller - DRAC 4/P (Driver) Windows 2003 DRAC4 Drivers
(Self Extracting Zip)
or
Dell: Remote Access Controller - DRAC 4/P (Driver) Windows 2000 DRAC4 Drivers
(Self Extracting Zip)
NOTE: The screen may blink several times as Windows starts and the Hardware Wizard discovers
the new DRAC 4/P display adapter.
NOTE: Novell
®
NetWare
®
and Red Hat
®
Linux operating systems use native drivers.
card video connector
card NIC connector

www.dell.com | support.dell.com
____________________
Information in this document is subject to change without notice.
© 2004 Dell Inc. All rights reserved. Printed in the U.S.A.
Reproduction in any manner whatsoever without the written permission of Dell Inc. is strictly forbidden.
Trademarks used in this text: Dell, the DELL logo, and PowerEdge are trademarks of Dell Inc.;
Microsoft and Windows are registered trademarks of Microsoft Corporation.
Other trademarks and trade names may be used in this document to refer to either the entities claiming the marks
and names or their products. Dell Inc. disclaims any proprietary interest in trademarks and trade names other than its own.

www.dell.com | support.dell.com
关于警告
警告:
警告表示存在可能导致财产损失、人身伤害或死亡的潜在危险。
安装
DRAC 4/P
注意:
在安装
DRAC 4/P
扩充卡之前,请先阅读以下安装说明。
警告:
许多修理只能由合格的维修技术人员进行。您只能根据产品说明文件中的授权执行故障
排除和简单修理,或者根据联机或电话服务和支持小组的指导执行操作。如果是由于非
Dell
授
权维修而导致的损坏,则不能享受保修。请阅读并遵循随产品附带的安全说明。
本说明文件提供了在
Dell PowerEdge
™
系统上安装
Dell
™
远程访问控制器
4/P (DRAC 4/P)
卡
的特殊说明。
警告:
为防止
DRAC 4/P
卡损坏,应确保在安装卡之前断开系统的交流电源。
1
关掉系统,然后断开系统的交流电源。
系统的 《产品信息指南》中提供了一系列安全步骤,在您打开机箱之前应该先执行这些
步骤,包括关掉系统和断开交流电源连接。但是,如果将
DRAC 4/P
卡安装在已关机但
仍然与交流电源连接的系统中,会损坏卡。请确保在安装
DRAC 4/P
卡之前断开系统的
交流电源。
2
打开系统外壳。有关说明,请参阅《安装与故障排除指南》中的“打开系统外壳”。
3
确定哪个扩充槽最适合安装
DRAC 4/P
卡。
从理想上来说,
DRAC 4/P
卡应该安装在主板上离
RAC
连接器最近的
PCI
扩充槽中。
有关主板连接器的图示,请参阅 《安装与故障排除指南》的 “跳线、开关和连接器”
中的 “主板连接器”。
4
将
DRAC 4/P
卡的接口电缆从卡连接到主板上的
RAC
连接器。请参阅图
1
。
注:
接口电缆和连接器采用锁定式设计,仅可以从一个方向连接。
5
将
DRAC 4/P
卡安装到扩充槽中:
a
确定
DRAC 4/P
卡的位置,使卡边缘的连接器与主板上的主板卡连接器对准。
请参阅图
1
。
b
将卡边缘的连接器稳固地插入主板的卡连接器,直至插卡完全就位。
注:
某些系统使用塑料杆将扩充卡支架固定至背面板,而不是使用螺钉。
c
安装将扩充卡支架固定至背面板的螺钉。
6
合上系统外壳。有关说明,请参阅《安装与故障排除指南》中的“合上系统外壳”。
2004 年 9 月

www.dell.com | support.dell.com
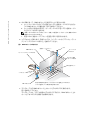
图
1.
安装
DRAC 4/P
卡
7
将显示器电缆连接至
DRAC 4/P
卡上的卡视频连接器。请参阅图
2
。
显示器电缆必须连接至
DRAC 4/P
卡上的卡视频连接器,而不要连接至系统的集成视频
连接器。
8
将网络连接至
DRAC 4/P
卡上的卡
NIC
连接器。请参阅图
2
。
网络电缆必须连接至
DRAC 4/P
卡上的卡
NIC
连接器,而不要连接至系统的集成
NIC
连
接器。
9
重新接通系统的交流电源,然后开机。
DRAC 4/P 卡
主板卡连接器
螺钉
扩充卡支架
扩充槽
接口电缆
RAC 连接器
卡接口连接器
卡边缘连接器
您的主板上的连接器和您实际使用的扩充槽可能有所不同,
视您的主板而定。

www.dell.com | support.dell.com
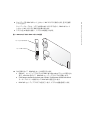
图
2. DRAC 4/P
视频和
NIC
连接器位置
10
配置
DRAC 4/P
卡:
a
在引导期间,屏幕将显示
DRAC 4/P <Ctrl><d>
设置程序选项。按
<Ctrl><d>
组合键,进入
DRAC 4/P
设置程序。
b
根据 《
Dell
远程访问控制器
4
用户指南》中的说明配置
DRAC 4/P
。
c
退出
DRAC 4/P
设置程序。系统然后继续执行引导过程。
如果您运行的是
Microsoft
®
Windows
®
操作系统,操作系统在启动时将会检测到几个与
DRAC 4/P
有关的新设备。这些设备的驱动程序位于
Dell OpenManage Server Assistant
CD
上
Systems Management
组下面的下列其中一个路径中:
Dell:Remote Access Controller - DRAC 4/P (Driver) Windows 2003 DRAC4 Drivers
(自解压文件)或
Dell:Remote Access Controller - DRAC 4/P (Driver) Windows 2000 DRAC4 Drivers
(自解压文件)
注:
当 Windows 启动和硬件向导找到新的 DRAC 4/P 显示适配器时,屏幕可能会闪烁多次。
注:
Novell
®
NetWare
®
和 Red Hat
®
Linux 操作系统使用自带的驱动程序。
卡视频连接器
卡 NIC 连接器

www.dell.com | support.dell.com
____________________
本文中的信息如有更改,恕不另行通知。
© 2004 Dell Inc.
版权所有,翻印必究。美国印制。
未经
Dell Inc.
书面许可,不得以任何方式进行复制。
本文中使用的商标:
Dell
、
DELL
徽标和
PowerEdge
是
Dell Inc.
的商标;
Microsoft
和
Windows
是
Microsoft
Corporation
的注册商标。
本文中述及的其他商标和产品名称是指拥有相应商标和名称的公司或其制造的产品。
Dell Inc.
对本公司的商标和产品名称之外的其他商标和产品名称不拥有任何专有权。

www.dell.com | support.dell.com
À propos de la mention “Précaution”
PRÉCAUTION : une PRÉCAUTION indique un risque potentiel d'endommagement du matériel,
de blessure corporelle ou de mort.
Installation d'une carte DRAC 4/P
AVIS : avant de procéder à l'installation d'une carte d'extension DRAC 4/P, prenez connaissance
des instructions d'installation.
PRÉCAUTION : la plupart des réparations doivent être effectuées uniquement par un technicien
de maintenance certifié. Procédez uniquement aux dépannages et réparations indiqués dans la
documentation du produit ou recommandés par les services de support en ligne ou par téléphone.
Les dommages causés par des interventions de maintenance non autorisées par Dell ne sont pas
couverts par votre garantie. Lisez et respectez les consignes de sécurité fournies avec le produit.
Ce document fournit des instructions particulières concernant l'installation d'un contrôleur d'accès
distant DRAC 4/P (Dell™ Remote Access Controller 4/P) sur un système Dell PowerEdge™.
PRÉCAUTION : pour éviter d'endommager la carte DRAC 4/P, assurez-vous que le système est
débranché avant l'installation.
1
Mettez le système hors tension et débranchez-le de la prise électrique.
Le
Guide d'information sur le produit
du système contient les consignes de sécurité qui
doivent être suivies avant l'ouverture du capot (mise hors tension, déconnexion de la prise
électrique, etc. Si le système dans lequel vous installez la carte DRAC 4/P est hors tension,
mais branché sur le secteur, un risque d'endommagement de la carte subsiste. Vérifiez que
le système est bien débranché avant d'installer la carte.
2
Ouvrez le système. Voir la section “Ouverture du système” dans le
Guide d'installation et
de dépannage
.
3
Déterminez le logement d'extension le plus approprié à l'installation de la carte DRAC 4/P.
Il est recommandé d'installer la carte dans le logement d'extension PCI le plus proche du
connecteur RAC de la carte système. Une illustration montrant les connecteurs de la carte
système se trouve à la section “Connecteurs de la carte système”, dans le
Guide d'installation
et de dépannage
(chapitre “Cavaliers, commutateurs et connecteurs”).
4
Connectez le câble d'interface de la carte DRAC 4/P au connecteur RAC de la carte système.
Voir la figure 1.
REMARQUE : le câble d'interface et les connecteurs sont munis d'un détrompeur pour être
connectés correctement.
Septembre 2004

www.dell.com | support.dell.com
5
Installez la carte DRAC 4/P dans le logement d'extension :
a
Positionnez la carte DRAC 4/P de sorte que le connecteur latéral s'aligne avec celui
de la carte système. Voir la figure 1.
b
Insérez ce connecteur latéral dans le connecteur de la carte système, jusqu'à ce que la carte
DRAC 4/P soit engagée à fond.
REMARQUE : sur certains systèmes, c'est une barre en plastique et non une vis qui est utilisée
pour fixer le support de la carte d'extension sur le panneau arrière.
c
Installez la vis qui fixe le support de carte d'extension au panneau arrière.
6
Refermez le système. Pour plus d'instructions, consultez la section “Fermeture du système”
du
Guide d'installation et de dépannage
.
Figure 1. Installation d'une carte DRAC 4/P
7
Branchez le câble du moniteur sur le connecteur vidéo de la carte DRAC 4/P. Voir la figure 2.
Le câble du moniteur doit être branché sur le connecteur vidéo de la carte DRAC 4/P
et non sur celui du système.
8
Branchez le câble réseau sur le connecteur NIC de la carte DRAC 4/P. Voir la figure 2.
Le câble réseau doit être branché sur le connecteur NIC de la carte DRAC 4/P et non sur celui
du système.
9
Rebranchez le système à la prise électrique et mettez-le sous tension.
Carte DRAC 4/P
Connecteur
de la carte
système
Vis
Support de carte d'extension
Logement
d'extension
Câble d'interface
Connecteur de la carte
d'accès distant
Connecteur
d'interface
Connecteur
latéral
Les connecteurs de la carte système et le logement d'extension
utilisé peuvent varier selon la carte système.

www.dell.com | support.dell.com
Figure 2. Emplacements des connecteurs NIC et vidéo sur la carte DRAC 4/P
10
Configurez la carte DRAC 4/P :
a
Au démarrage du système, l'option de configuration DRAC 4/P <Ctrl><d> s'affiche.
Appuyez sur <Ctrl><d> pour ouvrir le programme de configuration de la carte.
b
Configurez la carte comme indiqué dans le document
Dell Remote Access Controller 4
User's Guide
(Guide d'utilisation du contrôleur Dell DRAC 4).
c
Quittez le programme de configuration. Le système poursuit son démarrage.
Si vous utilisez un système d'exploitation Microsoft
®
Windows
®
, plusieurs nouveaux
périphériques liés à la carte DRAC 4/P sont détectés au démarrage du système. Les pilotes
de ces périphériques se trouvent dans l'un des chemins suivants, sous le groupe
Systems
Management
(Gestion de systèmes) du CD
Dell OpenManage Server Assistant
.
Dell : Remote Access Controller - DRAC 4/P (Driver) Windows 2003 DRAC4 Drivers
(zip auto-extractible)
ou
Dell : Remote Access Controller - DRAC 4/P (Driver) Windows 2000 DRAC4 Drivers
(zip auto-extractible)
REMARQUE : l'écran peut clignoter plusieurs fois au démarrage de Windows. Cela est dû à la
détection de la carte vidéo DRAC 4/P par l'Assistant Nouveau matériel.
REMARQUE : les systèmes d'exploitation Novell
®
NetWare
®
et Red Hat
®
Linux utilisent des pilotes
natifs.
Connecteur vidéo
Connecteur NIC

www.dell.com | support.dell.com
____________________
Les informations contenues dans ce document peuvent être modifiées sans préavis.
© 2004 Dell Inc. Tous droits réservés. Imprimé aux États-Unis.
La reproduction de ce document de quelque manière que ce soit sans l'autorisation écrite de Dell Inc. est strictement interdite.
Marques utilisées dans ce document : Dell, le logo DELL et PowerEdge sont des marques de Dell Inc. ;
Microsoft et Windows sont des marques déposées de Microsoft Corporation.
Tous les autres noms de marques et marques commerciales utilisés dans ce document se rapportent aux sociétés propriétaires
des marques et des noms de ces produits. Dell Inc. décline tout intérêt dans l'utilisation des marques déposées et des noms
de marques ne lui appartenant pas.

www.dell.com | support.dell.com
Warnhinweise
VORSICHT: VORSICHT zeigt eine potenziell gefährliche Situation an, die zu Sachschäden,
Verletzungen oder zum Tod führen könnte.
Installation der DRAC 4/P-Erweiterungskarte
HINWEIS: Lesen Sie diese Installationsanweisungen, bevor Sie die DRAC 4/P-Erweiterungskarte
einbauen.
VORSICHT: Viele Reparaturarbeiten dürfen nur von zugelassenen Servicetechnikern durchgeführt
werden. Fehlerbehebungsmaßnahmen oder einfache Reparaturen sollten Sie nur dann selbst
übernehmen, wenn dies mit der Produktdokumentation im Einklang steht oder Sie vom Team des
Online- oder Telefonsupports dazu aufgefordert werden. Schäden durch nicht von Dell genehmigte
Wartungsversuche werden nicht durch die Garantie abgedeckt. Lesen und befolgen Sie die zusammen
mit dem Produkt gelieferten Sicherheitshinweise.
Dieses Dokument enthält spezielle Anweisungen zur Installation der DRAC 4/P-Erweiterungskarte
(Dell™ Remote Access Controller 4/P) in ein Dell PowerEdge™-System.
VORSICHT: Um Schäden an der DRAC 4/P-Karte zu vermeiden, stellen Sie vor Installation der Karte
sicher, dass das System vom Netzstrom getrennt ist.
1
Fahren Sie das System herunter und trennen Sie es von der Netzstromquelle.
Im
Produktinformationshandbuch
des Systems ist beschrieben, welche Schritte vor dem
Öffnen der Systemabdeckung zur Sicherheit durchgeführt werden sollten, darunter
Ausschalten des Systems und Trennen der Netzstromverbindung. Beachten Sie, dass die
DRAC 4/P-Karte beschädigt werden kann, wenn sie in einem ausgeschalteten System
installiert wird, das noch immer an der Netzsteckdose angeschlossen ist. Vergewissern Sie
sich vor der Installation der DRAC 4/P-Karte, dass das System vom Netzstrom getrennt ist.
2
Öffnen Sie das System. Anweisungen finden Sie unter „Öffnen des Systems“ in der
Anleitung
zur Installation und Fehlersuche
.
3
Bestimmen Sie den am besten geeigneten Erweiterungssteckplatz für die DRAC 4/P-Karte.
Idealerweise sollte die DRAC 4/P-Karte in dem PCI-Erweiterungssteckplatz installiert
werden, der dem RAC-Anschluss auf der Systemplatine am nächsten liegt. Eine Darstellung
der Anschlüsse der Systemplatine finden Sie unter „Systemplatinenanschlüsse“ im Abschnitt
„Jumper, Schalter und Anschlüsse“ der
Anleitung zur Installation und Fehlersuche
.
September 2004

www.dell.com | support.dell.com
4
Verbinden Sie das Schnittstellenkabel der DRAC 4/P-Karte mit dem RAC-Anschluss
auf der Systemplatine. Siehe Abbildung 1.
ANMERKUNG: Das Schnittstellenkabel und die Anschlüsse sind codiert und lassen sich
nur auf eine Weise verbinden.
5
DRAC 4/P-Karte im Erweiterungssteckplatz einsetzen:
a
Halten Sie die DRAC 4/P-Karte so, dass der Platinenstecker mit dem Anschluss
auf der Systemplatine ausgerichtet ist. Siehe Abbildung 1.
b
Drücken Sie den Platinenstecker fest in den Anschluss auf der Systemplatine,
bis die Karte vollständig sitzt.
ANMERKUNG: Bei einigen Systemen wird die Halterung der Erweiterungskarte mit
einem Kunststoffteil statt mit einer Schraube an der Rückseite des Systems gesichert.
c
Befestigen Sie die Schraube, mit der die Erweiterungskartenhalterung an der Rückseite
gesichert wird.
6
Schließen Sie das System. Anweisungen finden Sie unter „Schließen des Systems“
in der
Anleitung zur Installation und Fehlersuche
.
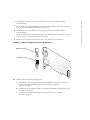
Abbildung 1. DRAC 4/P-Erweiterungskarte installieren
DRAC 4/P-Karte
Systemplatinen-
anschluss
Schraube
Erweiterungskartenhalterung
Erweiterungs-
steckplatz
Schnittstellenkabel
RAC-Anschluss
Kartenanschluss
Platinenstecker
Die Anschlüsse auf der Systemplatine und der tatsächliche
Erweiterungssteckplatz sind von der Systemplatine abhängig.

www.dell.com | support.dell.com
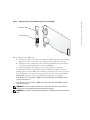
7
Verbinden Sie das Monitorkabel mit dem Bildschirmanschluss der DRAC 4/P-Karte.
Siehe Abbildung 2.
Das Monitorkabel muss am Bildschirmanschluss der DRAC 4/P-Karte angeschlossen werden,
nicht am integrierten Bildschirmanschluss des Systems.
8
Verbinden Sie das Netzwerkkabel mit dem Netzwerkanschluss der DRAC 4/P-Karte.
Siehe Abbildung 2.
Das Netzwerkkabel muss am Netzwerkanschluss der DRAC 4/P-Karte angeschlossen werden,
nicht am integrierten Netzwerkanschluss des Systems.
9
Schließen Sie das System an den Netzstrom an, und schalten Sie das System ein.
Abbildung 2. Bildschirm- und Netzwerkanschluss an der RAC 4/P-Karte
10
DRAC 4/P-Erweiterungskarte konfigurieren:
a
Während des Startvorgangs wird die Option zum DRAC 4/P-Setup mit <Strg><d>
angezeigt. Rufen Sie das DRAC 4/P-Setup-Programm auf, indem Sie
<Strg><d>drücken.
b
Konfigurieren Sie die DRAC 4/P-Karte wie im
Benutzerhandbuch zum Dell Remote Access
Controller 4
beschrieben.
c
Beenden Sie das DRAC 4/P-Setup-Programm. Das System setzt daraufhin
den Startvorgang fort.
Bildschirmanschluss
Netzwerkanschluss

www.dell.com | support.dell.com
Unter Microsoft
®
Windows
®
erkennt das Betriebssystem beim Startvorgang mehrere neue
DRAC 4/P-bezogene Geräte. Die Treiber für diese Geräte sind unter den folgenden Pfaden
in der Gruppe
Systems Management
(Systemverwaltung) auf der
Dell OpenManage Server
Assistant
-CD abgelegt:
Dell: Remote Access Controller - DRAC 4/P (Driver) Windows 2003 DRAC4 Drivers
(selbstentpackende Zip-Datei)
oder
Dell: Remote Access Controller - DRAC 4/P (Driver) Windows 2000 DRAC4 Drivers
(selbstentpackende Zip-Datei)
ANMERKUNG: Beim Startvorgang von Windows kann der Bildschirm einige Male blinken,
wenn der Hardware-Assistent den neuen DRAC 4/P-Grafikadapter identifiziert.
ANMERKUNG: Die Betriebssysteme Novell
®
NetWare
®
und Red Hat
®
Linux verwenden native Treiber.
____________________
Irrtümer und technische Änderungen vorbehalten.
© 2004 Dell Inc. Alle Rechte vorbehalten. Gedruckt in den USA.
Die Reproduktion dieses Dokuments in jeglicher Form ohne schriftliche Genehmigung von Dell Inc. ist streng verboten.
Marken in diesem Text: Dell, das DELL Logo und PowerEdge sind Marken von Dell Inc.;
Microsoft und Windows sind eingetragene Marken von Microsoft Corporation.
Alle anderen in dieser Dokumentation genannten Marken und Handelsbezeichnungen sind Eigentum der jeweiligen Hersteller
und Firmen. Dell Inc. erhebt keinen Anspruch auf Marken und Handelsbezeichnungen mit Ausnahme der eigenen.

www.dell.com | support.dell.com
警告について
警告: 物的損害、けが、または死亡の原因となる可能性があることを示します。
DRAC 4/P の取り付け
注意: DRAC 4/P 拡張カードを取り付ける前に、下記の取り付け手順をお読みください。
警告: 修理の多くは、資格を持つサービス技術者のみが行うことができます。 お客様は、
製品マニュアルで許可されている範囲に限り、またはオンラインサービスもしくはテレホン
サービスおよびサポートチームの指示によってのみ、トラブルシューティングと簡単な修理
を行うことができます。 デルが認可していないサービスによる故障は、保証の対象になりま
せん。 製品に同梱のマニュアルに書かれている安全にお使いいただくための注意をお読みに
なり、指示に従ってください。
本書では、
Dell PowerEdge™
システムに
Dell™ Remote Access Controller 4/P
(
DRAC 4/P
)カードを取り付けるための特別な手順について説明します。
警告: DRAC 4/P カードの損傷を防ぐために、カードを取り付ける前にシステムの電源プラグ
が AC 電源から取り外されていることを確認します。
1
システムをシャットダウンし、電源プラグを
AC
電源から取り外します。
ご使用のシステムに付属の『製品情報ガイド』には、システムの電源を切り、電源プ
ラグを
AC
電源から取り外すなど、システムのカバーを開く前に行うべき安全上必要
な一連の手順が記されています。
システムの電源がオフになっていても、
AC
電源装置
に接続したままの状態で
DRAC 4/P
カードを取り付けると、カードの損傷を招く場合
があります。
DRAC 4/P
カードを取り付ける前に、システムの電源プラグが
AC
電源装
置から取り外されていることを確認してください。
2
システムカバーを開きます。
手順については、『インストール&トラブルシューティン
グ』の「システムカバーの開き方」を参照してください。
3
DRAC 4/P
カードにとってどの拡張スロットが最適かを判断します。
DRAC 4/P
カードは、システム基板上の
RAC
コネクタに最も近い
PCI
拡張スロットに
取り付けるのが理想的です。
システム基板のコネクタの図については、『インストール
&トラブルシューティング』の「ジャンパ、スイッチ、コネクタ」の「システム基板
コネクタ」を参照してください。
4
カードに接続されている
DRAC 4/P
カードインタフェースケーブルを、システム基板
上のシステムの
RAC
コネクタに接続します。
図
1
を参照してください。
メモ: インタフェースケーブルとコネクタは、決まった方向にしか接続できないように
設計されています。
2004 年 9 月

www.dell.com | support.dell.com
5
次の手順に従って、
DRAC 4/P
カードを拡張スロットに取り付けます。
a
カードエッジコネクタがシステム基板上のシステム基板カードコネクタと揃うよ
うに
DRAC 4/P
カードを置きます。
図
1
を参照してください。
b
カードが完全に装着されるまで、カードエッジコネクタをシステム基板カードコ
ネクタにしっかり押し込みます。
メモ: ネジの代わりにプラスチックバーを使って拡張カードブラケットを背面パネルに
固定するシステムもあります。
c
背面パネルに拡張カードブラケットを固定するネジを取り付けます。
6
システムカバーを閉じます。
手順については、『インストール&トラブルシューティン
グ』の「システムカバーの閉じ方」を参照してください。
図 1 DRAC 4/P カードの取り付け
7
モニタケーブルを
DRAC 4/P
カード上のカードビデオコネクタに接続します。
図
2
を参照してください。
モニタケーブルは、システム内蔵のビデオコネクタではなく、
DRAC 4/P
カード上の
カードビデオコネクタに接続する必要があります。
DRAC 4/P カード
システム基板
カードコネクタ
ネジ
拡張カードブラケット
拡張スロット
インタフェースケーブル
RAC コネクタ
カードインタフェースコネクタ
カードエッジ
コネクタ
使用する実際の拡張スロットおよびシステム基板上のコネクタは、
システム基板によって異なる場合があります。

www.dell.com | support.dell.com
8
ネットワークを
DRAC 4/P
カード上のカード
NIC
コネクタに接続します。
図
2
を参照
してください。
ネットワークケーブルは、システム内蔵の
NIC
コネクタではなく、
DRAC 4/P
カード
上のカード
NIC
コネクタに接続する必要があります。
9
システムを
AC
電源に接続し、システムの電源を入れます。
図 2 DRAC 4/P ビデオおよび NIC コネクタの位置
10
次の手順に従って、
DRAC 4/P
カードの設定を行います。
a
起動中に、セットアッププログラムの
DRAC 4/P <Ctrl><d>
オプションが表示され
ます。
<Ctrl><d>
を押して、
DRAC 4/P
セットアッププログラムを起動します。
b
『
Dell Remote Access Controller 4 User's Guide
』(
Dell Remote Access Controller 4
ユーザーズガイド)の説明に従って
DRAC 4/P
の設定を行います。
c
DRAC 4/P
セットアッププログラムを終了します。
システムは起動を続行します。
カードビデオコネクタ
カード NIC コネクタ

www.dell.com | support.dell.com
Microsoft
®
Windows
®
オペレーティングシステムを実行している場合は、オペレー
ティングシステムの起動時にいくつかの新しい
DRAC 4/P
関連デバイスが検出されま
す。
これらのデバイスのドライバは、『
Dell OpenManage Server Assistant CD
』内の
Systems Management
グループ下の以下のいずれかのパスにあります。
Dell: Remote Access Controller - DRAC 4/P (Driver) Windows 2003 DRAC4
Drivers (Self Extracting Zip)
または
Dell: Remote Access Controller - DRAC 4/P (Driver) Windows 2000 DRAC4
Drivers (Self Extracting Zip)
(いずれも自己解凍式
Zip
ファイル)
メモ: Windows が起動し、ハードウェアウィザードが新しい DRAC 4/P ディスプレイアダプタ
を検出する時に、画面が何度か点滅する場合があります。
メモ: Novell
®
NetWare
®
および Red Hat
®
Linux オペレーティングシステムでは、
ネイティブドライバが使用されます。
____________________
本書の内容は予告なく変更されることがあります。
© 2004 すべての著作権は Dell Inc. にあります。 Printed in the U.S.A.
Dell Inc. の書面による許可のない複製は、いかなる形態においても厳重に禁じられています。
このマニュアルに使用されている商標: Dell、DELL ロゴ、および PowerEdge は Dell Inc. の商標です。
Microsoft および Windows は Microsoft Corporation の登録商標です。
本書では、必要に応じて上記記載以外の商標や会社名が使用されている場合がありますが、
これらの商標や会社名は、一切 Dell Inc. に所属するものではありません。

www.dell.com | support.dell.com
주의 기호
주의 : 이 기호는 재산상의 피해나 심각한 부상 또는 사망을 유발할 수 있는 위험이 있음을 경고
하는 표시입니다 .
DRAC 4/P 설치
주의사항 : DRAC 4/P 확장카드를 설치하기 전에 다음의 설치 지침을 숙지하시기 바랍니다 .
주의 : 대부분의 수리 작업은 유자격 서비스 기술자에 의해서만 이루어져야 합니다 . 사용자는 제
품 설명서에서 허가한 경우나 온라인 또는 전화서비스 / 지원팀에서 지시한 경우에만 문제 해결
절차 및 단순 수리 작업을 수행할 수 있습니다 . Dell 에서 공인하지 않은 서비스로 인한 손상에 대
해서는 보상을 받을 수 없습니다 . 제품과 함께 제공된 안전 지침을 읽고 따르십시오 .
이
문서에서는
Dell™ Remote Access Controller 4/P (DRAC 4/P)
카드를
Dell PowerEdge™
시스템에
설치하는데
필요한
특별
지침을
설명합니다
.
주의 : DRAC 4/P 카드의 손상을 방지하기 위해 카드를 설치하기 전에 시스템을 AC 전원으로부터
분리해야 합니다 .
1
시스템을
종료한
후
AC
전원을
분리합니다
.
시스템과
함께
제공되는
시스템
정보
설명서에는
시스템
종료와
AC
전원
분리
등
시스템
덮개를
열기
전에
수행해야
하는
안전
절차가
설명되어
있습니다
.
시스템이
AC
전원
공급
장치에
연결되어
있는
경우에는
주의가
필요합니다
.
이
경우
전원이
꺼져있어도
DRAC 4/P
카드를
설치하면
DRAC 4/P
카드가
손상될
우려가
있습니다
. DRAC 4/P
카드를
설치하기
전에
시스템이
AC
전원
공급
장치로부터
분리되어
있는지
확인하십시오
.
2
시스템을
엽니다
.
설치
및
문제
해결
설명서의
"
시스템
열기
"
를
참조하십시오
.
3
DRAC 4/P
카드에
적합한
확장
슬롯을
결정합니다
.
DRAC 4/P
카드는
시스템
보드
상의
RAC
커넥터와
가장
근접한
PCI
확장
슬롯에
설치하
는
것이
가장
좋습니다
.
시스템
보드
커넥터에
대한
그림은
설치
및
문제
해결
설명서
에
서
"
점퍼
,
스위치
및
커넥터
"
의
"
시스템
보드
커넥터
"
를
참조하십시오
.
4
카드의
DRAC 4/P
카드
인터페이스
케이블을
시스템
보드
상의
시스템
RAC
커넥터에
연
결합니다
.
그림
1
을
참조하십시오
.
참고 : 인터페이스 케이블 및 커넥터는 한 방향으로만 연결할 수 있으며 연결한 후에는 쉽게
빠지지 않습니다 .
5
DRAC 4/P
카드를
확장
슬롯에
설치합니다
.
a
카드
에지
커넥터를
시스템
보드
상의
시스템
보드
카드
커넥터에
맞춰
-DRAC 4/P
카
드를
위치시킵니다
.
그림
1
을
참조하십시오
.
2004 년 9 월

www.dell.com | support.dell.com
b
카드가
완전히
고정될
때까지
카드
에지
커넥터를
시스템
보드
카드
커넥터에
-
단단히
끼웁니다
.
참고 : 일부 시스템에서는 나사 대신에 플라스틱 막대를 사용하여 확장카드 브래킷을 후면
패널에 고정시킵니다 .
c
나사를
이용하여
확장카드
브래킷을
후면
패널에
고정시킵니다
.
6
시스템을
닫습니다
.
설치
및
문제
해결
설명서의
"
시스템
열기
"
를
참조하십시오
.
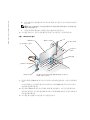
그림 1. DRAC 4/P 카드 설치
7
모니터
케이블을
DRAC 4/P
카드의
카드
비디오
커넥터에
연결합니다
.
그림
2
를
참조하십
시오
.
모니터
케이블은
시스템의
통합
비디오
커넥터가
아니라
DRAC 4/P
카드의
카드
비디오
커넥터에
연결해야
합니다
.
8
네트워크를
DRAC 4/P
카드의
카드
NIC
커넥터에
연결합니다
.
그림
2
를
참조하십시오
.
네트워크
케이블은
시스템의
통합
NIC
커넥터가
아니라
DRAC 4/P
카드의
카드
NIC
커넥
터에
연결해야
합니다
.
9
시스템을
AC
전원에
다시
연결한
후
시스템을
켭니다
.
DRAC 4/P 카드
시스템 보드
커넥터
나사
확장카드 브래킷
확장 슬롯
인터페이스 케이블
RAC 커넥터
카드 인터페이스 커넥터
카드 에지 커넥터
시스템 보드의 커넥터와 사용할 실제 확장 슬롯은 시스템 보드
에 따라 다를 수 있습니다 .

www.dell.com | support.dell.com
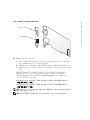
그림 2. DRAC 4/P 비디오 및 NIC 커넥터 위치
10
DRAC 4/P
카드를
구성합니다
.
a
부팅
중에
DRAC 4/P <Ctrl><d>
설치
프로그램
옵션이
표시됩니다
. <Ctrl><d>
를
눌러
DRAC 4/P
설치
프로그램을
실행합니다
.
b
Dell Remote Access Controller 4
사용
설명서에
설명된
대로
DRAC 4/P
를
구성합니다
.
c
DRAC 4/P
설치
프로그램을
종료합니다
.
그러면
계속하여
시스템
부팅
과정이
진행됩
니다
.
Microsoft
®
Windows
®
운영
체제를
실행하는
경우
운영
체제가
시작될
때
새로운
DRAC 4/P
관련
장치
서너
개가
자동으로
검색됩니다
.
이
장치들의
드라이버는
Dell OpenManage Server Assistant
CD
의
Systems Management
그룹
아래
있는
다음
경로
중
한
곳에
들어
있습니다
.
Dell: Remote Access Controller - DRAC 4/P (Driver) Windows 2003 DRAC4 Drivers
(
자동
압축
해제
Zip
파일
)
또는
Dell: Remote Access Controller - DRAC 4/P (Driver) Windows 2000 DRAC4 Drivers
(
자동
압축
해제
Zip
파일
)
참고 : Windows 가 시작되고 하드웨어 마법사에서 새 DRAC 4/P 디스플레이 어댑터를 검색할 때
화면이 몇 번 깜박일 수 있습니다 .
참고 : Novell
®
NetWare
®
및 Red Hat
®
Linux 운영 체제에서는 기본 드라이버를 사용합니다 .
카드 비디오 커넥터
카드 NIC 커넥터

www.dell.com | support.dell.com
____________________
본 설명서에 수록된 정보는 사전 통보 없이 변경될 수 있습니다 .
© 2004 Dell Inc. All rights reserved. 미국에서 인쇄됨 .
어떠한 경우에도 Dell Inc. 의 사전 승인 없이 무단 복제하는 행위는 엄격하게 금지되어 있습니다 .
본 설명서에 사용된 상표인 Dell, DELL 로고 및 PowerEdge 는 Dell Inc. 의 상표이며 ,
Microsoft 와 Windows 는 Microsoft Corporation 의 등록 상표입니다 .
본 설명서에서 특정 회사의 표시나 제품 이름을 지칭하기 위해 기타 상표나 상호를 사용할 수도 있습니다 .
Dell Inc. 는 자사가 소유하고 있는 것 이외에 기타 모든 등록 상표 및 상표 이름에 대한 어떠한 소유권도 보
유하지 않습니다 .

www.dell.com | support.dell.com
Información sobre los avisos de precaución
PRECAUCIÓN: un mensaje de PRECAUCIÓN indica el riesgo de daños materiales, lesiones corporales
o incluso la muerte.
Instalación de DRAC 4/P
AVISO: lea estas instrucciones de instalación antes de instalar la tarjeta de expansión DRAC 4/P.
PRECAUCIÓN: muchas reparaciones deben realizarlas únicamente los técnicos de servicio
autorizados. El usuario tan sólo debe solucionar los problemas y realizar las reparaciones sencillas
que se autorizan en la documentación del producto o si se lo indica el equipo de servicio y asistencia
en línea o telefónico. La garantía no cubre los daños debidos a reparaciones no autorizadas por Dell.
Lea y siga las instrucciones de seguridad entregadas con el producto.
Este documento proporciona instrucciones especiales para instalar la tarjeta Dell™ Remote Access
Controller 4/P (DRAC 4/P) en el sistema Dell PowerEdge™.
PRECAUCIÓN: a fin de no dañar la tarjeta DRAC 4/P, asegúrese de que el sistema está desenchufado
de la fuente de energía de CA antes de instalar la tarjeta.
1
Apague el sistema y desconéctelo de la fuente de energía de CA.
En la
Guía de información del producto
del sistema se especifican una serie de pasos de
seguridad que debe realizar antes de abrir la cubierta del sistema, como apagar el sistema y
desconectarlo de la fuente de energía de CA. La tarjeta DRAC 4/P podría resultar dañada si se
instala en un sistema que esté apagado, pero conectado a la fuente de alimentación de CA.
Asegúrese de que el sistema esté desconectado de la fuente de alimentación de CA antes de
instalar la tarjeta DRAC 4/P.
2
Abra el sistema. Consulte “Apertura del sistema” en la
Guía de instalación y solución
de problemas
para obtener instrucciones al respecto.
3
Determine qué ranura de expansión es la adecuada para la tarjeta DRAC 4/P.
Lo idóneo es instalar la tarjeta DRAC 4/P en la ranura de expansión PCI más cercana
al conector RAC de la placa base. Consulte “Conectores de la placa base” en “Puentes,
interruptores y conectores” de la
Guía de instalación y solución de problemas
para ver
una ilustración de los conectores de la placa base del sistema.
4
Conecte el cable de interfaz de la tarjeta DRAC 4/P al conector RAC de la placa base.
Consulte la figura 1.
NOTA: el cable de interfaz y los conectores están diseñados para admitir únicamente una posición
de encaje.
Septiembre de 2004

www.dell.com | support.dell.com
5
Instale la tarjeta DRAC 4/P en la ranura de expansión:
a
Coloque la tarjeta DRAC 4/P de forma que el conector de borde de tarjeta esté alineado
con el conector de tarjeta de la placa base. Consulte la figura 1.
b
Inserte firmemente el conector de borde de tarjeta en el conector de tarjeta de la placa
base hasta que esté totalmente encajado.
NOTA: algunos sistemas utilizan una barra de plástico en vez de un tornillo para fijar el soporte
de la tarjeta de expansión al panel posterior.
c
Monte el tornillo que fija el soporte de la tarjeta de expansión al panel posterior.
6
Cierre el sistema. Consulte “Cierre del sistema” en la
Guía de instalación y solución de
problemas
para obtener instrucciones al respecto.
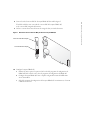
Figura 1. Instalación de la tarjeta DRAC 4/P
7
Conecte el cable del monitor al conector de vídeo de la tarjeta DRAC 4/P.
Consulte la figura 2.
El cable del monitor debe estar conectado al conector de vídeo de la tarjeta DRAC 4/P,
no al conector de vídeo integrado del sistema.
Tarjeta DRAC 4/P
Conector de
tarjeta de la
placa base
Tornillo
Soporte de la tarjeta de expansión
Ranura de
expansión
Cable de interfaz
Conector RAC
Conector de interfaz
de tarjeta
Conector de
borde de
tarjeta
Los conectores de la placa base y la ranura de expansión que
está utilizando pueden variar en función de la placa base.

www.dell.com | support.dell.com
8
Conecte la red al conector NIC de la tarjeta DRAC 4/P. Consulte la figura 2.
El cable de red debe estar conectado al conector NIC de la tarjeta DRAC 4/P,
no al conector NIC integrado del sistema.
9
Vuelva a conectar el sistema a la fuente de energía de CA y encienda el sistema.
Figura 2. Ubicaciones de los conectores NIC y de vídeo en la tarjeta DRAC 4/P
10
Configure la tarjeta DRAC 4/P:
a
Durante el inicio, aparece la opción <Ctrl><d> del programa de configuración de
DRAC 4/P. Pulse <Ctrl><d> y abra el programa de configuración de DRAC 4/P.
b
Configure la tarjeta DRAC 4/P como se explica en la guía del usuario de Dell Remote
Access Controller 4.
c
Salga del programa de configuración de la tarjeta DRAC 4/P. A continuación, el sistema
continúa con el inicio.
o
nector de vídeo de la tarjeta
Conector NIC de la tarjeta

www.dell.com | support.dell.com
Si utiliza un sistema operativo Microsoft
®
Windows
®
, el sistema operativo detecta varios
dispositivos nuevos relacionados con la tarjeta DRAC 4/P cuando se inicia. Los controladores
para esos dispositivos se encuentran en una de las siguientes rutas bajo el grupo
Systems
Management
en el CD
Dell OpenManage Server Assistant
:
Dell: Remote Access Controller - DRAC 4/P (Driver) Windows 2003 DRAC4 Drivers
(Self Extracting Zip)
o bien
Dell: Remote Access Controller - DRAC 4/P (Driver) Windows 2000 DRAC4 Drivers
(Self Extracting Zip)
NOTA: la pantalla puede parpadear varias veces cuando Windows se inicia y el asistente de hardware
detecta el nuevo adaptador para pantalla de DRAC 4/P.
NOTA: los sistemas operativos de Novell
®
NetWare
®
y Red Hat
®
Linux utilizan controladores nativos.
____________________
La información contenida en este documento puede modificarse sin previo aviso.
© 2004 Dell Inc. Reservados todos los derechos. Impreso en EE. UU.
Queda estrictamente prohibida la reproducción de este documento en cualquier forma sin la autorización por escrito de Dell Inc.
Marcas comerciales utilizadas en este texto: Dell, el logotipo de DELL y PowerEdge son marcas comerciales de Dell Inc.;
Microsoft y Windows son marcas comerciales registradas de Microsoft Corporation.
Otras marcas y otros nombres comerciales pueden utilizarse en este documento para hacer referencia a las entidades que los
poseen o a sus productos. Dell Inc. renuncia a cualquier interés sobre la propiedad de marcas y nombres comerciales que no
sean los suyos.
-
 1
1
-
 2
2
-
 3
3
-
 4
4
-
 5
5
-
 6
6
-
 7
7
-
 8
8
-
 9
9
-
 10
10
-
 11
11
-
 12
12
-
 13
13
-
 14
14
-
 15
15
-
 16
16
-
 17
17
-
 18
18
-
 19
19
-
 20
20
-
 21
21
-
 22
22
-
 23
23
-
 24
24
-
 25
25
-
 26
26
-
 27
27
-
 28
28


