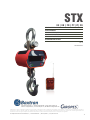
Baxtran STX Manual de usuario
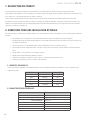
- Categoría
- Escalas personales
- Tipo
- Manual de usuario

11
V.2.2
ES | EN | FR | PT| IT| DE
MANUAL DE USUARIO
USER’S MANUAL
MANUEL D’UTILISATION
MANUAL DE USUÁRIO
MANUALE DI ISTRUZIONI
BEDIENUNGSANLEITUNG
STX
08/03/2023
Pol. Empordà Internacional Calle Molló, 3 | 17469 VILAMALLA - (Girona) SPAIN | T. (34) 972 527 212
El fabricante se reserva el derecho de modificar sin previo aviso las características de sus productos para introducir mejoras técnicas o cumplir con nuevas regulaciones oficiales./Le
constructeur se réserve le droit de modifier les caractéristiques de ses produits en vue d’y apporter des améliorations techniques ou de respecter de nouvelles réglamentations./The
manufacturer reserves the right to modify the specifications of its products in order to make technical improvements or comply with new regulations.
trade mark propiety of | marca propiedad de | trade mark propiety of
marchio di proprietà di | est une marque de | Die Marke ist Eigentum von:

STX

3
ESESMANUAL DE USUARIO STX
ÍNDICE
ES
1. DESCRIPCIÓN DEL PRODUCTO 4
2. DESCRIPCIÓN DEL PANEL 4
2.1 MODELOS DISPONIBLES 4
2.2 CARACTERÍSTICAS GENERALES 4
3. REQUISITOS PARA UNA ÓPTIMA INSTALACIÓN 5
4. FUNCIÓN DE LAS TECLAS DEL CONTROL REMOTO 5
5.UTILIZACIÓN DEL GANCHO 5
5.1 ENCENDER EL GANCHO 5
5.2 APAGAR EL GANCHO 5
5.3 TARA Y PUESTA A CERO 6
5.4 FUNCIÓN DE ACUMULACIÓN DE PESADAS 6
5.5 FUNCIÓN HOLD 6
5.6 SELECCIÓN DEL CANAL REMOTO 6
6. CALIBRACIÓN 6
7.CONFIGURACIÓN 7

ESESMANUAL DE USUARIO STX
4
1. DESCRIPCIÓN DEL PRODUCTO
El gancho STX combina célula, indicador de peso y batería, todo ubicado dentro de una robusta carcasa de aleación de aluminio.
Puede ser fácilmente montado en cualquier grúa o polipasto para pesar una amplia variedad de productos y equipos, accesorios (correas,
cadenas, etc...) pueden ser tarados para obtener el peso neto.
La pantalla cuenta con tecnología led súper brillante para proporcionar una distancia de visualización de hasta 25 metros.
Este dispositivo de medición de peso altamente eficiente representa una solución de pesaje muy asequible, de alto rendimiento y fiable para
cargas suspendidas y es ampliamente utilizado para una multitud de aplicaciones en diversas industrias como líneas eléctricas, construcción,
agricultura, puertos, almacenes, etc...
2. REQUISITOS PARA UNA OPTIMA INSTALACIÓN
Para obtener el máximo rendimiento y los mejores resultados, recomendamos utilizar e instalar el gancho de acuerdo con los siguientes requi-
sitos:
• No sobrecargar el gancho pesador, esto podría dañar la célula de carga y anular la garantía.
• No deje objetos colgados durante mucho tiempo, esto podría disminuir la precisión del gancho y reducir la duración de la célula
de carga.
• Antes de su utilización revisar la cadena y el gancho. Revisar regularmente los clips, pins y tornillos.
• Revisar con frecuencia la carga de la batería. Cuando el gancho se queda sin energía, cargar la batería con el alimentador/carga-
dor suministrado.
• No utilizar el gancho pesador en el caso de tormentas o lluvia.
• No someterlo a atmósferas con gases corrosivos.
• Instalar el gancho en un lugar seco y bien ventilado, no situarlo directamente sobre el suelo.
• No intentar reparar el gancho, contactar con su proveedor.
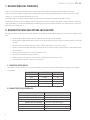
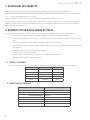
2.1 MODELOS DISPONIBLES
Para obtener el máximo rendimiento y los mejores resultados, recomendamos utilizar e instalar el gancho de acuerdo con los siguien-
tes requisitos:
Modelo Capacidad División (E)
STX1 1.000kg 200g
STX3 3.000kg 1kg
STX5 5.000kg 2kg
STX10 10.000kg 5kg
STX15 15.000kg 5kg
2.2 CARACTERÍSTICAS GENERALES
Classe III
Rango de Tara 100% Capacidad máxima
Tiempo de estabilización 10 s
Aviso de sobrecarga Max +9e
Máximo valor de sobrecarga 125% de la capacidad máxima
Alimentación Batería recargable 6V/1.4Ah
Display LED de 30mm altura
Rango del control remoto ≤ 20m

5
ESESMANUAL DE USUARIO STX
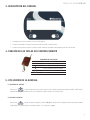
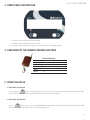
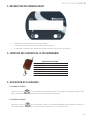
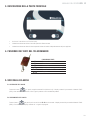
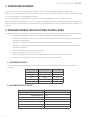
3. DESCRIPCIÓN DEL FRONTAL
• La pantalla es de 30 mm de altura con 5 secciones (dígitos).
• La indicación situada en el extremo izquierdo se ilumina cuando se realiza una tara
• La indicación del extremo derecho se ilumina cuando la báscula está estable independientemente del peso aplicado.
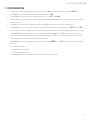
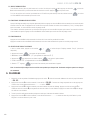
4. FUNCIÓN DE LAS TECLAS DEL CONTROL REMOTO
FUNCIONES DE LAS TECLAS
ATotalizar/Confirmar
BTara/Cero
CAcumular
D“Hold” (mantener lectura en display)
A+B Borrar total acumulado
B+D Apagar
5. UTILIZACIÓN DE LA BÁSCULA
5.1 ENCENDER EL GANCHO
Pulsar la tecla , el gancho realizará un auto chequeo (Versión 6.0), el display mostrará el porcentaje de batería “PA85”(85%) y
seguidamente se realiza la inicialización del cero y finalmente el gancho entrará en el modo de pesaje.
5.2 APAGAR EL GANCHO
Pulsar la tecla del gancho durante 2 segundos o las teclas D y B del control remoto. El display mostrará el porcentaje de batería
“PA80”(80%) 1,5 segundos después, el display mostrará “off” y el gancho se apagará.

ESESMANUAL DE USUARIO STX
6
5.3 TARA Y PUESTA A CERO
Para realizar una tara coloque el peso a tarar en el gancho, una vez tenga el peso estable pulse la tecla o la tecla B del control remoto
y el peso quedara tarado en la memoria del gancho. (Pulsar para destarar)
Si en el gancho no tenemos nada colgado, el peso debería ser cero, si nos muestra algún peso estando vacío, utilizaremos la tecla
del gancho o la tecla B del control remoto, para realizar el cero.
5.4 FUNCIÓN DE ACUMULACIÓN DE PESADAS
Cuando la lectura del display esté estable y con un peso por encima de 20 divisiones pulsar la tecla C del control remoto para acumular la
pesada efectuada y así consecutivamente. Pulsando la tecla C, a cada pesada iremos visualizando el número de acumulaciones (“n32”),
transcurridos 2 segundos el gancho vuelve al modo normal de pesaje.
Para visualizar la última pesada, así como el ultimo total, presione la tecla A en cualquier momento. Para cancelar la función de acumulación
de pesadas, pulsar la tecla B del control remoto para volver al modo normal de pesaje
5.5 FUNCIÓN HOLD
Pulsar la tecla D del control remoto, la lectura del display quedará fijada durante 30 segundos.
Pulsar de nuevo la tecla D del control remoto, la función Hold se desactiva y entra al modo normal de pesaje.
5.6 SELECCIÓN DEL CANAL REMOTO
1. Con el gancho apagado, pulsar las teclas y al mismo tiempo. El display mostrará: “Dsp X”. (función no disponible)
2. Pulsar la tecla para pasar a la siguiente opción.
3. Ahora la pantalla mostrara “CHX ” (“X ” que representa el canal actual 0-7 )
4. Presionar para seleccionar un canal y presionar para ir a la siguiente opción
5. La pantalla mostrarà “Ft0 ”.(Configuración del comando).
6. Mantener en "0 ". Presionar para volver el modo de pesaje y reiniciar el aparato.
Nota: El canal ya viene configurado con el mando correspondiente a cada gancho. Solo configurar cuando se haga un cambio
del mando
6. CALIBRACIÓN
1. Encender el gancho y durante la inicialización, mantener pulsada la tecla D del control remoto hasta visualizar “CAL SP”.
2. Pulsar la tecla A del control remoto, el display mostrará “CAL 00”, sin carga colgada en el gancho, pulsar la tecla A y el display mos-
trará brevemente “------“ y finalmente “LOAD”.
3. Pulsar la tecla D del control remoto para introducir el valor de la pesa de calibración. Apretar la tecla C una vez, o mantener pulsada la
tecla D para incrementar el valor del dígito en edición y pulsar solo una vez D, para cambiar de dígito en edición.
4. Colocar la pesa de calibración y espere unos segundos hasta que el indicador de estabilidad se encienda.
5. Pulsar la tecla A del control remoto, el display mostrará brevemente “------“ y finalmente mostrará el valor de peso. Retire la pesa y
apague el gancho y vuélvala a encenderlo para testear.

7
ESESMANUAL DE USUARIO STX
7. CONFIGURACIÓN
• Encender el gancho y durante la inicialización, mantener pulsada la tecla D del control remoto hasta visualizar “CAL SP”.
• Pulsar la tecla D del control remoto de nuevo, la pantalla mostrará “SET”.
• Pulsar la tecla A del control para visualizar el escalón actual “ej: d 2 → e=2kg”.
• Utilizar la tecla D del control remoto para cambiar el valor de la división y pulsar la tecla A del control remoto para confirmar y acceder
al siguiente parámetro.
• El display muestra ahora la capacidad programada en fábrica. Utilizar la tecla D del control remoto para cambiar el valor
• Pulsar la tecla A del control remoto para validar y que el display muestre el valor del filtro de pesaje, el display mostrará “ej fLT 00”.
Utilizar la tecla D del control remoto para cambiar el valor del filtro (cómo más alto el valor, más estable la lectura de peso, pero más
lenta la respuesta)
• Pulsar la tecla A del control remoto para validar, el display mostrará “ ej. rng 1” Utilizar la tecla D del control remoto para cambiar el
valor del rango de cero. (Cómo más alto el valor, menor desviación de cero y mayor recuperación del cero. Por el contrario, los valores
altos pueden interferir en el pesaje de cargas ligeras)
• Pulsar la tecla A del control remoto para validar, el display visualizará “AUPf0”.Utilice la tecla D para elegir el tiempo de auto apagado
deseado.
0 = sin auto apagado
1 = auto apagado en 15 minutos
2 = auto apagado en 30 minutos
• Pulsar la tecla A del control remoto para confirmar y volver al modo normal de pesaje.

STX

9
ENENUSER’S MANUAL STX
CONTENTS
EN
1. PRODUCT DESCRIPTION 10
2. PANEL DESCRIPTION 10
2.1 AVAILABLE MODELS 10
2.2 GENERAL FEATURES 10
3. REQUIREMENTS FOR OPTIMAL INSTALLATION 11
4. FUNCTIONS OF THE REMOTE CONTROL BUTTONS 11
5.USING THE HOOK. 11
5.1 SWITCHING THE HOOK ON 11
5.2 SWITCHING THE HOOK OFF 11
5.3 TARE AND ZEROING 12
5.4 SUMMING FUNCTION 12
5.5 HOLD FUNCTION 12
5.6 REMOTE CHANNEL SELECTION 12
6. CALIBRATION 12
7.CONFIGURATION 13

ENENUSER’S MANUAL STX
10
1. PRODUCT DESCRIPTION
The STX hook combines cell, weight indicator and battery, all inside a sturdy aluminium alloy housing.
It can be easily mounted on any crane or hoist to weigh a wide variety of products and equipment. Accessories (belts, chains, etc.) can be
zeroed to obtain the net weight.
The display features super bright LED technology which allows visualisation from up to 25 meters.
This highly efficient weight measuring device represents a very affordable, high performance and reliable weighing solution for suspended
loads and is widely used for a multitude of applications in various industries such as electric power, construction, agriculture, harbours, ware-
houses, etc.
2. REQUIREMENTS FOR OPTIMAL INSTALLATION
For maximum performance and best results, we recommend using and installing the hook in accordance with the following requirements:
• Do not overload the weighing hook, this could damage the load cell and void the warranty.
• Do not leave objects hanging for a long time, this could decrease the accuracy of the hook and shorten the life of the load cell.
• Check the chain and hook before using. Check clips, pins and screws regularly.
• Check the battery charge frequently. When the hook runs out of power, charge the battery with the charger supplied.
• Do not expose the weighing hook to the rain.
• Do not expose it to environments with corrosive gases.
• Install the hook in a dry and well-ventilated place; do not set it directly on the ground.
• Do not attempt to repair the hook; contact your supplier.
2.1 AVAILABLE MODELS
For maximum performance and best results, we recommend using and installing the hook in accordance with the following require-
ments:
Model Capacity Division (E)
STX1 1,000kg 200g
STX3 3,000kg 1kg
STX5 5,000kg 2kg
STX10 10,000kg 5kg
STX15 15,000kg 5kg
2.2 GENERAL FEATURES
Class III.
Tare Range 100% Maximum capacity
Stabilisation time 10 s
Overload warning Max +9e
Maximum overload value 125% of maximum capacity
Power supply Rechargeable battery 6V/1.4Ah
Display 30mm high LED
Remote control range ≤ 20m

11
ENENUSER’S MANUAL STX
3. FRONT PANEL DESCRIPTION
• The screen is 30 mm high and has 5 sections (digits).
• The signal on the far left lights up when there is a tare.
• The signal on the far right lights up when the scale is stable regardless of the weight applied.
4. FUNCTIONS OF THE REMOTE CONTROL BUTTONS
BUTTON FUNCTIONS
ATotalize / Confirm
BTara / Zero
CSumming function
DHold function (keep reading on display)
A+B Delete accumulated total
B+D Off
5. USING THE SCALE
5.1 SWITCHING THE HOOK ON
Upon pressing the button, the hook will perform a self-check Version 6.0, the display will show the remaining battery “PA85”
(85%), the zeroing initialisation will be performed and finally the hook will enter weighing mode.
5.2 SWITCHING THE HOOK OFF
Press the hook button for 2 seconds or the D and B remote control buttons. The display will show the battery percentage “PA80”
(80%), after 1.5 seconds the display will say “off” and the hook will turn off.

ENENUSER’S MANUAL STX
12
5.3 TARE AND ZEROING
To tare, place the weight to be tared on the hook. Once the weight is stable, press the button or the B button on the remote and the
weight will be saved in the hook’s memory. Press to remove the tare.
If there is nothing hanging on the hook, the weight should be zero. If it shows any other value while empty, use the hook button or
the B button on the remote to set it to zero.
5.4 SUMMING FUNCTION
When the display reading is stable and the weight exceeds 20 divisions, press the C button on the remote to sum up the measures. By pressing
the C button after each weighing, the display will show the number of measures (“n32”), and after 2 seconds the hook will return to the normal
weighing mode.
To display the previous weight, as well as the previous total weight, press the A button at any time. To cancel the summing function, press the
B button on the remote to return to the normal weighing mode
5.5 HOLD FUNCTION
Press the D button on the remote to fix the reading on the display for 30 seconds.
Press the D button on the remote again to turn off the Hold function and enter normal weighing mode.
5.6 REMOTE CHANNEL SELECTION
1. With the hook off, press the keys y at the same time. The display will show: “Dsp X”. (function not available)
2. Press the key to go to the next option.
3. Now the display will show “CHX” (“X” representing the current channel "0-7" )
4. Press key to select a channel and then press to go to the next option
5. The display will show “Ft0 ”. (Command configuration). Keep in "0 "
6. Keep at "0 ". Press to return the weighing mode and restart the device.
Note: The channel is already configured with the corresponding control for each hook. Only configure couando the control is
controlled
6. CALIBRATION
1. Switch on the hook and, during initialisation, press and hold down the D button on the remote to display “CAL SP”.
2. If you press the A button on the remote control, the display will show “CAL 00” when it has no load on the hook; press the A button and
the display will briefly show “------” and finally “LOAD”.
3. Press the D button on the remote control to enter the value of the calibration weight. Press the C button once, or hold down the D button
to increase the value selected and press D once to change between digits.
4. Hang the calibration weight and wait a few seconds until the stability indicator lights up.
5. Press the A button on the remote control, the display will briefly show “------” and finally show the weight value. Remove the weight,
switch off the hook and switch it back on to test it.

13
ENENUSER’S MANUAL STX
7. CONFIGURATION
• Switch on the hook and, during initialisation, press and hold down the D button on the remote control to display “CAL SP”.
• Press the D button on the remote control again and the display will show “SET”.
• Press the A button on the remote control to display the current step, ex. “d 2 → e=2kg”.
• Use the D button on the remote control to change the division value and press the A button on the remote control to confirm and access
the next parameter.
• The display now shows the factory-programmed capacity. Use the D button on the remote control to change the value
• Press the A button on the remote control to confirm. The display will show the value of the weighing filter, ex. “fLT 00”. Use the D but-
ton on the remote control to change the filter value (the higher the value, the more stable the weight reading, but the slower the response)
• Press the A button on the remote control to confirm. The display will show ex. “rng 1”. Use the D button on the remote control to
change the value of the zero range. (The higher the value, the smaller the deviation from zero and the greater the zero recovery. On the
other hand, high values can interfere with the weighing of light loads)
• Press the A button on the remote control to confirm; the display will show “AUPf0”. Use the D button to select the desired auto power
off time.
0 = no automatic power off
1 = auto power off in 15 minutes
2 = auto power off in 30 minutes
• Press the A button on the remote control to confirm and return to normal weighing mode.


FRFRMANUEL D’UTILISATION STX
1515
SOMMAIRE
FR
1. DESCRIPTION DU PRODUIT 16
2. DESCRIPTION DU PANNEAU 16
2.1 MODÈLES DISPONIBLES 16
2.2 CARACTÉRISTIQUES GÉNÉRALES 16
3. CONDITIONS POUR UNE INSTALLATION OPTIMALE 17
4. FONCTION DES TOUCHES DE LA TÉLÉCOMMANDE 17
5.UTILISATION DU CROCHET 17
5.1 ALLUMER LE CROCHET 17
5.2 ÉTEINDRE LE CROCHET 17
5.3 TARE ET REMISE À ZÉRO 18
5.4 FONCTION D'ACCUMULATION DE PESÉES 18
5.5 FONCTION HOLD 18
5.6 SÉLECTION DE CANAL À DISTANCE 18
6. CALIBRAGE 18
7.CONFIGURATION 19

FRFRMANUEL D’UTILISATION STX
1616
1. DESCRIPTION DU PRODUIT
Le crochet STX associe capteur, indicateur de poids et batterie, le tout placé dans une robuste couverture en alliage d’aluminium.
Il peut être facilement installé sur n’importe quelle grue ou palan pour peser une grande variété de produits, équipements et accessoires (cour-
roies, chaînes, etc...) qui peuvent être tarés pour obtenir le poids net.
L’écran est doté d’une technologie LED super lumineuse qui permet de fournir une distance de visualisation allant jusqu’à 25 mètres.
Cet appareil de mesure du poids très efficace représente une solution de pesage très abordable, performante et fiable pour les charges sus-
pendues et est largement utilisé pour une multitude d’applications dans diverses industries telles que les lignes électriques, la construction,
l’agriculture, les ports, les entrepôts, etc...
2. CONDITIONS POUR UNE INSTALLATION OPTIMALE
Pour une performance maximale et des résultats optimaux, nous recommandons d’utiliser et d’installer le crochet conformément aux exigences
suivantes :
• Ne surchargez pas le crochet peseur, cela pourrait endommager le capteur de chargement et annuler la garantie.
• Ne laissez pas pendre des objets pendant longtemps, cela pourrait diminuer la précision du crochet et raccourcir la durée de vie
du capteur de chargement.
• Vérifiez la chaîne et le crochet avant utilisation. Vérifiez régulièrement les clips, les broches et les vis.
• Vérifiez fréquemment la charge de la batterie. Lorsque le crochet est à court d’énergie, chargez la batterie à l’aide du chargeur
fourni.
• Ne pas utiliser le crochet peseur en cas d’orage ou de pluie.
• Ne pas exposer à des atmosphères gazeuses corrosives.
• Installez le crochet dans un endroit sec et bien ventilé, ne le placez pas directement sur le sol.
• N’essayez pas de réparer le crochet, contactez votre fournisseur.
2.1 MODÈLES DISPONIBLES
Pour une performance maximale et des résultats optimaux, nous recommandons d’utiliser et d’installer le crochet conformément aux
exigences suivantes :
Modèle Portée Division (E)
STX1 1 000 kg 200 g
STX3 3 000 kg 1 kg
STX5 5 000 kg 2 kg
STX10 10 000 kg 5 kg
STX15 15 000 kg 5 kg
2.2 CARACTÉRSITIQUES GÉNÉRALES
Classe III
Rang de tare 100% Portée maximale
Temps pour poids stable 10 sec
Avis de surcharge Max +9e
Valeur maximale de surcharge 125% de la capacité maximale
Alimentation Batterie rechargeable 6V/1.4Ah
Écran LED de 30 mm de haut
Portée de la télécommande ≤ 20 m

FRFRMANUEL D’UTILISATION STX
1717
3. DESCRIPTION DU PANNEAU AVANT
• La hauteur de l’écran est de 30 mm avec 5 sections (chiffres).
• Le voyant situé à l’extrémité gauche s’allume lorsqu’une tare est effectuée
• Le voyant situé à l’extrémité droite s’allume lorsque la balance est stable, quel que soit le poids appliqué.
4. FONCTION DES TOUCHES DE LA TÉLÉCOMMANDE
FONCTIONS DES TOUCHES
ATotaliser / Confirmer
BTare /zéro
CAccumuler
D« Hold » (maintenez la lecture sur l’écran)
A+B Supprimer le total accumulé
B+D Off
5. UTILISATION DE LA BALANCE
5.1 ALLUMER LE CROCHET
Appuyez sur la touche , le crochet effectue un autocontrôle Versaô 6.0, l’écran indique le pourcentage de batterie “PA85”
(85%), puis l’initialisation du zéro est effectuée et enfin le crochet passe en mode pesage.
5.2 ÉTEINDRE LE CROCHET
Appuyez sur la touche du crochet pendant 2 seconde ou sur les touches D et B de la télécommande. L’écran affiche le
pourcentage de batterie “PA80”(80%), 1,5 seconde plus tard, l’écran affiche « off » et le crochet s’éteint.

FRFRMANUEL D’UTILISATION STX
1818
5.3 TARE ET REMISE À ZÉRO
Pour effectuer une tare, placer le poids à tarer sur le crochet. Une fois que le poids est stable, appuyer sur la touche ou la touche
B de la télécommande et le poids sera taré dans la mémoire du crochet. Appuyez pur suprimer la tare.
S’il n’y a rien qui pèse sur le crochet, le poids doit être nul. S’il affiche un poids alors qu’il est vide, utilisez la touche du crochet
ou la touche B de la télécommande pour revenir à zéro.
5.4 FONCTION D’ACCUMULATION DE PESÉES
Lorsque l’affichage est stable et que le poids dépasse 20 divisions, appuyez sur la touche C de la télécommande pour accumuler la pesée
effectuée et ainsi de suite. En appuyant sur la touche C, vous pourrez visualiser le nombre d’accumulations (« n32 ») à chaque pesée.
Après 2 secondes, le crochet revient au mode de pesage normal.
Pour visualiser la dernière pesée ainsi que le dernier total, appuyez sur la touche A à n’importe quel moment. Pour annuler la fonction
d’accumulation de pesées, appuyez sur la touche B de la télécommande pour revenir au mode de pesage normal
5.5 FONCTION HOLD
Appuyez sur la touche D de la télécommande et la lecture de l’écran sera fixe pendant 30 secondes.
Appuyer à nouveau sur la touche D de la télécommande, la fonction Hold est désactivée et passe en mode de pesage normal.
5.6 SELECTION DE CANAL À DISTANCE
1. Avec le crochet éteinte, appuyez sur les touches y al mismo tiempo. El display mostrará: “Dsp X”. (función no
disponible)
2. Appuyez sur la touche pour passer à l’option suivante
3. Maintenant, l’écran montrera“CHX ” (“X ” qui représente le canal actuel 0-7 )
4. Appuyez sur pour sélectionner une chaîne et après pour passer à l’option suivante
5. L’écran montrera “Ft0 ”. (Configuration de la commande). Garder dans"0 "
6. Gardez à "0 ". Appuyez sur pour revenir au mode de pesée et redémarrer l’appareil.
Note: Le canal est déjà configuré avec le contrôle correspondant pour chaque hook. Seulement configurer quand vous changez
de commande
6. CALIBRAGE
1. Allumez le crochet et pendant l’initialisation appuyez sur la touche D de la télécommande. Maintenez-la enfoncée jusqu’à visualiser
« CAL SP ».
2. Appuyez sur la touche A de la télécommande, l’écran affiche « CAL 00 ». Sans aucune charge suspendue au crochet, appuyez sur
la touche A et l’écran indiquera brièvement « ------ » et enfin « LOAD ».
3. Appuyez sur la touche D de la télécommande pour entrer la valeur du poids de calibrage. Appuyer une fois sur la touche C ou
maintenez enfoncée la touche D pour augmenter la valeur du chiffre en cours d’édition et appuyez une seule fois sur Dpour changer
de chiffre en cours d’édition.
4. Placez la pesée de calibrage et attendez quelques secondes que l’indicateur de stabilité s’allume.
5. Appuyez sur la touche A de la télécommande, l’écran affiche brièvement « ------ » et ensuite la valeur du poids. Retirez le poids,
éteignez le crochet et rallumez-le pour le test.

FRFRMANUEL D’UTILISATION STX
1919
7. CONFIGURATION
• Allumez le crochet et maintenez la touche Dde la télécommande enfoncée pendant l’initialisation, jusqu’à visualiser « CAL SP ».
• Appuyer à nouveau sur la touche D de la télécommande, l’écran affichera « SET ».
• Appuyer sur la touche A de la commande pour visualiser l’échelon en cours « ex : d 2 → e=2kg ».
• Utilisez la touche D de la télécommande pour modifier la valeur de division et appuyez sur la touche A de la télécommande pour
confirmer et accéder au paramètre suivant.
• L’écran affiche maintenant la portée programmée en usine. Utilisez la touche D de la télécommande pour changer la valeur
• Appuyez sur la touche A de la télécommande pour valider et pour que l’écran affiche la valeur du filtre de pesage. L’écran indique
« ex fLT 00 ». Utilisez la touche D la télécommande pour changer la valeur du filtre (plus la valeur est élevée, plus la lecture du
poids est stable, mais plus la réponse est lente)
• Appuyez sur la touche A de la télécommande pour valider, l’écran indique « ex:rng 1 » Utilisez la touche D de la télécommande
pour modifier la valeur de la plage de zéro. (Plus la valeur est élevée, plus l’écart du zéro est faible et plus le retour à zéro est impor-
tant. Au contraire, les valeurs élevées peuvent interférer avec le pesage de charges légères)
• Appuyez sur la touche A de la télécommande pour valider, l’écran affiche « AUPf0 ». Utilisez la touche D pour choisir le temps de
mise hors tension automatique souhaité.
0 = pas de mise hors tension automatique
1 = mise hors tension automatique en 15 minutes
2 = mise hors tension automatique en 30 minutes
• Appuyez sur la touche A de la télécommande pour confirmer et revenir au mode de pesage normal.


21
PTPTMANUAL DE USUÁRIO STX
ÍNDICE
PT
1. DESCRIÇÃO DO PRODUTO 22
2. DESCRIÇÃO DO PAINEL 22
2.1 MODELOS DISPONÍVEIS 22
2.2 CARACTERÍSTICAS GERAIS 22
3. REQUISITOS PARA UMA INSTALAÇÃO ÓTIMA 23
4. FUNÇÃO DAS TECLAS DO TELECOMANDO 23
5.UTILIZAÇÃO DO GANCHO 23
5.1 LIGAR O GANCHO 23
5.2 APAGAR O GANCHO 23
5.3 TARA E COLOCAÇÃO A ZERO 24
5.4 FUNÇÃO DE ACUMULAÇÃO DE PESAGENS 24
5.5 FUNÇÃO HOLD 24
5.6 SELEÇÃO DE CANAL REMOTO 24
6. CALIBRAÇÃO 24
7.CONFIGURAÇÃO 25

PTPTMANUAL DE USUÁRIO STX
22
1. DESCRIÇÃO DO PRODUTO
O gancho STX combina célula, indicador de peso e bateria, todos alojados dentro de um robusto invólucro de liga de alumínio.
Pode ser facilmente montado em qualquer grua ou guindaste para pesar uma grande variedade de produtos e equipamentos, acessórios (cin-
tos, correntes, etc...) podem ser tarados para obter o peso líquido.
O ecrã possui tecnologia LED super brilhante para proporcionar uma distância de visualização de até 25 metros.
Este dispositivo de medição de peso altamente eficiente representa uma solução de pesagem muito acessível, de alto desempenho e confiável
para cargas suspensas e é amplamente utilizado para uma infinidade de aplicações em várias indústrias, tais como linhas de energia, constru-
ção, agricultura, portos, armazéns, etc ....
2. REQUISITOS PARA UMA INSTALAÇÃO ÓTIMA
Para obter o máximo desempenho e melhores resultados, recomendamos usar e instalar o gancho de acordo com os seguintes requisitos:
• Não sobrecarregue a balança do gancho, isso pode danificar a célula de carga e anular a garantia.
• Não deixe objetos pendurados por muito tempo, isso pode diminuir a precisão do gancho e encurtar a vida útil da célula de
carga.
• Antes de usar, verifique a corrente e o gancho. Verifique regularmente os clipes, pinos e parafusos.
• Verifique frequentemente a carga da bateria. Quando o gancho ficar sem energia, carregue a bateria com o alimentador/carregador
incluído.
• Não utilize o gancho de pesagem em caso de tempestades ou chuva.
• Não sujeitar a atmosferas gasosas corrosivas.
• Instale o gancho em local seco e bem ventilado, não o posicione diretamente no chão.
• Não tente reparar o gancho, contacte o seu fornecedor.
2.1 MODELOS DISPONÍVEIS
Para obter o máximo desempenho e melhores resultados, recomendamos usar e instalar o gancho de acordo com os seguintes
requisitos:
Modelo Capacidade Divisão (E)
STX1 1.000kg 200g
STX3 3 000kg 1kg
STX5 5 000kg 2kg
STX10 10 000kg 5kg
STX15 15 000kg 5kg
2.2 CARACTERÍSTICAS GERAIS
Classe III
Faixa da Tara 100% Capacidade máxima
Tempo de estabilização 10 s
Aviso de sobrecarga Máx +9e
Valor máximo de sobrecarga 125% Capacidade máxima
Alimentação Bateria recarregável 6V/1.4Ah
Display LED de 30mm de altura
Faixa do telecomando ou controle
remoto
≤ 20m

23
PTPTMANUAL DE USUÁRIO STX
3. DESCRIÇÃO DA PARTE FRONTAL
• O ecrã tem 30 mm de altura com 5 secções (dígitos).
• A indicação situada na extremidade esquerda acende quando for executada uma tara
• O visor da extremidade direita acende quando a balança estiver estável, independentemente do peso aplicado.
4. FUNÇÃO DAS TECLAS DO TELECOMANDO
FUNÇÕES DAS TECLAS
ATotalizar / Confirmar
BTara / Zero
CAcumular
D"Hold" (continue lendo no visor)
A+B Excluir total acumulado
B+D Desligar
5. UTILIZAÇÃO DA BALANÇA
5.1 LIGAR O GANCHO
Pressione a tecla , o gancho realizará uma auto-verificação Versão 6.0, o display mostrará a percentagem de bateria “PA85”
(85%) e posteriormente será realizada a inicialização do zero realizada e por último o gancho entrará em modo de pesagem.
5.2 APAGAR O GANCHO
Pressione a tecla de gancho por 2 segundo ou as teclas D y B do controle remoto ou telecomando. O display mostrará a
percentagem de bateria “PA80” (80% de voltagem), 1,5 segundos depois, o display mostrará “off” e o gancho será desligado.

PTPTMANUAL DE USUÁRIO STX
24
5.3 TARA E COLOCAÇÃO A ZERO
Ppara executar uma tara, coloque o peso a ser tarado no gancho, quando o peso estiver estável, pressione a tecla ou a tecla B do
controle remoto ou telecomando e o peso será tarado na memória do gancho. (Pressione para remorer a tara)
Se não houver nada pendurado no gancho, o peso deve ser zero, se mostrar qualquer peso estando vazio, será necessário usar a chave
de gancho ou a tecla B do controle remoto para fazer o zero.
5.4 FUNÇÃO DE ACUMULAÇÃO DE PESAGENS
Quando a leitura do visor estiver estável e o peso exceder 20 divisões, prima a tecla C do controlo remoto para acumular a pesagem
realizada e assim consecutivamente. Pressionando a tecla C em cada pesagem poderemos visualizar o número de acumulações (‘’n32’’)
, passados 2 segundos, o gancho volta ao modo de pesagem normal.
Para visualizar a última pesagem, bem como o último total, carregue na tecla A em qualquer momento. Para cancelar a função de
acumulação de pesagens, carregue na tecla B o telecomando para voltar ao modo de pesagem normal.
5.5 FUNÇÃO HOLD
Prima a tecla D do controlo remoto, a leitura do visor será fixada durante 30 segundos.
Pressione novamente a tecla D do controlo remoto, a função Hold (Manter) é desativada e entra no modo de pesagem normal.
5.6 SELEÇÃO DE CANAL COM O CONTROLE REMOTO
1. Com o gancho desligado, pressione as teclas y e ao mesmo tempo. O display mostrará: “Dsp X”. (função não disponível)
2. Pressione a tecla para ir para a próxima opção.
3. Agora a tela mostrará “CHX ” (“X ”que representa o canal atual 0-7 )
4. Pressione a tecla para seleccionar um canale, em seguido pressiona para ir para a próxima opçâo.
5. A tela mostrará “Ft0 ”.(Configuração de comando). Manter em"0 "
6. Manter em "0 ". Pressione para retornar ao modo de pesagem e reinicie o dispositivo.
Nota: O canal já está configurado com o controle correspondente para cada gancho. Apenas definido quando o controle é
controlado
6. CALIBRAGEM
1. Ligue o gancho e, durante a inicialização, prima e mantenha premida a tecla D a partir do controlo remoto para visualizar “ “CAL
SP”.
2. Prima a tecla A do controlo remoto e o visor mostrará “CAL 00sem carga pendurada no gancho, prima a tecla A e o visor mostrará
brevemente “------” e finalmente “------”LOAD”.
3. Premir a teclaD do controlo remoto para introduzir o valor do peso de calibração. Prima a tecla C uma vez, ou mantenha premida a
tecla D para aumentar o valor do dígito que está a ser editado e pressione apenas uma vez Dpara mudar de dígito para dígito.
4. Insira o peso de calibragem e aguarde alguns segundos até que o indicador de estabilidade acenda.
5. Prima a tecla A do controlo remoto, o visor mostrará brevemente “------” e, por fim, o valor do peso. Remova o peso e desligue o
gancho e ligue-o novamente para testar.

25
PTPTMANUAL DE USUÁRIO STX
7. CONFIGURAÇÃO
• Ligue o gancho e durante a inicialização prima e mantenha premida a tecla D a partir do controlo remoto para visualizar “ “CAL
SP”.
• Prima a tecla D do controlo remoto novamente, o visor exibirá “SET”.
• Prima a tecla A do controlo para mostrar o escalão atual ex: ”d 2 → e=2kg”.
• Use a tecla D no controlo remoto para alterar o valor da divisão e prima a tecla A do controlo remoto para confirmar e aceder ao
parâmetro seguinte.
• O visor apresenta agora a capacidade programada de fábrica. Usar a tecla D do controlo remoto ou telecomando para alterar o valor
• Prima a tecla A do controlo remoto ou telecomando para validar e que o visor mostre o valor do filtro de pesagem, o visor mostrará
ex: “fLT 00”. Usar a tecla D o controlo remoto para alterar o valor do filtro (quanto maior for o valor, mais estável será a leitura do
peso, mas mais lenta será a resposta)
• Prima a tecla A do controlo remoto ou telecomando a validar, o visor mostrará ex: “rng 1”Usar a tecla D do controlo remoto para
alterar o valor da faixa de zero. (Quanto maior for o valor, menor o desvio de zero e maior a recuperação zero. Pelo contrário, os
valores elevados podem interferir com a pesagem de cargas leves)
• Prima na tecla A do controlo remoto ou telecomando a validar, o visor apresentará “AUPf0”Use a tecla D para selecionar o tempo
de desligamento automático desejado.
0 = sem desligamento automático
1 = desligamento automático em 15 minutos
2 = desligamento automático em 30 minutos
• Prima a tecla A no controlo remoto para confirmar e voltar ao modo de pesagem normal.


27
ITITMANUALE DELL’UTENTE STX
INDICE
IT
1. DESCRIZIONE DEL PRODOTTO 28
2. DESCRIZIONE DEL PANNELLO 28
2.1 MODELLI DISPONIBILI 28
2.2 CARATTERISTICHE GENERALI 28
3. REQUISITI PER UN'INSTALLAZIONE OTTIMALE 29
4. FUNZIONE DEI TASTI DEL TELECOMANDO 29
5.USO DEL GANCIO 29
5.1 ACCENSIONE DEL GANCIO 29
5.2 SPEGNIMENTO DEL GANCIO 29
5.3 TARA E AZZERAMENTO 30
5.4 FUNZIONE DI ACCUMULO PESATURE 30
5.5 FUNZIONE HOLD 30
5.6 SELEZIONE DEL CANALE REMOTO 30
6. TARATURA 30
7.CONFIGURAZIONE 31

ITITMANUALE DELL’UTENTE STX
28
1. DESCRIZIONE DEL PRODOTTO
Il gancio STX comprende cella, indicatore di peso e batteria, il tutto alloggiato in una robusta custodia in lega di alluminio.
Può essere facilmente montato su qualsiasi gru o paranco per pesare una grande varietà di prodotti e attrezzature, gli accessori (cinghie, cate-
ne, ecc...) possono essere tarati per ottenere il peso netto.
Il display è dotato di tecnologia led super luminosa per fornire una distanza di visualizzazione fino a 25 metri.
Questo dispositivo di misurazione del peso ad alta efficienza rappresenta una soluzione di pesatura molto conveniente, ad alte prestazioni e
affidabile per carichi sospesi, oltre ad essere ampiamente utilizzato per una moltitudine di applicazioni in vari settori come linee elettriche,
edilizia, agricoltura, porti, magazzini, ecc...
2. REQUISITI PER UN'INSTALLAZIONE OTTIMALE
Per ottenere le massime prestazioni e i migliori risultati, si consiglia di utilizzare e installare il gancio secondo i seguenti requisiti:
• Non sovraccaricare il gancio pesatore, ciò potrebbe danneggiare la cella di carico e annullare la garanzia.
• Non lasciare gli oggetti appesi per lungo tempo, ciò potrebbe diminuire la precisione del gancio e ridurre la durata della cella di
carico.
• Prima dell'uso, controllare la catena e il gancio. Controllare regolarmente clip, perni e viti.
• Controllare frequentemente la carica della batteria. Quando il gancio si scarica, caricare la batteria con l'alimentatore/caricabatte-
rie in dotazione.
• Non utilizzare il gancio pesatore in caso di temporali o pioggia.
• Non esporre ad atmosfere con gas corrosivi.
• Installare il gancio in un luogo asciutto e ben ventilato, non appoggiarlo direttamente a terra.
• Non tentare di riparare il gancio, contattare il fornitore.
2.1 MODELLI DISPONIBILI
Per ottenere le massime prestazioni e i migliori risultati, si consiglia di utilizzare e installare il gancio secondo i seguenti requisiti:
Modello Portata Divisione (E)
STX1 1.000kg 200g
STX3 3.000kg 1kg
STX5 5.000kg 2kg
STX10 10.000kg 5kg
STX15 15.000kg 5kg
2.2 CARATTERISTICHE GENERALI
Classe III
Livello di Tara Capacità massima del 100%
Tempo di stabilizzazione 10 s
Avviso di sovraccarico Max +9e
Valore massimo di sovraccarico 125% della capacità massima
Alimentazione Batteria ricaricabile 6V/1.4Ah
Display LED alto 30 mm
Livello del telecomando ≤ 20m

29
ITITMANUALE DELL’UTENTE STX
3. DESCRIZIONE DELLA PARTE FRONTALE
• Lo schermo è alto 30 mm con 5 sezioni (cifre).
• L'indicazione all'estrema sinistra si accende quando si effettua una tara
• L'indicazione all'estrema destra si illumina quando la bilancia è stabile indipendentemente dal peso applicato.
4. FUNZIONE DEI TASTI DEL TELECOMANDO
FUNZIONI DEI TASTI
ATotalizzare/Confermare
BTara/Azzeramento
CAccumulare
D"Hold" (continua a leggere sul display)
A+B Cancellare il totale accumulato
B+D Spegnere
5. USO DELLA BILANCIA
5.1 ACCENSIONE DEL GANCIO
Premendo il tasto , il gancio eseguirà un'autoverifica (Versione 6.0), il display mostrerà la percentuale di batteria "PA85"
(85%), viene realizzato l'azzeramento e infine il gancio pesatore entra in modalità di pesatura.
5.2 SPEGNIMENTO DEL GANCIO
Premere il tasto del gancio per 2 secondi o i tasti D e B del telecomando. Il display mostrerà la percentuale di batteria "PA80"
(80%) 1,5 secondi dopo, il display mostrerà "off" e il gancio si spegnerà.

ITITMANUALE DELL’UTENTE STX
30
5.3 TARA E AZZERAMENTO
Pper eseguire una tara, posizionare il peso da tarare sul gancio, una volta che il peso è stabile, premere il tasto o il tasto B del
telecomando e il peso verrà azzerato nella memoria del gancio. (Premere per starare)
In assenza di pesi sul gancio, il peso dovrebbe equivalere a zero, se invece il display indica un peso, useremo il tasto del gancio
o il tasto B del telecomando, per eseguire l'azzeramento.
5.4 FUNZIONE DI ACCUMULO PESATURE
Quando la lettura del display è stabile e il peso supera le 20 divisioni, premere il tasto C del telecomando per accumulare la pesatura
effettuata e così via. Premendo il tasto C, ad ogni pesatura visualizzeremo il numero di accumulazioni ("n32"). Trascorsi 2 secondi, il
gancio ritorna alla modalità di pesatura normale.
Per visualizzare l'ultima pesatura e l'ultimo totale, premere il tasto A in qualsiasi momento. Per annullare la funzione di accumulo di
pesature, premere il tasto B il telecomando per tornare alla modalità di pesatura normale
5.5 FUNZIONE HOLD
Premere il tasto D del telecomando, la lettura del display resterà fissa per 30 secondi.
Premere di nuovo il tasto D sul telecomando, la funzione Hold si disattiva ed entra nella modalità di pesatura normale.
5.6 SELEZIONE DEL CANALE REMOTO
1. Con il gancio spento, premere contemporaneamente i tasti e . Il display mostrerà: “Dsp X”. (funzione non disponibile)
2. Premere il tasto per passare all'opzione successiva.
3. Ora il display mostrerà"CHX " ("X " che rappresenta il canale corrente 0-7 )
4. Premere per selezionare un canale e premere per passare all'opzione successiva
5. Il display visualizzerà"Ft0 ". (Configurazione dei comandi).
6. Mantenere a "0". Premere per tornare alla modalità di pesatura e riavviare il dispositivo.
Nota: Il canale è già configurato con il comando corrispondente per ogni gancio. Configurare solo quando si effettua un
cambio del comando
6. CALIBRAZIONE
1. Accendere il gancio e, durante l'inizializzazione, tenere premuto il tasto D dal telecomando fino a che non viene visualizzato "CAL
SP”.
2. Premere il tasto A del telecomando, il display mostrerà "CAL 00", senza carico sul gancio, premere il tasto A e il display mostrerà
brevemente "----------" e infine "LOAD”.
3. Premere il tasto D del telecomando per introdurre il valore della pesa di calibrazione. Premere il tasto C o tenere premuto il tasto D
al fine di aumentare il valore della cifra che si sta modificando e premere una sola volta Dper passare da una cifra all'altra.
4. Inserire il peso di calibrazione e attendere qualche secondo fino a che non si accende l'indicatore di stabilità.
5. Premere il tasto A del telecomando, il display mostrerà brevemente “------“ e infine il valore del peso. Rimuovere il peso e spegnere
il gancio e riaccenderlo per la prova.

31
ITITMANUALE DELL’UTENTE STX
7. CONFIGURAZIONE
• Accendere il gancio e, durante l'inizializzazione, tenere premuto il tasto D dal telecomando fino a che non viene visualizzato "CAL
SP”.
• Premere nuovamente il tasto D del telecomando, il display mostrerà "SET”.
• Premere il tasto A del telecomando per la visualizzazione del passaggio corrente ej: “d 2 → e=2kg”.
• Utilizzare il tasto D del telecomando per modificare il valore della divisione e premere il tasto A del telecomando per confermare e
accedere al parametro successivo.
• Il display mostra ora la capacità programmata in fabbrica. Utilizzare il tasto D del telecomando per modificare il valore
• Premere il tasto A del telecomando per confermare e per far sì che il display mostri il valore del filtro di pesatura, il display mostrerà
ej: “fLT 00”. Utilizzare il tasto D del telecomando per cambiare il valore del filtro (più alto è il valore, più stabile è la lettura del
peso, ma con una risposta più lenta)
• Premere il tasto A del telecomando per confermare, il display mostrerà ej: “rng 1" Usare il tasto D del telecomando per modificare
il valore del campo zero. (Più alto è il valore, minore è la deviazione di azzeramento e maggiore è il recupero dell'azzeramento. D'altra
parte, valori elevati possono interferire con la pesatura di carichi leggeri)
• Premere il tasto A del telecomando per confermare, il display mostrerà "AUPf0". Utilizzare il tasto D per selezionare il tempo di
spegnimento automatico desiderato.
0 = senza spegnimento automatico
1 = spegnimento automatico in 15 minuti
2 = spegnimento automatico in 30 minuti
• Premere il tasto A sul telecomando per confermare e tornare alla modalità di pesatura normale.


33
DEDEBEDIENUNGSANLEITUNG STX
INHALTSVERZEICHNIS
DE
1. PRODUKTBESCHREIBUNG 34
2. BESCHREIBUNG DER BEDIENEINHEIT 34
2.1 VERFÜGBARE MODELLE 34
2.2 ALLGEMEINE EIGENSCHAFTEN 34
3. VORAUSSETZUNGEN FÜR EINE OPTIMALE INSTALLATION 35
4. FUNKTION DER FERNBEDIENUNGSTASTEN 35
5.VERWENDUNG DES HAKENS 35
5.1 DEN HAKEN EINSCHALTEN 35
5.2 DEN HAKEN AUSSCHALTEN 35
5.3 TARA UND NULLSTELLUNG 36
5.4 FUNKTION WÄGEKUMULATION 36
5.5 HOLD-FUNKTION 36
5.6 AUSWAHL DES FUNKKANALS 36
6. KALIBRIERUNG 36
7.KONFIGURATION 37

DEDEBEDIENUNGSANLEITUNG STX
34
1. PRODUKTBESCHREIBUNG
Der STX-Haken kombiniert Zelle, Gewichtsanzeige und Batterie, die alle in einem robusten Aluminiumgehäuse untergebracht sind.
Er kann einfach an jedem Kran oder Hebezeug montiert werden, um eine Vielzahl von Produkten und Geräten zu wiegen. Zubehör (Gurte, Ketten,
etc....) kann tariert werden, um das Nettogewicht zu erhalten.
Das Display verfügt über eine superhelle LED-Technologie, die einen Betrachtungsabstand von bis zu 25 Metern ermöglicht.
Dieses hocheffiziente Gewichtsmessgerät stellt eine sehr preiswerte, leistungsstarke und zuverlässige Wägelösung für hängende Lasten dar und
wird für eine Vielzahl von Anwendungen in verschiedenen Branchen wie Energieversorgung, Bauwesen, Landwirtschaft, Häfen, Lagerhallen, etc.
eingesetzt.
2. VORAUSSETZUNGEN FÜR EINE OPTIMALE INSTALLATION
Für maximale Leistung und beste Ergebnisse empfehlen wir, den Haken gemäß den folgenden Anforderungen zu verwenden und zu installieren:
• Überlasten Sie den Wägehaken nicht, da dies die Wägezelle beschädigen und die Garantie erlöschen könnte.
• Lassen Sie keine Gegenstände für längere Zeit hängen, da dies die Genauigkeit des Hakens beeinträchtigen und die Lebensdauer
der Wägezelle verkürzen könnte.
• Überprüfen Sie vor Gebrauch die Kette und den Haken. Überprüfen Sie regelmäßig Clips, Stifte und Schrauben.
• Überprüfen Sie regelmäßig den Ladezustand des Akkus. Wenn der Haken keine Energie mehr hat, laden Sie den Akku mit dem
mitgelieferten Ladegerät auf.
• Verwenden Sie den Wägehaken nicht bei Sturm oder Regen.
• Nicht in Umgebungen mit korrosiven Gasen einsetzen.
• Installieren Sie den Haken an einem trockenen und gut belüfteten Ort, legen Sie ihn nicht direkt auf den Boden.
• Versuchen Sie nicht den Haken zu reparieren, sondern wenden Sie sich an Ihren Lieferanten.
2.1 VERFÜGBARE MODELLE
Für maximale Leistung und beste Ergebnisse empfehlen wir, den Haken gemäß den folgenden Anforderungen zu verwenden und zu
installieren:
Modell Tragfähigkeit Unterteilung (E)
STX1 1.000kg 200g
STX3 3.000kg 1kg
STX5 5.000kg 2kg
STX10 10.000kg 5kg
STX15 15.000kg 5kg
2.2 ALLGEMEINE EIGENSCHAFTEN
Klasse III
Tara-Bereich 100% Maximale Kapazität
Stabilisierungszeit 10 s
Überlastwarnung Max +9e
Maximaler Überlastwert 125 % der maximalen Kapazität
Stromversorgung Wiederaufladbarer Akku 6 V/1,4 Ah
Display LED 30 mm groß
Reichweite der Fernbedienung ≤ 20m

35
DEDEBEDIENUNGSANLEITUNG STX
3. BESCHREIBUNG DES BEDIENELEMENTS
• Der Bildschirm ist 30 mm groß und hat 5 Abschnitte (Ziffern).
• Die Anzeige ganz links leuchtet auf, wenn eine Tara durchgeführt wird
• Die Anzeige ganz rechts leuchtet, wenn die Waage unabhängig vom Gewicht stabil ist.
4. FUNKTION DER FERNBEDIENUNGSTASTEN
FUNKTIONEN DER TASTEN
ASummieren/Bestätigen
BTara/Null
CKumulieren
D"Hold" (Anzeige auf dem Display halten)
A+B Kumulative Summe löschen
B+D Ausschalten
5. ANWENDUNG DER WAAGE
5.1 DEN HAKEN EINSCHALTEN
Drücken Sie die Taste , der Haken führt einen Selbsttest durch (Version 6.0), die Anzeige zeigt den Batterieprozentsatz "PA85"
(85 %) und dann wird die Nullinitialisierung durchgeführt. Anschließend beginnt der Haken den Wägemodus.
5.2 DEN HAKEN AUSSCHALTEN
Drücken Sie die Taste am Haken für 2 Sekunden oder die Tasten D und B der Fernbedienung. Auf der Anzeige erscheint der
Batterieprozentsatz "PA80"(80 %). Nach 1,5 Sekunden erscheint "off" und der Haken schaltet sich aus.

DEDEBEDIENUNGSANLEITUNG STX
36
5.3 TARA UND NULLSTELLUNG
UMeine Tara durchzuführen, hängen Sie das zu tarierende Gewicht an den Haken. Sobald das Gewicht stabil ist drücken Sie die Taste
oder die Taste B der Fernbedienung und das Gewicht wird im Speicher des Hakens tariert. (Drücken Sie , um zu die
Tarierung aufzuheben)
Wenn nichts am Haken hängt, sollte das Gewicht Null sein. Wenn ein Leergewicht angezeigt wird, verwenden Sie die Taste am
Haken oder die Taste B der Fernbedienung, um auf Null zu stellen.
5.4 FUNKTION DER WÄGEKUMULATION
Wenn der Anzeigewert stabil ist und das Gewicht 20 Teilungen überschreitet, drücken Sie die Taste C der Fernbedienung, um die
durchgeführte Wägung zu akkumulieren und so weiter. Durch Drücken der Taste C wird bei jeder Wägung die Anzahl der Kumulationen
angezeigt („n32“). Nach 2 Sekunden kehrt der Haken in den normalen Wägemodus zurück.
Um das letzte Gewicht und die letzte Summe anzuzeigen, drücken Sie die Taste A. Dies ist jederzeit möglich. Um die Funktion der
Wägekumulation abzubrechen, drücken Sie die Taste B auf der Fernbedienung, um in den normalen Wägemodus zurückzukehren
5.5 HOLD-FUNKTION
Drücken Sie die Taste D der Fernbedienung. Nun wird der Wert der Anzeige für 30 Sekunden fixiert.
Drücken Sie erneut die Taste D auf der Fernbedienung, um die Hold-Funktion zu deaktivieren und in den normalen Wägemodus
zurückzukehren.
5.6 AUSWAHL DES FUNKKANALS
1. Drücken Sie bei ausgeschaltetem Haken die Tasten und gleichzeitig. Auf dem Display erscheint: “Dsp X”. (Funktion
nicht verfügbar)
2. Drücken Sie die Taste , um zur nächsten Option zu gelangen.
3. Auf der Anzeige erscheint nun “CHX " ("X " für den aktuellen Kanal 0-7 )
4. Drücken Sie , um einen Kanal auszuwählen und drücken Sie , um zur nächsten Option zu gelangen
5. Auf der Anzeige erscheint "Ft0 „ (Befehlskonfiguration).
6. Halten Sie "0". Drücken Sie , um in den Wägemodus zurückzukehren und das Gerät neu zu starten.
Hinweis: Der Kanal ist bereits mit der entsprechenden Steuerung für jeden Haken konfiguriert. Nur konfigurieren, wenn ein
Kontrollwechsel durchgeführt wird
6. KALIBRIERUNG
1. Schalten Sie den Haken ein und halten Sie während der Initialisierung die Taste D der Fernbedienung gedrückt, bis die Anzeige
"CAL SP” anzeigt.
2. Drücken Sie die Taste A der Fernbedienung. Auf dem Display erscheint "CAL 00“. Wenn keine Last am Haken hängt, drücken Sie
die Taste A und auf der Anzeige erscheint kurz "------" und schließlich "LOAD”.
3. Drücken Sie die TasteD auf der Fernbedienung, um den Wert des Kalibriergewichts einzugeben. Drücken Sie die Taste C einmal oder
halten Sie die Taste D gedrückt, um den Wert der zu bearbeitenden Ziffer zu erhöhen und drücken Sie nur einmal D, um von Ziffer zu
Ziffer zu wechseln.
4. Hängen Sie das Kalibriergewicht an und warten Sie einige Sekunden, bis die Stabilitätsanzeige leuchtet.
5. Drücken Sie die Taste A der Fernbedienung. Das Display zeigt kurz "------" und schließlich den Gewichtswert an. Entfernen Sie das
Gewicht und schalten Sie den Haken aus. Anschließend schalten Sie ihn zum Testen wieder ein.

37
DEDEBEDIENUNGSANLEITUNG STX
7. KONFIGURATION
• Schalten Sie den Haken ein und halten Sie während der Initialisierung die Taste D auf der Fernbedienung gedrückt, bis auf der An-
zeige "CAL SP” erscheint.
• Drücken Sie erneut die Taste D auf der Fernbedienung. Es erscheint die Anzeige "SET”.
• Drücken Sie die Taste A auf der Fernbedienung, um den aktuellen Schritt anzuzeigen z.B: d 2 → e=2kg”.
• Verwenden Sie die Taste D auf der Fernbedienung, um den Teilungswert zu ändern und drücken Sie die Taste A auf der Fernbedie-
nung, um den nächsten Parameter zu bestätigen und darauf zuzugreifen.
• Auf der Anzeige erscheint nun die werksseitig eingestellte Kapazität. Verwenden Sie die Taste D auf der Fernbedienung, um den Wert
zu ändern
• Drücken Sie die Taste A auf der Fernbedienung, um zu validieren und damit die Anzeige den Wert des Wägefilters anzeigt. Auf dem
Display erscheint z.B: fLT 00”. Verwenden Sie die Taste D auf der Fernbedienung, zum Ändern des Filterwertes (je höher der Wert,
desto stabiler der Gewichtswert, aber desto langsamer die Reaktion)
• Drücken Sie die Taste A auf der Fernbedienung, um zu validieren. Das Display zeigt z.B: rng 1". Benutzen Sie die Taste D auf der
Fernbedienung, um den Wert des Nullbereichs zu ändern. (Je höher der Wert, desto kleiner die Nullabweichung und desto größer die
Nullrückgewinnung. Andererseits können hohe Werte das Wägen von leichten Lasten stören)
• Drücken Sie die Taste A auf der Fernbedienung, um zu validieren. Das Display zeigt "AUPf0“ an. Benutzen Sie die Taste D, um die
gewünschte automatische Abschaltzeit auszuwählen.
0 = keine automatische Abschaltung
1 = automatische Abschaltung nach 15 Minuten
2 = automatische Abschaltung nach 30 Minuten
• Drücken Sie die Taste A auf der Fernbedienung, um zu bestätigen und in den normalen Wägemodus zurückzukehren.

DEDEBEDIENUNGSANLEITUNG STX
38

39
DEDEBEDIENUNGSANLEITUNG STX

4040
trade mark propiety of | marca propiedad de | trade mark propiety of
Pol. Empordà Internacional Calle Molló, 3
17469 VILAMALLA - (Girona) SPAIN
T. (34) 972 527 212
marchio di proprietà di | est une marque de | Die Marke ist Eigentum von:
-
 1
1
-
 2
2
-
 3
3
-
 4
4
-
 5
5
-
 6
6
-
 7
7
-
 8
8
-
 9
9
-
 10
10
-
 11
11
-
 12
12
-
 13
13
-
 14
14
-
 15
15
-
 16
16
-
 17
17
-
 18
18
-
 19
19
-
 20
20
-
 21
21
-
 22
22
-
 23
23
-
 24
24
-
 25
25
-
 26
26
-
 27
27
-
 28
28
-
 29
29
-
 30
30
-
 31
31
-
 32
32
-
 33
33
-
 34
34
-
 35
35
-
 36
36
-
 37
37
-
 38
38
-
 39
39
-
 40
40


Baxtran STX Manual de usuario
- Categoría
- Escalas personales
- Tipo
- Manual de usuario
en otros idiomas
- français: Baxtran STX Manuel utilisateur
- italiano: Baxtran STX Manuale utente
- English: Baxtran STX User manual
- Deutsch: Baxtran STX Benutzerhandbuch
- português: Baxtran STX Manual do usuário