Graco 840301 - SnugRide Manual de usuario
- Categoría
- Asiento de coche
- Tipo
- Manual de usuario
Este manual también es adecuado para

© 2002 Graco 447-4-02
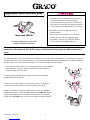
Adjustable Infant Restraint Base
See infant restraint owner’s manual for
complete installation instructions.
Base with LATCH
You must read and understand both the owner’s
manual from the infant restraint and these
instructions before using the infant restraint and
base. Keep this sheet with the instruction booklet
in the pocket of your infant restraint for reference.
This base can only be used with a Graco®
Infant Restraint.
If you do not have instructions for your infant
restraint or if you have any questions about
your product, call Graco at 1-888-224-6549 or
visit our website at www.gracobaby.com.
ecline the infant restraint/base on the vehicle seat. Use it AFTER you have carefully followed all of teps in
your infant restraint owner’s
The adjustable base is used along with the level indicator on the side of your infant restraint. To check the proper angle of
the infant restraint, first make sure the vehicle is on level ground and that the infant restraint/base is not tilted sideways on
the vehicle seat. Then check the level indicator. You must look straight on at the indicator.
If the indicator shows ONLY blue, the infant restraint is properly leveled.
If any orange is showing in the level indicator, the infant restraint is
either too upright or too reclined.
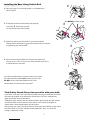
To lower the foot: pull down on the bottom of the foot to the desired
setting to adjust the recline .
To raise the foot: set the base on a flat surface, push in on the fingers
on the base and push down on the base to adjust the recline .
If there is still orange in the level indicator when the foot is completely
extended then place a rolled towel under the foot until ONLY blue shows.
Tighten belt through base, then reinstall infant restraint. Level indicator
should now show ONLY blue—if you still see orange, re-adjust recline .
Your new infant restraint base is equipped with Graco’s recline adjustment foot, which helps to properly recline the infant
restraint/base on the vehicle seat. Use it AFTER you have carefully followed all of the steps in your infant restraint owner’s
manual.
Storing LATCH
1. For ease of storing, extend LATCH
to its maximum length.
2. Locate the storage bars on bottom of
infant restraint base .
3. Fasten end of LATCH (without
adjustment belt) onto storage bar.
4. Repeat Step 3 for LATCH with
adjustment belt. After fastening onto
storage bar, pull on adjustment belt to
make sure LATCH is securely fastened.
5. LATCH storage should look like this
when complete .
Storage bars
Underside of Base
14

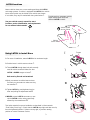
Newer vehicles have one or more seating positions with LATCH
anchorage systems. If vehicle is equipped with LATCH, the vehicle
lower anchor points may be visible at the vehicle seat crease.
If not visible, they may be marked with the symbol below .
See your vehicle owner’s manual for exact
locations, anchor identification, and requirements
for use with an infant restraint.
Tongue
Using LATCH to Install Base
1. For ease of installation, extend LATCH to its maximum length.
2. Position base in vehicle seat as shown .
3. Thread LATCH through base belt path normally
used for vehicle seat belt. Make sure that
LATCH is UNDER tongue on base .
Belt must lay flat and not be twisted.
4. Hook connectors to vehicle lower anchors.
Pull firmly on connectors to make sure they
are attached .
5. Tighten LATCH by pushing down hard on
base and pulling the adjustment belt .
6. NEVER put two LATCH connectors on one
vehicle LATCH anchor unless specifically
allowed by the manufacturer .
Test infant restraint for secure installation as described in infant restraint
“Final Safety Check” pg 2. Check that the LATCH stays tight and does not slip
from the tightened position. If it does not stay tight, try another seating
position or contact Customer Service.
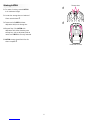
1. Place the base in a rear-facing position in a forward-facing
vehicle seat .
2. Thread the vehicle seat belt through the openings
in the base . Buckle the seat belt.
The seat belt should not be twisted.
3. Tighten the vehicle seat belt. Refer to your vehicle owners
manual and the instructions in your infant restraint owner’s manual
on tightening your vehicle belt .
4. Push the infant restraint down into the base and make sure
that you hear a “click”. Pull up on the infant restraint to be sure it
is latched securely into base.
If the infant restraint does not securely latch into the base,
the infant restraint provides NO protection for your child.
DO NOT use the infant restraint/base if the infant
restraint does not securely latch onto base .
Belt MUST go under tongue
Installing the Base Using Vehicle Belt
Vehicle Lower
Anchor Points
Vehicle
Seat Crease
LATCH locations
Typical seat in a passenger vehicle.
Other vehicle types may have
different LATCH locations.
CLICK!
Final Safety Check: Every time you drive with your child,
Push down on the top of the infant restraint slowly but firmly to make sure the vehicle
belt does not lengthen at all and that the vehicle belt or LATCH is fastened very
tightly around the infant restraint/base.
Holding the infant restraint near the vehicle belt path, twist and pull the seat forward
and to both sides to make sure the vehicle belt or LATCH does not lengthen or
loosen and the infant restraint does not easily move.
After placing your child in the infant restraint, recheck the level indicator on the side of
the infant restraint. The level indicator should show ONLY blue—if you still see
orange, re-adjust the recline.
2 3

Newer vehicles have one or more seating positions with LATCH
anchorage systems. If vehicle is equipped with LATCH, the vehicle
lower anchor points may be visible at the vehicle seat crease.
If not visible, they may be marked with the symbol below .
See your vehicle owner’s manual for exact
locations, anchor identification, and requirements
for use with an infant restraint.
Tongue
Using LATCH to Install Base
1. For ease of installation, extend LATCH to its maximum length.
2. Position base in vehicle seat as shown .
3. Thread LATCH through base belt path normally
used for vehicle seat belt. Make sure that
LATCH is UNDER tongue on base .
Belt must lay flat and not be twisted.
4. Hook connectors to vehicle lower anchors.
Pull firmly on connectors to make sure they
are attached .
5. Tighten LATCH by pushing down hard on
base and pulling the adjustment belt .
6. NEVER put two LATCH connectors on one
vehicle LATCH anchor unless specifically
allowed by the manufacturer .
Test infant restraint for secure installation as described in infant restraint
“Final Safety Check” pg 2. Check that the LATCH stays tight and does not slip
from the tightened position. If it does not stay tight, try another seating
position or contact Customer Service.
1. Place the base in a rear-facing position in a forward-facing
vehicle seat .
2. Thread the vehicle seat belt through the openings
in the base . Buckle the seat belt.
The seat belt should not be twisted.
3. Tighten the vehicle seat belt. Refer to your vehicle owners
manual and the instructions in your infant restraint owner’s manual
on tightening your vehicle belt .
4. Push the infant restraint down into the base and make sure
that you hear a “click”. Pull up on the infant restraint to be sure it
is latched securely into base.
If the infant restraint does not securely latch into the base,
the infant restraint provides NO protection for your child.
DO NOT use the infant restraint/base if the infant
restraint does not securely latch onto base .
Belt MUST go under tongue
Installing the Base Using Vehicle Belt
Vehicle Lower
Anchor Points
Vehicle
Seat Crease
LATCH locations
Typical seat in a passenger vehicle.
Other vehicle types may have
different LATCH locations.
CLICK!
Final Safety Check: Every time you drive with your child,
Push down on the top of the infant restraint slowly but firmly to make sure the vehicle
belt does not lengthen at all and that the vehicle belt or LATCH is fastened very
tightly around the infant restraint/base.
Holding the infant restraint near the vehicle belt path, twist and pull the seat forward
and to both sides to make sure the vehicle belt or LATCH does not lengthen or
loosen and the infant restraint does not easily move.
After placing your child in the infant restraint, recheck the level indicator on the side of
the infant restraint. The level indicator should show ONLY blue—if you still see
orange, re-adjust the recline.
2 3

© 2002 Graco 447-4-02
Adjustable Infant Restraint Base
See infant restraint owner’s manual for
complete installation instructions.
Base with LATCH
You must read and understand both the owner’s
manual from the infant restraint and these
instructions before using the infant restraint and
base. Keep this sheet with the instruction booklet
in the pocket of your infant restraint for reference.
This base can only be used with a Graco®
Infant Restraint.
If you do not have instructions for your infant
restraint or if you have any questions about
your product, call Graco at 1-888-224-6549 or
visit our website at www.gracobaby.com.
ecline the infant restraint/base on the vehicle seat. Use it AFTER you have carefully followed all of teps in
your infant restraint owner’s
The adjustable base is used along with the level indicator on the side of your infant restraint. To check the proper angle of
the infant restraint, first make sure the vehicle is on level ground and that the infant restraint/base is not tilted sideways on
the vehicle seat. Then check the level indicator. You must look straight on at the indicator.
If the indicator shows ONLY blue, the infant restraint is properly leveled.
If any orange is showing in the level indicator, the infant restraint is
either too upright or too reclined.
To lower the foot: pull down on the bottom of the foot to the desired
setting to adjust the recline .
To raise the foot: set the base on a flat surface, push in on the fingers
on the base and push down on the base to adjust the recline .
If there is still orange in the level indicator when the foot is completely
extended then place a rolled towel under the foot until ONLY blue shows.
Tighten belt through base, then reinstall infant restraint. Level indicator
should now show ONLY blue—if you still see orange, re-adjust recline .
Your new infant restraint base is equipped with Graco’s recline adjustment foot, which helps to properly recline the infant
restraint/base on the vehicle seat. Use it AFTER you have carefully followed all of the steps in your infant restraint owner’s
manual.
Storing LATCH
1. For ease of storing, extend LATCH
to its maximum length.
2. Locate the storage bars on bottom of
infant restraint base .
3. Fasten end of LATCH (without
adjustment belt) onto storage bar.
4. Repeat Step 3 for LATCH with
adjustment belt. After fastening onto
storage bar, pull on adjustment belt to
make sure LATCH is securely fastened.
5. LATCH storage should look like this
when complete .
Storage bars
Underside of Base
14

© 2002 Graco 447-4-02
Base ajustable del sistema de
seguridad para niños
Vea el manual del propietario del sistema de seguridad para
niños para obtener instrucciones completas sobre la instalación.
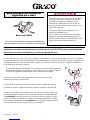
Base con LATCH
Antes de usar la base y el sistema de seguridad
para niños, debe leer y entender el manual del
propietario del sistema de seguridad y estas
instrucciones. Guarde esta hoja con el libro de
instrucciones como referencia en el bolsillo de su
sistema de seguridad.
Esta base se puede usar solamente con un
sistema de seguridad Graco®.
Si no recibió instrucciones con su sistema de
seguridad o si tuviera alguna pregunta sobre su
producto, llame a Graco al 1-888-224-6549 o visite
nuestro sitio web en www.gracobaby.com.
ecline the infant restraint/base on the vehicle seat. Use it AFTER you have carefully followed all of teps in
your infant restraint owner’s
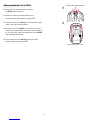
La base ajustable se usa junto con el nivel indicador en el costado de su sistema de seguridad para niños. Para verificar
el ángulo apropiado del sistema de seguridad, primero asegúrese que el vehículo esté nivelado y que la base/sistema de
seguridad para niños no está inclinado hacia el costado en el asiento del vehículo. Entonces, verifique el indicador del
nivel. Debe mirar de frente al indicador.
Si el indicador aparece SOLAMENTE en la zona azul, el sistema de seguridad está
debidamente nivelado. Si el indicador de nivel aparece en la zona de color naranja,
el sistema de seguridad está demasiado vertical o demasiado inclinado.
Para bajar el pie: tire hacia abajo del fondo del pie hasta alcanzar el valor
deseado para ajustar la reclinación .
Para elevar el pie: ponga la base en una superficie plana, empuje hacia adentro
los dedos de la base y empuje hacia abajo la base para ajustar la reclinación .
Si todavía el indicador de nivel aparece en la zona de color naranja cuando el pie
está completamente extendido, entonces coloque una toalla enrollada debajo del
pie SOLAMENTE hasta que aparezca en la zona de color azul. Ajuste el cinturón
a través de la base y luego vuelva a instalar el sistema de seguridad. El indicador
del nivel ahora debería aparecer SOLAMENTE en la zona azul-si todavía aparece
en la zona de color naranja, vuelva a ajustar la reclinación .
La base de su nuevo sistema de seguridad para niños está equipada con el pie Graco de ajuste inclinable que ayuda a reclinar
debidamente la base/sistema de seguridad sobre el asiento del vehículo. Úselo DESPUÉS de haber seguido detenidamente
todos los pasos en el manual del propietario de su sistema de seguridad para niños.
Almacenamiento del LATCH
1. Para facilitar el almacenamiento, extienda
el LATCH hasta el máximo.
2. Ubique las barras de almacenamiento en el
fondo de la base del sistema de seguridad .
3. Ajuste el extremo del LATCH (sin el cinturón de ajuste)
sobre la barra de almacenamiento.
4. Repita el Paso 3 del LATCH con el cinturón de ajuste.
Después de ajustarlo sobre la barra de almacenamiento,
tire el cinturón de ajuste para asegurarse que el LATCH
esté debidamente ajustado.
5. El almacenamiento del LATCH debería tener este
aspecto cuando esté terminado .
Barras de almacenamiento
Parte inferior de la base
14

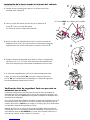
Los vehículos nuevos tienen uno o varios asientos equipados con
sistemas de anclaje LATCH. Si el vehículo viene equipado con LATCH,
se pueden ver los puntos de anclaje inferiores en el pliegue
del asiento del vehículo. Si no están visibles, pueden estar
marcados con el símbolo que sigue .
Vea el manual del propietario de su vehículo para informarse
sobre las ubicaciones exactas, la identificación de
los anclajes y los requisitos para su uso con el
sistema de seguridad para niños.
Lengüeta
Utilización del LATCH para instalar la base
1. Para facilitar la instalación, extienda el LATCH hasta el máximo.
2. Ponga la base en el asiento del vehículo como se indica .
3. Pase el LATCH por el recorrido del cinturón en la base que
normalmente se usa para el cinturón del asiento del vehículo.
Asegúrese que el LATCH esté DEBAJO de la lengüeta de la base .
El cinturón debe mantenerse plano sin torcerse.
4. Enganche los conectores a los sujetadores inferiores.
Tire firmemente de los conectores para asegurarse
que estén enganchados .
5. Ajuste el LATCH empujando con fuerza hacia abajo
sobre la base y tirando el cinturón de ajuste .
6. NUNCA ponga dos conectores LATCH en un vehículo con
sujetador LATCH a menos que el fabricante lo haya permitido
specíficamente .
Pruebe el sistema de seguridad para niños como se indica en la página 2
"Verificación final de seguridad". Verifique que el LATCH se mantiene apretado y no
se desliza de la posición apretada. De no mantenerse apretado, colóquelo en otro
asiento o póngase en contacto con el Servicio al Cliente.
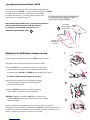
1. Coloque la base orientada hacia atrás en un asiento del vehículo
orientado hacia adelante .
2. Pase el cinturón del asiento del vehículo por las aperturas de
la base . Trabe el cinturón del asiento.
El cinturón del asiento no debe estar retorcido.
3. Ajuste el cinturón de seguridad del vehículo. Consulte el manual del
propietario del vehículo y las instrucciones en el manual del sistema de
seguridad para niños sobre cómo ajustar el cinturón del vehículo .
4. Empuje el sistema de seguridad hacia abajo en la base y asegúrese de
que escucha un "clic". Tire hacia arriba del sistema de seguridad para
niños para asegurarse que esté trabado apretadamente sobre la base.
Si el sistema de seguridad para niños no se traba apretadamente sobre
la base, el sistema de seguridad NO proporciona ninguna protección a
su niño. NO use la base/sistema de seguridad si el sistema de seguridad
no está debidamente trabado sobre la base .
El cinturón DEBE pasar debajo de la lengüeta.
Instalación de la base usando el cinturón del vehículo
Puntos de
anclaje inferior
del vehículo
Pliegue del
asiento del
vehículo
Las ubicaciones del sistime LATCH
Un asiento típico de un vehículo de pasajeros.
Otro tipo de vehículos disponen de otras
ubicaciones del sistema LATCH.
¡CLIC!
Verificación final de seguridad: Cada vez que sale en
automóvil con su niño,
Empuje hacia abajo lenta pero firmemente la parte de arriba del sistema de
seguridad para niños asegurarse que el cinturón del vehículo no se estira y que
el cinturón del vehículo o LATCH esté asegurado apretadamente alrededor de la
base/sistema de seguridad.
Gire y tire el asiento hacia adelante agarrando el sistema de seguridad cerca de la
recorrida del cinturón del vehículo y en ambos costados para asegurarse que el
cinturón del vehículo o LATCH no se alargue ni se afloje y que no se pueda mover
con facilidad el sistema de seguridad para niños.
Después de colocar a su niño en el sistema de seguridad, vuelva a verificar el
indicador del nivel en el costado del sistema de seguridad. El indicador del nivel
ahora debería aparecer SOLAMENTE en la zona azul-si todavía aparece en la
zona de color naranja, vuelva a ajustar la inclinación. 2 3

Los vehículos nuevos tienen uno o varios asientos equipados con
sistemas de anclaje LATCH. Si el vehículo viene equipado con LATCH,
se pueden ver los puntos de anclaje inferiores en el pliegue
del asiento del vehículo. Si no están visibles, pueden estar
marcados con el símbolo que sigue .
Vea el manual del propietario de su vehículo para informarse
sobre las ubicaciones exactas, la identificación de
los anclajes y los requisitos para su uso con el
sistema de seguridad para niños.
Lengüeta
Utilización del LATCH para instalar la base
1. Para facilitar la instalación, extienda el LATCH hasta el máximo.
2. Ponga la base en el asiento del vehículo como se indica .
3. Pase el LATCH por el recorrido del cinturón en la base que
normalmente se usa para el cinturón del asiento del vehículo.
Asegúrese que el LATCH esté DEBAJO de la lengüeta de la base .
El cinturón debe mantenerse plano sin torcerse.
4. Enganche los conectores a los sujetadores inferiores.
Tire firmemente de los conectores para asegurarse
que estén enganchados .
5. Ajuste el LATCH empujando con fuerza hacia abajo
sobre la base y tirando el cinturón de ajuste .
6. NUNCA ponga dos conectores LATCH en un vehículo con
sujetador LATCH a menos que el fabricante lo haya permitido
specíficamente .
Pruebe el sistema de seguridad para niños como se indica en la página 2
"Verificación final de seguridad". Verifique que el LATCH se mantiene apretado y no
se desliza de la posición apretada. De no mantenerse apretado, colóquelo en otro
asiento o póngase en contacto con el Servicio al Cliente.
1. Coloque la base orientada hacia atrás en un asiento del vehículo
orientado hacia adelante .
2. Pase el cinturón del asiento del vehículo por las aperturas de
la base . Trabe el cinturón del asiento.
El cinturón del asiento no debe estar retorcido.
3. Ajuste el cinturón de seguridad del vehículo. Consulte el manual del
propietario del vehículo y las instrucciones en el manual del sistema de
seguridad para niños sobre cómo ajustar el cinturón del vehículo .
4. Empuje el sistema de seguridad hacia abajo en la base y asegúrese de
que escucha un "clic". Tire hacia arriba del sistema de seguridad para
niños para asegurarse que esté trabado apretadamente sobre la base.
Si el sistema de seguridad para niños no se traba apretadamente sobre
la base, el sistema de seguridad NO proporciona ninguna protección a
su niño. NO use la base/sistema de seguridad si el sistema de seguridad
no está debidamente trabado sobre la base .
El cinturón DEBE pasar debajo de la lengüeta.
Instalación de la base usando el cinturón del vehículo
Puntos de
anclaje inferior
del vehículo
Pliegue del
asiento del
vehículo
Las ubicaciones del sistime LATCH
Un asiento típico de un vehículo de pasajeros.
Otro tipo de vehículos disponen de otras
ubicaciones del sistema LATCH.
¡CLIC!
Verificación final de seguridad: Cada vez que sale en
automóvil con su niño,
Empuje hacia abajo lenta pero firmemente la parte de arriba del sistema de
seguridad para niños asegurarse que el cinturón del vehículo no se estira y que
el cinturón del vehículo o LATCH esté asegurado apretadamente alrededor de la
base/sistema de seguridad.
Gire y tire el asiento hacia adelante agarrando el sistema de seguridad cerca de la
recorrida del cinturón del vehículo y en ambos costados para asegurarse que el
cinturón del vehículo o LATCH no se alargue ni se afloje y que no se pueda mover
con facilidad el sistema de seguridad para niños.
Después de colocar a su niño en el sistema de seguridad, vuelva a verificar el
indicador del nivel en el costado del sistema de seguridad. El indicador del nivel
ahora debería aparecer SOLAMENTE en la zona azul-si todavía aparece en la
zona de color naranja, vuelva a ajustar la inclinación. 2 3

© 2002 Graco 447-4-02
Base ajustable del sistema de
seguridad para niños
Vea el manual del propietario del sistema de seguridad para
niños para obtener instrucciones completas sobre la instalación.
Base con LATCH
Antes de usar la base y el sistema de seguridad
para niños, debe leer y entender el manual del
propietario del sistema de seguridad y estas
instrucciones. Guarde esta hoja con el libro de
instrucciones como referencia en el bolsillo de su
sistema de seguridad.
Esta base se puede usar solamente con un
sistema de seguridad Graco®.
Si no recibió instrucciones con su sistema de
seguridad o si tuviera alguna pregunta sobre su
producto, llame a Graco al 1-888-224-6549 o visite
nuestro sitio web en www.gracobaby.com.
ecline the infant restraint/base on the vehicle seat. Use it AFTER you have carefully followed all of teps in
your infant restraint owner’s
La base ajustable se usa junto con el nivel indicador en el costado de su sistema de seguridad para niños. Para verificar
el ángulo apropiado del sistema de seguridad, primero asegúrese que el vehículo esté nivelado y que la base/sistema de
seguridad para niños no está inclinado hacia el costado en el asiento del vehículo. Entonces, verifique el indicador del
nivel. Debe mirar de frente al indicador.
Si el indicador aparece SOLAMENTE en la zona azul, el sistema de seguridad está
debidamente nivelado. Si el indicador de nivel aparece en la zona de color naranja,
el sistema de seguridad está demasiado vertical o demasiado inclinado.
Para bajar el pie: tire hacia abajo del fondo del pie hasta alcanzar el valor
deseado para ajustar la reclinación .
Para elevar el pie: ponga la base en una superficie plana, empuje hacia adentro
los dedos de la base y empuje hacia abajo la base para ajustar la reclinación .
Si todavía el indicador de nivel aparece en la zona de color naranja cuando el pie
está completamente extendido, entonces coloque una toalla enrollada debajo del
pie SOLAMENTE hasta que aparezca en la zona de color azul. Ajuste el cinturón
a través de la base y luego vuelva a instalar el sistema de seguridad. El indicador
del nivel ahora debería aparecer SOLAMENTE en la zona azul-si todavía aparece
en la zona de color naranja, vuelva a ajustar la reclinación .
La base de su nuevo sistema de seguridad para niños está equipada con el pie Graco de ajuste inclinable que ayuda a reclinar
debidamente la base/sistema de seguridad sobre el asiento del vehículo. Úselo DESPUÉS de haber seguido detenidamente
todos los pasos en el manual del propietario de su sistema de seguridad para niños.
Almacenamiento del LATCH
1. Para facilitar el almacenamiento, extienda
el LATCH hasta el máximo.
2. Ubique las barras de almacenamiento en el
fondo de la base del sistema de seguridad .
3. Ajuste el extremo del LATCH (sin el cinturón de ajuste)
sobre la barra de almacenamiento.
4. Repita el Paso 3 del LATCH con el cinturón de ajuste.
Después de ajustarlo sobre la barra de almacenamiento,
tire el cinturón de ajuste para asegurarse que el LATCH
esté debidamente ajustado.
5. El almacenamiento del LATCH debería tener este
aspecto cuando esté terminado .
Barras de almacenamiento
Parte inferior de la base
14
-
 1
1
-
 2
2
-
 3
3
-
 4
4
-
 5
5
-
 6
6
-
 7
7
-
 8
8


Graco 840301 - SnugRide Manual de usuario
- Categoría
- Asiento de coche
- Tipo
- Manual de usuario
- Este manual también es adecuado para
En otros idiomas
- English: Graco 840301 - SnugRide User manual