
SV500N
Scheda sintesi vocale
Vocal synthesis card
Carte synthèse vocale
2
4
5
ELKRON
Tel. +39.011.3986711 – Fax +39.011.3986703
ELKRON è un marchio commerciale di URMET S.p.A.
ELKRON is a trademark of URMET S.p.A.
ELKRON est une marque commercial d
’
URMET S.p.A.
Via Bologna, 188/C - 10154 Torino (TO) – Italy
www.urmet.com MADE IN ITALY
ITALIANO
ATTENZIONE: in questo documento sono riportate solo alcune
indicazioni essenziali sul prodotto. Per ulteriori e dettagliate
informazioni fare riferimento ai manuali delle centrali MP500.
DESCRIZIONE GENERALE
La SV500N è il modulo di sintesi vocale che consente di registrare e
riascoltare messaggi personalizzati.
Esso include una serie di messaggi preregistrati disponibili in diverse
lingue.
1 INSERIMENTO NELLA CENTRALE
Il modulo SV500N deve essere connesso sulla scheda madre della
centrale per mezzo dell’apposito connettore.
NOTA: prima di aprire la centrale entrare in procedura di manutenzione
onde evitare di far suonare le sirene.
ATTENZIONE: il collegamento e scollegamento della scheda di sintesi
vocale deve essere effettuato a centrale non alimentata (rete e batteria
sconnesse).
2 INDIVIDUAZIONE DEL CONNETTORE
Il connettore per la scheda di sintesi vocale è identificato sulla scheda
madre come J4.
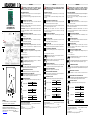
3 MONTAGGIO DEI DISTANZIALI
Montare sulla scheda di sintesi vocale i 2 distanziali di sostegno a
corredo nei fori indicati in figura 5 (D).
4 MONTAGGIO DELLA SCHEDA
Inserire il connettore a pettine nell’apposito connettore e i distanziali di
sostegno (forniti a corredo) attraverso i fori predisposti sulla scheda
madre.
5 SELEZIONE INGRESSO DI REGISTRAZIONE
Selezionare l’ingresso per la registrazione dei messaggi mediante il
ponticello (C - Fig. 5).
Le possibili scelte sono:
La registrazione avviene tramite una tastiera vocale collegata al
bus fonia (B – Fig. 5).
La registrazione avviene tramite l’auricolare (in dotazione)
collegato all’apposito jack (A – Fig. 5).
6 COLLEGAMENTO BUS FONIA
Collegare, se previsto, il doppino ritorto della linea fonia ai morsetti B (fig. 5).
Nel collegamento non è necessario tenere conto della polarità.
7 ALIMENTAZIONE DELLA CENTRALE
Fornire inizialmente la tensione di rete e collegare quindi la batteria.
8 REGISTRAZIONE E ASCOLTO MESSAGGI
Per informazioni sui procedimenti di registrazione e ascolto dei messaggi
fare riferimento al manuale di programmazione della centrale.
9 SELEZIONE DELLE LINGUE
Selezionare la lingua desiderata mediante i ponticelli JP4 e JP5 (E –Fig. 5).
CARATTERISTICHE TECNICHE
Tensione nominale di alimentazione
........
13,8 Vcc (prelevati dalla centrale)
Corrente nominale assorbita a 12 Vcc:
a riposo....................................................... 3 mA
in riproduzione ........................................... 20 mA max.
Numero max di messaggi registrabili ..... 94
ENGLISH
WARNING: In this document, just a number of basic indications
on the product are present. For further detailed information, refer to
MP500 control panel manuals.
GENERAL DESCRIPTION
SV500N is a vocal synthesis module that allows you to record and play
customized messages.
It includes a number of pre-recorded messages available in various
languages.
1 CONNECTION WITH THE CONTROL UNIT
The SV500N module must be connected with the control panel mother
board by means of the special connector supplied.
NOTE: Prior to opening the control unit, enter the maintenance procedure
so as to avoid causing the sirens to sound.
WARNING: The vocal synthesis card must be connected and
disconnected when the control panel is not powered (i.e. mains supply
and battery disconnected).
2 IDENTIFYING THE CONNECTOR
The vocal synthesis card connector is represented by J4 on the mother
board.
3 FITTING THE SPACERS
Fit the two supporting spacers (supplied with the unit) into the holes
shown in figure 5 (D) on the vocal synthesis card.
4 FITTING THE CARD
Put the comb connector into its connector and the supporting spacers
(supplied with the unit) through the holes provided on the mother board.
5 SELECTING THE RECORDING INPUT
Select the message recording input by means of the jumper connection
(C-Fig. 5).
The following choices can be made:
Recording is made by means of a vocal keyboard connected
with the audio bus (B – Fig. 5).
Recording is made by means of the earphone (supplied with
the unit) connected to the special (A – Fig. 5).
6 CONNECTING THE AUDIO BUS
Connect the audio bus line twisted duplex cable (if any) with terminals B
(fig. 5). You need not account for polarity when making the connection.
7 CONTROL UNIT POWER SUPPLY
First supply the mains voltage, then connect the battery.
8 MESSAGE RECORDING AND PLAYBACK
Refer to the control panel programming manual for more information on
the message recording and playback procedures.
9 LANGUAGES SELECTION
Select the desired language using the jumpers JP4 and JP5 (E–Fig. 5).
TECHNICAL CHARACTERISTICS
Rated supply voltage ...................... 13,8 Vdc (picked by the control panel)
Rated current absorption at 12 Vdc:
at rest ............................................................................ 3 mA
while playing back ....................................................... 20 mA max.
Max number of messages that can be recorded .... 94
FRANCAIS
ATTENTION: Dans ce document sont reportées uniquement
quelques indications essentielles sur le produit. Pour d’autres
informations détaillées consulter les manuels des centrales MP500.
DESCRIPTION GÉNÉRALE
La SV500N est le module de synthèse vocale qui permet d’enregistrer et
de ré-écouter des messages personnalisés.
Elle inclut une série de messages pré-enregistrés disponibles en
plusieurs langues.
1 INSERTION DANS LA CENTRALE
Le module SV500N doit être connecté sur la carte mère au moyen du
connecteur prévu à cet effet.
NOTE: avant d’ouvrir la centrale accéder à la procédure d’entretien afin
d’éviter de faire sonner les sirènes.
ATTENTION: le raccordement et le débranchement de la carte de
synthèse vocale doit être effectué avec la centrale non alimentée (réseau
et batterie débranchés).
2 IDENTIFICATION DU CONNECTEUR
Le connecteur pour la carte de synthèse vocale est identifié par la carte
mère comme J4.
3 MONTAGE DES ENTRETOISES
Monter sur la carte de synthèse vocale les 2 entretoises de soutien fourni
dans les trous indiqués dans la figure 5 (D).
4 MONTAGE DE LA CARTE
Brancher le connecteur à peigne au connecteur prévu à cet effet et
introduire les entretoises de soutien fournies à cet effet dans les trous
présents sur la carte mère.
5 SELECTION ENTREE D’ENREGISTREMENT
Sélectionner l‘entrée pour l’enregistrement des messages au moyen du
cavalier (C - Fig. 5).
Les choix possibles sont:
L’enregistrement est effectué au moyen d’un clavier vocal
raccordé au bus phonie (B – Fig. 5).
L’enregistrement est effectué au moyen de l’écouteur (fourni)
raccordé à la fiche mâle spécialement prévue (A – Fig. 5).
6 RACCORDEMENT BUS PHONIE
Raccorder, si prévu, la paire torsadée de la ligne phonie aux bornes B
(fig. 5). Dans le raccordement il n’est pas nécessaire de tenir compte de
la polarité.
7 ALIMENTATION DE LA CENTRALE
Alimenter initialement la tension de réseau et brancher ensuite la
batterie.
8 ENREGISTREMENT ET ECOUTE DES MESSAGES
Pour des informations sur les procédés d’enregistrement et d’écoute des
messages, consulter le Manuel de programmation de la centrale.
9 SELECTION DES LANGUES
Sélectionnez la langue souhaitée à l'aide des cavaliers JP4 et JP5
(E–Fig. 5).
CARACTERISTIQUES TECHNIQUES
Tension nominale d’alimentation
............
13,8 Vcc (prélevés de la centrale)
Courant nominal absorbé à 12 Vcc:
au repos ............................................................. 3 mA
en reproduction ................................................. 20 mA max.
Nombre max. de messages enregistrables ... 94
DS80CT66-001C LBT80803
E
D
C
A
B
80CT6610111 80CT6615111
JP4-JP5 CHIUSI: Italiano Spagnolo
80CT6610111 80CT6615111
JP5 CHIUSO: Inglese Tedesco
80CT6610111 80CT6615111
JP4 CHIUSO: Francese Sloveno
80CT6610111 80CT6615111
JP4-JP5 CLOSED: Italian Spanish
80CT6610111 80CT6615111
JP5 CLOSED: English German
80CT6610111 80CT6615111
JP4 CLOSED: French Slovenian
80CT6610111 80CT6615111
JP4-JP5 FERMÉ: Italienne Espagnol
80CT6610111 80CT6615111
JP5 FERMÉ: Anglaise Allemand
80CT6610111 80CT6615111
JP4 FERMÉ: Française Slovène
J4

SV500N
Tarjeta de síntesis de voz
Sprachsynthese-Karte
Kartica za sintezo govora
2
4
5
ELKRON
Tel. +39.011.3986711 – Fax +39.011.3986703
ELKRON es una marca registrada de URMET S.p.A.
ELKRON ist Markenzeichen von
URMET S.p.A.
ELKRON je blagovna znamka od podjetja URMET S.p.A.
Via Bologna, 188/C - 10154 Torino (TO) – Italy
www.urmet.com MADE IN ITALY
ESPANOL
ATENCIÓN: En este documento solo se citan algunas
indicaciones esenciales del producto. Para más información
detallada, remitirse a los manuales de las centrales MP500.
DESCRIPCIÓN GENERAL
La tarjeta SV500N es el módulo de síntesis de voz que permite grabar y
volver a escuchar mensajes personalizados.
Incluye una serie de mensajes pregrabados disponibles en varias
lenguas.
1 INTRODUCCIÓN EN LA CENTRAL
El módulo SV500N debe conectarse a la placa madre de la central
mediante el conector apropiado.
NOTA: antes de abrir la central, entrar en el procedimiento de
mantenimiento para evitar hacer sonar las sirenas.
ATENCIÓN: la conexión y desconexión de la tarjeta de síntesis de voz
se debe efectuar con la central sin alimentación (red y batería
desconectadas).
2 INDIVIDUALIZACIÓN DEL CONECTOR
El conector para la tarjeta de síntesis de voz se encuentra identificado en
la placa madre como J4.
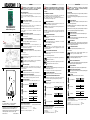
3 ONTAJE DE LOS DISTANCIADORES
Montar los 2 soportes distanciadores suministrados en los orificios
indicados en la figura 5 (D) de la tarjeta de síntesis de voz.
4 MONTAJE DE LA TARJETA
Colocar el conector DB en el conector correspondiente y los
distanciadores de apoyo, suministrados en dotación, a través de los
orificios preparados en la placa madre.
5 SELECCIÓN ENTRADA DE GRABACIÓN
Seleccionar la entrada para la grabación de los mensajes mediante el
puente (C - Fig. 5).
Las elecciones posibles son:
La grabación se realiza mediante un teclado de voz conectado
al bus sonido (B – Fig. 5).
La grabación se realiza mediante el auricular (suministrado)
conectado al jack correspondiente (A – Fig. 5).
6 CONEXIÓN BUS SONIDO
Conectar, si está previsto, el par retorcido de la línea sonido a los
terminales B (fig. 5). No es necesario tener en cuenta la polaridad para
realizar la conexión.
7 ALIMENTACIÓN DE LA CENTRAL
Suministrar inicialmente la tensión de red y luego conectar la batería.
8 GRABACIÓN Y ESCUCHA DE MENSAJES
Para más información sobre los procedimientos de grabación y escucha
de los mensajes, remitirse al manual de programación de la central.
9 SELECCIÓN DE IDIOMAS
Seleccione el idioma deseado con los puentes JP4 y JP5 (E – Fig. 5).
CARACTERÍSTICAS TÉCNICAS
Tensión nominal de alimentación
..............
13,8 V— (tomados de la central)
Corriente nominal absorbida a 13,8 Vcc:
en reposo .............................................................3 mA
durante reproducción .........................................20 mA máx.
Número máx. de mensajes registrables ..........94
DEUTSCH
ACHTUNG: In diesem Dokument werden nur einige wesentliche
Angaben zum Produkt wiedergegeben. Für weitere und detaillierte
Informationen beziehen Sie sich auf die Anleitungen der MP500
Zentralen.
ALLGEMEINE BESCHREIBUNG
Die SV500N ist das Modul der Sprachsynthese, mit welchem Sie
personalisierte Nachrichten aufnehmen und abhören können.
Dies beinhaltet eine Reihe von voreingestellten Nachrichten, die in
verschiedenen Sprachen verfügbar sind.
1 EINGABE IN DIE ZENTRALE
Das Modul SV500N muss mit dem entsprechenden Anschluss an die
Hauptplatine der Zentrale angeschlossen sein.
HINWEIS: Vor Öffnen der Zentrale die Verwaltung durchführen, um zu
vermeiden, dass die Sirene ertönt.
ACHTUNG: Der Anschluss und das Trennen der Sprachsynthese-Karte
muss bei ausgeschalteter Zentrale durchgeführt werden (Netz und
Batterie getrennt).
2 AUSWAHL DES ANSCHLUSSES
Der Anschluss für die Sprachsynthese-Karte ist auf der Hauptplatine als
J4 ausgewiesen
3 EINBAU DER ABSTANDHALTER
Auf die Sprachsynthese-Karte die 2 Abstandhalter in die Löcher,
angegeben in Abbildung 5 (D), einbauen.
4 EINBAU DER KARTE
Den Steckverbinder in den entsprechenden Anschluss und die
(mitgelieferten) Abstandhalter durch die vorgegebenen Löcher auf der
Hauptplatine einführen.
5 AUSWAHL EINGANG DER ERFASSUNG
Den Eingang für die Erfassung der Nachrichten durch die Drahtbrücke
auswählen (C - Abb. 5).
Mögliche Auswahlmöglichkeiten sind:
Die Erfassung durch eine Sprachtastatur, angeschlossen an
den Audiobus (B – Abb. 5).
Die Erfassung durch Kopfhörer (mitgeliefert), angeschlossen an
den entsprechenden Stecker (A – Abb. 5).
6 ANSCHLUSS AUDIOBUS
Falls vorgesehen, die verdrillte Zweidrahtleitung der Telefonleitung an die
Klemmen B anschließen (Abb. 5).
Beim Anschließen muss nicht auf die Polarität geachtet werden.
7 VERSORGUNG DER ZENTRALE
Für Stromversorgung sorgen und dann die Batterie anschließen.
8 ERFASSEN UND ANHÖREN DER NACHRICHTEN
Für Informationen über die Erfassung und das Anhören der Nachrichten
beziehen Sie sich auf die Programmierungsanleitung der Zentrale.
9 SPRACHAUSWAHL
Die gewünschte Sprache durch die Drahtbrücken JP4 und JP5
auswählen (E – Abb. 5).
TECHNISCHE EIGENSCHAFTEN
Nennspannung der Versorgung
...........
13,8 Vdc (der Zentrale entnommen)
Nennstromstärke bei 12 Vdc:
Ruhezustand ............................................. 3 mA
bei Wiedergabe ......................................... 20 mA max.
Max. Anzahl erfassbarer Nachrichten .... 94
SLOVENŠČINA
POZOR: V tem dokumentu je navedenih le nekaj ključnih
informacij o izdelku. Za dodatne in podrobnejše informacije
poglejte priročnike za centrale MP500.
SPLOŠNI OPIS
SV500N je modul za sintezo govora, ki omogoča, da lahko posnamete in
ponovno poslušate osebna sporočila.
Vključuje tudi vrsto vnaprej posnetih govornih sporočil, ki so na voljo v
več jezikih.
1 PRIKLOP NA CENTRALO
Modul SV500N je potrebno priključiti na matično ploščo centrale s
pomočjo ustreznega konektorja.
OPOMBA: vklopite postopek za vzdrževanje pred odpiranjem centrale,
da ne boste sprožili alarma.
POZOR: kartico za sintezo govora je potrebno priključiti in izključiti, ko
centrala ni pod napetostjo (omrežje in baterije so izključeni).
2 DOLOČITEV KONEKTORJA
Konektor kartice za sintezo govora je označen na matični plošči kot J4.
3 MONTAŽA DISTANČNIKOV
Montirajte na kartico za sintezo govora 2 podporna distančnika z opremo,
tj. v luknje, ki so označene na sliki 5 (D).
4 MONTAŽA KARTICE
Priključite grebenasti konektor v ustrezni konektor in privijte priložene
plastične vijake na podporne distančnike (priloženi) skozi luknje, ki so bile
predhodno narejene na matični plošči.
5 IZBIRA VHODA ZA POSNETEK
Izbirajte vhod za posnetek sporočil preko mostička (C - Slika 5).
Možne izbire so:
Posnetek se izvaja s pomočjo glasovne tipkovnice, ki je
povezana z glasovnim vodilom (B – Slika 5).
Posnetek se izvaja preko (priložene) slušalke, ki je povezana z
ustreznim jack priključkom (A – Slika 5).
6 POVEZAVA Z GLASOVNIM VODILOM
Priključite, po potrebi, twisted pair kabel glasovne linije na spojke B (Slika
5). Pri priključitvi ni potrebno upoštevati polarnosti.
7 NAPAJANJE CENTRALE
Na začetku uporabljajte omrežno napetost in potem priključite baterijo.
8 POSNETEK IN POSLUŠANJE SPOROČIL
Za informacije o postopkih za posnemanje in poslušanje sporočil poglejte
priročnik za programiranje centrale.
9 IZBIRA JEZIKA
Izbirajte željeni jezik preko mostičkov JP4 in JP5 (E– Slika 5).
TEHNIČNE LASTNOSTI
Nazivna napajalna napetost
....................
13,8 Vcc (prevzeta iz centrale)
Nazivni tok, ki je absorbiran na 12 Vcc:
v mirovanju .................................................................. 3 mA
v izvajanju .................................................................... 20 mA max.
Maks. število sporočil, ki se lahko posnamejo ........ 94
E
D
C
A
B
80CT6610111 80CT6615111
JP4-JP5 CERRADO: Italiana Español
80CT6610111 80CT6615111
JP5 CERRADO : Inglés Alemán
80CT6610111 80CT6615111
JP4 CERRADO: Francés Esloveno
80CT6610111 80CT6615111
JP4-JP5 GESCHLOSSEN: Italienisch Spanisch
80CT6610111 80CT6615111
JP5 GESCHLOSSEN : Englisch Deutsch
80CT6610111 80CT6615111
JP4 GESCHLOSSEN: Französisch Slowenisch
80CT6610111 80CT6615111
JP4-JP5 ZAPRTA: Italijanščina Španščina
80CT6610111 80CT6615111
JP5 ZAPRT : Angleščina Nemščina
80CT6610111 80CT6615111
JP4 ZAPRT: Francoščina Slovenščina
J4
DS80CT66-001C LBT80803
-
 1
1
-
 2
2

