Ultraloq U-BOLT-PRO-ZWAVE Manual de usuario
- Tipo
- Manual de usuario

Ultraloq U-Bolt Pro Z-Wave
Installation and User Guide
( )
V1.4
™

• Do not use a power drill for installation.
• Install and test the lock with the door open to avoid being
locked out.
• Please read all the instructions before contacting customer
support.
• Please contact customer support before returning the
product to the store.
• DO NOT install the batteries before installing the lock!
• Follow the instructions in sequential order!
• This lock is designed for the following operating temperatures:
Outside Lock Body: -31°F(-35°C) to 158°F (70°C)
Inside Lock Body: 14°F (-10°C) to 131°F (55°C)
• Please must use AA Alkaline Battery and don't use Lithium Battery
or Rechargeable Battery.
To ensure the best service, please register your account at
www.u-tec.com/register.html
Need Help?
For technical documents and more
Please visit www.u-tec.com/support
Email: [email protected]
Important Notes
Statements
- 1 -
Before using all Ultraloq products, please read all applicable terms,
rules, policies and usage provisions found at
www.u-tec.com/company/privacy. By using your Ultraloq, you
agree to be bound by the U-tec Privacy Policy.
Ultraloq Terms & Policies
Note:The Exterior Assembly of Ultraloq U-Bolt Pro Z-Wave
is waterproof, but the Interior Assembly is not waterproof
at all due to the battery box.

ENGLISH
Interior
Assembly
Exterior
Assembly
Interior Assembly
Mounting Plate
Screw A Screw C
Screw D Screw E
Strike
Screw B
Bolt Spacer
Backup Key
AA Alkaline Batteries
May not be included
for some regions
Screwdriver User Guide Drill Template
Reset Needle
- 2 -
Packing List
Ultraloq U-Bolt Pro WiFi
User Guide
(V1.0)
Drill Template(V1.6)
Face of the door Edge of the door
Centerline
Backset
2
3
/
4
”
(70 mm)
2
3
/
8
”
(60 mm)
1
3
/
4
”
(44mm)
1
3
/
8
”
(35 mm)
Centerline
Backset
2
3
/
4
”
(70 mm)
2
3
/
8
”
(60 mm)
1
3
/
4
”
(44mm)
1
3
/
8
”
(35 mm)
Fold
(V1.6)
Plantilla de Perforación
Cara de la puerta Borde de la puerta
Eje
Cara de la puertaBorde de la puerta
Eje
Doblar
Entrada de
la cerradura
Entrada de
la cerradura
Fold
Doblar
Drill Template(V1.6)
(V1.5)
Plantilla de Perforación
Face of the doorEdge of the door
2”(50mm)
2”
(50mm)

Please scan this QR code to watch the easy
step by step installation video before
attempting to install Ultraloq .
1”
25 mm
53 mm
2 1
/
8 ”
(33 mm ~ 50 mm)
15
/
16”
~
2 ”
2 3
/
4 ”
2 3
/
8 ”
(70 mm)
OR
(60 mm)
38 mm
1 1
/
2
”
Installation Guide
Installation Video
- 3 -
1. Preparing Door
Check the door’s dimensions.
Step 1
Measure to confirm that the door is between
15
/
16”
~
2 ”
(33 mm-50 mm) thick.
Step 2
Measure to confirm that the diameter of the hole is
2 1
/
8 ”
(53 mm)
or
1 1
/
2 ”
(38 mm)
Step 3
Measure to confirm that the backset is either
2 3
/
8 ” or 2 3
/
4
”
(60 mm or 70 mm) .
Step 4
Measure to confirm that the diameter of the hole in the door
edge is
1”
(25 mm).
Step 5
Measure to confirm the depth of the hole in the frame is at least
1''(25 mm).
If you have a new door, please drill the holes according to Drill
Template.
Or you can also view the webiste directly.
www.u-tec.com/lock/U-bolt_pro_zwave/guide
1''(25 mm)

- 4 -
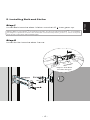
2. Installing Bolt and Strike
Step 1
Install Bolt into the door. Make sure the UP icon goes up.
Step 2
Note: Bolt is set for
2 3
/
8 ”
backset initially. It can be adjusted to
2 3
/
4 ”
if needed.
To adjust it please make sure the bolt is retracted, then, press it, twist and pull
it or push it to your desired length.
Install Strike into the door frame.
2
3
/
8
”2
3
/
4
”
Adjust the Bolt
basket length
ENGLISH

- 5 -
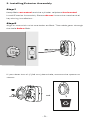
Step 1
Keep Bolt retracted and the cylinder tailpiece horizontal.
Install Exterior Assembly. Please do not insert the mechanical
key during installation .
Step 2
Align its two sticks with two holes on Bolt. The cable goes through
the hole below Bolt.
If your door has a
1 1
/
2 ”
(38 mm) bore hole, remove the spacer as
shown.
3. Installing Exterior Assembly

- 6 -
Step 1
Route the cable through the hole on Interior Assembly Mounting
Plate.
Step 2
Secure Interior Assembly Mounting Plate to Exterior Assembly
using Screws D.
4. Installing Interior Assembly Mounting Plate
Screw D
ENGLISH

- 7 -
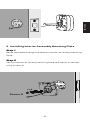
5. Installing Interior Assembly
Step 1
Remove the battery cover of the Interior Assembly.
Step 2
Insert the connector of the cable to the socket on Interior
Assembly. When you plug the connector, please make
sure the white teeth faces up. Press the connector in
firmly until it is completed seated.
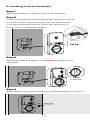
Step 3
Rotate the knob and keep it in a vertical position to stay
unlocked.
Step 4
Attach Interior Assembly to Mounting Plate and tighten 2 Screws E.
Unlocked

- 8 -
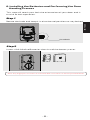
6. Installing the Batteries and Performing the Door
Handing Process
This step will teach your lock the orientation of your door and is
crucial to lock operation.
Step 1
Rotate the knob and keep it in a horizontal position to stay locked.
Step 2
Insert 4 AA Alkaline Batteries then install the battery cover.
Note: Any fingerprint or code can unlock U-Bolt Pro Z-Wave in Factory Default Mode.
Deadbolt
ENGLISH

- 9 -
Please watch our easy step by step User Guide video before
attempting to use your Ultraloq U-Bolt Pro Z-Wave Smart Lock.
User Guide
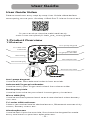
1. Product Overview
1.1 Exterior
User Guide Video
Anti-peep Keypad
Used to enter the code and unlock from outside.
Advanced Fingerprint Reader
Used to verify your finger and unlock from the outside.
Backup Key Hole
Used to insert the key to unlock in emergency situations.
Micro USB (5V)
Used to connect power bank to activate the lock when battery
runs out.
Tri-color LED Indicator
Shows you authorized or denied access, Bluetooth connectivity
status, battery status etc.
Ultraloq Button
Used to lock from the outside, illuminate the keypad for code
entry and confirm previous operation etc.
Advanced
Fingerprint Reader
Anti-peep Keypad
Micro USB (5V)
Metal Ring
Tri-color LED
Indicator
Ultraloq Button
Backup Key Hole
Or you can also view the webiste directly.
www.u-tec.com/lock/U-bolt_pro_zwave/guide

- 10 -
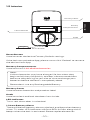
Reset Button
Used to reset the lock to Factory Default settings.
If the lock was paired to App, please must click "Delete" to remove
the device from App.
Battery Compartments
Used to insert 4 AA alkaline batteries.
Note:
Lithium batteries may have a longer life, but when they
begin to fail, they fail quickly. We don’t recommend them
because they don’t give you a lot of time to change your
batteries before the lock is completely dead.
Please don't use any Rechargeable Battery.
Battery Cover
Used to cover batteries and product label.
Knob
Used to unlock and lock the door from inside.
LED Indicator
Turns red when door is unlocked.
1.3 Low Battery Alarm
There will be low battery alert on the lock and App when battery
is low. Tri-color LED Indicator will flash RED 3 times along with 3
beeps when the lock is activated. Please replace batteries.
Reset Button
1.2 Interior
Battery
Compartments
Battery Cover
Knob
LED Indicator
RESET
ENGLISH

- 11 -
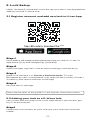
Step 1
Scan above QR code to download the App, or search “U-tec”in
App Store (iOS) and Google Play (Android).
Step 2
Open the App, register U-tec account and log in the account.
Step 3
Make sure the lock is in Factory Default Mode. Turn on
Bluetooth on your smartphone, stay near the lock (within 10 feet /
3 meters) and search the lock in the App.
Step 4
Pair the lock in the App.
2.2 Adding your lock to a Z-Wave hub
your smart lock can work with U-tec App alone if you haven’t got
any Z-Wave hub yet.
Step1
Follow the instructions of your hub, put your hub into inclusion
mode.
App
2. Lock Setup
Note: Please refer to the guide in U-tec App for more information.
Note: Ultraloq Z-Wave lock must be set up in the U-tec App before
adding it to the Z-Wave hub.
2.1 Register account and add new lock in U-tec App

ENGLISH
- 12 -
Step2
Open the U-tec App and go to Settings, select Z-Wave Control.
The App should state that “Your Ultraloq Smart Lock has not
been added to a Z-Wave hub yet”.
If your lock has been added to a hub already, please follow the
instructions in the FAQ to exclude your lock from the hub first.
Step3
Tap Add to Z-Wave hub,then follow the App instructions to
start the inclusion process. If your Z-Wave hub is Security 2
enabled and requires the Z-Wave QR code or pin code to add the
lock automatically, please find it on the back of the battery cover
of your smart lock.
When U-tec App states that the connection is successful, please
return to your hub interface to complete the setup.
This lock can be operated in any Z-Wave network with other
Z-Wave certified devices from other manufacturers. All
non-battery operated nodes within the network will act as
repeaters regardless of vendor to increase reliability of the
network.
Configuration parameters and association group information can
be found at u-tec.com/Support.
DON’T WANT TO USE THE APP?
Please go to page 17 for programming guide for Standalone Mode.
3. Using Your Lock
• User Code
3.1 Unlock From Outside
Enter 4-8 digit code and press Ultraloq Button to unlock .

• Z-Wave hub interface
Unlock through your hub interface when connected.
- 13 -
• Fingerprint
Place your finger on Fingerprint Reader to unlock.
• U-tec App
Use your U-tec App to unlock. Please refer to more information in
your App.
U-Bolt Pro WiFi
HUB

ENGLISH
1. Pull
- 14 -
3.2 Lock From Outside
Press Ultraloq Button to lock manually.
Enable Auto Lock feature and the lock will relock automatically.
3.3 Unlock From Inside
Rotate the knob to a vertical position to unlock.
3.4 Replace Batteries
Please use 4 high-quality alkaline AA batteries for replacement
when the battery is dead.
3.5 5V Emergency Power
Micro USB interface is used to connect regular 5V power bank to
activate the lock in case the battery is dead.
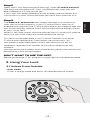
3.6 Emergency Key Override
Emergency Key Override can be used when the battery is dead.
Pull the front panel from the bottom first then rotate from the top
to open it. You can see Backup Key Hole inside. Insert the key and
rotate to unlock, just like any lock.
3.7 Enable Or Disable Auto Lock
Enable
Please keep Bolt unlocked and press "1" button for 3 seconds
until LED turns green and "1" button blinks.
Disable
Please keep Bolt unlocked and press "0" button for 3 seconds
until LED turns green and "0" button blinks.
This can also be set in U-tec App and Auto Lock timing can be
programmed between 10 seconds to 5 minutes. Factory Default
timing is 30 seconds.
Important Note
Please keep at least one key in secure location outside of
your place.
2. Rotate 3. Insert

- 15 -
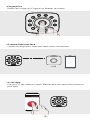
3.8 Anti-peep Keypad
The lock supports up to 16-digit Vague Code. Just enter any
16-digit code, as long as a correct code is included in what you
entered, you can open the door.
1:
2:
3:
1 2 3 4 5 6 X X X X X X
1 2 3 4 5 6
X X X X X X
1 2 3 4 5 6
X X X X X X
Example
User Code: 123456
Vague Code
3.9 Place Finger
1. For a higher recognition rate, please try to cover the
Fingerprint Reader completely with your finger, touching the
surrounding metal ring.
2. Make sure that your finger and Fingerprint Reader are clean
and dry. For Fingerprint Reader, use a clean, lint-free cloth to
wipe off any dirt or debris.
3. Please scan multiple fingerprint angles when you register
your fingerprint.
4. While scanning your finger, you shouldn't tap too quickly or
move your finger around.
5. If you have trouble enrolling one finger, try another.
6. U-Bolt Pro Z-Wave fingerprint sensor has self-study
function which the verification rate will be improved after
multiple success .
Bottom View Top View Side View

ENGLISH
- 16 -
4.2 Add User Code in Standalone Mode
Warning
Standalone Mode is NOT available after the lock is registered
in App! Please reset the lock to Factory Default Mode first to
program your lock in Standalone Mode.
Admin Code must be created first prior to any other programming.
Only one Admin Code is available.
4. Standalone Mode Programming Guide
IndicatorOperation
4.1 Add Admin Code in Standalone Mode
Hold for 3 sec 2 beeps with flashing
green light
Enter 4-8 digit Admin Code
and press
1 beep with green light,
then flashing green light
Enter the Admin Code again
and press 2 beeps with green light
Success All lights off
IndicatorOperation
Hold for 3 sec 2 beeps with flashing
blue light
Enter 4-8 digit Admin Code
and press
2 beeps with green light,
then steady blue light
Enter 4-8 digit User Code
and press 1 beep with green light,
then steady blue light
It is recommended to use U-tec App to program your lock. If
you don’t have a smartphone or don’t want to use the App, you
may follow the programming instructions below.

- 17 -
4.3 Add Fingerprint in Standalone Mode
2 beeps with green light
Success All lights off
Enter the User Code again
and press
IndicatorOperation
2 beeps with flashing
blue light
2 beeps with green light,
then steady blue light
Place Your Finger
Hold for 3 sec
Enter 4-8 digit Admin Code
and press
light
Success 2 beeps with green light
Lift and Place Your Finger
Lift and Place Your Finger
Lift and Place Your Finger
Lift and Place Your Finger
Lift and Place Your Finger
#1 and #2 light with beep
#3 and #4 light with beep
#5 and #6 light with beep
#7 and #8 light with beep
#9 and #0 light with beep

ENGLISH
- 18 -
4.4 Delete Admin and User
Please reset the lock to Factory Default Mode to delete Admin
and all Users.
How to reset the lock in Standalone Mode?
Please use a Reset Needle to push the Reset Button (at the
bottom of Interior Assembly) for around 3 seconds until you
hear one long beep and two short beeps.
FAQ
1. How to exclude my lock from a Z-Wave hub?
In the hub interface, find the place to remove the lock or follow
the hub instructions to put the hub into exclusion mode.
Open U-tec Appgo to Lock Settings, select Z-Wave Control
tap Remove my lock from Z-Wave hub, then follow the App
instructions to complete the process.
2. How to reset my Z-Wave lock?
Please note all data will be erased if you reset U-Bolt Pro Z-Wave
to factory default. Use this procedure only when your Z-Wave
hub is missing or otherwise inoperable.
Please note that removing your lock from a Z-Wave network does
not reset your lock. You still need to do the following operations if
a reset is to be done.
If you are using U-tec App as Owner, please click “Delete and
Reset” to remove the lock from your U-tec Account, then use a
Reset Needle to push the Reset Button (at the bottom of Interior
Assembly) for around 3 seconds until you hear one long beep and
two short beeps.
If U-Bolt Pro Z-Wave is working as Standalone Mode, please use a
Reset Needle to push the Reset Button (at the bottom of Interior
Assembly) for around 3 seconds until you hear one long beep and
two short beeps.
3. Can I still use U-tec App when my lock is
connected to a Z-Wave hub?
Yes, Ultraloq Z-Wave lock can be operated from both the Z-Wave
hub interface and U-tec App.
4. What if I lost the paired smartphone?
Please go to www.u-tec.com/myutec.html or login U-tec App
via another smartphone to change your U-tec Account password.

- 19 == -
5. How can I unlock U-Bolt Pro Z-Wave if the battery
runs out?
There will be low battery alert on the lock and App when battery is
low. Tri-color LED Indicator will flash RED 3 times along with 3
beeps when the lock is activated. Please replace batteries.
Solution 1. Use the backup key to unlock.
Solution 2. Connect a 5V power bank to activate the lock
temporarily.
6. What’s the difference between Owner, Admin,
Normal User and Temporary User?
Owner is the person who owns the lock and registers it in U-tec
App originally. Owner has all privileges.
Admin can always unlock via fingerprint, code or App. Admin can
add or delete Admin and Users, control all lock settings and view
logs.
Normal User can always unlock via fingerprint, code or App.
Temporary User has limited access within specific time range.
7. Does U-Bolt Pro Z-Wave work with accessories
such as bolt from third party?
It is recommended to use the original accessories for best
performance and stability.
8. What is the log capacity for U-Bolt Pro Z-Wave?
U-Bolt Pro Z-Wave supports maximum 1000 logs. The latest log
will replace the oldest one once log is full.
9.What is the user capacity for U-Bolt Pro Z-Wave?
U-Bolt Pro Z-Wave supports maximum 60 users and each user
can register 1 code and 2 fingerprints.
10. Can U-Bolt Pro Z-Wave work with a WiFi
network?
We recommend you remotely control your lock through the
Z-Wave hub. U-Bolt Pro Z-Wave can not work with a WiFi network
directly, However, it can be paired with an Ultraloq WiFi adapter. In
this case, you can remotely control it via U-tec App.

Ultraloq U-Bolt Pro Z-Wave
Guía de Instalación y Uso
( V1.4 )
™

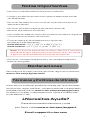
Para asegurar el mejor servicio, por favor registra tu cuenta en
www.u-tec.com/register.html
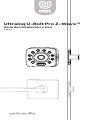
Notas Importantes
Declaraciones
- 1 -
• No uses un taladro electrónico para Instalación.
• Instala y prueba la cerradura con puerta abierta para evitar
ser bloqueada.
• Por favor lee todas las instrucciones antes de contactar al
apoyo de clientes.
• Por favor contacta al apoyo de clientes antes de
devolver el producto a la tienda.
• No instales las baterías antes de instalar la cerradura! ¡Sigue las
instrucciones en orden secuencial!
• Esta cerradura es diseñada para las siguientes
temperatura de operación:
Parte Exterior: -31˚F (-35˚C) a 158˚F (70˚C)
Parte Interior: -14˚F (-10˚C) a 131˚F (55˚C)
• Por favor, use batería alcalina AA y no use batería de litio o
batería recargable.
Antes de usar cualquier producto Ultraloq, por favor lea todos
los términos, reglas, políticas, y disposiciones de uso aplicables
que podrá encontrar en www.u-tec.com/company/privacy.
Usando su Ultraloq, usted acepta estar sujeto a la Política de
Privacidad de U-tec.
Términos y Políticas de Ultraloq
ESPAÑOL
Nota: El conjunto exterior de Ultraloq U-Bolt Pro Z-Wave es
resistente al agua, pero el conjunto interior no es resistente
al agua en absoluto debido a la caja de las baterías.
¿Necesitas Ayuda?
Para documentos técnicos y más
por favor visita www.u-tec.com/support
Email: [email protected]

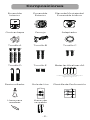
Ensamble
Interior
Ensamble
Exterior
Placa de Montaje del
Ensamble Interno
Tornillo A Tornillo C
Tornillo D
Contrachapa
Tornillo B
Cerrojo
Baterías Alcalinas AA
Podrían no venir incluidas para
algunas regiones
Destornillador Guía de Uso Plantilla de Perforación
Llave para
resetear
- 2 -
Composiciones
Ultraloq U-Bolt Pro WiFi
User Guide
(V1.0)
Drill Template(V1.6)
Face of the door Edge of the door
Centerline
Backset
2
3
/
4
”
(70 mm)
2
3
/
8
”
(60 mm)
1
3
/
4
”
(44mm)
1
3
/
8
”
(35 mm)
Centerline
Backset
2
3
/
4
”
(70 mm)
2
3
/
8
”
(60 mm)
1
3
/
4
”
(44mm)
1
3
/
8
”
(35 mm)
Fold
(V1.6)
Plantilla de Perforación
Cara de la puerta Borde de la puerta
Eje
Cara de la puertaBorde de la puerta
Eje
Doblar
Entrada de
la cerradura
Entrada de
la cerradura
Fold
Doblar
Drill Template(V1.6)
(V1.5)
Plantilla de Perforación
Face of the doorEdge of the door
2”(50mm)
2”
(50mm)
Adaptador
Llaves de
respaldo
Tornillo E

Por favor escanea este QR código para ver el
video de instalación de paso a paso antes de
intentar instalar Ultraloq U-Bolt Pro Z-Wave.
O también podrías revisar la página web
directamente.
www.u-tec.com/lock/U-bolt_pro_zwave/guide
Guía de Instalación
Video de Instalación
- 3 -
1. Preparando la puerta
Chequea las dimeniones de la puerta.
Paso 1
Mide para confirmar que el espesor de la puerta es entre
15
/
16”
~
2 ”
(33 mm-50 mm) .
Paso 2
Mide para confirmar que el diametro de agujero es
2 1
/
8 ”
(53 mm)
or
1 1
/
2
”
(38 mm) .
Paso 3
Mide para confirma que el backset de la puerta tiene un espesor
de
2 3
/
8 ” or 2 3
/
4
”
(60 mm o 70 mm) .
Paso 4
Mide para confirmar que el diametro del agujero en el borde
de la puerta es
1”
(25 mm).
Paso 5
Por favor, mida y confirme que la profundidad del agujero en el
marco es menos de 1 '' (25 mm).
Si tienes una puerta nueva, por favor perfora los agujeros según
la plantilla de perforación.
1”
25 mm
53 mm
2 1
/
8 ”
(33 mm ~ 50 mm)
15
/
16”
~
2 ”
2 3
/
4 ”
2 3
/
8 ”
(70 mm)
OR
(60 mm)
1''(25mm)
38 mm
1 1
/
2
”
ESPAÑOL

- 4 -
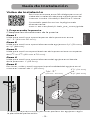
2. Instalación de Bolt y Cerrojo
Paso 1
Instala Bolt en tu puerta. Asegúrate el UP símbolo hacia arriba.
Paso 2
Instala Cerrojo en el marco de la puerta.
El Bolt es para 2 3/8” backset inicialmente. Se puede ajustar a 2 3/4 ” si es necesario.
Para ajustarlo por favor asegúrate que el Bolt está retraído, despues, presiónalo, gíralo
y jálalo o empújalo a la longitud que deseas.
Tornillo A
Tornillo B
Tornillo C
2
3
/
8
”2
3
/
4
”
Ajusta la longitud de
basket de bolt

- 5 -
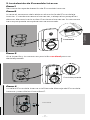
Paso 1
Manten el Cerrojo presionado y la cola del cilindro horizontal.
Instala Ensamble Externo. Por favor no instales la llave mecánica.
Paso 2
Alinea sus dos barras con dos orificios en el Cerrojo. El cable pasa
por el orificio debajo del Cerrojo.
Si tu puerta tiene un agujero de
1 1
/
2 ”
(38 mm), retira el adaptador
como se muestra.
3. Instalación de ensamble Externo
ESPAÑOL

- 6 -
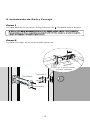
Paso 1
Pasa el cable a través del orificio en la placa de montaje de
ensamble.
Paso 2
Fija la placa de montaje del ensamble interno al ensamble
externo utilizando los tornillos D.
4. Instalación de Placa de Montaje del Ensamble Interno
Tornillo D

- 7 -
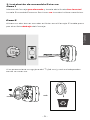
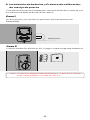
5. Instalación de Ensamble Interno
Paso 1
Remueve la tapa de baterías de Ensamble Interno.
Paso 2
Inserte el conector del cable en el enchufe del Ensamblaje
Interior. Cuando conecte el conector, coloque los pequeños
dientes blancos hacia arriba. Presione el conector firmemente
hasta que quede completamente asentado.
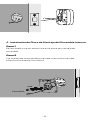
Paso 3
Gira la perilla y la manten en posición vertical para ser
desbloqueada.
Paso 4
Instala el Ensamble Interno a la Placa de Montaje del Ensamble
Interno y atornilla los 2 tornillos E.
Desbloqueada
Tornillo E
Levanta
ESPAÑOL

- 8 -
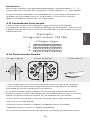
6. Instalación de baterías y Proceso de calibración
de manija de puerta
Este paso te enseñará a bloquear la orientación de tu puerta y es
crucial para la operación de la cerradura.
Paso 1
Gira la perilla y la manten en posición horizontal para ser
bloqueada.
Paso 2
Inserte 4 baterías alcalinas AA y luego instale la tapa de la batería.
Nota: Cualquier código puede desbloquear U-Bolt Pro Z-Wave
bajo modo predeterminado de fábrica.
Bloqueada

- 9 -
Por favor ve nuestro fácil video de Uso de Guía de paso a paso antes
de intentar usar tu Cerradura Inteligente Ultraloq U-Bolt Pro Z-Wave.
O también podrías revisar la página web directamente.
www.u-tec.com/lock/U-bolt_pro_zwave/guide
Guía de Uso
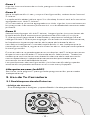
1. Descripción del producto
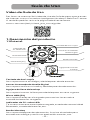
1.1 Exterior
Video de Guía de Uso
Teclado de Anti-espía
Se usa para entrar el código y desbloquear desde exterior.
Lector Avanzado de Huella Digital
Se usa para verificar tu huella y desbloquear desde exterior.
Agujero de llave de backup
Se usa para insertar la llave para desbloquear en caso urgente.
Micro USB (5V)
Se usa para conectar al cargador para activar la cerradura
cuando las baterías se agotan.
Indicador de Tri-color LED
Te muestra acceso autorizado o negado, estado de conectividad
Bluetooth, estado de baterías,etc.
Botón Ultraloq
Se usa para bloquear desde exterior, iluminar el teclado para
entrada con código y confirmar operación anterior, etc.
Lector Avanzado de
Huella Digital
Teclado de Anti-espía
Micro USB (5V)
Indicador de
Tri-color LED
Botón Ultraloq
Agujero de llave de
backup
Anillo Metálico
ESPAÑOL

- 10 -
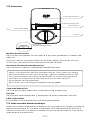
Botón de Reseteo
Se usa para resetear la cerradura a ajustes predeterminados de
fábrica.
Si la cerradura se emparejó con la App, deberías hacer clic en
"Eliminar" para eliminar el dispositivo de la App.
Compartimientos de Baterías
Se usa para insertar 4 baterías alcalinas AA.
Tapa de Baterías
Se usa para tapar baterías y etiquetas de producto.
Perilla
Se usa para desbloquear y bloquear la puerta desde interior.
LED Indicador
Enciende cuando puerta está desbloqueada.
1.3 Alarma de batería baja
Habrá una alerta de batería baja en la cerradura y la App cuando la
batería esté baja. El tricolor indicador LED destellará en ROJO 3
veces junto con 3 pitidos cuando se active la cerradura. Por favor,
reemplace las baterías.
1.2 Interior
Botón de Reseteo
Compartimientos
de Baterías
Tapa de Baterías
Perilla
LED Indicador
Nota: Las baterías de litio pueden tener una vida más larga,
pero cuando comienzan a agotar, agotan rápidamente. No
las recomendamos porque no te dan mucho tiempo para
cambiar tus baterías antes de que la cerradura está
completamente agotada.
Por favor, no use ninguna batería recargable.
RESET

- 11 -
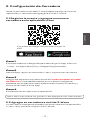
Paso 1
Escanea sobre el código QR para descargar la App, o busca
¨U-tec¨ en App Store(iOS) y Google Play(Android).
Paso 2
Abre la App, registra cuenta de U-tec y ingresa con la cuenta.
Paso 3
Asegúrate de que la cerradura está en modo predeterminado
de fábrica. Enciende Bluetooth en tu celular inteligente,
quédate cerca de la cerradura(dentro de 10 pies/3 metros) y
busca la cerradura en la App.
Paso 4
Emparejar la cerradura en la aplicación
2.2 Agregar su cerradura a un Hub Z-Wave
Su cerradura inteligente puede funcionar solo con la aplicación
U-tec si aún no tiene ningún Hub Z-Wave.
Escanear el código QR para descargar la
APP
2. Configuración de Cerradura
Nota: Por favor refiere a la guía en U-tec App para más información.
ESPAÑOL
Nota: la cerradura Ultraloq Z-Wave debe configurarse en la
aplicación U-tec antes de agregarla al Hub Z-Wave.
2.1 Registre la cuenta y agregue una nueva
cerradura en la aplicación U-tec

- 12 -
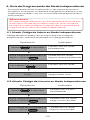
3. Uso de Tu Cerradura
• Código de Usuario
3.1 Desbloqueo desde Exterior
Entra código de 4-8 dígitos y apreta Botón Ultraloq para desbloquear.
¿No quieres usar la APP?
Por favor ve la página 17 para guía de programación para modo
Independiente.
Paso 1
Siga las instrucciones de su hub, ponga su hub en modo de
inclusión
Paso 2
Abra la aplicación U-tec y vaya a Configuración, seleccione Control
Z-Wave.
La aplicación debe indicar que "Su Ultraloq Smart Lock aún no se ha
agregado a un Hub Z-Wave".
Si su cerradura ya se ha agregado a un Hub, siga las instrucciones en
las preguntas frecuentes para excluir su candado del concentrador
primero.
Paso 3
Seleccione Agregar al Hub Z-Wave, luego siga las instrucciones de
la aplicación para comenzar el proceso de inclusión.Si su Hub
Z-Wave tiene Seguridad 2 habilitada y requiere el código QR o el
código PIN de Z-Wave para agregar la cerradura automáticamente,
búsquelo en la parte posterior de la tapa de la batería de su
cerradura inteligente. Cuando la aplicación U-tec indique que la
conexión es exitosa, regrese a la interfaz de su Hub para completar
la configuración.
Esta cerradura se puede operar en cualquier red Z-Wave con otros
dispositivos certificados Z-Wave de otros fabricantes. Todos los
nodos que no funcionan con baterías dentro de la red actuarán
como repetidores independientemente del proveedor para
aumentar la confiabilidad de la red.
Los parámetros de configuración y la información del grupo de
asociación se pueden encontrar en u-tec.com/Support.

- 13 -
• Huella Digital
Coloca tu huella en lector de huella digital para desbloquear.
• Aplicación U-tec
Use su aplicación U-tec para desbloquear. Consulte más
información en su App.
U-Bolt Pro WiFi
• Interfaz de Hub Z-Wave
Desbloquee a través de la interfaz de su Hub cuando
ESPAÑOL
HUB

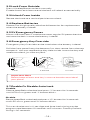
1. Pulsar
- 14 -
3.7 Activación o desactivación del Auto Bloqueo
Habilitar
Por favor manten cerrojo desbloqueado y apreta botón ¨1¨ 3
segundos hasta que LED se ponga verde y botón ¨1¨ parpadee.
3.2 Bloqueo Desde Exterior
Apreta Botón Ultraloq para bloquear manualmente.
Habilita función de Auto bloqueo y la cerradura va a rebloquear
automáticamente.
3.3 Desbloqueo Desde Interior
Gira la perilla a una posicioón vertical para desbloquear.
3.4 Reemplazar Baterías
Por favor usa 4 baterías alcalinas de alta calidad para
reemplazamiento cuando las baterías se agotan.
3.5 5V Energía de Emergencia
Micro USB interfaz se usa para conectar 5V cargador regular para
activar la cerradura en caso de que las baterías se agotan.
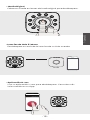
3.6 Llave de Emergencia Oculta
La llave de Emergencia Oculta se usa cuando las baterías se
agotan. Pulsa el panel frontal desde la parte inferior primero
luego gira desde la parte superior para abrirlo. Puedes ver agujero
de llave de Backup dentro. Inserta la liave y gírala para
desbloquearla como las tradicionales.
Nota Importante
Por favor guarda por lo menos una llave en una ubicación
segura fuera de tu casa.
3. Insertar 2. Girar

- 15 -
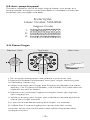
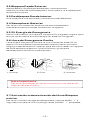
3.8 Teclado de Anti-espía
La cerradura permite códigos vagos de hasta 16 dígitos.
Simplemente ingresa cualquier código de 16 dígitos, mientras el
código correcto se encuentra incluído dentro de lo que ingresó,
podrá abrirla.
1:
2:
3:
1 2 3 4 5 6 X X X X X X
1 2 3 4 5 6
X X X X X X
1 2 3 4 5 6
X X X X X X
Ejemplo
Código de Usuario: 123456
Códigos Vagos
3.10 Posición de Huella
1. Para obtener una tasa de reconocimiento más alta, intenta
cubrir el lector de huella digital completamente con tu dedo,
tocando el anillo metálico circundante.
2. Asegúrate de que tu dedo y el lector de huellas dactilares
estén limpio y seco. Para el lector de huellas dactilares, usa una
paño sin pelusas para limpiar la suciedad o los residuos.
3. Por favor, escanee múltiples ángulos de huella digital cuando
registre su huella digital.
4.Mientras escaneas tu dedo, no debes tocar también
rápidamente o mueva tu dedo alrededor.
5. Si tienes problemas para registrar un dedo, prueba con otro.
Visión Inferior Visión Superior Visión lateral
Inhabillitar
Por favor manten cerrojo desbloqueado y apreta botón ¨0¨ 3
segundos hasta que LED se ponga verde y botón ¨0¨ parpadee.
Estos también pueden ser seteado en U-tec App y el plazo se
puede configurado entre 10 segundos y 5 minutos. Ajuste
determinado de fábrica es 30 segundos.
ESPAÑOL

- 16 -
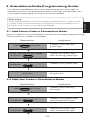
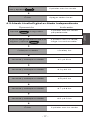
4.2 Añadir Código de Usuario en Modo Independiente
Advertencia
¡El modo independiente NO está disponible después de que
la cerradura ha sido registrado en App! Por favor resetea la
cerradura a modo predeterminado de fábrica primero para
programar la cerradura en Modo Independiente.
Código de Admin debe crear primero antes de cualquier
programación. Sólo está disponible un Código de Admin.
4. Guía de Programación de Modo Independiente
IndicadorOperación
4.1 Añadir Código de Admin en Modo Independiente
2 pitidos con luz verde
parpadeando
Entra Código de Admin de 4-8
dígitos y apreta
1 pitido con luz verde,
luego la verde parpadeando
Entra el código de Admin otra
vez y apreta 2 pitidos con luz verde
Éxito Apagan todas luces
Apreta 3 segundos
IndicadorOperación
Apreta 3 segundos 2 pitidos con luz azul
parpadeando
2 pitidos con luz verde,
luego luz azul estable
Entra Código de Admin de 4-8
dígitos y apreta
1 pitido con luz verde,
luego luz azul estable
Entra Código de Usuario de 4-8
dígitos y apreta
Se recomienda utilizar la aplicación U-tec para programar tu
cerradura. Si no tienes un teléfono inteligente o no quieres usar
la aplicación, puedes usar las instrucciones de programación a
continuación.

- 17 -
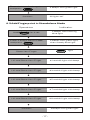
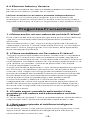
4.3 Añadir Huella Digital en Modo Independiente
2 pitidos con luz verde
Éxito Apagan todas luces
Entra el Código de Usuario otra
vez y apreta
IndicadorOperación
2 pitidos con luz verde
parpadeando
Entra Código de Admin de 4-8
dígitos y apreta 2 pitidos con luz verde,
luego luz azul estable
Coloque su dedo Ultraloq luz
Levante y coloque su dedo # 1 y # 2 luz
Levante y coloque su dedo # 3 y #4 luz
Levante y coloque su dedo # 5y # 6 luz
Levante y coloque su dedo # 7 y # 8 luz
Levante y coloque su dedo # 9 y # 0 luz
Éxito 2 pitidos con luz verde
Apreta 3 segundos
ESPAÑOL

- 18 -
Preguntas Frecuentes
1. ¿Cómo excluir mi cerradura de un Hub Z-Wave?
En la interfaz del hub, busque el lugar para quitar la cerradura o
siga las instrucciones del hub para ponerlo en modo de
exclusión.
Abra la aplicación U-tec, vaya a Configuración de Cerradura,
seleccione Control Z-Wave, seleccione Eliminar mi Cerradura
del Hub Z-Wave, luego siga las instrucciones de la aplicación
para completar el proceso.
2. ¿Cómo restablecer mi Cerradura Z-Wave?
Tenga en cuenta que todos los datos se borrarán si restablece
U-Bolt Pro Z-Wave a los valores predeterminados de fábrica.
Tenga en cuenta que quitar su cerradura de una red Z-Wave no
la restablece. Aún debe realizar las siguientes operaciones si se
va a realizar un reseteo. Utilice este paso sólo si el Hub de
Z-Wave no puede funcionar.
Si está utilizando la aplicación U-tec como propietario, haga clic
en "Eliminar y restablecer" para eliminar la cerradura de su
cuenta U-tec, luego use una aguja de restablecimiento para
presionar el botón de restablecimiento (en la parte inferior del
ensamblaje interior) durante aproximadamente 3 segundos
hasta que escuche un pitido largo y dos pitidos cortos.
Si está utilizando U-Bolt Pro Z-Wave como modo
independiente, utilice una aguja de reinicio para presionar el
botón de reinicio (en la parte inferior del ensamblaje interior)
durante unos 3 segundos hasta que escuche un pitido largo y
dos pitidos cortos.
3. ¿Puedo seguir usando la aplicación U-tec
cuando mi cerradura está conectada a un Hub
Z-Wave?
Sí, la cerradura Ultraloq Z-Wave se puede operar tanto desde la
interfaz del Hub Z-Wave como desde la aplicación U-tec.
4. ¿Qué pasa si pierdo el teléfono inteligente
emparejado?
Visita https://www.u-tec.com/myutec.html o ingresa en U-tec
App a través de otro teléfono inteligente para cambiar la
contraseña de tu cuenta U-tec.
4.4 Eliminar Admin y Usuario
Por favor resetea la cerradura a Modo predeterminado de fábrica
para eliminar Admin y todos los usuarios.
¿Cómo resetean la cerradura en Modo Independiente?
Por favor usa una llave para resetear a pulsar el botón de
reseteo(en la parte inferior de Ensamble Interno) acerca de 3
segundos hasta que se oyen un largo pitido u dos pitidos cortos.

- 19 -
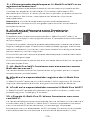
5. ¿Cómo puedo desbloquear U-Bolt Pro WiFi si se
agotan las baterías?
Habrá una alerta de batería baja en la cerradura y la aplicación
cuando las baterías estén bajas. El tricolor indicador LED
destellará en ROJO 3 veces junto con 3 pitidos cuando se active
la cerradura. Por favor, reemplace las baterías. Por favor
reemplázalas.
Solución 1. Usa la llave de backup para desbloquearla.
Solución 2. Conecta a 5V cargador para activar la cerradura
temporalmente.
6. ¿Cuál es la diferencia entre Propietario,
Administrador, Usuario normal y Usuario
temporal?
Propietario es la persona que posee U-Bolt Pro WiFi Max y la
registra en la App U-tec originalmente. El propietario tiene todos
los privilegios.
El administrador siempre puede desbloquear mediante huella
digital, código o App. El administrador puede agregar o eliminar
administradores y usuarios, controlar todas las configuraciones
de cerradura y ver los registros.
El usuario normal siempre puede desbloquear mediante huella
digital, código o App.
El usuario temporal tiene acceso limitado dentro de un rango de
tiempo específico.
7. ¿U-Bolt Pro WiFi funciona con accesorios como
Bolt de terceros?
Se recomienda utilizar los accesorios originales para un mejor
rendimiento y estabilidad.
8. ¿Cuál es la capacidad de registro de U-Bolt Pro
WiFi?
U-Bolt Pro WiFi admite un máximo de 1,000 registros. El último
registro reemplazará al más antiguo una vez que esté lleno.
9. ¿Cuál es la capacidad de usuario U-Bolt Pro WiFi?
U-Bolt Pro WiFi puede almacener hasta 60 usuarios, cada uno
puede registrar 1 código y 2 huellas.
10. ¿Puede U-Bolt Pro Z-Wave funcionar con una
red WiFi?
Le recomendamos que controle de forma remota su cerradura a
través del Hub Z-Wave. U-Bolt Pro Z-Wave no puede funcionar
con una red WiFi directamente, sin embargo, se puede
emparejar con un adaptador WiFi Ultraloq. En este caso, puede
controlarlo de forma remota a través de la aplicación U-tec.
ESPAÑOL

- 20-
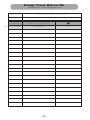
Manten Tus Registros
Keep Your Records
FECHA CÓDIGO DE ADMINISTRADOR
NOMBRE
Will Smith 12345678
E.j
CÓDIGO DE USUARIO
DATE ADMIN CODE
NAME USER CODE

© 2021 U-tec Group Inc.
U-tec and Ultraloq brands and products are trademarked
and protected under law in the United States.
Unauthorized use is prohibited. Ultraloq is sub-brand of
U-tec Group Inc.
-
 1
1
-
 2
2
-
 3
3
-
 4
4
-
 5
5
-
 6
6
-
 7
7
-
 8
8
-
 9
9
-
 10
10
-
 11
11
-
 12
12
-
 13
13
-
 14
14
-
 15
15
-
 16
16
-
 17
17
-
 18
18
-
 19
19
-
 20
20
-
 21
21
-
 22
22
-
 23
23
-
 24
24
-
 25
25
-
 26
26
-
 27
27
-
 28
28
-
 29
29
-
 30
30
-
 31
31
-
 32
32
-
 33
33
-
 34
34
-
 35
35
-
 36
36
-
 37
37
-
 38
38
-
 39
39
-
 40
40
-
 41
41
-
 42
42


