Ardo Carum Electric Breastpump Instrucciones de operación
- Tipo
- Instrucciones de operación

ardo carum
electric breastpump
Instructions for use | Gebrauchsanweisung | Mode d’emploi
Istruzioni per l’uso | Instrucciones de uso | Instruções de utilização
Gebruiksaanwijzing | Bruksanvisning | Käyttöohjeet | Instrukcja
użycia | Οδηγίες χρήσης | Kullanım kılavuzu | |

Languages Page
Instructions for use Carum – Breastpump for hospitals and hire 3-17
en
Gebrauchsanweisung Carum – Milchpumpe für Kliniken und Vermietung 18-32
de
Mode d'emploi Carum – Tire-lait pour les maternités et la location 33-47
fr
Istruzioni per l'uso Carum – Tiralatte professionale per uso ospedaliero o per noleggio 48-62
it
Instrucciones de uso Carum – Sacaleches para hospitales y alquiler 63-77
es
Gebruiksaanwijzing Carum – Borstkolf voor ziekenhuizen en verhuur 93-107
nl
Kullanım kılavuzu Carum – Klinikler ve Kiralama için Süt Pompası 168-182
tr
183-197
ar
pt Instruções de utilização Carum –
Bomba de extração de leite para uso hospitalar e aluguer
78-92
Carum – 198-212
zh
Οδηγίες χρήσης Carum – Θήλαστρο για νοσοκομεία και για ενοικίαση 153-167
el
pl Instrukcja użycia Carum – Laktator do szpitali i wypożyczania 138-152
Käyttöohjeet Carum – Rintapumppu sairaala- ja vuokrauskäyttöön 123-137
fi
Bruksanvisning Carum – Bröstpump för sjukhus och uthyrning 108-122
sv

en
3
TABLE OF CONTENTS
CARUM BREASTPUMP FOR HOSPITALS AND HIRE
Thank you for choosing the Carum breastpump from Ardo.
These instructions for use contain important and useful information about using the Carum.
When using electrical devices, all safety regulations must be followed. Please take your time. Read the
instructions for use through carefully before using the Carum breastpump for the first time.
The Carum is a vacuum pump that uses a double piston system. Using the control elements, every mother
can adjust the settings for the vacuum and cycle to her own needs. The vacuum does not change when
you adjust the cycle settings. The cycle also does not change when you adjust the vacuum settings. You
must be able to read and understand these instructions for use.
1. Product location in the container 4
2. Intended Use 5
2.1. Indications 5
2.2. Contraindications 5
3. Safety Instructions 5
4. Product Description 7
5. Start-up / Operation 8
5.1. Key 8
5.2. Start-up 9
5.2.1. Electrical connection 9
5.2.2. Connecting the pumpset (applied part) 9
5.2.3. Attaching the bottle holder 9
5.2.4. Attaching the Easy Freeze holder 9
5.3. Operation 10
5.3.1. Switching the pump on and off 10
5.3.2. Stimulation mode –
Orange background 10
5.3.3. Expression mode – Green background 11
5.3.4. "Sensitive Programme" 11
5.3.5. Triggering the let-down reflex again 11
5.3.6. Time measurement / Stopwatch 12
5.3.7. Dimmer function 12
5.3.8. Carum Battery 12
6. Useful tips 13
6.1. Expressing must never be painful. 13
6.2. Stimulating the milk let-down reflex 13
6.3. Efficient expressing 13
6.4. Increasing the volume of milk 13
7. Accessories / replacement parts 14
8. Error messages / status messages 14
8.1. Other possible faults during pumping 14
9. Cleaning / inspection / maintenance 15
9.1. Cleaning / disinfection 15
9.2. Inspection before switching on 15
9.3. Maintenance 15
9.3.1. Inspection checklist for hiring 15
9.3.2. Inspection checklist for use in hospitals 15
10. Warranty 16
11. Technical information 16
11.1. Technical data 16
11.2. Conformity 17
11.3. EMC test record 17
12. Transport and Storage 17
13. Service life and disposal 17

en
4
1. Product location in the container
a Carum breastpump
b Connector openings for the pumpset
c Control panel with LCD screen
d Connector for power cord
e Bottle holder
f Easy Freeze holder (holds freezer bag)
g Power cord
h Carum container
i Address field
j Pumpset (not included in the delivery contents)
k Instructions for use
g
b
f
ea
c
d
e
f
a
g
j
i
h
ardo carum
electric breastpump
Instructions for use | Gebrauchsanweisung | Mode d’emploi
Istruzioni per l’uso | Instrucciones de uso | Instruções de utilização
Gebruiksaanwijzing | Bruksanvisning | Käyttöohjeet | Instrukcja
użycia | Οδηγίες χρήσης | Kullanım kılavuzu | | 使用说明
k

en
5
2. Intended Use
2.1. Indications
The Carum breastpump is intended for use by breastfeeding women to express and collect their milk. It
can be used as a single pump or as a double pump. The device is only intended for use indoors and is
meant for several users.
2.2. Contraindications
The Carum must not be used during pregnancy because expressing milk can trigger contractions.
3. Safety Instructions
Important safety information
Please read the instructions for use carefully
before using the pump for the first time. Keep
these instructions for use in a safe place for later
reference.
The Carum is an electric breastpump for use in hospitals and for hire. For your health and safety and to
prevent damage to the device, the following safety rules must be followed.
Safety rules
DANGER: To avoid a fatal electric shock
• Only use the original power cord supplied by Ardo.
• Never use a faulty power cord.
• Never position an electrical device where it may fall into liquid.
• Never touch an electrical device that has fallen into liquid or is wet. Disconnect the device immediately
from the power supply.
• Never use a device that has fallen into liquid or is wet but send the device to a service point or the
manufacturer for inspection.
• Never use the Carum when taking a bath or showering.
• Never open the Carum! There is the risk of an electric shock.

en
6
WARNING: To avoid damage, electric shock, fire or injury
• The Carum is not intended for use outdoors.
• Never use the Carum if it is not functioning correctly, has been dropped, or is faulty.
• When using an electrical device, pay particular attention to children or people of impaired intelligence
who are nearby; electrical devices are not toys.
• You must always connect the power cord to the Carum first and then plug it into the power socket.
• Never leave the Carum unattended when it is connected to mains power supply.
• Disconnect the Carum from the mains power supply after use.
• The device is only disconnected when the power plug is removed from the power socket.
• Position the Carum so that it can be easily disconnected from the mains power supply.
• Keep the Carum as well as the power cord and all accessory parts away from hot surfaces.
• Only use the Carum for the purposes listed in the section "Intended use".
• Only use original Ardo pumpsets and original Ardo parts.
• Do not insert any objects into openings or tubes on the Carum and do not allow any objects to fall
into openings or tubes.
• Do not use the Carum in an environment in which oxygen is administered or sprays are used.
• The Carum must not be modified without the permission of the manufacturer.
WARNING: To avoid damaging your health or injuries
• Check the Carum and the associated parts before every use.
• Never use the Carum when you are sleeping or feeling tired.
• If expressing milk is uncomfortable or painful, stop pumping and ask for advice from the responsible
qualified personnel.
• Do not use the Carum if you are pregnant because expressing milk can trigger contractions.
• Follow the instructions in the relevant section "Cleaning / Inspection / Maintenance" for cleaning.
Car adapter
• The Carum and the Carum Battery are not intended for use outdoors even with the car adapter.
• Only use the original electrically protected car battery cable supplied by Ardo.
• Ensure that your car has a 12 V DC connection.
• Do not express milk while driving, even as a passenger. This may lead to an accident.
• Disconnect the Carum from the electrical system after use or after recharging.

en
7
4. Product Description
• The Carum electric breastpump is intended for use in hospitals and for hire.
• The Carum can be used for single pumping and double pumping (expressing milk from both breasts
at the same time).
• The cycles and the vacuum can be adjusted as required and independently of each other.
• The color screen provides visual orientation and the integrated stopwatch indicates the duration of
pumping.
• To mimic the natural suckling behavior of the baby, milk can be expressed in two phases using the
Carum: the stimulation mode and the actual expression mode. The stimulation mode starts the milk
flow and the subsequent expression mode enables efficient pumping of the milk.
• The Carum starts with the stimulation mode and changes independently to the expression mode after
two minutes. If required, you can switch to the expression mode early by pressing the mode button
during this two minute period.
• To stimulate the milk flow again while expressing, you can easily change back to the stimulation mode
at any time by pressing the mode button.
• The "Sensitive Programme" can be used if your nipples are sore to gently express milk with the
minimum starting vacuum and minimum cycle.
• Ardo pumpsets create a 100% hygienic barrier between the breast milk and the breastpump.
This closed system ensures that breast milk cannot end up in the tube of the pumpset or in the
breastpump itself.
• The Carum Battery contains a rechargeable battery unit.
• The Carum and the Carum Battery can be operated with mains power or with an optional car cable in
the car.
Carum Battery – the Carum with integrated rechargeable battery unit
The Carum Battery enables milk to be expressed anywhere and allows you to express milk beside the crib
of an ill or newborn baby. Being close to your baby helps with the let-down reflex.
• The running time with a fully charged battery unit is about four hours (at max. vacuum and max.
cycle). Recharging a flat battery unit takes about two hours.
• If the running time with a fully charged battery unit drops to less than one hour, the battery unit
needs to be replaced at the closest service point or the manufacturer to restore optimal operation.
• If the device is connected to the mains power, the battery unit is recharged while milk is being
expressed. The recharging time is prolonged in this case.
• If the Carum is connected to the electrical system of a vehicle via the car cable, the battery unit is not
recharged while milk is being expressed. After switching the device off, the battery unit is charged via
the electrical system of the car.

en
8
5. Start-up / Operation
5.1. Key
Follow the instructions for use
On / off button (stand-by button)
Vacuum button (to change the vacuum)
Cycle button (to change the cycle)
Mode button (to switch between stimulation / expression / "Sensitive Programme")
Dimmer button
Button for time measurement
Expression mode
Stimulation mode
Device with applied part BF
012
3
Conformity according to MDD 93 / 42 / EEC
Manufacturer
The device is subject to the requirements of the WEEE Directive
Power supply unit
Alternating current
Device is protection class II
IP21 Drip proof
Li-Ion Contains a lithium ion rechargeable battery unit
Device can be recycled

en
9
5.2. Start-up
5.2.1. Electrical connection
• Insert the power cord (a) into the Carum power connection (b)
and connect to the power socket.
5.2.2. Connecting the pumpset (applied part)
The use of the pumpset is described in the separate operating
instructions for the "Ardo Pumpset".
• Pumping with single pumpset:
Insert the tube connector (c) into one of the two connection
openings on the pump.
• Pumping with double pumpset:
Insert both tube connectors (d) into the connection openings
of the pump.
• The second opening (e) of the tube connector must always be
closed for both single and double pumping.
5.2.3. Attaching the bottle holder
The bottle holder (f) can be hung onto the back of the Carum or
freely positioned.
5.2.4. Attaching the Easy Freeze holder
The Easy Freeze holder (g) is used to hang a freezer bag or breast milk
bottle on the pumpset. It can be hung onto the back in place
of a bottle holder.
e
f
f
g
b
a
d
c

en
10
5.3. Operation
Vacuum and cycles can be adjusted independently of one another. Select
the setting that is most comfortable for you.
a
b
c
d
e
f
g
h
i
j
k
l
m
n
On / off button (stand-by button)
Vacuum button (to change the vacuum)
Vacuum indicator
Dimmer button
Dimmer information
Time information
Stopwatch information
Button for time measurement
Cycle indicator
Cycle button (to change the cycle)
Mode button (to switch between
stimulation / expression / "Sensitive Programme")
Expression mode
Stimulation mode
Information ribbon (n = e + f + g)
5.3.1. Switching the pump on and off
The Carum is switched on by pressing the on / off button once.
The display starts with the Welcome page. To switch the Carum off,
press the on / off button again.
00:00
Vacuum Cycles
CARUM
5.3.2. Stimulation mode – Orange background
When it is switched on, the Carum starts automatically in the stimulation
mode (orange background) with a rapid cycle and a slight vacuum. This
mode stimulates the let-down reflex. The automatic setting imitates the
natural behavior of the baby. At the start of breastfeeding, babies suckle
with rapid sucking movements and low suction strength which triggers
the flow of breast milk.
The stimulation mode lasts for two minutes and then switches
automatically to the expression mode.
The vacuum and the cycles can be increased or reduced by pressing the
buttons repeatedly or holding them down. The selected settings are
shown using bars. Adjust the vacuum and / or cycle so that you feel
comfortable.
00:00
Vacuum Cycles
CARUM
orange
00:00
Vacuum Cycles
CARUM
a
b
d
e f g
cl
m
i
h
k
j
n

en
11
5.3.3. Expression mode – Green background
In the expression mode (green background) the Carum switches gently
to a higher vacuum and a lower cycle. This automatic change imitates
the natural behavior of the baby because it changes its suckling behavior
as the breast milk starts to flow. The baby now sucks slower but with a
greater suction strength.
The vacuum and the cycles can be increased or reduced by pressing the
buttons repeatedly or holding them down. The selected settings are
shown using bars. Again, you can adjust the vacuum and / or cycle in this
mode so that you feel comfortable.
02:00
Vacuum Cycles
CARUM
green
5.3.4. "Sensitive Programme"
The "Sensitive Programme" (green background) pumps with a barely
detectable vacuum and cycle to enable gentle expressing of milk if you
have sore nipples.
The vacuum and the cycle can be increased or reduced by pressing the
buttons repeatedly or holding them down. The settings are shown using
bars.
Setting the "Sensitive Programme":
1. Press the on / off button
2. Press the mode button while the Welcome page is being displayed.
00:00
Vacuum Cycles
CARUM
00:00
Vacuum Cycles
CARUM
5.3.5. Triggering the let-down reflex again
In the expression mode (green background), you can switch to the
stimulation mode (orange background) at any time by pressing the mode
button again. This stimulates the milk flow again.
The mode button can also be used to change from the two minute
stimulation mode to the expression mode ahead of time.
00:00
Vacuum Cycles
CARUM

en
12
5.3.6. Time measurement / Stopwatch
The time measurement starts with switching on the Carum and is
displayed in the information ribbon.
• The time measurement is stopped by pressing the Time button once.
• By pressing the Time button again, the clock is reset to 00:00.
• Pressing the Time button again starts the time measurement once
more.
The time measurement is retained when changing modes but is reset to
00:00 when the Carum is switched off.
5.3.7. Dimmer function
The brightness of the display can be reduced by pressing the Dimmer
button once; at the same time the light bulb symbol in the information
ribbon fades out. By pressing the button again the display returns to its
normal brightness.
02:00
Vacuum Cycles
CARUM
5.3.8. Carum Battery
The Carum Battery with its integrated battery unit is identified on the
front panel by "BATTERY".
The battery unit charge status is displayed as a battery symbol in the
information ribbon. During recharging, the bars move from left to right
until the battery unit is fully recharged.
10:00
Vacuum Cycles
CARUM
BATTERY
02:00
Vacuum Cycles
CARUM

en
13
6. Useful tips
6.1. Expressing must never be painful.
• Check that the size of the breast shell fits the size of your nipple (see instructions for use for the
pumpset).
• Ensure that your nipple is centered in the breast shell.
• If your milk is not flowing, a breast massage while expressing may be helpful.
• If your nipples are sore or your breasts are painful, preferably use the "Sensitive Programme" without
stimulation beforehand. The "Sensitive Programme" starts pumping milk using a very gentle and low
vacuum.
6.2. Stimulating the milk let-down reflex
Because the let-down reflex when expressing can occur later than with natural breastfeeding, the
following tips may be helpful:
• Gently massage the breast before expressing milk.
• Drink a warm drink.
• Think about your baby and relax.
• Look at photos of your baby.
• Before expressing milk, place a warm "Ardo Temperature Pack" or a warm, damp cloth on the breast.
• Warm the breast shell, under running warm water for example, before using it.
6.3. Efficient expressing
• By massaging the breast while expressing, you can obtain more milk and improve the milk flow.
• Select a vacuum that makes you feel comfortable.
6.4. Increasing the volume of milk
• Pump both breasts at the same time (double pumping).
• Double pump for the first ten minutes or until milk no longer flows. Then switch to single pumping
and pump each breast for five minutes. With the hand that is now free, massage the breast gently
before pumping.

en
14
7. Accessories / replacement parts
Item Item number
Euro power cord 63.00.130
UK power cord 63.00.131
US power cord 63.00.132
Mobile stand, optional 63.00.129
Bottle holder 63.00.127
Easy Freeze holder 63.00.128
Various pumpsets and other accessories
as well as replacement parts
www.ardomedical.com
8. Error messages / status messages
Error
A fault in the Carum or the Carum Battery is indicated on the display by the adjacent
symbol. Please switch the device off and switch it on again. If the fault persists, please have
the device inspected by a service point or the manufacturer.
A flat battery unit in the Carum Battery is indicated on the screen by the adjacent symbol.
When this symbol appears on the display, the Carum Battery switches off automatically after
about 5 seconds. Insert the power cord into the device and connect it to the mains power
to recharge the battery unit.
8.1. Other possible faults during pumping
No vacuum or vacuum is too weak
Check that
• you are using an original Ardo pumpset. (Always express milk using an Ardo pumpset.)
• the second opening on the tube connector is closed.
• the tube connector is firmly seated in the connection opening of the pump.
• the pumpset is correctly assembled and is not damaged. (See instructions for use for the pumpset)
Carum does not function / display remains dark
Check that
• the power cord and its socket are visually in order and are not faulty. Never use a faulty cord or a cord
with faulty plugs!
• the power cord is correctly plugged into the Carum and into the power socket.
• the Carum works on another power socket.
• another device works on the same power socket.
If you confirm that the Carum is faulty, please have the device inspected by a service point or the
manufacturer.

en
15
9. Cleaning / inspection / maintenance
If the cleaning and inspections are not carried out as required, there is a risk of infection or of the device
developing a fault.
9.1. Cleaning / disinfection
• Always disconnect the Carum from the mains power supply before cleaning!
• The Carum is not waterproof which is why it must never be immersed in liquids! Never clean the
Carum in a dishwasher, hand basin, or under running water.
• You must also ensure that no cleaning liquid enters the connection openings for the pumpset or the
electrical connections.
Cleaning at home
• As required, wipe the outside of the Carum with a damp cloth. You may use a little standard
dishwashing detergent if necessary but do not use any abrasive cleaners.
• Clean the pumpset in accordance with the directions in the relevant instructions for use.
Cleaning in the hospital
• Carum: Wipe disinfection of the surfaces with a non-phenolic disinfectant. Do not use abrasive
cleaning agents.
• Mobile stand for the Carum: Wipe disinfection of the surfaces with a non-phenolic disinfectant. Do
not use abrasive cleaning agents.
• Clean the pumpset in accordance with the directions in the relevant instructions for use.
9.2. Inspection before switching on
• The housing and the display are intact.
• The power cord and the power socket are not damaged.
• The pumpset is clean, not faulty, and correctly assembled.
• The pumpset is correctly connected to the connection opening of the Carum.
• Any accessories are clean, not faulty, and correctly assembled.
• Mobile stand (optional): Check that the screws are tightened.
9.3. Maintenance
The Carum does not in principle need any maintenance. The following inspections are, however,
recommended to ensure perfect functioning:
9.3.1. Inspection checklist for hiring
Visually inspect the pump for cleanliness After every hire
Visually inspect the pump for completeness After every hire
Visually inspect the pump for damage After every hire
Simple functional check of the pump
(if the pump runs, the battery unit is charged)
After every hire
Vacuum check carried out by trained service personnel At least every 2 years
9.3.2. Inspection checklist for use in hospitals
Visually inspect the pump for cleanliness and damage Before and after each use
Vacuum check carried out by trained service personnel At least every 2 years

en
16
10. Warranty
The warranty period of the Carum breastpump is 3 years from the date of purchase; the dated receipt is
considered the certificate of warranty.
The warranty period for the reachargeable lithium ion battery unit for the Carum Battery is 1 year from
the date of purchase; the dated receipt is considered the certificate of warranty.
General warranty conditions
Ardo medical AG guarantees that the devices it manufactures are free of material and manufacturing
defects. With proper use, material that develops a defect during the warranty period is replaced free of
charge. To protect the right to make a warranty claim and to ensure that the device functions without
fault, the instructions for use must be followed and only accessories from Ardo medical AG may be used.
The warranty benefit is voided if the device has been modified in any way.
11. Technical information
11.1. Technical data
Dimensions of the pump L×W×H 302 × 240 × 180 mm
Pump weight 3.0 kg
Pump weight with reachargeable battery unit 3.7 kg
Power cord length 3 m
Mains voltage / frequency 100–240 VAC ± 10% / 50/60 Hz
Power consumption 135 VA
Mains fuse input P / N T 2.5 A / 250 VAC
Connector for car cable 12 V DC
Operating conditions
5–40°C (41–104°F)
10–93% RH, not condensing
700–1060 hPa
Degree of protection (pumpset is an applied part) BF
Protection class Class II
Classification as per MDD 93/42/EEC Class IIa
Dimensions of the mobile stand L×W×H 425 × 425 × 720 mm
Ground clearance 105 mm
Wheel diameter 75 mm
Mobile stand weight 7.0 kg

en
17
Vacuum (± 5% 1))Cycle (± 3)
Stimulation mode
Start value 60 mbar | 6 kPa | 45 mmHg 90 / min
Setting values 30–150 mbar | 3–15 kPa | 22–113 mmHg 72–120 / min
Expression mode
Start value * 45 / min
Setting values 30–330 mbar | 3–33 kPa | 22–248 mmHg 30–60 / min
"Sensitive Programme"
Start value 30 mbar | 3 kPa | 22 mmHg 30 / min
Setting values 30–330 mbar | 3–33 kPa | 22–248 mmHg 30–60 / min
* The expression mode uses the setting value last selected by the user in the stimulation mode and increases the vacuum by 30 mbar / 3 kPa /
22 mmHg
1) The vacuum values are independent of the actual atmospheric pressure.
11.2. Conformity 11.3. EMC test record
As per the Medical Device Directive 93/42 EEC, EN 60601-1,
EN 60601-1-2, EN ISO 10079-1, EN 60601-1-6, EN 60601-1-11,
2011/65/EU (RoHS)
MEDICAL – GENERAL MEDICAL EQUIPMENT
AS TO ELECTRICAL SHOCK, FIRE AND
MECHANICAL HAZARDS ONLY
IN ACCORDANCE WITH
ANSI/AAMI ES60601-1 (2005, C1:09, A2:10),
CAN/CSA C22.2 No.60601.1 (2008, R:2011)
E358823
See page 213
12. Transport and Storage
The original packaging must be used to transport and store the Carum and the Carum Battery. We
recommend storing the Carum protected against UV light (e.g., sunlight, halogen lamps), heat, and dust.
Carum Battery: Please obtain information from the particular airline about transport requirements when flying.
Temperature –20°C to +70°C (–4°F to 158°F)
Relative air humidity 10–93% RH, not condensing
Air pressure 700–1060 hPa
13. Service life and disposal
The service life of the device with proper use is 10 years excluding wear parts. This device contains
electronic components and a rechargeable lithium ion battery unit.
At the end of the service life of the device, the device and its accessories must be disposed of in
accordance with the locally applicable regulations.
Used reachargeable battery units must not be disposed of in household trash but
instead returned to the point of purchase or disposed of in accordance with locally
applicable regulations.
The device is subject to the requirements of the WEEE Directive.
0123

18
de
CARUM MILCHPUMPE FÜR KLINIKEN UND VERMIETUNG
Herzlichen Dank, dass Sie sich für die Carum Milchpumpe von Ardo entschieden haben.
In dieser Gebrauchsanweisung finden Sie wichtige und nützliche Angaben für die Anwendung der Carum.
Bei der Verwendung von elektrischen Geräten sind die Sicherheitsvorschriften unbedingt zu beachten.
Bitte nehmen Sie sich Zeit. Lesen Sie die Gebrauchsanweisung sorgfältig durch, bevor Sie die Milchpumpe
Carum zum ersten Mal benutzen.
Die Carum ist eine Vakuumpumpe mit einem Doppelkolbensystem. Mit Hilfe der Bedienelemente kann
jede Mutter die Einstellungen von Vakuum und Zyklus individuell anpassen. Das Vakuum bleibt stabil,
wenn die Benutzerin die Zykluseinstellungen ändert. Ebenso bleibt der Zyklus stabil, wenn die Benutzerin
die Vakuumeinstellungen ändert. Die Leserin muss in der Lage sein, diese Gebrauchsanweisung zu lesen
und zu verstehen.
INHALTSVERZEICHNIS
1. Produktplatzierung im Container 19
2. Verwendungszweck 20
2.1. Indikationen 20
2.2. Kontraindikationen 20
3. Sicherheitshinweise 20
4. Produktbeschreibung 22
5. Inbetriebnahme / Bedienung 23
5.1. Legende 23
5.2. Inbetriebnahme 24
5.2.1. Elektrischer Anschluss 24
5.2.2. Anschliessen des Pumpsets
(Anwendungsteil) 24
5.2.3. Einhängen des Flaschenhalters 24
5.2.4. Einhängen des Easy Freeze-Halters 24
5.3. Bedienung 25
5.3.1. Einschalten / Ausschalten 25
5.3.2. Stimulationsmodus – Oranger
Hintergrund 25
5.3.3. Abpumpmodus – Grüner Hintergrund 26
5.3.4. "Sensitive Programme" 26
5.3.5. Milchspendereflex erneut auslösen 26
5.3.6. Zeitmessung / Stoppuhr 27
5.3.7. Dimmfunktion 27
5.3.8. Carum Battery 27
6. Nützliche Tipps 28
6.1. Abpumpen darf nie schmerzhaft sein. 28
6.2. Milchspendereflex fördern 28
6.3. Effizientes Abpumpen 28
6.4. Milchmenge steigern 28
7. Zubehör / Ersatzteile 29
8. Fehleranzeige / Statusanzeige 29
8.1. Weitere mögliche Fehler beim Abpumpen 29
9. Reinigung / Kontrolle / Wartung 30
9.1. Reinigung / Desinfektion 30
9.2. Kontrolle vor dem Einschalten 30
9.3. Wartung 30
9.3.1. Checkliste zur Kontrolle für
Vermietung 30
9.3.2. Checkliste zur Kontrolle für
Krankenhausgebrauch 30
10. Garantie 31
11. Technische Information 31
11.1. Technische Daten 31
11.2. Konformität 32
11.3. EMV-Prüfprotokolle 32
12. Transport und Lagerung 32
13. Nutzungsdauer und Entsorgung 32

19
de
1. Produktplatzierung im Container
a Carum Milchpumpe
b Anschlussöffnungen für Pumpset
c Bedienpanel mit LCD-Anzeige
d Anschluss für Netzkabel
e Flaschenhalter
f Easy Freeze-Halter (Gefrierbeutel-Halter)
g Netzkabel
h Carum Container
i Adressfeld
j Pumpset (nicht im Lieferumfang enthalten)
k Gebrauchsanweisung
g
b
f
ea
c
d
e
f
a
g
j
i
h
ardo carum
electric breastpump
Instructions for use | Gebrauchsanweisung | Mode d’emploi
Istruzioni per l’uso | Instrucciones de uso | Instruções de utilização
Gebruiksaanwijzing | Bruksanvisning | Käyttöohjeet | Instrukcja
użycia | Οδηγίες χρήσης | Kullanım kılavuzu | | 使用说明
k

20
de
2. Verwendungszweck
2.1. Indikationen
Die Carum Milchpumpe ist für stillende Frauen zum Abpumpen und Sammeln ihrer Milch bestimmt.
Sie kann als Einzelpumpe und als Doppelpumpe verwendet werden. Das Gerät ist nur für den Gebrauch in
Innenräumen vorgesehen und ist für mehrere Benutzerinnen gedacht.
2.2. Kontraindikationen
Die Carum darf in der Schwangerschaft nicht benutzt werden, da Abpumpen Wehen auslösen kann.
3. Sicherheitshinweise
Wichtige Hinweise zur Sicherheit
Bitte lesen Sie die Gebrauchsanweisung vor dem
ersten Gebrauch aufmerksam durch. Bewahren
Sie die Gebrauchs anwei sung für späteres
Nachschlagen auf.
Die Carum ist eine elektrische Milchpumpe für den Gebrauch im Krankenhaus und für die Vermietung.
Für Ihre Gesundheit, Ihre Sicherheit sowie um Beschädigungen am Gerät zu vermeiden, sind die folgenden
Sicherheitsregeln einzuhalten.
Sicherheitsregeln
GEFAHR: Vermeidung eines tödlichen Stromschlages
• Verwenden Sie nur das original Netzkabel von Ardo.
• Verwenden Sie nie ein defektes Netzkabel.
• Platzieren Sie ein elektrisches Gerät nie so, dass es in eine Flüssigkeit fallen könnte.
• Greifen Sie nie nach einem elektrischen Gerät, welches in Flüssigkeit gefallen oder nass ist. Trennen
Sie das Gerät sofort von der Steckdose.
• Benutzen Sie nie ein in Flüssigkeit gefallenes oder nasses Gerät, sondern lassen Sie das Gerät von
einer Servicestelle oder dem Hersteller überprüfen.
• Benutzen Sie die Carum nie, während Sie baden oder duschen.
• Öffnen Sie die Carum nie! Es besteht die Gefahr eines Stromschlages.

21
de
WARNUNG: Vermeidung von Schaden, Stromschlag, Feuer oder Verletzung
• Die Carum ist nicht zur Verwendung im Freien bestimmt.
• Benutzen Sie die Carum nicht, wenn sie nicht richtig funktioniert, heruntergefallen oder defekt ist.
• Bei Verwendung eines elektrischen Geräts achten Sie besonders auf sich in der Nähe befindende
Kinder oder Personen mit Intelligenzminderung; elektrische Geräte sind keine Spielzeuge.
• Verbinden Sie das Netzkabel immer zuerst mit der Carum und erst danach mit der Steckdose.
• Lassen Sie die Carum nicht unbeaufsichtigt am Stromnetz.
• Trennen Sie die Carum nach dem Gebrauch vom Stromnetz.
• Eine Trennung vom Stromnetz ist nur gewährleistet, wenn der Netzstecker von der Steckdose getrennt
wird.
• Platzieren Sie die Carum so, dass eine Trennung vom Stromnetz einfach vorgenommen werden kann.
• Halten Sie die Carum sowie Netzkabel und alle Zubehörteile von heissen Flächen fern.
• Setzen Sie die Carum nur für den im Kapitel "Verwendungszweck" aufgeführten
bestimmungsgemässen Zweck ein.
• Verwenden Sie ausschliesslich original Ardo Pumpsets und original Ardo Teile.
• Führen Sie an der Carum keine Gegenstände in Öffnungen oder Schläuche ein und lassen Sie keine
Gegenstände hinein fallen.
• Benutzen Sie die Carum nicht in einem Umfeld, in dem Sauerstoff verabreicht oder Sprühmittel
verwendet wird.
• Die Carum darf ohne Erlaubnis des Herstellers nicht geändert werden.
WARNUNG: Vermeidung gesundheitlicher Schäden oder Verletzungen
• Kontrollieren Sie die Carum und die zugehörigen Teile vor jeder Anwendung.
• Benutzen Sie die Carum nicht, wenn Sie schlafen oder schläfrig sind.
• Sollte das Abpumpen unangenehm oder schmerzhaft sein, beenden Sie das Abpumpen und bitten die
zuständige Fachperson um Beratung.
• Benutzen Sie die Carum nicht, wenn Sie schwanger sind; Abpumpen kann Wehen auslösen.
• Zur Reinigung befolgen Sie die Anweisungen im entsprechenden Kapitel "Reinigung / Kontrolle /
Wartung".
Autoadapter
• Die Carum und die Carum Battery sind auch mit dem Autoadapter nicht zur Verwendung im Freien
bestimmt.
• Verwenden Sie ausschliesslich das elektrisch abgesicherte original Autobatteriekabel von Ardo.
• Vergewissern Sie sich, dass Ihr Auto über einen 12 VDC-Anschluss verfügt.
• Pumpen Sie während dem Autofahren nicht ab, auch nicht als Beifahrerin. Dies kann zu einem Unfall
führen.
• Trennen Sie das Gerät nach dem Gebrauch bzw. nach dem Aufladen vom Bordnetz.

22
de
4. Produktbeschreibung
• Die elektrische Milchpumpe Carum ist für den Gebrauch im Krankenhaus und für die Vermietung
bestimmt.
• Die Carum kann zum Einfachpumpen und Doppelpumpen (Abpumpen beider Brüste gleichzeitig)
benutzt werden.
• Die Zyklen (Cycles) und das Vakuum (Vacuum) können individuell und unabhängig voneinander
eingestellt werden.
• Das Farbdisplay biete eine visuelle Orientierung und die integrierte Stoppuhr informiert über die
Pumpdauer.
• Um das natürliche Saugverhalten des Babys nachzuahmen, kann mit der Carum in zwei Phasen
abgepumpt werden: dem Stimulationsmodus und dem eigentlichen Abpumpmodus. Der
Stimulationsmodus regt den Milchfluss an und der anschliessende Abpumpmodus ermöglicht ein
effizientes Abpumpen.
• Die Carum beginnt mit dem Stimulationsmodus und nach zwei Minuten wechselt sie selbsttätig in
den Abpumpmodus. Während diesen zwei Minuten kann bei Bedarf durch das Drücken der Modus-
Taste vorzeitig in den Abpumpmodus gewechselt werden.
• Um während des Abpumpens allenfalls den Milchfluss erneut zu stimulieren, ist ein sanfter Wechsel
zurück in den Stimulationsmodus jederzeit durch das Drücken der Modus-Taste möglich.
• Das "Sensitive Programme" ermöglicht bei wunden Brustwarzen ein sanftes Abpumpen mit
minimalem Startvakuum und minimalem Zyklus.
• Ardo Pumpsets bieten eine 100-prozentige Hygienebarriere zwischen Muttermilch und Milchpumpe.
Durch dieses geschlossene System ist sichergestellt, dass Muttermilch weder in den Schlauch des
Pumpsets, noch in die Milchpumpe gelangen kann.
• Die Carum Battery ist mit einem aufladbaren Akku ausgerüstet.
• Die Carum und Carum Battery können im Netzbetrieb oder mit einem optionalen Autokabel im Auto
betrieben werden.
Carum Battery – die Carum mit integriertem, aufladbarem Akku
Die Carum Battery ermöglicht ein ortsunabhängiges Abpumpen und erlaubt es Ihnen, z. B. direkt am
Bettchen eines kranken oder frühgeborenen Babys abzupumpen. Die Nähe zum Baby unterstützt den
Milchspendereflex.
• Die Laufzeit bei vollgeladenem Akku beträgt ca. vier Stunden (bei max. Vakuum und max. Zyklus).
Zum Laden des leeren Akkus werden ca. zwei Stunden benötigt.
• Sinkt die Laufzeit bei vollgeladenem Akku unter eine Stunde, sollte der Akku durch die nächste
Servicestelle oder den Hersteller ersetzt werden, um den optimalen Betrieb wieder zu gewährleisten.
• Ist das Gerät am Stromnetz angeschlossen, wird der Akku während des Abpumpens geladen. Die
Ladezeit verlängert sich dadurch.
• Ist die Carum über das Autokabel mit dem Bordnetz eines Fahrzeugs verbunden, wird während des
Abpumpens der Akku nicht geladen. Nach dem Ausschalten des Geräts wird der Akku über das
Bordnetz geladen.

23
de
5. Inbetriebnahme / Bedienung
5.1. Legende
Gebrauchsanweisung befolgen
Ein / Aus-Taste (Stand-by-Taste)
Vakuum-Taste (Verändern des Vakuums)
Zyklus-Taste (Verändern des Zyklus)
Modus-Taste (Wechsel Stimulations- / Abpumpmodus / "Sensitive Programme")
Dimmer-Taste
Taste Zeitmessung
Abpumpmodus
Stimulationsmodus
Gerät mit Anwendungsteil BF
012
3
Konformität gemäss MDD 93 / 42 EWG
Hersteller
Das Gerät unterliegt den Anforderungen der WEEE-Richtlinie
Netzgerät
Wechselstrom
Gerät der Schutzklasse II
IP21 Tropfwasserschutz
Li-Ion Enthält einen Lithium-Ionen-Akku
Gerät ist recycelbar

24
de
5.2. Inbetriebnahme
5.2.1. Elektrischer Anschluss
• Netzkabel (a) in den Carum Stromanschluss (b) einstecken und
mit Steckdose verbinden.
5.2.2. Anschliessen des Pumpsets (Anwendungsteil)
Der Gebrauch des Pumpsets ist in der separaten Bedienungsanleitung
"Ardo Pumpset" beschrieben.
• Pumpen mit Einfachpumpset:
Stecken Sie den Schlauchadapter (c) in eine der beiden
Anschlussöffnungen der Pumpe.
• Pumpen mit Doppelpumpset:
Stecken Sie die beiden Schlauchadapter (d) in die
Anschlussöffnungen der Pumpe.
• Die zweite Öffnung (e) des Schlauchadapters muss immer
verschlossen sein, sowohl beim Einfach- als auch beim
Doppelpumpen.
5.2.3. Einhängen des Flaschenhalters
Der Flaschenhalter (f) kann an der Rückseite der Carum
eingehängt oder freistehend platziert werden.
5.2.4. Einhängen des Easy Freeze-Halters
Der Easy Freeze-Halter (g) dient zum Aufhängen des Pumpsets mit
Gefrierbeutel oder Muttermilchflasche. Er kann an der Rückseite
anstelle des Flaschenhalters eingehängt werden.
e
f
f
g
b
a
d
c

25
de
5.3. Bedienung
Vakuum und Zyklen können unabhängig voneinander reguliert werden.
Wählen Sie die Einstellung, die für Sie am angenehmsten ist.
a
b
c
d
e
f
g
h
i
j
k
l
m
n
Ein / Aus-Taste (Stand-by-Taste)
Vakuum-Taste (Verändern des Vakuums)
Vakuum-Anzeige
Dimmer-Taste
Dimmer-Information
Zeit-Information
Stoppuhr-Information
Taste Zeitmessung
Zyklus-Anzeige
Zyklus-Taste (Verändern des Zyklus)
Modus-Taste (Wechsel Stimulations- /
Abpumpmodus / "Sensitive Programme")
Abpumpmodus
Stimulationsmodus
Informationszeile (n = e + f + g)
5.3.1. Einschalten / Ausschalten
Die Carum wird durch einmaliges Drücken der Ein / Aus-Taste
eingeschaltet. Das Display startet mit der Welcome-Seite. Zum
Ausschalten der Carum die Ein / Aus-Taste erneut drücken.
00:00
Vacuum Cycles
CARUM
5.3.2. Stimulationsmodus – Oranger Hintergrund
Die Carum startet nach dem Einschalten automatisch im Stimulations-
modus (oranger Hintergrund) mit einem schnellen Zyklus und einem
tiefen Vakuum. Dieser Modus fördert den Milchspendereflex. Die
automatische Einstellung imitiert das natürliche Verhalten des Babys.
Babys saugen zu Beginn einer Stillmahlzeit mit raschen Saugbewegungen
und geringer Saugstärke und lösen dadurch das Fliessen der Muttermilch
aus.
Der Stimulationsmodus dauert zwei Minuten und wechselt danach
automatisch in den Abpumpmodus.
Das Vakuum und die Zyklen können durch mehrmaliges Drücken
oder Halten der Tasten erhöht oder reduziert werden. Die gewählten
Einstellungen werden als Balken dargestellt. Passen Sie Vakuum und /
oder Zyklus Ihrem Wohlbefinden an.
00:00
Vacuum Cycles
CARUM
orange
00:00
Vacuum Cycles
CARUM
a
b
d
e f g
cl
m
i
h
k
j
n

26
de
5.3.3. Abpumpmodus – Grüner Hintergrund
Im Abpumpmodus (grüner Hintergrund) wechselt die Carum sanft zu
einem höheren Vakuum und einem tieferen Zyklus. Dieser automatische
Wechsel imitiert das natürliche Verhalten des Babys, denn es wechselt
beim Fliessen der Muttermilch sein Saugverhalten. Das Baby saugt jetzt
weniger schnell, dafür mit einer höheren Saugstärke.
Das Vakuum und die Zyklen können durch mehrmaliges Drücken
oder Halten der Tasten erhöht oder reduziert werden. Die gewählten
Einstellungen werden als Balken dargestellt. Passen Sie auch bei diesem
Modus Vakuum und / oder Zyklus Ihrem Wohlbefinden an.
02:00
Vacuum Cycles
CARUM
grün
5.3.4. "Sensitive Programme"
Das "Sensitive Programme" (grüner Hintergrund) pumpt mit einem kaum
spürbaren Vakuum und Zyklus und ermöglicht ein sanftes Abpumpen bei
wunden Brustwarzen.
Das Vakuum und der Zyklus können durch mehrmaliges Drücken der
Tasten sanft erhöht oder reduziert werden. Die Einstellungen werden als
Balken dargestellt.
"Sensitive Programme" einstellen:
1. Ein-/Aus Taste drücken
2. Während der Anzeige der Welcome-Seite die Modus-Taste drücken.
00:00
Vacuum Cycles
CARUM
00:00
Vacuum Cycles
CARUM
5.3.5. Milchspendereflex erneut auslösen
Im Abpumpmodus (grüner Hintergrund) kann jederzeit durch erneutes
Drücken der Modus-Taste in den Stimulationsmodus (oranger
Hintergrund) zurückgewechselt werden. Dadurch wird der Milchfluss
erneut angeregt.
Die Modus-Taste kann auch während des zweiminütigen
Stimulationsmodus zum frühzeitigen Wechsel in den Abpumpmodus
verwendet werden.
00:00
Vacuum Cycles
CARUM

27
de
5.3.6. Zeitmessung / Stoppuhr
Die Zeitmessung startet mit dem Einschalten der Carum und wird in der
Informationszeile angezeigt.
• Durch einmaliges Drücken der Zeit Taste wird die Zeitmessung
gestoppt.
• Beim zweiten Mal Drücken der Zeit Taste wird die Uhr auf 00:00
gesetzt.
• Durch nochmaliges Drücken der Zeit Taste startet die Zeitmessung
wieder.
Die Zeitmessung wird beim Modus-Wechsel jeweils übernommen, beim
Ausschalten der Carum jedoch wieder auf 00:00 gesetzt.
5.3.7. Dimmfunktion
Die Beleuchtung des Displays kann durch einmaliges Drücken der
Dimmer-Taste reduziert werden; gleichzeitig wird in der Informationszeile
das Lampensymbol abgeblendet dargestellt. Durch nochmaliges Drücken
der Taste wird das Dimmen aufgehoben.
02:00
Vacuum Cycles
CARUM
5.3.8. Carum Battery
Die Carum Battery mit eingebautem Akku ist auf der Frontfolie mit
"BATTERY" gekennzeichnet.
Der Akkustatus wird als Batteriesymbol in der Informationszeile angezeigt.
Beim Laden bewegen sich die Balken von links nach rechts, bis der Akku
vollgeladen ist.
10:00
Vacuum Cycles
CARUM
BATTERY
02:00
Vacuum Cycles
CARUM

28
de
6. Nützliche Tipps
6.1. Abpumpen darf nie schmerzhaft sein.
• Kontrollieren Sie, ob die Grösse der Brustglocke zu Ihren Brustwarzen passt (siehe
Gebrauchsanweisung Pumpset).
• Achten Sie darauf, dass die Brustwarze in der Brustglocke zentriert ist.
• Fliesst die Milch nicht, kann eine Brustmassage während des Abpumpens hilfreich sein.
• Bei wunden Brustwarzen oder schmerzhafter Brust vorzugsweise das "Sensitive Programme" ohne
vorherige Stimulation anwenden. Das "Sensitive Programme" beginnt das Abpumpen mit einem
besonders sanften und niedrigen Vakuum.
6.2. Milchspendereflex fördern
Da der Milchspendereflex beim Abpumpen später auftreten kann als beim natürlichen Stillen, können
folgende Punkte hilfreich sein:
• Massieren Sie die Brust vor dem Abpumpen sanft.
• Nehmen Sie ein warmes Getränk zu sich.
• Denken Sie an Ihr Baby und entspannen Sie sich.
• Betrachten Sie ein Foto Ihres Babys.
• Legen Sie vor dem Abpumpen zum Beispiel ein warmes "Ardo Temperature Pack" oder einen
feuchtwarmen Wickel auf die Brust.
• Erwärmen Sie vor dem Gebrauch die Brustglocke z. B. unter warmem Wasser.
6.3. Effizientes Abpumpen
• Durch Massieren der Brust während des Abpumpens kann mehr Milch gewonnen und der Milchfluss
verbessert werden.
• Wählen Sie ein komfortables Vakuum, welches Ihrem Wohlbefinden entspricht.
6.4. Milchmenge steigern
• Pumpen Sie beide Brüste gleichzeitig ab (Doppelpumpen).
• Pumpen Sie während den ersten zehn Minuten doppelt ab, oder bis keine Milch mehr fliesst.
Wechseln Sie danach zum Einfachpumpen und pumpen Sie pro Brust je fünf Minuten ab. Mit der nun
freien Hand massieren Sie dabei sanft die Brust, von der Sie abpumpen.

29
de
7. Zubehör / Ersatzteile
Artikel Artikel Nummer
Netzkabel Euro 63.00.130
Netzkabel UK 63.00.131
Netzkabel US 63.00.132
Rollgestell, optional 63.00.129
Flaschenhalter 63.00.127
Easy Freeze Halter 63.00.128
Diverse Pumpsets und weiteres Zubehör
sowie Ersatzteile
www.ardomedical.com
8. Fehleranzeige / Statusanzeige
Error
Ein Fehler bei der Carum und Carum Battery wird im Display mit nebenstehendem Symbol
dargestellt. Schalten Sie das Gerät aus und danach wieder ein. Bleibt der Fehler bestehen,
lassen Sie das Gerät von einer Servicestelle oder dem Hersteller überprüfen.
Bei der Carum Battery wird im Display mit nebenstehendem Symbol ein leerer Akku
dargestellt. Erscheint dieses Symbol im Display, schaltet sich die Carum Battery nach ca.
5 Sekunden selbsttätig aus. Schliessen Sie das Netzkabel am Gerät an und verbinden Sie es
mit dem Stromnetz, um den Akku zu laden.
8.1. Weitere mögliche Fehler beim Abpumpen
Kein Vakuum oder zu schwaches Vakuum
Prüfen Sie ob,
• Sie ein original Ardo Pumpset verwenden. (Pumpen Sie immer mit einem Ardo Pumpset ab.)
• die zweite Öffnung am Schlauchadapter verschlossen ist.
• der Schlauchadapter fest in der Anschlussöffnung der Pumpe steckt.
• das Pumpset richtig zusammengesetzt und nicht beschädigt ist. (Siehe Gebrauchsanweisung Pumpset)
Carum funktioniert nicht / Display bleibt dunkel
Prüfen Sie ob,
• das Netzkabel und seine Stecker optisch in Ordnung und nicht defekt sind. Verwenden Sie nie ein
defektes Kabel oder ein Kabel mit defekten Steckern!
• das Netzkabel an der Carum und an der Steckdose richtig eingesteckt ist.
• die Carum auch an einer anderen Steckdose funktioniert.
• ein anderes Gerät an derselben Steckdose funktioniert.
Falls sich ein Defekt der Carum bestätigt, lassen Sie das Gerät von einer Servicestelle oder dem Hersteller
überprüfen.

30
de
9. Reinigung / Kontrolle / Wartung
Bei Nichteinhalten der Reinigungsvorschriften und Kontrollen besteht die Gefahr einer Infektion oder eines
Defektes der Carum.
9.1. Reinigung / Desinfektion
• Trennen Sie die Carum vor dem Reinigen immer vom Stromanschluss!
• Die Carum ist nicht wasserdicht, deshalb nie in Flüssigkeiten tauchen! Reinigen Sie die Carum nie im
Geschirrspüler, im Waschbecken oder unter fliessendem Wasser.
• Achten Sie auch darauf, dass keine Reinigungsflüssigkeit in die Anschlussöffnungen für das Pumpset
und in die elektrischen Anschlüsse eindringt.
Reinigung zu Hause
• Wischen Sie bei Bedarf die Oberfläche der Carum mit einem feuchten Tuch ab. Wenn nötig dürfen Sie
dazu etwas handelsübliches Spülmittel verwenden, jedoch keine scheuernden Mittel.
• Das Pumpset reinigen Sie nach der Anweisung in der jeweiligen Gebrauchsanweisung.
Reinigung im Krankenhaus
• Carum: Wischdesinfektion der Oberflächen mit einem nichtphenolhaltigen Desinfektionsmittel. Keine
scheuernden Mittel verwenden.
• Rollgestell zu Carum: Wischdesinfektion der Oberflächen mit einem nichtphenolhaltigen
Desinfektionsmittel. Keine scheuernden Mittel verwenden.
• Das Pumpset reinigen Sie nach der Anweisung in der jeweiligen Gebrauchsanweisung.
9.2. Kontrolle vor dem Einschalten
• Das Gehäuse und das Display sind intakt.
• Das Netzkabel und die Stecker sind nicht beschädigt.
• Das Pumpset ist gereinigt, nicht defekt und richtig zusammengesetzt.
• Das Pumpset ist korrekt an die Anschlussöffnung der Carum angeschlossen.
• Allfälliges Zubehör ist gereinigt, nicht defekt und richtig zusammengesetzt.
• Rollgestell (optional): Kontrolle, ob die Schrauben angezogen sind.
9.3. Wartung
Die Carum ist grundsätzlich wartungsfrei. Um ein einwandfreies Funktionieren sicherzustellen, empfehlen
wir jedoch folgende Kontrollen:
9.3.1. Checkliste zur Kontrolle für Vermietung
Visuelle Kontrolle der Pumpe auf Sauberkeit Nach jeder Vermietung
Visuelle Kontrolle der Pumpe auf Vollständigkeit Nach jeder Vermietung
Visuelle Kontrolle der Pumpe auf Beschädigungen Nach jeder Vermietung
Einfache Funktionskontrolle der Pumpe
(Läuft die Pumpe, ist der Akku geladen)
Nach jeder Vermietung
Vakuumkontrolle durch geschultes Servicepersonal Mindestens alle 2 Jahre
9.3.2. Checkliste zur Kontrolle für Krankenhausgebrauch
Visuelle Kontrolle der Pumpe auf Sauberkeit und Beschädigungen Vor & nach jeder Benützung
Vakuumkontrolle durch geschultes Servicepersonal Mindestens alle 2 Jahre

31
de
10. Garantie
Die Garantiezeit der Carum Milchpumpe beträgt 3 Jahre ab Verkaufsdatum; der Rechnungsbeleg mit
Datum gilt als Garantieschein.
Die Garantiezeit des Lithium-Ionen-Akkus für die Carum Battery beträgt 1 Jahr ab Verkaufsdatum; der
Rechnungsbeleg mit Datum gilt als Garantieschein.
Allgemeine Garantiebedingungen
Ardo medical AG garantiert, dass die von ihr hergestellten Produkte frei sind von Material- und
Fabrikationsfehlern. Bei bestimmungsgemässem Gebrauch wird fehlerhaftes Material während der
Garantiezeit kostenlos ersetzt. Zur Wahrung des Garantieanspruchs und der einwandfreien Funktion des
Gerätes ist die Gebrauchsanweisung zu befolgen und ausschliesslich Zubehör von Ardo medical AG zu
verwenden. Die Garantieleistung entfällt, wenn Eingriffe im oder am Gerät vorgenommen wurden.
11. Technische Information
11.1. Technische Daten
Masse Pumpe LxBxH 302 × 240 × 180 mm
Pumpe Gewicht 3.0 kg
Pumpe Gewicht mit Akku 3.7 kg
Netzkabel Länge 3 m
Netzspannung / Netzfrequenz 100–240 VAC ±10 % / 50/60 Hz
Leistungsaufnahme 135 VA
Netzsicherung Eingang P / N T 2.5 A / 250 VAC
Anschluss für Autokabel 12 VDC
Betriebsbedingungen
5–40 °C (41–104 °F)
10–93 % RH nicht kondensierend
700–1060 hPa
Schutzgrad (Pumpset ist Anwendungsteil) BF
Schutzklasse Klasse II
Klassifizierung nach MDD93/42 EEC Klasse IIa
Masse Rollgestell LxBxH 425 x 425 x 720 mm
Unterfahrhöhe 105 mm
Rollendurchmesser 75 mm
Rollgestell Gewicht 7.0 kg

32
de
Vakuum (± 5 % 1))Zyklus (± 3)
Stimulationsmodus
Startwert 60 mbar | 6 kPa | 45 mmHg 90 / Min
Einstellwerte 30–150 mbar | 3–15 kPa | 22–113 mmHg 72–120 / Min
Abpumpmodus
Startwert * 45 / Min
Einstellwerte 30–330 mbar | 3–33 kPa | 22–248 mmHg 30–60 / Min
"Sensitive Programme"
Startwert 30 mbar | 3 kPa | 22 mmHg 30 / Min
Einstellwerte 30–330 mbar | 3–33 kPa | 22–248 mmHg 30–60 / Min
* Der Abpumpmodus übernimmt den letzten durch die Anwenderin gewählten Einstellwert im Stimulationsmodus und erhöht dieses Vakuum
um 30 mbar / 3 kPa / 22 mmHg
1) Die Vakuumwerte sind abhängig vom aktuellen Atmosphärendruck.
11.2. Konformität 11.3. EMV-Prüfprotokolle
Gemäss Richtlinie MDD 93/42 EEC, EN 60601-1, EN 60601-1-2,
EN ISO 10079-1, EN 60601-1-6, EN 60601-1-11, 2011/65/EU (RoHS)
MEDICAL – GENERAL MEDICAL EQUIPMENT
AS TO ELECTRICAL SHOCK, FIRE AND
MECHANICAL HAZARDS ONLY
IN ACCORDANCE WITH
ANSI/AAMI ES60601-1 (2005, C1:09, A2:10),
CAN/CSA C22.2 No.60601.1 (2008, R:2011)
E358823
Siehe Seite 213
12. Transport und Lagerung
Für Transport und Lagerung der Carum und der Carum Battery ist die Original-Verpackung zu verwenden.
Wir empfehlen eine vor UV-Licht (z. B. Sonnenlicht, Halogenlampen), Wärme und Staub geschützte
Lagerung.
Carum Battery: Über die Transportvorschriften beim Fliegen erkundigen Sie sich bitte bei der jeweiligen
Fluggesellschaft.
Temperatur –20 °C bis +70 °C (–4 °F bis 158 °F)
Relative Luftfeuchtigkeit 10–93 % nicht kondensierend
Luftdruck 700–1060 hPa
13. Nutzungsdauer und Entsorgung
Die Nutzungsdauer des Geräts bei bestimmungsgemässem Gebrauch beträgt 10 Jahre, ohne
Verschleissteile. Dieses Gerät enthält elektronische Bauteile und einen aufladbaren Lithium-Ionen-Akku.
Am Ende der Geräte-Nutzungsdauer müssen das Gerät und dessen Zubehör nach den örtlich geltenden
Vorschriften entsorgt werden.
Verbrauchte Akkus nicht in den Kehricht werfen, sondern der Verkaufsstelle
zurückgeben oder nach den örtlich geltenden Vorschriften entsorgen.
Das Gerät unterliegt den Anforderungen der WEEE-Richtlinie.
0123

fr
33
TABLE DES MATIÈRES
CARUM TIRE-LAIT POUR LES MATERNITÉS ET LA LOCATION
Vous avez opté pour le tire-lait Carum d'Ardo. Nous vous en remercions.
Dans le présent mode d'emploi, vous trouverez des indications importantes et utiles pour l'usage du Carum.
Lors de l'utilisation d'appareils électriques, il est indispensable de respecter les consignes de sécurité.
Veuillez prendre le temps. Lisez attentivement le mode d'emploi avant la première utilisation du tire-lait
Carum.
Le Carum est une pompe à vide à double piston. À l'aide des organes de commande, toute mère peut
ajuster les réglages de vide et de cycle individuellement. Le vide demeure stable lorsque l'utilisatrice
modifie les réglages de cycle. De même, le vide demeure stable lorsque l'utilisatrice modifie les réglages
de vide. La lectrice doit être en mesure de lire et de comprendre le présent mode d'emploi.
1. Placement du produit dans le container 34
2. Usage prévu 35
2.1. Indications 35
2.2. Contre-indications 35
3. Consignes de sécurité 35
4. Description du produit 37
5. Mise en service / utilisation 38
5.1. Légende 38
5.2. Mise en service 39
5.2.1. Raccordement électrique 39
5.2.2. Raccordement du set pour tire-lait
(pièce d'application) 39
5.2.3. Montage du porte-biberon 39
5.2.4. Montage du support Easy Freeze 39
5.3. Utilisation 40
5.3.1. Mise en marche / arrêt 40
5.3.2. Mode de stimulation – fond orange 40
5.3.3. Mode d'expression – fond vert 41
5.3.4. "Sensitive Programme" 41
5.3.5. Déclencher à nouveau le réflexe
d'éjection du lait 41
5.3.6. Chronométrage / chronomètre 42
5.3.7. Fonction de variation d'intensité
lumineuse 42
5.3.8. Carum Battery 42
6. Conseils utiles 43
6.1. Le tirage ne doit jamais être douloureux. 43
6.2. Promouvoir le réflexe d'éjection du lait 43
6.3. Expression efficace 43
6.4. Accroître la quantité 43
7. Accessoires / pièces de rechange 44
8. Affichage des erreurs / affichage d'état 44
8.1. Autres erreurs possibles lors de l'expression 44
9. Nettoyage / contrôle / maintenance 45
9.1. Nettoyage / désinfection 45
9.2. Contrôle avant la mise en marche 45
9.3. Maintenance 45
9.3.1. Check-list pour le contrôle en vue
de la location 45
9.3.2. Check-list pour le contrôle en vue
de l'utilisation à l'hôpital 45
10. Garantie 46
11. Information technique 46
11.1. Caractéristiques techniques 46
11.2. Conformité 47
11.3. Protocoles d'essai CEM 47
12. Transport et stockage 47
13. Durée d'utilisation et élimination 47

fr
34
1. Placement du produit dans le
container
a Tire-lait Carum
b Orifices de raccordement pour le set pour tire-lait
c Panneau de commande avec affichage LCD
d Raccordement pour câble de réseau
e Porte-biberon
f Support Easy Freeze (support pour sacs de congélation)
g Câble de réseau
a Container Carum
i Champ pour adresse
j Set pour tire-lait (non compris dans la livraison)
k Mode d'emploi
g
b
f
ea
c
d
e
f
a
g
j
i
h
ardo carum
electric breastpump
Instructions for use | Gebrauchsanweisung | Mode d’emploi
Istruzioni per l’uso | Instrucciones de uso | Instruções de utilização
Gebruiksaanwijzing | Bruksanvisning | Käyttöohjeet | Instrukcja
użycia | Οδηγίες χρήσης | Kullanım kılavuzu | | 使用说明
k

fr
35
2. Usage prévu
2.1. Indications
Le tire-lait Carum est destiné aux femmes qui allaitent, afin de pomper et de recueillir leur lait. Il peut être
utilisé comme tire-lait simple ou double pompage. L'appareil est uniquement prévu pour une utilisation à
l'intérieur et est conçu pour plusieurs utilisatrices.
2.2. Contre-indications
Le Carum ne doit pas être utilisé pendant la grossesse étant donné que le pompage peut déclencher des
contractions.
3. Consignes de sécurité
Consignes de sécurité importantes
Veuillez lire attentivement le mode d'emploi
avant la première utilisation. Conservez le mode
d'emploi afin de le consulter ultérieurement.
Le Carum est un tire-lait électrique destiné à l'usage à l'hôpital et pour la location. Pour votre santé, votre
sécurité ainsi que pour éviter les détériorations de l'appareil, respecter les règles de sécurité suivantes.
Règles de sécurité
DANGER : éviter une électrocution mortelle
• Utilisez uniquement le câble de réseau original d'Ardo.
• N'utilisez jamais un câble de réseau défectueux.
• Ne disposez jamais un appareil électrique de telle sorte qu'il pourrait tomber dans un liquide.
• Ne touchez jamais un appareil électrique tombé dans un liquide. Débranchez-le immédiatement.
• N'utilisez jamais un appareil tombé dans un liquide ou humide, mais faites-le contrôler par un centre
de service ou le fabricant.
• N'utilisez jamais le Carum pendant que vous prenez un bain ou une douche.
• N'ouvrez jamais le Carum ! Risque d'électrocution.

fr
36
MISE EN GARDE : éviter les dommages, les électrocutions, les incendies ou les blessures
• Le Carum n'est pas destiné à une utilisation à l'extérieur.
• N'utilisez jamais le Carum lorsqu'il ne fonctionne pas correctement, est tombé ou défectueux.
• Lorsque vous utilisez un appareil électrique, portez une attention particulière aux enfants ou aux
personnes dont l'intelligence est réduite ; les appareils électriques ne sont pas des jouets.
• Reliez toujours le câble de réseau avec le Carum et, seulement ensuite, avec la prise de courant.
• Ne laissez jamais le Carum branché sur le secteur sans surveillance.
• Débranchez le Carum après usage.
• Un débranchement du secteur n'est garanti que si la fiche secteur est séparée de la prise de courant.
• Placez le Carum de telle sorte qu'un débranchement du secteur puisse s'effectuer facilement.
• Maintenez le Carum ainsi que le câble de réseau et tous les accessoires éloignés des surfaces chaudes.
• Utilisez le Carum uniquement dans le but conforme aux prescriptions figurant au chapitre "Usage
prévu".
• Utilisez exclusivement des sets pour tire-lait Ardo originaux et des pièces Ardo originales.
• Ne placez pas d'objets devant des orifices ou tuyaux et n'y laissez jamais tomber d'objets.
• N'utilisez jamais le Carum dans un environnement où de l'oxygène est administré ou des aérosols sont
utilisés.
• Le Carum ne doit pas être modifié sans l'autorisation du fabricant.
MISE EN GARDE : éviter les préjudices pour la santé ou les blessures
• Contrôlez le Carum et les pièces correspondantes avant chaque utilisation.
• N'utilisez pas le Carum si vous dormez ou avez sommeil.
• Si l'expression est désagréable ou douloureuse, mettez-y fin et demandez conseil au spécialiste
compétent.
• N'utilisez pas le Carum si vous êtes enceinte ; l'expression peut provoquer des contractions.
• Pour le nettoyage, suivez les instructions figurant au chapitre "Nettoyage / contrôle / maintenance".
Adaptateur allume-cigare
• Le Carum et le Carum Battery ne sont pas destinés à une utilisation à l'extérieur, même avec
l'adaptateur allume-cigare.
• Utilisez uniquement le câble de batterie de voiture original protégé électriquement d'Ardo.
• Assurez-vous que votre voiture dispose d'un raccord 12 VCC.
• Ne tirez pas de lait pendant que vous roulez en voiture, même en tant que passagère. Ceci peut
entraîner un accident.
• Débranchez l'appareil du réseau de bord après usage ou après le chargement.

fr
37
4. Description du produit
• Le tire-lait électrique Carum est destiné à l'usage à l'hôpital et pour la location.
• Le Carum peut être utilisé pour le simple pompage et le double pompage (expression au niveau des
deux seins en même temps).
• Les cycles (Cycles) et le vide (Vacuum) peuvent être réglés individuellement et indépendamment les
uns des autres.
• Le display couleur offre une orientation visuelle et le chronomètre intégré informe au sujet de la durée
de pompage.
• Pour imiter le comportement de succion naturel du bébé, il est possible de tirer le lait, avec le Carum,
en deux phases : le mode de stimulation et le mode d'expression effectif. Le mode de stimulation
stimule le flux du lait et le mode d'expression qui suit permet une expression efficace.
• Le Carum commence par le mode de stimulation et au bout de deux minutes, il passe
automatiquement en mode d'expression. Au cours de ces deux minutes, il est possible, si nécessaire,
en appuyant sur la touche de mode, de passer en mode d'expression de façon anticipée.
• Afin de stimuler éventuellement à nouveau le pompage, un retour en douceur au mode de
stimulation est possible à tout moment en appuyant sur la touche de mode.
• En cas de mamelons irrités, le "Sensitive Programme" permet une expression en douceur avec un vide
initial minimal et un cycle minimal.
• Les sets pour tire-lait Ardo offrent une barrière hygiénique à 100 % entre le lait maternel et le tire-lait.
Grâce au système fermé, on s'assure que le lait maternel ne peut pénétrer dans le tuyau du set pour
tire-lait, ni dans le tire-lait.
• Le Carum Battery est équipé d'une batterie rechargeable.
• Le Carum et le Carum Battery peuvent fonctionner sur le secteur ou, avec un câble de voiture en
option, dans la voiture.
Carum Battery – le Carum avec batterie rechargeable intégrée
Le Carum Battery permet une expression indépendante du lieu et vous permet de tirer du lait par ex. juste
auprès du berceau d'un bébé malade ou prématuré. La proximité du bébé favorise le réflexe d'éjection du
lait.
• La durée lorsque la batterie rechargeable est intégralement chargée est d'env. quatre heures (en cas
de vide max. et de cycle max.). Pour charger la batterie rechargeable vide, il faut environ deux heures.
• Si la durée d'utilisation avec la batterie rechargeable totalement chargée tombe au-dessous d'une
heure, la batterie rechargeable doit être remplacée par le centre de service le plus proche ou le
fabricant afin de garantir à nouveau le fonctionnement optimal.
• Si l'appareil est raccordé sur le secteur, la batterie rechargeable est chargée pendant l'expression. De
ce fait, le temps de chargement se prolonge.
• Si le Carum est relié au réseau de bord d'un véhicule par le câble de voiture, la batterie rechargeable
n'est pas chargée pendant l'expression. Une fois l'appareil arrêté, la batterie rechargeable est chargée
par l'intermédiaire du réseau de bord.

fr
38
5. Mise en service / utilisation
5.1. Légende
Suivre le mode d'emploi
Touche marche / arrêt (touche de veille)
Touche de vide (modification du vide)
Touche de cycle (modification du cycle)
Touche de mode (passage mode de stimulation / d'expression / "Sensitive Programme")
Touche de variation d'intensité lumineuse
Touche de chronométrage
Mode d'expression
Mode de stimulation
Appareil avec pièce d'application BF
012
3
Conformité selon MDD 93 / 42 CEE
Fabricant
L'appareil est soumis aux exigences de la directive DEEE
Bloc secteur
Courant alternatif
Appareil de la classe de protection II
IP21 Protection contre les gouttes d'eau
Li-Ion Contient une batterie lithium-ion
L'appareil est recyclable

fr
39
5.2. Mise en service
5.2.1. Raccordement électrique
• Insérer le câble de réseau (a) dans le raccordement électrique du
Carum (b) et relier à la prise de courant.
5.2.2. Raccordement du set pour tire-lait (pièce d'application)
L'utilisation du set pour tire-lait est décrite dans le mode d'emploi
distinct "Set pour tire-lait Ardo".
• Tire-lait avec set pour tire-lait simple :
raccorder l'adaptateur de tubulure (c) à l'un des deux orifices de
raccordement du tire-lait.
• Tire-lait avec set pour tire-lait double :
raccorder les deux adaptateurs de tubulure (d) aux orifices de
raccordement du tire-lait.
• Le deuxième orifice (e) de l'adaptateur de tubulure doit toujours
rester obturé, aussi bien pour le simple pompage que pour le
double pompage.
5.2.3. Montage du porte-biberon
Le porte-biberon (f) peut être suspendu à l'arrière du Carum ou
disposé indépendamment.
5.2.4. Montage du support Easy Freeze
Le support Easy Freeze (g) sert à suspendre le set pour tire-lait
avec sac de congélation ou biberon de lait maternel. Il peut être
suspendu à l'arrière, à la place du porte-biberon.
e
f
f
g
b
a
d
c

fr
40
5.3. Utilisation
Le vide et les cycles peuvent être réglés indépendamment. Choisissez le
réglage le plus agréable pour vous.
a
b
c
d
e
f
g
h
i
j
k
l
m
n
Touche marche / arrêt (touche de veille)
Touche de vide (modification du vide)
Affichage du vide
Touche de variation d'intensité lumineuse
Information sur la variation d'intensité lumineuse
Information sur le chronométrage
Information sur le chronomètre
Touche de chronométrage
Affichage du cycle
Touche de cycle (modification du cycle)
Touche de mode (passage mode de stimulation /
d'expression / "Sensitive Programme")
Mode d'expression
Mode de stimulation
Ligne d'information (n = e + f + g)
5.3.1. Mise en marche / arrêt
Le Carum s'allume en appuyant une fois sur la touche marche / arrêt. Un
écran de bienvenue apparaît. Pour éteindre le Carum, appuyer à nouveau
sur la touche marche / arrêt.
00:00
Vacuum Cycles
CARUM
5.3.2. Mode de stimulation – fond orange
Après la mise en marche, le Carum démarre automatiquement en mode
de stimulation (fond orange) avec un cycle rapide et un vide faible. Ce
mode favorise le réflexe d'éjection du lait. Le réglage automatique imite
le comportement naturel du bébé. Au début de la tétée, les bébés tètent
avec des mouvements rapides et une puissance d'aspiration faible,
déclenchant ainsi l'écoulement du lait maternel.
Le mode de stimulation dure deux minutes et passe ensuite
automatiquement en mode d'expression.
Le vide et les cycles peuvent être augmentés ou réduits en appuyant
plusieurs fois sur les touches ou en les maintenant enclenchées. Les
réglages choisis sont représentés sous forme de barres. Adaptez le
vide et / ou le cycle à votre bien-être.
00:00
Vacuum Cycles
CARUM
orange
00:00
Vacuum Cycles
CARUM
a
b
d
e f g
cl
m
i
h
k
j
n

fr
41
5.3.3. Mode d'expression – fond vert
En mode d'expression (fond vert), le Carum passe en douceur à un vide
plus élevé et à un cycle plus faible. Ce changement automatique imite le
comportement naturel du bébé, en effet, il change son comportement de
succion lors de l'écoulement du lait maternel. Le bébé tète maintenant
moins rapidement, mais avec une puissance d'aspiration plus élevée.
Le vide et les cycles peuvent être augmentés ou réduits en appuyant
plusieurs fois sur les touches ou en les maintenant enclenchées. Les
réglages choisis sont représentés sous forme de barres. Également dans
ce mode, adaptez le vide et / ou le cycle à votre bien-être.
02:00
Vacuum Cycles
CARUM
vert
5.3.4. "Sensitive Programme"
Le "Sensitive Programme" (fond vert) exprime avec un vide et un cycle
à peine perceptibles et permet une expression en douceur lorsque les
mamelons sont irrités.
Le vide et le cycle peuvent être augmentés ou réduits en douceur en
appuyant plusieurs fois sur les touches. Les réglages sont représentés sous
forme de barres.
Régler "Sensitive Programme" :
1. Appuyer sur la touche marche / arrêt
2. Pendant l'affichage de la page Welcome, appuyer sur la touche de
mode. 00:00
Vacuum Cycles
CARUM
00:00
Vacuum Cycles
CARUM
5.3.5. Déclencher à nouveau le réflexe d'éjection du lait
En mode de réflexion (fond vert), il est possible, à tout moment, en
appuyant sur la touche de mode, de revenir au mode de stimulation
(fond orange). Ainsi, le flux du lait est à nouveau stimulé.
La touche de mode peut également être utilisée, pendant les deux
minutes de mode de stimulation, pour le passage anticipé au mode
d'expression.
00:00
Vacuum Cycles
CARUM

fr
42
5.3.6. Chronométrage / chronomètre
Le chronométrage débute automatiquement lorsqu'on met le Carum en
marche et s'affiche dans la ligne d'information.
• Lorsqu'on appuie une seule fois sur la touche de chronométrage, le
chronométrage s'arrête.
• Lorsqu'on appuie deux fois sur la touche de chronométrage, l'heure
est mise sur 00:00.
• Lorsqu'on appuie à nouveau sur la touche de chronométrage, le
chronométrage redémarre.
Le chronométrage reprend lors du changement de mode, lorsqu'on arrête
le Carum, il revient sur 00:00.
5.3.7. Fonction de variation d'intensité lumineuse
L'éclairage du display peut être réduit en appuyant plusieurs fois sur la
touche de variation d'intensité lumineuse ; en même temps, le symbole
de la lampe est représenté grisé. Lorsqu'on appuie à nouveau sur la
touche, la variation d'intensité lumineuse est supprimée.
02:00
Vacuum Cycles
CARUM
5.3.8. Carum Battery
Le Carum Battery à batterie rechargeable incorporée est repéré sur la
plaquette frontale par le terme "BATTERY".
Le symbole de la batterie rechargeable s'affiche sous la forme d'un
symbole de pile dans la ligne d'information. Lors du chargement,
les barres se déplacent de gauche à droite jusqu'à ce que la batterie
rechargeable soit pleinement chargée.
10:00
Vacuum Cycles
CARUM
BATTERY
02:00
Vacuum Cycles
CARUM

fr
43
6. Conseils utiles
6.1. Le tirage ne doit jamais être douloureux.
• Vérifiez si la taille de la téterelle correspond à vos mamelons (voir le mode d'emploi du set pour
tire-lait).
• Veillez à ce que le mamelon soit centré dans la téterelle.
• Si le lait ne s'écoule pas, un massage pendant l'expression peut être utile.
• Lorsque les mamelons sont irrités ou que les seins sont douloureux, utiliser de préférence le
"Sensitive Programme" sans stimulation antérieure. Le "Sensitive Programme" commence l'expression
avec un vide particulièrement doux et faible.
6.2. Promouvoir le réflexe d'éjection du lait
Étant donné que lors de l'expression, le réflexe d'éjection du lait peut survenir plus tard que lors de
l'allaitement naturel, les points suivants peuvent être utiles :
• Massez doucement le sein avant l'expression.
• Prenez une boisson chaude.
• Pensez à votre bébé et détendez-vous.
• Regardez une photo de votre bébé.
• Avant l'expression, appliquez sur le sein un "Ardo Temperature Pack" chaud ou une compresse
chaude et humide.
• Avant l'utilisation, réchauffez la téterelle, par ex. sous l'eau chaude.
6.3. Expression efficace
• Un massage du sein pendant le tirage permet d'obtenir plus de lait et améliore le flux du lait.
• Choisissez un vide confortable qui corresponde à votre bien-être.
6.4. Accroître la quantité
• Pompez les deux seins simultanément (double pompage).
• Effectuez un double pompage pendant les dix premières minutes, ou jusqu'à ce qu'il ne s'écoule plus
de lait. Passez ensuite au système de simple pompage. Tirez à raison de 5 minutes par sein. Avec la
main libre, massez doucement le sein dont vous tirez le lait.

fr
44
7. Accessoires / pièces de rechange
Article Référence article
Câble de réseau Euro 63.00.130
Câble de réseau R.-U. 63.00.131
Câble de réseau États-Unis 63.00.132
Bâti roulant, en option 63.00.129
Porte-biberon 63.00.127
Support Easy Freeze 63.00.128
Différents sets pour tire-lait
ainsi que pièces de rechange
www.ardomedical.com
8. Affichage des erreurs / affichage d'état
Error
Une erreur au niveau du Carum et du Carum Battery est représentée sur le display par le
symbole ci-contre. Éteignez et rallumez l'appareil. Si l'erreur persiste, faites-le contrôler par
un centre de service ou le fabricant.
Une erreur au niveau du Carum Battery est représentée sur le display par le symbole
ci-contre d'une batterie rechargeable vide. Si ce symbole apparaît dans le display, le Carum
Battery s'arrête de lui-même au bout d'env. 5 secondes. Raccordez le câble de réseau à
l'appareil et reliez-le au secteur afin de charger la batterie rechargeable.
8.1. Autres erreurs possibles lors de l'expression
Pas de vide ou vide trop faible
Vérifiez si
• vous utilisez un set pour tire-lait Ardo original. (Tirez du lait toujours avec un set pour tire-lait Ardo.)
• le deuxième orifice de l'adaptateur de tubulure est obturé.
• l'adaptateur de tubulure est bien enfoncé dans l'orifice de raccordement du tire-lait.
• le set pour tire-lait est correctement assemblé et non endommagé. (Voir mode d'emploi set pour
tire-lait)
Le Carum ne fonctionne pas / le display demeure sombre
Vérifiez si
• le câble de réseau et ses fiches sont en bon état sur le plan optique et ne sont pas défectueux.
N'utilisez jamais un câble défectueux ou un câble doté de fiches défectueuses !
• le câble de réseau est correctement enfoncé au niveau du Carum et de la prise.
• le Carum fonctionne également sur une autre prise de courant.
• un autre appareil fonctionne également sur une autre prise de courant.
Si un défaut du Carum est confirmé, faites-le contrôler par un centre de service ou le fabricant.

fr
45
9. Nettoyage / contrôle / maintenance
En cas de non-respect des consignes de nettoyage et contrôles, danger d'infection ou de défaut du Carum.
9.1. Nettoyage / désinfection
• Débranchez toujours le Carum avant le nettoyage !
• Le Carum n'est pas étanche à l'eau, donc ne jamais le plonger dans des liquides ! Ne nettoyez jamais
le Carum dans le lave-vaisselle, dans le lavabo ou sous l'eau courante.
• Veillez à ce qu'aucun liquide de nettoyage ne pénètre dans les orifices de raccordement pour le set
pour tire-lait et dans les raccordements électriques.
Nettoyage à domicile
• En cas de besoin, essuyez la surface du Carum avec un chiffon humide. Si nécessaire, vous pouvez
utiliser des produits vaisselle du commerce, mais pas de produits abrasifs.
• Nettoyez le set pour tire-lait selon les instructions figurant dans le mode d'emploi respectif.
Nettoyage à l'hôpital
• Carum : désinfection par essuyage des surfaces avec un désinfectant ne contenant pas de phénol. Ne
pas utiliser de produits abrasifs.
• Bâti roulant pour Carum : désinfection par essuyage des surfaces avec un désinfectant ne contenant
pas de phénol. Ne pas utiliser de produits abrasifs.
• Nettoyez le set pour tire-lait selon les instructions figurant dans le mode d'emploi respectif.
9.2. Contrôle avant la mise en marche
• Le boîtier et le display sont intacts.
• Le câble de réseau et les fiches ne sont pas endommagés.
• Le set pour tire-lait est nettoyé, non défectueux et correctement assemblé.
• Le set pour tire-lait est correctement raccordé à l'orifice de raccordement du Carum.
• Les accessoires éventuels sont nettoyés, non défectueux et correctement assemblés.
• Bâti roulant (en option) : contrôle si les vis sont serrées.
9.3. Maintenance
Le Carum n'exige en principe pas de maintenance. Pour assurer un parfait fonctionnement, nous
recommandons cependant les contrôles suivants :
9.3.1. Check-list pour le contrôle en vue de la location
Contrôle visuel de la propreté du tire-lait Après chaque location
Contrôle visuel de l'intégralité du tire-lait Après chaque location
Contrôle visuel des détériorations du tire-lait Après chaque location
Contrôle de fonctionnement simple du tire-lait
(si le tire-lait est en fonctionnement, la batterie rechargeable est chargée)
Après chaque location
Contrôle du vide par du personnel de service formé Au moins tous les 2 ans
9.3.2. Check-list pour le contrôle en vue de l'utilisation à l'hôpital
Contrôle visuel de la propreté et des détériorations du tire-lait Avant et après chaque
utilisation
Contrôle du vide par du personnel de service formé Au moins tous les 2 ans

fr
46
10. Garantie
La durée de la garantie du tire-lait Carum est de 3 ans à partir de la date de vente, la quittance datée
servant de bon de garantie.
La durée de la batterie lithium-ion du Carum Battery est de 1 an à partir de la date de vente, la quittance
datée servant de bon de garantie.
Conditions générales de garantie
Ardo medical AG garantit les produits qu'elle fabrique contre tous défauts de matériel et de fabrication.
Toute marchandise défectueuse utilisée conformément aux prescriptions est remplacée gratuitement
pendant la durée de la garantie. Pour conserver le droit à la garantie et assurer un parfait fonctionnement
de l'appareil, il convient de respecter les instructions données dans le mode d‘emploi et d'utiliser
exclusivement des accessoires Ardo medical AG. La prestation de garantie est supprimée lorsque des
interventions ont été pratiquées dans ou sur l'appareil.
11. Information technique
11.1. Caractéristiques techniques
Dimensions tire-lait LxlxH 302 × 240 × 180 mm
Poids tire-lait 3.0 kg
Poids tire-lait avec batterie rechargeable 3.7 kg
Longueur câble de réseau 3 m
Tension de réseau / fréquence de réseau 100–240 VCA ±10 % / 50/60 Hz
Puissance absorbée 135 VA
Fusible secteur entrée P / N T 2.5 A / 250 VCA
Raccordement pour câble de voiture 12 VCC
Conditions de fonctionnement
5–40 °C (41–104 °F)
10–93 % d'HR sans condensation
700–1060 hPa
Degré de protection (le set pour tire-lait est la
pièce d'application) BF
Classe de protection Classe II
Classification selon MDD93/42 CEE Classe IIa
Dimensions bâti roulant LxlxH 425 x 425 x 720 mm
Garde au sol 105 mm
Diamètre des roulettes 75 mm
Poids bâti roulant 7.0 kg

fr
47
Vide (± 5 % 1))Cycle (± 3)
Mode de stimulation
Valeur initiale 60 mbar | 6 kPa | 45 mmHg 90 / min
Valeurs de réglage 30–150 mbar | 3–15 kPa | 22–113 mmHg 72–120 / min
Mode d'expression
Valeur initiale * 45 / min
Valeurs de réglage 30–330 mbar | 3–33 kPa | 22–248 mmHg 30–60 / min
"Sensitive Programme"
Valeur initiale 30 mbar | 3 kPa | 22 mmHg 30 / min
Valeurs de réglage 30–330 mbar | 3–33 kPa | 22–248 mmHg 30–60 / min
* Le mode d'expression reprend la dernière valeur de réglage choisie par l'utilisatrice en mode de stimulation et augmente ce vide de 30 mbar
/ 3 kPa / 22 mmHg
1) Les valeurs de vide dépendent de la pression atmosphérique actuelle.
11.2. Conformité 11.3. Protocoles d'essai CEM
Selon directive MDD 93/42 EEC, EN 60601-1, EN 60601-1-2,
EN ISO 10079-1, EN 60601-1-6, EN 60601-1-11, 2011/65/EU (RoHS)
MEDICAL – GENERAL MEDICAL EQUIPMENT
AS TO ELECTRICAL SHOCK, FIRE AND
MECHANICAL HAZARDS ONLY
IN ACCORDANCE WITH
ANSI/AAMI ES60601-1 (2005, C1:09, A2:10),
CAN/CSA C22.2 No.60601.1 (2008, R:2011)
E358823
Voir page 213
12. Transport et stockage
Pour le transport et le stockage du Carum et du Carum Battery, utiliser l'emballage d'origine. Nous
recommandons un stockage protégé contre le rayonnement UV (p. ex. lumière solaire, lampes halogènes),
la chaleur et la poussière.
Batterie Carum : veuillez vous renseigner au sujet des consignes de transport lors des trajets en avion
auprès de la compagnie aérienne respective.
Température –20 °C à +70 °C (–4 °F à 158 °F)
Humidité relative de l'air 10–93 % sans condensation
Pression atmosphérique 700–1060 hPa
13. Durée d'utilisation et élimination
La durée d'utilisation de l'appareil utilisé conformément aux prescriptions est de 10 ans, sans pièces
d'usure. Cet appareil contient des composants électronique et une batterie rechargeable lithium-ion.
À la fin de la durée d'utilisation de l'appareil, l'appareil et ses accessoires doivent être éliminés selon les
consignes en vigueur au niveau local.
Ne pas jeter les batteries rechargeables utilisées dans les ordures ménagères, mais les
restituer au point de vente ou les éliminer selon les consignes en vigueur au niveau local.
L'appareil est soumis aux exigences de la directive DEEE.
0123

48
it
INDICE
CARUM TIRALATTE PROFESSIONALE PER USO OSPEDALIERO O PER NOLEGGIO
La ringraziamo sentitamente per avere scelto il tiralatte Carum di Ardo.
Nelle presenti istruzioni per l'uso troverà informazioni utili e importanti per l'impiego del tiralatte Carum.
Durante l'impiego di apparecchi elettrici, è fondamentale attenersi alle norme di sicurezza previste. Si
prenda un po' di tempo e legga attentamente le istruzioni per l'uso prima di utilizzare il tiralatte Carum
per la prima volta.
Carum è una pompa a vuoto con un sistema a doppio pistone. L'uso dei comandi permette ad ogni
mamma di personalizzare le impostazioni del vuoto e del ciclo. Il livello del vuoto rimane stabile quando
l'utente modifica le impostazioni del ciclo. In modo analogo, il ciclo rimane stabile quanto l'utente
modifica le impostazioni del vuoto. L'utente deve essere in grado di leggere e capire la presenti istruzioni
per l'uso.
1. Disposizione del prodotto nel contenitore 49
2. Uso previsto 50
2.1. Indicazioni 50
2.2. Controindicazioni 50
3. Indicazioni di sicurezza 50
4. Descrizione del prodotto 52
5. Messa in funzione / funzionamento 53
5.1. Legenda 53
5.2. Messa in funzione 54
5.2.1. Allacciamento elettrico 54
5.2.2. Collegamento del set tiralatte
(parte applicata) 54
5.2.3. Montaggio del portabiberon 54
5.2.4. Montaggio del supporto Easy Freeze 54
5.3. Funzionamento 55
5.3.1. Accensione / spegnimento 55
5.3.2. Modalità di stimolazione –
sfondo arancione 55
5.3.3. Modalità di estrazione – sfondo verde 56
5.3.4. "Sensitive Programme" 56
5.3.5. Stimolazione del riflesso di
erogazione del latte 56
5.3.6. Misurazione del tempo / cronometro 57
5.3.7. Funzione dimmer 57
5.3.8. Carum Battery 57
6. Suggerimenti utili 58
6.1. L'estrazione non deve mai essere dolorosa. 58
6.2. Come indurre il riflesso di erogazione del latte 58
6.3. Estrazione efficiente 58
6.4. Incremento della quantità di latte 58
7. Accessori / pezzi di ricambio 59
8. Indicazione di errore / indicazione dello stato 59
8.1. Altri possibili errori durante l'estrazione 59
9. Pulizia / controllo / manutenzione 60
9.1. Pulizia / disinfezione 60
9.2. Controllo prima dell'accensione 60
9.3. Manutenzione 60
9.3.1. Checklist dei controlli per il noleggio 60
9.3.2. Checklist dei controlli
per l'uso ospedaliero 60
10. Garanzia 61
11. Informazioni tecniche 61
11.1. Dati tecnici 61
11.2. Conformità 62
11.3. Protocolli di prova sulla compatibilità
elettromagnetica 62
12. Trasporto e conservazione 62
13. Durata utile e smaltimento 62

49
it
e
i
h
1. Disposizione del prodotto nel
contenitore
a Tiralatte Carum
b Aperture di collegamento per il set tiralatte
c Pannello di comando con display LCD
d Allacciamento per cavo di rete
e Portabiberon
f Supporto Easy Freeze
(supporto per sacca refrigerante per latte materno)
g Cavo di rete
h Contenitore Carum
i Campo per indirizzo
j Set tiralatte (non incluso nella fornitura standard)
k Istruzioni per l'uso
g
b
f
ea
c
d
f
a
g
j
ardo carum
electric breastpump
Instructions for use | Gebrauchsanweisung | Mode d’emploi
Istruzioni per l’uso | Instrucciones de uso | Instruções de utilização
Gebruiksaanwijzing | Bruksanvisning | Käyttöohjeet | Instrukcja
użycia | Οδηγίες χρήσης | Kullanım kılavuzu | | 使用说明
k

50
it
2. Uso previsto
2.1. Indicazioni
Il tiralatte Carum è destinato alle donne che allattano per estrarre e raccogliere il latte dal seno. Può essere
utilizzato sia come tiralatte semplice sia come tiralatte doppio. L'apparecchio è destinato esclusivamente
all'uso in interni e può essere utilizzato da più utenti.
2.2. Controindicazioni
Il tiralatte Carum non deve essere utilizzato in gravidanza in quanto l'estrazione di latte può dare inizio alle
contrazioni.
3. Indicazioni di sicurezza
Importanti indicazioni per la sicurezza
Leggere attentamente le istruzioni per l'uso prima
del primo utilizzo. Conservare le istruzioni per
l'uso per futuro riferimento.
Carum è un tiralatte elettrico ospedaliero o da noleggio. Per la propria sicurezza personale, nonché per
evitare danni all'apparecchio, osservare le seguenti norme di sicurezza.
Norme di sicurezza
PERICOLO: Prevenzione di folgorazione letale
• Utilizzare esclusivamente il cavo di rete originale di Ardo.
• Non utilizzare mai un cavo di rete difettoso.
• Non posizionare mai un apparecchio elettrico in ambienti in cui potrebbe cadere in acqua o altri
liquidi.
• Non toccare mai un apparecchio elettrico bagnato o caduto in un liquido, ma staccarlo subito dalla
presa elettrica.
• Non utilizzare mai un apparecchio bagnato o caduto in un liquido, ma affidarlo a un centro di
assistenza o al produttore per un controllo.
• Non utilizzare mai il tiralatte Carum mentre si fa il bagno o la doccia.
• Non aprire mai il tiralatte Carum! Pericolo di folgorazione.

51
it
AVVERTENZA: Prevenzione di danni, folgorazione, incendio o lesioni
• Il tiralatte Carum non è destinato all'uso all'aperto.
• Non utilizzare il tiralatte Carum se non funziona correttamente, è caduto oppure è difettoso.
• Quando si utilizza un apparecchio elettrico, accertarsi in particolare che non vi siano bambini o
persone con insufficienza mentale nelle vicinanze; gli apparecchi elettrici non sono giocattoli.
• Collegare sempre il cavo di rete prima al tiralatte Carum, poi alla presa elettrica.
• Non lasciare Carum incustodito mentre è collegato alla rete elettrica.
• Dopo l'uso, staccare il tiralatte Carum dalla rete elettrica.
• La disconnessione dalla rete elettrica è garantita solamente se si estrae la spina di rete dalla presa.
• Posizionare il tiralatte Carum in modo da poterlo facilmente scollegare dalla rete elettrica.
• Tenere il tiralatte Carum, il cavo di rete e tutti gli accessori lontani da superfici molto calde.
• Utilizzare il tiralatte Carum esclusivamente per la prevista finalità d'uso specificata nel capitolo "Uso
previsto".
• Utilizzare esclusivamente set tiralatte e componenti originali Ardo.
• Non introdurre oggetti nelle aperture o nei tubi flessibili del tiralatte Carum ed evitare la caduta di
oggetti sull'apparecchio.
• Non utilizzare il tiralatte Carum in un ambiente in cui si sta somministrando ossigeno o utilizzando
prodotti spray.
• Il tiralatte Carum non deve essere modificato senza l'autorizzazione del produttore.
AVVERTENZA: Prevenzione di danni per la salute o lesioni
• Controllare il tiralatte Carum e i relativi accessori prima di ogni utilizzo.
• Non utilizzare il tiralatte Carum durante il sonno o se si è assonnate.
• Qualora l'estrazione dovesse risultare sgradevole o dolorosa, interrompere l'uso del tiralatte e
richiedere la consulenza dello specialista.
• Non utilizzare il tiralatte Carum durante la gravidanza; l'estrazione può dare inizio alle contrazioni.
• Per la pulizia, seguire le istruzioni riportate nel capitolo "Pulizia / controllo / manutenzione".
Adattatore per auto
• I tiralatte Carum e Carum Battery non sono destinati all'uso all'aperto anche se collegati all'adattatore
per auto.
• Utilizzare esclusivamente il cavo originale Ardo per la batteria dell'auto dotato di protezione elettrica.
• Verificare che la propria auto disponga di un attacco da 12 VDC.
• Non eseguire l'aspirazione del latte né durante la guida, né come passeggero, poiché questa
operazione potrebbe causare un incidente.
• Dopo l'uso e / o dopo la ricarica staccare l'apparecchio dalla rete di bordo.

52
it
4. Descrizione del prodotto
• Il tiralatte elettrico Carum è destinato all'uso ospedaliero o a noleggio.
• Carum può essere utilizzato come tiralatte singolo e tiralatte doppio (estrazione simultanea da
entrambe le mammelle).
• Il livello del vuoto (Vacuum) e il numero di cicli (Cycles) possono essere regolati in modo personalizzato
e indipendentemente l'uno dall'altro.
• Il display a colori offre un orientamento visivo, mentre il cronometro integrato indica la durata
dell'estrazione.
• Per simulare il comportamento di suzione naturale del neonato, con il tiralatte Carum è possibile
estrarre il latte in due fasi: la modalità di stimolazione e la modalità di estrazione vera e propria. La
modalità di stimolazione stimola il flusso di latte, mentre la successiva modalità di estrazione consente
un'estrazione efficiente.
• Il tiralatte Carum inizia con la modalità di stimolazione e dopo due minuti passa automaticamente
alla modalità di estrazione. Nel corso di questi due minuti, se necessario è possibile passare
anticipatamente alla modalità di estrazione premendo il tasto Modalità.
• Per stimolare comunque il flusso di latte durante l'estrazione, è sempre possibile ritornare alla
modalità di stimolazione in qualsiasi momento premendo il tasto Modalità.
• In caso di capezzoli irritati, il "Sensitive Programme" consente l'estrazione delicata con minimo livello
di vuoto e minimo numero di cicli.
• I set tiralatte Ardo garantiscono una barriera igienica totale tra il latte materno e il tiralatte. Questo
sistema chiuso evita il contatto tra il latte materno e il tubo flessibile del set tiralatte o il tiralatte
stesso.
• Il tiralatte Carum Battery è dotato di una batteria ricaricabile.
• I tiralatte Carum e Carum Battery possono essere azionati tramite allacciamento alla rete elettrica
oppure in automobile con un apposito cavo opzionale.
Carum Battery – Tiralatte Carum con batteria integrata ricaricabile
Il tiralatte Carum Battery consente di estrarre il latte ovunque, ad es. direttamente accanto al lettino di un
neonato malato o prematuro. La vicinanza del lattante favorisce il riflesso di erogazione del latte.
• L'autonomia della batteria ricaricabile completamente carica è di circa quattro ore (con massimo livello
del vuoto e massimo numero di cicli). La ricarica della batteria ricaricabile completamente scarica
richiede circa due ore.
• Se con batteria ricaricabile completamente carica l'autonomia scende al di sotto di un'ora, si
raccomanda di sostituire la batteria presso il più vicino centro di assistenza o il produttore, in modo da
garantire il funzionamento ottimale dell'apparecchio.
• Se l'apparecchio è collegato alla rete elettrica, la batteria ricaricabile si carica durante l'estrazione. In
tal modo il tempo di ricarica si allunga.
• Se il tiralatte Carum è collegato alla rete di bordo di un veicolo tramite l'apposito cavo, durante
l'estrazione la batteria ricaricabile non si carica. Dopo avere spento l'apparecchio, la batteria
ricaricabile si carica attraverso la rete di bordo.

53
it
5. Messa in funzione / funzionamento
5.1. Legenda
Leggere le istruzioni per l'uso
Tasto on / off (tasto standby)
Tasto del vuoto (modifica del livello di vuoto)
Tasto del ciclo (modifica del numero di cicli)
Tasto Modalità (passaggio modalità di stimolazione / modalità di estrazione / "Sensitive
Programme")
Tasto per funzione dimmer
Tasto per la misurazione del tempo
Modalità di estrazione
Modalità di stimolazione
Apparecchio con parte applicata BF
012
3
Conformità ai sensi della direttiva MDD 93 / 42 CEE
Produttore
L'apparecchio è soggetto ai requisiti della Direttiva RAEE
Apparecchio elettrico
Corrente alternata
Apparecchio della classe di protezione ll
IP21 Protezione verso gocce d'acqua
Li-Ion Contiene una batteria ricaricabile agli ioni di litio
L'apparecchio è riciclabile

54
it
5.2. Messa in funzione
5.2.1. Allacciamento elettrico
• Inserire il cavo di rete (a) nella presa di corrente (b) di Carum e
collegarlo alla presa di rete.
5.2.2. Collegamento del set tiralatte (parte applicata)
L'uso del set tiralatte è descritto nelle istruzioni per l'uso separate
"Set tiralatte Ardo".
• Estrazione con set tiralatte singolo:
Collegare l'adattatore per tubo flessibile (c) a una delle due
aperture di collegamento del tiralatte.
• Estrazione con set tiralatte doppio:
Collegare i due adattatori per tubo flessibile (d) alle aperture di
collegamento del tiralatte.
• La seconda apertura (e) dell'adattatore per tubo flessibile deve
sempre essere chiusa sia nel tiralatte semplice, sia nel tiralatte
doppio.
5.2.3. Montaggio del portabiberon
Il portabiberon (f) può essere agganciato al lato posteriore del tiralatte
Carum oppure appoggiato accanto ad esso.
5.2.4. Montaggio del supporto Easy Freeze
Il supporto Easy Freeze (g) viene usato per agganciare il set tiralatte
con la sacca refrigerata o il biberon del latte materno. Può essere
agganciato sul lato posteriore del tiralatte Carum, al posto del
portabiberon.
e
f
f
g
b
a
d
c

55
it
5.3. Funzionamento
Il livello del vuoto e il numero di cicli possono essere regolati
indipendentemente l'uno dall'altro. Scegliere la regolazione ritenuta più
confortevole.
a
b
c
d
e
f
g
h
i
j
k
l
m
n
Tasto on / off (tasto standby)
Tasto del vuoto (modifica del livello di vuoto)
Indicatore del vuoto
Tasto per funzione dimmer
Indicazione della funzione dimmer
Indicazione della durata
Indicazione del cronometro
Tasto per la misurazione del tempo
Indicatore del numero di cicli
Tasto del ciclo (modifica del numero di cicli)
Tasto Modalità (passaggio modalità di stimolazione /
modalità di estrazione / "Sensitive Programme")
Modalità di estrazione
Modalità di stimolazione
Riga delle indicazioni (n = e + f + g)
5.3.1. Accensione / spegnimento
Per accendere il tiralatte Carum, premere una volta il tasto on / off. Sul
display compare la pagina di benvenuto. Per spegnere il tiralatte Carum,
premere di nuovo il tasto on / off.
00:00
Vacuum Cycles
CARUM
5.3.2. Modalità di stimolazione – sfondo arancione
Dopo l'accensione, Carum si avvia automaticamente nella modalità di
stimolazione (sfondo arancione) con un ciclo rapido e livello del vuoto basso.
Questa modalità favorisce il riflesso di erogazione del latte. L'impostazione
automatica imita il comportamento naturale del neonato. All'inizio di una
poppata, i neonati eseguono rapidi movimenti di suzione con bassa forza di
aspirazione, innescando così la fuoriuscita del latte materno.
La modalità di stimolazione dura due minuti, trascorsi i quali passa
automaticamente alla modalità di estrazione.
Il livello del vuoto e il numero dei cicli possono essere aumentati o
diminuiti premendo più volte o tenendo premuti i rispettivi tasti. Le
impostazioni selezionate sono visualizzate sotto forma di grafico a barre.
Adattare ciclo e vuoto in modo da sentirsi a proprio agio.
00:00
Vacuum Cycles
CARUM
arancione
00:00
Vacuum Cycles
CARUM
a
b
d
e f g
cl
m
i
h
k
j
n

56
it
5.3.3. Modalità di estrazione – sfondo verde
Nella modalità di estrazione (sfondo verde), il tiralatte Carum passa
delicatamente a un livello di vuoto più elevato e a un ciclo più basso.
Questo passaggio automatico imita il comportamento naturale del
neonato, che cambia il suo modo di suzione quando il latte materno inizia
a fuoriuscire. Il neonato esegue movimenti di suzione meno rapidi, ma
con maggiore forza di aspirazione.
Il livello del vuoto e il numero dei cicli possono essere aumentati o
diminuiti premendo più volte o tenendo premuti i rispettivi tasti. Le
impostazioni selezionate sono visualizzate sotto forma di grafico a barre.
Anche in questa modalità, adattare ciclo e vuoto in modo da sentirsi a
proprio agio.
02:00
Vacuum Cycles
CARUM
verde
5.3.4. "Sensitive Programme"
Il "Sensitive Programme" (sfondo verde) esegue l'estrazione con un livello
di vuoto appena percepibile e basso numero di cicli, una configurazione
che consente di estrarre il latte in modo delicato in caso di capezzoli
irritati.
Questa modalità consente il passaggio delicato da vuoto e ciclo più elevati
o più bassi premendo più volte i rispettivi tasti. Le impostazioni sono
visualizzate sotto forma di grafico a barre.
Per impostare il "Sensitive Programme", procedere come segue:
1. Premere il tasto on / off
2. Quando appare la pagina di benvenuto, premere il tasto Modalità. 00:00
Vacuum Cycles
CARUM
00:00
Vacuum Cycles
CARUM
5.3.5. Stimolazione del riflesso di erogazione del latte
Nella modalità di estrazione (sfondo verde) è possibile passare in qualsiasi
momento alla modalità di stimolazione (sfondo arancione) premendo di
nuovo il tasto Modalità. In tal modo si favorisce nuovamente la fuoriuscita
del flusso di latte.
Il tasto Modalità può anche essere premuto durante i due minuti della
modalità di stimolazione per passare anticipatamente alla modalità di
estrazione.
00:00
Vacuum Cycles
CARUM

57
it
5.3.6. Misurazione del tempo / cronometro
La misurazione del tempo si avvia al momento dell'accensione del tiralatte
Carum ed è visualizzata sulla riga delle indicazioni.
• Si interrompe premendo una volta il tasto del tempo.
• Premendo per la seconda volta questo tasto, il tempo viene resettato
su 00:00.
• Premendo di nuovo il tasto del tempo, la misurazione del tempo si
avvia nuovamente.
La misurazione del tempo viene mantenuta ogni volta che si esegue il
passaggio da una modalità all'altra, ma è resettata di nuovo a 00:00 al
momento dello spegnimento del tiralatte Carum.
5.3.7. Funzione dimmer
È possibile ridurre l'illuminazione del display premendo una volta il
tasto della funzione dimmer; contemporaneamente si riduce l'intensità
luminosa del simbolo della lampadina riportato nella riga delle indicazioni.
Premendo di nuovo il tasto, la funzione dimmer viene annullata.
02:00
Vacuum Cycles
CARUM
5.3.8. Carum Battery
Il tiralatte Carum Battery con batteria ricaricabile integrata è
contrassegnato dalla dicitura "BATTERY" sul tastierino anteriore.
Lo stato di carica della batteria ricaricabile viene visualizzato sulla riga
delle indicazioni sotto forma di simbolo della batteria. Durante il processo
di ricarica, le barre si spostano da sinistra a destra fino a quando la
batteria ricaricabile è completamente carica.
10:00
Vacuum Cycles
CARUM
BATTERY
02:00
Vacuum Cycles
CARUM

58
it
6. Suggerimenti utili
6.1. L'estrazione non deve mai essere dolorosa.
• Controllare che la dimensione della coppa sia adatta per i propri capezzoli (consultare le istruzioni per
l'uso del set tiralatte).
• Assicurarsi che il capezzolo sia centrato nella coppa.
• Se il latte non fuoriesce, può essere utile un massaggio durante l'estrazione.
• In caso di capezzoli irritati o di seno dolorante, utilizzare di preferenza il "Sensitive Programme"
non preceduto da stimolazione. Il "Sensitive Programme" inizia l'estrazione con un livello di vuoto
particolarmente basso e delicato.
6.2. Come indurre il riflesso di erogazione del latte
Rispetto all'allattamento naturale, con l'estrazione il riflesso di erogazione del latte può innescarsi più
tardi. In tal caso possono essere utili le seguenti misure:
• Massaggiare delicatamente il seno prima dell'estrazione.
• Bere una bevanda calda.
• Pensare al proprio bambino e rilassarsi.
• Osservare la foto del proprio bambino.
• Prima dell'estrazione, applicare ad es. il cuscinetto termico tiepido "Ardo Temperature Pack" o una
fascia tiepida umida sul seno.
• Riscaldare la coppa prima di applicarla, ad esempio sotto acqua tiepida.
6.3. Estrazione efficiente
• Massaggiando il seno durante l'estrazione, è possibile estrarre più latte con un flusso d'uscita migliore.
• Scegliere un livello di vuoto confortevole in modo da sentirsi a proprio agio.
6.4. Incremento della quantità di latte
• Estrarre il latte contemporaneamente da entrambe le mammelle (tiralatte doppio).
• Estrarre il latte durante i primi dieci minuti con il tiralatte doppio o fino a quando non fuoriesce più
latte. Passare poi al tiralatte singolo ed estrarre il latte da ogni mammella per cinque minuti ciascuna,
massaggiando delicatamente la mammella con la mano libera prima di iniziare l'estrazione.

59
it
7. Accessori / pezzi di ricambio
Articolo Art. N°
Cavo di rete Euro 63.00.130
Cavo di rete UK 63.00.131
Cavo di rete US 63.00.132
Carrello, opzionale 63.00.129
Portabiberon 63.00.127
Supporto Easy Freeze 63.00.128
Vari set tiralatte e altri accessori
e pezzi di ricambio
www.ardomedical.com
8. Indicazione di errore / indicazione dello stato
Error
Eventuali errori dei tiralatte Carum o Carum Battery vengono visualizzati sul display con
il simbolo riportato qui a lato. Spegnere e riaccendere l'apparecchio. Se l'errore persiste,
affidare l'apparecchio a un centro di assistenza o al produttore per un controllo.
Quando la batteria ricaricabile del tiralatte Carum Battery è completamente scarica, sul
display compare il simbolo riportato qui a lato. Se sul display compare questo simbolo, il
tiralatte Carum Battery si spegne automaticamente dopo circa 5 secondi. Per caricare la
batteria ricaricabile, collegare il cavo di rete all'apparecchio e connetterlo alla rete elettrica.
8.1. Altri possibili errori durante l'estrazione
Vuoto assente o troppo debole
Controllare se
• Si sta utilizzando un set tiralatte originale Ardo. (Eseguire sempre l'estrazione con un set tiralatte
Ardo).
• La seconda apertura dell'adattatore per tubo flessibile è chiusa.
• L'adattatore per tubo flessibile è inserito saldamente nell'apertura di collegamento del tiralatte.
• Il set tiralatte è montato correttamente e non è danneggiato. (Vedere le istruzioni per l'uso del set
tiralatte)
Carum non funziona / nessuna indicazione sul display
Controllare se
• Il cavo di rete e il relativo connettore sono integri e non presentano difetti visibili. Non utilizzare mai
un cavo difettoso o con connettore difettoso!
• Il cavo di rete è inserito correttamente nel tiralatte Carum e nella presa elettrica.
• Il tiralatte Carum funziona anche se collegato ad un'altra presa elettrica.
• Un altro apparecchio funziona se collegato alla medesima presa elettrica.
In presenza di un difetto confermato del tiralatte Carum, affidare l'apparecchio a un centro di assistenza o
al produttore per un controllo.

60
it
9. Pulizia / controllo / manutenzione
La mancata osservanza dei controlli e delle norme di pulizia comporta il pericolo di un'infezione o di un
difetto del tiralatte Carum.
9.1. Pulizia / disinfezione
• Prima della pulizia, staccare sempre il tiralatte Carum dalla rete elettrica!
• Il tiralatte Carum non è a tenuta stagna, non immergerlo mai in liquidi! Non lavare il tiralatte Carum
in lavastoviglie, nel lavandino o sotto acqua corrente.
• Durante la pulizia, accertarsi che nessun detergente liquido penetri nelle aperture di collegamento per
il set tiralatte e nelle prese elettriche.
Pulizia a casa
• All'occorrenza, pulire la superficie del tiralatte Carum con un panno umido. Se necessario, è possibile
utilizzare un normale detergente per stoviglie, evitando tuttavia l'uso di prodotti abrasivi.
• Pulire il set tiralatte secondo quanto indicato nelle rispettive istruzioni per l'uso.
Pulizia in ospedale
• Carum: disinfettare le superfici con un disinfettante privo di fenolo. Non utilizzare prodotti abrasivi.
• Carrello per Carum: disinfettare le superfici con un disinfettante privo di fenolo. Non utilizzare
prodotti abrasivi.
• Pulire il set tiralatte secondo quanto indicato nelle rispettive istruzioni per l'uso.
9.2. Controllo prima dell'accensione
• La scatola esterna e il display sono integri.
• Il cavo di rete e il relativo connettore non sono danneggiati.
• Il set tiralatte è pulito, non presenta difetti ed è montato correttamente.
• Il set tiralatte è collegato correttamente all'apertura di collegamento di Carum.
• Tutti gli eventuali accessori sono puliti, non presentano difetti e sono montati correttamente.
• Carrello (opzionale): Controllare che le viti siano serrate.
9.3. Manutenzione
Il tiralatte Carum è sostanzialmente esente da manutenzione. Per garantirne il perfetto funzionamento, si
raccomanda tuttavia di eseguire i seguenti controlli:
9.3.1. Checklist dei controlli per il noleggio
Controllo visivo del tiralatte per verificarne il livello di pulizia Dopo ogni noleggio
Controllo visivo del tiralatte per verificarne la completezza Dopo ogni noleggio
Controllo visivo del tiralatte per individuare eventuali danni Dopo ogni noleggio
Semplice controllo delle funzioni del tiralatte
(il tiralatte funziona, la batteria ricaricabile è carica)
Dopo ogni noleggio
Controllo del vuoto da parte di personale specializzato Almeno ogni 2 anni
9.3.2. Checklist dei controlli per l'uso ospedaliero
Controllo visivo del tiralatte per verificarne il livello di pulizia e
individuare eventuali danni
Prima e dopo ogni utilizzo
Controllo del vuoto da parte di personale specializzato Almeno ogni 2 anni

61
it
10. Garanzia
Il periodo di garanzia del tiralatte Carum è di 3 anni a partire dalla data di acquisto; la fattura con data
vale come certificato di garanzia.
Il periodo di garanzia della batteria ricaricabile agli ioni di litio del tiralatte Carum Battery è di 1 anno a
partire dalla data di acquisto; la fattura con data vale come certificato di garanzia.
Condizioni generali di garanzia
Ardo medical AG garantisce per i difetti di materiale e fabbricazione sugli articoli di propria produzione.
In caso di uso a norma, il materiale difettoso verrà sostituito gratuitamente durante il periodo di garanzia.
A tutela del diritto delle prestazioni in garanzia e del perfetto funzionamento dell'apparecchio, rispettare
quanto indicato nelle relative istruzioni per l'uso e utilizzare esclusivamente accessori di Ardo medical AG.
Il diritto alle prestazioni in garanzia si estingue in caso di interventi sull'apparecchio.
11. Informazioni tecniche
11.1. Dati tecnici
Dimensioni tiralatte L x P x A 302 × 240 × 180 mm
Peso tiralatte 3,0 kg
Peso tiralatte con batteria ricaricabile 3,7 kg
Lunghezza cavo di rete 3 m
Tensione / frequenza di rete 100–240 VAC ±10% / 50/60 Hz
Potenza assorbita 135 VA
Ingresso fusibile di rete P / N T 2,5 A / 250 VAC
Presa per cavo auto 12 VDC
Condizioni d'esercizio
5–40 °C (41–104 °F)
10–93% U.R. senza condensa
700–1060 hPa
Grado di protezione (il set tiralatte è una parte
applicata) BF
Classe di protezione Classe II
Classificazione secondo MDD93/42 CEE Classe IIa
Dimensioni carrello L x P x A 425 x 425 x 720 mm
Altezza da terra 105 mm
Diametro ruote 75 mm
Peso carrello 7,0 kg

62
it
Vuoto (± 5% 1))Ciclo (± 3)
Modalità di stimolazione
Valore iniziale 60 mbar | 6 kPa | 45 mmHg 90 / min
Valore impostato 30–150 mbar | 3–15 kPa | 22–113 mmHg 72–120 / Min
Modalità di estrazione
Valore iniziale * 45 / min
Valore impostato 30–330 mbar | 3–33 kPa | 22–248 mmHg 30–60 / Min
"Sensitive Programme"
Valore iniziale 30 mbar | 3 kPa | 22 mmHg 30 / min
Valore impostato 30–330 mbar | 3–33 kPa | 22–248 mmHg 30–60 / Min
* La modalità di estrazione mantiene l'ultimo valore impostato selezionato dall'utente nella modalità di stimolazione e aumenta tale livello del
vuoto di 30 mbar / 3 kPa / 22 mmHg
1) I valori del vuoto si riferiscono alla pressione atmosferica corrente.
11.2. Conformità 11.3. Protocolli di prova
sulla compatibilità
elettromagnetica
Conforme alla direttiva MDD 93/42 CEE, EN 60601-1, EN 60601-1-2,
EN ISO 10079-1, EN 60601-1-6, EN 60601-1-11, 2011/65/UE (RoHS)
MEDICAL – GENERAL MEDICAL EQUIPMENT
AS TO ELECTRICAL SHOCK, FIRE AND
MECHANICAL HAZARDS ONLY
IN ACCORDANCE WITH
ANSI/AAMI ES60601-1 (2005, C1:09, A2:10),
CAN/CSA C22.2 No.60601.1 (2008, R:2011)
E358823
Vedere pagina 213
12. Trasporto e conservazione
Per il trasporto e la conservazione dei tiralatte Carum e Carum Battery, usare l'imballaggio originale. Si consiglia di
conservare i prodotti in ambiente protetto da raggi ultravioletti (ad es. luce solare, lampade alogene), calore e polvere.
Carum Battery: Per le norme di trasporto aereo, rivolgersi alla rispettiva compagnia aerea.
Temperatura da –20 °C a +70 °C (da –4 °F a 158 °F)
Umidità relativa dell'aria 10–93% senza condensa
Pressione atmosferica 700–1060 hPa
13. Durata utile e smaltimento
La durata utile dell'apparecchio in caso di uso a norma è pari a 10 anni, escluse le parti soggette a usura.
Questo apparecchio contiene componenti elettroniche e una batteria ricaricabile agli ioni di litio.
Al termine della durata utile, l'apparecchio e i relativi accessori devono essere smaltiti ai sensi delle norme
locali vigenti.
Non gettare le batterie ricaricabili usate nei rifiuti domestici, ma riconsegnarli al
punto di vendita o smaltirli ai sensi delle norme locali vigenti.
L'apparecchio è soggetto ai requisiti della Direttiva RAEE.
0123

es
63
ÍNDICE
CARUM SACALECHES PARA HOSPITALES Y ALQUILER
Muchas gracias por haber elegido el sacaleches Carum de Ardo.
En estas instrucciones de uso encontrará datos importantes y útiles sobre el uso de Carum.
Al utilizar aparatos eléctricos se debe prestar atención necesariamente a las normas de seguridad. Por
favor, tómese tiempo. Lea atentamente las instrucciones de uso antes de utilizar el sacaleches por primera
vez.
Carum es un sacaleches de vacío con un sistema de doble émbolo. Con ayuda de los elementos de
manejo, toda madre puede adaptar los ajuste de vacío y ciclo de forma individual. El vacío permanece
estable si la usuaria modifica los ajustes del ciclo. Del mismo modo el ciclo permanece estable si la usuaria
modifica los ajustes del vacío. La lectora debe estar en condiciones de leer y entender estas instrucciones
de uso.
1. Colocación en el contenedor 64
2. Uso previsto 65
2.1. Indicaciones 65
2.2. Contraindicaciones 65
3. Advertencias de seguridad 65
4. Descripción del producto 67
5. Puesta en marcha / Servicio 68
5.1. Leyenda 68
5.2. Puesta en servicio 69
5.2.1. Conexión eléctrica 69
5.2.2. Conexión del set de extracción
(parte aplicada) 69
5.2.3. Enganche del soporte para botellas 69
5.2.4. Enganche del soporte de Easy Freeze 69
5.3. Servicio 70
5.3.1. Encendido / apagado 70
5.3.2. Modo de estimulación - fondo naranja 70
5.3.3. Modo de extracción - fondo verde 71
5.3.4. "Sensitive Programme" 71
5.3.5. Provocar de nuevo el reflejo de
salida de la leche 71
5.3.6. Cronometraje / cronómetro 72
5.3.7. Función de atenuación 72
5.3.8. Carum Battery 72
6. Consejos útiles 73
6.1. La extracción no debe ser nunca dolorosa 73
6.2. Fomento del reflejo de salida de la leche 73
6.3. Extracción eficiente 73
6.4. Aumento de la cantidad de leche 73
7. Accesorios / Repuestos 74
8. Indicador de error / Indicador de estado 74
8.1. Otros posibles fallos durante la extracción 74
9. Limpieza / Control / Mantenimiento 75
9.1. Limpieza / Desinfección 75
9.2. Control antes del encendido 75
9.3. Mantenimiento 75
9.3.1. Lista de control para el alquiler 75
9.3.2. Lista de control para el uso
en el hospital 75
10. Garantía 76
11. Información técnica 76
11.1. Datos técnicos 76
11.2. Conformidad 77
11.3. Registros de ensayos CEM 77
12. Transporte y almacenamiento 77
13. Vida útil y eliminación de residuos 77

es
64
1. Colocación en el contenedor
a Sacaleches Carum
b Aperturas de conexión para el set de extracción
c Panel de usuario con pantalla de LCD
d Conexión para cable de red
e Soporte para botellas
f Soporte Easy Freeze (soporte de bolsa para congelar)
g Cable de red
h Contenedor Carum
i Campo de dirección
j Set de extracción (no incluido)
k Instrucciones de uso
g
b
f
ea
c
d
e
f
a
g
j
i
h
ardo carum
electric breastpump
Instructions for use | Gebrauchsanweisung | Mode d’emploi
Istruzioni per l’uso | Instrucciones de uso | Instruções de utilização
Gebruiksaanwijzing | Bruksanvisning | Käyttöohjeet | Instrukcja
użycia | Οδηγίες χρήσης | Kullanım kılavuzu | | 使用说明
k

es
65
2. Uso previsto
2.1. Indicaciones
El sacaleches Carum está destinado para la extracción y recogida de leches en mujeres lactantes. Se puede
utilizar como sacaleches simple y doble. El aparato solo está diseñado para el uso en espacios interiores y
para varias usuarias.
2.2. Contraindicaciones
Carum no se puede utilizar en el embarazo, puesto que la extracción de leche puede provocar
contracciones.
3. Advertencias de seguridad
Advertencias de seguridad importantes
Por favor, lea atentamente las instrucciones antes
del primer uso. Conserve las instrucciones de uso
para una consulta posterior.
Carum es un sacaleches eléctrico para el uso en el hospital y para alquilar. Por su salud, su seguridad y
para evitar daños en el aparato, se deben cumplir las siguientes normas de seguridad.
Normas de seguridad
PELIGRO: Prevención de una descarga eléctrica mortal
• Utilice solamente el cable de red original de Ardo.
• No utilice nunca un cable de red defectuoso.
• No coloque nunca un aparato eléctrico de tal modo que pudiera caer en un líquido.
• No agarre nunca un aparato eléctrico que haya caído en un líquido o esté mojado. Desconecte el
aparato inmediatamente de la toma de corriente.
• No utilice nunca un aparato que haya caído dentro de un líquido o esté húmedo; pida al servicio
técnico o al fabricante que lo verifiquen.
• No utilice nunca Carum durante el baño o la ducha.
• ¡No abra nunca Carum! Existe el riesgo de sufrir una descarga eléctrica.

es
66
ADVERTENCIA: Prevención de daños, descarga eléctrica, incendio o lesiones
• Carum no está destinado para el uso al aire libre.
• No utilice nunca Carum si no funciona correctamente, se ha caído o está defectuoso.
• Al utilizar un aparato eléctrico, preste atención especialmente a los niños o a las personas con retraso
mental que se encuentren cerca, los aparatos eléctricos no son un juguete.
• Conecte siempre el cable de red primero a Carum y después a la toma de corriente.
• No deje Carum conectado a la red eléctrica sin vigilancia.
• Desconecte Carum de la red eléctrica tras el uso.
• La desconexión de la red eléctrica solo está garantizada si se desconecta el enchufe de la toma de
corriente.
• Coloque Carum de tal modo que se pueda realizar fácilmente una desconexión de la red eléctrica.
• Mantenga Carum, el cable de red y todos los accesorios alejados de superficies calientes.
• Utilice Carum solo para el fin previsto descrito en el capítulo "Uso previsto".
• Utilice exclusivamente sets de extracción originales y piezas originales de Ardo.
• No introduzca ningún objeto en las aberturas o tubos de Carum ni deje que caiga dentro ningún
objeto.
• No utilice nunca Carum en un entorno en el que se administre oxígeno o se utilice pulverización.
• No se puede modificar Carum sin el permiso del fabricante.
ADVERTENCIA: Prevención de daños para la salud o lesiones
• Controle Carum y los accesorios antes de cada uso.
• No utilice Carum si está dormida o somnolienta.
• En caso de que la extracción resulte desagradable o dolorosa, finalice la extracción y pida consejo al
personal especializado competente.
• No utilice Carum si está embarazada, la extracción puede provocar contracciones.
• Para la limpieza siga las instrucciones en el capítulo correspondiente "Limpieza / Control /
Mantenimiento".
Adaptador para el coche
• Carum y la batería Carum no están destinados al uso al aire libre, tampoco con el adaptador para el
coche.
• Utilice exclusivamente el cable de batería para el coche eléctricamente asegurado original de Ardo.
• Asegúrese de que su coche dispone de una conexión de 12 VDC.
• No realice la extracción durante la marcha, tampoco como pasajera. Esto puede provocar accidentes.
• Desconecte el aparato tras el uso o tras la carga de la red a bordo.

es
67
4. Descripción del producto
• El sacaleches eléctrico Carum está destinado para el uso en el hospital y para alquilar.
• Carum se puede utilizar como sacaleches simple y doble (extracción de ambos pechos al mismo
tiempo).
• Los ciclos (Cycles) y el vacío (Vacuum) se pueden ajustar de forma individual e independiente el uno
del otro.
• La pantalla de color ofrece una orientación visual y el cronómetro integrado informa sobre la duración
de la extracción.
• Para imitar el comportamiento de succión de los bebés, con Carum se puede extraer la leche en dos
fases: el modo de estimulación y el verdadero modo de extracción. El modo de estimulación estimula
el flujo de leche y, a continuación, el modo de extracción permite una extracción eficiente.
• Carum comienza con el modo de estimulación y, tras dos minutos, pasa automáticamente al modo
de extracción. Durante estos dos minutos, en caso necesario, se puede cambiar antes al modo de
extracción presionando el botón.
• Para estimular de nuevo el flujo de leche en caso necesario durante la extracción, se puede cambiar
suavemente en todo momento al modo de estimulación pulsando el botón de modo.
• El "Sensitive Programme" permite una extracción suave si tiene pezones adoloridos con un vacío
inicial mínimo y ciclo mínimo.
• Los sets de extracción Ardo ofrecen una barrera higiénica al 100 % entre la leche materna y el
sacaleches. Mediante este sistema cerrado se garantiza que la leche materna no pase a los tubos del
set de extracción ni al sacaleches.
• Carum Battery está dotado de una batería recargable.
• Die Carum y Carum Battery se pueden utilizar conectándolos a la red o a un cable de coche opcional.
Carum Battery – Carum con batería recargable integrada
Carum Battery posibilita la extracción de leche en cualquier lugar y le permite p. ej. extraer directamente
al lado de la cuna de bebés enfermos o prematuros. La cercanía al bebé favorece el reflejo de salida de la
leche.
• La duración de la batería totalmente recargada es de aprox. cuatro horas (con vacío máx. y ciclo
máx.). Para cargar la batería vacía se requieren aprox. dos horas.
• Si la duración de la batería completamente recargada es inferior a una hora, se debe sustituir la
batería recargable en el centro de servicio más próximo para garantizar el funcionamiento óptimo.
• Si el aparato está conectado a la red eléctrica, la batería se recarga durante la extracción. De este
modo se prolonga el tiempo de carga.
• Si Carum está conectado mediante el cable de coche a la red a bordo de un vehículo, la batería
recargable no se carga durante la extracción. Tras la desconexión del aparato, la batería recargable se
carga mediante la red a bordo.

es
68
5. Puesta en marcha / Servicio
5.1. Leyenda
Siga las instrucciones de uso
Botón de encendido / apagado (botón stand by)
Botón de vacío (modificación del vacío)
Botón de ciclo (modificación del ciclo)
Botón de modo (cambio del modo de estimulación / extracción / "Sensitive Programme")
Botón de atenuación
Botón de cronometraje
Modo de extracción
Modo de estimulación
Aparato con parte aplicada BF
012
3
Conformidad de acuerdo con MDD 93 / 42 CEE
Fabricante
El aparato está sujeto a las exigencias de la Directiva RAEE
Fuente de alimentación
Corriente alterna
Aparato de la clase de protección II
IP21 Protección contra gotas verticales de agua
Li-Ion Contiene una batería recargable de iones de litio
El aparato es reciclable

es
69
5.2. Puesta en servicio
5.2.1. Conexión eléctrica
• Introducir el cable de red (a) en la conexión eléctrica de Carum
(b) y conectar con la toma de corriente.
5.2.2. Conexión del set de extracción (parte aplicada)
El uso del set de extracción se describe en las instrucciones de servicio
"Set de extracción Ardo" por separado.
• Extracción con set de extracción simple:
Introduzca el adaptador de tubo (c) en una de las dos aberturas
de conexión del sacaleches.
• Extracción con set de extracción doble:
Introduzca ambos adaptadores de tubo (d) en las aberturas de
conexión del sacaleches.
• La segunda abertura (e) del adaptador de tubo siempre debe
estar cerrada, tanto en la extracción simple como también en la
doble.
5.2.3. Enganche del soporte para botellas
El soporte para botellas (f) se puede enganchar en la parte posterior
de Carum o poner suelto.
5.2.4. Enganche del soporte de Easy Freeze
El soporte de Easy Freeze (g) sirve para enganchar el set de extracción
con bolsa para congelar o botella para leche materna. Se puede
enganchar en la parte posterior en el lugar del soporte para botellas.
e
f
f
g
b
a
d
c

es
70
5.3. Servicio
El vacío y los ciclos se pueden regular de forma independiente. Elija el
ajuste que sea más agradable para usted.
a
b
c
d
e
f
g
h
i
j
k
l
m
n
Botón de encendido / apagado (botón stand by)
Botón de vacío (modificación del vacío)
Indicador de vacío
Botón de atenuación
Información de atenuación
Información del tiempo
Información del cronómetro
Botón de cronometraje
Indicador de ciclo
Botón de ciclo (modificación del ciclo)
Botón de modo (cambio del modo de estimulación /
extracción / "Sensitive Programme")
Modo de extracción
Modo de estimulación
Línea de información (n = e + f + g)
5.3.1. Encendido / apagado
Carum se enciende pulsando una vez el botón de encendido / apagado.
El display se inicia con la página de bienvenida. Para desconectar Carum,
pulse de nuevo el botón de encendido / apagado.
00:00
Vacuum Cycles
CARUM
5.3.2. Modo de estimulación - fondo naranja
Tras el encendido, Carum se inicia automáticamente en modo de
estimulación (fondo naranja) con un ciclo rápido y un vacío profundo.
Este modo fomenta el reflejo de salida de la leche. El ajuste automático
imita el comportamiento natural del bebé. Los bebés succionan al
comienzo de la toma con movimientos de succión rápidos y una fuerza de
succión menor, de esta manera provocan el flujo de la leche materna.
El modo de estimulación dura dos minutos y después cambia
automáticamente al modo de extracción.
El vacío y los ciclos se pueden aumentar o reducir presionando varias
veces o manteniendo las teclas presionadas. Los ajustes seleccionados se
presentan a modo de barras. Adapte el vacío y / o el ciclo a su bienestar.
00:00
Vacuum Cycles
CARUM
naranja
00:00
Vacuum Cycles
CARUM
a
b
d
e f g
cl
m
i
h
k
j
n

es
71
5.3.3. Modo de extracción - fondo verde
En el modo de extracción (fondo verde) Carum cambia suavemente a un
vacío más elevado y un ciclo más bajo. Este cambio automático imita el
comportamiento natural del bebé, pues con el flujo de la leche materna
cambia su comportamiento de succión. El bebé succiona ahora con
menor rapidez, pero con una fuerza de succión mayor.
El vacío y los ciclos se pueden aumentar o reducir presionando varias
veces o manteniendo las teclas presionadas. Los ajustes seleccionados se
presentan a modo de barras. Adapte también en este modo el vacío y / o
el ciclo a su bienestar.
02:00
Vacuum Cycles
CARUM
verde
5.3.4. "Sensitive Programme"
El "Sensitive Programme" (fondo verde) extrae la leche con un vacío y
ciclo apenas perceptibles, por lo que permite una extracción suave en
caso de tener los pezones adoloridos.
El vacío y el ciclo se pueden aumentar o reducir presionando suavemente
varias veces o manteniendo las teclas presionadas. Los ajustes se
presentan a modo de barras.
Ajuste del "Sensitive Programme":
1. Presionar el botón de encendido / apagado
2. Pulsar la tecla de modo durante la visualización de la página de
bienvenida. 00:00
Vacuum Cycles
CARUM
00:00
Vacuum Cycles
CARUM
5.3.5. Provocar de nuevo el reflejo de salida de la leche
En modo de extracción (fondo verde) se puede retroceder en todo
momento al modo de estimulación (fondo naranja) presionando de nuevo
el botón de modo. De esta manera se estimula de nuevo el flujo de leche.
Esta tecla de modo también se puede utilizar durante el modo de
estimulación de dos minutos para el cambio prematuro al modo de
extracción.
00:00
Vacuum Cycles
CARUM

es
72
5.3.6. Cronometraje / cronómetro
El cronometraje se inicia con el encendido de Carum y se visualiza en la
línea de información.
• Presionando una vez la tecla del tiempo se detiene el cronometraje.
• Presionando una segunda vez la tecla del tiempo se establece la hora
en 00:00.
• Presionando otra vez la tecla del tiempo se inicia de nuevo el
cronometraje.
El cronometraje se mantiene al cambiar de modo; no obstante, retorna de
nuevo a 00:00 al apagar Carum.
5.3.7. Función de atenuación
Presionando varias veces el botón atenuador se puede reducir la
iluminación del display; al mismo tiempo, el símbolo de la lámpara en la
línea de información aparece apagado. Presionando varias veces la tecla
se anula la atenuación.
02:00
Vacuum Cycles
CARUM
5.3.8. Carum Battery
La Carum Battery con batería recargable integrada se visualiza en la
lámina frontal con "BATTERY".
El estado de la batería se indica como símbolo de batería en la línea de
información. Durante la carga, las barras se desplazan de izquierda a
derecha hasta que la batería recargable esté completamente recargada.
10:00
Vacuum Cycles
CARUM
BATTERY
02:00
Vacuum Cycles
CARUM

es
73
6. Consejos útiles
6.1. La extracción no debe ser nunca dolorosa
• Controle si el tamaño del embudo para pecho se ajusta a su pezón (véanse las instrucciones de uso
del set de extracción).
• Asegúrese de que el pezón esté centrado en el embudo para pecho.
• Si no fluye la leche, puede ser útil aplicar un masaje durante la extracción.
• Si tiene los pezones o el pecho adoloridos, debe utilizar preferiblemente el "Sensitive Programme" sin
estimulación previa. El "Sensitive Programme" inicia la extracción con un vacío especialmente suave y
bajo.
6.2. Fomento del reflejo de salida de la leche
Puesto que durante la extracción el reflejo de salida de la leche puede aparecer más tarde que en la
lactancia natural, los siguientes puntos pueden resultar útiles:
• Realice un masaje suave en el pecho antes de la extracción.
• Tome una bebida caliente.
• Piense en su bebé y relájese.
• Mire una foto de su bebé.
• Antes de la extracción, coloque por ejemplo un "Ardo Temperature Pack" caliente o una compresa
húmeda y caliente en el pecho.
• Antes del uso, caliente el embudo para pecho p.ej. en agua caliente.
6.3. Extracción eficiente
• Realizando un masaje en el pecho durante la extracción se puede obtener más leche y mejorar su
flujo.
• Elija un vacío cómodo que le haga sentir bien.
6.4. Aumento de la cantidad de leche
• Extraiga la leche de ambos pechos al mismo tiempo (sacaleches dobles).
• Durante los primeros diez minutos extraiga la leche doble o hasta que no fluya más leche. Cambie
luego a extracción simple y extraiga cinco minutos de cada pecho. Con la mano ahora libre aplique un
masaje suave en el pecho del que extrae la leche.

es
74
7. Accesorios / Repuestos
Artículo Número de artículo
Cable de red Euro 63.00.130
Cable de red Reino Unido 63.00.131
Cable de red EE UU 63.00.132
Carro opcional 63.00.129
Soporte para botellas 63.00.127
Soporte Easy Freeze 63.00.128
Diversos sets de extracción y otros accesorios
así como repuestos
www.ardomedical.com
8. Indicador de error / Indicador de estado
Error
Se visualiza un fallo en Carum y la Carum Battery en el display con el símbolo adjunto.
Desconecte el aparato y vuelva a conectarlo después. Si el fallo persiste, pida al servicio
técnico o al fabricante que lo verifiquen.
Se visualiza una batería recargable vacía en la Carum Battery en el display con el
símbolo adjunto. Si aparece este símbolo en el display, la Carum Battery se desconecta
automáticamente después de aprox. 5 segundos. Conecte el cable de red al aparato y
enchúfelo a la red eléctrica para cargar la batería recargable.
8.1. Otros posibles fallos durante la extracción
No hay vacío o es demasiado débil
Verifique si
• ha utilizado un set de extracción Ardo original. (Realice siempre la extracción con un set de extracción
Ardo.)
• la segunda apertura del adaptador de tubo está cerrada.
• el adaptador de tubo está bien conectado a la apertura de conexión del sacaleches.
• el set de extracción está bien montado y no está dañado. (Véanse las instrucciones de uso del set de
extracción)
Carum no funciona / el display permanece oscuro
Verifique si
• el cable de red y su enchufe están bien y no presentan defectos. ¡No utilice nunca un cable
defectuoso ni un cable con enchufe defectuoso!
• el cable de red está bien conectado a Carum y bien introducido en la toma de corriente.
• Carum funciona en otra toma de corriente.
• otro aparato funciona en la misma toma de corriente.
Si se confirma un fallo de Carum, pida al servicio técnico o al fabricante que lo verifiquen.

es
75
9. Limpieza / Control / Mantenimiento
El incumplimiento de las normas de limpieza y los controles puede provocar infecciones o fallos en Carum.
9.1. Limpieza / Desinfección
• ¡Desenchufe siempre Carum de la conexión eléctrica antes de la limpieza!
• ¡Carum no es impermeable, por eso no se puede sumergir en líquidos! No limpie Carum en el
lavaplatos, el lavamanos o bajo agua corriente.
• Asegúrese también de que no entre líquido de limpieza en las aberturas de conexión para el set de
extracción en las conexiones eléctricas.
Limpieza en casa
• En caso de necesidad, limpie la superficie de Carum con un paño húmedo. Si es necesario, puede
utilizar un poco de detergente común, pero no agentes abrasivos.
• Limpie el set de extracción siguiendo las indicaciones de las instrucciones de uso respectivas.
Limpieza en el hospital
• Carum: Desinfección mediante frotado de las superficies con un desinfectante sin fenol. No utilizar
productos abrasivos.
• Carro para Carum: Desinfección mediante frotado de las superficies con un desinfectante sin fenol.
No utilizar productos abrasivos.
• Limpie el set de extracción siguiendo las indicaciones de las instrucciones de uso respectivas.
9.2. Control antes del encendido
• La cubierta y el display están intactos.
• El cable de red y el enchufe no están dañados.
• El set de extracción está limpio, no presenta defectos y está bien montado.
• El set de extracción está bien conectado a la apertura de conexión de Carum.
• Todos los accesorios que puedan ser necesarios están limpios, no presentan defectos y están bien
montados.
• Carro (opcional): Control del apriete de los tornillos.
9.3. Mantenimiento
Por principio, Carum no requiere mantenimiento. No obstante, para garantizar un funcionamiento
correcto, le recomendamos realizar algunos controles:
9.3.1. Lista de control para el alquiler
Control visual de la limpieza del sacaleches Después de cada alquiler
Control visual de la integridad del sacaleches Después de cada alquiler
Control visual de daños en el sacaleches Después de cada alquiler
Control simple del funcionamiento del sacaleches
(funciona el sacaleches, la batería está recargada)
Después de cada alquiler
Control del vacío por parte de personal de servicio formado Mínimo cada 2 años
9.3.2. Lista de control para el uso en el hospital
Control visual de limpieza y daños en el sacaleches Antes y después de cada
alquiler
Control del vacío por parte de personal de servicio formado Mínimo cada 2 años

es
76
10. Garantía
El periodo de garantía del sacaleches es de 3 años a partir de la fecha de compra, la factura con fecha
sirve de certificado de garantía.
El periodo de garantía de la batería recargable de iones de litio es de 1 año a partir de la fecha de compra,
la factura con fecha sirve de certificado de garantía.
Condiciones de garantía generales
Ardo medical AG garantiza que los productos que fabrica están exentos de fallos de material y fabricación.
En condiciones normales de utilización, durante el periodo de garantía se sustituye gratuitamente el
material defectuoso. Para preservar el derecho de garantía y el funcionamiento correcto se deben seguir
las instrucciones de uso del aparato y utilizar exclusivamente accesorios de Ardo medical AG. La prestación
de garantía se anula si se manipula el aparato.
11. Información técnica
11.1. Datos técnicos
Masa del sacaleches largo x ancho x alto 302 × 240 × 180 mm
Peso del sacaleches 3,0 kg
Peso del sacaleches con batería recargable 3,7 kg
Cable de red longitud 3 m
Tensión de red / Frecuencia de red 100–240 VAC ±10 % / 50/60 Hz
Potencia absorbida 135 VA
Fusible de red entrada P / N T 2.5 A / 250 VAC
Conexión para cable de coche 12 VDC
Condiciones de funcionamiento
5–40 °C (41–104 °F)
10–93 % HR no condensable
700–1060 hPa
Grado de protección (el set de extracción es parte
aplicada) BF
Clase de protección Clase II
Clasificación según MDD93/42 CEE Clase IIa
Masa del carro largo x ancho x alto 425 x 425 x 720 mm
Altura libre 105 mm
Diámetro de las ruedas 75 mm
Peso del carro 7,0 kg

es
77
Vacío (± 5 % 1))Ciclo (± 3)
Modo de estimulación
Valor inicial 60 mbar | 6 kPa | 45 mmHg 90 / min
Valores de ajuste 30–150 mbar | 3–15 kPa | 22–113 mmHg 72–120 / min
Modo de extracción
Valor inicial * 45 / min
Valores de ajuste 30–330 mbar | 3–33 kPa | 22–248 mmHg 30–60 / min
"Sensitive Programme"
Valor inicial 30 mbar | 3 kPa | 22 mmHg 30 / min
Valores de ajuste 30–330 mbar | 3–33 kPa | 22–248 mmHg 30–60 / min
* El modo de extracción utiliza el último valor de ajuste seleccionado por la usuaria en el modo de estimulación y aumenta este vacío en 30
mbar / 3 kPa / 22 mmHg
1) Los valores de vacío dependen de la presión atmosférica actual.
11.2. Conformidad 11.3. Registros de ensayos CEM
Conforme a la Directiva MDD 93/42 CEE, EN 60601-1, EN 60601-1-2,
EN ISO 10079-1, EN 60601-1-6, EN 60601-1-11, 2011/65/UE (RoHS)
MEDICAL – GENERAL MEDICAL EQUIPMENT
AS TO ELECTRICAL SHOCK, FIRE AND
MECHANICAL HAZARDS ONLY
IN ACCORDANCE WITH
ANSI/AAMI ES60601-1 (2005, C1:09, A2:10),
CAN/CSA C22.2 No.60601.1 (2008, R:2011)
E358823
Véase página 213
12. Transporte y almacenamiento
Para el transporte y el almacenamiento de Carum y Carum Battery se debe utilizar el embalaje original.
Recomendamos un almacenaje protegido de la luz UV (p.ej. luz solar, lámparas halógenas) el calor y el
polvo.
Carum Battery: Infórmese en la compañía aérea respectiva sobre las normas de transporte.
Temperatura –20 °C hasta +70 °C (–4 °F hasta 158 °F)
Humedad relativa del aire 10–93 % no condensable
Presión atmosférica 700–1060 hPa
13. Vida útil y eliminación de residuos
La vida útil del aparato en condiciones normales de utilización es de 10 años, sin piezas de desgaste. Este
aparato tiene componentes electrónicos y una batería recargable de iones de litio.
Al final de la vida útil del aparato, este y sus accesorios se deberá eliminar siguiendo la normativa local
vigente.
Las baterías recargables usadas no se deben tirar a la basura; se deben devolver al
lugar de venta o eliminar siguiendo la normativa local vigente.
El aparato está sujeto a las exigencias de la Directiva RAEE.
0123

78
pt
ÍNDICE
CARUM BOMBA DE EXTRAÇÃO DE LEITE PARA USO HOSPITALAR E ALUGUER
Obrigado por se ter decidido pela Bomba de extração de leite Carum da Ardo.
Nestas instruções de utilização poderá encontrar indicações importantes e úteis para a utilização da
bomba Carum.
Durante a utilização de equipamentos elétricos, deve observar impreterivelmente as normas de segurança.
Reserve alguns minutos. Leia atentamente as instruções de utilização antes de utilizar a bomba de
extração de leite Carum pela primeira vez.
A bomba Carum é uma bomba de vácuo com um sistema de pistão duplo. Com a ajuda dos elementos
de comando, a mãe pode ajustar individualmente a regulação do vácuo e do ciclo. O vácuo permanece
estável se a utilizadora alterar a regulação do ciclo. O ciclo também permanece estável se a utilizadora
alterar a regulação do vácuo. A leitora tem de ser capaz de ler e compreender estas instruções de
utilização.
1. Disposição do produto no recipiente 79
2. Utilização prevista 80
2.1. Indicações 80
2.2. Contraindicações 80
3. Indicações de segurança 80
4. Descrição do produto 82
5. Colocação em funcionamento / operação 83
5.1. Legenda 83
5.2. Colocação em funcionamento 84
5.2.1. Ligação elétrica 84
5.2.2. Ligação do conjunto de bombas
(peça aplicada) 84
5.2.3. Fixação do porta-biberões 84
5.2.4. Fixação do suporte Easy Freeze 84
5.3. Operação 85
5.3.1. Ligar e desligar a bomba 85
5.3.2. Modo de estimulação –
Fundo cor de laranja 85
5.3.3. Modo de extração – Fundo verde 86
5.3.4. "Sensitive Programme" 86
5.3.5. Provocar novamente o reflexo
de ejeção do leite 86
5.3.6. Medição do tempo / cronómetro 87
5.3.7. Função de regulação da luz 87
5.3.8. Carum Battery 87
6. Dicas úteis 88
6.1. A extração não pode ser dolorosa 88
6.2. Estimular o reflexo de ejeção do leite 88
6.3. Extração eficiente 88
6.4. Aumentar a quantidade de leite 88
7. Acessórios / peças sobressalentes 89
8. Indicação de erros / indicação do estado 89
8.1. Outros erros possíveis durante a extração 89
9. Limpeza / controlo / manutenção 90
9.1. Limpeza / desinfeção 90
9.2. Verificação antes de ligar 90
9.3. Manutenção 90
9.3.1. Lista de verificação para aluguer 90
9.3.2. Lista de verificação para o controlo
para utilização no hospital 90
10. Garantia 91
11. Informação técnica 91
11.1. Dados técnicos 91
11.2. Conformidade 92
11.3. Protocolo de ensaios de CEM 92
12. Transporte e armazenamento 92
13. Tempo de vida útil 92

79
pt
1. Disposição do produto no recipiente
a Bomba de extração de leite Carum
b Entrada para conjunto de bombas
c Painel de comando com ecrã LCD
d Ligação para cabo de rede
e Porta-biberões
f Suporte Easy Freeze (suporte para saco de congelação)
g Cabo de rede
h Recipiente Carum
i Campo de endereço
j Conjunto de bombas (não incluído no fornecimento)
k Instruções de utilização
g
b
f
ea
c
d
e
f
a
g
j
i
h
ardo carum
electric breastpump
Instructions for use | Gebrauchsanweisung | Mode d’emploi
Istruzioni per l’uso | Instrucciones de uso | Instruções de utilização
Gebruiksaanwijzing | Bruksanvisning | Käyttöohjeet | Instrukcja
użycia | Οδηγίες χρήσης | Kullanım kılavuzu | | 使用说明
k

80
pt
2. Utilização prevista
2.1. Indicações
A bomba de extração de leite Carum destina-se a mulheres lactantes para a extração e colheita de leite
materno. Pode ser utilizada como bomba individual e como bomba dupla. O equipamento foi concebido
para utilização exclusivamente em espaços fechados e por várias utilizadoras.
2.2. Contraindicações
A bomba Carum não pode ser utilizada durante a gravidez, uma vez que a extração provoca contrações.
3. Indicações de segurança
Avisos importantes de segurança
Antes da primeira utilização, leia atentamente as
instruções de utilização. Guarde as instruções de
utilização para consulta futura.
A bomba Carum é uma bomba de extração de leite elétrica para utilização no hospital bem como para
aluguer. Para o bem da sua saúde, da sua segurança e para evitar danos no equipamento, deve observar
as seguintes regras de segurança.
Regras de segurança
PERIGO: Prevenção de choque elétrico mortal
• Utilizar apenas o cabo de rede original da Ardo.
• Nunca utilizar um cabo de rede com defeito.
• Nunca posicionar um equipamento elétrico de modo que possa cair dentro de líquidos.
• Nunca agarrar um equipamento elétrico que tenha caído dentro de líquido ou que esteja molhado.
Desligar imediatamente o equipamento da tomada.
• Nunca utilizar um equipamento que tenha caído dentro de líquido ou que esteja molhado.
O equipamento deve ser verificado pelo serviço de assistência técnica ou pelo fabricante.
• Nunca utilizar a bomba Carum durante o banho ou o duche.
• Nunca abrir a bomba Carum! Existe o risco de choque elétrico.

81
pt
AVISO: Prevenção de danos, choque elétrico, ignição ou lesão
• A bomba Carum não se destina à utilização no exterior.
• Não utilizar a bomba Carum se esta não estiver a funcionar corretamente, se tiver caído ou se estiver
avariada.
• Ao utilizar um equipamento elétrico, preste especial atenção a crianças ou pessoas com deficiência
mental que se encontrem nas proximidades. Os equipamentos elétricos não são brinquedos.
• Ligue o cabo de rede sempre primeiro à bomba Carum e só depois à tomada.
• Não deixe a bomba Carum ligada à rede elétrica sem supervisão.
• Após a utilização, desligue a bomba Carum da rede elétrica.
• Esta só ficará desligada da rede elétrica quando a ficha é retirada da tomada.
• Posicione a bomba Carum de forma que seja fácil desligá-la da rede elétrica.
• Mantenha a bomba Carum, o cabo de rede e todos os acessórios afastados de superfícies quentes.
• Utilize a bomba Carum apenas para o fim indicado no capítulo "Utilização prevista".
• Utilize exclusivamente conjuntos de bombas e peças originais da Ardo.
• Não introduza objetos em aberturas ou tubos da bomba Carum nem deixe cair objetos para dentro da
mesma.
• Não utilize a bomba Carum em ambientes onde seja administrado oxigénio ou onde sejam utilizados
pulverizadores.
• A bomba Carum não pode ser alterada sem a autorização do fabricante.
AVISO: Prevenção de danos para a saúde ou lesões
• Verifique a bomba Carum e os respetivos acessórios antes de cada utilização.
• Não utilize a bomba Carum durante o sono ou com sonolência.
• Se a extração for desagradável ou dolorosa, interrompa a extração e aconselhe-se junto do pessoal
técnico competente.
• Não utilize a bomba Carum se estiver grávida. A extração pode provocar contrações.
• Para a limpeza, observe as instruções indicadas no respetivo capítulo "Limpeza / controlo /
manutenção".
Adaptador para carro
• A bomba Carum e a Carum Battery não se destinam à utilização no exterior, mesmo com o adaptador
para carro.
• Utilize apenas o cabo de bateria para carro eletricamente protegido original da Ardo.
• Certifique-se de que o carro possui uma ligação de 12 VCC.
• Não efetue a extração com o carro em andamento, mesmo se for passageira. Tal pode provocar um
acidente.
• Após a utilização ou após a carga, desligue a bomba Carum do sistema de alimentação.

82
pt
4. Descrição do produto
• A bomba de extração de leite elétrica Carum destina-se à utilização no hospital e para aluguer.
• A bomba Carum pode ser utilizada como bomba individual ou bomba dupla (extração de ambos os
seios).
• Os ciclos (Cycles) e o vácuo (Vacuum) podem ser regulados individualmente e independentes um do
outro.
• O display a cores proporciona uma orientação visual e o cronómetro integrado informa sobre
a duração da extração.
• De forma a imitar o padrão de sucção do bebé, é possível efetuar a extração com a bomba Carum em
duas fases: o modo de estimulação e o modo de extração propriamente dito. O modo de estimulação
estimula o fluxo de leite e o subsequente modo de extração permite uma extração eficiente.
• A bomba Carum inicia com o modo de estimulação e, após dois minutos, muda automaticamente
para o modo de extração. Durante esses dois minutos, se for necessário, é possível mudar
antecipadamente para o modo de extração.
• Para voltar a estimular o fluxo de leite durante a extração, é possível mudar suavemente para o modo
de estimulação mediante a pressão da tecla de modo.
• O "Sensitive Programme" permite uma extração suave no caso de mamilos doloridos com um vácuo
inicial e um ciclo mínimos.
• Os conjuntos de bombas Ardo proporcionam uma barreira de higiene a 100% entre o leite materno
e a bomba de extração de leite. Este sistema fechado garante que o leite materno seja impedido de
chegar ao tubo do conjunto de bombas, bem como à bomba de extração de leite.
• A Carum Battery está equipada com uma bateria recarregável.
• A bomba e a bateria Carum podem ser operadas ligadas à rede elétrica ou no carro, mediante
a utilização de um cabo para carro opcional.
Carum Battery – a bomba Carum com bateria recarregável integrada
A Carum Battery permite efetuar a extração em qualquer lugar, podendo fazê-lo, p. ex., diretamente junto
à cama do bebé doente ou prematuro. A proximidade com o bebé estimula o reflexo de ejeção do leite.
• O tempo de funcionamento com a bateria recarregável é de aproximadamente quatro horas (com
vácuo e ciclo máximos). Para recargar a bateria recarregável vazia são necessárias aproximadamente
duas horas.
• Se o tempo de funcionamento com a bateria recarregável totalmente carregada baixar para menos
de uma hora, a bateria deve ser substituída pelo serviço de assistência técnica ou pelo fabricante, de
forma a voltar a garantir um excelente funcionamento.
• Se o equipamento estiver ligado à rede elétrica, a bateria recarregável é carregada durante a extração.
O tempo de carga é, deste modo, prolongado.
• Se a bomba Carum estiver ligada ao sistema de alimentação de um veículo mediante um cabo para
carro, a bateria recarregável não é carregada durante a extração. Depois de desligar o equipamento,
a bateria recarregável é carregada através do sistema de alimentação.

83
pt
5. Colocação em funcionamento / operação
5.1. Legenda
Observar as instruções de utilização
Tecla ligar / desligar (tecla standby)
Tecla de vácuo (alteração do vácuo)
Tecla de ciclo (alteração do ciclo)
Tecla de modo (mudança entre modo de estimulação / modo de extração / "Sensitive
Programme")
Tecla de regulação da luz
Tecla de medição do tempo
Modo de extração
Modo de estimulação
Equipamento com peça aplicada do tipo BF
012
3
Conformidade de acordo com a norma relativa a dispositivos médicos 93 / 42 CEE
Fabricante
O equipamento cumpre os requisitos da norma REEE
Equipamento de alimentação elétrica
Corrente alternada
Equipamento da classe de proteção II
IP21 Proteção contra gotas de água
Li-Ion Contém uma bateria recarregável de iões de lítio
Equipamento reciclável

84
pt
5.2. Colocação em funcionamento
5.2.1. Ligação elétrica
• Inserir o cabo de rede (a) no conector de alimentação (b) da
Carum e ligar à tomada.
5.2.2. Ligação do conjunto de bombas (peça aplicada)
A utilização do conjunto de bombas encontra-se descrito nas
instruções de utilização separadas "Conjunto de bombas Ardo".
• Bombas com conjunto de bomba simples:
Insira o adaptador do tubo flexível (c) numa das duas entradas da
bomba.
• Bombas com conjunto de bomba dupla:
Insira ambos os adaptadores dos tubos flexíveis (d) nas
entradas da bomba.
• A segunda abertura (e) do adaptador do tubo flexível tem de
estar sempre tapado, tanto na bomba simples como na bomba
dupla.
5.2.3. Fixação do porta-biberões
O porta-biberões (f) pode ser fixado na parte posterior da bomba
Carum ou colocado separado da mesma.
5.2.4. Fixação do suporte Easy Freeze
O suporte Easy Freeze (g) serve para pendurar o conjunto de bombas
com saco para congelação ou o biberão para leite materno. Pode ser
fixado na parte posterior da bomba em vez do porta-biberões.
e
f
f
g
b
a
d
c

85
pt
5.3. Operação
O vácuo e os ciclos podem ser regulados independentes uns dos outros.
Selecione a regulação mais confortável para si.
a
b
c
d
e
f
g
h
i
j
k
l
m
n
Tecla ligar / desligar (tecla standby)
Tecla de vácuo (alteração do vácuo)
Indicação de vácuo
Tecla de regulação da luz
Informação de regulação da luz
Informação do tempo
Informação do cronómetro
Tecla de medição do tempo
Indicação do ciclo
Tecla de ciclo (alteração do ciclo)
Tecla de modo (mudança entre modo de
estimulação / modo de extração /
"Sensitive Programme")
Modo de extração
Modo de estimulação
Linha de informação (n = e + f + g)
5.3.1. Ligar e desligar a bomba
A bomba Carum é ligada pressionando uma vez a tecla de ligar / desligar.
O display inicia com a página de boas-vindas. Para desligar a bomba
Carum, voltar a pressionar a tecla ligar / desligar.
00:00
Vacuum Cycles
CARUM
5.3.2. Modo de estimulação – Fundo cor de laranja
Após ter sido ligada, a bomba Carum arranca automaticamente no modo
de estimulação (fundo cor de laranja) com um ciclo rápido e um vácuo
profundo. Este modo estimula o reflexo de ejeção do leite. A regulação
automática imita o padrão natural do bebé. Os bebés sugam no início da
amamentação com movimentos de sucção rápidos e uma força de sucção
reduzida, provocando assim o fluxo do leite materno.
O modo de estimulação dura dois minutos e passa depois
automaticamente para o modo de extração.
O vácuo e os ciclos podem ser aumentados ou reduzidos pressionando
várias vezes as teclas ou mantendo-as pressionadas. As regulações
selecionadas são apresentadas na forma de barras. Adapte o vácuo e / ou
o ciclo ao seu bem-estar.
00:00
Vacuum Cycles
CARUM
cor de laranja
00:00
Vacuum Cycles
CARUM
a
b
d
e f g
cl
m
i
h
k
j
n

86
pt
5.3.3. Modo de extração – Fundo verde
No modo de extração (fundo verde), a bomba Carum muda suavemente
para um vácuo mais elevado e um ciclo inferior. A comutação automática
imita o padrão natural do bebé, mudando o padrão de sucção durante
o fluxo de leite materno. O bebé suga agora com menos rapidez, mas,
em contrapartida, com uma maior força de sucção.
O vácuo e os ciclos podem ser aumentados ou reduzidos pressionando
várias vezes as teclas ou mantendo-as pressionadas. As regulações
selecionadas são apresentadas na forma de barras. Também neste modo,
adapte o vácuo e / ou o ciclo ao seu bem-estar.
02:00
Vacuum Cycles
CARUM
verde
5.3.4. "Sensitive Programme"
O "Sensitive Programme" (fundo verde) efetua a extração com um vácuo
e um ciclo quase impercetíveis e permite uma extração suave no caso de
mamilos doloridos.
O vácuo e o ciclo podem ser aumentados ou reduzidos suavemente
pressionando várias vezes as teclas. As regulações são apresentadas na
forma de barras.
Regular o "Sensitive Programme":
1. Pressionar a tecla ligar / desligar
2. Durante a apresentação da página de boas-vindas, pressionar a tecla
de modo. 00:00
Vacuum Cycles
CARUM
00:00
Vacuum Cycles
CARUM
5.3.5. Provocar novamente o reflexo de ejeção do leite
No modo de extração (fundo verde) é possível regressar ao modo de
estimulação (fundo cor de laranja) pressionando a tecla de modo. Deste
modo, o fluxo de leite é novamente estimulado.
A tecla de modo também pode ser utilizada durante os dois minutos
do modo de estimulação para mudar antecipadamente para o modo de
extração.
00:00
Vacuum Cycles
CARUM

87
pt
5.3.6. Medição do tempo / cronómetro
A medição do tempo inicia ao ligar a bomba Carum e é indicada na linha
de informação.
• A medição do tempo é interrompida pressionando uma vez a tecla de
tempo.
• Pressionar a tecla de tempo duas vezes repõe o relógio para 00:00.
• Voltando a pressionar a tecla de tempo inicia novamente a medição
do tempo.
A medição do tempo é adotada na mudança do modo, contudo, ao
desligar a bomba Carum, é reposta para 00:00.
5.3.7. Função de regulação da luz
A iluminação do display pode ser reduzida pressionando uma vez a tecla
de regulação da luz. Simultaneamente, o símbolo de lâmpada na linha
de informação surge como desativado. Voltando a pressionar a tecla,
a regulação da luz é anulada.
02:00
Vacuum Cycles
CARUM
5.3.8. Carum Battery
A Carum Battery com bateria recarregável incorporada encontra-se
identificada na capa frontal como "BATTERY".
O estado da bateria recarregável é indicado na forma de símbolo de
bateria na linha de informação. Ao carregar, as barras deslocam-se
da esquerda para a direita, até a bateria recarregável estar totalmente
carregada.
10:00
Vacuum Cycles
CARUM
BATTERY
02:00
Vacuum Cycles
CARUM

88
pt
6. Dicas úteis
6.1. A extração não pode ser dolorosa
• Controle se o tamanho da copa se adequa aos seus mamilos (ver instruções de utilização do conjunto
de bombas).
• Certifique-se de que o mamilo se encontra centrado na copa.
• Se não houver fluxo de leite, massajar o seio durante a extração poderá ajudar.
• Com mamilos ou seios doloridos, utilizar de preferência o "Sensitive Programme" sem estimulação
prévia. O "Sensitive Programme" inicia a extração com um vácuo particularmente suave e baixo.
6.2. Estimular o reflexo de ejeção do leite
Uma vez que o reflexo de ejeção do leite durante a extração pode ocorrer mais tarde do que durante
a amamentação natural, os seguintes pontos podem ser aconselháveis:
• Massaje o seio suavemente antes de proceder à extração.
• Tome uma bebida quente.
• Pense no seu bebé e descontraia.
• Olhe para uma foto do seu bebé.
• Antes da extração, coloque, p. ex., um "Ardo Temperature Pack" quente ou uma compressa quente
e húmida sobre o seio.
• Antes da utilização, aqueça a copa, p. ex., debaixo de água quente.
6.3. Extração eficiente
• A massagem dos seios durante a extração pode aumentar a quantidade de leite extraído e melhorar
o fluxo de leite.
• Selecione um vácuo confortável, adequado ao seu bem-estar.
6.4. Aumentar a quantidade de leite
• Efetue a extração em ambos os seios simultaneamente (bomba dupla).
• Extraia durante os primeiros dez minutos com a bomba dupla, ou até não haver fluxo de leite.
A seguir, mude para a bomba simples e efetue a extração cinco minutos em cada seio. Com a mão
livre, massaje suavemente o seio no qual está a efetuar a extração.

89
pt
7. Acessórios / peças sobressalentes
Artigo Referência
Cabo de rede Europa 63.00.130
Cabo de rede Reino Unido 63.00.131
Cabo de rede EUA 63.00.132
Carro, opcional 63.00.129
Porta-biberões 63.00.127
Suporte Easy Freeze 63.00.128
Diversos conjuntos de bombas e outros acessórios,
bem como peças sobressalentes
www.ardomedical.com
8. Indicação de erros / indicação do estado
Error
Os erros na bomba Carum e na Carum Battery são indicados no display com o símbolo ao
lado. Desligue e volte a ligar o equipamento. Se o erro persistir, o equipamento deve ser
verificado pelo serviço de assistência técnica ou pelo fabricante.
Na Carum Battery, uma bateria recarregável descarregada é indicada no display com
o símbolo ao lado. Se este símbolo surgir no display, a Carum Battery desliga-se
automaticamente após aproximadamente 5 segundos. Para carregar a bateria recarregável,
ligue o cabo de rede ao equipamento e à rede elétrica.
8.1. Outros erros possíveis durante a extração
Nenhum vácuo ou vácuo demasiado fraco
Verifique se
• está a utilizar um conjunto de bombas original da Ardo. (Efetue sempre a extração com um conjunto
de bombas Ardo.)
• a segunda abertura no adaptador do tubo flexível está tapada.
• o adaptador do tubo flexível está inserido de forma segura na entrada da bomba.
• o conjunto de bombas está corretamente montado e não está danificado. (Ver instruções de utilização
do conjunto de bombas)
A bomba Carum não funciona / display permanece escuro
Verifique se
• o cabo de rede e a ficha aparentam estar em boas condições e sem defeitos. Nunca utilize um cabo
com defeito ou um cabo com uma ficha defeituosa!
• o cabo de rede está corretamente ligado à bomba Carum e à tomada.
• a bomba Carum funciona noutra tomada.
• outro equipamento funciona na mesma tomada.
Caso se confirme uma avaria na bomba Carum, o equipamento deve ser verificado pelo serviço de
assistência técnica ou pelo fabricante.

90
pt
9. Limpeza / controlo / manutenção
Em caso de incumprimento das normas de limpeza e dos controlos, existe o risco de uma infeção ou
avaria da bomba Carum.
9.1. Limpeza / desinfeção
• Antes da limpeza, desligue sempre a bomba Carum da rede elétrica!
• A bomba Carum não é estanque, pelo que não deve ser mergulhada em líquidos! Nunca limpe
a bomba Carum na máquina de lavar-loiça, no lava-loiça ou sob água corrente.
• Certifique-se de que não entra solução de limpeza nas entradas do conjunto de bombas nem nas
ligações elétricas.
Limpeza em casa
• Sempre que necessário, limpe a superfície da bomba Carum com um pano húmido. Se necessário,
pode utilizar um detergente normal, mas nunca produtos abrasivos.
• O conjunto de bombas deve ser limpo de acordo com as instruções constantes nas instruções de
utilização.
Limpeza no hospital
• Carum: Desinfeção de lavagem das superfícies com um desinfetante não fenólico. Não utilizar
produtos abrasivos.
• Carro da bomba Carum: Desinfeção de lavagem das superfícies com um desinfetante não fenólico.
Não utilizar produtos abrasivos.
• O conjunto de bombas deve ser limpo de acordo com as instruções constantes nas instruções de
utilização.
9.2. Verificação antes de ligar
• O invólucro e o display estão intactos.
• O cabo de rede e as fichas não estão danificados.
• O conjunto de bombas está limpo, sem defeitos e corretamente montado.
• O conjunto de bombas está corretamente ligado à entrada da bomba Carum.
• Os possíveis acessórios estão limpos, sem defeitos e corretamente montados.
• Carro (opcional): Verificar se os parafusos estão apertados.
9.3. Manutenção
A bomba Carum não requer manutenção. Para garantir um bom funcionamento, recomendamos algumas
verificações:
9.3.1. Lista de verificação para aluguer
Controlo visual da bomba relativamente a limpeza Após cada aluguer
Controlo visual da bomba relativamente a integridade Após cada aluguer
Controlo visual da bomba relativamente a danos Após cada aluguer
Controlo simples do funcionamento da bomba
(a bomba funciona, a bateria recarregável está carregada)
Após cada aluguer
Controlo do vácuo por pessoal especializado da assistência técnica Pelo menos a cada 2 anos
9.3.2. Lista de verificação para o controlo para utilização no hospital
Controlo visual da bomba relativamente a limpeza e danos Antes e após cada utilização
Controlo do vácuo por pessoal especializado da assistência técnica Pelo menos a cada 2 anos

91
pt
10. Garantia
O período de garantia da bomba de extração de leite Carum é de 3 anos a partir da data de aquisição.
O recibo com data é válido como cartão de garantia.
O período de garantia da bateria recarregável de iões de lítio para a Carum Battery é de 1 ano a partir da
data de aquisição. O recibo com data é válido como cartão de garantia.
Condições gerais da garantia
A Ardo medical AG garante que os produtos que produz estão isentos de defeitos de material e de
fabrico. Em condições normais de utilização, o material defeituoso é substituído gratuitamente durante
o período de garantia. Para preservar a garantia e o funcionamento correto do equipamento, deve
observar as instruções de utilização e utilizar exclusivamente acessórios da Ardo medical AG. A garantia
é anulada se tiver havido intervenções no equipamento.
11. Informação técnica
11.1. Dados técnicos
Volume da bomba CxLxA 302 × 240 × 180 mm
Peso da bomba 3,0 kg
Peso da bomba com bateria recarregável 3,7 kg
Comprimento do cabo de rede 3 m
Voltagem / frequência de rede 100–240 VCA ±10 % / 50/60 Hz
Consumo de energia 135 VA
Fusível de rede entrada P / N T 2,5 A / 250 VCA
Ligação para cabo para carro 12 VCC
Condições de funcionamento
5–40 °C (41–104 °F)
10–93 % HR, sem condensação
700–1060 hPa
Grau de proteção (conjunto de bombas é peça
aplicada) BF
Classe de proteção Classe II
Classificação de acordo com a norma relativa a
dispositivos médicos 93/42 CEE Classe IIa
Volume do carro CxLxA 425 x 425 x 720 mm
Distância do solo 105 mm
Diâmetro das rodas 75 mm
Peso do carro 7,0 kg

92
pt
Vácuo (± 5% 1))Ciclo (± 3)
Modo de estimulação
Valor inicial 60 mbar | 6 kPa | 45 mmHg 90 / min
Parâmetros reguláveis 30–150 mbar | 3–15 kPa | 22–113 mmHg 72–120 / min
Modo de extração
Valor inicial * 45 / min
Parâmetros reguláveis 30–330 mbar | 3–33 kPa | 22–248 mmHg 30–60 / min
"Sensitive Programme"
Valor inicial 30 mbar | 3 kPa | 22 mmHg 30 / min
Parâmetros reguláveis 30–330 mbar | 3–33 kPa | 22–248 mmHg 30–60 / min
* O modo de extração assume o último valor regulado pela utilizadora no modo de estimulação e aumenta o vácuo em 30 mbar / 3 kPa /
22 mmHg
1) Os valores do vácuo dependem da pressão atmosférica atual.
11.2. Conformidade 11.3. Protocolo de ensaios de CEM
De acordo com a norma relativa a dispositivos médicos 93/42 CEE,
EN 60601-1, EN 60601-1-2, EN ISO 10079-1, EN 60601-1-6,
EN 60601-1-11, 2011/65/UE (RoHS)
MEDICAL – GENERAL MEDICAL EQUIPMENT
AS TO ELECTRICAL SHOCK, FIRE AND
MECHANICAL HAZARDS ONLY
IN ACCORDANCE WITH
ANSI/AAMI ES60601-1 (2005, C1:09, A2:10),
CAN/CSA C22.2 No.60601.1 (2008, R:2011)
E358823
Ver página 213
12. Transporte e armazenamento
Utilizar a embalagem original para o transporte e o armazenamento da bomba Carum e da Carum
Battery. Recomenda-se o armazenamento em local protegido de luz UV (p. ex., luz solar, lâmpadas de
halogéneo), calor e poeiras.
Carum Battery: Para normas de transporte, consulte a respetiva companhia aérea.
Temperatura –20 °C a +70 °C (–4 °F a 158 °F)
Humidade relativa do ar 10–93% HR, sem condensação
Pressão atmosférica 700–1060 hPa
13. Tempo de vida útil
O tempo de vida útil do equipamento com utilização correta é de 10 anos, sem peças de desgaste. Este
equipamento contém componentes eletrónicos e uma bateria recarregável de iões de lítio.
No final do tempo de vida útil do equipamento, o equipamento e os respetivos acessórios devem ser
eliminados de acordo com a regulamentação local.
Não eliminar as baterias recarregáveis gastas no caixote do lixo. Entregar no ponto
de venda ou eliminar de acordo com a regulamentação local.
O equipamento cumpre os requisitos da norma REEE.
0123

93
nl
INHOUDSOPGAVE
CARUM BORSTKOLF VOOR ZIEKENHUIZEN EN VERHUUR
Hartelijk dank dat u gekozen hebt voor de Carum borstkolf van Ardo.
In deze gebruiksaanwijzing vindt u belangrijke en nuttige informatie voor het gebruik van de Carum.
Bij het gebruik van elektrische apparaten is het van groot belang dat u de veiligheidsvoorschriften in acht
neemt. Neem hiervoor even de tijd. Lees de gebruiksaanwijzing aandachtig door voordat u de borstkolf
Carum voor de eerste keer gaat gebruiken.
De Carum is een vacuümpomp met een dubbel zuigersysteem. Met behulp van de bedieningselementen
kan elke moeder de instellingen van vacuüm en cyclus individueel aanpassen. Het vacuüm blijft stabiel
als de gebruikster de cyclusinstellingen verandert. Evenzo blijft de cyclus stabiel als de gebruikster de
vacuüminstellingen verandert. De lezeres moet in staat zijn om deze gebruiksaanwijzing te lezen en te
begrijpen.
1. Plaatsing van het product in de container 94
2. Beoogd gebruik 95
2.1. Indicaties 95
2.2. Contra-indicaties 95
3. Veiligheidsinstructies 95
4. Productbeschrijving 97
5. Ingebruikname / bediening 98
5.1. Legenda 98
5.2. Ingebruikname 99
5.2.1. Elektrische aansluiting 99
5.2.2. Aansluiten van de kolfset
(toegepast onderdeel) 99
5.2.3. Ophangen van de flessenhouder 99
5.2.4. Ophangen van de Easy Freeze-houder 99
5.3. Bediening 100
5.3.1. Inschakelen / Uitschakelen 100
5.3.2. Stimulatiemodus –
oranje achtergrond 100
5.3.3. Kolfmodus – groene achtergrond 101
5.3.4. "Sensitive Programme" 101
5.3.5. Toeschietreflex opnieuw opwekken 101
5.3.6. Tijdmeting / stopwatch 102
5.3.7. Dimfunctie 102
5.3.8. Carum Battery 102
6. Nuttige tips 103
6.1. Kolven mag nooit pijnlijk zijn. 103
6.2. Toeschietreflex bevorderen 103
6.3. Efficiënt afkolven 103
6.4. Melkvolume vergroten 103
7. Accessoires / reserveonderdelen 104
8. Foutmelding / statusweergave 104
8.1. Andere mogelijke fouten tijdens het kolven 104
9. Reiniging / controle / onderhoud 105
9.1. Reiniging / desinfectie 105
9.2. Controle voor het inschakelen 105
9.3. Onderhoud 105
9.3.1. Checklist ter controle voor verhuur 105
9.3.2. Checklist ter controle voor
ziekenhuisgebruik 105
10. Garantie 106
11. Technische informatie 106
11.1. Technische gegevens 106
11.2. Conformiteit 107
11.3. EMC-testprotocollen 107
12. Transport en opslag 107
13. Gebruiksduur en verwijdering 107

94
nl
1. Plaatsing van het product in de
container
a Carum borstkolf
b Aansluitopeningen voor kolfset
c Bedieningspaneel met LCD-display
d Aansluiting voor netsnoer
e Flessenhouder
f Easy Freeze-houder (vrieszak-houder)
g Netsnoer
h Carum container
i Adresveld
j Kolfset (niet bij de leveromvang inbegrepen)
k Gebruiksaanwijzing
g
b
f
ea
c
d
e
f
a
g
j
i
h
ardo carum
electric breastpump
Instructions for use | Gebrauchsanweisung | Mode d’emploi
Istruzioni per l’uso | Instrucciones de uso | Instruções de utilização
Gebruiksaanwijzing | Bruksanvisning | Käyttöohjeet | Instrukcja
użycia | Οδηγίες χρήσης | Kullanım kılavuzu | | 使用说明
k

95
nl
2. Beoogd gebruik
2.1. Indicaties
De Carum borstkolf is bestemd voor zogende vrouwen voor het kolven en verzamelen van hun melk.
Hij kan als enkel en als dubbelzijdig kolfapparaat gebruikt worden. Het apparaat is alleen bedoeld voor
gebruik binnenshuis en kan door meerdere personen gebruikt worden.
2.2. Contra-indicaties
De Carum mag niet worden gebruikt tijdens de zwangerschap, omdat afkolven weeën kan opwekken.
3. Veiligheidsinstructies
Belangrijke aanwijzingen voor de
veiligheid
Lees de gebruiksaanwijzing voor het
eerste gebruik aandachtig door. Bewaar de
gebruiksaanwijzing als naslagwerk voor later.
De Carum is een elektrische borstkolf voor gebruik in ziekenhuizen en voor verhuur. Neem voor
uw gezondheid, uw veiligheid en om beschadiging van het apparaat te voorkomen de volgende
veiligheidsvoorschriften in acht.
Veiligheidsvoorschriften
GEVAAR: Vermijden van een dodelijke elektrische schok
• Gebruik uitsluitend het originele netsnoer van Ardo.
• Gebruik nooit een defect netsnoer.
• Plaats een elektrisch apparaat nooit op zo'n manier dat het in een vloeistof kan vallen.
• Grijp nooit naar een elektrisch apparaat dat in een vloeistof gevallen of nat is. Trek de stekker van het
apparaat direct uit het stopcontact.
• Gebruik nooit een apparaat dat in een vloeistof gevallen of nat is, maar laat het apparaat door een
servicepunt of door de fabrikant controleren.
• Gebruik de Carum nooit tijdens het baden of douchen.
• Maak de Carum nooit open! Er bestaat gevaar voor een elektrische schok.

96
nl
WAARSCHUWING: Vermijden van schade, elektrische schokken, brand of letsel
• De Carum is niet bedoeld voor gebruik in de open lucht.
• Gebruik de Carum niet als hij niet goed werkt, gevallen of defect is.
• Let bij gebruik van een elektrisch apparaat met name goed op als er kinderen of zwakbegaafde
personen in de buurt zijn; elektrische apparaten zijn geen speelgoed.
• Verbind het netsnoer altijd eerst met de Carum en steek het dan pas in het stopcontact.
• Laat de Carum niet zonder toezicht op het elektriciteitsnet aangesloten.
• Scheid de Carum na gebruik van het elektriciteitsnet.
• Een scheiding van het elektriciteitsnet is alleen gegarandeerd als u de netstekker uit het stopcontact
trekt.
• Plaats de Carum zodanig dat het apparaat gemakkelijk van het elektriciteitsnet kan worden
gescheiden.
• Houd de Carum, het netsnoer en alle bijbehorende accessoires uit de buurt van hete oppervlakken.
• Gebruik de Carum alleen voor het in het hoofdstuk "Beoogd gebruik" genoemde gebruiksdoel.
• Gebruik uitsluitend originele Ardo kolfsets en originele Ardo onderdelen.
• Steek geen voorwerpen in openingen of slangen van de Carum en laat er geen voorwerpen in vallen.
• Gebruik de Carum niet in een omgeving waarin zuurstof wordt toegediend of sprays gebruikt
worden.
• Zonder toestemming van de fabrikant mogen er geen wijzigingen aan de Carum worden
aangebracht.
WAARSCHUWING: Vermijden van letsel of schade aan uw gezondheid
• Controleer de Carum en de bijbehorende onderdelen voor elk gebruik.
• Gebruik de Carum niet als u slaapt of slaperig bent.
• Mocht het afkolven onprettig of pijnlijk zijn, stop dan met kolven en vraag de verantwoordelijke
deskundige om advies.
• Gebruik de Carum niet als u zwanger bent; afkolven kan weeën opwekken.
• Voor de reiniging van het apparaat volgt u de instructies in het hoofdstuk "Reiniging / controle /
onderhoud".
Autoadapter
• De Carum en de Carum Battery zijn ook met de autoadapter niet bedoeld voor gebruik in de open
lucht.
• Gebruik uitsluitend de elektrisch afgeschermde originele autoaccukabel van Ardo.
• Controleer of uw auto over een 12 VDC-aansluiting beschikt.
• Kolf nooit tijdens het autorijden, ook niet als u passagier bent. Dit kan tot ongelukken leiden.
• Scheid het apparaat na gebruik / na het opladen van het boordnet.

97
nl
4. Productbeschrijving
• De elektrische borstkolf Carum is bedoeld voor gebruik in ziekenhuizen en voor verhuur.
• De Carum kan worden gebruikt voor enkel en dubbelzijdig kolven (afkolven van beide borsten
tegelijkertijd).
• De cycli (Cycles) en het vacuüm (Vacuum) kunnen individueel en onafhankelijk van elkaar worden
ingesteld.
• Het kleurendisplay biedt u een visuele oriëntatie en de geïntegreerde stopwatch informeert u over de
kolfduur.
• Om het natuurlijke zuiggedrag van uw baby na te bootsen, kan met de Carum in twee fasen worden
afgekolfd: de stimulatiemodus en de eigenlijke kolfmodus. De stimulatiemodus wekt de vloei van de
melk op en met de aansluitende kolfmodus kunt u efficiënt afkolven.
• De Carum begint met de stimulatiemodus en gaat na twee minuten vanzelf over op de kolfmodus.
Tijdens deze twee minuten kunt u desgewenst al eerder overschakelen op de kolfmodus door op de
modus-toets te drukken.
• Als u eventueel tijdens het kolven de vloei van de melk opnieuw wilt stimuleren, kunt u altijd weer
soepel terugkeren naar de stimulatiemodus door nogmaals op de modus-toets te drukken.
• Dankzij het "Sensitive Programme" is bij pijnlijke tepels zacht afkolven met minimaal startvacuüm en
minimale cyclus mogelijk.
• Ardo kolfsets bieden een 100 procent hygiënische barrière tussen moedermelk en borstkolf. Dankzij
dit gesloten systeem is gegarandeerd dat moedermelk niet in de slang van de kolfset en ook niet in de
borstkolf terecht kan komen.
• De Carum Battery is uitgerust met een oplaadbare accu.
• De Carum en Carum Battery kunnen via het elektriciteitsnet of met een optionele autokabel in de
auto gebruikt worden.
Carum Battery – de Carum met geïntegreerde, oplaadbare accu
Dankzij de Carum Battery bent u voor het afkolven niet aan een plaats gebonden en kunt u bijv. direct
aan het bedje van een zieke of te vroeg geboren baby kolven. De nabijheid van de baby ondersteunt de
toeschietreflex.
• De looptijd bij een volledig opgeladen accu bedraagt ca. vier uur (bij max. vacuüm en max. cyclus).
Voor het opladen van de lege accu is ongeveer twee uur nodig.
• Als de looptijd bij een volledig opgeladen accu tot onder een uur daalt, dan dient de accu door het
dichtstbijzijnde servicepunt of door de fabrikant te worden vervangen, om ervoor te zorgen dat het
apparaat weer optimaal functioneert.
• Is het apparaat op het elektriciteitsnet aangesloten, dan wordt de accu tijdens het afkolven
opgeladen. De laadtijd wordt hierdoor wel langer.
• Als de Carum via de autokabel met het boordnet van een voertuig is verbonden, dan wordt de
accu tijdens het kolven niet opgeladen. Na het uitschakelen van het apparaat wordt de accu via het
boordnet opgeladen.

98
nl
5. Ingebruikname / bediening
5.1. Legenda
Gebruiksaanwijzing opvolgen
Aan / uit-toets (stand-by-toets)
Vacuüm-toets (veranderen van het vacuüm)
Cyclus-toets (veranderen van de cyclus)
Modus-toets (wisselen tussen stimulatiemodus / kolfmodus / "Sensitive Programme")
Dimmer-toets
Toets tijdmeting
Kolfmodus
Stimulatiemodus
Apparaat met toegepast onderdeel van het type BF
012
3
Conformiteit volgens MDD 93 / 42 / EEG
Fabrikant
Het apparaat is onderworpen aan de eisen volgens de AEEA-Richtlijn
Voedingsapparaat
Wisselstroom
Apparaat van veiligheidsklasse II
IP21 Druipwaterbescherming
Li-Ion Bevat een lithium-ion-accu
Apparaat is recyclebaar

99
nl
5.2. Ingebruikname
5.2.1. Elektrische aansluiting
• Steek het netsnoer (a) in de stroomaansluiting van de Carum (b)
en vervolgens in een stopcontact.
5.2.2. Aansluiten van de kolfset (toegepast onderdeel)
Het gebruik van de kolfset staat beschreven in de aparte
bedieningshandleiding "Ardo kolfset".
• Kolven met enkele kolfset:
Steek de slangadapter (c) in een van de twee aansluitopeningen
van de borstkolf.
• Kolven met dubbelzijdige kolfset:
Steek de twee slangadapters (d) in de aansluitopeningen van
de borstkolf.
• De tweede opening (e) van de slangadapter moet altijd
afgesloten zijn, zowel bij enkel als bij dubbelzijdig kolven.
5.2.3. Ophangen van de flessenhouder
De flessenhouder (f) kan aan de achterzijde van de Carum worden
opgehangen of vrijstaand worden neergezet.
5.2.4. Ophangen van de Easy Freeze-houder
De Easy Freeze-houder (g) dient voor het ophangen van de kolfset
met vrieszak of moedermelkfles. Hij kan aan de achterzijde in plaats
van de flessenhouder worden opgehangen.
e
f
f
g
b
a
d
c

100
nl
5.3. Bediening
Vacuüm en cycli kunnen onafhankelijk van elkaar worden geregeld. Kies
de instelling die voor u het prettigst is.
a
b
c
d
e
f
g
h
i
j
k
l
m
n
Aan / uit-toets (stand-by-toets)
Vacuüm-toets (veranderen van het vacuüm)
Vacuüm-weergave
Dimmer-toets
Dimmer-informatie
Tijd-informatie
Stopwatch-informatie
Toets tijdmeting
Cyclus-weergave
Cyclus-toets (veranderen van de cyclus)
Modus-toets (wisselen tussen stimulatiemodus /
kolfmodus / "Sensitive Programme")
Kolfmodus
Stimulatiemodus
Informatieregel (n = e + f + g)
5.3.1. Inschakelen / Uitschakelen
De Carum wordt ingeschakeld door één keer op de aan / uit-toets te
drukken. Het display start met het Welcome-scherm. Om de Carum uit te
schakelen drukt u nogmaals op de aan / uit-toets.
00:00
Vacuum Cycles
CARUM
5.3.2. Stimulatiemodus – oranje achtergrond
Na het inschakelen start de Carum automatisch in de stimulatiemodus
(oranje achtergrond) met een snelle cyclus en een diep vacuüm. Deze
modus bevordert de toeschietreflex. Met deze automatische instelling
wordt het natuurlijke gedrag van de baby geïmiteerd. Baby's zuigen
aan het begin van een borstvoeding met snelle zuigbewegingen en een
geringe zuigsterkte en wekken daardoor het vloeien van de moedermelk
op.
De stimulatiemodus duurt twee minuten en gaat daarna automatisch
over op de kolfmodus.
Het vacuüm en de cycli kunnen verhoogd of verlaagd worden door de
toetsen meermaals in te drukken of ingedrukt te houden. De gekozen
instellingen worden weergegeven als balkjes. Pas vacuüm en / of cyclus
aan zoals u het prettig vindt.
00:00
Vacuum Cycles
CARUM
oranje
00:00
Vacuum Cycles
CARUM
a
b
d
e f g
cl
m
i
h
k
j
n

101
nl
5.3.3. Kolfmodus – groene achtergrond
In de kolfmodus (groene achtergrond) schakelt de Carum zachtjes over
op een hoger vacuüm en een lagere cyclus. Met deze automatische
omschakeling wordt het natuurlijke gedrag van de baby geïmiteerd,
want op het moment dat de moedermelk gaat vloeien, verandert ook het
zuiggedrag van de baby. De baby zuigt nu minder snel, maar wel met een
grotere zuigsterkte.
Het vacuüm en de cycli kunnen verhoogd of verlaagd worden door de
toetsen meermaals in te drukken of ingedrukt te houden. De gekozen
instellingen worden weergegeven als balkjes. Pas ook bij deze modus
vacuüm en / of cyclus aan zoals u het prettig vindt.
02:00
Vacuum Cycles
CARUM
groen
5.3.4. "Sensitive Programme"
Het "Sensitive Programme" (groene achtergrond) kolft met een
nauwelijks merkbaar vacuüm en cyclus en maakt bij pijnlijke tepels zacht
afkolven mogelijk.
Het vacuüm en de cyclus kunnen zachtjes verhoogd of verlaagd worden
door de toetsen meermaals in te drukken. De instellingen worden
weergegeven als balkjes.
"Sensitive Programme" instellen:
1. Druk op de aan / uit-toets
2. Druk terwijl het Welcome-scherm wordt getoond op de modus-toets.
00:00
Vacuum Cycles
CARUM
00:00
Vacuum Cycles
CARUM
5.3.5. Toeschietreflex opnieuw opwekken
In de kolfmodus (groene achtergrond) kunt u altijd weer terugkeren
naar de stimulatiemodus (oranje achtergrond) door opnieuw op de
modus-toets te drukken. Daardoor wordt de vloei van de melk opnieuw
opgewekt.
De modus-toets kan ook worden gebruikt om tijdens de twee minuten
stimulatiemodus voortijdig over te schakelen op de kolfmodus.
00:00
Vacuum Cycles
CARUM

102
nl
5.3.6. Tijdmeting / stopwatch
De tijdmeting start met het inschakelen van de Carum en wordt
weergegeven in de informatieregel.
• Door eenmaal op de tijd-toets te drukken wordt de tijdmeting
gestopt.
• Bij de tweede keer indrukken van de tijd-toets wordt de klok op
00:00 gezet.
• Door nogmaals op de tijd-toets te drukken start de tijdmeting weer.
De tijdmeting wordt bij een moduswissel steeds overgenomen, maar
wordt weer op 00:00 gezet zodra de Carum wordt uitgeschakeld.
5.3.7. Dimfunctie
De verlichting van het display kan worden gedimd door eenmaal op
de dimmer-toets te drukken; tegelijkertijd wordt in de informatieregel
het lampsymbool gedimd weergegeven. Door nogmaals op de toets te
drukken wordt het dimmen weer opgeheven.
02:00
Vacuum Cycles
CARUM
5.3.8. Carum Battery
De Carum Battery met ingebouwde accu is op de frontfolie gekenmerkt
met "BATTERY".
De accustatus wordt in de informatieregel weergegeven als
batterijsymbool. Tijdens het opladen bewegen de balkjes van links naar
rechts, tot de accu helemaal is opgeladen.
10:00
Vacuum Cycles
CARUM
BATTERY
02:00
Vacuum Cycles
CARUM

103
nl
6. Nuttige tips
6.1. Kolven mag nooit pijnlijk zijn.
• Controleer of de grootte van de borstschelp bij uw tepels past (zie gebruiksaanwijzing kolfset).
• Let erop dat de tepel in het midden van de borstschelp zit.
• Als er geen melk vloeit, kan een borstmassage tijdens het kolven helpen.
• Gebruik bij pijnlijke tepels of een pijnlijke borst bij voorkeur het "Sensitive Programme" zonder
voorafgaande stimulatie. Bij het "Sensitive Programme" begint het afkolven met een heel mild en
laag vacuüm.
6.2. Toeschietreflex bevorderen
Omdat de toeschietreflex tijdens het kolven later kan optreden dan bij natuurlijk zogen, kunnen de
volgende punten nuttig zijn:
• Masseer de borst voor het afkolven zachtjes.
• Drink iets warms.
• Denk aan uw baby en ontspant u zich.
• Kijk naar een foto van uw baby.
• Leg voordat u gaat kolven bijvoorbeeld een warm "Ardo Temperature Pack" of een vochtig-warm
kompres op uw borst.
• Warm de borstschelp voor gebruik bijv. onder warm water op.
6.3. Efficiënt afkolven
• Door tijdens het afkolven de borst te masseren kan er meer melk gewonnen en de vloei van de melk
verbeterd worden.
• Kies een comfortabel vacuüm dat u prettig vindt.
6.4. Melkvolume vergroten
• Kolf beide borsten tegelijkertijd (dubbelzijdig kolven).
• Kolf de eerste tien minuten dubbelzijdig af, of tot er geen melk meer vloeit. Ga daarna over op enkel
kolven en kolf per borst vijf minuten af. Met uw nu vrije hand masseert u daarbij zachtjes de borst die
u aan het afkolven bent.

104
nl
7. Accessoires / reserveonderdelen
Artikel Artikelnummer
Netsnoer Euro 63.00.130
Netsnoer UK 63.00.131
Netsnoer US 63.00.132
Mobiel onderstel, optioneel 63.00.129
Flessenhouder 63.00.127
Easy Freeze-houder 63.00.128
Diverse kolfsets en andere accessoires
en reserveonderdelen
www.ardomedical.com
8. Foutmelding / statusweergave
Error
Een fout in de Carum en Carum Battery wordt op het display weergegeven met
nevenstaand symbool. Schakel het apparaat uit en daarna weer in. Blijft de fout bestaan,
laat het apparaat dan door een servicepunt of door de fabrikant controleren.
Bij de Carum Battery wordt een lege accu op het display met nevenstaand symbool
weergegeven. Als dit symbool op het display verschijnt, wordt de Carum Battery na ca.
5 seconden automatisch uitgeschakeld. Sluit het netsnoer aan op het apparaat en verbind
het met het elektriciteitsnet om de accu op te laden.
8.1. Andere mogelijke fouten tijdens het kolven
Geen vacuüm of een te zwak vacuüm
Controleer of
• u een originele Ardo kolfset gebruikt. (Kolf altijd met een Ardo kolfset.)
• de tweede opening op de slangadapter gesloten is.
• de slangadapter stevig in de aansluitopening van de borstkolf is gestoken.
• de kolfset correct in elkaar gezet en niet beschadigd is. (Zie gebruiksaanwijzing kolfset.)
Carum werkt niet / display blijft donker
Controleer of
• het netsnoer en de stekkers eraan optisch in orde en niet defect zijn. Gebruik nooit een defect snoer
of een snoer met defecte stekkers!
• het netsnoer goed in de Carum en in het stopcontact is gestoken.
• de Carum wel op een ander stopcontact werkt.
• een ander apparaat wel op hetzelfde stopcontact werkt.
Als de Carum inderdaad defect blijkt te zijn, laat het apparaat dan door een servicepunt of door de
fabrikant controleren.

105
nl
9. Reiniging / controle / onderhoud
Als u zich niet aan de reinigingsvoorschriften en controles houdt, bestaat er gevaar voor een infectie of
een defect aan de Carum.
9.1. Reiniging / desinfectie
• Scheid de Carum voordat u hem gaat reinigen altijd van het elektriciteitsnet!
• De Carum is niet waterdicht, dompel hem daarom nooit in vloeistoffen! Reinig de Carum nooit in de
vaatwasser, in de gootsteen of onder stromend water.
• Let erop dat er geen reinigingsvloeistof de aansluitopeningen voor de kolfset en de elektrische
aansluitingen binnendringt.
Reiniging thuis
• Neem indien nodig het oppervlak van de Carum af met een vochtige doek. Als het nodig is mag
u daarbij een beetje gewoon afwasmiddel gebruiken, maar geen schurende middelen.
• De kolfset reinigt u volgens de instructie in de desbetreffende gebruiksaanwijzing.
Reiniging in het ziekenhuis
• Carum: Veegdesinfectie van de oppervlakken met een niet-fenolhoudend desinfectiemiddel.
Geen schurende middelen gebruiken.
• Mobiel onderstel voor Carum: Veegdesinfectie van de oppervlakken met een niet-fenolhoudend
desinfectiemiddel. Geen schurende middelen gebruiken.
• De kolfset reinigt u volgens de instructie in de desbetreffende gebruiksaanwijzing.
9.2. Controle voor het inschakelen
• De behuizing en het display zijn intact.
• Het netsnoer en de stekkers zijn niet beschadigd.
• De kolfset is gereinigd, niet defect en correct in elkaar gezet.
• De kolfset is correct op de aansluitopening van de Carum aangesloten.
• Eventuele accessoires zijn gereinigd, niet defect en correct in elkaar gezet.
• Mobiel onderstel (optioneel): Controle of de schroeven goed zijn aangedraaid.
9.3. Onderhoud
De Carum heeft in principe geen onderhoud nodig. Om een foutloze werking te garanderen, adviseren
wij echter de volgende controles:
9.3.1. Checklist ter controle voor verhuur
Visuele controle of de borstkolf schoon is Na elke verhuur
Visuele controle of de borstkolf compleet is Na elke verhuur
Visuele controle van de borstkolf op beschadigingen Na elke verhuur
Eenvoudige functiecontrole van de borstkolf
(loopt de pomp, is de accu opgeladen)
Na elke verhuur
Vacuümcontrole door geschoold servicepersoneel Ten minste om de 2 jaar
9.3.2. Checklist ter controle voor ziekenhuisgebruik
Visuele controle of de borstkolf schoon en onbeschadigd is Voor & na ieder gebruik
Vacuümcontrole door geschoold servicepersoneel Ten minste om de 2 jaar

106
nl
10. Garantie
De garantietermijn van de Carum borstkolf bedraagt 3 jaar vanaf verkoopdatum; de kwitantie met datum
geldt als garantiebewijs.
De garantietermijn van de lithium-ion-accu voor de Carum Battery bedraagt 1 jaar vanaf verkoopdatum;
de kwitantie met datum geldt als garantiebewijs.
Algemene garantievoorwaarden
Ardo medical AG garandeert dat de door haar vervaardigde producten vrij zijn van materiaal- en
fabricagefouten. Bij gebruik conform de bestemming wordt materiaal dat gebreken vertoont tijdens
de garantietermijn kosteloos vervangen. Voor het behoud van uw garantieaanspraken en een foutloze
werking van het apparaat dient u de gebruiksaanwijzing op te volgen en uitsluitend accessoires van
Ardo medical AG te gebruiken. De garantie komt te vervallen als er ingrepen in of aan het apparaat zijn
gedaan.
11. Technische informatie
11.1. Technische gegevens
Afmetingen borstkolf LxBxH 302 × 240 × 180 mm
Borstkolf gewicht 3.0 kg
Borstkolf gewicht met accu 3.7 kg
Netsnoer lengte 3 m
Netspanning / netfrequentie 100–240 VAC ±10 % / 50/60 Hz
Opgenomen vermogen 135 VA
Netzekering ingang P / N T 2.5 A / 250 VAC
Aansluiting voor autokabel 12 VDC
Bedrijfscondities
5–40 °C (41–104 °F)
10–93 % RH niet condenserend
700–1060 hPa
Mate van bescherming (kolfset is toegepast
onderdeel) BF
Veiligheidsklasse Klasse II
Classificering volgens MDD 93/42/EEG Klasse IIa
Afmetingen mobiel onderstel LxBxH 425 x 425 x 720 mm
Onderrijhoogte 105 mm
Roldiameter 75 mm
Mobiel onderstel gewicht 7.0 kg

107
nl
Vacuüm (± 5 % 1))Cyclus (± 3)
Stimulatiemodus
Startwaarde 60 mbar | 6 kPa | 45 mmHg 90 / min
Instelwaarden 30–150 mbar | 3–15 kPa | 22–113 mmHg 72–120 / min
Kolfmodus
Startwaarde * 45 / min
Instelwaarden 30–330 mbar | 3–33 kPa | 22–248 mmHg 30–60 / min
"Sensitive Programme"
Startwaarde 30 mbar | 3 kPa | 22 mmHg 30 / min
Instelwaarden 30–330 mbar | 3–33 kPa | 22–248 mmHg 30–60 / min
* De kolfmodus neemt de laatste door de gebruikster in de stimulatiemodus gekozen instelwaarde over en verhoogt dit vacuüm met
30 mbar / 3 kPa / 22 mmHg
1) De vacuümwaarden zijn afhankelijk van de actuele atmosferische druk.
11.2. Conformiteit 11.3. EMC-testprotocollen
Volgens Richtlijn MDD 93/42/EEG, EN 60601-1, EN 60601-1-2,
EN ISO 10079-1, EN 60601-1-6, EN 60601-1-11, 2011/65/EU (RoHS)
MEDICAL – GENERAL MEDICAL EQUIPMENT
AS TO ELECTRICAL SHOCK, FIRE AND
MECHANICAL HAZARDS ONLY
IN ACCORDANCE WITH
ANSI/AAMI ES60601-1 (2005, C1:09, A2:10),
CAN/CSA C22.2 No.60601.1 (2008, R:2011)
E358823
Zie pagina 213
12. Transport en opslag
Voor transport en opslag van de Carum en de Carum Battery moet de originele verpakking worden
gebruikt. Wij adviseren het apparaat beschermd tegen UV-licht (bijv. zonlicht, halogeenlampen), warmte
en stof op te slaan.
Carum Battery: Informeer voor de transportvoorschriften tijdens het vliegen bij de desbetreffende
luchtvaartmaatschappij.
Temperatuur –20 °C tot +70 °C (–4 °F tot 158 °F)
Relatieve luchtvochtigheid 10–93 % niet condenserend
Luchtdruk 700–1060 hPa
13. Gebruiksduur en verwijdering
De gebruiksduur van het apparaat bij gebruik conform de bestemming bedraagt 10 jaar, zonder
slijtageonderdelen. Dit apparaat bevat elektronische componenten en een oplaadbare lithium-ion-accu.
Aan het eind van de gebruiksduur van het apparaat moeten het apparaat en de bijbehorende accessoires
volgens de geldende plaatselijke voorschriften verwijderd worden.
Verbruikte accu's niet bij het huisvuil gooien, maar teruggeven aan het verkooppunt
of volgens de geldende plaatselijke voorschriften verwijderen.
Het apparaat is onderworpen aan de eisen volgens de AEEA-Richtlijn.
0123

108
sv
INNEHÅLL
CARUM BRÖSTPUMP FÖR SJUKHUS OCH UTHYRNING
Tack för att du har valt en Carum bröstpump från Ardo.
I den här bruksanvisningen hittar du viktig och användbar information för användning av Carum.
Vid användning av elektriska enheter måste säkerhetsföreskrifterna ovillkorligen beaktas. Ta dig tid att
göra detta. Läs igenom bruksanvisningen noggrant innan du använder Carum bröstpump för första
gången.
Carum är en vakuumpump med ett dubbelt kolvsystem. Med hjälp av kontrollerna kan alla mammor
anpassa inställningarna av vakuum och cykel individuellt. Vakuumet förblir stabilt när användaren ändrar
cykelinställningarna. På samma sätt förbli cykeln stabil när användaren ändrar vakuuminställningarna.
Användaren måste kunna läsa och förstå denna bruksanvisning.
1. Produktplacering i behållaren 109
2. Användning 110
2.1. Indikationer 110
2.2. Kontraindikationer 110
3. Säkerhetsinformation 110
4. Produktbeskrivning 112
5. Uppstart / användning 113
5.1. Symboler 113
5.2. Uppstart 114
5.2.1. Elektrisk anslutning 114
5.2.2. Anslutning av pumpsetet
(användningsdel) 114
5.2.3. Montera flaskhållaren 114
5.2.4. Montera Easy Freeze-hållaren 114
5.3. Användning 115
5.3.1. Slå på / stänga av 115
5.3.2. Stimuleringsmod – orange bakgrund 115
5.3.3. Utpumpningsmod – grön bakgrund 116
5.3.4. "Sensitive Programme" 116
5.3.5. Utlösa utdrivningsreflexen igen 116
5.3.6. Tidmätning / stoppur 117
5.3.7. Dimmerfunktion 117
5.3.8. Carum Battery 117
6. Användbara tips 118
6.1. Det får aldrig vara smärtsamt att pumpa ut mjölk.
118
6.2. Stimulera utdrivningsreflexen 118
6.3. Pumpa ut effektivt 118
6.4. Öka mjölkmängden 118
7. Tillbehör / reservdelar 119
8. Felindikator / statusindikator 119
8.1. Ytterligare eventuella fel vid utpumpning 119
9. Rengöring / kontroll / underhåll 120
9.1. Rengöring / desinfektion 120
9.2. Kontrollera innan du slår på enheten 120
9.3. Underhåll 120
9.3.1. Checklista för kontroll för uthyrning 120
9.3.2. Checklista för kontroll för sjukhusbruk 120
10. Garanti 121
11. Teknisk information 121
11.1. Tekniska data 121
11.2. Överensstämmelse 122
11.3. Testprotokoll elektromagnetisk
kompatibilitet 122
12. Transport och förvaring 122
13. Användningstid och kassering 122

109
sv
1. Produktplacering i behållaren
a Carum bröstpump
b Anslutningsöppning för pumpset
c Kontrollpanel med LCD-display
d Anslutning för nätkabel
e Flaskhållare
f Easy Freeze-hållare (hållare för fryspåse)
g Nätkabel
h Carum-behållare
i Adressfält
j Pumpset (medföljer inte leveransen)
k Bruksanvisning
g
b
f
ea
c
d
e
f
a
g
j
i
h
ardo carum
electric breastpump
Instructions for use | Gebrauchsanweisung | Mode d’emploi
Istruzioni per l’uso | Instrucciones de uso | Instruções de utilização
Gebruiksaanwijzing | Bruksanvisning | Käyttöohjeet | Instrukcja
użycia | Οδηγίες χρήσης | Kullanım kılavuzu | | 使用说明
k

110
sv
2. Användning
2.1. Indikationer
Carum bröstpump är avsedd att användas av ammande kvinnor för att pumpa ut och samla upp
bröstmjölk. Den kan användas som enkel- och dubbelpump. Enheten är endast avsedd för användning
inomhus och av flera användare.
2.2. Kontraindikationer
Carum får inte användas under graviditet eftersom utpumpning kan utlösa värkar.
3. Säkerhetsinformation
Viktig information om säkerheten
Läs igenom bruksanvisningen noggrant före den
första användningen. Spara bruksanvisningen för
senare referens.
Carum är en elektrisk bröstpump för användning på sjukhus och för uthyrning. För din hälsa och säkerhet
och för att förhindra skador på enheten, ska du beakta följande säkerhetsregler.
Säkerhetsregler
FARA: Förhindra en dödlig elektrisk stöt
• Använd bara Ardo nätkabel i original.
• Använd aldrig en skadad nätkabel.
• Placera aldrig en elektrisk enhet så att den kan falla ned i vätska.
• Ta aldrig upp en elektrisk enhet som har fallit ned i vätska eller som är våt. Koppla omedelbart bort
enheten från eluttaget.
• Använd aldrig en enhet som har fallit ned i vätska eller som är våt, utan lämna in den på ett
serviceställe eller hos tillverkaren för kontroll.
• Använd aldrig Carum när du badar eller duschar.
• Öppna aldrig Carum! Det finns en risk för en elektrisk stöt.

111
sv
VARNING: Förhindra skador, elektrisk stöt eller brand
• Carum är inte avsedd att användas utomhus.
• Använd inte Carum om den inte fungerar på rätt sätt, har fallit eller är trasig.
• Vid användning av en elektrisk enhet ska du vara extra uppmärksam i närheten av barn eller personer
med utvecklingsstörning; elektriska enheter är inte leksaker.
• Börja med att ansluta nätkabeln till Carum och därefter till eluttaget.
• Låt inte Carum vara ansluten till elnätet utan uppsikt.
• Koppla bort Carum från elnätet efter användning.
• Det går bara att garantera att enheten kopplats bort från elnätet om nätkontakten dragits ut ur
eluttaget.
• Placera Carum så att den är enkel att koppla bort från elnätet.
• Håll Carum samt nätkabeln och alla tillbehör borta från varma områden.
• Använd bara Carum för de syften som anges i kapitlet "Användning".
• Använd bara Ardo pumpset i original och Ardo originaldelar.
• Placera inga föremål i Carums öppningar eller slangar och låt inga föremål falla ned på Carum.
• Använd inte Carum i ett område där syre administreras eller spray används.
• Carum får inte modifieras utan tillstånd av användaren.
VARNING: Förhindra skador på hälsan
• Kontrollera Carum och tillbehören före varje användning.
• Använd aldrig Carum när du sover eller är sömnig.
• Om utpumpningen är obehaglig eller smärtsam, avsluta utpumpningen och kontakta vårdpersonal för
råd.
• Använd aldrig Carum när du är gravid; utpumpning kan utlösa värkar.
• Följ anvisningarna i kapitlet "Rengöring / kontroll / underhåll" för rengöring.
Biladapter
• Carum och Carum Battery är inte avsedda att användas utomhus med biladaptern.
• Använd bara den elektriskt säkrade bilbatterikabeln i original från Ardo.
• Kontrollera att din bil har en 12 VDC-anslutning.
• Pumpa inte ut under bilkörning, inte heller som medpassagerare. Detta kan leda till en olycka.
• Koppla bort enheten efter användning respektive laddning från elsystemet.

112
sv
4. Produktbeskrivning
• Den elektriska bröstpumpen Carum är avsedd för användning på sjukhus och för uthyrning.
• Carum kan användas för enkelpumpning och dubbelpumpning (pumpning av båda brösten
samtidigt).
• Cyklerna (cykler) och vakuumet (vakuum) kan ställas in individuellt och oberoende av varandra.
• Färgdisplayen ger visuell information och det integrerade stoppuret informerar om utpumpningens
varaktighet.
• För att efterlikna barnets naturliga sugbeteende kan Carum pumpa ut med två mod: stimuleringsmod
och utpumpningsmod. Stimuleringsmod stimulerar mjölkflödet och efterföljande utpumpningsmod
möjliggör en effektiv utpumpning.
• Carum börjar med stimuleringsmod och byter efter två minuter automatiskt till utpumpningsmod.
Under dessa två minuter kan du vid behov tidigare byta till utpumpningsmod genom att trycka på
mod-knappen.
• Om du under utpumpningen vill stimulera mjölkflödet igen kan du alltid varsamt byta tillbaka till
stimuleringsmod genom att trycka på mod-knappen.
• Med "Sensitive Programme" kan du vid ömma bröstvårtor pumpa ut varsamt med minimalt
startvakuum och minimal cykel.
• Ardo pumpset har en hyigenbarriär mellan bröstmjölk och bröstpump som är 100 % säker.
Genom detta slutna systemet säkerställs att bröstmjölken kan nå antingen pumpsetets slang eller
bröstpumpen.
• Carum Battery är utrustat med ett uppladdningsbart batteri.
• Carum och Carum Battery kan användas med elnätet eller med tillvalet bilkabeln i bilen.
Carum Battery – Carum med integrerat uppladdningsbart batteri
Carum Battery gör det möjligt att pumpa ut oberoende av plats, t.ex. direkt vid sängen hos ett sjukt eller
för tidigt fött barn. Närheten till barnet stimulerar utdrivningsreflexen.
• Drifttiden för ett fulladdat uppladdningsbart batteri är cirka fyra timmar (vid max. vakuum och max
cykel). Det tar cirka två timmar att ladda upp ett tomt uppladdningsbart batteri.
• Om drifttiden hos ett fulladdat uppladdningsbart batteri faller till under en timme ska det
uppladdningsbara batteriet bytas ut på närmaste serviceställe eller av tillverkaren för att säkerställa
optimal drift.
• Om enheten är ansluten till elnätet laddas det uppladdningsbara batteriet under utpumpningen.
Laddningstiden ökar härmed.
• Om Carum är ansluten via bilkabeln till elsystemet på ett fordon laddas det uppladdningsbara
batteriet inte under utpumpningen. När enheten stängs av laddas det uppladdningsbara batteriet via
elsystemet.

113
sv
5. Uppstart / användning
5.1. Symboler
Se bruksanvisningen
Av / på-knapp (stand-by-knapp)
Vakuum-knapp (ändra vakuum)
Cykel-knapp (ändra cykel)
Mod-knapp (växla mellan stimulerings- / utpumpningsmod / "Sensitive Programme")
Dimmer-knapp
Knapp för tidmätning
Utpumpningsmod
Stimuleringsmod
Enhet med användningsdel BF
012
3
Överensstämmelse med MDD 93 / 42 / EEG
Tillverkare
Enheten är föremål för kraven i WEEE-direktivet
Nätenhet
Växelström
Enhet i skyddsklass II
IP21 Droppvattenskydd
Li-Ion Innehåller ett uppladdningsbart batteri av litiumjon
Enheten kan återvinnas

114
sv
5.2. Uppstart
5.2.1. Elektrisk anslutning
• Anslut nätkabeln (a) i Carums elanslutning (b) och anslut till
eluttaget.
5.2.2. Anslutning av pumpsetet (användningsdel)
Användning av pumpsetet beskrivs i den separata bruksanvisningen
"Ardo pumpset".
• Pumpa med enkelpumpset:
Anslut slangadaptern (c) i ett av pumpens två
anslutningsöppningar.
• Pumpa med dubbelpumpset:
Anslut slangadaptern (d) i pumpens anslutningsöppningar.
• Den andra öppningen (e) på slangadaptern måste alltid vara
stängd, både vid enkel- och dubbelpumpning.
5.2.3. Montera flaskhållaren
Flaskhållaren (f) kan monteras på baksidan av Carum eller placeras
fristående.
5.2.4. Montera Easy Freeze-hållaren
Easy Freeze-hållaren (g) är avsedd att monteras på pumpsetet med
fryspåse eller bröstmjölkflaska. Den kan monteras på baksidan
istället för flaskhållaren.
e
f
f
g
b
a
d
c

115
sv
5.3. Användning
Vakuum och cykler kan regleras oberoende av varandra. Välj den
inställning som är bekvämast för dig.
a
b
c
d
e
f
g
h
i
j
k
l
m
n
Av / på-knapp (stand-by-knapp)
Vakuum-knapp (ändra vakuum)
Vakuum-indikator
Dimmer-knapp
Dimmer-information
Tidsinformation
Information om stoppur
Knapp för tidmätning
Cykel-indikator
Cykel-knapp (ändra cykel)
Mod-knapp (växla mellan stimulerings- /
utpumpningsmod / "Sensitive Programme")
Utpumpningsmod
Stimuleringsmod
Informationsrad (n = e + f + g)
5.3.1. Slå på / stänga av
Slå på Carum genom att trycka en gång på av / på-knappen.
Välkomstsidan visas på displayen. Stäng av Carum genom att trycka
på av / på-knappen igen.
00:00
Vacuum Cycles
CARUM
5.3.2. Stimuleringsmod – orange bakgrund
När du har slagit på Carum startar den automatiskt i stimuleringsmod
(orange bakgrund) med en snabb cykel och ett djupt vakuum. Detta mod
stimulerar utdrivningsreflexen. Den automatiska inställningen imiterar
barnets naturliga beteende. Barn suger i början av amningen med snabba
sugrörelser och mindre sugstyrka och utlöser därmed utdrivningen av
bröstmjölk.
Stimuleringsmod pågår två minuter och därefter byter enheten
automatiskt till utpumpningsmod.
Du kan öka eller minska vakuum och cykler genom att trycka flera gånger
på knapparna eller hålla ned knapparna. De valda inställningarna visas
som staplar. Anpassa vakuum och / eller cykel efter ditt välbefinnande.
00:00
Vacuum Cycles
CARUM
orange
00:00
Vacuum Cycles
CARUM
a
b
d
e f g
cl
m
i
h
k
j
n

116
sv
5.3.3. Utpumpningsmod – grön bakgrund
I utpumpningsmod (grön bakgrund) byter Carum varsamt till ett högre
vakuum och en djupare cykel. Detta automatiska byte imiterar barnets
naturliga beteende eftersom det växlar sitt sugbeteende när bröstmjölken
rinner till. Barnet suger nu mindre fort och med en högre sugstyrka.
Du kan öka eller minska vakuum och cykler genom att trycka flera gånger
på knapparna eller hålla ned knapparna. De valda inställningarna visas
som staplar. Anpassa även i detta mod vakuum och / eller cykel efter ditt
välbefinnande.
02:00
Vacuum Cycles
CARUM
grön
5.3.4. "Sensitive Programme"
"Sensitive Programme" (grön bakgrund) pumpar med ett knappt
märkbart vakuum och cykel och möjliggör varsam utpumpning vid ömma
bröstvårtor.
Du kan öka eller minska vakuum och cykel varsamt genom att trycka flera
gånger. Inställningarna visas som staplar.
Ställa in "Sensitive Programme":
1. Tryck på av / på-knappen
2. Tryck på mod-knappen när välkomstsidan visas.
00:00
Vacuum Cycles
CARUM
00:00
Vacuum Cycles
CARUM
5.3.5. Utlösa utdrivningsreflexen igen
I utpumpningsmod (grön bakgrund) kan du alltid byta tillbaka till
stimuleringsmod (orange bakgrund) genom att trycka på mod-knappen
igen. Detta stimulerar mjölkflödet igen.
Du kan också använda mod-knappen under stimuleringsmod
(två minuter) om du vill byta tidigare till utpumpningsmod.
00:00
Vacuum Cycles
CARUM

117
sv
5.3.6. Tidmätning / stoppur
Tidmätningen startar när du slår på Carum och visas på
informationsraden.
• Tryck en gång på tid-knappen för att stoppa tidmätningen.
• Tryck två gånger på tid-knappen för att ställa in klockan på 00:00.
• Om du trycker upprepade gånger på tid-knappen startar
tidmätningen igen.
Tidmätningen fortsätter alltid vid byte av mod och vid avstängning ställer
Carum på nytt in tiden till 00:00.
5.3.7. Dimmerfunktion
Du kan minska belysningen på displayen genom att trycka en gång på
dimmer-knappen; samtidigt dimmas lampsymbolen på informationsraden.
Om du trycker på dimmer-knappen igen upphävs dimningen. 02:00
Vacuum Cycles
CARUM
5.3.8. Carum Battery
Carum Battery med inbyggt uppladdningsbart batteri visas på framsidan
med beteckningen "BATTERY".
Det uppladdningsbara batteriets status visas som batterisymbol på
informationsraden. Vid uppladdning rör sig stapeln från vänster till höger
tills det uppladdningsbara batteriet är fulladdat.
10:00
Vacuum Cycles
CARUM
BATTERY
02:00
Vacuum Cycles
CARUM

118
sv
6. Användbara tips
6.1. Det får aldrig vara smärtsamt att pumpa ut mjölk.
• Kontrollera att storleken på brösttratten passar dina bröstvårtor (se bruksanvisningen till pumpsetet).
• Kontrollera att bröstvårtan är mitt i brösttratten.
• Om mjölken inte rinner till kan det hjälpa att massera bröstet under utpumpningen.
• Vid ömma bröstvårtor eller onda bröst bör du helst använda "Sensitive Programme" utan föregående
stimulering. "Sensitive Programme" börjar utpumpningen med ett mycket varsamt och lågt vakuum.
6.2. Stimulera utdrivningsreflexen
Eftersom utdrivningsreflexen kan uppkomma senare vid utpumpning än vid naturlig amning kan följande
punkter vara till hjälp:
• Massera bröstet varsamt före utpumpning.
• Drick en varm dryck.
• Tänk på ditt barn och slappna av.
• Titta på ett foto av ditt barn.
• Lägg t.ex. en varm "Ardo Temperature Pack" eller en varm och fuktig kompress på bröstet före
utpumpningen.
• Värm brösttratten under t.ex. varmt vatten före användning.
6.3. Pumpa ut effektivt
• Om du masserar bröstet under utpumpningen kan det öka mjölkproduktionen och förbättra
mjölkflödet.
• Välj ett bekvämt vakuum, som motsvarar ditt välbefinnande.
6.4. Öka mjölkmängden
• Pumpa båda brösten samtidigt (dubbelpumpning).
• Pumpa ut dubbelt så mycket under de första tio minuterna, eller tills mer mjölk rinner till. Byt därefter
till enkelpumpning och pumpa varje bröst under fem minuter. Med den fria handen masserar du
varsamt det bröst som du pumpar ut ifrån.

119
sv
7. Tillbehör / reservdelar
Artikel Artikelnummer
Nätkabel Europa 63.00.130
Nätkabel Storbritannien 63.00.131
Nätkabel USA 63.00.132
Rullställ, tillval 63.00.129
Flaskhållare 63.00.127
Easy Freeze-hållare 63.00.128
Diverse pumpset och ytterligare tillbehör
samt reservdelar
www.ardomedical.com
8. Felindikator / statusindikator
Error
Ett fel på Carum och Carum Battery visas på displayen med symbolen bredvid. Stäng av
och slå därefter på enheten. Om felet kvarstår, lämna in enheten på ett serviceställe eller till
tillverkaren för kontroll.
Ett fel på Carum Battery visas på displayen med symbolen bredvid, ett tomt
uppladdningsbart batteri. Om denna symbol visas på displayen stängs Carum Battery av
automatiskt efter cirka 5 sekunder. Anslut nätkabeln till enheten och anslut den till elnätet
för att ladda det uppladdningsbara batteriet.
8.1. Ytterligare eventuella fel vid utpumpning
Inget vakuum eller svagt vakuum
Kontrollera att
• du använder ett Ardo pumpset i original. (Pumpa alltid ut med ett Ardo pumpset.)
• den andra öppningen på slangadaptern är stängd.
• slangadaptern är ansluten till pumpens anslutningsöppning.
• pumpsetet är korrekt monterat och att det inte är skadat. (Se bruksanvisningen till pumpsetet)
Carum fungerar inte / displayen är mörk
Kontrollera att
• nätkabeln och dess uttag är korrekt och hela (visuellt). Använd inte en trasig kabel eller en kabel med
trasig kontakt!
• nätkabeln är korrekt ansluten till Carum och eluttaget.
• Carum också fungerar i ett annat uttag.
• en annan enhet fungerar i samma uttag.
Om du bekräftar ett fel på Carum, lämna in enheten till ett serviceställe eller tillverkaren för kontroll.

120
sv
9. Rengöring / kontroll / underhåll
Om du inte beaktar rengöringsföreskrifterna och kontrollerna finns risk för en infektion eller ett fel på
Carum.
9.1. Rengöring / desinfektion
• Koppla alltid bort Carum från elnätet före rengöring!
• Carum är inte vattentät och får aldrig läggas i vätskor! Rengör aldrig Carum i diskmaskinen, diskon
eller under rinnande vatten.
• Kontrollera att ingen rengöringsvätska tränger in i anslutningsöppningarna på pumpsetet och i de
elektriska anslutningarna.
Rengöring hemma
• Torka vid behov av ytan på Carum med en fuktig duk. Vid behov kan du använda ett vanligt
rengöringsmedel, dock inte slipande medel.
• Rengör pumpsetet enligt anvisningarna i bruksanvisningen.
Rengöring på sjukhus
• Carum: Desinficera ytan genom att torka av den med ett desinfektionsmedel som inte innehåller
fenol. Använd inte slipande medel.
• Rullställ till Carum: Desinficera ytan genom att torka av den med ett desinfektionsmedel som inte
innehåller fenol. Använd inte slipande medel.
• Rengör pumpsetet enligt anvisningarna i bruksanvisningen.
9.2. Kontrollera innan du slår på enheten
• Att höljet och displayen är hela.
• Att nätkabeln och kontakterna inte är skadade.
• Att pumpsetet är rengjort, helt och korrekt monterat.
• Att pumpsetet är korrekt anslutet till anslutningsöppningarna på Carum.
• Att eventuella tillbehör är rengjorda, hela och korrekt monterade.
• Rullställ (tillval): Kontrollera att skruvarna är åtdragna.
9.3. Underhåll
Carum är i princip underhållsfri. Vi rekommenderar dock följande kontroller för att säkerställa en felfri
funktion:
9.3.1. Checklista för kontroll för uthyrning
Visuell kontroll att pumpen är ren Efter varje uthyrning
Visuell kontroll att pumpen är komplett Efter varje uthyrning
Visuell kontroll av pumpen för skador Efter varje uthyrning
Enkel funktionskontroll av pumpen
(går pumpen, är det uppladdningsbara batteriet laddat)
Efter varje uthyrning
Vakuumkontroll av utbildad servicepersonal Minst vartannat år
9.3.2. Checklista för kontroll för sjukhusbruk
Visuell kontroll att pumpen är ren och utan skador Före och efter varje
användning
Vakuumkontroll av utbildad servicepersonal Minst vartannat år

121
sv
10. Garanti
Garantitiden för Carum bröstpump är 3 år från inköpsdatum; kvittot med inköpsdatum gäller som
garantibevis.
Garantitiden för det uppladdningsbara batteriet av litiumjon är 1 år från inköpsdatum; kvittot med
inköpsdatum gäller som garantibevis.
Allmänna garantivillkor
Ardo medical AG garanterar att den av oss tillverkade produkten är fri från material- och fabrikationsfel.
Vid avsedd användning ersätts felaktigt material under garantitiden utan kostnad. För att säkerställa
garantin och att enheten fungerar felfritt ska bruksanvisningen beaktas och endast tillbehör från Ardo
medical AG användas. Garantin upphör att gälla om enheten har öppnats eller manipulerats.
11. Teknisk information
11.1. Tekniska data
Pumpmått LxBxH 302 × 240 × 180 mm
Pumpvikt 3,0 kg
Pumpvikt med uppladdningsbart batteri 3,7 kg
Nätkabelns längd 3 m
Nätspänning / nätfrekvens 100–240 VAC ±10 % / 50/60 Hz
Ineffekt 135 VA
Nätsäkring ingång P / N T 2.5 A / 250 VAC
Anslutning för bilkabel 12 VDC
Driftvillkor
5–40 °C (41–104 °F)
10–93 % relativ luftfuktighet, ej kondenserande
700–1 060 hPa
Skyddsgrad (pumpset med användningsdel) BF
Skyddsklass Klass II
Klassificering enligt MDD93/42 EEG Klass IIa
Rullställets mått LxBxH 425 x 425 x 720 mm
Frigångshöjd 105 mm
Hjuldiameter 75 mm
Rullställets vikt 7,0 kg

122
sv
Vakuum (± 5 % 1))Cykel (± 3)
Stimuleringsmod
Startvärde 60 mbar | 6 kPa | 45 mmHg 90 / min
Inställningsvärde 30–150 mbar | 3–15 kPa | 22–113 mmHg 72–120 / min
Utpumpningsmod
Startvärde * 45 / min
Inställningsvärde 30–330 mbar | 3–33 kPa | 22–248 mmHg 30–60 / min
"Sensitive Programme"
Startvärde 30 mbar | 3 kPa | 22 mmHg 30 / min
Inställningsvärde 30–330 mbar | 3–33 kPa | 22–248 mmHg 30–60 / min
* Utpumpningsmod övertar det sista av användaren valda inställningsvärdet i stimuleringsmod och ökar detta vakuum med 30 mbar / 3 kPa /
22 mmHg
1) Vakuumvärdet är beroende av aktuellt atmosfärtryck.
11.2. Överensstämmelse 11.3. Testprotokoll
elektromagnetisk
kompatibilitet
Enligt riktlinje MDD 93/42 EEG, EN 60601-1, EN 60601-1-2,
EN ISO 10079-1, EN 60601-1-6, EN 60601-1-11, 2011/65/EU (RoHS)
MEDICAL – GENERAL MEDICAL EQUIPMENT
AS TO ELECTRICAL SHOCK, FIRE AND
MECHANICAL HAZARDS ONLY
IN ACCORDANCE WITH
ANSI/AAMI ES60601-1 (2005, C1:09, A2:10),
CAN/CSA C22.2 No.60601.1 (2008, R:2011)
E358823
Se sidan 213
12. Transport och förvaring
Använd originalförpackningen vid transport och förvaring av Carum och Carum Battery. Vi
rekommenderar förvaring i skydd mot UV-ljus (t.ex. solljus, halogenlampor), värme och damm.
Carum Battery: Kontakta respektive flygbolag för transportföreskrifter vid flygresa.
Temperatur –20 °C till +70 °C (–4 °F till 158 °F)
Relativ luftfuktighet 10–93 % ej kondenserande
Lufttryck 700–1 060 hPa
13. Användningstid och kassering
Enhetens användningstid vid avsedd användning uppgår till 10 år, förutan förbrukningsvaror. Denna
enhet innehåller elektroniska delar och ett uppladdningsbart batteri av litiumjon.
När enhetens livslängd är slut måste enheten och dess tillbehör kasseras enligt gällande lokala föreskrifter.
Använda uppladdningsbara batterier får inte kastas i soporna, utan ska lämnas
tillbaka till inköpsstället eller kasseras enligt gällande lokala föreskrifter.
Enheten är föremål för kraven i WEEE-riktlinjen.
0123

123
fi
SISÄLLYSLUETTELO
CARUM-RINTAPUMPPU SAIRAALA- JA VUOKRAUSKÄYTTÖÖN
Sydämelliset kiitokset päätöksestäsi hankkia Ardon Carum-rintapumppu.
Nämä käyttöohjeet sisältävät tärkeitä ja hyödyllisiä ohjeita, jotka tekevät Carum-rintapumpun käytön vielä
helpommaksi.
Sähkölaitteiden käytössä on erittäin tärkeää noudattaa seuraavia perusturvallisuusohjeita. Ota itsellesi
aikaa, ja lue käyttöohjeet huolellisesti ennen Carum-rintapumpun ensimmäistä käyttöä.
Carum on kaksoismäntäjärjestelmällä varustettu tyhjiöpumppu. Hallintalaitteiden avulla kaikilla äideillä
on mahdollisuus säätää tyhjiötä ja sykliä yksilöllisten tarpeiden mukaan. Tyhjiö pysyy vakaana käyttäjän
muuttaessa syklin asetuksia. Myös sykli pysyy vakaana käyttäjän muuttaessa tyhjiön asetuksia. Lukijan
pitää pystyä lukemaan ja ymmärtämään nämä käyttöohjeet.
1. Säiliöön sijoitettu laite 124
2. Käyttötarkoitus 125
2.1. Käyttöaiheet 125
2.2. Vasta-aiheet 125
3. Turvallisuusohjeita 125
4. Tuotekuvaus 127
5. Käyttöönotto / käyttö 128
5.1. Kuvien selitykset 128
5.2. Käyttöönotto 129
5.2.1. Sähköliitäntä 129
5.2.2. Pumppusetin liittäminen
(käytettävä osa) 129
5.2.3. Pullotelineen ripustaminen 129
5.2.4. Easy Freeze -telineen ripustaminen 129
5.3. Käyttö 130
5.3.1. Kytkentä päälle ja pois päältä 130
5.3.2. Stimulointitoiminto – oranssi tausta 130
5.3.3. Pumppaustoiminto – vihreä tausta 131
5.3.4. "Sensitive Programme" 131
5.3.5. Maidon herumisrefleksin
käynnistäminen uudelleen 131
5.3.6. Ajanmittaus / ajastin 132
5.3.7. Himmennystoiminto 132
5.3.8. Carum Battery 132
6. Hyödyllisiä vinkkejä 133
6.1. Rintojen pumppaaminen ei saa koskaan
aiheuttaa kipua. 133
6.2. Maidon herumisrefleksin edistäminen 133
6.3. Tehokas pumppaaminen 133
6.4. Maitomäärän lisääminen 133
7. Lisävarusteet / varaosat 134
8. Virhenäyttö / tilanäyttö 134
8.1. Muita mahdollisia pumppauksen
aikana ilmeneviä virheitä 134
9. Puhdistus, tarkastus, huolto 135
9.1. Puhdistus, desinfiointi 135
9.2. Tarkastus ennen päällekytkentää 135
9.3. Huolto 135
9.3.1. Tarkastusluettelo pumppua
vuokrattaessa 135
9.3.2. Tarkastusluettelo sairaalakäytössä 135
10. Takuu 136
11. Tekniset tiedot 136
11.1. Tekniset tiedot 136
11.2. Yhdenmukaisuus 137
11.3. EMC-tarkastusprotokollat 137
12. Kuljetus ja säilytys 137
13. Käyttöikä ja hävittäminen 137

124
fi
1. Säiliöön sijoitettu laite
a Carum-rintapumppu
b Pumppusetin liitäntäaukot
c LCD-näytöllinen ohjaustaulu
d Virtajohdon liitäntä
e Pulloteline
f Easy Freeze -teline (äidinmaidon pakastuspussi)
g Virtajohto
h Carum-säiliö
i Osoitekenttä
j Pumppusetti (hankittava erikseen)
k Käyttöohjeet
g
b
f
ea
c
d
e
f
a
g
j
i
h
ardo carum
electric breastpump
Instructions for use | Gebrauchsanweisung | Mode d’emploi
Istruzioni per l’uso | Instrucciones de uso | Instruções de utilização
Gebruiksaanwijzing | Bruksanvisning | Käyttöohjeet | Instrukcja
użycia | Οδηγίες χρήσης | Kullanım kılavuzu | | 使用说明
k

125
fi
2. Käyttötarkoitus
2.1. Käyttöaiheet
Carum-rintapumppu on tarkoitettu imettäville äideille äidinmaidon pumppaamiseen ja keräämiseen. Sitä
voidaan käyttää sekä yhden rinnan että kummankin rinnan samanaikaiseen pumppaamiseen. Laite on
tarkoitettu usean käyttäjän käyttöön ainoastaan sisätiloissa.
2.2. Vasta-aiheet
Carum-rintapumppua ei saa käyttää raskauden aikana, koska pumppaus saattaa käynnistää supistuksia.
3. Turvallisuusohjeita
Tärkeitä turvallisuutta koskevia ohjeita
Lue nämä käyttöohjeet huolellisesti ennen
ensimmäistä käyttökertaa. Säilytä käyttöohjeita
myöhempää tarvetta varten.
Carum on sähköinen rintapumppu sairaala- ja vuokrauskäyttöön. Oman terveytesi ja turvallisuutesi tähden
sekä pumpun vaurioitumisen ehkäisemiseksi on noudatettava seuraavia turvallisuusohjeita.
Turvallisuusohjeet
VAARA: Hengenvaarallisen sähköiskun välttäminen
• Käytä ainoastaan Ardon alkuperäistä virtajohtoa.
• Älä koskaan käytä viallista virtajohtoa.
• Älä koskaan aseta sähkölaitetta sellaiseen paikkaan, josta se voi pudota nesteeseen.
• Älä koskaan koske nesteeseen pudonneeseen tai märkään sähkölaitteeseen. Erota laite välittömästi
pistorasiasta.
• Älä koskaan käytä nesteeseen pudonnutta tai märkää laitetta, vaan toimita laite tarkastettavaksi
huoltoliikkeeseen tai valmistajalle.
• Älä koskaan käytä Carum-rintapumppua kylvyssä tai suihkussa.
• Älä koskaan avaa Carum-rintapumppua! Sähköiskun vaara.

126
fi
VAROITUS: Vaurioiden, sähköiskun, tulipalon ja vammojen välttäminen
• Carum-rintapumppua ei ole tarkoitettu ulkokäyttöön.
• Älä koskaan käytä Carum-rintapumppua, jos siinä ilmenee toimintahäiriö tai vika tai se on pudonnut
maahan.
• Huomioi sähkölaitetta käytettäessä erityisesti lähellä olevat lapset tai älykkyydeltään rajoittuneet
henkilöt; sähkölaitteet eivät ole leikkikaluja.
• Yhdistä virtajohto aina ensin Carum-rintapumppuun ja vasta sitten pistorasiaan.
• Carum-rintapumpun ei saa koskaan antaa olla verkkovirtaan kytkettynä ilman valvontaa.
• Kytke Carum-rintapumppu irti verkkovirrasta käytön jälkeen.
• Laite on erotettu verkkovirrasta ainoastaan silloin, kun verkkopistoke on irrotettu pistorasiasta.
• Aseta Carum-rintapumppu niin, että sen voi erottaa helposti verkkovirrasta.
• Pidä virtajohto ja kaikki lisävarusteosat poissa kuumilta pinnoilta.
• Käytä Carum-rintapumppua vain luvussa "Käyttötarkoitus" kuvattuun määräystenmukaiseen
käyttötarkoitukseen.
• Käytä ainoastaan alkuperäisiä Ardo-pumppusettejä ja alkuperäisiä Ardo-osia.
• Älä työnnä Carum-rintapumpun aukkoihin tai letkuihin mitään esineitä ja varo, ettei esineitä
myöskään putoa niihin.
• Älä käytä Carum-rintapumppua tiloissa, joissa annetaan happea tai käytetään suihkeita.
• Carum-rintapumppuun ei saa tehdä mitään muutoksia ilman valmistajan lupaa.
VAROITUS: Terveydellisten haittojen tai vammojen välttäminen
• Tarkista Carum-rintapumppu ja kaikki siihen kuuluvat osat aina ennen käyttöä.
• Älä käytä Carum-rintapumppua nukkuessasi tai väsyneenä.
• Jos pumppaus tuntuu epämiellyttävältä tai kivuliaalta, lopeta pumppaus ja kysy vastaavalta
ammattilaiselta neuvoa.
• Älä käytä Carum-rintapumppua, jos olet raskaana; pumppaus saattaa käynnistää supistuksia.
• Noudata puhdistuksessa luvussa "Puhdistus, tarkastus, huolto" annettuja ohjeita.
Autosovitin
• Carum- ja Carum Battery -rintapumppua ei ole autosovittimenkaan kanssa tarkoitettu ulkokäyttöön.
• Käytä ainoastaan sähköisesti varmistettua Ardon alkuperäistä auton akkujohtoa.
• Varmista, että autossa on 12 VDC -liitäntä.
• Älä käytä pumppausta ajaessasi autolla tai ollessasi autossa matkustajana. Seurauksena voi olla
onnettomuus.
• Kytke laite irti auton sähköjärjestelmästä käytön tai latauksen jälkeen.

127
fi
4. Tuotekuvaus
• Sähköinen Carum-rintapumppu on tarkoitettu sairaala- ja vuokrauskäyttöön.
• Carum-rintapumppua voi käyttää sekä yhden rinnan että kummankin rinnan samanaikaiseen
pumppaamiseen.
• Syklit (Cycles) ja tyhjiön (Vacuum) voi asettaa yksilöllisesti ja toisistaan riippumatta.
• Värinäytöstä nähdään pumpun toiminnot, ja integroitu ajastin ilmaisee pumppauksen keston.
• Vauvan imemiskäyttäytymistä voidaan stimuloida pumppaamalla Carum-rintapumpulla kahta eri
toimintoa käyttäen; stimulointitoimintoa ja varsinaista pumppaustoimintoa. Stimulointitoiminnolla
stimuloidaan maidon virtausta, ja pumppaustoiminto sen jälkeen mahdollistaa tehokkaan
pumppauksen.
• Carum-rintapumppu aloittaa stimulointitoiminnolla ja kytkeytyy kahden minuutin kuluttua
automaattisesti pumppaustoimintoon. Näiden kahden minuutin aikana voidaan tarvittaessa palata
ennenaikaisesti takaisin pumppaustoimintoon vastaavaa toimintopainiketta painamalla.
• Samoin maidon virtausta voidaan stimuloida uudelleen pumppauksen aikana palaamalla hellävaraisesti
takaisin stimulointitoimintoon vastaavaa toimintopainiketta painamalla.
• Nännien ollessa haavaiset "Sensitive Programme" mahdollistaa hellävaraisen pumppauksen
mahdollisimman pienellä aloitustyhjiöllä ja syklillä.
• Ardo-pumppusetit muodostavat 100-prosenttisen hygieniasuojan äidinmaidon ja rintapumpun
välissä. Tämän suljetun järjestelmän avulla estetään äidinmaidon joutuminen pumppusetin letkuun ja
rintapumppuun.
• Carum Battery on varustettu uudelleenladattavalla akulla.
• Carum- ja Carum Battery -rintapumppua voidaan käyttää verkkovirralla tai lisävarusteena saatavalla
autojohdolla autossa.
Carum Battery – integroidulla, uudelleenladattavalla akulla varustettu Carum-rintapumppu
Carum Battery -rintapumppua voidaan käyttää kaikkialla paikasta riippumatta. Se mahdollistaa
esim. pumppauksen sairaan vauvan tai keskosen vuoteen äärellä. Läheisyys vauvaan tukee maidon
herumisrefleksiä.
• Täyteen ladatulla akulla rintapumppua voidaan käyttää noin neljä tuntia (maks. tyhjiöllä ja maks.
syklillä). Tyhjän akun lataaminen kestää noin kaksi tuntia.
• Jos täyden akun käyttöaika on alle tunnin, akku on vaihdettava asianmukaisessa huoltoliikkeessä tai
valmistajalla, jotta optimaalinen käyttö on jälleen taattu.
• Kun laite on verkkovirtaan liitettynä, akku ladataan pumppauksen aikana. Latausaika on silloin
kuitenkin pidempi.
• Jos Carum-rintapumppu on liitetty autojohdolla auton sähköjärjestelmään, akkua ei ladata
pumppauksen aikana. Akku ladataan sähköjärjestelmän kautta vasta laitteen sammuttamisen jälkeen.

128
fi
5. Käyttöönotto / käyttö
5.1. Kuvien selitykset
Noudata käyttöohjetta
Virtapainike (valmiustilapainike)
Tyhjiöpainike (tyhjiön muuttaminen)
Syklipainike (syklin muuttaminen)
Toimintopainike (stimulointitoiminnon / pumppaustoiminnon / "Sensitive Programme"
-toiminnon vaihto)
Himmennyspainike
Ajanmittauspainike
Pumppaustoiminto
Stimulointitoiminto
Laite ja käytettävä osa BF
012
3
Yhdenmukainen MDD-direktiivin 93 / 42 / ETY kanssa
Valmistaja
Laite on WEEE-direktiivin vaatimusten alainen
Verkkolaite
Vaihtovirta
Suojausluokan II laite
IP21 Tippuvesisuojattu
Li-Ion Sisältää litiumioniakun
Laitteen voi kierrättää

129
fi
5.2. Käyttöönotto
5.2.1. Sähköliitäntä
• Liitä virtajohto (a) Carum-virtaliitäntään (b) ja yhdistä pistorasiaan.
5.2.2. Pumppusetin liittäminen (käytettävä osa)
Pumppusetin käyttö kuvataan erillisessä "Ardo-pumppusetti"-
käyttöohjeessa.
• Pumppaus yksittäisellä pumppusarjalla:
Liitä letkun sovitin (c) toiseen pumpun liitäntäaukoista.
• Pumppaus kummankin rinnan pumppaamiseen tarkoitetulla
pumppusarjalla:
Liitä molemmat letkun sovittimet (d) pumpun liitäntäaukkoihin.
• Letkun sovittimen toisen aukon (e) on aina oltava suljettuna
sekä yksittäisessä että kummankin rinnan pumppaamiseen
tarkoitetuissa pumpuissa.
5.2.3. Pullotelineen ripustaminen
Pullotelineen (f) voi ripustaa Carum-rintapumpun takaosaan tai
asettaa pystyasentoon sille sopivaan paikkaan.
5.2.4. Easy Freeze -telineen ripustaminen
Easy Freeze -teline (g) on tarkoitettu pumppusetin sekä
pakastuspussin tai äidinmaitopullon ripustamiseen. Sen voi ripustaa
rintapumpun takaosaan pullotelineen sijasta.
e
f
f
g
b
a
d
c

130
fi
5.3. Käyttö
Tyhjiötä ja syklejä voidaan säätää toisistaan riippumatta. Valitse itsellesi
miellyttävin asetus.
a
b
c
d
e
f
g
h
i
j
k
l
m
n
Virtapainike (valmiustilapainike)
Tyhjiöpainike (tyhjiön muuttaminen)
Tyhjiönäyttö
Himmennyspainike
Himmennystiedot
Aikatiedot
Ajastintiedot
Ajanmittauspainike
Syklinäyttö
Syklipainike (syklin muuttaminen)
Toimintopainike (stimulointitoiminnon /
pumppaustoiminnon / "Sensitive Programme"
-toiminnon vaihto)
Pumppaustoiminto
Stimulointitoiminto
Tietorivi (n = e + f + g)
5.3.1. Kytkentä päälle ja pois päältä
Carum-rintapumppu kytketään päälle painamalla kerran virtapainiketta.
Näyttöön tulee näkyviin aloitussivu. Carum-rintapumppu kytketään pois
päältä painamalla virtapainiketta uudelleen.
00:00
Vacuum Cycles
CARUM
5.3.2. Stimulointitoiminto – oranssi tausta
Carum-rintapumppu käynnistyy päällekytkennän jälkeen automaattisesti
stimulointitoiminnossa (oranssi tausta) nopealla syklillä ja syvällä tyhjiöllä.
Tämä toiminto edistää maidon herumisrefleksiä. Automaattinen asetus
jäljittelee vauvan luonnollista imemistä. Vauvat imevät imetyksen alussa
nopeilla imemisliikkeillä ja vähäisellä imuvoimakkuudella, mikä käynnistää
äidinmaidon virtauksen.
Stimulointitoiminto kestää kaksi minuuttia, minkä jälkeen laite kytkeytyy
automaattisesti pumppaustoimintoon.
Tyhjiötä ja syklejä voidaan korottaa tai vähentää painamalla painikkeita
toistuvasti tai pitämällä niitä painettuina. Valitut asetukset esitetään
palkkien muodossa. Säädä tyhjiö ja / tai sykli niin, että ne tuntuvat
miellyttäviltä.
00:00
Vacuum Cycles
CARUM
oranssi
n00:00
Vacuum Cycles
CARUM
a
b
d
e f g
cl
m
i
h
k
j

131
fi
5.3.3. Pumppaustoiminto – vihreä tausta
Pumppaustoiminnossa (vihreä tausta) Carum-rintapumppu kytkeytyy
hellävaraisesti suurempaan tyhjiöön ja hitaampaan sykliin. Tämä
automaattinen vaihto jäljittelee vauvan luonnollista imemistä, sillä vauva
muuttaa imemiskäyttäytymistään, kun maito alkaa herua. Vauva imee nyt
hitaammin, mutta suuremmalla imuvoimakkuudella.
Tyhjiötä ja syklejä voidaan korottaa tai vähentää painamalla painikkeita
toistuvasti tai pitämällä niitä painettuina. Valitut asetukset esitetään
palkkien muodossa. Säädä tyhjiö ja / tai sykli myös tässä toiminnossa niin,
että ne tuntuvat miellyttäviltä.
02:00
Vacuum Cycles
CARUM
vihreä
5.3.4. "Sensitive Programme"
"Sensitive Programme" -toiminnossa (vihreä tausta) rintapumppu
pumppaa tuskin havaittavalla tyhjiöllä ja syklillä sekä mahdollistaa siten
hellävaraisen pumppauksen nännien ollessa haavaiset.
Tyhjiötä ja sykliä voidaan korottaa tai vähentää hellävaraisesti painamalla
painikkeita toistuvasti. Asetukset esitetään palkkien muodossa.
"Sensitive Programme" -toiminnon säätäminen:
1. Paina virtapainiketta.
2. Aloitussivun näkyessä näytössä paina toimintopainiketta.
00:00
Vacuum Cycles
CARUM
00:00
Vacuum Cycles
CARUM
5.3.5. Maidon herumisrefleksin käynnistäminen uudelleen
Pumppaustoiminnosta (vihreä tausta) voidaan palata takaisin
stimulointitoimintoon (oranssi tausta) aina tarvittaessa painamalla
uudelleen toimintopainiketta. Tämä tehostaa maidon virtausta jälleen.
Toimintopainiketta painamalla voidaan myös palata ennenaikaisesti
pumppaustoimintoon kaksiminuuttisen stimulointitoiminnon aikana.
00:00
Vacuum Cycles
CARUM

132
fi
5.3.6. Ajanmittaus / ajastin
Ajanmittaus alkaa Carum-rintapumpun käynnistämisestä ja näkyy
tietorivillä.
• Ajanmittaus pysäytetään painamalla kerran aikapainiketta.
• Ajastin nollataan arvoon 00:00 painamalla painiketta toisen kerran.
• Ajanmittaus käynnistetään uudelleen painamalla aikapainiketta vielä
kerran.
Mitattu aika pysyy muuttumattomana toimintojen vaihdon yhteydessä.
Kun Carum-rintapumppu kytketään pois päältä, aika kuitenkin nollataan
arvoon 00:00.
5.3.7. Himmennystoiminto
Näytön valoisuutta voidaan vähentää painamalla kerran
himmennyspainiketta; tietorivillä näkyvä lamppusymboli näkyy silloin
himmennettynä. Näytön valoisuuden voi palauttaa normaaliksi painamalla
painiketta vielä kerran.
02:00
Vacuum Cycles
CARUM
5.3.8. Carum Battery
Integroidulla uudelleenladattavalla akulla varustetun Carum Battery
-rintapumpun etupaneelissa on "BATTERY"-teksti.
Akun lataustila ilmaistaan tietorivillä näkyvällä akkusymbolilla. Latauksen
aikana palkit liikkuvat vasemmalta oikealle, kunnes akku on ladattu
täyteen.
10:00
Vacuum Cycles
CARUM
BATTERY
02:00
Vacuum Cycles
CARUM

133
fi
6. Hyödyllisiä vinkkejä
6.1. Rintojen pumppaaminen ei saa koskaan aiheuttaa kipua.
• Tarkista, että maidonkerääjän koko on nänneillesi sopiva (katso pumppusetin käyttöohje).
• Varmista, että nänni on maidonkerääjän keskellä.
• Jos maito ei virtaa, voi rinnan hierominen pumppauksen aikana auttaa.
• Jos nännit ovat haavaiset tai rinnat tuntuvat kivuliailta, käytä mieluiten "Sensitive Programme"
-toimintoa ilman stimulointia. "Sensitive Programme" -toiminnossa pumppaus alkaa erityisen
hellävaraisella ja alhaisella tyhjiöllä.
6.2. Maidon herumisrefleksin edistäminen
Koska maidon herumisrefleksi voi käynnistyä pumpattaessa myöhemmin kuin imetettäessä, seuraavista
toimenpiteistä voi olla apua:
• Hiero rintaa hellävaraisesti ennen pumppaamista.
• Juo jotakin lämmintä.
• Rentoudu ja ajattele vauvaasi.
• Katsele vauvasi valokuvaa.
• Aseta lämmin "Ardo Temperature Pack" tai lämpöiset, kosteat hauteet rinnoillesi ennen
pumppaamista.
• Lämmitä maidonkerääjä esim. lämpimällä vedellä ennen käyttöä.
6.3. Tehokas pumppaaminen
• Rinnan hieronnalla pumppaamisen aikana voidaan saada enemmän maitoa ja maito virtaa paremmin.
• Valitse miellyttävältä tuntuva tyhjiö.
6.4. Maitomäärän lisääminen
• Pumppaa kumpikin rinta samanaikaisesti.
• Pumppaa ensimmäisen 10 minuutin aikana kumpaakin rintaa samanaikaisesti tai kunnes maitoa ei
enää virtaa. Siirry sitten vain yhden rinnan pumppaamiseen. Pumppaa kumpaakin rintaa 5 minuuttia.
Hiero samalla pumpattavaa rintaa hellävaraisesti vapaalla kädelläsi.

134
fi
7. Lisävarusteet / varaosat
Tuote Tuotenumero
Euro-virtajohto 63.00.130
UK-virtajohto 63.00.131
US-virtajohto 63.00.132
Rullateline, valinnainen 63.00.129
Pulloteline 63.00.127
Easy Freeze -teline 63.00.128
Eri pumppusettejä sekä muita lisävarusteita ja
varaosia
www.ardomedical.com
8. Virhenäyttö / tilanäyttö
Error
Carum- ja Carum Battery -rintapumpussa oleva virhe ilmaistaan näytössä näkyvällä, viereisen
esimerkin mukaisella symbolilla. Kytke laite pois päältä ja sitten takaisin päälle. Jos virhe ei
korjaannu, toimita laite tarkastettavaksi huoltoliikkeeseen tai valmistajalle.
Carum Battery -rintapumpussa oleva virhe ilmaistaan näytössä viereisen esimerkin mukaisella
sekä tyhjän akun symbolilla. Jos tämä symboli tulee näkyviin näyttöön, Carum Battery
kytkeytyy automaattisesti pois päältä noin 5 sekunnin kuluttua. Lataa akku liittämällä
virtajohto laitteeseen ja yhdistämällä sen verkkovirtaan.
8.1. Muita mahdollisia pumppauksen aikana ilmeneviä virheitä
Tyhjiötä ei muodostu lainkaan tai se on liian heikko
Tarkista, että
• käytät alkuperäistä Ardo-pumppusettiä. (Käytä pumppaukseen aina alkuperäistä Ardo-pumppusettiä.)
• letkun sovittimen toinen aukko on kiinni.
• letkun sovitin on kiinnitetty tiukasti pumpun liitäntäaukkoon.
• pumppusetin kaikki osat ovat paikoillaan eikä niissä ole vaurioita. (Katso pumppusetin käyttöohjeet.)
Carum-rintapumppu ei toimi / näyttö on pimeä
Tarkista, että
• virtajohto ja pistoke ovat silmämääräisesti vaurioitumattomia ja ettei niissä ole vikoja. Älä koskaan
käytä viallista johtoa tai viallisella pistokkeella varustettua johtoa.
• virtajohto on liitetty oikein Carum-rintapumppuun ja pistorasiaan.
• Carum-rintapumppu toimii myös toisessa pistorasiassa.
• toinen laite toimii samassa pistorasiassa.
Jos tarkastuksessa todetaan Carum-rintapumpun vika, toimita laite tarkastettavaksi huoltoliikkeeseen tai
valmistajalle.

135
fi
9. Puhdistus, tarkastus, huolto
Puhdistusmääräysten ja tarkastusten laiminlyöminen johtaa infektioiden tai Carum-rintapumpun
vaurioitumisen vaaraan.
9.1. Puhdistus, desinfiointi
• Kytke Carum-rintapumppu aina irti verkkovirrasta ennen puhdistamista.
• Carum-rintapumppu ei ole vesitiivis eikä sitä saa siten koskaan upottaa nesteisiin. Älä koskaan
puhdista Carum-rintapumppua astianpesukoneessa, pesualtaassa tai juoksevalla vedellä.
• Varmista, ettei pumppusetin liitäntäaukkoihin eikä sähköliitäntöihin pääse puhdistusnestettä.
Puhdistus kotona
• Pyyhi Carum-rintapumpun pinta tarvittaessa kostealla pyyhkeellä. Tavanomaisia astianpesuaineita
voidaan tarvittaessa käyttää. Älä kuitenkaan käytä hankaavia aineita.
• Puhdista pumppusetti vastaavien käyttöohjeiden määräysten mukaisesti.
Puhdistus sairaalassa
• Carum: Pyyhi pinnat desinfiointiaineella, joka ei sisällä fenolia. Älä käytä hankaavia aineita.
• Carum-rintapumpun rullateline: Pyyhi pinnat desinfiointiaineella, joka ei sisällä fenolia. Älä käytä
hankaavia aineita.
• Puhdista pumppusetti vastaavien käyttöohjeiden määräysten mukaisesti.
9.2. Tarkastus ennen päällekytkentää
• Kotelo ja näyttö ovat vaurioitumattomat.
• Virtajohdossa ja pistokkeessa ei ole vaurioita.
• Pumppusetti on puhdistettu, siinä ei ole vikoja ja sen kaikki osat ovat paikoillaan.
• Pumppusetti on liitetty oikein Carum-rintapumpun liitäntäaukkoon.
• Kaikki lisävarusteet on puhdistettu, niissä ei ole vikoja ja niiden kaikki osat ovat oikein paikoillaan.
• Rullateline (valinnainen): Tarkista, että kaikki ruuvit on kiristetty.
9.3. Huolto
Carum-rintapumppu on pääsääntöisesti huoltovapaa. Varmista moitteeton toiminta kuitenkin seuraavien
tarkastusten avulla:
9.3.1. Tarkastusluettelo pumppua vuokrattaessa
Pumpun puhtauden silmämääräinen tarkistus Jokaisen vuokrauksen jälkeen
Pumpun täydellisyyden silmämääräinen tarkistus Jokaisen vuokrauksen jälkeen
Pumpun vaurioiden silmämääräinen tarkistus Jokaisen vuokrauksen jälkeen
Pumpun yksinkertainen toiminnan tarkistus
(toimiiko pumppu, onko akku ladattu)
Jokaisen vuokrauksen jälkeen
Koulutetun huoltohenkilön suorittama tyhjiön tarkastus Vähintään 2 vuoden välein
9.3.2. Tarkastusluettelo sairaalakäytössä
Pumpun puhtauden ja vaurioiden silmämääräinen tarkistus Aina ennen käyttöä ja käytön
jälkeen
Koulutetun huoltohenkilön suorittama tyhjiön tarkastus Vähintään 2 vuoden välein

136
fi
10. Takuu
Carum-rintapumpun takuuaika on 3 vuotta ostopäivästä alkaen; päivätty lasku toimii takuutodistuksena.
Carum Battery -rintapumpun litiumioniakun takuuaika on 1 vuosi ostopäivästä alkaen; päivätty lasku
toimii takuutodistuksena.
Yleiset takuuehdot
Ardo medical AG takaa, ettei yrityksen valmistamissa tuotteissa ole materiaali- ja valmistusvirheitä.
Virheellinen materiaali korvataan takuuaikana edellyttäen, että laitetta on käytetty määräysten mukaisesti.
Takuuvaateen ja laitteen moitteettoman toiminnan varmistamiseksi käyttöohjeita on noudatettava ja
laitteessa saa käyttää ainoastaan Ardo medical AG:n lisävarusteita. Takuu raukeaa, jos laitteelle on jo tehty
jotain toimenpiteitä.
11. Tekniset tiedot
11.1. Tekniset tiedot
Pumpun mitat P x L x K 302 × 240 × 180 mm
Pumpun paino 3,0 kg
Pumpun ja akun paino 3,7 kg
Virtajohdon pituus 3 m
Verkkojännite / verkkotaajuus 100 ... 240 VAC ±10 % / 50/60 Hz
Tehonotto 135 VA
Verkkosulakkeen tulo P / N T 2.5 A / 250 VAC
Autojohdon liitäntä 12 VDC
Käyttöolosuhteet
5 ... 40 °C (41 ... 104 °F)
Suhteellinen ilmankosteus 10 ... 93 %, tiivistymätön
700 ... 1060 hPa
Suojausaste (pumppusetti on käytettävä osa) BF
Suojausluokka Luokka II
Direktiivin MDD 93/42/EEC mukainen luokitus Luokka IIa
Rullatelineen mitat P x L x K 425 x 425 x 720 mm
Aliajokorkeus 105 mm
Pyörien halkaisija 75 mm
Rullatelineen paino 7,0 kg

137
fi
Tyhjiö (± 5 % 1))Sykli (± 3)
Stimulointitoiminto
Aloitusarvo 60 mbar | 6 kPa | 45 mmHg 90 / min.
Asetusarvot 30 ... 150 mbar | 3 ... 15 kPa | 22 ... 113 mmHg 72 ... 120 / min.
Pumppaustoiminto
Aloitusarvo * 45 / min.
Asetusarvot 30 ... 330 mbar | 3 ... 33 kPa | 22 ... 248 mmHg 30 ... 60 / min.
"Sensitive Programme"
Aloitusarvo 30 mbar | 3 kPa | 22 mmHg 30 / min.
Asetusarvot 30 ... 330 mbar | 3 ... 33 kPa | 22 ... 248 mmHg 30 ... 60 / min.
* Pumppaustoiminto käyttää käyttäjän viimeksi valitsemaa asetusarvoa stimulointitoiminnossa ja korottaa sitä 30 mbar / 3 kPa / 22 mmHg.
1) Tyhjiöarvot riippuvat senhetkisestä ilmanpaineesta.
11.2. Yhdenmukaisuus 11.3. EMC-tarkastusprotokollat
Direktiivien MDD 93/42 EEC, EN 60601-1, EN 60601-1-2, EN ISO 10079-1,
EN 60601-1-6, EN 60601-1-11, 2011/65/EU (RoHS) mukaisesti
MEDICAL – GENERAL MEDICAL EQUIPMENT
AS TO ELECTRICAL SHOCK, FIRE AND
MECHANICAL HAZARDS ONLY
IN ACCORDANCE WITH
ANSI/AAMI ES60601-1 (2005, C1:09, A2:10),
CAN/CSA C22.2 No.60601.1 (2008, R:2011)
E358823
Katso sivu 213
12. Kuljetus ja säilytys
Carum- ja Carum Battery -rintapumpun kuljetukseen ja säilytykseen on käytettävä alkuperäistä pakkausta.
Suosittelemme suojaamaan laitteen UV-valolta (esim. auringonvalolta, halogeenilampuilta), lämmöltä ja
pölyltä säilytyksen aikana.
Carum Battery: Pyydä lisätietoa lentomatkoilla noudatettavista kuljetusmääräyksistä kyseisestä
lentoyhtiöstä.
Lämpötila –20 ... +70 °C (–4 ... 158 °F)
Suhteellinen ilmankosteus 10 ... 93 %, tiivistymätön
Ilmanpaine 700 ... 1060 hPa
13. Käyttöikä ja hävittäminen
Laitteen käyttöikä määräystenmukaisessa käytössä on 10 vuotta ilman kuluvia osia. Tämä laite sisältää
elektroniikkaosia ja ladattavan litiumioniakun.
Käyttöiän päätyttyä laite ja sen lisävarusteet on hävitettävä paikallisesti voimassaolevien määräysten
mukaisesti.
Käytettyjä akkuja ei saa hävittää kunnallisjätteen seassa, vaan ne on palautettava
jälleenmyyjälle tai hävitettävä paikallisesti voimassaolevien määräysten mukaisesti.
Laite on WEEE-direktiivin vaatimusten alainen.
0123

138
pl
–

139
pl
c
d
e
i
e
c
d
e
ardo carum
electric breastpump
Instructions for use | Gebrauchsanweisung | Mode d’emploi
Istruzioni per l’uso | Instrucciones de uso | Instruções de utilização
Gebruiksaanwijzing | Bruksanvisning | Käyttöohjeet | Instrukcja
użycia | Οδηγίες χρήσης | Kullanım kılavuzu | | 使用说明
i

140
pl
Ważne wskazówki dotyczące bezpieczeństwa
Przed pierwszym użyciem należy dokładnie
przeczytać instrukcję użycia. Należy zachować
instrukcję użycia do późniejszego wglądu.

141
pl

142
pl

143
pl
012
3
IP21
Li-Ion

144
pl
e
d
c

145
pl
c
d
e
i
n
00:00
Vacuum Cycles
CARUM
00:00
Vacuum Cycles
CARUM
00:00
Vacuum Cycles
CARUM
d
e
c
i
n

146
pl
02:00
Vacuum Cycles
CARUM
00:00
Vacuum Cycles
CARUM
00:00
Vacuum Cycles
CARUM
00:00
Vacuum Cycles
CARUM

147
pl
02:00
Vacuum Cycles
CARUM
10:00
Vacuum Cycles
CARUM
BATTERY
02:00
Vacuum Cycles
CARUM

148
pl

149
pl
Error

150
pl

151
pl

152
pl
*
Zgodnie z dyrektywą MDD 93/42 EWG, EN 60601-1, EN 60601-1-2,
EN ISO 10079-1, EN 60601-1-6, EN 60601-1-11, 2011/65/EU (RoHS)
MEDICAL – GENERAL MEDICAL EQUIPMENT
AS TO ELECTRICAL SHOCK, FIRE AND
MECHANICAL HAZARDS ONLY
IN ACCORDANCE WITH
ANSI/AAMI ES60601-1 (2005, C1:09, A2:10),
CAN/CSA C22.2 No.60601.1 (2008, R:2011)
E358823
Patrz strona 213
0123

153
el

154
el
c
d
e
i
e
c
d
e
i
ardo carum
electric breastpump
Instructions for use | Gebrauchsanweisung | Mode d’emploi
Istruzioni per l’uso | Instrucciones de uso | Instruções de utilização
Gebruiksaanwijzing | Bruksanvisning | Käyttöohjeet | Instrukcja
użycia | Οδηγίες χρήσης | Kullanım kılavuzu | | 使用说明

155
el
Σημαντικές υποδείξεις ασφαλείας
Παρακαλώ διαβάστε προσεκτικά τις οδηγίες
χρήσης πριν από την πρώτη χρήση. Κρατήστε
τις οδηγίες χρήσης για μελλοντικές αναφορές.

156
el

157
el

158
el
012
3
IP21
Li-Ion

159
el
e
d
c

160
el
c
d
e
i
n
00:00
Vacuum Cycles
CARUM
00:00
Vacuum Cycles
CARUM
00:00
Vacuum Cycles
CARUM
a
b
d
e f g
cl
m
i
h
k
j
n

161
el
02:00
Vacuum Cycles
CARUM
00:00
Vacuum Cycles
CARUM
00:00
Vacuum Cycles
CARUM
00:00
Vacuum Cycles
CARUM

162
el
02:00
Vacuum Cycles
CARUM
10:00
Vacuum Cycles
CARUM
BATTERY
02:00
Vacuum Cycles
CARUM

163
el

164
el
Error

165
el

166
el

167
el
*
Σύμφωνα με την οδηγία για ιατροτεχνολογικά προϊόντα (MDD) 93/42/ΕΟΚ, EN 60601-1,
EN 60601-1-2, EN ISO 10079-1, EN 60601-1-6, EN 60601-1-11, 2011/65/ΕΕ (RoHS)
MEDICAL – GENERAL MEDICAL EQUIPMENT
AS TO ELECTRICAL SHOCK, FIRE AND
MECHANICAL HAZARDS ONLY
IN ACCORDANCE WITH
ANSI/AAMI ES60601-1 (2005, C1:09, A2:10),
CAN/CSA C22.2 No.60601.1 (2008, R:2011)
E358823
Βλ. σελίδα 213
0123

168
tr
Klinikler ve Kiralama için

169
tr
c
d
e
e
c
d
e
ardo carum
electric breastpump
Instructions for use | Gebrauchsanweisung | Mode d’emploi
Istruzioni per l’uso | Instrucciones de uso | Instruções de utilização
Gebruiksaanwijzing | Bruksanvisning | Käyttöohjeet | Instrukcja
użycia | Οδηγίες χρήσης | Kullanım kılavuzu | | 使用说明

170
tr
Önemli güvenlik bilgileri
Lütfen ilk kullanımdan önce kullanma talimatlarını
dikkatle okuyun. Kullanım kılavuzunu daha sonra
başvurmak üzere muhafaza edin.

171
tr

172
tr

173
tr
012
3
IP21
Li-Ion

174
tr
e
d
c

175
tr
c
d
e
i
n
00:00
Vacuum Cycles
CARUM
00:00
Vacuum Cycles
CARUM
00:00
Vacuum Cycles
CARUM
d
e
c
i
n

176
tr
02:00
Vacuum Cycles
CARUM
00:00
Vacuum Cycles
CARUM
00:00
Vacuum Cycles
CARUM
00:00
Vacuum Cycles
CARUM

177
tr
02:00
Vacuum Cycles
CARUM
10:00
Vacuum Cycles
CARUM
BATTERY
02:00
Vacuum Cycles
CARUM

178
tr

179
tr
Error

180
tr

181
tr

182
tr
*
MDD 93/42 EEC, EN 60601-1, EN 60601-1-2, EN ISO 10079-1,
EN 60601-1-6, EN 60601-1-11, 2011/65/EU'ya (RoHS) uygundur
MEDICAL – GENERAL MEDICAL EQUIPMENT
AS TO ELECTRICAL SHOCK, FIRE AND
MECHANICAL HAZARDS ONLY
IN ACCORDANCE WITH
ANSI/AAMI ES60601-1 (2005, C1:09, A2:10),
CAN/CSA C22.2 No.60601.1 (2008, R:2011)
E358823
Bkz. Sayfa 213
0123

ar
183
CARUM
.Ardo Carum
.Carum
. . .
. . Carum
. . .
184 .1
185 .2
185 .2.1
185 .2.2
185 .3
187 .4
188 / .5
188 .5.1
189 .5.2
189 5.2.1
189 ( ) 5.2.2
189 5.2.3
189 Easy-Freeze 5.2.4
190 .5.3
190 / 5.3.1
190 - 5.3.2
191 - 5.3.3
191 "Sensitive Programme" 5.3.4
191 5.3.5
192 / 5.3.6
192 5.3.7
192 Carum Battery 5.3.8
193 .6
193 . .6.1
193 .6.2
193 .6.3
193 .6.4
194 / .7
194 / .8
194 .8.1
195 / / .9
195 / .9.1
195 .9.2
195 .9.3
195 9.3.1
195 9.3.2
196 .10
196 .11
196 .11.1
197 .11.2
197 EMV- .11.3
197 .12
197 .13

ar
184
.1
Carum
( ) Easy Freeze
Carum
( )
ardo carum
electric breastpump
Instructions for use | Gebrauchsanweisung | Mode d’emploi
Istruzioni per l’uso | Instrucciones de uso | Instruções de utilização
Gebruiksaanwijzing | Bruksanvisning | Käyttöohjeet | Instrukcja
użycia | Οδηγίες χρήσης | Kullanım kılavuzu | | 使用说明

ar
185
.2
.2.1
. . Carum
.
.2.2
. Carum
.3
.
.
. Carum
.
:
•Ardo
•.
•.
•. .
•.
•. Carum
•. !Carum

ar
186
:
•. Carum
•. Carum
•
.
•. Carum
•. Carum
•. Carum
•.
•. Carum
•. Carum
•." " Carum
• . Ardo Ardo
•. Carum
• . Carum
•. Carum
:
•. Carum
•. Carum
•.
•. Carum
•." / / "
•. Carum Carum
•Ardo
• .VDC 12
• . .
•.

ar
187
.4
•. Carum
•.( ) Carum
•. (Vacuum) (Cycles)
•.
• . : Carum
.
• . Carum
.
•.
•. "Sensitive Programme"
• . 100 Ardo
.
•. Carum
•. Carum Carum
. Carum - Carum
. Carum
.
• .( ) 4
.
•
.
• . .
• . Carum
.

ar
188
/ .5
.5.1
( ) /
( ) -
( ) -
("Sensitive Programme" / / ) -
-
BF
012
3
MDD 93 / 42 EWG
WEEE
II
IP21
Li-Ion

ar
189
.5.2
5.2.1
•. Carum () ()
( ) 5.2.2
."Ardo "
•:
. ()
•:
. ()
• ()
.
5.2.3
. ()
Easy-Freeze 5.2.4
() Easy-Freeze
. .

ar
190
.5.3
. .
( ) /
( ) -
-
-
-
-
-
-
( ) -
/ ) -
("Sensitive Programme" /
( + + = )
/ 5.3.1
. . / Carum
. / Carum
00:00
Vacuum Cycles
CARUM
- 5.3.2
. ( ) Carum
. .
.
.
.
. / .
00:00
Vacuum Cycles
CARUM
00:00
Vacuum Cycles
CARUM

ar
191
- 5.3.3
. Carum ( )
.
.
.
. / .
02:00
Vacuum Cycles
CARUM
"Sensitive Programme" 5.3.4
( ) "Sensitive Programme"
.
.
:"Sensitive Programme"
/ .1
. .2
00:00
Vacuum Cycles
CARUM
00:00
Vacuum Cycles
CARUM
5.3.5
( ) ( )
. .
.
00:00
Vacuum Cycles
CARUM

ar
192
/ 5.3.6
. Carum
•.
• .00:00
• .
.00:00 Carum
5.3.7
. .
Carum Battery 5.3.8
. "BATTERY" Carum Battery
.
.
10:00
Vacuum Cycles
CARUM
BATTERY
02:00
Vacuum Cycles
CARUM
02:00
Vacuum Cycles
CARUM

ar
193
.6
. .6.1
•( )
•.
• .
• "Sensitive Programme" . "Sensitive Programme"
.
.6.2
.
•.
• .
•.
•.
• . "Ardo "
•.
.6.3
•.
• .
.6.4
• ( )
• . .
.

ar
194
/ .7
63.00.130
63.00.131
63.00.132
63.00.129
63.00.127
Easy Freeze 63.00.128
www.ardomedical.com
/ .8
Error
. Carum Carum
. .
Carum .
. . 5
.8.1
•(Ardo ) .Ardo
•.
•.
•( ) .
/ Carum
•! .
•. Carum
• . Carum
•.
Carum .

ar
195
/ / .9
.Carum
/ .9.1
•. Carum
• Carum . Carum
.
•.
•. . Carum
•.
•. . :Carum
•. . :Carum
•.
.9.2
• .
•.
•.
•.Carum
•.
• .
.9.3
: . Carum
9.3.1
( )
9.3.2

ar
196
.10
. 3 Carum
.
. Ardo medical AG
Ardo medical .
. . AG
.11
.11.1
×× 180 × 240 × 302
3,0
3,7
3
/ 60/50 / ±10% 240-100
135
P / N T 2.5 A / 250 VAC
12
( 104-41) 40 - 5
% 93-10
1060-700
( ) BF
II
MDD 93 / EEC 42 IIa
×× 720 × 425× 425
105
75
7,0

ar
197
((1 % 5 ±) (3 ±)
45 / 6 / 60 / 90
113-22 / 15-3 / 150-30 / 120-72
* / 45
248-22 / 33-3 / 330-30 / 60-30
"Sensitive Programme"
22 / 3 / 30 / 30
248-22 / 33-3 / 330-30 / 60-30
22 / 3 / 30 *
(1
.11.2EMV- .11.3
MDD 93/42 EEC, EN 60601-1, EN 60601-1-2,
EN ISO 10079-1, EN 60601-1-6, EN 60601-1-11, 2011/65/EU (RoHS)
MEDICAL – GENERAL MEDICAL EQUIPMENT
AS TO ELECTRICAL SHOCK, FIRE AND
MECHANICAL HAZARDS ONLY
IN ACCORDANCE WITH
ANSI/AAMI ES60601-1 (2005, C1:09, A2:10),
CAN/CSA C22.2 No.60601.1 (2008, R:2011)
E358823
213
.12
( ) .Carum
.
. Carum
158 -4) +70 -20
(
% 93-10
1060-700
.13
. . 10
.
.
WEEE
0123

198
zh

199
zh
b
f
c
f
j
h
ardo carum
electric breastpump
Instructions for use | Gebrauchsanweisung | Mode d’emploi
Istruzioni per l’uso | Instrucciones de uso | Instruções de utilização
Gebruiksaanwijzing | Bruksanvisning | Käyttöohjeet | Instrukcja
użycia | Οδηγίες χρήσης | Kullanım kılavuzu | | 使用说明
k

200
zh

201
zh

202
zh

203
zh
012
3
IP21
Li-Ion

204
zh
f
f
b
c

205
zh
b
c
f
h
j
k
00:00
Vacuum Cycles
CARUM
00:00
Vacuum Cycles
CARUM
00:00
Vacuum Cycles
CARUM
b
f
c
h
k
j

206
zh
02:00
Vacuum Cycles
CARUM
00:00
Vacuum Cycles
CARUM
00:00
Vacuum Cycles
CARUM
00:00
Vacuum Cycles
CARUM

207
zh
02:00
Vacuum Cycles
CARUM
10:00
Vacuum Cycles
CARUM
BATTERY
02:00
Vacuum Cycles
CARUM

208
zh

209
zh
Error

210
zh

211
zh

212
zh
*
MEDICAL – GENERAL MEDICAL EQUIPMENT
AS TO ELECTRICAL SHOCK, FIRE AND
MECHANICAL HAZARDS ONLY
IN ACCORDANCE WITH
ANSI/AAMI ES60601-1 (2005, C1:09, A2:10),
CAN/CSA C22.2 No.60601.1 (2008, R:2011)
E358823
0123

EMC Test Report
213

Summary of test for Electromagnetic Compatibility
The test of electromagnetic compatibility according to IEC / EN 60601-1-2 for this device has shown that in the intended use
no endangering of the functional safety or a failure of this device due to electromagnetic influences are to be expected.
This device uses HF-energy exclusively for its internal function.
Its HF-transmission is therefore very small, and it is therefore unlikely that adjacent electronic equipment will be affected.
Since the propagation of electromagnetic variables is affected by absorptions and reflections from structures and / or by
objects and people, the following must be observed:
This device should not be operated at a short distance from other devices. Do not place any other devices
on the housieng of this device. If it must operate at a short distance from other devices, the device should
be observed to verify its intended performance. If abnormal performance is observed, additional measures
may be necessary, such as re-orienting or relocating the device.
Mobile radio equipment or mobile phones should not be used at a short distance from this device or its
mains power cable.
Interference may occur in the vicinity of equipment marked with the symbol adjacent.
214


Ardo medical AG
Gewerbestrasse 19
6314 Unterägeri
Switzerland
T +41 41 754 70 70
F +41 41 754 70 71
info@ardo.ch
www.ardomedical.com
99.03.788 / V02 / 01.2023
0123 Class IIa
-
 1
1
-
 2
2
-
 3
3
-
 4
4
-
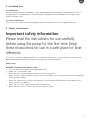 5
5
-
 6
6
-
 7
7
-
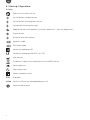 8
8
-
 9
9
-
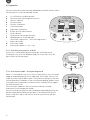 10
10
-
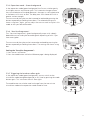 11
11
-
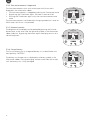 12
12
-
 13
13
-
 14
14
-
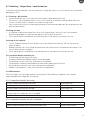 15
15
-
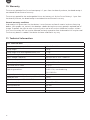 16
16
-
 17
17
-
 18
18
-
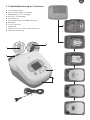 19
19
-
 20
20
-
 21
21
-
 22
22
-
 23
23
-
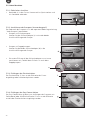 24
24
-
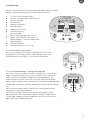 25
25
-
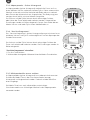 26
26
-
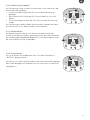 27
27
-
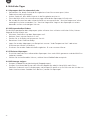 28
28
-
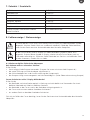 29
29
-
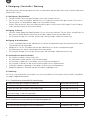 30
30
-
 31
31
-
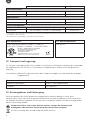 32
32
-
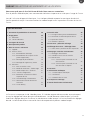 33
33
-
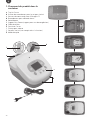 34
34
-
 35
35
-
 36
36
-
 37
37
-
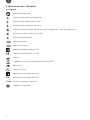 38
38
-
 39
39
-
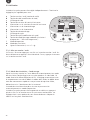 40
40
-
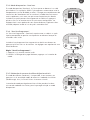 41
41
-
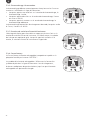 42
42
-
 43
43
-
 44
44
-
 45
45
-
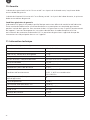 46
46
-
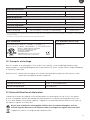 47
47
-
 48
48
-
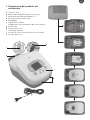 49
49
-
 50
50
-
 51
51
-
 52
52
-
 53
53
-
 54
54
-
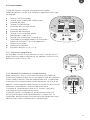 55
55
-
 56
56
-
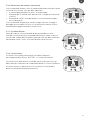 57
57
-
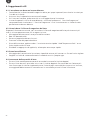 58
58
-
 59
59
-
 60
60
-
 61
61
-
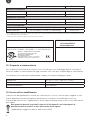 62
62
-
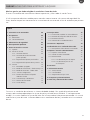 63
63
-
 64
64
-
 65
65
-
 66
66
-
 67
67
-
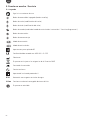 68
68
-
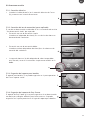 69
69
-
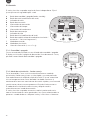 70
70
-
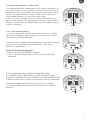 71
71
-
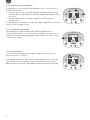 72
72
-
 73
73
-
 74
74
-
 75
75
-
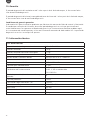 76
76
-
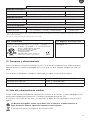 77
77
-
 78
78
-
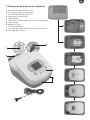 79
79
-
 80
80
-
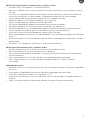 81
81
-
 82
82
-
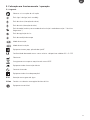 83
83
-
 84
84
-
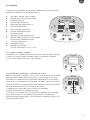 85
85
-
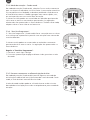 86
86
-
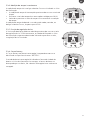 87
87
-
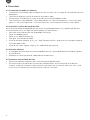 88
88
-
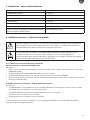 89
89
-
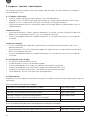 90
90
-
 91
91
-
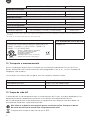 92
92
-
 93
93
-
 94
94
-
 95
95
-
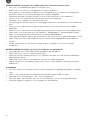 96
96
-
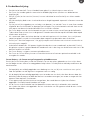 97
97
-
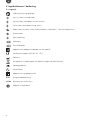 98
98
-
 99
99
-
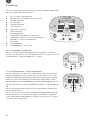 100
100
-
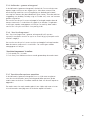 101
101
-
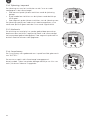 102
102
-
 103
103
-
 104
104
-
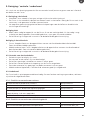 105
105
-
 106
106
-
 107
107
-
 108
108
-
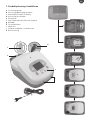 109
109
-
 110
110
-
 111
111
-
 112
112
-
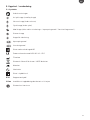 113
113
-
 114
114
-
 115
115
-
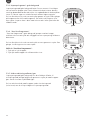 116
116
-
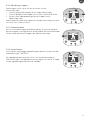 117
117
-
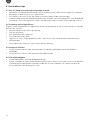 118
118
-
 119
119
-
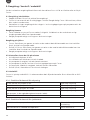 120
120
-
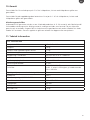 121
121
-
 122
122
-
 123
123
-
 124
124
-
 125
125
-
 126
126
-
 127
127
-
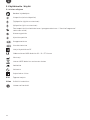 128
128
-
 129
129
-
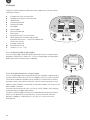 130
130
-
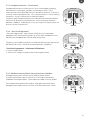 131
131
-
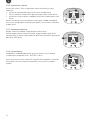 132
132
-
 133
133
-
 134
134
-
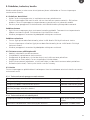 135
135
-
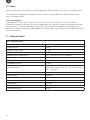 136
136
-
 137
137
-
 138
138
-
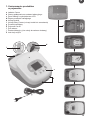 139
139
-
 140
140
-
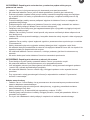 141
141
-
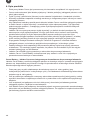 142
142
-
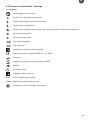 143
143
-
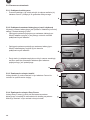 144
144
-
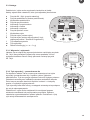 145
145
-
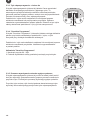 146
146
-
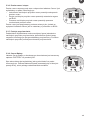 147
147
-
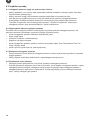 148
148
-
 149
149
-
 150
150
-
 151
151
-
 152
152
-
 153
153
-
 154
154
-
 155
155
-
 156
156
-
 157
157
-
 158
158
-
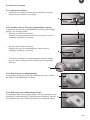 159
159
-
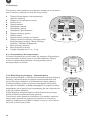 160
160
-
 161
161
-
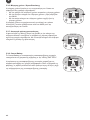 162
162
-
 163
163
-
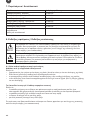 164
164
-
 165
165
-
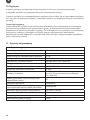 166
166
-
 167
167
-
 168
168
-
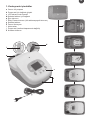 169
169
-
 170
170
-
 171
171
-
 172
172
-
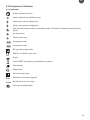 173
173
-
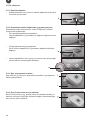 174
174
-
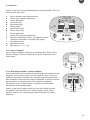 175
175
-
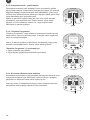 176
176
-
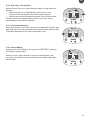 177
177
-
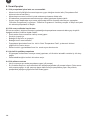 178
178
-
 179
179
-
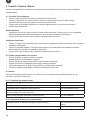 180
180
-
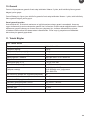 181
181
-
 182
182
-
 183
183
-
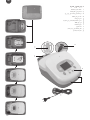 184
184
-
 185
185
-
 186
186
-
 187
187
-
 188
188
-
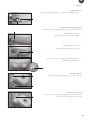 189
189
-
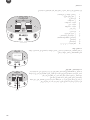 190
190
-
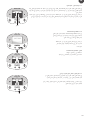 191
191
-
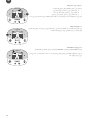 192
192
-
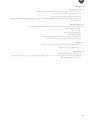 193
193
-
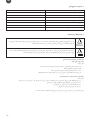 194
194
-
 195
195
-
 196
196
-
 197
197
-
 198
198
-
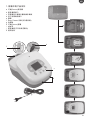 199
199
-
 200
200
-
 201
201
-
 202
202
-
 203
203
-
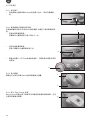 204
204
-
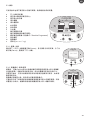 205
205
-
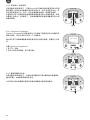 206
206
-
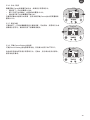 207
207
-
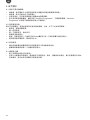 208
208
-
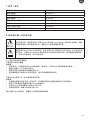 209
209
-
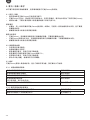 210
210
-
 211
211
-
 212
212
-
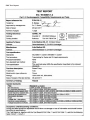 213
213
-
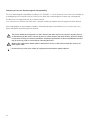 214
214
-
 215
215
-
 216
216


