
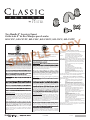
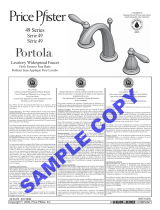
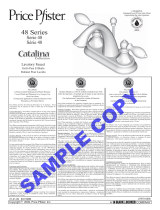
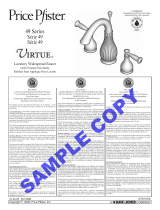
Two Handle 8” Lavatory Faucet
Grifería de 8” de Dos Manijas para Lavabo
049-CSVC, 049-CSVPC, 049-CSLC, 049-CSLPC, 049-CSCC, 049-CSCPC
Pfister Consumer Care Guide.
To keep your new faucet looking beautiful, please follow these simple
care instructions:
DO: 1. Simply rinse the faucet with clear water
2. Dry the faucet with a clean soft cotton cloth.
DO NOT: Use any abrasive cleansers, cloths, or paper towels.
Use any cleaning agents containing acids, polish
abrasives, or harsh cleaner or soaps.
Regular and routine cleaning will reduce the need for heavy cleaning
and polishing. If heavy cleaning is required, the following procedure
is recommended:
1. Remove as much surface dirt and fi lm as possible
using clear water and a soft cotton cloth (as described
above).
2. Use any of the following to remove tough surface
film and buildup:
-Mild liquid detergents.
-Clear liquid glass cleaners.
-Non-acidic, non-abrasive gentle liquid or fully
dissolved powdered cleansers mixed according to
manufacture’s specifications.
-Non-abrasive liquid polishers
3. Once clean, rinse faucet again with clear water to
thoroughly remove cleanser and blot dry with a soft
cotton cloth.
If you have any doubts or questions concerning care and maintenance of
your faucet, please contact your local authorized Pfister dealer.
Guía de Pfister para el Cuidado por el Consumidor.
Para que su grifo nuevo luzca siempre bello, por favor siga estas sencillas
instruccionesde cuidado:
SÍ: 1. Simplemente enjuague el grifo con agua limpia.
2. Seque el grifo con un paño de algodón suave y
limpio.
NO: Use limpiadores, paños o toallas de papel abrasivos.
Use agentes limpiadores que contengan ácidos,
abrasivos para pulir, ni limpiadores o jabones ásperos.
La limpieza regular y rutinaria reduce la necesidad de efectuar limpiezas
profundas o pulimentos. Si es necesario efectuar una limpieza profunda,
se recomienda hacer lo siguiente::
1. Desaloje la mayor cantidad posible de suciedad
superficial usando agua limpia y un paño suave de
algodón (como se explicó anteriormente).
2. Para desalojar las películas superfi ciales duras y la
acumulación, use cualquiera de los siguientes
productos:
-Detergentes líquidos suaves.
-Limpiadores líquidos y claros para vidrio.
-Limpiadores suaves sin ácidos ni abrasivos, líquidos o
de polvo totalmente disueltos y mezclados de acuerdo a
las especifi caciones del fabricante.
-Pulidores líquidos no abrasivos.
3. Una vez esté limpio el grifo, enjuáguelo nuevamente
con agua limpia para sacar completamente los
limpiadores y séquelo por absorción con un paño suave
de algodón.
Si tiene cualquier duda o pregunta relacionada con el cuidado y
mantenimiento de su grifo, por favor póngase en contacto con su
proveedor local autorizado de Pfister.
35418-0200
05/12/14
™
Own Your Home
(Commercial Applications Limit the Duration of the
Warranties as Provided Below)
.
Limited Warranties:
installed, the Product will be free of all defects in material and workmanship
that would impair the intended and proper use of the Product. If the Product is
installed in a commercial application, the above mechanical warranty shall be
limited for a period of ten (10) years from the date of purchase of the Product.
the original purchaser owns the home in which the Product is originally
installed. If the Product is installed in a commercial application, the above
Exclusive Remedy: In the event of any defect in the Product that breaches
defective part of the Product. Repair or replacement of the Product is the
exclusive remedy.
this warranty, the original purchaser may: (1) call 1-800-Pfaucet (1-800-
732-8238) for a consumer service representative who can assist you, or (2)
Forest, CA 92610, and include a description of the problem, model number,
your name, address, phone number and approximate date of purchase, or (3)
com, or (4) notify the location or distributor from which the Product was
for inspection and proof of purchase may be required.
Limitations and Exclusions:
PFISTER WILL NOT BE LIABLE FOR ANY OTHER DAMAGES
OR LOSSES, INCLUDING, BUT NOT LIMITED TO, INCIDENTAL
AND/OR CONSEQUENTIAL DAMAGES, REGARDLESS OF THE
LEGAL THEORY ASSERTED, INCLUDING ANY CLAIM OR BREACH
OF WARRANTY HEREUNDER OR ANY OTHER CAUSE, AND
WHETHER ARISING IN CONTRACT OR IN TORT (including negligence
and strict liability).
states do not allow limitations or exclusions of incidental or consequential
damages, so the above limitations or exclusions may not apply to you. This
which vary from state to state.
The above warranties do not cover damage resulting from improper
maintenance, repair, cleaning or installation, misuse, abuse, alterations,
accidents or acts of God.
™
Garantía Mecánica y sobre el Acabado Limitada de por Vida
Cubre las funciones y el acabado por el tiempo en que usted sea
propietario de su casa
(Las Aplicaciones Comerciales Limitan la Duración
de las Garantías)
se requiera la presentación de una Prueba de compra para obtener cualquiera
Garantías Limitadas:
original sea propietario de la casa en el que se hubiese instalado inicialmente
en material y mano de obra que pueda afectar el uso proyectado y correcto
del Producto. Si el Producto se instala en una aplicación comercial, la
garantía mecánica que antecede estará limitada a un período de diez (10)
años a partir de la fecha de compra del Producto.
en que el comprador original sea propietario de la casa en la que hubiese
instalado inicialmente el Producto. Si el Producto se instala en una
aplicación comercial, la garantía sobre el acabado que precede para
Productos que no contengan el acabado “Pforever” estará limitada a un
periodo de cinco (5) años a partir de la fecha de compra.
Recurso exclusivo: En el caso de que haya un defecto en el Producto que
la pieza defectuosa del Producto. La reparación o el reemplazo del Producto
es el recurso exclusivo.
o servicio bajo esta garantía, el comprador original puede: (1) llamar al
1-800-Pfaucet (1-800-732-8238) para hablar con un representante de servicio
al cliente que lo pueda ayudar, o (2) escribir al departamento de servicio
U.S.A., e incluir una descripción del problema, el número del modelo, su
nombre, dirección, número de teléfono y fecha aproximada de compra, o
(3) enviar un e-mail al departamento de servicio al consumidor de Price
lugar o al distribuidor en donde se compró el Producto. En cualesquiera de
y es posible que se requiera la presentación de una prueba de compra.
Limitaciones y Exclusiones:
PFISTER NO SE HARÁ RESPONSABLE DE NINGÚN OTRO DAÑO O
PERJUICIO, INCLUYENDO, PERO SIN ESTAR LIMITADO A DAÑOS
INCIDENTALES Y/O CONSECUENTES, SIN IMPORTAR LA TEORÍA LEGAL
A LA QUE SE ALEGUE, INCLUYENDO TODO RECLAMO O VIOLACIÓN DE
LA GARANTÍA PRESENTE O CUALQUIER OTRA CAUSA, Y YA SEAN COMO
RESULTADO DE LA LEY CONTRACTUAL O LA DE ANTECEDENTES
(incluyendo negligencia y responsabilidad estricta).
cualquier momento. Ciertos estados no permiten limitaciones o exclusiones
de daños incidentales o consecuentes, de manera que es posible que las
limitaciones o exclusiones que preceden no correspondan en su caso. Esta
Las garantías que preceden no cubren daños y perjuicios ocasionados
como resultado de mantenimiento, reparaciones, limpieza o instalación
inadecuados, mal uso, abuso, alteraciones, accidentes o causas de fuerza
mayor.
EO7490A
SAMPLE COPY

ESPAÑOL
ENGLISH
3
4
5
2
5A
5C
5B
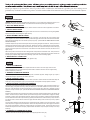
1 BEFORE PROCEEDING
WARNING: Read all the instructions completely before proceeding. If you are uncertain about installing this product, call a
professional. This product should be installed in accordance with all local and state plumbing and building codes.
2 SHUT OFF WATER SUPPLY
Cover sink drain with cloth to avoid losing small parts. Remove old faucet. Clean sink surface in preparation for new faucet.
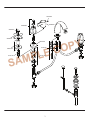
3 FAUCET INSTALLATION
Place Faucet facing forward and base plate through the center holes of sink. From underneath sink, secure by placing Rubber
Gasket and Fixing Nut onto Mounting Post. Tighten securely.
4 DRAIN ASSEMBLY INSTALLATION
Remove stopper and unscrew flange from the top of the pop-up assembly. Insert drain body with its mack washer, plastic
friction ring and locknut, which is assembled on the body in that order. Apply a bead of A.S.T.M. recommended silicone sealer
to the underside of the flange and screw it into the top of the pop-up body. (DO NOT USE OIL BASED SEALER AS IT MAY
DAMAGE THE FINISH).
Thread the Tailpiece securely into the drain body with the pivot rod opening facing the back of the sink. Thread up the locknut
making the mack washer fits properly in the sink drain hole. Tighten locknut securely. Tighten the slipnut in the waste drain
around the tailpiece. Place the drain stopper into the drain body. Unscrew the nut from the drain body and take off the spring
clip from the ball rod and place the nut in the ball rod. Insert the ball rod into the side hole of t he drain, slide the nut on and
tighten securely.
With lift rod in position on the faucet, insert lift rod through the lift rod strap and retain it with thumb screw. Insert pivot rod into
one hole of the spring clip. Guide the pivot rod through one of the holes in the lift rod strap and secure it with the second hole
in the spring clip. Adjust the height of the lift rod by loosening up the thumb screw and resetting it tightly.
5 WATER SUPPLY CONNECTION
Connect Water Supply Line (5A) to Mounting Post (5B). Tighten nut (5C).
1 ANTES DE COMENZAR
ADVERTENCIA: Lea todas las instrucciones completamente antes de comenzar. Si no está seguro acerca de cómo
instalar este producto, llame a un profesional. Este producto debe ser instalado conforme a todos los códigos locales y
estatales de plomería y construcción.
2 CIERRE EL SUMINISTRO DE AGUA
Cubra el drenaje del lavadero con un trapo para evitar perder los elementos pequeños. Extraiga el grifo viejo. Limpie la
superficie del lavadero en preparación para recibir el grifo nuevo.
3 INSTALACIÓN DEL GRIFO
Coloque el grifo mirando hacia adelante y la placa de la base a través de los orificios centrales del lavabo. Desde abajo del
lavabo, fíjelo colocando el empaque de goma y la tuerca de fijación sobre el poste de montaje. Apriete con firmeza.
4 INSTALACIÓN DE CONJUNTO DEL DRENAJE
Quite el tapón y distormille la brida del extemo superior del conjunto de vaciado rápido. Inserte el cuerpo del drenaje con su
arandela de apoyo, anillo plastic de fricción y tuerca para retencion, los cuales están instalados en el cuerpo en ese orden.
Aplique un cordón de selladore de silicona recomendado por A.S.T.M. al lado inferior de la brida y atornillela al extreme
superior del cuerpo de vaciado rápido. (NO USE UN SELLADOR CON BASE DE ACEITE YA QUE PODRIA DANAR EL
ACABADO).
Atornille la cola firmemente al cuerop del drenaje con la abertura de la barra de pivote apuntando hacia la parte de atrias del
lavadero. Instale la tuerca para retencion hacindo que la arandela de apoyo calce correctamente en el agujero del drenaje
del lavadero. Apriete la tuerca para retención firmemente. Apriete las tuerca corrediza en el drenaje de residues alerededor
de la cola. Destornille la tuerca del cuerpo del drenaje y quite las presilla de resorte de la barra de rótula y coloque las tuerca
en la barra de rótula. Inserte la barra de rótula en el agujero lateral del drenaje, deslice la tuerca en posicion y aprietela
firmemente.
Con la barra de levantamiento en positión sobre el grifo, insertéla en la banda y sujetéla con el tornillo de mariposa> Inserte
la barra de pivote en un agujero de la presilla de resorte. Guie la barra de pivote a traves de uno de los agujeros en las banda
para la barra de levantamineto y sujetéla con el Segundo agujero en la presilla de resorte. Ajuste la altura de la barra de
levantamiento aflojando el tornillo de mariposa y reposicionándolo firmemente. Coloque el tapón del drenaje en el cuerpo
del drenaje.
5 CONEXIÓN AL SUMINISTRO DE AGUA
Conecte la tubería del suministro de agua (5A) al poste de montaje (5B). Apriete la tuerca (5C).
2
Gracias por comprar este producto Pster. Todos los productos Pster son fabricados cuidadosamente y probados para ofrecer un largo uso sin
problemas bajo condiciones normales. Este producto es fácil de instalar utilizando herramientas básicas y lasinstrucciones ilustradas adjuntas.

9741760
3
9741730
9741740
960154A
940847A
9501490
960153A
940846A
9501480
940848A
SAMPLE COPY
-
 1
1
-
 2
2
-
 3
3


Pfister 049-CSLPC Instruction Sheet
- Tipo
- Instruction Sheet
- Este manual también es adecuado para
en otros idiomas
- English: Pfister 049-CSLPC
Artículos relacionados
-
 Pfister 040-CSCPC Instruction Sheet
-
 Pfister 807-CSCC Instruction Sheet
-
Black & Decker Amherst Price Pfister 49-HA1 Guía de instalación
-
 Pfister HHL-YPLK Guía de instalación
-
 Pfister F-049-DK00 Guía de instalación
-
 Pfister F-049-ST0K Guía de instalación
-
 Pfister GT49YP1K Guía de instalación
-
 Pfister HHL-EKMK Guía de instalación
-
 Pfister GT49DF0C Guía de instalación
-
 Pfister F-049-VTYY Guía de instalación


