LG 22LD350C El manual del propietario
- Categoría
- Televisores LCD
- Tipo
- El manual del propietario


OWNER’S MANUAL
LCD TV
Please read this manual carefully before operating
your set and retain it for future reference.
P/NO : SAC34134202 (1004-REV02)
www.lg.com
The model and serial number of the TV is located
on the back and one side of the TV.
Record it below should you ever need service.
MODEL
SERIAL
19LD350
22LD350
26LD350
32LD350
19LD350C
22LD350C
32LD320

2
WARNING / CAUTION
The lightning flash with arrowhead
symbol, within an equilateral triangle, is
intended to alert the user to the presence
of uninsulated “dangerous voltage” within the
product’s enclosure that may be of sufficient
magnitude to constitute a risk of electric shock to
persons.
The exclamation point within an equilateral
triangle is intended to alert the user to
the presence of important operating and
maintenance (servicing) instructions in the litera-
ture accompanying the appliance.
TO REDUCE THE RISK OF ELECTRIC SHOCK
DO NOT REMOVE COVER (OR BACK). NO
USER SERVICEABLE PARTS INSIDE. REFER TO
QUALIFIED SERVICE PERSONNEL.
WARNING/CAUTION
TO REDUCE THE RISK OF FIRE AND ELECTRIC
SHOCK, DO NOT EXPOSE THIS PRODUCT TO
RAIN OR MOISTURE.
NOTE TO CABLE/TV INSTALLER
This reminder is provided to call the CATV system
installer’s attention to Article 820-40 of the National
Electric Code (U.S.A.). The code provides guidelines for
proper grounding and, in particular, specifies that the
cable ground shall be connected to the grounding system
of the building, as close to the point of the cable entry
as practical.
WARNING / CAUTION
To prevent fire or shock hazards, do not expose
this product to rain or moisture.
FCC NOTICE
Class B digital device
This equipment has been tested and found to comply
with the limits for a Class B digital device, pursuant to
Part 15 of the FCC Rules. These limits are designed
to provide reasonable protection against harmful
interference in a residential installation. This equipment
generates, uses and can radiate radio frequency energy
and, if not installed and used in accordance with the
instructions, may cause harmful interference to radio
communications. However, there is no guarantee that
interference will not occur in a particular installation.
If this equipment does cause harmful interference to
radio or television reception, which can be determined
by turning the equipment off and on, the user is
encouraged to try to correct the interference by one
or more of the following measures:
- Reorient or relocate the receiving antenna.
- Increase the separation between the equipment and
receiver.
- Connect the equipment to an outlet on a circuit
different from that to which the receiver is connected.
- Consult the dealer or an experienced radio/TV
technician for help.
This device complies with part 15 of the FCC Rules.
Operation is subject to the following two conditions:
(1) This device may not cause (harmful) interference,
and (2) this device must accept any interference
received, including interference that may cause unde-
sired operation (of the device).
Any changes or modifications in construction of this
device which are not expressly approved by the party
responsible for compliance could void the user’s
authority to operate the equipment.
CAUTION
Do not attempt to modify this product in any way
without written authorization from LG Electronics.
Unauthorized modification could void the user’s
authority to operate this product.

3
IMPORTANT SAFETY INSTRUCTIONS
SAFETY INSTRUCTIONS
Read these instructions.
Keep these instructions.
Heed all warnings.
Follow all instructions.
Do not use this apparatus near water.
Clean only with dry cloth.
Do not block any ventilation openings. Install in
accordance with the manufacturer’s instructions.
Do not install near any heat sources such as
radiators, heat registers, stoves, or other
apparatus (including amplifiers) that produce
heat.
Do not defeat the safety purpose of the polarized
or grounding-type plug. A polarized plug has
two blades with one wider than the other. A
grounding type plug has two blades and a
third grounding prong, The wide blade or the
third prong are provided for your safety. If the
provided plug does not fit into your outlet,
consult an electrician for replacement of the
obsolete outlet.
Protect the power cord from being walked on
or pinched particularly at plugs, convenience
receptacles, and the point where they exit from
the apparatus.
Only use attachments/accessories specified by
the manufacturer.
Use only with the cart, stand, tripod, bracket,
or table specified by the manufacturer, or sold
with the apparatus. When a cart is used, use
caution when moving the cart/apparatus com-
bination to avoid injury from tip-over.
Unplug this apparatus during lighting storms
or when unused for long periods of time.
Refer all servicing to qualified service personnel.
Servicing is required when the apparatus has
been damaged in any way, such as power-
supply cord or plug is damaged, liquid has
been spilled or objects have fallen into the
apparatus, the apparatus has been exposed to
rain or moisture, does not operate normally, or
has been dropped.
1
2
3
4
5
7
8
6
9
10

4
SAFETY INSTRUCTIONS
Never touch this apparatus or antenna during
a thunder or lighting storm.
When mounting a TV on the wall, make sure
not to install the TV by the hanging power and
signal cables on the back of the TV.
Do not allow an impact shock or any objects to
fall into the product, and do not drop onto the
screen with something.
CAUTION concerning the Power Cord:
It is recommend that appliances be placed
upon a dedicated circuit; that is, a single
outlet circuit which powers only that appliance
and has no additional outlets or branch
circuits. Check the specification page of this
owner's manual to be certain.
Do not connect too many appliances to the
same AC power outlet as this could result in
fire or electric shock.
Do not overload wall outlets. Overloaded wall
outlets, loose or damaged wall outlets, extension
cords, frayed power cords, or damaged or
cracked wire insulation are dangerous. Any of
these conditions could result in electric shock
or fire. Periodically examine the cord of your
appliance, and if its appearance indicates damage
or deterioration, unplug it, discontinue use of
the appliance, and have the cord replaced with
an exact replacement part by an authorized
servicer. Protect the power cord from physical
or mechanical abuse, such as being twisted,
kinked, pinched, closed in a door, or walked
upon. Pay particular attention to plugs, wall
outlets, and the point where the cord exits the
appliance.
Do not make the TV with the power cord
plugged in. Do not use a damaged or loose
power cord. Be sure do grasp the plug when
unplugging the power cord. Do not pull on the
power cord to unplug the TV.
WARNING - To reduce the risk of fire or electrical
shock, do not expose this product to rain,
moisture or other liquids. Do not touch the TV
with wet hands. Do not install this product
near flammable objects such as gasoline or
candles or expose the TV to direct air
conditioning.
Do not expose to dripping or splashing and do
not place objects filled with liquids, such as
vases, cups, etc. on or over the apparatus (e.g.
on shelves above the unit).
GGRROOUUNNDDIINNGG
Ensure that you connect the earth ground wire
to prevent possible electric shock (i.e. a TV
with a three-prong grounded AC plug must be
connected to a three-prong grounded AC out-
let). If grounding methods are not possible,
have a qualified electrician install a separate
circuit breaker.
Do not try to ground the unit by connecting it
to telephone wires, lightening rods, or gas
pipes.
DDIISSCCOONNNNEECCTTIINNGG DDEEVVIICCEE FFRROOMM MMAAIINNSS
Mains plug is the disconnecting device. The
plug must remain readily operable.
As long as this unit is connected to the AC wall
outlet, it is not disconnected from the AC
power source even if you turn off this unit by
SWITCH.
12
11
14
13
16
17
18
19
Power
Supply
Short-circuit
Breaker
15

5
AANNTTEENNNNAASS
OOuuttddoooorr aanntteennnnaa ggrroouunnddiinngg
If an outdoor antenna is installed, follow the
precautions below. An outdoor antenna system
should not be located in the vicinity of over-
head power lines or other electric light or
power circuits, or where it can come in contact
with such power lines or circuits as death or
serious injury can occur.
Be sure the antenna system is grounded so as
to provide some protection against voltage
surges and built-up static charges.
Section 810 of the National Electrical Code
(NEC) in the U.S.A. provides information with
respect to proper grounding of the mast and
supporting structure, grounding of the lead-in
wire to an antenna discharge unit, size of
grounding conductors, location of antenna dis-
charge unit, connection to grounding elec-
trodes and requirements for the grounding
electrode.
AAnntteennnnaa ggrroouunnddiinngg aaccccoorrddiinngg ttoo tthhee
NNaattiioonnaall EElleeccttrriiccaall CCooddee,, AANNSSII//NNFFPPAA 7700
CClleeaanniinngg
When cleaning, unplug the power cord and rub
gently with a soft cloth to prevent scratching.
Do not spray water or other liquids directly on
the TV as electric shock may occur. Do not
clean with chemicals such as alcohol, thinners
or benzene.
MMoovviinngg
Make sure the product is turned off,
unplugged and all cables have been removed. It
may take 2 or more people to carry larger TVs.
Do not press against or put stress on the front
panel of the TV.
VVeennttiillaattiioonn
Install your TV where there is proper ventila-
tion. Do not install in a confined space such as
a bookcase. Do not cover the product with
cloth or other materials (e.g.) plastic while
plugged in. Do not install in excessively dusty
places.
Take care not to touch the ventilation open-
ings. When watching the TV for a long period,
the ventilation openings may become hot.
If you smell smoke or other odors coming from
the TV or hear strange sounds, unplug the power
cord contact an authorized service center.
Do not press strongly upon the panel with
hand or sharp object such as nail, pencil or
pen, or make a scratch on it.
Keep the product away from direct sunlight.
FFoorr LLCCDD TTVV
If the TV feels cold to the touch, there may be
a small “flicker” when it is turned on. This is
normal, there is nothing wrong with TV.
Some minute dot defects may be visible on the
screen, appearing as tiny red, green, or blue
spots. However, they have no adverse effect on
the monitor's performance.
Avoid touching the LCD screen or holding your
finger(s) against it for long periods of time.
Doing so may produce some temporary dis-
tortion effects on the screen.
20
23
25
24
26
27
28
21
22
Antenna Lead in Wire
Antenna Discharge Unit
(NEC Section 810-20)
Grounding Conductor
(NEC Section 810-21)
Ground Clamps
Power Service Grounding
Electrode System (NEC
Art 250, Part H)
Ground Clamp
Electric Service
Equipment
NEC: National Electrical Code
ON DISPOSAL
(Only Hg lamp used LCD TV)
The fluorescent lamp used in this product contains
a small amount of mercury. Do not dispose of
this product with general household waste.
Disposal of this product must be carried out in
accordance to the regulations of your local authority.

6
CONTENTS
WARNING / CAUTION
. . . . . . . . . . . . . . . . . . . . . . . . . . . . 2
SAFETY INSTRUCTIONS
. . . . . . . . . . . . . . . . . . . . . . . . . . 3
FEATURE OF THIS TV
. . . . . . . . . . . . . . . . . . . . . . . . . . . . . . . 8
PREPARATION
Accessories
. . . . . . . . . . . . . . . . . . . . . . . . . . . . . . . . . . . . . . . . . . . . . . . . . . . . . . 9
Front Panel Information
. . . . . . . . . . . . . . . . . . . . . . . . . . . . . . . . . . . 10
Back Panel Information . . . . . . . . . . . . . . . . . . . . . . . . . . . . . . . . . . . . 12
Stand Instructions
. . . . . . . . . . . . . . . . . . . . . . . . . . . . . . . . . . . . . . . . . . . 14
VESA Wall Mounting . . . . . . . . . . . . . . . . . . . . . . . . . . . . . . . . . . . . . . . . 18
Cable Management
. . . . . . . . . . . . . . . . . . . . . . . . . . . . . . . . . . . . . . . . .
19
Desktop Pedestal Installation
. . . . . . . . . . . . . . . . . . . . . . . . . . .
20
Swivel Stand
. . . . . . . . . . . . . . . . . . . . . . . . . . . . . . . . . . . . . . . . . . . . . . . . . . .
20
Positioning your Display
. . . . . . . . . . . . . . . . . . . . . . . . . . . . . . . . . . 20
Attaching the TV to a Desk
. . . . . . . . . . . . . . . . . . . . . . . . . . . . . . 21
Kensington Security System
. . . . . . . . . . . . . . . . . . . . . . . . . . . . .
21
Securing the TV to the wall to prevent falling when
the TV is used on a stand
. . . . . . . . . . . . . . . . . . . . . . . . . . . . . . . . 22
Antenna or Cable Connection . . . . . . . . . . . . . . . . . . . . . . . . . . 23
EXTERNAL EQUIPMENT SETUP
HD Receiver Setup
. . . . . . . . . . . . . . . . . . . . . . . . . . . . . . . . . . . . . . . . . 24
DVD Setup
. . . . . . . . . . . . . . . . . . . . . . . . . . . . . . . . . . . . . . . . . . . . . . . . . . . . .
27
VCR Setup
. . . . . . . . . . . . . . . . . . . . . . . . . . . . . . . . . . . . . . . . . . . . . . . . . . . . . 29
Other A/V Source Setup
. . . . . . . . . . . . . . . . . . . . . . . . . . . . . . . . .
30
USB Connection
. . . . . . . . . . . . . . . . . . . . . . . . . . . . . . . . . . . . . . . . . . . . . 30
Audio out Connection . . . . . . . . . . . . . . . . . . . . . . . . . . . . . . . . . . . . .
31
Headphone Setup
. . . . . . . . . . . . . . . . . . . . . . . . . . . . . . . . . . . . . . . . . . .
31
PC Setup
. . . . . . . . . . . . . . . . . . . . . . . . . . . . . . . . . . . . . . . . . . . . . . . . . . . . . . . . 32
WATCHING TV / CHANNEL CONTROL
Remote Control Functions
. . . . . . . . . . . . . . . . . . . . . . . . . . . . . . .
38
Turning On the TV
. . . . . . . . . . . . . . . . . . . . . . . . . . . . . . . . . . . . . . . . . .
40
Channel Selection
. . . . . . . . . . . . . . . . . . . . . . . . . . . . . . . . . . . . . . . . . . .
40
Volume Adjustment . . . . . . . . . . . . . . . . . . . . . . . . . . . . . . . . . . . . . . . . .
40
Initial Setting
. . . . . . . . . . . . . . . . . . . . . . . . . . . . . . . . . . . . . . . . . . . . . . . . . . .
41
On-Screen Menus Selection
. . . . . . . . . . . . . . . . . . . . . . . . . . . . . 42
Quick Menu
. . . . . . . . . . . . . . . . . . . . . . . . . . . . . . . . . . . . . . . . . . . . . . . . . . . .
44
Channel Setup
- Auto Scan (Auto Tuning)
. . . . . . . . . . . . . . . . . . . . . . . . . . . 45
- Add / Delete Channel (Manual Tuning)
. . . . . .
46
- Channel Editing
. . . . . . . . . . . . . . . . . . . . . . . . . . . . . . . . . . . . . . . . 47
Channel List . . . . . . . . . . . . . . . . . . . . . . . . . . . . . . . . . . . . . . . . . . . . . . . . . . . .
48
Favorite Channel Setup
. . . . . . . . . . . . . . . . . . . . . . . . . . . . . . . . . . . . 49
Favorite Channel List
. . . . . . . . . . . . . . . . . . . . . . . . . . . . . . . . . . . . . . . 50
Brief Information
. . . . . . . . . . . . . . . . . . . . . . . . . . . . . . . . . . . . . . . . . . . . . 51
Input List
. . . . . . . . . . . . . . . . . . . . . . . . . . . . . . . . . . . . . . . . . . . . . . . . . . . . . . . . 52
Input Label . . . . . . . . . . . . . . . . . . . . . . . . . . . . . . . . . . . . . . . . . . . . . . . . . . . . . 53
AV Mode
. . . . . . . . . . . . . . . . . . . . . . . . . . . . . . . . . . . . . . . . . . . . . . . . . . . . . . . . 54
Simple Manual . . . . . . . . . . . . . . . . . . . . . . . . . . . . . . . . . . . . . . . . . . . . . . . .
54
Key Lock
. . . . . . . . . . . . . . . . . . . . . . . . . . . . . . . . . . . . . . . . . . . . . . . . . . . . . . . . .
55
SIMPLINK
. . . . . . . . . . . . . . . . . . . . . . . . . . . . . . . . . . . . . . . . . . . . . . . . . . . . . . . 56
USB
Entry Modes
. . . . . . . . . . . . . . . . . . . . . . . . . . . . . . . . . . . . . . . . . . . . . . . . . . . 58
Photo List
. . . . . . . . . . . . . . . . . . . . . . . . . . . . . . . . . . . . . . . . . . . . . . . . . . . . . . .
59
Music List
. . . . . . . . . . . . . . . . . . . . . . . . . . . . . . . . . . . . . . . . . . . . . . . . . . . . . . . 63
PICTURE CONTROL
Picture Size (Aspect Ratio) Control
. . . . . . . . . . . . . . . . . .
66
Picture Wizard
. . . . . . . . . . . . . . . . . . . . . . . . . . . . . . . . . . . . . . . . . . . . . . . . . 68
Preset Picture Settings (Picture Mode)
. . . . . . . . . . . . .
70
Manual Picture Adjustment - User Mode
. . . . . . . . . . 71
Picture Improvement Technology
. . . . . . . . . . . . . . . . . . . . . 72
Expert Picture Control
. . . . . . . . . . . . . . . . . . . . . . . . . . . . . . . . . . . . .
73
Energy Saving
. . . . . . . . . . . . . . . . . . . . . . . . . . . . . . . . . . . . . . . . . . . . . . . . .
76
Picture Reset
. . . . . . . . . . . . . . . . . . . . . . . . . . . . . . . . . . . . . . . . . . . . . . . . . . . 77
Power Indicator
. . . . . . . . . . . . . . . . . . . . . . . . . . . . . . . . . . . . . . . . . . . . . . .
77
Demo Mode
. . . . . . . . . . . . . . . . . . . . . . . . . . . . . . . . . . . . . . . . . . . . . . . . . . .
78

7
SOUND & LANGUAGE CONTROL
Auto Volume Leveler (Auto Volume) . . . . . . . . . . . . . . . . . 79
Clear Voice II
. . . . . . . . . . . . . . . . . . . . . . . . . . . . . . . . . . . . . . . . . . . . . . . . . . 80
Preset Sound Setting (Sound Mode)
. . . . . . . . . . . . . . . . 81
Sound Setting Adjustment - User Mode
. . . . . . . . . . . 82
Infinite Sound
. . . . . . . . . . . . . . . . . . . . . . . . . . . . . . . . . . . . . . . . . . . . . . . . . 83
Balance
. . . . . . . . . . . . . . . . . . . . . . . . . . . . . . . . . . . . . . . . . . . . . . . . . . . . . . . . . . 84
TV Speakers On/Off Setup
. . . . . . . . . . . . . . . . . . . . . . . . . . . . . 85
Audio Reset
. . . . . . . . . . . . . . . . . . . . . . . . . . . . . . . . . . . . . . . . . . . . . . . . . . . 86
Stereo/SAP Broadcasts Setup
. . . . . . . . . . . . . . . . . . . . . . . . . .
87
Audio Language
. . . . . . . . . . . . . . . . . . . . . . . . . . . . . . . . . . . . . . . . . . . . . . 88
On-Screen Menus Language Selection
. . . . . . . . . . . . . 89
Caption Mode
- Analog Broadcasting System Captions
. . . . . . . 90
- Digital Broadcasting System Captions
. . . . . . . . 91
- Caption Option
. . . . . . . . . . . . . . . . . . . . . . . . . . . . . . . . . . . . . . .
92
TIME SETTING
Clock Setting
- Auto Clock Setup
. . . . . . . . . . . . . . . . . . . . . . . . . . . . . . . . . . . .
93
- Manual Clock Setup . . . . . . . . . . . . . . . . . . . . . . . . . . . . . . . . . 94
Auto On/Off Time Setting
. . . . . . . . . . . . . . . . . . . . . . . . . . . . . .
95
Sleep Timer Setting
. . . . . . . . . . . . . . . . . . . . . . . . . . . . . . . . . . . . . . . . .
96
PARENTAL CONTROL / RATINGS
Set Password & Lock System
. . . . . . . . . . . . . . . . . . . . . . . . . . . 97
Channel Blocking
. . . . . . . . . . . . . . . . . . . . . . . . . . . . . . . . . . . . . . . . . .
10 0
Movie & TV Rating
. . . . . . . . . . . . . . . . . . . . . . . . . . . . . . . . . . . . . . . .
101
Downloadable Rating
. . . . . . . . . . . . . . . . . . . . . . . . . . . . . . . . . . . . .
106
External Input Blocking
. . . . . . . . . . . . . . . . . . . . . . . . . . . . . . . . . .
10 7
APPENDIX
Troubleshooting
. . . . . . . . . . . . . . . . . . . . . . . . . . . . . . . . . . . . . . . . . . . .
108
Maintenance
. . . . . . . . . . . . . . . . . . . . . . . . . . . . . . . . . . . . . . . . . . . . . . . . . .
111
Product Specifications . . . . . . . . . . . . . . . . . . . . . . . . . . . . . . . . . . . .
112
IR Codes
. . . . . . . . . . . . . . . . . . . . . . . . . . . . . . . . . . . . . . . . . . . . . . . . . . . . . . . 113
External Control Through RS-232C
. . . . . . . . . . . . . . . . .114
Open Source License
. . . . . . . . . . . . . . . . . . . . . . . . . . . . . . . . . . . . .
120

8
FEATURE OF THIS TV
The AV Mode optimizes the picture into Cinema,
Sports, and game Mode according to the video and
audio content. The viewer has the ability to quickly
choose the correct mode for the picture they are
viewing.
Automatically enhances and amplifies the sound of
human voice frequency range to help keep dialogue
audible when background noise swells.
LG TV include a unique invisible speaker system,
tuned by renowned audio expert, Mr. Mark Levinson.
Speakers are embedded in strategic spots behind the
front cabinet and use minute vibrations to turn the
entire front bezel into the speaker system. The result
is a clean, polished look, and enhanced audio by
increasing the “sweet spot”, giving a wider and richer
sound field.
HDMI, the HDMI logo and High-Definition
Multimedia Interface are trademarks or registered
trademarks of HDMI Licensing LLC."
Manufactured under license from Dolby Laboratories.
“
Dolby
“and the double-D symbol are trademarks of
Dolby Laboratories.
This TV contains the detailed calibrations necessary
for professional certification by the Imaging Science
Foundation. The resulting ISF “day” and “night” modes
will then be accessible by the user to experience the
best their LG HDTV has to offer.
CALIBRATE LIKE A PRO: Sophisticated and detailed
calibrations can be made through the ISFccc mode.
Detailed calibration requires a licensed technician.
Please contact your local dealer to inquire about an
ISF certified technician.
High-definition television. High-resolution digital
television broadcast and playback system composed
of roughly a million or more pixels, 16:9 aspect-ratio
screens, and AC3 digital audio. A subset of digital
television, HDTV formats include 1080p, 1080i, and
720p resolutions.
■
When a fixed image (e.g. logos, screen menus, video game, and computer display) is displayed on the TV
for an extended period, it can become permanently imprinted on the screen. This phenomenon is known
as “image burn” or “burn-in.” Image burn is not covered under the manufacturer’s warranty.
■
In order to prevent image burn, avoid displaying a fixed image on your TV screen for a prolonged period
(2 or more hours for LCD, 1 or more hours for Plasma).
■
Image burn can also occur on the letterboxed
areas of your TV if you use the 4:3 aspect ratio
setting for an extended period.
IMPORTANT INFORMATION TO PREVENT “IMAGE BURN
/ BURN-IN” ON YOUR TV SCREEN

PREPARATION
9
ACCESSORIES
PREPARATION
Ensure that the following accessories are included with your TV. If an accessory is missing, please contact the
dealer where you purchased the TV.
The accessories included may differ from the images below.
1.5V 1.5V
Owner’s Manual Power Cord
Remote Control,
Batteries (AAA)
E
N
E
R
G
Y
C
H
V
O
L
123
45
0
6
789
P
A
G
E
S
A
V
I
N
G
TV
A
V
M
O
D
E
I
N
P
U
T
F
A
V
R
A
T
I
O
M
U
T
E
E
N
T
E
R
M
A
R
K
L
IS
T
F
L
A
S
H
B
K
M
E
N
U
I
N
F
O
Q
.
M
E
N
U
B
A
C
K
E
X
I
T
CD Manual
FFoorr 1199//2222LLDD335500,, 1199//2222LLDD335500CC
Cable Holder
(Refer to P.19)
FFoorr 2266//3322LLDD335500
(M4x20)
Screws for stand
assembly(Refer to P.16)
Screw for stand fixing
(Refer to P.21)
Protection Cover
(Refer to P.17)
Protection Cover
(Refer to P.14)
x 8
OOppttiioonn EExxttrraass
* Wipe spots on the exterior only with
the polishing cloth.
* Do not wipe roughly when removing
stains. Excessive pressure may cause
scratches or discoloration.
Polishing Cloth
Not included with all models
D-sub 15 pin Cable
When using the VGA (D-sub 15 pin
cable) PC connection, the user
must use shielded signal interface
cables with ferrite cores to maintain
standards compliance.
FFoorr 3322LLDD332200
(M4x24)
Screws for stand assembly
(Refer to P.15)
Screw for stand fixing
(Refer to P.21)
Protection Cover
(Refer to P.15)
x 4

PREPARATION
10
FRONT PANEL INFORMATION
PREPARATION
■
Image shown may differ from your TV.
INPUT
MENU
VOL
CH
ENTER
CHANNEL ( , )
Buttons
VOLUME
(-, +) Buttons
ENTER Button
19/22LD350, 19/22LD350C
MENU Button
POWER Button
INPUT Button
SPEAKER
Power/Standby Indicator
Illuminates red in standby mode.
Illuminates blue when the TV is switched on.
Remote Control Sensor
CH
VOL
ENTER
INPUT
MENU
CHANNEL ( , )
Buttons
VOLUME (+, -)
Buttons
ENTER Button
MENU Button
INPUT Button
POWER Button
26/32LD350

11
32LD320
INPUT
MENU
ENTER
CH
VOL
CHANNEL (
DD
,
EE
)
Buttons
VOLUME (+, -)
Buttons
ENTER Button
MENU Button
INPUT Button
POWER Button
SPEAKER
Remote Control Sensor,
Power/Standby Indicator
Illuminates red in standby mode.
Illuminates blue when the TV is switched on.

PREPARATION
12
BACK PANEL INFORMATION
PREPARATION
K
AC-IN
RS-232C IN
(
CONTROL&SERVICE)
ANTENNA/
CABLE IN
VIDEO
YPB PR
L R
AUDIO
RGB IN (PC)
/DVI IN
AV IN
VIDEO
AUDIO
R
L/MONO
COMPONENT IN
OPTICAL
DIGITAL
AUDIO OUT
AUDIO IN
(RGB/DVI)
1 4
19/22LD350, 19/22LD350C
7 6
■
Image shown may differ from your TV.
USB IN
SERVICE ONLY
H/P
2 3 5
IN 2
VIDEO
AUDIO
L/MONO
R
H/P
USB IN
SERVICE ONLY
AV IN 2
1
8
9
5
9
8
11
1
/DVI IN
RS-232C IN
(
CONTROL&SERVICE)
ANTENNA
/CABLE IN
VIDEO
YPB PR
L R
AUDIO
RGB IN (PC)
VIDEO
AUDIO
R
L/MONO
COMPONENT IN
OPTICAL
DIGITAL
AUDIO OUT
AUDIO IN
(RGB/DVI)
AV IN 1
1 4
26LD350
7 6
2 3 5

PREPARATION
13
■
Image shown may differ from your TV.
AC IN
IN 2
VIDEO
AUDIO
L/MONO
R
H/P USB IN
AV IN 2
1
10
9
5
1
/DVI IN
RS-232C IN
(
CONTROL&SERVICE)
ANTENNA
/CABLE IN
VIDEO
YPB PR
L R
AUDIO
RGB IN (PC)
VIDEO
AUDIO
R
L/MONO
COMPONENT IN
OPTICAL
DIGITAL
AUDIO OUT
AUDIO IN
(RGB/DVI)
AV IN 1
1 4
32LD350, 32LD320
7 6
2 3 5
11
HDMI/DVI IN, HDMI IN
Digital Connection.
Supports HD video and Digital audio. Doesn’t
support 480i.
Accepts DVI video using an adapter or HDMI to
DVI cable (not included).
RGB IN (PC)
Analog PC Connection. Uses a D-sub 15 pin cable
(VGA cable).
AUDIO IN (RGB/DVI)
1/8" (0.32 cm) headphone jack for analog PC
audio input.
OPTICAL DIGITAL AUDIO OUT
Digital optical audio output for use with amps and
home theater systems.
Note: In standby mode, this port doesn’t work.
RS-232C IN (CONTROL & SERVICE) PORT
Used by third party devices.
This port is used for Service or Hotel mode.
AV (Audio/Video) IN
Analog composite connection. Supports standard
definition video only (480i).
ANTENNA/CABLE IN
Connect over-the air signals to this jack.
Connect cable signals to this jack.
COMPONENT IN
Analog Connection.
Supports HD.
Uses a red, green, and blue cable for video & red
and white for audio.
USB IN SERVICE ONLY
Used for software updates.
HEADPHONE INPUT
0.32 cm (1/8 inch) headphone jack impedance
16
Ω, Maximum audio out 15 mW
USB IN
Used for viewing photos and listening to MP3s.
Power Cord Socket
For operation with AC power.
Caution: Never attempt to operate the TV on DC
power.
1
2
3
4
5
9
8
7
6
10
11

PREPARATION
14
STAND INSTRUCTIONS (For 19/22LD350, 19/22LD350C)
PREPARATION
■
Image shown may differ from your TV.
PROTECTION COVER
After removing the stand, install the included
pprrootteeccttiioonn ccoovveerr
over the hole for the stand.
After removing the protection paper from the
protection cover, adhere it to the TV as shown.
Carefully place the TV screen side down on a
cushioned surface to protect the screen from
damage.
Assemble the TV as shown until you hear it click.
1
2
INSTALLATION
DETACHMENT
Carefully place the TV screen side down on a
cushioned surface to protect the screen from
damage.
1
Remove the screws from the TV.
2
Detach the stand from TV.
3
PPRROOTTEECCTTIIOONN CCOOVVEERR

PREPARATION
15
STAND INSTRUCTIONS (For 32LD320)
Carefully place the TV screen side down on a
cushioned surface to protect the screen from
damage.
Assemble the TV as shown.
Fix the 4 screws securely using the holes in the
back of the TV.
1
2
3
INSTALLATION
GG
When assembling the desk type stand, make sure
the screw is fully tightened (If not tightened fully,
the TV can tilt forward after the product installa-
tion). Do not over tighten.
NOTE
!
DETACHMENT
Carefully place the TV screen side down on a
cushioned surface to protect the screen from
damage.
1
Loose the screws from TV.
2
Detach the stand from TV.
3
After removing the stand, install the included
pprrootteecc--
ttiioonn ccoovveerr
over the hole for the stand.
Press the
PPRROOTTEECCTTIIOONN CCOOVVEERR
into the TV until
you hear it click.
PROTECTION COVER
(M4x24)

PREPARATION
16
STAND INSTRUCTIONS (For 26/32LD350)
PREPARATION
Carefully place the TV screen side down on a
cushioned surface to protect the screen from
damage.
Assemble the parts of the
SSTTAANNDD BBOODDYY
with
CCOOVVEERR BBAASSEE
of the TV by using the 4
screws supplied.
Fix the 4 screws securely using the holes in the
back of the TV.
1
2
Assemble the TV as shown.
3
4
INSTALLATION
GG
When assembling the desk type stand, make sure
the screws are fully tightened (If not tightened
fully, the TV can tilt forward after the product
installation). Do not over tighten.
NOTE
!
■
Image shown may differ from your TV.
CCOOVVEERR BBAASSEE
SSTTAANNDD BBOODDYY
(M4x20)
(M4x20)

PREPARATION
17
DETACHMENT
Carefully place the TV screen side down on a
cushioned surface to protect the screen from
damage.
1
Remove the screws from the TV.
2
Detach the stand from TV.
3
After removing the stand, install the included
pprrootteeccttiioonn ccoovveerr
over the hole for the stand.
Press the
PPRROOTTEECCTTIIOONN CCOOVVEERR
into the TV
until you hear it click.
PROTECTION COVER

PREPARATION
18
VESA WALL MOUNTING
PREPARATION
Install your wall mount on a solid wall perpendicular to the floor. When attaching to other building materials, please
contact your nearest installer.
If installed on a ceiling or slanted wall, it may fall and result in severe personal injury.
We recommend that you use an LG brand wall mount when mounting the TV to a wall.
LG recommends that wall mounting be performed by a qualified professional installer.
GG
Do not install your wall mount kit while your TV is turned on. It may result in personal
injury due to electric shock.
CAUTION
GG
Screw length needed depends on the wall mount
used. For further information, refer to the instruc-
tions included with the mount.
GG
Standard dimensions for wall mount kits are shown
in the table.
GG
When purchasing our wall mount kit, a detailed
installation manual and all parts necessary for
assembly are provided.
GG
Do not use screws longer then the standard dimen-
sion, as they may cause damage to the inside to
the TV.
GG
For wall mounts that do not comply with the VESA
standard screw specifications, the length of the
screws may differ depending on their specifica-
tions.
GG
Do not use screws that do not comply with the
VESA standard screw specifications.
Do not use fasten the screws too strongly, this may
damage the TV or cause the TV to a fall, leading to
personal injury. LG is not liable for these kinds of
accidents.
GG
LG is not liable for TV damage or personal injury
when a non-VESA or non specified wall mount is
used or the consumer fails to follow the TV installa-
tion instructions.
NOTE
!
Model
VESA (A
*
B)
Standard Screw Quantity
Wall Mounting Bracket
(sold separately)
19LD350,
19LD350C,
22LD350,
22LD350C
26LD350,
32LD350,
32LD320
10 0
*
10 0 M 4 4
200
*
10 0 M 4 4
AA
BB
LSW100B, LSW100BG

PREPARATION
19
CABLE MANAGEMENT
For 19/22LD350, 19/22LD350C
After connecting the cables as necessary,
install CABLE HOLDER as shown and bundle
the cables.
K
AC-IN
1
■
Image shown may differ from your TV.
For 26/32LD350, 32LD320
AC IN
AC IN
AC IN
AC IN
AC IN
AC IN
AC IN
AC IN
AC IN
Connect the cables as necessary.
To connect additional equipment, see the
EXTERNAL EQUIPMENT SETUP section.
Open the CABLE MANAGEMENT CLIP as
shown.
CABLE MANAGEMENT CLIP
1
2
Put the cables inside the CABLE MANAGEMENT
CLIP and snap it closed.
3

PREPARATION
20
DESKTOP PEDESTAL INSTALLATION
PREPARATION
For proper ventilation, allow a clearance of 4 inches on all four sides from the wall.
■
Image shown may differ from your TV.
4 inches
GG
Ensure adequate ventilation by following the clearance recommendations.
GG
Do not mount near or above any type of heat source.
CAUTION
4 inches
4 inches
4 inches
SWIVEL STAND (Except 19/22LD350, 19/22LD350C)
After installing the TV, you can adjust the TV set manually to the left or right direction by 20 degrees to suit
your viewing position.
POSITIONING YOUR DISPLAY (For 19/22LD350, 19/22LD350C)
■
Here shown may be somewhat different from your TV.
■
Adjust the position of the panel in various ways for maximum comfort.
• Tilt range
12
0
3
0

PREPARATION
21
ATTACHING THE TV TO A DESK (Except 19/22LD350, 19/22LD350C)
The TV must be attached to a desk so it cannot be pulled in a forward/backward direction, potentially causing
injury or damaging the product.
GG
To prevent TV from falling over, the TV should be securely attached to the floor/wall per installation
instructions. Tipping, shaking, or rocking the machine may cause injury.
WARNING
1-Screw
(provided as parts of the product)
Desk
Stand
KENSINGTON SECURITY SYSTEM
■
This feature is not available for all models.
- The TV is equipped with a Kensington Security System connector on
the back panel. Connect the Kensington Security System cable as
shown below.
- For the detailed installation and use of the Kensington Security
System, refer to the user’s guide provided with the Kensington
Security System.
For further information, contact
hhttttpp::////wwwwww..kkeennssiinnggttoonn..ccoomm
,
the internet homepage of the Kensington company. Kensington sells
security systems for expensive electronic equipment such as note-
book PCs and LCD projectors.
NOTE: The Kensington Security System is an optional accessory.

PREPARATION
22
SECURING THE TV TO THE WALL TO PREVENT FALLING
WHEN THE TV IS USED ON A STAND
PREPARATION
We recommend that you set up the TV close to a wall so it cannot fall over if pushed backwards.
Additionally, we recommend that the TV be attached to a wall so it cannot be pulled in a forward direction,
potentially causing injury or damaging the product.
Caution: Please make sure that children don’t climb on or hang from the TV.
■
Insert the eye-bolts (or TV brackets and bolts) to tighten the product to the wall as shown in the picture.
*If your product has the bolts in the eye-bolts position before inserting the eye-bolts, loosen the bolts.
* Insert the eye-bolts or TV brackets/bolts and tighten them securely in the upper holes.
Secure the wall brackets with the bolts (sold separately) to the wall. Match the height of the bracket that is
mounted on the wall to the holes in the product.
Ensure the eye-bolts or brackets are tightened securely.
■
Use a sturdy rope (sold separately) to tie the product. It is safer to tie
the rope so it becomes horizontal between the wall and the product.
■
You should purchase necessary components to prevent the TV from tipping over (when not using a wall mount).
■
Image shown may differ from your TV.
GG
Use a platform or cabinet strong enough and large enough to support the size and weight of the TV.
GG
To use the TV safely make sure that the height of the bracket on the wall and the one on the TV are the same.
NOTE
!

PREPARATION
23
ANTENNA OR CABLE CONNECTION
1. Antenna (Analog or Digital)
Wall Antenna Socket or Outdoor Antenna without a Cable Box
Connections.
For optimum picture quality, adjust antenna direction if needed.
2. Cable
Wall
Antenna
Socket
Outdoor
Antenna
(VHF, UHF)
Cable TV
Wall Jack
Multi-family Dwellings/Apartments
(Connect to wall antenna socket)
RF Coaxial Wire (75 ohm)
RF Coaxial Wire (75 ohm)
Single-family Dwellings /Houses
(Connect to wall jack for outdoor antenna)
Be careful not to bend the copper wire
when connecting the antenna.
Copper Wire
■
To improve the picture quality in a poor signal area, please purchase a signal amplifier and install properly.
■
If the antenna needs to be split for two TV’s, install a 2-Way Signal Splitter.
■
If the antenna is not installed properly, contact your dealer for assistance.
ANTENNA
/CABLE IN
■
To prevent damage do not connect to the power outlet until all connections are made between the devices.
■
Image shown may differ from your TV.
ANTENNA
/CABLE IN

EXTERNAL EQUIPMENT SETUP
24
EXTERNAL EQUIPMENT SETUP
HD RECEIVER SETUP
This TV can receive digital over-the-air/digital cable signals without an external digital set-top box. However, if
you do receive digital signals from a digital set-top box or other digital external device.
Component Connection
1. How to connect
Connect the video outputs
(
Y, P
B
, PR
)
of the digital set-
top box to the
CCOOMMPPOONNEENNTT IINN VVIIDDEEOO
jacks on
the TV. Match the jack colors (Y = green, P
B
= blue, and
P
R = red).
Connect the audio output of the digital set-top box to
the
CCOOMMPPOONNEENNTT IINN AAUUDDIIOO
jacks on the TV.
2
1
2. How to use
■
Turn on the digital set-top box.
(
Refer to the owner’s manual for the digital set-top box operation.
)
■
Select the
CCoommppoonneenntt
input source on the TV using the
IINNPPUUTT
button on the remote control.
■
To prevent the equipment damage, never plug in any power cords until you have finished connecting all equipment.
■
This part of EXTERNAL EQUIPMENT SETUP mainly use picture for
3322LLDD335500
.
RS-232C IN
(
CONTROL&SERVICE)
ANTENNA
/CABLE IN
B IN (PC)
VIDEO
AUDIO
R
L/MONO
OPTICAL
DIGITAL
AUDIO OUT
AUDIO IN
(RGB/DVI)
AV IN 1
VIDEO
YPB PR
L R
AUDIO
COMPONENT IN
Y L RPB PR
1
2
Y, C
B/
PB
, C
R/P
R
Supported Resolutions
Horizontal Vertical
Frequency
(
KHz
)
Frequency
(
Hz
)
15.73 59.94
15.73 60.00
31.47 59.94
31.50 60.00
44.96 59.94
45.00 60.00
33.72 59.94
33.75 60.00
26.97 23.976
27.00 24.00
33.71 29.97
33.75 30.00
67.432 59.94
67.50 60.00
Resolution
720x480i
720x480p
1280x720p
1920x1080i
1920x1080p
Signal
480i
480p
720p
1080 i
1080 p
Component
Yes
Yes
Yes
Yes
Yes
HDMI
No
Yes
Yes
Yes
Yes

EXTERNAL EQUIPMENT SETUP
25
HDMI Connection
Connect the digital set-top box to the
HHDDMMII//DDVVII
II NN
or
HHDDMMII//DDVVII IINN 11//22
* jack on the TV.
No separate audio connection is necessary.
HDMI supports both audio and video.
1. How to connect
2. How to use
■
Turn on the digital set-top box.
(
Refer to the owner’s manual for the digital set-top box.
)
■
Select the
HHDDMMII
or
HHDDMMII11//22
* input source on the TV
using the
IINNPPUUTT
button on the remote control.
2
1
RS-232C IN
(
CONTROL&SERV
VIDEO
YPB PR
L
AUDIO
RGB IN (PC)
VIDEO
AUD
L/MONO
COMPONENT IN
OPTICAL
DIGITAL
AUDIO OUT
AUDIO IN
(RGB/DVI)
1
/DVI IN
HDMI OUTPUT
1
HDMI-DTV
Horizontal Vertical
Frequency
(
KHz
)
Frequency
(
Hz
)
31.47 59.94
31.50 60.00
44.96 59.94
45.00 60.00
33.72 59.94
33.75 60.00
26.97 23.976
27.00 24.00
33.71 29.97
33.75 30.00
67.432 59.94
67.50 60.00
Resolution
720x480p
1280x720p
1920x1080i
1920x1080p
* HDMI 2: For 26/32LD350, 32LD320
GG
If an HDMI cables doesn’t support HDMI version 1.3, it
can cause flickers or no screen display. In this case use the
latest cables that support HDMI version 1.3.
GG
HDMI Audio Supported Format: AC3 (32 KHz, 44.1 KHz,
48 KHz), Linear PCM (32 KHz, 44.1 KHz, 48 KHz)
NOTE
!

EXTERNAL EQUIPMENT SETUP
26
EXTERNAL EQUIPMENT SETUP
DVI to HDMI Connection
RS-232C IN
(
CONTROL&SERVICE)
VIDEO
YPB PR
L R
AUDIO
RGB IN (PC)
VIDEO
AUDIO
R
L/MONO
COMPONENT IN
OPTICAL
DIGITAL
AUDIO OUT
AV IN 1
1
/DVI IN
AUDIO IN
(RGB/DVI)
L R
DVI OUTPUT
AUDIO
1
2
GG
A DVI to HDMI cable or adapter is required for this con-
nection. DVI doesn't support audio, so a separate audio
connection is necessary.
NOTE
!
Connect the DVI output of the digital set-top box to
the
HHDDMMII//DDVVII IINN
or
HHDDMMII//DDVVII IINN 11
jack on the
TV.
Connect the digital set-top box audio output to the
AAUUDDIIOO IINN ((RRGGBB//DDVVII))
jack on the TV.
1. How to connect
2. How to use
■
Turn on the digital set-top box.
(
Refer to the owner’s manual for the digital set-top box.
)
■
Select the
HHDDMMII
or
HHDDMMII11
input source on the TV using
the
IINNPPUUTT
button on the remote control.
2
1

EXTERNAL EQUIPMENT SETUP
27
DVD SETUP
Component Connection
Component Input ports
To get better picture quality, connect a DVD player to the
component input ports as shown below.
Component ports on the TV
YPB PR
Video output ports
on DVD player
Y
Y
Y
Y
P
B
B-Y
Cb
Pb
P
R
R-Y
Cr
Pr
RS-232C IN
(
CONTROL&SERVICE)
ANTENNA
/CABLE IN
N
(PC)
VIDEO
AUDIO
R
L/MONO
OPTICAL
DIGITAL
AUDIO OUT
AUDIO IN
(RGB/DVI)
AV IN 1
VIDEO
YPB PR
L R
AUDIO
COMPONENT IN
Y L RPB PR
1 2
Connect the video outputs
(
Y, PB
, P
R
)
of the DVD to
the
CCOOMMPPOONNEENNTT IINN VVIIDDEEOO
jacks on the TV. Match
the jack colors
(
Y = green, P
B
= blue, and PR = red
)
.
Connect the audio outputs of the DVD to the
CCOOMMPPOONNEENNTT IINN AAUUDDIIOO
jacks on the TV.
1. How to connect
2. How to use
■
Turn on the DVD player, insert a DVD.
■
Select the
CCoommppoonneenntt
input source on the TV using the
IINNPPUUTT
button on the remote control.
■
Refer to the DVD player's manual for operating instructions.
2
1

EXTERNAL EQUIPMENT SETUP
28
EXTERNAL EQUIPMENT SETUP
Composite (RCA) Connection
RS-232C IN
(
CONTROL&SERVICE)
ANTENNA
/CABLE IN
VIDEO
YPB PR
L R
AUDIO
N (PC)
COMPONENT IN
OPTICAL
DIGITAL
AUDIO OUT
AUDIO IN
(RGB/DVI)
VIDEO
AUDIO
R
L/MONO
AV IN 1
L R
VIDEO
AUDIO
HDMI Connection
RS-232C I
(
CONTROL&SER
VIDEO
YPB PR
L
AUD
RGB IN (PC)
VIDEO
AU
L/MONO
COMPONENT IN
OPTICAL
DIGITAL
AUDIO OUT
AUDIO IN
(RGB/DVI)
1
/DVI IN
HDMI OUTPUT
1
Connect the
AAUUDDIIOO
/
VVIIDDEEOO
jacks between TV and
DVD. Match the jack colors (Video = yellow, Audio Left
= white, and Audio Right = red).
1. How to connect
2. How to use
■
Turn on the DVD player, insert a DVD.
■
Select the
AAVV
or
AAVV11//22
* input source on the TV using the
IINNPPUUTT
button on the remote control.
■
Refer to the DVD player's manual for operating instructions.
1
Connect the HDMI output of the DVD to the
HHDDMMII//DDVVII IINN
or
HHDDMMII//DDVVII IINN 11//22
* jack on
the TV.
No separated audio connection is necessary.
HDMI supports both audio and video.
1. How to connect
2. How to use
■
Select the
HHDDMMII
or
HHDDMMII11//22
* input source on the TV
using the
IINNPPUUTT
button on the remote control.
■
Refer to the DVD player's manual for operating instructions.
2
1
* AV2: For 26/32LD350, 32LD320
* HDMI 2: For 26/32LD350, 32LD320
GG
If an HDMI cables doesn’t support HDMI version 1.3, it
can cause flickers or no screen display. In this case use the
latest cables that support HDMI version 1.3.
GG
HDMI Audio Supported Format: AC3 (32KHz, 44.1KHz,
48KHz), Linear PCM (32KHz, 44.1KHz, 48KHz)
NOTE
!
1

EXTERNAL EQUIPMENT SETUP
29
VCR SETUP
Antenna Connection
Connect the RF antenna out socket of the
VCR to the
AANNTTEENNNNAA//CCAABBLLEE IINN
sock-
et on the TV.
Connect the antenna cable to the RF
antenna in socket of the VCR.
1. How to connect
■
Set VCR output switch to 3 or 4 and then tune
TV to the same channel number.
■
Insert a video tape into the VCR and press PLAY
on the VCR.
(
Refer to the VCR owner’s manual.
)
2. How to use
2
1
R
IO
UDIO
R
AV IN 1
ANTENNA
/CABLE IN
L R
S-VIDEO VIDEO
OUTPUT
SWITCH
ANT IN
ANT OUT
AUDIO
Wall Jack
Antenna
1
2
Composite (RCA) Connection
GG
If you have a mono VCR, connect the audio cable from
the VCR to the
AAUUDDIIOO LL//MMOONNOO
jack of the TV.
NOTE
!
L R
S-VIDEO VIDEO
AUDIO
OUTPUT
SWITCH
ANT IN
ANT OUT
RS-232C IN
(
CONTROL&SERVICE)
ANTENNA
/CABLE IN
VIDEO
YPB PR
L R
AUDIO
IN (PC)
COMPONENT IN
OPTICAL
DIGITAL
AUDIO OUT
AUDIO IN
(RGB/DVI)
VIDEO
AUDIO
R
L/MONO
AV IN 1
1
Connect the
AAUUDDIIOO
/
VVIIDDEEOO
jacks between TV and
VCR. Match the jack colors (Video = yellow, Audio Left
= white, and Audio Right = red).
1. How to connect
2. How to use
■
Insert a video tape into the VCR and press PLAY on the
VCR.
(
Refer to the VCR owner’s manual.
)
■
Select the
AAVV
or
AAVV11//22
* input source on the TV using
the
IINNPPUUTT
button on the remote control.
1
* AV2: For 26/32LD350, 32LD320

EXTERNAL EQUIPMENT SETUP
30
EXTERNAL EQUIPMENT SETUP
OTHER A/V SOURCE SETUP
VIDEO
AUDIO
L/MONO
R
USB IN
AV IN 2
IN 2
H/P
L R
VIDEO
Camcorder
Video Game Set
Connect the
AAUUDDIIOO
/
VVIIDDEEOO
jacks
between TV and external equipment.
Match the jack colors
.
(
Video = yellow, Audio Left = white, and
Audio Right = red
)
1. How to connect
2. How to use
■
Select the
AAVV22
* input source on the TV using
the
IINNPPUUTT
button on the remote control.
■
If connected to
AAVV
or
AAVV IINN 11
input, select
the
AAVV
or
AAVV11
input source on the TV.
■
Operate the corresponding external equipment.
1
1
* AV2: For 26/32LD350, 32LD320
USB CONNECTION (For 32LD350, 32LD320)
IN 2
VIDEO
AUDIO
L/MONO
R
H/P USB IN
AV IN 2
Memory Key
Connect the USB device to the
UUSSBB II NN
jack on the side
of TV.
1. How to connect
1
2. How to use
■
After connecting the
UUSSBB II NN
jack, you use the USB
function. (
GG
pp..5588
)
1
or

EXTERNAL EQUIPMENT SETUP
31
AUDIO OUT CONNECTION
Send the TV’s audio to external audio equipment via the Audio Output port.
If you want to enjoy digital broadcasting through 5.1-channel speakers, connect the OPTICAL DIGITAL
AUDIO OUT terminal on the back of TV to a Home Theater (or amp).
1
/DVI IN
RS-232C IN
(
CONTROL&SERVICE)
VIDEO
YPB PR
L R
AUDIO
RGB IN (PC)
VIDEO
AUDIO
R
L/MONO
COMPONENT IN
AUDIO IN
(RGB/DVI)
AV IN 1
OPTICAL
DIGITAL
AUDIO OUT
1
2
GG
When connecting with external audio equipments, such as
amplifiers or speakers, you can turn the TV speakers off in
the menu (
GG
pp..8855
).
NOTE
!
G
Do not look into the optical output port. Looking at the
laser beam may damage your vision.
GG
Audio with ACP (Audio Copy Protection) function may
block digital audio output.
CAUTION
Connect one end of the optical cable to the TV port of
OOPPTTIICCAALL DDIIGGIITTAALL AAUUDDIIOO OOUUTT
.
Connect the other end of the optical cable to the digi-
tal audio input on the audio equipment.
Set the “TV Speaker option - Off” in the AUDIO
menu. (
GG
pp..8855
). See the external audio equipment
instruction manual for operation.
1. How to connect
2
3
1
HEADPHONE SETUP
You can listen to the sound through the headphone.
Plug the headphone into the headphone socket.
To adjust the headphone volume, press the
VVOOLL
+ or
- button. If you press the
MMUUTTEE
button, the sound
from the headphone is switched off.
1. How to connect
2
1
IN 2
VIDEO
AUDIO
L/MONO
R
AV IN 2
H/P
USB IN

PC SETUP
EXTERNAL EQUIPMENT SETUP
32
EXTERNAL EQUIPMENT SETUP
This TV provides Plug and Play capability, meaning that the PC adjusts automatically to the TV's settings.
VGA (D-Sub 15 pin) Connection
1
/DVI IN
RS-232C I
(
CONTROL&SERV
VIDEO
YPB PR
L
AUDI
VIDEO
AU
L/MONO
COMPONENT IN
OPTICAL
DIGITAL
AUDIO OUT
RGB IN (PC)
AUDIO IN
(RGB/DVI)
RGB OUTPUT
AUDIO
2
1
Connect the VGA output of the PC to the
RRGGBB IINN
((
PPCC
))
jack on the TV.
Connect the PC audio output to the
AAUUDDIIOO IINN
((
RRGGBB//DDVVII
))
jack on the TV.
1. How to connect
2. How to use
■
Turn on the PC and the TV.
■
Select the
RRGGBB--PPCC
input source on the TV using the
IINNPPUUTT
button on the remote control.
2
1
DVI to HDMI Connection
RS-232C IN
(
CONTROL&SERVICE)
VIDEO
YPB PR
L R
AUDIO
RGB IN (PC)
VIDEO
AUDIO
R
L/MONO
COMPONENT IN
OPTICAL
DIGITAL
AUDIO OUT
AV IN 1
1
/DVI IN
AUDIO IN
(RGB/DVI)
DVI OUTPUT
AUDIO
1
2
Connect the DVI output of the PC to the
HHDDMMII//DDVVII
II NN
or
HHDDMMII//DDVVII IINN 11
jack on the TV.
Connect the PC audio output to the
AAUUDDIIOO IINN
((RRGGBB//DDVVII))
jack on the TV.
1. How to connect
2. How to use
■
Turn on the PC and the TV.
■
Select the
HHDDMMII
or
HHDDMMII11
input source on the TV using
the
IINNPPUUTT
button on the remote control.
2
1

EXTERNAL EQUIPMENT SETUP
33
NOTES
!
Horizontal Vertical
Frequency
(
KHz
)
Frequency
(
Hz
)
31.469 70.08
31.469 70.08
31.469 59.94
37.879 60.31
48.363 60.00
47.776 59.87
47.720 59.799
Resolution
720x400
1360x768
640x480
800x600
1024x768
640x350
1280x768
Supported Display Specifications (RGB-PC, HDMI-PC)
GG
To get the the best picture quality, adjust the PC
graphics card to 1360x768.
GG
Depending on the graphics card, DOS mode may
not work if a HDMI to DVI Cable is in use.
GG
In PC mode, there may be noise associated with
the resolution, vertical pattern, contrast or bright-
ness. If noise is present, change the PC output to
another resolution, change the refresh rate to
another rate or adjust the brightness and contrast
on the PICTURE menu until the picture is clear.
GG
Avoid keeping a fixed image on the screen for a
long period of time. The fixed image may become
permanently imprinted on the screen.
GG
The synchronization input form for Horizontal and
Vertical frequencies is separate.
GG
Depending on the graphics card, some resolution
settings may not allow the image to be positioned
on the screen properly.
GG
When selecting HDMI-PC, set the “Input Label -
PC” in the OPTION menu.

EXTERNAL EQUIPMENT SETUP
34
EXTERNAL EQUIPMENT SETUP
Screen Setup for PC mode
Selecting Resolution
You can choose the resolution in RGB-PC mode.
The
PPoossiittiioonn
,
PPhhaassee
, and
SSiizzee
can also be adjusted.
You can use this function only when the PC resolution is set to 1024X768, 1280X768 or 1360X768.
Select
PPIICCTTUURREE
.
Select
SSccrreeeenn ((RRGGBB--PPCC))
.
Select
RReessoolluuttiioonn
.
Select the desired resolution.
1
MENU
3
4
2
ENTER
ENTER
ENTER
5
ENTER
Auto Config.
Resolution
Position
Size
Phase
Reset
SCREEN
Move
Prev.
1024 x 768
1280 x 768
1360 x 768
Enter
Move
PICTURE
E
RG
• Contrast 50
• Brightness 50
• Sharpness 50
• Color 50
• Tint 0
• Advanced Control
• Picture Reset
Screen (RGB-PC)

EXTERNAL EQUIPMENT SETUP
35
Auto Configure
Automatically adjusts picture position and minimizes image instability. After adjustment, if the image is still
not correct, try using the manual settings or a different resolution or refresh rate on the PC.
Select
SSccrreeeenn ((RRGGBB--PPCC))
.
Select
AAuuttoo CCoonnffiigg..
.
Auto Config.
Resolution
Position
Size
Phase
Reset
SCREEN
Move
Prev.
To Set
3
2
ENTER
ENTER
Select
YYeess
.
4
ENTER
Start Auto Configuration.
5
ENTER
Select
PPIICCTTUURREE
.
1
MENU
■
If the position of the image is still not
correct, try Auto adjustment again.
■
If picture needs to be adjusted again
after Auto adjustment in RGB-PC, you
can adjust the
PPoossiittiioonn
,
SSiizz ee
or
PPhhaassee
.
Yes No
Enter
Move
PICTURE
E
RG
• Contrast 50
• Brightness 50
• Sharpness 50
• Color 50
• Tint 0
• Advanced Control
• Picture Reset
Screen (RGB-PC)

EXTERNAL EQUIPMENT SETUP
36
EXTERNAL EQUIPMENT SETUP
Adjustment for screen Position, Size, and Phase
If the picture is not clear after auto adjustment and especially if characters are still trembling, adjust the picture
phase manually.
This feature operates only in RGB-PC mode.
Select
PPoossiittiioonn
,
SSiizzee
, or
PPhhaassee
.
Make appropriate adjustments.
Auto Config.
Resolution
Position
Size
Phase
Reset
GF
D
E
SCREEN
Move
Prev.
3
ENTER
4
ENTER
■
PPoossiittiioonn
: This function is to adjust pic-
ture to left/right and up/down as you
prefer.
■
SSiizzee
: This function is to minimize any
vertical bars or stripes visible on the
screen background. And the horizontal
screen size will also change.
■
PPhhaassee
: This function allows you to
remove any horizontal noise and clear or
sharpen the image of characters.
Select
PPIICCTTUURREE
.
Select
SSccrreeeenn ((RRGGBB--PPCC))
.
1
MENU
2
ENTER
5
ENTER
Enter
Move
PICTURE
E
RG
• Contrast 50
• Brightness 50
• Sharpness 50
• Color 50
• Tint 0
• Advanced Control
• Picture Reset
Screen (RGB-PC)

EXTERNAL EQUIPMENT SETUP
37
Screen Reset (Reset to original factory values)
Returns
PPoossiittiioonn
,
SSiizzee
, and
PPhhaassee
to the default factory settings.
This feature operates only in RGB-PC mode.
Auto Config.
Position
Resolution
Size
Phase
Reset
SCREEN
Move
Prev.
To Set
Select
RReesseett
.
3
ENTER
Select
PPIICCTTUURREE
.
Select
SSccrreeeenn ((RRGGBB--PPCC))
.
1
MENU
2
ENTER
Select
YYeess
.
4
ENTER
5
ENTER
Yes No
Enter
Move
PICTURE
E
RG
• Contrast 50
• Brightness 50
• Sharpness 50
• Color 50
• Tint 0
• Advanced Control
• Picture Reset
Screen (RGB-PC)

WATCHING TV / CHANNEL CONTROL
38
REMOTE CONTROL FUNCTIONS
WATCHING TV / CHANNEL CONTROL
When using the remote control, aim it at the remote control sensor on the TV.
ENERGY
CHVOL
123
45
0
6
789
P
A
G
E
SAVING
TV
AV MODE
INPUT
FAV
RATIO
MUTE
ENTER
MARK
LIST
FLASHBK
MENU
INFO
Q.MENU
BACK
EXIT
POWER
ENERGY SAVING
AV MODE
INPUT
TV
VOLUME UP
/DOWN
MARK
FAV
RATIO
MUTE
CHANNEL
UP/DOWN
PAGE
UP/DOWN
COLOR BUTTON
Turns the TV on from standby or off to standby.
Adjusts the Energy Saving.
GG
pp..7766
Toggles through preset Video and Audio modes.
GG
pp..5544
Rotates through inputs.
Also switches the TV on from standby.
GG
pp..5522
Returns to the last TV channel.
Adjusts the volume.
Select the input to apply the Picture Wizard settings.
GG
pp..6699
Use to mark or unmark a photo/music.
GG
pp..6600,, 6644
Scroll through the programmed Favorite channels.
GG
pp..5500
Changes the aspect ratio.
GG
pp..6666
Switches the sound on or off.
GG
pp..4400
Changes the channel.
Moves from one full set of screen information to the next
one.
Access special functions in some memus.
Controls USB menu (Photo List and Music List.)
Controls the SIMPLINK compatible devices.
USB,
SIMPLINK
Control buttons

WATCHING TV / CHANNEL CONTROL
39
■
Open the battery compartment cover on the
back side and install the batteries matching
correct polarity.
■
Install two 1.5V AAA batteries. Don’t mix old
or used batteries with new ones.
■
Close cover.
Installing Batteries
ENERGY
CHVOL
123
45
0
6
789
P
A
G
E
SAVING
TV
AV MODE
INPUT
FAV
RATIO
MUTE
ENTER
MARK
LIST
FLASHBK
MENU
INFO
Q.MENU
BACK
EXIT
— (DASH)
LIST
FLASHBK
MENU
INFO
Q.MENU
THUMBSTICK
(Up/Down/Left
Right/ENTER)
BACK
SIMPLINK
EXIT
Used to enter a program number for multiple program
channels such as 2-1, 2-2, etc.
Displays the channel table.
GG
pp..4488
Tunes to the last channel viewed.
Displays the main menu or clears all on-screen displays and
return to TV viewing.
Displays channel information at the top of the screen.
GG
pp..5511
Opens the list of Quick Menu options.
GG
pp..4444
Navigates the on-screen menus and adjusts the system
settings to your preference.
Allows the user to move return one step in an interactive
application or other user interaction function.
See a list of AV devices connected to TV.
When you toggle this button, the SIMPLINK menu appears
at the screen.
GG
pp..5566--5577
Clears all on-screen displays and return to TV viewing.
NUMBER button

WATCHING TV / CHANNEL CONTROL
40
TURNING ON THE TV
WATCHING TV / CHANNEL CONTROL
NOTE
!
GG
If you intend to be away on vacation, disconnect the power plug from the wall power outlet.
GG
If you do not complete the
IInniittiiaall sseettttiinngg
, it will appear whenever the TV is switched on until the
IInniittiiaall
sseettttiinngg
procedure is completed.
First, connect power cord correctly.
At this moment, the TV switches to standby mode.
■
In standby mode to turn TV on, press the ,
IINNPPUUTT
,
CC HH (( ))
button on the TV or press the
PPOOWWEERR
,
IINNPPUUTT
,
CCHH ((
or
))
,
NNuummbbeerr ((00
~
99 ))
button on the remote control.
Select the viewing source by using the
IINNPPUUTT
button on the remote control.
■
This TV is programmed to remember which power state it was last set to, even if the power cord is out.
When finished using the TV, press the
PPOOWWEERR
button on the remote control. The TV reverts to standby
mode.
1
2
3
Press the
CCHH ((
or
))
or
NNUUMMBBEERR
buttons to select a channel number.
1
VOLUME ADJUSTMENT
CHANNEL SELECTION
Press the
VVOOLL ((++
or
--))
button to adjust the volume.
If you want to switch the sound off, press the
MMUUTTEE
button.
You can cancel the Mute function by pressing the
MMUUTTEE
or
VVOOLL ((++
or
--))
button.
Adjust the volume to suit your personal preference.
1
2
3

WATCHING TV / CHANNEL CONTROL
41
INITIAL SETTING
This Function guides the user to easily set the essential items for viewing the TV for the first time when pur-
chasing the TV. It will be displayed on the screen when turning the TV on for the first time. It can also be acti-
vated from the user menus.
■
Default selection is “
HHoommee UUssee
”. We recommend setting the TV to “
HHoommee UUssee
” mode for the best pic-
ture in your home environment.
■
“
SSttoorree DDeemmoo
” Mode is only intended for use in retail environments. Customers can adjust the “
PPiiccttuurree
menu -
PPiiccttuurree mmooddee
” manually while inspecting the TV, but the TV will automatically return to preset in-
store mode after 5 minutes.
■
“
SSttoorree DDeemmoo
” Mode is an optimal setting for displaying at stores. “Store Demo” mode initializes the TV
to set the image quality.
■
You can also adjust
IInniittiiaall SSeettttiinngg
in the
OOPPTTIIOONN
menu.
Check your antenna connection and start
AAuuttoo TTuunniinngg
.
1
ENTER
Step3. Time setting
Step4. Auto Tuning
Language
Step1. Selecting Language
English
Español
Français
Selecting the environment.
Choose the setting mode you want.
Select [Home Use] when setting TV up
in-home. You can adjust picture quality
accordingly through Picture Mode menu
option.
Store Demo
Home Use
Mode Setting
Step2. Mode setting
NextPrevious
NextPrevious
Select
AAuuttoo
or
MMaannuuaall
.
Select desired time
option.
1
2
ENTER
Month
Current Time Setting
02
Date
21
Year
2009
Hour
10 AM
Minute
10
Time Zone
Eastern
Daylight Saving
Auto
FF
Auto
GG
Time Setting
NextPrevious
Before starting,
be sure that the
TV antenna is connected.
Auto Tuning
Next
Simple Manual
Previous
INFO
i
Select Menu Language.
1
ENTER
Select
HHoommee UUssee
.
1
ENTER
For 19/22LD350C

WATCHING TV / CHANNEL CONTROL
42
ON-SCREEN MENUS SELECTION
WATCHING TV / CHANNEL CONTROL
Your TV's OSD (On Screen Display) may differ slightly from that shown in this manual.
Display each menu.
Select a menu item.
Accept the current selection.
1
MENU
3
2
ENTER
ENTER
Return to TV viewing.
4
EXIT
Enter
Move
Auto Tuning
Manual Tuning
Channel Edit
CHANNEL
CHANNEL
TIME
PICTURE
OPTION
AUDIO
LOCK
Enter
Move
Auto Volume : On
Clear Voice II : On
• Level 3
Balance 0
Sound Mode : Standard
•
Infinite Sound :
Off
• Treble 50
• Bass 50
AUDIO
LR
-+
Enter
Move
Clock
Off Time : Off
On Time : Off
Sleep Timer : Off
TIME
Enter
Move
Lock System : Off
Set Password
Block Channel
Movie Rating
TV Rating-Children
TV Rating-General
Downloadable Rating
Input Block
LOCK
Enter
Move
Menu Language : English
Audio Language : English
Input Label
SIMPLINK : On
Key Lock : Off
Simple Manual
Caption : Off
Set ID : 1
OPTION
Lock System : Off
Set Password
Block Channel
TV Rating-English
TV Rating-French
Downloadable Rating
Input Block
For USA For Canada
Enter
Move
Aspect Ratio : 16:9
Picture Wizard
Energy Saving
: Off
Picture Mode : Standard
• Backlight 70
• Contrast 90
• Brightness 50
• Sharpness 70
PICTURE
E E
E
19/22/26LD350, 19/22LD350C

WATCHING TV / CHANNEL CONTROL
43
Display each menu.
Select a menu item.
Accept the current selection.
1
MENU
3
2
ENTER
ENTER
Return to TV viewing.
4
EXIT
Enter
Move
Auto Tuning
Manual Tuning
Channel Edit
CHANNEL
CHANNEL
OPTION
PICTURE
LOCK
AUDIO
INPUT
TIME
USB
Enter
Move
Aspect Ratio : 16:9
Picture Wizard
Energy Saving
: Off
Picture Mode : Standard
• Backlight 70
• Contrast 90
• Brightness 50
• Sharpness 70
PICTURE
E
Enter
Move
Auto Volume : On
Clear Voice II : On
• Level 3
Balance 0
Sound Mode : Standard
•
Infinite Sound :
Off
• Treble 50
• Bass 50
AUDIO
E
Enter
Move
Clock
Off Time : Off
On Time : Off
Sleep Timer : Off
TIME
Enter
Move
Photo List
Music List
USB
Enter
Move
TV
AV1
AV2
Component
RGB-PC
HDMI1
HDMI2
INPUT
Enter
Move
Lock System : Off
Set Password
Block Channel
Movie Rating
TV Rating-Children
TV Rating-General
Downloadable Rating
Input Block
LOCK
Lock System : Off
Set Password
Block Channel
TV Rating-English
TV Rating-French
Downloadable Rating
Input Block
Enter
Move
Menu Language : English
Audio Language : English
Input Label
SIMPLINK : On
Key Lock : Off
Simple Manual
Caption : Off
Set ID : 1
OPTION
For USA For Canada
E
LR
-+
32LD350, 32LD320
NOTE
!
GG
PPoowweerr IInnddiiccaattoorr
: For 32LD320

WATCHING TV / CHANNEL CONTROL
44
QUICK MENU
WATCHING TV / CHANNEL CONTROL
Display each menu.
Make appropriate adjustments.
ßßAAssppeecctt RRaattiioo
: Selects your desired picture format.
PPiiccttuurree MMooddee
: Selects the factory preset picture depend on the viewing environment.
SSoouunndd MMooddee
: Selects the factory preset sound for type of program.
MMuullttii AAuuddiioo
: Changes the audio language (Digital signal).
SSAAPP
: Selects MTS sound (Analog signal).
SSlleeeepp TTiimmeerr
: Select the amount of time before your TV turns off automatically.
DDeell//AAdddd//FFaavv
: Select channel you want to add/delete or add the channel to the Favorite List.
CCaappttiioonn
: Select on or off.
EEnneerrggyy SSaavviinngg
: Select the Energy Saving level to reduce the TV’s power consumption by adjusting back-
light.
UUSSBB DDeevviiccee
: Select “Eject” in order to eject a USB device.
Your TV's OSD (On Screen Display) may differ slightly from what is shown in this manual.
Q.Menu (Quick Menu) is a menu of features which users might use frequently.
1
Q.MENU
2
3
EXIT
Return to TV viewing.
A
16:9
FF
Aspect Ratio
GG
A
A
16:9
FF
Aspect Ratio
GG
19/22/26LD350, 19/22LD350C 32LD350, 32LD320

WATCHING TV / CHANNEL CONTROL
45
CHANNEL SETUP
Auto Scan (Auto Tuning)
Automatically finds all channels available through antenna or cable inputs, and stores them in memory on the
channel list.
Run this function if you change your residence or move the TV.
Auto Tuning memorizes only the channels available at the time.
Select
CCHHAANNNNEELL
.
Select
AAuuttoo TTuunniinngg
.
Select
YYeess
.
Run
AAuuttoo ttuunniinngg
.
Enter
Move
CHANNEL
Enter
Move
CHANNEL
1
MENU
3
2
ENTER
ENTER
4
ENTER
Auto Tuning
Manual Tuning
Channel Edit
Auto Tuning
Manual Tuning
Channel Edit
■
The TV will ask for a password if parental
control has been activated (LOCK
Menu). Use the password you set up in
the LOCK Menu to allow a channel
search.
■
When setting the Auto tuning or Manual
tuning, the number of maximum channels
you can store is 1000.
It is subject to change depending on the
broadcasting signal environment.
■
Memorizes all the available channels in
the order of DTV, TV, CADTV and CATV.
5
BACK
Return to the previous menu.
EXIT
Return to TV viewing.
Check your antenna connection.
The previous channel information
will be updated during Auto
Tuning.
Yes
No

WATCHING TV / CHANNEL CONTROL
46
WATCHING TV / CHANNEL CONTROL
Select
CCHHAANNNNEELL
.
1
MENU
2
ENTER
When selecting DTV or CADTV input signal, you can view the on-screen signal strength monitor to see the qual-
ity of the signal being received.
Add/Delete Channel (Manual Tuning)
Enter
Move
CHANNEL
Enter
Move
CHANNEL
Channel
Select channel type and
RF-channel number.
FF
DTV
GG
2
Close
Delete
Auto Tuning
Manual Tuning
Channel Edit
DTV 2-1
Bad Normal Good
Select
MMaannuuaall TTuunniinngg
.
Select
DDTTVV
,
TT VV
,
CCAADDTTVV
, or
CCAATTVV
.
Select channel you want to add
or delete.
3
ENTER
4
Select
AAdddd
or
DDeelleettee
.
5
ENTER
Auto Tuning
Manual Tuning
Channel Edit
■
The TV will ask for a password if parental
control has been activated (LOCK
Menu). Use the password you set up in
the LOCK Menu to allow a channel
search.
■
When setting the Auto tuning or Manual
tuning, the number of maximum channels
you can store is 1000.
It is subject to change depending on the
broadcasting signal environment.
6
BACK
Return to the previous menu.
EXIT
Return to TV viewing.

WATCHING TV / CHANNEL CONTROL
47
Select a channel.
3
ENTER
The channels in the Channel Edit List are displayed in black and the channels deleted from the Channel Edit
List are displayed in blue.
When a channel number is deleted, it means that you will be unable to select it using
CCHH
button during TV
viewing.
If you wish to select the deleted channel, directly enter the channel number with the NUMBER buttons or select
it in the
CChhaannnneell EEddiitt
menu.
Channel Editing
Enter
Move
CHANNEL
Auto Tuning
Manual Tuning
Channel Edit
Select
CCHHAANNNNEELL
.
1
MENU
2
ENTER
Select
CChhaannnneell EEddiitt
.
Return to the previous menu.
5
BACK
Return to TV viewing.
EXIT
Ch. Change
Page Change
CH
Navigation
Previous
Add/Delete
■
Keep pressing the button and use the
or buttons to move between DTV,
TV, CADTV and CATV.
■
If the channel list is too long, use the
CC HH
or button to move between pages.
Add or delete a channel.
4
BLUE

WATCHING TV / CHANNEL CONTROL
48
CHANNEL LIST
WATCHING TV / CHANNEL CONTROL
You can check which channels are stored in the memory by displaying the channel list.
Display the
CChhaannnneell LLiisstt
.
1
LIST
Displaying Channel List
Select a channel.
1
Switch to the chosen channel number.
2
ENTER
Selecting a channel in the channel list
Turn the pages.
1
CH
P
A
G
E
Return to TV viewing.
2
EXIT
Paging through a channel list
Exit
2-1
3-1
4-1
DTV
DTV
DTV
Channel List
This padlock is displayed
when the channel is locked
with parental control.

WATCHING TV / CHANNEL CONTROL
49
FAVORITE CHANNEL SETUP
Favorite Channels are a convenient feature that lets you quickly select channels of your choice without waiting
for the TV to select all the in-between channels.
To tune to a favorite channel, press the
FFAAVV
(Favorite) button repeatedly.
Return to TV viewing.
4
EXIT
Select
FFaavvoorriittee
.
3
Select your desired channel.
1
CH
P
A
G
E
123
45
0
6
789
2
Q.MENU
Select
DDeell//AAdddd//FFaavv
.
or
A
Favorite
FF
Del/Add/Fav
GG
A
Favorite
FF
Del/Add/Fav
GG

WATCHING TV / CHANNEL CONTROL
50
FAVORITE CHANNEL LIST
WATCHING TV / CHANNEL CONTROL
Exit
2-1
3-1
4-1
DTV
DTV
DTV
Favorite List
Select a channel.
1
Switch to the chosen channel number.
2
ENTER
Selecting a channel in the favorite channel list
Turn the pages.
1
CH
P
A
G
E
Return to TV viewing.
2
EXIT
Paging through a favorite channel list
Display the Favorite channel list.
1
FAV
MARK
Displaying the favorite channel list

WATCHING TV / CHANNEL CONTROL
51
BRIEF INFORMATION
1
INFO
Brief Info shows the present screen information.
Show the Brief Info on the screen.
2
BACK
Return to TV viewing.
Brief Info Title Test..
Sat, Feb 21, 2009 10:10 AM 11:40 AM
CNN
DOLBY DIGITAL
10:40 AM
Multilingual CaptionD 1080i TV-PG D L S V
CC
Program title
Day, Month, Year
Program start time
Program progress bar
Program finish time
Present time
Banner information
1 2 3 4 5 67
1
2
3
4
5
6
7
MMuullttiilliinngguuaall
: The program contains two or more audio services. Use
the
QQ..MMEENNUU
menu to select wanted Audio.
CCaappttiioonn
: The program contains one or more caption services. Use
the
QQ..MMEENNUU
menu to select wanted Closed caption.
DDoollbbyy DDiiggiittaall
: The program contains a Dolby Digital audio signal
in TV and HDMI input source.
The original aspect ratio of the video is 4:3
The original aspect ratio of the video is 16:9 (wide)
The video resolution is 720x480i
The video resolution is 720x480p
The video resolution is 1280x720p
The video resolution is 1920x1080i
The video resolution is 1920x1080p
VV--CChhiipp
: The program contains V-Chip information. Refer to the
LOCK menu: A (Age), D (Dialogue), L (Language), S (Sex), V
(Violence), FV (Fantasy Violence)
480i
480p
720p
1080 i
1080 p
4:3
16:9
CC
D

WATCHING TV / CHANNEL CONTROL
52
INPUT LIST
WATCHING TV / CHANNEL CONTROL
TV AV Component
HDMI RGB-PC
19/22LD350,
19/22LD350C:
TV AV1 AV2
HDMI2 HDMI1 RGB-PC
Component
26/32LD350,
32LD320:
Select the desired input source.
■
32LD350, 32LD320: You can also select the desired input source in the
IINNPPUUTT
menu.
1
INPUT
ENTER
TV AV Component RGB-PC HDMI1
TV AV Component RGB-PC HDMI1
Input Label
Exit
Select a desired input source (except
TT VV
).
Then, you can select your desired
IInnppuutt
LLaabbeell
with using Blue button.
GG
pp..5533
ie)
ie) In case of changing the input label using Blue button
Only these input signals which are connected to a TV can be activated and selected.
■
TT VV
: Select it to watch over-the-air, cable and digi-
tal cable broadcasts.
■
AAVV
: Select them to watch a VCR or other external
equipment.
■
CCoommppoonneenntt
: Select them to watch DVD or a
Digital set-top box.
■
RRGGBB--PPCC
: Select it to view PC input.
■
HHDDMMII
: Select them to watch high definition
devices.
VCR DVD PC Game
■
When new external device is connected, this popup menu is
displayed automatically.
If selecting
YYeess
, you can select input source that you want to
appreciate.
■
But, when selecting “
SSIIMMPPLLIINNKK
-
OOnn
”, popup menu for HDMI
input will not be displayed.
No
Yes
!
New external input is connected.
Do you want to use this?
AV2
Disconnected inputs are inactive (grayed out)

WATCHING TV / CHANNEL CONTROL
53
INPUT LABEL
This indicates which device is connected to which input port.
Enter
Move
OPTION
Menu Language : English
Audio Language : English
Input Label
SIMPLINK : On
Key Lock : Off
Simple Manual
Caption : Off
Set ID : 1
AV
Component
RGB-PC
HDMI
FF GG
Close
Select
OOPPTTIIOONN
.
Select
IInnppuutt LLaabbeell
.
Select the label.
1
MENU
2
ENTER
Select the source.
3
ENTER
4
5
BACK
Return to the previous menu.
EXIT
Return to TV viewing.
With using OPTION menu
Select the source.
Select the label.
1
INPUT
2
3
BACK
Return to the previous menu.
EXIT
Return to TV viewing.
With using INPUT button
19/22LD350,
19/22LD350C
AV1
AV2
Component
RGB-PC
HDMI1
HDMI2
FF GG
Close
26/32LD350,
32LD320
EE
BLUE

WATCHING TV / CHANNEL CONTROL
54
AV MODE
WATCHING TV / CHANNEL CONTROL
AV Mode toggles through preset Video and Audio settings.
1
AV MODE
2
Off Cinema
Game Sport
Press the
AAVV MMOODDEE
button repeatedly to
select the desired source.
ENTER
■
If you select “
CCiinneemmaa
” in AV mode,
CCiinneemmaa
will be selected both for “PIC-
TURE menu - Picture Mode” and “AUDIO
menu - Sound Mode” respectively.
■
If you select “
OOffff
” in AV mode, the
“
PPiiccttuurree MMooddee
” and “
SSoouunndd MMooddee
”
return to previous selected value.
■
OOffff
: Disables the AV MODE.
■
CCiinneemmaa
: Optimizes video and audio for
watching movies.
■
SSppoorrtt
: Optimizes video and audio for
watching sports events.
■
GGaammee
: Optimizes video and audio for
playing games.
SIMPLE MANUAL
You can easily and effectively access the TV information by viewing a simple manual on the TV.
During the Simple Manual operation, audio will be muted.
Select
OOPPTTIIOONN
.
Select
SSiimmppllee MMaannuuaall
.
1
MENU
2
ENTER
Select the part of the manual you
want to see.
3
ENTER
4
EXIT
Return to TV viewing.
Enter
Move
OPTION
Menu Language : English
Audio Language : English
Input Label
SIMPLINK : On
Key Lock : Off
Simple Manual
Caption : Off
Set ID : 1
EE

WATCHING TV / CHANNEL CONTROL
55
KEY LOCK
The TV can be set up so that it can only be used with the remote control.
This feature can be used to prevent unauthorized viewing by locking out the front panel controls.
This TV is programmed to remember which option it was last set to even if you turn the TV off.
Select
OOPPTTIIOONN
.
Select
KKeeyy LLoocckk
.
1
MENU
2
ENTER
Select
OO nn
or
OOffff
.
3
ENTER
■
In
KKeeyy LLoocckk
‘
OO nn
’, if the TV is turned off,
press the
rr
/ I, INPUT, CH
(( ))
button
on the TV or POWER, INPUT, CH
((
))
or NUMBER buttons on the remote
control.
■
With the
KKeeyy LLoocckk OOnn
, the display
‘
KKeeyy LLoocckk
’ appears on the screen if
any button on the front panel is pressed
while viewing the TV.
4
BACK
Return to the previous menu.
EXIT
Return to TV viewing.
!
Enter
Move
OPTION
Menu Language : English
Audio Language : English
Input Label
SIMPLINK : On
Key Lock : On
Simple Manual
Caption : Off
Set ID : 1
EE
Enter
Move
OPTION
Menu Language : English
Audio Language : English
Input Label
SIMPLINK : On
Key Lock : Off
Simple Manual
Caption : Off
Set ID : 1
EE
Off
On

WATCHING TV / CHANNEL CONTROL
56
WATCHING TV / CHANNEL CONTROL
SIMPLINK allows you to control and play other AV devices connected with HDMI cable without additional
cables and settings. This TV may work with devices with HDMI-CEC support, but only devices with the
logo are fully supported.
SIMPLINK can be turned on and off in the user menus.
Enter
Move
OPTION
Select
OOPPTTIIOONN
.
Select
SSIIMMPPLLIINNKK
.
Select
OOnn
or
OOffff
.
Enter
Move
OPTION
E
1
MENU
3
2
ENTER
ENTER
Menu Language : English
Audio Language : English
Input Label
SIMPLINK : On
Key Lock : Off
Simple Manual
Caption : Off
Set ID : 1
Menu Language : English
Audio Language : English
Input Label
SIMPLINK : On
Key Lock : Off
Simple Manual
Caption : Off
Set ID : 1
Off
On
NOTE
!
GG
Connect the HDMI/DVI IN or HDMI IN terminal of the TV to the rear terminal (HDMI terminal) of the
SIMPLINK device with the HDMI cable.
GG
When you switch the Input source with the INPUT button on the remote control, the SIMPLINK device
will stop.
GG
When you select a device with home theater functionality, the sound output automatically switches to
the home theater speakers and the TV speakers are turned off.
GG
If a connected SIMPLINK home theater system doesn't play the audio from the TV, connect the DIGITAL
AUDIO OUT terminal on the back of the TV to the DIGITAL AUDIO IN terminal on the back of the SIM-
PLINK device with an OPTICAL cable.
E
4
BACK
Return to the previous menu.
EXIT
Return to TV viewing.

WATCHING TV / CHANNEL CONTROL
57
■
DDiirreecctt PPllaayy::
After connecting AV devices to the TV, you can directly control the devices and play media with-
out additional settings.
■
SSeelleecctt AAVV ddeevviiccee::
Enables you to select one of the AV devices connected to TV.
■
DDiisscc ppllaayybbaacckk::
Control connected AV devices by pressing the ,
ENTER,
G
,
A
,
ll ll
,
FF
and
GG
buttons.
■
PPoowweerr ooffff aallll ddeevviicceess::
When you power off the TV, all connected devices are turned off.
■
SSwwiittcchh aauuddiioo--oouutt::
Offers an easy way to switch audio-out.
■
SSyynncc PPoowweerr oonn::
When the equipment with Simplink function connected HDMI terminal starts to play, The TV
will change automatically to turn on mode.
(A device, which is connected to the TV through a HDMI cable but does not support SIMPLINK, does not provide
this function)
Note: To operate SIMPLINK, an HDMI cable over Version 1.3 with *CEC function should be used. (*CEC: Consumer
Electronics Control).
SIMPLINK Menu
TTVV vviieewwiinngg
: Switch to the previous TV
channel regardless of the current mode.
DDIISSCC ppllaayybbaacckk
: Select and play discs.
When multiple discs are available, the titles
of discs are conveniently displayed at the
bottom of the screen.
VVCCRR ppllaayybbaacckk
: Control the connected
VCR.
HHDDDD RReeccoorrddiinnggss ppllaayybbaacckk
: Control
recordings stored in HDD.
AAuuddiioo OOuutt ttoo HHoommee TThheeaatteerr ssppeeaakk--
eerr//AAuuddiioo OOuutt ttoo TTVV
: Select Home
Theater speaker or TV speaker for Audio
Out.
SIMPLINK Functions
1
2
3
4
5
GG
When no device is connected
(displayed in gray)
GG
Selected Device
GG
When a device is connected
(displayed in bright color)
1
2
3
4
5
Display
SSIIMMPPLLIINNKK
menu.
Select the desired device.
Control connected AV devices.
1
3
2
ENTER
ENTER

ENTRY MODES
USB
58
USB (For 32LD350, 32LD320)
Precautions when using the USB device
GG
Only a USB storage device is recognizable.
GG
If the USB storage device is connected through a
USB hub, the device is not recognizable.
GG
A USB storage device using an automatic recogni-
tion program may not be recognized.
GG
A USB storage device which uses its own driver
may not be recognized.
GG
The recognition speed of a USB storage device
may depend on each device.
GG
Please do not turn off the TV or unplug the USB
device when the connected USB storage device is
working. When such device is suddenly separated
or unplugged, the stored files or the USB storage
device may be damaged.
GG
Only use a USB storage device which has normal
music files or image files.
GG
Please use only a USB storage device which was
formatted as a FAT 32 or NTFS file system provid-
ed with the Windows operating system. In case of
a storage device formatted as a different utility
program which is not supported by Windows, it
may not be recognized.
GG
Please connect power to a USB storage device
(over 0.5A) which requires an external power sup-
ply. If not, the device may not be recognized.
GG
Please connect a USB storage device with cable is
offered by USB maker. If connected with cable is
not offered by USB maker or an excessively long
cable, the device may not be recognized.
GG
Some USB storage devices may not be supported
or operate properly.
GG
Please backup important files because data on
USB device may be damaged. Data management is
consumer's responsibility and as a result, the man-
ufacturer does not cover data damage.
GG
If your USB memory device has multiple partitions,
or if you use a USB multi-card reader, you can use
up to 4 partitions or USB memory devices.
GG
In case of USB storage devices formatted as NTFS,
deletion is not allowable.
GG
File alignment method of USB storage device is
similar to Window XP and file name can recognize
up to 100 English characters.
GG
The recommended capacity is 1TB or less for a
USB external hard disk and 32 GB or less for USB
memory.
GG
If a USB external hard disk with a “Energy Saving”
function doesn’t work, turn the hard disk off and
on again to make it work properly. Refer to the
user manual of the application USB external hard
disk.
When removing the USB device
Connect the USB device to the
UUSSBB IINN
jacks on the side of TV.
3
Select
PPHHOOTTOO LLIISSTT
or
MMUUSSIICC LLIISSTT
.
1
IN 2
USB IN
Memory Key
PHOTO LIST MUSIC LIST
Select
UUSSBB DDeevviiccee
.
Select
EEjjeecctt
.
Select the
UUSSBB DDeevviiccee
menu before removing the
USB device.
2
ENTER
1
Q.MENU
2
ENTER
■
This TV supports JPG and MP3 files.
When you connect a USB device, this pop up menu is displayed automatically.
When the Pop Up menu does not appear, you can select Photo List or Music List in the USB menu.
In USB device, you can not add a new folder or delete the existing folder.

PHOTO LIST
USB
59
You can view .JPG files from USB storage devices.
The On Screen Display on your model may be slightly different.
Screen Components
Moves to upper level folder
Preview: Display the
thumbnail/folder name of
the photo in the selected
folder
Current page/Total pages
Total number of marked photos
Corresponding buttons on
the remote control
Supported photo file:
*
.JPG
■
You can play JPG files only.
■
Only baseline scan is supported among JPG.
■
Available JPG size (width x height, pixel): 64 x 64 - 15360 x 8640
Select
UUSSBB
.
Select
PPhhoottoo LLiisstt
.
2
1
MENU
ENTER
ENTER
1
2
3
4
5
Navigation Popup Menu Page Change Mark Exit
CH
MARK
5
Page 2/3
No Marked
Photo List
Up Folder
1366
x
768, 125KB
KY101
06/10/2008
KY102
04/03/2008
JMJ001
01/01/2000
JMJ002
06/15/2008
JMJ003
04/03/2008
JMJ004
02/18/2008
KY103
03/30/2008
KY104 06/19/2008
KY105
01/31/2008
JMJ005
05/13/2008
JMJ006
05/26/2008
JMJ007
02/18/2008
JMJ008
02/18/2008
Up Folder
Drive1
JMJ001
3 4
2
1

USB
60
USB
Photo Selection and Popup Menu
Select the target folder or drive.
Select the desired photos.
2
Show the Popup menu.
3
1
■
Use the
CCHH
button to navigation in the
photo page.
■
Use the
MMAARRKK
button to mark or unmark a
photo. When one or more photos are marked,
you can view individual photos or a slide show
of the marked photos. If no photos are marked,
you can view all photos individually or all pho-
tos in the folder in a slide show.
4
Select the desired Popup menu.
ENTER
ENTER
ENTER
Page 2/3
No Marked
Photo List
Up Folder
1366
x
768, 125KB
KY101
06/10/2008
KY102
04/03/2008
JMJ001
01/01/2000
JMJ002
06/15/2008
JMJ003
04/03/2008
JMJ004
02/18/2008
KY103
03/30/2008
KY104
06/19/2008
KY105
01/31/2008
JMJ005
05/13/2008
JMJ006
05/26/2008
JMJ007
02/18/2008
JMJ008
02/18/2008
Up Folder
Page 2/3
No Marked
Photo List
Up Folder
1366
x
768, 125KB
KY101
06/10/2008
KY102
04/03/2008
JMJ001
01/01/2000
JMJ002 06/15/2008
JMJ003
04/03/2008
JMJ004
02/18/2008
KY103
03/30/2008
KY104
06/19/2008
KY105
01/31/2008
JMJ005
05/13/2008
JMJ006 05/26/2008
JMJ007
02/18/2008
JMJ008
02/18/2008
Up Folder
Drive1
Drive1
JMJ001
JMJ001
1366x768, 125KB
View
Mark All
Delete
Close
Navigation Page Change Mark Exit
CH
MARK
Popup Menu
Navigation Page Change Mark Exit
CH
MARK
Popup Menu
When you select a file (not folder), this PopUp
menu is displayed.
GG
VViieeww
: Display the selected item.
GG
MMaarrkk AAllll
: Mark all photos on the screen.
GG
UUnnmmaarrkk AAllll
: Deselect all marked photos.
GG
DDeelleettee
: Delete the selected photo item.
GG
CClloossee
: Close the pop-up menu.

USB
61
Full Screen Menu
You can change the Photo List view so that it fills the screen. More operations are available in full
screen mode.
■
Use the
CCHH
button to navigation in the
photo page.
Select the target folder or drive.
Select the desired photos.
Show the Popup menu.
5
Select
VViieeww
.
The selected photo is displayed in
full size.
2
3
1
4
ENTER
ENTER
ENTER
Page 2/3
No Marked
Photo List
Up Folder
1366
x
768, 125KB
KY101
06/10/2008
KY102
04/03/2008
JMJ001 01/01/2000
JMJ002 06/15/2008
JMJ003 04/03/2008
JMJ004
02/18/2008
KY103
03/30/2008
KY104
06/19/2008
KY105
01/31/2008
JMJ005 05/13/2008
JMJ006 05/26/2008
JMJ007 02/18/2008
JMJ008 02/18/2008
Up Folder
Page 2/3
No Marked
Photo List
Up Folder
1366
x
768, 125KB
KY101
06/10/2008
KY102
04/03/2008
JMJ001
01/01/2000
JMJ002
06/15/2008
JMJ003
04/03/2008
JMJ004
02/18/2008
KY103
03/30/2008
KY104
06/19/2008
KY105
01/31/2008
JMJ005
05/13/2008
JMJ006
05/26/2008
JMJ007
02/18/2008
JMJ008
02/18/2008
Up Folder
Drive1
Drive1
JMJ001
JMJ001
1366x768, 125KB
View
Mark All
Delete
Close
Navigation Page Change Mark Exit
CH
MARK
Popup Menu
Navigation Page Change Mark Exit
CH
MARK
Popup Menu
The aspect ratio of a photo may change the size of
the photo displayed on the screen in full size.
1/17
Slideshow BGM Delete Option Hide

USB
62
USB
Select the
SSlliiddeesshhooww
,
BBGGMM
,
((RRoottaattee))
,
DDeelleettee
,
OOppttiioonn
, or
HHiiddee..
■
Use button to select the previous or
next photo.
■
Use button to select and control
the menu on the full-sized screen.
ENTER
6
NOTE
!
GG
This TV will not be able to decode
most JPG images saved using the
Progressive option.
1/17
Slideshow BGM Delete Option Hide
Press
FF GG
to set the time interval between slides.
Slide Speed
Fast
Cancel
...
Music Album
Enter
GG
SSlliiddeesshhooww
: Selected photos are displayed during the
slide show. If no photo is selected, all photos in the cur-
rent folder are displayed during slide show.
■
Set the time interval of the slide show in
OOppttiioonn
.
GG
BBGGMM
: Listen to music while viewing photos in full size.
■
Set the BGM device and album in
OOppttiioonn
.
GG
((RRoottaattee))
: Rotate photos.
■
Rotates the photo 90°, 18 0 °, 270°, 360° clockwise.
■
Photo cannot be rotated if its width is greater than
the available supported resolution height.
GG
DDeelleettee
: Delete photos.
GG
OOppttiioonn
: Set values for
SSlliiddee SSppeeeedd
and
MMuussiicc
AAllbbuumm
.
■
Use button and
EENNTTEERR
button to set
values. Then go to and press
EENNTTEERR
to save
the settings.
■
You cannot change
MMuussiicc AAllbbuumm
while BGM is
playing.
GG
HHiiddee
: Hide the menu on the full-sized screen.
■
To see the menu again on the full-sized screen, press
EENNTTEERR
button to display.

MUSIC LIST
USB
63
You can use the Music List menu to play MP3 files from a USB storage device.
This TV cannot play back copy-protected files.
The On Screen Display on your model may be slightly different.
Screen Components
Supported music file:
*
.MP3
Bit rate range 32 Kbps - 320 Kbps
• Sampling rate (Sampling Frequency)
MPEG1 layer 3: 32 kHz, 44.1 kHz, 48 kHz
MPEG2 layer 3: 16 kHz, 22.05 kHz, 24 kHz
MPEG2.5 layer 3: 8 kHz, 11.025 kHz, 12 kHz
Moves to upper level folder
Preview: If any album jacket
for the file exists, this jack-
et is displayed.
Current page/Total pages
Total number of marked
musics
Corresponding buttons on
the remote control
1
3
4
5
2
Select
UUSSBB
.
Select
MMuussiicc LLiisstt
.
1
2
MENU
ENTER
ENTER
Music List
Up Folder
Title Duration
3 4
2
1
Page 2/3
No Marked
Drive1
Navigation Popup Menu Page Change Mark Exit
CH
MARK
5
AA
00:00 / 04:16
Up Folder
M1
M2
M4
M5
M3
M3

USB
64
USB
Music Selection and Popup Menu
■
Use the
CCHH
button to navigation in
the music page.
■
Use
MMAARRKK
button to mark or unmark a music
file. If no music is marked, all the music in the
folder will be played in sequence. When one or
more music files are marked, the marked music
files will be played in sequence. If you want to
listen to only one song repeatedly, just mark
that one file and play.
Select the target folder or drive.
Select the desired musics.
Show the Popup menu.
Select the desired Popup menu.
2
3
1
4
ENTER
ENTER
ENTER
5
EXIT
Return to TV viewing.
Navigation Page Change Mark Exit
CH
MARK
Popup Menu
Navigation Page Change Mark Exit
CH
MARK
Popup Menu
Page 2/3
No Marked
Music List
Up Folder
AA
00:00 / 04:16
Up Folder
Drive1
Title
Duration
Page 2/3
No Marked
Music List
Up Folder
AA
00:00 / 04:16
Up Folder
Drive1
Title
Duration
3945 KB
128 Kbps
Play
Play with Photo
Mark All
Delete
Close
GG
PPllaayy
(During stop): Play the selected music.
Once a song finishes playing, the next selected
one will be played. When there are no selected
musics to play, the next one in the current fold-
er will be played. If you go to a different folder
and press the
EENNTTEERR
button, the current
music in playback will stop.
GG
PPllaayy MMaarrkkeedd
: Play the selected musics. Once
a music finishes playing, the next selected one
will be played automatically.
GG
SSttoopp PPllaayy
(During playback): Stop the play-
ing musics.
GG
PPllaayy wwiitthh PPhhoottoo
: Start playing the selected
musics and then move to the Photo List.
GG
MMaarrkk AAllll
: Mark all musics in the folder.
GG
UUnnmmaarrkk AAllll
: Deselect all marked music.
GG
DDeelleettee
: Delete the selected music.
GG
CClloossee
: Close the pop-up menu.
M1
M2
M3
M3
M4
M5
M1
M2
M3
M3
M4
M5

USB
65
■
The play information box (as shown below) will automatically
move across the screen when there is no user input to pre-
vent a fixed image remaining on the screen for a extended
period of time.
NOTE
!
GG
When music is playing, is displayed in front of the music play time.
GG
A damaged or corrupted music file that does not play displays 00:00 as the play time.
GG
Music files with copy-protection will not play.
GG
Press
EENNTTEERR
,
AA
,
BBAACCKK
, or
EEXXIITT
button to stop the screen saver.

PICTURE CONTROL
66
PICTURE SIZE (ASPECT RATIO) CONTROL
PICTURE CONTROL
This feature lets you choose the way an analog picture with a 4:3 aspect ratio is displayed on your TV.
You can select a different aspect ratio depending on input source (analog broadcasting, digital broadcasting,
aux).
■
You can also adjust
AAssppeecctt RRaattiioo
in
the
QQ..MMEENNUU
.
■
Press the
RRAATTIIOO
button repeatedly to
select the desired picture format.
Enter
Move
PICTURE
E
Enter
Move
PICTURE
E
Aspect Ratio : 16:9
Picture Wizard
Energy Saving
: Off
Picture Mode : Standard
• Backlight 70
• Contrast 90
• Brightness 50
• Sharpness 70
Aspect Ratio : 16:9
Picture Wizard
Energy Saving
: Off
Picture Mode : Standard
• Backlight 70
• Contrast 90
• Brightness 50
• Sharpness 70
16:9
Just Scan
Set By Program
4:3
Zoom
Cinema Zoom 1
Select
PPIICCTTUURREE
.
Select
AAssppeecctt RRaattiioo
.
Select the desired picture format.
1
MENU
3
2
ENTER
ENTER
4
BACK
Return to the previous menu.
EXIT
Return to TV viewing.

PICTURE CONTROL
67
16:9
Adjust the picture horizontally, in a linear pro-
portion to fill the entire screen.
Just Scan
Normally the edges of video signals are cropped
1-2%. Just Scan turns off this cropping and
shows the complete video.
Notes: If there is noise on the edges of the original
signal, it will be visible when Just Scan is activated.
JJuusstt SSccaann
operates only in
DTV/CADTV/Component/HDMI-DTV/DVI-DTV
(720p/1080i/1080p) input source.
Set By Program
Selects the proper picture proportion to match
the source’s image.
4:3
Choose 4:3 when you want to view a picture
with an original 4:3 aspect ratio.
Zoom
Choose Zoom when you want to view the picture
without any alteration. However, the top and
bottom portions of the picture will be cropped.
■
When adjusting in Q.MENU menu,
a. or button: Adjust proportion of Zoom.
b. or button: Move the image on the screen.
Cinema Zoom
Choose Cinema Zoom when you want to
enlarge the picture in correct proportion.
This enlarges an image with cinemascope aspect
ratio (2.35:1) without distortion.
Note: When enlarging or reducing the picture,
the image may become distorted.
■
or button: Adjust proportion of
Cinema Zoom. The adjustment range is 1-16.
■
or button: Move the image on the screen.
Just Scan
(4:3 4:3)
(16:9 16:9)
Set By Program
Set By Program

PICTURE CONTROL
68
PICTURE WIZARD
PICTURE CONTROL
Select
PPIICCTTUURREE
.
Select
PPiiccttuurree
WWiizzaarrdd
.
1
MENU
2
ENTER
ENTER
Adjust
PPiiccttuurree WWiizzaarrdd
.
Adjust
WWhhiittee LLeevveell
.
3
ENTER
Adjust
BBllaacckk LLeevveell
.
4
ENTER
5
ENTER
Adjust
HHoorriizzoonnttaall
SShhaarrppnneessss
.
8
ENTER
Adjust
CCoolloorr
.
6
ENTER
Adjust
TTiinntt
.
7
ENTER
Picture Wizard
With Picture Wizard, you can adjust the picture quality of the
original image.
G
Black Level
Set the screen above identical to the Recommended sample
below.
NextPrevious
NextPrevious
• Brightness 50
EE
EE
Low HighRecommended
Color
Set the screen above identical to the Recommended sample
below.
NextPrevious
• Color 50
EE
EE
Low HighRecommended
White Level
Set the screen above identical to the Recommended sample
below.
NextPrevious
Low HighRecommended
• Contrast 90
EE
EE
Tint
Set the screen above identical to the Recommended sample
below.
NextPrevious
Low HighRecommended
• Tint 0
EE
EE
RG
Horizontal Sharpness
Set the screen above identical to the Recommended sample
below.
NextPrevious
• H Sharpness 50
EE
EE
Low HighRecommended
Enter
Move
PICTURE
E
Aspect Ratio : 16:9
Picture Wizard
Energy Saving
: Off
Picture Mode : Standard
• Backlight 70
• Contrast 90
• Brightness 50
• Sharpness 70
This feature lets you adjust the picture quality of the
original image.
Use this to calibrate the screen quality by adjusting
the Black and White Level etc. You can calibrate the
screen quality by easily following each step.
When you adjust the image to
LLooww
,
RReeccoommmmeennddeedd
or
HHiigghh
, you can see the example
of the changes you made.

PICTURE CONTROL
69
Select input source to apply the
settings.
14
FAV
MARK
Adjust
VVeerrttiiccaall
SShhaarrppnneessss
.
9
ENTER
Adjust
BBaacckklliigghhtt
.
13
ENTER
Finish the Picture Wizard.
16
ENTER
Save.
15
ENTER
Complete
ConfirmMovePrevious
Vertical Sharpness
Set the screen above identical to the Recommended sample
below.
NextPrevious
• V Sharpness 50
EE
EE
Low HighRecommended
Backlight
Set the Backlight to your Brightness preference.
NextPrevious
• Backlight 50
EE
EE
Dark BrightRecommended
DTV
TV
AV1
AV2
Component
RGB-PC
HDMI1
HDMI2
Select (an) input(s) to apply the settings.
Warning: The picture quality may vary according to the
different types of signal and inputs.
E
E
Mark
MARK
■
If you stop the setting before the final
step, the changes will not be saved to
the TV.
■
Once the
PPiiccttuurree WWiizzaarrdd
sets the pic-
ture quality,
EEnneerrggyy SSaavviinngg
is changed
to
OOffff
automatically.
Close
The current adjustment value is saved to
Expert1.
i
Adjust
CCoolloorr
TTeemmppeerraattuurree
.
10
ENTER
Color Temperature
Set the Color Temperature as you like. Refer to the samples
below.
NextPrevious
• Color Temperature Warm
EE
EE
Warm CoolMedium
Adjust
DDyynnaammiicc
CCoonnttrraasstt
.
11
ENTER
Dynamic Contrast
Set the Dynamic Contrast as you like. Refer to the samples
below.
NextPrevious
• Dynamic Contrast Off
EE
EE
Off HighMedium
Adjust
CCoolloorr GGaaiinn
.
12
ENTER
Color Gain
Set the Color Gain as you like. Refer to the samples below.
NextPrevious
• Color Gain Original
EE
EE
Original HighMedium

PICTURE CONTROL
70
PRESET PICTURE SETTINGS (PICTURE MODE)
PICTURE CONTROL
There are factory presets for picture settings available in the user menus. You can use a preset, change each
setting manually.
Enter
Move
PICTURE
E
Enter
Move
PICTURE
E
Aspect Ratio : 16:9
Picture Wizard
Energy Saving
: Off
Picture Mode : Standard
• Backlight 70
• Contrast 90
• Brightness 50
• Sharpness 70
Aspect Ratio : 16:9
Picture Wizard
Energy Saving
: Off
Picture Mode : Standard
• Backlight 70
• Contrast 90
• Brightness 50
• Sharpness 70
Select
PPIICCTTUURREE
.
Select
PPiiccttuurree MMooddee
.
Select
VViivviidd
,
SSttaannddaarrdd
,
NNaattuurraall
,
CCiinneemmaa
,
SSppoorrtt
, or
GGaammee
.
1
MENU
3
2
ENTER
ENTER
4
BACK
Return to the previous menu.
EXIT
Return to TV viewing.
Vivid
Standard
Natural
Cinema
Sport
Game
Expert1
Expert2
■
VViivviidd
,
SSttaannddaarrdd
,
NNaattuurraall
,
CCiinneemmaa
,
SSppoorrtt
, and
GGaammee
Settings are preset for
the optimum picture quality at the facto-
ry.
■
VViivviidd
: This is the mode to maximize the
effect of the video in the retail store.
Strengthen the contrast, brightness,
color and sharpness for vivid picture.
■
SSttaannddaarrdd
: This is the mode to realize
optimum viewing condition for the gen-
eral user.
■
NNaattuurraall
: This is the mode to display the
most natural screen status.
■
CCiinneemmaa
: This mode optimizes video for
watching movies.
■
SSppoo rrtt
: This is the video mode to
emphasize dynamic video and primary
color (e.g, white, uniform, grass, sky blue
etc.) by realizing the optimal screen for
sports.
■
GGaammee
: This is the mode to realize fast
response speed in a fast gaming screen.
■
EExxppeerrtt
: This is the mode to adjust the
video in detail for video quality expert
and general user.
■
You can also adjust
PPiiccttuurree MMooddee
in
the
QQ..MMEENNUU
.

PICTURE CONTROL
71
MANUAL PICTURE ADJUSTMENT - USER MODE
Adjust the picture appearance to suit your preference and viewing situations.
Select
PPIICCTTUURREE
.
Make appropriate adjustments.
Select
BBaacckklliigghhtt
,
CCoonnttrraasstt
,
BBrriigghhttnneessss
,
SShhaarrppnneessss
,
CCoolloorr
, or
TTiinntt
.
1
MENU
Select
PPiiccttuurree MMooddee
.
2
ENTER
Select
VViivviidd
,
SSttaannddaarrdd
,
NNaattuurraall
,
CCiinneemmaa
,
SSppoorrtt
, or
GGaammee
.
3
ENTER
4
ENTER
5
ENTER
6
BACK
Return to the previous menu.
EXIT
Return to TV viewing.
Enter
Move
PICTURE
E
Aspect Ratio : 16:9
Picture Wizard
Energy Saving
: Off
Picture Mode : Standard
• Backlight 70
• Contrast 90
• Brightness 50
• Sharpness 70
• Backlight 70
EE
EE
EE
EE
Enter
■
When adjusting Energy Saving,
BBaacckklliigghhtt
function is disabled.
■
BBaacckklliigghhtt
: This function adjusts the
brightness of LCD panel, to control the
brightness of the screen. Adjusting the
backlight is recommended when setting
the brightness of the set. When decreas-
ing the backlight, the brightness of the
black becomes darker without any loss in
video signal and the power consumption
is reduced.
■
CCoonnttrraasstt
: Increase or decrease the gra-
dient of the video signal. You may use
Contrast when the bright part of picture
is saturated.
■
BBrriigghhttnneessss
: Adjusts the base level of
the signal in the picture. You may use
Brightness when the dark part of the pic-
ture is saturated.
■
SShhaarrppnneessss
: Adjusts the level of crisp-
ness in the edges between the light and
dark areas of the picture. The lower the
level, the softer the image.
■
CCoolloorr
: Adjusts intensity of all colors.
■
TTiinntt
: Adjusts the balance between red
and green levels.

PICTURE CONTROL
72
PICTURE IMPROVEMENT TECHNOLOGY
PICTURE CONTROL
Select
PPIICCTTUURREE
.
Select
AAddvvaanncceedd CCoonnttrrooll
.
Select your desired options.
1
MENU
3
2
ENTER
ENTER
5
BACK
Return to the previous menu.
EXIT
Return to TV viewing.
Make appropriate adjustments.
4
Enter
Move
PICTURE
E
RG
• Contrast 50
• Brightness 50
• Sharpness 50
• Color 50
• Tint 0
• Advanced Control
• Picture Reset
Screen (RGB-PC)
Enter
Move
PICTURE
E
RG
• Contrast 50
• Brightness 50
• Sharpness 50
• Color 50
• Tint 0
• Advanced Control
• Picture Reset
Screen (RGB-PC)
Color Temperature
FF
Medium
GG
Dynamic Contrast
Off
Dynamic Color
Off
Noise Reduction
Off
Gamma
Medium
Black Level
Low
Eye Care
Off
Real Cinema
Off
Close
E
You can calibrate the screen for each Picture Mode or set the video value according to the special video screen.
You can set the video seeing differently for each input.
To reset to the factory default after making adjustments to each input source, execute the
PPiiccttuurree RReesseett
function for each
PPiiccttuurree MMooddee
.

PICTURE CONTROL
73
EXPERT PICTURE CONTROL
Select
PPIICCTTUURREE
.
Select
PPiiccttuurree MMooddee
.
Select
EExxppeerrtt CCoonnttrrooll
.
Select
EExxppeerrtt11
or
EExxppeerrtt22
.
1
MENU
3
2
ENTER
ENTER
4
ENTER
Make appropriate adjustments.
6
By segmenting categories,
EExxppeerrtt11
and
EExxppeerrtt22
provide more categories which users can set as they see
fit, offering the optimal picture quality for users.
This may also be used be a professional to help optimize the TV performance in the environment the TV is in.
7
BACK
Return to the previous menu.
EXIT
Return to TV viewing.
Enter
Move
PICTURE
E
RG
• Brightness 50
• H Sharpness 50
• V Sharpness 50
• Color 50
• Tint 0
• Expert Control
• Picture Reset
Screen (RGB-PC)
Dynamic Contrast
FF
Off
GG
Noise Reduction
Low
Gamma
Off
Black Level
Low
Real Cinema
Off
Color Standard
SD
Color Gamut
Standard
Edge Enhancer
High
xvYCC
Auto
Close
E
Select your desired menu option.
5
ENTER
Enter
Move
PICTURE
E
Aspect Ratio : 16:9
Picture Wizard
Energy Saving
: Off
Picture Mode : Expert1
• Backlight 80
• Contrast 90
• Brightness 50
• H Sharpness 50
Vivid
Standard
Natural
Cinema
Sport
Game
Expert1
Expert2

PICTURE CONTROL
74
PICTURE CONTROL
■
Set to warm to enhance hotter colors such as red, or set to cool to make picture
bluish.
■
Adjusts the contrast to keep it at the best level according to the brightness of the
screen. The picture is improved by making bright parts brighter and dark parts darker.
■
Adjusts screen colors so that they look livelier, richer and clearer. This feature
enhances hue, saturation and luminance so that red, blue, green and white look
more vivid.
■
Reduces screen noise without compromising video quality.
Low : Make dark and middle gray level area of the picture brighter.
Medium: Express original picture levels.
High: Make dark and middle gray level area of the picture darker.
■
You can adjust brightness of dark area and middle gray level area of the picture.
Low: The reflection of the screen gets darker.
High: The reflection of the screen gets brighter.
Auto: Realizing the black level of the screen and set it to High or Low automatically.
■
Set black level of the screen to proper level.
■
This function enables to select 'Low' or 'High' in the following mode: AV (NTSC-M),
HDMI or Component. Otherwise, 'Black level' is set to 'Auto'.
*This feature is not available for all models.
■
Adjust the brightness of the screen to prevent the screen from being too bright.
Dims extremely bright pictures.
■
This feature is disabled in “
PPiiccttuurree MMooddee--VViivviidd
,
CCiinneemmaa
”.
■
Makes video clips recorded in film look more natural by eliminating judder effect.
Dynamic Contrast
Dynamic Color
Noise Reduction
Gamma
Black Level
Eye Care
Real Cinema
Color Temperature
(Advanced Control)

PICTURE CONTROL
75
■
Convert the color of a different video to HD color.
■
Adjusts the overall color of the screen by changing the color of white.
a. Method : 2 Points
- Pattern: Inner, Outer
- Red/Green/Blue Contrast, Red/Green/Blue Brightness:
The adjustment range is -50 - +50.
b. Method : 10 Point IRE
- Pattern: Inner, Outer
- IRE (Institute of Radio Engineers) is the unit to display the size of the video signal
and can be set among 10, 20, 30 - 100. You can adjust Red, Green or Blue accord-
ing to each setting.
- Luminance: This function displays calculated luminance value for 2.2 gamma. You can
input luminance value you want at 100 IRE, than the target luminance value for 2.2
gamma is displayed at every 10 steps from 10 IRE to 90 IRE.
- Red/Green/Blue: The adjustment range is -50 - +50.
■
As the tool used by the experts to make adjustments by using the test patterns, this
does not affect other colors but can be used to selectively adjust the 6 color areas
(Red/Green/Blue/Cyan/Mgt/Yellow).
Color difference may not be distinctive even when you make the adjustments for the
general video.
Adjusts Red/Green/Blue/Yellow/Cyan, Magenta.
- Red/Green/Blue/Yellow/Cyan, Magenta Color: The adjustment range is -30 - +30.
- Red/Green/Blue/Yellow/Cyan, Magenta Tint: The adjustment range is -30 - +30.
- This feature is disable in RGB-PC and HDMI-PC mode.
*This feature is not available for all models.
■
As the technology to reduce the power consumption while keeping the same bright-
ness, this has the effect of reducing power consumption, improvement in contrast.
Color Temperature
(Expert Control)
Color Management System
OPC
Color Standard
Standard: Displays standard set of colors.
Wide: Increase number of colors used.
■
Maximize the utilization of color to increase color quality.
Color Gamut
■
Show clearer and distinctive yet natural edges in of the video.
■
This function is enabled in "
PPiiccttuurree MMooddee
-
CCiinneemmaa
,
EExxppeerrtt
".
Edge Enhancer
■
This is the pattern necessary for expert adjustment.
■
This function is enabled in "
PPiiccttuurree MMooddee
-
EExxppeerrtt
" when you watch DTV.
Expert Pattern
■
This is the function to filter the specific colors of the video.
You can use the RGB filter to set color saturation and hue accurately.
Color Filter
*This feature is not available for all models.
■
This is the function to express richer color.
■
This feature represents rich color as much as conventional video signal.
■
This function is enabled in "
PPiiccttuurree mmooddee
-
CCiinneemmaa
,
EExxppeerrtt
" when xvYCC sig-
nal is inputted through HDMI.
xvYCC

PICTURE CONTROL
76
ENERGY SAVING
PICTURE CONTROL
It reduces the TV’s power consumption by lowering the backlight level.
You can increase the brightness of your screen by adjusting the
EEnneerrggyy SSaavviinngg
level or by setting the
PPiiccttuurree
MMooddee
.
■
When selecting
SSccrreeeenn ooffff
, TV turned
off after 3 seconds.
■
If you adjust “
EEnneerrggyy SSaavviinngg--
MMiinniimmuumm
,
MMeeddiiuumm
,
MMaaxxiimmuumm
”,
BBaacckklliigghhtt
feature will not work.
■
Press the
EENNEERRGGYY SSAAVVIINNGG
button
repeatedly to select the appropriate
Energy Saving setup.
Select
PPIICCTTUURREE
.
Select
EEnneerrggyy SSaavviinngg
.
1
MENU
2
ENTER
Select
OOffff
,
MMiinniimmuumm
,
MMeeddiiuumm
,
MMaaxxiimmuumm
, or
SSccrreeeenn OOffff
.
3
ENTER
4
BACK
Return to the previous menu.
EXIT
Return to TV viewing.
Enter
Move
PICTURE
E
Enter
Move
PICTURE
E
Aspect Ratio : 16:9
Picture Wizard
Energy Saving
: Off
Picture Mode : Standard
• Backlight 70
• Contrast 90
• Brightness 50
• Sharpness 70
Aspect Ratio : 16:9
Picture Wizard
Energy Saving
: Off
Picture Mode : Standard
• Backlight 70
• Contrast 90
• Brightness 50
• Sharpness 70
Off
Minimum
Medium
Maximum
Screen off

PICTURE CONTROL
77
PICTURE RESET
Settings of the selected picture modes return to the default factory settings.
Select
PPIICCTTUURREE
.
Select
PPiiccttuurree RReesseett
.
1
MENU
2
ENTER
Enter
Move
PICTURE
E
RG
• Contrast 50
• Brightness 50
• Sharpness 50
• Color 50
• Tint 0
• Advanced Control
• Picture Reset
Screen (RGB-PC)
Enter
Move
PICTURE
E
RG
• Contrast 50
• Brightness 50
• Sharpness 50
• Color 50
• Tint 0
• Advanced Control
• Picture Reset
Screen (RGB-PC)
Resetting video configuration...
ii
No
Yes
All picture settings will be resetted.
Continue?
?
Initialize the adjusted value.
4
Select
YYeess
.
3
ENTER
ENTER
5
EXIT
Return to TV viewing.
Select
OOPPTTIIOONN
.
Select
PPoowweerr IInnddiiccaattoorr
.
1
MENU
2
ENTER
Select your desired options.
4
Select
SSttaannddbbyy LLiigghhtt
or
PPoowweerr LLiigghhtt
.
3
ENTER
POWER INDICATOR
-
For 32LD320
Adjust the power/standby indicator light of TV front.
■
SSttaannddbbyy LLiigghhtt
: Determines whether to set the
indicator light on the front of the TV to
OO nn
or
OOffff
in standby mode.
■
PPoowweerr LLiigghhtt
: Determines whether to set the
indicator light on the front of the TV to
OO nn
or
OOffff
when the power turns on.
Enter
Move
OPTION
SIMPLINK : On
Key Lock : Off
Simple Manual
Caption : Off
Set ID : 1
Power Indicator
Demo Mode : Off
Initial Setting : Home Use
Enter
Move
OPTION
SIMPLINK : On
Key Lock : Off
Simple Manual
Caption : Off
Set ID : 1
Power Indicator
Demo Mode : Off
Initial Setting : Home Use
EE
Power Light
Standby Light
On
Close
FF
On
GG
5
BACK
Return to the previous menu.
EXIT
Return to TV viewing.

PICTURE CONTROL
78
DEMO MODE
PICTURE CONTROL
Select
OOPPTTIIOONN
.
Select
DDeemmoo MMooddee
.
1
MENU
2
ENTER
Select
OO nn
to show the various
feature of the TV.
3
ENTER
4
EXIT
Return to TV viewing.
After a while,
DDeemmoo MMooddee
starts.
If you want to stop the demo, press any button
(Except VOL +, - and MUTE button).
Enter
Move
OPTION
Input Label
SIMPLINK : On
Key Lock : Off
Simple Manual
Caption : Off
Set ID : 1
Demo Mode : Off
Initial Setting : Store Demo
Enter
Move
OPTION
Input Label
SIMPLINK : On
Key Lock : Off
Simple Manual
Caption : Off
Set ID : 1
Demo Mode : On
Initial Setting : Store Demo
EE
Off
On
Displays a slide show to explain the various feature of this TV.
■
This feature is disabled in “
IInniittiiaall
SSeettttiinngg--HHoommee UUssee
”.

SOUND & LANGUAGE CONTROL
79
SOUND & LANGUAGE CONTROL
AUTO VOLUME LEVELER (AUTO VOLUME)
Auto Volume makes sure that the volume level remains consistent whether you are watching a commercial or a
regular TV program.
Because each broadcasting station has its own signal conditions, volume adjustment may be needed every
time the channel is changed. This feature allows users to enjoy stable volume levels by making automatic
adjustments for each program.
Select
AAUUDDIIOO
.
Select
AAuuttoo VVoolluummee
.
Select
OO nn
or
OOffff
.
1
MENU
3
2
ENTER
ENTER
4
BACK
Return to the previous menu.
EXIT
Return to TV viewing.
Enter
Move
AUDIO
Auto Volume : Off
Clear Voice II : Off
• Level 3
Balance 0
Sound Mode : Standard
•
Infinite Sound :
Off
• Treble 50
• Bass 50
Enter
Move
AUDIO
Auto Volume : On
Clear Voice II : Off
• Level 3
Balance 0
Sound Mode : Standard
•
Infinite Sound :
Off
• Treble 50
• Bass 50
E
LR
E
LR
Off
On
-+
-+

SOUND & LANGUAGE CONTROL
80
CLEAR VOICE II
By differentiating the human sound range from others, it improves the sound quality of voices.
Select
AAUUDDIIOO
.
Select
CClleeaarr VVooiiccee IIII
.
Select
OO nn
or
OOffff
.
1
MENU
3
2
ENTER
ENTER
6
BACK
Return to the previous menu.
EXIT
Return to TV viewing.
Enter
Move
AUDIO
Auto Volume : Off
Clear Voice II : Off
• Level 3
Balance 0
Sound Mode : Standard
•
Infinite Sound :
Off
• Treble 50
• Bass 50
Enter
Move
AUDIO
Auto Volume : Off
Clear Voice II : On
• Level 3
Balance 0
Sound Mode : Standard
•
Infinite Sound :
Off
• Treble 50
• Bass 50
E
LR
E
LR
Select
LLeevveell
.
4
ENTER
Make appropriate adjustments.
5
ENTER
Adjustment for Clear Voice Level
With selecting
OOnn
-+
-+
Off
On

SOUND & LANGUAGE CONTROL
81
PRESET SOUND SETTINGS (SOUND MODE)
Sound Mode lets you enjoy the best sound without any special adjustment as the TV sets the appropriate
sound options based on the program content.
Enter
Move
AUDIO
Auto Volume : Off
Clear Voice II : Off
• Level 3
Balance 0
Sound Mode : Standard
•
Infinite Sound :
Off
• Treble 50
• Bass 50
Enter
Move
AUDIO
Auto Volume : Off
Clear Voice II : Off
• Level 3
Balance 0
Sound Mode : Standard
•
Infinite Sound :
Off
• Treble 50
• Bass 50
E
LR
E
LR
Select
AAUUDDIIOO
.
Select
SSoouunndd MMooddee
.
Select
SSttaannddaarrdd
,
MMuussiicc
,
CCiinneemmaa
,
SSppoorrtt
, or
GGaammee
.
1
MENU
3
2
ENTER
ENTER
4
BACK
Return to the previous menu.
EXIT
Return to TV viewing.
■
SSttaannddaarrdd
,
MMuussiicc
,
CCiinneemmaa
,
SSppoorrtt
,
and
GGaammee
are preset for optimum
sound quality at the factory.
■
You can also adjust
SSoouunndd MMooddee
in
the
QQ..MMEENNUU
.
■
SSttaannddaarrdd
: Offers standard-quality
sound.
■
MMuussiicc
: Optimizes sound for listening to
music.
■
CCiinneemmaa
: Optimizes sound for watching
movies.
■
SSppoorrtt
: Optimizes sound for watching
sports events.
■
GGaammee
: Optimizes sound for playing
games.
-+
-+
Standard
Music
Cinema
Sport
Game

SOUND & LANGUAGE CONTROL
82
SOUND SETTING ADJUSTMENT - USER MODE
SOUND & LANGUAGE CONTROL
Adjust the sound to suit your taste and room situations.
Select
AAUUDDIIOO
.
Select
SSoouunndd MMooddee
.
Select
TTrreebbllee
or
BBaassss
.
1
MENU
4
2
ENTER
Select
SSttaannddaarrdd
,
MMuussiicc
,
CCiinneemmaa
,
SSppoorrtt
, or
GGaammee
.
3
ENTER
ENTER
Enter
Move
AUDIO
LR
E
Auto Volume : Off
Clear Voice II : Off
• Level 3
Balance 0
Sound Mode : Standard
•
Infinite Sound :
Off
• Treble 50
• Bass 50
Enter
Move
AUDIO
LR
E
Auto Volume : Off
Clear Voice II : Off
• Level 3
Balance 0
Sound Mode : Standard
•
Infinite Sound :
Off
• Treble 50
• Bass 50
6
BACK
Return to the previous menu.
EXIT
Return to TV viewing.
Close
EE
EE
• Treble 50
• Bass 50
•
Infinite Sound
Off
Make appropriate adjustments.
5
ENTER
-+ -+

SOUND & LANGUAGE CONTROL
83
INFINITE SOUND
Select
AAUUDDIIOO
.
Select
IInnffiinniittee SSoouunndd
.
Select
OO nn
or
OOffff
.
1
MENU
3
2
ENTER
ENTER
4
BACK
Return to the previous menu.
EXIT
Return to TV viewing.
Select this option to sound realistic.
Enter
Move
AUDIO
LR
E
Auto Volume : Off
Clear Voice II : Off
• Level 3
Balance 0
Sound Mode : Standard
•
Infinite Sound :
Off
• Treble 50
• Bass 50
Enter
Move
AUDIO
LR
E
Auto Volume : Off
Clear Voice II : Off
• Level 3
Balance 0
Sound Mode : Standard
•
Infinite Sound :
Off
• Treble 50
• Bass 50
Close
• Treble 50
• Bass 50
•
Infinite Sound
Off
-+ -+
■
If sound quality or volume is not at the level
you want, it is recommended to use a separate
home theater system or amp to cope with dif-
ferent user environments.
■
If you select “
CClleeaarr VVooiiccee IIII--OOnn
”,
IInnffiinniittee
SSoouunndd
feature will not work.
EE
EE

SOUND & LANGUAGE CONTROL
84
BALANCE
SOUND & LANGUAGE CONTROL
Select
AAUUDDIIOO
.
Select
BBaallaannccee
.
Make appropriate adjustments.
1
MENU
3
2
ENTER
ENTER
Adjust the left/right sound of speaker to suit your taste and room situations.
4
BACK
Return to the previous menu.
EXIT
Return to TV viewing.
Enter
Move
AUDIO
Auto Volume : Off
Clear Voice II : Off
• Level 3
Balance 0
Sound Mode : Standard
•
Infinite Sound :
Off
• Treble 50
• Bass 50
Enter
Move
AUDIO
Auto Volume : Off
Clear Voice II : Off
• Level 3
Balance 0
Sound Mode : Standard
•
Infinite Sound :
Off
• Treble 50
• Bass 50
E
LR
E
LR
-+
-+
Close
EE
EE
Balance 0
LR

SOUND & LANGUAGE CONTROL
85
TV SPEAKERS ON/OFF SETUP
Turn the TV speakers off if using external audio equipment.
Select
AAUUDDIIOO
.
Select
TTVV SSppeeaakkeerr
.
Select
OO nn
or
OOffff
.
1
MENU
3
2
ENTER
ENTER
4
BACK
Return to the previous menu.
EXIT
Return to TV viewing.
Enter
Move
AUDIO
• Level 3
Balance 0
Sound Mode : Standard
•
Infinite Sound :
Off
• Treble 50
• Bass 50
• Reset
TV Speaker : On
LR
E
Enter
Move
AUDIO
• Level 3
Balance 0
Sound Mode : Standard
•
Infinite Sound :
Off
• Treble 50
• Bass 50
• Reset
TV Speaker : On
LR
E
Off
On
-+
-+

SOUND & LANGUAGE CONTROL
86
AUDIO RESET
SOUND & LANGUAGE CONTROL
Settings of the selected Sound Mode return to the default factory settings.
Select
AAUUDDIIOO
.
Select
RReesseett
.
1
MENU
2
ENTER
Initialize the adjusted value.
3
ENTER
4
EXIT
Return to TV viewing.
Enter
Move
AUDIO
• Level 3
Balance 0
Sound Mode : Standard
•
Infinite Sound :
Off
• Treble 50
• Bass 50
• Reset
TV Speaker : On
LR
E
Enter
Move
AUDIO
• Level 3
Balance 0
Sound Mode : Standard
•
Infinite Sound :
Off
• Treble 50
• Bass 50
• Reset
TV Speaker : On
LR
E
Resetting audio configuration...
ii
-+
-+

SOUND & LANGUAGE CONTROL
87
STEREO/SAP BROADCAST SETUP
For Analog only: This TV can receive MTS stereo programs and any SAP (Secondary Audio Program) that accom-
panies the stereo program if the station transmits an additional sound signal. Mono sound is automatically used
if the broadcast is only in Mono.
Select
SSAAPP
.
Select
MMoonnoo
,
SStteerreeoo
, or
SSAAPP
.
Return to TV viewing.
1
Q.MENU
3
2
EXIT
Select
MMuullttii AAuuddiioo
.
Select other languages.
Return to TV viewing.
1
Q.MENU
3
2
EXIT
Analog TV Digital TV
A
English
FF
Multi Audio
GG

SOUND & LANGUAGE CONTROL
88
AUDIO LANGUAGE
SOUND & LANGUAGE CONTROL
Other languages may be available if a digital signal is provided by the broadcasting station.
This feature operates only in DTV/CADTV mode.
Select
OOPPTTIIOONN
.
Select
AAuuddiioo LLaanngguuaaggee
.
Select your desired language.
1
MENU
3
2
ENTER
ENTER
4
BACK
Return to the previous menu.
EXIT
Return to TV viewing.
Enter
Move
OPTION
Menu Language : English
Audio Language : English
Input Label
SIMPLINK : On
Key Lock : Off
Simple Manual
Caption : Off
Set ID : 1
Enter
Move
OPTION
Menu Language : English
Audio Language : English
Input Label
SIMPLINK : On
Key Lock : Off
Simple Manual
Caption : Off
Set ID : 1
EE EE
English
Spanish
French

SOUND & LANGUAGE CONTROL
89
ON-SCREEN MENUS LANGUAGE SELECTION
The menus can be shown on the screen in the selected language.
Select
OOPPTTIIOONN
.
Select
MMeennuu LLaanngguuaaggee
.
Select your desired language.
From this point on, the on-screen menus
will be shown in the selected language.
1
MENU
3
2
ENTER
ENTER
4
BACK
Return to the previous menu.
EXIT
Return to TV viewing.
Enter
Move
OPTION
Menu Language : English
Audio Language : English
Input Label
SIMPLINK : On
Key Lock : Off
Simple Manual
Caption : Off
Set ID : 1
Enter
Move
OPTION
Menu Language : English
Audio Language : English
Input Label
SIMPLINK : On
Key Lock : Off
Simple Manual
Caption : Off
Set ID : 1
EE EE
English
Español
Français

SOUND & LANGUAGE CONTROL
90
CAPTION MODE
SOUND & LANGUAGE CONTROL
Captions are provided to help people with hearing loss watch TV. Select a caption mode for displaying cap-
tioning information if provided on a program. Analog caption displays information at any position on the screen
and is usually the program's dialog. Caption/Text, if provided by the broadcaster, would be available for both
digital and analog channels on the Antenna/Cable. This TV is programmed to memorize the caption/text mode
which was last set when you turned the power off. This function is only available when
CCaappttiioonn
Mode is set
OO nn
.
Select
OOPPTTIIOONN
.
Select
CCaappttiioonn
.
Select
OO nn
.
1
MENU
3
2
ENTER
ENTER
Select
CCCC11
-
44
or
TTeexxtt11
-
44
.
4
Analog Broadcasting System Captions
■
When selecting
OOffff
, Sub-menus for
Analog, DTV, and Digital Option become
disabled.
■
CCAAPPTTIIOONN
The term for the words that scroll
across the bottom of the TV screen;
usually the audio portion of the pro-
gram provided for the hearing impaired.
■
TTEEXXTT
The term for the words that appear in a
large black frame and almost cover the
entire screen; usually messages provid-
ed by the broadcaster.
5
BACK
Return to the previous menu.
EXIT
Return to TV viewing.
Enter
Move
OPTION
Menu Language : English
Audio Language : English
Input Label
SIMPLINK : On
Key Lock : Off
Simple Manual
Caption : Off
Set ID : 1
Enter
Move
OPTION
Menu Language : English
Audio Language : English
Input Label
SIMPLINK : On
Key Lock : Off
Simple Manual
Caption : CC1
Set ID : 1
Mode
CC1
Close
Digital Option
FF
On
GG
EE EE

SOUND & LANGUAGE CONTROL
91
Digital Broadcasting System Captions
Choose the language you want the DTV/CADTV Captions to appear in.
Other Languages can be chosen for digital sources only if they are included on the program.
This function in only available when Caption Mode is set On.
Select
OOPPTTIIOONN
.
Select
CCaappttiioonn
.
Select
OO nn
.
1
MENU
3
2
ENTER
ENTER
Select
CCCC11
-
44
,
TTeexxtt11
-
44
, or
SSeerrvviiccee11
-
66
.
4
5
BACK
Return to the previous menu.
EXIT
Return to TV viewing.
Enter
Move
OPTION
Menu Language : English
Audio Language : English
Input Label
SIMPLINK : On
Key Lock : Off
Simple Manual
Caption : Off
Set ID : 1
Enter
Move
OPTION
Menu Language : English
Audio Language : English
Input Label
SIMPLINK : On
Key Lock : Off
Simple Manual
Caption : CC1
Set ID : 1
EE EE
Mode
CC1
Close
Digital Option
FF
On
GG

SOUND & LANGUAGE CONTROL
92
SOUND & LANGUAGE CONTROL
Caption Option
Customize the DTV/CADTV captions that appear on your screen.
This function in only available when Caption Mode is set On.
Select
OOPPTTIIOONN
.
Select
CCaappttiioonn
.
Select
OO nn
.
1
MENU
3
2
ENTER
ENTER
Select
CCuussttoomm
.
5
ENTER
Customize the
SSiizzee
,
FFoonntt
, etc., to your
preference. A preview icon is provided at
the bottom of the screen, use it to see the
caption language.
6
Select
DDiiggiittaall OOppttiioonn
.
4
Size
A Standard
Font
Font 1
Text Color
White
Text Opacity
Solid
Edge Type
None
Edge Color
Black
Bg Color
Black
Bg Opacity
Solid
Close
FF
Custom
GG
■
SSiizzee
: Set the word size.
■
FFoonntt
: Select a typeface for the text.
■
TTeexxtt CCoolloorr
: Choose a color for the
text.
■
TTeexxtt OOppaacciittyy
: Specify the opacity
for the text color.
■
BBgg ((BBaacckkggrroouunndd)) CCoolloorr
: Select a
background color.
■
BBgg ((BBaacckkggrroouunndd)) OOppaacciittyy
: Select
the opacity for the background color.
■
EEddggee TTyyppee
: Select an edge type.
■
EEddggee CCoolloorr
: Select a color for the
edges.
7
BACK
Return to the previous menu.
EXIT
Return to TV viewing.
Enter
Move
OPTION
Menu Language : English
Audio Language : English
Input Label
SIMPLINK : On
Key Lock : Off
Simple Manual
Caption : Off
Set ID : 1
Enter
Move
OPTION
Menu Language : English
Audio Language : English
Input Label
SIMPLINK : On
Key Lock : Off
Simple Manual
Caption : CC1
Set ID : 1
EE EE
Mode
CC1
Close
Digital Option
On

TIME SETTING
93
CLOCK SETTING
TIME SETTING
Auto Clock Setup
The time is set automatically from a digital channel signal.
The digital channel signal includes information for the current time provided by the broadcasting station.
Set the clock manually if the current time is set incorrectly by the auto clock function.
Select
TTIIMMEE
.
Select
CClloocckk
.
Select
AAuuttoo
.
1
MENU
3
2
ENTER
ENTER
Select your viewing area time zone.
• U.S.A:
EEaasstteerrnn
,
CCeennttrraall
,
MMoouunnttaaiinn
,
PPaacciiffiicc
,
AAllaasskkaa
, or
HHaawwaaiiii
.
• Canada:
EEaasstteerrnn
,
CCeennttrraall
,
MMoouunnttaaiinn
,
PPaacciiffiicc
,
NNeeww FF..llaanndd
, or
AAttllaannttiicc
.
4
Select
AAuuttoo
,
OOffff
, or
OOnn
(depending on
whether or not your viewing area observes
Daylight Saving time).
5
6
BACK
Return to the previous menu.
EXIT
Return to TV viewing.
Enter
Move
TIME
Clock
Off Time : Off
On Time : Off
Sleep Timer : Off
Enter
Move
TIME
Clock
Off Time : Off
On Time : Off
Sleep Timer : Off
Month
Date
21
Year
2009
Hour
10 AM
02
Minute
10
Time Zone
Eastern
Daylight
Saving
Auto
Close
FF
Auto
GG

TIME SETTING
94
TIME SETTING
Manual Clock Setup
If the current time setting is wrong, reset the clock manually.
Enter
Move
TIME
Clock
Off Time : Off
On Time : Off
Sleep Timer : Off
Enter
Move
TIME
Clock
Off Time : Off
On Time : Off
Sleep Timer : Off
Select
TTIIMMEE
.
Select
CClloocckk
.
Select
MMaannuuaall
.
1
MENU
3
2
ENTER
ENTER
Select the Year, Month, Date, Hour, or Minutes
option.
4
Set the Year, Month, Date, Hour, or Minutes
option.
5
6
BACK
Return to the previous menu.
EXIT
Return to TV viewing.
Month
Date
21
Year
2009
Hour
10 AM
02
Minute
10
Time Zone
Eastern
Daylight
Saving
Auto
Close
FF
Manual
GG

TIME SETTING
95
AUTO ON/OFF TIME SETTING
This function operates only if the current time has been set.
The
OOffff TTiimmee
function overrides the
OOnn TTiimmee
function if they are both set to the same time.
The TV must be in standby mode for the
OOnn TTiimmee
to work.
If you do not press any button within 2 hours after the TV turns on with the
OOnn TTiimmee
function, the TV will
automatically revert to standby mode.
■
To cancel
OOnn//OOffff TTiimmee
function, select
OOffff
.
■
Only for On Time function
Select
IInnppuutt
.
Select the desired input source.
Select
TTIIMMEE
.
Select
OOffff TTiimmee
or
OOnn TTiimmee
.
Select
RReeppeeaatt
.
1
MENU
3
2
ENTER
ENTER
Select
OOffff
,
OOnnccee
,
DDaaiillyy
,
MMoonn..
~
FFrrii..
,
MMoonn..
~
SSaatt..
,
SSaatt..
~
SSuunn..
, or
SSuunn..
.
4
Select and set
HHoouurr
or
MMiinnuuttee
.
5
1
ENTER
3
4
2
When Selecting
TTVV
:
set the channel at turn-on.
Adjust to sound level at
turn-on.
6
BACK
Return to the previous menu.
EXIT
Return to TV viewing.
Enter
Move
TIME
Clock
Off Time : Off
On Time : Off
Sleep Timer : Off
Enter
Move
TIME
Clock
Off Time : Off
On Time : 6:30 AM (Once)
Sleep Timer : Off
Repeat
FF
Once
GG
Hour
6 AM
Minute
30
Input
TV
Channel
TV 2-0
Volume
30
Close
Feb. 21, 2009 10:10 AM

TIME SETTING
96
SLEEP TIMER SETTING
TIME SETTING
The Sleep Time turns the TV off at the preset time.
Note that this setting is cleared when the TV is turned off.
■
To cancel the
SSlleeeepp TTiimmeerr
, select
OOffff
.
■
You can also adjust
SSlleeeepp TTiimmeerr
in
the
QQ..MMEENNUU
.
Select
TTIIMMEE
.
Select
SSlleeeepp TTiimmeerr
.
Make appropriate adjustments.
1
MENU
3
2
ENTER
ENTER
4
BACK
Return to the previous menu.
EXIT
Return to TV viewing.
Enter
Move
TIME
Clock
Off Time : Off
On Time : Off
Sleep Timer : Off
Enter
Move
TIME
Clock
Off Time : Off
On Time : Off
Sleep Timer : Off
Off
10 min.
20 min.
30 min.
60 min.
90 min.
120 min.
180 min.
240 min.

PARENTAL CONTROL / RATING
97
PARENTAL CONTROL / RATINGS
Parental Control can be used to block specific channels, ratings and other viewing sources.
The Parental Control Function (V-Chip) is used to block program viewing based on the ratings sent by the broad-
casting station. The default setting is to allow all programs to be viewed. Viewing can be blocked by choosing the
type of the program and the categories. It is also possible to block all program viewing for a time period. To use
this function, the following must be done :
1. Set ratings and categories to be blocked.
2. Specify a password
3. Enable the lock
V-Chip rating and categories
Rating guidelines are provided by broadcasting stations. Most television programs and television movies can be
blocked by TV Rating and/or Individual Categories. Movies that have been shown at the theaters or direct-to-
video movies use the Movie Rating System
(
MPAA
)
only.
Ratings for Television programs including made-for-TV movies:
■
TV-G
(
General audience
)
■
TV-PG
(
Parental guidance suggested
)
■
TV-14
(
Parents strongly cautioned
)
■
TV-MA
(
Mature audience only
)
■
TV-Y
(
All children
)
■
TV-Y7
(
Children 7 years older
)
Set up blocking schemes to block specific channels, ratings, and external viewing sources.
A password is required to gain access to this menu.
Setting up Your Password
For USA For Canada
Close
Enter Password
* * * *
Select
LLOOCCKK
.
1
MENU
ENTER
Input the password.
2
123
45
0
6
789
■
Enter the password as requested.
■
The TV is set up with the initial password
“0-0-0-0”.
SET PASSWORD & LOCK SYSTEM
Enter
Move
Lock System : Off
Set Password
Block Channel
Movie Rating
TV Rating-Children
TV Rating-General
Downloadable Rating
Input Block
LOCK
Enter
Move
Lock System : Off
Set Password
Block Channel
TV Rating-English
TV Rating-French
Downloadable Rating
Input Block
LOCK

PARENTAL CONTROL / RATING
98
PARENTAL CONTROL / RATINGS
Enables or disables the blocking scheme you set up previously.
Lock System
Select
LLoocckk SSyysstteemm
.
Select
OO nn
or
OOffff
.
4
3
ENTER
■
When you select
OO nn
, the Lock System
is enable.
Select
LLOOCCKK
.
1
MENU
ENTER
Input the password.
2
123
45
0
6
789
5
BACK
Return to the previous menu.
EXIT
Return to TV viewing.
Enter
Move
LOCK
Lock System : Off
Set Password
Block Channel
Movie Rating
TV Rating-Children
TV Rating-General
Downloadable Rating
Input Block
Enter
Move
LOCK
Lock System : On
Set Password
Block Channel
Movie Rating
TV Rating-Children
TV Rating-General
Downloadable Rating
Input Block
Off
On

PARENTAL CONTROL / RATING
99
Change the password by inputting a new password twice.
Set Password
Select
SSeett PPaasssswwoorrdd
.
Choose any 4 digits for your new password.
As soon as the 4 digits are entered, re-enter
the same 4 digits on the
CCoonnffiirrmm
.
4
3
ENTER
123
45
0
6
789
Select
LLOOCCKK
.
1
MENU
ENTER
Input the password.
2
123
45
0
6
789
5
BACK
Return to the previous menu.
EXIT
Return to TV viewing.
Enter
Move
LOCK
Lock System : Off
Set Password
Block Channel
Movie Rating
TV Rating-Children
TV Rating-General
Downloadable Rating
Input Block
Enter
Move
LOCK
Lock System : Off
Set Password
Block Channel
Movie Rating
TV Rating-Children
TV Rating-General
Downloadable Rating
Input Block
Close
New
* * * *
Confirm
* * * *

PARENTAL CONTROL / RATING
100
CHANNEL BLOCKING
PARENTAL CONTROL / RATINGS
Blocks any channels that you do not want to watch or that you do not want your children to watch.
Select
BBlloocckk CChhaannnneell
.
Select a channel to block or unblock.
4
3
ENTER
Select
LLOOCCKK
.
1
MENU
ENTER
Input the password.
2
123
45
0
6
789
6
BACK
Return to the previous menu.
EXIT
Return to TV viewing.
Enter
Move
LOCK
Lock System : Off
Set Password
Block Channel
Movie Rating
TV Rating-Children
TV Rating-General
Downloadable Rating
Input Block
Ch. Change
Page Change
CH
Navigation
Previous
Block/Unblock
■
If a channel is locked, enter the pass-
word to unlocked it temporarily.
Block or unblock a channel.
5
GREEN

PARENTAL CONTROL / RATING
101
MOVIE & TV RATING
Movie Rating (MPAA)
-
For USA
Blocks movies according to the movie ratings limits specified, so children cannot view certain movies. You can
set the ratings limit by blocking out all the movies with the ratings above a specified level. Keep in mind that
the movie ratings limit only applies to movies shown on TV, not TV programs, such as soap operas.
Select
MMoovviiee RRaattiinngg
.
Select
GG
,
PPGG
,
PPGG--1133
,
RR
,
NNCC--1177
,
XX
, or
BBlloocckkiinngg OOffff
.
4
3
ENTER
Blocking off : Permits all programs
G
PG
PG-13
R
NC-17
X
Blocking Off
■
If
MMoovviiee RRaattiinngg
,
TTVV RRaattiinngg--
CChhiillddrreenn
or
TTVV RRaattiinngg--GGeenneerraall
is
locked, enter the password to unlocked
it temporarily.
■
G (General audience)
■
PG (Parental guidance suggested)
■
PG-13 (Parents strongly cautioned)
■
R (Restricted)
■
NC-17 (No one 17 and under admitted)
■
X (Adult only)
■
Blocking Off (Permits all programs)
GG
If you set PG-13: G and PG movies will
be available, PG-13, R, NC-17 and X will
be blocked.
Select
LLOOCCKK
.
1
MENU
ENTER
Input the password.
2
123
45
0
6
789
5
BACK
Return to the previous menu.
EXIT
Return to TV viewing.
Enter
Move
LOCK
Lock System : Off
Set Password
Block Channel
Movie Rating
TV Rating-Children
TV Rating-General
Downloadable Rating
Input Block
Enter
Move
LOCK
Lock System : Off
Set Password
Block Channel
Movie Rating
TV Rating-Children
TV Rating-General
Downloadable Rating
Input Block

PARENTAL CONTROL / RATING
102
PARENTAL CONTROL / RATINGS
Select
TTVV RRaattiinngg--CChhiillddrreenn
.
Select
AAggee
or
FFaannttaassyy VViioolleennccee
.
4
3
ENTER
Select block options.
5
ENTER
■
Age (applies to TV-Y, TV-Y7)
■
Fantasy Violence (applies to TV-Y7)
TV Rating Children
-
For USA
Prevents children from watching certain children's TV programs, according to the ratings limit set. The children
rating does not apply to other TV programs. Unless you block certain TV programs intended for mature audi-
ences in the TV Rating - sub menu, your children can view those programs.
Select
LLOOCCKK
.
1
MENU
ENTER
Input the password.
2
123
45
0
6
789
6
BACK
Return to the previous menu.
EXIT
Return to TV viewing.
Enter
Move
LOCK
Lock System : Off
Set Password
Block Channel
Movie Rating
TV Rating-Children
TV Rating-General
Downloadable Rating
Input Block
Enter
Move
LOCK
Lock System : Off
Set Password
Block Channel
Movie Rating
TV Rating-Children
TV Rating-General
Downloadable Rating
Input Block
Close
Age
Fantasy Violence

PARENTAL CONTROL / RATING
103
TV Rating General
-
For USA
Based on the ratings, blocks certain TV programs that you and your family do not want to view.
Select
TTVV RRaattiinngg--GGeenneerraall
.
Select
AAggee
,
DDiiaalloogguuee
,
LLaanngguuaaggee
,
SSeexx
or
VViioolleennccee
.
4
3
ENTER
Select block options.
5
ENTER
■
Age (applies to TV-G,TV-PG,TV-14,TV-
MA).
■
Dialogue-sexual dialogue (applies to
TV-PG,TV-14).
■
Language-adult language (applies to
TV-PG, TV-14, TV-MA).
■
Sex-sexual situations (applies to TV-PG,
TV-14, TV-MA).
■
Violence (applies to TV-PG, TV-14, TV-
MA).
Select
LLOOCCKK
.
1
MENU
ENTER
Input the password.
2
123
45
0
6
789
6
BACK
Return to the previous menu.
EXIT
Return to TV viewing.
Enter
Move
LOCK
Lock System : Off
Set Password
Block Channel
Movie Rating
TV Rating-Children
TV Rating-General
Downloadable Rating
Input Block
Enter
Move
LOCK
Lock System : Off
Set Password
Block Channel
Movie Rating
TV Rating-Children
TV Rating-General
Downloadable Rating
Input Block
Close
Age
Dialogue
Language
Sex
Violence

PARENTAL CONTROL / RATING
104
PARENTAL CONTROL / RATINGS
TV Rating English
-
For CANADA
Selecting Canadian English rating system.
Select
TTVV RRaattiinngg--EEnngglliisshh
.
Select
EE
,
CC
,
CC88++
,
GG
,
PPGG
,
1144++
,
1188++
, or
BBlloocckkiinngg OOffff
.
4
3
ENTER
Blocking off : Permits all programs
E
C
C8+
G
PG
14+
18+
Blocking Off
■
If
TTVV RRaattiinngg--EEnngglliisshh
or
TTVV RRaattiinngg--
FFrreenncchh
is locked, enter the password
to unlocked it temporarily.
■
E (Exempt)
■
C (Children)
■
C8+ (Children eight years and older)
■
G (General programming, suitable for
all audiences)
■
PG (Parental Guidance)
■
14+ (Viewers 14 years and older)
■
18+ (Adult programming)
■
Blocking Off (Permits all programs)
Select
LLOOCCKK
.
1
MENU
ENTER
Input the password.
2
123
45
0
6
789
5
BACK
Return to the previous menu.
EXIT
Return to TV viewing.
Enter
Move
LOCK
Lock System : Off
Set Password
Block Channel
TV Rating-English
TV Rating-French
Downloadable Rating
Input Block
Enter
Move
LOCK
Lock System : Off
Set Password
Block Channel
TV Rating-English
TV Rating-French
Downloadable Rating
Input Block

PARENTAL CONTROL / RATING
105
TV Rating French
-
For CANADA
Selecting Canadian French rating system.
Select
TTVV RRaattiinngg--FFrreenncchh
.
Select
EE
,
GG
,
88aannss++
,
1133aannss++
,
1166aannss++
,
1188aannss++
, or
BBlloocckkiinngg ooffff
.
4
3
ENTER
Blocking off : Permits all programs
E
G
8ans+
13ans+
16ans+
18ans+
Blocking Off
■
E (Exempt)
■
G (General)
■
8ans+ (General-Not convenient for lit-
tle children)
■
13ans+ (Not convenient for children of
13 years and younger)
■
16ans+ (Not convenient for children of
16 years and younger)
■
18ans+ (This programs is only for
adults)
■
Blocking off (Permits all programs)
Select
LLOOCCKK
.
1
MENU
ENTER
Input the password.
2
123
45
0
6
789
5
BACK
Return to the previous menu.
EXIT
Return to TV viewing.
Enter
Move
LOCK
Lock System : Off
Set Password
Block Channel
TV Rating-English
TV Rating-French
Downloadable Rating
Input Block
Enter
Move
LOCK
Lock System : Off
Set Password
Block Channel
TV Rating-English
TV Rating-French
Downloadable Rating
Input Block

PARENTAL CONTROL / RATING
106
DOWNLOADABLE RATING
PARENTAL CONTROL / RATINGS
This function is available only for digital channels.
This function operates only when TV has received Region5 Rating data.
Select
DDoowwnnllooaaddaabbllee RRaattiinngg
.
Select desired
DDoowwnnllooaaddaabbllee
RRaattiinngg
option.
4
3
ENTER
Select desired option and block it.
5
ENTER
Select
LLOOCCKK
.
1
MENU
ENTER
Input the password.
2
123
45
0
6
789
6
BACK
Return to the previous menu.
EXIT
Return to TV viewing.
Enter
Move
LOCK
Lock System : Off
Set Password
Block Channel
Movie Rating
TV Rating-Children
TV Rating-General
Downloadable Rating
Input Block
Enter
Move
LOCK
Lock System : Off
Set Password
Block Channel
Movie Rating
TV Rating-Children
TV Rating-General
Downloadable Rating
Input Block
Humor
Sport
Cruelty
Language
Sadness
Genre
Age
Close
E
E
■
Based on rating table, your TV's OSD
(On Screen Display) may differ slightly
from what is shown in this manual.
■
If a Downloadable rating is locked,
enter the password to unlocked it
temporarily.

PARENTAL CONTROL / RATING
107
EXTERNAL INPUT BLOCKING
Enables you to block an input.
Select
IInnppuutt BBlloocckk
.
Select input source.
4
3
Select
OOnn
or
OOffff
.
5
ENTER
Select
LLOOCCKK
.
1
MENU
ENTER
Input the password.
2
123
45
0
6
789
6
BACK
Return to the previous menu.
EXIT
Return to TV viewing.
Enter
Move
LOCK
Lock System : Off
Set Password
Block Channel
Movie Rating
TV Rating-Children
TV Rating-General
Downloadable Rating
Input Block
AV
Component
RGB-PC
HDMI
FF GG
Close
19/22LD350,
19/22LD350C
AV1
AV2
Component
RGB-PC
HDMI1
HDMI2
FF GG
Close
26/32LD350, 32LD320

APPENDIX
108
TROUBLESHOOTING
APPENDIX
TThhee ooppeerraattiioonn ddooeess nnoott wwoorrkk nnoorrmmaallllyy..
TThhee vviiddeeoo ddooeess nnoott wwoorrkk..
No picture &No sound
No or poor color
or poor picture
Poor reception on
some channels
Lines or streaks
in pictures
No picture
when connecting HDMI
Horizontal/vertical bars
or picture shaking
Picture appears slowly
after switching on
The remote control
doesn’t work
Power is suddenly
turned off
■
Check to see if there is any object between the product and the remote control
causing obstruction. Ensure you are pointing the remote control directly at the TV.
■
Ensure that the batteries are installed with correct polarity (+ to +, - to -).
■
Ensure that the correct remote operating mode is set: TV, VCR etc.
■
Install new batteries.
■
Is the sleep timer set?
■
Check the power control settings. Power interrupted.
■
TV will be automatically turned off, in case of no signal for 15 minutes.
■
Check whether the product is turned on.
■
Try another channel. The problem may be with the broadcast.
■
Is the power cord inserted into wall power outlet?
■
Check your antenna direction and/or location.
■
Test the wall power outlet, plug another product’s power cord into the outlet
where the product’s power cord was plugged in.
■
This is normal, the image is muted during the product startup process. Please
contact your service center, if the picture has not appeared after five minutes.
■
Adjust Color in menu option.
■
Keep a sufficient distance between the product and the VCR.
■
Try another channel. The problem may be with the broadcast.
■
Are the video cables installed properly?
■
Activate any function to restore the brightness of the picture.
■
Check for local interference such as an electrical appliance or power tool.
■
Station or cable product experiencing problems, tune to another station.
■
Station signal is weak, reorient antenna to receive weaker station.
■
Check for sources of possible interference.
■
Check antenna (Change the direction of the antenna).
■
Check HDMI cable over version 1.3.
The HDMI cables don’t support HDMI version 1.3, it cause flickers or no screen
display. In this case use the latest cables that support HDMI version 1.3.
*This feature is not available for all models.

APPENDIX
109
TThheerree iiss aa pprroobblleemm iinn PPCC mmooddee.. ((OOnnllyy PPCC mmooddee aapppplliieedd))
■
Adjust resolution, horizontal frequency, or vertical frequency.
■
Check the input source.
■
Work the Auto configure or adjust clock, phase, or H/V position. (Option)
■
Check the signal cable.
■
Reinstall the PC video card.
The signal is out of range
Screen color is unstable
or single color
Vertical bar or stripe on
background &
Horizontal Noise &
Incorrect position
Picture OK & No sound
Unusual sound from
inside the product
No sound
when connecting HDMI
or USB
No output from one
of the speakers
TThhee aauuddiioo ddooeess nnoott wwoorrkk..
■
Press the VOL or VOLUME button.
■
Sound muted? Press MUTE button.
■
Try another channel. The problem may be with the broadcast.
■
Are the audio cables installed properly?
■
Adjust Balance in menu option.
■
A change in ambient humidity or temperature may result in an unusual noise
when the product is turned on or off and does not indicate a fault with the
product.
■
Check HDMI cable over version 1.3.
■
Check USB cable over version 2.0.
■
Use normal MP3 file.
*This feature is not available for all models.

APPENDIX
110
APPENDIX
MMoovviiee LLiisstt PPrroobblleemmss
The file does not appear
on the Movie List.
Message is displayed
saying “Unsupported
Audio” or the video is
working normally but
the audio is not working
normally.
Subtitle is not working.
Message is displayed
saying “This file is
invalid” or the audio is
working normally but
the video is not working
normally.
■
Check whether the extension is supported.
■
Check whether the file is playing normally on a PC.
(Check whether the file is damaged.)
■
Check whether the resolution is supported.
■
Check whether the video/audio codec is supported.
■
Check whether the frame rate is supported.
■
Check whether the file is playing normally on a PC.
(Check whether the file is damaged.)
■
Check whether the audio codec is supported.
■
Check whether the bit rate is supported.
■
Check whether the sample rate is supported.
■
Check whether the file is playing normally on a PC.
(Check whether the file is damaged.)
■
Check whether the video file and subtitle file name are the same.
■
Check whether the video file and subtitle file are located in the same folder.
■
Check whether the subtitle file is supported.
■
Check whether the language is supported. (When you open the subtitle file in
Memo Pad, you can check the language of the subtitle file.)

MAINTENANCE
APPENDIX
111
Early malfunctions can be prevented. Careful and regular cleaning can extend the amount of time you can
enjoy your new TV.
Caution: Be sure to turn the power off and unplug the power cord before you begin any cleaning.
Cleaning the Screen
Here’s a great way to keep the dust off your screen for a while. Wet a soft cloth in a mixture of lukewarm
water and a little fabric softener or dish washing detergent. Wring the cloth until it’s almost dry, and then
use it to wipe the screen.
Make sure the excess water is off the screen, and then let it air-dry before you turn on your TV.
Cleaning the Cabinet
■
To remove dirt or dust, wipe the cabinet with a soft, dry, lint-free cloth.
■
Please be sure not to use a wet cloth.
Extended Absence
GG
If you expect to leave your TV dormant for a long time (such as a vacation), it’s a good idea to unplug
the power cord to protect against possible damage from lightning or power surges.
CAUTION
2
1

APPENDIX
112
APPENDIX
PRODUCT SPECIFICATIONS
■
The specifications shown above may be changed without prior notice for quality improvement.
MODELS
AC100-240V ~ 50/60Hz
NTSC-M, ATSC, 64 & 256 QAM
VHF 2-13, UHF 14-69, CATV 1-135, DTV 2-69, CADTV 1-135
75 ohm
32 ~ 104°F (0 ~ 40°C)
Less than 80%
-4 ~ 140°F (-20 ~ 60°C)
Less than 85%
Dimensions
(Width x Height
x Depth)
Weight
Power requirement
Television System
Program Coverage
External Antenna Impedance
Environment
condition
With stand
Without stand
With stand
Without stand
Operating Temperature
Operating Humidity
Storage Temperature
Storage Humidity
19LD350 (19LD350-UB)
19LD350C (19LD350C-UA)
22LD350 (22LD350-UB)
22LD350C (22LD350C-UA)
457.0 mm x 336.0 mm x 164.9 mm
(17.9 inch x 13.2 inch x 6.4 inch)
457.0 x 290.0 x 65.0 mm
(17.9 inch x 11.4 inch x 2.5 inch)
3.4 kg (7.4 lbs)
3.1 kg (6.8 lbs)
526.0 mm x 377.0 mm x 164.9 mm
(20.7 inch x 14.8 inch x 6.4 inch)
526.0 mm x 331.0 mm x 65.0 mm
(20.7 inch x 13.0 inch x 2.5 inch)
4.3 kg (9.4 lbs)
4.0 kg (8.8 lbs)
Dimensions
(Width x Height
x Depth)
Weight
With stand
Without stand
With stand
Without stand
663.0 mm x 484.0 mm x 206.8 mm
(26.1 inch x 19.0 inch x 8.1 inch)
663.0 mm x 423.0 mm x 79.9 mm
(26.1 inch x 16.6 inch x 3.1 inch)
7.3 kg (16.0 lbs)
6.2 kg (13.6 lbs)
800.0 mm x 565.0 mm x 206.8 mm
(31.4 inch x 22.2 inch x 8.1 inch)
800.0 mm x 509.0 mm x 73.8 mm
(31.4 inch x 20.0 inch x 2.9 inch)
9.2 kg (20.2 lbs)
8.2 kg (18.0 lbs)
MODELS
26LD350
(26LD350-UB)
Dimensions
(Width x Height
x Depth)
Weight
With stand
Without stand
With stand
Without stand
805.0 mm x 583.0 mm x 224.0 mm
(31.6 inch x 22.9 inch x 8.8 inch)
805.0 mm x 528.0 mm x 79.9 mm
(31.6 inch x 20.7 inch x 3.1 inch)
10.8 kg (23.8 lbs)
9.7 kg (21.3 lbs)
MODELS
32LD320
(32LD320-UA)
32LD350
(32LD350-UB)

APPENDIX
113
IR CODES
Code
Function Note
(Hexa)
Code
Function Note
(Hexa)
08 POWER
Remote Control Button (Power On/Off)
45 Q.MENU Remote Control Button
43 MENU Remote Control Button
0B INPUT Remote Control Button
10-19 Number Key 0-9 Remote Control Button
4C - (Dash)/LIST Remote Control Button
1A FLASHBK Remote Control Button
09 MUTE Remote Control Button
02 VOL + Remote Control Button
03 VOL - Remote Control Button
00 CH Remote Control Button
01 CH Remote Control Button
1E FAV/MARK Remote Control Button
40 Remote Control Button
41 Remote Control Button
07 Remote Control Button
06 Remote Control Button
44 ENTER Remote Control Button
28 BACK Remote Control Button
5B EXIT Remote Control Button
0F TV Remote Control Button
95 ENERGY SAVING Remote Control Button
7E SIMPLINK Remote Control Button
AA INFO Remote Control Button
79 RATIO Remote Control Button
30 AV MODE Remote Control Button
72 RED Remote Control Button
71 GREEN Remote Control Button
63 YELLOW Remote Control Button
61 BLUE Remote Control Button
B0
G
Remote Control Button
B1
A
Remote Control Button
BA
ll ll
Remote Control Button
8F
FF
Remote Control Button
8E
GG
Remote Control Button
D6 TV Discrete IR Code
(TV Input Selection)
C4 POWER ON Discrete IR Code
(Only Power On)
C5 POWER OFF Discrete IR Code
(Only Power Off)
5A AV or AV1 Discrete IR Code
(AV or AV1 Input Selection)
D0 AV2 Discrete IR Code
(AV2 Input Selection)
BF COMPONENT Discrete IR Code
(Component Input Selection)
D5 RGB-PC Discrete IR Code
(RGB-PC Input Selection)
CE HDMI or HDMI1 Discrete IR Code
(HDMI or HDMI1 Input Selection)
CC HDMI2 Discrete IR Code
(HDMI2 Input Selection)
76 Ratio 4:3 Discrete IR Code
(Only 4:3 Mode)
77 Ratio 16:9 Discrete IR Code
(Only 16:9 Mode)
AF Ratio Zoom Discrete IR Code
(Only Zoom Mode)

APPENDIX
114
EXTERNAL CONTROL THROUGH RS-232C
APPENDIX
RS-232C Setup
The RS-232C port allows you connect the RS-232C input jack to an external control device (such as a computer
or an A/V control system) to control the TV’s functions externally.
■
Note: RS-232C on this unit is intended to be used with third party RS-232C control hardware and software.
The instructions below are provided to help with programming software or to test functionality using telenet
software.
1
/DVI IN
ANTENNA
/CABLE IN
VIDEO
YPB PR
L R
AUDIO
RGB IN (PC)
VIDEO
AUDIO
R
L/MONO
COMPONENT IN
OPTICAL
DIGITAL
AUDIO OUT
AUDIO IN
(RGB/DVI)
AV IN 1
RS-232C IN
(
CONTROL&SERVICE)
Type of Connector; D-Sub 9-Pin Male
No. Pin Name
1 No connection
2 RXD
(
Receive data
)
3 TXD
(
Transmit data
)
4 DTR
(
DTE side ready
)
5 GND
6 DSR
(
DCE side ready
)
7 RTS
(
Ready to send
)
8 CTS
(
Clear to send
)
9 No Connection
1
6
5
9
PC
Communication Parameters
■
Baud rate : 9600 bps
(
UART
)
■
Data length : 8 bits
■
Parity : None
■
Stop bit : 1 bit
■
Communication code : ASCII code
■
Use a crossed (reverse) cable.
NOTE
!
GG
This product has command echo back in the
RS-232C Command.
i.e)

APPENDIX
115
RS-232C Configurations
Use this function to specify a TV ID number.
Refer to ‘Real Data Mapping’.
Either cable below can be used.
Set ID
PC TV
RXD 2 3 TXD
TXD 3 2 RXD
GND 5 5 GND
DTR 4 6 DSR
DSR 6 4 DTR
RTS 7 8 CTS
CTS 8 7 RTS
D-Sub 9 D-Sub 9
PC TV
RXD 2 3 TXD
TXD 3 2 RXD
GND 5 5 GND
DTR 4 6 DTR
DSR 6 4 DSR
RTS 7 7 RTS
CTS 8 8 CTS
D-Sub 9 D-Sub 9
7-Wire Configuration
(
Serial female-female NULL modem cable
)
3-Wire Configurations
(
Not standard
)
Select
OOPPTTIIOONN
.
Select
SSeett IIDD
.
Choose the desired TV ID number.
The adjustment range of Set ID is
1~99.
1
MENU
3
2
ENTER
ENTER
4
BACK
Return to the previous menu.
EXIT
Return to TV viewing.
Enter
Move
OPTION
Menu Language : English
Audio Language : English
Input Label
SIMPLINK : On
Key Lock : Off
Simple Manual
Caption : Off
Set ID : 1
Enter
Move
OPTION
Menu Language : English
Audio Language : English
Input Label
SIMPLINK : On
Key Lock : Off
Simple Manual
Caption : Off
Set ID : 1
EE EE
FF
1
GG
Close
■
Real data mapping
0 : Step 0
A : Step 10 (SET ID 10)
F : Step 15 (SET ID 15)
10 : Step 16 (SET ID 16)
63 : Step 99 (SET ID 99)
64 : Step 100

APPENDIX
116
Command Reference List
APPENDIX
CCOOMMMMAANNDD11 CCOOMMMMAANNDD22
20. Channel Tuning
DATA
(Hexadecimal)
CCOOMMMMAANNDD11 CCOOMMMMAANNDD22
DATA
(Hexadecimal)
CCOOMMMMAANNDD11 CCOOMMMMAANNDD22
DATA00
(Hexadecimal)
DATA01
(Hexadecimal)
DATA02
(Hexadecimal)
DATA03
(Hexadecimal)
DATA04
(Hexadecimal)
DATA05
(Hexadecimal)
physical major major low minor high minor low attribute
program high program low
ma
01. Power k a 00 ~ 01
02. Input Select x b (
GG
p.117)
03. Aspect Ratio k c (
GG
p.117)
04. Screen Mute k d (
GG
p.117)
05. Volume Mute k e 00 ~ 01
06. Volume Control k f 00 ~ 64
07. Contrast k g 00 ~ 64
08. Brightness k h 00 ~ 64
09. Color k i 00 ~ 64
10. Tint k j 00 ~ 64
11. Sharpness k k 00 ~ 64
12. OSD Select k l 00 ~ 01
13. Remote Control
Lock Mode
Transmission / Receiving Protocol
TTrraannssmmiissssiioonn
[Command 1] : First command to control the set.
(j, k, m or x)
[Command 2] : Second command to control the set.
[Set ID] : You can adjust the set ID to choose desired TV ID
number in Setup menu. Adjustment range is 1
~ 99.
When selecting Set ID ‘0’, every connected the TV is
controlled. Set ID is indicated as decimal
(
1
~ 99
)
on
menu and as Hexa decimal
(
0x0
~ 0x63
)
on transmission
/receiving protocol.
[DATA] : To transmit the command data.
Transmit the ‘FF’ data to read status of command.
[Cr] : Carriage Return
ASCII code ‘0x0D’
[ ] : ASCII code ‘space (0x20)’
* In this model, TV will not send the status during the standby mode.
OOKK AAcckknnoowwlleeddggeemmeenntt
The TV transmits ACK (acknowledgement) based on this for-
mat when receiving normal data. At this time, if the data is
data read mode, it indicates present status data. If the data is
data write mode, it returns the data of the PC computer.
* In this model, TV will not send the status during the standby mode.
* Data Format
[Command 2] : Use as command.
[Set ID] : Use the small character, if set ID is 10, it will send the ‘0’, ‘a’.
[DATA] : Use the small character, if data is 0 x ab, it will send the ‘a’, ‘b’.
[OK] : Use the large character.
EErrrroorr AAcckknnoowwlleeddggeemmeenntt
The TV transmits ACK (acknowledgement) based on this for-
mat when receiving abnormal data from non-viable functions
or communication errors.
Data1: Illegal Code
Data2: Not supported function
Data3: Wait more time
* In this model, TV will not send the status during the standby mode.
* Data Format
[Command 2] : Use as command.
[Set ID] : Use the small character, if set ID is 10, it will send the ‘0’, ‘a’.
[DATA] : Use the small character, if data is 0 x ab, it will send the ‘a’, ‘b’.
[NG] : Use the large character
[[CCoommmmaanndd11]][[CCoommmmaanndd22]][[ ]][[SSeett IIDD]][[ ]][[DDaattaa]][[CCrr]]
[[CCoommmmaanndd22]][[ ]][[SSeett IIDD]][[ ]][[OOKK]][[DDaattaa]][[xx]]
[[CCoommmmaanndd22]][[ ]][[SSeett IIDD]][[ ]][[NNGG]][[DDaattaa]][[xx]]
14. Treble k r 00 ~ 64
15. Bass k s 00 ~ 64
16. Balance k t 00 ~ 64
17.
Color Temperature
k u 00 ~ 02
18. Energy Saving j q (
GG
p.118)
19. Auto Configuration j u (
GG
p.118)
21. Channel Add/Del m b 00 ~ 01
22. Key m c (
GG
p.119)
23. Backlight m g 00 ~ 64
00 ~ 01
k m

APPENDIX
117
0011.. PPoowweerr ((CCoommmmaanndd:: kk aa))
To control Power On/Off of the TV.
Transmission [k][a][ ][Set ID][ ][Data][Cr]
Data 00: Power Off Data 01: Power On
Acknowledgement [a][ ][Set ID][ ][OK/NG][Data][x]
* In a like manner, if other functions transmit ‘FF’ data
based on this format, Acknowledgement data feedback
presents status about each function.
* Note: In this model, TV will send the Acknowledge
after power on processing completion.
There might be a time delay between command and
acknowledge.
0022.. IInnppuutt SSeelleecctt ((CCoommmmaanndd:: xx bb))
To select input source for TV.
Transmission [x][b][ ][Set ID][ ][Data][Cr]
Data 00: DTV (Antenna) Data 01: DTV (Cable)
Data 10: Analog (Antenna) Data 11: Analog (Cable)
Data 20: AV/AV1 Data 21: AV2
Data 40: Component Data 60: RGB-PC
Data 90: HDMI/HDMI1 Data 91: HDMI2
Acknowledgement [b][ ][Set ID][ ][OK/NG][Data][x]
* Use the feature depending on your model.
0033.. AAssppeecctt RRaattiioo ((CCoommmmaanndd:: kk cc))
To adjust the screen format.
Transmission [k][c][ ][Set ID][ ][Data][Cr]
Data 01: 4:3 09: Just scan
02: 16:9 10: Cinema Zoom1
04: Zoom
06: Set by program 1F: Cinema Zoom16
Acknowledgement [c][ ][Set ID][ ][OK/NG][Data][x]
0044.. SSccrreeeenn MMuuttee ((CCoommmmaanndd:: kk dd))
To select screen mute on/off.
Transmission [k][d][ ][Set ID][ ][Data][Cr]
Data 00: Screen mute off (Picture on), Video-out Mute off
Data 01: Screen mute on (Picture off)
Data 10: Video-out Mute on
Acknowledgement [d][ ][Set ID][ ][OK/NG][Data][x]
* In case of Video-out Mute on only, TV will display On
Screen Display (OSD). But, in case of screen mute on,
TV will not display On Screen Display (OSD).
0055.. VVoolluummee MMuuttee ((CCoommmmaanndd:: kk ee))
To control volume mute on/off.
You can also adjust mute using the MUTE button on
remote control.
Transmission [k][e][ ][Set ID][ ][Data][Cr]
Data 00: Volume mute on (Volume off)
Data 01: Volume mute off (Volume on)
Acknowledgement [e][ ][Set ID][ ][OK/NG][Data][x]
0066.. VVoolluummee CCoonnttrrooll ((CCoommmmaanndd:: kk ff))
To adjust volume.
You can also adjust volume with the volume buttons on
remote control.
Transmission [k][f][ ][Set ID][ ][Data][Cr]
Data Min: 00 ~ Max: 64 (*transmit by Hexadecimal code)
*Refer to ‘Real data mapping’.
Acknowledgement [f][ ][Set ID][ ][OK/NG][Data][x]
0077.. CCoonnttrraasstt ((CCoommmmaanndd:: kk gg))
To adjust screen contrast.
You can also adjust contrast in the PICTURE menu.
Transmission [k][g][ ][Set ID][ ][Data][Cr]
Data Min: 00 ~ Max: 64 (*transmit by Hexadecimal code)
*Refer to ‘Real data mapping’.
Acknowledgement [g][ ][Set ID][ ][OK/NG][Data][x]
0088.. BBrriigghhttnneessss ((CCoommmmaanndd:: kk hh))
To adjust screen brightness.
You can also adjust brightness in the PICTURE menu.
Transmission [k][h][ ][Set ID][ ][Data][Cr]
Data Min: 00 ~ Max: 64 (*transmit by Hexadecimal code)
*Refer to ‘Real data mapping’.
Acknowledgement [h][ ][Set ID][ ][OK/NG][Data][x]
0099.. CCoolloorr ((CCoommmmaanndd:: kk ii))
To adjust screen color.
You can also adjust color in the PICTURE menu.
Transmission [k][i][ ][Set ID][ ][Data][Cr]
Data Min: 00 ~ Max: 64 (*transmit by Hexadecimal code)
*Refer to ‘Real data mapping’.
Acknowledgement [i][ ][Set ID][ ][OK/NG][Data][x]
1100.. TTiinntt ((CCoommmmaanndd:: kk jj))
To adjust screen tint.
You can also adjust tint in the PICTURE menu.
Transmission [k][j][ ][Set ID][ ][Data][Cr]
Data Red: 00 ~ Green: 64 (*transmit by Hexadecimal code)
*Refer to ‘Real data mapping’.
Acknowledgement [ j ][ ][Set ID][ ][OK/NG][Data][x]

APPENDIX
118
APPENDIX
1111.. SShhaarrppnneessss ((CCoommmmaanndd:: kk kk))
To adjust screen sharpness.
You can also adjust sharpness in the PICTURE menu.
Transmission [k][k][ ][Set ID][ ][Data][Cr]
Data Min: 00 ~ Max: 64 (*transmit by Hexadecimal code)
*Refer to ‘Real data mapping’.
Acknowledgement [k][ ][Set ID][ ][OK/NG][Data][x]
1122.. OOSSDD SSeelleecctt ((CCoommmmaanndd:: kk ll))
To select OSD (On Screen Display) on/off.
Transmission [k][l][ ][Set ID][ ][Data][Cr]
Data 00: OSD off Data 01: OSD on
Acknowledgement [l][ ][Set ID][ ][OK/NG][Data][x]
1133.. RReemmoottee CCoonnttrrooll LLoocckk MMooddee ((CCoommmmaanndd:: kk mm))
To lock the remote control and the front panel controls
on the set.
Transmission [k][m][ ][Set ID][ ][Data][Cr]
Data 00: Lock off Data 01: Lock on
Acknowledgement [m][ ][Set ID][ ][OK/NG][Data][x]
If you’re not using the remote control and front panel
controls on the TV, use this mode. When main power is
on/off, remote control lock is released.
If Key Lock is on in the standby mode, TV will not turn on
by POWER button of remote control and on the TV.
1144.. TTrreebbllee ((CCoommmmaanndd:: kk rr))
To adjust treble.
You can also adjust treble in the AUDIO menu.
Transmission [k][r][ ][Set ID][ ][Data][Cr]
Data Min: 00 ~ Max: 64 (*transmit by Hexadecimal code)
*Refer to ‘Real data mapping’.
Acknowledgement [r][ ][Set ID][ ][OK/NG][Data][x]
1155.. BBaassss ((CCoommmmaanndd:: kk ss))
To adjust bass.
You can also adjust bass in the AUDIO menu.
Transmission [k][s][ ][Set ID][ ][Data][Cr]
Data Min: 00 ~ Max: 64 (*transmit by Hexadecimal code)
*Refer to ‘Real data mapping’.
Acknowledgement [s][ ][Set ID][ ][OK/NG][Data][x]
1166.. BBaallaannccee ((CCoommmmaanndd:: kk tt))
To adjust balance.
You can also adjust balance in the AUDIO menu.
Transmission [k][t][ ][Set ID][ ][Data][Cr]
Data Min: 00 ~ Max: 64 (*transmit by Hexadecimal code)
*Refer to ‘Real data mapping’.
Acknowledgement [t][ ][Set ID][ ][OK/NG][Data][x]
1177.. CCoolloorr TTeemmppeerraattuurree ((CCoommmmaanndd:: kk uu))
To adjust color temperature.
You can also adjust color temperature in the PICTURE menu.
Transmission [k][u][ ][Set ID][ ][Data][Cr]
Data 00: Medium 01: Cool 02: Warm
Acknowledgement [u][ ][Set ID][ ][OK/NG][Data][x]
1188.. EEnneerrggyy SSaavviinngg ((CCoommmmaanndd:: jj qq))
To control the energy saving function.
Transmission [ j ][q][ ][Set ID][ ][Data][Cr]
Data 00: Energy saving - off
01: Energy saving - Minimum
02: Energy saving - Medium
03: Energy saving - Maximum
05: Energy saving - Screen off
Acknowledgement [q][ ][Set ID][ ][OK/NG][Data][x]
1199.. AAuuttoo CCoonnffiigguurraattiioonn ((CCoommmmaanndd:: jj uu))
To adjust picture position and minimize image shaking
automatically. Auto configuration only works in RGB-PC
mode.
Transmission [ j ][u][ ][Set ID][ ][Data][Cr]
Data 01: To set
Acknowledgement [u][ ][Set ID][ ][OK/NG][Data][x]
2200.. CChhaannnneell TTuunniinngg ((CCoommmmaanndd:: mm aa))
To tune channel to following physical/major/minor number.
Transmission [m][a][ ][Set ID][ ][Data00][ ][Data01]
[ ][Data02][ ][Data03][ ][Data04][ ][Data05][Cr]
Digital channels have a Physical, Major, and Minor channel
number. The Physical number is the actual digital channel
number, the Major is the number that the channel should
be mapped to, and the Minor is the sub-channel. Since
the ATSC tuner automatically maps the channel to the
Major number, the Physical number is not required when
sending a command.
Data 00: Physical Channel Number
NTSC air: 02~45, NTSC cable: 01, 0E~7D
ATSC air: 01~45, ATSC cable: 01~87
Data 01 & 02: Major Channel Number
Data 01: High byte Data 02: Low byte
Two bytes are available for the Major and Minor, nor-
mally only the second byte is used.
Data 03 & 04: Minor Channel Number
Not needed for NTSC.

APPENDIX
119
Data5:
The table above lists the binary code which must be
converted to Hexadecimal before sending. For example:
The binary code to tune the sub source to an NTSC
cable channel is “1000 0001”, which translates to “81”
in Hex.
* 7th bit : For which source do you want to change the
channel.
* 6th bit: Use a two part or one part channel. Most cases
just use 0 since it’s ignored when using NTSC.
* 5th bit: Use 0 with NTSC since it can only use the phys-
ical channel number. Normally use 1 for ATSC since most
times it doesn’t matter what the physical number is.
* 4th bit: Set to 0.
* 3-0 bits: Choose signal type.
* Tune Command Examples:
1. Tune to the analog (NTSC) cable channel 35.
Data 00 = Physical of 35 = 23
Data 01 & 02 = No Major = 00 00
Data 03 & 04 = No Minor = 00 00
Data 05 = 0000 0001 in binary = 01
Total = ma 00 23 00 00 00 00 01
2. Tune to the digital (ATSC) local channel 30-3.
Data 00 = Don’t know Physical = 00
Data 01 & 02 = Major is 30 = 00 1E
Data 03 & 04 = Minor is 3 = 00 03
Data 05 = 0010 0010 in binary = 22
Total = ma 00 00 00 1E 00 03 22
Acknowledgement[a][ ][Set ID][ ][OK][Data00][Data01]
[Data02][Data03][Data04][x][a][ ][Set ID]
[ ][NG][Data00][x]
2211.. CChhaannnneell AAdddd//DDeell ((CCoommmmaanndd:: mm bb))
To add and delete the channels.
Transmission [m][b][ ][Set ID][ ][Data][Cr]
Data 00: Channel Delete Data 01: Channel Add
Acknowledgement [b][ ][Set ID][ ][OK/NG][Data][x]
2222.. KKeeyy ((CCoommmmaanndd:: mm cc))
To send IR remote control code.
Transmission [m][c][ ][Set ID][ ][Data][Cr]
See page 113.
Acknowledgement [c][ ][Set ID][ ][OK/NG][Data][x]
When TV is in the standby mode, TV will turn on by
POWER button of remote control only.
2233.. BBaacckklliigghhtt ((CCoommmmaanndd:: mm gg))
To adjust screen backlight.
Transmission [m][g][ ][Set ID][ ][Data][Cr]
Data Min:00 ~ Max:64 (*transmit by Hexadecimal code)
*Refer to ‘Real data mapping’.
Acknowledgement [g][ ][Set ID][ ][OK/NG][Data][x]
Step
NTSC Air
NTSC Cable
ATSC Air
ATSC Cable_std
ATSC Cable_hrc
ATSC Cable_irc
ATSC cable_auto
Reserved
...
Reserved
1
0
0
1
1
0
0
1
1
x
1
2
0
0
0
0
1
1
1
1
x
1
3
0
0
0
0
0
0
0
0
x
1
4
x
x
x
x
x
x
x
x
x
x
Reserved
5
0
1
Use
No Use
Using Physical
Channel
6
0
1
Two
One
Two/One
Part Channel
7
0
1
Main
Sub
Main/Sub
Picture
0
0
1
0
1
0
1
0
1
x
1

APPENDIX
120
OPEN SOURCE LICENSE
-
This feature is not available for all models.
APPENDIX
Copyright (C) 1989, 1991 Free Software Foundation, Inc., 51
Franklin Street, Fifth Floor, Boston, MA 02110-1301 USA
Everyone is permitted to copy and distribute verbatim copies of
this license document, but changing it is not allowed.
Preamble
The licenses for most software are designed to take away your
freedom to share and change it. By contrast, the GNU General
Public License is intended to guarantee your freedom to share
and change free software - to make sure the software is free for
all its users. This General Public License applies to most of the
Free Software Foundation's software and to any other program
whose authors commit to using it. (Some other free software
foundation software is covered by the GNU Lesser General Public
License instead.) You can apply it to your programs, too.
When we speak of free software, we are referring to freedom, not
price. Our General Public Licenses are designed to make sure that
you have the freedom to distribute copies of free software (and
charge for this service if you wish), that you receive source code
or can get it if you want it, that you can change the software or
use pieces of it in new free programs; and that you know you can
do these things.
To protect your rights, we need to make restrictions that forbid
anyone to deny you these rights or to ask you to surrender the
rights. These restrictions translate to certain responsibilities for
you if you distribute copies of the software, or if you modify it.
For example, if you distribute copies of such a program, whether
gratis or for a fee, you must give the recipients all the rights that
you have. You must make sure that they, too, receive or can get
the source code. And you must show them these terms so they
know their rights.
We protect your rights with two steps: (1) copyright the soft-
ware, and (2) offer you this license which gives you legal permis-
sion to copy, distribute and/or modify the software.
Also, for each author's protection and ours, we want to make cer-
tain that everyone understands that there is no warranty for this
free software. If the software is modified by someone else and
passed on, we want its recipients to know that what they have is
not the original, so that any problems introduced by others will
not reflect on the original authors' reputations.
Finally, any free program is threatened constantly by software
patents. We wish to avoid the danger that redistributors of a free
program will individually obtain patent licenses, in effect making
the program proprietary. To prevent this, we have made it clear
that any patent must be licensed for everyone's free use or not
licensed at all.
The precise terms and conditions for copying, distribution and
modification follow.
GNU GENERAL PUBLIC LICENSE
TERMS AND CONDITIONS FOR COPYING, DISTRIBUTION
AND MODIFICATION
0. This license applies to any program or other work which con-
tains a notice placed by the copyright holder saying it may be
distributed under the terms of this General Public License. The
"Program", below, refers to any such program or work, and a
"work based on the Program" means either the Program or any
derivative work under copyright law: that is to say, a work con-
taining the Program or a portion of it, either verbatim or with
modifications and/or translated into another language.
(Hereinafter, translation is included without limitation in the
term "modification".) Each licensee is addressed as "you".
Activities other than copying, distribution and modification
are not covered by this license; they are outside its scope.
The act of running the Program is not restricted, and the out-
put from the program is covered only if its contents constitute
a work based on the program (independent of having been
made by running the program). Whether that is true depends
on what the program does.
1. You may copy and distribute verbatim copies of the program's
source code as you receive it, in any medium, provided that
you conspicuously and appropriately publish on each copy an
appropriate copyright notice and disclaimer of warranty; keep
intact all the notices that refer to this license and to the
absence of any warranty; and give any other recipients of the
program a copy of this license along with the Program.
You may charge a fee for the physical act of transferring a
copy, and you may at your option offer warranty protection in
exchange for a fee.
2. You may modify your copy or copies of the program or any
portion of it, thus forming a work based on the Program, and
copy and distribute such modifications or work under the
terms of section 1 above, provided that you also meet all of
these conditions:
a) You must cause the modified files to carry prominent
notices stating that you changed the files and the date of
any change.
GNU GENERAL PUBLIC LICENSE
Version 2, June 1991

APPENDIX
121
b) You must cause any work that you distribute or publish,
that in whole or in part contains or is derived from the
Program or any part there of, to be licensed as a whole at
no charge to all third parties under the terms of this
license.
c) If the modified program normally reads commands interac-
tively when run, you must cause it, when started running
for such interactive use in the most ordinary way, to print
or display an announcement including an appropriate
copyright notice and a notice that there is no warranty (or
else, saying that you provide a warranty) and that users
may redistribute the program under these conditions, and
telling the user how to view a copy of this license.
(Exception: if the Program itself is interactive but does not
normally print such an announcement, your work based on
the Program is not required to print an announcement.)
These requirements apply to the modified work as a whole. If
identifiable sections of that work are not derived from the
Program, and can be reasonably considered independent and
separate works in themselves, then this license, and its terms,
do not apply to those sections when you distribute them as
separate works. But when you distribute the same sections as
part of a whole which is a work based on the Program, the dis-
tribution of the whole must be on the terms of this license,
whose permissions for other licensees extend to the entire
whole, and thus to each and every part regardless of who
wrote it.
Thus, it is not the intent of this section to claim rights or con-
test your rights to work written entirely by you; rather, the
intent is to exercise the right to control the distribution of
derivative or collective works based on the program.
In addition, mere aggregation of another work not based on
the program with the Program (or with a work based on the
program) on a volume of a storage or distribution medium
does not bring the other work under the scope of this license.
3. You may copy and distribute the program (or a work based on
it, under section 2) in object code or executable form under
the terms of sections 1 and 2 above provided that you also
do one of the following:
a) Accompany it with the complete corresponding machine-
readable source code, which must be distributed under the
terms of sections 1 and 2 above on a medium customarily
used for software interchange; or,
b) Accompany it with a written offer, valid for at least three
years, to give any third party, for a charge no more than
your cost of physically performing source distribution, a
complete machine-readable copy of the corresponding
source code, to be distributed under the terms of sections
1 and 2 above on a medium customarily used for software
interchange; or,
c) Accompany it with the information you received as to the
offer to distribute corresponding source code. (This alter-
native is allowed only for noncommercial distribution and
only if you received the program in object code or exe-
cutable form with such an offer, in accord with Subsection
b above.)
The source code for a work means the preferred form of the
work for making modifications to it. For an executable work,
complete source code means all the source code for all mod-
ules it contains, plus any associated interface definition files,
plus the scripts used to control compilation and installation
of the executable. However, as a special exception, the source
code distributed need not include anything that is normally
distributed (in either source or binary form) with the major
components (compiler, kernel, and so on) of the operating
system on which the executable runs, unless that component
itself accompanies the executable.
If distribution of executable or object code is made by offer-
ing access to copy from a designated place, then offering
equivalent access to copy the source code from the same
place counts as distribution of the source code, even though
third parties are not compelled to copy the source along with
the object code.
4. You may not copy, modify, sublicense, or distribute the Program
except as expressly provided under this license. Any attempt
otherwise to copy, modify, sublicense or distribute the
Program is void, and will automatically terminate your rights
under this license. However, parties who have received copies,
or rights, from you under this license will not have their licens-
es terminated so long as such parties remain in full compli-
ance.
5. You are not required to accept this license, since you have not
signed it. However, nothing else grants you permission to
modify or distribute the Program or its derivative works.
These actions are prohibited by law if you do not accept this
license. Therefore, by modifying or distributing the program
(or any work based on the program), you indicate your accep-
tance of this license to do so, and all its terms and conditions
for copying, distributing or modifying the program or works
based on it.
6. Each time you redistribute the program (or any work based on
the Program), the recipient automatically receives a license
from the original licensor to copy, distribute or modify the
Program subject to these terms and conditions. You may not
impose any further restrictions on the recipients' exercise of
the rights granted herein. You are not responsible for enforc-
ing compliance by third parties to this license.

APPENDIX
122
APPENDIX
7. If, as a consequence of a court judgment or allegation of
patent infringement or for any other reason (not limited to
patent issues), conditions are imposed on you (whether by
court order, agreement or otherwise) that contradict the con-
ditions of this license, they do not excuse you from the con-
ditions of this license. If you cannot distribute so as to satis-
fy simultaneously your obligations under this license and any
other pertinent obligations, then as a consequence you may
not distribute the program at all. For example, if a patent
license would not permit royalty-free redistribution of the
program by all those who receive copies directly or indirectly
through you, then the only way you could satisfy both it and
this license would be to refrain entirely from distribution of
the program.
If any portion of this section is held invalid or unenforceable
under any particular circumstance, the balance of the section
is intended to apply and the section as a whole is intended to
apply in other circumstances.
It is not the purpose of this section to induce you to infringe
any patents or other property right claims or to contest valid-
ity of any such claims; this section has the sole purpose of
protecting the integrity of the free software distribution sys-
tem, which is implemented by public license practices. Many
people have made generous contributions to the wide range
of software distributed through that system in reliance on
consistent application of that system; it is up to the
author/donor to decide if he or she is willing to distribute
software through any other system and a licensee cannot
impose that choice.
This section is intended to make thoroughly clear what is
believed to be a consequence of the rest of this license.
8. If the distribution and/or use of the program is restricted in
certain countries either by patents or by copyrighted inter-
faces, the original copyright holder who places the program
under this license may add an explicit geographical distribution
limitation excluding those countries, so that distribution is
permitted only in or among countries not thus excluded. In
such case, this license incorporates the limitation as if written
in the body of this license.
9. The Free Software Foundation may publish revised and/or
new versions of the General Public License from time to time.
Such new versions will be similar in spirit to the present ver-
sion, but may differ in detail to address new problems or con-
cerns.
Each version is given a distinguishing version number. If the
program specifies a version number of this license which
applies to it and "any later version", you have the option of
following the terms and conditions either of that version or of
any later version published by the Free Software Foundation.
If the program does not specify a version number of this
license, you may choose any version ever published by the
Free Software Foundation.
10.If you wish to incorporate parts of the program into other free
programs whose distribution conditions are different, write to
the author to ask for permission. For software which is copy-
righted by the Free Software Foundation, write to the Free
Software Foundation; we sometimes make exceptions for this.
Our decision will be guided by the two goals of preserving the
free status of all derivatives of our free software and of pro-
moting the sharing and reuse of software generally.
NO WARRANTY
11.BECAUSE THE PROGRAM IS LICENSED FREE OF CHARGE,
THERE IS NO WARRANTY FOR THE PROGRAM, TO THE
EXTENT PERMITTED BY APPLICABLE LAW. EXCEPT WHEN
OTHERWISE STATED IN WRITING THE COPYRIGHT HOLD-
ERS AND/OR OTHER PARTIES PROVIDE THE PROGRAM "AS
IS" WITHOUT WARRANTY OF ANY KIND, EITHER
EXPRESSED OR IMPLIED, INCLUDING, BUT NOT LIMITED
TO, THE IMPLIED WARRANTIES OF MERCHANTABILITY
AND FITNESS FOR A PARTICULAR PURPOSE. THE ENTIRE
RISK AS TO THE QUALITY AND PERFORMANCE OF THE
PROGRAM IS WITH YOU. SHOULD THE PROGRAM PROVE
DEFECTIVE, YOU ASSUME THE COST OF ALL NECESSARY
SERVICING, REPAIR OR CORRECTION.
12.IN NO EVENT UNLESS REQUIRED BY APPLICABLE LAW OR
AGREED TO IN WRITING WILL ANY COPYRIGHT HOLDER,
OR ANY OTHER PARTY WHO MAY MODIFY AND/OR
REDISTRIBUTE THE PROGRAM AS PERMITTED ABOVE, BE
LIABLE TO YOU FOR DAMAGES, INCLUDING ANY GENERAL,
SPECIAL, INCIDENTAL OR CONSEQUENTIAL DAMAGES
ARISING OUT OF THE USE OR INABILITY TO USE THE PRO-
GRAM (INCLUDING BUT NOT LIMITED TO LOSS OF DATA
OR DATA BEING RENDERED INACCURATE OR LOSSES SUS-
TAINED BY YOU OR THIRD PARTIES OR A FAILURE OF THE
PROGRAM TO OPERATE WITH ANY OTHER PROGRAMS),
EVEN IF SUCH HOLDER OR OTHER PARTY HAS BEEN
ADVISED OF THE POSSIBILITY OF SUCH DAMAGES.

APPENDIX
123
END OF TERMS AND CONDITIONS
How to apply these terms to your new programs
If you develop a new program, and you want it to be of the great-
est possible use to the public, the best way to achieve this is to
make it free software which everyone can redistribute and change
under these terms.
To do so, attach the following notices to the program. It is safest
to attach them to the start of each source file to most effective-
ly convey the exclusion of warranty; and each file should have at
least the "copyright" line and a pointer to where the full notice is
found.
one line to give the program's name and a brief idea of what it
does.
Copyright (C) <year> <name of author>
This program is free software; you can redistribute it and/or
modify it under the terms of the GNU General Public License as
published by the Free Software Foundation; either version 2 of
the license, or (at your option) any later version.
This program is distributed in the hope that it will be useful, but
WITHOUT ANY WARRANTY; without even the implied warranty
of MERCHANTABILITY or FITNESS FOR A PARTICULAR PUR-
POSE. See the GNU General Public License for more details.
You should have received a copy of the GNU General Public
License along with this program; if not, write to the Free Software
Foundation, Inc., 51 Franklin Street, Fifth Floor, Boston, MA
02110-1301 USA.
Also add information on how to contact you by electronic and
paper mail.
If the program is interactive, make it output a short notice like
this when it starts in an interactive mode:
Gnomovision version 69, Copyright (C) year name of author
Gnomovision comes with ABSOLUTELY NO WARRANTY; for
details type ‘show w’. This is free software, and you are welcome
to redistribute it under certain conditions; type ‘show c’ for
details.
The hypothetical commands ‘show w’ and ‘show c’ should show
the appropriate parts of the General Public License. Of course,
the commands you use may be called something other than
‘show w’ and ‘show c’; they could even be mouse-clicks or menu
items-whatever suits your program.
You should also get your employer (if you work as a programmer)
or your school, if any, to sign a “copyright disclaimer” for the pro-
gram, if necessary. Here is a sample; alter the names:
Yoyodyne, Inc., hereby disclaims all copyright interest in the pro-
gram ‘Gnomovision’ (which makes passes at compilers) written by
James Hacker.
signature of Ty Coon, 1 April 1989
Ty Coon, President of Vice
This General Public License does not permit incorporating your
program into proprietary programs. If your program is a subrou-
tine library, you may consider it more useful to permit linking pro-
prietary applications with the library. If this is what you want to
do, use the GNU Lesser General Public License instead of this
license.

APPENDIX
124
APPENDIX
Copyright (C) 1991, 1999 Free Software Foundation, Inc. 51
Franklin Street, Fifth Floor, Boston, MA 02110-1301 USA
Everyone is permitted to copy and distribute verbatim copies of
this license document, but changing it is not allowed.
[This is the first released version of the Lesser GPL. It also
counts as the successor of the GNU Library Public License, ver-
sion 2, hence the version number 2.1.]
Preamble
The licenses for most software are designed to take away your
freedom to share and change it. By contrast, the GNU General
Public Licenses are intended to guarantee your freedom to share
and change free software - to make sure the software is free for
all its users.
This license, the Lesser General Public License, applies to some
specially designated software packages - typically libraries - of
the Free Software Foundation and other authors who decide to
use it. You can use it too, but we suggest you first think careful-
ly about whether this license or the ordinary General Public
License is the better strategy to use in any particular case, based
on the explanations below.
When we speak of free software, we are referring to freedom of
use, not price. Our General Public Licenses are designed to make
sure that you have the freedom to distribute copies of free soft-
ware (and charge for this service if you wish); that you receive
source code or can get it if you want it; that you can change the
software and use pieces of it in new free programs; and that you
are informed that you can do these things.
To protect your rights, we need to make restrictions that forbid
distributors to deny you these rights or to ask you to surrender
these rights. These restrictions translate to certain responsibilities
for you if you distribute copies of the library or if you modify it.
For example, if you distribute copies of the library, whether gratis
or for a fee, you must give the recipients all the rights that we
gave you. You must make sure that they, too, receive or can get
the source code. If you link other code with the library, you must
provide complete object files to the recipients, so that they can
relink them with the library after making changes to the library
and recompiling it. And you must show them these terms so they
know their rights.
We protect your rights with a two-step method: (1) we copyright
the library, and (2) we offer you this license, which gives you legal
permission to copy, distribute and/or modify the library.
To protect each distributor, we want to make it very clear that
there is no warranty for the free library. Also, if the library is mod-
ified by someone else and passed on, the recipients should know
that what they have is not the original version, so that the origi-
nal author's reputation will not be affected by problems that
might be introduced by others.
Finally, software patents pose a constant threat to the existence
of any free program. We wish to make sure that a company can-
not effectively restrict the users of a free program by obtaining a
restrictive license from a patent holder. Therefore, we insist that
any patent license obtained for a version of the library must be
consistent with the full freedom of use specified in this license.
Most GNU software, including some libraries, is covered by the
ordinary GNU General Public License. This license, the GNU
Lesser General Public License, applies to certain designated
libraries, and is quite different from the ordinary General Public
License. We use this license for certain libraries in order to per-
mit linking those libraries into non-free programs.
When a program is linked with a library, whether statically or
using a shared library, the combination of the two is legally
speaking a combined work, a derivative of the original library. The
ordinary General Public License therefore permits such linking
only if the entire combination fits its criteria of freedom. The
Lesser General Public License permits more lax criteria for linking
other code with the library.
We call this license the "Lesser" General Public License because
it does Less to protect the user's freedom than the ordinary
General Public License. It also provides other free software devel-
opers Less of an advantage over competing non-free programs.
These disadvantages are the reason we use the ordinary General
Public License for many libraries. However, the Lesser license pro-
vides advantages in certain special circumstances.
For example, on rare occasions, there may be a special need to
encourage the widest possible use of a certain library, so that it
becomes a de-facto standard. To achieve this, non-free programs
must be allowed to use the library. A more frequent case is that
a free library does the same job as widely used non-free libraries.
In this case, there is little to gain by limiting the free library to free
software only, so we use the Lesser General Public License.
In other cases, permission to use a particular library in non-free
programs enables a greater number of people to use a large body
of free software. For example, permission to use the GNU C
Library in non-free programs enables many more people to use
the whole GNU operating system, as well as its variant, the
GNU/Linux operating system.
GNU LESSER GENERAL PUBLIC LICENSE
Version 2.1, February 1999

APPENDIX
125
Although the Lesser General Public License is Less protective of
the users' freedom, it does ensure that the user of a program that
is linked with the Library has the freedom and the wherewithal to
run that program using a modified version of the Library.
The precise terms and conditions for copying, distribution and
modification follow. Pay close attention to the difference between
a "work based on the library" and a "work that uses the library".
The former contains code derived from the library, whereas the
latter must be combined with the library in order to run.
GNU LESSER GENERAL PUBLIC LICENSE
TERMS AND CONDITIONS FOR COPYING, DISTRIBUTION
AND MODIFICATION
0. This license agreement applies to any software library or other
program which contains a notice placed by the copyright hold-
er or other authorized party saying it may be distributed
under the terms of this Lesser General Public License (also
called “this license”). Each license is addressed as "you".
A “library” means a collection of software functions and/or
data prepared so as to be conveniently linked with application
programs (which use some of those functions and data) to
form executables.
The “Library”, below, refers to any such software library or work
which has been distributed under these terms. A “work based
on the Library” means either the Library or any derivative work
under copyright law: that is to say, a work containing the
library or a portion of it, either verbatim or with modifications
and/or translated straightforwardly into another language.
(Hereinafter, translation is included without limitation in the
term “modification”.)
“Source code” for a work means the preferred form of the
work for making modifications to it. For a library, complete
source code means all the source code for all modules it con-
tains, plus any associated interface definition files, plus the
scripts used to control compilation and installation of the
library.
Activities other than copying, distribution and modification
are not covered by this license; they are outside its scope.
The act of running a program using the Library is not restrict-
ed, and output from such a program is covered only if its con-
tents constitute a work based on the library (independent of
the use of the Library in a tool for writing it). Whether that is
true depends on what the library does and what the program
that uses the library does.
1. You may copy and distribute verbatim copies of the library's
complete source code as you receive it, in any medium, pro-
vided that you conspicuously and appropriately publish on
each copy an appropriate copyright notice and disclaimer of
warranty; keep intact all the notices that refer to this license
and to the absence of any warranty; and distribute a copy of
this license along with the Library.
You may charge a fee for the physical act of transferring a
copy, and you may at your option offer warranty protection in
exchange for a fee.
2. You may modify your copy or copies of the Library or any
portion of it, thus forming a work based on the Library, and
copy and distribute such modifications or work under the
terms of section 1 above, provided that you also meet all of
these conditions:
a) The modified work must itself be a software library.
b) You must cause the files modified to carry prominent
notices stating that you changed the files and the date of
any change.
c) You must cause the whole of the work to be licensed at no
charge to all third parties under the terms of this license.
d) If a facility in the modified Library refers to a function or a
table of data to be supplied by an application program that
uses the facility, other than as an argument passed when
the facility is invoked, then you must make a good faith
effort to ensure that, in the event an application does not
supply such function or table, the facility still operates, and
performs whatever part of its purpose remains meaningful.
(For example, a function in a library to compute square roots
has a purpose that is entirely well-defined independent of the
application. Therefore, Subsection 2d requires that any appli-
cation-supplied function or table used by this function must be
optional: if the application does not supply it, the square root
function must still compute square roots.)
These requirements apply to the modified work as a whole. If
identifiable sections of that work are not derived from the
library, and can be reasonably considered independent and
separate works in themselves, then this license, and its terms,
do not apply to those sections when you distribute them as
separate works. But when you distribute the same sections as
part of a whole which is a work based on the library, the dis-
tribution of the whole must be on the terms of this license,
whose permissions for other licenses extend to the entire
whole, and thus to each and every part regardless of who
wrote it.
Thus, it is not the intent of this section to claim rights or con-
test your rights to work written entirely by you; rather, the
intent is to exercise the right to control the distribution of
derivative or collective works based on the library.
In addition, mere aggregation of another work not based on
the library with the library (or with a work based on the
library) on a volume of a storage or distribution medium does
not bring the other work under the scope of this license.

APPENDIX
126
APPENDIX
3. You may opt to apply the terms of the ordinary GNU General
Public License instead of this License to a given copy of the
Library. To do this, you must alter all the notices that refer to
this License, so that they refer to the ordinary GNU General
Public License, version 2, instead of to this License. (If a newer
version than version 2 of the ordinary GNU General Public
License has appeared, then you can specify that version
instead if you wish.) Do not make any other change in these
notices.
Once this change is made in a given copy, it is irreversible for
that copy, so the ordinary GNU General Public License applies
to all subsequent copies and derivative works made from that
copy.
This option is useful when you wish to copy part of the code
of the library into a program that is not a library.
4. You may copy and distribute the library (or a portion or deriv-
ative of it, under Section 2) in object code or executable form
under the terms of Sections 1 and 2 above provided that you
accompany it with the complete corresponding machine-
readable source code, which must be distributed under the
terms of sections 1 and 2 above on a medium customarily
used for software interchange.
If distribution of object code is made by offering access to
copy from a designated place, then offering equivalent access
to copy the source code from the same place satisfies the
requirement to distribute the source code, even though third
parties are not compelled to copy the source along with the
object code.
5. A program that contains no derivative of any portion of the
Library, but is designed to work with the Library by being
compiled or linked with it, is called a “work that uses the
Library”. Such a work, in isolation, is not a derivative work of
the Library, and therefore falls outside the scope of this
license.
However, linking a “work that uses the library” with the Library
creates an executable that is a derivative of the Library
(because it contains portions of the library), rather than a
“work that uses the library”. The executable is therefore cov-
ered by this license. Section 6 states terms for distribution of
such executable.
When a “work that uses the library” uses material from a head-
er file that is part of the library, the object code for the work
may be a derivative work of the library even though the source
code is not.
Whether this is true is especially significant if the work can be
linked without the library, or if the work is itself a library. The
threshold for this to be true is not precisely defined by law.
If such an object file uses only numerical parameters, data
structure layouts and accessories, and small macros and small
inline functions (ten lines or less in length), then the use of
the object file is unrestricted, regardless of whether it is legal-
ly a derivative work. (Executable containing this object code
plus portions of the library will still fall under Section 6.)
Otherwise, if the work is a derivative of the library, you may
distribute the object code for the work under the terms of
Section 6. Any executable containing that work also fall under
Section 6, whether or not they are linked directly with the
library itself.
6. As an exception to the sections above, you may also combine
or link a "work that uses the library" with the library to pro-
duce a work containing portions of the library, and distribute
that work under terms of your choice, provided that the terms
permit modification of the work for the customer's own use
and reverse engineering for debugging such modifications.
You must give prominent notice with each copy of the work
that the library is used in it and that the Library and its use
are covered by this license. You must supply a copy of this
license. If the work during execution displays copyright
notices, you must include the copyright notice for the library
among them, as well as a reference directing the user to the
copy of this license. Also, you must do one of these things:
a) Accompany the work with the complete corresponding
machine-readable source code for the library including
whatever changes were used in the work (which must be
distributed under Sections 1 and 2 above); and, if the work
is an executable linked with the Library, with the complete
machine-readable “work that uses the Library”, as object
code and/or source code, so that the user can modify the
library and then relink to produce a modified executable
containing the modified library. (It is understood that the
user who changes the contents of definitions files in the
library will not necessarily be able to recompile the appli-
cation to use the modified definitions.)
b) Use a suitable shared library mechanism for linking with the
library. A suitable mechanism is one that (1) uses at run time
a copy of the library already present on the user’s computer
system, rather than copying library functions into the exe-
cutable, and (2) will operate properly with a modified version
of the library, if the user installs one, as long as the modified
version is interface-compatible with the version that the
work was made with.
c) Accompany the work with a written offer, valid for at least
three years, to give the same user the materials specified in
Subsection 6, above, for a charge no more than the cost of
performing this distribution.
d) If distribution of the work is made by offering access to
copy from a designated place, offer equivalent access to
copy the above specified materials from the same place.
e) Verify that the user has already received a copy of these
materials or that you have already sent this user a copy.

APPENDIX
127
For an executable, the required form of the "work that uses
the library" must include any data and utility programs need-
ed for reproducing the executable from it. However, as a spe-
cial exception, the materials to be distributed need not
include anything that is normally distributed (in either source
or binary form) with the major components (compiler, kernel,
and so on) of the operating system on which the executable
runs, unless that component itself accompanies the exe-
cutable.
It may happen that this requirement contradicts the license
restrictions of other proprietary libraries that do not normal-
ly accompany the operating system. Such a contradiction
means you cannot use both them and the library together in
an executable that you distribute.
7. You may place library facilities that are a work based on the
library side-by-side in a single library together with other
library facilities not covered by this license, and distribute
such a combined library, provided that the separate distribu-
tion of the work based on the Library and of the other library
facilities is otherwise permitted, and provided that you do
these two things:
a) Accompany the combined library with a copy of the same
work based on the Library, uncombined with any other
library facilities. This must be distributed under the terms
of the sections above.
b) Give prominent notice with the combined library of the
fact that part of it is a work based on the library, and
explaining where to find the accompanying uncombined
form of the same work.
8. You may not copy, modify, sublicense, link with, or distribute
the library except as expressly provided under this license.
Any attempt otherwise to copy, modify, sublicense, link with,
or distribute the library is void, and will automatically termi-
nate your rights under this license. However, parties who have
received copies, or rights, from you under this license will not
have their licenses terminated so long as such parties remain
in full compliance.
9. You are not required to accept this license, since you have not
signed it. However, nothing else grants you permission to mod-
ify or distribute the library or its derivative works. These
actions are prohibited by law if you do not accept this license.
Therefore, by modifying or distributing the library (or any work
based on the library), you indicate your acceptance of this
license to do so, and all its terms and conditions for copying,
distributing or modifying the library or works based on it.
10.Each time you redistribute the library (or any work based on
the Library), the recipient automatically receives a license
from the original licensor to copy, distribute, link with or mod-
ify the library subject to these terms and conditions. You may
not impose any further restrictions on the recipients' exercise
of the rights granted herein.
You are not responsible for enforcing compliance by third
parties with this license.
11.If, as a consequence of a court judgment or allegation of
patent infringement or for any other reason (not limited to
patent issues), conditions are imposed on you (whether by
court order, agreement or otherwise) that contradict the con-
ditions of this license, they do not excuse you from the con-
ditions of this license. If you cannot distribute so as to satis-
fy simultaneously your obligations under this license and any
other pertinent obligations, then as a consequence you may
not distribute the library at all. For example, if a patent license
would not permit royalty-free redistribution of the library by
all those who receive copies directly or indirectly through
you, then the only way you could satisfy both it and this
license would be to refrain entirely from distribution of the
library.
If any portion of this section is held invalid or unenforceable
under any particular circumstance, the balance of the section
is intended to apply, and the section as a whole is intended to
apply in other circumstances.
It is not the purpose of this section to induce you to infringe
any patents or other property right claims or to contest valid-
ity of any such claims; this section has the sole purpose of
protecting the integrity of the free software distribution sys-
tem which is implemented by public license practices. Many
people have made generous contributions to the wide range
of software distributed through that system in reliance on
consistent application of that system; it is up to the
author/donor to decide if he or she is willing to distribute
software through any other system and a license cannot
impose that choice.
This section is intended to make thoroughly clear what is
believed to be a consequence of the rest of this license.
12.If the distribution and/or use of the library is restricted in cer-
tain countries either by patents or by copyrighted interfaces,
the original copyright holder who places the library under this
license may add an explicit geographical distribution limitation
excluding those countries, so that distribution is permitted
only in or among countries not thus excluded. In such case,
this license incorporates the limitation as if written in the body
of this license.
13.The Free Software Foundation may publish revised and/or
new versions of the Lesser General Public License from time to
time. Such new versions will be similar in spirit to the present
version, but may differ in detail to address new problems or
concerns.
Each version is given a distinguishing version number. If the
library specifies a version number of this license which applies
to it and “any later version”, you have the option of following
the terms and conditions either of that version or of any later
version published by the Free Software Foundation.

APPENDIX
128
APPENDIX
If the library does not specify a license version number, you
may choose any version ever published by the Free Software
Foundation.
14.If you wish to incorporate parts of the library into other free
programs whose distribution conditions are incompatible with
these, write to the author to ask for permission. For software
which is copyrighted by the Free Software Foundation, write
to the Free Software Foundation; we sometimes make excep-
tions for this. Our decision will be guided by the two goals of
preserving the free status of all derivatives of our free software
and of promoting the sharing and reuse of software generally.
NO WARRANTY
15.BECAUSE THE LIBRARY IS LICENSED FREE OF CHARGE,
THERE IS NO WARRANTY FOR THE LIBRARY, TO THE
EXTENT PERMITTED BY APPLICABLE LAW. EXCEPT WHEN
OTHERWISE STATED IN WRITING THE COPYRIGHT HOLD-
ERS AND/OR OTHER PARTIES PROVIDE THE LIBRARY "AS
IS" WITHOUT WARRANTY OF ANY KIND, EITHER
EXPRESSED OR IMPLIED, INCLUDING, BUT NOT LIMITED
TO, THE IMPLIED WARRANTIES OF MERCHANTABILITY
AND FITNESS FOR A PARTICULAR PURPOSE. THE ENTIRE
RISK AS TO THE QUALITY AND PERFORMANCE OF THE
LIBRARY IS WITH YOU. SHOULD THE LIBRARY PROVE
DEFECTIVE, YOU ASSUME THE COST OF ALL NECESSARY
SERVICING, REPAIR OR CORRECTION.
16.IN NO EVENT UNLESS REQUIRED BY APPLICABLE LAW OR
AGREED TO IN WRITING WILL ANY COPYRIGHT HOLDER,
OR ANY OTHER PARTY WHO MAY MODIFY AND/OR
REDISTRIBUTE THE LIBRARY AS PERMITTED ABOVE, BE
LIABLE TO YOU FOR DAMAGES, INCLUDING ANY GENERAL,
SPECIAL, INCIDENTAL OR CONSEQUENTIAL DAMAGES
ARISING OUT OF THE USE OR INABILITY TO USE THE
LIBRARY (INCLUDING BUT NOT LIMITED TO LOSS OF DATA
OR DATA BEING RENDERED INACCURATE OR LOSSES SUS-
TAINED BY YOU OR THIRD PARTIES OR A FAILURE OF THE
LIBRARY TO OPERATE WITH ANY OTHER SOFTWARE),
EVEN IF SUCH HOLDER OR OTHER PARTY HAS BEEN
ADVISED OF THE POSSIBILITY OF SUCH DAMAGES.
END OF TERMS AND CONDITIONS
How to apply these terms to your new libraries
If you develop a new library, and you want it to be of the great-
est possible use to the public, we recommend making it free soft-
ware that everyone can redistribute and change. You can do so
by permitting redistribution under these terms (or, alternatively,
under the terms of the ordinary General Public License).
To apply these terms, attach the following notices to the library.
It is safest to attach them to the start of each source file to most
effectively convey the exclusion of warranty; and each file should
have at least the “copyright” line and a pointer to where the full
notice is found.
one line to give the library's name and a brief idea of what it does.
Copyright (C) <year> <name of author>
This library is free software; you can redistribute it and/or modify
it under the terms of the GNU Lesser General Public License as
published by the Free Software Foundation; either version 2.1 of
the license, or (at your option) any later version.
This library is distributed in the hope that it will be useful, but
WITHOUT ANY WARRANTY; without even the implied warranty
of MERCHANTABILITY or FITNESS FOR A PARTICULAR PUR-
POSE. See the GNU Lesser General Public License for more
details.
You should have received a copy of the GNU Lesser General
Public License along with this library; if not, write to the Free
Software Foundation, Inc., 51 Franklin Street, Fifth Floor, Boston,
MA 02110-1301 USA
Also add information on how to contact you by electronic and
paper mail.
You should also get your employer (if you work as a programmer)
or your school, if any, to sign a “copyright disclaimer” for the
library, if necessary. Here is a sample; alter the names:
Yoyodyne, Inc., hereby disclaims all copyright interest in the
library ‘Frob’ (a library for tweaking knobs) written by James
Random Hacker.
signature of Ty Coon, 1 April 1990
Ty Coon, President of Vice

APPENDIX
129
1.Definitions.
1.0.1. “Commercial use” means distribution or otherwise making
the covered code available to a third party.
1.1. “Contributor” means each entity that creates or con-
tributes to the creation of modifications.
1.2. “Contributor version” means the combination of the orig-
inal code, prior modifications used by a contributor, and
the modifications made by that particular contributor.
1.3. “Covered code” means the original code or modifications
or the combination of the original code and modifications,
in each case including portions thereof.
1.4. “Electronic distribution mechanism” means a mechanism
generally accepted in the software development communi-
ty for the electronic transfer of data.
1.5. “Executable” means covered code in any form other than
source code.
1.6. “Initial developer” means the individual or entity identified
as the initial Developer in the Source Code notice required
by exhibit A.
1.7. “Larger work” means a work which combines covered code
or portions thereof with code not governed by the terms
of this License.
1.8. “License” means this document.
1.8.1. “Licensable” means having the right to grant, to the maxi-
mum extent possible, whether at the time of the initial
grant or subsequently acquired, any and all of the rights
conveyed herein.
1.9. “Modifications” means any addition to or deletion from
the substance or structure of either the original code or
any previous modifications. When covered code is
released as a series of files, a modification is:
A. Any addition to or deletion from the contents of a file
containing original code or previous modifications.
B. Any new file that contains any part of the original code
or previous modifications.
1.10. “Original code” means source code of computer software
code which is described in the source code notice
required by exhibit as original code, and which, at the time
of its release under this license is not already covered
code governed by this license.
1.10.1.
“Patent claims” means any patent claim(s), now owned or
hereafter acquired, including without limitation, method,
process, and apparatus claims, in any patent licensable by
grantor.
1.11. “Source code” means the preferred form of the covered
code for making modifications to it, including all modules
it contains, plus any associated interface definition files,
scripts used to control compilation and installation of an
executable, or source code differential comparisons
against either the original code or another well known,
available covered code of the contributor's choice. The
source code can be in a compressed or archival form, pro-
vided the appropriate decompression or de-archiving soft-
ware is widely available for no charge.
1.12. “You” (or “Your”) means an individual or a legal entity
exercising rights under, and complying with all of the terms
of, this license or a future version of this license issued
under section 6.1.
For legal entities, “You” includes any entity which controls,
is controlled by, or is under common control with You. For
purposes of this definition, “control” means (a) the power,
direct or indirect, to cause the direction or management of
such entity, whether by contract or otherwise, or (b) own-
ership of more than fifty percent (50%) of the outstand-
ing shares or beneficial ownership of such entity.
2. Source Code License.
2.1. The initial developer grant.
The initial developer hereby grants You a world-wide, roy-
alty-free, non-exclusive license, subject to third party intel-
lectual property claims:
a) under intellectual property rights (other than patent or
trademark) licensable by initial developer to use, repro-
duce, modify, display, perform, sublicense and distrib-
ute the original code (or portions thereof) with or with-
out modifications, and/or as part of a larger work; and
(b) under patents claims infringed by the making, using or
selling of original code, to make, have made, use, prac-
tice, sell, and offer for sale, and/or otherwise dispose
of the original code (or portions there of).
MOZILLA PUBLIC LICENSE
Version 1.1
---------------

APPENDIX
130
APPENDIX
(c) the licenses granted in this section 2.1(a) and (b) are
effective on the date Initial developer first distributes
original code under the terms of this license.
(d) Notwithstanding section 2.1(b) above, no patent
license is granted: 1) for code that You delete from the
original Code; 2) separate from the original code; or
3) for infringements caused by: i) the modification of
the original code or ii) the combination of the original
code with other software or devices.
2.2. Contributor Grant.
Subject to third party intellectual property claims, each
contributor hereby grants You a world-wide, royalty-free,
non-exclusive license
(a) under intellectual property rights (other than patent
or trademark) licensable by contributor, to use,
reproduce, modify, display, perform, sublicense and
distribute the modifications created by such contribu-
tor (or portions thereof) either on an unmodified
basis, with other modifications, as covered code
and/or as part of a larger work; and
(b) under patent claims infringed by the making, using, or
selling of modifications made by that contributor
either alone and/or in combination with its contributor
version (or portions of such combination), to make,
use, sell, offer for sale, have made, and/or otherwise
dispose of: 1) modifications made by that contributor
(or portions thereof); and 2) the combination of mod-
ifications made by that contributor with its contributor
version (or portions of such combination).
(c) the licenses granted in sections 2.2(a) and 2.2(b) are
effective on the date contributor first makes commer-
cial use of the covered code.
(d) Notwithstanding section 2.2(b) above, no patent
license is granted: 1) for any code that contributor has
deleted from the contributor version; 2) separate from
the contributor version; 3) for infringements caused
by: i) third party modifications of contributor version
or ii) the combination of modifications made by that
contributor with other software (except as part of the
contributor version) or other devices; or 4) under
patent claims infringed by covered code in the
absence of modifications made by that contributor.
3. Distribution Obligations.
3.1. Application of license.
The modifications which You create or to which you con-
tribute are governed by the terms of this license, including
without limitation section 2.2. The source code version of
covered code may be distributed only under the terms of
this license or a future version of this license released
under section 6.1, and you must include a copy of this
license with every copy of the source code you distribute.
You may not offer or impose any terms on any source code
version that alters or restricts the applicable version of
this license or the recipients' rights hereunder. However,
you may include an additional document offering the
additional rights described in section 3.5.
3.2. Availability of source code.
Any modification which you create or to which you con-
tribute must be made available in source code form under
the terms of this license either on the same media as an
executable version or via an accepted electronic distribu-
tion mechanism to anyone to whom you made an exe-
cutable version available; and if made available via elec-
tronic distribution mechanism, must remain available for at
least twelve (12) months after the date it initially became
available, or at least six (6) months after a subsequent
version of that particular modification has been made
available to such recipients. You are responsible for ensur-
ing that the source code version remains available even if
the electronic distribution mechanism is maintained by a
third party.
3.3. Description of modifications.
You must cause all covered code to which you contribute to
contain a file documenting the changes You made to create
that covered code and the date of any change. You must
include a prominent statement that the modification is
derived, directly or indirectly, from original code provided by
the initial developer and including the name of the initial
developer in (a) the source code, and (b) in any notice in an
executable version or related documentation in which you
describe the origin or ownership of the covered code.
3.4. Intellectual property matters
(a) Third party claims.
If contributor has knowledge that a license under a third
party's intellectual property rights is required to exercise
the rights granted by such contributor under sections 2.1
or 2.2, contributor must include a text file with the source
code distribution titled "LEGAL" which describes the claim
and the party making the claim in sufficient detail that a
recipient will know whom to contact. If contributor obtains
such knowledge after the modification is made available as
described in section 3.2, contributor shall promptly modi-
fy the LEGAL file in all copies contributor makes available
thereafter and shall take other steps (such as notifying
appropriate mailing lists or newsgroups) reasonably calcu-
lated to inform those who received the covered code that
new knowledge has been obtained.
(b) Contributor APIs.
If contributor's modifications include an application
programming interface and contributor has knowledge of
patent licenses which are reasonably necessary to implement
that API, contributor must also include this information in
the LEGAL file.

APPENDIX
131
(c) Representations.
contributor represents that, except as disclosed pursuant
to section 3.4(a) above, contributor believes that contributor's
modifications are contributor's original creation(s)
and/or contributor has sufficient rights to grant the rights
conveyed by this license.
3.5. Required notices.
You must duplicate the notice in exhibit A in each file of
the source code. If it is not possible to put such notice in
a particular source code file due to its structure, then You
must include such notice in a location (such as a relevant
directory) where a user would be likely to look for such a
notice. If You created one or more modification(s), you
may add your name as a contributor to the notice
described in exhibit A. you must also duplicate this license
in any documentation for the source code where You
describe recipients' rights or ownership rights relating to
covered code. You may choose to offer, and to charge a
fee for, warranty, support, indemnity or liability obligations
to one or more recipients of covered code. However, you
may do so only on your own behalf, and not on behalf of
the Initial developer or any contributor. You must make it
absolutely clear than any such warranty, support, indemni-
ty or liability obligation is offered by you alone, and You
hereby agree to indemnify the Initial developer and every
contributor for any liability incurred by the Initial develop-
er or such contributor as a result of warranty, support,
indemnity or liability terms you offer.
3.6. Distribution of executable versions.
You may distribute covered code in executable form only if
the requirements of section 3.1-3.5 have been met for
that covered code, and if you include a notice stating that
the source code version of the covered code is available
under the terms of this license, including a description of
how and where you have fulfilled the obligations of section
3.2. The notice must be conspicuously included in any
notice in an executable version, related documentation or
collateral in which you describe recipients' rights relating
to the covered code. You may distribute the executable
version of covered code or ownership rights under a
license of your choice, which may contain terms different
from this license, provided that you are in compliance with
the terms of this license and that the license for the exe-
cutable version does not attempt to limit or alter the recip-
ient's rights in the source code version from the rights set
forth in this license. If you distribute the executable ver-
sion under a different license you must make it absolutely
clear that any terms which differ from this license are
offered by you alone, not by the Initial developer or any
contributor. You hereby agree to indemnify the initial
developer and every contributor for any liability incurred
by the initial developer or such contributor as a result of
any such terms You offer.
3.7. Larger works.
You may create a larger work by combining covered code
with other code not governed by the terms of this license
and distribute the larger work as a single product. In such
a case, you must make sure the requirements of this
license are fulfilled for the covered code.
4. Inability to comply due to statute or regulation.
If it is impossible for you to comply with any of the terms
of this license with respect to some or all of the covered
code due to statute, judicial order, or regulation then you
must: (a) comply with the terms of this license to the max-
imum extent possible; and (b) describe the limitations and
the code they affect. Such description must be included in
the LEGAL file described in section 3.4 and must be
included with all distributions of the source code. Except
to the extent prohibited by statute or regulation, such
description must be sufficiently detailed for a recipient of
ordinary skill to be able to understand it.
5. Application of this license.
This license applies to code to which the initial developer has
attached the notice in exhibit A and to related covered code.
6. Versions of the license.
6.1. New versions.
Netscape communications corporation (“Netscape”) may
publish revised and/or new versions of the license from
time to time. Each version will be given a distinguishing
version number.
6.2. Effect of new versions.
Once covered code has been published under a particular
version of the license, you may always continue to use it
under the terms of that version. You may also choose to
use such covered code under the terms of any subsequent
version of the license published by netscape. No one
other than netscape has the right to modify the terms
applicable to covered code created under this license.
6.3. Derivative works.
If You create or use a modified version of this license
(which you may only do in order to apply it to code which
is not already covered code governed by this license), You
must (a) rename Your license so that the phrases
"Mozilla", "MOZILLAPL", "MOZPL", "Netscape", "MPL",
"NPL" or any confusingly similar phrase do not appear in
your license (except to note that your license differs from
this license) and (b) otherwise make it clear that Your
version of the license contains terms which differ from the
Mozilla Public license and netscape Public License. (Filling
in the name of the initial developer, original code or con-
tributor in the notice described in exhibit A shall not of
themselves be deemed to be modifications of this license.)

APPENDIX
132
APPENDIX
7. DISCLAIMER OF WARRANTY.
COVERED CODE IS PROVIDED UNDER THIS LICENSE
ON AN “AS IS” BASIS, WITHOUT WARRANTY OF ANY
KIND, EITHER EXPRESSED OR IMPLIED, INCLUDING,
WITHOUT LIMITATION, WARRANTIES THAT THE COV-
ERED CODE IS FREE OF DEFECTS, MERCHANTABLE, FIT
FOR A PARTICULAR PURPOSE OR NON-INFRINGING.
THE ENTIRE RISK AS TO THE QUALITY AND PERFOR-
MANCE OF THE COVERED CODE IS WITH YOU.
SHOULD ANY COVERED CODE PROVE DEFECTIVE IN
ANY RESPECT, YOU (NOT THE INITIAL DEVELOPER OR
ANY OTHER CONTRIBUTOR) ASSUME THE COST OF
ANY NECESSARY SERVICING, REPAIR OR CORRECTION.
THIS DISCLAIMER OF WARRANTY CONSTITUTES AN
ESSENTIAL PART OF THIS LICENSE. NO USE OF ANY
COVERED CODE IS AUTHORIZED HEREUNDER EXCEPT
UNDER THIS DISCLAIMER.
8. TERMINATION.
8.1. This license and the rights granted hereunder will terminate
automatically if you fail to comply with terms herein and
fail to cure such breach within 30 days of becoming aware
of the breach. All sublicenses to the covered code which
are properly granted shall survive any termination of this
license. Provisions which, by their nature, must remain in
effect beyond the termination of this license shall survive.
8.2. If you initiate litigation by asserting a patent infringement
claim (excluding declatory judgment actions) against ini-
tial developer or a contributor (the initial developer or
contributor against whom you file such action is referred
to as “Participant”) alleging that:
(a) such participant's contributor version directly or indi-
rectly infringes any patent, then any and all rights
granted by such participant to you under sections 2.1
and/or 2.2 of this license shall, upon 60 days notice
from Participant terminate prospectively, unless if within
60 days after receipt of notice you either: (i) agree in
writing to pay participant a mutually agreeable reasonable
royalty for your past and future use of modifications
made by such participant, or (ii) withdraw your litigation
claim with respect to the contributor version against
such participant. If within 60 days of notice, a reasonable
royalty and payment arrangement are not mutually
agreed upon in writing by the parties or the litigation
claim is not withdrawn, the rights granted by partici-
pant to you under sections 2.1 and/or 2.2 automati-
cally terminate at the expiration of the 60 day notice
period specified above.
(b) any software, hardware, or device, other than such par-
ticipant's contributor Version, directly or indirectly
infringes any patent, then any rights granted to You by
such participant under sections 2.1(b) and 2.2(b) are
revoked effective as of the date you first made, used,
sold, distributed, or had made, modifications made by
that participant.
8.3. If you assert a patent infringement claim against partici-
pant alleging that such participant's contributor version
directly or indirectly infringes any patent where such claim
is resolved (such as by license or settlement) prior to the
initiation of patent infringement litigation, then the rea-
sonable value of the licenses granted by such participant
under sections 2.1 or 2.2 shall be taken into account in
determining the amount or value of any payment or
license.
8.4. In the event of termination under sections 8.1 or 8.2
above, all end user license agreements (excluding distributors
and resellers) which have been validly granted by you or
any distributor hereunder prior to termination shall survive
termination.
9. LIMITATION OF LIABILITY.
UNDER NO CIRCUMSTANCES AND UNDER NO LEGAL
THEORY, WHETHER TORT (INCLUDING NEGLIGENCE),
CONTRACT, OR OTHERWISE, SHALL YOU, THE INITIAL
DEVELOPER, ANY OTHER CONTRIBUTOR, OR ANY DIS-
TRIBUTOR OF COVERED CODE,OR ANY SUPPLIER OF
ANY OF SUCH PARTIES, BE LIABLE TO ANY PERSON FOR
ANY INDIRECT, SPECIAL, INCIDENTAL, OR CONSEQUEN-
TIAL DAMAGES OF ANY CHARACTER INCLUDING, WITH-
OUT LIMITATION, DAMAGES FOR LOSS OF GOODWILL,
WORK STOPPAGE, COMPUTER FAILURE OR MALFUNC-
TION, OR ANY AND ALL OTHER COMMERCIAL DAM-
AGES OR LOSSES, EVEN IF SUCH PARTY SHALL HAVE
BEEN INFORMED OF THE POSSIBILITY OF SUCH DAM-
AGES. THIS LIMITATION OF LIABILITY SHALL NOT APPLY
TO LIABILITY FOR DEATH OR PERSONAL INJURY RESULT-
ING FROM SUCH PARTY'S NEGLIGENCE TO THE EXTENT
APPLICABLE LAW PROHIBITS SUCH LIMITATION. SOME
JURISDICTIONS DO NOT ALLOW THE EXCLUSION OR
LIMITATION OF INCIDENTAL OR CONSEQUENTIAL DAM-
AGES, SO THIS EXCLUSION AND LIMITATION MAY NOT
APPLY TO YOU.
10. U.S. GOVERNMENT END USERS.
The covered code is a "commercial item," as that term is
defined in 48 C.F.R. 2.101 (Oct. 1995), consisting of
"commercial computer software" and "commercial computer
software documentation," as such terms are used in 48
C.F.R. 12.212 (Sept. 1995). Consistent with 48 C.F.R.
12.212 and 48 C.F.R. 227.7202-1 through 227.7202-4
(June 1995), all U.S. Government end users acquire cov-
ered code with only those rights set forth herein.

APPENDIX
133
11. MISCELLANEOUS.
This license represents the complete agreement concerning
subject matter hereof. If any provision of this license is
held to be unenforceable, such provision shall be reformed
only to the extent necessary to make it enforceable. This
License shall be governed by California law provisions
(except to the extent applicable law, if any, provides oth-
erwise), excluding its conflict-of-law provisions. With
respect to disputes in which at least one party is a citizen
of, or an entity chartered or registered to do business in
the united states of america, any litigation relating to this
License shall be subject to the jurisdiction of the federal
courts of the northern district of california, with venue
lying in santa clara county, california, with the losing party
responsible for costs, including without limitation, court
costs and reasonable attorneys' fees and expenses. The
application of the united nations convention on contracts
for the International sale of goods is expressly excluded.
Any law or regulation which provides that the language of
a contract shall be construed against the drafter shall not
apply to this license.
12. RESPONSIBILITY FOR CLAIMS.
As between initial developer and the contributors, each
party is responsible for claims and damages arising, directly
or indirectly, out of its utilization of rights under this
license and you agree to work with initial developer and
contributors to distribute such responsibility on an equitable
basis. Nothing herein is intended or shall be deemed to
constitute any admission of liability.
13. MULTIPLE-LICENSED CODE.
Initial developer may designate portions of the covered
code as "Multiple-Licensed". "Multiple-Licensed" means
that the initial developer permits you to utilize portions of
the covered code under your choice of the NPL or the
alternative licenses, if any, specified by the initial developer
in the file described in exhibit A.
EXHIBIT A -Mozilla Public License.
The contents of this file are subject to the Mozilla Public License
Version 1.1 (the “license”); you may not use this file except in
compliance with the License. You may obtain a copy of the
license at http://www.mozilla.org/MPL/
Software distributed under the license is distributed on an "AS
IS" basis, WITHOUT WARRANTY OF ANY KIND, either express
or implied. See the license for the specific language governing
rights and limitations under the License.
The Original Code is ______________________________________.
The Initial Developer of the Original Code
is___________________.
Portions created by ______________________ are Copyright (C)
_______________________. All Rights Reserved.
Contributor(s): ______________________________________.
Alternatively, the contents of this file may be used under the
terms of the _____ license (the "[___] License"), in which case
the provisions of [______] license are applicable instead of those
above. If you wish to allow use of your version of this file only
under the terms of the [____] license and not to allow others to
use your version of this file under the MPL, indicate your decision
by deleting the provisions above and replace them with the
notice and other provisions required by the [___] license. If you
do not delete the provisions above, a recipient may use your version
of this file under either the MPL or the [___] license."
NOTE: The text of this exhibit A may differ slightly from the text
of the notices in the source code files of the original code. You
should use the text of this exhibit A rather than the text found in
the original code/source code for Your modifications.

OWNER’S MANUAL
LCD TV
Please read this manual carefully before operating
your set and retain it for future reference.
P/NO : SAC34134202 (1004-REV01)
www.lg.com
The model and serial number of the TV is located
on the back and one side of the TV.
Record it below should you ever need service.
MODEL
SERIAL

P/NO : SAC34134202 (1004-REV02)
www.lg.com
Notez les numéros de modèle et de série de
l’appareil qui figurent sur l’étiquette au dos du
moniteur. Et inscrivez-les sur le dessus ou au verso
de ce manuel.
MODÈLE
PUBLICATION PÉRIODIQUE
GUIDE DE L’UTILISATEUR
TÉLÉVISEUR COULEUR
À CRISTAUX LIQUIDES
Veuillez lire ce manuel attentivement avant d’utiliser votre appareil et
conservez-le pour consultation ultérieure.
19LD350
22LD350
26LD350
32LD350
19LD350C
22LD350C
32LD320

2
AVERTISSEMENT/ATTENTION
L’éclair avec flèche dans un triangle
équilatéral est destiné à aviser l’utilisateur
de la présence de ten-sion dangereuse
non isolée dans le boîtier de l’appareil pouvant être
suffisamment forte pour causer un risque de choc
électrique.
Le point d’exclamation dans un triangle
équilatéral est destiné à aviser l’utilisateur
de la présence d’in-structions de fonc-
tionnement et d’entretien.
POUR RÉDUIRE LE RISQUE DE CHOC
ÉLECTRIQUE, NE PAS ENLEVER LE COUVERCLE
(OUDOS). AUCUNE PIÈCE NE PEUT ÊTRE
RÉPARÉE PAR L’UTILISATEUR. RÉFÉRER TOUT
SER-VICE À UN TECHNICIEN QUALIFIÉ.
AVERTISSEMENT/ATTENTION
AFIN D’ÉVITER TOUT RISQUE DE CHOC
ÉLECTRIQUE OU INCENDIAIRE, NE PAS EXPOS-
ER CE PRODUIT À LA PLUIE OU L’HUMIDITÉ.
NOTE À L’INSTALLATEUR DE LA
CÂBLODISTRIBUTION
Ceci est un rappel à l’installateur de la câblodistribution
de tenir compte de l’article 820-40 du National Electric
Code (É.-U.). On y trouve les lignes directrices portant
sur une mise à la terre conforme. On y stipule, entre
autres, que le conducteur de terre du câble doit être
raccordé au système de mise à la terre de l’immeuble,
aussi près que possible du point d’entrée du câble.
AVERTISSEMENT/ATTENTION
POUR ÉVITER TOUT RISQUE DE CHOC
ÉLECTRIQUE OU D’INCENDIE, NE PAS EXPOSER
CE PRODUIT À LA PLUIE OU À L’HUMIDITÉ.
AVIS DE LA FCC
Appareil numérique de classe B
Cet appareil a été testé et est conforme aux exigences
pour appareil numérique de classe B, partie 15 des
règlements de la FCC. Ces limites sont conçues pour
assurer une protection raisonnable contre les
interférences nocives dans une installation résidentielle.
Cet équipement génère, utilise et peut radier de
l’énergie de radiofréquence et s’il n’est pas installé et
utilisé conformément aux instructions, peut causer
des interférences nuisibles aux communications
radio. Toutefois, il n’y a aucune garantie que des
interférences ne surviendront pas. Si cet appareil
cause des inter-férences à la réception radio et télé,
ce qui peut être déterminé en mettant l’appareil hors
circuit, puis en circuit, l’utilisateur peut essayer de
corriger cette interférence d’une des façons suivantes:
- Réorienter l’antenne réceptrice.
- Éloigner l’appareil du récepteur.
- Brancher l’appareil sur un circuit différent de celui
du récepteur.
- Consulter le marchand ou un technicien qualifié en
radio et téléviseur.
Ce dispositif est conforme à la partie 15 des régle-
mentations de la FCC.
L’opération est assujettie aux deux conditions suiv-
antes: (1) Ce dispositif ne doit pas causer d’inter-
férences (nocives) et (2) ce dispositif doit accepter
toute interference reçue risquant causer une opera-
tion indésirable de l’appareil.
Tout changement ou modification non expressément
approuvé par la partie responsable concernant la
conformité peut annuler la possibilité de l’utilisateur
à utiliser cet appareil.
ATTENTION
Ne pas tenter de modifier cet appareil de quelle que
façon que ce soit sans une autorisation écrite de LG
Electronics.
Toute modification non autorisée peut annuler la
possibilité de l’utilisateur à utiliser cet appareil.

3
INSTRUCTIONS DE SÉCURITÉ IMPORTANTES
CONSIGNES DE SÉCURITÉ
Lire ces instructions.
Conserver ces instructions.
Observer les avertissements.
Observer les instructions.
Ne pas utiliser cet appareil près de l’eau.
Nettoyer seulement avec un chiffon sec.
Ne pas obstruer les ouvertures de ventilation.
Installer conformément aux instructions du
fabricant.
Ne pas installer à proximité de sources de chaleur
comme radiateurs, registres de chauffage,
cuisinières ou tout autre appareil (incluant
amplificateurs) produisant de la chaleur.
Ne pas outrepasser le dispositif de sécurité de la
fiche polarisée ou mise à la terre. Une fiche
polarisée est dotée de deux lames dont une plus
large que l’autre. Une fiche mise à la terre est
dotée de deux lames et d’une broche mise à la
terre. La lame large ou la broche sont destinées à
la sécurité. Si la fiche ne peut être branchée sur la
prise, demander à un électricien qualifié de
remplacer la prise usitée.
Protéger le cordon d’alimentation afin qu’il ne
soit pas écrasé ni pincé, surtout à la prise et au
point où il sort de l’appareil.
Utiliser seulement les accessoires spécifiés par
le fabricant.
Utiliser seulement avec chariot, support, fixation
ou table spécifiés par le fabricant ou vendus
avec l’appareil. Au moment d’utiliser avec un
chariot, faire attention pour le déplacer afin
qu’il ne bascule pas avec l’appareil.
Débranchez cet appareil pendant les orages ou
durant les longues périodes d’inutilisation.
Référer tout service à un technicien qualifié. Un
service est requis lorsque l’appareil a été
endommagé comme le cordon d’alimentation
ou la fiche, du liquide a été renversé ou des
objets sont tombés dans l’appareil, s’il a été
exposé à la pluie ou à l’humidité, s’il ne fonctionne
pas normalement ou a été échappé.
1
2
3
4
5
7
8
6
9
10

4
CONSIGNES DE SÉCURITÉ
Ne jamais toucher cet appareil ou l’antenne
lors d’un orage ou d’une tempête.
Si vous fixez votre téléviseur au mur, veillez à ne
pas le suspendre par le cordon d’alimentation
et le câble situés à l’arrière du moniteur.
Faites attention à ce qu’aucun objet ne choque
sur l’appareil, et ne laissez pas tomber d’élé-
ments solides sur l'écran.
ATTENTION concernant le cordon d’alimentation:
Il est recommandé que la plupart des appareils
soient branchés sur un circuit dédié qui est une
prise simple qui alimente seulement cet appareil
et qu’il n’y a pas d’autres prises additionnelles
ou circuits terminaux. Vérifier les données
techniques dans le guide du propriétaire.
Ne pas brancher un trop grand nombre d’ap-
pareils à la même prise c.a. puisque cela pour-
rait causer un incendie ou un choc électrique.
Ne pas surcharger les prises murales. Une sur
charge, des prises endommagées ou lâches,
des rallonges, des cordons effrités ou dont
l’isolation est endommagée, peuvent être
dangereux. Si ces conditions existent, il peut
en résulter un risque de choc électrique ou
d’incendie. Vérifier périodiquement le cordon
de l’appareil et s’il semble endommagé et
détérioré, le débrancher et ne pas utiliser
l’appareil tant que le cordon n’est pas remplacé
par un modèle de rechange semblable par un
technicien qualifié.
Protéger le cordon de tout abus physique ou
mécanique. Il ne doit pas être tordu, pincé,
situé près de la porte et il ne faut pas marcher
dessus. Porter une attention particulière aux
fiches, prises murales et au point de sortie de
l’appareil.
Ne pas déplacer le téléviseur lorsque le cordon
d’alimentation est branché. Ne pas utiliser le
téléviseur si le cordon est endommagé ou
desserré. Assurez-vous de tirer sur la prise du
cordon lorsque vous voulez le débrancher; ne
tirez pas sur le cordon pour débrancher le
téléviseur.
AVERTISSEMENT - Pour réduire le risque d’in-
cendie ou de choc électrique, n’exposez pas ce
produit à la pluie, à l’humidité ou à d’autres liq-
uides. Ne touchez pas le téléviseur si vous avez les
mains mouillées. Ne pas installer ce produit près
de produits inflammables comme de l’essence ou
des chandelles ou exposer le téléviseur à une
source directe de climatisation.
Ne pas exposer le téléviseur à des gouttes ou à
des éclaboussures d’eau et ne pas déposer
d’objets remplis de liquide comme des vases,
des tasses, etc. sur le téléviseur ou les placer
au-dessus de celui-ci (par exemple sur une
étagère, au-dessus de l’appareil).
MMIISSEE ÀÀ LLAA TTEERRRREE
S’assurer de brancher la mise à la terre pour
empêcher les chocs électriques possible (par
ex., un téléviseur avec une prise à trois fils c.a. mis
à la masse doit être branché à une prise c.a. trois
fils, mise à la masse). Si les méthodes de mise à
la terre ne sont pas possibles, demander à un
électricien d’installer un coupe-circuit séparé.
Ne pas mettre l’appareil à la terre sur les fils de
téléphone, paratonnerre ou tuyau à gaz.
RREETTIIRREERR DDUU RRÉÉSSEEAAUU ÉÉLLEECCTTRRIIQQUUEE
Vous devez débrancher l'appareil de la prise
principale. La prise doit demeurer disponible et
fonctionnelle.
Tant que cette unité est reliée à la prise murale,
elle est toujours alimentée en courant alternatif
même si vous éteignez le bouton d’alimenta-
tion.
12
11
14
13
16
17
18
19
Alimentation
électrique
Coupe-circuit
15

5
AANNTTEENNNNEE
MMiissee àà llaa tteerrrree ddee ll’’aanntteennnnee eexxttéérriieeuurree
Si une antenne extérieure a été installée, veuillez
suivre les directives indiquées ci-dessous. Un
système avec antenne extérieure ne devrait pas
se trouver près de lignes aériennes d’électricité
ou de tout autre circuit de transport d’électric-
ité ou d’alimentation électrique ni près de tout
endroit où il peut entrer en contact avec de
telles lignes de transport ou circuits électriques
puisque cela pourrait entraîner le décès de la
personne qui y touche ou que celle-ci pourrait
subir des blessures graves.
Assurez-vous que le système d’antenne soit
mis à la masse pour ainsi offrir une certaine
protection contre la tension et l’accumulation
de statique.
L’article 810 du National Electrical Code (NEC)
des États-Unis donne de l’information à l’égard
de la mise à la masse appropriée du mât et de la
structure de soutien, de la mise à la masse du fil
de connexion à une unité de décharge de l’an-
tenne, de la taille des conducteurs de mise à la
masse, de l’emplacement de l’unité de décharge
de l’antenne, de la connexion à des électrodes
de mise à la masse et des exigences que doit
respecter l’électrode de mise à la masse.
LLaa mmiissee àà llaa mmaassssee ddee ll’’aanntteennnnee ddeevvrraaiitt
êêttrree ccoonnffoorrmmee aauu NNaattiioonnaall EElleeccttrriiccaall
CCooddee,, AANNSSII//NNFFPPAA 7700 ddeess ÉÉttaattss--UUnniiss..
NNeettttooyyaaggee
Lorsque vous nettoyez le téléviseur, assurez-vous
de l’avoir d’abord débranché. Utilisez un chiffon
doux pour éviter d’égratigner le téléviseur. Ne
pas vaporiser d’eau ou d’autres liquides directe-
ment sur le téléviseur puisque cela pourrait
causer un choc électrique. Ne pas nettoyer le
téléviseur avec des produits chimiques comme
de l’alcool, du diluant ou du benzène.
DDééppllaacceemmeenntt
Assurez-vous que le téléviseur a été éteint, qu’il
a été débranché et que tous les câbles et cor-
dons ont été retirés. Deux personnes ou plus
pourront être requises pour transporter les
plus gros téléviseurs. Ne pas vous appuyer
contre le panneau avant du téléviseur ou
causer de la tension sur ce panneau.
VVeennttiillaattiioonn
Installez votre téléviseur dans un endroit
offrant une ventilation appropriée. Ne pas l’in-
staller dans un endroit confiné comme une bib-
liothèque. Ne pas recouvrir l’appareil de tissu
ou d’autres matériaux comme du plastique,
lorsqu’il est branché. Ne pas l’installer dans un
endroit excessivement poussiéreux.
Attention de ne pas toucher les bouches de
ventilations. Lors de longue période de vision-
nement, les bouches de ventilation du
téléviseur risquent devenir chaudes.
Si vous sentez une odeur de fumée ou que
d’autres odeurs se dégagent du téléviseur ou
qu’il produit des sons étranges, débranchez le
cordon d’alimentation et communiquez avec
un centre de service autorisé.
N’appuyez pas avec force sur le panneau avec
une main ou un objet pointu comme un clou,
un crayon ou un stylo et évitez les égratignures.
Garder l’appareil éloigné de la lumière directe
du soleil.
PPOOUURR LLEESS TTÉÉLLÉÉVVIISSEEUURRSS AACCLL
Si le téléviseur est froid lorsque vous le touchez, il
se peut qu’il y ait un léger papillotement lorsque
vous l’allumez. Ceci est tout à fait normal.
Il se peut que quelques minuscules points col-
orés rouges, verts ou bleus, apparaissent à
l’écran. Cependant, ils n’ont aucune incidence
sur le bon fonctionnement de l’appareil.
Évitez de toucher l’écran ACL ou d’y laisser vos
doigts pendant une période prolongée. Ceci
pourrait provoquer une déformation tempo-
raire de l’image.
20
23
25
24
26
27
28
21
MISE AU REBUS
(seules des lampes au mercure sont util-
isées avec le téléviseur ACL)
Les lampes fluorescentes utilisées dans ce pro-
duit contiennent une minime quantité de mer-
cure. Ne pas jeter cet appareil avec vos déchets
domestiques. La mise au rebus de cet appareil
doit être effectuée en fonction des règles en
vigueur dans votre communauté.
22
Fil d’entrée d’antenne
Décharge d’antenne
(section 810-20 du NEC)
Conducteur mis à la terre
(section 810-21 du NEC)
Pince de mise à la terre
Système d’électrode
de mise à la terre (article 250,
section H du NEC)
Pince de mise à la terre
Équipement électrique
NEC - Code national d’électricité

6
TABLE DES MATIÈRES
AVERTISSEMENT/ATTENTION
. . . . . . . . . . . . . 2
CONSIGNES DE SÉCURITÉ
. . . . . . . . . . . . . . . . . . . . . 3
CARACTÉRISTIQUES DU TÉLÉVISEUR
. . . . 8
PRÉPARATION
Accessoires
. . . . . . . . . . . . . . . . . . . . . . . . . . . . . . . . . . . . . . . . . . . . . . . . . . . . . . 9
Information relative au panneau avant
. . . . . . . . . . . . . . . 10
Information relative au panneau arrière . . . . . . . . . . . . . 12
Instructions du support
. . . . . . . . . . . . . . . . . . . . . . . . . . . . . . . . . . . 14
Système de fixation vesa (Association des standards
vidéo)
. . . . . . . . . . . . . . . . . . . . . . . . . . . . . . . . . . . . . . . . . . . . . . . . . . . . . . . . . . . . . 18
Pince du Compartiment à fils . . . . . . . . . . . . . . . . . . . . . . . . . . . 19
Installation sur un Bureau
. . . . . . . . . . . . . . . . . . . . . . . . . . . . . . . . 20
Socle Pivotant . . . . . . . . . . . . . . . . . . . . . . . . . . . . . . . . . . . . . . . . . . . . . . . . . 20
Positionnement de l'écran
. . . . . . . . . . . . . . . . . . . . . . . . . . . . . . .
20
Fixation du téléviseur à un meuble
. . . . . . . . . . . . . . . . . . . .
21
Utilisation du Système de sécurité Kensington
. . . . 21
Installer le téléviseur au mur de façon sécuritaire
pour l’empêcher de tomber lorsqu’il est installé sur
un pied
. . . . . . . . . . . . . . . . . . . . . . . . . . . . . . . . . . . . . . . . . . . . . . . . . . . . . . . . . . .
22
Connexion antenne ou câble
. . . . . . . . . . . . . . . . . . . . . . . . . . . . 23
CONFIGURATION DE LA SOURCE AUXILIAIRE
Installation de Récepteur HD
. . . . . . . . . . . . . . . . . . . . . . . . . .
24
Réglage DVD
. . . . . . . . . . . . . . . . . . . . . . . . . . . . . . . . . . . . . . . . . . . . . . . . . .
27
Réglage magnétoscope
. . . . . . . . . . . . . . . . . . . . . . . . . . . . . . . . . . .
29
Réglage source A/V externe . . . . . . . . . . . . . . . . . . . . . . . . . . . . . 30
Connexion USB
. . . . . . . . . . . . . . . . . . . . . . . . . . . . . . . . . . . . . . . . . . . . . . .
30
Connexion de sortie audio . . . . . . . . . . . . . . . . . . . . . . . . . . . . . . .
31
Headphone Setup
. . . . . . . . . . . . . . . . . . . . . . . . . . . . . . . . . . . . . . . . . . . 31
Réglage PC
. . . . . . . . . . . . . . . . . . . . . . . . . . . . . . . . . . . . . . . . . . . . . . . . . . . . . 32
VISIONNEMENT DE LA TÉLÉVISION /
COMMANDE DES CHAÎNES
Fonctions de la télécommande
. . . . . . . . . . . . . . . . . . . . . . . . . 38
Mise en circuit du téléviseur
. . . . . . . . . . . . . . . . . . . . . . . . . . . . .
40
Sélection de chaîne
. . . . . . . . . . . . . . . . . . . . . . . . . . . . . . . . . . . . . . . . .
40
Réglage du volume . . . . . . . . . . . . . . . . . . . . . . . . . . . . . . . . . . . . . . . . . . 40
Réglage initial . . . . . . . . . . . . . . . . . . . . . . . . . . . . . . . . . . . . . . . . . . . . . . . . . . 41
Sélection des menus affichés à l’écran
. . . . . . . . . . . . . . 42
Menu éclair (Quick Menu) . . . . . . . . . . . . . . . . . . . . . . . . . . . . . .
44
Repérage de canaux
- Recherche automatique des chaînes
(Syntonisation automatique)
. . . . . . . . . . . . . . . . . . . . . 45
- Ajout/Effacement des chaînes
(Syntonisation manuelle)
. . . . . . . . . . . . . . . . . . . . . . . . . . . 46
- Édition des chaînes
. . . . . . . . . . . . . . . . . . . . . . . . . . . . . . . . . . .
47
Liste des canaux
. . . . . . . . . . . . . . . . . . . . . . . . . . . . . . . . . . . . . . . . . . . . . . 48
Mémoire des canaux préférés
. . . . . . . . . . . . . . . . . . . . . . . . . . . .
49
Liste des favoris
. . . . . . . . . . . . . . . . . . . . . . . . . . . . . . . . . . . . . . . . . . . . . . .
50
Info. en bref
. . . . . . . . . . . . . . . . . . . . . . . . . . . . . . . . . . . . . . . . . . . . . . . . . . . . 51
Liste d’entrées
. . . . . . . . . . . . . . . . . . . . . . . . . . . . . . . . . . . . . . . . . . . . . . . . . 52
Indentité source . . . . . . . . . . . . . . . . . . . . . . . . . . . . . . . . . . . . . . . . . . . . . . 53
Mode AV
. . . . . . . . . . . . . . . . . . . . . . . . . . . . . . . . . . . . . . . . . . . . . . . . . . . . . . . .
54
Guide Simple
. . . . . . . . . . . . . . . . . . . . . . . . . . . . . . . . . . . . . . . . . . . . . . . . . .
54
Touches verrouillées
. . . . . . . . . . . . . . . . . . . . . . . . . . . . . . . . . . . . . . . . 55
SIMPLINK
. . . . . . . . . . . . . . . . . . . . . . . . . . . . . . . . . . . . . . . . . . . . . . . . . . . . . . .
56
USB
Modes d’entrée
. . . . . . . . . . . . . . . . . . . . . . . . . . . . . . . . . . . . . . . . . . . . . . . 58
Liste photo
. . . . . . . . . . . . . . . . . . . . . . . . . . . . . . . . . . . . . . . . . . . . . . . . . . . . .
59
Liste musique
. . . . . . . . . . . . . . . . . . . . . . . . . . . . . . . . . . . . . . . . . . . . . . . . . .
63
COMMANDE DE L’IMAGE
Commande de la taille de l’image (Allongement)
. . . . . .
66
Assistant image
. . . . . . . . . . . . . . . . . . . . . . . . . . . . . . . . . . . . . . . . . . . . . . .
68
Configuration préréglée des images (Mode image)
. . . 70
Réglage manuel de l’image - Mode personnel
. . . .
71
Technologie d’amélioration de l’image
. . . . . . . . . . . . . .
72
Commande experte d’image
. . . . . . . . . . . . . . . . . . . . . . . . . . . . .
73
Économie d’énergie
. . . . . . . . . . . . . . . . . . . . . . . . . . . . . . . . . . . . . . . . . 76
Réinitialisation de l’image
. . . . . . . . . . . . . . . . . . . . . . . . . . . . . . . .
77
Voyant Lumineux
. . . . . . . . . . . . . . . . . . . . . . . . . . . . . . . . . . . . . . . . . . . . . 77
Mode Démo
. . . . . . . . . . . . . . . . . . . . . . . . . . . . . . . . . . . . . . . . . . . . . . . . . . .
78

7
COMMANDE DU SON ET DE LA LANGUE
Contrôle Automatique du Volume (Vol.normalisé)
79
Voix claires II
. . . . . . . . . . . . . . . . . . . . . . . . . . . . . . . . . . . . . . . . . . . . . . . . . . . 80
Configuration préréglée du son (Mode audio)
. . 81
Réglages du son - Mode personnel
. . . . . . . . . . . . . . . . . . 82
Infinite Sound
. . . . . . . . . . . . . . . . . . . . . . . . . . . . . . . . . . . . . . . . . . . . . . . . . 83
Équilibre
. . . . . . . . . . . . . . . . . . . . . . . . . . . . . . . . . . . . . . . . . . . . . . . . . . . . . . . . . 84
Réglage marche-arrêt des haut-parleurs
du téléviseur
. . . . . . . . . . . . . . . . . . . . . . . . . . . . . . . . . . . . . . . . . . . . . . . . . .
85
Réinitialisation du mode audio
. . . . . . . . . . . . . . . . . . . . . . . .
86
Réglage diffusions stéréo/SAP
. . . . . . . . . . . . . . . . . . . . . . . . . . 87
Langage audio
. . . . . . . . . . . . . . . . . . . . . . . . . . . . . . . . . . . . . . . . . . . . . . . . 88
Sélection de langue pour les menus à l’écran
. . . . 89
Sous-titres
-
Sous-titres à système de diffusion analogique
. . 90
-
Sous-titres à système de diffusion numérique
. . . 91
- Option sous-titres
. . . . . . . . . . . . . . . . . . . . . . . . . . . . . . . . . . .
92
RÉGLAGE DE L’HEURE
Réglage de la pendule
- Réglage automatique
. . . . . . . . . . . . . . . . . . . . . . . . . . . . . . .
93
- Réglage manuel
. . . . . . . . . . . . . . . . . . . . . . . . . . . . . . . . . . . . . . . 94
Réglage de la minuterie-marche/arrêt automatique
95
Réglage de la minuterie-Arrêt différé
. . . . . . . . . . . . . . . .
96
COMMANDE PARENTALE / CLASSEMENT
Système de Réglage de mot de passe et
Verrouillagae
. . . . . . . . . . . . . . . . . . . . . . . . . . . . . . . . . . . . . . . . . . . . . . . . . . .
97
Blocage des chaînes
. . . . . . . . . . . . . . . . . . . . . . . . . . . . . . . . . . . . . .
10 0
Classement des films et des émissions télévisées
.
101
Téléchargeable
. . . . . . . . . . . . . . . . . . . . . . . . . . . . . . . . . . . . . . . . . . . . . .
106
Blocage de l’entrée externe . . . . . . . . . . . . . . . . . . . . . . . . . . . . 10 7
ANNEXE
Liste de vérification de dépannage
. . . . . . . . . . . . . . . . . .
108
Entretien
. . . . . . . . . . . . . . . . . . . . . . . . . . . . . . . . . . . . . . . . . . . . . . . . . . . . . . . . 111
Spécifications de l’appareil
. . . . . . . . . . . . . . . . . . . . . . . . . . . . . .
112
Codes IR . . . . . . . . . . . . . . . . . . . . . . . . . . . . . . . . . . . . . . . . . . . . . . . . . . . . . . .
113
Commande externe par le biais du RS-232C
. . . .
114
Notice sur le logiciel open source
. . . . . . . . . . . . . . . . . . .
120

8
CARACTÉRISTIQUES DU TÉLÉVISEUR
Le mode AV optimise l'image pour le cinéma, les
sports et le mode jeu en fonction du contenu visuel et
audio. Le spectateur peut sélectionner rapidement le
mode approprié à l'image qu'il regarde.
Augmente automatiquement et amplifie le son de la
gamme de fréquence humaine de voix pour maintenir
une audition optimale du dialogue quand le bruit de
fond augmente.
Le téléviseur LG inclut un système de haut-parleurs
invisibles unique, accordé par l'expert audio renommé,
M. Mark Levinson. Des haut-parleurs sont enfoncés
dans les caches stratégiques derrière le coffret avant
et utilisent des vibrations très précises pour trans-
former le tableau de contrôle entier en système de
haut-parleur. Le résultat est un design propre et lisse,
et une acoustique optimisée en augmentant le « sweet
spot », qui offre un champ sonore plus large et plus
riche.
HDMI, le logo HDMI et High-Definition Multimedia
Interface sot des marques deposes de HDMI
Licensing LLC.
Fabriqué sous la licence de Dolby Laboratories.
‘Dolby’ et le symbole du double D sont des marques
déposées de Dolby Laboratories.
Ce téléviseur offre les réglages précis exigés pour la
certification professionnelle par l’Imaging Science
Foundation. Les modes « nuit » et « jour » d'ISF en
résultant, sont donc accessibles et permettent aux
utilisateurs de profiter pleinement de leur télévision
haute définition LG.
CALIBREZ COMME UN PRO :
Des calibrations sophistiquées et détaillées peuvent
être réalisées avec le mode ISFccc.
Un technicien qualifié est requis pour effectuer une
calibration détaillée.
Veuillez vous adresser à votre détaillant local pour
trouver un technicien qualifié ISF.
Télévision Haute Définition. Système de diffusion et
de lecture d’émissions de télévision numérique à
grande résolution, comprenant environ 1 millions de
pixels, le format d’écran 16/9 et l’audio numérique
AC3. Avec une télévision non numérique, les formats
HDTV comprennent les résolutions 1080p, 1080i et
720p.
■
Quand une image fixe (par exemple logos, menus d'écran, affichage de jeu vidéo, et d'ordinateur) est
affichée pendant une période prolongée sur le téléviseur, elle peut rester imprimée de manière permanente
sur l'écran. Ce phénomène est connu sous le nom de « brûlure d'image » ou « brûlure ». La brûlure d'image
n'est pas couverte par la garantie du fabricant.
■
Afin d'empêcher la brûlure d'image, éviter d’afficher une image fixe sur votre écran de télévision pendant
une période prolongée (2 heures ou plus pour l'affichage à cristaux liquides, 1 heures ou plus pour le
plasma).
■
La brûlure d'image peut également se produire
si vous utilisez le format 4:3 pendant une péri-
ode prolongée.
INFORMATION IMPORTANTE POUR ÉVITER LE
PHÉNOMÈNE DE « INCRUSTATION D’IMAGE » SUR
VOTRE ÉCRAN DE TÉLÉVISEUR.

PRÉPARATION
9
ACCESSOIRES
PRÉPARATION
S’assurer que les accessoires suivants sont compris avec l’appareil. S’il manque des accessoires, communiquer
avec le marchand où l’appareil a été acheté.
Il se peut que les accessoires inclus ne correspondent pas aux illustrations ci-dessous.
1.5V 1.5V
Manuel de l’Utilisateur Cordon d’alimentation
Télécommande,
Piles
(AAA)
E
N
E
R
G
Y
C
H
V
O
L
123
45
0
6
789
P
A
G
E
S
A
V
I
N
G
TV
A
V
M
O
D
E
I
N
P
U
T
F
A
V
R
A
T
I
O
M
U
T
E
E
N
T
E
R
M
A
R
K
L
IS
T
F
L
A
S
H
B
K
M
E
N
U
I
N
F
O
Q
.
M
E
N
U
B
A
C
K
E
X
I
T
Manuel sur CD
PPoouurr 1199//2222LLDD335500,, 1199//2222LLDD335500CC
Serre-fils
(Voir page P.19)
PPoouurr 2266//3322LLDD335500
(M4x20)
Écrous pour l’assemblage
de la base(Voir page P.16)
Vis para fijar del soporte
(Voir page P.21)
Couvercle de protection
(Voir page P.17)
Couvercle de
protection
(Voir page P.14)
x 8
EEnn ooppttiioonn
* N’essuyez les taches apparaissant sur la
surface extérieure qu’à l’aide d’un chif-
fon à lustrer.
* N'essuyez pas énergiquement la sur-
face pour enlever la saleté. Autrement,
cela risquerait de rayer ou de décolorer
la surface de l’appareil.
Chiffon à lustrer
Non inclus avec tous les modèles
D-sub câble 15 broches
Lors de l’utilisation d’une connexion
PC VGA (câble D-sub à 15
broches), l'utilisateur doit utiliser
des câbles de passage de signaux
blindés à noyaux de ferrite pour
conserver la conformité du produit
aux normes de la standard.
PPoouurr 3322LLDD332200
(M4x24)
Écrous pour l’assemblage
de la base(Voir page P.15)
Vis para fijar del soporte
(Voir page P.21)
Couvercle de protection
(Voir page P.15)
x 4

PRÉPARATION
10
INFORMATION RELATIVE AU PANNEAU AVANT
PRÉPARATION
■
Cette illustration peut ne pas correspondre à votre téléviseur.
INPUT
MENU
VOL
CH
ENTER
Touche( , )
CANAL
Touche
VOLUME (-, +)
Touche ENTER( , )
19/22LD350, 19/22LD350C
Touche MENU
Touche ALIMENTATION
Touche SOURCE
HAUT-PARLEUR
Voyant alimentation/attente
S’allume en rouge lorsque l’appareil est en Veille.
S’illumine en bleu lorsque le téléviseur est allumé.
Capteur de télécommande
CH
VOL
ENTER
INPUT
MENU
Touche ( , )
CANAL
Touche
VOLUME (+, -)
Touche ENTER
Touche MENU
Touche SOURCE
Touche
ALIMENTATION
26/32LD350

11
32LD320
INPUT
MENU
ENTER
CH
VOL
HAUT-PARLEUR
Capteur de télécommande,
Voyant alimentation/attente
S’allume en rouge lorsque l’appareil est en Veille.
S’illumine en bleu lorsque le téléviseur est
allumé.
Touche ( , )
CANAL
Touche
VOLUME (+, -)
Touche ENTER
Touche MENU
Touche SOURCE
Touche
ALIMENTATION

PRÉPARATION
12
INFORMATION RELATIVE AU PANNEAU ARRIÈRE
PRÉPARATION
K
AC-IN
RS-232C IN
(
CONTROL&SERVICE)
ANTENNA/
CABLE IN
VIDEO
YPB PR
L R
AUDIO
RGB IN (PC)
/DVI IN
AV IN
VIDEO
AUDIO
R
L/MONO
COMPONENT IN
OPTICAL
DIGITAL
AUDIO OUT
AUDIO IN
(RGB/DVI)
1 4
19/22LD350, 19/22LD350C
7 6
■
Cette illustration peut ne pas correspondre à votre téléviseur.
USB IN
SERVICE ONLY
H/P
2 3 5
IN 2
VIDEO
AUDIO
L/MONO
R
H/P
USB IN
SERVICE ONLY
AV IN 2
1
8
9
5
9
8
11
1
/DVI IN
RS-232C IN
(
CONTROL&SERVICE)
ANTENNA
/CABLE IN
VIDEO
YPB PR
L R
AUDIO
RGB IN (PC)
VIDEO
AUDIO
R
L/MONO
COMPONENT IN
OPTICAL
DIGITAL
AUDIO OUT
AUDIO IN
(RGB/DVI)
AV IN 1
1 4
26LD350
7 6
2 3 5

PRÉPARATION
13
■
Cette illustration peut ne pas correspondre à votre téléviseur.
AC IN
IN 2
VIDEO
AUDIO
L/MONO
R
H/P USB IN
AV IN 2
1
10
9
5
1
/DVI IN
RS-232C IN
(
CONTROL&SERVICE)
ANTENNA
/CABLE IN
VIDEO
YPB PR
L R
AUDIO
RGB IN (PC)
VIDEO
AUDIO
R
L/MONO
COMPONENT IN
OPTICAL
DIGITAL
AUDIO OUT
AUDIO IN
(RGB/DVI)
AV IN 1
1 4
32LD350, 32LD320
7 6
2 3 5
11
HDMI/DVI IN, HDMI IN
Connexion numérique.
Prend en charge les signaux vidéo et audion-
umériques de haute définition. Ne prend pas en
charge le mode 480i.
Prend en charge le signal DVI à l’aide d’un adapta-
teur ou d’un câble HDMI vers DVI (non inclus).
RGB IN (PC)
Connexion analogique pour PC. Nécessite un
câble D-sub à 15 broches (câble VGA).
AUDIO IN (RGB/DVI)
Prise pour écouteurs de 1/8" (0.32 cm) pour l’en-
trée du signal audio analogique du PC.
OPTICAL DIGITAL AUDIO OUT
Prise de sortie audionumérique pour l’amplificateur
ou système cinéma maison.
Remarque: en mode attente, ces prises sont
désactivées.
RS-232C IN (CONTROL & SERVICE) PORT
Utilisé sur appareils offerts par des tiers.
Cette prise est utilisée pour les modes de service,
d’utilisation commerciale ou réseau hospitalier.
AV (Audio/Video) IN
Connexion analogique composite. Prend en charge
uniquement le signal vidéo de définition standard
(480i).
ANTENNA/CABLE IN
Brancher les signaux d’antenne sur l’appareil.
Reliez les signaux du câble à cette prise.
COMPONENT IN
Connexion analogique.
Prend en charge les signaux haute définition.
Nécessite un câble rouge, un câble vert et un câble
bleu pour le signal vidéo, et un câble rouge et un
câble blanc pour le signal audio.
USB IN SERVICE ONLY
Permet d'installer des mises à jour logicielles.
HEADPHONE INPUT
Jack pour écouteur 0.32cm (1/8 po) Impédance
16
Ω, Sortie audio maximale 15mW.
USB IN
Permet de regarder des photos, d’écouter des
fichiers MP3.
Prise de cordon d'alimentation
Cet appareil fonctionne sur c.a.
Avertissement : Ne jamais faire fonctionner sur une
alimentation c.c.
1
2
3
4
5
9
8
7
6
10
11

PRÉPARATION
14
INSTRUCTIONS DU SUPPORT (Pour 19/22LD350, 19/22LD350C)
PRÉPARATION
■
Cette illustration peut ne pas correspondre à votre téléviseur.
COUVERCLE DE PROTECTION
Une fois la base retirée, fixez le
CCOOUUVVEERRCCLLEE DDEE PPRROOTTEECC--
TTIIOONN
sur la cavité servant à accueillir la base.
Lorsque vous aurez retiré la pellicule protectrice du couver-
cle de protection, placez le couvercle sur le téléviseur à la
place indiquée dans l’illustration.
Placez soigneusement l'écran du téléviseur, face
vers le bas, sur un coussin afin de ne pas
endommager l'appareil.
Assemblez le téléviseur jusqu’à ce que vous
entendiez un clic.
1
2
INSTALLATION DÉMONTAGE
Placez soigneusement l'écran du téléviseur, face
vers le bas, sur un coussin afin de ne pas
endommager l'appareil.
1
Desserrez les vis du téléviseur.
2
Démontez le support du téléviseur.
3
CCOOUUVVEERRCCLLEE DDEE PPRROOTTEECCTTIIOONN

PRÉPARATION
15
INSTRUCTIONS DU SUPPORT (Pour 32LD320)
Assemblez le téléviseur tel qu’illustré.
Fixez bien les quatre vis dans les trous situés au
dos de l’appareil.
1
2
3
INSTALLATION
GG
Lors de l’assemblage du support de plateau, véri-
fiez que le boulon est bien serré à fond (S’il n’est
pas serré à fond, le produit peut pencher vers l’a-
vant après son installation). Ne pas trop serrer.
REMARQUE
!
Desserrez les vis du téléviseur.
2
Une fois la base retirée, fixez le
CCOOUUVVEERRCCLLEE DDEE
PPRROOTTEECCTTIIOONN
sur la cavité servant à accueillir la base.
Insérez le
CCOOUUVVEERRCCLLEE DDEE PPRROOTTEECCTTIIOONN
dans le
téléviseur jusqu’à ce que vous entendiez un clic.
COUVERCLE DE PROTECTION
Placez soigneusement l'écran du téléviseur, face
vers le bas, sur un coussin afin de ne pas
endommager l'appareil.
Placez soigneusement l'écran du téléviseur, face
vers le bas, sur un coussin afin de ne pas
endommager l'appareil.
1
Démontez le support du téléviseur.
3
DÉMONTAGE
(M4x24)

PRÉPARATION
16
INSTRUCTIONS DU SUPPORT (Pour 26/32LD350)
PRÉPARATION
Placez soigneusement l'écran du téléviseur, face
vers le bas, sur un coussin afin de ne pas
endommager l'appareil.
Assemblez le
CCOORRPPSS
et le
PPIIEEDD DDEE LLAA BBAASSEE
du téléviseur à l’aide des 4 vis inclues.
Fixez bien les quatre vis dans les trous situés au
dos de l’appareil.
1
2
Assemblez le téléviseur tel qu’illustré.
3
4
INSTALLATION
GG
Lors de l’assemblage du support de plateau, véri-
fiez que le vis est bien serré à fond (S’il n’est pas
serré à fond, le produit peut pencher vers l’avant
après son installation). Ne pas trop serrer.
REMARQUE
!
■
Cette illustration peut ne pas correspondre à votre téléviseur.
PPIIEEDD DDEE LLAA BBAASSEE
CCOORRPPSS DDEE LLAA
BBAASSEE
(M4x20)
(M4x20)

PRÉPARATION
17
DÉMONTAGE
Placez soigneusement l'écran du téléviseur, face
vers le bas, sur un coussin afin de ne pas
endommager l'appareil.
1
Desserrez les vis du téléviseur.
2
Démontez le support du téléviseur.
3
Une fois la base retirée, fixez le
CCOOUUVVEERRCCLLEE DDEE
PPRROOTTEECCTTIIOONN
sur la cavité servant à accueillir la
base.
Insérez le
CCOOUUVVEERRCCLLEE DDEE PPRROOTTEECCTTIIOONN
dans le téléviseur jusqu’à ce que vous entendiez un
clic.
COUVERCLE DE PROTECTION

PRÉPARATION
18
SYSTÈME DE FIXATION VESA
(ASSOCIATION DES STANDARDS VIDÉO)
PRÉPARATION
Installez votre fixation murale sur un mur solide perpendiculaire au plancher. Lorsque vous devez fixer à d’autres
matériaux de construction, veuillez contacter le détaillant le plus proche de chez vous.
Si le téléviseur est installé au plafond ou sur un mur incliné, il peut chuter et causer des blessures corporelles graves.
Nous vous préconisons l’utilisation d’un support de montage mural de la marque LG pour monter le téléviseur sur un mur.
recommande que l’installation murale soit effectuée par un installateur professionnel qualifié.
GG
N’installez pas votre ensemble de fixation murale pendant que votre téléviseur est allumé.
Il pourrait en résulter des blessures corporelles causées par une décharge électrique.
ATTENTION
GG
La longueur des vis dépend de la fixation murale
utilisée. Pour un complément d’information,
reportez-vous aux instructions qui accompagnent
la fixation.
GG
Les dimensions standard des ensembles de fixation
murale sont présentées dans le tableau.
GG
Avec l’achat de notre ensemble de fixation murale,
un manuel d’installation détaillé et toutes les
pièces requises pour l’assemblage sont fournis.
GG
N’utilisez pas des vis plus longues que la dimension
standard, puisqu’elles peuvent endommager l’in-
térieur du téléviseur.
GG
Pour les fixations murales qui ne sont pas con-
formes aux spécifications de la norme VESA con-
cernant les vis, la longueur des vis peut différer
dépendant de leurs caractéristiques techniques.
GG
N’utilisez pas des vis qui ne sont pas conformes
aux spécifications de la norme VESA concernant les
vis.
Ne serrez pas les vis trop à fond, ce qui peut
endommager le téléviseur ou causer la chute du
téléviseur et des blessures corporelles. LG n’est pas
responsable dans le cas de ce type d’accident.
GG
LG n’est pas responsable des dommages au
téléviseur ou des blessures corporelles lorsqu'une
fixation murale non conforme à la norme VESA ou
qu’une fixation non spécifiée est utilisée ou que l'u-
tilisateur néglige de suivre les instructions d’installa-
tion du téléviseur.
REMARQUE
!
Modèle
VESA (A
*
B)
Vis standard Quantité
Support mural
(vendu séparément)
19LD350,
19LD350C,
22LD350,
22LD350C
26LD350,
32LD350,
32LD320
10 0
*
10 0 M 4 4
200
*
10 0 M 4 4
AA
BB
LSW100B, LSW100BG

PRÉPARATION
19
PINCE DU COMPARTIMENT À FILS
Pour 19/22LD350, 19/22LD350C
Après avoir relié les câbles selon les besoins,
installez la SERRE-FILS tel qu’indiqué puis
empaquetez les câbles.
K
AC-IN
1
■
Cette illustration peut ne pas correspondre à votre téléviseur.
Pour 26/32LD350, 32LD320
AC IN
AC IN
AC IN
AC IN
AC IN
AC IN
AC IN
AC IN
AC IN
Branchez les câbles convenablement.
Pour relier un appareil supplémentaire,
reportez-vous à la section CONFIGURATION
DE LA SOURCE AUXILIAIRE.
Installez le PINCE DU COMPARTIMENT À
FILS comme montré.
PINCE DU COMPARTIMENT À FILS
1
2
Insérez les câbles dans la PINCE DU COMPARTI-
MENT À FILS et fermez-la.
3

PRÉPARATION
20
INSTALLATION SUR UN BUREAU
PREPARATION
Pour assurer une ventilation adéquate, laisser un espacement de 10 centimètres (4 pouces) des quatre côtés à
partir du mur.
■
Cette illustration peut ne pas correspondre à votre téléviseur.
10 centimètres
GG
Assurez une bonne ventilation en respectant ces recommandations.
GG
Ne pas installer l’appareil près ou au-dessus d’une source de chaleur.
ATTENTION
10 centimètres
10 centimètres (4 pouces)
10 centimètres
SOCLE PIVOTANT (Sauf 19/22LD350, 19/22LD350C)
Après avoir installé le téléviseur, le régler manuellement vers la gauche ou la droite de 20° selon la position de
visionnement désirée.
POSITIONNEMENT DE L'ÉCRAN (Pour 19/22LD350, 19/22LD350C)
■
La représentation peut être quelque peu différente de la réalité.
■
Ajustez la position de l'appareil à la position la plus confortable pour vous.
• Rayon d'inclinaison
12
0
3
0

PRÉPARATION
21
FIXATION DU TÉLÉVISEUR À UN MEUBLE (Sauf 19/22LD350, 19/22LD350C)
Nous recommandons de fixer le téléviseur à un meuble afin d'éviter qu'il ne puisse être tiré ou poussé, ce qui
pourrait occasionner des blessures ou des dommages à l'appareil.
GG
Le téléviseur doit être solidement fixé au plancher ou au mur selon les instructions d’assemblage afin
d’éviter qu’il ne tombe. Faire basculer ou remuer l’appareil peut occasionner des blessures.
ATTENTION
1 - Vis
(fournie avec l’appareil)
Meuble
Base
UTILISATION DU SYSTÈME DE SÉCURITÉ KENSINGTON
■
Cette fonction n'est pas disponible pour tous les modèles.
- Le Connecteur du Système de sécurité Kensington se trouve sur le
panneau arrière du projecteur. Connecter le câble du Système de
sécurité Kensington comme ci-dessous.
- Pour l'installation détaillée et l'utilisation du Système de sécurité
Kensington, se référer au guide de l'utilisateur annexé au kit du
Système de sécurité Kensington.
Et pour plus d'informations, contacter
hhttttpp::////wwwwww..kkeennssiinnggttoonn..ccoomm
, la page d'accueil internet de la
société Kensington qui gère les équipements électroniques co˚teux
tels que les PC portables ou les projecteurs LCD.
REMARQUE: Le Système de sécurité Kensington est un article en option.

PRÉPARATION
22
INSTALLER LE TÉLÉVISEUR AU MUR DE FAÇON SÉCURITAIRE POUR
L’EMPÊCHER DE TOMBER LORSQU’IL EST INSTALLÉ SUR UN PIED
PRÉPARATION
Nous vous conseillons d’installer votre téléviseur à proximité immédiate d’un mur afin que ce dernier retienne
l’appareil en cas de basculement vers l’arrière.
De plus, nous vous conseillons également d’attacher le téléviseur au mur afin qu’il ne bascule pas vers l’avant,
ce qui pourrait causer des blessures et endommager l’appareil.
Attention : Assurez-vous que les enfants ne montent pas ni s’accrochent au téléviseur.
■
Insérez les boulons à œil (ou les supports et boulons de la TV) pour attacher le produit au mur comme le montre
l’image.
*Insérez les boulons à œil et serrez-les à fond dans les orifices supérieurs.
Fixez les supports au mur avec les boulons (vendu séparément). Faites correspondre la hauteur des supports
montés au mur avec les orifices du produit.
Vérifiez que les boulons à œil et supports soient bien complètement serrés.
■
Utilisez une ficelle solide (vendu séparément) pour attacher l’appareil.
Il est plus sûr d’attacher la corde de façon à ce qu’elle soit horizontale
entre le mur et l’appareil.
■
Vous devriez vous procurer les pièces requises pour éviter que le téléviseur ne bascule sur sa base.
■
Cette illustration peut ne pas correspondre à votre téléviseur.
GG
Servez-vous d’une plateforme ou d'une armoire suffisamment grande pour accueillir le téléviseur, et suff-
isamment solide pour en supporter le poids.
GG
Pour utiliser le téléviseur en toute sécurité, veillez à ce que la hauteur du support mural et celle du
téléviseur correspondent.
REMARQUE
!

PRÉPARATION
23
CONNEXION ANTENNE OU CÂBLE
1. Antenne (analogique ou numérique)
Douille d’antenne murale ou antenne extérieure sans connexion à
un convertisseur. Pour une qualité d’image maximale, régler la
direction de l’antenne au besoin.
2. Câble
Douille
antenne
murale
Antenne
extérieure
(VHF, UHF)
Prise
murale de
télédistribu-
tion
Appartement à logements
(branché sur une douille antenne murale)
Fil coaxial RF 75 ohms
Fil coaxial RF 75 ohms
Appartement à logements
(branché sur une prise murale pour antenne
extérieure)
Attention de ne pas tordre le fil de cuivre
lorsque vous branchez l’antenne.
Fil bronze
■
Dans une z one où le signal est faible, pour améliorer la qualité, acheter et installer un amplificateur de signal.
■
Si l’antenne doit être séparée pour deux téléviseurs, installer un séparateur de signal 2 façons pour les connexions.
■
Si l’antenne n’est pas installée adéquatement, communiquer avec le marchand pour de l’aide.
ANTENNA
/CABLE IN
■
Pour éviter d’endommager le téléviseur, ne branchez pas le cordon d‘alimentation avant de procéder au branchement
de tous les appareils.
■
Cette illustration peut ne pas correspondre à votre téléviseur.
ANTENNA
/CABLE IN

CONFIGURATION DE LA SOURCE AUXILIAIRE
24
CONFIGURATION DE LA SOURCE AUXILIAIRE
INSTALLATION DE RÉCEPTEUR HD
Cet appareil peut recevoir les signaux câble/hors antenne numérique sans boîte numérique extérieure. Toutefois il faut
recevoir les signaux numériques depuis une boîte ou autre appareil externe numérique, voir l’illustration ci-dessous.
Connexion des composantes
1. Comment brancher
Reliez les sorties vidéo
(
Y, P
B
, PR
)
du boîtier de la
télévision numérique aux prises d’entrée
CCOOMMPPOO--
NNEENNTT IINN VVIIDDEEOO
de l’appareil. Respectez les couleurs
des prises (Y = vert, P
B
= bleu et PR = rouge).
Reliez la sortie audio du boîtier de la télévision
numérique aux prises d’entrée
CCOOMMPPOONNEENNTT IINN
AAUUDDIIOO
de l’appareil.
2
1
2. Comment utiliser
■
Mettre la boîte numérique en circuit
(voir le guide du propriétaire).
■
Sélectionnez la source d’entrée
CCoommppoossaannttee
sur le
téléviseur à l’aide de la touche
IINNPPUUTT
de la télécommande.
■
Pour éviter que l'équipement ne subisse des dommages, ne branchez aucun cordon d'alimentation avant que
tous les composants aient été raccordés.
■
Cette section de CONFIGURATION DE LA SOURCE AUXILIARE fait principalement appel aux illustrations des
modèles
3322LLDD335500
.
RS-232C IN
(
CONTROL&SERVICE)
ANTENNA
/CABLE IN
B IN (PC)
VIDEO
AUDIO
R
L/MONO
OPTICAL
DIGITAL
AUDIO OUT
AUDIO IN
(RGB/DVI)
AV IN 1
VIDEO
YPB PR
L R
AUDIO
COMPONENT IN
Y L RPB PR
1
2
Y, C
B/
PB
, C
R/P
R
Résolutions prises en charge
Fréquence Fréquence
Horizontale
(
KHz
)
Verticale
(
Hz
)
15.73 59.94
15.73 60.00
31.47 59.94
31.50 60.00
44.96 59.94
45.00 60.00
33.72 59.94
33.75 60.00
26.97 23.976
27.00 24.00
33.71 29.97
33.75 30.00
67.432 59.94
67.50 60.00
Résolution
720x480i
720x480p
1280x720p
1920x1080i
1920x1080p
Signal
480i
480p
720p
1080 i
1080 p
Composante
Oui
Oui
Oui
Oui
Oui
HDMI
Non
Oui
Oui
Oui
Oui

CONFIGURATION DE LA SOURCE AUXILIAIRE
25
Connexion HDMI
Reliez le boîtier de la télévision numérique à la prise
HHDDMMII//DDVVII IINN
ou
HHDDMMII//DDVVII IINN 11//22
* de l’appareil.
Un branchement audio séparé n’est pas nécessaire.
L'interface HDMI prend en charge l'audio et le vidéo.
1. Comment brancher
2. Comment l’utiliser
■
Allumez le boîtier de la télévision numérique
(Consultez le
manuel de l’utilisateur de votre boîtier numérique).
■
Sélectionnez la source d’entrée
HHDDMMII
ou
HHDDMMII11//22
* sur le
téléviseur à l’aide de la touche
IINNPPUUTT
de la télécom-
mande.
2
1
RS-232C IN
(
CONTROL&SERV
VIDEO
YPB PR
L
AUDIO
RGB IN (PC)
VIDEO
AUD
L/MONO
COMPONENT IN
OPTICAL
DIGITAL
AUDIO OUT
AUDIO IN
(RGB/DVI)
1
/DVI IN
HDMI OUTPUT
1
HDMI-DTV
Fréquence Fréquence
Horizontale
(
KHz
)
Verticale
(
Hz
)
31.47 59.94
31.50 60.00
44.96 59.94
45.00 60.00
33.72 59.94
33.75 60.00
26.97 23.976
27.00 24.00
33.71 29.97
33.75 30.00
67.432 59.94
67.50 60.00
Résolution
720x480p
1280x720p
1920x1080i
1920x1080p
* HDMI 2: Pour 26/32LD350, 32LD320
GG
Les câbles HDMI ne prennent pas en charge l’HDMI ver-
sion 1.3, ils causent des scintillements ou aucun affichage.
Dans ce cas, utilisez des câbles plus récents qui prennent
en charge HDMI version 1.3.
GG
Le mode HDMI supporte les formats audio: AC3 (32KHz,
44.1KHz, 48KHz), Linear PCM (32KHz, 44.1KHz, 48KHz)
REMARQUE
!

CONFIGURATION DE LA SOURCE AUXILIAIRE
26
CONFIGURATION DE LA SOURCE AUXILIAIRE
Connexion DVI vers HDMI
RS-232C IN
(
CONTROL&SERVICE)
VIDEO
YPB PR
L R
AUDIO
RGB IN (PC)
VIDEO
AUDIO
R
L/MONO
COMPONENT IN
OPTICAL
DIGITAL
AUDIO OUT
AV IN 1
1
/DVI IN
AUDIO IN
(RGB/DVI)
L R
DVI OUTPUT
AUDIO
1
2
GG
Cette connexion requiert un câble DVI vers HDMI ou un
adaptateur. Comme la connexion DVI ne prend pas en
charge le signal audio, une connexion audio autonome est
requise.
REMARQUE
!
Reliez la sortie DVI du boîtier de la télévision
numérique à la prise
HHDDMMII//DDVVII IINN
ou
HHDDMMII//DDVVII
IINN 11
de l’appareil.
Reliez la sortie audio du boîtier de la télévision numérique
à la prise
AAUUDDIIOO IINN ((RRGGBB//DDVVII))
de l’appareil.
1. Comment brancher
2. Comment l’utiliser
■
Allumez le boîtier de la télévision numérique (Consultez le
manuel de l’utilisateur de votre boîtier numérique).
■
Sélectionnez la source d’entrée
HHDDMMII
ou
HHDDMMII11
sur le
téléviseur à l’aide de la touche
IINNPPUUTT
de la télécommande.
2
1

CONFIGURATION DE LA SOURCE AUXILIAIRE
27
RÉGLAGE DVD
Connexion des composantes
Ports Entrée Composante
Pour une meilleure qualité d’image, connectez votre lecteur DVD
aux ports d’entrée composante comme montré ci-dessous.
Ports Composante de la TV
YPB PR
Ports de sortie vidéo du
lecteur DVD
Y
Y
Y
Y
P
B
B-Y
Cb
Pb
P
R
R-Y
Cr
Pr
RS-232C IN
(
CONTROL&SERVICE)
ANTENNA
/CABLE IN
N
(PC)
VIDEO
AUDIO
R
L/MONO
OPTICAL
DIGITAL
AUDIO OUT
AUDIO IN
(RGB/DVI)
AV IN 1
VIDEO
YPB PR
L R
AUDIO
COMPONENT IN
Y L RPB PR
1 2
Reliez les sorties vidéo
(
Y, PB
, P
R
)
du DVD aux prises
CCOOMMPPOONNEENNTT IINN VVIIDDEEOO
de l’appareil. Respectez
les couleurs.
(
Y = vert, P
B = bleu et P
R = rouge
)
.
Reliez les sorties audio du DVD aux prises
CCOOMMPPOO--
NNEENNTT IINN AAUUDDIIOO
de l’appareil.
1. Comment brancher
2. Comment l’utiliser
■
Allumez votre lecteur et insérez un DVD.
■
Sélectionnez la source d’entrée
CCoommppoossaannttee
sur le
téléviseur à l’aide de la touche
IINNPPUUTT
de la télécommande.
■
Reportez-vous au manuel d’utilisation du lecteur DVD.
2
1

CONFIGURATION DE LA SOURCE AUXILIAIRE
28
CONFIGURATION DE LA SOURCE AUXILIAIRE
Connexion composite (RCA)
RS-232C IN
(
CONTROL&SERVICE)
ANTENNA
/CABLE IN
VIDEO
YPB PR
L R
AUDIO
N (PC)
COMPONENT IN
OPTICAL
DIGITAL
AUDIO OUT
AUDIO IN
(RGB/DVI)
VIDEO
AUDIO
R
L/MONO
AV IN 1
L R
VIDEO
AUDIO
Connexion HDMI
RS-232C I
(
CONTROL&SER
VIDEO
YPB PR
L
AUD
RGB IN (PC)
VIDEO
AU
L/MONO
COMPONENT IN
OPTICAL
DIGITAL
AUDIO OUT
AUDIO IN
(RGB/DVI)
1
/DVI IN
HDMI OUTPUT
1
Reliez les prises
AAUUDDIIOO
/
VVIIDDEEOO
du téléviseur et
DVD. Respectez les couleurs (Vidéo = jaune, Audio
Gauche = blanc et Audio Droit = rouge).
1. Comment brancher
2. Comment l’utiliser
■
Allumez votre lecteur et insérez un DVD.
■
Sélectionnez la source d’entrée
AAVV
ou
AAVV11//22
* sur le
téléviseur à l’aide de la touche
IINNPPUUTT
de la télécommande.
■
Reportez-vous au manuel d’utilisation du lecteur DVD.
1
Reliez la sortie HDMI due DVD aux prises
HHDDMMII//DDVVII
II NN
ou
HHDDMMII//DDVVII IINN 11//22
* de l’appareil.
Un branchement audio séparé n’est pas nécessaire.
L'interface HDMI prend en charge l'audio et le vidéo.
1. Comment brancher
2. Comment l’utiliser
■
Sélectionnez la source d’entrée
HHDDMMII
ou
HHDDMMII11//22
* sur
le téléviseur à l’aide de la touche
IINNPPUUTT
de la télécom-
mande.
■
Reportez-vous au manuel d’utilisation du lecteur DVD.
2
1
* AV2: Pour 26/32LD350, 32LD320
* HDMI 2: Pour 26/32LD350, 32LD320
GG
Les câbles HDMI ne prennent pas en charge l’HDMI ver-
sion 1.3, ils causent des scintillements ou aucun affichage.
Dans ce cas, utilisez des câbles plus récents qui prennent
en charge HDMI version 1.3.
GG
Le mode HDMI supporte les formats audio: AC3 (32KHz,
44.1KHz, 48KHz), Linear PCM (32KHz, 44.1KHz, 48KHz)
REMARQUE
!
1

CONFIGURATION DE LA SOURCE AUXILIAIRE
29
RÉGLAGE MAGNÉTOSCOPE
Branchement de l'antenne
Reliez la sortie antenne RF du magnéto-
scope à la prise
AANNTTEENNNNAA//CCAABBLLEE IINN
de l’appareil.
Branchez le câble de l’antenne à la prise
antenne RF du magnétoscope.
1. Comment brancher
■
Réglez l’interrupteur de sortie du magnétoscope sur
3 ou 4 puis réglez la télévision sur le même canal.
■
Insérez une cassette vidéo dans le magnétoscope et
appuyez sur la touche PLAY.
(Reportez-vous au manuel de l’utilisateur du magné-
toscope).
2. Comment l’utiliser
2
1
R
IO
UDIO
R
AV IN 1
ANTENNA
/CABLE IN
L R
S-VIDEO VIDEO
OUTPUT
SWITCH
ANT IN
ANT OUT
AUDIO
Prise Murale
Antenne
1
2
Connexion composite (RCA)
GG
Si votre magnétoscope n’est pas stéréo, reliez le câble
audio entre le magnétoscope et la prise
AAUUDDIIOO
LL//MMOONNOO
de l’appareil.
REMARQUE
!
L R
S-VIDEO VIDEO
AUDIO
OUTPUT
SWITCH
ANT IN
ANT OUT
RS-232C IN
(
CONTROL&SERVICE)
ANTENNA
/CABLE IN
VIDEO
YPB PR
L R
AUDIO
IN (PC)
COMPONENT IN
OPTICAL
DIGITAL
AUDIO OUT
AUDIO IN
(RGB/DVI)
VIDEO
AUDIO
R
L/MONO
AV IN 1
1
Reliez les prises
AAUUDDIIOO
/
VVIIDDEEOO
du téléviseur et du
magnétoscope. Respectez les couleurs (Vidéo = jaune,
Audio Gauche = blanc et Audio Droit = rouge)
1. Comment brancher
2. Comment l’utiliser
■
Insérez une cassette vidéo dans le magnétoscope et
appuyez sur la touche PLAY. (Reportez-vous au manuel de
l’utilisateur du magnétoscope).
■
Sélectionnez la source d’entrée
VViiddééoo
ou
VViiddééoo11//22
* sur
le téléviseur à l’aide de la touche
IINNPPUUTT
de la télécom-
mande.
1
* AV2: Pour 26/32LD350, 32LD320

CONFIGURATION DE LA SOURCE AUXILIAIRE
30
CONFIGURATION DE LA SOURCE AUXILIAIRE
RÉGLAGE SOURCE A/V EXTERNE
VIDEO
AUDIO
L/MONO
R
USB IN
AV IN 2
IN 2
H/P
L R
VIDEO
Caméscope numérique
Console de jeux vidéo
Reliez les prises
AAUUDDIIOO
/
VVIIDDEEOO
du
téléviseur et de l’appareil externe.
Respectez les couleurs
(
Vidéo = jaune, Audio Gauche = blanc, et
Audio Droit = rouge
)
1. Comment brancher
2. Comment l’utiliser
■
Sélectionnez la source d’entrée
VViiddééoo22
* sur le
téléviseur à l’aide de la touche
IINNPPUUTT
de la
télécommande.
■
Si la composante est branchée à l’entrée
AAVV
ou
AAVV IINN 11
, sélectionnez la source d’entrée
VViiddééoo
ou
VViiddééoo11
sur le téléviseur.
■
Faites fonctionner l’appareil externe.
1
1
* AV2: Pour 26/32LD350, 32LD320
CONNEXION USB (Pour 32LD350, 32LD320)
IN 2
VIDEO
AUDIO
L/MONO
R
H/P USB IN
AV IN 2
Memory Key
Branchez le périphérique USB dans les prises
UUSSBB II NN
situées sur le côté du téléviseur.
1. Comment brancher
1
2. Comment l’utiliser
■
Vous utilisez la fonction
UUSSBB IINN
après avoir branché les
prises
UUSSBB
. (
GG
pp..5588
)
1
ou

CONFIGURATION DE LA SOURCE AUXILIAIRE
31
CONNEXION DE SORTIE AUDIO
Relier le son du téléviseur vers de l’équipement audio externe par le biais de la prise optique.
Si vous désirez bénéficier de la télédiffusion numérique sur système de son ambiophonique, branchez un
câble optique (optionnel) à l’arrière de la télé et reliez-le à un système cinéma maison ou amplificateur
ambiophonique.
1
/DVI IN
RS-232C IN
(
CONTROL&SERVICE)
VIDEO
YPB PR
L R
AUDIO
RGB IN (PC)
VIDEO
AUDIO
R
L/MONO
COMPONENT IN
AUDIO IN
(RGB/DVI)
AV IN 1
OPTICAL
DIGITAL
AUDIO OUT
1
2
GG
Lorsque vous branchez équipements audios externes
comme des amplificateurs ou des haut-parleurs, vous pou-
vez désactiver les haut-parleurs du téléviseur à partir du
menu (
GG
pp..8855
).
REMARQUE
!
GG
Ne pas regarder à l’intérieur du port de sortie optique.
Regarder un rayon laser peut endommager vos yeux.
GG
La fonction ACP (Audio Copy Protection) peut bloquer la
sortie audio numérique.
ATTENTION
Branchez l’une des extrémités du câble optique au port
OOPPTTIICCAALL DDIIGGIITTAALL AAUUDDIIOO OOUUTT
du téléviseur.
Branchez l’autre extrémité dans l’entrée audio
numérique (optique) de l’équipement audio.
Réglez “Haut-Parleur TV – Arrêt” dans le menu AUDIO.
(
GG
pp..8855
). Consultez le manuel d’utilisation de
l’équipement audio externe.
1. Comment brancher
2
3
1
INSTALLATION D'UN CASQUE
Branchez le casque à la prise pour casque.
Pour régler le volume du casque, appuyez sur le bou-
ton
VVOOLL
+ ou -. Si vous appuyez sur le bouton
MMUUTTEE
,
le son du casque sera désactivé.
1. Comment brancher
2
1
IN 2
VIDEO
AUDIO
L/MONO
R
AV IN 2
H/P
USB IN

RÉGLAGE PC
CONFIGURATION DE LA SOURCE AUXILIAIRE
32
CONFIGURATION DE LA SOURCE AUXILIAIRE
Cette TV dispose d’une fonctionnalité Plug&Play (prête à utiliser), ce qui signifie que l’ordinateur se règle
automatiquement en fonction des réglages de la télévision.
Connexion VGA (D-sub à 15 broches)
1
/DVI IN
RS-232C I
(
CONTROL&SERV
VIDEO
YPB PR
L
AUDI
VIDEO
AU
L/MONO
COMPONENT IN
OPTICAL
DIGITAL
AUDIO OUT
RGB IN (PC)
AUDIO IN
(RGB/DVI)
RGB OUTPUT
AUDIO
2
1
Reliez la sortie VGA de l’ordinateur à la prise
RRGGBB IINN
((PPCC))
de l’appareil.
Reliez la sortie audio du PC à la prise
AAUUDDIIOO IINN
((RRGGBB//DDVVII))
de l’appareil.
1. Comment brancher
2. Comment l’utiliser
■
Allumez votre ordinateur et l’appareil.
■
Sélectionnez la source d’entrée
RRGGBB--PPCC
sur le téléviseur à
l’aide de la touche
IINNPPUUTT
de la télécommande.
2
1
Connexion DVI vers HDMI
RS-232C IN
(
CONTROL&SERVICE)
VIDEO
YPB PR
L R
AUDIO
RGB IN (PC)
VIDEO
AUDIO
R
L/MONO
COMPONENT IN
OPTICAL
DIGITAL
AUDIO OUT
AV IN 1
1
/DVI IN
AUDIO IN
(RGB/DVI)
DVI OUTPUT
AUDIO
1
2
Reliez la sortie DVI du PC à la prise
HHDDMMII//DDVVII IINN
ou
HHDDMMII//DDVVII IINN 11
de l’appareil.
Reliez la sortie audio du PC à la prise
AAUUDDIIOO IINN
((RRGGBB//DDVVII))
de l’appareil.
1. Comment brancher
2. Comment l’utiliser
■
Allumez votre ordinateur et l’appareil.
■
Sélectionnez la source d’entrée
HHDDMMII
ou
HHDDMMII11
sur le
téléviseur à l’aide de la touche
IINNPPUUTT
de la télécommande.
2
1

CONFIGURATION DE LA SOURCE AUXILIAIRE
33
REMARQUE
!
Fréquence Fréquence
Horizontale
(
KHz
)
Verticale
(
Hz
)
31.469 70.08
31.469 70.08
31.469 59.94
37.879 60.31
48.363 60.00
47.776 59.87
47.720 59.799
Résolution
720x400
1360x768
640x480
800x600
1024x768
640x350
1280x768
Spécifications des Affichages Compatibles (RGB-PC, HDMI-PC)
GG
Pour obtenir la meilleure qualité d’image possible,
réglez la carte graphique de votre ordinateur à la
résolution 1360x768.
GG
En fonction de votre carte graphique, il se peut
que le mode DOS ne fonctionne pas si vous
utilisez un câble DVI vers HDMI.
GG
En mode PC, il se peut qu’il y ait des défauts du
point de vue de la résolution, de l’alignement ver-
tical, du contraste ou de la brillance. Si tel est le
cas, modifiez la résolution de la sortie PC ainsi que
le taux de rafraîchissement et réglez la brillance et
le contraste dans le menu IMAGE jusqu’à ce que
l’image soit claire.
GG
Évitez de laisser une image fixe à l’écran pendant
une période prolongée. Celle-ci pourrait s’im-
primer de manière permanente à l’écran.
GG
La synchronisation des fréquences Horizontales et
Verticales est séparée.
GG
Sur certains modèles de carte graphique, il se peut
que certains réglages de résolution empêchent l’af-
fichage de l’image au bon endroit sur l’écran.
GG
En choisissant HDMI-PC, réglez l’identité source à
PC dans le menu OPTION.

CONFIGURATION DE LA SOURCE AUXILIAIRE
34
CONFIGURATION DE LA SOURCE AUXILIAIRE
Réglage de l’écran pour mode PC
Sélection de la résolution
Vous pouvez choisir le mode RGB-PC.
D’autres réglages, comme la
PPoossiittiioonn
, la
PPhhaassee
et la
TTaaiillllee
peuvent également être modifiés.
Vous ne pouvez utiliser cette fonction que lorsque la résolution PC est réglée à 1024X768, 1280X768 ou
1360X768.
Sélectionnez
IIMMAAGGEE
.
Sélectionnez
ÉÉccrraann ((RRGGBB--PPCC))
.
Sélectionnez
RRééssoolluuttiioonn
.
Sélectionnez la résolution souhaitée.
1
MENU
3
4
2
ENTER
ENTER
ENTER
5
ENTER
Entrer
Déplacer
IMAGE
E
RG
• Contraste 50
• Brillance 50
• Netteté 50
• Couleur 50
• Teinte 0
• Contrôle avancé
• Réinitialisation
Écran (RGB-PC)
Config.auto
Résolution
Position
Taille
Phase
Réinitialisation
ÉCRAN
Déplacer
Préc.
1024 x 768
1280 x 768
1360 x 768

CONFIGURATION DE LA SOURCE AUXILIAIRE
35
Config.Auto
Ajuste automatiquement la position de l’image et en réduit l’instabilité. Si l’image ne s’affiche toujours pas
correctement après l’avoir ajustée, essayez le réglage manuel ou choisissez une résolution différente, ou
encore un autre taux de rafraîchissement sur votre PC.
Sélectionnez
ÉÉccrraann ((RRGGBB--PPCC))
.
Sélectionnez
CCoonnffiigg..aauuttoo
.
3
2
ENTER
ENTER
Sélectionnez
OOuuii
.
4
ENTER
Démarrage de la configuration automatique.
5
ENTER
Sélectionnez
IIMMAAGGEE
.
1
MENU
■
Si la position de l’image n’est toujours pas
satisfaisante, essayez de nouveau l’ajuste-
ment automatique.
■
Si vous avez encore besoin d’ajuster l'im-
age après avoir utilisé l’ajustement
automatique du mode RGB-PC, vous pou-
vez modifier la
PPoossiittiioonn
, la
TTaaiillllee
et la
PPhhaassee
de l’image.
Entrée
Déplacer
IMAGE
E
RG
• Contraste 50
• Brillance 50
• Netteté 50
• Couleur 50
• Teinte 0
• Contrôle avancé
• Réinitialisation
Écran (RGB-PC)
Config.auto
Résolution
Position
Taille
Phase
Réinitialisation
ÉCRAN
Déplacer
Préc.
Régler
Oui Non

CONFIGURATION DE LA SOURCE AUXILIAIRE
36
CONFIGURATION DE LA SOURCE AUXILIAIRE
Réglage de la position de Position, Taille, Phase
Si l’image n’est pas claire après le réglage automatique et surtout si les caractères vibrent, régler la Phase
manuellement.
Cette fonctionnalité n’est offerte qu’en mode RGB-PC.
Sélectionnez
PPoossiittiioonn
,
TTaaiillllee
ou
PPhhaassee
.
Effectuez les réglages appropriés.
3
ENTER
4
ENTER
■
PPoossiittiioonn
: Cette fonction sert à ajuster la
position Gauche/Droite et Haut/Bas de
l’image en fonction de vos préférences.
■
TTaaiillllee
: Cette fonction sert à réduire les
lignes verticales ou les rayures visibles en
fond d’écran. Les dimensions horizontales
de l’écran sont également modifiées.
■
PPhhaassee
: Cette fonction vous permet
d’éliminer le brouillage horizontal et
d’améliorer la netteté et le contraste de
l’affichage des caractères.
Sélectionnez
IIMMAAGGEE
.
Sélectionnez
ÉÉccrraann ((RRGGBB--PPCC))
.
1
MENU
2
ENTER
5
ENTER
Entrer
Déplacer
IMAGE
E
RG
• Contraste 50
• Brillance 50
• Netteté 50
• Couleur 50
• Teinte 0
• Contrôle avancé
• Réinitialisation
Écran (RGB-PC)
Config.auto
Résolution
Position
Taille
Phase
Réinitialisation
GF
D
E
ÉCRAN
Déplacer
Préc.

CONFIGURATION DE LA SOURCE AUXILIAIRE
37
Réinitialisation de l’écran (chargement des paramètres usine)
Réinitialise les réglages de l’image effectués en usine touchant la
PPoossiittiioonn
, la
TTaaiillllee
et la
PPhhaassee
.
Cette fonctionnalité n’est offerte qu’en mode RGB-PC.
Sélectionnez
RRééiinniittiiaalliissaattiioonn
.
3
ENTER
Sélectionnez
IIMMAAGGEE
.
Sélectionnez
ÉÉccrraann ((RRGGBB--PPCC))
.
1
MENU
2
ENTER
Sélectionnez
OOuuii
.
4
ENTER
5
ENTER
Entrer
Déplacer
IMAGE
E
RG
• Contraste 50
• Brillance 50
• Netteté 50
• Couleur 50
• Teinte 0
• Contrôle avancé
• Réinitialisation
Écran (RGB-PC)
Config.auto
Position
Résolution
Taille
Phase
Réinitialisation
ÉCRAN
Déplacer
Préc.
Régler
Oui Non

38
FONCTIONS DE LA TÉLÉCOMMANDE
VISIONNEMENT DE LA TÉLÉVISION / COMMANDE DES CHAÎNES
Au moment d’utiliser la télécommande, la diriger vers le capteur sur l’appareil.
ENERGY
CHVOL
123
45
0
6
789
P
A
G
E
SAVING
TV
AV MODE
INPUT
FAV
RATIO
MUTE
ENTER
MARK
LIST
FLASHBK
MENU
INFO
Q.MENU
BACK
EXIT
POWER
ENERGY SAVING
AV MODE
INPUT
TV
VOLUME
ASCENDANT
/DESCENDANT
MARK
FAV
RATIO
MUTE
CHANNEL
ASCENDANT
/DESCENDANT
PAGE
ASCENDANT
/DESCENDANT
Touches colorées
Met le téléviseur en marche et le met en mode d’attente.
Permet de régler la fonction
ÉÉccoonnoommiiee dd’’éénneerrggiiee
.
GG
pp..7766
Alterne entre les modes préréglés vidéo et audio.
GG
pp..5544
Alterne les sources d’entrées
Met le téléviseur en marche.
GG
pp..5522
il’écran revient à la dernière chaîne de télévision affichée.
Règle le volume.
Permet de choisir l'entrée pour appliquer les réglages
AAssssiissttaanntt iimmaaggee
.
GG
pp..6699
Utilisez pour marquer ou démarquer un fichier photo/
musique.
GG
pp..6600,, 6644
Utiliser pour faire défiler les canaux préférés.
GG
pp..5500
Pour changer le ratio.
GG
pp..6666
Sonorité marche-arrêt.
GG
pp..4400
Change de canal.
Passe d’une page d’information à l’autre.
Functions accès spécial dans certains menus.
Contrôle Menu USB (Liste photo et Liste musique).
Commande des appareils SIMPLINK.
Touches
USB,
SIMPLINK
VISIONNEMENT DE LA TÉLÉVISION / COMMANDE DES CHAÎNES

VISIONNEMENT DE LA TÉLÉVISION / COMMANDE DES CHAÎNES
39
■
Installation des piles à l’arrière et les installer
en observant les polarités.
■
Installer deux piles 1,5 V AAA. Ne pas
mélanger des piles usées avec des piles
neuves.
■
Remettre le couvercle.
Installation des piles
ENERGY
CHVOL
123
45
0
6
789
P
A
G
E
SAVING
TV
AV MODE
INPUT
FAV
RATIO
MUTE
ENTER
MARK
LIST
FLASHBK
MENU
INFO
Q.MENU
BACK
EXIT
— (TIRET)
LIST
FLASHBK
MENU
INFO
Q.MENU
NAVIGATEUR
(ascendant/descen
dant/gauche
droite/ENTER)
BACK
SIMPLINK
EXIT
Utilisé pour entrer un numéro d'émission pour des canaux
à émissions multiples comme 2-1, 2-2,etc.
Affiche le tableau des chaînes.
GG
pp..4488
Syntonise les canaux plus récents.
Affiche le menu principal ou efface tous les affichages à
l'écran et revient au mode de visionnage TV.
Pour afficher les informations en haut de l’écran.
GG
pp..5511
Ouvre la liste d'options du menu rapide.
GG
pp..4444
Permet de naviguer les menus à l’écran et effectuer les
réglages selon ses préférences.
Permet à l’utilisateur de retourner à l’opération précé-
dente d’une application ou d’une fonction interactive.
Consulter une liste des appareils audiovisuels connectés
au téléviseur.
Lorsque vous appuyez sur cette touche, le menu
SIMPLINK apparaît à l'écran.
GG
pp..5566--5577
Efface tous les affichages à l'écran et revient au mode de
visionnage TV.
Touches
NUMÉRIQUES

VISIONNEMENT DE LA TÉLÉVISION / COMMANDE DES CHAÎNES
40
MISE EN CIRCUIT DU TÉLÉVISEUR
VISIONNEMENT DE LA TÉLÉVISION / COMMANDE DES CHAÎNES
REMARQUES
!
GG
Si l’on part en vacances, débrancher le cordon d’alimentation de la prise murale.
GG
Si vous ne terminez pas la procédure d’installation (
RRééggllaaggee iinniittiiaall
), le menu de réglage initial sera
affiché à chaque fois que vous mettrez le téléviseur en marche et, tant que le
RRééggllaaggee iinniittiiaall
ne sera pas
complété.
D’abord, brancher correctement le cordon d’alimentation.
À ce moment le téléviseur se met en mode attente.
■
En mode attente pour mettre l’appareil en circuit, presser ,
IINNPPUUTT
,
CCHH (( ))
sur le téléviseur ou
presse
PPOOWWEERR
,
IINNPPUUTT
,
CCHH ((
ou
))
,
NNUUMMÉÉRRIIQQUUEESS (( 00
~
99 ))
sur la télécommande.
Sélectionner la source de visionnement avec les touches
IINNPPUUTT
sur la télécommande.
■
Le téléviseur est programmé pour se rappeler à quelle position il était même si le cordon d’alimentation est
enlevé.
Lorsque l’on a terminé d’utiliser le téléviseur, presser
PPOOWWEERR
sur la télécommande, l’appareil revient au
mode attente.
1
2
3
Appuyez sur la touche
CCHH ((
ou
))
ou
NNUUMMÉÉRRIIQQUUEESS
pour définir un
numéro de chaîne.
1
RÉGLAGE DU VOLUME
SÉLECTION DE CHAÎNE
Appuyez sur la touche
VVOOLL ((++
ou
--))
pour ajuster le volume.
Si vous souhaitez couper le son, appuyer sur la touche
MMUUTTEE
.
Vous pouvez réactiver le son en appuyant de nouveau sur la touche
MMUUTTEE
ou
VVOOLL ((++
ou
--))
.
Réglez le volume à votre convenance.
1
2
3

41
RÉGLAGE INITIAL
Cette fonction permet à l’utilisateur de facilement configurer les éléments de base qui permettent de regarder
le téléviseur pour la première fois après son achat. Ces éléments apparaîtront à l’écran dès la première utilisa-
tion du téléviseur. La fonction peut également être activée à partir des menus utilisateur.
■
Le réglage par défaut correspond au mode “
RRééssiiddeennttiieellllee
”. Pour la résidence, nous recommandons le mode
“
RRééssiiddeennttiieellllee
” qui procurera une qualité d’image optimale.
■
Le mode “
DDéémmoo eenn mmaaggaassiinn
” est conçu uniquement pour les téléviseurs utilisés en magasin. L’utilisateur
peut régler le
MMooddee iimmaaggee
manuellement, lorsqu’il inspecte le téléviseur, mais le téléviseur rétablira le
réglage In
DDéémmoo eenn mmaaggaassiinn
5 prédéfini après un délai de 5 minutes.
■
Le mode “
DDéémmoo eenn mmaaggaassiinn
” est un réglage optimal pour l’affichage dans les magasins. Il initialise le
téléviseur pour permettre le réglage de la qualité de l’image.
■
Vous pouvez également régler l’option
RRééggllaaggee iinniittiiaall
dans le menu
OOPPTTIIOONN
.
Vérifiez votre raccordement d’antenne et
commencer la
SSyynnttoonniissaattiioonn aauuttoo
.
1
ENTER
Étape 3. Réglage temporel
Étape 4. Syntonisation auto
Étape 1. Sélection de la langue
Étape 2. Choix du mode
Sélectionnez
AAuuttoo
ou
MMaannuueell
.
Régler l'heure désirée.
1
2
ENTER
Avant de commencer,
assurez-vous que
l'antenne du téléviseur est branchée.
Syntonisation auto
Suivant
Guide simple
Préc.
INFO
i
Sélectionnez Langage menu.
1
ENTER
Sélectionnez
RRééssiiddeennttiieellllee
.
1
ENTER
Langage
English
Español
Français
SuivantPréc.
Choisir l'environnement.
Sélectionner mode approprié.
Sélectionnez [Résidentielle] lorsque vous
configurez la télé àla maison. Vous pouvez
ajuster la qualité d’image en conséquence
par le biais du menu image.
Démo en magasin
Résidentielle
Choix du mode
SuivantPréc.
Mois
Heure courante
02
Date
21
Année
2009
Heure
10 AM
Minute
10
Fuseau
Est
Heure avancée
Auto
FF
Auto
GG
Réglage temporel
SuivantPréc.
VISIONNEMENT DE LA TÉLÉVISION / COMMANDE DES CHAÎNES
Pour 19/22LD350C

42
SÉLECTION DES MENUS AFFICHÉS À L’ÉCRAN
VISIONNEMENT DE LA TÉLÉVISION / COMMANDE DES CHAÎNES
L’écran OSD de votre téléviseur peut différer légèrement de l’illustration du présent manuel.
Affiche chaque menu.
Sélectionner une option de menu.
Accepte la sélection en cours.
1
MENU
3
2
ENTER
ENTER
Retourner à l’affichage télé.
4
EXIT
Entrer
Déplacer
Syntonisation auto
Syntonisation manuelle
Edit. Chaînes
CANAL
CANAL
HEURE
IMAGE
OPTION
AUDIO
VÉRROUILLÉ
Entrer
Déplacer
Vol. normalisé : Marche
Voix claires II : Marche
• Niveau 3
Équilibre 0
Mode audio : Standard
•
Infinite Sound :
Arrêt
• Aigu 50
• Grave 50
AUDIO
LR
-+
Entrer
Déplacer
Pendule
Mise en arrêt : Arrêt
Mise en éveil : Arrêt
Minuterie : Arrêt
HEURE
Entrer
Déplacer
Lock System : Arrêt
Mot de passe
Bloquez canal
Films
Enfants
Général
Téléchargeable
Bloc source
VÉRROUILLÉ
Entrer
Déplacer
Langage menu(Language)
: Français
Langage audio : Anglais
Indentité source
SIMPLINK : Marche
Touches verrouillées: Arrêt
Guide simple
Sous-titres : Arrêt
Identité TV : 1
OPTION
Verrouillage : Arrêt
Mot de passe
Bloquez canal
Anglais
Français
Téléchargeable
Bloc source
Pour les É.-U. Pour le Canada
Entrer
Déplacer
Allongement : 16:9
Assistant image
Économie d’énergie:
Arrêt
Mode image : Standard
•
Rétroéclairage
70
• Contraste 90
• Brillance 50
• Netteté 70
IMAGE
E E
E
19/22/26LD350, 19/22LD350C
VISIONNEMENT DE LA TÉLÉVISION / COMMANDE DES CHAÎNES

43
Affiche chaque menu.
Sélectionner une option de menu.
Accepte la sélection en cours.
1
MENU
3
2
ENTER
ENTER
Retourner à l’affichage télé.
4
EXIT
Entrer
Déplacer
Syntonisation auto
Syntonisation manuelle
Edit. Chaînes
CANAL
CANAL
OPTION
IMAGE
VÉRROUILLÉ
AUDIO
SOURCE
HEURE
USB
Entrer
Déplacer
Allongement : 16:9
Assistant image
Économie d’énergie:
Arrêt
Mode image : Standard
•
Rétroéclairage
70
• Contraste 90
• Brillance 50
• Netteté 70
IMAGE
E
Entrer
Déplacer
Vol. normalisé : Marche
Voix claires II : Marche
• Niveau 3
Équilibre 0
Mode audio : Standard
•
Infinite Sound :A
rrêt
• Treble 50
• Grave 50
AUDIO
E
Entrer
Déplacer
Pendule
Mise en arrêt : Arrêt
Mise en éveil : Arrêt
Minuterie : Arrêt
HEURE
Entrer
Déplacer
Liste photo
Liste musique
USB
Entrer
Déplacer
TV
Vidéo1
Vidéo2
Composante
RGB-PC
HDMI1
HDMI2
SOURCE
Entrer
Déplacer
Verrouillage : Arrêt
Mot de passe
Bloquez canal
Films
Enfants
Général
Téléchargeable
Bloc source
VÉRROUILLÉ
Verrouillage : Arrêt
Mot de passe
Bloquez canal
Anglais
Français
Téléchargeable
Bloc source
Entrer
Déplacer
Langage menu(Language)
: Français
Langage audio : Anglais
Indentité source
SIMPLINK : Marche
Touches verrouillées: Arrêt
Guide simple
Sous-titres : Arrêt
Identité TV : 1
OPTION
Pour les É.-U. Pour le Canada
E
LR
-+
32LD350, 32LD320
VISIONNEMENT DE LA TÉLÉVISION / COMMANDE DES CHAÎNES
REMARQUES
!
GG
VVooyyaannttss lluummiinneeuuxx
: Pour 32LD320

44
MENU ÉCLAIR (QUICK MENU)
VISIONNEMENT DE LA TÉLÉVISION / COMMANDE DES CHAÎNES
Affiche chaque menu.
Effectuez les réglages appropriés.
AAlllloonnggeemmeenntt
: Permet de sélectionner le format d'image désirée.
MMooddee iimmaaggee
: Pour choisir le mode image réglée en usine selon l’environnement de visionnement.
MMooddee aauuddiioo
: Sélectionner le son approprié pour le programme.
MMuullttii--aauuddiioo
:
Modifier la langue audio (signal numérique).
SSAAPP
:
Permet de choisir la sonorité MTS (signal analogique).
MMiinnuutteerriiee
: Pour choisir la durée avant la mise hors circuit automatique du téléviseur.
SSuupp//AAjjoo//PPrréé
: Sélectionnez les chaînes que vous désirez ajouter ou supprimer, ou ajoutez les chaînes à votre
liste de chaînes favorites.
SSoouuss--ttiittrreess
: Sélectionner Marche ou Arrêt.
ÉÉccoonnoommiiee dd’’éénneerrggiiee
: Régler le niveau d’économie d’énergie afin de réduire la consommation énergétique
du téléviseur en ajustant le rétroéclairage.
DDiissppoossiittiiff UUSSBB
: Sélectionnez la fonction “Éjection” pour retirer le périphérique USB.
L’écran OSD de votre téléviseur peut différer légèrement de l’illustration du présent manuel.
Le menu éclair (Quick Menu) comprend des fonctions auxquelles l’utilisateur pourrait faire fréquemment appel.
1
Q.MENU
2
3
EXIT
Retourner à l’affichage télé.
A
16:9
FF
Allongement
GG
A
A
16:9
FF
Allongement
GG
19/22/26LD350, 19/22LD350C 32LD350, 32LD320
VISIONNEMENT DE LA TÉLÉVISION / COMMANDE DES CHAÎNES

45
REPÉRAGE DE CANAUX
Recherche automatique des chaînes (Syntonisation automatique)
Trouve automatiquement tous les canaux disponibles par l’antenne ou la télédistribution et les met en mémoire
dans la liste de canaux.
Exécutez cette fonction si vous déménager ou déplacer le téléviseur.
La syntonisation automatique ne place en mémoire que les stations disponibles lors de l’exécution.
Sélectionnez
CCAANNAALL
.
Sélectionnez
SSyynnttoonniissaattiioonn aauuttoo
.
Sélectionnez
OOuuii
.
Effectuer le
SSyynnttoonniissaattiioonn aauuttoo
.
Entrer
Déplacer
CANAL
Entrer
Déplacer
CANAL
1
MENU
3
2
ENTER
ENTER
4
ENTER
Syntonisation auto
Syntonisation manuelle
Edit. Chaînes
Syntonisation auto
Syntonisation manuelle
Edit. Chaînes
■
Le téléviseur demandera un mot de passe
si le contrôle parental a été activé (menu
de
VVÉÉRRRROOUUIILLLLÉÉ
).
Utilisez le mot de passe que vous avez
défini dans le menu de
VVÉÉRRRROOUUIILLLLÉÉ
pour autoriser une recherche de canal.
■
Lors du réglage de la syntonisation
automatique ou manuelle, le nombre
maximum de stations pouvant être
placées en mémoire est de 1 000.
Sujet à changer dépendamment de l’en-
vironnement des signaux télédiffusés.
■
Place en mémoire toutes les stations
disponibles dans l’ordre DTV, TV, CADTV
et CATV.
5
BACK
Retourner au menu précédent.
EXIT
Retourner à l’affichage télé.
Vérifiez la connexion à l'antenne.
Les renseignements de la chaîne
précédente seront mis à jour
durant le repérage automatique
des chaînes.
Oui
Non
VISIONNEMENT DE LA TÉLÉVISION / COMMANDE DES CHAÎNES

46
VISIONNEMENT DE LA TÉLÉVISION / COMMANDE DES CHAÎNES
Sélectionnez
CCAANNAALL
.
1
MENU
2
ENTER
Lorsque vous sélectionnez les signaux d’entrée DTV ou CADTV, vous pouvez afficher le témoin évaluant l’in-
tensité du signal à l’écran de manière à voir la qualité du signal reçu.
Ajout/Effacement des chaînes (Syntonisation manuelle)
Entrer
Déplacer
CANAL
Entrer
Déplacer
CANAL
Canal
Sélectionnez le type de chaîne et le
numéro de la chaîne-RF.
FF
DTV
GG
2
Fermer
Supprimer
Syntonisation auto
Syntonisation manuelle
Edit. Chaînes
DTV 2-1
Faible Normal Fort
Sélectionnez
SSyynnttoonniissaattiioonn mmaannuueellllee
.
Sélectionnez
DDTTVV
,
TT VV
,
CCAADDTTVV
ou
CCAATTVV
.
Sélectionnez la chaîne que vous
désirez ajouter ou supprimer.
3
ENTER
4
Sélectionnez
AAjjoouutteerr
ou
SSuupppprriimmeerr
.
5
ENTER
Syntonisation auto
Syntonisation manuelle
Edit. Chaînes
■
Le téléviseur demandera un mot de passe
si le contrôle parental a été activé (menu
de
VVÉÉRRRROOUUIILLLLÉÉ
).
Utilisez le mot de passe que vous avez
défini dans le menu de
VVÉÉRRRROOUUIILLLLÉÉ
pour autoriser une recherche de canal.
■
Lors du réglage de la syntonisation
automatique ou manuelle, le nombre
maximum de stations pouvant être
placées en mémoire est de 1 000.
Sujet à changer dépendamment de l’en-
vironnement des signaux télédiffusés.
6
BACK
Retourner au menu précédent.
EXIT
Retourner à l’affichage télé.
VISIONNEMENT DE LA TÉLÉVISION / COMMANDE DES CHAÎNES

47
Sélectionner une chaîne.
3
ENTER
Les stations mémorisées dans la section
ÉÉddiitt.. CChhaaîînneess
y sont affichées en noir alors que les stations sup-
primées y sont affichées en bleu.
Lorsqu’une chaîne est supprimée cela signifie que vous ne pourrez la sélectionner par le biais des touches
CCHH
en naviguant les stations disponibles au téléviseur.
Si vous désirez sélectionner une chaîne supprimée, saisissez directement le numéro de la chaîne respective avec
les touches numériques ou réactivez-la par le biais du menu
EEddiitt..CChhaaíínneess
.
Édition des chaînes
Entrer
Déplacer
CANAL
Syntonisation auto
Syntonisation manuelle
Edit. Chaînes
Sélectionnez
CCAANNAALL
.
1
MENU
2
ENTER
Sélectionnez
EEddiitt.. CChhaaîînneess
.
Retourner au menu précédent.
5
BACK
Retourner à l’affichage télé.
EXIT
Changez canal
Page suivante
CH
Navigation
Préc.
Ajout/Sup
■
Continuez d’appuyer la touche et
d’utiliser les touches et afin de
passer entre DTV, TV, CADTV et CATV.
■
Si la liste de stations est trop longue,
utilisez les touches CH et afin de
passer de page en page.
Ajouter ou supprimer une chaîne.
4
BLEU
VISIONNEMENT DE LA TÉLÉVISION / COMMANDE DES CHAÎNES

48
LISTE DES CANAUX
VISIONNEMENT DE LA TÉLÉVISION / COMMANDE DES CHAÎNES
Vous pouvez vérifier quelles chaînes sont enregistrées dans la mémoire en affichant la liste des chaînes.
Afficher la
LLiissttee ddeess ccaannaauuxx
.
1
LIST
Affichage de la liste des chaînes
Choisir une chaîne.
1
Se rendre au numéro de chaîne choisi.
2
ENTER
Sélection d'une chaîne dans la liste des chaînes
Tourner les pages.
1
CH
P
A
G
E
Retourner à l’affichage télé.
2
EXIT
Pagination à l’aide d’une liste de chaînes
Sortie
2-1
3-1
4-1
DTV
DTV
DTV
Liste des canaux
Ce cadenas est affiché
quand la chaîne est verrouil-
lée avec le contrôle parental.
VISIONNEMENT DE LA TÉLÉVISION / COMMANDE DES CHAÎNES

49
MÉMOIRE DES CANAUX PRÉFÉRÉS
Les stations préférées sont une façon agréable de vous donner accès rapide à une gamme de stations de votre
choix sans avoir à naviguer toutes les autres intermédiaires.
Pour sélectionner un canal préféré, appuyez la touche
FFAAVV
(Favoris) de façon répétitive.
Retourner à l’affichage télé.
4
EXIT
Sélectionnez
PPrrééfféérréé
.
3
Sélectionnez le canal souhaité.
1
CH
P
A
G
E
123
45
0
6
789
2
Q.MENU
Sélectionnez
SSuupp//AAjjoo//PPrréé
.
ou
A
Préféré
FF
Sup/Ajo/Pré
GG
A
Préféré
FF
Sup/Ajo/Pré
GG
VISIONNEMENT DE LA TÉLÉVISION / COMMANDE DES CHAÎNES

50
LISTE DES FAVORIS
VISIONNEMENT DE LA TÉLÉVISION / COMMANDE DES CHAÎNES
Sortie
2-1
3-1
4-1
DTV
DTV
DTV
Liste des favoris
Choisir une chaîne.
1
Se rendre au numéro de chaîne choisi.
2
ENTER
Sélection d'une chaîne dans la liste des
chaînes préférées
Tourner les pages.
1
CH
P
A
G
E
Retourner à l’affichage télé.
2
EXIT
Pagination par une liste des chaînes
préférées
Afficher la liste des chaînes préférées.
1
FAV
MARK
Affichage de la liste des chaînes préférées
VISIONNEMENT DE LA TÉLÉVISION / COMMANDE DES CHAÎNES

51
INFO. EN BREF
1
INFO
Écran Info vous montre les informations de l’écran en cours.
Appuyez sur la touche INFO pour faire apparaître l’Écran Info.
2
BACK
Retourner à l’affichage télé.
VISIONNEMENT DE LA TÉLÉVISION / COMMANDE DES CHAÎNES
Brief Info Title Test..
Sat, Feb 21, 2009 10:10 AM 11:40 AM
CNN
DOLBY DIGITAL
10:40 AM
Multilingual CaptionD 1080i TV-PG D L S V
CC
Titre programme
Jour, Mois, Année
Heure début programme
Barre de progression du
programme
Heure fin programme
heure en cours
Bande d’information
1 2 3 4 5 67
1
2
3
4
5
6
7
S-titre
MMuullttiilliinngguuee
: Multilingue: programme contenant un ou plusieurs ser-
vices audio. Appuyez sur
QQ..MMEENNUU
pour choisir l’audio désiré.
SS--ttiittrree
: programme contenant un ou plusieurs services de sous-
titres. Appuyez sur
QQ..MMEENNUU
pour sélectionner celui désiré.
DDoollbbyy DDiiggiittaall
: L’émission est munie d’un signal Dolby Digital accessible par
le biais des prises TV et HDMI.
Aspect ratio d’origine de vidéo est 4:3
Aspect ratio d’origine de vidéo est 16:9 (large)
Définition vidéo est 720x480i
Définition vidéo est 720x480p
Définition vidéo est 1280x720p
Définition vidéo est 1920x1080i
Définition vidéo est 1920x1080p
VV--CChhiipp
: Programme contenant information puce V, voir VÉRROUILLÉ
menu: A (Age), D (Dialogue), L (Langue), S (Sexe), V (Violence), FV
(violence fantaisiste)
480i
480p
720p
1080 i
1080 p
4:3
16:9
CC
D

52
LISTE D’ENTRÉES
VISIONNEMENT DE LA TÉLÉVISION / COMMANDE DES CHAÎNES
TV Vidéo Composante
HDMI RGB-PC
19/22LD350,
19/22LD350C:
TV Vidéo1 Vidéo2
HDMI2 HDMI1 RGB-PC
Composante
26/32LD350,
32LD320:
Sélectionner la source de signal d’entrée.
■
32LD350, 32LD320: Vous pouvez également choisir le signal d’entrée dans le menu
1
INPUT
ENTER
TV Vidéo Composante RGB-PC HDMI1
TV Vidéo Composante RGB-PC HDMI1
Indentité source
Sortie
Sélectionnez la source d’entrée qui convient
(sauf
TT VV
). Ensuite, vous pouvez sélectionner
une
IInnddeennttiittéé ssoouurrccee
au moyen de la
touche Bleue.
GG
pp..5533
c.-à-d.)
c.-à-d.) Pour changer l'étiquette d'entrée en utilisant la touche bleue.
Vous ne pouvez choisir et activer que les signaux d'entrée branchés au téléviseur.
■
TT VV
: pour regarder des émissions par antenne,
câble ou câble numérique.
■
VViiddééoo
: pour lire le signal d’un magnétoscope ou
d’un autre appareil externe.
■
CCoommppoossaannttee
: pour regarder un DVD ou le signal
d’un décodeur numérique.
■
RRGGBB--PPCC
: pour visualiser le signal d’entrée du PC.
■
HHDDMMII
: pour visualiser le signal provenant d’un
appareil haute définition.
Magnétoscope DVD PC Jeu
■
Lorsqu'un nouvel appareil externe est branché à l’appareil, le
menu contextuel suivant apparaît automatiquement.
Lorsque vous sélectionnez
OOuuii
, vous pouvez choisir la source
d’entrée que vous souhaitez utiliser.
■
Par contre, lorsque vous sélectionnez “
SSIIMMPPLLIINNKK
-
MMaarrcchhee
”
en mode HDMI, le même menu contextuel n’apparaît pas.
Non
Oui
!
Nouvelle entrée externe connectée.
Voulez-vous l'utiliser?
Vidéo2
Les entrées déconnectées sont inactives
(elles sont grisées).
VISIONNEMENT DE LA TÉLÉVISION / COMMANDE DES CHAÎNES

53
INDENTITÉ SOURCE
Ceci indique lequel dispositif est branché à laquelle prise d’entrée.
Entrer
Déplacer
OPTION
Langage menu(Language)
: Français
Langage audio : Anglais
Indentité source
SIMPLINK : Marche
Touches verrouillées: Arrêt
Guide simple
Sous-titres : Arrêt
Identité TV : 1
Vidéo
Composante
RGB-PC
HDMI
FF GG
Fermer
Sélectionnez
OOPPTTIIOONN
.
Sélectionnez
IInnddeennttiittéé ssoouurrccee
.
Sélectionner l’identification appropriée.
1
MENU
2
ENTER
Sélectionner la source.
3
ENTER
4
5
BACK
Retourner au menu précédent.
EXIT
Retourner à l’affichage télé.
Au moyen du menu OPTION
Sélectionner la source.
Sélectionner l’identification
appropriée.
1
INPUT
2
3
BACK
Retourner au menu précédent.
EXIT
Retourner à l’affichage télé.
Au moyen de la touche INPUT
19/22LD350,
19/22LD350C
Vidéo1
Vidéo2
Composante
RGB-PC
HDMI1
HDMI2
FF GG
Fermer
26/32LD350,
32LD320
EE
BLEU
VISIONNEMENT DE LA TÉLÉVISION / COMMANDE DES CHAÎNES

54
MODE AV
VISIONNEMENT DE LA TÉLÉVISION / COMMANDE DES CHAÎNES
Le Mode AV alterne entre les réglages préréglés vidéo et audio.
1
AV MODE
2
Arrêt Film
Jeu Sport
Appuyez plusieurs fois sur la touche
AAVV
MMOODDEE
pour sélectionner la source.
ENTER
■
L’option «
FFiillmm
» du mode audiovisuel
(AV Mode) permet de choisir cette
option à la fois dans le « menu IMAGE –
Mode image » et dans le « Menu AUDIO -
Mode audio ».
■
Lorsque vous sélectionnez «
AArrrrêêtt
»en
mode AV, l’image que vous aviez sélec-
tionnée à l’origine sera rétablie.
■
AArrrrêêtt
: Désactive l’AV MODE.
■
FFiillmm
: optimise la vidéo et l'acoustique
pour regarder des films.
■
SSppoorrtt
: optimise la vidéo et l'acoustique
pour regarder des manifestations
sportives.
■
JJeeuu
: optimise la vidéo et l'acoustique
pour jouer.
GUIDE SIMPLE
Vous pouvez facilement et efficacement accéder à l'information de la télévision en regardant un guide simple
sur le téléviseur.
Pendant l'opération guide simple, l’audio sera en mode silence.
Sélectionnez
OOPPTTIIOONN
.
Sélectionnez
GGuuiiddee ssiimmppllee
.
1
MENU
2
ENTER
Choisissez la partie du manuel que
vous voulez voir.
3
ENTER
4
EXIT
Retourner à l’affichage télé.
Entrer
Déplacer
OPTION
Langage menu(Language)
: Français
Langage audio : Anglais
Indentité source
SIMPLINK : Marche
Touches verrouillées: Arrêt
Guide simple
Sous-titres : Arrêt
Identité TV : 1
EE
VISIONNEMENT DE LA TÉLÉVISION / COMMANDE DES CHAÎNES

55
TOUCHES VERROUILLÉES
Il est possible de régler le téléviseur de manière à ce que seule la télécommande puisse être utilisée.
Cette fonction peut être utilisée afin de prévenir l’usage non autorisé en verrouillant les commandes du pan-
neau frontal.
Ce téléviseur est configuré de manière à mémoriser l’option ayant été utilisée en dernier, et ce, même lorsque
vous l’éteignez.
Sélectionnez
OOPPTTIIOONN
.
Sélectionnez
TToouucchheess vveerrrroouuiillllééeess
.
1
MENU
2
ENTER
Sélectionnez
MMaarrcchhee
ou
AArrrrêêtt
.
3
ENTER
■
Lorsque le verrouillage est activé, si le
téléviseur est éteint, peser sur le bouton
rr
/ I, INPUT, CH
(( ))
de l'appareil
ou les boutons POWER, INPUT, CH
((
))
ou
NNuumméérriiqquueess
de la télécom-
mande.
■
Verrouillage en circuit, l’affichage
‘
TToouucchheess vveerrrroouuiillllééeess
’ figure à l’écran
si toute touche sur le panneau avant est
pressée.
4
BACK
Retourner au menu précédent.
EXIT
Retourner à l’affichage télé.
!
Entrer
Déplacer
OPTION
Langage menu(Language)
: Français
Langage audio : Anglais
Indentité source
SIMPLINK : Marche
Touches verrouillées: Marche
Guide simple
Sous-titres : Arrêt
Identité TV : 1
EE
Entrer
Déplacer
OPTION
Langage menu(Language)
: Français
Langage audio : Anglais
Indentité source
SIMPLINK : Marche
Touches verrouillées: Arrêt
Guide simple
Sous-titres : Arrêt
Identité TV : 1
EE
Arrêt
Marche
VISIONNEMENT DE LA TÉLÉVISION / COMMANDE DES CHAÎNES

56
VISIONNEMENT DE LA TÉLÉVISION / COMMANDE DES CHAÎNES
SIMPLINK vous permet de commander et lire d’autres périphériques audio/vidéo par un câble HDMI, et sans
câbles ni réglages supplémentaires. Ce téléviseur pourrait ne pas fonctionner avec les périphériques avec
prise en charge HDMI-CEC, mais seuls les périphériques avec le logo sont totalement pris en
charge. SIMPLINK peut être activé ou désactivé par les menus utilisateurs.
Entrer
Déplacer
OPTION
Sélectionnez
OOPPTTIIOONN
.
Sélectionnez
SSIIMMPPLLIINNKK
.
Sélectionnez
MMaarrcchhee
ou
AArrrrêêtt
.
Entrer
Déplacer
OPTION
E
1
MENU
3
2
ENTER
ENTER
Langage menu(Language)
: Français
Langage audio : Anglais
Indentité source
SIMPLINK : Marche
Touches verrouillées: Arrêt
Guide simple
Sous-titres : Arrêt
Identité TV : 1
Langage menu(Language)
: Français
Langage audio : Anglais
Indentité source
SIMPLINK : Marche
Touches verrouillées: Arrêt
Guide simple
Sous-titres : Arrêt
Identité TV : 1
Arrêt
Marche
REMARQUE
!
GG
Branchez la borne HDMI/DVI IN ou HDMI IN du téléviseur sur la borne arrière (sortie HDMI) de l'appareil
SIMPLINK à l'aide du câble HDMI.
GG
Lorsque vous changez de source d'entrée avec la touche INPUT de la télécommande, l’appareil SIM-
PLINK cessera de fonctionner.
GG
Lorsque vous sélectionnez un appareil cinéma maison, la sortie sonore est automatiquement relayée aux
haut-parleurs dudit système cinéma maison.
GG
Si un cinéma maison SIMPLINK ne lit pas le signal audio du téléviseur auquel il est raccordé, branchez la sor-
tie audio numérique (DIGITAL AUDIO OUT), située à l’arrière de l’appareil, à l'entrée audio numérique
(DIGITAL AUDIO IN) de l’appareil SIMPLINK au moyen d’un câble optique.
E
4
BACK
Retourner au menu précédent.
EXIT
Retourner à l’affichage télé.
VISIONNEMENT DE LA TÉLÉVISION / COMMANDE DES CHAÎNES

VISIONNEMENT DE LA TÉLÉVISION / COMMANDE DES CHAÎNES
57
■
LLeeccttuurree ddiirreeccttee::
après avoir connecté les appareils audiovisuels au téléviseur, vous pouvez commander directe-
ment les appareils et la lecture de médias sans définir de paramètres supplémentaires.
■
SSéélleeccttiioonn ddee ll''aappppaarreeiill aauuddiioovviissuueell::
vous permet de sélectionner l'un des appareils audiovisuels connecté au téléviseur.
■
LLeeccttuurree ddee ddiissqquuee::
pour commander les appareils audiovisuels en appuyant sur les touches ,
ENTER,
G
,
A
,
ll ll
,
FF
et
GG
.
■
MMiissee hhoorrss tteennssiioonn ddee ttoouuss lleess aappppaarreeiillss::
lorsque vous éteignez le téléviseur, tous les appareils connectés
sont également éteints.
■
BBaassccuulleemmeenntt ddee llaa ssoorrttiiee aauuddiioo::
procure un moyen facile pour changer la sortie audio.
■
AAlliimmeennttaattiioonn ssyynncchhrroonniissééee::
Quand l'équipement avec la fonction Simplink est connecté à la prise HDMI
commence à jouer, le téléviseur affiche ce mode automatiquement.
(Un appareil connecté au téléviseur par un câble HDMI mais qui n'est pas pris en charge par SIMPLINK n'offre pas
cette fonction.)
Remarque: Pour le fonctionnement d’un lien simple, on peut utiliser le câble HDMI dans une version supérieure à
1.3 avec *CEC. (*CEC: Consumer Electronics Control).
Menu SIMPLINK
AAffffiicchhaaggee ttéélléé
: Passe à la chaîne de
télévision précédente peu importe le mode
courant.
LLeeccttuurree ddee ddiissqquuee
: Permet de sélection-
ner et de lire des disques. Lorsque de mul-
tiples disques sont disponibles, les titres de
disques s'affichent de façons pratique au
bas de l'écran.
LLeeccttuurree ddee mmaaggnnééttoossccooppee
: Permet de
commander le magnétoscope branché au
téléviseur.
LLeeccttuurree dd''eennrreeggiissttrreemmeennttss ssuurr ddiissqquuee
dduurr
: Permet de lire des fichiers sur le disque
dur.
SSoorrttiiee aauuddiioo vveerrss lleess hhaauutt--ppaarrlleeuurrss ddee
cciinnéémmaa mmaaiissoonn//ssoorrttiiee aauuddiioo vveerrss llee
ttéélléévviisseeuurr
: Sélectionnez les haut-parleurs
de cinéma maison ou du téléviseur pour la
sortie audio.
Fonctions SIMPLINK
1
2
3
4
5
GG
Lorsque aucun appareil n'est
connecté (s'affiche en gris)
GG
Appareil sélectionné
GG
Lorsqu'un appareil est connecté
(s'affiche en couleur vive)
Affichage du menu
SSIIMMPPLLIINNKK
.
Sélectionner l’appareil.
Permet de commander des appareils
audiovisuels branchés au téléviseur.
1
3
2
ENTER
ENTER
1
2
3
4
5

MODES D’ENTRÉE
USB
58
USB (Pour32LD350, 32LD320)
Mesures de sécurité concernant les périphériques USB
GG
Seuls les périphériques de stockage USB peuvent
être reconnus.
GG
Si le périphérique de stockage USB est branché
par l’entremise d’un concentrateur USB, le
périphérique ne peut être reconnu.
GG
Un périphérique de stockage USB utilisant un
programme de reconnaissance automatique peut
ne pas être reconnu.
GG
Un périphérique de stockage USB utilisant son
propre pilote peut ne pas être reconnu.
GG
La vitesse de reconnaissance d’un périphérique de
stockage USB varie selon le périphérique utilisé.
GG
Veuillez ne pas mettre en marche le téléviseur ou
débrancher le périphérique USB lorsque le
périphérique de stockage USB branché à l’ap-
pareil est en fonction. Lorsqu’un périphérique
similaire est retiré ou débranché, les fichiers
stockés ou le périphérique de stockage USB peu
vent être endommagés.
GG
N’utilisez que dispositifs USB n’ayant que fichiers
musique ou photo de format normal.
GG
Veuillez n’utiliser qu’un périphérique de stockage
USB ayant été formaté à l’aide du système de fichi-
er FAT 32 ou NTFS fourni avec le système d’ex-
ploitation Windows. Tout périphérique de stockage
formaté en tant que programme utilitaire non pris
en charge par Windows ne pourra être reconnu.
GG
Veuillez alimenter tout dispositif USB (plus de
0,5A) nécessitant une source de puissance
externe. Sinon, le dispositif risque ne pas être
reconnu.
GG
Veuillez brancher un périphérique de stockage
USB à l’aide d’un câble certifié. Si le périphérique
est branché à l’aide d’un câble non certifié ou
excessivement long, il peut ne pas être reconnu.
GG
Certains périphériques de stockage USB ne sont
pas pris en charge ou fonctionnent inadéquatement
GG
Veuillez effectuer une copie de sauvegarde des
fichiers importants puisque certaines données
présentes sur les périphériques USB peuvent être
corrompues. La responsabilité de la gestion des
données revient à l’utilisateur et, en conséquence,
le fabricant ne couvrira pas les dommages causés
aux données.
GG
Si votre dispositif USB possède multiple partitions,
ou si vous utilisez un lecteur USB multicartes, vous
pouvez utiliser jusqu’à 4 partitions ou dispositifs
USB.
GG
Pour les dispositifs d’emmagasinage USB mis en
forme NTFS, la suppression n’est pas permise.
GG
La méthode d’alignement des fichiers d’un
périphérique de stockage USB ressemble à celle
de Windows XP. Ainsi, le périphérique reconnaît
une centaine de caractères qui peuvent être util-
isés dans le nom du fichier.
GG
La capacité recommandée est de 1 térabit ou moin-
dre pour un disque dur USB externe et de 32 giga-
bit ou moindre pour une clé-mémoire USB.
GG
Au cas où le disque dur USB externe à fonction «
écologique » ne fonctionne pas, le mettre hors cir-
cuit puis de nouveau en marche afin de le faire
fonctionner. Veuillez vous référer au manuel du
périphérique disque dur externe USB.
Au moment de retirer un périphérique USB
Branchez le périphérique USB dans les prises
UUSSBB IINN
situées sur le côté du téléviseur.
3
Sélectionnez
LLIISSTTEE PPHHOOTTOO
ou
LLIISSTTEE
MMUUSSIIQQUUEE
.
1
IN 2
USB IN
Memory Key
LISTE PHOTO
LISTE MUSIQUE
Sélectionnez
DDiissppoossiittiiff UUSSBB
.
Sélectionnez
ÉÉjjeeccttiioonn
.
Sélectionnez le menu
DDiissppoossiittiiff UUSSBB
avant de
retirer le périphérique USB.
2
ENTER
1
Q.MENU
2
ENTER
■
Ce téléviseur prend en charge les formats JPG et
MP3.
Lorsque vous branchez un dispositif USB, ce menu contextuel apparait automatiquement.
Lorsque le menu contextuel n’apparait pas, vous pouvez sélectionner Liste Photo ou Liste Musique dans le
menu USB.
En mode Périphérique USB, vous ne pouvez ajouter de nouveau dossier ou supprimer un dossier existant.

LISTE PHOTO
USB
59
Vous pouvez visualiser des fichiers JPG qui se trouvent sur un périphérique USB.
L’écran Affichage à l’écran (On Screen Display) de votre modèle de téléviseur peut être légèrement différent.
Composant de l’écran
Retourne au dossier en amont
Aperçu: affiche un aperçu et le
nom du répertoire de la photo
dans le répertoire sélectionné.
Page en cours/Pages totales
Nombre total de photos minia-
tures sélectionnées
Boutons correspondants de la
télécommande
Format de fichiers photo pris en charge : *.JPG
■
Vous pouvez uniquement lire des fichiers JPG.
■
Seul le balayage en mode « baseline » est pris en charge sur JPG.
■
Taille JPEG disponible (largeur x hauteur, pixels): 64 x 64 - 15360 x 8640
Sélectionnez
UUSSBB
.
Sélectionnez
LLiissttee pphhoottoo
.
2
1
MENU
ENTER
ENTER
1
2
3
4
5
Navigation Menu contextuel Page suivante Sélectionner Sortie
CH
MARK
5
Page 2/3
Non marqué
Liste photo
Dossier en amont
1366
x
768, 125KB
KY101 06/10/2008
KY102
04/03/2008
JMJ001
01/01/2000
JMJ002
06/15/2008
JMJ003 04/03/2008
JMJ004
02/18/2008
KY103
03/30/2008
KY104 06/19/2008
KY105
01/31/2008
JMJ005
05/13/2008
JMJ006
05/26/2008
JMJ007 02/18/2008
JMJ008
02/18/2008
Dossier en amont
Lecteur1
JMJ001
3 4
2
1

USB
60
USB
Sélection de photo et menu contextuel
Sélectionner le répertoire ou le lecteur cible.
Sélectionner les photos.
2
Afficher le menu contextuel.
3
1
■
Utilisez les touches
CCHH
pour faire défiler
la page de photos.
■
Utilisez le bouton
MMAARRKK
pour sélectionner ou
désélectionner une photo. Lorsqu’une ou
plusieurs photos sont sélectionnées, vous pouvez
afficher les photos individuellement ou un dia-
porama des photos sélectionnées. Si aucune
photo n’est sélectionnée, vous pouvez afficher
toutes les photos individuellement ou un diapo-
rama de toutes les photos du dossier.
4
Sélectionner le menu contextuel.
ENTER
ENTER
ENTER
Lorsque vous sélectionnez un fichier (et non un
répertoire), ce menu contextuel apparaît à l’écran.
GG
VViissiioonnnneerr
: Affiche l’élément sélectionné.
GG
SSéélleecctt..ttoouuss
: Sélectionne toutes les photos à
l’écran.
GG
DDéésséélleecctt..TToouuss
: Désélectionner les photos
sélectionnées.
GG
SSuupppprriimmeerr
: Supprime la photo sélectionnée.
GG
FFeerrmmeerr
: Ferme le menu contextuel.
Page 2/3
Non marqué
Liste photo
Dossier en amont
1366
x
768, 125KB
KY101 06/10/2008
KY102 04/03/2008
JMJ001 01/01/2000
JMJ002 06/15/2008
JMJ003 04/03/2008
JMJ004
02/18/2008
KY103
03/30/2008
KY104 06/19/2008
KY105 01/31/2008
JMJ005 05/13/2008
JMJ006 05/26/2008
JMJ007 02/18/2008
JMJ008 02/18/2008
Dossier en amont
Page 2/3
Non marqué
Liste photo
Dossier en amont
1366
x
768, 125KB
KY101
06/10/2008
KY102
04/03/2008
JMJ001
01/01/2000
JMJ002
06/15/2008
JMJ003
04/03/2008
JMJ004
02/18/2008
KY103
03/30/2008
KY104
06/19/2008
KY105
01/31/2008
JMJ005
05/13/2008
JMJ006
05/26/2008
JMJ007
02/18/2008
JMJ008
02/18/2008
Dossier en amont
Lecteur1
Lecteur1
JMJ001
JMJ001
1366x768, 125KB
Visionner
Sélect.tous
Supprimer
Fermer
Navigation Page suivante Sélectionner Sortie
CH
MARK
Menu contextuel
Navigation Page suivante Sélectionner Sortie
CH
MARK
Menu contextuel

USB
61
Menu Plein écran
Vous pouvez modifier l'affichage de la liste de photos pour qu’elle occupe tout l’écran du téléviseur.
D’autres options sont offertes en mode plein écran.
■
Utilisez les touches
CCHH
pour faire défiler
la page de photos.
Sélectionner le répertoire ou le lecteur cible.
Sélectionner les photos.
Afficher le menu contextuel.
5
Sélectionnez
VViissiioonnnneerr
.
La photo sélectionnée s’affiche en
mode plein écran.
2
3
1
4
ENTER
ENTER
ENTER
L’allongement d’une photo peut changer la taille de
la photo affichée sur l’écran dans normal.
Page 2/3
Non marqué
Liste photo
Dossier en amont
1366
x
768, 125KB
KY101
06/10/2008
KY102
04/03/2008
JMJ001
01/01/2000
JMJ002
06/15/2008
JMJ003
04/03/2008
JMJ004
02/18/2008
KY103
03/30/2008
KY104
06/19/2008
KY105
01/31/2008
JMJ005
05/13/2008
JMJ006
05/26/2008
JMJ007
02/18/2008
JMJ008
02/18/2008
Dossier en amont
Drive1
JMJ001
1366x768
125KB
Visionner
Sélect.tous
Supprimer
Fermer
Page 2/3
Non marqué
Liste photo
Dossier en amont
1366
x
768, 125KB
KY101 06/10/2008
KY102 04/03/2008
JMJ001 01/01/2000
JMJ002 06/15/2008
JMJ003 04/03/2008
JMJ004
02/18/2008
KY103 03/30/2008
KY104 06/19/2008
KY105 01/31/2008
JMJ005 05/13/2008
JMJ006 05/26/2008
JMJ007 02/18/2008
JMJ008 02/18/2008
Dossier en amont
Lecteur1
JMJ001
Navigation Page suivante Sélectionner Sortie
CH
MARK
Menu contextuel
Navigation Page suivante Sélectionner Sortie
CH
MARK
Menu contextuel
1/17
Diaporama
MDF
Supprimer
Option Masquer

USB
62
USB
Sélectionnez
DDiiaappoorraammaa
,
MMDDFF
,
((RRoottaattiioonn))
,
SSuupppprriimmeerr
,
OOppttiioonn
ou
MMaassqquueerr..
■
Utilisez les boutons pour sélectionner la
photo précédente ou suivante.
■
Utilisez les boutons pour sélection-
ner et contrôler le menu en mode plein écran.
ENTER
6
REMARQUE
!
GG
Ce téléviseur ne peut pas lire la plu-
part des images en format JPEG
sauvegardées en mode progressif.
GG
DDiiaappoorraammaa
: Les photos sélectionnées sont affichées
dans le diaporama. Si aucune image n’est sélectionnée,
toutes les photos du répertoire sélectionné s’affichent
dans le diaporama.
■
Réglez l’intervalle du diaporama à partir du menu
OOppttiioonn
.
GG
MMDDFF
: Écoutez de la musique alors que vous visionnez
les photos en mode plein écran.
■
Réglez le dispositif de musique d’arrière-plan et l’album
à partir du menu
OOppttiioonn
.
GG
((RRoottaattiioonn))
: Fait pivoter les photos.
■
Permet de faire pivoter la photo de 90°, 18 0 °, 270°,
360° dans le sens des aiguilles d’une montre.
■
La photo ne peut être pivotée si sa largeur est plus
grande que la résolution en hauteur disponible
soutenue.
GG
SSuupppprriimmeerr
: Supprimez les photos.
GG
OOppttiioonn
: Définissez les paramètres du
VViitteessssee ddiiaappooss
et
DDoossssiieerr mmuussiiqquuee
.
■
Utilisez le bouton et appuyez sur
EENNTTEERR
pour définir les paramètres. Allez ensuite à et
appuyez sur
EENNTTEERR
pour enregistrer les paramètres.
■
Vous ne pouvez modifier le
DDoossssiieerr mmuussiiqquuee
lorsque BGM (MDF) est en fonction.
GG
MMaassqquueerr
: Masque le menu en mode plein écran.
■
Pour afficher le menu de nouveau en mode plein
écran, appuyez sur le bouton
EENNTTEERR
.
1/17
Diaporama
MDF
Supprimer
Option Masquer
Appuyez
FF GG
pour régler l’intervalle
de temps entre les diapos.
Vitesse diapos
Rapide
Annuler
...
Dossier musique
Entrer
Entrer

LISTE MUSIQUE
USB
63
Vous pouvez utiliser le menu « Liste de pistes (Music List) » pour lire des fichiers MP3 qui se trouvent sur un
périphérique USB.
Ce téléviseur ne peut lire les fichiers protégés contre la copie.
L’écran Affichage à l’écran (On Screen Display) de votre modèle de téléviseur peut être légèrement différent.
Composant de l’écran
Format de fichiers de musique pris en charge :
*
.MP3
Débit binaire 32Kbps ~ 320Kbps
• Fréquence d’échantillonnage (Fréquence d’échantillonnage)
MPEG1 3
e
couche: 32 kHz, 44.1 kHz, 48 kHz
MPEG2 3
e
couche: 16 kHz, 22.05 kHz, 24 kHz
MPEG2.5 3
e
couche: 8 kHz, 11.025 kHz, 12 kHz
Retourne au dossier en amont
Aperçu: affiche, le cas
échéant, un aperçu de la
pochette de disque.
Page en cours/Pages totales
Nombre total de misuque
miniatures sélectionnées
Boutons correspondants de la
télécommande
1
3
4
5
2
Sélectionnez
UUSSBB
.
Sélectionnez
LLiissttee mmuussiiqquuee
.
1
2
MENU
ENTER
ENTER
Liste musique
Dossier en amont
Titre Durée
3 4
2
1
Page 2/3
Non marqué
Drive1
AA
00:00 / 04:16
Dossier en amont
Navigation Menu contextuel Page suivante Sélectionner Sortie
CH
MARK
5
M1
M2
M4
M5
M3
M3

Navigation Page suivante
Sélectionner
Sortie
CH
MARK
Menu contextuel
Navigation Page suivante
Sélectionner
Sortie
CH
MARK
Menu contextuel
Page 2/3
Non marqué
Liste musique
Dossier en amont
AA
00:00 / 04:16
Dossier en amont
Lecteur
Titre
Durée
Page 2/3
Non marqué
Liste musique
Dossier en amont
AA
00:00 / 04:16
Dossier en amont
Lecteur
Titre
Durée
3945 KB
128 Kbps
Lire
Lire avec photo
Sélect.tous
Supprimer
Fermer
USB
64
USB
Sélection de music et menu contextuel
■
Utilisez le bouton
CCHH
pour vous déplacer
dans la page des titres musicaux.
■
Utilisez le bouton
MMAARRKK
pour sélectionner ou
désélectionner une piste. Si aucune piste n’est
sélectionnée, tous les fichiers se trouvant dans
le dossier seront joués consécutivement.
Lorsqu’une ou plusieurs pistes sont sélection-
nées, celles-ci sont lues de façon consécutive.
Par exemple, si vous souhaitez écouter une
seule piste à plusieurs reprises, sélectionnez sim-
plement la piste en question et faites-en la lec-
ture.
Sélectionner le répertoire ou le lecteur cible.
Sélectionner les pièces musicales
désirées.
Afficher le menu contextuel.
Sélectionner le menu contextuel.
2
3
1
4
ENTER
ENTER
ENTER
5
EXIT
Retourner à l’affichage télé.
GG
LLiirree
(pendant l’arrêt): Lit les pistes sélection-
nées.
Lorsque la lecture d’une piste se termine, la
prochaine piste sélectionnée sera jouée. Si
aucune piste n’est sélectionnée, la piste suiv-
ante du dossier en cours sera jouée. Si vous
accédez à un autre dossier et appuyez sur le
bouton
EENNTTEERR
, la lecture de la piste en cours
sera interrompue.
GG
LLiirree sséélleecctt..
: Lire les pistes sélectionnées. Une
fois la lecture d’une piste terminée, la piste
suivante joue automatiquement.
GG
AArrrrêêtteerr llaa lleeccttuurree
(pendant le playback):
Arrêter le musics de jeu.
GG
LLiirree aavveecc pphhoottoo
: Démarre la lecture des
pistes sélectionnées, puis se déplace vers la
liste de photos.
GG
SSéélleecctt..ttoouuss
: Sélectionne toutes les pistes du
dossier.
GG
DDéésséélleecctt..ttoouuss
: Désélectionner les photos
sélectionnées.
GG
SSuupppprriimmeerr
: Supprime les pistes sélection-
nées.
GG
FFeerrmmeerr
: Ferme le menu contextuel.
M1
M2
M3
M3
M4
M5
M1
M2
M3
M3
M4
M5

USB
65
■
Si vous n’appuyez sur aucune touche, la boîte d’information
de lecture (illustrée ci-dessous) se déplacera automatique-
ment dans l’écran pour éviter qu’une image fixe demeure
trop longtemps à l’écran.
REMARQUE
!
GG
Lors de la lecture d'une piste, apparaît devant le temps de lecture.
GG
Une piste endommagée ou corrompue ne jouera pas et le temps de lecture 00:00 s’affichera à l’écran.
GG
Les fichiers protégés contre la copie ne joueront pas.
GG
Appuyez sur
EENNTTEERR
,
AA
,
BBAACCKK
, ou
EEXXIITT
pour arrêter l’économiseur d’écran.

COMMANDE DE L’IMAGE
66
COMMANDE DE LA TAILLE DE L’IMAGE (ALLONGEMENT)
COMMANDE DE L’IMAGE
Cette fonctionnalité vous permet de choisir comment vous souhaitez qu’une image analogique 4:3 apparaisse
à l’écran.
Vous pouvez choisir un allongement différent selon la source (analogique, numérique ou auxiliaire).
■
L’on peut aussi
AAlllloonnggeemmeenntt
le menu
QQ ..MMEENNUU
.
■
Appuyez la touche
RRAATTIIOO
de façon
répétitive pour sélectionner le format
d’image désiré.
Entrer
Déplacer
IMAGE
E
Entrer
Déplacer
IMAGE
E
Allongement : 16:9
Assistant image
Économie d’énergie:
Arrêt
Mode image : Standard
•
Rétroéclairage
70
• Contraste 90
• Brillance 50
• Netteté 70
Allongement : 16:9
Assistant image
Économie d’énergie:
Arrêt
Mode image : Standard
•
Rétroéclairage
70
• Contraste 90
• Brillance 50
• Netteté 70
16:9
Sur mesure
Selon source
4:3
Zoom
Zoom cinéma 1
Sélectionnez
IIMMAAGGEE
.
Sélectionnez
AAlllloonnggeemmeenntt
.
Sélectionner le format d'image désirée.
1
MENU
3
2
ENTER
ENTER
4
BACK
Retourner au menu précédent.
EXIT
Retourner à l’affichage télé.

COMMANDE DE L’IMAGE
67
16:9
Choisir ce format pour régler une image horizon-
talement en proportion linéaire pour remplir
l’écran.
Sur mesure
Habituellement, le recadrage des images est de 1 %
à 2 %. La fonctionnalité Just Scan permet d'ar-
rêter ce recadrage et d'afficher les images dans
leur intégralité.
Remarque: Si des interférences sont présentent
sur les bordures de l’image d’origine, elles seront
visibles lorsque la fonctionnalité Just Scan est
activée.
Cette fonctionnalité est disponible uniquement en
mode DTV/CADTV/Composante/HDMI-DTV/DVI-
DTV (720p/1080i/1080p).
Selon source
Sélectionner la proportion appropriée pour cor-
respondre à la source d’image.
4:3
Choisir ce format pour visionner une image avec
le rapport d’origine.
Zoom
Choisir pour visionner une image sans altération.
Toutefois les portions du haut et du bas sont
coupées.
■
Lorsque vous effectuez les réglages au menu
Q.MENU,
a. Touche ou : Règle les proportions du
zoom.
b. Touche ou : Déplace l’image à l’écran.
Zoom cinéma
Choisir pour agrandir l’image en proportion cor-
recte. Ceci élargit l’image en allongement ciné-
mascope (2,35:1) sans distorsion.
Remarque: en agrandissant ou rapetissant une
image, elle peut devenir déformée.
■
Touche ou : Règle les proportions du
zoom cinéma. La portée de réglage est de 1-16.
■
Touche ou : Déplace l’image à l’écran.
(4:3 4:3)
(16:9 16:9)
Sur mesure
Selon source
Selon source

COMMANDE DE L’IMAGE
68
ASSISTANT IMAGE
COMMANDE DE L’IMAGE
Sélectionnez
IIMMAAGGEE
.
Sélectionnez
AAssssiissttaanntt iimmaaggee
.
1
MENU
2
ENTER
ENTER
Procédez avec l’
AAssssiissttaanntt iimmaaggee
.
Réglez le
NNiivveeaauu dduu bbllaanncc
.
3
ENTER
Réglez le
NNiivveeaauu nnooiirr
.
4
ENTER
5
ENTER
Réglez la
NNeetttteettéé hhoorrii--
zzoonnttaallee
.
8
ENTER
Réglez le
CCoouulleeuurr
.
6
ENTER
Réglez le
TTeeiinnttee
.
7
ENTER
Niveau noir
Ajustez l’écran ci-dessus de sorte qu’il soit identique à
l’exemple ci-dessous.
SuivantPréc.
• Brillance 50
EE
EE
Faible ÉlevéRecommandé
Teinte
Ajustez l’écran ci-dessus de sorte qu’il soit identique à
l’exemple ci-dessous.
SuivantPréc.
Faible ÉlevéRecommandé
• Teinte 0
EE
EE
RG
Netteté horizontale
Ajustez l’écran ci-dessus de sorte qu’il soit identique à
l’exemple ci-dessous.
SuivantPréc.
• Netteté h 50
EE
EE
Faible ÉlevéRecommandé
Entrer
Déplacer
IMAGE
E
Allongement : 16:9
Assistant image
Économie d’énergie:
Arrêt
Mode image : Standard
•
Rétroéclairage
70
• Contraste 90
• Brillance 50
• Netteté 70
Cette fonction vous permet d’optimiser la qualité de
l’image apparaissant à l’écran.
Utilisez l’
AAssssiissttaanntt IImmaaggee
afin de raffiner et calibr-
er la qualité d’image à l’écran en réglant le niveau
noir, blanc, etc. Vous pouvez exécuter cette calibra-
tion en suivant les quelques simples étapes figurant
à l’écran.
Des exemples de
FFaaiibbllee
,
RReeccoommmmaannddéé
ou
ÉÉlleevvéé
vous guideront afin de faciliter la tâche en cours.
Assistant image
L'assistant image vous permet d'ajuster la qualité de l'image
originale.
G
SuivantPréc.
Niveau du blanc
Ajustez l’écran ci-dessus de sorte qu’il soit identique à
l’exemple ci-dessous.
SuivantPréc.
Faible ÉlevéRecommandé
• Contraste 90
EE
EE
Couleur
Ajustez l’écran ci-dessus de sorte qu’il soit identique à
l’exemple ci-dessous.
SuivantPréc.
• Couleur 50
EE
EE
Faible ÉlevéRecommandé

COMMANDE DE L’IMAGE
69
Choisissez la ou les source(s)
d’entrée où y appliquer les
réglages.
14
FAV
MARK
Réglez la
NNeetttteettéé
VVeerrttiiccaallee
.
9
ENTER
Réglez la
RRééttrrooééccllaaiirraaggee
.
13
ENTER
Arrêtez la fonction Assistant image.
16
ENTER
Sauvegarde.
15
ENTER
Netteté verticale
Ajustez l’écran ci-dessus de sorte qu’il soit identique à
l’exemple ci-dessous.
SuivantPréc.
• Netteté v 50
EE
EE
Faible ÉlevéRecommandé
■
Si vous interrompez l’installation avant
l'étape finale, les changements ne seront
pas appliqués à la télévision.
■
Dès que l’
AAssssiissttaanntt iimmaaggee
règle la
qualité d’image, le réglage
ÉÉccoonnoommiiee
dd’’éénneerrggiiee
se met à
AArrrrêêtt
par lui-même.
Term iné
RépéterDéplacerPréc.
DTV
TV
Vidéo1
Vidéo2
Composante
RGB-PC
HDMI1
HDMI2
Choisissez une ou plusieurs entrées auxquelles appliquer les
réglages.
Avertissement: La qualité de l’image peut varier selon les
différents types de signaux et d’entrées.
E
E
Sélectionner
MARK
Fermer
Les configurations actuelles sont
sauvegardées sur Expert1.
i
• Contraste dynamique Arrêt
Réglez la
TTeemmppéérraattuurree
ccoouulleeuurr
.
10
ENTER
Température couleur
Régler la température de couleur désirée. Veuillez vous référer
aux échantillons ici-bas.
SuivantPréc.
• Température couleur Chaud
EE
EE
Chaud FroidMoyen
Réglez la
CCoonnttrraassttee
ddyynnaammiiqquuee
.
11
ENTER
Contraste dynamique
Réglez le contraste dynamique désiré. Veuillez vous référer aux
échantillons ici-bas.
SuivantPréc.
EE
EE
Arrêt ÉlevéMoyen
Réglez la
GGaaiinn ddee
ccoouulleeuurr
.
12
ENTER
Gain de couleur
Réglez la saturation de couleur désirée. Veuillez vous référer
aux échantillons ici-bas.
SuivantPréc.
• Gain de couleur Original
EE
EE
Original ÉlevéMoyen
Rétroéclairage
Ajustez le rétroéclairage selon vos préférences.
SuivantPréc.
•
Rétroéclairage
50
EE
EE
Sombre ClairRecommandé

COMMANDE DE L’IMAGE
70
CONFIGURATION PRÉRÉGLÉE DES IMAGES (MODE IMAGE)
COMMANDE DE L’IMAGE
Vous pouvez choisir des réglages d’image effectués en usine dans les menus utilisateur. Vous pouvez choir un
réglage effectué en usine, le modifier manuellement.
Entrer
Déplacer
IMAGE
E
Entrer
Déplacer
IMAGE
E
Allongement : 16:9
Assistant image
Économie d’énergie:
Arrêt
Mode image : Standard
•
Rétroéclairage
70
• Contraste 90
• Brillance 50
• Netteté 70
Allongement : 16:9
Assistant image
Économie d’énergie:
Arrêt
Mode image : Standard
•
Rétroéclairage
70
• Contraste 90
• Brillance 50
• Netteté 70
Sélectionnez
IIMMAAGGEE
.
Sélectionnez
MMooddee iimmaaggee
.
Sélectionnez
CCllaaiirr
,
SSttaannddaarrdd
,
NNaattuurreell
,
FFiillmm
,
SSppoorrtt
ou
JJeeuu
.
1
MENU
3
2
ENTER
ENTER
4
BACK
Retourner au menu précédent.
EXIT
Retourner à l’affichage télé.
Clair
Standard
Naturel
Film
Sport
Jeu
Expert1
Expert2
■
CCllaaiirr
,
SSttaannddaarrdd
,
NNaattuurreell
,
FFiillmm
,
SSppoorrtt
et
JJeeuu
sont prédéterminés en usine pour
une obtenir qualité d’image optimale.
■
CCllaaiirr
: ce mode maximise l'effet de la
vidéo dans le magasin de détail. Renforce
le contraste, l'éclat, la couleur et l'acuité
pour une image vive.
■
SSttaannddaarrdd
: ce mode garantit un vision-
nement optimal pour une utilisation
standard.
■
NNaattuurreell
: ce mode affiche un écran plus
naturel.
■
FFiillmm
: ce mode optimise la vidéo pour
des films.
■
SSppoorrtt
: c'est le mode vidéo qui optimise
la vidéo dynamique et la couleur primaire
(ex, blanc, uniforme, herbe, bleu ciel,
etc.) en réalisant un écran optimal pour
les sports.
■
JJeeuu
: ce mode permet une vitesse de
réponse rapide, dans un écran rapide de
jeu.
■
EExxppeerrtt
: c'est le mode pour ajuster la
vidéo en détail pour l'expert vidéo et l'u-
tilisateur général.
■
L’on peut aussi
MMooddee iimmaaggee
le menu
QQ.. MMEENNUU
.

COMMANDE DE L’IMAGE
71
RÉGLAGE MANUEL DE L’IMAGE - MODE PERSONNEL
Règle l’apparence de l’image selon ses préférences et situations de visionnement.
Sélectionnez
IIMMAAGGEE
.
Effectuez les réglages appropriés.
Sélectionnez
RRééttrrooééccllaaiirraaggee
,
CCoonnttrraassttee
,
BBrriillllaannccee
,
NNeetttteettéé
,
CCoouulleeuurr
ou
TTeeiinnttee
.
1
MENU
Sélectionnez
MMooddee iimmaaggee
.
2
ENTER
Sélectionnez
CCllaaiirr
,
SSttaannddaarrdd
,
NNaattuurreell
,
FFiillmm
,
SSppoorrtt
ou
JJeeuu
.
3
ENTER
4
ENTER
5
ENTER
6
BACK
Retourner au menu précédent.
EXIT
Retourner à l’affichage télé.
Entrer
Déplacer
IMAGE
E
Allongement : 16:9
Assistant image
Économie d’énergie:
Arrêt
Mode image : Standard
•
Rétroéclairage
70
• Contraste 90
• Brillance 50
• Netteté 70
•
Rétroéclairage
70
EE
EE
EE
EE
Entrer
■
En mode
ÉÉccoonnoommiiee dd’’éénneerrggiiee
, le
réglage
RRééttrrooééccllaaiirraaggee
est désactivé.
■
RRééttrrooééccllaaiirraaggee
: ce réglage détermine
l’intensité lumineuse fournie au panneau
ACL. En décroissant ce réglage la bril-
lance du noir devient plus sombre sans
aucune perte au signal vidéo et voit la
consommation énergétique du panneau
réduite.
■
CCoonnttrraassttee
: accroit ou décroît le
dégradé du signal vidéo. Régler lorsque
les portions vives de l’image sont sat-
urées.
■
BBrriillllaannccee
: règle le niveau de base du
signal vidéo dans l’image. Régler lorsque
les portions sombres de l’image sont sat-
urées.
■
NNeetttteettéé
: règle la définition du détail
des bordures entre les portions sombres
et pâles de l’image. Plus le niveau est bas,
plus l’image est douce et plus il est élevé
plus l’image est rauque.
■
CCoouulleeuurr
: ajuste l'intensité de toutes les
couleurs.
■
TTeeiinnttee
: ajuste l'équilibre entre les
niveaux rouges et verts.

COMMANDE DE L’IMAGE
72
TECHNOLOGIE D’AMÉLIORATION DE L’IMAGE
COMMANDE DE L’IMAGE
Sélectionnez
IIMMAAGGEE
.
Sélectionnez
CCoonnttrrôôllee aavvaannccéé
.
Sélectionnez les options désirées.
1
MENU
3
2
ENTER
ENTER
5
BACK
Retourner au menu précédent.
EXIT
Retourner à l’affichage télé.
Effectuez les réglages appropriés.
4
Entrer
Déplacer
IMAGE
E
RG
• Contraste 50
• Brillance 50
• Netteté 50
• Couleur 50
• Teinte 0
• Contrôle avancé
• Réinitialisation
Écran (RGB-PC)
Entrer
Déplacer
IMAGE
E
RG
• Contraste 50
• Brillance 50
• Netteté 50
• Couleur 50
• Teinte 0
• Contrôle avancé
• Réinitialisation
Écran (RGB-PC)
Température couleur
FF
Moyen
GG
Contraste dynamique
Arrêt
Couleur dynamique
Arrêt
Réduction bruit vidéo
Arrêt
Gamma
Moyen
Niveau noir
Faible
Soin optique
Arrêt
Cinéma réalité
Arrêt
Fermer
E
Vous pouvez calibrer l'écran pour chaque mode d'image ou placer la valeur vidéo selon l'écran vidéo spécial.
Vous pouvez régler la valeur vidéo différemment pour chaque entrée.
Pour réinitialiser au réglage d'usine après avoir effectué des réglages pour chaque source d'entrée, exécutez
RRééiinniittiiaalliissaattiioonn
pour chaque
MMooddee iimmaaggee
.

COMMANDE DE L’IMAGE
73
COMMANDE EXPERTE D'IMAGE
Sélectionnez
IIMMAAGGEE
.
Sélectionnez
MMooddee iimmaaggee
.
Sélectionnez
CCoonnttrrôôllee eexxppeerrtt
.
Sélectionnez
EExxppeerrtt11
ou
EExxppeerrtt22
.
1
MENU
3
2
ENTER
ENTER
4
ENTER
Effectuez les réglages appropriés.
6
En segmentant les catégories,
EExxppeerrtt11
et
EExxppeerrtt22
procurent beaucoup plus de fins réglages aptes à être
ajustés par les usagers à leur guise afin d’optimiser au maximum la performance visuelle du téléviseur.
Ces réglages, entre les mains d’un professionnel, vous assurera l’ultime optimisation de performance visuelle
d’image pour le contexte ambiant où le téléviseur est installé.
7
BACK
Retourner au menu précédent.
EXIT
Retourner à l’affichage télé.
Entrer
Déplacer
IMAGE
E
RG
• Brillance 50
• Netteté h 50
• Netteté V 50
• Couleur 50
• Teinte 0
• Contrôle expert
• Réinitialisation
Écran (RGB-PC)
Contraste dynamique
FF
Moyen
GG
Réduction bruit vidéo
Arrêt
Gamma
Moyen
Niveau noir
Faible
Cinéma réalité
Arrêt
Norme de couleurs
SD
Gamme de couleurs
Standard
Amélioration des contours
Élevé
xvYCC
Auto
Fermer
E
Sélectionnez l’option de menu désirée.
5
ENTER
Entrer
Déplacer
IMAGE
E
Allongement : 16:9
Assistant image
Économie d’énergie:
Arrêt
Mode image : Expert1
•
Rétroéclairage
80
• Contraste 90
• Brillance 50
• Netteté h 50
Clair
Standard
Naturel
Film
Sport
Jeu
Expert1
Expert2

COMMANDE DE L’IMAGE
74
COMMANDE DE L’IMAGE
■
Régler à chaud afin d'intensifier les couleurs chaudes tel le rouge ou, régler à froid
afin d'obtenir une image plus bleuâtre.
■
Règle le contraste afin de le garder au meilleur niveau selon la brillance de l'écran.
L'image se voit améliorée en rendant les portions claires plus vives et les portions
foncées plus sombres.
■
Règle les couleurs à l'écran afin de les rendre plus vives, riches et claires. Cet attrib-
ut améliore la tonalite, saturation et luminance pour que le rouge, bleu, vert et blanc
resplendissent de plus de vivacité.
■
Réduit le bruit vidéo à l'écran sans compromettre la qualité du traitement vidéo.
Faible: rend les endroits de niveau gris moyen et foncé de l'image plus brillants.
Moyen: respecte les niveaux originaux de l'image.
Élevé: rend les endroits de niveau gris moyen et foncé de l'image plus sombres.
■
Vous pouvez régler la brillance des endroits à niveau gris moyen et foncé de l'image.
Faible: le reflet de l'écran s'assombrit.
Élevé: le reflet de l'écran s'éclaircit.
Auto: se règle automatiquement en fonction de ce qui apparait à l'écran.
■
Règle le niveau noir de l'écran au niveau approprié.
■
Cet attribut permet de sélectionner "Faible" ou "Élevé" dans les modes suivant: AV
(NTSC), HDMI ou composante. Autrement, il se limite à "Auto".
*Cet attribut n'est pas disponible pour tous les modèles.
■
Règle la brillance de l'écran afin de prévenir celle-ci de s'avérer trop brillante. Réduit
l'intensité lumineuse d'images extrêmement brillantes.
■
Cette fonction est désactivée en “
MMooddee iimmaaggee--CCllaaiirr
,
FFiillmm
”.
■
Rend les clips vidéo enregistrés en mode "film" beaucoup plus naturel en éliminant
les effets de trépidation.
Contraste dynamique
Couleur dynamique
Réduction bruit vidéo
Gamma
Niveau noir
Soin optique
Cinéma réalité
Température couleur
(Advanced Control)

COMMANDE DE L’IMAGE
75
■
Convertit la palette de couleurs d'un signal vidéo différent aux couleurs HD.
■
Cette fonction sert à régler les couleurs à l'écran en général de façon à vous plaire.
a. Méthode: 2 points
- Tracé: intérieur, extérieur
- Contraste rouge/vert/bleu, Brillance rouge/vert/bleu:
La portée du réglage est de -50 à +50.
b. Méthode : Échelle IRE 10 pts
- Tracé: Intérieur, Extérieur
- IRE (institut des ingénieurs radio) est l'unité d'intensité du signal vidéo et peut être
réglée par multiple de 10 jusqu'à 100. Vous pouvez régler les couleurs rouge, vert et
bleu selon chaque intensité.
- Brillance: cette fonction affiche une valeur de luminance calculée pour gamma 2,2.
Vous pouvez entrer quelconque valeur de luminance désirée à 100 IRE puis la valeur de
luminance ciblée pour gamma 2,2 sera affichée à chaque 10 étapes de 10 IRE à 90 IRE.
- Rouge/vert/bleu: la portée du réglage est de -50 à +50.
■
Étant l'outil principal utilisé par les calibreurs professionnels, il sert à régler les 3
couleurs primaires (rouge/vert/bleu) et les 3 couleurs secondaires
(jaune/cyan/magenta) individuellement l'une de l'autre.
La différence de couleur risque ne pas se distinguer même en effectuant les réglages
vidéo en général
Regle Rouge/Vert/Bleu/Jaune/Cyan/Magenta.
- Couleur Rouge/Vert/Bleu/Jaune/Cyan/Magenta: la portée du réglage est de -30 à +30.
- Teinte Rouge/Vert/Bleu/Jaune/Cyan/Magenta: la portée du réglage est de -30 à +30.
- Fonction inactive en mode RGB-PC et HDMI-PC.
*Cet attribut n'est pas disponible pour tous les modèles.
■
Étant la technologie désignée à réduire la consommation énergétique tout en
maintenant la même clarté, cette fonction a pour effet de réduire la consommation
énergétique tout en améliorant le contraste à l'écran.
Température couleur
(Expert Control)
Système gérance des
couleurs
OPC
Norme de couleurs
Standard: affiche une surface de couleurs normale.
Étendue: mode conçu à amplifier la richesse des couleurs à l'écran dans les endroits
éclatants.
■
Optimise l’utilisation des couleurs afin d’accroître la qualité des couleurs.
Gamme des couleurs
■
Reproduit les coins dans l'image plus clairement et distinctivement tout en conser-
vant une allure naturelle.
■
Cette fonction n'est adaptée qu'en “
MMooddee iimmaaggee -- FFiillmm,, EExxppeerrtt
”.
Amélioration des contours
■
Présente des motifs nécessaires aux réglages expert.
■
Cette fonction n'est adaptée qu'en “
MMooddee iimmaaggee -- EExxppeerrtt
” que lorsque vous
regardez la télédiffusion numérique.
Alignement expert
■
Cette fonction sert a filtrer les couleurs primaires spécifique du signal vidéo.
Utiliser les filtres rouge, vert ou bleu pour régler la teinte et saturation de couleur
plus précisément.
Filtre couleur
*Cet attribut n'est pas disponible pour tous les modèles.
■
Cette fonction s'exprime d'une palette de couleurs plus riche.
■
Cet attribut reproduit autant les couleurs riches que celles d'un signal vidéo con-
ventionnel.
■
Cette fonction n'est adaptée qu'en “
MMooddee iimmaaggee -- FFiillmm,, EExxppeerrtt
” que lorsque le
signal xvYCC est alimenté par le biais d'une prise HDMI.
xvYCC

COMMANDE DE L’IMAGE
76
ÉCONOMIE D’ÉNERGIE
COMMANDE DE L’IMAGE
Ceci réduit la consommation énergétique du téléviseur en décroissant l’intensité du rétroéclairage.
Vous pouvez accroitre la luminosité de votre écran en réglant le niveau
ÉÉccoonnoommiiqquuee dd’’éénneerrggiiee
ou en réglant
le
MMooddee iimmaaggee
.
■
En choisissant
ÉÉccrraann ddééssaaccttiivvéé
, celle-
ci s’affiche entièrement de noir après 3
secondes.
■
Si vous réglez “
ÉÉccoonnoommiiee dd’’éénneerrggiiee--
MMiinniimmuumm
,
MMooyyeenn
,
MMaaxxiimmuumm
” le
réglage manuel du
RRééttrrooééccllaaiirraaggee
devient désactivé.
■
Appuyez la touche
EENNEERRGGYY SSAAVVIINNGG
répétitivement afin de sélectionner le
réglage approprié.
Sélectionnez
IIMMAAGGEE
.
Sélectionnez
ÉÉccoonnoommiiee dd’’éénneerrggiiee
.
1
MENU
2
ENTER
Sélectionnez
AArrrrêêtt
,
MMiinniimmuumm
,
MMooyyeenn
,
MMaaxxiimmuumm
ou
ÉÉccrraann ddééssaacc--
ttiivvéé
.
3
ENTER
4
BACK
Retourner au menu précédent.
EXIT
Retourner à l’affichage télé.
Entrer
Déplacer
IMAGE
E
Entrer
Déplacer
IMAGE
E
Allongement : 16:9
Assistant image
Économie d’énergie:
Arrêt
Mode image : Standard
•
Rétroéclairage
70
• Contraste 90
• Brillance 50
• Netteté 70
Allongement : 16:9
Assistant image
Économie d’énergie:
Arrêt
Mode image : Standard
•
Rétroéclairage
70
• Contraste 90
• Brillance 50
• Netteté 70
Arrêt
Minimum
Moyen
Maximum
Écran désactivé

77
RÉINITIALISATION DE L’IMAGE
Les réglages des modes image sélectionnés retournent aux valeurs par défaut.
Sélectionnez
IIMMAAGGEE
.
Sélectionnez
RRééiinniittiiaalliissaattiioonn
.
1
MENU
2
ENTER
Initialiser la valeur réglée.
4
Sélectionnez
OOuuii
.
3
ENTER
ENTER
5
EXIT
Retourner à l’affichage télé.
Entrer
Déplacer
IMAGE
E
RG
• Contraste 50
• Brillance 50
• Netteté 50
• Couleur 50
• Teinte 0
• Contrôle avancé
• Réinitialisation
Écran (RGB-PC)
Entrer
Déplacer
IMAGE
E
RG
• Contraste 50
• Brillance 50
• Netteté 50
• Couleur 50
• Teinte 0
• Contrôle avancé
• Réinitialisation
Écran (RGB-PC)
Pré-réglage vidéo en cours...
ii
Non
Oui
Tous les réglages seront réinitialisés.
Continuez?
?
COMMANDE DE L’IMAGE
VOYANT LUMINEUX
-
Pour 32LD320
Permet de régler l’allumage/la mise en veille du voyant à l'avant de la télévision.
Sélectionnez
OOPPTTIIOONN
.
Sélectionnez
VVooyyaanntt lluummiinneeuuxx
.
1
MENU
2
ENTER
Sélectionnez les options désirées.
4
Sélectionnez
VVooyyaanntt aatttteennttee
ou
DD’’aalliimmeennttaattiioonn
.
3
ENTER
■
VVooyyaanntt aatttteennttee
: détermine à savoir régler le
voyant lumineux à l’avant du téléviseur à
MMaarrcchhee
ou
AArrrrêêtt
en mode de veille.
■
DD’’aalliimmeennttaattiioonn
: détermine à savoir régler le
voyant lumineux à l’avant du téléviseur à
MMaarrcchhee
ou
AArrrrêêtt
lorsque l’appareil est mis en
circuit.
Entrer
Déplacer
OPTION
SIMPLINK : Marche
Touches verrouillées: Arrêt
Guide simple
Sous-titres : Arrêt
Identité TV : 1
Voyant lumineux
Mode démo : Arrêt
Réglage initial : Résidentielle
Entrer
Déplacer
OPTION
SIMPLINK : Marche
Touches verrouillées: Arrêt
Guide simple
Sous-titres : Arrêt
Identité TV : 1
Voyant lumineux
Mode démo : Arrêt
Réglage initial : Résidentielle
EE
D’alimentation
Voyant attente
Marche
Fermer
FF
Marche
GG
5
BACK
Retourner au menu précédent.
EXIT
Retaourner à l’affichage télé.

COMMANDE DE L’IMAGE
78
MODE DÉMO
COMMANDE DE L’IMAGE
Sélectionnez
OOPPTTIIOONN
.
Sélectionnez
MMooddee ddéémmoo
.
1
MENU
2
ENTER
Sélectionner
MMaarrcchhee
pour afficher les dif-
férentes fonctions de la télévision.
3
ENTER
4
EXIT
Retourner à l’affichage télé.
Après quelques instants, le
MMooddee ddéémmoo
démarre.
Si vous voulez arrêter la démo, appuyez sur n'importe
quelle touche (Sauf VOL +, - et MUTE touche).
Affiche un diaporama qui explique les différentes fonctions de cette télévision.
■
Cette fonction est désactivée sous
“
RRééggllaaggee iinniittiiaall--RRééssiiddeennttiieellllee
”.
Entrer
Déplacer
OPTION
Indentité source
SIMPLINK : Marche
Touches verrouillées: Arrêt
Guide simple
Sous-titres : Arrêt
Identité TV : 1
Mode démo : Arrêt
Réglage initial :
Démo en magasin
Entrer
Déplacer
OPTION
Indentité source
SIMPLINK : Marche
Touches verrouillées: Arrêt
Guide simple
Sous-titres : Arrêt
Identité TV : 1
Mode démo : Marche
Réglage initial :
Démo en magasin
EE
Arrêt
Marche

COMMANDE DU SON ET DE LA LANGUE
79
CONTRÔLE AUTOMATIQUE DU VOLUME (VOL.NORMALISÉ)
COMMANDE DU SON ET DE LA LANGUE
S’assure que le volume demeure constant soit lors d’une publicité ou de retour à l’émission.
Puisque chaque station émettrice a ses propres signaux, l'ajustement de volume peut être nécessaire à chaque
fois que vous changez de chaîne. Ce dispositif vous permet de profiter d’un volume stable en faisant des
ajustements automatiques pour chaque programme.
Sélectionnez
AAUUDDIIOO
.
Sélectionnez
VVooll..nnoorrmmaalliisséé
.
Sélectionnez
MMaarrcchhee
ou
AArrrrêêtt
.
1
MENU
3
2
ENTER
ENTER
4
BACK
Retourner au menu précédent.
EXIT
Retourner à l’affichage télé.
Entrer
Déplacer
AUDIO
Vol.normalisé : Marche
Voix claires II : Marche
• Niveau 3
Équilibre 0
Mode audio : Standard
•
Infinite Sound :
Arrêt
• Aigu 50
• Grave 50
Entrer
Déplacer
AUDIO
Vol.normalisé : Marche
Voix claires II : Marche
• Niveau 3
Équilibre 0
Mode audio : Standard
•
Infinite Sound :
Arrêt
• Aigu 50
• Grave 50
E
LR
E
LR
Arrêt
Marche
-+
-+

COMMANDE DU SON ET DE LA LANGUE
80
VOIX CLAIRES II
En différenciant la voix humaine des autres sons, les voix humaines ressortent mieux.
Sélectionnez
AAUUDDIIOO
.
Sélectionnez
VVooiixx ccllaaiirreess IIII
.
Sélectionnez
MMaarrcchhee
ou
AArrrrêêtt
.
1
MENU
3
2
ENTER
ENTER
6
BACK
Retourner au menu précédent.
EXIT
Retourner à l’affichage télé.
Sélectionnez
NNiivveeaauu
.
4
ENTER
Effectuez les réglages appropriés.
5
ENTER
Réglage du niveau Voix claire II
lors de la mise en Marche
Entrer
Déplacer
AUDIO
Vol.normalisé : Marche
Voix claires II : Marche
• Niveau 3
Équilibre 0
Mode audio : Standard
•
Infinite Sound :
Arrêt
• Aigu 50
• Grave 50
Entrer
Déplacer
AUDIO
Vol.normalisé : Marche
Voix claires II : Marche
• Niveau 3
Équilibre 0
Mode audio : Standard
•
Infinite Sound :
Arrêt
• Aigu 50
• Grave 50
E
LR
E
LR
-+ -+
Arrêt
Marche

COMMANDE DU SON ET DE LA LANGUE
81
CONFIGURATION PRÉRÉGLÉE DU SON (MODE AUDIO)
Balaie les changements de sonorité pendant les publicités, puis règle le niveau sonore pour correspondre au
niveau audio spécifié.
Sélectionnez
AAUUDDIIOO
.
Sélectionnez
MMooddee aauuddiioo
.
Sélectionnez
SSttaannddaarrdd
,
MMuussiiqquuee
,
FFiillmm
,
SSppoorrtt
ou
JJeeuu
.
1
MENU
3
2
ENTER
ENTER
4
BACK
Retourner au menu précédent.
EXIT
Retourner à l’affichage télé.
■
SSttaannddaarrdd
,
MMuussiiqquuee
,
FFiillmm
,
SSppoorrtt
et
JJeeuu
sont les options préréglées en usine
pour améliorer la qualité du son.
■
L’on peut aussi
MMooddee aauuddiioo
le menu
QQ.. MMEENNUU
.
■
SSttaannddaarrdd
: offre un son de qualité stan-
dard.
■
MMuussiiqquuee
: optimise le son pour écouter
de la musique.
■
FFiillmm
: optimise le son pour regarder des
films.
■
SSppoorrtt
: optimise le son pour des mani-
festations sportives.
■
JJeeuu
: optimise le son pour les jeux.
Entrer
Déplacer
AUDIO
Vol.normalisé : Marche
Voix claires II : Marche
• Niveau 3
Équilibre 0
Mode audio : Standard
•
Infinite Sound :
Arrêt
• Aigu 50
• Grave 50
Entrer
Déplacer
AUDIO
Vol.normalisé : Marche
Voix claires II : Marche
• Niveau 3
Équilibre 0
Mode audio : Standard
•
Infinite Sound :
Arrêt
• Aigu 50
• Grave 50
E
LR
E
LR
-+ -+
Standard
Musique
Film
Sport
Jeu

COMMANDE DU SON ET DE LA LANGUE
82
RÉGLAGES DU SON - MODE PERSONNEL
COMMANDE DU SON ET DE LA LANGUE
Règle le son selon ses préférences et l’emplacement de la pièce.
Sélectionnez
AAUUDDIIOO
.
Sélectionnez
MMooddee aauuddiioo
.
Sélectionnez
AAiigguu
ou
GGrraavvee
.
1
MENU
4
2
ENTER
Sélectionnez
SSttaannddaarrdd
,
MMuussiiqquuee
,
FFiillmm
,
SSppoorrtt
ou
JJeeuu
.
3
ENTER
ENTER
6
BACK
Retourner au menu précédent.
EXIT
Retourner à l’affichage télé.
Effectuez les réglages appropriés.
5
ENTER
Entrer
Déplacer
AUDIO
LR
E
Vol.normalisé : Marche
Voix claires II : Marche
• Niveau 3
Équilibre 0
Mode audio : Standard
•
Infinite Sound :
Arrêt
• Aigu 50
• Grave 50
Entrer
Déplacer
AUDIO
LR
E
Vol.normalisé : Marche
Voix claires II : Marche
• Niveau 3
Équilibre 0
Mode audio : Standard
•
Infinite Sound :
Arrêt
• Aigu 50
• Grave 50
Fermer
EE
EE
• Aigu 50
• Grave 50
•
Infinite Sound
Arrêt
-+
-+

COMMANDE DU SON ET DE LA LANGUE
83
INFINITE SOUND
Sélectionnez
AAUUDDIIOO
.
Sélectionnez
IInnffiinniittee SSoouunndd
.
Sélectionnez
MMaarrcchhee
ou
AArrrrêêtt
.
1
MENU
3
2
ENTER
ENTER
4
BACK
Retourner au menu précédent.
EXIT
Retourner à l’affichage télé.
Choisir cette option pour un son réaliste.
■
Si la qualité sonore ou le volume n’est pas au
niveau désiré, il est recommande d’utiliser un
système cinéma maison ou d’amplification afin
de compenser pour environnements d’usagers
différents.
■
Si vous sélectionnez “
VVooiixx ccllaaiirreess IIII--
MMaarrcchhee
”, la fonction
IInnffiinniittee SSoouunndd
ne fonc-
tionnera pas.
Entrer
Déplacer
AUDIO
LR
E
Vol.normalisé : Marche
Voix claires II : Marche
• Niveau 3
Équilibre 0
Mode audio : Standard
•
Infinite Sound :
Arrêt
• Aigu 50
• Grave 50
Entrer
Déplacer
AUDIO
LR
E
Vol.normalisé : Marche
Voix claires II : Marche
• Niveau 3
Équilibre 0
Mode audio : Standard
•
Infinite Sound :
Arrêt
• Aigu 50
• Grave 50
-+
-+
Fermer
•Aigu 50
• Grave 50
•
Infinite Sound
Arrêt
EE
EE

COMMANDE DU SON ET DE LA LANGUE
84
ÉQUILIBRE
COMMANDE DU SON ET DE LA LANGUE
Sélectionnez
AAUUDDIIOO
.
Sélectionnez
ÉÉqquuiilliibbrree
.
Effectuez les réglages appropriés.
1
MENU
3
2
ENTER
ENTER
Réglez le son du haut-parleur gauche/droit en fonction de vos préférences et de la disposition de la pièce.
4
BACK
Retourner au menu précédent.
EXIT
Retourner à l’affichage télé.
Entrer
Déplacer
AUDIO
Vol.normalisé : Marche
Voix claires II : Marche
• Niveau 3
Équilibre 0
Mode audio : Standard
•
Infinite Sound :
Arrêt
• Aigu 50
• Grave 50
Entrer
Déplacer
AUDIO
Vol.normalisé : Marche
Voix claires II : Marche
• Niveau 3
Équilibre 0
Mode audio : Standard
•
Infinite Sound :
Arrêt
• Aigu 50
• Grave 50
E
LR
E
LR
-+ -+
Fermer
EE
EE
Équilibre 0
LR

COMMANDE DU SON ET DE LA LANGUE
85
RÉGLAGE MARCHE-ARRÊT DES
HAUT - PARLEURS DU TÉLÉVISEUR
Met les haut-parleurs du téléviseur hors circuit si l’on utilise un équipement audio externe.
Sélectionnez
AAUUDDIIOO
.
Sélectionnez
HHaauutt--PPaarrlleeuurr TTVV
.
Sélectionnez
MMaarrcchhee
ou
AArrrrêêtt
1
MENU
3
2
ENTER
ENTER
4
BACK
Retourner au menu précédent.
EXIT
Retourner à l’affichage télé.
Entrer
Déplacer
AUDIO
• Niveau 3
Équilibre 0
Mode audio : Standard
•
Infinite Sound :
Arrêt
• Aigu 50
• Grave 50
• Réinitialisation
Haut-Parleur TV: Marche
LR
E
Entrer
Déplacer
AUDIO
• Niveau 3
Équilibre 0
Mode audio : Standard
•
Infinite Sound :
Arrêt
• Aigu 50
• Grave 50
• Réinitialisation
Haut-Parleur TV: Marche
LR
E
Arrêt
Marche
-+ -+

COMMANDE DU SON ET DE LA LANGUE
86
RÉINITIALISATION DU MODE AUDIO
COMMANDE DU SON ET DE LA LANGUE
Les réglages du mode audio sélectionnés retournent aux valeurs par défaut.
Sélectionnez
AAUUDDIIOO
.
Sélectionnez
RRééiinniittiiaalliissaattiioonn
.
1
MENU
2
ENTER
Initialiser la valeur réglée.
3
ENTER
4
EXIT
Retourner à l’affichage télé.
Entrer
Déplacer
AUDIO
• Niveau 3
Équilibre 0
Mode audio : Standard
•
Infinite Sound :
Arrêt
• Aigu 50
• Grave 50
• Réinitialisation
Haut-Parleur TV: Marche
LR
E
Entrer
Déplacer
AUDIO
• Niveau 3
Équilibre 0
Mode audio : Standard
•
Infinite Sound :
Arrêt
• Aigu 50
• Grave 50
• Réinitialisation
Haut-Parleur TV: Marche
LR
E
Réinitialisation en cours...
ii
-+ -+

COMMANDE DU SON ET DE LA LANGUE
87
RÉGLAGE DIFFUSIONS STÉRÉO/SAP
Signal analogique uniquement: ce téléviseur peut recevoir les programmes stéréo MTS et tout SAP (Secondary
Audio Program) accompagnant un programme stéréo, si la station transmet un signal audio additionnel. Le son
mono est utilisé automatiquement si le signal n’est émis qu’en mode mono.
Sélectionnez
SSAAPP
.
Sélectionnez
MMOONNOO
,
SSTTÉÉRRÉÉOO
ou
SSAAPP
.
Retourner à l’affichage télé.
1
Q.MENU
3
2
EXIT
Sélectionnez
MMuullttii--aauuddiioo
.
Sélectionner d’autres langues.
Retourner à l’affichage télé.
1
Q.MENU
3
2
EXIT
Téléviseur analogique Téléviseur numérique
A
Anglais
FF
Multi-audio
GG

COMMANDE DU SON ET DE LA LANGUE
88
LANGAGE AUDIO
COMMANDE DU SON ET DE LA LANGUE
D’autres langues sont disponibles si un signal numérique est fourni par le diffuseur.
Cette fonctionnalité est disponible uniquement en mode DTV/CADTV.
Sélectionnez
OOPPTTIIOONN
.
Sélectionnez
LLaannggaaggee aauuddiioo
.
Sélectionner la langue désirée.
1
MENU
3
2
ENTER
ENTER
4
BACK
Retourner au menu précédent.
EXIT
Retourner à l’affichage télé.
Entrer
Déplacer
OPTION
Langage menu(Language)
: Français
Langage audio : Anglais
Indentité source
SIMPLINK : Marche
Touches verrouillées: Arrêt
Guide simple
Sous-titres : Arrêt
Identité TV : 1
Entrer
Déplacer
OPTION
Langage menu(Language)
: Français
Langage audio : Anglais
Indentité source
SIMPLINK : Marche
Touches verrouillées: Arrêt
Guide simple
Sous-titres : Arrêt
Identité TV : 1
EE EE
Anglais
Espagnol
Français

COMMANDE DU SON ET DE LA LANGUE
89
SÉLECTION DE LANGUE POUR LES MENUS À L’ÉCRAN
Les menus peuvent figurer dans la langue choisie.
Sélectionnez
OOPPTTIIOONN
.
Sélectionnez
LLaannggaaggee mmeennuu ((LLaanngguuaaggee))
.
Sélectionner la langue désirée.
À partir de ce point les menus à l’écran
figurent dans la langue choisie.
1
MENU
3
2
ENTER
ENTER
4
BACK
Retourner au menu précédent.
EXIT
Retourner à l’affichage télé.
Entrer
Déplacer
OPTION
Langage menu(Language)
: Français
Langage audio : Anglais
Indentité source
SIMPLINK : Marche
Touches verrouillées: Arrêt
Guide simple
Sous-titres : Arrêt
Identité TV : 1
Entrer
Déplacer
OPTION
Langage menu(Language)
: Français
Langage audio : Anglais
Indentité source
SIMPLINK : Marche
Touches verrouillées: Arrêt
Guide simple
Sous-titres : Arrêt
Identité TV : 1
EE EE
English
Español
Français

COMMANDE DU SON ET DE LA LANGUE
90
SOUS-TITRES
COMMANDE DU SON ET DE LA LANGUE
Les sous-titres permettent aux gens souffrant de déficience auditive de regarder la télé. Sélectionner un mode
sous-titres pour afficher l’information fournie par le programme. Les sous-titres analogiques donnent l’informa-
tion à toute position à l’écran, habituellement le dialogue.Les sous-titres/texte, si fournis par le télédiffuseur,
seraient offerts pour les canaux numériques et analogiques, sur la source antenne/câble. Ce téléviseur est pro-
grammé pour se rappeler le mode sous-titres/ texte réglé au moment de la mise hors circuit. Cette fonction n’est
disponible que lorsque le mode
SSoouuss--ttiittrreess
est
MMaarrcchhee
.
Sélectionnez
OOPPTTIIOONN
.
Sélectionnez
SSoouuss--ttiittrreess
.
Sélectionnez
MMaarrcchhee
.
1
MENU
3
2
ENTER
ENTER
Sélectionnez
SS--TTiittrree11
-
44
ou
TTeexxttee11
-
44
.
4
Sous-titres à système de diffusion analogique
■
Lorsque
AArrrrêêtt
est sélectionné, les sous-
menus des options Analog Analogique,
DTV et Numérique sont désactivés.
■
SSoouuss--ttiittrreess
Il s’agit des mots qui défilent au bas de
l’écran, habituellement la portion audio
d’un programme pour malentendants.
■
TTeexxttee
Il s’agit de mots qui défilent dans un
grand cadre noir couvrant presque tout
l’écran, habituellement des messages
fournis par le diffuseur.
5
BACK
Retourner au menu précédent.
EXIT
Retourner à l’affichage télé.
Entrer
Déplacer
OPTION
Langage menu(Language)
: Français
Langage audio : Anglais
Indentité source
SIMPLINK : Marche
Touches verrouillées: Arrêt
Guide simple
Sous-titres : Arrêt
Identité TV : 1
Entrer
Déplacer
OPTION
Langage menu(Language)
: Français
Langage audio : Anglais
Indentité source
SIMPLINK : Marche
Touches verrouillées: Arrêt
Guide simple
Sous-titres : S-Titre1
Identité TV : 1
Mode
S-Titre 1
Fermer
Option numérique
FF
Marche
GG
EE EE

COMMANDE DU SON ET DE LA LANGUE
91
Sous-titres à système de diffusion numérique
Choisir la langue désirée pour les sous-titres DTV/CADTV.
D'autres langues peuvent être choisies pour des sources numériques seulement si elles sont incluses sur le pro-
gramme.
Cette fonction n’est disponible que lorsque le mode
SSoouuss--ttiittrreess
est
MMaarrcchhee
.
Sélectionnez
OOPPTTIIOONN
.
Sélectionnez
SSoouuss--ttiittrreess
.
Sélectionnez
MMaarrcchhee
.
1
MENU
3
2
ENTER
ENTER
Sélectionnez
SS--TTiittrree11
-
44
,
TTeexxttee11
-
44
ou
SSeerrvviiccee11
-
66
.
4
5
BACK
Retourner au menu précédent.
EXIT
Retourner à l’affichage télé.
Entrer
Déplacer
OPTION
Langage menu(Language)
: Français
Langage audio : Anglais
Indentité source
SIMPLINK : Marche
Touches verrouillées: Arrêt
Guide simple
Sous-titres : Arrêt
Identité TV : 1
Entrer
Déplacer
OPTION
Langage menu(Language)
: Français
Langage audio : Anglais
Indentité source
SIMPLINK : Marche
Touches verrouillées: Arrêt
Guide simple
Sous-titres : S-Titre1
Identité TV : 1
EE EE
Mode
S-Titre 1
Fermer
Option numérique
FF
Marche
GG

COMMANDE DU SON ET DE LA LANGUE
92
COMMANDE DU SON ET DE LA LANGUE
Option sous-titres
Pour personnaliser les sous-titres DTV/CADTV figurant à l’écran.
Cette fonction n’est disponible que lorsque le mode
SSoouuss--ttiittrreess
est
MMaarrcchhee
.
Sélectionnez
OOPPTTIIOONN
.
Sélectionnez
SSoouuss--ttiittrreess
.
Sélectionnez
MMaarrcchhee
.
1
MENU
3
2
ENTER
ENTER
Sélectionnez
PPeerrssoonnnnaalliisséé
.
5
ENTER
Personnaliser les options
TTaaiillllee
,
CCaarraaccttèèrreess
, etc., to your preference.
Un icone aperçu figure au bas de l’écran,
l’utiliser pour voir les sous-titres.
6
Sélectionnez
OOppttiioonn nnuumméérriiqquuee
.
4
■
TTaaiillllee
: Règle la grosseur des mots fig-
urant.
■
CCaarraaccttèèrreess
: Sélectionne le type des
mots.
■
CCoouulleeuurr tteexxttee
: Pour choisir la
couleur du texte.
■
OOppaacciittéé tteexxttee
: Spécifier l’opacité
pour la couleur du texte.
■
CCoouulleeuurr ffoonndd
: Pour choisir la couleur
du fond.
■
OOppaacciittéé ffoonndd
: Pour choisir l’opacité
du fond.
■
TTyyppee bboorrdduurree
: Pour choisir un type
de bordure.
■
CCoouulleeuurr bboorrdduurree
: Pour choisir la
couleur de bordure.
7
BACK
Retourner au menu précédent.
EXIT
Retourner à l’affichage télé.
Taille
A Standard
Caractères
Caractères 1
Couleur texte
Blanc
Opacité
texte
Solide
Type bordure
Aucun
Couleur bordure
Noir
Couleur fond
Noir
Opacité fond
Solide
Fermer
FF
Personnalisé
GG
Entrer
Déplacer
OPTION
Langage menu(Language)
: Français
Langage audio : Anglais
Indentité source
SIMPLINK : Marche
Touches verrouillées: Arrêt
Guide simple
Sous-titres : Arrêt
Identité TV : 1
Entrer
Déplacer
OPTION
Langage menu(Language)
: Français
Langage audio : Anglais
Indentité source
SIMPLINK : Marche
Touches verrouillées: Arrêt
Guide simple
Sous-titres : S-Titre1
Identité TV : 1
EE EE
Mode
S-Titre 1
Fermer
Option numérique
Marche

REGLAGE DE L’HEURE
93
RÉGLAGE DE LA PENDULE
RÉGLAGE DE L’HEURE
Réglage automatique
L’heure est réglée automatiquement depuis un signal de canal numérique.
Le signal de canal numérique comprend l’information pour l’heure en cours fournie par le diffuseur.
Régler la pendule manuellement, si l’heure est incorrecte.
Sélectionnez
HHEEUURREE
.
Sélectionnez
PPeenndduullee
.
Sélectionnez
AAuuttoo
.
1
MENU
3
2
ENTER
ENTER
Sélectionner votre fuseau horaire.
• États-Unis:
EEsstt
,
CCeennttrraallee
,
RRoocchheeuusseess
,
PPaacciiffiiqquuee
,
AAllaasskkaa
ou
HHaawwaaiiii
.
• Canada:
EE sstt
,
CCeennttrraallee
,
RRoocchheeuusseess
,
PPaacciiffiiqquuee
,
MMaarriittiimmee
ou
AAttllaannttiiqquuee
.
4
Sélectionnez
AAuuttoo
,
AArrrrêêtt
, ou
MMaarrcchhee
si
votre pays est soumis au passage à l’heure
d’été.
5
6
BACK
Retourner au menu précédent.
EXIT
Retourner à l’affichage télé.
Entrer
Déplacer
HEURE
Pendule
Mise en arrêt : Arrêt
Mise en éveil : Arrêt
Minuterie : Arrêt
Entrer
Déplacer
HEURE
Pendule
Mise en arrêt : Arrêt
Mise en éveil : Arrêt
Minuterie : Arrêt
Mois
Date
21
Année
2009
Heure
10 AM
02
Minute
10
Fuseau
Est
Heure
avancée
Auto
Fermer
FF
Auto
GG

REGLAGE DE L’HEURE
94
REGLAGE DE L’HEURE
Réglage manuel
Si l’heure en cours est erronée, régler manuellement.
Sélectionnez
HHEEUURREE
.
Sélectionnez
PPeenndduullee
.
Sélectionnez
MMaannuueell
.
1
MENU
3
2
ENTER
ENTER
Sélectionner l’option Mois, Date, Année,
Heure et Minutes.
4
Régler l’option Mois, Date, Année, Heure et
Minutes.
5
6
BACK
Retourner au menu précédent.
EXIT
Retourner à l’affichage télé.
Entrer
Déplacer
HEURE
Pendule
Mise en arrêt : Arrêt
Mise en éveil : Arrêt
Minuterie : Arrêt
Entrer
Déplacer
HEURE
Pendule
Mise en arrêt : Arrêt
Mise en éveil : Arrêt
Minuterie : Arrêt
Mois
Date
21
Année
2009
Heure
10 AM
02
Minute
10
Fuseau
Est
Heure
avancée
Auto
Fermer
FF
Manuel
GG

REGLAGE DE L’HEURE
95
RÉGLAGE DE LA MINUTERIE- MARCHE/ARRÊT AUTOMATIQUE
Fonctionne seulement si l’heure est réglée.
MMiissee eenn aarrrrêêtt
outrepasse
MMiissee eenn éévveeiill
si elles sont réglées à la même heure.
Le téléviseur doit être en mode attente pour que la minuterie marche fonctionne.
Si aucune touche n’est pressée dans un délai de 2 heures une fois le téléviseur mis en circuit avec la minuterie
marche, le téléviseur revient automatiquement au mode attente.
■
Pour annuler
MMiissee eenn aarrrrêêtt
/
éévveeiill
function,
choisir
AArrrrêêtt
.
■
Pour la fonction Mise en éveil seulement
Sélectionnez
SSoouurrccee
.
Sélectionner la source de signal
d’entrée.
Sélectionnez
HHEEUURREE
.
Sélectionnez
MMiissee eenn aarrrrêêtt
ou
MMiissee eenn éévveeiill
.
Sélectionnez
RRééppéétteerr
.
1
MENU
3
2
ENTER
ENTER
Sélectionnez
AArrrrêêtt
,
UUnnee ffooiiss
,
QQuuoottiiddiieenn
,
LLuunn..
~
VVeenn..
,
LLuunn..
~
SSaamm..
,
SSaamm..
~
DDiimm..
ou
DDiimmaanncchhee
.
4
Sélectionner et Régler
HHeeuurree
ou
MMiinnuuttee
.
5
1
ENTER
3
4
2
Lorsque
TT VV
est sélectionné:
régler pour choisir le canal à
syntoniser
Régler pour régler le niveau
sonore à la mise en cir-cuit.
6
BACK
Retourner au menu précédent.
EXIT
Retourner à l’affichage télé.
Entrer
Déplacer
HEURE
Pendule
Mise en arrêt : Arrêt
Mise en éveil : Arrêt
Minuterie : Arrêt
Entrer
Déplacer
HEURE
Pendule
Mise en arrêt : Arrêt
Mise en éveil : Arrêt
Minuterie : Arrêt
Répéter
FF
Une
fois
GG
Heure
6 AM
Minute
30
Source
TV
Canal
TV 2-0
Volume
30
Fermer
Fév. 21, 2009 10:10 AM

REGLAGE DE L’HEURE
96
RÉGLAGE DE LA MINUTERIE - ARRÊT DIFFÉRÉ
REGLAGE DE L’HEURE
Pour mettre le téléviseur hors circuit à une heure donnée.
Il est à noter que ce réglage est annulé lorsque le téléviseur est mis en circuit.
■
Pour annuler la
MMiinnuutteerriiee
, sélectionnez
AArrrrêêtt
.
■
L’on peut aussi
MMiinnuutteerriiee
le menu
QQ ..
MMEENNUU
.
Sélectionnez
HHEEUURREE
.
Sélectionnez
MMiinnuutteerriiee
.
Effectuez les réglages appropriés.
1
MENU
3
2
ENTER
ENTER
4
BACK
Retourner au menu précédent.
EXIT
Retourner à l’affichage télé.
Entrer
Déplacer
HEURE
Pendule
Mise en arrêt : Arrêt
Mise en éveil : Arrêt
Minuterie : Arrêt
Entrer
Déplacer
HEURE
Pendule
Mise en arrêt : Arrêt
Mise en éveil : Arrêt
Minuterie : Arrêt
Arrêt
10 min.
20 min.
30 min.
60 min.
90 min.
120 min.
180 min.
240 min.

COMMANDE PARENTALE /CLASSEMENT
97
COMMANDE PARENTALE /CLASSEMENT
Le contrôle parental peut être utilisé pour verrouiller canaux, cotes et autres sources de visionnement.
Défaut permet tout programme. Le visionnement peut être bloqué par type de programme et par catégories
choisis. Il est aussi possible de bloquer tout visionnement pour une période donnée. Pour utiliser cette fonction,
il faut faire ce qui suit :
1. Régler les codes et catégories à bloquer.
2. Spécifier un mot de passe
3. Activer le verrouillage
Cote puce V et catégories
Les directives sont fournies par les diffuseurs. La plupart des programmes télé et des films peuvent être bloqués
par cote télé et/ou catégories individuelles. Les films qui ont été diffusés au cinéma ou directement sur vidéo
utilisent le système de cote de film (MPAA) seulement.
Classifications pour les programmes de télévision y compris les téléfilms:
■
TV-G (Tout public)
■
TV-PG (Avis Parental Souhaité)
■
TV-14 (Avis Parental Exigé)
■
TV-MA (Adultes)
■
TV-Y (Pour enfants)
■
TV-Y7 (Interdit aux moins de 7 ans)
Configurez vos options de blocage pour bloquer certaines chaînes, classifications et sources externes de lecture.
Un code d’accès est exigé pour accéder à ce menu.
Réglage de votre code d’acces
Sélectionnez
VVÉÉRRRROOUUIILLLLÉÉ
1
MENU
ENTER
Entrer le mot de passe.
2
123
45
0
6
789
■
Indiquez le code d’accès comme demandé.
■
Le téléviseur est réglé avec le code d’accès
initial ‘0-0-0-0’.
SYTÈME DE RÉGLAGE DE MOT DE PASSE ET VERROUILLAGE
Pour les É.-U. Pour le Canada
Fermer
Mot de Passe
* * * *
Entrer
Déplacer
Verrouillage : Arrêt
Mot de passe
Bloquez canal
Films
Enfants
Général
Téléchargeable
Bloc source
VÉRROUILLÉ
Entrer
Déplacer
Verrouillage : Arrêt
Mot de passe
Bloquez canal
Anglais
Français
Téléchargeable
Bloc source
VÉRROUILLÉ

COMMANDE PARENTALE /CLASSEMENT
98
COMMANDE PARENTALE /CLASSEMENT
Active ou désactive la stratégie de contrôle que vous avez configurée précédemment.
Système de verrouillage
Sélectionnez
VVeerrrroouuiillllaaggee
.
Sélectionnez
MMaarrcchhee
ou
AArrrrêêtt
.
4
3
ENTER
■
Si vous choisissez
MMaarrcchhee
, le système
de verrouillage est activé.
Sélectionnez
VVÉÉRRRROOUUIILLLLÉÉ
1
MENU
ENTER
Entrer le mot de passe.
2
123
45
0
6
789
5
BACK
Retourner au menu précédent.
EXIT
Retourner à l’affichage télé.
Entrer
Déplacer
VÉRROUILLÉ
Verrouillage : Arrêt
Mot de passe
Bloquez canal
Films
Enfants
Général
Téléchargeable
Bloc source
Entrer
Déplacer
VÉRROUILLÉ
Verrouillage : Marche
Mot de passe
Bloquez canal
Films
Enfants
Général
Téléchargeable
Bloc source
Arrêt
Marche

COMMANDE PARENTALE /CLASSEMENT
99
Changez le mot de passe en saisissant deux fois le nouveau mot de passe.
Définition du mot de passe
Sélectionnez
MMoott ddee ppaassssee
.
choisissez quatre chiffres au choix pour votre
nouveau mot de passe et saisissez-les sur le
champ. Une fois les quatre chiffres entrés, res-
saisissez le mot de passe pour
RRééppéétteerr
.
4
3
ENTER
123
45
0
6
789
Sélectionnez
VVÉÉRRRROOUUIILLLLÉÉ
1
MENU
ENTER
Entrer le mot de passe.
2
123
45
0
6
789
5
BACK
Retourner au menu précédent.
EXIT
Retourner à l’affichage télé.
Entrer
Déplacer
VÉRROUILLÉ
Verrouillage : Arrêt
Mot de passe
Bloquez canal
Films
Enfants
Général
Téléchargeable
Bloc source
Entrer
Déplacer
VÉRROUILLÉ
Verrouillage : Arrêt
Mot de passe
Bloquez canal
Films
Enfants
Général
Téléchargeable
Bloc source
Fermer
Nouveau
* * * *
Répéter
* * * *

COMMANDE PARENTALE /CLASSEMENT
100
BLOCAGE DES CHAÎNES
COMMANDE PARENTALE /CLASSEMENT
Verrouille les chaînes que vous ne souhaitez pas regarder ou celles que vous ne souhaitez pas que vos enfants
regardent.
Sélectionnez
BBllooqquueezz CCaannaall
.
Sélectionner une chaîne à
bloquer ou à débloquer.
4
3
ENTER
Sélectionnez
VVÉÉRRRROOUUIILLLLÉÉ
1
MENU
ENTER
Entrer le mot de passe.
2
123
45
0
6
789
6
BACK
Retourner au menu précédent.
EXIT
Retourner à l’affichage télé.
■
Si une station est verrouillée, entrez le
mot de passe pour accès temporaire.
Bloquer ou débloquer une
chaîne.
5
VERT
Entrer
Déplacer
VÉRROUILLÉ
Verrouillage : Arrêt
Mot de passe
Bloquez canal
Films
Enfants
Général
Téléchargeable
Bloc source
Changez canal
Page suivante
CH
Navigation
Préc.
Bloc/Débloc

COMMANDE PARENTALE /CLASSEMENT
101
CLASSEMENT DES FILMS ET DES ÉMISSIONS TÉLÉVISÉES
Classement des films (MPAA)
-
Pour les É.-U
Empêche le visionnage des films en fonction de du classement qui leur a été affecté, afin que les enfants ne puis-
sent pas accéder aux contenus à caractère choquant ou jugé comme tel. Vous pouvez ainsi fixer des limites en
bloquant l’accès aux films dont l’indice de classement dépasse un certain seuil. Gardez à l’esprit que les limites
de classement s’appliquent uniquement aux films retransmis à la TV, et non aux programmes TV comme par
exemple les feuilletons.
Sélectionnez
FFiillmmss
.
Sélectionnez
GG
,
PPGG
,
PPGG--1133
,
RR
,
NNCC--1177
,
XX
ou
BBlloocc DDééssaaccttiivvéé
.
4
3
ENTER
■
Si
FFiillmmss
,
EEnnffaannttss
ou
GGéénnéérraall
est
verrouillée, entrez le mot de passe
pour accès temporaire.
■
G (Audience Générale)
■
PG (Conseil Parental Suggéré)
■
PG-13 (Parents Fortement Avertis)
■
R (Restreint)
■
NC-17 (Restreint pour 17 ans et moins)
■
X (Adulte Seulement)
■
Bloc Désactivé (tout programme permis)
GG
Si vous classez un programme dans la
catégorie PG-13 : Les films de caté-
gorie G et PG pourront être visionnés,
les films PG-13, R, NC-17 et X seront
bloqués.
Sélectionnez
VVÉÉRRRROOUUIILLLLÉÉ
1
MENU
ENTER
Entrer le mot de passe.
2
123
45
0
6
789
5
BACK
Retourner au menu précédent.
EXIT
Retourner à l’affichage télé.
Bloc Désactivé: Tout programme
permis
G
PG
PG-13
R
NC-17
X
Bloc désactivé
Entrer
Déplacer
VÉRROUILLÉ
Verrouillage : Arrêt
Mot de passe
Bloquez canal
Films
Enfants
Général
Téléchargeable
Bloc source
Entrer
Déplacer
VÉRROUILLÉ
Verrouillage : Arrêt
Mot de passe
Bloquez canal
Films
Enfants
Général
Téléchargeable
Bloc source

COMMANDE PARENTALE /CLASSEMENT
102
COMMANDE PARENTALE /CLASSEMENT
Sélectionnez
EEnnffaannttss
.
Sélectionnez
AAggee
ou
VViioolleennccee FFaannttaaiissiiee
.
4
3
ENTER
Sélectionner les options de blocage.
5
ENTER
■
Age (s’applique à TV-Y, TV-Y7)
■
Violence Fantaisie (s’applique à TV-Y7)
Classement des emissions pour enfants
-
Pour les É.-U
Empêche les enfants de visionner certains programmes TV, en fonction du classement qui leur a été affecté. Ce
classement ne s’applique pas aux autres émissions TV. À moins que vous ne bloquiez expressément certaines
émissions TV réservées à un public mature dans le sous menu TV Rating, vos enfants pourront visionner ces pro-
grammes.
Sélectionnez
VVÉÉRRRROOUUIILLLLÉÉ
1
MENU
ENTER
Entrer le mot de passe.
2
123
45
0
6
789
6
BACK
Retourner au menu précédent.
EXIT
Retourner à l’affichage télé.
Entrer
Déplacer
VÉRROUILLÉ
Verrouillage : Arrêt
Mot de passe
Bloquez canal
Films
Enfants
Général
Téléchargeable
Bloc source
Entrer
Déplacer
VÉRROUILLÉ
Verrouillage : Arrêt
Mot de passe
Bloquez canal
Films
Enfants
Général
Téléchargeable
Bloc source
Fermer
Age
Violence Fantaisie

COMMANDE PARENTALE /CLASSEMENT
103
Classement des emissions
-
Pour les É.-U
Basé sur les classements, filtre certaines émissions télévisées que vous et votre famille ne souhaitez pas regarder.
Sélectionnez
GGéénnéérraall
.
Sélectionnez
AAggee
,
DDiiaalloogguuee
,
LLaannggaaggee
,
SSeexxee
ou
VViioolleennccee
.
4
3
ENTER
Sélectionner les options de blocage.
5
ENTER
■
Age(s’applique à TV-G,TV-PG,TV-14,TV-MA)
■
Dialogue (s’applique à TV-PG,TV-14)
■
Langage (s’applique à TV-PG,TV-14,TV-MA)
■
Sexe (s’applique à TV-PG,TV-14,TV-MA)
■
Violence (s’applique à TV-PG,TV-14,TV-MA)
Sélectionnez
VVÉÉRRRROOUUIILLLLÉÉ
1
MENU
ENTER
Entrer le mot de passe.
2
123
45
0
6
789
6
BACK
Retourner au menu précédent.
EXIT
Retourner à l’affichage télé.
Entrer
Déplacer
VÉRROUILLÉ
Verrouillage : Arrêt
Mot de passe
Bloquez canal
Films
Enfants
Général
Téléchargeable
Bloc source
Entrer
Déplacer
VÉRROUILLÉ
Verrouillage : Arrêt
Mot de passe
Bloquez canal
Films
Enfants
Général
Téléchargeable
Bloc source
Fermer
Age
Dialogue
Langage
Sexe
Violence

COMMANDE PARENTALE /CLASSEMENT
104
COMMANDE PARENTALE /CLASSEMENT
Systéme de classement en anglais
-
Pour le Canada
Sélection du système de classement en Anglais (Canada).
Sélectionnez
AAnnggllaaiiss
.
Sélectionnez
EE
,
CC
,
CC88++
,
GG
,
PPGG
,
1144++
,
1188++
ou
BBlloocc DDééssaaccttiivvéé
.
4
3
ENTER
■
Si
AAnnggllaaiiss
ou
FFrraannççaaiiss
est verrouil-
lée, entrez le mot de passe pour accès
temporaire.
■
E (Exemptés)
■
C (Enfants)
■
C8+ (Enfants de 8 ans et plus)
■
G (Émissions générales, pour tout public)
■
PG (Accord parental souhaitable)
■
14+ (Public de 14 ans et plus)
■
18+ (Émissions pour adulte)
■
Bloc Désactivé (Filtrage désactivé)
Sélectionnez
VVÉÉRRRROOUUIILLLLÉÉ
1
MENU
ENTER
Entrer le mot de passe.
2
123
45
0
6
789
5
BACK
Retourner au menu précédent.
EXIT
Retourner à l’affichage télé.
Bloc Désactivé: Tout programme
permis
E
C
C8+
G
PG
14+
18+
Bloc désactivé
Entrer
Déplacer
VÉRROUILLÉ
Verrouillage : Arrêt
Mot de passe
Bloquez canal
Anglais
Français
Téléchargeable
Bloc source
Entrer
Déplacer
VÉRROUILLÉ
Verrouillage : Arrêt
Mot de passe
Bloquez canal
Anglais
Français
Téléchargeable
Bloc source

COMMANDE PARENTALE /CLASSEMENT
105
Systeme de classement en français
-
Pour le Canada
Sélection du système de classement en français (Canada).
Sélectionnez
FFrraannççaaiiss
.
Sélectionnez
EE
,
GG
,
88aannss++
,
1133aannss++
,
1166aannss++
,
1188aannss++
ou
BBlloocc DDééssaaccttiivvéé
.
4
3
ENTER
■
E (Exemptés)
■
G (Général)
■
8ans+ (Général-Ne convient pas aux enfants)
■
13ans+ (Ne convient pas aux moins de 13 ans)
■
16ans+ (Ne convient pas aux moins de 16 ans)
■
18ans+ (Pour adultes seulement)
■
Bloc Désactivé (Tout programme permis)
Sélectionnez
VVÉÉRRRROOUUIILLLLÉÉ
1
MENU
ENTER
Entrer le mot de passe.
2
123
45
0
6
789
5
BACK
Retourner au menu précédent.
EXIT
Retourner à l’affichage télé.
Bloc Désactivé: Tout programme
permis
E
G
8ans+
13ans+
16ans+
18ans+
Bloc désactivé
Entrer
Déplacer
VÉRROUILLÉ
Verrouillage : Arrêt
Mot de passe
Bloquez canal
Anglais
Français
Téléchargeable
Bloc source
Entrer
Déplacer
VÉRROUILLÉ
Verrouillage : Arrêt
Mot de passe
Bloquez canal
Anglais
Français
Téléchargeable
Bloc source

COMMANDE PARENTALE /CLASSEMENT
106
TÉLÉCHARGEABLE
COMMANDE PARENTALE /CLASSEMENT
Il est possible que cette fonction uniquement pour les signaux de canal numérique.
Cette fonction est uniquement disponible lorsque la télévision a reçu des données de classification de Région5.
Sélectionnez
TTéélléécchhaarrggeeaabbllee
.
Sélectionnez l’option
TTéélléécchhaarrggeeaabbllee
.
4
3
ENTER
Sélectionnez une des options et bloquez-la.
5
ENTER
Sélectionnez
VVÉÉRRRROOUUIILLLLÉÉ
1
MENU
ENTER
Entrer le mot de passe.
2
123
45
0
6
789
6
BACK
Retourner au menu précédent.
EXIT
Retourner à l’affichage télé.
■
Si
TTéélléécchhaarrggeeaabbllee
est verrouillée,
entrez le mot de passe pour accès
temporaire.
Entrer
Déplacer
VÉRROUILLÉ
Verrouillage : Arrêt
Mot de passe
Bloquez canal
Films
Enfants
Général
Téléchargeable
Bloc source
Entrer
Déplacer
VÉRROUILLÉ
Verrouillage : Arrêt
Mot de passe
Bloquez canal
Films
Enfants
Général
Téléchargeable
Bloc source
Humo
Inte
Erot
Fermer
E
E
■
En fonction du tableau de classification,
l'affichage à l'écran de votre télévision
peut différer légèrement de ce qui est
illustré dans ce guide.

Entrer
Déplacer
VÉRROUILLÉ
Verrouillage : Arrêt
Mot de passe
Bloquez canal
Films
Enfants
Général
Téléchargeable
Bloc source
COMMANDE PARENTALE /CLASSEMENT
107
BLOCAGE DE L'ENTRÉE EXTERNE
Vous permet de bloquer un signal.
Sélectionnez
BBlloocc ssoouurrccee
.
Sélectionner une source.
4
3
Sélectionnez
MMaarrcchhee
ou
AArrrrêêtt
.
5
ENTER
Sélectionnez
VVÉÉRRRROOUUIILLLLÉÉ
1
MENU
ENTER
Entrer le mot de passe.
2
123
45
0
6
789
6
BACK
Retourner au menu précédent.
EXIT
Retourner à l’affichage télé.
Vidéo
Composante
RGB-PC
HDMI
FF GG
Fermer
19/22LD350,
19/22LD350C
Vidéo1
Vidéo2
Composante
RGB-PC
HDMI1
HDMI2
FF GG
Fermer
26/32LD350, 32LD320

ANNEXE
108
LISTE DE VÉRIFICATION DE DÉPANNAGE
ANNEXE
LL’’ooppéérraattiioonn nnee ffoonnccttiioonnnnee ppaass nnoorrmmaalleemmeenntt..
LL’’iimmaaggee nnee ffoonnccttiioonnnnee ppaass..
Pas d’image ni de son
Pas de couleur ou
couleur/image terne
Mauvaise réception de
certaines chaînes
Lignes ou stries sur
l'image
Aucune image en
connectant la prise HDMI
Lignes horizontales/verti-
cales ou image trem-
blotante
L’image apparaît lente-
ment après la mise sous
tension
La télécommande ne
fonctionne pas
L’unité s’est éteinte
subitement
■
Assurez-vous qu’aucun n’objet n'interfère entre le poste de télévision et la télécom-
mande. Assurez-vous que vous pointez la télécommande correctement vers le poste
de télévision.
■
Assurez vous d’avoir installé les batteries en respectant la polarité (+ vers +, - vers -).
■
Assurez-vous d’avoir sélectionné le bon mode de fonctionnement à distance : TV, VCR etc.
■
Remplacez les piles.
■
Est-ce qu’une mise en veille a été programmée?
■
Vérifiez les paramètres de gestion de l’alimentation. Coupure de courant.
■
Le téléviseur s’éteindra automatiquement si aucun signal n’est transmis à la
source TV et d’entrée ou si la télécommande est inactive pendant 15 minutes.
■
Vérifiez que le poste est allumé.
■
Essayez une autre chaîne. Le problème peut venir de la réception d’une chaîne
particulière.
■
Le câble d’alimentation est-il correctement inséré dans la prise murale?
■
Vérifiez la direction et la location de votre antenne.
■
Contrôlez la prise de courant, branchez la prise de courant d’un autre appareil
dans la prise dans laquelle la prise du poste de TV était branchée.
■
C’est normal, l’image est absente durant le processus de démarrage du produit.
Veuillez contactez votre SAV, si l’image n’apparaît toujours pas après cinq minutes.
■
Réglez les couleurs dans les options de menu.
■
Respectez une distance suffisante entre le magnétoscope et le téléviseur.
■
Essayez une autre chaîne. Le problème peut venir de la réception d’une chaîne
particulière.
■
Les connexions vidéo sont-elles correctes?
■
Activez n’importe quelle fonction pour restaurer la luminosité de l’image.
■
Recherchez les causes d’interférence comme un appareil ou un outil électrique.
■
La station ou le câble du poste rencontrent des problèmes, passez sur une autre chaîne.
■
Le signal de la station est faible, orientez l’antenne pour recevoir un signal plus fort.
■
Recherchez les possibles sources d’interférence.
■
Contrôlez l’antenne (changez l'orientation de l'antenne).
■
Vérifiez la compatibilité du câble HDMI avec la version 1.3.
Les câbles HDMI ne prennent pas en charge l’HDMI version 1.3, ils causent des
scintillements ou aucun affichage. Dans ce cas, utilisez des câbles plus récents qui
prennent en charge HDMI version 1.3.
*Cette fonction n'est pas disponible pour tous les modèles.

ANNEXE
109
Image correcte mais pas
de son
IIll yy aa uunn pprroobbllèèmmee eenn mmooddee PPCC.. ((ss’’aapppplliiqquuee aauu MMooddee PPCC uunniiqquueemmeenntt))
Le signal est en dehors de
la plage (format invalide)
La couleur de l’écran est
instable ou couleur unique
Des lignes verticales ou des
rayures en fond d’écran &
du bruit horizontal & une
position incorrecte
LLee ssoonn nnee ffoonnccttiioonnnnee ppaass..
■
Appuyez sur les touches VOL ou VOLUME.
■
Son en sourdine? Appuyez sur la touche MUTE.
■
Essayez avec une autre chaîne. Le problème vient peut être de la réception
d’une chaîne particulière.
■
Les connexions audio sont-elles correctes?
■
Ajustez la balance Droite/gauche dans les options de menu.
■
Un changement du degré d’humidité ou de la température du milieu ambiant
peut provoquer ce genre de désagrément lorsque le produit est allumé ou
éteint. Il ne s'agit pas d'un dysfonctionnement du produit.
■
Vérifiez la compatibilité du câble HDMI avec la version 1.3
■
Vérifiez la compatibilité du câble USB avec la version 2.0
■
Utilisez un fichier MP3 normal.
■
Réglez la résolution, la fréquence horizontale, ou la fréquence verticale.
■
Vérifiez la source d’entrée.
■
Lancez la configuration automatique ou réglez l'horloge, la phase, ou la position H/V.
(Option)
■
Vérifier le câble.
■
Réinstallez la carte vidéo du PC.
Le poste émet un son
inhabituel
Aucun son en connectant
la prise HDMI/USB
Un haut-parleur ne pro-
duit aucun son
*Cette fonction n'est pas disponible pour tous les modèles.

ANNEXE
110
ANNEXE
PPrroobbllèèmmeess aavveecc llaa lliissttee ddee ffiillmmss
Le fichier n’apparaît pas
sur la liste de films.
Un message s’affiche
de type « Audio non-
supporté" ou la vidéo
fonctionne comme il
faut mais pas l’audio.
Le sous-titrage ne
fonctionne pas.
Un message s’affiche de
type « Ce fichier n’est
pas valide" ou l’audio
fonctionne comme il faut
mais pas la vidéo.
■
Vérifier si l’extension est prise en charge.
■
Vérifier s’il est possible de lire sans problèmes le fichier sur un PC.
(Vérifier que le fichier ne soit pas endommagé)
■
Vérifier que la résolution soit prise en charge.
■
Vérifier que le codec audio/vidéo soit pris en charge.
■
Vérifier que la vitesse de défilement du film soit prise en charge.
■
Vérifier s’il est possible de lire sans problèmes le fichier sur un PC.
(Vérifier que le fichier ne soit pas endommagé)
■
Vérifier que le codec audio soit pris en charge.
■
Vérifier que le débit binaire soit pris en charge.
■
Vérifier que la fréquence d’échantillonnage soit prise en charge.
■
Vérifier s’il est possible de lire sans problèmes le fichier sur un PC.
(Vérifier que le fichier ne soit pas endommagé)
■
Vérifier si les noms de fichier vidéo et sous-titrage sont les mêmes.
■
Vérifier si les fichiers vidéo et sous-titrage se trouvent dans le même dossier.
■
Vérifier que le fichier sous-titrage soit pris en charge.
■
Vérifier que la langue soit prise en charge. (Lorsque vous ouvrez un fichier de sous-
titrage dans Memo Pad, vous pouvez vérifier la langue du fichier sous-titrage.)

ENTRETIEN
ANNEXE
111
Il est possible de prévenir les défaillances avant qu’elles surviennent. Un nettoyage régulier et assidu peut
prolonger la durée de vie de votre téléviseur.
Attention: Veillez à mettre l’appareil hors tension et à débrancher le cordon d’alimentation avant de procéder
au nettoyage.
Nettoyage de l’écran
Voici un truc pour empêcher la poussière de se déposer sur l’écran pendant un certain temps. Mouillez un
chiffon doux avec de l’eau tiède. Ajoutez un peu de produit assouplissant ou de détergent liquide pour vais-
selle sur le chiffon. Tordez le chiffon jusqu’à ce qu’il soit presque sec et utilisez-le pour essuyer l’écran.
Ne laissez pas l’eau s’accumuler sur l’écran. Laissez sécher avant de mettre le téléviseur sous tension.
Nettoyage du boîtier
■
Pour enlever la poussière ou les saletés, essuyez le boîtier avec un chiffon doux non pelucheux.
■
Ne mouillez pas le chiffon.
Absence prolongée
GG
Si vous prévoyez ne pas utiliser votre téléviseur pour une longue période (comme des vacances), il est
conseillé de débrancher le cordon d’alimentation afin de ne pas risquer que la foudre ou les surtensions
n’endommagent l’appareil.
ATTENTION
2
1

ANNEXE
112
ANNEXE
SPÉCIFICATIONS DE L’APPAREIL
■
Les spécifications qui figurent ci-dessus peuvent être modifiées sans préavis.
MODÈLES
AC100-240V ~ 50/60Hz
NTSC-M, ATSC, 64 & 256 QAM
VHF 2 à 13, UHF 14 à 69, CATV 1 à 135, DTV 2 à 69, CADTV 1 à 135
75 ohm
32 ~ 104°F (0 ~ 40°C)
Inférieur à 80%
-4 ~ 140°F (-20 ~ 60°C)
Inférieur à 85%
Dimensions
(Largeur x Hauteur
x Profondeur)
Poids
Alimentation requise
Systèm de télévision
Programmation
Impédance de l’antenne externe
Environnement
Support y compris
Support non compris
Support y compris
Support non compris
19LD350 (19LD350-UB)
19LD350C (19LD350C-UA)
22LD350 (22LD350-UB)
22LD350C (22LD350C-UA)
457.0 mm x 336.0 mm x 164.9 mm
(17.9 pouces x 13.2 pouces x 6.4 pouces)
457.0 x 290.0 x 65.0 mm
(17.9 pouces x 11.4 pouces x 2.5 pouces)
3.4 kg (7.4 livres)
3.1 kg (6.8 livres)
526.0 mm x 377.0 mm x 164.9 mm
(20.7 pouces x 14.8 pouces x 6.4 pouces)
526.0 mm x 331.0 mm x 65.0 mm
(20.7 pouces x 13.0 pouces x 2.5 pouces)
4.3 kg (9.4 livres)
4.0 kg (8.8 livres)
Dimensions
(Largeur x Hauteur
x Profondeur)
Poids
Support y compris
Support non compris
Support y compris
Support non compris
663.0 mm x 484.0 mm x 206.8 mm
(26.1 pouces x 19.0 pouces x 8.1 pouces)
663.0 mm x 423.0 mm x 79.9 mm
(26.1 pouces x 16.6 pouces x 3.1 pouces)
7.3 kg (16.0 livres)
6.2 kg (13.6 livres)
800.0 mm x 565.0 mm x 206.8 mm
(31.4 pouces x 22.2 pouces x 8.1 pouces)
800.0 mm x 509.0 mm x 73.8 mm
(31.4 pouces x 20.0 pouces x 2.9 pouces)
9.2 kg (20.2 livres)
8.2 kg (18.0 livres)
MODÈLES
26LD350
(26LD350-UB)
32LD350
(32LD350-UB)
Dimensions
(Largeur x Hauteur
x Profondeur)
Poids
Support y compris
Support non compris
Support y compris
Support non compris
805.0 mm x 583.0 mm x 224.0 mm
(31.6 pouces x 22.9 pouces x 8.8 pouces)
805.0 mm x 528.0 mm x 79.9 mm
(31.6 pouces x 20.7 pouces x 3.1 pouces)
10.8 kg (23.8 livres)
9.7 kg (21.3 livres)
MODELS
32LD320
(32LD320-UA)
Température de fonctionnement
Humidité de fonctionnement
Température d’entreposage
Humidité d’entreposage

ANNEXE
113
CODES IR
Code
Fonction Remarque
(Hexa)
Code
Fonction Remarque
(Hexa)
08 POWER
Touche télécommande (alimentation marche-arrêt)
45 Q.MENU Touche télécommande
43 MENU Touche télécommande
0B INPUT Touche télécommande
10-19 Numériques 0-9 Touche télécommande
4C - (Tiret)/LIST Touche télécommande
1A FLASHBK Touche télécommande
09 MUTE Touche télécommande
02 VOL + Touche télécommande
03 VOL - Touche télécommande
00 CH Touche télécommande
01 CH Touche télécommande
1E FAV/MARK Touche télécommande
40 Touche télécommande
41 Touche télécommande
07 Touche télécommande
06 Touche télécommande
44 ENTER Touche télécommande
28 BACK Touche télécommande
5B EXIT Touche télécommande
0F TV Touche télécommande
95 ENERGY SAVING Touche télécommande
7E SIMPLINK Touche télécommande
AA INFO Touche télécommande
79 RATIO Touche télécommande
30 AV MODE Touche télécommande
72 ROUGE Touche télécommande
71 VERT Touche télécommande
63 JAUNE Touche télécommande
61 BLEU Touche télécommande
B0
G
Touche télécommande
B1
A
Touche télécommande
BA
ll ll
Touche télécommande
8F
FF
Touche télécommande
8E
GG
Touche télécommande
D6 TV Code IR discret
(sélection entrée TV)
C4 POWER ON Code IR discret
(marche seulement)
C5 POWER OFF Code IR discret
(arrêt seulement)
5A Vidéo ou Vidéo1 Code IR discret
(sélection entrée Vidéo ou Vidéo1)
D0 Vidéo2 Code IR discret
(sélection entrée Vidéo2)
BF COMPOSANTE Code IR discret
(sélection entrée Composante)
D5 RGB-PC Code IR discret
(sélection entrée RGB-PC)
CE HDMI ou HDMI1 Code IR discret
(sélection entrée HDMI ou HDMI1)
CC HDMI2 Code IR discret
(sélection entrée HDMI2)
E9 HDMI3 Code IR discret
(sélection entrée HDMI3)
76 Ratio 4:3 Code IR discret
(seulement mode 4:3)
77 Ratio 16:9 Code IR discret
(seulement mode 16:9)
AF Ratio Zoom Code IR discret
(seulement mode Zoom)

ANNEXE
114
COMMANDE EXTERNE PAR LE BIAIS DU RS-232C
ANNEXE
Réglage RS-232C
Le port RS-232C vous permet de brancher la prise d'entrée RS-232C à un appareil de commande externe (comme
un ordinateur ou un système de commande audiovisuel) pour commander les fonctions du téléviseur par un dis-
positif externe.
■
Remarque: Le port RS-232C de cette unité est conçu pour être utilisé par du matériel et des logiciels RS-232C
offerts par des tiers.
Les instructions ci-dessous sont fournies pour vous aider à programmer le logiciel ou pour en vérifier la fonc-
tionnalité à l'aide du logiciel Telenet.
1
/DVI IN
ANTENNA
/CABLE IN
VIDEO
YPB PR
L R
AUDIO
RGB IN (PC)
VIDEO
AUDIO
R
L/MONO
COMPONENT IN
OPTICAL
DIGITAL
AUDIO OUT
AUDIO IN
(RGB/DVI)
AV IN 1
RS-232C IN
(
CONTROL&SERVICE)
Type de connecteur ; D-sub, mâle à 9 broches
No. Nom de la broche
1 Aucune connexion
2 RXD (donnée reçue)
3 TXD (donnée envoyée)
4 DTR (côté DTE prêt)
5 GND
6 DSR (côté DCE prêt)
7 RTS (prêt à envoyer)
8 CTS (prêt à envoyer)
9 Aucune connexin
1
6
5
9
PC
Paramètres de communication
■
Taux baud : 9600 bps
(
UART
)
■
Longueur de donnée : 8 bits
■
Parité : aucune
■
Bit d’arrêt : 1 bit
■
Code de communication : ASCII
■
Utiliser un câble croisé (renversé).
REMARQUE
!
GG
Ce produit comporte une commande de retour d'é-
cho dans le protocole de commande RS-232C.
c.-à-d.)

ANNEXE
115
Configurations RS-232C
Utiliser cette fonction pour spécifier un numéro d’identification du téléviseur.
Voir Planification donnée réelle.
N'importe quel câble indiqué ci-dessous peut être utilisé.
Réglage identification
PC TV
RXD 2 3 TXD
TXD 3 2 RXD
GND 5 5 GND
DTR 4 6 DSR
DSR 6 4 DTR
RTS 7 8 CTS
CTS 8 7 RTS
D-Sub 9 D-Sub 9
PC TV
RXD 2 3 TXD
TXD 3 2 RXD
GND 5 5 GND
DTR 4 6 DTR
DSR 6 4 DSR
RTS 7 7 RTS
CTS 8 8 CTS
D-Sub 9 D-Sub 9
Configurations à 7 fils
(
Câble série NULL modem femelle-femelle
)
Configurations à 3 fils
(pas de standard)
Sélectionnez
OOPPTTIIOONN
.
Sélectionnez
IIddeennttiittéé TTVV
.
Choisir le numéro désiré.
La gamme de réglage est de 1 à
99.
1
MENU
3
2
ENTER
ENTER
4
BACK
Retourner au menu précédent.
EXIT
Retourner à l’affichage télé.
■
Planification donnée réelles
0 : Étape 0
A : Étape 10 (Identité TV 10)
F : Étape 15 (Identité TV 15)
10 : Étape 16 (Identité TV 16)
63: Étape 99 (Identité TV99)
64: Étape 100
Entrer
Déplacer
OPTION
Langage menu(Language)
: Français
Langage audio : Anglais
Indentité source
SIMPLINK : Marche
Touches verrouillées: Arrêt
Guide simple
Sous-titres : Arrêt
Identité TV : 1
Entrer
Déplacer
OPTION
Langage menu(Language)
: Français
Langage audio : Anglais
Indentité source
SIMPLINK : Marche
Touches verrouillées: Arrêt
Guide simple
Sous-titres : Arrêt
Identité TV : 1
EE EE
FF
1
GG
Fermer

ANNEXE
116
Liste de référence de commande
ANNEXE
CCOOMMMMAANNDDEE11 CCOOMMMMAANNDDEE22
Donnée
(hexadécimale)
CCOOMMMMAANNDDEE11 CCOOMMMMAANNDDEE22
Donnée
(hexadécimale)
01. Alimentation k a 00 ~ 01
02. Sélection entrée x b (
GG
p.117)
03. Allongement k c (
GG
p.117)
04. Sourdine écran k d (
GG
p.117)
05. Volume sourdine k e 00 ~ 01
06. Volume k f 00 ~ 64
07. Contraste k g 00 ~ 64
08. Brillance k h 00 ~ 64
09. Couleur k i 00 ~ 64
10. Teinte k j 00 ~ 64
11. Netteté k k 00 ~ 64
12 .
Sélection affichage à l’écran
k l 00 ~ 01
13. Verrouillage
télécommande
Protocole de transmission / réception
TTrraannssmmiissssiioonn
[Commande 1] : Première commande pour contrôler l’ap-
pareil.(j, k, m ou x)
[Commande 2] : Seconde commande pour contrôler l’ap-
pareil.
[ID du Téléviseur] : pour régler l’identification pour choisir le
numéro désiré pour l’ordinateur au menu
réglage. Gamme de 1 à 00. En sélection-
nant 0, chaque appareil branché sur le
téléviseur est contrôlé. Régler comme
indiqué (1 à 99) au menu et une décimale
hexagonale (0x0 à 0x63) au protocole de
transmission/réception.
[Donnée] : Pour transmettre donnée de commande.
Transmet ‘FF’ pour lire la position de la commande
* Dans ce modèle, TV n’enverra pas la statut en mode attente.
[Cr] : Retour de chariot
Code ASCII ‘0x0D’
[ ] : Code ASCII ‘espace (0x20)’
CCoonnffiirrmmaattiioonn
Le moniteur transmet ACK (reconnaissance) en fonction de
ce format au moment de recevoir des données normales. À ce
moment, si la donnée est en mode lecture, elle indique la
donnée de position actuelle. Si en mode écriture, elle
retourne la donnée de l’ordinateur.
* Dans ce modèle, TV n’enverra pas la statut en mode attente.
* Format de donnés
[Commande 2] : Utilisation comme commande.
[ID du Téléviseur] : Utilisation le petite caractère, si ID du
Téléviseur est 10, il enverra ‘0’, ‘a’.
[Donnée] : Utilisation le petite caractère, si donnée est 0 x ab,
il enverra ‘a’, ‘b’.
[OK] : Utilisation le grand caractère.
EErrrreeuurr ddee ccoonnffiirrmmaattiioonn
Le moniteur transmet ACK en fonction de ce format au
moment de recevoir une donnée anormale depuis les fonc-
tions non viables ou erreurs de communication.
Donnée1: code illégal
Donnée2: fonction non supportée
Donnée3: attendre plus
* Dans ce modèle, TV n’enverra pas la statut en mode attente.
* Format de donnés
[Commande 2] : Utilisation comme commande.
[ID du Téléviseur] : Utilisation le petite caractère, si ID du
Téléviseur est 10, il enverra ‘0’, ‘a’.
[Donnée] : Utilisation le petite caractère, si donnée est 0 x ab,
il enverra ‘a’, ‘b’.
[NG] : Utilisation le grand caractère.
[[CCoommmmaannddee11]][[CCoommmmaannddee22]][[ ]][[IIddeennttiittéé TTVV]][[ ]][[DDoonnnnéé]][[CCrr]]
[[CCoommmmaannddee22]][[ ]][[IIddeennttiittéé TTVV]][[ ]][[OOKK]][[DDoonnnnéé]][[xx]]
[[CCoommmmaannddee22]][[ ]][[
IIddeennttiittéé TTVV
]][[ ]][[NNGG]][[DDoonnnnéé]][[xx]]
14. Aiguës k r 00 ~ 64
15. Basses k s 00 ~ 64
16. Équilibre k t 00 ~ 64
17.
Température de Couleur
k u 00 ~ 02
18. Économie d’énergie j q (
GG
p.118)
19. Configuration auto j u (
GG
p.118)
21 .
Ajout/suppression canal
m b 00 ~ 01
22. Clé m c (
GG
p.119)
23. Rétroéclairage m g 00 ~ 64
00 ~ 01
k m
20.
Syntonisation Canal
CCOOMMMMAANNDDEE11 CCOOMMMMAANNDDEE22
Donnée0
(Hexadécimale)
Donnée1
(Hexadécimale)
Donnée2
(Hexadécimale)
Donnée3
(Hexadécimale)
Donnée4
(Hexadécimale)
Donnée5
(Hexadécimale)
ma
Programme
Physique Haut
Principal
Programme Bas
Principal
Bas
Secondair
e Haut
Secondair
e Bas
Attribut

ANNEXE
117
0011.. AAlliimmeennttaattiioonn ((CCoommmmaannddee:: kk aa))
Contrôle marche arrêt TV
Transmission [k][a][ ][Identité][ ][Donnée][Cr]
Donnée 0 : Arrêt Donnée 1 : Marche
Confirmation [a][ ][Identité][ ][OK/NG][Donnée][x]
* De même, si d’autres fonctions transmettent une don-
née FF en fonction de ce format, le retour de donnée
reconnue présente la position de chaque fonction.
* Dans ce modèle, la TV enverra le confirmation après
puissance sur traiter l’accomplissement.
* Il pourrait y a un moment retardent entre la commande
et la confirmation.
0022.. SSéélleeccttiioonn eennttrrééee ((CCoommmmaannddee:: xx bb))
Pour sélectionner source entrée du TV.
Transmission [x][b][ ][Identité TV][ ][Donnée][Cr]
Donnée 00: DTV (
Antenne
) Donnée
01: DTV (Cable)
Donnée
10: Analogue
(Antenne
) Donnée
11: Analogue
(
câble)
Donnée
20: Vidéo/Vidéo1
Donnée
21: Vidéo2
Donnée
40:
Composante
Donnée
60: RGB-PC
Donnée
90: HDMI/HDMI1 Donnée
91: HDMI2
Confirmation [b][ ][Identité TV][ ][OK/NG][Donnée][x]
* Utilisez le dispositif selon votre modèle.
0033.. AAlllloonnggeemmeenntt ((CCoommmmaannddee:: kk cc))
Règle le format écran.
Transmission [k][c][ ][Identité TV][ ][Donnée][Cr]
Donnée 01: 4:3 09: Sur mesure
02: 16:9 10: Zoom cinéma1
04: Zoom
06: Selon source 1F: Zoom cinéma16
Confirmation [c][ ][Identité TV][ ][OK/NG][Donnée][x]
0044.. SSoouurrddiinnee ééccrraann ((CCoommmmaannddee:: kk dd))
Pour sélectionner sourdine marche-arrêt.
Transmission [k][d][ ][Identité TV][ ][Donnée][Cr]
Donnée 0 : Arrêt (image marche), Video-out Mute off
Donnée 1 : Marche (image arrêt)
Data 10: Video-out Mute on
Confirmation
[d][ ][Set ID][ ][OK/NG][Data][x]
* En cas de sortie vidéo en mode silence, l'affichage
d'écran (OSD) sera opérationnel sur la télévision. Mais,
en cas d'écran en mode silence, la télévision n’ef-
fectuera aucun affichage à l'écran (OSD).
0055.. VVoolluummee ssoouurrddiinnee ((CCoommmmaannddee:: kk ee))
Contrôle volume sourdine marche-arrêt.
Utiliser aussi la touche MUTE sur la télécommande.
Transmission [k][e][ ][Identité TV][ ][Donnée][Cr]
Donnée 0 : Volume sourdine marche (Volume arrêt)
Donnée 1 : Volume sourdine arrêt (Volume marche)
Confirmation [e][ ][Identité TV][ ][OK/NG][Donnée][x]
0066.. VVoolluummee ((CCoommmmaannddee:: kk ff))
Règle le contrôle.
Utiliser aussi les touches volumes sur la télécommande.
Transmission [k][f][ ][Identité TV][ ][Donnée][Cr]
Donnée Min: 0 ~ Max: 64 (*Transmis par hexadécimal code)
*Voir planification de donnée réelle’.
Confirmation [f][ ][Identité TV][ ][OK/NG][Donnée][x]
0077.. CCoonnttrraassttee ((CCoommmmaannddee:: kk gg))
Règle le contraste.
Aussi par le menu image.
Transmission [k][g][ ][Identité TV][ ][Donnée][Cr]
Donnée Min: 0 ~ Max: 64 (*Transmis par hexadécimal code)
*Voir planification de donnée réelle’.
Confirmation [g][ ][Identité TV][ ][OK/NG][Donnée][x]
0088.. BBrriillllaannccee ((CCoommmmaannddee:: kk hh))
Règle la brillance.
Aussi par le menu image.
Transmission [k][h][ ][Identité TV][ ][Donnée][Cr]
Donnée Min: 0 ~ Max: 64 (*Transmis par hexadécimal code)
*Voir planification de donnée réelle’.
Confirmation [h][ ][Identité TV][ ][OK/NG][Donnée][x]
0099.. CCoouulleeuurr ((CCoommmmaannddee:: kk ii))
Règle la couleur.
Aussi par le menu image.
Transmission [k][i][ ][Identité TV][ ][Donnée][Cr]
Donnée Min: 0 ~ Max: 64 (*Transmis par hexadécimal code)
Voir planification de données réelles 1 ci-dessous.
Confirmation [i][ ][Identité TV][ ][OK/NG][Donnée][x]
1100.. TTeeiinnttee ((CCoommmmaannddee:: kk jj))
Règle la teinte.
Aussi par le menu image
Transmission [k][j][ ][Identité TV][ ][Donnée][Cr]
Donnée Rouge: 0 ~ Vert: 64(*Transmis par hexadécimal code)
Voir planification de données réelles ci-dessous.
Confirmation
[ j ][ ][
Identité TV
][ ][OK/NG][
Donnée
][x]

ANNEXE
118
ANNEXE
1111.. NNeetttteettéé ((CCoommmmaanndd:: kk kk))
Règle la netteté.
Aussi par le menu image.
Transmission [k][k][ ][Identité TV][ ][Donnée][Cr]
Donnée Min: 0 ~ Max: 64(*Transmis par hexadécimal code)
Voir planification de données réelles ci-dessous.
Confirmation [k][ ][Identité TV][ ][OK/NG][Donnée][x]
1122.. SSéélleeccttiioonn aaffffiicchhaaggee àà ll’’ééccrraann ((CCoommmmaannddee:: kk ll))
Sélectionne marche-arrêt.
Transmission [k][l][ ][Identité TV][ ][Donnée][Cr]
Donnée 0: OSD Arrêt Donnée 1: OSD Marche
Confirmation [l][ ][Identité TV][ ][OK/NG][Donnée][x]
1133.. VVeerrrroouuiillllaaggee ttééllééccoommmmaannddee ((CCoommmmaannddee:: kk mm))
Verrouille la télécommande et le panneau avant.
Transmission [k][m][ ][Identité TV][ ][Donnée][Cr]
Donnée 0: Verrouillage arrêt
Donnée 1: Verrouillage marche
Confirmation [m][ ][Identité TV][ ][OK/NG][Donnée][x]
Si l’on n’utilise pas la télécommande et les commandes du
panneau avant pour le moniteur, utiliser ce mode. Lorsque
l’alimentation principale est marche-arrêt, le verrouillage
de télécommande est désactivé.
Si le verrouillage est en mode 'veille', la télévision ne s'al-
lumera ni avec la touche POWER de la télécommande ni
avec celle de la télévision.
1144.. AAiigguuëëss ((CCoommmmaannddee:: kk rr))
Pour régler le aiguës.
L’on peut aussi régler les aiguës au menu Audio.
Transmission [k][r][ ][Identité TV][ ][Donnée][Cr]
Donnée Min: 0 ~ Max: 64 (*Transmis par hexadécimal code)
Voir planification de données réelles ci-dessous.
Confirmation [r][ ][Identité TV][ ][OK/NG][Donnée][x]
1155.. BBaasssseess ((CCoommmmaannddee:: kk ss))
Pour régler le basses.
L’on peut aussi régler la basses au menu Audio.
Transmission [k][s][ ][Identité TV][ ][Donnée][Cr]
Donnée Min: 0 ~ Max: 64 (*Transmis par hexadécimal code)
Voir planification de données réelles ci-dessous.
Confirmation[s][ ][Identité TV][ ][OK/NG][Donnée][x]
1166.. ÉÉqquuiilliibbrree ((CCoommmmaannddee:: kk tt))
Pour régler l’équilibre
L’on peut aussi régler l’équilibre au menu Audio.
Transmission [k][t][ ][Identité TV][ ][Donnée][Cr]
Donnée Min: 0 ~ Max: 64 (*Transmis par hexadécimal code)
Voir planification de données réelles ci-dessous.
Confirmation [t][ ][Identité TV][ ][OK/NG][Donnée][x]
1177.. TTeemmppéérraattuurree ddee ccoouulleeuurr ((CCoommmmaannddee:: kk uu))
Pour régler la température de couleur.
L’on peut aussi régler la température de couleur au menu image.
Transmission [k][u][ ][Identité TV][ ][Donnée][Cr]
Donnée 00: Moyen 01: Froid 02: Chaud
Confirmation [u][ ][Identité TV][ ][OK/NG][Donnée][x]
1188.. ÉÉccoonnoommiiee dd’’éénneerrggii ((CCoommmmaannddee:: jj qq))
Pour contrôler la fonction d’économie d’énergie.
Transmission [j][q][ ][Identité TV][ ][Donnée][Cr]
Donnée 00: Économie d'énergie - Arrêt
01: Économie d'énergie- Minimum
02: Économie d'énergie - Moyen
03: Économie d'énergie - Maximum
05: Économie d'énergie - Écran désactivé
Confirmation [q][ ][Identité TV][ ][OK/NG][Donnée][x]
1199.. CCoonnffiigguurraattiioonn aauuttoo ((CCoommmmaannddee:: jj uu))
Pour contrôler la position de l’image et minimiser automa-
tiquement le tremblement d’image. La configuration
automatique marche seulement sous RGB-PC.
Transmission [j][u][ ][Identité TV][ ][Donnée][Cr]
Donnée1: Pour régler.
Confirmation [u][ ][Identité TV][ ][OK/NG][Donnée][x]
2200.. SSyynnttoonniissaattiioonn CCaannaall ((CCoommmmaannddee:: mm aa))
Syntonise un canal suivant numéro physique/majeur/mineur
Transmission [m][a][ ][Identité TV][ ][Donnée0][ ][Donnée1]
[ ][Donnée2][ ][Donnée3][ ][Donnée4][ ][Donnée5][Cr]
Les canaux numériques possèdent un numéro de canal
physique, majeur et mineur. Le numéro physique est le
numéro de canal numérique réel, le majeur est le numéro
auquel le canal doit être assigné et le mineur est le sous-
canal. Comme le syntoniseur ATSC assigne automatique-
ment le canal au numéro majeur, le numéro physique n'est
pas requis lors de la transmission d'une commande.
Donnée 0: numéro physique
NTSC air: 02~45, NTSC câble: 01, 0E~7D
ATSC air: 01~45, ATSC câble: 01~87
Donnée1 & 2:Numéro canal principal
Donnée1: byte élevé Donnée2: byte faible
Deux octets sont disponibles pour le majeur et le
mineur, mais en général seul le deuxième est utilisé.
Donnée3 & 4: Numéro mineur
Non requis pour NTSC.

ANNEXE
119
Donnée 05
:
Le tableau ci-dessus présente le code binaire devant être
converti en hexadécimales avant la transmission. Par exem-
ple: Le code binaire pour syntoniser la source hiérar-
chique inférieure sur un canal par câble NTSC est “1000
0001”, qui se traduit par “81” en hexadécimales.
*7
e
bit : La source à laquelle vous désirez changer le canal.
*6
e
bit : Utiliser un canal en deux parties ou en une partie.
Dans la plupart des cas, il suffit d'utiliser 0 puisque la
valeur est ignorée lors de l'utilisation du NTSC.
*5
e
bit: Utiliser 0 avec NTSC car il ne peut être utilisé
qu'avec le numéro de canal physique. Le 1 est normale-
ment utilisé pour ATSC car dans la plupart des cas le
numéro physique n'a pas d'importance.
*4
e
bit: Définir à 0.
* Bits 3 à 0 : Choisir le type de signal.
* Exemples de commandes de syntonisation : :
1. Syntoniser sur le canal 35 par câble analogique (NTSC).
Donnée
0 = Physique de 35 = 23
Donnée 1 & 2 = Pas de majeur = 00 00
Donnée
3 & 4 = Pas de mineur = 00 00
Donnée
5 = 0000 0001 en binaire = 01
Total = ma 00 23 00 00 00 00 01
2. Syntoniser sur le canal local numérique (ATSC) 30-3
Donnée
0 = Le physique est inconnu = 00
Donnée
1 & 2 = Le majeur est 30 = 00 1E
Donnée
3 & 4 = Le mineur est 3 = 00 03
Donnée
5 = 0010 0010 en binaire = 22
Total = ma 00 00 00 1E 00 03 22
Confirmation[a][ ][Identité TV][ ][OK][Donnée0]
[Donnée1][Donnée2][Donnée3][Donnée4][x][a][ ]
[Identité TV][ ][NG][Donnée0][x]
2211.. AAjjoouutt//ssuupppprreessssiioonn ccaannaall ((CCoommmmaannddee:: mm bb))
Pour ajouter ou supprimer des canaux
Transmission [m][b][ ][Identité TV][ ][Donnée][Cr]
Donnée 0: canal supprimé Donnée 1: canal ajouté
Confirmation [b][ ][Identité TV][ ][OK/NG][Donnée][x]
2222.. CClléé ((CCoommmmaannddee:: mm cc))
Pour envoyer le code clé de télécommande à IR
Transmission [m][c][ ][Identité TV][ ][Donnée][Cr]
Donnée Code clé: voir page 113.
Confirmation [c][ ][Identité TV][ ][OK/NG][Donnée][x]
Quand la télévision est en mode 'veille', vous ne pouvez
l’allumer qu’avec la touche POWER de la télécommande.
2233.. RRééttrrooééccllaaiirraaggee ((CCoommmmaannddee:: mm gg))
Pour ajuster la lumière arrière d’écran.
Transmission [m][g][ ][Identité TV][ ][Donnée][Cr]
Donnée Min: 0 ~ Max: 64 (*Transmis par hexadécimal code)
*Voir planification de donnée réelle’.
Confirmation [g][ ][Identité TV][ ][OK/NG][Donnée][x]
Réglage
NTSC Air
NTSC câble
ATSC Air
ATSC câble_std
ATSC câble_hrc
ATSC câble_irc
ATSC câble_auto
Réservé
-
Réservé
1
0
0
1
1
0
0
1
1
x
1
2
0
0
0
0
1
1
1
1
x
1
3
0
0
0
0
0
0
0
0
x
1
4
x
x
x
x
x
x
x
x
x
x
réservé
5
0
1
Deux
Un
Canal 2 / 1
parties
6
0
1
Utilisation
Aucune
Utilisation
Utilisation d’un
canal physique
7
0
1
Princ.
Sec.
Image sec-
ondaire/princ.
0
0
1
0
1
0
1
0
1
x
1

ANNEXE
120
NOTICE SUR LE LOGICIEL OPEN SOURCE
-
Cette fonction n'est pas disponible pour tous les modèles.
ANNEXE
Les suivants exécutables GPL et bibliothèques LGPL/MPL utilisés dans ce produit sont sujets aux Accords de
Licence GPL2.0/LGPL2.1/MPL1.1:
EXECUTABLES GPL:
■
Linux kernel 2.6
■
busybox
■
lzo
BIBLIOTHEQUES LGPL:
■
uClibc
BIBLIOTHEQUES MPL:
■
Nanox
LG Electronics offre de vous fournir le code source sur un CD-ROM contre les frais des coûts de cette distribution,
comme les coûts du support, de l’envoi et de l’emballage, sous demande par courrier électronique à LG Electronics
à: opensour[email protected]
Cette offre est valable par une période de trois (3) ans depuis la date de distribution de ce produit par LG
Electronics.
Vous pouvez obtenir une copie des licences GPL, LGPL et MPL au site suivant :
- http://www.gnu.org/licenses/old-licenses/gpl-2.0.html
- http://www.gnu.org/licenses/old-licenses/lgpl-2.1.html
- http://www.mozilla.org/MPL/MPL-1.1.html
Vous pouvez, de plus, obtenir une traduction des licences GPL et LGPL au site suivant :
- http://www.gnu.org/licenses/old-licenses/gpl-2.0-translations.html
- http://www.gnu.org/licenses/old-licenses/lgpl-2.1-translations.html
Ce logiciel est partiellement basé sur le travail du Groupe Indépendant JPEG droits réservés © 1991 – 1998,
Thomas G. Lane.
Ce produit inclut une :
■
Bibliothèque libpng : droits réservés © 2004 Glenn Randers-Pehrson
■
Bibliotheque compression zlib : droits réservés © 1995-2002 Jean-loup Gailly and Mark Adler.
■
Bibliotheque tinyxml : droits réservés (c) 2000-2006 Lee Thomason


P/NO : SAC34134202 (1004-REV01)
www.lg.com
Notez les numéros de modèle et de série de
l’appareil qui figurent sur l’étiquette au dos du
moniteur. Et inscrivez-les sur le dessus ou au verso
de ce manuel.
MODÈLE
PUBLICATION PÉRIODIQUE
GUIDE DE L’UTILISATEUR
TÉLÉVISEUR COULEUR
À CRISTAUX LIQUIDES
Veuillez lire ce manuel attentivement avant
d’utiliser votre appareil et conservez-le pour
consultation ultérieure.

MANUAL DE USUARIO
TELEVISOR LCD
Lea atentamente este manual antes de poner en
marcha su equipo y guárdelo para futuras consultas.
P/NO : SAC34134202 (1004-REV02)
www.lg.com
El número de modelo y serie del televisor se
encuentra en la parte posterior y en un lateral del
televisor respectivamente.
Anótelo a continuación para tenerlo disponible en
caso de necesitar asistencia.
MODELO
SERIE
19LD350
22LD350
26LD350
32LD350
19LD350C
22LD350C
32LD320

2
ADVERTENCIA / PRECAUCIÓN
ADVERTENCIA / PRECAUCIÓN
No exponga este equipo a la lluvia o la humedad
excesiva, a fin de evitar riesgo de incendio o
choque eléctrico.
ADVERTENCIA DE LA FCC
Dispositivo digital de Clase B
Este equipo ha sido probado y se ha demostrado que
cumple los límites para dispositivos digitales de Clase
B, conforme a la Parte 15 de las normas FCC. Estos
límites han sido diseñados para proporcionar una
protección razonable contra interferencias perjudi-
ciales en una instalación residencial. Este equipo
genera, emplea, y puede radiar energía de radiofre-
cuencia y, si no se instala y usa conforme al manual
de instrucciones, podría causar interferencias perju-
diciales a las comunicaciones por radio. Sin embargo,
no existe garantía de que la interferencia no ocurra en
una instalación en particular. Si este equipo causara
interferencias molestas a su recepción de radio o
televisión, lo que podrá determinarse apagando y
prendiendo el equipo, se insta al usuario a tratar de
corregir las interferencias mediante una o más de las
siguientes medidas:
- Reoriente o reubique la antena de recepción.
- Aumente la separación entre el producto y el receptor.
- Conecte el producto a una toma de alimentación
dispuesta en un circuito distinto al del receptor.
- Póngase en contacto con su proveedor o solicite
ayuda a un técnico especializado de radio/TV.
Este dispositivo cumple con la parte 15 de las reglas
de FCC.
El funcionamiento esta sujeto a las siguientes dos
condiciones: (1) Este dispositivo no causa interfer-
encia (nociva) y (2) Este dispositivo debe aceptar
cualquier interferencia recibida, incluyendo interfer-
encias que puedan causar un funcionamiento (del
dispositivo).
Cualquier cambio o modificación no aprobada expre-
samente por la parte responsable por conformidad
podría anular la potestad del usuario para usar el
equipo.
PRECAUCIÓN
No intente modificar este producto de ningún modo
sin disponer de autorización por escrito de LG
Electronics. La modificación sin autorización podría
anular la potestad del usuario para usar este producto.
ADVERTENCIA PRECAUCION
RIESGO DE CHOQUE ELECTRICO
NO ABRIR
El símbolo de descarga dentro del tri-
angulo equilátero, señala al usuario la
presencia de voltaje peligroso sin ais-
lamiento en el interior del aparato de tal intensi-
dad que podría presentar riesgo de descarga
eléctrica.
El símbolo de admiración dentro del trian-
gulo equilátero, indica al usuario que el man-
ual que acompaña a este aparato contiene
instrucciones referentes a su funcionamiento y man-
tenimiento.
PARA REDUCIR EL RIESGO DE DESCARGA
ELECTRICA NO RETIRE LA CUBIERTA NI LA
PARTE POSTERIOR DE ESTE APARATO.
ADVERTENCIA/PRECAUCION
PARA REDUCIR EL RIESGO DE INCENDIO O
DESCARGA ELECTRICA, NO EXPONGA EL TELE-
VISOR A LA LLUVIA O HUMEDAD.
NOTA PARA EL INSTALADOR DE
CABLE/TV
Este recordatorio cumple el propósito de llamar la aten-
ción del instalador del sistema CATV con respecto al
Artículo 820-40 del Código Eléctrico Nacional (EE.UU.).
El código proporciona las directrices necesarias para
lograr una conexión a tierra correcta y, en particular,
especifica que el cable de puesta a tierra deberá estar
conectado al sistema de puesta a tierra del edificio, tan
cerca del punto de entrada del cable como resulte práctico.

3
ADVERTENCIA
INSTRUCCIONES DE SEGURIDAD IMPORTANTES
Lea estas instrucciones.
Guarde estas instrucciones.
Tenga en cuenta todas las advertencias.
Siga todas las instrucciones.
No utilice este producto cerca del agua.
Límpielo sólo con un paño seco.
No bloquee las aberturas de ventilación. Instale
siguiendo las instrucciones del fabricante.
No lo coloque cerca de fuentes de calor, como
radiadores, rejillas de aire caliente, estufas u
otros aparatos (incluidos los amplificadores)
que emitan calor.
No anule el propósito de seguridad del tomacor-
riente polarizado o ni del de puesta a tierra. Un
tomacorriente polarizado cuenta con dos clavijas,
una más ancha que la otra. Un tipo de tomacorri-
ente con conexión a tierra dispone de dos clavijas
y una tercera de puesta a tierra, el terminal ancho
o la tercera clavija está puesta por su seguridad.
Si el tomacorriente incluido no es adecuado para
su toma de pared, póngase en contacto con un
electricista para que realice el reemplazo de la
toma obsoleta.
Proteja el cable de alimentación para que no lo
pisen ni aplasten, especialmente en las clavijas,
las tomas y el punto de salida del aparato
Utilice únicamente acoplamientos y accesorios
especificados por el fabricante.
Utilícelo sólo con el estante fijo o con ruedas,
trípode, soporte o mesa especificados por el
fabricante o con el accesorio suministrado con
el aparato. Si utiliza un carrito, tenga cuidado al
moverlo junto con el aparato para evitar
lesiones en caso de que éste se caiga.
Desenchufe este producto en caso de no
utilizarlo durante un largo periodo de tiempo.
Desenchufe este equipo durante tormentas
con aparato eléctrico o si no piensa usarlo
durante largos períodos de tiempo.
Sólo el personal calificado puede encargarse
del servicio técnico. La asistencia técnica es
necesaria si el aparato presenta algún daño,
como por ejemplo, si el cable o la clavija de
alimentación están dañados, si se derrama
líquido o se introducen objetos dentro del
aparato, si el aparato ha estado expuesto a la
lluvia o humedad, si no opera correctamente o
si se ha caído.
1
2
3
4
5
7
8
6
9
10

4
ADVERTENCIA
No toque el aparato o la antena durante una
tormenta eléctrica.
Cuando monte el televisor en la pared,
asegúrese de no colgar el televisor en cables
eléctricos y de señal de la parte trasera.
No golpee el producto ni permita que le caigan
objetos encima ni en la pantalla.
PRECAUCIÓN en cuanto al cable de alimentación:
Se recomienda colocar la mayoría de los aparatos
en un circuito dedicado. Es decir, un circuito de
salida única que alimenta sólo a ese aparato y que
no tiene tomas o circuitos adicionales.
Compruebe la página de especificaciones de este
manual del propietario para estar seguro.
No conecte demasiados electrodomésticos a
la misma toma de pared de corriente alterna ya
que hacerlo podría suponer riesgo de incendio
o choque eléctrico.
No sobrecargue las tomas de pared. Las tomas
de pared sobrecargadas, sueltas o dañadas,
los alargadores, los cables de alimentación
deshilachados o el aislante agrietado de los
cables podrían resultar peligrosos. Cualquiera
de estas condiciones podría provocar un
incendio o una descarga eléctrica. Examine
periódicamente el cable de su aparato y si
parece dañado o deteriorado, desenchúfelo,
deje de usarlo y solicite al centro de servicio
técnico autorizado que lo sustituyan por un
nuevo equivalente. Proteja el cable de ali-
mentación de daños físicos o mecánicos y
evite doblarlo, aplastarlo, pellizcarlo o pisarlo
con una puerta o caminar sobre él. Ponga
especial atención en los enchufes, tomas de
pared y el punto por donde el cable sale del
aparato.
No manipule la TV con el cable de ali-
mentación enchufado. No utilice cables de ali-
mentación dañados o mal conectados.
Asegúrese de desenchufar el cable de ali-
mentación sujetando el enchufe. No tire del
cable de alimentación para desenchufar la TV.
ADVERTENCIA - A fin de reducir el riesgo de
incendio o choque eléctrico, no exponga este
aparato a la lluvia, humedad u otros líquidos. No
toque la TV con las manos mojadas. No instale
este producto cerca de objetos inflamables como
gasolina o velas, ni exponga la TV al flujo directo
de aparatos de aire acondicionado.
No exponga este aparato a goteos o salpica-
duras, ni coloque sobre él objetos que con-
tengan líquidos, como floreros, tazas, etc. (por
ejemplo en estantes sobre la unidad).
TTOOMMAA AA TTIIEERRRRAA
Asegúrese de conectar el cable de toma a tierra
para evitar posibles descargas eléctricas. (es
decir, que una TV con un enchufe de tres polos,
debe conectarse a una toma de pared con tres
polos). Si no es posible la puesta a tierra, con-
tacte con un electricista calificado para que
instale un interruptor automático independiente.
No intente conectar la unidad a tierra medi-
ante cables telefónicos, pararrayos o tuberías
de gas.
DDEESSCCOONNEECCTTAARR EELL DDIISSPPOOSSIITTIIVVOO DDEE LLAA RREEDD
Este dispositivo se desconecta desenchufándolo
del cable de red. El enchufe debe con tar con
un acceso sin obstáculos.
Mientras esta unidad esté conectada a un
tomacorriente de ca se desconectará de dicha
fuente aunque apague la unidad mediante el
INTERRUPTOR DE PRENDIDO.
12
11
14
13
16
17
18
19
Alimentación
Interruptor
diferencial
15

5
AANNTTEENNAASS
CCoonneexxiióónn aa ttiieerrrraa ddee llaa aanntteennaa eexxtteerriioorr
Si dispusiera de una antena exterior instalada,
tome las medidas de seguridad que se exponen
a continuación. Los sistemas de antenas exteri-
ores no deben situarse cerca de tendidos eléc-
tricos u otros circuitos de iluminación eléctrica
o de suministro, ya que podrían entrar en con-
tacto con dichos tendidos o circuitos eléctricos
provocando lesiones graves e incluso la muerte.
Asegúrese de que el conjunto de la antena
disponga de toma de tierra que lo proteja de
posibles subidas de tensión y de acumulación
de cargas estáticas.
La sección 810 del Código eléctrico nacional
(NEC) de los EE.UU., proporciona información
relativa a la correcta puesta a tierra del mástil
y la estructura de soporte, de la parte inicial
del cable a una unidad de descarga de antena,
la sección de los conductores de puesta a tier-
ra, emplazamiento de las unidades de descarga
de antena, la forma de conectar los electrodos
a tierra, así como los requisitos que deben
cumplir dichos electrodos.
PPuueessttaa aa ttiieerrrraa ddee uunnaa aanntteennaa ddee aaccuueerr--
ddoo ccoonn eell CCóóddiiggoo eellééccttrriiccoo nnaacciioonnaall,,
AANNSSII//NNFFPPAA 7700
LLiimmppiieezzaa
Antes de iniciar labores de limpieza, desenchufe
el cable de alimentación y limpie cuidadosa-
mente la unidad con un paño suave para evitar
arañazos superficiales. No rocíe directamente
agua vaporizada u otros líquidos sobre la TV
para evitar posibles choques eléctricos. No
limpie la unidad con productos químicos como
alcoholes, disolventes o benceno.
TTrraannssppoorrttee
Asegúrese de que el producto esté apagado,
desenchufado y que todos los cables hayan
sido desconectados. Harán falta dos o más
personas para transportar TVs de gran tamaño.
No someta el panel frontal de la TV a presiones
o esfuerzos excesivos.
VVeennttiillaacciióónn
Instale su TV en un lugar que disponga de ven-
tilación apropiada. No la instale en espacios
cerrados como, por ejemplo, una estantería. No
cubra el producto con paños u otros materiales,
como plásticos, mientras esté enchufada. No
instale la unidad en lugares con exceso de polvo.
Tener cuidado de no tocar las aberturas de
ventilación. Al ver la televisión durante un largo
período, las aberturas de ventilación pueden
calentarse.
Si percibe olor a quemado o de cualquier otro
tipo, o detecta sonidos extraños procedentes
de su TV, desenchufe el cable de alimentación
y contacte con el servicio técnico autorizado.
No presione en exceso el panel con sus manos
u objetos afilados, como tornillos, lápices o
bolígrafos, y evite rayarlo.
Mantenga el producto lejos de la luz directa
del sol.
PPAARRAA LLAA TTVV DDEE LLCCDD
Si siente la TV fría al tocar, puede que haya un
pequeño “flicker” cuando se ha encendido.
Esto es normal, no hay nada malo con la TV.
Unos pocos defectos de puntos pueden ser
visibles en la pantalla, apareciendo en un color
rojo, verde o azul. Pero ellos no tienen ningún
efecto equivocado para la función del monitor.
Evitese a tocar la pantalla LCD o agarrarla con
su(s) dedo(s) por un periodo largo de tiempo.
Si lo hace, eso puede provocar una distorción
temporal en la pantalla.
20
23
24
25
26
27
28
21
22
Cable de entrada de la antena
Unidad de descarga de la antena
(Sección 810-20 del NEC)
Conductor de puesta a tierra
(Sección 810-21 del NEC)
Abrazadera de puesta a tierra
Sistema de electrodo de conexión
a tierra del servicio de suministro
(Art. 250, parte H del NEC)
Abrazadera de puesta a tierra
Equipo de
servicio eléctrico
NEC: Código Eléctrico Nacional
DISPOSICIÓN
(Sólo lámpara de Hg utilizada en TV LCD)
Lámpara fluorescente usada en este producto
contiene una cantidad mínima de mercurio. No
lo disponga este producto con basura normal de
la casa. Disposición de este producto debe ser
manejado de acuerdo a la autoridad local de su
provincia.

6
CONTENIDO
ADVERTENCIA / PRECAUCIÓN
. . . . . . . . . . . . 2
ADVERTENCIA
. . . . . . . . . . . . . . . . . . . . . . . . . . . . . . . . . . . . . . . . . . . . 3
FUNCIONES DE ESTE TV
. . . . . . . . . . . . . . . . . . . . . . . . . 8
PREPARACIÓN
Accesorios
. . . . . . . . . . . . . . . . . . . . . . . . . . . . . . . . . . . . . . . . . . . . . . . . . . . . . . .
9
Información del panel frontal
. . . . . . . . . . . . . . . . . . . . . . . . . .
10
Información del panel posterior
. . . . . . . . . . . . . . . . . . . . . .
12
Instrucciones
. . . . . . . . . . . . . . . . . . . . . . . . . . . . . . . . . . . . . . . . . . . . . . . . . . 14
Montaje para la pared VESA . . . . . . . . . . . . . . . . . . . . . . . . . . . .
18
Organizador de cables . . . . . . . . . . . . . . . . . . . . . . . . . . . . . . . . . . . . . 19
Instalación de un pedestal de escritorio
. . . . . . . . . . 20
Soporte del eslabon giratorio
. . . . . . . . . . . . . . . . . . . . . . . . . 20
Posición de la pantalla
. . . . . . . . . . . . . . . . . . . . . . . . . . . . . . . . . . . .
20
Unión del televisor a un escritorio
. . . . . . . . . . . . . . . . . . . 21
Sistema de seguridad Kensington
. . . . . . . . . . . . . . . . . . . . 21
Fijación de la TV a la pared para evitar que se caiga
cuando esté instalada sobre un soporte tipo
pedestal
. . . . . . . . . . . . . . . . . . . . . . . . . . . . . . . . . . . . . . . . . . . . . . . . . . . . . . . . . 22
Conexión de la Antena o cable
. . . . . . . . . . . . . . . . . . . . . . . . .
23
CONEXIONES DE EQUIPO EXTERNO
Instalación del HDSTB
. . . . . . . . . . . . . . . . . . . . . . . . . . . . . . . . . . . . 24
Instalación del DVD
. . . . . . . . . . . . . . . . . . . . . . . . . . . . . . . . . . . . . . . . .
27
Instalación del VCR . . . . . . . . . . . . . . . . . . . . . . . . . . . . . . . . . . . . . . . . . 29
Configuración de otra fuente de A/V
. . . . . . . . . . . . . .
30
Conexión USB
. . . . . . . . . . . . . . . . . . . . . . . . . . . . . . . . . . . . . . . . . . . . . . . .
30
Conexión de salida de Audio . . . . . . . . . . . . . . . . . . . . . . . . . . .
31
Configuración del audífono
. . . . . . . . . . . . . . . . . . . . . . . . . . . . 31
Instalación de la PC . . . . . . . . . . . . . . . . . . . . . . . . . . . . . . . . . . . . . . . . . 32
VER LA TV / CONTROL DE CANAL
Funciones de los botones del control remoto
. . . .
38
Encendido del TV
. . . . . . . . . . . . . . . . . . . . . . . . . . . . . . . . . . . . . . . . . . .
40
Ajuste del Canal . . . . . . . . . . . . . . . . . . . . . . . . . . . . . . . . . . . . . . . . . . . . . 40
Ajuste del volumen
. . . . . . . . . . . . . . . . . . . . . . . . . . . . . . . . . . . . . . . . .
40
Configuración Inicial
. . . . . . . . . . . . . . . . . . . . . . . . . . . . . . . . . . . . . . . 41
Selección y ajuste del menú pantalla . . . . . . . . . . . . . . . . 42
Quick Menu (menú rápido) . . . . . . . . . . . . . . . . . . . . . . . . . . . . . 44
Búsqueda de canales
-
Escaneo atomático (Sintonización automática)
. . 45
- Agregar/Eliminar los Canales (Sintonización
Manual)
. . . . . . . . . . . . . . . . . . . . . . . . . . . . . . . . . . . . . . . . . . . . . . . . . . .
46
- Edición de Canal . . . . . . . . . . . . . . . . . . . . . . . . . . . . . . . . . . . . . . 47
Lista de canales
. . . . . . . . . . . . . . . . . . . . . . . . . . . . . . . . . . . . . . . . . . . . . . 48
Configuración de los canales favoritos
. . . . . . . . . . . .
49
Lista de canales favoritos
. . . . . . . . . . . . . . . . . . . . . . . . . . . . . . . .
50
INFO. BREVE
. . . . . . . . . . . . . . . . . . . . . . . . . . . . . . . . . . . . . . . . . . . . . . . . . . 51
Lista de entradas
. . . . . . . . . . . . . . . . . . . . . . . . . . . . . . . . . . . . . . . . . . . . 52
Etiqueta de entrada
. . . . . . . . . . . . . . . . . . . . . . . . . . . . . . . . . . . . . . . . . 53
Modo AV
. . . . . . . . . . . . . . . . . . . . . . . . . . . . . . . . . . . . . . . . . . . . . . . . . . . . . . . . 54
Manual Simple . . . . . . . . . . . . . . . . . . . . . . . . . . . . . . . . . . . . . . . . . . . . . . . .
54
Bloqueo de teclas
. . . . . . . . . . . . . . . . . . . . . . . . . . . . . . . . . . . . . . . . . . . . 55
SIMPLINK
. . . . . . . . . . . . . . . . . . . . . . . . . . . . . . . . . . . . . . . . . . . . . . . . . . . . . . .
56
USB
Modoo de entrada
. . . . . . . . . . . . . . . . . . . . . . . . . . . . . . . . . . . . . . . . . . 58
Lista de fotos
. . . . . . . . . . . . . . . . . . . . . . . . . . . . . . . . . . . . . . . . . . . . . . . . . .
59
Lista de música
. . . . . . . . . . . . . . . . . . . . . . . . . . . . . . . . . . . . . . . . . . . . . . .
63
CONTROL DE IMAGEN
Tamaño de la Imagen (Aspecto de pantalla)
. . . .
66
Asistente de imagen
. . . . . . . . . . . . . . . . . . . . . . . . . . . . . . . . . . . . . . . .
68
Ajustes de la Imagen Prestablecida (Modo imagen)
70
Control Manual de Imagen- Modo usuario
. . . . . . . .
71
Tecnología de Mejora de la Imagen
. . . . . . . . . . . . . . . . .
72
Control experto de imagen
. . . . . . . . . . . . . . . . . . . . . . . . . . . . . . 73
Ahorro de energía
. . . . . . . . . . . . . . . . . . . . . . . . . . . . . . . . . . . . . . . . . . .
76
Restablecimiento de la imagen
. . . . . . . . . . . . . . . . . . . . . . . . 77
Indicador de Poder
. . . . . . . . . . . . . . . . . . . . . . . . . . . . . . . . . . . . . . . . . 77
Modo Demo.
. . . . . . . . . . . . . . . . . . . . . . . . . . . . . . . . . . . . . . . . . . . . . . . . . .
78

7
CONTROL DE SONIDO Y DE IDIOMA
Nivelador Automático de volumen . . . . . . . . . . . . . . . . . . 79
Voz Clara II
. . . . . . . . . . . . . . . . . . . . . . . . . . . . . . . . . . . . . . . . . . . . . . . . . . . . . 80
Ajuste de sonido preestablecido (Modo de audio)
. . 81
Ajuste de sonido - Modo usuario
. . . . . . . . . . . . . . . . . . . . . 82
Sonido Infinito
. . . . . . . . . . . . . . . . . . . . . . . . . . . . . . . . . . . . . . . . . . . . . . . . 83
Ajuste de Balance
. . . . . . . . . . . . . . . . . . . . . . . . . . . . . . . . . . . . . . . . . . . . 84
Disposición de bocinas de TV
. . . . . . . . . . . . . . . . . . . . . . . . .
85
Reajuste de audio
. . . . . . . . . . . . . . . . . . . . . . . . . . . . . . . . . . . . . . . . . . . .
86
Disfrute de la transmisión Estéreo/SAP
. . . . . . . . . . . 87
Idioma del audio
. . . . . . . . . . . . . . . . . . . . . . . . . . . . . . . . . . . . . . . . . . . . . 88
Selección del lenguaje en la pantalla
. . . . . . . . . . . . . . . . 89
Subtítulos
-
Sistemas de texto oculto de programas analógicos
. 90
-
Sistemas de texto oculto de programas digitales
. .
91
- Opciones del texto oculto
. . . . . . . . . . . . . . . . . . . . . . .
92
CONFIGURACIÓN HORARIA
Programacion del reloj
- Configuración Auto del Reloj
. . . . . . . . . . . . . . . . . . . .
93
- Configuración Manual del Reloj
. . . . . . . . . . . . . . . .
94
Ajustes de Encendido / Apagado Automático del
temporizador
. . . . . . . . . . . . . . . . . . . . . . . . . . . . . . . . . . . . . . . . . . . . . . . . . . 95
Configuración del temporizador de apagado
automático
. . . . . . . . . . . . . . . . . . . . . . . . . . . . . . . . . . . . . . . . . . . . . . . . . . . . .
96
CONTROL PATERNO /CLASIFICACIONES
Establecer contraseña y bloqueo del sistema
. .
97
Bloqueo de canales
. . . . . . . . . . . . . . . . . . . . . . . . . . . . . . . . . . . . . . 10 0
Clasificaciones de Películas y TV
. . . . . . . . . . . . . . . . . . . 101
Clasificación Descargable
. . . . . . . . . . . . . . . . . . . . . . . . . . . . . . 106
Bloqueo de entrada externa
. . . . . . . . . . . . . . . . . . . . . . . . . .
10 7
APÉNDICE
Lista de verificación de problemas
. . . . . . . . . . . . . . . . .
108
Mantenimiento
. . . . . . . . . . . . . . . . . . . . . . . . . . . . . . . . . . . . . . . . . . . . . .
111
Especificaciones del producto
. . . . . . . . . . . . . . . . . . . . . . . . 112
Códigos de IR
. . . . . . . . . . . . . . . . . . . . . . . . . . . . . . . . . . . . . . . . . . . . . . .
113
Configuración de dispositivo externo del control
. . .
114
Aviso sobre software de código abierto
. . . . . . . . .120

8
FUNCIONES DE ESTE TV
El modo AV optimiza la imagen en el modo película,
deportes y juego acorde al contenido de video y
audio. El visor tiene la habilidad de escoger rápida-
mente el modo correcto para la imágenes que se están
visualizando.
Mejora y amplifica automáticamente el sonido dentro
del rango de frecuencia de la voz humana para ayudar
a mantener audibles los diálogos ante un aumento del
ruido de fondo.
El televisor LG incluye un sistema de altoparlantes
exclusivo, ajustado por el renombrado experto en
audio, Mark Levinson. Los altoparlantes están integra-
dos en lugares estratégicos tras la cubierta frontal, y
emplean minúsculas vibraciones para girar la totalidad
del bisel frontal hacia el sistema del altoparlante. Esto
genera un aspecto limpio y elegante, a la vez que
mejora el audio incrementando los “puntos óptimos”,
proporcionando un campo de sonido más rico y
amplio.
HDMI, tel logotipo HDMI y el interfaz multimedia de
alta definición son marcas comerciales o registradas
de HDMI Licensing LLC.”
Fabricado bajo licencia de Dolby Laboratories.
“
Dolby
“y el símbolo de la doble-D son marcas
comerciales de Dolby Laboratories.
Este televisor cuenta con las calibraciones concretas
necesarias para la certificación profesional por parte
de la Imaging Science Foundation. El usuario podrá
acceder a los modos “día” y “noche” ISF resultantes a
fin de aprovechar al máximo todo lo que su HDTV de
LG puede ofrecer.
CALIBRE COMO UN PROFESIONAL:
El modo ISFccc permite realizar calibraciones
sofisticadas y detalladas.
La realización de calibraciones detalladas debe ser
realizada por un técnico certificado.
Por favor, contacte con su distribuidor local para
solicitar la asistencia de un técnico certificado por ISF.
Televisión de alta definición. El sistema de emisión y
reproducción de TV digital de alta resolución está com-
puesto por casi un millón o más de píxeles, pantallas
con relación de aspecto 16:9 y audio digital AC3. Un
sub-equipo de TV digital, formato HDTV incluye res-
oluciones de 1 080 progresivo y 1 080 entrelazado y
720 progresivo.
■
Al visualizar una imagen fija (Ej.: logotipos, menús de pantalla, videojuegos e imágenes procedentes de com-
putadoras) en el televisor durante un período de tiempo prolongado, dicha imagen puede quedar impresa
permanentemente sobre la pantalla. Este fenómeno se conoce como “degradación de la imagen por sobre-
exposición” o "quemado”. Problema que no está cubierto por la garantía del fabricante.
■
A fin de evitar la degradación de la imagen por sobreexposición, no permita la visualización de imágenes
fijas en su pantalla durante un período de tiempo prolongado (2 horas o más para una pantalla LCD, 1
hora o más para pantallas de plasma).
■
El efecto de degradación de imagen por
sobreexposición también puede producirse
en las zonas de bandas del formato letterbox
(apaisado) de su televisor si usa el ajuste de
formato de pantalla en 4:3 durante un perío-
do de tiempo prolongado.
INFORMACIÓN IMPORTANTE PARA EVITAR EL EFECTO
“DEGRADACIÓN DE LA IMAGEN POR SOBRE EXPOSICION
/ QUEMADO” EN LA PANTALLA DE SU TELEVISOR

PREPARACIÓN
9
ACCESORIOS
PREPARACIÓN
Asegurese de que los siguientes accesorios estén incluidos con su TV. Si algún accesorio no está incluido, favor
de contactar al distribuidor del producto en el lugar donde realizó la compra.
Los accesorios que se incluyen pueden ser diferentes a los de las imágenes a continuación.
1,5Vcc 1,5Vcc
Manual de Usuario Cable de Alimentación
Control Remoto,
Baterías (AAA)
E
N
E
R
G
Y
C
H
V
O
L
123
45
0
6
789
P
A
G
E
S
A
V
I
N
G
TV
A
V
M
O
D
E
I
N
P
U
T
F
A
V
R
A
T
I
O
M
U
T
E
E
N
T
E
R
M
A
R
K
L
IS
T
F
L
A
S
H
B
K
M
E
N
U
I
N
F
O
Q
.
M
E
N
U
B
A
C
K
E
X
I
T
Manual en CD
PPaarraa 1199//2222LLDD335500,, 1199//2222LLDD335500CC
Sujetacables
(Refiérase a la p.19)
PPaarraa 2266//3322LLDD335500
(M4x20)
para la base ensamblada
(Refiérase a la p.16)
Tornillos para fijación
vertical
(Refiérase a la p.21)
Cubierta de protección
(Refiérase a la p.17)
Cubierta de protección
(Refiérase a la p.14)
x 8
OOppcciioonneess EExxttrraass ((AAddiicciioonnaalleess))
* Solo limpie las manchas exteriores con un
paño.
* No limpie con demasiada fuerza para inten-
tar quitar las manchas. Tenga cuidado, ya
que si limpia con demasiada fuerza podría
rayar o decolorar la superficie.
Paño de limpieza
No incluido en todos los modelos
Cable D-sub de
15 terminales
Cuando utilice la conexión VGA (cable D-
sub de 15 pins) para la PC, el usuario debe
usar cables de interfaz de señal recubier-
tos (cable D-sub de 15 clavijas) con
núcleos de ferrita para mantener el
cumplimiento estándar del producto.
PPaarraa 3322LLDD332200
(M4x24)
para la base ensamblada
(Refiérase a la p.15)
Tornillos para fijación
vertical
(Refiérase a la p.21)
Cubierta de protección
(Refiérase a la p.15)
x 4

PREPARACIÓN
10
INFORMACIÓN DEL PANEL FRONTAL
PREPARACIÓN
■
Es probable que esta vista no coincida con su TV.
INPUT
MENU
VOL
CH
ENTER
Botones de
CANAL ( , )
Botones de
VOLUMEN (-, +)
Botón ENTER
19/22LD350, 19/22LD350C
Botón MENU
Botón POWER
Botón INPUT
ALTOPARLANTE
Indicador de Encendido/Standby
Se ilumina en rojo en el modo de espera.
Se ilumina de color azul cuando el aparato
está encendido.
Sensor de Control Remoto
CH
VOL
ENTER
INPUT
MENU
Botones de
CANAL ( , )
Botones de
VOLUMEN (+, -)
Botón ENTER
Botón MENU
Botón INPUT
Botón POWER
26/32LD350

11
32LD320
INPUT
MENU
ENTER
CH
VOL
Sensor de Control Remoto
Indicador de Encendido/Standby
Se ilumina en rojo en el modo de espera.
Se ilumina de color azul cuando el aparato está
encendido.
ALTOPARLANTE
Botones de
CANAL ( , )
Botones de
VOLUMEN (+, -)
Botón ENTER
Botón MENU
Botón INPUT
Botón POWER

PREPARACIÓN
12
INFORMACIÓN DEL PANEL POSTERIOR
PREPARACIÓN
K
AC-IN
RS-232C IN
(
CONTROL&SERVICE)
ANTENNA/
CABLE IN
VIDEO
YPB PR
L R
AUDIO
RGB IN (PC)
/DVI IN
AV IN
VIDEO
AUDIO
R
L/MONO
COMPONENT IN
OPTICAL
DIGITAL
AUDIO OUT
AUDIO IN
(RGB/DVI)
1 4
19/22LD350, 19/22LD350C
7 6
■
Es probable que esta vista no coincida con su TV.
USB IN
SERVICE ONLY
H/P
2 3 5
IN 2
VIDEO
AUDIO
L/MONO
R
H/P
USB IN
SERVICE ONLY
AV IN 2
1
8
9
5
9
8
11
1
/DVI IN
RS-232C IN
(
CONTROL&SERVICE)
ANTENNA
/CABLE IN
VIDEO
YPB PR
L R
AUDIO
RGB IN (PC)
VIDEO
AUDIO
R
L/MONO
COMPONENT IN
OPTICAL
DIGITAL
AUDIO OUT
AUDIO IN
(RGB/DVI)
AV IN 1
1 4
26LD350
7 6
2 3 5

PREPARACIÓN
13
■
Es probable que esta vista no coincida con su TV.
AC IN
IN 2
VIDEO
AUDIO
L/MONO
R
H/P USB IN
AV IN 2
1
10
9
5
1
/DVI IN
RS-232C IN
(
CONTROL&SERVICE)
ANTENNA
/CABLE IN
VIDEO
YPB PR
L R
AUDIO
RGB IN (PC)
VIDEO
AUDIO
R
L/MONO
COMPONENT IN
OPTICAL
DIGITAL
AUDIO OUT
AUDIO IN
(RGB/DVI)
AV IN 1
1 4
32LD350, 32LD320
7 6
2 3 5
11
HDMI/DVI IN, HDMI IN
Conexión digital.
Compatible con video HD y audio digital. No es
compatible con 480 entrelazado.
Acepta video DVI con un adaptador o un cable de
HDMI a DVI (no incluido).
RGB IN (PC)
Conexión análoga a la PC. Utilice un cable D-sub
de 15 pins (cable VGA).
AUDIO IN (RGB/DVI)
Enchufe de auriculares 1/8" (0,32 cm) para la
entrada de audio análoga de la PC.
OPTICAL DIGITAL AUDIO OUT (Salida de Audio
Digital Óptico)
Salida óptica de audio digital para usar con amplifi-
cadores y sistemas de cine en casa.
Nota: En el modo de espera, este puerto no funciona.
RS-232C IN (CONTROL & SERVICE)
Utilizado por otros fabricantes.
Este puerto se usa para mantenimiento y
reparación o para el modo Hotel.
AV (Audio/Video) IN
Conexión análoga compuesta. Compatible solo con
una definición de video estándar (480 entrelazado).
ANTENNA/CABLE IN
Conecte las señales de la transmisión a este puerto.
Conecte los cables de señal a este conector.
COMPONENT IN
Conexión análoga.
Compatible con HD.
Utiliza un cable rojo, verde y azul para video y uno
rojo y blanco para audio.
USB IN SERVICE ONLY
Utilizado para la actualización de software.
HEADPHONE INPUT
Conexión de auriculares de 0.32cm (1/8")
Impedancia 16
Ω,
Salida de audio máxima 15mW.
USB IN
Utilizado para ver fotos, escuchar MP3.
Socket del Cordón de Alimentación
Esta TV funciona con alimentación de corriente
alterna (ca)
Cuidado: Nunca aplique voltaje de corriente con-
tinua (cc) a esta TV.
1
2
3
4
5
9
8
7
6
10
11

PREPARACIÓN
14
INSTRUCCIONES (para 19/22LD350, 19/22LD350C)
PREPARACIÓN
■
La imagen puede ser diferente a la de su televisor.
Coloque con cuidado pantalla de la TV sobre
una superficie acolchada que la proteja de posi-
bles daños.
Monte el televisor de la forma indicada, hasta
que oiga el tope.
1
2
INSTALACIÓN
CCOOUUVVEERRCCLLEE DDEE PPRROOTTEECCTTIIOONN
SEPARACIÓN
Coloque con cuidado la pantalla de la TV sobre
una superficie acolchada que la proteja de posi-
bles daños.
1
Afloje los tornillos del televisor.
2
Separar el soporte del televisor
3
CUBIERTA DE PROTECCIÓN
Tras extraer el soporte, instale la
CCUUBBIIEERRTTAA DDEE PPRROO--
TTEECCCCIIÓÓNN
incluida sobre el hueco dejado por este.
Luego de sacar el papel de protección de la cubierta de pro-
tección, adhiérala al televisor según se muestra en la imagen.

PREPARACIÓN
15
INSTRUCCIONES (Para 32LD320)
Monte la TV como se ilustra.
Ajuste firmemente los 4 pernos en los huecos de
la parte posterior de la TV.
1
2
3
GG
Al realizar un montaje de sobremesa, compruebe
que los tornillos estén apretados correctamente.
(De no ser así, el producto podría inclinarse hacia
delante tras su instalación). Si, por el contrario,
apretara el tornillos en exceso, podría deformarse
por abrasión en el área de apriete del mismo. No
sobreapriete los tornillos.
NOTA
!
Afloje los tornillos del televisor.
2
Tras extraer el soporte, instale la
CCUUBBIIEERRTTAA DDEE
PPRROOTTEECCCCIIÓÓNN
incluida sobre el hueco dejado por
este.
Inserte la
CCUUBBIIEERRTTAA DDEE PPRROOTTEECCCCIIÓÓNN
en el
televisor hasta que escuche un sonido de chasquido.
CUBIERTA DE PROTECCIÓN
Coloque con cuidado pantalla de la TV sobre
una superficie acolchada que la proteja de posi-
bles daños.
Coloque con cuidado la pantalla de la TV sobre
una superficie acolchada que la proteja de posi-
bles daños.
1
Separar el soporte del televisor
3
INSTALACIÓN SEPARACIÓN
(M4x24)

PREPARACIÓN
16
INSTRUCCIONES (para 26/32LD350)
PREPARACIÓN
Coloque con cuidado la pantalla de la TV sobre
una superficie acolchada que la proteja de
posibles daños.
Monte las piezas del
SSOOPPOORRTTEE DDEELL CCOONN--
JJUUNNTTOO
con la
BBAASSEE DDEELL SSOOPPOORRTTEE
del tele-
visor mediante los 4 tornillos incluidos.
Ajuste firmemente los 4 pernos en los huecos de
la parte posterior de la TV.
1
2
Monte la TV como se ilustra.
3
4
INSTALLATION
GG
Al realizar un montaje de sobremesa, compruebe
que los tornillos estén apretados correctamente.
(De no ser así, el producto podría inclinarse hacia
delante tras su instalación). Si, por el contrario,
apretara el tornillos en exceso, podría deformarse
por abrasión en el área de apriete del mismo. No
sobreapriete los tornillos.
NOTA
!
■
La imagen puede ser diferente a la de su televisor.
BBAASSEE DDEELL SSOOPPOORRTTEE
SSOOPPOORRTTEE DDEELL
CCOONNJJUUNNTTOO
(M4x20)
(M4x20)

PREPARACIÓN
17
SEPARACIÓN
Coloque con cuidado la pantalla de la TV sobre
una superficie acolchada que la proteja de
posibles daños.
1
Afloje los tornillos del televisor.
2
Separar el soporte del televisor.
3
Tras extraer el soporte, instale la
CCUUBBIIEERRTTAA
DDEE PPRROOTTEECCCCIIÓÓNN
incluida sobre el hueco
dejado por este.
Inserte la
CCUUBBIIEERRTTAA DDEE PPRROOTTEECCCCIIÓÓNN
en
el televisor hasta que escuche un sonido de
chasquido.
CUBIERTA DE PROTECCIÓN

PREPARACIÓN
18
MONTAJE PARA LA PARED VESA
PREPARACIÓN
Realice la instalación mural sobre una pared sólida, perpendicular al suelo. Al montar sobre otros materiales de con-
strucción, por favor, póngase en contacto con su instalador más cercano.
En instalaciones del techo o sobre paredes inclinadas, la unidad puede caer y provocar graves daños personales.
Le recomendamos que utilice un soporte de montaje de pared de la marca LG, cuando ud. ponga la TV en la pared.
LG recomienda que el montaje de pared lo realice un instalador profesional calificado.
GG
No instale su equipo de montaje mural mientras la TV está encendida. Eso podría
provocar lesiones personales por choques eléctricos.
PRECAUCIÓN
GG
La longitud de los tornillos necesarios varía en fun-
ción de la pared en la que se realice el montaje.
Para obtener más información, consulte las instruc-
ciones incluidas con el equipo de montaje.
GG
Las dimensiones estándar para el equipo de mon-
taje mural se muestran en la tabla.
GG
Al adquirir nuestro equipo de montaje mural, le
será suministrado un manual de instrucciones
detallado y todas las piezas necesarias para la
instalación.
GG
No utilice tornillos más largos que los de dimensión
estándar mostrados, ya que podría dañar el interior
de la TV.
GG
Para montajes murales que no cumplan con las
especificaciones para tornillos del estándar VESA,
la longitud de estos puede diferir dependiendo de
sus especificaciones.
GG
No utilice tornillos que no cumplan con las especi-
ficaciones relativas a los mismos del estándar
VESA.
No apriete los tornillos en exceso, ya que podría
dañar la TV o provocar que cayera provocando
daños personales. LG no se hace responsable de
este tipo de accidentes.
GG
LG no se hace responsable por los daños ocasiona-
dos en la TV o las lesiones personales producidas
cuando no se utilice un equipo de montaje que
cumpla con el estándar VESA o se monte sobre un
muro que no haya sido especificado o si el cliente no
sigue las instrucciones de instalación de la TV.
NOTA
!
Modelos
VESA (A
*
B)
Tornillo
estándar
Cantidad
Soporte para instalación en pared
(de venta por separado)
19LD350,
19LD350C,
22LD350,
22LD350C
26LD350,
32LD350,
32LD320
10 0
*
10 0 M 4 4
200
*
10 0 M 4 4
AA
BB
LSW100B, LSW100BG

PREPARACIÓN
19
ORGANIZADOR DE CABLES
Para 19/22LD350, 19/22LD350C
Tras conectar los cables necesarios, instale el
SUJETACABLES como se indica para agru-
parlos.
K
AC-IN
1
■
La imagen puede ser diferente a la de su televisor.
Para 26/32LD350, 32LD320
AC IN
AC IN
AC IN
AC IN
AC IN
AC IN
AC IN
AC IN
AC IN
Conecte los cables necesarios.
Para conectar un equipo adicional, vea la sección
de CONEXIONES DE EQUIPO EXTERNO.
Instale el ORGANIZADOR DE CABLES
como la imagen.
ORGANIZADOR DE CABLES
1
2
Ajuste el ORGANIZADOR DE CABLES como se
muestra en la imagen.
3

PREPARACIÓN
20
INSTALACIÓN DE UN PEDESTAL DE ESCRITORIO
PREPARACIÓN
Para conseguir una ventilación adecuada, deje un espacio de 10,1 cm de separación entre la pared y los costados
del televisor.
■
La imagen puede ser diferente a la de su televisor.
10, 1 c m
GG
Asegure la ventilación adecuada dejando el espacio recomendado.
GG
No instale la unidad próxima o sobre ninguna fuente de calor.
CUIDADO
10, 1 c m
10, 1 c m
10, 1 c m
SOPORTE DEL ESLABON GIRATORIO (Excepto 19/22LD350, 19/22LD350C)
Despues de instalar la TV, puede ajustar el TV manualmente 20 grados a la izquierda y derecha para satisfacer su
angulo de vision.
POSICIÓN DE LA PANTALLA (para 19/22LD350, 19/22LD350C)
■
Es probable que esta vista no coincida con su TV.
■
Ajuste la posición del panel en diversas formas para obtener una máxima comodidad.
• Rango de inclinación
12
0
3
0

PREPARACIÓN
21
UNIÓN DEL TELEVISOR A UN ESCRITORIO
(Excepto 19/22LD350, 19/22LD350C)
Recomendamos que el televisor se una a un escritorio, de modo que no se mueva hacia adelante o hacia atrás,
causando posibles lesiones o daños en el producto.
GG
Para evitar que se caiga el televisor, debe estar sujetado seguramente al piso o pared según las
instrucciones de la instalación. Si inclina, sacude o balancea la máquina, podría causar lesiones
CUIDADO
1-Tornillo
(incluidos como las partes del producto)
Escritorio
Soporte
SISTEMA DE SEGURIDAD KENSINGTON
■
Esta característica no se encuentra disponible para todos los modelos.
- El televisor tiene instalado un conector de Sistema de seguridad
Kensington en el panel posterior. Conecte el cable de Sistema de
seguridad Kensington como se indica a continuación.
- Para obtener información detallada sobre la instalación y uso del
Sistema de seguridad Kensington, consulte la guía del usuario que se
incluye con este sistema.
Para obtener información adicional, visite
hhttttpp::////wwwwww..kkeennssiinnggttoonn..ccoomm
, la página Web de Kensington. Esta
empresa vende sistemas de seguridad para equipos electrónicos de
alto costo, como PC portátiles y proyectores LCD.
NOTA: El Sistema de seguridad Kensington es un accesorio opcional.

PREPARACIÓN
22
FIJACIÓN DE LA TV A LA PARED PARA EVITAR QUE SE CAIGA
CUANDO ESTÉ INSTALADA SOBRE UN SOPORTE TIPO PEDESTAL.
PREPARACIÓN
Instalelo cerca de la pared así el producto no se cae cuando esté presionado hacia atrás.
Las instrucciones mostradas a continuación son más seguras para instalar el producto en la pared así no se
caerá cuando el producto esté presionado hacia enfrente. Esto protegerá el producto y la gente de la caida
hacia enfrente. También prevendrá el producto del daño causado por la caida.
Cuidado:Favor de estar seguro de que los niños no se suban ni se cuelguen del producto.
■
Use los soportes y los tornillos para fijar el producto en la pared como se muestra.
* Si el producto tiene los tornillos en el lugar de los tornillosde ojo antes de insertar estos últimos, afloje los tornillos.
Asegúrese de los soportes con los tornillos (De venta por separado) en la pared que estén ajustados firmemente.
Para usar el producto seguramente asegúrese de que la altura de los soportes montados en la pared sea la misma
que la del producto.
Asegúrese de que los tornillos de ojo o soportes estén apretados en forma segura.
■
Use un cordón fuerte (De venta por separado) para ajustar el produc-
to. Es más seguro usar un cordón, así se quedará horizontalmente
entre la pared y el producto.
■
Debe adquirir los componentes necesarios para prevenir que el televisor vuelque (cuando no se use el montaje
de pared).
■
La imagen puede ser diferente a la de su televisor.
GG
Utilice una plataforma o armario suficientemente fuerte y grande para soportar el tamaño y el peso de la
TV.
GG
Para utilizar la TV con seguridad, asegúrese que la altura los soportes están a la misma altura en la pared
y en el aparato de televisión.
NOTA
!

PREPARACIÓN
23
CONEXIÓN DE LA ANTENA O CABLE
1. Antena (analógica o digital)
Toma de entrada de pared o antena exterior sin conexiones a caja de cables.
Para lograr la mejor calidad de imagen, ajuste la posición de la antena si fuera
necesario.
2. Cable
Enchufe de
antena de
la pared
Antena de
exterior
(VHF, UHF)
Puerto de TV
de Cable en
la pared
Viviendas/Apartamentos
(Conectar al enchufe de antena en la pared)
Cable Coaxial RF (75 ohm)
Cable Coaxial RF (75 ohm)
Casa privada
(Conectar a un enchufe de pared de la antena
exterior)
Asegúrese de no doblar el cable de cobre
cuando conecte la antena.
Alambre de
bronce
■
En áreas de señal deficiente, puede obtener una mejor calidad en la imagen si instala un amplificador de señal.
■
Si está siendo utilizada una antena para dos unidades, use un divisor de señal para conectarse.
■
El cable y el convertidor de antena no son proporcionados con el producto.
ANTENNA
/CABLE IN
■
Para prevenir daños, no conecte a la corriente hasta que estén instaladas todas las conexiones entre los dispositivos.
■
La imagen puede ser diferente a la de su televisor.
ANTENNA
/CABLE IN

CONEXIONES DE EQUIPO EXTERNO
24
CONEXIONES DE EQUIPO EXTERNO
INSTALACIÓN DEL HDSTB
Este TV puede recibir señales de la transmisión digital/cable sin una caja sintonizadora externa. Pero si ud. recibe
señales digitales desde una caja sintonizadora u otro dispositivo externo digital, refiérase a las siguientes figuras.
Conexión de componentes
1. Cómo conectar
Conecte las salidas de video
(
Y, P
B
, PR
)
del decodificador
digital a los puertos de
CCOOMMPPOONNEENNTT IINN VVIIDDEEOO
en
la unidad. Haga coincidir los colores de los conectores (Y
= Verde, P
B = Azul, PR
= Rojo).
Conecte la salida de audio del docodificador digital a los
puertos de
CCOOMMPPOONNEENNTT IINN AAUUDDIIOO
en la unidad.
2
1
2. Cómo usar
■
Encienda el Set-top box digital.
(Refiérase al manual de usuario del Set-top box digital.)
■
Seleccione la fuente de entrada del
CCoommppoonneennttee
en el
televisor con el botón de
IINNPPUUTT
en el control remoto.
■
Para evitar daños en el equipo, no enchufe ningún cable de alimentación hasta haber finalizado la conexión com-
pleta de todo el equipo.
■
Esta parte de la CONEXIONES DE EQUIPO EXTERNO utiliza principalmente imagen para modelo
3322LLDD335500
.
RS-232C IN
(
CONTROL&SERVICE)
ANTENNA
/CABLE IN
B IN (PC)
VIDEO
AUDIO
R
L/MONO
OPTICAL
DIGITAL
AUDIO OUT
AUDIO IN
(RGB/DVI)
AV IN 1
VIDEO
YPB PR
L R
AUDIO
COMPONENT IN
Y L RPB PR
1
2
Y, C
B/
PB
, C
R/P
R
Resoluciones compatibles
Frecuencia Frecuencia
Horizontal
(
kHz
)
Vertical
(
Hz
)
15,73 59,94
15,73 60,00
31,47 59,94
31,50 60,00
44,96 59,94
45,00 60,00
33,72 59,94
33,75 60,00
26,97 23,976
27,00 24,00
33,71 29,97
33,75 30,00
67,432 59,94
67,50 60,00
Resolución
720 x 480
entrelazado
720 x 480
progresivo
1 280 x 720
progresivo
1 920 x 1 080
entrelazado
1 920 x 1 080
progresivo
Señal
480 entrelazado
480 progresivo
720 progresivo
1 080 entrelazado
1 080 progresivo
Componente
Sí
Sí
Sí
Sí
Sí
HDMI
No
Sí
Sí
Sí
Sí

CONEXIONES DE EQUIPO EXTERNO
25
Conexión HDMI
Conecte la salida HDMI del decodificador de señales
digitales al conector
HHDDMMII//DDVVII IINN
o
HHDDMMII//DDVVII
IINN 11//22
* en el televisor.
No se necesita conexión de audio por separado.
HDMI admite audio y video.
1. Cómo conectar
2. Cómo usar
■
Encienda el decodificador digital.
(Refiérase al manual de usuario del decodificador digital.)
■
Seleccione la fuente de entrada del
HHDDMMII
o
HHDDMMII11//22
* input
en el televisor con el botón de
IINNPPUUTT
en el control remoto.
2
1
RS-232C IN
(
CONTROL&SERV
VIDEO
YPB PR
L
AUDIO
RGB IN (PC)
VIDEO
AUD
L/MONO
COMPONENT IN
OPTICAL
DIGITAL
AUDIO OUT
AUDIO IN
(RGB/DVI)
1
/DVI IN
HDMI OUTPUT
1
HDMI-DTV
Frecuencia Frecuencia
Horizontal
(
kHz
)
Vertical
(
Hz
)
31,47 59,94
31,50 60,00
44,96 59,94
45,00 60,00
33,72 59,94
33,75 60,00
26,97 23,976
27,00 24,00
33,71 29,97
33,75 30,00
67,432 59,94
67,50 60,00
Resolución
720 x 480
progresivo
1 280 x 720
progresivo
1 920 x 1 080
entrelazado
1 920 x 1 080
progresivo
* HDMI 2: Para 26/32LD350, 32LD320
GG
Los cables HDMI que no admiten la versión 1.3 de HDMI,
provocan parpadeos o no muestran la imagen en pantalla.
Si este es el caso, utilice cables recientes que soporten la
versión 1.3 de HDMI.
GG
El modo HDMI admite formato de audio AC3 (32KHz,
44.1KHz, 48KHz), Linear PCM (32KHz, 44.1KHz, 48KHz)
NOTA
!

CONEXIONES DE EQUIPO EXTERNO
26
CONEXIONES DE EQUIPO EXTERNO
Conexión de DVI a HDMI
RS-232C IN
(
CONTROL&SERVICE)
VIDEO
YPB PR
L R
AUDIO
RGB IN (PC)
VIDEO
AUDIO
R
L/MONO
COMPONENT IN
OPTICAL
DIGITAL
AUDIO OUT
AV IN 1
1
/DVI IN
AUDIO IN
(RGB/DVI)
L R
DVI OUTPUT
AUDIO
1
2
GG
Se precisa un cable o adaptador de DVI a HDMI para realizar
esta conexión. El DVI no es compatible con el audio, por
ello, se necesita una conexión de audio por separado.
NOTA
!
Conecte la salida de DVI del decodificador digital al
puerto de
HHDDMMII//DDVVII IINN
o
HHDDMMII//DDVVII IINN 11
en la
unidad.
Conecte las salidas de audio del decodificador al puer-
to de
AAUUDDIIOO IINN ((RRGGBB//DDVVII))
en la unidad.
1. Cómo conectar
2. Cómo usar
■
Encienda el decodificador digital.
(Refiérase al manual de usuario del decodificador digital.)
■
Seleccione la fuente de entrada del
HHDDMMII
o
HHDDMMII11
en el
televisor con el botón de
IINNPPUUTT
en el control remoto.
2
1

CONEXIONES DE EQUIPO EXTERNO
27
INSTALACIÓN DEL DVD
Conexión de componentes
Puertos de la Entrada de Componente
Puede obtener una mejor calidad de imagen si conecta el
reproductor de DVD a los puertos de la entrada del compo-
nente como la imagen mostrada.
Puertos de Componente en la TV
YP
B
P
R
Puertos de la salida del
reproductor de DVD
Y
Y
Y
Y
P
B
B-Y
Cb
Pb
P
R
R-Y
Cr
Pr
RS-232C IN
(
CONTROL&SERVICE)
ANTENNA
/CABLE IN
N
(PC)
VIDEO
AUDIO
R
L/MONO
OPTICAL
DIGITAL
AUDIO OUT
AUDIO IN
(RGB/DVI)
AV IN 1
VIDEO
YPB PR
L R
AUDIO
COMPONENT IN
Y L RPB PR
1 2
Conecte las salidas de video
(
Y, PB
, P
R
)
del DVD a
los puertos de
CCOOMMPPOONNEENNTT IINN VVIIDDEEOO
en la
unidad. Haga coincidir los colores de los conectores
(
Y = Verde, P
B = Azul, P
R
= Rojo
)
.
Conecte las salidas de audio del DVD a los puertos de
CCOOMMPPOONNEENNTT IINN AAUUDDIIOO
en la unidad.
1. Cómo conectar
2. Cómo usar
■
Encienda el reproductor de DVD, inserte un DVD.
■
Seleccione la fuente de entrada del
CCoommppoonneennttee
en el
televisor con el botón de
IINNPPUUTT
en el control remoto.
■
Refiérase al manual de usuario del reproductor de DVD
para seguir las instrucciones.
2
1

CONEXIONES DE EQUIPO EXTERNO
28
CONEXIONES DE EQUIPO EXTERNO
Conexión compuesta (RCA)
RS-232C IN
(
CONTROL&SERVICE)
ANTENNA
/CABLE IN
VIDEO
YPB PR
L R
AUDIO
N (PC)
COMPONENT IN
OPTICAL
DIGITAL
AUDIO OUT
AUDIO IN
(RGB/DVI)
VIDEO
AUDIO
R
L/MONO
AV IN 1
L R
VIDEO
AUDIO
Conexión HDMI
RS-232C I
(
CONTROL&SER
VIDEO
YPB PR
L
AUD
RGB IN (PC)
VIDEO
AU
L/MONO
COMPONENT IN
OPTICAL
DIGITAL
AUDIO OUT
AUDIO IN
(RGB/DVI)
1
/DVI IN
HDMI OUTPUT
1
Connect the
AAUUDDIIOO
/
VVIIDDEEOO
jacks between TV and
DVD. Match the jack colors (Video = yellow, Audio Left
= white, and Audio Right = red).
1. Cómo conectar
2. Cómo usar
■
Encienda el reproductor de DVD, inserte un DVD.
■
Seleccione la fuente de entrada del
AAVV
o
AAVV11//22
* en el
televisor con el botón de
IINNPPUUTT
en el control remoto.
■
Refiérase al manual de usuario del reproductor de DVD
para seguir las instrucciones.
1
Conecte la salida de HDMI del DVD al puerto de
HHDDMMII//DDVVII IINN
o
HHDDMMII//DDVVII IINN 11//22
* en la unidad.
No se necesita conexión de audio por separado.
HDMI admite audio y video.
1. Cómo conectar
2. Cómo usar
2
1
* AV2: Para 26/32LD350, 32LD320
* HDMI 2: Para 26/32LD350, 32LD320
GG
Los cables HDMI que no admiten la versión 1.3 de HDMI,
provocan parpadeos o no muestran la imagen en pantalla.
Si este es el caso, utilice cables recientes que soporten la
versión 1.3 de HDMI.
GG
El modo HDMI admite formato de audio AC3 (32KHz,
44.1KHz, 48KHz), Linear PCM (32KHz, 44.1KHz, 48KHz)
NOTA
!
1
■
Seleccione la fuente de entrada del
HHDDMMII
o
HHDDMMII11//22
*en
el televisor con el botón de
IINNPPUUTT
en el control remoto.
■
Refiérase al manual de usuario del reproductor de DVD para
seguir las instrucciones.

CONEXIONES DE EQUIPO EXTERNO
29
INSTALACIÓN DEL VCR
Conexión de la antena
Conecte el conector de la antena exterior
de RF del VCR al conector de la
AANNTTEENNNNAA//CCAABBLLEE IINN
del televisor.
Conecte el cable de antena al puerto de
la antena RF del VCR.
1. Cómo conectar
■
Ponga el interruptor de salida del VCR en 3 ó 4 y
luego sintonice el televisor en el mismo número de
canal.
■
Inserte una cinta de video en el VCR y presione el
botón AUDIO PLAY del VCR (Vea el manual de
usuario del VCR).
2. Cómo usar
2
1
R
IO
UDIO
R
AV IN 1
ANTENNA
/CABLE IN
L R
S-VIDEO VIDEO
OUTPUT
SWITCH
ANT IN
ANT OUT
AUDIO
Conector de pared
Antena
1
2
Conexión compuesta (RCA)
GG
Si ud. tiene un VCR monofónico, conecte el cable de audio
de VCR al puerto
AAUUDDIIOO LL//MMOONNOO
de la unidad.
NOTA
!
L R
S-VIDEO VIDEO
AUDIO
OUTPUT
SWITCH
ANT IN
ANT OUT
RS-232C IN
(
CONTROL&SERVICE)
ANTENNA
/CABLE IN
VIDEO
YPB PR
L R
AUDIO
IN (PC)
COMPONENT IN
OPTICAL
DIGITAL
AUDIO OUT
AUDIO IN
(RGB/DVI)
VIDEO
AUDIO
R
L/MONO
AV IN 1
1
Conecte las salidas de
AAUUDDIIOO
/
VVIIDDEEOO
entre la TV y
el VCR.Coincida los colores de salidas (Video =
amarillo, Audio izquierdo = blanco, Audio derecho =
rojo)
1. Cómo conectar
2. Cómo usar
■
Inserte una cinta de video en el VCR y presione el botón
PLAY del VCR. (Vea el manual de usuario del VCR).
■
Seleccione la fuente de entrada del
AAVV
o
AAVV11//22
* en el
televisor con el botón de
IINNPPUUTT
en el control remoto.
1
* AV2: Para 26/32LD350, 32LD320

CONEXIONES DE EQUIPO EXTERNO
30
CONEXIONES DE EQUIPO EXTERNO
CONFIGURACIÓN DE OTRA FUENTE DE A/V
VIDEO
AUDIO
L/MONO
R
USB IN
AV IN 2
IN 2
H/P
L R
VIDEO
Grabadora de video
Unidad de video juego
Conecte los puertos de
AAUUDDIIOO
/
VVIIDDEEOO
entre la TV y un equipo externo.
Coincida los colores de puertos
(
Video
= amarillo, Audio izquierdo = blanco,
Audio derecho = rojo
)
1. Cómo conectar
2. Cómo usar
■
Seleccione la fuente de entrada del
AAVV22
* en el
televisor con el botón de
IINNPPUUTT
en el control
remoto.
■
Si está conectado a la entrada
AAVV
o
AAVV IINN 11
seleccione la fuente de entrada del
AAVV
o
AAVV11
en
el televisor.
■
Opere el equipo externo correspondiente.
Refiérase a la guía de la operación de equipo
externo.
1
1
* AV2: Para 26/32LD350, 32LD320
CONEXIÓN USB (Para 32LD350, 32LD320)
IN 2
VIDEO
AUDIO
L/MONO
R
H/P USB IN
AV IN 2
Memory Key
Conecte el dispositivo USB a los conectores
UUSSBB IINN
(Entrada de USB) en el televisor.
1. Cómo conectar
1
2. Cómo usar
■
Una vez conectados los conectores
UUSSBB IINN
, use la fun-
ción USB. (
GG
pp..5588
)
1
o

CONEXIONES DE EQUIPO EXTERNO
31
CONEXIÓN DE SALIDA DE AUDIO
Conecte el cable de audio de TV al equipo de audio externo (sistema de estéreo) por el puerto de Salida Optica
de Audio.
Si desea disfrutar de emisiones digitales a través de los altoparlantes con sonido 5.1ch, conecte la toma
OPTICAL DIGITAL AUDIO OUT a la parte posterior del televisor a un sistema de cine en casa (o a un amplifi-
cador).
1
/DVI IN
RS-232C IN
(
CONTROL&SERVICE)
VIDEO
YPB PR
L R
AUDIO
RGB IN (PC)
VIDEO
AUDIO
R
L/MONO
COMPONENT IN
AUDIO IN
(RGB/DVI)
AV IN 1
OPTICAL
DIGITAL
AUDIO OUT
1
2
GG
Cuando conecte equipos de audio externos, como amplifi-
cadores o bocinas, puede apagar los altoparlantes del televi-
sor desde el menú. (
GG
pp..8855
)
NOTA
!
GG
No mire dentro del puerto de salida óptica. Mirar el rayo
láser puede dañar su vista.
GG
El audio con la función ACP (protección anticopia de
audio) podrían bloquear la salida de audio digital.
PRECAUCIÓN
Conecte una salida del cable
OOPPTTIICCAALL
al puerto de TV
óptico de la
DDIIGGIITTAALL AAUUDDIIOO OOUUTT
.
Conecte otro extremo de cable óptico a la entrada de
audio digital óptico en el equipo de audio.
Ajuste la “Parlantes de TV - Apagado” en el menú
AUDIO. (
GG
pp..8855
). Cuando se conecta a un equipo de
audio externo como amplificadores o bocinas por favor
apague las bocinas de TV.
1. Cómo conectar
2
3
1
CONFIGURACIÓN DEL AUDÍFONO
Puede escuchar el sonido a través del auricular.
Enchufe el audífono al conector.
Para ajustar el volumen del audífono, presione el botón
VVOOLL
+ o -. Si presiona el botón
MMUUTTEE
, se desactiva el
sonido del audífono.
1. Cómo conectar
2
1
IN 2
VIDEO
AUDIO
L/MONO
R
AV IN 2
H/P
USB IN

INSTALACIÓN DE LA PC
CONEXIONES DE EQUIPO EXTERNO
32
CONEXIONES DE EQUIPO EXTERNO
Esta TV proporciona la capacidad de Plug and Play, significa que la PC se ajusta automáticamente por las
programaciones de la TV.
Conexión VGA (D-Sub de 15 pins)
1
/DVI IN
RS-232C I
(
CONTROL&SERV
VIDEO
YPB PR
L
AUDI
VIDEO
AU
L/MONO
COMPONENT IN
OPTICAL
DIGITAL
AUDIO OUT
RGB IN (PC)
AUDIO IN
(RGB/DVI)
RGB OUTPUT
AUDIO
2
1
Conecte la salida de VGA de la PC al puerto de
RRGGBB
IINN
((
PPCC
))
en la unidad.
Conecte las salidas de audio de la PC al puerto de
AAUUDDIIOO IINN
((
RRGGBB//DDVVII
))
en la unidad.
1. Cómo conectar
2. Cómo usar
■
Encienda la PC y la unidad.
■
Seleccione la fuente de entrada del
RRGGBB--PPCC
en el televisor
con el botón de
IINNPPUUTT
en el control remoto.
2
1
Conexión de DVI a HDMI
RS-232C IN
(
CONTROL&SERVICE)
VIDEO
YPB PR
L R
AUDIO
RGB IN (PC)
VIDEO
AUDIO
R
L/MONO
COMPONENT IN
OPTICAL
DIGITAL
AUDIO OUT
AV IN 1
1
/DVI IN
AUDIO IN
(RGB/DVI)
DVI OUTPUT
AUDIO
1
2
Conecte la salida de DVI de la PC al puerto de
HHDDMMII//DDVVII IINN
o
HHDDMMII//DDVVII IINN 11
en la unidad..
Conecte las salidas de audio de la PC al puerto de
AAUUDDIIOO IINN ((RRGGBB//DDVVII))
en la unidad.
1. Cómo conectar
2. Cómo usar
■
Encienda la PC y la unidad.
■
Seleccione la fuente de entrada del
HHDDMMII
o
HHDDMMII11
en el
televisor con el botón de
IINNPPUUTT
en el control remoto.
2
1

CONEXIONES DE EQUIPO EXTERNO
33
NOTAS
!
Frecuencia Frecuencia
Horizontal
(
kHz
)
Vertical
(
Hz
)
31,469 70,08
31,469 70,08
31,469 59,94
37,879 60,31
48,363 60,00
47,776 59,87
47,720 59,799
Resolución
720 x 400
1 360 x 768
640 x 480
800 x 600
1 024 x 768
640 x 350
1 280 x 768
Resolución de Despliegue (RGB-PC, HDMI-PC)
GG
Nosotros le recomendamos que use 1 360 x 768
para el modo PC, esto le ofrecerá la mejor calidad
de imagen.
GG
Dependiendo de la tarjeta gráfica, el modo DOS
puede no funcionar si utiliza un cable HDMI a DVI.
GG
En el modo PC, podría verse ruido asociado con la
resolución, un diseño vertical, contraste o brillo. Si
observa ruidos, cambie la salida de la PC a otra
resolución, cambie la tasa de actualización a otra
tasa o ajuste el brillo y el contraste en el menú de
IMAGEN hasta que la imagen se vea clara.
GG
Evite mantener una imagen fija en pantalla durante
largos periodos de tiempo. La imagen fija podría
grabarse permanentemente en pantalla.
GG
Las formas de la entrada de sincronización para la
frecuencia horizontal y vertical están separadas.
GG
Según la tarjeta de gráficos que posea, algunas
resoluciones podrían no posicionarse adecuada-
mente en la pantalla.
GG
Al escoger HDMI-PC, Ajuste la “Etiqueta de entra-
da - PC” en el menú OPCIÓN.

CONEXIONES DE EQUIPO EXTERNO
34
CONEXIONES DE EQUIPO EXTERNO
Configuración de pantalla para el modo PC
Seleccionar la resolución
Puede seleccionar la resolución en el modo RGB-PC.
También pueden ajustarse la
UUbbiiccaacciióónn
, la
FFaassee
y el
TTaammaaññoo
.
Podrá escoger esta opción sólo cuando la resolución del PC esté ajustada en 1 024X768, 1 280X768 ó 1 360X768.
Seleccione
IIMMAAGGEENN
.
Seleccione
PPaannttaallllaa ((RRGGBB--PPCC))
.
Seleccione
RReessoolluucciióónn
.
Seleccione la resolución deseada.
1
MENU
3
4
2
ENTER
ENTER
ENTER
5
ENTER
Auto Config.
Resolución
G
Ubicación
Tamaño
Fase
Restablecer
Pantalla
Mover
Previo
Ingresar
Mover
IMAGEN
• Contraste 50
• Brillo 50
• Nitidez 50
• Color 50
• Tinte 0
• Control Avanzado
• Restablecer imagen
Pantalla (RGB-PC)
RG
E
1024 x 768
1280 x 768
1360 x 768

CONEXIONES DE EQUIPO EXTERNO
35
Auto configuración
Ajusta automáticamente la posición de la imagen y minimiza la inestabilidad de la imagen. Luego del ajuste, si
la imagen aún no es adecuada, intente usar los ajustes manuales o una resolución diferente o actualice la tasa
de la PC.
Seleccione
PPaannttaallllaa ((RRGGBB--PPCC))
.
Seleccione
AAuuttoo CCoonnffiigg..
.
3
2
ENTER
ENTER
Seleccione
SSíí
.
4
ENTER
Iniciar la auto configuración.
5
ENTER
Seleccione
IIMMAAGGEENN
.
1
MENU
■
Si la posición de la imagen aún no es la
adecuada, intente auto ajustar nueva-
mente.
■
Si la imagen debe ajustarse nuevamente
luego del auto ajuste en RGB-PC, puede
ajustar la
UUbbiiccaacciióónn
, el
TTaammaaññoo
, o la
FFaassee
.
Auto Config.
G
Resolución
Ubicación
Tamaño
Fase
Restablecer
Pantalla
Mover
Previo
Para ajustar
Ingresar
Mover
IMAGEN
• Contraste 50
• Brillo 50
• Nitidez 50
• Color 50
• Tinte 0
• Control Avanzado
• Restablecer imagen
Pantalla (RGB-PC)
RG
E
Sí No

CONEXIONES DE EQUIPO EXTERNO
36
CONEXIONES DE EQUIPO EXTERNO
Ajuste para la Ubicación, Tamaño y Fase de la pantalla
Si la imagen no se ve clara luego del auto ajuste y, especialmente, si los caracteres aún tiemblan, ajuste la fase de
la imagen manualmente.
Esta característica solo opera en modo RGB-PC.
Seleccione
UUbbiiccaacciióónn
,
TTaammaaññoo
o
FFaassee
.
Realice los ajustes adecuados.
3
ENTER
4
ENTER
■
UUbbiiccaacciióónn
: Esta función es para ajustar
la imagen a la izquierda/derecha y arri-
ba/ abajo a su preferencia.
■
TTaammaaññoo
: Esta función es para minimizar
cualquier barra vertical o rayas visibles en
el fondo de pantalla. Y también cambiará
el tamaño de pantalla.
■
FFaassee
: Esta función le deja remover
cualquier ruido horizontal y hace clara o
nitida la imagen de caracteres.
Seleccione
IIMMAAGGEENN
.
Seleccione
PPaannttaallllaa ((RRGGBB--PPCC))
.
1
MENU
2
ENTER
5
ENTER
Auto Config.
Resolución
Ubicación
Tamaño
Fase
Restablecer
GF
D
E
Pantalla
Mover
Previo
Ingresar
Mover
IMAGEN
• Contraste 50
• Brillo 50
• Nitidez 50
• Color 50
• Tinte 0
• Control Avanzado
• Restablecer imagen
Pantalla (RGB-PC)
RG
E

CONEXIONES DE EQUIPO EXTERNO
37
Reajustar la pantalla (Regreso a los valores originales de la fábrica)
Restaura los ajustes de
UUbbiiccaacciióónn
,
TTaammaaññoo
y
FFaassee
a los predeterminados de fábrica.
Esta característica solo opera en modo RGB-PC.
Seleccione
RReessttaabblleecceerr
.
3
ENTER
Seleccione
IIMMAAGGEENN
.
Seleccione
PPaannttaallllaa ((RRGGBB--PPCC))
.
1
MENU
2
ENTER
Seleccione
SSíí
.
4
ENTER
5
ENTER
Auto Config.
Ubicación
Resolución
Tamaño
Fase
Restablecer
Pantalla
Mover
Previo
Para ajustar
Ingresar
Mover
IMAGEN
• Contraste 50
• Brillo 50
• Nitidez 50
• Color 50
• Tinte 0
• Control Avanzado
• Restablecer imagen
Pantalla (RGB-PC)
RG
E
Sí No

VER LA TV / CONTROL DE CANAL
38
FUNCIONES DE LOS BOTONES DEL CONTROL REMOTO
VER LA TV / CONTROL DE CANAL
Cuando use el control remoto dirija el sensor del control remoto hacia panel frontal de la TV.
ENERGY
CHVOL
123
45
0
6
789
P
A
G
E
SAVING
TV
AV MODE
INPUT
FAV
RATIO
MUTE
ENTER
MARK
LIST
FLASHBK
MENU
INFO
Q.MENU
BACK
EXIT
POWER
ENERGY SAVING
AV MODE
INPUT
TV
VOLUMEN
SUBIR/BAJAR
MARK
FAV
RATIO
MUTE
CANAL
ARRIBA/ABAJO
PAGINA
ARRIBA/ABAJO
Botones color
Prende el televisor desde el modo de espera o lo apaga
poniéndolo en dicho modo.
Ajusta la función
AAhhoorrrroo ddee eenneerrggííaa
.
GG
pp..7766
Conmuta entre modos preestablecidos de video y audio.
GG
pp..5544
Alterna entre las entradas.
También prende el televisor desde el modo de espera.
GG
pp..5522
la pantalla vuelve al último canal de TV.
Ajusta el volumen.
Escoja la entrada para aplicar los ajustes del
AAssiisstteennttee ddee
iimmaaggeenn..
GG
pp..6699
Utilizar para marcar o desmarcar una foto/música.
GG
pp..6600,, 6644
Se desplaza a través de los canales programados favoritos.
GG
pp..5500
Selecciona su formato de imagen deseado.
GG
pp..6666
Enciende y apaga el sonido.
GG
pp..4400
Cambia el canal.
Se mueve de un conjunto de información en pantalla al
siguiente.
Funciones especiales de acceso en algunos menús.
Controla menú USB (Lista de fotos, Lista de música.)
Controla los dispositivos compatibles con la función
SIMPLINK.
Botones
USB,
SIMPLINK

VER LA TV / CONTROL DE CANAL
39
■
Abra la tapa del compartimiento de las
baterías en la parte posterior e instale las
baterías con la polaridad correcta.
■
Instale dos baterías de 1,5 Vcc tipo AAA. No
mezcle las baterías nuevas con las usadas.
■
Cierre la tapa.
Colocando las Baterías
ENERGY
CHVOL
123
45
0
6
789
P
A
G
E
SAVING
TV
AV MODE
INPUT
FAV
RATIO
MUTE
ENTER
MARK
LIST
FLASHBK
MENU
INFO
Q.MENU
BACK
EXIT
— (GUIÓN)
LIST
FLASHBK
MENU
INFO
Q.MENU
THUMBSTICK
(Arriba/Abajo/Iz
quierda/Derecha
/ENTER)
BACK
SIMPLINK
EXIT
Entra al número de canales multiples de programa como 2
- 1, 2 - 2, etc.
Muestra la lista de canales.
GG
pp..4488
Regresa al último canal visto.
Muestra el menú principal o cierra todas las visualizaciones
en pantalla y a ver la imagen del televisor.
Muestra información sobre el canal en la parte superior de la
pantalla.
GG
pp..5511
Abre la lista de opciones del menú rápido.
GG
pp..4444
Le permite navegar a través de los menús en la pantalla y
ajustar el sistema de acuerdo a sus preferencias.
Permite al usuario desplazarse un paso hacia atrás en una
aplicación interactiva o en otras funciones interactivas.
Consulte una lista de dispositivos AV conectados al televisor.
Al alternar este botón, aparece el menú SIMPLINK en la
pantalla.
GG
pp..5566--5577
Cierra todas las visualizaciones en pantalla y a ver la ima-
gen del televisor.
Botones
Numerados

VER LA TV / CONTROL DE CANAL
40
ENCENDIDO DEL TV
VER LA TV / CONTROL DE CANAL
NOTA
!
GG
Si usted va a estar ausente en vacaciones, desconecte el TV del tomacorriente.
GG
Si no completa los ajustes iniciales, estos aparecerán cada vez que prenda el televisor hasta que com-
plete dicho proceso.
Primero conecte el cable de alimentación correctamente.
En este momento, el TV cambia al modo en espera.
■
En el modo de espera para encender el TV, presione los botones ,
IINNPPUUTT
,
CCHH((
o
))
en el TV
o presione
PPOOWWEERR
,
IINNPPUUTT
,
CCHH((
o
))
y
nnúúmmeerrooss ((00 -- 99))
del control remoto.
Seleccione la fuente de visualización utilizando el botón
IINNPPUUTT
en el control remoto.
■
Esta TV está programada para recordar qué estado de energía se configuró por última vez, incluso si el
cable de alimentación se desconecta.
Cuando deje de usar la TV, presione el botón
((PPOOWWEERR))
en el control remoto. El televisor vuelve al modo
apagado.
1
2
3
Presione el botón
CCHH ((
o
))
o de
NNÚÚMMEERROO
para seleccionar un
número del canal.
1
AJUSTE DEL VOLUMEN
AJUSTE DEL CANAL
Presione el botón
VVOOLL ((++
o
--))
para ajustar el volumen.
Si ud. quiere apagar el sonido, presione el botón
MMUUTTEE
.
Ud. puede cancelar esta función presionando el botón
MMUUTTEE
o
VVOOLL ((++
o
--))
.
Ajuste el volumen según su preferencia personal.
1
2
3

VER LA TV / CONTROL DE CANAL
41
CONFIGURACIÓN INICIAL
Verifique su conexión de antena y ejecute
la función
SSiinnttoonniizzaacciióónn aauuttoommááttiiccaa
.
1
ENTER
Seleccione
AAuuttoommááttiiccoo
o
MMaannuuaall
.
Seleccione la opción de
tiempo deseada.
1
2
ENTER
Seleccione Idioma del menú.
1
ENTER
Seleccione Modo
HHoommee UUssee
.
1
ENTER
Esta función guía al usuario para que pueda configurar fácilmente los elementos escenciales para ver el televisor
por primera vez cuando lo adquiere. Se visualizará en la pantalla cuando encienda el televisor por primera vez.
También puede activarse desde los menús del usuario.
■
La selección preestablecida es “
HHoommee UUssee
”. Recomendamos el establecimiento de la televisón a modo
“
HHoommee UUssee
” para la mejor imágen en su entorno familiar.
■
“
SSttoorree DDeemmoo
” Modo sólo destinado para su utilización en entornos de venta al por menor. Los clientes
pueden ajustar el “menú
IIMMAAGGEENN
-
MMooddoo iimmaaggeenn
” manualmente mientras que la inspección de la tele-
visión, pero la televisión regresará automáticamente a la preestablecida en almacén después de 5 minutos.
■
El modo “
SSttoorree DDeemmoo
” proporciona un ajuste óptimo para la visualización de la unidad en establecimien-
tos de venta al por menor. El modo “
SSttoorree DDeemmoo
” inicia la TV para ajustar la calidad de la imagen.
■
También ud. puede hacer la
CCoonnffiigguurraacciióónn IInniicciiaall
con el menú
OOPPCCIIÓÓNN
.
Paso3. Configuración de Hora
Paso4. Sintonización automática
Lenguaje
Paso1. Selección de idioma
English
Español
Français
Seleccionando el entorno.
Escoja modo config. que desee.
Seleccione [Home Use] para configurar su
televisior en casa. Puede ajustar la calidad
de la imagen a través de la opciónde
menú Picture Mode.
Store Demo
Home Use
Configuración de modo
Paso2. Configuración de Modo
SiguientePrev.
SiguientePrev.
Mes
Config. de Hora Actual
02
Fecha
21
Año
2009
Hora
10 AM
Minuto
10
Zona horaria
Este
Horario de verano
Automático
FF
Automático
GG
Configuración de Hora
SiguientePrev.
Antes de comenzar
asegúrese de que la
antena del TV esté conectada.
Sintonización automática
Siguiente
Manual Simple
Prev.
INFO
i
Para 19/22LD350C

VER LA TV / CONTROL DE CANAL
42
SELECCIÓN Y AJUSTE DEL MENÚ PANTALLA
VER LA TV / CONTROL DE CANAL
El OSD (On Screen Display, Despliegue En la Pantalla) de su TV puede ser un poco diferente que este manual.
Visualizar todos los menús.
Seleccione un elemento del menú.
Acepte la selección actual.
1
MENU
3
2
ENTER
ENTER
Regresar a la pantalla del televisor.
4
EXIT
19/22/26LD350, 19/22LD350C
Ingresar
Mover
Sintonización automática
Sintonización manual
Edición de Canales
CANAL
CANAL
HORA
IMAGEN
OPCIÓN
AUDIO
BLOQUEAR
Ingresar
Mover
Volumen automático
: Apagado
Voz Clara II : Apagado
• Nivel 3
Balance 0
Modo de audio : Estándar
•
Sonido Infinito:
Apagado
• Agudos 50
• Graves 50
AUDIO
LR
Ingresar
Mover
Reloj
Hora de Apagado : Apagado
Hora de Encendido: Apagado
Temporizador : Apagado
HORA
Ingresar
Mover
Sist. de Bloqueo : Apagado
Fijar Contraseña
Bloquear Canales
Clasif. Películas
Clasif. Edad
Clasif. General
Clasif. Descargable
Bloqueo de entradas
BLOQUEAR
Ingresar
Mover
Idioma del menú(Language)
: Español
Lenguaje de Audio : Inglés
Etiqueta de entrada
SIMPLINK : Apagado
Bloqueo de Teclas : Apagado
Manual Simple
Subtítulo : Apagado
ID del Televisor : 1
OPCIÓN
Ingresar
Mover
Aspecto de pantalla
: 16:9
Asistente de imagen
Ahorro de energía
: Apagado
Modo imagen : Estándar
•
Luz de Fondo
70
• Contraste 90
• Brillo 50
• Nitidez 70
IMAGEN
E E
E
Sist. de Bloqueo : Apagado
Fijar Contraseña
Bloquear Canales
Clasif.-Inglés
Clasif.-Francés
Clasif. Descargable
Bloqueo de entradas
Para EE.UU. Para Canadá
-+

VER LA TV / CONTROL DE CANAL
43
Visualizar todos los menús.
Seleccione un elemento del menú.
Acepte la selección actual.
1
MENU
3
2
ENTER
ENTER
Regresar a la pantalla del televisor.
4
EXIT
32LD350, 32LD320
Ingresar
Mover
Sintonización automática
Sintonización manual
Edición de Canales
CANAL
CANAL
OPCIÓN
IMAGEN
BLOQUEAR
AUDIO
ENTRADAS
HORA
USB
Ingresar
Mover
Aspecto de pantalla
: 16:9
Asistente de imagen
Ahorro de energía
: Apagado
Modo imagen : Estándar
•
Luz de Fondo
70
• Contraste 90
• Brillo 50
• Nitidez 70
IMAGEN
E
Ingresar
Mover
Volumen automático
: Apagado
Voz Clara II : Apagado
• Nivel 3
Balance 0
Modo de audio : Estándar
•
Sonido Infinito:
Apagado
• Agudos 50
• Graves 50
AUDIO
E
Ingresar
Mover
Reloj
Hora de Apagado : Apagado
Hora de Encendido: Apagado
Temporizador : Apagado
HORA
Ingresar
Mover
Lista de fotos
Lista de música
USB
Ingresar
Mover
TV
AV1
AV2
Componente
RGB-PC
HDMI1
HDMI2
ENTRADAS
Ingresar
Mover
Sist. de Bloqueo : Apagado
Fijar Contraseña
Bloquear Canales
Clasif. Películas
Clasif. Edad
Clasif. General
Clasif. Descargable
Bloqueo de entradas
BLOQUEAR
Sist. de Bloqueo : Apagado
Fijar Contraseña
Bloquear Canales
Clasif.-Inglés
Clasif.-Francés
Clasif. Descargable
Bloqueo de entradas
Ingresar
Mover
Idioma del menú(Language)
: Español
Lenguaje de Audio : Inglés
Etiqueta de entrada
SIMPLINK : Apagado
Bloqueo de Teclas : Apagado
Manual Simple
Subtítulo : Apagado
ID del Televisor : 1
OPCIÓN
Para EE.UU. Para Canadá
E
LR
-+
NOTA
!
GG
IInnddiiccaaddoorr ddee PPooddeerr
: Para 32LD320

VER LA TV / CONTROL DE CANAL
44
QUICK MENU (MENÚ RÁPIDO)
VER LA TV / CONTROL DE CANAL
Visualizar todos los menús.
Realice los ajustes adecuados.
AAssppeeccttoo ddee ppaannttaallllaa
: Selecciona el formato de imagen que desee.
MMooddoo iimmaaggeenn
: Selecciona modos de imagen predeterminadas de fábrica en función de las condiciones
de observación.
MMooddoo ddee aauuddiioo
: Selecciona modos de sonido predeterminados de fábrica para los diferentes tipos de pro-
grama.
MMuullttii AAuuddiioo
: Cambia el lenguaje de audio (señal digital).
SSAAPP
: Seleccione sonido MTS (Señal Analoga)
TTeemmppoorriizzaaddoorr
: Seleccione el plazo de tiempo antes de que su TV se apague automáticamente.
BBoorrrr//AAggrr//FFaavv
: Seleccione el canal que desee agregar o eliminar, o agregue el canal a la lista de favoritos.
SSuubbttííttuulloo
: Seleccione encendido o apagado
AAhhoorrrroo ddee eenneerrggííaa
: Escoja el nivel de la función Ahorro de energía para reducir el consumo eléctrico del
televisor, ajustando el nivel de luz de fondo.
DDiissppooss UUSSBB
: Seleccione “Expulsar” para expulsar el dispositivo USB.
Los menús de visualización en pantalla de su TV pueden diferir ligeramente de las ilustraciones mostradas en este
manual.
El menú rápido (Q.Menu) es un menú destinado a las funciones que el usuario utiliza con más frecuencia.
1
Q.MENU
2
3
EXIT
Regresar a la pantalla del televisor.
A
16:9
FF
Aspecto de pantalla
GG
A
A
16:9
FF
Aspecto de pantalla
GG
19/22/26LD350, 19/22LD350C 32LD350, 32LD320

VER LA TV / CONTROL DE CANAL
45
BÚSQUEDA DE CANALES
Escaneo automático (Sintonización automática)
Busca automaticamente todos los canales disponibles por las entradas de antena o cable y los guarda en la
memoria de la lista de canales.
Ejecute esta función si cambia de vivienda o cambia el emplazamiento del televisor.
La función de sintonización automática memoriza sólo los canales que están disponibles en este momento.
Seleccione
CCAANNAALL
.
Seleccione
SSiinnttoonniizzaacciióónn aauuttoommááttiiccaa
.
Seleccione
SSíí
.
Ejecutar la
SSiinnttoonniizzaacciióónn aauuttoommááttiiccaa
.
1
MENU
3
2
ENTER
ENTER
4
ENTER
■
El televisor solicitará una contraseña si el
control parental ha sido activado (menú
de
BBLLOOQQUUEEAARR
). Use la contraseña
establecida en el menú de
BBLLOOQQUUEEAARR
para permitir una búsqueda de canal.
■
Al establecer la sintonización automática
o manual, el número máximo de canales
que podrá guardar es de 1 000.
Esto está sujeto a cambios dependiendo
de las condiciones de la señal de emisión.
■
Memoriza todos los canales disponibles
en el siguiente orden: DTV, TV, CADTV y
CATV.
5
BACK
Regresar al menú anterior.
EXIT
Regresar a la pantalla del televisor.
Ingresar
Mover
CANAL
Sintonización automática
Sintonización manual
Edición de Canales
Ingresar
Mover
CANAL
Sintonización automática
Sintonización manual
Edición de Canales
Compruebe conexión de antena.
La información previa de canales
se actualizará en la Sintonización
automática.
Sí
No

VER LA TV / CONTROL DE CANAL
46
VER LA TV / CONTROL DE CANAL
Seleccione
CCAANNAALL
.
1
MENU
2
ENTER
Si selecciona señal de entrada DTV o CADTV, puede visualizar el monitor de intensidad de la señal en la pantalla
para ver la calidad de la señal que se recibe.
Agregar/Eliminar los Canales (Sintonización manual)
Seleccione
SSiinnttoonniizzaacciióónn mmaannuuaall
.
Seleccione
DDTTVV
,
TT VV
,
CCAADDTTVV
o
CCAATTVV
.
Seleccione el canal que desee
agregar o borrar.
3
ENTER
4
Seleccione
AAggrreeggaarr
o
BBoorrrraarr
.
5
ENTER
■
El televisor solicitará una contraseña si el
control parental ha sido activado (menú
de
BBLLOOQQUUEEAARR
). Use la contraseña
establecida en el menú de
BBLLOOQQUUEEAARR
para permitir una búsqueda de canal.
■
Al establecer la sintonización automática
o manual, el número máximo de canales
que podrá guardar es de 1 000.
Esto está sujeto a cambios dependiendo
de las condiciones de la señal de emisión.
6
BACK
Regresar al menú anterior.
EXIT
Regresar a la pantalla del televisor.
Ingresar
Mover
CANAL
Sintonización automática
Sintonización manual
Edición de Canales
Ingresar
Mover
CANAL
Sintonización automática
Sintonización manual
Edición de Canales
Canal
Seleccione el tipo de canal y el
número de canal de RF.
FF
DTV
GG
2
Cerrar
Agregar
DTV 2-1
Mala Normal Buena

VER LA TV / CONTROL DE CANAL
47
Seleccione un canal.
3
ENTER
Los canales de la Lista de edición de canales aparecen en negro y los canales eliminados de la lista aparecen en
azul.
Al omitir un número de canal, no podrá escogerlo mediante el botón
CCHH
durante la visualización del televisor.
Si desea escoger el programa omitido, introduzca directamente su número mediante los botones NUMÉRICOS
o escójalo en el menú
EEddiicciióónn ddee ccaannaalleess
.
Edición de canal
Seleccione
CCAANNAALL
.
1
MENU
2
ENTER
Seleccione
EEddiicciióónn ddee CCaannaalleess
.
Regresar al menú anterior.
5
BACK
Regresar a la pantalla del televisor.
EXIT
■
Mantenga presionado el botón y use
los botones o para desplazarse
entre DTV, TV, CADTV y CATV.
■
Si la lista de canales es demasiado larga,
use los botones CH o para
desplazarse por las páginas.
Agregar o Borrar el canal.
4
AZUL
Ingresar
Mover
CANAL
Sintonización automática
Sintonización manual
Edición de Canales
Cambio de Canal
Cambio de página
CH
Navegación
Previo
Agregar/Borrar

VER LA TV / CONTROL DE CANAL
48
LISTA DE CANALES
VER LA TV / CONTROL DE CANAL
Podrá examinar los programas almacenados en la memoria visualizando la lista de canales.
Muestra la
LLiissttaa ddee ccaannaalleess
.
1
LIST
Visualización de la lista de canales
Escoja un canal.
1
Cambie al número de canal escogido.
2
ENTER
Selección de un canal de la lista de canales
Pase las páginas.
1
CH
P
A
G
E
Regresar a la pantalla del televisor.
2
EXIT
Paso de páginas de una lista de canales
Salir
2-1
3-1
4-1
DTV
DTV
DTV
Lista de canales
Este candado se indica cuando el
canal está bloqueado mediante el
control parental.

VER LA TV / CONTROL DE CANAL
49
CONFIGURACIÓN DE LOS CANALES FAVORITOS
La lista de Canales favoritos es una función muy cómoda que le permitirá cambiar rápidamente entre sus canales
preferidos sin tener que esperar a que el televisor sintonice todos los canales intermedios.
Presione repetidamente el botón
FFAAVV
(Favorite) para seleccionar canales favoritos almacenados.
Regresar a la pantalla del televisor.
4
EXIT
Seleccione
FFaavvoorriittoo
.
3
Escoja el canal que prefiera.
1
CH
P
A
G
E
123
45
0
6
789
2
Q.MENU
Seleccione
BBoorrrr//AAggrr//FFaavv
.
o
A
Favorito
FF
Borr/Agr/Fav
GG
A
Favorito
FF
Borr/Agr/Fav
GG

VER LA TV / CONTROL DE CANAL
50
LISTA DE CANALES FAVORITOS
VER LA TV / CONTROL DE CANAL
Salir
2-1
3-1
4-1
DTV
DTV
DTV
Lista de favoritos
Escoja un canal.
1
Cambie al número de canal escogido.
2
ENTER
Selección de un canal de la lista de
canales favoritos
Pase las páginas.
1
CH
P
A
G
E
Regresar a la pantalla del televisor.
2
EXIT
Paso de páginas de la lista de canales
favoritos
Muestre la lista de canales favoritos
1
FAV
MARK
Visualización de la lista de canales
favoritos

VER LA TV / CONTROL DE CANAL
51
INFO. BREVE
1
INFO
La información breve muestra la información de la pantalla actual.
Mostrar la Información breve en pantalla.
2
BACK
Regresar a la pantalla del televisor.
Brief Info Title Test..
Sat, Feb 21, 2009 10:10 AM 11:40 AM
CNN
DOLBY DIGITAL
10:40 AM
Multilingual CaptionD 1080i TV-PG D L S V
CC
Titulo de programa
Día de semana, Mes, Año
Hora de inicio de programa
Barra de progreso de programa
Hora de termino de Programa
Hora actual
Información de estandarte
1 2 3 4 5 67
1
2
3
4
5
6
7
Subtítulo
480 entrelazado
480 progresivo
720 progresivo
1 080 entrelazado
1 080 progresivo
4:3
16:9
CC
MMuullttiilliinngguuaall
: El programa contiene dos o más canales
de audio disponibles. Use el menú
QQ..MMEENNUU
para
escoger la pista de audio que desee.
SSuubbttííttuulloo
: El programa contiene subtítulos
disponibles en uno o más idiomas. Use el menú
QQ..MMEENNUU
para escoger los subtítulos que desee.
DDoollbbyy DDiiggiittaall
: El programa contiene señal Dolby dig-
ital de entrada en la televisión y la fuente de entrada
HDMI
El formato de imagen original del video es 4:3.
El formato de imagen original del video es 16:9.
La resolución de video es de 720 x 480 entrelazado
La resolución de video es de 720 x 480 progresivo
La resolución de video es de 1 280 x 720 progresivo
La resolución de video es de 1 920 x 1 080 entrelazado
La resolución de video es de 1 920 x 1 080 progresivo
VV--CChhiipp
: El programa contiene información V-Chip.
Referente al menú de BLOQUEAR: A (Edad), D
(Diálogo), L (Lenguaje), S (Sexo), V (Violencia), FV
(Violencia de Fantasía)
D

VER LA TV / CONTROL DE CANAL
52
LISTA DE ENTRADAS
VER LA TV / CONTROL DE CANAL
TV AV Componente
HDMI RGB-PC
19/22LD350,
19/22LD350C:
TV AV1 AV2
HDMI2 HDMI1 RGB-PC
Componente
26/32LD350,
32LD320:
Seleccione la fuente de entrada deseada.
■
32LD350, 32LD320: También puede seleccionar la fuente de entrada deseada en el
menú de
EENNTTRRAADDAASS
.
1
INPUT
ENTER
Solo estas señales de entrada que están conectadas a un televisor pueden activarse y seleccionarse.
TV AV Componente RGB-PC HDMI1
TV AV Componente RGB-PC HDMI1
Etiqueta de entrada
Salir
Seleccione una fuente de entrada deseada
(excepto
TT VV
). Luego, puede escoger la
EEttiiqquueettaa ddee eennttrraaddaa
que prefiera usando
el botón Azul.
GG
pp..5533
Ej.)
Ej.) En caso de cambiar la etiqueta de entrada mediante el botón Azul.
■
TT VV
: selecciónelo para mirar estaciones de aire,
cable y digitales.
■
AAVV
: selecciónelo para mirar una video casetera u
otro equipo externo.
■
CCoommppoonneennttee
: selecciónelos para mirar un DVD o
un decodificador digital.
■
RRGGBB--PPCC
: selecciónelo para ver la PC.
■
HHDDMMII
: selecciónelo para ver en dispositivos de
alta definición.
VCR DVD PC Juego
■
Cuando se encuentra conectado un dispositivo externo, este
menú emergente se visualiza automáticamente.
Si selecciona
SSíí
, puede seleccionar la fuente de entrada que
desee percibir.
■
Pero, si selecciona “
SSIIMMPPLLIINNKK
-
EEnncceennddiiddoo
” en modo HDMI,
este menú emergente podría no visualizarse.
No
Sí
!
Nueva entrada externa conectada.
¿Desea utilizarla?
AV2
Las entradas desconectadas están inactivas
(se indican en gris)

VER LA TV / CONTROL DE CANAL
53
ETIQUETA DE ENTRADA
Esto indica qué dispositivo está conectado a cada puerto de entrada.
Ingresar
Mover
OPCIÓN
Idioma del menú(Language)
: Español
Lenguaje de Audio : Inglés
Etiqueta de entrada
SIMPLINK : Encendido
Bloqueo de Teclas : Apagado
Manual Simple
Subtítulo : Apagado
ID del Televisor : 1
AV
Componente
RGB-PC
HDMI
FF GG
Cerrar
Seleccione
OOPPCCIIÓÓNN
.
Seleccione
EEttiiqquueettaa ddee
eennttrraaddaa
.
Seleccione la etiqueta.
1
MENU
2
ENTER
Seleccione la fuente.
3
ENTER
4
5
BACK
Regresar al menú anterior.
EXIT
Regresar a la pantalla del televisor.
Usando el menú OPCIÓN
Seleccione la fuente.
Seleccione la etiqueta.
1
INPUT
2
3
BACK
Regresar al menú anterior.
EXIT
Regresar a la pantalla del televisor.
Usando el botón de INPUT
19/22LD350,
19/22LD350C
AV1
AV2
Componente
RGB-PC
HDMI1
HDMI2
FF GG
Cerrar
26/32LD350,
32LD320
EE
AZUL

VER LA TV / CONTROL DE CANAL
54
MODO AV
VER LA TV / CONTROL DE CANAL
El Modo AV cambia entre los ajustes de video y audio.
1
AV MODE
2
Apagado Cine
Juego Deporte
Presione repetidamente el botón
AAVV MMOODDEE
para seleccionar el modo que desee.
ENTER
■
Si selecciona “
CCiinnee
” en modo AV, el
CCiinnee
se seleccionará para el “menú IMAGEN -
Modo imagen” y para el “menú AUDIO -
Modo de audio” respectivamente.
■
Si selecciona “
AAppaaggaaddoo
” en modo AV, el
“
MMooddoo iimmaaggeenn
” y el “
MMooddoo ddee
aauuddiioo
” volverán a tener el valor selec-
cionado anteriormente.
■
AAppaaggaaddoo
: Desactiva el MODO AV.
■
CCiinnee
: optimiza video y audio para disfru-
tar películas.
■
DDeeppoorrttee
: optimiza video y audio para
disfrutar de eventos deportivos.
■
JJuueeggoo
: optimiza video y audio para jugar
a videojuegos.
MANUAL SIMPLE
Podrá acceder fácil y eficazmente a la información del televisor visualizando un manual simple en el propio
aparato.
Mientras se muestra el manual simple, el audio permanecerá desactivado.
Seleccione
OOPPCCIIÓÓNN
.
Seleccione
MMaannuuaall SSiimmppllee
.
1
MENU
2
ENTER
Escoja la sección del manual que
desea examinar.
3
ENTER
4
EXIT
Regresar a la pantalla del televisor.
Ingresar
Mover
OPCIÓN
Idioma del menú(Language)
: Español
Lenguaje de Audio : Inglés
Etiqueta de entrada
SIMPLINK : Apagado
Bloqueo de Teclas : Apagado
Manual Simple
Subtítulo : Apagado
ID del Televisor : 1
EE

VER LA TV / CONTROL DE CANAL
55
BLOQUEO DE TECLAS
El televisor se puede configurar de modo tal que se pueda usar sólo con el control remoto.
El objetivo de esta función es evitar que sea utilizado por personas no autorizadas, bloqueando los controles
del panel frontal.
Este televisor está programado para recordar la última opción definida, incluso si apaga el televisor.
Seleccione
OOPPCCIIÓÓNN
.
Seleccione
BBllooqquueeoo ddee TTeeccllaass
.
1
MENU
2
ENTER
Seleccione
AAppaaggaaddoo
o
EEnncceennddiiddoo
.
3
ENTER
■
En
BBllooqquueeaaddoo EEnncceennddiiddoo
, si la unidad
está apagada, presione el botón
rr
/ I,
INPUT, CH
(( ))
de la unidad o los
botones de POWER, INPUT, CH
(( ))
o números del control remoto.
■
Con
BBllooqquueeoo ddee TTeeccllaass EEnncceennddiiddoo
,
se aparecerá ‘
BBllooqquueeoo ddee TTeeccllaass
’
en la pantalla si cualquier botón del
panel frontal ha presionado cuando mira
la unidad.
4
BACK
Regresar al menú anterior.
EXIT
Regresar al menú anterior.
!
Ingresar
Mover
OPCIÓN
Idioma del menú(Language)
: Español
Lenguaje de Audio : Inglés
Etiqueta de entrada
SIMPLINK : Encendido
Bloqueo de Teclas : Encendido
Manual Simple
Subtítulo : Apagado
ID del Televisor : 1
EE
Ingresar
Mover
OPCIÓN
Idioma del menú(Language)
: Español
Lenguaje de Audio : Inglés
Etiqueta de entrada
SIMPLINK : Encendido
Bloqueo de Teclas : Apagado
Manual Simple
Subtítulo : Apagado
ID del Televisor : 1
EE
Apagado
Encendido

VER LA TV / CONTROL DE CANAL
56
VER LA TV / CONTROL DE CANAL
La función SIMPLINK le permite controlar y leer dispositivos AV conectados mediante cable HDMI sin ningún
otro cable ni ajuste adicional. Este televisor podría funcionar con dispositivos compatibles con HDMI-CEC,
pero sólo serán completamente compatibles con dispositivos distinguidos con el logotipo .
SIMPLINK puede activarse y desactivarse desde los menús de usuario.
Ingresar
Mover
OPCIÓN
Seleccione
OOPPCCIIÓÓNN
.
Seleccione
SSIIMMPPLLIINNKK
.
Seleccione
EEnncceennddiiddoo
o
AAppaaggaaddoo
.
Ingresar
Mover
OPCIÓN
E
1
MENU
3
2
ENTER
ENTER
Idioma del menú(Language)
: Español
Lenguaje de Audio : Inglés
Etiqueta de entrada
SIMPLINK : Encendido
Bloqueo de Teclas : Apagado
Manual Simple
Subtítulo : Apagado
ID del Televisor : 1
Idioma del menú(Language)
: Español
Lenguaje de Audio : Inglés
Etiqueta de entrada
SIMPLINK : Encendido
Bloqueo de Teclas : Apagado
Manual Simple
Subtítulo : Apagado
ID del Televisor : 1
Apagado
Encendido
NOTA
!
GG
Conecte la terminal HDMI/DVI IN o HDMI IN del televisor a la terminal posterior (salida HDMI) del dis-
positivo SIMPLINK con el cable HDMI.
GG
Al encender la fuente de Entrada con el botón
IINNPPUUTT
en el control remoto, se desactivará el dispositivo
SIMPLINK.
GG
Al escoger un dispositivo que disponga de la función de cine en casa, la salida de sonido cambiará
automáticamente a los altoparlantes del sistema de cine en casa, desactivándose los del televisor.
GG
Si un sistema de home theater SIMPLINK no se reproduce en el audio del televisor, conecte la terminal de
SALIDA DE AUDIO DIGITAL a la parte posterior del televisor a la terminal de ENTRADA DE AUDIO DIGI-
TAL en la parte posterior del dispositivo SIMPLINK con un cable ÓPTICO.
E
4
BACK
Regresar al menú anterior.
EXIT
Regresar a la pantalla del televisor.

VER LA TV / CONTROL DE CANAL
57
■
RReepprroodduucccciióónn ddiirreeccttaa::
Luego de conectar los dispositivos AV al televisor, puede controlar directamente los
dispositivos y medios de reproducción sin ninguna configuración adicional.
■
SSeelleecccciioonnee ddiissppoossiittiivvoo AAVV::
Le permite seleccionar uno de los dispositivos conectados al televisor y
reproducirlo.
■
RReepprroodduucccciióónn ddeell ddiissccoo::
Controle los dispositivos AV conectados presionando los botones ,
ENTER,
G
,
A
,
ll ll
,
FF
y
GG
.
■
AAppaagguuee ttooddooss llooss ddiissppoossiittiivvooss::
Para que está función aplique, todos los dispositivos conectados al
televisor deben de estar detenidos.
■
DDeessccoonneeccttee eell aauuddiioo ::
Ofrece una forma fácil de desactivar el audio.
■
SSyynncc PPoowweerr oonn::
Al iniciar la lectura en un equipo conectado a la toma HDMI que disponga de función Simplink,
el televisor se prenderá automáticamente.
(Un dispositivo, el cual se conecta al televisor a través del cable HDMI pero no es compatible con Simplink, no
proporciona esta función )
Nota:Para activar el enlace simple, debe emplear el cable HDMI con el dispositivo *CEC. (*CEC: Consumer
Electronics Control).
Menú SIMPLINK
Funciones de SIMPLINK
Visualizar el menú
SSIIMMPPLLIINNKK
.
Seleccione el dispositivo deseado.
Controle los dispositivos AV conectados.
1
3
2
ENTER
ENTER
VViissuuaalliizzaacciióónn ddeell tteelleevviissoorr
: Cambie
al canal del televisor anterior, sin importar
el modo actual.
RReepprroodduucccciióónn ddee DDIISSCC ((DDiissccoo))
:
Seleccione y reproduzca los discos.
Cuando existan varios discos disponibles,
los títulos de los discos aparecerán en la
parte inferior de la pantalla.
RReepprroodduucccciióónn ddee VVCCRR
: Reproduzca y
controle el VCR conectado.
RReepprroodduucccciióónn ddee ggrraabbaacciioonneess HHDDDD
:
Reproduzca y controle las grabaciones
almacenadas en HDD.
SSaalliiddaa ddee aauuddiioo aa bboocciinnaa HHTT//
SSaalliiddaa ddee aauuddiioo aa tteelleevviissoorr
:
Seleccione parlante HT o parlante TV
para salida de audio.
1
2
3
4
5
GG
Cuando no hay un dispositivo
conectado (aparece en gris)
GG
Dispositivo seleccionado
GG
Cuando hay un dispositivo
esta conectado (Muestra un
color brillante)
1
2
3
4
5

MODOS DE ENTRADA
USB
58
USB (Para 32LD350, 32LD320)
Cuando desconecte el dispositivo USB
Conecte el dispositivo USB a las tomas
UUSSBB
II NN
en el lateral de la TV.
3
Seleccione
LLIISSTTAA DDEE FFOOTTOOSS
o
LLIISSTTAA DDEE MMÚÚSSIICCAA
.
1
IN 2
USB IN
Memory Key
Seleccione
DDiissppooss UUSSBB
.
Seleccione
EExxppuullssaarr
.
Seleccione el menú
DDiissppooss UUSSBB
antes de
desconectar el dispositivo USB.
2
ENTER
1
Q.MENU
2
ENTER
■
Este televisor es compatible con los formatos JPG y
MP3.
Cuando usted conecta el dispositivo USB, el menú emergente se muestra automáticamente.
Cuando el menú emergente no aparece, usted puede seleccionar del menú del USB una lista de fotos o de música.
En el dispositivo USB, no puede agregar una nueva carpeta ni borrar la carpeta existente.
LISTA DE FOTOS
LISTA DE MÚSICA
Conexión del dispositivo USB
GG
Sólo se puede reconocer un dispositivo de alma-
cenamiento USB.
GG
Si el dispositivo de almacenamiento USB se
conecta a través del hub USB, el dispositivo no es
reconocible.
GG
Es posible que no se reconozca un dispositivo de
almacenamiento USB mediante el programa de
reconocimiento automático.
GG
Es posible que no se reconozca un dispositivo de
almacenamiento USB que utiliza su propio con-
trolador.
GG
La velocidad de reconocimiento de un dispositivo
de almacenamiento USB dependerá de cada dis-
positivo.
GG
No apague el televisor ni desconecte el dispositi-
vo USB cuando el dispositivo de almacenamiento
USB conectado esté funcionando. Al separar o
desenchufar repentinamente dicho dispositivo, se
pueden dañar los archivos almacenados o el dis-
positivo de almacenamiento USB.
GG
Únicamente utilice un dispositivo USB de alma-
cenamiento el cual contiene archivos normales de
música o imágenes.
GG
Use sólo un dispositivo de almacenamiento USB
formateado como sistema de archivo FAT 32 o
NTFS, incluido con el sistema operativo Windows.
En el caso de un dispositivo de almacenamiento
formateado como programa utilitario diferente no
compatible con Windows, éste podría no ser
reconocido.
GG
Por favor, si desea conectar un dispositivo de
almacenamiento USB (mas de 0.5 A) este
requiere una fuente de poder externa. Si no, el dis-
positivo no será reconocido.
GG
Conecte un dispositivo de almacenamiento USB
con un cable certificado. Si se conecta con un
cable no certificado o con un cable excesivamente
largo, el dispositivo podría no ser reconocido.
GG
Algunos dispositivos de almacenamiento USB
podrían no ser compatibles o no funcionar ade-
cuadamente.
GG
Realice copias de seguridad de sus archivos
importantes, ya que los datos almacenados en el
dispositivo USB podrían resultar dañados. La
gestión de datos es responsabilidad del cliente, y
en consecuencia, el fabricante no cubre en garan-
tía los daños en los datos guardados en el pro-
ducto.
GG
Si su memoria USB tiene múltiples particiones, o si
utiliza un lector de memoria multipuerto, puede
utilizar hasta 4 particiones o una memoria USB.
GG
En el caso de los dispositivos de almacenamiento
USB en formato NTFS, no pueden ser detectados.
GG
El método de alineación del dispositivo USB de
almacenaje es similar al de Windows XP y los
nombres de archivos pueden reconocer hasta
100 caracteres ingleses.
GG
La capacidad recomendada para un disco duro
externo USB es de 1TB o menos y para una memo-
ria clave USB es de 32 GB o menos.
GG
Si un disco duro externo USB con “Ahorro de
energía” no funciona, apague el disco duro y
encienda de nuevo para que funcione. Consulte el
manual de usuario para la aplicación de un disco
duro externo USB.

LISTA DE FOTOS
USB
59
Puede visualizar archivos .JPG de dispositivos de almacenaje USB.
La visualización en la pantalla de su modelo puede variar levemente.
Componentes de la pantalla
Archivo de foto compatible: *.JPG
■
Solo puede ejecutar archivos JPG.
■
Solo el escaneo baseline es compatible con JPG.
■
Disponible JPG en tamaño (ancho x alto, en píxeles): 64 x 64 - 15360 x 8640
Seleccione
UUSSBB
.
Seleccione
LLiissttaa ddee ffoottooss
.
2
1
MENU
ENTER
ENTER
Muévase a la carpeta de nivel
superior.
Previsualizar: visualice las imá-
genes en miniatura o el nombre
de la carpeta de las fotos en la
carpeta seleccionada.
Página actual/Total de páginas
Número total de fotos en
miniatura marcadas
Botones correspondientes en
el control remoto
1
2
3
4
5
Navegación Menú emergente Cambio de página Marcar Salir
CH
MARK
5
Página 2/3
No marcado
Lista de fotos
Carpeta arriba
1366
x
768, 125KB
KY101
06/10/2008
KY102
04/03/2008
JMJ001
01/01/2000
JMJ002
06/15/2008
JMJ003
04/03/2008
JMJ004
02/18/2008
KY103
03/30/2008
KY104 06/19/2008
KY105
01/31/2008
JMJ005
05/13/2008
JMJ006
05/26/2008
JMJ007
02/18/2008
JMJ008
02/18/2008
Carpeta arriba
Drive1
JMJ001
3 4
2
1

USB
60
USB
Seleccione la carpeta o el disco de destino.
Seleccione las fotos deseadas.
2
Visualice el menú emergente.
3
1
■
Utilice el botón
CCHH
para navegar en la
página de fotos.
■
Use el botón
MMAARRKK
para marcar o desmarcar
una foto. Cuando se marca una o más fotos, se
pueden ver las fotos en forma individual o una
presentación de las fotos marcadas. Si no se
marca ninguna foto, se pueden ver todas las
fotos en forma individual o todas las fotos en la
carpeta, como presentación.
4
Seleccione el menú emergente
deseado.
ENTER
ENTER
ENTER
Selección de fotos y menú emergente
Página 2/3
No marcado
Lista de fotos
Carpeta arriba
1366
x
768, 125KB
KY101
06/10/2008
KY102
04/03/2008
JMJ001
01/01/2000
JMJ002
06/15/2008
JMJ003
04/03/2008
JMJ004
02/18/2008
KY103
03/30/2008
KY104
06/19/2008
KY105
01/31/2008
JMJ005
05/13/2008
JMJ006
05/26/2008
JMJ007
02/18/2008
JMJ008
02/18/2008
Carpeta arriba
Página 2/3
No marcado
Lista de fotos
Carpeta arriba
1366
x
768, 125KB
KY101
06/10/2008
KY102
04/03/2008
JMJ001
01/01/2000
JMJ002 06/15/2008
JMJ003
04/03/2008
JMJ004
02/18/2008
KY103
03/30/2008
KY104
06/19/2008
KY105
01/31/2008
JMJ005
05/13/2008
JMJ006 05/26/2008
JMJ007
02/18/2008
JMJ008
02/18/2008
Carpeta arriba
Drive1
Drive1
JMJ001
JMJ001
1366x768, 125KB
Ver
Marcar todo
Borrar
Cerrar
Navegación Cambio de página Marcar Salir
CH
MARK
Menú emergente
Navegación Cambio de página Marcar Salir
CH
MARK
Menú emergente
Cuando selecciona un archivo (no una carpeta),
se visualiza el menú emergente.
GG
VVeerr
: Muestra el elemento seleccionado.
GG
MMaarrccaarr ttooddoo
: Marca todas las fotos de la pantalla.
GG
DDeessmmaarrccaarr ttooddoo
: Cancele la selección de las
fotos marcadas.
GG
BBoorrrraarr
: Borra la foto seleccionada.
GG
CCeerrrraarr
: Cierra el menú emergente.

USB
61
■
Use el botón
CCHH
para navegar en la
página de fotos en miniatura.
Seleccione la carpeta o el disco de destino.
Seleccione las fotos deseadas.
Visualice el menú emergente.
5
Seleccione
VVeerr
.
La foto seleccionada se visualiza en
el modo de pantalla completa.
2
3
1
4
ENTER
ENTER
ENTER
Menú de pantalla completa
Puede cambiar la vista de la lista de fotos para que ocupe toda la pantalla. Se encuentran disponibles
más funciones en el modo de pantalla completa.
La relación de aspecto de una foto puede cambiar el
tamaño de la foto exhibida en pantalla completa.
1/17
Presentación
BGM Borrar Opción Ocultar
Página 2/3
No marcado
Lista de fotos
Carpeta arriba
1366
x
768, 125KB
KY101
06/10/2008
KY102
04/03/2008
JMJ001
01/01/2000
JMJ002
06/15/2008
JMJ003
04/03/2008
JMJ004
02/18/2008
KY103
03/30/2008
KY104
06/19/2008
KY105
01/31/2008
JMJ005
05/13/2008
JMJ006
05/26/2008
JMJ007
02/18/2008
JMJ008
02/18/2008
Carpeta arriba
Página 2/3
No marcado
Lista de fotos
Carpeta arriba
1366
x
768, 125KB
KY101 06/10/2008
KY102 04/03/2008
JMJ001 01/01/2000
JMJ002
06/15/2008
JMJ003
04/03/2008
JMJ004
02/18/2008
KY103 03/30/2008
KY104 06/19/2008
KY105 01/31/2008
JMJ005 05/13/2008
JMJ006
05/26/2008
JMJ007
02/18/2008
JMJ008
02/18/2008
Carpeta arriba
Drive1
Drive1
JMJ001
JMJ001
1366x768, 125KB
Ver
Marcar todo
Borrar
Cerrar
Navegación Cambio de página Marcar Salir
CH
MARK
Menú emergente
Navegación Cambio de página Marcar Salir
CH
MARK
Menú emergente

USB
62
USB
Seleccione
PPrreesseennttaacciióónn
,
BBGGMM
,
((GGiirraarr))
,
BBoorrrraarr
,
OOppcciióónn
o
OOccuullttaarr..
■
Use el botón para seleccionar la foto
anterior o siguiente.
■
Use el botón para seleccionar y
controlar el menú en la pantalla completa.
ENTER
6
NOTA
!
GG
Este televisor no podrá decodificar
las imágenes JPG que se guardaron
utilizando la opción progresiva.
Presione
FF GG
para definir el intervalo
de tiempo entre las diapositivas.
Veloc. de presentación
Rápido
Cancelar
...
Carpeta de música
Ingresar
1/17
Presentación
BGM Borrar Opción Ocultar
GG
PPrreesseennttaacciióónn
: Las fotos seleccionadas se visualizan
durante la presentación de diapositivas. Si no se selec-
ciona ninguna foto, todas las fotos en la carpeta actual
se visualizan durante la presentación de diapositivas.
■
Defina el intervalo de tiempo de la presentación en
OOppcciióónn
.
GG
BBGGMM
: Escuche música mientras ve las fotos en tamaño
completo.
■
Defina el dispositivo BGM y álbum en
OOppcciióónn
.
GG
((GGiirraarr))
: Girar fotos.
■
Gira la foto 90°, 18 0 °, 270°, 360° en el sentido de
las agujas del reloj.
■
No podrá girarse cuando el ancho de la foto sea
mayor que la altura de resolución admitida.
GG
BBoorrrraarr
: Borre las fotos.
GG
OOppcciióónn
: Defina los valores para
VVeelloocc.. ((VVeelloocciiddaadd))
ddee pprreesseennttaacciióónn
y
CCaarrppeettaa ddee mmúússiiccaa
.
■
Use el botón y el botón
EENNTTEERR
para
definir los valores. Luego vaya a y presione
EENNTTEERR
para guardar la configuración.
■
Puede cambiar BGM Device (Dispositivo BGM)/
CCaarrppeettaa ddee mmúússiiccaa
mientras BGM se está repro-
duciendo.
GG
OOccuullttaarr
: Oculte el menú en la pantalla de tamaño com-
pleto.
■
Para ver nuevamente el menú en pantalla completa,
presione el botón
EENNTTEERR
.

LISTA DE MÚSICA
USB
63
Puede utilizar el menú de listado de música para reproducir archivos MP3 de un dispositivo USB de almacenaje.
Este televisor no puede reproducir archivos protegidos contra copia.
La visualización en la pantalla de su modelo puede variar levemente.
Componentes de la pantalla
Archivos de música compatibles:
*
.MP3
Frecuencia de tasa binaria 32kb/s ~ 320kb/s
• Frecuencia de muestreo
MPEG1 capa 3: 32 kHz, 44.1 kHz, 48 kHz
MPEG2 capa 3: 16 kHz, 22.05 kHz, 24 kHz
MPEG2.5 capa 3: 8 kHz, 11.025 kHz, 12 kHz
Muévase a la carpeta de nivel
superior.
Previsualizar: si el álbum tiene
una portada, se visualizará.
Página actual/Total de páginas
Número total de música en
miniatura marcadas
Botones correspondientes en
el control remoto
1
3
4
5
2
Seleccione
UUSSBB
.
Seleccione
LLiissttaa ddee mmúússiiccaa
.
1
2
MENU
ENTER
ENTER
Lista de música
Carpeta arriba
Título Duración
3 4
2
1
Página 2/3
No marcado
Drive1
Navegación Menú emergente Cambio de página Marcar Salir
CH
MARK
5
AA
00:00 / 04:16
Carpeta arriba
M1
M2
M4
M5
M3
M3

USB
64
USB
Seleccione la carpeta o el disco de destino.
Seleccione todas las canciones.
Visualice el menú emergente.
Seleccione el menú emergente deseado.
2
3
1
4
ENTER
ENTER
ENTER
5
EXIT
Regresar a la pantalla del televisor.
Selección de música y menú emergente
■
Use el botón
CCHH
para navegar en la
página de títulos de música.
■
Use el botón
MMAARRKK
para marcar o desmarcar
una música. Si no se marca ninguna música,
toda la música en la carpeta se reproducirá en
secuencia. Cuando uno o más archivos de
música estén marcados, la música marcada se
reproducirá en secuencia. Si desea escuchar
sólo una música repetidamente, simplemente
marque esa música y reprodúzcala.
Página 2/3
No marcado
Lista de música
Carpeta arriba
AA
00:00 / 04:16
Carpeta arriba
Drive1
Títle
Duración
Página 2/3
No marcado
Lista de música
Carpeta arriba
AA
00:00 / 04:16
Carpeta arriba
Drive1
Títle
Duración
3945 KB
128 Kbps
Reproducir
Repr. con fotos
Marcar todo
Borrar
Cerrar
GG
RReepprroodduucciirr
(Durante la pausa.): Reproduzca
la música seleccionada. Durante la reproduc-
ción, puede seleccionar un archivo diferente
para reproducir y el archivo comenzará en
forma automática. Una vez que finalice la repro-
ducción de una música, comenzará a repro-
ducirse la siguiente seleccionada. Cuando ya
no haya música seleccionada para reproduc-
ción, se reproducirá la siguiente en la carpeta
actual. Si va a una carpeta diferente y presiona
el botón
EENNTTEERR
, la música actualmente en
reproducción se detendrá.
GG
RReepprr..mmaarrccaaddooss
: Reproduzca la música selec-
cionada. Cuando una canción termina de
reproducirse, la siguiente canción seleccionada
se reproducirá automáticamente.
GG
DDeetteenneerr rreepprroodd..
: Comience a reproducir la
música seleccionada y luego muévase a la lista
de fotos.
GG
RReepprr..ccoonn ffoottooss
: Comience reproduciendo la
música seleccionada y luego muévase a la lista
de fotos.
GG
MMaarrccaarr ttooddoo
: Marque toda la música del
fólder.
GG
DDeessmmaarrccaarr ttooddoo
: Cancele la selección de
todas las canciones.
GG
BBoorrrraarr
: Borrar la música seleccionada.
GG
CCeerrrraarr
: Cierre el pop- up menú.
Navegación Cambio de página Marcar Salir
CH
MARK
Menú emergente
Navegación Cambio de página Marcar Salir
CH
MARK
Menú emergente
M1
M2
M3
M3
M4
M5
M1
M2
M3
M3
M4
M5

USB
65
■
El cuadro de información de reproducción (como se muestra
a continuación) se moverá automáticamente por toda la
pantalla cuando no haya una acción por parte del usuario
que evite que la imagen fija de la pantalla permanezca por
un período de tiempo prolongado.
NOTA
!
GG
Cuando se reproduce una canción, se visualiza
frente al tiempo de reproducción.
GG
Un archivo de música dañado o alterado muestra 00:00 como el tiempo de reproducción.
GG
Los archivos de música protegidos contra copia no se reproducirán.
GG
Presione el botón
EENNTTEERR
,
AA
,
BBAACCKK
o
EEXXIITT
para desactivar el protector de pantalla.

CONTROL DE IMAGEN
66
TAMAÑO DE LA IMAGEN (ASPECTO DE PANTALLA)
CONTROL DE IMAGEN
Esta función le permite elegir de una imagen analoga una relación de aspecto 4:3 mostrada en la TV.
Podrá escoger una relación de aspecto diferente dependiendo de la fuente de entrada (emisión analógica,
emisión digital, aux., etc.).
■
También ud. puede hacer la
AAssppeeccttoo
ddee ppaannttaallllaa
con el menú
QQ.. MMEENNÚÚ
.
■
Presione el botón
RRAATTIIOO
repetida-
mente para seleccionar el formato de la
imagen deseado.
Seleccione
IIMMAAGGEENN
.
Seleccione
AAssppeeccttoo ddee ppaannttaallllaa
.
Seleccione el formato de imagen deseado.
1
MENU
3
2
ENTER
ENTER
4
BACK
Regresar al menú anterior.
EXIT
Regresar a la pantalla del televisor.
Ingresar
Mover
IMAGEN
E
Ingresar
Mover
IMAGEN
E
Aspecto de pantalla
: 16:9
Asistente de imagen
Ahorro de energía
: Apagado
Modo imagen : Estándar
•
Luz de Fondo
70
• Contraste 90
• Brillo 50
• Nitidez 70
Aspecto de pantalla
: 16:9
Asistente de imagen
Ahorro de energía
: Apagado
Modo imagen : Estándar
•
Luz de Fondo
70
• Contraste 90
• Brillo 50
• Nitidez 70
16:9
Sólo búsqueda
Por Programa
4:3
Zoom
Zoom cine 1

67
16:9
Seleccione cuando desea ajustar la imagen
horizontalmente, en una proporción lineal para
llenar la pantalla completa.
Sólo búsqueda
Normalmente los bordes de las señales de video
quedan recortadas un 1-2%. El modo Sólo
búsqueda desactiva este recorte y muestra el
video completo.
Notas: Si hubiera ruido en los bordes de la señal
original, serán visibles cuando el modo Sólo
búsqueda esté activado.
Esta función sólo se opera en los modos de
DTV/CADTV/Component/HDMI-DTV/DVI-DTV
(720 progresivo/1 080 entrelazado/1 080 progresivo).
Por Programa
Selecciona la proporción de imagen adecuada
para que se corresponda con la imagen fuente.
4:3
La selección siguiente le dejará ver una imagen
con la proporción original de aspecto 4:3.
Zoom
Seleccione cuando desea ver la imagen sin
ninguna alteración. Sin embargo, las porciones
superior e inferior de la imagen serán cortadas.
■
Al ajustar en el menú Q.MENU,
a. Botón o : Ajuste el Zoom a proporción.
b. Botón o : Mueve la imagen de la pantalla.
Zoom cine
Seleccione Zoom cine cuando desee ampliar la
imagen en la proporción correcta.
Esta función amplía una imagen hasta obtener
una relación de aspecto de cinemascope
(2.35:1) sin distorsión.
Nota: La imagen puede verse distorsionada al
ampliarla o reducirla.
■
Botón o : Ajuste el Zoom cine a proporción.
El rango de ajuste es de 1-16.
■
Botón o : Mueve la imagen de la pantalla.
(4:3 4:3)
(16:9 16:9)
CONTROL DE IMAGEN
Sólo búsqueda
Por Programa
Por Programa

CONTROL DE IMAGEN
68
ASISTENTE DE IMAGEN
CONTROL DE IMAGEN
Seleccione
IIMMAAGGEENN
.
Seleccione
AAssiisstteennttee
ddee iimmaaggeenn
.
1
MENU
2
ENTER
ENTER
Ajuste el
AAssiisstteennttee ddee iimmaaggeenn
.
Ajuste el
NNiivveell ddee bbllaannccooss
.
3
ENTER
Ajuste el
NNiivveell NNeeggrroo
.
4
ENTER
5
ENTER
Ajuste el
NNiittiiddeezz hhoorrii--
zzoonnttaall
.
8
ENTER
Ajuste el
CCoolloorr
.
6
ENTER
Ajuste el
TTiinnttee
.
7
ENTER
Esta función le permitirá ajustar la calidad de imagen
de la imagen original.
Úsela para calibrar la calidad en pantalla ajustando el
nivel de negro y blanco, etc. Podrá calibrar la calidad
en pantalla siguiendo unos sencillos pasos.
Cuando usted ajusta la imagen a
BBaajjoo
,
RReeccoommeennddaaddoo
o
AAllttoo
, Usted puede ver el ejemplo
del cambio que hizo.
Ingresar
Mover
IMAGEN
E
Aspecto de pantalla
: 16:9
Asistente de imagen
Ahorro de energía
: Apagado
Modo imagen : Estándar
•
Luz de Fondo
70
• Contraste 90
• Brillo 50
• Nitidez 70
Asistente de imagen
Con asistente de imagen, puede ajustar la calidad de imagen
de la imagen original.
G
SiguientePrev.
Nivel Negro
Configure la pantalla superior siguiente el ejemplo de abajo.
SiguientePrev.
• Brillo 50
EE
EE
Bajo AltoRecomendado
Nivel de blancos
Configure la pantalla superior siguiente el ejemplo de abajo.
SiguientePrev.
Bajo AltoRecomendado
• Contraste 90
EE
EE
Color
Configure la pantalla superior siguiente el ejemplo de abajo.
SiguientePrev.
• Color 50
EE
EE
Bajo AltoRecomendado
Tinte
Configure la pantalla superior siguiente el ejemplo de abajo.
SiguientePrev.
Bajo AltoRecomendado
• Tinte 0
EE
EE
RG
Nitidez horizontal
Configure la pantalla superior siguiente el ejemplo de abajo.
SiguientePrev.
• Nitidez H 50
EE
EE
Bajo AltoRecomendado

CONTROL DE IMAGEN
69
Escoja una fuente de entrada para
aplicar los ajustes.
14
FAV
MARK
Ajuste el
NNiittiiddeezz vveerrttiiccaall
.
9
ENTER
Ajuste el
LLuuzz ddee FFoonnddoo
.
13
ENTER
Finalice el
AAssiisstteennttee ddee iimmaaggeenn
.
16
ENTER
Guardar.
15
ENTER
Finalizar
ConfirmarMoverPrev.
Backlight
Set the Backlight to your Brightness preference.
NextPrevious
• Backlight 50
EE
EE
Dark BrightRecommended
DTV
TV
AV1
AV2
Componente
RGB-PC
HDMI1
HDMI2
Seleccionar una(s) entrada(s) para aplicar configuración.
Advertencia: La calidad de la imagen puede variar
dependiendo de los diferentes tipos de señal y entradas.
E
E
Marcar
MARK
■
Si detiene los ajustes antes del paso
final, dichos cambios no quedarán apli-
cados en el televisor.
■
Una vez que el
AAssiisstteennttee ddee iimmaaggeenn
ajusta la calidad de imagen, la función
AAhhoorrrroo ddee eenneerrggííaa
cambia automáti-
camente a modo
AAppaaggaaddoo
.
Nitidez vertical
Configure la pantalla superior siguiente el ejemplo de abajo.
SiguientePrev.
• Nitidez V 50
EE
EE
Bajo AltoRecomendado
Cerrar
El valor de ajuste actual se guardó en
Experto1.
i
Ajuste el
TTeemmppeerraattuurraa
ddee CCoolloorr
.
10
ENTER
Temperatura de Color
Adjuste la Temperatura de Color a su gusto. Vea los ejmplos
mostrados abajo
SiguientePrev.
• Temperatura de Color Cálido
EE
EE
Cálido FríoMedio
Adjust
CCoonnttrraassttee
DDiinnáámmiiccoo
.
11
ENTER
Contraste Dinámico
Adjuste el Contraste Dinámico a su gusto. Tome como referencia
los ejemplos de abajo.
SiguientePrev.
• Contraste Dinámico Apagado
EE
EE
Apagado AltoMedio
Adjust
GGaannaanncciiaa ddee
ccoolloorr..
12
ENTER
Ganancia de color
Adjuste la Ganancia de Color a su gusto. Tome como referencia
los ejemplos de abajo.
SiguientePrev.
• Ganancia de color Original
EE
EE
Original AltoMedio

CONTROL DE IMAGEN
70
AJUSTES DE LA IMAGEN PRESTABLECIDA (MODO IMAGEN)
CONTROL DE IMAGEN
Hay configuraciones predeterminadas de fábrica disponibles en los menús del usuario. Puede usar una config-
uración predeterminada, cambiar cada configuración manualmente.
Seleccione
IIMMAAGGEENN
.
Seleccione
MMooddoo iimmaaggeenn
.
Seleccione
VViivvoo
,
EEssttáánnddaarr
,
NNaattuurraall
,
CCiinnee
,
DDeeppoorrttee
o
JJuueeggoo
.
1
MENU
3
2
ENTER
ENTER
4
BACK
Regresar al menú anterior.
EXIT
Regresar a la pantalla del televisor.
■
Los ajustes
VViivvoo
,
EEssttáánnddaarr
,
NNaattuurraall
,
CCiinnee
,
DDeeppoorrttee
y
JJuueeggoo
son preestable-
cidos en fábrica para lograr la mejor cal-
idad de imagen.
■
VViivvoo
: este es el modo para maximizar el
efecto del video en el expositor de la
tienda. Intensifica el contraste, brillo,
color y la nitidez para ofrecer imágenes
vivas
■
EEssttáánnddaarr
: este es el modo con el que se
obtienen condiciones óptimas de visual-
ización para el usuario general.
■
NNaattuurraall
: este es el modo para que la
pantalla muestre la imagen de la forma
más natural posible.
■
CCiinnee
: este modo optimiza el video para
disfrutar películas.
■
DDeeppoorrttee
: este es el modo de video para
enfatizar el video dinámico y los colores
primarios (ej.: blanco, uniforme, césped,
azul del cielo, etc.) obteniendo el ajuste
óptimo de la pantalla para disfrutar los
deportes.
■
JJuueeggoo
: este es el modo para obtener
velocidad de respuesta rápida en una
pantalla rápida de videojuego.
■
EExxppeerrttoo
: este es el modo para ajustar el
video de forma pormenorizada para
expertos en calidad de video y usuarios
generales.
■
También ud. puede hacer la
MMooddoo iimmaa--
ggeenn
con el menú
QQ.. MMEENNÚÚ
.
Ingresar
Mover
IMAGEN
E
Ingresar
Mover
IMAGEN
E
Aspecto de pantalla
: 16:9
Asistente de imagen
Ahorro de energía
: Apagado
Modo imagen : Estándar
•
Luz de Fondo
70
• Contraste 90
• Brillo 50
• Nitidez 70
Aspecto de pantalla
: 16:9
Asistente de imagen
Ahorro de energía
: Apagado
Modo imagen : Estándar
•
Luz de Fondo
70
• Contraste 90
• Brillo 50
• Nitidez 70
Vivo
Estándar
Natural
Cine
Deporte
Juego
Experto1
Experto2

CONTROL DE IMAGEN
71
CONTROL MANUAL DE IMAGEN - MODO USUARIO
Ajuste la apariencia de la imagen según sus preferencias y situaciones de visualización.
Seleccione
IIMMAAGGEENN
.
Realice los ajustes adecuados.
Seleccione
LLuuzz ddee FFoonnddoo
,
CCoonnttrraassttee
,
BBrriilllloo
,
NNiittiiddeezz
,
CCoolloorr
o
TTiinnttee
.
1
MENU
Seleccione
MMooddoo iimmaaggeenn
.
2
ENTER
Seleccione
VViivvoo
,
EEssttáánnddaarr
,
NNaattuurraall
,
CCiinnee
,
DDeeppoorrttee
o
JJuueeggoo
.
3
ENTER
4
ENTER
5
ENTER
6
BACK
Regresar al menú anterior.
EXIT
Regresar a la pantalla del televisor.
■
Al ajustar el
AAhhoorrrroo ddee eenneerrggííaa
, la
función
LLuuzz ddee FFoonnddoo
se desactivará.
■
LLuuzz ddee FFoonnddoo
: esta función ajusta el
brillo del panel LCD para controlar la
luminosidad de la pantalla. Se recomien-
da modificar la luz de fondo al ajustar el
brillo del aparato. Al disminuir la luz de
fondo, el brillo de los negros se vuelve
más oscuro sin pérdidas en la señal de
video y el consumo eléctrico se reduce.
■
CCoonnttrraassttee
: aumenta o disminuye el
gradiente de la señal de video. Podría
usar el mando de contraste cuando las
partes brillantes de la imagen queden
saturadas.
■
BBrriilllloo
: Ajuste el nivel base de la señal en
la imagen. Puede usar brillo cuando la
oscuridad de la imagen este saturada.
■
NNiittiiddeezz
: ajusta el nivel de nitidez de los
bordes entre las zonas de imagen ilumi-
nadas y oscuras. Cuanto más bajo sea el
nivel, más suave la imagen.
■
CCoolloorr
: ajusta la intensidad de todos los
colores.
■
TTiinnttee
: ajusta el balance entre niveles de
rojo y verde.
Ingresar
Mover
IMAGEN
E
Aspecto de pantalla
: 16:9
Asistente de imagen
Ahorro de energía
: Apagado
Modo imagen : Estándar
•
Luz de Fondo
70
• Contraste 90
• Brillo 50
• Nitidez 70
• Luz de Fondo 70
EE
EE
EE
EE
Ingresar

CONTROL DE IMAGEN
72
TECNOLOGÍA DE MEJORA DE LA IMAGEN
CONTROL DE IMAGEN
Seleccione
IIMMAAGGEENN
.
Seleccione
CCoonnttrrooll AAvvaannzzaaddoo
.
Seleccione sus opciones deseadas.
1
MENU
3
2
ENTER
ENTER
5
BACK
Regresar al menú anterior.
EXIT
Regresar a la pantalla del televisor.
Realice los ajustes adecuados.
4
Puede calibrar la pantalla para cada Modo de imagen o ajustar el valor del video de acuerdo con la pantalla
especial de video.
Puede ajustar un valor de video diferente para cada entrada.
Para reiniciar a los ajustes preestablecidos de fábrica tras realizar ajustes para cada fuente de entrada, ejecute
el
RReessttaabblleecceerr iimmaaggeenn
para cada
MMooddoo iimmaaggeenn
.
Ingresar
Mover
IMAGEN
E
RG
• Contraste 50
• Brillo 50
• Nitidez 50
• Color 50
• Tinte 0
• Control Avanzado
• Restablecer imagen
Pantalla (RGB-PC)
Ingresar
Mover
IMAGEN
E
RG
• Contraste 50
• Brillo 50
• Nitidez 50
• Color 50
• Tinte 0
• Control Avanzado
• Restablecer imagen
Pantalla (RGB-PC)
Temperatura de Color
FF
Medio
GG
Contraste Dinámico
Apagado
Color Dinámico
Apagado
Reducción de ruido
Apagado
Gamma
Medio
Nivel Negro
Bajo
Protección Visual
Apagado
Cine real
Apagado
Cerrar
E

CONTROL DE IMAGEN
73
CONTROL EXPERTO DE IMAGEN
Seleccione
IIMMAAGGEENN
.
Seleccione
MMooddoo iimmaaggeenn
.
Seleccione
CCoonnttrrooll ddee EExxppeerrttoo
.
Seleccione
EExxppeerrttoo11
o
EExxppeerrttoo22
.
1
MENU
3
2
ENTER
ENTER
4
ENTER
Realice los ajustes adecuados.
6
Al segmentar categorías, el
EExxppeerrttoo11
y
EExxppeerrttoo22
proporcionan más categorías que los usuarios pueden
configurar a su gusto, lo que ofrece una calidad de imagen óptima para los usuarios.
Esto también puede ser usado al modo experto para ayudar a optimizar el desempeño de la TV en el medio
ambiente en que la TV este ubicada.
7
BACK
Regresar al menú anterior.
EXIT
Regresar a la pantalla del televisor.
Seleccione su opción del menú deseada.
5
ENTER
Ingresar
Mover
IMAGEN
E
RG
• Brillo 50
• Nitidez H 50
• Nitidez V 50
• Color 50
• Tinte 0
• Control de Experto
• Restablecer imagen
Pantalla (RGB-PC)
Contraste Dinámico
FF
Apagado
GG
Reducción de ruido
Apagado
Gamma
Medio
Nivel Negro
Bajo
Cine real
Apagado
Color Estándar
SD
Rango de color
Estándar
Mejorador de contornos
Alto
xvYCC
Automático
Cerrar
E
Ingresar
Mover
IMAGEN
E
Aspecto de pantalla
: 16:9
Asistente de imagen
Ahorro de energía
: Apagado
Modo imagen : Experto1
•
Luz de Fondo
80
• Contraste 90
• Brillo 50
• Nitidez H 50
Vivo
Estándar
Natural
Cine
Deporte
Juego
Experto1
Experto2

CONTROL DE IMAGEN
74
CONTROL DE IMAGEN
■
Ajuste en cálido para mejorar los colores de gama más cálida como el rojo o en frío
para dar a la imagen un tono más azulado.
■
Ajusta el contraste para mantenerlo en el nivel óptimo dependiendo del brillo de la
pantalla. La resolución de la graduación mejora haciendo más brillantes las partes
brillantes y más oscuras, las oscuras.
■
Ajusta los colores en pantalla para que aparezcan vivos y limpios. Esta función mejora
el tono, saturación e iluminación de forma que rojos, azules, verdes y blancos parez-
can más vivos.
■
Reduce el ruido en pantalla sin afectar la calidad de video.
Bajo : ilumina la zona de nivel oscuro y gris de la imagen.
Medio: graduación rápida de la imagen original.
Alto: oscurece la zona de nivel oscuro y gris de la imagen.
■
Puede ajustar el brillo de la zona oscura y la zona del nivel de gris de la imagen.
Bajo: La reflexión de pantalla se pone más obscura.
Alto: La reflexión de pantalla se pone más clara.
Automático: Cuando advierta el nivel negro en la pantalla, se establecerá en alto o
bajo automáticamente.
■
Ajuste el nivel de negro de la pantalla al nivel adecuado.
■
Esta función permite escoger “Bajo” o “Alto” en el siguiente modo: AV (NTSC-M),
HDMI o por componentes. De lo contrario, el “Nivel Negro” se ajusta en
“Automático”.
* Esta característica no se encuentra disponible para todos los modelos.
■
Ajuste el brillo de la pantalla para evitar el brillo excesivo de la misma.
Atenúa imágenes muy brillantes.
■
Esta característica se desactiva en “
MMooddoo iimmaaggeenn -- VViivvoo
,
CCiinnee
”.
■
Hace que los videoclips grabados en la película parezcan más naturales mediante la
eliminación de efecto “judder”.
Contraste Dinámico
Color Dinámico
Reducción de ruido
Gamma
Nivel Negro
Protección Visual
Cine real
Temperatura de Color
(Advanced Control)

CONTROL DE IMAGEN
75
■
Convierte a color HD un video que posea color diferente.
■
Esta es la función para ajustar el color general de la pantalla a su gusto.
a. Método : 2 puntos
- Patrón: Interior, Exterior
- Contraste Rojo/Verde/Azul, Brillo Rojo/Verde/Azul:
El rango de ajuste es de -50 - +50.
b. Método : IRE de 10 puntos
- Patrón: Interior, Exterior
- IRE (Institute of Radio Engineers: Instituto de ingenieros de radio) es la unidad para
visualizar el tamaño de la señal de video y puede ajustarse entre 10, 20, 30 – 100.
Puede ajustar el rojo, verde o azul de acuerdo a cada valor.
- Luminosidad: Esta función muestra la luminancia calculada por 2.2 gamas.
Puede ingresar el valor de la luminancia como usted desee a 100 IRE, el objetivo de
luminancia por 2.2 gamas es mostrado cada 10 pasos de 10 IRE’ hasta 90 IRE.
- Rojo/Verde/Azul: El rango de ajuste es de -50 - +50.
■
Al igual que la herramienta usada por los expertos para realizar ajustes mediante los
modelos de pruebe, esta no afecta a otros colores, pero puede usarse para ajustar
selectivamente las 6 zonas de color (Rojo/Verde/Azul/Amarillo/Cian/Magenta).
La diferencia de color podría no distinguirse aun cuando realice ajustes para el video
general.
Ajuste el Rojo/Verde/Azul/Amarillo/Cian/Magenta.
- Color Rojo/Verde/Azul/Amarillo/Cian/Magenta: El rango de ajuste es de -30 - +30.
- Tinte Rojo/Verde/Azul/Amarillo/Cian/Magenta: El rango de ajuste es de -30 - +30.
- Esta característica se desactiva en modo RGB-PC y HDMI-PC.
* Esta característica no se encuentra disponible para todos los modelos.
■
Es la tecnología para reducir el consumo de energía manteniendo el nivel de brillo,
esta tiene el efecto de reducir el consumo energético, mejorando el contraste.
Color Temperature
(Expert Control)
Sistema de Mantenimiento
de Color
OPC
Color Estándar
Estándar: Muestra el área de los colores estándar.
Ancho: modo para usar y ajustar la zona de color de la pantalla.
■
Maximice el uso del color para incrementar la calidad.
Rango de color
■
Mostrar las esquinas del video más claras y nítidas, pero siempre naturales.
■
Esta función se activa en "
MMooddoo iimmaaggeenn
-
EExxppeerrttoo
”.
Majorador de contornos
■
Este es el modelo necesario para ajuste experto.
■
Esta función se activa en "
MMooddoo iimmaaggeenn
-
EExxppeerrttoo
” al ver televisión digital (DTV).
Patrón experto
■
Esta es la función para filtrar la zona específica de color del video.
Puede usar el filtro RGB para ajustar exactamente la saturación y el tono de color.
Filtro de Color
* Esta característica no se encuentra disponible para todos los modelos.
■
Esta es la función para mostrar colores vivos.
■
Esta función representa colores más vivos al igual que señales de video convencionales.
■
Esta función se activa en "
MMooddoo iimmaaggeenn -- CCiinnee,, EExxppeerrttoo
” cuando la señal
xvYCC entra a través de la toma HDMI.
xvYCC

CONTROL DE IMAGEN
76
AHORRO DE ENERGÍA
CONTROL DE IMAGEN
Si reduce el nivel de consumo de energia disminuye el nivel de la luz de fondo.
Puede incrementar el brillo de su pantalla ajustando el nivel
AAhhoorrrroo ddee EEnneerrggííaa
o
MMooddoo iimmaaggeenn
.
■
Al escoger
AAppaaggaaddoo ddee PPaannttaallllaa
, el
televisor se apagará pasados 3 segundos.
■
Si ajusta “
AAhhoorrrroo ddee eenneerrggííaa--MMíínniimmoo
,
MMeeddiioo
,
MMááxxiimmoo
”, la función
LLuuzz ddee
ffoonnddoo
no funcionará.
■
Presione el botón de
EENNEERRGGYY SSAAVVIINNGG
repetitivamente para seleccionar la con-
figuración apropiada para el ahorro de
energía.
Seleccione
IIMMAAGGEENN
.
Seleccione
AAhhoorrrroo ddee eenneerrggííaa
.
1
MENU
2
ENTER
Seleccione
AAppaaggaaddoo
,
MMíínniimmoo
,
MMeeddiioo
,
MMááxxiimmoo
o
AAppaaggaaddoo ddee PPaannttaallllaa
.
3
ENTER
4
BACK
Regresar al menú anterior.
EXIT
Regresar a la pantalla del televisor.
Ingresar
Mover
IMAGEN
E
Ingresar
Mover
IMAGEN
E
Aspecto de pantalla
: 16:9
Asistente de imagen
Ahorro de energía
: Apagado
Modo imagen : Estándar
•
Luz de Fondo
70
• Contraste 90
• Brillo 50
• Nitidez 70
Aspecto de pantalla
: 16:9
Asistente de imagen
Ahorro de energía
: Apagado
Modo imagen : Estándar
•
Luz de Fondo
70
• Contraste 90
• Brillo 50
• Nitidez 70
Apagado
Mínimo
Medio
Máximo
Apagado de Pantalla

CONTROL DE IMAGEN
77
RESTABLECIMIENTO DE LA IMAGEN
Las configuraciones de los modos de pantalla seleccionados vuelven a las configuraciones predeterminadas de
fábrica.
Seleccione
IIMMAAGGEENN
.
Seleccione
RReessttaabblleecceerr iimmaaggeenn
.
1
MENU
2
ENTER
Inicialice el valor ajustado.
4
Seleccione
SSíí
.
3
ENTER
ENTER
5
EXIT
Regresar a la pantalla del televisor.
Ingresar
Mover
IMAGEN
E
RG
• Contraste 50
• Brillo 50
• Nitidez 50
• Color 50
• Tinte 0
• Control Avanzado
• Restablecer imagen
Pantalla (RGB-PC)
Ingresar
Mover
IMAGEN
E
RG
• Contraste 50
• Brillo 50
• Nitidez 50
• Color 50
• Tinte 0
• Control Avanzado
• Restablecer imagen
Pantalla (RGB-PC)
Restableciendo configuración de video...
ii
No
Sí
Todas las imágenes serán reseteadas.
¿Desea continuar?
?
Seleccione
OOPPCCIIÓÓNN
.
Seleccione
IInnddiiccaaddoorr ddee PPooddeerr
.
1
MENU
2
ENTER
Seleccione sus opciones deseadas.
4
Seleccione
LLuuzz ddee AAppaaggaaddoo
o
LLuuzz ddee EEnncceennddiiddoo
.
3
ENTER
INDICADOR DE PODER
-
Para 32LD320
Ajuste el indicador luminoso de prendido/modo de espera de la parte frontal del televisor.
■
LLuuzz ddee AAppaaggaaddoo
: establece si ajustar el indi-
cador luminoso de la parte frontal del televisor
para que esté
EEnncceennddiiddoo
o
AAppaaggaaddoo
cuando
la unidad se encuentra en el modo de espera.
■
LLuuzz ddee EEnncceennddiiddoo
: establece si ajustar el indi-
cador luminoso de la parte frontal del televisor
para que esté
EEnncceennddiiddoo
o
AAppaaggaaddoo
cuando
la unidad está apagada.
Ingresar
Mover
OPCIÓN
SIMPLINK : Apagado
Bloqueo de Teclas : Apagado
Manual Simple
Subtítulo : Apagado
ID del Televisor : 1
Indicador de Poder
Modo Demo. : Apagado
Configuración Inicial
: Home Use
Ingresar
Mover
OPCIÓN
SIMPLINK : Apagado
Bloqueo de Teclas : Apagado
Manual Simple
Subtítulo : Apagado
ID del Televisor : 1
Indicador de Poder
Modo Demo. : Apagado
Configuración Inicial
: Home Use
EE
Luz de Encendido
Luz de Apagado
Encendido
Cerrar
FF
Encendido
GG
5
BACK
Regresar al menú anterior.
EXIT
Regresar a la pantalla del televisor.

CONTROL DE IMAGEN
78
MODO DEMO. (MODO DE DEMOSTRACIÓN)
CONTROL DE IMAGEN
Seleccione
OOPPCCIIÓÓNN
.
Seleccione
MMooddoo DDeemmoo..
1
MENU
2
ENTER
Escoja
EEnncceennddiiddoo
para mostrar
la distintas funciones del televisor.
3
ENTER
4
EXIT
Regresar a la pantalla del televisor.
Tras un breve período de tiempo, comenzará el
MMooddoo DDeemmoo..
.
Si desea detener la demostración, pulse cualquier
botón (Excepto botón VOL +, - y MUTE).
Visualice el pase de diapositivas que explica distintas funciones de este televisor.
■
Esta característica se desactiva en
“
CCoonnffiigguurraacciióónn IInniicciiaall--HHoommee UUssee
”.
Ingresar
Mover
OPCIÓN
Etiqueta de entrada
SIMPLINK : Apagado
Bloqueo de Teclas : Apagado
Manual Simple
Subtítulo : Apagado
ID del Televisor : 1
Modo Demo. : Apagado
Configuración Inicial
: Store Demo
Ingresar
Mover
OPCIÓN
Etiqueta de entrada
SIMPLINK : Apagado
Bloqueo de Teclas : Apagado
Manual Simple
Subtítulo : Apagado
ID del Televisor : 1
Modo Demo. : Apagado
Configuración Inicial
: Store Demo
EE
Apagado
Encendido

CONTROL DE SONIDO Y DE IDIOMA
79
CONTROL DE SONIDO Y DE IDIOMA
NIVELADOR AUTOMÁTICO DE VOLUMEN
Volumen automático le asegura que el nivel de volumen permanece constante si está viendo anuncios o un pro-
grama de televisión.
Debido a que la señal de cada cadena de televisión dispone de características propias, podría ser preciso
ajustar el volumen cada vez que cambie de canal. Esta función permite a los usuarios disfrutar de niveles uni-
formes de volumen realizándose ajustes automáticos para cada canal.
Seleccione
AAUUDDIIOO
.
Seleccione
VVoolluummeenn aauuttoommááttiiccoo
.
Seleccione
EEnncceennddiiddoo
o
AAppaaggaaddoo
.
1
MENU
3
2
ENTER
ENTER
4
BACK
Regresar al menú anterior.
EXIT
Regresar a la pantalla del televisor.
Ingresar
Mover
AUDIO
Volumen automático
: Apagado
Voz Clara II : Apagado
• Nivel 3
Balance 0
Modo de audio : Estándar
•
Sonido Infinito :
Apagado
• Agudos 50
• Graves 50
Ingresar
Mover
AUDIO
Volumen automático
: Encendido
Voz Clara II : Apagado
• Nivel 3
Balance 0
Modo de audio : Estándar
•
Sonido Infinito :
Apagado
• Agudos 50
• Graves 50
E
LR
E
LR
Apagado
Encendido
-+ -+

CONTROL DE SONIDO Y DE IDIOMA
80
CONTROL DE SONIDO Y DE IDIOMA
VOZ CLARA II
Como diferencia el registro de sonidos de los otros, logra que la calidad de sonido de las voces sea mejor.
Seleccione
AAUUDDIIOO
.
Seleccione
VVoozz CCllaarraa IIII
.
Seleccione
EEnncceennddiiddoo
o
AAppaaggaaddoo
.
1
MENU
3
2
ENTER
ENTER
6
BACK
Regresar al menú anterior.
EXIT
Regresar a la pantalla del televisor.
Seleccione
NNiivveell
.
4
ENTER
Realice los ajustes adecuados.
5
ENTER
Ajuste del nivel de la función Voz Clara II
con la selección
EEnncceennddiiddoo
Ingresar
Mover
AUDIO
Volumen automático
: Apagado
Voz Clara II : Apagado
• Nivel 3
Balance 0
Modo de audio : Estándar
•
Sonido Infinito :
Apagado
• Agudos 50
• Graves 50
Ingresar
Mover
AUDIO
Volumen automático
: Apagado
Voz Clara II : Encendido
• Nivel 3
Balance 0
Modo de audio : Estándar
•
Sonido Infinito :
Apagado
• Agudos 50
• Graves 50
E
LR
E
LR
-+ -+
Apagado
Encendido

CONTROL DE SONIDO Y DE IDIOMA
81
AJUSTES DE SONIDO PREESTABLECIDOS (MODO DE AUDIO)
Modo de audio le permite disfrutar del mejor sonido sin ningún ajuste especial porque la televisión configura
las opciones de sonido apropiadas según el contenido del programa.
Seleccione
AAUUDDIIOO
.
Seleccione
MMooddoo ddee aauuddiioo
.
Seleccione
EEssttáánnddaarr
,
MMúússiiccaa
,
CCiinnee
,
DDeeppoorrttee
o
JJuueeggoo
.
1
MENU
3
2
ENTER
ENTER
4
BACK
Regresar al menú anterior.
EXIT
Regresar a la pantalla del televisor.
■
EEssttáánnddaarr
,
MMúússiiccaa
,
CCiinnee
,
DDeeppoorrttee
,
JJuueeggoo
son prefijados para la buena cal-
idad de sonido en la fabrica.
■
También ud. puede hacer el cambio a
MMooddoo ddee aauuddiioo
en el menú
QQ ..
MMEENNÚÚ
.
■
EEssttáánnddaarr
: ofrece sonido de calidad
estándar.
■
MMúússiiccaa
: optimiza el sonido para
escuchar música.
■
CCiinnee
: optimiza el sonido para disfrutar
películas..
■
DDeeppoorrttee
: optimiza el sonido para dis-
frutar eventos deportivos.
■
JJuueeggoo
: optimiza el sonido para jugar
con videojuegos.
Ingresar
Mover
AUDIO
Volumen automático
: Apagado
Voz Clara II : Apagado
• Nivel 3
Balance 0
Modo de audio : Estándar
•
Sonido Infinito :
Apagado
• Agudos 50
• Graves 50
Ingresar
Mover
AUDIO
Volumen automático
: Apagado
Voz Clara II : Apagado
• Nivel 3
Balance 0
Modo de audio : Estándar
•
Sonido Infinito :
Apagado
• Agudos 50
• Graves 50
E
LR
E
LR
-+ -+
Estándar
Música
Cine
Deporte
Juego

CONTROL DE SONIDO Y DE IDIOMA
82
AJUSTE DE SONIDO - MODO USUARIO
CONTROL DE SONIDO Y DE IDIOMA
Usted puede ajustar sonidos agudos y bajos a los niveles de su preferencia.
Seleccione
AAUUDDIIOO
.
Seleccione
MMooddoo ddee aauuddiioo
.
Seleccione
AAgguuddooss
o
GGrraavveess
.
1
MENU
4
2
ENTER
Seleccione
EEssttáánnddaarr
,
MMúússiiccaa
,
CCiinnee
,
DDeeppoorrttee
o
JJuueeggoo
.
3
ENTER
ENTER
6
BACK
Regresar al menú anterior.
EXIT
Regresar a la pantalla del televisor.
Realice los ajustes adecuados.
5
ENTER
Ingresar
Mover
AUDIO
LR
E
Volumen automático
: Apagado
Voz Clara II : Apagado
• Nivel 3
Balance 0
Modo de audio : Estándar
•
Sonido Infinito :
Apagado
• Agudos 50
• Graves 50
Ingresar
Mover
AUDIO
LR
E
Volumen automático
: Apagado
Voz Clara II : Apagado
• Nivel 3
Balance 0
Modo de audio : Estándar
•
Sonido Infinito :
Apagado
• Agudos 50
• Graves 50
Cerrar
EE
EE
• Agudos 50
• Graves 50
•
Sonido Infinito
Apagado
-+ -+

CONTROL DE SONIDO Y DE IDIOMA
83
SONIDO INFINITO
Seleccione
AAUUDDIIOO
.
Seleccione
SSoonniiddoo IInnffiinniittoo
.
Seleccione
EEnncceennddiiddoo
o
AAppaaggaaddoo
.
1
MENU
3
2
ENTER
ENTER
4
BACK
Regresar al menú anterior.
EXIT
Regresar a la pantalla del televisor.
Escoja esta opción para obtener un sonido realista.
■
Si la calidad del sonido o volumen no es el nivel
que usted desea, le recomendamos que use por
separado un sistema de teatro en casa o un
amplificador para distintos entornos de
usuario.
■
Si selecciona “
VVoozz CCllaarraa IIII--EEnncceennddiiddoo
”, l a
característica
SSoonniiddoo IInnffiinniittoo
no funcionará.
Ingresar
Mover
AUDIO
LR
E
Volumen automático
: Apagado
Voz Clara II : Apagado
• Nivel 3
Balance 0
Modo de audio : Estándar
•
Sonido Infinito :
Apagado
• Agudos 50
• Graves 50
Ingresar
Mover
AUDIO
LR
E
Volumen automático
: Apagado
Voz Clara II : Apagado
• Nivel 3
Balance 0
Modo de audio : Estándar
•
Sonido Infinito :
Apagado
• Agudos 50
• Graves 50
-+ -+
Cerrar
• Agudos 50
• Graves 50
•
Infinite Sound
Apagado
EE
EE

CONTROL DE SONIDO Y DE IDIOMA
84
AJUSTE DE BALANCE
CONTROL DE SONIDO Y DE IDIOMA
Seleccione
AAUUDDIIOO
.
Seleccione
BBaallaannccee
.
Realice los ajustes adecuados.
1
MENU
3
2
ENTER
ENTER
Puede ajustar el balance de sonido de las bocinas a los niveles que desea ud.
4
BACK
Regresar al menú anterior.
EXIT
Regresar a la pantalla del televisor.
Ingresar
Mover
AUDIO
Volumen automático
: Apagado
Voz Clara II : Apagado
• Nivel 3
Balance 0
Modo de audio : Estándar
•
Sonido Infinito :
Apagado
• Agudos 50
• Graves 50
Ingresar
Mover
AUDIO
Volumen automático
: Apagado
Voz Clara II : Apagado
• Nivel 3
Balance 0
Modo de audio : Estándar
•
Sonido Infinito :
Apagado
• Agudos 50
• Graves 50
E
LR
E
LR
-+ -+
Cerrar
EE
EE
Balance 0
LR

CONTROL DE SONIDO Y DE IDIOMA
85
DISPOSICIÓN DE BOCINAS DE TV
Apague los parlantes si está utilizando un equipo de audio externo.
Seleccione
AAUUDDIIOO
.
Seleccione
PPaarrllaanntteess ddee TTVV
.
Seleccione
EEnncceennddiiddoo
o
AAppaaggaaddoo
.
1
MENU
3
2
ENTER
ENTER
4
BACK
Regresar al menú anterior.
EXIT
Regresar a la pantalla del televisor.
Ingresar
Mover
AUDIO
• Nivel 3
Balance 0
Modo de audio : Estándar
•
Sonido Infinito :
Apagado
• Agudos 50
• Graves 50
• Restablecer
Parlantes de TV : Encendido
LR
E
Ingresar
Mover
AUDIO
• Nivel 3
Balance 0
Modo de audio : Estándar
•
Sonido Infinito :
Apagado
• Agudos 50
• Graves 50
• Restablecer
Parlantes de TV : Encendido
LR
E
Apagado
Encendido
-+ -+

CONTROL DE SONIDO Y DE IDIOMA
86
REAJUSTE DE AUDIO
CONTROL DE SONIDO Y DE IDIOMA
Las configuraciones de los modos de sonido seleccionados vuelven a las configuraciones predeterminadas de
fábrica.
Seleccione
AAUUDDIIOO
.
Seleccione
RReessttaabblleecceerr
.
1
MENU
2
ENTER
Inicialice el valor ajustado.
3
ENTER
4
EXIT
Regresar a la pantalla del televisor.
Ingresar
Mover
AUDIO
• Nivel 3
Balance 0
Modo de audio : Estándar
•
Sonido Infinito :
Apagado
• Agudos 50
• Graves 50
• Restablecer
Parlantes de TV : Encendido
LR
E
Ingresar
Mover
AUDIO
• Nivel 3
Balance 0
Modo de audio : Estándar
•
Sonido Infinito :
Apagado
• Agudos 50
• Graves 50
• Restablecer
Parlantes de TV : Encendido
LR
E
Restableciendo configuración de audio...
ii
-+ -+

CONTROL DE SONIDO Y DE IDIOMA
87
DISFRUTE DE LA TRANSMISIÓN ESTÉREO/SAP
Solo para análogos: este televisor puede recibir programas de estéreo MTS y de cualquier SAP (programa de
audio secundario) que acompañe el programa de estéreo si la estación transmite una señal de sonido adicional.
El sonido mono se utiliza automáticamente si se transmite solo en mono.
Seleccione
SSAAPP
.
Seleccione
MMoonnoo
,
SStteerreeoo
o
SSAAPP
.
Regresar a la pantalla del televisor.
1
Q.MENU
3
2
EXIT
Seleccione
MMuullttii AAuuddiioo
.
Seleccione otro idioma.
Regresar a la pantalla del televisor.
1
Q.MENU
3
2
EXIT
Televisor análogo Televisor digital
A
Inglés
FF
Multi Audio
GG

CONTROL DE SONIDO Y DE IDIOMA
88
IDIOMA DEL AUDIO
CONTROL DE SONIDO Y DE IDIOMA
Es posible que haya otros idiomas disponibles si la emisora proporciona una señal digital.
Esta función opera sólo en modo DTV/CADTV.
Seleccione
OOPPCCIIÓÓNN
.
Seleccione
LLeenngguuaajjee ddee AAuuddiioo
.
Seleccione su idioma deseado.
1
MENU
3
2
ENTER
ENTER
4
BACK
Regresar al menú anterior.
EXIT
Regresar a la pantalla del televisor.
Ingresar
Mover
OPCIÓN
Idioma del menú(Language)
: Español
Lenguaje de Audio : Inglés
Etipueta de entrada
SIMPLINK : Apagado
Bloqueo de Teclas : Apagado
Manual Simple
Subtítulo : Apagado
ID del Televisor : 1
Ingresar
Mover
OPCIÓN
Idioma del menú(Language)
: Español
Lenguaje de Audio : Inglés
Etipueta de entrada
SIMPLINK : Apagado
Bloqueo de Teclas : Apagado
Manual Simple
Subtítulo : Apagado
ID del Televisor : 1
EE EE
Inglés
Español
Francés

CONTROL DE SONIDO Y DE IDIOMA
89
SELECCIÓN DEL LENGUAJE EN LA PANTALLA
Los menus pueden ser mostrados en la pantalla en el idioma inicial seleccionado.
Seleccione
OOPPCCIIÓÓNN
.
Seleccione
IIddiioommaa ddeell mmeennúú((LLaanngguuaaggee))
.
Seleccione su idioma deseado.
De aquí en adelante la exhibición en la pantalla
aparecerá en el idioma seleccionado.
1
MENU
3
2
ENTER
ENTER
4
BACK
Regresar al menú anterior.
EXIT
Regresar a la pantalla del televisor.
Ingresar
Mover
OPCIÓN
Idioma del menú(Language)
: Español
Lenguaje de Audio : Inglés
Etipueta de entrada
SIMPLINK : Apagado
Bloqueo de Teclas : Apagado
Manual Simple
Subtítulo : Apagado
ID del Televisor : 1
Ingresar
Mover
OPCIÓN
Idioma del menú(Language)
: Español
Lenguaje de Audio : Inglés
Etipueta de entrada
SIMPLINK : Apagado
Bloqueo de Teclas : Apagado
Manual Simple
Subtítulo : Apagado
ID del Televisor : 1
EE EE
English
Español
Français

CONTROL DE SONIDO Y DE IDIOMA
90
SUBTÍTULOS
CONTROL DE SONIDO Y DE IDIOMA
Se debe proporcionar subtítulos para ayudar a ver TV a las personas que no escuchan. Seleccione un modo de
subtitulado para visualizar la información de subtitulado si el programa lo proporciona. El subtitulado análogo
visualiza información en cualquier posición de la pantalla y se trata generalmente del cuadro de diálogo del pro-
grama. El subtitulado o el texto, si la estación los proporciona, serían aconsejables para los canales digitales o
análogos de la antena o cable. Este televisor está programado para memorizar el modo de subtitulado o texto
que fue configurado la última vez que apagó el equipo. Esta función sólo está disponible cuando Modo
Subtítulos está definido en Encendido.
Seleccione
OOPPCCIIÓÓNN
.
Seleccione
SSuubbttííttuulloo
.
Seleccione
EEnncceennddiiddoo
.
1
MENU
3
2
ENTER
ENTER
Seleccione
SSuubbttíítt..11
-
44
,
TTeexxttoo11
-
44
.
4
Sistemas de texto oculto de programas analógicos
■
When selecting
OOffff
, Sub-menus for
Analog, DTV, and Digital Option become
disabled.
■
CCAAPPTTIIOONN
The term for the words that scroll
across the bottom of the TV screen;
usually the audio portion of the pro-
gram provided for the hearing impaired.
■
TTEEXXTT
The term for the words that appear in a
large black frame and almost cover the
entire screen; usually messages provid-
ed by the broadcaster.
5
BACK
Regresar al menú anterior.
EXIT
Regresar a la pantalla del televisor.
Ingresar
Mover
OPCIÓN
Idioma del menú(Language)
: Español
Lenguaje de Audio : Inglés
Etipueta de entrada
SIMPLINK : Apagado
Bloqueo de Teclas : Apagado
Manual Simple
Subtítulo : Apagado
ID del Televisor : 1
Ingresar
Mover
OPCIÓN
Idioma del menú(Language)
: Español
Lenguaje de Audio : Inglés
Etipueta de entrada
SIMPLINK : Apagado
Bloqueo de Teclas : Apagado
Manual Simple
Subtítulo : Subtít.1
ID del Televisor : 1
Modo
Subtít.1
Cerrar
Opción digital
FF
Encendido
GG
EE EE

CONTROL DE SONIDO Y DE IDIOMA
91
Sistemas de texto oculto de programas digitales
Seleccione el idioma en el que desea que aparezcan los textos ocultos de DTV/CADTV.
Sólo podrán escogerse otros idiomas para las fuentes digitales si están incluidos en el programa.
Esta función sólo está disponible cuando Modo Subtítulos está definido en Encendido.
Seleccione
OOPPCCIIÓÓNN
.
Seleccione
SSuubbttííttuulloo
.
Seleccione
EEnncceennddiiddoo
.
1
MENU
3
2
ENTER
ENTER
Seleccione
SSuubbttíítt..11
-
44
,
TTeexxttoo11
-
44
o
SSeerrvviicciioo11
-
66
.
4
5
BACK
Regresar al menú anterior.
EXIT
Regresar a la pantalla del televisor.
Ingresar
Mover
OPCIÓN
Idioma del menú(Language)
: Español
Lenguaje de Audio : Inglés
Etipueta de entrada
SIMPLINK : Apagado
Bloqueo de Teclas : Apagado
Manual Simple
Subtítulo : Apagado
ID del Televisor : 1
Ingresar
Mover
OPCIÓN
Idioma del menú(Language)
: Español
Lenguaje de Audio : Inglés
Etipueta de entrada
SIMPLINK : Apagado
Bloqueo de Teclas : Apagado
Manual Simple
Subtítulo : Subtít.1
ID del Televisor : 1
EE EE
Modo
Subtít.1
Cerrar
Opción digital
FF
Encendido
GG

CONTROL DE SONIDO Y DE IDIOMA
92
CONTROL DE SONIDO Y DE IDIOMA
Opciones del texto oculto
Personalice el texto oculto de DTV/CADTV que aparece en la pantalla.
Esta función sólo está disponible cuando Modo Subtítulos está definido en Encendido.
Seleccione
OOPPCCIIÓÓNN
.
Seleccione
SSuubbttííttuulloo
.
Seleccione
EEnncceennddiiddoo
.
1
MENU
3
2
ENTER
ENTER
Seleccione
PPeerrssoonnaalliizzaarr
.
5
ENTER
Personalizar el
TTaammaaññoo
,
LLeettrraa
, etc.,
según sus preferencias.
En la parte inferior de la pantalla se pro-
porciona un icono de previsualización.
Utilícelo para ver el idioma del texto ocul-
to.
6
Seleccione
OOppcciióónn ddiiggiittaall
.
4
■
TTaammaaññoo
: Ajuste el tamaño en el que
aparecerán las palabras.
■
LLeettrraa
: Seleccione un tipo de letra para
las palabras.
■
CCoolloorr ddeell TTeexxttoo
: Escoja un color para
el texto.
■
OOppaacciiddaadd ddeell TTeexxttoo
: Especifique la
opacidad del color del texto.
■
CCoolloorr ddee FFoonnddoo
: Seleccione un color
de fondo.
■
OOppaacciiddaadd ddeell FFoonnddoo
: Seleccione la
opacidad del color de fondo.
■
TTiippoo ddee CCoonnttoorrnnoo
: Seleccione un tipo
de borde.
■
CCoolloorr ddeell CCoonnttoorrnnoo
: Seleccione un color
para el borde.
7
BACK
Regresar al menú anterior.
EXIT
Regresar a la pantalla del televisor.
Ingresar
Mover
OPCIÓN
Idioma del menú(Language)
: Español
Lenguaje de Audio : Inglés
Etipueta de entrada
SIMPLINK : Apagado
Bloqueo de Teclas : Apagado
Manual Simple
Subtítulo : Apagado
ID del Televisor : 1
Ingresar
Mover
OPCIÓN
Idioma del menú(Language)
: Español
Lenguaje de Audio : Inglés
Etipueta de entrada
SIMPLINK : Apagado
Bloqueo de Teclas : Apagado
Manual Simple
Subtítulo : Subtít.1
ID del Televisor : 1
EE EE
Modo
Subtít.1
Cerrar
Opción digital
Encendido
Tamaño
A Estándar
Letra
Letra 1
Color del Texto
Blanco
Opacidad del Texto
Sólido
Tipo de Contorno
Ninguno
Color del Contorno
Negro
Color de Fondo
Negro
Opacidad del Fondo
Sólido
Cerrar
FF
Personalizar
GG

CONFIGURACIÓN HORARIA
93
PROGRAMACION DEL RELOJ
CONFIGURACIÓN HORARIA
Configuración Auto del Reloj
El tiempo se selecciona automáticamente desde una señal de canal digital.
La señal del canal digital incluye información de la hora actual proporcionada por la emisora que transmite.
Si la hora actual es incorrecta, puede ajustar manualmente el reloj mediante la función de reloj automático.
Seleccione
HHOORRAA
.
Seleccione
RReelloojj
.
Seleccione
AAuuttoommááttiiccoo
.
1
MENU
3
2
ENTER
ENTER
Seleccione la zona horaria de su área de
recepcion.
• EE.UU:
EE ssttee
,
CCeennttrraall
,
MMoonnttaaññaa
,
PPaaccííffiiccoo
,
AAllaasskkaa
o
HHaawwaaiiii
.
• Canadá:
EEss ttee
,
CCeennttrraall
,
MMoonnttaaññaa
,
PPaaccííffiiccoo
,
TTeerrrraannoovvaa
o
AAttlláánnttiiccoo
.
4
Seleccione
AAuuttoommááttiiccoo
,
AAppaaggaaddoo
,
EEnncceennddiiddoo
, dependiendo de si su región
hace o no uso del Horario de verano.
5
6
BACK
Regresar al menú anterior.
EXIT
Regresar a la pantalla del televisor.
Ingresar
Mover
HORA
Reloj
Hora de Apagado : Apagado
Hora de Encendido: Apagado
Temporizador : Apagado
Ingresar
Mover
HORA
Reloj
Hora de Apagado : Apagado
Hora de Encendido: Apagado
Temporizador : Apagado
Mes
Fecha
21
Año
2009
Hora
10 AM
02
Minuto
10
Zona horaria
Este
Horario de
Verano
Automático
Cerrar
FF
Automático
GG

CONFIGURACIÓN HORARIA
94
CONFIGURACIÓN HORARIA
Configuración Manual del Reloj
Si la hora actual programada esta equivocada, restablezca el reloj manualmente.
Seleccione
HHOORRAA
.
Seleccione
RReelloojj
.
Seleccione
MMaannuuaall
.
1
MENU
3
2
ENTER
ENTER
Seleccione bien el año, el mes, la fecha, la
hora o el minuto
4
Ajustar bien el año, el mes, la fecha, la hora o
el minuto
5
6
BACK
Regresar al menú anterior.
EXIT
Regresar a la pantalla del televisor.
Ingresar
Mover
HORA
Reloj
Hora de Apagado : Apagado
Hora de Encendido: Apagado
Temporizador : Apagado
Ingresar
Mover
HORA
Reloj
Hora de Apagado : Apagado
Hora de Encendido: Apagado
Temporizador : Apagado
Mes
Fecha
21
Año
2009
Hora
10 AM
02
Minuto
10
Zona horaria
Este
Horario de
Verano
Automático
Cerrar
FF
Manual
GG

CONFIGURACIÓN HORARIA
95
El temporizador apagado cambia la unidad automáticamente al modo de espera en el tiempo prefijo.
La función de apagado se invalida en la función de encendido si ambos están configurados para el mismo tiempo.
La unidad debe estar en el modo de espera para que funcione el temporizador encendido.
Después de dos horas de que está cambiada la unidad por la función de encendido, se cambiará al modo de
espera automáticamente si no haya presionado ningún botón.
■
Para cancelar la función de
HHoorraa ddee AAppaaggaaddoo
//HHoorraa ddee EEnncceennddiiddoo
, seleccionar
AAppaaggaaddoo
.
■
Sólo para la función Hora de Encendido
Seleccione
EEnnttrraaddaa
.
Seleccione la fuente de entrada
deseada.
Seleccione
HHOORRAA
.
Seleccione
HHoorraa ddee AAppaaggaaddoo
o
HHoorraa ddee EEnncceennddiiddoo
.
Seleccione
RReeppeettiirr
.
1
MENU
3
2
ENTER
ENTER
Seleccione
AAppaaggaaddoo
,
UUnnaa vveezz
,
DDiiaarriiaammeennttee
,
LLuunn..
~
VViiee..
,
LLuunn..
~
SSáább..
,
SSáább..
~
DDoomm..
o
LLuunneess
.
4
Seleccione y ajustar
HHoorraa
o
MMiinnuuttoo
.
5
1
ENTER
3
4
2
Si selecciona
TTVV
:
Seleccione el canal que desea.
Regresar al menú previo.
6
BACK
Regresar al menú anterior.
EXIT
Regresar a la pantalla del televisor.
AJUSTES DE ENCENDIDO/ APAGADO
AUTOMÁTICO DEL TEMPORIZADOR
Ingresar
Mover
HORA
Reloj
Hora de Apagado : Apagado
Hora de Encendido: Apagado
Temporizador : Apagado
Ingresar
Mover
HORA
Reloj
Hora de Apagado : Apagado
Hora de Encendido:
6:30 AM (Una vez)
Temporizador : Apagado
Repetir
FF
Una vez
GG
Hora
6 AM
Minuto
30
Entrada
TV
Canal
TV 2-0
Volumen
30
Cerrar
Feb 21, 2009 10:10 AM

CONFIGURACIÓN HORARIA
96
CONFIGURACIÓN DEL TEMPORIZADOR
DE APAGADO AUTOMÁTICO
CONFIGURACIÓN HORARIA
La Hora del Apagador para Dormir apaga el TV después de un tiempo prefijado.
Si apaga el TV después de haber programado la hora del Apagador para dormir, el ajuste se borrará.
■
Para cancelar
TTeemmppoorriizzaaddoorr
, seleccione
AAppaaggaaddoo
.
■
También ud. puede hacer la
TTeemmppoorriizzaaddoorr
con el menú
QQ.. MMEENNÚÚ
.
Seleccione
HHOORRAA
.
Seleccione
TTeemmppoorriizzaaddoorr
.
Realice los ajustes adecuados.
1
MENU
3
2
ENTER
ENTER
4
BACK
Regresar al menú anterior.
EXIT
Regresar a la pantalla del televisor.
Ingresar
Mover
HORA
Reloj
Hora de Apagado : Apagado
Hora de Encendido: Apagado
Temporizador : Apagado
Ingresar
Mover
HORA
Reloj
Hora de Apagado : Apagado
Hora de Encendido: Apagado
Temporizador : Apagado
Apagado
10 min.
20 min.
30 min.
60 min.
90 min.
120 min.
180 min.
240 min.

CONTROL PATERNO / CLASIFICACIONES
97
CONTROL PATERNO /CLASIFICACIONES
Es posible utilizar el control paterno para bloquear los canales específicos, las clasificaciones y otras fuentes de visualización.
La función del control paterno (V-Chip) se utiliza para bloquear la visualización de un programa que se basa en las clasi-
ficaciones enviadas por la emisora. La configuración por defecto permite ver todos los programas. Es posible bloquear
la visualización según el tipo de programa y las categorías que se quieran bloquear. También es posible bloquear la visu-
alización de todos los programas durante un período de tiempo. Para utilizar esta función, debe hacer lo siguiente:
1. Configure las clasificaciones y las categorías que desee bloquear.
2. Especifique una contraseña.
3. Permita el bloqueo
Clasificaciones y categorías V-Chip
Las pautas para la clasificación las proporcionan las emisoras. La mayoría de los programas y películas de televisión
se pueden bloquear mediante las clasificaciones de la televisión y/o las categorías individuales. Tanto las películas
que se han emitido en los cines como las películas de salida directa de alquiler utilizan únicamente el sistema de
clasificación de películas de la Asociación Americana de Películas (MPAA).
Clasificación para los programas de televisión que incluye a las películas
para televisión:
■
TV-G
(
Para todos los públicos
)
■
TV-PG
(
Se sugiere la compañía paterna
)
■
TV-14
(
Para mayores de 14 años. Se recomienda la supervisión paterna
)
■
TV-MA
(
Sólo público adulto
)
■
TV-Y
(
Para todas las edades
)
■
TV-Y7
(
Para niños mayores de 7 años
)
Le deja configurar el esquema de bloqueo para bloquear unos canales especificados, clasificación y fuentes de vista.
Una contraseña es requerida para acceder a este menú si el sistema de bloqueo está activado.
Configuración de su Contraseña
Seleccione
BBLLOOQQUUEEAARR
.
1
MENU
ENTER
Meter la contraseña.
2
123
45
0
6
789
■
Entre la contraseña requerida.
■
La TV está configurada con la contraseña
inicial “0-0-0-0”.
ESTABLECER CONTRASEÑA Y BLOQUEO DEL SISTEMA
Para EE.UU. Para Canadá
Cerrar
Ingresar Contraseña
* * * *
Ingresar
Mover
Sist. de Bloqueo : Apagado
Fijar Contraseña
Bloquear Canales
Clasif. Películas
Clasif. Edad
Clasif. General
Clasif. Descargable
Bloqueo de entradas
BLOQUEAR
Ingresar
Mover
Sist. de Bloqueo : Apagado
Fijar Contraseña
Bloquear Canales
Clasif.-Inglés
Clasif.-Francés
Clasif. Descargable
Bloqueo de entradas
BLOQUEAR

CONTROL PATERNO / CLASIFICACIONES
98
CONTROL PATERNO / CLASIFICACIONES
Activa o desactiva el estado de bloqueo establecido con anterioridad.
Bloqueo Del Sistema
Seleccione
SSiisstt.. ddee BBllooqquueeoo
.
Seleccione
EEnncceennddiiddoo
o
AAppaaggaaddoo
.
4
3
ENTER
■
Al seleccionarlo, activara el Bloqueo del
sistema.
Seleccione
BBLLOOQQUUEEAARR
.
1
MENU
ENTER
Meter la contraseña.
2
123
45
0
6
789
5
BACK
Regresar al menú anterior.
EXIT
Regresar a la pantalla del televisor.
Ingresar
Mover
BLOQUEAR
Sist. de Bloqueo : Apagado
Fijar Contraseña
Bloquear Canales
Clasif. Películas
Clasif. Edad
Clasif. General
Clasif. Descargable
Bloqueo de entradas
Ingresar
Mover
BLOQUEAR
Sist. de Bloqueo : Encendido
Fijar Contraseña
Bloquear Canales
Clasif. Películas
Clasif. Edad
Clasif. General
Clasif. Descargable
Bloqueo de entradas
Apagado
Encendido

CONTROL PATERNO / CLASIFICACIONES
99
Cambie la contraseña introduciendo dos veces una nueva.
Establecer Contraseña
Seleccione
FFiijjaarr CCoonnttrraasseeññaa
.
Escoja 4 dígitos para su
NNuueevvaa
contraseña e
introdúzcalos.
Después de introducir los 4 dígitos, vuelva a
hacerlo en el campo
CCoonnffiirrmmaarr
.
4
3
ENTER
123
45
0
6
789
Seleccione
BBLLOOQQUUEEAARR
.
1
MENU
ENTER
Meter la contraseña.
2
123
45
0
6
789
5
BACK
Regresar al menú anterior.
EXIT
Regresar a la pantalla del televisor.
Ingresar
Mover
BLOQUEAR
Sist. de Bloqueo : Apagado
Fijar Contraseña
Bloquear Canales
Clasif. Películas
Clasif. Edad
Clasif. General
Clasif. Descargable
Bloqueo de entradas
Ingresar
Mover
BLOQUEAR
Sist. de Bloqueo : Apagado
Fijar Contraseña
Bloquear Canales
Clasif. Películas
Clasif. Edad
Clasif. General
Clasif. Descargable
Bloqueo de entradas
Cerrar
Nueva
* * * *
Confirmar
* * * *

CONTROL PATERNO / CLASIFICACIONES
100
BLOQUEO DE CANALES
CONTROL PATERNO / CLASIFICACIONES
Bloquea cualquier canal que no desee visualizar o que no desea que sus hijos puedan ver.
Seleccione
BBllooqquueeaarr CCaannaalleess
.
Seleccione un canal para bloquear o
desbloquear.
4
3
ENTER
Seleccione
BBLLOOQQUUEEAARR
.
1
MENU
ENTER
Meter la contraseña.
2
123
45
0
6
789
6
BACK
Regresar al menú anterior.
EXIT
Regresar a la pantalla del televisor
■
Si el canal esta bloqueado, ponga la
contraseña para desbloquear tempo-
ralmente.
Bloquear o desbloquear un canal.
5
VERDE
Ingresar
Mover
BLOQUEAR
Sist. de Bloqueo : Apagado
Fijar Contraseña
Bloquear Canales
Clasif. Películas
Clasif. Edad
Clasif. General
Clasif. Descargable
Bloqueo de entradas
Cambio de Canal
Cambio de página
CH
Navegación
Previo
Bloq/Desbloq

CONTROL PATERNO / CLASIFICACIONES
101
CLASIFICACIONES DE PELÍCULAS Y TV
Clasificaciones de peliculas -
Para EE.UU.
Bloquea películas conforme a los límites de clasificación especificados, de tal forma que los niños no puedan
ver ciertas películas. Puede configurar este límite para que bloquee todas las películas cuya clasificación sea
superior a un nivel especificado. Tenga presente que este límite sólo será aplicable a las películas que aparez-
can en TV, no a los propios programas de TV, como series de TV.
Seleccione
CCllaassiiff.. PPeellííccuullaass
.
Seleccione
GG
,
PPGG
,
PPGG--1133
,
RR
,
NNCC--1177
,
XX
o
DDeessbbllooqquueeaaddoo
.
4
3
ENTER
■
Si un parámetro de la función
CCllaassiiff..
PPeellííccuullaass
,
CCllaassiiff.. EEddaadd
o
CCllaassiiff..
GGeenneerraall
está bloqueado, introduzca la
contraseña para desbloquearlo temporal-
mente.
■
G (Audiencia General)
■
PG (Guía por padres sugerida)
■
PG-13 (Advertencia para padres)
■
R (Restringido)
■
NC-17 (Restringido17 años y menores)
■
X (Sólo Adultos)
■
Desbloqueado (Todos permitidos)
GG
Si selecciona PG-13: Estarán
disponibles las películas G y PG mientras
que se bloquearán las PG-13, R, NC-17
y X.
Seleccione
BBLLOOQQUUEEAARR
.
1
MENU
ENTER
Meter la contraseña.
2
123
45
0
6
789
5
BACK
Regresar al menú anterior.
EXIT
Regresar a la pantalla del televisor.
Desbloqueado: Todos permitidos
G
PG
PG-13
R
NC-17
X
Desbloqueado
Ingresar
Mover
BLOQUEAR
Sist. de Bloqueo : Apagado
Fijar Contraseña
Bloquear Canales
Clasif. Películas
Clasif. Edad
Clasif. General
Clasif. Descargable
Bloqueo de entradas
Ingresar
Mover
BLOQUEAR
Sist. de Bloqueo : Apagado
Fijar Contraseña
Bloquear Canales
Clasif. Películas
Clasif. Edad
Clasif. General
Clasif. Descargable
Bloqueo de entradas

CONTROL PATERNO / CLASIFICACIONES
102
CONTROL PATERNO / CLASIFICACIONES
Seleccione
CCllaassiiff.. EEddaadd
.
Seleccione
EEddaadd
o
VViioolleenncciiaa ddee
FFaannttaassííaa
.
4
3
ENTER
Seleccione las opciones de bloqueo.
5
ENTER
■
Edad (se aplica a TV-Y, TV-Y7)
■
Violencia de fantásía (se aplica a TV-Y7)
Clasificacion de TV- Infantil
-
Para EE.UU.
Evita que los niños vean ciertos programas infantiles de TV, conforme al límite de clasificación establecido.
Esta clasificación no es aplicable a otros programas de TV.
A menos que bloquee ciertos programas de TV pensados para audiencias maduras en el menú secundario de
clasificación de la TV, sus hijos estarán expuestos a estos programas.
Seleccione
BBLLOOQQUUEEAARR
.
1
MENU
ENTER
Meter la contraseña.
2
123
45
0
6
789
6
BACK
Regresar al menú anterior.
EXIT
Regresar a la pantalla del televisor.
Ingresar
Mover
BLOQUEAR
Sist. de Bloqueo : Apagado
Fijar Contraseña
Bloquear Canales
Clasif. Películas
Clasif. Edad
Clasif. General
Clasif. Descargable
Bloqueo de entradas
Ingresar
Mover
BLOQUEAR
Sist. de Bloqueo : Apagado
Fijar Contraseña
Bloquear Canales
Clasif. Películas
Clasif. Edad
Clasif. General
Clasif. Descargable
Bloqueo de entradas
Cerrar
Edad
Violencia de Fantasía

CONTROL PATERNO / CLASIFICACIONES
103
Clasificacion de TV - General
-
Para EE.UU.
En base a la Clasificación esta opción bloquea ciertos programas de TV que usted y su familia no desean ver.
Seleccione
CCllaassiiff.. GGeenneerraall
.
Seleccione
EEddaadd
,
DDiiáállooggoo
,
LLeenngguuaajjee
,
SSeexxoo
o
VViioolleenncciiaa
.
4
3
ENTER
Seleccione las opciones de bloque.
5
ENTER
■
Edad (Edad se aplica a TV-G,TV-PG,TV-14,
TV-MA)
■
Diálogos- diálogos con contenido sexual
(se aplica a TV-PG y TV-14)
■
Lenguaje- lenguaje adulto (se aplica a
TV-PG, TV-14 y TV-MA)
■
Sexo - situaciones sexuales (se aplica a
TV-PG, TV-14 y TV-MA)
■
Violencia (se aplica a TV-PG,TV-14,TV-MA)
Seleccione
BBLLOOQQUUEEAARR
.
1
MENU
ENTER
Meter la contraseña.
2
123
45
0
6
789
6
BACK
Regresar al menú anterior.
EXIT
Regresar a la pantalla del televisor.
Ingresar
Mover
BLOQUEAR
Sist. de Bloqueo : Apagado
Fijar Contraseña
Bloquear Canales
Clasif. Películas
Clasif. Edad
Clasif. General
Clasif. Descargable
Bloqueo de entradas
Ingresar
Mover
BLOQUEAR
Sist. de Bloqueo : Apagado
Fijar Contraseña
Bloquear Canales
Clasif. Películas
Clasif. Edad
Clasif. General
Clasif. Descargable
Bloqueo de entradas
Cerrar
Edad
Diálogo
Lenguaje
Sexo
Violencia

CONTROL PATERNO / CLASIFICACIONES
104
CONTROL PATERNO / CLASIFICACIONES
Clasif.-Inglés
-
Para CANADÁ
Selección del sistema de clasificación de idioma inglés canadiense.
Seleccione
CCllaassiiff..--IInnggllééss
.
Seleccione
EE
,
CC
,
CC88++
,
GG
,
PPGG
,
1144++
,
1188++
o
DDeessbbllooqquueeaaddoo
.
4
3
ENTER
■
Si un parámetro de la función
CCllaassiiff..--
IInnggllééss
o
CCllaassiiff..--FFrraannccééss
está blo-
queado, introduzca la contraseña para
desbloquearlo temporalmente.
■
E (Exento)
■
C (Niños)
■
C8+ (Niños de ocho años y mayores)
■
G (Programación general, para toda la
audiencia)
■
PG (Guía para padres)
■
14+ (Televidentes de 14 años y mayores)
■
18+ (Esta emisión está reservada a los
adultos)
■
Desbloqueado (Todos permitidos)
Seleccione
BBLLOOQQUUEEAARR
.
1
MENU
ENTER
Meter la contraseña.
2
123
45
0
6
789
5
BACK
Regresar al menú anterior.
EXIT
Regresar a la pantalla del televisor.
Desbloqueado: Todos permitidos
E
C
C8+
G
PG
14+
18+
Desbloqueado
Ingresar
Mover
BLOQUEAR
Sist. de Bloqueo : Apagado
Fijar Contraseña
Bloquear Canales
Clasif.-Inglés
Clasif.-Francés
Clasif. Descargable
Bloqueo de entradas
Ingresar
Mover
BLOQUEAR
Sist. de Bloqueo : Apagado
Fijar Contraseña
Bloquear Canales
Clasif.-Inglés
Clasif.-Francés
Clasif. Descargable
Bloqueo de entradas

CONTROL PATERNO / CLASIFICACIONES
105
Clasif.-Francés
-
Para CANADÁ
Selección del sistema de clasificación de idioma francés canadiense.
Seleccione
CCllaassiiff..--FFrraannccééss
.
Seleccione
EE
,
GG
,
88aannss++
,
1133aannss++
,
1166aannss++
,
1188aannss++
o
DDeessbbllooqquueeaaddoo
.
4
3
ENTER
■
E (Exento)
■
G (General)
■
8ans+ (General-No aconsejado para
niños pequeños)
■
13ans+ (Esta emisión puede no con-
venir a niños menores de 13 años)
■
16ans+ (Esta emisión no conviene a
menores de 16 años)
■
18ans+ (Esta emisión está reservada a
los adultos)
■
Desbloqueado (Todos permitidos)
Seleccione
BBLLOOQQUUEEAARR
.
1
MENU
ENTER
Meter la contraseña.
2
123
45
0
6
789
5
BACK
Regresar al menú anterior.
EXIT
Regresar a la pantalla del televisor.
Desbloqueado: Todos permitidos
E
G
8ans+
13ans+
16ans+
18ans+
Desbloqueado
Ingresar
Mover
BLOQUEAR
Sist. de Bloqueo : Apagado
Fijar Contraseña
Bloquear Canales
Clasif.-Inglés
Clasif.-Francés
Clasif. Descargable
Bloqueo de entradas
Ingresar
Mover
BLOQUEAR
Sist. de Bloqueo : Apagado
Fijar Contraseña
Bloquear Canales
Clasif.-Inglés
Clasif.-Francés
Clasif. Descargable
Bloqueo de entradas

CONTROL PATERNO / CLASIFICACIONES
106
CLASIFICACIÓN DESCARGABLE
CONTROL PATERNO / CLASIFICACIONES
Esta función está disponible solamente para la señal de los canales digitales.
Esta función funciona solamente cuando la TV ha recibido datos del grado Region 5.
Seleccione
CCllaassiiff.. DDeessccaarrggaabbllee
.
Seleccione la opción de frecuencia de
descarga deseada.
4
3
ENTER
Seleccione la opción deseada y bloquéela.
5
ENTER
Seleccione
BBLLOOQQUUEEAARR
.
1
MENU
ENTER
Meter la contraseña.
2
123
45
0
6
789
6
BACK
Regresar al menú anterior.
EXIT
Regresar a la pantalla del televisor.
■
Si un parámetro de la función
CCllaassiiff..
DDeessccaarrggaabbllee
está bloqueado, intro-
duzca la contraseña para desbloquearlo
temporalmente.
Ingresar
Mover
BLOQUEAR
Sist. de Bloqueo : Apagado
Fijar Contraseña
Bloquear Canales
Clasif. Películas
Clasif. Edad
Clasif. General
Clasif. Descargable
Bloqueo de entradas
Ingresar
Mover
BLOQUEAR
Sist. de Bloqueo : Apagado
Fijar Contraseña
Bloquear Canales
Clasif. Películas
Clasif. Edad
Clasif. General
Clasif. Descargable
Bloqueo de entradas
Humo
Inte
Erot
Cerrar
E
E
■
De acuerdo con la tabla del grado, OSD
(Desplegado en la pantalla) de su TV
puede diferenciar levemente de lo que se
muestra en este manual.

CONTROL PATERNO / CLASIFICACIONES
107
BLOQUEO DE ENTRADA EXTERNA
Le permite bloquear una entrada.
Seleccione
BBllooqquueeoo ddee eennttrraaddaass
.
Seleccione una fuente.
4
3
Seleccione
AAppaaggaaddoo
o
EEnncceennddiiddoo
5
ENTER
Seleccione
BBLLOOQQUUEEAARR
.
1
MENU
ENTER
Meter la contraseña.
2
123
45
0
6
789
6
BACK
Regresar al menú anterior.
EXIT
Regresar a la pantalla del televisor.
Ingresar
Mover
BLOQUEAR
Sist. de Bloqueo : Apagado
Fijar Contraseña
Bloquear Canales
Clasif. Películas
Clasif. Edad
Clasif. General
Clasif. Descargable
Bloqueo de entradas
AV
Componente
RGB-PC
HDMI
FF GG
Cerrar
19/22LD350,
19/22LD350C
AV1
AV2
Componente
RGB-PC
HDMI1
HDMI2
FF GG
Cerrar
26/32LD350, 32LD320

APÉNDICE
108
LISTA DE VERIFICACIÓN DE PROBLEMAS
APÉNDICE
NNoo ssee ttrraabbaajjaa nnoorrmmaallmmeennttee..
EEll vviiddeeoo nnoo ffuunncciioonnaa
No imagen
No sonido
Color o imagen deficiente, o
No color
Recepción pobre en
algunos canales
Lineas o rayas en las
imagenes
No hay recepción de
imagen al conectar la
toma HDMI
Bar horizontal/vertical o
imagen temblante
La imagen aparece lenta-
mente después de enceder
la TV
El control remoto no
funciona
De repente la TV se
apaga
■
Verifique para ver si hay algún objeto entre el producto y el control remoto cau-
sando la obstrucción. Asegúrese de apuntar el control remoto directamente al televisor.
■
Están puestas las baterías con la polaridad correcta (+con + y -con -)?
■
Está correcta la configuración del modo remoto de la operación: TV, VCR etc.?
■
Ponga nuevas baterías.
■
Está configurado el tiempo para dormir?
■
Verifique las configuraciones de control de la potencia. La potencia interrumpida.
■
El Televisor se apagará automáticamente en 15 minutos en caso de que no haya
señal.
■
Verifique si el producto está encendido.
■
Intente otro canal. El problema puede ser con la transmisión.
■
Está metido el cordón de alimentación dentro del tomacorriente de la pared?
■
Verifique la dirección y/o la ubicación de su antena.
■
Pruebe el tomacorriente, enchufe un cordón de alimentación de otro producto en el
tomacorriente donde estaba enchufado el cordón de alimentación del producto.
■
Es normal, la imagen es muda durante el proceso de inicio del producto. Favor de
contactar a su centro de servicio, si la imagen no aparece cinco minutos después.
■
Ajuste Color en la opción del menú.
■
Mantenga una distancia suficiente entre el producto y el VCR.
■
Intente otro canal. El problema puede ser con la transmisión.
■
Están instalados apropiadamente los cables de video?
■
Active cualquier función para restablecer el brillo de la imagen.
■
Verifique la interferencia local como aparatos eléctricos o herramientas de potencia.
■
Estación o cable con problemas experimentales, sintonice a otra estación.
■
Si la señal de estación es débil, reubique la antena para recibir estación más debil.
■
Verifique las fuentes de la interferencia posible.
■
Verifique la antena (Cambie la dirección de la antena).
■
Verifique que el cable HDMI admita la versión 1.3.
Los cables HDMI que no admiten la versión 1.3 de HDMI, provocan parpadeos o
no muestran la imagen en pantalla. Si este es el caso, utilice cables recientes que
soporten la versión 1.3 de HDMI.
* Esta característica no se encuentra disponible para todos los modelos.

APÉNDICE
109
HHaayy uunn pprroobblleemmaa eenn eell mmooddoo PPCC.. ((SSóólloo ssee aapplliiccaa eenn eell mmooddoo PPCC))
■
Ajuste la resolución, la frecuencia horizontal o vertical.
■
Verifique la fuente de la entrada.
■
Ponga a trabajar auto-configuración o ajuste el reloj, la fase o la posición H/V.
(opción)
■
Verifique el cable de señal.
■
Reinstale la tarjeta de video de la PC.
La señal está fuera del
rango
(Formato no válido)
El color de pantalla es
inestable o color único
Barra o raya vertical en
el fondo, Ruido horizon-
tal y posicion incorrecta
Imagen OK pero
No sonido
Sonido raro desde interior
del producto
No hay sonido al conec-
tar tomas HDMI/USB
No salida de una de las
bocinas
EEll aauuddiioo nnoo ffuunncciioonnaa
■
Presione el botón VOL +/- (o Volume).
■
Sonido mudo? Presione el botón MUTE.
■
Intente otro canal. El problema puede ser con la transmisión.
■
Están instalados apropiadamente los cables de audio?
■
Ajuste el Balance en la opción del menú.
■
Un cambio en la ambiente de humedad o temperatura puede causar un sonido
raro cuando enciende o apaga el producto y esto no significa la falla del pro-
ducto.
■
Verifique que el cable HDMI admite la versión 1.3.
■
Verifique que el cable USB admite la versión 2,0.
■
Lea archivos MP3 normales.
* Esta característica no se encuentra disponible para todos los modelos.

APÉNDICE
110
APÉNDICE
PPrroobblleemmaass ddee llaa lliissttaa ddee ppeellííccuullaass
El archivo no aparece en
la lista de películas.
Se indica el mensaje
“Audio no compatible” o
el video funciona con
normalidad pero el
audio no lo hace.
Los subtítulos no
funcionan.
Se indica el mensaje “Este
archivo no es váldo” o el
audio funciona con
normalidad pero el video
no lo hace.
■
Chequear si su extensión está admitida.
■
Chequee si el archivo se lee con normalidad en el PC.
(Chequee si el archivo está dañado).
■
Chequee si su resolución está admitida.
■
Chequee si el códec de video/audio está admitido.
■
Chequee si la velocidad de imagen está admitida.
■
Chequee si el archivo se lee con normalidad en el PC.
(Chequee si el archivo está dañado).
■
Chequee si el códec de audio está admitido.
■
Chequee si la velocidad de bits está admitida.
■
Chequee si la frecuencia de muestreo está admitida.
■
Chequee si el archivo se lee con normalidad en el PC.
(Chequee si el archivo está dañado).
■
Chequee si el archivo de video y el de subtítulos tienen el mismo nombre.
■
Chequee si el archivo de video y el de subtítulos están situados en la misma carpeta.
■
Chequear si el archivo de subtítulos está admitido.
■
Chequear si el idioma está admitido. (Al abrir el archivo de subtítulos en el Bloc
de notas, podrá chequear el idioma del archivo de subtítulos).

MANTENIMIENTO
APÉNDICE
111
Las malfunciones anticipadas pueden ser prevenidas. La limpieza regular y cuidadosa puede extender la suma
de tiempo que ud. va a tener su nueva TV. Asegurese apagar la TV y desenchufar el cordón de alimentación
antes de empezar cualquier tipo de limpieza.
Limpiando la pantalla
Aqui hay una buena manera para mantener su pantalla limpia por un tiempo. Moje una tela suave en una
mezcla de agua tibia con un poco de suavizante de ropa, o detergente de platos. Escurra la tela hasta que
esté casi seca, luego limpie la pantalla con ella.
Asegurese que no haya exceso de agua por la pantalla, luego dejela secar por el aire antes de encender su TV.
Limpiando el gabinete
■
Para remover la suciedad o polvo, limpie el gabinete con una tela suave, seca y sin pelusa.
■
Favor de asegurarse no usar una tela mojada.
Ausencia Extendida
GG
Si ud. espera dejar su TV por un tiempo largo (como las vacaciones), será buena idea desenchufar el
cordón de alimentación para proteger la TV contra el daño posible por alguna descarga electrica.
PRECAUCIÓN
2
1

APÉNDICE
112
APÉNDICE
ESPECIFICACIONES DEL PRODUCTO
■
Las especificaciones mostradas arriba se pueden cambiar sin previo aviso para la mejora de calidad.
MODELOS
Dimensiones
(Ancho x Altura
x Profundidad)
Peso
incluyendo la base
excluyendo la base
incluyendo la base
excluyendo la base
19LD350 (19LD350-UB)
19LD350C (19LD350C-UA)
22LD350 (22LD350-UB)
22LD350C (22LD350C-UA)
457.0 x 336.0 x 164.9 mm
(17.9 x 13.2 x 6.4 pulgadas)
457.0 x 290.0 x 65.0 mm
(17.9 x 11.4 x 2.5 pulgadas)
3.4 kg (7.4 libras)
3.1 kg (6.8 libras)
526.0 x 377.0 x 164.9 mm
(20.7 x 14.8 x 6.4 pulgadas)
526.0 x 331.0 x 65.0 mm
(20.7 x 13.0 x 2.5 pulgadas)
4.3 kg (9.4 libras)
4.0 kg (8.8 libras)
Dimensiones
(Ancho x Altura
x Profundidad)
Peso
incluyendo la base
excluyendo la base
incluyendo la base
excluyendo la base
663.0 x 484.0 x 206.8 mm
(26.1 x 19.0 x 8.1 pulgadas)
663.0 x 423.0 x 79.9 mm
(26.1 x 16.6 x 3.1 pulgadas)
7.3 kg (16.0 libras)
6.2 kg (13.6 libras)
800.0 x 565.0 x 206.8 mm
(31.4 p x 22.2 x 8.1 pulgadas)
800.0 x 509.0 x 73.8 mm
(31.4 x 20.0 x 2.9 pulgadas)
9.2 kg (20.2 libras)
8.2 kg (18.0 libras)
MODELOS
26LD350
(26LD350-UB)
32LD350
(32LD350-UB)
Dimensiones
(Ancho x Altura
x Profundidad)
Peso
incluyendo la base
excluyendo la base
incluyendo la base
excluyendo la base
805.0 x 583.0 x 224.0 mm
(31.6 x 22.9 x 8.8 pulgadas)
805.0 x 528.0 x 79.9 mm
(31.6 x 20.7 x 3.1 pulgadas)
10.8 kg (23.8 libras)
9.7 kg (21.3 libras)
MODELOS
32LD320
(32LD320-UA)
100-240V ~ 50/60Hz
NTSC-M, ATSC, 64 & 256 QAM
VHF 2 - 13 UHF 14 - 69 CATV 1 - 135 DTV 2 - 69 CADTV 1 - 135
75 ohm
32 - 104°F (0 - 40°C)
Menos de 80%
-4 - 140°F (-20 - 60°C)
Menos de 85%
Power requirement
Television System
Program Coverage
External Antenna Impedance
Condición
de ambiente
Temp.de operación
Humedad de operación
Temp.para almacenar
Humedad para almacenar

APÉNDICE
113
CÓDIGOS DE IR
Code
Function Note
(Hexa)
Code
Function Note
(Hexa)
08 POWER
Botón control Remoto (Encendido/apagado)
45 Q.MENU Botón control Remoto
43 MENU Botón control Remoto
0B INPUT Botón control Remoto
10-19
Teclas de números 0-9
Botón control Remoto
4C - (Guión)/LIST Botón control Remoto
1A FLASHBK Botón control Remoto
09 MUTE Botón control Remoto
02 VOL + Botón control Remoto
03 VOL - Botón control Remoto
00 CH Botón control Remoto
01 CH Botón control Remoto
1E FAV/MARK Botón control Remoto
40 Botón control Remoto
41 Botón control Remoto
07 Botón control Remoto
06 Botón control Remoto
44 ENTER Botón control Remoto
28 BACK Botón control Remoto
5B EXIT Botón control Remoto
0F TV Botón control Remoto
95 ENERGY SAVING Botón control Remoto
7E SIMPLINK Botón control Remoto
AA INFO Botón control Remoto
79 RATIO Botón control Remoto
30 AV MODE Botón control Remoto
72 ROJO Botón control Remoto
71 VERDE Botón control Remoto
63 AMARILLO Botón control Remoto
61 AZUL Botón control Remoto
B0
G
Botón control Remoto
B1
A
Botón control Remoto
BA
ll ll
Botón control Remoto
8F
FF
Botón control Remoto
8E
GG
Botón control Remoto
D6 TV Código discreto IR
(TV de entrada)
C4 POWER ON Código discreto IR
(Sólo encendido)
C5 POWER OFF Código discreto IR
(Sólo apagado)
5A AV o AV1 Código discreto IR
(AV o AV1 de entrada)
D0 AV2 Código discreto IR
(AV2 de entrada)
BF COMPONENTE Código discreto IR
(Componente de entrada)
D5 RGB-PC Código discreto IR
(RGB-PC de entrada)
CE HDMI o HDMI1 Código discreto IR
(HDMI o HDMI1 de entrada)
CC HDMI2 Código discreto IR
(HDMI2 de entrada)
E9 HDMI3 Código discreto IR
(HDMI3 de entrada)
76 Ratio 4:3 Código discreto IR
(Sólo modo 4:3)
77 Ratio 16:9 Código discreto IR
(Sólo modo 16:9)
AF Ratio Zoom Código discreto IR
(Sólo modo Zoom)

APÉNDICE
114
CONFIGURACIÓN DE DISPOSITIVO EXTERNO DEL CONTROL
APÉNDICE
Instalación de RS-232C
El puerto RS-232 permite conectar el conector de entrada RS-232C a un dispositivo de control externo (como
una computadora o un sistema de control de A/V) para controlar en forma externa las funciones del televisor.
■
Nota: El RS-232 de esta unidad está diseñado para ser utilizado con hardware y software de control de RS-
232 de terceros.
Las instrucciones que aparecen a continuación se entregan para servir de ayuda con el software de progra-
mación o para probar la funcionalidad del uso de software telenet.
1
/DVI IN
ANTENNA
/CABLE IN
VIDEO
YPB PR
L R
AUDIO
RGB IN (PC)
VIDEO
AUDIO
R
L/MONO
COMPONENT IN
OPTICAL
DIGITAL
AUDIO OUT
AUDIO IN
(RGB/DVI)
AV IN 1
RS-232C IN
(
CONTROL&SERVICE)
Tipo del Conector; Macho D-Sub 9-Pines
No. Pin Name
1 No conexión
2 RXD (Recepción de datos)
3 TXD (Transmisión de datos)
4 DTR (Lado DTE listo)
5 GND
6 DSR (Lado DCE listo)
7 RTS (Listo para enviar)
8 CTS (Aprobado para enviar)
9 No Conexión
1
6
5
9
PC
Comunicación de los Parametros
■
Velocidad de banda : 9 600 b/s
(
UART
)
■
Longitud de datos : 8 bits
■
Paridad : No se aplica
■
Bit de detención : 1 bit
■
Código de comunicación : Código ASCII
■
Use un cable cruzado (reverso).
NOTA
!
GG
Este producto posee resonancia de comando
en el Comando RS-232C.
Ej.)

APÉNDICE
115
Configuraciones de RS-232C
Use esta función para especificar un número de ID de la unidad.
Refiérase a “Mapeo de datos reales”.
Se puede utilizar cualquiera de los cables a continuación.
Configuración de ID
PC TV
RXD 2 3 TXD
TXD 3 2 RXD
GND 5 5 GND
DTR 4 6 DSR
DSR 6 4 DTR
RTS 7 8 CTS
CTS 8 7 RTS
D-Sub 9 D-Sub 9
PC TV
RXD 2 3 TXD
TXD 3 2 RXD
GND 5 5 GND
DTR 4 6 DTR
DSR 6 4 DSR
RTS 7 7 RTS
CTS 8 8 CTS
D-Sub 9 D-Sub 9
Configuración de 7-Cables
(
Cable de módem NULL hembra-hembra serial
)
Configuración de 3-Cables
(No estándar)
Seleccione
OOPPCCIIÓÓNN
.
Seleccione
IIDD ddeell TTeelleevviissoorr
.
Seleccione el número deseado de
ID del monitor. Rango de ajuste de
IIDD ddeell TTeelleevviissoorr
1
-
99.
1
MENU
3
2
ENTER
ENTER
4
BACK
Regresar al menú anterior.
EXIT
Regresar a la pantalla del televisor.
■
Mapeo de datos reales
0 : Paso 0
A : Paso 10 (ID del Televisor 10)
F : Paso 15 (ID del Televisor 15)
10 : Paso 16 (ID del Televisor 16)
63 : Paso 99 (ID del Televisor 99)
64 : Paso 100
Ingresar
Mover
OPCIÓN
Idioma del menú(Language)
: Español
Lenguaje de Audio : Inglés
Etiqueta de entrada
SIMPLINK : Apagado
Bloqueo de Teclas : Apagado
Manual Simple
Subtítulo : Apagado
ID del Televisor : 1
Ingresar
Mover
OPCIÓN
Idioma del menú(Language)
: Español
Lenguaje de Audio : Inglés
Etiqueta de entrada
SIMPLINK : Apagado
Bloqueo de Teclas : Apagado
Manual Simple
Subtítulo : Apagado
ID del Televisor : 1
EE EE
FF
1
GG
Cerrar

APÉNDICE
116
Lista de Referencia de los Comandos
APÉNDICE
CCOOMMMMAANNDD11 CCOOMMMMAANNDD22
20.
Sintonización de canales
DATA
(Hexadecimal)
CCOOMMMMAANNDD11 CCOOMMMMAANNDD22
DATA
(Hexadecimal)
CCOOMMAANNDDOO11 CCOOMMAANNDDOO22
DATO 00
(Hexadecimal)
DATA01
(Hexadecimal)
DATA02
(Hexadecimal)
DATA03
(Hexadecimal)
DATA04
(Hexadecimal)
DATA05
(Hexadecimal)
Programa Programa mayor bajo menor alto menor bajo atributo
físicoalto mayor bajo
ma
01. Alimentación k a 00 - 01
02. Selección de entrada x b (
GG
p.117)
03. Aspecto de pantalla k c (
GG
p.117)
04. Modo Pantalla k d (
GG
p.117)
05. Silenciador de volumen k e 00 - 01
06. Control de volumen k f 00 - 64
07. Contraste k g 00 - 64
08. Brillo k h 00 - 64
09. Color k i 00 - 64
10. Tinte k j 00 - 64
11. Nitidez k k 00 - 64
12. Selección de OSD k l 00 - 01
13. Modo bloqueado
de control remoto
Protocolo de Transmisión /Recepción
TTrraannssmmiissssiióónn
[Comando 1] : Primer comando para controlar la TV.(j,k,m o x)
[Comando 2] : Segundo comando para controlar la TV.
[ID del Televisor]: Ud. puede ajustar la ID de unidad para
seleccionar el número deseado de ID de la
TV en el menú Especial. Rango de ajuste es
de 1 a 99. Cuando seleccione la ID de
unidad ‘0 ’,cada TV conectada será contro-
lada. ID de unidad está indicado en decimal
(1 - 99)en el menú en Hexadecimal (0x0 -
0x63) en la transmisión/recibiendo el pro-
tocolo.
[DATO] : Para transmitir los datos de comando.
Transmite el dato ‘FF ’a leer estados de comando
[Cr] : Retorno
Código ASCII como ‘0x0D’
[ ] : Código ASCII como ‘espacio (0x20)’
* En este modelo, el televisor no enviará el estado durante el modo
apagado.
RReeccoonnoocciimmiieennttoo ddee OOKK
La TV transmite ACK (reconocimiento)basando en este for-
mato cuando recibe un dato normal. En este momento,si el
dato está en el modo de leer, esto indica el estado de dato
actual. Si el dato está en el modo de escribir, esto regresa los
datos de la computadora.
* Formato de datos
[Comando 2] : Use como comando.
[ID del Televisor] : Use el carácter pequeño, si la ID definida es 10,
enviará ‘0’,’a’
[DATO] : Use el carácter pequeño, si los datos son 0 x ab, enviará ‘a’, ‘b’.
[OK] : Use el carácter grande
RReeccoonnoocciimmiieennttoo ddee NNGG
La TV transmite ACK (reconocimiento)basando en este for-
mato cuando recibe un dato anormal de funciones no-viable
o errores de comunicación.
Dato1: Código ilegal.
Dato2: Función no soportada.
Dato3: Esperar más tiempo.
* En este modelo, el televisor no enviará el estado durante el modo
apagado.
* Formato de datos
[Comando 2] : Use como comando.
[ID del Televisor] : Use el carácter pequeño, si la ID definida es 10,
enviará ‘0’,’a’
[DATO] : Use el carácter pequeño, si los datos son 0xab, enviará ‘a’, ‘b’.
[NG] : Use el carácter grande
[[CCoommaannddoo11]][[CCoommaannddoo22]][[ ]][[IIDD ddeell TTeelleevviissoorr]][[ ]][[DDaattoo]][[CCrr]]
[[CCoommaannddoo22]][[ ]][[SSeett IIDD]][[ ]][[OOKK]][[DDaattaa]][[xx]]
[[CCoommaannddoo22]][[ ]][[
IIDD ddeell TTeelleevviissoorr
]][[ ]][[NNGG]][[DDaattoo]][[xx]]
14. Agudos k r 00 - 64
15. Graves k s 00 - 64
16. Balance k t 00 - 64
17. Temperatura de Color k u 00 - 02
18. Ahorro de energía j q (
GG
p.118)
19. Auto Configuración j u (
GG
p.118)
21. Agr./Eli. de canal m b 00 - 01
22. Botones m c (
GG
p.119)
23. Luz de fondo m g 00 - 64
00 ~ 01
k m

APÉNDICE
117
0011.. AAlliimmeennttaacciióónn ((CCoommaannddoo:: kk aa))
Para controlar la potencia Encendida/Apagada de la TV.
Transmisión [k][a][ ][ID del Televisor][ ][Data][Cr]
Dato 00 : Apagado Dato 01 : Encendido
Reconocimiento
[a][ ][ID del Televisor][ ][OK/NG][Dato][x]
* Si otras funciones transmiten datos ‘FF’ basados en
este formato, el reconocimiento de retroalimentación
de datos, presenta un estado acerca de cada función.
* En este modelo, el televisor enviará la Información después
de la finalización del procesamiento de encendido.
Es posible que exista un retraso entre el comando y la
información.
0022.. SSeelleecccciióónn ddee eennttrraaddaa ((CCoommaannddoo:: xx bb))
Para seleccionar la fuente de entrada para la TV.
Transmisión [x][b][ ][ID del Televisor][ ][Dato][Cr]
Dato 00: DTV (Antena) Dato 01: DTV (Cable)
Dato 10: Análogo (Antena) Dato 11: Análogo (Cable)
Dato 20: AV/AV1 Dato 21: AV2
Dato 40:
Componente
Dato 60: RGB-PC
Dato 90: HDMI/HDMI1 Dato 91: HDMI2
Reconocimiento [b][ ][ID del Televisor][ ][OK/NG][Dato][x]
* Use la función según su modelo.
0033.. AAssppeeccttoo ddee ppaannttaallllaa ((CCoommaannddoo:: kk cc))
Para ajustar el formato de la pantalla.
Transmisión [k][c][ ][ID del Televisor][ ][Dato][Cr]
Dato 01: 4:3 09: Sólo búsqueda
02: 16:9 10: Zoom cine1
04: Zoom
06: Por Programa 1F: Zoom cine16
Reconocimiento [c][ ][
ID del Televisor
][ ][OK/NG][Dato][x]
0044.. MMooddoo PPaannttaallllaa ((CCoommaannddoo:: kk dd))
Para seleccionar modo de pantalla encendido/apagado.
Transmisión [k][d][ ]
[ID del Televisor]
[ ][Dato][Cr]
Dato 00: Modo apagado de pantalla
(Imagen encendida) Video-out Mute off
Dato 01: Modo encendido de pantalla (Imagen apagada)
Dato 10: Video-out Mute on
Reconocimiento [d][ ]
[ID del Televisor]
[ ][OK/NG][Dato][x]
* Sólo en el caso de que la función Silencio de la salida
de video esté activada, el televisor mostrará la visual-
ización en pantalla (OSD) Pero en el caso de que la
función Silencio de la salida de video esté desactivada,
el televisor no mostrará la visualización en pantalla
(OSD).
0055.. SSiilleenncciiaaddoorr ddee vvoolluummeenn ((CCoommaannddoo:: kk ee))
Para controlar el encendido/apagado del silenciador de
volumen, También puede ajustar el silenciador utilizando
el botón MUTE en el control remoto.
Transmisión [k][e][ ][ID del Televisor][ ][Dato][Cr]
Dato 00: Encendido del silenciador de volumen (Sin volumen)
Dato 01: Apagado del silenciador de volumen (Con volumen)
Reconocimiento
[e][ ][ID del Televisor][ ][OK/NG][Dato][x]
0066.. CCoonnttrrooll ddee vvoolluummeenn ((CCoommaannddoo:: kk ff))
Para ajustar el volumen.
También puede ajustar el volumen con los botones de
volumen en el control remoto.
Transmisión [k][f][ ][ID del Televisor][ ][Dato][Cr]
Dato Min: 00 - Max: 64 (*transmitir por código hexadecimal)
Véase ‘Mapeo de datos reales’.
Reconocimiento
[f][ ][ID del Televisor][ ][OK/NG][Dato][x]
0077.. CCoonnttrraassttee ((CCoommaannddoo:: kk gg))
Para ajustar el contraste de la pantalla.
También puede ajustar el contraste en el menú Imagen.
Transmisión [k][g][ ][ID del Televisor][ ][Dato][Cr]
Dato Min: 00 - Max: 64 (*transmitir por código hexadecimal)
Véase ‘Mapeo de datos reales’.
Reconocimiento
[g][ ][ID del Televisor][ ][OK/NG][Dato][x]
0088.. BBrriilllloo ((CCoommaannddoo:: kk hh))
Para ajustar el brillo de la pantalla.
También puede ajustar el brillo en el menú Imagen.
Transmisión [k][h][ ][ID del Televisor][ ][Dato][Cr]
Dato Min: 00 - Max: 64 (*transmitir por código hexadecimal)
Véase ‘Mapeo de datos reales’.
Reconocimiento
[h][ ][ID del Televisor][ ][OK/NG][Dato][x]
0099.. CCoolloorr ((CCoommaannddoo:: kk ii))
Para ajustar el color de pantalla.
También puede ajustar el brillo en el menú Imagen.
Transmisión [k][i][ ][ID del Televisor][ ][Dato][Cr]
Dato Min: 00 - Max: 64 (*transmitir por código hexadecimal)
Véase ‘Mapeo de datos reales’.
Reconocimiento
[i][ ][ID del Televisor][ ][OK/NG][Dato][x]
1100.. TTiinnttee ((CCoommaannddoo:: kk jj))
Para ajustar el tinte de la pantalla.
Ud. puede ajustar el tinte en el menú Imagen.
Transmisión [k][j][ ][ID del Televisor][ ][Dato][Cr]
Dato Rojo : 00 - Verde : 64(*transmitir por código hexadecimal)
Véase ‘Mapeo de datos reales’.
Reconocimiento
[j][ ][ID del Televisor][ ][OK/NG][Dato][x]

APÉNDICE
118
APÉNDICE
1111.. NNiittiiddeezz ((CCoommaannddoo:: kk kk))
Para ajustar la nitidez de la pantalla.
También puede ajustar la nitidez en el menú Imagen.
Transmisión [k][k][ ][ID del Televisor][ ][Dato][Cr]
Dato Min: 00 - Max: 64 (*transmitir por código hexadecimal)
Véase ‘Mapeo de datos reales’.
Reconocimiento
[k][ ][ID del Televisor][ ][OK/NG][Dato][x]
1122.. SSeelleecccciióónn ddee OOSSDD ((CCoommaannddoo:: kk ll))
Para seleccionar OSD (On Screen Display) encendido/apagado.
Transmisión [k][l][ ][ID del Televisor][ ][Dato][Cr]
Dato 00: Apagado de OSD Dato 01: Encendido de OSD
Reconocimiento
[l][ ][ID del Televisor][ ][OK/NG][Dato][x]
1133.. MMooddoo ddee bbllooqquueeoo ddee ccoonnttrrooll rreemmoottoo
((CCoommaannddoo:: kk mm))
Para bloquear los mandos del panel frontal en el monitor
y en el mando a distancia.
Transmisión [k][m][ ][ID del Televisor][ ][Dato][Cr]
Dato 00: Bloquear Apagado, 01: Bloquear Encendido
Reconocimiento
[m][ ][ID del Televisor][ ][OK/NG][Dato][x]
* Si ud. no está usando el control remoto y tampoco los
controles del panel frontal en la unidad, use este
modo. Cuando la potencia principal enciende y apaga,
el bloqueo de control remoto será liberado.
*
Si el Bloqueo de teclas está en el modo de espera, el
televisor no se prenderá mediante el botón de POWER
del control remoto ni del propio televisor
1144.. AAgguuddooss ((CCoommaannddoo:: kk rr))
Para ajustar los agudos.
También puede ajustar los agudos en el menú audio.
Transmisión [k][r][ ][ID del Televisor][ ][Dato][Cr]
Dato Min : 0 - Max : 64 (*transmitir por código hexadecimal)
Véase ‘Mapeo de datos reales’.
Reconocimiento
[r][ ][ID del Televisor][ ][OK/NG][Dato][x]
1155.. GGrraavveess ((CCoommaannddoo:: kk ss))
Para ajustar los graves.
También puede ajustar los graves en el menú audio.
Transmisión [k][s][ ][ID del Televisor][ ][Dato][Cr]
Dato Min : 0 - Max : 64 (*transmitir por código hexadecimal)
Véase ‘Mapeo de datos reales’.
Reconocimiento
[s][ ][ID del Televisor][ ][OK/NG][Dato][x]
1166.. BBaallaannccee ((CCoommaannddoo:: kk tt))
Para ajustar el balance.
También puede ajustar el balance en el menú audio.
Transmisión [k][t][ ][ID del Televisor][ ][Dato][Cr]
Dato Min : 0 - Max : 64 (*transmitir por código hexadecimal)
Véase ‘Mapeo de datos reales’.
Reconocimiento
[t][ ][ID del Televisor][ ][OK/NG][Dato][x]
1177.. TTeemmppeerraattuurraa ddee CCoolloorr ((CCoommaannddoo:: kk uu))
Para ajustar la temperatura de color.
También puede ajustar la temperatura de color en el
Menú Imagen.
Transmisión [k][u][ ][ID del Televisor][ ][Dato][Cr]
Dato 00: Medio 01: Frio 02: Cálido
Reconocimiento
[u][ ][ID del Televisor][ ][OK/NG][Dato][x]
1188.. AAhhoorrrroo ddee eenneerrggííaa ((CCoommaannddoo:: jj qq))
Control de la función de Ahorro de Energía.
Transmisión [ j ][q][ ][ID del Televisor][ ][Dato][Cr]
Dato 00: Ahorro de energía - Apagado
01: Ahorro de energía - Mínimo
02: Ahorro de energía - Medio
03: Ahorro de energía - Máximo
05: Ahorro de energía - Apagado de Pantalla
Reconocimiento
[q][ ][ID del Televisor][ ][OK/NG][Dato][x]
1199.. AAuuttoo CCoonnffiigguurraacciióónn ((CCoommaannddoo:: jj uu))
Ajustar la posición de la imagen y reducir el temblor de la
imagen en forma automática. La auto configuración sólo
funciona con RGB-PC.
Transmisión [j][u][ ][ID del Televisor][ ][Dato][Cr]
Dato 01: Para configurar
Reconocimiento
[u][ ][ID del Televisor][ ][OK/NG][Dato][x]
2200.. SSiinnttoonniizzaacciióónn ddee ccaannaalleess ((CCoommaannddoo:: mm aa))
Para sintonizar los canales en el siguiente número
físico/mayor/menor.
Transmisión
[m][a][ ][ID del Televisor][ ][Dato00][ ][Dato01]
[ ][Dato02][ ][Dato03][ ][Dato04][ ][Dato05][Cr]
Los canales digitales poseen un número de canal Físico,
Mayor y Menor. El número Físico es el número de canal dig-
ital real, el Mayor es el número al cual el canal se debe aso-
ciar y el Menor es el subcanal. Dado que el sintonizador
ATSC automáticamente asocia el canal al número Mayor, el
número Físico no se requiere.
Dato 00: Número de canal físico
NTSC aéreo: 02 - 45, NTSC cable: 01, 0E - 7D
ATSC aéreo: 01 - 45, ATSC cable: 01 - 87
Dato 01 & 02: Mayor número de canal
Dato 01: Bytes altos Dato 02: Bytes bajos
Se encuentran disponibles dos bytes para el Mayor y
Menor, y normalmente sólo se usa el segundo byte.
Dato 03 & 04: Número de canal menor
No se necesita para NTSC.

APÉNDICE
119
Dato 05:
En la tabla anterior aparece el código binario que se
debe convertir a Hexadecimal antes del envío. Por ejemp-
lo: El código binario para sintonizar la subfuente en un
canal de cable NTSC es “1000 0001”, el cual se traduce
a “81” en Hex.
* 7° bit: Para qué fuente desea cambiar el canal.
* 6° bit: Use un canal de dos partes o de una parte. En la
mayoría de los casos use simplemente 0, ya que se ignora
cuando se utiliza NTSC.
* 5° bit: Use 0 con NTSC, ya que sólo puede utilizar el
número de canal físico. Normalmente use 1 para ATSC, ya
que la mayoría de las veces no importa cuál sea el número
físico.
* 4° bit: Ajuste en 0.
* Bits 3-0: Elija el tipo de señal.
* Ejemplos de comando de sintonización:
1. Sintonice en canal de cable análogo (NTSC) 35
Dato 00 = Físico de 35 = 23
Dato 01 & 02 = Sin Mayor = 00 00
Dato 03 & 04 = Sin Menor = 00 00
Dato 05 = 0000 0001 en binario = 01
Total = ma 00 23 00 00 00 00 01
2. Sintonice en el canal local digital (ATSC) 30 - 3
Dato 00 = No se conoce el Físico = 00
Dato 01 & 02 = Mayor es 30 = 00 1E
Dato 03 & 04 = Menor es 3 = 00 03
Dato 05 = 0010 0010 en binario = 22
Total = ma 00 00 00 1E 00 03 22
Reconocimiento
[a][ ][ID del Televisor][ ][OK][Dato00]
[Dato01][Dato02][Dato03][Dato04][x][a][ ][ID del
Televisor] [ ] [NG][Dato00][x]
2211.. AAggrr..//EEllii.. ddee ccaannaall ((CCoommaannddoo:: mm bb))
Para agregar y eliminar canales.
Transmisión [m][b][ ][ID del Televisor][ ][Dato][Cr]
Dato 00: Borrar programa Dato 01: Memorizar programa
Reconocimiento
[b][ ][ID del Televisor][ ][OK/NG][Dato][x]
2222.. BBoottoonneess ((CCoommaannddoo:: mm cc))
Para mandar el código de botón remotó IR.
Transmisión [m][c][ ][ID del Televisor][ ][Dato][Cr]
Vea la página 113.
Reconocimiento
[c][ ][ID del Televisor][ ][OK/NG][Dato][x]
Cuando el televisor se encuentra en modo de espera, éste
sólo podrá prenderse mediante el botón POWER del con-
trol remoto.
2233.. LLuuzz ddee ffoonnddoo ((CCoommaannddoo:: mm gg))
Para ajustar la luz trasera de la pantalla.
Transmisión [m][g][ ][ID del Televisor][ ][Dato][Cr]
Dato Min:0 - Máx:64(*transmitir por código hexadecimal)
Véase ‘Mapeo de datos reales’.
Reconocimiento
[g][ ][ID del Televisor][ ][OK/NG][Dato][x]
Paso
NTSC Air
NTSC Cable
ATSC Air
ATSC Cable_std
ATSC Cable_hrc
ATSC Cable_irc
ATSC cable_auto
Reservado
...
Reservado
1
0
0
1
1
0
0
1
1
x
1
2
0
0
0
0
1
1
1
1
x
1
3
0
0
0
0
0
0
0
0
x
1
4
x
x
x
x
x
x
x
x
x
x
Reservado
5
0
1
Uso
Sin uso
Uso de canal
físico
6
0
1
Dos
Uno
Canal de
dos/una parte
7
0
1
Principal
S
ecundaria
Imagen princi-
pal/secundaria
0
0
1
0
1
0
1
0
1
x
1

APÉNDICE
120
APÉNDICE
AVISO SOBRE SOFTWARE DE CÓDIGO ABIERTO
-
Esta característica no se encuentra disponible para todos los modelos.
Los siguientes ejecutables GPL y bibliotecas LGPL/MPL utilizados en este producto están sujetos a contratos de
licencia GPL2.0/LGPL2.1/MPL1.1:
EJECUTABLES GPL:
■
Kernel Linux 2.6
■
busybox
■
lzo
BIBLIOTECAS LGPL:
■
uClibc
BIBLIOTECAS MPL:
■
Nanox
LG Electronics le ofrece un código fuente en CD-ROM por un precio que cubre el costo de realizar dicha distribu-
ción, tal como el costo del soporte, el envío y el manejo si envía una petición por e-mail a LG Electronics:
opensour[email protected]
Esta oferta es válida por un periodo de tres (3) años a partir de la fecha de distribución de este producto por parte
de LG Electronics.
Podrá obtener una copia de las licencias GPL, LGPL, MPL en la dirección
- http://www.gnu.org/licenses/old-licenses/gpl-2.0.html
- http://www.gnu.org/licenses/old-licenses/lgpl-2.1.html
- http://www.mozilla.org/MPL/MPL-1.1.html
Así mismo, podrá encontrar la traducción de las licencias GPL, LGPL en la dirección
- http://www.gnu.org/licenses/old-licenses/gpl-2.0-translations.html
- http://www.gnu.org/licenses/old-licenses/lgpl-2.1-translations.html
Este software está basado, en parte, en el trabajo del Independent JPEG Group copyright © 1991 – 1998, Thomas G. Lane.
Este producto incluye
■
Librería libpng : copyright © 2004 Glenn Randers-Pehrson
■
Zlib Librería de compresión: Copyright © 1995-2002 Jean-loup Gailly yMark Adler.
■
Librería tinyxml : copyright (c) 2000-2006 Lee Thomason


MANUAL DE USUARIO
TELEVISOR LCD
Lea atentamente este manual antes de poner en
marcha su equipo y guárdelo para futuras
consultas.
P/NO : SAC34134202 (1004-REV01)
www.lg.com
El número de modelo y serie del televisor se
encuentra en la parte posterior y en un lateral del
televisor respectivamente.
Anótelo a continuación para tenerlo disponible en
caso de necesitar asistencia.
MODELO
SERIE
-
 1
1
-
 2
2
-
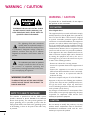 3
3
-
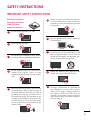 4
4
-
 5
5
-
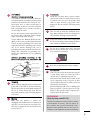 6
6
-
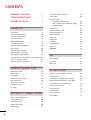 7
7
-
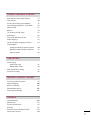 8
8
-
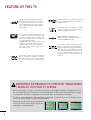 9
9
-
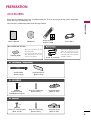 10
10
-
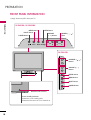 11
11
-
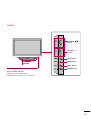 12
12
-
 13
13
-
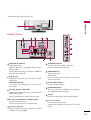 14
14
-
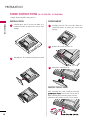 15
15
-
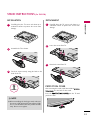 16
16
-
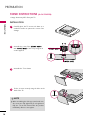 17
17
-
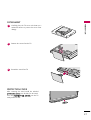 18
18
-
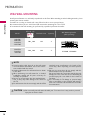 19
19
-
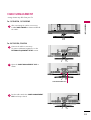 20
20
-
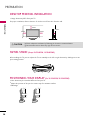 21
21
-
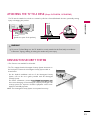 22
22
-
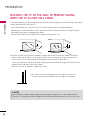 23
23
-
 24
24
-
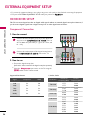 25
25
-
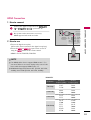 26
26
-
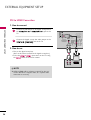 27
27
-
 28
28
-
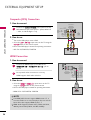 29
29
-
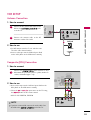 30
30
-
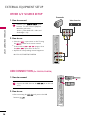 31
31
-
 32
32
-
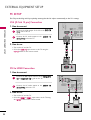 33
33
-
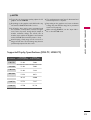 34
34
-
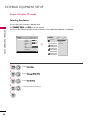 35
35
-
 36
36
-
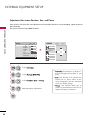 37
37
-
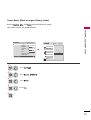 38
38
-
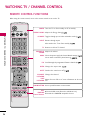 39
39
-
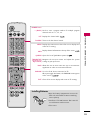 40
40
-
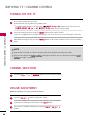 41
41
-
 42
42
-
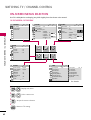 43
43
-
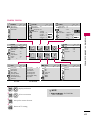 44
44
-
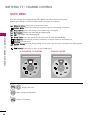 45
45
-
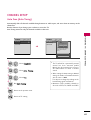 46
46
-
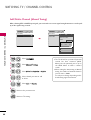 47
47
-
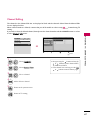 48
48
-
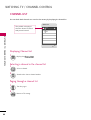 49
49
-
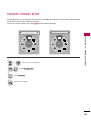 50
50
-
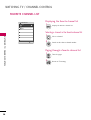 51
51
-
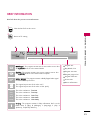 52
52
-
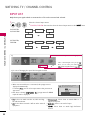 53
53
-
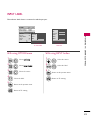 54
54
-
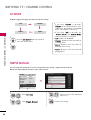 55
55
-
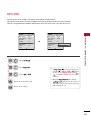 56
56
-
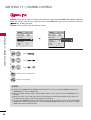 57
57
-
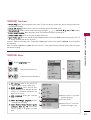 58
58
-
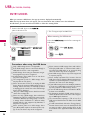 59
59
-
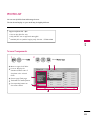 60
60
-
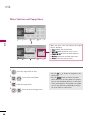 61
61
-
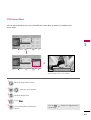 62
62
-
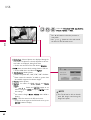 63
63
-
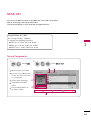 64
64
-
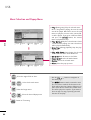 65
65
-
 66
66
-
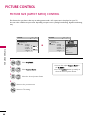 67
67
-
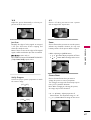 68
68
-
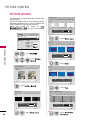 69
69
-
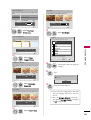 70
70
-
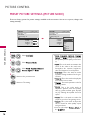 71
71
-
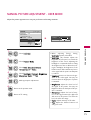 72
72
-
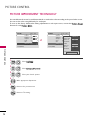 73
73
-
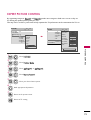 74
74
-
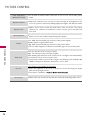 75
75
-
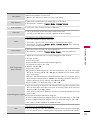 76
76
-
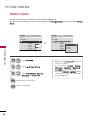 77
77
-
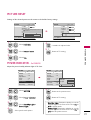 78
78
-
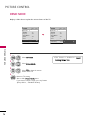 79
79
-
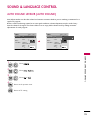 80
80
-
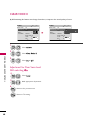 81
81
-
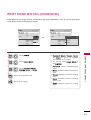 82
82
-
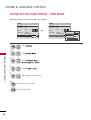 83
83
-
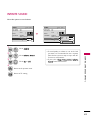 84
84
-
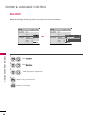 85
85
-
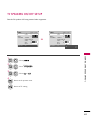 86
86
-
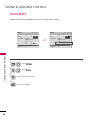 87
87
-
 88
88
-
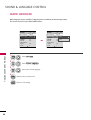 89
89
-
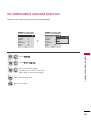 90
90
-
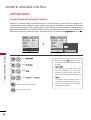 91
91
-
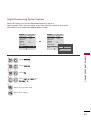 92
92
-
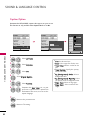 93
93
-
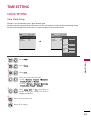 94
94
-
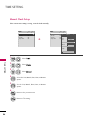 95
95
-
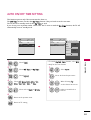 96
96
-
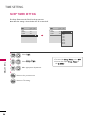 97
97
-
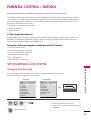 98
98
-
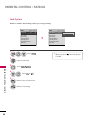 99
99
-
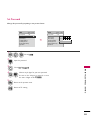 100
100
-
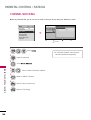 101
101
-
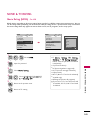 102
102
-
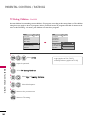 103
103
-
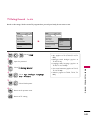 104
104
-
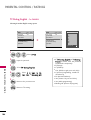 105
105
-
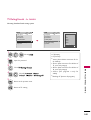 106
106
-
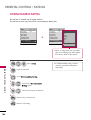 107
107
-
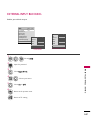 108
108
-
 109
109
-
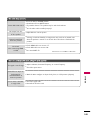 110
110
-
 111
111
-
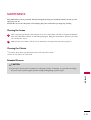 112
112
-
 113
113
-
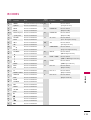 114
114
-
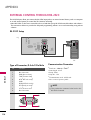 115
115
-
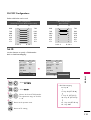 116
116
-
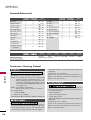 117
117
-
 118
118
-
 119
119
-
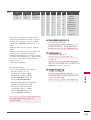 120
120
-
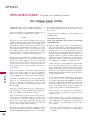 121
121
-
 122
122
-
 123
123
-
 124
124
-
 125
125
-
 126
126
-
 127
127
-
 128
128
-
 129
129
-
 130
130
-
 131
131
-
 132
132
-
 133
133
-
 134
134
-
 135
135
-
 136
136
-
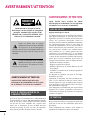 137
137
-
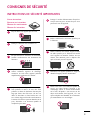 138
138
-
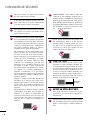 139
139
-
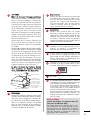 140
140
-
 141
141
-
 142
142
-
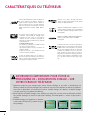 143
143
-
 144
144
-
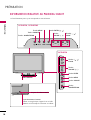 145
145
-
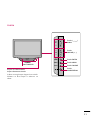 146
146
-
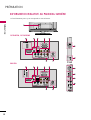 147
147
-
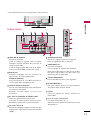 148
148
-
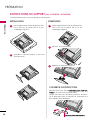 149
149
-
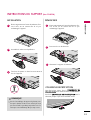 150
150
-
 151
151
-
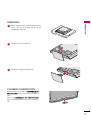 152
152
-
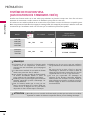 153
153
-
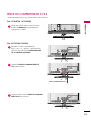 154
154
-
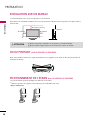 155
155
-
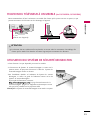 156
156
-
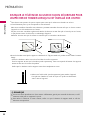 157
157
-
 158
158
-
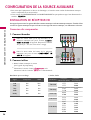 159
159
-
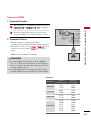 160
160
-
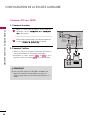 161
161
-
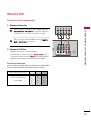 162
162
-
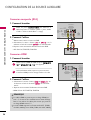 163
163
-
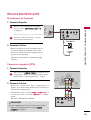 164
164
-
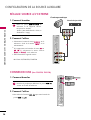 165
165
-
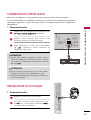 166
166
-
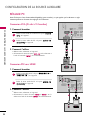 167
167
-
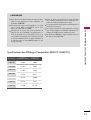 168
168
-
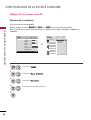 169
169
-
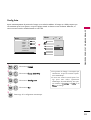 170
170
-
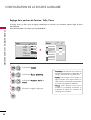 171
171
-
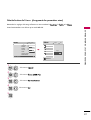 172
172
-
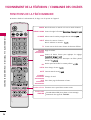 173
173
-
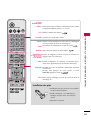 174
174
-
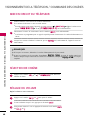 175
175
-
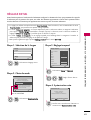 176
176
-
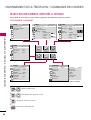 177
177
-
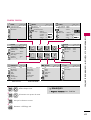 178
178
-
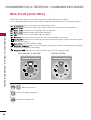 179
179
-
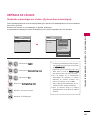 180
180
-
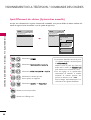 181
181
-
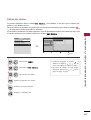 182
182
-
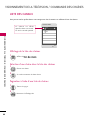 183
183
-
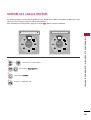 184
184
-
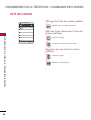 185
185
-
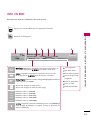 186
186
-
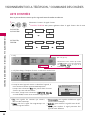 187
187
-
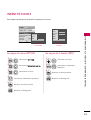 188
188
-
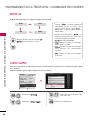 189
189
-
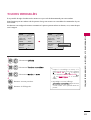 190
190
-
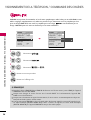 191
191
-
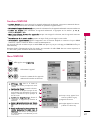 192
192
-
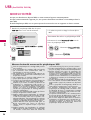 193
193
-
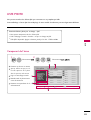 194
194
-
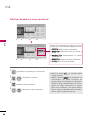 195
195
-
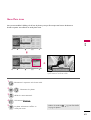 196
196
-
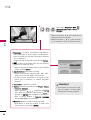 197
197
-
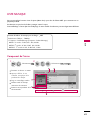 198
198
-
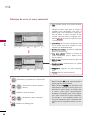 199
199
-
 200
200
-
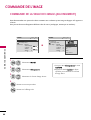 201
201
-
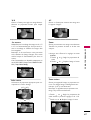 202
202
-
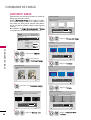 203
203
-
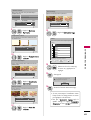 204
204
-
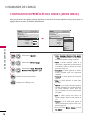 205
205
-
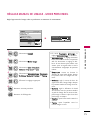 206
206
-
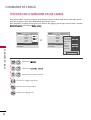 207
207
-
 208
208
-
 209
209
-
 210
210
-
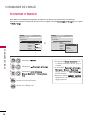 211
211
-
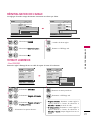 212
212
-
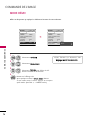 213
213
-
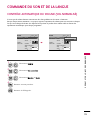 214
214
-
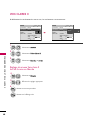 215
215
-
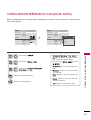 216
216
-
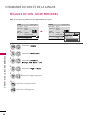 217
217
-
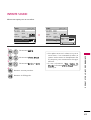 218
218
-
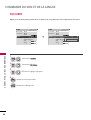 219
219
-
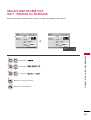 220
220
-
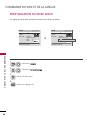 221
221
-
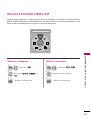 222
222
-
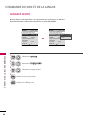 223
223
-
 224
224
-
 225
225
-
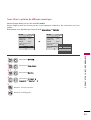 226
226
-
 227
227
-
 228
228
-
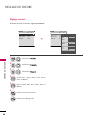 229
229
-
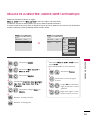 230
230
-
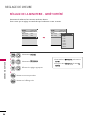 231
231
-
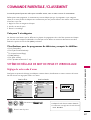 232
232
-
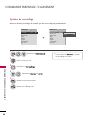 233
233
-
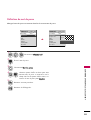 234
234
-
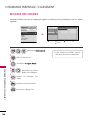 235
235
-
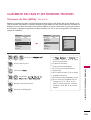 236
236
-
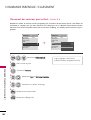 237
237
-
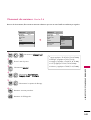 238
238
-
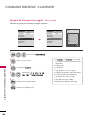 239
239
-
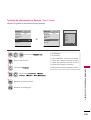 240
240
-
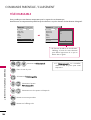 241
241
-
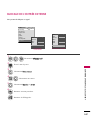 242
242
-
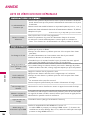 243
243
-
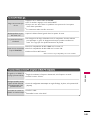 244
244
-
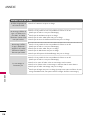 245
245
-
 246
246
-
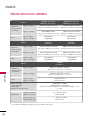 247
247
-
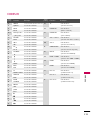 248
248
-
 249
249
-
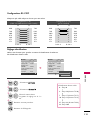 250
250
-
 251
251
-
 252
252
-
 253
253
-
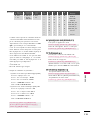 254
254
-
 255
255
-
 256
256
-
 257
257
-
 258
258
-
 259
259
-
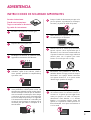 260
260
-
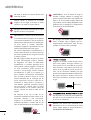 261
261
-
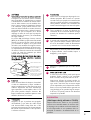 262
262
-
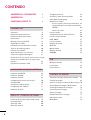 263
263
-
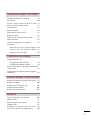 264
264
-
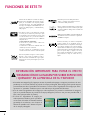 265
265
-
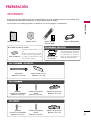 266
266
-
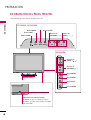 267
267
-
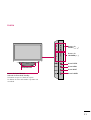 268
268
-
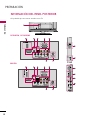 269
269
-
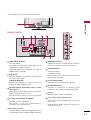 270
270
-
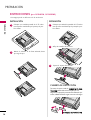 271
271
-
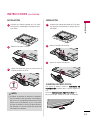 272
272
-
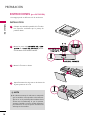 273
273
-
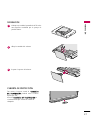 274
274
-
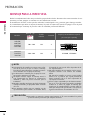 275
275
-
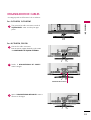 276
276
-
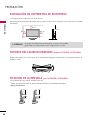 277
277
-
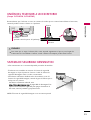 278
278
-
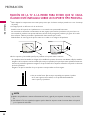 279
279
-
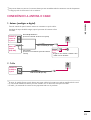 280
280
-
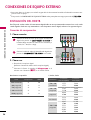 281
281
-
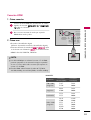 282
282
-
 283
283
-
 284
284
-
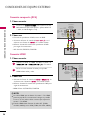 285
285
-
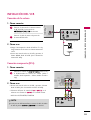 286
286
-
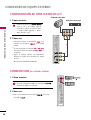 287
287
-
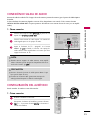 288
288
-
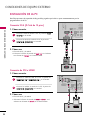 289
289
-
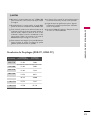 290
290
-
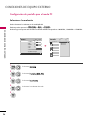 291
291
-
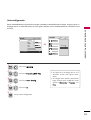 292
292
-
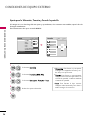 293
293
-
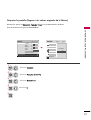 294
294
-
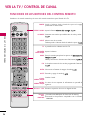 295
295
-
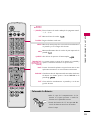 296
296
-
 297
297
-
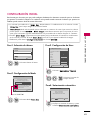 298
298
-
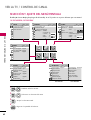 299
299
-
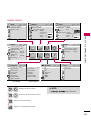 300
300
-
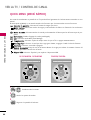 301
301
-
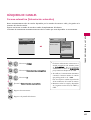 302
302
-
 303
303
-
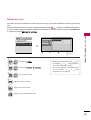 304
304
-
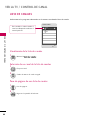 305
305
-
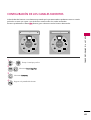 306
306
-
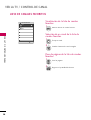 307
307
-
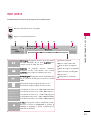 308
308
-
 309
309
-
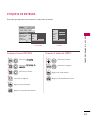 310
310
-
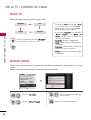 311
311
-
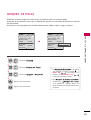 312
312
-
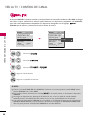 313
313
-
 314
314
-
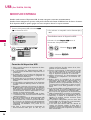 315
315
-
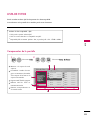 316
316
-
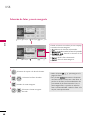 317
317
-
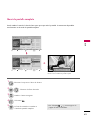 318
318
-
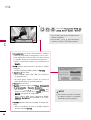 319
319
-
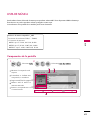 320
320
-
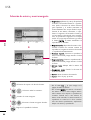 321
321
-
 322
322
-
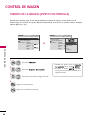 323
323
-
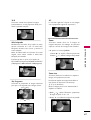 324
324
-
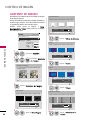 325
325
-
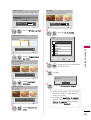 326
326
-
 327
327
-
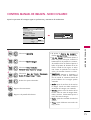 328
328
-
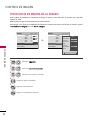 329
329
-
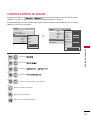 330
330
-
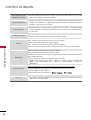 331
331
-
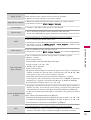 332
332
-
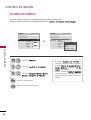 333
333
-
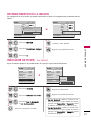 334
334
-
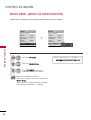 335
335
-
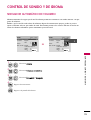 336
336
-
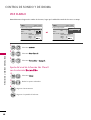 337
337
-
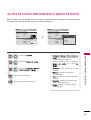 338
338
-
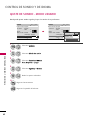 339
339
-
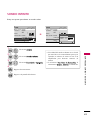 340
340
-
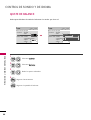 341
341
-
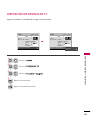 342
342
-
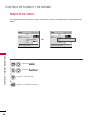 343
343
-
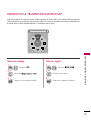 344
344
-
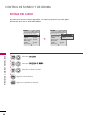 345
345
-
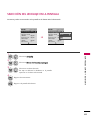 346
346
-
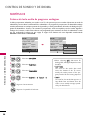 347
347
-
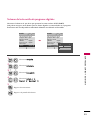 348
348
-
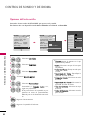 349
349
-
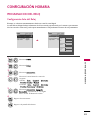 350
350
-
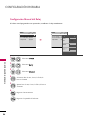 351
351
-
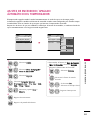 352
352
-
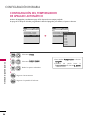 353
353
-
 354
354
-
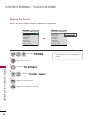 355
355
-
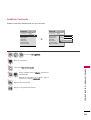 356
356
-
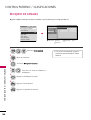 357
357
-
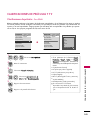 358
358
-
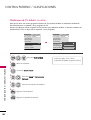 359
359
-
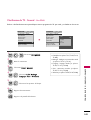 360
360
-
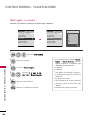 361
361
-
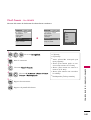 362
362
-
 363
363
-
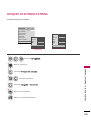 364
364
-
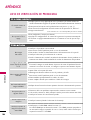 365
365
-
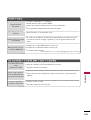 366
366
-
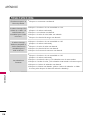 367
367
-
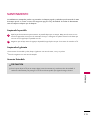 368
368
-
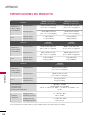 369
369
-
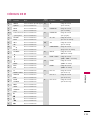 370
370
-
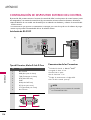 371
371
-
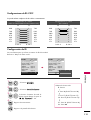 372
372
-
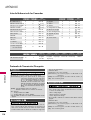 373
373
-
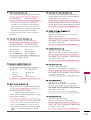 374
374
-
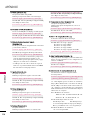 375
375
-
 376
376
-
 377
377
-
 378
378
-
 379
379


LG 22LD350C El manual del propietario
- Categoría
- Televisores LCD
- Tipo
- El manual del propietario
en otros idiomas
- français: LG 22LD350C Le manuel du propriétaire
- English: LG 22LD350C Owner's manual
- português: LG 22LD350C Manual do proprietário